

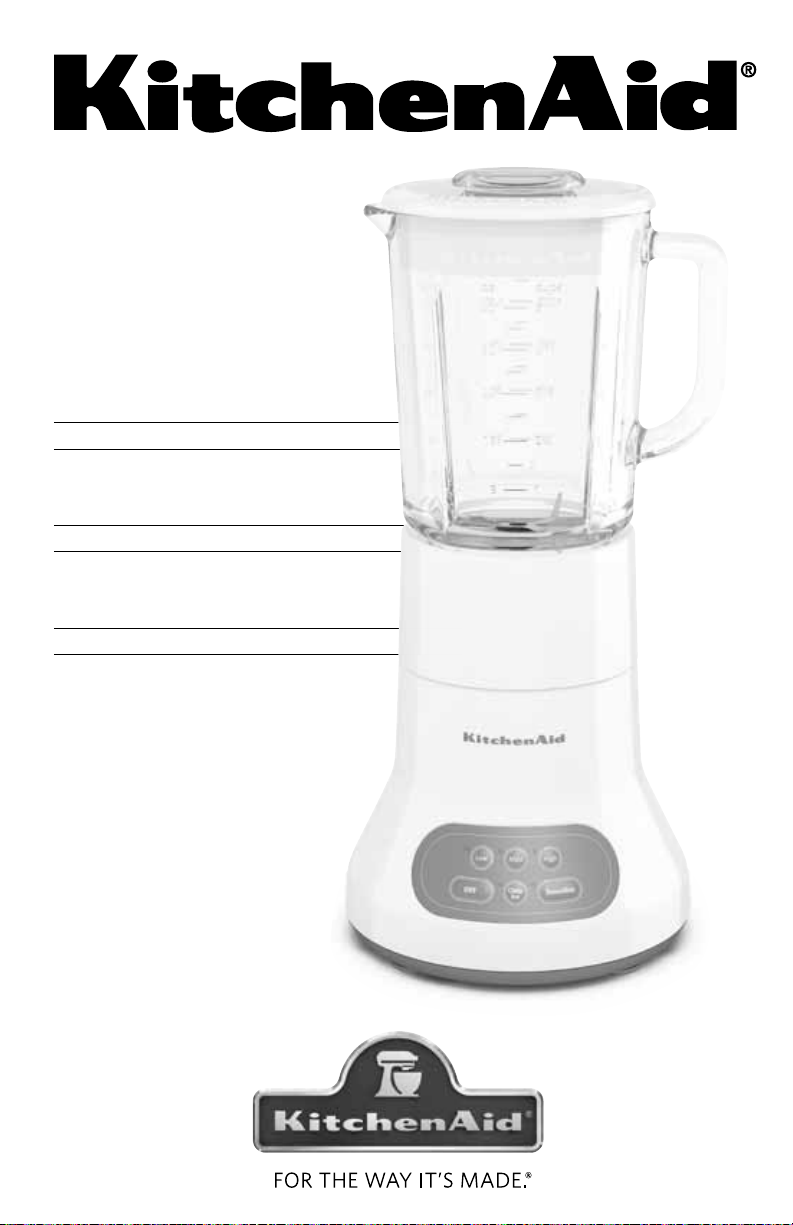
Page 1
3
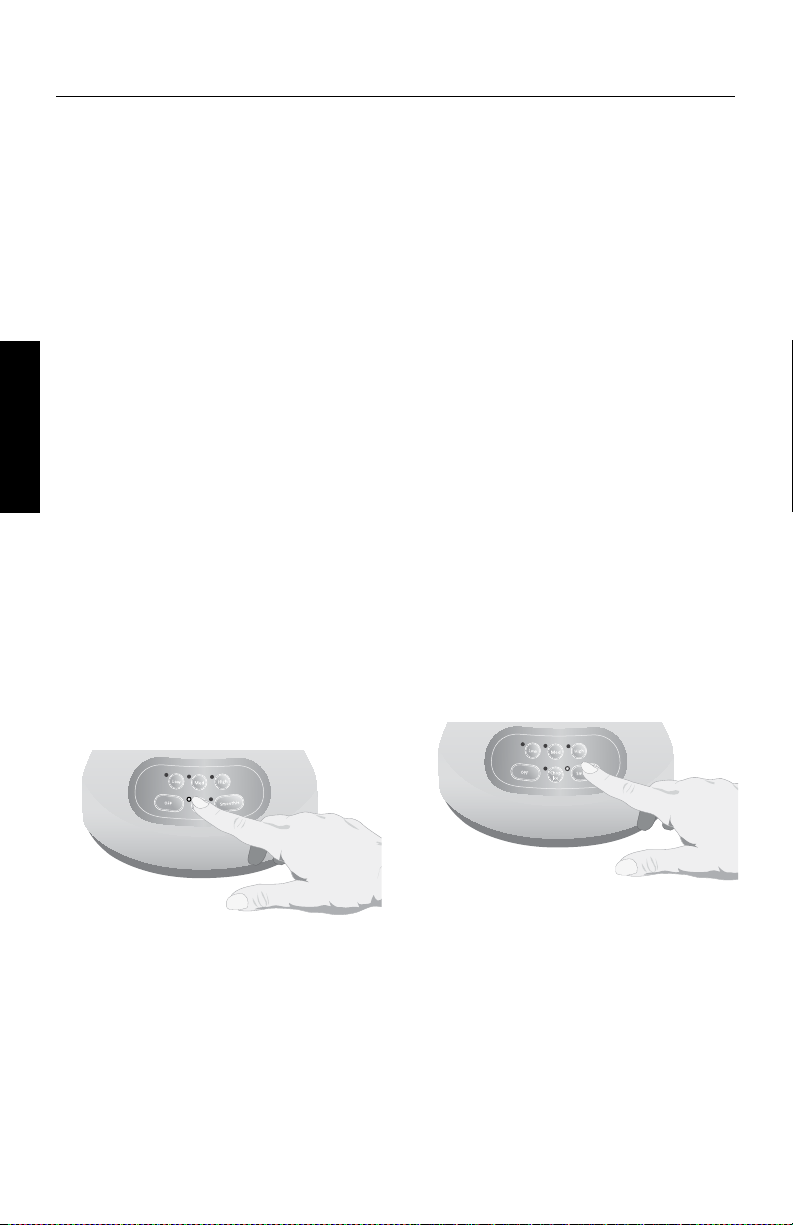
SPEED
VITESSE
VELOCIDAD
BLENDER
INSTRUCTIONS
MÉLANGEUR
INSTRUCTIONS
LICUADORA
INSTRUCCIONES
KSB354
USA: 1-800-541-6390
Canada: 1-800-807-6777
KitchenAid.com
KitchenAid.ca
Page 2

Proof of Purchase & Product Registration
Always keep a copy of the sales receipt
showing the date of purchase of your
Blender. Proof of purchase will assure you
of in-warranty service.
Before you use your Blender, please fill out
and mail your product registration card
packed with the unit. This card will enable
Model Number ______________________________________________________________
Serial Number _______________________________________________________________
Date Purchased ______________________________________________________________
Store Name and Location ______________________________________________________
us to contact you in the unlikely event of
a product safety notification and assist us
in complying with the provisions of the
Consumer Product Safety Act. This card
does not verify your warranty.
Please complete the following for your
personal records:
Preuve d’achat et enregistrement du produit
Veuillez conserver une copie du coupon de
caisse indiquant la date d’achat de votre
mélangeur. La preuve d’achat vous assure
du service d’après-vente sous garantie.
Avant d’utiliser votre mélangeur, veuillez
remplir et poster la carte d’enregistrement
du produit accompagnant l’appareil.
Grâce à cette carte, nous pourrons vous
Numéro de modèle __________________________________________________________
appeler dans l’éventualité improbable d’un
avis de sécurité et nous conformer plus
facilement aux dispositions de la loi sur la
sécurité des produits de consommation.
Cette carte ne confirme pas votre garantie.
Veuillez remplir ce qui suit pour vos
dossiers personnels :
Numéro de série _____________________________________________________________
Date d’achat ________________________________________________________________
Nom du marchand et adresse __________________________________________________
Comprobante de compra y registro del producto
Siempre conserve una copia del recibo
de ventas que especifique la fecha de
compra de su licuadora. El comprobante
de compra le asegurará el servicio técnico
bajo garantía.
Antes de utilizar la licuadora, complete y
envíe por correo su tarjeta de registro del
producto que viene junto con la unidad.
Esta tarjeta nos permitirá contactarnos
Número del modelo __________________________________________________________
Número de serie _____________________________________________________________
Fecha de compra ____________________________________________________________
Nombre de la tienda y dirección ________________________________________________
con usted en el improbable caso de
una notificación de algún problema de
seguridad con el producto y nos ayudará a
cumplir con las cláusulas de la Consumer
Product Safety Act (Ley sobre la seguridad
de los productos para el consumidor). Esta
tarjeta no asegura su garantía.
Complete lo siguiente para su
registro personal:
Page 3

Table of Contents
INTRODUCTION
Proof of Purchase & Product Registration .............................................Inside Front Cover
Blender Safety ................................................................................................................2
Important Safeguards ....................................................................................................3
Electrical Requirements ..................................................................................................3
FEATURES AND OPERATION
Blender Features ............................................................................................................4
Preparing the Blender for Use ........................................................................................6
Before First Use ......................................................................................................6
Blender Assembly ...................................................................................................6
Using the Blender ..........................................................................................................7
Before Use ..............................................................................................................7
Operating the Blender ............................................................................................7
CHOP ICE ................................................................................................................8
SMOOTHIE .............................................................................................................8
Soft Start
®
Blending Feature ...................................................................................9
Ingredient Cup .......................................................................................................9
CARE AND CLEANING
To Clean Individual Components ....................................................................................9
To Clean Without Disassembly .......................................................................................9
Troubleshooting ...........................................................................................................10
WARRANTY AND SERVICE INFORMATION
KitchenAid
®
Blender Warranty ...................................................................................... 11
Hassle-Free Replacement Warranty – 50 United States and District of Columbia ..........12
Hassle-Free Replacement Warranty – Canada ...............................................................12
How to Arrange for Warranty Service in Puerto Rico ....................................................12
How to Arrange for Service after the Warranty Expires – All Locations .........................13
How to Arrange for Service Outside these Locations ....................................................13
How to Order Accessories and Replacement Parts ........................................................13
ENGLISH
NOTE: DUE TO THE UNIQUE CONTAINER AND BLADE DESIGN, READ THESE
INSTRUCTIONS BEFORE USING YOUR NEW KITCHENAID
®
BLENDER TO ACHIEVE
MAXIMUM PERFORMANCE RESULTS.
1
Page 4

Blender Safety
Your safety and the safety of others are very important.
We have provided many important safety messages in this manual and on your
appliance. Always read and obey all safety messages.
ENGLISH
All safety messages will tell you what the potential hazard is, tell you how to
reduce the chance of injury, and tell you what can happen if the instructions are
not followed.
This is the safety alert symbol.
This symbol alerts you to potential hazards that can kill or hurt you
and others.
All safety messages will follow the safety alert symbol and either
the word “DANGER” or “WARNING.” These words mean:
You can be killed or seriously
DANGER
WARNING
injured if you don’t immediately
follow instructions.
You can be killed or seriously injured
if you don’t follow instructions.
2
Page 5

IMPORTANT SAFEGUARDS
When using electrical appliances, basic safety precautions should always be followed to
reduce the risk of fire, electric shock, and/or injury to persons including the following:
1. Read all instructions.
2. To protect against risk of electrical
shock, do not put Blender in water or
other liquid.
3. Close supervision is necessary
when any appliance is used by or
near children.
4. Unplug from outlet when not in use,
before putting on or taking off parts,
and before cleaning.
5. Avoid contact with moving parts.
6. Do not operate the Blender with
a damaged cord or plug or after
appliance malfunctions, or is dropped
or damaged in any manner. Return
appliance to the nearest Authorized
Service Center for examination, repair
or electrical or mechanical adjustment.
7. Do not use outdoors.
8. Do not let cord hang over edge of
table or counter.
9. Keep hands and utensils out of
container while blending to reduce
the risk of severe injury to persons or
damage to the Blender. A scraper may
be used but must be used only when
the Blender is not running.
10. Blades are sharp. Handle carefully.
11. To reduce risk of injury, never put
locking collar with blades onto the
base without having the pitcher
properly attached.
12. Always operate Blender with cover
in place.
13. The use of attachments, including
canning jars, not recommended by
KitchenAid may cause a risk of injury
to persons.
14. When blending hot liquids, remove
center piece of two-piece cover.
15. This product is designed for
household use only.
ENGLISH
SAVE THESE INSTRUCTIONS
Electrical Requirements
Volts: 120 Volts A.C.
Hertz: 60 Hz
NOTE: Your Blender has a 2-prong
polarized plug. To reduce the risk of
electrical shock, this plug will fit in an
outlet only one way. If the plug does
not fit in the outlet, contact a qualified
electrician. Do not modify the plug in
any way.
Do not use an extension cord. If the
power supply cord is too short, have a
qualified electrician or serviceman install
an outlet near the appliance.
Do not use an extension cord.
Doing so can result in death
or fire.
3
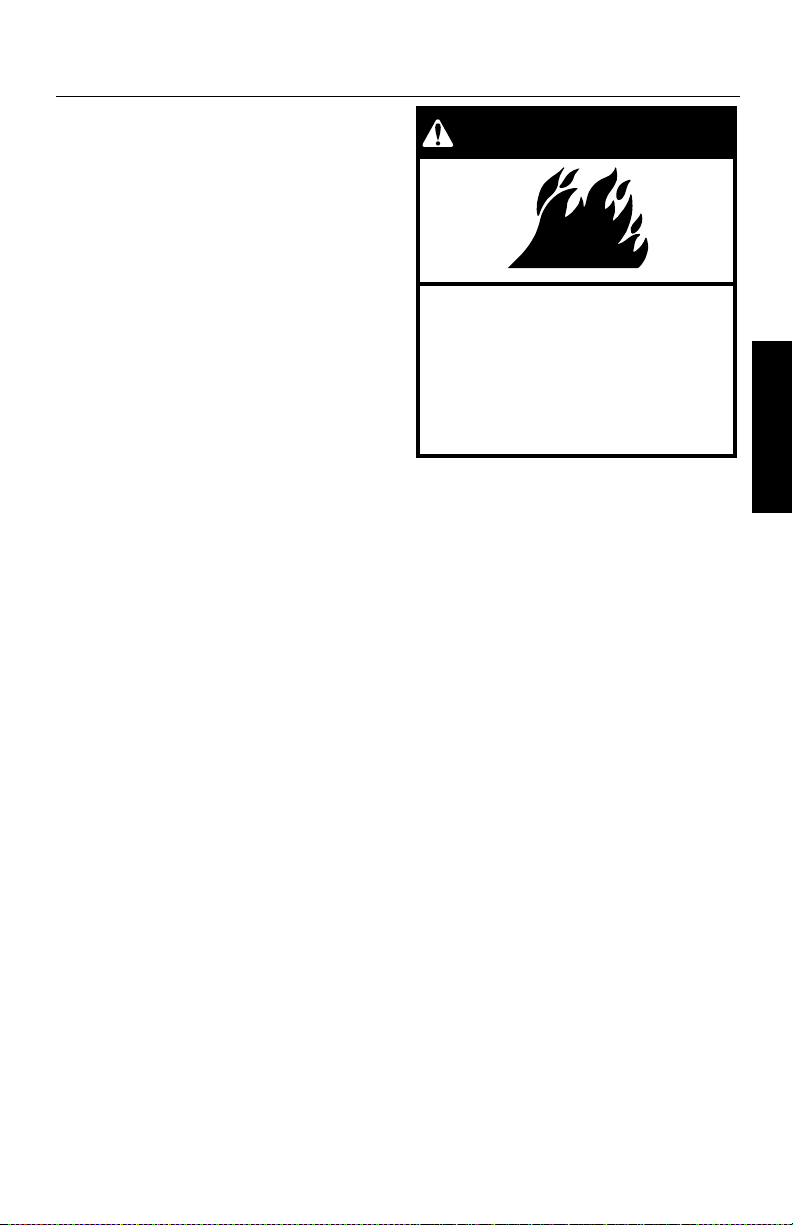
WARNING
Fire Hazard
Page 6
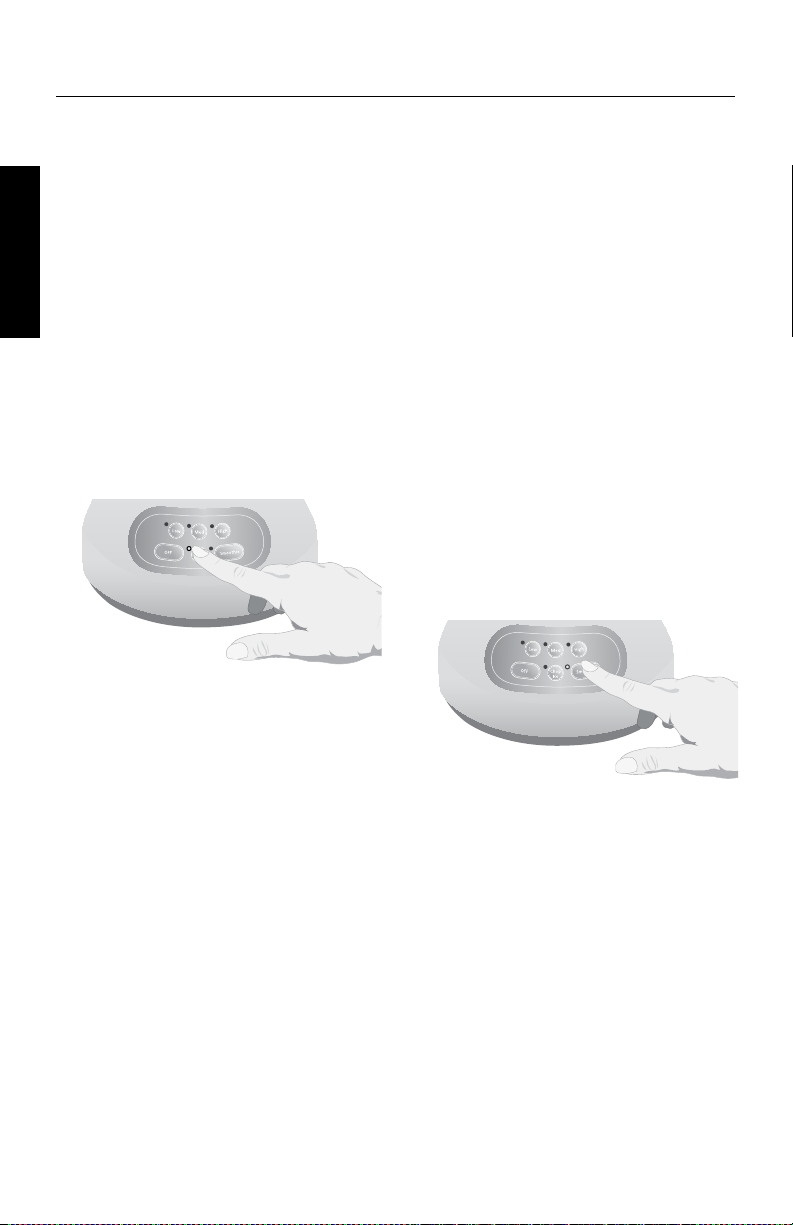
Med
Low
Hi
g
h
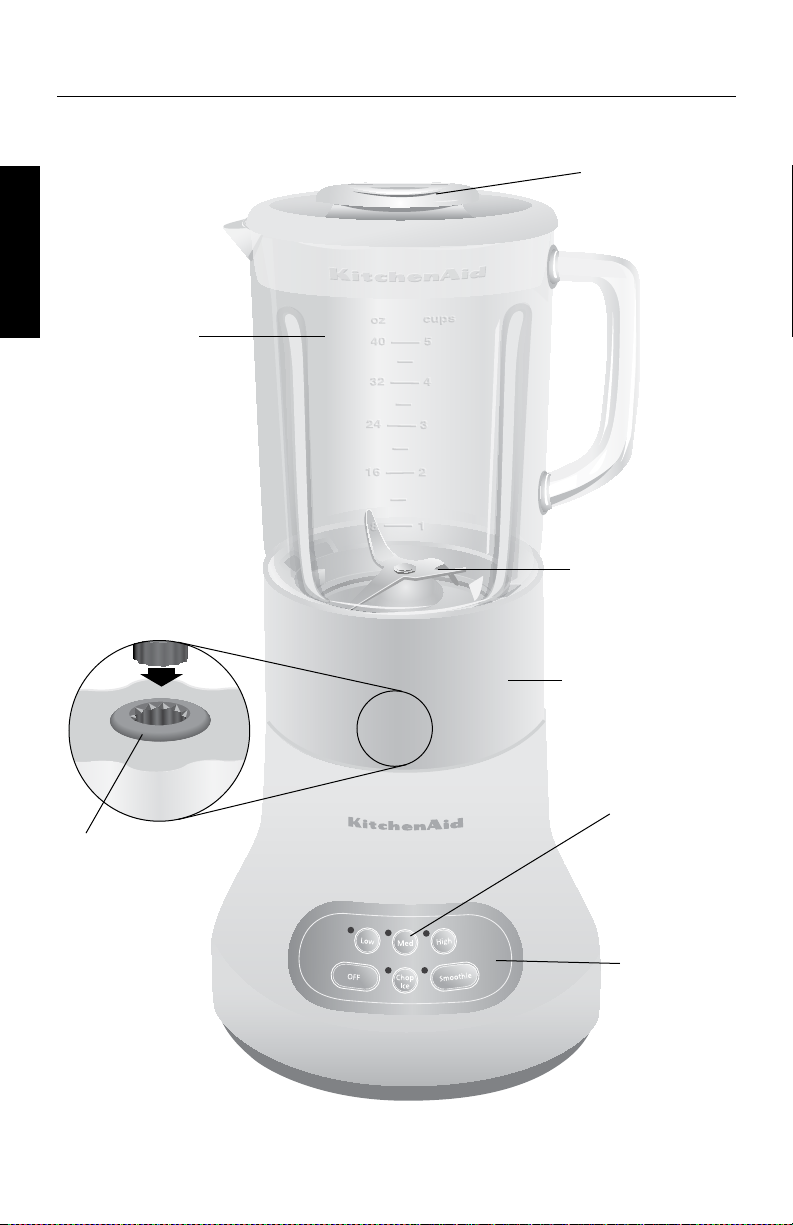
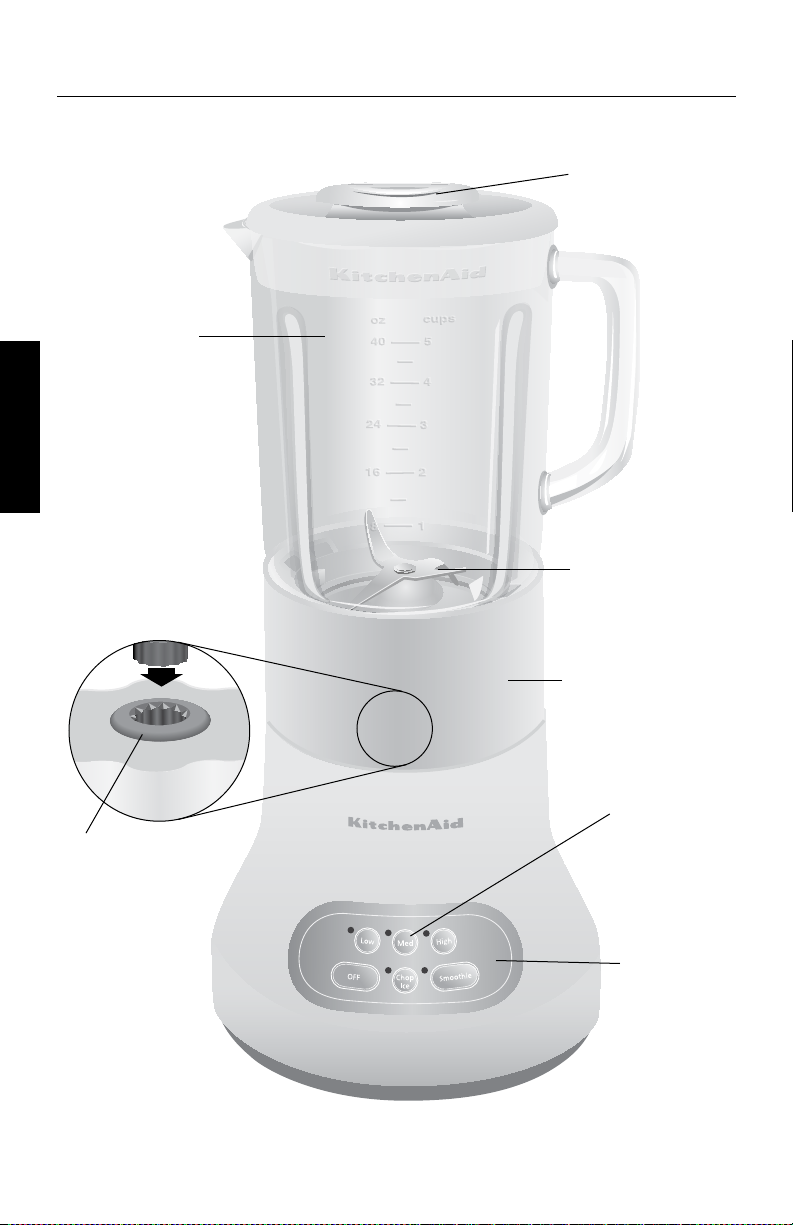
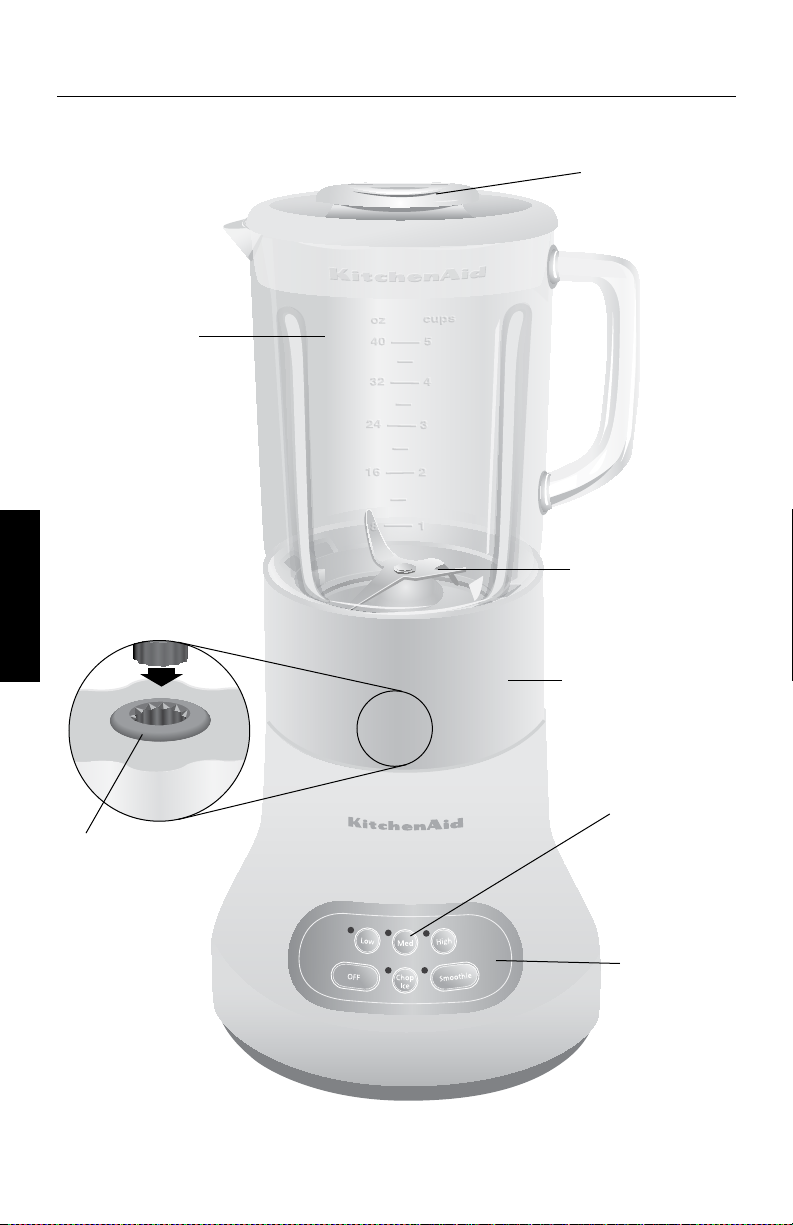
Blender Features
Lid with Clear,
ENGLISH
Generous
40 oz. (1.2 L)
Glass Pitcher
2 oz. (60 ml)
Ingredient Cup
Patented, Stainless
Steel Blade
Durable
Steel-Reinforced
Coupler
Locking Collar
and Blade
Assembly
Speed
Selection
Buttons
Clean Touch™
Control Pad
4
Page 7

Blender Features
This Blender was built and tested to
KitchenAid quality standards for optimum
performance and long, trouble-free life.
Robust Motor
Rugged motor supplies the power for
superb performance with all blending
tasks — from chopping a tray of ice for
frozen-style drinks to stirring homemade
coffee drinks for consistent flavor.
Generous 40 oz.
(1.2 L) Glass Pitcher
Glass Pitcher resists scratches,
stains and odors. Pitcher is
removable from the locking
collar for easy cleaning and
withstands a range of extreme temperatures.
Lid with Clear 2 oz. (60 ml)
Ingredient Cup
Lid provides a strong seal. The removable
ingredient cup measures ingredients and
allows them to be added while blending.
Patented, Stainless Steel Blade
Sharp over-sized tines are positioned on
four different planes for fast, thorough and
consistent blending.
Locking Collar and Blade Assembly
Durable, one-piece blade design is built
into the locking collar for easy handling
and cleaning. Dishwasher-safe assembly
keeps the blades from rotating until the
pitcher is properly attached to the collar
and put on the Blender base.
Durable Steel-Reinforced Coupler
Commercial-quality coupler with 12
interlocking teeth provide direct transfer
of motor power to the blades. Pitcher
coupler is coated for quiet operation.
Speed Selection Buttons
Blend with confidence, control and
consistency at 3 speed settings, HIGH,
MEDIUM and LOW. Create frozen drinks
in seconds with the CHOP ICE feature
and perfect smoothies with the
SMOOTHIE feature.
Soft Start
The Blender starts at a slower speed to
pull ingredients into the blade then quickly
increases to selected speed setting. This
design feature reduces start-up kick and
allows hands-free operation.
Clean Touch™ Control Pad
Wipes clean in an instant. Smooth
control pad has no seams or gaps to
trap ingredients.
Smoothie Button
A feature created and optimized for
making the best smoothie, it blends
ingredients at just the right speed to make
a great smoothie each and every time.
Chop Ice Button
Specifically designed for chopping ice, this
feature automatically pulses at staggered
intervals for optimal results. Great for
frozen-style drinks.
®
Blending Feature
ENGLISH
5
Page 8
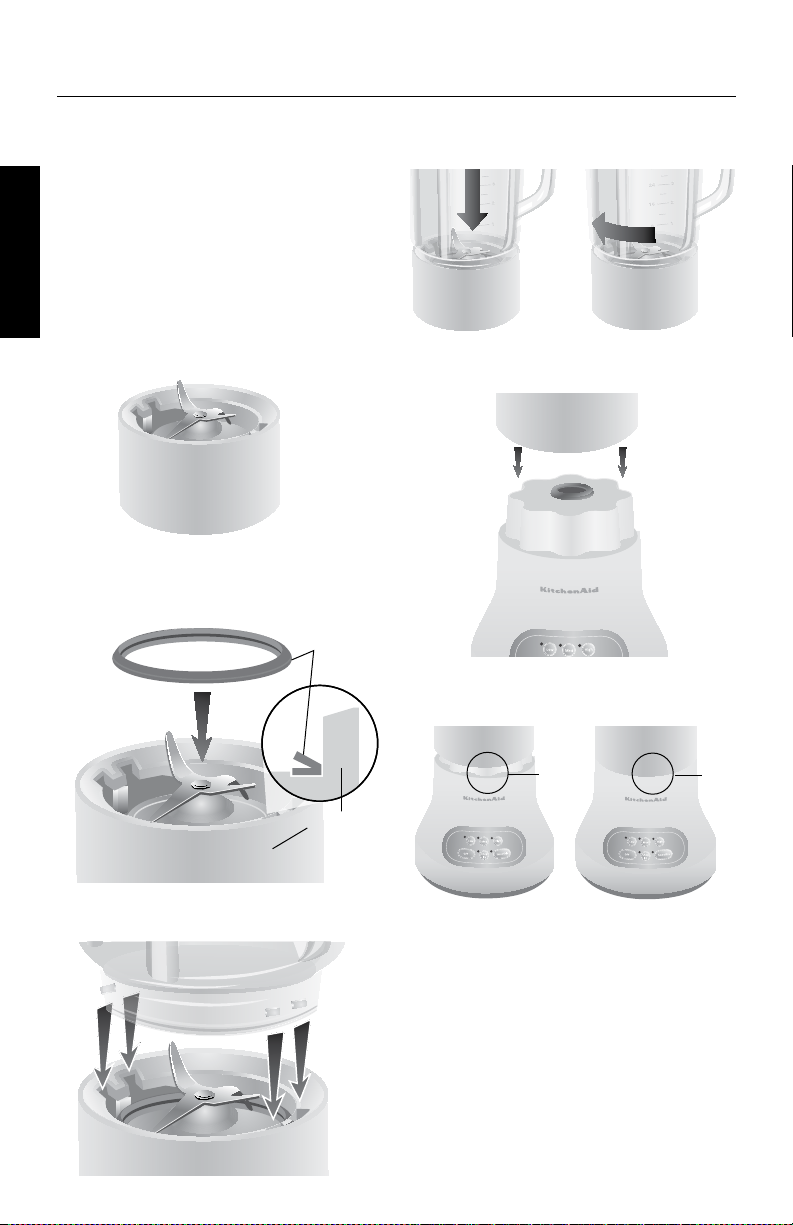
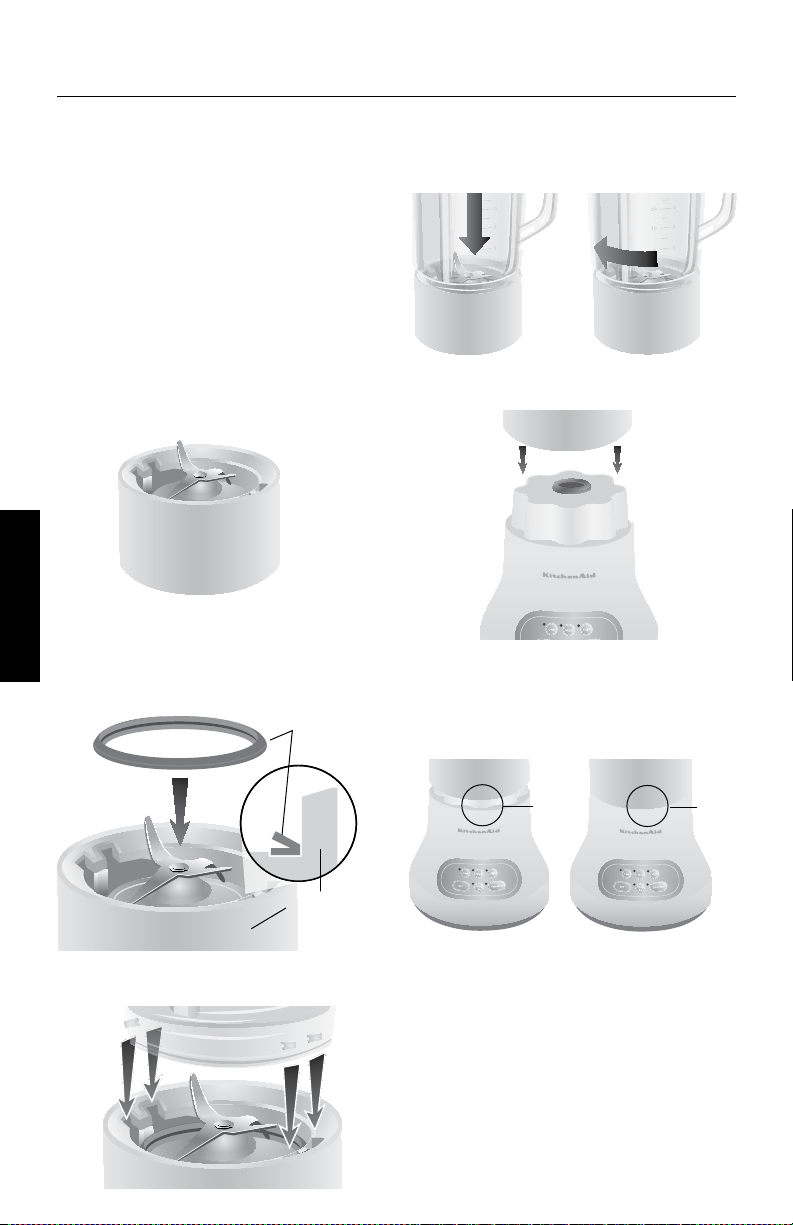
Preparing the Blender for Use
Before First Use
Before using your Blender for the first time,
wipe Blender base with a warm sudsy
cloth, then wipe clean with a damp cloth.
Dry with a soft cloth. Wash pitcher, lid with
ENGLISH
ingredient cup, locking collar and blade
assembly and sealing ring in warm, sudsy
water (see Care and Cleaning). Rinse parts
and wipe dry.
Blender Assembly
1. Put locking collar with blades pointing
up on a sturdy surface.
2. Put sealing ring, flat side down, around
the blades and into the groove within
the locking collar.
Sealing
Ring
4. Press down and rotate pitcher
clockwise, approximately ¼ turn until
two clicks are heard.
5. Put pitcher assembly onto the
Blender base.
NOTE: When properly positioned, pitcher
assembly will rest completely on Blender
base. If not, repeat steps 3 and 4.
Locking
Collar
3. Align the pitcher tabs with the slots in
the locking collar.
6. Put lid on pitcher.
6
Gap
No
Gap
Page 9
Preparing the Blender for Use
WARNING
Fire Hazard
Do not use an extension cord.
Doing so can result in death
or fire.
7. Plug power cord into a grounded
2-prong polarized outlet. Blender is
now ready for operation.
Using the Blender
Before Use
NOTE: When the Blender is on, the CHOP
ICE indicator light is lit.
- Do not interfere with blade movement
- Do not remove pitcher lid
Operating the Blender
The KitchenAid
HIGH, MEDIUM and LOW and also has a
SMOOTHIE feature and CHOP ICE feature.
1. With convenient one-step operation,
this Blender only operates when a
speed selection button is pressed.
2. Before operating the Blender, make
sure the pitcher is properly secured
in the locking collar and assembly is
positioned on the Blender base.
®
Blender has three speeds:
8. Before removing the pitcher from the
base, always press OFF and unplug the
power cord. Lift the pitcher assembly
in a straight, upward motion off of the
Blender base.
Gap
NOTE: If a gap exists between the locking
collar and the base, the pitcher might not
be locked into the locking collar or the
pitcher assembly is not positioned properly
on the Blender base. See Blender Assembly
for further instructions.
3. Put ingredients into the pitcher and
firmly attach lid.
4. Press the desired speed button for
continuous operation at that speed.
The red indicator light by the selected
speed will stay lit. You may change
speeds without stopping the unit by
pressing a new speed button.
IMPORTANT: If blending hot foods or
liquids, remove the center ingredient cup.
Operate only on LOW speed.
5. To turn off the Blender, press OFF. The
OFF button will stop any speed and
deactivate the Blender at the same time.
6. Before removing the pitcher unplug the
power cord.
7
Continued on next page
ENGLISH
No
Gap
Page 10
Using the Blender
CHOP ICE
Your KitchenAid
®
Blender offers a CHOP
ICE feature. When selected, the Blender
automatically pulses at staggered intervals
ENGLISH
at the optimal speed for chopping ice.
1. Before operating the Blender, make
sure the pitcher assembly is properly
positioned on the Blender base.
NOTE: If a gap exists between the locking
collar and the base, the pitcher might not
be locked into the locking collar or the
pitcher assembly is not positioned properly
on the Blender base. See Blender Assembly
for further instructions.
2. Put ingredients into the pitcher and
firmly attach lid.
3. Press CHOP ICE. The indicator light will
stay lit. The Blender will automatically
pulse at staggered intervals.
4. To turn off the CHOP ICE feature, press
OFF. The Blender is now ready for
continuous operation.
5. Before removing the pitcher unplug the
power cord.
SMOOTHIE
Your KitchenAid
®
Blender offers a
SMOOTHIE feature that is created and
optimized for making great smoothies. It
blends ingredients at just the right speed.
1. Before operating the Blender, make
sure the pitcher assembly is properly
positioned on the Blender base.
NOTE: If a gap exists between the locking
collar and the base, the pitcher might
not be locked into the locking collar or
the pitcher assembly is not positioned
properly on the Blender base. See Blender
Assembly, page 6 for further instructions.
2. Put ingredients into the pitcher and
firmly attach lid.
3. Press SMOOTHIE. The indicator light
will stay lit. The Blender will blend
at the right speed to give you a
great smoothie.
4. To turn off the SMOOTHIE, Press
OFF. The Blender is now ready for
continuous operation.
5. Before removing the pitcher unplug the
power cord.
8
Page 11

Using the Blender
Soft Start
The Soft Start
automatically starts the Blender at a slower
speed to pull ingredients into the blade
assembly then quickly increases to selected
speed setting for optimal performance.
NOTE: The Soft Start
works when a speed is selected from the
OFF mode and does not work with the
CHOP ICE feature.
®
Blending Feature
®
blending feature
®
blending feature
Care and Cleaning
Ingredient Cup
The 2 oz. (60 ml)
ingredient cup
can be used to
measure and
add ingredients
to the pitcher.
Remove cup and add ingredients at LOW
or MEDIUM speeds. When operating at
higher speeds, with a full pitcher or with
hot contents, stop the Blender and then
add ingredients.
ENGLISH
The Blender pitcher, locking collar and
blade can be easily cleaned as individual
components or together, without
disassembly.
•CleantheBlenderthoroughlyafter
every use
•DonotimmersetheBlenderbaseor
cord in water
•Donotuseabrasivecleansersor
scouring pads
To Clean Individual Components:
1. Lift the pitcher assembly in a straight,
upward motion off of the Blender
base. Then, rotate the pitcher
counterclockwise, two clicks, to
separate locking collar and blade
assembly and sealing ring, from the
pitcher. Wash components with warm
soapy water. Rinse and wipe dry.
NOTE: Pitcher can be placed in the
bottom rack of an automatic dishwasher.
The lid, ingredient cup, locking collar and
blade assembly, and sealing ring can be
put in the top rack. For best results, hand
washing is recommended.
2. Wipe the Blender base and cord with
a warm, sudsy cloth; wipe clean with a
damp cloth, and dry with a soft cloth.
To Clean Without Disassembly:
1. Put the pitcher on the Blender base,
fill half full with warm (not hot) water,
and add 1 or 2 drops of dishwashing
liquid. Put the lid on the pitcher, press
the LOW speed setting, and run the
Blender for 5 to 10 seconds. Remove
the pitcher and empty contents. Rinse
with warm water until clean.
2. To clean the lid and ingredient cup,
wash in warm soapy water, then rinse
and dry thoroughly.
3. Wipe the Blender base and cord with
a warm, sudsy cloth; wipe clean with a
damp cloth, and dry with a soft cloth.
9
Page 12
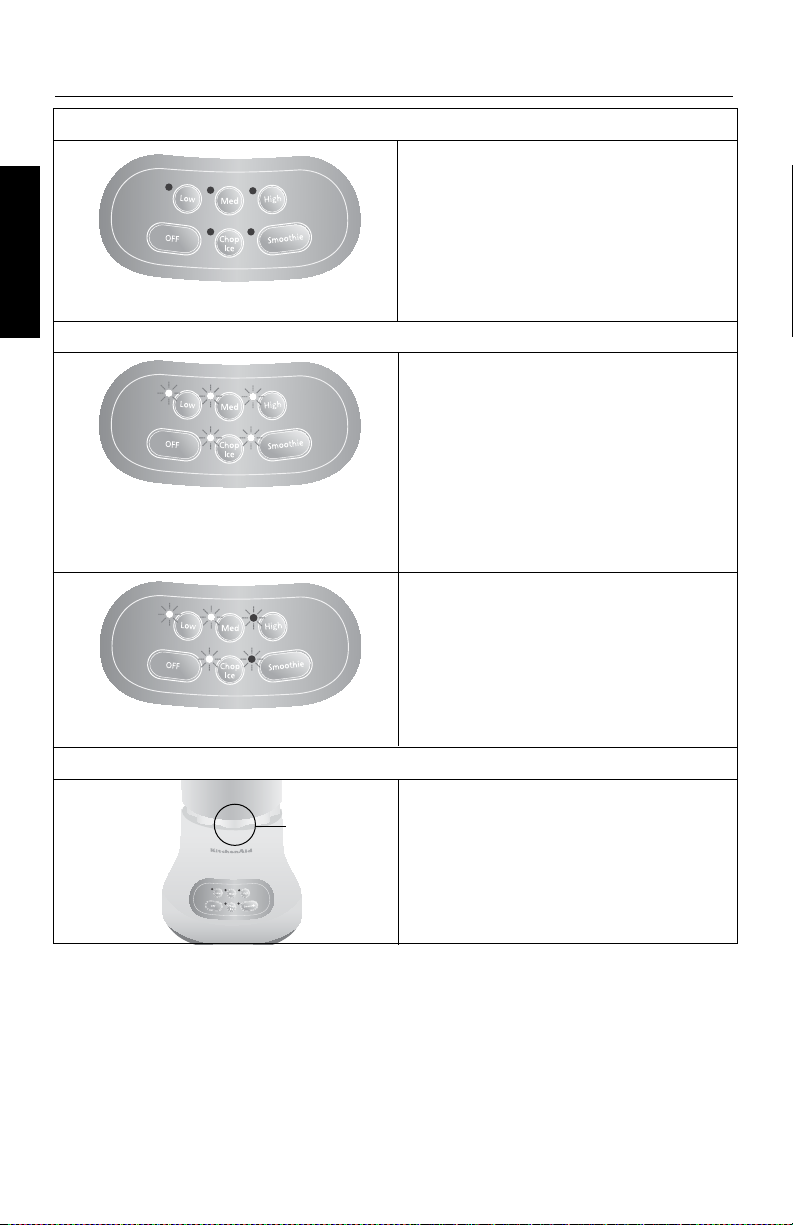
Troubleshooting
The Blender does not operate when a setting is selected:
Check to see if the Blender is plugged
into a polarized 2-prong outlet. If it
ENGLISH
No indicator lights are lit.
The Blender stops while blending:
All indicator lights are flashing
at the same time.
Indicator lights are flashing alternately.
is, press OFF, then unplug the Blender.
Plug it back into the same outlet. If the
Blender still does not work, check the
fuse or circuit breaker on the electrical
circuit the Blender is connected to and
make sure the circuit is closed.
The Blender may be overloaded. If the
Blender becomes overloaded when
blending heavy ingredients, it will
automatically shut off to prevent damage
to the motor. Press OFF to reset the
Blender and unplug the power cord.
Remove the pitcher from the base and
divide contents into smaller batches.
Adding liquid to the ingredients may also
reduce the load on the Blender.
The Blender may be jammed. If it’s
jammed, the Blender will stop running
to avoid damage to the motor. Press
OFF to reset the Blender and unplug
the power cord. Remove the pitcher
assembly from the base, free the blades
by breaking-up or removing the contents
at the bottom of the pitcher.
The Blender turns on, but blades will not rotate:
Gap
If the problem cannot be fixed with the steps provided in this section, contact KitchenAid
or an Authorized KitchenAid Service Center.
USA/Puerto Rico: Canada: Mexico:
1-800-541-6390 1-800-807-6777 01-800-024-17-17 (JV Distribuciones)
01-800-902-31-00 (Industrias Birtman)
See the KitchenAid Warranty and Service section on page 11 for additional details.
Do not return the Blender to the retailer – they do not provide service.
The pitcher is not properly secured in
the locking collar. Press down and rotate
pitcher clockwise in the locking collar past
the second “click”. This will allow the
pitcher assembly to engage the coupler.
See page 6 for Blender Assembly.
10
Page 13

KitchenAid® Blender Warranty
Length of
Warranty:
50 United States, the
District of Columbia,
Canada, and Puerto
Rico: One-year limited
warranty from date of
purchase.
DISCLAIMER OF IMPLIED WARRANTIES; LIMITATION OF REMEDIES IMPLIED
WARRANTIES, INCLUDING TO THE EXTENT APPLICABLE WARRANTIES OF
MERCHANTABILITY OR FITNESS FOR A PARTICULAR PURPOSE, ARE EXCLUDED TO THE
EXTENT LEGALLY PERMISSIBLE. ANY IMPLIED WARRANTIES THAT MAY BE IMPOSED BY
LAW ARE LIMITED TO ONE YEAR, OR THE SHORTEST PERIOD ALLOWED BY LAW. SOME
STATES AND PROVINCES DO NOT ALLOW LIMITATIONS OR EXCLUSIONS ON HOW LONG
AN IMPLIED WARRANTY OF MERCHANTABILITY OR FITNESS LASTS, SO THE ABOVE
LIMITATIONS OR EXCLUSIONS MAY NOT APPLY TO YOU.
KitchenAid
Will Pay For:
50 United States, the
District of Columbia
and Canada: Hassle-free
replacement of your
Blender. See the following
page for details on how to
arrange for replacement.
OR
In Puerto Rico:
The replacement parts
and repair labor costs to
correct defects in materials
and workmanship. Service
must be provided by an
Authorized KitchenAid
Service Center. To arrange
for service, follow the
instructions on page 12.
KitchenAid
Will Not Pay For:
A. Repairs when Blender
is used in other than
normal single family
home use.
B. Damage resulting from
accident, alteration,
misuse or abuse or
use with products
not approved by
KitchenAid.
C. Replacement parts or
repair labor costs for
Blender when operated
outside the country of
purchase.
ENGLISH
IF THIS PRODUCT FAILS TO WORK AS WARRANTED, CUSTOMER’S SOLE AND EXCLUSIVE
REMEDY SHALL BE REPAIR OR REPLACEMENT ACCORDING TO THE TERMS OF THIS
LIMITED WARRANTY. KITCHENAID AND KITCHENAID CANADA DO NOT ASSUME ANY
RESPONSIBILITY FOR INCIDENTAL OR CONSEQUENTIAL DAMAGES. This warranty gives
you specific legal rights and you may also have other rights which vary from state to
state or province to province.
11
Page 14

Hassle-Free Replacement Warranty –
50 United States and District of Columbia
We’re so confident the quality of our
products meets the exacting standards of
KitchenAid that, if your Blender should
ENGLISH
fail within the first year of ownership,
KitchenAid will arrange to deliver an
identical or comparable replacement to
your door free of charge and arrange to
have your original Blender returned to us.
Your replacement unit will also be covered
by our one year limited warranty. Please
follow these instructions to receive this
quality service.
If your KitchenAid
within the first year of ownership, simply
call our toll-free Customer Satisfaction
Center at 1-800-541-6390 Monday
through Friday, 8 a.m. to 8 p.m. (Eastern
Time), or Saturday, 10 a.m. to 5 p.m. Give
the consultant your complete shipping
address. (No P.O. Box numbers, please.)
When you receive your replacement
Blender, use the carton and packing
materials to pack up your original Blender.
In the carton, include your name and
address on a sheet of paper along with
a copy of the proof of purchase (register
receipt, credit card slip, etc.).
®
Blender should fail
Hassle-Free Replacement Warranty – Canada
We’re so confident the quality of our
products meets the exacting standards
of the KitchenAid brand that, if your
Blender should fail within the first year
of ownership, KitchenAid Canada will
replace your Blender with an identical
or comparable replacement. Your
replacement unit will also be covered
by our one year limited warranty. Please
follow these instructions to receive this
quality service.
If your KitchenAid
within the first year of ownership, take the
Blender or ship collect to an Authorized
KitchenAid Canada Service Centre. In the
carton include your name and complete
shipping address along with a copy of the
proof of purchase (register receipt, credit
card slip, etc.). Your replacement Blender
will be returned prepaid and insured. If you
are unable to obtain satisfactory service
in this manner call our toll-free Customer
eXperience Centre at 1-800-807-6777.
Or write to us at:
Customer eXperience Centre
KitchenAid Canada
1901 Minnesota Court
Mississauga, ON L5N 3A7
®
Blender should fail
How to Arrange for Warranty Service
in Puerto Rico
Your KitchenAid® Blender is covered by
a one-year limited warranty from the
date of purchase. KitchenAid will pay
for replacement parts and labor costs
to correct defects in materials and
workmanship. Service must be provided by
an Authorized KitchenAid Service Center.
Take the Blender or ship prepaid and
insured to an Authorized KitchenAid
Service Center. Your repaired Blender will
be returned prepaid and insured. If you
are unable to obtain satisfactory service in
this manner, call toll-free 1-800-541-6390
to learn the location of a Service Center
near you.
12
Page 15

How to Arrange for Service
after the Warranty Expires – All Locations
For service information in the 50
WARNING
Electrical Shock Hazard
Disconnect power before
servicing.
Failure to do so can result in
death or electrical shock.
Before calling for service, please review the
Troubleshooting section on page 10.
United States, District of Columbia,
and Puerto Rico,
call toll-free 1-800-541-6390.
Or write to:
Customer Satisfaction Center
KitchenAid Portable Appliances
P.O. Box 218
St. Joseph, MI 49085-0218
Or contact an Authorized Service Center
near you.
For service information in Canada,
call toll-free 1-800-807-6777.
Or write to:
Customer eXperience Centre
KitchenAid Canada
1901 Minnesota Court
Mississauga, ON L5N 3A7
How to Arrange for Service
Outside these Locations
ENGLISH
Consult your local KitchenAid dealer or the
store where you purchased the Blender for
information on how to obtain service.
How to Order Accessories
and Replacement Parts
To order accessories or replacement
parts for your Blender in the 50
United States, District of Columbia,
and Puerto Rico,
call toll-free 1-800-541-6390 Monday
through Friday, 8 a.m. to 8 p.m. (Eastern
Time), or Saturday, 10 a.m. to 5 p.m.
Or write to:
Customer Satisfaction Center
KitchenAid Portable Appliances
P.O. Box 218
St. Joseph, MI 49085-0218
For service information in Mexico,
call toll-free
01-800-024-17-17 (JV Distribuciones)
Or
01-800-902-31-00 (Industrias Birtman)
To order accessories or replacement
parts for your Blender in Canada,
call toll-free 1-800-807-6777.
Or write to:
Customer eXperience Centre
KitchenAid Canada
1901 Minnesota Court
Mississauga, ON L5N 3A7
To order accessories or replacement
parts for your Blender in Mexico,
call toll-free
01-800-024-17-17 (JV Distribuciones)
Or
01-800-902-31-00 (Industrias Birtman)
13
Page 16

Table des matières
INTRODUCTION
Preuve d’achat et enregistrement du produit ..............................Deuxième de couverture
Sécurité du mélangeur .................................................................................................15
Consignes de sécurité importantes ................................................................................16
Alimentation électrique .................................................................................................17
CARACTÉRISTIQUES ET FONCTIONNEMENT
Caractéristiques du mélangeur ......................................................................................18
Avant de se servir du mélangeur ...................................................................................20
Avant la première utilisation ..................................................................................20
FRANÇAIS
Assemblage du mélangeur ....................................................................................20
Utilisation du mélangeur ...............................................................................................21
Avant d’utiliser le mélangeur .................................................................................21
Mode d’emploi du mélangeur ...............................................................................21
CHOP ICE (BROYAGE DE GLACE) ............................................................................22
SMOOTHIE (YOGOURT FOUETTÉ) ........................................................................22
Fonction de mélange Soft Start
Tasse d’ingrédients ................................................................................................23
ENTRETIEN ET NETTOYAGE
Nettoyage des composants individuels ..........................................................................23
Pour nettoyer sans démonter ........................................................................................23
Dépannage ...................................................................................................................24
®
............................................................................23
GARANTIE ET INFORMATION SUR LE SERVICE APRÈS-VENTE
Garantie du mélangeur KitchenAid
®
..............................................................................25
Garantie de satisfaction totale et de remplacement -
50 États des États–Unis district federal de Columbia .....................................................26
Garantie de satisfaction totale et de remplacement - Canada ........................................26
Comment obtenir une réparation sous garantie à Puerto Rico.......................................26
Comment obtenir une réparation hors garantie - Tous les territoires .............................27
Comment obtenir une réparation en dehors de ces territoires .......................................27
Comment commander des accessoires et des pièces de rechange ................................27
REMARQUE : EN RAISON DU MODÈLE UNIQUE DU CONTENANT ET DE LA LAME, LISEZ
CES INSTRUCTIONS AVANT D’UTILISER VOTRE NOUVEAU MÉLANGEUR KITCHENAID
®
POUR OBTENIR DES RÉSULTATS DE PERFORMANCE MAXIMUM.
14
14
Page 17

Sécurité du mélangeur
DANGER
Votre sécurité et celle des autres est très importante.
Nous donnons de nombreux messages de sécurité importants dans ce manuel
et sur votre appareil ménager. Assurez-vous de toujours lire tous les messages
de sécurité et de vous y conformer.
Voici le symbole d’alerte de sécurité.
Ce symbole d’alerte de sécurité vous signale les dangers
potentiels de décès et de blessures graves à vous et à d’autres.
Tous les messages de sécurité suivront le symbole d’alerte de
sécurité et le mot “DANGER” ou “AVERTISSEMENT”. Ces mots
signifient :
Risque possible de décès ou de
blessure grave si vous ne suivez pas
immédiatement les instructions.
Risque possible de décès ou de
AVERTISSEMENT
Tous les messages de sécurité vous diront quel est le danger potentiel et vous
disent comment réduire le risque de blessure et ce qui peut se produire en cas
de non-respect des instructions.
blessure grave si vous ne suivez
pas les instructions.
FRANÇAIS
15
Page 18

CONSIGNES DE SÉCURITÉ
IMPORTANTES
Lorsque vous utilisez un appareil électrique, vous devez toujours respecter les consignes
de sécurité fondamentales afin de réduire les risques d’incendie, de choc électrique et/
ou de blessure y compris les consignes suivantes :
1. Lisez toutes les instructions.
2. Pour vous protéger contre les
chocs électriques, ne plongez pas
le mélangeur dans l’eau ni dans
d’autres liquides.
3. Il est nécessaire de surveiller de près
FRANÇAIS
l’utilisation de cet appareil par des
enfants ou à proximité de ceux-ci.
4. Débranchez l’appareil de la prise de
courant lorsqu’il n’est pas utilisé,
avant de monter ou de démonter des
pièces avant de le nettoyer.
5. Évitez de toucher aux pièces mobiles.
6. N’utilisez pas le mélangeur si le
cordon ou la fiche sont endommagés
ou s’ils présentent un défaut de
fonctionnement ou s’ils tombent
ou sont endommagés de quelque
manière que ce soit. Rapportez
l’appareil au centre de réparation le
plus proche pour le faire examiner,
réparer ou régler.
7. N’utilisez pas l’appareil à l’extérieur.
8. Ne laissez pas pendre le cordon du
bord de la table ou du comptoir.
9. N’introduisez pas les doigts ni des
ustensiles dans le récipient pendant
le mélange pour limiter les risques de
blessures graves ou de dommages au
mélangeur. Utilisez un grattoir, mais
seulement quand le mélangeur est
arrêté.
10. Les lames sont tranchantes.
Manipuler avec soin.
11. Pour réduire le risque de blessure, ne
jamais placer le col de verrouillage
avec les lames sur le socle sans que le
récipient soit bien installé.
12. Utilisez toujours le mélangeur avec le
couvercle en place.
13. L’utilisation d’accessoires, dont
les bocaux de conserve, non
recommandés par KitchenAid peut
présenter un risque de blessure.
14. Enlevez la pièce centrale du couvercle
à deux pièces si vous mélangez des
liquides chauds.
15. Ce produit est réservé à un usage
domestique.
CONSERVEZ CES DIRECTIVES
16
Page 19
Alimentation électrique
AVERTISSEMENT
Volts: 120 Volts A.C.
Hertz: 60 Hz
NOTE: Votre mélangeur a une fiche
polarisée à 2 broches. Pour réduire le
risque de choc électrique, cette fiche
entre dans une prise d’une seule manière.
Si la fiche n’entre pas entièrement dans la
prise, contactez un électricien qualifié. Ne
modifiez pas la fiche de quelque façon
que ce soit.
Ne pas utiliser de rallonge. Si le cordon
d’alimentation est trop court, demandez à
un électricien qualifié ou à un réparateur
d’installer une prise près de l’appareil.
Risque d’incendie
Ne pas utiliser un câble de
rallonge.
Le non-respect de cette
instruction peut causer un décès,
ou un incendie.
FRANÇAIS
17
Page 20
Med
Low
Hi
g
h
Caractéristiques du mélangeur
Couvercle avec
tasse d´ingrédients
transparente de
60 ml (2 oz)
Généreux
FRANÇAIS
récipient de
verre de
1,2 L (40 oz)
Lame en acier
inoxydable
brevetée
Coupleurs
durables
renforcés d’acier
18
18
Assemblage
de col de
verrouillage
et de lame
Touches de
sélection de
la vitesse
Clavier de
commande
Clean Touch™
Page 21

Caractéristiques du mélangeur
Ce mélangeur a été fabriqué et testé selon
les normes de qualité de KitchenAid pour
une performance optimale et une vie
longue et sans problème.
Moteur puissant
Un moteur robuste fournit la puissance
nécessaire à une performance superbe
pour tous les types de mélange —- que ce
soit broyer un plateau de glaçons pour des
boissons glacées ou mélanger des boissons
au café préparées à la maison pour une
saveur constante.
Généreux récipient de
verre de 1,2 L (40 oz)
Le récipient de verre résiste aux
égratignures, aux taches et aux
odeurs. Le récipient se retire
du col de verrouillage pour
faciliter le nettoyage et résiste à une plage
de températures extrêmes.
Couvercle à tasse d’ingrédients
transparente de 60 ml (2 oz)
Le couvercle fournit un joint solide. La
tasse d’ingrédients amovible permet de
mesurer et d’ajouter les ingrédients tout en
mélangeant.
Lame en acier inoxydable brevetée
Les dents surdimensionnées et
tranchantes sont placées sur quatre
plans différents pour un mélange rapide,
complet et consistant.
Assemblage de col de verrouillage et
de lame
Le modèle de lame durable d’une pièce,
est construit dans le col de verrouillage
pour faciliter la manipulation et le
nettoyage. L’assemblage convenant
au lave-vaisselle empêche les lames de
tourner jusqu’à ce que le récipient ou le
bocal d’accessoires soit bien installé au col
et placé dans le socle du mélangeur.
Coupleur renforcé en acier durable
Le coupleur de qualité commerciale à 12
dents interverrouillables offre un transfert
direct de la puissance du moteur aux lames.
Le coupleur du récipient est recouvert pour
un fonctionnement silencieux.
Boutons de sélection de vitesse
Mélangez avec confiance, contrôle et
constance à 3 réglages de vitesse, HIGH,
MEDIUM et LOW (ÉLEVÉE, MOYENNE
et BASSE). Créez des boissons glacées
en quelques secondes avec la fonction
CHOP ICE (BROYAGE DE GLACE) et des
yogourts fouettés parfaits avec la fonction
SMOOTHIE.
Fonction de mélange Soft Start
Le mélangeur commence à une vitesse plus
lente pour attirer les aliments dans la lame,
puis augmente rapidement au réglage de
vitesse choisi. Cette fonction du modèle
réduit l’impulsion de démarrage et permet
un fonctionnement à mains libres.
Touche de commande Clean Touch™
S’essuie facilement en un instant. La
touche de commande lisse n’a pas de
coutures ou d’écarts pour enfermer les
ingrédients.
Bouton Smoothie (yogourt fouetté)
Une fonction créée et optimisée pour
préparer le meilleur yogourt fouetté,
elle mélange les ingrédients à la bonne
vitesse pour donner un yogourt fouetté
fantastique à chaque fois.
Bouton Chop Ice (broyage de glace)
Cette fonction conçue spécifiquement
pour broyer la glace, donne
automatiquement des impulsions à des
intervalles décalés pour des résultats
optimaux. Fantastique pour des boissons
glacées.
®
FRANÇAIS
19
19
Page 22

Avant de se servir du mélangeur
Avant la première utilisation
Avant d’utiliser votre mélangeur pour la
première fois, essuyez le socle de l’appareil
avec un chiffon tiède et savonneux, puis
essuyez avec un chiffon humide.
Asséchez avec un chiffon souple. Lavez
le récipient, le couvercle de la tasse
d’ingrédients, l’assemblage de col de
verrouillage et de lame et la bague
d’étanchéité dans de l’eau chaude et
savonneuse (reportez-vous à Entretien et
nettoyage). Rincez les pièces et essuyez
pour assécher.
FRANÇAIS
Assemblage du mélangeur
1. Placez le col de verrouillage avec les
lames pointant vers le haut sur une
surface solide.
2. Placez la bague d’étanchéité, côté plat
vers le bas, autour des lames et dans la
rainure dans le col de verrouillage.
3. Alignez les languettes du récipient avec
les fentes du col de verrouillage.
4. Pressez et tournez le récipient dans le
sens horaire d’environ
ce que vous entendiez deux clics.
5. Mettez l’assemblage du récipient sur le
socle du mélangeur.
1
⁄4 de tour jusqu’à
Bague
d’étanchéité
Col de
verrouillage
REMARQUE : Lorsqu’il est bien placé,
l’assemblage du récipient reposera
entièrement sur le socle du mélangeur.
Sinon, répétez les étapes 3 et 4.
Écart
6. Mettez le couvercle sur le récipient.
20
Sans
écart
Page 23

Avant de se servir du mélangeur
AVERTISSEMENT
Risque d’incendie
Ne pas utiliser un câble de
rallonge.
Le non-respect de cette
instruction peut causer un décès,
ou un incendie.
Avant d’utiliser le mélangeur
REMARQUE : Lorsque le mélangeur est
en marche, le témoin lunimeux CHOP ICE
(broyage de glace) est allumé.
- n’entravez pas le déplacement de la
lame
- ne retirez pas le couvercle du récipient
Mode d’emploi du mélangeur
Le mélangeur KitchenAid
HIGH (élevée), MEDIUM (moyenne) et LOW
(basse), et a aussi une fonction SMOOTHIE
(yogourt fouetté) et fonction CHOP ICE
(broyage de glace).
1. Avec un fonctionnement pratique à
une étape, ce mélangeur fonctionne
seulement lorsque vous appuyez sur un
bouton de sélection de vitesse.
2. Avant d’utiliser l’appareil, assurez-vous
que le récipient est bien installé dans le
col de verrouillage et que l’assemblage
est placé sur le socle du mélangeur.
Utilisation du mélangeur
®
a trois vitesses :
7. Branchez le cordon dans une prise de
courant polarisée, mise à la terre à
2 broches. Le mélangeur est
maintenant prêt à utiliser.
8. Avant de retirer le récipient du socle,
appuyez toujours sur le bouton
« OFF » (arrêt) et débranchez le cordon.
Soulevez l’assemblage du récipient
d’un mouvement vers le haut et droit
du socle du mélangeur.
Écart
REMARQUE : S’il y a un écart entre le
col de verrouillage et le socle, le récipient
pourrait ne pas être verrouillé dans le
col de verrouillage ou l’assemblage du
récipient n’est pas placé correctement sur
le socle du mélangeur. Reportez-vous à
l’assemblage du mélangeur pour d’autres
instructions.
3. Placez les ingrédients dans le récipient
et installez le couvercle bien en place.
4. Appuyez sur le bouton de vitesse voulu
pour un fonctionnement continu à
cette vitesse. Le témoin lumineux rouge
près de la vitesse choisie restera allumé.
Vous pouvez changer les vitesses sans
arrêter l’appareil en appuyant sur un
nouveau bouton de vitesse.
IMPORTANT : Si vous mélangez des aliments
chauds ou des liquides, retirez la tasse
d’ingrédients du centre. Faites fonctionner
seulement à la vitesse LOW (basse).
Sans
écart
FRANÇAIS
21
Suite à la page suivante
Page 24
Utilisation du mélangeur
5. Pour éteindre le mélangeur, appuyez sur
le bouton « OFF » (arrêt). Le bouton «
OFF » (arrêt) s’arrêtera à toutes vitesses
et
désactivera le mélangeur en même temps.
6. Avant de retirer le récipient, débranchez
le cordon d’alimentation.
CHOP ICE (BROYAGE DE GLACE)
Votre mélangeur KitchenAid
®
offre une
fonction CHOP ICE (broyage de glace).
Lorsque vous la choisissez, le mélangeur
passe automatiquement à des impulsions à
FRANÇAIS
intervalles décalés à vitesse optimale pour
broyer la glace.
1. Avant d’utiliser l’appareil, assurez-vous
que le récipient est bien installé sur le
socle du mélangeur.
REMARQUE : S’il y a un écart entre le
col de verrouillage et le socle, le récipient
pourrait ne pas être verrouillé dans le
col de verrouillage ou l’assemblage du
récipient n’est pas placé correctement sur
le socle du mélangeur. Reportez-vous à
l’Assemblage du mélangeur, page 20 pour
d’autres instructions.
2. Placez les ingrédients dans le récipient
et installez le couvercle bien en place.
3. Appuyez sur le bouton CHOP ICE
(broyage de glace). Le témoin lumineux
restera allumé. Le mélangeur passera
automatiquement à des impulsions à
SMOOTHIE (YOGOURT FOUETTÉ)
Votre mélangeur KitchenAid
®
offre une
fonction SMOOTHIE (yogourt fouetté) qui
est créée et optimisée pour préparer des
yogourts fouettés fantastiques. Elle mélange
les ingrédients à la bonne vitesse.
1. Avant d’utiliser l’appareil, assurez-vous
que le récipient est bien installé sur le
socle du mélangeur.
REMARQUE : S’il y a un écart entre le
col de verrouillage et le socle, le récipient
pourrait ne pas être verrouillé dans le
col de verrouillage ou l’assemblage du
récipient n’est pas placé correctement sur
le socle du mélangeur. Reportez-vous à
l’Assemblage du mélangeur pour d’autres
instructions.
2. Placez les ingrédients dans le récipient
et installez le couvercle bien en place.
3. Enfoncez SMOOTHIE (yogourt fouetté).
Le témoin lumineux restera allumé.
Le mélangeur mélangera à la bonne
vitesse pour vous donner un yogourt
fouetté fantastique.
4. Pour arrêter la fonction SMOOTHIE,
appuyez sur le bouton « OFF » (arrêt).
Le mélangeur est maintenant prêt pour
une utilisation continue.
5. Avant de retirer le récipient,
débranchez le cordon d’alimentation.
intervalles décalés.
4. Pour arrêter la fonction CHOP ICE
(broyage de glace), appuyez sur le
bouton « OFF » (arrêt). Le mélangeur
est maintenant prêt pour une utilisation
continue.
5. Avant de retirer le récipient,
débranchez le cordon d’alimentation.
22
Page 25

Utilisation du mélangeur
Fonction de mélange Soft Start
La fonction de mélange Soft Start® fait
démarrer automatiquement le mélangeur
à une vitesse plus basse pour attirer les
ingrédients dans l’assemblage d
e lame, puis augmente rapidement
au réglage de vitesse choisi pour une
performance optimale.
REMARQUE : La fonction de mélange
Soft Start
une vitesse du mode « OFF » (arrêt) et ne
fonctionne pas avec la fonction CHOP ICE
(broyage de glace).
®
fonctionne lorsqu’on choisit
®
Entretien et nettoyage
Tasse d’ingrédients
La tasse d’ingrédients
de 60 ml (2 oz) peut
être utilisée pour
mesurer et ajouter
des ingrédients au
récipient. Retirez la
tasse et ajoutez les ingrédients à la vitesse
LOW (basse) ou MEDIUM (moyenne). En
fonctionnant à des vitesses plus élevées, avec
un récipient plein ou avec un contenu chaud,
arrêtez le mélangeur pour ajouter ensuite les
ingrédients.
Le récipient du mélangeur, le col de
verrouillage et la lame se nettoient
facilement comme composants individuels
ou ensemble, sans démonter.
•Nettoyezbienlemélangeuraprès
chaque utilisation.
•Neplongezpaslesocledumélangeurni
le cordon dans l’eau.
•N’utilisezpasdenettoyantsabrasifsou
de tampons à récurer.
Nettoyage des composants individuels
1. Soulevez l’assemblage du récipient
d’un mouvement vers le haut et
droit du socle du mélangeur. Tournez
ensuite le récipient dans le sens
antihoraire, deux clics, pour séparer
l’assemblage de col de verrouillage et
de lame et la bague d’étanchéité du
récipient. Lavez les composants dans
de l’eau tiède savonneuse. Rincez et
essuyez pour assécher.
REMARQUE : Le récipient peut être
placé dans le plateau inférieur d’un lavevaisselle automatique. Le couvercle, la
tasse d’ingrédients, l’assemblage de col
de verrouillage et de lame et la bague
d’étanchéité peuvent être placés dans
le plateau supérieur. Pour les meilleurs
résultats, il est recommandé de laver à
la main.
2. Essuyez le socle du mélangeur et
le cordon avec un chiffon tiède et
savonneux, essuyez avec un chiffon
humide et asséchez avec un
chiffon doux.
Pour nettoyer sans démonter
1. Mettez le récipient sur le socle du
mélangeur, remplissez à moitié d’eau
tiède (non chaude) et ajoutez 1 ou
2 gouttes de détergent liquide pour
la vaisselle. Mettez le couvercle sur
le récipient, appuyez sur le réglage
de vitesse LOW (basse) et faites
fonctionner le mélangeur pendant 5
à 10 secondes. Retirez le récipient et
videz le contenu. Rincez à l’eau tiède
jusqu’à ce qu’il soit propre.
2. Pour nettoyer le couvercle et la tasse
d’ingrédients, lavez à l’eau tiède et
savonneuse, rincez et essuyez bien.
3. Essuyez le socle du mélangeur et
le cordon avec un chiffon tiède et
savonneux, essuyez avec un chiffon
humide et asséchez avec un
chiffon doux.
FRANÇAIS
23
Page 26

Dépannage
Le mélangeur ne fonctionne pas lorsqu’un réglage est choisi :
Vérifiez si le mélangeur est branché
dans une prise polarisée à 2 broches.
S’il l’est, appuyez sur le bouton « OFF »
(arrêt), puis débranchez le mélangeur.
Rebranchez ensuite dans la même prise.
Si le mélangeur ne fonctionne toujours
pas, vérifiez les fusibles ou le disjoncteur
Aucun témoin lumineux n’est alumé.
Le mélangeur s’arrête en mélangeant :
FRANÇAIS
Tous les témoins lumineux clignotent en
Les témoins lumineux clignotent de
Le mélangeur se met en marche, mais les lames ne tournent pas :
même temps.
manière alternative.
Écart
de la maison du circuit électrique où le
mélangeur est branché et assurez-vous
que le circuit est fermé.
Le mélangeur pourrait être surchargé. Si
le mélangeur est surchargé en mélangeant
des ingrédients lourds, il s’arrêtera
automatiquement pour éviter tout dommage
au moteur. Appuyez le bouton « OFF » (arrêt)
pour réinitialiser le mélangeur et débranchez
le cordon d’alimentation. Retirez le récipient
du socle et séparez le contenu en
plus petits lots. Ajouter du liquide aux
ingrédients peut aussi réduire la charge
du mélangeur.
Le mélangeur pourrait être bloqué. S'il est
bloqué, le mélangeur cessera de fonctionner
pour éviter tout dommage au moteur.
Enfoncez « OFF » (arrêt) pour réinitialiser
le mélangeur et débranchez le cordon
d’alimentation. Retirez le récipient ou
l’assemblage du bocal d’accessoires du socle
et avec une spatule à râcler, libérez les lames
en décomposant ou retirant le contenu au
bas du récipient ou du bocal d’accessoires.
Le récipient n’est pas bien installé dans le
col de verrouillage. Pressez et tournez le
récipient dans le sens horaire dans le col
de verrouillage pour dépasser le second
« clic ». Ceci permettra au récipient
d’engager le coupleur. Voir page 20 pour
l’assemblage du mélangeur.
Si vous ne pouvez pas corriger le problème avec les étapes de cette section, contactez
KitchenAid ou un Centre de service autorisé KitchenAid.
É.U./Puerto Rico : Canada : Mexique :
1-800-541-6390 1-800-807-6777 01-800-024-17-17 (JV Distribuciones)
01-800-902-31-00 (Industrias Birtman)
Consultez la section Garantie et réparation des produits KitchenAid de la page 25 pour obtenir
plus de détails. Ne retournez pas le mélangeur au détaillant – il ne fournit pas le service.
24
Page 27

Garantie du mélangeur KitchenAid
®
Durée de la
garantie :
50 États des États-Unis,
le district fédéral de
Columbia, le Canada et
Puerto Rico : Garantie
limitée d’un an à compter
de la date d’achat.
DÉSAVEU DE GARANTIE TACITE, LIMITATION DES RECOURS LES GARANTIES
TACITES, Y COMPRIS DANS LA MESURE APPLICABLE LES GARANTIES DE QUALITÉ
MARCHANDE OU D’APTITUDE À UN EMPLOI PARTICULIER, SONT EXCLUES DANS LA
MESURE AUTORISÉE PAR LA LOI. TOUTE GARANTIE TACITE IMP0SÉE PAR LA LOI EST
LIMITÉE À UN AN, OU LA DURÉE MINIMUM PERMISE PAR LA LOI. PUISQUE CERTAINES
JURIDICTIONS NE PERMETTENT PAS L’EXCLUSION OU LA LIMITATION DE DURÉE DES
GARANTIES IMPLICITES DE QUALITÉ MARCHANDE OU D’APTITUDE À UN EMPLOI
PARTICULIER, LES LIMITATIONS CI-DESSUS PEUVENT DONC NE PAS S’APPLIQUER À VOUS.
KitchenAid prendra
en charge :
50 États des ÉtatsUnis, district fédéral de
Columbia et Canada :
Garantie de satisfaction
totale et de remplacement
de votre mélangeur.
Consultez la page suivante
pour obtenir des détails sur
la façon de remplacer le
mélangeur.
OU
À Puerto Rico :
Les coûts des pièces de
rechange et de maind’œuvre pour corriger
les défauts de matériaux
et de main-d’œuvre. Le
service après-vente doit
être assuré par un Centre
de réparation autorisé
KitchenAid. Pour obtenir
une réparation, suivez les
directives de la page 26.
KitchenAid ne prendra
pas en charge :
A. Les réparations
découlant de
l’utilisation du
mélangeur dans un
contexte autre qu’un
foyer unifamilial
normal.
B. Les dommages
attribuables aux causes
suivantes : un accident,
une modification, la
mauvaise utilisation,
un emploi abusif
ou une utilisation
non approuvée par
KitchenAid.
C. Les coûts des pièces
de rechange ou de
main-d’oeuvre pour le
mélangeur si ce dernier
est utilisé à l’extérieur
du pays d’achat.
FRANÇAIS
SI CET APPAREIL NE FONCTIONNE PAS COMME GARANTI, LE SEUL ET EXCLUSIF
RECOURS DES CLIENTS EST LA RÉPARATION OU LE REMPLACEMENT SELON LES
DISPOSITIONS DE LA GARANTIE LIMITÉE. KITCHENAID ET KITCHENAID-CANADA
N’ASSUMENT AUCUNE RESPONSABILITÉ EN CAS DE DOMMAGES ACCESSOIRES OU
INDIRECTS. Cette garantie vous confère des droits spécifiques auxquels peuvent s’ajouter
d’autres droits variant d’un État ou d’une province à l’autre.
25
Page 28

Garantie de satisfaction totale et de
remplacement - 50 États des États-Unis,
district fédéral de Columbia
Nous sommes tellement certains que
la qualité de nos produits satisfait aux
normes exigeantes de KitchenAid que, si le
mélangeur cesse de fonctionner au cours
de la première année, KitchenAid livrera
gratuitement un appareil identique ou
comparable à votre porte et s’occupera de
récupérer le mélangeur originel.
L’appareil de rechange sera aussi couvert
par notre garantie limitée d’un an. Veuillez
FRANÇAIS
suivre ces instructions pour recevoir ce
service de qualité.
Si le mélangeur KitchenAid
fonctionner durant la première année, il
suffit d’appeler le numéro sans frais
®
cesse de
Garantie de satisfaction
totale et de remplacement - Canada
Nous sommes tellement certains que
la qualité de nos produits satisfait aux
normes exigeantes de KitchenAid que,
si le mélangeur cesse de fonctionner au
cours de la première année, KitchenAid le
remplacera par un appareil identique ou
comparable. L’appareil de rechange sera
aussi couvert par notre garantie limitée
d’un an. Veuillez suivre ces instructions
pour recevoir ce service de qualité.
Si le mélangeur KitchenAid
fonctionner au cours de la première
année, apportez-le ou retournez-le port
dû à un Centre de réparation KitchenAid
®
cesse de
1-800-541-6390 du Centre de satisfaction
de la clientèle du lundi au vendredi de 8
h à 20 h (heure de l’Est) ou le samedi de
10 h à 17 h. Fournissez votre adresse de
livraison complète au représentant. (Pas de
boîte postale).
Quand vous recevez le mélangeur de
rechange, veuillez utiliser le carton et les
matériaux d’emballage pour emballer le
mélangeur originel.
Écrivez vos nom et adresse sur une feuille
de papier et mettez-la dans le carton avec
une copie de la preuve d’achat (reçu de
caisse, facture de règlement par carte de
crédit, etc.)
autorisé. Écrivez vos nom et adresse
complète sur une feuille de papier et
mettez-la dans le carton avec une copie de
la preuve d’achat (reçu de caisse, facture
de règlement par carte de crédit, etc.) Le
mélangeur de rechange sera expédié port
prépayé et assuré. Si le service ne s’avère
pas satisfaisant, appelez le numéro sans
frais du Centre d’eXpérience à la clientèle :
1-800-807-6777. Ou écrivez à :
Centre d’eXpérience à la clientèle
KitchenAid Canada
1901 Minnesota Court
Mississauga, ON L5N 3A7
Comment obtenir une réparation sous
garantie à Puerto Rico
Le mélangeur KitchenAid® est couvert par
une garantie limitée d’un an à partir de
la date d’achat. KitchenAid prendra en
charge les coûts des pièces de rechange et
de main-d’œuvre pour corriger les défauts
de matériaux et de main-d’œuvre. Le
service après-vente doit être assuré par un
Centre de réparation autorisé KitchenAid.
Apportez le mélangeur ou retournez-le port
payé et assuré à un Centre de réparation
autorisé de KitchenAid. Le mélangeur réparé
vous sera retourné port prépayé et assuré.
S’il est impossible d’obtenir des réparations
satisfaisantes de cette manière, appelez le
numéro sans frais 1-800-541-6390 pour
obtenir l’adresse d’un Centre de réparation
près de chez vous.
26
Page 29

Comment obtenir une réparation hors
garantie – tous les territoires
Pour obtenir de l’information sur
AVERTISSEMENT
Risque de choc électrique
Déconnecter la source de courant
électrique avant l'entretien.
Le non-respect de cette instruction
peut causer un décès ou un choc
électrique.
Avant d’appeler pour faire réparer
l’appareil, consultez la section Dépannage
de la page 24.
les réparations dans les 50 États
des États-Unis, le district fédéral de
Columbia et Puerto Rico, appelez le
numéro sans frais 1-800-541-6390.
Ou écrivez à :
Centre de satisfaction de la clientèle
KitchenAid Portable Appliances
P.O. Box 218, St. Joseph, MI 49085-0218
Ou contactez un centre de réparation
autorisé près de chez vous.
Pour obtenir de l’information sur
les réparations au Canada, appelez le
numéro sans frais 1-800-807-6777.
Ou écrivez à :
Centre d’eXpérience à la clientèle
KitchenAid Canada, 1901 Minnesota Court
Mississauga, ON L5N 3A7
Comment obtenir une réparation
en dehors de ces territoires
FRANÇAIS
Demandez à votre distributeur local
KitchenAid ou au détaillant où le
mélangeur a été acheté où le faire réparer.
Pour obtenir de l’information sur les
réparations au Mexique,
appelez le numéro sans frais
01-800-024-17-17 (JV Distribuciones) ou
01-800-902-31-00 (Industrias Birtman)
Comment commander des accessoires
et des pièces de rechange
Pour commander des accessoires
ou des pièces de rechange pour le
mélangeur dans les 50 États des
États-Unis, dans le district fédéral de
Columbia et à Puerto-Rico,
appelez sans frais le 1-800-541-6390 du
lundi au vendredi, de 8 h à 20 h (heure de
l’Est), le samedi de 10 h à 17 h.
Ou écrivez à :
Centre de satisfaction de la clientèle
KitchenAid Portable Appliances
P.O. Box 218
St. Joseph, MI 49085-0218
Pour commander des accessoires
ou des pièces de rechange pour le
mélangeur au Canada, appelez le
numéro sans frais 1-800-807-6777.
Ou écrivez à :
Centre d’eXpérience à la clientèle
KitchenAid Canada, 1901 Minnesota Court
Mississauga, ON L5N 3A7
Pour commander des accessoires
ou des pièces de rechange pour le
mélangeur au Mexique,
appelez le numéro sans frais
01-800-024-17-17 (JV Distribuciones) ou
01-800-902-31-00 (Industrias Birtman)
27
Page 30

Tabla de contenidos
INTRODUCCIÓN
Comprobante de compra y registro del producto............................ Reverso de la carátula
Seguridad con la licuadora............................................................................................29
Medidas de seguridad importantes ...............................................................................30
Requerimientos eléctricos .............................................................................................31
CARACTERÍSTICAS Y OPERACIÓN
Características de la licuadora .......................................................................................32
Preparación de la licuadora para su uso ........................................................................34
Antes del primer uso .............................................................................................34
Ensamblaje de la licuadora ....................................................................................34
Uso de la licuadora .......................................................................................................35
Antes de usar ........................................................................................................35
Operación de la licuadora ......................................................................................35
PICAR HIELO ..........................................................................................................36
BATIDOS ................................................................................................................36
ESPAÑOL
Característica de licuado Soft Start
Taza para ingredientes ...........................................................................................37
CUIDADO Y LIMPIEZA
Limpieza de componentes individuales .........................................................................37
Limpieza sin desensamblar ............................................................................................37
Resolución de problemas ..............................................................................................38
®
.......................................................................37
GARANTÍA E INFORMACIÓN DE SERVICIO
Garantía de la licuadora KitchenAid
®
.............................................................................39
Garantía de reemplazo sin molestias -
en los 50 Estados Unidos y en el Distrito de Columbia ..................................................40
Garantía de reemplazo sin molestias en Canadá ...........................................................40
Cómo ordenar el servicio de garantía en Puerto Rico ....................................................40
Cómo ordenar el servicio luego de la expiración de la garantía –
en todas las localidades ................................................................................................41
Cómo ordenar el servicio fuera de estas localidades ......................................................41
Cómo ordenar accesorios y piezas de repuesto .............................................................41
NOTA: DEBIDO AL DISEÑO ÚNICO DEL CONTENEDOR Y LA CUCHILLA, LEA ESTAS
INSTRUCCIONES ANTES DE USAR SU NUEVA LICUADORA KITCHENAID
®
PARA
LOGRAR LOS MEJORES RESULTADOS.
2828
Page 31

Seguridad con la licuadora
Su seguridad y la seguridad de los demás es muy importante.
Hemos incluido muchos mensajes importantes de seguridad en este manual y en
su electrodoméstico. Lea y obedezca siempre todos los mensajes de seguridad.
Este es el símbolo de advertencia de seguridad.
Este símbolo le llama la atención sobre peligros potenciales que
pueden ocasionar la muerte o una lesión a usted y a los demás.
Todos los mensajes de seguridad irán a continuación del símbolo
de advertencia de seguridad y de la palabra ”PELIGRO” o
”ADVERTENCIA”. Estas palabras significan:
Si no sigue las instrucciones de
PELIGRO
ADVERTENCIA
Todos los mensajes de seguridad le dirán el peligro potencial, le dirán cómo
reducir las posibilidades de sufrir una lesión y lo que puede suceder si no se
siguen las instrucciones.
inmediato, usted puede morir o sufrir
una lesión grave.
Si no sigue las instrucciones, usted
puede morir o sufrir una lesión grave.
ESPAÑOL
29
Page 32

MEDIDAS DE SEGURIDAD
IMPORTANTES
Cuando utilice electrodomésticos, siempre se deben seguir las precauciones básicas de
seguridad para reducir la posibilidad de riesgos de incendios, descargas eléctricas y/o
lesiones a personas. Las instrucciones son las siguientes:
1. Lea todas las instrucciones.
2. Para protegerse del riesgo de
descargas eléctricas, no coloque la
licuadora sobre agua ni otro líquido.
3. Es necesario que supervise de cerca
cuando algún electrodoméstico está
siendo utilizado cerca de los niños o
está siendo utilizado por éstos.
4. Desenchúfela cuando no esté en uso,
antes de colocar o quitar las piezas y
antes de la limpieza.
5. Evite el contacto con las piezas
móviles.
6. No utilice la licuadora con un cable
ESPAÑOL
o un enchufe dañado ni luego de un
mal funcionamiento ni si se ha caído
o dañado de alguna forma. Devuelva
la licuadora al Centro de servicio
técnico autorizado más cercano para
su inspección, reparación o ajuste
eléctrico o mecánico.
7. No la utilice a la intemperie.
8. No deje que el cable cuelgue del
borde de la mesa o mesada.
9. Mantenga las manos y los utensilios
lejos del recipiente mientras mezcle
para reducir el riesgo de lesiones
graves a personas o de daños a
la licuadora. Puede utilizarse una
espátula raspadora pero se debe
utilizar sólo cuando la licuadora no
esté en funcionamiento.
10. Las cuchillas son filosas. Manéjelas
con cuidado.
11. Para disminuir el riesgo de sufrir
una lesión, nunca coloque el collar
de seguridad con las cuchillas en
la base si la jarra no está puesta
correctamente.
12. Siempre haga funcionar la licuadora
con la tapa.
13. El uso de accesorios como potes
enlatados no recomendados por
KitchenAid pueden ocasionar lesiones
a las personas.
14. Cuando procese líquidos calientes,
retire la parte central de la tapa de
dos piezas.
15. Este producto está diseñado para ser
utilizado sólo para uso doméstico.
GUARDE ESTAS INSTRUCCIONES
30
Page 33

Requerimientos eléctricos
Voltaje: 120 Voltios CA únicamente.
Frecuencia: 60 Hz
NOTA: Esta licuadora tiene un enchufe
bifásico polarizado. Para disminuir el
riesgo de sufrir una descarga eléctrica,
éste enchufe entrará en un tomacorriente
en un solo sentido. Si el enchufe no entra
en el tomacorriente, comuníquese con
un electricista calificado. No modifique el
enchufe de ninguna manera.
No utilice cable de extensión. Si el cable
de corriente es muy corto, pida a un
electricista o técnico calificado que instale
un tomacorriente cerca del aparato.
ADVERTENCIA
Peligro de Incendio
No use un cable eléctrico de
extensión.
No seguir esta precaución
puede ocasionar la muerte, o
incendio.
ESPAÑOL
31
Page 34
Med
Low
Hi
g
h
Características de la licuadora
Tapa con taza
para ingredientes
transparente de
60 ml (2 oz.)
Gran jarra
de vidrio de
1,2 L (40 oz)
ESPAÑOL
Cuchilla patentada
de acero inoxidable
Acopladores
durables y
reforzados
de acero
32
32
Collar de
seguridad
y ensamblaje
de cuchillas
Botones
selectores de
velocidad
Base de control
Clean Touch™
Page 35

Características de la licuadora
Esta licuadora fue fabricada y probada
de acuerdo con las normas de calidad de
KitchenAid para un óptimo rendimiento y
una larga duración sin problemas.
Potente motor
El resistente motor imparte la potencia
necesaria para lograr un desempeño
excepcional en todas las tareas de licuado,
desde picar una bandeja con hielo para
bebidas heladas estilo frozen hasta
revolver bebidas caseras a base de café
para obtener un sabor homogéneo.
Gran jarra de vidrio de
1,2 L (40 oz)
La jarra de vidrio es resistente a
rayones, manchas y olores. La
jarra puede sacarse del collar
de seguridad para facilitar su limpieza y
resiste un rango de temperaturas extremas.
Tapa con taza para ingredientes de
60 ml (2 oz)
La tapa proporciona un sellado firme.
La taza para ingredientes desmontable
sirve para medir ingredientes y permite
agregarlos mientras se está licuando.
Cuchilla de acero inoxidable patentada
Los grandes y filosos dientes están
dispuestos en cuatro planos distintos
para obtener un licuado rápido, completo
y uniforme.
Collar de seguridad y ensamblaje
de cuchillas
La duradera cuchilla de una pieza está
integrada al collar de seguridad para un
fácil manejo y limpieza. El ensamblaje,
que se puede meter al lavavajillas, impide
que las cuchillas giren hasta que la jarra
o el vaso accesorio estén correctamente
colocados en el collar y en la base de
la licuadora.
Conexión de acoplamiento de acero
reforzado
El acoplador de calidad comercial con
12 dientes entrelazados transfiere
directamente la potencia del motor a las
cuchillas. El acoplador de la jarra está
recubierta para que opere de
forma silenciosa.
Botones de selección de velocidad
Licue con confianza, control y consistencia
a 3 velocidades: ALTA, MEDIA y BAJA.
Prepare bebidas heladas en cuestión de
segundos con la función PICAR HIELO y
batidos perfectos con la función BATIDOS.
Característica de licuado Soft Start
La licuadora arranca a una velocidad
menor para ayudar a llevar los ingredientes
hacia las cuchillas y luego aumenta
rápidamente a la velocidad seleccionada.
Esta característica de diseño reduce el
golpeteo inicial y permite su uso sin
intervención del usuario.
Panel de control Clean Touch™
Puede limpiarse en un instante. El panel de
control liso no tiene hendiduras o huecos
donde puedan quedar atrapados los
ingredientes.
Botón de batidos
Esta función, creada y optimizada para
preparar los mejores batidos, licua los
ingredientes a la velocidad precisa para
preparar un excelente batido todas
las veces.
Botón de picador de hielo
Esta función, diseñada específicamente
para picar hielo, se activa
automáticamente a intervalos escalonados
para brindar resultados óptimos. Es
excelente para preparar bebidas heladas
estilo frozen.
®
ESPAÑOL
3333
Page 36
Preparación de la licuadora para su uso
Antes del primer uso
Antes de usar su licuadora por primera vez,
limpie la base con un paño con agua tibia
jabonosa, y después con un paño húmedo.
Seque con un paño suave. Lave la jarra,
la tapa con taza para ingredientes, el
ensamblaje del collar de seguridad y
las cuchillas, y el anillo de sellado con
agua tibia jabonosa (vea ”Cuidado y
limpieza”). Enjuague las partes y séquelas
con un paño.
Ensamblaje de la licuadora
1. Coloque el collar de seguridad con las
cuchillas apuntando hacia arriba sobre
una superficie sólida.
ESPAÑOL
2. Coloque el anillo de sellado, con el
lado plano hacia abajo, alrededor de
la cuchilla y métalo en la muesca del
interior del collar de seguridad.
Anillo de
sellado
4. Presione hacia abajo y gire la jarra en
dirección de las manecillas del reloj,
dando aproximadamente
hasta que escuche dos golpecitos.
5. Coloque el ensamblaje de la jarra en la
base de la licuadora.
NOTA: Cuando está colocado
correctamente, el ensamblaje de la jarra
descansa completamente sobre la base de
la licuadora. Si no es así, repita los pasos
3 y 4.
1
⁄4 de giro,
Collar de
seguridad
3. Alinee las lengüetas de la jarra con las
ranuras del collar de seguridad.
Espacio
6. Ponga la tapa en la jarra.
34
Sin
espacio
Page 37

Preparación de la licuadora para su uso
7. Conecte el cable de corriente a un
ADVERTENCIA
Peligro de Incendio
No use un cable eléctrico de
extensión.
No seguir esta precaución
puede ocasionar la muerte, o
incendio.
tomacorriente bifásico polarizado. La
licuadora está lista para funcionar.
8. Antes de quitar la jarra de la base,
siempre pulse OFF y desconecte el cable
de corriente. Levante el ensamblaje de
la jarra con un movimiento recto para
separarla de la base de la licuadora.
Uso de la licuadora
Antes de usar
NOTA: Cuando la licuadora está
encendida, se prende la luz indicadora
de la función PICAR HIELO.
- No interfiera con el movimiento de
las cuchillas.
- No quite la tapa de la jarra
Espacio
Sin
espacio
ESPAÑOL
Operación de la licuadora
La Licuadora KitchenAid
velocidades:
ALTA, MEDIA y BAJA; y también tiene
funciones de BATIDOS y PICAR HIELO.
1. Con el conveniente modo de operación
en un solo paso, esta licuadora
funciona solamente cuando se pulsa
uno de los botones de selección de
velocidad.
2. Antes de operar la licuadora, asegúrese
de que la jarra esté bien puesta en el
collar de seguridad y que el ensamblaje
esté bien puesto en la base de la
licuadora.
®
tiene tres
NOTA: Si hay un espacio entre el
collar de seguridad y la base, es posible
que la jarra no esté bien colocada en el
collar de seguridad o que el ensamblaje de
la jarra no esté bien puesto en la base de
la licuadora. Para mayores instrucciones,
vea ”Ensamblaje de la licuadora”.
3. Coloque los ingredientes en la jarra y
ponga firmemente la tapa.
4. Pulse el botón de velocidad deseado,
para que la licuadora opere
continuamente a dicha velocidad. La
luz indicadora roja junto al botón de
velocidad seleccionado se mantendrá
encendida. Puede cambiar de
velocidades sin tener que detener la
unidad; sólo debe presionar otro botón
de velocidad.
Continúa en la página siguiente
35
Page 38

Uso de la licuadora
IMPORTANTE: Si va a licuar alimentos
o líquidos calientes, quite la taza para
ingredientes del centro. Opere sólo a
velocidad BAJA.
5. Para apagar la licuadora, pulse OFF. El
botón OFF detendrá cualquier opción
de velocidad y, al mismo tiempo,
desactivará la licuadora.
6. Antes de quitar la jarra, desconecte el
cable de corriente.
PICAR HIELO
La licuadora KitchenAid
®
ofrece una
función para PICAR HIELO. Cuando
selecciona esta función, la licuadora se
activa automáticamente a intervalos
escalonados
a la velocidad óptima para picar hielo.
1. Antes de operar la licuadora, asegúrese
de que la jarra esté bien puesta en la
base de la licuadora.
NOTA: Si queda un espacio entre el
ESPAÑOL
collar de seguridad y la base, es posible
que la jarra no esté bien colocada en el
collar de seguridad o que el ensamblaje de
la jarra no esté bien puesta en la base de
la licuadora. Para mayores instrucciones,
vea ”Ensamblaje de la licuadora”.
2. Coloque los ingredientes en la jarra y
ponga firmemente la tapa.
3. Oprima CHOP ICE (picar hielo).
La luz indicadora se mantendrá
encendida. La licuadora se activará
automáticamente a intervalos
escalonados.
BATIDOS
La licuadora KitchenAid
®
ofrece una función
para preparar BATIDOS, que está diseñada y
optimizada para preparar batidos fabulosos.
Esta función licua los ingredientes a la
velocidad precisa.
1. Antes de operar la licuadora, asegúrese
de que la jarra esté bien puesta en la
base de la licuadora.
NOTA: Si queda un espacio entre el
collar de seguridad y la base, es posible
que la jarra no esté bien colocada en el
collar de seguridad o que el ensamblaje de
la jarra no esté bien puesta en la base de
la licuadora. Para mayores instrucciones,
vea ”Ensamblaje de la licuadora”, en la
página 34.
2. Coloque los ingredientes en la jarra y
ponga firmemente la tapa.
3. Oprima SMOOTHIE (batido). La luz
indicadora se mantendrá encendida. La
unidad licuará a la velocidad precisa
para entregarle un batido fabuloso.
4. Para detener la función de BATIDOS,
pulse OFF. La licuadora ahora está lista
para funcionar en modo continuo.
5. Antes de quitar la jarra, desconecte el
cable de corriente.
4. Para detener la función de picar hielo,
oprima OFF. La licuadora ahora está
lista para funcionar en modo continuo.
5. Antes de quitar la jarra, desconecte el
cable de corriente.
36
Page 39

Uso de la licuadora
Característica de licuado Soft Start
La característica de licuado Soft Start
hace que la licuadora arranque
automáticamente a una velocidad menor,
que ayuda a llevar los ingredientes hacia
el ensamblaje de cuchillas, y después
aumenta rápidamente hasta la velocidad
seleccionada para lograr un desempeño
óptimo.
NOTA: La característica de licuado Soft
®
Start
sólo funciona cuando se selecciona
una velocidad en modo OFF y no funciona
con la función de picar hielo.
®
®
Cuidado y limpieza
Taza para
ingredientes
La taza para
ingredientes de
60 ml (2 oz) sirve
para medir y
agregar ingredientes
a la jarra. Quite la taza y agregue los
ingredientes en velocidad BAJA o MEDIA.
Cuando opere a velocidades más altas, con
la jarra llena o con contenidos calientes,
detenga la licuadora y después agregue los
ingredientes.
La jarra, el collar de seguridad y la
cuchilla de la licuadora pueden limpiarse
fácilmente en forma individual o en
conjunto, sin necesidad de desarmarlos.
•Limpieminuciosamentelalicuadora
después de cada uso
•Nosumerjalabaseoelcabledela
licuadora en agua
•Nouselimpiadoresabrasivosni
estropajos
Limpieza de componentes
individuales
1. Levante el ensamblaje de la jarra con
un movimiento recto para separarlo
de la base de la licuadora. Después
gire la jarra en sentido contrario a las
manecillas del reloj hasta que oiga dos
clics, para separar el ensamblaje del
collar de seguridad y las cuchillas, y el
anillo de sellado de la jarra. Lave los
componentes con agua tibia jabonosa.
Enjuáguelas y séquelas con un paño.
NOTA: La jarra puede ponerse en la
cesta inferior de un lavavajillas automático.
La tapa, la taza para ingredientes, el
ensamblaje del collar de seguridad y las
cuchillas, y el anillo de sellado pueden
colocarse en la cesta superior. Para obtener
los mejores resultados, se recomienda lavar
a mano.
2. Limpie la base y el cable de la licuadora
con un paño empapado en agua tibia
jabonosa; limpie con un paño húmedo
y seque con un paño suave.
Limpieza sin desensamblar
1. Coloque la jarra en la base de la
licuadora, llénela hasta la mitad con
agua tibia (no caliente) y agregue 1 ó
2 cucharaditas de detergente líquido
para platos. Coloque la tapa en la
jarra, pulse la opción de velocidad
BAJA y accione la licuadora durante 5
a 10 segundos. Saque la jarra y vacíe
el contenido. Enjuague con agua tibia
hasta que esté limpia.
2. Para limpiar la tapa y la taza para
ingredientes, lave con agua tibia
jabonosa y enjuague y seque bien.
3. Limpie la base y el cable de la licuadora
con un paño empapado en agua tibia
jabonosa; limpie con un paño húmedo
y seque con un paño suave.
ESPAÑOL
37
Page 40
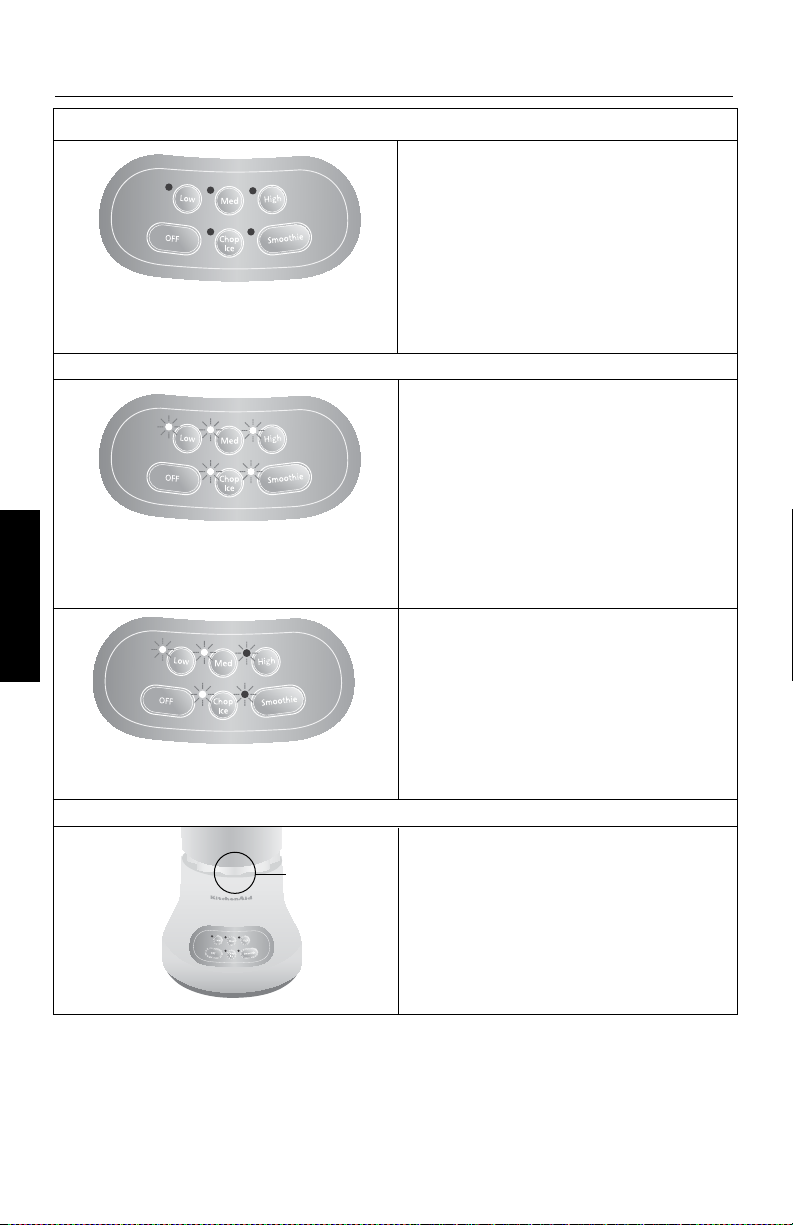
Resolución de problemas
La licuadora no funciona cuando se selecciona una opción:
Verifique que la licuadora esté conectada
a un tomacorriente bifásico polarizado.
Si lo está, oprima OFF y desconecte
la licuadora. Vuelva a conectarla en el
mismo tomacorriente. Si la licuadora
sigue sin funcionar, verifique el fusible
o interruptor automático del circuito
No hay ninguna luz indicadora encendida.
La licuadora se detiene mientras licua:
ESPAÑOL
Todas las luces indicadoras están
parpadeando al mismo tiempo.
Todas las luces indicadoras están
parpadeando en forma alternada.
La licuadora enciende, pero las cuchillas no giran:
Espacio
Si no se puede resolver el problema mediante los pasos proporcionados en esta sección,
póngase en contacto con KitchenAid o con un Centro de Servicio Autorizado de KitchenAid.
EE. UU./Puerto Rico: Canadá: México:
1-800-541-6390 1-800-807-6777 01-800-024-17-17 (JV Distribuciones)
01-800-902-31-00 (Industrias Birtman)
Para obtener más detalles, consulte la sección de Garantía y Servicio KitchenAid en la página
39. No devuelva la licuadora a la tienda donde la compró; ellos no brindan el servicio técnico.
eléctrico al que está conectada la
licuadora y asegúrese de que el circuito
esté cerrado.
Es posible que la licuadora esté
sobrecargada. Si la licuadora se sobrecarga
al mezclar ingredientes pesados, ésta se
apagará automáticamente para evitar
que se dañe el motor. Pulse OFF para
restablecer la licuadora y desconecte el
cable de corriente. Retire la jarra de la base
y divida los contenidos en porciones más
pequeñas. También puede disminuir la
carga sobre la licuadora agregando líquido
a los ingredientes.
Es posible que la licuadora esté atascada.
Si la licuadora se atasca, ésta dejará de
funcionar para evitar que se dañe el motor.
Pulse OFF para restablecer la licuadora y
desconecte el cable de corriente. Quite la
jarra o el vaso accesorio de la base y con
una espátula suave, libere las cuchillas, ya
sea separando o quitando el contenido del
fondo de la jarra o vaso accesorio.
La jarra no está sujeta correctamente en
el collar de seguridad. Presione hacia
abajo y gire la jarra en dirección de las
manecillas del reloj dentro del collar de
seguridad hasta que escuche el segundo
clic. Esto hará que el ensamblaje de la
jarra quede enganchado en el acoplador.
Consulte las instrucciones de ensamblaje
de la licuadora en la página 34.
38
Page 41

Garantía de la licuadora KitchenAid
®
Duración de
la garantía:
En los 50 Estados
Unidos, el Distrito de
Columbia, Canadá y
Puerto Rico: Un año de
garantía limitada a partir
de la fecha de compra.
LA EXENCIÓN DE RESPONSABILIDAD DE LAS GARANTÍAS IMPLÍCITAS; LAS
GARANTÍAS IMPLÍCITAS DE LIMITACIÓN DE LOS RECURSOS
INCLUYENDO GARANTÍAS EN LA MEDIDA EN QUE SE APLIQUEN A LA
COMERCIABILIDAD O APTITUD CON UN FIN DETERMINADO, SON EXCLUIDAS EN
LA MEDIDA PERMISIBLE POR LEY. CUALQUIER GARANTÍA IMPLÍCITA QUE PUEDA
SER IMPUESTA POR LEY ESTÁ LIMITADA A UN AÑO O AL PERÍODO MÁS CORTO
PERMITIDO POR LEY. ALGUNOS ESTADOS Y PROVINCIAS NO PERMITEN LIMITACIONES
NI EXCLUSIONES EN RELACIÓN CON LA DURACIÓN DE UNA GARANTÍA IMPLÍCITA
DE COMERCIABILIDAD O DE APTITUD, DE MANERA TAL QUE LAS LIMITACIONES O
EXCLUSIONES ANTERIORES PUEDEN QUE NO SE APLIQUEN EN SU CASO.
KitchenAid
pagará por:
En los 50 Estados
Unidos, el Distrito de
Columbia y Canadá:
El reemplazo de su
licuadora sin molestias.
Consulte la siguiente página
para obtener los detalles
sobre cómo realizar el
reemplazo.
O
En Puerto Rico:
Los costos de los repuestos
y del trabajo de reparación
para corregir los defectos
en los materiales y la mano
de obra. El servicio técnico
debe ser provisto por un
Centro de servicio técnico
de KitchenAid autorizado.
Para solicitar un servicio
técnico, siga las instrucciones
de la página 40.
KitchenAid
no pagará por:
A. Las reparaciones
cuando la licuadora
sea utilizada con otro
fin que no sea el uso
doméstico normal de
una familia.
B. Los daños como
consecuencia de un
accidente, alteración,
mal uso, abuso o
uso con productos
no aprobados por
KitchenAid.
C. Los costos de repuestos
o de mano de obra
de reparación para la
licuadora cuando ha
sido utilizada fuera
del país donde fue
comprada.
ESPAÑOL
SI ESTE PRODUCTO NO FUNCIONA SEGÚN SE GARANTIZA, EL ÚNICO Y EXCLUSIVO
RECURSO DEL CLIENTE SERÁ LA REPARACIÓN O EL REEMPLAZO SEGÚN LOS TÉRMINOS
Y LAS CONDICIONES DE ESTA GARANTÍA LIMITADA. KITCHENAID Y KITCHENAID
CANADÁ NO ASUMEN NINGUNA RESPONSABILIDAD POR DAÑOS INCIDENTALES O
CONSIGUIENTES. Esta garantía le otorga derechos legales específicos y es posible que
usted goce de otros derechos que varían de estado en estado o de provincia en provincia.
39
Page 42

Garantía de reemplazo sin molestias -
en los 50 Estados Unidos
y el Distrito de Columbia
Confiamos tanto en que la calidad de
nuestros productos cumple con las exigentes
normas de KitchenAid, que si la licuadora
presentara alguna falla durante el primer
año, le enviaremos un reemplazo sin cargo
idéntico o comparable a su domicilio y
arreglaremos la devolución de la licuadora
original El reemplazo de su unidad también
estará cubierto por nuestra garantía limitada
de un año. Siga estas instrucciones para
recibir este servicio de calidad.
Si su licuadora KitchenAid
falla durante el primer año, simplemente
llame gratis a nuestro Centro de satisfacción
®
presentara alguna
Garantía de reemplazo sin molestias
ESPAÑOL
Confiamos tanto en que la calidad de
nuestros productos cumple con las
exigentes normas de KitchenAid que, si su
Licuadora presentara alguna falla durante
el primer año, KitchenAid Canada la
reemplazará por una idéntica o comparable.
El reemplazo de su unidad también estará
cubierto por nuestra garantía limitada de
un año. Siga estas instrucciones para recibir
este servicio de calidad.
Si su licuadora KitchenAid
alguna falla durante el primer año, lleve la
licuadora o mándela con envío a cobrar a
un Centro de servicio técnico KitchenAid
®
presentara
al cliente KitchenAid al 1-800-541-6390,
de lunes a viernes de 8 a.m. a 8 p.m.
(Hora del Este), o los sábados, de 10 a.m.
a 5 p.m. Proporcione al asesor su dirección
completa para el envío. (No se aceptan
números de casillas postales).
Cuando reciba la unidad de reemplazo de
su licuadora, utilice la caja y los materiales
de embalaje para embalar la licuadora
original. En la caja, escriba su nombre y
dirección en un papel junto con la copia
del comprobante de compra (recibo de
compra, ticket de la tarjeta de crédito, etc.)
en Canadá
autorizado. En la caja, escriba su nombre
y dirección postal en un papel junto
con la copia el comprobante de compra
(recibo de compra, ticket de la tarjeta de
crédito, etc.) La licuadora de reemplazo
se le entregará de forma prepaga y
asegurada. Si no queda satisfecho con el
servicio, llame gratis a nuestro Centro de
interacción con el cliente al
1-800-807-6777. O escríbanos a:
Customer eXperience Centre
KitchenAid Canada
1901 Minnesota Court
®
Mississauga, ON L5N 3A7
Cómo ordenar el servicio de garantía
en Puerto Rico
Su licuadora KitchenAid® tiene garantía
de un año a partir de la fecha de compra.
KitchenAid pagará los repuestos y la
mano de obra para corregir defectos en
los materiales y en la mano de obra. El
servicio técnico debe ser provisto por un
Centro de servicio técnico de KitchenAid
autorizado.
Lleve la licuadora o mándela con envío
asegurado a cobrar a un Centro de
servicio técnico de KitchenAid autorizado.
Su licuadora reparada se le entregará de
forma prepaga y asegurada. Si no queda
satisfecho con el servicio, llame gratis
al 1-800-541-6390 para averiguar la
ubicación del Centro de servicio técnico
más cercano.
40
Page 43

Cómo ordenar el servicio luego de la expiración
de la garantía – en todas las localidades
Para información del servicio en
ADVERTENCIA
Peligro de Choque Eléctrico
Desconecte el suministro de
energía antes de dar
mantenimiento.
No seguir esta instrucción
puede ocasionar la muerte o
choque eléctrico.
Antes de llamar al servicio técnico, revise
la sección de Resolución de problemas en
la página 38.
los 50 Estados Unidos, Distrito de
Columbia y
Puerto Rico,
llame gratis al
1-800-541-6390.
O escriba a:
Customer Satisfaction Center
KitchenAid Portable Appliances
P.O. Box 218
St. Joseph, MI 49085-0218
O contacte con un Centro de servicio
técnico autorizado cercano a su domicilio.
Para información del servicio
en Canadá
llame gratis al
1-800-807-6777.
O escriba a:
Customer eXperience Centre
KitchenAid Canada
1901 Minnesota Court
Mississauga, ON L5N 3A7
Cómo ordenar el servicio fuera
de estas localidades
ESPAÑOL
Consulte su distribuidor de KitchenAid
local o a la tienda donde compró la
licuadora para obtener información sobre
el servicio técnico.
Para información del servicio
en México,
llame gratis al
01-800-024-17-17 (JV Distribuciones) o
01-800-902-31-00 (Industrias Birtman)
Como ordenar accesorios y piezas de repuesto
Para ordenar accesorios o piezas de
repuesto para su licuadora en los
50 Estados Unidos, en el Distrito de
Columbia y en Puerto Rico,
llame gratis al 1-800-541-6390, de lunes a
viernes, de 8 a.m. a 8 p.m. (Hora del Este)
o los sábados, de 10 a. m. a 5 p. m.
O escriba a:
Customer Satisfaction Center,
KitchenAid Portable Appliances,
P.O. Box 218,
St. Joseph, MI 49085-0218
Para ordenar accesorios o piezas de
repuesto para su licuadora en Canadá
llame gratis al 1-800-807-6777.
O escriba a:
Customer eXperience Centre
KitchenAid Canada
1901 Minnesota Court
Mississauga, ON L5N 3A7
Para ordenar accesorios o piezas de
repuesto para su licuadora en México,
llame gratis al
01-800-024-17-17 (JV Distribuciones) o
01-800-902-31-00 (Industrias Birtman)
41
Page 44

® Registered trademark/Marque déposée/Marca registrada KitchenAid, U.S.A.
™ Trademark/Marque de commerce/Marca de comercio KitchenAid, U.S.A.
The shape of the stand mixer is a registered trademark/La forme du batteur sur socle est une marque déposée/
La forma de la batidora con base es una marca registrada KitchenAid, U.S.A.
KitchenAid Canada licensee in Canada/Emploi sous licence par KitchenAid Canada au Canada.
© 2009. All rights reserved. Tout droits réservés. Todos los derechos reservados.
W10256453A (6696AdZw509)
 Loading...