

Page 1

KRSC 9011/1
KRSC 9006
KRSF 9005/SL
KRSF 9005/BL
Assembly instructions
Page 2

Page 3

Before installing the refrigerator 4
Water connection 4
Electrical connection 5
Positioning and levelling your refrigerator 6
Installation dimensions and requirements 7
Removing the freezer door (A) 8
Removing the refrigerator door (B) 8
Fitting the freezer door (C) 9
Fitting the refrigerator door (D) 9
Horizontal alignment of freezer and refrigerator door (E) 10
Vertical alignment of freezer and refrigerator door (F) 10
Page 4
4
Your new appliance is a FULL NO FROST model exclusively for domestic use, i.e. both refrigerator and
freezer compartments are provided with an automatic defrosting function.
This manual contains indications and warnings for correct and safe installation of the appliance - read it
carefully before starting installation operations.
The model you have purchased may differ slightly with respect to some descriptions in this manual, since
this manual covers several models.
Keep this manual for future consultation. If you sell the appliance give it to the new buyer.
Install the appliance in a dry and well-ventilated place.
Avoid locations in direct sunlight or near a source of heat (oven, heating, etc.). If this cannot be avoided,
install the appliance respecting the following minimum distances:
Coal or paraffin stoves: 30 cm
Electric and/or gas stoves: 3 cm
To allow product handling and sufficient air circulation, leave at least 1 cm clearance at the sides, above the
appliance, and between the rear panel and the wall.
Before installing the refrigerator
Disconnect the appliance from the mains
power supply before starting operations.
• The ice maker and water circuit must be
connected to a water supply of potable and/or
chemically purified water.
• Make sure to comply with the current local
regulations regarding connection to the water
system.
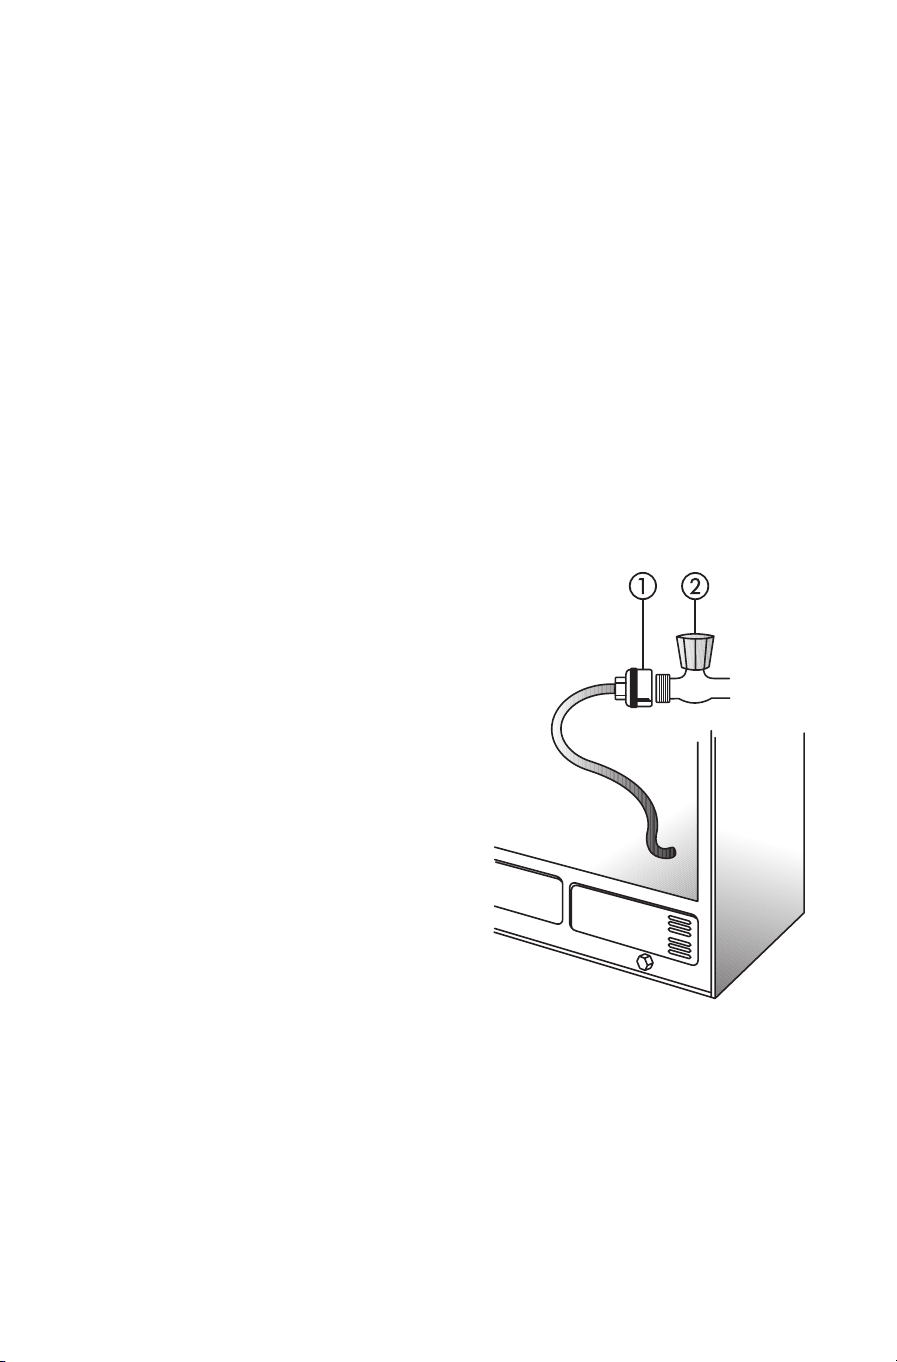
• The appliance is supplied with a water pipe
(1.800 m. long) already connected to the back
of the product.
• The water pipe is in accordance with IEC 61770
standard.
• Remove the packing tape from the grey coiled
water pipe on the back of the product.
• Connect the transition connector (1) to the
household water supply (2).
• Make sure the water pipe is not twisted.
• The appliance is pre-set for operation at
pressures between 0.17 and 0.81 Mpa (1.7 and
8.1 bar).
• Open the water tap. Check for and eliminate
any leaks.
• The appliance does not require any adjustment
or water drain.
Water connection
Page 5

5
Earthing of the appliance is compulsory by law.
The type of current and the mains voltage to which
the appliance is connected must correspond to that
given on the rating plate.
The connection socket must be accessible even
after installation, so that the appliance can be
unplugged if necessary.
If this is not possible, connect the appliance to the
mains by means of a two-pole switch, with contact
opening distance of at least 3mm, located in an
accessible place.
If the power cable plug and socket are not of the
same type, replace the socket.
Do not pull the power cable when unplugging the
appliance.
Electrical connection
Page 6

6
The refrigerator has two front wheels and
two rear wheels at the base of each product
on each side, and two adjustable feet at the
front (see figure A).
If the appliance seems unsteady or you want
the doors to close easier, adjust the
appliance’s tilt following the instructions
below (depending on the model, as shown in
the figures on the right).
1. Check the installation location to be sure you
have at least 1 cm clearance on all sides
including the top.
2. Connect the appliance to the mains power
supply.
3. Move the refrigerator into its final position.
4. Open both doors and remove the plinth to
locate the feet and the levelling bolts at the left
and right of the refrigerator base (if provided).
The top screw (1) adjusts the back wheel, if
present, while the bottom screw (2) adjusts the
front wheel (see figure B).
5. Use the wrench provided to adjust the levelling
bolts. Turn the levelling bolt clockwise to raise
the appliance, or anti-clockwise to lower it. It
may take several turns of the levelling bolts
and/or the feet to adjust the tilt of the
refrigerator.
6. After adjusting the level ensure that both feet
touch the floor to ensure safe operation.
Note: Do not unscrew the levelling bolts and
the feet too much as they could fall out.
Aligning the doors
If after switching on the appliance and adjusting the
refrigerator and freezer doors, the doors are
misaligned, disconnect the appliance from the
power supply and adjust both doors as indicated in
the diagram at the end of this manual.
Figure A
Figure B
Positioning and levelling your refrigerator
Page 7

7
Page 8

8
Page 9

9
Page 10

10
Page 11

Page 12

5019 102 00382
Printed in Italy
n
03/08
GB
 Loading...