

KitchenAid KOSC104FSS0 Owner’s Manual
SELF-CLEANING BUILT-IN ELECTRIC
CONVECTION OVEN
Use & Care Guide
For questions about features, operation/performance, parts, accessories or service, call: 1-800-807-6777,
or visit our website at www.kitchenaid.ca.
FOUR ÉLECTRIQUE À CONVECTION
AUTONETTOYANT ENCASTRÉ
Guide d’utilisation et d’entretien
Pour des questions concernant les caractéristiques, le fonctionnement, la performance, les pièces de rechange, accessoires ou pour
une intervention de dépannage, composer: 1-800-807-6777, ou visiter notre site internet www.kitchenaid.ca.
Table of Contents/Table des matières .....................................2
Model/Modèle KOSC104FSS
400010890404

TABLE OF CONTENTS TABLE DES MATIÈRES
OVEN SAFETY ................................................................................3
Parts and Features .......................................................................5
ELECTRONIC OVEN CONTROLS .................................................6
Control Panel ................................................................................6
OVEN USE .......................................................................................7
Aluminum Foil ...............................................................................7
Oven Vent .....................................................................................7
Inserting Oven Racks and Other Accessories .............................7
Oven Functions ............................................................................8
Cooking Table.............................................................................14
Recommended Use and Tips ....................................................17
OVEN CARE ..................................................................................18
Self-Cleaning Cycle ....................................................................18
General Cleaning ........................................................................20
Rack Guides ...............................................................................20
Oven Lamp .................................................................................20
TROUBLESHOOTING ..................................................................21
ASSISTANCE OR SERVICE .........................................................22
In Canada ...................................................................................22
WARRANTY ..................................................................................23
SÉCURITÉ DU FOUR ...................................................................24
Pièces et caractéristiques ..........................................................26
COMMANDE ÉLECTRONIQUE DU FOUR .................................27
Tableau de commande ...............................................................27
UTILISATION DU FOUR ...............................................................28
Papier d’aluminium ....................................................................28
Évent du four ..............................................................................28
Insertion des grilles de four et autres accessoires ....................28
Fonctions du four .......................................................................29
Tableau de cuisson ....................................................................36
Utilisation recommandée et astuces .........................................39
ENTRETIEN DU FOUR .................................................................41
Programme d’autonettoyage .....................................................41
Nettoyage général ......................................................................43
Guides de grilles .........................................................................44
Lampe du four ............................................................................44
DÉPANNAGE .................................................................................45
ASSISTANCE OU SERVICE .........................................................46
Au Canada ..................................................................................46
GARANTIE .....................................................................................47
2
OVEN SAFETY
Your safety and the safety of others are very important.
We have provided many important safety messages in this manual and on your appliance. Always read and obey all safety
messages.
This is the safety alert symbol.
This symbol alerts you to potential hazards that can kill or hurt you and others.
All safety messages will follow the safety alert symbol and either the word “DANGER” or “WARNING.”
These words mean:
You can be killed or seriously injured if you don't immediately
DANGER
WARNING
All safety messages will tell you what the potential hazard is, tell you how to reduce the chance of injury, and tell you what can
happen if the instructions are not followed.
State of California Proposition 65 Warnings:
WARNING: This product contains one or more chemicals known to the State of California to cause cancer.
WARNING: This product contains one or more chemicals known to the State of California to cause birth defects or other
reproductive harm.
follow instructions.
You
can be killed or seriously injured if you don't
instructions.
follow
3
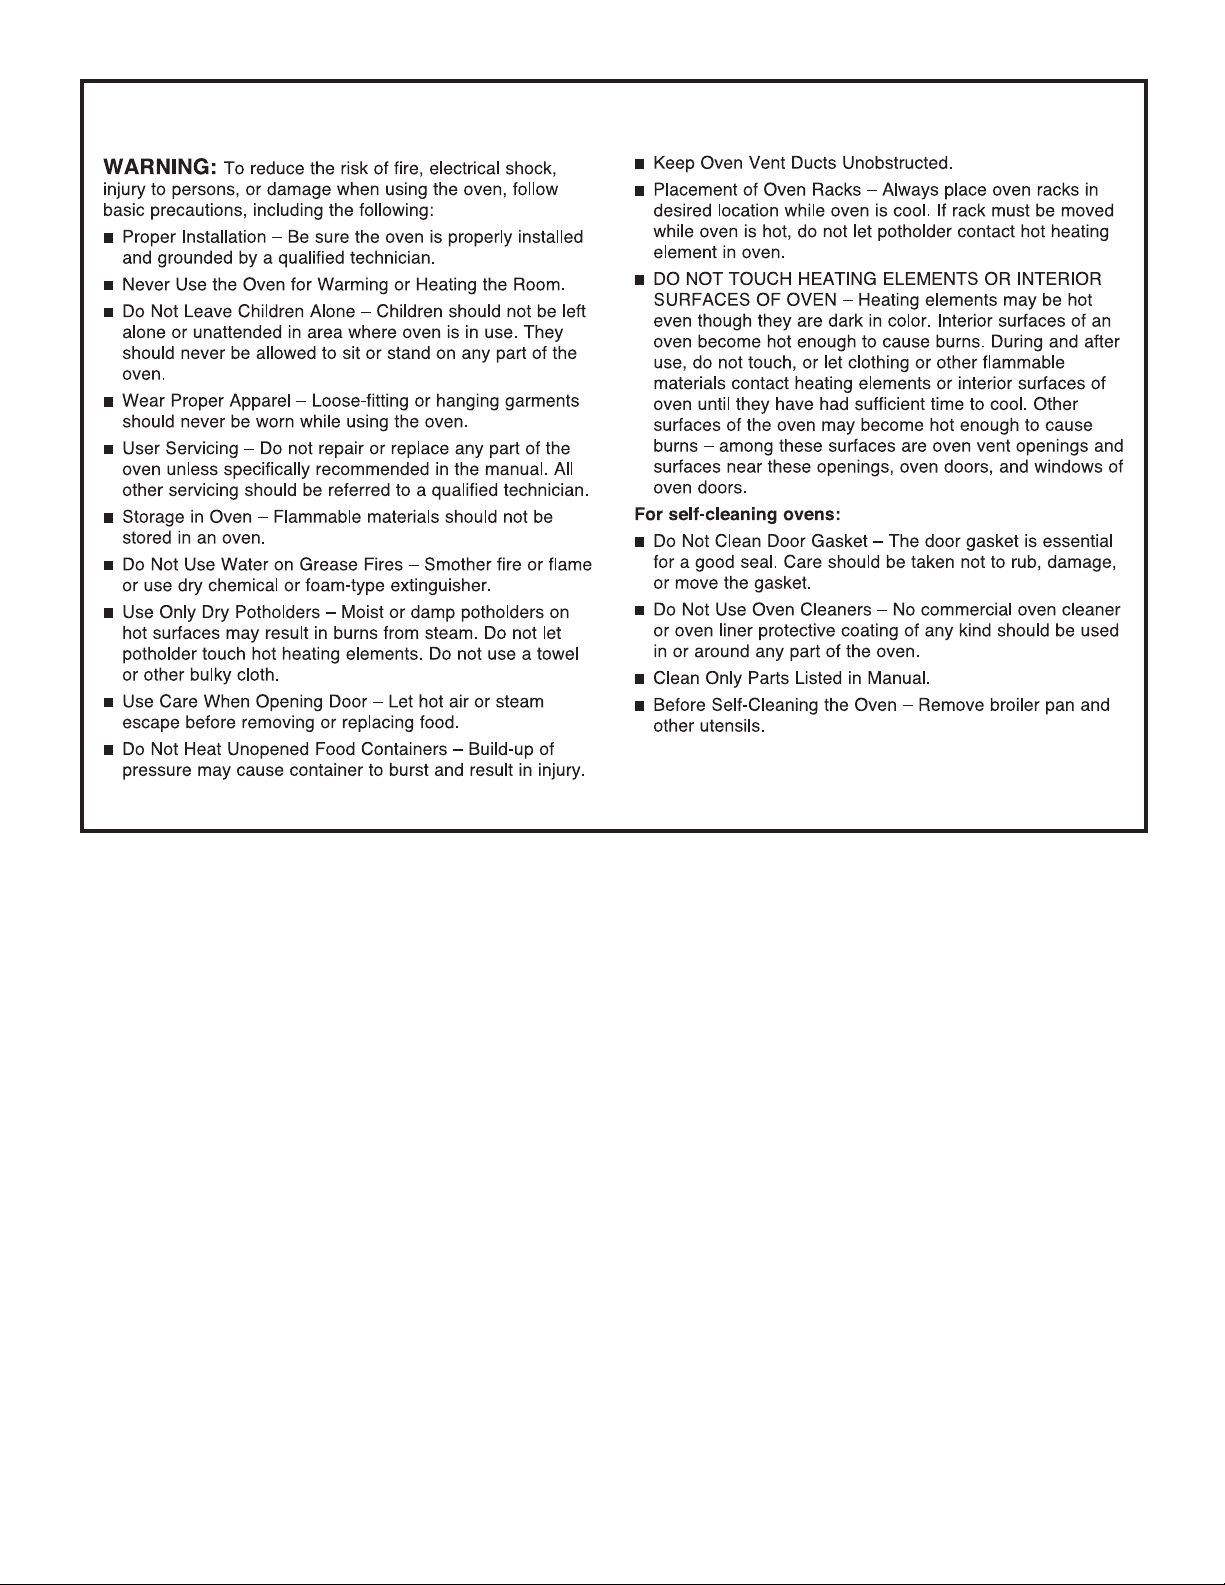
IMPORTANT SAFETY INSTRUCTIONS
SAVE THESE INSTRUCTIONS
4
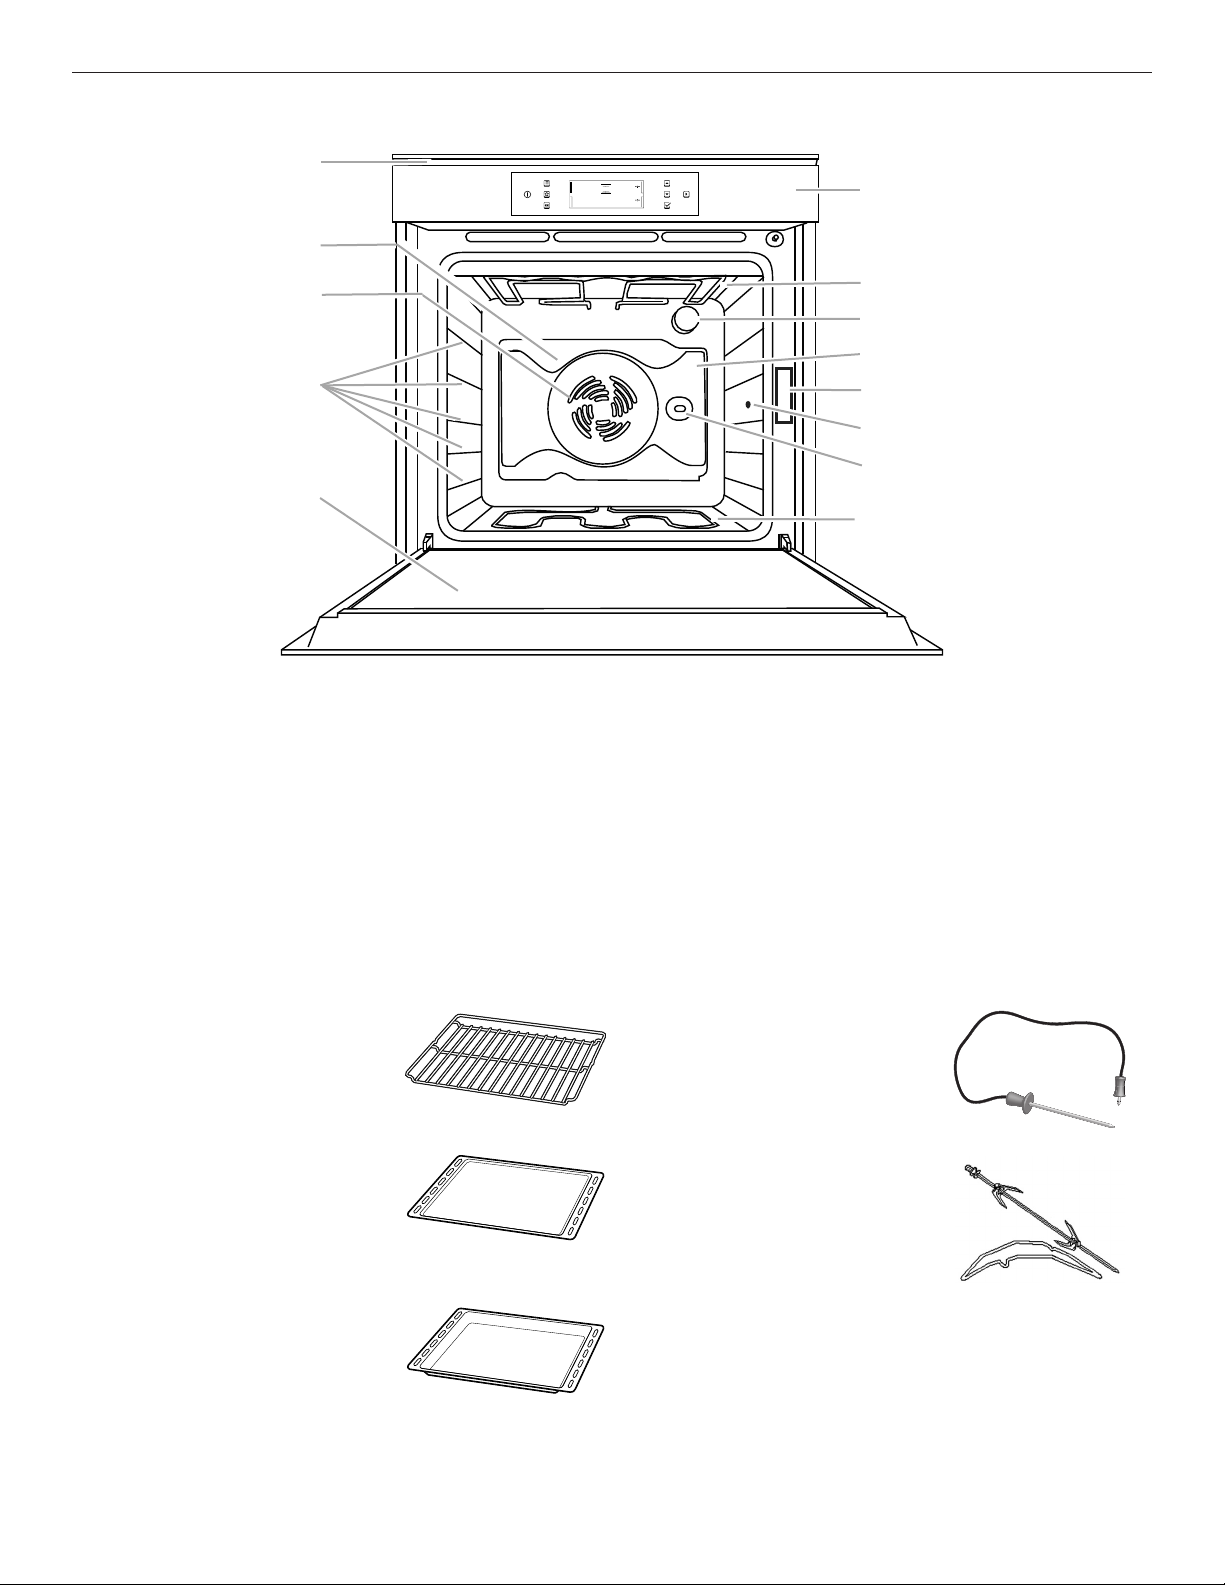
PARTS AND FEATURES
E
200˚C
COOK TIME
TEMPERATURE
Conventional
YES
END TIME
PREHEAT
D
F
C
G
H
I
B
J
K
L
A
M
A. Door
B. Position of shelves (number of
shelves is indicated on front of oven)
C. Fan
D. Circular heating element (not visible)
E. Cooling fan (not visible)
F. Control panel
G Upper heating element/broil
H. Lamp
I. Rear wall
J. Model and serial number plate
(do not remove)
K. Meat probe connection
L. Rotisserie
M. Bottom heating element (not visible)
NOTES:
■ During cooking, the cooling fan may turn on at intervals to minimize energy consumption.
■ After cooking is complete and the oven has been turned off, the cooling fan may continue to run for a short time.
■ During cooking, if the oven door is opened, the heating elements will turn off.
Accessories supplied
Oven rack: The oven rack can be
used to grill food or as a support
for pans, cake tins, and other
ovenproof cooking receptacles.
Drip tray: The drip tray is designed
to be positioned under the oven
rack to collect fat or as an oven tray
for cooking meat, fish, vegetables,
focaccia, etc.
Baking tray: The baking tray is
used for cooking all breads and
pastries, roasts, fish en papillotte,
etc.
Meat probe: The meat probe
is used to measure the core
temperature of food during
cooking.
Rotisserie: The rotisserie is used
for uniform roasting of large pieces
of meat and poultry.
Accessories not supplied
Additional accessories can be purchased separately. Refer to the “Assistance or Service” section.
5
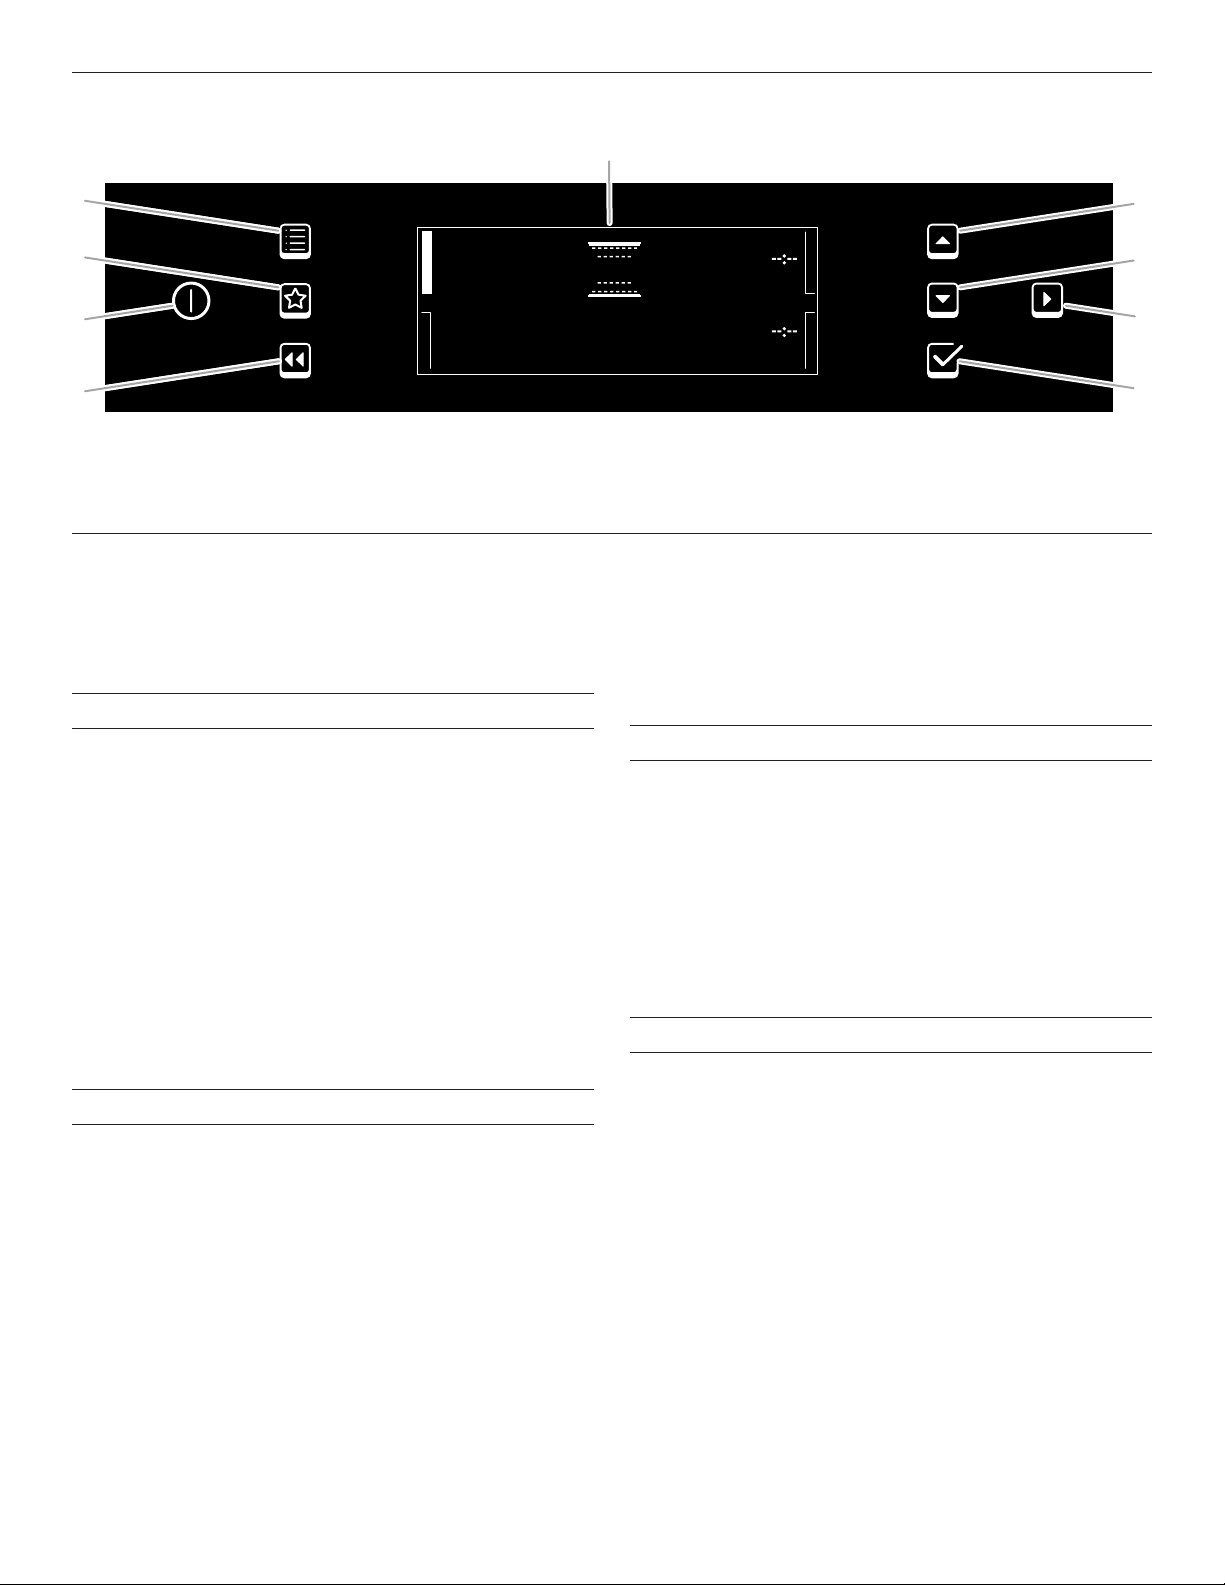
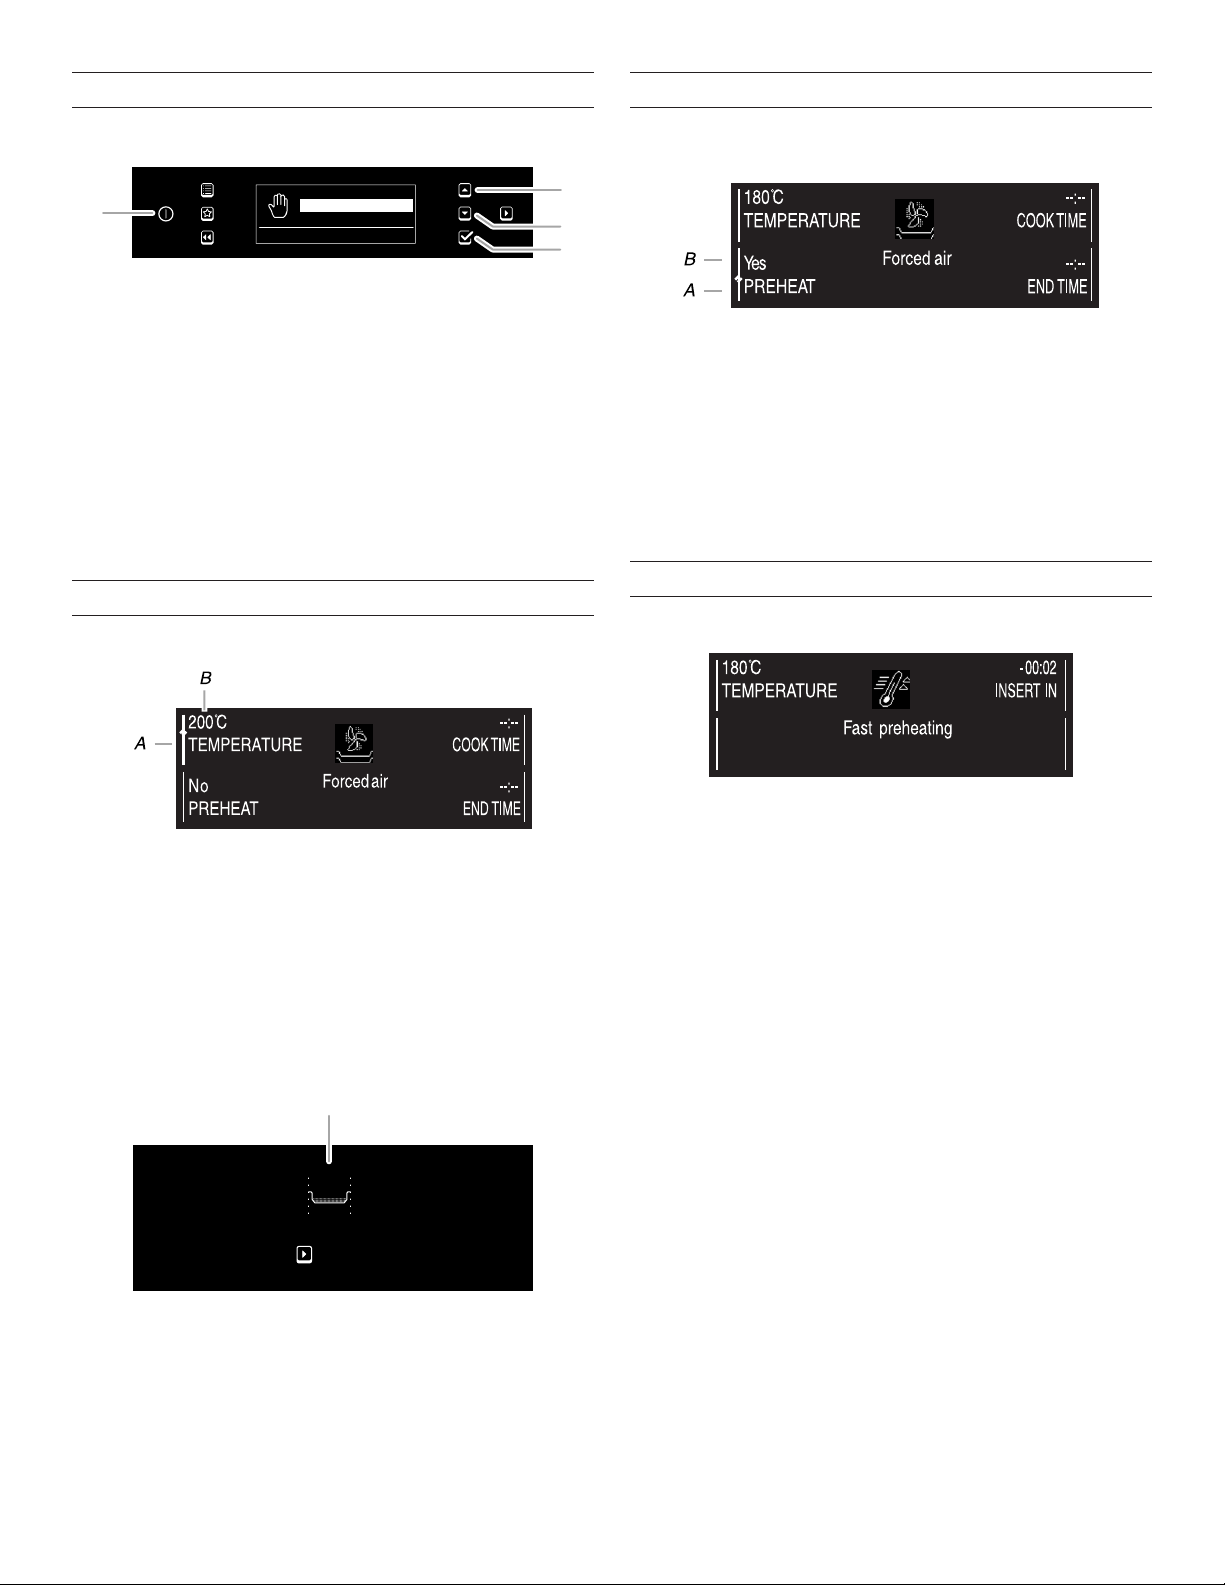
ELECTRONIC OVEN CONTROLS
E
D
D
C
C
200˚C
TEMPERATURE
COOK TIME
F
G
B
B
A
A
YES
PREHEAT
A. Previous screen
B. On/Off
C. Favorites
D. Menu
Conventional
Control Panel
The control panel houses the control menu and function
controls. The control keypads are very sensitive and require
only a light touch to activate.
For more information about the individual controls, see their
respective sections in this manual.
Language and Clock
When the oven is turned on for the first time, you will have to
select the desired language and set the correct time.
To set the language and time, refer to the following instructions.
1. Touch the On/Off keypad. The display will show the list of
the first three available languages.
2. Touch the “Up” or “Down” arrow keypad to scroll through
the list.
3. When the desired language is highlighted, touch the Select/
Confirm Settings keypad. After the desired language is
selected, the display will flash 12:00.
4. Touch the “Up” or “Down” arrow keypad to scroll through
the time.
NOTE: To scroll through the time more quickly, touch and
hold the keypad.
5. Touch the Select/Confirm Settings keypad to select the time.
The display will show the list of functions.
Settings
1. Touch the “Up” or “Down” arrow keypad to scroll through
the menu and highlight “Settings”. The display indicates
the settings that can be changed (language and time, oven
sounds volume, display brightness, energy saving function,
temperature, °C or °F, and power).
2. Touch the Select/Confirm Settings keypad to select settings.
3. Touch the “Up” or “Down” arrow keypad to scroll to the
desired setting.
4. Once the setting is highlighted, touch the Select/Confirm
Settings keypad.
5. Touch the “Up” or “Down” arrow keypad to change the
setting.
6. Touch the Select/Confirm Settings keypad. A message
appears on the display confirming your selection.
H
END TIME
I
E. Oven display
F. Up arrow
G. Down arrow
H. Start
I. Select/Confirm settings
NOTES:
■ When the oven is turned off and the Ecomode (energy
saving) function is selected (On), the display turns off after
a few seconds.
■ When the oven is turned off and the Ecomode (energy
saving) function is not selected (Off), the display dims.
Key Lock
The Key Lock function can be used to lock the control panel
keypads.
To activate Key Lock, touch the Previous Screen and Select/
Confirm Settings keypads at the same time and hold them for at
least 3 seconds.
When activated, the keypads are locked, the display shows a
message, and the Lock symbol is displayed.
This function can also be activated during cooking.
To deactivate Key Lock, repeat the above procedure.
NOTE: When the Key Lock function is activated, the oven can
be turned off only by touching the On/Off keypad.
Power
To change the power setting to LOW, refer to the following
instructions.
1. Touch the “Up” or “Down” arrow keypad to scroll through the
menu and highlight “Settings.”
2. Touch the Select/Confirm Settings keypad to select settings.
3. Touch the “Up” or “Down” arrow keypad to scroll through the
menu and highlight Power.
4. Touch the Select/Confirm Settings keypad to select Power.
5. Touch the “Up” or “Down” arrow keypad to scroll through the
menu and highlight LOW.
6. Touch the Select/Confirm Settings keypad to select LOW.
6
OVEN USE
B
A
C
Odors and smoke are normal when the oven is used the first few
times, or when it is heavily soiled.
During oven use, the heating elements will not remain on, but will
cycle on and off throughout oven operation.
Aluminum Foil
IMPORTANT: To avoid permanent damage to the oven bottom
finish, do not line the oven bottom with any type of foil or liner.
■ For best cooking results, do not cover entire rack with foil
because air must be able to move freely.
Oven Vent
A. Control panel
B. Oven vent
C Oven door
Inserting Oven Racks and Other Accessories
NOTE: The oven rack and other accessories are provided with a
locking mechanism to avoid their unintentional removal.
Insert the oven rack horizontally, with the raised rail facing
upward as shown.
IMPORTANT: The health of some birds is extremely sensitive to
the fumes given off. Exposure to the fumes may result in death
to certain birds. Always move birds to another closed and wellventilated room.
■ To catch spills, place foil on rack below dish. Make sure
foil is at least 1/2" (1.3 cm) larger than the dish and that it is
turned up at the edges.
The oven vent should not be blocked or covered since it allows
the release of hot air and moisture from the oven. Blocking or
covering vents will cause poor air circulation, affecting cooking.
Do not set plastics, paper, or other items that could melt or burn
near the oven vent.
NOTE: Accessories such as the drip tray and baking tray are
inserted in the same manner.
A
A. Raised rail
A
7
Oven Functions
Your oven contains a number of functions used to program the oven for cooking and select other functions. The following table lists
the functions available and their descriptions.
Functions Tables
Main Menu Table
Symbol Function Function Description
Settings Set the display (language, time,
brightness, volume of acoustic
signal, energy saving function,
temperature unit, and power).
Traditional Functions Table
Symbol Function Function Description
Fast
preheating
To preheat the oven rapidly.
Professional
functions
Traditional
functions
Special
functions
Automatic
cleaning
Specific functions for the type
of dish chosen with the ideal
temperature recommended.
The oven is automatically
programmed for optimum
preheating. Cooking is managed
automatically with a dedicated
cycle for each recipe. For roasting
functions, the option of using the
meat probe is available.
Used to select Traditional
Functions. Refer to the
“Traditional Functions” table.
Used to select Special Functions.
Refer to the “Special Functions”
table.
To burn off spatters produced
during cooking with an extremely
high temperature cycle
(approximately 825°F [450°C]).
Two automatic cleaning cycles are
available: a complete cycle (Pyro)
and a shorter cycle (Express).
The complete cycle is best for
very dirty ovens, while the shorter
cycle should be used at regular
intervals.
Conventional To cook any dish on one shelf
Grill To grill steak, kebabs, and
Turbogrill To roast large pieces of meat
Forced air To cook a variety of food requiring
Convection
bake
only.
Use the third shelf. To cook
pizza, savory pies, and sweets
with liquid fillings, use the first or
second shelf.
sausages or to cook vegetables
au gratin and toast bread. Use the
fourth or fifth shelf.
When grilling meat, use the drip
tray to collect cooking juices.
Position it on the third or fourth
shelf and add approximately
0.13 gal. (0.5 L) of water.
The oven does not have to be
preheated. During cooking, the
oven door must remain closed.
(legs, roast beef, chickens), use
the middle shelves.
Use the drip tray to collect
cooking juices. Position it on
the first or second shelf and add
approximately 0.5 gal. (1.9 L) of
water.
The oven does not have to be
preheated. During cooking, the
oven door must remain closed.
With this function, you can also
use the rotisserie.
the same cooking temperature
on several shelves, a maximum
of 3 shelves can be used at the
same time. For example, fish,
vegetables, and cakes.
This function can be used to cook
different foods without odors
being transferred from one food to
another.
Use the third shelf to cook on
one shelf only, the first and fourth
shelves to cook on two shelves,
and the first, third, and fifth
shelves to cook on three shelves.
To cook meat and pies with liquid
filling (savoury or sweet) on a
single shelf. Use the third shelf.
8
Special Functions Table
A
B
C
Symbol Function Function Description
Defrost To speed up defrosting of food.
Place food on the middle shelf.
Leave food in its packaging in
order to keep it from drying out.
List of Functions
1. Touch the On/Off keypad to turn the oven on. The list of
functions will be displayed.
Keep warm For keeping cooked food (meat,
fried food, and flans) hot and
crisp. Place food on the middle
shelf.
This function will not activate if the
temperature in the oven is above
150°F (65°C).
Rising For optimal rising of sweet or
savoury dough. Place the dough
on the second shelf. The oven
does not have to be preheated.
For best results, do not start the
rising function if the oven is still
hot after a cooking cycle.
Slow cooking
meat or fish
To gently cook meat at
200°F (90°C) and fish at
175°F (85°C). This function slow
cooks to ensure the food remains
tender and succulent.
Due to the low temperature,
the food does not brown and
the results are similar to steam
cooking.
Brown roasts in the pan first in
order to seal in the meat’s natural
juices.
Cooking times range from 2 hours
for fish weighing 10.5 oz (300 g)
to 4-5 hours for fish weighing
6.6 lbs (3 kg).
For meat, cooking times range
from 4 hours for meat weighing
2.2 lbs (1 kg) to 6-7 hours for meat
weighing 6.6 lbs (3 kg).
For optimum results, do not open
the oven door during cooking.
Use the meat probe (if provided)
or a standard oven thermometer.
Yogurt For preparing homemade yogurt.
Use small china jars or aluminum
foil baking cups.
Cover with aluminum foil during
cooking. Position the drip tray
with the containers on the first
shelf. The oven does not have to
be preheated.
A. Highlighted function symbol
B. Other functions available
C. Highlighted function name
D. Highlighted function description
D
2. Touch the “Up” or “Down” arrow keypad to scroll through the
menu and highlight the desired function.
3. Touch the Select/Confirm Settings keypad to select the
function.
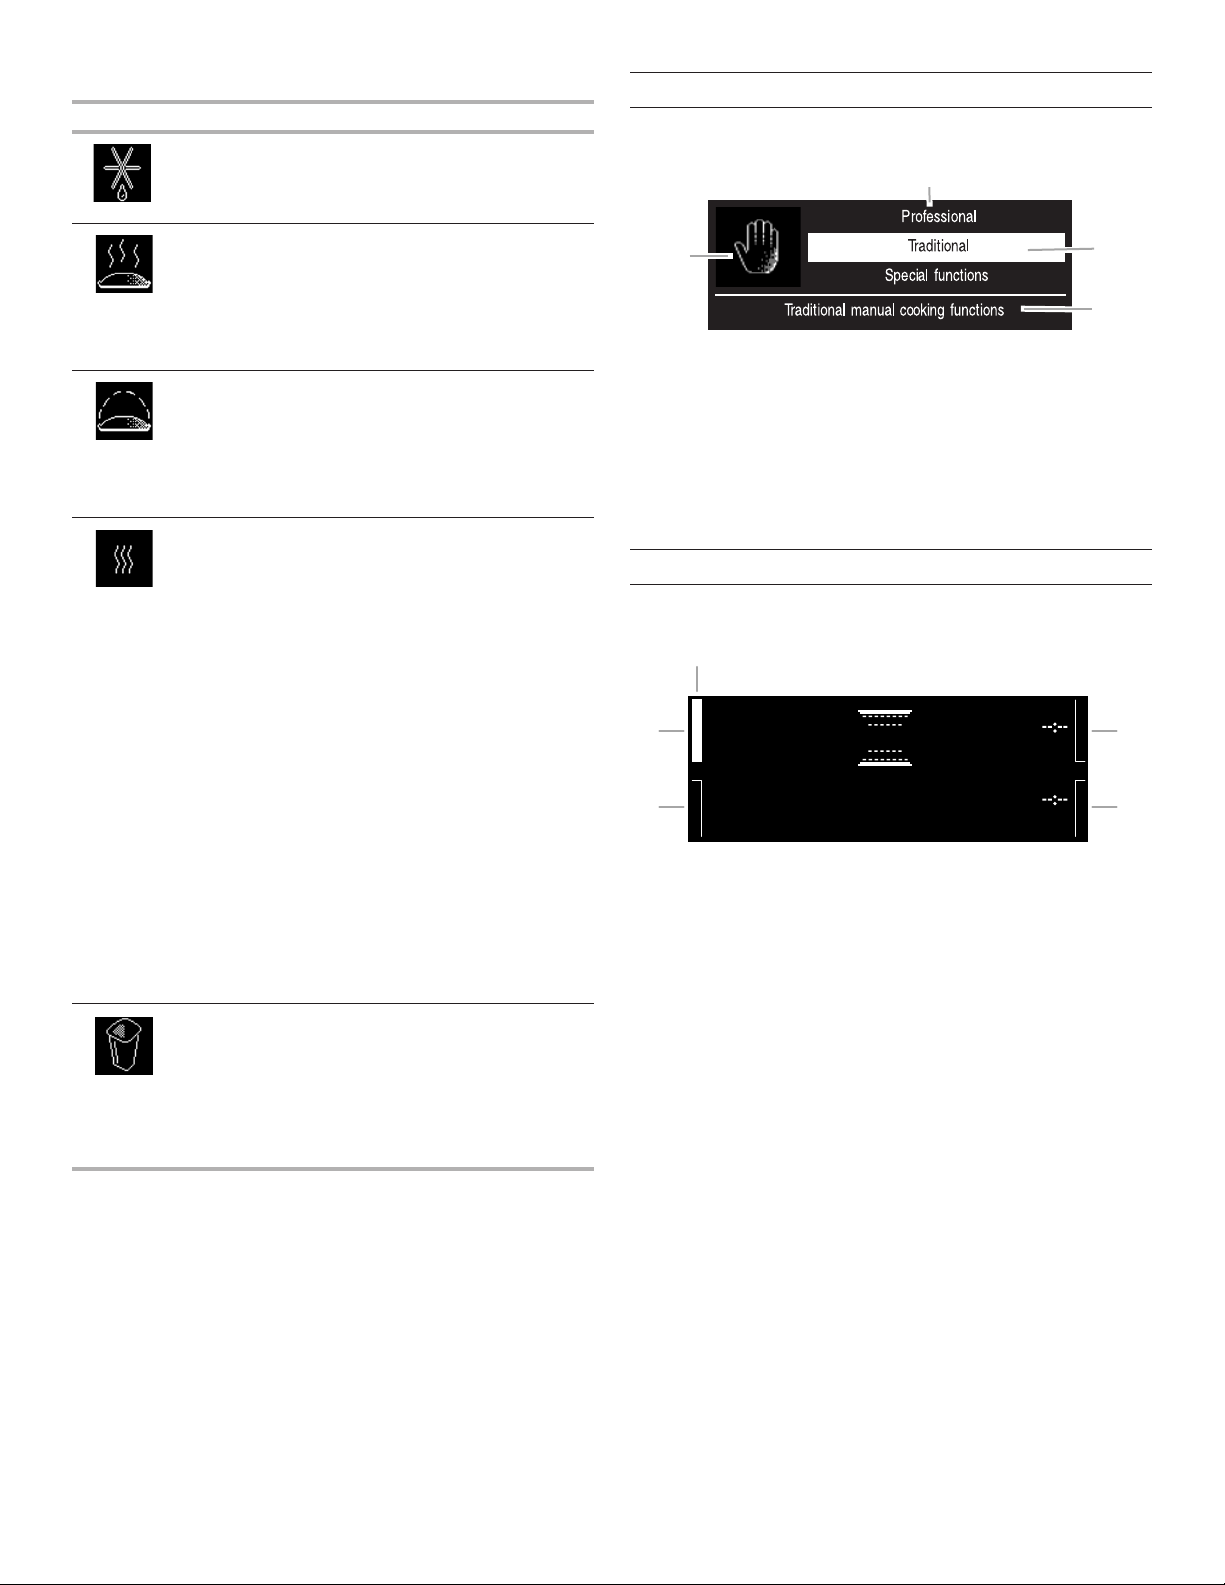
Function Details
After selecting the desired cooking function, the cooking settings
will be displayed.
E
A C
200˚C
TEMPERATURE
COOK TIME
Conventional
NO
PREHEAT
A. Zone 1
B. Zone 2
C. Zone 3
D. Zone 4
E. Cursor
1. To move between the different zones, use the “Up” or
“Down” arrow keypad. The cursor will move between the
selectable functions in zones 1 through 4.
2. Touch the Select/Confirm Settings keypad to select the
desired function to be changed.
3. If the preset values are the desired value, touch the Start
keypad to start the oven.
4. If the preset values are not the desired value, use the “Up” or
“Down” arrow keypad to highlight the desired value.
5. Touch the Select/Confirm Settings keypad to select the
value.
6. Touch the Start keypad to start the oven.
NOTE: For a complete list of cooking functions, refer to the
tables in the “Oven Functions” section.
END TIME
DB
9
Selecting Cooking Functions
Selecting Oven Preheating
1. Touch the On/Off keypad to turn the oven on. The list of
cooking functions will be displayed.
Professional
A
Traditional manual cooking functions
Traditional
Special Functions
B
C
D
A. On/Off
B. Up arrow
C. Down arrow
D. Select/Confirm settings
2. To browse the cooking functions, touch the “Up” or “Down”
arrow keypad. The selected function is highlighted in white in
the center of the display.
3. Select the function by touching the Select/Confirm Settings
keypad. The cooking settings are shown on the display.
4. If the preset values are those desired, touch the Start
keypad. To change the preset values, refer to “Function
Details” in this section.
NOTE: For the list and description of functions, refer to the
tables in the “Oven Functions” section.
Setting the Temperature/Output of the Grill
To change the temperature or output of the grill, use the
following procedure.
If you do not want to preheat the oven for those functions that
do not require it, use the following procedure to turn preheating
off.
A. Preheat zone
B. Yes/No display
1. Touch the “Up” or “Down” arrow keypad to move the cursor
to the preheat zone.
2. Touch the Select/Confirm Settings keypad. “Yes” flashes on
the display.
3. Touch the “Up” or “Down” arrow keypad until “No” flashes
on the display.
4. Touch the Select/Confirm Settings keypad to select no
preheating.
Fast Preheating
If you want to preheat the oven quickly, use the following
procedure to select fast preheating.
A. Temperature zone
B. Temperature value
1. Touch the “Up” or “Down” arrow keypad and position the
cursor next to the Temperature zone.
2. Touch the Select/Confirm Settings keypad. The temperature/
grill value will flash on the display.
3. Touch the “Up” or “Down” arrow keypad to scroll through the
grill value and select the desired temperature/grill value.
4. Touch the Select/Confirm Settings keypad to confirm.
5. Touch the Start keypad. The display indicates the shelf
position number on which the food should be placed.
A
200˚C
TEMPERATURE
3
COOK TIME
Insert food on level 3
NO
PREHEAT
6. Touch the Start keypad to begin cooking.
NOTE: The temperature can also be changed during cooking by
following the same procedure.
Press when done
A. Shelf position number
END TIME
1. Touch the “Up” or “Down” arrow keypad to select the Fast
Preheating function.
2. Touch the Select/Confirm Settings keypad to select fast
Preheating.
3. If the displayed temperature is the temperature you desire,
touch the Start keypad to start the oven. To change the
temperature, refer to “Setting the Temperature/Output of the
Grill” in this section.
4. When the oven reaches the preheat temperature, a tone
will sound and the oven will automatically select the
Conventional function.
5. If a different cooking function is desired, touch the Menu
keypad and select the desired function.
10
Setting Cooking Time
A
B
This function can be used to set a cooking time from 1 minute to
the maximum time allowed by the selected cooking function. At
the end of the cooking time, the oven will turn off automatically.
Setting End of Cooking Time/Delayed Start
WARNING
Food Poisoning Hazard
Do not let food sit in oven more than one hour before
or after cooking.
Doing so can result in food poisoning or sickness.
A. Cooking time
B. Cooking time zone
C. End of cooking time
1. Touch the “Up” or “Down” arrow keypad and position the
cursor next to the Cook Time zone.
2. Touch the Select/Confirm Settings keypad. “--:--” will flash
on the display.
3. Touch the “Up” or “Down” arrow keypad to scroll through the
time and select the desired cooking time.
4. Touch the Select/Confirm Settings keypad to select the
cooking time.
5. The “Cook Time” and “End Time” will be displayed.
Browning
At the end of cooking time, with certain functions, you have the
option to brown your dish.
NOTE: Browning can be selected only when a cooking time has
been set.
200˚C
TEMPERATURE
COOK TIME
Cooking nished at 20:00
NO
PREHEAT
1. At the end of the cooking time, the display will indicate “Up
Arrow to prolong, Select/Confirm Settings to brown.”
2. Touch the Select/Confirm Settings keypad to select a
5 minute browning cycle.
3. The display will indicate “Browning” with a cook time of
5 minutes and an end time 5 minutes after the end of the
cooking time (for example, 20:05).
NOTE: Browning can be used only once after cooking.
to prolong, to brown
A B
A. Up arrow
B. Select/Confirm settings
END TIME
The end of cooking time can be set to delay the start of cooking
by a maximum of 23 hours and 59 minutes.
NOTES:
■ End of cooking time can be set only after a cooking time has
been set.
■ End of cooking time can be set only when preheating is not
required for the selected cooking function.
■ During the time before cooking starts, the oven can turned
on by touching the Start keypad.
■ At any time during cooking, set values (temperature, grill
setting, cooking time, end of cooking time) can be changed
using the “Up” or “Down” arrow keypad and the Select/
Confirm Settings keypad.
1. Set the cooking time. Refer to “Setting Cooking Time” in this
section. After the cooking time is set, the display shows the
end of cooking time (for example 20:10).
A. Cooking time
B. End of cooking time zone
2. To change the end of cooking time, and therefore the
cooking start time, position the cursor next to the end of
cooking time zone using the “Up” or “Down” arrow keypad.
3. Touch the Select/Confirm Settings keypad. The end of
cooking time flashes.
4. Touch the “Up” or “Down” arrow keypad to select the
desired end of cooking time. Then touch Select/Confirm
Settings keypad.
5. Touch the Start keypad. The display indicates shelf on which
the food should be placed.
6. Touch the Start keypad to activate the end of cooking time
function.
The oven will start cooking at the time required to finish
cooking at the end of cooking set time. For example, if the
cooking time is set at 20 minutes and the end of cooking
time is set to 20:10, the oven will begin cooking at 19:50.
11
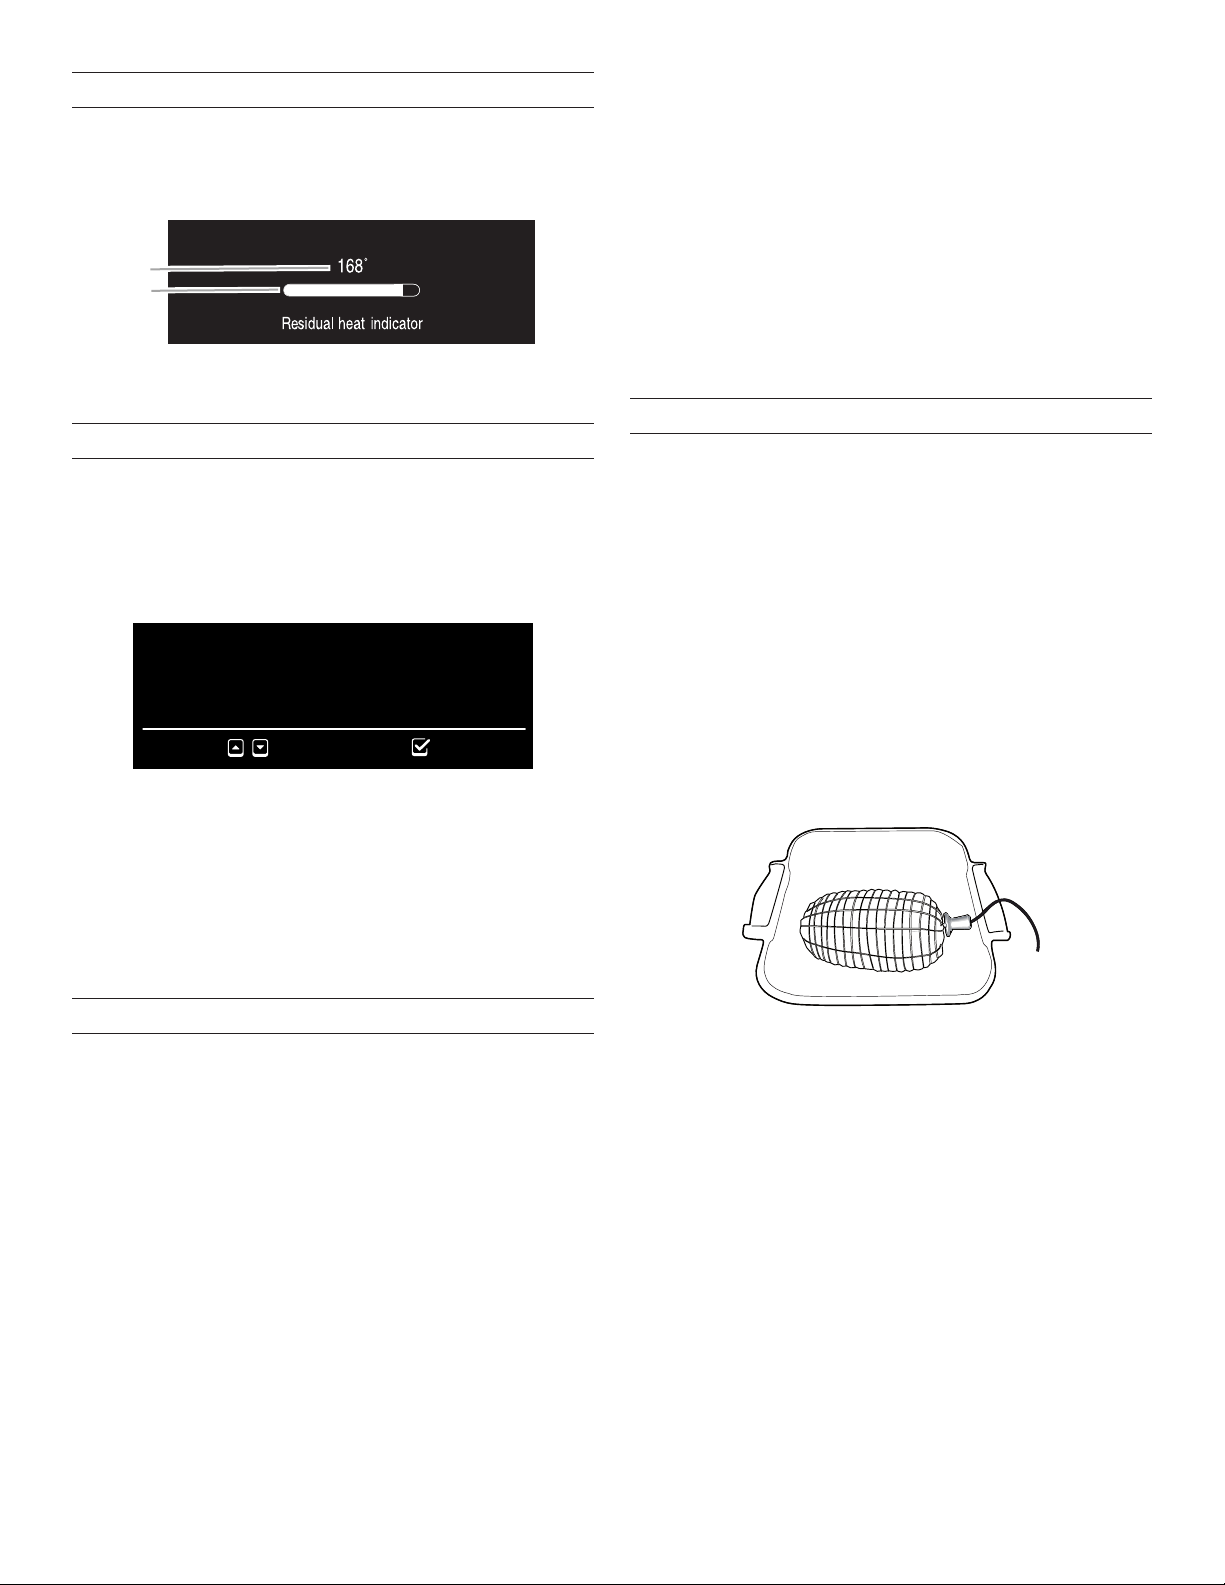
Indication of Residual Heat Inside the Oven
B
At the end of cooking or when the oven is switched off, and the
temperature inside the oven is over 100°F (50°C), the display
shows the current oven temperature. A bar indicating the cooling
progress is also displayed. When the residual heat reaches
100°F (50° C), the display will switch to the current time.
A
A. Current oven
temperature
B. Cooling progress bar
Timer
The Timer function can be used only with the oven turned off. It
is useful for timing dishes being cooked outside of the oven. For
example, timing the cooking time of pasta being cooked on a
cooktop.
The timer can be set to a maximum of 1 hour and 30 minutes.
1. With the oven turned off, touch the Select/Confirm Settings
keypad. The display will show “00:00:00.”
200˚C
TEMPERATURE
NO
PREHEAT
Press to set the timer, to start
00 : 00 : 00
(HH) (MM) (SS)
2. Touch the “Up” or “Down” arrow keypad to select the
desired time.
3. Touch the Select/Confirm Settings keypad to start the
timer. When the set time has elapsed, the display will show
“00:00:00,” and an acoustic signal will sound.
NOTE: The time can be extended by repeating the above
procedure.
4. To turn the timer off, touch the Select/Confirm Settings
keypad. The time of day will be shown on the display.
COOK TIME
END TIME
Professional Pastry Function
Pâtè a Choux
Croissant/Brioches
Sponge Cake
Plum Cake
Short Pastry
Professional Roasting Function
Veal—Pork
Roast Beef Rare
Roast Beef Medium
Roast Chicken
Roast Turkey
Custom (customizable function for cooking meat)
Meat Probe
The meat probe allows you to measure the core temperature
of meat during cooking. The meat probe measures between
30°F (0°C) and 210°F (100°C) to ensure that meat is cooked to
perfection. The required core temperature can be set for the type
of meat being cooked.
The meat probe can be used with the following functions:
■ Conventional
■ Convection bake
■ Forced air
■ Turbo grill
■ Slow cooking meat and slow cooking fish
■ Pro roasting
IMPORTANT: Position the meat probe accurately in the meat to
obtain perfect cooking results.
Insert the meat probe fully into the fleshiest part of the meat,
avoiding bones and fatty parts.
Professional Functions
Professional functions allow you to choose from 17 recipes. The
oven offers a cooking function for every recipe category and
suggests the ideal temperature and shelf for cooking the dish.
For additional information regarding these functions, refer to the
Recipe Book. The Recipe Book contains a number of recipes
that you can personalize to suit your own taste.
The professional functions available are listed below. The
cooking time and temperature for each recipe are indicated on
the oven display and also in the Recipe Book.
For recipes listed in the Professional Roasting Function, you
have the option to use the meat probe. Refer to “Meat Probe” in
this section for instructions on how to use it.
Professional Bakery Function
Traditional Bread
Malt Bread
Pan Pizza
Thin Pizza
Savoury Pie
Baguette
12
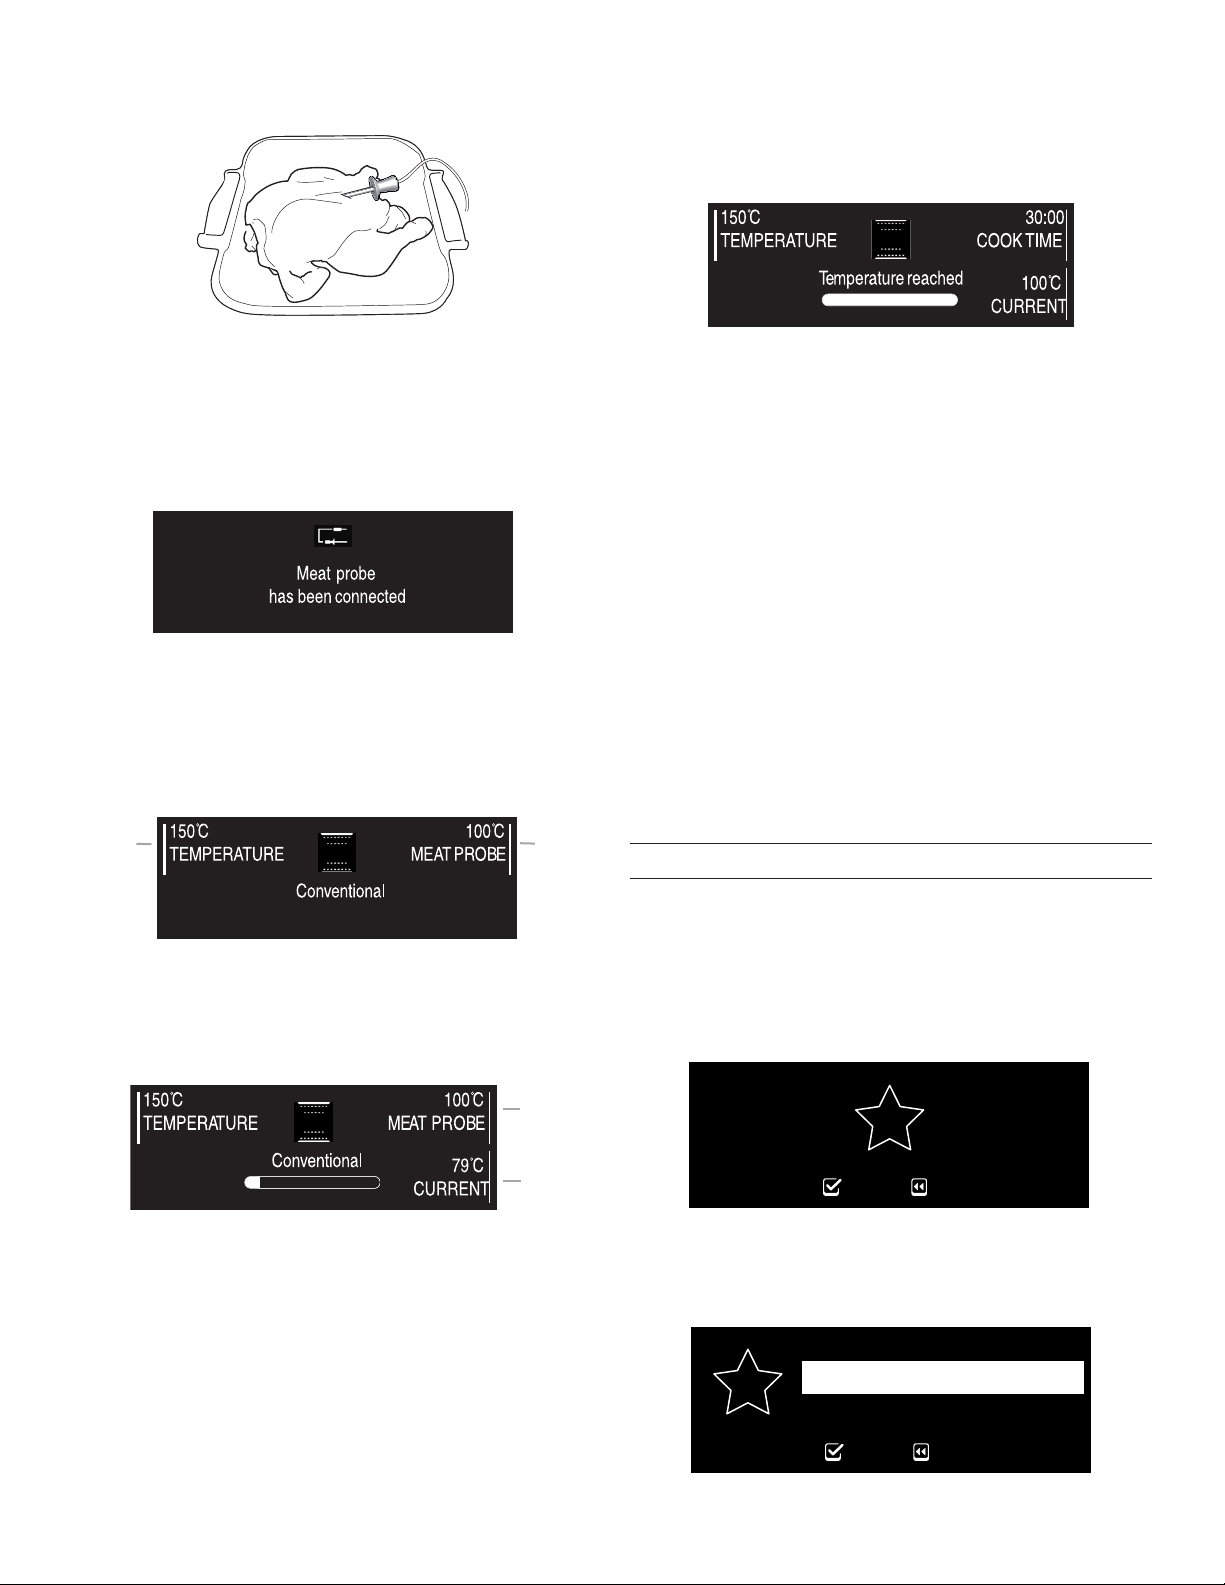
For poultry, the meat probe should be inserted into the middle of
A
B
A
the breast. Make sure the meat probe tip is not positioned in a
hollow part of the poultry.
Within the first two minutes of cooking start, the desired core
temperature of the meat can be changed.
After two minutes, the core temperature of the meat cannot be
changed and Zone 3 of the display changes to the cook time.
“Temperature reached” is displayed when the desired core
temperature of the meat is reached.
If the meat you are cooking has very irregular thicknesses, make
sure it is cooked properly before removing it from the oven.
Insert the plug on the end of the meat probe into the meat probe
connector located on the right wall of the oven chamber. Refer
to the illustration in the “Parts and Features” section.
NOTE: If the meat probe is not inserted, cooking proceeds in the
traditional mode.
The display advises that the meat probe is connected.
After the “Meat probe has been connected” confirmation
message, the display shows all of the cooking parameters
selected:
■ Zone 1: oven temperature.
■ Zone 3: the desired core temperature of the meat.
B
A. Zone 1
B. Zone 3
Touch the Start keypad to start cooking.
Zone 4 of the display shows the current core temperature of the
meat.
This message remains on the display for 3 seconds. If the “Up”
arrow keypad is touched within this 3-second time, the cooking
time can be increased. Zone 3 of the display displays the time if
the cooking time is increased.
If the “Up” arrow keypad is not touched within this 3-second
time, the oven continues cooking for 6 minutes.
At the end of cooking, the display changes to allow you to select
browning. Refer to “Browning” in this section.
NOTES:
■ To change the desired core temperature of the meat after
2 minutes have elapsed from cooking start, the meat probe
must be unplugged from the meat probe connector in oven
chamber and then plugged in again.
■ If the meat probe is connected before a cooking function is
selected, only cooking functions without preheating can be
selected.
■ For recipes that require preheating, insert the meat with the
meat probe inserted only after preheating. Be sure to plug
the meat probe into the meat probe connector in the oven
chamber.
■ When “Pro Roasting,” preheating is included for all recipes.
Therefore, do not insert the meat probe or place the meat in
the oven before preheating has finished.
Favorites
You can save the settings used to cook your favorite dishes.
The settings for up to 10 dishes can be saved.
To save the settings for a favorite dish, use the following
procedure:
1. Touch the Access functions keypad at the end of the cooking
time. The display shows the message “Touch [Select/
Confirm Settings keypad] to save [Previous Screen keypad]
to cancel.”
200˚C
TEMPERATURE
COOK TIME
NO
PREHEAT
Touch to save to cancel
2. Touch the Select/Confirm Settings keypad. The display will
show the first available position from 1 to 10. To change the
position, touch the “Up” or “Down” arrow keypad to scroll
through the positions.
END TIME
200˚C
TEMPERATURE
2 Forced air
COOK TIME
NO
PREHEAT
Touch to save to cancel
END TIME
13
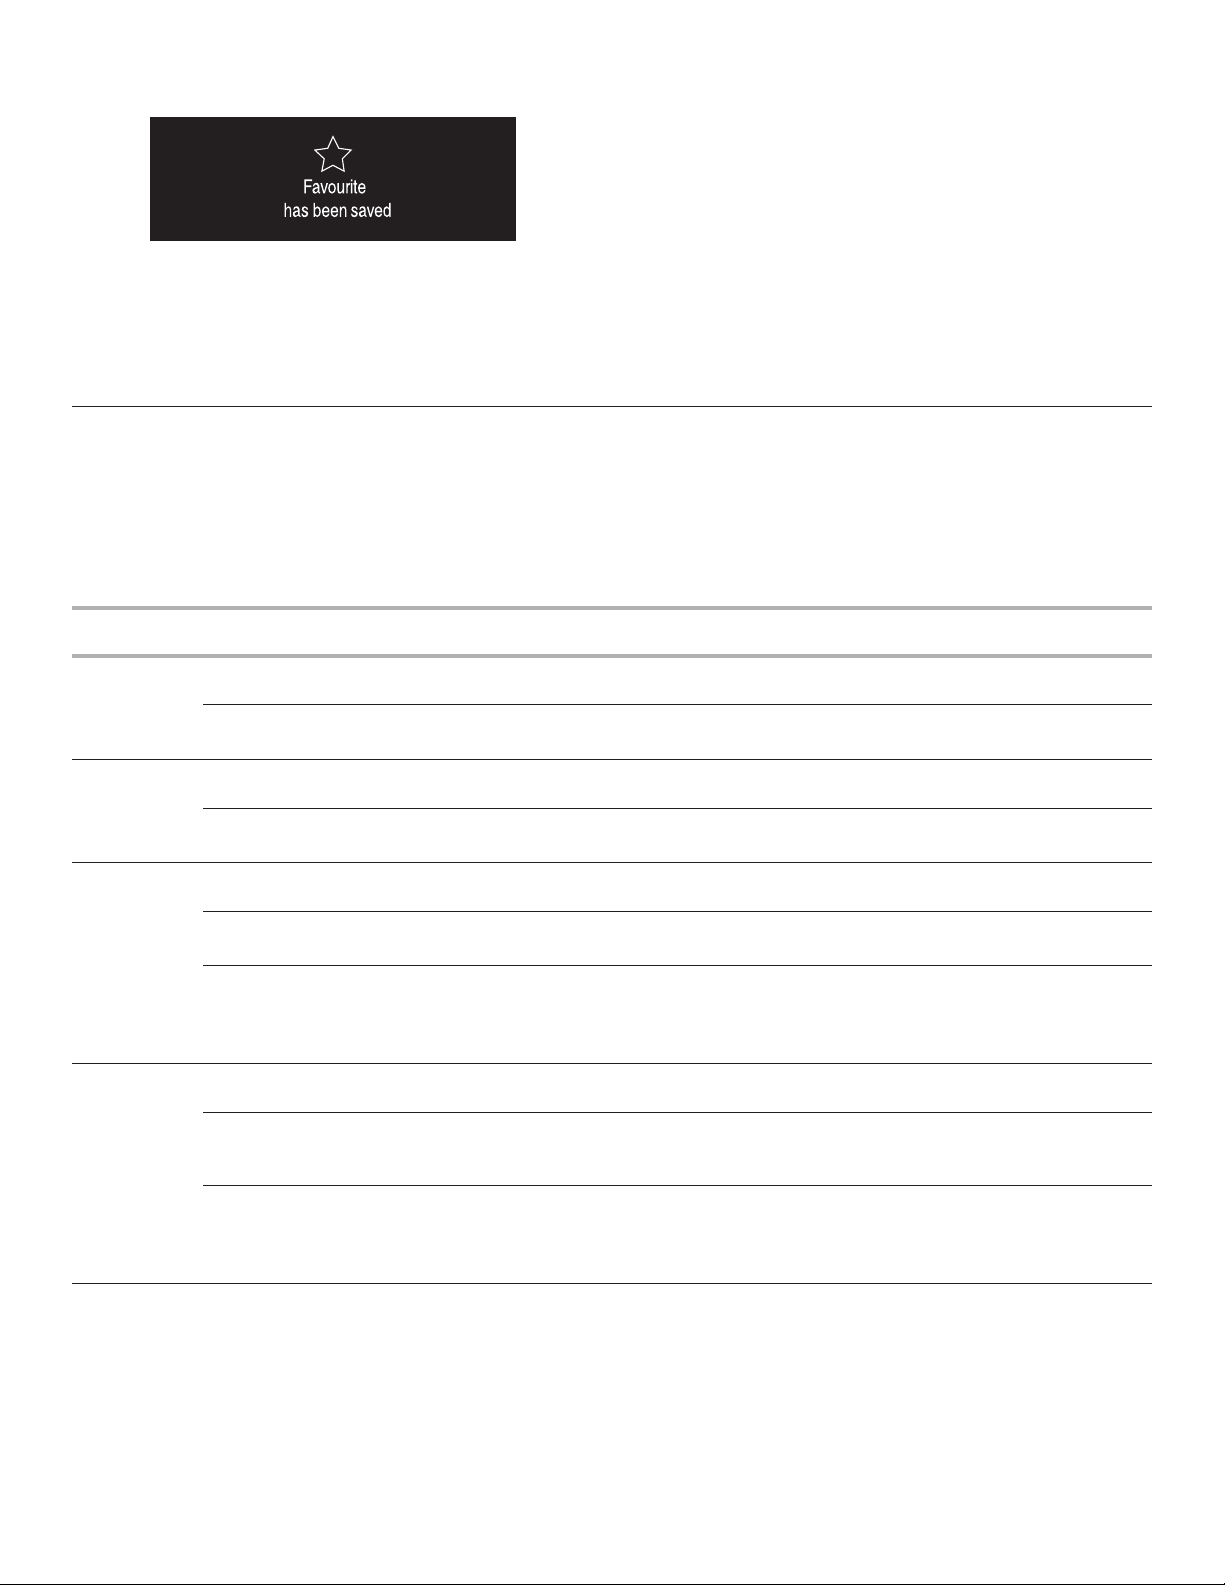
3. Touch the Select/Confirm Settings keypad to save your
settings. The display confirms that a favorite has been saved.
When the memory is full or the position is already in use, the
position will be overwritten (updated with the new settings) if you
touch the Select/Confirm Settings keypad.
If you do not want to save the settings, touch the Previous
Screen keypad. You can then proceed to another function by
touching the “Up” or “Down” arrow keypad or turn the oven off
by touching the On/Off keypad.
Cooking Table
The Cooking Table indicates the best function to use for the
recipes listed, to be cooked on one or more shelves at the same
time. Cooking temperatures and times are recommended only
and may vary depending upon the amount of food and type of
accessory used. Touch the lowest recommended values to begin
with and, if the food is not cooked enough, increase the values.
Cooking Table
To view previously saved settings:
1. Touch the Access Functions keypad. The display will show
the position number of the stored setting.
2. Touch the “Up” or “Down” arrow keypad to scroll though the
stored settings.
3. With the desired stored setting highlighted, touch the Select/
Confirm Settings keypad to select the setting.
4. Touch the Start keypad to start cooking.
Touch the accessories supplied and preferably dark colored
metal cake tins and oven trays. You can also use pans and
accessories in oven glassware or stoneware but cooking times
will be slightly longer. To obtain best results, follow the advice
given in the cooking table for the choice of accessories supplied
to be placed on the various shelves.
Recipe Function Preheating Shelf (from bottom) Temperature
Conventional Yes 2 and 3 300°-350°F
Leavened
cakes
Filled pies
(cheesecake,
strudel, fruit
pie)
Biscuits/
Tartlets
Choux buns
Forced Air - 1 and 4 300°-350°F
Convection
Bake
Forced Air - 1 and 4 300°-375°F
Conventional Yes 3 325°-350°F
Forced Air - 1 and 4 300°-325°F
Forced Air - 1, 3, and 5 300°-325°F
Conventional - 3 350°-375°F
Forced Air - 1 and 4 350°-375°F
Forced Air - 1, 3, and 5 350°-375°F
- 3 300°-375°F
°F (°C)
(160°-180°C)
(160°-180°C)
(160°-200°C)
(160°-200°C)
(170°-180°C)
(150°-170°C)
(150°-170°C)
(180°-200°C)
(180°-200°C)
(180°-200°C)
Time
(minutes)**
30-90 Cake tin on oven rack
30-90 Shelf 4: cake tin on oven rack
35-90 Drip tray/baking tray or oven
40-90 Shelf 4: cake tin on oven rack
20-45 Drip tray/baking tray
20-45 Shelf 4: baking tray
20-45 Shelf 5: oven tray on wire shelf/
30-40 Drip tray/baking tray
35-45 Shelf 4: oven tray on wire shelf/
35-45 Shelf 5: oven tray on wire shelf/
Accessories
Shelf 1: cake tin on oven rack
rack and cake tin
Shelf 1: cake tin on oven rack
Shelf 1: drip tray
baking tray
Shelf 3: baking tray
Shelf 1: drip tray
baking tray
Shelf 1: drip tray
baking tray
Shelf 3: baking tray
Shelf 1: drip tray
14

Recipe Function Preheating Shelf (from bottom) Temperature
Conventional - 3 175°F (90°C) 110-150 Drip tray/baking tray
Forced Air - 1 and 4 175°F (90°C) 140-160 Shelf 4: oven tray on wire shelf/
Meringues
Bread/Pizza/
Focaccia
Frozen pizza
Savoury pies
(vegetable
pie, quiche)
Vols-au-vent/
Puff pastry
crackers
Lasagna/
Baked pasta/
Cannelloni/
Flans
Lamb/Veal/
Beef/Pork
2.2 lbs (1 kg)
Chicken/
Rabbit/Duck
2.2 lbs (1 kg)
Turkey/
Goose
6.6 lbs (3 kg)
Forced Air - 1, 3, and 5 175°F (90°C) 140-160 Shelf 5: oven tray on wire shelf/
Conventional Yes 1 and 2 350°-475°F
Forced Air - 1 and 4 350°-475°F
Forced Air - 1, 3, and 5 350°-475°F
Conventional - 3 475°F (250°C) 10-20 Shelf 3: drip tray/baking tray or
Forced Air - 1 and 4 425°-475°F
Convection
Bake
Forced Air - 1 and 4 350°-375°F
Forced Air - 1, 3, and 5 350°-375°F
Conventional - 3 375°-400°F
Forced Air - 1 and 4 350°-375°F
Forced Air - 1, 3, and 5 350°-375°F
Conventional - 3 375°-375°F
Conventional - 3 375°-400°F
Conventional - 3 400°-450°F
Conventional - 2 375°-400°F
- 3 350°-375°F
°F (°C)
(190°-250°C)
(190°-250°C)
(190°-250°C)
(230°-250°C)
(180°-190°C)
(180°-190°C)
(180°-190°C)
(190°-200°C)
(180°-190°C)
(180°-190°C)
(190°-200°C)
(190°-200°C)
(200°-230°C)
(190°-200°C)
Time
(minutes)**
15-50 Drip tray/baking tray
25-50 Shelf 4: oven tray on wire shelf/
25-50 Shelf 5: oven tray on wire shelf/
10-25 Shelf 4: oven tray on wire
40-55 Cake tin on oven rack
45-60 Shelf 4: cake tin on oven rack
45-60 Shelf 5: cake tin on oven rack
20-30 Drip tray/baking tray
20-40 Shelf 4: oven tray on oven rack
20-40 Shelf 5: oven tray on oven rack
45-65 Oven tray on oven rack/baking
80-110 Drip tray or oven tray on oven
50-100 Drip tray or oven tray on oven
80-130 Drip tray or oven tray on oven
Accessories
baking tray
Shelf 1: drip tray
baking tray
Shelf 3: baking tray
Shelf 1: drip tray
baking tray
Shelf 1: drip tray/baking tray
baking tray
Shelf 3: oven tray on wire shelf/
baking tray
Shelf 1: drip tray
oven rack
shelf/baking tray
Shelf 1: drip tray
Shelf 1: cake tin on oven rack
Shelf 3: cake tin on oven rack
Shelf 1: drip tray/baking tray
and cake tin
Shelf 1: drip tray/baking tray
Shelf 3: oven tray on oven rack/
baking tray
Shelf 1: drip tray
tray
rack
rack
rack
15
 Loading...