

KitchenAid KJA45 Owner's Manual
KJA45

2

MAXIMUM EXTRACTION JUICER INSTRUCTIONS
TABLE OF CONTENTS
MAXIMUM EXTRACTION JUICER SAFETY
Important safeguards ������������������������������������������������������������������������������������������� 4
Electrical requirements �������������������������������������������������������������������������������������� 6
Electrical equipment waste disposal �������������������������������������������������������������������� 6
PARTS AND FEATURES
Parts and accessories ������������������������������������������������������������������������������������������� 7
ASSEMBLING THE MAXIMUM EXTRACTION JUICER
Assembling the Maximum Extraction Juicer parts ����������������������������������������������� 8
OPERATING THE MAXIMUM EXTRACTION JUICER
Making juice ������������������������������������������������������������������������������������������������������� 10
TIPS FOR GREAT RESULTS
Quick tips ����������������������������������������������������������������������������������������������������������11
CARE AND CLEANING
Cleaning the Maximum Extraction Juicer ���������������������������������������������������������� 12
TROUBLESHOOTING ������������������������������������������������������������������������������������������ 14
English
3
MAXIMUM EXTRACTION JUICER SAFETY
IMPORTANT SAFEGUARDS
When using electrical appliances, basic safety precautions
should always be followed, including the following:
1. Read all instructions� Misuse of appliance may result in
personal injury�
2. The use of attachments not recommended or sold by
KitchenAid may cause re, electric shock, or injury.
3. Do not operate without the pulp container in place�
4. Always make sure Juicer lid is securely closed before
motor is turned on� Do not remove the lid while the Juicer
is in operation�
5. Do not attempt to defeat the cover interlock mechanism�
6. Be sure to turn the Juicer off and unplug it from the power
outlet when not in use, after each use, before putting on or
taking off parts, and before cleaning. Make sure the motor
stops completely before disassembling�
7. Do not open until blades and rotating sieve stops�
8. Avoid contacting moving parts�
4

9. Blades are sharp� Care should be taken when handling
the sharp cutting blades, emptying the bowl and during
cleaning�
10. Do not put your ngers or other objects into the Juicer
opening while it is in operation� If food becomes lodged
in opening, use pusher or another piece of fruit or
vegetable to push it down� Never feed by hand� Always
use the pusher. When this method is not possible, turn
the motor off and disassemble the Juicer to remove the
remaining food�
11. Do not use outdoors�
12. Children should be supervised to ensure they do not play
with the appliance� The appliance is not to be used by
children� The appliance and cord should be out of reach
of children� Children shall not clean or perform user
maintenance on the appliance without supervision�
13. This appliance is not intended for use by persons with
reduced physical sensory or mental capabilities, or lack of
experience and knowledge, unless they have been given
supervision or instructions concerning use of the appliance
in a safe way and understand the hazards involved�
14. Do not operate the appliance if the sieve or rotating parts
are damaged� Return appliance to the nearest Authorized
Service Facility for examination, repair, or electrical or
mechanical adjustment�
15. Do not operate the appliance if the cord or plug is
damaged, after the appliance malfunctions, or is dropped
or damaged in any manner� Return appliance to the nearest
Authorized Service Facility for examination, repair,
or electrical or mechanical adjustment�
16. To protect against risk of electrical shock, do not immerse
Juicer body in water or other liquids�
17. To prevent damage to gear assembly, do not immerse
Juicer body in water or other liquids�
18. Do not let the cord hang over the edge of table or counter�
English
5
MAXIMUM EXTRACTION JUICER SAFETY
19. This appliance is intended to be used in household and
similar applications such as:
- staff kitchen areas in shops, ofces or other working
environments;
- farm houses;
- by clients in hotels, motels and other residential type
environments;
- bed and breakfast type environments�
SAVE THESE INSTRUCTIONS
Electrical requirements
Volts: 220-240 VAC
Hertz: 50 Hz
Wattage: 230W
NOTE: If the plug does not fit in the
outlet, contact a qualified electrician. Do
not modify the plug in any way� Do not use
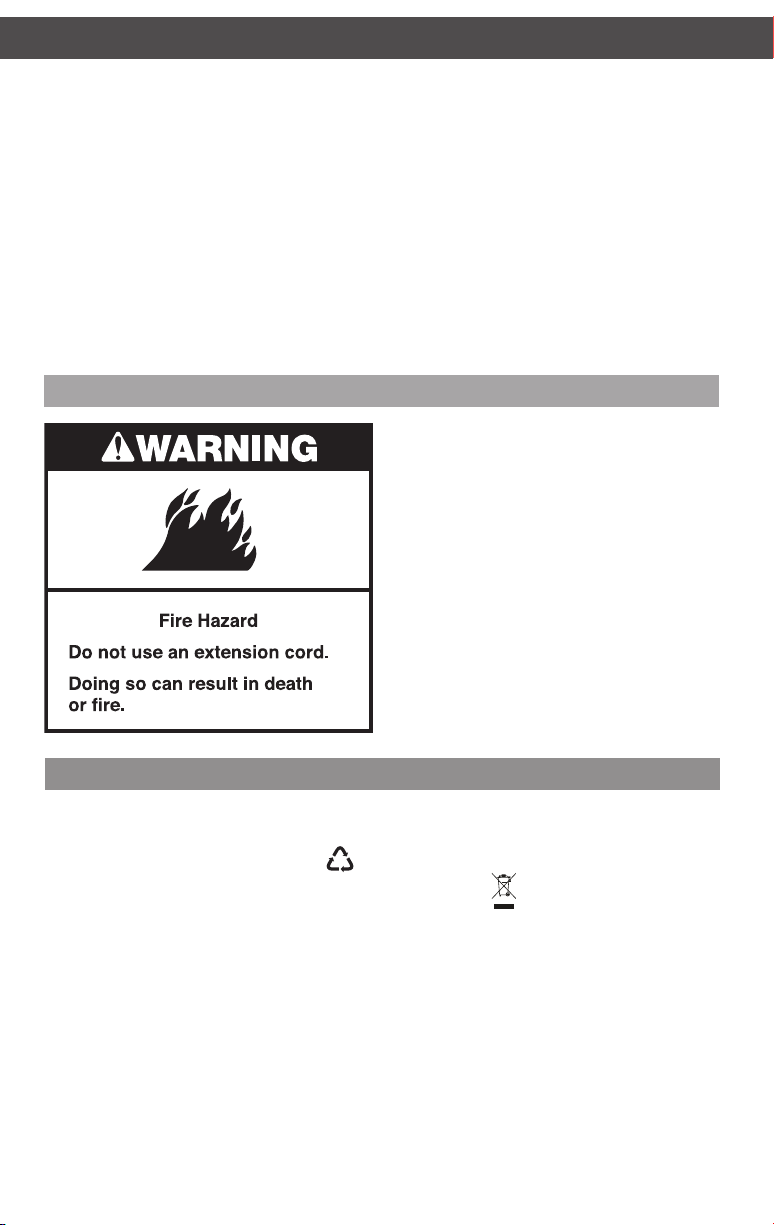
an adapter�
Do not use an extension cord� If the power
supply cord is too short, have a qualified
electrician or serviceman install an outlet
near the appliance�
Your appliance is Insulation Class type I,
which provides a grounding conductor in
the power cord�
Electrical equipment waste disposal
Disposal of packing material
The packing material is 100% recyclable
and is marked with the recycle symbol �
The various parts of the packing must
therefore be disposed of responsibly
and in full compliance with local authority
regulations governing waste disposal�
Scrapping the product
- This appliance is marked in compliance
with European Directive 2012/19/EU, Waste
Electrical and Electronic Equipment (WEEE)�
- By ensuring this product is disposed of
correctly, you will help prevent potential
negative consequences for the environment
6
and human health, which could otherwise
be caused by inappropriate waste handling
of this product�
- The symbol
accompanying documentation indicates
that it should not be treated as domestic
waste but must be taken to an appropriate
collection center for the recycling of
electrical and electronic equipment�
For more detailed information about
treatment, recovery and recycling of this
product, please contact your local city ofce,
your household waste disposal service or the
shop where you purchased the product�
on the product or on the
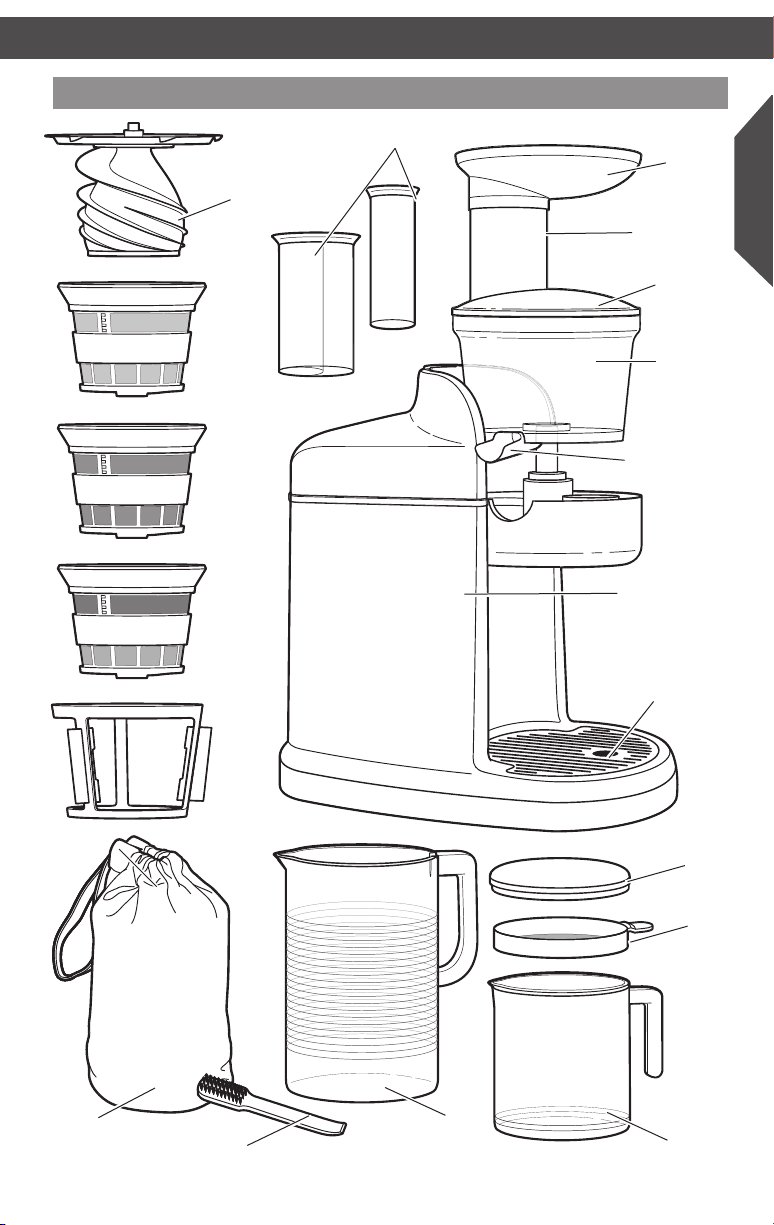
Parts and accessories
Low pulp screen
High pulp screen
Sauce screen
Screen wiper basket
Auger/blade
assembly
2-in-1 food pusher
Hopper
Feed chute
Juicer lid
Juicing
bowl
Pulp chute
Main Juicer
body
Removable
drip tray grate
and drip tray
basin
English
Screen storage bag
Cleaning brush
(for screens)
Pulp container
Juice
container lid
Foam
screen
Juice container
7
ASSEMBLING THE MAXIMUM EXTRACTION JUICER
Assembling the Maximum Extraction Juicer parts
Before First Use
Before using your Maximum Extraction Juicer for the first time, the Main Juicer body should be
wiped clean with a damp cloth� All other parts should be washed by hand or in the top rack of
the dishwasher� See “Care and Cleaning” section�
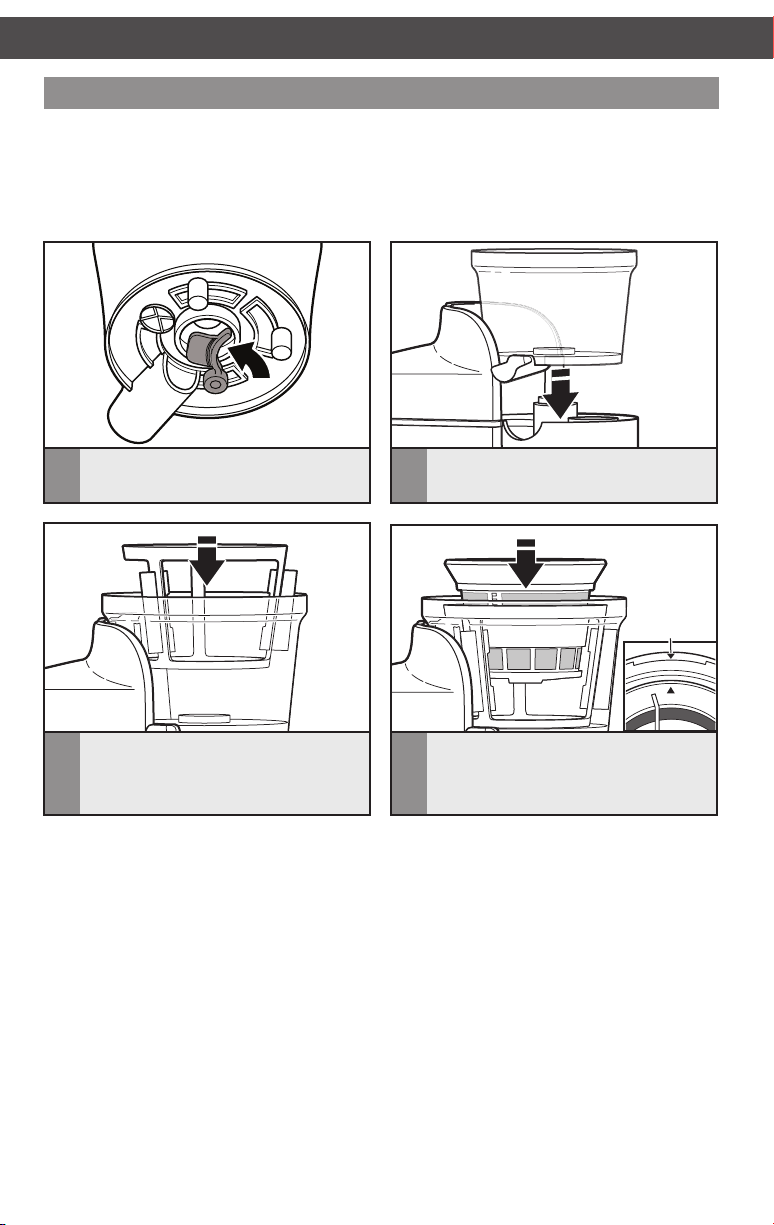
Slide the gasket into place behind
1
the pulp chute�
Put the screen wiper basket into the
3
bowl�
Place the bowl into the juicer body�
2
Place the screen of your choice into
4
the screen wiper basket so that the
alignment mark matches up with the
mark on the bowl�
Alignment
marks
8

English
Place the auger/blade assembly inside
5
the screen�
Place hopper on top of feed chute�
7
Insert food pusher in feed chute�
Place the lid on the juicer, aligning the
6
unlocked icon on the lid with the red
arrow on the juicing bowl� Rotate lid
clockwise until lid locks into place�
Place juice container under juice bowl,
8
and pulp container beneath pulp chute�
9
OPERATING THE MAXIMUM EXTRACTION JUICER
Making juice
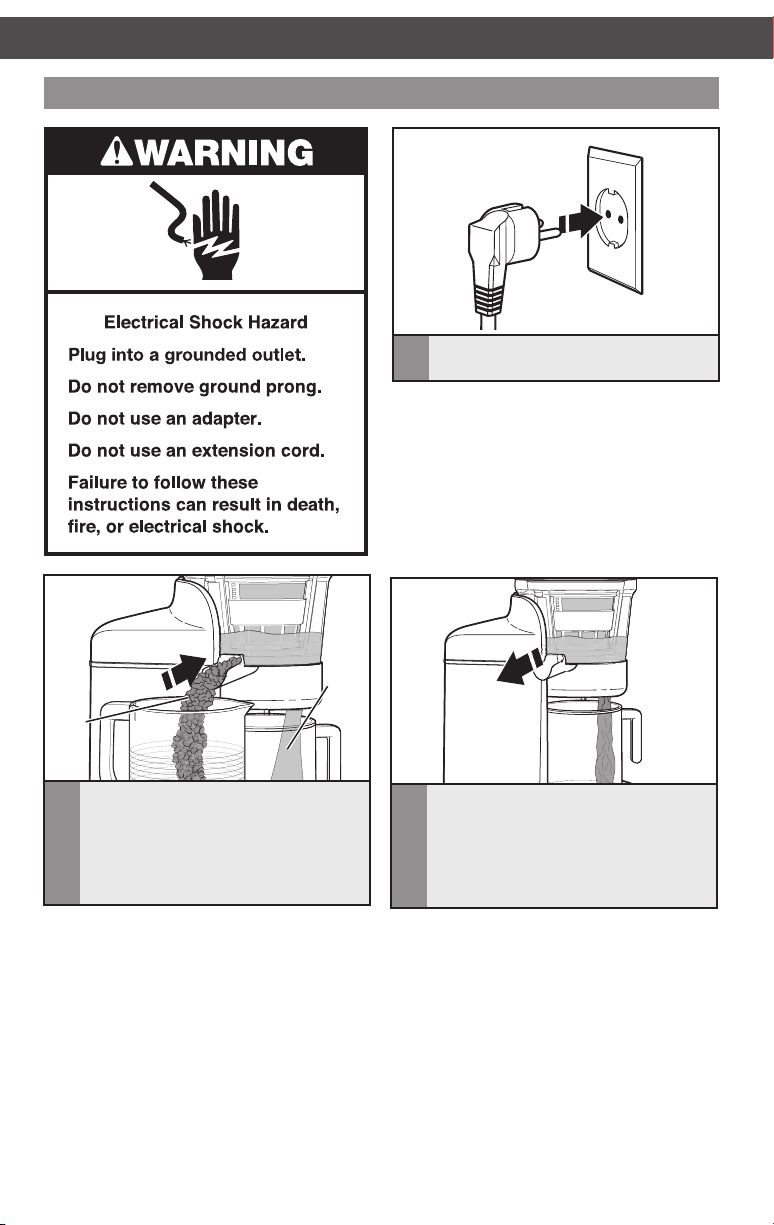
Plug into a grounded outlet�
1
BEFORE JUICING: Large seeds or pits
need to be removed prior to juicing to
avoid damage to the auger or screens� This
includes fruits such as; nectarines, peaches,
mangoes, apricots, plums, cherries, etc.
Pulp
To make juice, the pulp chute should
2
always be pushed in; this is the open
positon. When the pulp chute is open,
pulp created while juicing will flow
through the pulp chute, separating it
from the juice�
10
Juice
To make sauces, make sure the rubber
3
gasket is in place, and sauce screen is
installed� Pull the pulp chute out; this
is the closed position� When the pulp
chute is closed, the juice and fiber exit
through the juice chute as a sauce�
 Loading...