

KitchenAid KIDS42, KIDS36 User Manual

8564766
8564766
8564766
®
HOME APPLIANCES
INSTALLATION INSTRUCTIONS
BRIVA™DISHWASHER
INSTRUCCIONES DE INSTALACIÓN
LAVAVAJILLAS BRIVA
™
INSTRUCTIONS D’INSTALLATION
LAVE-VAISSELLE BRIVA
™
KIDS42
KIDS36
2
DISHWASHER SAFETY
TABLE OF CONTENTS
DISHWASHER SAFETY . . . . . . . . . . . . . . . . . . . . . . . . . . . . . . .2
INSTALLATION REQUIREMENTS . . . . . . . . . . . . . . . . . . . . . . .3
Tools and Parts . . . . . . . . . . . . . . . . . . . . . . . . . . . . . . . . . . . . .2
Location Requirements . . . . . . . . . . . . . . . . . . . . . . . . . . . .3
Drain Requirements . . . . . . . . . . . . . . . . . . . . . . . . . . . . . . .6
Water SupplyRequirements . . . . . . . . . . . . . . . . . . . . . . . . .6
Electrical Requirements . . . . . . . . . . . . . . . . . . . . . . . . . . . .6
INSTALLATION INSTRUCTIONS . . . . . . . . . . . . . . . . . . . . . . . .7
Prepare Dishwasher . . . . . . . . . . . . . . . . . . . . . . . . . . . . . . .7
Install Dishwasher . . . . . . . . . . . . . . . . . . . . . . . . . . . . . . . .7
Make Electrical Connection . . . . . . . . . . . . . . . . . . . . . . . . .7
Connect Water Supply . . . . . . . . . . . . . . . . . . . . . . . . . . . . .9
Complete Installation . . . . . . . . . . . . . . . . . . . . . . . . . . . . . .9
You can be killed or seriously injured if you don't immediately
You
can be killed or seriously injured if you don't
follow
All safety messages will tell you what the potential hazard is, tell you how to reduce the chance of injury, and tell you what can
happen if the instructions are not followed.
Your safety and the safety of others are very important.
We have provided many important safety messages in this manual and on your appliance. Always read and obey all safety
messages.
This is the safety alert symbol.
This symbol alerts you to potential hazards that can kill or hurt you and others.
All safety messages will follow the safety alert symbol and either the word “DANGER” or “WARNING.”
These words mean:
follow instructions.
instructions.
DANGER
WARNING
■ This dishwasher is manufactured for indoor use only.
■ Observe all governing codes and ordinances.
■ Install this dishwasher as specified in these instructions.
■ Installation should be performed by a qualified service
technician. The dishwasher must be installed to meet all
electrical and plumbing national and local codes and
ordinances.

3
Tools and Parts
Gather the required tools and parts before starting installation.
Read and follow the safety instructions provided with any tools
listed here. Additional tools may be required to cut contertop and
install drain lines.
Tools needed:
■ Utility knife
■ 5/8" open-end wrench
■ 7/16" deep well socket
■ small tubing cutter
■ tape measure
■ flat bladed screwdriver
■ plumber’s putty
■ 10" adjustable wrench that opens to 1-1/8" (2.9 cm)
■ Teflon
®
tape or pipe joint compound
■ 1 cartridge silicone caulk and caulk gun
■ sink strainer locknut wrench
Parts needed:
■ Copper tubing with compression fitting for water fill line (3/8"
is recommended). Length needed is determined by specific
installation requirements.
■ Copper tubing with compression fittings for faucet connection.
Length and diameter needed are determined by specific
faucet installation requirements.
■ faucet
■ 2, 1-1/2" drain P traps
■ 3-1/2" sink strainer
■ 90° elbow with 3/8" N.P.T. external threads on one end.
(The other end must fit your water supply line.)
In addition, if direct wiring:
■ 1/4" hex nut driver
■ 2, twist-on connectors of proper size to connect house wiring
to 16-gauge dishwasher wiring.
■ CSA-certified, U.L.- or C.-U.L. listed conduit connector to fit
7/8" (2.2 cm) hole
Parts supplied:
■ Undercounter clamp brackets – adjustable for countertops
3/4" (1.9 cm) to 1-1/2" (3.8 cm) thick
■ cutting board
INSTALLATION REQUIREMENTS
Location Requirements
Protect dishwasher and water lines leading to dishwasher against
freezing. Damage from freezing is not covered by the warranty.
If dishwasher will be left unused for a period of time or in a
location where it may be subject to freezing, have it winterized by
authorized service personnel.
The dishwasher is shipped ready for installation of a one-hole
faucet. If a two-, three-, or four-hole faucet is to be installed, the
holes must be added by a qualified plumber, according to the
faucet manufacturer’s specifications.
If the hot water accessory tank, Part No. 4396282 will be used,
the tank should be installed first. It may be difficult to install the
drain line to the T&P valve on the hot water accessory tank, if it is
not installed first.
4
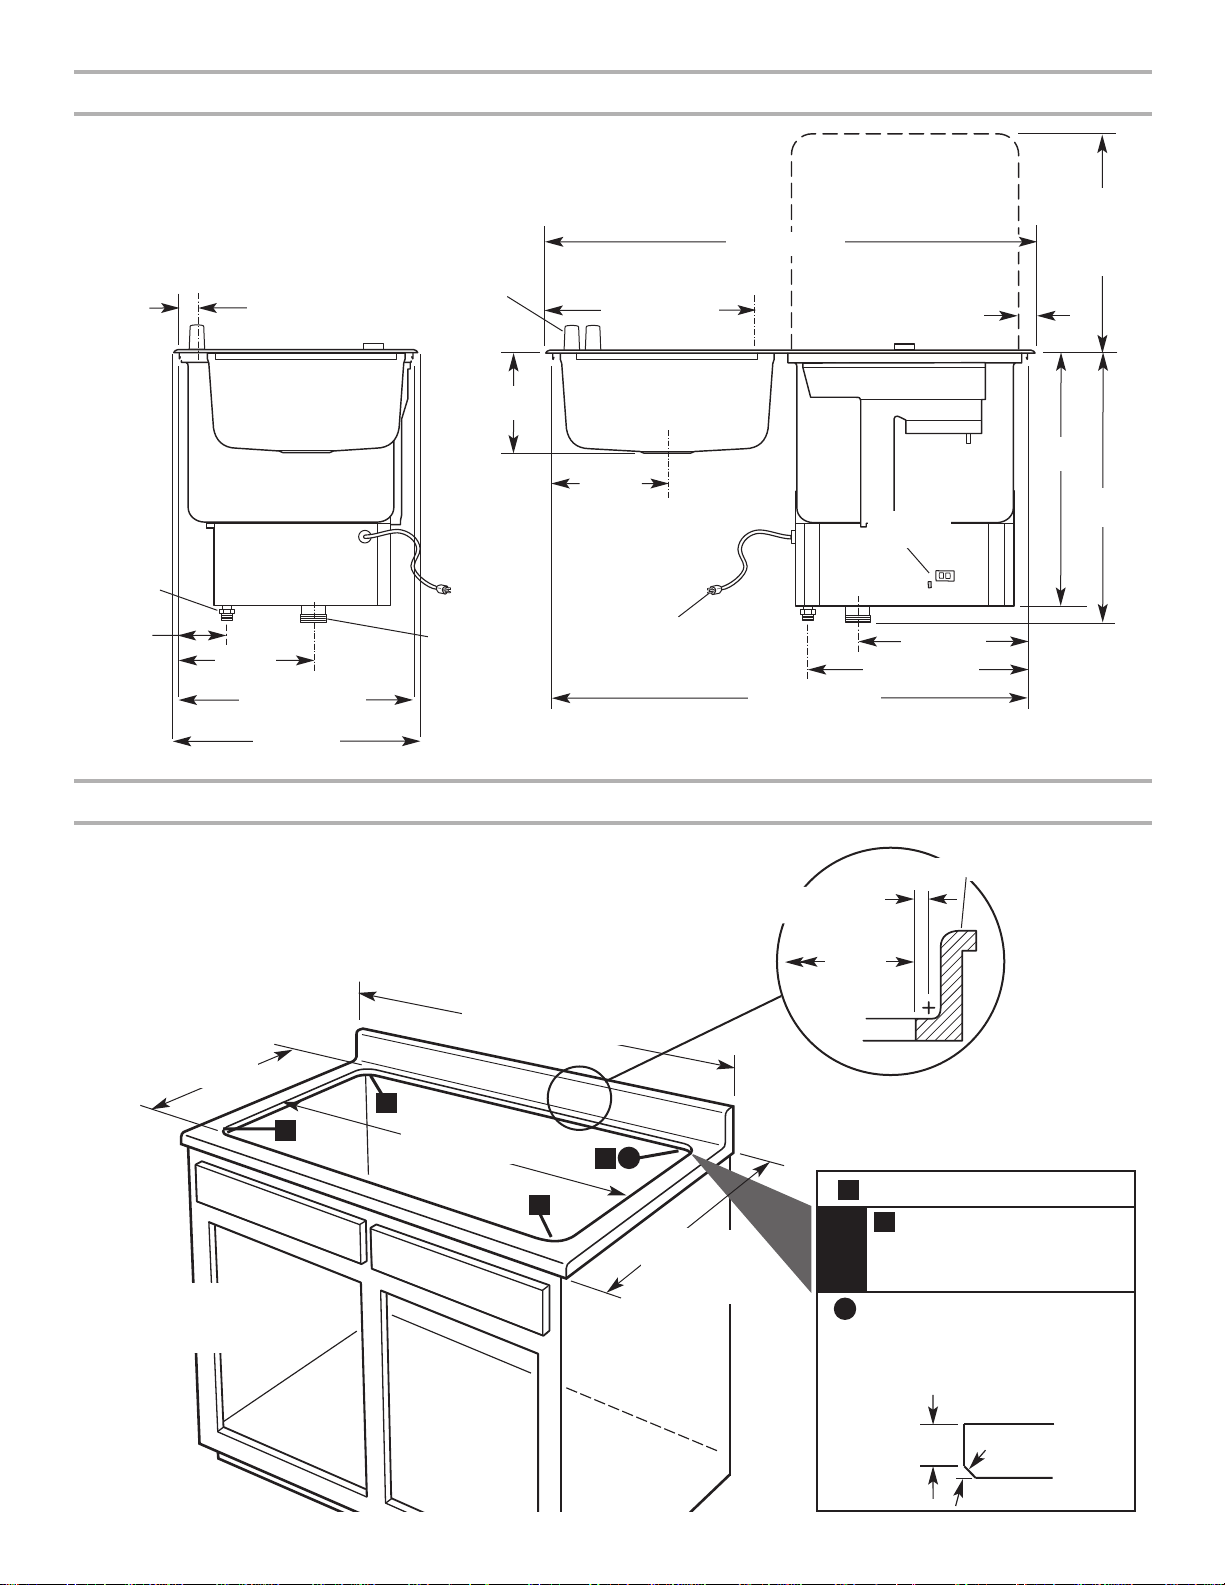
Back right corner: If countertop is
more than 3/4" (1.9 cm) thick,
measure down 3/4" (1.9 cm) and cut
45° bevel all the way around radius.
19-3/8"
(49.2 cm)
maximum
opened lid
height
20-21/32" (52.5 cm)
9-7/16"
(24.0 cm)
1-3/4" (4.4 cm)
to center of single
hole faucet
factory
installed air
gaps
dishwasher
drain
water inlet
valve
(between clamp rails)
22" (55.9 cm)
(between clamp rails)
5-25/32"
(14.7 cm)
39-11/16" (100.8 cm)
14" (35.6 cm)
18-5/16" (46.5 cm)
22-1/32"
(56.0 cm)
21"
(53.3 cm)
1-1/4"
(3.2 cm)
8"
(20.3 cm)
9-9/16"
(24.3 cm)
center of
sink drain
5-1/2 ft. (1.7 m)
3-prong ground-type
power supply cord
16-7/8" (42.9 cm)
to center of single
hole faucet
A
*NOTE: The cutout must be accurately cut to the dimensions shown within
1/16" (1.6 mm). Dishwasher top flange overlaps the countertop cutout
by 7/16" (1.1 cm) on front and back edges and 1/4" (6.4 mm) on sides.
• Cabinetry and countertop must be sturdy enough to support loaded
dishwasher and sink (400 lbs. [181.4 kg]).
IMPORTANT: Corner radius dimensions
specified must be used. If they are not,
the dishwasher will not fit the opening.
radius: 2-1/4" (5.7 cm)
C
3/4"
(1.9 cm)
45°
for base cabinet
installations, min. 42"
(106.7 cm) width required
21-1/8"
(53.7 cm)
(see *NOTE)
A
A
B
40" (101.6 cm)
(see *NOTE)
A
It is recommended that sink
water and drain line
connections be located on
this side of cabinet.
It is recommended
that dishwasher water
and drain line
connections be
located on this side
of cabinet.
C
21-1/8"
(53.7 cm)
(see *NOTE)
backsplash
CRITICAL
RADIUS
B
radius: 1" (2.5 cm) – the
right back corner must be
cut to this radius
GFCI reset
buttons
25" (63.5 cm) deep
countertop
Countertop must be
level.
SIDE FRONT
40-1/2" (102.9 cm)
7/16" (1.1 cm) min.
flat surface required
KIDS42 Product dimensions
KIDS42 Cabinet requirements
5
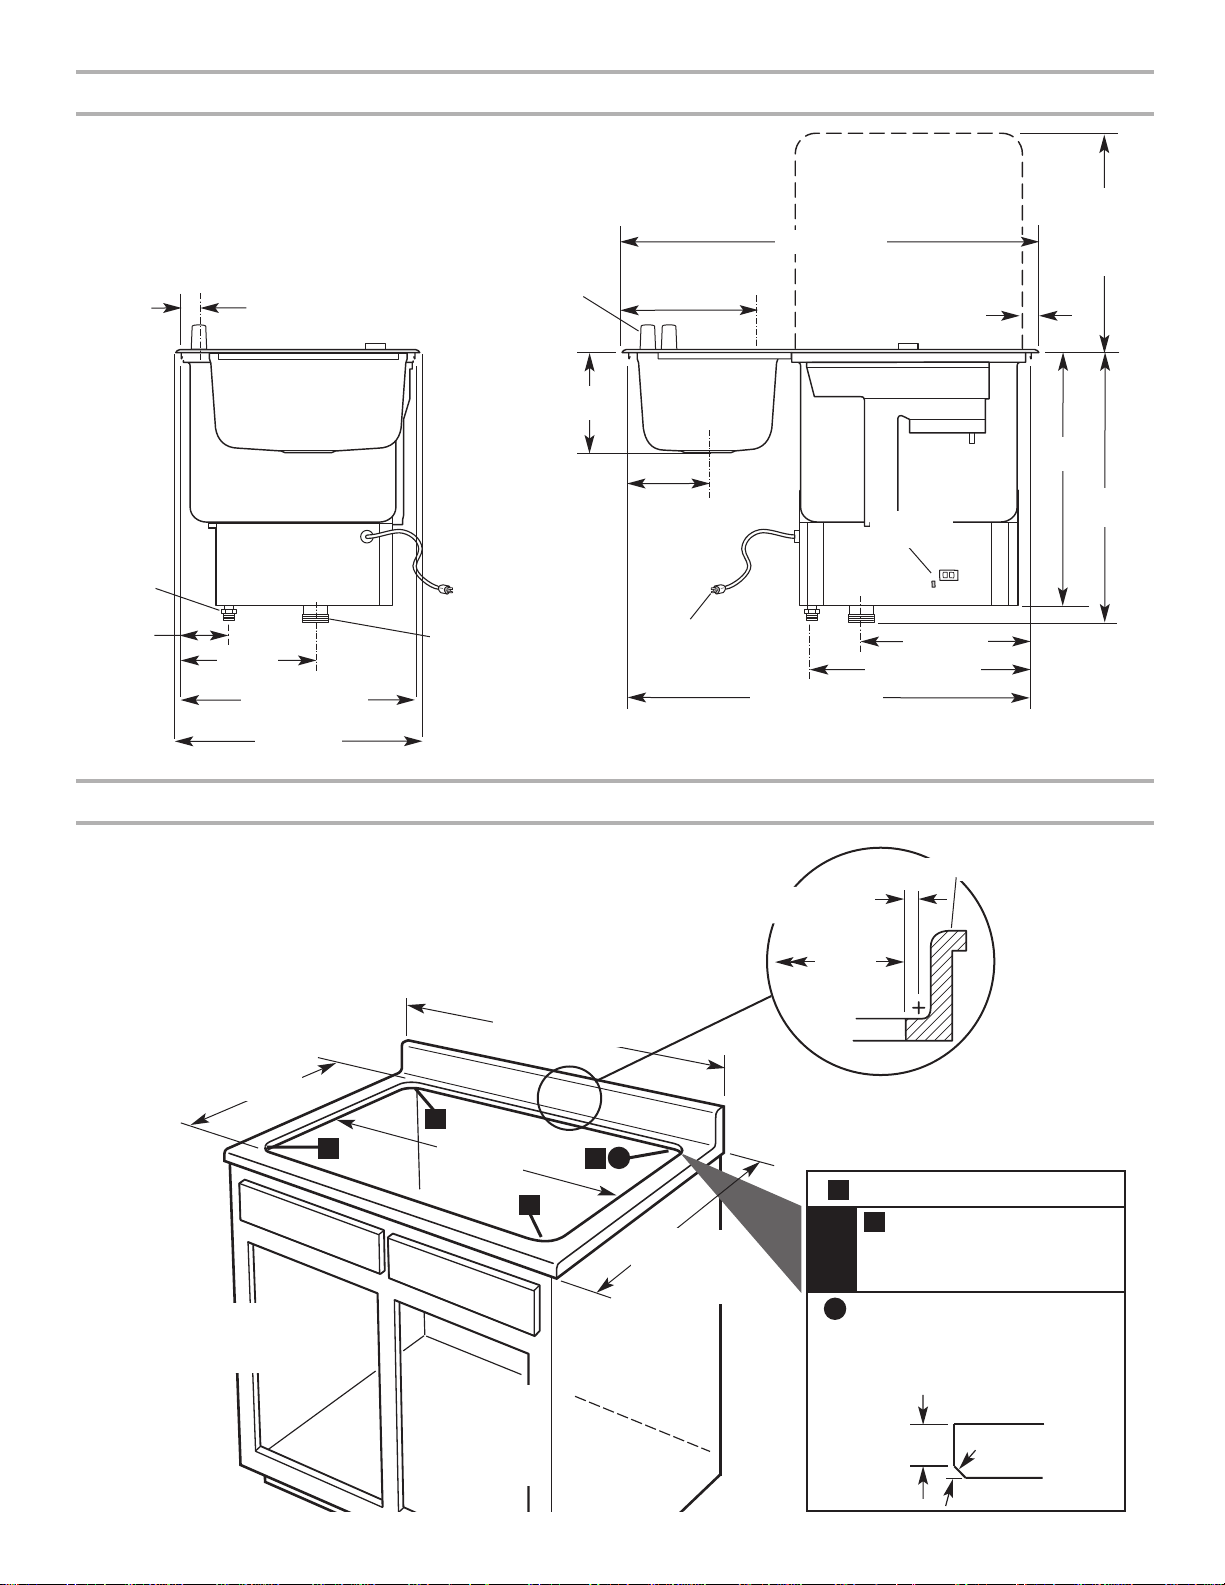
Back right corner: If countertop is
more than 3/4" (1.9 cm) thick,
measure down 3/4" (1.9 cm) and cut
45° bevel all the way around radius.
19-3/8"
(49.2 cm)
maximum
opened lid
height
20-21/32" (52.5 cm)
9-7/16"
(24.0 cm)
1-3/4" (4.4 cm)
to center of single
hole faucet
factory
installed air
gaps
dishwasher
drain
water inlet
valve
(between clamp rails)
22" (55.9 cm)
(between clamp rails)
5-25/32"
(14.7 cm)
33-11/16" (85.6 cm)
14" (35.6 cm)
18-5/16" (46.5 cm)
22-1/32"
(56.0 cm)
21"
(53.3 cm)
1-1/4"
(3.2 cm)
8"
(20.3 cm)
6-9/16"
(16.6 cm)
center of
sink drain
5-1/2 ft. (1.7 m)
3-prong ground-type
power supply cord
10-7/8" (27.5 cm)
to center of single
hole faucet
A
*NOTE: The cutout must be accurately cut to the dimensions shown within
1/16" (1.6 mm). Dishwasher top flange overlaps the countertop cutout
by 7/16" (1.1 cm) on front and back edges and 1/4" (6.4 mm) on sides.
• Cabinetry and countertop must be sturdy enough to support loaded
dishwasher and sink (400 lbs. [181.4 kg]).
IMPORTANT: Corner radius dimensions
specified must be used. If they are not,
the dishwasher will not fit the opening.
radius: 2-1/4" (5.7 cm)
C
3/4"
(1.9 cm)
45°
for base cabinet
installations, min. 36"
(91.4 cm) width required
21-1/8"
(53.7 cm)
(see *NOTE)
A
A
B
34" (86.4 cm)
(see *NOTE)
A
It is recommended that sink
water and drain line
connections be located on
this side of cabinet.
It is recommended
that dishwasher water
and drain line
connections be
located on this side
of cabinet.
C
21-1/8"
(53.7 cm)
(see *NOTE)
backsplash
CRITICAL
RADIUS
B
radius: 1" (2.5 cm) – the
right back corner must be
cut to this radius
GFCI reset
buttons
25" (63.5 cm) deep
countertop
Countertop must be
level.
SIDE FRONT
34-1/2" (87.6 cm)
7/16" (1.1 cm) min.
flat surface required
KIDS36 Product dimensions
KIDS36 Cabinet requirements
6
Drain Requirements
Separate drain P-traps for the sink and dishwasher must be
provided.
Dishwasher drain:
If the dishwasher drain exits through the back wall, the centerline
of the drain pipe must be a minimum of 1/2" (1.3 cm) below the
dishwasher drain. This is required to completely drain the
dishwasher tub so that no standing water remains in tub.
Water Supply Requirements
For dishwasher:
■ Hot water line with 20-120 psi (138-827 kPa) water pressure.
120°F (49°C) water at dishwasher.
■ Copper tubing with compression fitting. 3/8" O.D. is
recommended.
■ A 90° elbow with 3/8" N.P.T. external pipe threads on one end.
IMPORTANT: Do not solder within 6" (15.2 cm) from water inlet
valve.
For sink faucet:
■ Hot and cold water line.
■ Copper tubing with compression fittings for specific faucet to
be installed.
Electrical Requirements
■ If codes permit and a separate ground wire is used, it is
recommended that a qualified electrician determine that the
ground path is adequate.
■ Do not ground to a gas pipe.
22-1/32"
(56.0 cm)
to bottom of
dishwasher drain
1/2" (1.3 cm)
minimum
back wall
■ Check with a qualified electrician if you are not sure the
dishwasher is properly grounded.
■ Do not have a fuse in the neutral or ground circuit.
■ A 120-volt, 60 Hz, AC-only, 15 or 20 amp fused electrical
supply is required. (Circuit breaker or time-delay fuse is
recommended.) It is recommended that a separate circuit
serving only this appliance be provided.
Hot Water Accessory Tank
If you plan to install the Hot Water Accessory Tank Part
No. 4396282, an additional separate120-volt, 60 Hz, AC-only, 15
or 20 amp fused electrical supply is required.
Garbage Disposer
If you plan to install a garbage disposer, an additional separate
120-volt, 60 Hz, AC-only, 15 or 20 amp fused electrical supply is
required.
Recommended ground method
For your personal safety, this appliance must be grounded. This
appliance is equipped with a power supply cord having a 3 prong
ground plug. To minimize possible shock hazard, the cord must
be plugged into a mating 3 prong ground-type outlet, grounded in
accordance with local codes and ordinances.
If a mating outlet is not available, it is the personal responsibility
and obligation of the customer to have a properly grounded
3 prong outlet installed by a qualified electrician.
If dishwasher must be direct wired
■ Use flexible, armored or non-metallic sheathed, copper wire
with grounding wire that meets the wiring requirements for
your home and local codes and ordinances.
■ Use a CSA-certified, U.L.- or C-U.L.-listed conduit connector
or if using non-metallic sheathed, copper wire, a CSAcertified, U.L.- or C-U.L.-listed cable clamp connector.
WARNING
WARNING
Electrical Shock Hazard
Electrically ground dishwasher.
Connect ground wire to green ground connector in
terminal box.
Do not use an extension cord.
Failure to follow these instructions can result in death,
fire, or electrical shock.
Electrical Shock Hazard
Plug into a grounded 3 prong outlet.
Do not remove ground prong.
Do not use an adapter.
Do not use an extension cord.
Failure to follow these instructions can result in death,
fire, or electrical shock.
7
INSTALLATION INSTRUCTIONS
Prepare Dishwasher
IMPORTANT: If hot water accessory tank (accessory Part
No. 4396282) will be used, the tank must be installed first.
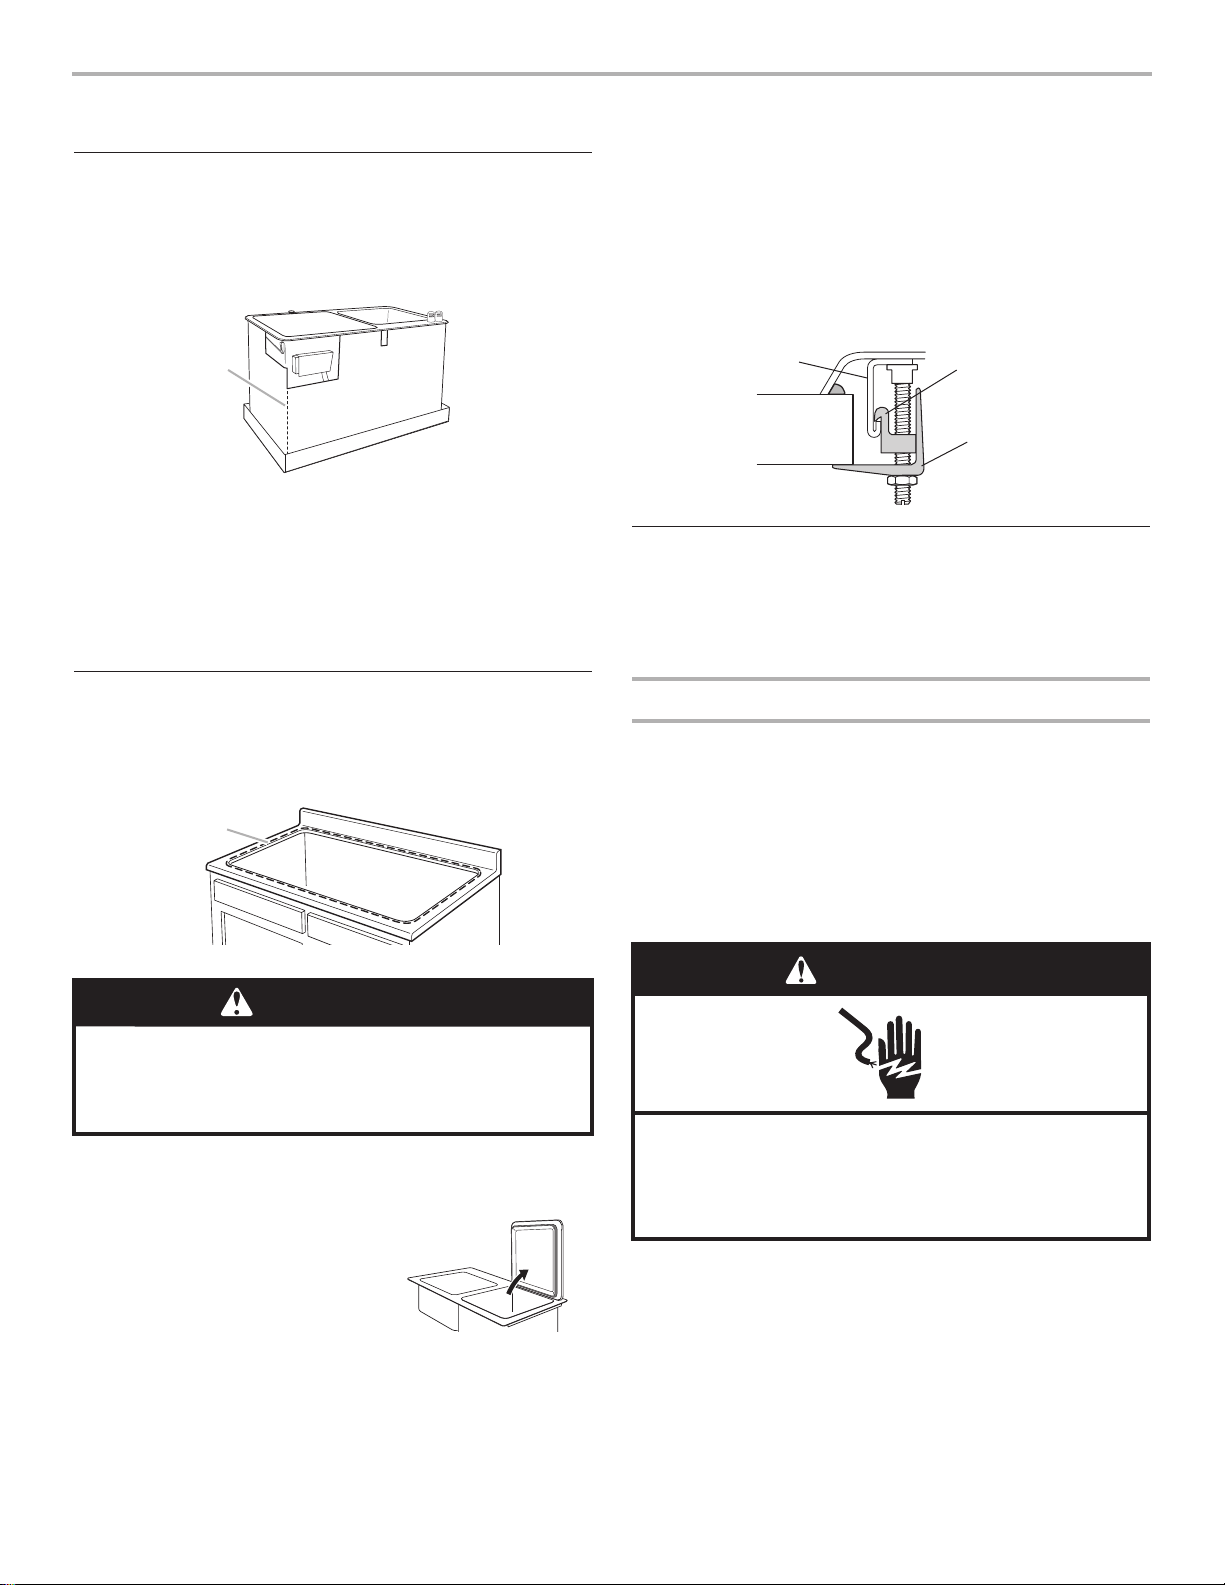
1. With a utility knife, cut along the back right corner of inner
carton.
2. Remove inner carton. Leave dishwasher on bottom pad.
3. Install faucet (not included). The dishwasher is shipped ready
for installation of a one-hole faucet. If a two-, three- or fourhole faucet is to be installed, the holes must be added by a
qualified plumber according to the faucet manufacturer's
specifications.
Install Dishwasher
1. Mark countertop and apply a 1/4" (6.4 mm) bead of silicone
caulk 1/4" (6.4 mm) away from dishwasher cutout on sides
and 7/16" (1.1 cm) on front and back.
2. Set the dishwasher into countertop cutout. Make sure front of
dishwasher is parallel to front edge of countertop.
IMPORTANT: To prevent damage to
right-hand hinge, open dishwasher lid
before setting dishwasher into
countertop cutout.
3. Immediately remove any excess caulking.
back of
inner carton
cut along
this corner
1/4" (6.4 mm)
bead of silicone
caulk
dishwasher
cutout
WARNING
Excessive Weight Hazard
Use two or more people to move and install dishwasher.
Failure to do so can result in back or other injury.
4. Install two clamp brackets, evenly spaced, on front, back and
left (sink) side clamp rails. Optional: If space permits, install
two clamp brackets, evenly spaced, on the right side rail.
To install clamps:
■ Hook upper clamp onto rail. Use flat-blade screwdriver to
attach clamp to rail.
■ Use 7/16" deep-well socket and securely tighten nut
against lower clamp. Do not overtighten.
Make Electrical Connection
If you are:
■ direct wiring, use Option 1
■ using a power supply cord, use Option 2
Option 1, Direct wired method
If dishwasher must be directly wired to meet local codes, the
power supply cord must be removed and dishwasher wired
directly. Electrical connections must be contained within the
terminal box and meet all national and local codes and
ordinances.
Route direct wire so that it does not touch lower part of
dishwasher tub to prevent undue sound and vibration.
If power supply cord is removed, the dishwasher must be
connected with copper wire only.
1. Disconnect power.
rail
upper clamp
lower clamp
countertop
WARNING
Electrical Shock Hazard
Disconnect electrical power at the fuse box or circuit
breaker box before installing dishwasher.
Failure to do so can result in death or electrical shock.
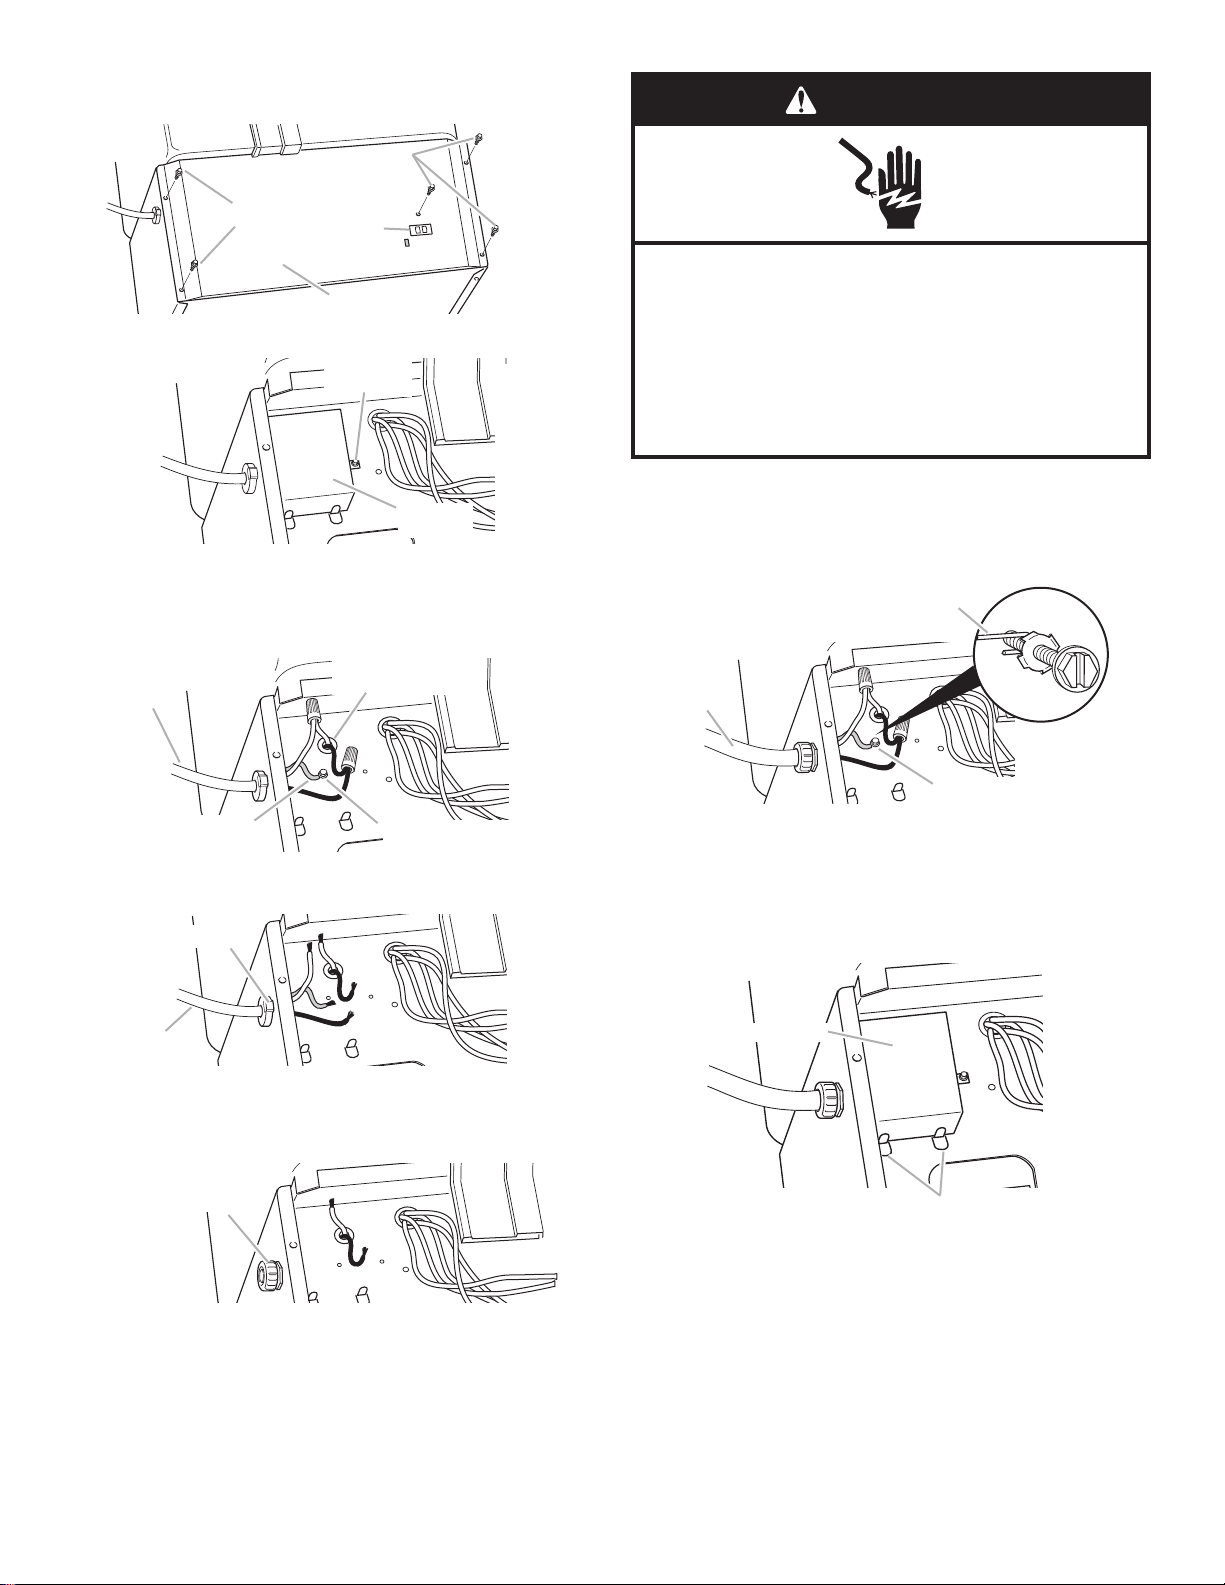
10. Route direct wire through conduit and connect wires as
follows:
■ Form ground wire into a hook and wrap clockwise around
ground screw under washer. Tighten ground screw
securely.
■ Use twist-on connectors of proper size to connect direct
wire to 16-gauge wire dishwasher wiring. Connect black
wires together and white wires together.
11. Reinstall terminal box.
IMPORTANT: The tabs must be under the terminal box as
shown.
8
2. Remove 5 screws (2 each side and above GFCI) holding the
metal front panel and remove panel.
3. Remove terminal box screw and terminal box.
4. Remove power cord green ground wire from under green
ground screw.
5. Remove twist-on connectors and disconnect black and white
wires. Do not reuse connectors.
6. Use pliers and squeeze locking tab in the power cord strain
relief grommet.
7. Remove power cord and grommet.
8. Install a CSA-certified, U.L.- or C-U.L.-listed conduit
connector in power cord hole.
9. Install conduit.
screws
screws
GFCI
front panel
green ground wire
do not remove this
grommet
power cord
conduit
connector
terminal box
screw
terminal
box
green ground screw
power cord
locking tab
green ground
screw
ground wire
direct wire
tabs
terminal box
WARNING
Electrical Shock Hazard
Electrically ground dishwasher.
Connect ground wire to green ground connector in
terminal box.
Do not use an extension cord.
Failure to follow these instructions can result in death,
fire, or electrical shock.
Complete Installation
Power supply cord method
Direct wire method
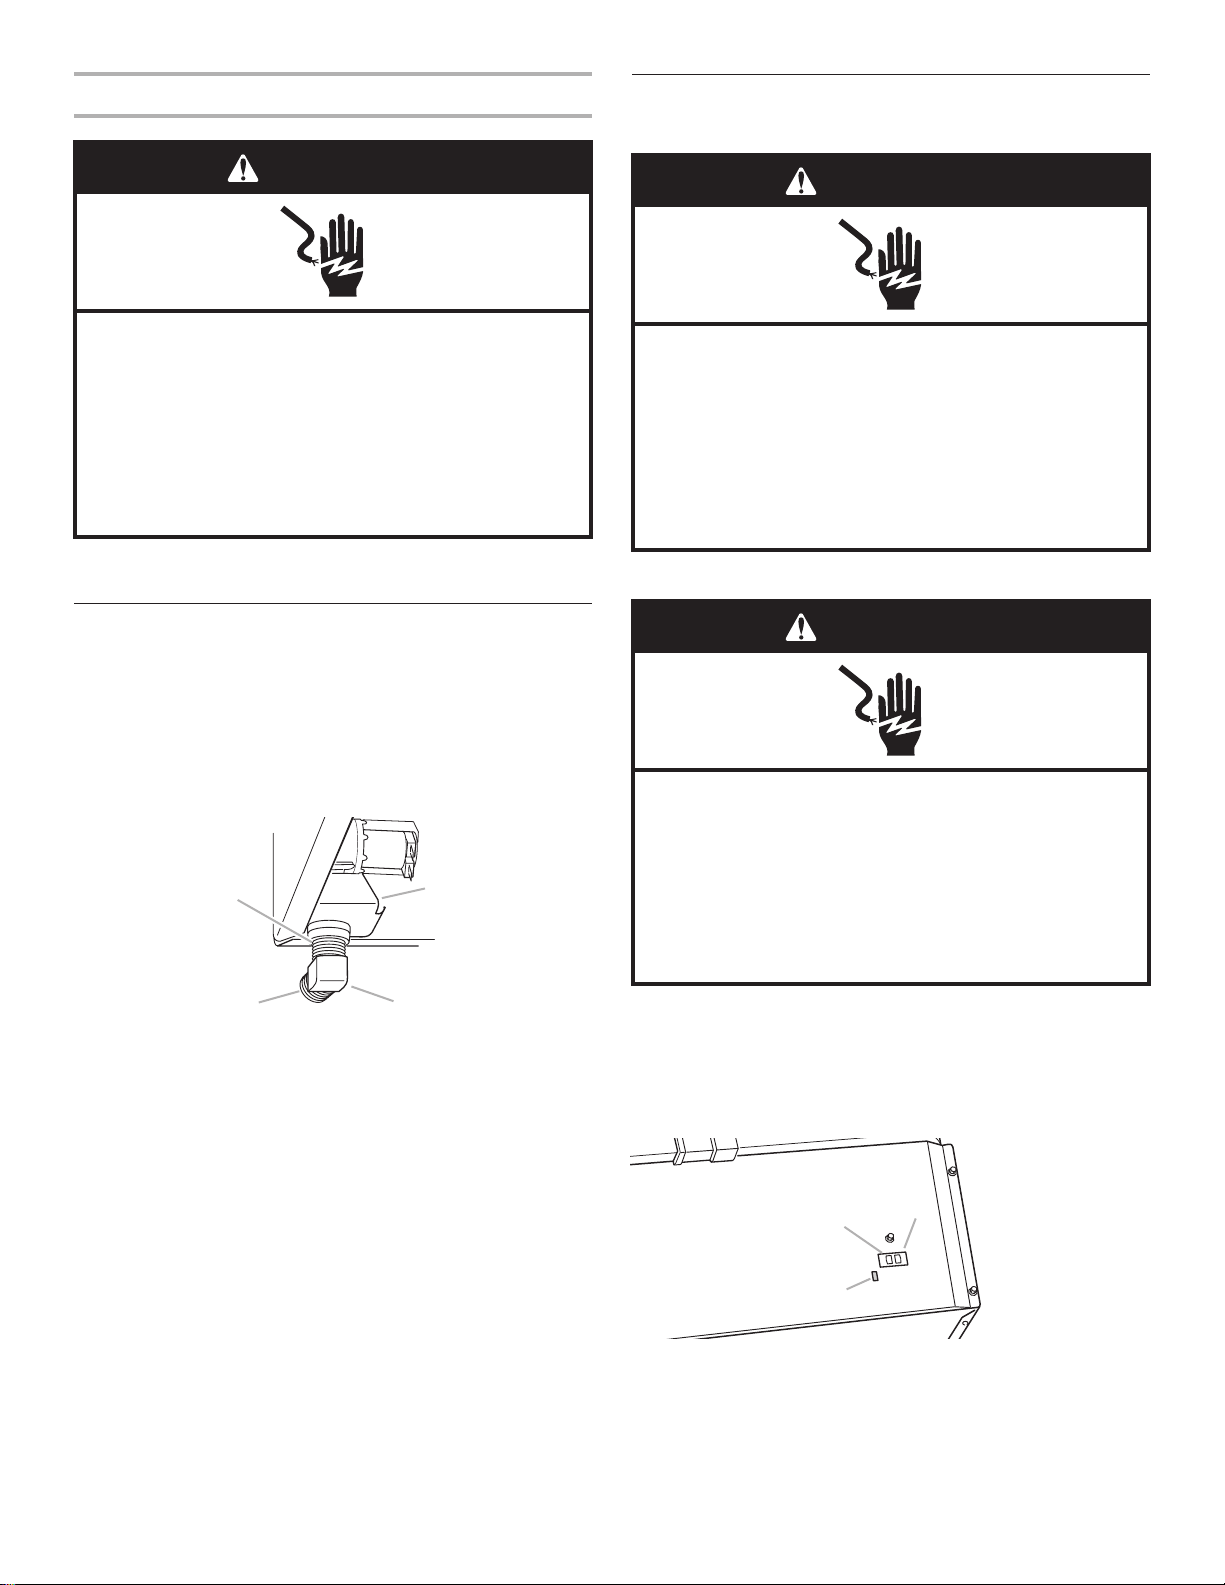
1. Plug in dishwasher or reconnect power.
IMPORTANT: The following steps must be done before using
the dishwasher, to test and activate the GFCI.
2. Press the reset button on the GFCI. The indicator should be
visible.
3. Press the test button on the GFCI. The indicator should
disappear.
4. Press the reset button. The indicator should reappear.
If the GFCI fails this test, do not use the dishwasher. Call
the KitchenAid Customer Interaction Center toll-free at
1-800-422-1230 or in Canada, 1-800-461-5681, for
assistance.
reset
test
indicator
9
Option 2, Power supply cord method
1. Plug into a grounded 3 prong outlet.
Connect Water Supply
1. Apply Teflon®tape or pipe joint compound to 90° elbow fitting
and connect fitting to water inlet valve.
2. Use adjustable wrench and tighten elbow until snug and
facing the direction needed for your water fill line installation.
IMPORTANT: If you are installing the Hot Water Accessory
Tank, go back to its Installation Instructions and complete that
installation at this time.
3. Connect the dishwasher water fill line.
a. Slide nut onto copper tubing about 1" (2.5 cm).
b. Slide ferrule onto the tubing. Do not position ferrule on the
end of the tubing.
c. Put the tubing into the elbow as far as it will go.
d. Slide the nut and ferrule forward and start the nut onto the
elbow threads. Be gentle when handling and positioning
the copper tubing, it bends and kinks easily.
e. With copper tubing pushed into elbow as far as it will go,
use a 5/8" open-end wrench and tighten the compression
nut securely.
4. Connect hot and cold water lines to faucet.
5. Connect the sink and dishwasher drain plumbing.
6. Turn water supply on to both dishwasher and sink faucet.
Check for leaks.
water fill line
connection
do not apply Teflon®tape
or pipe joint compound
apply Teflon®tape or
pipe joint compound
water inlet
valve
WARNING
Electrical Shock Hazard
Plug into a grounded 3 prong outlet.
Do not remove ground prong.
Do not use an adapter.
Do not use an extension cord.
Failure to follow these instructions can result in death,
fire, or electrical shock.
WARNING
Electrical Shock Hazard
Plug into a grounded 3 prong outlet.
Do not remove ground prong.
Do not use an adapter.
Do not use an extension cord.
Failure to follow these instructions can result in death,
fire, or electrical shock.
WARNING
Electrical Shock Hazard
Electrically ground dishwasher.
Connect ground wire to green ground connector in
terminal box.
Do not use an extension cord.
Failure to follow these instructions can result in death,
fire, or electrical shock.

8564766
® Registered Trademark/™ Trademark of KitchenAid, U.S.A.; KitchenAid Canada Licensee in Canada.
® Teflon is a registered trademark of E.I. Du Pont de Nemours and Company.
© 2004 All rights reserved.
Printed in U.S.A.
09/2004
Check operation
1. Refer to the Use and Care Guide that came with this
dishwasher and run the dishwasher through a complete cycle.
2. If Hot Water Accessory Tank is installed, wait about 45
minutes before starting the next dishwasher cycle to allow the
hot water tank to finish heating. (Refer to the Installation
Instructions and Use and Care Guide supplied with the Hot
Water Accessory Tank.)
3. When the hot water tank is first heated, it is normal for a small
amount of water to be discharged into the dishwasher.
4. Check for leaks.
 Loading...