

KITCHENAID KIDS01EK User Manual

BRIVA™ IN-SINK DISHWASHER
(For Residential Use Only)
Use & Care Guide
For questions about features, operation/performance, parts accessories or service, call:
or visit our website at...
www.kitchenaid.com
Table of Contents............................................................................................................2
1-800-422-1230
Model KIDS01EK
8529407

TABLE OF CONTENTS
DISHWASHER SAFETY.............................................................. 3
Before Using Your Dishwasher....................................................4
PARTS AND FEATURES ............................................................ 5
START-UP GUIDE ..........................................................................6
Using Your New Dishwasher .......................................................6
Using Your New Dishwasher As a Sink.......................................7
DISHWASHER LOADING...............................................................7
Loading Suggestions ...................................................................7
Loading Rack ...............................................................................7
Loading Silverware Basket ..........................................................9
DISHWASHER USE........................................................................9
Detergent Use ..............................................................................9
Rinse Aid Dispenser...................................................................10
Dishwasher Performance Tips...................................................10
Cycle Selection Charts...............................................................11
Canceling a Cycle ......................................................................11
Changing a Cycle or Setting ......................................................12
Adding Items During a Cycle .....................................................12
Option Selections.......................................................................12
Status Indicators ........................................................................13
BRIVA™ In-Sink Wash System..................................................13
Drying System............................................................................14
WASHING SPECIAL ITEMS.........................................................14
DISHWASHER CARE ...................................................................15
Cleaning......................................................................................15
Drain Air Gap..............................................................................16
Storing........................................................................................16
TROUBLESHOOTING ..................................................................16
ASSISTANCE OR SERVICE.........................................................18
WARRANTY .............................................................................. 20
2
DISHWASHER SAFETY
Your safety and the safety of others are very important.
We have provided many important safety messages in this manual and on your appliance. Always read and obey all
safety messages.
This is the safety alert symbol.
This symbol alerts you to potential hazards that can kill or hurt you and others.
All safety messages will follow the safety alert symbol and either the word “DANGER” or
“WARNING.” These words mean:
You can be killed or seriously injured if you don't
immediately follow instructions.
can be killed or seriously injured if you don't
You
follow instructions.
All safety messages will tell you what the potential hazard is, tell you how to reduce the chance of injury, and tell you
what can
happen if the instructions are not followed.
3

Before Using Your Dishwasher
WARNING
Electrical Shock Hazard
Plug into a grounded 3 prong outlet.
Do not remove ground prong.
Do not use an adapter.
Do not use an extension cord.
Failure to follow these instructions can result in
death, fire, or electrical shock.
■
Install where dishwasher is protected from the elements.
Protect against freezing to avoid possible rupture of fill valve.
Such ruptures are not covered by the warranty. See “Storing”
in the “Dishwasher Care” section for winter storage
information.
■
Install and level dishwasher in a cabinet countertop that will
hold the weight, and in an area suitable for its size and use.
■
Remove all shipping plugs from hoses and connectors (such
as the cap on the drain outlet) before installing. See
Installation Instructions for complete information.
■
This product is provided with a Ground Fault Circuit
Interrupter (GFCI) located on the front base of the dishwasher
inside the cabinet. A GFCI is designed to protect you against
the dangers of line to ground electrical faults. If the
applicance develops a fault of this type, the GFCI is designed
to disconnect the power to the appliance. This is a built-in
safety feature. The GFCI should be tested once a month.
RESET TEST
Once a month test procedure:
1.
Press TEST button. Indicator should be Off (no indicator
visible in window).
2.
Press RESET. Indicator should be On (indicator visible in
window).
NOTE:
If the GFCI fails this test, do not use the dishwasher.
Call the Customer Interaction Center for service. (See
“Assistance or Service” section of this manual.)
4
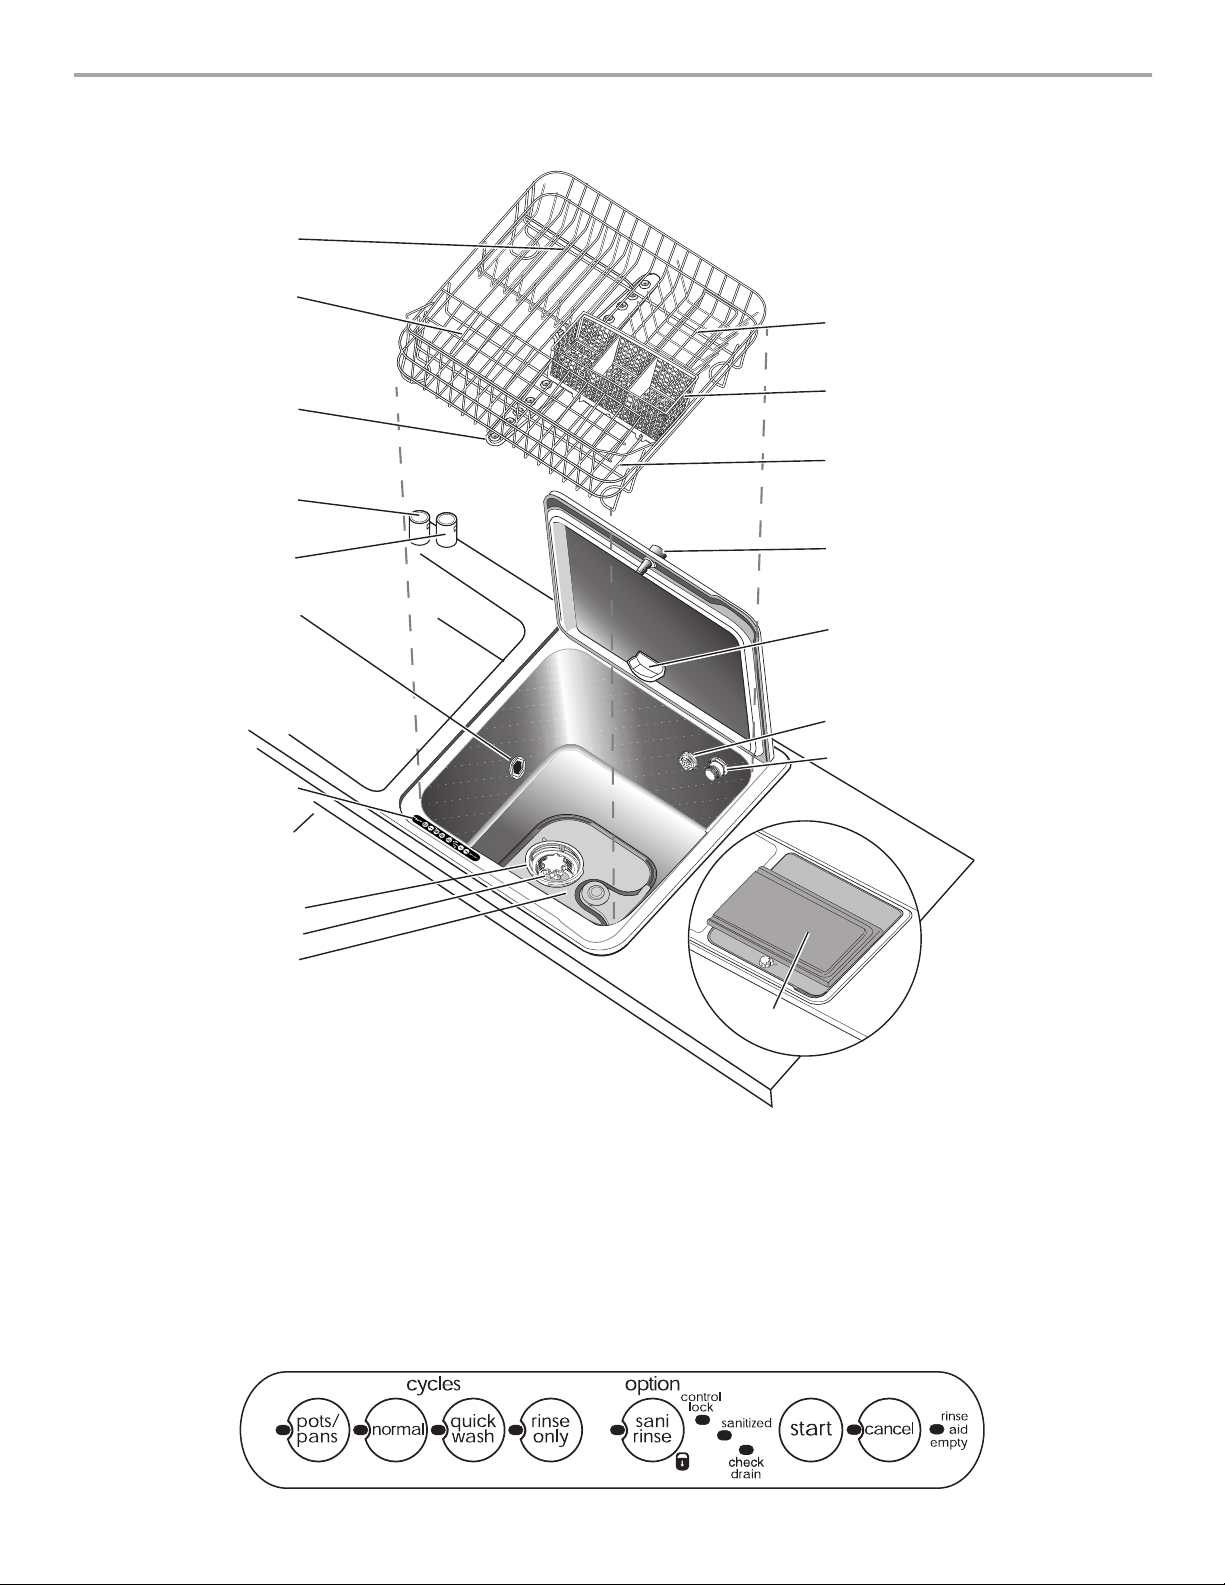
PARTS AND FEATURES
1
2
12
3
4
5
6
10
11
13
14
15
16
17
18
7
8
9
1.
Large rack insert
2.
Fold-down cup shelf
3.
Spray arm
4.
Drain air gap
5.
Fill air gap
6.
Water inlet opening
Control Panel
7.
Control panel
8.
Model and serial number label [on the
front of the sink under the counter]
9.
Drain screen basket
10.
Drain stopper
11.
Drain fine screen
12.
Medium rack insert
13.
Silverware basket
19
14.
Small rack insert
15.
Lid knob latch
16.
Detergent cup
17.
Rinse aid dispenser
18.
Rinse aid fill
19.
Wood cutting board
5
START-UP GUIDE
start
Before using your dishwasher, remove all packaging materials.
Read this entire Use and Care Guide. You will find important
safety information and useful operating tips.
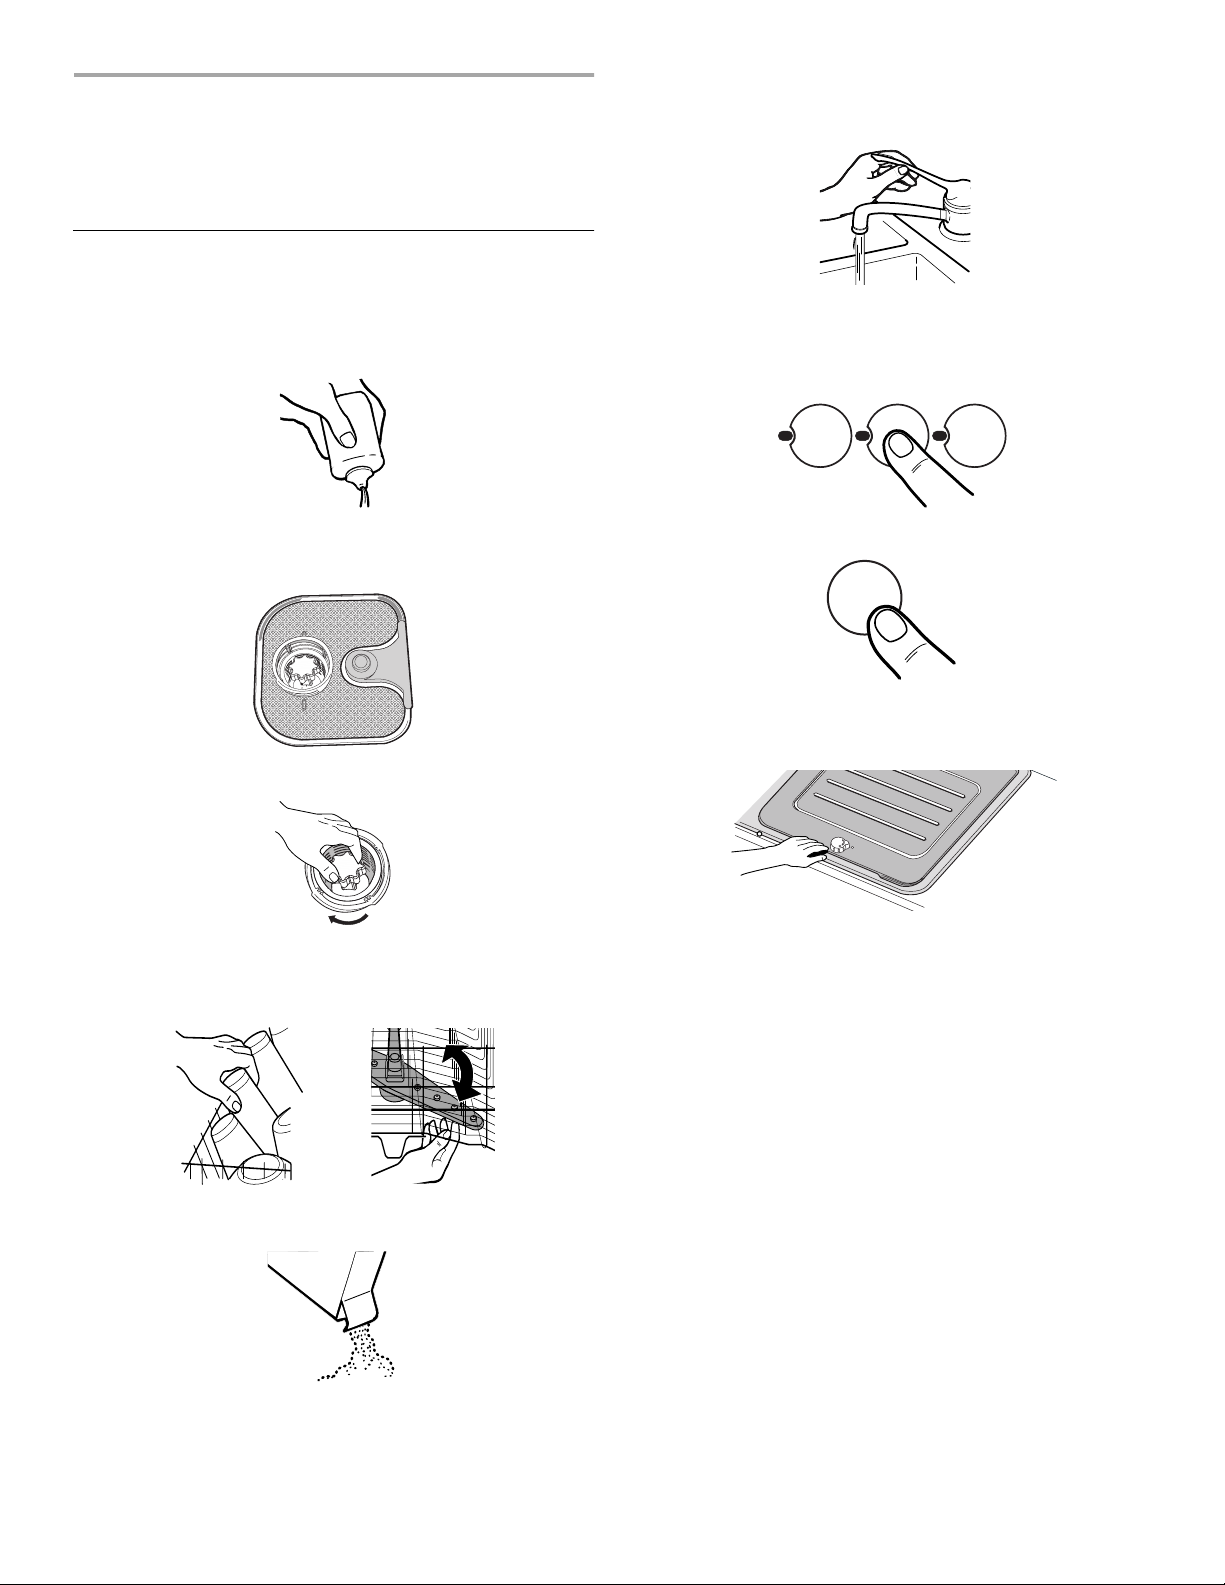
Using Your New Dishwasher
1.
Rinse aid is essential for good drying. Be sure to fill the
dispenser before you use your new dishwasher. Each filling
will last about 1 to 3 months depending on your usage. (See
“Rinse Aid Dispenser.”)
2.
Scrape large food soil and hard items (toothpicks or bones)
from dishes.
3.
Check and clean drain assembly screens. (See “Cleaning.”)
7.
If you do not have the hot water tank accessory, run hot water
at the sink until the water is hot. (See “Dishwasher
Performance Tips.”) Turn off water.
8.
Press the desired cycle and option selections on the top of
the dishwasher opening. Or press Start pad to repeat the
same cycle and options as the previous cycle. (See
“Dishwasher Use.”)
9.
Press the Start pad on the top of the dishwasher opening.
4.
Insert the drain stopper and turn clockwise one-quarter turn
to close.
5.
Properly load the dishwasher. (See “Dishwasher Loading.”)
Load dishes with space in between so water will reach the
soiled surfaces. Make sure nothing prevents the spray arm(s)
from spinning freely.
6.
Add detergent and check the rinse aid dispenser. Add rinse
aid if needed. (See “Dishwasher Use.”)
The lights on the control panel will flash once.
10.
Push lid firmly closed. Turn lid knob to latch.
If the lid is opened during the cycle, the cycle will stop. Close
the lid firmly and the cycle will continue.
NOTE:
If the dishwasher senses the drain stopper is not
closed properly, selected cycle is cancelled. Lid pops open
and Check Drain indicator is lit. Insert drain stopper again and
seal. Start cycle again.
11.
The lid opens automatically at the end of the cycle.
NOTE:
Do not place anything on the dishwasher lid when
running a cycle.
6
 Loading...