


KECC604BBL00
KitchenAid KECC604BBL00, KECC602BBL00, KECC667BSS00, KECC604BSS00, KECC602BSS00 Use & Care Manual
...
l_itchen_kid _
ELECTRIC COOKTOP
For questions about features, operation/performance, parts, accessories or service, call: 1-800-422-1230 or visit our website at
In Canada, call 1-800-807-6777 or visit our website at www.kitchenaid.ca
www.kitchenaid.com
TABLE DE CUISSON l_LE_QUE
Au Canada, pour assistance, installation ou service, composer le 1-800-807-6777 ou visiter notre site Web au www.kitchenaid.ca
Table of Contents/Table des matieres ............................................................................. 2
W10353375C
TABLEOF CONTENTS TABLEDES MATIERES
COOKTOP SAFETY ........................................................................ 2
PARTS AN D FEATU RES -
TOUCH-ACTIVATED CONTROLS ................................................ 4
COOKTOP CONTROLS -
TOUCH-ACTIVATED CONTROLS ................................................ 5
Cooktop Controls ......................................................................... 5
Keep Warm ................................................................................... 6
Simmer ......................................................................................... 6
Melt ............................................................................................... 6
Dual/Triple Element ...................................................................... 7
Control Lock ................................................................................. 7
PARTS AND FEATURES - KNOB CONTROLS ............................ 8
COOKTOP CONTROLS - KNOB CONTROLS ............................. 9
Cooktop Controls ......................................................................... 9
Even-Heat TM ULTRA Element ...................................................... 9
Even-Heat TM Element ................................................................... 9
Dual Circuit Element ................................................................... 10
Keep Warm ................................................................................. 10
COOKTOP USE ............................................................................ 11
Ceramic Glass ............................................................................ 11
Home Canning ........................................................................... 11
Cookware ................................................................................... 11
COOKTOP CARE .......................................................................... 12
General Cleaning ........................................................................ 12
TROUBLESHOOTING .................................................................. 13
ASSISTANCE OR SERVICE ......................................................... 14
In the U.S.A................................................................................ 14
Accessories ................................................................................ 14
In Canada ................................................................................... 14
WAR RANTY .................................................................................. 15
SleCURITle DE LA TABLE DE CUISSON .................................... 17
PIECES ET CARACTleRISTIQUES -
COMMANDES TACTILES ............................................................ 19
COMMANDES DE LA TABLE DE CUlSSON -
COMMANDES TACTILES ............................................................ 20
Commandes de latable de cuisson .......................................... 20
Maintien au chaud ...................................................................... 21
Mijotage ...................................................................................... 21
Faire fondre ................................................................................ 22
€:lements double/triple ............................................................... 22
Verrouillage des commandes ..................................................... 22
Pli=CES ET CARACTleRISTIQUES -
COMMANDES ,&,BOUTONS ROTATIFS ..................................... 23
COMMANDES DE LA TABLE DE CUISSON -
COMMANDES ,&,BOUTONS ROTATIFS ..................................... 24
Commandes de la table de cuisson .......................................... 24
€:lement Even-Heat TM (chaleur uniforme) ULTRA ...................... 25
€:lement Even-Heat TM (chaleur uniforme) ................................... 25
€:lement a double circuit ............................................................. 25
Maintien au chaud ...................................................................... 26
UTILISATION DE LA TABLE DE CUISSON ................................ 26
Vitroceramique ........................................................................... 26
Mise en conserve & la maison .................................................... 27
Ustensiles de cuisson ................................................................ 27
ENTRETIEN DE LA TABLE DE CUISSON .................................. 28
Nettoyage gen6ral ...................................................................... 28
DlePANNAGE ................................................................................. 29
ASSISTANCE OU SERVICE ......................................................... 30
Accessoires ................................................................................ 30
Au Canada .................................................................................. 30
GARANTIE ..................................................................................... 31
COOKTOP SAFETY
Your safety and the safety of others are very important.
We have provided many important safety messages in this manual and on your appliance. Always read and obey all safety
messages.
This is the safety alert symbol.
This symbol alerts you to potential hazards that can kill or hurt you and others.
All safety messages will follow the safety alert symbol and either the word "DANGER" or "WARNING."
These words mean:
You can be killed or seriously injured if you don't immediately
follow instructions.
You can be killed or seriously injured if you don't follow
instructions.
All safety messages will tell you what the potential hazard is, tell you how to reduce the chance of injury, and tell you what can
happen if the instructions are not followed.
2
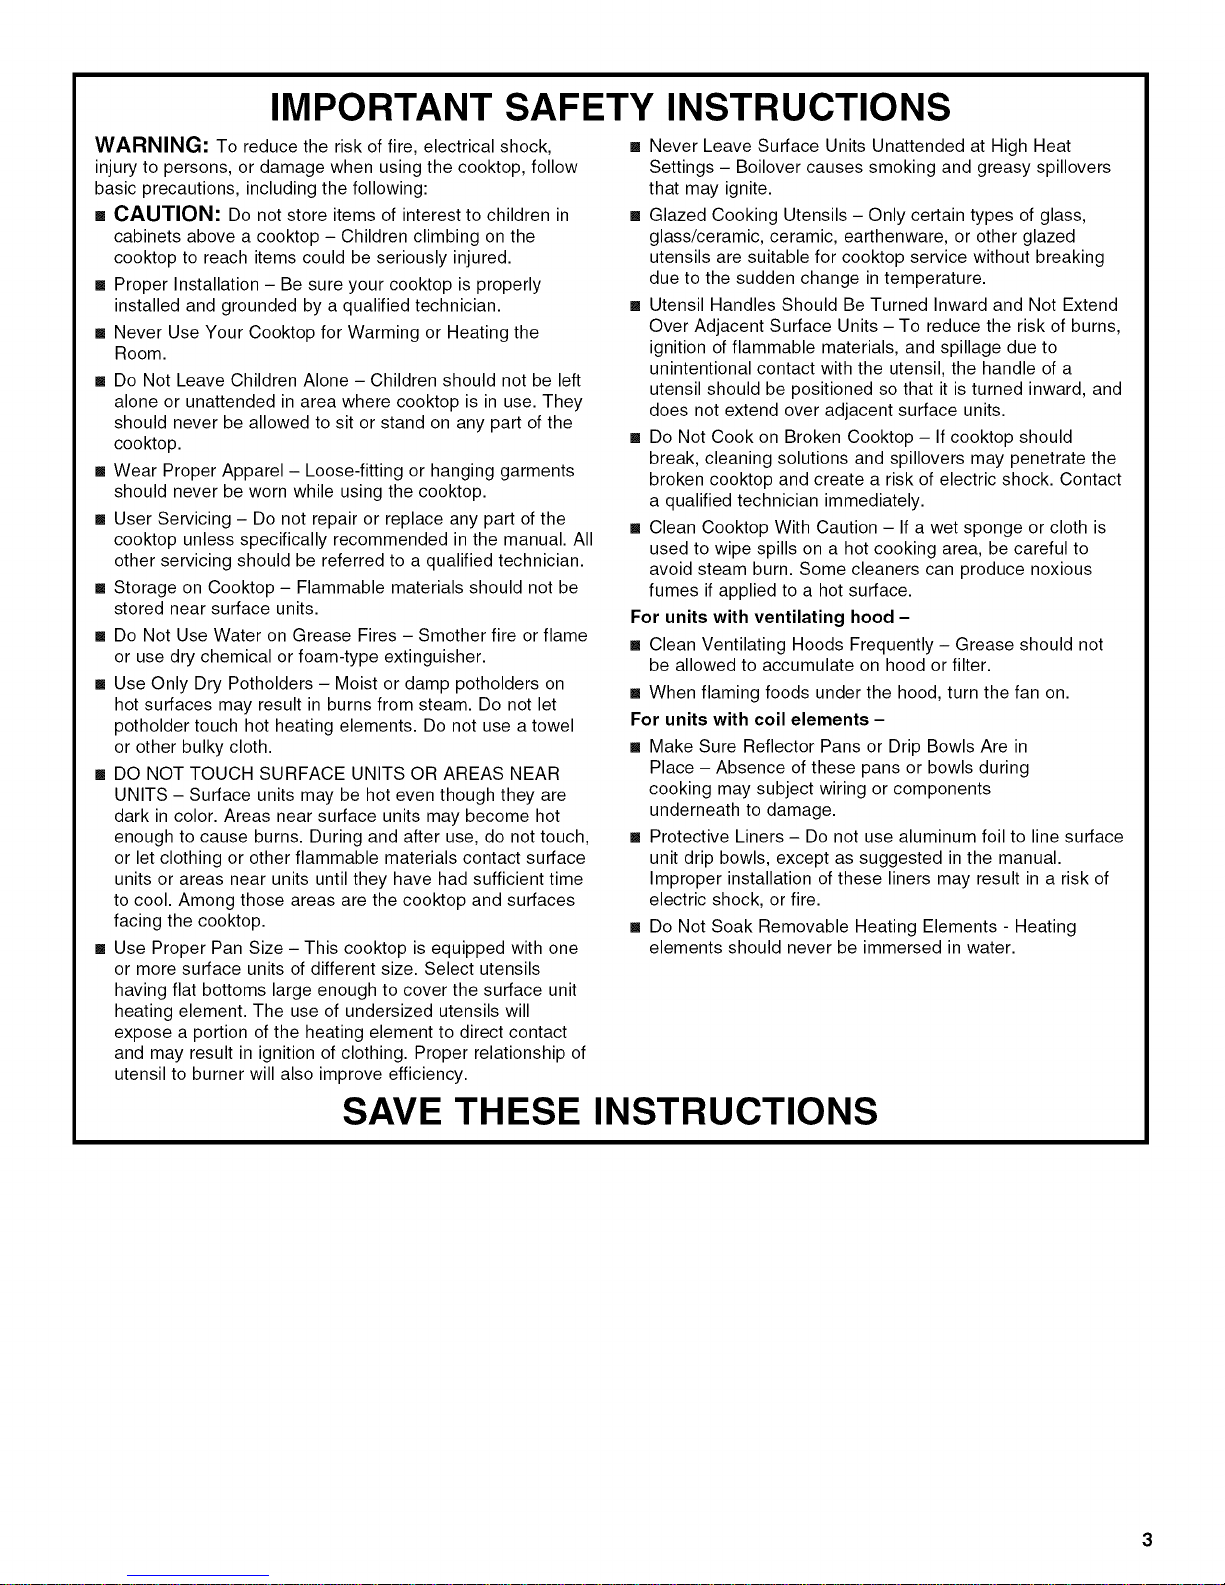
IMPORTANT SAFETY INSTRUCTIONS
WARNING: To reduce the risk of fire, electrical shock,
injury to persons, or damage when using the cooktop, follow
basic precautions, including the following:
[] CAUTION: Do not store items of interest to children in
cabinets above a cooktop - Children climbing on the
cooktop to reach items could be seriously injured.
[] Proper Installation - Be sure your cooktop is properly
installed and grounded by a qualified technician.
[] Never Use Your Cooktop for Warming or Heating the
Room.
[] Do Not Leave Children Alone - Children should not be left
alone or unattended in area where cooktop is in use. They
should never be allowed to sit or stand on any part of the
cooktop.
[] Wear Proper Apparel - Loose-fitting or hanging garments
should never be worn while using the cooktop.
[] User Servicing - Do not repair or replace any part of the
cooktop unless specifically recommended in the manual. All
other servicing should be referred to a qualified technician.
[] Storage on Cooktop - Flammable materials should not be
stored near surface units.
[] Do Not Use Water on Grease Fires - Smother fire or flame
or use dry chemical or foam-type extinguisher.
[] Use Only Dry Potholders - Moist or damp potholders on
hot surfaces may result in burns from steam. Do not let
potholder touch hot heating elements. Do not use a towel
or other bulky cloth.
[] DO NOT TOUCH SURFACE UNITS OR AREAS NEAR
UNITS - Surface units may be hot even though they are
dark in color. Areas near surface units may become hot
enough to cause burns. During and after use, do not touch,
or let clothing or other flammable materials contact surface
units or areas near units until they have had sufficient time
to cool. Among those areas are the cooktop and surfaces
facing the cooktop.
[] Use Proper Pan Size - This cooktop is equipped with one
or more surface units of different size. Select utensils
having flat bottoms large enough to cover the surface unit
heating element. The use of undersized utensils will
expose a portion of the heating element to direct contact
and may result in ignition of clothing. Proper relationship of
utensil to burner will also improve efficiency.
[] Never Leave Surface Units Unattended at High Heat
Settings - Boilover causes smoking and greasy spillovers
that may ignite.
[] Glazed Cooking Utensils - Only certain types of glass,
glass/ceramic, ceramic, earthenware, or other glazed
utensils are suitable for cooktop service without breaking
due to the sudden change in temperature.
[] Utensil Handles Should Be Turned Inward and Not Extend
Over Adjacent Surface Units - To reduce the risk of burns,
ignition of flammable materials, and spillage due to
unintentional contact with the utensil, the handle of a
utensil should be positioned so that it is turned inward, and
does not extend over adjacent surface units.
[] Do Not Cook on Broken Cooktop - If cooktop should
break, cleaning solutions and spillovers may penetrate the
broken cooktop and create a risk of electric shock. Contact
a qualified technician immediately.
[] Clean Cooktop With Caution - If a wet sponge or cloth is
used to wipe spills on a hot cooking area, be careful to
avoid steam burn. Some cleaners can produce noxious
fumes if applied to a hot surface.
For units with ventilating hood -
[] Clean Ventilating Hoods Frequently - Grease should not
be allowed to accumulate on hood or filter.
[] When flaming foods under the hood, turn the fan on.
For units with coil elements -
[] Make Sure Reflector Pans or Drip Bowls Are in
Place - Absence of these pans or bowls during
cooking may subject wiring or components
underneath to damage.
[] Protective Liners - Do not use aluminum foil to line surface
unit drip bowls, except as suggested in the manual.
Improper installation of these liners may result in a risk of
electric shock, or fire.
[] Do Not Soak Removable Heating Elements - Heating
elements should never be immersed in water.
SAVE THESE INSTRUCTIONS
PARTS AND FEATURES- TOUCH-ACTWATED CONTROLS
This manual covers different models. The cooktop you have purchased may have some or all of the items listed. The locations and
appearances of the features shown here may not match those of your model.
Control Panels
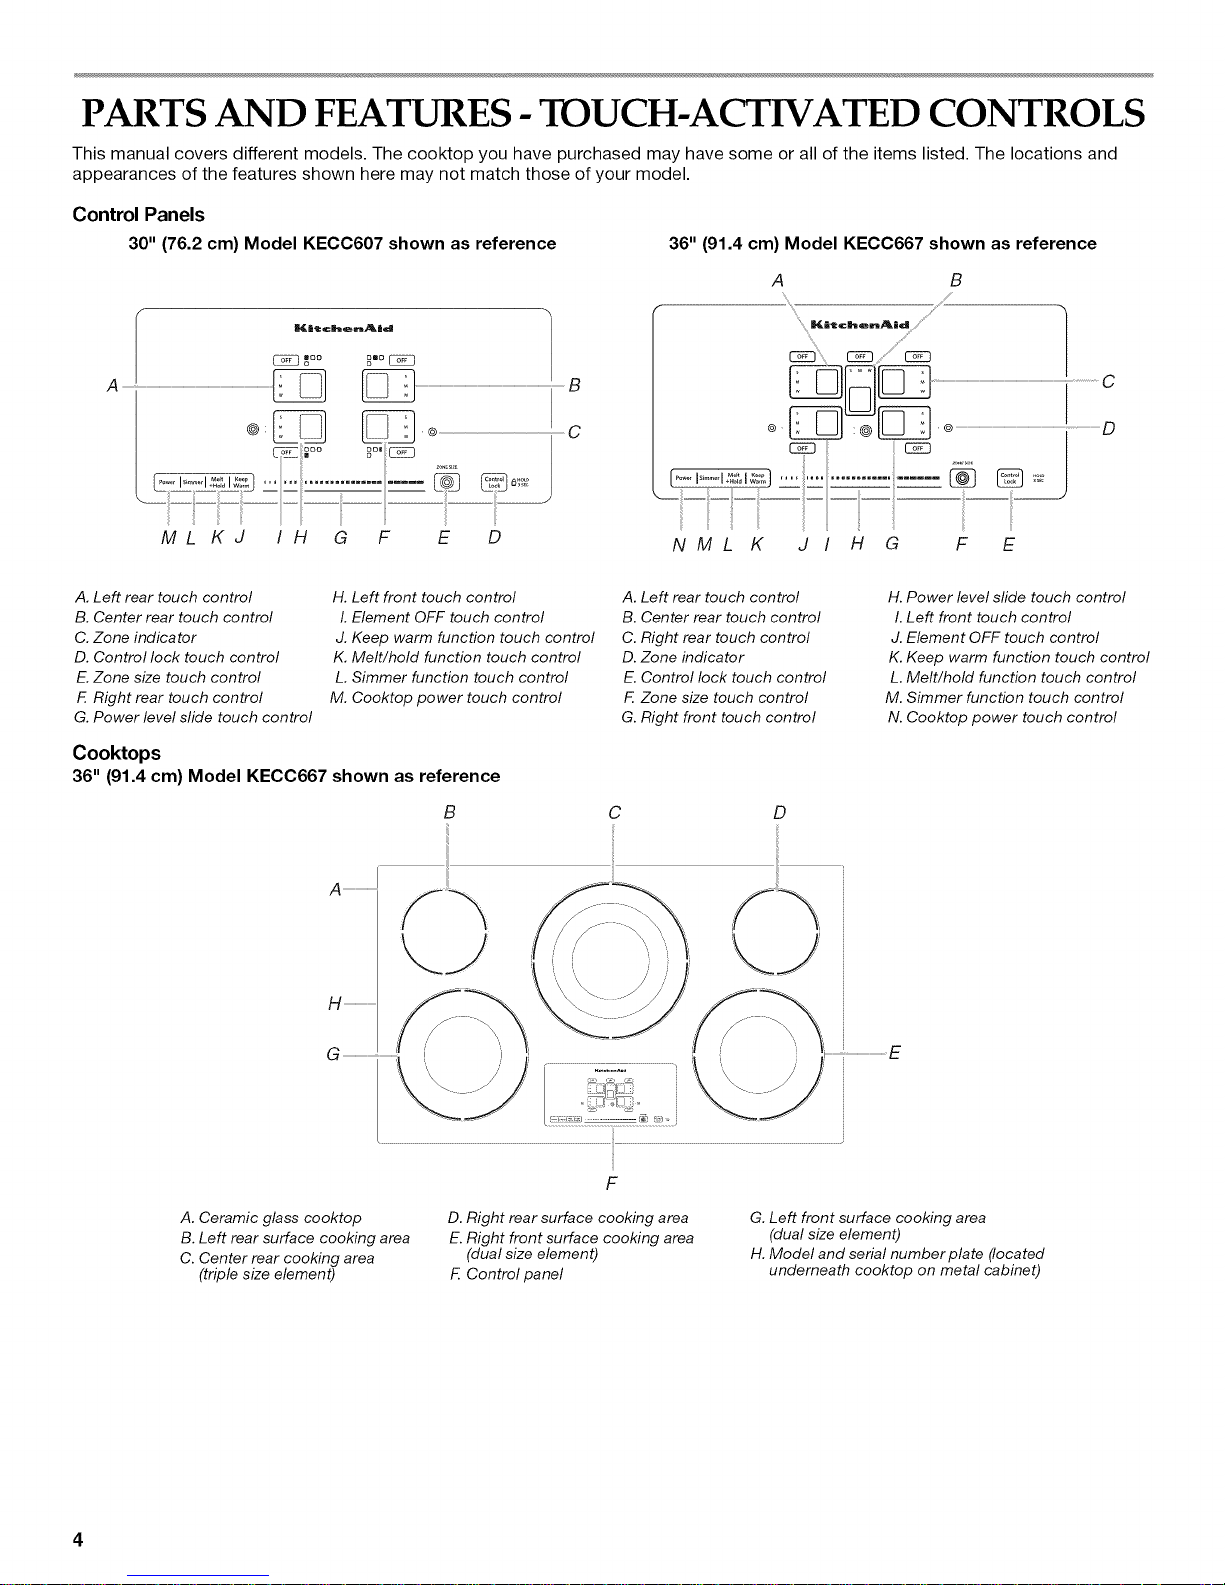
30" (76.2cm) Model KECC607 shown as reference 36" (91.4 cm) Model KE00667 shown as reference
A B
,% ....,
l_ltt chenA|d
_°° 8=°C_3
MLKJ IH G F E D
B
C
___ " '-" ....... --
NML K J ! H G F E
% jf_
...........C2D...............
A. Left rear touch control
B. Center rear touch control
C. Zone indicator
D. Control lock touch control
E.Zone size touch control
E Right rear touch control
G. Power level slide touch control
H. Left front touch control
I. Element OFF touch control
J. Keep warm function touch control
K. Melt/hold function touch control
L. Simmer function touch control
M. Cooktop power touch control
Cooktops
36" (91.4cm) Model KE00667 shown as reference
B C D
A ....................................
H .................................
A. Left rear touch control
B. Center rear touch control
C. Right rear touch control
D. Zone indicator
E. Control lock touch control
F. Zone size touch control
G. Right front touch control
i/ _,_
H. Power level slide touch control
I.Left front touch control
J. Element OFF touch control
K.Keep warm function touch control
L. Melt/hold function touch control
M. Simmer function touch control
N. Cooktop power touch control
A. Ceramic glass cooktop
B. Left rear surface cooking area
C. Center rear cooking area
(triple size element)
F
D. Right rear surface cooking area
E. Right front surface cooking area
(dual size element)
F. Control panel
G. Left front surface cooking area
(dual size element)
H. Model and serial number plate (located
underneath cooktop on metal cabinet)
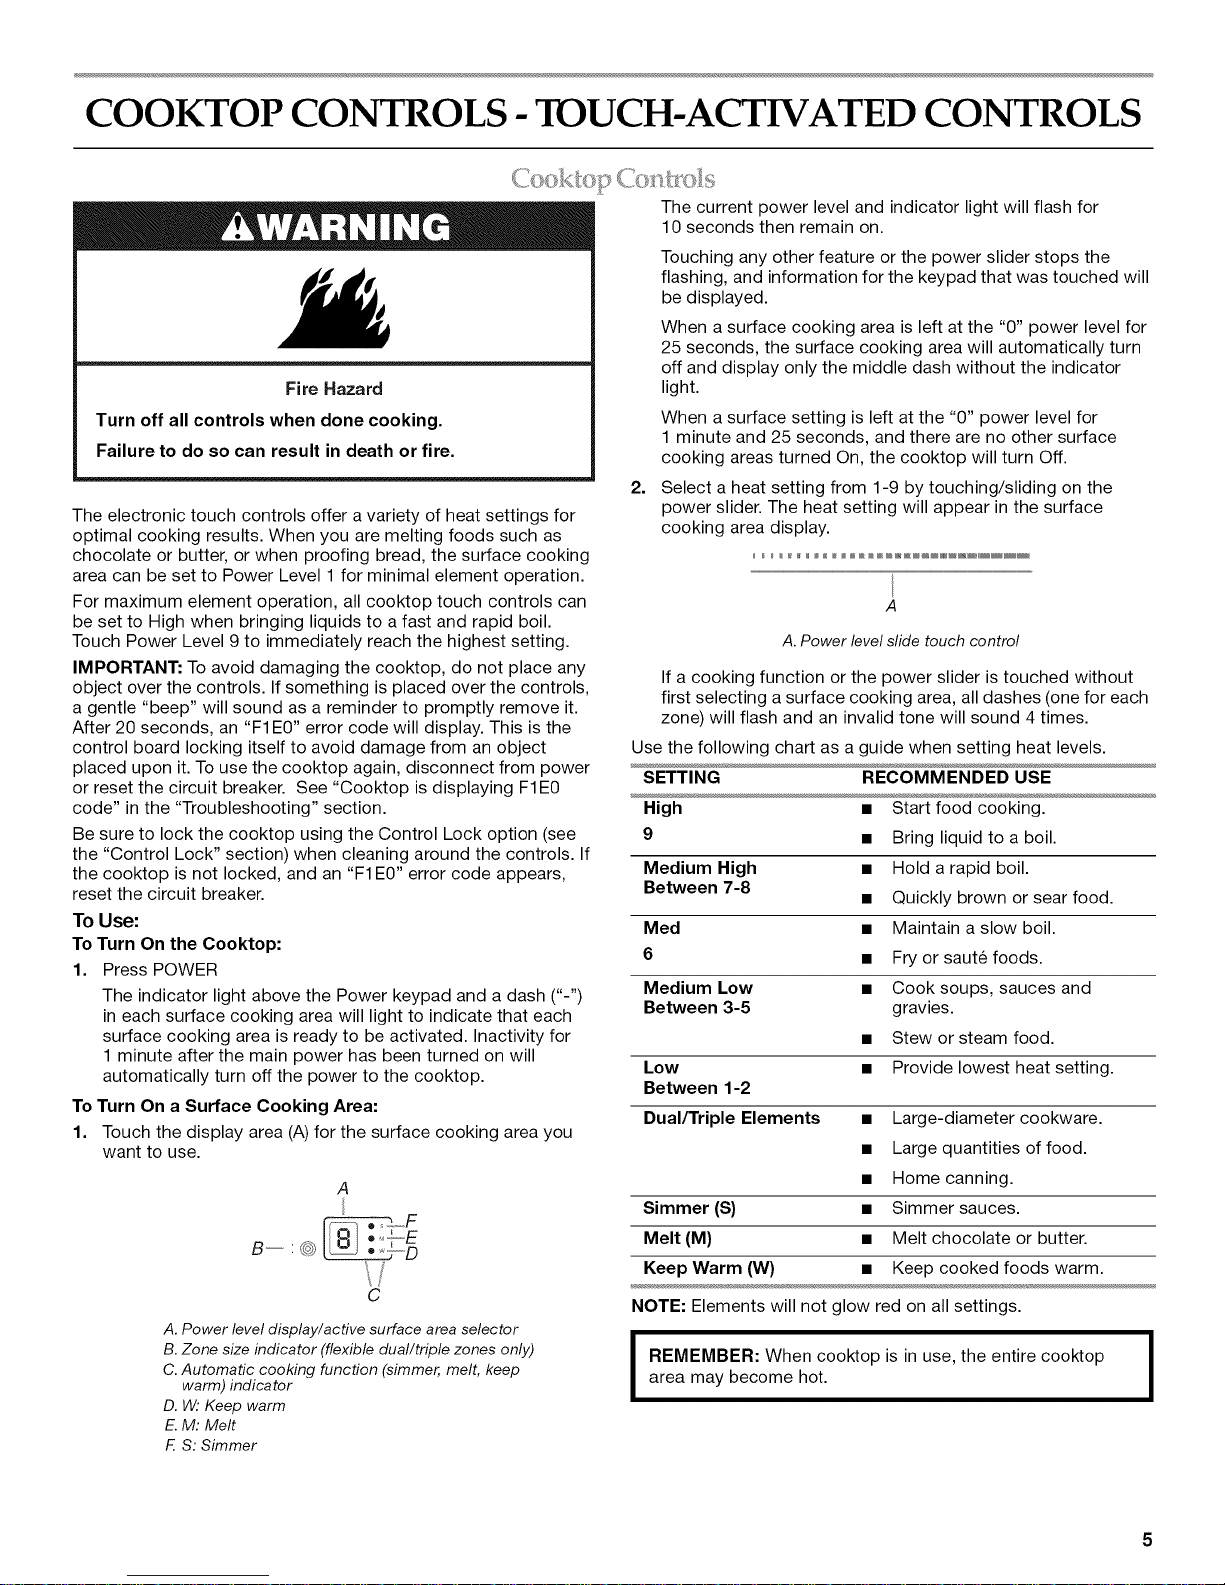
COOKTOP CONTROLS - TOUCH-ACTWATED CONTROLS
The current power level and indicator light will flash for
10 seconds then remain on.
Touching any other feature or the power slider stops the
flashing, and information for the keypad that was touched will
be displayed.
When a surface cooking area is left at the "0" power level for
25 seconds, the surface cooking area will automatically turn
Fire Hazard
Turn off all controls when done cooking.
Failure to do so can result in death or fire.
The electronic touch controls offer a variety of heat settings for
optimal cooking results. When you are melting foods such as
chocolate or butter, or when proofing bread, the surface cooking
area can be set to Power Level 1 for minimal element operation.
For maximum element operation, all cooktop touch controls can
be set to High when bringing liquids to a fast and rapid boil.
Touch Power Level 9 to immediately reach the highest setting.
IMPORTANT: To avoid damaging the cooktop, do not place any
object over the controls. If something is placed over the controls,
a gentle "beep" will sound as a reminder to promptly remove it.
After 20 seconds, an "F1E0" error code will display. This is the
control board locking itself to avoid damage from an object
placed upon it. To use the cooktop again, disconnect from power
or reset the circuit breaker. See "Cooktop is displaying F1E0
code" in the "Troubleshooting" section.
Be sure to lock the cooktop using the Control Lock option (see
the "Control Lock" section) when cleaning around the controls. If
the cooktop is not locked, and an "F1 E0" error code appears,
reset the circuit breaker.
To Use:
To Turn On the Cooktop:
1. Press POWER
The indicator light above the Power keypad and a dash ("-")
in each surface cooking area will light to indicate that each
surface cooking area is ready to be activated. Inactivity for
1 minute after the main power has been turned on will
automatically turn off the power to the cooktop.
To Turn On a Surface Cooking Area:
1. Touch the display area (A)for the surface cooking area you
want to use.
A
B--:@
\/
C
A. Power level display/active surface area selector
B. Zone size indicator (flexible dual/triple zones only)
C. Automatic cooking function (simmer, melt, keep
warm) indicator
D. W: Keep warm
E.M: Melt
F. S: Simmer
off and display only the middle dash without the indicator
light.
When a surface setting is left at the "0" power level for
1 minute and 25 seconds, and there are no other surface
cooking areas turned On, the cooktop will turn Off.
2.
Select a heat setting from 1-9 by touching/sliding on the
power slider. The heat setting will appear in the surface
cooking area display.
A
A. Power level slide touch control
If a cooking function or the power slider is touched without
first selecting a surface cooking area, all dashes (one for each
zone) will flash and an invalid tone will sound 4 times.
Use the following chart as a guide when setting heat levels.
SETTING RECOMMENDED USE
High • Start food cooking.
9 • Bring liquid to a boil.
Medium High • Hold a rapid boil.
Between 7-8
Med • Maintain a slow boil.
6 • Fry or saute foods.
Medium Low • Cook soups, sauces and
Between 3-5 gravies.
Low • Provide lowest heat setting.
Between 1-2
Dual/Triple Elements • Large-diameter cookware.
Simmer (S) • Simmer sauces.
Melt (M) • Melt chocolate or butter.
Keep Warm (W) • Keep cooked foods warm.
NOTE: Elements will not glow red on all settings.
area may become hot.
I EMEMBER: When cooktop is in use, the entire cooktop I
• Quickly brown or sear food.
• Stew or steam food.
• Large quantities of food.
• Home canning.
I

Automatic cooking functions
All elements feature automatic cooking levels (Simmer and Melt)
that will set the cooktop to precisely the right level for special
tasks. These settings can be used on more than one element at
the same time.
To Use:
1. Touch the display area of the cooking element you want to
use.
2. Touch the setting you wish to use (Simmer or Melt). An "A"
will appear in the display, and the indicator light next to the
correct function will light.
Hot Surface Indicator Light
An "H" will appear in the surface cooking area display as long as
any surface cooking area is too hot to touch, even after the
surface cooking area(s) is turned off.
O_
• w
The Simmer function can be used on all surface cooking areas.
Simmer can be used on more than 1 surface cooking area at a
time.
To Use
To Turn On:
1. Check that a surface cooking area has been selected.
2. Touch SIMMER. "A" will appear in the display, and the
indicator light next to Simmer will light.
To Turn Off:
Simmer can be turned off in 3 different ways:
1. Use the power slider to set to a heat level.
OR
2. Touch the surface cooking area OFF keypad.
OR
3. Select a different cooking function.
Component Temperature Management
The cooktop regulates the temperature of the internal
components during use. The cooktop may automatically reduce
the power of all the elements in use to keep the internal
components from overheating. To resume optimal cooking
performance, allow the cooktop to cool down for 30 minutes.
Food Poisoning Hazard
Do not let food sit for more than one hour before or
after cooking.
Doing so can result in food poisoning or sickness.
The Keep Warm surface cooking area can be used to keep
cooked foods warm. One hour is the recommended maximum
time to maintain food quality.
It is not recommended for heating cold foods. When the Keep
Warm function is in use, it will not glow red like the cooking
zones, but the indicator light will glow on the control panel.
Use only cookware and dishes recommended for oven and
cooktop use, and those that have flat bottoms to make direct
contact with the cooktop surface. Use pot holders or oven mitts
to remove cookware.
Cover all foods with a lid or aluminum foil. Do not use plastic
wrap to cover food, as it may melt onto the cooktop surface.
When warming baked goods, allow a small opening in the cover
for moisture to escape.
To Use:
1. Touch the display area of the cooking element you want to
use. Keep Warm can be used on more than one element at
the same time.
2. Touch the Keep Warm setting. An "A" will appear in the
display, and the indicator light next to the correct function will
light.
The Melt function can be used on all surface cooking areas. Melt
+ Hold can be used on more than 1 surface cooking area at a
time.
To Use
To Turn On:
1. Check that a surface cooking area has been selected.
2. Touch MELT. "A" will appear in the display, and the indicator
light next to Melt will light.
To Turn Off:
Melt can be turned off in 3 different ways:
1. Use the power slider to set to a heat level.
OR
2. Touch the surface cooking area OFF keypad.
OR
3. Select a different cooking function.
6
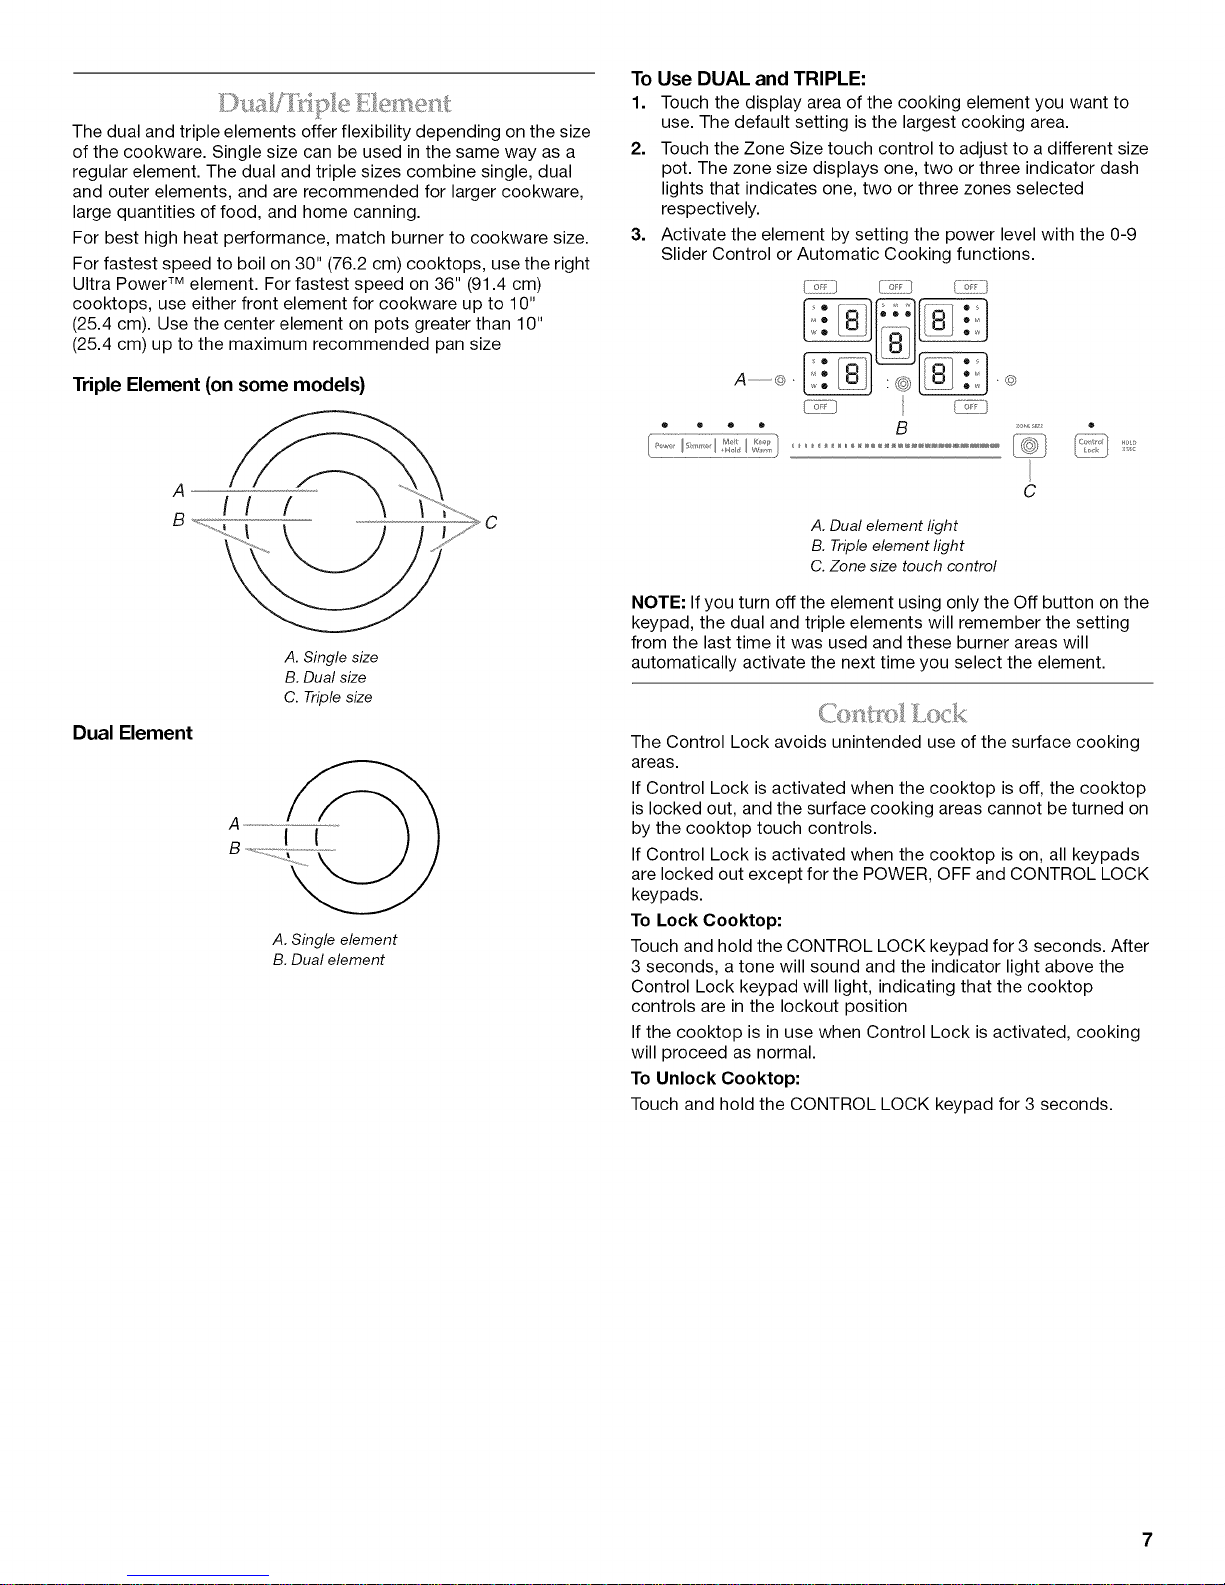
The dual and triple elements offer flexibility depending on the size
of the cookware. Single size can be used in the same way as a
regular element. The dual and triple sizes combine single, dual
and outer elements, and are recommended for larger cookware,
large quantities of food, and home canning.
For best high heat performance, match burner to cookware size.
For fastest speed to boil on 30" (76.2 cm) cooktops, use the right
Ultra Power TM element. For fastest speed on 36" (91.4 cm)
cooktops, use either front element for cookware up to 10"
(25.4 cm). Use the center element on pots greater than 10"
(25.4 cm) up to the maximum recommended pan size
Triple Element (on some models)
C
A. Single size
B. Dual size
C. Triple size
Dual Element
A
I
A. Single element
B. Dual element
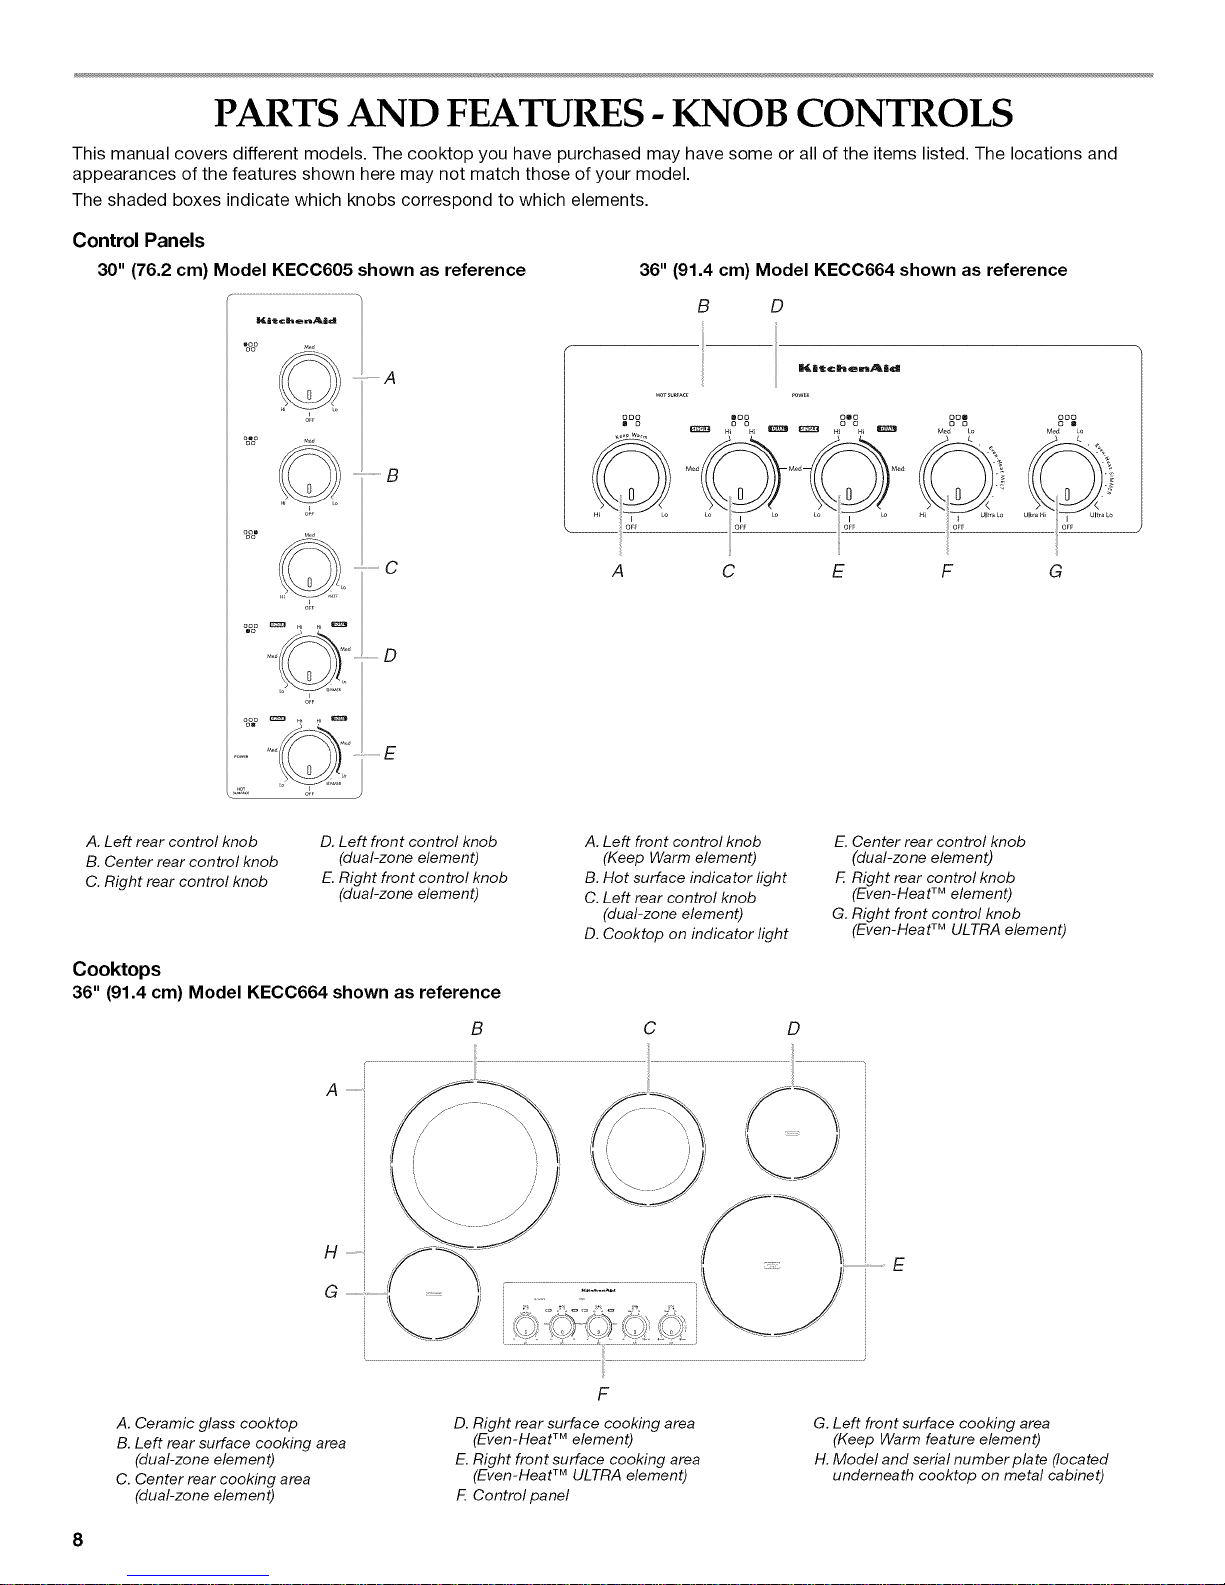
To Use DUAL and TRIPLE:
1. Touch the display area of the cooking element you want to
use. The default setting is the largest cooking area.
2. Touch the Zone Size touch control to adjust to a different size
pot. The zone size displays one, two or three indicator dash
lights that indicates one, two or three zones selected
respectively.
3. Activate the element by setting the power level with the 0-9
Slider Control or Automatic Cooking functions.
e • • •
[ .......I ................ ..........
C
A. Dual element light
B. Triple element light
C. Zone size touch control
NOTE: Ifyou turn off the element using only the Off button on the
keypad, the dual and triple elements will remember the setting
from the last time it was used and these burner areas will
automatically activate the next time you select the element.
The Control Lock avoids unintended use of the surface cooking
areas.
If Control Lock is activated when the cooktop is off, the cooktop
is locked out, and the surface cooking areas cannot be turned on
by the cooktop touch controls.
If Control Lock is activated when the cooktop is on, all keypads
are locked out except for the POWER, OFF and CONTROL LOCK
keypads.
To Lock Cooktop:
Touch and hold the CONTROL LOCK keypad for 3 seconds. After
3 seconds, a tone will sound and the indicator light above the
Control Lock keypad will light, indicating that the cooktop
controls are in the lockout position
If the cooktop is in use when Control Lock is activated, cooking
will proceed as normal.
To Unlock Cooktop:
Touch and hold the CONTROL LOCK keypad for 3 seconds.
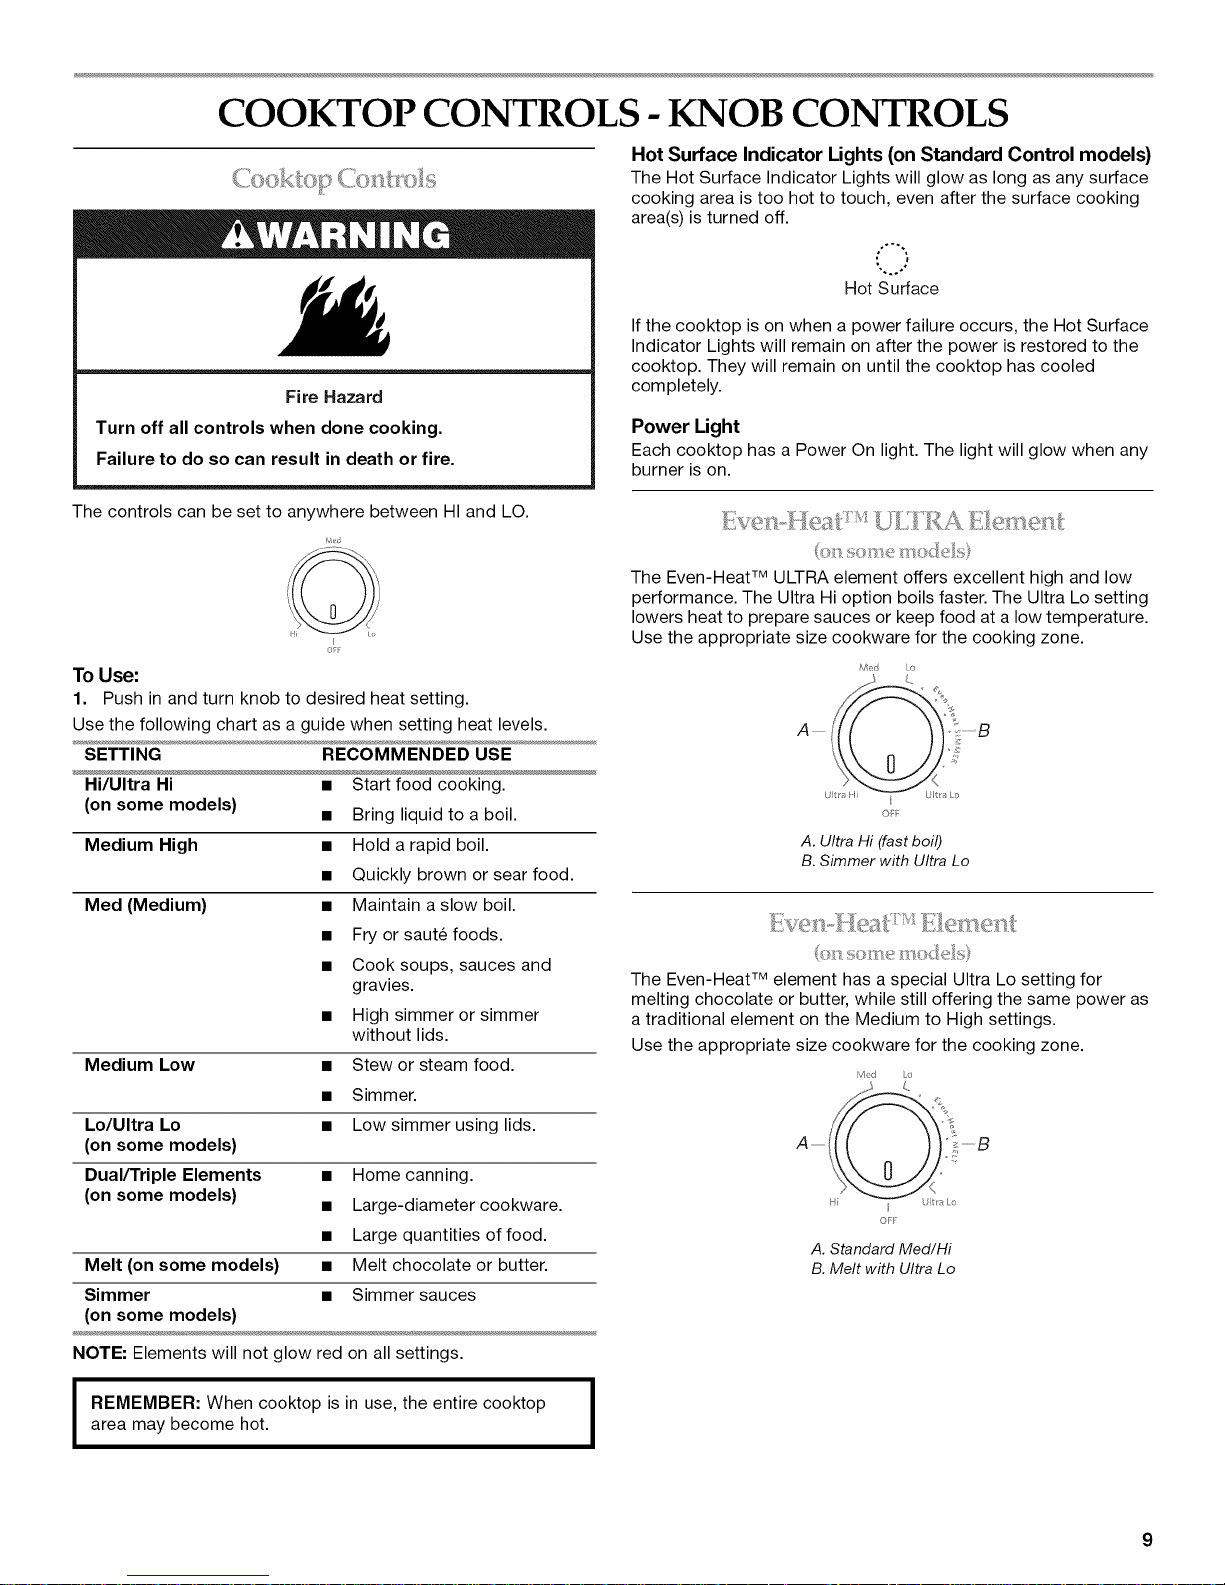
PARTS AND FEATURES- KNOB CONTROLS
This manual covers different models. The cooktop you have purchased may have some or all of the items listed. The locations and
appearances of the features shown here may not match those of your model.
The shaded boxes indicate which knobs correspond to which elements.
Control Panels
30" (76.2 cm) Model KECC605 shown as reference
36" (91.4 cm) Model KE00664 shown as reference
B D
A. Left rear control knob
B. Center rear control knob
C. Right rear control knob
.............A
................S
C
D. Left front control knob
(dual-zone element)
E. Right front control knob
(dual-zone element)
ooo
= o
=oo ooo oo_ ooo
HO 0m _ _ 0 0H _ 0 0 0 a
C E F G
A. Left front control knob
(Keep Warm element)
B. Hot surface indicator light
C. Left rear control knob
(dual-zone element)
D. Cooktop on indicator light
KitchenA|d
E. Center rear control knob
(dual-zone element)
F. Right rear control knob
(Even-Heat TM element)
G. Right front control knob
(Even-Heat TM ULTRA element)
Cooktops
36" (91.4cm) Model KE00664 shown as reference
A. Ceramic glass cooktop
B. Left rear surface cooking area
(dual-zone element)
C. Center rear cooking area
(dual-zone element)
8
D. Right rear surface cooking area
(Even-Heat TM element)
E. Right front surface cooking area
(Even-Heat TM ULTRA element)
F. Control panel
E
G. Left front surface cooking area
(Keep Warm feature element)
H. Model and serial number plate (located
underneath cooktop on metal cabinet)
COOKTOP CONTROLS- KNOB CONTROLS
Fire Hazard
Turn off all controls when done cooking.
Failure to do so can result in death or fire.
The controls can be set to anywhere between HI and LO.
d
o_
To Use:
1. Push in and turn knob to desired heat setting.
Use the following chart as a guide when setting heat levels.
SETTING RECOMMENDED USE
Hi/Ultra Hi • Start food cooking.
(on some models)
Medium High
Med (Medium)
Medium Low •
Lo/Ultra Lo •
(on some models)
Dual/Triple Elements • Home canning.
(on some models) • Large-diameter cookware.
Melt (on some models) • Melt chocolate or butter.
Simmer • Simmer sauces
(on some models)
• Bring liquid to a boil.
• Hold arapid boil.
• Quickly brown or sear food.
• Maintain a slow boil.
• Fry or saute foods.
• Cook soups, sauces and
gravies.
• High simmer or simmer
without lids.
Stew or steam food.
Simmer.
Low simmer using lids.
• Large quantities of food.
Hot Surface Indicator Lights (on Standard Control models)
The Hot Surface Indicator Lights will glow as long as any surface
cooking area is too hot to touch, even after the surface cooking
area(s) is turned off.
,°"%
%.o÷*
Hot Surface
If the cooktop is on when a power failure occurs, the Hot Surface
Indicator Lights will remain on after the power is restored to the
cooktop. They will remain on until the cooktop has cooled
completely.
Power Light
Each cooktop has a Power On light. The light will glow when any
burner is on.
The Even-Heat TM ULTRA element offers excellent high and low
performance. The Ultra Hi option boils faster. The Ultra Lo setting
lowers heat to prepare sauces or keep food at a low temperature.
Use the appropriate size cookware for the cooking zone.
A •
LJtr_ Lo
OFF
A.Ultra Hi (fast boil)
B. Simmer with Ultra Lo
The Even-Heat TM element has aspecial Ultra Lo setting for
melting chocolate or butter, while still offering the same power as
a traditional element on the Medium to High settings.
Use the appropriate size cookware for the cooking zone.
..............S
/
utra Lo
OFf
A. Standard Med/Hi
B. Melt with Ultra Lo
NOTE: Elements will not glow red on all settings.
area may become hot.
I EMEMBER: When cooktop is in use, the entire cooktop I
I
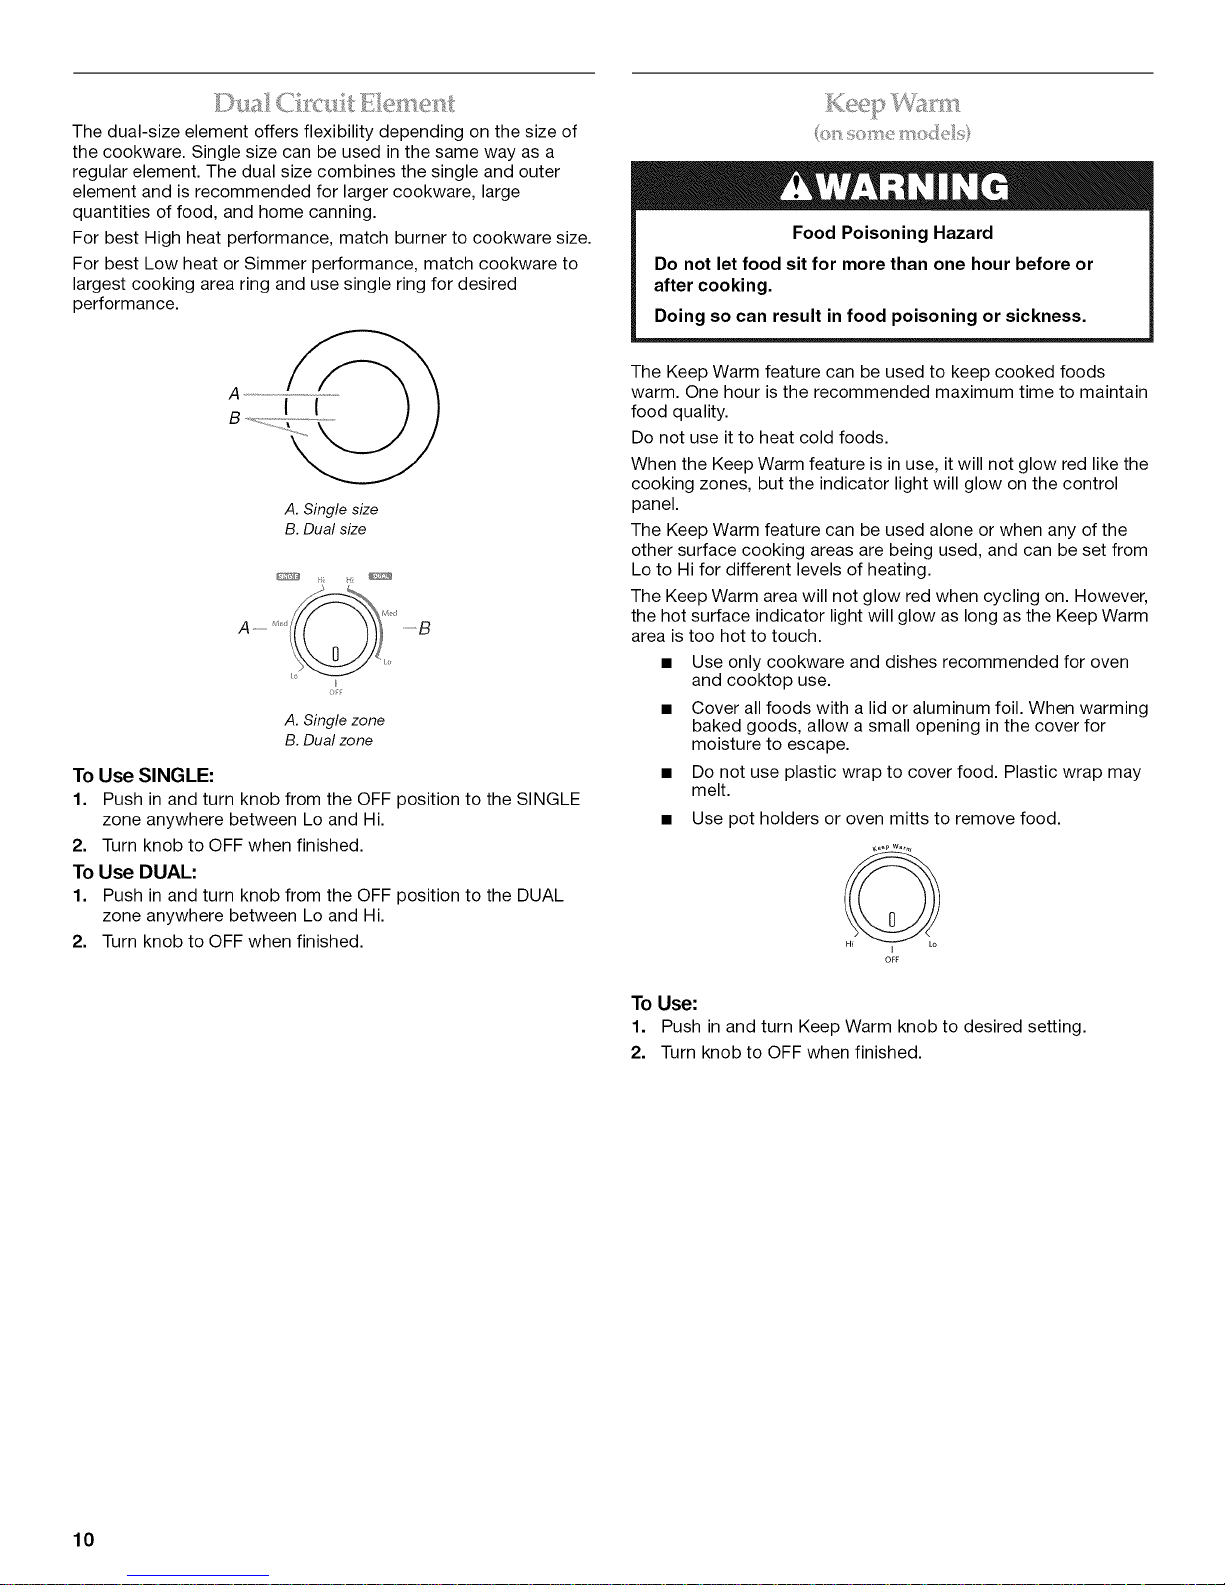
The dual-size element offers flexibility depending on the size of
the cookware. Single size can be used in the same way as a
regular element. The dual size combines the single and outer
element and is recommended for larger cookware, large
quantities of food, and home canning.
For best High heat performance, match burner to cookware size.
For best Low heat or Simmer performance, match cookware to
largest cooking area ring and use single ring for desired
performance.
Food Poisoning Hazard
Do not let food sit for more than one hour before or
after cooking.
Doing so can result in food poisoning or sickness.
A
I
A.Single size
B.Dual size
A <'
A. Single zone
B. Dual zone
To Use SINGLE:
1. Push in and turn knob from the OFF position to the SINGLE
zone anywhere between Lo and Hi.
2. Turn knob to OFF when finished.
To Use DUAL:
1. Push in and turn knob from the OFF position to the DUAL
zone anywhere between Lo and Hi.
2. Turn knob to OFF when finished.
.............g
The Keep Warm feature can be used to keep cooked foods
warm. One hour is the recommended maximum time to maintain
food quality.
Do not use it to heat cold foods.
When the Keep Warm feature is in use, it will not glow red like the
cooking zones, but the indicator light will glow on the control
panel.
The Keep Warm feature can be used alone or when any of the
other surface cooking areas are being used, and can be set from
Lo to Hi for different levels of heating.
The Keep Warm area will not glow red when cycling on. However,
the hot surface indicator light will glow as long as the Keep Warm
area is too hot to touch.
• Use only cookware and dishes recommended for oven
and cooktop use.
• Cover all foods with a lid or aluminum foil. When warming
baked goods, allow a small opening in the cover for
moisture to escape.
Do not use plastic wrap to cover food. Plastic wrap may
melt.
Use pot holders or oven mitts to remove food.
10
To Use:
1. Push in and turn Keep Warm knob to desired setting.
2. Turn knob to OFF when finished.
 Loading...