

Page 1
JAVASTUDIO™
COLLECTION
COFFEE MAKERS
WITH GLASS CARAFE
INSTRUCTIONS
CAFETIÈRES
COLLECTION
JAVASTUDIO
AVEC CARAFE EN VERRE
INSTRUCTIONS
™
COLECCIÓN
™
JAVASTUDIO
CAFETERAS
ELÉCTRICAS
CON GARAFFA
DE VIDRIO
INSTRUCCIONES
KCM511, KCM534
USA: 1-800-541-6390
Canada: 1-800-807-6777
KitchenAid.com
KitchenAid.ca
Page 2

Proof of Purchase & Product Registration
Always keep a copy of the sales receipt
showing the date of purchase of your
Coffee Maker. Proof of purchase will
assure you of in-warranty service.
Before you use your Coffee Maker, please
fill out and mail your product registration
card packed with the unit. This card will
Model Number ______________________________________________________________
Serial Number _______________________________________________________________
Date Purchased ______________________________________________________________
Store Name and Location ______________________________________________________
enable us to contact you in the unlikely
event of a product safety notification and
assist us in complying with the provisions
of the Consumer Product Safety Act. This
card does not verify your warranty.
Please complete the following for your
personal records:
Preuve d’achat et enregistrement du produit
Veuillez conserver une copie du ticket de
caisse indiquant la date d’achat de votre
cafetière. La preuve d’achat vous assure du
service d’après-vente sous garantie.
Avant d’utiliser votre cafetière, veuillez
remplir et poster la carte d’enregistrement
du produit accompagnant l’appareil.
Grâce à cette carte, nous pourrons vous
Numéro de modèle __________________________________________________________
contacter dans l’éventualité improbable
d’un avis de sécurité et nous conformer
plus facilement aux dispositions de
la loi sur la sécurité des produits de
consommation. Cette carte ne confirme pas
la garantie.
Veuillez remplir ce qui suit pour votre
dossier personnel :
Numéro de série _____________________________________________________________
Date d’achat ________________________________________________________________
Nom du magasin et emplacement ______________________________________________
Comprobante de compra y registro del producto
Conserve siempre una copia del recibo de
ventas que especifique la fecha de compra
de su cafetera eléctrica. El comprobante
de compra le asegurará el servicio técnico
bajo garantía.
Antes de utilizar su cafetera eléctrica,
complete y envíe por correo su tarjeta
de registro del producto que viene junto
con la unidad. Esta tarjeta nos permitirá
Número del modelo __________________________________________________________
Número de serie _____________________________________________________________
Fecha de compra ____________________________________________________________
Nombre de la tienda y ubicación ________________________________________________
contactarlo en el improbable caso de
la notificación de algún problema de
seguridad con el producto y nos ayudará a
cumplir con las cláusulas de la Consumer
Product Safety Act (Ley sobre la seguridad
de los productos para el consumidor). Esta
tarjeta no asegura su garantía.
Complete la siguiente información para su
registro personal:
Page 3

Table of Contents
INTRODUCTION
Proof of Purchase & Product Registration .............................................. Inside Front Cover
Coffee Maker Safety ........................................................................................................2
Important Safeguards ..................................................................................................... 2
Electrical Requirements ...................................................................................................3
FEATURES AND OPERATION
Coffee Maker General Features .......................................................................................4
Display and Control Pad Features ....................................................................................6
Preparing Your Coffee Maker for Use ..............................................................................7
Pre-Use Cleaning .....................................................................................................7
Installing the Ion-Exchange Water Filter ...................................................................7
To Set the Time-of-Day Clock ...................................................................................7
Operating Your Coffee Maker .........................................................................................8
Brewing Coffee ........................................................................................................ 8
The Pause and Pour Feature ..................................................................................... 9
Using the Automatic Brew Timer ...........................................................................10
The Cleaning Needed Indicator ..............................................................................10
Coffee Brewing Suggestions: Advice for Great Taste ......................................................11
CARE AND CLEANING
Cleaning the Coffee Maker ...........................................................................................12
Descaling the Coffee Maker ..........................................................................................12
Troubleshooting ............................................................................................................13
WARRANTY AND SERVICE INFORMATION
KitchenAid
Hassle-Free Replacement Warranty – 50 United States and District of Columbia ...........15
Hassle-Free Replacement Warranty – Canada ................................................................15
How to Arrange for Warranty Service in Puerto Rico .....................................................15
How to Arrange for Service after the Warranty Expires – All Locations .......................... 16
How to Arrange for Service Outside these Locations ..................................................... 16
How to Order Accessories and Replacement Parts .........................................................16
®
Coffee Maker Warranty ..............................................................................14
ENGLISH
1
Page 4
Coffee Maker Safety
Your safety and the safety of others are very important.
We have provided many important safety messages in this manual and on your
appliance. Always read and obey all safety messages.
ENGLISH
the word “DANGER” or “WARNING.” These words mean:
All safety messages will tell you what the potential hazard is, tell you how to
reduce the chance of injury, and tell you what can happen if the instructions are
not followed.
This is the safety alert symbol.
This symbol alerts you to potential hazards that can kill or hurt you
and others.
All safety messages will follow the safety alert symbol and either
You can be killed or seriously
DANGER
WARNING
injured if you don’t immediately
follow instructions.
You can be killed or seriously injured
if you don’t follow instructions.
IMPORTANT SAFEGUARDS
When using electrical appliances, basic safety precautions should always be followed,
including the following:
1. Read all instructions.
2. Do not touch hot surfaces. Use handles or knobs.
3. To protect against electrical shock, do not immerse cord, plugs, or Coffee Maker in
water or other liquid.
4. Close supervision is necessary when any appliance is used by or near children.
5. Unplug Coffee Maker from outlet before cleaning. Allow to cool before putting on
or taking off parts, and before cleaning the appliance.
6. Do not operate any appliance with a damaged cord or plug, or after the appliance
malfunctions or has been damaged in any manner. Return appliance to the nearest
Authorized Service Facility for examination, repair, or adjustment.
7. The use of accessories not recommended by the appliance manufacturer may result
in fire, shock or injury to persons.
8. Do not use outdoors.
9. Do not let cord hang over edge of table or counter, or touch hot surfaces.
10. Do not place on or near a hot gas or electric burner, or in a heated oven.
11. Do not use appliance for other than its intended use.
2
Page 5

12. Do not use appliance without lid properly placed on container (carafe).
13. The container (carafe) is designed for use with this appliance. It must never be used
on a range top.
14. Do not set a hot container (carafe) on a wet or cold surface.
15. Do not use a cracked container or a container (carafe) having a loose or
weakened handle.
16. Do not clean container with cleaners, steel wool pads, or other abrasive material.
17. This product is designed for household use only.
SAVE THESE INSTRUCTIONS
Electrical Requirements
Volts: 120 V.A.C. only. Hertz: 60 Hz
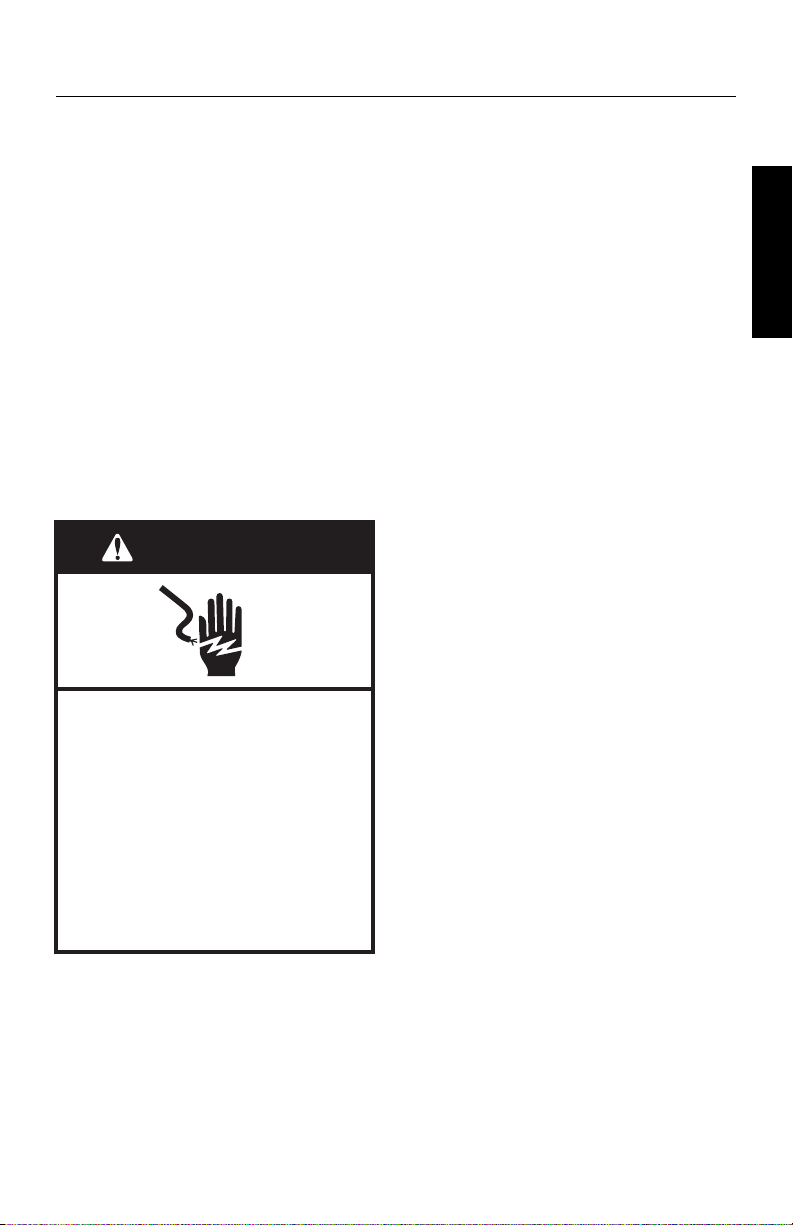
WARNING
Electrical Shock Hazard
Plug into a grounded 3 prong
outlet.
Do not remove ground prong.
Do not use an adapter.
Do not use an extension cord.
Failure to follow these
instructions can result in death,
fire, or electrical shock.
ENGLISH
NOTE: Yo ur Coffee Maker has a 3 prong
grounded plug. To reduce the risk of
electrical shock, this plug will fit in an
outlet only one way. If the plug does
not fit in the outlet, contact a qualified
electrician. Do not modify the plug
in any way.
Do not use an extension cord. If the
power supply cord is too short, have a
qualified electrician or serviceman install
an outlet near the appliance.
3
Page 6

ENGLISH
Coffee Maker General Features
4
Page 7

Coffee Maker General Features
JavaSpa™ Showerhead
Extra-wide showerhead sprays the brew
basket evenly with hot water, ensuring
even coffee extraction and outstanding
flavor.
1100-Watt Heat Pump (not shown)
Powerful heat pump brews rich, flavorful
coffee.
Electronic Temperature Control
Fully electronic control directly monitors
the temperature of the heat pump to
brew - and keep - coffee at optimal
temperatures.
Pause & Pour Feature
Pause and pour lets you remove the
carafe and pour a cup of coffee before
brewing is finished. A special valve seals
the brew basket tightly, eliminating drips.
End-Of-Brewing Tone
A tone sounds when coffee is finished
brewing.
Automatic Shutoff
Coffee Maker automatically shuts off two
hours after brewing.
Split-Lid
Access the brew basket and water
reservoir by lifting the split-lid. The front
lid covers the brew basket and reservoir
fill-channel. The rear lid covers the water
reservoir and water filter.
Brew Basket
Lift the front lid to access the removable,
dishwasher-safe brew basket. The basket
holds a 10-12 cup flat-bottom paper
coffee filter or the gold tone permanent
filter.
Reservoir Fill-Channel
The Coffee Maker features a convenient
front-fill water reservoir. Just lift the front
lid and use the convenient fill-channel to
add water. You can also lift the rear lid
and add water directly to the reservoir.
Brew Timer Display
Shows the AM or PM time-of-day. An
easy-to-set 24 hour brew timer will brew
coffee at the selected time, day or night.
“Time Since Brew” Display
30, 60, 90, and 120-minute segments
light up to indicate the time elapsed since
the last carafe was brewed.
Clean Touch™ Control Pad
The control pad makes operating the
Coffee Maker simple. The pad is sealed
against spills, will not trap grime, and is
a snap to wipe clean.
Glass Carafe
Dishwasher-safe glass carafe features a
no-drip pouring spout and comfortable
handle.
Gold Tone Permanent Filter
The high-performance gold tone filter
eliminates the need for paper coffee
filters. Coffee Maker can also use paper
filters, if desired.
Ion-Exchange Water Filter / Water
Level Indicator (not shown)
Advanced filter reduces chlorine and
other contaminants which impair coffee
flavor. Filter also softens the water, which
increases the time between descalings.
The filter handle serves as a convenient
water level indicator.
Coffee Scoop
Use one level scoop of ground coffee for
each cup desired.
Full-Length Cord Storage
(not shown)
Compartment in back of coffee maker
keeps excess cord out of the way.
Wrap-Around Housing
Stylish design minimizes heat loss from
the carafe while protecting it from
accidental spills and breakage.
ENGLISH
5
Page 8
ENGLISH
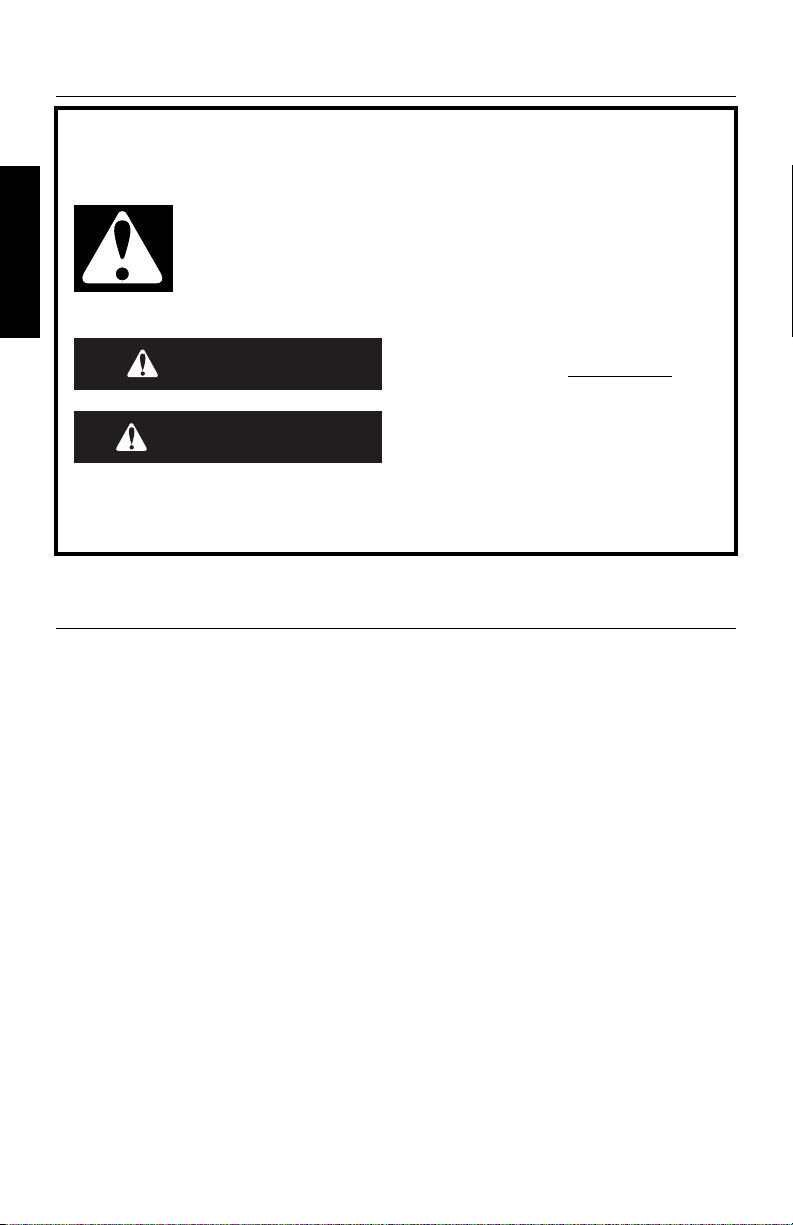
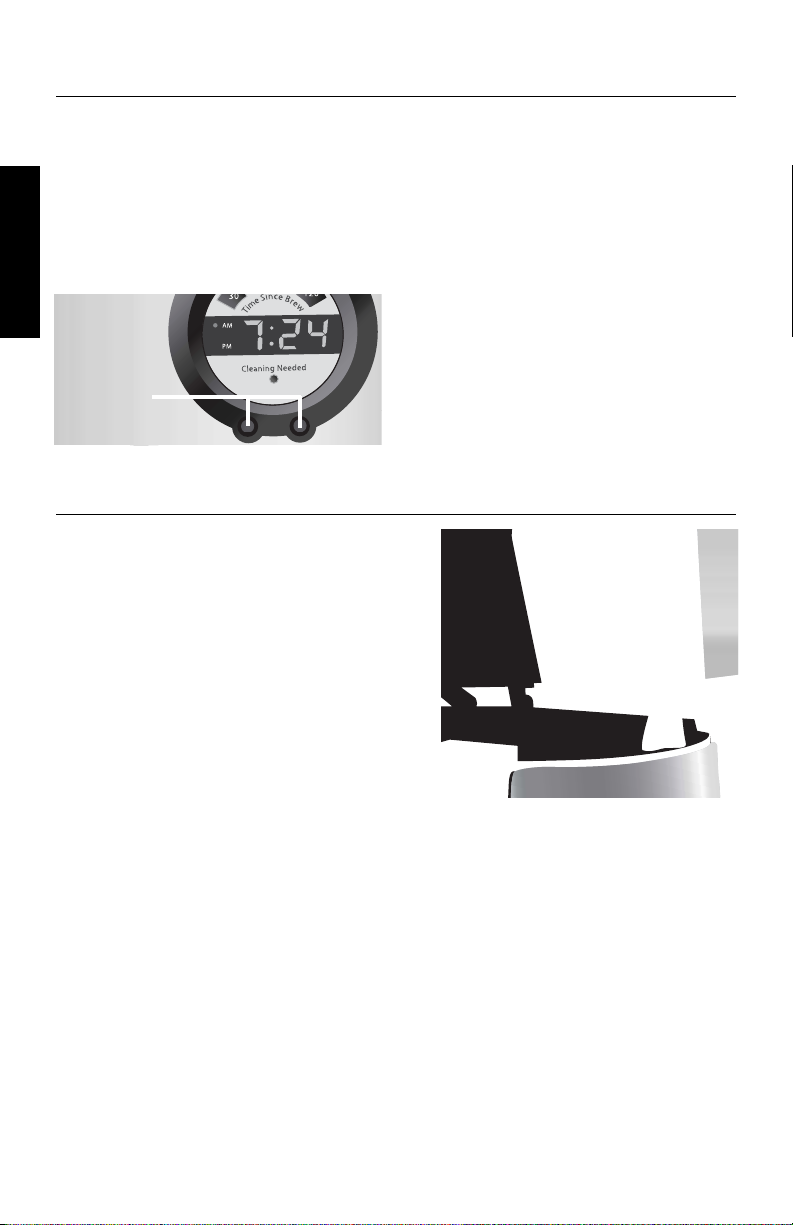
“Time Since Brew”
Display
Brew Timer
Display
Display and Control Pad Features
Cleaning Needed
Indicator
“H” and “M” Buttons
On/Off 1-4 Cup Auto On Set
DISPLAY FEATURES:
Brew Timer Display
Shows the time-of-day. Small lights
indicate whether the time is AM or PM.
“Time Since Brew” Display
Display shows the time elapsed since
the completion of the brewing cycle.
The
“
30” segment will light immediately
after brewing. Every 30 minutes, a new
segment will light.
Cleaning Needed Indicator
The indicator will light after brewing if
the Coffee Maker requires descaling.
“H” and “M” Buttons
Use the “H” (hour) and “M” (minute)
buttons to program the brew timer or set
the time-of-day clock.
(Program)
CONTROL PAD FEATURES:
On/Off
Press to turn the Coffee Maker on or off.
1-4 Cup
This special cycle ensures optimum flavor
when brewing small pots of coffee. An
indicator light shows when the 1 to 4 cup
brew cycle is activated.
Auto On
Press to turn the automatic brew timer on
or off.
Set (Program)
Press to program an automatic brew
time.
Set (Clock)
Press to set the time-of-day clock.
6
Set
(Clock)
Page 9
Preparing Your Coffee Maker for Use
Pre-Use Cleaning
Wash the brew basket, gold tone
permanent filter, and carafe in hot, soapy
water, then rinse with clean water and
dry. Do not use abrasive cleansers or
scouring pads.
Installing the Ion-Exchange
Water Filter
Use of the ion-exchange water filter
is strongly recommended. The filter
softens the water while reducing chlorine
and other contaminants which impair
coffee flavor. The handle of the filter also
serves as a water level indicator. Use of
the water filter is optional: the Coffee
Maker will operate normally without it.
The water filter is for use only with
municipally treated tap water or
well water that is regularly tested for
contaminants.
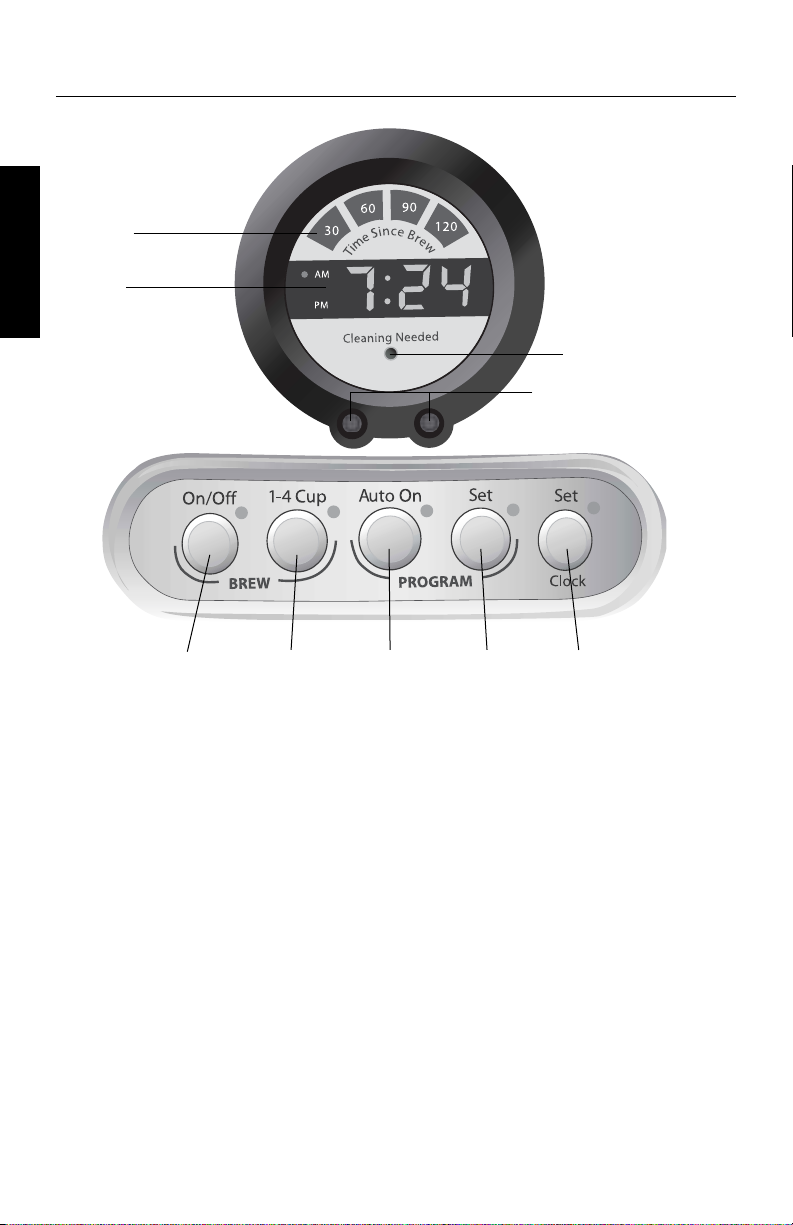
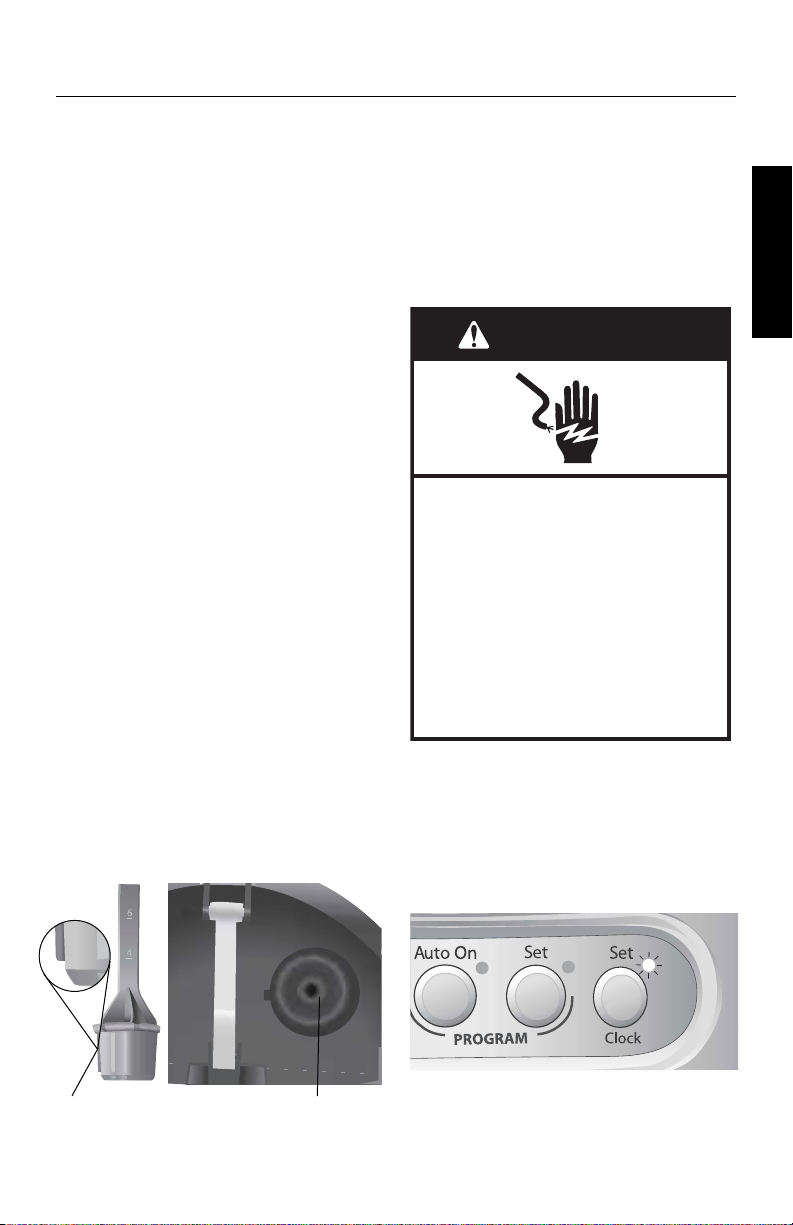
1. The filter consists of a long handle
with a filter cartridge at the end.
2. Place the filter cartridge in a separate
container filled with fresh, cool water.
The cartridge should remain submerged
in the water for 10 minutes. Rinse
the filter under running tap water for
5 seconds after soaking.
3. Lift the rear portion of the split-lid
using the tabs on either side of the lid.
4. Place the filter cartridge in the circular
well at the bottom of the water
reservoir, aligning the tab on the
cartridge with the notch in the well. The
water level markings on the filter handle
will face forward. Push the cartridge
slightly to make sure it fits snugly.
5. Every time you install a new filter, run
the Coffee Maker through a complete
brewing cycle without coffee. Use a
full carafe of clean, cool water.
6. Replace the filter every three months
under normal use. Replace it more
often under heavy use or hard-water
conditions.
To Set the Time-of-Day Clock
WARNING
Electrical Shock Hazard
Plug into a grounded 3 prong
outlet.
Do not remove ground prong.
Do not use an adapter.
Do not use an extension cord.
Failure to follow these
instructions can result in death,
fire, or electrical shock.
1. Plug into a grounded 3 prong outlet.
2. When the Coffee Maker is first
plugged in or when power is restored
after an interruption, the brew timer
display will initially show 12:00 am.
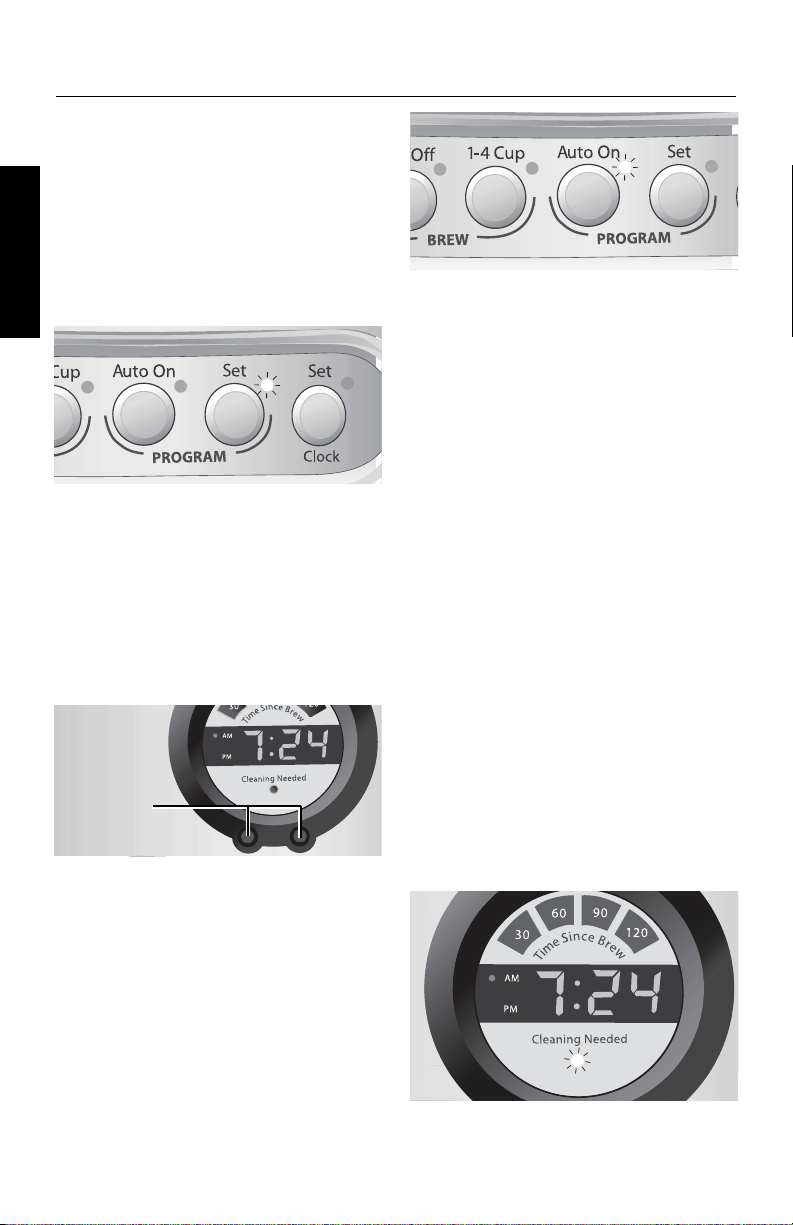
3. Press the Set (Clock) Button. The brew
timer display and Set (Clock) indicator
will begin to flash.
ENGLISH
Ta b Notch & Filter Well
7
Page 10
Preparing Your Coffee Maker for Use
4. Press the “H” (hour) and “M” (minute)
Buttons below the brew timer display
to set the hour and minutes. If a “H”
or “M” Button is pressed and held, the
ENGLISH
digits will scroll rapidly. The AM and
PM indicator lights on the brew timer
display will change when the hour digits
roll past “12”. Make sure the hour set is
correct with respect to AM or PM.
“H” and “M”
Buttons
Operating Your Coffee Maker
BREWING COFFEE
NOTE: Brew one pot of fresh, cool water
and discard before brewing the first pot
of coffee. (First time use only).
1. Fill a carafe with enough fresh, cool
water to make the desired amount
of coffee. A graduated scale on the
side of the glass carafe helps measure
the amount of water required. The
right side of the scale (“coffee”) is a
measurement of carafe volume in
1
4
⁄4 ounce (125 mL) cups. The left side
of the scale (“water”) indicates the
amount of water needed to produce a
given number of cups.
5. Press the Set (Clock) Button to exit
the clock-setting mode. The digits
on the brew timer display will stop
flashing and the Set (Clock) indicator
will go out. The Coffee Maker will
automatically record the displayed
time and exit clock-setting mode if no
buttons are pressed for 10 seconds.
3. After filling the reservoir, place the
carafe on the Coffee Maker’s carafe
tray. Make sure the lid is secure and in
the locked position, and the bottom
of the carafe is fully seated on the
tray – if the carafe isn’t seated, the
pause and pour feature may engage
and may cause water and coffee to
overflow the brew basket.
2. Lift the front lid and fill the water
reservoir with fresh cool water using
the reservoir fill-channel to the right
of the brew basket. Water can also be
poured directly into the reservoir at
the back of the Coffee Maker.
8
Page 11
Operating Your Coffee Maker
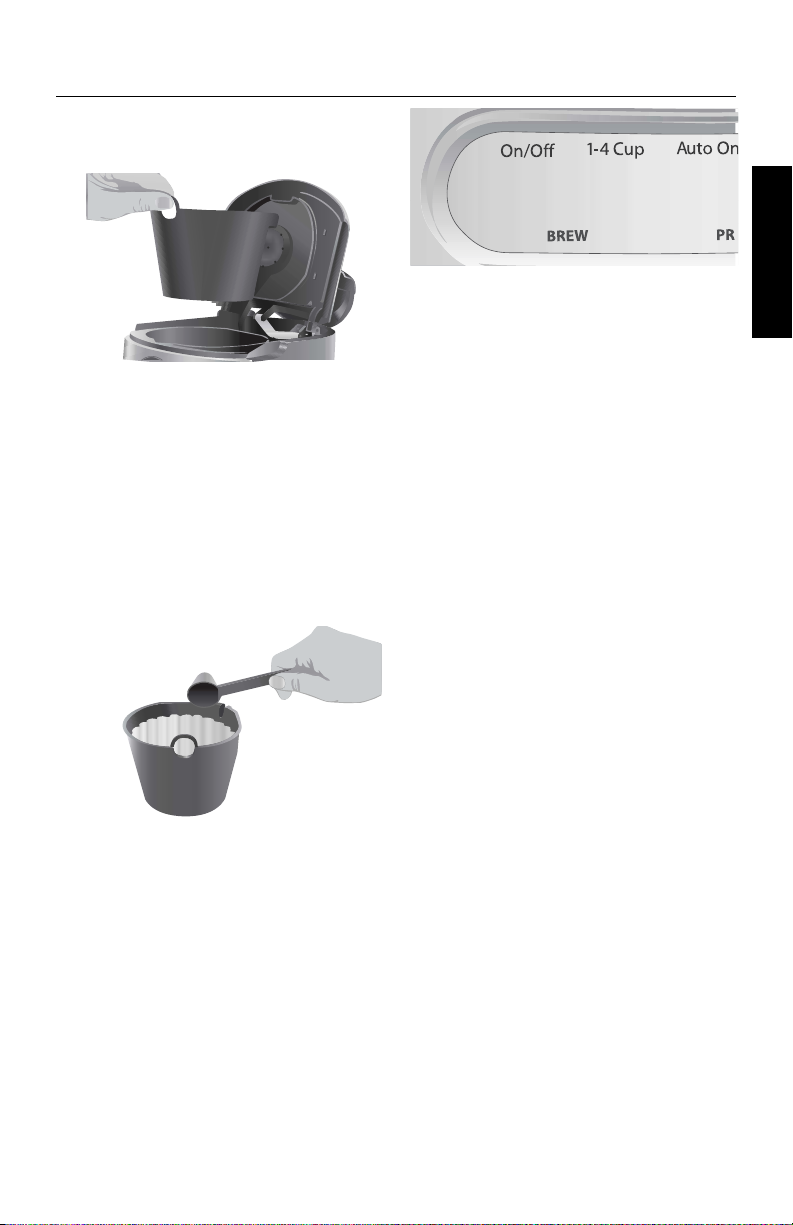
4. Remove the brew basket from the top
of the Coffee Maker by grasping the
finger loop on the front of the basket.
5. Insert a 10-12 cup flat-bottom paper
filter or the gold tone permanent filter
into the brew basket. Do not use both
types of filters at the same time. Using
both filters might cause water and
coffee to overflow the brew basket.
6. Using the included scoop, fill the filter
with one level scoop of ground coffee
for each cup desired. Use a medium
grind appropriate for automatic drip
coffee makers: too fine a grind will
produce bitterness and may clog the
coffee filter.
NOTE: Always place the filter and
coffee into the removable brew basket.
Do not operate the Coffee Maker
without the brew basket in place.
7. Shake the brew basket slightly to even
out the bed of coffee. Place the basket
into the Coffee Maker, push it down
to seat it securely. Be sure the front lid
is fully closed before brewing.
8. Press the On/Off Button to begin
brewing coffee. If you are only
brewing 1 to 4 cups of coffee, press
the 1-4 Cup Button immediately after
pressing the On/Off Button. The 1 to
4 cup brew cycle heats small
quantities of water thoroughly,
ensuring optimum flavor with small
pots of coffee.
NOTE: Lifting the front lid while coffee is
brewing will interrupt the brew process
and impair flavor.
9. The Coffee Maker will sound the
end-of-brewing tone when brewing
is complete.
10. The “Time Since Brew” display
indicates the time elapsed since the
completion of the brewing cycle.
11. At the end of 2 hours, the Coffee
Maker will automatically shut off. To
turn off the Coffee Maker manually,
press the On/Off button. The outside of
the carafe may be warm to the touch
after brewing. Use discretion when
placing the carafe on unprotected
surfaces immediately after brewing.
12. Repeat steps 1-8 to brew additional
carafes of coffee. Always turn off the
Coffee Maker and allow it to cool for
five minutes before starting the next
brew cycle.
THE PAUSE AND POUR FEATURE
The pause and pour feature enables you
to remove the carafe from the Coffee
Maker and pour a cup of coffee before
brewing is finished. When the carafe is
removed, a special valve stops the flow
of coffee from the brew basket. Brewing,
however, does not stop. If the carafe is
not placed back on the Carafe Tray
within 25 seconds, water and coffee will
overflow the brew basket.
9
ENGLISH
Page 12
Operating Your Coffee Maker
USING THE AUTOMATIC BREW TIMER
The Coffee Maker can be programmed to
brew coffee at a preset time, making it easy
to wake up to fresh coffee every morning.
ENGLISH
To program and activate the automatic
brew timer:
1. Press the Set (Program) Button. The brew
timer display and Set (Program) indicator
will begin to flash. The brew timer
display will show the last brew time set.
2. Press the “H” (hour) and “M” (minute)
Buttons below the brew timer display
to set the hour and minutes. If a “H”
or “M” Button is pressed and held,
the digits will scroll rapidly. The AM
and PM indicator lights on the brew
timer display will change when the
hour digits roll past “12”. Make sure
the desired brew time is correct with
respect to AM or PM.
“H” and “M”
Buttons
3. After setting the brew time, press
the Set (Program) Button to exit the
program-setting mode. The Coffee
Maker will automatically record the
displayed brew time and exit the
program-setting mode if no buttons
are pressed for 10 seconds.
4. Fill the Coffee Maker with coffee
and fresh water, then activate the
automatic brew timer by pressing the
Auto On Button. The programmed
brew time will appear briefly on the
brew timer display before it returns
to the time-of-day, and the Auto On
indicator will illuminate.
5. The Coffee Maker will begin brewing
at the programmed time.
6. Each time you want the Coffee Maker
to brew at the programmed time,
activate the automatic brew timer
by pressing the Auto On Button. The
Coffee Maker will always default to
the last brew time set.
NOTE: To cancel automatic brewing,
deactivate the brew timer by pressing the
Auto On Button. When deactivated, the
Auto On indicator light will go out.
If program time has not been set prior
to pressing Auto On button, the coffee
maker will enter program set mode (see
“Using the Automatic Brew Timer” on
page 10).
THE CLEANING NEEDED INDICATOR
Calcium deposits (“scale”) from water will
build up in the Coffee Maker heat pump
over time and impair brewing efficiency
and coffee quality. When the Coffee
Maker detects a build-up of scale, the
cleaning needed indicator will light after
a brewing cycle is complete. Once this
occurs, descaling should be done as soon
as possible to preserve the performance
and life of your Coffee Maker. Please see
page 12 for descaling steps.
10
Page 13

Coffee Brewing Suggestions:
Advice for Great Taste
Fresh Coffee Beans
Truly great coffee can only come from
fresh coffee beans. To preserve the
freshness of your coffee beans, keep the
beans in an opaque, air-tight container
and store them in a cool, dry place.
Refrigeration is not recommended, as
condensation tends to form on the
beans whenever the container is opened.
Freezing can help preserve beans stored
for an extended period, but it will also
impair the flavor.
The Right Grind
The best cup of coffee comes from
coffee beans that are properly ground
just before brewing. Grinders like the
KitchenAid
LINE
KitchenAid
excellent results. When grinding, be
sure to grind your coffee to a medium
grind level – the appropriate grind for
automatic drip coffee makers.
The Proper Amount
of Ground Coffee
A good starting point is one scoop
of coffee for every cup of brew water
marked on the carafe or the water filter
guide. Finer grinds usually require less
coffee, but may also produce bitterness
and clog the filter.
®
Blade Coffee Grinder, PRO
®
Series Burr Coffee Mill, or the
®
Model A-9® Coffee Mill offer
For weaker coffee, brew using the
suggested ratio of coffee grounds
and water, then dilute with hot water.
This maximizes flavor and minimizes
bitterness.
Brew Water Purity
For better tasting coffee, use the ionexchange water filter that comes
with your Coffee Maker. It reduces
contaminants, softens the water, and
enhances flavor. Be sure to replace the
filter promptly every three months.
Where local water is extremely poor,
you may wish to use bottled water. Do
not use distilled water or mineral water
since they can damage your Coffee
Maker.
Coffee Maker Cleanliness
Since the coffee oils that build up on the
brew basket and carafe can go stale and
impair the flavor of the brewed coffee,
it’s important that these two items are
cleaned daily in order to make the besttasting coffee.
ENGLISH
11
Page 14

Care and Cleaning
Cleaning the Coffee Maker
1. Remove the brew basket and carafe
from the Coffee Maker.
2. Wash the brew basket and gold tone
ENGLISH
permanent filter in hot, soapy water
and rinse with hot water. Do not use
abrasive cleansers or scouring pads.
These parts can also be washed in the
upper rack of a dishwasher.
3. Unplug the Coffee Maker and wipe
the housing with a warm, soapy cloth.
Then wipe clean with a damp cloth
and dry with a soft cloth. Do not use
abrasive cleansers or scouring pads.
Descaling the Coffee Maker
The Coffee Maker can be descaled using
a packaged descaling agent or vinegar.
Always mix the descaling solution using
cool water.
• When using a descaling agent, follow
the directions on the package for the
recommended amounts of descaling
agent and water to use.
• When using vinegar, fill the carafe with
a solution consisting of
1
⁄2 water.
1
⁄2 vinegar and
Descaling Steps:
1. Before descaling, always remove the
water filter (see “Installing the IonExchange Water Filter” on page 7) and
make sure the brew basket contains
no coffee or coffee filters.
2. Run the Coffee Maker through a
complete brewing cycle using a full
carafe of the descaling solution.
3. If the cleaning needed indicator lights
after the brewing cycle is complete,
repeat Step 2 using fresh descaling
solution. Keep repeating Step 2 until
the cleaning needed indicator no
longer lights after brewing.
4. Rinse the Coffee Maker by running
it through two brewing cycles using a
full carafe of fresh, cool water
each time.
5. Wash the brew basket in hot, soapy
water and rinse with hot water. This
part can also be washed in the upper
rack of the dishwasher.
6. Reinstall or replace the water filter.
Replace the filter every three months
under normal usage, or more often
with heavy use.
12
Page 15
Troubleshooting
• If the brew timer display is not
illuminated:
Check to see if the Coffee Maker is
plugged into a grounded 3 prong outlet.
If it is, check the fuse or circuit breaker
on the electrical circuit the Coffee Maker
is connected to and make sure the circuit
is closed.
• If only a portion of the water
added to the Coffee Maker actually
brews:
The Coffee Maker requires immediate
descaling. Please refer to the descaling
instructions on the previous page.
• If “Err4” appears on the brew
timer display:
– A button may be jammed. Unplug the
Coffee Maker and press each button
several times.
WARNING
• If “Err1”, “Err2”, or “Err3” appear
on the brew timer display:
Press the On/Off Button to reset the
Coffee Maker. (If the Coffee Maker
has been stored or used in a cool
environment, warm the Coffee Maker to
normal room temperature before doing
this.) If the error codes reappear, there
is a problem with the Coffee Maker
electronics.
If the problem cannot be fixed with the
steps above, please refer to the Warranty
and Service section beginning on the
following page.
ENGLISH
Electrical Shock Hazard
Plug into a grounded 3 prong
outlet.
Do not remove ground prong.
Do not use an adapter.
Do not use an extension cord.
Failure to follow these
instructions can result in death,
fire, or electrical shock.
– Plug the Coffee Maker into a grounded
3 prong outlet.
– If “Err4” appears again on the display,
repeat this procedure.
13
Page 16
KitchenAid® Coffee Maker Warranty
Length of
Warranty:
50 United States, the
District of Columbia,
ENGLISH
Canada, and Puerto
Rico: One-year limited
warranty from date of
purchase.
DISCLAIMER OF IMPLIED WARRANTIES; LIMITATION OF REMEDIES IMPLIED
WARRANTIES, INCLUDING TO THE EXTENT APPLICABLE WARRANTIES OF
MERCHANTABILITY OR FITNESS FOR A PARTICULAR PURPOSE, ARE EXCLUDED TO THE
EXTENT LEGALLY PERMISSIBLE. ANY IMPLIED WARRANTIES THAT MAY BE IMPOSED BY
LAW ARE LIMITED TO ONE YEAR, OR THE SHORTEST PERIOD ALLOWED BY LAW. SOME
STATES AND PROVINCES DO NOT ALLOW LIMITATIONS OR EXCLUSIONS ON HOW LONG
AN IMPLIED WARRANTY OF MERCHANTABILITY OR FITNESS LASTS, SO THE ABOVE
LIMITATIONS OR EXCLUSIONS MAY NOT APPLY TO YOU.
KitchenAid
Will Pay For:
50 United States, the
District of Columbia
and Canada: Hassle-free
replacement of your
Coffee Maker. See the
following page for details
on how to arrange for
replacement.
OR
In Puerto Rico:
The replacement parts
and repair labor costs to
correct defects in materials
and workmanship. Service
must be provided by an
Authorized KitchenAid
Service Center. To arrange
for service, follow the
instructions on page 15.
KitchenAid
Will Not Pay For:
A. Repairs when Coffee
Maker is used in other
than normal single
family home use.
B. Damage resulting from
accident, alteration,
misuse or abuse or
use with products
not approved by
KitchenAid.
C. Replacement parts or
repair labor costs for
Coffee Maker when
operated outside the
country of purchase.
IF THIS PRODUCT FAILS TO WORK AS WARRANTED, CUSTOMER’S SOLE AND EXCLUSIVE
REMEDY SHALL BE REPAIR OR REPLACEMENT ACCORDING TO THE TERMS OF THIS
LIMITED WARRANTY. KITCHENAID AND KITCHENAID CANADA DO NOT ASSUME ANY
RESPONSIBILITY FOR INCIDENTAL OR CONSEQUENTIAL DAMAGES. This warranty gives
you specific legal rights and you may also have other rights which vary from state to
state or province to province.
14
Page 17

Hassle-Free Replacement Warranty –
50 United States and District of Columbia
We’re so confident the quality of our
products meets the exacting standards
of KitchenAid that, if your Coffee
Maker should fail within the first year
of ownership, KitchenAid will arrange
to deliver an identical or comparable
replacement to your door free of charge
and arrange to have your original Coffee
Maker returned to us. Your replacement
unit will also be covered by our one year
limited warranty. Please follow these
instructions to receive this quality service.
If your KitchenAid
fail within the first year of ownership,
simply call our toll-free Customer
Satisfaction Center at 1-800-541-6390
Monday through Friday, 8 a.m. to 8 p.m.
(Eastern Time), or Saturday, 10 a.m. to
5 p.m. Give the consultant your complete
shipping address. (No P.O. Box numbers,
please.)
When you receive your replacement
Coffee Maker, use the carton and packing
materials to pack up your original Coffee
Maker. In the carton, include your name
and address on a sheet of paper along
with a copy of the proof of purchase
(register receipt, credit card slip, etc.).
®
Coffee Maker should
Hassle-Free Replacement Warranty – Canada
We’re so confident the quality of our
products meets the exacting standards
of the KitchenAid
Coffee Maker should fail within the first
year of ownership, KitchenAid Canada
will replace your Coffee Maker with an
identical or comparable replacement. Your
replacement unit will also be covered
by our one year limited warranty. Please
follow these instructions to receive this
quality service.
brand that, if your
If your KitchenAid
fail within the first year of ownership,
take the Coffee Maker or ship collect to
an Authorized KitchenAid Canada Service
Centre. In the carton include your name
and complete shipping address along
with a copy of the proof of purchase
(register receipt, credit card slip, etc.). Your
replacement Coffee Maker will be returned
prepaid and insured. If you are unable to
obtain satisfactory service in this manner
call our toll-free Customer Interaction
Centre at 1-800-807-6777.
Or write to us at:
Customer Interaction Centre
KitchenAid Canada
1901 Minnesota Court
Mississauga, ON L5N 3A7
®
Coffee Maker should
ENGLISH
How to Arrange for Warranty Service
in Puerto Rico
Your KitchenAid® Coffee Maker is covered
by a one-year limited warranty from
the date of purchase. KitchenAid will
pay for replacement parts and labor
costs to correct defects in materials and
workmanship. Service must be provided by
an Authorized KitchenAid Service Center.
Ta ke the Coffee Maker or ship prepaid
and insured to an Authorized KitchenAid
Service Center. Your repaired Coffee Maker
will be returned prepaid and insured.
If you are unable to obtain satisfactory
service in this manner, call toll-free
1-800-541-6390 to learn the location
of a Service Center near you.
15
Page 18

How to Arrange for Service
after the Warranty Expires – All Locations
Before calling for service, please review the
Troubleshooting section on page 13.
For service information in the 50
ENGLISH
United States, District of Columbia,
and Puerto Rico,
call toll-free 1-800-541-6390.
Or write to:
Customer Satisfaction Center
KitchenAid Portable Appliances
P. O. Box 218
St. Joseph, MI 49085-0218
Or contact an Authorized Service Center
near you.
How to Arrange for Service
Outside these Locations
Consult your local KitchenAid dealer or
the store where you purchased the
Coffee Maker for information on how to
obtain service.
For service information in Canada,
call toll-free 1-800-807-6777.
Or write to:
Customer Interaction Centre
KitchenAid Canada
1901 Minnesota Court
Mississauga, ON L5N 3A7
For service information in Mexico,
call toll-free
01-800-024-17-17
(JV Distribuciones)
Or
01-800-902-31-00
(Industrias Birtman)
How to Order Accessories
and Replacement Parts
To order accessories or replacement
parts for your Coffee Maker in the 50
United States, District of Columbia,
and Puerto Rico,
call toll-free 1-800-541-6390 Monday
through Friday, 8 a.m. to 8 p.m. (Eastern
Time), or Saturday, 10 a.m. to 5 p.m.
Or write to:
Customer Satisfaction Center
KitchenAid Portable Appliances
P. O. Box 218
St. Joseph, MI 49085-0218
To order accessories or replacement
parts for your Coffee Maker in
Canada,
call toll-free 1-800-807-6777.
Or write to:
Customer Interaction Centre
KitchenAid Canada
1901 Minnesota Court
Mississauga, ON L5N 3A7
To order accessories or replacement
parts for your Coffee Maker in
Mexico,
call toll-free
01-800-024-17-17
(JV Distribuciones)
Or
01-800-902-31-00
(Industrias Birtman)
16
Page 19

Table des matières
INTRODUCTION
Preuve d’achat et enregistrement du produit ...............................Deuxième de couverture
Sécurité de la cafetière ..................................................................................................18
Consignes de sécurité importantes ................................................................................18
Alimentation .................................................................................................................19
CARACTÉRISTIQUES ET FONCTIONNEMENT
Caractéristiques générales de la cafetière ......................................................................20
Caractéristiques de l’affichage et des touches de commande ........................................22
Préparer la cafetière ......................................................................................................23
Nettoyage avant utilisation ....................................................................................23
Installer le filtre à eau à échange ionique ..............................................................23
Pour régler l’heure à l’horloge ...............................................................................23
Utilisation de la cafetière ...............................................................................................24
Faire le café ...........................................................................................................24
La fonction pause et verser ....................................................................................25
Utiliser la minuterie ...............................................................................................26
Indicateur de besoin de nettoyage .........................................................................26
Suggestions pour faire le café : Conseil pour un café savoureux ....................................27
FRANÇAIS
ENTRETIEN ET NETTOYAGE
Nettoyer la cafetière ......................................................................................................28
Détartrer la cafetière .....................................................................................................28
Dépannage ...................................................................................................................29
INFORMATION SUR LA GARANTIE ET LES RÉPARATIONS
Garantie Cafetière KitchenAid
Garantie de satisfaction totale et de remplacement –
50 États des États-Unis, district fédéral de Columbia. ....................................................31
Garantie de satisfaction totale et de remplacement – Canada .......................................31
Comment obtenir une réparation sous garantie à Puerto Rico ......................................31
Comment obtenir une réparation hors garantie – tous les territoires .............................32
Comment obtenir une réparation en dehors de ces territoires .......................................32
Comment commander des accessoires et des pièces de rechange. ................................32
®
.....................................................................................30
17
Page 20

Sécurité de la cafetière
Votre sécurité et celle des autres est très importante.
Nous donnons de nombreux messages de sécurité importants dans ce manuel
et sur votre appareil ménager. Assurez-vous de toujours lire tous les messages
de sécurité et de vous y conformer.
Voici le symbole d’alerte de sécurité.
Ce symbole d’alerte de sécurité vous signale les dangers
potentiels de décès et de blessures graves à vous et à d’autres.
To us les messages de sécurité suivront le symbole d’alerte de
sécurité et le mot “DANGER” ou “AVERTISSEMENT”. Ces mots signifient :
FRANÇAIS
DANGER
AVERTISSEMENT
To us les messages de sécurité vous diront quel est le danger potentiel et vous
disent comment réduire le risque de blessure et ce qui peut se produire en cas
de non-respect des instructions.
Risque possible de décès ou de
blessure grave si vous ne suivez pas
immédiatement les instructions.
Risque possible de décès ou de
blessure grave si vous ne suivez
pas les instructions.
CONSIGNES DE SÉCURITÉ IMPORTANTES
Lorsqu’on utilise un appareil électrique, il faut toujours respecter certaines règles de
sécurité fondamentales, notamment les suivantes.
1. Lire toutes les instructions.
2. Ne pas toucher les surfaces chaudes. Utiliser les poignées ou les boutons.
3. Pour protéger contre les risques de choc électrique, ne pas plonger le cordon, les
fiches ou la cafetière dans l’eau ou dans aucun liquide.
4. Il est nécessaire de surveiller de près l’utilisation de cet appareil par ou à proximité
d’enfants.
5. Débrancher l’appareil avant de le nettoyer. Laisser refroidir avant de monter ou
d’enlever des pièces et avant de nettoyer.
6. Ne pas utiliser un appareil dont la fiche ou le cordon sont abîmés, qui présente un
problème de fonctionnement ou qui est endommagé de quelque manière que ce
soit. L'emporter au centre de service autorisé le plus proche pour examen, réparation
ou réglage.
7. L’emporter d’accessoires non recommandés par le fabricant de l’appareil pourrait
provoquer un incendie, un choc électrique ou des blessures.
8. Ne pas utiliser à l’extérieur.
9. Ne pas laisser pendre le cordon de la table ou du comptoir ou toucher des
surfaces chaudes.
18
Page 21

10. Ne pas placer près d’une plaque électrique chaude, d’un brûleur allumé ou dans un
four chaud.
11. Ne pas utiliser cet appareil à une fin autre que celle pour laquelle il a été conçu.
12. N’utiliser cet appareil que si le couvercle est correctement placé sur la carafe.
13. La carafe a été conçue pour être utilisée avec cet appareil. Elle ne doit jamais être
utilisée sur une cuisinière.
14. Ne pas poser la carafe chaude sur une surface mouillée ou froide.
15. Ne pas utiliser une carafe fêlée ou possédant une poignée desserrée ou affaiblie.
16. Ne pas nettoyer la carafe avec des nettoyeurs, de la paille de fer ou d’autres
matériaux abrasifs.
17. Cet appareil est pour usage domestique uniquement.
CONSERVEZ CES INSTRUCTIONS
Alimentation
Tension : 120 volts c.a. uniquement.
Fréquence : 60 Hz
AVERTISSEMENT
Risque de choc électrique
Brancher sur une prise à 3
alvéoles reliée à la terre.
Ne pas enlever la broche de
liaison à la terre.
Ne pas utiliser un adaptateur.
Ne pas utiliser un câble de
rallonge.
Le non-respect de ces
instructions peut causer
un décès, un incendie ou un
choc électrique.
FRANÇAIS
REMARQUE : La cafetière est équipée
d’une prise à la terre à 3 broches. Pour
réduire le risque de choc électrique, cette
prise mâle ne peut être insérée dans
la prise femelle que d’une seule façon.
Contacter un électricien qualifié si la prise
mâle ne s’insère pas correctement dans la
prise femelle. Ne pas modifier la prise de
quelque manière que ce soit.
Ne pas utiliser de rallonge. Si le cordon
d’alimentation est trop court, faire installer
une prise femelle proche de l’appareil par
un électricien qualifié.
19
Page 22

FRANÇAIS
20
Page 23

Caractéristiques générales de la cafetière
Pomme d'arrosoir JavaSpa™
La pomme très large arrose le panier
d’eau chaude de façon uniforme,
garantissant une extraction régulière du
café et un goût extraordinaire.
Pompe à chaleur de 1100 watts
(non illustré)
La pompe à chaleur puissante permet de
faire un café riche et goûteux.
Commande électronique de
température
Une commande sophistiquée de
température contrôle la pompe à chaleur
puissante de 1100 watts pour garantir
des températures optimales pour infuser
le café et le laisser en attente.
Fonction Pause et Verser
Pause et verser permet d’enlever la carafe
et de verser une tasse avant que le café soit
fini. Une valve spéciale scelle étroitement le
panier, empêchant de couler.
To nalité de « Café prêt »
Une tonalité résonne quand le café
est prêt.
Arrêt automatique
La cafetière s’arrête automatiquement
deux heures après la fin de l’infusion.
Couvercle articulé
Soulever le couvercle articulé pour
atteindre le panier et le réservoir d’eau. La
partie avant du couvercle couvre le panier
et le canal de remplissage du réservoir. La
partie arrière couvre le réservoir d’eau et
le filtre à eau.
Panier-filtre
Soulever la partie avant du couvercle pour
atteindre le panier filtre amovible allant
au lave-vaisselle. Le panier-filtre permet
l’utilisation d’un filtre à café en papier à
fond plat pour 10 à 12 tasses de café ou
du filtre permanent doré.
Canal de remplissage du réservoir
La Cafetière possède un réservoir pratique
à remplissage par l’avant. Soulever la
partie avant du couvercle et utiliser le
canal de remplissage pratique pour
ajouter de l’eau. Vous pouvez aussi
soulever la partie arrière du couvercle et
ajouter de l’eau directement au réservoir.
Affichage minuterie
Montre l’heure du jour AM ou PM. Une
minuterie 24 heures facile à régler fera le
café à l’heure choisie, jour ou nuit.
Affichage « temps écoulé »
Des segments de 30-, 60-, 90- et 120minutes s’allument pour indiquer le
temps écoulé depuis que la dernière
carafe de café a été faite.
Clavier de commande Clean Touch™
L’ opération de la cafetière est rendue très
simple par le clavier de commande. Le
clavier est scellé contre ce que l’on peut
renverser. Il ne ramasse pas la saleté et il
est très facile à nettoyer.
Carafe en verre
La carafe en verre lavable au lave-vaisselle
comprend un bec verseur antigouttes et
une poignée ergonomique.
Filtre permanent doré
Le filtre doré à haute performance
élimine le besoin de filtres en papier. La
cafetière prend aussi des filtres en papier
si on le désire.
Indicateur de niveau d’eau/filtre à
eau à échange ionique (non illustré)
Le filtre perfectionné réduit la quantité
de chlore et d’autres contaminants qui
détériorent le goût du café. Le filtre
adoucit aussi l’eau, ce qui allonge
l’intervalle entre détartrages. Pratique,
la poignée du filtre sert d’indicateur de
niveau d’eau pratique.
Mesure
Utiliser une mesure à niveau de café
moulu par tasse.
Rangement du cordon pleine
longueur (non illustré)
Le compartiment au dos de la cafetière
permet de ranger l’excédent de cordon.
Boîtier enveloppant
Sa conception élégante réduit les pertes
de chaleur tout en protégeant la carafe
des déversements et des bris accidentels.
21
FRANÇAIS
Page 24

FRANÇAIS
Caractéristiques de l’affichage et
des touches de commande
22
Page 25

Préparer la cafetière
Nettoyage avant utilisation
Laver le panier, le filtre permanent doré et
la carafe dans de l’eau savonneuse chaude
puis rincer à l’eau claire et sécher. Ne pas
utiliser de produits de nettoyage abrasifs
ou des tampons à récurer.
Installer le filtre à eau
à échange ionique
Il est fortement recommandé d’utiliser le
filtre à eau à échange ionique. Le filtre
adoucit l’eau tout en réduisant la quantité
de chlore et d’autres contaminants qui
détériorent le goût du café. La poignée
du filtre sert aussi d’indicateur de niveau
d’eau. L’utilisation du filtre à eau n’est
pas obligatoire : La Cafetière fonctionnera
normalement sans lui.
Le filtre à eau doit être utilisé
uniquement avec l’eau du robinet
traitée ou avec de l’eau du puits testée
régulièrement pour contaminants.
1. Le filtre consiste en une longue poignée
terminé par une cartouche filtre.
2. Placer la cartouche du filtre dans un
conteneur séparé rempli d’eau douce
fraîche. La cartouche doit rester
submergée dans l’eau pendant 10
minutes. Rincer le filtre sous le robinet
pendant 5 secondes après l’avoir fait
tremper.
3. Soulever la partie arrière du couvercle
en utilisant les onglets sur chaque côté
du couvercle.
4. Placer la cartouche du filtre dans le
trou circulaire au fond du réservoir
d’eau, alignant l’onglet sur la
cartouche avec l’entaille dans le trou.
Les marques de niveau d’eau sur la
poignée du filtre font face à l’avant.
Pousser légèrement la cartouche pour
s’assurer qu’elle rentre serrée.
5. Chaque fois qu’on installe un nouveau
filtre, faire faire un cycle complet sans
café à la cafetière. Utiliser une carafe
pleine d’eau propre et fraîche.
6. En cas d’utilisation normale,
remplacer le filtre tous les trois mois.
Le remplacer plus souvent en cas
d’utilisation plus fréquente ou si l’eau
est calcaire.
Pour régler l’heure à l’horloge
FRANÇAIS
1. Brancher dans une prise à la terre à
3 bornes.
2. Quand la cafetière est branchée pour
la première fois ou après une panne
d’électricité, la minuterie indiquera
12:00 a.m.
3. Appuyer sur le bouton réglage
(horloge). La minuterie s’affiche
et l’indicateur réglage (horloge)
commence à clignoter.
Onglet Entaille et orifice du filtre
23
Page 26

Préparer la cafetière
4. Appuyer sur les boutons « H » (heure)
et « M » (minute) sous l’affichage
de la minuterie pour régler l’heure
et les minutes. Les chiffrent défilent
rapidement si on continue d’appuyer
sur le bouton « H » ou le bouton
« M ». Les voyants AM et PM sur
l’affichage de la minuterie changent
quand le chiffre de l’heure passe
« 12 ». S’assurer que l’heure est réglée
correctement sur AM ou PM.
FRANÇAIS
Boutons
« H » et « M »”
Utilisation de la cafetière
FAIRE LE CAFÉ
REMARQUE : Faire passer une carafe
d’eau douce fraîche et jeter avant de faire
le café pour la première fois. (Première
utilisation uniquement.)
1. Remplisser une carafe avec une
quantité suffisante d’eau douce et
fraîche pour préparer la quantité de
café désirée. Une échelle graduée sur
la paroi de la carafe en verre facilite la
mesure de la quantité d’eau requise. Le
côté droit de l’échelle (« Coffee ») est
une mesure du volume de la carafe en
tasse de 125 ml (4 1⁄4 onces). Le côté
gauche de l’échelle (« Water ») indique
la quantité d’eau requise pour préparer
un nombre de tasses donné.
2. Soulever le couvercle avant et
remplissez le réservoir d’eau douce
et fraîche en utilisant le canal du
réservoir de remplissage situé à
droite du panier d’infusion. Vous
5. Appuyer sur le bouton Réglage
(horloge) pour sortir du mode de
réglage de l’horloge. Les chiffres sur
l’affichage minuterie s’arrêtent de
clignoter et l’indicateur de réglage
(horloge) s’éteint. La cafetière
enregistre automatiquement le temps
affiché et le mode de réglage de
l’horloge si aucun bouton n’est pressé
pendant 10 secondes.
pouvez également verser l’eau
directement dans le réservoir situé à
l’arrière de la cafetière.
3. Après avoir rempli le réservoir, placer
la carafe sur le plateau à carafe.
Assurez-vous que le couvercle est
bien fermé et bloqué. Veiller à ce
que le fond de la carafe repose bien
sur le plateau - si la carafe n’est pas
bien placée, la fonction Pause et
verser peut se déclencher et causer
un débordement d’eau et de café du
panier d’infusion.
24
Page 27

Utilisation de la cafetière
4. Enlever le panier du dessus de la
cafetière en le prenant par la petite
anse sur le devant du panier.
5. Placer un filtre à café en papier à fond
plat pour 10 à 12 tasses ou le filtre
permanent doré dans le panier-filtre.
Ne pas utiliser les deux types de filtre
en même temps. Utiliser les deux
filtres peut faire déborder l’eau et le
café du panier-filtre.
6. À l’aide de la mesure, remplisser
le filtre avec une mesure à niveau
de café moulu pour chaque tasse
désirée. Utiliser du café moulu à
grosseur moyenne pour les cafetières
automatiques goutte à goutte.
Des grains trop finement moulus
produisent de l’amertume et peuvent
engorger le filtre à café.
REMARQUE : Toujours mettre le filtre
et le café dans le panier amovible.
Ne pas utiliser la Cafetière si le panier
n’est pas en place.
7. Secouer légèrement le panier-filtre
pour aplanir le café. Placer le panier
dans la cafetière et poussez-le vers
le bas pour bien le mettre en place.
Assurez-vous que le couvercle avant
est complètement fermé avant de
commencer.
8. Appuyer sur le bouton Marche/Arrêt
pour de commencer à faire le café.
Si on ne fait que d’1 à 4 tasses de
café, appuyer sur le bouton 1-4 tasses
immédiatement après avoir appuyé sur
le bouton Marche/Arrêt. Le cycle 1-4
tasses garantit le meilleur goût possible
quand on fait une petite quantité.
REMARQUE : Soulever la partie avant
du couvercle pendant que le café se fait
interrompt le processus et nuit au goût.
9. Quand le café est prêt, la Cafetière
émet une tonalité.
10. L’affichage « temps écoulé » indique le
temps écoulé depuis que le café est fait.
11. Au bout de 2 heures, la Cafetière
s’arrête automatiquement. Appuyer
sur le bouton Marche/Arrêt pour
éteindre la Cafetière manuellement.
L’ extérieur de la carafe peut être
chaud au toucher. Faire attention en
plaçant la carafe sur une surface non
protégée dès que le café est fait.
12. Répéter les étapes 1-8 pour faire
des carafes de café supplémentaires.
Toujours éteindre la Cafetière et la
laisser refroidir pendant cinq minutes
avant de refaire du café.
LA FONCTION PAUSE ET VERSER
La fonction pause et verser permet
d’enlever la carafe de la Cafetière et de
verser une tasse avant que tout le café
soit fait. Une valve spéciale empêche le
café de couler du panier quand on enlève
la carafe. Le café continue cependant de
se faire. De l’eau et du café déborderont
du panier si on ne replace pas la carafe
sur le Plateau à Carafe dans les 25
secondes.
25
FRANÇAIS
Page 28

Utilisation de la cafetière
UTILISER LA MINUTERIE
On peut programmer la cafetière pour
faire le café à une heure déterminée, ce
qui permet de se réveiller à l’odeur du
café frais chaque matin.
Pour programmer et mettre en route la
minuterie :
1. Appuyer sur le bouton réglage
(Programme). La minuterie s’affiche
et l’indicateur réglage (Programme)
commence à clignoter. La minuterie
affiche le dernier réglage.
FRANÇAIS
2. Appuyer sur les boutons « H » (heure)
et « M » (minute) sous l’affichage
de la minuterie pour régler l’heure
et les minutes. Les chiffres défilent
rapidement si on continue d’appuyer
sur le bouton « H » ou sur le bouton
« M ». Les voyants AM et PM sur
l’affichage de la minuterie changent
quand le chiffre de l’heure passe
« 12 ». S’assurer que l’heure
voulue pour faire le café est réglée
correctement sur AM ou PM.
5. La Cafetière commencera à
fonctionner à l’heure programmée.
6. Chaque fois que l’on veut faire du
café à l’heure programmée, mettre
en route la minuterie en appuyant
sur le bouton Auto On. Le défaut
sera toujours le dernier réglage de la
minuterie.
REMARQUE : Pour annuler, désactiver
la minuterie en appuyant sur le bouton
Auto On. Une fois désactivée, la lumière
de l’indicateur Auto On s’éteint. Si
aucune programmation n’a été faite
avant d’appuyer sur le bouton Auto
On, la cafetière se mettra en mode
programmation (voir « Utiliser la
Minuterie » à la page 26).
INDICATEUR DE BESOIN DE NETTOYAGE
Avec le temps, un dépôt de calcium
(« tartre ») de l’eau se forme dans la
pompe à chaleur de la Cafetière et entrave
l’efficacité de l’appareil et la qualité du
café. Quand la Cafetière détecte une
accumulation de tartre, l’indicateur de
besoin de nettoyage d’allume à la fin
d’un cycle. Il faut alors détartrer dès que
possible pour préserver la performance et
la vie utile de la Cafetière. Voir page 28
pour le détartrage.
3. Après avoir réglé l’heure pour faire le
café, appuyer sur le bouton Réglage
(Programme) pour sortir du mode
programmation. La cafetière enregistre
automatiquement le temps affiché et
sort du mode programmation si aucun
bouton n’est pressé pendant 10 secondes.
4. Remplir la Cafetière de café et d’eau
fraîche puis mettre en route la
minuterie en appuyant sur le bouton
Auto On. L’heure programmée
apparaît brièvement sur l’affichage
minuterie avant de revenir à l’heure
réelle. L’indicateur Auto On s’allume.
26
Page 29

Suggestions pour faire le café :
Conseil pour un café savoureux
Grains frais
Un café vraiment bon ne peut provenir
que de grains frais. Pour conserver la
fraîcheur des grains, les garder dans
un conteneur opaque, étanche et les
ranger dans un endroit frais et sec. Il
n’est pas recommandé de réfrigérer.
De la condensation se forme sur les
grains quand on ouvre le conteneur. La
congélation peut aussi aider à conserver
les grains pendant une longue période,
mais cela peut aussi dénaturer le goût.
Moudre correctement
Le meilleur café provient de grains moulus
correctement juste avant de faire le café.
Des moulins à café comme le Moulin à
café avec couteau KitchenAid
à café de la Série Pro Line
café A-9
résultats. Ne pas oublier de moudre au
niveau moyen – le type approprié pour les
cafetières automatiques goutte à goutte.
La bonne quantité de café moulu
Un bon début est une mesure de café
pour chaque tasse d’eau comme indiqué
sur la carafe ou le guide du filtre à eau.
Moudre plus fin demande normalement
moins de café, mais peut aussi produire
de l’amertume et boucher le filtre.
®
KitchenAid offrent d’excellents
®
, le moulin
®
ou le moulin à
Pour faire du café moins fort, utiliser les
proportions de café et d’eau suggérées
puis diluer avec de l’eau chaude. Cela
maximise le goût et minimise l’amertume.
Pureté de l’eau
Pour un café plus goûteux avec un
meilleur goût, utiliser le filtre à eau à
échange ionique qui équipe la Cafetière.
Il réduit les contaminants, adoucit l’eau
et rehausse le goût. Ne pas oublier de
remplacer le filtre tous les trois mois.
Si l’eau locale est de très mauvaise
qualité, on peut préférer d’utiliser de
l’eau en bouteille. Ne pas utiliser de l’eau
minérale ou de l’eau distillée qui peuvent
endommager la Cafetière.
Propreté de la Cafetière
Comme les huiles du café qui
s’accumulent dans le panier et la carafe
peuvent rancir et dénaturer le goût du
café, il est important de les nettoyer
chaque jour pour obtenir un
meilleur café.
FRANÇAIS
27
Page 30

Entretien et nettoyage
Nettoyer la cafetière
1. Enlever le panier et la carafe de
la Cafetière.
2. Laver le panier et le filtre permanent
doré dans de l’eau savonneuse
chaude, puis rincer à l’eau chaude. Ne
pas utiliser de produits de nettoyage
abrasifs ou des tampons à récurer. On
peut aussi nettoyer ces pièces dans le
panier supérieur d’un lave-vaisselle.
3. Débrancher la Cafetière et essuyer le
boîtier avec un torchon savonneux
FRANÇAIS
tiède. Essuyer ensuite avec un torchon
humide et sécher avec un torchon doux.
Ne pas utiliser de produits de nettoyage
abrasifs ou des tampons à récurer.
Détartrer la cafetière
On peut détartrer la Cafetière avec un
agent de détartrage en paquet ou du
vinaigre. Toujours mélanger la solution de
détartrage à l’eau froide.
• Quand on utilise un agent de
détartrage, suivre les instructions
sur le paquet quant à la quantité
recommandée de produit et d’eau.
• Quand on utilise du vinaigre, remplir la
carafe d’une solution moitié vinaigre/
moitié eau.
Étapes à suivre pour le détartrage :
1. Avant de détartrer, toujours enlever
le filtre à eau (voir « Installer le filtre à
eau à échange ionique » à la page 23)
et s’assurer que le panier ne contient
ni café ni filtre.
2. Faire faire un cycle complet à la
Cafetière en utilisant une carafe pleine
de solution détartrante.
3. Si l’indicateur de besoin de nettoyage
s’allume à la fin du cycle, répéter
l’étape 2 avec une solution détartrante
fraîche. Répéter l’étape 2 jusqu’à
ce que l’indicateur de besoin de
nettoyage cesse de s’allumer à la fin
d’un cycle.
4. Rincer la Cafetière en lui faisant faire
deux cycles, utilisant chaque fois une
pleine carafe d’eau fraîche.
5. Laver le panier dans de l’eau
savonneuse tiède et rincer à l’eau
chaude. On peut aussi nettoyer cette
pièce dans le panier supérieur d’un
lave-vaisselle.
6. Réinstaller ou remplacer le filtre à eau.
Remplacer le filtre tous les trois mois
en cas d’usage normal, plus souvent
en cas d’usage plus extensif.
28
Page 31

Dépannage
• Si l’affichage minuterie ne
s’allume pas :
Vérifier que la Cafetière est bien branchée
dans une prise à trois bornes à la terre.
Si c’est le cas, vérifier le fusible ou le
disjoncteur du circuit électrique sur lequel
il est branché et s’assurer que le circuit
est fermé.
• Si seulement une portion de l’eau
ajoutée à la Cafetière chauffe :
Il faut détartrer la Cafetière
immédiatement. Voir les instructions de
détartrage à la page précédente.
• Si « Err4 » apparaît sur l’affichage
minuterie :
– Un bouton peut être coincé.
Débrancher la Cafetière et appuyer
plusieurs fois sur chaque bouton.
AVERTISSEMENT
• Si « Err1 », « Err2 » ou « Err3 »
apparaît sur l’affichage minuterie :
Appuyer sur le bouton Marche/Arrêt
pour réinitialiser la cafetière. (Si la
cafetière a été rangée ou utilisée dans
un milieu froid, la laisser se réchauffer
à la température ambiante normale
avant de le faire.) Si les codes d’erreurs
apparaissent à nouveau, le circuit
électronique de la cafetière fait problème.
Si on ne peut pas réparer le problème en
suivant les étapes ci-dessus, voir la section
Garantie et Réparations qui commence à
la page suivante.
FRANÇAIS
Risque de choc électrique
Brancher sur une prise à 3
alvéoles reliée à la terre.
Ne pas enlever la broche de
liaison à la terre.
Ne pas utiliser un adaptateur.
Ne pas utiliser un câble de
rallonge.
Le non-respect de ces
instructions peut causer
un décès, un incendie ou un
choc électrique.
– Brancher la Cafetière dans une prise à la
terre à 3 bornes.
– Si « Err4 » apparaît encore sur
l’affichage, répéter cette procédure.
29
Page 32

Garantie Cafetière KitchenAid
®
Durée de la garantie :
50 États des États-Unis,
le district fédéral de
Columbia, le Canada et
Puerto Rico : Garantie
limitée d’un an à compter
de la date d’achat.
FRANÇAIS
DÉSAVEU DE GARANTIE TACITE, LIMITATION DES RECOURS LES GARANTIES
TACITES, Y COMPRIS DANS LA MESURE APPLICABLE LES GARANTIES DE QUALITÉ
MARCHANDE OU D’APTITUDE À UN EMPLOI PARTICULIER, SONT EXCLUES DANS LA
MESURE AUTORISÉE PAR LA LOI. TOUTE GARANTIE TACITE IMPOSÉE PAR LA LOI EST
LIMITÉE À UN AN, OU LA DURÉE MINIMUM PERMISE PAR LA LOI. PUISQUE CERTAINES
JURIDICTIONS NE PERMETTENT PAS L’EXCLUSION OU LA LIMITATION DE DURÉE DES
GARANTIES IMPLICITES DE QUALITÉ MARCHANDE OU D’APTITUDE À UN EMPLOI
PARTICULIER, LES LIMITATIONS CI-DESSUS PEUVENT DONC NE PAS S’APPLIQUER À VOUS.
KitchenAid
prendra en charge :
50 États des États-Unis,
district fédéral de
Columbia et le Canada :
Garantie de satisfaction
totale et de remplacement
de votre Cafetière. Consultez
la page suivante pour
obtenir des détails sur la
façon de remplacer
votre Cafetière.
OU
À Puerto Rico:
Les coûts des pièces de
rechange et de maind’œuvre pour corriger
les défauts de matériaux
et de main-d’œuvre. Le
service après-vente doit
être assuré par un Centre
de réparation autorisé
KitchenAid. Pour obtenir
une réparation, suivez les
directives de la page 31.
KitchenAid ne prendra
pas en charge :
A. Les réparations
découlant de
l’utilisation de la
Cafetière dans un
contexte autre que
celui d’un foyer
unifamilial normal.
B. Les dommages
attribuables aux
causes suivantes :
un accident, une
modification, la
mauvaise utilisation,
un emploi abusif
ou une utilisation
non approuvée par
KitchenAid.
C. Les coûts des pièces
de rechange ou de
main-d’oeuvre pour la
Cafetière si ce dernier
est utilisé à l’extérieur
du pays d’achat.
SI CET APPAREIL NE FONCTIONNE PAS COMME GARANTI, LE SEUL ET EXCLUSIF
RECOURS DES CLIENTS EST LA RÉPARATION OU LE REMPLACEMENT SELON LES
DISPOSITIONS DE LA GARANTIE LIMITÉE. KITCHENAID ET KITCHENAID-CANADA
N’ASSUMENT AUCUNE RESPONSABILITÉ EN CAS DE DOMMAGES ACCESSOIRES OU
INDIRECTS. Cette garantie vous confère des droits spécifiques auxquels peuvent s’ajouter
d’autres droits variant d’un État ou d’une province à l’autre.
30
Page 33

Garantie de satisfaction totale et de
remplacement - 50 États des États-Unis,
district fédéral de Columbia
Nous sommes tellement certains que
la qualité de nos produits satisfait aux
normes exigeantes de KitchenAid que, si
la Cafetière cesse de fonctionner au cours
de la première année, KitchenAid livrera
gratuitement un appareil identique ou
comparable à votre porte et s’occupera de
récupérer la Cafetière originelle. L’appareil
de rechange sera aussi couvert par notre
garantie limitée d’un an. Veuillez suivre ces
instructions pour recevoir ce service
de qualité.
Si la Cafetière KitchenAid™ cesse de
fonctionner durant la première année, il
suffit de composez le numéro sans frais
Garantie de satisfaction totale et de
remplacement - Canada
Nous sommes tellement certains que
la qualité de nos produits satisfait aux
normes exigeantes de KitchenAid que, si
la Cafetière cesse de fonctionner au cours
de la première année, KitchenAid Canada
la remplacera par un appareil identique ou
comparable. L’appareil de rechange sera
aussi couvert par notre garantie limitée
d’un an. Veuillez suivre ces instructions
pour recevoir ce service de qualité.
Si la Cafetière KitchenAid™ cesse de
fonctionner au cours de la première
année, apportez-la ou retournez-la port
dû à un Centre de Service Autorisé de
KitchenAid Canada. Écrivez vos nom et
1-800-541-6390 du Centre de satisfaction
de la clientèle du lundi au vendredi de
8 h à 20 h (heure de l’est) ou le samedi de
10 h à 17 h. Fournissez votre adresse de
livraison complète au représentant. (Pas de
boîte postale).
Quand vous recevez la Cafetière de
rechange, veuillez utiliser le carton et les
matériaux d’emballage pour emballer la
Cafetière originelle. Écrivez vos nom et
adresse sur une feuille de papier et mettezla dans le carton avec une copie de la
preuve d’achat (reçu de caisse, facture de
règlement par carte de crédit, etc.)
adresse complète sur une feuille de papier
et mettez-la dans le carton avec une copie
de la preuve d’achat (reçu de caisse, facture
de règlement par carte de crédit, etc.) La
Cafetière de rechange sera expédiée port
prépayée et assurée. Si le service ne s’avère
pas satisfaisant, composez le numéro sans
frais du Centre de relations avec la clientèle :
1-800-807-6777.
Ou écrivez à :
Centre de relations avec la clientèle
KitchenAid Canada
1901 Minnesota Court
Mississauga, ON L5N 3A7
FRANÇAIS
Comment obtenir une réparation sous
garantie à Puerto Rico
La Cafetière KitchenAid™ est couverte par
une garantie limitée d’un an à partir de
la date d’achat. KitchenAid prendra en
charge les coûts des pièces de rechange et
de main-d’œuvre pour corriger les défauts
de matériaux et de main-d’œuvre. Le
service après-vente doit être assuré par un
Centre de réparation autorisé KitchenAid.
Apportez la Cafetière ou retournez-la port
payée et assurée à un Centre de réparation
autorisé de KitchenAid. La Cafetière réparée
vous sera retournée port prépayée et assurée.
S’il est impossible d’obtenir des réparations
satisfaisantes de cette manière, composez
le numéro sans frais 1-800-541-6390 pour
obtenir l’adresse d’un Centre de réparation
près de chez vous.
31
Page 34

Comment obtenir une réparation hors
garantie – tous les territoires
Avant d’appeler pour faire réparer l’appareil,
consultez la section Dépannage de la page 29.
Pour obtenir de l’information sur
les réparations dans les 50 États
des États-Unis, le district fédéral de
Columbia et Puerto Rico, composez le
numéro sans frais 1-800-541-6390.
Ou écrivez à :
Customer Satisfaction Center
KitchenAid Portable Appliances
FRANÇAIS
P. O. Box 218
St. Joseph, MI 49085-0218
Comment obtenir une réparation
en dehors de ces territoires
Demandez à votre distributeur local
KitchenAid ou au détaillant où la Cafetière
a été achetée où la faire réparer.
Comment commander des accessoires
et des pièces de rechange
Ou contactez un centre de réparation
autorisé près de chez vous.
Pour obtenir de l’information sur les
réparations au Canada, composez le
numéro sans frais 1-800-807-6777.
Ou écrivez à :
Customer Interaction Centre
KitchenAid Canada
1901 Minnesota Court
Mississauga, ON L5N 3A7
Pour obtenir de l’information sur les
réparations au Mexique, composez le
numéro sans frais
01-800-024-17-17
(JV Distribuciones)
ou
01-800-902-31-00
(Industrias Birtman)
Pour commander des accessoires ou
des pièces de rechange pour votre
Cafetière dans les 50 États, le District
de Columbia et Puerto Rico,
composez sans frais le 1-800-541-6390
du lundi au vendredi, de 8 h à 20 h (heure
de l’est), le samedi de 10 h à 17 h.
Ou écrivez à :
Customer Satisfaction Center
KitchenAid Portable Appliances
P. O. Box 218
St. Joseph, MI 49085-0218
Pour commander des accessoires
ou des pièces de rechange pour la
Cafetière au Canada, composez le
numéro sans frais 1-800-807-6777.
Ou écrivez à :
Customer Interaction Centre
KitchenAid Canada
1901 Minnesota Court
Mississauga, ON L5N 3A7
Pour commander des accessoires
ou des pièces de rechange pour la
Cafetière au Mexique, composez le
numéro sans frais
01-800-024-17-17
(JV Distribuciones)
ou
01-800-902-31-00
(Industrias Birtman)
32
Page 35

Índice
INTRODUCCIÓN
Comprobante de compra y registro del producto ........................... En el interior de la portada
Seguridad de la cafetera eléctrica ..................................................................................34
Medidas de seguridad importantes ...............................................................................34
Requisitos eléctricos ......................................................................................................35
CARACTERÍSTICAS Y FUNCIONAMIENTO
Características generales de la cafetera eléctrica ............................................................36
Funciones de la pantalla y de la base de control ...........................................................38
Preparación de la cafetera eléctrica para su uso ............................................................39
Limpieza antes del uso ..........................................................................................39
Instalación del filtro de agua de intercambio iónico ...............................................39
Ajuste de la hora en el reloj ...................................................................................39
Funcionamiento de la cafetera eléctrica ........................................................................40
Colado del café .....................................................................................................40
La función Pausa y vierta .......................................................................................41
Uso del temporizador de colado automático .........................................................42
El indicador “Cleaning Needed” (Limpieza requerida) ............................................43
Sugerencias para elaborar café: Consejo para obtener un sabor extraordinario .............43
ESPAÑOL
CUIDADO Y LIMPIEZA
Limpieza de la cafetera eléctrica ....................................................................................44
Desincrustación de la cafetera eléctrica .........................................................................44
Solución de problemas .................................................................................................45
INFORMACIÓN DE GARANTÍA Y SERVICIO
Garantía de la cafetera eléctrica KitchenAid
Garantía de reemplazo sin dificultades en los
50 estados de los Estados Unidos y en el Distrito de Columbia .....................................47
Garantía de reemplazo sin dificultades en Canadá ........................................................47
Cómo obtener el servicio de garantía en Puerto Rico ....................................................47
Cómo obtener el servicio de garantía una vez vencida la garantía –
Todos los lugares ..........................................................................................................48
Cómo obtener el servicio técnico fuera de éstas ubicaciones .........................................48
Cómo realizar un pedido de accesorios y repuestos ......................................................48
®
.................................................................46
33
Page 36

Seguridad de la cafetera eléctrica
Su seguridad y la seguridad de los demás es muy importante.
Hemos incluido muchos mensajes importantes de seguridad en este manual y en
su electrodoméstico. Lea y obedezca siempre todos los mensajes de seguridad.
Este es el símbolo de advertencia de seguridad.
Este símbolo le llama la atención sobre peligros potenciales que
pueden ocasionar la muerte o una lesión a usted y a los demás.
To dos los mensajes de seguridad irán a continuación del símbolo
de advertencia de seguridad y de la palabra “PELIGRO” o “ADVERTENCIA”.
Estas palabras significan:
Si no sigue las instrucciones de
inmediato, usted puede morir o
sufrir una lesión grave.
Si no sigue las instrucciones, usted
puede morir o sufrir una lesión grave.
To dos los mensajes de seguridad le dirán el peligro potencial, le dirán cómo
reducir las posibilidades de sufrir una lesión y lo que puede suceder si no se
ESPAÑOL
siguen las instrucciones.
MEDIDAS DE SEGURIDAD IMPORTANTES
Cuando utilice electrodomésticos, siempre se deben seguir las precauciones básicas de
seguridad. Las instrucciones son las siguientes:
1. Lea todas las instrucciones.
2. No toque las superficies calientes. Utilice las manijas o perillas.
3. Para protegerse contra descargas eléctricas, no sumerja el cable, los enchufes ni la
cafetera eléctrica en agua ni en ningún otro líquido.
4. Es necesario que supervise de cerca cuando algún electrodoméstico está siendo utilizado cerca de los niños o está siendo utilizado por éstos.
5. Desenchufe la cafetera eléctrica antes de limpiarla. Deje enfriar antes de colocar o
quitar piezas y antes de limpiar el electrodoméstico.
6. No utilice ningún electrodoméstico con un cable o un enchufe dañado, luego de
un mal funcionamiento ni si se ha dañado de alguna forma. Devuelva el electrodoméstico al centro de servicio técnico autorizado más cercano para su inspección,
reparación o ajuste.
7. El uso de accesorios no recomendados por el fabricante del electrodoméstico puede
ocasionar incendios, descargas o lesiones a personas.
8. No lo utilice a la intemperie.
9. No permita que el cable cuelgue del borde de la mesa o mostrador ni que toque
superficies calientes.
10. No lo coloque sobre ni cerca de un quemador eléctrico o a gas caliente ni dentro
de un horno caliente.
11. No utilice el electrodoméstico con ningún otro fin que no sea el indicado.
34
Page 37

12. No use el electrodoméstico sin colocar la tapa apropiadamente en el contenedor
(garrafa).
13. El contenedor (garrafa) está diseñado para ser usado con este electrodoméstico.
Nunca debe ser usado en una estufa.
14. No coloque un contenedor (garrafa) caliente en una superficie mojada o fría.
15. No use un contenedor rajado o un contenedor (garrafa) que tenga una manija floja
o debilitada.
16. No limpie el recipiente con limpiadores, esponjas de lana de acero ni otro material
abrasivo.
17. Este producto está diseñado para ser utilizado sólo para uso doméstico.
CONSERVE ESTAS INSTRUCCIONES
Requisitos eléctricos
Voltios: Sólo 120 V.C.A. Hertz: 60 Hz
ADVERTENCIA
ESPAÑOL
Peligro de Choque Eléctrico
Conecte a un contacto de pared
de conexión a tierra de 3
terminales.
No quite la terminal de conexión
a tierra.
No use un adaptador.
No use un cable eléctrico de
extensión.
No seguir estas instrucciones
puede ocasionar la muerte,
incendio o choque eléctrico.
NOTA: Su cafetera eléctrica tiene un
contacto de pared de conexión a tierra
de 3 terminales. Para reducir el riesgo
de descargas eléctricas, este enchufe
encajará en el tomacorriente sólo de una
manera. Si el enchufe no encaja en el
tomacorriente, contacte a un electricista
autorizado. No modifique el enchufe de
ninguna manera.
No utilice un cable de extensión. Si
el cable del suministro eléctrico es
demasiado corto, solicite a un electricista
o a un técnico calificado que instale un
tomacorriente cerca del electrodoméstico.
35
Page 38

ESPAÑOL
36
Page 39

Características generales de la cafetera eléctrica
Boquilla JavaSpa™
La boquilla extra ancha rocía la cesta del
filtro en forma pareja con agua caliente
asegurando la extracción pareja de café y un
sabor extraordinario.
Bomba de calor de 1100 vatios
(no se muestra)
La potente bomba de calor elabora un
café sabroso y rico.
Control electrónico de temperatura
El sofisticado control de temperatura
regula la potente bomba de calor de
1100 vatios para garantizar siempre una
elaboración constante.
Función Pausa y vierta
La función Pausa y vierta le permite retirar
la garrafa y servir una taza de café antes
de que la elaboración haya finalizado. Una
válvula especial cierra herméticamente la
cesta del filtro, lo que evita que gotee.
Alarma de final del colado
Se escuchará una alarma cuando el colado
de café haya finalizado.
Apagado automático
La cafetera eléctrica se apaga
automáticamente dos horas después
del colado.
Tap a d ividida
Levante la tapa divida para tener acceso a la
cesta del filtro y al depósito de agua. La tapa
frontal cubre la cesta del filtro y el conducto
de llenado del depósito. La tapa trasera
cubre el depósito de agua y el filtro de agua.
Cesta del filtro
Levante la tapa frontal para tener acceso a
la cesta del filtro desmontable que se puede
lavar en el lavaplatos. La cesta sostiene un
filtro de papel de base plana para 10-12
tazas o el filtro permanente dorado.
Conducto de llenado del depósito
La cafetera eléctrica presenta un conveniente
depósito de agua que se llena desde la
parte delantera. Sólo levante la tapa frontal
y utilice el conveniente conducto de llenado
para añadir agua. También puede levantar la
tapa trasera y añadir agua directamente en
el depósito.
Pantalla del temporizador de colado
Muestra la hora en formato AM y PM.
El temporizador de colado de 24 horas
fácil de programar colará café a la hora
seleccionada, de día o de noche.
Pantalla “Time Since Brew”
(Tiempo desde que coló)
Se enciende en segmentos de 30, 60,
90 y 120 minutos para indicar el tiempo
transcurrido desde que coló la
última garrafa.
Base de control Clean Touch™
La base de control simplifica el
funcionamiento de la cafetera eléctrica.
La base está impermeabilizada contra
derrames, no recogerá suciedad y es fácil
de limpiar.
Garaffa de vidrio
La garaffa de vidrio apta para lavaplatos
tiene un pico que no gotea y una
cómoda asa.
Filtro permanente dorado
El filtro dorado de alto rendimiento elimina
la necesidad de utilizar filtros de papel para
café. La cafetera eléctrica también puede
utilizar filtros de papel, si lo desea.
Filtro de agua de intercambio
iónico/Indicador del nivel del agua
(no se muestran)
El avanzado filtro reduce el nivel de
cloro y otros agentes contaminantes que
alteran el sabor del café. El filtro también
suaviza el agua, lo cual disminuye la
frecuencia de las desincrustaciones.
La manija del filtro sirve como un
conveniente indicador del nivel de agua.
Cuchara para café
Utilice una cucharada rasa de café molido
para cada taza deseada.
Compartimiento para guardar el cable
(no se muestra)
El compartimiento en la parte de atrás
de la cafetera quita del camino el exceso
de cable.
Alojamiento envolvente
El diseño elegante minimiza la pérdida del
calor de la garrafa mientras la protege de
derrames accidentales o rotura.
ESPAÑOL
37
Page 40

Funciones de la pantalla y de la base de control
Pantalla “Time
Since Brew”
(Tiempo desde
que coló)
Pantalla del
temporizador de
elaboración
Indicador “Cleaning
Needed” (Limpieza
requerida)
Botones “H” y “M”
ESPAÑOL
Encendido/
apagado
FUNCIONES DE LA PANTALLA:
Pantalla del temporizador de colado
Muestra la hora. Pequeñas luces indican si
la hora es AM o PM.
Pantalla “Time Since Brew”
(Tiempo desde que coló)
La pantalla muestra el tiempo
transcurrido desde que se completó el
ciclo de colado. El segmento “30” se
encenderá inmediatamente después del
colado. Cada 30 minutos se encenderá
un nuevo segmento.
Indicador “Cleaning Needed”
(Limpieza requerida)
El indicador se encenderá después del
colado si es necesario desincrustar la
cafetera eléctrica.
Botones “H” y “M”
Utilice los botones “H” (hora) y “M”
(minuto) para programar el temporizador
de colado o ajustar la hora en el reloj.
1-4 tazas Encendido
automático
Ajustar
(programa)
FUNCIONES DE LA BASE DE CONTROL:
Encendido/apagado
Presione para encender o apagar la
cafetera eléctrica.
1-4 tazas
Este ciclo especial garantiza un sabor
óptimo cuando se cuela poca cantidad
de café. Una luz indicadora muestra si el
ciclo de colado de 1 a 4 tazas
está activado.
Encendido automático
Presione para encender o apagar el
temporizador de colado automático.
Ajustar (programa)
Presione para programar una hora de
colado automático.
Ajustar (reloj)
Presione para ajustar la hora en el reloj.
38
Ajustar (reloj)
Page 41

Preparación de la cafetera eléctrica para su uso
Limpieza antes del uso
Lave la cesta del filtro, el filtro permanente
dorado y la garrafa con agua jabonosa
caliente y luego, enjuáguelos con agua
limpia y séquelos. No utilice limpiadores
abrasivos ni estropajos.
Instalación del filtro de agua de
intercambio iónico
Se recomienda enfáticamente utilizar el
filtro de agua de intercambio iónico. El
filtro suaviza el agua al mismo tiempo que
reduce el nivel de cloro y otros agentes
contaminantes que alteran el sabor del café.
La manija del filtro también sirve como un
indicador del nivel de agua. El uso del filtro
de agua es opcional: la cafetera eléctrica
funcionará normalmente sin él.
El filtro de agua es sólo para utilizar con
agua corriente tratada por el municipio o
con agua de pozo analizada regularmente
en busca de agentes contaminantes.
1. El filtro consta de una manija larga con
un cartucho filtrante en el extremo.
2. Coloque el cartucho filtrante en un
recipiente separado con agua dulce
fría. El cartucho debe permanecer
sumergido en el agua durante 10
minutos. Enjuague el filtro bajo el agua
corriente durante 5 segundos después
de que se haya empapado.
3. Levante la parte trasera de la tapa
dividida utilizando las lengüetas
ubicadas a ambos lados de la tapa.
4. Coloque el cartucho filtrante en el
hueco circular ubicado en la parte
inferior del depósito de agua, alineando
la lengüeta del cartucho con la ranura
del hueco circular. Las marcas del nivel
de agua que se encuentran en la manija
del filtro deberán estar orientadas
hacia el frente. Presione levemente el
cartucho para asegurarse de que encaje
perfectamente.
5. Cada vez que instale un filtro nuevo,
haga funcionar la cafetera eléctrica un
ciclo de elaboración completo sin café.
Utilice una garrafa llena de agua limpia
y fría.
6. Reemplace el filtro cada tres meses
en condiciones normales de uso.
Reemplácelo con mayor frecuencia
cuando el agua es dura o cuando se
lo utiliza mucho.
Ajuste de la hora en el reloj
ADVERTENCIA
ESPAÑOL
Peligro de Choque Eléctrico
Conecte a un contacto de pared
de conexión a tierra de 3
terminales.
No quite la terminal de conexión
a tierra.
No use un adaptador.
No use un cable eléctrico de
extensión.
No seguir estas instrucciones
puede ocasionar la muerte,
incendio o choque eléctrico.
Lengüeta Ranura y hueco del filtro
1. Enchufe en un contacto de pared de
conexión a tierra con 3 terminales.
2. Cuando se enchufa la cafetera eléctrica
por primera vez o cuando se reestablece
la energía eléctrica después de un
corte, la pantalla del temporizador de
elaboración inicialmente mostrará la
hora 12:00 a.m.
39
Page 42

Preparación de la cafetera eléctrica para su uso
3. Presione el botón “Set (Clock)” (Ajustar
(reloj)). La pantalla del temporizador
de colado y el indicador “Set (Clock)”
(Ajustar (reloj)) comenzarán a titilar.
4. Presione los botones “H” (hora) y
“M” (minuto) ubicados debajo de la
pantalla del temporizador de colado
para ajustar la hora y los minutos.
Si se mantiene presionado el botón
“H” o “M”, los dígitos se desplazarán
rápidamente. Las luces indicadoras
AM y PM que aparecen en la pantalla
del temporizador de elaboración
cambiarán cuando los dígitos de la
ESPAÑOL
hora pasen el número “12”. Asegúrese
Funcionamiento de la cafetera eléctrica
COLADO DEL CAFÉ
NOTA: Haga funcionar la cafetera eléctrica
con una garrafa de agua dulce fría y deséchela
antes de preparar la primera garrafa de café.
(Sólo la primera vez que se utiliza).
1. Llene la garrafa con suficiente agua al
tiempo para hacer la cantidad de café
que desee. La escala de graduación
lateral de la garrafa le ayuda a medir
la cantidad de agua requerida. El lado
derecho de la escala (“Coffee”) es una
medida del volumen de la garrafa en
tazas de 4izquierdo de la escala (“Water”) indica
la cantidad de agua necesaria para
producir un número dado de tazas.
2. Levante la tapa frontal y llene el
recipiente con agua fría utilizando
1
⁄4 onzas (125ml.). El lado
de que la hora fijada sea la correcta
con respecto a AM o PM.
5. Presione el botón “Set (Clock)” (Ajustar
(reloj)) para salir de la función de ajuste
del reloj. Los dígitos que aparecen
en la pantalla del temporizador de
colado dejarán de titilar y el indicador
“Set (Clock)” (Ajustar (reloj)) se
apagará. La cafetera eléctrica registrará
automáticamente la hora mostrada en la
pantalla y saldrá de la función de ajuste
del reloj si no se presiona ningún botón
durante 10 segundos.
el canal de llenado del depósito a la
derecha de la cesta del filtro. El agua
también puede verterse directamente
en el depósito en la parte posterior de
la cafetera.
3. Después de llenar el depósito, coloque
la garrafa en la bandeja para la garrafa
de la cafetera. Compruebe que la tapa
esté adecuadamente asegurada y que
la parte inferior de la garrafa descanse
completamente sobre la bandeja – si
la garrafa no está adecuadamente
colocada, la función de pausa y vierta
podría activarse y ocasionar que el
agua y el café se desbordaran de la
cesta del filtro.
40
Page 43

Funcionamiento de la cafetera eléctrica
.4. Retire la cesta del filtro de la parte
superior de la cafetera eléctrica
agarrando el aro que se encuentra en la
parte de adelante de la cesta.
5. Inserte un filtro de papel de base plana
para 10-12 tazas o el filtro permanente
dorado dentro de la cesta del filtro. No
utilice ambos tipos de filtros al mismo
tiempo. Si utiliza ambos filtros podría
hacer que el agua y el café desborden la
cesta del filtro.
6. Si utiliza la cuchara incluida, llene el
filtro con una cucharada rasa de café
molido para cada taza deseada. Utilice
una molienda mediana adecuada para
cafeteras eléctricas de goteo automático:
una molienda demasiado fina hará que
el café se torne amargo y puede obstruir
el filtro de café.
On/Off (Encendido/apagado). El ciclo
de colado de 1 a 4 tazas garantiza un
sabor óptimo cuando se cuela poca
cantidad de café.
NOTA: Si levanta la tapa frontal mientras
se está colando el café, interrumpirá el
proceso de colado y alterará el sabor.
9. La cafetera eléctrica emitirá la alarma
final del colado una vez finalizado
el colado.
10. La pantalla “Time Since Brew” (Tiempo
desde que coló) indica el tiempo
transcurrido desde que se completó el
ciclo de colado.
ESPAÑOL
NOTA: Siempre coloque el filtro y
el café dentro de la cesta del filtro
desmontable. No haga funcionar la
cafetera eléctrica sin la cesta del filtro.
7. Agite levemente la cesta del filtro para
nivelar la base de café. Coloque la
cesta dentro de la cafetera eléctrica,
presiónela hacia abajo para asentarla
de manera segura. Asegúrese de que
la tapa frontal esté totalmente cerrada
antes de colar el café.
8. Presione el botón On/Off (Encendido/
apagado) para comenzar a elaborar
el café. Si sólo está colando de 1 a
4 tazas de café, presione el botón
1-4 Cup (1-4 tazas) inmediatamente
después de presionar el botón
11. Al término de 2 horas, la cafetera
eléctrica se apagará automáticamente.
Para apagar la cafetera eléctrica
manualmente, presione el botón On/
Off (Encendido/apagado). El exterior
de la garrafa puede estar caliente
al tacto después del colado. Use su
sentido común cuando coloque la
garrafa sobre superficies sin protección
inmediatamente después del colado.
12. Repita los pasos 1-8 para colar más
garrafas de café. Siempre apague la
cafetera eléctrica y deje que se enfríe
durante 5 minutos antes de comenzar
con el siguiente ciclo de colado.
LA FUNCIÓN PAUSA Y VIERTA
La función Pausa y vierta le permite
retirar la garrafa de la cafetera eléctrica
y servir una taza de café antes de que el
colado haya finalizado. Cuando se retira
la garrafa, una válvula especial detiene el
41
Page 44

Funcionamiento de la cafetera eléctrica
flujo de café desde la cesta del filtro. El
colado, sin embargo, no se detiene. Si
la garrafa no se coloca nuevamente en
la bandeja para la garrafa dentro de 25
segundos, el agua y el café desbordarán
la cesta del filtro.
USO DEL TEMPORIZADOR DE
COLADO AUTOMÁTICO
Se puede programar la cafetera eléctrica
para que cuele café en algún momento,
lo que facilita despertar todas las
mañanas con un café recién hecho. Para
programar y activar el temporizador de
colado automático:
1. Presione el botón “Set (Program)”
(Ajustar (programa)). La pantalla del
temporizador de colado y el indicador
“Set (Program)” (Ajustar (programa))
comenzarán a titilar. En la pantalla del
temporizador de colado aparecerá la
ESPAÑOL
última hora de colado programada.
2. Presione los botones “H” (hora) y
“M” (minuto) ubicados debajo de la
pantalla del temporizador de colado
para ajustar la hora y los minutos.
Si se mantiene presionado el botón
“H” o “M”, los dígitos se desplazarán
rápidamente. Las luces indicadoras AM
y PM que aparecen en la pantalla del
temporizador de colado cambiarán
cuando los dígitos de la hora pasen el
número “12”. Asegúrese de que la hora
de colado deseada sea la correcta con
respecto a AM o PM.
Botones
“H” y “M”
la función de ajuste de programa.
La cafetera eléctrica registrará
automáticamente la hora de colado
que aparece en la pantalla y saldrá de
la función de ajuste de programa si no
se presiona ningún botón durante
10 segundos.
4. Llene la cafetera eléctrica con
café y agua dulce, luego, active el
temporizador de colado automático
presionando el botón “Auto On”
(Encendido automático). La hora
programada de colado aparecerá
brevemente en el visualizador del
temporizador de colado antes de que
regrese a la hora del día y el indicador
“A uto On” (Encendido automático)
se ilumine.
5. La cafetera eléctrica comenzará el ciclo
de colado a la hora programada.
6. Cada vez que desee que la cafetera
eléctrica elabore café a la hora
programada, active el temporizador
de colado automático presionando
el botón “Auto On” (Encendido
automático). La cafetera eléctrica
siempre funcionará de manera
predeterminada a la última hora de
colado programada.
NOTA: Para cancelar el colado
automático, desactive el temporizador de
colado presionando el botón “Auto On”
(Encendido automático). Cuando esté
desactivado, la luz del indicador “Auto
On” (Encendido automático) se apagará.
Si no se ajustó la hora del programa
antes de presionar el botón “Auto On”
(Encendido automático), la cafetera
eléctrica ingresará a la función de ajustar
programa (ver “Uso del temporizador de
colado automático” en la página 42).
3. Después de ajustar la hora de colado,
presione el botón “Set (Program)”
(Ajustar (programa)) para salir de
42
Page 45

Funcionamiento de la cafetera eléctrica
EL INDICADOR “CLEANING NEEDED”
(LIMPIEZA REQUERIDA)
Con el tiempo se acumularán depósitos
de calcio (“incrustaciones”) por el agua
en la bomba de calor de la cafetera
eléctrica y alterarán la efectividad del
colado y la calidad del café. Cuando la
cafetera eléctrica detecte acumulación
de incrustaciones, el indicador de
limpieza requerida se encenderá una vez
finalizado el ciclo de colado. Una vez
que esto ocurre, se debe proceder con la
desincrustación tan pronto como posible
para mantener el rendimiento y la vida útil
de su cafetera eléctrica. Vea la página 44
para obtener información sobre los pasos
para la desincrustación.
Sugerencias para colar café:
Consejo para obtener un sabor extraordinario
Granos de café frescos
El café verdaderamente delicioso sólo se
obtiene de granos de café frescos. Para
conservar la frescura de sus granos de
café, guárdelos en un recipiente hermético,
opaco y almacénelos en un lugar seco y
fresco. No se recomienda refrigerarlos ya
que tiende a formarse condensación en los
granos cada vez que se abre el recipiente.
El congelamiento puede ayudar a conservar
los granos almacenados por un período de
tiempo prolongado pero también alterará
el sabor.
La molienda adecuada
La mejor taza de café se obtiene de
granos de café molidos adecuadamente
justo antes del colado. Los molinillos
como el Molinillo para café de cuchillas
KitchenAid
de la serie Pro Line
café Modelo A-9
resultados excelentes. Cuando muela
el café, asegúrese de molerlo hasta un
nivel medio, la molienda adecuada para
cafeteras eléctricas de goteo automático.
La cantidad adecuada de café molido
Un buen punto de partida es una
cucharada de café por cada taza de agua
marcada en la garrafa o en la guía del
filtro de agua. Una molienda más fina
®
, el Molinillo de café de placas
®
o el Molinillo de
®
KitchenAid® ofrecen
generalmente requiere menos café pero
también puede hacer que el café se torne
amargo y obstruir el filtro.
Para un café más suave, utilice la
proporción sugerida de café molido y
agua, luego, diluya con agua caliente.
Esto maximiza el sabor y minimiza el
sabor amargo.
Pureza del agua para el colado
Para obtener un café con mejor sabor,
utilice el filtro de agua de intercambio
iónico que viene con su cafetera eléctrica.
Éste reduce los agentes contaminantes,
suaviza el agua y realza el sabor.
Asegúrese de reemplazar el filtro
puntualmente cada tres meses.
Si el agua local no es buena, es posible
que desee utilizar agua embotellada. No
utilice agua destilada ni agua mineral ya
que pueden dañar su cafetera eléctrica.
Limpieza de la cafetera eléctrica
Como el aceite del café que se acumula
en la cesta del filtro y en la garrafa puede
echarse a perder y alterar el sabor del
café elaborado, es importante limpiarlos
diariamente para preparar el café
más delicioso.
43
ESPAÑOL
Page 46

Cuidado y limpieza
Limpieza de la cafetera eléctrica
1. Retire la cesta del filtro y la garaffa de
la cafetera eléctrica.
2. Lave la cesta del filtro y el filtro
permanente dorado con agua
jabonosa caliente y enjuáguelos con
agua caliente. No utilice limpiadores
abrasivos ni estropajos. Estas piezas
también se pueden lavar en la rejilla
superior del lavaplatos.
3. Desenchufe la cafetera eléctrica y
limpie el alojamiento con un paño con
agua tibia jabonosa. Luego, limpie
con un paño húmedo y seque con
un paño suave. No utilice limpiadores
abrasivos ni estropajos.
Desincrustación de la
cafetera eléctrica
Se puede desincrustar la cafetera eléctrica
utilizando un agente desincrustante
ESPAÑOL
envasado o vinagre. Siempre mezcle la
solución desincrustante utilizando agua fría.
• Cuando utilice un agente
desincrustante, siga las instrucciones
del envase para obtener información
sobre las cantidades recomendadas de
agente desincrustante y de agua que
debe utilizar.
• Cuando utilice vinagre, llene la garrafa
con una solución que contenga vinagre
y agua en partes iguales
Pasos para desincrustar:
1. Antes de la desincrustación, retire
siempre el filtro de agua (vea
“Instalación del filtro de agua de
intercambio iónico” en la página 39) y
asegúrese de que la cesta del filtro no
tenga café ni filtros de café.
2. Haga funcionar la cafetera eléctrica un
ciclo completo utilizando una garrafa
llena con la solución desincrustante.
3. Si el indicador de “limpieza requerida”
se enciende una vez finalizado el cielo
de colado, repita el paso 2 utilizando
una solución desincrustante nueva.
Repita el paso 2 las veces que sea
necesario hasta que el indicador de
“limpieza requerida” no se encienda
más luego del colado.
4. Enjuague la cafetera eléctrica
haciéndola funcionar dos ciclos de
colado utilizando una garrafa llena de
agua dulce fría cada vez.
5. Lave la cesta del filtro con agua
jabonosa caliente y enjuáguela con
agua caliente. Esta pieza también se
puede lavar en la rejilla superior del
lavaplatos.
6. Vuelva a instalar o reemplace el filtro
de agua. Reemplace el filtro cada tres
meses en condiciones normales de uso
o con más frecuencia cuando se le da
mucho uso.
44
Page 47

Solución de problemas
• Si la pantalla del temporizador de
colado no está iluminada:
Verifique si la cafetera eléctrica está
enchufada en un contacto de pared
de conexión a tierra con 3 terminales.
Si la cafetera eléctrica está enchufada,
verifique si el fusible o el interruptor del
circuito eléctrico de la cafetera están
conectados y asegúrese de que el circuito
esté cerrado.
• Si sólo se filtra una parte del agua
añadida en la cafetera:
La cafetera eléctrica necesita que la
desincruste de inmediato. Consulte las
instrucciones sobre desincrustación en la
página anterior.
• Si aparece “Err4” en la pantalla del
temporizador de colado:
– Un botón puede estar trabado.
Desenchufe la cafetera eléctrica y
presione cada botón varias veces.
ADVERTENCIA
• Si aparece “Err1”, “Err2” o “Err3”
en la pantalla del temporizador
de colado:
Presione el botón de On/Off (encendido/
apagado) para reiniciar la cafetera. (Si la
cafetera ha sido almacenada o utilizada
en un ambiente frío, caliente la cafetera
a temperatura ambiente antes de hacer
esto.) Si los códigos de error vuelven a
aparecer, hay un problema con el sistema
electrónico de la cafetera.
Si el problema no se soluciona con los
pasos antes mencionados, consulte la
sección de Garantía y servicio técnico que
comienza en la página siguiente.
ESPAÑOL
Peligro de Choque Eléctrico
Conecte a un contacto de pared
de conexión a tierra de 3
terminales.
No quite la terminal de conexión
a tierra.
No use un adaptador.
No use un cable eléctrico de
extensión.
No seguir estas instrucciones
puede ocasionar la muerte,
incendio o choque eléctrico.
– Enchufe la cafetera eléctrica en un
contacto de pared de conexión a tierra
con 3 terminales.
– Si aparece “Err4” en la pantalla
nuevamente, repita este procedimiento.
45
Page 48

Garantía de la cafetera eléctrica KitchenAid
®
Duración de la
garantía:
50 estados de los
Estados Unidos, el
Distrito de Columbia,
Canadá y Puerto Rico:
Un año de garantía
limitada a partir de la
fecha de compra.
ESPAÑOL
LA EXENCIÓN DE RESPONSABILIDAD DE LAS GARANTÍAS IMPLÍCITAS; LAS
GARANTÍAS IMPLÍCITAS DE LIMITACIÓN DE LOS RECURSOS, INCLUYENDO GARANTÍAS
EN LA MEDIDA EN QUE SE APLIQUEN A LA COMERCIABILIDAD O APTITUD CON UN
FIN DETERMINADO, SON EXCLUIDAS EN LA MEDIDA PERMISIBLE POR LEY. CUALQUIER
GARANTÍA IMPLÍCITA QUE PUEDA SER IMPUESTA POR LEY ESTÁ LIMITADA A UN AÑO O
AL PERÍODO MÁS CORTO PERMITIDO POR LEY. ALGUNOS ESTADOS Y PROVINCIAS NO
PERMITEN LIMITACIONES NI EXCLUSIONES EN RELACIÓN CON LA DURACIÓN DE UNA
GARANTÍA IMPLÍCITA DE COMERCIABILIDAD O DE APTITUD, DE MANERA TAL QUE LAS
LIMITACIONES O EXCLUSIONES ANTERIORES PUEDEN QUE NO SE APLIQUEN EN SU CASO.
KitchenAid
pagará por:
50 estados de los
Estados Unidos, el
Distrito de Columbia
y Canadá: El reemplazo
de su cafetera eléctrica
sin dificultades. Consulte
la siguiente página para
obtener los detalles sobre
cómo realizar el reemplazo.
O
En Puerto Rico:
Los costos de los repuestos
y del trabajo de reparación
para corregir los defectos
en los materiales y la
mano de obra. El servicio
técnico debe ser provisto
por un Centro de servicio
técnico de KitchenAid
autorizado. Para solicitar
un servicio técnico, siga
las instrucciones de la
página 47.
KitchenAid
no pagará por:
A. Las reparaciones
cuando la cafetera
eléctrica sea utilizada
con otro fin que no
sea el uso doméstico
normal.
B. Los daños como
consecuencia de un
accidente, alteración,
mal uso, abuso o
uso con productos
no aprobados por
KitchenAid.
C. Los costos de los
repuestos o de la
mano de obra de
reparación de la
cafetera eléctrica
cuando haya sido
utilizada fuera del país
donde fue comprada.
SI ESTE PRODUCTO NO FUNCIONA SEGÚN SE GARANTIZA, EL ÚNICO Y EXCLUSIVO
RECURSO DEL CLIENTE SERÁ LA REPARACIÓN O EL REEMPLAZO SEGÚN LOS TÉRMINOS
Y LAS CONDICIONES DE ESTA GARANTÍA LIMITADA. KITCHENAID Y KITCHENAID CANADÁ
NO ASUMEN NINGUNA RESPONSABILIDAD POR DAÑOS INCIDENTALES O CONSIGUIENTES.
Esta garantía le otorga derechos legales específicos y es posible que usted goce de otros
derechos que varían de estado en estado o de provincia en provincia.
46
Page 49

Garantía de reemplazo sin dificultades en los 50 estados de los Estados Unidos
y en el Distrito de Columbia
Confiamos tanto en que la calidad de
nuestros productos cumple con las
exigentes normas de KitchenAid que, si su
cafetera eléctrica presentara alguna falla
durante el primer año, le enviaremos un
reemplazo sin cargo idéntico o parecido a
su domicilio y arreglaremos la devolución
de su cafetera eléctrica original. El
reemplazo de su unidad también estará
cubierto por nuestra garantía limitada de
un año. Siga estas instrucciones para recibir
este servicio de calidad.
Si su cafetera eléctrica KitchenAid
presentara alguna falla durante el primer
año, simplemente llame gratis a nuestro
®
Centro de satisfacción al cliente KitchenAid
al 1-800-541-6390, de lunes a viernes de 8
a.m. a 8 p.m. (Hora del Este), o los sábados,
de 10 a.m. a 5 p.m. Proporcione al asesor
su dirección completa para el envío. (No se
aceptan números de casillas postales).
Cuando reciba la unidad de reemplazo
de su cafetera eléctrica, utilice la caja y
los materiales de embalaje para embalar
su cafetera original. En la caja, escriba
su nombre y dirección en un papel junto
con la copia del comprobante de compra
(recibo de compra, ticket de la tarjeta de
crédito, etc.)
Garantía de reemplazo sin dificultades
en Canadá
Confiamos tanto en que la calidad de
nuestros productos cumple con las
exigentes normas de KitchenAid que, si su
cafetera eléctrica presentara alguna falla
durante el primer año, KitchenAid Canada
la reemplazará por una idéntica o parecida.
El reemplazo de su unidad también estará
cubierto por nuestra garantía limitada
de un año. Siga estas instrucciones para
recibir este servicio de calidad.
Si su cafetera eléctrica KitchenAid
presentara alguna falla durante el primer
año, lleve la cafetera eléctrica o mándela
con envío a cobrar a un Centro de servicio
técnico KitchenAid Canada autorizado.
®
En la caja, escriba su nombre y dirección
postal en un papel junto con la copia
el comprobante de compra (recibo de
compra, ticket de la tarjeta de crédito,
etc.) La cafetera eléctrica de reemplazo
se le entregará de forma prepaga y
asegurada. Si no queda satisfecho con
el servicio, llame de manera gratuita a
nuestro Centro de interacción con el
cliente al 1-800-807-6777.
O escríbanos a:
Customer Interaction Centre
KitchenAid Canada
1901 Minnesota Court
Mississauga, ON L5N 3A7
ESPAÑOL
Cómo obtener el servicio de garantía
en Puerto Rico
Su cafetera eléctrica KitchenAid® tiene
garantía de un año a partir de la fecha de
compra. KitchenAid pagará los repuestos
y la mano de obra para corregir defectos
en los materiales y en la mano de obra. El
servicio técnico debe ser provisto por un
Centro de servicio técnico de KitchenAid
autorizado.
Lleve la cafetera eléctrica o mándela con
envío asegurado a cobrar a un Centro de
servicio técnico de KitchenAid autorizado.
La cafetera eléctrica reparada se le
entregará de forma prepaga y asegurada.
Si no queda satisfecho con el servicio, llame
de manera gratuita al 1-800-541-6390
para averiguar la ubicación del Centro de
servicio técnico más cercano.
47
Page 50

Cómo obtener el servicio de garantía una vez
vencida la garantía – Todos los lugares
Antes de llamar al servicio técnico, revise
la sección de Solución de problemas en la
página 45.
Para obtener información sobre el
servicio técnico en los 50 estados
de los Estados Unidos, el Distrito de
Columbia y Puerto Rico,
llame de manera gratuita al
1-800-541-6390.
O escriba a:
Customer Satisfaction Center
KitchenAid Portable Appliances
P. O . Box 218
St. Joseph, MI 49085-0218
Cómo obtener el servicio técnico
fuera de éstas ubicaciones
ESPAÑOL
Consulte a su distribuidor de KitchenAid
local o a la tienda donde compró la
cafetera eléctrica para obtener información
sobre el servicio técnico.
O contáctese con un Centro de servicio
técnico autorizado cercano a su domicilio.
Para obtener información sobre el
servicio técnico en Canadá,
llame de manera gratuita al
1-800-807-6777.
O escriba a:
Customer Interaction Centre
KitchenAid Canada
1901 Minnesota Court
Mississauga, ON L5N 3A7
Para obtener información sobre el
servicio técnico en México,
llame de manera gratuita al
01-800-024-17-17
(JV Distribuciones)
o
01-800-902-31-00
(Industrias Birtman)
Como realizer un pedido de
accesorios y repuestos
Para solicitar accesorios o repuestos
para su cafetera eléctrica en los 50
estados de los Estados Unidos, en el
Distrito de Columbia y en Puerto Rico,
llame de manera gratuita al
1-800-541-6390, de lunes a viernes de
8 a.m. a 8 p.m. (Hora del Este), o los
sábados, de 10 a.m. a 5 p.m.
O escriba a:
Customer Satisfaction Center
KitchenAid Portable Appliances
P. O . Box 218
St. Joseph, MI 49085-0218
Para solicitar accesorios o repuestos
para su cafetera eléctrica en Canadá,
llame de manera gratuita al 1-800-807-6777.
O escriba a:
Customer Interaction Centre
KitchenAid Canada
1901 Minnesota Court
Mississauga, ON L5N 3A7
Para solicitar accesorios o repuestos
para su cafetera eléctrica en México,
llame de manera gratuita al
01-800-024-17-17
(JV Distribuciones)
o
01-800-902-31-00
(Industrias Birtman)
48
Page 51

Page 52

®Registered trademark/Marque déposée/Marca registrada KitchenAid, U.S.A.
™ Trademark/Marque de commerce/Marca de comercio KitchenAid, U.S.A.,
KitchenAid Canada licensee in Canada/Emploi licencié par KitchenAid Canada au Canada.
©2006. All rights reserved. Tous droits réservés. Todos los derechos reservados.
(5393dZw506)
 Loading...