

Page 1
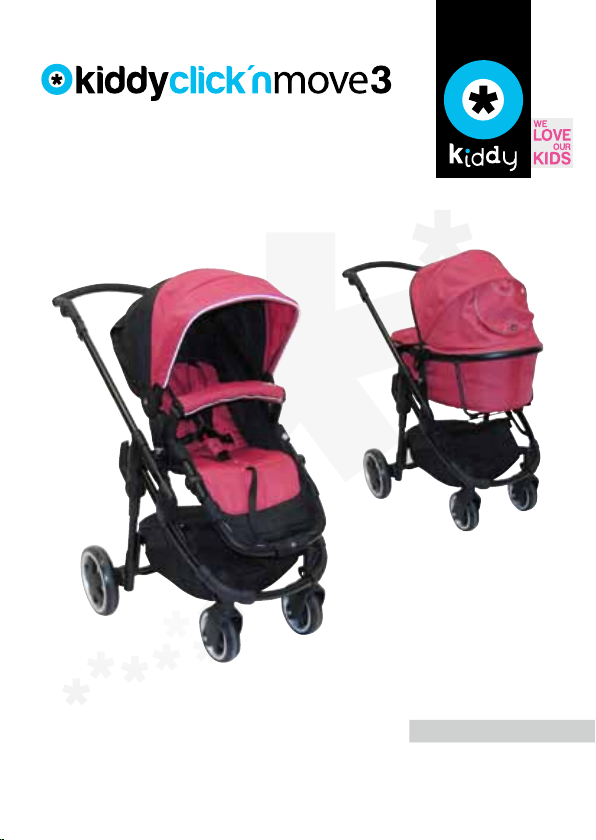
EN
Directions for use
ES
Manual de uso
Page 2
2
1
1
1 2
2
2
3
1
2
3 4
5 6
1
2
1
2
11
22
7 8
Page 3
1
GO
2
9 10
2
1
1
11 12
1
3
2
3
13 14
1
STOP
2
1
1
1
2
2
a
b
c
2
15 16
1
1
Page 4
2
17 18
1
19 20
21 22
3
2
1
3
1
2
23 24
1
Page 5
25 26
27 28
2
29 30
1
31 32
2
1
2
2
1
1
22
1
Page 6
1
33 34
2
2
1
35 36
2
1
37 38
39 40
2
1
1
2
Page 7
2
1
41 42
2
1
43
Page 8

Page 9
EN
1. General safety tips 10
2. Unpacking 14
3. Adjustments 14
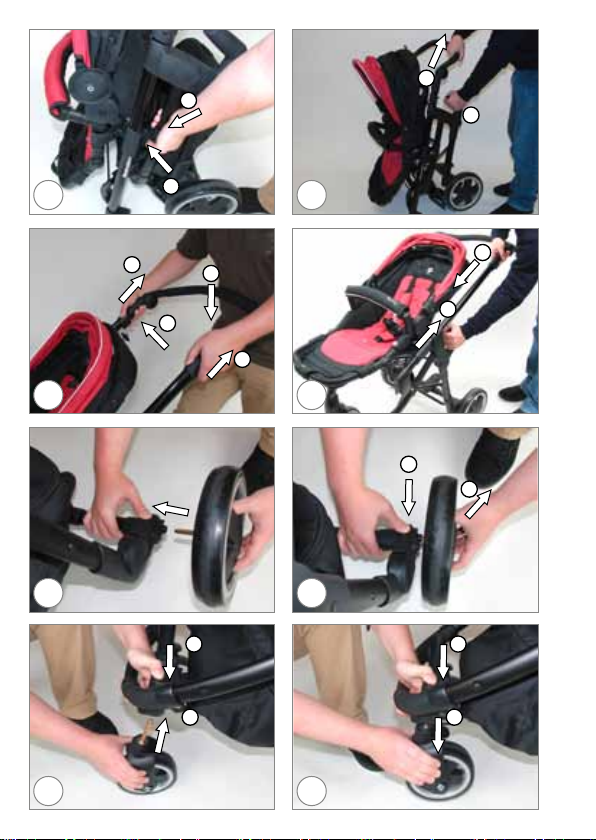
3.1 Unfolding the chassis 14
3.2 Folding the chassis 15
3.3 Attaching/removing the rear wheels 15
3.4 Attaching/removing the front wheels 16
3.5 Locking/releasing the swivel front wheels 16
3.6 Adjustment of the parking brake 16
3.7 Adjustment of the handle bar 17
4. Utilization of Kiddy Click’n Move 3 with push chair seat 17
4.1 Attaching/removing the pushchair seat at/from Chassis 17
4.2 Adjustment of the sun roof 18
4.3 Adjustment of the footrest 18
4.4 Adjustment of the reclined/upright position 19
4.5 Opening/Closing the bumper bar 19
4.6 Securing the child with the 5-point belt system 20
4.6.1 Opening of the 5-point belt system 20
4.6.2 Width adjustment and securing the child 20
4.6.3 Height adjustment of the shoulder belts 21
4.7 Removing/re-installing the 5-point belt system 21
4.8 Removing/re-installing the cover of pushchair seat 22
5. Utilization of Kiddy Click’n Move 3 with pram body 23
5.1 Unfolding the pram body 23
5.2 Utilization as carrycot 24
5.3 Attaching/removing the pram body at/from Chassis 26
5.4 Adjustment of the sun roof 27
5.5 Removing/re-installing the cover of the pram body 27
6. Utilization of Kiddy Click’n Move 3 with Infant carrier 28
6.1 Attaching/removing the infant carrier adaptors 28
6.2 Attaching/removing the infant carrier 28
7. Care and maintenance 30
7.1 Care and maintenance of the chassis in general 30
7.2 Fabric care in general 30
8. Warranty 31
9
Page 10

EN
Operation manual Kiddy Click’n Move 3
IMPORTANT
Keep this instructions for further reference.
We’re delighted that you have chosen the Kiddy Click’n Move 3 as your preferred
travelsystem.
The Kiddy Click’n Move 3 is the latest innovative product in our stroller line.
This stroller is a first-class product that guarantees a long-term useful life,
if used correctly.
Your Kiddy Click’n Move 3 is ASTM F833 tested and homologated.
Your Kiddy Click’n Move 3 is suitable for children from birth up to the age of
approxi mately 4 years or 25 kg. However, the following appropriate specifications
for the respective age groups must be applied:
infant carrier: from birth up to 28,5 lbs (13 kg / approx. 1.5 years)
carrycot: from birth up to 20 lbs (9 kg / approx. 6 months)
push chair seat: from 20 lbs (9 kg) up to 55 lbs (25kg approx. 4 years)
1.General safety tips
Read these instructions carefully before use and keep them for future reference.
Your child’s safety may be affected if you do not follow these instructions.
WARNING
Never leave your child unattended.
10
10
Page 11
EN
WARNING
Ensure that all the locking devices are engaged
before use.
WARNING
To avoid injury ensure that your child is kept
away when unfolding or folding this product.
WARNING
Take also care that you don’t entrap extremities
in moveable parts.
WARNING
Do not let your child play with this product.
WARNING
Use a harness as soon as your child can sit unaided.
WARNING
The pushchair seat is not suitable for children
under 6 months.
WARNING
Always use the restraint system.
11
11
Page 12

EN
WARNING
Check that the pram body or seat unit or car seat
attachment devices are correctly engaged before use.
WARNING
This product is not suitable for running or skating.
WARNING
Do not overload the basket, the bag of pushchair
seat and cup holder. Maximum weight in basket
is 5 kg, in the bag of pushchair seat 0,5 kg and in
cup holder 0,5 kg. Any load could cause hazardous instability of the stroller!
WARNING
Parcels or accessory items,or both, placed on the
unit may cause the unit to became unstable.
WARNING
Do not use the stroller with more than one child
at a time.
WARNING
Only use accessories and spare parts approved
by Kiddy.
12
12
Page 13
EN
WARNING
Always use the crotch strap in combination with
the waist belt. Attaching points (D-ring) for a
separate belt harness are provided at the outer
ends of the crotch restraint.
WARNING
The parking break shall be engaged when placing and removing the children.
WARNING
Periodically monitor the belts, the buckle and if
rivets, screws or parts get loose.
WARNING
Never use the stroller on stairs or escalators.
WARNING
Child may slip into leg openings and strangle
Never use in reclined carriage position(s) unless
(manufacturer to insert product specific instructions).
13
13
Page 14
EN
2. Unpacking
WARNING
Remove protective material and plastic bags and
dispose of them before assembling the stroller.
WARNING
To avoid suffocation keep the packing material
away from children.
WARNING
Adult assembly is required. Keep small children
away while assembling the stroller.
3. Adjustments
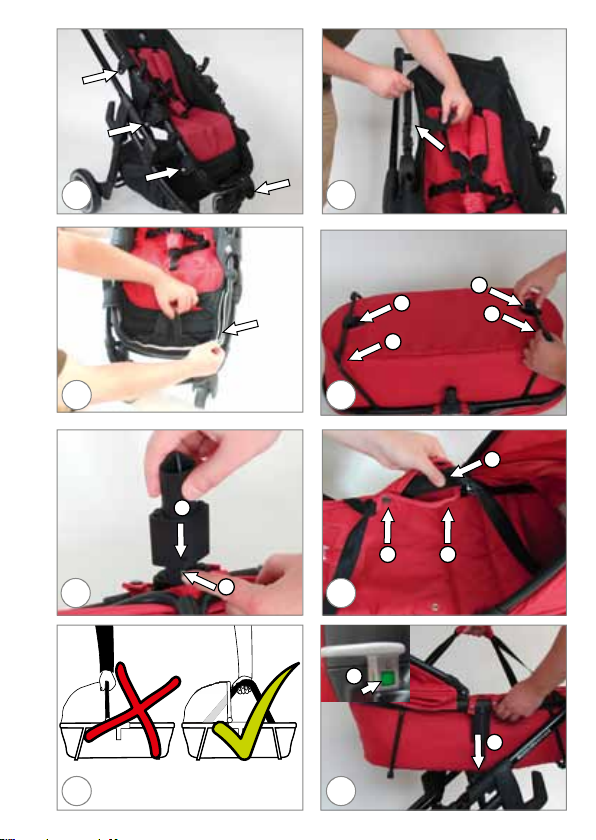
3.1 Unfolding the chassis
Place the chassis upright. Grasp with your left hand the lower frame at left side
(fig. 1; No. 1) and keep the locking button pressed (fig. 1; no. 2). Then lift with your
right hand the handle bar upwards (fig. 2; no. 2) until the locking mechanism is
released.
Release the lower frame, grasp the hand-grip (fig. 2; no. 1) and unfold the chassis
completely by lifting the handle bar upwards (fig. 2; no. 2) until the fixing mechanism at both sides is closed.
14
14
Page 15
EN
WARNING
Ensure that both locking devices of the chassis
are engaged before use.
3.2 Folding the chassis
Keep the releasing button under the right side of the handle pressed (fig. 3; no.
1) and pull both releasing sliders backwards (fig. 3; no. 2) and simultaneously the
handle bar downwards (fig. 3; no. 3).
Now pull the hand-grip (fig. 4; no. 1) with your left hand and push the handle bar
(fig. 4; no. 2) until the locking button clicks in position.
WARNING
Take care that you don’t entrap extremities in
moveable parts.
WARNING
The chassis is completely flat foldable , when the
push chair seat is mounted in driving direction.
3.3 Attaching/removing the rear wheels
To mount a rear wheel keep the locking button pressed (fig 5; no. 1) and push the
axle in the hub of the chassis (fig 5; no. 2).
WARNING
Test whether both rear wheels are locked in
place and tightly connected to the chassis by
pulling them to the outside.
15
15
Page 16
EN
To remove a rear wheel, keep the locking button pressed (fig. 6; no. 1) and pull the
wheel outwards (fig. 6; no. 2).
3.4 Attaching/removing the front wheels
To mount a front wheel keep the locking button pressed (fig. 7; no. 1) push the
vertical axle in the holding bracket of the chassis (fig. 7; no. 2).
WARNING
Test whether both front wheels are locked in
place and tightly connected to the chassis by
pulling them downwards.
To remove a front wheel, keep the locking button pressed (fig. 8; no. 1) and pull
the wheel downwards (fig. 8; no. 2)
3.5 Locking/releasing the swivel front wheels
To lock the front wheels, they must be turned in the straight-forward position.
Then push the fixing lever upwards (fig. 9; no. 1) until the button locks in place.
To release the wheels for free swivel, push the fixing lever downwards
(fig. 9; no. 2).
3.6 Adjustment of the parking brake
Press the pedal backwards down to activate the brakes (fig. 10, “STOP”).
WARNING
Don‘t let go of the stroller until you are sure that
the parking brake is fully engaged.
16
16
Page 17
EN
To release the brakes, press the pedal frontwards (fig. 10, “GO”).
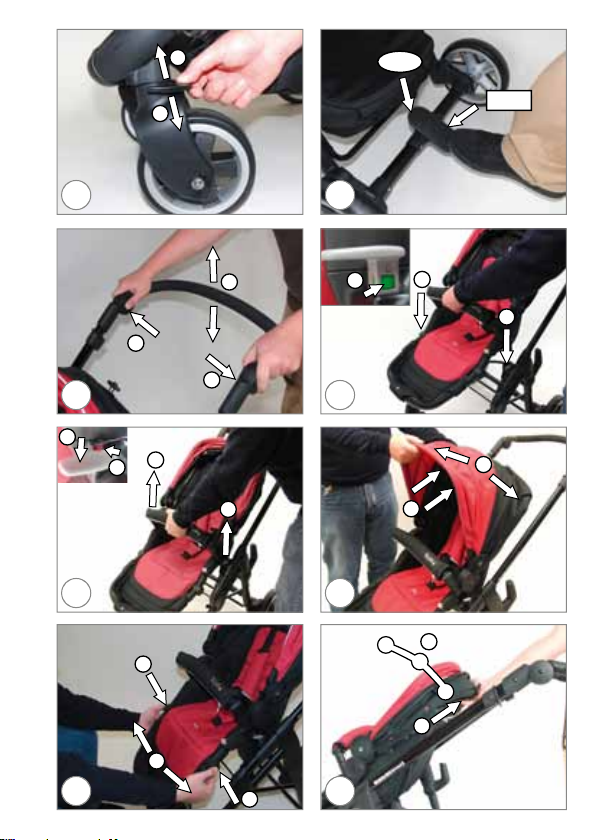
3.7 Adjustment of the handle bar
Keep both release buttons pressed (fig. 11; no. 1) and then turn the handle bar in
the desired position (fig. 11; no. 2).
4. Utilization of Kiddy Click’n move 3 with pushchair seat
4.1 Attaching/removing the pushchair seat at/from Chassis
WARNING
The pushchair seat is intended for children from
6 months (appr. 20 lbs/9 kg) up to 4 years (max.
55 lbs/25 kg).
WARNING
This seat unit is not suitable for children under
6 months.
WARNING
Ensure that the parking brake is activated after
unfolding the chassis as described in point 3.1.
If infant carrier adapters were used, they must be removed from the chassis. The
pushchair seat can be used front or rear facing the driving direction.
17
17
Page 18

EN
Insert both plugs of the pushchair seat on the left and right support on the chassis until they lock into the place and sit tight (fig.12; no. 1) and the indication at
locking button is “green” (fig.12; no. 2) .
WARNING
Before using the pushchair seat make sure that
both locking buttons indicate “green”. When
the locking buttons indicate “red”, pull these
upwards, so that “green” will be indicated. Test
by pulling upwards whether the pushchair seat
is locked in place and tightly connected to the
chassis.
To remove the pushchair seat from the chassis press both locking buttons downwards (fig.13; no.1) so that these indicate “red” (fig.13; no. 2) and pull the push
chair seat upwards (fig. 13; no. 3).
4.2 Adjustment of the sun roof
The sun roof can be adjusted freely into the desired position by turning the front
bar of the sun roof (fig. 14; no. 1).
If you want to open the sun roof into the maximum position, open both snap
fastener inside (fig. 14; no. 2).
4.3 Adjustment of the footrest
Keep both release buttons pressed (fig. 15, no. 1) and then turn the foot rest in
the desired position (fig. 15; no. 2).
18
18
Page 19

EN
WARNING
Ensure that both locking buttons are engaged
after the adjustment.
4.4 Adjustment of the reclined/upright position
Pull the handle on backside of the backrest to release the locking mechanism
(fig. 16; no. 1) and turn the pushchair seat in the desired position (a, b, c , fig. 16;
no. 2).
WARNING
Ensure that the reclining mechanism is engaged
after losing of the handle.
4.5 Opening/ Closing the bumper bar
To open the bumper bar, press one of the release buttons (fig. 17; no. 1) and tip
the bumper bar to the side (fig. 17; no. 2).
To close the bumper bar, plug in the locking button back into the support on the
pushchair seat.
WARNING
Make sure by a pulling test that the bumper bar
is always closed correctly when seat unit is in
use.
WARNING
Never use the pushchair seat without bumper
bar.
19
19
Page 20

EN
4.6 Securing the child with the 5-point belt system
WARNING
Avoid serious injury from falling or sliding out.
Always use the 5-point belt system in described
manner when you use your kiddy click’n move3
with pushchair seat.
4.6.1 Opening of the 5-point belt system
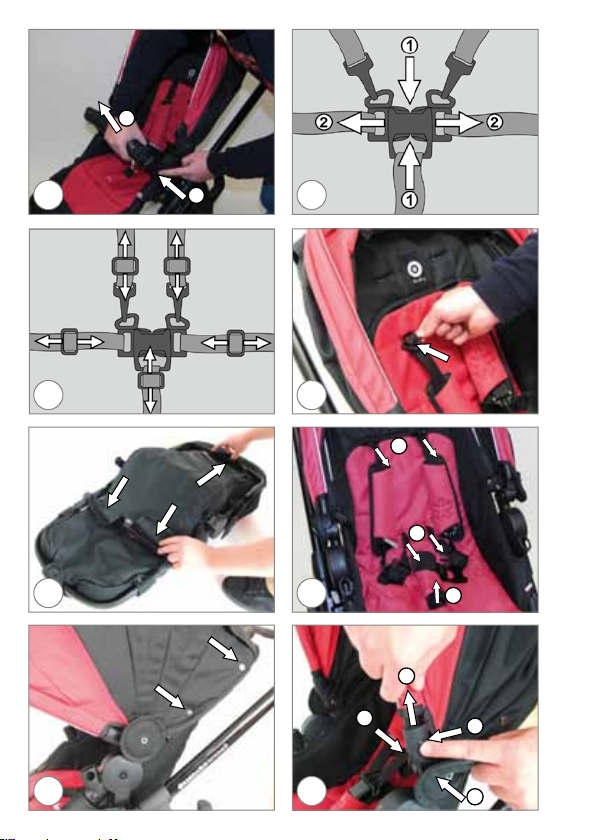
To open the buckle, push the buttons in the middle of the buckle (fig. 18; no. 1)
and pull the buckle tongues outwards (fig. 18; no. 2).
4.6.2 Width adjustment and securing the child
Place the child in the pushchair, put the shoulder belts over childs shoulder and
the buckle between the legs. Push the buckle tongues into the buckle and check
if it is closed.
WARNING
Test whether the buckle is correctly locked by
pulling on the belts.
The belt system can be adjusted by sliding the 5 belt adjusters in the desired
direction (fig. 19).
WARNING
The belt system is adjusted correctly when the
belts lay firmly on the child’s body.
20
20
Page 21

EN
4.6.3 Height adjustment of the shoulder belts
Open the velcro on the backside of the backrest.
Push the plastic clip from the backside of the backrest through the hole to the
front.
Do the same on the second side.
Now insert the plastic clip into the hole in the required height (fig. 20).
WARNING
The plastic clip must lay flat on the backside of
the backrest.
WARNING
Make sure that both shoulder belts are fixed in
the same height.
4.7 Removing/re-installing the 5-point belt system
Open the Velcro behind the back rest and on the lower side of the seat part
(fig. 21).
Put one hand under the cover and thread the end clip of buckle belt through the
hole of seat plate (fig. 22; no. 1). Then thread both end clips of hip belts through
the lower holes of backrest. (fig. 22; no. 2). Then thread both end clips of the
shoulder belts through the upper holes of back rest (fig. 22; no. 3).
To re-install the 5 point belt system, follow the steps for removing the belt system
in reverse order.
21
21
Page 22

EN
WARNING
Before using the pushchair seat make sure that
the 5-Point belt system is correctly re-installed,
the buckles match together and work, the belts
are flat routed, the end clips of hip belts and
shoulder belts are placed flat behind rear plate
and the end clip of buckle belt is placed flat under the back slot of seat plate.
4.8 Removing/re-installing the cover of pushchair seat
To remove the sun roof open the snap fastener at upper frame of push chair
seat (fig. 23). Open the snap fastener at both sides of sun roof joint (fig. 24; no. 1).
Press both locking buttons (fig. 24; no. 2).
Remove the sun roof by lifting the frame upwards (fig. 24; no. 3).
To remove the Cover of pushchair seat open the snap fastener (fig. 25) and zipper
(fig. 26/27) around the whole frame.
Remove the 5-point belt system as explained under point 4.7.
Now the cover can removed completely.
To re-install the cover, follow the steps for removing the cover in reverse order.
WARNING
Before using the pushchair seat make sure that
the 5-Point belt system is correctly re-installed
as explained under point 4.7 that the cover is
22
22
Page 23

EN
correctly re-installed and all snap fastener and
zippers are correctly closed.
5. Utilization of Kiddy Click’n Move 3 with pram body
WARNING
This product is suitable for a child who cannot
sit up unaided, roll over and cannot push itself
up on its hands or knees. From birth to approximately 6 months (max. 20 lbs / 9 kg).
WARNING
Never use the pram body if your child can sit up
by itself.
WARNING
Do not add a mattress thicker than 30 mm!
5.1 Unfolding the pram body
Pull both support bars outwards (fig. 28; no.1). until they lock into place on the
brackets (fig. 28; no. 2).
WARNING
Before each use make sure that the support bars
are locked in place.
23
23
Page 24

EN
Keep the locking buttons (fig. 29; no. 1) pressed at both plugs and install the
extension parts (fig. 29; no. 2).
WARNING
Before using as pram body make sure that the
extension parts are locked in place.
For folding the pram body, follow the steps for unfolding in reverse order.
5.2 Utilization as carrycot
WARNING
This product is suitable for a child who cannot
sit up unaided, roll over and cannot push itself
up on its hands or knees. From birth to approximately 6 months (max. 20 lbs / 9 kg).
WARNING
Never leave your child unattended.
WARNING
Never use this carrycot on a stand.
WARNING
Place this carrycot only on a firm, horizontal level and dry surface.
24
24
Page 25

EN
WARNING
Don´t let other children play unattended near
the carrycot.
WARNING
Do not use if any part is broken, torn or missing.
WARNING
Inspect the carrying belts and the bottom regularly for signs or damage and wear.
WARNING
Be aware of the risk of open fire and other source
of strong heat, such as electric bar fires, gas fires,
etc., in the near vicinity of carrycot.
Place both carrying belts on top of each other (fig. 30; no. 1) into the belt pad and
close both snap fasteners (fig. 30; no. 2).
WARNING
Never use the sun roof front frame for carrying
the carrycot (fig. 31)!
25
25
Page 26

EN
5.3 Attaching / removing the pram body at/from chassis
WARNING
Ensure that the parking brake is activated after
unfolding the chassis as described in point 3.1.
If infant carrier adapters were used, they must be removed from the chassis.
The pram body can be used front or rear facing the driving direction.
Insert both plugs of the pram body on the left and right support on the chassis
until they lock into the place and sit tight (fig. 32; no. 1) and the indication at
locking button is “green” (fig. 32; no. 2).
WARNING
Before using the pram body seat make sure that
both locking buttons indicate “green”. When the
locking buttons indicate “red”, pull these upwards, so that “green” will be indicated. Test by
pulling upwards whether the pram body is locked in place and tightly connected to the the
chassis.
WARNING
The carrying belts shall be left out of the pram
body during use (fig. 33)
26
26
Page 27

EN
To remove the pram body from the chassis press both locking buttons down-
wards (fig. 34; no.1) so that these indicate “red” and pull the pram body upwards
(fig. 34; no.2).
5.4 Adjustment of the sun roof
The sun roof can be adjusted freely into the desired position by turning the front
bar of the sun roof (fig. 35).
5.5 Removing/re-installing the cover of the pram body
To remove the sun roof open the snap fastener at frame of pram body (fig. 36;
no. 1).
Open the snap fastener at both sides of sun roof joint (fig. 36; no. 2).
Press both locking buttons (fig. 37; no. 1).
Remove the sun roof by lifting the frame upwards (fig. 37; no. 2)
To remove the cover of pram body open the snap fastener (fig. 38) and zipper (fig.
39) around the whole frame.
Remove the mattress. Now the cover can removed completely.
To re-install the cover, follow the steps for removing the cover in reverse order.
WARNING
Before using the pram body make sure that the
cover and the is correctly re-installed and all snap
fastener and zippers are correctly closed the carrying belts are place correctly the mattress is inside.
27
27
Page 28

EN
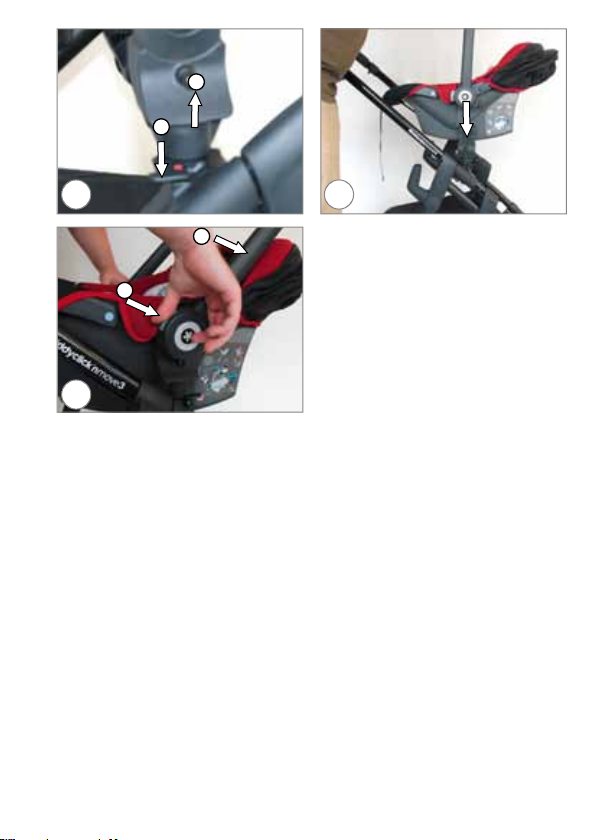
6. Utilization of Kiddy click’n Move 3 with infant carrier
6.1 Attaching/removing the infant carrier adaptors
WARNING
Ensure that the parking brake is activated after
unfolding the chassis as described in point 3.1.
Insert both plugs of the infant carrier adapter on the left and right support on the
chassis until they lock into the place and sit tight (fig. 40; no. 1) and the indication
at locking button is “green” (fig. 40; no. 2).
WARNING
Before installing of infant carrier seat make sure
that both locking buttons indicate “green”. When
the locking buttons indicate “red”, pull these upwards, so that “green” will be indicated. Test by
pulling upwards whether the are locked in place
and tightly connected to the the chassis.
To remove the infant carrier adapters from the chassis press both locking buttons
downwards so that these indicate “red” (fig. 41; no. 1) and pull the adapters upwards (fig. 41; no. 2).
6.2 Attaching/removing the infant carrier
WARNING
Make sure that your child is secured in the infant
carrier like described in it’s operating manual.
2828
Page 29

EN
Attach the infant carrier against driving direction on the adaptors (fig. 42).
Hold both buttons at the handle of the infant carrier pushed (fig. 43; no. 1).
Turn the handle in frontal direction until the handle buttons lock in place
(fig. 43; no. 2).
WARNING
Ensure before using that the adaptors and the
infant carrier are engaged!
To remove the kiddy infant carrier push both handle buttons and turn
the handle in carrying position.
WARNING
Ensure that both handle buttons are engaged.
Now the infant carrier can be removed from the adaptors.
WARNING
For car seats used in conjunction with a chassis, this vehicle does not replace a cot or a bed.
Should your child need to sleep, then it should
be placed in a suitable pram body, cot or bed.
2929
Page 30

EN
7. Care and maintenance
7.1 Care and maintenance of the chassis in general
Periodically check the chassis for loose screws, rivets or worn out or defective
parts. Check the fabric cover and belts for open seams or other defects.
Don’t use the stroller when you noticed a defect. Defective parts have to be changed or repaired before using the stroller again. If a wheel is squeaking, spray some
liquid silicone lubricant on the axles. Wipe off unnecessary lubricant.
The chassis can be cleaned with a mild cleanser or with a damp cloth. Never use
caustic cleansing agents (e.g. solvents, strong detergents).
7.2 Fabric care in general
All of our fabric meets the highest standards regarding colourfastness against UV
radiation. Nevertheless, all fabric fades when exposed to UV radiation. This is not
due to defective fabric but to normal wear and tear, which is not covered by the
warranty. When the cover (or the chassis) is wet, allow to dry unfolded at room
temperature before storing or using.
The seat cover and the belt pads are machine washable with mild detergent in
delicate cycle. Don’t bleach, spin or tumble dry the cover. Don’t centrifuge, peg
out the cover in wet condition. Don’t heat iron any part of the cover.
The sunroofs are hand washable only. Use a mild detergent and rinse it out with
much warm water. Don’t centrifuge, peg out the cover in wet condition.
3030
Page 31

EN
8. Warranty
This stroller was manufactured by Kiddy.
kiddy USA warrants this product to the original retail purchaser as follows:
LIMITED ONE YEAR WARRANTY
This product is warranted against defective materials and workmanship for one
year from the date of original purchase. Proof of purchase is required. Your exclusive
path of recall for this warranty is that kiddy USA Inc. will, as an option, provide, repair
or replace components of this product or refund the original purchase price of the
product. kiddy USA Inc. reserves the right to discontinue or change fabrics, parts,
models or products, or to make substitutions.
To make a claim under this warranty, you must contact ‘Kiddy consumer services’
on tel: 678 377 3309 or write to us using the address on the back of the booklet.
Proof of purchase is required.
PLEASE COMPELETE AND MAIL THE OWNER REGISTRATION CARD WITHIN (30)
DAYS OF PURCHASE OR REGISTER ONLINE
(www.kiddyusa.com).
WARRANTY LIMITATIONS
This warranty does not include damages which arise from negligence, misuse,
salt corrosion, or use not in accordance with the user guide.
The use of non-Kiddy accessories is not approved by kiddy USA Inc. The use of
unapproved accessories could cause this product to become dameged or dangerous. Their use automatically voids the kiddy USA Inc. warranty.
3131
Page 32

EN
LIMITATION OF DAMAGES
The warranty and remedies as set forth above are exclusive and in lieu of all
others, oral or written express or implied. In no event will kiddy USA Inc. or the
retailer selling this product be liable to you for any damages, including incidental
or consequential damages, arising from the use this product. Please contact your
specialist dealer immediately in the event of warranty claim.
LIMITATIONS OF WARRANTIES AND OTHER WARRANTY TERMS AND STATE LAWS
Any implied warranties, including implied warranties of merchantability and fitness
for a particular purpose, shall be limited to the duration and terms of the express
written warranty. Some states do not allow limitations on how long an implied
warranty lasts or the exclusion or limitation of incidental or consequential damages, so the above limitations may not apply to you. This warranty gives you
specific legal rights, and you may have other rights, which vary from state to
state. Neither kiddy USA Inc., nor the retailer selling this product, authorizes any
person to create for it any other warranty, obligation, or liability in connection
with this product.
The Kiddy team wishes you and your child a good and safe trip at all
times.
3232
Page 33

ES
1. Consejos generales de seguridad 34
2. Desembalaje 38
3. Ajustes 38
3.1 Apertura del chasis 38
3.2 Plegado del chasis 39
3.3 Montaje/desmontaje de las ruedas traseras 39
3.4 Montaje/desmontaje de las ruedas delanteras 40
3.5 Bloqueo/desbloqueo de las ruedas delanteras giratorias 40
3.6 Ajuste del freno 41
3.7 Ajuste de la barra 41
4. Uso de Kiddy Click'n Move 3 con la sillita de paseo 41
4.1 Montaje/desmontaje de la sillita de paseo del chasis 41
4.2 Ajuste de la cubierta solar 42
4.3 Ajuste del reposapiés 43
4.4 Ajuste de la posición reclinada/vertical 43
4.5 Apertura/cierre de la barra de seguridad 43
4.6 Protección del niño con el sistema de cinturones de 5 puntos 44
4.6.1 Apertura del sistema de cinturones de 5 puntos 44
4.6.2 4.6.2 Ajuste de anchura y seguridad del niño 44
4.6.3 Ajuste de altura de los cinturones de hombros 45
4.7 Desmontaje/re-instalación del sistema de cinturones de 5 puntos 46
4.8 Desmontaje/re-instalación de la cubierta de la sillita de paseo 47
5. Uso de Kiddy Click'n Move 3 con la estructura del cochecito 48
5.1 Apertura de la estructura del cochecito 48
5.2 Uso como capazo 49
5.3 Montaje/Desmontaje de la estructura del cochecito del chasis 51
5.4 Ajuste de la cubierta solar 52
5.5 Desmontaje/re-instalación de la cubierta de la estructura del cochecito 52
6. Uso de Kiddy Click'n Move 3 con el portabebés 53
6.1 Montaje/desmontaje de los adaptadores del portabebés 53
6.2 Montaje/Desmontaje del portabebés 54
7. Cuidado y mantenimiento 55
7.1 Cuidado y mantenimiento del chasis en general 55
7.2 Cuidado del tejido en general 55
8. Garantía 56
33
Page 34

ES
Manual de uso de Kiddy Click'n Move 3
IMPORTANTE
Guarde las presentes instrucciones para consultarlas en el futuro.
Gracias por haber escogido el Kiddy Click'n Move 3 como su sistema de viaje
favorito.
El Kiddy Click'n Move 3 es el último producto de nuestra línea de cochecitos.
Este cochecito es un producto de primera clase que garantiza una larga vida útil,
si se usa correctamente.
El Kiddy Click'n Move 3 ha sido testado y homologado conforme a la norma
ASTM F833.
El Kiddy Click'n Move 3 es apto para niños recién nacidos hasta unos 4 años de
edad o 25 kg. Sin embargo, se deben aplicar las siguientes especificaciones para
cada grupo de edad:
portabebés: para niños recién nacidos hasta 13 kg (aprox. 1 año y medio)
capazo: para niños recién nacidos hasta 9 kg (aprox. 6 meses)
sillita de paseo: para niños de 9 kg hasta 25 kg (aprox. 4 años)
1. Consejos generales de seguridad
Lea detenidamente las presentes instrucciones antes de usar este artículo y guárdelas para consultarlas en el futuro. La seguridad de su hijo se puede ver afectada
si no sigue las siguientes instrucciones.
ADVERTENCIA
Nunca deje a su hijo desatendido.
34
34
Page 35

ES
ADVERTENCIA
Asegúrese de que todos los dispositivos de bloqueo estén accionados antes de su uso.
ADVERTENCIA
Para evitar lesiones, cerciórese de que su hijo se
mantenga alejado al abrir o plegar este producto.
ADVERTENCIA
Asegúrese también de no pillar ninguna parte
corporal con los componentes móviles.
ADVERTENCIA
No permita que su hijo juegue con este
producto.
ADVERTENCIA
Utilice un arnés en cuanto su hijo se pueda sentar sin ayuda.
ADVERTENCIA
La sillita de paseo no es apta para niños menores
de 6 meses.
ADVERTENCIA
Utilice siempre el sistema de retención.
35
35
Page 36

ES
ADVERTENCIA
Compruebe que la estructura del cochecito o la
unidad del asiento e incluso los dispositivos de
unión al asiento del coche estén correctamente
ajustados antes de su uso.
ADVERTENCIA
Este producto no es apto para correr o patinar.
ADVERTENCIA
No sobrecargue el cesto, la bolsa de la sillita de
paseo o el portavasos. El peso máximo en el cesto es de 5 kg, en la bolsa de la sillita de paseo 0,5
kg y en el portavasos 0,5 kg. Toda sobrecarga
podría afectar peligrosamente a la estabilidad
del cochecito.
ADVERTENCIA
Los paquetes o elementos accesorios, o ambos,
colocados en la unidad pueden hacer que esta
pierda estabilidad.
ADVERTENCIA
No use el cochecito con más de un niño a la vez.
36
36
Page 37

ES
ADVERTENCIA
Use únicamente accesorios y recambios aprobados por Kiddy.
ADVERTENCIA
Use siempre el cinturón pélvico junto con el de
la cintura. Los puntos de unión (anillo D) para
un arnés de cinturón independiente están en los
extremos exteriores de la retención pélvica.
ADVERTENCIA
Use el freno cuando siente y levante al niño.
ADVERTENCIA
Supervise periódicamente los cinturones, las
hebillas, y si los remaches, tornillos o piezas se
aflojan.
ADVERTENCIA
Nunca use el cochecito en escaleras normales ni
mecánicas.
ADVERTENCIA
El niño se puede deslizar hacia las aberturas para
las piernas y correr peligro de estrangulamiento.
Nunca use la posición (o posiciones) reclinada(s)
37
37
Page 38

ES
del cochecito a menos que (instrucciones específicas del producto a insertar por el fabricante).
2. Desembalaje
ADVERTENCIA
Retire el material protector y las bolsas de plástico, y deséchelas antes de montar el cochecito.
ADVERTENCIA
Para evitar riesgos de asfixia, mantenga el material de embalaje alejado de los niños.
ADVERTENCIA
El montaje debe ser llevado a cabo por un adulto. Mantenga alejados a los niños pequeños durante el montaje del cochecito.
3. Ajustes
3.1 Apertura del chasis
Coloque el chasis de pie. Agarre con la mano izquierda la estructura inferior del
lado izquierdo (fig. 1, n.º 1) y mantenga el botón de bloqueo presionado (fig. 1,
n.º 2). Con la mano derecha, levante la barra (fig. 2, n.º 2) hasta que el mecanismo
de bloqueo se libere.
38
38
Page 39

ES
Suelte la estructura inferior, tome el agarre manual (fig. 2, n.º 1) y abra el chasis
completamente levantando la barra (fig. 2, n.º 2) hasta que el mecanismo de fijación se cierre en ambos lados.
ADVERTENCIA
Asegúrese de que ambos dispositivos de bloqueo del chasis estén accionados antes de usar.
3.2 Plegado del chasis
Mantenga presionado el botón de liberación bajo el lado derecho del asa (fig.
3, n.º 1) y tire hacia atrás de ambos deslizadores de liberación (fig. 3, n.º 2) y, al
mismo tiempo, hacia abajo de la barra (fig. 3, n.º 3).
Ahora tire del agarre manual (fig. 4, n.º 1) con la mano izquierda, y presione la
barra (fig. 4, n.º 2) hasta que el botón de bloqueo encaje en su sitio.
ADVERTENCIA
Asegúrese de no pillar ninguna parte corporal
con los componentes móviles.
ADVERTENCIA
El chasis queda completamente plano al plegarlo, cuando la sillita de paseo se monta en el
sentido de la conducción.
3.3 Montaje/desmontaje de las ruedas traseras
Para montar una rueda trasera, mantenga el botón de bloqueo presionado (fig 5,
n.º 1) y empuje el eje hacia el centro del chasis (fig 5, n.º 2).
39
39
Page 40

ES
ADVERTENCIA
Compruebe que ambas ruedas traseras estén
bloqueadas en su sitio y debidamente unidas al
chasis tirando de ellas hacia afuera.
Para retirar una rueda trasera, mantenga el botón de bloqueo presionado (fig. 6,
n.º 1) y tire de la rueda hacia afuera (fig. 6, n.º 2).
3.4 Montaje/desmontaje de las ruedas delanteras
Para montar una rueda delantera, mantenga el botón de bloqueo presionado (fig
7, n.º 1) y empuje el eje vertical hacia el soporte de sujeción del chasis (fig 7, n.º 2).
ADVERTENCIA
Compruebe que ambas ruedas delanteras estén
bloqueadas en su sitio y debidamente unidas al
chasis tirando de ellas hacia abajo.
Para retirar una rueda delantera, mantenga el botón de bloqueo presionado (fig.
8, n.º 1) y tire de la rueda hacia abajo (fig. 8, n.º 2).
3.5 Bloqueo/desbloqueo de las ruedas delanteras giratorias
Para bloquear las ruedas delanteras, deben estar giradas en posición recta hacia
delante. Entonces presione la palanca de fijación hacia arriba (fig. 9, n.º 1) hasta
que el botón se bloquee en su sitio.
Para desbloquear las ruedas y que puedan girar, presione la palanca de fijación
hacia abajo (fig. 9; n.º 2).
40
40
Page 41

ES
3.6 Ajuste del freno
Presione el pedal hacia detrás para activar los frenos (fig. 10, "STOP").
ADVERTENCIA
No suelte el cochecito hasta que esté seguro de
que el freno está bien accionado.
Para liberar los frenos, presione el pedal hacia delante (fig. 10, "GO").
3.7 Ajuste de la barra
Mantenga ambos botones de liberación presionados (fig. 11, n.º 1) y gire entonces la barra a la posición deseada (fig. 11, n.º 2).
4. Uso de Kiddy Click'n Move 3 con la sillita de paseo
4.1 Montaje/desmontaje de la sillita de paseo del chasis
ADVERTENCIA
La sillita de paseo está pensada para niños de 6
meses (aprox. 9 kg) a 4 años (máx. 25 kg).
ADVERTENCIA
Esta unidad de asiento no es apta para niños menores de 6 meses.
41
41
Page 42

ES
ADVERTENCIA
Asegúrese de que el freno esté activado tras abrir el chasis, tal como se describe en el punto 3.1.
Si se usan adaptadores de portabebés, se deben retirar del chasis. La sillita de
paseo se puede usar delante o detrás en el sentido de la conducción.
Inserte ambos conectores de la sillita de paseo en el soporte izquierdo y derecho
del chasis hasta que queden bien bloqueados en su sitio (fig. 12, n.º 1) y la indicación del botón de bloqueo esté "verde" (fig. 12, n.º 2).
ADVERTENCIA
Antes de usar la sillita de paseo, asegúrese de
que ambos botones de bloqueo estén en "verde". Cuando los botones de bloqueo estén en
"rojo", tire de estos hacia arriba para que se muestren en "verde". Pruebe tirando hacia arriba si
la sillita de paseo está bloqueada en su sitio y
bien unida al chasis.
Para retirar la sillita de paseo del chasis, presione ambos botones de bloqueo
hacia abajo (fig. 13, n.º 1) de forma que se muestren en "rojo" (fig. 13, n.º 2) y tire
de la sillita de paseo hacia arriba (fig. 13, n.º 3).
4.2 Ajuste de la cubierta solar
La cubierta solar se puede ajustar libremente en la posición que desee girando la
barra frontal de la cubierta solar (fig. 14, n.º 1).
42
42
Page 43

ES
Si quiere abrir la cubierta solar al máximo, abra los dos broches de presión interiores (fig. 14, n.º 2).
4.3 Ajuste del reposapiés
Mantenga ambos botones de liberación presionados (fig. 15, n.º 1) y gire entonces el reposapiés a la posición deseada (fig. 15, n.º 2).
ADVERTENCIA
Asegúrese de que ambos botones de bloqueo
estén accionados tras el ajuste.
4.4 Ajuste de la posición reclinada/vertical
Tire del asa en la parte trasera del respaldo para liberar el mecanismo de bloqueo
(fig. 16, n.º 1) y gire la sillita de paseo a la posición deseada (a, b, c, fig. 16, n.º 2).
ADVERTENCIA
Asegúrese de que el mecanismo de reclinación
está accionado tras soltar el asa.
4.5 Apertura/cierre de la barra de seguridad
Para abrir la barra de seguridad, presione uno de los botones de liberación (fig.
17, n.º 1) e incline la barra de seguridad al lado (fig. 17, n.º 2).
Para cerrar la barra de seguridad, inserte el botón de bloqueo de nuevo en el
soporte de la
sillita de paseo.
43
43
Page 44

ES
ADVERTENCIA
Asegúrese (probando a tirar de ella) de que la
barra de seguridad esté siempre bien cerrada
cuando la unidad del asiento se esté usando.
ADVERTENCIA
Nunca use la sillita de paseo sin la barra de seguridad.
4.6 Protección del niño con el sistema de cinturones de 5 puntos
ADVERTENCIA
Evite lesiones graves por caída o deslizamiento. Use siempre el sistema de cinturones de 5
puntos del modo descrito cuando use el Kiddy
Click'n Move 3 con la sillita de paseo.
4.6.1 Apertura del sistema de cinturones de 5 puntos
Para abrir la hebilla, presione los botones en el centro de la hebilla (fig. 18, n.º 1) y
tire de las lengüetas de la hebilla hacia afuera (fig. 18, no. 2)
4.6.2 Ajuste de anchura y seguridad del niño
Siente al niño en la sillita y coloque los cinturones de los hombros sobre estos y
la hebilla entre las piernas. Introduzca las lengüetas en la hebilla y compruebe
que está cerrada.
44
44
Page 45

ES
ADVERTENCIA
Compruebe si la hebilla está debidamente cerrada tirando de los cinturones.
El sistema de cinturones se puede ajustar deslizando los 5 ajustadores de cinturón en la dirección deseada (fig. 19).
ADVERTENCIA
El sistema de cinturones está bien ajustado cuando los cinturones se disponen con firmeza sobre el cuerpo del niño.
4.6.3 Ajuste de altura de los cinturones de hombros
Abra el velcro en la parte trasera del respaldo.
Presione el broche de plástico en la parte trasera del respaldo a través del orificio
en la parte frontal.
Haga lo mismo en el segundo lado.
Ahora inserte el broche de plástico en el orificio a la altura requerida (fig. 20).
ADVERTENCIA
El broche de plástico debe estar en posición plana en la parte trasera del respaldo.
45
45
Page 46

ES
ADVERTENCIA
Asegúrese de que ambos cinturones de hombros se han fijado a la misma altura.
4.7 Desmontaje/re-instalación del sistema de cinturones de 5 puntos
Abra el velcro tras el respaldo y en la parte inferior de la parte del asiento (fig. 21).
Coloque una mano bajo la cubierta y pase el broche final del cinturón de la hebilla por el orificio de la base del asiento (fig. 22n n.º 1). Entonces pase ambos
broches finales de los cinturones de la cadera por los orificios inferiores del respaldo. (fig. 22; n.º 2). Entonces pase ambos broches finales de los cinturones de
los hombros por los orificios superiores del respaldo (fig. 22, n.º 3).
Para re-instalar el sistema de cinturones de 5 puntos, siga los pasos de desmontar
el sistema de cinturones en el orden inverso.
ADVERTENCIA
Antes de usar la sillita de paseo, asegúrese de
que el sistema de cinturones de 5 puntos esté
bien re-instalado, que las hebillas coincidan y
funcionen, que los cinturones estén planos, que
los broches finales de los cinturones de cadera y
hombros estén planos detrás de la base posterior, y que el broche final del cinturón de la hebilla
esté plano bajo la ranura posterior de la base del
asiento.
46
46
Page 47

ES
4.8 Desmontaje/re-instalación de la cubierta de la sillita de paseo
Para retirar la cubierta solar, abra el broche de presión en la estructura superior de
la sillita de paseo (fig. 23). Abra el broche de presión en ambos lados de la junta
de la cubierta solar (fig. 24, n.º 1).
Presione ambos botones de bloqueo (fig. 24, n.º 2).
Retire la cubierta solar levantando la estructura (fig. 24, n.º 3).
Para retirar la cubierta de la sillita de paseo, abra el broche de presión (fig. 25) y
pase la cremallera (fig. 26/27) alrededor de toda la estructura.
Retire el sistema de cinturones de 5 puntos como se detalla en el punto 4.7.
Ahora la cubierta se puede quitar completamente.
Para re-instalar la cubierta, siga los pasos de desmontaje de la cubierta en el orden inverso.
ADVERTENCIA
Antes de usar la sillita de paseo, asegúrese de
que el sistema de cinturones de 5 puntos esté
bien re-instalado tal como se explica en el punto
4.7, que la cubierta esté bien re-instalada y que
todos los broches de presión y cremalleras estén
bien cerrados.
47
47
Page 48

ES
5. Uso de Kiddy Click'n Move 3 con la estructura del cochecito
ADVERTENCIA
Este producto es apto para un niño que no se
pueda sentar sin ayuda, ni se pueda girar o levantar con ayuda de las manos o rodillas. Desde
recién nacidos hasta aproximadamente 6 meses
(máx. 9 kg).
ADVERTENCIA
Nunca use la estructura del cochecito si el niño
se puede sentar solo.
ADVERTENCIA
¡No coloque un colchón de más de 30 mm de
grosor!
5.1 Apertura de la estructura del cochecito
Tire de ambas barras de soporte hacia afuera (fig. 28, n.º 1) hasta que se bloqueen
en su sitio en los soportes (fig. 28, n.º 2).
ADVERTENCIA
Antes de cada uso, asegúrese de que las barras
de soporte estén bloqueadas en su sitio.
Mantenga los botones de bloqueo presionados (fig. 29, n.º 1) en ambos conectores e instale los extensores (fig. 29, n.º 2)
48
48
Page 49

ES
ADVERTENCIA
Antes de usar como estructura del cochecito,
asegúrese de que los extensores estén bloqueados en su sitio.
Para plegar la estructura del cochecito, siga los pasos de la apertura en el orden
inverso.
5.2 Uso como capazo
ADVERTENCIA
Este producto es apto para un niño que no se
pueda sentar sin ayuda, ni se pueda girar o levantar con ayuda de las manos o rodillas. Desde
recién nacidos hasta aproximadamente 6 meses
(máx. 9 kg).
ADVERTENCIA
Nunca deje a su hijo desatendido.
ADVERTENCIA
Nunca use este capazo sobre un soporte.
ADVERTENCIA
Coloque el capazo únicamente sobre una superficie firme, horizontal y seca.
49
49
Page 50

ES
ADVERTENCIA
No deje que otros niños jueguen desatendidos
cerca del capazo.
ADVERTENCIA
No usar si falta alguna pieza, si está rota o dañada.
ADVERTENCIA
Inspeccione periódicamente los cinturones de
transporte y el botón por si presentan indicios
de daño o desgaste.
ADVERTENCIA
Sea consciente del riesgo que puede entrañar
un fuego u otras fuentes de calor intenso, como
resistencias de estufas, fuegos de gas, etc. cerca
del capazo.
Meta ambos cinturones de transporte superpuestos (fig. 30, n.º 1) en la almohadilla de los cinturones y cierre ambos broches de presión (fig. 30, n.º 2).
ADVERTENCIA
¡Nunca use la estructura frontal de la cubierta
solar para llevar el capazo (fig. 31)!
50
50
Page 51

ES
5.3 Montaje/desmontaje de la estructura del cochecito del chasis
ADVERTENCIA
Asegúrese de que el freno esté activado tras abrir el chasis, tal como se describe en el punto 3.1.
Si se usan adaptadores de portabebés, se deben retirar del chasis.
La estructura del cochecito se puede usar delante o detrás en el sentido de la
conducción.
Inserte ambos conectores de la estructura del cochecito en el soporte izquierdo
y derecho del chasis hasta que se queden bien bloqueados en su sitio (fig. 32, n.º
1) y la indicación del botón de bloqueo esté "verde" (fig. 32, n.º 2).
ADVERTENCIA
Antes de usar la estructura del cochecito, asegúrese de que ambos botones de bloqueo estén en
"verde". Cuando los botones de bloqueo estén
en "rojo", tire de estos hacia arriba para que se
muestren en "verde". Pruebe tirando hacia arriba si la estructura del cochecito está bloqueada
en su sitio y bien unida al chasis.
ADVERTENCIA
Los cinturones de transporte se deben dejar fuera de la estructura del cochecito durante su uso
(fig. 33).
51
51
Page 52

ES
Para retirar la estructura del cochecito del chasis, presione ambos botones de
bloqueo hacia abajo (fig. 34, n.º 1) de forma que se muestren en "rojo" y tire de la
estructura del cochecito hacia arriba (fig. 34, n.º 2).
5.4 Ajuste de la cubierta solar
La cubierta solar se puede ajustar en la posición que desee girando la barra frontal de la cubierta solar (fig. 35).
5.5 Desmontaje/re-instalación de la cubierta de la estructura del coche-
cito
Para retirar la cubierta solar, abra el broche de presión en el bastidor de la estructura del cochecito (fig. 36, n.º 1).
Abra el broche de presión en ambos lados de la junta de la cubierta solar (fig.
36, n.º 2).
Presione ambos botones de bloqueo (fig. 37, n.º 1).
Retire la cubierta solar levantando la estructura (fig. 37, n.º 2).
Para retirar la cubierta de la estructura del cochecito, abra el broche de presión
(fig. 38) y pase la cremallera (fig. 39) alrededor de toda la estructura.
Retire el colchón. Ahora la cubierta se puede quitar completamente.
Para re-instalar la cubierta, siga los pasos de desmontaje de la cubierta en el orden inverso.
ADVERTENCIA
Antes de usar la estructura del cochecito, asegú-
5252
Page 53

ES
rese de que la cubierta esté bien re-instalada,
que todos los broches de presión y cremalleras
estén bien cerrados, que los cinturones de transporte estén en su sitio y que el colchón esté dentro.
6. Uso de Kiddy Click'n Move 3 con el portabebés
6.1 Montaje/desmontaje de los adaptadores del portabebés
ADVERTENCIA
Asegúrese de que el freno esté activado tras abrir el chasis, tal como se describe en el punto 3.1.
Inserte ambos conectores del adaptador del portabebés en el soporte izquierdo
y derecho del chasis hasta que se queden bien bloqueados en su sitio (fig. 40, n.º
1) y la indicación del botón de bloqueo esté "verde" (fig. 40, n.º 2).
ADVERTENCIA
Antes de usar el asiento del portabebés, asegúrese de que ambos botones de bloqueo estén en
"verde". Cuando los botones de bloqueo estén
en "rojo", tire de estos hacia arriba para que se
muestren en "verde". Pruebe tirando hacia arriba si ambos adaptadores están bloqueados en
su sitio y bien unidos al chasis.
5353
Page 54

ES
Para retirar los adaptadores del portabebés del chasis, presione ambos botones
de bloqueo hacia abajo de forma que se muestren en "rojo" (fig. 41, n.º 1) y tire de
los adaptadores hacia arriba (fig. 41, n.º 2).
6.2 Montaje/desmontaje del portabebés
ADVERTENCIA
Asegúrese de que el niño esté bien sujeto en el
portabebés, tal como se describe en el manual
de instrucciones.
Una el portabebés a los adaptadores en sentido contrario al de la conducción
(fig. 42).
Mantenga ambos botones presionados en el asa del portabebés (fig. 43, n.º 1).
Gire el asa en dirección frontal hasta que los botones del asa se bloqueen en su
sitio (fig. 43; n.º 2).
ADVERTENCIA
Antes de usar, asegúrese de que los adaptadores
y el portabebés estén bien unidos.
Para retirar el portabebés de Kiddy, presione ambos botones del asa y
después gire el asa a la posición de transporte.
ADVERTENCIA
Asegúrese de que ambos botones del asa estén
accionados.
5454
Page 55

ES
Ahora el portabebés se puede retirar de los adaptadores.
ADVERTENCIA
En el caso de asientos de coche usados con un
chasis, este vehículo no sustituye a la cuna o la
cama. Si el niño necesita dormir, se debe colocar en una estructura de cochecito, cuna o cama
adecuada.
7. Cuidado y mantenimiento
7.1 Cuidado y mantenimiento del chasis en general
Revise periódicamente si el chasis presenta tornillos o remaches sueltos o gastados, o si hay partes defectuosas. Revise si la funda de tejido y los cinturones presentan costuras abiertas u otros defectos.
No use el cochecito si detecta algún defecto. Las piezas defectuosas se deben
sustituir o reparar antes de volver a usar el cochecito. Si una rueda chirría, rocíe
lubricante de silicona líquida en los ejes. Limpie con un trapo el exceso de lubricante.
El chasis se puede limpiar con un producto suave o con un paño húmedo. Nunca
use limpiadores cáusticos (p. ej. disolventes, detergentes agresivos).
7.2 Cuidado del tejido en general
Todos nuestros tejidos cumplen las normativas más exigentes en cuanto a inalterabilidad cromática por radiación UV. Sin embargo, todos los tejidos se destiñen
por la exposición a la radiación UV. No se trata de un defecto del tejido, sino de
un desgaste y deterioro normal que la garantía no cubre. Si la funda (o el chasis)
5555
Page 56

ES
se moja, permita que se seque extendida a temperatura ambiente antes de guardarla o usarla.
La funda del asiento y las almohadillas de los cinturones se pueden lavar a máquina con detergente suave en un ciclo de lavado delicado. No use lejía con la funda,
no la centrifugue ni la introduzca en la secadora. No centrifugue la funda, ni la
cuelgue cuando esté mojada. No planche ninguna parte de la funda.
vLa cubierta solar solo se puede lavar a mano. Utilice un detergente suave y en-
juáguela con abundante agua caliente. No centrifugue la funda, ni la cuelgue
cuando esté mojada.
8. Garantía
Este cochecito ha sido fabricado por Kiddy.
kiddy USA garantiza este producto a su comprador inicial como sigue:
GARANTÍA LIMITADA DURANTE UN AÑO
Este producto está garantizado contra defectos en materiales o mano de obra
durante un año desde la fecha de su compra original. Se requiere el justificante de compra. La exclusiva vía de reclamaciones contemplada en esta garantía
indica que kiddy USA Inc., como opción, proporcionará, reparará o sustituirá los
componentes de este producto o reembolsará el precio original de compra del
5656
Page 57

ES
producto. kiddy USA Inc. se reserva el derecho de suspender o cambiar tejidos,
piezas, modelos o productos, o de realizar sustituciones.
Para realizar una reclamación conforme a esta garantía, debe contactar con el
"servicio de atención al cliente de Kiddy" en el teléfono: 678 377 3309, o escribirnos a la dirección indicada en la parte posterior del folleto. Se requiere el justificante de compra.
POR FAVOR, CUMPLIMENTE Y ENVÍE POR CORREO LA TARJETA DE REGISTRO DEL
PROPIETARIO EN UN PLAZO NO SUPERIOR A (30) DÍAS DESDE LA COMPRA O REGISTRO EN LÍNEA
(www.kiddyusa.com).
LIMITACIONES DE LA GARANTÍA
La presente garantía no incluye daños que puedan surgir de la negligencia, el
uso inadecuado, la corrosión salina u otros usos diferentes de lo indicado en la
guía de usuario.
El uso de accesorios no pertenecientes a Kiddy no estará aprobado por kiddy
USA Inc. El uso de accesorios no aprobados podría hacer que este producto se
dañase o fuese peligroso. Su uso invalidará automáticamente la garantía expedida por kiddy USA Inc.
LIMITACIÓN DE DAÑOS
La garantía y las soluciones descritas anteriormente son exclusivas y aplicables
en vez de otras, expresadas o implícitas de forma verbal o escrita. En ningún caso,
kiddy USA Inc., o la tienda que venda este producto se responsabilizará ante usted por daños, incluyendo daños incidentales o consecuentes, resultantes del
uso de este producto. Contacte de inmediato con su distribuidor especializado si
quiere ejercer algún derecho de la garantía
5757
Page 58

ES
LIMITACIONES DE LA GARANTÍA Y OTROS TÉRMINOS DE LA GARANTÍA Y LEYES
ESTATALES
Toda garantía implícita, incluyendo garantías implícitas de comerciabilidad o
idoneidad para un fin concreto, deberán limitarse a la duración y los términos de
la garantía escrita, expresa. Algunos estados no permiten las limitaciones sobre
la duración de una garantía o la exclusión o limitación de daños incidentales o
consecuentes, de modo que las limitaciones anteriores pueden no aplicarse en
su caso. Esta garantía le confiere derechos legales específicos, además de otros
derechos que puede tener y que varían de un estado a otro. Ni kiddy USA Inc., ni
otras tiendas donde se venda este producto, autoriza a ninguna persona a crear
por sí misma cualquier otra garantía, obligación o responsabilidad en relación
con este producto.
El equipo de Kiddy le desea a usted y su hijo un buen viaje, y siempre con
total seguridad.
5858
Page 59

kiddy USA, Inc.
STE 100
685 Dividend Dr.
Peachtree City, GA 30269
USA
phone 1-855-92-KIDDY
e-mail info@kiddyusa.com
Status 03/2013
 Loading...