


Status 08/2012 USA
EN Directions for use
ES Manual de uso

1 |
2 |
3 |
4 |
5 |
6 |
7 |
8 |
2

STOP 
GO 
 STOP
STOP
9 |
|
10 |
GO |
a |
2 |
|
|
|
b |
|
|
|
c |
1 |
|
11 |
|
12 |
|
13 |
14 |
15 |
16 |
3

17
19
21
23
18
20
22
2 |
3 |
1 |
|
6
4
5
24
4
 2
2
25 |
1 |
26 |
5

|
|
|
|
EN |
|
1. |
General safety tips |
|
|
7 |
|
2. |
Unpacking |
|
|
10 |
|
3. |
Adjustments |
|
|
10 |
|
3.1 |
Unfolding the chassis |
|
|
10 |
|
3.2 |
Folding the chassis |
|
|
10 |
|
3.3 |
Attaching / removing the sunroof |
|
|
11 |
|
3.4 |
Adjustment of the sunroof |
|
|
11 |
|
3.5 |
Removing / attaching the front wheels |
11 |
|||
3.6 |
Fixing the swivel front wheels |
|
|
11 |
|
3.7 |
Adjustment of the parking brake |
|
|
11 |
|
3.8 |
Adjustment of the reclined / upright position |
12 |
|||
3.9 |
Adjustment of the footrest |
|
|
12 |
|
4. |
Securing the child with the 5-point belt system |
12 |
|||
4.1 |
Opening the 5-point belt system |
|
|
12 |
|
4.2 |
Width adjustment of the 5-point belt system and securing the child |
13 |
|||
4.3 |
Height adjustment of the shoulder belts |
13 |
|||
4.4 |
Opening / Closing the bumper bar |
13 |
|||
5. |
Using with infant carrier |
|
|
14 |
|
5.1 |
Mounting the travelsystem adaptors on the chassis |
14 |
|||
5.2 |
Mounting the infant carrier adaptors |
14 |
|||
5.3 |
Mounting and removing a kiddy infant carrier |
15 |
|||
5.4 |
Removing the infant carrier adaptors |
16 |
|||
5.5 |
Removing the travelsystem adaptors |
16 |
|||
6. |
Removing and mounting the cover |
16 |
|||
6.1 |
Removing and mounting the belt system |
16 |
|||
6.2 |
Removing and mounting the cover |
17 |
|||
7. |
Care and maintenance |
|
|
17 |
|
7.1 |
Care and maintenance of the chassis |
17 |
|||
7.2 |
Fabric care in general |
|
|
17 |
|
8. |
Warranty |
6 |
|
18 |
|
|
|
|
|
|
|

EN
Operating manual„Kiddy City’n Move”
We’re delighted that you have chosen the Kiddy City’n Move as your preferred stroller.
The Kiddy City’n Move is the latest innovative product in our stroller line. This stroller is a first-class product that guarantees a long-term useful life, if used correctly.
Your Kiddy City’n Move is ASTM F833 tested and homologated.
The stroller Kiddy City’n Move can be used for children from 20 lbs (9 kg) up to 55 lbs (25 kg). If you use the stroller with an infant carrier, it can be used for Babies from birth up to 28,5 lbs (13 kg).
1. General safety tips
 WARNING
Read and understand these instuctions before using this product. To ensure proper use, store this operating manual in a convenient place so it can be referred to often. Failure to follow all warnings and instructions could result in serious injury or death.
 WARNING
Keep these instructions stored.
 WARNING
Never leave your child unattended.
 WARNING
Before using, make sure that all parts of the stroller are properly locked in place.
7

EN
 WARNING
Do not overload the basket, bag of sunroof and cup holder. Maximum weight in basket is 11 lbs (5 kg), in bag of sunroof 0,4 lbs (0,2 kg) and in cupholder 1.1 lbs (0,5 kg). Any load could cause hazardous instability of the stroller!
 WARNING
This stroller is intended for walking speed only. Do not use while jogging, skating, etc.
 WARNING
Do not use the stroller with more than one child at a time.
 WARNING
Do not hang or place items on the stroller handle or frame.
 WARNING
Do not use the stroller with a child who weights more than 55 lbs (25 kg).
 WARNING
Avoid serious injury from falling or sliding out. Always use the seat belt for securing the child.
8

EN
 WARNING
Always set the parking brake when the stroller is not moving, especially when you place your child (or infant carrier) in (on) the stroller.
 WARNING
Periodically monitor the belts, the buckle and if rivets, screws or parts get loose.
 WARNING
Adult assembly is required. Keep small children away while assembling the stroller.
 WARNING
Only use accessories and replacement parts approved by Kiddy.
 WARNING
Do not allow children to climb on or play with the stroller.
 WARNING
Never use the stroller on stairs or escalators.
 WARNING
To avoid entrapment or pinching, do not fold or unfold the stroller when child is in or around stroller. Take also care that you don’t entrap extremities in moveable parts.
9

EN
 WARNING
Parcels or accessory items, or both, placed on the unit may cause the unit to became unstable.
2. Unpacking
Remove protective material and plastic bags and dispose of them before assembling the stroller. Keep the material away from children.
3. Adjustments
3.1 Unfolding the chassis
Open the locking hook at the side of the chassis (fig. 1).
Open the chassis by holding the handle and lifting it upwards (fig. 2). Step on the pedal until the chassis clicks in position (fig. 3).
 WARNING
Ensure chassis locking devices are engaged before use!
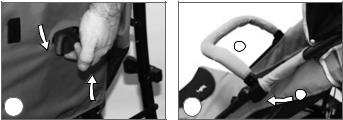
3.2 Folding the chassis
Pull the folding handle upwards (fig. 4, no. 1) and step on the folding lever (fig. 4; no. 2) on the right side of the chassis.
Then push the handle frontwards (fig. 5; no. 3) until the locking hook is closed.
 WARNING
Take care that you don’t entrap extremities in moveable parts.
10
EN
3.3 Attaching / removing the sunroof
Push the sunroof clip into the holder on chassis (fig. 6; no. 1). Afterwards close the snap fastener (fig. 6; no. 2) and close the velcro fasteners (fig. 6; no. 3). Do the same on the opposite side also.
If you want to remove the sunroof, proceed like decribed above in reverse manner.
3.4 Adjustment of the sunroof
Push the hinges on the left and right side downwards to close and fix the sunroof (fig. 7; no. 1).
To open the sunroof pull both hinges upwards (fig. 7; no. 2).
3.5 Removing / attaching the front wheels
To remove the front wheels push the button (fig. 8; no. 1) on the lower side of the wheels and pull out the wheels simultaneously (fig. 8; no. 2).
To attach the wheels, stick them on the front wheel holder until they securely lock in place.
3.6 Fixing the swivel front wheels
Bring the front wheels in “straightforward” direction. Afterwards push down the but-
tons (fig. 9; no. 1) on the left and right wheel.
 WARNING
Ensure both locking devices are engaged before use!
If you want to use the swivel wheels, push both buttons upwards (fig. 9; no. 2).
3.7 Adjustment of the parking brake
To set the parking brake push the brake levers on both sides downwards (fig. 10; “STOP”).
11
 Loading...