

Page 1
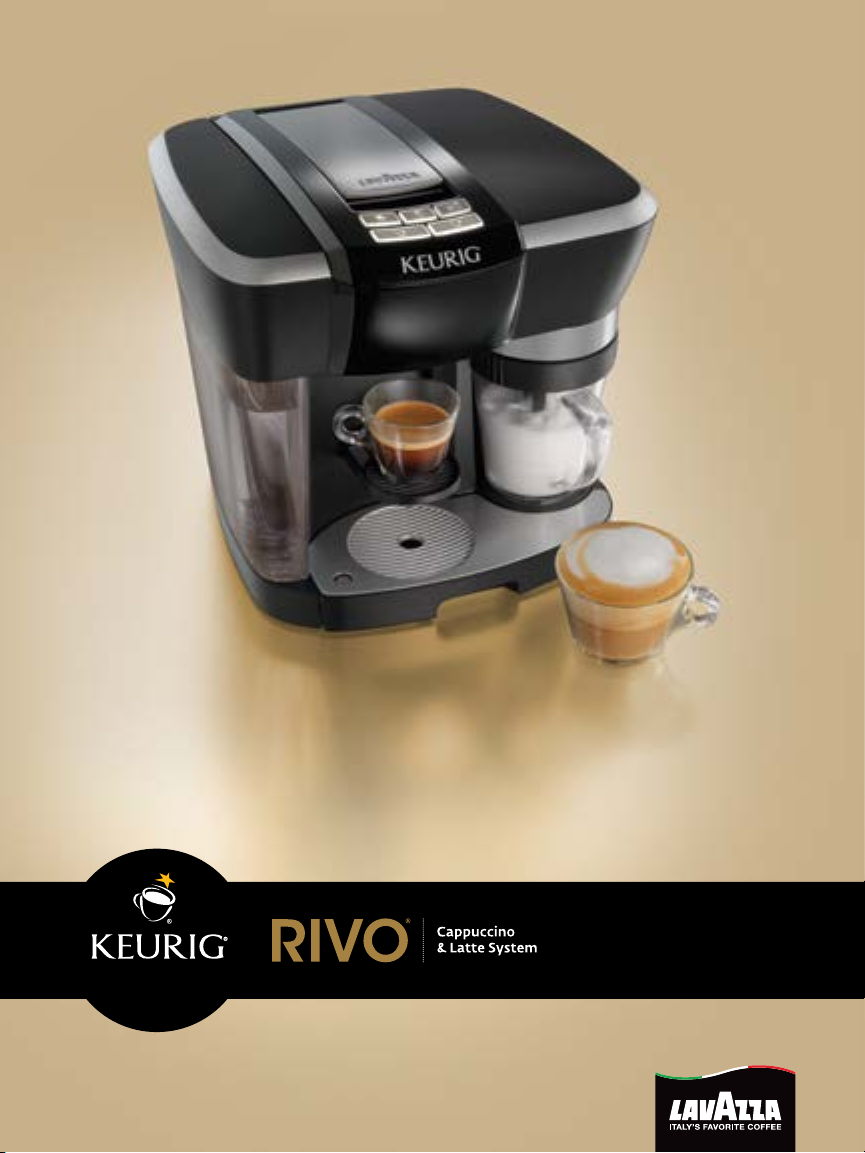
Keurig® Rivo® R500
Let’s Begin!
Use and Care Guide
Page 2
IMPORTANT SAFEGUARDS
Safe Operation & Use
When using electrical appliances, basic safety precautions should be
followed, including the following:
1. Read all instructions before using.
2. Do not touch hot surfaces. Use handles
and knobs when available.
3. This appliance must be properly installed
and located in accordance with these
instructions before it is used.
4. The use of accessory attachments
not recommended by the appliance
manufacturer may result in fire,
electrical shock or injury to persons.
5. Do not place on or near a hot gas or
electric burner, or in a heated oven.
6. Do not use outdoors.
7. To protect against fire, electric shock and
injury do not immerse cords, plugs or the
appliance in water or any other liquid.
8. Do not overfill the Water Reservoir
with water.
9. Use only water in this appliance! Do not
put any other liquids or foods in the Water
Reservoir except as instructed in the
Cleaning Instructions in this guide.
10. Unplug system before cleaning or
maintenance. Allow to cool before putting
on or taking off parts and before cleaning
the appliance. System automatically
enters standby mode after 2 minutes of
non use.
11. For best operation, plug the appliance
into its own electrical outlet on a
dedicated circuit to prevent flickering
of lights, blowing of fuses or tripping a
circuit breaker.
12. Do not operate any appliance with a
damaged cord or plug or after the
appliance malfunctions or is damaged
in any manner. Contact Keurig Customer
Service to report any malfunction of or
damage to the system.
13. Do not let the cord hang over the
edge of the table or counter, or touch
hot surfaces.
14. Close supervision is necessary when any
appliance is used by or near children.
15. Do not lift the Handle to open the system
while brewing is in progress.
16. Always keep the Water Reservoir Lid
on the Water Reservoir unless you are
refilling it.
17. This appliance is equipped with a
Power Cord having a grounding wire
with a grounding plug. The appliance
must be grounded using a 3-hole
properly grounded outlet. In the event
of an electrical short circuit, grounding
reduces the risk of electrical shock.
18. If the outlet is a standard 2-prong wall
outlet, it is your personal responsibility
and obligation to have it replaced with a
properly grounded 3-prong wall outlet.
19. Do not, under any circumstances, cut
or remove the third (ground) prong
from the Power Cord or use an adapter.
20. Consult a qualified electrician if
the grounding instructions are not
completely understood, or if doubt
exists as to whether the appliance is
properly grounded.
21. Do not use the appliance for other than
its intended use.
2 3
SAVE THESE INSTRUCTIONS.
DO NOT permit children to use system unless there is adult supervision. System
dispenses very hot water.
®
CAUTION: There are sharp needles that puncture the Rivo
Pack Holder and in the bottom of the Rivo® Pack Holder. To avoid risk of injury, do not put
your fingers in the Rivo
CAUTION: There is extremely hot water in the Rivo
To avoid risk of injury, do not lift the Handle or open the Rivo
during the brewing process.
CAUTION: The Frothing Whisk is detachable and may pose a choking hazard.
WARNING: Very hot steam and liquid. Use only with Frothing Pitcher included. Operation
with any other pitcher or operation with no pitcher may result in injury. Failure to use the
included Frothing Pitcher invalidates the Warranty.
SHORT CORD INSTRUCTIONS: A short power supply cord is provided to reduce the risk
of becoming entangled in or tripping over a longer cord. If an extension cord is used, (1)
the marked electrical rating of the cord set or extension cord should be at least as great
as the electrical rating of the appliance; (2) the cord should be arranged so that it will not
drape over the countertop or tabletop where it can be pulled on by children or tripped over
unintentionally; and (3) the extension cord must include a 3-prong grounding plug.
THIS PRODUCT IS FOR HOUSEHOLD USE ONLY.
®
Pack Assembly Housing.
®
pack located above the Rivo
Pack Holder during the brew process.
®
Pack Assembly Housing
®
WARNING THIS PRODUCT CONTAINS CHEMICALS, INCLUDING LEAD, WHICH IS KNOWN
TO THE STATE OF CALIFORNIA TO CAUSE CANCER, BIRTH DEFECTS OR OTHER REPRODUCTIVE HARM.
WARNING
RISK OF FIRE OR
ELECTRIC SHOCK
DO NOT OPEN
WARNING TO USERS AND PARENTS: DO NOT permit children to use system unless there
is adult supervision. System dispenses very hot water.
!
WARNING: TO REDUCE THE RISK OF FIRE OR ELECTRIC SHOCK, DO NOT REMOVE THE
BOTTOM COVER. NO USER SERVICEABLE PARTS ARE INSIDE. REPAIR SHOULD BE
DONE BY AUTHORIZED SERVICE PERSONNEL ONLY.
Page 3
WELCOME
Thank you for purchasing the Keurig® Rivo® Cappuccino & Latte System. Before operating
®
the Rivo
clean and care for the system. We hope you enjoy crafting the perfect espresso, cappuccino,
latte and more!
system, we recommend carefully reading these instructions to learn how to use,
TABLE OF CONTENTS
SYSTEM OVERVIEW 6
PREPARING YOUR SYSTEM 8
THE CONTROL PANEL 10
TIPS BEFORE YOU BEGIN 11
USING YOUR SYSTEM 12
HELPFUL HINTS 16
CLEANING AND MAINTENANCE 18
TROUBLESHOOTING 20
WARRANTY 22
Record Your Rivo® System Serial Number Above
The serial number can be found on the bottom of the Rivo® system gift box
and on the side of the system behind the Water Reservoir. Removing the serial
number label from the Rivo® system will void warranty.
4 5
Page 4
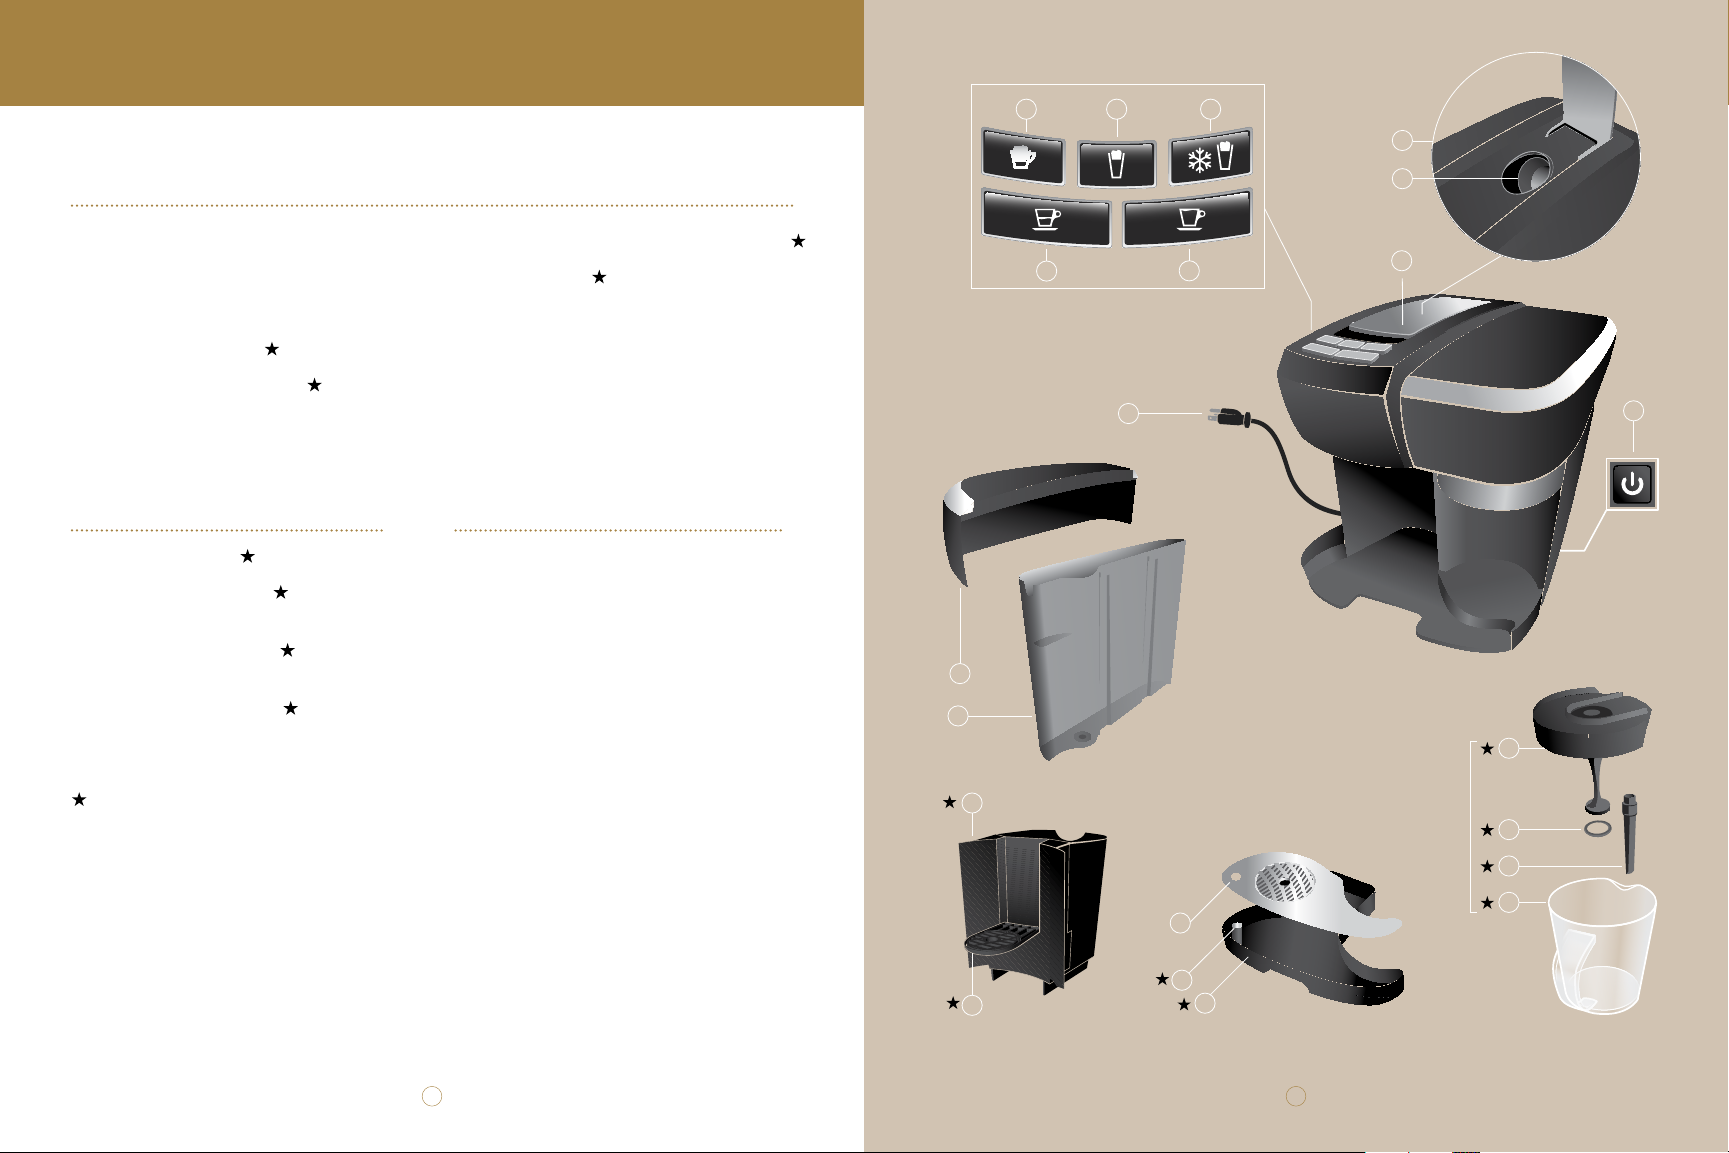
SYSTEM OVERVIEW
CONTROL PANEL
RIVO® SYSTEM
A Water Reservoir Lid
B Water Reservoir
C Power Cord
D Rivo
E Beverage Platform
F Drip Tray Lid
FROTHING PITCHER
M Frothing Lid
N Frothing Whisk
(Detachable)
O Steaming Wand
(Detachable)
P Frothing Pitcher
®
Pack Bin
G Drip Tray Overflow Indicator
H Drip Tray
I Power Button
(located on back of system)
J Handle
K Rivo
L Rivo
®
Pack Assembly Housing
®
Pack Holder
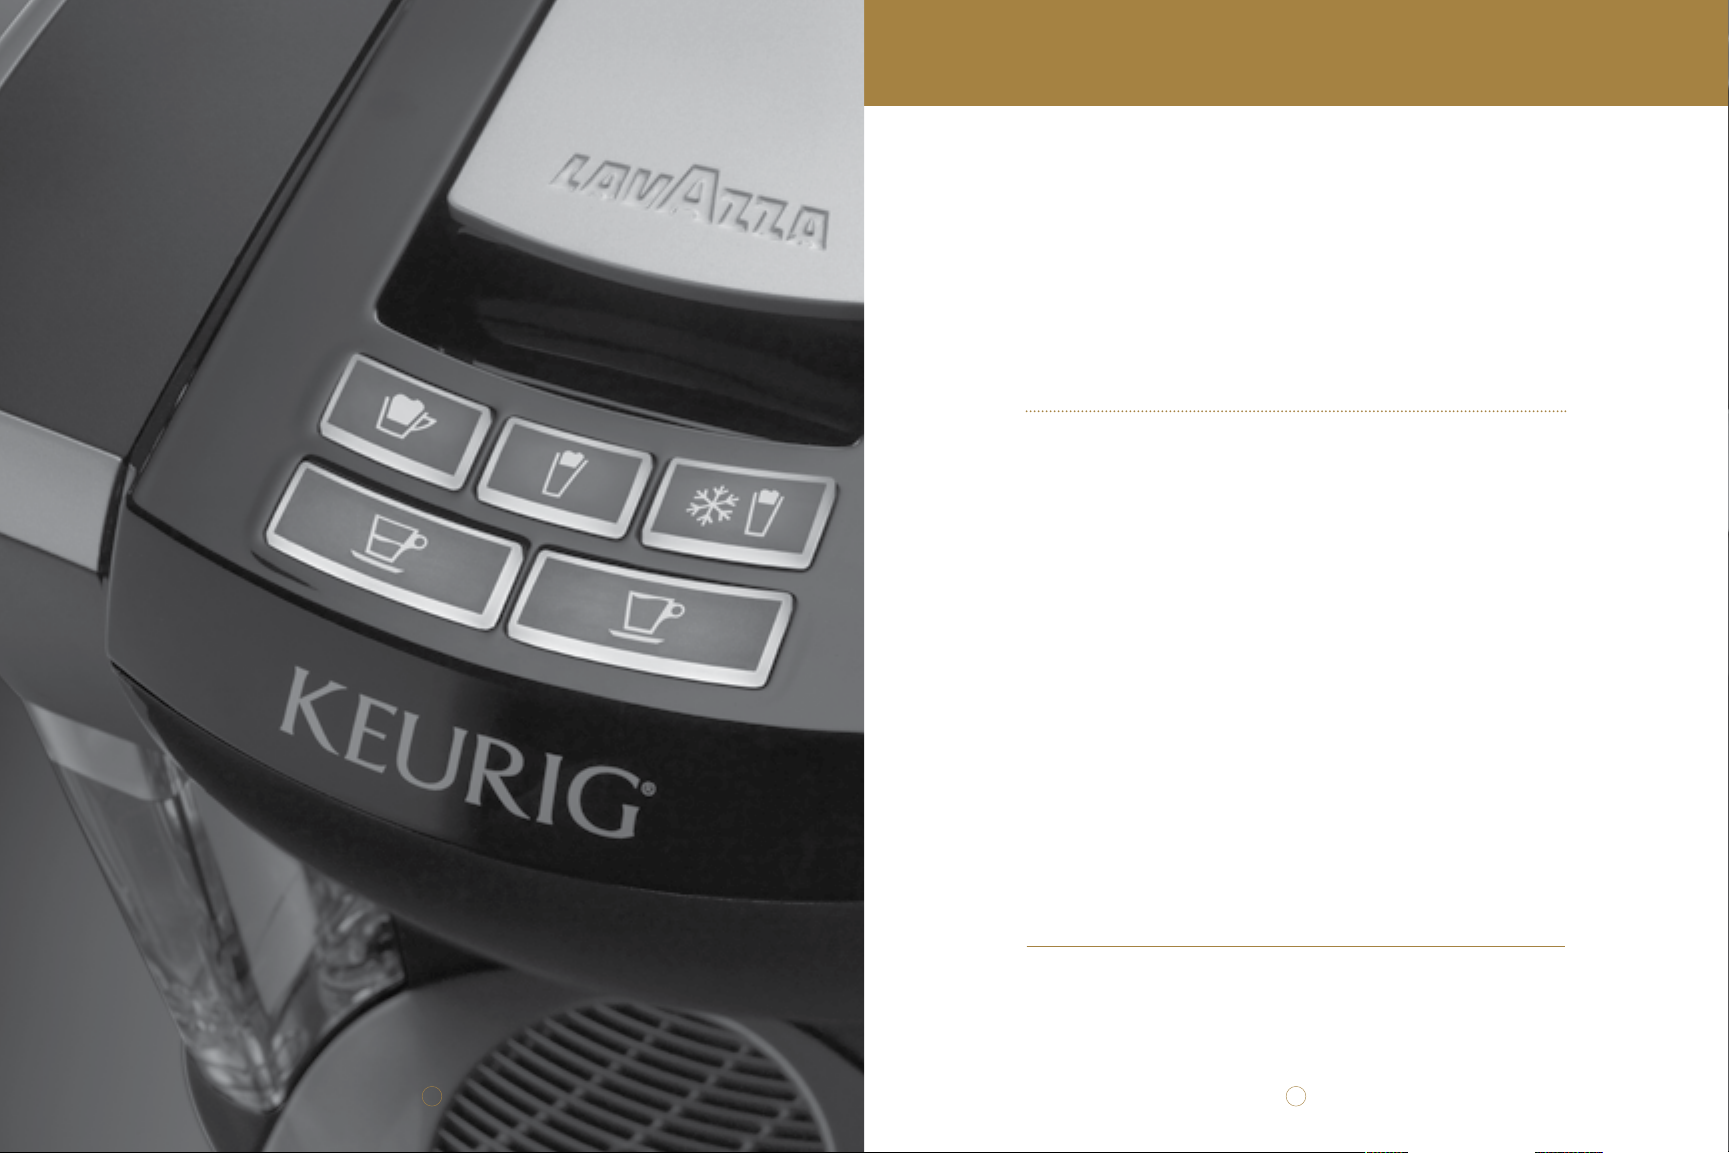
CONTROL PANEL
Q Short Espresso Button
R Espresso Lungo Button
S Cappuccino Froth Button
T Latte Froth Button
U Cold Froth Button
S
Q
A
B
T
C
U
K
L
R
J
I
M
Indicates components which are top-rack dishwasher safe.
Do not place any other components in the dishwasher.
The Keurig® Rivo® system only uses Rivo® packs.
6 7
D
E
FROTHING
PITCHER
F
G
H
N
O
P
Page 5

PREPARING YOUR SYSTEM
STEP 1: Prepare the Water Reservoir
STEP 1: Remove all packing materials from the Keurig
®
system and Frothing Pitcher. Place the system on a flat,
Rivo
stable surface away from water and heat sources. Remove
all adhesive tape and labels.
STEP 2: Lift and remove the Water Reservoir Lid, then
remove the Water Reservoir by lifting up and away from
the Rivo® system.
STEP 3: Rinse the Water Reservoir. Fill the Water Reservoir
with bottled or filtered water.
Hot water or any other liquid may damage the Water Reservoir.
Always ensure the Water Reservoir is filled to the REFILL line
®
before turning on the Rivo
system.
®
STEP 2: Prime the Frothing System
STEP 1: Remove packing material and static cling from
Frothing Pitcher.
STEP 2: Plug the Power Cord into a grounded outlet and
press the Power Button located on the back of the system.
You will hear a single beep when the Frothing Pitcher has
been positioned securely. If the Frothing Pitcher has not been
positioned securely, you will hear three beeps when selecting
your frothing mode. Simply remove the Frothing Pitcher and
re-insert securely until you hear a single beep.
STEP 6: Remove the Frothing Pitcher from the system
and carefully remove the Frothing Lid. Discard the water
and dry all the components.
STEP 3: Prime the Brewing System
STEP 1: Place a 12 oz. mug on the Drip Tray.
STEP 2: Press the Espresso Lungo Button to run the first
cleansing brew. When brew is complete, discard the hot
water from the mug.
The first cleansing froth and cleansing brew cycles prepare the
system for your first beverage. It is normal for the system to be
slightly louder during these initial cycles.
®
After brewing, the Rivo
your next brew.
system will automatically prepare for
1 Min
1 Min
STEP 3: Fill Frothing Pitcher to MIN FILL with water and
secure the Frothing Lid on the Frothing Pitcher.
STEP 4: Place the sealed Frothing Pitcher into the system.
After about one minute, the Control Panel will flash and you
®
will hear a beep. This indicates the Rivo
STEP 5: Press the Latte Froth Button to run the first
cleansing froth.
system is ready.
As a safety feature, your system will automatically shut off
at any stage when it is idle for longer than two minutes. Press
the Power Button to restart.
You are now ready to craft your
first beverage!
98
Page 6

THE CONTROL PANEL TIPS BEFORE YOU BEGIN
DO NOT FROTH THE MILK TwICE
x
2
Do not froth the milk twice. This could lead to overflowing
the Frothing Pitcher and scalding the milk.
FROTHING MODES
CAPPUCCINO FROTH
Creates more foam and less
steamed milk. Perfect for a
cappuccino or macchiato.
For a cappuccino fill with milk to MIN FILL and for a latte fill with milk to MAX FILL.
SHORT ESPRESSO (1.4 OZ.)
Perfect for espresso beverages such
as a cappuccino, latte or macchiato.
In order to ensure ideal pressure for espresso and frothed milk, the Rivo®
system is designed to perform one function at a time.
*Be sure to add enough milk to fill to MIN FILL, but do not fill beyond
MAX FILL. Do not add ice, syrup or any other ingredients to the milk prior
to frothing. Doing so may damage the system.
LATTE FROTH
Creates less foam and
more steamed milk.
Perfect for a latte.
ESPRESSO LUNGO (2.8 OZ.)
Perfect for an americano
or iced latte.
ESPRESSO SIZES
*
COLD FROTH
Keeps your milk cold, creates
less foam and more milk.
Perfect for an iced latte.
READy TO FROTH
NOT SECURELy
POSITIONED
STOP
ONLy USE COLD MILK
Be sure the milk is cold, as milk at room temperature will
not froth as well as cold milk.
FROTHING PITCHER NOTIFICATION
You will hear a single beep when the Frothing Pitcher has
been positioned securely. If the Frothing Pitcher has not
been positioned securely, you will hear three beeps when
selecting your frothing mode. Simply remove the Frothing
Pitcher and re-insert securely until you hear a single beep.
ICED BEvERAGES
Do not brew espresso directly into a glass cup filled with
ice. Doing so may cause the glass to crack or break. Do not
add ice, syrup or any other ingredients to the milk prior to
frothing. Doing so may damage the system.
STOPPING THE FROTHING FUNCTION
Should you need to stop the frothing function at any time,
simply press the frothing button selected.
®
THE DRIP TRAy AND RIvO
Do not remove the Drip Tray/Pack Bin while frothing
or brewing.
PACK BIN
10 11
Page 7

USING YOUR SYSTEM
Crafting a Short and Lungo Espresso
Please see “Tips Before You Begin” on page 11 before you begin
the brewing process.
STEP 1:
STEP 2: Lift the Handle and place a Rivo® pack in the
Rivo
STEP 3: Select your desired espresso size on the
Control Panel:
The Short Espresso Button will deliver a 1.4 oz. espresso
into you mug. This is perfect for espresso beverages such
as a cappuccino, latte or macchiato.
The Espresso Lungo Button will deliver a 2.8 oz. espresso
into your mug. This is perfect for an americano or iced latte.
Place a mug on the Drip Tray.
®
Pack Holder. Lower the Handle.
Crafting a Cappuccino
Please see “Tips Before You Begin” on page 11 before you begin
the brewing process.
STEP 1:
Frothing Pitcher (4.5 oz.) and place the Frothing Lid
on the Frothing Pitcher.
Be sure to add enough milk to fill to MIN FILL,
but do not fill beyond MAX FILL. Do not add
ice, syrup or any other ingredients to the milk prior
to frothing. Doing so may damage the system.
STEP 2: Return the sealed Frothing Pitcher to the
system and press the Cappuccino Froth Button.
You will hear a single beep when the Frothing Pitcher has
been positioned securely. If the Frothing Pitcher has not been
positioned securely, you will hear three beeps when selecting
your frothing mode. Simply remove the Frothing Pitcher and
re-insert securely until you hear a single beep.
Pour COLD MILK to MIN FILL of the
MIN FILL
STEP 4: When the espresso is complete, remove the
mug from the Drip Tray and enjoy! Or craft your favorite
espresso beverage using recipes on the following pages or
in the enclosed Welcome Book.
12 13
STEP 3: Place a 12 oz. mug on the Drip Tray and prepare
a Short Espresso (1.4 oz.) by selecting the Short Espresso
Button on the Control Panel.
STEP 4: When the espresso is complete, pull the Frothing
Pitcher from the system and carefully remove the Frothing
Lid. Pour the milk over the espresso and enjoy!
Page 8

CARING FOR YOUSING YOUR SYSTEM
MAX FILL
Crafting a Latte
Please see “Tips Before You Begin” on page 11 before you begin
the brewing process.
STEP 1:
Frothing Pitcher (6 oz.) and place the Frothing Lid on
the Frothing Pitcher.
Be sure to add enough milk to fill to MIN FILL,
but do not fill beyond MAX FILL. Do not add
ice, syrup or any other ingredients to the milk prior
to frothing. Doing so may damage the system.
STEP 2: Return the sealed Frothing Pitcher to the system
and press the Latte Froth Button.
You will hear a single beep when the Frothing Pitcher has
been positioned securely. If the Frothing Pitcher has not been
positioned securely, you will hear three beeps when selecting
your frothing mode. Simply remove the Frothing Pitcher and
re-insert securely until you hear a single beep.
Pour COLD MILK to MAX FILL of the
Crafting an Iced Latte
Please see “Tips Before You Begin” on page 11 before you begin
the brewing process.
STEP 1:
Frothing Pitcher (6 oz.) and place the Frothing Lid on
the Frothing Pitcher.
Be sure to add enough milk to fill to MIN FILL,
but do not fill beyond MAX FILL. Do not add
ice, syrup or any other ingredients to the milk prior
to frothing. Doing so may damage the system.
STEP 2: Return the sealed Frothing Pitcher to the system
and press the Cold Froth Button.
You will hear a single beep when the Frothing Pitcher has
been positioned securely. If the Frothing Pitcher has not been
positioned securely, you will hear three beeps when selecting
your frothing mode. Simply remove the Frothing Pitcher and
re-insert securely until you hear a single beep.
Pour COLD MILK to MAX FILL of the
MAX FILL
STEP 3: Place a 12 oz. mug on the Drip Tray and prepare
a Short Espresso (1.4 oz.) by selecting the Short Espresso
Button on the Control Panel.
STEP 4: When the espresso is complete, pull the Frothing
Pitcher from the system and carefully remove the Frothing
Lid. Pour the milk over the espresso and enjoy!
14 15
STEP 3: Fill a cup with ice and set aside. Place a separate
3 oz. mug on the Beverage Platform and prepare an
Espresso Lungo (2.8 oz.) by selecting the Espresso Lungo
Button on the Control Panel. Pour the espresso over the ice.
Do not brew espresso directly into a glass cup filled
with ice. Doing so may cause the glass to crack or break.
STEP 4: Pull the Frothing Pitcher from the system and
carefully remove the Frothing Lid. Pour the milk over the
espresso and enjoy!
Page 9

HELPFUL HINTS
1 AUTOMATIC SHUT-OFF — As a safety feature, your system will automatically shut off
after it is idle for longer than two minutes. Press the Power Button to restart.
2 COLD MILK — Be sure the milk is cold, as milk at room temperature will not froth as
well as cold milk. Additionally, depending on the type of milk, it will froth differently.
3 FROTHING PITCHER NOTIFICATION — If the Frothing Pitcher has not been
positioned securely, you will hear three beeps when selecting a frothing mode. Remove
the Frothing Pitcher and re-insert, until you hear one beep, ensuring the Frothing Pitcher
is securely in place.
4 FROTHING MILK — Do not froth milk twice. This could lead to over flowing the Frothing
Pitcher and scalding the milk.
5 THE RIGHT wATER — For the best tasting espresso, cappuccino or latte we
recommend using bottled or filtered water. We do not recommend using distilled
or reverse osmosis water.
6 ICED BEvERAGES — Creating an iced latte or cappuccino is easy. Fill a cup with ice and
set aside. Brew espresso into a separate mug and pour the espresso over the ice. Use the
Cold Froth Button to froth milk and add the milk to the iced espresso.
Do not brew espresso directly into a glass cup filled with ice. Doing so may cause the glass
to crack or break. Do not add ice, syrup or any other ingredients to the milk prior to frothing.
Doing so may damage the system.
9 THE DRIP TRAy AND RIvO® PACK BIN — The Drip Tray is designed to capture
excess liquid from the brewing process and will fill with liquid after 10 to 12 brews. The
®
Drip Tray Indicator will become visible when the Drip Tray is almost full. The Rivo
®
Bin holds up to 12 used Rivo
packs. Empty both components by carefully removing them
Pack
from the system. Empty contents of the Drip Tray into the sink and dispose of the used
®
packs. Clean and dry both components before returning them to the system. Do
Rivo
not remove the Drip Tray/Pack Bin while brewing or frothing.
10 CLEAN yOUR SySTEM REGULARLy — To keep your system looking and performing
at its best, be sure to clean the external and internal components as indicated on page 18.
11 STORING — When storing your system, empty and dry all components. Store your
system upright in a safe, dry, frost-free environment.
7 STOPPING THE FROTHING FUNCTION — Should you need to stop the frothing
function at any time, simply press the frothing button selected.
8 EMPTy wATER RESERvOIR NOTIFICATION — If the Water Reservoir becomes
empty during brewing or frothing, the system will stop. The Control Panel will light up
in a circular pattern, flashing on the last mode used, and you will hear a series of beeps.
If the Water Reservoir is filled within two minutes, simply press the last used mode and
continue crafting your beverage. If more than two minutes have passed, the system will
automatically shut off. Press the Power Button and begin a new brew. You will need a
®
new Rivo
pack.
16 1716
Page 10

WARRANTYCLEANING AND MAINTENANCE
Before cleaning the Keurig® Rivo® system, unplug the Power Cord. Clean the external,
detachable components with warm, soapy water and rinse thoroughly with water.
Dishwasher-safe components (see page 6) can be placed on the top rack of the dishwasher.
Do not use solvents, alcohol or other harsh substances. Do not place any components
in oven.
wATER RESERvOIR — The Water Reservoir should be cleaned regularly. The Water
Reservoir is not dishwasher safe. Wash by hand with warm water and mild soap and rinse
thoroughly with water.
FROTHING PITCHER — After each use, thoroughly clean all components of the Frothing
Pitcher. Place them on the top rack of the dishwasher or wash by hand with warm water
and mild soap and rinse thoroughly with water.
Clean the interior components after every 10 to 12 beverages:
BREwING COMPONENTS — To clean the interior brewing components, place a mug on a
the Drip Tray. Lift and lower the Handle without inserting a Rivo® pack and press the Espresso
Lungo Button. When the process is complete, discard the water from the mug.
FROTHING COMPONENTS — Fill Frothing Pitcher to MIN FILL with water. Secure the
Frothing Lid and place the Frothing Pitcher into the system. Press the Latte Froth Button and
wait for the cycle to complete. Remove the Frothing Pitcher from the system and carefully
remove the Frothing Lid. Discard the water and dry all components.
DRIP TRAy AND RIvO
from the brewing process and will fill with liquid after 10 to 12 beverages. The Drip Tray
Indicator will become visible when the Drip Tray is almost full. The Rivo® Pack Bin holds up to
12 used Rivo® packs. Empty both components by carefully removing them from the system.
Empty contents of the Drip Tray into the sink and dispose of the used Rivo® packs. Clean both
components with warm, soapy water and rinse thoroughly with water. Dry components
before returning them to the system.
®
PACK BIN — The Drip Tray is designed to capture excess liquid
DESCALING — Mineral content in water varies from place to place. Depending on the
mineral content of the water in your area, calcium deposits or scale may build up in your
system. Scale is non-toxic, but left unattended, it can hinder system performance. Regularly
descaling your system every three to six months helps maintain the heating element, and
other internal parts that come in contact with water. Calcium deposits may build up faster,
making it necessary to descale more often.
You will need a large ceramic mug, a full bottle of Keurig™ Descaling Solution, fresh water and
access to a sink. Do not use a paper cup.
STEP 1: Descaling Solution Rinse
• Empty the Water Reservoir. Press the Power Button to turn the system on.
• Pour the entire bottle of Keurig
™
Descaling Solution into the Water Reservoir.
Then fill the empty bottle with water and pour into the Water Reservoir.
• Place a large mug on the Drip Tray Plate and run a cleansing brew using the
Espresso Lungo Button. Do not use a Rivo
®
pack. Pour the contents of the
mug into the sink.
STEP 2: Discard and Rinse
• Discard any residual solution and rinse the Water Reservoir thoroughly.
STEP 3: Fresh Water Rinse
• Ensure the Water Reservoir is filled with fresh water.
• Place a large mug on the Drip Tray Plate and run a cleansing brew using the
Espresso Lungo Button. Do not use a Rivo
®
pack. Pour the contents of
the mug into the sink.
• Repeat the brew process until you have completed at least 12 brews using the
Espresso Lungo Button. You will need to refill the Water Reservoir at least
one time during this process.
Visit www.keurig.com to purchase the Keurig
™
Descaling Solution.
18 19
Page 11

TROUBLESHOOTING
SITUATION
System does not have power
System will not brew
System will not brew
when used for the first time
System shuts off automatically
SOLUTION
• Plug system into an independent outlet.
• Make sure the Power Button has been pressed.
• During normal operation, the system will shut off when
it is idle for longer than two minutes. Press the Power
Button to restart.
• Check to be sure that the system is plugged in securely.
• Plug into a different outlet.
• Reset your home circuit breaker, if necessary.
• Make sure the system has power (see above).
• Check that the Water Reservoir is filled.
• System may be cold or frozen. Let system rest at room
temperature for at least two hours before powering on.
• Make sure the system has power (see above).
• Under normal operation, the system will shut off when
it is idle for longer than two minutes. Press the Power
Button to restart.
• If the system shuts off in the middle of a brew (not from
power outage), make sure the Water Reservoir is filled.
The Power Button does
not turn system off
Red Indicator appears
The system pump is
making a loud sound
The Handle won’t close
The espresso tastes weak
The milk does not froth
SITUATION
in Drip Tray
SOLUTION
• The Power Button will only restart or turn on the
system. It will not turn the system off. The system will
automatically shut off after two minutes (see “System
shuts off automatically,” on the opposite page).
• This means that the Drip Tray is almost full. Carefully
remove the Drip Tray (CAUTION: there may be hot
liquid in it). Empty contents into the sink.
• Refill the Water Reservoir.
®
• Empty the Rivo
• A Rivo® pack may have been inserted incorrectly. Lift
and lower the Handle to adjust the Rivo® pack.
• Empty the Rivo® Pack Bin.
• Ensure you are using a new Rivo® pack. Rivo® packs
cannot be reused.
• Make sure you are using cold milk. Milk at room
temperature will not froth well.
Pack Bin.
There is liquid in the Drip Tray
• The Drip Tray is designed to capture excess liquid from
the brewing process.
• When the Drip Tray is almost full, the red Drip Tray
Overflow Indicator will appear. Carefully remove the
Drip Tray (there may be hot liquid in it). Empty contents
into the sink.
20 21
The Control Panel Buttons are
flashing in a circular pattern
If other issues arise with your system, call Keurig Customer Service at
1.866.901.BREW (2739). Damage to the system resulting from the failure to follow these
• The Water Reservoir needs to be refilled.
instructions will void the Warranty.
Page 12

WARRANTY
Limited One Year Warranty
Keurig warrants that your brewer will be free of defects in materials or workmanship under normal
home use for one year from the date of purchase. It is recommended that you fill out and return the
warranty card enclosed with your system so that your purchase information will be stored in our system.
Keurig will, at its option, repair or replace a defective system without charge upon its receipt of proof
of the date of purchase. If a replacement system is necessary to service this warranty, the replacement
system may be new or reconditioned. If replacement system is sent, it will carry the remaining warranty
of the original system.
This warranty only applies to systems operated in the United States and Canada. This warranty gives you
specific legal rights, and you may also have other rights that vary from state to state and, in the case of
Canada, from province to province.
Only the use of Keurig Brewed® Rivo® brand packs and accessories will guarantee the proper functioning
and lifetime of your Keurig® system. Any damage to or malfunction of your system resulting from the use
of non Keurig Brewed® Rivo® brand packs and accessories may not be covered by this warranty or may
result in a service fee if the defect is determined to be caused by such use.
What is not covered by the Limited Warranty?
THIS WARRANTY DOES NOT COVER CONSEQUENTIAL OR INCIDENTAL DAMAGES SUCH AS
PROPERTY DAMAGE AND DOES NOT COVER INCIDENTAL COSTS AND EXPENSES RESULTING
FROM ANY BREACH OF THIS WARRANTY, EVEN IF FORESEEABLE. Some states or provinces do not
allow the exclusion or limitations of incidental or consequential damages, so the above limitation or
exclusion may not apply to you depending on the state or province of purchase. Nor does this warranty
cover damages caused by use of non Keurig® Rivo® brand packs or accessories, services performed by
anyone other than Keurig or its authorized service providers, use of parts other than genuine Keurig
parts, or external causes such as abuse, misuse, inappropriate power supply or acts of God.
Other Limitations
THIS WARRANTY IS EXCLUSIVE AND IS IN LIEU OF ANY OTHER EXPRESS WARRANTY, WHETHER
WRITTEN OR ORAL. IN ADDITION, KEURIG HEREBY SPECIFICALLY DISCLAIMS ALL OTHER
WARRANTIES WITH RESPECT TO YOUR R500 SYSTEM, INCLUDING ANY IMPLIED WARRANTY OF
MERCHANTABILITY OR FITNESS FOR ANY PARTICULAR PURPOSE. Some states or provinces do not
allow disclaimers of such implied warranties or limitations on how long an implied warranty lasts, so the
above limitation may not apply to you depending on the state or the province of purchase.
How do you obtain warranty service?
Keurig® systems are high-quality appliances and, with proper care, are intended to provide years of
satisfying performance. However, should the need arise for warranty servicing, simply call Keurig
Customer Service at our toll free phone number 1.866.901.BREW (2739). Please do not return your
system for servicing without first speaking to Keurig Customer Service to obtain a Returns Material
Authorization (RMA) number. Keurig® systems returned without an RMA number will be returned to the
sender without servicing.
Keurig, Incorporated
55 Walkers Brook Drive
Reading, MA 01867
1.866.901.BREW (2739)
22
Page 13

Keurig, Incorporated
55 Walkers Brook Drive
Reading, MA 01867
Keurig, Incorporated is a
wholly-owned subsidiary
of Green Mountain
Coffee Roasters, Inc.
For Household Use Only
Made in China.
Printed in China.
© 2013 Keurig, Incorporated
All rights reserved
www.keurig.com | 1.866.901.BREW (2739)
P/N 60-2022 46-00 0 Rev B 07/13
 Loading...