


USE & CARE GUIDE
GOURMET SINGLE-CUP BREWING SYSTEM
MINI – MODEL B30
Please read and save these instructions
Pour les directives en Francais, veullez vous reporter a la page 7

Press here to open and insert a K-Cup
Cup Sensors
Drip Plate
Flashes to alert you to place a cup on the drip tray
Lights RED, indicates heating
Flashes to indicate when to press for brew
Press here to turn on the brewer
Dimensions: 11"H x 7"W x 10"D |
Drip Tray |
(279mm H x 178mm W x 254mm D) |
|
|
|
Weight: 6.5 Lbs. (2.95Kgs) |
|
Electrical:120VAC, 700W 60Hz
Approvals: cULus Approved for Commercial and Household Use Only
When using electrical appliances, basic safety precaution should be followed, including the following:
1.Read all instructions before using.
2.Do not touch hot surfaces. Use handles and knobs when available.
3.This appliance must be properly installed and located in accordance with these instructions before it is used.
4.The use of accessory attachments not recommended by the appliance manufacturer may result in fire, electrical shock or injury to persons.
5.Do not place on or near a hot gas or electric burner, or in a heated oven.
6.Do not use outdoors.
7.To protect against fire, electric shock and injury to persons do not immerse cord, plugs, or the appliance in water or other liquid.
8.Use only water in this appliance! Do not put any other liquids or foods in the Water Reservoir.
9.Unplug the coffee brewer when not in use and before cleaning. Allow to cool before attaching or removing parts and before cleaning the appliance.
10.Do not operate any appliance with a damaged cord or plug or after the appliance malfunctions or is damaged in any manner. Contact your Keurig Customer Service to arrange for replacement or repair.
11.Do not let the cord hang over the edge of the table or counter, or touch hot surfaces.
12.To disconnect, turn the Power Button on the right-front of the Brewer off and then remove the plug from the wall outlet.
13.Close supervision is necessary when any appliance is used by or near children.
14.Do not push the PRESS TO OPEN button while brewing is in progress.
15.This appliance is equipped with a power cord having a grounding wire with a grounding plug. The appliance must be grounded using a 3-hole properly grounded outlet. In the event of an electrical short circuit, grounding reduces the risk of electrical shock.
16.If the outlet is a standard 2-prong wall outlet, it is your personal responsibility and obligation to have it replaced with a properly grounded 3-prong wall outlet.
17.Do not, under any circumstances, cut or remove the third (ground) prong from the power cord or use an adapter.
18.Consult a qualified electrician if the grounding instructions are not completely understood, or if doubt exists as to whether the appliance is properly grounded.
19.Do not use the appliance for other than its intended use.
SAVE THESE INSTRUCTIONS
CAUTION: There are two sharp needles that puncture the K-Cup® portion pack, one above the K-Cup® Holder and the other in the bottom of the K-Cup® Holder.
To avoid risk of injury, do not put your fingers in the K-Cup® chamber.
WARNING: This product contains chemicals, including lead, known to the State of California to cause cancer, birth defects or other reproductive harm.
CAUTION: There is extremely hot water in the K-Cup® Holder during the brew process.
To avoid risk of injury, do not open the K-Cup® chamber during the brew process.
WARNING
RISK OF FIRE OR ELECTRIC SHOCK
DO NOT OPEN
WARNING: TO REDUCE THE RISK OF FIRE OR ELECTRIC SHOCK, DO NOT REMOVE THE BOTTOM COVER. NO USER SERVICEABLE PARTS ARE INSIDE. REPAIR SHOULD BE DONE BY AUTHORIZED SERVICE PERSONNEL ONLY.
THIS PRODUCT IS FOR COMMERCIAL AND HOUSEHOLD USE
To reduce the risk of injury, do not drape cord over the counter top or table top where it can be pulled on by children or tripped over unintentionally.
Record your Brewer Serial Number here. _________
The Serial Number is located on the Serial Number label found on the bottom of the brewer box.
1
SECTION 1
SET-UP & OPERATION
Plug Brewer into its own grounded outlet.
If the electric circuit is overloaded with other appliances, your Brewer may not function properly. If possible, the Brewer should be operated on its own circuit, separate from other appliances.
CAUTION: There are two sharp needles that puncture the K-Cup® portion pack, one above the K-Cup® Holder and the other in the bottom of the K-Cup® Holder.
To avoid risk of injury, do not put your fingers in the K-Cup® Chamber.
Select a K-Cup® portion pack. Do not remove the foil lid or puncture the K-Cup® portion pack.
1 |
Make sure the brew- |
|
er is plugged in. |
Press the Power Button found on the front of the Brewer.
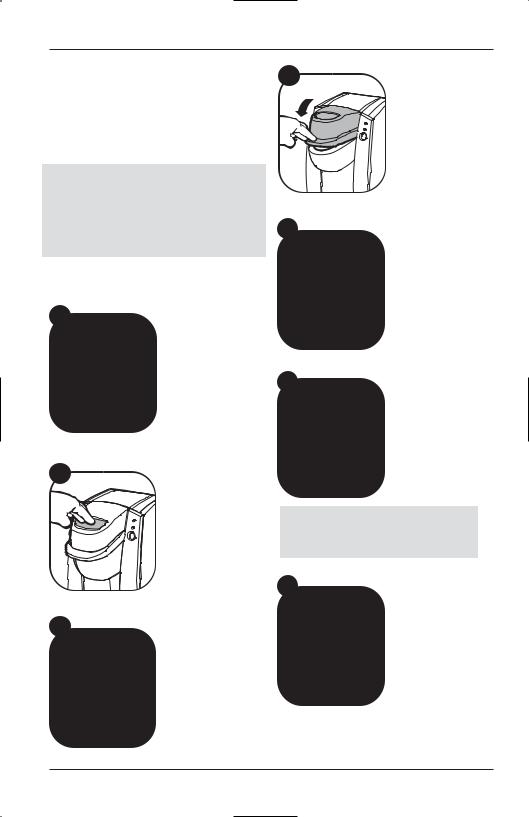
2 |
Depress the large |
|
|
|
“PRESS TO OPEN” |
|
button on top of the |
|
brewer. |
3
Place a K-Cup® portion pack in the K-Cup® Holder.
Do not remove the foil lid.
4
Lower the Handle completely and firmly to close the Lid and puncture the K-Cup® portion pack.
5 |
The Hot Water Tank |
|
|
|
cover will open auto- |
|
matically. |
Fill the Hot Water Tank with filtered or bottled water up to the FILL LEVEL indicator.
6 |
Close the Hot Water |
|
Tank cover. The |
“PLACE CUP” light will be flashing
Place a 10 oz coffee cup in the dispense area on the drip tray.
NOTE: Do not use a clear, glass mug. Cup sensor will not "read" the glass mug and the "Place Mug" light will flash.
Press the flashing 7 BREW button. The
HEATING light will be illuminated.
When the water reaches temperature, the HEATING light will go off and the coffee/tea/hot cocoa will start to dispense.
Your cup of gourmet coffee, tea or hot cocoa will be ready in less than 3 minutes. Enjoy!
2
SECTION 2
CLEANING & MAINTENANCE
IMPORTANT: Make sure the brewer is unplugged before cleaning
Cleaning Drip Tray & External Parts
Regular cleaning of the Brewer’s external components is recommended using a damp lint-free cloth only.
1.Never immerse the base unit in water or other liquids. The Housing and other external components may be cleaned with a damp, non-abrasive, lint free cloth.
2.The Drip Tray can accumulate liquids. The Drip Tray and Drip Tray Plate should be periodically inspected and cleaned with a damp soapy non-abrasive lint free cloth. The Drip Tray and Drip Tray Plate should not be put into the dishwasher. To remove the Drip Tray Assembly, simply slide it toward you, keeping it level at all times to avoid spilling.
Cleaning the K-Cup® Portion Pack
Holder Assembly
1.Cleaning the Parts
The K-Cup® Holder Assembly is dishwasher safe. To remove from the Brewer, open the brewer by pressing the button. Grasp the top of the K-Cup® Holder with one hand while pushing up on the bottom of the K-Cup® Holder from underneath with the
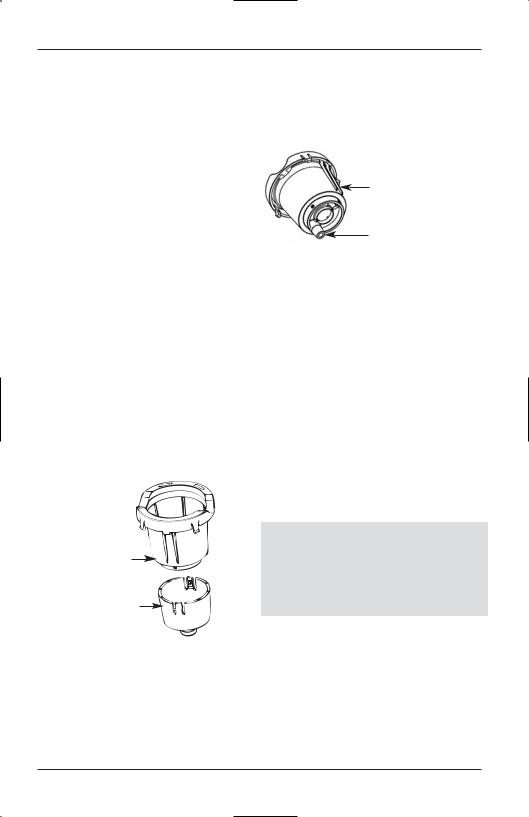
K-Cup Holder
Assembly
K-Cup Holder
Funnel
other until it releases. After cleaning, align the K-Cup® Holder with the opening using the two front ribs as a guide and snap into place from the top.
2.Cleaning the Funnel
The Funnel can be removed from the K-Cup® Holder by pulling on it until it
snaps off. The Funnel is dishwasher safe. To replace it just snap it back onto the K-Cup® Holder Assembly.
K-Cup Holder
Insert paper clip here to clean out the exit needle
3.Cleaning the Exit Needle
The Exit Needle is located on the inside bottom of the K-Cup® Holder. Should a clog arise due to coffee grinds, it can be cleaned using a paper clip or similar tool. Remove K-Cup® Holder and then remove the funnel, insert the paper clip into the Needle to loosen the clog and push it out. The K-Cup® Holder is dishwasher safe. NOTE: The Entrance needle does not require cleaning.
CAUTION: There are sharp needles that puncture the K-Cup® above the K-Cup® Holder and in the bottom of the K-Cup® Holder. To avoid risk of injury, do not put your fingers in the K-Cup® Chamber.
When finished cleaning, reassemble the K-Cup holder and funnel and replace in the brewer. Close the brewer, the water fill lid will pop open.
NOTE: Over time, discoloration, spotting or staining may appear in the Hot Water Tank. This is normal and will vary depending on the mineral content of the bottled or filtered water used in the brewer and will not affect the operation of the brewer.
Cleaning the Hot Water Tank
To access the Hot Water Tank, press the PRESS TO OPEN button and then lower the handle completely, the water fill lid will pop open. Inspect the Hot Water Tank area and clean with a damp lint free cloth as necessary. Close the water fill lid when finished.
3

Emptying the Hot Water Tank
1.Ensure that the water fill lid is closed.
2.Place a cup on the drip plate then press and hold the brew button until all the water has been dispensed. Note, there will be a delay of 4 - 5 seconds until water starts to dispense.
Storage
Empty the Hot Water Tank before storing and take care to ensure that you store your Brewer in a safe and frost free environment. It is suggested to store your brewer in the upright position. If you store the Brewer in a cold environment, you run the risk of condensation freezing inside the Brewer and causing damage. When you prepare to use it after storage, we recommend wiping the Hot Water Tank with a damp lint-free cloth and running three cleansing brews without a K-Cup®.
If your Brewer has been in an environment below freezing, please be sure to let it warm to room temperature for 2 hours before using.
De-Scaling Your Brewer
Mineral content in bottled or filtered water varies. Depending on the mineral content of the water, calcium deposits or scale may build up in your Brewer. Scale is non-toxic but left unattended, it can hinder Brewer performance. Descaling your Brewer helps maintain the heating element, and other internal parts of the Brewer that come in contact with water.
The Brewer should be de-scaled every 3-6 months to ensure optimal performance or when there are white deposits in the Hot Water Tank. It is possible for calcium deposits to build up faster, making it necessary to de-scale more often.
Step 1: Make sure you have at least 8 ounces of undiluted white vinegar on hand. You will also need a 10 oz ceramic cup (do not use a paper cup) and access to a sink.
Step 2: Fill Hot Water Tank with 8 ounces of undiluted white vinegar up to the FILL LEVEL mark, place a ceramic cup on the drip tray.
Step 3: Close the lid, and perform a brew into the ceramic cup without adding a K-Cup®.
Step 4: Pour the contents of the ceramic cup into the Hot Water Tank, careful the liquid will be hot, close the lid. Start a brew but power off the brewer just after it starts to dispense and then allow it to sit for at least 30 minutes.
Step 5: After the prescribed period of time, perform a brew without adding a K-Cup®. Empty the contents of the ceramic cup into the sink , be careful as contents may be hot.
Step 6: Fill the Hot Water Tank with 8 ounces of bottled water, close the water fill lid, place a cup on the drip tray and perform a brew.
Step 7: Repeat Step 6 three times using bottled water (with no K-Cup in place) to cleanse the brewer plumbing and get rid of any residual taste from the vinegar.
The brewer is now ready for normal use again.
Service
Beyond these recommended cleaning and maintenance procedures this brewer is not user serviceable, for service please refer to the Warranty section in this guide.
4
 Loading...