

Keurig K65 Owner Manual

Owner’s manual
Keurig® K-Cup® K60/K65 Special Edition & Signature Brewers
manuel D’uTIlIsaTIOn
Cafetières à K-Cup® K60/K65 Special Edition et Signature de Keurig
®
1

IMPORTANT SAFEGUARDS Safe Operation & Use
When using electrical appliances, basic
safety precautions should be followed,
including the following:
1. Read all instructions before using.
2. Do not touch hot surfaces. Use handles
and knobs when available.
3. This appliance must be properly
installed and located in accordance
with these instructions before it is used.
4. The use of accessory attachments
not recommended by the appliance
manufacturer may result in fire,
electrical shock or injury to persons.
5. Do not place on or near a hot gas or
electric burner, or in a heated oven.
6. Do not use outdoors.
7. To protect against fire, electric shock
and injury do not immerse cords, plugs,
or the appliance in water or any other
liquid.
8. Do not overfill the Water Reservoir
with water.
9. Use only water in this appliance! Do
not put any other liquids or foods in the
Water Reservoir except as instructed in
the Cleaning Instructions in this guide.
10. Turn off and unplug the brewer before
cleaning or maintenance. Allow to cool
before putting on or taking off parts
and before cleaning the appliance.
11. For best operation, plug the appliance
into its own electrical outlet on a
dedicated circuit to prevent flickering
of lights, blowing of fuses or tripping a
circuit breaker.
12. Do not operate any appliance with a
damaged cord or plug or after
the appliance malfunctions or is
damaged in any manner. Contact
Keurig Customer Service to report
any malfunction of or damage to the
brewer.
13. Do not let the cord hang over the edge
of the table or counter, or touch hot
surfaces.
14. To disconnect, press the Power Button
on the brewer to ‘OFF’ status and then
remove the plug from the wall outlet.
15. Close supervision is necessary when
any appliance is used by or near
children.
16. Do not lift the brewer Handle while
brewing is in progress.
17. Always keep the Water Reservoir Lid
on the Water Reservoir unless you are
refilling it.
18. This appliance is equipped with a power
cord having a grounding wire with a
grounding plug. The appliance must
be grounded using a 3-hole properly
grounded outlet. In the event of an
2
electrical short circuit, grounding
reduces the risk of electrical shock.
19. If the outlet is a standard 2-prong wall
outlet, it is your personal responsibility
and obligation to have it replaced with a
properly grounded 3-prong wall outlet.
20. Do not, under any circumstances, cut or
remove the third (ground) prong from
the power cord or use an adapter.
21. Consult a qualified electrician if
the grounding instructions are not
completely understood, or if doubt
exists as to whether the appliance is
properly grounded.
22. Do not use the appliance for other than
its intended use.
SAVE THESE
INSTRUCTIONS.
WARNING TO USERS AND PARENTS
1. DO NOT permit children to use brewer
unless there is adult supervision. Brewer
dispenses very hot water.
2. SPECIAL NOTICE FOR HOT COCOA USERS:
IMMEDIATELY AFTER USING A HOT COCOA
K-CUP® PACK, RUN a Hot Water Brew Cycle
without a K-Cup
®
pack to avoid the possibility
of clogging the exit needle. DO NOT assume
the next user will do this.

CAUTIO N: There are two sharp needles that puncture the K-Cup® pack, one
above the K-Cup® Pack Holder and the other in the bottom of the K-Cup® Pack
Holder. To avoid risk of injury, do not put your fingers in the K-Cup® Pack
Assembly Housing.
CAUTIO N: There is extremely hot water in the K-Cup
brew process. To avoid risk of injury, do not lift the Handle or open the K-Cup®
Pack Assembly Housing during the brewing process.
CAUTIO N: Do not fill above MAX FILL line. If you fill the Water Reservoir above this
point, you may occasionally get a larger brew than you selected for your first brew
of the day. If you prefer to have your reservoir filled to the top, we recommend you
use a large mug for your first brew of the day to avoid any risk of overflow.
CAUTION: Please always keep the brewer in its upright position to avoid
potential injury and/or damage to your brewer.
SHORT CORD INSTRUCTIONS:
reduce the risk of becoming entangled in or tripping over a longer cord.
If an extension cord is used, (1) the marked electrical rating of the cord set or
extension cord should be at least as great as the electrical rating of the
appliance; (2) the cord should be arranged so that it will not drape over the
countertop or tabletop where it can be pulled on by children or tripped over
unintentionally; and (3) the extension cord must include a 3-prong grounding plug.
THIS PRODUCT IS FOR HOUSEHOLD USE ONLY.
A short power supply cord is provided to
®
Pack Holder during the
TABLE OF CONTENTS
KEURIG® GOURMET SINGLE CUP HOME BREWING SYSTEM
K60/K65 Special Edition & Signature Brewers — Using Your Brewer
SET-UP
Helpful Hints ........................................................................................ 4
Unpacking ............................................................................................ 4
Features ............................................................................................... 5
SECTION 1 — SET-UP & FIRST BREW
Set-Up & First Brew ........................................................................... 6
SECTION 2 — CONTROLS & INDICATORS
Setting the Clock ............................................................................... 10
Programming On/Off Features ...................................................... 10
Programming Brew Temperature ................................................. 12
SECTION 3 — CLEANING & MAINTENANCE
Cleaning ..............................................................................................12
Descaling ............................................................................................14
Storage ...............................................................................................14
SECTION 4 — TROUBLESHOOTING ..................................................15
SECTION 5 — WARRANTY.................................................................16
WARNING
RISK OF FIRE OR
ELECTRIC SHOCK
DO NOT OPEN
WARNING: TO REDUCE THE RISK OF FIRE OR
ELECTRIC SHOCK, DO NOT REMOVE THE
BOTTOM COVER. NO USER SERVICEABLE
PARTS ARE INSIDE. REPAIR SHOULD BE DONE
!
BY AUTHORIZED SERVICE PERSONNEL ONLY.
Record your brewer serial number here.
See Un packing In structi ons on page 4 fo r serial num ber locati on.
Remov ing the ser ial number l abel from th e brewer wi ll void war ranty.
3

Set-Up
Helpful Hints
1. Plug brewer into its own grounded outlet.
If the electric circuit is overloaded with other
appliances, your brewer may not function
properly. The brewer should be operated on
its own circuit, separate from other appliances.
2. Keep your brewer turned “ON.”
To brew a fresh cup of coffee, tea or hot cocoa
anytime you want, keep your brewer turned
“ON” all the time. However, the brewer is fully
programmable so you can set it to turn on and
off automatically to match your schedule.
Or, if you prefer, set the brewer to automatically
turn off after a period of time. Follow the simple
instructions on pages 10–12 to find the settings
that are most convenient for you.
3. For the best tasting gourmet coffee, tea or
hot cocoa, Keurig recommends using bottled
or filtered water.
Water quality varies from place to place.
If you notice an undesirable taste in your cup
of coffee, tea or hot cocoa (such as chlorine
or other mineral tastes) we recommend you
consider using bottled water or water from a
filtration system. For best results, carefully
follow manufacturer’s instructions when using
any water filtration system.
4. Customize the size, flavor & brew that’s
perfect for you.
With the choice of over 250 varieties of
K-Cup® packs and 3 brew sizes (Small Cup-
5.25 oz., Small Mug-7.25 oz. and Large
Mug-9.25 oz.), your Keurig® brewer gives you
endless options to customize the size, flavor
and brew that’s perfect for you. For a strong,
intense cup, select an Extra Bold K-Cup®
pack (with up to 30% more ground coffee than
regular varieties) and brew size that’s right
for you. The smaller the brew size, the more
intense flavor in your cup. The larger the brew
size, the less intense flavor in your cup.
5. Remove K-Cup® pack af ter use.
Please see page 7 for brewing instructions.
6. Brewing into a travel mug.
To brew into a travel mug, simply remove the
Drip Tray Assembly and place the travel mug
on the Drip Tray Base.
7. Descale brewer regularly.
Please see page 14 for instructions.
Unpacking Instructions
1. Place brewer box on a large steady surface
(such as a table or countertop) or on the floor.
Open the box.
4
Remove enclosed literature.
2.
3. Turn the box on its side with front of box
face down.
4. Reach into the box and grasp the plastic bag
that contains the brewer.
5. Carefully pull the plastic bag (and packaging
materials) toward you and out of the box. The
brewer will still be encased in the polyfoam
and be on its side.
6. Remove the top polyfoam packaging material.
7. Carefully lift brewer off of the bottom polyfoam
and place it upright on a flat, steady surface.
8. Lift plastic bag off of brewer.
9. Record the serial number for this brewer on
page 3 of this guide. The serial number can
be found on the bottom of the brewer box or
on the brewer behind the Drip Tray (when
removed).
10. Place the brewer upright on a flat, steady
surface. Remove tape holding Water Reservoir
in place.
We recommend you save all packing materials in
case future shipping of the product is necessary.
WARNING:
Keep all plastic bags away
from children.

Features K60/K65 Special Edition & Signature Brewers
E
A
H
T
U
N
T
C
I
D
B
O
J
G
F
K
P Q R
M
L
K60/K65 Special Edition & Signature Brewers Controls and Indicators
A. Water Reservoir Lid
B. Water Reservoir
C. MAX FILL
D. Water Reservoir
Lock Tab Slots
E. Handle
F. Funnel
G. K-Cup
H. Lid
I. K-Cup
J. Housing
®
Pack Holder
(F and G are the K-Cup®
Pack Holder Assembly)
®
Pack
Assembly Housing
K. Drip Tray Plate
L. Drip Tr ay
M. Drip Tray Base
N. Vent
O. Power Cord
5
P. Small Cup Button 5.25 oz.
Q. Small Mug Button 7.25 oz.
R. Large Mug Button 9.25 oz.
S. Menu Button
T. LCD Control Center
U. Power Button
S

SECTION 1 Set-Up & First Brew
IMPORTANT: You cannot use your Keurig
®
brewer until
it has been set-up for its first use as set forth below.
NOTE: If brewer has been exposed to temperatures
below freezing, allow brewer at least two hours to
reach room temperature before brewing. A frozen
or extremely cold brewer will not operate.
fig.
1
Setting Up Your Brewer
1. Unwrap cord and plug the brewer into
a grounded outlet. Remove all pieces of
packing tape and clear plastic sticker
from LCD Control Center.
2. Place a large mug (10 oz. minimum) on the
Drip Tray Plate.
3. Remove the Water Reservoir from brewer
by first removing Lid from Reservoir (fig. 1),
then lifting Reservoir straight up and away
from brewer (may be tight), (fig. 2). Rinse
with fresh water.
Lo ck Tabs
fig.
fig.
4. Fill Water Reservoir with bottled or filtered
2
3
water so that the water is to and not beyond
the MA X FILL line.
5. Place Water Reservoir base into the left side
of the brewer and be sure the Water Reser voir
Lock Tabs engage with the brewer (fig.2).
Replace Lid on Water Reservoir.
6. Press the Power Button found directly
above the LCD Control Center (fig. 3).
7. The LCD Control Center will illuminate and
indicate “NOT READY.” NOTE: A K-Cup
should not be used for this sequence
NOTE: If the Water Reservoir is empty or
not in place on the brewer, the LCD Control
Center will also indicate “ADD WATER.” None
of the buttons will be activated until water
is added to the Water Reservoir and Water
Reser voir is in place.
®
pack
.
6

fig.
fig.
8. The brewer will automatically fill the
4
internal tank with water and then the water
will be heated. This will take about 4 minutes.
During the heating period, the LCD Control
Center will indicate “NOT READY” (fig. 4). Do
not lift Handle during this heating period.
Once the water is heated, “READY TO BREW”
will be indicated and the Brew Buttons will be
illuminated (fig. 5). NOTE: You may see small
amounts of water coming from the Vent and
dripping into the Water Reservoir during this
and subsequent heating — this is normal.
Lift and lower the Handle. Press the Small
9.
5
Mug Button to start a cleansing brew. When
the brew cycle is complete, pour the hot
water into the sink.
10. The one-time set-up process is now
complete and you are ready to brew!
NOTE: The brewer may take 15 seconds
between brews and then “READY TO BREW”
will be indicated.
fig.
fig.
Ready to Brew Your First Cup
6
1. LCD Control Center will indicate
“READY TO BREW.”
2. Place a cup or mug on the Drip Tray Plate.
3. Lift the Handle and the K-Cup
will open toward you (fig. 6).
4. Select a K-Cup
NOTE: Do not remove the foil
lid or puncture the K-Cup
5. Place a K-Cup
K-Cup® Pack Holder (fig. 7).
CAUTION: There are two sharp needles that
puncture the K-Cup
7
K-Cup
of the K-Cup
injur y, do not put your fingers in the K-Cup
Pack Assembly Housing.
Lower the Handle to close the Lid over the
6.
K-Cup® Pack Holder. (When it is closed
completely, the LCD Control Center will
indicate “READY TO BREW” and the Small
Cup, Small Mug and Large Mug Buttons will
flash for up to 60 seconds.)
®
pack.
®
pack.
®
pack in the
®
®
Pack Holder and the other in the bottom
pack, one above the
®
Pack Holder. To avoid risk of
®
Pack Holder
®
7

SECTION 1 Set-Up & First Brew (Continued)
7. Choose the brew size of coffee, tea or hot
cocoa by pressing the button that indicates
your choice. The Small Cup choice will yield
a 5.25 oz. serving, the Small Mug choice will
Small Cup
(5.25 oz.)
Small Mug
(7.25 oz.)
Large Mug
(9.25 oz.)
yield a 7.25 oz. serving and the Large Mug
choice will yield a 9.25 oz. serving. NOTE: If
you do not push a Brew Button in 60 seconds,
the LCD Control Center will return to “READY
TO BREW” and the Brew Buttons will be
disabled to prevent accidental activation.
Re-activate the Brew Buttons by lifting and
lowering the Handle completely.
The LCD Control Center will indicate
8.
“BREWING” and the brew size you selected
will illuminate. CAUTI ON: There is extremely
hot water in the K-Cup
brew process. To avoid risk of injury, do not lift
the Handle or open the K-Cup
Housing during the brew process.
There may be a short pause prior to beverage
9.
being dispensed. The entire brew process
lasts for approximately 1 minute and ends
with a burst of air to remove all liquid from
the K-Cup® pack.
®
Pack Holder during the
®
Pack Assembly
10. Lift the Handle and dispose of the used
K-Cup® pack. CAUTION: K-Cup
will be hot.
Enjoy your first cup of Keurig Brewed®
11.
gourmet coffee, tea or hot cocoa!
12. The LCD Control Center may indicate “NOT
READY” as the brewer heats water for the next
brew cycle. “READY TO BREW” will be indicated
after about 15 seconds. NOTE: During this period,
your brewer will prepare for the next brew. The
pump will make a vibrating sound. This is normal.
®
pack
Stopping the Brew Process
If you need to stop brewing after the process has started, press the Power
Button to turn the brewer off. The flow of coffee, tea or hot cocoa will stop,
the heating element will shut off, and the blue lights illuminating the brew
buttons and Water Reservoir will no longer be illuminated. NOTE: You may get
less coffee, tea or hot cocoa in your cup during your next brew. We recommend
that you perform a cleansing brew after a terminated brew. Then your NEXT
brew will be the volume you have selected.
8

Adding Water
Brewing Hot Water
fig.
2. Remove the Water Reservoir from brewer by first removing the Lid from
the Water Reservoir, then lifting the Water Reservoir straight up and away
from brewer. Fill with water to and not beyond the MA X FILL line. Place
the Water Reservoir back on the brewer and replace the Lid. IMPORTANT:
Do not remove the Water Reservoir during the brewing process.
The LCD Control Center will indicate “ADD
8
WATER” when the level in the Water Reservoir
is low or if the Water Reservoir has been removed
(fig. 8). The blue light in the Water Reser voir
will also blink when water needs to be added.
The brewer will not allow you to brew when “ADD
WATER” is indicated.
The Water Reservoir can be filled in two ways.
Remove the Water Reservoir Lid and pour water
1.
directly into the Water Reservoir while it is still
attached to the brewer. Fill with water to and not
beyond the MAX FILL line. Replace the Lid.
Brewing Iced Beverages
Your iced tea and iced coffee taste best when fresh-brewed hot over ice. Try it by
placing a tall cup filled with ice on the Drip Tray Plate (the Drip Tray Assembly
can be removed to accommodate taller cups), choose your favorite K-Cup®
pack and press your preferred brew size. Also, look for the Brew Over Ice icon
on K-Cup® packs that are specially crafted to brew over ice! IMPORTANT: Do not
brew into a cup made of gl ass. Doing so may cause the glass to crack or break.
Your brewer is able to produce hot water for making hot cocoa from a packet,
for use in cooking, for making soups, etc. Simply follow the instructions on
page 7 — “Ready To Brew Your First Cup” — without adding a K-Cup® pack.
NOTE: After brewing a hot cocoa K-Cup® pack, we recommend running a
cleansing brew without a K-Cup
®
pack.
Purging the Brewer
If your brewer has not been used for more than one week, you should purge
the water from the internal tank.
1. If there is water in the Water Reservoir, remove the Lid, then lift the
Water Reservoir straight up and away from brewer. Discard water, rinse
and refill with water. Place the Water Reservoir back on the brewer and
replace the Lid. (If there is no water in the Water Reser voir, simply refill.)
2. Be sure the brewer is turned on. Lift and lower the Handle on the brewer
without inserting a K-Cup® pack.
3. The LCD Control Center will indicate “READY TO BREW” and the Small
Cup, Small Mug and Large Mug Buttons will flash. Be sure to have a
large mug on the Drip Tray Plate and then press the Large Mug Button.
4. Repeat steps 2 and 3 one more time to completely purge water from
internal tank.
If you are experiencing any problems with your brewer, please contact
Customer Service at 1.866.901.BREW (2739).
9

SECTION 2 Controls & Indicators (LCD Control Center)
Setting the Clock
Setting the clock is optional. When the clock is set, the time will appear in
the LCD Control Center. NOTE: You must set the clock if you will be using the
On/Off Time programming feature.
Press the Menu Button.
fig.
9
5. When you have reached the correct time, press the Menu Button five
times to scroll through the remaining programming options and exit
the programming mode.
6. The correct time should now be displayed in the LCD Control Center.
NOTE: If power is interrupted to the brewer by unplugging it, or if power
is lost, follow the procedure above to reset the time as the clock will not be
visible until the time is set.
1.
2. The word “OFF” will appear at the bottom
of the LCD Control Center to indicate that
the clock is not set. The programming
options will appear on the LCD Control
Center with a small arrow pointing to “SET
CLOCK” (fig. 9). “H” (Hour) and “M” (Minute)
will appear and blink.
3. Press or hold the blue Small Cup Button under
the blinking “H” until you have reached the
appropriate hour. If the hour has passed 12,
the indicator switches from “AM” to “PM.”
4. Press or hold the blue Large Mug Button under
the blinking “M” to set the minutes.
Programming On/Off Features
The brewer provides three modes so that you can enjoy gourmet coffee, tea
or hot cocoa on your own schedule. By programming your brewer to turn on
each morning, you will never have to wait for the brewer to warm up to brew
a gourmet cup of coffee.
1. Leave it ON all the time. The brewer can be left on all the time so that it is
always ready to brew a fresh cup of gourmet cof fee, tea or hot cocoa. To turn
the brewer off at any time, simply press the Power Button. (NOTE
the clock remains on if set, you can not brew a cup of coffee, te a or hot cocoa.)
Press the Power Button again to restore power to the brewer. You will have
to wait for the water to heat up before the brewer is ready to brew.
2. Set the brewer to Auto Off following a
specified period of time after the last brew.
fig.
10
10
a. Press the Menu Button twice to program the
Auto Off feature. The LCD Control Center will
display the programming options with a small
arrow next to “SET AUTO OFF” (fig. 10).
b. Press or hold the blue Small Cup Button
under the blinking “H” to advance 1 hour at
a time, up to 9 hours.
:
Although
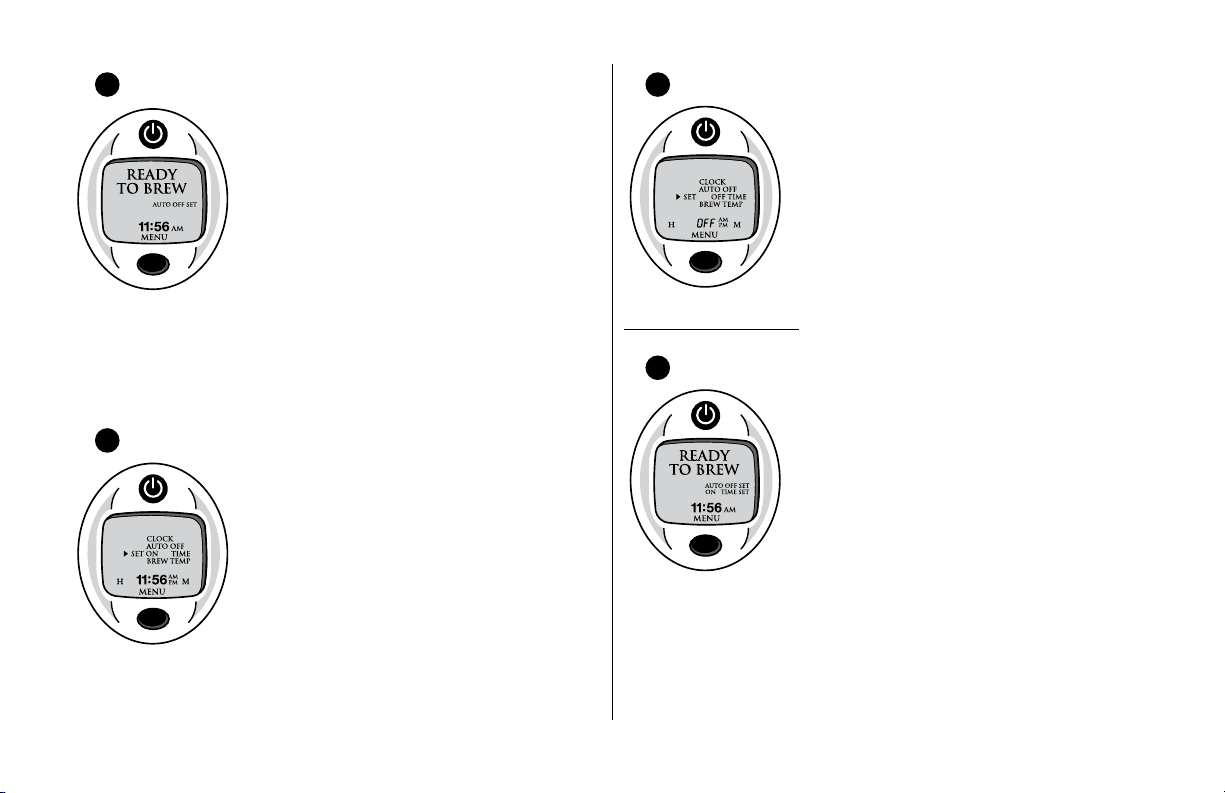
fig.
11
c. After setting the desired Auto Off Time, press
the Menu Button four times to scroll through
the remaining programming options and exit
the programming mode. “AUTO OFF SET”
(fig. 11) will now be indicated to confirm that
it has been set.
d. To cancel the Auto Off feature, press the
Menu Button twice to reach the Auto Off
programming mode. Press and release the
Small Cup Button under the blinking “H”
to advance one hour at a time until “OFF”
is indicated.
3. Program your brewer for a specific On/Off Time. NOTE: To use this
programming feature, the clock must be set to the correct time. The clock
will not be displayed unless the time is set.
fig.
12
a. After setting the correct time (required), press
the Menu Button three times to program the On
Time feature. The LCD Control Center will show
the programming options with a small arrow
next to “SET ON TIME” (fig. 12).
b. Press or hold the blue Small Cup Button under
the “H” to scroll through the hours to your
desired “ON TIME” hour.
c. Press or hold the blue Large Mug Button under
the “M” to scroll through the minutes to your
desired “ON TIME” minutes.
d. After setting the desired time, press the Menu Button to save the
“ON TIME” and move to the “SET OFF TIME” (fig. 13).
fig.
13
e. If you want to set an “OFF TIME,” repeat the
procedure above in steps b & c to set your
desired “OFF TIME.”
f. To complete the process, press the Menu Button
two more times to exit the programming mode.
The LCD Control Center will indicate the options
you have set.
g. The On Time and Off Time functions oper ate
independently from one another. To cancel
either set function, follow the steps above and
use the “H” and “M” buttons to advance to 12:00
AM. Make sure the M button is set to :00, then
fig.
14
change the “H” button. When you reach 12:00
AM, the LCD Control Center will indicate “OFF”
and the function will be disabled.
EXAMPLE
:
If you chose to set the On Time at
6:15 AM and the Off Time for 10:00 PM, then the
brewer will be “READY TO BREW” and maintain
hot water in the tank during that time so that it is
always ready for you to brew. If you wanted to
brew outside this window, simply press the Power
Button and you can brew as soon as the water is
heated and the “READY TO BREW” is indicated on
the LCD Control Center.
NOTE: The “AUTO OFF” Timer and the On/Off Time programming options
operate independently but can also be programmed to work together. For example,
you can set the On Time function to turn on at 7:00 AM and then set the Auto Off
Timer function to turn off the brewer two hours after the last brew (fig. 14).
11
 Loading...