

D
GB
F
NL
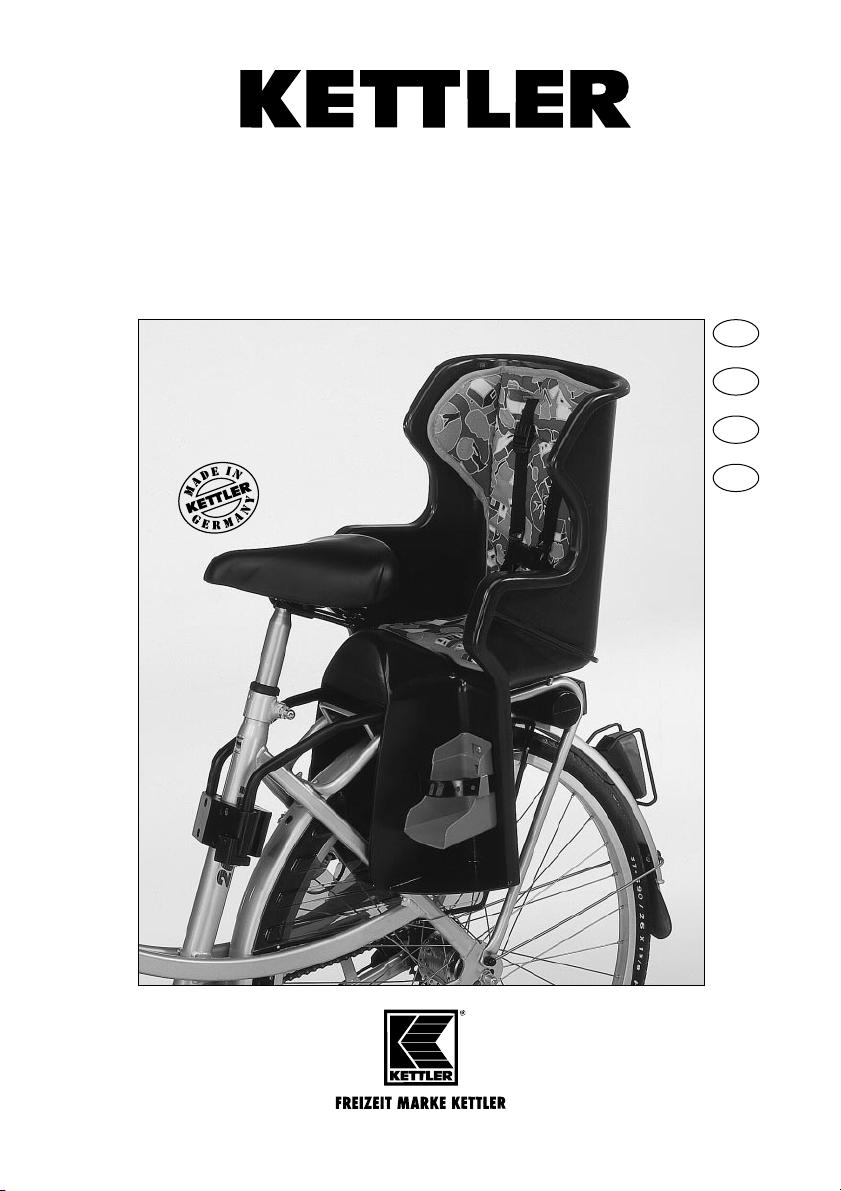
Montageanleitung und Handhabungshinweise
Fahrrad-Kindersitz „DUMBO”
Art.-Nr. 8947-050
Der Umwelt zuliebe: wir drucken auf 100% Altpapier!
Abb. ähnlich
4
Assembly Instructions
GB
KETTLER´s child’s seat was designed incompliance with applicable safety regulations and manufactured under permanent quality control. The knowledge gained in this process is used to constantly improve and develope our products. In order to offer our customers the very best in quality, we reserve the right to make technical changes at
any time. Should you have the need of assistance, please conntact your dealer.
For Your Safety
■ Only use this bicycle child's seat for its intended purpose, i.e. only mount it above the bike's rear axle by means
of the included mounting parts and only use it for the transport of children.
■ The child’s seat can be used for bicycles whose minimum diameter of the wheels is 26 inch; the diameter of the
frame tube must be 28, 30, 32, 35 or 40 mm.
■ Any other exploitation is inadmissible may may even be dangerous. The manufacturer cannot be held liable for
damage caused by unauthorized use.
■ The bicycle used must be safe and correspond with the Road Traffic Licensing Regulations (StVZO). According
to § 21 of Road Traffic Regulations (StVO) and/or §§ 4 and 7 of StVO only children under the age of 7 years
may be carried by persons who are at least 16 years old. The seat may be loaded with max. 22 kg (weight of
child plus additional luggage). Moreover, children who cannot sit alone (up to about 9 months) should not be
carried.
■ If you have a special bicycle structure please ask your dealer as to whether your bike is suitable for the use of
a child's seat.
■ The bicycle must be suited for accepting such additional loads. Furthermore, the admissible total weight of the
bicycle including child and child's seat must not be exceeded. If necessary, ask your bicycle manufacturer or
supplier for the bicycle's carrying capacity.
■ Do not attach additional luggage to the child's seat. If necessary, use a luggage carrier for the front axle in order
to obtain a load balance. Please, note that the carrying capacity of bicycle and child's seat are not exceeded.
■ If you transport your bicycle on a luggage rail on your car, by all means dismount the child's seat from your
bicycle since with growing velocities the air resistance increases which may lead to a higher fuel consumption
and to exceeding the carrying capacity of the luggage rail.
■ The child’s seat for bicycles meets all safety regulations. Repair works done by non-experts and alterations to the
construction (dismounting original parts, attachment of parts without approval) may cause harm to the user.
■ Damaged components may jeopardize your or the child’s safety. Therefore, before beginning a ride, you should
check all components for potential damage and loose connections (screws, connections, safety belts etc.).
■ Damaged or worn components have to be replaced immediately. Exclusively use original KETTLER spare parts.
■ When attaching the seat to a bicycle that has a saddle stem with suspension please take into account the
distance between the seat and the suspension spring. You should ensure that the child’s fingers cannot reach the
spring thus avoiding the possibility of injury.
Assembly
■ The child’s seat must be positioned such that it is not in contact with the luggage carrier. The distance between
luggage carrier and tube shackle must be min. 25 mm.
■ Fix the tube shackle parallel to the ground. This results in a seat which is slightly inclined towards the rear such
that the child may not slide out of the seat. The seat back is slighty inclined to the rear.
■ The load centre (marked by a red point) may only be within 10 cm behind the wheel hub (explained in detail
below).
Please read these instructions carefully before the assembly and first use. You will get important information on your safety as well
as the use and maintenance of the child’s seat. Retain these instructions for information and for maintenance works as well as orders
for spare parts.
fert. Falls Bedarf an entsprechendem Verschraubungsmaterial besteht, ist dieses durch den Zusatz „mit Verschraubungsmaterial“ bei der Ersatzteilbestellung anzugeben.
Heinz Kettler GmbH & Co. KG · Postfach 1020 · D- 59463 Ense-Parsit
Österreich: KETTLER Hotline 0660/7373
http://www.kettler.net

5
■ In case of saddles with uncovered springs the latter have to be covered as a protection against bruises (e. g.
art. nr. 8947-690).
■ Further to that the rear wheel is provided with an additional cover on the spokes or a protective device to pre-
vent dresses from getting mingled with the spokes.
Handling and security of riding
■ Please observe that the riding behaviour of the bicycle changes when the child’s seat is used (irrespective of
child being present or not). Owing to the increased centre of gravity the bicycle's behaviour may unfavourable
change and the bicycle's dirigibility may be impaired. For this reason, ride carefully – in particular with regard
to braking and evading manoeuvres. Also avoid riding with one hand.
■ Ask the child to sit quietly. Sudden weight transfers by the child may considerably affect your safety during a
ride.
■ Pay attention that the child does not handle any objects (e.g. toys) which might get mingled with the whels. Clo-
thes or extremities of the child should never get into turning parts or into the brake and transmission system.
■ Protect your child from sharp edges at your bicycle, from worn cables and other parts that might lead to inju-
ries.
■ Before beginning a ride and during a tour check whether or not the child’s seat is positioned firmly on the bicy-
cle; also check screwings and other connections for proper seat.
■ Only transport the child with the safety belt being fastened and the foot straps being closed. Have a check during
the breaks that those safety devices are still unopened.
■ Even if no child is carried, close the seat belt to avoid that it gets into turning parts or that it clings to parts that
are passed during riding.
■ Pay attention to a suitable and sufficiently warm clothing of your child.Children who are sitting still normale cool
down faster than the rider.
■ Do not park your bicycle before the child has left its seat.
■ We recommend that adult and child wear suitable helmets.
■ Adjust the headrest such that its upper edge matches the child's ear level.
■ In cases of doubt and any other question do not hesitate to contact your specialized dealer.
■ Never leave your child alone and unattended in its child’s seat due it the danger of the bicycle falling over.
■ If seat or clothers are dam it is possible that the colour of the seat could mark pale coloured clothes due to fric-
tion.
Service and maintenance
■ Always use environmentally friendly substances (never aggressive or etching ones) for the cleaning and service
of the child’s seat for bicycles.
■ You can also clean safety belts, if required. In this case it is especially important not to use aggressive substances!
Usually a weak rinsing lye or suds.
Accessories
■ If you want to attach the seat to another bicycle, you can order a second carrier for the child’s seat. (item no.
8947-633).
■ To secure the child’s seat from theft, a cylinder lock can be inserted into the seat support bracket (see page 18).
The lock (type K.01.32.G1) is not supplied with the seat. The lock is obtainable from: Firma P.C. Fischer, Kaiserstraße 126, D-58300 Wetter/Ruhr, tel. (0) 23 35/42 64, fax (0) 23 35/58 46
Note on Assembly
Assembly must be carried out carefully by an adult.
Carefully read these mounting instructions before beginning with the work itself. The individual steps are additionally explained in the sequence of figures by means of symbols, in some cases a text mark indicates that a written explanation is available. Strictly follow the individual mounting steps to ensure a safe use and operation of the
unit.
For technical reasons, we reserve the right to carry out preliminary assembly work (e.g. addition of tubing plugs).
List of spare parts page 18-19
When ordering spare parts, always state the full article number, spare-part number, the quantity required and the
inspection number stamped on the back.
6
Instructions de montage
F
Ce fauteuil porte-enfant de KETTLER a été construit en fonction de l’état actuel des prescriptions de sécurité. Sa construction fait l’objet d’un contrôle de qualité constant. Les connaissances acquises sont utilisées lors de notre travail de développement. Pour cette raison, nous nous réservons le droit de procéder à des modifications de la technique et de la stylique, afin de pouvoir toujours proposer à nos clients des produits de qualité optimale. Si vous
avez qand même des éclamations, veuillez vous mettre en rapport avec votre concessionnaire.
Consignes importantes pour l’utilisation
■ Ce fauteuil porte-enfant pour bicyclette ne doit être utilisé que pour sa destination, c’est-à-dire pour le montage
sur l’essieu arrière d’une bicyclette avec les pièces de montage y destinées pour le transport des enfants.
■ Ce fauteuil porte-enfant est prévu pour bicyclettes aux roues d’un diamètre de 660,4 mm et au cadre en tube
de 28, 30, 32, 35 ou 40 mm de diamètre.
■ Tout autre emploi est interdit et peut être dangereux. Le constructeur ne pourra être rendu responsable de dom-
mages causés par l’emploi abusif dudit fauteuil.
■ La bicyclette utilisée doit répondre aux prescriptions de sécurité et au règlement d’immatriculation. Selon § 21
du code de la route, le fauteuil porte-enfant pour bicyclette ne doit être utilisé que pour le transport des enfants
n’ayant pas encore 7 ans par des personnes âgées de 16 ans au moins. Le fauteuil ne doit pas être chargé d’un
poids excédant 22 kg (poids de l’enfant plus bagage). De plus, il ne faut pas transporter des enfants n’étant pas
encore à même de se tenir indépendamment (jusqu’à 9 mois environ)..
■ Dans le cas de constructions spéciales de bicyclettes, consultez le fabricant et assurez-vous que la bicyclette est
propre à l’utilisation d’un fauteuil porte-enfant.
■ La bicyclette doit être appropriée à une telle charge complémentaire. De plus, le poids de la bicyclette avec l’en-
fant et le fauteuil ne doit pas excéder le poids total autorisé. Le cas échéant, consultez le fabricant ou le fournisseur de la bicyclette en ce qui concerne la limite de charge de la bicyclette.
■ N’attachez pas de bagage complémentaire au fauteuil. Le cas échéant, utilisez un porte-bagages sur l’essieu
avant pour la répartition des charges. Faites attention à ne pas excéder la limite de charge de la bicyclette et
du fauteuil.
■ Si vous transportez la bicyclette avec un dispositif porte-bicyclette monté sur une voiture, il faut absolument
démonter le fauteur porte-enfant puisque la résistance de l’air – et par conséquent la consommation de carburant - augmente avec des vitesses élevées. De plus, la limite de charge du dispositif porte-bicyclette pourrait être
excédée.
■ Le fauteuil porte-enfant répond aux prescriptions en vigueur en matière de sécurité. Toute réparation ou modifi-
cation inappropriée (démontage de pièces d’origine, montage de pièces non autorisées, etc.) peut constituer
une source de danger pour l’utilisateur.
■ Les composants endommagés peuvent menacer la sécurité du cycliste et celle de l’enfant transporté. Aussi y a-t-
il lieu, avant le départ, de vérifier si les composants sont en bon état et que les assemblages sont bien vissés
(vis, raccords embrochables, ceintures de sécurité, etc.).
■ Remplacer immédiatement les composants usés ou endommagés. N’utiliser que des pièces de rechange KETT-
LER d’origine.
■ En cas de montage d'un siège-enfant sur un vélo équipeé d’une tige de selle avec suspension, il faut bien faire
attention à la direction du ressort. Ceci est très important pour éviter une blessure aux mains de l’enfant.
Lire attentivement les présentes instructions avant le montage et avant la première utilisation. Elles contiennent des remarques importantes pour la sécurité ainsi que pour l’emploi et l’entretien de le fauteuil porte-enfant. On est prié de garder les présentes instructions pour avoir les renseignements dont on peut avoir besoin, pour effectuer l’entretien ou pour commander des pièces de rechange.
The seat may only be ordered at an authorized dealer.
Example order: Art. no. 8947-050/spare-part no. 42108002/2 pieces/inspection no. .................... Please keep
original packaging of this article, so that it may be used for transport at a later date, if necessary. Important: spare
part prices do not include fastening material; if fastening material (bolts, nuts, washers etc.) is required, this should
be clearly stated on the order by adding the words „with fastening material“.
KETTLER (GB) Ltd. · Merse Road · North Moons Moat · Redditch, Worcestershire B 98 9 HL · Great Britain
KETTLER International Inc. · P.O. Box 2747 · Virginia Beach, VA 23450 · USA
http://www.kettler.net
11
1
Für die Montage an verschiedenen Fahrrädern mit verschiedenen Rahmenrohrdurchmessern liegen
Distanzstücke bei. Messen Sie den Rohrdurchmesser Ihres Fahrrades (am Sattelrohr) und wählen Sie das
entsprechende Distanzstück (Durchmesser jeweils eingeprägt). Für den Durchmesser 28 mm ist kein
Distanzstück erforderlich.
Spacers are enclosed for mounting the seat on bicycle frames with different tube diameters. Measure the
diameter of the tubes of your bicycle frame (saddle socket) and select the correct spacer to fit it. The diameter is stamp on the spacer. No spacer is required for tube diameter 28 mm.
Pour le montage de la selle sur les cadres à diamètres de tubes différents, nous avons prévu des pièces
d’ajustage. Mesurer le diamètre de votre tube de selle. Choisir la pièce d’ajustage (le diamètre est
imprimé). Pour un diamètre de
28 mm de tube de cadre, une pièce d’ajustage n’est pas nécessaire.
Voor de montage van het kinderzitje aan de diverse fietsframes met verschillende buisdiameters zijn hulpstukken bijgeleverd. Meet de diameter van de buis van uw fiets (zadelbuis) en kies het passende hulpstuk (de diameter is erop gedrukt). Voor een buisdiameter van 28 mm is geen hulpstuk nodig.
D
GB
F
NL
Erklärung der Montagesymbole
Note on Assembly
Symbols
Légende des symoles
de montage
Toelichting bij de
montagesymbolen
Benutzen Sie einen Innensechskant (Imbus-)Schlüssel
zur Verschraubung.
Use a wrench for screwing.
Pour le raccord, utiliser
une clé pour vis à six pans
creux.
Gebruik een zeskant
(imbus)sleutel om vast te
schrowven.
Benuztn Sie einen Mauloder Ringschlüssel zur Verschraubung
Use an open-ended or
ring-type wrench for this
bolt (included).
Pour le raccord, utiliser ne
clé à fourche ou une clé
polygonale.
Gebruik een bek- of ringsleutel om vast te schroeven.
Die Pfeile im Bild geben
die Montage- bzw. Bewegungsrichtung an.
The arrows show the ditection of assembly.
Les flèches dans les différentes fig. indiquent le
sens de montage ou de
mouvement.
De pijlen op de afbeelding
geven de montage- respectivelijk de bewegingsrichting aan.
D
F
GB
NL
Ø
?

12
2
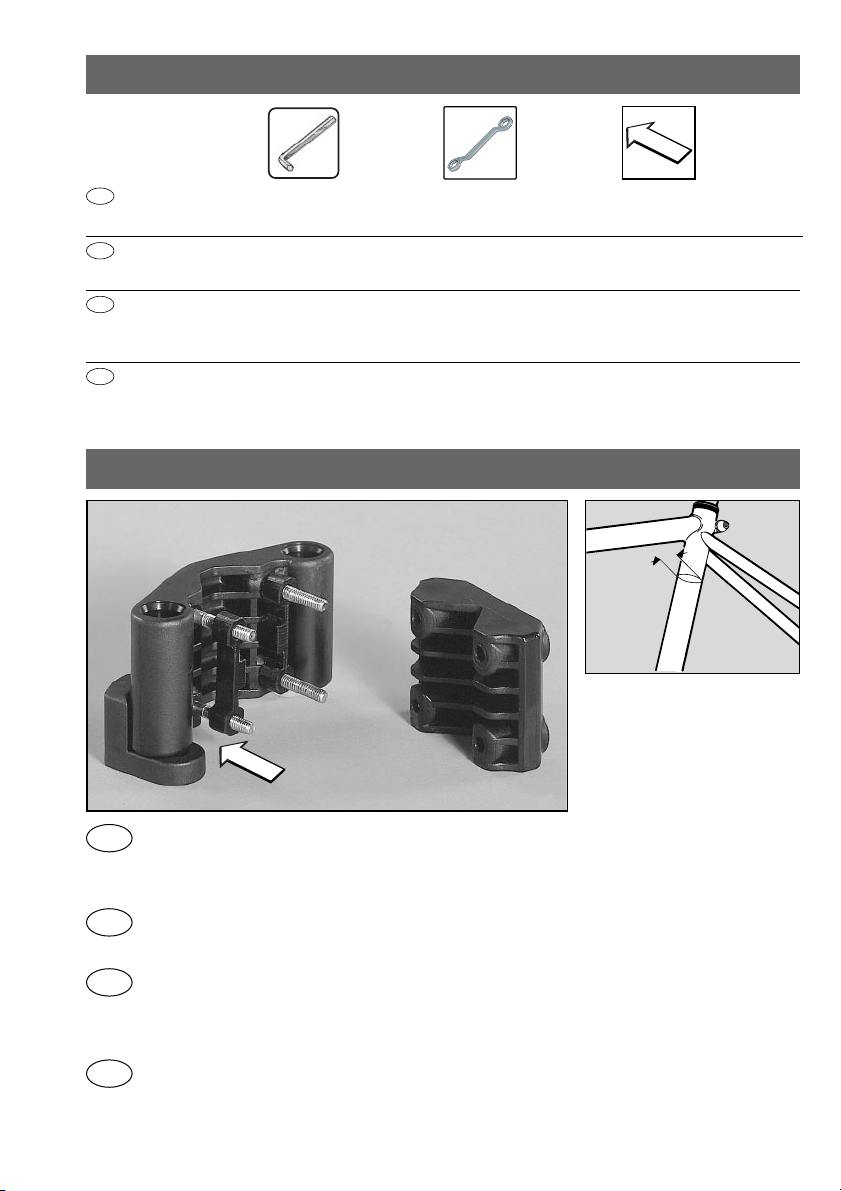
Bei der Montage der Halterung 4-6 beachten Sie bitte, daß die Schrauben selbstsichernd sind (durch die
Sicherung lassen sich die Schrauben manchmal etwas schwerer drehen). Der Sicherungsknebel 6 muß in
Fahrtrichtung links liegen. Ziehen Sie die Schrauben noch nicht richtig fest, so daß Sie die Halterung noch
ausrichten können!
When mounting the carrier (4 - 6) please observe that the screw are self-locking (the lock may sometimes
cause problems when turning the screw). The securing toggle (6) must be positioned on the left (seen in
moving direction). Do not tighten the screws completely to be still capable of aligning the carrier!
Au montage de l’attache (4 - 6), tenir compte du fait que les vis sont à freinage interne (les vis sont parfois dures à serrer en raison du freinage interne). Le dispositif de sécurité (6) doit se trouver à gauche dans
le sens de marche. Ne pas encore serrer les vis à fond pour pouvoir ajuster le dispositif de sécurité.
Bij de montage van de houder (4 - 6) wilt u er wel op letten, dat de schroeven zelfborgend zijn (door de
zekering kunnen de schroeven soms wat moeilijker rondgedraaid worden). De veiligheidsknevel (6) moet
in rijrichting gezien links liggen. De schroeven nog niet helemaal vast aandraaien, zodat u de houder nog
kunt richten!
D
GB
F
NL

13
3
min. 2,5 cm
Die Halterung muß so ausgerichtet sein, daß der eingesetzte Rohrbügel 3 keinen Kontakt mit dem Gepäckträger hat und mindestens 2,5 cm darüber steht. Wenn dieser Abstand korrekt eingestellt ist, ziehen Sie
die Schrauben über kreuz fest, bis sich die Halterung unter mäßigem Kraftaufwand weder in horizontaler
noch vertikaler Richtung bewegen läßt. Beim Einsetzen des Rohrbügels (auch mit montiertem Sitz) muß der
Sicherungsknebel arretiert werden (nach hinten schieben). Entnahme des Rohrbügels, bzw. Sitzes: Sicherungsknebel nach vorn schieben.
The carrier must be aligned such that the tube shackle (3) inserted is without contact to the luggage carrier; the minimum distance between both must be 2.5 cm. After this distance has been set correctly, tighten
the screws crosswise, until the carrier can be moved neither horizontally nor vertically with moderate force
being applied. When inserting the tube shackle (this also applies when the seat is mounted) the safety toggle must be locked (push backwards). Removal of the tube shackle or seat: pull safety toggle forward.
L’attache doit àtre ajustée de maniäre à ce que le tube-cadre (3) ne soit pas en contact avec le porte-bagages, mais à environ 2,5 cm au-dessus. Quand cet intervalle sera réglé correctement, serrer les vis, en croix
et à fond jusqu’à ce que l’attache ne puisse plus se déplacer, ni verticalement, ni horizontalement lorsqu’on exerce sur elle une force modérée. Pour la mise en place du tube-cadre (avec siège monté également), le dispositif de sécurité doit être bloqué (pousser vers l’arrière). Pour enlever le tube-cadre ou le
siège: pousser le dispositif de sécurité vers l’avant.
De houder moet zó gericht zijn, dat de ingezette buisbeugel (3) geen contact met de bagagedrager heeft
en minstens 2,5 cm erboven staat. Als deze afstand goed ingesteld is, draait u de schroeven kruisgewijs
vast, tot de houder, als er matig kracht gezet wordt, noch in horizontale, noch in verticale richting bewogen kan worden. Bij het inzetten van de buisbeugel (ook met het gemonteerde zitje) moet de veiligheidsknevel vastgezet worden (naar achteren schuiven). Als de buisbeugel respectievelijk het zitje verwijderd
moet worden: de veiligheidsknevel naar voren schuiven.
D
GB
F
NL

14
4
max. 10 cm
!
Bei der Montage des Sitzes 1 auf dem Rohrbügel kann zwischen drei Positio-nen gewählt werden. Hierbei ist zu beachten, daß der Schwerpunkt (gekennzeichnet durch den roten Punkt am Sitz) nicht weiter als
max. 10 cm hinter der Radnabe liegen darf!
When mounting the seat (1) on the tube shackle the user can choose among three positions. Attention has
to be paid to the centre of gravity (marked by a red point on the seat): it must not be more than max. 10
cm behind the wheel hub.
Au montage du siège (1) sur le tube-cadre, on a le choix entre trois positions. Veiller cependant à ce que
le centre de gravité (marqué par le point rouge sur le siège) ne soit pas à plus de 10 cm au maximum derrière le moyeu de roue.
Bij de montage van het zitje (1) op de buisbeugel kan tussen drie standen gekozen worden. Men moet
erop letten, dat het zwaartepunt (gekenmerkt door de rode punt op het zitje) niet meer dan hoogstens 10
cm achter de wielnaaf ligt!
D
GB
F
NL

15
5
6
Hängen Sie die Laschen
der Fußriemen 9 in die
dafür vorgesehenen Befestigungen der Fußstützen 7+8
ein.
Insert the flaps of the slings
for the feet (9) into the provided fastenings of the foot
rests (7+8).
Introduire l’extrémité des
courroies pour les pieds (9)
dans les dispositifs de fixation prévus à cet effet dans
les repose-pieds (7+8).
Hang de strippen van de
voetriemen (9) in de daarvoor aanwezige bevestigingen van de voetsteunen
(7+8).
D
GB
F
NL
Ansetzen der Fußstützen: die Winkelhaken der Fußstützen müssen richtig in das entsprechende Loch des
Sitzkörpers greifen. Die Fußstütze muß so montiert werden, daß die Füße des Kindes bei bequemer Sitzposition mit ihrer gesamten Fläche aufliegen.
Attachment of the foot rests: the angular hooks of the foot rests must properly engage with the relevant hole
of the body of the seat. The foot rest must be mounted such that the entire bottom surface of the child’s feet
is supported when the child sits conveniently.
Montage des repose-pieds: les crochets des repose-pieds doivent prendre correctement dans le trou cor-
respondant du siège. Le repose-pied doit être monté de manière à ce que tout le pied repose bien lorsque
l’enfant est confortablement assis.
Aanzetten van de voetsteunen: de winkelhaken van de voetsteunen moeten op de juiste manier in het corresponderende gat van de zitromp pakken. De voetsteun moet zó gemonteerd worden, dat de voeten van
het kind, als het makkelijk zit, met hun gehele oppervlakte erop liggen.
D
GB
F
NL

16
7
8
Die Schultergurte 11 lassen sich gemäß der Körpergröße des Kindes in der
Höhe verstellen.
The shoulder straps (11)
can be adjusted in accordance with the child’s tallness.
Les ceintures pour les épaules sont réglables (11) en
hauteur en fonction de la
taille de l’enfant.
De schoudergordels (11)
kunnen in overeenstemming met de lichaamsgrootte van het kind in de
hoogte versteld worden.
D
GB
F
NL
Kleben Sie die beiliegenden Reflektoren 13 auf die
leicht aufgerauten Punkte
an der Sitzrückseite.
Stick the reflectors (13)
attached to the slightly
roughened areas on the
back of the seat.
Coller les réflecteurs (13)
joints aux points rendus
rugueux à la surface arrière du siège.
Plak de bijgevoegde reflectors (13) op de iets ruwgemaakte punten aan de
achterkant van het zitje.
D
GB
F
NL

17
9
D
GB
F
NL
Achten Sie unbedingt auf das korrekte Anlegen der Sicherheitsgurte!
It is urgently required that you pay attention to the proper fastening of the safety belts.
Veiller à ce que la ceinture de sécurité soit bien attachée.
Let er absoluut op, dat de veiligheidsgordels goed aangelegd zijn.

18
Ersatzteilliste
Kindersitz DUMBO 8947-050
Farbe blau/silber
Teil-Nr. Bezeichnung Stück Bestellnummer
1 Sitzteil 1 70122853
2 Klettband 20x100mm 1 96600202
3 Rohrbügel 1 91960096
4 Aufnahme Rohrbügel 1 70122860
5 Befestigungselement 1 70122870
6 Sicherungsclip 1 70122865
7 Fußstütze (rechts) 1 70122619
8 Fußstütze (links) 1 70122609
9 Klettverschlußband 2 42108002
10 Kindersitz (Polster) 1 58947050
11 Gurtsystem (kpl.) 1 91960057
12 Rändelmutter M5 2 10104000
13 Reflektor 2 33901127
14 Federscheibe 2 10601001
15 Schraubenbeutel 1 98580590
16 Distanzplättchen 8 70122845
17 Verstärkungsschelle 2 91960066
18
19 Rändelstift ø5x22mm 1 11101006
20 Schnalle für Haltebügel (zu Gurtsystem) 3 70122565
21 Gehäuse für Gurtverschluß (zu Gurtsystem) 1 10122035
22 Stecker für Gurtverschluß (zu Gurtsystem) 2 10122043

19
Ersatzteilzeichnung
Spare parts drawing and list
Dessin et liste des pièces de rechange
GB
F
NL
Reserveonderdeeltekening en -lijst
11
20
22
21
10
12
19
14
7
8
21
13
9
17
16
456
3

20
20
docu 704b/09.02
Bei Reklamationen bitte diese Kontrollnummer angeben.
In case of complaint, please state this control number.
En cas de réclamation, prière de mentionner ce numéro de contrôle.
Bij reclamaties dit controlenummer vermelden.
D
F
GB
NL
 Loading...