

Page 1
Owner’s manual
Page 2

INDEX
SWITCH ON THE INSTRUMENT . . . . . . . . . . . . . . . . . . . . . . . . . . . . . . . . . . . . . . . . . . . . . . . . . . . . . . . . . . . . . . . . . . . . . . . . . . . . . . . . . . . . . . . . . . . . . . . . . . . . . . . . pag. 1
SAFETY INSTRUCTIONS
. . . . . . . . . . . . . . . . . . . . . . . . . . . . . . . . . . . . . . . . . . . . . . . . . . . . . . . . . . . . . . . . . . . . . . . . . . . . . . . . . . . . . . . . . . . . . . . . . . . . . . . . . . . . . . . . . . . . . . . 1
CONNECTIONS / OUTPUTS
. . . . . . . . . . . . . . . . . . . . . . . . . . . . . . . . . . . . . . . . . . . . . . . . . . . . . . . . . . . . . . . . . . . . . . . . . . . . . . . . . . . . . . . . . . . . . . . . . . . . . . . . . . . . . 4
VOICES
. . . . . . . . . . . . . . . . . . . . . . . . . . . . . . . . . . . . . . . . . . . . . . . . . . . . . . . . . . . . . . . . . . . . . . . . . . . . . . . . . . . . . . . . . . . . . . . . . . . . . . . . . . . . . . . . . . . . . . . . . . . . . . . . . . . . . . . . . . . . . . . . . . . . . . . . . . 6
USER VOICES
. . . . . . . . . . . . . . . . . . . . . . . . . . . . . . . . . . . . . . . . . . . . . . . . . . . . . . . . . . . . . . . . . . . . . . . . . . . . . . . . . . . . . . . . . . . . . . . . . . . . . . . . . . . . . . . . . . . . . . . . . . . . . . . . . . . . . . . . . . . . 8
DRAWBARS
. . . . . . . . . . . . . . . . . . . . . . . . . . . . . . . . . . . . . . . . . . . . . . . . . . . . . . . . . . . . . . . . . . . . . . . . . . . . . . . . . . . . . . . . . . . . . . . . . . . . . . . . . . . . . . . . . . . . . . . . . . . . . . . . . . . . . . . . . . . . . . . . . 10
PROGRAM
. . . . . . . . . . . . . . . . . . . . . . . . . . . . . . . . . . . . . . . . . . . . . . . . . . . . . . . . . . . . . . . . . . . . . . . . . . . . . . . . . . . . . . . . . . . . . . . . . . . . . . . . . . . . . . . . . . . . . . . . . . . . . . . . . . . . . . . . . . . . . . . . . . . . 11
SOUND BANK / RAM CARD
. . . . . . . . . . . . . . . . . . . . . . . . . . . . . . . . . . . . . . . . . . . . . . . . . . . . . . . . . . . . . . . . . . . . . . . . . . . . . . . . . . . . . . . . . . . . . . . . . . . . . . . . . . . . . . . 14
KEYBOARD CONTROLS
. . . . . . . . . . . . . . . . . . . . . . . . . . . . . . . . . . . . . . . . . . . . . . . . . . . . . . . . . . . . . . . . . . . . . . . . . . . . . . . . . . . . . . . . . . . . . . . . . . . . . . . . . . . . . . . . . . . . . . 16
EFFECTS
. . . . . . . . . . . . . . . . . . . . . . . . . . . . . . . . . . . . . . . . . . . . . . . . . . . . . . . . . . . . . . . . . . . . . . . . . . . . . . . . . . . . . . . . . . . . . . . . . . . . . . . . . . . . . . . . . . . . . . . . . . . . . . . . . . . . . . . . . . . . . . . . . . . . . . . 19
UTILITY
. . . . . . . . . . . . . . . . . . . . . . . . . . . . . . . . . . . . . . . . . . . . . . . . . . . . . . . . . . . . . . . . . . . . . . . . . . . . . . . . . . . . . . . . . . . . . . . . . . . . . . . . . . . . . . . . . . . . . . . . . . . . . . . . . . . . . . . . . . . . . . . . . . . . . . . . . . . 23
STYLES
. . . . . . . . . . . . . . . . . . . . . . . . . . . . . . . . . . . . . . . . . . . . . . . . . . . . . . . . . . . . . . . . . . . . . . . . . . . . . . . . . . . . . . . . . . . . . . . . . . . . . . . . . . . . . . . . . . . . . . . . . . . . . . . . . . . . . . . . . . . . . . . . . . . . . . . . . 29
ARRANGER
. . . . . . . . . . . . . . . . . . . . . . . . . . . . . . . . . . . . . . . . . . . . . . . . . . . . . . . . . . . . . . . . . . . . . . . . . . . . . . . . . . . . . . . . . . . . . . . . . . . . . . . . . . . . . . . . . . . . . . . . . . . . . . . . . . . . . . . . . . . . . . . . .
33
CUSTOM STYLE / ARRANGE VIEW
. . . . . . . . . . . . . . . . . . . . . . . . . . . . . . . . . . . . . . . . . . . . . . . . . . . . . . . . . . . . . . . . . . . . . . . . . . . . . . . . . . . . . . . . . . . . . . . . 35
DRUM MIXER
. . . . . . . . . . . . . . . . . . . . . . . . . . . . . . . . . . . . . . . . . . . . . . . . . . . . . . . . . . . . . . . . . . . . . . . . . . . . . . . . . . . . . . . . . . . . . . . . . . . . . . . . . . . . . . . . . . . . . . . . . . . . . . . . . . . . . . . . . . . . . . 36
PATTERN
. . . . . . . . . . . . . . . . . . . . . . . . . . . . . . . . . . . . . . . . . . . . . . . . . . . . . . . . . . . . . . . . . . . . . . . . . . . . . . . . . . . . . . . . . . . . . . . . . . . . . . . . . . . . . . . . . . . . . . . . . . . . . . . . . . . . . . . . . . . . . . . . . . . . . . 38
SONG PLAY
. . . . . . . . . . . . . . . . . . . . . . . . . . . . . . . . . . . . . . . . . . . . . . . . . . . . . . . . . . . . . . . . . . . . . . . . . . . . . . . . . . . . . . . . . . . . . . . . . . . . . . . . . . . . . . . . . . . . . . . . . . . . . . . . . . . . . . . . . . . . . . . . 45
FOOTSWITCH
. . . . . . . . . . . . . . . . . . . . . . . . . . . . . . . . . . . . . . . . . . . . . . . . . . . . . . . . . . . . . . . . . . . . . . . . . . . . . . . . . . . . . . . . . . . . . . . . . . . . . . . . . . . . . . . . . . . . . . . . . . . . . . . . . . . . . . . . . . . . . 50
SONG RECORD
. . . . . . . . . . . . . . . . . . . . . . . . . . . . . . . . . . . . . . . . . . . . . . . . . . . . . . . . . . . . . . . . . . . . . . . . . . . . . . . . . . . . . . . . . . . . . . . . . . . . . . . . . . . . . . . . . . . . . . . . . . . . . . . . . . . . . . . . 51
ACCORDION
. . . . . . . . . . . . . . . . . . . . . . . . . . . . . . . . . . . . . . . . . . . . . . . . . . . . . . . . . . . . . . . . . . . . . . . . . . . . . . . . . . . . . . . . . . . . . . . . . . . . . . . . . . . . . . . . . . . . . . . . . . . . . . . . . . . . . . . . . . . . . . . 51
OUT ASSIGN
. . . . . . . . . . . . . . . . . . . . . . . . . . . . . . . . . . . . . . . . . . . . . . . . . . . . . . . . . . . . . . . . . . . . . . . . . . . . . . . . . . . . . . . . . . . . . . . . . . . . . . . . . . . . . . . . . . . . . . . . . . . . . . . . . . . . . . . . . . . . . . 53
ARABIC
. . . . . . . . . . . . . . . . . . . . . . . . . . . . . . . . . . . . . . . . . . . . . . . . . . . . . . . . . . . . . . . . . . . . . . . . . . . . . . . . . . . . . . . . . . . . . . . . . . . . . . . . . . . . . . . . . . . . . . . . . . . . . . . . . . . . . . . . . . . . . . . . . . . . . . . . . . 54
REGISTRATION
. . . . . . . . . . . . . . . . . . . . . . . . . . . . . . . . . . . . . . . . . . . . . . . . . . . . . . . . . . . . . . . . . . . . . . . . . . . . . . . . . . . . . . . . . . . . . . . . . . . . . . . . . . . . . . . . . . . . . . . . . . . . . . . . . . . . . . . . . 55
MIDI
. . . . . . . . . . . . . . . . . . . . . . . . . . . . . . . . . . . . . . . . . . . . . . . . . . . . . . . . . . . . . . . . . . . . . . . . . . . . . . . . . . . . . . . . . . . . . . . . . . . . . . . . . . . . . . . . . . . . . . . . . . . . . . . . . . . . . . . . . . . . . . . . . . . . . . . . . . . . . . . . . 56
DISK
. . . . . . . . . . . . . . . . . . . . . . . . . . . . . . . . . . . . . . . . . . . . . . . . . . . . . . . . . . . . . . . . . . . . . . . . . . . . . . . . . . . . . . . . . . . . . . . . . . . . . . . . . . . . . . . . . . . . . . . . . . . . . . . . . . . . . . . . . . . . . . . . . . . . . . . . . . . . . . . . 60
SAMPLER
. . . . . . . . . . . . . . . . . . . . . . . . . . . . . . . . . . . . . . . . . . . . . . . . . . . . . . . . . . . . . . . . . . . . . . . . . . . . . . . . . . . . . . . . . . . . . . . . . . . . . . . . . . . . . . . . . . . . . . . . . . . . . . . . . . . . . . . . . . . . . . . . . . . . . 66
SEQUENCER
. . . . . . . . . . . . . . . . . . . . . . . . . . . . . . . . . . . . . . . . . . . . . . . . . . . . . . . . . . . . . . . . . . . . . . . . . . . . . . . . . . . . . . . . . . . . . . . . . . . . . . . . . . . . . . . . . . . . . . . . . . . . . . . . . . . . . . . . . . . . . . 71
VOICE BANKS
. . . . . . . . . . . . . . . . . . . . . . . . . . . . . . . . . . . . . . . . . . . . . . . . . . . . . . . . . . . . . . . . . . . . . . . . . . . . . . . . . . . . . . . . . . . . . . . . . . . . . . . . . . . . . . . . . . . . . . . . . . . . . . . . . . . . . . . . . . . 91
STYLES
. . . . . . . . . . . . . . . . . . . . . . . . . . . . . . . . . . . . . . . . . . . . . . . . . . . . . . . . . . . . . . . . . . . . . . . . . . . . . . . . . . . . . . . . . . . . . . . . . . . . . . . . . . . . . . . . . . . . . . . . . . . . . . . . . . . . . . . . . . . . . . . . . . . . . . . . . . 93
GROOVES
. . . . . . . . . . . . . . . . . . . . . . . . . . . . . . . . . . . . . . . . . . . . . . . . . . . . . . . . . . . . . . . . . . . . . . . . . . . . . . . . . . . . . . . . . . . . . . . . . . . . . . . . . . . . . . . . . . . . . . . . . . . . . . . . . . . . . . . . . . . . . . . . . . . . 95
DRUM SETS
. . . . . . . . . . . . . . . . . . . . . . . . . . . . . . . . . . . . . . . . . . . . . . . . . . . . . . . . . . . . . . . . . . . . . . . . . . . . . . . . . . . . . . . . . . . . . . . . . . . . . . . . . . . . . . . . . . . . . . . . . . . . . . . . . . . . . . . . . . . . . . . . 96
ACCESSORIES
. . . . . . . . . . . . . . . . . . . . . . . . . . . . . . . . . . . . . . . . . . . . . . . . . . . . . . . . . . . . . . . . . . . . . . . . . . . . . . . . . . . . . . . . . . . . . . . . . . . . . . . . . . . . . . . . . . . . . . . . . . . . . . . . . . . . . . . . .
105
MIDI IMPLEMENTATION
. . . . . . . . . . . . . . . . . . . . . . . . . . . . . . . . . . . . . . . . . . . . . . . . . . . . . . . . . . . . . . . . . . . . . . . . . . . . . . . . . . . . . . . . . . . . . . . . . . . . . . . . . . . . . . . . . . . . . . 107
EXCLUSIVE MESSAGES
. . . . . . . . . . . . . . . . . . . . . . . . . . . . . . . . . . . . . . . . . . . . . . . . . . . . . . . . . . . . . . . . . . . . . . . . . . . . . . . . . . . . . . . . . . . . . . . . . . . . . . . . . . . . . . . . . . . . . 109
TECHNICAL SPECIFICATIONS
. . . . . . . . . . . . . . . . . . . . . . . . . . . . . . . . . . . . . . . . . . . . . . . . . . . . . . . . . . . . . . . . . . . . . . . . . . . . . . . . . . . . . . . . . . . . . . . . . . . . . . . . 114
ABNORMAL RUNNING CONDITIONS
. . . . . . . . . . . . . . . . . . . . . . . . . . . . . . . . . . . . . . . . . . . . . . . . . . . . . . . . . . . . . . . . . . . . . . . . . . . . . . . . . . . . . . . . . . 115
ERROR MESSAGES
. . . . . . . . . . . . . . . . . . . . . . . . . . . . . . . . . . . . . . . . . . . . . . . . . . . . . . . . . . . . . . . . . . . . . . . . . . . . . . . . . . . . . . . . . . . . . . . . . . . . . . . . . . . . . . . . . . . . . . . . . . . . . . . 115
Page 3
This Instructions manual is valid for instruments X1 (keyboard), X4 (expander module) and X 8
(keyboard with buttons) .
In fact, these instruments have the same technical-musical characteristics and only differentiate
themselves from one another in the type of keyboard used (this is the case for X 1 and X 8) or for
the fact that they do not have internal amplification (this is the case for X4).
KETRON X SERIES
Page 4
1
SWITCH ON THE INSTRUMENT
When the instrument is switched on, the display panel indicates the name of the instrument and,
straight after this, (only when the HARD DISK has been installed inside it) the inscription “SOUND
BANK AUTOLOADING… ” appears for a few seconds. This function automatically activates the
loading of the Sound Bank Folk contained in folder 1 of the HD.
The folder from which to draw the Sound Bank can however be selected by the user by means of a
special procedure that will be described further on in the POWER ON SETUP paragraph.
The user can import new Sound Banks from floppy disk, save them onto a specific folder of the
Hard disk and then set it up so that a specific Sound Bank will be loaded automatically when the
instrument is switched on.
This useful function also allows the user to select and load new sounds while playing or even before
playing, depending on the type of repertoire required.
WARNING
In the Pattern section, a few “bonus” PATTERNS have been saved, which partly use sounds contained in the Sound Bank Folk loaded when the instrument was switched on.
Should the instrument not be equipped with a Hard disk and consequently be unable to load these
sounds, these Patterns could be played incorrectly.
SAFETY INSTRUCTIONS
MEANING OF GRAPHIC SYMBOLS:
The lightning arrow inside an equilateral triangle warns you about the presence
of dangerous, not insulated voltage that may constitute a risk of electric shock.
The exclamation mark in an equilateral triangle informs you about important
instructions in the User's Manual.
INSTRUCTIONS ABOUT RISK OF FIRE, ELECTRIC SHOCK OR INJURY TO PERONS.
Warning: to reduce the risk of fire or electric shock, do not expose this instrument to rain or moisture.
- Earthing instructions -
CAUTION !!!
RISK OF ELECTRIC SHOCK
DO NOT OPEN
CAUTION!
TO REDUCE THE RISK OF ELECTRIC
SHOCK, DO NOT OPEN THE COVER.
Page 5
2
This product must be connected to an earthed outlet. In case of malfunctioning, the earthing will
reduce the risk of electric shock. The instrument comes with an earthed power cable and plug to be
used with an earthed outlet.
DANGER - Improper earthing connections may cause electric shocks. In case of doubts, have your
electric installation checked by a qualified electrician. Do not modify the power cable coming with
the instrument.
IMPORTANT SAFETEY AND INSTALLATION INSTRUCTIONS
WARNING - When using electrical products, some basic precautions must be followed, including
the following:
1 Before using this instrument, carefully read the User's Manual.
2 When the instrument is used by children, the presence of an adult is required.
3 Do not use the instrument near water, for example near a wash-basin, a swimming-pool,
a wet surface, etc.
4 The instrument must be used only on supports recommended by the manufacturer.
5 Do not play the instrument at a high volume for a long period of time: exceedingly loud
music can cause damage to your health.
6 The instrument is to be used in a position where adequate ventilation is provided.
7 Use the instrument far away from heat sources such as radiators, heaters, etc.
8 Use only the supplied power cable for connecting the instrument to the mains.
The identification and power supply data are reported on the bottom of the instrument.
9 Disconnect the power cable if the instrument is not used for longer periods of time.
10
Be careful to avoid any objects or liquids from falling into the inside of the enclosure.
11
Bring the instrument to an service centre in the following cases:
a. Damages on the power cable or plug.
b. Objects or liquids fallen into its inside.
c. The instrument has been exposed to rain.
d. Abnormal running or an evident decrease of the instrument's performance.
e. The instrument has fallen down or the enclosure has been damaged.
12.
Never try to repair the instrument yourself. All operations must be performed by
specialised engineers.
KEEP THESE INSTRUMENTS IN A SAFE PLACE
HOW TO AVOID RADIO/TV INTERFERENCE
This instrument operates at radio frequencies, and if not correctly installed according to the instructions
supplied, it may cause interference with radio and television reception.
Though this instrument has been designed according to the applicable standards and notwithstanding
the reasonable protections against interference it has been equipped with, there is no guarantee that
such events will not occur. In order to check if the interference is actually caused by this instrument,
switch it off and see if the interference disappears. Then switch it on again and check if the interference
appears again.
Once you have made sure that the interference is originated by this instrument, take one of the fol-
Page 6

3
lowing measures:
1. Tu rn the radio or TV antenna in a different direction. .
2. Modify the instrument's position with respect to the receiver.
3. Increase the distance between the instrument and the receiver.
4. Connect the instrument's plug to a different outlet to make sure that the instrument and
the receiver are connected to two different circuits.
5. If necessary, contact a specialised technician.
WARNINGS
After having read the safety precautions and instructions on the previous pages, carefully read and
conform to the following recommendations:
POWER SUPPLY
Before connecting this instrument to any other equipment (amplifier, mixer, other MIDI
instruments, etc.) make sure that all units are switched off.
Read the instructions about Radio and TV interference..
HOW TO CLEAN THIS INSTRUMENT
Use only a soft and dry cloth to clean the external surface of your instrument.
Never use petrol, thinners or solvents generally speaking.
OTHER PRECAUTIONS
If you wish to use your instrument abroad and if you have any doubts about the power supply,
contact a qualified engineer previously.
The instrument should never be subject to strong vibrations.
Never exert excessive pressure on the keys and knobs.
Do not place any objects on the central display. The transparent panel could brake or be
damaged and the reading of data could become more difficult.
The instrument's cover could be slightly heated during playing. This is caused by heat
dissipation of its internal components and is considered to be a normal effect.
Nonetheless the instrument should be placed in a ventilated area, if possible.
IN ORDER NOT TO LOOSE DATA
Please remember that the data stored in the instrument can be deleted at any time in case of
abnormal running conditions. We therefore advise to carry out back-up copies of your data
during the various programming phases.
Page 7

4
CONNECTIONS / OUTPUTS
REAR PANEL
The rear panel is provided with the following connection points: (from the left )
Speaker off / on: Internal loud speaker cut out switch.
Inputs: These are two stereo audio inputs ( Right and Left/Mono ) that may be used to connect
external devices such as MIDI Expanders, CD player, MiniDisc , DAT etc.. The signal of these
devices will be amplified by means of the same stereo output of the instrument (Left / Right
Output) but at a constant level, or independently from the Volume controls of the instrument.
Outputs: The instrument is provided with 4 audio outputs. The Left/Mono 1 and Right 2 outputs
are the two main stereo outputs and are used to connect the system to the external amplification
system ( Stereo Mixer or Stereo amplifier ).
It is important to make sure that the Bass, Middle and Treble tones of the Mixer or amplifier are set
at a linear position (central) so that the natural balance of the keyboard sounds are not altered.
Furthermore the quality of the instrument speakers or monitors is fundamental in order to guarantee a correct audio response throughout the entire frequency range without any excessive privilege
to the Bass or Treble bands.
The instrument may also be connected to a normal domestic Hi-Fi system making sure that the
amplification is not excessively high or distorted.
It may occur that the level of the output signal from the instrument is too high for the input sensitivity of the AUX IN of the stereo. In this case the sound would be quite distorted. If this should
occur, merely reduce the general instrument volume by means of the Master potentiometer to restore normal sound levels.
Outputs 3 and 4 are 2 Mono outputs which may be used ( in addition to the 2 main stereo ones )
for the separate external amplification of some specific instrument sections. For further details concerning the possibility of the assignment of the 3 and 4 Outputs refer to the OUT ASSIGN. chapter
( Page 49).
Footswitch: This is a multi-pin socket for the connection of the two FS 6 or FS 13 pedals (optional ).
These pedals allow the easy control of many instrument functions ( i.e. Fill In, Ending etc )
without taking the hands off the keyboard.
The list of programmable functions on the 2 pedal controls is found in the FOOT SWITCH
chapter ( Page 46).
Sustain pedal: A socket for the Sustain pedal control (optional). The Sustain Pedal is an accessory
required for the ideal response of the keyboard over all the percussion instruments such as the
Piano, E-piano, Harpsichord etc.
Volume pedal: A socket for the stereo Volume Control pedal (optional).
Warning : by connecting Volume pedals to the instrument different to those recommended for the
instrument may cause keyboard anomalies, for example, incorrect adjustment of the Volume or
worse still hazardous short-circuits.
Midi: The instrument is provided with 4 Midi sockets:
Midi in 1 (GM): This input is to be used to connect a Computer or other instruments transmitting
in General Midi Standard ( Sequencers, Keyboards etc. ), if only the Midi In input is used and
not the keyboard and panel controls.
Midi in 2 (Keyboard): The Midi In 2 input must be used when the instrument is to be connected
to Master keyboards, Keyboards, Midi Accordions, Digital Pianos etc.. In this case the instrument
is controlled by an external keyboard and performs exactly like a Midi module.
Midi Out: Main Midi Output of the keyboard. To be used when transferring data to an external
Page 8
Midi unit.
Midi Thru: The Midi Thru is a copy of the Midi In 1 ( GM ) and may be used to connect one or
more expander modules in series with the instrument.
The THRU socket functions exclusively in conjunction with the Midi in 1 ( GM ) socket and
therefore is inefficient when used in conjunction with the Midi In 2 socket ( Keyboard ).
Computer Interface: By means of the Computer Interface socket the instrument is able to communi-
cate with computers without MIDI interface (PC or Macintosh). This may be useful, for example,
for receiving / transmitting information about Songs or about music sequences of various kinds.
A special cable is required for the connection ( optional – available on request) that differs according to whether a PC or McIntosh is to be connected.
FRONT PANEL
The front panel of the instrument is provided with the following connection points:
Headphone: A socket for the Stereo headphones. We advise the use of a high quality pair of Hi-Fi
headphones in order to avoid losing the quality sound of the instrument especially of the extre-
me high and low frequencies.
The sound volume in the headphones may be adjusted directly using the Master potentiometer.
When the headphones are connected the internal amplification is shut off.
Micro Input: A stereo Input for a Microphone with sensitivity control.
2 Microphones may be connected to the Micro socket by means of an appropriate adapter
(which will function in Mono mode ). If the keyboard is also equipped with the Vocalist kit
(optional ), one of the 2 Microphones may control the Harmonizer effect whereas the other may
function normally without interfering with the Vocalist functions.
The MICRO input may also be used to connect other instruments such as the Electric Guitar,
Keyboard etc.. Make sure to adjust the Gain accordingly.
For all the Microphone control functions, refer to the MICRO section within the EFFECTS
chapter ( Page 22).
Note
The Microphone level may vary considerably depending on the type of Microphone used.
Reset the Gain control to zero each time the Microphone is connected or disconnected in order to
avoid undesired noises. If the microphone is placed too near the internal speakers ( or external in
the case of external amplification ) some feedback may be encountered. Adjust the position of the
microphone and reduce if necessary the amplification level or the Microphone Gain.
Amplification: The keyboard is provided with internal amplification with a 2 x 25 WRMS stereo
amplifier, two 8” Loudspeakers and two tweeters.
5
Page 9
VOICES
The complex system of the basic sounds of the X series is sub-divided into various Banks according to
the scheme below:
VOICES BANK 1 / 2 256 Sounds ( 128 on 2 Banks )
RAM BANK 112 Sounds + 8 Drum Sets + Grooves
CARD BANK 112 Sounds + 8 Drum Sets + Grooves
USER VOICES BANK 2 16 Digital Drawbars + Samples + .Wave files
Furthermore there are other Voice Banks available with the possibility of controlling, combining and
modifying the standard Sounds listed above:
2nd VOICE combined with Voices Bank 1 and 2, Users and Drawbars
1 TOUCH 48 distributed on Bank 1 and 2
PROGRAMS 128
USER VOICES 128
VOICE BANKS
The Bank is selected using the Bank 1/2* key. Bank 2 is in use when the LED is lit, whereas when
the LED is off Bank 1 is in use.
The Voices of Bank 1 are grouped into 16 families exactly
according to the General Midi standards. The Voices of
Bank 2, in order to utilise the instrument Timbre possibilities in the best possible manner, are sub-divided into
groups of 8 with free sounds assignment.
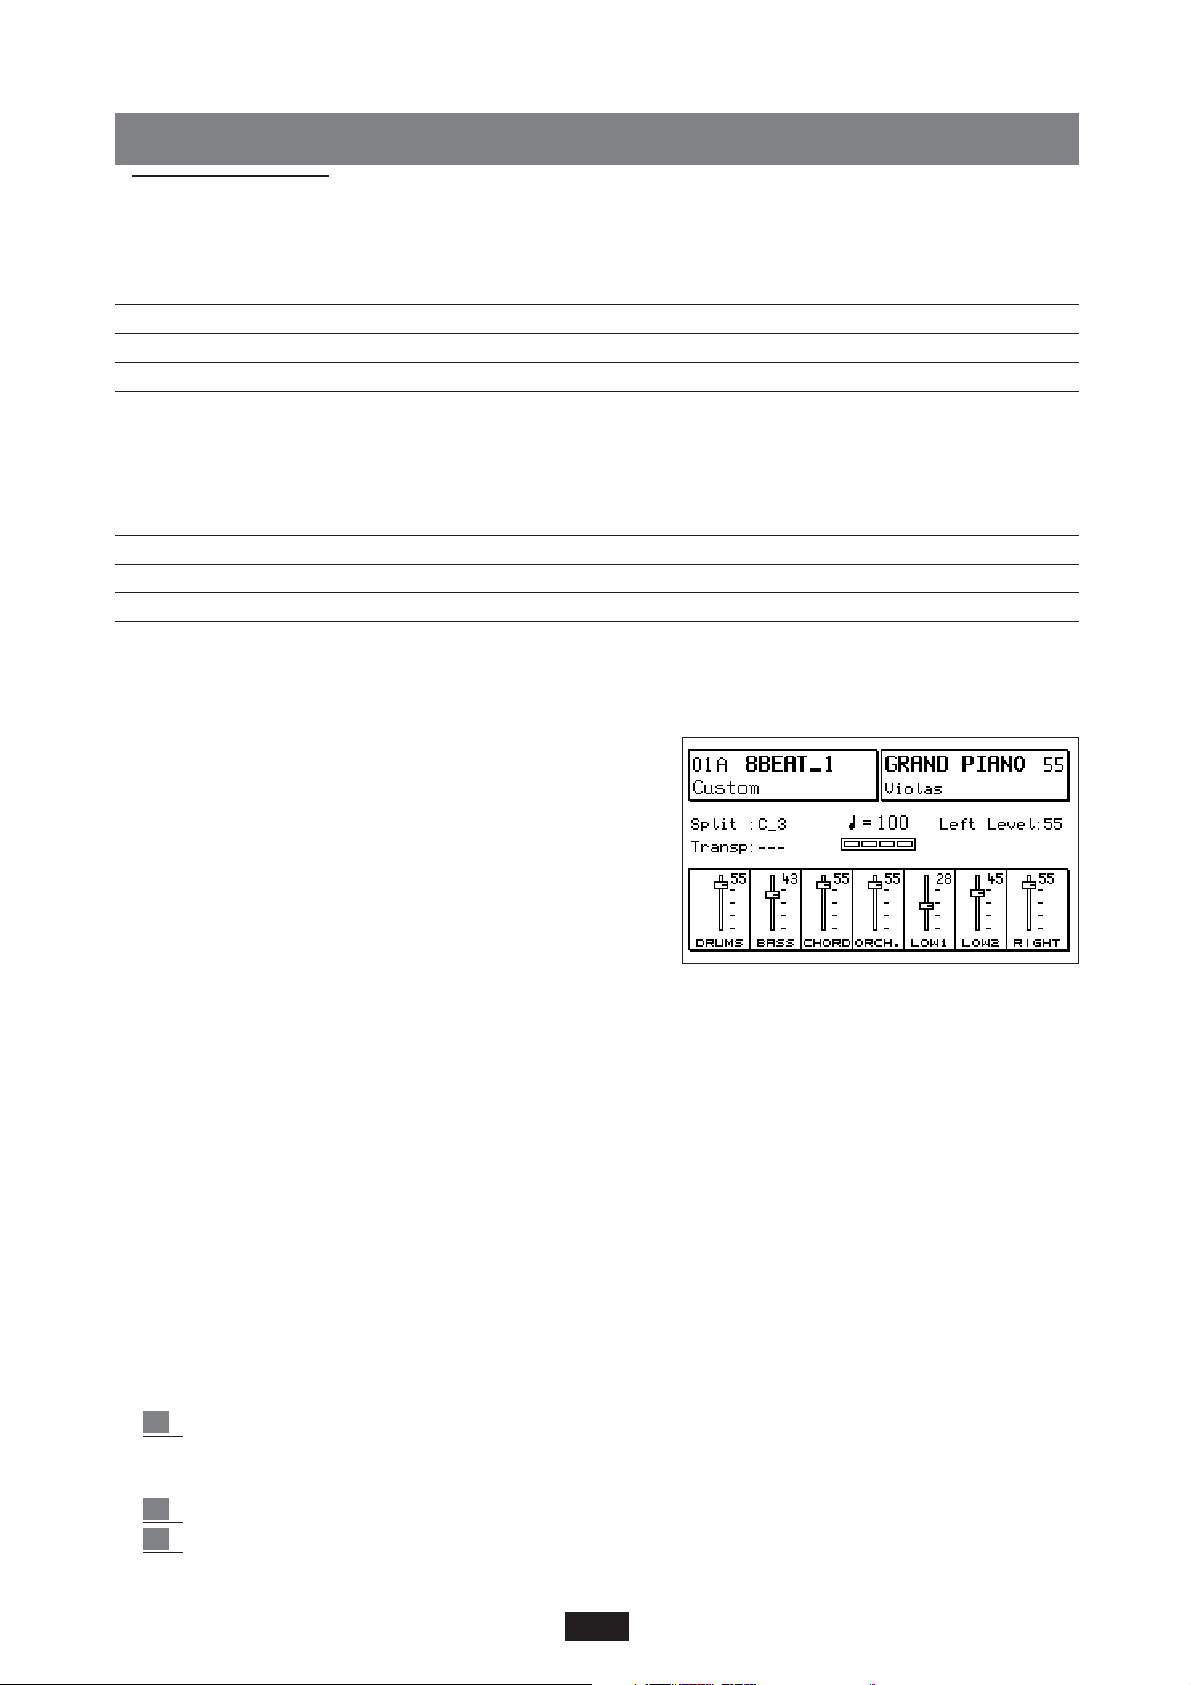
To select a Voice, select the family key and then using the
8 keys from A – H select the Voice desired. The selected
Voice appears at the top right-hand corner of the Display.
The number at the side ( 55 in the illustration ) corresponds to the Volume of the right Hand, whereas the
smaller writing below the Voice ( Violas in the illustration ) corresponds to the second Voice assigned. ( See
2nd Voice below). The complete list of Voices of Banks 1 and 2 are provided at the end of the handbook.
SECOND VOICE
To each of the 256 standard sounds of the instrument ( also to the User Voices and to the Drawbars)
a second Voice has been matched, which is required to immediately confer additional emphasis to
the melody line without necessarily having to program a similar combination within the Program.
Merely press the 2nd Voice key to enter the 2nd Voice.
With the Program enabled the 2nd Voice is disabled.
The second Voices pre-selected by the manufacturer may be modified by changing the Voice,
Volume and the Transposer as indicated below.
2nd Voice Edit
Per modificare la 2nd Voice:
1 press the Edit key at the side of 2nd Voice. A black arrow appears on the display next to 2nd
Voice together with the initials T: --- 45 , where T refers to the Transposer and 45 to the
Volume of the 2nd Voice.
2 select the new voice from the 2 Voice Banks available.
3 to set the Transposer use the 2 Cursor / Transposer < > keys. A transposition of +/- 12
6
Page 10
semitones is possible. The position --- corresponds to the normal tuning.
4 use the 2 Value keys to modify the volume.
To save the 2nd Voices modified in the internal flash memory:
5 press SAVE/ENTER and select 2nd Voices. Then press the Save key ( F10) to confirm.
Pressing both keys 2nd Voice and Edit at the same time, the 2nd Voice active at the time being is
confirmed (function shown by an asterisk) and will not change any more, even if the various instruments' voices are modified.
This procedure completely saves all the 2nd Voices stored on the keyboard, namely those relating to
both Bank 1 and 2 and those relating to the User Voices.
The DEFAULT function is used to restore the original 2nd Voices of the manufacturer.
To reload the latter, simply press SAVE / ENTER , select 2nd Voices and press DEFAULT to confirm.
Warning: If the aforesaid Save procedure is not performed, the new 2nd Voices saved will be lost
when the instrument is switched off.
It is therefore advisable to frequently save the data during a long editing phase.
1 TOUCH VOICE
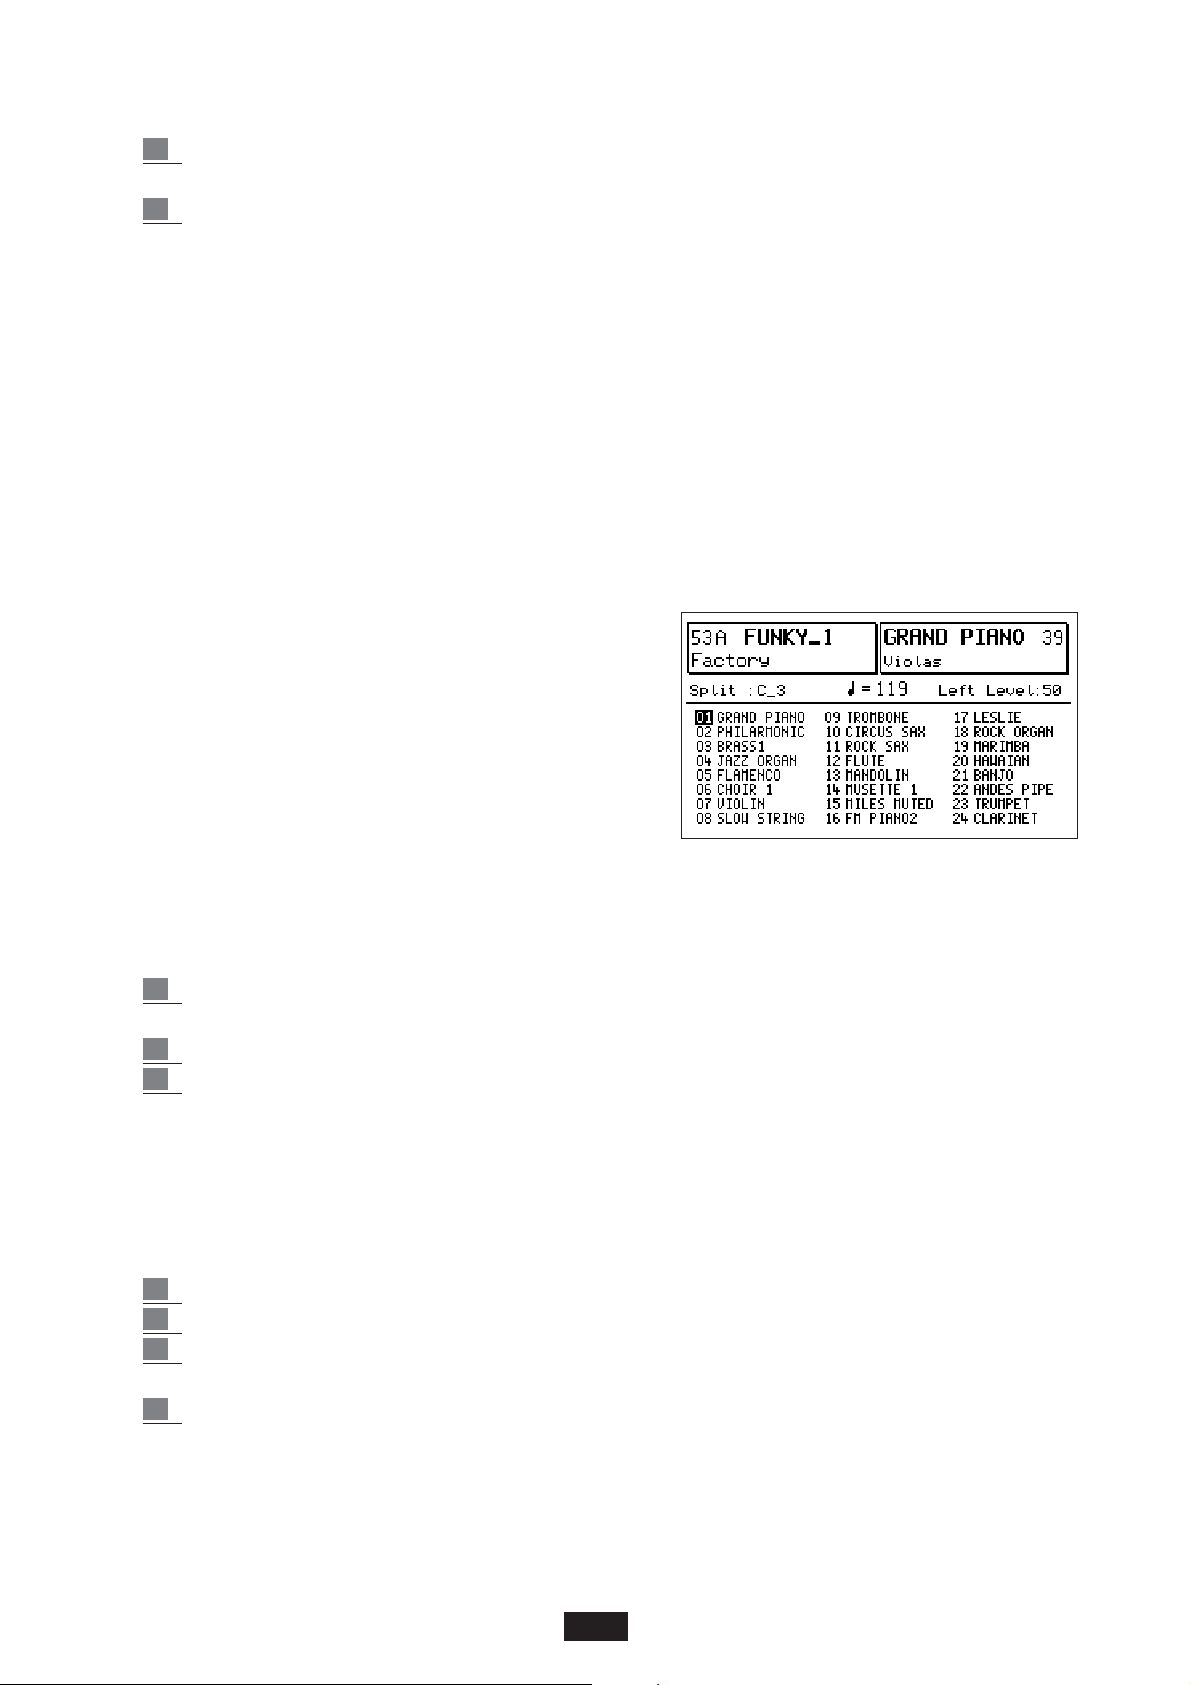
The 1 Touch section includes 48 Voices (24 on Bank 1
and 24 on Bank 2) selected from the 256 standard Voices,
from the Users Voices and from the Programs.
This function allows the user to select the Voice desired
by pressing one key only rather than the 2 or 3 keys
usually required to change the sound within the GM
standard.
Furthermore it allows the user to group 48 preferred
Voices, 24 for each of the 2 Banks in two individual lists that are clearly shown on the display:
(The 1 Touch list in the illustration below is purely indicative)
To select the 1 Touch voices:
1 press the 1 Touch key. The 1 Touch sound list appears on the display. (Press Exit to return
to the main display).
2 press the Bank 1 / 2 key to select the Bank.
3 Select the 1 Touch item in the Voice Bank section by directly pressing the key having the
same number from 1 to 24 (the number is clearly seen above the first 24 keys).
The selection of the 1 Touch Bank is achieved using the Bank Ω key or the Page < > key.
The list of the 48 1 Touch Voices stored on the keyboard is purely indicative; the user may easily
modify it according to the specific requirements.
To modify the 1 Touch list:
1 Press the Save/Enter key and select 1 Touch List.
2 Enable the Edit function.
3 Using the Cursor < > keys, select the number of the item and then select the voice, be it a
Voice from Banks 1/ 2, a User voice or Program.
4 Once the list has been completed, press the Save/Enter key once again to save it and confirm
by pressing the Save key ( F10).
7
Page 11
USER VOICES
The User Voice section enables the user to modify and customise the sounds of the X series thanks
to a sophisticate editing program.
The 128 User Voices are divided into families, just like the standard Voices and located in Bank 1
(Bank 2 as we will see is assigned to the Drawbars, the Samples and the. Wave files.
To program a User Voice:
1 Select the Voice to be modified. The Voice may be a pre-existing Voice of the manufacturer
or even a standard Voice selected from the 256 voices of the 2 Banks (in the second
hypothesis the User key must remain off).
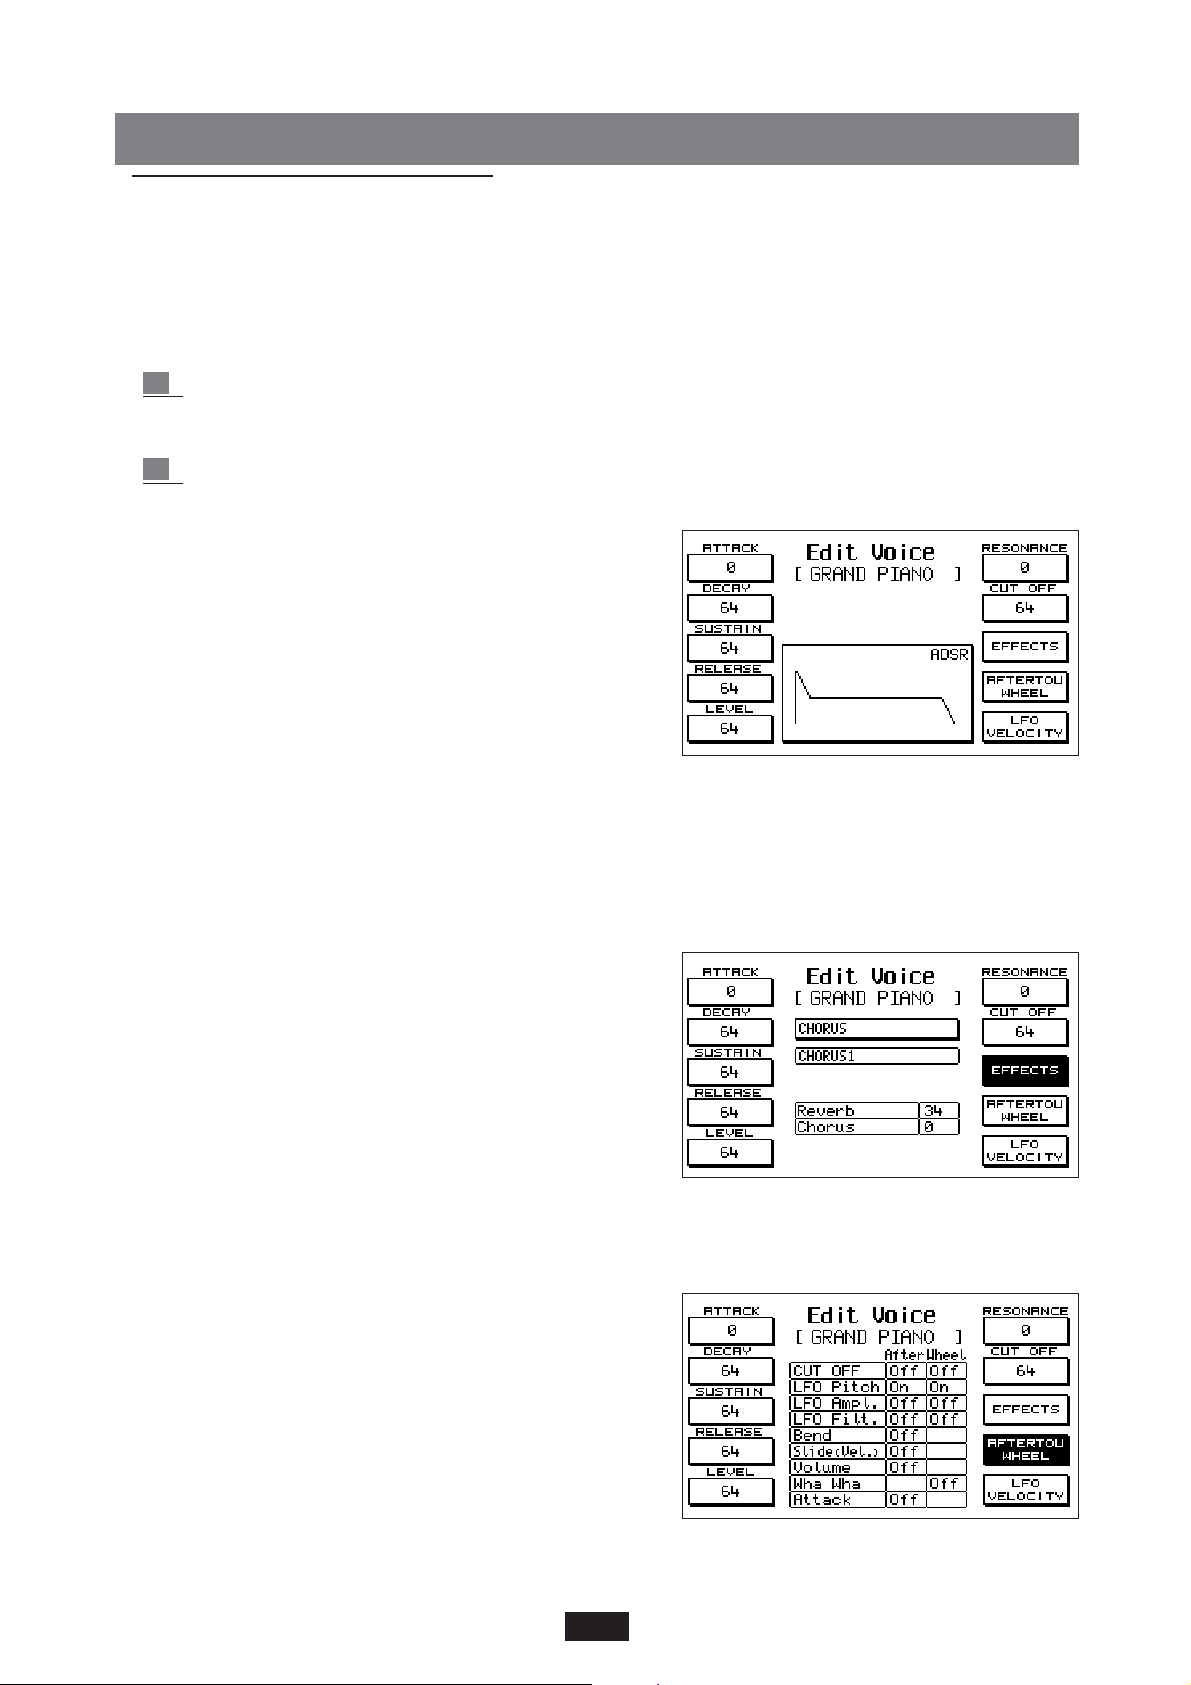
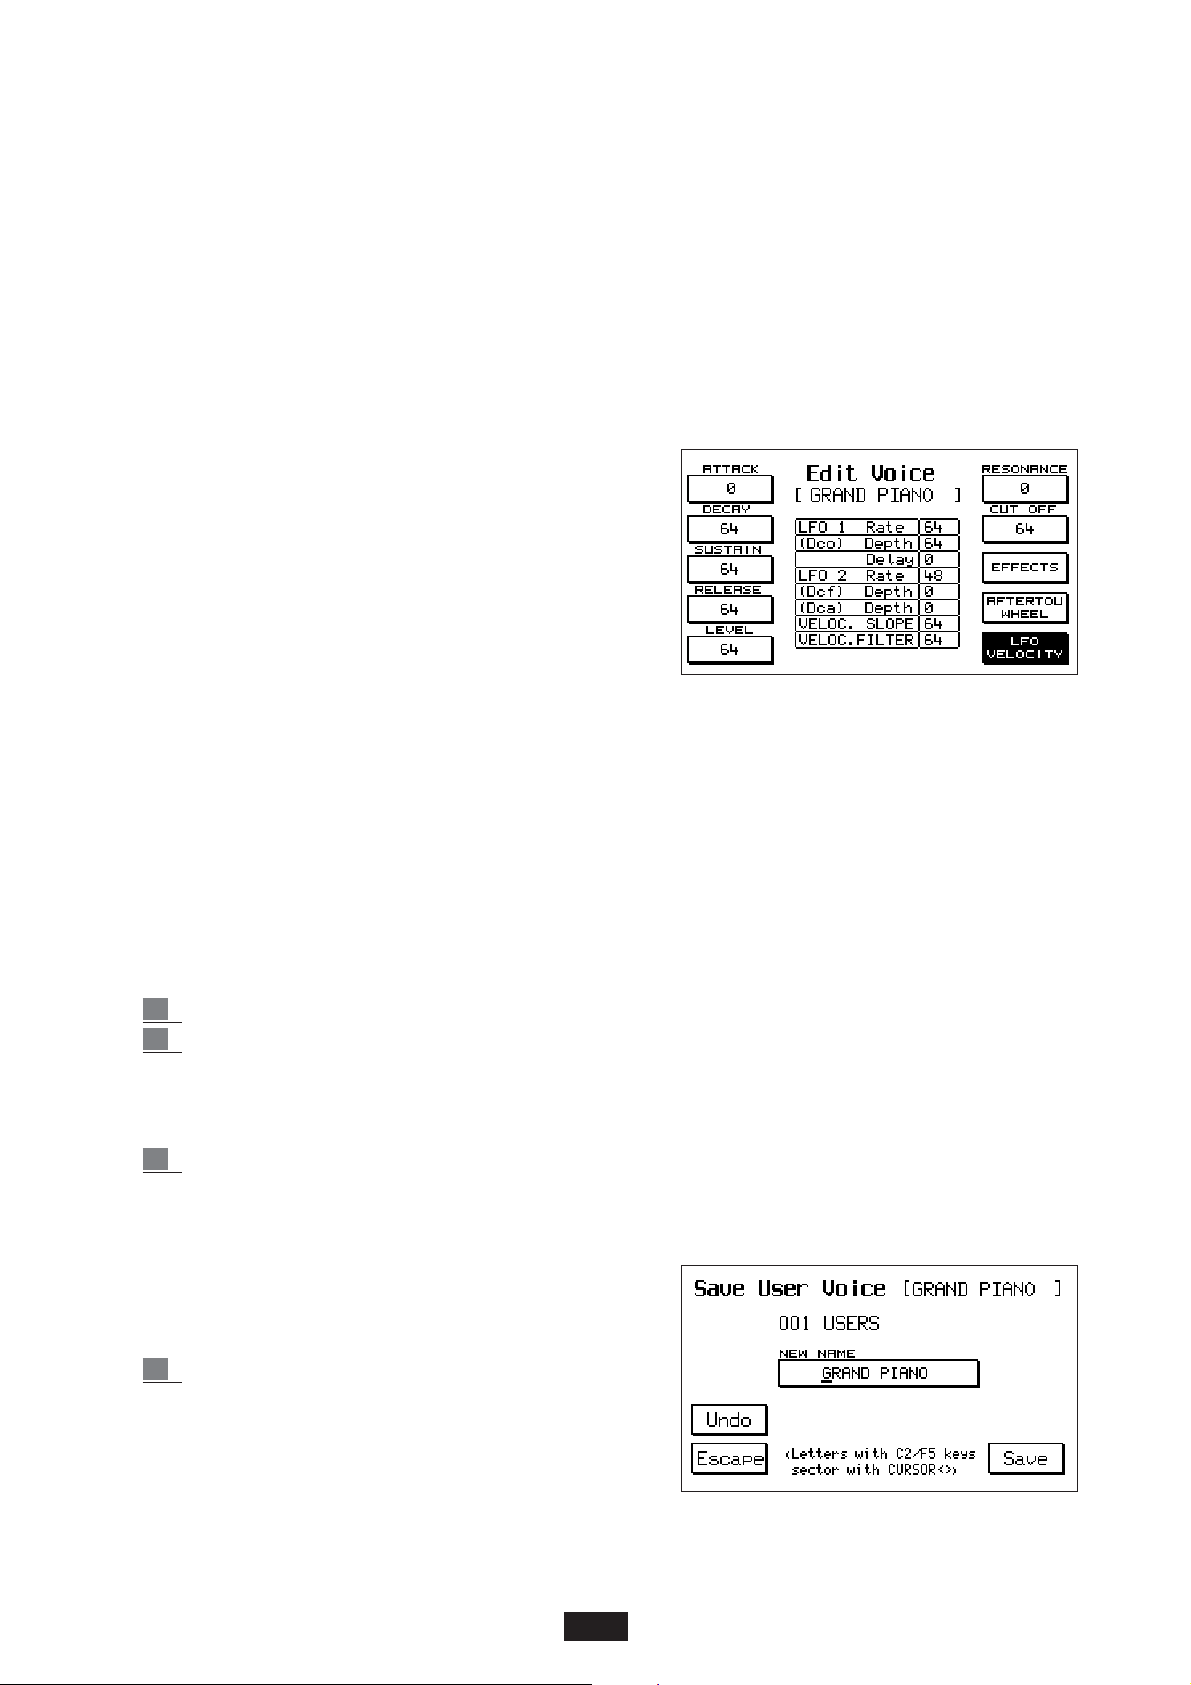
2 Press the Edit Voice key (F 7). The following will appear on the display:
The sound Edit function includes the controls of the ADSR
(Attack, Decay, Sustain, Release, Level, Resonance, Cut Off),
the Effects, the controls with Aftertouch and Wheel, LFO
and dynamics control.
Access is gained to the 4 Edit Voice pages using the Page
< > keys.
ADSR / FILTER - the controls of the ADSR are selected
using the F1 – F5 keys . The curve of the ADSR is
displayed at the centre of the Display. Use the F 6 and F 7 keys to select the 2 Filter controls,
Resonance and Cut Off.
Using the Value < > keys the value of each part is modified.
EDIT VOICE EFFECTS - As for the Effects , using the Value < > keys the various pre-set
Effects combinations may be selected and using the
Cursor < > keys the contents of the Effects or the
Effects combination to be edited are viewed.
For a better understanding of the possibilities of the Effects
section of the instrument and for the list of all the kinds of
Effects available we advise you to refer to the EFFECTS chapter (Page. 22). Once the individual Effect to be edited has
been selected using the Cursor, the Value keys are used to
scroll all the versions of the Effects, User inclusive.
Then again with the Cursor < > keys access may be gained to
the boxes below in which the Volumes of the various Effects selected are located: the value of the Volume
may be modified using the Value < > keys .
EDIT VOICE AFTERTOUCH - WHEEL
This part of the Edit section enables the user to assign
some functions to the User Voice that may be controlled
by means of the Aftertouch of the keyboard or by means
of the Wheel Modulation or both.
Use the Cursor < > keys to scroll all the options foreseen
for Aftertouch and Wheel. Using the Value < > keys ,
On / Off is selected.
Cut Off: controls the opening and closing of the filter.
8
Page 12
LFO Pitch, Amplitude and Filter: these activate the modulation on the Oscillator (Vibrato), on the
Amplitude (Tremolo) or on the Filter.
Volume: Volume control by means of the Aftertouch.
Wha Wha: Wha Wha effect assigned to the wheel Modulation.
Slide: this special effect affects the sound tuning, creating a sort of Pitch envelope each time a key is
pressed hard. This proves extremely useful while playing to simulate the attack of the typical sound
of the wind instruments.
Attack: this parameter causes all the effects controlled with the After Touch to start with a slight
and gradual delay. Used appropriately this function confers impressive expressiveness to the
melody lines.
EDIT VOICE LFO - VELOCITY
This section controls the parameters regarding the LFO's
and the Dynamics of the User Voice.
Use the Cursor < > keys to select the box and the Value
< > keys to modify the value.
LFO 1 (Dco) Rate, Depth, Delay : Vibrato velocity, intensity and delay control.
LFO 2 (Dcf, Dca) Rate, Depth, Delay : velocity, intensity,
delay control applied to the modulation on the filter and
on the Amplitude.
VELOCITY OFFSET: this parameter controls the slope of the dynamic curve controlled in
Amplitude. 64 is the value corresponding to the standard setting of the internal sound.
VELOCITY FILTER: controls the opening of the Filter according to the key dynamics. With value 64
the standard condition is achieved, with lower values a less brilliant sound is achieved even when
playing with high dynamics.
To save the User Voice once modified:
1 Press Save / Enter.
2 At the top right-hand side of “Save Voice” the original name of the User Voice is indicated.
The current number and name of the location are indicated below.
To change the location number of the new User Voice simply set a new number by selecting
it by means of the Voice bank keys (1 –128).
3 It is also possible to write a new name for the User Voice. To do this, simply write the letters
by pressing the keys between C2 and F 5 (or using the Value < > keys) and moving the sec-
tor by means of the Cursor < > keys.
A maximum of 12 letters are permissible.
The last symbol ( F 5 ) cancels the string of letters
from the point in which the cursor is positioned
onwards.
4 If the name has been written correctly press Save
to confirm the entry. The User Voice saved is
stored in the memory even after the instrument
has been switched off. To save the 128 User
Voices on Disk see the DISK Chapter.
9
Page 13
DRAWBARS
The digital Drawbars section is positioned in the first 16 User Voice locations of Bank 2.
To gain access to the section:
1 press the User Voice key.
2 select Bank 2 (Bank 1/2 key lit)
3 press the EDIT VOICE function key (F7).
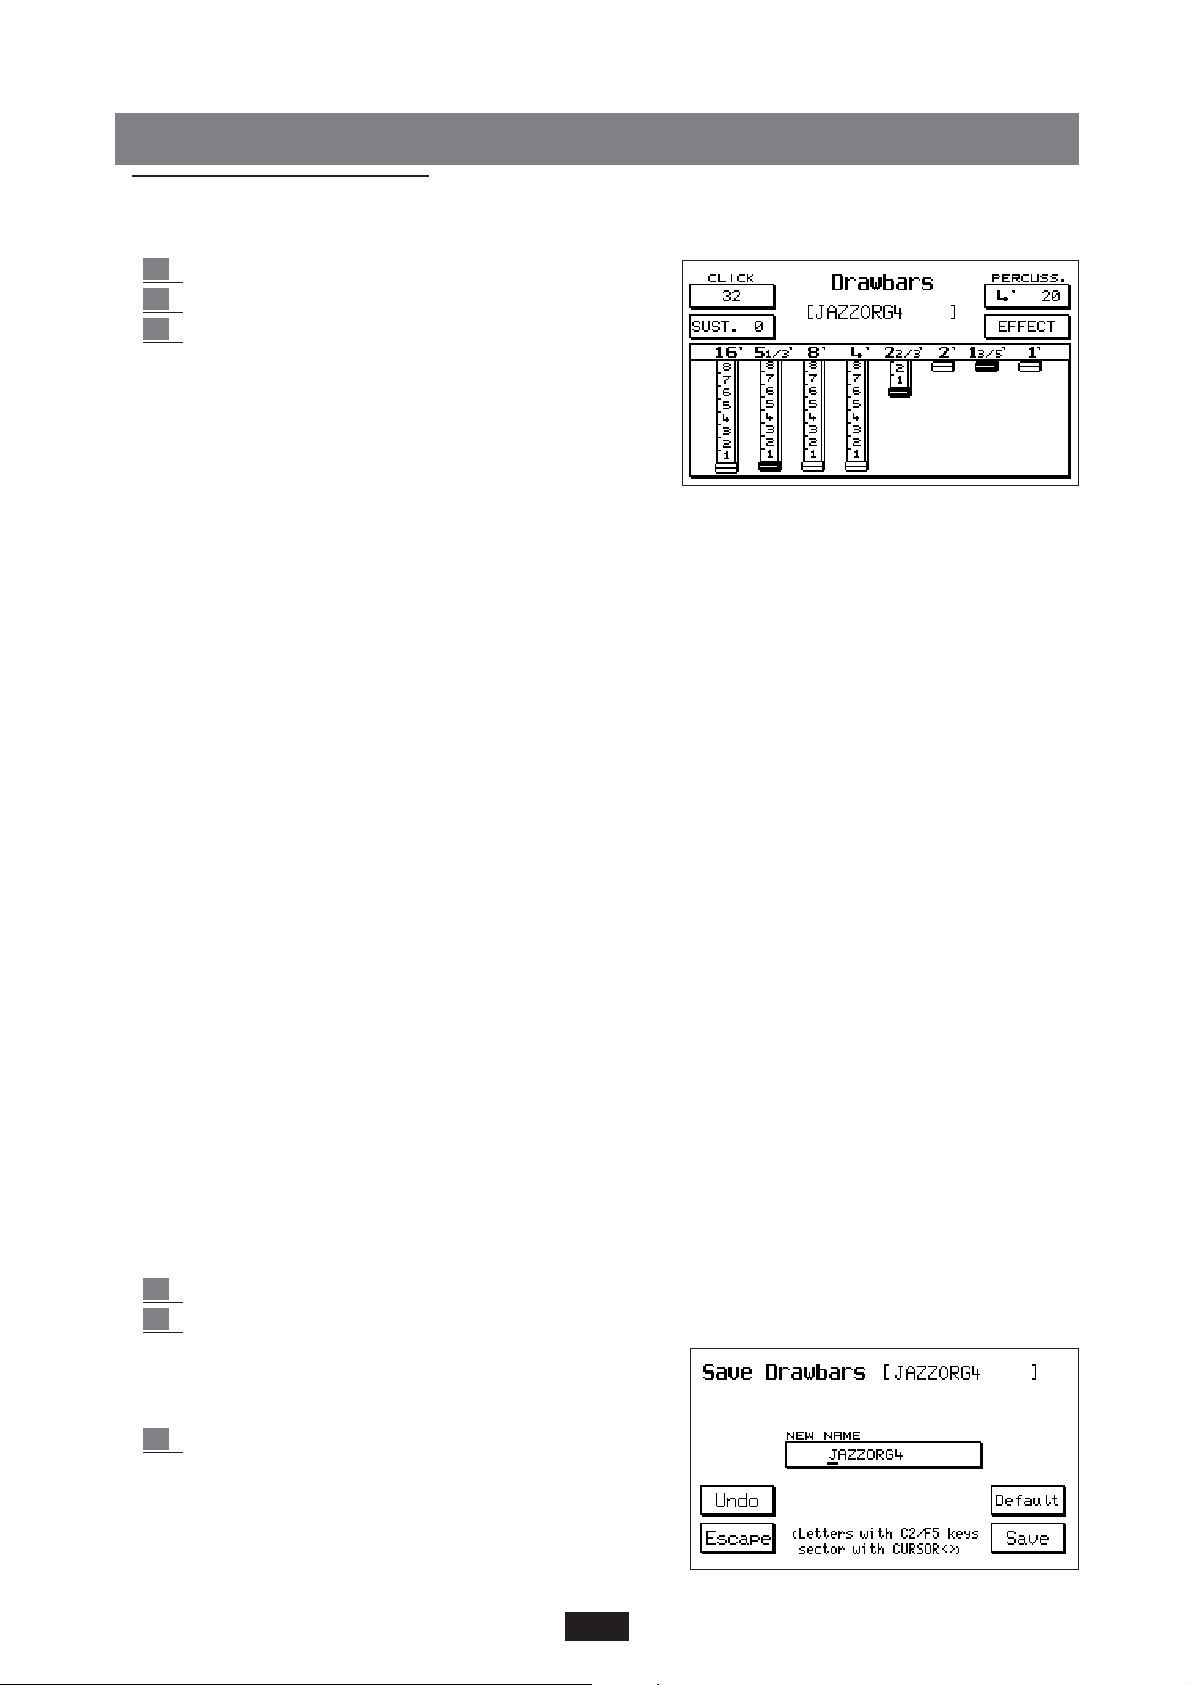
The Drawbars are not selected per family as for the GM
standard sounds, but by simply following the progressive
number indicated above the keys from 1 to 16.
In addition to the numerous organ Voices stored on the
keyboard, the Drawbars section allows the user to program
many other organ sound combinations following the typical
system of the electro-magnetic organs, or rather by means
of the harmonic drawbars or Drawbars.
Click: typical noise in the sound attack of the electro-magnetic organ. The value is modified using
the Value < > keys.
(Note: the Click included in the Drawbar effect is not saved in the Program, but may be added as
an individual item at a later date: Prg. Change 91 Bank 2)
Sustain: Sustain effect, typical of the electronic Organs of the Sixties/Seventies. The value may be
changed using the Value < > keys.
Percussion: the percussion is a fundamental feature in the sound of the Jazz and Rock Organ. The
2 percussions 4' and 2 2/3' are alternated by pressing the function key (F6) successively. The
volume is modified using the Value < > keys.
Effects: by pressing the F 7 key access is gained to the Effects of the Drawbars, consisting of
Chorus and Vibrato. Vibrato may be applied to the Oscillator (Dco), to the Amplitude (Dca) or to
the Filter (Dcf) with an overall velocity control (Rate).
Use the Cursor < > keys to select the effect desired and use the Value + / - keys to modify the
amount. Press the F7 key once again to return to the Drawbars display.
Drawbars: 8 Drawbars are available: 16', 5 1/3', 8', 4', 2 2/3', 2', 1 3/5', 1'. The first 6 Drawbars
may be controlled by means of the first six pairs of Volume keys situated at the left-hand side of
the panel (16' - 2'); the remaining 2 Drawbars (1 3/5' - 1') are controlled by means of the 2 Page
< > and Cursor < > keys .
The volume range of each Drawbar is pointed out with a numeric grading from 0 to 8 (the actual
control steps are 32).
The Drawbar level is reset to zero by pressing the two keys at the same time.
To save a Drawbar combination:
1 Press Save / Enter.
2 If the name is not to be modified simply press Save to confirm.
To modify the name write the letters using the C2
to F5 keys and move the sector using the Cursor
< >key. Then press Save to confirm the entry.
3 The Default key restores the original combinations
of the manufacturer. The Undo function on the
other hand saves only the last combination saved
in that location.
10
Page 14
PROGRAM
The Program section is a powerful Editing area for the X series sounds. It enables the combination of up to
4 Voices simultaneously, with the possibility of modifying the Voice, Volume, Octave, Tuning, Pan/Pot,
Effects, Keyboard split, Sustain functions, Portamento and Velocity switch for each one of them.
Furthermore it also enables the user to create special effects such as Duet and Trio. By using the Programs
appropriately the user may expand and customise the sounds system of the instrument as desired.
To save a Program:
1 Press the Program key.
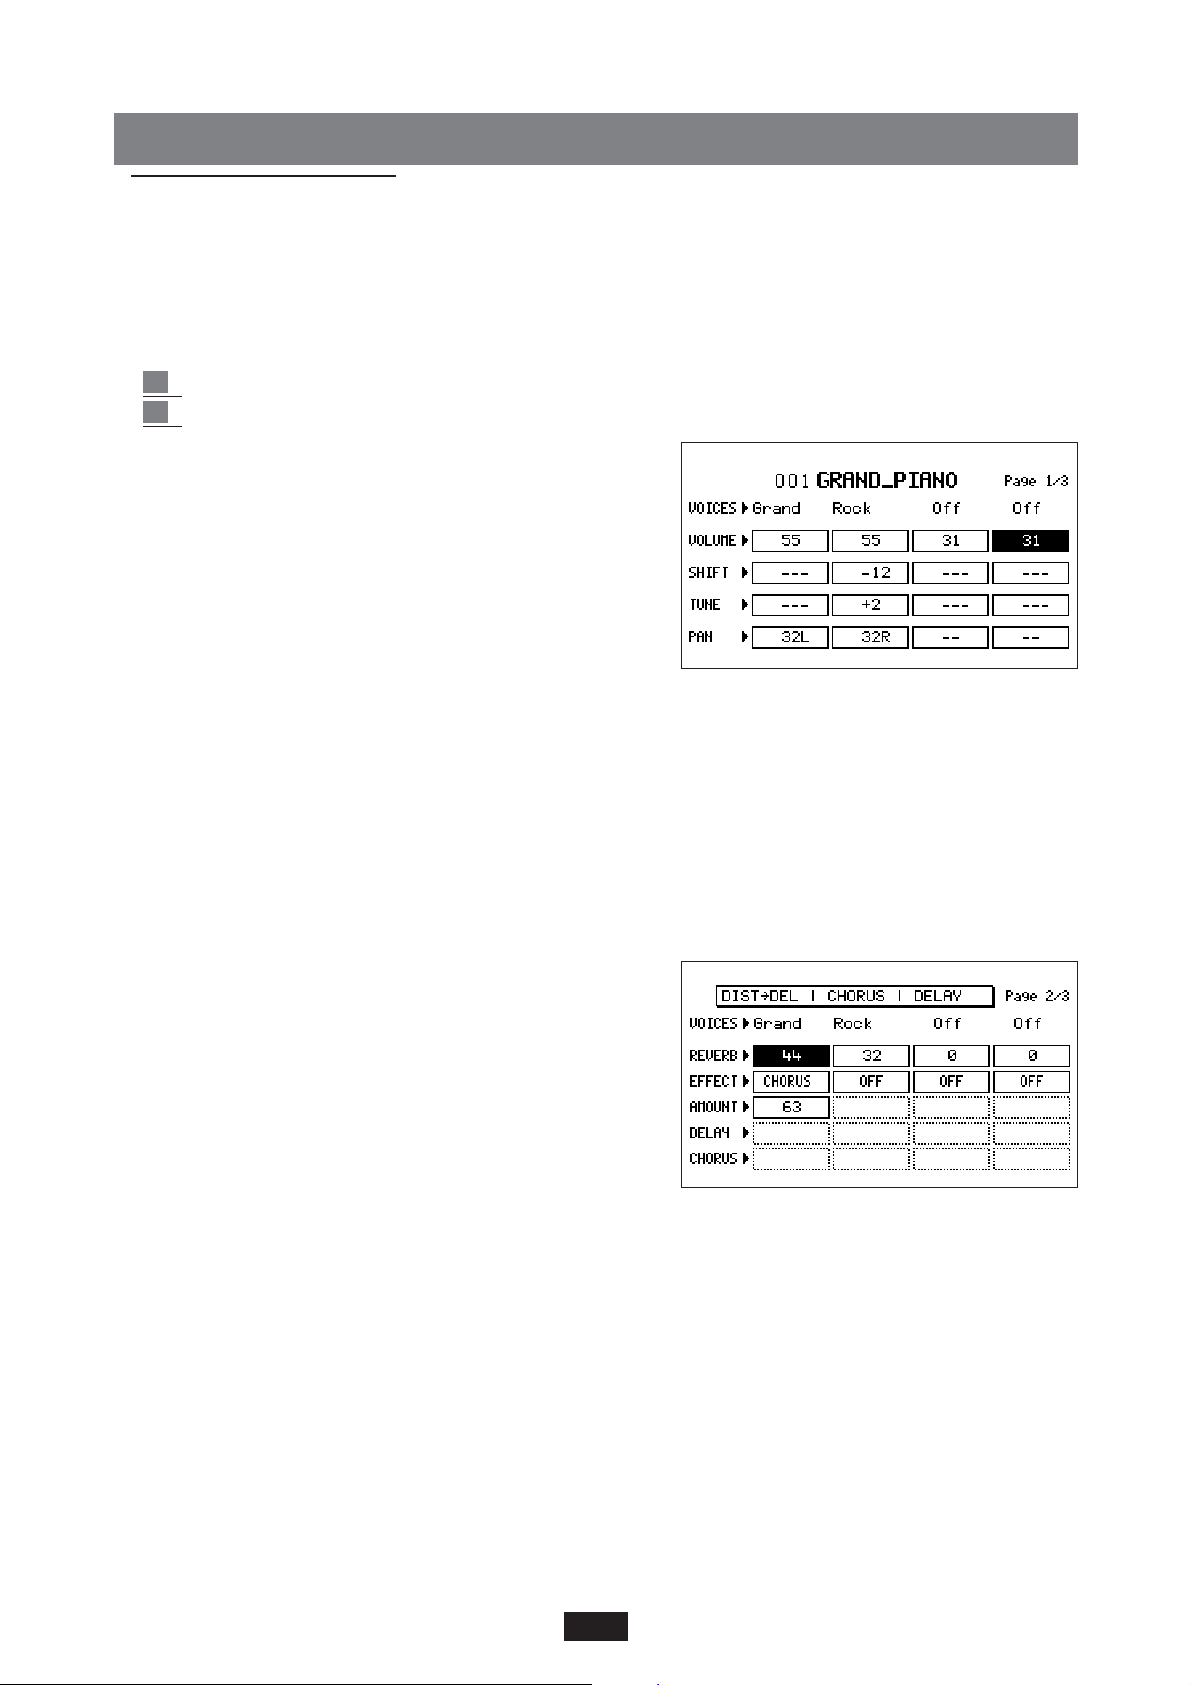
2 Press the Edit Program function key (F8). Access is gained to page no. 1:
The display shows the first page of the Edit Program with
these functions:
Voices: By repeatedly pressing the function key F 1 or F6
the Voice is selected. To modify the voice simply select it
normally using the Voice Bank keys.
Volume: to gain access to the 4 Volumes, repeatedly
press the function key F2 or key F 7. The Volume
value is modified using the Value < > keys. If the two
Value keys are pressed simultaneously the volume is reset to zero.
Shift: the Shift control shifts the tuning of the Voice by Semitone in semitone, with a total range of
+ / - 63 semitones. By pressing repeatedly the function key F 3 or F 8 the Voice is sought; with
the Value < > keys the value is set.
Tune:
fine tuning control with a max. range of +/- 63 steps corresponding to + / - one semitone. The
Voice is selected using the function key F 4 or F 9 and the value is modified using the Value < > keys .
Pan: the Pan / Pot controls the location of the Voice in the stereo panorama with an amplitude of
64 steps Left and 64 steps Right. The 0 value corresponds to the middle position. The Voice is
selected using the F 5 or F 10 keys. The value is controlled using the Value < > keys. Use the Page > key to
proceed to the 2nd page of the Program concerning
the Effects.
Effect: The group of Effects is indicated on the top line.
The groups are combinations of pre-set Effects that
allow the simultaneous functioning of a number of
Effects. Each program may run with one group of
Effects alone.
Use the Cursor < > keys to scroll the 5 available groups:
• Chorus / Distorsor / Delay
• Distorsor > Chorus / Chorus
• Delay > Chorus / Chorus
• Distorsor > Delay / Chorus / Delay
• Distorsor > Delay > Chorus / Delay > Chorus / Chorus
For each Voice one of the Effects may be enabled or one of the combinations of Effects between the
diagonal strokes.
Voices: the voices of the 4 Program Voices may also be selected from this display.
Reverb.: Controls the amount of Reverberation for each Voice. Use the F2 or F 7 key to select the
Voice and the Value + / - keys to set the value.
Effect: this parameter enables the selection of the Effect or the combination of Effects for the Voice.
11
Page 15
Use key F3 or F8 to select the Voice and the Value keys to set the type of Effect.
Amount: Effect amount control. Use the F4 or F9 key to select the Voice and the Value keys to
modify the value. Press the 2 Value keys simultaneously to reset the value to zero.
Delay - Chorus: these parameters enable the individual control of the Chorus and Delay level if 2
or 3 Effects are overlapped. Use the F5 or F10 key to select the 4 Voices for both Chorus and for
Delay. Use the Value < > keys to control the amount.
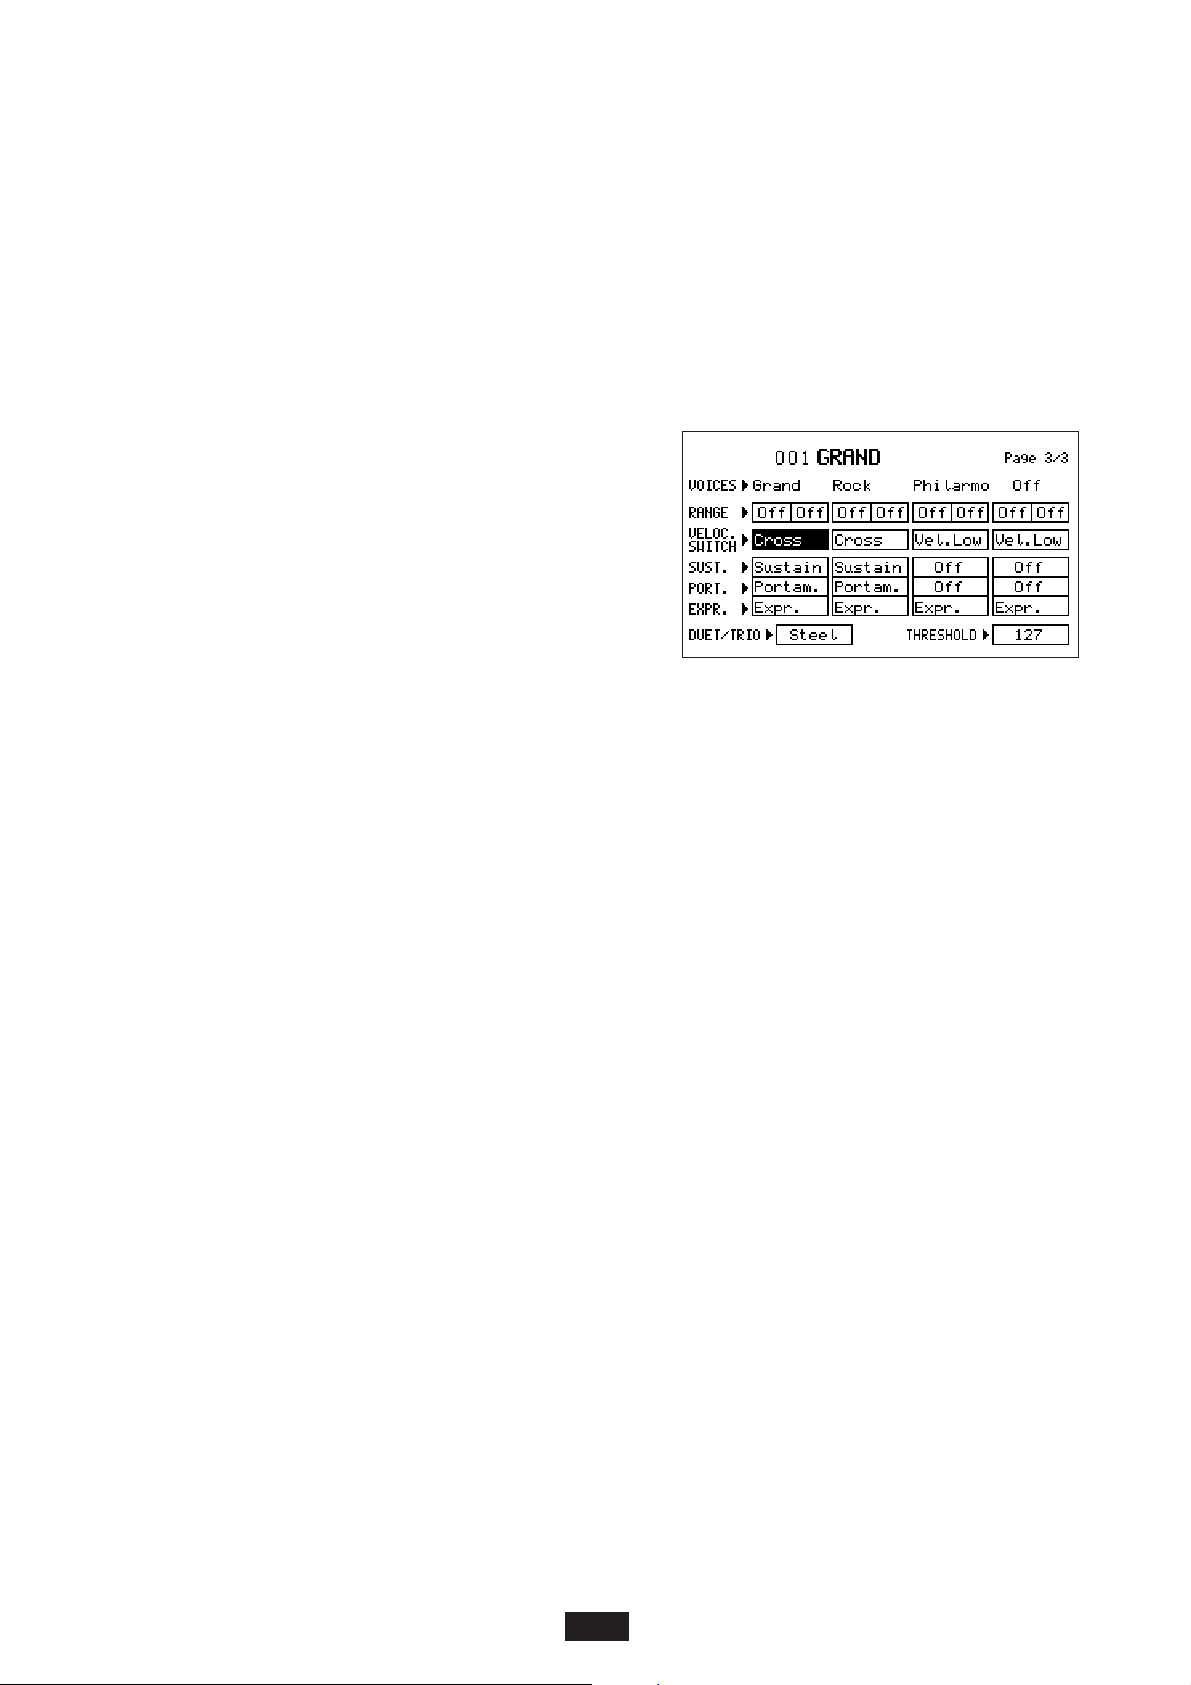
Use the Page > key to proceed to Page no.3 Edit Program concerning the Range, Velocity,
Sustain, Portamento, Duet and Trio functions.
Voices: Use the F1 or F 6 key to select the Voice for which the Voice is to be changed.
Range: this parameter restricts the keyboard section within which the Voice may function.
2 Sections are foreseen for each Voice which establi-
sh the lowest note and the highest note.
Use function keys F2 or F 7 to select the sector.
The value of the lowest and highest note for the
Voice is set by directly playing these notes on the
keyboard from C1 to C6 (or using the Value < >
keys). By pressing the 2 Value < > keys simultaneou-
sly OFF appears in both sectors. When the Voice is in
the Off mode, this means that it plays over the entire
keyboard but once the keyboard split is enabled with the Arranger to the left, it will play only in
the melody part. This is the most frequently used mode, but there is also the possibility of
assigning a part of the program to the left and the other to the Song part. To achieve this
second possibility, merely set a Range with a value of i.e. C1-C3 on the Voices to be assigned
to the left.In this case, even if the keyboard split is enabled on C3, these Voices will remain
active on the left-hand side or Arranger. This function proves particularly useful to enhance
the background sounds of the Arranger in addition to the 2 Lower, or to transform the left-
hand side of the Program in a true lower Manual Organ, if the instrument is to be configured
as an Organ by connecting the MIDI pedal.
Velocity Switch: this parameter enables the control of the Program Voices functioning, according
to the keyboard dynamics. Use keys F 3 or F 8 to select the Voice. Use the Value < > keys to
select the Velocity operational Mode:
Normal: normal sound dynamics.
Low: in the low position the Voice plays with a dynamic amplitude that ranges from the minimum to
the Threshold value.
Il Threshold consists of a Dynamic threshold above or below which the Voice will no longer play.
I.e. in the Low position and with a Threshold value of 64, the Voice will play from the minimum
to the Dynamic value of 64.
Use key F 10 to select the function and the Value < > keys to search for the Threshold value.
High: in the High position the Voice will play only when the Threshold value is exceeded up to the maxi-
mum dynamic value. ( 127 ). The Velocity Switch function may be used to create Programs in which
there is a strong voice differentiation between soft dynamics and maximum dynamics.
Cross: in the Cross position and only for the first two voices, you can obtain the gradual cros-
sing from the first voice over to the second one depending on the dynamics applied to the
keyboard. The Dynamics threshold where one sound crosses over to the next can be selected
by means of the Threshold value.
Sustain - Portamento: this parameter enables the Sustain pedal effects function (optional) and
Portamento on the individual Voices (if the Portamento key is pressed).
Use key F4 or F9 to select the Voice and the Value < > keys to confirm the Effect selected.
12
Page 16
Duet - Trio: access is gained to the 2 functions by pressing F5 a number of times. The effect is cut-out
in the OFF position. In the Duet status, the Voice no. 1 of the Program will play exclusively only the
highest note, Voice no. 2 the lowest note. EXAMPLE : in a Duet with a Clarinet at Voice 1 and
Trumpet at Voice 2, when the two notes are played, the Clarinet will always play the highest note
and the Trumpet the lowest note. The Trio works in the same way as the Duet, with the excep-
tion that the 3rd Voice added (Voice no. 3) plays the highest note of the three notes played.
With a bit of practice and a correct musical phrasing the Duet and Trio effects enable the user to
achieve extremely interesting results for all typical Folklore, March and Band music.
Steel: press F5 repeatedly to have access to it. The Steel function allows you to assign the pitch
bend only to the lowest-pitch note of two notes played at the same time in the singing part, imi-
tating in a very realistic way the typical effect of Hawaiian Guitar or Pedal Steel Guitar.
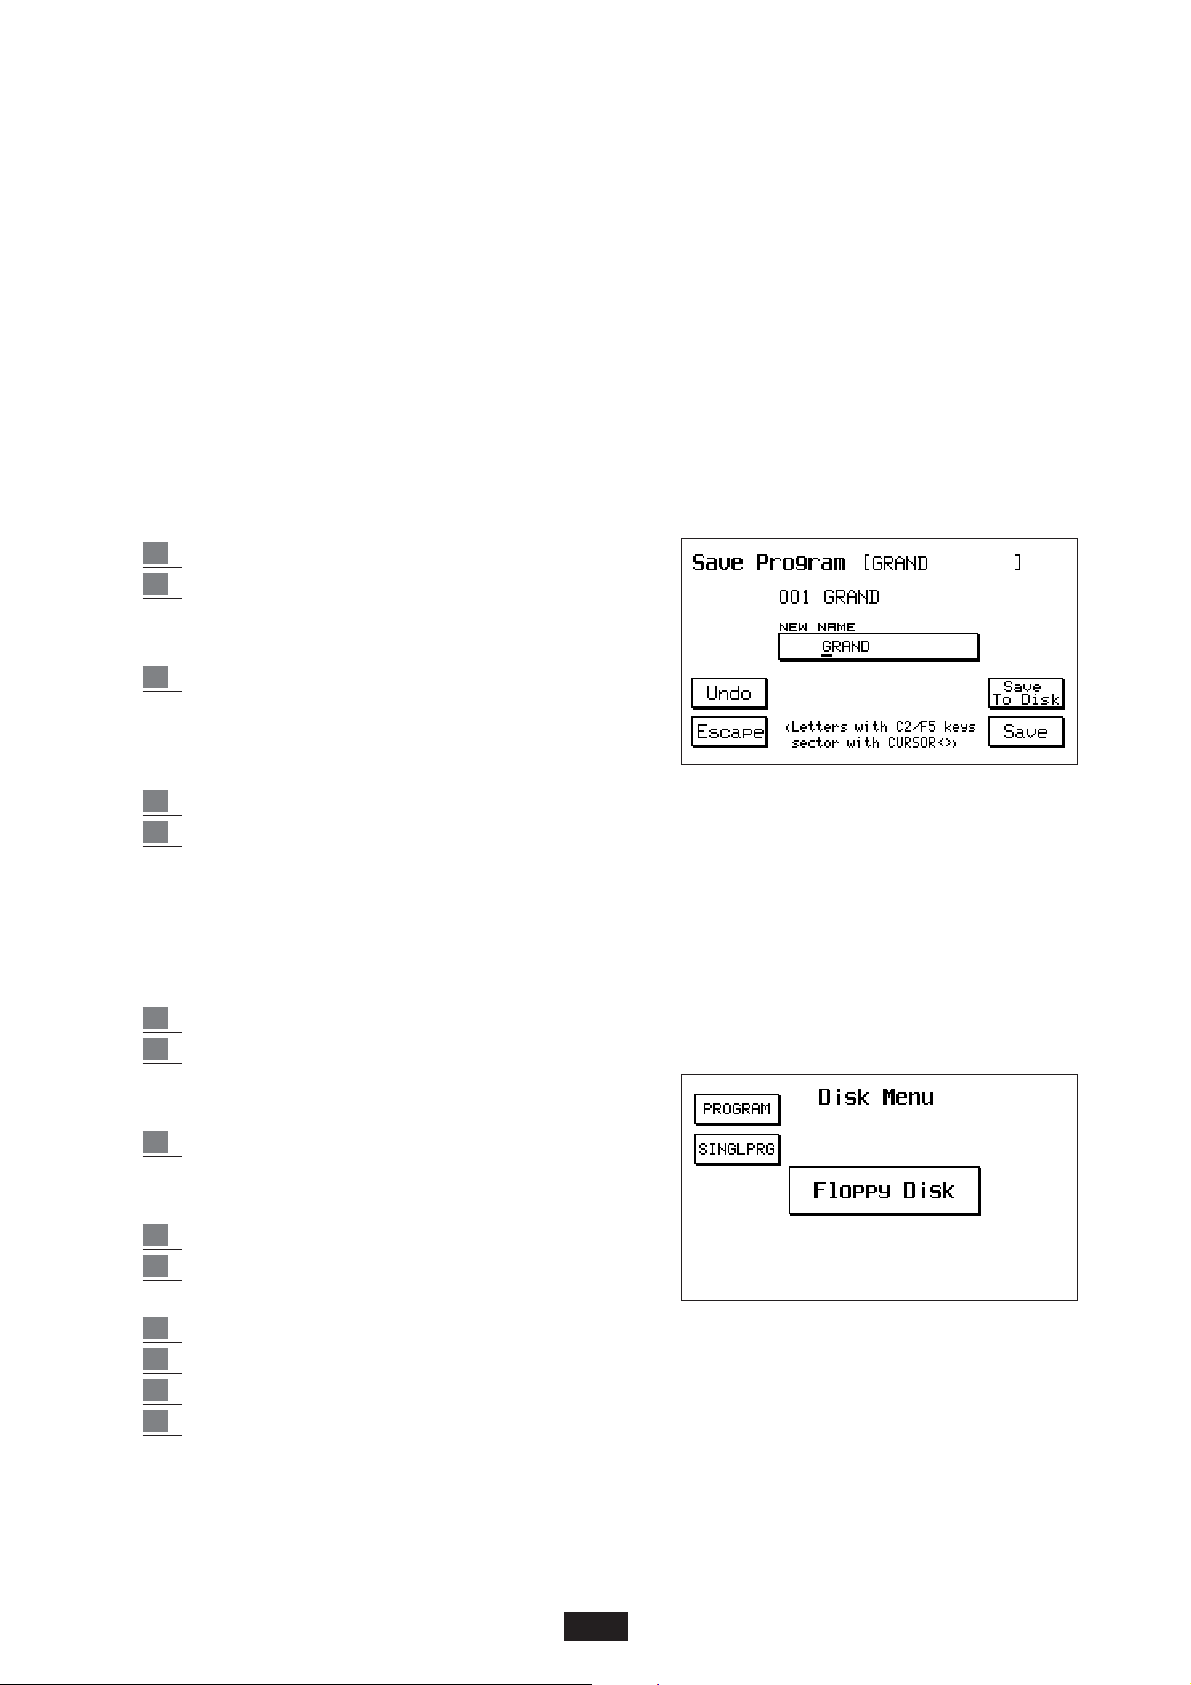
To save the program once the Editing phase is complete:
1 Press Save / Enter.
2 It is possible to assign a new location to the
Program by selecting it directly from the 128
available.
3 A new name may also be given to the Program:
the letters are entered using the keyboard from
C2 to F5 and the syllable is split using the Cursor
< > key.
4 If the previous name is left, simply save by pressing function key F10 (Save).
5 If a mistake is made, the program conditions previous to the last modifications made may
be restored before saving by means of the Undo (F4) key.
To save a single Program in a folder of the Hard Disk or onto a Floppy Disk once the Edit phase
has been completed:
1 Press Save/Enter
2 Press Save to Disk (F9) You can also give the Program a new name: you can write the
letters using the keyboard from C2 to F5 and you
can move syllables using the Cursor < >.
3 Press F10 to save
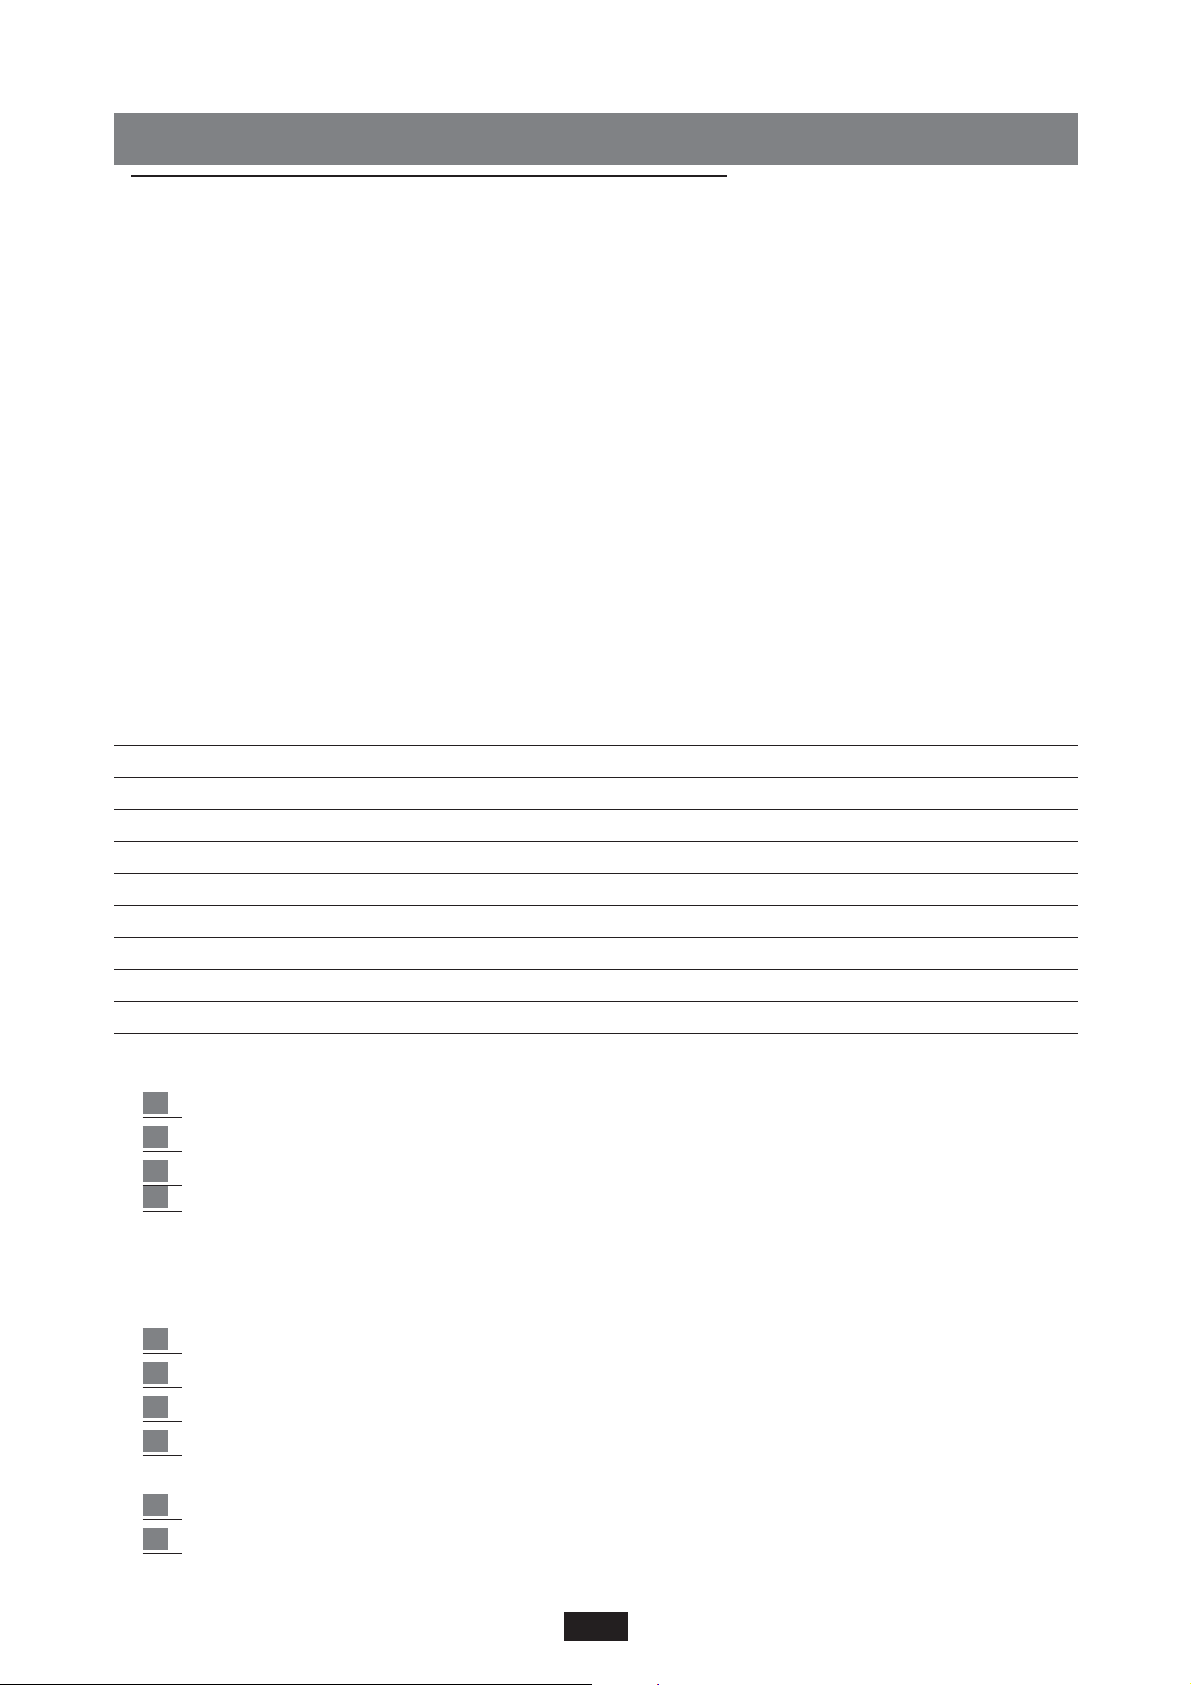
To load the Single Program from disk:
1 Press Disk
2 Select Hard or Floppy according to the location
(if on Hard Disk or on floppy disk).
3 Press Exit
4 Press Edit Program
5 Select the number of the Single Program using the numeric keypad (Select)
6 To load the subsequent ones, resume the procedure from point 4
Note: if the Edit Program menu is exited without saving the new program beforehand, the new
setting will be lost. For the Saving on Disk functions refer to the DISK chapter.
13
Page 17

SOUND BANK / RAM CARD
The Sound system of the X series may be expanded and continuously updated by means of new SOUND
BANKS that may be loaded on RAM or Card. The RAM consists of a standard 16 Mbyte Simm inside
the instrument whereas the CARD is an external 8 Mbyte Flash Card which may be directly connected
to the instrument by means of the appropriate slot situated at the front part of the keyboard.
SOUND BANK
The SOUND BANK is a block of sounds made up of 8 floppy disks, in the case of 8 Mbytes, or 16
floppy disks in the case of 16 Mbytes. Each floppy disk contains a single Sound file with a progressive number; i.e. the file stored in Disk no. 1 will be called Sound_1.Snd. The Sound Banks may be
loaded in the internal SIMM or in the optional FLASH CARD; they may be loaded directly from
Floppy Disk or from Hard Disk. It is advisable to copy the files onto Hard Disk first then from there
to load them individually in the Simm or Flash card.
How to copy a Sound Bank onto Hard Disk
1 – Insert the Floppy containing the first file of the Sound Bank (the progressive numbers of the
Floppy disks are printed on the outer label).
2 – Press the Disk key.
3 – Select the Folder in which the files are to be copied using the keyboard from 0 to 9.
4 – Read the Floppy Disk contents by pressing Page < >.
5 – Press key F4 (Copy).
6 – Press key F10 (Execute) to confirm the operation.
Follow this procedure for all the Floppy Disks that make up the Sound Bank. All the Sound Bank
files are to be copied in the same Folder. The initial transfer of the Sound Bank files from Floppy to
Hard Disk requires a certain amount of time. The following loading from Hard Disk to Simm will be
much quicker (approximately 1 minute and 20 seconds for a 8-Mbytes Sound Bank).
How to load the Simm or the Flash card from Hard Disk
Loading from HARD DISK
1 – Press the Disk button.
2 – Set the Hard Disk using Page < >.
3 – Using the keyboard 0-9, select the Folder containing the Sound Bank files
4 – Select a file from the Sound Bank using Value +/5 – Unlock the Card Lock function (see Utility chapter)
If you now wish to load the SIMM:
6 – Extract the Flash Card if it has been inserted into the special Slot .
7 – Press F2 Load.
8 – Press F10 Execute to set the operation going.
All files concerning the selected Sound Bank will automatically be loaded onto the Simm. If you have
forgotten to remove the Flash Card from the special Slot, the display will warn you as follows when
you press F2 Load:“Warning! Loading will erase card data? F5: Exit F10: Execute.” If you still intend
to write the Simm, extract the Flash Card, then press F10. Press F5 to abandon the operation.
If on the other hand you wish to load the FLASH CARD:
9 – Insert the Flash Card into the special Slot.
10 – Press F2 Load.
The display will warn you as follows: “Warning! Loading will erase card data? F5: Exit F10:
Execute.” If you still intend to write the Flash Card, press F10. Press F5 to abandon the operation.
14
Page 18

Loading from FLOPPY DISK
1 – Insert the first floppy disk of the Sound Bank and press the
Disk button.
2 – Set the Floppy using Page < >. (if you are already in floppy,
press F1 Dir)
To continue, resume the procedure from point 6 of this paragraph.
The procedure to follow will require a little more time, seeing as
the Sound Bank diskettes must be loaded one by one.
NOTES concerning the SIMM and the CARD
• The data loaded in the Simm are erased when the keyboard is turned off. Therefore each time the keyboard is turned on, the Sound
Bank desired must be reloaded.
• The contents of the Simm (or of the Flash Card if inserted) are erased as soon as a new Sound
Bank is loaded.
• The 16-Mbytes Sound Bank (16 floppy disks) may be loaded in the Simm alone.
• It is possible to save a countless number of Sound Banks on Hard Disk and to create an impressive Sounds and Grooves Library that may be used according to the specific requirements.
• It is possible to simultaneously run a Sound Bank loaded on Ram and a different Sound Bank stored on Card directly.
• The sounds stored in the Sound Bank Ram or Card may be entered within the Programs and stored in Registration.
• For Sound Banks containing the Grooves, a Floppy disk containing the Styles especially programmed for those Grooves will be supplied together with the 8 floppy disks. These Styles are then
loaded individually in the internal memory as Patterns (See DISK: Load Pattern).
• The Flash Card takes longer to load than the Simm, but its advantage lies in the fact that it
remains permanently stored and accessible without Loading operations even after the keyboard
has been turned off.
• Merely completely and accurately insert the Card into its slot to connect it to the instrument.
(The Card will not run if it is not inserted correctly).
• Disable the RAM key before removing the Card.
• The Card must not be removed while the Grooves and Sounds contained within are running.
Once the Sound Bank has been loaded from the Disk:
1) – Press the RAM key to activate the Sound Bank of the RAM (Simm).
2) – Press both the RAM and BANK 2 keys to activate the Sound Bank of the CARD.
HARD DISK Data (for X1 HD only)
The Hard Disk of model instrument HD comes with the following outfit of Sounds and Styles:
FOLDER 1:SOUND BANK 1 = Piano 1, Ensemble, Power Organ 1, Power Organ 2, Full Organ, 60Choir,
Effects 1 ( Car Start, Jet, Racing , Airport ), Effects 2 ( Roaster, Splash, River, Rain ), Applause, Piano 2.
SOUND BANK 2 : Techno 1, Techno 2, Dream, Magic, Sweep Pad, Rotary Organ, B3 Organ, Pipe
Organ, Tango Accordion, X1 Pad, Grooves 1 – 6 ( 18 Grooves ).
SOUND BANK 3 : Default Autoloading Folk Sound Bank
SONG STYLES from MS 50 / MS 60 ( 56 Patterns )
FACTORY SET-UP ( Programs, Registrations, Custom Styles Standard, Custom Styles Remix, User
Drum Sets, User Voices ).
FOLDER 2:INTERNAL STYLES from MS 100 ( 99 Patterns )
FOLDER 3: INTERNAL STYLES from MS 50 / MS 60 ( 99 Patterns )
FOLDER 4: STYLE MIX from MS LIBRARY ( 151 Patterns )
15
Page 19
KEYBOARD CONTROLS
The X series has been designed to meet the most demanding requirements of a live performance
and therefore has been implemented with a large number of keyboard controls that may be easily
activated by the user while playing in order to better control the expressiveness of the music.
Key Velocity
The instrument is equipped with a keyboard of 61 semi-weighted keys with Dynamics and After
Touch control. 6 Dynamic Curves are available: Soft 1, Soft 2, Normal, Hard 1, Hard 2, Fixed.
To change the dynamic response of the keyboard:
1 – Press key F 3 to gain access to the UTILITY Menu.
2 – The F10 key is pressed repeatedly to scroll the various types of dynamic Curves available.
The SOFT 2 curve is that set as the default parameter and the FIXED 127 curve corresponds to
dynamic cut-out. If the dynamic curve is to be changed permanently, this may be done using the
Power On Set Up function (see below). If on the other hand the activation of a different dynamic
curve is required only temporary, the Registration function may be used.
Power On Set Up
The function is used to change some original keyboard settings so that when the instrument is switched on the new values set by the user are always available.
The parameters that may be saved in the Power On Set Up mode are:
Style Custom/Factory (led) Portamento time Chord Mode
Style Bank A/B (led) Equalizer Dynamic Arranger
Pattern (led) Separate Out Assignment Autocrash
1 Touch (led) Accordion Mode Pedalboard Font 1-2 text lyric
Global transposer Lower 1 Hold Bass to Lower 4 switch mode
Split point Lower 2 Hold Reverb Lock
Reverb Level Lower Lock Sync time
Harmony type Bass Lock Canali Gm Tx-Rx
Dynamic Curve Pianist Sustain Sustain 2nd voice
Global Tune Swell to right Arabic mode
To save the new Set Up:
1 Press the Save / Enter key.
2 Press the F3 key - Power On set Up.
3 Press key F10 - Save to confirm the entry.
4
The Default function - F9 is used to restore the original Power On conditions set by the manufacturer.
SOUNDBANK AUTOLOADING
This function allows you to load a Sound Bank when the instrument is switched on.
1
1 Press Disk
2 Select the folder containing the SoundBank you wish to load
3 Select the first file of the Soundbank
4 Press the Save/Enter button. A new configuration file called INITXX.PWR will be saved
onto disk, which contains all the information on the Sound bank.
5 Go back to the main display screen and Press the Save/Enter button
6 Press F3 Power On Setup
16
Page 20

When the instrument is switched on, the file InitXX.Pwr will be opened and the selected
Soundbank will automatically be loaded.
Press on the Exit button during the AutoLoading operation to cancel the latter and go back to the
main display screen.
HARMONY
This function adds grace or complementary notes to the melody based on the chords achieved on the
Arranger part.
To gain access to the Harmony functions:
1 Press the Harmony key.
2
Use the F 1 – F 9 keys to select the available effects.
The instrument is provided with the following types of harmonies:
CLOSE 1: the notes of the chord played on the left hand section are repeated on the right hand section and summed to song line.
CLOSE 2: like Close 2, but with a more complex and differentiated harmonization, depending on
the key played.
DOUBLE UP: adds the higher octave to the song.
DOUBLE DOWN: adds the lower octave to the song.
5TH: adds the higher fifth octave to the song.
8 + 5th: adds the lower octave and fifth to the song.
TRILL: to achieve this effect at least 2 notes must be played on the Song part.
The 2 notes are automatically repeated one after the other.
The repeating velocity is controlled with the Speed function - F9.
REPEAT: repeating effect on the individual note played.
The Repeat Time is synchronized with the standard Time of the Styles and quantified according to
the various types of Speed available.
SPEED: velocity control for the Trill and Repeat effects.
The Velocity values are: 4, 6, 8, 12, 16, 24, 32.
TRANSPOSER
The Transposer function enables the global transposing
of the general tuning of the instrument.
To gain access to the transposer function simply press one of the 2 Cursor / Transposer < > keys.
" GLOBAL TRANSPOSER " will appear on the display
for approximately 2 seconds during which time the transposition of the instrument may be modified using the 2 Cursor / Transposer < > keys.
The max. transposition permissible is + / - 24 semitones.
The new transposition value remains on the main display next to “Transp”.
To restore normal Tuning conditions ( or rather
transposition 0 ) simply press the 2 Cursor / Transposer < > keys at the same time.
SPLIT
The Split function is used to establish which part of the keyboard is assigned to the Arranger and
which to the melody part. The normal condition is C3.
To modify the Split:
1 Press and hold down the Split key.
17
Page 21
2 Simultaneously play the key related to the Split
point desired on the keyboard.
3 Release the Split key. The new value will remain
effective until the keyboard is switched off.
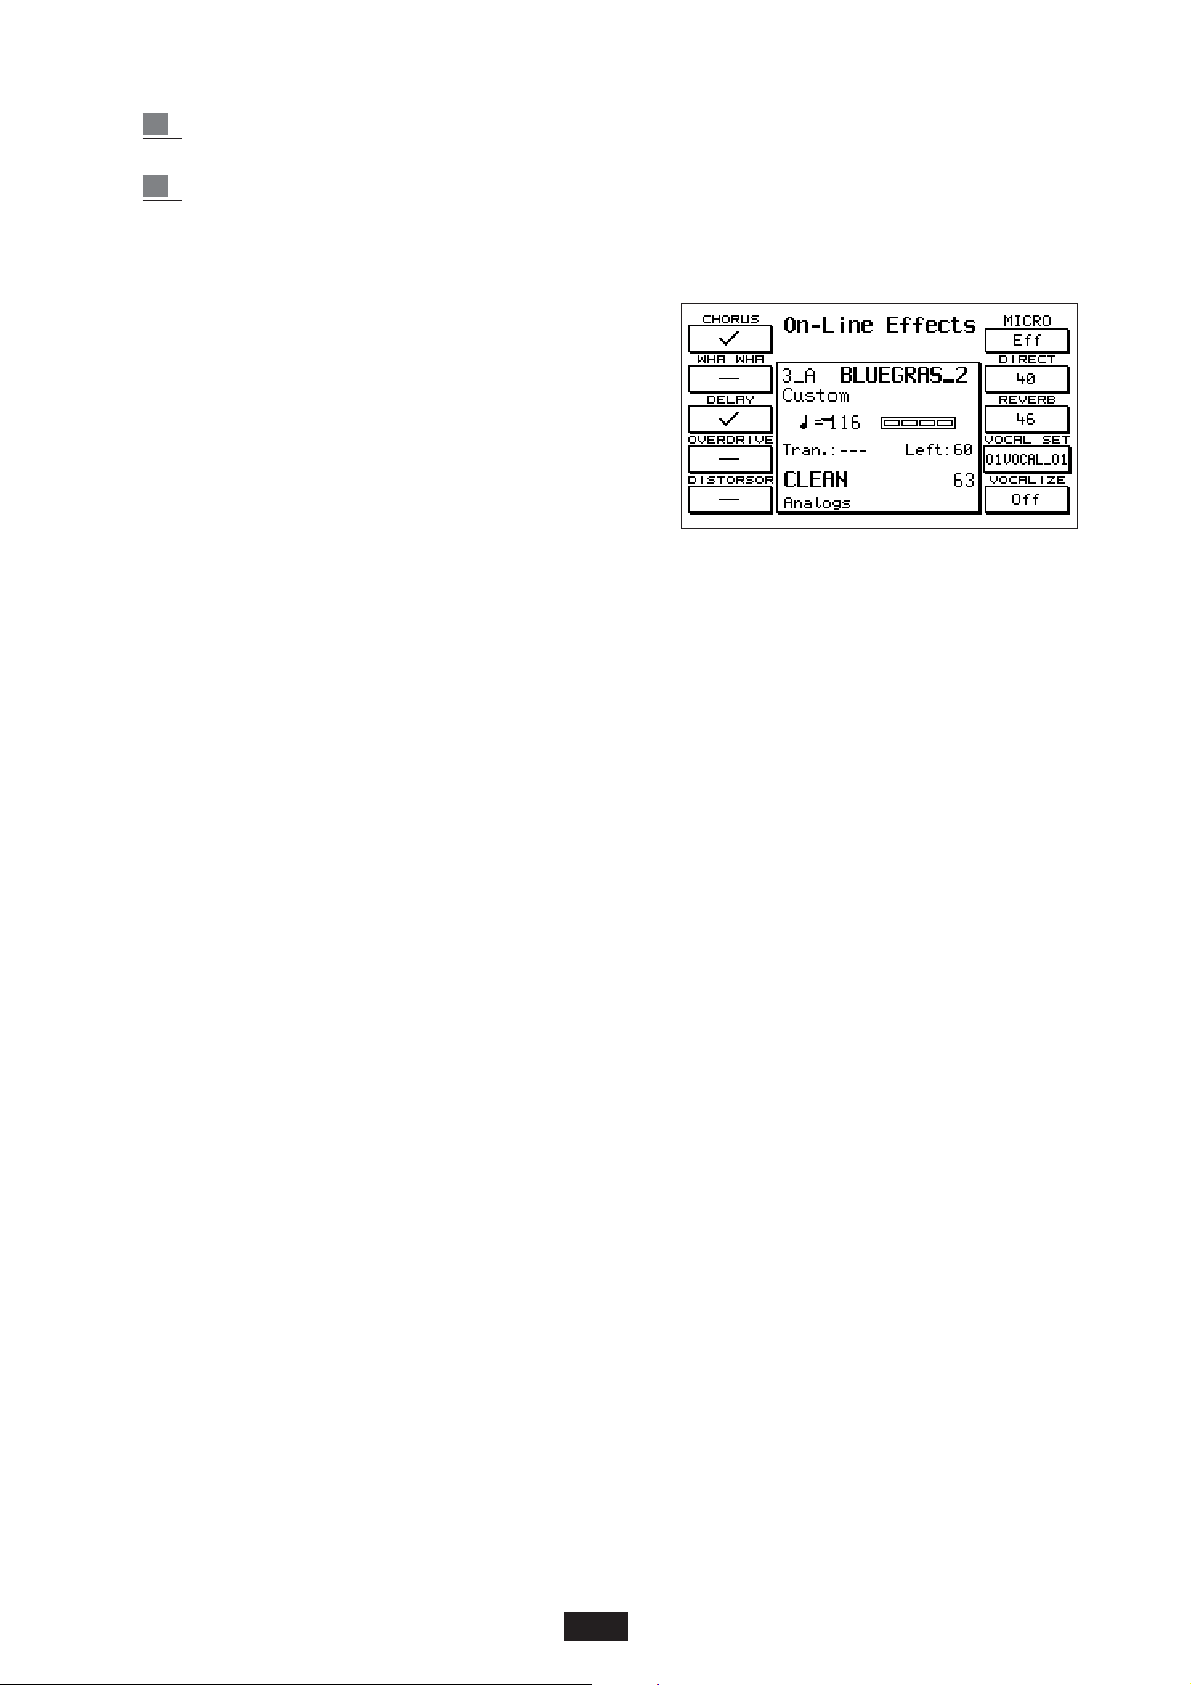
ON LINE EFFECTS
This section of the instrument controls the immediate
enabling on the Song part (Right) of the most important
Effects available.
This an important prerogative when playing live music as
it allows the player to immediately change the type of
Effect while playing without entering into the main
Effects menu.
To gain access to the On- Line Effects:
1 – Press the On- line Effects key.
F 1: Chorus: F 1 activates this effect.
F 2: Wha Wha: F 2 activates this effect.
To obtain the Wha Wha effect, the instrument must be connected to the Volume Pedal (optio-
nal). As long as the Wha Wha function is active, the volume Pedal no longer controls the
general volume of the instrument but rather only that of the Wha Wha effect.
You can obtain remarkabe Effects with Wha Wha on all electric guitar Voices.
F 3: Delay: F 3 activates this effect.
F 4: Overdrive: the Overdrive effect consists of a gradual saturation of the sound associated
with the Volume Pedal control.
It is the typical effect of old electromagnetic organs which made a characteristic distorted sound
when the pedal was pushed all the way down.
Just like the Wha Wha effect, the Volume Pedal (optional) must be connected to the instrument
for the Overdrive to work.
This effect is particularly suitable for all those Organ, Jazz and Rock Voices.
F 5: Distorsor: typical Distortion effect of the electric Guitar. It can also be applied to other
sounds to obtain particular effects.
F 6: Exclusion / insertion of the Effect on the Microphone. (Effect / Dry)
F 7: Level of the Microphone’s direct signal. Use the Value + / - buttons to modify the value.
F 8: Level of Reverberation on the Microphone. Use the Value + / -buttons to modify the value.
F 9: Vocal Set. Selection of the type of Vocalizer using Value .(See the KIT VOCALIZER Manual)
F 10 : Exclusion / insertion of Vocalizer . On / Off .
18
Page 22
EFFECTS
The Effects Menu controls all the effects of the 2 DSP supplied with the X series.
To gain access to this menu press the function key F 2 - EFFECTS from the main display.
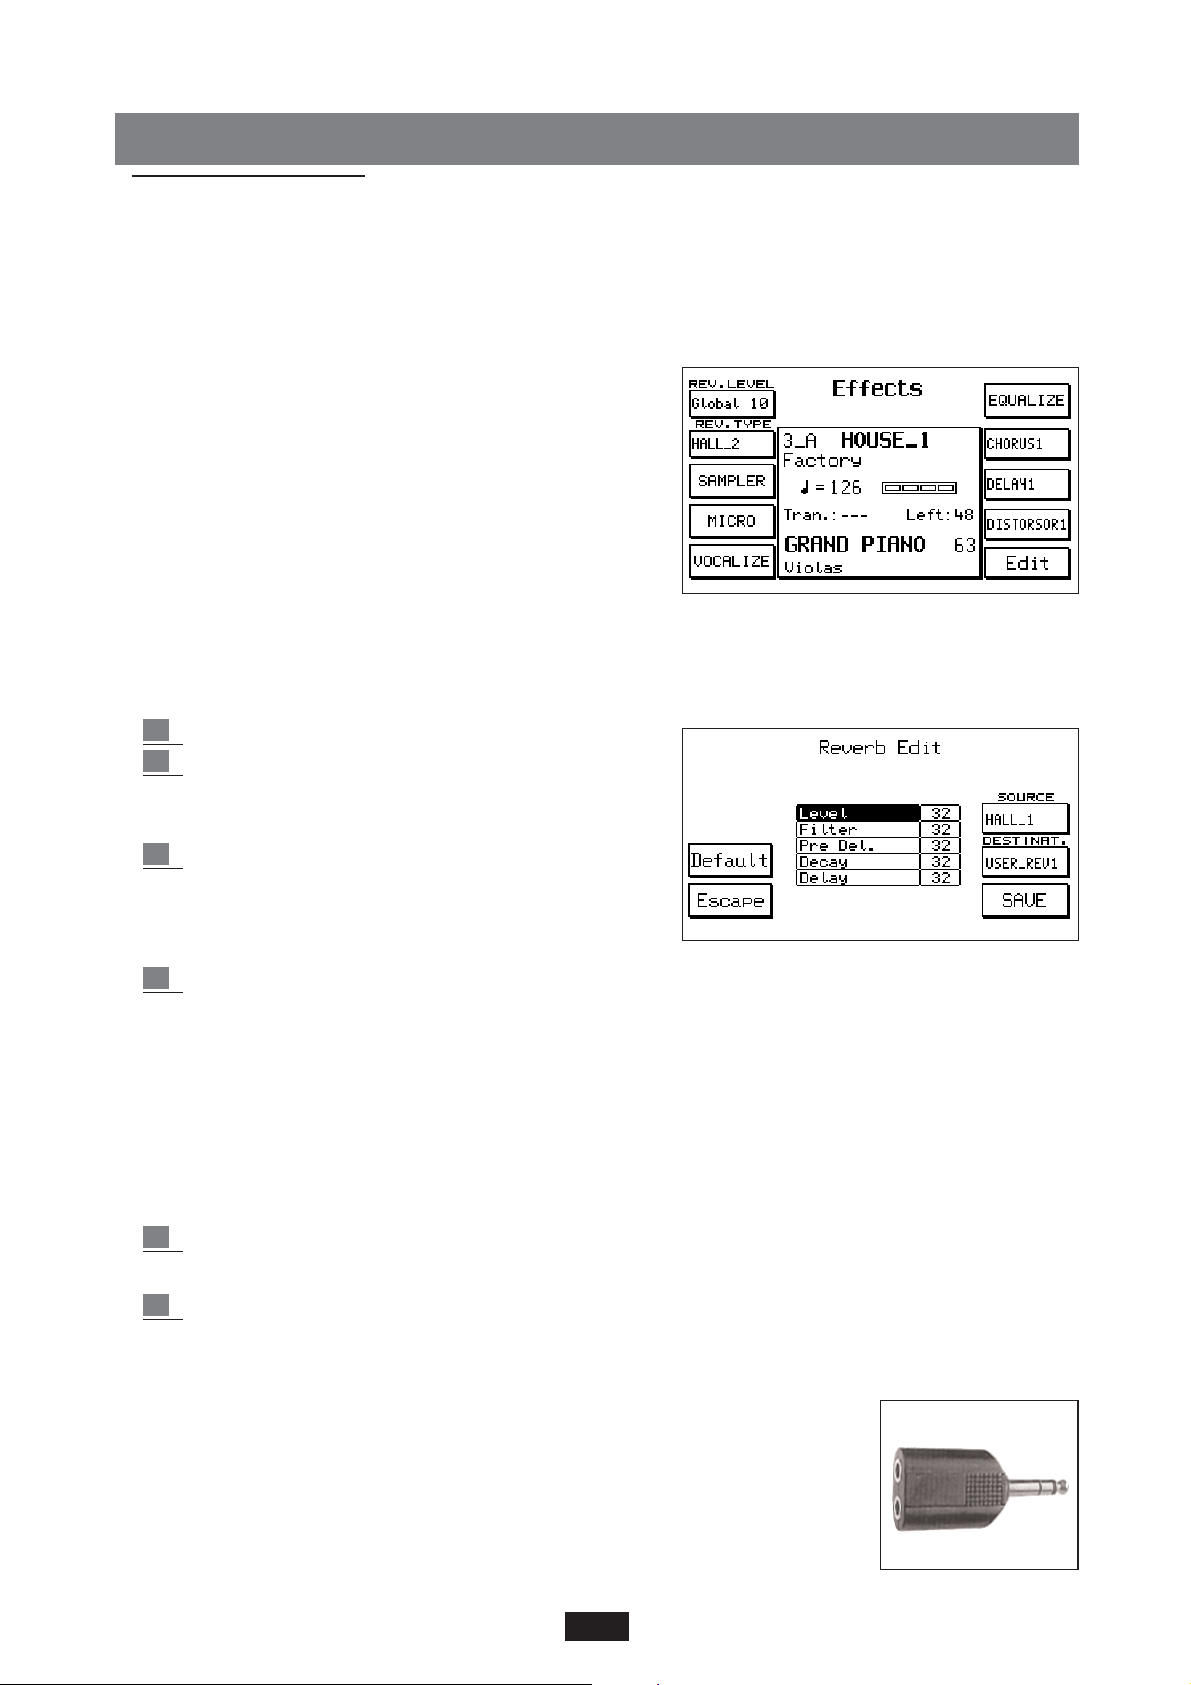
REVERBERATION
Reverb Level: this parameter controls the general
Reverberation level of the instrument. Key F1 is used to
select the parameter and the Value + / - keys are used to
modify the value (from 1 to 16).
Reverb Type: choice of the type of Reverberation. Use key
F 2 to select the function and the Value keys to search
for the type of Reverberation amongst the 16 preset and
the 4 User Reverb. available:
BOX 1, BOX 2, ROOM 1, ROOM 2, STUDIO 1, STUDIO 2, HALL 1, HALL 2, STAGE 1, STAGE
2, THEATRE, CATHEDRAL, ARENA, VALLEY, PLANET, GALAXY, USER REVERB 1 - 4.
Reverb Edit: this section allows the user to modify the Reverberation effects.
1 Press Edit to gain access to the function.
2 the Source parameter - F8 defines the type of
effect to be modified. By repeatedly pressing key
F 8 the various types available are scrolled.
3
the Destination parameter – F 9 establishes in which
of the 4 User Reverb. locations available the new
Reverberation will be saved after it has been edited.
Press key F9 repeatedly to set the location.
4 Using the Cursor < < keys the various control parameters are selected and the Value + / - keys
modify the value.
Level: amount of the effect.
Filter: softening of the high frequencies on the Reverberation.
Predelay: predelay timing, or rather the delay from the start of the sound to the first sound repeat
or reflection.
Decay: decay length of the reverberation.
Delay: thinning out of the repeats between the various delays that make up the reverb.
5 simply press F 10 – SAVE to save the new Reverberation. The Reverberation thus edited
will take the name of the corresponding User Reverberation.
6 Use the DEFAULT function (F 4) to restore the original Reverberation effects.
SAMPLER: section devoted to Sampling. (See Sampler paragraph)
MICROPHON: Microphone control menu. To gain access to the functions concerning the Microphone:
1 Enter into the EFFECT menu using key F 2.
2 Press key F 4 – Micro.
19
Page 23

Level 1 / Level 2: these 2 parameters (F1 and F 2) control the input level of the stereo Microphone
separately for part 1 and part 2. It is indeed possible to connect 2 Microphones to the instrument
by means of a special adaptor indicated in the illustration.The Input Micro Overload LED situated
at the right-hand side of the panel next to Registration, points out that the Micro Input is saturated.
In this case it may be useful to reduce the Microphone Gain using the potentiometer situated on the
front panel.The volume of part 1 and part 2 is modified using the Value + / - keys.
Pan 1 / Pan 2: (F 3 - F 4) pan Pot control on the part 1 and 2 of the Microphone. The value is
modified using the Value + / - keys.
Music Vol (F5): this function allows you to adjust the global volume of the keyboard without alte-
ring the volume of the microphone. The range is from 32 to 63.
Echo/Reverb 1 / 2: (F 6 - F 7) these 2 parameters separately control the amount of the Echo or
Reverberation Effect on the 2 Micro Inputs.
By repeatedly pressing key F 6 or F 7 part 1 or part 2 is selected and the value of the effect is
modified using the Value + / - keys.
Pitch Shift: Vocal shift effect by 1 ovate on the Voice tuning (+ / - 12). The Pitch Shift functions
exclusively on part 1 of the Microphone.
Dry: (F 9) this parameter cuts out the Echo or Reverberation Effects on the Microphone.
Quite useful for changing over from “singing” to “speaking” during the live performance.
Active / Inactive: (F 10). Microphone cut out function, particularly useful if the microphone is not
provided with the On/Off switch.
VOCALIZER
You can access it from the Effects menu by pressing F5.The Vocalizer is a professional
Harmonizer effect (optional) that can be applied to the instrument. It is capable of synthesizing
3 harmonising Voices on the basis of the note sung at the microphone input and it provides for
many control functions such as Harmony type, Effects, Filter, Octave etc. The Vocalizer kit is
supplied upon request and it should be installed inside the keyboard by specially qualified personnel in accordance with the instructions attached. All information regarding the operation of
the VOCALIZER section is contained in a special Instructions Manual that is provided together
with the Vocalizer Kit (optional).
EQUALIZER:
3-band Equalizer: Low, Mid, Hi . To gain access to the function:
1 Enter into the Effects menu using key F 2.
2 Press key F 6.
3 Use keys F1, F2, and F 3 to choose the band;
use the Value + / - keys to select the values from
2 to 12 dB + / -.
The Equalizer globally affects the instrument and therefore affects both the external and internal
amplification. The set Equalizer combination is stored until the instrument is switched off but
may be saved in Registration and in the Power On Set Up function.
CHORUS: To gain access to the Chorus effects:
1 Enter into the Effects menu using the F2 key from the main display.
2 Press key F 7 . Use the Value + / - keys to select the 12 types of Chorus available:
20
Page 24
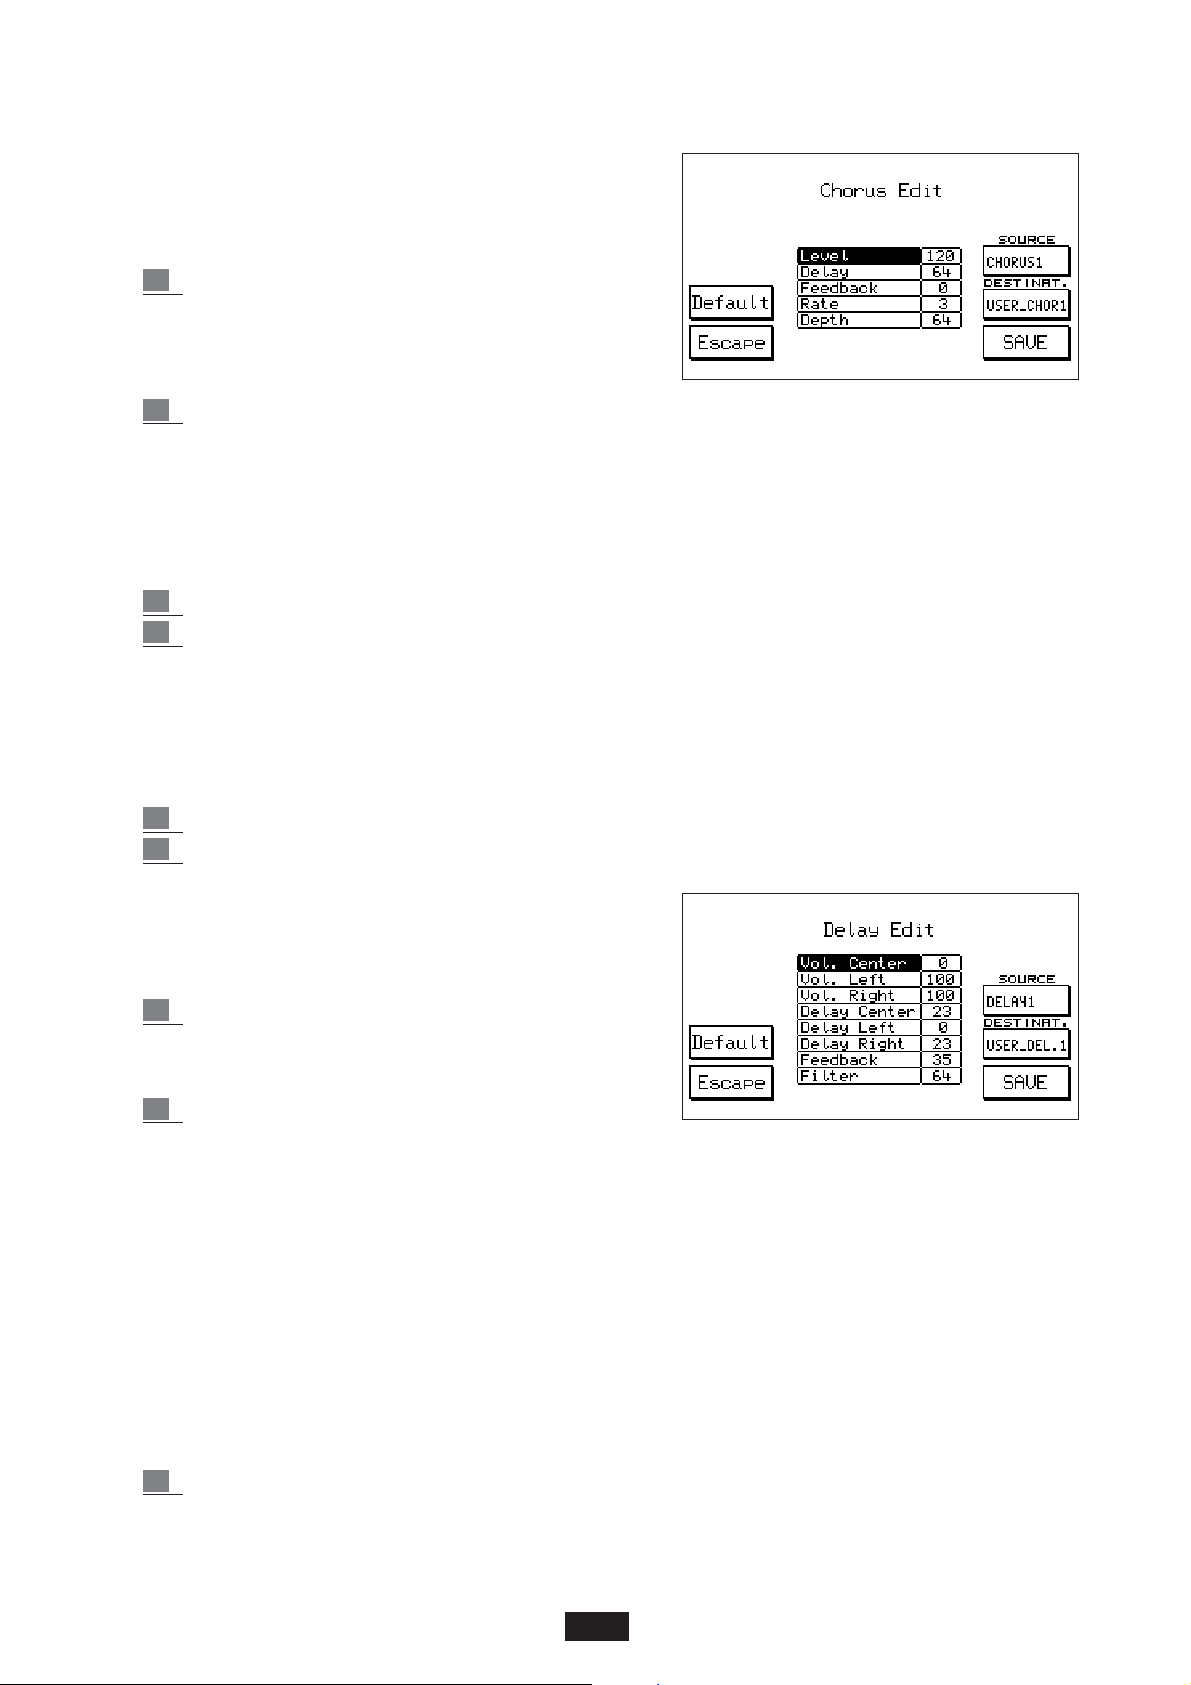
CHORUS 1 - 5, FLANGER, SHORT DELAY, FEEDBACK, USER CHORUS 1 - 4.
The User Chorus are 4 locations in which up to 4 Chorus
effects modified by the user may be saved.
To gain access to the Chorus Edit function press key
F 10 – Edit.
3 The F 8 and F 9 parameters are used to select
the Chorus to be modified (Source) and the
User Chorus where the new effect is to be
located (Destination) respectively.
4 Using Cursor < > the parameters are selected and using Value + / - the value is modified:
Level: global amount of the effect.
Delay: length of the delay.
Feedback: : feedback level on the delay.
Rate: Modulation Velocity.
Depth: modulation Intensity.
5 Simply press F10 - SAVE to save the new Chorus in the pre-selected User Chorus.
6 To exit from Edit press Escape – F 5.
The Default function – F 4 is used to restore the original Chorus effects.
DELAY: to gain access to the Delay effects:
1 Enter into the Effects menu using key F2 from the main display.
2 press key F 8 . Use the Value + / - keys to select the 12 types of Delay available:
DELAY 1 – 8 , USER DELAY 1 – 4 .
The Delay effects modified by the user may be saved in
the 4 User locations.
To gain access to the Edit function of Delay press key F10:
3 Use keys F 8 and F 9 to set the Delay to be
modified (Source) and the destination User
location (Destination).
4 Using Cursor < > the various parameters are
selected and using Value + / - the value is modified.
Considering that the Delay functions in stereophony the following parameters on the Left
and Right may be controlled:
Volume Center: central level
Volume Left: left part level
Volume Right: right part level
Delay Center: amount of delay on the center
Delay Left: amount of delay on the left part
Delay Right: amount of delay on the right part
Feedback: feedback level on the delays.
Filter . softening control of the filter on the repeats.
5 Press F10 - SAVE to save the new Delay.
Using the Default function (F 4) the original Delays may be restored.
Press F5 - Escape to exit from the function.
21
Page 25
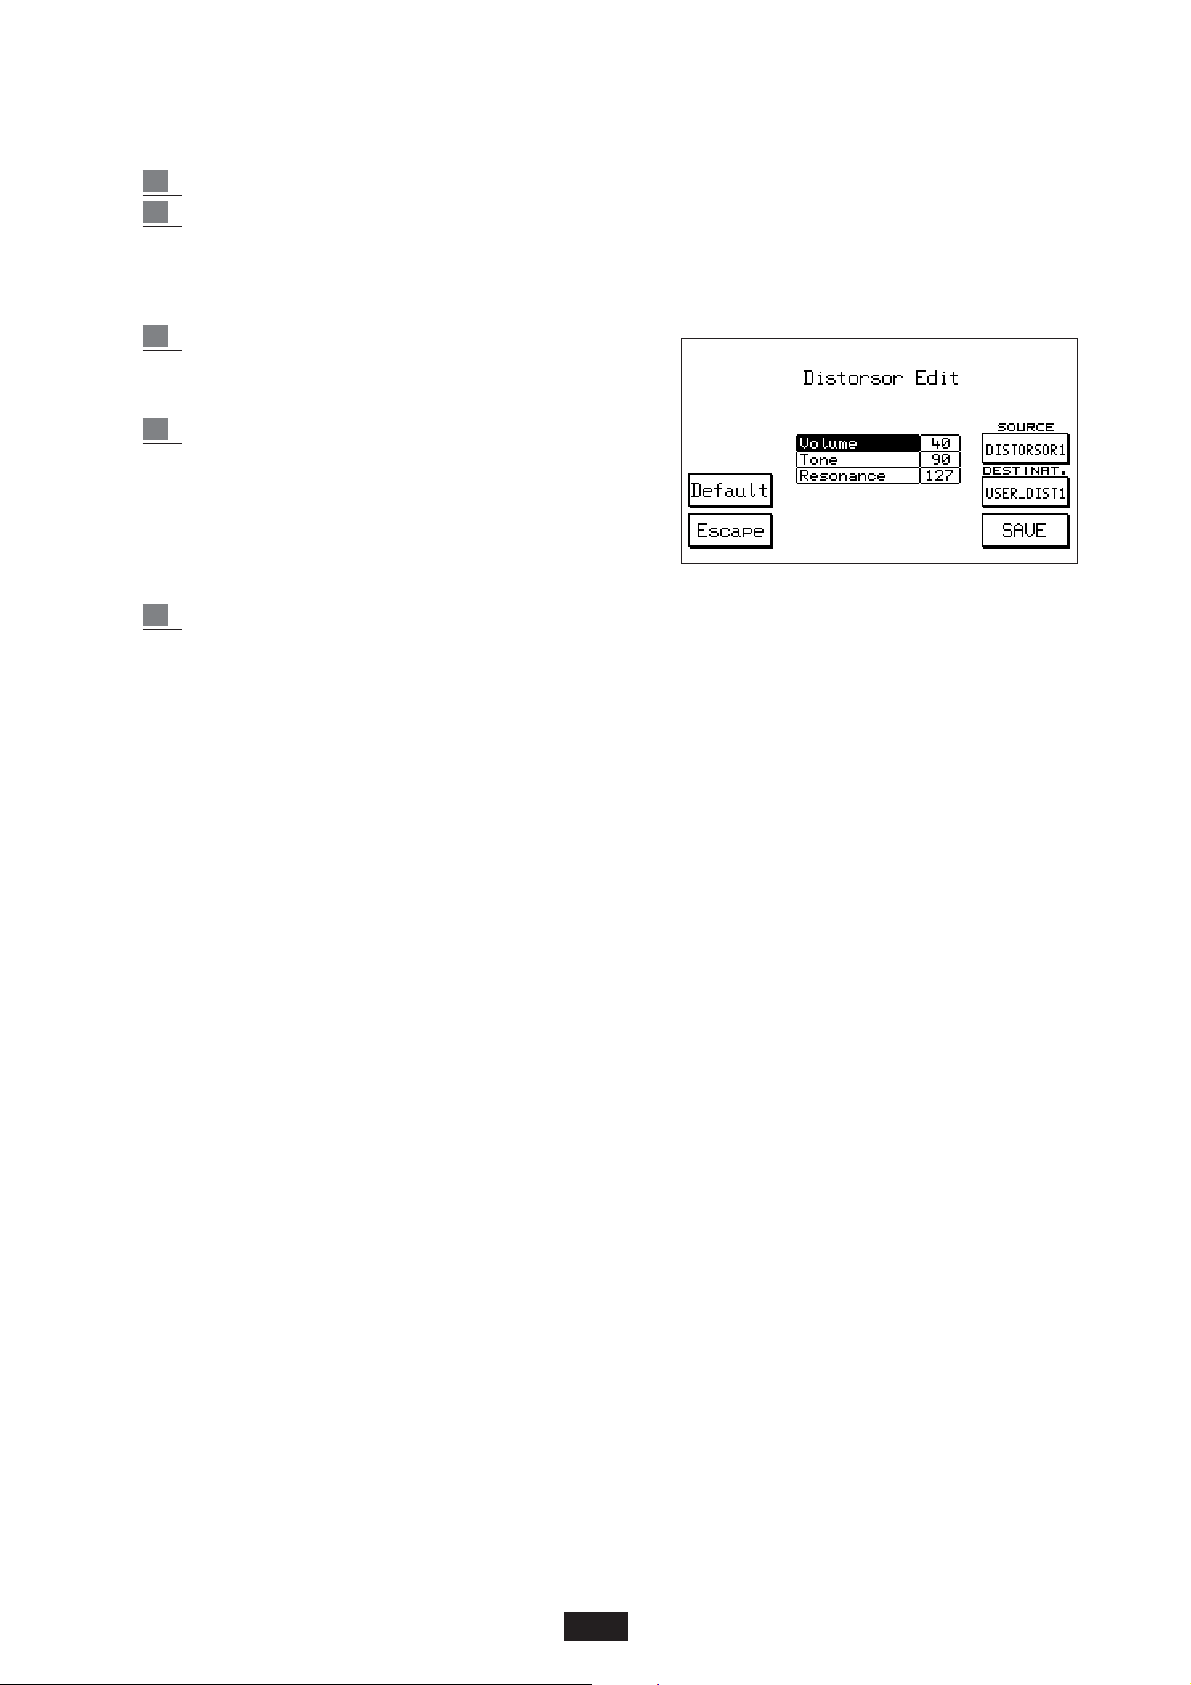
DISTORSOR: to gain access to the Distorsor effects:
1 Enter into the Effects menu using key F2 from the main display.
2 Press F 9 – Distorsor. Use the Value + / - keys to select the various types of Distorsor
available : Distorsor 1 - 8, User Distorsor 1 – 4.
4 new programmable Distorsor effects may be saved in the 4 User Distorsor locations.
To gain access the Edit function of the effect press the Edit key – F 10 :
3 Use key F 8 – Source to select the Distorsor effect
to be modified and key F 9 – Destination to select
the User location in which it is to be saved.
4 Using Cursor < > the parameters may be selected
and using Value + / - the new value may be set.
Volume: general level of the effect.
Tone: filter control (Range 16 / 102)
Resonance: resonance control (Range 24 / 127).
With value 127 the resonance is set at zero.
5 To save the new Distorsor effect press F 10 – SAVE.
Using the Default function – F 4 the original Distorsor effects are restored.
ROTOR: the Rotor effect is maybe the most classic effect of the electronic Organ and is achieved by
rotating the loudspeaker of the special Organ amplifier.
Using the ROTOR ON key the effect is enabled; using the SLOW / FAST key the velocity change is
controlled.
The Rotor effect has no affect on the following Organ Voices of the instrument: Leslies, Rock Organ,
Church Organ, Rotor B3, Positive, 2nd Perc., 3rd Perc., Click.
22
Page 26
UTILITY
Introduction
In the main display screen, press the F3 function button to have access to the Utility section, which
is made up of 3 pages, each one of which can be selected by means of the special page > < buttons
on the top right-hand side of the front panel of the instrument.
The first page is as follows: in the middle of the display panel, the current style is indicated, along
with the tempo value, the transposer, the level of the left split of the keyboard, the main sound and
the secondary one. This display is constant throughout all 3 pages. On the right- and left-hand side
of the display panel, the various functions relating to the respective buttons appear, and these vary
from page to page.
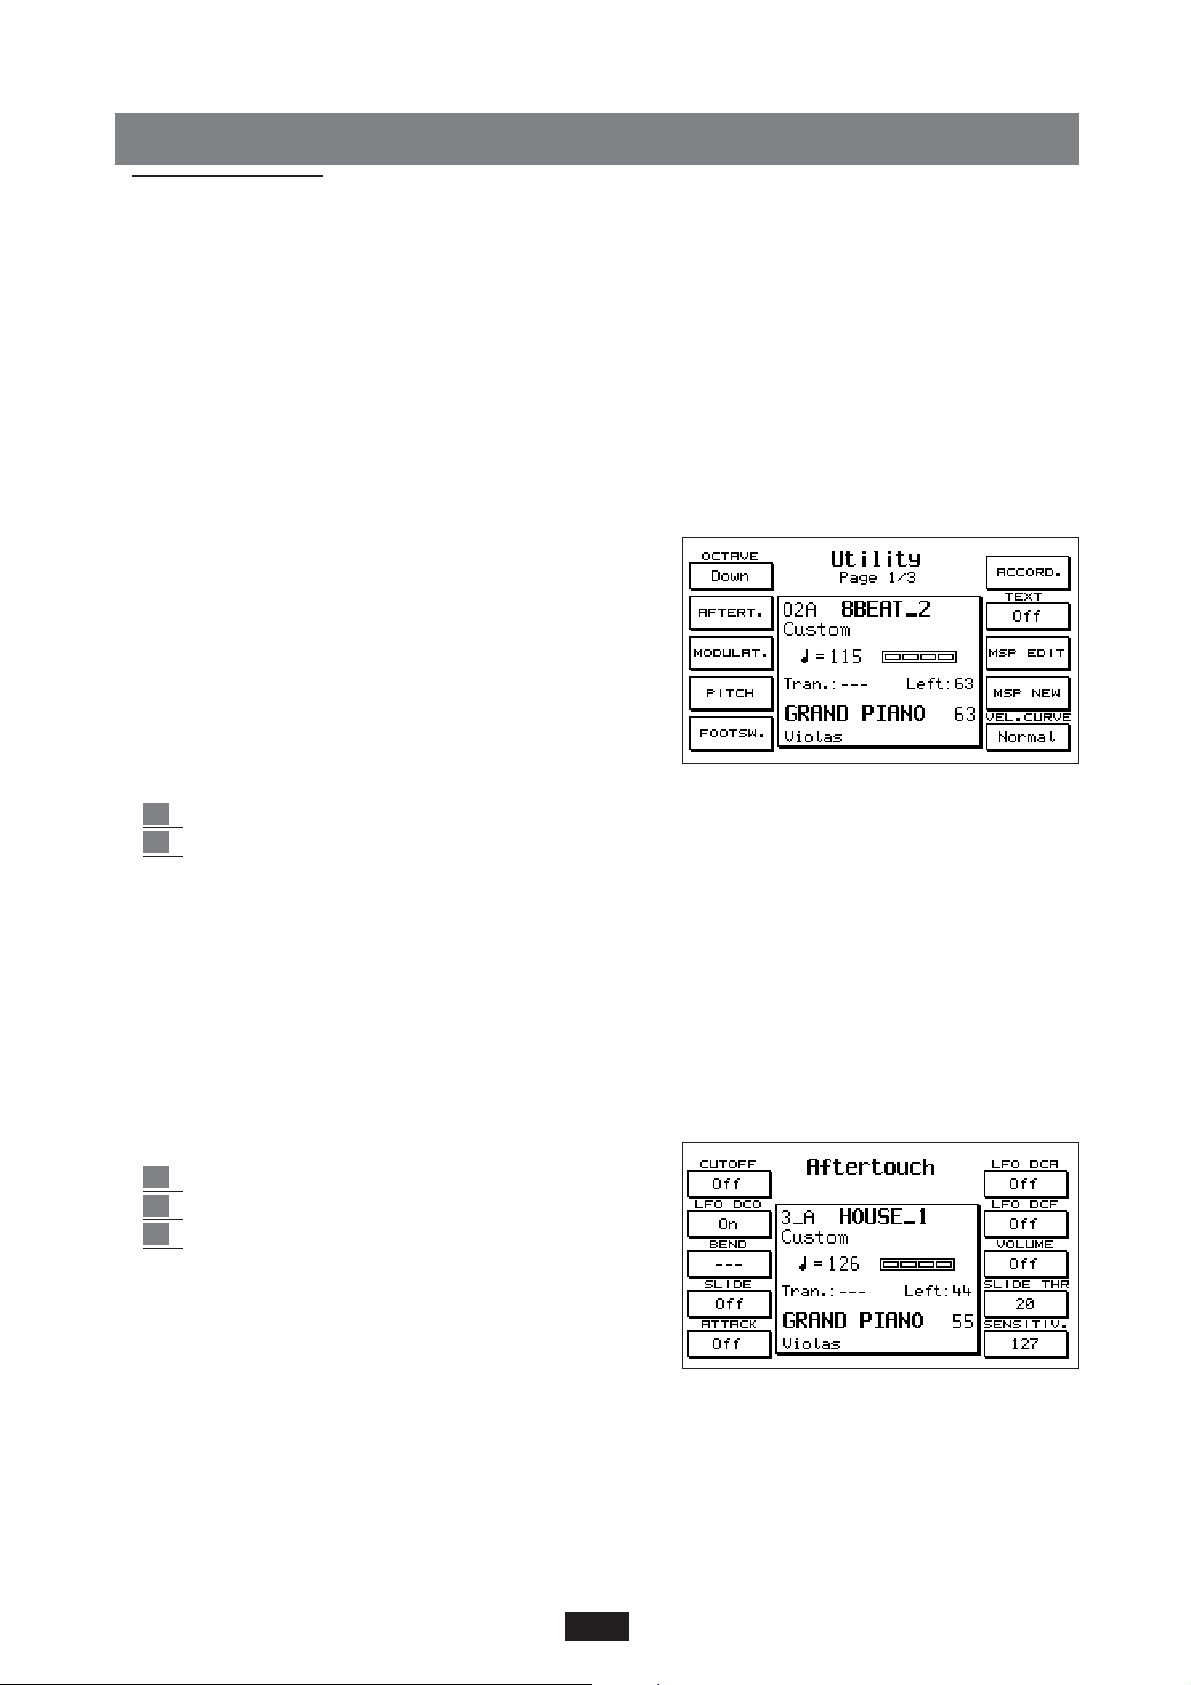
PAGE 1 UTILITY
OCTAVE (F1)
The Octave function enables the immediate transposition
by one octave down or up (+/- 12 semitones) over the
entire keyboard. To enable this function simply press the
Octave key.
The octave selection is achieved in the following manner:
1 Press the F3 key – Utility.
2 The Octave change is associated with function key F1. Down corresponds to the lower
Octave; Up to the higher Octave.
Using the Power On Set Up function it is possible to establish which of the two options, Down and
Up is always enabled when the instrument is switched on (See the Power On Set Up paragraph).
The Down or Up function of the Octave may also be saved in Registration.
AFTER TOUCH (F2)
On the contrary to the Velocity Key that controls the velocity with which the key is pressed, the
After Touch controls the pressure applied to the key after it has reached the end-of-stroke. In other
words, the After Touch starts to work when a key is pressed harder than usually done so to play.
To gain access to the After Touch controls:
1 Press the After Touch key.
2 Press key F 3 – Utility .
3 Enable the After Touch function using key F2.
Cut Off: control of the Filter associated with the After
Touch. The parameter is enabled using the F1 key.
Lfo Dco, Dcf, Dca: 3 modulation controls associated
with the After Touch and relative to the Oscillator (Dco), Filter (Dcf) and amplitude (Dca)
respectively. The 3 parameters are selected using keys F 2, F 6 and F 7.
Bend: when Bend is pressed, the After Touch function shifts the tuning upwards or downwards,
depending on whether the Bend value is positive or negative. This movement is performed in
semitones, with a range of + / - 24 semitones. Use key F 3 to select the Bend parameter and the
Value + / - keys to modify the value.
23
Page 27
Slide: the Slide effect function ( F 4 ) is enabled with the After Touch key pressed but in actual fact is
associated with the Velocity Key of the keyboard. Simply play with strong dynamics to immediately
evaluate the effect, which consists of the rapid adjustment of the tuning in the sound attack, quite
similar to that commonly encountered in the attack of almost all wind instruments.
The Slide function may be used successfully to enhance the reality and incisiveness of music phrases
of the song line in particular with all the Voices of Saxophone, Trombone, Clarinet, Guitar.
Slide Threshold (THR): this parameter (F 9) controls the Key Velocity threshold exceeding which
the Slide effect starts to function. The value is modified using the Value + / - keys and has a range
of 0 to 64. Lower the value, less key dynamics is required to activate the Slide. The default value
if set at 25.
Attack: the Attack parameter (F 5) causes all the effects connected to the After Touch to start to
function with a sort of slight and gradual delay.
This function is useful for accurately controlling the expressiveness of the song Voices, especially
those that are not provided with natural sampled modulation.
Volume: Vo lume control associated with the After Touch. The parameter is enabled using key F8.
Sensitivity: this parameter (F 10) controls the sensitivity of the After Touch. The sensitivity modi-
fies the global amount of the various effects associated with the After Touch, with a range of from
0 to 127. The value is selected using the Value + / - keys.
At 0 the After Touch is no longer effective.
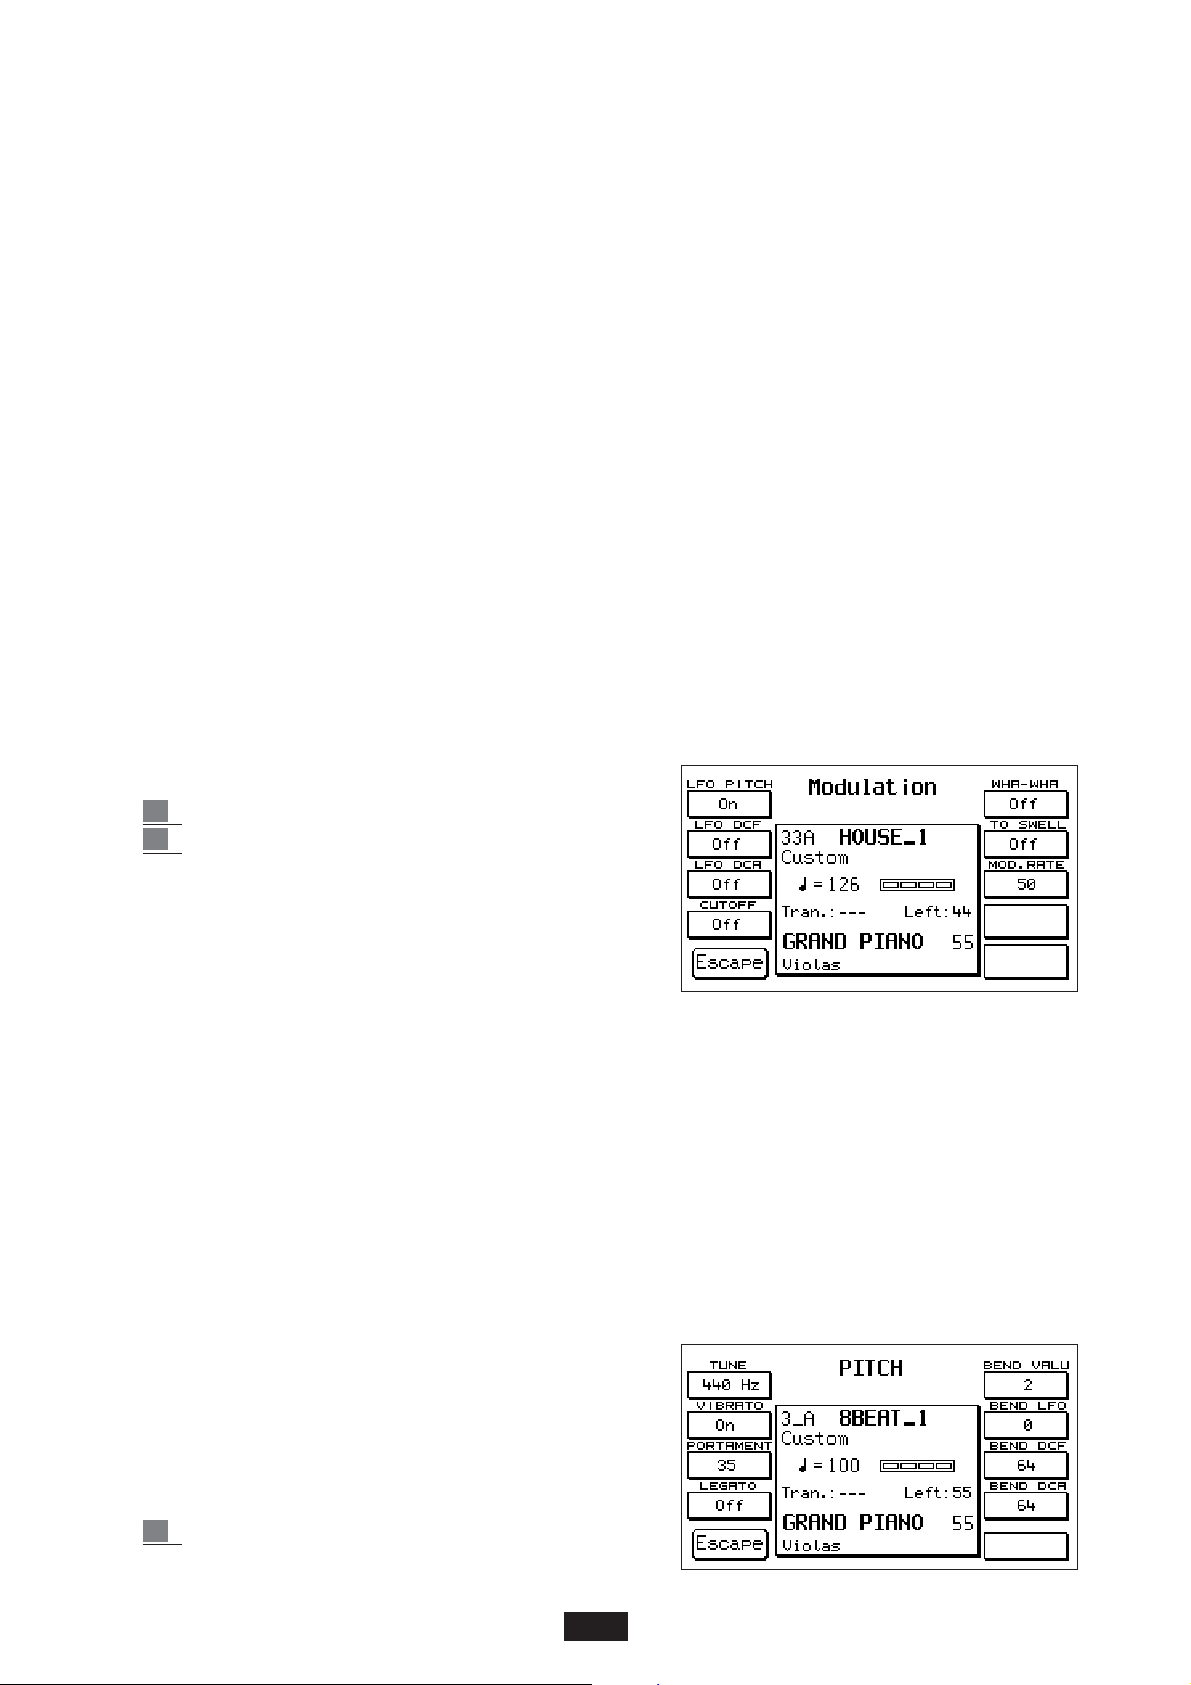
MODULATION (F3)
The Modulation menu controls all the functions associated with the Modulation wheel: Lfo, Cut
Off, Wha Wha, Expression.
To gain access to this menu:
1 Press key F3 – Utility.
2 Press key F3 – Modulation
Lfo Pitch, Dcf, Dca:
the On / Off selection of these 3 functions is achieved using keys F1 – F2 – F3. It enables to
control respectively, by means of the Wheel, the Modulation of the LFO over the Oscillator, Filter or Amplitude.
To cut-out the LFO Pitch parameter one of the other 2 LFO’s must be pressed first, or Cut-Off or
Wha Wha; with the purpose of leaving one function assigned to the Wheel at all times.
Cut Off: this parameter (F 4) associates the complete opening and closing control of the filter with
the Wheel Modulation. The enabling of the parameter is controlled with the F4 key.
Wha Wha: Wha Wha effect control by means of the Modulation Wheel. The parameter is enabled
using the F6 key. The two Cut Off and Wha Wha effects are self-disabling.
To Swell: this function transfers all the aforesaid effects for the Modulation Wheel to the Volume
Pedal (optional). Modulation. It is enabled using key F 7. This function is obviously enabled only
if the Volume Pedal is connected to the keyboard.
Modulation Rate: Velocity control of the Modulation for the three LFO effects associated with the
Modulation Wheel. The parameter is enabled using the F8 key and the value is controlled by
means of the Value + / - keys.
PITCH (F4)
the Pitch menu controls the effects assigned to the Pitch
Wheel and other functions related to the tuning such as
Tune, Vibrato, Portamento and Legato.
To gain access to the Pitch menu :
1 Press the F3 key – Utility.
24
Page 28

2 Press the F4 key – Pitch.
Tune: The Tune controls the general tuning of the instrument with an amplitude of + / - 100 cents,
or rather +/- 1 semitone. To modify the tuning press key F1 and adjust using the Value + / keys. By pressing the two Value keys simultaneously the standard 440Hz tuning is restored.
Vibrato: this parameter is used to disable the Vibrato from the Voices where this is provided for.
Note : Some Voices of the instrument have been sampled with the natural Vibrato of the instrument;
thes voices are obviously not affected by the aforesaid function.
To disable the Vibrato simply press key F2.
Portamento: this parameter controls the velocity of the Portamento effect. The value is changed
using the Value + / - keys.
Legato: with the Legato function in the ON position (F4) the Portamento is transformed into the
Mono mode and is operational on one Voice alone. To achieve the Legato effect between two
notes, one of the two notes must be held down.
The Legato function may be extremely useful when simulating the phrasing of some traditional
soloist instruments such as the Violin, Trumpet, Trombone etc.
Bend Value: this parameter (F 6) controls the amplitude of the Pitch Bend expressed in semitones.
If the Pitch Wheel is moved upwards (Up) the tones are sharpened, whereas moving it
downwards (DOWN), the tones are flattened. The standard value is 2 semitones +/- and the max.
permissible range is + /- 24 semitones.
To set a different value use the Value + / - keys.
The following functions enable the association of some interesting controls to the Pitch Wheel
concerning the LFO, the Filter and the Amplitude.
Bend LFO: controls the amount of LFO assigned to the Pitch wheel. The value is modified using
the Value + / - keys.
Bend DCF: controls the Filter associated with the Pitch Wheel. The value is modified using the Value
+ / - keys. Moving it upwards, the Voice filter opens; moving it downwards the Filter closes. With
value 127 the maximum filter amplitude is achieved; value 64 corresponds to the standard value.
Bend VCA: controls the sound amplitude associated with the Pitch Wheel. The value is changed
using the Value < > keys. With value 127 the maximum amplitude is achieved, value 64 corresponds to the standard value.
FOOTSWITCH (F5)
Access to the functions assigned to the Pedal control (See Footswitch chapter).
ACCORDION (F6)
Access to the menu of the Accordion section (See ACCORDION chapter).
TEXT (F7)
Press F7 repeatedly to select the size of the character used by the text (Font 1 / Font 2), or to exclude the display of the text whilst playing.
MSP EDIT, F9 MSP NEW (F8)
These two functions concern the Multisamples and are described in the Sampler section of this
manual.
Vel. Curve (F9)
Press F10 repeatedly to select among the 6 dynamic answer curves available: Normal. Hard1.
Hard2. Fixed. Soft1. Soft2. With the Fixed curve, you can use the value +/- buttons to establish the
fixed value of Key Velocity that the instrument sends via Midi .
25
Page 29

PAGE 2 UTILITY
On Page 2, the functions are:
ARABIC (F1)
Press F1 to access the ARABIC menu, in which you can
modify the instrument’s standard tuning adapting it to the
type of tuning used in Arab countries. (See ARABIC
chapter)
VIDEO (F2)
The Video function (F2) allows you to use the value +/ - buttons to determine the settings for the
optional video card (Instructions provided together with the Video card).
REGISTRATION MODE (F3)
In Registration Mode, you can select all types of parame-
ters that can be assigned to the Registrations (Block or
Single).
The first display screen appears in the centre and consists
of the Global list of functions. This is the main display
screen, which you always go back to after having
scrolled through all the pages of the submenus available.
In general:
1) – Select the various functions using the CURSOR buttons.
2) – Use F 10 – SELECT to select the On / Off condition.
3) – Use F7 – SAVE to confirm the configuration that can be stored in Registration.
Utility Page 2/2: Press F 3 repeatedly to scroll down 2 display screens that list many keyboard
functions and various commands. In the ON position, their storing in Registration is activated.
To exclude this, just select the function using the Cursor, set on Off using Select and then press
Save to confirm.
By default, the Midi, Footswitch and Accordion functions are on the Off position, seeing as you may
find it useful that such parameters always stay configured in the same way regardless of the
Registration inserted.
Arrange Page 3/3: Press F 1 repeatedly to have access to three display screens that list which func-
tions of the Arranger can be stored in Registration or not.
Drum Mixer: this function allows you to activate or not on registration the storing of all the para-
meters regarding the Drum Mixer, i.e. the On/Off exclusion, the volumes, the effects etc. of the
percussion groups.
Effects: List of all the Effects that can be stored in Registration.
Tabs Page 2/2: List of the buttons whose on / off condition can be saved on Registration.
Default: the Default function (F 8) restores the original Registration Mode configuration of the
manufacturer.
Switch off: this useful function (F 9) automatically switches off the luminous led of the small
Registration button after a few moments.
This helps to prevent a new Registration from being unintentionally selected instead of a new Style
while the rhythm is in operation.
In fact, the two Style and Registration sections use the same numeric keypad 0 – 9 for the selection.
26
Page 30
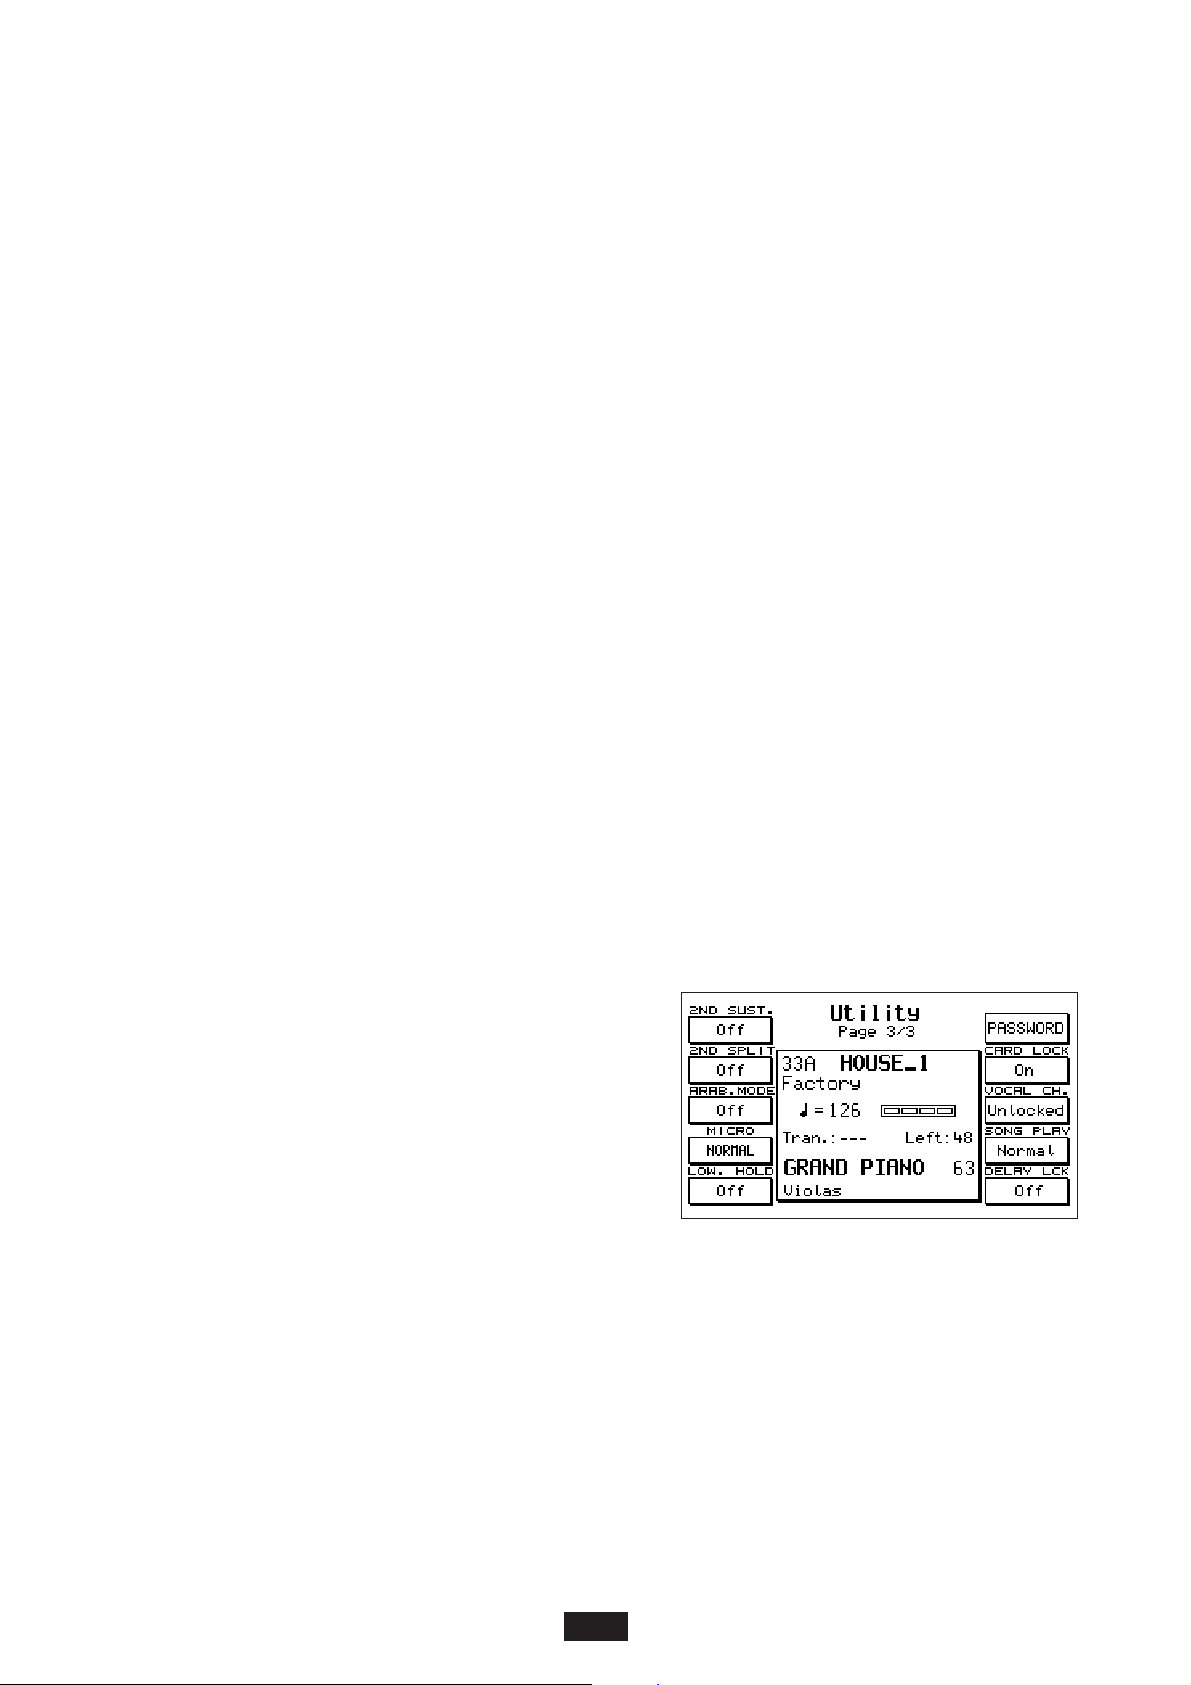
DISP.TIME (F4)
mediante questa funzione è possibile impostare con i tasti value+- il tempo di permanenza delle
schermate nel display.
PIANIST (F5)
Questo tasto, premuto ripetutamente consente di selezionare il modo Automatic o il modo Normal
per la funzione Pianist. Per ulteriori dettagli sulla funzione Pianist rimandiamo alla sezione Pianist
all’interno del capitolo riguardante gli Styles e l’Arranger.
KEYBOARD OUT ASS (F6)
Questo tasto premette l’accesso alla pagina che gestisce l’invio delle note suonate sulla tastiera alle 4
uscite audio dello strumento. Per i dettagli consultare il capitolo Out Assign.
GM OUT ASS. (F7)
Mediante questo tasto si accede alla pagina che assegna le uscite separate alle 16 parti GM. Per i dettagli consultare il capitolo Out Assign.
BLOCK REGISTRATION (F8)
Con questo tasto si seleziona il tipo di registration corrente (Block o Single).
4SW. MODE (F9)
this special function is to be used when the instrument is connected to Midi SOLTON Pedalboard
and to the special pedal for guitarists with 4 switches to change key.
When the parameter is on the ON position, each new change in key remains stored in the memory
even if you do not continue to press the corresponding switch.
On the other hand, on the OFF position, the variation in key only remains effective for as long as
the switch is pressed, after which it goes back to the Major key.
SONG EXPRESSION (F10)
this function allows you to control the global level of the Song during playing with the use of the
expression Pedal.
PAGE 3 UTILITY
In page 3, the functions are:
2ND VOICE SUSTAIN ON/OFF (F1)
Activates or deactivates the pedal-control of the Sustain on the 2nd Voice.
2ND VOICE SPLIT ON/OFF. (F2)
This function allows you to determine a point of split only for the 2nd Voice. The point of split is
fixed by pressing F 2 and playing a key on the keyboard.
ARAB.MODE. (F3)
Makes it possible to select the Styles with the use of just one figure that indicates the units. To select
the number of tens, press both the Count In button and the desired number at the same time.
When Arab. Mode is activated, the normal function of COUNT IN is deactivated.
27
Page 31

28
MICRO DRY ON STOP/ NORMAL. (F4)
Select Dry On Stop to remove the effect on the microphone each time the arranger is stopped using
the Stop button. Normal: this is the standard condition.
LOWER HOLD ON/OFF. (F5)
Activates or deactivates the operation of the storage on the 2 Lower on the Stop position.
F6: PASSWORD. (F6)
Allows you to assign a personal Password to all the Folders on the Hard Disk. This function is useful for those Folders which have previously been locked using the LOCK function. (See DISK functions). In fact, with the Password, these folders benefit from a further protection from erasure procedures, writing and copying on the part of third parties, seeing as you first need to enter your
Password to be able to deactivate the Lock device.
The Password can be assigned to the Folder of the Hard Disk which is active upon operation in the
following way:
1) – Press F 1- Modify. If a Password does not already exist in the Folder, just write the new name
on the NEW line. The name must be composed of a maximum of 6 letters. To confirm, press F 10 –
Confirm.
2) – If an old Password already exists and you intend to modify it, first write the old name on the
HOLD line, then write the new one on the NEW line and confirm it.
CARD LOCK . (F7)
Function of protection from the accidental writing on the Flash Card.
VOCALIZER CHANNEL LOCKED / UNLOCKED. (F8)
You can lock the Vocalizer mode on a specific Midi Channel. This function can be extremely useful
if you possess many Midifiles which have the Vocalizer track on a specific Midi Channel (e.g. 05). In
this case, in fact, if this function did not exist, you would have to set the Vocalizer onto this Midi
Channel for every new Song. You can select the Vocalizer mode within the General Midi (GM) using
the PART MODE – F8 function (Voice, Drum Set, Groove, VOCALIZER).
To access the Lock – Unlock function for the Midi Channel of the Vocalizer, use the F8 button in
the Utility – Pag 3 menu.
SONG PLAY NORMAL/FAST: (F9)
Selection of the access time to the Midifile on Hard Disk. On the NORMAL position, the access time
is the instrument’s normal access time; on the other hand, on the FAST position, the Midifile starts
immediately from the first notes in the sequence, ignoring the fist 1 or 2 initial beats and thus
allowing you to go from one Song to the next much faster.
F10: DELAY LOCK: (F10)
Allows you to lock the type of Delay active at that moment.
Page 32

STYLES
The Style section controls the whole Automatic Arrangement of the X series and consists of the following main sections:
FACTORY STYLES: 198 original Styles sub-divided into 2 banks (A / B).
CUSTOM STYLES: Exact copy of the Factory Styles, but with the possibility of Editing and saving
on behalf of the user.
PATTERNS: Styles freely programmable.
The Factory Styles section includes 198 Styles split up into 2 banks of 99 Styles each (A and B).
The list of Styles may be seen at the top part of the keyboard. In Bank A, mainly modern Styles are
grouped; in Bank B, mostly dancing, Latin, and Folklore type Styles are grouped. The complete list
of Styles is provided at the end of the handbook.
To select a Style:
1 Select the Bank using the Bank A/B key. If the LED is lit, Bank B is in use.
2 Write the number of the Style using the numeric keyboard from 0 – 9.
The name of the Style selected appears at the top left hand corner of the Display.
Style Structure
Each Style is made up of 8 Automatic Instrument sections plus 2 manual sections (Lower).
Drums
Groove
Bass
Chord 1 (Chords)
Chord 2 “
Chord 3 “
Chord 4 (Orchestral)
Chord 5 “
Lower 1 (Manual Tuning)
Lower 2 “
The various parts that make up the Arrangement are:
4 Arranger : A, B, C and D
3 Fill Ins
1 Break
3 Intros
3 Endings
Volume controls
At the bottom part of the main display, the controls of the Arranger Volume are clearly seen together with
the volume control of the Right part. The Volume on the individual parts is controlled by means of the
pair of keys situated at the right hand side of the panel. The Chords section globally controls the first three
chords (1, 2 and 3), whereas the Orchestral section controls the volume of Chords 4 and 5. (Individual
controls are possible within the Arrange View menu). Press the two Volume keys at the same time to reset
the Volume. The Master slider potentiometer adjusts the general volume over the entire instrument
Left Level: globally controls the Volume of the whole automatic section. The value is indicated
on the Display next to “Left Level” and can be modified using the < > Value / Balance keys.
The Left Level value may be saved for each Style in the Custom Style section.
29
Page 33

Tempo: The Tempo is controlled by means of the 2 Slow and Fast keys with a range that varies
between 40 and 250 beats per minute. By pressing the two Slow / Fast keys the tempo is locked
on the value in use at that instant: the condition is pointed out on the Display by an asterisk to
the left of the Tempo value. To release the tempo press the 2 keys at the same time once again.
Start: Style start and stop command.
Hold: Memory function for the Arranger.
Count In / Restart / Pause: this key controls 3 different functions:
Count In: consists of an empty measure executed with the Stick before the Start begins. It is enabled by
setting the key in the Stop position. If the Jump key is enabled, the Count In may be activated and
immediately following press Intro so that Count In and Intro are achieved one after the other.
Restart: if the Restart key is pressed while the Style is in use, the Style will restart from the initial
step despite the point in which it is currently situated.
Pause: Pause function when listening to the Song. It functions only when the Song Play key is pressed.
Key Start: With Style in the Stop position and with the Key Start on, the Arranger starts to play as
soon as a chord is played on the keyboard. If the Hold key is pressed, the Arranger continues to
play even after the keys are released.
Key Stop: with the Key Stop on, the Arranger starts to play as soon as a chord is set on the key-
board just like the Start Key; if however the chord is held down for at least half a second
approximately, after this amount of time the keys may be released and the chord remains stored
in the memory all the same (if the Hold key is pressed). It is possible to accurately control the
stand-by time required for this synchronization function of the Stop Key by means of the
Sync.Time parameter, in the following manner:
1 Press the F 4 key – Arrange Mode from the main display
2 Press the Page > key.
3 The F3 parameter enables the Sync Time function. Use the Value + / - keys to modify the
value expressed in thousands of a second. Higher the value, longer the chord must be held
down before it may be released. In cases of music requiring rapid gaps (i.e. Tango) lower values
may be recommended (i.e. 200 or 300 ms); for slow songs (i.e.16 Beat) it is probably more advisable to select higher values such as 500 or 600 thousands of a second. By pressing the + / - keys
at the same time the standard value of 400 ms is restored.
Key Start + Key Stop: : With both the Start Key and Stop Key on and the Style in the Stop posi-
tion, the Arranger starts as soon as the keyboard is touched and stops as soon as the keys are
released.
Fill Ins 1, 2, 3: are variations of the Style of a timing of 1 measure being brief harmony rhythm ele-
ments. When pressed in the Stop status the Fill Ins may be used as Intros.
Break: the Break is a musical partial or complete stop beat for the entire arrangement.
Jump: the Jump function is used to achieve some special effect combined with the Fill Ins and with
the Intro / Ending:
Jump + Fill Ins: With Jump pressed and the Style in use, each time the Fill Ins 1 and 2 are pressed, the Arranger shifts cyclically from A towards D. If the Fill 3 is pressed the Arranger shifts in
the opposite direction from D towards A. When the Break function is enabled, the Arranger is
not affected.
Jump + Intro/Ending: with Jump enabled in the Stop position, if the Intro is started the corresponding Ending is performed.
With the Jump enabled in the Start position, if the Ending is started, the corresponding Intro is
performed after which the Style continues.
Jump + Count In: with Jump enabled in the Stop position, if Count In is pressed first and then
30
Page 34

Intro these will be performed one after the other.
Intro / Ending: the Arranger foresee 3 Intro’s and 3 Ending’s. The Intro 1 / Ending 1 are mostly
programmed without changing the tuning therefore the user may resolve the harmony as desired. Intro / Ending 2 and 3 are on the other hand programmed with harmony variations within
and therefore it is inadvisable to change the tuning while they are playing. After the Intro the
Arranger is pre-arranged always on Arrange A, unless a different Arrange is selected during the
Intro.
Fade Out: the Fade out enables the “fading out” effect, or rather the gradual decrease in the general
instrument Volume down to zero.
Lock: The Lock function is used to block the arrangement of the Drum, Bass and Chords section in
a differentiated manner so that when switching over to one Arrange to the other the pattern of
that section remains unaltered. This function allows the user to arrange the Style as preferred
creating original combinations amongst the various Arrangers. To activate the Lock function
simply select Arranger first and then press the DRUM, BASS or CHORDS keys depending on the
section to be locked.
When changing the various Arrange you will notice that the section with the Lock enabled will not
be affected.
PIANIST: The Pianist function automatically modifies the keyboard split and transforms it into one
single piano type keyboard. In this condition the Automatic Arrangement can be controlled
playing the keyboard with two hands. There are two Pianist operating modes available: Auto
and Standard. To select them, press F3 – Utility, Page > and then F5 Auto – Standard.
Auto: This mode is selected by default. In the Auto mode, it is sufficient to play a chord of at least 3
notes on any keyboard area. As soon as this chord has been recognised, it is possible to play the
lead with one or two notes on the piano, whereas the automatic accompaniment continues
playing the last chord pressed.
Standard: The Standard mode is selected by means of the Sustain Pedal. If the Sustain Pedal is
pressed immediately after having played a chord on the keyboard, the Arrangement will remain
stored with this specific chord as long as the Sustain pedal remains pressed.
Pianist Sustain: This function is used to activate or deactivate the Sustain effect on the pedal while
the Pianist mode is inserted. To select this function, press F4-Arrange Mode, Page > and then F7.
Manual Bass: this function allows the user to play the Bass manually. Each time the manual Bass is
enabled the 2 Lower Chords and the entire Arrangement are cut out.
31
Page 35

To Lowest: this function causes the Automatic Bass to perform its harmony loop starting always
from the lowest note between those that make up the chord and not from the fundamental note
of the chord acknowledged.
To Root: the Bass to Root function returns all the automatic Bass notes to the fundamental note of
the chord, despite notes or harmony loops programmed in the Arrange.
ARRANGE TO.
Differentiated activation of the Program Changes on the
Arranger section when the keyboard is working with
the Simm loaded and the Card inserted. To have
access to this function, press F9 – Drum Set.
F8 corresponds with the ARRANGE TO option, which
allows you to assign one of the following 3 Program
Changes onto the Arranger:
INTERNAL (Internal Sounds)
RAM (Simm Sounds)
CARD (Card Sounds)
To select, press the F8 button repeatedly. In Simm position, the Arranger can accept the sounds
contained within the Simm as Program Change, and in Card position, it can accept those contained within the Card.
32
Page 36

33
ARRANGER
Each Style is made up of 4 Arrangements , A, B, C e D . A corresponds to the beginning of the
song, B and C are the intermediary variations and D is the Style in its complete form.
ARRANGE MODE: the Arrange Mode menu controls many functions related to the functioning
of the Arranger. It is laid out on two pages.
To gain access to page 1 from the main menu, simply
press F4 – Arrange Mode.
Lower 1- 2 Hold: Use the F 1 and F 2 keys to enable or
disable the Memory in the 2 manual Lower Chords.
The default memory setting is enabled on Lower 1.
Lower 1- 2 Octave: the F 3 and F 4 keys are used to
select the function and the Value + / - are used to select
the octave (from 1 to 3) for the 2 Lower Chords.
Bass+Lower: when the function is enabled (F 5), each time the Style is situated in the Stop status,
the 2 Lower Chords play in the Arranger part together with the Manual Bass, allowing the harmony to be played manually.
Bass Sustain: Sustain control on the Manual Bass. Key F 6 is used to enable the parameter and the
Value + / - keys are used to modify the value. When the Bass + Lower function is enabled the
Sustain is automatically shifted to value 20.
Bass Octave: Octave control of the Manual Bass. Key F 7 is used to enable the function and the
Value + / - keys are used to modify the octave (+/- 3).
Right Swell: this function (F 8) allows the control with the Volume Pedal of the volume part alone
(Right). The Arranger section will play at a constant level, the same as that in use when the Right
Swell function is enabled.
Pedalboard: if the Midi Pedal board Mod. SOLTON K 8 is connected this parameter allows the
user to enable the functioning of the Arranger section on the Pedal board.
To enable the Pedalboard mode, press F4 - Arrange Mode and then the F9 key.
For a correct functioning, it is required to set the RX Midi Channel (reception) of the left section
(globally controlling the automatic Chords) to the same transmission channel as the Midi pedal
board (if a SOLTON pedal board is used, the default transmission channel is channel Midi 02).
Pressing the MANUAL key, the pedal board Bass will be set to the manual mode, like on an organ.
Obviously the pedal board usually plays only pre-arranged major chords.
The tonality can be modified according to two different methods: either with the pedal switches
(see Footswitches FS 13 and FS 6) or with a special 4 switches pedal for guitar players
(Mod. 9AC101).
A special function, the so-called 4-Switch-Mode, is
foreseen for using the pedal Mod. 9AC101. This function makes sure that the chords will not remain stored
after each change of tonality, but automatically return
to major.
In order to gain access to the 4-Switch-Mode press F3Utility, then press Page > to go to page 2 Utility and
then press F9.
Bass to Pedal: this function exempts the Automatic Bass from the keyboard to assign it to the
Pedal board alone. It is a useful function if (in the pedal board mode) the automatic chords are
required from the keyboard and the automatic Bass from the Pedal board.
Page 37

Press F4 – Arrange Mode and then F10 to select this function.
Press Page > to proceed to Page 2 of the Arrange Mode menu:
Set Tempo: this function allows you to carry out a metronomic tempo advancing in pre-established steps. To have access to this function, press F 1 and to choose the furtherance value, use the
Value buttons. Every time you press the Page <> buttons, you speed up or slow down the Tempo
according to the pre-established furtherance value (by default: 5).
AutoCrash: this parameter (F 2) cuts out the automatic Crash Cymbal usually played at the end of
the Fill Ins and Intros of the Styles.
Sync Time: stand-by time control in the Stop Key function before the keys may be released.
(See Start Key / Stop Key functions). The value is changed using the Value + / - keys.
Lower Lock / Bass Lock: these 2 functions (F 4 – F
5) are used to block the voice of the 2 Lower sec-
tions and Bass, so that these remain
unaltered when switching over from one Style to
another.
Chord Mode: with these functions (F 6) you can activate
the selection of the 3 different modes of operation for the
automatic chord recognition: Fingered, Easy 1, Easy 2.
When the Fingered mode is inserted (F 6), the chords
will execute an accompaniment based on the notes that have effectively been played. Therefore, for
example, if you press just two keys, instead of the complete chord you will obtain an accompaniment
made up of just two notes. In Easy 1 mode, the chord recognition is instantly adapted based on the
notes played or released on the keyboard. In Easy 2 mode, the chord recognition is based exclusively
on the notes added. If you remove some notes from the chord previously set (without playing a new
one), the Arranger does not undergo any variations.
Pianist Sustain: this parameter is used to enable or otherwise the Sustain control when the Pianist
effect is enabled. (See Pianist function).
Retrigger & Mode: this menu contains the group of Retrigger functions and the selection of the
Close/Parallel mode for the Bass and the Chords. Press key F8 to gain access to this menu.
Retrigger. The Retrigger on Bass and Chord is enabled using keys F 2, F3, F4, F6, F7, F8.
The Retrigger function consists of the fact that each time a chord is changed the Bass plays the
fundamental note of the chord at all times.
Close/Parallel: this function is used to establish whether the Automatic Chord must play in Close
or Parallel mode. Using Cursor < > the chord is selected and using SELECT the option may be
selected.In Close mode the Chord adapts to the tone changes with close inversions according to
the rules of the musical harmony. In Parallel mode the chord is simply transposed from C to B
without altering the musical intervals of the notes of which it is made up. Press Escape to return
to Page 2 of Arrange mode.
Dynamic Arranger: controls the dynamics assigned to the individual Arranger sections.
To gain access to the function press key F 9 – Dyn. Arr (on page 2 of the Arrange Mode menu).
Active - Inactive : F10 is pressed in order to activate or deactivate the Dynamic Arranger. This function is
on when Active is selected. The Dynamic Arranger value is usually set to 32 for each section, corre-
sponding to 50% of the maximum value available (63). Lower values will produce a feeble variation of
the Arranger parts between low and high dynamics, whereas higher values will produce a much more
evident variation.The value is modified pressing the Value +/e keys.
Reverb Lock: : this function (F 10) is used to lock the type of Reverberation relating to the Style cur-
rently selected, so that it remains active even if new Styles are selected. In this way, the reverberation
remains locked, even upon the execution of a Midifile containing a different reverberation.
34
Page 38

CUSTOM STYLE / ARRANGE VIEW
The Arrange View menu of the X series is sub-divided into 4 pages (Volume, Reverb, Effects, Pan).
It allows an accurate control of all the instrumental parts of the Arranger, allowing the modification
of the Sounds, Volumes and the Effects of each Style before it is saved in the Custom Style section.
To gain access to the menu from the main display simply
press F 5 – Arrange View. Use the Page < > keys to select
the 4 pages. SOUND MODIFICATION: the change of the
voices that characterise the Style may be carried out from
any one of the 4 View pages. The sounds may be modified on each of the 4 Arrange’s A, B, C, D and on each of
the 3 Intros and Endings available.
To modify the sound, simply select the part using the relative function key. The part becomes black for 2 seconds
approximately, during which time the new voice may be searched for in the Voice Bank section. The modification of the sounds on the Arrangers may be carried out also in the Stop position whereas for Intro and
Ending the Style must be in use to do so. The new voices selected remain saved in the memory only until a
new Style is selected. To permanently save them the Style must be saved as a Customer Style. (see below).
Volume (Page1): controls the Volume of the Arranger parts. Use the F 1 – F 10 function keys to
select the parts and the Value + / - keys to modify the value.
Reverb: (Page 2) controls the amount of Reverberation for the various parts.
Effects: (Page 3) controls the type and amount of the effect on the Style parts. To enable the effect,
select the part first (which will become black) and then repeatedly press the same function key to
select Chorus, Delay or Distorsor. Then use the Value + / - keys to modify the amount of the effect.
Pan: (Page 4) controls the panoramic assignment of the Pan / Pot on the Style parts. Select the part
(which becomes black) and use Value + / - to search for the Pan Pot value desired. The available
values range from 0 to 64 for Right and Left . Press both Value keys at the same time to achieve a
position marked by two dashes - - , which corresponds to the central Pan Pot position.
How to save a CUSTOM STYLE : After having modified the Style using the aforelisted Arrange
View functions, the new condition may be saved in the following manner:
1 Press Enter / Save.
2 Press key F 2 – Styles.
3 Press the Save key to confirm. Before saving, the Style name may be changed by writing the
letters using the keys from C2 to F 5 and moving the sector using Cursor < >.
Important: In the Custom Style, together with the parameters relating to Sounds, Volumes, Effects
and Pan Pot included in the Arrange View menu, the following functions are also automatically
saved (See Arrange Mode) :
- Tempo
- Arranger Volume ( Left Level )
- Octave of the 2 Lower Chords
- Retrigger on Bass and Chords
- Close / Parallel mode for the Chords
- Drum Mixer
Volume Reset: Within the Arrange View Menu, you can put an individual section of the Arranger in
Mute condition with the volume at zero by pressing the two Value buttons at the same time.
In this condition, the section always remains with the volume at zero, even if a new Style is selected.
If on the other hand the volume is reset just by using the Value button, this modification is only valid for
the Style in question and therefore if you select a new Style, the normal volume value will be restored.
35
Page 39

DRUM MIXER
This section may be truly defined as a digital mixer specialized for the rhythm section of the X series.
All the percussion sounds of the instrument have been grouped in 10 sections, for each of which it is
possible to control: On/Off, Volume, Reverb. and Pan Pot.
1 - KICK : Bass Drum, Grancassa, Surdo.
2 - SNARE: Snare Drum, Rim Shot, Brush, Roll.
3 - HI HAT: Hi Hat
4 - CYMBAL: Ride Cymbal, Brush Cymbal, Crash, Crashrol, Crashrev, Symphonic.
5 - TOM / FX: Toms, Timbales, Clap, Scratch, Effects, Vocals.
6 - TAMB: Tambourine
7 - LATIN 1: Congas, Bongos, Tambora, Cajon.
8 - LATIN 2: Cowbell, Sticks, Agogo, Cuica, Whistle, Guiro, Vibraslap, Castagnet,
Fingersnap, Claves, Woodblock, Metronome.
9 - LATIN 3: Maracas, Shaker, Triangle, Guira, Fx, Scratch.
The Drum Mixer menu is sub-divided into 4 pages. The pages are selected using the PAGE < >
keys. To gain access to the menu from the main display simply press the Drum Mixer – F 10 key.
Drum On / Off: (Page 1) this function is used to rapidly cut out or enable the 10 percussion sections of the
instrument. The function is extremely useful when personally intervening on the rhythm while playing.
Drum Volume: (Page 2) controls the volumes of the individual percussion sections. Once the part has
been selected the Volume value is modified using the Value
+ / - keys from o to 15 .
Drum Reverb: (Page 3) controls the reverberation.
Use keys F 1 – F 10 to select the part and the Value + / keys to select the value from o to 15.
Drum Pan-Pot: (Page 4) controls the stereo panorama
from 64 Left to 64 Right . The value is modified using the
Value + / - keys, which if pressed together at the same
time set the Pan Pot at the central value. ( the central
value is identified by two dashes - - .)
GROOVES
Section 10 of the Drum Mixer menu controls the Grooves. The Grooves are sampled rhythms taken
from original or recorded performances or even typical modern Dance / Tecno Loops.
They may play alone or in combination with the internal Drum Set without ever falling out of step
with the standard Tempo.
The instrument contains a large number of Grooves within its internal sound memory, which are
used in many of the Factory and Custom Styles stored and can also control a countless number of
Grooves using RAM and CARD (See RAM – CARD chapter).
In the Handbook appendage the Styles that employ the Grooves in the Arrangement are indicated
and the complete List of Grooves with the indications concerning the Sound Bank, Program
Changes etc. is also available.
DRUM SET: The instrument is provided with 16 Drum Sets and 8 User Drum Sets:
001 - STANDARD 029 - RAVE 066 - LATIN
009 - FOLK 030 - HIP HOP 073 - ROCK & ROLL 1 2
010 - ACOUSTIC 033 - FUSION 121 - BEAT
017 - HARD ROCK 041 - BRUSH 122 - ELECTRO
025 - DANCE 049 - ORCHESTRA 123 - COUNTRY
026 - TECHNO 057 - CONTEMPORARY 124 - R&B
028 - PROGRESSIVE 065 - LATIN 125/ 128 - USER DRUM SETS
36
Page 40

Press key F 9 – Drum Set to gain access the Drum Set menu from the main display:
Manual On/Off: Use key F 1 to enable the Manual Drums function, namely the manual functio-
ning of the percussion instruments on the keyboard.
Key Shift: this parameter is used to shift the position of the percussion sounds on the keyboard with a
range of + / - 24 semitones. Key F 6 is used to enable the parameter and the Value < > keys to control the Shift.
Drums to: this function is used to select the association of the Drum Set and of the Groove with
the internal sound generation (Internal) with the Ram Simm (Ram) or with the Flash Card
(Card). The 3 modes are enabled by pressing key F8. The Ram mode is enabled only if the
Simm is loaded with a Sound Bank; the selection of the Card mode will be enabled only if the
Card is inserted in its slot. It is crucial to check this status when Drum Sets or Grooves sent
from the Simm or the Card are used. I.e. if a Card
containing Grooves is inserted, the Drums function
must be set in the CARD position for the Grooves to
run correctly.
Drum Set Edit: this function is used to program new
Drum Sets starting from the 16 pre-existing ones.
Press F 9 – Edit to gain access to the Edit function.
At the center of the Display the name of the Drum
Set in use at the time may be seen and beneath, the
number of the User Drum Set in which the new Set
edited is to be saved.
Press Escape to change the current Drum set and then
select the new number using the Value < > keys.
Manual: F 1 controls the enabling of the Manual Drum
on the keyboard.
Key: this parameter is used to point out the key currently
concerned with Edit. To choose a new key, simply play
the key desired on the keyboard or scroll using the
Value + / - keys.
Group: Use key F 3 – Group to select the function and the Value + / - keys to select the percussion
section concerned (Kick, Snare etc.).
Instrument: F 4 enables the choice of a certain percussion instrument within the same section.
Each section includes many instruments of the same kind. I.e. the Kick section includes 32 different
kinds of Drums (Kick 1 – 32), The snare section includes 46 Snares etc.
The instrument selection is achieved using the Value + / - keys. To evaluate the sound, it may be useful to play the key concerned and scroll the various percussion instruments available at the same
time using the Value keys.
Key Shift: (F 6) transposition of the keyboard in semitones. It is used to shift the entire Drum Set
by an octave or even a few semitones to adapt to Midi sequences that are not programmed according to the GM standard.
Pitch: Tuning of the individual percussion instrument. The parameter is enabled using key F 7 and
the Value < > keys are used to control, by semitones, the tuning of the sound currently enabled
on the Display. The range is + / - 24 semitones.
Drum On/Off: this function is used to return from the Drum Edit display directly to that of Drum
On/ Off.
To save the Drum Set edited, simply press key F 9 – SAVE.
A new name may be given to the Drum Set by writing the letters using keys from C 2 to F 5 and
shifting the sectors using Cursor < > .
37
Page 41

PATTERN
The Pattern section of the X series allows the user to perform the following:
1 Load new styles, over 198 standard stored in the ROM of the instrument.
2 Program complete new Styles.
3 Compose Styles by simply copying parts of the internal Styles or Patterns already stored.
This function enables the composition of new Styles without having to play them to
program them.
4 Completely edit the 198 internal Styles.
All programming and modifications performed on the Styles within the Pattern section are stored
in the memory (provided that they are saved correctly) even after the instrument is switched off.
The Pattern key (situated at the side of keys A/B and Factory/Custom) activates the Styles/Pattern section.
The Patterns may be personally created Styles or Styles of the SOLTON Library for instrument. The
Library Styles must be loaded in the Pattern memory via Floppy Disk ( See DISK: Load Pattern).
The Pattern list
The instrument allows for the list of patterns present in the internal storage to be displayed. To do this,
just press the EDIT PATTERN button when the style is in operation.
198 memory locations are provided for the Patterns, 99 on Bank A and 99 on Bank B.
The Bank is selected, as for the standard styles, using the Bank A/B key.
Bank A = LED off
Bank B = LED lit
To call-up the pattern:
1 Press the Pattern key.
2 Select Bank A or B.
3 Compose the pattern number using the keyboard keys from 0 - 9.
It is advisable to set the Split function on C3 before gaining access to the EDIT PATTERN menu.
EDIT PATTERN
The Edit Pattern key allows the user to gain direct access
to the Edit function concerning the Pattern.
To program a pattern:
1 Press the Edit Pattern key.
2 Select the Pattern number to be programmed
using the keyboard keys from 0 - 9.
The Display shows various Edit parameters in
correspondence with the function keys
PARAMETER
Press key F2 to gain access to this menu.
Before programming a pattern it is advisable to set
most of the parameters shown in this display.
Tempo: The Tempo is always 120 in the empty Pattern.
This value may be modified using the two Tempo
Slow – Fast keys (or using the Value +/- keys).
Time signature: : Musical division of the bars.
The Time signature value is 4/4 in the empty Pattern.
38
Page 42

To modify the value:
1 Press key F2 once only. In this way, the first half of the box relating to the Time Signature
becomes black.
2 Modify the figure using the Value +/- keys. The values that may be set range from 1 to 16.
3 To modify the second Time signature value in the box press key F2 again.
Modify the figure using the Value +/- keys. The values that may be selected are 4 to 8.
The Time signature may be set only when the pattern is empty. After something has been
recorded (using the Record function), this value may no longer be modified, if not after
having deleted the whole pattern.
Autocrash: this function is used to establish whether the automatic crash must be activated after
every Fill, Break and Intro or not. The automatic crash is activated if “V” is left.
Crash level: establishes the volume at which the autocrash is to be played. This parameter is to be
considered only when the Autocrash function is in use. The default value is 96, but may be
modified in the following manner:
1 Press function key F4 to select the box relating to the Crash level parameter.
2 Modify the value using the value +/-keys. The values that may be selected range from 1 to 127.
Lower 1 octave: this is used to define the octave at which the Lower 1 is to be played (manual
chord). The default value is + 1. To modify the Lower 1 octave:
1 Press function key F6.
2 Modify the value using the Value +/- keys. The values that may be selected range from -3 to +3.
Lower 2 octave: the same as the above. To modify the Lower 2 octave:
1 Press function key F7.
2 Modify the value using the Value +/- keys.
Bass octave: establishes the octave at which the fundamental bass is to be played. The default
value is C1 but may be modified by pressing function key F8. The values provided are C1, (the
most common mode) C0 and C2.
Bass type: establishes if the bass is to be played lower or higher than the E0 note. This function
may be modified using function key F9.
4STRINGS: In this mode the automatic bass will never be played lower than the E0 note with 4
strings.
5STRINGS: In this mode the automatic bass may be played down to C0, just like the modern
electric basses with 5strings.
The Bass octave and Bass type functions should generally work together. Let’s see why in the following example:
Let’s suppose we have a style in which the fundamental bass note corresponds to CO. If we want
the bass to perform the pattern correctly, we must set the Bass Octave function on C0 and the
Bass Type on 5strings.
Mode / Retrigger: As may be seen from the illustration below, the two Mode (relating to the
Chords) and the Retrigger (relating to the Chords and Bass) functions are indicated at the centre
of the Display. For the contents and meaning of these two functions, refer to the RETRIGGER &
MODE paragraph within the ARRANGE MODE chapter.
To modify the Mode and Retrigger functions setting proceed as follows:
1 Use the Cursor < > keys to search for the parameter concerned.
2 Modify the value using the Value +/- keys.
Save: to make sure that all the modifications executed in the PARAMETER menu are stored in the
memory, they must be saved by pressing function key F10. After the Save operation, the instrument
replaces “Empty” with “Pattern”. Press function key F5 (Escape) to return to the main display of the
PARAMETER menu (See “Parameter” illustration).
39
Page 43

RECORD
Pattern recording function.
Press function key F1 to gain access to this menu.
Use the RECORD function to create complete Styles entirely
similar to the 198 internal Factory Styles. The parts making
up the Style that may be programmed are the following:
ARRANGE
FILL1, FILL2, FILL3, BREAK
INTRO1, INTRO2, INTRO3
END1, END2, END3.
The individual instrument sections that may be programmed are the following:
DRUM, BASS, CHORD1, CHORD2, CHORD3, CHORD4, CHORD5, GROOVE.
The Groove section is not shown in the RECORD display as it may not be programmed in the
Pattern; we can however use it by copying it from the standard Styles, using the Copy function
(See Pattern copy).
Before actually starting to record, the following operations must be performed:
Choose the part to be recorded:
1 Press function key F1.
2 Choose the part using the Value +/- keys.
Choose the number of the Bars:
1 Position the cursor on the number to the right of “BAR”. The default value is 4 but the
values that may be selected range from 1 to 16.
2 Modify the values using the Value +/- keys.
This parameter may be modified only while the part selected is completely empty. The bar numbers may be selected for the following parts: Intro1, Intro2, Intro3, Arrange, End1, End2 and
End3. The Fills and the Break have a fixed time of 1 bar.
Choose the instrument section to be recorded using the Cursor < > keys.
When the Drum section is recorded, the percussion sounds and the effects located below key 36
and above key 96 may also be used.
To transpose the Drum section:
1 Position the cursor on Drum.
2 Modify the value using the Value +/- keys. The available values are: -12, +12, +24, +36 and 0.
0 is the default value and is displayed with dashes.
Choose the Quantize value:
1 Press key F6.
2 Search for the desired value using the Value +/- keys. The available values are:
Real (real Tempo or no quantization), 1, 4, 8, 16, 32, 4T, 8T, 16T, 32T. The letter T stands
for Triplet, or rather musical division in triplets.
How to record the individual instrument sections:
1 Press key F8. In this way the REC function is selected.
2 Press the Start/Stop key to start Recording. After one bar stand-by (“beat 4 “or” Pre-count”)
we may start playing.
It is crucial to bear in mind the following possibilities when recording the Pattern:
- All the notes played during the Pre-count are entered in the first step of the first bar.
- The last recording totally deletes the previous recording with the exception of the Drum section,
on which subsequent over-recordings may be performed.
- The sounds for each instrument section may be selected using the Voice Banks keys.
- It is possible also to record the variations of tempo in the Drum section using the Slow/Fast keys.
40
Page 44

Playing back the Pattern:
The instrument automatically selects the PLAY function at the end of Recording. To play back all
that has been recorded:
- If the Drum section is concerned, merely press the Start/Stop key.
- If the other sections are concerned a chord must be played on the Left part of the instrument and
then press the Start/Stop key. This is indeed the reason why it is crucial to position the Split function on C3 before gaining access to the EDIT PATTERN menu.
If the quantization of the parts recorded is unsatisfactory we may modify it as follows:
Quantize:
1 Press function key F6.
2 Modify the value using the Value +/- keys.
3 Press function key F7 (Quantize), which confirms the new quantization
This function allows the re-quantization of what was played in the last recording, even a number
of times.
Solo: the Solo function is used to listen to one instrument section at a time.
1 Select the instrument section desired using the Cursor < >keys.
2
Press key F2 to activate the Solo function. This is activated when a “V” appears in the relative box.
Metronome: The Metronome function may be activated or cut out using function key F4.
VELOCITY: used to modify the Key Velocity value of the trace selected.
Press key F9 to gain access to the Velocity menu.
The Velocity control may be adjusted for both the entire track and for the single note.
1 Press function key F1 to modify the entire track.
Press F2 and the NOTE to be edited to modify
the single event.
In both cases, proceed as follows:
2 Press function key F3 to select VALUE.
3 Use the Value +/- keys to establish the increment or
decrement value of the Velocity control.
4 Press key F10 to make the operation effective.
Press function key F5 (Escape), to return to the Record
menu (See illustration)
Clear: depending on the instrument section selected, this function allows the user to delete in a
number of manners. While only the global cancellation of the track is provided for the Bass and
5strings, for the Drum section on the other hand it is possible also to cancel a single note of the
entire Groove section and of the Tempo variations.
To cancel Bass section or one of the 5 chords:
1 Search for the instrument section to be cancelled using the Cursor < > keys.
2 Press and hold down function key F10.
3 While key F10 is held down, press function key F5 to confirm the cancellation of the
entire track.
To cancel in the Drum sections:
1 Position the cursor on Drum.
2 Press and hold down function key F10.
At this stage with function key F10 held down, a number of possibilities are available:
a) Cancel the entire Drum section by pressing function key F5.
41
Page 45

b) Cancel the single note by playing it on the keyboard.
c) Cancel the Tempo variations by pressing function key F2.
d) Cancel the entire Groove section by pressing F1.
The last function indicated may be used if the standard Styles containing the Grooves are edited.
Save: Before starting to program a new part of the Style or before exiting from the Record menu, if
all that has been recorded is to be stored in the memory, function F5 must be pressed (Save).
If the user forgets to press F5, the instrument will offer the user another possibility to save the last
modifications performed. The displays warns the user in the following manner:
"Pattern Changed; F5 Save; F10 Continue".
- Press F5 to save.
- Press F10 to continue the execution without saving the last modifications made.
To exit from the Record menu and to return to the main page of Edit Pattern press the Exit key.
PART CLEAR:
Press function key F3 to gain access to the Part Clear menu.
The PART CLEAR menu is used to entirely or partially
cancel the Pattern.
To cancel the entire Pattern: press key F1, then F10 to
confirm the operation.
To cancel the single parts:
1 Select the Part to be cancelled using the function
keys. To select the Intro, the Fill or the Ending press the relative function key a number of
times. The Part selected is enhanced at the centre of the Display.
2 Press F10 to confirm the operation.
Press F5 to exit from the Part Clear menu.
You can also delete the programmed notes individually. This operation must be carried during
Recording with the Start on: just insert F 10 – Clear and play the notes on the keyboard that you
wish to delete.
To delete one or more notes from the whole sequence, then keep these notes pressed for the whole
length of the programmed cycle.
COPY: the Copy function is used to construct a Pattern by copying Parts or individual instrument
sections of Styles Factory of the instrument or of other Patterns.
Press key F4 to gain access to the Copy menu.
As may be seen from the display, the Style to be copied
is shown to the left (Source) and the destination Style
to the right (Destination).
To copy a Pattern:
1 Use function key F1 to choose the Style group from
which the style to be copied is to be taken:
Factory A/B, Custom A/B, Pattern A/B.
2 Select the style (Source) using the keyboard keys 0 - 9.
3 Press F6 to set the A/B group of the destination Pattern.
4 Select the destination Pattern using the keyboard keys 0 - 9.
At this stage, three possibilities are available
- COPY THE ENTIRE STYLE.
Set Global using key F3, then press F10 to confirm the operation.
- COPY THE PARTS OF THE STYLE SEPARATELY (Intro, Arrange, Fill etc.).
1. Select the Part of the Style to be copied using key F3.
42
Page 46

2. Select the destination Part using key F8. It is crucial to bear in mind that the Arrange are
copied with the Arrange, the Fills/Break with the Fills/Break, the Intros with the Intros and the
Endings with the Endings. It is not possible for example, to copy a Fill on an Arranger.
3. Set All Parts using key F4.
4. Press F10 to confirm the operation.
- COPY THE SINGLE INSTRUMENT SECTIONS SEPARATELY (Drum, Bass etc.)
1. Select the Part of the Style to be copied using key F3.
2. Select the destination Part using key F8.
3. Select the instrument section to be copied using key F4.
4. Select the destination instrument section using key F8. Bear in mind that the Drum section must
always be copied in the Drum section; and the same applies to the Bass section. The chords may
be copied without restrictions, or rather it is possible to copy Chord 1 on Chord 3 and so on.
5. Press F10 to confirm the operation.
When working in the Copy menu, never loose sight of the centre of the Display, which constantly up-dates the user concerning the operations being performed.
PATTERN LIST
This function is used to view the list of Patterns stored in the
instrument memory. Press function key F5 to gain access to
the Pattern list menu. (The list displayed is purely indicative).
You can also access this function from the main display
screen of the instrument, by pressing the Pattern Edit button,
on the top right-hand side of the front panel, when the style
is in operation (start). If the Patterns stored are more than 33,
they are displayed on a number of pages. Use Page +/- keys
to scroll the pages. To exit from the Pattern List press key F5.
DELETE: The Delete function is used to delete the
Patterns stored in the memory of the instrument.
Press the function key F6 to gain access to the Delete menu.
The display shows the complete list of Patterns.
1 Search for the Pattern using the Cursor < > keys.
When these are more than 33, the list is displayed
on a number of pages; use the Page +/- keys to
scroll the pages.
2 Use key F9 to select those to be cancelled.
3 Press function key F10 to make the operation effective.
Press function key F5 to exit from the Delete menu.
DISK SAVE: the Disk save function (F7) allows you to save one or more patterns onto Hard Disk or
onto Floppy Disk:
1 Press F7 (Disk Save)
2 Set the pattern to be saved using the Cursor </> buttons
3 Press F9 (Select) to select the pattern
4 Press F10 (Execute)
5 Enter the name of the pattern under which you wish to save it (using the Value +/- buttons
to change the character and the Cursor </> buttons to advance)
6 Press F10 (Exec.) to confirm.
43
Page 47

MIDI RECORD: from the main Edit Pattern display screen, you can have access to Midi Record F9.
Thanks to this function, you can record the Pattern directly from a complete sequence transmitted
by Computer or Sequencer .
To record a Pattern from Computer :
1 Connect the Midi In 2 of the instrument to the Midi Out of the Computer and the Midi Out
of the instrument to the Midi In of the computer.
2 Activate the Midi Clock In of the Computer (deactivate the Thru if inserted)
3 Deactivate Midi Clock In , Out and Thru on the instrument
4 Prepare the sequence to transmit on the Computer
5 The channel of each track of the sequence must correspond to that of the various sections of
the style as they have already been selected in the Midi RX of the instrument
6 Press the Edit Pattern button
7) Select the MIDI RECORD function using F7
8) Make sure that the Time Signature of the Pattern on the PARAMETER section corresponds to that
of the sequence to be transmitted.
9) Choose the part to record (Arrange A, B,C,D, Intro, Fill etc.)
10) Set the Value Quantize function to the desired value. (In the event of very complex sequences,
we recommend you set the REAL value).
11) Choose the number of Beats to record using the BAR function
12) Press F8 to select REC .
13) Press the Start button. The recording will automatically stop at the end of the set beats. All the
tracks will be recorder in one go.
14) To listen to it again, press Start and play the Pattern normally. In this phase, you can give different Quantizations for the acquired sequence before saving it.
15) To save the Pattern, press F5 Save.
FORMAT: the Format function formats the Flash ROM of the instrument.
This operation deletes all the Patterns stored in the instrument, restoring the available memory
percentage to a maximum of 99%.
This is quite a risky operation and for this reason some Confirm Warnings have been provided
before formatting is actually executed.
If the Flash ROM of the instrument is to be formatted:
1 Press key F10 three times (following the warnings given on the Display)
2 Then press key F5 to definitely confirm the operation.
How to modify Sounds, Volumes and effects of the Pattern.
- To modify the Program Change, Volumes, Pan Pot and amount of the Effect on the Pattern programmed, the ARRANGER VIEW menu must be used, which has already been explained in the
chapter dedicated to the Custom Styles (See CUSTOM SYTLE, Page 32)
- Use the EFFECTS menu to modify the type of Reverb., Chorus, Delay and Distorsor. (See page 22)
How to save the modifications.
Modifications of the Patterns using the Arrange View menu become effective only if they are saved
in the memory by following the procedure below:
1 Press the Save/Enter key.
2 Press key F2.
3 A new name may be given to the Pattern: the letters are written using the keyboard keys from
C2 to F5 (or the Value +/- keys) and the syllable is split using the Cursor < > keys.
4 Press key F10 to save.
44
Page 48

SONG PLAY
The Song Play mode is used to allow the instrument to copy the following from Hard Disk or from
Floppy Disk:
- Midi files (format 0 and 1) according to the GM protocol (General Midi standard).
- Songs Words & Music (Karaoke)
- TXT Files (Text files in TXT format)
Copying a Midi File from Hard Disk or from Floppy Disk
In SONG PLAY the call-up, search and copying procedures of the Midi-files may be performed
while the instrument is playing.
To call-up a Song or Midi-file from Disk:
1 Press the SONG PLAY key.
2 Select the Hard or Floppy disk drive using the
Page +/ - keys.
3 Select the name of the folder desired using the
Cursor < > keys (in the case of Hard Disk).
4 Press F5 Dir to display the list of Midi-files stored
in the Folder or in the Floppy disk selected.
The display shows 20 midi-files for each display,
arranged in two columns.
If the midi-files in the folder (or in the floppy disk),
are more than 20 (this is enhanced by the arrows below
the name of the last midi-file), press the Value + - key
to display the rest of the directory.
5 Select the number of the Song desired using the
Select keys. The number of the Songs is always
made up of three figures, as up to 999 Midi-files
may be sent to a single Folder of the Hard Disk. The number is placed to the left of the
name of the Song within the directory.
Note: The selection of Songs having a number below 100 ( i.e. no. 9 or no. 47) may be made by
entering the relative single figure or the two figures alone. In this case however, the stand-by time of
the Song will be slightly longer.
The display will show the number and name of the Song.
6 Press Start/Stop to start or stop the copying of the Song.
Automatic Search System of midi-files
If hundreds of Midi-files are grouped together in one folder, these would be displayed in the directory in alphabetical order. It would therefore be difficult to search for the song in this manner, and
not very practical (especially when playing live).
This problem may be solved using the Automatic Search System of the midi-file.
1 After having stopped the Song or while the Song is playing, press F5 Dir.
The instrument returns to the directory of the midi-files within the folder (or Floppy).
Together with the midi-files directory, a rectangle will be displayed, situated below “Hard”
or “Floppy Disk”, in which a flashing cursor is seen.
The automatic search of the songs may be executed from this position.
2 Enter, using the keyboard keys (from note C2 to note F5), the initial letter of the song title
desired. This letter will appear inside the rectangle with the flashing cursor and the directory
45
Page 49

will display the 20 midi-files, the title of which, starts with the letter entered previously.
The Automatic Search System foresees the entry of up to eight letters. By adding more letters a more
precise song search is achieved. For example:
To call-up the Song entitled “My Song”:
1 Press note D4 on the keyboard (corresponding to letter M). The letter “M” will appear in
the rectangle and at the same time the directory will display the 20 midi-files starting with
the letter “M”.
2 If “My Song” should not appear on the display, enter the letter Y after M (pressing note D5).
In this way the search will be more selective as the directory will display all the Midi-files
that start with “My”.
NAME ENTRY ERRORS: if the name is entered incorrectly, press F5 and repeat the entry.
3 As soon as the Song is found, press Enter to confirm the selection.
4 Then press Start to start playing the Song.
Function keys that are useful in Song Play
In Song Play, while copying a midi-file, improvised modifications of certain parameters of the same
midi-file and to the right part of the keyboard set for the Song may be performed using the following panel keys:
KeyboardTransposer.: (F3) this function is used to
transpose the Right part of the keyboard only while
the Song is being played. This is obtained by setting
the KeybTrans function in the On position and
using the Transposer function – F4 (See below) to
select the transposition on the Right part only of
the keyboard.
Transposer: (F4) simultaneously performs the global transposition of the Song and of the Right
part of the keyboard. The range is + o – 72 semitones.
The value of the Transposer is modified using the Value +/- keys. Cancel the transposition by
simply pressing both Value +/ - keys at the same time.
Effect: (F2) Press key F2 - Effect to gain direct access to the control page of the standard Effects
of the instrument, which may be adjusted while a midi-file is being played (See Effect
Chapter).
If the Midi-file provides the test, this must be cut out using key F10 – Lyric Off.
The type and amount of Reverb., for example, may be modified by gaining access to the
Microphone and vocalist functions or by using the Equalizer.
On-Line Effects: Insert the On Line Effects button when the Song is playing to have the possibility
of intervening on the Effects of the Right part or Singing
F 1 : Chorus
F 2 : Wha Wha.
F 3 : Delay
F 4 : Overdrive
F 5 : Distorsor
F 6 : Exclusion / insertion of the Effect on the Microphone. (Effect / Dry)
46
Page 50

F 7 : Level of the Microphone’s direct signal
F 8 : Level of Reverberation on the Microphone
F 9 : Vocal Set. Section of the type of Vocalizer using Value .(See KIT VOCALIZER Manual)
F 10 : Exclusion / insertion of Vocalizer. On / Off .
Note: If you wish to play over the entire keyboard, the Split Point must be positioned on C1.
The Right part is not part of the 16 GM parts of the midi file, but is an independent part.
Count/Pause/Restart: this key controls the three different functions.
Count: Selection and starting of a Song from a desired beat number.
1 With the Song Play enabled and in the Stop position enter the number of the song.
2 Press the Count/Pause/Restart key. (The Count box becomes black).
3 Select the beat number from which the play back is to start using the Value + / - keys.
4 Press the Count/Pause/Restart key again. The instrument will position itself on the beat selected and
will enter into the pause position.
5 Press the Count/Pause/Restart key again to start the Song.
Pause: the Count/Pause/Restart key pressed while the song is played sets the actual Song in the
Pause position (the letter “P” to the right of the title of the song points out the function).
Restart: Restarts the Song after the Pause. (The Restart is used also for the Style to restart the
Arrange from the beginning).
GM Part: (F1) This function is used to display every single part of the midi-file. The following
parameters may be modified: Volume – Amount of Reverb. Chorus and Pan Pot Key Shift, Ch.Tx
and Ch.Rx, Part Mode, Mute.
The improvised modifications made to the midi-file may be saved on Disk. The following paragraph
explains how to modify these parameters and how to save them on Disk (Editing of the set-up of a
midi-file).
Fade Out: used during the execution of a Song, it produces the characteristic “fade out” effect.
Song Balance: the volume of the Song with regard to the Right part of the instrument may be
adjusted using the Value +/ - keys. The Song may be balanced only from the Song Play main
display.
Editing of the set up of a Midi-file
This part extends the possibilities of editing midi-files, already dealt with in the chapter dedicated
to the SEQUENCER. (Function. Optimizing and modifying a midi-file).
The procedure is quite simple and immediate. Remain in SONG PLAY:
1 Start the Midi-file desired.
2 Press Stop after 4 or 5 bars.
This will allow the instrument to set all the
Midi-file controls on the various GM parts.
3 Press F1- GM Part.
Warning: Return to the previous display only
when the modification made have been saved,
otherwise these will be permanently lost.
Modify all the GM parameters (see: GM Part –
General Midi chapter) as desired.
4 Press the Save/Enter key.
The display will ask the user whether the new
47
Page 51

48
general set-up of the Song as modified is to
be saved.
5 Press F10 - Execute to confirm or F5 – Escape to delete.
Song Word & Music (Karaoke)
The Song Word & Music (Karaoke) Midi-files of the SOLTON Library are Midi-files containing the
words of the song programmed and in time with the song. The lyrics are indicated on the display
panel and the syllables change colour as the Song proceeds (Karaoke). Press the F7 button repeatedly to highlight the syllables (UNDERLINE and MARK) or to establish whether the display should
indicate the song lyrics entirely (FullScreen) or indicate the words in the upper half and the directory of the folder (only with Hard Disk) in the lower half.(1/2Screen). All the functions and procedures described up to this point for the Midi-files without texts are the same also for the Songs
Word & Music with Karaoke.
Juke Box: (F6)
The Juke-Box function is used to display and copy without interrupting the Midi-files, according
to a NEXT selection or improvised.
Access to this function may be gained even when the Song is being played.
1 Press F6 – Juke-Box, while the main Song Play
display is in use.
2 Select the Hard Disk or Floppy Disk drive using
the Page < > keys (This function is possible only
in the Stop position).
3 View, if necessary, the list of the Songs available in
the Folder or in the Floppy Disk.
4 elect the Song number by entering the numbers
using the keyboard keys 0-9. The number and
name of the Song appear at the top left-hand
corner of the display.
5 Press Start to start the Song copying function.
6 Next. While the Song is being played, it is possible to book the next song, by viewing the
list of Songs using the Cursor < > keys and by selecting the Song desired using the Value
+/- keys. When the Song is selected using the Value keys, its name will be displayed in
the NEXT box.
7 When the Song being played ends or is interrupted, the number and the title of the
song booked previously in the NEXT box appears at the top left corner of the
display.
8 Press Start to start the new Song.
9 tart again from point 3 to continue using the JUKE-BOX function.
10 Press Exit to return to the main Song Play display.
Color: (F7) this function allows you to select the type of highlighting of the Song lyrics:
1 Mark: this is an indicator, situated on the left-hand margin of the display, which highlights
the line of the lyrics synchronised at that moment with the melody.
2 Underline: underlines the lyrics as they proceed with the song line.
3 Full Screen. indicates the lyrics on the whole display
4 1/2Screen: indicates the lyrics in the upper half and the directories in the lower half of the display
Page 52

Lead On/Off: (F8) Cuts out or enables the melodic line of the Song.
Warning: The On or Off position for the Song remains enabled also for all the Songs that follow.
Lead Channel: (F9) Establishes on which midi channel the Song line must be played. The
melody is normally recorded on the Midi 4 channel. If however, some Midi-files have their
melody on channel 1, the Lead Channel may be set on number 1 (pointing out the box with
F9 and changing the value using the Value + - keys), and the melody also on the other Songs
may be cut out using F3.
Orchestra Off: Upon selecting the Lead Channel using the value +- buttons, after having gone
beyond channel 16, the word Orchestr appears. This functions is used to put all the Midi chan-
nels in Mute, except for Bass and drums. To confirm this function, press F 8 and set the Lead
section on Off .
Lyric On/Off: (F10) Enables / Disables the display of the text on the display for the Song Word &
Music Midi-files.
Warning: Once the On or Off position has been chosen, this will remain active also for the Songs
that follow.
Text Files in TXT format
The instrument is capable of handling Files in TXT format, or rather files of written documents on PC
and having .txt extension. This allows the user, for example, to write Song texts on computer, to save
them as text Files with .txt extension and therefore to load them from Floppy Disk onto the instrument.
The TXT files may run on the keyboard in 2 different manners:
1 Arranger mode: the text is visible on the display while the Style is running.
2 Song Play mode: the text is visible on the Display while the Midi-file is running. In this case
the Midi-file is loaded together with the text (provided that the text name is the same as the
Midi-file as indicated below).
TXT Files in the Arranger mode
In the Arranger mode (playing with the Styles), the TXT files are loaded with the usual Disk procedure, choosing the TXT. Section using File Choice (See DISK LOAD).
1 The text loaded will appear on the display.
2 Press Page < > to proceed to the following text pages. This operation may be achieved also
using the pedal switches FS 13 or FS 6).
Font 1/2: The size of the letters may be selected for the TXT files.
From the main display of the Arranger mode:
1 Press key F3 Utility.
2 Press F7- Text repeatedly to select the Font 1 position (small format), Font 2 (large format)
and Off (cut out text).
In the Arranger and Song Play mode it is possible to make the TXT text disappear temporarily by pressing
the Exit key. In Song Play it is not possible to choose the Font, therefore it must be done in advance.
TXT Files in the Song Play mode
Simultaneous loading of a midi-file and relative TXT text file)
In Song Play a midi-file may be automatically called-up (from Hard Disk or from Floppy Disk)
and its relative text in TXT format.
To do this, a Midi-file and a TXT File having the same name must be saved on the same
49
Page 53

Sustain
Soft
Sostenuto
ArrangerA
Arranger B
Arranger C
Arranger D
In/End.1
In.End/.2
In.End/3
Fill 1
Fill2
Fill3
Break
Start/Stop
Count In
Key Start
Key Stop
Rot.On/Off
Rot.Slw/Fst
Registr.Up
Registr.Down
Tempo+
TempoMinor
7th
m7th
5+
dim
glide
kick off
Snare Off
Hi-Hat Off
Cymbal Off
Tom/Off
Tamb.Off
Latin1 off
Latin 2 Off
Latin 3 off
Groove off
Drum lock
Bass lock
Chords lock
Fall Off
Shake
Overdrive
Delay
Wha-wha
Chorus
Reverb
Distorsor
Text PageText Page+
Vocalizer
Jump
Arabic1
Arabic2
Arabic3
Arabic4
Arabic5
Arabic6
Micro Dry
Fade Out
Crash
Voice Down
Voice Up
Harmony
Program
Swell
TrasposerTrasposer+
2nd Voice
Folder of the Hard Disk or on the same Floppy Disk: i.e. mySong.mid (midi file) and
mySong.txt (.txt text).
To automatically call-up the Midi-file and its TXT text:
1 Press Song Play
2 Select Hard or Floppy Disk using keys Page < >
3 Call-up the directory using F5 Dir
4 Select the number of the Song of which the text having the same name is to be loaded.
The TXT text will be automatically displayed.
5 Press Start to start the Song.
6 Press Page < > to scroll the pages of the TXT text, forwards and backwards.
Synchronisation of the Txt file with the Midifile
You can synchronise in real time the feed of the pages of the Txt text within the Midifile. Just use the
Page + button while the Song is playing and the text will be indicated on the Display .
Once the Song has been completed, press the SAVE / ENTER button and then confirm using F 10.
If the operation is not optimal and you wish to repeat it, just press F 4 to restore the original file.
FOOTSWITCH
The Foot switch menu enables the assignment of many functions of the X series to the Pedal control. On request 2 effects pedals may be supplied, the FS 13 (13 switches) and the FS 6 (6 switches). Below is the list of functions that may be assigned to the Footswitch :
To gain access to the Foot switch function from the main display:
1 Press F3 – Utility
2 Press F 5 – Foot switch.
3 To modify the standard configuration of the 13
switches, with Cursor < > the switch is selected
and with Value -/+ all the aforelisted functions that
may be assigned to the pedal are scrolled.
To save a different setting of the Foot switches:1 – Press Save/Enter and confirm using F 10 –
Save.The Default function – F 10 restores the original manufacturer’s configuration.
50
Page 54

ACCORDION
The Accordion menu is reserved exclusively to the accordion. Press key F6 to gain access to the menu.
At this stage,
connect the accordion to the MIDI IN 2 socket if this has not
been done so previously, of which the default setting is
Keyboard (See MIDI UTILITY at page 53).
How to set the parameters for the accordion.
Press the function key F10 to enable the functions of the
Accordion menu. As soon as ACTIVE is set, the Midi
Receive automatically positions itself on Accordion 1.
This automatic function has been achieved to facilitate the midi connection to the accordion.
The Midi ACCORDION 1 set-up is effective with most of the accordions currently available.
International or Belgique: This parameter must remain on International with all types of accordions, barring those that use the recognition system of the Belgian type chords.
Press key F1 to switch over from International to Belgique.
Left Velocity: This is used to set the dynamics of the voices that are manually played with the
accordion chords. To modify the value:
1. Press F2 to select the function.
2. Modify the value using the Value +/- keys.
The value to be set may vary depending on the accordion.
Right Velocity: This is used to set the dynamics of the voices that are played on the right section.
51
SONG RECORD
The Song Record function consists of the registration of a sequence played in real time on the keyboard. All the Midi events and variations applied to the control panel such as Tempo, Sounds,
Volumes, Effect etc. are recorded in the sequence.
The Song is directly recorded on Disk ( Floppy or Hard ) as standard Midi-files .
To record the Song:
1 Press the Song Record key.
2 Before starting to record, a name must be given to
the sequence. Write the letters using the C 2 to F 5
keys; shift the sector using Cursor < >, then press
F 10 – Save.
3 The Display will show a new message " Press F 10
to Start Record ". Press Start.
4 “Recording” will be enhanced on the main Display.
The sounds may be modified and the Style may be selected from this status before starting to
record. Recording starts as soon as the first event is enabled, or rather the first note is played or
Start, Intro or Ending is activated and ends when the Song Record key is disabled.
To listen to the Song:
6 When the Song Record key is disabled, the keyboard automatically pre-arranges itself in
Song Play with the sequence just recorded.
7 To listen simply press Start.IDI
Page 55

To modify the value:
1. Press F3 to select the function
2. Modify the value using the Value +/- keys
The Left Velocity and Right Velocity functions are extremely useful when using an accordion
without the transmission of expressive control.
Left Drum: When this function is ON, the Drum section of the instrument may be played manually by means of the bass and chords of the accordion. Use key F4 to enable or disable the function.
The percussion sounds and the respective dynamics value is displayed at the centre of the screen.
Two percussion sounds are provided for both the bass and the chords of the accordion. To modify
the sounds and the respective set dynamics value:
1.
The sounds and the dynamics value to be modified are selected using the Cursor < > keys.
2. The new sounds and the respective dynamics values are found using the Value +/- keys
When a sound is to be completely cut-out, merely position the dynamics value at 0. It is advisable
to use the Left Drum function when one of the styles of the keyboard is disabled.
Bass Sustain: This is used to select the length of the sustain on the manual bass. This function is
operational only when the Manual key is lit. To modify the value:
1. Press key F6 to select the function.
2. Search for the value desired using the Value +/- keys.
Bass to Chord: When this function is ON, the bass note becomes part of the recognition of the
chord. It is thus possible to play special chords that are not typical of the accordion.
Example: By playing the Do Major chord and the Si bass, a chord of Do 7m is achieved.
Bass Octave: This is used to select the octave of the manual bass. This function too is effective
only when the Manual key is lit.To modify the bass octave:
1. Press key F8 to select the function
2. Search for the new value using the Value +/- keys
Lower Octave: This is used to select the octave of the two Lowers.
1. Press key F9 once to select Lower 1; Press key F9 twice to select Lower 2.
2. Modify the values using the Value +/- keys.
Use key F9 (Escape) to exit from the Accordion menu.
Some useful tips for the accordionist
1. Connect the midi cable to the Midi In 2 socket.
2. Activate the Accordion menu
3. If the accordion sections (Right, Bass and chords) fail to play correctly, make sure that the
midi channels have been set correctly.
4. If the setting of the Channel Receive is modified, save the new setting as Accordion 1. This ope-
ration is used to automatically call-up the new Midi setting when the Accordion menu is activated.
5. There are two Midi Set-ups reserved to the accordionist, namely Accordion 1 and Accordion 2.
6. Accordion 1 is advisable when automatic styles are used or when a manual accompanimentis played.
7. Accordion 2 is advisable when classic songs are played. In fact, it is thus possible to control
all 16 parts of the Midi In 2 from the accordion.
8. The Accordion menu may be saved in Registration.
9. To set the bass in Manual mode, activate the MANUAL function using the appropriate key.
52
Page 56

OUT ASSIGN
This menu controls the assignment of the various parts of the instrument on the 4 Audio outputs
available. There are 2 separate modes for the audio assignment, one concerning the keyboard and
the other concerning the General Midi (GM).
Keyboard Out Assign
To gain access to the menu from the main display:
1 Press F 3 – Utility
2 Press Page > to proceed to the second Utility page.
3 Key F 6 – Keyboard Out Assign enables the control function of the outputs for the
Keyboard, or rather over the various parts: Drums, Bass, Chords, Lower, Right, Microphone.
L&R Standard: (F 1)
normal stereo functioning
mode of the keyboard with the Left/Mono 1 and
Right 2 outputs.
L&R Out 3: (F 2) this function is used to send one or
more parts of the instrument to Output 3 using the 2
L/R stereo outputs at the same time.
Use Cursor < > to scroll all the parts and use Value
+ / - to confirm which parts are assigned to Out.3.
The effects remain activated on Left and Right. Output 3 is without effects.
L&R Out 3 & 4: this function is used to send one or more parts of the instrument to either
Output 3 or Output 4. The control is the same as above for L&R Out3.
Using this combination, only the Chorus, Delay and Distorsor effects remain activated on the
Left and Right (the Reverb. is cut out).
Separate 1, 2, 3, 4: this function enables the free assignment of the parts of the keyboard to any
of the 4 Outputs available. Using this combination, all the internal instrument Effects are cut out.
The Cursor is used to select the parts and the Value + / - keys to select the Output.
The Default function restores the initial conditions on each of the Out Assign combinations.
GM Out Assign: Assignment of the separate outputs for the 16 GM parts. To gain access to the
menu from the main display:
1 Press F 3 - Utility
2 Press Page > to proceed to the second Utility page.
3 Press key F 7 – GM Out Assign.
This section controls the assignment of the
outputs on the Percussion sections and on the
16 General Midi parts
The selection of the parts and the assignment of the Outputs is performed in the same way as for
the aforesaid Keyboard Out Assign.
The Default function – F 6 restores the standard mode on each of the combinations.
53
Page 57

ARABIC
The Arabic Menu enables the modification of the standard tuning of the X series, adapting it to the
types of tuning commonly used in Arabic countries.
The variations of the Transposer also act on the Arabic scale.
To gain access to the menu from the main display:
1 Press F 3 – Utility
2 Press key Page > to proceed to the second Utility page.
3 Press F 1 – Arabic.
Left: (F 1) this parameter is used to establish whether
the Arabic scale intervals are to be operational also
on the Arranger and Lower part of the instrument.
By pressing F1 repeatedly the mode is selected.
In the NO position, the Arabic functioning is cut
out from the whole left part.
Footswitch: (F 6) This button activates the NOTE MAPPING function that allows you to assign
the alterations of the Arabic scale to the Footswitch buttons and the ARABIC SET function that
automatically activates the 6 Arabic combinations that the instrument can store on the first 6
switches of the Footswitch (FS6 or FS 13).
Arabic Scale: The selection of the intervals of the Arabic scale is achieved using the keyboard
keys from C 5 to B 5. Each time a key is pressed, the corresponding note on the Display
becomes black. The number - 50 refers to the tuning
of a quarter of a tone (the exact semitone would
have a value of 100 ).
Using the Value + / - keys the tuning of each key
may be modified with extreme preciseness within
the range of – 100 / + 99.
If the same key is pressed twice the value is reset.
The Normal key – F 10 restores the standard tuning.
6 different types of tuning may be saved according
to the Arabic scale on 6 Arabic locations.
Proceed as follows to save a certain Arabic scale setting after having modified it:
Press Save / Enter.
Use Cursor < > to select the Arabic location and F10 to confirm.After saving, the Display
returns to the Arabic Scale display.
The 6 Arabic locations saved may be easily activated while playing live using the pedal switches
FS 6 and FS 13 (see Foot switch).
54
Page 58

REGISTRATION
The Registration function consists of the global saving of the general status of the instrument with its main
functions. Two types of Registrations are available on the X
series: Block Registrations and Single Registrations.
The selection between the 2 types is achieved in the
following manner:
1 - Press key F3 - Utility
2 - Press Page >
3 - Press key F8 to select Block or Single.
Block Registrations
The Block registration concerns the entire block of 198
Registrations within the instrument, split up into 2 Banks of 99 registrations each (A and B). The Block
mode will be
that enabled when the instrument is turned on. All the external panel commands together with
their relative functions may be programmed in Registration and also the internal parameters of the various
operational menus. The selection is made, as for the Styles, by means of the numerical keyboard from 0 to 9.
To save a Registration: supposing we have already set the instrument panel as desired, having
selected the Style and modified the Tempo, Volumes, Sounds etc..
To save, simply:
1 - Press Save / Enter.
2 - Press F 1- Registration.
3 - Use the keyboard 0 – 9 to select the destination number of the Registration and the A/B key
to select the Bank. A name may also be given to the Registration by writing the letters using
keys C 2 to F 5 and shifting the sector using Cursor < > .
4 - Press F 10 – Save to confirm.
The Registrations thus saved are stored in the memory even after the instrument has been switched off.
Single Registration
The Single Registration is a Registration exactly the same as the internal Registrations of the Block
Registrations group, with the exception that it is controlled via Disk only (Hard or Floppy) and therefore is saved and called-up from Disk individually, one at a time. (The Single mode is selected in
the manner described at the beginning of the Registration chapter).
How to save a Single Registration on Disk (after having set the instrument panel in the mode desired):
1 - Press Save/Enter
2 - Press key F1 - Registration
3 - Name the Single Registration
4 - Select the folder of destination by means of the nume-
ric keypad 0-9
5 - Press key F10 to confirm
The Single Registrations are saved on Disk in alphabetical
order and with their individual progressive number. To call them up, merely type-in the number using the
keyboard from 0 to 9. Unlike the Block Registrations, the number of the Single Registration is made up of
3 figures which allows, for example, up to 999 Single Registrations to be sent to a single folder of the Hard
Disk. For numbers made up of 1 to 2 figures simply type-in only the single figure or the 2 relative figures.
If there are files.TXT or Midifiles on the Disk bearing the same name as the Registration, the homonymous
text file as well as the Song will instantly be loaded together with the Single Registration. To activate the
Song, just press the Song Play button and Start. These functions are most definitely useful for musicians
who love performing live using the Styles, because they allow them to manage the Style, the sound of the
Song, the song lyrics and the Midifile using just the one Single Registration.
55
Page 59

MIDI
The Midi, Musical Instrument Digital Interface, is an international communication interface that
enables equipment provided with Midi to exchange musical information.
The X series is provided with a wide range of Midi functions that allow it to adequately interface
with complex Midi systems.
The keyboard may function with 32 Midi channels, 16 related to the GM standard and 16 related
to the internal instrument sections. (Rhythm, Bass, Arranger etc.).
Note: Never use Midi cables longer than 15 meters as this could cause errors during data transfer.
To gain access to the Midi menu from the main
display, press F 6 – MIDI.
This display shows all the main functions relative to
the Midi for the internal instrument sections.
Lets take a closer look at them in order.
Channel Transmit: (F 1) Press key F 1 to gain access
to the control of the Midi Transmission Channels for
all the instrument sections. Cursor < > is used to
select the various parts and Value + / - to select the
number of the Midi Channel from 1 to 16.
The function key F 4 enables the automatic switchover between the two Receive and Transmit menus.
The Escape key – F 5 is used to return to the initial
display.
Channel Receive: (F 2) controls the Midi Reception
Channels. It functions identically to the Transmit
Channel section.
Midi Set up: these are pre-fixed Midi setting combinations, typical for some types of keyboard
connections to external devices.The Midi Set Up are available for both the Midi Transmit section
and Midi Receive section.
The Midi Set up may be freely edited and therefore saved by means of the Power On Set Up function
(See the relevant passage), so that it is automatically enabled when the instrument is switched on.
Midi Set Up Transmit: General, Master Keyboard, User 1, User 2, User 3, User 4.
Midi Set Up Receive: General 1, General 2, Accordion 1, Accordion 2, User 1, User 2.
Transposer Transmit / Receive: (F 3 - F 4) Controls the Midi transposition in transmission and
reception.
The overall range is + / - 72 semitones (6 octaves). The Cursor keys are used to select the part
and the Value + / - keys to select the value.
Filter Tx / Rx: the 2 Filter functions (F 5 – F 6) control
the enabling or otherwise to receive/transmit on behalf
of the instrument of some Midi information concerning exclusive Messages, Keys, Volume, Effects etc.
To select the type of message use the Cursor < >
keys; the cut out of the reception/transmission part is
achieved using the Select key – F 10 (an asterisk
points out the part cut out) .
56
Page 60

Program Change Tx / Rx: (F 7 - F 8) control function
for the transmission/reception of Program changes on the
various instrument sections. The second box (2nd / Prg)
refers to the Program change of the 2nd Voice and to that
of the Programs dealt with as a single voice.
The last 4 boxes (Voice 1 – 4) refer on the other hand to
the individual Program change of the 4 Voices that may
be assigned to the Program.
Use the Cursor key to select the part and the Select key to
disable the tx/rx function for the program change
(an asterisk appears on the part cut out).
Clock - SoftThru: (F 9) this parameter controls 2 func-
tions: the Clock and the Soft Thru . Use the Cursor to
select the part and Select - F10 (asterisk) to confirm
the activation of the function.
Clock In: Clock is a standard message for Midi synchro-
nization. If the Clock In is enabled the Start of the
instrument awaits the incoming Midi synchronization
message sent from external units.
Clock Out: When Clock Out is enabled, the Clock Start signal
is sent from the instrument to the external Midi units, which
consequently activate their start in perfect timing.
Soft Thru 1/2: the Soft Thru function consists of the
direct re-transmission on the Midi Out of the data received to the Midi In. It may be separately enabled on Midi
In1 – GM ( Soft Thru 1) and on Midi In 2 – Keyboard
(Soft Thru 2). The Cursor is used to select the Soft Thru
1 or 2 and the Select key to enable the function.
MIDI UTILITY
Access is gained to some special Midi functions using key F 10 – Utility
Midi In 1: (F 1) this function enables the modification of the initial Midi setting according to which
the GM is always combined with Midi In 1 (16 parts). Press F 1 to establish that the Midi In 1
may function in the two GM or Keyboard modes.
Midi In 2 / Computer: (F2) as above but related to the Midi In 2. This function establishes also
which type of Midi Input is used by the Computer Interface socket.
Midi Out: (F 3) this parameter selects which Midi configuration (GM, Keyboard or GM+Keyboard)
must be sent to the Midi Out.
Computer Out: (F 4) as for Midi Out but related to the
Computer Interface socket.
Computer: (F6) this parameter is used to select the type of
Computer (PC or McIntosh) to which the instrument is
to be connected if the Computer Interface socket is used.
The condition is selected by pressing repeatedly key
57
Page 61

F 6. In the NO position the Comp.Interface socket is not enabled.
Local On /Off: (F 7) when the Local parameter is set in the OFF position, all the internal sections
that are set in Midi Reception will no longer function via keyboard. In this case the instrument
may be used only as a sound module via Midi.
GM PARTS (General Midi)
The GM section of the instrument enables the accurate control over the contents of the 16 parts that
make up the General Midi Standard.
The Midi In 1 (GM) socket is that pre-arranged for the correct functioning in General Midi
Standard.
To gain access to the GM menu from the main display simply press F 1 – GM.
The Display will appear as follows:
To modify the parameters within the first GM display:
1 Use the Page < > keys to select the Midi parts from 1 to 16.
2 select the function using the F 1 – F 10 keys and modify using the Value + / - keys.
Volume - Reverb- Chorus - Pan Pot: (F 1- F2 - F3 - F 4) Reverb- Chorus – Pan Pot : (F 1- F2 –
F3 – F 4) Volume, Reverberation, Chorus, Pan Pot controls. The Delay and Distorsor effects are
also included in the Chorus parameter, which may be selected using Cursor < >.
The amount of the effect is controlled using the
Value + / - keys.
The Pan Pot ranges from 0/64 Left to 0/64 Right ;
Press both Value keys together to set to zero which
corresponds to the Pan Pot in central position.
Filter: the Filter function is used to enable/disable the
reception of some Midi messages on the single 16
parts of the General Midi. To gain access to the function press key F5.
Use key F 1 or F 6 to select the first 4 channels; with F 2 or F 7 channels from 5 to 8 and so
on through to 16.
Use the Value + / - keys to select the various Midi controls that may be disabled namely:
Note, Control Change, Program Change, After Touch, Pitch Bend, Volume, Pan Pot, Reverb,
Chorus, Modulation Wheel, Expression, RPN, NRPN.For each one of these controls, it is possible
to establish whether they are to be filtered or not by means of key F 10 – On/Off. In the ON position a certain function is disabled; in the OFF position it is enabled.
Key Shift: Tuning transposition + / 24 semitones. The value is changed using the Value + / - keys.
Channel Tx / Rx: transmission and reception channel control. Use key F 7 to select Tx or Rx; use
the Value + / - keys to select the channel.
Part Mode: this parameter is used to establish whether a certain Midi part must function as Voice or as
Drum Set. This mode may be useful if the Midi-file is programmed with 2 separate Drum Sets.
Press key F 8 repeatedly to select the mode.
Mute: (F 9) cut out of the single part. If the 16 Parts function is enabled when Mute is in use, the
Volume display appears (see below).
16 Parts: (F 10) This function is used to globally display the mode of all the 16 Midi parts rela-
ted to the single parameter in use at the time (Volume, Reverb, Chorus etc.). I.e. if the
58
Page 62

Volume parameter is in use (F 1), and the 16 Parts
function is enabled (F 10) the Display will appear as
follows: Use key F 1 or F 6 to select the first 4 parts,
with F 2 or F 7 the parts from 5 to 8 and so on through to 16.The Volume value is modified using the Value
+ / - keys. When a single part is selected, this becomes black and it may be Muted by pressing key F 10.
To cut out the Mute on the part, simply press key F 10
again while the part is selected.
(The Mute mode is not enabled in the case of the GM
Filter function).
When one of the 16 Parts display is shown, the next
display may be pulled up or the previous display using
the PAGE < > keys.
REMOTE GM LEVEL. Global Volume control for all 16
GM parts of a Module connected to the Midi In 1 of
the instrument. To activate this control, use the two
Page + / - buttons with Volume values ranging from 0
to 16 and only intervene during Song Play with Start inserted.
HOW TO CALL-UP THE INSTRUMENT SOUNDS VIA MIDI
Voices Type Control Change 0 (Bank) Program Change
Voices Bank A Value: 0 1-128
Voices Bank B Value: 1 1-128
User Voices Value: 2 1-128
Flash Card Voices Value: 3 1-128
Grooves (Internal) Value: 4 1-36
Grooves (Flash Card o Simm) Value: 4 113-128
Drawbars Value: 5 1-16
Simm Voices Value: 6 1-128
MSP o Files.Wave Value: 7 1-8
Drum sets (Internal) 1-112
121-124
User Drum set 125-128
Drum sets (Card) Value: 3 113-120
Drum sets (Simm) Value: 6 113-120
Programs 1-128
One touch 1-48
Registrations Value: 0 1-128
Value: 1 1-70
Program: To call-up a Program via Midi, the relative Program change must be sent to the Right
midi channel. To perform this operation the Program key must be lit.
One touch :
To call-up a One touch selection via Midi, the relative Program change must be sent to the
midi channel of the Right section. To perform this operation the One touch key must be lit.
Registration: To call-up a Registration via Midi, the relative Program change must be sent to the
Registration midi channel. The Registration may be called-up even if the key is OFF.
59
Page 63

DISK
The Disk menu controls all the functions relating to the Floppy Disk and to the Hard Disk of the X series.
The Floppy Disk drive driver supplied with the instrument controls disks from 730 and 1.44 Kbytes.
The Hard Disk (optional) is the ATA – IDE 2,5” type with a capacity of 1Gbyte to 8Gbytes.
The installation of the Hard Disk may be achieved at an authorized centre and in any event by
highly skilled personnel.
The Hard Disk is sub-divided into 99 Folders (or files) each of which can control up to 999 files of
various types.
To gain access to the Disk functions:
1 Press the Disk key.
2 Use the Page < > keys / Hard /Floppy to select
the Hard or Floppy drive. (If the Hard Disk is not
inserted, the Floppy drive will always be activated).
3 The Display supplies the screen relating to the
global directory of the Files stored on Disk.
The directory pages are scrolled using the Cursor keys
(if these are more than one) and the single file is selected
using the Value + / - keys.
Each file is identified by its extension:
- Midi-file: .Mid
- Pattern: .Pat
- Custom Style: .Sty
- Program: .Prg
- User Voice: .Usv
- Registration: .Reg
- MS DOS Text: .Txt
- Sound Bank: .Snd
- Single samples: .Wav
- Multiple samples: .Msp
Let’s see the Disk functions in detail.
DIR: (F1) The Dir function supplies the global directory of the Disk at all times.
LOAD: (F2): File loading function from Disk (Floppy or Hard) to the internal memory of the
instrument. The loading function may be performed by directly pointing the file form the general
directory (in which all the files stored on Disk are listed). This solution is useful if the directory
does not contain a large number of files (i.e. floppy).
When the files are many and different, such as on Hard Disk, then the Load operation may be
performed after having selected the desired section first (Pattern, Programs, User etc.) by means of
the File Choice parameter (F5). (See below).
The loading operation may be single or multiple.
In the case of single loading the file selected (or rather the black file) is loaded by simply pressing Load.
In the case of multiple loading 2 procedures are possible:
PARTIAL LOAD: Select the files to be loaded using the Value + / - keys and the Select function –
F10. The files selected will be indicated by an arrow at the left-hand side. Press F2 – Load to confirm.
GLOBAL LOAD: make the global selection of all the files shown on the Display by pressing both
Value keys simultaneously (an arrow to the left of all the files will appear). Then press F2 - Load
60
Page 64

61
to confirm.
The Load operation concerns all types of files with the exception of the Midi-files (. Mid ). If File
Choice is pressed and Midi-file is selected and the Load function is disabled.
The multiple Load function may be useful for the Pattern, Custom Styles, Wave and Multiple
sample files. In the other cases, simply load the single file, as each file already includes all the
effects of the same type within the keyboard.
For example, a Program or User file includes all the 128 Programs and the 128 Users programmed
on the instrument, a Registration file includes all the 198 Registrations available and so on.
Load Sound: The Loading of the Sound Files is simpler than that of the other files. There are three
types of Sound files:
- SOUND: corresponds to a complete Sound Bank of the SOLTON Library for X 1 and consists
of a block of Sounds (or Grooves) of 8 or 16 Mbytes that may be loaded on Ram (Siam) or Card
(See RAM / CARD chapter).
- WAVE: the .Wave files are samples in Sample standard format (Microsoft) that the keyboard is
capable of importing, reading, saving. The .Wav extension is also applied to the new single samples achieved on the instrument by means of the Sampler function (See SAMPLER).
- MSP : Multiple-sample. The Multiple-sample is a sound made up of a number of samples
(.Wave) assigned to various areas of the keyboard. The samples may be the new ones achieved
with the instrument or also external.Wave samples.
To enable the loading of one of the three types of Sound from Disk to Ram Simm:
1 Select the type of sound using keys F1, F2 or F3.
2 Choose the file to be loaded using the Value +/- keys.
3 Press key F2 – Load to confirm the operation.
We remind you that the .SOUND file related to a complete Sound Bank will take up 8 free Mbytes
of the Simm and may be selected by enabling the RAM key.
The .wave files and .Msp (Multi-sample) files will be
allocated on the first free location between the 8 available
on User Voice – Bank 2 , from no. 17 to no. 24.
SAVE: (F3) The Save function is used to save the data
stored within the keyboard on Disk (Floppy or Hard).
1 Before gaining access to the Save function,
select the Floppy or Hard drive to be used for
saving using the Page < > keys.
2
Press the Save key – F3. The Display sets
itself in the File Choice display (See below)
allowing the choice of which section to be
saved on Disk.
3 Select the section to be saved using function keys
F2 – F10. The Display appears for the saving of
all the other functions in the same way as for the
example illustrated for the Programs:
4 Give the File a new name and press F10 –
Execute to confirm.
COPY
the Disk Copy function enables the copying of files from Hard Disk to Floppy (and vice versa).
How to copy the files from Floppy to Hard Disk.
Page 65

1 Insert the Floppy Disk containing the files to be copied in the instrument Drive.
2 Select Hard Disk using the Page < > keys.
3 Select the TargetFolder using the keyboard from 0 to 9, namely the folder in which the files
will be copied.
4 Select Floppy Disk using the Page < > keys. The display will thus indicate all the files
stored in the disk
5 Select the files to be copied. Scroll the page using the Cursor < > keys and move from one
to file to the other using the Value +/- keys. Use key F10-Select to select the files to be
copied. If only files having a certain type of extension (i.e. only midifiles) are to be
displayed before making the selection, press F5 (Files choice), then choose the extension desired using the function keys from F1 to F10 (in this case, F5 Midifile).
At this stage select the files to be copied following the procedure described in point 5.
6 Once the files have been selected, press key F4-
Copy.
7 We have the following possibilities in the Disk
Copy menu:
Press F10 (Execute) to copy one file at a time.
Press F9 (Copy All) to copy all the files selected.
Press F8 (Skip) to skip the copy of a certain file
and to proceed to the next one.
Press F5 (Escape) to cancel the operation and to
return to the main page of the Disk menu.
How to copy the files from Hard to Floppy Disk
1 Insert a Floppy Disk with a certain amount of available memory in the instrument Drive.
2 Select Hard Disk using the Page < > keys.
3 Select the Source Folder using the keyboard from 0 to 9, namely the folder containing the
files to be copied. The display will thus indicate all the files contained in the folder.
4 Select the files to be copied. Use the Cursor < > keys to scroll the page and the Value +/-
keys to move from one file to another. Use key F10 to select the files to be copied.
If only files having a certain type of extension (i.e. only midifiles) are to be displayed before
making the selection, press F5 (Files choice), then choose the extension desired using the
function keys from F1 to F10 (in this case, F5 Midifile). At this stage select the files to be
copied following the procedure described in point 5.
5 Once the files have been selected, press F4 - Copy.
6 We have the following possibilities in the Disk Copy menu:
- Press F10 (Execute) to copy one file at a time.
- Press F9 (Copy All) to copy all the files selected.
- Press F8 (Skip) to skip the copy of a certain file and to proceed to the next one.
- Press F5 (Escape) to cancel the operation and to return to the main page of the Disk menu.
See figure.
FILE CHOICE: the File Choice function (F5) enables the selection of a certain group of Files from
the general directory of the Disk. This is quite useful when rapidly searching for a file or a number
of files on Hard Disk, where hundreds of files of various extensions may be saved in the same
Folder. The groups of files are:
- Program
62
Page 66

- Registration
- Pattern
- Custom Syles
- Sound (Sound, Wave, Smp)
- Text
- User Voice
- User Drum
To select the type of file simply press the corresponding function key and the Display automatically
supplies the directory of the Files pre-selected.
DELETE:
This function is used to delete files on Disk. Likewise for all said above for the Disk Load operations, the Delete function may be Single or Multiple and may be performed from the main directory or in a more selective manner, section by section by means of the File Choice function.
To delete:
1 first select the file using the Value + / - keys (Select for multiple selection)
2 press Delete – F6.
3 The display will request further confirmation. Press F10 – Execute to confirm the
cancellation or F5 - Exit to exit.
RENAME:
To change the name of the file. The renaming may be performed individually.
To rename a file:
1 select the file using the Value + / - keys. The file may be selected from the general directory
or from the pre-selected section using the File Choice function.
2 Press Rename – F7.
3 Write the new name using the keys from C 2 to F5 and moving the sector using the
Cursor < > keys.
FOLDER: the Folder menu (F8) enables the display and editing of the Folders stored on Hard Disk.
The folder is selected by means of the 0-9 Select keyboard.
- New: (F1) the New function enables the creation of a new Folder. To do this, simply write the name of
the new Folder and confirm using key F10 – Execute.
- Delete: (F2) global cancellation of the Folder.
To delete, select the Folder concerned (which will become black) using the Value + / - keys and
press F2 – Delete.
The display will request the user to confirm the operation twice before allowing the Folder to be
effectively cancelled with key F10 – Execute. To cancel the operation press F5 – Exit.
Warning: the Delete Folder operation permanently cancels all the Files stored in the Folder.
Before performing the operation it is advisable to carefully evaluate if there are any files to be recovered, copying them onto another Folder of Floppy Disk.
-
Rename: (F3) Folder renaming function. Write the new name and confirm using key F10
– Execute.
- Lock: (F4) the Lock function allows the user to enable a safeguard against accidental Folder canceling
or modifications. The Lock function makes it impossible to Delete or Rename a Folder.
To enable the safeguard select the file using the Value +/- keys and press F4 – Lock.
To disable the safeguard press Lock once again while the Folder concerned is activated.
63
Page 67

- Report: the Report function allows the user to save the document related to the contents of the
Folder currently in use on Floppy Disk.
The document will have a .TXT extension and will bear the same name as the Folder. The directories it contains are divided up according to extension and are ranked in alphabetical order.
This document may be easily read and printed using a normal IBM compatible personal
computer.
The possibility of printing the directory of the various Folders on paper may prove quite useful if
the Folder holds many Files.
To save the document on Floppy disk simply select the Folder concerned and then press F6 –
Report.
Copy: This function enables the copying of files from one folder to another on the Hard Disk..
In order to copy files from one folder to another:
1 Press F7 to gain access to the Copy menu.
2 Select the Source Folder, containing the fils to be copied, using the keyboard from 0 to 9.
3 Select the files to be copied, which will be displayed in the center of the display.
Use the Cursor < > keys to scroll the page and the Value +/- keys to move from one file to
another. Use key F10 (Select) to select the files to be copied.
4 Press F8 (Target folder) to select the target folder.
5 Use the Value +/- keys to select the folder into which the files are to be copied (These folders
must be already existing and must be named).
6 Press F10 Execute to perform the copy.
7 We have the following possibilities available:
Press F10 (Execute) to copy one file at a time.
Press F9 (Copy All) to copy all the files selected.
Press F8 (Skip) to skip the copy of a certain file and to proceed to the next one.
Press F5 (Escape) to cancel the operation and to return to the main page of the Folder
menu.
DISK UTILITY: from the main Disk directory by pressing F9 access is gained to the Disk Utility
menu, which includes the following functions:
Info: (F1) this function illustrates the properties of the Disk (Hard or Floppy), indicating the capa-
city, the number of the Files, the Folders and the percentage of free memory.
Tempo: (F2) this function allows the user to change the initial Tempo of the Song or Midi-file
stored on the Disk. To change the tempo:
1 Press F2 – Tempo. The display shows the directory of the Midi-files stored on the Disk.
2 Select the Midi-file using the Value + / - keys. (the file becomes black).
3 Press F10 – Execute.
4 Use the Value keys to select the tempo variation + / - .
5 Press F10 – Execute.
6 Before saving the new Midi-file with the different tempo the name may be written.
Then press F10 – Execute to confirm.
Transposer:
this function allows the user to perform the global transposition of the midi-files
on Disk.
64
Page 68

To transpose the Midi-file:
1 Press F3 – Transp. The Display shows the directory of the midi-files.
2 Select the file using the Value + / - keys.
3 Press F10 – Execute.
Format: Hard Disk formatting. This function permanently deletes the entire contents of the
Hard Disk and is therefore to be executed only if the entire Disk is to be re-configured.
For this reason, a safeguard function has been provided (Lock Format) that prevents any kind
of accidental formatting.
If key F4 is pressed to gain access to the Format function no modifications will be made.
To gain access to the Format function:
1 Press key F6 – Lock Format.
2 If the user intends to proceed press F10 – Execute to disable the Lock Format safeguard.
3 Now press F4 to enable the Format function.
4 The message “Hard Disk Format. Are you sure ??” warns the user that the Hard Disk is
going to be formatted. Press F10- Execute if the operation is to be actually performed.
5 A second message appears: “Warning ! All Disk data will be deleted”.
By pressing F5 – Escape the function may be exited; by pressing F10 – Execute on the
other hand, the Hard Disk will be formatted.
Chain Edit: (F7) this function enables a chain of Midi-files to be programmed.
To save a chain:
1 Press key F7 – Chain Edit. The display shows the Midi-files directory.
2 Select the first Midi-file of the chain using the Value +/- keys and press F10 – Select to assign
number 1 to the file.
3 Proceed in the same manner using the Value and Select keys for the Midi-files that follow.
Finally press F7 – Save Chain to confirm the selection.
4 Assign a name to the chain and press F10 – Execute to save.
Chain List: (F8) this function enables all the Song chains stored on disk to be displayed.
Use Escape to return to the main directory.
Surface Control: Hard Disk surface control. This function takes a few minutes and is used to
check if the Disk drive is efficient. If the control detects abnormal running conditions or faults
of the Hard Disk, “Fatal Error” will appear.
In this case an authorized service centre must control the unit (or a specialized technician)
who will check the type of fault possibly encountered on the Hark Disk drive and replace it
if necessary.
If the Surface Control detects no abnormal running conditions at the end of the execution (100%
Completed) the display returns to the Disk Utility directory.
65
Page 69

SAMPLER
The Sampler section of the X series enables the direct Sampling of any sound by means of the
Microphone input and also enables the control of. Wave files loaded externally via Floppy Disk.
The .Wave files are samples in Midi Sample standard Microsoft format.
The memory available for Sampling and .Wave files on the Ram Simm is 8 Mbytes.
Sampling is performed with 16 linear Bits with 44,1 KHz
sampling frequency.
The individual samples may be modified by means of a
sophisticate Edit and may be sub-divided into a number
of Splits (up to 32) to create Multiple-samples (Multiplesample .MSP).
The individual. Wave samples or the Multiple-samples
are assigned to Bank 2 - User Voice in the 8 locations
from no.17 to no. 24.
SAMPLER menu
To gain access to the Sampler menu:
1 Press F2 – Effects in the main display.
2 Then press key F3 – SAMPLER. The display shows the main Sampler display with a series
of functions.
Load: (F1) this function allows you to load Samples or Wave files present on Disk with an imme-
diate operation and without entering the general Disk menu.
To load the Samples from Disk:
1 Press F1- Load
2 Select the folder containing the samples from the Hard Disk using the numeric keypad
3 Choose the file to load using the Value buttons.
4 Press F 2 - Load to confirm. The file will be placed in the first free location among the 8 pro-
vided for the Sampler (Bank 2 - User Voice from no. 17 to no. 24).
Time: (F2) sampling time. The default value is 3,5 secs. but may be modified using the Value +/-
keys up to 7 secs.
Trigger: (F3) Input signal level threshold beyond which the Sampling starts automatically when in the
Start position. Lower the Trigger value, less input signal is required to start sampling; vice versa if the
Trigger value is higher, the sampling will start only when the signal reaches a high level.
However careful attention must be paid: in many cases (see Voice, Wind Instruments, Piano,
Guitar sampling) if a high Trigger value is left, there is the risk that the sound attack is cut with
the outcome of the original sound becoming rather unnatural.
It is therefore advisable to sample with Trigger values that are not excessively high (i.e. between
1 and 10). Any empty spaces between the sampling start and the actual sound attack may be eliminated later in Edit.
Loop: (F4) control of the type of Loop to be assigned to the samples. By pressing key F4 repeatedly
the 4 available Loop options are selected:
- FORWARD : in the Forward mode the Loop repeats a certain portion of the sample in a cyclic
manner, outlined by Loop and End points (See Edit), reading the sample forwards at all times.
This is the most commonly used Loop and may be achieved on a single sample Period
(PERIOD LOOP) or on a rather long portion (LONG LOOP).
- REVERSE : in the Reverse mode the sample is read backwards, from the end towards the
beginning. The sample transformation from Forward to Reverse mode is achieved automati-
66
Page 70

cally when Reverse is selected.
- ALTERNATE: in the Alternate mode the sample Loop, outlined by the Loop and End points, is
read once forwards and once backwards in a cyclic manner.
- REVERSE LOOP: the Loop repeats its cycle starting from the end of the sample and not from
the Loop point as in the Forward mode.
Pitch: (F7)
The Pitch function is used to establish whether the sample must be played with a
normal tuning (STANDARD) or with a fixed tuning (FIXED). The selection is achieved
using function key F7.
Key: (F8) is used to establish on which key the sample must play with its true frequency. The selection
is made using key F8 and select the key desired using the Value keys. The default value is C 3.
Fine: (F 9)
controls the fine tuning of the sample with a range of 1 semitone only upwards (+ 99 cents).
If a fine tuning downwards is required it is advisable to lower the Key value by 1 semitone first
and then to adjust the tuning with Fine.
SAMPLING
Before starting the sampling operation, bear in mind that:
A Only 1 sampling may be performed at a time. The beginning of a new sampling deletes the
whole Ram Simm dedicated to the Sampler section.
B Before proceeding with another sampling, the sound sampled previously must be Saved
(if it is to be stored) otherwise it would be deleted.
C The Sampling memory may be optimized in various manners depending on the length of
the samples. For short samples it may be useful to use the Loop to save memory space.
D Up to 8 multiple-samplings may be achieved (Multiple-sampling) with a maximum of 32
samples for every Multiple-sample.
E All samples are saved with extension. Wav.
How to record the sample
1 Connect the sound source to be sampled to the Micro Input.
We will use one microphone as an example.
Adjust the voice level on the microphone so that there is no distortion.
(The luminous Micro Input Overload indicator in the Voice Bank area lights up when
the signal is slightly too high).
2 Press F2 – Effects in the main display.
3 Press F3 – SAMPLER.
4 Choose the timing of the sampling using the
Time function (See above).
5 Press key F 10 – Start. Sampling will start only
when a signal is present on the microphone
input and when the keyboard is in a waiting
position, without performing other functions.
6 Speak or sing into the microphone.
Sampling and ends when the dark bar that indicates the sampling time reaches zero.
7 Play the keyboard to play back the sample. If the KEY value has not been modified,
the original sample will play on C3.
How to save the sample
Before saving the sample it is advisable to make the modifications required on the actual sample to
optimize it (See View and Loop function).
67
Page 71

If the sample is valid, it may be saved as follows:
1 Press Save/Enter. Give the sample a name (if you wish to do so).
2 Select the folder of destination using the numeric keypad 0-9
3 Press F10 - Execute to confirm
4 Press F5 to go back to the main Sampler menu.
VIEW - LOOP
The View menu (F6 on the main Sampler display) enables the display of the sample recorded and to
modify its Start, Loop and End points to find an ideal Loop.
Start: (F1) sample starting point. It is extremely difficult to make the Start coincide with the actual
start of the sound in the sampling phase especially when low Trigger values are set. Start enables
the precise achievement of the actual start of the sound eliminating the initial empty or unrequired part of the sample.
Press F1 to shift the Start point and modify the value using the Value + /- keys. To better display
the wave shape it is advisable to modify the Zoom values (See below).
Loop: (F 2) this function is used to establish the starting point of the Loop. Press key F2 and
modify the point using the Value +/- keys.
End: (F3) End establishes the end of the sample and also that of the Loop if a Loop has been achie-
ved on the sound.
Zoom: (F4) the Zoom function is used to proportionally enlarge the image of the wave shape of the
sample. When searching for the Loop the Zoom function must be used to precisely fix the starting and ending points of the actual Loop.
To modify the Zoom simply press F4 and select the
available values using the Value +/- keys:
ENVEL supplies the global image of the sample envelope.
X 10, X 100, X 1600 supplies the different Zoom
resolutions, i.e. in the case of a Loop on the period,
(See illustration), the value x 100 may be used to
roughly identify the period on which a Loop is to
be achieved, while the value x 1600 is used to
display and exactly fix the starting and ending point of the actual period.
Some useful tips for finding the Loop
The most appropriate Loop finding for each sample is a work phase that requires a certain amount
of skill and also some time.
The type of most commonly used Loop is the Loop Forward,
which may be on the Period or Long Loop.
- LOOP on the PERIOD: The Loop on the period is advisable when the wave shape is quite constant and even
(i.e. a Guitar or Organ sound) and when there are no
beats, modulations, vibrato or similar.
The first operation to perform is to select the sample
area where the period is to be selected. To do this, use
the Zoom values x 10 or better still x 100.
Once the area has been identified, the Period must be isolated. The period is usually quite clear as
it is a wave shape repeated a number of times within the actual sample.
Use the Value + / - keys to shift the Loop and End point of the sample until the period is found.
Then the zero point must be searched for accurately at the beginning and end of the period, or
68
Page 72

rather the point in which the mean line intersects with the wave shape. To find the zero point,
shift the Zoom on the maximum value, namely x 1600.
If the period has been cut precisely, the sample should have an ideal Loop.
- LONG LOOP: Long Loop is advised for songs that are rich in modulation (i.e. Arcs, Chorus, Pads) for
which it is more or less impossible to achieve a Loop on the single period.
The sample portion must be selected first and foremost, which will be repeated with the Loop in a cyclic
manner. It is advisable, as a general rule, to identify a rather even sample portion.
Once the sample area has been outlined with the End and Loop points, search for the zero point at the
beginning and end of the sample. Then gradually shift the
Loop cursor using the Value + / - keys until an Ideal Loop
point is found. This operation may require some time, but if
the sample is valid, it will surely be worth the while.
A good
Long Loop should not contain clicks or annoying noises, but
should play in as natural a manner as possible.
MSP
MSP stands for Multiple-sample, in other words the
instrument section that controls the assignment of a number of samples to various areas of the keyboard or splits.
As the sampling and saving of the sound as.Wave files are referred to a single sample, the MSP
function allows the user to call-up a number of .wave files at the same time from Disk and to
edit them until new more complex sounds are composed, made up of a number of splits and a
number of samples.
Up to 8 Multisamples are available (each made up of a
maximum of 64 splits), situated in the User Voice - Bank
2 section from no. 17 to no. 24.
The Multiple-sample may be achieved using samples
recorded directly on the instrument or also using .Wave
files acquired externally via Disk. The achievement or the
editing of a new Multiple-sample involves the cancellation of the Ram Simm area dedicated to Sampling.
To gain access to the MSP functions from the main display:
1 Press F3 – Utility/Smp .
2 Press F9 – MSP New if a new Multiple-sample is to be created or press F8 – MSP Edit if an
MSP previously achieved is to be modified.
MSP New: (F9) this function introduces the creation of a new Multiple-sample, for which .Wave files
must be loaded first of all that are to be used to compose the various splits.
Press Load F10 to access the folder containing the files: To modify it, use the numeric keypad 0-9.
The file selection is achieved using the Value +/- keys.
The files loading may be Single or Multiple.
For the Single Loading, simply press F 2 – Load to load the
file selected at the time (namely the black file).
For the Multiple Loading first select all the files concerned
using key F 10 – Select then press F2- Load.
Once the .Wave files have been loaded, the instrument
automatically sets itself in the Edit function of the Multiplesample or MSP Edit with this first display:
The Editing of the Multiple-sample is sub-divided into 2 pages. Lets examine the functions of the 1st Page:
Start / End: (F1 - F2) the Start and the End are used to establish the lowest and highest note of
69
Page 73

each split associated with a certain sample. The .Wave file in which the Start and End points are
modified is always the file in use at the time on the display (black file). The note may be selected
by simply pressing F1 or F2 and playing the note on the keyboard (from C#0 to G8). It is with
this function that the structure of the Multiple-sample is made up on the keyboard, assigning a
certain sound to each split and establishing how many keys are part of the same split.
Volume: (F3) volume control of the individual .Wave file associated with the split. The value is
modified using keys Value +/- .
Remove: (F4) this function eliminates the .Wave file in use at the time from the Ram.
Pitch: (F6) Press F6 to select the type of tuning of the sample that may be normal (Standard) or
fixed (Fixed), or rather identical over the entire keyboard.
Key: (F7) is used to establish to which key the original sample frequency is to be assigned. It may
prove useful to correct a frequency incorrectly assigned to the sample before this was saved on
disk. The key is selected using the Value keys.
Fine: (F8) fine tuning of the sample with a shift of 1 semitone upwards (+99 cents).
Max Wave: (F 9) selection of the number of splits expected for the Multisample. Choose from 16, 32 or 64.
Press the Page > key to proceed to the Multiple-sample
functions of the 2nd Page, with ADSR, Filter and
Dynamic controls on the single samples and also the global assignment of the Effects of the Multiple-sample.
Attack, Decay, Sustain, Release, Cut Off: (F1 - F6)
these parameters enable an accurate control to be
achieved on the ADSR and on the Filter of each single
.Wave file in use and displayed (black file). To modify
the value simply press the key concerned and use the
Value +/- keys.
Fine Tune: controls the Multiple-sample fine tune.
Dca / Dcf Offset e Slope: these 4 parameters control the dynamic action (Key Velocity) applied to
the amplitude or to the filter of the Multiple-sample. The Offset controls the amplitude or filter
level with minimum dynamics, whereas the Slope controls the sound amplitude level or the ope-
ning of the filter with maximum dynamics.
To modify the dynamics values simply press the corresponding key and change using the Value +/- keys.
Global Effect: this section controls the Effects that may be assigned to the Multiple-sample
(Chorus, Reverb, Distorsor etc.). The effects are split up into blocks with the same structure,
already described in the Programs chapter. (See Effects on Programs). Use the Value keys to select
the group of Effects and the Cursor is used to scroll the boxes relating to the amount of the
various effects; the amount may be modified using the Value +/- keys.
Coarse Tune: this function achieves the transposition of +/- 2 octaves on the Multiple-sample. This
transposition is valid only if the Multiple-sample is used on the Right part. The value is modified
using the Value +/-keys.
Global Level: global Volume control of the Multiple-sample. The value is modified using the Value +/-keys.
Rotor: this function enables the Rotor effect of the Multiple-sample and is inserted using the two
buttons Rotor/On – Slow/Fast.
How to save the Multiple-sample
Once the Edit has been completed, the Multisample can be saved onto Disk as follows:
1 Press Enter / Save.
2 Give the Multisample a new name (if you wish to do so).
3 Select the folder of destination using the numeric keypad 0-9
4 Press F 10 - Execute to confirm the saving operation
The Wave files are in this way saved with the pitch value selected within the MSP Edit menu descri-
bed above. N.B.: the MSP (Multisamples) sounds can also be inserted within the 1 Touch voices .
70
Page 74

SEQUENCER
Introduction
The internal sequencer of the instrument allows the user to create or modify midi sequences in a rapid
and functional manner, being provided with advanced functions that are typical only to sophisticated
computer programs. Press the SEQUENCER button to access the main page. Note. All operations
performed on the sequencer must always be saved on disk (see LOAD/SAVE) before exiting the menu
or turning the keyboard off. Otherwise, the recorded data will be lost forever. When in the Sequencer
mode, the first track out of the 16 available is selected. All the tracks are empty, including the MASTER
TRACK. The various functions can be accessed from the main page.
NAME: Use the Cursor<> buttons to access this box and
give a new name to the sequence (“SEQUENCE” by
default). Press the Save/Name button: an edit window
will appear, bearing the current name of the sequence.
Every letter that is highlighted by the blinking cursor
can be changed by typing on the keyboard. Each key
corresponds to a letter that is clearly marked in the
serigraphy on the ketyboard. After each letter entry
from the keyboard, the cursor automatically moves forward by one letter (you may enter up to 8
letters). As an alternative to the keyboard, the Value-/+ buttons may be used. In this case the cursor will not move forward automatically. If the Value-/+ buttons are pressed together, all edited
letters, starting from the current cursor position, will be cancelled. The Cursor<> buttons can be
used to move the cursor from one letter to another. Press F10 (Execute) to confirm the new
name, press F5 (Escape) to cancel editing.
TEMPO: It is the speed, expressed in quarters per minute, with which the sequence will be played
once it has been recorded. The tempo default value is the one of the last style selected. Use the
Cursor <> buttons to access the TEMPO box and change the tempo value by pressing the Value/+ buttons. When the recording starts, the tempo is memorized in the MASTER TRACK. During
recording, use the Fast/Slow buttons to register any tempo variations on the MASTER TRACK.
Tempo events can be entered, modified and cancelled after recording, by using the MASTER
TRACK menu functions as explained below.
TIME SIGNATURE: It is the bar musical division. The default value is 4/4, i.e. each bar is divided
into four quarters. Use the Cursor <> buttons to access the SIGN box and change the numerator/denominator values by pressing the Value-/+ buttons. When the recording starts, the SIGNATURE is memorized on the MASTER TRACK. As with tempo, the SIGNATURE can be entered,
modified and cancelled by using the MASTER TRACK menu.
POSITION: It indicates the current position of the sequence. It is divided into three areas that can
be accessed by means of the Cursor<> buttons or by pressing the F1 button in succession. The
first value indicates the bars, the second value indicates the quarters, the third value indicates the
71
Page 75

steps making up one quarter. Each quarter is made up of 48 steps. Once the position has been
selected, its default value [1 1 1] can be changed by pressing the Value -/+ buttons. Pressing the
Value -/+ buttons together will reset the default value.
TRACKS: The sequencer is divided into sixteen tracks, plus one MASTER TRACK. Track names are
given in the center of the page, preceded by a progressive number.
Track default name is “TRACK_n”. Single track names can be changed by means of the
OPTIONS menu described hereafter. Recording is performed on the highlighted track; therefore,
the track on which one wants to record must be selected before recording begins.
Tracks are selected by pressing the Page<> buttons. The display will show only the group of
tracks from 01 to 08 or the group from 09 to 16. Therefore, every time you scroll the tracks, pas-
sing from track 08 to 09 by pressing Page> or from 09 to 08 by pressing Page<, the display is
updated with the new group of tracks. Tracks can be selected also by using the Cursor <> but-
tons, but in this case you must pass through the field [Chan.] reserved for playback midi chan-
nels. In any case, even if the midi channel field stays highlighted, the selected running track is
the one on the left-hand side of the highlighted area.
CHAN: The playback midi channel is shown on the right-hand side of each track name. Use the
Cursor <> buttons to access the channel box and the Value -/+ buttons to change the playback
channel. By default, the channel is set on [All]; this means that when playing back, the midi chan-
nels will be reproduced on the originally recorded channels. Instead, by selecting values from 1 to
16, all the midi events recorded on the related track will play on the selected channel. For example,
events belonging to the same midi channel can be recorded on different tracks (for example, by
playing on the right-hand side of the keyboard), and different midi playback channels can later be
set for each recorded track.
STAT: The [Stat] column shows the status for each track. Initially, the column is empty; this means
that nothing has been recorded. During recording, the display shows an arrow “>” indicating that
each event will be recorded on the selected track. When the recording stops, if at least one event
has been recorded, the display will show an “i” (initialized track). The initialization status is
removed from the display only if the track is completely deleted. If a track is in the Mute mode,
the Status is ‘*’ (although the track contains data, it is not played back). If a track is in the Solo
mode, the Status is ‘s’ (during playback, only the Solo track plays).
FREE: This indicates the percentage of memory available. (see DEFRAG function for memory opti-
mization).
SYNCSTART: It can be switched on/off by pressing the F6 function button. If SYNCSTART is [Off],
the sequence (clock) starts moving forward as soon as the recording begins, starting from the
selected POSITION. If the first midi event falls in the PRECOUNT phase (see OPTIONS func-
tion), this will force the POSITION into the selected value. Instead, if SYNCSTART is [On], the
sequence starts moving forward only when the first event arrives. In this case the PRECOUNT is
switched off. Recording with the SYNCSTART switched on is very useful when you want to
record an internal style on the sequencer. In this case, recording begins only after the style has
been switched on (START buttons, Fills buttons, Key Start, etc.).
RECORD: Recording is switched on/off by pressing the F2 button. There are two recording modes:
72
Page 76

Overdub and Replace, which can be selected from the OPTIONS menu.
Overdub: At every recording (run), the recorded events are mixed temporally to the events
recorded during the previous runs.
Replace: The new recorded data replace the previous ones.
HOW TO RECORD A SEQUENCE
Introduction.
There are various ways of recording a sequence starting from an empty sequencer (no initialized
track). How to load sequences from disks (midi files) and how to use the editing functions for
already-recorded sequences are topics that will be discussed in specific paragraphs. Before
describing the recording procedure, here is some general preliminary information about midi
events and about how to deal with them (if you already have this information, you can skip this
sub-paragraph).
Midi Events: The sequencer is capable of recording and playing back events in the midi format.
Every midi event is represented by a small set of data. Each datum is normally called “byte” and
contains coded “musical” information. For example, every note that is transmitted to the sequencer is coded in a set of three bytes, so that parameters such as timbre, volume, pan-pot, amount
of reverb, expression, sustain, etc., are coded. In general, every midi event is made up of 2 or 3
bytes; the first one indicates the type of event and is called STATUS, while the other bytes are
data and have different meanings depending on the STATUS.
STATUS Dati 1st 2nd
NOTA (NOTE ON/OFF) 2 bytes Note, Velocity
CONTROLLO (CONTROL CHANGE) 2 bytes Type, Value
PROGRAMMA (PROGRAM CHANGE) 1 byte Program(timbre)
ALTERAZIONE ALTEZZA (PITCH BEND) 2 bytes Pitch value
PRESSIONE DOPO TOCCO(AFTERTOUCH) 1 byte Key pressure value
SYSTEM MESSAGES or EXCLUSIVE MESSAGES are particularly important; they are made up of
a greater and variable number of data. They contain information (type of effect, lyrics, sound
parameters, etc.) in a format that is typical to the instrument. System messages will be described
in the MASTER TRACK paragraph.
MIDI CHANNEL: Every Note, Control, Program, Pitch bend, Aftertouch event is associated
with information about the midi channel to which the event is directed. There are 16 midi channels and, thanks to channeling feature, 16 different instruments can be made to play separately.
Example. One normally says “The piano is playing on channel 1”. This means that the change
program relating to a piano timbre has been sent on channel 1; therefore, all the notes sent on
channel 1 will be played with the piano timbre and they will take up the controls (volume,
reverb, etc.) that were previously set for that specific channel. System messages (for example,
exclusive systems) are not associated with a midi channel; in the sequencer, they are memorized
only on the MASTER TRACK. In the NOTE events, the first of the two data bytes contains the
note that was played, while the second one contains information about the speed with which the
key generating the note was pressed. The speed value will determine the musical timbral
response of the instrument; for example, many timbres will play at a higher or lower volume
depending on the speed of the note. In the CONTROL events, the first byte indicates the type of
control, for example, 7 for Volume, 10 for pan-pot, while the second byte normally expresses the
amount of control. A number of controls and related codes are given below (see midi implementation in the Instructions Handbook for a more detailed list).
73
Page 77

Banco suoni 0
Sounds Desk 0
Modulation Wheel 1
Vocal Glide Tempo 5
Volume 7
Pan-pot 10
Expression Pedal 11
Sustain on/off Pedal 64
Vocal Glide/off 65
Reverb 91
Amount of Effects 93
NRPN LSB 98
NRPN MSB 99
RPN LSB 100
RPN MSB 101
DATA ENTRY RPN/NRPN 6
RPN(Registered Parameter Numbers), NRPN (Non-Registered Parameter Numbers), are special
controls that are used to change sound parameters such as, for example, musical entry, release,
filter, timbral resonance. Some NRPN are used to change volume, pan, reverb, chorus, pitch of
every single percussion instrument, e.g. drum, roll, etc. for drum sets. In general, this type of
control is divided into three events.
RPN/NRPN MSB (Most significant byte).
RPN/NRPN LSB (Least significant byte).
RPN/NRPN DATA ENTRY (data) (see midi implementation in the Instructions Handbook for
more details).
Every event that is recorded by the sequencer is associated with the temporal position in which
the event was “seized” (see EDIT menu), represented in bars, bar quarters, steps per quarter.
Notes are also associated with their duration, which is given by the difference in the amount of
time elapsing between the On note (depressed key) and the Off note (released key).
Recording: Once recording is switched on by pressing the F2 button, every midi event is recor-
ded on the selected track, regardless of the event output channel. Thus, events coming from any
channel can be recorded on one single track (therefore, do not confuse track with midi channel).
For example, if a style is recorded on track 01, when track 01 is played back, all the parts of the
style will play because each one of them is associated with a midi channel (see MIDI FILTER
function). To select only one or some parts of a style, the midi-in channel of those parts that are
not to be recorded must be “shut” (see MIDI FILTER function). If a style is recorded internally or
by using the midi plug In 2 (Keyb), the channels are the ones set in the MIDI Channel Tx menu
(see Instructions Handbook). Instead, if recording is made from the midi 1 (GM), the channels
are those set in the General Midi Chan Rx menu(see Instructions Handbook).
Summarizing, in order to record a track::
1 From the MIDI FILTER menu, close the in-coming channels that you do not want to record.
2 Use Page <> or Cursor <> buttons to select the track you want to record.
3 Set the channel of the track you want to record on All, so that you can playback what you recorded.
4 Select the recording mode Overdub/Replace as already described.
5 Set SYNCSTART on On or Off as already described.
6 Determine the initial recording position.
74
Page 78

7 Press F2 to start recording.
8 At this point, you may start playing: every midi event will be recorded.
9 ress F2 again to stop recording.
How to play back recorded tracks:
It is possible to playback during recording whatever was previously recorded. If, instead you
simply want to play back, you need to press the Seq. Play (Save/Enter) button. Playback will
start from the set POSITION. Note. The POSITION can be brought back rapidly to [1 1 1] by
pressing the Value -/+ buttons together, even without selecting the box. In order to playback the
track on a channel that is different from the recorded one, you will have to work on the column
[Chan.] that is to the right of the recorded track. Be careful, though, because if several midi
channels were recorded and you enter values that are different from All, all the events will play
on the same playback channel, thus generating unwanted effects.
MUTE: It switches off the selected track. After selecting a track, it is switched off (no event is repro-
duced) by pressing F9 (MUTE); pressing F9 once more will switch it on again
SOLO: Allows you to switch off all tracks except the one in Solo. After selecting a track, it is put in
solo by pressing F10 (SOLO); pressing F10 again will remove the solo.
NOTE. Only one track at a time can be in solo.
SEQUENCE QUANTIZATION
Quantization means changing the position of the recorded events so that the selected musical
division can be followed exactly, thus eliminating small performance imperfections.
QUANTIZE: Enter the QUANTIZE menu by pressing the F3 button.
The track that is selected in that precise moment or part of it can be quantized.
The name of the track chosen for quantization and the locators indicating the FROM: position
(where quantization will start from) and TO: position (where quantization will end) will appear
in the center of the page.
Use the Cursor<> buttons to select the locator and the Value -/+ buttons to change its position.
The locators are represented by the usual three numbers indicating bar, bar quarter and step.
In order to quantize a track, proceed as follows:
1 Use F1(NOTE), F2(CONTROL), F3(PROGRAM
CHANGE), F4(ALL) to select the type of event you
want to quantize. If you press F4(ALL), all the events
will be quantized and, therefore, the NOTE,
CONTROL and PROGRAM CHANGE events will
automatically be deselected. Pressing F1 or F2 or F3
will automatically deselect ALL if the latter had been
previously selected. By default, quantization is performed only on notes (most commonly used
condition).
2 pressing F6 repeatedly to select the desired quantization value. The following values are available:
real no quantization
64T 1/96 of a bar (triplet)
75
Page 79

64 1/64 of a bar
32T 1/48 of a bar (triplet)
32 1/32 of a bar
16T 1/24 of a bar (triplet)
16 1/16 of a bar
8T 1/12 of a bar (triplet)
8 1/8 of a bar
4T 1/6 of a bar
4 1/4 of a bar
2 1/2 bar
11 bar
3 Use F7(LAST RECORD), F8(PART), F9(ALL TRACK) to select the part of the track that will
be quantized.
LAST RECORD: The last recording is quantized; the locators are automatically set on the positions of the last recording.
PART:Any part of the track. This condition is automatically highlighted when a locator is changed.
ALL TRACK: The whole track. By pressing F9, the locators are positioned at the beginning and
at the end of the track respectively. “Beginning” is the position of the first event, “end” is the position of the last event.
4 Press F10(Execute) to perform the operation. If the result of this operation is unsatisfactory,
you can use a different quantization value and repeat the operation.
Editing single events (EDIT function):
EDIT: This function allows you to edit every event that
has been recorded on the selected track. Access the
first page of the EDIT menu by pressing the F5 button.
The menu is divided into two pages. For both pages,
the midi events with their temporal position are centered on the display. Let us have a detailed look at the
fields relating to the events that are centered on the
display.
Position: The Position column gives you the temporal position of the event in bars, quarters,
steps. Every quarter is divided into 48 steps.
Length: It indicates the length of the note events alone; the field is blank for the other events.
E.g. Length 1 2 0 indicates a note lasting 1 bar + 2 quarters; Length 0 3 24 indicates a note
lasting _ plus 24 steps.
1st: The meaning of this parameter changes according to the midi event that is represented. The
range of values for this field is 0-127. In the case of NOTES, it indicates the note that was played.
E.g. C_4, G_3. In the case of control, it indicates the type of control – as shown in the table
below, where the most commonly used controls are given (see midi implementation in the
Instructions Handbook for a more detailed list).
76
Page 80

1st = 0 Bank (sound bank selection marked “Bank” on the display).
1 Modulation (modulation wheel marked “Modul” on the display).
5 Portamento Time
6 Data Entry (contains RPN and NRPN controls data and is marked “DtaEn” on the
display).
7 Volume (marked “Vol.” on the display).
10 Pan-Pot (marked “Pan” on the display).
11 Expression (expression pedal marked “Expr.” on the display).
64 Sustain (marked “Sust.” on the display).
65 Portamento on/off (marked "Port." on the display).
66 Sustain pedal on/off (marked "Sost." on the display).
67 Soft pedal on/off (marked "Soft" on the display).
84 Wha-wha on/off.
85 Wha-wha amount.
91 Reverb amount (marked “Rev.” on the display).
93 Effects amount (marked “Cho.” on the display).
98 Byte LSB (significant menu) NRPN (marked "NrpnL").
99 Byte MSB (most significant) NRPN (marked "NrpnM").
100 Byte LSB RPN (marked "RpnL").
101 Byte MSB RPN (marked "RpnM").
121 Reset all controllers (sets main controls at default value and is marked “RstCn” on
the display).
123 All notes Off (reset played notes marked “Allof” on the display).
In the case of PROGRAM, it indicates the timbre (see list of voices in the Instructions
Handbook).
if Bank = 0 (first sound bank)
Program = 0 Piano
1 Rock Piano
2 Upright
3 Honky Tonk
" "
16 Leslies
17 Jazz Organ
" "
Bank = 1 (second sound bank)
Program = 0 Concert
1 Digipiano
2 House Piano
3 Stage Piano
" "
16 Rotor B3
17 Pop Organ
" "
Bank = 2 (user voices bank)
77
Page 81

Program 0 timbre user 1 will play
“1 timbre user 2 will play
Bank = 3 (card bank) the flash card timbres will play
Bank = 4 (groove bank) the grooves will play
Bank = 5 (drawbars bank) the drawbars will play
Bank = 6 (ram bank) the ram timbres will play
Bank = 7 (msp bank) the msp timbres will play (selected through sampling)
In the case of PITCH BEND (or WHEEL) both 1st and 2nd indicate the pitch value of the bend wheel.
2nd: The meaning of this parameter, too, is different according to the type of event that is represented. The range of values of this field is 0-127. In the case of note events, the parameter indicates the speed at which the note was played. In the case of control events, it indicates the amount
of such control; for example, the amount of volume (7), reverb (91), chorus (93), expression
(11), etc. For the pan-pot (10), value 64 means that the pan is centered, while for smaller values
the pan is moved to the left and for greater values it is moved to the right. For the sustain (64),
portamento (65), wha-wha (84), soft (67), sustained (66), value 0 means that the effect is Off
while value 127 indicates that it is On.
Event: It indicates the type of Note, Control, Program, Pitch Bend, Aftertouch event (there are
no exclusive messages since they are recorded only on the MASTER TRACK).
Channel: It is the midi channel where the event was recorded.
Let us now have a look at the functions available in the EDIT pages.
EDIT (page one).
EDIT Position: The F1 and Value -/+ buttons can be used to change the position of the sequence
and the display will be updated accordingly. Use the Cursor<> buttons to scroll events. If
OPTIONS is set on On STEP TRACE in the menu, use the Cursor <> buttons to listen to the
notes played. This function is useful to trace parts of the sequence.
EDIT View: It allows you to select only certain types of events. Pressing F2 repeatedly will allow
you to select in succession: ALL -> NOTE -> CONTROL -> PROGRAM CHANGE. The display
will be updated accordingly.
EDIT Modify: It allows you to change the selected sequence. Press the F6 button to access an edit win-
dow; use the Cursor <> buttons to move around the various fields of the event that you want to change;
use the Value -/+ buttons to change the selected field. Press F10 (Execute) to confirm the operation or
F5 (Escape) to cancel it. If, for example, you want to change the timbre, select the event marked Progr
in the Event field; press F6 (MODIFY), use the Cursor <> buttons to access the related box on field 1st;
use the Value -/+ buttons to select the new timbre, press F10 (Execute). For example, if you want to
move a note, simply replace its Position field with the new position.
EDIT Insert: This function allows you to insert a single event in any position. Press the F3 (INSERT) but-
ton to access an editing window. The Event field is selected by default. Use the Value <> buttons to
78
Page 82

select the event type you want to insert. Use the Cursor <> buttons to move around the various event
fields to edit parameters. Press F10 to confirm the operation, or F5 to cancel it.
EDIT Delete: This function deletes a single event; press F4 (DELETE) to open the window (non
editable) containing the selected event. If you confirm by pressing F10, the event will be deleted.
Press F5 to cancel the operation and the event will not be deleted.
EDIT (seconda pagina):
Press Page > to access the second edit page. Two
important functions can be accessed from the second
page; FADER and LOGICAL.
EDIT FADER: This function allows you to insert controls
continuously so that you can give expression to the
sequence. This function is useful if, for example: You want
to obtain a crescendo or fade an orchestra instrument. You
want to move the Pan-pot continuously Left-center-Right to simulate movement. You want to change the
filter of an instrument gradually (Cut-Off) in order to obtain, for e.g., effects such as Wha-Wha.
Let us make an example so that the use of this function becomes clearer: Say you want to obtain a
volume crescendo from 1 to 96 and then a decrescendo from 96 to 20. Let us suppose that the
crescendo should go from bar 31 to bar 33; the decrescendo from bar 33 to bar 36. Use the
Cursor <> buttons to access the various function fields.
a) Use the Value -/+ buttons to select “VOLUME” from the EVENT box.
b) In the three position boxes (1st POSIT, 2nd POSIT, 3rd POSIT) enter the following settings:
1
st
Position [31 1 1]. Crescendo start position
2ndPosition [33 1 1]. Decrescendo start position (in this position the volume reaches its
maximum value)
3
rd
Position [36 1 1]. Fading end position.
c) In the three Value boxes (1st VALUE, 2nd VALUE, 3rd VALUE) enter the following settings:
1stVALUE: 1. Crescendo start volume value.
2
nd
VALUE: 96. Crescendo end and decrescendo start volume value.
3rdVALUE: 20. Decrescendo end value.
Note. If you want to perform only one crescendo or decrescendo, press the Value -/+ buttons
together and set the 3rd VALUE field on Off. Interposed arrows between the VALUE fields indicate whether you are performing a crescendo or a decrescendo.
a) In the STEP box, select the number of steps for which each volume crescendo or decrescendo
is to take place. Use the Value -/+ buttons to change the value. In the REPEAT box, select the
number of bars for which the entire FADER cycle is to be repeated. If, for example, you use the
Value -/+ buttons to enter value 2, the volume crescendo and decrescendo will take place for two
consecutive bars.
b) Press F10(Execute) to confirm the operation. Press F5(Escape) to return to the EDIT page EDIT.
EDIT Logical: Press F4 to access the LOGICAL function. This is a quite complicated but powerful
function. It allows you to edit in a complete manner groups of events of the running track. Let us
start by describing the various fields making up the page (use the Cursor <> buttons to access them).
79
Page 83

COND:
Condition relating to the operational range (top left-hand side of the display). It selects the temporal
interval that will be affected by the edit function. If you select All with the Value -/+ buttons, the
changes will applied to the entire track. If you select Equal, only the events with position visualized
in RANGE OP (operational interval) will be affected. The position can be changed by using the
Cursor <> buttons to select the desired box and then pressing the Value -/+ buttons accordingly.
If you select Internal, only the events with position falling inside the position values shown in
RANGE OP will be affected. The events with position outside this interval will not be changed.
Therefore, the changes will affect all the events starting from the position shown at the top of the
RANGE OP box and down until the events in the position shown at the bottom of the same box.
If you select External, the changes will affect only the events in the position outside the operational
interval, while the events falling inside the interval given in RANGE OP will not be changed.
STATUS: This box allows you to select the event types that will be affected by the changes. They
are ALL, NOTE, PROGRAM, CONTROL, PITCH WHEEL(BEND), AFTERTOUCH.
COND: Condition relating to the event fields.
1st:
All: the operation will affect the events, regardless of the value (see above). For example, in the case
of STATUS NOTE, all the notes will be considered, in the case of STATUS PROGRAM, all the
timbres will be considered.
Equal: the operation will affect only one event type shown and editable in the FROM field. For
example, in the case of NOTES, only the note shown in the FROM field will be changed, in the
case of CONTROL, the operation will affect only the control with the number shown in the
FROM field. If, for example, the number shown is 7, the operation will affect the volume; if,
instead, the number shown is 1, the operation will affect modulation.
Internal: The operation will affect only the events with values falling inside the editable interval
given by FROM and TO. If the STATUS is NOTES, only the notes inside the interval will be
changed.
External: The operation will affect only the events with values falling outside the editable interval
given by FROM and TO. If the STATUS is NOTES, all the notes falling inside the interval will be
excluded.
2nd: The same considerations made for field 1st hold true, except that the conditions All, Equal,
Internal, External refer to the 2nd value of the event (second byte). For example, in the case of
notes, 2nd is the velocity; in the case of control, 2nd normally indicates the amount of control,
for example the amount of reverb if 1st = 91. For example, Internal can be used to select notes
where the dynamics falls inside a given value (shown in the related FROM TO box).
Chann: Conditions relating to the midi channel field. The All, Equal, Internal, External conditions
will affect events represented by 1st and 2nd which will also satisfy the condition on the midi
channel as set in the related box.
Len: Condition relating to the duration of notes. This condition can be accessed and is valid only if NOTES
is selected on the STATUS. If ALL is selected, this condition will in any case affect only the notes.
80
Page 84

LOGICAL operations: Once the conditions relating to intervals and events have been selected as
described above, one can decide what operations to perform.
OPERATIONS on events (RESULT fields): All events satisfying the conditions relating to the
operational interval and the conditions relating to their values can be transformed as follows:
STAT: Status transformation. The status will be transformed into the one shown in the left-hand
box; therefore, a note event can become, for example, a control event. If the status is not changed, there will be no transformation of events, i.e. notes will remain notes, etc. We suggest not to
change the result status unless specific sound effects are desired.
1 (1st): By selecting this field you can perform operations such as addition subtraction equality. For
example, in the case of STATUS NOTES, you can transpose the notes by one octave upwards by
entering [+] (addition) and entering 12 (amount that will be added to the notes) in the value
box. If None is selected, no operation will be performed on the first byte of the event.
2 (2nd): By selecting this field you can perform operations such as addition subtraction equality.
For example, in the case of STATUS NOTES, you can change the velocity of the notes
downwards by 10 points by entering [-] (subtraction) and value 10. If None is selected, no operation will be performed on the second byte of the event.
CH (Channel): You can change the midi channel of the events by entering for instance the value
16. All the events that satisfy the set conditions will take up midi channel 16. If None is selected,
no operation will be performed on the channel of the event. Contrarily to the other functions,
this one does not allow you to choose any of the three operations -/+/=; in fact, the = sign is
fixed. You can only choose the midi channel.
LEN (length): This is valid only for note events. For example, you can “stretch” the duration of a
note by one quarter by entering [+] and [0 1 0]. You can give the notes a fixed duration of 2
quarters with [=] and [0 2 0]. If None is selected, no operation will be performed on the duration
of the note event.
QUANTIZE: Use F6 to select the quantization value and press F10 (Execute): the events will be
quantized.
EXTRACT: Press F7 for selection and then F10 to execute: the events will be moved from the run-
ning track to the first available track.
COPY: Use F8 to select the function and then use F10 to enter the end position in the COPY POSI-
TION box: starting from the position set in COPY POSITION, all the events will be copied.
DELETE: Use F9 to select the function and then press F10: all the events will be deleted. The
Quantize, Extract, Copy, Delete operations take place
according to the conditions set in the upper part of the
display and they do not take into account the Result
part. The Copy function, as mentioned earlier, takes
into account also the parameter that is in the lower
part of the “Copy Posit” display.
Example. Let us suppose you are editing the notes of a
81
Page 85

track on the basis of the following characteristics:
- They are in the interval going from bar 32 to 64.
- They are different from C_2.
- Their velocity ranges from 32 to 48.
- They are on midi channel 14.
- Their duration is _.
To select the notes with the above-mentioned characteristics:
a) Go on COND (top left) and select Internal:
b) Go on RANGE OP and set [32 1 1] in the upper part of the box and [65 1 1] in the bottom
part of the box.
c) Set NOTES in the STATUS box.
d) In the COND 1st field select the External condition and set C_2 in the FROM section and
again C_2 in the TO section.
e) In the COND 2nd field select Internal and set 32 in the FROM field and 48 in the TO field.
f) In the CHANN field select Equal and enter 14 in the FROM field.
g) In the LEN field select Equal and enter [0 1 0] in the FROM field.
At this point you have set the desired conditions on the
notes. You may now perform the various editing operations as described above.
COPY/MOVE: The COPY/MOVE function allows you to
copy or move parts of a track or an entire track to other
positions on the same track or to a different track. Access
the function by pressing the F8 button. Two windows
will appear in the center of the COPY/MOVE page. The
upper window refers to the source track, the lower one
to the end track. You can access the various editing fields by pressing the Cursor <> buttons and you
can set values by using the Value -/+ buttons. Set the source track on the source track window
together with the track interval that will be copied/moved FROM -> TO. On the end track window,
set the track and the starting point where the source track interval will be positioned after copying or
moving. When you access the menu, the entire selected running track is selected by default as source
track and the ALL box is highlighted. This implies that all midi type-events will be copied or moved.
You may select only certain events by pressing the buttons F1 (NOTES), F2 (CONTROL), F3 (PROGRAM CHANGE), F4 (PITCH BEND). Press F9 to choose between copying or moving the events.
Press F10 to execute or F5 to exit the operation.
Examples. Suppose you have recorded a few drum beats on a track. Your objective is to repeat the beat
so as to obtain a complete sequence. To do so, the COPY function can be used more than once.
Suppose you have recorded a track that is shifted by one bar compared to the other tracks. By moving
the track to the position anticipated by one bar, you can bring the track concerned back into “phase”.
By copying notes that are positioned close together, you can create an “echo” effect.
DELETE It allows you to delete entirely or partially the events of the selected track. Press the F7
button to access this function. A window will be highlighted in the middle of the display. In this
window you can enter the interval that will be deleted FROM -> TO. When you enter the menu,
the entire track is selected by default and the ALL box is highlighted. This means that all midi
type-events will be deleted. You may select only certain events to be deleted by pressing F1
(NOTES), F2 (CONTROL), F3 (PROGRAM CHANGE), F4 (PITCH BEND). Press F7 LAST
RECORD if you want to delete only the last recording.
82
Page 86

83
DELETE LINK: Press F8 to select/deselect the DELETE LINK mode. Selecting this function will
allow you to link the events that are positioned at the two ends of the deleted interval, so that
you will not have a “hole” in the deleted interval. Press F10 to execute the deletion but, before
that, confirmation will be requested by means of the message “Are you sure?”. Press F5 to exit
without deleting.
DEFRAG: When you perform several deletions, the memory space is not freed completely.
Therefore, you might be “short” of memory even if your sequence is a short one. Press F9
(DEFRAG) to “format” the memory and free the spaces lost through deletion.
FUNCTION: When FUNCTION is selected by pressing the F4 button, new functions of the
sequencer become operational such as OPTIONS, MIDI FILTER, MASTER TRACK LOAD/SAVE,
DEMIX, MIXDOWN, VELOCITY, TRANSPOSER.
OPTIONS: Access this menu by pressing the F2 button after you have entered the FUNCTION
mode by pressing F2. Press the F5 button (Escape) to exit the menu.
METRONOME: Press F1 to switch the metronome
On/Off during recording.
MODE RECORD: Press F1 to select the two recording modes Overdub and Replace (see RECORD).
RECORD PRECOUNT: By repeatedly pressing F3
you may select the bars that will pass between the
moment the recording is launched and the moment it
actually starts. You can choose from 0 to 5 precount
bars. The precount is shown on the POSITION box
with a negative sign (-). The precount is interrupted
when the first event arrives. When in the SYNCSTART mode, it is automatically switched off
since it is not necessary.
CHASE EVENTS: When this function is On (F4 button), regardless of the position from which
the sequence starts, the CONTROL CHANGE and the PROGRAM CHANGE of the sequence are
transmitted in any case, even when recorded in previous positions. If, for example, the starting
point of a sequence is set at number 20 and the controls are set at bar 1, the sequencer will
immediately send all the controls that are present from the beginning of the sequence up to bar
20. This functions allows the notes to play in the set manner, regardless of the starting point of
the sequence.
RESET STOP: If this function is On (F6 button), at every stop the suspended notes are deleted
and the pitch bend is reset.
STEP TRACE: If this function is On(F8 button), you can use the Cursor<> buttons to move
around the EDIT menu and play back the recorded notes while scrolling them. This function is
useful to trace parts of the sequence.
TRACK NAME: Use the Cursor<> buttons to scroll through the names of the tracks shown in
the middle of the display. Press the F7 button if you want to change the name of a track with a
selected number. This way you will access the usual name editing window. The procedure to edit
a new name is the same as the one already described in the NAME paragraph. Press F10
(Execute) to save, press F5 (Escape) to exit.
MIDI FILTER: Before describing in detail the various menu functions, here is some information
about the musical parts and the channels on which such parts play. The sequencer is capable of
managing up to 16 musical parts for each track. Every part is associated with a midi channel. If a
sequence is recorded using the styles of the musical instrument, the instrument parts will be
Page 87

recorded on channels set in the MIDI channel Tx menu. With MIDI SETUP set on “General”, by
default the part -> channel association is the following (recommended one):
Part Channel
Preset (right) 1
2nd Voice (right) 2
Lower1 (left) 3
Lower2 (left) 4
Bass (left) 5
Chord1 (left) 6
Chord2 (left) 7
Chord3 (left) 8
Groove (left) 9
Drum (left) 10
Chord4 (left) 11
Chord5 (left) 12
Program voice1 (right) 13
Program voice2 (right) 14
Program voice3 (right) 15
Program voice4 (right) 16
By playing the keyboard on the left hand side of the split, the left parts are switched on, while by
playing on the right hand side the right parts are switched on. For example, on the left hand side in
the stop mode only the two lowers play whereas, if you keep start pressed and set a chord, the
drums will play together with the other parts of the style. The preset plays on the right hand side
but if you enter the program, the parts of the program or the 2nd voice will play if you access by
pressing the related button. If a channel is switched off, it will not be recorded by the sequencer.
The MIDI FILTER can be used to filter the events and the incoming and outgoing channels (by
default no event or channel is filtered). In order to filter the events so that they are not recorded,
you must first use the Cursor <> or Page <> buttons to select the event box on the IN column (incoming). You can filter:: Note, Control Change, Program change, Pitch Bend, Aftertouch, Exclusive
Messages. In order to switch the filter on, press the F10 button to make the dot appear in the box.
The procedure is the same also for the channels. If you want to record an event or a channel
without playing it and exit at the midi out, the filter must be put in the OUT column.
Special mention must be made for the clock IN OUT boxes.
In this case, an empty box means that the clock is switched off. When the clock is set on IN, the
clock inside the sequencer is switched off. It has to be powered from the outside by means of a
midi or by switching on the internal mode (Start, Fills, etc.). If the clock is set on OUT, both
midi events and the midi clock will pass through the midi out. If the sequencer IN clock is switched on and so is the MIDI out clock (see MIDI CLOCK SOFTTHRU Menu), when the style is
switched on by pressing the Start button, the style clock out will also start the recording. On the
contrary, if the MIDI FILTER clock out and the MENU MIDI CLOCK SOFTTHRU clock in are
switched on, also the internal style will automatically start when the recording.
DEMIX: This function allows you to pick out every single recorded channel from a track and to
transfer it to other tracks so that, in the end, every track will have only one channel associated to
it. To demix a track from the main menu, select the track by using the Cursor<> or Page <> but-
84
Page 88

tons and then press F4 (FUNCTION) followed by F7 (DEMIX). Example: Suppose you have
recorded an internal style on track 01 and you want to change the bass round. By using the
Demix function, the events on the bass channel will be transferred to a separate track (e.g. track
number 5 since by default the bass plays on channel number 5). At this point, select track 05
which contains the information about the bass alone. The Chan. column highlights the number
of the demixed channel. The track can be deleted and recorded again, it can be edited, etc. and
you can be sure that the operations will concern only the bass.
MIXDOWN: This function allows you to mixdown the contents of one or more tracks unto a track.
The original midi channels of the events will be maintained.
To select the tracks that you want to mix, use the Cursor <> or Page <> buttons, then press F8
(MIXDOWN) to show that the track will be mixed. Note. Only initialized tracks (status ‘i’) can
be selected.
When you press MIXDOWN, an ‘M’ will appear in the status column. Once all the tracks to be
mixed have been selected, press F10 (Execute). A window will appear in the middle of the
display; us the Value -/+ buttons to choose the end track. By pressing F10 (Execute), all the
tracks that have been selected for mixage will be mixed down unto the end track. The original
tracks will be lost forever.
VELOCITY/TRANSPOSER: This function affects only note events.
It allows you to:
a) Transpose notes (in semitones) so that you may for example change the tone of a sequence or
re-establish the natural interval of a musical instrument.
b) Change the velocity, i.e. the volume in general of each note, to achieve improved performance.
Access the menu by pressing F4 (FUNCTION) and then F9 (VELOCITY/TRANSP.). The display
will show the selected running track on which changes will be made and the FROM -> TO position locators outlining the temporal interval where the operation will be performed.
The two fields VELOCITY, TRANSPOSER are in the lower part of the display. Use the Cursor <>
buttons to select the locators and the VELOCITY or TRANSPOSER controls. Controls can be
accessed directly also by pressing the F5 button. Use the Value -/+ buttons to change the values.
Example:
If you set FROM: 1 1 1
TO: 4 1 1
VELOCITY: -23
TRANSPOSER: +12
The first 3 bars of the running track will be raised by one octave, while the velocity will be lowered by 23 (less volume for every note).
MASTER TRACK: The MASTER TRACK is the track on which all bar, signature and exclusive mes-
sages controlling parameters such as effects, lyrics, etc. are recorded. Press F4 (FUNCTION) and
then F4 (MASTER TRACK) again to access the master track from the main menu. The recorded
events are shown in the center of the display.
Position: gives you the position of the events (bars, quarters, steps)
Event:
Tempo: performance tempo
Signature: musical division
ExcMsg: exclusive messages of other producers
85
Page 89

Solton: Solton exclusive messages
Part: name of the musical part
Lyrics: lyric events (rows of letters)
How to edit exclusive messages.
An exclusive message is made up of a set of bytes with values ranging between 0 and 127. Data in
the sequencer are given in hexadecimal notation in the 00h-7fh range. For the list of Solton exclusive messages, please refer to the annex in the Instructions Handbook. Press F6 (EXCL.MSG.) to
enter an exclusive message. At this point you will access a window with 24 boxes which will allow
you to enter up to 24 bytes (Solton messages have a smaller number of bytes). The position of the
message is given on the top left-hand corner; you may change this position by pressing the Value -/+
buttons. For every box you may enter or change a message byte, using the Cursor<> buttons to
select and the Value -/+ buttons to make changes. By pressing both Value -/+ buttons together you
will cancel the content of the selected box.
NOTE. The boxes must be filled one after the other, without leaving blank boxes.
Solton exclusive messages are already part of the instrument and can be recognized by the fact that
the first data byte (ID) is 26h(38).
The general form of a Solton exclusive message that can change the instrument parameters is:
F0h, 26h, 7Bh, parameter code value_1, value_2, .. ,value_n, F7
Values F0h and F7h are entered automatically by the sequencer.
Let us see some examples:
By entering 26h in the first box and 7bh in the second box, the third box gives you the message
parameter code.
Third box: 00h reverb type
01h chorus type
02h reverb level
06h delay type
11h distorsor type
" "
For the complete list, please refer to the annexes in the Instructions Handbook.
From the fourth box onwards, you must enter one or more values according to the parameter in the third
box. For example, by entering 26H 7BH 00H 00H, the instrument will set the reverb type 00h = box1.
By entering 26H 7BH 00H 07H you will set reverb number 07h(Hall2).
By entering 26H 7BH 06H 02H you will set delay number 02h(Delay3).
By entering 26H,7Bh,0Bh,00h as first 4 bytes, the fifth byte will indicate the part and the sixth effect
that the sound will take up on that part.
Example (effect allocation).
86
Page 90

In general: F0H, 26H, 7BH, 0BH, 00H, Part, Effect, F7H
By entering in the boxes 26H 7BH 0BH 00H 00H 02h, the distorsor will go on part 0 (See table
below).
Part
0 Preset (right)
1 2nd Voice (right)
2 Lower1 (left)
3 Lower2 (left)
4 Bass (left)
5 Chord1 (left)
6 Chord2 (left)
7 Chord3 (left)
8 Groove (left)
9 Drum (left)
10 Chord5 (left)
11 Program voice1 (right)
12 Program voice2 (right)
13 Program voice3 (right)
14 Program voice4 (right)
Effect 00h no effect
01h Leslie
02h Distorsor
03h Chorus
04h Delay
05h Delay + Chorus
06h Distorsor + Chorus
07h Distorsor + Delay
08h Distorsor + Delay + Chorus
Press F10 to save the message, F5 to cancel the operation. NOTE. The message is always added to
the master track; therefore, if you want it to replace another message, you will first have to delete
the old one.
Master track DELETE EVENT: Pressing F4 will immediately delete the selected event (without
confirmation request) from the master track.
Master track INS/MOD TEMPO: It allows you to insert/modify tempo events.Press F2 to open
the edit window. Use the Cursor <> buttons to access the Position and Value fields, and the Value
-/+ buttons to perform changes. Press F10 to execute, F5 to cancel.
Master track INS/MOD SIGNATURE: It allows you to insert/modify signature events. Press F3 to
open the edit window. Use the Cursor <> buttons to access the Position and Value fields, and the
Value -/+ buttons to perform changes. Press F10 to execute, F5 to cancel.
Master track LYRIC: Press F8 to access the LYRIC page where you can insert lyric events in the
87
Page 91

sequence. The lyric events available in many MIDIFILES contain the text of a song and if they are
inserted into the sequence on a syllabic basis, you will have a KARAOKE-type effect when you
play it back in the PLAY SONG mode.
LYRIC INSERT/MODIFY: It allows you to insert/modify lyric events. Press F2 to open an edit win-
dow where you can select the position; place the cursor to the right of the position and open a
new window where you can edit letters. The letter above the cursor can be inserted by using the
keyboard or the Value -/+ buttons. Some buttons have special functions. The B_1 button allows
you to change the letters associated with the keys from small letters to capital letters. The G_5
button is the Carriage Return button shown on the display by an arrow to the right. The F#-5
button selects a number of international signs. The F_5 button deletes the cursor position up to
the end of the sentence (this can be done also by pressing the Value -/+ buttons together). Use
the Cursor <> buttons to move from one letter to the other. Once the sentence is edited, it can be
memorized in the lyric event by pressing F10; press F5 to go back to the position field; pressing
F5 again will cancel the operation.
LYRIC AUTOMATIC: It allows you to insert lyric events automatically, changing the notes of a selected
channel of the running track into lyric events. You can choose the channel where there is a melodic line
that follows the singing. Every lyric event can later be edited to insert a new syllable.
In other words:
Once the track on which changes are to be made has been selected from the main menu, enter
the MASTER TRACK.
Press F8 (LYRIC).
Press F6 to select (with Value -/+) the channel where the track melodic line is.
Press F3 (AUTOMATIC).
At this point, position the locators From and To in the set interval.
Press F10 to confirm the operation. By doing so, the notes of the selected track interval will be
copied on the MASTER TRACK as lyric events.
At this point, empty lyric events will be made available for editing with INSERT/MODIFY as pre-
viously described.
LYRIC DELETE EVENT: Pressing F4 (DELETE EVENT) will delete the lyric event that was pre-
viously selected with the Cursor <> buttons.
NAME PART: It allows you name every part of the sequence. Once the sequence names have been
entered, the name will appear in the POSITION box of the sequencer main page.
Example: x.1.1 can be called “Strophe 1”, y.1.1 “Strophe 2”, and z.1.1 “Refrain” in order to have an
automatic reference point. Press F9 to name a part. A window is opened where you can set the initial
position of the part and the name of the part itself. Use the Cursor <> buttons to move from one
Position value to the other and the Value -/+ buttons to change the values. Once the position has been
chosen, place the cursor on the default name “Part”. Another window will automatically open so that
you can give a new name to the part. Syllables are selected by using the Value -/+ buttons o by using the
keyboard. If the Value -/+ buttons are used, use the Cursor <> buttons to move along from one syllable
to the next. Press F10 to confirm the operation, F5 to exit.
VIEW: It allows you to choose the type of event to show in the MASTER TRACK menu. Press F6
(VIEW) repeatedly to select the events. ALL : all events are displayed.
LYRIC: only lyric events are displayed.
88
Page 92

PART : only part name events are displayed.
TEMPO: tempo and signature are displayed.
EXCL : exclusive messages are displayed.
OPTIONS: Press F4 to enter the FUNCTION mode and then F2 to access this menu. Press F5
(Escape) to exit the menu.
METRONOME: By pressing F1, the metronome is switched on/off during the recording stage.
MODE RECORD: By pressing F1, the two recording modes, Overdub and Replace, are selected
(see RECORD).
RECORD PRECOUNT: By repeatedly pressing F3 you select the bars that must elapse between the
moment in which the recording command is given and the moment in which the recording
actually starts. You can have from 0 to 5 precount bars. The precount is displayed in the POSITION box, marked with a negative sign (-). The precount is interrupted when the first event
starts. In the SYNCSTART mode it is automatically switched off since it is not required.
CHASE EVENTS: When this function is On (F4 button), regardless of the position from which the
sequence starts, the CONTROL CHANGE and the PROGRAM CHANGE of the sequence are
transmitted in any case, even if they were recorded in previous positions. If, for example, the
starting point of a sequence is set at number 20 and the controls are set at bar 1, the sequencer
will immediately send all the controls that are present from the beginning of the sequence up to
bar 20. This functions allows the notes to play in the set manner, regardless of the starting point
of the sequence.
RESET STOP: If this function is On (F6 button), at every stop the suspended notes are deleted and
the pitch bend is reset.
STEP TRACE: If this function is On (F8 button), you can use the Cursor<> buttons to move
around the EDIT menu and play back the recorded notes while scrolling them.
This function is useful to trace parts of the sequence.
TRACK NAME: Use the Cursor<> buttons to scroll through the names of the tracks shown in the
middle of the display. Press the F7 button if you want to change the name of the track with a
selected number. This way you will access the usual name editing window. The procedure to edit
a new name is the same as the one already described in the NAME paragraph. Press F10
(Execute) to save, F5 (Escape) to exit.
LOAD/SAVE: A sequence can be imported from outside (disk), provided it is in a midi file format.
The instrument is capable of interpreting the midi file format (see SONG PLAY section of the
Instructions Handbook). During the LOAD phase, the midi file (MID extension) is automatically
translated into a format that the sequencer can read and it is loaded in the memory. Therefore, it
can be edited for changes, additions, deletions by using the sequencer’s functions. Once the
sequence imported through LOAD or recorded from zero has been edited, it can be saved in the
midi file format. To this end, the SAVE function is used. Once saved on disk, the sequence can
be reproduced (by accessing the SONG PLAY menu).
In detail:
89
Page 93

LOAD: Access the function from the main menu by pressing F4 (FUNCTION) and then F6
(LOAD/SAVE). You will access a page on the display with the following arrangement: The midi
files directory is in the center of the display. If the HARD DISK is selected, the directory refers to
the midi files that are in the Folder that is selected and shown in the upper part of the display.
For example, if HARD [03 Newfold] is shown, the files are those belonging to folder number 3
named Newfold. If Floppy Disk is shown, the filed are those belonging to the main directory of
the floppy. Use the numeric buttons 0-9 to change Folders; use the Page <> buttons to select the
Floppy from the Hard Disk and vice versa. If you change a diskette in the floppy and you want to
update the display so that it shows also the contents of the new diskette, press F4 (Dir) because
updating in this case is not automatic. To select the midi file that has to be loaded, use the
Cursor <> buttons to change page; use the Value -/+ buttons to move between files. Loading
modes are highlighted in the MODE box which can be changed by pressing F3. They are:
REPLACE: The midi file will replace any sequence that is in the memory (this sequence will be
deleted). In this case press F1 (Load) and the selected midi file will be loaded in the memory,
deleting everything else that was already in the memory.
MERGE: The midi file will merge with the sequence that is already in the memory. Once the
MERGE mode is set, a window appears in the middle of the display. You can select the position
(by using the Cursor <> and Value -/+ buttons) where the midi file will be “hooked” unto the
already-existing sequence. This function can be used to merge several midi files by selecting their
positions accordingly. If you want the midi files to play in the proper manner, we recommend
that you use the Merge function for midi files saved in 0 format (i.e. made up of one single
track). Once the midi files have been loaded in the memory, use the Demix function to assign
one track to every channel. To load the selected midi file, set its position and then press F10.
After the loading procedure, the sequencer will automatically return to the main menu. The
tracks containing midi files will take up the “i” status; if the midi file is in the multitrack format,
a reproduction channel (Chan. column) will be automatically set for every track. Instead, the
tempo and signatures of the midi files, and any lyrics or exclusive messages, will be recorded on
the MASTER TRACK.
SAVE: A recorded or loaded sequence can be saved on disk in the midi file format by using the
SAVE function. The SAVE procedure is similar to the LOAD one, except that F6 (SAVE) must be
pressed instead of F1. Once a name has been assigned to the sequence that will be saved, press
F10 (Execute) to confirm the operation. Press F5 (Escape) to exit the menu without performing
any operation. We recommend that you save the sequence not only at the end of your work session but also before performing risky operations such as Delete, Mixdown, Copy/Move. In this
way, should any of these operations not give you the desired results, you can always use LOAD
to reload your original sequence. After saving, press F5 to return to the main menu.
90
Page 94

91
GRAND PIANO 1
ROCK PIANO 2
UPRIGHT 3
HONKY TONK 4
RODES PIANO 5
DX PIANO 6
HARPSICHORD 7
CLAVINET 8
CELESTA 9
GLOCKEN 10
MUSIC BOX 11
VIBRAPHONE 12
MARIMBA 13
XYLOPHON 14
BELLS 15
SANTUR 16
LESLIES 17
JAZZ ORGAN 18
ROCK ORGAN 19
CHURCH ORG. 20
THEATRE ORG 21
MUSETTE 1 22
HARMONICA 23
ACCORDION 24
FLAMENCO 25
FOLK 26
JAZZ 27
CLEAN 28
MUTED 29
OVERDRIVE 30
ROCK LEAD 31
HARMONICS 32
ACOUSTIC 33
FINGERED 34
PICKED 35
FRETLES 36
SLAP 1 37
SLAP 2 38
SYNBASS1 39
SYNBASS2 40
VIOLIN 41
VIOLA 42
CELLO 43
CONTRABASS 44
TREMOLO STR 45
PIZZICATO 46
HARP 47
TIMPANI 48
PHILARMONIC 49
SLOW STRING 50
SYNSTRINGS1 51
SYNSTRINGS2 52
CHOIR 1 53
CHOIR 2 54
SYNVOICE 55
ORCH. HITS 56
TRUMPET 57
TROMBONE 58
TUBA 59
MUTE TRUMPT 60
FRENCH HORN 61
BRASS1 62
SYNBRASS1 63
SYNBRASS2 64
BLOWED SAX 65
ALTO SAX 66
ROCK SAX 67
TENOR SAX 68
OBOE 69
ENGL. HORN 70
BASSOON 71
CLARINET 72
PICCOLO 73
FLUTE 74
RECORDER 75
ANDES PIPE 76
BOTTLE 77
SHAKUHASHI 78
WHISTLE 79
OCARINA 80
SQUARE LEAD 81
SAW LEAD 82
CALLIOPE 83
WHA LEAD 84
PLATE LEAD 85
VOX LEAD 86
SAW 5TH 87
FM LEAD 88
FANTASY 89
WARM 90
SCORE 91
SPACE 92
DARK 93
METAL 94
HALO 95
SWEEP 96
ICE RAIN 97
SOUNDTRACK 98
CRYSTAL 99
ATMOSPHERE 100
BRIGHTNESS 101
GOBLIN 102
ECHODROPS 103
STAR THEME 104
SITAR 105
BANJO 106
SHAMISEN 107
KOTO 108
KALIMBA 109
BAG PIPE 110
FIDDLE 111
SHANAI 112
TINKLE BELL 113
AGOGO 114
STEEL DRUMS 115
WOODBLOCK 116
TAIKO 117
MELOTOM 118
SYNT DRUM 119
REVERSE CYM 120
FRET NOISE 121
BREATH 122
SEASHORE 123
BIRD 124
TELEPHONE 125
HELICOPTER 126
APPLAUSE 127
GUN SHOT 128
VOICES BANK 1
Page 95

92
CONCERT 1
DIGIPIANO 2
HOUSE PIANO 3
STAGE PIANO 4
ELECTRO PNO 5
FUNKY PIANO 6
FM PIANO1 7
FM PIANO2 8
MALLET 9
CHIMES 10
HAMMER 11
DAMP VIBES 12
MALIMBA 13
CARILLON 14
TINKLES 15
WINDCHIMES 16
ROTOR B3 17
POP ORGAN 18
DRAWBARS 19
POSITIVE 20
MUSETTE 2 21
ORGANETTO 22
CASSOTTO 23
BANDONEON 24
SPANISH 25
COUNTRY 26
PLUCKED 27
60’S MUTED 28
STOPPED 5TH 29
BLUES LEAD 30
12 STRINGS 31
MELOBAR 32
SINUS 33
FUSION 34
FUNK 35
FM BASS1 36
FM BASS2 37
SYNBAS3 38
SYNBAS4 39
SYNBAS5 40
SYMPHONY 41
VIOLAS 42
GLOCKSTRING 43
OCTASTRING1 44
OCTASTRING2 45
MARCATO STR 46
ORCHESTRA 47
SLOW ARCOS 48
STRING ENS. 49
DIGISTRINGS 50
LAAAH 51
MMMH 52
TOOOH 53
UUUH 54
AAAH 55
UAP & BOOM 56
TIJUANA 57
CORNET 58
TUBA & BASS 59
MILES MUTED 60
FLUGELHORN 61
BRASS 2 62
GROWBRASS1 63
FX BRASS 64
SOPRANO SAX 65
CIRCUS SAX 66
ALTOSOFT 67
GROWL SAX 68
MARIACHI 69
GROWBRASS2 70
BLARE 71
HORNS 72
ALTO FLUTE 73
FIFE 74
VOICE FLUTE 75
PAN FLUTE 76
ANALOGS 77
FLANGER 78
BRIGHTSAW 79
WIRING 80
WOW 81
SAW WAVE 82
SQUARE WAVE 83
SINUS WAVE 84
POP BASS 85
UNDERBAS 86
HOUSEBAS 87
TECNOBAS 88
2ND PERC. 89
3RD PERC. 90
CLICK 91
EL. ORGAN 1 92
EL. ORGAN 2 93
EL. ORGAN 3 94
HARD ORGAN 95
HOUSE ORGAN 96
POWER GUIT. 97
FUNKY 98
SOLID BODY 99
STRATO 100
TREMOLO GUI 101
TELECAST 102
ROCK STOPS 103
WHA GUITAR 104
HAWAIAN 105
MANDOLIN 106
DARK JAZZ 107
BOUZUKI 108
PEDAL STEEL 109
POP GUITAR 110
FISA 8’ 111
SAX BLOW 112
FX 1 113
FX 2 114
FX 3 115
FX 4 116
FX 5 117
FX 6 118
FX 7 119
FX 8 120
VOCAL 1 121
VOCAL 2 122
VOCAL 3 123
VOCAL 4 124
VOCAL 5 125
JODLERS 126
SCIENCE-FX 127
SCRATCHES 128
VOICES BANK 2
Page 96

93
01A 8BEAT_1 51A R&BLUES_2
02A 8BEAT_2 52A R&BLUES_3
03A 8BEAT_3 53A FUNKY_1
04A 8BEAT_4 54A FUNKY_2
05A 8BEAT_5 55A FUNKY_3
06A 16BEAT_1 56A FUNKY_4
07A 16BEAT_2 57A BLUES_1
08A 16BEAT_3 58A BLUES_2
09A 16BEAT_4 59A SLOWBLUES
10A 16BEAT_5 60A ROCK_1
11A 8BALLAD_1 61A ROCK_2
12A 8BALLAD_2 62A ROCKBALLAD
13A 8BALLAD_3 63A ROCKSHUFFLE_1
14A 8BALLAD_4 64A ROCKSHUFFLE_2
15A 16BALLAD_1 65A B.B.ROCK
16A 16BALLAD_2 66A PARTYBEAT1
17A 16BALLAD_3 67A PARTYBEAT2
18A 16BALLAD_4 68A JAZZORGAN1
19A LIGHTPOP_1 69A JAZORGAN_2
20A LIGHTPOP_2 70A BROADWAY
21A LIGHTPOP_3 71A MOONLIGHT
22A POPFUNK_1 72A SWING_1
23A POPFUNK_2 73A SWING_2
24A POPFUNK_3 74A SLOW_1
25A HIPHOP_1 75A SLOW_2
26A HIPHOP_2 76A WESTERN_1
27A HIPHOP_3 77A WESTERN_2
28A EASYRAP_1 78A CTRYROCK_1
29A EASYRAP_2 79A CTRYROCK_2
30A TECHNO_1 80A CTRYSLOW_1
31A TECHNO_2 81A CTRYSLOW_2
32A TECHNO_3 82A CNTRYPOP_1
33A HOUSE_1 83A CNTRYPOP_2
34A HOUSE_2 84A CNTRYPOP_3
35A HOUSE_3 85A CNTRYFOX_1
36A DISCO_1 86A CNTRYFOX_2
37A DISCO_2 87A BLUEGRAS_1
38A DISCO_3 88A BLUEGRAS_2
39A DISCO_4 89A CNTRYWALZ1
40A ACIDJAZZ_1 90A CNTRYWALZ2
41A ACIDJAZZ_2 91A CNTRYBEAT
42A ACIDJAZZ_3 92A 5/4
43A RAP_1 93A DJANGO
44A RAP_2 94A JAMSESSION
45A JUNGLE 95A GOSPEL
46A GRUNGE 96A MOVIESONG
47A R&BGROOVE 97A NEWAGE
48A SOUL 98A CELTIC_1
49A MOTOWN 99A CELTIC_2
50A R&BLUES_1
STYLES BANK A
Page 97

94
01B BIGBAND_1 51B PASODOBLE1
02B BIGBAND_2 52B PASODOBLE2
03B BIGBAND_3 53B GIPSY
04B BIGBAND_4 54B CARIBE
05B SLOWDIXIE 55B LATIN DANCE1
06B CHARLESTON 56B LATIN DANCE2
07B FOXBALLAD1 57B LIMBO
08B FOXBALLAD2 58B REGGAE_1
09B SLOWFOX 59B REGGAE_2
10B FOXTROT_1 60B BAJON
11B FOXTROT_2 61B PARTY POLKA1
12B QUICKSTEP 62B PARTY POLKA2
13B POP_60 63B BAVARIAN
14B TWIST_1 64B WALTZ_1
15B TWIST_2 65B WALTZ_2
16B TEX_MEX 66B WALTZ_3
17B ROCK&ROLL1 67B SLOWALTZ_1
18B ROCK&ROLL2 68B SLOWALTZ_2
19B ROCK&ROLL3 69B JAZZWALTZ
20B BOOGIE 70B POLKA_1
21B BUGG 71B POLKA_2
22B SHUFFLE 72B POLKA_3
23B SLOWROCK_1 73B TANGO_1
24B SLOWROCK_2 74B TANGO_2
25B SLOWROCK_3 75B TANGO_3
26B SLOWROCK_4 76B MAZURKA_1
27B BEGUINE_1 77B MAZURKA_2
28B BEGUINE_2 78B WIENER
29B BEGUINE_3 79B MUSETTE
30B BOSSANOVA1 80B MARCH_1
31B BOSSANOVA2 81B MARCH_2
32B CHACHA_1 82B OBERPOLKA
33B CHACHA_2 83B OBERWALTZ
34B SAMBA_1 84B HULLY GULLY_1
35B SAMBA_2 85B HULLY GULLY_2
36B JAZZSAMBA 86B MACARENA
37B DISCOSAMBA 87B MENEITO
38B SALSA_1 88B LAMBADA
39B SALSA_2 89B LETKISS
40B SALSAFUNK 90B TARANTELLA
41B MAMBO 91B RUMBA NAPOLETANA 1
42B MERENGUE_1 92B RUMBA NAPOLETANA 2
43B MERENGUE_2 93B SALTARELLO
44B BOLERO 94B JIGS
45B CUMBIA 95B REELS
46B BACHATA 96B ROMANTIC
47B GUAJIRA 97B WESTRIDE
48B RUMBA FLAMENCA 98B BAROQUE
49B SEVILLANA 99B CANCAN
50B RANCHER
STYLES BANK B
Page 98

95
P Ch Name Key Groove Key Groove Key Groove Key Groove
1 Bachata C1 Bachata
2 Bolero C1 Bolero
3 ChaCha C1 ChaCha A C3 ChaCha B C5 ChaCha C
4 Cumbia C1 Cumbia C4 ChaCha C
5 Guajira C1 Guajira
6 Mambo C1 Mambo A C3 Mambo B C5 ChaCha C
7 Salsa C1 Salsa A C3 Salsa B C5 Salsa C C0 ChaCha C
8 Rhumba C1 Rhumba
9 Merengue 1 C1 Merengue 1
10 Merengue 2 C1 Merengue 2A C3 Merengue 2B
11 Congas 1 C1 Congas 1
12 Congas 2 C1 Congas 2
13 Gipsy C1 Gipsy A C3 Gipsy B
14 Maracas C1 Maracas
15 Tambourine C1 Tamb A C2 Tamb B C3 Tamb C
16 Brush C1 Brush
17 House C1 House A C2 House B
18 Rap 1 C1 Rap 1
19 Rap 2 C1 Rap 2
20 Rap 3 C1 Rap 3
21 Techno 1 C1 Techno 1
22 Techno 2 C1 Techno 2
23 Ethnic 1 C1 Bachata F#1 Maracas D2 Brush F#3A Congas 1
#4 Rhumba
24 Ethnic 2 C1 Bachata F#1 Maracas D2 Brush Rap 1 F#3 Tamb A
A#3 D5 Rap 2
25 Groovemix 1 C1 Rap 2 C#2 Gipsy A F3 Mambo A A4 Congas 1
C5 Techno 2
26 Groovemix 2 C1 Rap 2 C#2 Gipsy A F2 Salsa A A#4 Rhumba
C#6 Techno 3
27 Groovemix 3 C1 Techno 2 G#1 Salsa A C3 Merengue 1 C#4 Merengue 2A
C#5 Merengue 2B
28 Groovemix 4 C1 Congas 2 G#1 Congas 1 C3 Gipsy A E4 Gipsy B
A5 House B
29 Groovemix 5 C1 Salsa A E2 Salsa C E3 Mambo A G#4 Mambo B
30 Groovemix 6 C1 Mambo A E2 Mambo B G3 Congas 1 B4 Rap 3
31 Groovemix 7 C1 ChaCha A E2 ChaCha B G#3 Guajira C5 Bolero
A5 Bachata D#6 ChaCha C
32 Groovemix 8 C1 Cumbia C#2 House A D#2 House B C3 Techno 1
B3 Guajira G#4 Maracas 2
33 Groovemix 9 C1 Rap 1 E2 Rap 2 F3 Rap 3 A4 Tamb B
F5 Techno 4
34 Groovemix 10 C1 Rap 1 E2 Rap 2 F3 Congas 1 A4 Tamb B
F5 Techno 4
35 Groovemix 11 C1 Tamb A E1 Maracas C2 Congas 2 G#2 Bolero
E3 Bachata A#3 Rhumba D5 House A E5 House B
36 Groovemix 12 C1 Merengue 2A C2
Merengue 2B C#3 House A D#3 House B
C4 Rap 2 D#5 Tamb A
F
5
Snare 1 F
#5
Snare
2
GROOVES
Page 99

96
DRUM SETS
Standard
Program change 1
Folk
Program change 9
24 Crash roll 76 Wood block hi 24 Crash roll 76 Wood block hi
25 Snare 35 77 Wood block low 25 Snare 35 77 Wood block low
26 Fingersnap 78 Cuica 1 26 Fingersnap 78 Cuica 1
27 Slap 79 Cuica 2 27 Slap 79 Cuica 2
28 Spings 80 Triangle 2 28 Spings 80 Triangle 2
29 Scratch up 81 Triangle 1 29 Scratch up 81 Triangle 1
30 Scratch down 82 Shaker 1 30 Scratch down 82 Shaker 1
31 Sticks 1 83 Shaker 2 31 Sticks 1 83 Shaker 2
32 Click 1 84 Sticks 2 32 Click 1 84 Sticks 2
33 Metronome 1 85 Castagnet 33 Metronome 1 85 Castagnet
34 Metronome 2 86 Tambourine 2 34 Metronome 2 86 Tambourine 3
35 Kick 1 87 Rim shot 2 35 Kick 3 87 Rim shot 3
36 Kick 5 88 Snare 3 36 Kick 9 88 Snare 7
37 Rimshot 1 89 Snare 11 37 Rimshot 5 89 Snare 2
38 Snare 33 90 Snare 10 38 Snare 17 90 Snare 20
39 Clap 1 91 Stick 4 39 Clap 2 91 Stick 3
40 Snare 1 92 Stick 2 40 Snare 19 92 Stick 1
41 Standard tom 6 93 Close 2 41 Standard tom 6 93 Close 1
42 Stick 1 94 Open 2 42 Stick 1 94 Open 1
43 Standard tom 5 95 Reverse 43 Standard tom 5 95 Reverse
44 Close 1 96 Applause 44 Close 2 96 Applause
45 Standard tom 4 97 Belltree 45 Standard tom 4 97 Belltree
46 Open 1 98 Telephone 46 Open 2 98 Telephone
47 Standard tom 3 99 Hua 47 Standard tom 3 99 Hua
48 Standard tom 2 100 Hay 48 Standard tom 2 101 Hay
49 Crash 2 101 Hey 49 Crash 2 101 Hey
50 Standard tom 1 102 Huu 50 Standard tom 1 102 Huu
51 Ride 1 103 Uhh 51 Ride 3 103 Uhh
52 Crash 3 104 Fx 1 52 Crash 3 104 Fx 1
53 Bell 105 Fx 2 53 Bell 105 Fx 2
54 Tambourine 1 106 Arriba 54 Tambourine 1 106 Arriba
55 Splash 107 Ayombre 55 Splash 107 Ayombre
56 Cowbell 3 108 Cadera 56 Cowbell 2 108 Cadera
57 Crash 1 109 Cumbia 57 Crash 1 109 Cumbia
58 Vibraslap 110 Sabor 58 Vibraslap 110 Sabor
59 Ride 2 111 Salsa 59 Ride 2 111 Salsa
60 Bongo hi 112 Brrr 60 Bongo hi 112 Brrr
61 Bongo low 113 Aaah 61 Bongo low 113 Aaah
62 Conga middle 114 Haihai 62 Conga middle 114 Haihai
63 Conga hi 115 Rico 63 Conga hi 115 Rico
64 Conga low 116 Seashore 64 Conga low 116 Seashore
65 Timbales hi 117 Pfif 65 Timbales hi 117 Pfif
66 Timbales low 118 Jodler 1 66 Timbales low 118 Jodler 1
67 Agogo hi 119 Jodler 2 67 Agogo hi 119 Jodler 2
68 Agogo low 120 Laser 68 Agogo low 120 Laser
69 Cabasa 121 Sexwhisp 69 Cabasa 121 Sexwhisp
70 Maracas 1 122 Scratch 1 70 Maracas 3 122 Scratch 1
71 Whistle short 123 Scratch 2 71 Whistle short 123 Scratch 2
72 Whistle long 124 Scratch 3 72 Whistle long 124 Scratch 3
73 Guiro 1 125 Scratch 4 73 Guiro 1 125 Scratch 4
74 Guiro 2 126 Scratch 5 74 Guiro 2 126 Scratch 5
75 Claves 75 Claves
Page 100

97
DRUM SETS
Acoustic
Program change 10
Hard Rock
Program change 17
24 Crash roll 76 Wood block hi 24 Crash roll 76 Wood block hi
25 Snare 35 77 Wood block low 25 Snare 35 77 Wood block low
26 Fingersnap 78 Cuica 1 26 Fingersnap 78 Cuica 1
27 Slap 79 Cuica 2 27 Slap 79 Cuica 2
28 Spings 80 Triangle 2 28 Spings 80 Triangle 2
29 Scratch up 81 Triangle 1 29 Scratch up 81 Triangle 1
30 Scratch down 82 Shaker 1 30 Scratch down 82 Shaker 1
31 Sticks 1 83 Shaker 2 31 Sticks 1 83 Shaker 2
32 Click 1 84 Sticks 2 32 Click 1 84 Sticks 2
33 Metronome 1 85 Castagnet 33 Metronome 1 85 Clap 1
34 Metronome 2 86 Tambourine 1 34 Metronome 2 86 Tambourine 3
35 Kick 9 87 Rim shot 1 35 Kick 11 87 Rim shot 2
36 Kick 1 88 Snare 1 36 Kick 12 88 Snare 13
37 Rimshot 6 89 Snare 15 37 Rimshot 3 89 Snare 1
38 Snare 12 90 Snare 16 38 Snare 23 90 Snare 4
39 Clap 2 91 Stick 4 39 Clap 2 91 Middle 2
40 Snare 13 92 Stick 3 40 Snare 5 92 Stick 3
41 Acoustic tom 6 93 Close 2 41 Standard tom 6 93 Close 1
42 Stick 1 94 Open 2 42 Stick 2 94 Open 1
43 Acoustic tom 5 95 Reverse 43 Standard tom 5 95 Reverse
44 Close 1 96 Applause 44 Close 2 96 Applause
45 Acoustic tom 4 97 Belltree 45 Standard tom 4 97 Belltree
46 Open 1 98 Pandero 1 46 Open 2 98 Telephone
47 Acoustic tom 3 99 Pandero 2 47 Standard tom 3 99 Hua
48 Acoustic tom 2 100 Pandero 3 48 Standard tom 2 101 Hay
49 Crash 2 101 Hey 49 Crash 2 101 Hey
50 Acoustic tom 1 102 Huu 50 Standard tom 1 102 Huu
51 Ride 1 103 Uhh 51 Ride 3 103 Uhh
52 Crash 3 104 Fx 1 52 Crash 3 104 Fx 1
53 Bell 105 Fx 2 53 Bell 105 Fx 2
54 Tambourine 3 106 Arriba 54 Tambourine 1 106 Arriba
55 Splash 107 Ayombre 55 Splash 107 Ayombre
56 Cowbell 3 108 Cadera 56 Cowbell 2 108 Cadera
57 Crash 1 109 Cumbia 57 Crash 1 109 Cumbia
58 Vibraslap 110 Sabor 58 Vibraslap 110 Sabor
59 Ride 2 111 Salsa 59 Ride 4 111 Salsa
60 Bongo hi 112 Brrr 60 Bongo hi 112 Brrr
61 Bongo low 113 Aaah 61 Bongo low 113 Aaah
62 Conga middle 114 Haihai 62 Conga middle 114 Haihai
63 Conga hi 115 Rico 63 Conga hi 115 Rico
64 Conga low 116 Seashore 64 Conga low 116 Seashore
65 Timbales hi 117 Pfif 65 Timbales hi 117 Pfif
66 Timbales low 118 Jodler 1 66 Timbales low 118 Jodler 1
67 Agogo hi 119 Jodler 2 67 Agogo hi 119 Jodler 2
68 Agogo low 120 Laser 68 Agogo low 120 Laser
69 Cabasa 121 Sexwhisp 69 Cabasa 121 Sexwhisp
70 Maracas 1 122 Scratch 1 70 Maracas 3 122 Scratch 1
71 Whistle short 123 Scratch 2 71 Whistle short 123 Scratch 2
72 Whistle long 124 Scratch 3 72 Whistle long 124 Scratch 3
73 Guiro 1 125 Scratch 4 73 Guiro 1 125 Scratch 4
74 Guiro 2 126 Scratch 5 74 Guiro 2 126 Scratch 5
75 Claves 75 Claves
 Loading...