


Owner’s Manual
INDICE PAG.
Safety Instructions Connections Control panel and push button functions
Right Menu and Live setting Parameter management A guide how to start playing Voices and User Voices
Programs and One Touch Voices Drawbars Drum Set Arranger
Using a MIDI pedal for the bass Pattern Edit Power On Set Up
Song Play, Midi file and Karaoke Drum Remix Video Out and Karaoke
Recording a Midi file
.KAR, .MID (Midi files) & .TXT (text) files Using the microphone Vocalizer Effects Registrations Utility Midi Accordions Midi Disk
MidJay Utility Multi-Tab
Technical Tables
2
4
6
12
14
15
20
24
28
29
31
40
41
46
47
53
54
55
56
58
59
64
66
69
73
75
79
86
89
181
SD5 1
Safety Instructions
Safety Instructions
MEANING OF GRAPHIC SYMBOLS:
The lightning arrow inside an equilateral triangle warns you about the presence of dangerous, not insulated voltage that may constitute a risk of electric shock. The exclamation mark in an equilateral triangle informs you about important instructions in the User's Manual.
INSTRUCTIONS ABOUT RISK OF FIRE, ELECTRIC SHOCK OR INJURY TO PERONS
CAUTION !!! |
RISK OF ELECTRIC SHOCK |
DO NOT OPEN |
CAUTION! |
TO REDUCE THE RISK OF ELECTRIC SHOCK, DO NOT OPEN THE |
COVER. |
Warning: to reduce the risk of fire or electric shock, do not expose this instrument to rain or moisture. - Earthing instructions -
This product must be connected to an earthed outlet. In case of malfunctioning, the earthing will reduce the risk of electric shock. The instrument comes with an earthed power cable and plug to be used with an earthed outlet.
DANGER - Improper earthing connections may cause electric shocks. In case of doubts, have your electric installation checked by a qualified electrician. Do not modify the power cable coming with the instrument.
IMPORTANT SAFETY AND INSTALLATION INSTRUCTIONS
WARNING - When using electrical products, some basic precautions must be followed, including the following:
•Before using this instrument, carefully read the User's Manual.
•When the instrument is used by children, the presence of an adult is required.
•Do not use the instrument near water, for example near a wash-basin, a swimming-pool, a wet surface, etc.
•The instrument must be used only on supports recommended by the manufacturer.
•Do not use the instrument where there is any risk of it getting splashed with water or of water dripping on it, such as near wash basins, swimming pools or on wet surfaces etc. Do not put containers with water on top of the instrument.
•The instrument is to be used in a position where adequate ventilation is provided.
•Use the instrument far away from heat sources such as radiators, heaters, etc.
•Use only the supplied power cable for connecting the instrument to the mains.
The identification and power supply data are reported on the bottom of the instrument.
•Disconnect the power cable if the instrument is not used for longer periods of time.
•If you need to disconnect the instrument from the power supply, use the ON/OFF switch at the back of the instrument. The instrument must be positioned so that the ON/OFF switch is easily accessible.
•Bring the instrument to an service centre in the following cases:
a.Damages on the power cable or plug.
b.Objects or liquids fallen into its inside.
c.The instrument has been exposed to rain.
d.Abnormal running or an evident decrease of the instrument's performance.
e.The instrument has fallen down or the enclosure has been damaged.
•Never try to repair the instrument yourself. All operations must be performed by specialised engineers.
KEEP THESE INSTRUMENTS IN A SAFE PLACE
HOW TO AVOID RADIO/TV INTERFERENCE
This instrument operates at radio frequencies, and if not correctly installed according to the instructions supplied, it may cause interference with radio and television reception.
Though this instrument has been designed according to the applicable standards and notwithstanding the reasonable protections against interference it has been equipped with, there is no guarantee that such events will not occur. In order to check if the interference is actually caused by this instrument, switch it off and see if the interference disappears. Then switch it on again and check if the interference appears again. Once you have made sure that the interference is originated by this instrument, take one of the following measures:
•Turn the radio or TV antenna in a different direction. .
•Modify the instrument's position with respect to the receiver.
•Increase the distance between the instrument and the receiver.
•Connect the instrument's plug to a different outlet to make sure that the instrument and the receiver are connected to two different circuits.
•If necessary, contact a specialised technician.
2SD5
Safety Instructions
WARNINGS
After having read the safety precautions and instructions on the previous pages, carefully read and conform to the following recommendations:
POWER SUPPLY
•Before connecting this instrument to any other equipment (amplifier, mixer, other MIDI instruments, etc.) make sure that all units are switched off.
•Read the instructions about Radio and TV interference..
HOW TO CLEAN THIS INSTRUMENT
•Use only a soft and dry cloth to clean the external surface of your instrument. Never use petrol, thinners or solvents generally speaking. OTHER PRECAUTIONS
•If you wish to use your instrument abroad and if you have any doubts about the power supply, contact a qualified engineer previously.
•The instrument should never be subject to strong vibrations.
•Never exert excessive pressure on the keys and knobs.
•Do not place any objects on the central display. The transparent panel could brake or be damaged and the reading of data could become more difficult.
•The instrument's cover could be slightly heated during playing. This is caused by heat dissipation of its internal components and is considered to be a normal effect. Nonetheless the instrument should be placed in a ventilated area, if possible.
IN ORDER NOT TO LOOSE DATA
Please remember that the data stored in the instrument can be deleted at any time in case of abnormal running conditions. We therefore advise to carry out back-up copies of your data during the various programming phases.
AC POWER ADAPTORS
To connect these instruments to the wall socket you will need the supplied KETRON AC Power adaptors.
Use of other AC adaptors could result in damage to the instrument’s power circuit. So be sure to ask for the right kind.
BATTERY NOTICE
These products may contain a small non-rechargeable battery which ( if applicable ) is soldered in place. The average little span of this type of battery is some years ( approximately 5 ). When replacement becomes necessary, contact a qualified service representative to perform the replacement.
Warning : do not attempt to disassemble, or incinerate any battery. Keep all batteries away from children. Dispose of used batteries promptly and as regulated by the laws in your area.
INFORMATION FOR USERS
”Observe European Directives 2002/95, 2002/96 and 2003/108 with regard to the reduced use of harmful substances on electrical and electronic instruments and also observe waste disposal regulations.”
The symbol with the bin crossed out on the instrument points out that it must be separated from other waste at the end of its useful life span and not just thrown away in the bin.
The user must therefore hand the instrument over to differentiated waste disposal centres authorised to process electronic and electro-technical waste at the end of its useful life span, or give it back to the retailer when purchasing a new similar type of device on a basis of 1-to-1 ratio.
The differentiated disposal of the equipment for the possible future recycling of its constructional parts contributes in safeguarding the environment and human health.
The user is subject to administrative fines in the case of the abusive disposal of the product.
SD5 3
Connections
Connections
|
|
|
|
|
|
|
|
|
|
|
|
|
|
|
|
|
|
|
|
|
|
|
1 |
|
3 |
|
|
|
5 |
|
7 |
|
|
9 |
|
|
11 |
||||||||
|
|
2 |
|
|
|
4 |
6 |
8 |
|
|
10 |
|
|
|||||||||
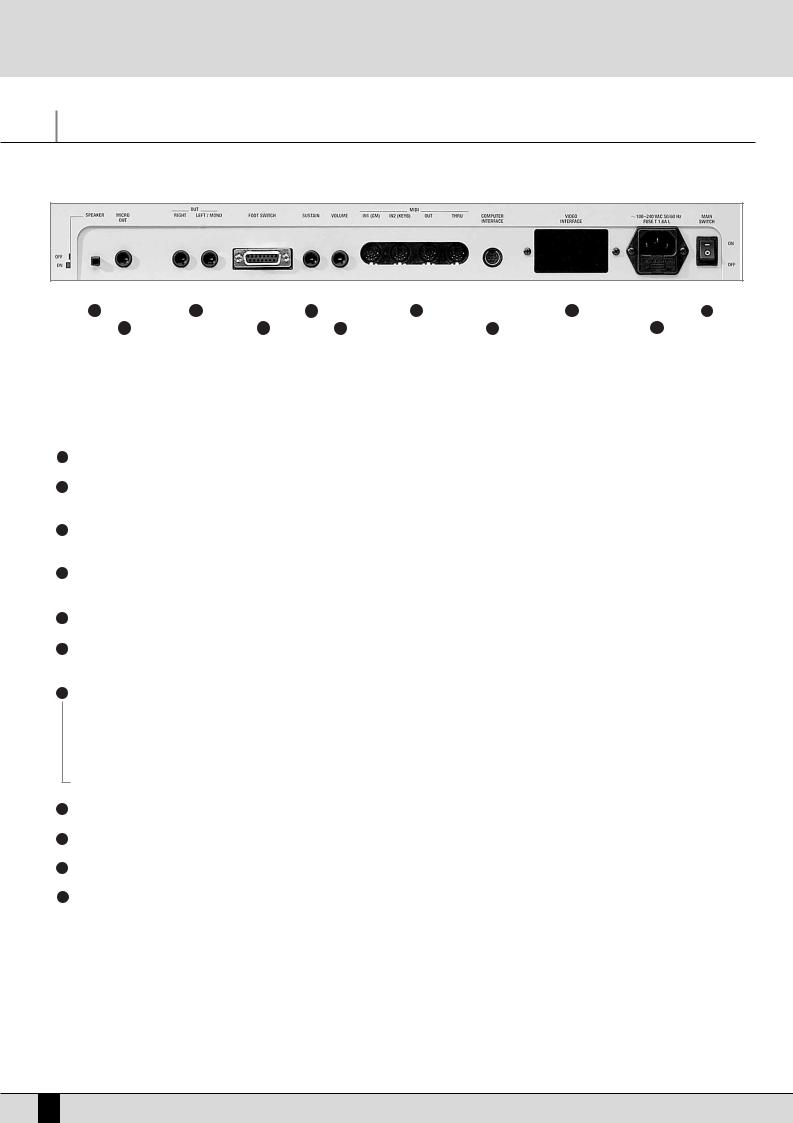
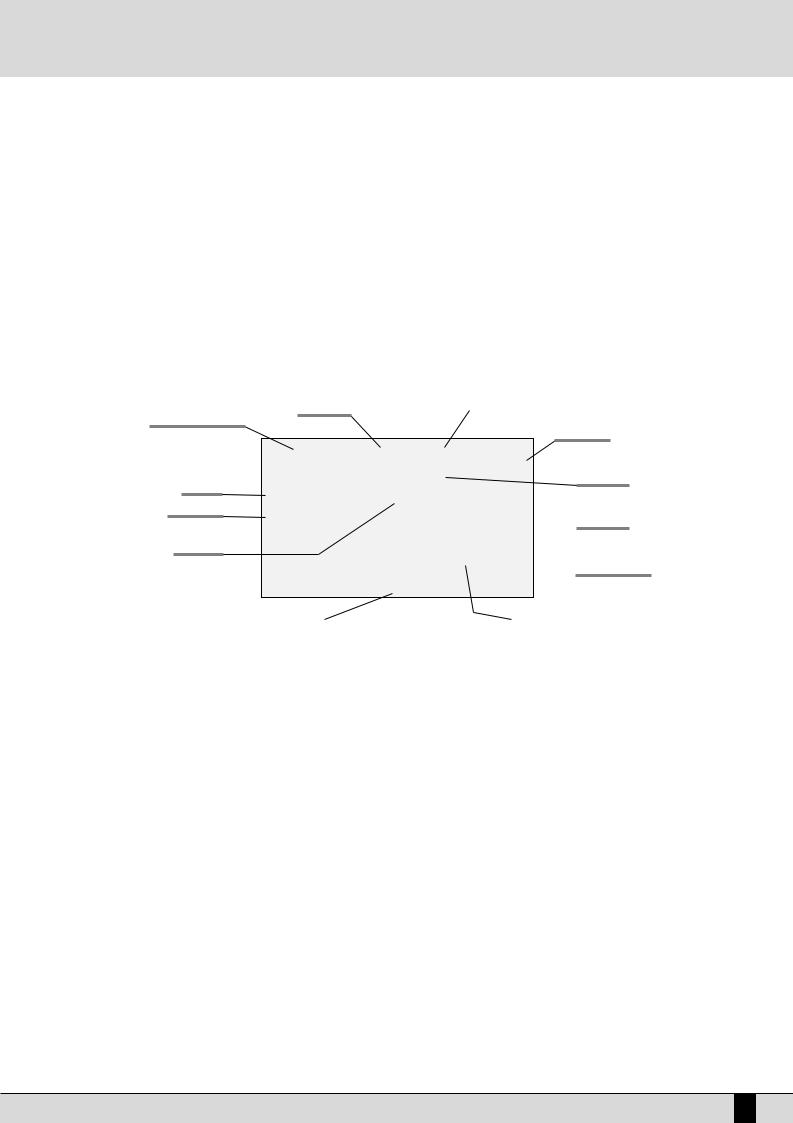
The SD5 is provided with all the audio and MIDI connections as required by current standards including the sockets for the pedals needed for its optimum use. The only optional extras are the hardisk, video interface and the two pedals.
REAR CONNECTION
1SPEAKER: Button used to enable and disable the built-in speakers of the instrument.
2MICRO 1 OUTPUT: Monophonic 1/4'' jack direct audio output of the input signal of Micro 1 processed by the Vocalizer but not by the internal effects like Reverb or chorus.
3OUTPUT LEFT/MONO, RIGHT: Monophonic 1/4” jack audio outputs where the Left out can work as the summed monophonic output for the whole instrument. When the Left and Right outputs are used the SD5 works in stereo.
4PEDAL FOOTSWITCH: This is a multipolar socket used to connect optional pedals with six or thirteen switches, to control many functions including automatic accompaniment commands etc.
5SUSTAIN PEDAL: This is the socket for the Sustain On/Off type pedal.
6VOLUME PEDAL: This is the socket for the continuous Volume control pedal. It is advisable to use pedals produced by Ketron to avoid dangerous short circuits or abnormal conditions in general.
7MIDI In (GM): Midi Input Port used just to control the General MIDI sound generator of the SD5 with sixteen MIDI parts.
MIDI In 2 (Keyboard): MIDI port for connecting an external MIDI keyboard or accordion which can operate the SD5 in a similar way to its own keyboard.
MIDI Out: MIDI port used to send the data generated by the SD5, including automatic accompaniment and lead part(s).
MIDI Thru: MIDI port that allows all data from the MIDI IN1 to pass through unaltered.
8COMPUTER INTERFACE: The SD5 can be directly connected to a PC or to a Mac via this port.
9VIDEO INTERFACE: This optional device is used to display the words of a Midi file and other information provided by the musician on a monitor for the audience.
10 AC: Socket for the power supply cable.
11MAIN SWITCH: This push button turns the SD5 on & off.
FRONT CONNECTIONS
HEADPHONES: Allows you to connect stereo headphones.
GAIN: Controls the gain of the microphone audio inputs.
MICRO INPUT: Unbalanced _'' mono audio jack input for two microphones, (if a stereo-mono adapter is used). The Micro Input signal can be processed by the inner Vocalizer of the SD5 and by the global effects. Without the adapter, only one microphone can be used.
4SD5
Connections
FURTHER ELEMENTS OF THE SD5
HARD DISK
The optional hard disk allows you to store Midi files, Patterns and any other files processed by the SD5.
DISK DRIVE
Supplied as standard, it is used to read and write 720 KB and 1.4 MB of data on floppy disks in DOS format. Floppy disks formatted on any PC can also be used.
JOYSTIC
Used to change timbre pitch if moved horizontally and to change the modulation effects if moved vertically.
AFTERTOUCH
When the key reaches its full stroke, after pressing it normally, you can exploit a further brief section of the stroke, which is clearly felt by pressing the key further, to control the addition of some effects such as vibrato and pitch bend. In this way, it is easier to control the various timbres. The version of Aftertouch implemented on the SD5 is the single-sound version, in other words the effect produced affects all the keys pressed at that time.
VELOCITY
The key dynamics is used to control some timbre parameters such as the volume of the note or the filter.
GENERAL VOLUME
The volume cursor seen on the front panel controls the general volume of the audio outputs Left & Right of the whole keyboard, including the microphone signals. The cursor does not send a Volume data to the MIDI Out port.
MULTI-TABS
This set of 16 buttons is used to rapidly access various functions that prove useful in the various musical contexts of the instrument. For example, you can control the mute function of the various percussion sections, directly access the 16 parts of the General Midi or activate and launch sound effects.
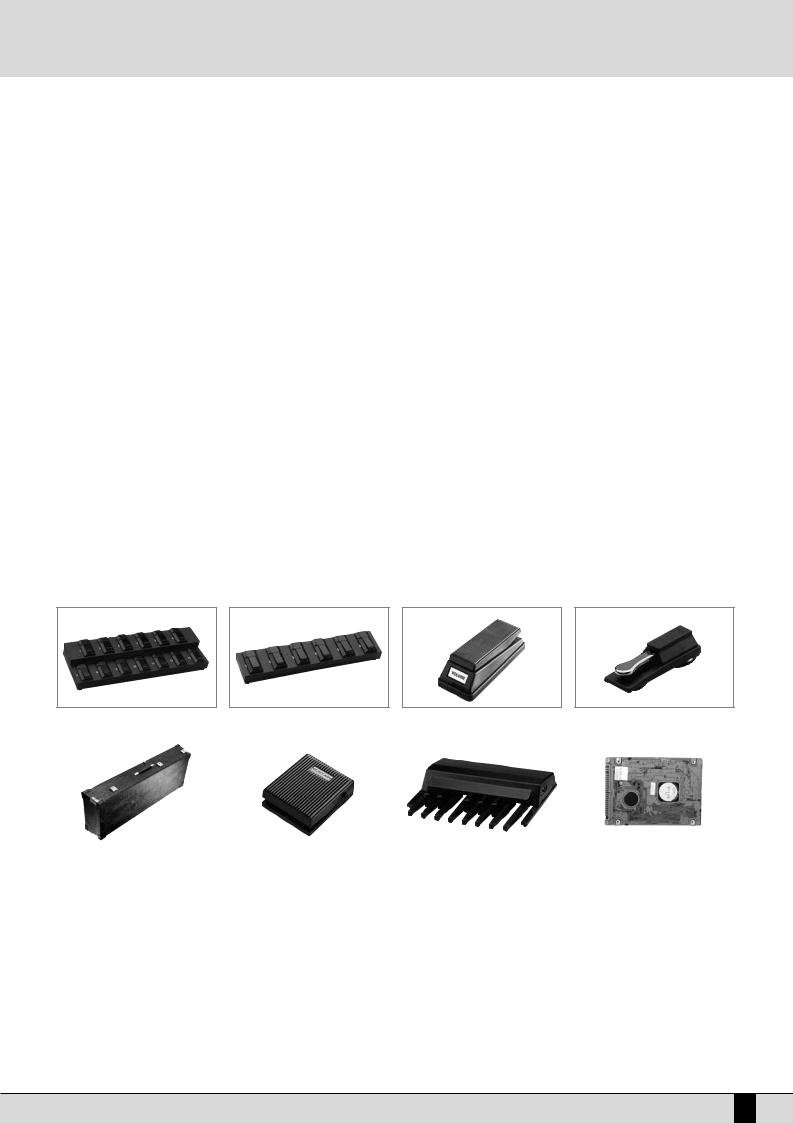
ACCESSORIES
COD. 9AC093 |
|
COD. 9AC103 |
|
COD. 9AC113 |
|
COD. 9AC114 |
|
|
|
|
|
|
|
|
|
|
|
|
|
|
COD. 9VA005 COD. 9AC121 COD. 9PEMK8 COD. 9HD004
VIDEO INTERFACE: P/N 9AC134 |
VOCALIZER: P/N 9VO004 |
DELUXE CONTAINER WITH WHEELS: P/N 9VA005D |
PATTERNS EXPANSION FLASH CARD: P/N 9AC116 |
PC CABLE: P/N 9AC123 |
MAC CABLE: P/N 9AC122 |
|
|
|
SD5 5
Control panel and push button functions
Control panel and push button functions
The control panel is divided into sections according to the group of functions related to the push buttons. From left to right you will see the following:
VOLUME |
Two rows of six push buttons that are used to control the general volume for the Drums, Bass, Chords, 2ND Voice and Right |
|
sections. The volume can be muted by pressing the right-hand and left-hand VOLUME push buttons of that section together |
|
at the same time. To restore the volume set prior to muting simply press one of the two VOLUME push buttons of the section |
|
once. To raise the lead volume, press and hold down the right-hand RIGHT VOLUME push button. To lower the volume, use the |
|
left-hand push button instead. Using the 2ND VOICE keys, you can control the volume of the second voice that affects the |
|
melodic line of the SD5. Thanks to this feature, you can therefore add a second sound on the right section and produce inte- |
|
resting timbre layers, the sound balancing of which can be controlled with the dedicated volume keys. |
PAGE + PAGE - |
When the display shows that there are more pages following the first one (as for Voice and Style), the PAGE + push button |
|
is used to move one page forwards and PAGE - to go back a page. The PAGE + and PAGE - push buttons, with the LED of the |
|
DISK push button lit, are used to select either the hard disk or the floppy disk drive. In this case, to move onto the following |
|
pages of a directory, the musician must use the CURSOR +/- push buttons. In the main default page the PAGE + and PAGE - |
|
push buttons directly control the Tempo value of the Arranger in steps which can be determined (in the UTILITIES page). |
DATA CURSOR |
When there are a number of parameters to be modified within a menu or when the function buttons are not directly related |
|
to a specific parameter (as in the case of parameters situated in the middle of the display), the 4 DATA CURSOR keys are used |
|
to select and modify the value of the parameter required. According to their direction, as you read through this manual you |
|
will notice that we call these buttons UP (arrow pointing upwards), DOWN (arrow pointing downwards), LEFT (arrow pointing to |
|
the left) and RIGHT (arrow pointing to the right). Generally speaking, the UP and DOWN buttons are used to select the para- |
|
meter to be edited while the LEFT and RIGHT buttons are used to change the value of the parameter currently selected and |
|
therefore they act as VALUE+/- function buttons. When you press the LEFT and RIGHT keys together at the same time, the |
|
parameter selected is reset and if you press them again, the parameter is set back at its initial value, even after it has been |
|
modified. In many contexts, the same procedure can be done by pressing the ENTER key. In this case again, the parameter |
|
currently selected is reset after it is pressed once and is set back at its original value when the key is pressed again. |
|
Generally speaking the LEFT and RIGHT buttons are used to change the value of the parameter currently selected and the- |
|
refore they act as VALUE+/- function buttons. When you press the two keys together at the same time, the parameter selec- |
|
ted is reset and if you press them again, the parameter is set back at its initial value, even after it has been modified. In the |
|
Disk environment, the DATA CURSOR LEFT and RIGHT keys are used to select successive groups of files that are not shown on |
|
the display, while the DATA CURSOR UP, DOWN keys are used as VALUE+/- function buttons and are also used to select files. |
ENTER |
The Enter key is used to confirm the value currently selected. In some cases, such as in the Disk environment for example, |
|
it is used to start or to load Midifiles. |
TRANSPOSE |
They are used to Transpose all the musical sections of the SD5 in steps of one semitone. To reset the Transposer, simply |
|
press the buttons together at the same time. |
SAVE |
This is used to store and save on disk any edits or modifications carried out by the user. |
EXIT |
This push button is pressed once to return to the main page of the display. EXIT is disabled in the Song Play menu where |
|
the SONG PLAY push button should be pressed again exit the Song Play mode and return to the main display page. |
6SD5
Control panel and push button functions
DISK ON |
This is used to gain access to the management functions both on floppy disk and optional/built in hard disk. When the DISK |
|
LED is lit the PAGE + and PAGE - push buttons can be used to select either the hard disk or the floppy disk. |
MICRO (Vacalizer) |
This is used to access the menu of the Microphone and of the Vocalizer (optional) |
TALK |
This is used to disable the effects on the microphone. |
1 TOUCH TO STYLE |
With this push button will be possible to enable or disable automatic recall of ont touch memories linked to the current style. |
SPLIT |
Split is used to establish which part of the keyboard is assigned to the Arranger and which one to the lead. By default the |
|
split point is set on the note C3, so below this note the keyboard is assigned to the Arranger, whereas above it is assigned |
|
to executing the lead. Proceed as follows to modify the Split: |
1.Press the Split button and keep it pressed. At the same time, on the keyboard play the key corresponding to the desired Split point.
2.Release the Split button. The new value will remain stored until the keyboard is turned off.
LEFT MENU This is used to access the menu dedicated to the arranger functions and to the Split point.
THE DISPLAY, THE MAIN PAGE AND THE FUNCTION PUSH BUTTONS
Style volume |
Selected sound |
Style number and name
Sound volume
Second Voice
Split note
Transposition
 Played chord
Style tempo
 Right hand volume
Accompaniment sections volumes |
|
Left hand volume |
From the main page of the display, the programming functions can be accessed using the function push buttons at the side of the display together with the dedicated push buttons. Based on the functions called up, the display shows the related parameters and enables their selection thanks to the push buttons at the side of the display (or function keys from F1 to F10. They are referred to as function buttons because they have a different function depending on the page displayed). Therefore simply press the function push button adjacent to a parameter to enable or select that parameter. When the parameters are situated in the middle of the display then they are selected using the CURSOR push buttons.While you will find detailed descriptions of the modification pages further on, below is a description of the single parameters that are displayed.
Number, name and volume of the style: This indicates the name and number of the style currently in use. Use the STYLE push buttons to call up another one. To modify the volume of the arranger, press the DATA CURSOR (Left Right) push buttons, which in this page are used as Balance.
Sound selected and volume: To change the sound in use on the Right lead section use the VOICES push buttons related to the single group or the USER VOICES push button. The pair of RIGHT VOLUME push buttons are used to modify the volume of the sound.
Second Voices: This indicates a second sound to be layered with the Right lead section. It is entered using the 2ND VOICE push button.
Split and transposition point: This indicates the key to the right of which the melodic section is played or Right section dedicated to the right hand; whereas on the left you will find the part of keyboard used to acknowledge the chords for the Arranger and for the notes to be played in the Lower section with the left hand. The modification is made with the related key.
Transp. This indicates the number of semitones for transposition that can be changed using the TRANSPOSE + e TRANSPOSE push buttons. When a double dash is displayed transposition is off.
Tempo and beat of the style: This indicates the current Tempo of the Arranger. Use the TEMPO + e TEMPO - push buttons to modify it. The beat indicator is used to avoid visually losing the beat of the bar being played.
Chord: This indicates the chord currently being played. To change it play another chord on the part of keyboard to the left of the Split point.
Volume cursors of the main sections of the keyboard: These graphically display, with absolute values, the settings of the volumes of the Drums, Bass, Chord and Right sections, the value of which can be directly modified using the pair of VOLUME push buttons pairs. To modify the
SD5 7

Control panel and push button functions
display contrast turn the CONTRAST knob on the control panel. A set of functions corresponds to each function push button F1/F10, in the main page of the display, which can be directly accessed by pressing the relative push button.
F1 GM: This selects the menu with the parameters related to the single MIDI parts of the sixteen offered by the standard General MIDI.
F2 EFFECT: This is used to quickly modify the Reverbs and to enable the modulation effects and also to access the individual parameters of the single effects.
F3 UTILITY: This controls the overall parameters of the keyboard and the physical controllers.
F4 ARRANGE MODE: This is used to gain access to the parameters dedicated to the Arranger when playing live.
F5 ARRANGE VIEW: Four menu pages offer the facility to re-program the sounds, volumes and effects of each single section of the Arranger. F6 MIDI: Through the sub-menus, access is gained to the programming of MIDI events even during transmission and reception mode and to
the assignment function of the MIDI channels to each single section of the keyboard.
F7 EDIT USER/DRAWBARS: This is used to modify the main parameters relating to the sound such as the envelope, the filter and the LFOs. When a Drawbar sound is selected (pressing first USER VOICE and selecting then the BASS-FX bank using the Voice push buttons group), the EDIT USER /DRAWBARS push button allows you to access programming and to display the single Drawbars to create new organ sounds.
F8 EDIT PROGRAM: This is used to program or modify the parameters relative to the four sounds that can be used at the same time for the lead section within a selected Program.
F9 EDIT DRUM: For the drum tracks and other features. This group of functions is dedicated to the programming of a complete drum kit, of which up to two samples can be indicated for each key of the keyboard.
F10 DRUM MIXER: This allows you turn on/off, modify the volume, pan and reverb of each of the individual percussion groups within the current drum kit.
THE PUSH BUTTONS RELATED TO THE SELECTION OF STYLES
Ten push buttons are used to call up just as many groups of styles directly from the control panel. When a group is selected the display shows five styles to the left and another five to the right. To enable a style simply press the function push button next to its name on the display. Considering that the SD5 offers more than ten styles per group, the user can move onto the next pages either using the PAGE + or PAGE - push buttons, or by repeatedly pressing the push button related to the group of styles in use. When the SD5 reaches the last page of styles available, the user can return to the first page by pressing the push button for that same group of styles again instead of the PAGE + or PAGE - push buttons. In some editing situations the twelve STYLES push buttons become numeric keys that are used to enter the value directly.
THE PUSH BUTTONS RELATED TO THE SELECTION OF VOICES
The two rows of six push buttons called VOICES are used to call up sounds or Preset Voices according to the family to which they belong. When a family is selected with one push button the display shows five Voices to the left and five Voices to the right, which can be enabled by pressing the function push button next to the desired sound. Considering the fact that the SD5 offers more than ten Voices per family, the user can move onto the next pages either using the PAGE + or PAGE - push buttons or by repeatedly pressing the push button of that family of Voices in use. When the SD5 reaches the last page of Voices available, the user can return to the first page of Voices by pressing the same push button for that family of Voices again rather than the PAGE + or PAGE - push buttons.
The VOICES push buttons are not only used to call up the pre-set voices alone.
●If the LED of the USER VOICE push button (i.e. of the bank of sounds that can be programmed by the user) is activated, then the VOICES push buttons call up the 128 User Voice sounds in groups of ten at a time.
●If USER VOICE and BASS-FX are enabled, an organ sound corresponds to each single VOICES push button.
●If the LED of the PROGRAM push button is lit, the VOICE push buttons call up the Program voices.
●If the LED of the ONE TOUCH push button is lit, buttons calls up one of the six pages of the One Touch memory locations.
PUSH BUTTONS ON THE RIGHT-HAND SIDE OF THE CONTROL PANEL
PROGRAM |
When the LED is lit, 10 Program locations are displayed, to be selected using the function push buttons. A Program combines |
|
up to four voices dedicated to the lead section with the related parameters. |
2ND VOICE |
When the LED is lit, the second Voice assigned to the equivalent Lead voice is enabled. It's name is displayed under the name |
|
of the Lead voice to the top right side of the display screen. |
USER VOICE |
When the LED is lit, this allows you to call up the User Voices using the Voice push buttons. |
1 TOUCH |
When the LED is lit, ten sounds within the first of the eight groups available are displayed. The One Touch Solo function is |
|
used to save the most frequently used Voices so that they can be called up easier rather than having to first select the voice |
|
group and then a sound from within it. |
REGISTRATION |
The Registrations memorise all the SD5 settings for instant retrieval , including the automatic call up of Midi and TXT files. When |
|
the LED is lit the user can call up one of the 198 Registrations using the numeric keypad, namely the STYLE push buttons. |
LEAD EFFECT |
The SD5 allows you to assign Delay, Distorsor and Overdrive effects to the Right section together with the standard Reverb |
|
and Chorus effects. From the Lead Effect page, you can activate up to four effects simultaneously assigned to the sound of |
8SD5
Control panel and push button functions
the right hand. From this menu you can also control the effects of the microphone, activate the vocalizer (optional) and pullup the current vocal set.
USER VOICE This activates the bank of timbres that can be programmed by the user. The VOICES buttons pull-up the timbres in groups of ten at a time.
PIANIST Generally speaking it is preferable to have one keyboard portion dedicated to chords acknowledgement and the other one to the solos and the lead. For the true pianist player, however, it may not be sufficient to have a length of just nearly four octaves available. The Pianist function deletes this division and dedicates the complete keyboard to the sound(s) assigned to the Right section and to the chords acknowledgement. Obviously the best results are obtained with pianist sounds such as the Grand Piano or the Vintage electric piano. Pianist allows you to use the complete extension of the keyboard for just one timbre, and at the same time it also allows you to control the Arranger. There are two different ways to acknowledge the chord, which you can choose at pleasure in the Utility menu. The default method is Standard.
AFTERTOUCH The SD5 keyboard features the Aftertouch effect that can be activated by pressing the special button. By pressing F3 (Utility), however, and then F2 (Aftertouch), you may assign other controls to the Aftertouch (for further details please refer to the Utility chapter of the operator's manual).
PORTAMENTO This button activates the Portamento, or the Legato or the Mono mode set in the Utility menu for the Right timbre.
OCTAVE+/ OCTAVE- These are used to transpose the octave of the Right section, in other words the melody of the right hand, by one octave higher or lower.
DOUBLE |
This doubles the notes played on the keyboard, adding the notes with one lower octave. |
HARMONY |
When the LED is lit, it activates the harmony function of the timbre of the Right section according to the settings of the rela- |
|
ted menu. |
RECORD SONG |
This is used to record a Midifile that contains everything played on the keyboard. |
PLAY SONG |
This activates the playing function of the Midifile. It is also used to pull-up concentrations of Midifiles and to display the |
|
words of the songs on the instrument display. |
MANUAL DRUMS When led is on you can play single instruments of your own drum set all over the keybed. This function turn off automatically Right and Left Sections and allows to control Manual Drum section by Drum Volume slider. If Manual Drum is activate while Style Chord are running these tracks will play the latest chord recognized. MANUAL DRUM doesn't turn off the original Style Drum track
PATTERN |
When the LED is lit, this allows you to select Styles loaded in RAM from the floppy disk or from the hard disk. |
EDIT |
This activates the Edit mode for the pattern. In this environment you can edit, modify or create new styles for the keyboard. |
RIGHT MENU |
This is used to access the menu dedicated to the soloist part and to the settings for the right hand. |
THE PUSH BUTTONS REQUIRED TO CONTROL THE ARRANGER
The bottom row of the control panel is almost entirely dedicated to controlling the Arranger in real time.
RIGHT MENU |
This is used to access a menu for settings relevant to the section to the right of the Split point, used for the lead to |
|
program effects for the Voices and the microphone as well as the editing of the Second Voice. |
ROTOR ON |
This button (Led on) apply Leslie © effect on SD 5 Organ timbre in order to emulate typical Hammond © tonewheels |
|
sound! |
ROTOR SLOW/FAST |
This increases or decreases the modulating speed of the Leslie ® effect. |
BASS TO LOWEST |
If this function is enabled the harmonic bass evolution has its lowest note always referred to the lowest one of the |
|
chord played. This makes it possible to perform a number of pieces of music keeping unaltered the melodic struc- |
|
ture of the bass. |
MANUAL BASS |
This excludes all the parts of the Arranger and leaves the Drum tracks and the bass timbre activated. The bass can |
|
then be manually played on the keyboard portion to the left of the split point. |
JUMP |
When Led is on this function switch automatically Style variation ( A B C D ) any time you'll press Fill In button. |
|
Moreover with JUMP function you could use Intro feature as Fill too! |
SD5 9

Control panel and push button functions
KEY START/SONG REMIX PLAY |
When the LED is lit and the Arranger is stopped, this push button is used to start the accompaniment when a note |
|
to the left of the split point on the keyboard is played. If an INTRO or a FILL is selected, as soon as a chord is played, |
|
that Intro or Fill-In of the style will start. To control the performance of the Lower section, namely the manual voi- |
|
ces for the left hand, the player must access the ARRANGE MODE menu where these Lower voices can be disabled |
|
when the Arranger is not running. This also allows the user to prevent the Lower voice(s) from sounding prior to the |
|
arranger starting. When in Song Play mode, this push button is used to select the drum track of the Song being |
|
played, for the Remix function. |
KEY STOP/STYLE REMIX PLAY |
When the LED is lit it stops the Arranger performance if a very short note or chord is played. It is restarted if another |
|
one or even the same one is played. If the note or the chord is held down for longer than a quarter note, the |
|
Arranger continues to play. With the Arranger stopped, KEY STOP is used to restart it by playing a chord that is lon- |
|
ger than the time set in Sync Time in the Arrange Mode menu. If a FILL or an INTRO has been selected, with the |
|
Arranger stopped and a chord that is longer than the above mentioned value is played, the whole FILL or the INTRO |
|
will be played, whereas if the chord is very short, the Arranger will stop immediately. If the KEY START LED is lit, as |
|
soon as the player takes his hand off the left part of the split point, the Arranger stops and starts again as soon as |
|
a note or a chord is played on the part of the keyboard to the left of the split point. When in Song Play mode, this |
|
push button is used to select the drum track of the Style for the Remix function. |
FILL |
When the Arranger is enabled, this key is pressed to activate one or more Fill-in beats. If it is pressed with the style stop- |
|
ped, it will be played. If the Jump function is enabled (LED lit), the FILL button skips the style onto the next variation. |
BREAK |
This is used to add a Break beat at the end of which the Arranger will start to play again. |
TAP |
If you tap on this button with a set frequency four times, the SD5 determines the tempo value automatically (based |
|
on how quickly or slowly you were tapping on this button) and uses this new tempo for the arranger or sequence |
|
to be played. The playback of the arranger or sequence will start provided they were in stop or standby mode prior |
|
to tapping on the TAP button. When the Arranger and Sequencer are running, the push button is used to increase |
|
the Tempo in steps of five points each time it is pressed (Accelerando). By holding the TAP push button down, the |
|
Accelerando is reversed (this can be seen by the direction of the arrow) thus decreasing the Tempo in steps of five |
|
each time it is pressed (Ritardando). |
COUNT/PAUSE RESTART |
With the Arranger stopped, COUNT adds a Count In beat where the artificial 'drummer' (using drum sticks) counts |
|
in 4 beats. If an INTRO has also been pressed before COUNT with the JUMP push button enabled, the Intro chosen |
|
will be enabled at the end of the count. With the Arranger running, pressing this push button immediately restarts |
|
the arranger with the first beat of the first bar, regardless of which measure the arranger is currently in. This may |
|
prove very useful when backing a singer whose timing is all over the place! When working with the Sequencer |
|
(SEQUENCER LED lit), this push button sets the playback to stand-by until the COUNT/PAUSE RESTART push button is |
|
pressed again (used as a PAUSE). |
START |
When pressed it starts to play the automatic accompaniment. If START is pressed while the Arranger is already |
|
playing then everything is stopped, in other words it acts as a Stop push button. |
HOLD |
When the LED is on the last chord played to the left of the Split point on the keyboard is memorised and kept acti- |
|
ve driving the Arranger which carries on playing normally even after the left hand is taken off the keys. This chord |
|
is held as the harmonic basis of all the Arranger parts until a new chord is actually played below the split point |
|
which the Arranger follows by changing the parts to suit. If the LED is switched off, the accompaniment will only |
|
work as long as the chord is held down on the keyboard, but the drum tracks will continue to play regardless. |
SLOW |
This decreases the Tempo value of the Arranger or of the Sequencer. |
FAST |
This increases the Tempo value of the Arranger or of the Sequencer. By pressing SLOW and FAST together at the |
|
same time, the Tempo value is locked (marked by an asterisk) so that it cannot be modified by calling up another |
|
Style with a different Tempo. To disable this locking, press SLOW and FAST together at the same time . To restore |
|
the default Tempo of the style press PAGE + and PAGE - together at the same time. |
A, B, C, D/RIFF. |
Each of these push buttons corresponds to a variation of the style, from the most simple to the most complex. Further |
|
to these push buttons, also Jump Fill in the Left Control menu can be used to move forward or back between the varia- |
|
tions. In some styles, the arrangement D may be made up of a Riff or in other words of a typical harmonic sequence |
|
and produced in reference to the type of music of the rhythm selected. The presence of a Riff sequence is pointed out |
|
on the display of the SD5 by the letter R between two square brackets ([R]) under the name of the current style. |
|
Furthermore, each time a style with a Riff is selected, the LED relative to the arrangement D flashes. When the Riff is |
|
activated, when you press the relative key, the arranger acknowledges the chord played just in the first musical beat. |
|
The Riff will only be played based on the harmonic tune played at the time. |
10 SD5

Control panel and push button functions
INTRO/END 1, 2, 3 (REMIX SELECT, DRUM MIXER, DRUM&BASS)
|
If one of these three push buttons is pressed while the Arranger is stopped an Intro is enabled, of which there are |
|
three with varying complexity. If one of these three push buttons is pressed while the Arranger is playing, an Ending |
|
is enabled with three available variations having different levels of complexity. If the Jump Fill push button is ena- |
|
bled and an Intro push button is pressed, the Intro selected will be played. While in Song Play mode, the three push- |
|
buttons enable the Remix functions to be controlled on the piece of music being played. |
ARR: MUTE |
This is used to mute some sections of the automatic accompaniment, which can be defined by the user. This func- |
|
tion enables greater control on behalf of the user of the automatic accompaniment and offers additional musical |
|
flexibility. |
SD5 11
Right Menu and Live setting
Right Menu and Live setting
Right Menu button allow to select useful parameters and setting available on
Right section.
F1 2ND Sustain Activates or deactivates the Sustain on the Second Voice
F2 2ND Split This is used to define the split point of the keyboard, dedicated to the Right section, above which the timbre assigned to Second Voice will not be playing. The relevant note can be selected using the keyboard.
F3 Velocity Curve This selects a different reaction curve for the Right voice, to be chosen among Normal, Hard 1, Hard 2, Soft 1, Soft 2 or Fixed
with a value to be programmed with the DATA CURSOR push buttons.
F4 2ND Voice Edit After having pressed the F4 function button, it will be possible to use the Voice push buttons to select a new voice to assign to the Second Voice. Press EXIT after having completed the selection, or save pressing SAVE, F6-2nd Voice and F10-Save.
F5 2ND Lock This makes it impossible to change the timbre assigned to Second Voice by calling up a Preset.
F6 Pianist Sustain Activates or otherwise the Sustain function in the Pianist mode, so you can use the Sustain pedal to 'freeze' the last recognized chord and to freely play, right after having set the chord, along the complete keyboard. Releasing the sustain pedal will allow the SD5 to recognize the next valid chord played anywhere on the keyboard.
F7 Pianist Mode |
Enables selection of the Pianist mode. The AUTO mode, set by default, requires at least a chord of three notes, played no |
|
matter where, to acknowledge a chord. Once the chord has been acknowledged, this can be maintained playing a melody |
|
with not more than two notes played at the same time. The Standard mode, is obtained using the Sustain pedal. If the |
|
Sustain pedal is pressed right after having set the chord on the keyboard, the Arranger uses only the chord that was ack- |
|
nowledged before the Sustain was activated. It is possible to disable the Sustain on the timbre in use to utilise the Sustain |
|
pedal exclusively for the Pianist function, using F7 Pianist Sustain. |
F8 Fade |
Controls the Fade In/Out function. If the Arranger is activated, this generates the fading out effect, i.e. this function brings |
|
the volume of all sections, including the Right section, from the present volume down to zero. If the Arranger is off, this |
|
function produces the fading in effect, i.e. it brings all the sections from volume zero to their programmed volume levels. |
|
Pressing this button repeatedly will not cause any abrupt volume changes. |
F9 Bass Boost |
This value can be modified by pressing the F9 push button repeatedly, and indicates the increase of the frequency indica- |
|
ted in F10, expressed in dB. |
F10 Frequency |
Pressing the F10 function button repeatedly, you modify the frequency to which equalisation is to be applied with F9 Bass |
|
Boost, in order to obtain more complex basses. |
LEAD EFFECTS
LEAD EFFECT push button calls up a menu dedicated to managing the effects for the Voices used in the Right section, namely the lead. It also includes parameters required to control the microphone input. The parameters available for the Right section are the following:
F1 Chorus |
By pressing the function push button repeatedly the Chorus |
||
|
effect is enabled or otherwise on the Right section. |
|
|
F2 Wha-Wha |
This is an amazing effect for guitar riffs but it can be used in |
||
|
many other situations. The optional Volume pedal is to be con- |
||
|
nected to control it better. The Wha-Wha effect can also be |
|
|
|
|
||
|
controlled by the Modulation Wheel using the Utility |
menu |
|
|
and the F3 Modulation function where the F7 Wha-Wha |
function is to be set as On. |
|
F3 Delay |
This is used to enable the Delay effect on the Right section by pressing the relative function push button repeatedly. |
||
12 SD5
Right Menu and Live setting
F4 Overdrive It gradually saturates the sound controlled by the optional Volume Pedal. It is one of the effects required to simulate jazz and rock organs in the best way possible. The Overdrive cuts out the use of the Distortion effect.
F5 Distorsor This enables the Distortion effect on the Right section, cutting out the use of the Overdrive.
The parameters available to control the microphone input are the following:
F6 Micro Effect |
This enables, or otherwise, the use of the effects for the Right section on the microphone input. |
F7 Direct |
This is used to modify the quantity of direct signal that goes to the audio output. It is modified using the VALUE +/- push |
|
buttons. |
F8 Reverb |
This indicates the quantity of Reverb assigned to the microphone input. The value is modified using the VALUE +/- push but- |
|
tons. |
F9 Vocal Set |
This is used to select a Vocal Set of the Vocalizer without going through the Vocalizer menu directly. |
F10 Vocalizer |
This enables the Vocalizer effect on the microphone input. |
HARMONY
Allows you to harmonise the lead played on the Right section according to the chord played. Activating Harmony with the relative push button displays a page from where you can select the type of harmonization using the function buttons. It is not possible to activate more than one type of harmonization as each selection deletes the previously selected one. Press again HARMONY button ( Led off ) to turn off this function.
The following parameters are available:
F1 Full
F2 Jazz
F3 Tap Delay4
F4 Tap Delay8
F5 5TH
F6 Blue Gras
F7 Trill
F8 Repeat
F9 Speed
F10 Folk 1 e Folk 2 these are other two harmonization modes suitable for folk music.
SD5 13

Parameter management
Parameter management
Before going into the actual programming subjects, the musician should first be aware of how the menus and parameters of the sd5 work. The rules that are listed in this chapter are valid for all the following sections and are crucial to controlling the keyboard in the best way possible.
CONVENTIONS
The following conventions are used within this manual, which refer to:
Push buttons on the control panel: all in capital letters or bold print (for example START, STOP, SPLIT push buttons)
Functions, parameters, items, commands displayed and that can be selected using the F1-F10 function keys adjacent to them: in bold print (for example F5 Escape, F10 Save)
CALLING UP THE MENUS
The parameters of the sd5 are grouped in menus that are always called up from the main page of the display which can be accessed using the EXIT push button (apart from some exceptions which we will see later).
The first group of parameter menus is associated with the F1-F10 function push buttons at the side of the display and include the following menus:
F1 GM - F2 EFFECT - F3 UTILITY - F4 ARRANGE MODE - F5 ARRANGE VIEW - F6 MIDI - F7 EDIT USER/DRAWBARS - F8 EDIT PROGRAM F9 EDIT DRUM - F10 DRUM MIXER
A second group of menus is associated directly with some push buttons on the control panel. They are called up from the main page and are exited using the EXIT push button and also using the push button again that was used to call up these pages. The menus relative to the single push buttons are the following:
SONG RECORD - PATTERN EDIT, DISK - SAVE - MICRO VOCALIZER - LEAD EFFECT - LEFT MENU - RIGHT MENU - SONG PLAY HARMONY
The EXIT push button must always be pressed to exit one of these pages. The Song Play menu is an exception to this rule.
The push buttons related to this menu must be pressed again to return to the main page of the display. This procedure has been devised to prevent the playback of a Midi file from being accidentally stopped by pressing the EXIT push button by mistake.
EXCEPTIONS TO THE EXIT COMMAND
In some menus in addition to the EXIT push button the Escape command may appear, which is assigned to a function push button at the side of the display. Therefore if the EXIT push button should fail to work, look carefully at the display to find the Escape function amongst the commands, or try pressing the key used to access the specific menu again.
THE F1-F10 FUNCTION PUSH BUTTONS
There are five push buttons to the left and five to the right of the display. They are called that as they have no specific function (apart from calling up the menus as already explained), but they take on the function of the command displayed next to them. If you take a close look you will see that a blue line connects each function push button that relates to a specific area on the display. This area, when there are choices or commands available, displays a rectangle that bears the name of either the function, of the Voice or of the style to be called up.
DATA ENTRY
There are various possibilities based on the parameter to be modified within a menu.
Direct call up: for the Voices and the Styles, the selecting of one of these using a function push button immediately calls them up.
Enabling and disabling: Some parameters may have an ON status and Off status, Active or Inactive and the function push button related to that parameter is used to alternate between the two.
Selection of a line of parameters: Likewise for Program editing, the function push button is used to select a group of parameters, the value of which is entered using the VALUE +/- push buttons.
Parameters in the middle of the display: Likewise for Voice editing, some parameters may be found in the middle of the display and are accessed using the DATA CURSOR push buttons.
Entering words or letters: When saving some files the sd5 requests the entry of words, which can be done using the keys on the keyboard to which letters and numbers are assigned. The DATA CURSOR Left/Right push buttons are used to move within the letters of the name and the DATA CURSOR Down/Up push buttons are used to enter the required letter.
14 SD5

A guide on how to start playing
A guide on how to start playing
You will certainly want to instantly know how to use some functions of the SD5 such as how to call up Styles and Voices, reproduce Midi files, how to use the Arranger, how to use a MIDI accordion and the Vocalizer with a microphone. If this is the case then this section is just up your street. If you're a programmer interested in the nitty-gritty capabilities of this unit, then you can move on to the in-depth sub-sections ahead which explain each area in greater detail.
PLAYING A MIDIFILE FROM FLOPPY DISK
●Select the file to be loaded using the DATA CURSOR keys
●Press the ENTER key or the START/STOP key to start playing.
While a Midifile is being played, you can select the next one using the DATA CURSOR keys and play it with the F7 GO NEXT key.
●As you can see, the SD5 automatically numbers the Midifiles present. You can load a Midifile by entering the number using the numerical keyboard relative to the STYLES buttons.
Press the EXIT key to move onto a second Play environment.
●In this environment, you can view, if you wish, the list of Midifiles contained using the F5 Dir function.
●You can also select a Midifile by entering its number or one or more successive letters of the title using the notes of the KEYBOARD.
If you enter a single number that does not start with zeros, the SD5 waits a few seconds and loads the song with that number. Once loaded, the display shows the title of the Midifile loaded.
●To go back to the main page of the display, press the SONG PLAY button (the LED switches off)
PLAYING A MIDIFILE FROM HARD DISK
●Select the file to be loaded using the DATA CURSOR keys
●Press the ENTER key or the START/STOP key to start playing.
While a Midifile is being played, you can select the next one using the DATA CURSOR keys and play it using the F7 GO NEXT key. To switch off the melodic line of the Midifile, press key F8 LEAD ON.
To view or hide the words, press the F10 LYRIC function key.
●You can load a Midifile by entering the number using the numerical keyboard relative to the STYLES buttons In this case again, press the EXIT key to move onto a second Play environment.
●In this environment, you can view, if you wish, the list of Midifiles contained using the F5 Dir function
●You can also select a Midifile by entering its number or a number of successive letters of the title using the notes of the KEYBOARD.
If you enter a single number that does not start with zeros, the SD5 waits a few seconds and loads the song with such number. Once loaded, the display shows the title of the Midifile loaded.
●To go back to the main page of the display, press the SONG PLAY button (the LED switches off)
HOW TO REPRODUCE A .KAR MIDI FILE
The Midi files with .KAR extension are normally Midi files with the Karaoke words already stored. The .KAR files are however almost always Standard Midi files in format 1 and therefore need to be converted to format 0 so that they can be reproduced instantly. The same procedure is required for the Midi files in format 1.
CONTROLLING PLAYBACK (REPRODUCTION)
Whether you have loaded a song from floppy or hard disk, some commands are offered on the control panel to modify some reproduction parameters in real time.
●To reproduce the song press the START/ENTER push button.
●To stop the procedure press the START push button once more.
●To pause the current playback of a midifile, press the CONT/PAUSE push button.
●To continue playback of a midifile which has been paused, press the CONT/PAUSE push button once more.
●To turn off the lead part of the song press: F8 Lead (Off).
●To reproduce just the Drum and Bass tracks alone, press INTRO 3/Drum&Bass. "Drum&Bass" will be displayed.
●To display the words when available on the display (Karaoke), press: F10 Lyric (On).
●To increase the volume of the song compared to the timbre assigned to the keyboard, press the DATA CURSOR (Left and Right) keys, which in this context act as BALANCE function buttons.
●To select another Midi file to be reproduced, enter its number using the numeric keypad (i.e. the STYLES push buttons).
SD5 15
A guide on how to start playing
TRANSPOSITION
Select F3 Transp from the Song Play page to transpose the Midifile. This also allows you to choose if only the song or also the current keyboard voice(s) is/are to be transposed.
Set the F1 Global parameter to ON. In this way, using the TRANSPOSE +/- push buttons, you can transpose both the keyboard and the Midi file in semitones. Another extremely useful function is available in the same menu, which relates to the musical transposition of the bass line. By enabling parameter F6 Intellig. (default setting is On), the bass line will always play within its natural range irrespective of the transposition level.
HOW TO RECORD A MIDI FILE WITH THE SD5
The Song Record function on the other hand is used to create a Midi file by recording everything played on the keyboard and various tracks of the Arranger. This last method is used to exploit the powerful automatic arrangement functions to obtain a complete song. A separate section has been dedicated to the Sequencer and below is the information on how to record a song using Song Record:
●From the main page of the display, press the SONG RECORD button.
●Enter the name to be given to the Midi file using the KEYBOARD keys.
●Save the title using the F10 SAVE function.
●Start SONG RECORD using the F10 START function.
●From here you can start playing, start the Arranger, call up voices and Styles and the SD5 will record everything (including the changes made to voices, styles etc).
●Once the song has been recorded, press the SONG RECORD button.
●The Midi file just recorded is now ready to be played back using the START push button.
Considering the fact that this is in actual fact a true Midi file, it can later be modified using a sequencer software for example to add finishing touches.
HOW TO USE THE ARRANGER
The Arranger is the engine of the SD5's automatic accompaniment function. It produces an accompaniment according to musical styles selected, the chords played and the settings of the control panel. The heart of the Arranger is the Style, namely a combination of bass, drum and harmony tracks which have been designed for that kind of music. Without going into too much detail, these tracks can have four variations called A, B, C and D/Riff, three Intro's and three Endings that have different levels of complexity. Then there are also the Fill-Ins with which you can move on from one variation to the other or even remain on the same variation, depending on what you prefer. Generally speaking the Arranger of the SD5 is very powerful and allows you to build up your accompaniment very carefully. Start from an Intro, then proceed to the least complex variation (A). With a Fill-In, move onto the refrain with a second variation (B) and terminate with an End. This is just a simple example of what you can do. Whatever the case Ketron has developed some Styles that will never smother the lead vocal or voices being played, but will enhance it.
When the SD5 is turned on it is always pre-set to use the Arranger with a piano sound for the lead (Right section) to be played with the right hand, a background for the left hand (Lower section), a keyboard split point to keep the right hand separate from the left (set to note C3). The part to the left of the split point of the keyboard is used not only to control the two Lower voices but also to acknowledge the chord played by the user, which will be shown on the display.
HOW TO SELECT A STYLE
There are ten STYLES buttons under the display, each of which has a certain style of music.
For each of these Ketron has foreseen up to a maximum of 30 Styles. The individual Style is called up using the relative function key (F1-F10), situated at the side of the display which when pressed, immediately calls up the Style for the Arranger. The SD5 stores the Styles of each kind of music in groups of ten and the number of the next groups is indicated as Pages. To call up the other groups of Styles that are not currently displayed, simply press the STYLES push button again to which the groups belong or use the PAGE +/-
push buttons. The display will show the Styles that follow, which can be selected again using the relative push buttons at the side of the display (F1-F10).
16 SD5
A guide on how to start playing
HOW TO CONTROL THE ARRANGER
The Arranger controls are also described in the Arranger section. Below are simply the main concepts.
●To change the split point, press and hold the SPLIT push button down. Then simultaneously press the key on the keyboard that will be the new split point.
●To start the Arranger press the START push button.
●To stop the Arranger press the START push button once more.
●To add an Intro with the Arranger stopped, play the starting chord first below the split point and then press one of the three INTRO 1,2,3 push buttons.
●To add a fill-in with the Arranger running, press the FILL button and the most suitable Fill-in for the current arrangement will be started.
●To start the Arranger with the first chord played, set it up on standby using the dedicated push button KEY START (the LED lights up).
●To start the Intro with the starting chord of your choice, select an Intro using one of the INTRO 1,2,3 push buttons and then play the chord
●To conclude an automatic accompaniment with an Ending, ensure the LED of the JUMP button is switched off (so that is really disabled) and press one of the INTRO/ENDING 1, 2, 3 buttons while the Arranger is playing.
●To call up one of the four variations, with the Arranger running, press one of the A,B,C,D push buttons.
●To move forward to the next variation with the Fill enable the Jump.
●To play over the whole keyboard and to acknowledge the chords, activate the Pianist function using the dedicated PIANIST function button.
●To modify the tempo set on the Arranger, use the TEMPO + TEMPO - push buttons.
●To create an Accelerando press the TAP/RIT ACC push button repeatedly and briefly.
●To create a Ritardando, change the direction of the arrow by holding the TAP/RIT ACC push button down for a few seconds and then press it repeatedly and briefly.
●To enter a break, press the BREAK push button.
●To stop an accompaniment when the next chord is released, enable the KEY STOP push button (the LED of the push button lights up) and then play and rapidly release a chord.
●To hold the arrangement only while the chord is played, enable these functions using the dedicated push buttons: KEY START+KEY STOP.
●To play the accompaniment again from the first beat, no matter what measure it currently is in, press the RESTART push button.
●To cut-out the accompaniment tracks, except for the drum tracks, when no chord is played, disable the HOLD function using the dedicated HOLD push button (the LED switches off).
●To balance the volume of the Arranger with the lead played on the part of keyboard to the right of the split point, press these push buttons: BALANCE +/- (DATA CURSOR).
●To restore the original tempo of the Style, press the PAGE +/- push buttons simultaneously.
●To repeat all the Fill-ins cyclically, hold the FILL button down.
●To reproduce only the Ending while the Arranger is stopped, enable the JUMP and then press one of the three Intro push buttons.
●To repeat one of the three INTRO's available while a Style is being played, activate the JUMP function using the related key, then press one of the three INTRO/ENDING keys.
HOW TO LOAD A STYLE FROM DISK
The memory area dedicated to Patterns makes it possible to load new Styles from a floppy disk or from the hard disk and to keep them in memory even when the instrument is switched off. Once they are loaded in the RAM, they can be called up using the Pattern push button and the Styles push buttons.
●Press the DISK ON push button and use the PAGE + and PAGE - push buttons to select either the hard disk or the floppy disk (depending on where the styles to be loaded reside).
●From the folder on the hard disk or from the floppy disk choose one or a number of Patterns to load into the RAM.
●Enable the loading operation by pressing F2 Load and use the DATA CURSOR - push buttons to select the target memory location. Otherwise you may use F9 Automatic to load the styles automatically into the current available RAM locations.
●Press F10 Execute to confirm the operation, or press F10 Escape to annul it.
●You may delete the contents of the RAM and replace them with the Styles you wish to load using F8 Clear All &Load.
●Pressing the EXIT push button takes you back to the main page. Then press the PATTERN push button and, using the STYLES push buttons, select the Style loaded.
HOW TO USE THE VOICES
To the right of the keyboard split point, when the Split function is enabled, a lead can be played with the right hand independently from the Arranger. The default voice assigned is the 'Acoustic Piano', but any of the sixteen sound groups can be called up at will using the 16 VOICES push buttons. Like the Styles, the sounds too are displayed in groups (and pages) of ten and any remaining groups following the first are poin-
SD5 17

A guide on how to start playing
ted out by “Page” with the number on the right indicating the number of groups available.
Once a family has been selected from the 16 voice groups using the dedicated VOICES push buttons to the right of the control panel, 5 sounds appear on the right and five on the left of the display. Simply press the function push button corresponding to each sound of the display (F1F10) to call up the relative sound. The voice selected will be displayed under the four-beat bar logo. To display the groups of sounds that follow the first page, use either the PAGE +/- push buttons or press the same VOICES push button again for that family of sounds. In this case the groups will be selected cyclically. The Modulation Wheel and the Pitch Bend are immediately available as well as the Aftertouch to control additional sound or timbre parameters using key dynamics. It is worth remembering that up to four split or layered timbres can be used for the lead section, which is programmable as explained later in the 'PROGRAMS' chapter.
HOW TO USE THE MICROPHONE AND THE VOCALIZER
The SD5 can work with up to two microphones connected to the dedicated front mic input. The Micro input is processed by the Vocalizer, namely the effect with which the vocals can be naturally harmonized either according to the chords played, or a harmony track of a Midi file or the notes played on the keyboard. What you need is a good microphone, a cable and the SD5. When you connect the microphone, adjust its gain moving the Gain cursor until the sound starts becoming distorted, then reduce the Gain down to a level in which the distortion disappears. The purpose of the Gain control is that of boosting the microphone signal to an ideal level. As default setting the SD5 keeps the microphone input turned off to prevent any interference or noise from entering the internal audio path.
Once the microphone has been connected the inputs are to be enabled. Proceed as follows to do so:
●Go to the main page of the display using the EXIT push button.
●Access the MICRO menu using the dedicated button.
●The display shows various options. enable the input pressing F10 (Active).
●To balance the volume of the microphone with that of the keyboard in general, select the parameter and adjust its value using the VALUE +/- push buttons: F1 LEVEL 1 VALUE +/-
●To return to the main page of the display press the EXIT push button.
At this stage you can use effects like reverb on the voice signal from the mic, which can be modified as desired. The versatility of the Vocalizer of the SD5 is such that it can be used in various ways. First and foremost the SD5 is capable of identifying the pitch of the note that you are singing so that it can be harmonized correctly and naturally. This function however depends on the operating mode chosen for the Vocalizer.
●You can harmonize the voice according to the chords played on the left part of the keyboard or, in Pianist mode, over the whole keyboard. This method of utilising the notes by the Vocalizer is called Automatic Chord and includes the identification of the note sung via the microphone input.
●Using the 'Keyboard Harmony' mode You can harmonize the voice according to the notes you play directly on the right part of the keyboard rather than the note sung .i.e. the produced vocal harmonies are exactly the notes you play whatever your vocal note!
●You can use a dedicated track of a Midi file, compatible with the Vocalizer in MIDI mode, to control the harmonization.
●You can use the Vocalizer as a normal Pitch Shifter, where the interval of the note generated stays fixed and moves in parallel with the note sung in Fixed Interval mode.
●You can use the Vocalizer as an effects processor to create special effects with the voice, in Vocal Effect mode.
●With the microphone in use, from page Micro-Vocalize, menu press the F10 push button to set the parameter on Active.
●To enable a different mode to that set as default, select it using the function F3 MODES push button
●A list with the settings programmed will appear in the centre of the display. To select one use the CURSOR +/- push buttons
●To disable the Vocalizer, press the F10 push button and select Inactive.
●To return to the main page press the EXIT push button.
To simplify the choice of the operational mode when playing live (when the Vocalizer is in use), you can immediately call up the Harmony Right settings, which belong to the Keyboard Harmony mode using the A and C push buttons and Unison, in the Fixed Interval mode using the B and D push buttons. The SD5 also automatically identifies the track of the Midi file dedicated to the Vocalizer and enables it as soon as you start the playback. However during playback it is important not to touch the A, B, C and D push buttons otherwise the Vocalizer will disable the MIDI mode related to that Midi file and will activate the one assigned to one of the push buttons. As you will see, there are many other parameters, but for a start these few tips should be sufficient.
HOW TO USE A MIDI ACCORDION
Ketron has reserved a dedicated menu for the connection of accordions equipped with MIDI interface, which must exploit the MIDI In 2 input. To reach the parameters required, from the main page shown on the display, access F3 UTILITY and from this page select F1 ACCORDION. Various parameters to be modified are offered here. The most important however is the enabling of the MIDI accordion that is achieved by pressing F10
18 SD5
A guide on how to start playing
that switches from Inactive to Active. If you already own a MIDI accordion you most probably already know most of the parameters provided.
In any event the default settings should work efficiently with almost all types of MIDI accordions. It is important to remember that if your MIDI accordion seems not to work you most probably have to work on the matching of the MIDI channels, which are accessed using the F6 MIDI menu. When the Accordion mode is enabled, the SD5 does indeed automatically modify the MIDI settings that can be re-pro- grammed at any time.
THE REGISTRATIONS
All the parameters dealt with up to this point, and many more can be saved and called up instantly thanks to the 198 Registrations. The handiness of the Registration function becomes clearer as you go along and are crucial when playing live as they are used to call up all the settings of an automatic accompaniment or a Midi file with words and audio files. There are two types of Registrations: those on board in memory (Block Registration) and those stored on disk (Single Registration). The SD5 can hold one Block Registration at any given time. There are 198 registers within each Block Registration which are called up by enabling the Registration push button and then entering the number of the Register using the numeric keypad (STYLES push buttons). The SD5 comes with 198 pre-set default Registers. The Single Registrations on the other hand are loaded one at a time from hard disk or floppy disk. There may be up to 999 Single
Registrations for each folder of the disk and are called up by first enabling the REGISTRATION push button after having modified the selection mode for Registrations in the Utility menu using F7 Regis. Mode and
then entering the 3-digits number using the numeric keypad (STYLES push buttons).
The real secret of the Registration however is yet to follow. On most electronic keyboards, to load a Midi file, a pattern and a text file, you have to go through at least three procedures to access the disk, which is maybe not appreciated by the audience who have to sit waiting due to access time. The SD5 does all this just by simply calling up a Registration. If indeed the name of the Registration is the same as that of the Midi file, the text file and the pattern, when it is called up the SD5 will automatically load all these files, without having to access the DISK functions. Added to this the fact that you can pre-program the Registrations at home in comfort and you'll realise quickly how incredibly fast and handy the SD5 is when playing live!
For the time being we will end on how to simply save a Registration for later recall. Once you have set the Sounds, the Style, the Arranger options and any other parameter as desired, as well as all the other control panel settings on the SD5 (as they currently are), press the SAVE push button; select F1 Registration and enter the name to be assigned using the keys of the keyboard. To change the destination in memory, enter the number of the target Registration using the STYLE push buttons.
Once the name has been entered and the position in the list chosen, all you have to do is confirm everything using F10 Save, or exit without saving anything using F5 Escape or EXIT.
The calling up of a Registration overrides all the other functions in use at the time. The elements a change in Registration should or should not affect can be determined and will be discussed in further detail.
SD5 19

Voices and User Voices
Voices and User Voices
One of the fundamental features of the SD5 is its sound quality and consequently the synthesis technology exploited that is based on multisamples processed by subtractive synthesis, frequency modulation and additive synthesis. The samples have been developed over the last few years by a team of international programmers. For example, the impressive Acoustic Piano voice, exploits up to 64 samples painstakingly arranged along the keyboard on two different levels of dynamics. For each voice the musician can use up to a maximum of two oscillators at the most, but the quality of the single samples is such that most of the voices use only one oscillator. This aspect directly affects the polyphony, which is not halved: the 64-note Polyphony is for the most part a reality! The synthesizer of the SD5 exploits a 24 dB/octave LPF filter with three envelopes, two LFO's and a complete modulation section. The FM synthesis is based on an algorithm with four operators of which two are carriers and two modulators, while the additive synthesis is used for creating the Hammond organ voices in the Drawbars mode. We have intentionally restricted access to the synthesis parameters especially for FM since it is a complicated system and was used only at the manufacturing stage to create a few of the sounds which are offered and are generally ready to use.
The SD5 also has a bank of factory 'Preset Voices', a General MIDI bank (used again for the Styles) and a bank of 110 User Voices. The latter is where you store your own voices using the General MIDI or other voices as your starting point.
Note: Remember too that the Preset Voices, namely the richer life-like voices, can be used only by the Lower and Right section for playing manually, whereas the accompaniment tracks will use only the Voices in General MIDI format to maintain the compatibility with GM standards. For the Right part the Programs allow the use of up to four Voices at the same time, split or layered over the keyboard and with individual editing parameters for each. It is also possible to set a second voice to be layered with the main voice (Second Voice).
To call up the Voices you can use the control panel push buttons VOICES and USER VOICE, or you can create a list of customised Voices with the most frequently used voices (1 Touch).
There is a specific mode for the drums that allows you to play the drum sets right over the whole keyboard. The SD5 uses drum sets derived both from samples and grooves created by recording famous drummers or percussionists live. These then were processed via a proprietary procedure to create a drum set, but with “real” percussion instruments (Live Drum). Both types of drum sets can be used by the musician live, right over the entire keyboard.
CALLING UP THE VOICES
The two rows of six push buttons called VOICES are used to call up the voices according to the family in which they belong. When a family is selected using the push button, the display shows five Voices to the left and five Voices to the right, which can be selected by pressing the function button associated to that voice. The last Bank of Voices is dedicated to the Drawbar voices if you press the USER VOICE push button.
When the SD5 reaches the last page of Voices available, if you press the same push button for that family of voices again you will return to the group of voices of the first page. This last move (unlike the others) cannot be made using the PAGE + and PAGE - push buttons.
The VOICES push buttons do not call up the preset voices alone.
If the LED of the USER VOICE push button is lit, you get the bank of user editable voices. The 110 voices in this bank can be called up using the 'VOICES' push buttons in groups of eight at a time.
If the LED of the DRAWBAR push button is lit, the last bank of Voices calls up a single Organ voice only.
If the LED of the PROGRAM push button is lit, then the VOICE push buttons call up the 'Program' memories.
If the LED of the ONE TOUCH push button it lit, then the first row of VOICE push buttons calls up one of the six pages that make up the One Touch memories (where your favourite voices are stored).
SECOND VOICE
The SD5 offers the facility to create a layer using two voices for the section to the right of the keyboard split point. The display shows the name of another Voice called the 'Second Voice in small letters under the selected main Voice's name. To activate the 'Second Voice' press the 2ND VOICE push button (the LED lights up).
As a default setting, the SD5 already has a Second Voice assigned to each lead voice, but this voice can be modified. This editing procedure can be carried out once the Second Voice is switched on.
From the main page press Right Menu and then PAGE +. From the menu displayed, select F4 2nd Voice Edit
Select the group to which the new voice for the Second Voice belongs using the VOICES push buttons. Only the name of the first Voice of that group will appear.
Use the equivalent function buttons (F1-F10) to select the other Voices that follow the first one in the group selected.
To modify the octave of the Second Voice, use the TRANSPOSER +/- push buttons that will act as TRANSPOSER push buttons while the Voice is selected.
To modify the volume of the Second Voice, use the DATA CURSOR push buttons for the volume while the voice is selected.
This editing procedure can be repeated for each voice assigned as the Second Voice. Remember to save the modifications made (which would otherwise be lost when the SD5 is turned off and default to those set by Ketron) by proceeding as follows:
Press SAVE Select F6 2nd Voice
Confirm the procedure using F10 Save, thus the modifications are saved permanently in Flash RAM.
To restore the original settings of the Second Voice preset by Ketron, use function push button F9 Default instead of confirming the procedure.
20 SD5

Voices and User Voices
USER VOICE
As we have already explained, the SD5 is also a powerful synthesizer based on samples. We have chosen to limit the editable parameters to just those essential for most common use. Any modification made to a voice can be saved in one of the 120 memory locations in the User Voice bank, divided into twelve groups of ten User Voices each. To call up a User Voice follow the normal procedures used for calling up a Voice (mentioned above). The only difference is that the USER VOICE push button must be enabled (LED lit). As for programming, there are two ways:
●Press the USER VOICE push button to enable the User Voice bank.
●Select one of the ten User Voices using the function push buttons from the twelve banks that can be called up using the VOICES push buttons.
●Press the function push button related to the User Voice selected once again.
Or alternatively;
●Press the USER VOICE push button to enable the User Voice bank.
●Select one of the ten User Voices using the function push buttons from the twelve banks that can be called up using the VOICES push buttons.
●Press EXIT to return to the main page of the display that will keep the User Voice selected in use.
●Access the programming menu using F7 Edit Voice.
Together with the User Voices the SD5 allows the user to also edit the voices in the
General MIDI bank. To call up a voice for editing from this bank, proceed as follows:
●Enable the User Voice bank (LED lit).
●Access Edit Voice using the procedures just described (the page will show the voice parameters).
●Select a GM voice within the sixteen families, again with USER VOICE enabled, using the VOICES push buttons. Use the PAGE +/- push buttons to call up the ten voices that follow when available and the function push buttons to select the voice to be edited.
Once the edit page of this User Voice is accessed using either procedure, the display will be configured as follows:
THE ELEMENTS USED FOR VOICE PROGRAMMING
A voice in the SD5 exploits a sampled wave form stored in a Wavetable as a sound source. The wave form can also be created from a number of different samples, arranged across the keyboard as multi-splits or stacked to velocity-switch according to the key dynamics, but in any event these samples cannot be modified by the user on the SD5. The raw sound of the wave form is processed via an amplitude envelope (ADSR) that tailors the curve by which the sound volume varies over time after a note is played. There are different types of envelopes: that are used by the SD5 is made up of four segments, namely the Attack (the time the sound takes to reach the maximum level), Decay (the time that the sound takes to drop from maximum level to that established by the Sustain), Sustain (the level at which the sound remains until the note played is released), and Release (the time the sound takes to drop from the Sustain level to Zero level). This type of envelope is referred to as ADSR. Together with the control via ADSR, the SD5 enables the musician to modify the level of the harmonics of the sound with a filter that literally cuts-off the frequencies above a point, the so-called 'cut-off'. The frequencies near the cut-off point can be boosted with the Resonance, to create those classic sweeps that are typical of analogue synthesizers and often heard in dance music. Again using the programming page the user can assign effects and Reverb to the voices and can modify the type and amount of control exerted by the after touch and the modulation wheel on some voice parameters. Amongst these is also the LFO (Low Frequency Oscillator) that is required to create tremolo effects when it is applied to the amplitude (DCA), and vibrato effects when it is applied to the pitch (DCO) and finally filter modulation effects when applied to the DCF.
AMPLITUDE AND FILTER PARAMETERS
The programming parameters can all be accessed from the Edit Voice menu using function push buttons F8, F9 and F10 and using the DATA CURSOR (Left and Right) push buttons to move around and enter the values of the parameters. Below is a detailed description of the parameters:
F1 Attack This sets the value of the Attack segment that can be modified using the DATA CURSOR push buttons. F2 Decay: This sets the value of the Decay segment that can be modified using the DATA CURSOR push buttons. F3 Sustain: This sets the value of the Sustain segment that can be modified using the DATA CURSOR push buttons. F4 Release: This sets the value of the Release segment that can be modified using the DATA CURSOR push buttons.
F5 Level: This sets the value of the total volume of the voice that can be modified using the DATA CURSOR push buttons.
To simplify programming of the envelope, the display also shows a graph, the segments of which change proportionally with the values set for the ADSR.
F6 Resonance: This sets the Resonance value that can be modified using the DATA CURSOR push buttons.
F6 Cut Off: This sets the cut-off point value of the low pass filter that can be modified using the DATA CURSOR push buttons.
SD5 21

Voices and User Voices
THE EFFECTS
Using F8 Effect the user can access the effects page for the Reverb and Chorus effects. Press F7 Effect to display the level of the Reverb (always present unless it is set at zero) and the multi-effect that can be disabled (Off). To access these parameters use the DATA CURSOR push buttons.
As for the multi-effects, once the algorithm has been enabled and selected, one or more parameters appear right under the Reverb, which are used to choose the type of the single effects within the multi-effects used by the voice. For further information see the Effects section.
CONTROL WITH MODULATION WHEEL
Press F9 Wheel and the display will show a 2 -column table in which the first indicates the parameter, the second the on/off status of the Modulation Wheel. Use the DATA CURSOR keys to select and enter a parameter. Below is the explanation of the individual parameters:
CUT OFF: This enables the control of the opening and closing of the filter, by altering its cut-off. It is used for example to create the analogue type sweeps or to brighten a sound by letting through more of the higher frequencies and harmonics as the Cut Off point is raised.
LFO Pitch: This enables the modulation on the pitch (Vibrato), by controlling the modulation intensity of the LFO.
LFO Amplitude: This enables the modulation of the Amplitude (Tremolo), controlling the modulation intensity of the LFO.
LFO Filter: This enables the modulation on the Filter, controlling the modulation intensity of the LFO. Volume: controllo del Volume per mezzo dell'Aftertouch.
Wha Wha: This controls the Wha Wha effect via the use of the Modulation Wheel.
Slide (Vel): This affects the tuning of the sound, creating a sort of slight pitch bend each time a key is pressed strongly. It may prove quite useful when playing to realistically simulate the sound attack typical of wind instruments, such as the Sax and Trumpets.
Attack: This makes all the parameters controlled with After touch start working with a slight and gradual delay. If used skilfully it confers amazing expressiveness to the leads. To hear its affect, at least one of the parameters amongst those listed must be controlled by After touch and obviously the After touch must be used. It is quite handy, for example, when assigning a pitch bend to the After touch and playing with high velocities that could trigger the After touch. This system safeguards the use of the After touch with additional control.
Portamento: enables the use of the Portamento for the voice.
Legato: enables the Legato mode for the amplitude envelope.
Wha To Pedal: assigns the Wha-Wha control to the pedal.
Mono: sets the Voice to mono.
LFO E VELOCITY
Press F10 LFO Velocity to access the parameters dedicated to the use of the LFO and the velocity to control some crucial voice parameters. To select a parameter, use the DATA CURSOR keys. Below is the description of the individual parameters:
LFO 1 (DCO) Rate: This establishes the modulation frequency or speed of the LFO dedicated to the pitch. Higher the value, faster will be the vibrato.
LFO 1 (DCO) Depth: This specifies the operating intensity of the LFO on DCO, which determines how heavy or deep the Vibrato effect will be.
22 SD5

Voices and User Voices
LFO 1 (DCO) Delay: This specifies the delay after which the LFO will affect theDCO to create the vibrato effect.
LFO 2 Rate: This establishes the speed of the LFO dedicated to the control of the filter and the amplitude.
LFO 2 (DCF) Depth: This specifies the operating intensity of LFO on the cut-off point of the filter, therefore generating a closing and opening effect of the filter that, if the Resonance is set at high levels, can produce an effect somewhat akin to a wah wah effect.
LFO 2 (DCA) Depth: this specifies the operating intensity of the LFO on the amplitude which creates a tremolo effect.
Velocity Slope: This is used to modify the response curve to the Velocity for the User Voice being modified that, at zero, mutes the voice.
Velocity Filter: This controls the opening of the filter according to the key dynamics. Value 64 is the standard setting. Lower values obtain a less brilliant sound, even when playing at high velocity.
Octave Shift: This shifts the octave of the User Voice by a range within - 2 octaves and +2 octaves.
SAVING A USER VOICE
An edited User Voice must be saved permanently in the memory otherwise it will be lost when the SD5 is turned off. The saving 'prompt' appears automatically after any parameter has been modified and the user attempts to exit the programming menu using EXIT, or by pressing
the SAVE push button to enable the saving procedure. In both cases the page that appears shows the destination in memory location with the name of the User Voice already there at that time. To change the destination in memory directly, enter the destination number using the numeric keypad STYLES buttons. This page is also used to modify the name to be given to the User Voice, using the keys of the keyboard. To confirm the procedure press F10 SAVE.
F5 Escape: This cancels the saving procedure. The new User Voice will be saved on the same source location.
SAVING ALL THE USER VOICES ON DISK
The entire contents of the User Voice bank can be saved on hard disk or floppy disk by using the following procedure:
●Press DISK and select the destination disk using push buttons PAGE +/-.
●Go to the desired folder by entering the number using the numeric keypad relative to the STYLES push buttons.
●Enable the saving procedure using F3 Save.
●Select F10 Others and then F2 User Voice.
A page appears where the name of the file is to be entered using the keyboard keys.
Confirm the procedure using F10 Exec, or cancel using F5 Escape.
.
SD5 23

Programs and One Touch Voices
Programs and One Touch Voices
PROGRAMS
A number of voices are often used simultaneously to enhance the voice of the lead part, namely the right section to the right of the keyboard split point. The simplest method is that of using the Second Voice but for more demanding musicians, up to four Voices (separately combined together) can be exploited. Using the Programs the musician can obtain a remarkably versatile voice for the right hand and also right along the keyboard. The player could, for example, use two further voices for the Lower section and leave another two for the Right section or use different voices according to the key dynamics and again could transform the part of the keyboard to the left of the split point into a real lower organ keyboard to be controlled with a MIDI pedal. Using the Programs the player can create Harmony effects such as Duet, Trio and Steel. The SD5 provides the musician with 120 Programs that are distributed over twelve pages of ten Programs each. To call up a Program simply enable the PROGRAM push button and select one of the
Programs displayed using the function push buttons. Use the twelve VOICES push buttons to call up the groups of Programs.
MODIFYING A PROGRAM
Select a Program and then press the function push button relative to the Program selected again or from the main display, after having selected the Program to be modified, access menu F8 Edit Program. In any event the display shows four columns, each of which corresponds to a Voice used in the Program, whereas the horizontal lines refer to the parameters, grouped together in three pages that are accessed using the PAGE +/- push buttons. To move around within the parameters of the horizontal lines use the corresponding function push buttons that select the parameter at the side of that in use each time the push button is pressed again.
A GUIDE TO THE PARAMETERS
PAGE 1
From this page access is gained to some overall parameters that directly affect the
Voice performance.
F1/F6 Voice: this indicates the voice used for the Voice selected. To change it follow the same procedures used to call up a Voice from the main page. Once a Voice has been selected, wait a few seconds to return to the Edit Program page or press the EXIT push button. To disable a Voice selected press the DATA CURSOR push simultaneously.
When a Voice is selected, the F10 Harmony function appears immediately at the bottom right part of the display, which is used to enable the harmonization function for that Voice. Only one Voice within the Program can use the harmonization function and it is distinguished from the others by the letter “H”
written under the name. If the Harmony function has already been applied to a Voice, it will be automatically disabled when the same function is set on another Voice.
A completely different matter is the fourth Voice of a Program: together with harmonization, with the same rules as those for the other Voices, it can become a Second Voice and therefore enabled or disabled using the 2ND VOICE push button.
To avail of this option, once you have moved onto the fourth Voice, press F10 Harmony twice. The first time it is pressed the letter “H” will appear under the name of the voice, the second time it is pressed the Harmony setting is restored and the fourth Voice is transformed into Second Voice, which will be pointed out by “2nd” under the name.
F2/F7 Volume: This indicates the value of the volume for each single Voice that can be varied using the DATA CURSOR push buttons which, if pressed together at the same time, will set the value to zero.
F3/F8 Shift: This is the transposition value in semitones (+/- 63) that can be modified using the DATA CURSOR push buttons which, if pressed together at the same time, will set the value to zero.
F4/F9 Tune: This is the fine tuning value (+/- 63 steps corresponding to one semitone), that can be modified using the DATA CURSOR push buttons which, if pressed together at the same time, will set the value to zero.
F5/F10 Pan: This is the Pan pot value on the stereo front (+/- 64) that can be modified using the DATA CURSOR push buttons which, if pres-
24 SD5
Programs and One Touch Voices
sed together at the same time, will set the value to zero. Zero corresponds to the middle position.
PAGE 2
The second page is used to set the entity of the effects for the single Voices. For all four Voices the Send for the Reverb is always available whereas the other parameters available depend on the type of algorithm selected for the Effect which, in this case, can work as a multi-effect unit with distortion, chorus and delay algorithms combined in five different ways. When the Effect is enabled on a Voice, the musician may also establish which algorithm of the multi-effect the Voice should use. The choice of the type of multi-effect is made using the DATA CURSOR push buttons and the combination of algorithms is shown directly on the display via which the musician can find out which algorithms are set in series (the output of the first enters in the second effect) or in parallel (the output of the effect goes directly to the audio output).
Let's take this combination as an example: Delay > Chorus oChorus
In this case there are two effects set in parallel with each other, namely: 1- Delay > Chorus
2- Chorus
with two effects in series with each other where a Delay enters in a Chorus.
If this multi-effect should be selected, there would be two selection possibilities in the Effect parameter: Delay > Chorus and Chorus. The five multi-effects available, of which only one however can be used for a Program, are:
Chorus / Distorsor / Delay
Distorsor > Chorus / Chorus Delay > Chorus / Chorus Distorsor > Delay / Chorus / Delay
Distorsor > Delay > Chorus / Delay > Chorus / Chorus
F1/F6 Voice: This indicates the voice used for the Voice selected. To change it refer to all explanations for page 1.
F2/F7 Reverb: This controls the Reverb entity for each Voice, that can be modified using the DATA CURSOR buttons which, if pressed together at the same time, will set the value to zero.
F3/F8 Effect: This enables the multi-effect and is used to choose which algorithm of the multi-effect will be used for the Voice, using the DATA CURSOR push buttons.
F4/F9 Amount: This controls the signal entity to be sent to the multi-effect and, in particular, to the pre-selected algorithm, that can be modified using the DATA CURSOR buttons which, if pressed together at the same time, will set the value to zero.
F5/F10 Delay e Chorus: These control the signal entity to be sent to the delay or the chorus, when an appropriate algorithm has been selected. Compared to all seen up to here, the parameters within the horizontal lines are only called up using the function push button F5/F10, as there is no function push button
available for the last line.
PAGE 3
From this page the musician can make some adjustments that are required to limit the keyboard range and the velocity for a Voice. It is thus possible to arrange a number of voices in different parts of the Right section (split) and to call up the voice based on the key dynamics (velocity switch).
F1/F6 Voice: This indicates the voice used for the part selected. To change it, refer to similar explanations for page 1.
F2/F7 Range: For each Voice it is possible to indicate the lower and
higher limit of the keyboard within which the voice will be played, simply by playing the relative note on the keyboard when selecting the value or by using the DATA CURSOR push buttons which, if pressed together at the same time, will reset the value, setting it in Off. When this parameter is in Off the Voice will play on the whole part of keyboard to the right of the split point. To be able to also play the Voice on the part of keyboard to the left of the split point, the adequate keyboard range is to be set.
F3/F8 Velocity Switch: This is used to enable the velocity switch mode, namely the use of the voice according to the key dynamics, that can be modified using the DATA CURSOR push buttons. The operating modes may be:
SD5 25
Programs and One Touch Voices
Normal: The voice is always enabled whatever the velocity value set.
Low: The Voice is enabled only for velocity values ranging from 0 to the velocity value specified in F10 Threshold with the DATA CURSOR push buttons.
High: The Voice will only play for velocity values that range from the velocity value specified in F10 Threshold to value 127 (maximum dynamics).
Cross: This can be enabled only for the first two Voices and it enables a gradual switching from one Voice to another according to the dynamics, where the central point of this switching is set by the F10 Threshold value.
F4/F9 Sustain - Portamento -Expression: this is used to enable, or otherwise, the use of the Sustain, the Portamento and the Expression. The three lines of parameters can only be accessed using the function push buttons F4/F9.
F5 Duet/Trio: This is used to choose the polyphony response to the keyboard mode, to create interesting combinations between the voices.
Off: This means that no alternative polyphony response is enabled.
Duet: The first Voice Program will have priority as the highest note, the second Voice will have priority as the lowest note. For example, if the first Voice is a clarinet and the second Voice a trumpet, when the two notes are played the clarinet will always play the highest note whereas the trumpet will always play the lowest note.
Trio: As for Duet but with the third Voice that will always play the lowest note.
Steel: This is used to assign the pitch bend only to the lowest note between two notes played at the same time, realistically simulating the typical Hawaiian guitar or pedal steel guitar effect.
Morph: Using the Modulation Wheel it is possible to control the mix between the two voices assigned to Voice 1 and 2. When the Modulation Wheel is set at minimum only the first Voice will be heard; when it is at maximum only the second Voice will be heard. In this way it is possible to obtain a morphing between the two Voices in real time controlled by the musician.
SAVING AND LOADING A PROGRAM
Once a Program has been modified or programmed, it must be saved in the memory or on disk for future recall or use. It is advisable to save your favourite programs in RAM due to the fact that these are immediately available and can be recalled instantaneously. Programs which reside in DISK have to be loaded into RAM prior to being used.
PROCEED AS FOLLOWS TO SAVE A SINGLE PROGRAM IN RAM
●Select the program to be saved.
●Access the Edit Program environment by pressing the function push button
relative to the Program selected once again or from the main page of the display by pressing F8 Edit Program.
●Press SAVE. The page that appears will show the destination memory location that can be modified by entering the number with the STYLE push-buttons and the name to be assigned to the Program using the keys of the keyboard.
●Confirm that the program is to be saved using F10 Save. Press F5 Escape to annul the operation.
PROCEED AS FOLLOWS TO SAVE A SINGLE PROGRAM ON DISK
●Press DISK and select the destination disk on which the Program is to be saved, using the PAGE +/- push buttons. If you have selected the hard disk, also select the destination folder.
●Repeat the procedure given for saving in RAM up to the SAVE page.
●Enable saving on disk using F9 Save To Disk.
●Confirm the procedure using F10 Exec, or cancel using F5 Escape.
●When the Program to be saved on disk has the same name as a Program that already exists, the display shows three options, namely:
F5 Name this is used to give a new name to the Program and then to confirm that it is to be saved using F10 Exec F10 Overwrite this enables saving by cancelling and overwriting the Program that already exists on disk.
F4 Dir this displays the disk directory enabling the user to control the names that already exist. The user can only return to the saving on disk page from the directory by exiting (pressing EXIT) and therefore repeating the procedure just described. In this case all the modifications made to the Program will be stored in volatile memory.
PROCEED AS FOLLOWS TO LOAD A SINGLE PROGRAM FROM DISK
●Press the DISK push button.
●Choose from which disk the program is to be loaded using the PAGE +/- push buttons.
●Select the type of file to be loaded using F5 File Choice.
●Select F2 Single Program or F7 Program to load a complete bank.
●Type in the number of the folder in which the Single Programs to be loaded are stored using the numeric keypad (STYLES push buttons).
●Select the Program using the DATA CURSOR push buttons.
●Press F2 Load
26 SD5
Programs and One Touch Voices
ONE TOUCH
With all these voices on board, you will soon notice that you do have some voices that you use more often than others. These 'favourite' voices can be stored in a special location in memory (One Touch) which renders quick access and recall during live performances. The SD5 already contains Ketron's favourite voices within the current One Touch locations as default but you can later edit and replace these with your favourite voices. Groups of ten favourite Voices can be created at a time. To call up one of these voices simply press the 1 TOUCH push buttons (LED lit). On the main page the first ten Voices of the list are displayed. To display the other five pages (with ten Voices each), use the first six VOICES push buttons or scroll the pages using the PAGE +/- push buttons. To select the Voice desired press the relative function push button.
To modify the list proceed as follows:
●Press the SAVE push button:
●Select F4 One Touch Edit which will display the first page of the list. To access the other pages use just the PAGE +/- push buttons.
●Find the location to be replaced with a new Voice, selecting it using the function push buttons.
●Select the Voice that will replace that in the list by following the procedures already described for calling up voices. The audio files could also be used but these will not be loaded automatically when turning on again.
Note: Furthermore, the SD5 does not acknowledge original audio files within the list, which distributes the audio files in their loading order. If the audio files
are to be used in One Touch it is advisable to create a group of files to be loaded upon turning the keyboard on in the same order in which they appear in the list (Sound Block).
●Press EXIT to return to the One Touch Edit page.
●Once the list has been completed press SAVE again.
●Confirm the procedure using F10 Save or Cancel the procedure using F5 Escape or Reset the default list using F9 Default.
●Press F8 Disk Save to save on the selected disk.
SD5 27
Drawbars
Drawbars
Thanks to the very powerful sound engine of the SD5, it is possible to also reproduce very accurately the sounds of classic electromagnetic organs, among which the Hammond ©‚ certainly is the most famous one with the most important timbre. If you do not know what an electromagnetic organ is, keep in mind that their timbres used to be mixed using so-called drawbars, with a specific harmonic corresponding to each of them. In order to compose the timbre, the required harmonics used to be added on different levels. The SD5 reproduces these sounds displaying the drawbars that can be controlled in real time by a number of buttons on the panel.
If you wish to use the Drawbars to call up an organ sound, enable USER VOICE and then select BASS-FX that corresponds with the bank of Voices dedicated to these timbres. To call up the single timbre among the 10 available, use the F1-F10 function buttons.
PROGRAMMING THE ORGAN TIMBRE
If you wish to modify a preset and program your own settings, from the main display page, press USER VOICE, then press BASS-FX . Select the voice you wish to modify, using the function push buttons. Once you have selected the voice, press the same function push button once more to access the edit page.
The SD5 allows you to control a number of particular features relevant to the original organ timbre, to be called up with the function buttons and the DATA CURSOR (Left, Right) buttons and modified with the DATA CURSOR (Up and Down) buttons. These parameters are described in detail in the following:
Drawbar: use the DATA CURSOR (Left, Right) push buttons to select the drawbar, and use the DATA CURSOR (Up and Down) buttons to modify its level.
F1 Click: activates the typical noise when the sound of the electromagnetic organ starts. Use the DATA CURSOR buttons to modify its level.
F2 Sustain: an effect used on the electronic organs of the sixties and seventies, extending the decline time of the timbre; the relevant value is programmed using the DATA CURSOR buttons.
F6 Percussion: this is a basic feature of the Jazz and Rock organ sound. The percussion introduced is to be chosen among 4' and 2 2/3' by pressing the F6 function key. The percussion volume is modified using the DATA CURSOR keys.
F7 Effects: this allows you to access the typical effects associated to the electromagnetic organ, i.e. Chorus and Vibrato. The Vibrato can be applied to the oscillator (Dco), the amplitude (Dca) or the filter (Dcf) with a global speed control (Rate). Pressing DATA CURSOR (Up and Down) you select the parameter and pressing con DATA CURSOR (Left, Right) you modify the quantity. To go back to the Drawbars page, press once more the F7 function button.
Each Drawbars configuration can be saved on the Drawbar bank replacing the existent ones.
Proceed as follows to store a Drawbars combination:
●Press SAVE.
●If you do not wish to modify the name, press F10 Save to confirm.
●If you wish to modify the name, enter the letters using the keys of the keyboard and move with the CURSOR +/- buttons. Then press F10 Save to confirm.
●The F9 Default function restores the original factory set combinations.
●The F4 Undo function restores the last combination prior to the current modifications.
●The F5 Escape function aborts the storage operation.
28 SD5
 Loading...