

Page 1
1
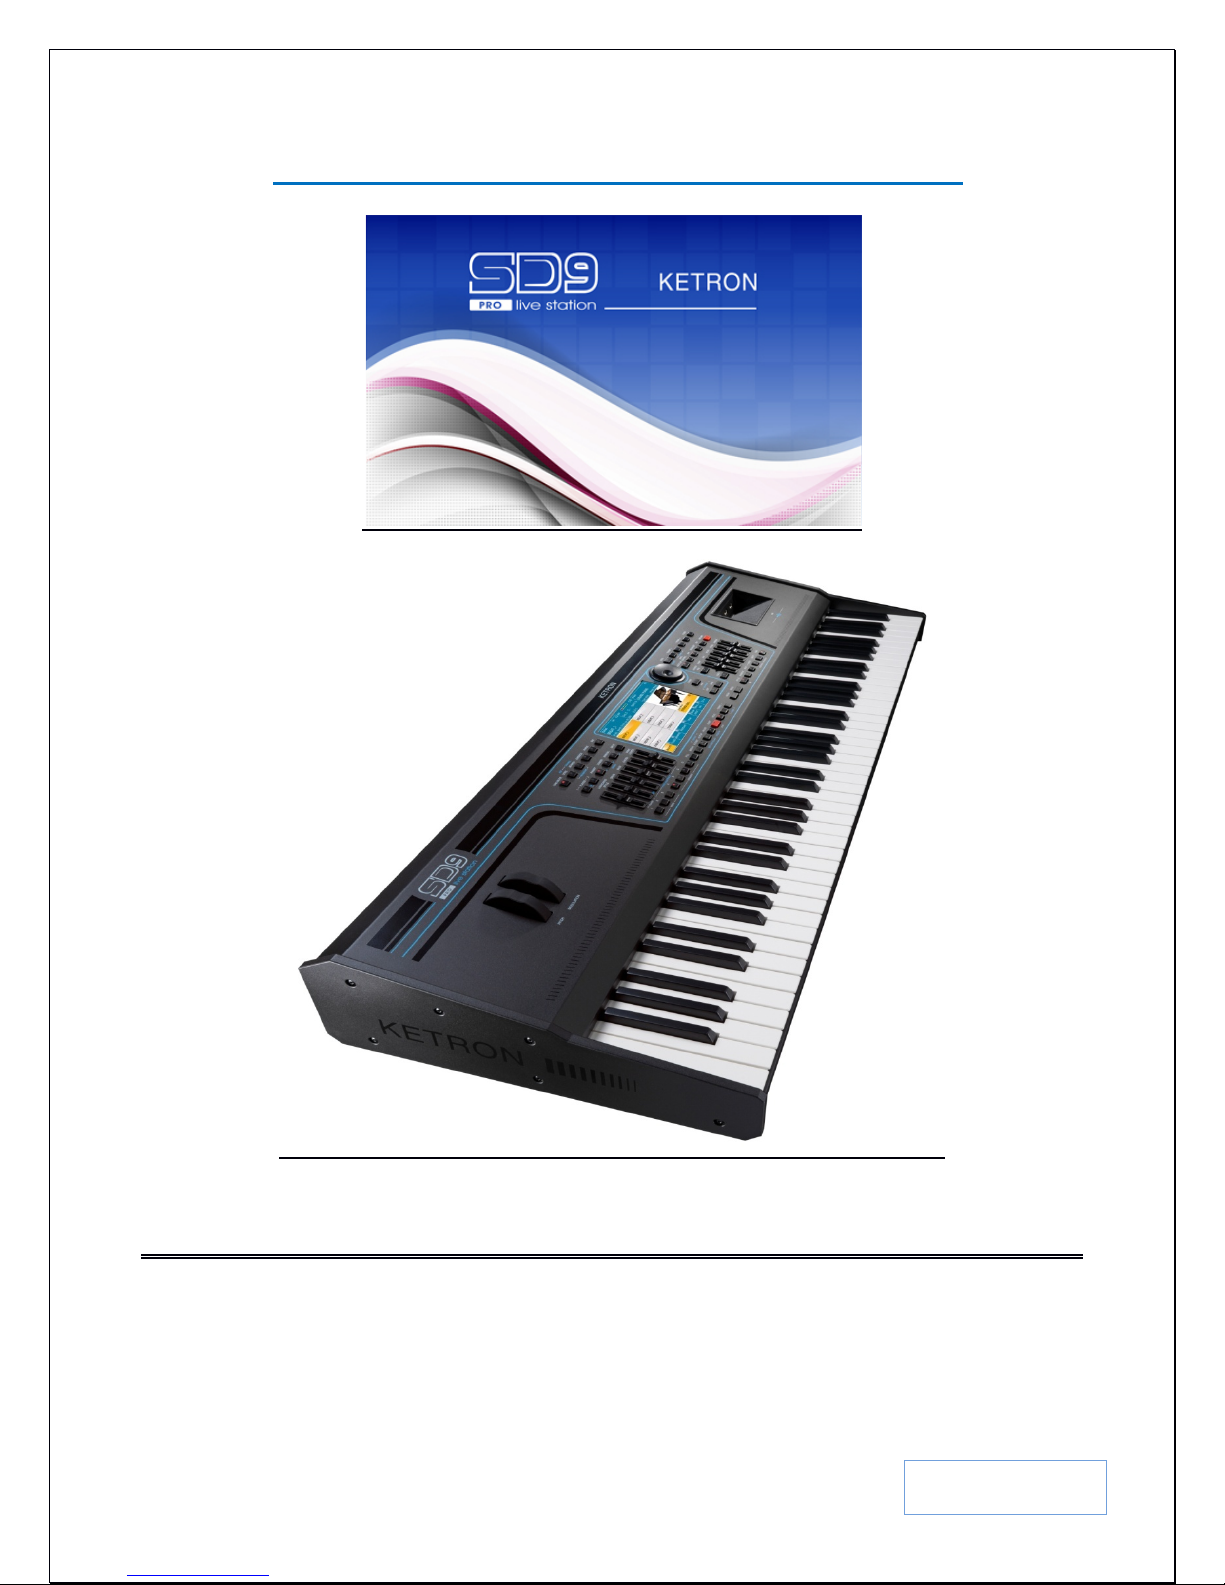
KETRON SD9 PRO MANUAL, HINTS & TIPS (V 1.0)
KETRON SD9 Manual & Tutorial
Written by AJAM Inc. USA
In collaboration with KETRON Srl Italy
Page 2
2
TABLE OF CONTENTS
2.A
2.B
2.C
2.D
2.E
2.F
2.G
2.H
2.I
2.J
2.K
2.L
2.M
2.N
3.A
3.B
3.C
Number Topic Page
1
1
2
Accessing and using more voices from Random Access Memory 8
Playing 2 Lead Sounds / Voices at once (2nd Voice) 9
Using / Layering more than 2 sounds / Voice Edit 12
Playing up to 2 voices with the left hand 16
Changing the Sounds / Voices played by your left hand 18
Navigating the SD9 PRO 3
Playing in Full Keyboard mode 4
Sounds & Voices 6
Playing and using Sounds 6
How to change the 2nd voice 10
3
Other parameters that control the Lower Voices 18
Playing Left hand bass - Manual Bass 20
Saving your Keyboard Settings / Registrations 22
Recalling your Registrations / Song Settings 23
Adding harmony to your sounds / Voices 24
Assigning Harmony types to your lead sounds/Voices 25
Instantly double a lead voice 25
Adding Professional Effects to your voice as you play (Live Effects) 26
Assigning what gets affected by the Live Effects 27
List of favorite voices - Voice List 27
How to create your own Voice List 28
KETRON SD9 Manual & Tutorial
Page 3
3
4
4.A
4.B
4.C
4.D
4.E
4.F
4.G
4.H
Variations
4.I
4.J
4.K
4.L
4.M
5.A
5.B
Vocal Harmonizer - Voicetron
80
5.C
5.D
6.A
6.B
STYLES 31
Selecting styles/beats & Arrangements 32
Various parts of the styles - explained 34
How to Select a style for a song 36
How to play and enjoy using styles 38
One Touch Settings & Variations 45
Voice to Arranger/Variations 46
Creating your own One Touch Settings 46
5
6
Style
(More or Less busy) 48
Modifying Styles (STYLE VIEW) 49
Unique Arranger Features 52
Adding & Syncing Arpeggios to Styles 61
Assembling your own style - Modeling 64
Creating a new Style & Beat 69
Microphone and Vocal Harmonizer (Voicetron) 75
Microphone Preset settings 76
Vocalizer Tips and Tricks 85
Using a Guitar and on board Stomp Boxes / Microphone 2 Input 85
Saving and Recalling Keyboard Settings / Song Settings / Registrations 88
Creating a Song Setup / Registration 88
Determining what a Song Setting/Registration saves/recalls and ignores 89
KETRON SD9 Manual & Tutorial
Page 4
4
6.C
Recalling your Song Set up/Registrations at the show/gig 92
7.A
Keyboard Controls & Settings
130
7
8
9
10
11
12
13
14
Audio and Midi RECORDING 95
Song and Phrase 95
Audio, Video and Multi Media Player 97
Using Audio Drums & Arranger with Midifiles (Drum Restyle) 100
Playlist 103
Placing my best tunes in one place (MY FOLDER) 108
Using MARKERS in Songs 109
Removing Lead Instrument Sounds from Songs (Lead Mute) 110
Adjusting Midi file Instrumentation with Volume Sliders on the panel
(Midi Mix)
Play Modes 114
MIDI Modes and Settings 120
Audio Editor (Wave Files) 123
Digital Copy of User manual 124
Set up / Preferences 125
Backup (Export entire system, Playlist, My Folder) 128
110
Output Assign (Assigning Drum, Bass or Chords to separate output Aux /
15
16
17
18
1/4 Note Tuning ( Arabic Settings) 136
Registration / Song settings and Controls 138
KETRON SD9 Manual & Tutorial
Headphone)
Footswitches & Assigning them 132
External Video Monitor Setup 134
131
Page 5
5
Congratulations on your purchase of the KETRON SD9 PRO Arranger & Player Electronic keyboard. Unlike
any other keyboard that has gone before it, this multi-media musical work horse is the first in its class o f musical
instruments to combine modern features you actually need and will use for and during your performances, such as
• High quality natural sounds which sound just like the instruments it emulates. Cl ose your e ye s a n d you
would think a musician playing say the sax was right there in front o f you
• A vast new library of Live audio Guitars and Live Audio drums which places before you ‘musicians ’ yo u
control right at your finger tips with in no vative tools such as Style Modelin g and Launc hPad with the
capability to change the tonality of the audio elements in real time
• Loop Maker t aken to the next level with LaunchPad which provides style modeling and real time
sequencin g of midi and a udio elements which can be synchronized and used in li ve or studio performances
• A new Sample Editor that now provide s the means for you to utilize your own samples as instruments or
create your own drum sets which can in turn be used with styles/tracks or used to enhance Midifiles
• A simple and easy to use operating system which can easily be utilized through a very intuitive a nd wide
touch color screen
• Multi player capabilities with extensive control o ver audio, including the new Audio Multi Tracking featur e
• Four Playbox banks which now allow you to customize and store 999 of your favorite songs (Mp3, wave,
Midifiles) within each one.
…. all of this built into a very affordable package, and one that was designed by musicians and for musicians. Right
out of the box, the SD9 PRO is ready for any artist, performer, studio engineer or entertainer to use on stage, at a
place of worship, or in the studio – with incredible Audi o Drums, authentic live bass and backings suitable for
almost any song, thanks to the vast library of professional sounds and rhythms and the flexibility to be able to
control them all quickly in real t ime.
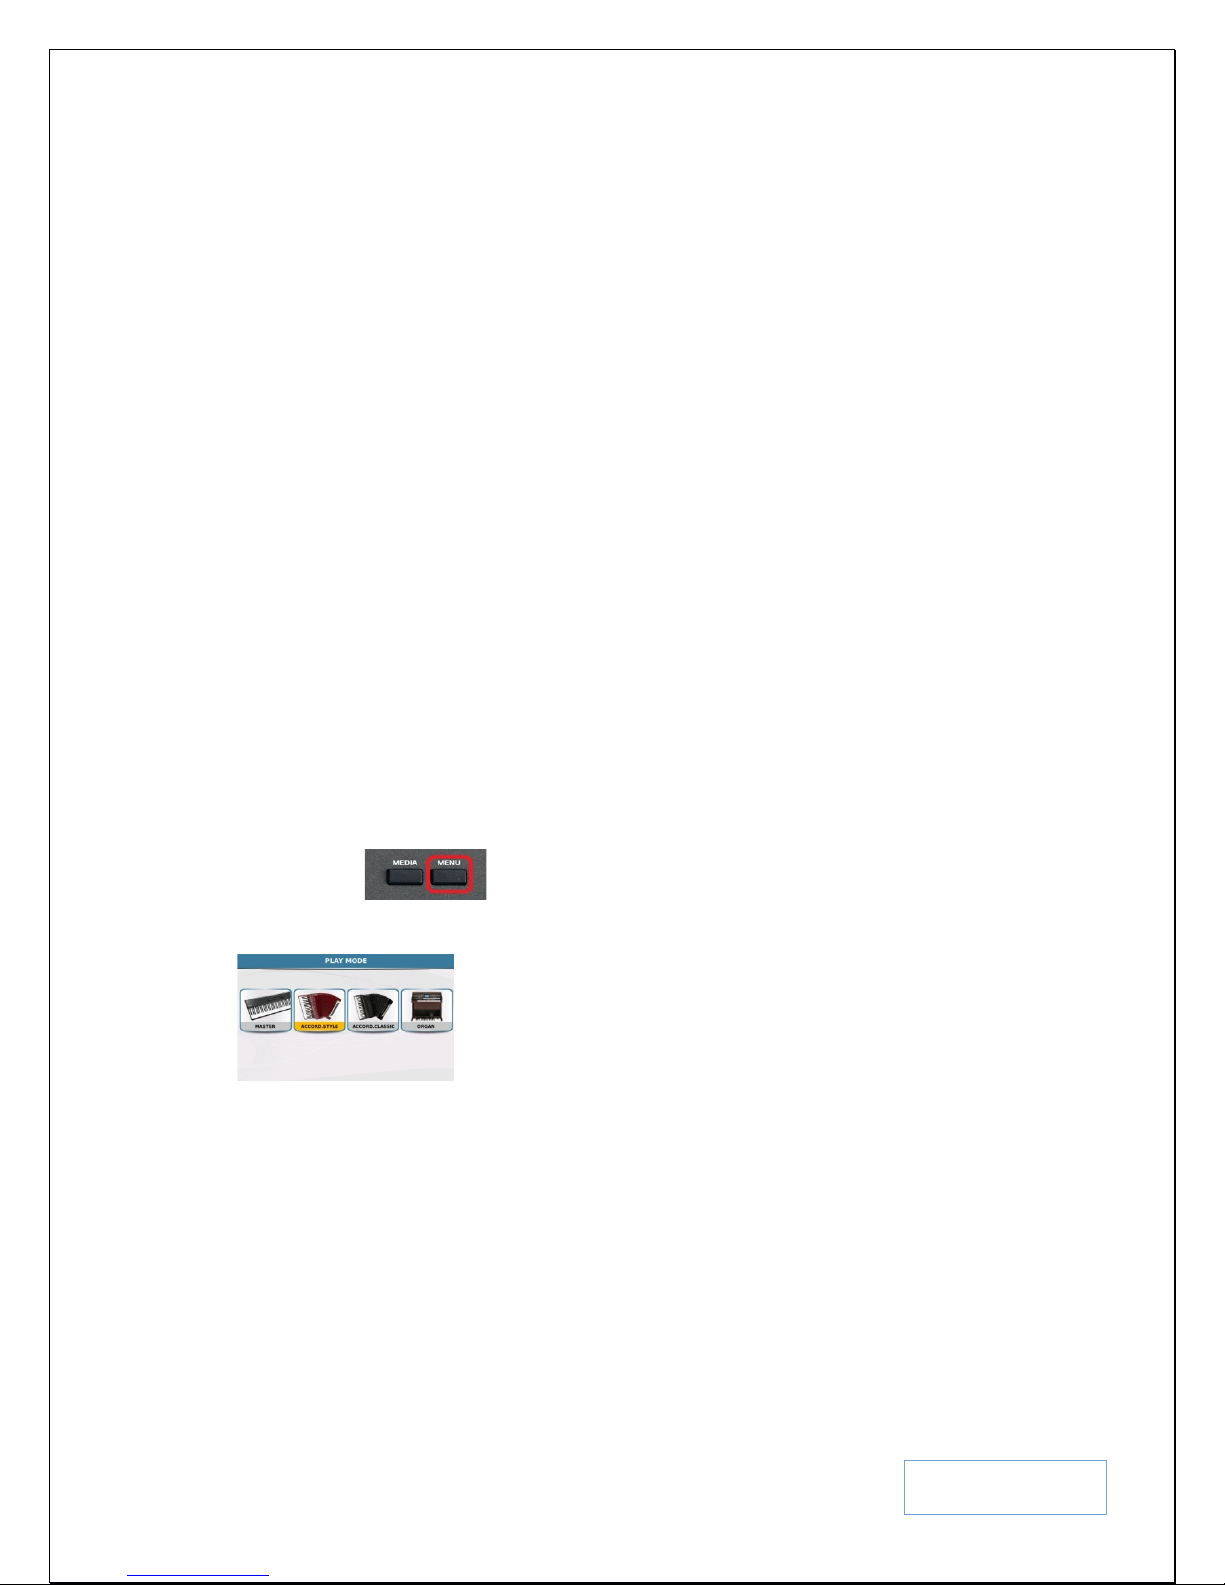
Depending on your purpose of purchasing the KETRON SD9 PRO, you can set it up for various PLAY MODES
based on your needs (as a Pianist, Organist, Accordionist, Guitarist …etc) simply by pressing the MENU button on
the right side of the panel - and touching the PLAY M ODE to display the following screen from
which you can select the play mode you’re intere sted in.
This PLAY MODE feature is discussed in more depth below under the
MENU section in PLAY MODE Page 154.
KETRON SD9 Manual & Tutorial
Page 6
6
1. GETTING AROUND THE SD9 PRO QUICKLY – NAVIGATION
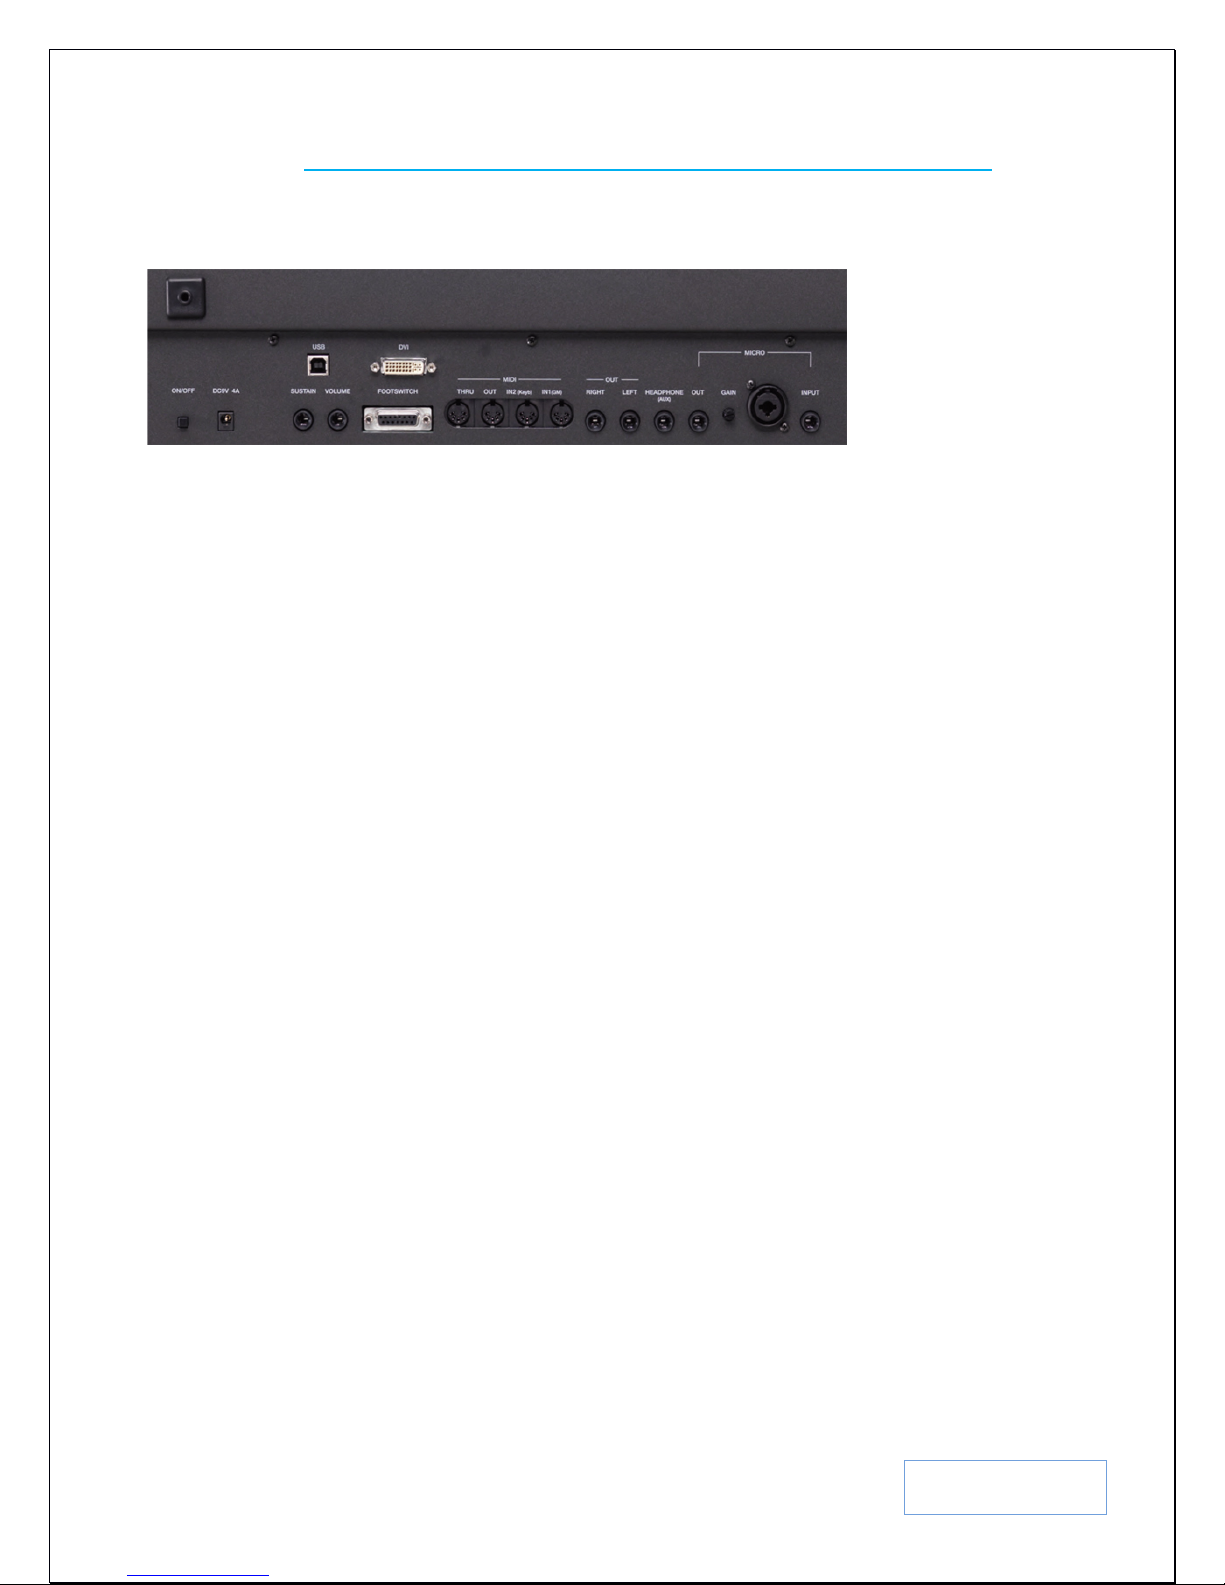
Before we get started, let’s see how to set up the SD9 PRO by taking a look at the connections on the back (as
shown in Fig. A. below). This will enable us to better understand how the SD9 PRO interacts with the outside world.
Fig. A.
Thanks to its clean design, the SD9 PRO has most of its connectors tugged away in the back, allowing it to easily
interface with various optional devices. Let’s take a closer look at the back … from left to right.
• ON/OFF:- This is the power switch used to power the instrument on or off. Please note t hat once you turn
on the instrument, it may take about 30 second for it to completely boot up as it loads the various data
needed for operation. Also, when you turn off the keybo ard, allow about 10 seconds for it to properly save
all relevant material and power down. Do not disconnect power to the instrument while it is powered on or
powering down!
• DC9V/4A:- Mains power supply socket. For proper functioning, connect only the supplied power adaptor
to the instrument (which is an automatic 110v ~ 240v adaptor). Warrantee could be voided if a different
power adaptor is used!
• SUSTAIN:- Connect the optional KETRON sustain pedal to this jack. The Sustain pedal can be used to
play the piano or other Sounds (as on a standard piano), but can also be programmed to be used as a Rotor
switch to switch the rotor Leslie organ speed between fast or slow when using Organ sounds, or to prevent
the arranger from recognizing and changing chords whe n playing as a solo pianist (PIANIST MODE –
Sustain Pedal turned on).
• USB:- Connect the SD9 Pro to a computer using a stand a rd USB printer cable. This port can be used for 2
purposes (which are discussed in more detail under “MIDI” on page 160):-
o MIDI IN/OUT:- Rather than using 2 standard 5 pin Midi DIN cables to connect to the MIDI IN1
(GM) and MIDI OUT port, the SD9 Pro is capable of communicating with external MIDI devices
via the USB port using just one USB cable (when MENU – MIDI – USB MIDI is turned on).
This facilitates using the sound engine of the SD9 Pro from Midi based software like Cubase or
Cakewalk or Sonar … etc.
o DATA:- The SD9 pro can be connected to a computer via this port such that the contents of its
internal Solid State Drive (or op tional SSD drive if installed) can be mana ged via an external
computer. This allows you to quickly and simply drag and drop files between the SD9 Pro and
your computer’s storage devices (when MENU – MIDI – USB MIDI is turned off!)
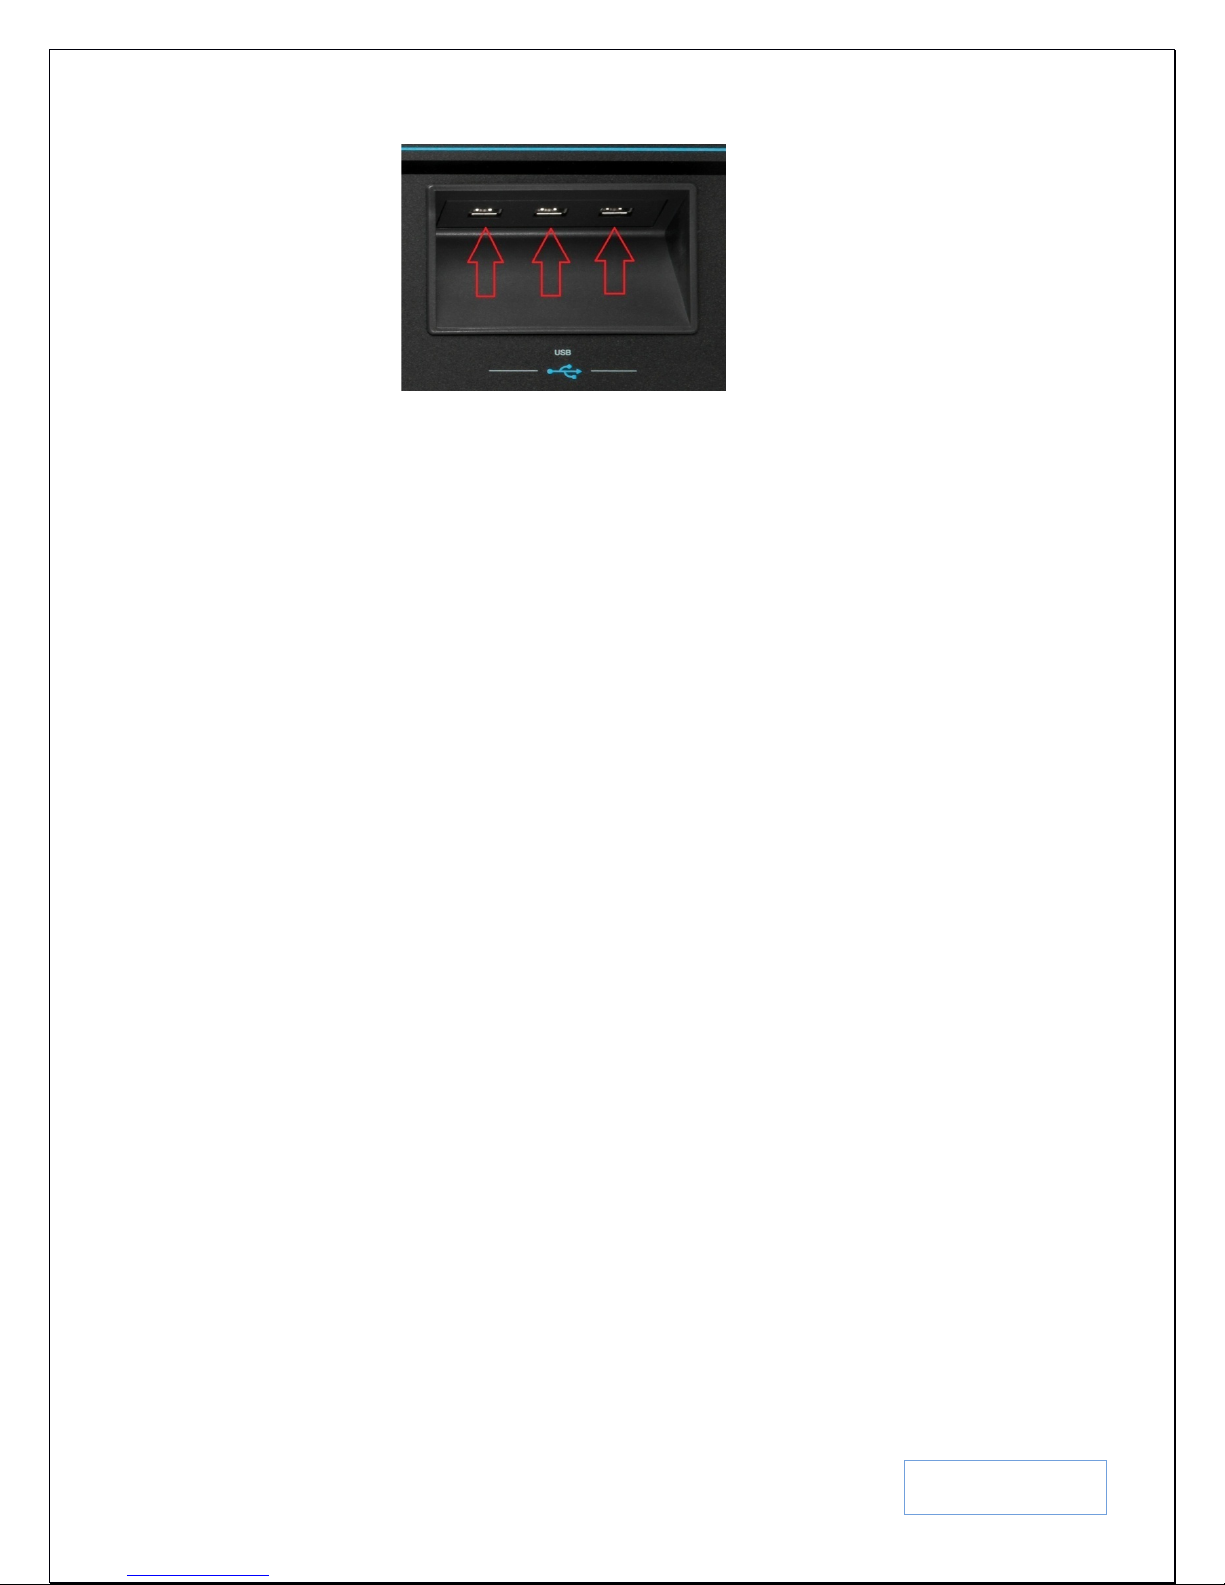
o USB Pen Drives:- There are 3 USB ports located at the front – top of the panel (as shown in Fig.
B. below) for use with USB devices such as sticks, Pen drives, external Hard drives … etc
KETRON SD9 Manual & Tutorial
Page 7
7
Fig. B.
• VOLUME:- Connect an optional KETRON Volume pedal to this connector. This pedal can be used to
control the entire volume of the keyboard as you perform, or it can be programmed to control only the
volume of the style or the Player (when playing Audio, video or midifiles) – (MENU – CONTROLS –
EXPR. PEDAL). It can also be programmed to act as a wha wha pedal to insert wha wha effects into say
guitar sou nds (VOICE EDI T – PAGE 4 –WHA WHA MODE=PEDAL). More of this in the “MENUCONTROLS” section on page 172.
• FOOTSWITCH:- Connect the optional KETRON FS6 or FS13 Effects pedals to this multi-pin connector.
These pedals can be use to control many functions that exist in the SD9 P ro such as Start/Stop, Fill ins, Pdf
Page change, voice change, vocalizer on/off, mic on/off, chord tonalities … etc. A complete list of these
functions and how to program the effects pedals are under MENU – FOOTSWITCH on page 174.
• DVI:- Video monitor output to connect t he SD9 Pr o to an external TV screen or monitor. Using the
appropriate adaptor, you can connect the SD9 Pro to an external monitor with HDMI or VG A input jacks.
You can also determine if all data shown on the SD9 Pro’s screen is projected onto the external monitor
(MIRROR on) or only lyrics, pdf and data related to songs (MIRROR off). The details of this can be seen
under MENU – VIDEO – MIRROR on page 176.
• MIDI PORTS:- T he various 5 pin DIN midi ports are used as follows (more in the MIDI section found on
page 160):-
o THRU:- This connector is used to pass onto another device all information received at the MIDI
IN (GM) jack. So if you daisy chain your instruments such that you have a controller connected to
the SD9 Pro and another instrument connected to the SD9 Pro which you also want controlled
from your controller, connect your controller’s MIDI OUT to the SD9 PRO’s MIDI IN 1 (GM)
and then the other instrument’s MIDI IN to the MIDI THRU of the SD9 PRO. T his way, all data
the SD9 PRO receives at it’s MIDI IN 1 GM is automatically passed (with non interference from
the SD9 PRO) onto the next instrument in the Midi chain.
o OUT:- Connect the SD9 Pro’s MIDI out to another MIDI device (slave) you want the SD9 PRO
to control (master). Y ou can use thi s to get other sounds out of other sound modules or to control
other musical devices from the SD9 PRO.
o IN2 (KEYB):- If you want to control the SD9 PRO from another MIDI controller and be able to
control/play with its internal styles and lead voices, connect the device’s MIDI OUT to the SD9
PRO’s MIDI IN2 (KEYB).
o IN1 (GM):- Use this to control the SD9 Pro from an exter nal Midi Sequencer program on a
computer or equivale nt . This gives you acces s to the entire Sound engine of the S D9 PRO.
• OUT (Right & Left):- Used to connect the SD9 PRO to a Sound system or equivalent. It is strongly
recommended you use both Left and Right outputs (stereo) to get the best s ound quality and take
advantage of the built in effects. Using only one (mono) may not yield the same high quality results.
KETRON SD9 Manual & Tutorial
Page 8
8
• HEADPHONE (AUX):- This connector is used to connect a good pair of headphones to the SD9 PRO. It
can also be programmed to be used as an additional output (AUXILARY) which can be programmed to be
the output of just bass, drums, lead/right hand voices or other tracks per software upgrade.
• MICRO:- The dedicated microphones are described and used as follows (more details in the
MICROPONE section found in page 117:-
o OUT:- This is used to con nect the output of the microphone and vocal harmonizer to an external
mixer. This ensures total control of just the voice of the musician (e.g. using an external unit to
add special effects to just the lead vocalist), while keeping t he voice out of the general mix of the
instrument.
o GAIN:- This knob i s used to set the input/gain level of the signa l coming int o the MICRO
(1/4”/XLR) Combo input jack. A good starting point it to turn the knob completely anti-clockwise
(0) and then turn ½ way up (line should be at the 12 o’clock position) to avoid feedback.
o COMBO MIC INPUT JACK:- Connect a dynamic microphone (either with XLR or ¼” jack) to
this connector.
o ¼” INPUT JACK:- Connect a line in (e.g. external music player or Ipad … etc) or a GUITAR
into this ¼” jack. If you connect a GUITAR, the SD9 Pro also has ‘stomp box’ editable guitar
effects already built plus a guitar tuner for your electric or acoustic electric guitar to always be in
tune (more under INPUT – MICRO2/GUITAR on page 125).
Navigating the SD9 PRO is v er y easy and can be done in a number of ways using these useful key buttons:-
1. TOUCH SCREEN:- The bright touch screen allows you to touch icons directly on the
screen. To access contents within folders, simply touch the folder twice (as you would double click on a
mouse) to open it.
2. DATA/VALUE DIAL/WHEEL:- This wheel allows you to change the values of selected items.
So, if you touch a numeric icon on the screen (for an example), you can tur n this wheel to change its value
quickly. You can also c hange the pages in certain screens (like style, voice etc).
3. EXIT button:- This button is very useful to get out of sub menus or folders and get back to the
main operating screen of the SD9 PRO during operation.
4. ENTER button:- This button is used to enter and display the content of folders in the screen or
to confirm operations on the screen such as pop up messages.
5. SAVE button:- Depending on which screen is being displayed, this button is used to SAVE
current settings, custom start u p, User styles, Registrations etc. This will be explained in details wit hin the
manual below
KETRON SD9 Manual & Tutorial
Page 9
9
KETRON SD9 Manual & Tutorial
Page 10
10
2. PLAYING THE SD9 PRO - FULL KEYBOARD (PIANIST) & SPLIT (ARRANGER) MODES
When you turn on the SD9 PRO, it initially turns on in the SPLIT/ARRANGER MODE, where the key bed has a
SPLIT POINT. To the left of the split point are the keys used to control the arranger or play separate LOWER
voice(s), and the keys t o the right s ide are used to play Right/Lead voice(s). The DEFAULT VOICE for the RIGHT
side is the GRAND PIANO, while the default voice for the LEFT side is the ELECTRIC PIANO & SOFT PADS.
To assign a new split point on the keyboard, press and hol d down the SPLIT button o n the panel as shown above.
The current split po int will be displayed on the screen (right side) as shown be l ow:-
Fig. 1. Split point shown on display
While still holdin g down the SPLIT button, you c an now assign a new spl it point by pressing t he key on the key bed
where you want the split point to be. So if you want the split point to be at F#2, as you hold down the SPLIT button,
press the F#2 key and this will become the new split point (which will also be part of the right/lead voice) and it will
KETRON SD9 Manual & Tutorial
Page 11
11
be displayed on the screen – right section where the split value is current ly being di s played. Release the SPLIT
button once set as needed.
Tips:- If you don’t want a SPLIT point (while holding down the SPLIT button), you can also press the first key to
the left of the keyboard (E) and the entire keyboard will now be the lead/right voice.
The proper way however to ignore the split point would be to press the PIANIST button (left side of panel) and turn
it on, or press the HOME/STYLE butto n to turn it off (HOME mode).
This button automatically removes the SPLIT point and the entire keyboard becomes one … (PIANIST MODE) with one voice/voices governed by the RIGHT/Lead voice selection. In this mode (PIANIST), you can then select a
voice or voices and play through the entire keyboard – just as you would do on a regular keyboard. In the PIANIST
mode, a musician can also play the arranger as a regular piano and still have the automatic accompaniment follow
along as they play (the keyboard follows you and not the other way around). This is discussed in more detail below
in section 4.J - PIANIST (page 68)
KETRON SD9 Manual & Tutorial
Page 12
12
3. PLAYING SOUNDS ON THE KEYBOARD
Unlike any other keyboard you’ve come across, you will quickly realize that the SD9 PRO produces some of the
best natural sounds for a keyboard i n its class. The new Stereo Grand Piano, new live violin, trumpets, and other
natural ins truments come to life and ‘breath’ in your hands as you play them on t he SD9 PRO, proving once again,
that KETRON has lived up to its motto of “Best Natural Sounds”. The AjamSonic version adds an additional 140
new professional voices. These can be accessed under the various USER VOICE sub groups.
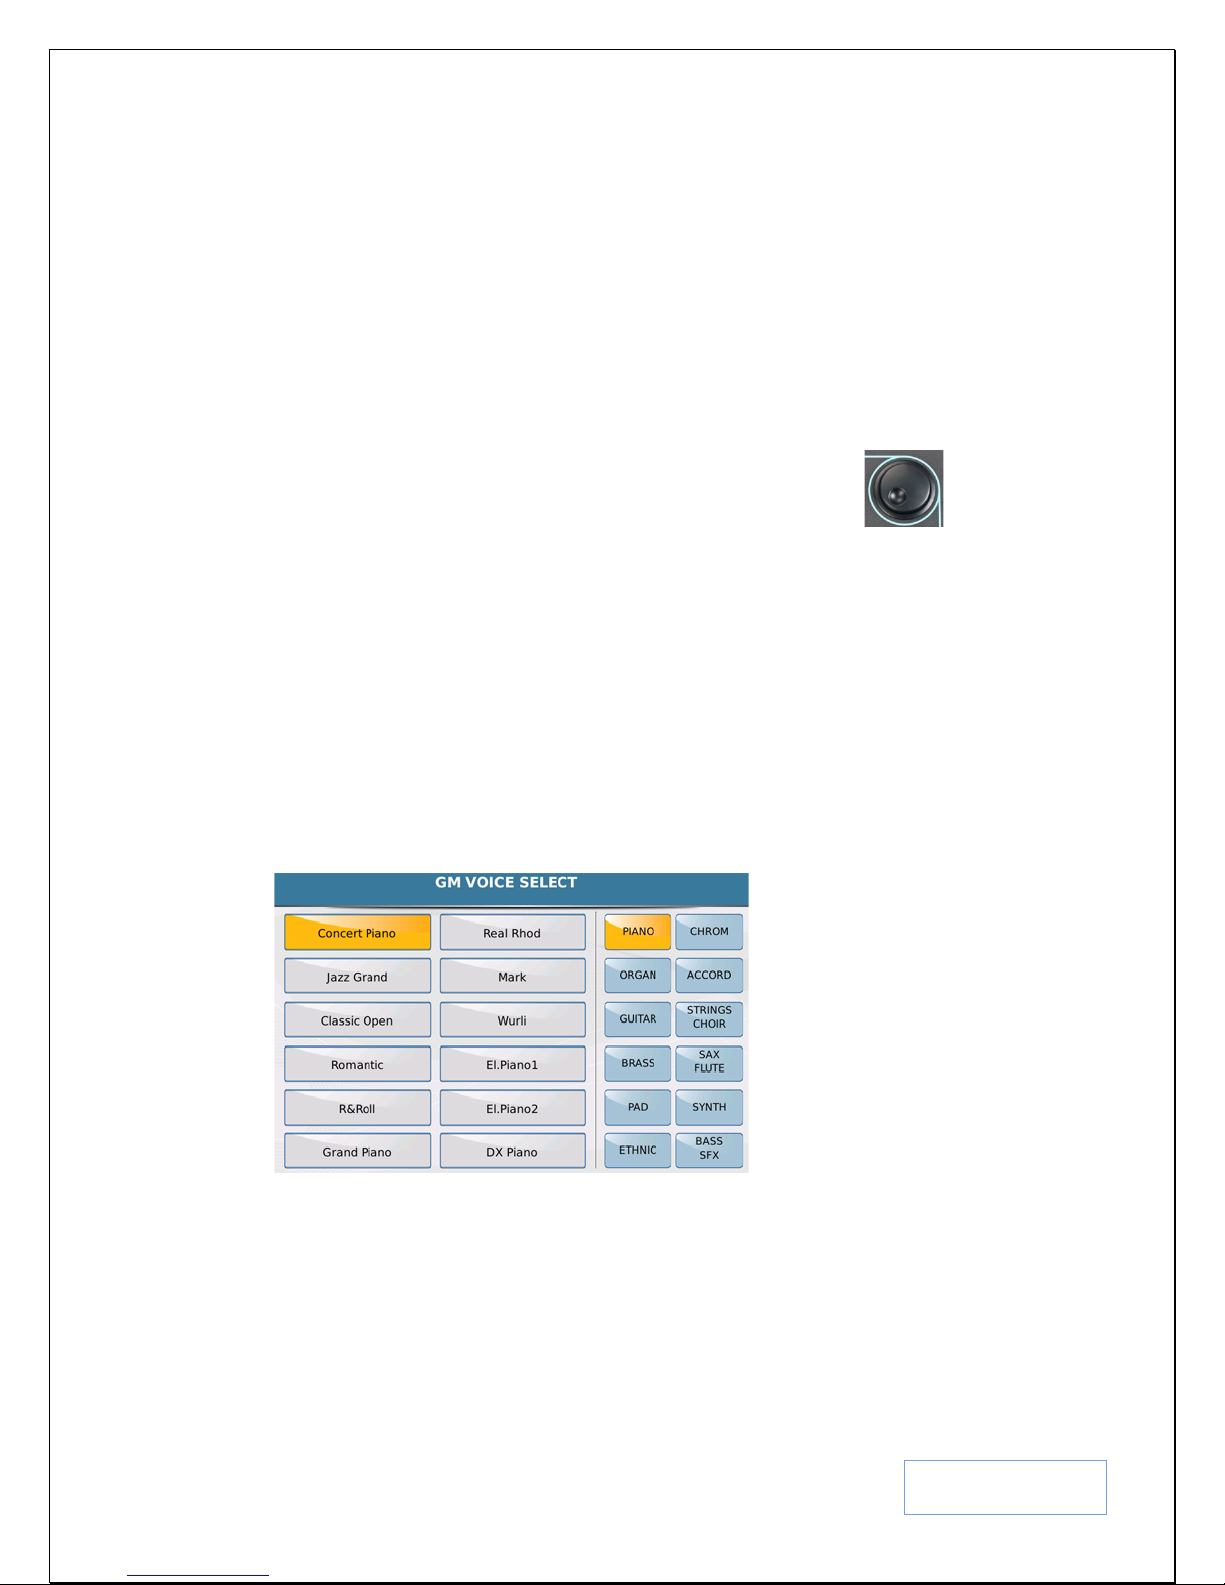
2.A - PLAYING & USING SOUNDS (LEAD VOICES)
The SD9 PRO comes loaded with more than 600 voices. There are more than 350 preset voices (which are either
individual or layered sounds as prepared by KETRON). Press the VOICE button on the SD9 PRO’s panel (right
side) or to uch the curre nt voice displayed in the top right box on the scr een.
or touch =>
Fig. 2. Voice on panel Fig. 3. Voice touch on screen
The following screen will be disp layed….
Fig. 4. Voice Groups
As you can see , the right sid e of the screen shows the various voice groups or categories where all the voices in the
keyboard reside in. The current voice group selected is highlighted in yellow (in the above case, PIANO), while the
various voices in this gr oup are shown on the left side of the screen (in this case the various pianos found in the
PIANO group). To use a voice , simply touch it. If you cannot fi nd a voice you want, pre ss the voice group butto n
once more (or press the ENTER/PAGE button below the wheel or turn the data wheel) to access the next page of
voices in this same group. Once you find the voice you need, simpl y t ouch it on the left side of the screen and this
becomes your new lead/right voice.
KETRON SD9 Manual & Tutorial
Page 13

13
2.B - PLAYING/LAYERING 2 VOICES TOGETHER (2nd VOICE)
You can instantly add an additional voice to your lead voice - which we call 2
nd
VOICE. From the factory, each
lead voice already has an additional voice assigned to it which you can quickly turn on/off by simply pressing the
nd
2
voice button on the pane l. The 2nd voice’s volume can be controlled by raising the corresponding 2nd Voice
volume slider below it. Together with the RIGHT volume slider (for the lead/main voice) you c an adjust how you
want both voices to sound relative to one another as each voice’s volume is independent of the other for the SD9
PRO.
Fig. 5. 2nd Voice button and slider Fig. 6. 2nd Voice Select
2.C - HOW TO CHANGE THE 2
nd
VOICE OF ANY LEAD VOICE
Assuming you’re not satisfied with the factory’s 2
change the 2
nd
voice of any lead voice and make it your own? There are 2 ways t o change the 2nd voice of each
nd
voices that have been assigned to the lead voice, how do you
Preset/lead voice – one is quick and temporal, while the other method is permanent but requires you to go into the
voice editor.
The first quick method is to simply touch the 2
nd
voice box from the main screen as shown below in Fig. 7.
Fig. 7. Touch 2nd Voice icon on screen Fig. 8. Sound Selection for 2nd Voice
KETRON SD9 Manual & Tutorial
Page 14

14
This will open up another screen (Fig. 8) showing the current 2nd voice and what voice group it belongs to. The
appropriate 2
nd
voice can then be selected (just as was down above for the lead voice) – by touching the voice gr oup
to the right side of the screen and touching which of the 12 voices displayed to the left of the scree n you want to use.
Remember you can always turn the data wheel or touch the voice group once more to access even more voices
within this voice groups.
This method allows you to quickly change the 2
nd
voice as you perform live - however, o nce you turn off the
keyboard, this setting will be lost.
To permanently edit the 2
nd
voice and associate with any lead voice, you will have to go into the VOICE ED I TOR.
• From the voice selection screen, touch and hold the lead/main voice whose 2nd voice you want to edit for 2
seconds. A screen similar to this one b e low will be displayed that shows all the elements (individual voices)
that make up this voice ( the vo ices used to create this lead voice you have selected will be turned ON as
shown on the far left On/OFF column).
Fig. 9. 2nd Voice Edit Fig. 10. 2nd Voice Selection
• To select a new 2nd voice for this lead vo i ce, touch the curre nt voice in the 2nd Voice box (4th row) shown in
Fig. 9 above. A screen similar to Fig. 10 above will be displayed. This screen shows the current 2
that is being used for this lead voice (left side – Grand Piano) and t he voice group from wh ich this voice
was selected (right side - PIANO).
• You can now select yo ur new 2nd voice for this lead voice (as was done in the quick set up above), simply
select the voice group (to the right) where you think your 2
nd
voice resides, then select that 2nd voice (to the
left of the screen). If you do not see the voice you are looking for – turn the data wheel or press the
ENTER/PAGE button to d isplay the next page of voices tha t exist in the current ca t egory/voice group.
There are many pages of voices per voice group which you can access this way.
• When done, press the SAVE button (below the data wheel) to save your new USER VOICE and it’s
corresponding 2
nd
voice (remember, you cannot over write the factory voices so whenever a modification is
made to a factory voice and you want to save it, it is saved as a USER VOICE. This therefore means that if
you go back and select this factory voice, the original 2
nd
voice that was assigned to it by KETRON will still
be there, and not yours).
KETRON SD9 Manual & Tutorial
nd
voice
Page 15
15
Fig. 11. Saving 2
SAVE FACTORY:- This sav es your ne w voice in the USER VOICE location but with
the same factory name. You can also rename it in the next screen that pops up with the
QUERTY keyboard.
SAVE AS:- Opens a QUERTY keybo ard where you can name your new vo i ce and save
it by touching the ENTER button on the screen. Your new voice will now be saved
(together with your matching 2
nd
voice) as a USER VOICE.
CANCEL:- Nothing is saved and you will be returned to t he previous GM VOICE
SELECT screen. You can press the EXIT button on the panel to get back to the Voice
EDITOR screen and press EXIT again to get back to the voice selection screen. (The
EXIT button usually steps you out of functions the same way you came in … meaning as
you go in deeper and deeper into functions or menus, you can use the EXIT button to step
out in steps as well … very useful if you want to make a minor correction in a previous
step but do not want to start all over!)
• To play this voice (with your new 2nd voice assigned to it):-
Press the VOICE button once more to access the voices.
Touch USER on the bottom right side of the scr een (it comes on yellow). When you
touch any of the voice group buttons from here on, the voices displayed to the left of the
screen will be the USER VOICES (not factory voices). To play the factory voices once
more , this USER b utton must be off (not yellow).
Touch the group to the right of the screen where your new voice resides (PIANO,
GUITAR). (Hint:- It will be the same group from which you started with above when you
wanted to create a new 2
nd
voice for your lead voice). All the user voices in that group
will now be displayed to the left of the screen.
Touch your new voice to the left of the screen and play.
To turn on the 2nd voice (just as you did for the factory voices), simply press the 2nd voice
button on the right side of the panel. Adjust its volume using the volume slider below it.
You can always go back and forth between the FACTORY VOICES (USER Voice
button off – not yellow) and the USER Voices (user voice button on – yellow) b y
touching the USER voic e button then selecting which voi ce you want to use for your
performance.
nd
Voice
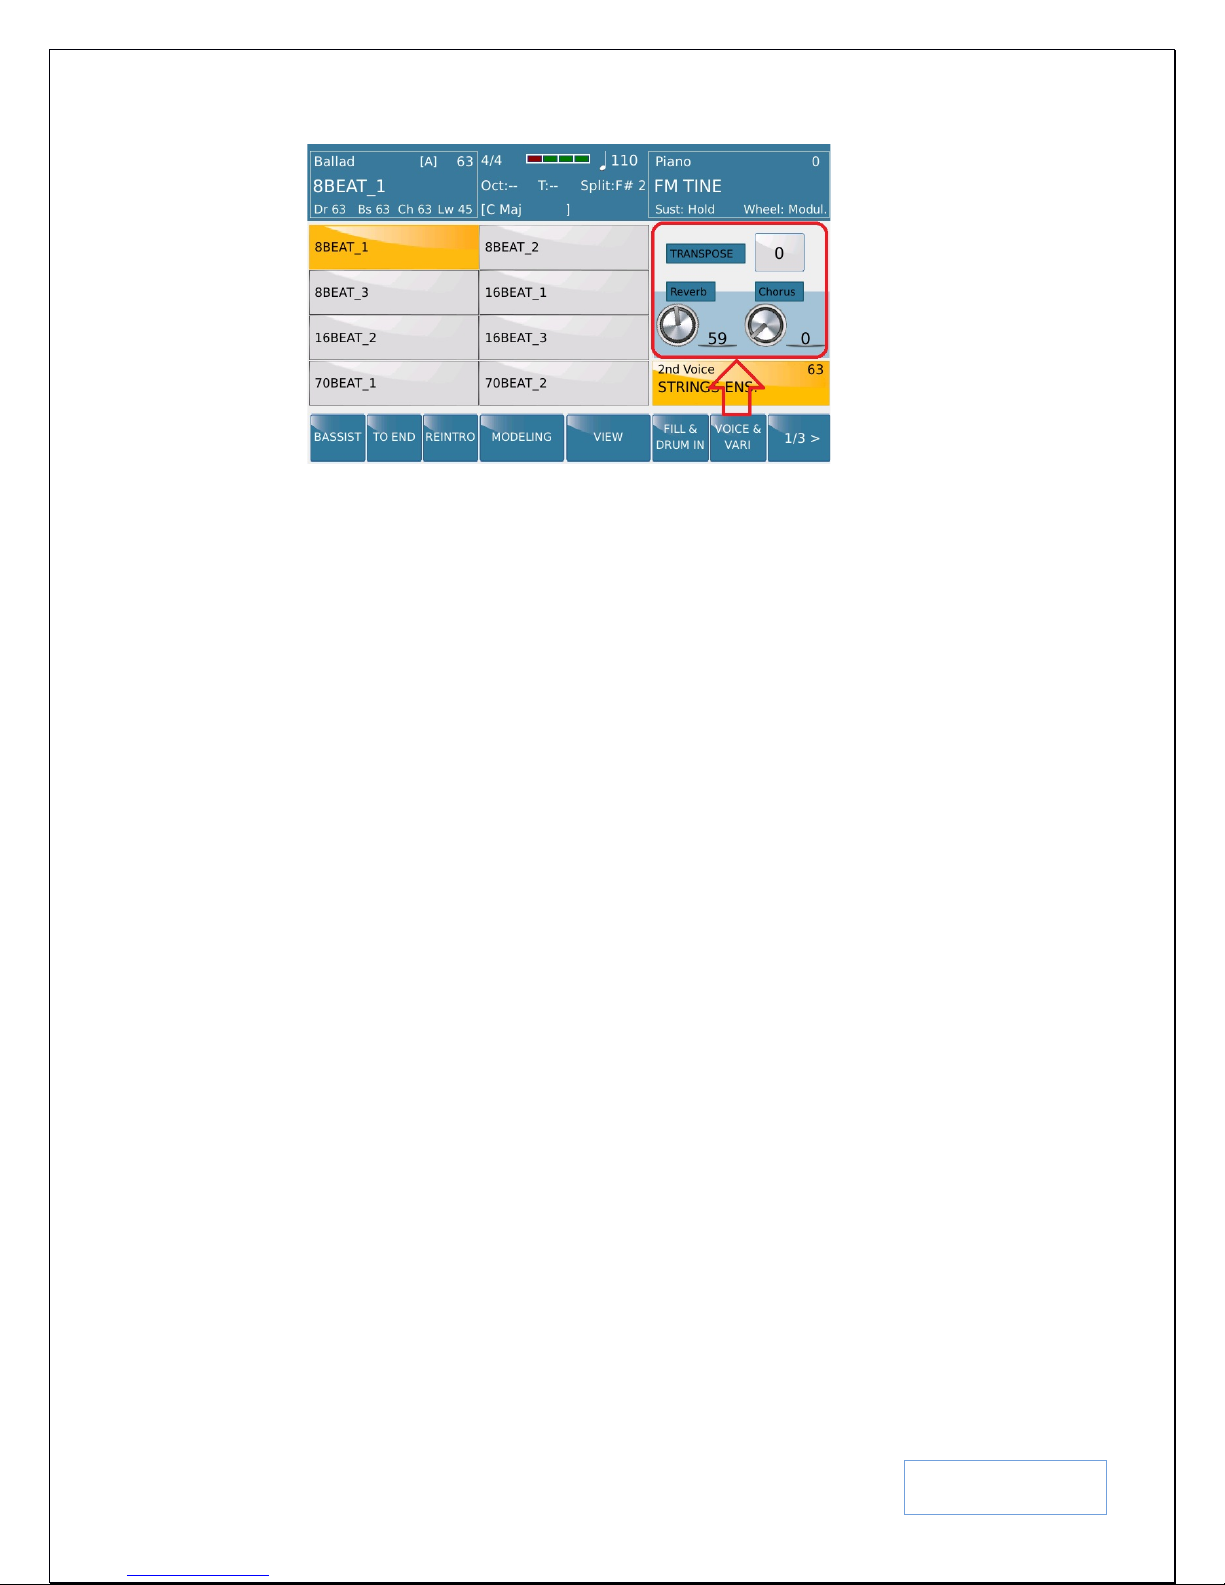
Tips:- The 2nd voice also has a new neat feature that allows certain parameters to be applied only to the 2nd voice
(independent of the lead voice). To access these parameters, touch the 2
seconds to display the following screen –
KETRON SD9 Manual & Tutorial
nd
voice icon on the screen for about 2
Page 16
16
Fig. 12. 2
nd
Voice Parameters
The following parameters that pertain to just the 2
nd
voice can be edited in the new pop
up screen shown above in Fig. 12.
TRANSPOSE:- Touch the transpose box and turn the data wheel to transpose ONLY the
nd
2
voice. The lead voice will remain un transposed!
REVERB:- Touch the corr esponding REVERB icon box and either turn the dial on the
screen or turn the data wheel to change its corresponding value. Again, these values are
valid for the current selection and are lost once a new voice is selected. To change them
permanently, refer to the perma nent solution above for editing the 2
nd
voice on page 14
CHORUS:- Touch the required Chorus box and either t urn the dia l on the screen or turn
the data wheel to change its corresponding value. Again, these values are valid for the
current selection and are lost once a new voice is selected. To change them permanently,
refer to the permanent solution above for editing the 2
nd
voice on page 14.
2.D - LAYERING VOICES (PROGRAMMING VOICES)
Still not satisfied with only 2 voices to play/layer on the right hand and want to layer 3-4 voices at once? Despite all
the voices found on the SD9 PRO, many want to be able to customize voices, layer with 2 or 3 voices, have 3
different voices with 3 different split points on the keyboard, have 3 voic es with each voice pl aying only when the
keys are played soft, medium or hard, make changes and save as their own customized voice (USER VOICE) …
etc. This is very easily done on the SD9 PRO, and at the touch of the scre en, you can instantly recal l your
layered/edited voice and use them as you wish.
To start editing a voice, from the voice screen, touch and hold down for 2 seconds a voice you want to edit or layer
or one that comes close to the voice you wish to create. This opens up the VOICE EDITO R. Your screen should
look somet hing Fig. 13 below (in this case, the Lounge Tenor Sax was selected):-
KETRON SD9 Manual & Tutorial
Page 17
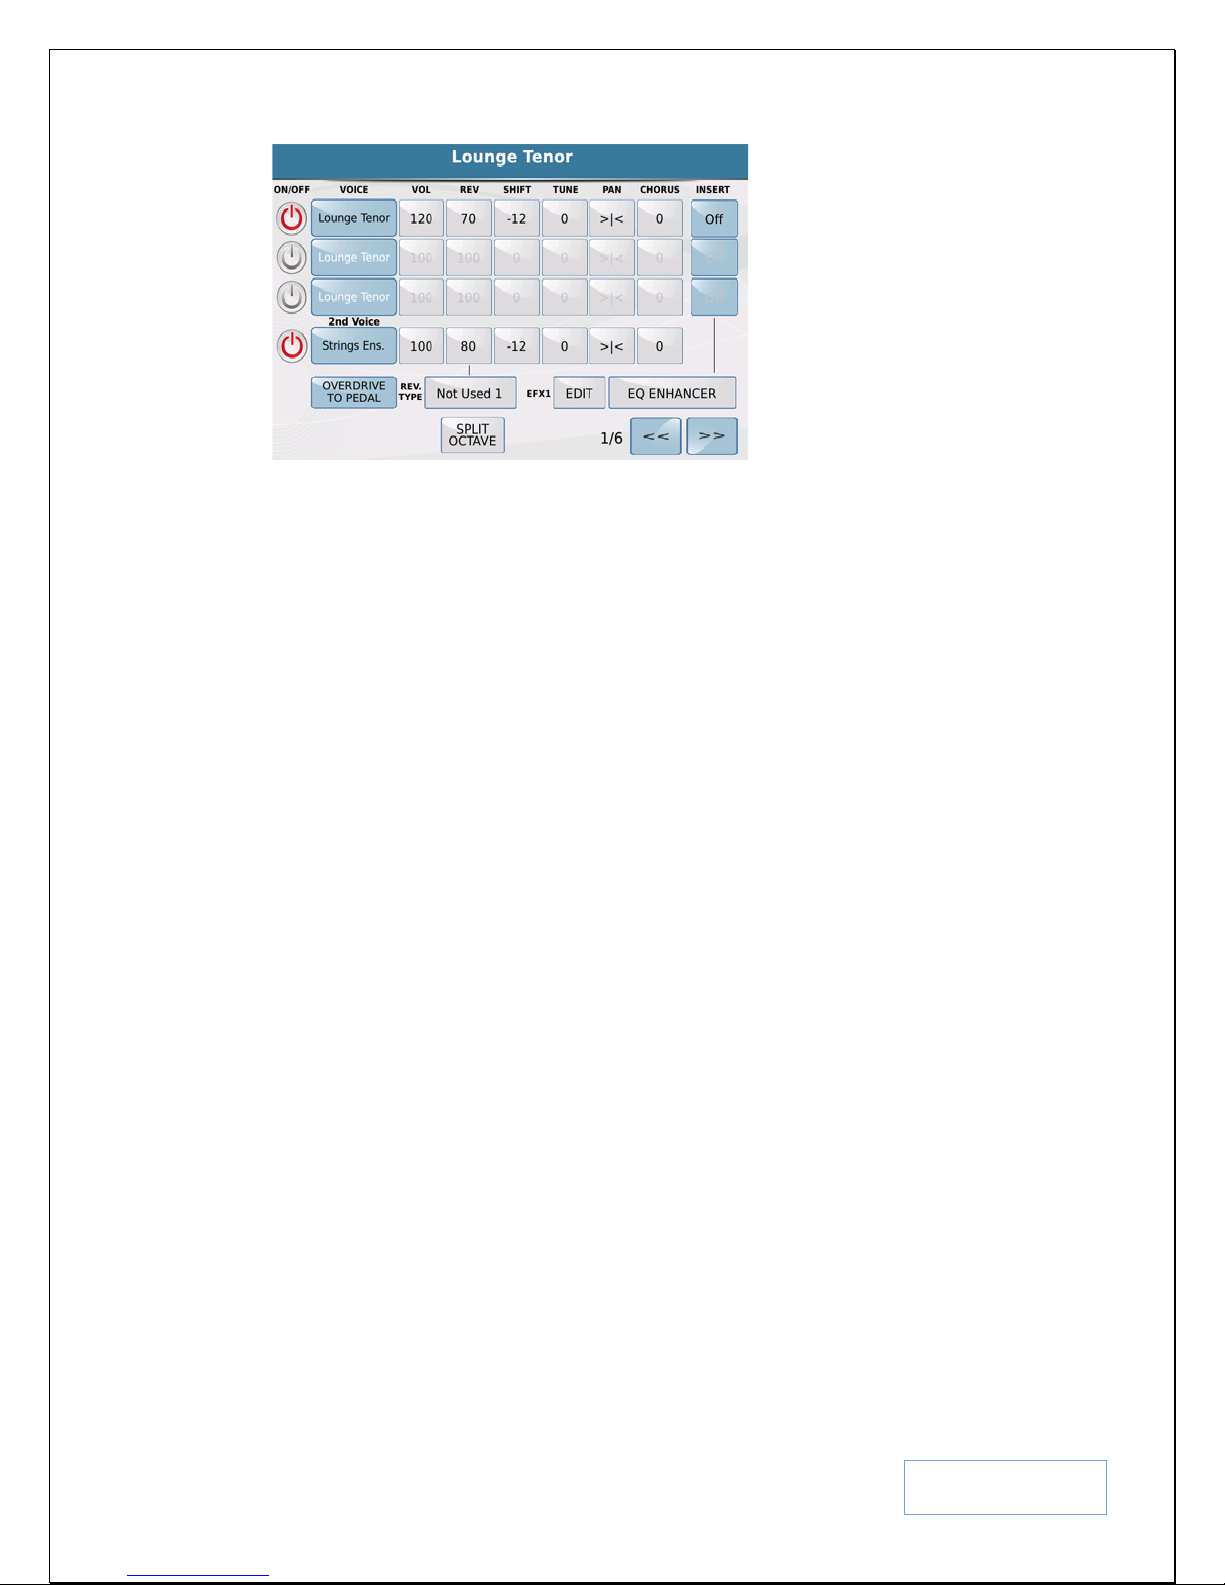
17
Fig. 13. Voice Edito r Page 1/6
The voice editor in the SD9 P RO is quit extensive but very intuitive and easy to use. Once this screen (first page of
6) is displayed you will notice the following:-
• 4 Rows of voices (with access to each one’s volume, reverb level, shift, tune, pan and chorus parameters).
You can also insert effects into either of the first 3 (lead vo ices) and select which effect type is used per
voice selection.
• The first 3 rows represent the voices that can be layered to create a new voice. In this case, only 1 voice
was used (Lounge Tenor) to create the LOUNGE TENOR voice (it’s corresponding on/off icon is on –
red). By touc hing the ON/OFF icon to the left and next to ea ch voice, you can turn on/off the individual
voices you want to use/layer together. As yo u turn the voi ces ON, the parameter values (voice, volume,
shift, tune …etc) associated with each voice turns black showing that this selected voice is now active so
you can cha nge them as you see needed.
Tips:- Even when inactive (white) you can still edit parameters of a voice (touch the
parameter and turn the wheel to change its value), however the effects of these changes
will only be heard if yo u turn this voice ON (by touching the On/Off icon to the le ft of
the screen).
• The 4th row is t he 2nd voice tied to this lead/main voice. This is where you can change the 2nd voice of each
lead instrument and then later save as a USER VOICE of your own (as previously discussed above in page
14).
• To the RIGHT of this screen, you can also turn on/off effects that you want assoc ia te d with the individual
voices. The effect type is selected at the bottom. You can also assign effects that will be activated by the
volume pedal (e.g. OVERDRIVE TO PEDAL) as shown above.
• SPLIT OCTAVE:- When this button is ON (yellow), if the PIANIST button is ON (in full keyboard mode)
the octave of the entire keyboard is shifted up 1 to compensate for the lack of the extra keys. If this button
is OFF, then turning on the PIANIST button will have no effect on thi s sound.
KETRON SD9 Manual & Tutorial
Page 18
18
Fig. 14. Voice Editor p age 2/6
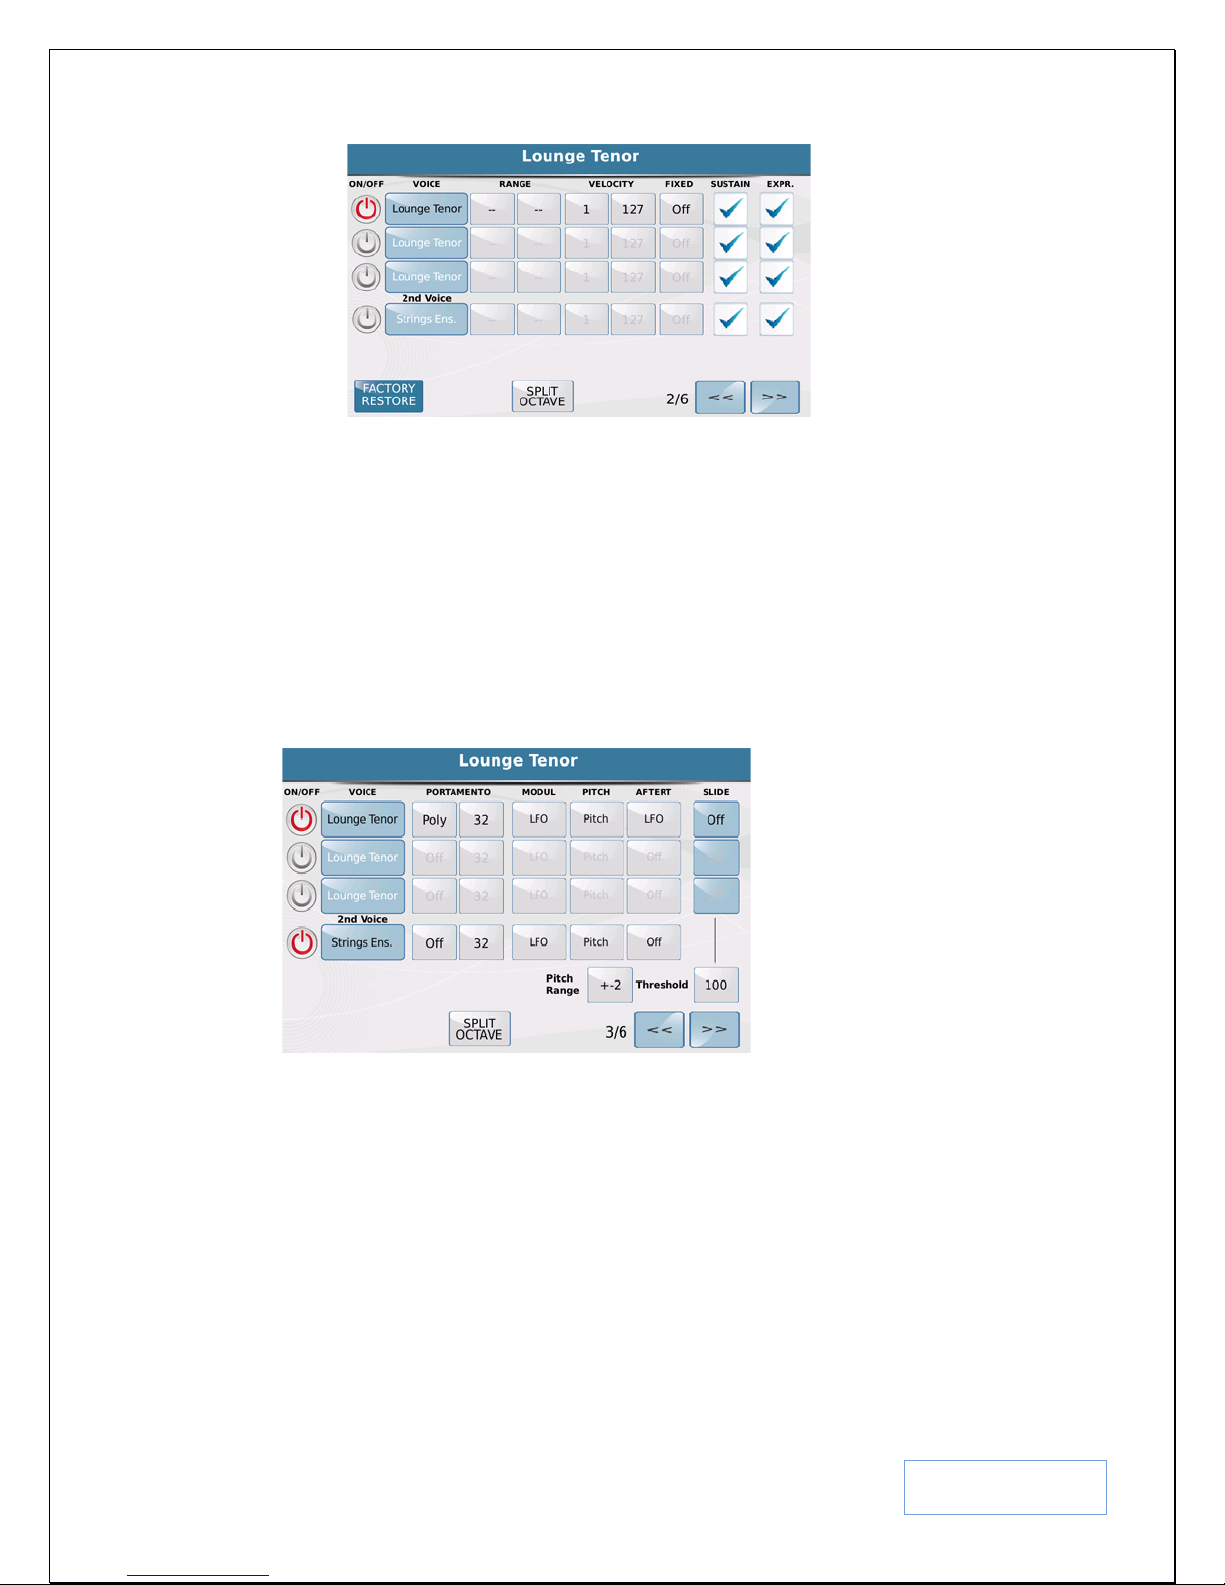
• Page 2/6 gives you access to the RANGE (split points within which the selected voice will be heard over
the keyboard), VELOCITY (how hard/soft a key is pressed before this element of this sound is heard – soft
[0] to hard [127]), FIXED (if on, then regardless of how soft/hard a key is pressed, the sound will be heard
at the same volume/tone which can be set by turning the data value wheel once highlighted), SUSTAIN
(the sustain pedal will have an effect on this voice if checked), EXP (the volume pedal will have an effect on
this voice if checked).
Tips:- Right he re, you can create a very ‘intell igent’ voice which dep ending on what area
of the keyboard you play, you will hear element/voice 1, element/voice 2, depending on
how hard you play, yo u wi ll he ar ele ment/voice2, or element/voice 3 … and so on.
• Page 3/6 gives you access to set certain parameters of this voice (Portamento, modulation, pitch … etc)
which you can turn on/off by touching the rela ted icon.
KETRON SD9 Manual & Tutorial
Fig. 15. Voice Editor page 3/6
Page 19
19
Fig. 16. Voice Editor page 4/6
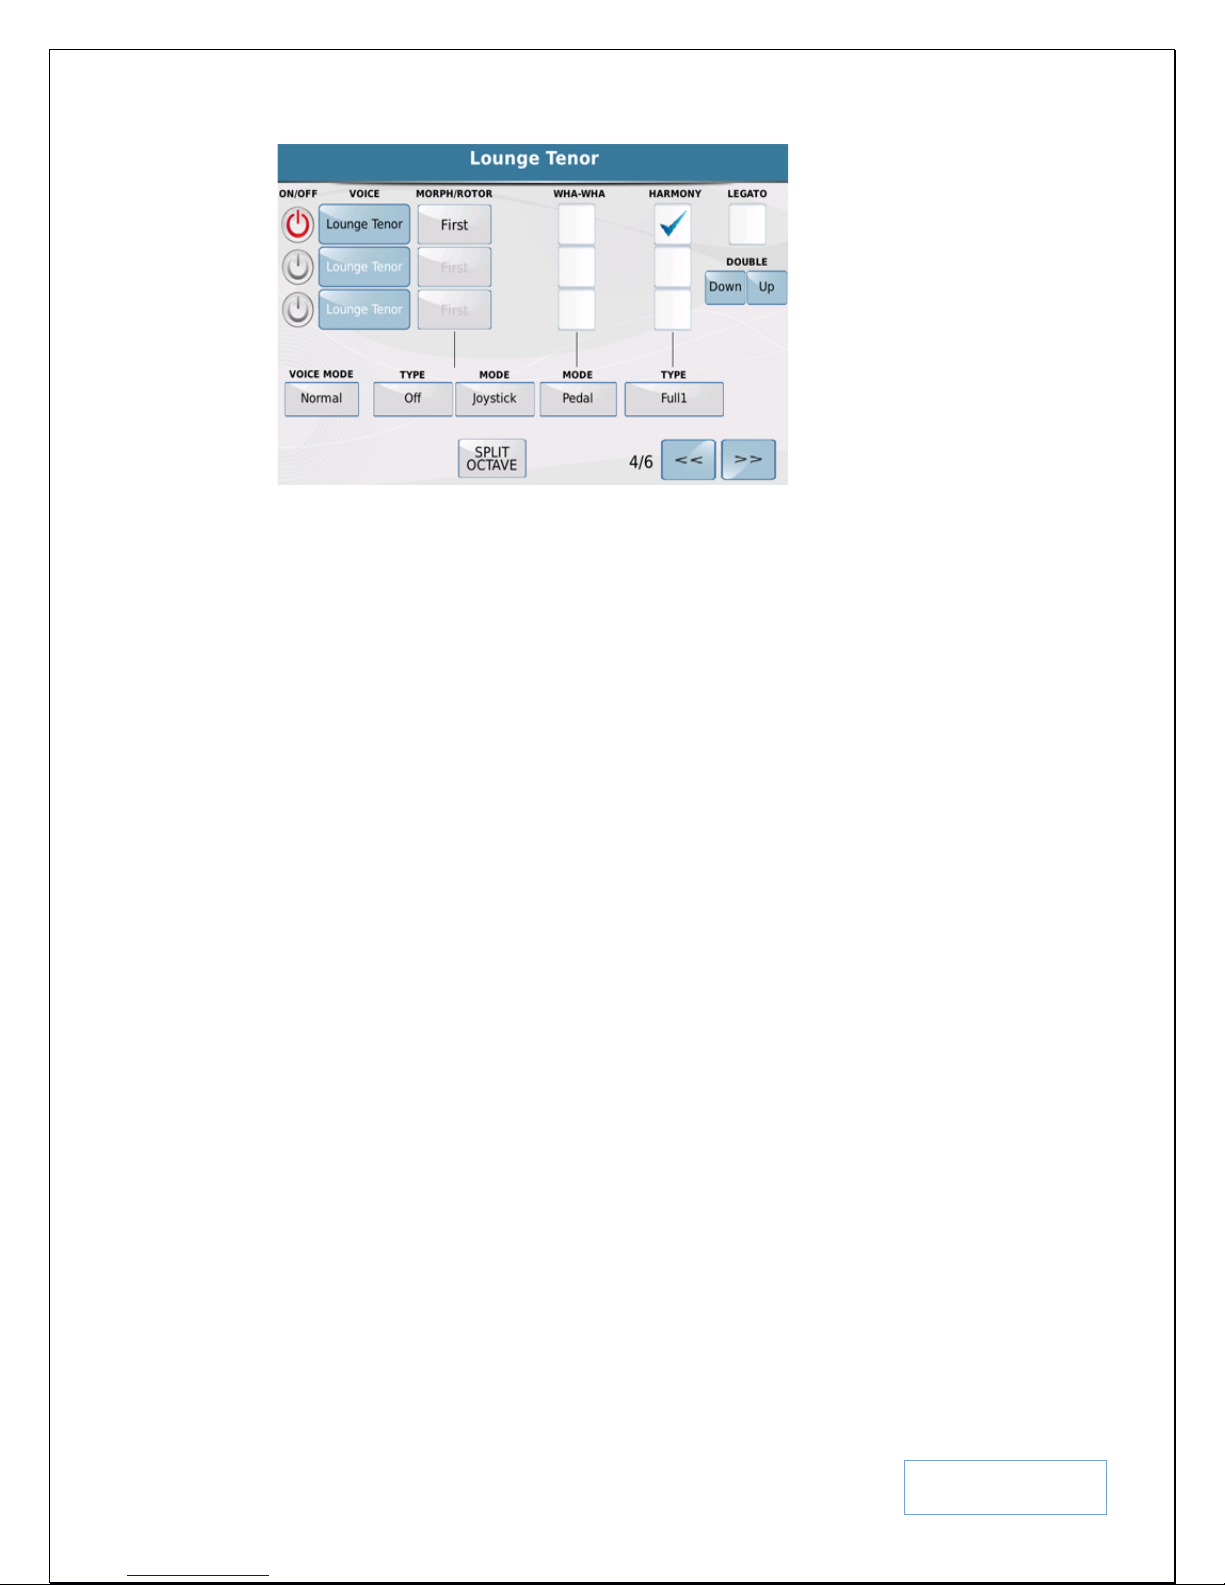
• Page 4/6 is a powerful page in this editor. It allows one to set the following (if say you are using all 3
voices to create this huge custom voice):-
MORPH/ROTOR:- If you set Voice 1 as First and Voice 2 as Second, with the
Modulation wheel up, you will hear voice 1 but as you move the modulation wheel
down, it now morphs into Voice 2 once completely down. You can also select the type of
morph below the screen by touching the TYPE and selecting from (Rotor, Normal and
Coupling) by turning the data wheel. Select what controller (in MODE) will be used to
implement this effect (Joy stick – using the modulation wheel, Pedal – using the optional
volume pedal, Sust. Switch – using the optional sustain pedal, Aftertouch – pressing hard
on the keybed).
• Tips:- Set voice 1 to an organ (with a slow rotor speed), and set voice 2 to an
organ with a fast rotor speed. Now, whenever you select this voice, you can turn
on the leslie rotor by morphing from the organ with the slow rotor speed into the
organ with the fast rotor speed just by moving the modulation wheel from the
down to the up position.
WHA-WHA: – If checked, this element/voice will have the wha wha effect applied to it
if a volume pedal is plugged into the SD9 PRO. This volume pedal can then be used to
manually turn on/off the wha-wha – great when editing guitar sounds and trying to
emulate the wah wah effect of an electric guitar!
HARMONY: – Adds the harmony t ype (shown in the TYPE box) to the so und with the
checked harmony box whenever t he harmony button on the panel is t urned on (described
in more details below in section 2K – HARMONY on Page 28). This has brought about
great harmonies for single or layered voices – depending on which of the 3 voices in this
screen you want harmonized.
VOICE MODE:- Touch this and turn the data wheel to select which voice mode is
appropriate for your new voi ce (e.g. Steel – where if 2 notes are played and you bend the
pitch wheel, only the lowest note bends), Duet and Trio – harmony modes with 2 or 3
voices harmonically added to the lead voice etc.
DOUBLE:- Sets the effect of the double function (down or up) when Double is activated
under KEYB . CONTROL below in Pa ge 29, Fig. 32.
KETRON SD9 Manual & Tutorial
Page 20
20
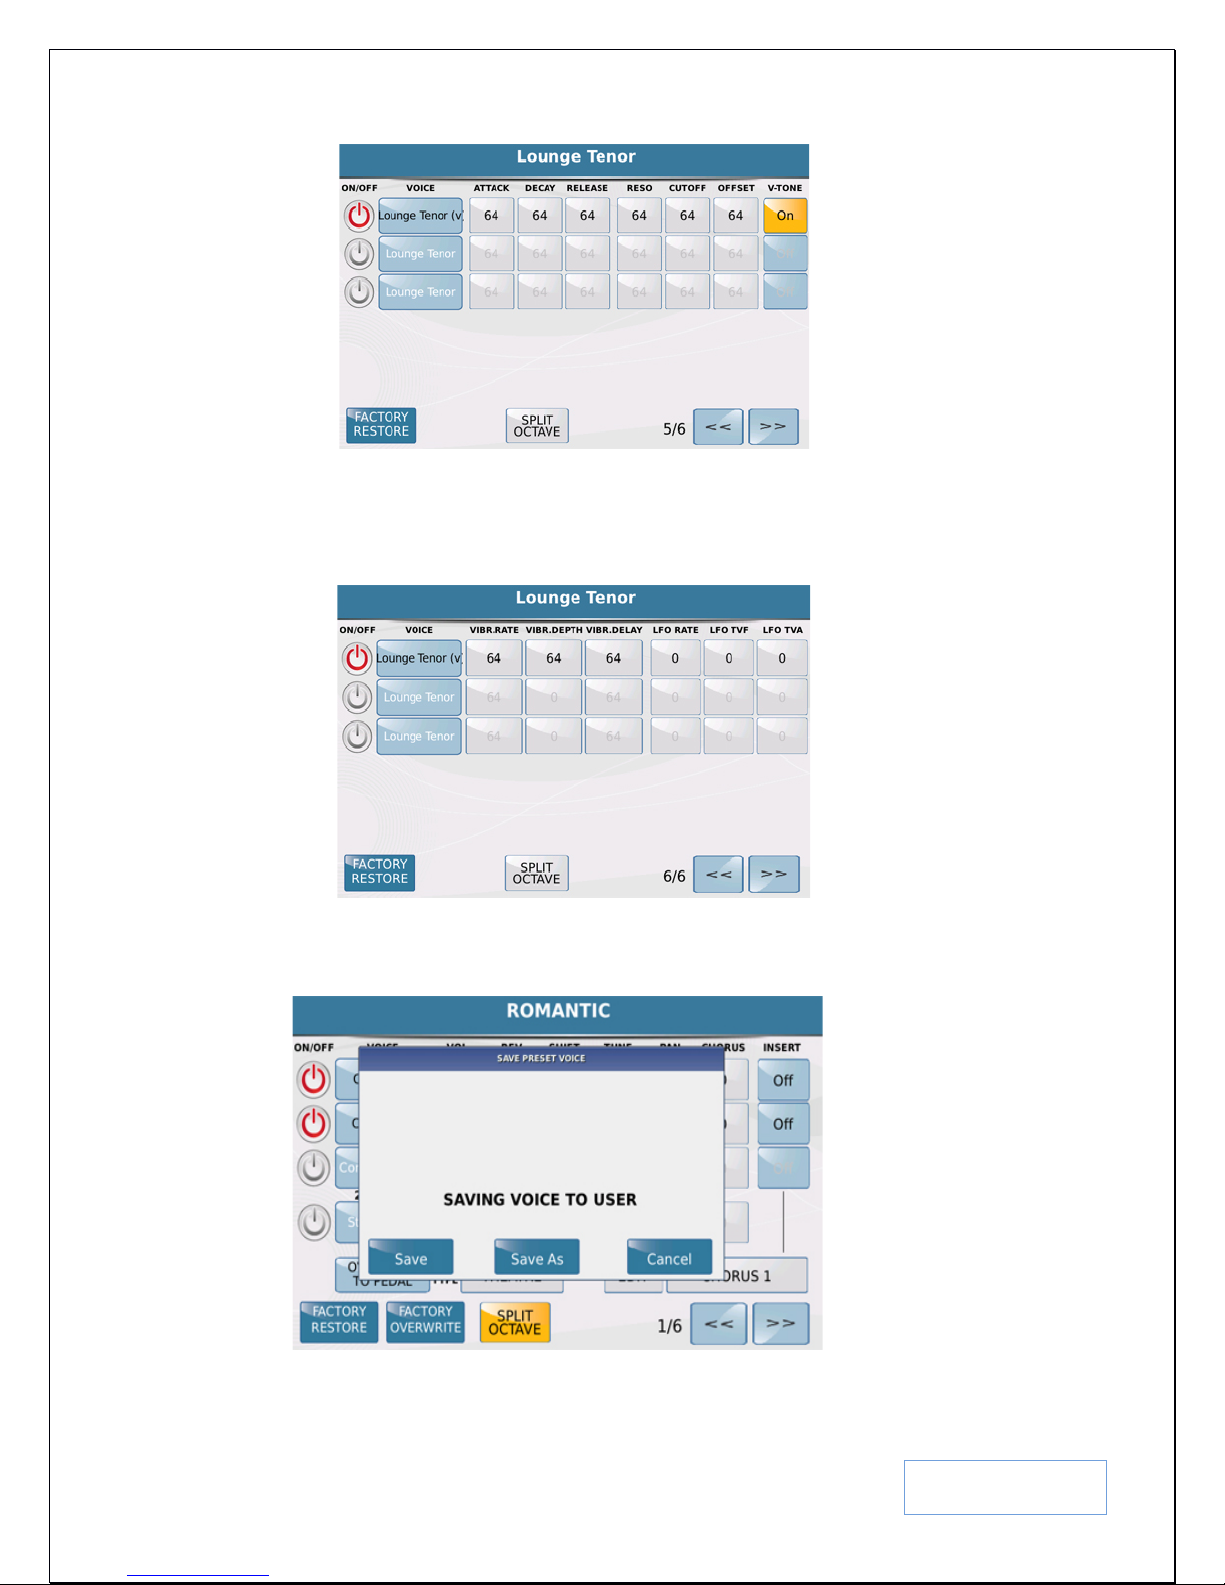
Fig. 17. Voice Editor page 5/6
• Page 5/6 gives you access to set the attack, decay ... etc. These parameters impact the actual voice/sample
you are editing and can be used to actually create a ‘new’ voice all together if edited properly.
• V-TONE:- Adds natural characteristics and embellishments to the Sound.
• Page 6/6 below is a continuation from page 5/6 above.
Fig. 18. Voice Editor page 6/6
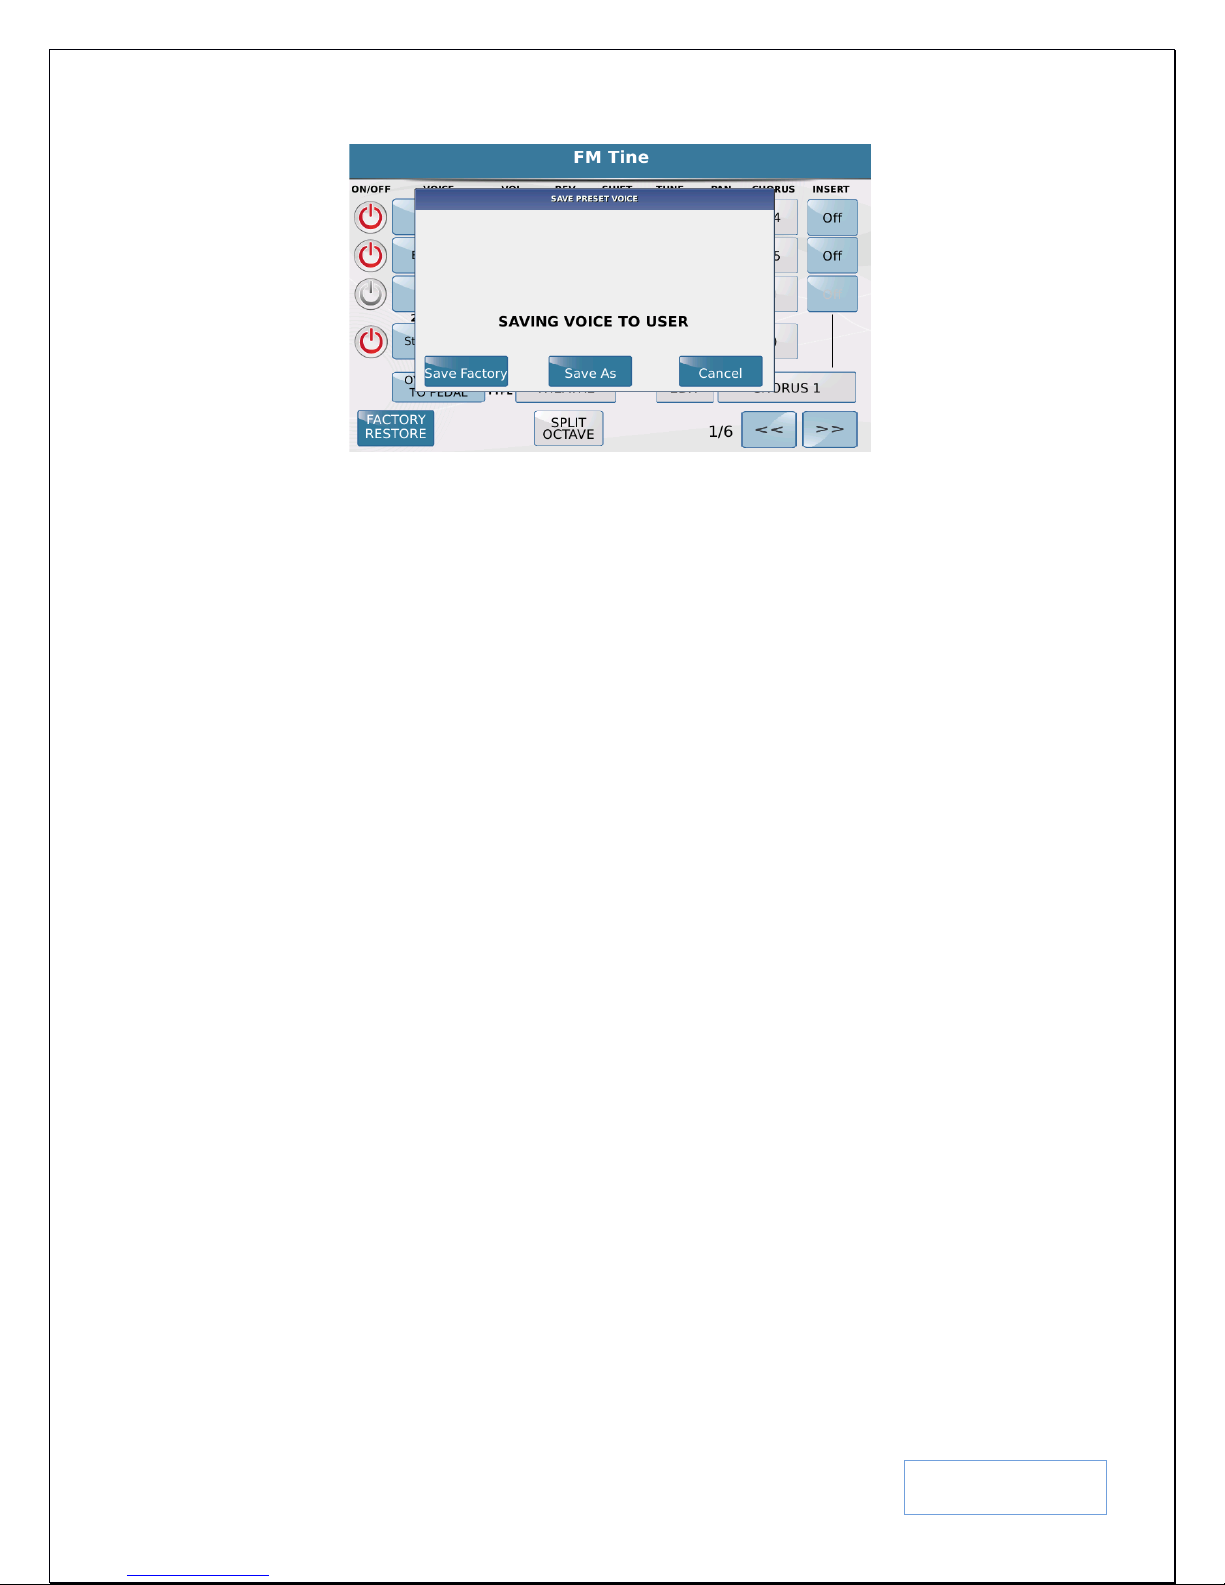
Once you have created your new voice, simply press the SAVE button on the panel to display the following
options:-
KETRON SD9 Manual & Tutorial
Fig. 19a. Saving User Voice
Page 21
21
• SAVE:- Saves this new voice in the USER VOICE section with the same name as the factory voice.
• SAVE AS:- Allows you to name this new vo i ce and save in the USER VOICE section whe n you press
ENTER (after naming it).
• CANCEL:- Cancels all changes and reverts to the VOICE EDIT screen you just came from. If you press
the EXIT button on the panel, all settings are restored and the keyboard returns to the voice selection
screen.
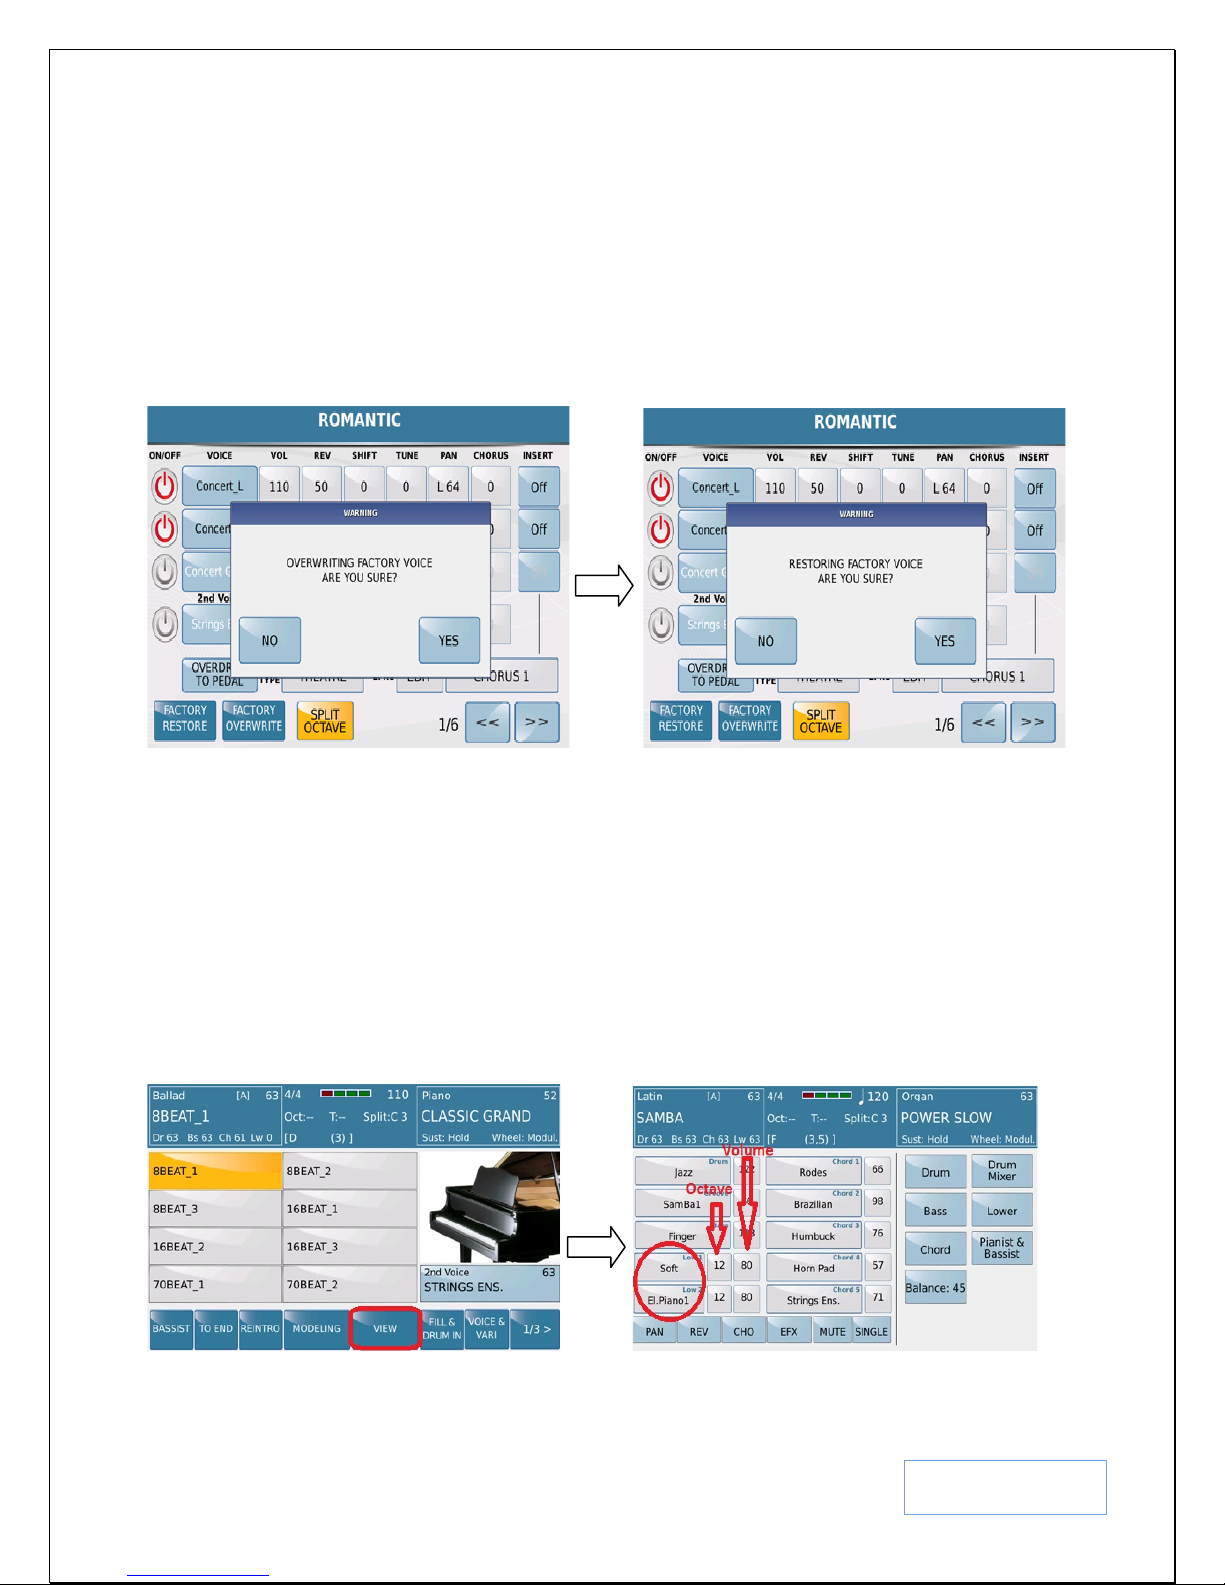
To over write the factory voice wit h your new voice, do not press the SAVE button when done. Instead,
touch the FACTORY O VERWRITE icon on the screen – then confirm if you want to proceed or not.
Fig. 19b. Saving Fact ory Voice Fig. 19c. Saving Factory Voice
2.E - PLAYING 2 VOICES WITH YOUR LEFT HAND (LOW ER VOICES)
With the keyboard in SPLIT mode, you can also assign up to 2 separate voices and play them together or separately
on the left side of the ke yboard as well. These voices are usually determined by the style that is currently being used,
but we will show you how irrespective of the style selected, you can call up and use voices to the left of the SPLIT
point of the keyboard.
• First make sure yo ur SD9 PRO is displaying the default screen (screen it powers on with or similar. If not,
simply press EXIT repeatedly until you get there). Your screen should look like this:-
Fig. 20. Style selection screen Fig. 21. Style View screen
KETRON SD9 Manual & Tutorial
Page 22
22
• Touch the VIEW icon from this page to display the STYLE VIEW window – where all the
elements/musicians/tracks that make up the style are displayed with their corresponding values. This will
include the LOW 1 (LOWER 1) and LOW 2 (LOWER 2) - 2 left man ual voic es as shown in the next
screen.
In this example, the first LOWER VOI CE ( LOW1) is called SOFT, and the 2nd LOWER VOICE (LOW2) is called
EL. PIANO1. This means that if the LOWER volume slider is up and you play any key to the left of the SPLIT point
on the keybo ard, you wil l hear these 2 voices (depending on how they are set up in the LOWER mode – see section
2G, page 24 below).
In this screen, all the parts/tracks that make up the style/beat are displayed and next to each one is the VOLUME of
that part. The LOWER voices have an extra column – OCTAVE. This value determines the octave of the voice
which you can change by touching t he number a nd changing it by turning the data wheel (+/- 12).
The column next to the OCTAVE values is the VOLUME col umn. Each LOWER/Left voice has a va lue whic h you
can change by touching i t and adjusting using the data value wheel. The LOWER volume slider on the left front
panel controls the general volume for both LOWER voices.
2.F - CHANGING THE SOUNDS/VOICES PLAYED WITH YOUR LEFT HAND.
You can change the voice(s) played on the left of the keyboard as follows:-
• Touch the voice inside the LOW1 box (to change the first left voice). The following screen will be
displayed s howing you the voice groups on the right and the voices on the left whe re the current LOWER1
voice is from.
Fig. 22. Lower Voice selection
• Touch the voice group where you believe the voice you want to assign to the left hand resides. The left side
of the screen will show the voices in this group. You can t urn the data wheel or press the ENTER/PAGE
button to access more voices in this current group.
• Touch the voice you want to play with your left hand.
• Press EXIT to return to the STYLE VIEW PAGE.
KETRON SD9 Manual & Tutorial
Page 23
23
• If you want an additional LEFT Voice (LOWER2), touch the voice in the LOW2 box and pick a different
voice for it i n the next screen – just as you did for the first left voice. Press EXIT to return to the style view
page.
• Play and ma ke sure this i s the voice you want to use in this par ticular scenario
• You can then save this voice within the current style b y pressing the SAVE button on the panel and savin g
as a USER STYLE. To make this permanent such t hat no matter what style you pick the LOWER VOCIES
are not changed (LOCKED), from the STYLE VIEW page, touch LOWER to display the controls relevant
to the LOWER VOICES
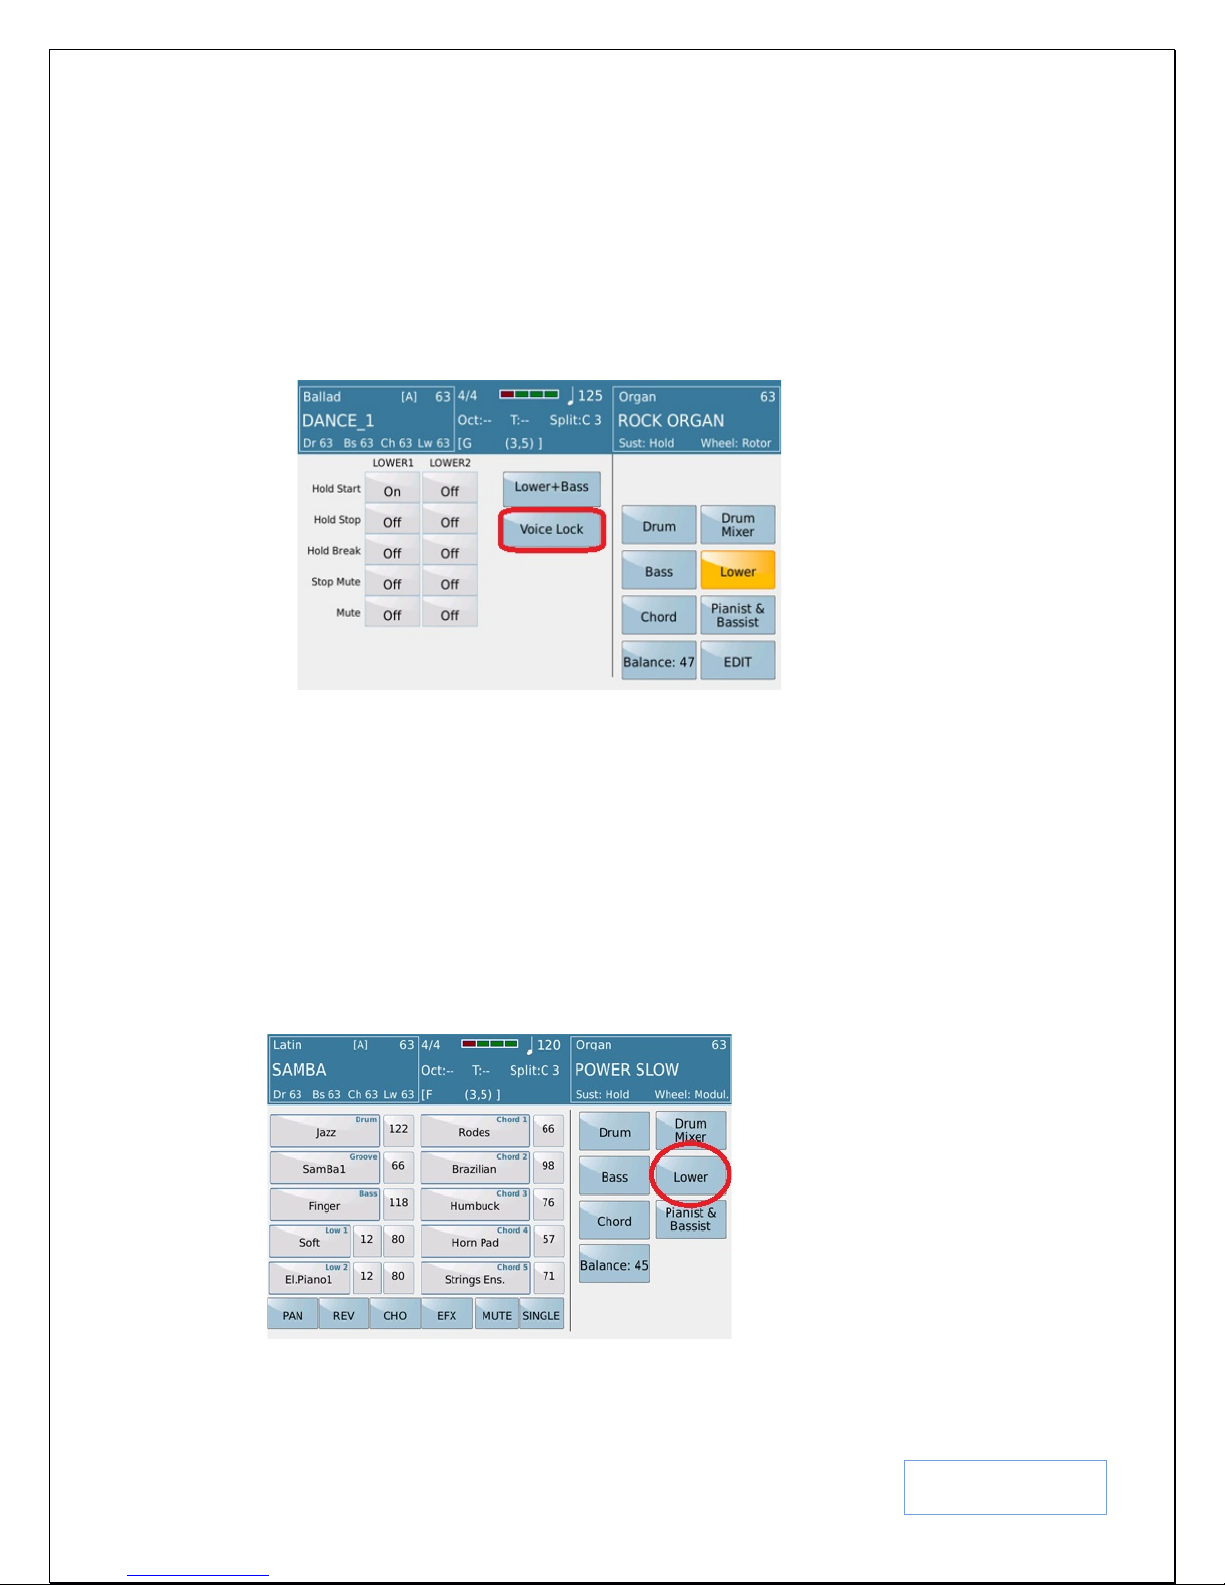
Fig. 23. Lower Voice Freeze
• Touch VOICE LOCK to freeze the lower voices such that these voices don’t change even when the styl es
are changed. Don’t forget t o save this under the CUSTOM START UP (when you press SAVE from the
main screen) such that you don’t ha ve to repeat this process each time the unit is turned off and back on.
2.G - OTHER PARAMETERS THAT CON TROL THE LOWER VOICE(S)
There are other parameters and functions that govern the Left/LOWER voices and other parts of the Arranger
section (Drum, Bass, Chord, Drum Mixer, Lower and Pianist & Bassist), however i n this section of this manual, we
will only focus on the LO WER (since we are referring to the LEFT voices). These can be accessed by touching the
LOWER button on the screen as was done above:-
Fig. 24. Accessing Lower Voice features & Controls
KETRON SD9 Manual & Tutorial
Page 24
24
The following screen is now displayed showing you the different parameters that control the LEFT/LOWER
voices:-
Fig. 25. Lower Voice Features and Controls
For each LEFT/LOWER voice, you can do the following from this screen:-
• Hold Start:- [Hold on Start]. When on, if a style is playing (and the HOLD button is on), this voice will be
sustained (held) until the style is stopped.
• Hold Stop:- [Hold on Stop]. Whe n on, if a styl e is not playing (stopped) or if you are just playing the
keyboard normally and the HOLD button is on, this voice will b e su stained (held). This is very useful
especially if you have PAD/SYNTH or STRING voices on the LEFT side and you do not want a break
between when you pla y/change chords on the left. In ord er to have a continuous voice, use thi s feature. To
stop playing the voice, turn off the HOLD STOP on the appropriate LOWER voice or simply turn off the
HOLD button.
• Hold Break:- The Lower voices are still heard when the style is quickly stopped using the Key Start/Key
Stop feature.
• Stop Mute:- When o n, the Left/LOWER voic es are not hea rd during rapid breaks (when Key Start and
Key stop are on and the left chord is played and release immediately or…. When only Key stop is on and
same action is carried out. One the arranger is played normally, the voices are heard again.
• Mute:- This mutes the LEFT/LOWER voice as needed.
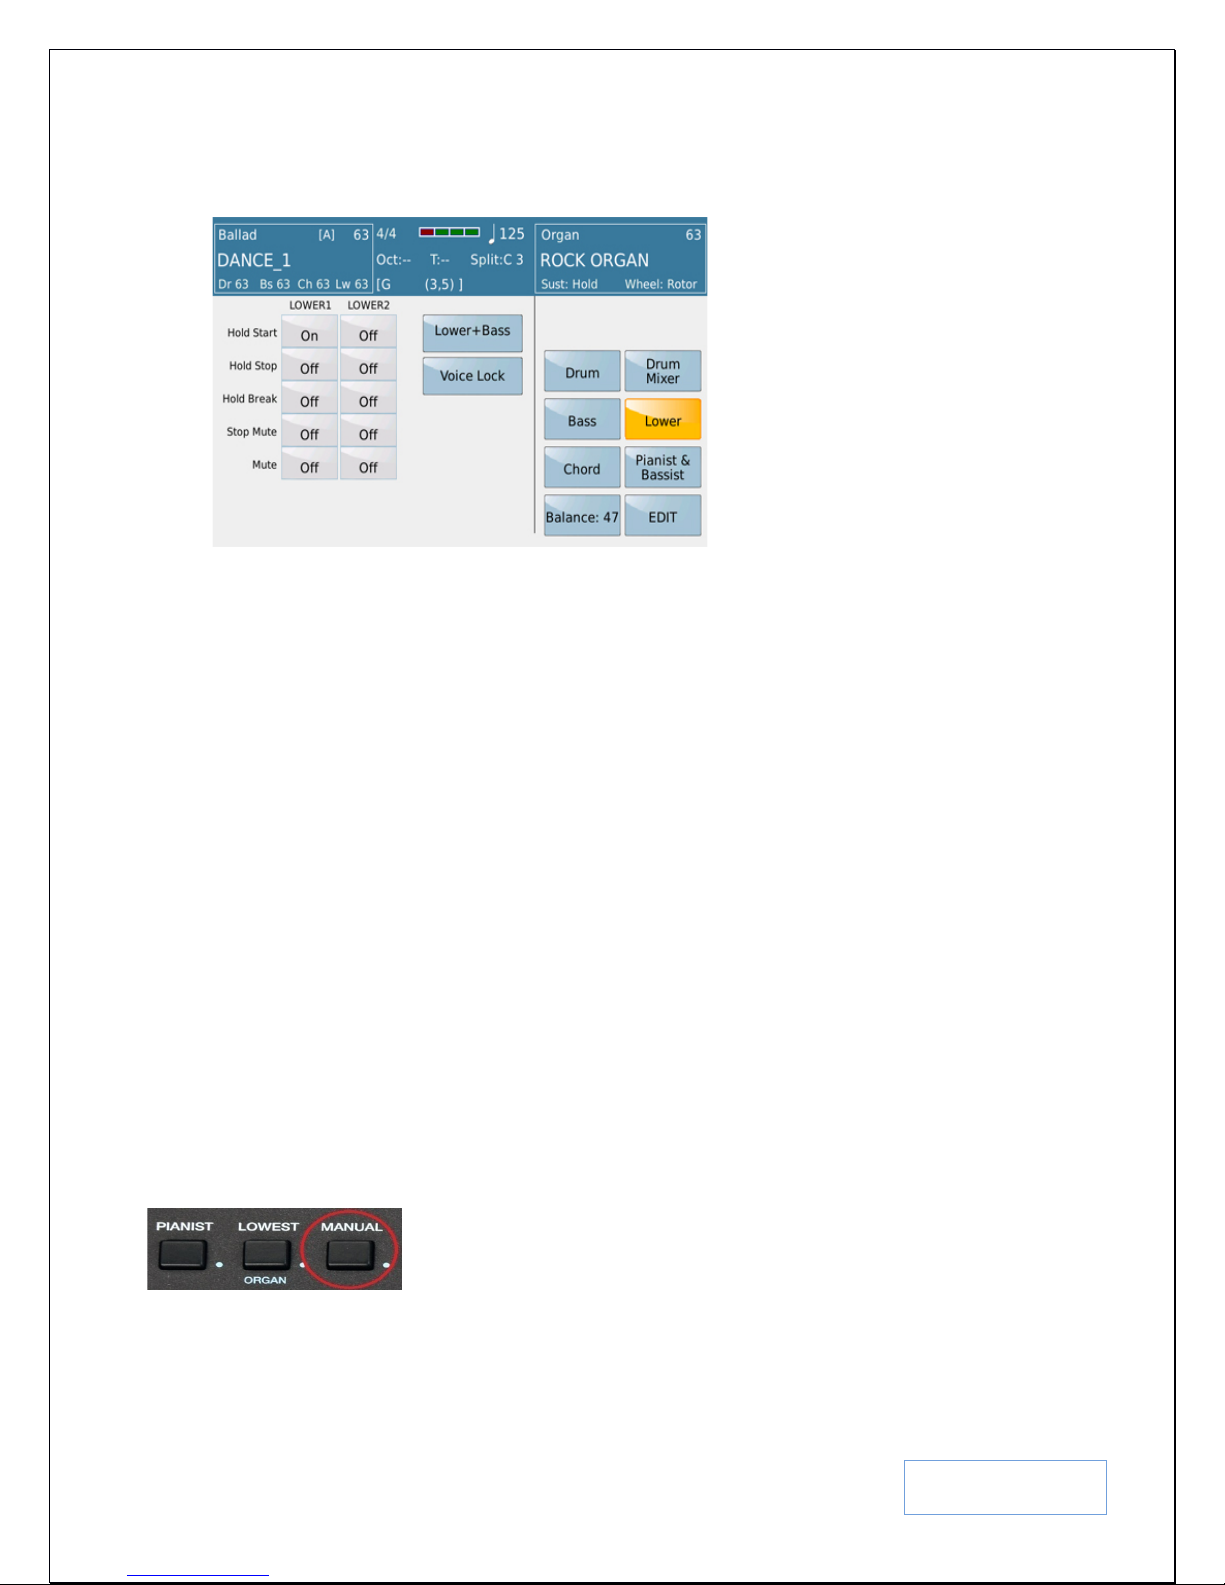
2.H - PLAYING LEFT HAND BASS - MANUAL BASS
You can also play left ha d BASS on t he SD9 PRO, i.e. pla y ba ss lines manually on the left side with your left hand,
while playing lead parts with a sepa r a te vo ic e on the right side of the keyboard. To accomplish this quickly and
easily, simply press the MANUAL button on the left side of the panel.
Now when you play any no t es to the left of the SPLIT point, you will hear the bass (Bass instrument is determined
by whatever style has been selected prior to this). So, you can now play a manual bass solo with your left hand. To
change the bass instrument currently being used –
KETRON SD9 Manual & Tutorial
Page 25
25
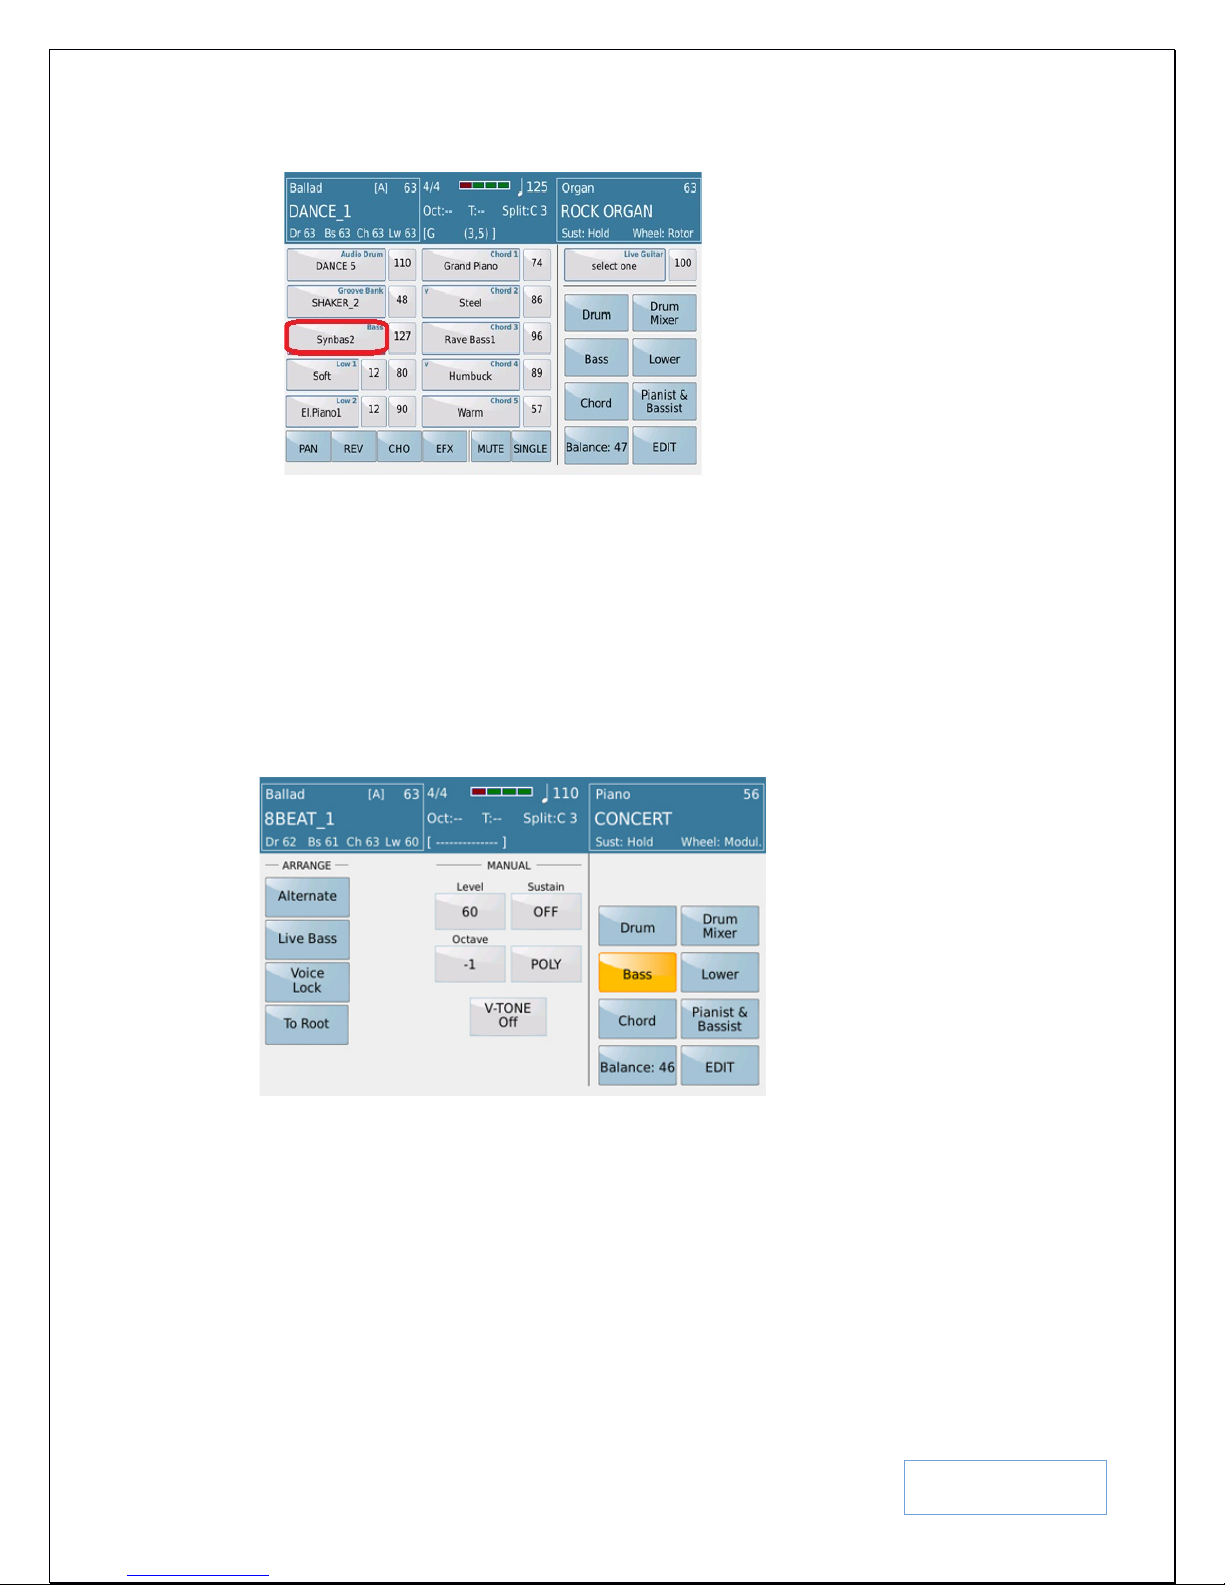
• From the main page, touch VIEW to enter the STYLE VIEW mode once more.
Fig. 26. Style View – Chan ging Bass
• Your screen should look similar to this one above. The bass box shows the current bass ins t rument being
used/heard.
• Touch the current bass instrument (in the example above, Synbas2) to display all the other bass sounds
within the BASS voice group. Remember you can turn the data wheel or press the ENTER/PAGE button
to change the page and di s play other bass instruments. Once you find a bass sound you like, t ouch it to
insert it into the bass box above.
• Press EXIT to return to the style view page and your new bas s should be in the bass box.
• You can also access other BASS parameters and functions by touching the BASS box on this screen above
(right side) to display the followin g functions:-
The left side of the screen now shows some very interesting BASS features under 2 columns – ARRANGE (where
you can use these features with the STYLE’s bass/ auto bass – described in more details above under 2H – Manual
bass Page 24) or MANUAL (with you playing bass manually to the left side of the split point).
Let’s exploit the other features associated with the MANUAL Bass (which to change, simply touch and turn the
data wheel):-
LEVEL:- This is the volu me of the manual bass. Adjust according to the right volume so
as to get a good mix.
KETRON SD9 Manual & Tutorial
Fig. 27. Bass features
Page 26
26
SUSTAIN
• ON (1-63):- When you play a bass note, t he note get s sustained. The higher the
value, the longer the ba ss note gets sustained.
Tips:- This is great when playing tu nes that have sustaine d or
linked bass notes e.g. some old Pop tunes. Also great if ending
a song and you need that su stained ba s s not at the end. Use in
conjunctio n wit h STYLE VIEW – LOWER – Lower+Bass
= “ON” or Bass Hold + Lower.
• OFF:- When you play a bass note, there is not sustain and the note dies off as
soon as you release the key. This is great when p l aying tunes that have rapid or
complex bass lines like Jazz or Latin (Merengue), where the individual bass
notes must be heard but not split over into the next note!
VOICE LOCK:- Turn this on (yellow) to freeze the current bass. Usually when a band is
performing, the bass player plays the same bass instrument for all songs. As such, use this
feature to LOCK/FREEZE the bass instrument currently being used so that regardless of
which style is later selected, the same bass instrument is retained throughout.
OCTAVE:- Select the OCTAVE of the bass instrument. -1 is the default but for some
old Jazz tunes, you may want to set the OCTAVE at -2 (2 octaves lower).
POLY:– allows you to play more than one bass note at a time.
MONO:– You can o nly play one note at a time. If 2 or more notes are played, only the
first note is heard.
V-TONE – This special feature adds “ambience” and more realism to the bass sound (or
any instrument when selected in VOICE EDIT).
As for the Arranger BASS feature, this is discus sed in more details below unde r “4j – Arranger Instrument
features” on page 64.
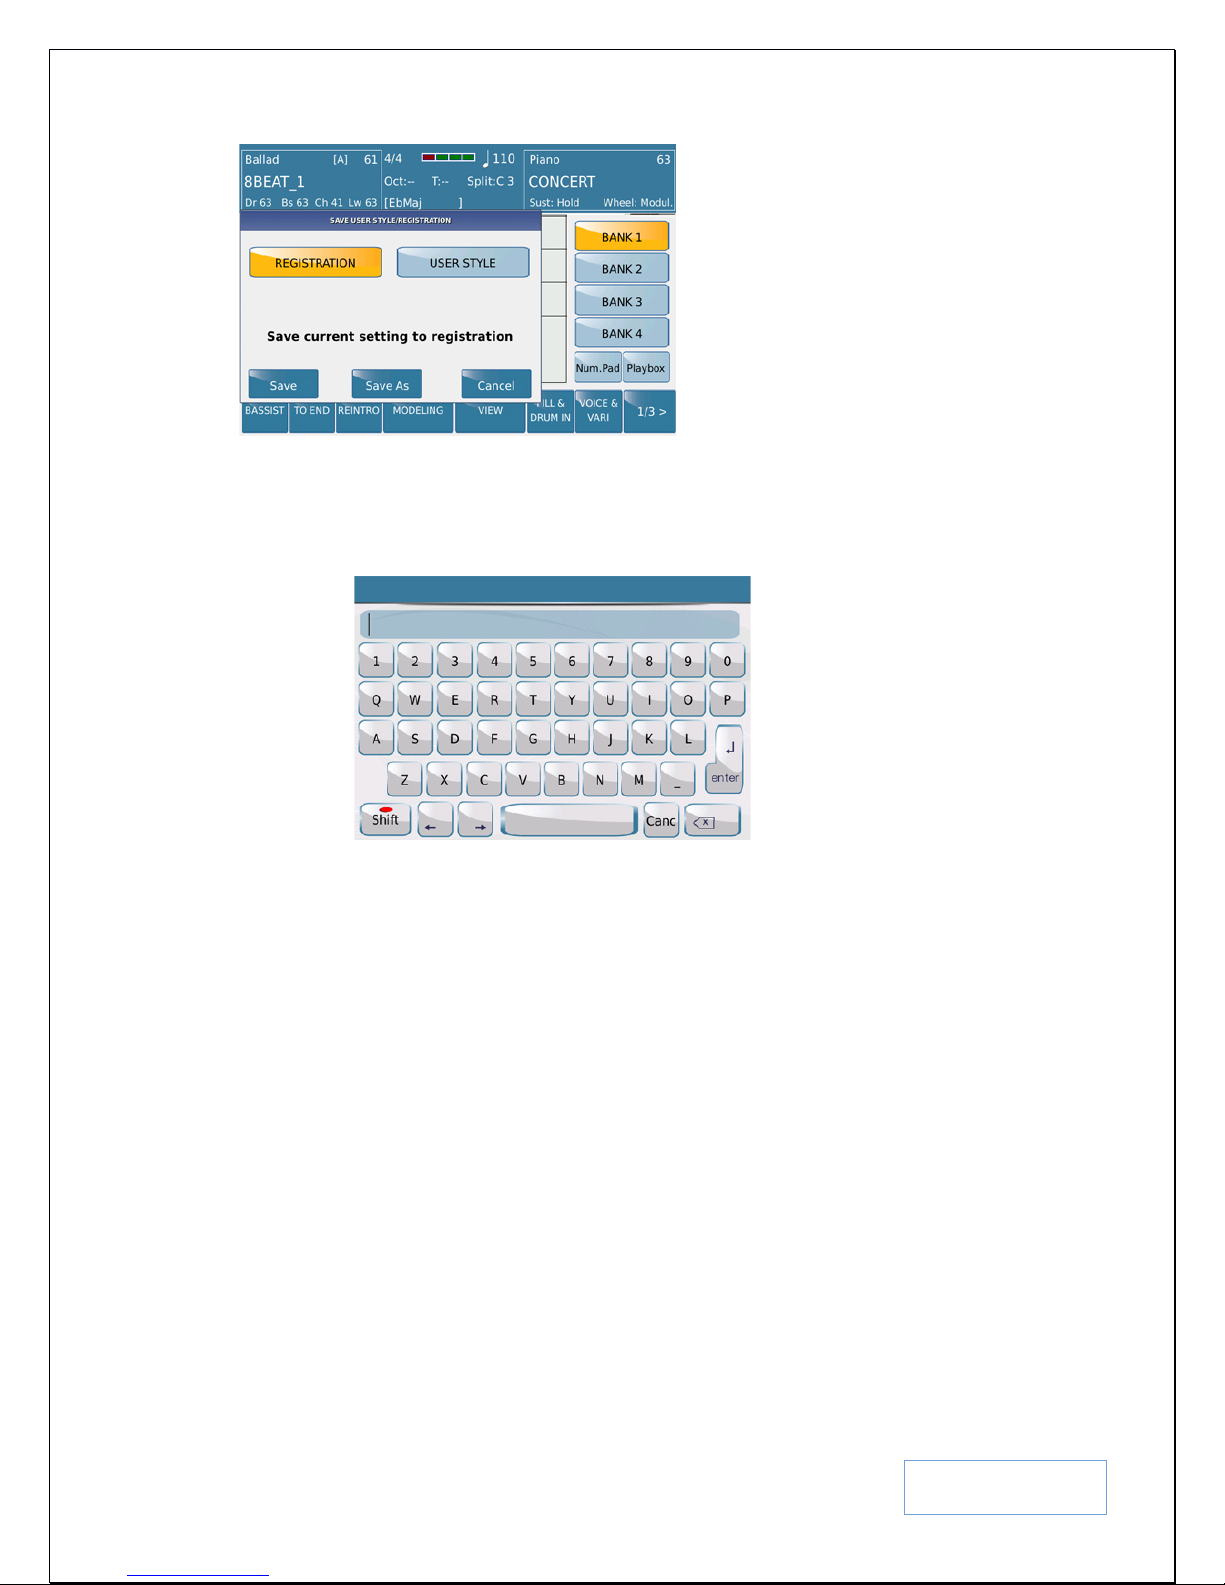
2.I – QUICKLY SAVING YOUR KEYBOARD SETTINGS (REGISTRATIONS) FOR FUTURE RECALL
All voices are now set but – how do you save this set up so you can instantly recall and use it in the future? Your
keyboard is all set up. You have the LEFT voice(s) that you need. You have the perfect RIGHT/Lead voice that you
need for a particular tune. You don’t have time to recreate this scenario at a show in front of your guests so what do
you do? How do you save this setup for a particul ar song so that you can instantly recall it a t the touch of a button
when you are ready to play? This is discussed in depth below under 7 – Keyboard settings/Registrations on Page
129, but we will give you a summary here.
• With the voices now all s et up the way you want, press the REGS button on the top right si de of the pane l
close to the data wheel to go to the REGISTRATION screen (current Bank 1).
• Press the SAVE button
• The following screen will now be displayed:-
KETRON SD9 Manual & Tutorial
Page 27
27
Fig. 28. Saving Registrations / Song set up
• Touch REGISTRATION (Registrations are Song / Keyboard Setups which you save and can instantly
recall for live or studio performances) – and it should turn yellow.
• Now touch SAVE AS to give your current setting a name using the next screen’s QUERTY keybed …
Fig. 29. Naming Registrations / Song set up
and touch ENTER to save your song/keyboard set up with the new name.
• You can now change the se t up of the keyboard and create different settings and save them again the same
way with different names to create a library of keyboard settings for different songs. Note that even though
you have created a setting for a song, as you perform, you can always overwrite this setting instantly as you
change voices, tempo, styles on t he fly. The settings wi ll still be in memory, unless you save and o verwrite
them.
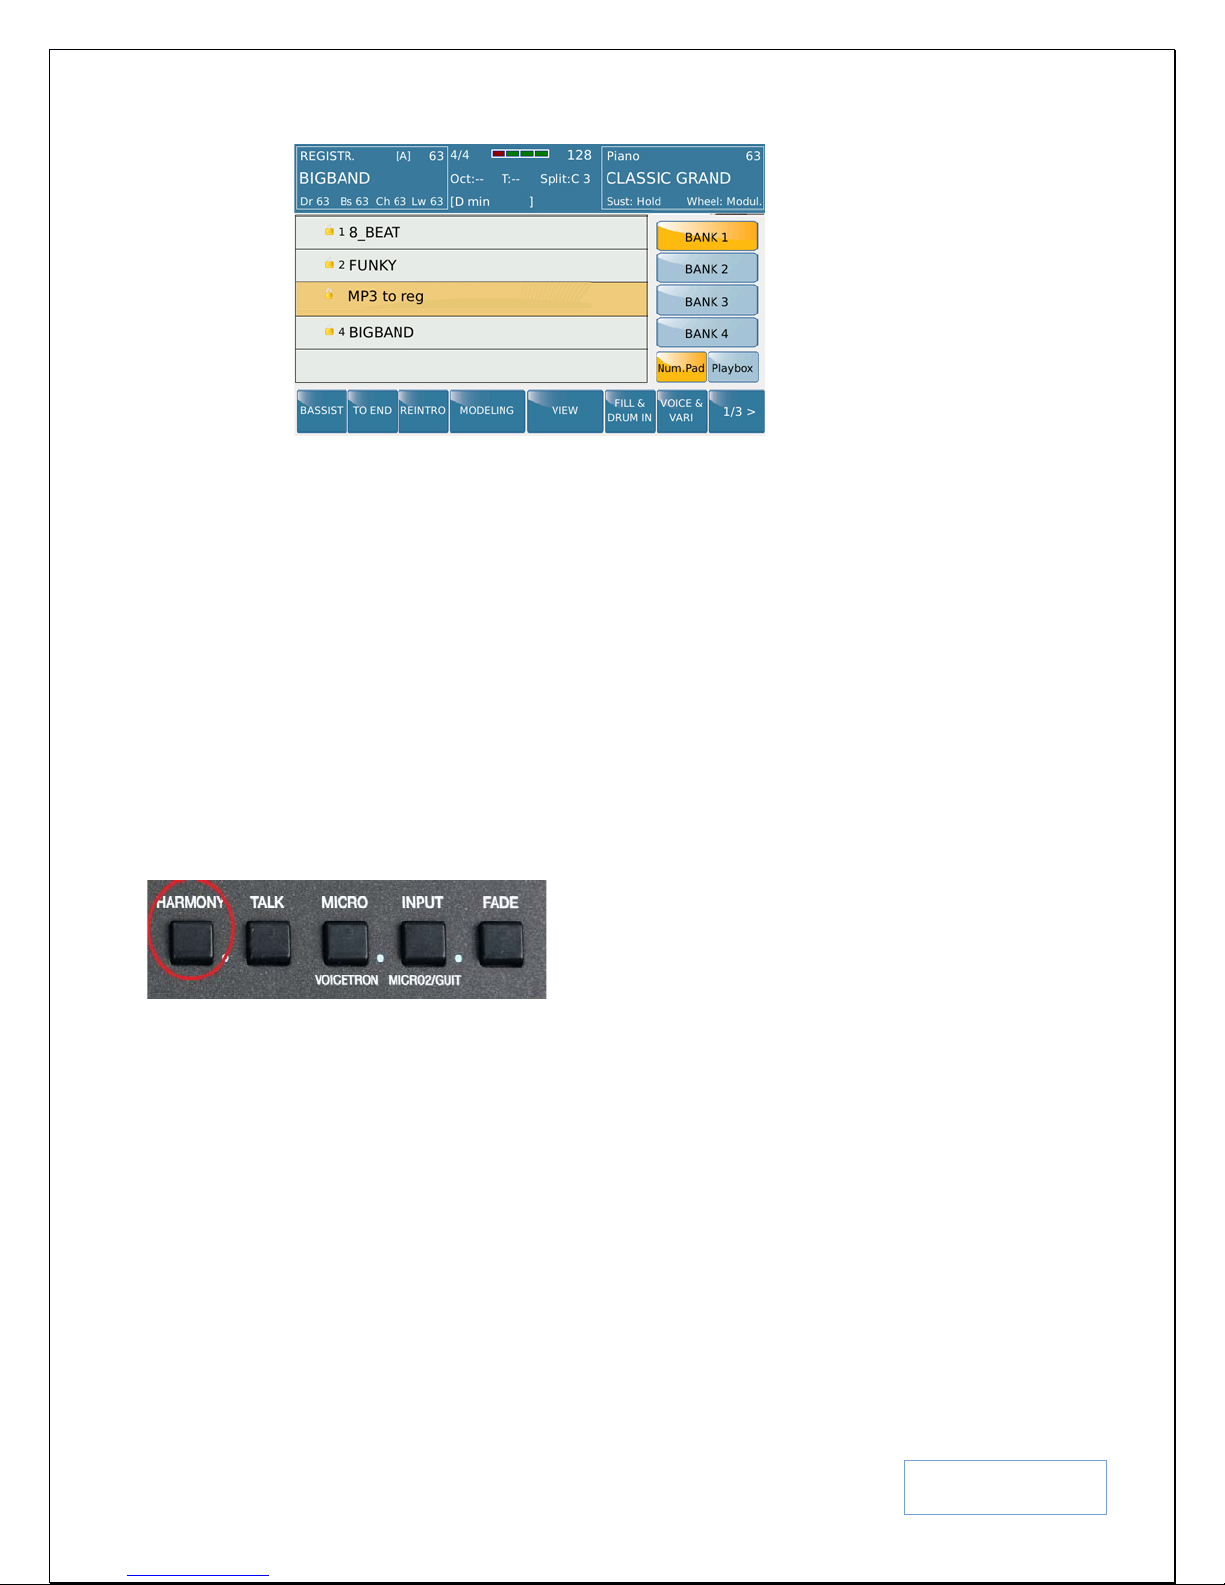
2.J - QUICKLY RECALLING YOUR SETTINGS (REGISTRATIONS) AT A SHOW OR PERFORMANCE
Now that you have created many instant s etups you can instantly recall (right hand, left hand, bass voices … etc),
how do you recall them once you get to your gig as you won’t have time to set the keyboard up for each song again?
• Press the REGS (Registration) button found on the top right side of the panel to access the
REGISTRATION screen which looks something like this:-
KETRON SD9 Manual & Tutorial
Page 28
28
Fig. 30. Registrations in Banks
• As you can see from the screen above, you have 4 banks of registrations/set ups and each bank can hold
1024 single registrations or song set ups. BANK1 is the default where your current registration will reside
(unless you changed it), so if BANK 1 is not already on (yellow), touc h it, or touch the bank whe re you
want to retrieve your registrati on or song setting.
• The center of the screen will now display your registrations along with some that were already put here by
the factory. Scroll down (using the data wheel) to highlight your registration you want to load and p ress
ENTER or touch it twice (double click) to load it. Your settings will be loaded immediately (left hand,
right hand, manual bass [if applicable], style … etc ) and you can then play the song the se tting was
initially created for.
2.K - INSTANTLY ADDING HARMONY TO YOUR SOUNDS/VOICES
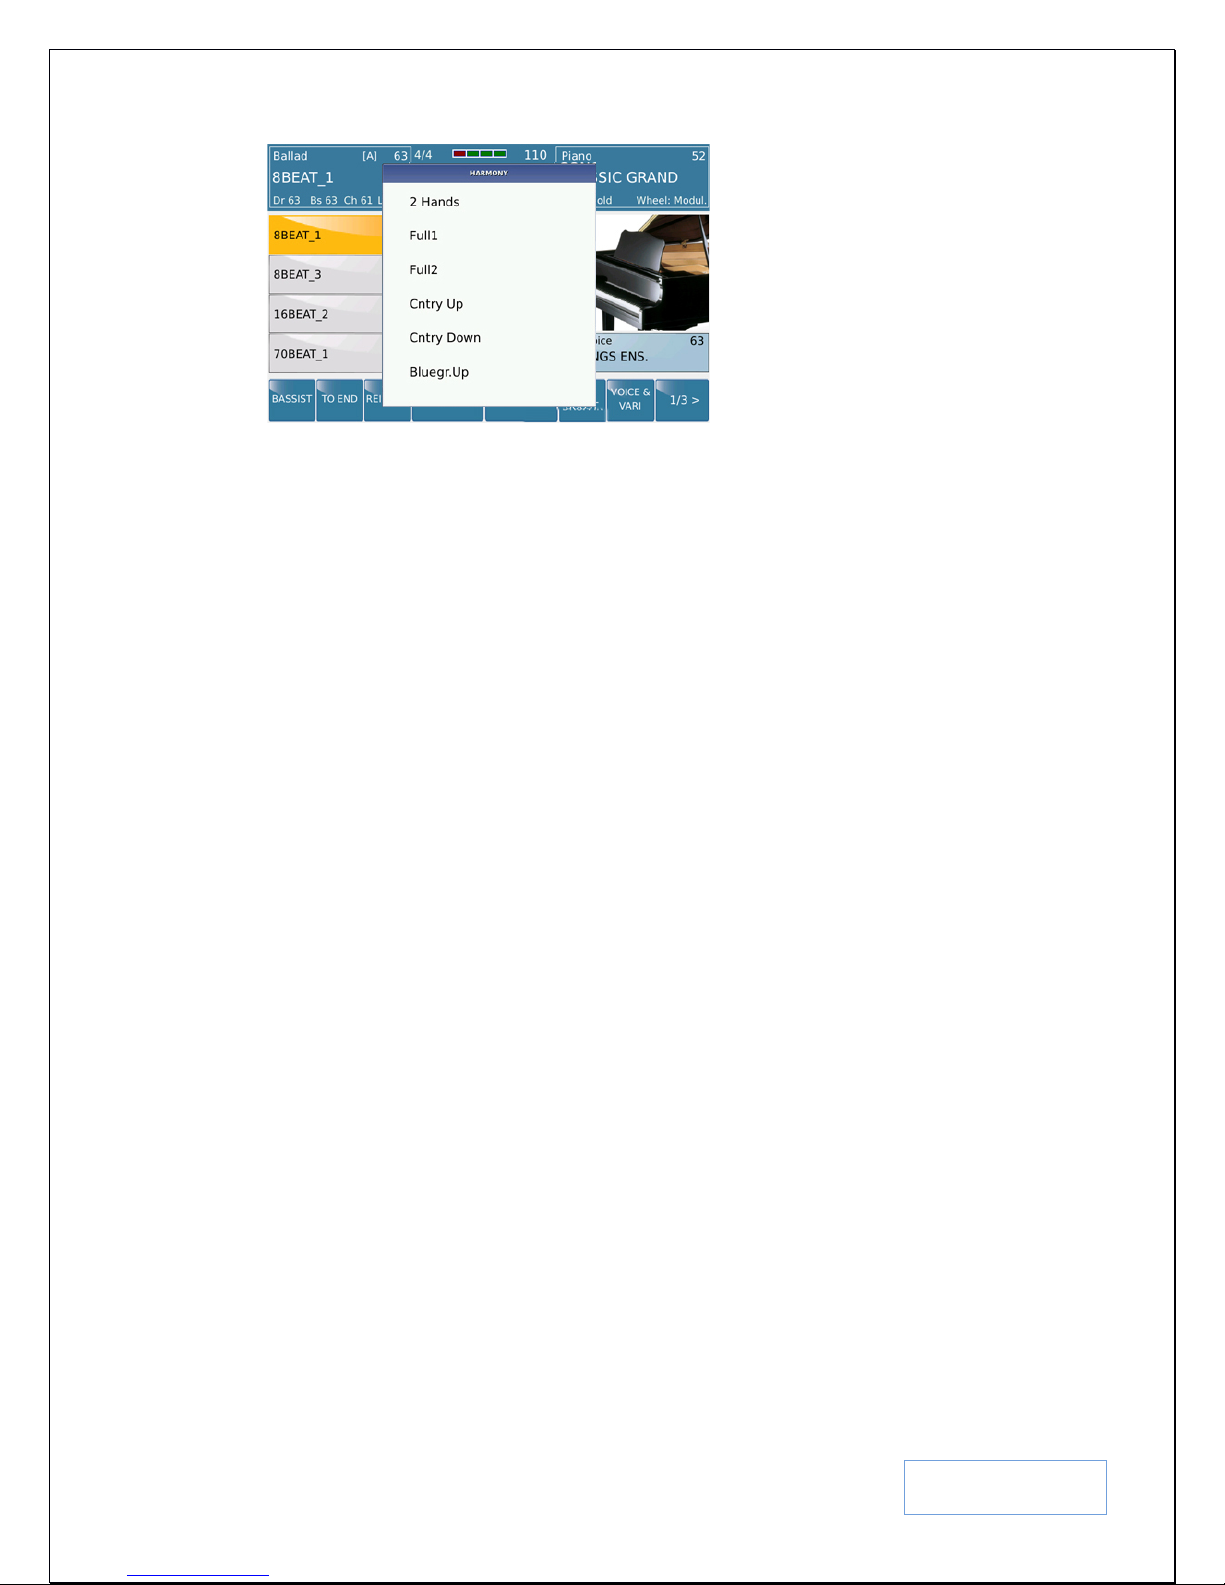
You can instantly add harmony to your voices by pressing the HARMONY button on the bottom right panel of the
SD9 PRO.
Once you do this, play a chord with your left hand and the n play sounds with your right. You will notice that as you
play, the SD9 PRO will generate harmony notes to supplement the notes you play, based on the chords played by
your left hand. The harmony type used can be selected by pressing and holding down the HARMONY button for 2
seconds to display the various ha rmony type s which you can scroll through by turning the data wheel a nd selecting
by touching the harmony type on the screen.
The most efficient way to utilize this feature is to be in SPLIT/ARRANGER MODE (STYLE button should be ON,
PIANIST button OFF). When you play lead voices to the RIGHT of the split po int, harmonies are instantly added to
these voices based on the chords to play to the LEFT of the split point of the keyboard.
SELECTING HARMONY TYPES:- By pre s s ing and holding down the HARMONY button (as mentioned
above), the screen will display the various harmony types to choose from.
KETRON SD9 Manual & Tutorial
Page 29
29
Fig. 31. Adding Harmony notes to lead voices
Touch the harmony type you want (or turn the data wheel to reveal even more). Now play a chord to the left and a
lead voice to the right and listen to how the SD9 PRO instantly adds harmony to your lead voice.
2.L - ASSIGNING HARMONY TYPES TO YOUR VOICES
You can assign which harmony types are used automatically with your voices or if you choose to layer voices,
which voices the automatic harmonies will be added to and which will be ignored, or further still … set which
harmony type to apply to which of your layered voices once this voice is recalled (USER VOICE). This has already
been described above in Fig 16 (Screen Page 4/6) on page 19.
Please note that these harmonies referred to above, are for the voices you play on the keyboard and not what you
sing through the microphone (VOCAL HARMONIES). VOCAL HARMONIES are covered below (6.B
VOICETRON – Page 121).
2.M - INSTANTLY DOUBLE A LEAD VOICE (DOUBLE) – ADD A NO TE ABOVE/BELOW YOURS
Ever play a brass instrument on a regular keyboard and notice how ‘thin’ it sounds compared to the real thing? To
do so properly, you would have to play with both hands where one hand would play an octave higher than the other
so as to create the same sound as a live band would. On an arranger keyboard (such as the SD9 PRO), this becomes
a little tricky especially since your left hand is u sually focused on playing chords. To accomplish thi s , the DOUBLE
icon on the SD9 PRO takes care of this drawback instantly. To access this, press the KEYB. CONTROL (Keyboard
Control) button to display the following screen shown below in Fig. 32.
KETRON SD9 Manual & Tutorial
Page 30
30
Fig. 32. Doubling Lead Voice notes
• In order to illustrate this better, for this example, press the VOICE button and s elect the BRASS group.
Now touch t he BRASS SECTION voice on the screen.
• Play it with your right hand (single notes only). Great sound s but ….
• Now come back into the KEYB. CONTROL and touch the DOUBLE icon to turn it on (it will turn yellow)
and play again. The note you play plus a note lower in octave should both be heard at the same time as you
play the single notes. The value of the OCTAVE (up or down) is set in the SOUND EDITOR (Page 4/6 as
shown in Fig. 16 above).
• Other features found in this screen are:-
PORTAMENTO:- Notes will slide up and down depending on the last note played.
AFTERTOUCH: - Turns on/off the aft ertouch (what happens when you press down a
little harder on a key).
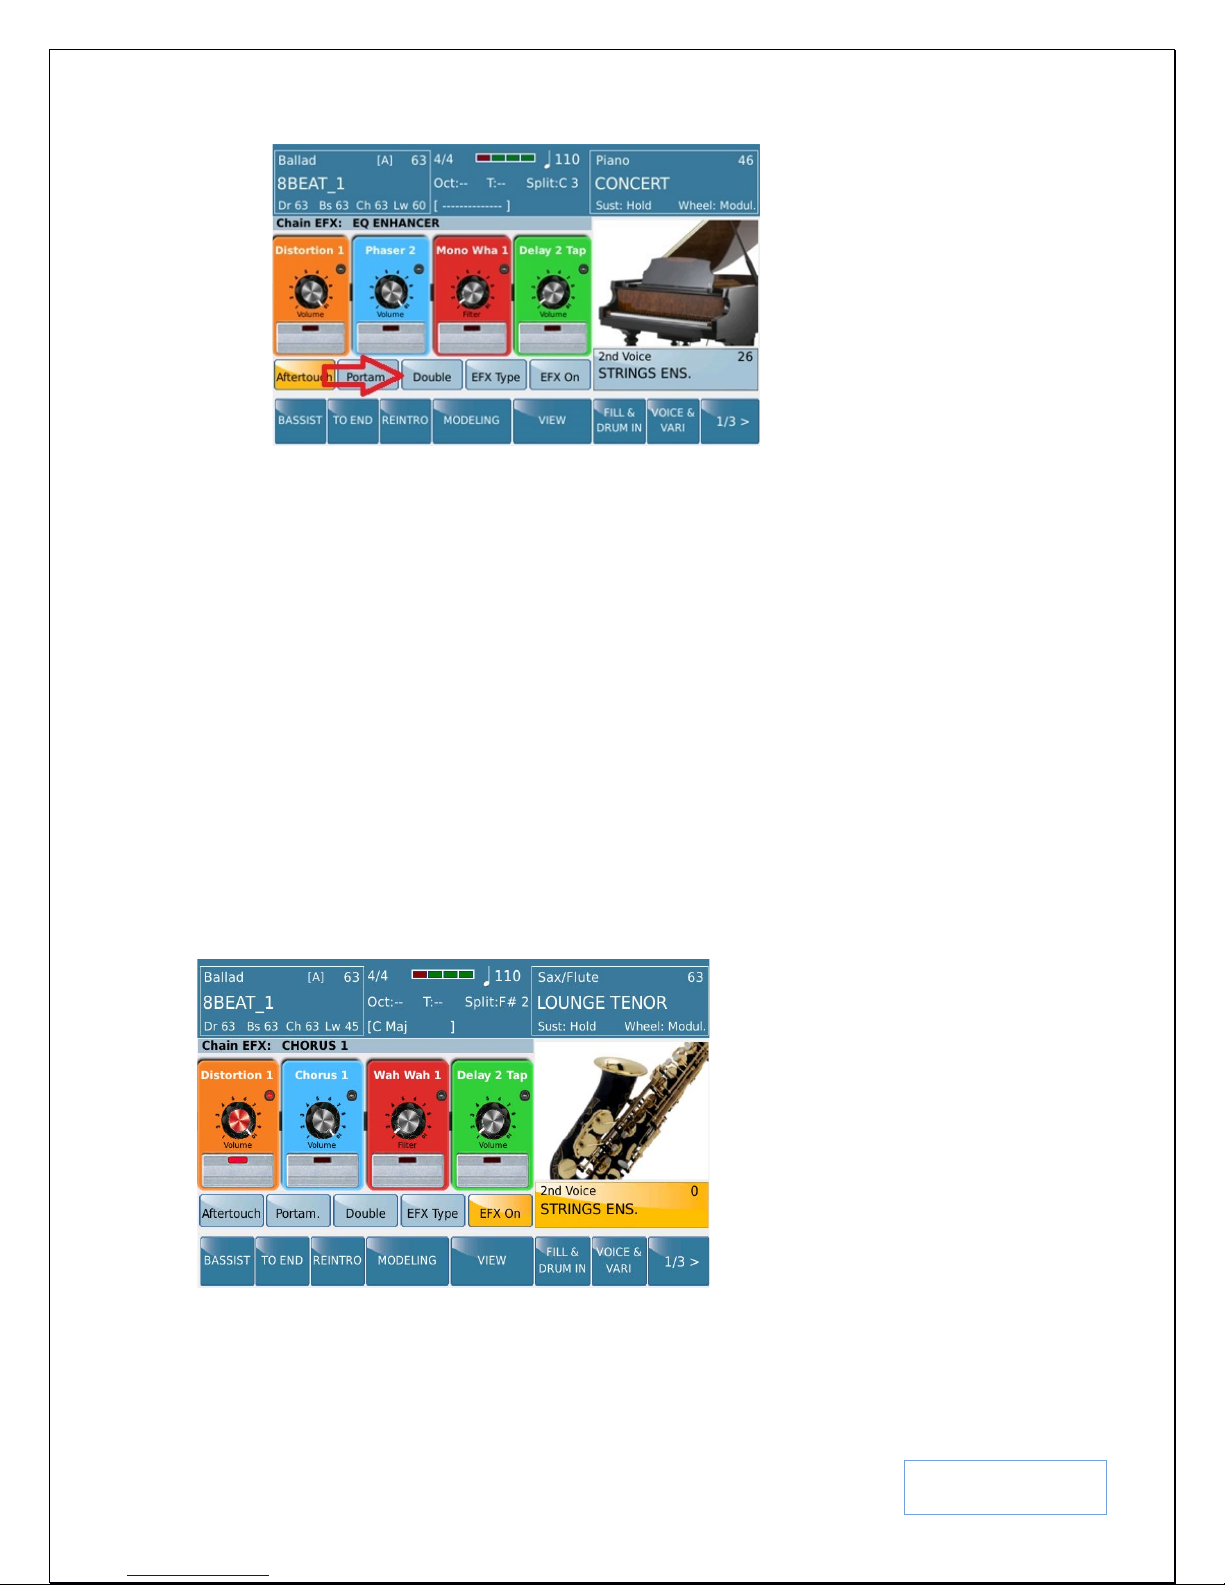
2.N - ADDING EFFEC TS TO YOUR LEAD VOICE
You can now add or chain up to 4 individual effects to the lead voice and control the parameters in real time, leaving
the effects applied to the other parts of the keyboard unaltered. To access the effects screen, press the KEYB.
CONTROL button on the right side of the panel to display the following screen (as initially shown above) –
Touch EFX ON (turns yellow) to turn on the ef fects and apply them to your lead voic e . The signal is routed from
the first effect stomp box (Distor tion) to the last effect stomp box (De la y). By touching each of the boxes, preset
effect types dedicated to that box will be displayed on a list at the center of the screen and you can choose which
KETRON SD9 Manual & Tutorial
Fig. 33. Adding Effec ts ju s t t o lead voice(s)
Page 31

31
effect you want to apply to the current selected sound. So for example if you want to change the distortion effect,
simply touch the distortion stomp box to display a list of distortion presets as shown here –
Fig. 34. Selecting Effect types for lead voice(s)
Touch the effect you want to activate (in this example, Distortion 3 has been selected). The label on the box changes
to display (Distortion 3). If you selecte d another preset say Overdrive 1, “Overdrive 1” will be displayed on this first
stomp box as the effect gets applied to the sound.
You can now move on to the blue stomp box (CHO RUS) and to uch it to display a list of preset cho rus effects as
shown –
Fig. 35. Selecting Effect types for lead voice(s)
Once more a drop down list of various chorus presets is displayed. Simply turn the wheel to display and touch the
preset you want. The relevant effect stomp box (blue) will now be updated with the selected effects type. Please note
that even though a selected effects type has been chosen, it will not be heard until you turn on the effects stomp box
(by touching the silver switch on the box itself …. Red virtual light on the switch comes on).
Now for those who are not experts on applying effects to various voices, KETRON have spent hours developing a
huge library of various effects combinations and storing them into master PRESETS. These presets automatically
combine the various effects offered by all 4 effects stomp boxes to give you the best combination of each for the
sound you want.
To access these ‘master’ presets, simply touch the EFX Type icon on this screen to di s play the va rious INSE R T
PRESETS.
KETRON SD9 Manual & Tutorial
Page 32

32
Fig. 36. Selecting Effect types for lead vo ic e( s )
Turn the data wheel and touch the effect you want. Notice how all 4 effect boxes adjust accordingly (on/off, effect
type, effect amount) to create the effect just selected.
You can still further tweak the effects parameters of each box and then save as your own effects type by pressing the
SAVE button on the panel while this screen is up, to display the following save options –
Fig. 37. Saving User Effects settings
Select the user location by touching it (in this case, touching “FUZZ LEAD”). Choose from the following drop
down menu wh ich user location yo u want to use to save your new Insert Effects set t ings at –
Fig. 38. Saving User Effect type into location
KETRON SD9 Manual & Tutorial
Page 33

33
3. INSTANTLY ADDING PROFESSIONAL & LIVE MIXING EFFECTS
You can instantly add Li ve EFX (such as. altering Filter, Dampler or Resonance parameters) to your lead voice
and other parts of the keyboard like Drums and the Player (wave, mp3 and midifiles). To do so, simply press the
FILTER button found on the top right side of the panel.
The FILTER light on the b utton will turn on (which means the LIVE EFX is now being applied to whatever part
they were assigned to). N ow touch the Q (Resonance) and FC (Cut off Frequency) sliders on the right side of the
screen as shown above in Fig. 34 above and slide them up and down to apply the relevant e ffects to the relevant
parts assigned. The filter can be assigned to affect parameters of the Player (wave or Mp3 files played by either
Player 1 or Player 2), Right or/and Drum simply by touching either of the s e under the “Assign EFX t o” part of the
screen above. In the examp le above, only the Right/lea d voice will be impacted by the filter (Right is yellow/on).
Tips:- If you tur n off the FILTER and then l ater turn it back on aga in, the previous setti ngs of the fil ter will be used.
This allows you to simply use the FILTER button for turning the filter on and off from now on s o you do not have
to reset the filter parameters each time it is activated. These will be reset only if the instrument is turned off.
3.A - VOICE LIST
You have gone through all these voices and found out that for certain scenarios, you only need between 10 to 20
voices or so. How can you quickly access just a few voices that you need and not be bothered with all the others?
You can create a voice list (FAVORITE VOICE LIST) and store your favorite voices in this list such t hat when you
press the VOICE LIST button, only your favorite voices will be displayed on the screen. This saves a lot of time
during live p erformances and it gi ves you quick access to your best sounds or sounds you use often. If you organize
the voices in a particular order, you can also select them by scrolling up a nd down the voices automaticall y using the
optional FS6 of FS13 effects pedals (using VOICE UP and VOICE DOWN in the FOOTSWITCH MENU [MENU –
Footswitch] ), thus freeing up your hands to play.
Fig. 34. EFX Filter
KETRON SD9 Manual & Tutorial
Page 34

34
3.B - CREATIG YOUR OWN VOICE LIST.
• Press the VOICE LIST button to display the first page of 10 favorite voices KETRON has recommended
(shown in Fig. 35 below). You can select and use any of these voices as usual by simply touching the voice
on the screen.
Fig. 35. Voice List (Favorite voices)
• If you turn the data wheel or press the ENTER/PAGE button, you can access the next 10 pages of 10
voices each. The page you’re currently in will b e displayed in the top r ight box sect i on as shown below in
Fig. 36.
Fig. 36. Voice List Pages displayed in top right box (1-10)
• Now let us select a voice we want to replace in the current Voice List. In this example, let’s replace the
voice MUSETTE with a voice of our own.
• Simply touch the voice - MUSETTE voice on the screen for about 2 seconds as shown in Fig. 37 below (If
you touch and release quickly, it will just be a voice selection meaning the Mussete voice will be selected
and heard when you play!).
Fig. 37. Voice List Editor –Touch and hold for 2 secs!
KETRON SD9 Manual & Tutorial
Page 35

35
• The SD9 PRO will quickly display the next screen which is the voice screen where the current voice
resides (the voice groups are to the right and voices to the left as usual). The VOICE LIST button will
now flash as you are in VOICE LIST EDIT mode.
Fig. 38. Assigning new Voice to current Voice List location
• Select the voice group t o the right you believe your voice resides in and touch the voice with which you
want to replace the MUSETTE. In this case, we have touched the voice group ACCORDION and so it is
highlighted in yellow – while the left of the screen displays the first page of accordions.
Tips:- You can also use USER VOICES in the voice list. Simply press the USER icon
in the voice group selection. Since you can layer voices and save as user voices, this
means you can create a voice list with voices that are instant layers of voices or voices
with new effects as edited in VOICE EDIT.
Fig. 39. Using User Voices in Voice List
Touch the voice you want to use and it will be loaded into the voice loca tion in question.
Remember more voices exist in the next pages, so turn the data whee l to display them.
• Press EXIT once you have touched the appropriate voice. You will be returned to the VOICE LIST page
and guess what? Where your MUSETTE was, you should now find your new voice in the same lo cation.
• Repeat the above action – touch and hold a voice you want to get rid of/replace – go to the voice screen and
make a new selection of the voice you want in that location instead – press EXIT to return to the VOICE
LIST screen … etc.
• Remember the VOICE LIST is made up of 10 pages with each page being able to display 10 voices each –
so you can fill the VOICE LIST up with up to 100 of your favorite voices (you don’t have to do this as just
10 voices in the first page may be sufficient ... but at least you know you can).
• Once done, you will now need to SAVE your favorite voices (VOICE LIST) or else when you turn off the
SD9 PRO, they will be lost and you will have to do this all over again.
KETRON SD9 Manual & Tutorial
Page 36

36
• To save your VOICE LIST, simply press the SAVE button while you are in the VOICE LIST p age
(VOICE LIST button should NOT be flashing in edit mode).
• The following “SAVE VOICE LIST” page should be displayed.
Fig. 40. Saving N ew Voice List
• Touch SAVE to save your new VOICE LIST (or EXIT to cancel and do more editing or abort the VOICE
LIST all together by pressing the VOICE LIST button and turning it off). From now on, whenever you
press the VOICE LIST button, you will have access to your favorite voices. (NB:- You are not provided an
option to name the Voice List as you can only create 1 voice list [of up to 100 favorite voices] and store in
the SD9 PRO).
Tips:- You can arrange your favorite voices in order (e.g. Piano, Sax, Guitar, Stri ngs
…etc). Then with one of the optional footswitc h p ed al (say FS6), you can program switch
1 as Voice up and switch 2 as voice down. Now as you perform, simply step on switch 1
to move up your voice list (Piano-> Sax -> Guitar -> Strings … etc). Now, you can step
on switch 2 to go backwards (Strings -> Guitar -> Sax -> Piano).
KETRON SD9 Manual & Tutorial
Page 37

37
4. STYLES, BEATS & ACCOMPANIMENTS
Some people call them beats. Others call them patterns. In the Arranger Musical world, they are called styles. Styles
are the heart of every arranger keyboard. These are musical ‘phrases’ which can be altered in real time to produce
music based on the chords or notes played on the keyboard. The SD9 PRO comes loaded with 260 styles (the
AJAMSONIC version has an additional 400 styles) meaning you will rarely lack a style to perform any kind of
music in your repertoire.
Fig. 41. Style Se l ection Fig. 42. Styles
One of the unique features of the SD9 Pro’s styles are its inclusion of Audio elements (Live Audio Drums, Bass and
Guitars) used within the st yles and controlled b y the user. This means tha t when you play an Audio s tyle (those with
Live Audio drums and Guitars are denoted by the word “Live” next to the style’s name), you will hear live guitars
and drums and even if you change the tempo of the style, these audio element’s p i tch remain in the key in which you
are performing. This feature (being able to change the tempo and maintain the pitch, or change pitch and maintain
the tempo of audio) has been available to DJs for years but is now being made available by KETRON in musical
instruments of this price point, borrowed from the AUDYA flagship series. The compl ex algorithms with
manipulating audio are seamle ss ly handled by the SD9 Pro. Simply play a chord and listen to how all the audio parts
of the style follow flawlessly and although they are audio, you still have control over the tempo, pitch and to nality
… all in real time, meaning for onc e, the instrument follows the musician and not the other way around as has
usually been the case when using audio files in music. This technology is even further exploited granting the user
even more controls with the new LaunchPad feature covered in more details below in section 5 LaunchPad o n page
96.
KETRON SD9 Manual & Tutorial
Page 38

38
4.A - SELECTING STYLES/BEATS FOR ONE MAN BAND PERFORMANCES
The SD9 PRO powers on in the STYLE mode (default page with a split point on the keyboard) as shown below in
Fig. 43. If you are in a different setting, simply press the STYLE/HOME button on the right sid e of the panel to get
back to the STYLE Mode/Page (STYLE button turns on).
Fig. 43. Style information dis pl ay
First of it kind, the SD9 Pro offers styles with 8, yes eight variations (while most arrangers offer only 4), but this
will be elaborated upon in detail b e low.
How do we interpret all this information displayed on the screen at once? Remember that one of the strengths of the
Operating System of the SD9 PRO is to give the use r the current status of the keyboard at any given time. To
accomplish this, KETRON has impl emented a system that shows you what the cur rent status of the keyboard is
(style and voice selected, tempo, … etc) at any given moment on the top section of the scre en, particul arly usef ul for
live situations.
Here is a general interpretation of the main screen (shown in Fig. 43 above) while in STYLE mode (default screen
of the SD9 PRO as of OS 1.0)
• The top left box of the screen shows :-
The group the current style resides in (Ballad),
The variation of the style currently selected [A-1, A-2, B-1, B-2, C-1, C-2, D-1, & D-2].
The overall volume of the style (63 max)
The name of the current style selected (16BALLAD_2) – in capital letters.
The individual volume levels of the Drum(Dr), Bass (Bs), Chords (Ch) and Lower parts
(Lw) of the style (Dr 63, Bs 63, Ch 61 Lw 0)
You can touch this box to quickly access the Style select ion page
• The top center box sho ws:-
The time si gnature of t he style (4/4, 3/4, etc)
The bar co unter [----]
The tempo /BPM (110, 80 … etc)
The Octave setting for the Right/Lead voices (Oct:-)
The Keyboard transposition value (T:-)
The keyboard split p oint (Split: F#2)
The chords played on the keyboard [F# (3) ]
KETRON SD9 Manual & Tutorial
Page 39

39
Fig. 44. Voice informat i on di splay
The top right corner of the screen shows the following information related to the Right/Lead voice being
used on the keyboard (for this example shown in Fig. 44 above):-
Group where the voice resides in (Piano).
Volume of the lead/right voice (63)
Name of the voice in Capital letters (DX PIANO 2)
Sustain Pedal and Wheel current settings
You can touch this box to quickly access the voice select i on page or press the VOICE
button on the instrument’s panel.
4.B - BETTER EXPLAN ATION OF THE V ARIOUS PARTS/TRACKS OF A STYLE
Styles in the SD9 PRO are broken down into the following sect ions:-
• 3 Intros/Endings
• 4~8 Arranger/Variation parts of the style [A-1, A-2, B-1, B-2, C-1, C-2, D-1 and D-2]
• 4 Fill ins
• 4 Breaks
• 1 To End (short ending).
These style parts can be easily controlled with the following buttons below the screen as shown in Fig. 45 below -
KETRON SD9 Manual & Tutorial
Fig. 45. Style Control buttons on panel
Page 40

40
... and the following buttons on the bottom part of the screen (main page 2/3) as shown in Fig. 46 below:
<<
Page 2/3 (Touch “2/3” to change pages!)
Fig. 46. Style Control button s on scr ee n
Each style section (intros, endings, arrangements and fill ins) is made up of 11 tracks - “your band members” who
are:-
Drums (the drummer)
Percussion (the percussionist)
Bass (the bass player)
Automatic Chords controlled by the style (Ch1 - Ch5) (the other musicians)
Manual chords controlled by the player (Lower1 and Lower2)
Live Guitars (the live guitar p layer)
You can see all these parts by pressing the VIEW button fro m the main page (1/3), or touching and holding down
the style for 2 seconds as shown in Fig. 47 below …
Fig. 47. Style View
KETRON SD9 Manual & Tutorial
<<Page 1/3 (Touch “1/3” to change pages!) …
Page 41

41
… to display the STYLE VIEW (your complete band) as shown in Fig. 48 below –
Fig. 48. Style View display
We will discuss this screen in more details below but at a glance, this gives you ac c ess to the individual style pa rts,
instruments used, volume of each instrument, and using the icons at the bottom of the screen, access to PAN, REV,
CHORUS, EFX levels of each instrument … etc. Using the MUTE icon, you also have the capability to mute
individual tracks or ‘musicians’ (…at least in this case, they won’t talk back at you)!
4.C - HOW TO SELECT A STYLE/BEAT FOR YOUR MUSICAL PERFORMANCE
As mentioned earlier, the SD9 PRO comes with many styles / beats to choose from. How do you select the
right style or beat for your performance? When you turn on your SD9 PRO, the default style selec te d is
called 16BALLAD1 from the BALLAD style category as shown below (may vary in your instrument ).
To select a style, touch the top left box that shows the current style selected –
KETRON SD9 Manual & Tutorial
Fig. 49. Selecting a Style
Page 42

42
The following screen will be displayed showing you the various style groups to the right side of the screen
(as highlighted below in Fig. 50) –
Fig. 50. Style Groups display
As you can see from this example, the current style selected is from the BALLAD style group (shown on
the right side of the screen) and the style’s name is 8BEAT_1 (selected on the left). Notice that the top part
of the screen remains the same, showing you t he style information and voice information at a glance.
• To choose a style, touc h the style gr oup where you believe the style you want to use is (for this example,
BALLAD was touched). The first 10 styles in the BALLAD group are displayed to the left side of the
screen. By turning the data wheel or pressing the ENTER/PAGE button or repeatedly touching the
BALLAD style group icon, you can access the next pages of BA LLAD styles (styles in groups of 10 will
be displayed at once). Once you find the style you want, to uch its corresponding icon on the screen.
Please note that an hour glass maybe displayed temporarily – why? The SD 9 PRO uses
AUDIO styles (which have live audio drums and guitars) and so wheneve r an Audio
style is loaded, the corresponding audio drums and guitars of the style need to be loaded
as well, hence the extremely short delay. Once loaded, the top part of the screen will be
updated showing you the new style selection. The voice will also be updated if the
VOICE TO ABCD is turned on (style is automatically assigned voices that are called up
as you change from variation A-D. This will be explained in details below under 4.F
Voice assigned to Variations ABCD – Page 50).
• You can now press EXIT to return to the default screen once more. Notice the updated page!
KETRON SD9 Manual & Tutorial
Page 43

43
4.D - THE RECOMMENDED WAY TO PLAY AND FULLY ENJOY THE STYLES (AUTO TRACKS)
K.START
K.STOP
STATUS/MODE
OFF
OFF
Nothing happ ens
button
ON
OFF
Style starts
keyboard.
OFF
ON
Style starts
released, the style
To better explain the style functi ons and ho w a nd when to us e what, we have provided the image a bove of the SD9
PRO’s style control buttons (hard buttons). We have also relabeled some so that others who have used other
manufacturer’s arrangers are comfortable with the ‘terminology’ used by KETRON.
• To play the style you just selected properly: Press the K.START (Key Start/SYNC START) button. When this button is on, the style
will start playing with complete backing once you play a key to the left of the SPLIT
point (or any key if the PIANIST button is on [full keyboard mode]). You can also simply
press the red START button if you want to hear drums only – until you play a chord to
bring in the r est of the arrangemen t.
K.STOP & K.START both work this way –
on chord section
with Keys. To
start the style,
you will have to
either manual l y
press any of the
Intro/Fill/Start
playing as soon
as a chord is
played on the
playing as soon
as a chord is
played on the
keyboard -
however if a
chord is played
for less than 1
second and keys
are released, the
style stops. If a
chord is played
for longer than 1
second and t hen
the keys are
KETRON SD9 Manual & Tutorial
Page 44

44
continues
playing. Very
ON
ON
Style only plays
stops playing.
useful when
adding start/stop
effects o r
repeated manual
breaks while
playing a tune.
when chords are
played on the
keyboard. If the
keys/chor ds are
released at
anytime, the style
Now press any of the INTRODUCTION (INTRO) buttons (Intro 3 would be more
musical and in some styles, has lead parts as well built into the tonality changes) and the
SD9 PRO will play the INTRO#3 of this style after you play a chor d to the left of the
keyboard split point (or anywhere on the keyboard if PIANIST mode is on).
Press ARRANGER A (VARIATION A) to start your song. As you progress into a verse,
now select ARRANGER B (VARIATION B) ... etc. C & D are busier and better used
for the endings of songs or as you climax into your song. Also note some ‘Live’ styles
have 8 variations, instead of 4! In such cases, you can press any of the ARRANGER
buttons repeatedly to access yet another variation associated to the style. A style wi t h 8
variations (instead of 4) can be distingu ished from the others by a number associated with
the variation part (e.g. A-1, A-2, B-1, B-2, C-1, C-2, D-1 & D-2) which will be d isplayed
in the style box at the top left corner of the screen as shown below –
Fig. 51. Distinguishing styles with 8 Arranger Variations/Sections from those with only 4
In this case, while the style is playing say Arranger A-1, by pressing the arranger A
button once more, the ne xt var ia tio n [A-2] can be accessed. For most styles, the part with
the most prominent variation ap plied to it is the Live Audio drum, where the 2
includes subtle drum fill ins and some sliding bass notes!
KETRON SD9 Manual & Tutorial
nd
variation
Page 45

45
Press ENDING 3 - same button as Intro but works as such – if the style is not bein g
played and you press it, i t works as an INTRODUCTION. If the style is being playe d and
you press it, it now wor ks as an ENDING (unless the REINTRO is on, in which case if the
style is playing, it always acts as an INTRO).
You can use the TEMPO (SPEED/BMP) buttons to slow down the style or speed it up.
The audio live, drums and audio live guitar are right there behind you with no chan ge in
pitch!
The HOLD button allows you to play and release a chord and the SD9 PRO will still
maintain tha t chord … until a new chord is played. If the HOLD button is off, the chord
is released as soon as you lift your fingers off the keyboard (chord section).
RESTART – allo ws you to restart the style at any given time. This is very useful
especially if you have a vocalist that cannot keep to time and you have to follow him/her
instead!
FILL – This b utton introduces a fill in as you are playing (where the drummer or/and
bass player or/and other musicians i ntroduce an abrupt variation into the music. This is
usually use d to move from one part of the music to another, for an example going fr om a
verse to a chorus of a song. There are 4 fills so depending on what arrangement you are
on (A-D), the correspondin g Fill in (1-4) will be heard.
BREAK – This button introduces a break as you are playing (where the drummer or/and
bass player or/and other musicians stop playing) and are lead back in by a drum fill. This
is usually used to move from one part of the music to another, for an example going from
a verse to a chorus of a song or introduce a solo musician or climax of the song being
performed. There are 4 breaks so depending on what arrangement you are on (A-D), the
corresponding Break (1-4) will be heard.
• AUTO FILL & BR EAK – This is a new and innovative feature introduced b y
KETRON in the SD9 Pro. By pressing and holding down the FILL or BREAK
button on the panel, the style randomly selects and pla ys fi ll ins and breaks
while you are playing. This eliminates redundancy and always leaves the
performer wanting mor e as they neve r know what to expect.
Now let’s explain some of the SOFT style controls found on the bottom of the screen (the others that have
intentionally been skipped in this section [such as BASSIST & MODELLING] will be exp lained in their
relevant chapters below on page 68, due to the extensive information involved in these sections). The
bottom right corner of the screen displays the current page you are on. Since there were too many controls
to list below the screen, they were sub divided into 3 pages as shown -
KETRON SD9 Manual & Tutorial
Page 46

46
Fig. 52. Style Control Page 1/3
TO END:- To uch this when you want to e nd a style within a measure or 2 max. This is
used in place of the regular ENDINGS (1-3) when a sudden but clean ending is needed
… e.g. your host comes on to the micr ophone whi l e you are p laying and you have not
quit gotten to the end of the song or a comfortable spot to press that ENDING1 (which by
the way would still end in about 3 measures).
REINTRO:- KETRON have added this feature (demanded by many over the years). As
the style is playing, you may want to play the I NTRO line once more and so by pressing
REINTRO:- (on when yellow), if you press any of the INTRO buttons, the INTRO (and
not the ending as usual) will be played once more. Once the INTRO is played, the style
will return to the variation it was playing just before the INTRO was pressed (unless
while the INTRO is being played, you press a different variation button).
FILL & DRUM IN :- Instantly mute the drums but as soon as you press either of the
FILL or BREAK buttons (or touch either FILL or Break icons on the screen), the drums
come right back in with a roll. This effect is great for re-creating the ‘live’ feel especially
with songs that have a ‘gentle’ ve rse and then a great dru m roll that brings you into the
chorus!
Page 2/3 (Touch page “1/3” icon to move to the next page ... 2/3). Your screen should look like this:-
KETRON SD9 Manual & Tutorial
Fig. 53. Style Control Page 2/3
Page 47

47
This screen gives you di rect access to the 4 FILL ins and 4 Breaks of the Arranger. The panel only gives
you access to one fill and one break at a time – however, when this button is pressed, the FILL/BREAK
you hear depends on the Arranger/Variation that is being played before the button was pressed (as earlier
mentioned above). So, if you were playing Arranger A and you press the FILL in button, Fill 1 will be
heard. If you were playing Arranger B and you pressed the BREAK button, BREAK2 will be heard. If you
were playing Arranger C and you pressed the FILL in button, FILL 3 will be heard.
Page 3/3 (Programmable parameters).
When you press the page button (2/3), page 3 will be displayed and looks like this –
Fig. 54. Style Control Page 3/3
The first 3 soft touch buttons at the bo ttom of the screen are also accessible as described below under (4.J –
STYLE VIEW – DRUM on Page 60). By havi ng them here right at your finger tips, it means you have
direct access to these functions without digging into menus and pages to find them. The beauty of the SD9
PRO is that this same page offers you 5 Programmable soft touch icons (USER TAB 1-5) which you can
assign to a ny of the funct i ons within their menu. Let’s explain each of these icons and their functions:-
FILL TO ARRANGER:- As the name implies, as you play a style, if you press the
FILL IN/BREAK button, the Arranger/Variatio n automatically jumps to the next one
once the fill is over. Once it gets to Arranger D, it cycles back to Arranger A.
AUTO FILL:- If you turn on the AUTO FILL (yellow) , then as you play the style and
switch form Arranger to Arranger (Variation to Variation), the style automatically plays a
Fill in between changes so that it sounds flawless and more pro fessional. The other way
to achieve this same result would be to press a FILL in and then while the fill in is still
playing, press the next Arranger (variation). With AUTO FILL on, t his saves you one
extra button to push – which means you can focus more on playing and less on navigating
the SD9 PRO
After Fill:- The fill In is automatically ac tivated if you press down hard on the keys. This
is the best a s your fingers never ha ve to leave the keybed. With this turned on ( yellow),
simply play and press ha rd when you want to activate the fill in!
USER TAB (1-5). Touch any of these to display 30 (in groups of 6) functions you can
assign to these buttons. Turn the data wheel to display the next set of 6 functions and
when you see a function you want to assign to any of these, simply touch it and it will be
assigned to t hat particular soft touch button. Repeat thi s for the othe rs. When done, press
SAVE – CUSTOM START UP (the SD9 PRO will save this START UP setting so y ou
KETRON SD9 Manual & Tutorial
Page 48

48
no longer have to repeat this each time the keyboard is turned on. FACTORY START
UP will revert to all FACTORY SETTINGS so leave this … unless you want to RESET the
SD9 PRO to factory settings).
If you need to program and use more settings, you can do so by programming functions
you can control with your feet, using the opt i onal FS6 (6 s witches) or FS13 (13 switches)
effects pedal. To do so
• Press the MENU button on the panel -
Your next screen should look like this –
KETRON SD9 Manual & Tutorial
Fig. 55. Main Menu
Page 49

49
• Touch FOOTSWITCH to display the foot switch programming page as sho w
below
Fig. 56. Footswitches
• Now touch t he switch yo u want to assign a function to (e.g. #10) and a drop
down menu showing all relevant functions you can assign to switch #10 are
displayed. You can use the data wheel to scroll down the list to display other
functions not currently displa yed on the first page.
Fig. 57. Programming Footswitches
• When you see a function you want to assig n to switch #10, touch it and it is
automatically assigned to that switch (the programmed function is now
displayed right below the relevant switch).
• Press EXIT to get back to the main footswitch page and repeat the above for the
other switches you want to progr am. Please note that alt hough the diagram
shows the FS 13, it also applies to the FS6 (sim ply use the first row of s witches
(1-6) and ignore the rest)!
• When done (wh ile still in the FOOTSWITCH page), press the SAVE button
and touch SAVE to save the footswitch settings so you don’t have to repeat this
process each time the SD9 Pro is turned off and back on. You can save up t o 4
footswitch settings (SET 1-4) as shown below the screen.
KETRON SD9 Manual & Tutorial
Page 50

50
4.E - YOUR BEST VOICES & STYLE VARIATION
You can assign voices to each of the style arrangements/variations such that as you play, you do not have to worry
about manual ly changing the voic es of the lead/right hand (One To uch Setting). As you switch from style variation
to variation, the lead voices will chan ge automatically so you just focus o n p laying. Regardless of which voice is
selected, you can always manually override them by simply selecting another voice.
Fig. 58. Voices and Variation
From the main STYLE VIEW page above, touch the VOICE & VARI (Variation) button on the bottom of the
screen to display the following page –
Fig. 59. Voice and Variation Con trol
This page has 2 main functions which we will explain in detail – VOICE TO ABCD (OneTouch voices displayed at
the center of the screen – first row) and VARIATION (muting/playing arranger sounds so the style sounds less or
more busy depending on your application - displayed at the center of the screen - second row).
4.F - VOICES ASSIGNED TO VARIATIONS A, B, C & D (SIN GLE TOUCH SETTINGS)
As previously mentioned above , you can set up the SD9 PRO such that certain voices are assigned to the arranger
parts and the arranger changes these voices for you automatically as you perform. For this to happen, you must turn
on the VOICE TO ABCD by to uching it on this screen (it will turn yellow). Using this example, the voices that
have been assigned to the various arranger/variation parts of this 8BEAT1 style are as follows:-
• GRAND PIANO - Assigned to Arranger/Varia tion A. When you play Arranger A, the lead/right voice
automatically selected will be the Grand Piano.
KETRON SD9 Manual & Tutorial
Page 51

51
• MARK - Assigned to Arranger/Variation B. When you play Arranger B, the lead/right voice automatically
selected will be the Mark piano.
• PIANO&STRINGS - Assigned to Arranger/Variati on C. When you play Arranger C, the lead/right voice
automatically selected will be the Piano & Strings.
• POP ORGAN - Assigned to Arranger/Variation D. When you play Arranger D, the lead/right voice
automatically selected will be the Pop Organ.
Tips:- This function can be used in various applications – for an example, you can have these 4 voices as your main
(best) voices for this style of music or … for the evening. Now turn OFF the VOICE TO ABCD such that as you
switch arr angers, the voice does N OT change a utomatically. In thi s mode, you can now play and touch any of these
4 voices at any time. Use them as your 4 favorite voices for this style. You can also have these 4 voices set up such
that if you are playing with any bac king track/Midifile, simply touch the voice you want a nd play along. Remember
that your edited/created User voices can also be used in these 4 locations!
4.G - CREATING YOUR OWN VOIC ES FOR EACH VARIATION (Single Touch Setting)
Remember that these are the voices that have been set by KETRON for all the factory styles. You can always
change these and use your o wn voices to be associated with an y st yle (factory or yours – USER). To do this:-
• First select the style whose lead voices you want to modify (Factory or User style) and go back to the
VOICE & VARI screen as shown above by touching VOIC E & VARI from the main style screen.
• Touch and hold for 2 seconds the voice you want to replace (e.g. the first voice - Grand Piano).
• The SD9 PRO will automatically display the VOICE selection page for you to select the ne w vo ic e you
want to put into the selected location. Select a voice as mentioned above in 1.A – ACCESSING AND
USING VOICES).
• Press EXIT when done and your new voice will be in place of the GRAND PIANO.
• Repeat the above process for all the voices you want to replace.
• When done, press the SAVE button on the right panel t o save the new style with your voices – remember
you cannot overwrite a factory style so this style will now be saved as a USER Style in the same group as
the previous factory style.
KETRON SD9 Manual & Tutorial
Fig. 60. Saving User Styles
Page 52

52
• Make sure “USER STYLE” is highlighted (in yellow) and NOT REGISTRATION . If not, touch it so it is
highlighted.
• Touch-
SAVE – if you want to maintain the same factory name
SAVE AS – if you wan t to give thi s s tyle a ne w name in the next screen displayed.
Fig. 61. Naming User style
• Touch ENTER in the next screen after naming the style to save it.
CANCEL – To abort this operation
• To use this style with your Voices, from the ST YLES page, t ouch USER, go to the group your style resided
in and touch it. It will now be set to play … with your voices!
4.H - STYLE VARIATIONS - MAKING STYLES LESS OR MORE BUSY
The variation section of this p a ge allows you to instantly mute st yle parts so that the style is less redundant or busy,
especially if you bring these parts in and out of the style as you play. This is a very useful feature if you are a
professional player and play a lot. In many cases, you will want certain style parts (e.g. STRINGS) not to play
because you want to play a SOLO using … STRING S and you do not want your STRINGS to clash wi t h those
being performed by the style.
Fig. 62. Style Variation (on/off)
In this case, s imply touc h any of the VARIATION pa rts to turn them on (denoted by the red underline) or off (grey
underline). In the example above, they are all ON so all the style parts are heard. The first 3 voices are associated
with chords 3, 4 and 5 of the style (which you can see in more detail under the VIEW screen), while the last voice is
the Live Audio Guitar that is associated with this arranger section of the style. As you switch between Arranger A,
B, D and D, notice how the sounds related to the variation parts (chords) and Live audio Guitar also changed
respectively - depending on the style. This feature allows professionals to mute excessive musical phrases in order to
KETRON SD9 Manual & Tutorial
Page 53

53
better express themselves by playing more parts live without havi ng the style get in the way ... while also allowing
musicians who are growing th e c a pability to sound complete and live – with a little help from the SD9 PRO.
NB:- The 3
rd
VARIATION part/voice (this location is currently occupied by “Strings Ens” in the above example)
can be replaced with a variation for the DRUM/Groove instead. This is discussed in more details below under “4J –
Features dedicated to Drum. Bass Chord’ section” on page 60.
4.I - MAKING SLIGHT MODIFICATIONS TO STYLES IN STYLE VIEW
So, you’ve found a style that you li ke, however you wish to change so me of the sounds used in the style or volume,
panning or effects used in some of the parts or use the provided KETRON library of Live Audio Drums or Live
Audio guitars within a s tyle. How do you proceed to do just that without having to remodel or rebuild the style from
scratch? You are not stuck with the styles the way they are voiced, balanced and EQed from the factory. You can
easily make these modifications mentioned above and save them a s a USER STYLE for future recall and use – just
as a factory style. Remember that although you could be ma ki ng modifications to a FACTORY style, when you go
to save it, the SD9 PRO will save the style as a USER style so you will always have you factory styles the way they
were from the factory and you can always go back to them at a future date.
From the main style page, touch STYLE VIEW icon to display the various style elements as shown below -
Fig. 63 . Style Sele ction Fig. 64. Style View
Notice again that the top part of the screen still shows the current condition of the keyboard (styles used, voices
used, tempo … etc) while the middle shows you the vari ous parts of the style and corres ponding elements (volume in
this case, Pan values, Reverb, chorus and Effects amounts … etc).
Let’s try and interpret the information displayed on this screen a nd how to make the relevant change s we want in
this section. The DANCE_1 style is made up of:-
• LIVE DRUM:- This box displays either the drum kit or audio live drum used. In the example above, the
drum used is “FOLK_POP_82” which is an Audio Live drum kit/wave file as shown in the first b ox (center
part of screen). Here is how you can distinguish between the drum kits or audio drums used:-
“Small letters” – Midi drum kit (e.g. Folk, Room … etc)
“Capital letters” – Audio Drums (Sliced) (e.g. 8 BALLAD 2, BLUES)
KETRON SD9 Manual & Tutorial
Page 54

54
“Capital letters ending with a number [or (L)] – Live Audio Drums (wave file –
number denotes the original tempo/bpm the drum loop was recorded at), (e.g.
16BEAT_76 (L), BALLAD_104 (L) … etc.
• You can touch the Live Drum box to display a list of Midi drum kits, Audio Drums or Audio Live Drums
to choose fr om to change the drums of the style . Turn the da ta wheel to d isplay more and touch t he one you
want to use. Press EXIT to return to the style view screen and the new Live Drum will be shown in the
Live Drum box.
Fig. 65. Style View – Live Drums Fig. 66. Live Drum Selection
Note that when you select a Live Audio Drum, regardless of which Arrangement you are in, the selection
automatically assigns the various Live Audio Drums for all the other sections. So if you are in Arranger A,
and you select a Live Audio Drum to use in Arranger A, automatically, the corresponding Live Audio
Drum elements for Arranger B, C and D (and A-2, B-2, C-2 and D-2 for styles with 8 variations) will be
selected so you need not repeat this selection for the Arranger B, C … etc.
• Groove/Audio Drum:- Mostly p ercussionist playing a “Bachata” groove as shown in the example below
in Fig. 76.The Groove/Groove Bank box is also an audio file but time-sliced – denoted with small let te rs.
This could also be an Audio Drum (Capital letters), depending on the selection made as shown below. Turn
the data wheel to display even more Grooves and touch the one you want to us. Press EXIT to return to the
style view s creen and t he new groo ve will be shown in the Groove box.
Fig. 67. Style View – Groove Fig. 68. Groove Selection
KETRON SD9 Manual & Tutorial
Page 55

55
If you are in Arranger A, and you select a Live Audio Drum to use in Arranger A, automatically, the
corresponding Live Audio Drum elements for Arranger B, C and D (and A-2, B-2, C-2 and D-2 for styles
with 8 variations) will be selected so you need not repeat this selection for the Arranger B, C … etc.
• Bass:- A bass player playing a “Folk Bass” guitar as show in t he Bass box in Fig. 69. If you wa n t to change
the bass instrument used, simply touch the Bass box to display other bass instruments to select from. As
you see, the BASS SFX voice group is lit as this is where all the bass sounds reside. Turn the data wheel to
display even more bass sounds and touch the one you want – then press EXIT to return to the style view
screen. Note that the notes that were being played by this bass part remain un-altered. Only the bass
instrument will change! To change the not es, you will have to us the STYLE EDITO R (Page 77).
Fig. 69. Style View – Bass Fig. 70. Bass Selection
• Low1 & Low2:- 2 Left Voices/Instruments “Soft” pad and “Jazz Piano” of the Manual chords parts which
you play live with your left hand as you play the arranger or as stand alone voices. Next to them is the
octave of each instrument (which you can change by touching the value and turning the wheel) and their
corresponding volume (which again can be changed by touching the value and turning the data wheel).
This was explained in greater detail under “2.E - LOWER VOICE” on page 21 above. If you want to
change the lower instruments used, simply touch the Low1 or Low2 box to display other instruments to
select from. As you see, the corresponding voice group is lit as this is where all the sounds currently used
reside. Turn the data wheel to display even mor e sounds a nd touch the one you want – then pr ess EXIT to
return to the style view screen.
Fig. 71. Style View – Lower 1 & Lower 2 Fig. 72. Lower 1 and Lower 2 Voice Selection
KETRON SD9 Manual & Tutorial
Page 56

56
Tips:- If you intend to use the lower voices manually (that is without using the style) or you want to keep these
voices fixed so that when you switch from one style to another, these voices remain the sa me, you can d o so by
touching the LOWER icon in the style view screen to display LOWER re la te d functions - and touching
VOICE LOCK in t he next screen (it turns yellow showing i t is on).
Fig. 73. Style View – Lower Fig. 74. Lower Functions & Tools
This way, the LOWER 1 & LOWER 2 voices will remain constant, regardless of what style is selected for us.
• Chord 1 ~ Chord 5:- T hink of these a s musicians “Chord 1/Peter” playing the Mark Piano, “Chord
2/Nancy” playing Steel guitar … and “Chord 5/John” playing Iperpad on the synthe s i zer. These are
melodic chords you control using the a rranger as you perform. “-----“ denotes no voices being used wit hi n
the chord track. To change any “musician’s”/chord’s instrument, simply touch the related icon to display
the current voice and its corresponding voice group. Then select the new voice you want to use in the next
page displayed instead (as shown in Fig. 76). Press EXIT to return to the style view page. Note that the
notes that we re being played by this chord part remain un-altered - only the instrumentation will change!
You can turn the data wheel to display even more voices within the selected Voice group.
Fig. 75. Style View – Chords 1 - 5 Fig. 76. Chord Voice Selection
• Live Guitar:- An Audio Live Guitar strum or pick that follows you no matter what chords you play or how
fast or slow you alter the tempo of your performance. In this example, the Live Guitar being used is
“16FOLK_8” displayed in the Live Guitar box shown with it s corresponding volume in the next box. To
change the Live Audio Guitar, simply touch the Live Guitar b ox to as shown in Fig. 77 to display the
current list of Live Guitars to select from in Fig. 78. Then select the new Live Guitar you want to use
instead and press EXIT to return to the style view page. Note that since these are Live Audio Guitars, when
KETRON SD9 Manual & Tutorial
Page 57

57
you change them, the structure, guitar instrument, strumming t ype, melodic lines … etc of the guitar
changes too as these were recorded by live musicians in a studio environment! You can turn t he data wheel
to display even more Live Audio Guitars to choose from within the select ed group.
Fig. 77. Style View – L iv e Au d io Guitar Fig. 78. Live Audio Gui tar Selection
Tips:- Play the style whi l e browsing through the Audio Live Guitars so as to be able to
listen to them since sometimes, it is not possible to simply know how a live guitar will
sound just by its name.
The Live Audio Guitars available are described as such:-
• Names ending with a number (e.g. FLAMENCA_1, FLAMENCA_2) –
Different Flamenca guitar strum t ype s.
• Names ending with (ST) (e.g. FOLK_BALL_1(ST) – Stereo Guitar (best
appreciated with the SD9 Pro plugged into a stereo sound system so you hear
the individual parts coming out of both L and R speakers). A mono/single
connection will make it harder to no tic e such Live Guitars)!
• Names ending with (6th)or (7th) (e.g. FUNK_3(7th) – Guitar Strum includes a 6th
th
or 7
tonality element within.
• Names ending with RIFF (e.g. SWING_RIFF) – Guitar strum includes a riff
(minimum chord progression within which makes it more ‘lively’).
• “NO LIVE GUITAR” – No Live Guitar is selected.
This initial VIEW screen is the VOLUME screen (where you can regulate the volumes for all the individual parts)
and by touch ing any of the volumes associated with the instrument, you can adj us t each instrument’s volume
accordingly.
KETRON SD9 Manual & Tutorial
Page 58

58
Fig. 79. Style View - Single or Global Edit
The adjustments being made to any of the style parts can be made to impact just the current Arranger /Variation (A
in this case since the top box displays [A] and on the panel, Arranger/Variation A is lit up - so Arranger A is being
modified) if SINGLE is selected on the screen (below the CHORD 5’s volume box). If you want to make these
adjustment such that t hese changes are also carried out in ARRANGER B, C and D (such that you do not have to
manually go into these separately and adjust all over again), then touch the SINGLE icon so it toggles to
GLOBAL (yellow) before making any adjustments. When GLOBAL is displaye d, any cha n ges yo u ma ke will no w
impact all the ARRANGER/VARIATION parts together. SINGLE is useful if you only want to make changes t o
one of the variations/arrangements only without impacting the other parts.
Tips:- To make changes to the fills and breaks, f irst press the corresponding Ar ranger butt on, then press the FILL or
BREAK … so if you want to make changes to Fill 2, press the Arr. B button, then press the FILL (Fill 2 will be
displayed in the top left style box).
As mentioned before, the first STYLE VIEW page displays the VOLUME of the various style parts. How do you
access the other parameters and change their values as you see fit? Simple. Just touch the parameters below the
screen as shown below in Fig. 80a.
PAN (VOLUME LEFT OR RIGHT):- Touch this to display the screen where you can adjust how much of the parts
you want coming out of t he left or r i ght speaker. L shows th e value out the left spea ker and R shows the value out of
the right speaker. It helps to create a great surround environment when you partially pan the instruments left and
right about +/- 40.
REV (REVERB):- Touch this to adjust how much reverb you want applied to each part (0-127).
KETRON SD9 Manual & Tutorial
Fig. 80a. Style View- Effects on Style parts
Page 59

59
CHO (CHORUS):- Touch this to adjust how much CHORUS you want applied to each part (0-127).
EFX (EFFECTS):- Touch this to select which parts you wa nt routed through the EFFECT S bus (EFX = ON/OFF).
The box below the LOW2 box will display the current effect type. Touch it to change the effect (remember you can
use the data wheel to scroll through other effects below and touch the one you want – then press EXIT to return to
the STYLE VIEW – EFFECTS page). Touch EFX again to exit from the effects mode (not yellow).
Tips:- There is a special effect type (ROT OR) which can be selected from the drop down men u shown in
Fig. 80b below, by touching the effects box (1) and then turning the data wheel until you see ‘ROTOR’ in the drop
down menu – then touch ‘RO TOR’ to set the effect.
Fig. 80b. Style View- Effects Rotor assign Fig. 80c. Style View- Rotor on/off
Touch the EFFECTS box next to Chord 3 (as shown in Fig. 80c above) to apply this effect to the voice in Chord 3.
If you have not alr eady done so, you shoul d touch the voice in Chord 3 and switch it to an organ voice. Now, as you
play the style, you will notice how as you play, the organ’s Leslie effect gradually speeds up or slows down. You
may want to turn up the volume of Chord 3 a little more to truly experience and appreciate this feature.
This effect is effective only with C ho rd 3. It applies an automatic Lesslie Slow/Fast effect onto the sound sele c te d in
chord 3 based on how you’re playing, so try and use Organ Sounds for this chord if you intend to use this effect.
Touch
MUTE:- Touch t his icon when you want to mute individual parts of the style. With the MUTE o n (yellow), when
you touch an y of the volumes related to any of the style parts, that track is insta ntly turned off (mute). A “M” will be
displayed in it’s corresponding volume box as shown in Fig. 81 below.
Fig. 81. Style View- Muting Style parts
In the exampl e above, C hord 1 has been muted (“M” in volume box). Touching the volume box once more will turn
the track back on and return it’s volume to what it was before it was turned off (Muted). Touch the MUTE icon
KETRON SD9 Manual & Tutorial
Page 60

60
below the screen once more to return to the VIEW –VOLUME – where touching the volu me box and turning the
data wheel will allow you adjust the volume of the selected track.
4.J - FEATURES DEDIC A TED TO – DRUMS, BASS, CHORDS
Now in this section (still from th e STYLE VIEW page), we will discuss in more deta il some of the amazing control
and features the SD9 PRO offers from KETRON. You will notice that some of these features are unique to the SD9
PRO or KETRON instr uments in general and the way you set up their settings can set you apart from others with the
same keyboard. Despite a lot of automation available to you, you can still manually control many of the automatic
elements thus putting a human feeling behind an electronic keyboard.
Fig. 82. Style View – Control Elements
• Touch the DRUM icon to a ccess the following scre en and functions associated with the DRUMS (DRUM
turns yellow):-
Fig. 83. Style View - Single or Global Edit
Vari 3 To Groove:- As mentioned above in “4H –STYLE VARIATION” on page 52
section, the 3
rd
variation can be programmed to be for Drums/Grooves and not a chord
track of the s tyle, meaning you wil l be able to turn on/off busy drum and percus s ion parts
associated with the style. This ha ppens when you turn o n the Vari 3 To Groove on
(Variation 3 on the main Voice & Variation screen gets replaced by the GROOVE).
KETRON SD9 Manual & Tutorial
Page 61

61
Fig. 84. Variation with Voice in location 3 Fig. 85. Variation with Groove in location 3
This way, you now have 2 musical V ARIATIONS t o use and 1 percussive/drum
VARIATION. This is very useful especially for LATIN styles and beats that tend to have
a lot of percussive parts. There comes a time when muting some of this at the touch of a
button creates room for musicians to fully express themselves without competing wit h the
SD9 PRO! Of course there are those who would prefer the keyboard played all the parts
while they lay down a solid lead-instr ument line.
AUTO FILL:- If you turn on the AUTO FILL (yellow), then as you play the s tyle and
switch form Arranger to Arranger (Variation to Variation), the style automatically plays a
Fill in between changes so that it sounds flawless and more pro fessional. The other way
to achieve this same result would b e to press a FILL in and then while the fill in is still
playing, press the next Arranger (variation). With AUTO FILL on, t his saves you one
extra button to push – which means you can focus more on playing and less on navigating
the SD9 PRO
FILL TO ARRANGE:- As the name implies, as you play a style, if you press the FILL
IN/BREAK button, the Arranger/Variation automa t ically jumps to the nex t one once t he
fill is over. Once it gets to Arranger D, it cycles back to Arranger A.
Aftertouch Fill:- The fill In is automatically activated if you press down hard on the
keys. This is the best as your fingers never ha ve to leave t he keybed. With this turned on
(yellow), simply play and press hard when you want to activate the fill in!
Audio Drum/Drum:- Touch thi s to change t he drum kit being used or select an Audio
Live Drum to be used wit h the style. Touch the relevant following boxes and turn the
data wheel to change the Volume and Reverb amount of the Drums.
• LIVE DRUM – Used to select preset Equalizer curves. Touch this box to
display preset EQ curves.
KETRON SD9 Manual & Tutorial
Page 62

62
Fig. 86. Live Drum select
Touch the curve you wo uld want to apply to the Audio Drums.
Depending on which set ting you set, you may enhance sa y t he
bass or mid or high frequency of the audio drums. When you
find a suitable setting, press EXIT to return to the D RUM
settings screen.
• Drum Boost:- Touch this icon to instantly boost up the volume of the drums.
AUTO CRASH – Sound hear whenever a fill in is pressed or when you switch from one
variation to another.
• INTRO AUTO CRASH: -When on (Yellow), whenever an INTRO is played, a
‘crash’ is heard at the end of the INTRO and just before any of the
Arranger/Variations are heard. You can touch the ‘KEY’ box to change the
instrument that is heard (CRASH/RIDE) by turning the wheel once selected.
• FILL AUTO CRASH: -When on (Yellow), whenever an FILL IN/B REAK is
played, a ‘crash’ is heard at the end of the FILL/BREAK and just before any of
the Arranger/Variations are heard. You can touch the ‘KEY’ box to change the
instrument that is hear d (CRASH/RIDE) by turning the wheel once selected.
TEMPO RANGE (MIN/MAX):- Touc h t his to manual ly set the maximum and
minimum BPM/TEMPO for the selected style. Since the SD9 PRO uses Audio Drums,
this feature is very handy when you want to limi t the range of the style just before the
audio component begins to distort (once the audio drum is stretched too far).
• Touch DRUM MIXER to access the following screen and functions associated with the Style’s Midi
DRUMS (DRUM MIXER turns yell ow):-
Fig. 87. Drum Mixer and Edit
KETRON SD9 Manual & Tutorial
Page 63

63
From this screen, you can now
• Touch the individual i nstruments t o mute them (yellow bar appears below their
names)
• Touch the volume (VOL) column and use the data wheel to increase/decrease
the volume of individual drum parts (e.g. increase the volume of just the snare
drum or reduce the volume of the high hat … etc).
• Touch the reverb (REV) column and use the data wheel to increase/decrease the
reverb level of the individual drum parts (e.g. increase the reverb on the latin
percussions, reduce it on the kick drum all together) ... etc.
SPEAKING OF D RU MS … you can also play manual drum kits on the screen of the
SD9 Pro. Simply press the DRUM button on the right si de of the panel (light comes on)
and play the drums on the screen (it’s preferable if you do this from the main screen so
you are not lost).
Fig. 88. Dr um Kit
To play the entire drum kit on the keybed, touch the MANUAL icon on the drum screen.
Now, you can use the keybed to play the entire drum kit (as described by GM1 and GM2
protocall).
To change the drum kit of the manual drum set you are playing on the ke yboard or screen
• simply touch the current drum set s hown below the screen (in this case
Standard_sd) and pick a new drum set from the pop up list displayed by
touching it on the displayed list. Y ou can turn the data wheel to display even
more drum kits if the one you’re looking for is not initially displayed.
Fig. 89. Drum Set select
KETRON SD9 Manual & Tutorial
Page 64

64
• You can also remap the current drum kit and make your own drum kit. To do
this, simpl y touch the drum instrument you want to change (e.g. K i ck drum) on
the screen (a small red square will be displayed on the instrument touched) as
shown on the kick drum below.
Fig. 90. Drum Set tune
• Touch the remap box and select a new kick drum to replace the current one
from the pop up list shown (or whatever drum instrument you selected on the
screen).
• Touch BASS to access the following screen and functions associated with the BASS (BASS turns yellow):-
KETRON SD9 Manual & Tutorial
Page 65

65
Fig. 91. Style View – Bass Parameters
The left side of the screen now shows some very interesting BASS features under 2 columns – ARRANGE (where
you can use these features with the STYLE’S bass/ auto bass) and MANUAL (with you playing bass manually on
the left side of the split point).
Let’s exploit the ARRANGE (ARRANGER/STYLE) bass features:-
ALTERNATE:- This is a special mode for the a lte r nate Bass that adapts it to the chord
change according to the correct rule of musical harmony. For example, by not repeating
the basic note or the fi ft h that you have played. This function works only in Style s where
the alternate Bass is programmed with tonic and fifth intervals.
LIVE BASS:- This function synchronizes the Bass immediately regardless of when the
chord is played within a measure. In other words the Bass plays immediately when you
play the not e without waiting for the “down b eat” of the measure. When this is off, the
bass not is only heard on the down beat of the style’s measure.
VOICE LOCK:- When on (yellow), this locks the bass sound so that regardless of which
style you pick or keyboard setting/Registration you load, the ba ss instrument does not
change.
TO ROOT:- When on (yellow), the arranger takes all the melodic notes of the automatic
Bass and plays them as a basic note of the chord. When playing a song, you can turn this
on and off at various parts of the song to emulate a live-band feel.
On the left side of the panel is a button calle d LOWEST.
When on (lights up), the SD9 PRO assigns the lowest note of the chord to the Bass over and above the
basic chord played. In this way the Bass will play in inversion. T his again is a tool you can use to bring
more life to your music – especially when used sparingly and alternating with TO ROOT in the screen
above.
KETRON SD9 Manual & Tutorial
Page 66

66
As for the manual BASS feature, this was already described above in details under 2.H– Manual bass Page 24 –
PLAYING LEFT HAND BASS.
This same BASS screen can also be accessed by pressing and holding down the
MANUAL bass button on the left side of the panel
• Touch CHORD to access the following screen –
Fig. 92. Style View – Chord Parameters
The first column on the left provides access to the chord settings. You may select either NORMAL or RETRIGGER
modes.
• In Normal mode a chord plays during the basic measure as programmed.
• In Retrigger mode the chord is heard every time it is played – i.e. the ind ividual chord notes a re
played regardless of where you are as you play the style.
The second column gives you access to the chord types, namely – CLOSED or PARALLEL. These chord settings
and modes only affect the Arranger/Accompaniment controlled chords (Chord1, Chord2, Chord3, Chord4, and
Chord5).
• In Close mode the chords ad apt the intervals to the next notes following the rules of conventional
harmony.
• In Parallel mode the notes of the chords programmed are transposed in parallel without changing the
intervals.
• At the centre of the display you will find the MO D E function that may be set
to EASY or FINGER modes.
• On Easy 1 and Easy 2 modes the instrument plays in standard mode recognizing the chord. Some
tones may also be obtained by not playing the full chord. For example, you may play a major
chord by playing only the tonic part. With the tonic plus the minor third you play a minor chord,
with the tonic plus the seventh you play a seventh chord.
KETRON SD9 Manual & Tutorial
Page 67

67
• On Easy 3 modes, single fingered chords are recognized so by playing a singl e note, (e.g. A, the
complete A chord is heard. To play a 7
in this case).
th
, simply press the note that creates the 7th chord (G and A
• On Fingered 1 a nd Fingered 2 modes the chord is recognized and played only according to the
notes yo u play.
• Variation to In/End – This allows you to be able to apply the insta nt muting or un muting of the
chord elements also within Intros and Endings from the main VOICE & VARI screen discussed above
in page XXX. When this is on (yellow), while playing any intro or ending, you can instantly turn off or
on the different chord parts which are associated to these icons. If this is off, then this feature only
works within the Arranger parts (A-1, A-2, B-1, B-2 … D-1 and D-2).
• V-TONE ON/OFF – Special sound with a round ribbon ‘tone’ automati cally generated along with the
sound to give it that rich effect.
• Touch LOWER to access the following screen:-
Fig. 93. Style View – Lower Parameters
There are 2 columns associated with both the LOWER1 and LOWER2 voices which are the two
sounds that can be assigned left of the split point of the keyboard (Left Hand Voice). Let’s describe
each function in full and how it ca n be of use to you:-
• H OLD START: When set to ON, the Lower1 or Lower 2 sounds will be held (sustained) as you play
a style. The setting is enabled for a ll the Styles. This is great when sustai ned sounds like PADS or
STRINGS are assigned to the left hand. This is what keyboard players would be playing in a live band
when a vocalist is singing, say a verse (soft).
• HOLD STOP: Whe n s et to ON, t he Lower1 or Lower 2 sounds will be hel d (sustai ned) even when the
style is not playing (or has been stopped). Hold STOP is generally always disabled, but could be used
in, say a style, where once the music ends, you still want the PADS to be sustained way after the
ENDING has been completed. Very useful for Orchestral/Theatric music.
• HO LD B REAK: When off th e LOWER voice is not heard (interr upted) when any of the BREAK
buttons are pressed while a style is being played. This could be useful if say you used a BRASS
instrument as one of the lower voices and want to use a break and want the horns to come to an abrupt
stop/end, especially with DANCE music.
• STOP MUTE: When this is set to ON, the LOWER voice is not heard when the style is not running.
• MUTE: Instantly mutes the Lower voice selected regardless of whether the style is on (playing) or
stopped.
KETRON SD9 Manual & Tutorial
Page 68

68
• LO WER + BASS -
o Touch once to turn on (yellow). W hen on, this functions only when the style is not running
(STOP) and allows you to play the manual Bass for the chord you are p laying, together with
the two Lower voices. This is very useful whe n the musici an wishes to play a solo
introduction before starting the automatic accompaniment. Once the Style starts however the
Bass will be controlled automatically by the Style according to the chords played.
o Touch once more to display “Bass Hold Lower”. In t hi s mode, when a chord is p layed (with
the style off), the bass note is sustained before fading out.
o Touch again t o turn off.
• VO ICE LO CK : Locks (freezes) the voices selected on the Lower/Left section so that regardless of
which Registration (Setting) or Style you select, the LOWER vo ices will always rema in the same
• P IA NIST & BASSIS T - to access the following screen:-
Fig. 94. Style View Pianist & Bassist
o Here you may use the Arranger in piano mode, P IANI ST (ON) … in other words eliminating
the split and extending the Upper section over the full keyboard (“Full Upper” mode). The
chord will therefore be recognized on the Left section but also over the full keyboard, and
whatever voice you select will be used through the entire keyboard.
o Also in this window, you may set the Arranger t o where yo u can play bass with your left hand
simply by touching BASSIST on the s creen - BASSIST(ON).
o The two modes, Bassist/Pianist, may only be used one at a time. They will now be described
in mo re d etail:
PIANIST
o Auto: In this mode, simply play 3 or more notes on the keyboard so that the chord is
recognized and once this happens, you can then play the melody with one, or at the most two
notes, without changing the chords of the Arr anger.
o Standard: In this mode you freeze the chord recognized with the Sustain Pedal so as to play
on the keybo ard without altering the tone of the Arranger. This is the t ypical way a piano
player plays anyway – pressing the sustain pedal when the notes being placed are in the
current chord just played.
o Sustain Pedal: When this par ameter is enabled (ON), the Sustain Pedal control on Pianist is
enabled once plugged into the SD9 PRO.
BASSIST
o The Bassist function allows you to play the Manual Bass on the left section of the keyboard
while controlling the Arranger and song line at the same t ime on the r ight section.
o This function has 2 playing modes: EASY and EXPERT.
EASY: This is the default mode of BASSIST. When you press BASSIST, the
Manual Bass is automatically selected for the left hand while chords are recognized
KETRON SD9 Manual & Tutorial
Page 69

69
by interpreting the note played by both the left (Bass) and the notes played with the
right hand. Simply play a chord of at least 3 notes on the r i ght sectio n for the
instrument to create an accompaniment which the SD9 PRO will play along with the
selected style. In this mode, you may also play a song line of no more than 2 notes
played together since 3 notes are automatically recognized as a new chord. This
interactive style of play allows a Piano player to play freely without l oosing their
original playing skills while playing the bass manually with the left hand.
o EXPERT: Expert mode is very similar to Easy mode, but facilitate d with the SUSTAIN
PEDAL. Play 3 notes to create a chord, then press the SUSTAIN PEDAL to freeze that chord.
Any other notes played (2, or 3 or 4 or …) do not alter the chord of the arranger until the
SUSTAIN PEDAL is released. Once the pedal is released, the next chord played on the
keyboard is immediately recognized and played. This is the most professional method that
allows a Piano player to freely express themselves without having to ‘learn’ a new/standard
way of playing the Arranger keyboard.
The Expert Mode takes a little bit of practice in order for you to know just when to press that
SUSTAIN PEDAL so as to lock the c hord, however it is well worth it since it allows you
great freed om to express yourself musically when pla ying the Song just as a Pianist would.
o SUSTAIN PEDAL: For both Pianist and Bassist modes, the Sustain Pedal op tion allows yo u
to enable/disable Sustain on the lead/Right hand voices when you press the pedal.
• BALANCE: - This is used to balance the volume between the STYLE and the Lead voice. Touch this
box and adjust the volume of the style with relation to the volume of the other instruments by turning
the data wheel.
• EDIT:- Touch this to access the new STYLE EDITOR. This is used to further edit styles (change and
record notes, velocity of notes …etc) or better still create a style from scratch. This is discussed in more
detail under STYLE EDITOR on PAGE 77.
4.K - ADDING ARPEGGIOS (ARPS) TO YOUR STYLES & MUSIC
This is a new feature covered in more depth below under LIVE MODELING, however, yes you can
add Arps and other instrument progressions (bass, piano, strings, brass … etc) to your existing factory
or user styles. This function can morph any c urrent style into a modern dance or techno style or add
fresh guitar strums horn lines ... etc to a rather boring style. This modificat ion is easily accomplished
through LIVE MODELING.
To do so, from the default screen –
• Selec t the style to which you want to modify and add an Arp to.
• Touch the LIVE MODELING icon on the screen to display the following screen below -
Fig. 95. Style Modeling
KETRON SD9 Manual & Tutorial
Page 70

70
• As you can see from the example above, the left side of the screen shows (in 3 rows) the various t racks
of the arranger. The BASS is the default track that is selected. Each of the tracks is highlighted in red
meaning it is on/active. If you touch any of the tracks, it can be muted (turns blue). This is especially
useful when you want to listen to a n isola ted track or tracks!
• The right side of the screen shows you the templates you can select from (Live Drum, Audio Drum,
Groove, Bass … etc). Based on the selection made on the left side, the templates you have access to
will be shown in BLACK (so in this case, since the BASS track is selected, you can touch the BASS
template on the right to display the various bass groups [from which you can select a bass progression
from] ). Below that is the Volume (Vol), Reverb (Rev) and Chorus (Cho) for the selected style track.
• Touch and hold down the CHORD 2 icon (e.g.) for 2 seconds to display a page similar to Fig. 96b
below –
Fig. 96a. Chord 2 Selection
• As you see on the right side of the screen below the CHORD 2 label, you can have access to
GROOVE, PIANO, GUITAR and ORCHESTRAL musical tracks and arps which you can replace the
current Cho rd 2 track with.
• On the right side of the screen, touch GUITAR to access the Guitar Library of arpeggios and other
orchestral guitar lines. Your display will look like this :-
Fig. 96b. Guitar Group Selection
KETRON SD9 Manual & Tutorial
Page 71

71
• The drop down menu sho ws the variou s Guitar gro ups from which you can se l ect your Apr Guitars .
For this example, touch the first group ( Ballad/Pop) to display the various Arps and guitar
arrangements in that group as shown below –
Fig. 96C. Guita r AR P Selection
• Touch one of the ARPs and it will insta ntly be loaded into CHORD 2 (it’s name also displayed below
the CHORD 2 icon).
• Since they are named generically ( Arp01, Arp02 …. Etc), it would be wise to press the r e d START
button on the panel to start playing the style ( play a chord so the full arranger is playing) and as the
style plays, listen to each of these to see which one you want to use.
o For clarity, you can isolate/SOLO CHOR D 2 by touching all the other style parts (red bar
below each style icon turns blue = off).
o You can also take this a step further and change the instrument used to create the ARP (in this
case the guitar). You may want to replace the STEEL guitar with another guitar or another
instrument from anothe r category such as Brass or Pia no. To do this, with CHORD 2 still
selected, simply touc h the VOICE CHANGE icon to d isp lay the current instrument and it’ s
source –
o The part circled in red (right of the screen) shows you the various voice groups. You can pick
any of these where you believe the instrument you want to replace the guitar resides in. For
this example, we kept the guitar group and selected a new guitar – SOLIDBODY to the left
(in the part circled in green – which displa y s a ll the instruments within the currently sele c ted
group). Press EXIT when done to return to the previous screen.
KETRON SD9 Manual & Tutorial
Fig. 97. Voice selection for Arps and licks
Page 72

72
• O nce you have found the o ne you want, press the next ARRANGER section (A-D) on the panel and
repeat the above – to change o r modify the va rious sec tions of the Arranger tracks professionally!
• When you have completed modeling your style, you will need to save it as a USER STYLE, or else all
changes will be lost once you select a new style or turn off the instrument. To save the new style as a
USER style, simply press SAVE o n the panel ( rig ht side) to display this screen below-
Fig. 98. Save User style
• Touch SAVE AS and name your new style in the next screen – then to uch the ENTER button on the
screen and save as a USER style. This style can now be used by you instantly by selecting it from the
appropriate style category (USER STYLE on [yellow]) or in a REGISTRATION (Keyboard set up).
4.L - ASSEMB LING YOUR OWN STYLES USING EXISTING SEQUENCES ( STYLE MODELING)
Up until thi s point, we have been discussing ma king minor adjustments to factory styles (such as changing voices,
modifying effects … etc) and saving the m as USER STYLES for future use. Apar t from making changes to existing
style parts, you can change them al l together or customize them in one of two wa ys:-
A. Assemble a style of your own usi ng existing style parts (LIVE MODELING) which can incorporate
adding Audio Live Drums and Audio Live Guitars to existing Midi styles and thus creating new Audio
styles.
B. Creating a style from scratch (STYLE EDITING) either d irectly on the SD9 Pro or by using professional
Midi software such as Cakewalk on a computer).
KETRON has created a nice tool for the SD9 PRO which allows you to alter the Drums, Bass, or any of the chord
parts (1-5) to create an entirely new style and since all these parts were carefully created by professionals in studios
from all o ver t he world, it means your work is drastically reduced when it come to creating a style because most of it
has already been done for you. Let’s take a closer look at LIVE MODELING.
First of all, select a style that comes close to the style you have in mind to create. Then from the main styles page,
touch LIVE MODELING below the screen –
KETRON SD9 Manual & Tutorial
Page 73

73
Fig. 99. Style Modeling
You can see all the relevant parts that make up the style on the left side of the screen. They are labeled as such:-
o LD:- Live Drums
o Dr:- Midi Drums
o Grv:- Groove
o Bs:- Bass
o 1 - 5:- Chords 1 – 5
o Lg:- Live Audio Guitar
o Low1, 2:- (Lower 1 and 2 voices)
NB:- Touching these once turns the track on (red) or off (blue), but touching and holding down an icon (e.g. Dr.
or LD) for 2 seconds allows you to change the content of the track wi t h the new modeling information!
These are the parts you can modify and replace with hundreds of other style-templates that KETRON has provided
for use in each section – so you have different templates for Live Drum, Audio Drum, Groove (percussion), Bass,
Piano, Orchestral, Guitar and Live Guitar which are shown on the right side of the screen. Best of all, you ca n also
introduce Live Audio drums and Live Audio Guitars to any style using this MODELLING tool.
At this point, it will be smart to p ress the red START button to start playing the style so yo u hear how it is currently
(with no adjustment) and then adjust as suggested below.
Want to go ahead and introduce a Live Audio Drum into this style? Simply touch and hold down the DRUM icon on
the screen for 2 seconds. The right side of the screen displays “LIVE DRUM”, and below it, the option to open up
the LIVE DRUM library is available. To display the various Audio Live Drums (names ending with a bpm number
and “(L)” for LIVE), touch and hold down the Live Drum (Ld) track for 2 seconds to open up the Live Drum
Library as shown below.
KETRON SD9 Manual & Tutorial
Fig. 100a. Live Drum Selection
Page 74

74
• Now touch the LIVE DRUM icon on the right side to d isp lay the available LIVE DRUMS you ca n
select from as shown in the example below.
Fig. 101. Modeling – Live Audio Drums
You can now try out the various Aud io Live drums or grooves you want t o use as you play the st yle. If you want to
hear just the drums bei ng worked on, simply touch the other style parts (Bass, Chords ... etc to mute them (not red)
)so you can focus on the drums. To get back to the original drum kit used within the s tyle, touch the ORIGINAL
icon.
Let’s say we want to change the GROOVE of the style. Simply touch the GRV icon on the screen for 2 seconds to
display the following screen below –
Fig. 102. Modeling – Groove Drums
Again, the right side of the screen displays the name of what you’re about to edit (GROOVE) while below that you
can now touch the GROOVE icon to display the groups of available grooves you can choose from as shown below.
Fig. 103. Modeling – Groove Drum Selection
KETRON SD9 Manual & Tutorial
Page 75

75
As the style plays, you will immediately notice the new Groove playing once selected. This track can also be used as
a Drum track so technically, the SD9 Pro has 2 Drum tracks.
From the style view screen, touch the Drum icon to dis play the foll owing screen from which you can further
control:-
o VOL:- Volume of the Drum or Live Drum or Audio Drum
o Rev:- Amount of Reverb applied to the Drum track
o Live Drum (FLAT):- (Preset EQ settings to be a pplied to the Live Drum track)
o Drum Boost:- Instantly boost the Live Drum track
Fig. 104. Style View - Drum Selection
You can once more select an Audio Drum groove or Live Audio Drum for the style by touchi ng the DRUM box in
which the current drum type is displayed (Standard2_sd in the example above) to display the following.
Fig. 105. Style View - Drum Select
The following message may be displayed if large audio drums are being loaded at any given time:-
KETRON SD9 Manual & Tutorial
Fig. 106. Style Modeling – “Wait please!”
Page 76

76
Tip:- An additional feature to BASS and CHORDS (1-5) is that not only can you modify the Bas s and Chord lines
by making a selection from the database on the left, but you can also change the actual instrument being played by
touching the VOICE CHANGE icon on the right and picking a new instrument from the list displayed. (Don’t forget
to turn the data wheel to display even more instruments and press EXIT when done).
NB:- The Fill ins, Breaks and Intro/Endings are not affected by Modeling!
Once you have competed modeling your style, you will need to save it as a USER STYLE, or else all changes are
lost once you select a new style or turn off the instrument. To save the new style as a USER style, simply press
SAVE on the panel.
Fig. 107. User Style Save
Touch SAVE AS and name your new style in the next screen –
Fig. 108. User Style name
Touch the ENTER button on the screen and save as a USER style. This styl e can now be used by you i nstantly by
selecting it from the appropriate style category (USER STYLE on (yellow)) or in a REGISTRATION (Keyboard set
up).
KETRON SD9 Manual & Tutorial
Page 77

77
4.M - CREATING YOUR OWN NEW STYLES FROM SCRATCH (STYLE EDITOR & CREATOR)
We have seen how we can make slight alterations such as volume, effects and re voicing of a style under STYLE
VIEW above (Page 40), or how we can make drastic changes and enhance an ex isting style including introducing
Live Audio Drums and Li ve Audio bass element s using Modeling as shown above in Page 69). How about creating
your own styles from scratch or c hanging musi cal notes, deleting parts or deeper modifications to exis t ing style
tracks? This can be done in one of 2 ways with regards to the SD9 Pro.
1. CREATE STYLES DIRECTLY ON THE SD9 PRO
2. CREATE STYLES USING AN EXTERNAL PC & MIDI SOFTWARE
[1]. CREATING STYLES DIRECLTY ON THE SD9 PRO (New)
The new STYLE ED ITO R in the SD9 Pro allows you to to ta lly rearrange existing styles, re-record different tracks
of existing styles or create styles from scratch. The editor can be accessed from the style view page. If you want to
edit an existing style, select that st yle now (as previously mentioned above).
From the style page, press the VIEW icon (Fig. 109 below) to display the STYLE VIEW page.
Fig. 109. Style View Fig. 110. STYLE - EDIT
Press the EDIT ico n from the style view page (Fig. 110 above) to get into the STYLE ED ITO R (Fig. 111 below).
Fig. 111. Current Status of SD9 Pro in top section of screen Fig. 112. Style Editor
KETRON SD9 Manual & Tutorial
Page 78

78
The top portion of this screen (section 1) highlighted in Fig. 111 (as is the c ase with most displays of the SD9 Pro) is
dedicated to showing the current style and voice information in real time, so you are always aware of where you are
within the SD9 Pro. The bottom sect ion of the screen highlighted (section 2) is the STYLE ED ITOR which
provides the current style elements to the left and various editable parameters to the right of the screen as expressed
in Fig. 112. Using examples where applicable, we will go through the various editable parameters shown so you
clearly understand how the STYLE EDITOR works.
[ARR.A]:- This icon shows yo u what arranger section you are currently work ing with. To change to another pa rt of
the style, touch this icon to display the various Style sections from which you can determine which part of the style
you want to work on (Arranger A, B, C, D, Fill in, Ending … etc) as shown below in Fig. 113 and Fig. 114.
Fig. 113. Style Editor – Arranger Fig. 114. Style Editor – Style Sections
Fig. 114 shows 5 columns in the SELECT SECTION area of the screen (ARRANGE, FILL, BREAK, INTRO,
ENDING) and below each column, all the relevant parts of the sections. You can now selec t the part you want to
work on by touching it. The screen will automatically return to (Fig. 113) and display the style section you selected
in Fig. 114 ([ARR.A] in this case). So, if you had to uched “1” under the INTRO column (INTRO1), then INTRO1
will now be displayed in the Style Editor Arrange Page (Fig. 113) – where you now have [ARR.A] and any
recording or editing performed will impact just the style elements or tracks of INTRO 1.
Let’s take a closer look at the functions sho wn in Fig. 114 and understand how to use them when recording style
tracks:-
• CLICK:- Turn this on (yell ow) if you wa nt to hear a metronome/ Click when you press RECORD to
record a style part. This metronome guides you while you r ecord to keep you in beat. Note t hat the
metronome itself is not recorded in your track!
• SOLO:- Turn this on (ye llow) if you want to isolate the c urrent track you are working on (mu te all
other tracks). This is sometimes needed especially when you are trying to record subtle or complex
notes and the other style elements (tracks) are getting in the way. You can later t ouch SOLO again (to
turn off/un mute all the other tracks) and listen to the entire mix.
• Style measure [1/8]:- Shows you how many measures are in the style section you are about to record.
This value is s et under the PARAMETER controls in the style editor screen (Fig. 114). In the
example above, this part [ARR.A] is 8 measures long. Each Arranger section can now have different
style measure lengths, so Arranger 8 can be 8 measures long while Arranger B (of the same style) can
be 16 measures long. The maximum length is 128! NB:- With the capability to record up to 128
measures in each section, this means that you could technically use the STYLE EDITOR as a
KETRON SD9 Manual & Tutorial
Page 79

79
SEQUENCER to record an entire song and simply record say the song introduction in Intr o 1 (8
measures long) verse 1 in arranger A (24 measures long), Verse 2 in Arranger B (24 measures long),
Bridge in Arranger C (8 measures long) and the c horus in Ar ranger D (16 measures long). Note that if
you using the arranger t o record a complete song (RIFF mode), then you can record chord progressions
and key cha nges withi n t he recor ded material knowing that you will NOT use the arranger to change
chords in real time. This opens up new doors to using the SD9 Pro as a professional workstation.
[MAJ/MIN/7th]:- This is used to display and determine wha t tonality or harmonic mode you want to respond to the
notes you are about to record. So in other words, if you want to records notes that you want to be played only when
a minor or 7
th
chord is played, you can touch this i con to display the following window –
Fig. 114b. Style Editor – Tonality values
So if you want to record a track and the notes you are about to record should be heard ONLY when you play minor
chords, the n t ouch the MAJ icon and on the next screen, touch MINOR. You will be returned to the STYLE
EDITOR main page from wh ich you can t ouch RECORD to start recording your minor tracks. Note that when you
select MAJOR, then the notes recorded will not only be applied to MAJOR chords but also to MINOR and 7
th
. Use
this option if you want t he arranger to work for you and Fig.ure out the appropriate chord notes to play once the
respective chords are detected. NB:- A [*] next to any of the tonalities d e no te s that you are probably working with a
existing style which already has notes that have been programmed within the selected tonalities (so for the example
above, MAJOR * means this style already has notes recorded in the MAJOR tonality). In such an exampl e, if a trac k
already has notes recorded under MAJOR, and you now select that same track and want to record notes that should
be expressed only when a minor chord is played, select MINOR before recording. Style elements recorded using the
MAJOR tonality will also be valid when you play minor and 7
Minor or 7
th
data.
th
chords as well, if you do not specifically record
[PARAMETR]:- This is used to set the global p a r ameter settings of the style. When editing an existing style, the
parameter values would have been set already. However, if creating a new style from scratch, these values should be
set before you actually start recording. The parameters shown will be the parameters of the selected style part – so if
Arr A was selected, the parameter values shown are those of Arranger A.
KETRON SD9 Manual & Tutorial
Page 80

80
Fig. 115. Style Editor – Parameter Values
Let’s take a closer look at the parameter values and how to use them.
• Global/Single:- This box determines if the ad justments below (tempo, time signature and bar) should
be applied to the entire style or just the part selected above (in this case ARR.A). If Global is displayed,
then all the parameters in this box will be applied to the entire style (and need not be done for each
part individually). Set this to Global when recording styles that have the same time signature and
tempo all through (such as Pop, Country … and many Western musically inclined styles). If you touch
the box so that “Single” is displayed, then the parameters shown/edited will be applied only to the
current selection (Arranger A), which means you will have to repeat this to set the parameters for all
the other sections. This ‘Single’ option is gr eat when you have a style that may have arranger parts
with different time signatures ( e.g. Arranger A has a time signature of 4/4 and tempo of 80, while
Arranger B has a time signature of ¾ and a tempo of 120 .. etc). Many middle eastern styles follow
such varyi ng and compl ex time signatures and t empos for an example.
• CHO RD MODE:- This is used to set the Chord structure for all the chord tracks (Chord 1 – Chord 5).
Touch CHORD MODE (Fig. 116 below) to display the various chord modes applicable to the chord
tracks of the style (shown below in Fig. 117).
Fig. 116. Style Editor – Chord Mode Fig. 117. Style Editor – Chord mode values
As initially mentione d above under STYLE VIEW – CHORD on page 56, the first column on the left shown in
Fig. 117 provides access to the chord settings. You may select either NORMAL or RETRIGGER mode.
• In Normal mode a chord plays during the basic measure as programmed.
KETRON SD9 Manual & Tutorial
Page 81

81
• In Retrigger mode the chord is heard every time it is played – i.e. the individual cho rd notes are
played regardless of where you are as you play the style.
The second column gives you access to the chord types, namely – CLOSED or PARALLEL. These chord settings
and modes only affect the Arranger/Accompaniment controlled chords (Chord1, Chord2, Chord3, Chord4, and
Chord5).
• In Close mode the chords adap t the intervals to the next notes following the rules of conventional
harmony.
• In Parallel mode the notes of the chords programmed are transposed in parallel without changing the
intervals.
• Touch EXIT when done to return to the PARAMT ER screen as shown in Fig. 116 above.
• GLOBAL SETUP:- This section of the scree n is dedicated to the following options applicable to the entire
style.
Loop:- When set to on, the style co ntinues to play when in RECORD mode which al lows
you to keep recording additional no te s. When set to off, the style plays through the set
number of measures only once and stops – meaning if you want to record add i tional
notes, you will have to press RECORD and record again. Set this to OF F when you know
you have to record minimum number of notes and can do this in one shot. Set this to ON
when you know you will need additional passes to record more information which you
cannot do in one take.
Click:- This controls the metronome cli ck being u s ed to guide you as you re cord. Yo u
can turn the click on/off or and set the volume of the click by touching the box next to it
and turning the data wheel to set the volume of the click (0-63). Remember the click does
not get recorded with the style!
Key:-Used to set the reference root key in which the style will be recorded in (usually C).
Notice that any key can now be set as the reference key for the style. Touch the Key icon
(Fig. 118 below) to display all the possible reference keys in which you can record your
style’s current track in (Fig. 119).
Fig. 118. Style Editor – Chord Mode Fig. 119. Style Editor – Chord mode values
N ote that once you set the key you wa nt to recor d in, keep to thi s key structure as you
record the various elements of your style – bearing in mind that when the style is
complete, you will be able to play in any key/chord and the arranger will play the chord
appropriately. Once you have recorded this track, you can test it by pressing the
KETRON SD9 Manual & Tutorial
Page 82

82
START/STOP red button and playing and changing chord s just to hear how the arranger
will interpret the note s you just r ecorded in the key of “C” i n the other keys played.
Press the EXIT button to return to the PARAMETER scr e e n (Fig. 118 above).
SOLO:- Isolate t his track (by muting all the others) so only what you are recording is
heard.
[CONTROLS]:- This provides additional control to bass or chord tracks (depended on which track was selected up
above in Section 2 of Fig. 111). These controls can be described as follows:-
- RESO – Defines the amount of resonance applied to the selected track.
- ARAIC SCALE – Enables (ON) or disables (OFF) the Arabic scale mode being applied to the selected
track.
- PITCH RANGE – Sets the range of the pitch bend wheel. The higher this value is, the more notes are
covered by the pitch wheel when moved up or down.
- Port. to Time – Use to set the Portamento time on the current track being recorded.
- Mod. To Filter – Enables (ON) or disables (OFF) the modulation effect filter on the current track being
recorded.
- Bend Assign – Here you can assign (Pitch, Rotor to chord 3 and Portamento). Rotor can only be applied to
chord 3 so when recording a style, reserve Chord 3 for Organ sounds!
[COPY]:- This provides the option to copy parts of an existing style into your edited or new style. In other words,
you can save yourself sometime and ‘borrow’ parts of an existing style and use in your style so tha t you don’t have
to program the notes from scratch. This come in handy especially since it is sometimes impossible to program
“professionally” on the instrument and so copying these tracks from existing styles saves a lot of time and perfects
your style.
Touch COPY to display the following window shown in Fig. 120 below.
The screen shows the following information which can be used as described here:-
Fig. 120. Style Editor – COPY
• SOURCE:- This denotes the source of the style you want to copy parts from. Touch the SOURCE box and
select where the style whose parts you want to copy from reside (Factory, User or Modeling).
KETRON SD9 Manual & Tutorial
Page 83

83
Fig. 121. Style Editor – SOURCE (FACTORY/USER) Fig. 122. Style Edit or – SOURCE (MODELING)
If the Source selected is either FACTORY or USER, then they screen from which you can select styles
from remains as shown in Fig. 120 above.
However if the source selected is MODELING, then the screen changes slightly to o ffer you the option to
select which modeling part you want to use (e.g. Family icon no w shows GROOVE with a drop down
menu from which you can select available Groove banks such as AFRO_A Groove) as shown below in Fig.
123. You can turn the data wheel to display even more Grooves to select from.
Fig. 123. Style Editor – COPY Groove Fig. 124. Style Editor – COPY Modeling G roo ve S el ect ed
• FAMILY:- This is the style g roup (e.g. Pop, Ballad, Dance, Latin … etc) from which you will select which
style you want to copy parts from. When you touch the F AMILY icon, the display shows the various Style
groups fro m which you can select by turning t he data wheel and touching the style group from which you
want to select the style you want to use).
Fig. 125. Style Editor – COPY Family Selected Fig. 124. Style Editor – COPY Style
KETRON SD9 Manual & Tutorial
Page 84

84
• STYLE:- After selecting the FAMILY where the style resides, touch STYLE icon (Fig. 126 above) to
display the list of available styles. U se the data wheel and scroll through all the available styles from which
you can select the style you want copy parts from by simply touching it. The selected style will be
displayed in the STYLE i con box shown in Fig. 124.
• SECTION:- Once the style has been selected, you can now select what section or track of the style you
want to copy (such as Arranger A, B, C, D , Fill in, Intro … etc) as shown in Fig. 125 below.
Fig. 125. Style Editor – COPY Section Fig. 126. Style Editor – COPY Part
PART:- With the appropriate section selected above (in Fig. 125), now go ahead and select the part or
track you want to COPY from by touc hing the PART icon and scrolling through with the data wheel
which part you want (Drums, Bass, Cho rds) as sho wn in Fig. 126 above.
• Once you have selected the appropriate track you want to copy from the appropriate style, your screen
should look similar to that below in Fig. 127. Touch the EXECUTE icon to perform the actual copy
operation.
Fig. 127. Style Editor – COPY EXECUTE
• Y ou can now repeat the COPY process above to copy other style parts. Please note that you can assemble
an entire style from scratch by simply copying parts (e.g. Drums from 8Beat 1, Bass from 16Beat_3, Chord
1 and Chord 2 from 8Beat 3, Chords 4 and 5 from Country 4, the entire Arranger B and C from 16Beat 4,
… etc).
[CLEAR]:- Unless you’re a musical genius, chances are you will make some mistakes along the way as you record.
No problem! You’ve now have 2 ways out. The first way out is using the CLEAR icon as shown in Fig. 128 below.
KETRON SD9 Manual & Tutorial
Page 85

85
Fig. 128. Style Editor – CLEAR ALL Fig. 129. Style Editor – CLEAR SINGLE EVENT
By default, the ALL option is selec te d (as shown in Fig. 128 above), so if you touch EXECUTE, all the re c ordings
(weather copied onto the current track or recorded directly on the keyboard onto the current track) will be erased.
If you want to delete just a single note or a few notes within the currently selected track, you can touch the SINGLE
icon and touch the note you want to delete or simply touch the note on the keyboar d you want to delete and the key’s
note will be displayed on the screen next to the SINGLE icon box (as shown in Fig. 129 – C3 is displayed next to
SINGLE in this example).
Touch EXECUTE to perform the delete operation. Note the UNDO icon next to the EXECUTE icon. If you realize
that you mistakenly del eted something, you can UNDO this oper ation by touching the UNDO icon. The deleted
notes will be restored.
• CONTROLS:- Use this to delete any Controls and pitch bend events recorded on the track. This helps if
you want to record new control settings.
[QUANTIZE]:- Unless you get it right the first or 2nd time, when recording tracks like drums or bass or even
guitars, despite usin g a click or metronome, c hances are when you p lay back wha t you have recorded, things may
not seem to be lined up properly. When this happens, you can use the QUANTIZE function to ‘shift’ the notes
appropriately to the right down beat of the musical scale. Say for an example you were recording a kick drum on a
4/4 time signature. Now when you initially record the track, sometimes the kick drum beat may not fall exactly on
the down beat of the current measure and may be off as such ….
Fig. 130. Style Editor – QUANTIZE
KETRON SD9 Manual & Tutorial
Page 86

86
You can therefore touch the QUANTIZE this by touching the QUANTIZE icon on the screen and then choosing the
quantize value (in this case 4) and touch EXECUTE to perform the quantize action. Test the style out to make sure
it now sounds appropriate. Remember, if not, you can always touch UNDO to undo this quantize action. Then select
the next value up (8) a nd try again. Remember, t he higher the number, the ‘tighter’ the quantizatio n, in other words
the SD9 Pro will fit the notes on the next 8
th
, or 16th or 32nd or 64th beat. For complex Latin or African or even Jazz
beats, it is sometimes better to let the st yle ‘loose’ and use REAL ( no quantiza tion).
[VELOCITY OCTAVE]:- From this screen, you can adjust the velocity of note or the entire track or change the
octave of notes.
Fig. 131. Style Editor – VELOCITY OCTAVE
The default selection once this screen is displayed is ALL. In this case, if you touch the VELOCITY VALUE icon,
you can turn the data wheel to increase or decrease the velocity value of all either ALL the notes , or simply t ouch
the note on t he SD9 Pro that you think is too loud or too low, then adjust the velocity accordingly. You can also
touch the OCTAVE value and adj us t accordingly (touching the keyboard once more will switch on the Single icon,
meaning the change will impact just the single note that was touched).
[NEW STYLE]:- To uch this icon if you want to record a new style from scratch.
Fig. 132. Style Editor – NEW STYLE Fig. 133. Style Editor – NEW STYLE NAME
Please note that all tracks of any style that was temporally loaded into the sequencer memory will be deleted (no
actual Factory or User Style will be deleted) once you touc h “Yes” on the followin g message dis played as shown
in Fig. 132 above. You will t hen be asked t o name your new style s o type it in on the next screen using the
QWERTY keybed displayed as shown in Fig. 133 above.
You will now be taken back to the STY LE EDITOR main page.
KETRON SD9 Manual & Tutorial
Page 87

87
Fig. 134. Style Editor – MAIN PAGE
Tips:- Here is how we suggest you start to record a style from scratch.
a. From the main style editor screen, set the PARAMETERS for t he new
style (Page 80 Fig.115 above),
b. Set the CONTROL values of the new style (Page 85, Fig. 128 above).
c. Select what part or track you want to record (ARR.A, A RR.B…Page
78, Fig. 113 above).
d. Select the TONALITY of your musical track (does not apply to drums
– Page 79, Fig. 114b above).
e. Touch the RECORD icon on the screen (it turns light red) to enter the
RECORD STAND BY mode (where the SD9 Pro waits for you).
f. Pre ss the START/STOP button on the panel t o start rec ording. A count
in of 4 ticks is heard to gui de you in on the tempo selected, and
recording can begin right after that.
i. Use COPY to use previously recorded materials from other
style parts or from MODELING Tables or GROOVES, or
AUDIO LIVE GUITARS or AUDIO LIVE DRUMS (Page
82, Fig. 120 above).
ii. When done, p ress the SAVE button on the panel and touch
a. Save – t o save your new style with the same
b. Save As – to give the style a new name (if
c. Cancel – If you want to cancel the
name as that given at the beginning of this
recording.
you decide to change your mind).
Recording.
[2] CREATE STYLES USING AN EXTERNAL PC & MIDI SOFTWARE
It is possible to create a new style for the KETRON SD9 PRO electronic keyboard (OS 1.0) by first creating a
professional standard Midifile using an external PC sequencer (such as Cubase, Sonar, Logic … etc) and then
importing this file into the instru ment to be used as a style.
This tutorial covers the phases, formats and procedures needed to create a new style for the SD9 PRO.
KETRON STYLE FORMAT:-
D), 4 Fill ins, 4 Breaks, 3 Intros and 3 Endings. In order to create a style, you will need to implement in one
Standard Midifile (format 0) all the parts mentioned above, separated by special markers.
Here are the rules that govern each of the style’s parts:-
KETRON styles are composed of the following parts:- 4 Arrangements (A, B, C &
KETRON SD9 Manual & Tutorial
Page 88

88
4 Arrangers (A, B, C & D):- This can vary between 2 – 16 measures max, however, the st andard length is usually 8
measures long.
4 Fill ins (A, B, C & D):- Each fill in is associa te d with it’s respective Arran ger part (so Fill A is associated with
Arranger A .. etc) and is a maximum of 1 measure long.
4 Breaks (A, B, C & D):- Each break is associated with its respective Arranger part (so Break A is associated with
Arranger A .. etc) and is a maximum of 1 measure long.
Intro/Ending:- The length of the 3 Intros and 3 Endings varies depending o n the style and is at the d i s cretion of the
user. In each of these however, if you want to maintain the format used by the factory style, please proceed as
follows:-
Intro1:- The shortest intro phrase, usually just 1 measur e long.
End 1:- Immediate ending in general of about 2-3 measures long – depending
on the style and BPM of music.
Intro2:- Usually just 2 measures long, recor ded in the ke y of C major or C
minor, with no chord changes and no melody li ne(s).
End2:- Just 2 measure s , recorded in the key o f C major o r C minor, with no
chord changes and no melody line(s).
Intro3 – End 3:- Written in the key of C major and C minor, but with free
harmonic chord changes within a nd may include melody line(s).
Each section within the Midifile has to be characterized by a marker which must have the following categorical
names (corresponding to the style part and chord format – Maj = Major; MIN=Minor; SEV=Seventh):
ARRA_MAJ FILA_MAJ BRKA_MAJ INT1_MAJ END1_MAJ
ARRB_MAJ FILB_MAJ BRKB_MAJ INT2_MAJ END2_MAJ
ARRC_MAJ FILC_MAJ BRKC_MAJ INT3_MAJ END3_MAJ
ARRD_MAJ FILD_MAJ BRKD_MAJ
ARRA_MIN FILA_MIN BRKA_MIN INT1_MIN END1_MIN
ARRB_MIN FILB_MIN BRKB_MIN INT2_MIN END2_MIN
ARRC_MIN FILC_MIN BRKC_MIN INT3_MIN END3_MIN
ARRD_MIN FILD_MIN BRKD_MIN
ARRA_SEV FILA_SEV BRKA_SEV INT1_SEV END1_SEV
ARRB_SEV FILB_SEV BRKB_SEV INT2_SEV END2_SEV
ARRC_SEV FILC_SEV BRKC_SEV INT3_SEV END3_SEV
ARRD_SEV FILD_SEV BRKD_SEV
The marker has to be positioned exactly at the beginning of the measure and precede every other event of that
section. The control change (volume, pan, reverb, chorus and exchange programs) must be positioned exactly at the
beginning of the measure and precede every other type of event notes and continuous control (modulation, Pitch
KETRON SD9 Manual & Tutorial
Page 89

89
Bend, etc.)
The first measure of the Midi file must have only one marker on the fir s t tick. The marker must have the following
name “Audya Style 1.0”.
You can now start reco rding the events/notes of the style from the second measure.
The sequence order of the Midi parts of each section and of the marker is at the discretion of the user. (Ex.
ARRA_MAJ, INT3_MIN, FILLC_MAJ, etc.). There is no fixed order to arrange these parts, as they will
automatically be assigned to the appropriate style parts in the SD9 PRO.
All sections and related markers should be written back to back - without leaving any empty measures or spaces
within the midifile.
STYLE PARTS A N D RELATED M ID I C HANNELS:- In ea c h section, it is possible to pro gra m the mid i parts
associated with each part. Here are the recommended style parts, midi channels and instruments to use:-
Style Part Midi Ch. Instrument Note(s)
DRUM1 Ch 10 Drum Set
DRUM2 Ch 9 Groove
BASS Ch 5 Bass
CHORD1 Ch. 6 El Piano / Ac Piano (suggested)
CHORD2 Ch. 7 Ac Gtr / El Gtr (suggested)
CHORD3 Ch. 8 Strings / Pad (suggested)
CHORD4 Ch. 11 Synth (suggested)
CHORD5 Ch. 12 Lead (suggested)
To get you up to speed quickly, we ha ve atta c hed to this tutorial a sample midifile (70’s POP.mid) which you can
use as a template to start. This is a template of an existing st yle in the SD9 PRO so you can see how we programmed
it.
By loading and opening this file in your sequencer, you will be ab le to immediately realize the structure and
different sections used to create this Ketr o n st yl e.
You can then replace the parts and notes of this template with yours utilizing your sequencer.
It is very imp ortant that you also comply with the following rules:-
1) The Arrangement parts (A-D), Fill ins and Breaks must be programmed in C Major. With built in Chord
algorithms, the SD9 PRO can then automatically generate all other chords played on the arranger so long as this
KETRON SD9 Manual & Tutorial
Page 90

90
structure is correct.
2) The following Midi events and controls can be used within the Midifile:-
Note On/Off, Bend, Modulation, Sustain, Expression, Pan Pot, Re v, Chorus,
Wha-Wha (On: CC 86 value 127 – Off CC 86 value 0. Chorus CC 85 - 0 to 127), Portamento On/Off (On: CC
65 value 127, Off CC 85 value 0), Portamento Time CC 5 value 0 to 127, Tempo Track (BPM).
3) The Midifile must be saved in Midi format 0 (zero) plus contain sub divisio n markers and must have a resolution
of 480 TPQ.
4) Never program double notes within the midifile at the same time on the same track.
5) All midi e vents within a section and marker should not over ride/overlay the next marker.
6) Do not wri te control change or pitch bend e vents on the same note neither during note on or off.
Fig. 135. Software Style Editor – Cubase
Screen showing example of the Midifile "70's POP.mid" using Cubase
Once you have completed recording the Midifile, you can now transfer it into the SD9 PRO for use as a style. The
SD9 PRO also provides you with more tools to further enhance your new style, giving you the possibility to add say
Audio Drums, or using the Style Modeling tool, grants access to hundreds of professional style parts such as bass.
Chords, grooves etc.
CONVERTING THE MIDIFILE CREATED INTO SD9 PRO STYLE FO RMAT:- After saving the Midifile
as type/format 0, simply rename the midifile with the new extension *.KST (example 70's POP.KST)[ – where KST
= Ketron Style].
Fig. 136. Software Style Editor Computer
Connect the SD9 PRO via USB to
KETRON SD9 Manual & Tutorial
Page 91

91
your computer and transfer the *KST file into any of the USER STYLE sub folders (Pop, Dance, Ballad … etc). For
this example, we will copy the file into the POP sub-folder.
Fig. 137. Software Style Editor – Com puter co nnect
Disconnect the SD9 PRO from your computer and go on the keyboard – press the STYLE button (on) and Touch
the USER st yl e icon on the s creen. Now, touch the style group you copied your new style into (in this case Pop).
Fig. 138. Software Style Editor –
Computer connect
The SD9 PRO will now load the style (*KST) a nd a utomatically assign all the style parts, re la tive effects ... etc as
needed by the style to the relative style
buttons (Intro, Arranger A-D, Fill Ins ..
etc).
You can further enhance the style by
going to style view (touch VIEW) from
where you will have access to the
individual style components (Drum,
Bass, Chords .. etc) from which you can
modify the volume, program change,
effects, pan and other style parameters
such as parallel/close chord modes, retrigger, etc for each style part.
KETRON SD9 Manual & Tutorial
Page 92

92
Fig. 139. Style Editor – View
Once complete with adjustments, press the SAVE button and s ave your fini shed style (as noted i n the user manual).
Fig. 140a. Software Style Editor – Save User Style
As mentioned earlier, it is also possible to further enhance or modify the style using the new Style Modeling feature
to described above in 4.L- Assembling your own style Page 72.
4.N USING YOUR OWN AUDIO DRUMS IN STYLES
The SD9 Pro allows you to utilize your User Audio Drums with the Modeling feature found on the main page.
KETRON SD9 Manual & Tutorial
Fig. 140b. User Audio Drums - MODELING
Page 93

93
You can create User Audio Drums (Wave 44,100, 16-bit) using specific Audio Editor Software, or by importing
User Audio Drums which were already created for the AUDYA series keyboards.
Whatever the origin of these files is, the SD9 Pro can "locate" and manage them through the DRUM part of the
Modeling feature. In order to be properly recognized and utilized, these audio files must have the following name
structure and assigned as such:-
ARRA.wav = For Variation A
ARRB.wav = For Variation B
ARRC.wav = For Variation C
ARRD.wav = For Variation D
FILA. wav = For Fill A
FILB.wav = For Fill B
FILC.wav = For Fill C
FILD. wav = For Fill D
BRKA.wav = For Bre ak A
BRKB.wav = For Break B
BRKC.wav = For Break C
BRKD.wav = For Break D
INT1.wav = For Intro 1
INT2.wav = For Intro 2
INT3.wav = For Intro 3
END1.wav = For End 1
END2.wav = For End 2
END3.wav = For End 3
Fig. 140c. User Audio Drums - Layout
KETRON SD9 Manual & Tutorial
Page 94

94
NB:- If You want to add an additional Variation drum elements for arrangements A / B / C / D, these additional files
should be named as: ARRA_1.wav, ARRB_1.wav, etc etc
These files must all then be saved in a folder which is named after the style and includes the original bpm the
audio drums where recorded in (e.g. Mystyle_140) which will be a sub-folder located in the SD9 Pro’s directory in
the following root folder: USER_MODELING / Live Drum
Fig. 140d. User Audio Drums – Folder display
Once you copy over these files into this folder, the SD9 Pro must be restarted so that the files and related parameters
are "recognized" by the instrument. So turn Off the SD9 Pro and turn it back on again, then, proceed to select the
new folder under the Modeling Audio Drum feature.
You will know if you wer e successful in creating your new audio dru ms o r not fro m the following screen that should
show your new audio drums!
Fig. 140e. User Audio Drums - Display
You can now go further to adjust the volume, effects and other related parameters from the Arranger VIEW page (in
the Live Drum box) which displays the source/folder from whi ch the audi o drums reside.
KETRON SD9 Manual & Tutorial
Page 95

95
Fig. 140f. User Audio Drums - Usage
This featur e allows the user to cust omize the ir own arra ngements with original audio dr ums and follow innovative
musical trends.
NB:- User Audio Drum files in addition to the 44,100 and 16-bit audio feature should be organized in terms of
length (Cut) accurately so that when they are played, the loop point will have a perfect cycling feature. If the files
are not properly "cut" you will notice a kind of audio ‘stumble’ when you play the audio element until the end. We
recommend you use professional audio editors to create the start and end points of these drum sounds in the right
way. This is the only way to ensure a smooth transition as you switch between arranger parts and performances.
KETRON SD9 Manual & Tutorial
Page 96

96
5. LAUNCHPAD – PLAYIG & CONTROLLING MIDI & AUDIO SEQUENCES IN
REAL TIME & IN SYNC!
Using high quality professional sounds, complex Midi phrases, Live Audio Drums, Live Audio Guitars and other
audio files, KETRON has been able to manufacture a real live sounding keyboard which is only lim ited by your
imagination!
Raising the bar to an even higher level, the slight limitations of the style engine (harmonic conflicts and being
forced into a ‘structured’ way of playing) has been overcome by the new LaunchPad, which in a nut shell, gives you
the opportunity to either play alo ng wit h or play sophisticated midi and audio sequences but still be in control at the
touch of a pad on the screen. In a nut shell, the LaunchPad is made up of audio and Midi musical sequences and
loops whose tonalities you can either control in real time together or follow - and in sync! The SD9 PRO can
manage up to 12 pads simultaneously within a scene and can load up to 6 scenes at once! This provides a plethora of
music data which can be recalled and used at any given time. You can now perfo rm your so ng your way wh i le
enriching it with special effect s, RIFF progressions, re-organizing the structure of the song … all on the fly!
Fig. 141. LaunchPad Structure
Picture this – that for a song or a performance (using the layout example above in Fig. 141), you have -
• arranged various midi elements needed to perform this song live (MIDI)
• previously cut/sliced sections of audio (wave) sequences and included these within your project (Wave)
• used one of the internal Audio Live Drums for your sequence – Live Drummer (Wave)
• used MODELING and extracted from the KETRON library orchestral, Guitar, Piano and bass phrases to
incorporate in your new song
• a nd finally arranged your sequences wit h the LaunchPad for your song as pads for your -
introduction (in Scene 1)
verse (in Scene 2)
chorus (in Scene 3)
bridge (in Scene 4)
other chorus (in Scene 5)
ending (in Scene 6)
• As you perform live, you simply “activate” which elements/pads (Midi and Wave/Audio) you want to use in
the sequence in real time. You can punch in and punch out these by simply touching their corresponding
pads on the screen (pad turns red when on).
• You now have the best of both musical worlds (Workstation and Arranger) - all in one - the SD9 Pro’s new
LaunchPad feature. Why? You now have -
KETRON SD9 Manual & Tutorial
Page 97

97
Pads that have chord progressions within so in this case, t hese pads will be programmed
to ignore wha t ever chor ds you are playing on the keyboar d (great for complex midi or
audio notes that are not properly handled by an arranger such as when playing Jazz).
Pads with no chord progressions within and so these pads follow whatever chords you are
playing on the keyboard (great for non complex midi or audio notes that are easily
handled by an arranger such as when playing Ballads or Pop … etc).
Pads that are programmed to control the status of other pads when used (so Pad 2 can be
programmed such that when it is turned on, it will turn off Pad 1 [if it were on] while it
will at the same time turn on Pad 3 as well), etc.
But how does this differ from a regular sequencer in the market today (you may ask)? Unlike other sequenc er s, yo u
can now -
• control the tonality of the midi and audio elements of the pads you choose to, so you are not
locked into the existing chord structure or format of the song
• control the t onality or change the c hord structure of the a udio/wave Guitars thus giving the
musician total control of their per formance
• vary the tempo of the overall performance by speeding up or reducing the tempo and all elements
of the pads (midi and audio/wave) will vary accordi ngly with no change in pitch to the a udio
elements!
• when an Audio Live Drum or Groove i s us ed, using the Arranger buttons (A, B, C and D) and the
Fill and Breaks, you can in real time change the Drum sequence or flawlessly introduce fill ins and
breaks irrespective of what section of the song you are performing.
• borrow tracks from various style parts (Chord1 from the style 8 Beat Ballad, Chord 3 from the
style Folk Beat …etc) and use with your perfo rmance without being locked into using styles!
Tips:- When wor kin g wit h t he LaunchPad, arrange your musical elements (pads) keeping in mind that as yo u
transition between scenes, the pads being played from the previous scene will be stopped as soon as the new scene
becomes active. If there is a pad/track that you want played in the next scene as well, then this pad/track should be
available in both scenes so that as you transitio n to the next scene, it is equally activated in that scene as well as soon
as the scene is ready to be played. This is true especially for Dru ms, Bass, and Percussion … etc. Each of these pads
can also be controlled independently of one another (one can be set to loop, another play straight through and stop
at the end of its measures, others play only when they are touched (and stop playing once you release your finger
from the pad), some play independently of what chords are played on the keyboard, others played following the
chord structure played on the keyboard in real time, some programmed to be re-triggered each time the chord is
changed … etc). As you can see from just these few features mentioned abo ve , you now have more contr o l over the
musical elements and can breathe more life and entertainment into your performance since you now have total
control over the musical elements found in the pads!
Let’s take a closer look at the LauchPad and see how this new tool can be of great benefit both to professional
musician and armatures l ooking to s ound great and take charge of their music. For the example below, we will ta ke
just one pad and work through the various features that can be applied to it. Note that the tools discussed below can
be applied to all 12 pads and only vary slightly based on the content of the pad you’re about to edit (audio or midi
data).
KETRON SD9 Manual & Tutorial
Page 98

98
5.A LOADING THE PADS WITH MID I, AUDIO & OTHER DATA TRACKS
Touch the LAUNCHPAD button on the panel to access the main LaunchPad screen with 12 pads as shown below in
Fig. 142 (pad numbers on the screen [Pad1,Pad 2 … Pad 12] are for illustrative purposes only to give you a better
understanding of how the pad are laid out on the screen).
As you can see from Fig. 142 above, the top left sectio n o f the screen (previously for style information) now displays
LaunchPad information (such as the name of the current LaunchPad project being used, current active scene and
style elements information). There are 12 free (empty) multi-pads available on the left side of the screen (highlighted
in red for illustrative purposes in this manual) which you can load up with various musical elements (such as MIDI
phrases or sequences, Live Audio Drums, Drum kits [e.g. Kick, Snare … etc], Live Audio Guitars, Audio Bass and
your custom wave files … etc).
NB:- Wave files must have a sample rate of 44100 and in 16 bit stereo format and a maximum of 3 waves can be
used in each scene, in other words, only 3 pads can contain wave files within each scene (15 wave files per
LaunchPad project)!
To the right of the screen (highlighted in blue for illustrative purposes in this manual) are the scene controls. These
controls are used to govern the operation of the entire scene or project; however, we will take a closer look at these
functions and how to use them later below in Page 109. For now, be fore we walk through an example with just 1
single pad, let’s load up an example (there are 30 demo LaunchPad projects in the SD9 Pro).
Fig. 142. LaunchPad Main screen
• Touch OPEN (found in the SCENE CONTROL area of the screen) to display the available LauchPad
projects.
• Turn the data wheel to dis play even more projects (since the screen only displays 9 at a time).
• Touch the one you want to try out and p ress the EXIT button to return to the LaunchPad main screen.
• Press the START button on th e panel to start playing the contents of SCENE 1. You can touch indi vidual
pads to turn them on/off and play along with the song contents of each scene.
• N ow, touch SC ENE 2 to start playing it’s contents at the start of the next bar.
• Touch SCENE 3 to play it’s contents … and so on and so forth!
Let’s get ba ck to explaining in detail how to assign and use a pad. F rom this explanation, you can quickly set up
other pads for use.
KETRON SD9 Manual & Tutorial
Page 99

99
• Touch one of the pads you want to load with data – The pad will be highlighted in red and “EDIT” will be
displayed below it showing tha t this pad is in edit mode (in the example below in Fig. 143, Pad # 3 has
been selected). You can only Edit one pad at a time!
Fig. 143. LaunchPad - EDIT
• The right side of the screen shows you the different categories (Sources) from which you can grab an
element to assign to your pad. These categories also form part of the MODELING tool as these are the
categories in which KETRON has placed an extensive large library of progressions and loops to select from
as follows -
o AUDIO DRUM:- Complete audio Wave drum loops recorded by professional musicians. Some of
these are 16, 24, 32 …etc bars long with real human feeling and expression. These have been
placed into various categories for easier search and use. By touching the name of the A udio Dru m
in the drop down list, the entire audio drum with variations are automatically loaded and you can
manually go through each one by pr essing Arr anger A, B, C and D. If you touch and hold for 2
seconds the Audio Drum name in the drop down list, a new list is displayed showing you the
individual elements (waves) t hat make up the complete audio drum, from which you can select
just one (e.g. Arranger A part) to assign to a pad.
o GROOVE/KIT:- Complete percussive groove loops. Also contains a special group of Drum kits
(Kit Looper) which allows you to assign individual drum components (kick, snare, high hat
…etc) to various pads and use as a drum set. Together with Pitch, Filter and Resonance controls
(as illustrated below in EDIT PA D – SOUND CONTROL, on page 103), each instrume nt c an
individually be tuned to create your own special and unique drum set/kit!
o BASS:- Bass phrases categorized in groups (e.g. Ballad/Pop, R&B/Funk, Dance, Latin … etc) for
easier location and use.
o PIANO:- Professional Piano licks by professionals categorized in groups (e.g. Ballad/Pop,
R&B/Funk, Dance, Latin … etc) for easier search and use.
o GUITAR:- Professional guitar phrases, strums and licks categorized in groups (e.g. Ballad/Pop,
R&B/Funk, Dance, Latin … etc)
o LIVE GUITAR:- Special Audio Live Guitar strums, riffs and licks impossible to recre a te on a
keyboard - recorded by professionals categorized in groups (e.g. Folk, Electric, Nylon … etc) for
easier search and use.
KETRON SD9 Manual & Tutorial
Page 100

100
o ORCHESTRAL:- Synth, Strings, Choir, Brass, Accordion and User Mod eling phrase s and licks
categorized in groups (e.g. Ensemble, Synth, Sfx, User Modeling … etc) for easier search and use.
o CLEAR:- Removes anything that was previously assigned to the selected pad.
o WAVE:- Audio Wave files categorized in groups (e.g. ChillJazz, Disco and your Wave files).
They are located in the internal SSD location LAUNCH_PAD/RESOURCES/WAVE subfolder.
Within this sub-folder (under MEDIA), you can also create additional sub-folders (e.g. Mp3,
Wave, Midifiles) so as to better organize your songs for easier search and use.
o USER:- These are audio files (wave and mp3) and midifiles (format 0, single channel, resolution
480 ticks/quarter note) which you either created or loaded into the machine (and they are located
in the internal SSD location LAUN CH_PAD/RESOURCES /USE R subfolder. Within this sub folder (under MEDIA), you can also create additional sub-folders (e.g. Mp3, Wave, Midifiles) so as
to better organize your songs for easier search and use.
• So, if you want to assign an audio drum to this pad you would touch the AUDIODRUM icon in this
section and select from the drop down menu which group your audio drums reside in – then select which
Audio Drum to use. For this exa mple, we will select a Bass line so touch the BASS icon as shown.
Fig. 144. LaunchPad – EDIT Bass Fig. 145. LaunchPad - EDIT Bass Family Select
• As shown in Fig. 145 above, the SD9 Pro now displays a list of various Bass Family groups and each of
these groups are loaded with various bass lines pertaining to the family group. Depending, on the music
you are preparing this scene for, touch the family where you believe a bass line close to your composition
resides. If you want to use your own previously created/recorded bass line, touch the USER icon in Fig.
144 to display your midi sequences in the next screen (to sele c t from files found in the
LAUNCH_PAD/RESOURCES/USER folder of the internal SSD). For this example, go a head and touch the
Ballad/Pop family in the scroll list to display all the various bass lines for Ballads and Pop music. You can
tell what Pad you are editing and what selection you are about to make from the title of the drop do wn list
“PAD 3 FAMILY CHOOSE” shown above the drop down menu. Your screen shoul d look similar to Fig.
146 below
KETRON SD9 Manual & Tutorial
 Loading...