

Page 1
Owner’s Manual
Page 2

Page 3

SD5
1
INDICE
Safety Instructions
Connections
Control panel and push button functions
Right Menu and Live setting
Parameter management
A guide how to start playing
Voices and User Voices
Programs and One Touch Voices
Drawbars
Drum Set
Arranger
Using a MIDI pedal for the bass
Pattern Edit
Power On Set Up
Song Play, Midi file and Karaoke
Drum Remix
Video Out and Karaoke
Recording a Midi file
.KAR, .MID (Midi files) & .TXT (text) files
Using the microphone
Vocalizer
Effects
Registrations
Utility
Midi Accordions
Midi
Disk
MidJay Utility
Multi-Tab
Technical Tables
PAG.
2
4
6
12
14
15
20
24
28
29
31
40
41
46
47
53
54
55
56
58
59
64
66
69
73
75
79
86
89
181
Page 4

Safety Instructions
MMEEAANNIINNGG OOFF GGRRAAPPHHIICC SSYYMMBBOOLLSS::
The lightning arrow inside an equilateral triangle warns you about the presence
of dangerous, not insulated voltage that may constitute a risk of electric shock.
The exclamation mark in an equilateral triangle informs you about important
instructions in the User's Manual.
IINNSSTTRRUUCCTTIIOONNSS AABBOOUUTT RRIISSKK OOFF FFIIRREE,, EELLEECCTTRRIICC SSHHOOCCKK OORR
IINNJJUURRYY TTOO PPEERROONNSS
Warning: to reduce the risk of fire or electric shock, do not expose this instrument to rain or moisture.
- Earthing instructions This product must be connected to an earthed outlet. In case of malfunctioning, the earthing will reduce the risk of electric shock. The instrument comes with an earthed power cable and plug to be used with an earthed outlet.
DDAANNGGEERR
- Improper earthing connections may cause electric shocks. In case of doubts, have your electric installation checked by a qualified
electrician. Do not modify the power cable coming with the instrument.
IIMMPPOORRTTAANNTT SSAAFFEETTYY AANNDD IINNSSTTAALLLLAATTIIOONN IINNSSTTRRUUCCTTIIOONNSS
WWAARRNNIINNGG
- When using electrical products, some basic precautions must be followed, including the following:
•
Before using this instrument, carefully read the User's Manual.
•
When the instrument is used by children, the presence of an adult is required.
•
Do not use the instrument near water, for example near a wash-basin, a swimming-pool, a wet surface, etc.
•
The instrument must be used only on supports recommended by the manufacturer.
•
Do not use the instrument where there is any risk of it getting splashed with water or of water dripping on it, such as near wash basins,
swimming pools or on wet surfaces etc. Do not put containers with water on top of the instrument.
•
The instrument is to be used in a position where adequate ventilation is provided.
•
Use the instrument far away from heat sources such as radiators, heaters, etc.
•
Use only the supplied power cable for connecting the instrument to the mains.
The identification and power supply data are reported on the bottom of the instrument.
•
Disconnect the power cable if the instrument is not used for longer periods of time.
•
If you need to disconnect the instrument from the power supply, use the ON/OFF switch at the back of the instrument.
The instrument must be positioned so that the ON/OFF switch is easily accessible.
•
Bring the instrument to an service centre in the following cases:
aa..
Damages on the power cable or plug.
bb..
Objects or liquids fallen into its inside.
cc..
The instrument has been exposed to rain.
dd..
Abnormal running or an evident decrease of the instrument's performance.
ee..
The instrument has fallen down or the enclosure has been damaged.
•
Never try to repair the instrument yourself. All operations must be performed by specialised engineers.
KEEP THESE INSTRUMENTS IN A SAFE PLACE
HHOOWW TTOO AAVVOOIIDD RRAADDIIOO//TTVV IINNTTEERRFFEERREENNCCEE
This instrument operates at radio frequencies, and if not correctly installed according to the instructions supplied, it may cause interference
with radio and television reception.
Though this instrument has been designed according to the applicable standards and notwithstanding the reasonable protections against interference it has been equipped with, there is no guarantee that such events will not occur. In order to check if the interference is actually caused
by this instrument, switch it off and see if the interference disappears. Then switch it on again and check if the interference appears again. Once
you have made sure that the interference is originated by this instrument, take one of the following measures:
•
Turn the radio or TV antenna in a different direction. .
•
Modify the instrument's position with respect to the receiver.
•
Increase the distance between the instrument and the receiver.
•
Connect the instrument's plug to a different outlet to make sure that the instrument and the receiver are connected to two different circuits.
•
If necessary, contact a specialised technician.
SD5
2
Safety Instructions
CCAAUUTTIIOONN !!!!!!
RRIISSKK OOFF EELLEECCTTRRIICC SSHHOOCCKK
DDOO NNOOTT OOPPEENN
CCAAUUTTIIOONN!!
TTOO RREEDDUUCCEE TTHHEE RRIISSKK OOFF EELLEECCTTRRIICC SSHHOOCCKK,, DDOO NNOOTT OOPPEENN TTHHEE
CCOOVVEERR..
Page 5
SD5
3
WWAARRNNIINNGGSS
After having read the safety precautions and instructions on the previous pages, carefully read and conform to the following recommendations:
PPOOWWEERR SSUUPPPPLLYY
•
Before connecting this instrument to any other equipment (amplifier, mixer, other MIDI instruments, etc.) make sure that all units are
switched off.
•
Read the instructions about Radio and TV interference..
HHOOWW TTOO CCLLEEAANN TTHHIISS IINNSSTTRRUUMMEENNTT
•
Use only a soft and dry cloth to clean the external surface of your instrument. Never use petrol, thinners or solvents generally speaking.
OOTTHHEERR PPRREECCAAUUTTIIOONNSS
•
If you wish to use your instrument abroad and if you have any doubts about the power supply, contact a qualified engineer previously.
•
The instrument should never be subject to strong vibrations.
•
Never exert excessive pressure on the keys and knobs.
•
Do not place any objects on the central display. The transparent panel could brake or be damaged and the reading of data could become
more difficult.
•
The instrument's cover could be slightly heated during playing. This is caused by heat dissipation of its internal components and is considered to be a normal effect. Nonetheless the instrument should be placed in a ventilated area, if possible.
IINN OORRDDEERR NNOOTT TTOO LLOOOOSSEE DDAATTAA
Please remember that the data stored in the instrument can be deleted at any time in case of abnormal running conditions. We therefore advise
to carry out back-up copies of your data during the various programming phases.
AACC PPOOWWEERR AADDAAPPTTOORRSS
To connect these instruments to the wall socket you will need the supplied KETRON AC Power adaptors.
Use of other AC adaptors could result in damage to the instrument’s power circuit. So be sure to ask for the right kind.
BBAATTTTEERRYY NNOOTTIICCEE
These products may contain a small non-rechargeable battery which ( if applicable ) is soldered in place. The average little span of this type of
battery is some years ( approximately 5 ). When replacement becomes necessary, contact a qualified service representative to perform the
replacement.
WWaarrnniinngg ::
do not attempt to disassemble, or incinerate any battery. Keep all batteries away from children. Dispose of used batteries promptly
and as regulated by the laws in your area.
INFORMATION FOR USERS
”Observe European Directives 2002/95, 2002/96 and 2003/108 with regard to the reduced use of harmful substances
on electrical and electronic instruments and also observe waste disposal regulations.”
The symbol with the bin crossed out on the instrument points out that it must be separated from other waste at the
end of its useful life span and not just thrown away in the bin.
The user must therefore hand the instrument over to differentiated waste disposal centres authorised to process electronic and electro-technical waste at the end of its useful life span, or give it back to the retailer when purchasing a
new similar type of device on a basis of 1-to-1 ratio.
The differentiated disposal of the equipment for the possible future recycling of its constructional parts contributes in
safeguarding the environment and human health.
The user is subject to administrative fines in the case of the abusive disposal of the product.
Safety Instructions
Page 6
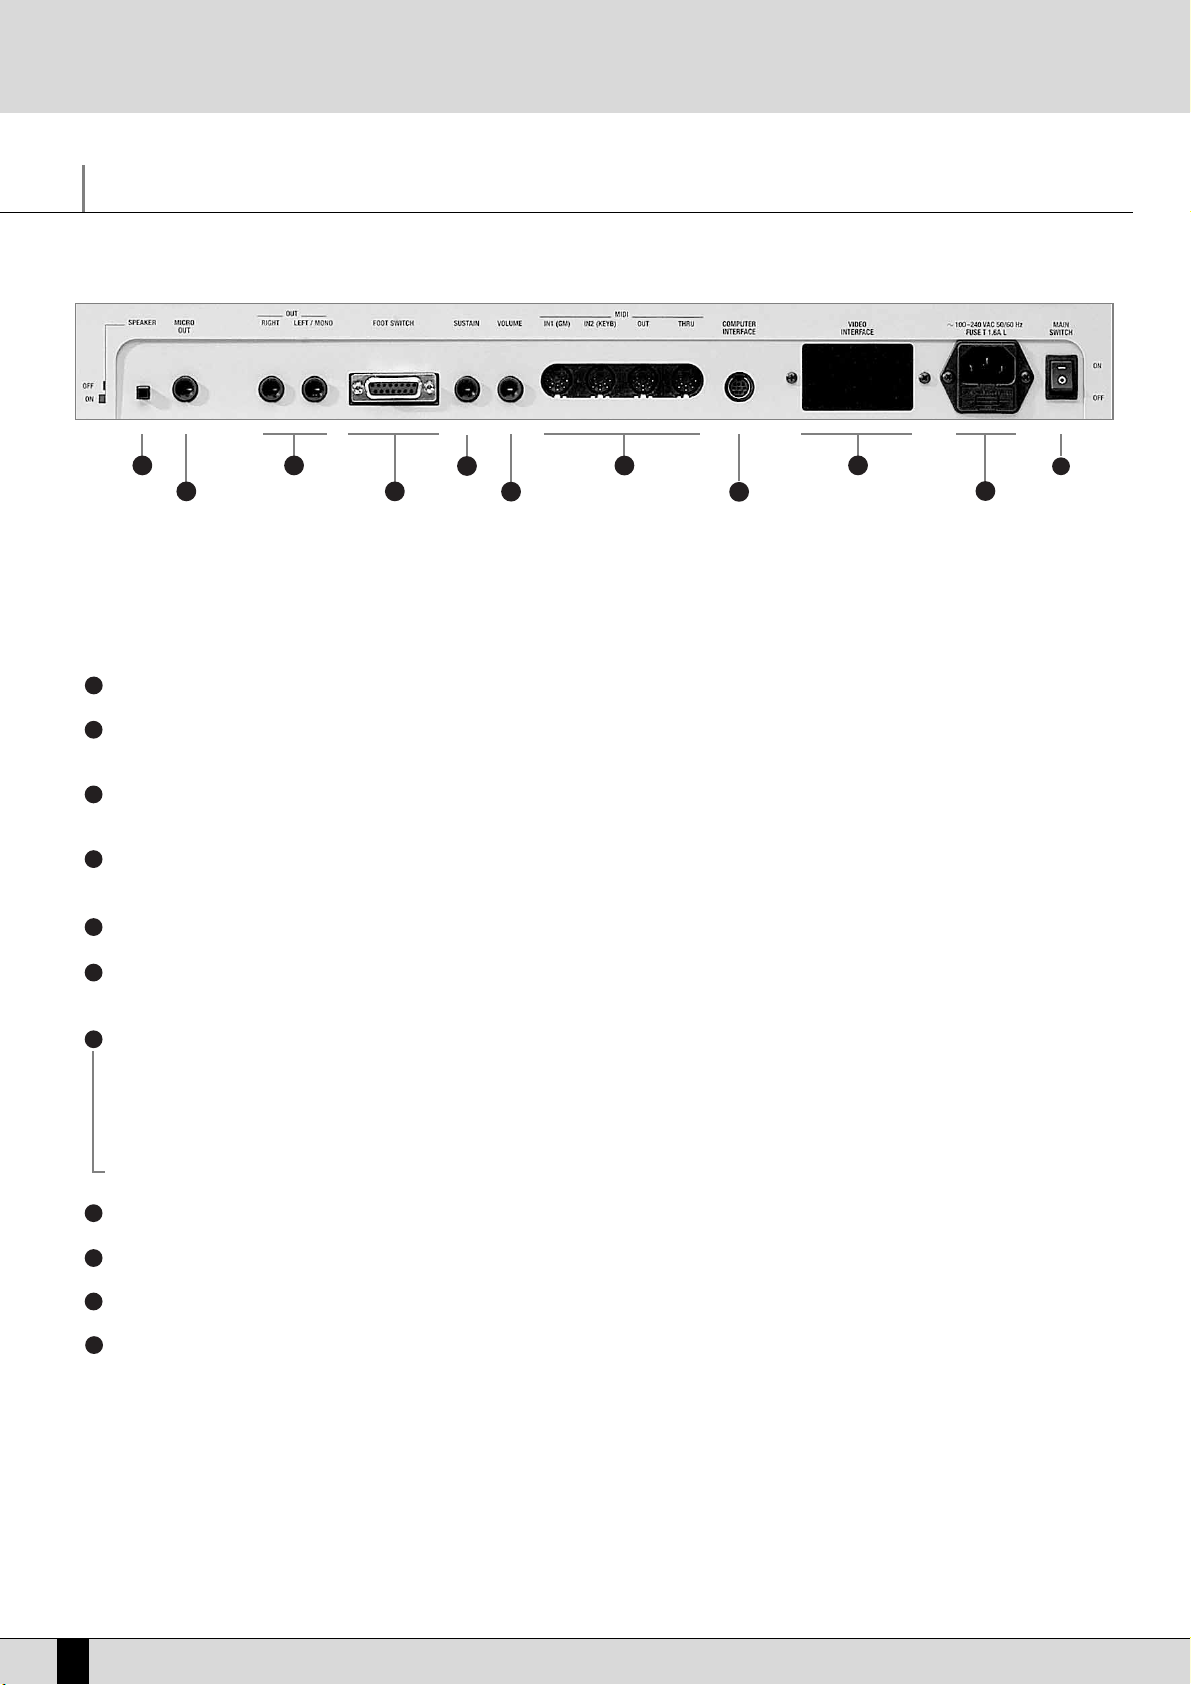
Connections
The SD5 is provided with all the audio and MIDI connections as required by current standards including the sockets for the pedals needed for
its optimum use. The only optional extras are the hardisk, video interface and the two pedals.
REAR CONNECTION
SPEAKER: Button used to enable and disable the built-in speakers of the instrument.
MICRO 1 OUTPUT: Monophonic 1/4'' jack direct audio output of the input signal of Micro 1 processed by the Vocalizer but not by the inter-
nal effects like Reverb or chorus.
OUTPUT LEFT/MONO, RIGHT: Monophonic 1/4” jack audio outputs where the Left out can work as the summed monophonic output for
the whole instrument. When the Left and Right outputs are used the SD5 works in stereo.
PEDAL FOOTSWITCH: This is a multipolar socket used to connect optional pedals with six or thirteen switches, to control many functions
including automatic accompaniment commands etc.
SUSTAIN PEDAL: This is the socket for the Sustain On/Off type pedal.
VOLUME PEDAL: This is the socket for the continuous Volume control pedal. It is advisable to use pedals produced by Ketron to avoid dan-
gerous short circuits or abnormal conditions in general.
MIDI In (GM): Midi Input Port used just to control the General MIDI sound generator of the SD5 with sixteen MIDI parts.
MIDI In 2 (Keyboard):
MIDI port for connecting an external MIDI keyboard or accordion which can operate the SD5 in a similar way to its own keyboard.
MIDI Out: MIDI port used to send the data generated by the SD5, including automatic accompaniment and lead part(s).
MIDI Thru: MIDI port that allows all data from the MIDI IN1 to pass through unaltered.
COMPUTER INTERFACE: The SD5 can be directly connected to a PC or to a Mac via this port.
VIDEO INTERFACE:
This optional device is used to display the words of a Midi file and other information provided by the musician on a monitor for the audience.
AC: Socket for the power supply cable.
MAIN SWITCH: This push button turns the SD5 on & off.
FRONT CONNECTIONS
HEADPHONES: Allows you to connect stereo headphones.
GAIN: Controls the gain of the microphone audio inputs.
MICRO INPUT: Unbalanced _'' mono audio jack input for two microphones, (if a stereo-mono adapter is used). The Micro Input signal can be pro-
cessed by the inner Vocalizer of the SD5 and by the global effects. Without the adapter, only one microphone can be used.
SD5
4
Connections
1 3
2
1
2
3
4
5
6
7
4
5
6
7
8
9
10
11
8
9
10
11
Page 7

SD5
5
FURTHER ELEMENTS OF THE SD5
HARD DISK
The optional hard disk allows you to store Midi files, Patterns and any other files processed by the SD5.
DISK DRIVE
Supplied as standard, it is used to read and write 720 KB and 1.4 MB of data on floppy disks in DOS format. Floppy disks formatted on any PC can
also be used.
JOYSTIC
Used to change timbre pitch if moved horizontally and to change the modulation effects if moved vertically.
AFTERTOUCH
When the key reaches its full stroke, after pressing it normally, you can exploit a further brief section of the stroke, which is clearly felt by pressing the key further, to control the addition of some effects such as vibrato and pitch bend. In this way, it is easier to control the various timbres. The version of Aftertouch implemented on the SD5 is the single-sound version, in other words the effect produced affects all the keys
pressed at that time.
VELOCITY
The key dynamics is used to control some timbre parameters such as the volume of the note or the filter.
GENERAL VOLUME
The volume cursor seen on the front panel controls the general volume of the audio outputs Left & Right of the whole keyboard, including the
microphone signals. The cursor does not send a Volume data to the MIDI Out port.
MULTI-TABS
This set of 16 buttons is used to rapidly access various functions that prove useful in the various musical contexts of the instrument. For example, you can control the mute function of the various percussion sections, directly access the 16 parts of the General Midi or activate and launch sound effects.
ACCESSORIES
Connections
COD. 9AC093 COD. 9AC103 COD. 9AC113 COD. 9AC114
COD. 9VA005 COD. 9AC121 COD. 9PEMK8 COD. 9HD004
VIDEO INTERFACE: P/N 9AC134 VOCALIZER: P/N 9VO004 DELUXE CONTAINER WITH WHEELS: P/N 9VA005D
PATTERNS EXPANSION FLASH CARD: P/N 9AC116 PC CABLE: P/N 9AC123 MAC CABLE: P/N 9AC122
Page 8
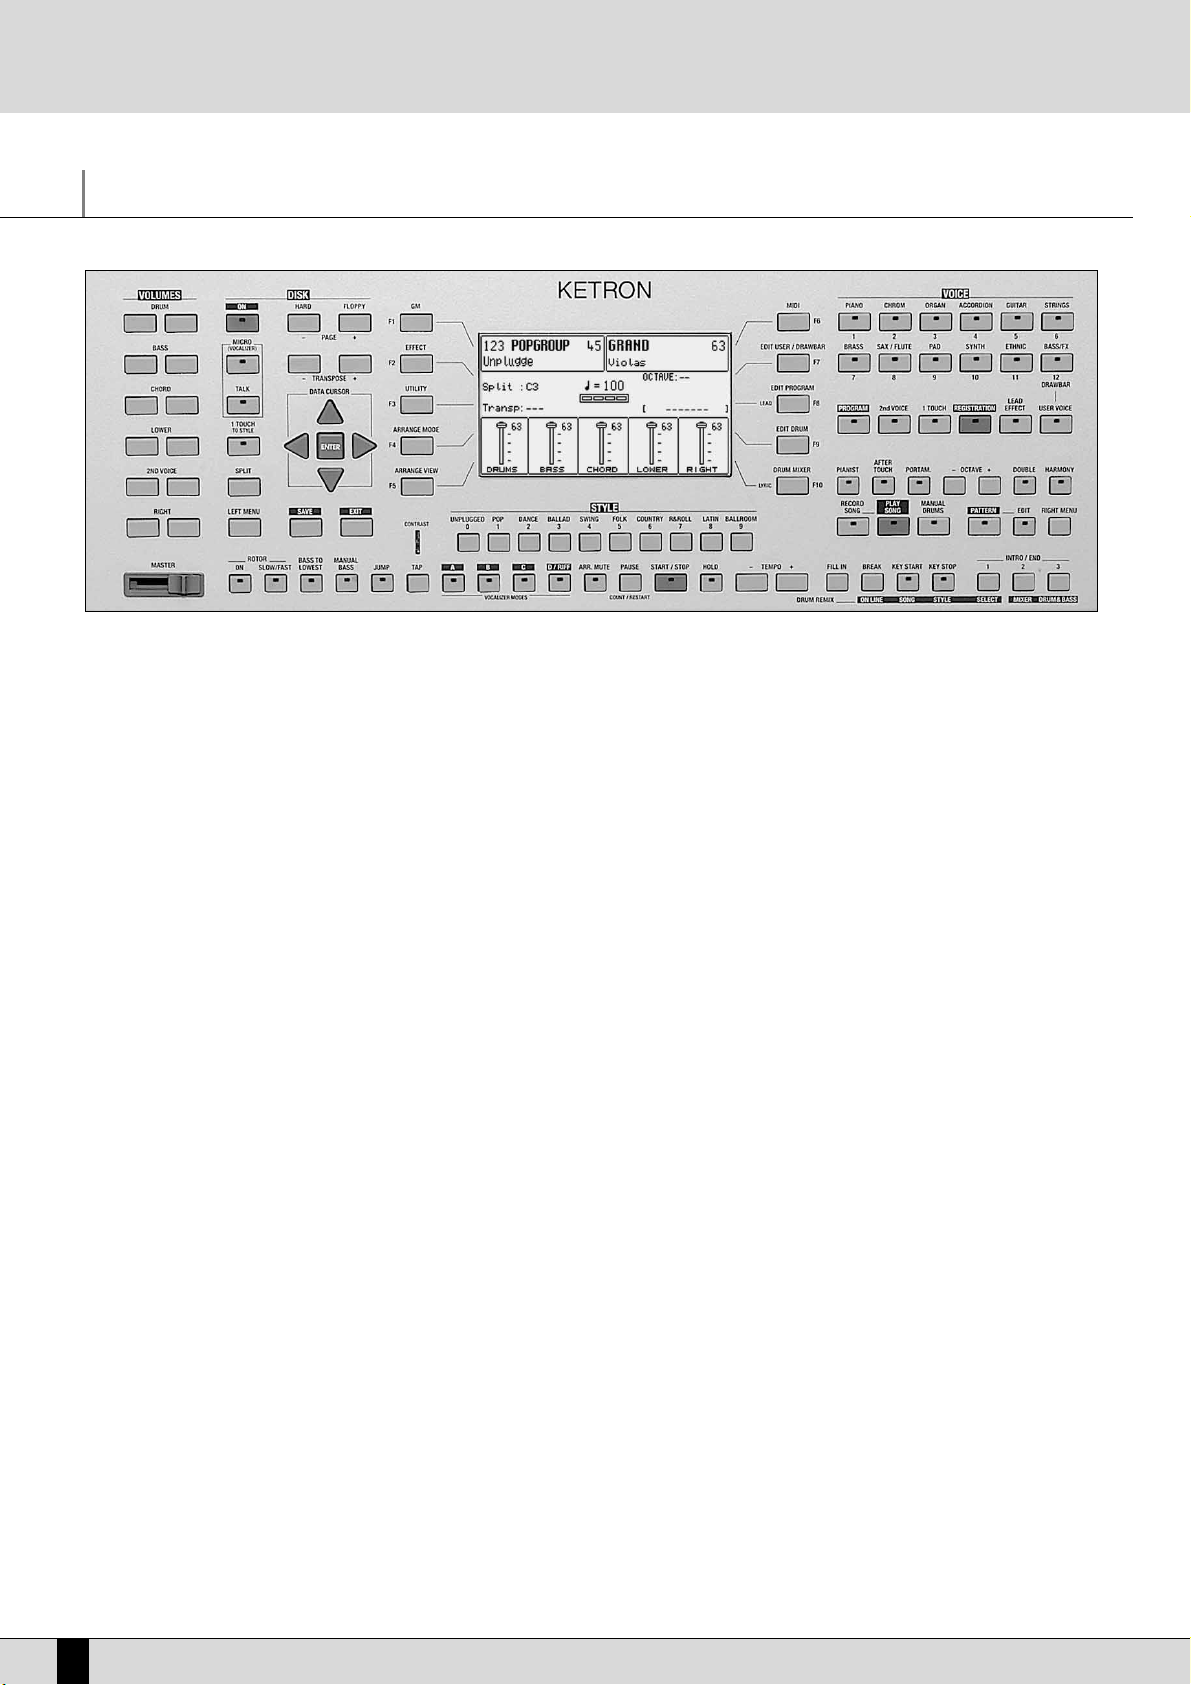
Control panel and push button functions
The control panel is divided into sections according to the group of functions related to the push buttons. From left to right you will see the following:
VOLUME
Two rows of six push buttons that are used to control the general volume for the Drums, Bass, Chords, 2ND Voice and Right
sections. The volume can be muted by pressing the right-hand and left-hand
VVOOLLUUMMEE
push buttons of that section together
at the same time. To restore the volume set prior to muting simply press one of the two
VVOOLLUUMMEE
push buttons of the section
once. To raise the lead volume, press and hold down the right-hand
RRIIGGHHTT VVOOLLUUMMEE
push button. To lower the volume, use the
left-hand push button instead. Using the
22NNDD VVOOIICCEE
keys, you can control the volume of the second voice that affects the
melodic line of the SD5. Thanks to this feature, you can therefore add a second sound on the right section and produce interesting timbre layers, the sound balancing of which can be controlled with the dedicated volume keys.
PAGE + PAGE - When the display shows that there are more pages following the first one (as for Voice and Style), the
PPAAGGEE ++
push button
is used to move one page forwards and
PPAAGGEE --
to go back a page. The
PPAAGGEE ++
and
PPAAGGEE --
push buttons, with the LED of the
DDIISSKK
push button lit, are used to select either the hard disk or the floppy disk drive. In this case, to move onto the following
pages of a directory, the musician must use the
CCUURRSSOORR ++//--
push buttons. In the main default page the
PPAAGGEE ++
and
PPAAGGEE --
push buttons directly control the
TTeemmppoo
value of the Arranger in steps which can be determined (in the UTILITIES page).
DATA CURSOR
When there are a number of parameters to be modified within a menu or when the function buttons are not directly related
to a specific parameter (as in the case of parameters situated in the middle of the display), the 4
DDAATTAA CCUURRSSOORR kkeeyyss
are used
to select and modify the value of the parameter required. According to their direction, as you read through this manual you
will notice that we call these buttons UP (arrow pointing upwards),
DDOOWWNN
(arrow pointing downwards),
LLEEFFTT
(arrow pointing to
the left) and
RRIIGGHHTT
(arrow pointing to the right). Generally speaking, the
UUPP
and
DDOOWWNN
buttons are used to select the para-
meter to be edited while the
LLEEFFTT
and
RRIIGGHHTT
buttons are used to change the value of the parameter currently selected and
therefore they act as
VVAALLUUEE++//--
function buttons. When you press the LEFT and RIGHT keys together at the same time, the
parameter selected is reset and if you press them again, the parameter is set back at its initial value, even after it has been
modified. In many contexts, the same procedure can be done by pressing the
EENNTTEERR
key. In this case again, the parameter
currently selected is reset after it is pressed once and is set back at its original value when the key is pressed again.
Generally speaking the
LLEEFFTT
and RIGHT buttons are used to change the value of the parameter currently selected and the-
refore they act as
VVAALLUUEE++//--
function buttons. When you press the two keys together at the same time, the parameter selected is reset and if you press them again, the parameter is set back at its initial value, even after it has been modified. In the
DDiisskk
environment, the
DDAATTAA CCUURRSSOORR LLEEFFTT
and
RRIIGGHHTT
keys are used to select successive groups of files that are not shown on
the display, while the
DDAATTAA CCUURRSSOORR UUPP, DDOOWWNN
keys are used as
VVAALLUUEE++//--
function buttons and are also used to select files.
ENTER The Enter key is used to confirm the value currently selected. In some cases, such as in the Disk environment for example,
it is used to start or to load Midifiles.
TRANSPOSE They are used to
TTrraannssppoossee
all the musical sections of the SD5 in steps of one semitone. To reset the Transposer, simply
press the buttons together at the same time.
SAVE This is used to store and save on disk any edits or modifications carried out by the user.
EXIT This push button is pressed once to return to the main page of the display.
EEXXIITT
is disabled in the Song Play menu where
the
SSOONNGG PPLLAAYY
push button should be pressed again exit the Song Play mode and return to the main display page.
SD5
6
Control panel and push button functions
Page 9
SD5
7
DISK ON This is used to gain access to the management functions both on floppy disk and optional/built in hard disk. When the
DDIISSKK
LED is lit the
PPAAGGEE ++
and
PPAAGGEE --
push buttons can be used to select either the hard disk or the floppy disk.
MICRO (Vacalizer)
This is used to access the menu of the Microphone and of the Vocalizer (optional)
TALK This is used to disable the effects on the microphone.
1 TOUCH TO STYLE
With this push button will be possible to enable or disable automatic recall of ont touch memories linked to the current style.
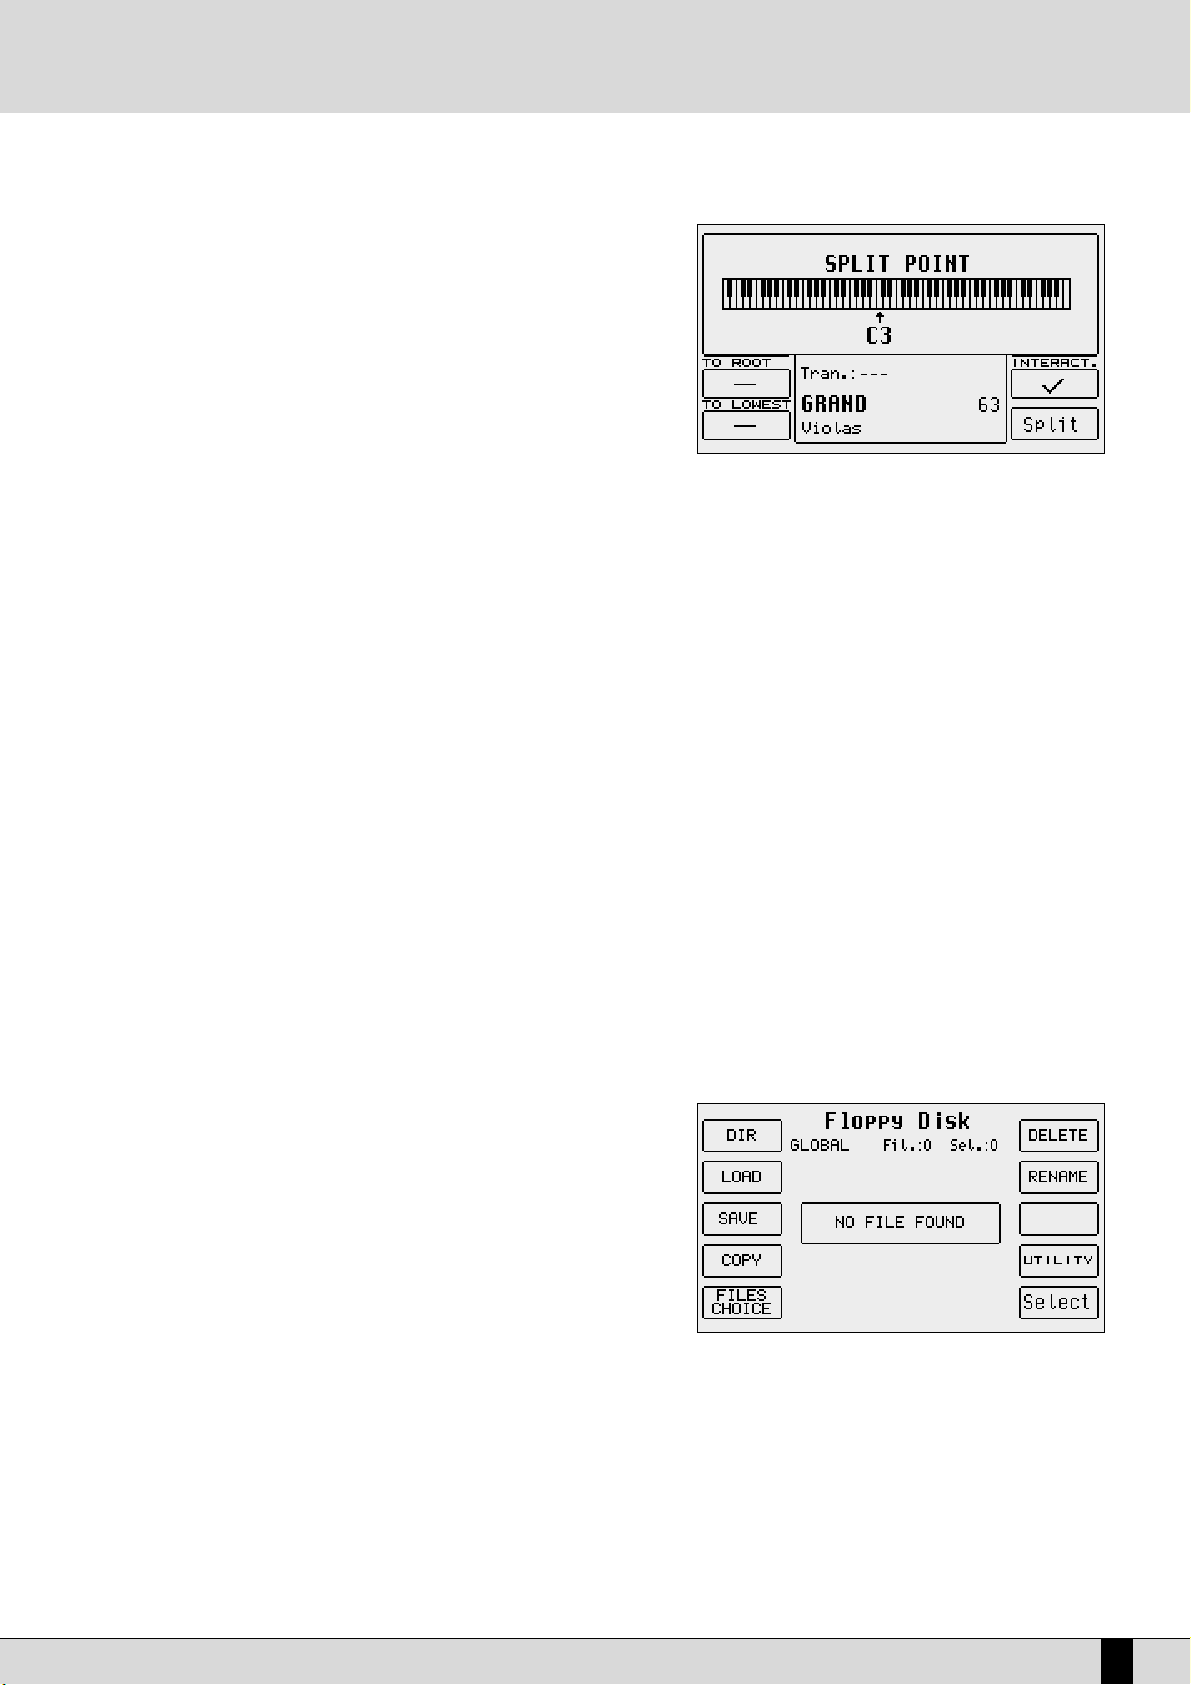
SPLIT Split is used to establish which part of the keyboard is assigned to the Arranger and which one to the lead. By default the
split point is set on the note C3, so below this note the keyboard is assigned to the Arranger, whereas above it is assigned
to executing the lead. Proceed as follows to modify the Split:
1. Press the Split button and keep it pressed. At the same time, on the keyboard play the key corresponding to the
desired Split point.
2. Release the Split button. The new value will remain stored until the keyboard is turned off.
LEFT MENU This is used to access the menu dedicated to the arranger functions and to the Split point.
THE DISPLAY, THE MAIN PAGE AND THE FUNCTION PUSH BUTTONS
From the main page of the display, the programming functions can be accessed using the function push buttons at the side of the display
together with the dedicated push buttons. Based on the functions called up, the display shows the related parameters and enables their selection thanks to the push buttons at the side of the display (or function keys from F1 to F10. They are referred to as function buttons because they
have a different function depending on the page displayed). Therefore simply press the function push button adjacent to a parameter to enable or select that parameter. When the parameters are situated in the middle of the display then they are selected using the CURSOR push buttons.While you will find detailed descriptions of the modification pages further on, below is a description of the single parameters that are
displayed.
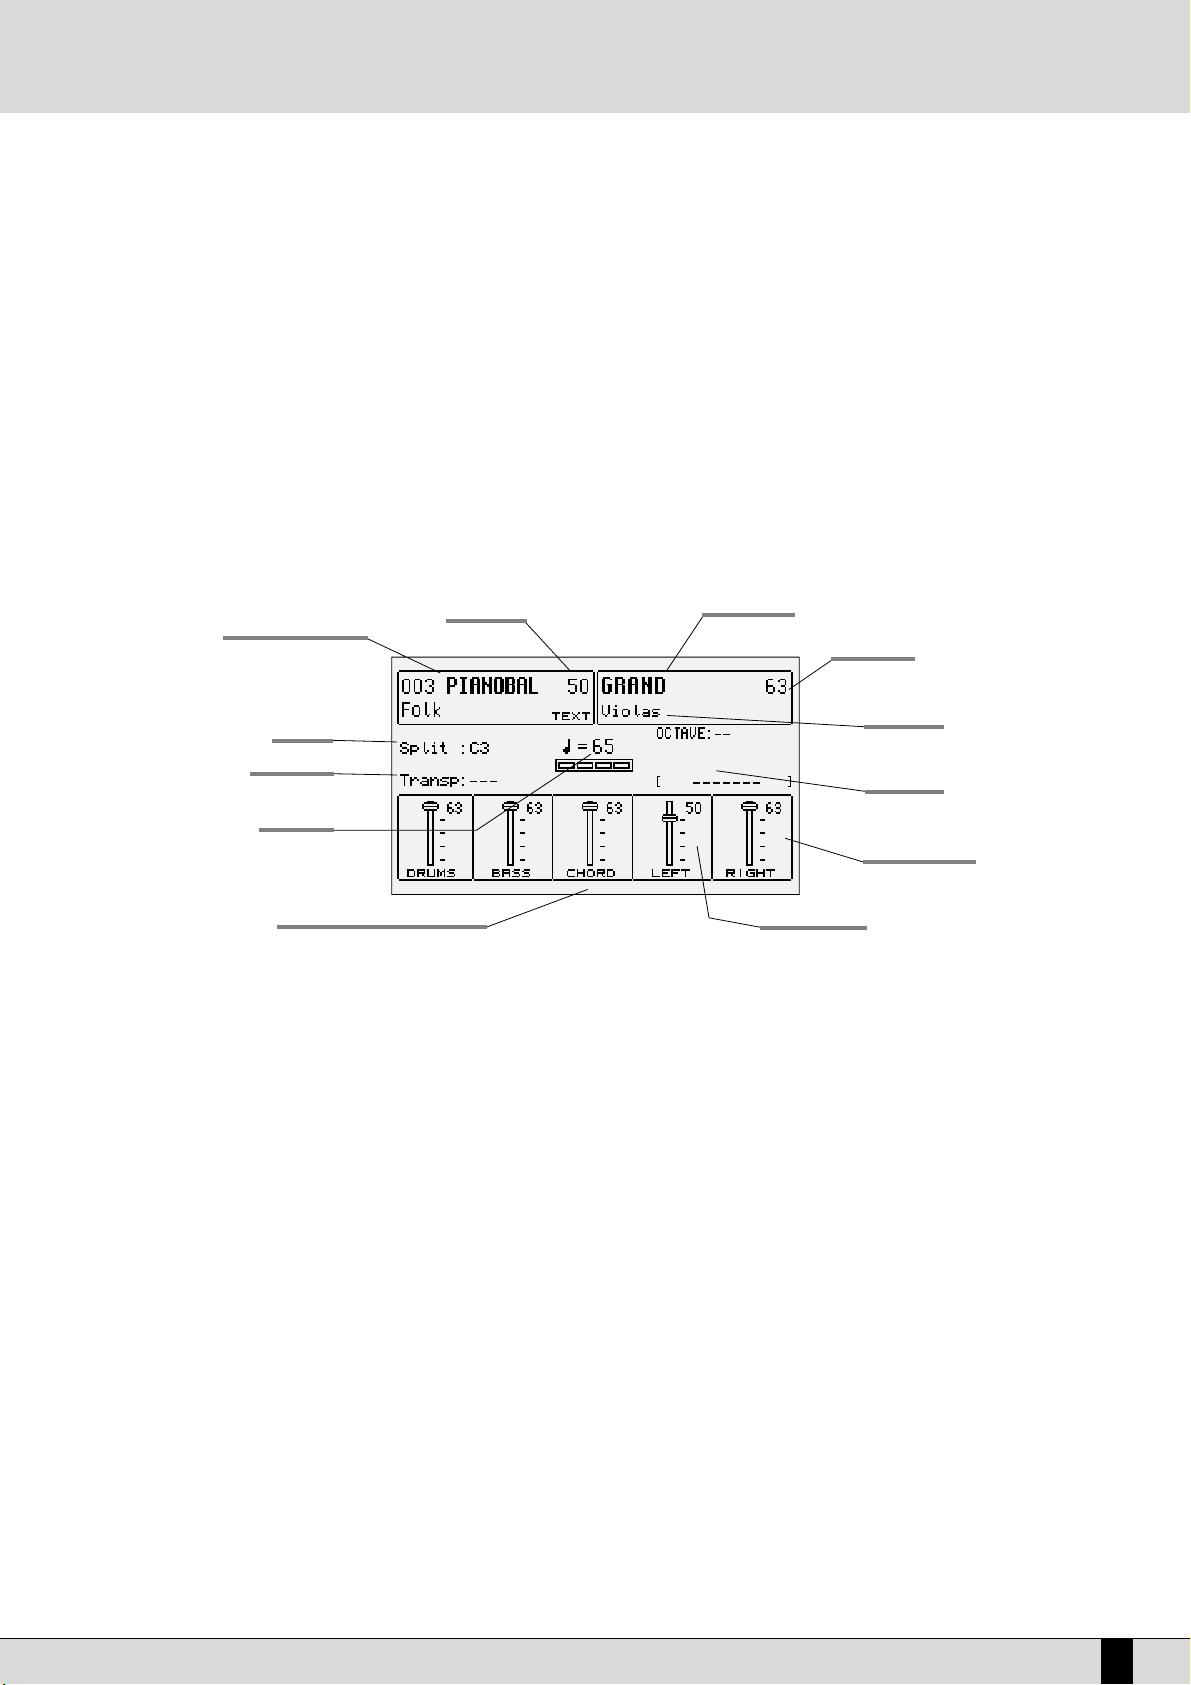
Number, name and volume of the style: This indicates the name and number of the style currently in use. Use the
SSTTYYLLEE
push buttons to call
up another one. To modify the volume of the arranger, press the
DDAATTAA CCUURRSSOORR(LLeefftt RRiigghhtt
) push buttons, which in this page are used as
BBaallaannccee
.
Sound selected and volume: To change the sound in use on the Right lead section use the
VVOOIICCEESS
push buttons related to the single group or
the
UUSSEERR VVOOIICCEESS
push button. The pair of
RRIIGGHHTT VVOOLLUUMMEE
push buttons are used to modify the volume of the sound.
Second Voices: This indicates a second sound to be layered with the Right lead section. It is entered using the
22NNDD VVOOIICCEE
push button.
Split and transposition point: This indicates the key to the right of which the melodic section is played or Right section dedicated to the right
hand; whereas on the left you will find the part of keyboard used to acknowledge the chords for the Arranger and for the notes to be played in
the Lower section with the left hand. The modification is made with the related key.
Transp. This indicates the number of semitones for transposition that can be changed using the
TTRRAANNSSPPOOSSEE ++ eTTRRAANNSSPPOOSSEE
push buttons. When
a double dash is displayed transposition is off.
Tempo and beat of the style: This indicates the current Tempo of the Arranger. Use the
TTEEMMPPOO ++e TTEEMMPPOO --
push buttons to modify it. The beat
indicator is used to avoid visually losing the beat of the bar being played.
Chord: This indicates the chord currently being played. To change it play another chord on the part of keyboard to the left of the
SSpplliitt
point.
Volume cursors of the main sections of the keyboard: These graphically display, with absolute values, the settings of the volumes of the
Drums, Bass, Chord and Right sections, the value of which can be directly modified using the pair of
VVOOLLUUMMEE
push buttons pairs. To modify the
Control panel and push button functions
Style number and name
Style volume
Split note
Transposition
Selected sound
Sound volume
Second Voice
Played chord
Right hand volume
Style tempo
Left hand volume
Accompaniment sections volumes
Page 10

display contrast turn the
CCOONNTTRRAASSTT
knob on the control panel. A set of functions corresponds to each function push button
FF11//FF1100
, in the main
page of the display, which can be directly accessed by pressing the relative push button.
F1 GM: This selects the menu with the parameters related to the single MIDI parts of the sixteen offered by the standard General MIDI.
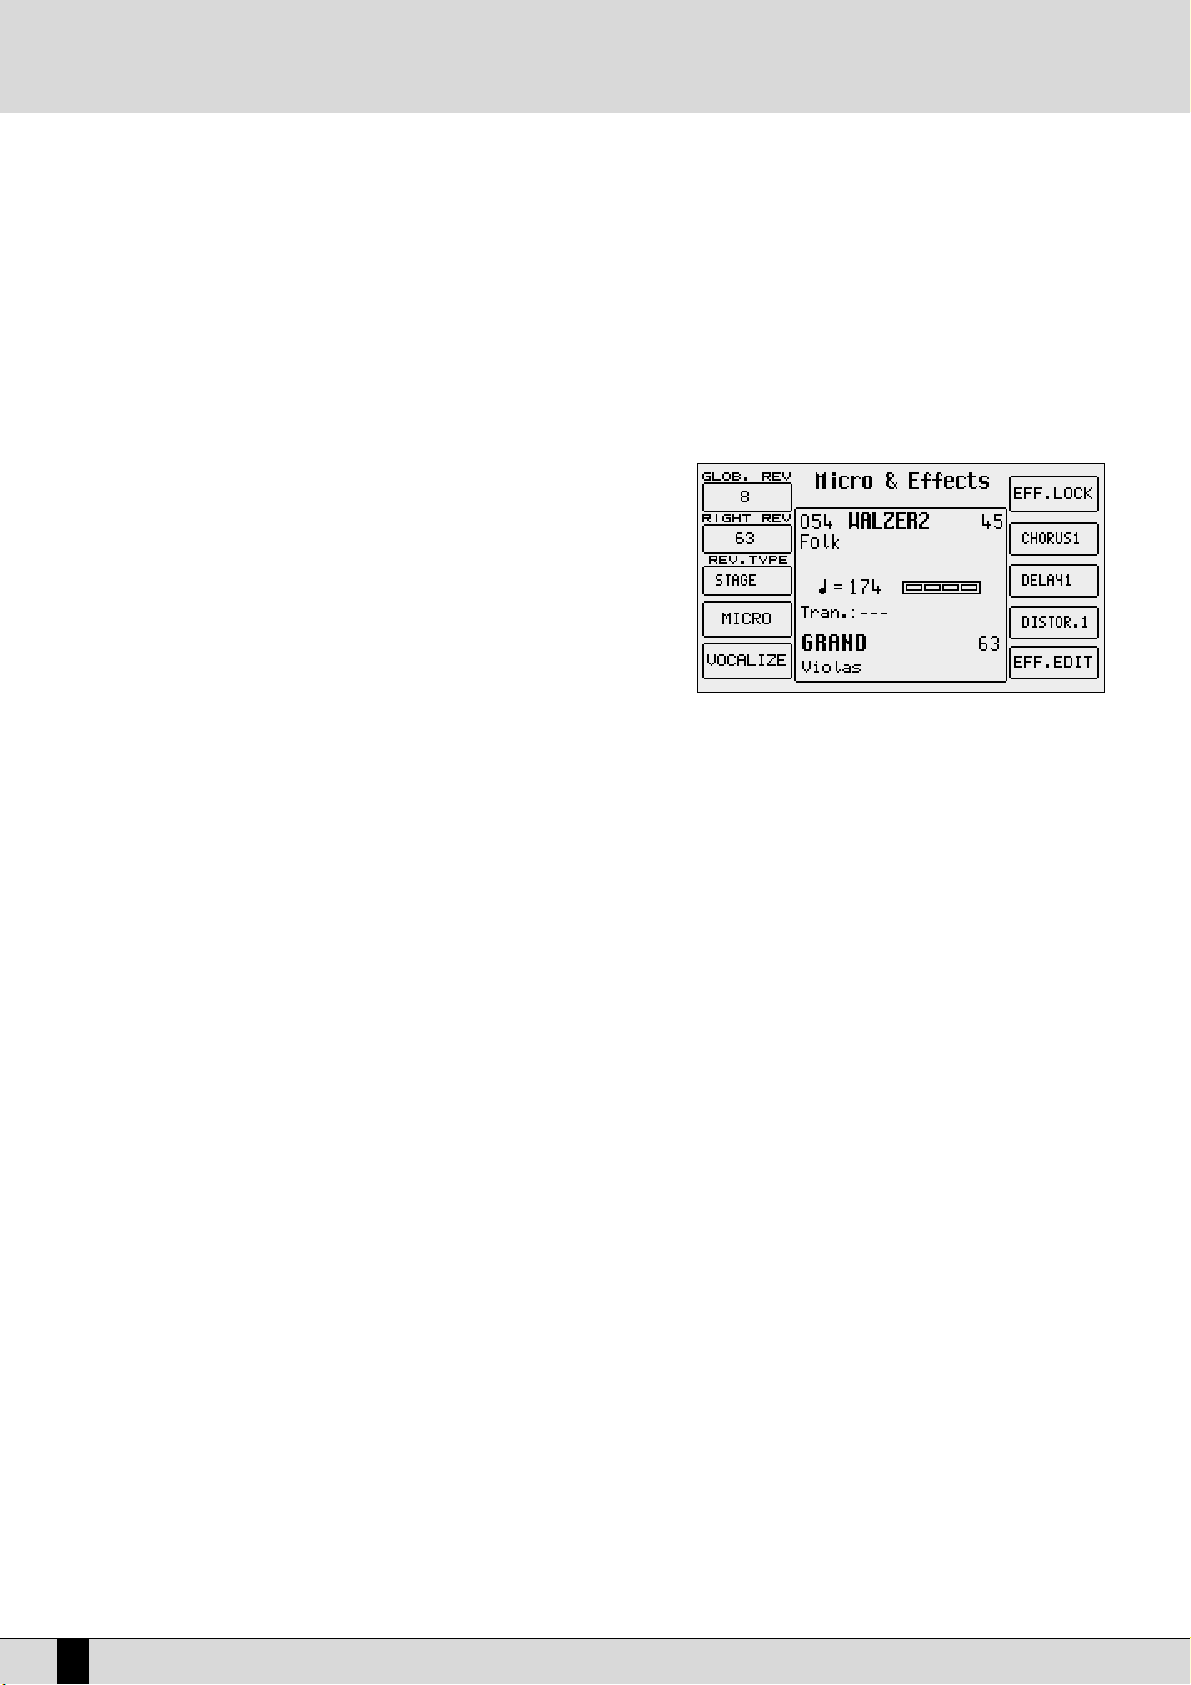
F2 EFFECT: This is used to quickly modify the Reverbs and to enable the modulation effects and also to access the individual parameters of
the single effects.
F3 UTILITY: This controls the overall parameters of the keyboard and the physical controllers.
F4 ARRANGE MODE: This is used to gain access to the parameters dedicated to the Arranger when playing live.
F5 ARRANGE VIEW: Four menu pages offer the facility to re-program the sounds, volumes and effects of each single section of the Arranger.
F6 MIDI: Through the sub-menus, access is gained to the programming of MIDI events even during transmission and reception mode and to
the assignment function of the MIDI channels to each single section of the keyboard.
F7 EDIT USER/DRAWBARS: This is used to modify the main parameters relating to the sound such as the envelope, the filter and the LFOs.
When a Drawbar sound is selected (pressing first
UUSSEERR VVOOIICCEE
and selecting then the
BBAASSSS--FFXX
bank using the Voice push buttons group),
the
EEDDIITT UUSSEERR //DDRRAAWWBBAARRSS
push button allows you to access programming and to display the single Drawbars to create new organ sounds.
F8 EDIT PROGRAM: This is used to program or modify the parameters relative to the four sounds that can be used at the same time for the
lead section within a selected Program.
F9 EDIT DRUM: For the drum tracks and other features. This group of functions is dedicated to the programming of a complete drum kit, of
which up to two samples can be indicated for each key of the keyboard.
F10 DRUM MIXER: This allows you turn on/off, modify the volume, pan and reverb of each of the individual percussion groups within the cur-
rent drum kit.
THE PUSH BUTTONS RELATED TO THE SELECTION OF STYLES
Ten push buttons are used to call up just as many groups of styles directly from the control panel. When a group is selected the display shows
five styles to the left and another five to the right. To enable a style simply press the function push button next to its name on the display.
Considering that the SD5 offers more than ten styles per group, the user can move onto the next pages either using the
PPAAGGEE ++
or
PPAAGGEE --
push
buttons, or by repeatedly pressing the push button related to the group of styles in use. When the SD5 reaches the last page of styles available, the user can return to the first page by pressing the push button for that same group of styles again instead of the
PPAAGGEE ++
or
PPAAGGEE --
push
buttons. In some editing situations the twelve
SSTTYYLLEESS
push buttons become numeric keys that are used to enter the value directly.
THE PUSH BUTTONS RELATED TO THE SELECTION OF VOICES
The two rows of six push buttons called
VVOOIICCEESS
are used to call up sounds or Preset Voices according to the family to which they belong. When
a family is selected with one push button the display shows five Voices to the left and five Voices to the right, which can be enabled by pressing the function push button next to the desired sound. Considering the fact that the SD5 offers more than ten Voices per family, the user can
move onto the next pages either using the
PPAAGGEE ++
or
PPAAGGEE --
push buttons or by repeatedly pressing the push button of that family of Voices in
use. When the SD5 reaches the last page of Voices available, the user can return to the first page of Voices by pressing the same push button
for that family of Voices again rather than the
PPAAGGEE ++
or
PPAAGGEE --
push buttons.
The
VVOOIICCEESS
push buttons are not only used to call up the pre-set voices alone.
●
If the
LLEEDD
of the
UUSSEERR VVOOIICCEE
push button (i.e. of the bank of sounds that can be programmed by the user) is activated, then the
VVOOIICCEESS
push
buttons call up the 128 User Voice sounds in groups of ten at a time.
●
If
UUSSEERR VVOOIICCEE
and
BBAASSSS--FFXX
are enabled, an organ sound corresponds to each single VOICES push button.
●
If the LED of the
PPRROOGGRRAAMM
push button is lit, the VOICE push buttons call up the Program voices.
●
If the LED of the
OONNEE TTOOUUCCHH
push button is lit, buttons calls up one of the six pages of the One Touch memory locations.
PUSH BUTTONS ON THE RIGHT-HAND SIDE OF THE CONTROL PANEL
PROGRAM When the LED is lit, 10 Program locations are displayed, to be selected using the function push buttons. A Program combines
up to four voices dedicated to the lead section with the related parameters.
2ND VOICE When the LED is lit, the second Voice assigned to the equivalent Lead voice is enabled. It's name is displayed under the name
of the Lead voice to the top right side of the display screen.
USER VOICE When the LED is lit, this allows you to call up the User Voices using the Voice push buttons.
1 TOUCH When the LED is lit, ten sounds within the first of the eight groups available are displayed. The
OOnnee TToouucchh SSoolloo
function is
used to save the most frequently used Voices so that they can be called up easier rather than having to first select the voice
group and then a sound from within it.
REGISTRATION
The Registrations memorise all the SD5 settings for instant retrieval , including the automatic call up of Midi and TXT files. When
the LED is lit the user can call up one of the 198 Registrations using the numeric keypad, namely the
SSTTYYLLEE
push buttons.
LEAD EFFECT The SD5 allows you to assign Delay, Distorsor and Overdrive effects to the Right section together with the standard Reverb
and Chorus effects. From the
LLeeaadd EEffffeecctt
page, you can activate up to four effects simultaneously assigned to the sound of
SD5
8
Control panel and push button functions
Page 11

the right hand. From this menu you can also control the effects of the microphone, activate the vocalizer (optional) and pullup the current vocal set.
USER VOICE
This activates the bank of timbres that can be programmed by the user. The
VVOOIICCEESS
buttons pull-up the timbres in groups of ten at a time.
PIANIST Generally speaking it is preferable to have one keyboard portion dedicated to chords acknowledgement and the other one
to the solos and the lead. For the true pianist player, however, it may not be sufficient to have a length of just nearly four
octaves available. The
PPiiaanniisstt
function deletes this division and dedicates the complete keyboard to the sound(s) assigned
to the
RRiigghhtt
section and to the chords acknowledgement. Obviously the best results are obtained with pianist sounds such
as the Grand Piano or the Vintage electric piano.
PPiiaanniisstt
allows you to use the complete extension of the keyboard for just
one timbre, and at the same time it also allows you to control the Arranger. There are two different ways to acknowledge the
chord, which you can choose at pleasure in the
UUttiilliittyy
menu. The default method is
SSttaannddaarrdd
.
AFTERTOUCH The SD5 keyboard features the Aftertouch effect that can be activated by pressing the special button. By pressing F3 (Utility),
however, and then F2 (Aftertouch), you may assign other controls to the Aftertouch (for further details please refer to the
Utility chapter of the operator's manual).
PORTAMENTO This button activates the Portamento, or the Legato or the Mono mode set in the Utility menu for the Right timbre.
OCTAVE+/ OCTAVE-
These are used to transpose the octave of the Right section, in other words the melody of the right hand, by one octave
higher or lower.
DOUBLE This doubles the notes played on the keyboard, adding the notes with one lower octave.
HARMONY When the LED is lit, it activates the harmony function of the timbre of the Right section according to the settings of the rela-
ted menu.
RECORD SONG This is used to record a Midifile that contains everything played on the keyboard.
PLAY SONG This activates the playing function of the Midifile. It is also used to pull-up concentrations of Midifiles and to display the
words of the songs on the instrument display.
MANUAL DRUMS When led is on you can play single instruments of your own drum set all over the keybed. This function turn off automati-
cally Right and Left Sections and allows to control Manual Drum section by Drum Volume slider. If Manual Drum is activate
while Style Chord are running these tracks will play the latest chord recognized.
MMAANNUUAALL DDRRUUMM
doesn't turn off the original
Style Drum track
PATTERN When the LED is lit, this allows you to select Styles loaded in RAM from the floppy disk or from the hard disk.
EDIT This activates the Edit mode for the pattern. In this environment you can edit, modify or create new styles for the keyboard.
RIGHT MENU This is used to access the menu dedicated to the soloist part and to the settings for the right hand.
THE PUSH BUTTONS REQUIRED TO CONTROL THE ARRANGER
The bottom row of the control panel is almost entirely dedicated to controlling the Arranger in real time.
RIGHT MENU This is used to access a menu for settings relevant to the section to the right of the Split point, used for the lead to
program effects for the Voices and the microphone as well as the editing of the Second Voice.
ROTOR ON This button (Led on) apply Leslie © effect on SD 5 Organ timbre in order to emulate typical Hammond © tonewheels
sound!
ROTOR SLOW/FAST This increases or decreases the modulating speed of the Leslie ® effect.
BASS TO LOWEST If this function is enabled the harmonic bass evolution has its lowest note always referred to the lowest one of the
chord played. This makes it possible to perform a number of pieces of music keeping unaltered the melodic structure of the bass.
MANUAL BASS This excludes all the parts of the Arranger and leaves the Drum tracks and the bass timbre activated. The bass can
then be manually played on the keyboard portion to the left of the split point.
JUMP When Led is on this function switch automatically Style variation ( A B C D ) any time you'll press Fill In button.
Moreover with JUMP function you could use Intro feature as Fill too!
SD5
9
Control panel and push button functions
Page 12

KEY START/SONG REMIX PLAY
When the LED is lit and the Arranger is stopped, this push button is used to start the accompaniment when a note
to the left of the split point on the keyboard is played. If an
IINNTTRROO
or a
FFIILLLL
is selected, as soon as a chord is played,
that Intro or Fill-In of the style will start. To control the performance of the Lower section, namely the manual voices for the left hand, the player must access the
AARRRRAANNGGEE MMOODDEE
menu where these Lower voices can be disabled
when the Arranger is not running. This also allows the user to prevent the Lower voice(s) from sounding prior to the
arranger starting. When in Song Play mode, this push button is used to select the drum track of the Song being
played, for the Remix function.
KEY STOP/STYLE REMIX PLAY
When the LED is lit it stops the Arranger performance if a very short note or chord is played. It is restarted if another
one or even the same one is played. If the note or the chord is held down for longer than a quarter note, the
Arranger continues to play. With the Arranger stopped,
KKEEYY SSTTOOPP
is used to restart it by playing a chord that is lon-
ger than the time set in Sync Time in the Arrange Mode menu. If a
FFIILLLL
or an
IINNTTRROO
has been selected, with the
Arranger stopped and a chord that is longer than the above mentioned value is played, the whole FILL or the INTRO
will be played, whereas if the chord is very short, the Arranger will stop immediately. If the
KKEEYY SSTTAARRTT
LED is lit, as
soon as the player takes his hand off the left part of the split point, the Arranger stops and starts again as soon as
a note or a chord is played on the part of the keyboard to the left of the split point. When in Song Play mode, this
push button is used to select the drum track of the Style for the Remix function.
FILL
When the Arranger is enabled, this key is pressed to activate one or more Fill-in beats. If it is pressed with the style stopped, it will be played. If the
JJuummpp
function is enabled (LED lit), the
FFIILLLL
button skips the style onto the next variation.
BREAK This is used to add a Break beat at the end of which the Arranger will start to play again.
TAP If you tap on this button with a set frequency four times, the SD5 determines the tempo value automatically (based
on how quickly or slowly you were tapping on this button) and uses this new tempo for the arranger or sequence
to be played. The playback of the arranger or sequence will start provided they were in stop or standby mode prior
to tapping on the
TTAAPP
button. When the Arranger and Sequencer are running, the push button is used to increase
the Tempo in steps of five points each time it is pressed (
AAcccceelleerraannddoo
). By holding the TAP push button down, the
Accelerando is reversed (this can be seen by the direction of the arrow) thus decreasing the Tempo in steps of five
each time it is pressed (
RRiittaarrddaannddoo
).
COUNT/PAUSE RESTART With the Arranger stopped,
CCOOUUNNTT
adds a Count In beat where the artificial 'drummer' (using drum sticks) counts
in 4 beats. If an
IINNTTRROO
has also been pressed before
CCOOUUNNTT
with the
JJUUMMPP
push button enabled, the Intro chosen
will be enabled at the end of the count. With the Arranger running, pressing this push button immediately restarts
the arranger with the first beat of the first bar, regardless of which measure the arranger is currently in. This may
prove very useful when backing a singer whose timing is all over the place! When working with the Sequencer
(
SSEEQQUUEENNCCEERR
LED lit), this push button sets the playback to stand-by until the
CCOOUUNNTT/PPAAUUSSEE RREESSTTAARRTT
push button is
pressed again (used as a PAUSE).
START When pressed it starts to play the automatic accompaniment. If
SSTTAARRTT
is pressed while the Arranger is already
playing then everything is stopped, in other words it acts as a Stop push button.
HOLD When the LED is on the last chord played to the left of the Split point on the keyboard is memorised and kept acti-
ve driving the Arranger which carries on playing normally even after the left hand is taken off the keys. This chord
is held as the harmonic basis of all the Arranger parts until a new chord is actually played below the split point
which the Arranger follows by changing the parts to suit. If the LED is switched off, the accompaniment will only
work as long as the chord is held down on the keyboard, but the drum tracks will continue to play regardless.
SLOW This decreases the Tempo value of the Arranger or of the Sequencer.
FAS T This increases the Tempo value of the Arranger or of the Sequencer. By pressing
SSLLOOWW
and
FFAASSTT
together at the
same time, the Tempo value is locked (marked by an asterisk) so that it cannot be modified by calling up another
Style with a different Tempo. To disable this locking, press
SSLLOOWW
and
FFAASSTT
together at the same time . To restore
the default Tempo of the style press
PPAAGGEE ++
and
PPAAGGEE --
together at the same time.
A, B, C, D/RIFF.
Each of these push buttons corresponds to a variation of the style, from the most simple to the most complex. Further
to these push buttons, also
JJuummpp FFiillll
in the
LLeefftt CCoonnttrrooll
menu can be used to move forward or back between the variations. In some styles, the arrangement D may be made up of a Riff or in other words of a typical harmonic sequence
and produced in reference to the type of music of the rhythm selected. The presence of a Riff sequence is pointed out
on the display of the SD5 by the letter R between two square brackets ([R]) under the name of the current style.
Furthermore, each time a style with a Riff is selected, the LED relative to the arrangement D flashes. When the Riff is
activated, when you press the relative key, the arranger acknowledges the chord played just in the first musical beat.
The Riff will only be played based on the harmonic tune played at the time.
SD5
10
Control panel and push button functions
Page 13

SD5
11
INTRO/END 1, 2, 3 (REMIX SELECT, DRUM MIXER, DRUM&BASS)
If one of these three push buttons is pressed while the Arranger is stopped an Intro is enabled, of which there are
three with varying complexity. If one of these three push buttons is pressed while the Arranger is playing, an Ending
is enabled with three available variations having different levels of complexity. If the Jump Fill push button is enabled and an Intro push button is pressed, the Intro selected will be played. While in Song Play mode, the three pushbuttons enable the Remix functions to be controlled on the piece of music being played.
ARR: MUTE This is used to mute some sections of the automatic accompaniment, which can be defined by the user. This func-
tion enables greater control on behalf of the user of the automatic accompaniment and offers additional musical
flexibility.
Control panel and push button functions
Page 14
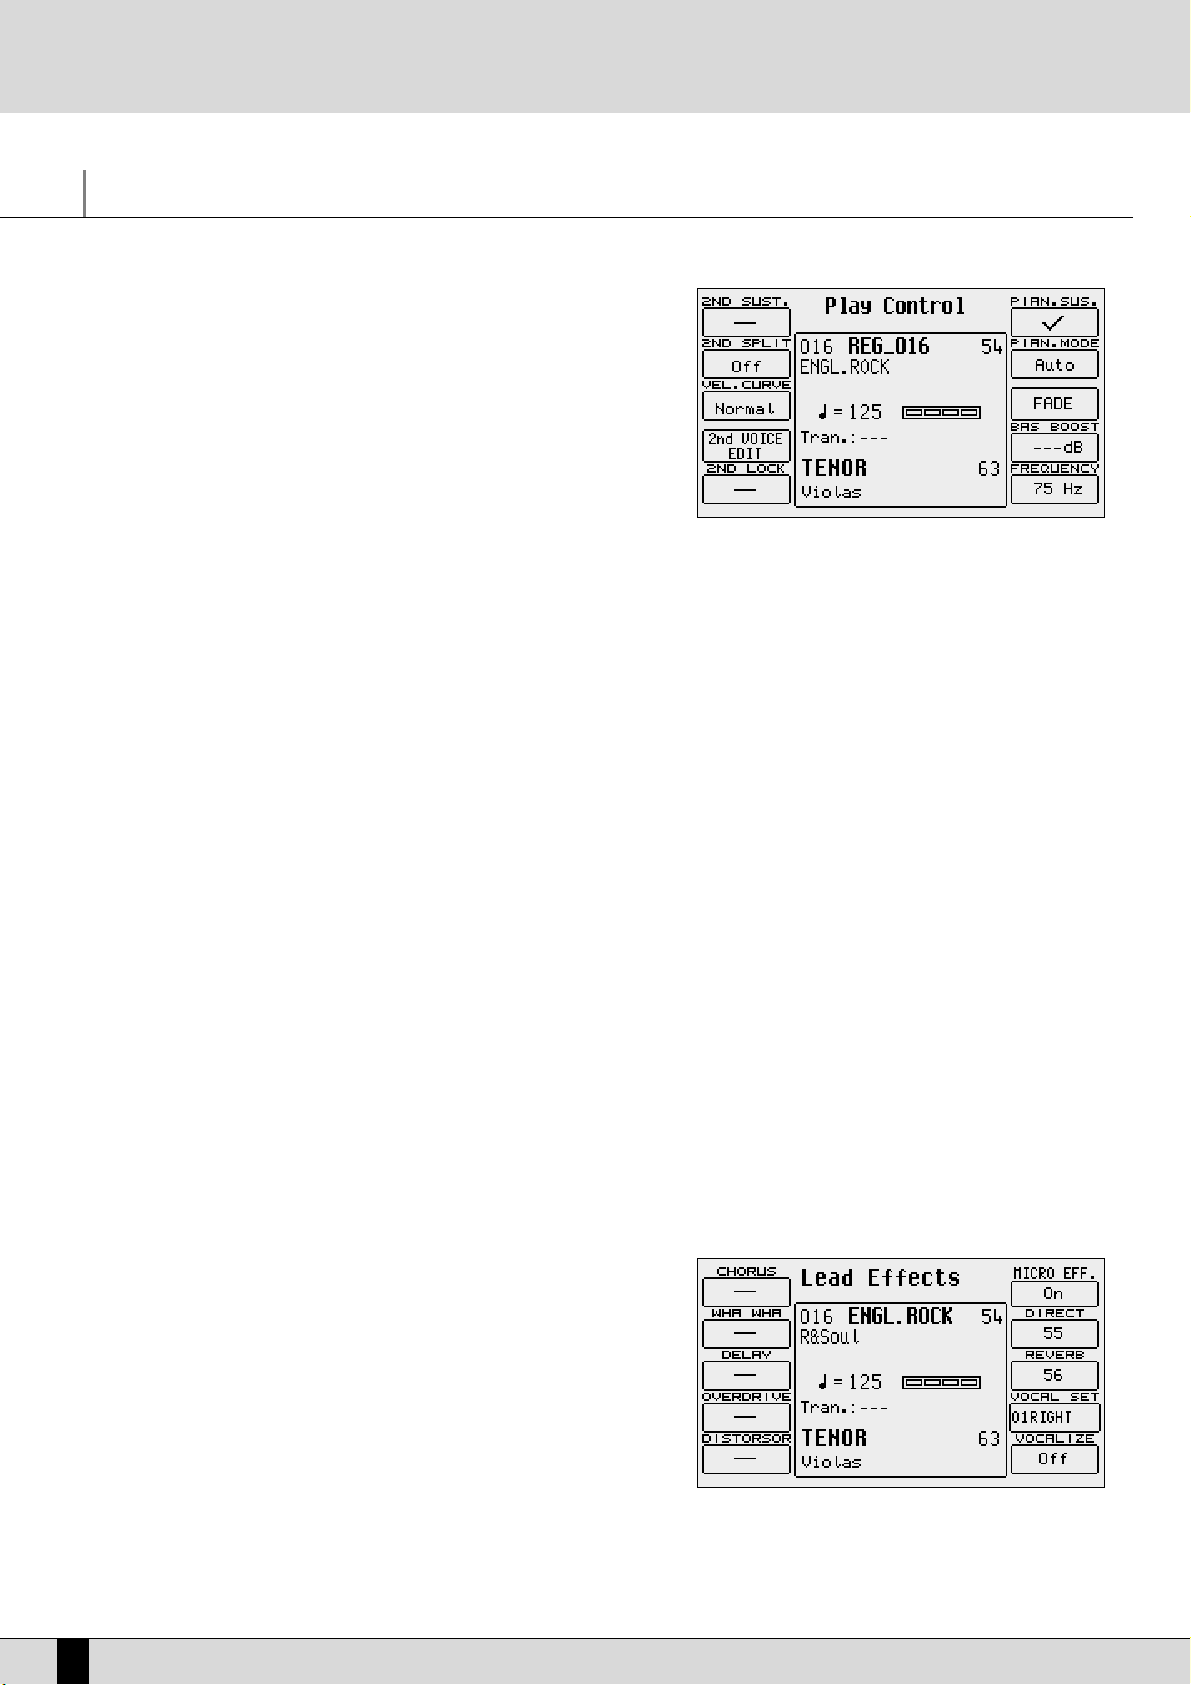
Right Menu and Live setting
Right Menu button allow to select useful parameters and setting available on
Right section.
F1 2ND Sustain Activates or deactivates the Sustain on the Second Voice
F2 2ND Split This is used to define the split point of the keyboard, dedica-
ted to the Right section, above which the timbre assigned to
Second Voice will not be playing. The relevant note can be
selected using the keyboard.
F3 Velocity Curve This selects a different reaction curve for the Right voice, to
be chosen among Normal, Hard 1, Hard 2, Soft 1, Soft 2 or Fixed
with a value to be programmed with the
DDAATTAA CCUURRSSOORR
push buttons.
F4 2ND Voice Edit
After having pressed the F4 function button, it will be possible to use the Voice push buttons to select a new voice to assign
to the Second Voice. Press
EEXXIITT
after having completed the selection, or save pressing SAVE, F6-2nd Voice and F10-Save.
F5 2ND Lock This makes it impossible to change the timbre assigned to Second Voice by calling up a Preset.
F6 Pianist Sustain Activates or otherwise the
SSuussttaaiinn
function in the
PPiiaanniisstt
mode, so you can use the
SSuussttaaiinn
pedal to 'freeze' the last recognized chord and to freely play, right after having set the chord, along the complete keyboard. Releasing the sustain pedal
will allow the SD5 to recognize the next valid chord played anywhere on the keyboard.
F7 Pianist Mode Enables selection of the Pianist mode. The
AAUUTTOO
mode, set by default, requires at least a chord of three notes, played no
matter where, to acknowledge a chord. Once the chord has been acknowledged, this can be maintained playing a melody
with not more than two notes played at the same time. The Standard mode, is obtained using the
SSuussttaaiinn
pedal. If the
Sustain pedal is pressed right after having set the chord on the keyboard, the Arranger uses only the chord that was acknowledged before the
SSuussttaaiinn
was activated. It is possible to disable the Sustain on the timbre in use to utilise the Sustain
pedal exclusively for the
PPiiaanniisstt
function, using
FF77 PPiiaanniisstt SSuussttaaiinn
.
F8 Fade Controls the Fade In/Out function. If the Arranger is activated, this generates the fading out effect, i.e. this function brings
the volume of all sections, including the
RRiigghhtt
section, from the present volume down to zero. If the Arranger is off, this
function produces the fading in effect, i.e. it brings all the sections from volume zero to their programmed volume levels.
Pressing this button repeatedly will not cause any abrupt volume changes.
F9 Bass Boost This value can be modified by pressing the
FF99
push button repeatedly, and indicates the increase of the frequency indica-
ted in
FF1100
, expressed in dB.
F10 Frequency Pressing the
FF1100
function button repeatedly, you modify the frequency to which equalisation is to be applied with
FF99 BBaassss
BBoooosstt
, in order to obtain more complex basses.
LEAD EFFECTS
LLEEAADD EEFFFFEECCTT
push button calls up a menu dedicated to managing the effects for
the Voices used in the Right section, namely the lead. It also includes parameters
required to control the microphone input. The parameters available for the Right
section are the following:
F1 Chorus By pressing the function push button repeatedly the Chorus
effect is enabled or otherwise on the Right section.
F2 Wha-Wha This is an amazing effect for guitar riffs but it can be used in
many other situations. The optional Volume pedal is to be connected to control it better. The Wha-Wha effect can also be
controlled by the Modulation Wheel using the Utility menu
and the
FF33 MMoodduullaattiioonn
function where the
FF77 WWhhaa--WWhhaa
function is to be set as
OOnn
.
F3 Delay This is used to enable the Delay effect on the Right section by pressing the relative function push button repeatedly.
SD5
12
Right Menu and Live setting
Page 15
SD5
13
F4 Overdrive It gradually saturates the sound controlled by the optional Volume Pedal. It is one of the effects required to simulate jazz
and rock organs in the best way possible. The Overdrive cuts out the use of the Distortion effect.
F5 Distorsor This enables the Distortion effect on the Right section, cutting out the use of the Overdrive.
The parameters available to control the microphone input are the following:
F6 Micro Effect This enables, or otherwise, the use of the effects for the Right section on the microphone input.
F7 Direct This is used to modify the quantity of direct signal that goes to the audio output. It is modified using the
VVAALLUUEE ++//--
push
buttons.
F8 Reverb This indicates the quantity of Reverb assigned to the microphone input. The value is modified using the
VVAALLUUEE ++//--
push but-
tons.
F9 Vocal Set This is used to select a Vocal Set of the Vocalizer without going through the Vocalizer menu directly.
F10 Vocalizer This enables the Vocalizer effect on the microphone input.
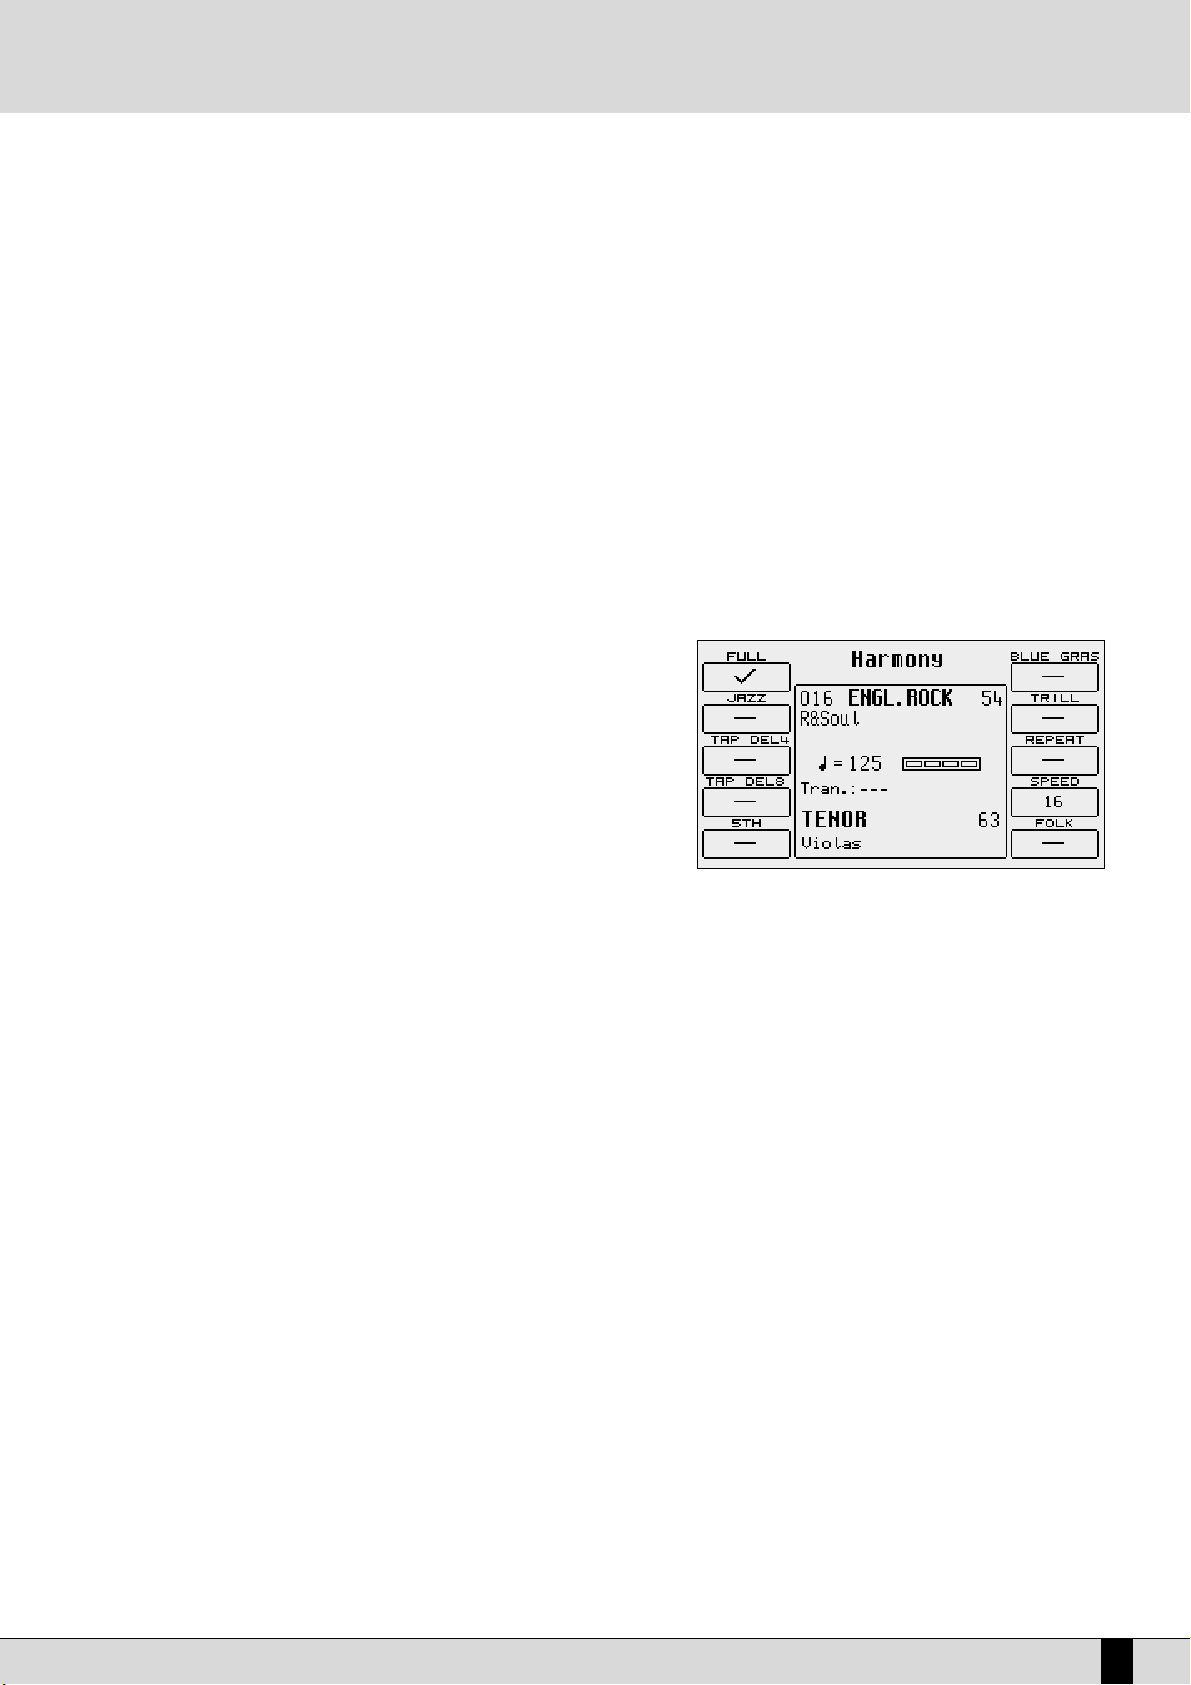
HARMONY
Allows you to harmonise the lead played on the
RRiigghhtt
section according to the
chord played. Activating
HHaarrmmoonnyy
with the relative push button displays a page
from where you can select the type of harmonization using the function buttons.
It is not possible to activate more than one type of harmonization as each selection deletes the previously selected one. Press again HARMONY button ( Led off )
to turn off this function.
The following parameters are available:
F1 Full The notes of the chord played on the portion left to the split
point are repeated on the right part and added to the lead
played.
F2 Jazz Similar to Full, but with a more complex harmonization, differentiated according to the sound played on the
RRiigghhtt
part.
F3 Tap Delay4 The instrument executes four repetitions of notes played on the keyboard.
F4 Tap Delay8 The instrument executes eight repetitions of notes played on the keyboard.
F5 5TH Adds the fifth superior to the lead.
F6 Blue Gras Typical country harmonization.
F7 Trill To obtain this effect, you need to play at least two notes on the
RRiigghhtt
section. The two notes are automatically and alter-
natively repeated according to the speed set with
FF99 SSppeeeedd
.
F8 Repeat Repeats the single note played with the speed set with
FF99 SSppeeeedd
and synchronised with the Tempo value in use.
F9 Speed Pressing the relevant function button repeatedly sets different speeds for
FF77 TTrriillll
and
FF88 RReeppeeaatt
F10
Folk 1 e Folk 2 these are other two harmonization modes suitable for folk music.
Right Menu and Live setting
Page 16

Parameter management
Before going into the actual programming subjects, the musician should first be aware of how the menus and parameters of the sd5 work. The
rules that are listed in this chapter are valid for all the following sections and are crucial to controlling the keyboard in the best way possible.
CONVENTIONS
The following conventions are used within this manual, which refer to:
Push buttons on the control panel: all in capital letters or bold print (for example
SSTTAARRTT, SSTTOOPP, SSPPLLIITT
push buttons)
Functions, parameters, items, commands displayed and that can be selected using the
FF11--FF1100
function keys adjacent to them: in bold print (for
example
FF55 EEssccaappee,FF1100 SSaavvee
)
CALLING UP THE MENUS
The parameters of the sd5 are grouped in menus that are always called up from the main page of the display which can be accessed using the
EEXXIITT
push button (apart from some exceptions which we will see later).
The first group of parameter menus is associated with the
FF11--FF1100
function push buttons at the side of the display and include the following
menus:
F1 GM - F2 EFFECT - F3 UTILITY - F4 ARRANGE MODE - F5 ARRANGE VIEW - F6 MIDI - F7 EDIT USER/DRAWBARS - F8 EDIT PROGRAM
F9 EDIT DRUM - F10 DRUM MIXER
A second group of menus is associated directly with some push buttons on the control panel. They are called up from the main page and are
exited using the
EEXXIITT
push button and also using the push button again that was used to call up these pages. The menus relative to the single
push buttons are the following:
SONG RECORD - PATTERN EDIT, DISK - SAVE - MICRO VOCALIZER - LEAD EFFECT - LEFT MENU - RIGHT MENU - SONG PLAY
HARMONY
The
EEXXIITT
push button must always be pressed to exit one of these pages.
The Song Play menu is an exception to this rule.
The push buttons related to this menu must be pressed again to return to the main page of the display. This procedure has been devised to prevent the playback of a Midi file from being accidentally stopped by pressing the
EEXXIITT
push button by mistake.
EXCEPTIONS TO THE EXIT COMMAND
In some menus in addition to the
EEXXIITT
push button the
EEssccaappee
command may appear, which is assigned to a function push button at the side
of the display. Therefore if the
EEXXIITT
push button should fail to work, look carefully at the display to find the
EEssccaappee
function amongst the com-
mands, or try pressing the key used to access the specific menu again.
THE F1-F10 FUNCTION PUSH BUTTONS
There are five push buttons to the left and five to the right of the display. They are called that as they have no specific function (apart from
calling up the menus as already explained), but they take on the function of the command displayed next to them. If you take a close look you
will see that a blue line connects each function push button that relates to a specific area on the display. This area, when there are choices or
commands available, displays a rectangle that bears the name of either the function, of the Voice or of the style to be called up.
DATA ENTRY
There are various possibilities based on the parameter to be modified within a menu.
DDiirreecctt ccaallll uupp::
for the Voices and the Styles, the selecting of one of these using a function push button immediately calls them up.
EEnnaabblliinngg aanndd ddiissaabblliinngg::
Some parameters may have an ON status and Off status, Active or Inactive and the function push button related to that
parameter is used to alternate between the two.
SSeelleeccttiioonn ooff aa lliinnee ooff ppaarraammeetteerrss::
Likewise for Program editing, the function push button is used to select a group of parameters, the value of
which is entered using the
VVAALLUUEE ++//--
push buttons.
PPaarraammeetteerrss iinn tthhee mmiiddddllee ooff tthhee ddiissppllaayy::
Likewise for Voice editing, some parameters may be found in the middle of the display and are acces-
sed using the
DDAATTAA CCUURRSSOORR
push buttons.
Entering words or letters: When saving some files the sd5 requests the entry of words, which can be done using the keys on the keyboard to
which letters and numbers are assigned. The
DDAATTAA CCUURRSSOORR LLeefftt//RRiigghhtt
push buttons are used to move within the letters of the name and the
DDAATTAA CCUURRSSOORR DDoowwnn//UUpp
push buttons are used to enter the required letter.
SD5
14
Parameter management
Page 17

SD5
15
A guide on how to start playing
You will certainly want to instantly know how to use some functions of the SD5 such as how to call up Styles and Voices, reproduce Midi files,
how to use the Arranger, how to use a MIDI accordion and the Vocalizer with a microphone. If this is the case then this section is just up your
street. If you're a programmer interested in the nitty-gritty capabilities of this unit, then you can move on to the in-depth sub-sections ahead
which explain each area in greater detail.
PLAYING A MIDIFILE FROM FLOPPY DISK
●
Select the file to be loaded using the
DDAATTAA CCUURRSSOORR
keys
●
Press the
EENNTTEERR
key or the
SSTTAARRTT//SSTTOOPP
key to start playing.
While a Midifile is being played, you can select the next one using the
DDAATTAA CCUURRSSOORR
keys and play it with the
FF77 GGOO NNEEXXTT
key.
●
As you can see, the SD5 automatically numbers the Midifiles present. You can load a Midifile by entering the number using the numerical
keyboard relative to the
SSTTYYLLEESS
buttons.
Press the
EEXXIITT
key to move onto a second Play environment.
●
In this environment, you can view, if you wish, the list of Midifiles contained using the
FF55 DDiirr
function.
●
You can also select a Midifile by entering its number or one or more successive letters of the title using the notes of the
KKEEYYBBOOAARRDD
.
If you enter a single number that does not start with zeros, the SD5 waits a few seconds and loads the song with that number. Once loaded,
the display shows the title of the Midifile loaded.
●
To go back to the main page of the display, press the
SSOONNGG PPLLAAYY
button (the LED switches off)
PLAYING A MIDIFILE FROM HARD DISK
●
Select the file to be loaded using the
DDAATTAA CCUURRSSOORR
keys
●
Press the
EENNTTEERR
key or the
SSTTAARRTT//SSTTOOPP
key to start playing.
While a Midifile is being played, you can select the next one using the
DDAATTAA CCUURRSSOORR
keys and play it using the
FF77 GGOO NNEEXXTT
key.
To switch off the melodic line of the Midifile, press key
FF88 LLEEAADD OONN
.
To view or hide the words, press the
FF1100 LLYYRRIICC
function key.
●
You can load a Midifile by entering the number using the numerical keyboard relative to the STYLES buttons
In this case again, press the
EEXXIITT
key to move onto a second Play environment.
●
In this environment, you can view, if you wish, the list of Midifiles contained using the
FF55 DDiirr
function
●
You can also select a Midifile by entering its number or a number of successive letters of the title using the notes of the
KKEEYYBBOOAARRDD
.
If you enter a single number that does not start with zeros, the SD5 waits a few seconds and loads the song with such number. Once loaded, the display shows the title of the Midifile loaded.
●
To go back to the main page of the display, press the
SSOONNGG PPLLAAYY
button (the LED switches off)
HOW TO REPRODUCE A .KAR MIDI FILE
The Midi files with .KAR extension are normally Midi files with the Karaoke words already stored. The .KAR files are however almost always
Standard Midi files in format 1 and therefore need to be converted to format 0 so that they can be reproduced instantly. The same procedure is
required for the Midi files in format 1.
CONTROLLING PLAYBACK (REPRODUCTION)
Whether you have loaded a song from floppy or hard disk, some commands are offered on the control panel to modify some reproduction parameters in real time.
●
To reproduce the song press the
SSTTAARRTT//EENNTTEERR
push button.
●
To stop the procedure press the
SSTTAARRTT
push button once more.
●
To pause the current playback of a midifile, press the
CCOONNTT//PPAAUUSSEE
push button.
●
To continue playback of a midifile which has been paused, press the
CCOONNTT//PPAAUUSSEE
push button once more.
●
To turn off the lead part of the song press:
FF88 LLeeaadd ((OOffff))
.
●
To reproduce just the Drum and Bass tracks alone, press
IINNTTRROO 33//DDrruumm&&BBaassss. ""DDrruumm&&BBaassss""
will be displayed.
●
To display the words when available on the display (Karaoke), press:
FF1100 LLyyrriicc ((OOnn))
.
●
To increase the volume of the song compared to the timbre assigned to the keyboard, press the
DDAATTAA CCUURRSSOORR ((LLeefftt aanndd RRiigghhtt))
keys, which
in this context act as
BBAALLAANNCCEE
function buttons.
●
To select another Midi file to be reproduced, enter its number using the numeric keypad (i.e. the STYLES push buttons).
A guide on how to start playing
Page 18
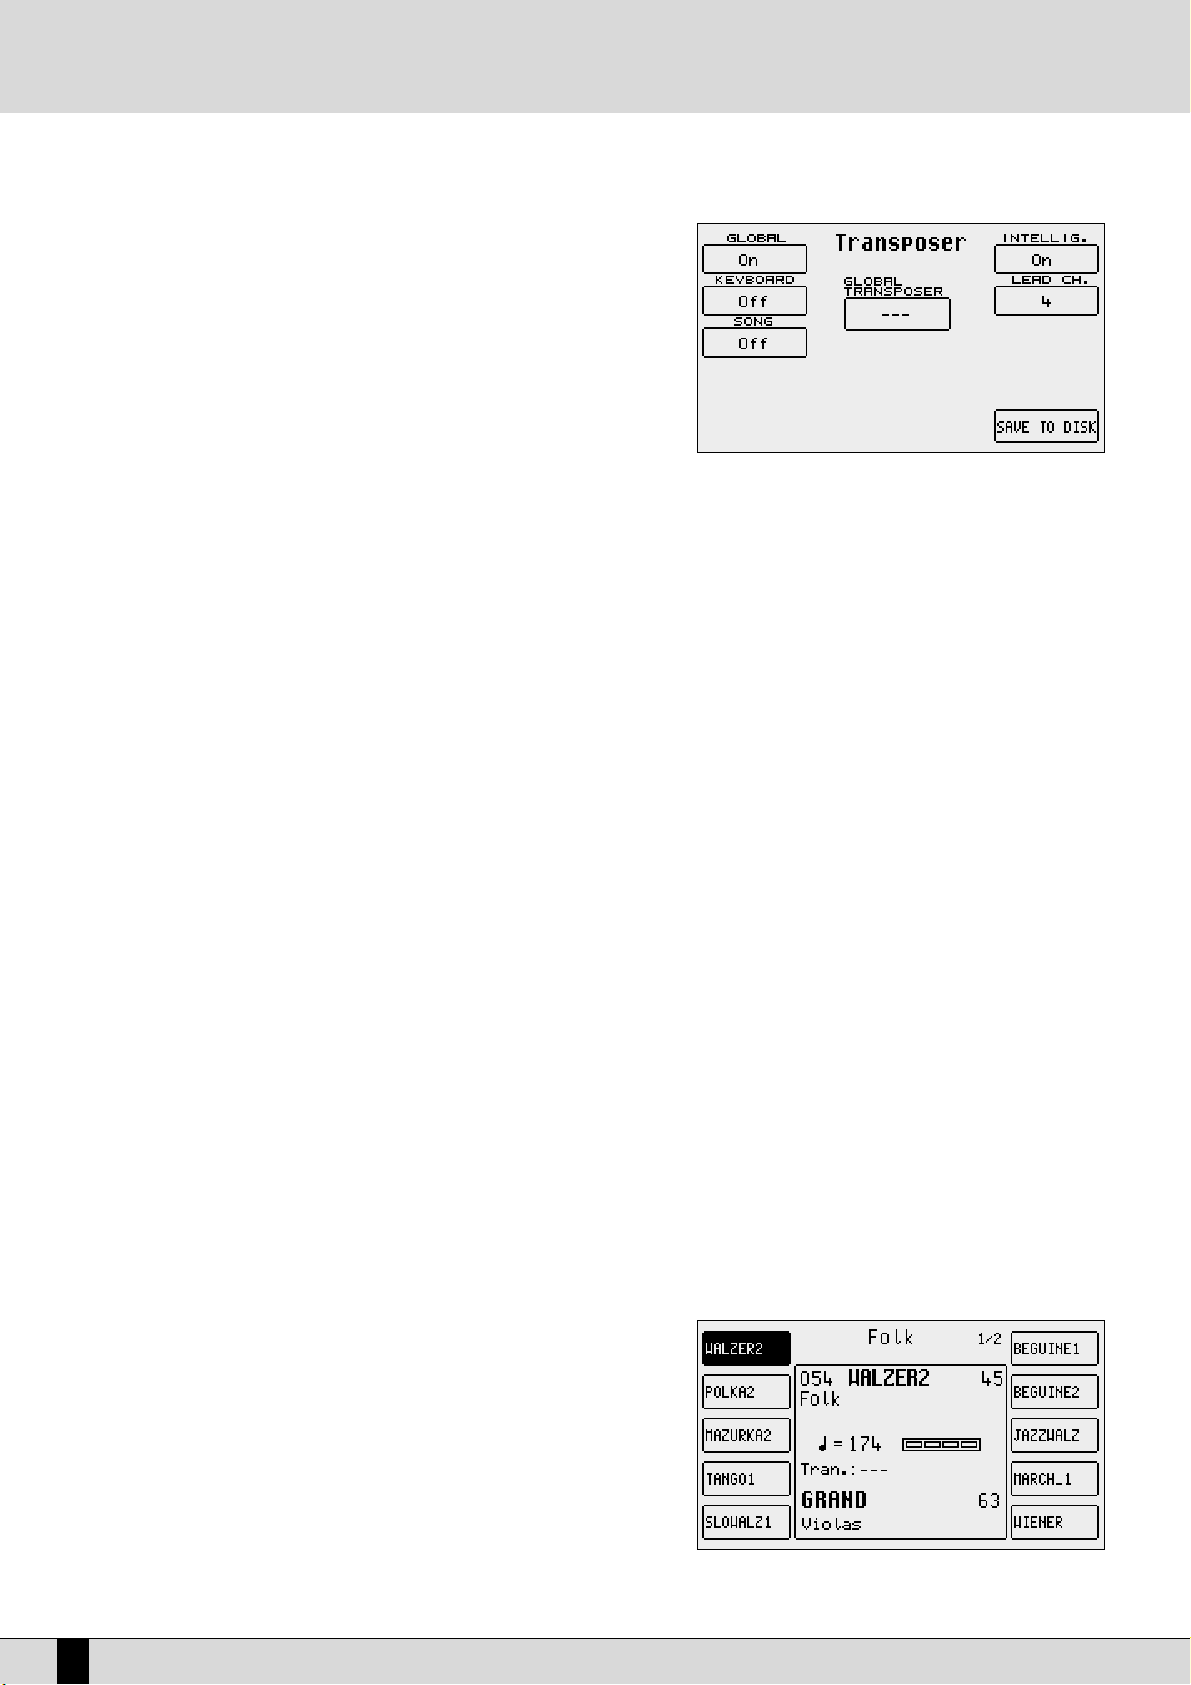
TRANSPOSITION
Select
FF33 TTrraannsspp
from the
SSoonngg PPllaayy
page to transpose the Midifile. This also
allows you to choose if only the song or also the current keyboard voice(s) is/are
to be transposed.
Set the F1 Global parameter to ON. In this way, using the
TTRRAANNSSPPOOSSEE ++//--
push buttons, you can transpose both the keyboard and the Midi file in semitones. Another
extremely useful function is available in the same menu, which relates to the musical transposition of the bass line. By enabling parameter
FF66 IInntteelllliigg..
(default setting is On), the bass line will always play within its natural range irrespective of the
transposition level.
HOW TO RECORD A MIDI FILE WITH THE SD5
The
SSoonngg RReeccoorrdd
function on the other hand is used to create a Midi file by recording everything played on the keyboard and various tracks of
the Arranger. This last method is used to exploit the powerful automatic arrangement functions to obtain a complete song. A separate section
has been dedicated to the Sequencer and below is the information on how to record a song using Song Record:
●
From the main page of the display, press the
SSOONNGG RREECCOORRDD
button.
●
Enter the name to be given to the Midi file using the
KKEEYYBBOOAARRDD
keys.
●
Save the title using the
FF1100 SSAAVVEE
function.
●
Start
SSOONNGG RREECCOORRDD
using the
FF1100 SSTTAARRTT
function.
●
From here you can start playing, start the Arranger, call up voices and Styles and the SD5 will record everything (including the changes made
to voices, styles etc).
●
Once the song has been recorded, press the
SSOONNGG RREECCOORRDD
button.
●
The Midi file just recorded is now ready to be played back using the
SSTTAARRTT
push button.
Considering the fact that this is in actual fact a true Midi file, it can later be modified using a sequencer software for example to add finishing
touches.
HOW TO USE THE ARRANGER
The Arranger is the engine of the SD5's automatic accompaniment function. It produces an accompaniment according to musical styles selected, the chords played and the settings of the control panel. The heart of the Arranger is the Style, namely a combination of bass, drum and
harmony tracks which have been designed for that kind of music. Without going into too much detail, these tracks can have four variations called A, B, C and D/Riff, three Intro's and three Endings that have different levels of complexity. Then there are also the Fill-Ins with which you can
move on from one variation to the other or even remain on the same variation, depending on what you prefer. Generally speaking the Arranger
of the SD5 is very powerful and allows you to build up your accompaniment very carefully. Start from an Intro, then proceed to the least complex variation (A). With a Fill-In, move onto the refrain with a second variation (B) and terminate with an End. This is just a simple example of
what you can do. Whatever the case Ketron has developed some Styles that will never smother the lead vocal or voices being played, but will
enhance it.
When the SD5 is turned on it is always pre-set to use the Arranger with a piano sound for the lead (Right section) to be played with the right
hand, a background for the left hand (Lower section), a keyboard split point to keep the right hand separate from the left (set to note C3).
The part to the left of the split point of the keyboard is used not only to control the two Lower voices but also to acknowledge the chord played
by the user, which will be shown on the display.
HOW TO SELECT A STYLE
There are ten
SSTTYYLLEESS
buttons under the display, each of which has a certain style
of music.
For each of these Ketron has foreseen up to a maximum of 30 Styles. The individual Style is called up using the relative function key (
FF11--FF1100
), situated at the side
of the display which when pressed, immediately calls up the Style for the Arranger.
The SD5 stores the Styles of each kind of music in groups of ten and the number
of the next groups is indicated as Pages. To call up the other groups of Styles that
are not currently displayed, simply press the
SSTTYYLLEESS
push button again to which
the groups belong or use the
PPAAGGEE ++//--
push buttons. The display will show the Styles that follow, which can be selected
again using the relative push buttons at the side of the display (
FF11--FF1100
).
SD5
16
A guide on how to start playing
Page 19
SD5
17
HOW TO CONTROL THE ARRANGER
The Arranger controls are also described in the Arranger section. Below are simply the main concepts.
●
To change the split point, press and hold the
SSPPLLIITT
push button down. Then
simultaneously press the key on the keyboard that will be the new split point.
●
To start the Arranger press the
SSTTAARRTT
push button.
●
To stop the Arranger press the
SSTTAARRTT
push button once more.
●
To add an Intro with the Arranger stopped, play the starting chord first below
the split point and then press one of the three
IINNTTRROO 11,,22,,33
push buttons.
●
To add a fill-in with the Arranger running, press the
FFIILLLL
button and the most
suitable Fill-in for the current arrangement will be started.
●
To start the Arranger with the first chord played, set it up on standby using the dedicated push button
KKEEYY SSTTAARRTT
(the LED lights up).
●
To start the Intro with the starting chord of your choice, select an Intro using one of the
IINNTTRROO 11,,22,,33
push buttons and then play the chord
●
To conclude an automatic accompaniment with an Ending, ensure the LED of the
JJUUMMPP
button is switched off (so that is really disabled) and
press one of the
IINNTTRROO//EENNDDIINNGG 11,, 22,, 33
buttons while the Arranger is playing.
●
To call up one of the four variations, with the Arranger running, press one of the
AA,,BB,,CC,,DD
push buttons.
●
To move forward to the next variation with the Fill enable the
JJuummpp
.
●
To play over the whole keyboard and to acknowledge the chords, activate the Pianist function using the dedicated PIANIST function button.
●
To modify the tempo set on the Arranger, use the
TTEEMMPPOO ++ TTEEMMPPOO --
push buttons.
●
To create an Accelerando press the TAP/RIT ACC push button repeatedly and briefly.
●
To create a Ritardando, change the direction of the arrow by holding the
TTAAPP//RRIITT AACCCC
push button down for a few seconds and then press
it repeatedly and briefly.
●
To enter a break, press the
BBRREEAAKK
push button.
●
To stop an accompaniment when the next chord is released, enable the
KKEEYY SSTTOOPP
push button (the LED of the push button lights up) and
then play and rapidly release a chord.
●
To hold the arrangement only while the chord is played, enable these functions using the dedicated push buttons:
KKEEYY SSTTAARRTT++KKEEYY SSTTOOPP
.
●
To play the accompaniment again from the first beat, no matter what measure it currently is in, press the
RREESSTTAARRTT
push button.
●
To cut-out the accompaniment tracks, except for the drum tracks, when no chord is played, disable the HOLD function using the dedicated
HOLD push button (the LED switches off).
●
To balance the volume of the Arranger with the lead played on the part of keyboard to the right of the split point, press these push buttons:
BBAALLAANNCCEE ++//-- (DDAATTAA CCUURRSSOORR
).
●
To restore the original tempo of the Style, press the PAGE +/- push buttons simultaneously.
●
To repeat all the Fill-ins cyclically, hold the FILL button down.
●
To reproduce only the Ending while the Arranger is stopped, enable the
JJUUMMPP
and then press one of the three Intro push buttons.
●
To repeat one of the three INTRO's available while a Style is being played, activate the
JJUUMMPP
function using the related key, then press one
of the three
IINNTTRROO//EENNDDIINNGG
keys.
HOW TO LOAD A STYLE FROM DISK
The memory area dedicated to Patterns makes it possible to load new Styles from
a floppy disk or from the hard disk and to keep them in memory even when the
instrument is switched off. Once they are loaded in the RAM, they can be called up
using the
PPaatttteerrnn
push button and the Styles push buttons.
●
Press the DISK ON push button and use the
PPAAGGEE ++
and
PPAAGGEE --
push buttons to
select either the hard disk or the floppy disk (depending on where the styles
to be loaded reside).
●
From the folder on the hard disk or from the floppy disk choose one or a number of Patterns to load into the RAM.
●
Enable the loading operation by pressing
FF22 LLooaadd
and use the
DDAATTAA CCUURRSSOORR --
push buttons to select the target memory location. Otherwise you may use
FF99
AAuuttoommaattiicc
to load the styles automatically into the current available RAM locations.
●
Press
FF1100 EExxeeccuuttee
to confirm the operation, or press
FF1100 EEssccaappee
to annul it.
●
You may delete the contents of the RAM and replace them with the Styles you wish to load using
FF88 CClleeaarr AAllll &&LLooaadd
.
●
Pressing the
EEXXIITT
push button takes you back to the main page. Then press the
PPAATTTTEERRNN
push button and, using the
SSTTYYLLEESS
push buttons,
select the Style loaded.
HOW TO USE THE VOICES
To the right of the keyboard split point, when the Split function is enabled, a lead can be played with the right hand independently from the
Arranger. The default voice assigned is the 'Acoustic Piano', but any of the sixteen sound groups can be called up at will using the 16 VOICES
push buttons. Like the Styles, the sounds too are displayed in groups (and pages) of ten and any remaining groups following the first are poin-
A guide on how to start playing
Page 20
ted out by “Page” with the number on the right indicating the number of groups available.
Once a family has been selected from the 16 voice groups using the dedicated
VVOOIICCEESS
push buttons to the right of the control panel, 5 sounds
appear on the right and five on the left of the display. Simply press the function push button corresponding to each sound of the display (
FF11--
FF1100
) to call up the relative sound. The voice selected will be displayed under the four-beat bar logo. To display the groups of sounds that follow
the first page, use either the
PPAAGGEE ++//--
push buttons or press the same
VVOOIICCEESS
push button again for that family of sounds. In this case the groups will be selected cyclically. The Modulation Wheel and the Pitch Bend are immediately available as well as the Aftertouch to control additional sound or timbre parameters using key dynamics. It is worth remembering that up to four split or layered timbres can be used for the lead
section, which is programmable as explained later in the
''PPRROOGGRRAAMMSS''
chapter.
HOW TO USE THE MICROPHONE AND THE VOCALIZER
The SD5 can work with up to two microphones connected to the dedicated front
mic input. The Micro input is processed by the Vocalizer, namely the effect with
which the vocals can be naturally harmonized either according to the chords
played, or a harmony track of a Midi file or the notes played on the keyboard. What
you need is a good microphone, a cable and the SD5. When you connect the
microphone, adjust its gain moving the Gain cursor until the sound starts becoming distorted, then reduce the Gain down to a level in which the distortion disappears. The purpose of the Gain control is that of boosting the microphone signal
to an ideal level. As default setting the SD5 keeps the microphone input turned off
to prevent any interference or noise from entering the internal audio path.
Once the microphone has been connected the inputs are to be enabled. Proceed
as follows to do so:
●
Go to the main page of the display using the
EEXXIITT
push button.
●
Access the
MMIICCRROO
menu using the dedicated button.
●
The display shows various options. enable the input pressing
FF1100 ((AAccttiivvee))
.
●
To balance the volume of the microphone with that of the keyboard in general, select the parameter and adjust its value using the
VVAALLUUEE
++//--
push buttons:
FF11 LLEEVVEELL 11 VVAALLUUEE ++//--
●
To return to the main page of the display press the
EEXXIITT
push button.
At this stage you can use effects like reverb on the voice signal from the mic, which can be modified as desired. The versatility of the Vocalizer
of the SD5 is such that it can be used in various ways. First and foremost the SD5 is capable of identifying the pitch of the note that you are
singing so that it can be harmonized correctly and naturally. This function however depends on the operating mode chosen for the Vocalizer.
●
You can harmonize the voice according to the chords played on the left part of the keyboard or, in
PPiiaanniisstt
mode, over the whole keyboard.
This method of utilising the notes by the Vocalizer is called
AAuuttoommaattiicc CChhoorrdd
and includes the identification of the note sung via the
microphone input.
●
Using the '
KKeeyybbooaarrdd HHaarrmmoonnyy
' mode You can harmonize the voice according to the notes you play directly on the right part of the
kkeeyybbooaarrdd
rather than the note sung .i.e. the produced vocal harmonies are exactly the notes you play whatever your vocal note!
●
You can use a dedicated track of a Midi file, compatible with the Vocalizer in
MMIIDDII
mode, to control the harmonization.
●
You can use the Vocalizer as a normal
PPiittcchh SShhiifftteerr
, where the interval of the note generated stays fixed and moves in parallel with the note
sung in
FFiixxeedd IInntteerrvvaall
mode.
●
You can use the Vocalizer as an effects processor to create special effects with the voice, in
VVooccaall EEffffeecctt
mode.
●
With the microphone in use, from page
MMiiccrroo--VVooccaalliizzee
, menu press the
FF1100
push button to set the parameter on
AAccttiivvee
.
●
To enable a different mode to that set as default, select it using the function
FF33 MMOODDEESS
push button
●
A list with the settings programmed will appear in the centre of the display. To select one use the
CCUURRSSOORR ++//--
push buttons
●
To disable the Vocalizer, press the F10 push button and select
IInnaaccttiivvee
.
●
To return to the main page press the
EEXXIITT
push button.
To simplify the choice of the operational mode when playing live (when the Vocalizer is in use), you can immediately call up the Harmony Right
settings, which belong to the
KKeeyybbooaarrdd HHaarrmmoonnyy
mode using the A and C push buttons and
UUnniissoonn
, in the
FFiixxeedd IInntteerrvvaall
mode using the B and
D push buttons. The SD5 also automatically identifies the track of the Midi file dedicated to the Vocalizer and enables it as soon as you start
the playback. However during playback it is important not to touch the A, B, C and D push buttons otherwise the Vocalizer will disable the
MMIIDDII
mode related to that Midi file and will activate the one assigned to one of the push buttons. As you will see, there are many other parameters,
but for a start these few tips should be sufficient.
HOW TO USE A MIDI ACCORDION
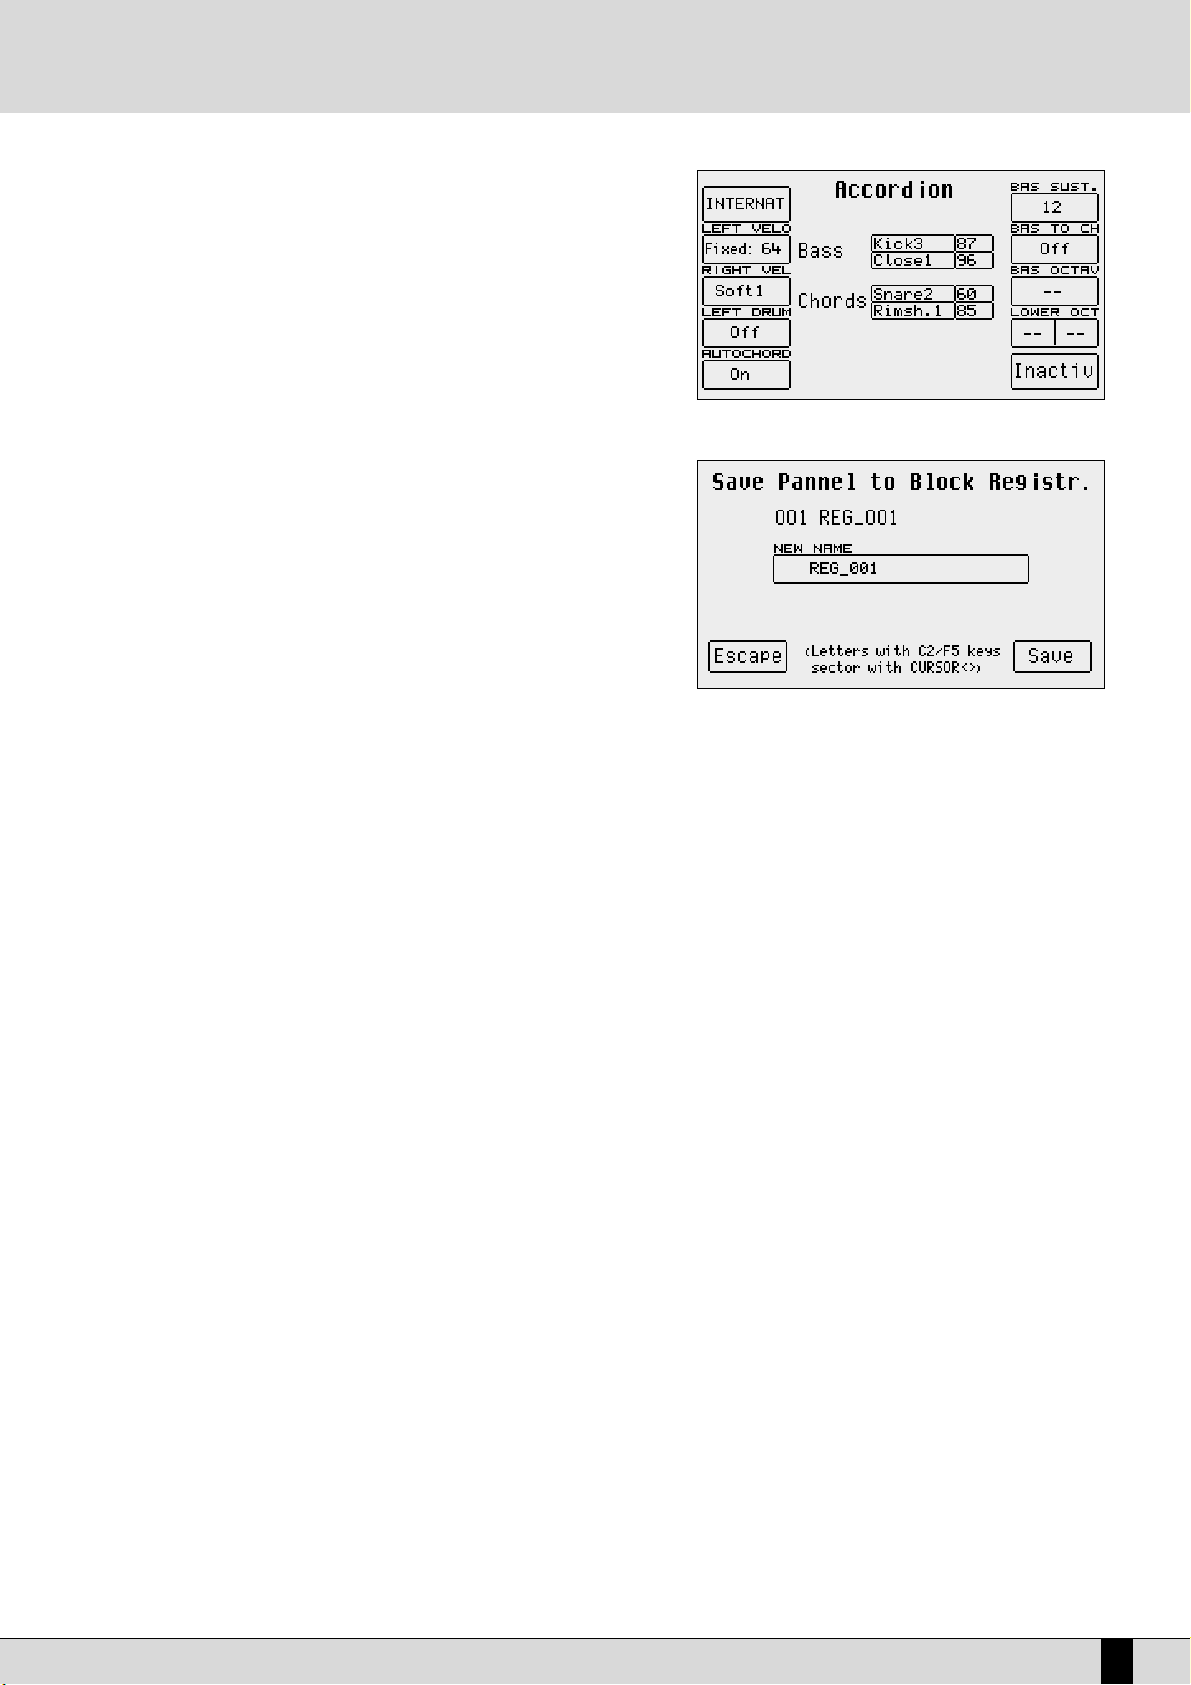
Ketron has reserved a dedicated menu for the connection of accordions equipped with MIDI interface, which must exploit the MIDI In 2 input. To
reach the parameters required, from the main page shown on the display, access
FF33 UUTTIILLIITTYY
and from this page select
FF11 AACCCCOORRDDIIOONN
. Various
parameters to be modified are offered here. The most important however is the enabling of the MIDI accordion that is achieved by pressing F10
SD5
18
A guide on how to start playing
Page 21
SD5
19
that switches from Inactive to Active. If you already own a MIDI accordion you most
probably already know most of the parameters provided.
In any event the default settings should work efficiently with almost all types of
MIDI accordions. It is important to remember that if your MIDI accordion seems not
to work you most probably have to work on the matching of the MIDI channels,
which are accessed using the
FF66 MMIIDDII
menu. When the
AAccccoorrddiioonn
mode is enabled,
the SD5 does indeed automatically modify the MIDI settings that can be re-programmed at any time.
THE REGISTRATIONS
All the parameters dealt with up to this point, and many more can be saved and
called up instantly thanks to the 198 Registrations. The handiness of the
Registration function becomes clearer as you go along and are crucial when
playing live as they are used to call up all the settings of an automatic accompaniment or a Midi file with words and audio files. There are two types of
Registrations: those on board in memory (
BBlloocckk RReeggiissttrraattiioonn
) and those stored on
disk (
SSiinnggllee RReeggiissttrraattiioonn
). The SD5 can hold one Block Registration at any given
time. There are 198 registers within each Block Registration which are called up by
enabling the Registration push button and then entering the number of the
Register using the numeric keypad (STYLES push buttons). The SD5 comes with 198
pre-set default Registers. The Single Registrations on the other hand are loaded
one at a time from hard disk or floppy disk. There may be up to 999 Single
Registrations for each folder of the disk and are called up by first enabling the
RREEGGIISSTTRRAATTIIOONN
push button after having modified the selection
mode for Registrations in the
UUttiilliittyy
menu using
FF77 RReeggiiss.. MMooddee
and
then entering the 3-digits number using the numeric keypad (
SSTTYYLLEESS
push buttons).
The real secret of the Registration however is yet to follow. On most electronic keyboards, to load a Midi file, a pattern and a text file, you have
to go through at least three procedures to access the disk, which is maybe not appreciated by the audience who have to sit waiting due to
access time. The SD5 does all this just by simply calling up a Registration. If indeed the name of the Registration is the same as that of the Midi
file, the text file and the pattern, when it is called up the SD5 will automatically load all these files, without having to access the DISK functions.
Added to this the fact that you can pre-program the Registrations at home in comfort and you'll realise quickly how incredibly fast and handy
the SD5 is when playing live!
For the time being we will end on how to simply save a Registration for later recall. Once you have set the Sounds, the Style, the Arranger options
and any other parameter as desired, as well as all the other control panel settings on the SD5 (as they currently are), press the
SSAAVVEE
push but-
ton; select
FF11 RReeggiissttrraattiioonn
and enter the name to be assigned using the keys of the keyboard. To change the destination in memory, enter the
number of the target Registration using the
SSTTYYLLEE
push buttons.
Once the name has been entered and the position in the list chosen, all you have to do is confirm everything using
FF1100 SSaavvee
, or exit without
saving anything using
FF55 EEssccaappee
or
EEXXIITT
.
The calling up of a Registration overrides all the other functions in use at the time. The elements a change in Registration should or should not
affect can be determined and will be discussed in further detail.
A guide on how to start playing
Page 22

Voices and User Voices
One of the fundamental features of the SD5 is its sound quality and consequently the synthesis technology exploited that is based on multisamples processed by subtractive synthesis, frequency modulation and additive synthesis. The samples have been developed over the last few
years by a team of international programmers. For example, the impressive Acoustic Piano voice, exploits up to 64 samples painstakingly arranged along the keyboard on two different levels of dynamics. For each voice the musician can use up to a maximum of two oscillators at the
most, but the quality of the single samples is such that most of the voices use only one oscillator. This aspect directly affects the polyphony,
which is not halved: the 64-note Polyphony is for the most part a reality! The synthesizer of the SD5 exploits a 24 dB/octave LPF filter with three
envelopes, two LFO's and a complete modulation section. The FM synthesis is based on an algorithm with four operators of which two are carriers and two modulators, while the additive synthesis is used for creating the Hammond organ voices in the Drawbars mode. We have intentionally restricted access to the synthesis parameters especially for FM since it is a complicated system and was used only at the manufacturing stage to create a few of the sounds which are offered and are generally ready to use.
The SD5 also has a bank of factory 'Preset Voices', a General MIDI bank (used again for the Styles) and a bank of 110 User Voices. The latter is
where you store your own voices using the General MIDI or other voices as your starting point.
Note: Remember too that the Preset Voices, namely the richer life-like voices, can be used only by the Lower and Right section for playing
manually, whereas the accompaniment tracks will use only the Voices in General MIDI format to maintain the compatibility with GM standards.
For the Right part the Programs allow the use of up to four Voices at the same time, split or layered over the keyboard and with individual editing parameters for each. It is also possible to set a second voice to be layered with the main voice (Second Voice).
To call up the Voices you can use the control panel push buttons
VVOOIICCEESS aanndd UUSSEERR VVOOIICCEE
, or you can create a list of customised Voices with the
most frequently used voices (1 Touch).
There is a specific mode for the drums that allows you to play the drum sets right over the whole keyboard. The SD5 uses drum sets derived
both from samples and grooves created by recording famous drummers or percussionists live. These then were processed via a proprietary procedure to create a drum set, but with “real” percussion instruments (Live Drum). Both types of drum sets can be used by the musician live, right
over the entire keyboard.
CALLING UP THE VOICES
The two rows of six push buttons called
VVOOIICCEESS
are used to call up the voices according to the family in which they belong. When a family is
selected using the push button, the display shows five Voices to the left and five Voices to the right, which can be selected by pressing the function button associated to that voice. The last Bank of Voices is dedicated to the Drawbar voices if you press the
UUSSEERR VVOOIICCEE
push button.
When the SD5 reaches the last page of Voices available, if you press the same push button for that family of voices again you will return to the
group of voices of the first page. This last move (unlike the others) cannot be made using the
PPAAGGEE ++
and
PPAAGGEE --
push buttons.
The
VVOOIICCEESS
push buttons do not call up the preset voices alone.
If the LED of the
UUSSEERR VVOOIICCEE
push button is lit, you get the bank of user editable voices. The 110 voices in this bank can be called up using the
'
VVOOIICCEESS
' push buttons in groups of eight at a time.
If the LED of the
DDRRAAWWBBAARR
push button is lit, the last bank of Voices calls up a single Organ voice only.
If the LED of the
PPRROOGGRRAAMM
push button is lit, then the
VVOOIICCEE
push buttons call up the 'Program' memories.
If the LED of the
OONNEE TTOOUUCCHH
push button it lit, then the first row of
VVOOIICCEE
push buttons calls up one of the six pages that make up the One Touch
memories (where your favourite voices are stored).
SECOND VOICE
The SD5 offers the facility to create a layer using two voices for the section to the right of the keyboard split point. The display shows the name
of another Voice called the 'Second Voice in small letters under the selected main Voice's name. To activate the 'Second Voice' press the
22
NNDD
VVOOIICCEE
push button (the LED lights up).
As a default setting, the SD5 already has a Second Voice assigned to each lead voice, but this voice can be modified. This editing procedure can
be carried out once the Second Voice is switched on.
From the main page press
RRiigghhtt MMeennuu
and then
PPAAGGEE ++..
From the menu displayed, select
FF44 22
nndd
VVooiiccee EEddiitt
Select the group to which the new voice for the Second Voice belongs using the
VVOOIICCEESS
push buttons. Only the name of the first Voice of that
group will appear.
Use the equivalent function buttons (F1-F10) to select the other Voices that follow the first one in the group selected.
To modify the octave of the Second Voice, use the
TTRRAANNSSPPOOSSEERR ++//--
push buttons that will act as
TTRRAANNSSPPOOSSEERR
push buttons while the Voice is
selected.
To modify the volume of the Second Voice, use the
DDAATTAA CCUURRSSOORR
push buttons for the volume while the voice is selected.
This editing procedure can be repeated for each voice assigned as the Second Voice. Remember to save the modifications made (which would
otherwise be lost when the SD5 is turned off and default to those set by Ketron) by proceeding as follows:
Press
SSAAVVEE
Select
FF66 22
nndd
VVooiiccee
Confirm the procedure using
FF1100 SSaavvee
, thus the modifications are saved permanently in Flash RAM.
To restore the original settings of the Second Voice preset by Ketron, use function push button
FF99 DDeeffaauulltt
instead of confirming the procedure.
SD5
20
Voices and User Voices
Page 23
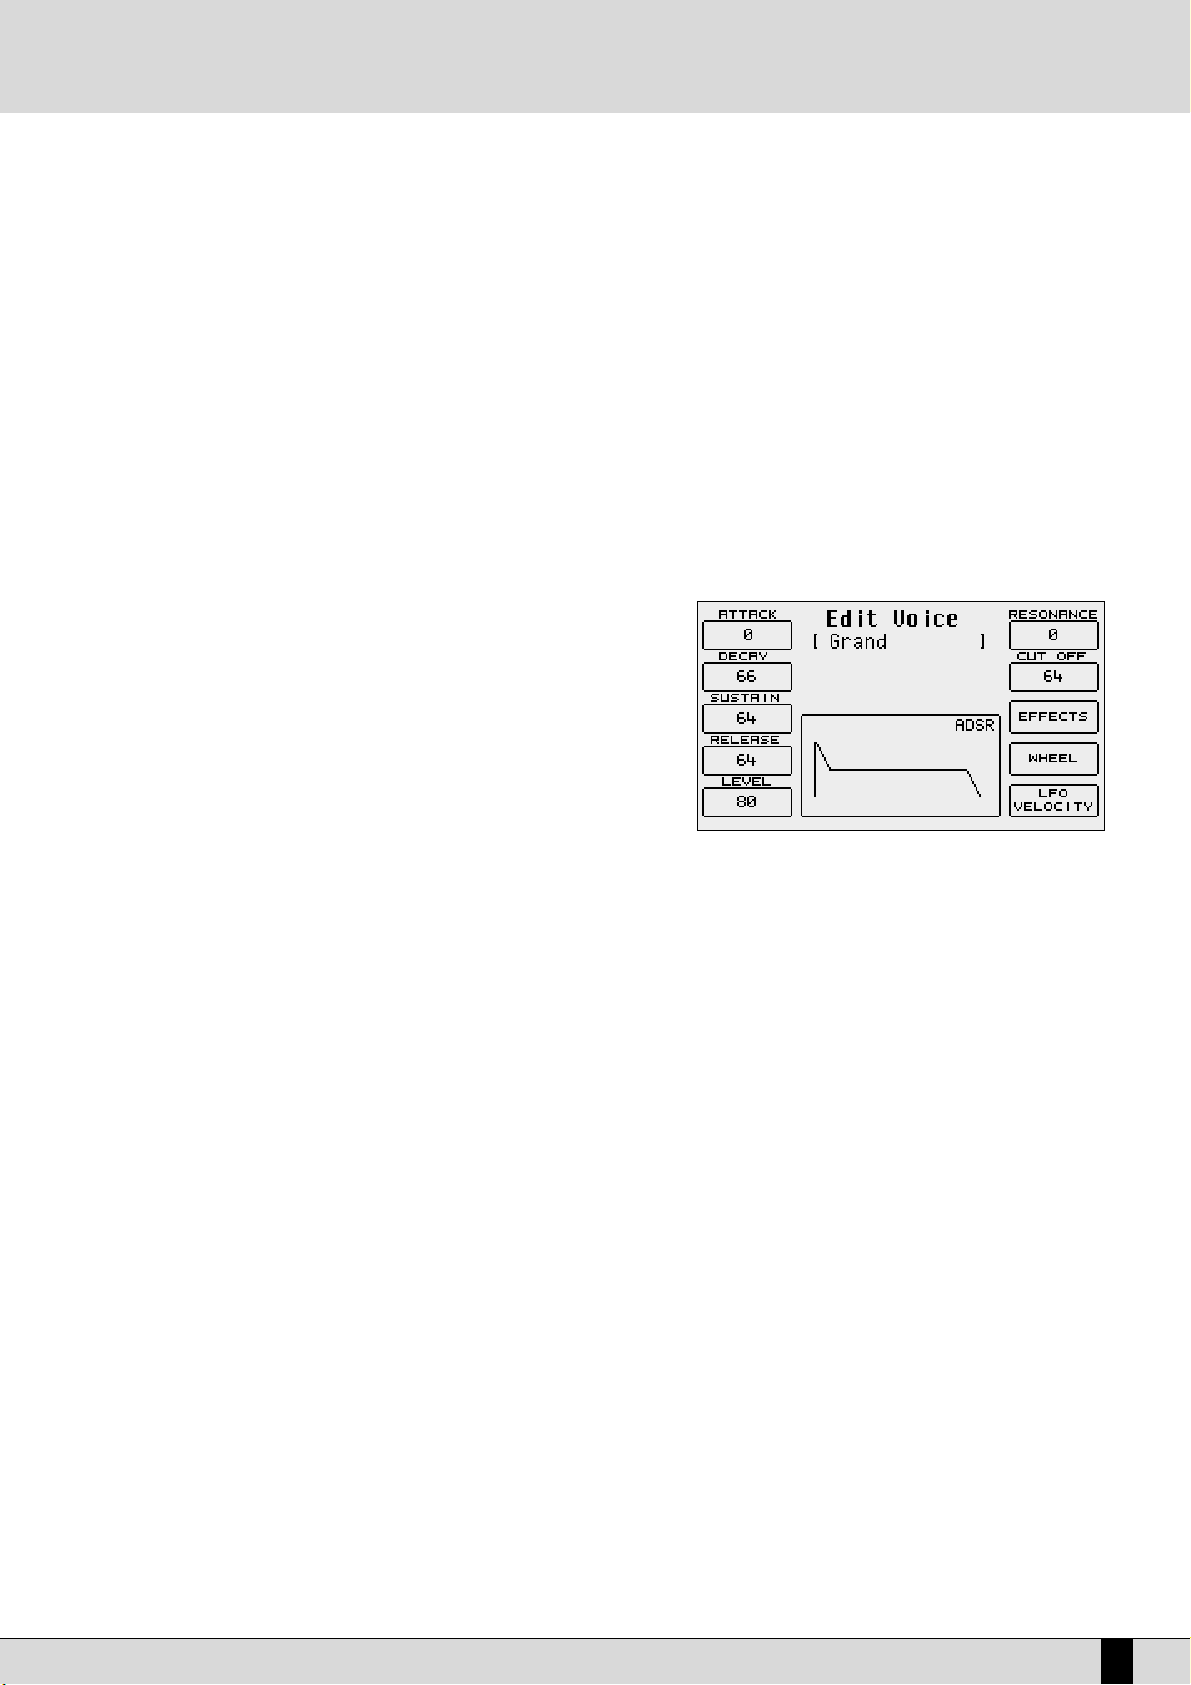
SD5
21
USER VOICE
As we have already explained, the SD5 is also a powerful synthesizer based on samples. We have chosen to limit the editable parameters to just
those essential for most common use. Any modification made to a voice can be saved in one of the 120 memory locations in the User Voice
bank, divided into twelve groups of ten User Voices each. To call up a User Voice follow the normal procedures used for calling up a Voice (mentioned above). The only difference is that the
UUSSEERR VVOOIICCEE
push button must be enabled (LED lit). As for programming, there are two ways:
●
Press the
UUSSEERR VVOOIICCEE
push button to enable the User Voice bank.
●
Select one of the ten User Voices using the function push buttons from the twelve banks that can be called up using the VOICES push buttons.
●
Press the function push button related to the User Voice selected once again.
Or alternatively;
●
Press the
UUSSEERR VVOOIICCEE
push button to enable the User Voice bank.
●
Select one of the ten User Voices using the function push buttons from the twelve banks that can be called up using the VOICES push buttons.
●
Press
EEXXIITT
to return to the main page of the display that will keep the User Voice selected in use.
●
Access the programming menu using
FF77 EEddiitt VVooiiccee..
Together with the User Voices the SD5 allows the user to also edit the voices in the
General MIDI bank. To call up a voice for editing from this bank, proceed as follows:
●
Enable the User Voice bank (LED lit).
●
Access
EEddiitt VVooiiccee
using the procedures just described (the page will show the
voice parameters).
●
Select a GM voice within the sixteen families, again with
UUSSEERR VVOOIICCEE
enabled,
using the
VVOOIICCEESS
push buttons. Use the
PPAAGGEE ++//--
push buttons to call up the
ten voices that follow when available and the function push buttons to select
the voice to be edited.
Once the edit page of this User Voice is accessed using either procedure, the
display will be configured as follows:
THE ELEMENTS USED FOR VOICE PROGRAMMING
A voice in the SD5 exploits a sampled wave form stored in a Wavetable as a sound source. The wave form can also be created from a number of
different samples, arranged across the keyboard as multi-splits or stacked to velocity-switch according to the key dynamics, but in any event
these samples cannot be modified by the user on the SD5. The raw sound of the wave form is processed via an amplitude envelope (ADSR) that
tailors the curve by which the sound volume varies over time after a note is played. There are different types of envelopes: that are used by
the SD5 is made up of four segments, namely the Attack (the time the sound takes to reach the maximum level), Decay (the time that the sound
takes to drop from maximum level to that established by the Sustain), Sustain (the level at which the sound remains until the note played is
released), and Release (the time the sound takes to drop from the Sustain level to Zero level). This type of envelope is referred to as ADSR.
Together with the control via ADSR, the SD5 enables the musician to modify the level of the harmonics of the sound with a filter that literally
cuts-off the frequencies above a point, the so-called 'cut-off'. The frequencies near the cut-off point can be boosted with the Resonance, to create those classic sweeps that are typical of analogue synthesizers and often heard in dance music. Again using the programming page the user
can assign effects and Reverb to the voices and can modify the type and amount of control exerted by the after touch and the modulation wheel
on some voice parameters. Amongst these is also the LFO (Low Frequency Oscillator) that is required to create tremolo effects when it is applied
to the amplitude (DCA), and vibrato effects when it is applied to the pitch (DCO) and finally filter modulation effects when applied to the DCF.
AMPLITUDE AND FILTER PARAMETERS
The programming parameters can all be accessed from the Edit Voice menu using function push buttons
FF88, FF99
and
FF1100
and using the
DDAATTAA CCUURR--
SSOORR ((LLeefftt aanndd RRiigghhtt))
push buttons to move around and enter the values of the parameters. Below is a detailed description of the parameters:
F1 Attack This sets the value of the Attack segment that can be modified using the
DDAATTAA CCUURRSSOORR
push buttons.
F2 Decay: This sets the value of the Decay segment that can be modified using the
DDAATTAA CCUURRSSOORR
push buttons.
F3 Sustain: This sets the value of the Sustain segment that can be modified using the
DDAATTAA CCUURRSSOORR
push buttons.
F4 Release: This sets the value of the Release segment that can be modified using the
DDAATTAA CCUURRSSOORR
push buttons.
F5 Level: This sets the value of the total volume of the voice that can be modified using the
DDAATTAA CCUURRSSOORR
push buttons.
To simplify programming of the envelope, the display also shows a graph, the segments of which change proportionally with the values set for
the ADSR.
F6 Resonance: This sets the Resonance value that can be modified using the
DDAATTAA CCUURRSSOORR
push buttons.
F6 Cut Off: This sets the cut-off point value of the low pass filter that can be modified using the
DDAATTAA CCUURRSSOORR
push buttons.
Voices and User Voices
Page 24
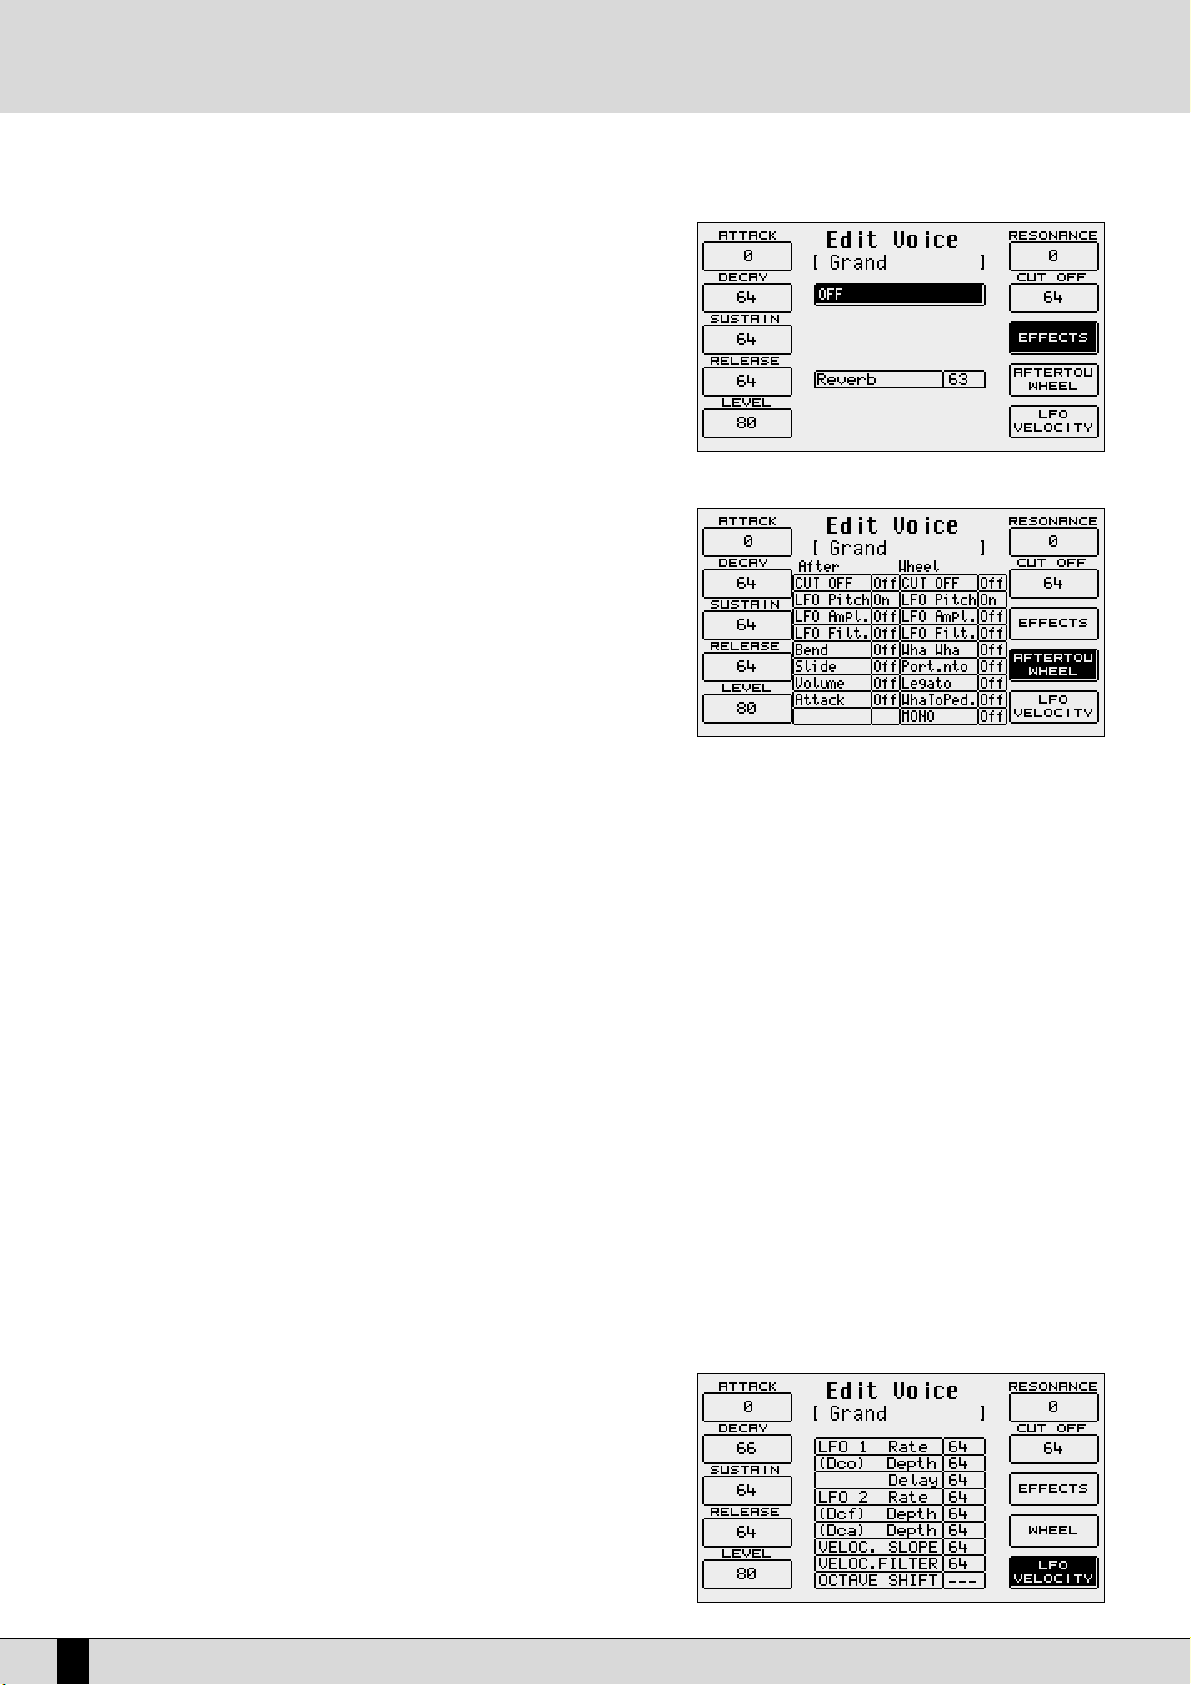
THE EFFECTS
Using
FF88 EEffffeecctt
the user can access the effects page for the Reverb and Chorus
effects. Press
FF77 EEffffeecctt
to display the level of the Reverb (always present unless it
is set at zero) and the multi-effect that can be disabled (
OOffff
). To access these para-
meters use the
DDAATTAA CCUURRSSOORR
push buttons.
As for the multi-effects, once the algorithm has been enabled and selected, one or
more parameters appear right under the Reverb, which are used to choose the
type of the single effects within the multi-effects used by the voice. For further
information see the Effects section.
CONTROL WITH MODULATION WHEEL
Press
FF99 WWhheeeell
and the display will show a 2 -column table in which the first indicates the parameter, the second the on/off status of the Modulation Wheel. Use the
DDAATTAA CCUURRSSOORR
keys to select and enter a parameter. Below is the explanation of
the individual parameters:
CUT OFF: This enables the control of the opening and closing of the filter,
by altering its cut-off. It is used for example to create the analogue type sweeps or to brighten a sound by letting through more
of the higher frequencies and harmonics as the Cut Off point is
raised.
LFO Pitch: This enables the modulation on the pitch (Vibrato), by controlling
the modulation intensity of the LFO.
LFO Amplitude: This enables the modulation of the Amplitude (Tremolo), controlling the modulation intensity of the LFO.
LFO Filter: This enables the modulation on the Filter, controlling the modulation intensity of the LFO.
Volume: controllo del Volume per mezzo dell'Aftertouch.
Wha Wha: This controls the Wha Wha effect via the use of the Modulation Wheel.
Slide (Vel): This affects the tuning of the sound, creating a sort of slight pitch bend each time a key is pressed strongly. It may prove
quite useful when playing to realistically simulate the sound attack typical of wind instruments, such as the Sax and Trumpets.
Attack: This makes all the parameters controlled with After touch start working with a slight and gradual delay. If used skilfully it
confers amazing expressiveness to the leads. To hear its affect, at least one of the parameters amongst those listed must be
controlled by After touch and obviously the After touch must be used. It is quite handy, for example, when assigning a pitch
bend to the After touch and playing with high velocities that could trigger the After touch. This system safeguards the use of
the After touch with additional control.
Portamento: enables the use of the Portamento for the voice.
Legato: enables the Legato mode for the amplitude envelope.
Wha To Pedal: assigns the Wha-Wha control to the pedal.
Mono: sets the Voice to mono.
LFO E VELOCITY
Press
FF1100 LLFFOO VVeelloocciittyy
to access the parameters dedicated to the use of the LFO
and the velocity to control some crucial voice parameters. To select a parameter,
use the
DDAATTAA CCUURRSSOORR kkeeyyss
. Below is the description of the individual parameters:
LFO 1 (DCO) Rate: This establishes the modulation frequency or speed of the
LFO dedicated to the pitch. Higher the value, faster will be
the vibrato.
LFO 1 (DCO) Depth:
This specifies the operating intensity of the LFO on DCO, which
determines how heavy or deep the Vibrato effect will be.
SD5
22
Voices and User Voices
Page 25

SD5
23
LFO 1 (DCO) Delay: This specifies the delay after which the LFO will affect theDCO to create the vibrato effect.
LFO 2 Rate: This establishes the speed of the LFO dedicated to the control of the filter and the amplitude.
LFO 2 (DCF) Depth: This specifies the operating intensity of LFO on the cut-off point of the filter, therefore generating a closing and opening
effect of the filter that, if the Resonance is set at high levels, can produce an effect somewhat akin to a wah wah effect.
LFO 2 (DCA) Depth: this specifies the operating intensity of the LFO on the amplitude which creates a tremolo effect.
Velocity Slope: This is used to modify the response curve to the Velocity for the User Voice being modified that, at zero, mutes the voice.
Velocity Filter: This controls the opening of the filter according to the key dynamics. Value 64 is the standard setting. Lower values obtain
a less brilliant sound, even when playing at high velocity.
Octave Shift: This shifts the octave of the User Voice by a range within - 2 octaves and +2 octaves.
SAVING A USER VOICE
An edited User Voice must be saved permanently in the memory otherwise it will be lost when the SD5 is turned off. The saving 'prompt' appears
automatically after any parameter has been modified and the user attempts to exit the programming menu using
EEXXIITT
, or by pressing
the
SSAAVVEE
push button to enable the saving procedure. In both cases the page that appears shows the destination in memory location with the
name of the User Voice already there at that time. To change the destination in memory directly, enter the destination number using the numeric keypad
SSTTYYLLEESS
buttons. This page is also used to modify the name to be given to the User Voice, using the keys of the keyboard. To confirm
the procedure press
FF1100 SSAAVVEE
.
FF55 EEssccaappee
: This cancels the saving procedure. The new User Voice will be saved on the same source location.
SAVING ALL THE USER VOICES ON DISK
The entire contents of the User Voice bank can be saved on hard disk or floppy disk by using the following procedure:
●
Press
DDIISSKK
and select the destination disk using push buttons
PPAAGGEE ++//--
.
●
Go to the desired folder by entering the number using the numeric keypad relative to the
SSTTYYLLEESS
push buttons.
●
Enable the saving procedure using
FF33 SSaavvee
.
●
Select
FF1100 OOtthheerrss
and then
FF22 UUsseerr VVooiiccee
.
A page appears where the name of the file is to be entered using the keyboard keys.
Confirm the procedure using
FF1100 EExxeecc
, or cancel using
FF55 EEssccaappee
.
.
Voices and User Voices
Page 26
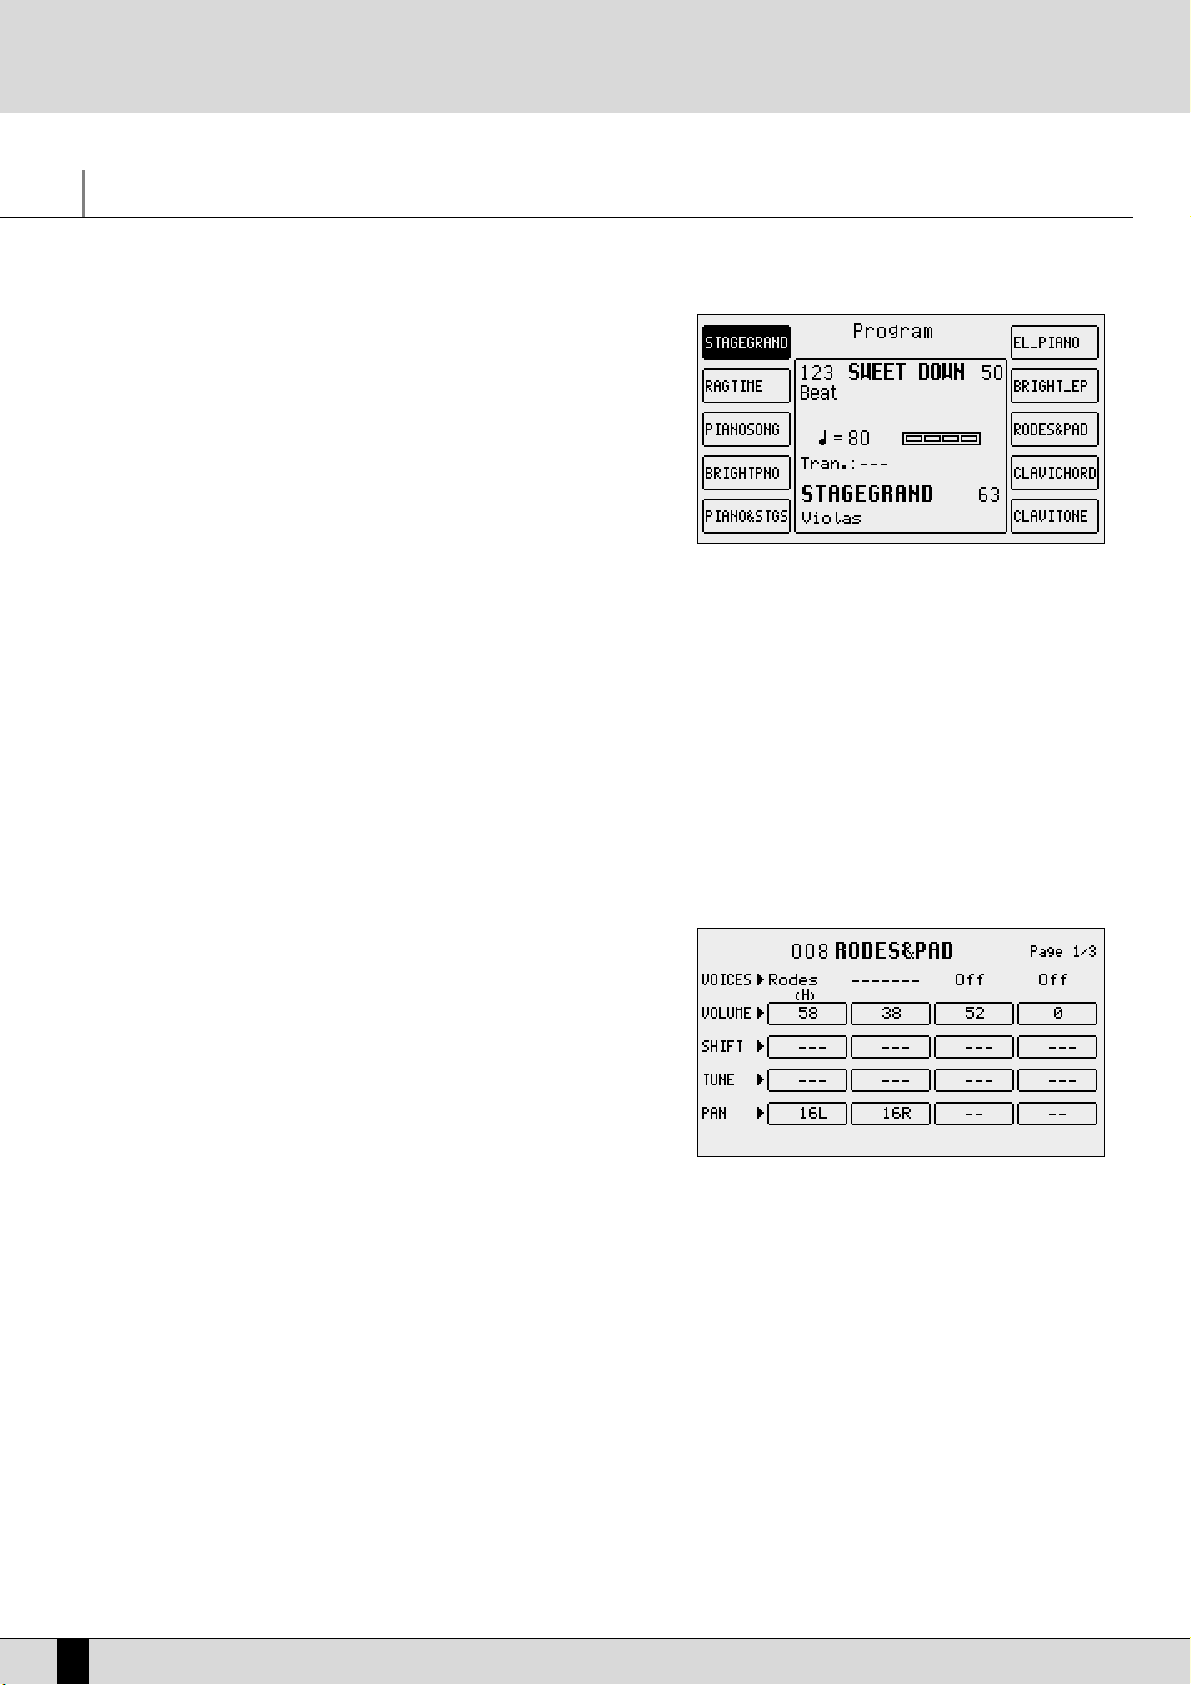
Programs and One Touch Voices
PROGRAMS
A number of voices are often used simultaneously to enhance the voice of the lead
part, namely the right section to the right of the keyboard split point. The simplest method is that of using the Second Voice but for more demanding musicians, up
to four Voices (separately combined together) can be exploited. Using the
Programs the musician can obtain a remarkably versatile voice for the right hand
and also right along the keyboard. The player could, for example, use two further
voices for the Lower section and leave another two for the Right section or use
different voices according to the key dynamics and again could transform the part
of the keyboard to the left of the split point into a real lower organ keyboard to be
controlled with a MIDI pedal. Using the Programs the player can create Harmony
effects such as Duet, Trio and Steel. The SD5 provides the musician with 120
Programs that are distributed over twelve pages of ten Programs each. To call up
a Program simply enable the
PPRROOGGRRAAMM
push button and select one of the
Programs displayed using the function push buttons. Use the twelve
VVOOIICCEESS
push buttons to call up the groups of Programs.
MODIFYING A PROGRAM
Select a Program and then press the function push button relative to the Program selected again or from the main display, after having selected the Program to be modified, access menu
FF88 EEddiitt PPrrooggrraamm
. In any event the display shows four columns, each of which corresponds to a
Voice used in the Program, whereas the horizontal lines refer to the parameters, grouped together in three pages that are accessed using the
PPAAGGEE ++//--
push buttons. To move around within the parameters of the horizontal lines use the corresponding function push buttons that select
the parameter at the side of that in use each time the push button is pressed again.
A GUIDE TO THE PARAMETERS
PAGE 1
From this page access is gained to some overall parameters that directly affect the
Voice performance.
F1/F6 Voice: this indicates the voice used for the Voice selected. To change
it follow the same procedures used to call up a Voice from the
main page. Once a Voice has been selected, wait a few seconds
to return to the
EEddiitt PPrrooggrraamm
page or press the
EEXXIITT
push but-
ton. To disable a Voice selected press the
DDAATTAA CCUURRSSOORR
push
simultaneously.
When a Voice is selected, the
FF1100 HHaarrmmoonnyy
function appears
immediately at the bottom right part of the display, which is
used to enable the harmonization function for that Voice. Only
one Voice within the Program can use the harmonization function and it is distinguished from the others by the letter “HH”
written under the name. If the Harmony function has already been applied to a Voice, it will be automatically disabled when
the same function is set on another Voice.
A completely different matter is the fourth Voice of a Program: together with harmonization, with the same rules as those
for the other Voices, it can become a Second Voice and therefore enabled or disabled using the
22NNDD VVOOIICCEE
push button.
To avail of this option, once you have moved onto the fourth Voice, press F10 Harmony twice. The first time it is pressed the
letter “H” will appear under the name of the voice, the second time it is pressed the Harmony setting is restored and the
fourth Voice is transformed into
SSeeccoonndd VVooiiccee
, which will be pointed out by “
22nndd
” under the name.
F2/F7 Volume: This indicates the value of the volume for each single Voice that can be varied using the
DDAATTAA CCUURRSSOORR
push buttons which,
if pressed together at the same time, will set the value to zero.
F3/F8 Shift: This is the transposition value in semitones (+/- 63) that can be modified using the
DDAATTAA CCUURRSSOORR
push buttons which, if pres-
sed together at the same time, will set the value to zero.
F4/F9 Tune: This is the fine tuning value (+/- 63 steps corresponding to one semitone), that can be modified using the
DDAATTAA CCUURRSSOORR
push
buttons which, if pressed together at the same time, will set the value to zero.
F5/F10 Pan: This is the Pan pot value on the stereo front (+/- 64) that can be modified using the DATA CURSOR push buttons which, if pres-
SD5
24
Programs and One Touch Voices
Page 27
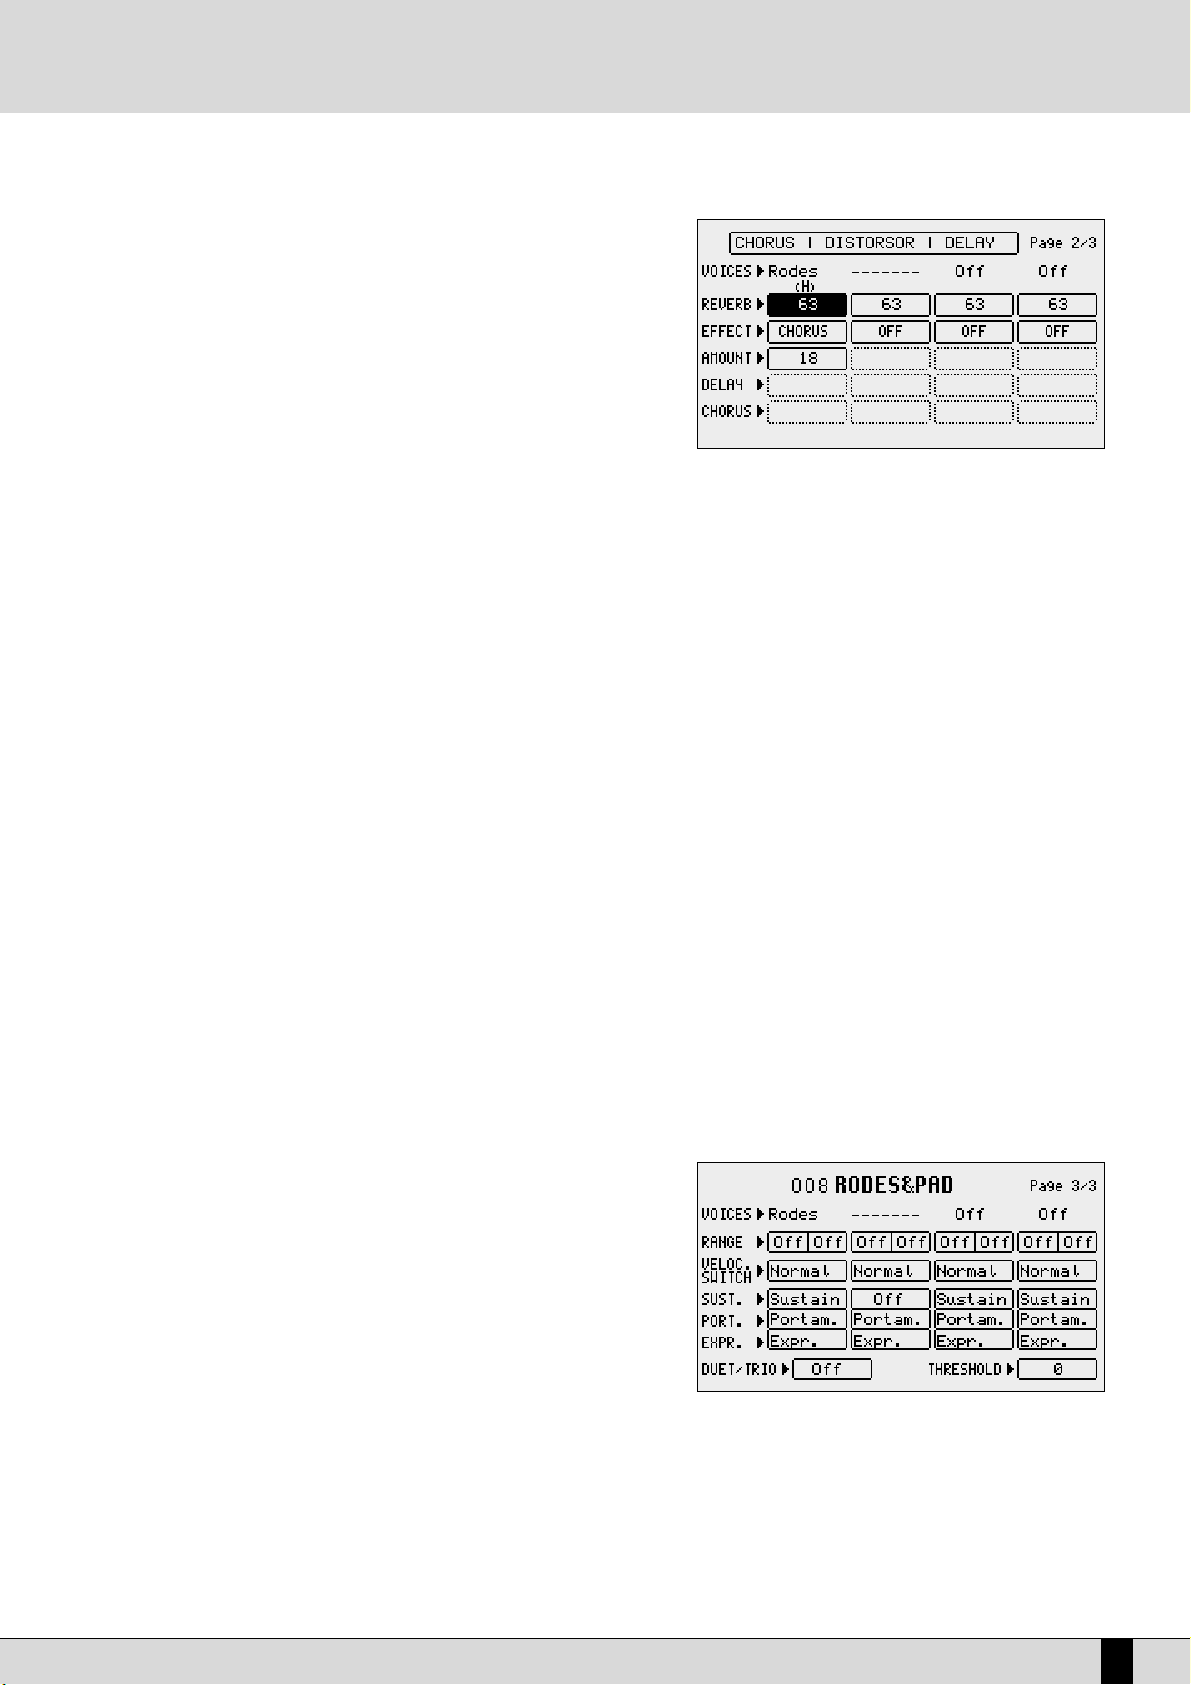
SD5
25
sed together at the same time, will set the value to zero. Zero
corresponds to the middle position.
PAGE 2
The second page is used to set the entity of the effects for the single Voices. For
all four Voices the Send for the Reverb is always available whereas the other parameters available depend on the type of algorithm selected for the Effect which, in
this case, can work as a multi-effect unit with distortion, chorus and delay algorithms combined in five different ways. When the Effect is enabled on a Voice, the
musician may also establish which algorithm of the multi-effect the Voice should
use. The choice of the type of multi-effect is made using the
DDAATTAA CCUURRSSOORR
push
buttons and the combination of algorithms is shown directly on the display via
which the musician can find out which algorithms are set in series (the output of
the first enters in the second effect) or in parallel (the output of the effect goes
directly to the audio output).
Let's take this combination as an example:
Delay > Chorus oChorus
In this case there are two effects set in parallel with each other, namely:
1- Delay > Chorus
2- Chorus
with two effects in series with each other where a Delay enters in a Chorus.
If this multi-effect should be selected, there would be two selection possibilities in the Effect parameter: Delay > Chorus and Chorus.
The five multi-effects available, of which only one however can be used for a Program, are:
Chorus / Distorsor / Delay
Distorsor > Chorus / Chorus
Delay > Chorus / Chorus
Distorsor > Delay / Chorus / Delay
Distorsor > Delay > Chorus / Delay > Chorus / Chorus
F1/F6 Voice: This indicates the voice used for the Voice selected. To change it refer to all explanations for page 1.
F2/F7 Reverb: This controls the Reverb entity for each Voice, that can be modified using the
DDAATTAA CCUURRSSOORR
buttons which, if pres-
sed together at the same time, will set the value to zero.
F3/F8 Effect: This enables the multi-effect and is used to choose which algorithm of the multi-effect will be used for the Voice,
using the
DDAATTAA CCUURRSSOORR
push buttons.
F4/F9 Amount: This controls the signal entity to be sent to the multi-effect and, in particular, to the pre-selected algorithm, that can
be modified using the
DDAATTAA CCUURRSSOORR
buttons which, if pressed together at the same time, will set the value to zero.
F5/F10 Delay e Chorus: These control the signal entity to be sent to the delay or the chorus, when an appropriate algorithm has been selec-
ted. Compared to all seen up to here, the parameters within the horizontal lines are only called up using the function
push button
FF55//FF1100
, as there is no function push button
available for the last line.
PAGE 3
From this page the musician can make some adjustments that are required to limit
the keyboard range and the velocity for a Voice. It is thus possible to arrange a
number of voices in different parts of the Right section (split) and to call up the
voice based on the key dynamics (velocity switch).
F1/F6 Voice: This indicates the voice used for the part selected. To
change it, refer to similar explanations for page 1.
F2/F7 Range:
For each Voice it is possible to indicate the lower and
higher limit of the keyboard within which the voice will be played, simply by playing the relative note on the keyboard
when selecting the value or by using the
DDAATTAA CCUURRSSOORR
push buttons which, if pressed together at the same time, will
reset the value, setting it in Off. When this parameter is in Off the Voice will play on the whole part of keyboard to the
right of the split point. To be able to also play the Voice on the part of keyboard to the left of the split point, the adequate keyboard range is to be set.
F3/F8 Velocity Switch: This is used to enable the velocity switch mode, namely the use of the voice according to the key dynamics, that can
be modified using the
DDAATTAA CCUURRSSOORR
push buttons. The operating modes may be:
Programs and One Touch Voices
Page 28
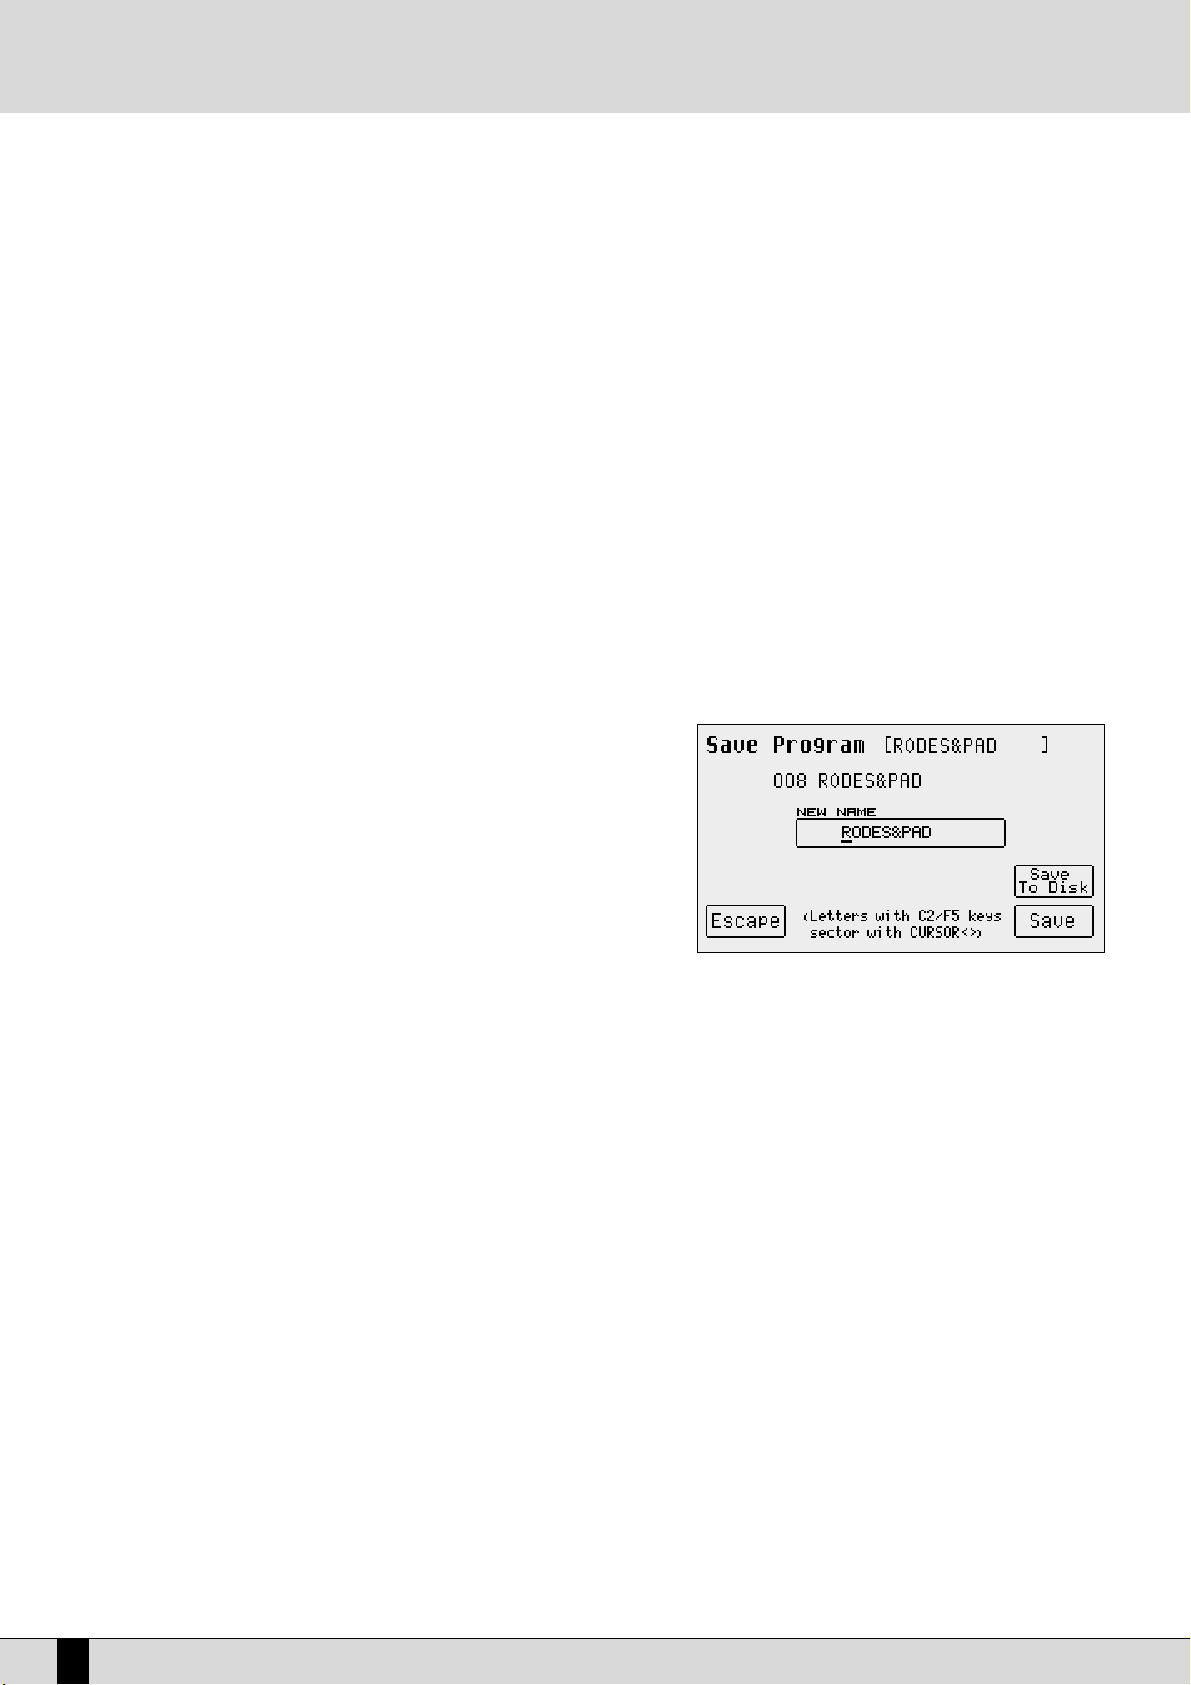
Normal: The voice is always enabled whatever the velocity value set.
Low: The Voice is enabled only for velocity values ranging from 0 to the velocity value specified in
FF1100
TThhrreesshhoolldd
with the DATA CURSOR push buttons.
High: The Voice will only play for velocity values that range from the velocity value specified in
FF1100 TThhrreesshhoolldd
to value 127 (maximum dynamics).
Cross: This can be enabled only for the first two Voices and it enables a gradual switching from one Voice to
another according to the dynamics, where the central point of this switching is set by the
FF1100 TThhrreesshhoolldd
value.
F4/F9 Sustain - Portamento -Expression: this is used to enable, or otherwise, the use of the Sustain, the Portamento and the Expression.
The three lines of parameters can only be accessed using the function push buttons
FF44//FF99
.
F5 Duet/Trio: This is used to choose the polyphony response to the keyboard mode, to create interesting combinations between the
voices.
Off: This means that no alternative polyphony response is enabled.
Duet:
The first Voice Program will have priority as the highest note, the second Voice will have priority as the
lowest note. For example, if the first Voice is a clarinet and the second Voice a trumpet, when the two notes are
played the clarinet will always play the highest note whereas the trumpet will always play the lowest note.
Trio: As for Duet but with the third Voice that will always play the lowest note.
Steel: This is used to assign the pitch bend only to the lowest note between two notes played at the same time,
realistically simulating the typical Hawaiian guitar or pedal steel guitar effect.
Morph: Using the Modulation Wheel it is possible to control the mix between the two voices assigned to Voice
1 and 2. When the Modulation Wheel is set at minimum only the first Voice will be heard; when it is at maximum
only the second Voice will be heard. In this way it is possible to obtain a morphing between the two Voices in
real time controlled by the musician.
SAVING AND LOADING A PROGRAM
Once a Program has been modified or programmed, it must be saved in the
memory or on disk for future recall or use. It is advisable to save your favourite
programs in RAM due to the fact that these are immediately available and can be
recalled instantaneously. Programs which reside in DISK have to be loaded into
RAM prior to being used.
PROCEED AS FOLLOWS TO SAVE A SINGLE PROGRAM IN RAM
●
Select the program to be saved.
●
Access the
EEddiitt PPrrooggrraamm
environment by pressing the function push button
relative to the Program selected once again or from the main page of the display by pressing
FF88 EEddiitt PPrrooggrraamm
.
●
Press
SSAAVVEE
. The page that appears will show the destination memory location that can be modified by entering the number with the
SSTTYYLLEE
push-buttons and the name to be assigned to the Program using the keys of the keyboard.
●
Confirm that the program is to be saved using
FF1100 SSaavvee
. Press
FF55 EEssccaappee
to annul the operation.
PROCEED AS FOLLOWS TO SAVE A SINGLE PROGRAM ON DISK
●
Press
DDIISSKK
and select the destination disk on which the Program is to be saved, using the
PPAAGGEE ++//--
push buttons. If you have selected the
hard disk, also select the destination folder.
●
Repeat the procedure given for saving in RAM up to the
SSAAVVEE
page.
●
Enable saving on disk using
FF99 SSaavvee TToo DDiisskk
.
●
Confirm the procedure using
FF1100 EExxeecc
, or cancel using
FF55 EEssccaappee
.
●
When the Program to be saved on disk has the same name as a Program that already exists, the display shows three options, namely:
F5 Name this is used to give a new name to the Program and then to confirm that it is to be saved using
FF1100 EExxeecc
F10 Overwrite this enables saving by cancelling and overwriting the Program that already exists on disk.
F4 Dir this displays the disk directory enabling the user to control the names that already exist. The user can only return to the
saving on disk page from the directory by exiting (pressing
EEXXIITT
) and therefore repeating the procedure just described. In this case
all the modifications made to the Program will be stored in volatile memory.
PROCEED AS FOLLOWS TO LOAD A SINGLE PROGRAM FROM DISK
●
Press the
DDIISSKK
push button.
●
Choose from which disk the program is to be loaded using the
PPAAGGEE ++//--
push buttons.
●
Select the type of file to be loaded using
FF55 FFiillee CChhooiiccee
.
●
Select
FF22 SSiinnggllee PPrrooggrraamm
or
FF77 PPrrooggrraamm
to load a complete bank.
●
Type in the number of the folder in which the Single Programs to be loaded are stored using the numeric keypad (
SSTTYYLLEESS
push buttons).
●
Select the Program using the
DDAATTAA CCUURRSSOORR
push buttons.
●
Press
FF22 LLooaadd
SD5
26
Programs and One Touch Voices
Page 29
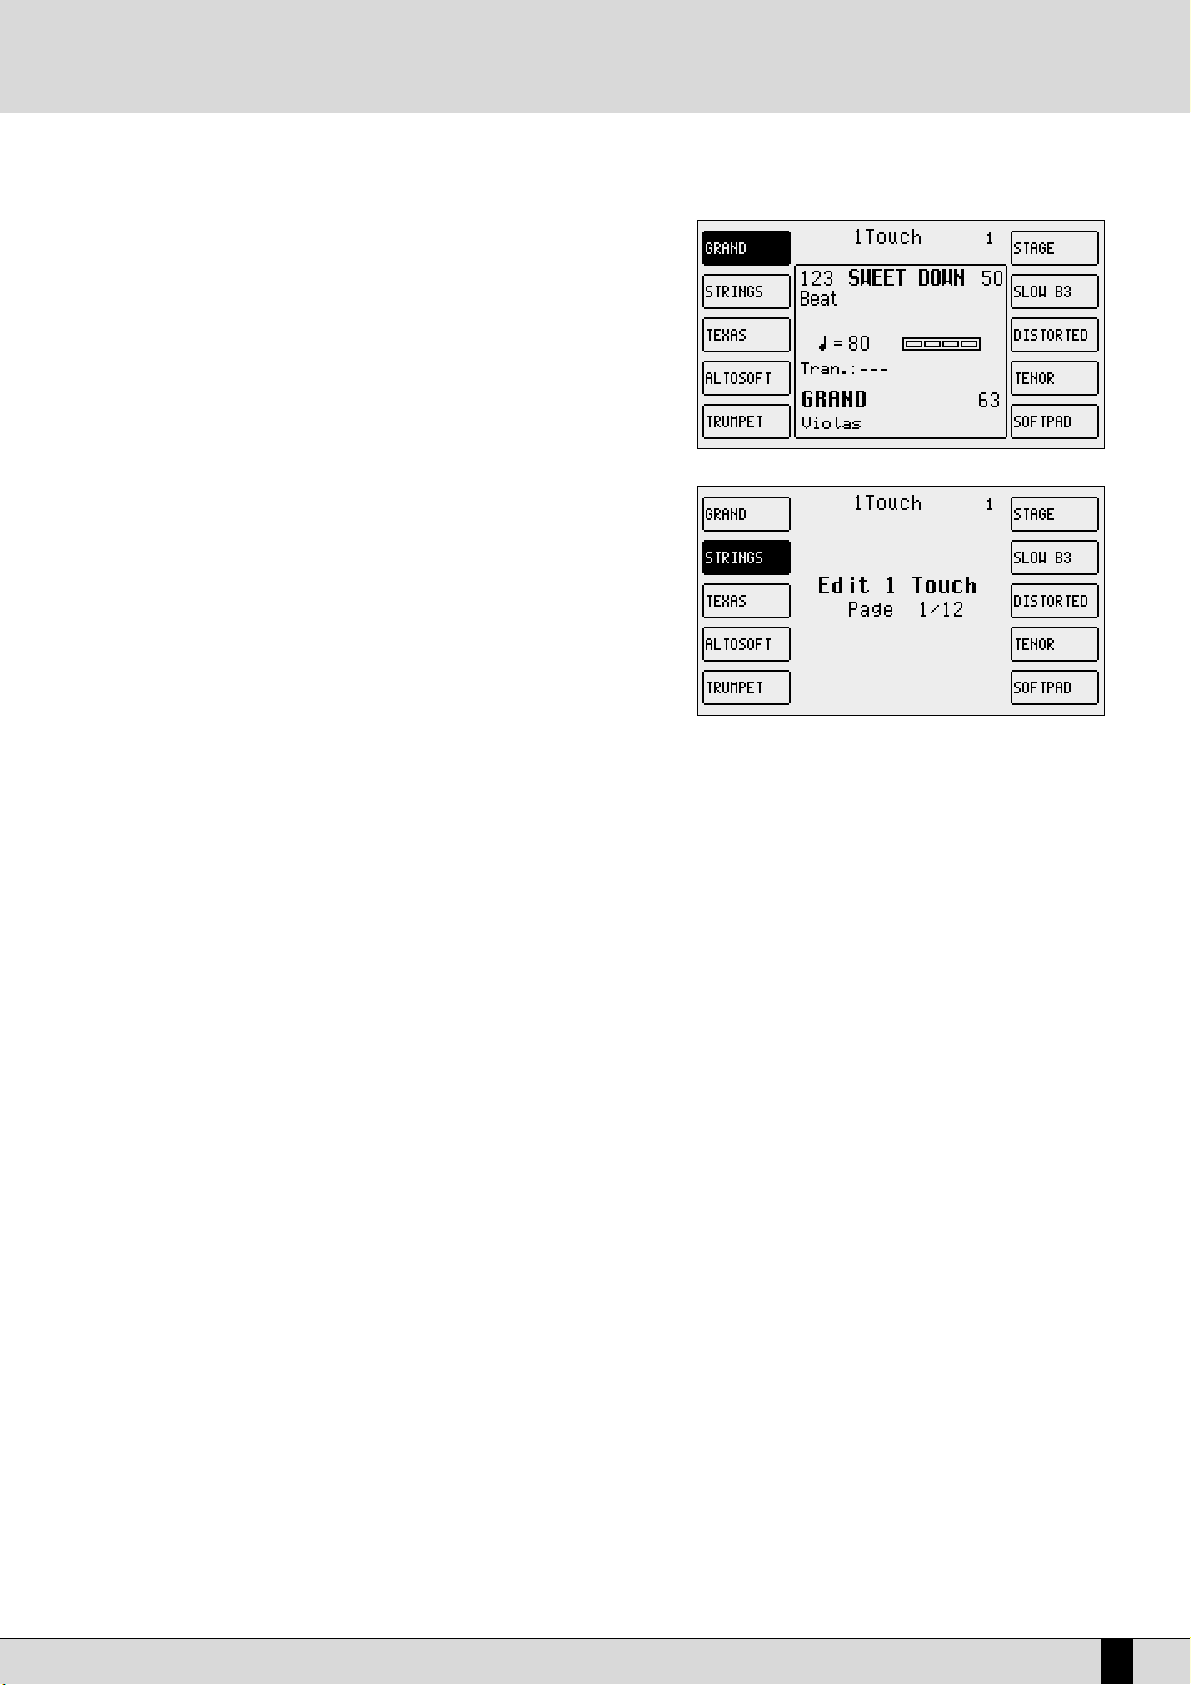
ONE TOUCH
With all these voices on board, you will soon notice that you do have some voices
that you use more often than others. These 'favourite' voices can be stored in a
special location in memory (One Touch) which renders quick access and recall
during live performances. The SD5 already contains Ketron's favourite voices
within the current One Touch locations as default but you can later edit and replace these with your favourite voices. Groups of ten favourite Voices can be created
at a time. To call up one of these voices simply press the
11 TTOOUUCCHH
push buttons
(LED lit). On the main page the first ten Voices of the list are displayed. To display
the other five pages (with ten Voices each), use the first six
VVOOIICCEESS
push buttons
or scroll the pages using the
PPAAGGEE ++//--
push buttons. To select the Voice desired
press the relative function push button.
To modify the list proceed as follows:
●
Press the
SSAAVVEE
push button:
●
Select
FF44 OOnnee TToouucchh EEddiitt
which will display the first page of the list. To access
the other pages use just the
PPAAGGEE ++//--
push buttons.
●
Find the location to be replaced with a new Voice, selecting it using the function push buttons.
●
Select the Voice that will replace that in the list by following the procedures
already described for calling up voices. The audio files could also be used but
these will not be loaded automatically when turning on again.
NNoottee
: Furthermore, the SD5 does not acknowledge original audio files within
the list, which distributes the audio files in their loading order. If the audio files
are to be used in One Touch it is advisable to create a group of files to be loaded upon turning the keyboard on in the same order in which
they appear in the list (Sound Block).
●
Press
EEXXIITT
to return to the One Touch Edit page.
●
Once the list has been completed press
SSAAVVEE
again.
●
Confirm the procedure using
FF1100 SSaavvee
or Cancel the procedure using
FF55 EEssccaappee
or Reset the default list using
FF99 DDeeffaauulltt
.
●
Press
FF88 DDiisskk SSaavvee
to save on the selected disk.
SD5
27
Programs and One Touch Voices
Page 30
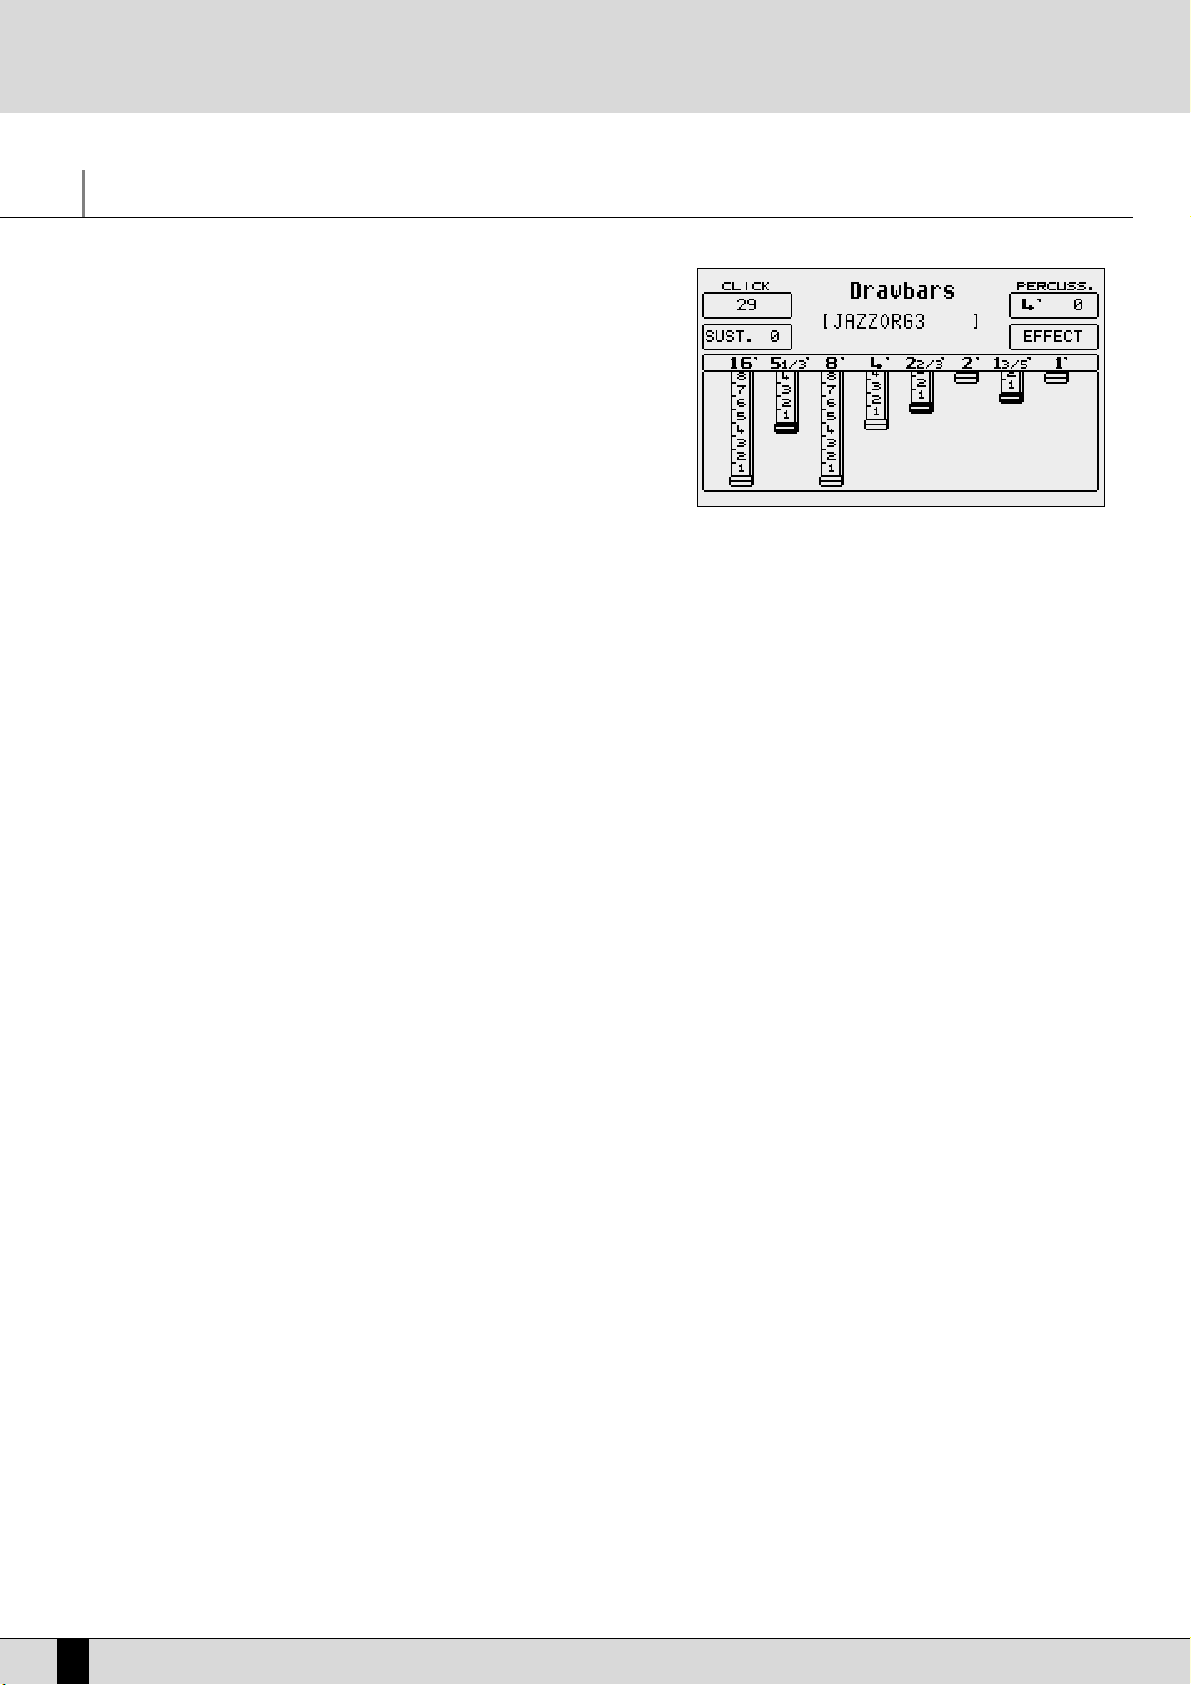
Drawbars
Thanks to the very powerful sound engine of the SD5, it is possible to also reproduce very accurately the sounds of classic electromagnetic organs, among which
the Hammond ©‚ certainly is the most famous one with the most important timbre. If you do not know what an electromagnetic organ is, keep in mind that their
timbres used to be mixed using so-called drawbars, with a specific harmonic corresponding to each of them. In order to compose the timbre, the required harmonics used to be added on different levels. The SD5 reproduces these sounds
displaying the drawbars that can be controlled in real time by a number of buttons
on the panel.
If you wish to use the Drawbars to call up an organ sound, enable
UUSSEERR VVOOIICCEE
and
then select
BBAASSSS--FFXX
that corresponds with the bank of Voices dedicated to these
timbres. To call up the single timbre among the 10 available, use the
FF11--FF1100
func-
tion buttons.
PROGRAMMING THE ORGAN TIMBRE
If you wish to modify a preset and program your own settings, from the main display page, press
UUSSEERR VVOOIICCEE
, then press
BBAASSSS--FFXX
. Select the
voice you wish to modify, using the function push buttons. Once you have selected the voice, press the same function push button once more
to access the edit page.
The SD5 allows you to control a number of particular features relevant to the original organ timbre, to be called up with the function buttons
and the
DDAATTAA CCUURRSSOORR ((LLeefftt,, RRiigghhtt))
buttons and modified with the
DDAATTAA CCUURRSSOORR ((UUpp aanndd DDoowwnn))
buttons. These parameters are described in
detail in the following:
Drawbar: use the
DDAATTAA CCUURRSSOORR ((LLeefftt,, RRiigghhtt))
push buttons to select the drawbar, and use the
DDAATTAA CCUURRSSOORR ((UUpp aanndd DDoowwnn))
buttons to
modify its level.
F1 Click:
activates the typical noise when the sound of the electromagnetic organ starts. Use the
DDAATTAA CCUURRSSOORR
buttons to modify its
level.
F2 Sustain: an effect used on the electronic organs of the sixties and seventies, extending the decline time of the timbre; the relevant
value is programmed using the
DDAATTAA CCUURRSSOORR
buttons.
F6 Percussion: this is a basic feature of the Jazz and Rock organ sound. The percussion introduced is to be chosen among 4' and 2 2/3' by
pressing the
FF66
function key. The percussion volume is modified using the
DDAATTAA CCUURRSSOORR
keys.
F7 Effects: this allows you to access the typical effects associated to the electromagnetic organ, i.e. Chorus and Vibrato. The Vibrato
can be applied to the oscillator (Dco), the amplitude (Dca) or the filter (Dcf) with a global speed control (Rate). Pressing
DDAATTAA
CCUURRSSOORR ((UUpp aanndd DDoowwnn))
you select the parameter and pressing con
DDAATTAA CCUURRSSOORR ((LLeefftt,, RRiigghhtt))
you modify the quantity. To
go back to the Drawbars page, press once more the
FF77
function button.
Each Drawbars configuration can be saved on the Drawbar bank replacing the existent ones.
Proceed as follows to store a Drawbars combination:
●
Press
SSAAVVEE
.
●
If you do not wish to modify the name, press
FF1100 SSaavvee
to confirm.
●
If you wish to modify the name, enter the letters using the keys of the keyboard and move with the
CCUURRSSOORR ++//--
buttons. Then press F10 Save
to confirm.
●
The
FF99 DDeeffaauulltt
function restores the original factory set combinations.
●
The
FF44 UUnnddoo
function restores the last combination prior to the current modifications.
●
The
FF55 EEssccaappee
function aborts the storage operation.
SD5
28
Drawbars
Page 31

SD5
29
Drum Set
The rhythm section of the SD5 uses both the regular Drum Sets and the Live sampled drum loops. The regular Drums are assigned to the Drum
1 track (MIDI channel 10), whereas the Live Drums are assigned to the Drum 2 track (MIDI channel 9) within a style.
The SD5 is equipped with 24 preset Drum Sets and 24 additional User Drum Sets that can be freely programmed by the user. Live Drums can be
programmed and modified only within a Style, from the Arrange View menu.
PLAYING A DRUM SET
To play a Drum Set on the keyboard, you need to activate the
MMaannuuaall DDrruummss
function using the relative button of the panel. If a style is being
played, the Drum track still remains active but it is impossible to change the chord until the
MMaannuuaall DDrruummss
function is disabled.
To change the Drum Set, simply go to
EEddiitt DDrruumm SSeett
and select the set required using function keys F1.. F7. or move onto the next pages using
the
PPAAGGEE ++//--
buttons or the first six
VVOOIICCEESS
buttons
The Drum Sets written with lower case letters are editable locations and available for new User Drum Sets to be stored in.
LIVE DRUM SETS
The SD5 features an innovation of the electronic keyboard technology, allowing you to achieve fluidity and musicality of rhythms that so far,
have been simply inconceivable. All this is the result of extensive musical research and complex processing of sampled drum loops (grooves).
With the SD5, in fact, the groove is not a simple audio file combined within the rhythm, but an actual Live Drum Set where the single instruments have been separated for each single key of the keyboard. This particular feature on the one hand allows you to use the grooves at different speeds without changes to the intonation, and on the other hand it enables you to arrange the rhythm according to your own taste. Using
the Live Drum Sets on a separate track makes it possible to complete the rhythm section with the usual Drum Sets and to combine groups of
similar instruments in Arrange View. It is not possible to play Live Drum Set directly on the keyboard. The only moment in which you can listen
to it and especially play it is while editing the Style. The instrument's disposition in a Live Drum Set is substantially different from the one in a
usual MIDI Drum Set, so some time might be needed to become familiar with the way these drum parts are laid out on the keyboard.
DRUM MIXER
The four Drum Mixer pages allow you to turn on/off, control the Volume, Reverb, Pan and parameters for ten categories of percussion instruments within a drum set. This makes it possible to personalise the Drum Sets and the Live Drum Sets in a few instances, simply by activating or
deactivating a group of instruments. With regard to the Live Drum Sets, you may perceive a number of instruments at a very low volume, although you have deactivated them: this behaviour is a result of the groove processing and is not a defect of the SD5.
To access the Drum Mixer pages from the main display page press the
FF1100 DDRRUUMM MMIIXXEERR
button and scroll the next pages with the
PPAAGGEE ++//--
but-
tons. Otherwise you may use
FF99 EEDDIITT DDRRUUMM
, select
FF99 EEDDIITT
and then
FF99 DDRRUUMM MMIIXXEERR
.
F1 Kick
F2 Snare ( Snare, Rim Shot )
F3 Hi Hat
F4 Cymbals ( Crash, Ride, Cup )
F5 Toms/FX
F6 Rimshot
F7 Latin 1 ( Congas , Bongos, Tambora )
F8 Latin 2 ( Cowbell, Guiro, Claves, )
F9 Latin3/Tamb ( Maracas, Cabaza, Shaker, Guira, Whistle )
F10 CLAP/FX
The first page allows you to activate or deactivate the instruments of a percussion
group, by pressing the function buttons corresponding to the specific group.
To disable all the drums sets in one go, simply press the
DDAATTAA CCUURRSSOORR ((LLeefftt aanndd
RRiigghhtt))
keys together at the same time, which correspond to the
VVAALLUUEE ++//--
func-
tion; when you press one of the two buttons, all the sets are re-activated.
The second page is used to control the volume of the single groups to be selected
with the relevant function keys. The volume of the selected group can be modified
from value 1 to 15 using the
DDAATTAA CCUURRSSOORR
buttons.
The third page is used to control the reverb quantity of the single groups to be
selected with the relevant function keys. The reverb quantity of the selected group
Drum Set
Page 32

can be modified from value 1 to 15 using the
DDAATTAA CCUURRSSOORR
buttons.
The fourth page is used to control the pan value (stereo position) for the single groups to be selected with the relevant function keys. The pan
value of the selected group can be modified in steps of 64 to the right (R) or to the left (L) using
DDAATTAA CCUURRSSOORR
buttons. Pressing both
DDAATTAA
CCUURRSSOORR ((LLeefftt aanndd RRiigghhtt
buttons at the same time brings the pan back to the neutral value, i.e. in the centre (-).
HOW TO CREATE OR MODIFY A DRUM SET
Despite the fact that most machines do follow the current General MIDI mapping
for drums, you might encounter and older generation machine whose drum mappings do not correspond to GM format, but you would like to establish on the SD5
to create compatibility.
The SD5 allows for creation and programming of a Drum Set which can be stored
among the User Drum Sets (replacing the pre-set ones) and can be used within the
styles. If you wish to access the editing pages, press the
EEXXIITT
button to go to the
main page and then press F9 Edit Drum. Otherwise you may access the edit page
via
FF1100 DDRRUUMM MMIIXXEERR
, selecting
FF1100 DDRRUUMM SSEETT
and then
FF99 EEDDIITT
.
You are now able to edit the Drum Set presently selected and shown in the centre
of the display, under which the destination User Drum Set for storage is shown,
which cannot be modified. In fact the association between the preset Drum Sets
and the User Drum Sets is prearranged.
If you wish to modify the settings of the single key, first of all play the note, which
will be shown in
FF22 KKeeyy
, and then modify the following parameters to be selected
with the function buttons. The values are input using the
DDAATTAA CCUURRSSOORR ((LLeefftt aanndd
RRiigghhtt))
buttons.
F1 Live Snare: if this parameter is set to On, the snare intonation will be sli-
ghtly modified during the performance to simulate what happens in reality (since a snare drum does have different intonations depending on how hard, soft or at what angle it is hit).
It makes the Drum Set more expressive.
F3 Group: Percussion group from which the sound to be assigned to the
note is to be selected. This allows quicker sound assignment.
F4 Instrument: Sound to be assigned to the note. Pressing the
DDAATTAA CCUURRSSOORR ((LLeefftt aanndd RRiigghhtt))
buttons, further to the sounds foreseen for
the specific percussion group, you scroll the complete list of sounds without having to use
FF33 GGrroouupp
.
F5 Escape: Aborts the Drum Set editing mode.
F6 Key Shift: Repeatedly pressing this button transposes the complete Drum Set by octaves.
F7 Pitch: Transposes the sound assigned to the note by halftones.
F8 Tune: Transposes the sound assigned to the note by hundredths.
F9 Drum Mixer: selects the Drum Mixer page.
F10 Save: Calls up the storage page, where to enter the name of the modified Drum Set using the keyboard keys and the
DDAATTAA CCUURR--
SSOORR
buttons. Pressing
FF1100 SSaavvee
once more you confirm the saving procedure, which will overwrite the User Drum Set. The
FF55 EEssccaappee
button deletes storage and takes you back to the Edit Drum Set page.
SD5
30
Drum Set
Page 33

SD5
31
Arranger
The Arranger is the heart of the automatic accompaniment of the SD5. It allows you to create a dynamic and versatile arrangement using the
Styles and their controls.
A Style is a group of short sequences relevant to major, minor and seventh tonalities or different tonalities combined with each other. The
Arranger has the task to suitably modify those basic sequences, according to the chord played, to create continuous harmonies that may also
be based on more complex chords like the thirteenths and the diminished ones.
The Sd5 offers some absolutely new functions in this division.
SSmmooootthh AAlltteerrnnaattee
: Compared to the conventional devices, the alternated bass on the seventh chord, may behave in a sophisticated manner on
some styles, adapting the intervals according to correct musical harmony rules. For example, the fundamental note of the chord is no longer
repeated each time it is acknowledged, but rather the corresponding fifth chord is played.
SSmmaarrtt 77TThh
: In some typical styles (salsa, oberkrain, etc.), in which the sixth chord is present on the arrangement, it is interpreted/modified intelligently by the SD5 each time a seventh chord is played, depending on whether the chord played previously was higher or lower.
RRiiffff
: In some cases the Arranger D consists of a complex harmonic sequence that develops over a number of musical beats. The Riff always
matches the musical style selected and is used to play solos or sophisticated performances without having to worry about setting the harmonic accompaniment sequence.
The sequences a Style is made up of are called Parts and refer to single moments of the arrangement, like the introduction, the ending and the
fill ins, i.e. the small detachments between the single parts of a piece of music.
Each Section is made up of a number of tracks for the single instruments that make up a musical arrangement.
The SD5 has available the following parts for each Style:
Intro 1: one or more introduction bars
Intro 2: one or more introduction bars that are more complex than those of Intro 1
Intro 3: one or more introduction bars that are more complex than those of Intro 2
Fill 1: one detachment bar
Fill 2: one detachment bar that is more complex than the one of Fill In 1
Fill 3: one detachment bar that is more complex than the one of Fill In 2
Break (Fill 4): one percussion detachment bar
Ending 1: one or more ending bars
Ending 2: one or more ending bars that are more complex than those of Ending 1
Ending 3: one or more ending bars that are more complex than those of Ending 2
Arrange A: a simple accompaniment variation
Arrange B: an accompaniment variation that is more complex than the one of
Arrange A
Arrange C: an accompaniment variation that is more complex than the one of
Arrange B
Arrange D/Riff:
an accompaniment variation that is more complex than the one of
Arrange C. In some cases this Arranger, as already mentioned, acts
as Riff, in other words it activates a typical harmonic sequence for
the musical type of style set. The presence of a Riff is enhanced
when you load the style by the fact that the LED of the Arranger D
flashes (the LED flashes until it is played for the first time) and
also by the symbol (R) on the Display under the name of the style
loaded. Neither Fill-ins nor the Break can be activated while a Riff
is being played.
When playing a Riff, the normal acknowledgement method of the chords is altered. The acknowledgement method is determined by the settings of the
RRIIFFFF KKEEYY
function in the
IINNTTEERRAACCTTIIVVEE AARRRRAANNGGEERR
menu.
Depending on the settings of this function, you can set the harmonic note of the Riff only during the first musical beat (
RRIIFFFF KKEEYY NNoonnee mmooddee
).
In this case, once a Riff has been launched and the initial chord has been acknowledged, the musician can play freely over the whole keyboard in pianist mode or using the Lower's for the left part and the Preset's for the right part.
Alternatively, you can force the acknowledgement of the chord at any time by pressing the FILL IN key (
RRIIFFFF KKEEYY FFiillll IInn mmooddee
) or by pressing
harder on the keyboard keys (
RRIIFFFF KKEEYY AAfftteerr mmooddee
) just the same as what occurs for the
AAFFTTEERR FFIILLLL
function.
To set this mode, please refer to the section dedicated to the
LLEEFFTT MMEENNUU
.
Each part of the Arranger is made up of a maximum of eight tracks divided into:
Drum 1: track for the drums and percussion instruments of the Drum Set
Bass: bass line track
Chord 1, 2, 3, 4, 5: melodic accompaniment tracks
Drum 2: track where the Live Drums are employed.
Arranger
Page 34

Editing, modifying and copying accompaniment tracks and sections is achieved with Edit Patter.
For each Style, the SD5 allows you to modify the voices that are assigned to the tracks, as well as the volumes, the pan value and the amount
of the effects sent. The Arranger is controlled through the SD5 keyboard, pedals and buttons, or via MIDI. This last feature is particularly useful
for those who use a MIDI accordion.
PANEL COMMANDS
KEY START: When the relative LED is lit and the Arranger is in Stop status (not playing), the automatic accompaniment is started
as soon as you play a chord on the left to the split point of the keyboard. If an
IINNTTRROO
is selected, as soon as you play
a chord the introduction will be started. If you wish to control the behaviour of the Lower section, i.e. the voices providing the background for the left hand, go to the
AARRRRAANNGGEE MMOODDEE
menu from the main display page, where you can
disable the Lower sound if the Arranger is not On. In this way you avoid the lower notes being played before the arranger starts. If the
HHOOLLDD LLEEDD
is lit, the Arranger remembers the chord played even after you stopped pressing the keys
associated with the current chord to the left of the split point.
KEY STOP: If this LED is on, playing a chord or a note of short duration interrupts the Arranger performance. It is restarted as
soon as you play the same or another chord all together. If the note or the chord is pressed for more than a given
value that can be programmed in Arrange Mode, the Arranger continues playing. If the Arranger is Off,
KKEEYY SSTTOOPP
restarts it if you play a chord over a longer time than the one foreseen.
If you have selected a
FFIILLLL
or an
IINNTTRROO
, the Arranger is Off and you play a chord over a longer time than the one fore-
seen, the complete
FFIILLLL
or
IINNTTRROO
will be performed. If instead you play a very short chord, the Arranger is immedia-
tely stopped after you lift your left hand off the keyboard. If the
KKEEYY SSTTAARRTT
LED is also lit, as soon as you remove your
hand from the section on the left from the split point, the Arranger is stopped and will be restarted as soon as you
play a note or a chord to the left of the splint point. The time elapsing before the
KKeeyy SSttoopp
becomes active can by
programmed in
SSyynncc TTiimmee
in the
AArrrraannggee MMooddee
menu.
FILL IN: These are Style variations with the duration of one bar, used as short harmonic intervals to enhance the rhythm. When
the Arranger is activated with this pushbuttons is pressed, a Fill-In bar is entered, and at its end the Arranger goes
back to the conditions previous to the Fill In.
The SD5 avails of 3 different fill's that will be activated based on the current arrangement.
If the
JJuummpp
function is menu, the
FFIILLLL
push buttons allow you to go to the next Style variation. While the Arranger is
in Stop condition, the Fill Ins can be used as short Intros and they start the execution directly, without the need to
switch over to the Start condition. If you wish to use all the tracks of the automatic accompaniment, before pressing
the
FFIILLLL
push button while the Arranger is in Stop condition, play the chord on the keyboard section on the left from
the split point.
BREAK: This enters one partial or complete stoppage bar of the complete Arranger. At its end the Arranger continuous playing
as before.
TAP: Tapping four times on this button (with a pre-determined frequency/tempo in mind) allows the SD5 to identify the
Tempo value to be assigned to the Arranger and to the Sequencer, while they not currently playing (activated). As
soon as the Tempo value is identified, the performance is started with this assigned new tempo once the
arranger/sequence is started. The minimum number of 'taps' depends on the time signature, i.e. a 3/4 Style requires
three taps on this button, whereas a 4/4 Style needs four taps on this button in order to accurately register a tempo
value.
NNoottee::
Some Styles will not accept the complete range of Tempo values due to the fact that they contain Live Drums.
If values of extreme ranges are used, they will be rounded down to the permitted limit. If the Arranger and the
Sequencer are playing, this button allows you to increase the Tempo by steps of five points on each press
(
AAcccceelleerraannddoo
). Keeping
TTAAPP
pressed down, the increase direction is changed (you can see this from the arrow near
to the Tempo value), i.e. the Tempo is decreased by steps of five points on each press (
RRiittaarrddaannddoo
).
CONT/PAUSE/RESTART: Controls three different functions. With the Arranger Off,
CCOOUUNNTT
enters a Count Down bar where a drum stick (the
imaginary drummer) counts off the introduction to the current style.
With the Arranger On, pressing this button causes the arranger to immediate return to the beginning of the first bar
of the first measure, no matter what time it is pressed. This may be useful in the case where a singer is out of
beat/tempo!
If you are working with the
MMIIDDIIFFIILLEESS
(the LED
SSOONNGG//OOLLAAYY
is lit), this button stops reproduction (pause) and resumes
play when next the
CCOOUUNNTT//PPAAUUSSEE// RREESSTTAARRTT
is pressed.
START: A press on this push button starts the automatic accompaniment. If the Arranger is already playing, a press on START
stops everything, i.e. it becomes a Stop button.
HOLD: When the relevant LED is on, the last chord played to the left of the split point of the keyboard will remain sustained.
In other words, while the Arranger is playing, this button allows you to maintain active all the accompaniment and
SD5
32
Arranger
Page 35

SD5
33
bass tracks without the need to keep the chord pressed on the keyboard. In fact if the LED is off, the accompaniment
plays only as long as the chord is pressed on the keyboard, whereas the drums tracks continue playing irrespective
of whether the chord is held pressed or not.
TEMPO - : Decreases the Tempo value of the Arranger or the Sequencer.
TEMPO + : Increases the Tempo value of the Arranger or the Sequencer. Pressing both
TTEEMMPPOO ++//--
push buttons at the same time
blocks the Tempo value (which will then be marked with an *) so that this will not be modified when calling up another
Style having a different Tempo. If you wish to disable the blocking, press
TTEEMMPPOO ++//--
. at the same time.
INTRO/ENDING 1, 2, 3: The Arranger has three Intros and three Endings. Intro1 and Ending 1 are programmed without chord changes, so you
may develop the harmony as you prefer by manually playing the chords on the left part of the keyboard. On the other
hand, Intro 2 and 3, as well as Ending 2 and 3, are programmed with harmony variations within these parts, so it is
recommended that you do not change the chords while these parts are playing.
Pressing one of these buttons while the Arranger is in Stop causes the instrument to activate the selected Intro and
to go on to the Arrange A variation, unless you have previously selected a different type of Arrange. If the Arranger
is in Start condition, pressing one of these buttons activates the relevant Ending. If the
JJuummpp
function is enabled and
the Arranger is being executed, pressing any Intro button starts the execution of the selected Intro.
ARR. MUTE: This is used to mute some sections of the automatic accompaniment, which can be defined by the user. This func-
tion enables greater control on behalf of the user of the automatic accompaniments and offers additional musical
flexibility. When editing the pattern, you can define which sections are to be muted by pressing this key.
MENU LEFT
Pressing this push button, you access a menu that is dedicated to programming a
number of Arranger parameters and to calling up some specific functions. Press
LLEEFFTT MMEENNUU
to enable this menu.
F1 Retrigger & Mode: This calls up the
RReettrriiggggeerr
function and the relevant
editing page. It is set by default on the bass and Chord
2 track of the Style, thus allowing you to repeat the fundamental note every time a chord is changed. If the
retrigger is activated also for the accompaniment
tracks, these repeat the chord programmed on the first
step of the first Style measure. The following parameters are available:
F1 Smooth Alternate: allow to enable or disable
alternate bass width play coherence instead on
usually root repetition
F2 Bass: this is activated by default and is disabled by pressing the F2 push button again;
F3 Chord 1: pressing the relevant push button activates the
RReettrriiggggeerr
function for the
CChhoorrdd 11
track;
F4 Chord 2: pressing the relevant push button activates the
RReettrriiggggeerr
function for the
CChhoorrdd 22
track;
F6 Chord 3: pressing the relevant push button activates the
RReettrriiggggeerr
function for the
CChhoorrdd 33
track;
F7 Chord 4: pressing the relevant push button activates the
RReettrriiggggeerr
function for the
CChhoorrdd 44
track;
F8 Chord 5: pressing the relevant push button activates the
RReettrriiggggeerr
function for the
CChhoorrdd 55
track.
F9 Inversion: This makes it possible to choose the highest note for the chords in the parallel mode. If this note
is exceeded, the chord goes down to the lower octave, Range EB/G.
Mode: The
MMooddee
function defines the harmonic behaviour of the accompaniment tracks (
CChhoorrdd 11,, 22,, 33,, 44,, 55
) to
be chosen between Close, the mode using chords with close inversions, and
PPaarraalllleell
, the mode moving the
chords without altering the intervals it is made up of. Generally speaking the Close option is the most musical
and natural one. If you wish to modify the
MMooddee
parameter, select the Style track pressing the
DDAATTAA CCUURRSSOORR
buttons and modify the parameter pressing
FF1100 SSeelleecctt
. To go back to the second page of
LLeefftt MMeennuu
, press
FF55
EEssccaappee
.
F2 Dyn. Arranger: Using the keyboard velocity, you may control the volume of the single tracks of a Style. The page called up by Dynamic
AArrrraannggeerr
allows you to set for each track the keyboard dynamics sensibility, thus modifying the volume of the track.
Arranger
Page 36

The higher the value, the more the track volume
depends on velocity. The following parameters are available:
F1 Drum: velocity sensibility for the
DDrruumm
tracks
FF22 BBaassss
: velocity sensibility for the
BBaassss
track
FF33 CChhoorrdd 11
: velocity sensibility for the
CChhoorrdd 11
track
FF44 CChhoorrdd 22::
velocity sensibility for the
CChhoorrdd 22
track
FF66 CChhoorrdd 33
: velocity sensibility for the
CChhoorrdd 33
track
FF77 CChhoorrdd 44
: velocity sensibility for the
CChhoorrdd 44
track
FF88 CChhoorrdd 55::
velocity sensibility for the
CChhoorrdd 55
track
FF55 EEssccaappee::
returns to the second page of Left Control Menu .
FF1100 AAccttiivvee//IInnaaccttiivvee::
pressing repeatedly the relevant push button activates and deactivates the
DDyynnaammiicc
AArrrraannggeerr
function.
If you wish to modify the sensibility value for the single tracks after having selected them with the relevant
function push button, use the
DDAATTAA CCUURRSSOORR
buttons.
F3 Interactive Arrange: This is used to mute the
CChhoorrdd
accompaniment while
playing the lead on the
RRiigghhtt
section, on the right from
the split point of the keyboard. In this way, when the
musician plays a solo, some sections of the accompaniment chosen by him will be muted, enhancing the solo
part and avoiding over all cluttering of the music. At the
end of the solo, the muted sections will be automatically re-activated.
The
IInntteerraaccttiivvee AArrrraannggee
parameters are:
F1 Brass: When this is selected, the brass of the
automatic accompaniment will be muted while a
lead is played on the Right section.
F2 Intro: When this is selected, the Interactive
Arrange of the Brass will be activated also for the Intro's.
F3 Ending: The same as
FF22 IInnttrroo
but dedicated to the Ending
F4 After Fill: This is used to activate the Fill's of the Arranger via the Aftertouch function of the keyboard; when
this function is activated, all you need to do is press harder on the keys of the keyboard to activate the current
Fill.
F5 RIFF KEY: This is used to set the acknowledgement method of the chords during a Riff. Press function key
F5 a number of times or use the
DDAATTAA CCUURRSSOORR
keys to set the following operating modes:
- FILL IN: The acknowledgement of the chord is forced when the
FFIILLLL IINN
key is pressed on the panel of
the instrument.
- AFTER: The acknowledgement of the chord is forced when the keys of the keyboard are pressed har-
der than usual (AFTERTOUCH).
- NONE: The acknowledgement of the chord is only enabled during the first musical beat of the Riff. It
is impossible to set a new chord before the Riff has ended or before you have changed arrangement.
F6 Chord 2: Pressing function button
FF66
activates the
IInntteerraaccttiivvee AArrrraannggee
function for the
CChhoorrdd
2 track.
Pressing the same button once more disables the function.
F7 Chord 3: the same as
FF66 CChhoorrdd 22
but for the
CChhoorrdd
3 track.
F8 Chord 4: the same as
FF66 CChhoorrdd 22
but for the
CChhoorrdd
4 track.
F9 Chord 5: the same as
FF66 CChhoorrdd 22
but for the
CChhoorrdd
5 track.
F10 Active/Inactive: pressing the function button F10 activates or deactivates the
IInntteerraaccttiivvee AArrrraannggee
function. This
function can be also activated from the first Left ControlMenu page, using the
FF99 IInntteerraaccttiivvee
parameter.
F4 Rootless: The Rootless function enables a special type of chords acknowledgement based on chords without fundamental note.
F5 To Root: If this function is enabled, the notes of the bass track are all referred to the fundamental note of the chord tonality,
excluding the harmonic evolution. This can be used together with
TToo LLoowweesstt
.
F6 Jump Intro: Works in combination with the
IINNTTRROO 11,, 22,, 33
push buttons. When enabled, and with the Arranger in Stop condition,
after having pressed one of the three
IINNTTRROO
push buttons, the Arranger starts playing only the bars of the relevant
Ending. When the Arranger is playing, pressing one of the
IINNTTRROO 11,, 22,, 33
push buttons causes the Arranger to play the
SD5
34
Arranger
Page 37

SD5
35
bars of the Intro selected and to continue playing the currently activated Arrange.
F7 Lock Drum: This makes it possible to lock the Drum Set change independently from which Arrangement has been chosen, within
the same Style. This means that when you change from one Arrangement to another, this section will remain unaltered. If this function is activated while switching over to another Style, the previous settings will be maintained with
the sounds of the Style selected, i.e. also the Style selected last will have one or more accompaniment tracks identical for all Arrangements.
F8 Lock Bass: The same as for
LLoocckk DDrruumm
, but dedicated to the Bass track.
F9 Lock Chord: The same as for
LLoocckk DDrruumm
, but dedicated to the Chord 1, 2, 3, 4, 5 parts.
F10 Swing Bass: This is the operating mode for the Automatic Bass that always and instantly plays the fundamental note of the chord
acknowledged even if the player is too early or too late compared to the rhythmic pattern. This function proves extremely useful if the chord changes frequently, during which the Bass must follow the pitch change with precision.
ARRANGE MENU MODE
From the main display page you gain access to the control of the different Arranger functions by pressing
FF44 AArrrraannggee MMooddee
. The functions are
listed on two pages that can be accessed using the
PPAAGGEE ++//--
buttons. The parameters are assigned to the relevant function buttons. The modifications carried out on the different parameters are valid for all the Styles but are not permanently stored. If you also wish to call up these
modifications later on, you need to save them within a Registration. The parameters set in Arrange Mode are valid for all Styles until a new
Registration is called up (although a registration can be programmed to either affect or not affect the arranger mode settings).
ARRANGE MODE: FIRST PAGE
F1 Low 1 Hold: pressing repeatedly the function push button
FF11
activa-
tes the storage of the notes played with
LLoowweerr 11
while
the Arranger is playing. In this way you will still hear the
notes played with
LLoowweerr 11
on the left to the split point
of the keyboard, even after you have stopped playing
them.
HHoolldd
on
LLoowweerr 11
is activated by default, since
usually a strings or pad voice is used.
F2 Low 2 Hold: the same as
FF11 LLooww 11 HHoolldd
, but dedicated to the second
sound assigned to
LLoowweerr 22 HHoolldd
on
LLoowweerr 22
is disabled
by default, since usually a piano type voice is used.
F3 Off Stop:
The
LLoowweerr
sounds are muted if the Arranger is Stopped
and the sounds are heard again when the Arranger starts playing. This function is most useful to set a chord for the
Intro without hearing the notes played by the
LLoowweerr
parts. Activate this if you often use the Intro with the
SSyynncc SSttaarrtt
,
thus you avoid hearing (for a very short period of time) the notes of the chords played in the
LLoowweerr
section. This mode
is different from what is offered in
FF55 LLOOWWEERR MMOODDEE
.
NNoottee
: If the LOWER MODE Is set to 'HOLD STOP', Off stop Is automatically de-activated.
F4 Lower Mute: This function mutes the Lower voice.
F5 Lower Mode: This allows you to establish how the voices assigned to
LLoowweerr 11
and 22will sound if the
FF11
and
FF22 LLooww HHoolldd
are activa-
ted and the LED of the
HHOOLLDD
button is on, while the Arranger is in Stop condition. The following conditions can be
selected pressing repeatedly the F5 function button:
Normal: the
LLoowweerr
sounds stop playing as soon as you release the notes on the keyboard part to the left of
the split point;
BBaassss ++ LLoowweerr::
to the timbres of
LLoowweerr
also those of the bass of the Style are added, to underline the keynote of the chord even while the Arranger is stopped. The timbres stop playing as soon as you release the notes
on the left to the split point.
HHoolldd SSttoopp::
the notes of the
LLoowweerr
part remain in
HHoolldd
even after they are released on the keyboard - they are
sustained indefinitely.
BBaassss ++ LLoowweerr HHoolldd SSttoopp::
This is the combination of the operating modes mentioned previously.
F6 Bass: the first of the two values possible, selected by repeatedly pressing the function push button
FF66
, indicates the sustain
time of the bass sound which can be set using the
DDAATTAA CCUURRSSOORR
push buttons. The second parameter establishes if
the
MMaannuuaall BBaassss
is to be polyphonic, maintaining the decay of the single chords, or monophonic. The parameter is
modified with the
DDAATTAA CCUURRSSOORR
buttons.
F7 Bass Boost: This is used to increase or decrease the level of the lower frequencies of the audio range, to boost or reduce them
according to the amplification system. The default value suggested by the manufacturer Is 'No Boost'.
Arranger
Page 38

F8 Bas Octav: The parameter indicates the +/- transposition by two octaves of the bass timbre and is modified using the
DDAATTAA CCUURR--
SSOORR
push buttons.
F9 Ped. Board: This function must be enabled by pressing the relevant function button in order to use the optional pedal board con-
trolling the arranger performance. For further information please see the section dedicated to the pedal-board.
F10 Bass To Pb: If a pedal-board is connected, activating this function with the relevant function button and with
MMaannuuaall BBaassss
enabled, the pedal-board allows you to play the bass timbre of the Style, independently from the Arranger, while on the
keyboard part to the left of the split point you may still play the Arranger chord.
ARRANGE MODE: SECOND PAGE
F1 4SW. Mode:
This activates the chords acknowledgement mode on the
pedalboard. For further details, please refer to the end of
this chapter.
F2 Bass Lock: Activating this, the Bass sounds are 'locked', i.e. the
voice used for the bass remains the same, even if you
change from the current style to another.
F3 Lower Lock: Activating this, the Lower sounds are 'locked', i.e. the
voice used for the Lower voices remains the same, even
if you change the Style.
F4 Tempo Step: If selected with the relevant function push button and
modified with the
DDAATTAA CCUURRSSOORR
push buttons, this function allows you to define the value by which the Tempo is to
be increased or decreased by each single press of the
RRIITT AACCCC(TTAAPP
) push button.
F5 Sync Time: This can be modified using the
DDAATTAA CCUURRSSOORR
buttons and allows you to define after how many milliseconds exactly
the Arranger continues playing with the
SSYYNNCC SSTTOOPP
button activated and the chord played. If a chord is played for a
period of time that is shorter than the value set,
KKEEYY SSTTOOPP
terminates the execution of the Style. In those musical
styles requiring quick intervals (like for the Tango) values around 150 milliseconds are recommended, in the slower
ones like the 16 Beats a value of about 500 or 600 milliseconds are recommended. Pressing the push buttons
DDAATTAA
CCUURRSSOORR
together, you restore the standard value of 250 milliseconds.
F6 Chord Mode: Pressing repeatedly the
FF66
function button modifies the chord acknowledgement mode, choosing among the fol-
lowing four possibilities:
FFiinnggeerreedd 11
acknowledges the chord only according to the notes actually played in the very moment, so that
even chords made up of two notes are acknowledged if one single note is released after playing a three notes
chord, with the other two notes still pressed down, even with HOLD activated.
FFiinnggeerreedd 22
is similar to Fingered 1, but keeps all the notes of the chord played in memory. If in a chord of three
notes only one is released, the chord will remain still the original one.
EEaassyy 11
performs a chord with a minimum of notes. If for example you play only the keynote, you obtain a major
chord; adding the third minor you create a minor chord, playing the seventh with the keynote you obtain a
seventh chord.
EEaassyy 22
is similar to Easy 1 but acknowledges also chords to which further notes are added in addition to the
original ones, avoiding that you need to replay the hole chord again.
F7 Touch Assign: This is used to assign one of the twelve groups of One Touch to the Style in use. When the Style is selected again later,
the SD5 will automatically load the One Touch group assigned to it.
F8 Touch Style: When enabled, when the Style is selected, one of the twelve One Touch groups is also simultaneously pulled up. In
this way you may program first the single One Touch groups with the sounds that are most suitable for the specific
musical genre, and then you may assign the specific group to the Style you are modifying.
F9 Auto Fill: With Auto Fill feature activate SD5 will assign relative Fill in conjunction to arranger button (A, B, C, D). Break feature
will be assign to arrange D button.
F10 Bass Accordion: Manual bass will be forced (or unforced) in accordion mode in conjunction to automatic arrangement status.
NNoorrmmaall ::
manual bass will be active when automatic arrangement will be in Stop position.
OOFFFF oonn SSTTOOPP::
manual bass will be deactivate in Stop position.
ARRANGE VIEW MENU
From the main page of the display you can access five pages, using
FF55 AArrrraannggee VViieeww
, to modify timbres, volumes, reverbs, effects, pan and mute
SD5
36
Arranger
Page 39

SD5
37
of each single track that makes up the Style.
When the modification procedure has been terminated, the new modifications to the Style are saved overwriting the original Style.
For easier programming, you may set the
AArrrraannggee VViieeww
pages while the Style is playing.
The tracks playing are indicated by a small blinking point. The single tracks of the automatic accompaniment, as well as
LLoowweerr 11
and
LLoowweerr 22
,
are assigned to the relevant function push buttons. Select F4 Lower 1 or F5 Lower 2, to display the current part related to the Arranger and the
transposition of the part selected. Use the
PPAAGGEE ++//--
buttons to call up the next pages.
MODIFYING THE SOUNDS
From any of the four pages you may also modify the sound assigned to a track for the
AArrrraannggee AA,, BB,, CC,, DD,, IInnttrroo 11,, 22,, 33,, EEnnddiinngg 11,, 22,
, 33
parts.
Modification can affect either the currently selected Arranger part (
SSiinnggllee
mode) or all parts (
GGlloobbaall
mode), except for the Drum Sets, whose
modifications affect all parts.
The sound can be selected while the Arranger is stopped for the
AArrrraannggee AA,, BB,, CC
and DDparts, whereas for the Intros and Endings you need to
start the Arranger, call up the
IInnttrroo
or the
EEnnddiinngg
and then, once you have started the part, select the sound you wish to modify.
Use the following procedure to change a sound:
●
Select the Style you wish to modify and then press EXIT to go back to the main page of the display.
●
Gain access to Arrange View by pressing the F5 ARRANGE VIEW button or by pressing the selected Style twice.
●
To modify an Arranger part, select it using the dedicated function push buttons. The Arranger can either be playing or in stop statues.
For the Intros and the Endings, the selection can be carried out only with the Arranger playing. To see which one of the melodic accompaniment
tracks currently have data (melodic information), you may start the Arranger and observe which tracks have a small blinking point associated
with them.
●
To select the track whose timbre is to be modified, use the relevant function push buttons to the side of the display, the selected track becomes highlighted for about two seconds.
●
Within these two seconds, you need to press one of the
VVOOIICCEESS
push buttons to call up the voice family. From that moment on there will be
no time limits to find the voice you want to associate with the selected accompaniment track.
●
Select the voice using the
VVOOIICCEESS
push buttons (and, if required, the
PPAAGGEE ++//--
buttons) prior to the function push buttons to select the exact
voice.
●
Once the voice has been selected, use the
DDAATTAA CCUURRSSOORR
buttons to determine if the modification has to refer to all the Arranger parts (Global
mode) or only to the one currently in use (
SSiinnggllee
mode). The
GGlloobbaall/SSiinnggllee
parameter can be shown on the bottom of the display or above
the box where the title of the Style in use is shown. Live Drums are excluded.
The sound choices made in
GGlloobbaall
or in
SSiinnggllee
mode applies also to the two
LLoowweerr
parts and the
DDrruumm 11
track. In the latter case, after having
selected the
DDrruumm 11
track, the
VVOOIICCEESS
push buttons call up groups of preset Drum Sets and User Drum Sets. It is not possible to modify the Drum
Set of Drum 2 because this exploits a Live Drum and particular settings which would thwart the modification. The Style modified as described
above must be saved if you do not want to lose the settings. Further details will be given later on in this section.
LOWER TRANSPOSITION 1 & 2
Select the part pressing
FF44 LLoowweerr 11
or
FF55 LLoowweerr 22
. On the display the present Arranger part and the transposition of the selected part is
displayed. Set the transposition with the
TTRRAANNSSPPOOSSEE ++//--
push buttons within a few seconds; otherwise the
LLoowweerr
transposition parameter disap-
pears and the
TTRRAANNSSPPOOSSEE ++//--
push buttons take over the function to transpose the entire Style and keyboard.
Repeat the operation for the other Style parts.
ARRANGE VIEW: FIRST PAGE
Further to modifying the volume for the single tracks and the
LLoowweerr
parts, the SD5
allows you to activate the
MMuuttee
function on a single track.
This setting will remain stored also for the next Styles selected.
In order to activate the
MMuuttee
function on a track, select the track pressing the rele-
vant function button and then press both
DDAATTAA CCUURRSSOORR ((LLeefftt aanndd RRiigghhtt))
buttons
at the same time.
If you wish to restore the initial volume value, press one of the two
DDAATTAA CCUURRSSOORR
push buttons.
In order to modify the volume of a track or of a part, select it with the relevant
function push button.
Modify the volume value using the
DDAATTAA CCUURRSSOORR ((LLeefftt aanndd RRiigghhtt))
push buttons.
The
MMuuttee
function is activated only by pressing both DATA CURSOR (Left and Right)
push buttons at the same time, and not by setting the value to zero. For the
LLoowweerr
parts only, you may establish a different volume value for the single Arranger parts.
Arranger
Page 40

ARRANGE VIEW: SECOND PAGE
The reverb quantity of each track (and for the
LLoowweerr
parts) remains unvaried for
all Style parts. To carry out any modification, select the track or the part pressing
the relevant function button. Modify the value pressing the
DDAATTAA CCUURRSSOORR ((LLeefftt aanndd
RRiigghhtt))
buttons.
ARRANGE VIEW: THIRD PAGE
For each Lower part or track it is possible to establish which effect (Chorus, Delay
or Distortion) will be used to process the voice further to the quantity of the effect
applied. To modify this setting, select the track or the part using the relevant function button, then press the same function button repeatedly until the effect to be
assigned is displayed. On the selected track or part, use the
VVAALLUUEE ++//--
push but-
tons to enter the quantity of effect to be applied to the timbre.
ARRANGE VIEW: FOURTH PAGE
The pan function, with different values for Right and Left, allows you to position
the timbre on the stereo panorama. To modify the setting, select the track or the
part using the relevant function button and change the value pressing the
DDAATTAA
CCUURRSSOORR ((LLeefftt aanndd RRiigghhtt))
push buttons. Two dashes indicate that
the timbre is placed to the centre of the stereo panorama.
ARRANGE VIEW:FIFTH PAGE
For each of the 4 Arrangers, you can program which sections will be Muted each
time the
AARRRRAANNGGEERR MMUUTTEE
key is pressed. From this edit page, press function keys
FF55....FF1100
to establish the sections involved in such function.
STORING AND SAVING THE CUSTOM STYLES
All
AArrrraannggee VViieeww
parameters of
AARRRRAANNGGEE MMOODDEE
as well as those on the second page of
LLeefftt MMeennùù
described must be saved in a
CCuussttoomm SSttyyllee
so you can call them up later on. In other words, the Style to store replaces the source style that was modified in RAM. Use the normal procedure foreseen for the
SSAAVVEE
command.
SD5
38
Arranger
Page 41

SD5
39
STORING A CUSTOM STYLE
●
After having modified the parameters, press the
SSAAVVEE
button to activate the storage operation.
●
Select
FF22 SSttyylleess
from the page displayed.
●
Enter the Style name using the keys of the keyboard and
DDAATTAA CCUURRSSOORR
push buttons.
●
Confirm the operation pressing
FF1100 SSaavvee
or exit the page pressing
FF55 EEssccaappee
. The modified parameters are saved together with the Style in
the Flash RAM memory.
SAVING ALL CUSTOM STYLES ON A DISK
You may save all Custom Styles in one single block on the disk.
●
Open the DISK menu pressing the relevant push button.
●
Select the target using the Styles push buttons to input the corresponding number.
●
Press F3 Save to activate the saving procedure.
●
Select F6 Custom Styles.
●
Enter the file name using the keyboard keys and the DATA CURSOR push buttons.
●
Confirm the operation pressing F10 Exec or quit the procedure pressing F5 Escape.
●
The file thus created contains all the Custom Styles and has the extension .STY
Arranger
Page 42

Using a MIDI pedal for the bass
The SD5 enables the connection of a MIDI pedal to control the manual bass line and to set the chords. The MIDI reception channel is to be set
for the bass part on the same transmission channel as the pedal, by proceeding as follows:
●
Connect the MIDI pedal to MIDI In 2 (Keyboard).
●
From the main page of the display press
FF66 MMIIDDII
.
●
Select
FF22 CChhaannnneell RReecceeiivvee
.
●
Find the Bass parameter using the
DDAATTAA CCUURRSSOORR ((UUpp aanndd DDoowwnn))
push buttons and modify the receiving MIDI channel using the
DDAATTAA CCUURR--
SSOORR ((LLeefftt aanndd RRiigghhtt))
push buttons based on that of the pedal.
●
Enable the
MMaannuuaall BBaassss
mode on the
LLeefftt MMeennùù
menu using the
FF33 MMaannuuaall BBaassss
function.
●
Enable the use of the pedalboard to play the bass timbre associated with the Style in use, calling up the
FF1100 BBaass TToo PPbb
function from the
AArrrraannggee MMooddee
menu.
The pedal can also be used to add chords, however, when it is used alone it cannot play above the Major chords. To modify the tonality of the
chords use the optional pedal switches FS13 and FS6 or use a pedal with four switches for guitarists (Mod. 9AC101) that has a special method of
adding tonality variations. Proceed as follows to enable it:
●
From the main page of the display press
FF44 AArrrraannggee MMooddee
.
●
Move onto page 23 using the
PPAAGGEE ++
push button.
●
Press
FF11 44SSww. MMooddee
to set as
OOnn
.
The MIDI parameters modified can be saved in a MIDI Set-up whereas the status of
44SSww. MMooddee
can be saved in a Registration.
USING A MIDI PEDAL FOR THE CHORDS
Proceed as follows to control the chords from the pedal:
●
In the
AARRRRAANNGGEE MMOODDEE
- Page 1 set F9 to Normal
●
If the
SSttaarrtt
button is lit, the major chord relating to the note pressed on the pedal-board will be heard. The minor and 7thchords can be obtai-
ned by using a special 3 switches pedal or the Footswitch with 6 or 13 switches.
●
If the
SSttaarrtt
button is not lit, the 2 Lower parts play in major tonality.
DYNAMICS
The bass dynamics can be controlled from the pedal using the Normal/Fixed function (F9 in the Arrange Mode menu). If set to Fixed, the dynamics becomes fixed and its value can be modified from 0 to 127 by acting on "Value".
SD5
40
Using a MIDI pedal for the bass
Page 43

SD5
41
Pattern Edit
With all the current styles on board plus the bonus styles offered within RAM, there is still the eagerness for some to create their own styles …
totally from scratch.
The SD5 can be used to record new Styles both in real time and also by exploiting a MIDI connection to automate and speed-up the process when
recording from an external source. The SD5 is compatible with Patterns of the MS series. When these are loaded in the RAM, the SD5 performs
an automatic conversion that is not visible to the musician.
The structure of a Style of the SD5 (also called Pattern) entails eight separate tracks with independent parameters, namely:
- Drum: associated with a Drum Set for the rhythm section.
- Bass: associated with a GM timbre for the bass track.
- Chord 1: associated with a GM timbre for the first lead accompaniment track.
- Chord 2: associated with a GM timbre for the second lead accompaniment track
- Chord 3: associated with a GM timbre for the third lead accompaniment track
- Chord 4: associated with a GM timbre for the fourth lead accompaniment track
- Chord 5: associated with a GM timbre for the fifth lead accompaniment track
- Drum 2: associated with the use of a Live Drum derived from a groove
Each of these tracks is found within a
PPaarrtt
, or rather a specifically defined section of the automatic accompaniment.
The following parts can be programmed on the SD5:
- To End
- Arrange A
- Intro 1, 2, 3
- Arrange B
- Fill In 1, 2, 3, 4 (Break)
- Arrange C
- Ending 1, 2, 3
- Arrange D/Riff
To modify an existing Style in ROM, create a new Pattern using
PPaatttteerrnn EEddiitt
and copy the parameters using the
FF44 CCooppyy
function. You may either
modify an already loaded Pattern by entering the relevant number with the
SSTTYYLLEE
buttons or you may select an empty RAM location on the
Pattern bank, using the
SSTTYYLLEE
buttons to enter the number of the location.
In this last case the creation of a Pattern also corresponds to the creation of a .PAT file for which you may name and save on the disk. A new
Pattern stored on an empty RAM location will be saved with the general name "Pattern". To modify its name, you need to save it on disk and
use the
RReennaammee
function to modify its name and then reload it into the RAM.
PPaatttteerrnn EEddiitt
does not work on Styles stored in Floppy Disk. They must therefore be loaded into the Pattern bank prior to use.
From a purely technical point of view,
PPaatttteerrnn EEddiitt
exploits only one RAM location to modify the Style. This means that all the modifications
made must be saved each time they are made otherwise
the Style will be lost when the SD5 is turned off. This RAM location is managed completely automatically and is not seen by the musician, who
need not worry about it.
THE FIRST PAGE OF THE EDIT PATTERN MENU
To access the editing function of a Style, press the
PPaatttteerrnn EEddiitt
key on the instru-
ment panel. Consequently, the LED of the
PPAATTTTEERRNN
will light up to point out that
you are working in the relative bank.The first page of Pattern Edit is used to call
up a set of functions, with relative parameters, using the function push buttons.
The name of the Style selected or created will be seen in the middle of the display
of the first page.
Below is the explanation of the parameters of the various menus that can be called up from the first page.
F1 RECORD
From this page you can record and reproduce the single tracks of a
PPaarrtt
. The default setting is Arrange A as the Part to be modified and the
reproduction function (
FF88 PPllaayy
) enabled.
To be able to playback the
PPaarrtt
selected you must set a chord on the keyboard in the part to the left of the split point (just as you would play
the arranger in normal mode).
NNoottee::
If, before accessing
PPaatttteerrnn EEddiitt
, the split point was set at the bottom end of the keyboard (first key to the left), it will be impossible to
set the chord. If this is the case, exit
PPaatttteerrnn EEddiitt
and set a new split point. Return to
PPaatttteerrnn EEddiitt
and
FF11 RReeccoorrdd
to playback all the tracks of
the
PPaarrtt
according to the chord set.
Pattern Edit
Page 44

As for the recording principles, for each Part you must establish which tonality is to be recorded between Major, Minor, Seventh, Seventh Major,
Seventh Minor and two combinations that are required to keep the rhythm and lead structure unaltered while modifying only the tonality.
Once the tonality has been selected, establish which Part is to be recorded using F1 and the relative track, by selecting it with push buttons
DDAATTAA CCUURRSSOORR
. Once the track has been identified its octave can be modified using the
DDAATTAA CCUURRSSOORR ((LLeefftt aanndd RRiigghhtt))
push buttons (including
that for the Drum track
so that the sounds beyond the visual range can also be used) and change the sounds assigned if you wish.
If the Pattern has been newly created, before you record any
PPaarrtt
you can modify the number of measures within the pattern, using the
DDAATTAA
CCUURRSSOORR
push button to highlight Bar and then select the measure number using
DDAATTAA CCUURRSSOORR ((LLeefftt aanndd RRiigghhtt))
If however you are modifying a
Pattern or a Part that already exists, it will be impossible to change the measure value.
Note: The Fill In's always have a fixed duration of one beat.
To change the reproduction and registration Tempo simply use the
TTEEMMPPOO ++e TTEEMMPPOO --
push buttons.
Below is the explanation of the single parameters that can be called up using the function push buttons.
ASSIGNING VOICES TO THE ARRANGER TRACKS
For the lead tracks (Bass, Chord 1, 2, 3, 4 and 5) the voices of the USER VOICE bank can be used. The Drawbar voices however cannot be used.
Select a lead track using the
DDAATTAA CCUURRSSOORR ((UUpp aanndd DDoowwnn))
push buttons.
Select the voice to be assigned using the
VVOOIICCEESS
push buttons. Use the PAGE +/- push buttons to call up the groups of voices and the function
push buttons to select the sound.
For the User Voices, enable the
UUSSEERR VVOOIICCEE
, use the
PPAAGGEE ++//--
push buttons and select the voice using the relative function push button.
The Drum 1 and 2 tracks are dedicated to the exclusive use of the Drum Sets. Drum 2 is exclusively for the Live Drums derived from grooves.
For the Drum 1 track you can select the pre-set Drum Sets and the User Drum Sets.
Select the Drum 1 track using the
DDAATTAA CCUURRSSOORR ((UUpp aanndd DDoowwnn))
push buttons and, using the VOICES, PAGE +/-push buttons and function push
buttons, assign the new Drum Set to the
track. F9 Drum allows you to toggle between Drum 1 and Drum 2.
DESCRIPTION OF THE PARAMETERS
F1 Part: Once
FF11
has been pressed using the
DDAATTAA CCUURRSSOORR ((LLeefftt aanndd RRiigghhtt))
push buttons the
PPaarrtt
to be recorded or reproduced
Is called up. The order of appearance is: Arrange A, B, C, D, Fill In 1, 2, 3, 4, Intro 1, 2, 3, Ending 1, 2, 3. Before you start
recording, it is a good rule of thumb to always make sure that the
PPaarrtt
on which you are working is really that desired
to avoid confusion.
F2 Solo: When this function is enabled, only the track selected at the time will be reproduced in Play mode. All others with recor-
ded material will be mutted.
F3 Tonality: This is used to establish which tonality the Part being recorded will be associated with, between Major, Minor, Seventh
and combinations of the three. In this way you can create completely different arrangements because of the various
combinations of tonality (i.e. you can create arrangements that will respond only to Major chords, create some that will
respond only to Minor chords and the arrangement differs from the previous etc.). To simplify the recording phase it is
also possible to record a section only in Major leaving it up to the SD5 to extract the various versions of minor and
seventh. To do this select
““MM..mm..77tthh””
for Tonality and record the section with an arrangement in Do/C major.
F4 Metronome: When enabled, the SD5 will use a Stick sound to count the tempo.
F5 Save: This is used to save the modifications permanently in the memory.
F6 Value Quantize: In registration mode it may be handy to take the notes to a temporal grid, the value of which can be modified using the
DDAATTAA CCUURRSSOORR ((LLeefftt aanndd RRiigghhtt))
push buttons. The lack of Quantize is pointed out by “
RReeaall
”, whereas maximum Quantize
has a value of 2. The letter “TT” indicates values arranged in triples.
F7 Quantize: While
FF66 VVaalluuee QQuuaannttiizzee
works during recording, this function can be used to quantize the notes even after the recor-
ding is through. Having chosen the track, establish the Quantize value using
FF66 VVaalluuee QQuuaannttiizzee
and then press
FF77
QQuuaannttiizzee
to quantize the notes recorded.
F8 Rec/Play:
This is used to switch between recording (
RReecc
) of the
PPaarrtt
and reproduction (
PPllaayy
). To play back any Part, even without
modifying it, can be selected using
FF11 PPaarrtt
and then be played back using
FF77 PPllaayy
. By enabling the Arranger using
SSTTAARRTT
and
by playing a chord (split point permitting), you can playback the
PPaarrtt
involved as many times as desired (just as in standard
arranger mode).
F9 Velocity:
This is used to modify the velocity values of one or all the notes of the track when selected. By enabling the function a new
page with the following parameters is accessed:
FF11 GGlloobbaall::
Select this to modify all the notes within the track.
FF22 NNoottee::
This is used to select the note whose velocity is to be modified by simply playing it on the keyboard.
FF33 VVaalluuee::
This establishes the increase or decrease value to be given to the velocity of the note selected using
SD5
42
Pattern Edit
Page 45

SD5
43
FF22 NNoottee
, or of all the notes using
FF11 GGlloobbaall
. The value is entered using the
DDAATTAA CCUURRSSOORR ((LLeefftt aanndd RRiigghhtt))
push
buttons.
FF1100 EExxeeccuuttee::
This executes the modification.
FF55 EEssccaappee::
This is used to cancel the whole procedure unless it has been previously confirmed using
FF1100
EExxeeccuuttee
, and sends to the previous page
FF11 RReecco
orrdd
.
F10 Clear: This is used to cancel the contents of a track in a different
manner for the Drum tracks and the lead tracks (including
Bass). It is indeed possible to select and cancel the drum
'notes' associated with the Drum tracks. Once the Drum
track to be modified has been selected, press and hold
down the F10 Clear push button. A new window will appear
with the following parameters:
F1 Drum 2: This cancels Drum track 2
FF22 TTeemmppoo::
This is present only for Drum 1 track. If
you select this function any Tempo data recorded
will be cancelled.
FF33 NNoottee::
This is used to cancel a single note. By
holding down F10 Clear of the previous page, play
the note to be cancelled on the keyboard. It will be cancelled immediately without a confirmation dialog.
FF55 GGlloobbaall::
Press this push button to cancel the entire Drum track. With regards to the lead track, it is only possible to cancel the entire track. Select the track to be cancelled and hold down F10 Clear and a new page will
appear with:
F5 Global: By selecting this function the whole contents of the track are cancelled immediately,
without the display of a confirmation dialog.
NNoottee::
There are two aspects to bear in mind when recording:
●
The variations made to the tempo using
TTEEMMPPOO -- e TTEEMMPPOO ++
(during a recording) are recorded and associated with the Drum 1 track.
●
When recording on a track that already bears some musical data, the old notes will not be cancelled. In other as you record onto this track,
the notes played are also recorded (while the old ones remain) by means of an over-dubbing process.
Press the
EEXXIITT
key to return to the initial page of Pattern Edit.
F2 PARAMETER
From the Edit Pattern menu you can select this page where some overall parameters for the whole Pattern can be modified. It is preferable to set these parameters
before recording a track or a
PPaarrtt
. Some of these parameters can only be modified
with a newly created Pattern (no recording has occurred).
F1 Tempo: Its default setting is 120 bpm. This value can be modified
using the
TTEEMMPPOO -- e TTEEMMPPOO ++ orDDAATTAA CCUURRSSOORR
push buttons.
F2 Time Signature:
This establishes the musical division. The values can be modified using the
DDAATTAA CCUURRSSOORR
push buttons and by pressing
FF22
TTiimmee SSiiggnnaattuurree
again to change the position in the division.
F3 Autocrash: If enabled (√), a 'Crash' will be played automatically at the
end of every Fill In, Break and Intro.
F4 Crash Level: This establishes the Crash volume related to the Autocrash. It is modified using the
DDAATTAA CCUURRSSOORR
push buttons.
F5 Escape: This is used to return to the main
EEddiitt PPaatttteerrnn
menu.
F8 Bas Octav: This is used to define the octave in which the fundamental note of the bass is found. The value is modified by repeatedly
pressing the
FF88 BBaassss OOccttaavvee
function push button to toggle within various values.
F9 Bass Type: While a bass with four strings cannot go below the note E0, a bass with five strings can go down to note C0. In other words
by choosing a 4-string bass the bass note will not go below E0 and if you change to a 5-string bass the lowest note will
be C0. Pay attention also to the
FF88 BBaassss OOccttaavvee
value, which could cancel the choice of the
BBaassss TTyyppee
. To select a
BBaassss
TTyyppee
press the
FF99 BBaassss TTyyppee
function push button repeatedly.
F10 Save: This is used to save all the parameters modified.
All the lead tracks and respective harmonization and
RReettrriiggggeerr
modes are shown in the middle of the display. To move around within these para-
meters, use the
DDAATTAA CCUURRSSOORR ((UUpp aanndd DDoowwnn))
push buttons and use the
DDAATTAA CCUURRSSOORR ((LLeefftt aanndd RRiigghhtt))
push buttons to modify their status.
The harmonization mode that will also be seen in the Arrange Mode menu is used to choose between two types of harmonization of the notes:
Pattern Edit
Page 46

CClloossee
is used to stay as near as possible to the notes even when the chord played is further away.
PPaarraalllleell
on the other hand is used to shift/tran-
spose the notes without altering their intervals. Generally the more musical results are obtained with the
CClloossee
mode.
With the
RReettrriiggggeerr
mode set to On, when the chord is changed, the fundamental note for the bass track is always played and the notes pro-
grammed on the Chord track found in the first measure are repeated instantly.
HOW TO RECORD A PATTERN PART
After having chosen the Pattern to modify, press
FF11 RReeccoorrdd
to record a
PPaarrtt
.
Select which section to be record using
FF11
and the
DDAATTAA CCUURRSSOORR
push buttons.
Select the tonality of the chord for the track to be recorded using
FF33 TToonnaalliittyy
(Major, Minor or Seventh). In normal conditions with “M.m.7th”,
the Pattern will record a single chord valid for all the tonalities. In this case, the chord programmed must strictly be DO/C major so that the SD5
can then use this to correctly interpret for all other variations of the chord during standard arranger playback.
From the
FF11 RReeccoorrdd
menu, select the track to be recorded using the pulsanti
DDAATTAA CCUURRSSOORR ((UUpp aanndd DDoowwnn))
push buttons.
The voice of the track selected can be changed simply by calling it up using the
VVOOIICCEE
push buttons and relative function push buttons. Once
you have made your choice, press
EEXXIITT
to return to the previous menu.
Enable the metronome (which will help you maintain timing during the recording) using
FF44 MMeettrroonnoommee
.
Switch
FF88 RReecc//PPllaayy
to
RReecc
.
Press the
SSTTAARRTT
push button to start recording. After one pre-count you can start recording.
Upon completion of the number of beats available the recording will stop and automatically the SD5 will switch to
PPllaayy
mode.
Press
SSTTAARRTT
to play back all recorded notes and play a chord on the left part of the keyboard. The track reproduction will loop around the set
number of measures until
SSTTAARRTT
is pressed again.
Save the whole recording within the current Pattern using
FF55 SSaavvee
.
F3 PART CLEAR
From the initial page of
EEddiitt PPaatttteerrnn
you can access this page to cancel the whole con-
tents of a single Part. Simply press the function push button relative to the
PPaarrtt
, after
having selected any variations and press
FF1100 EExxeeccuuttee
to cancel.
F1 Global: deletes the data of all Parts.
F2 Intro: This is used to select Intro 1, 2, 3, by pressing
FF22 IInnttrroo
repeatedly.
F3 Fill In:
This is used to select Fill In 1, 2, 3, 4, by pressing
FF33 FFiillll IInn
repeatedly.
F4 Ending:
This is used to select Ending 1, 2, 3, by pressing F4 Ending repeatedly.
F5 Escape: This is used to return to the Edit Pattern page.
F6 Arrange A: This is used to select Arrange A.
F7 Arrange B: This is used to select Arrange B
F8 Arrange C: This is used to select Arrange C
F9 Arrange D: This is used to select Arrange D
F10 Execute: This is used to cancel the
PPaarrtt
selected at the time.
F4 COPY
This is accessed from the initial
PPaatttteerrnn EEddiitt
page, to copy a whole existing Pattern (or
PPaarrtt
of it) to the Pattern being edited.
NNoottee::
If the Pattern being modified already has some tracks recorded, then the source tracks or Parts must have the same time signature and
the same length in beats as the destination tracks. The copy function is used to define not only the original
PPaarrtt
but also the track within the
PPaarrtt
to be copied. Page
FF44 CCooppyy
appears as follows:
F1 Source: This is used to specify the memory location from which the file to be copied is selected, amongst Custom (in Flash RAM)
and Pattern by pressing
FF11 SSoouurrccee
again. Immediately underneath is the number of the source Style. To change the Style
to be copied, simply enter the number of the Style using the numeric keypad (
SSTTYYLLEESS
push buttons).
F3 Part: This is used to specify the
PPaarrtt
to be copied by pressing
FF33 PPaarrtt
repeatedly. Included are Global, Intro 1, 2, 3, Ending 1, 2,
3, Fill In 1, 2, 3, 4 (Break). Arrange A, B, C, D. If
GGlloobbaall
is selected all the
PPaarrttss
of one Style will be copied.
F4 Tracks:
When
FF33 PPaarrtt
is any other than
GGlloobbaall
, the track to be copied can also be specified, amongst Drums, Chord 1, 2, 3,4, 5 and Drums 2.
F5 Escape: This is used to return to the
PPaatttteerrnn EEddiitt
page.
F6 Destination: This provides information on the destination Pattern. This is usually the currently selected Pattern and it cannot be modi-
fied unless you exit
FF44 CCooppyy
and load a new Pattern for editing.
F8 Destination Part: When selecting a
PPaarrtt
of which a number of variations are available, you can modify the destination
PPaarrtt
provided that it
matches the original one. Thus, for example, if the source
PPaarrtt
is Arrange A, you could choose not only Arrange A as desti-
nation but also B, C and D. The same applies to Intro, Ending and Fill In. To select a different
PPaarrtt
press the function push
button
FF66 DDeessttiinnaattiioonn PPaarrtt
repeatedly.
SD5
44
Pattern Edit
Page 47

SD5
45
F9 Destination Track:
If a Chord track has been selected in
FF44 TTrraacckkss
, you can copy it to a different Chord track than the original one, as explai-
ned for
FF66 DDeessttiinnaattiioonn PPaarrtt
. To select a different Chord track, press function push button
FF77 DDeessttiinnaattiioonn TTrraacckk
repeatedly.
F10 Save: This is used to confirm and to save the copy procedure set with the parameters as indicated above.
F5 REMAP
This function allows you to modify the order of the Patterns within the Pattern bank.
The page shows the list of the Patterns stored in RAM, to each of which a three digits
position number is assigned. With
FF99 SSeelleecctt
and using the
DDAATTAA CCUURRSSOORR
, push buttons
you can select the Patterns according to the desired order. Next to those selected, the
new position number will appear. After having terminated the selection, press
FF1100 SSaavvee
to confirm the operation. Pressing
FF88 CClleeaarr
you restore the original positions,
FF55
EEssccaappee
takes you back to the initial page of
PPaatttteerrnn EEddiitt
.
F6 DELETE
deletes Patterns from the Flash RAM bank.
FF99 SSeelleecctt
allows you to select one or a number of Patterns to delete from those stored in the bank.
FF1100 EExxeeccuuttee
confirms and deletes the selected Pattern(s), while
FF55 EEssccaappee
takes you back to the original page of Edit Pattern.
F7 DISK SAVE
allows you to save on the presently activated disk, one or a number of Patterns as single files having the extension .PAT.
FF99 SSeelleecctt
allows you
to select the Pattern to be saved among those present in the Pattern bank.
FF1100 EExxeeccuuttee
saves the Pattern while
FF55 EEssccaappee
takes you back to the
main page of
EEddiitt PPaatttteerrnn
.
F9 MIDI RECORD
The procedure explained above requires careful editing and recording of track by track and part by part. What about recording all parts to a
selected component (e.g. Arrange A) at once?
From the main Edit Pattern display screen, you can have access to
MMiiddii RReeccoorrdd FF99
.
Thanks to this function, you can record the Pattern directly from a complete sequence transmitted by an external Computer or Sequencer.
To record a Pattern from a Sequencer/Computer:
●
Connect the Midi In 2 of the instrument to the Midi Out of the Computer and the Midi Out of the instrument to the Midi In of the computer.
●
Activate the Midi Clock In of the Computer (deactivate the Thru if inserted).
●
Activate Midi Clock Out on the instrument.
●
Prepare the sequence to be transmitted from the Computer/sequencer.
●
The channel of each track of the sequence must correspond to that of the various sections of the style as currently selected in the Midi RX
of the instrument.
●
Press the Edit Pattern button.
●
Select the MIDI RECORD function using F9.
●
Make sure that the Time Signature of the Pattern on the PARAMETER section corresponds to that of the sequence to be transmitted.
●
Choose the part to record (Arrange A, B,C, D, Intro, Fill etc.)
●
Set the Value Quantize function to the desired value. (In the event of very complex sequences, we recommend you select the 'REAL' value).
●
Choose the number of Beats to record using the BAR function
●
Press F8 to select
RREECC
.
●
Press the Start button. The recording will automatically stop at the end of the set number of beats. All the tracks will be recorded at once.
●
To listen to it again, press Start and play the Pattern normally. In this phase, you can give different Quantizations for the acquired sequence before saving it.
●
To save the Pattern, press F5 Save.
The biggest difference compared to the traditional recording method lies in the possibility to record all the tracks via MIDI in one go. In fact, each track
corresponds to a specific MIDI channel and by creating, for example, four beats of Arrange A on the external sequencer using all the tracks containing
the Parts, the whole contents of the Part can be sent from the sequencer to be reproduced. In any event it is always possible to send a single track
from the external sequencer using the internal functions of the sequencer such as the equivalent Mute and Solo functions.
NNoottee::
It is advisable not
to use Program Changes in the sequence that will be controlled by the external sequencer. They can be modified at a later date by selecting the
most appropriate voices for each track, from the
FF11 RReeccoorrdd
or
FF99 MMIIDDII RReeccoorrdd
page as already explained above. This
method of working avoids confusion.
F10 FORMAT
Deletes the complete Pattern and the Flash RAM banks.
FF1100 EExxeeccuuttee
confirms the operation,
FF55 EEssccaappee
takes you back to the
PPaatttteerrnn EEddiitt
page.
Pattern Edit
Page 48

Power On Set Up
It will soon become clear to you that each time you power on the SD5, there are some features that always default to values set by Ketron (which
you almost always have to change or modify prior to using the keyboard). Some of the most important settings programmed for the use of your
SD5 can be stored in such a way that they are automatically called up when turning the instrument on, thus avoiding loss of time involved during
re-programming. The parameters are not grouped on the same page, but distributed in a number of menus such as
AArrrraannggee MMooddee,, AArrrraannggee VViieeww,,
MMIIDDII MMuullttii--TTaabb MMOODDEE SSEELLEECCTT
as well as the push buttons on the control panel. The following table reports all the parameters that can currently
be stored and automatically set on turning the instrument on.
1 Touch (led)
4 switch mode
Accordion Mode
Arabic mode
Autocrash
Bass Lock
Bass to Lower
Bass Octave
Bass Mono / Poly
Fingered
Finger 2
For this function just one invisible memory location exists, that is maintained even when the keyboard is Off. There is, however, the possibility
to store a number of Power On Set Up settings on the disk. If you feel that your present setting is the optimal one for the parameters listed in
the above table, you may store or save them on the disk for future recall using the following procedure:
●
Press the
SSAAVVEE
button to activate the procedure.
●
Select F3 Power On Setup
The following four functions are displayed:
F5 Escape: deletes the operation and returns to the main page of the display.
F8 Disk Save: Saves the Power On Set Up to the disk you selected before confirming the saving in Flash RAM. To save another Power On Set
Up file it is necessary that the previous one is renamed using the
RReennaammee
function in the Disk menu (please refer to the Disk
section).
F9 Default: This restores the initial conditions of all parameters included in the above table as determined by Ketron.
F10 Save: This saves the current settings in the Flash RAM memory of the SD5.
Midi Menu
Microphone Active / Inactive
Lower off on stop
Music Volume
Delay Lock
Micro Dry On Stop
Setup Video mode, color zoom
Pianist Mode (standard, auto)
Tempo Step
Arranger lock
Automatic switch off registr.
Global Bass retrigger
Hold on stop
Live Drum
Interactive Arrange
Bass Boost
Out Levels ( Menu Effects)
Modo Selezione Timbri
Modo Selezione Styles numerica o a pagine
Video Monitor Size/Position
New Operating System updates (found on the internet at www.ketron.it) may further modify the above lists.
SD5
46
Power On Set Up
Easy 1
Easy 2
Song Balance
Registration
Switch On / Off
Modulation Amount / Rate
Vocalist Active-Inactive-Internal - None
Bass to Pedal
Bass hold
Bass Retrigg. Accordion
Fixed Dynamic Value
Chorus lock
Distorsor lock
General levels
Canali Gm Tx-Rx
Dynamic Arranger
Dynamic Curve
Equalizer
Global transposer
Global Tune
Harmony type
Lower 1 Hold
Lower 2 Hold
Lower Lock
Pattern (led)
Pedalboard
Pianist Sustain
Portamento time
Reverb Level
Reverb Lock
Page 49

SD5
47
Song Play, Midi file and Karaoke
Playback of Midi files has never been any easier. With the direct play feature of the
SD5, midi files can be played back and recorded instantaneously to disk (either HD
or FD). Song Play is accessed using the dedicated push button on the control panel
and is used to reproduce and organize Midi files, whether they are on hard disk or
floppy disk. SD5 offers a new function (Drum Remix) for real rime modification of
the Midi files with regard to the musical style used by the drum track. As a matter
of fact, you may apply the rhythm structure of a Style with its three Fill Ins and its
four Arranges to any Midi file. The accompaniment tracks of the Midi file will
remain unvaried and it will be possible to realise simple and effective remix operations. You may pass over from rhythm tracks of a Style to its Midi file tracks at
any time, using the dedicated push buttons. As an addition to the Drum Remix feature as well in Song Play, the Drum Mixer is able to mute percussion groups in real
time, and Drums & Bass to instantly reproduce only the drums and the bass of a
Midi file. No matter how you use the Midi files, the SD5 allows you to personalise their use and to create an individual music style totally of your
choice!
The SD5 is compatible with the following formats:
●
Standard MIDI Files in format 0 and 1(the latter only for songs with no more than 16 tracks)
●
Midi files with .MID extension
●
Midi files with .KAR extension
●
Midi files with Lyrics events and .KAR or .MID extension
●
General MIDI Level 1
Note that the words set in syllables can only be displayed if the Midi file has Lyric events. The SD5 can however import a text file (.TXT), to be
linked to a Midi file, without having to use software to add the words. This possibility is described in the “Text files” section.
To make it easier to find a Midi file, the SD5 automatically numbers the Midi files both in hard disk and floppy. The numbering cannot be changed and is assigned following the temporal order in which the Midi files are added to those previously stored in a Folder.
The numbering does not alter the name or the contents of the Midi files.
PLAYING A MIDIFILE FROM FLOPPY DISK
To gain access to the reproduction menu of Midi files press:
SSOONNGG PPLLAAYY
, Choose whether to load the Midi file from floppy disk by pressing the
PAGE+ push button:
FFLLOOPPPPYY ((PPAAGGEE ++))
●
Select the file to be loaded using the
DDAATTAA CCUURRSSOORR
keys
●
Press the
EENNTTEERR
key or the
SSTTAARRTT//SSTTOOPP
key to start playing.
●
While a Midifile is being played, you can select the next one using the DATA CURSOR keys and play it with the
FF77 GGOO NNEEXXTT
key.
●
As you can see, the SD5 automatically numbers the Midifiles present. You can load a Midifile by entering the number using the numerical
keyboard relative to the
SSTTYYLLEESS
buttons.
Press the
EEXXIITT
key to move onto a second Play environment.
●
In this environment, you can view, if you wish, the list of Midifiles contained using the
FF55 DDiirr
function.
●
You can also select a Midifile by entering its number or one or more successive letters of the title using the notes of the
KKEEYYBBOOAARRDD
.
●
If you enter a single number that does not start with zeros, the SD5 waits a few seconds and loads the song with that number. Once loaded,
the display shows the title of the Midifile loaded.
●
To go back to the main page of the display, press the
SSOONNGG PPLLAAYY
button (the LED switches off)
PLAYING A MIDIFILE FROM HARD DISK
To gain access to the reproduction menu of Midi files press:
SSOONNGG PPLLAAYY
, Choose whether to load the Midi file from floppy disk by pressing the
PAGE+ push button:
HHAARRDD ((PPAAGGEE --))
●
Select the file to be loaded using the
DDAATTAA CCUURRSSOORR
keys
●
Press the
EENNTTEERR
key or the
SSTTAARRTT//SSTTOOPP
key to start playing.
●
While a Midifile is being played, you can select the next one using the
DDAATTAA CCUURRSSOORR
keys and play it using the
FF77 GGOO NNEEXXTT
key.
●
To switch off the melodic line of the Midifile, press key
FF88 LLEEAADD OONN
.
●
To view or hide the words, press the
FF1100 LLYYRRIICC
function key.
●
You can load a Midifile by entering the number using the numerical keyboard relative to the
SSTTYYLLEESS
buttons
●
In this case again, press the
EEXXIITT
key to move onto a second Play environment.
●
In this environment, you can view, if you wish, the list of Midifiles contained using the
FF55 DDiirr
function
●
You can also select a Midifile by entering its number or a number of successive letters of the title using the notes of the
KKEEYYBBOOAARRDD
. If you
enter a single number that does not start with zeros, the SD5 waits a few seconds and loads the song with such number. Once loaded, the
display shows the title of the Midifile loaded.
Song Play, Midi file and Karaoke
Page 50

●
To go back to the main page of the display, press the
SSOONNGG PPLLAAYY
button (the LED switches off)
●
To alternate between one folder and another in Song Play, use the
DDAATTAA CCUURRSSOORR ((UUpp aanndd DDoowwnn))
keys.
To create a chain of Midifiles and to save them on disk, use the Chain Edit function in the Disk utility menu, for which you are recommended to
refer to the dedicated section of this chapter; you can create a chain with a maximum of 32 Midifiles, saved as .CHN files and displayed in F5 Dir
of Song Play with letter “c” before the name.
HOW TO CONVERT A .KAR MIDI FILE TO A .MID MIDI FILE
The SD5 allows you to convert a Midi file having .KAR format.
Press
DDIISSKK
to access the Disk menu.
Use
PPAAGGEE ++//--
to select the disk containing the .KAR Midi file to convert. If necessary, select the Folder containing the Midi file by entering its
number using the
SSTTYYLLEE
push buttons. Use the
DDAATTAA CCUURRSSOORR
push buttons to choose the Midi file to convert.
Selecting the .KAR Midi file displays the
FF33 CCoonnvveerrtt
function that automatically converts the source Midi file and generates a new one.
BALANCING AND PLAYING THE SOUNDS ASSIGNED TO THE KEYBOARD
One of the prerogatives of the SD5 is the availability of sounds that can be played on the keyboard while the Midi file is playing. In fact, the two
parts (Lower and Bass) as well as Right and Manual Drum remain in use, separated by the split point that can be programmed even while the
Midi file is being reproduced. The sounds of the Lower parts can be modified, before enabling
SSoonngg PPllaayy
, in
AArrrraannggee VViieeww
whereas the Manual
Bass is controlled directly by the track of the Midi file to which the bass is assigned.
The Right section can use the following voice groups:
●
Voices
●
User Voices
●
Drawbar
They can be selected in the usual manner (as described in previous chapters above).
Furthermore, the Programs are also enabled, therefore the musician can avail of a potential of four sounds arranged over the whole keyboard.
To play the bass timbre manually, first disable that of the track of the Midifile and activate
MMaannuuaall BBaassss
using the related button.
The global volume of the Midifile and that of all the timbres associated with the keyboard is controlled using the
DDAATTAA CCUURRSSOORR ((lleefftt aanndd rriigghhtt))
keys.
The Volume of the Right and Manual Bass parts is controlled using the relative
VVOOLLUUMMEE
push buttons.
The global volume of the Midi file and that of all the voices associated with the keyboard is on the other hand controlled by the
VVAALLUUEE ++//--
push
buttons (Balance). By pressing them together at the same time, the whole Midi file is muted compared to the keyboard. The muting of the volume using this procedure however only relates to the built-in sound generator of the SD5, therefore there will be no changes if the Midi file is
reproduced by an external module controlled via MIDI by the SD5. For the latter the general volume can be controlled using
PPAAGGEE ++//-- ((GGMM RReemmoottee
LLeevveell))
only when the Midi file is being played back; otherwise using the
PPAAGGEE ++//--
push buttons will select the disk drive to be used (FD or HD).
If the Midi file is generated by an external module via MIDI and is being played back through the SD5, the
PPAAGGEE ++//--
push buttons pressed together
at the same time mute the volume of the external module and not that of the built-in generator of the SD5.
LOCATING A MIDI FILE RAPIDLY
If hundreds of Midi files are grouped in a Folder they will be displayed in alphabetical order and with their own number assigned according to
the time order in which they were copied or created in the Folder. One of these Midi files can be called up at any time from
SSoonngg PPllaayy
by entering the associated/assigned number using the numeric keypad, but it may prove more handy to search a Midi file according to its title.
To search by title (auto search), proceed as follows:
●
Go to the main Play page using the
EEXXIITT
key.
●
Display the list of Midi files using
FF55 DDiirr
.
●
Enter the first letters of the title using the keyboard's keys, which will be shown in the dedicated box under the disk in use.
●
The display will show the first 20 Midi files found with these letters. To see the next use the
DDAATTAA CCUURRSSOORR
push buttons.
●
The search function becomes more accurate by adding more letters.
●
If a title is entered incorrectly, press
FF55
to start the procedure again.
●
If there is only one Midi file with that title, be it partial or complete, press
SSAAVVEE
to immediately load the Midi file.
●
If you have found the Midi file within the list given, load it by entering its number using the numeric keypad.
●
Once the Midi file has been loaded, press
SSTTAARRTT
to play it.
THE SONG PLAY FUNCTIONS
The page pulled-up by activating
SSoonngg PPllaayy
and then by pressing the
EEXXIITT
key, contains various functions used to manage the Midifile. The
details follow.
SD5
48
Song Play, Midi file and Karaoke
Page 51

SD5
49
F1 GM Part: This calls up a set of pages for modifying the parame-
ters of a single tracks. Later on you will find a specific
section with more detailed explanations.
F2 Count:
This has a double function. It displays the number of
the beat as the Midi file is being played. By pressing
the relative function push button on the other hand it
leads directly to the
EEffffeeccttss
page where the effects for
the Midi file can be set. This page is described in the
EEffffeeccttss
section. To return from
EEffffeecctt
page to the
SSoonngg
PPllaayy
page, press
EEXXIITT
.
F3 Transpose: This leads to a page dedicated to the transposition
options available with the following parameters:
Transposer: This is set in the middle of the
display and points out the transposition value
in semitones entered using the
CCUURRSSOORR
push
buttons (Transposer). This value can be
applied to the Midi file, to just the keyboard, or
to both. Keep in mind that Midi file transposition can be also modified from the
DDiisskk ((FF99
UUttiilliittyy,, FF33 TTrraannsspp..))
menu where the Midi file is
saved with the new transposition value.
Please refer to the relevant section.
FF11 GGlloobbaall::
When set to On, the transposition
value is applied to both Midi files and keyboard.
FF22 KKeeyybbooaarrdd::
When set to On, the transposition value is applied only to the keyboard, without altering the
Midi file.
FF33 SSoonngg::
When set to On, the transposition value is applied only to the Midi file, without altering the sounds
assigned to the keyboard.
FF66 IInntteelllliiggeenntt TTrraannssppoosseerr::
This applies a special transposition to the tracks of the Midi file so that the single sounds are always played in their natural range and are re-lead within the original octave. The results
are much more musical than with the simple application of the transposition (which otherwise as an example could produce excessive 'high' notes if say a song were transposed 9 semitones up!). It is enabled as a
default setting.
FF77 LLeeaadd CChhaannnneell::
By selecting a parameter and using the
DDAATTAA CCUURRSSOORR
push buttons you can modify the
MIDI channel of the Midi file that bears the main lead, which can be muted using the
LLeeaadd OOffff
function. The
lead is usually set to channel 4.
FF1100 SSaavvee TToo DDiisskk::
This is used to save the settings of the transposition for the tracks of the Midi file once
and for all by recording a new Midi file on disk that replaces the previous one. The procedure is done using
SSoonngg PPllaayy
in stopped status. If the Midi file has an audio loop, the
SSaavvee TToo DDiisskk
command modifies the into-
nation of the loop without altering the velocity and the synchronisation with the Tempo.
F4 Global Transposition: This allows you to transpose the complete Midi file by semitones using the
DDAATTAA CCUURRSSOORR
push buttons, except for
track 10 dedicated to the drums.
F5 Dir: This is used to display the list of Midi files stored in the Folder or in the disk in use. It's function has already been
described in the sections on how to load a Midi file.
F6 Jukebox: Go back to the main display by pressing the
PPLLAAYY SSOONNGG
key. In this environment, you can rapidly alternate between
one Midifile and another using the GoTo Next function or simply by selecting a new one and pressing the
EENNTTEERR
key.
The options available follow:
F7 Go Next: This indicates the next Midi file to be played back or loaded.
FF88 LLeeaadd::
If set to On, the lead track will be reproduced. If pressed again the track of the Midi file indicated
as Lead Channel will be disabled.
FF1100 LLyyrriicc::
If there are Lyric events in the Midi file and if the function is set to On, the display shows the words
set in syllables. In this status, if
FF1100
is pressed again, the function will be disabled.
F7 Video:
This is used to control the optional video interface. Further details are provided in the Video Out and Karaoke section.
F8 Lead: This is used to quickly enable or disable the track of the lead established with
LLeeaadd CChhaannnneell
in page
FF33 TTrraannssppoosseerr
.
Press the function push button to switch On and Off. If the MIDI channel does not correspond to that of the lead,
there is the risk of disabling a different track such as that of the bass or of another instrument. The
FF88 LLeeaadd
status
is valid for all Midi files.
Song Play, Midi file and Karaoke
Page 52

F9 Drum Remix: This allows you to enable the Remix function of the drums track. For further information, please refer to the Drum
Remix chapter.
F10 Lyric: The display choice applies to all Midi files. Its default setting is Off. Press the function push button
FF1100
again if the
Midi file has Lyrics events and they will be set in syllables on the display. From the lyrics display page, exit using the
FF1100
function push button.
MODIFYING AND SAVING THE PARAMETERS OF THE TRACKS OF A MIDI FILE
The SD5 can modify the Volume, Reverb, Chorus and Pan parameters for each single track (Part) of a Midi file. It can also always filter out undesired MIDI events, transpose the track, enable the Mute and define the MIDI receiving and transmitting channels for each track. To go beyond
the General MIDI standard Level 1, it is also possible to convert the track into one dedicated to the use of a Drum Set or the Vocalizer. These
parameters can be edited only after having started the Midi file for some measures - just enough to load the single track parameter information that is always defined at the beginning of each Midi file.
The SD5 allows for two different editing methods: the first is based on displaying one track or Part at a time, the second shows the setting of
the single parameter for all sixteen parts.
From the page pulled-up by activating
SSoonngg PPllaayy
and then by pressing the
EEXXIITT
key, press the
FF11 GGMM PPaarrtt
key. The instrument display changes
and shows the Edit environment for the parameters of the Midifile.
NNoottee::
It is not necessary to continue playing the Midi file once the parameters have been loaded in the memory, however by modifying the para-
meters while the Midi file is playing, it will be much easier to play back the result.
MODIFYING A SINGLE PART OF A MIDI FILE
Once a Midi file has been loaded, enable
SSOONNGG PPLLAAYY
and from the main page press
FF11 GGMM PPaarrtt
to call up the page dedicated to the parameters of a single track of the
Midi file. The Part is shown in the middle of the display, the parameters which can
be modified are associated with the function push buttons. Right underneath is
the voice assigned to the Part and the effect used. The bottom part of the display
is dedicated to monitoring the activities of the sixteen Parts, while playing the Midi
file and can be useful when locating a Part to be modified.
To move around between the single Parts use the
PPAAGGEE ++//--
push buttons.
You can access one of the 16 parts directly using the
MMuullttii--ttaabb
keys of the SD5.
Please consult the specific chapter for further information.
The parameters that can be modified must be selected using the dedicated function push button before the value can be modified.
Timbre: Each track can use a voice taken from the Voice, User Voice and RAM/Flash bank. To modify the voice assigned, follow the normal procedure using the
VVOOIICCEESS,, UUSSEERR VVOOIICCEE,, PPAAGGEE ++//--
push buttons and the function push buttons.
MMoodduullaattiioonn eeffffeecctt::
For each single track you can choose the modulation effect to be applied to the voice between Chorus, Distorsor and Delay,
using the
DDAATTAA CCUURRSSOORR
push buttons. The effect entity can be programmed using F3 Chorus/Distorsor/Delay.
F1 Volume: This modifies the volume of the whole track. The value can be changed using the
DDAATTAA CCUURRSSOORR
push buttons which,
if pressed together at the same time, reset the value.
F2 Reverb: This modifies the Reverb entity applied to the track. The value can be changed using the
DDAATTAA CCUURRSSOORR
push but-
tons which, if pressed together at the same time, reset the value.
F3 Chorus/Distorsor/Delay:
This modifies the entity of the modulation effect chosen between Chorus, Distorsor and Delay assigned to the track
using the
DDAATTAA CCUURRSSOORR ((UUpp aanndd DDoowwnn))
push buttons. The value can be changed using the
DDAATTAA CCUURRSSOORR ((LLeefftt aanndd
RRiigghhtt))
push buttons which, if pressed together at the same time, reset the value. The display shows the type of
effect chosen next to
FF33
and also below the voice.
F4 Panpot: This modifies the arrangement of the voice on the ste-
reo panorama. The value can be changed using the
DDAATTAA CCUURRSSOORR
push buttons which, if pressed together
at the same time, take the voice back to the middle of
the stereo panorama (I.e. equal volume levels on both
speakers).
F5 Filter: This calls up the page where some MIDI events can be
muted from the playback of the track. For example,
the user may wishes to avoid using the Modulation or
some other MIDI parameter that directly affects the
voice. The MIDI filters can also be used to better con-
SD5
50
Song Play, Midi file and Karaoke
Page 53

SD5
51
trol an external MIDI module. The page called up from F5 Filter shows a table of four lines and four columns relative to the sixteen Parts. To be able to access the MIDI filter of a single Part use the F1 and F6 push buttons for Parts
1, 2, 3 and 4 that are to be selected by pressing the same push buttons repeatedly. Use push buttons F2 and F7 for
Parts 5, 6, 7, and 8. Use push buttons F3 and F8 for Parts 9, 10, 11 and 12 and push buttons F4 and F9 for Parts 13, 14,
15 and 16. Once the Part to which the MIDI filter is to be applied has been found, select which MIDI message is not to
be carried during playback using the DATA CURSOR push buttons and enable the filter using the F10 On/Off push button. The filter is enabled when “ON” appears next the MIDI message to be filtered. The following MIDI messages can
be filtered:
Notes: all notes within the track
Control Change: all Control Changes within the track
Program Change: all Program Changes
After Touch: all After touch events
Pitch Bend: all Pitch Bend events
Volume: only Control Change 07 Volume
Pan: only Control Change 10 Pan
Reverb: only Control Change XX Reverb Send
Chorus: only Control Change XX Effect Send
Modulation Wheel: only Control Change 01 Modulation
Expression: only Control Change 11 Expression
RPN: only Control Change XX RPN
NRPN: only Control Change XX NRPN
To exit from
FF55 FFiilltteerr
press
EEXXIITT
or F5 Escape. You will be returned to the main page of
SSoonngg PPllaayy
.
F6 Key Shift: This changes the transposition of the track selected by up to +/- 24 semitones. The value can be changed using the
DDAATTAA CCUURRSSOORR
push buttons which, if pressed together at the same time, reset the value.
F7 Channel Tx Rx:
When the push button
FF77
is pressed repeatedly it switches from TX (which indicates the transmission MIDI channel) to
RX (which establishes the MIDI receiving channel). The value can be changed using the
DDAATTAA CCUURRSSOORR
push buttons. If
no value is specified the track receives and transmits on the MIDI channel having the same number as the Part.
F8 Part Mode: This modifies the operational mode of the track, using the
DDAATTAA CCUURRSSOORR
push buttons. The possible choices are:
Voice: track dedicated to the use of a voice
Drumset: track dedicated to the use of a Drum Set
Drum2: track dedicated to the use of Live Drums
Vocalize: track dedicated to the control of the Vocalizer
Based on the choice made Drum Set, Live Drum, Voice and Vocal Set can be called up or otherwise; whereas in the
case of Voice and Drum Set mode the Voice and Drum Set are called up normally. For Drum 2 and Vocal Set the Live
Drums and Vocal Sets must be selected using the
DDAATTAA CCUURRSSOORR
push buttons.
NNoottee::
The modification of the operational mode of a track can make the song incompatible with modules using the
General MIDI format, but it offers the best possible conditions for creating Midi files on the SD5.
F9 Mute: If this function is enabled , the selected track will not be heard during playback.
F10 16 Parts: This enables the display of each single parameter, showing its value for all sixteen Parts.
MODIFYING A PARAMETER FOR THE SIXTEEN PARTS
As already mentioned the status of a single parameter for all sixteen tracks can be
displayed using the
FF1100 1166 PPaarrttss
function just described above.
To rapidly access a parameter, select it from the GM Part page and then press
FF1100 1166
PPaarrttss
to display the status of that parameter for the sixteen tracks. The page
FF1100 1166
PPaarrttss
structure shows a table with four rows and four columns relative to the sixteen
Parts. To access the single Part use push buttons
FF11
and
FF66
for Parts 1, 2, 3 and 4 that
can be selected by pressing the same push buttons repeatedly. Use push buttons
FF22
and
FF77
for Parts 5, 6, 7, and 8. Use push buttons
FF33
and
FF88
for Parts 9, 10, 11 and 12 and
push buttons
FF44
and
FF99
for Parts 13, 14, 15 and 16.
Once the Part has been found, it's value can be modified using the
DDAATTAA CCUURRSSOORR
push buttons which, if pressed together at the same time, will reset the value.
The parameters that can be modified in this way are distributed over seven pages
that are called up using push buttons
PPAAGGEE ++//--
, and include Volume, Reverb, Effects,
Pan, Shift, Channel Rx, Channel Tx, )already explained in the previous section).
The
FF55 MMuuttee ((SSoolloo))
function is used to establish which track will be impacted by the
FF1100 MMuuttee
action. When
FF55
is set on
MMuuttee ((SSoolloo))
, F10 is used to
mute only the track selected at the time from playback. Press F5 again and the relative function is changed into
SSoolloo ((MMuuttee))
and
FF1100 MMuuttee
mutes
out all the tracks with the exception of that selected. Press
EEXXIITT
or
FF55 EEssccaappee
to return to the main page of Song . To save the modifications to the
song (so that when next this song is called up, it will be played back using these new parameter settings
SSAAVVEE
should be used.
Song Play, Midi file and Karaoke
Page 54

SAVING THE PARAMETERS MODIFIED (SAVE SONG SETUP)
The parameters that can be saved within a Midi file are indicated in the table and also include the volume balance between Midi file and keyboard, the Tempo value, the settings of the Drum Mixer, the voice for the Right section and the settings for the Vocalist track. The saving function is called up only when the Midi file is stopped and must be used only within the
FF11 GGMM PPaarrtt
menus. It is therefore important to save each
modification within
FF11 GGMM PPaarrtt
before returning to the main page of
SSoonngg PPllaayy
, using the
SSAAVVEE
function that enables the relative page. It is used
to enter a new name for the Midi file (otherwise the original file will be replaced with this new one), using the keyboard keys and the
CCUURRSSOORR
++//--
push buttons. To cancel the procedure press
FF55 EEssccaappee
, to save and cancel the previous settings press
FF99 RReemmoovvee
or to confirm saving press
FF1100 EExxeeccuuttee
. The Midi file thus modified is saved in the same folder from which it was loaded.
SAVE SONG SETUP PARAMETERS
●
Program Change ●Transposer ( Global/Song) ●Tempo ●Song Balance ●Effects ●Pan ●Drum Mixer ●Volume ●Note Shift ●Right Hand Voice
Proceed as follows to resave the Midi file after editing
●
Press F1 – GM. ●Press Stop ●Press Save / Enter ●Assign a name to the Song or overwrite the exisisting Song
●
Press F10- Execute to confirm. ●The Remove function is used to delete a previously saved Song.
CREATING A PERMANENT CHAIN OF MIDI FILES ON DISK
The Disk menu offers a function that is indeed used to create and save song chains of a maximum of 32 Midi files. From the main page of the
display press the
DDIISSKK
push buttons and then F9 Utility. The controls required to create a chain are the following:
F7 Chain Edit: This creates chains of Midi files of no more than 32 Midi files, to be reproduced in sequence without having therefore to call up
each file individually. It only works for the Midi files stored in the same Folder or on the same floppy disk. Once F7 Chain Edit is pressed, the SD5
displays the Midi files stored in the Folder that can be selected using the
DDAATTAA CCUURRSSOORR
push buttons. The options available are:
F5 Escape: this cancels the procedure
F7 Save Chain: this creates a file with .CHN extension within the same Folder that bears the Midi files relative to the chain programmed.
F8 Chain List: This displays all the chains of Midi files already stored within the Folder in use.
F10 Select This selects the Midi file to be added to the chain according to the desired order. Next to the Midi file selected, the number of the
position within the chain is displayed.
The following procedures are required to create a midi file chain:
●
Select the Folder where the Midi files are stored using the numeric keypad (
SSTTYYLLEESS
push buttons).
●
Press
FF77 CChhaaiinn EEddiitt
.
●
Find the first Midi file of the chain using the
DDAATTAA CCUURRSSOORR
push buttons.
●
Select the Midi file using
FF1100 SSeelleecctt
. A number will appear at the side of the name that indicates the position within the chain.
●
Find and select the next Midi file(s).
●
If you make a mistake, find the Midi file and press
FF1100 SSeelleecctt
again. The Midi file will be removed from the chain and the Midi files will move
back one position.
●
Save the chain using
FF77 SSaavvee CChhaaiinn
, from the page called up the name can be entered using the keyboard and the CURSOR push buttons.
Confirm using
FF1100 EExxeecc
or cancel using
FF55 EEssccaappee
.
USING THE CHAIN OF MIDI FILES
The chain thus created is loaded in
SSoonngg PPllaayy
using the
LLooaadd
function from the
DDiisskk
menu or is called up directly from the first page of
SSoonngg
PPllaayy
, by entering the number associated with the Chain file using the numeric keypad (
SSTTYYLLEESS
push buttons). The chain file can be recognised
by the letter “c” next to the number and before the name. When switching to
SSoonngg PPllaayy
the title of the first Midi file will appear. There are three
ways of moving along the chain: Leave the Midi files to end normally, the SD5 will load the next one and will begin playback automatically
without any further input from the user. Without starting
SSoonngg PPllaayy
with the
SSTTAARRTT
push button, use the
VVAALLUUEE ++//--
push buttons to select the
Midi files of the chain. While
SSoonngg PPllaayy
is playing, press the
CC
OOUUNNTT//PPAAUUSSEE//RREESSTTAARRTT
push button to call up another Midi file and then use the
DDAATTAA CCUURRSSOORR
push buttons.
Once the Midi file(s) has been found, press the
CCOOUUNNTT//PPAAUUSSEE//RREESSTTAARRTT
push button again to start
SSoonngg PPllaayy
again with the new Midi file.
Whatever the method used, if the execution of a Midi file is stopped using the
SSTTAARRTT
push button,
SSoonngg PPllaayy
will loose the data of the chains
for good and it will have to be re-loaded again.
SWITCHING QUICKLY FROM A MIDI FILE TO A STYLE ( AND VICE-VERSA ) WHILE PLAYING.
The following SD5 functions have been conceived to allow the musician to obtain optimum interaction between Styles and Songs during live
performance. In fact, they allow an extremely quick switch over from reproducing a MIDI file to using a Style and from a Style to a MIDI file
without any substantial interruption of performance.
How to switch over from a Midifile to a Style :
●
Press the Style button ( Key Stop ) while the MIDI file is playing. ●Select the Styles group.
●
Enter the desired Style and play normally in the Arranger mode on the keyboard.
NNOOTTEE ::
If the MIDI file is set with the
DDrruumm RReemmiixx
function activated ( which means that the Style - Key Stop button is already activated ), pro-
ceed as follows :
●
Select the Styles group. ●Press
ttwwiiccee
the button relevant to the Style you wish to call up ( the box gets a black background).
How to switch over from a Style to a Midifile :
●
Press the
DDiisskk
button while the Style is activated. ●Select the desired MIDI file from the directory.
●
Press the Load function button to activate the Song.
SD5
52
Song Play, Midi file and Karaoke
Page 55

SD5
53
Drum Remix
To liven up or simply modify a song, all you have to do usually is change the
rhythm structure of the drums or the percussion instruments, which is always contemplated in the remix of famous songs and dance. When the user changes the
drum track, he also often modifies the balance of the individual percussion instruments too, with a crescendo in the number of instruments that make up a rhythm
track. The SD5 instrument enables the realisation of similar results, utilising the
percussion tracks of the Styles instead of that of the drums of a Midi file, enabling
the muting of single percussion groups of the rhythm track. When the Midi file is
being played it is also possible to change the original style, to activate three Fill's
and to pull-up one of the four Arrangers in real time!
REMIX WITH ONE STYLE
To activate the Remix function, first pull-up the Midi file in
SSoonngg PPllaayy
(pls. see relative chapter) and then, again from the
SSoonngg PPllaayy
page, acti-
vate
FF99 DDrruumm RReemmiixx
, before playing the Midi file. “
SSttyyllee SSeelleecctt
” will appear on the display to point out that this mode within the Drum Remix
function has been activated. At this stage select the remix mode by pressing the
IINNTTRROO--EENNDD 11//RREEMMIIXX SSEELLEECCTT
button, which is used to toggle
between
SSoonngg SSeelleecctt
(the style buttons are used to enter the numbers to immediately pull-up a new Midifile other than that currently selected)
and
SSttyyllee SSeelleecctt
(the style buttons are used to enter the number to pull-up a Style whose drum tracks are to be used to replace those within
the midifile). Once the desired Style has been selected, you can play the Midi file with the Remixed drums track by pressing
PPLLAAYY
. During play
back, you can always switch from the original track to the remixed one using the
KKEEYY SSTTAARRTT//SSOONNGG RREEMMIIXX PPLLAAYY aanndd KKEEYY SSTTOOPP//SSTTYYLLEE RREEMMIIXX PPLLAAYY
buttons. If you wish to start the Midi file with the original track,(once the Remix function has been activated and the Style chosen) select
KKEEYY
SSTTAARRTT//SSOONNGG RREEMMIIXX PPLLAAYY
before you start playing. The volume of the rhythm tracks of the Style can be balanced relative to the Midi file, using
the
DDAATTAA CCUURRSSOORR ((LLeefftt aanndd RRiigghhtt))
buttons once you have selected
SSttyyllee SSeelleecctt
using the
IINNTTRROO--EENNDD 11//RREEMMIIXX SSEELLEECCTT
button. Vice versa you can
balance the volume of the Midi file, again using the
DDAATTAA CCUURRSSOORR
buttons, when
SSoonngg SSeelleecctt
is selected with
IINNTTRROO--EENNDD 11//RREEMMIIXX SSEELLEECCTT
. These
modifications, together with the selection of the Style for Remix, can be saved by switching to
FF11 GGMM PPaarrtt
and then by pressing
SSAAVVEE
to activa-
te the saving procedure of a new Song Set-up on the disc currently selected.
To keep the
DDrruumm RReemmiixx
function enabled when pulling-up another Midifile, activate the
DDrruumm RReemmiixx OOnn--LLiinnee
function by pressing the
BBRREEAAKK
kkeeyy ((OONN LLIINNEE))
. The activation of the above-mentioned function is enhanced on the display, by key F9 with the appearance of the message
RRMMXX
((OOnnLLiinnee))
. In this mode you can go to
SSoonngg SSeelleecctt
mode using the
IINNTTRROO--EENNDD 11
key and select a new Midifile. The Remix will not be interrupted
and the new Midifile will play with the rhythm currently selected.
The Remix function can be activated also from a certain measure onward.
●
Load the SONG and press DRUM REMIX
●
In front of F2 two numbers appear: the first indicates the START measure, the second indicates the END measure.
●
Press F2 and use VALUE to select the measure from which you wish the REMIX to start.
●
Press START. The DRUM REMIX starts from the measure number selected.
DRUM MIXER
Ketron has grouped percussion sounds in nine categories for each drum set that can be selected using function keys
FF11--FF99
, after having pres-
sed the
IINNTTRROO--EENNDD 22//DDRRUUMM MMIIXXEERR
button. When a category is checked, the percussion instruments correlated to it will play, otherwise their volu-
mes will be muted (
MMuuttee
function). The purpose of the
DDrruumm MMiixxeerr
is that of being able to create new rhythm combinations simply by
MMuuttiinngg
some percussion instruments, which proves especially useful in South American rhythms and in dance styles.
DDrruumm MMiixxeerr
also works for the
sampled grooves, offering the most realistic effect and rhythmical versatility ever seen up to date.
Using
FF1100 DDrruummsseett
, you can modify the Drum Set used in the Style. The page pulled-up is used to select between six pages of Drumset, each of
which can be pulled-up using the function buttons. From this page, you can also play the Drum Set on the keyboard by activating
FF1100 MMaannuuaall
and by accessing the Edit page of the Drum Set using
FF99 EEddiitt
.
DRUM & BASS
The
IINNTTRROO--EENNDD 33//DDRRUUMM && BBAASSSS
button has another function when in Song Play. It mutes the volume of all the tracks with the exception of that
of the drums and bass.
Drum Remix
Page 56

Video Out and Karaoke
The optional video card allows you to use a TV set or a computer monitor (or a LCD
monitor) to display messages, words set in syllables from a Midi file or to duplicate
the display of the SD5.
The options for the video output are grouped in the
SSoonngg PPllaayy
menu that is enabled
using the dedicated push button.
When working in
SSoonngg PPllaayy
, access the
VViiddeeoo
page by pressing the
FF77 VViiddeeoo
function
push button from the initial page of the
SSoonngg PPllaayy
menu to set all the parameters
that are described below.
Press F5 Escape to return to the
SSoonngg PPllaayy
page.
WRITING A MESSAGE TO BE SENT TO THE VIDEO OUTPUT
A box (
VViiddeeoo MMeessssaaggee
) appears in the middle of the display where a message to be
displayed on the video output can be entered using the keyboard keys, which will appear in the lowest line of the TV screen or the monitor. This
possibility is rather handy and can be used to communicate with the audience, introduce yourself or to write dedications when playing live.
To write the words of the message (no longer than 32 characters) use the keyboard keys and the
DDAATTAA CCUURRSSOORR
push buttons.
Once the message has been entered, confirm using
FF1100 EExxeeccuuttee
to transfer it to the video output.
Press
FF99 CClleeaarr
to cancel the whole message.
The message will remain on the video output irrespective of the operational status.
CHANGING THE BACKGROUND AND TEXT COLOUR
The SD5 can select two different colours for the background and for the words: The combinations are Blue/White or White/Black.
To change the colour of the background use
FF11::
press the function push button repeatedly.
The settings of these parameters depend also on the
FF66 MMiirrrroorr
function.
FF22 SSIIZZEE::
This allows you to define the horizontal and vertical dimensions of the computer monitor connected, to obtain optimum synchroniza-
tion with the monitor frequency. The values are modified pressing the
DDAATTAA CCUURRSSOORR
buttons and moving with F2.
FF33 PPOOSSIITTIIOONN::
This allows you to establish the position of the text within the monitor area, using horizontal and vertical values. The values are
modified pressing the
DDAATTAA CCUURRSSOORR
push buttons and moving with F3.
MODIFYING THE SCREEN LAY-OUT
The
FF44 LLyyrriicc MMooddee
function is used to establish how the space on the video screen will be used. The settings are called up by pressing the rela-
tive function push button repeatedly with Song Play stopped, namely:
Full Screen: this uses the full screen to display the words of the Midi file.
1/2 Screen: the directory of the Midi files is displayed in the bottom half of the screen and the words of the Midi file in the top half
If you choose the Full Screen mode, again using
FF44 LLyyrriicc MMooddee
, the display mode of the text syllables can be defined for which there are two options:
Underline: this underlines the syllables in real time with the lead.
Mark: an indicator appears to the left of the line to be sung.
Another function used to control the screen performance is
FF66 MMiirrrroorr
that is used to reproduce (or otherwise) the conditions of the display of
the SD5 based on its status:
On: means that everything that appears on the SD5 display can be displayed on the screen.
Off: means that only the Midi file words appear on the screen despite the SD5 display.
The
MMiirrrroorr OOffff
status may prove useful to read the words on the screen when the words displayed on the SD5 is set on off via
LLyyrriicc OOffff
, and can
only be set with
SSoonngg PPllaayy
stopped.
F7 Zoom: this is used to enable, or otherwise, the enlargement of the words shown on the screen. The Zoom function is not
effective if F6 Mirror is set as On.
SD5
54
Video Out and Karaoke
Page 57

SD5
55
Recording a Midi file
Everything that is played on the SD5, including the automatic accompaniment and the changes made on the control panel, can be recorded as
a Midi file directly to a Floppy Disk or Hard Disk. Everything recorded can later be modified using a sequencer software for PC/Mac. Considering
the fact that the accompaniment tracks use sounds in standard General MIDI, it is also possible to quickly create some arrangements which will
also be compatible with other GM modules. Some of the properties of the SD5 may however be lost if reproduced on GM modules, especially the
use of the Live Drum tracks (Drum 2), the response to the modulation of the voices for the Right section of the keyboard that are not compatible with the General MIDI Standard, and the use of the Drawbars.
To start recording a Midi file, press SONG PLAY push button. The Midi file will be
recorded on the disk that is currently selected and, if the hard disk is selected, in
the folder that was previously accessed.
The page called up is used to enter the name of the Midi file using the keyboard
keys and the
DDAATTAA CCUURRSSOORR
push buttons, to cancel the procedure using
FF55 EEssccaappee
and to confirm the creation of the Midi file using
FF1100 SSaavvee
. On this page, use the
PPAAGGEE ++//--
push buttons to select the destination disk as well.
Once the Midi file has been created, the display will show the
FF1100 SSttaarrtt
function. By
pressing the relative function push button, “
RReeccoorrddiinngg
” appears under the Tempo
bar and the recording of the Midi file starts, even with the Arranger disabled, thus
enabling all the basic settings to be recorded that will then go into the fist measure of the Midi file. The Tempo starts only if the Arranger is enabled.
Recording is not stopped by pressing the
SSTTAARRTT
push button once again but only if both the
DDIISSKK
and
SSOONNGG PPLLAAYY
push buttons are pressed at
the same time. Once
SSoonngg RReeccoorrdd
is disabled, the SD5 resets itself automatically, ready to playback everything recorded within the current ses-
sion in
SSoonngg PPllaayy
.
Recording a Midi file
Page 58

.KAR, .MID (Midi files) & .TXT (text) files
The karaoke function is used to show the words (Lyrics) of a Midi file being reproduced on the display, aligning the text in syllables via some
graphic solutions. The words of a Midi file are handled as meta events and therefore there are Midi files + Lyrics with .MID and .KAR. extensions.
Generally, all there is in a .KAR file is a normal Midi file in format 1 and therefore it is to be converted into format 0 for it to be reproduced directly.
The SD5 not only reads Midi files with Lyrics in format 0 and 1, but can also convert a .KAR Midi file into a new .MID Midi file in format 0 with text
meta events.
The solution of the Midi file with words has been designed to read the words of the song, often set in syllables and synchronized with the tempo
directly on the display. Thus you can do away with music stands, booklets and piles of sheets, as displaying the lyrics is handier for the musician and also looks less 'clumsy' and more professional. It is also possible to display the words of a song on an external monitor using an optional video card thus additionally involving the audience when needed.
The SD5 does not just display the words of a Midi file. The text files generated on any word processor, both for PC and for MAC, with .TXT extension can be displayed even when the Arranger is being used or for Midi files that do not already originally have Lyrics. For the latter the SD5
offers a tempo synchronization function.
The .TXT files do not depend on a Midi file (unlike with Midi files with lyrics, whereas the Lyrics events are entered in the MIDI Standard). Both
may have the same function but they are handled differently.
The best results for the Midi files with Lyrics are obtained exploiting the Midi files of the Ketron Song Word & Music library, where the words of
the song are handled so that the colour of the words syllables changes in time with the lead.
USING .KAR MIDI FILES
There are many ways of converting a .KAR Midi file into a .MID Midi file on the Computer. The SD5 entails the copying of the .KAR Midi file in Hard
Disk and then converting it. Conversion can also be carried out on the Floppy Disk.
●
Insert the Floppy Disk with the .KAR file in the disk drive.
●
Enable the
DDIISSKK
menu using the dedicated push button.
●
Go to floppy using the
PPAAGGEE ++//--
push buttons. The display will show confirmation that the disk is selected.
●
Select the .KAR file to be copied using the
DDAATTAA CCUURRSSOORR
push buttons.
●
Confirm that the file is to be copied using
FF44 CCooppyy
. The file will be copied into the folder that was last used on the hard disk.
●
Once the file has been copied, exit from the Disk menu using the
EEXXIITT
push button or go straight to the Hard Disk by pressing
PPAAGGEE --
once.
The SD5 will show the contents of the Folder.
●
Select the .KAR Midi file to be converted from the Folder.
●
Press
FF33 CCoonnvveerrtt
and the SD5 converts the Midi file and upon completion opens a window where the name of the Midi file can be modified,
saved or overwritten using the usual procedures.
Once the Midi file with Lyrics events has been converted it can be played using Song Play. From the Song Play menu the display of the words of
the song loaded can be disabled using F10 Lyric Off.
USING .TXT FILES
The text files in .TXT format are used to display the words of a song on the SD5 display, both in
SSoonngg PPllaayy
mode and when the Arranger is being
used. The advantage of using .TXT files lies in the simplicity of creating them on PC/Mac and then saving them in Hard Disk or loading them from
Floppy Disk. Using the .TXT files you can create your own library of song words to be called up instantly from hard disk, enabling you to leaving
entire musical compilations at home. The .TXT files can be loaded and displayed both with the Arranger and in
SSoonngg PPllaayy
mode. In both cases,
the words can be made to temporarily disappear by pressing
EEXXIITT
, and pressing
EEXXIITT
once more allows the lyrics to be re-displayed.
Note: For those using Mac computers, it is crucial to remember that it is preferable to:
●
Write the accents without using letters already having accents
●
Save the file in text format with line interruption
●
Add the.TXT extension to the name of the file (It should not be longer than 8 characters).
USING .TXT FILES WITH THE ARRANGER
Whatever the status of the Arranger (running or stopped), access can be gained to the loading of TXT files at any time:
●
Press the
DDIISSKK
push button.
●
Choose between Floppy Disk or Hard Disk using the
PPAAGGEE ++//--
push buttons.
●
If you choose Hard Disk you must find the Folder bearing the TXT files.
●
Once you have found the .TXT file to be loaded using the
DDAATTAA CCUURRSSOORR
push buttons, enable RAM loading using
FF22 LLooaadd
.
●
The words are displayed in the bottom of the display. When a number of pages are present, the next pages are scrolled using the
PPAAGGEE ++//--
push buttons or the optional pedals FS6 or FS13.
●
Press the
PPAAGGEE ++//--
push buttons together to display the first page of the words and press them again to go to the last page of the words.
Press them a third time to return to the words page displayed initially.
●
To disable the display, press the
EEXXIITT
push button which, if pressed again, displays the words once more.
SD5
56
.KAR, .MID (Midi files) & .TXT (text) files
Page 59

SD5
57
The display of the words in the Arranger mode can be disabled using function push button
FF77 TTeexxtt
, set in
OOffff
, in the
FF33 UUttiilliittyy
menu that is acces-
sed from the main page of the display.
To automate the loading procedure of a .TXT file you can use a Registration keeping in mind two conditions:
●
The Single Registration must have the same name as the .TXT file to be loaded.
●
The .TXT file and that of the Single Registration must be stored within the same Folder (if using the HD) or same floppy disk.
If you record the settings of the Arranger, including the Style, in a Registration with the same name as the .TXT file to be loaded; when you call
up the Registration, the .TXT file will also be automatically loaded. The loading speed is obviously longer when the .TXT file is read from the
floppy disk rather than the hard disk
USING .TXT FILES WITH SONG PLAY
Compared to the Arranger it is not possible to first load a Midi file and then the .TXT file to be displayed. The method to automate the whole
process is that of giving the Midi file and it's associated .TXT file the same name so that, when loading the Midi file, the .TXT file is automatically found and loaded too. In
SSoonngg PPllaayy
as well, the display of the .TXT file is controlled by the
EEXXIITT
push button. The same conditions mentioned
above apply here too:
●
The Midi file must have the same name as the .TXT to be loaded.
●
The .TXT file and the Midi file must be stored in the same Folder (if on HD) or floppy disk.
To automatically call up the Midi file and the .TXT file set with the above mentioned conditions use the controls already described in
SSoonngg PPllaayy
(see specific section). To scroll any pages that follow, the words must be displayed and then use the
PPAAGGEE ++//--
push buttons. Press the
PPAAGGEE ++//--
pp
ush buttons together to display the first page of the words, press again to go to the last page of words and press a third time to return to the
page displayed initially.
SYNCHRONIZING THE CHANGES TO THE LYRICS/TEXT PAGE WITH A MIDI FILE
The SD5 can record the page change of the .TXT file displayed at any stage of a Midi file. By writing a text with black lines, you can achieve results
very close to Karaoke, obviously with some graphic restrictions. The synchronization procedure is always enabled when reproducing the Midi
file and there are no direct functions or controls to call it up. To achieve this however;
●
Load the Midi file and the .TXT file in
SSoonngg PPllaayy
.
●
Enable the Midi file playback mode using
SSTTAARRTT
.
●
When you wish to call up the next page press the
PPAAGGEE ++
push button (just as you would performing live).
●
Repeat the procedure for the following pages until the entire song is completed.
●
Press
SSAAVVEE
to record the synchronized page change.
●
Confirm the registration using
FF1100 SSaavvee
, or cancel the procedure using
FF55 EEssccaappee
.
●
The SD5 associates the page changes with the beats and the measures in which the page change occurred using some special codes within
the .TXT file. The Midi file itself is not modified in any way whatsoever. Therefore to return to the original .TXT file use the
FF44 CClleeaarr
function
and this will cancels these codes from the .TXT file.
.KAR, .MID (Midi files) & .TXT (text) files
Page 60

Using the microphone
The SD5 can use two separate microphones if an optional adapter is utilised to divide the stereo input into two microphone inputs. Input Mic 1
is the only one that can exploit the built-in Vocalizer plus it is provided with a separate audio output to allow the lead voice signal be processed with an external mixer. To use both microphones correctly, you have to adjust the input gain using the dedicated cursor on the front panel
to reach an ideal noise signal level. To check if this level is correct, simply sing or speak into the microphone while adjusting the cursor and
listen to the result. If the gain is too high, the audio signal would be unpleasantly distorted and if the gain is too low, the signal will be disturbed in proportion with the quality of the cable and the microphone. For these reasons, it is better to spend a little bit more for a quality dynamic and sturdy microphone and strong connection cable.
NNoottee::
Some other aspects must be remembered when using a microphone:
●
Always connect the microphone with the volume of the SD5 at zero, with the gain at zero and the amplifier turned off.
●
Keep the microphone away from the speakers as there could be Larsen/feedback effects, which could seriously damage your PA.
●
In small rooms it is preferable to use a microphone with hypercardoid diagram to avoid Larsen/feedback effects.
●
Keep the microphone on a very solid rod to avoid mechanical noises interfering with your voice.
●
Keep the microphone cable away from power supply cables and lines.
●
When you connect all your equipment remember that the speakers and the amplifier are always the last to be turned on and the first to be
turned off.
MICRO EDIT
The parameters of the microphone are stored in the
MMiiccrroo ((VVooccaalliizzeerr))
menu, which
is pulled-up using the dedicated button on the panel of the instrument. The parameters relative to the microphone are correlated to the relative function push buttons and can be saved in a Registration.
F1 Level 1: This specifies the volume of the microphone on input Mic 1.
Once the parameter has been selected using the function
push button, the value is then varied using the
DDAATTAA CCUURR--
SSOORR ((LLeefftt aanndd RRiigghhtt))
buttons, which if pressed together at
the same time reset the value.
F2 Level 2: This specifies the volume of the microphone on input Mic
2. Once the parameter has been selected using the function push button the value is then varied using the
DDAATTAA
CCUURRSSOORR ((LLeefftt aanndd RRiigghhtt))
push buttons, which if pressed together at the same time reset the value.
F3 Pan 1: This selects the position on the stereo front of the microphone on input Mic 1. The signal of the microphone is set in the
middle when the parameter shows two dashes (- -). The value is modified using the
DDAATTAA CCUURRSSOORR ((LLeefftt aanndd RRiigghhtt))
push
buttons (which if pressed together at the same time set the signal back in the middle).
F4 Pan 2: The same as
FF33 PPaann 11
but for the microphone signal on input Mic 2.
F5 Music Vol: This balances the microphone signals with the sound generator of the SD5. The value is modified using the
DDAATTAA CCUURRSSOORR
((LLeefftt aanndd RRiigghhtt))
push buttons which, if pressed together at the same time, set the value back at maximum. If the level of
the two microphones is not sufficient to stand out compared to the SD5, it is useful to remember to reduce this value.
F6 Echo 1-2: A delay can be set on the two microphone signals, the intensity of which is controlled by this value. To switch between
input Mic 1 and Mic 2 press the function push button F6 cyclically. The value is entered using the
DDAATTAA CCUURRSSOORR ((LLeefftt aanndd
RRiigghhtt))
push buttons which, if pressed together at the same time, reset the value.
F7 Reverb 1-2: The same as
FF66 EEcchhoo 11--22
, but for the reverb for each input.
F8 Pitch Shift: This only affects the signal of the microphone on input Mic 1 and is used to transpose the notes sung in the microphone
in steps of semitones. When the values are excessive the sound of the voice is distorted. This effect is one of the
Vocalizer features. The value is increased or decreased using the
DDAATTAA CCUURRSSOORR ((LLeefftt aanndd RRiigghhtt))
push buttons which, if
pressed together at the same time, reset the value.
F9 VOCALIZER: This opens the control menu of the Vocalizer. Refer to the next chapter for further explanations on this subject
F10 Active/Inactive: This enables or disables the microphone inputs. If they are connected but not being used, it is a good rule to disable the
inputs to avoid disturbing noises.
EXCLUDING THE EFFECTS WHILE TALKING
One of the most frequently complained problems of musicians is that of being able to exclude the effects from the microphone signal when
talking to the audience.
The SD5 solves this problem with the
TTAALLKK
function that can be activated with the TALK key on the panel of the instrument. When you press
the TALK key, all the effects applied to the microphone will be automatically excluded. To restore the previous configuration, simply disable the
TTAALLKK
function by pressing the TALK key again.
SD5
58
Using the microphone
Page 61

SD5
59
Vocalizer
The Vocalizer produces particular types effects used to harmonise the audio signal on the microphone input according to some specific rules.
It is dedicated to the human voice, and adds two or three notes to the single note sung into the microphone, thus creating a vocal duo or trio
utilising the sound of the voice on the microphone input. The SD5 applies the Vocalizer to the signal coming from the Micro input and uses (for
harmonization information) the chords played on the keyboard or those on the MIDI In 2 input. The Vocalizer control can also be carried out by
a MIDI track of a Midi file or by information collected on MIDI In 1. Due to the fact that the Vocalizer includes the control of the elements forming the sound, to further harmonize it also allows significant alternations to the sound itself, for example to transform a male voice into a
female one.
The SD5 Vocalizer is freely programmable and consents storage of all parameters in one of the twelve RAM Vocal Sets, in addition to the four
Vocal Sets in ROM. It also features the opportunity of assigning some Arranger control buttons, like Fill or Arrange, a different algorithm, such
as to automate voice harmonization, too. The assignments made to the Arrange A, B, C and D buttons are valid even while reproducing a song,
so it will be possible to call up a different algorithm (or vocal set) by pressing one of these buttons.
HOW TO ACTIVATE THE VOCALIZER
Before using the Vocalizer, you need to connect a microphone of high quality to
the audio input Micro 1 and regulate the amplification acting on the Gain cursor.
From the main Micro page (activated with the relative key), press
FF99 VVooccaalliizzeerr
to
access the dedicated menu.
Set parameter
FF1100
to
AAccttiivvee
in order to enable the Vocalizer.
THE VOCALIZER MODES
The Vocalizer performs differently according to which of the five different harmonization modes (Automatic Chord 1, Automatic Chord 2,
Keyboard Harmony, Fixed Interval and Vocal Effects) has been selected. Each one of these modes includes different algorithms that will be
displayed in the centre of the display.
Automatic Chord 1 and Automatic Chord 2 produce the additional notes in accordance with the chord played and in association with the note
that was sung into the microphone input.
Keyboard Harmony adds the notes according to the chord played but independently from the recognition of the note sung. A particular aspect
of Keyboard Harmony is the MIDI Mode drawing the notes to be added to the human voice from a MIDI track of a Midi file. This opportunity is
included by a number of commercial Midi files and the SD5 is compatible with most of these files.
Fixed Interval transforms the Vocalizer into a common Pitch Shifter, i.e. it adds the voices according to fixed intervals and not based on the
chord recognition. Vocal Effects offers special effects algorithms that totally transform the character of the original voice.
THE VOCALIZER PARAMETERS
The Vocalizer page indicates the presently selected Vocal Set to be edited and, in the centre, the list of algorithms available according to the
selected harmonization mode. To it's side, associated to the function buttons, you will find a number of directly accessible parameters, or functions over which you may access other parameters that will be shown at the centre of the display.
F1 Direct: allows you to define the quantity of audio signal to be drawn from the Micro 1 input and to be used together with
the Vocalizer effect. This can be modified with the
DDAATTAA CCUURRSSOORR
buttons.
F2 Vocalize: controls the quantity of Vocalizer processed signal present on the audio output. This can be modified by acting on
the
DDAATTAA CCUURRSSOORR
buttons.
F3 Modes: pressing repeatedly the F3 function button modifies the harmonization mode and, as a consequence, the available
algorithms displayed at the centre of the display that can be selected with the
CCUURRSSOORR ++//--
buttons.
F4 Octave: transposes the voices that have been added to the lead by +/- two octaves. When set on Automatic, the voices will
remain within the octave of the note that has been sung. Can be modified with the
VVAALLUUEE ++//--
buttons.
F5 Hold: this will be present only if the harmonization mode is set on Keyboard Harmony; if activated, this function allows
you to store the notes recognised by the Vocalizer as you change from one chord to another.
Vocalizer
Page 62

F6 Effects: this allows you to modify the effects settings, to apply
the Vibrato and the Limiter, to modify the vocal sound
and to activate a number of modulations. The Reverb
and the Delay are the general ones and are programmable. The parameters are selected with the
DDAATTAA
CCUURRSSOORR ((UUpp aanndd DDoowwnn))
buttons and the value is ente-
red with the
DDAATTAA CCUURRSSOORR ((LLeefftt aanndd RRiigghhtt))
buttons. To
go back to the main page of Vocalizer Edit, press once
more the
FF66 EEffffeeccttss
function button.
The following describes the parameters in detail:
Reverb Level: Reverb quantity to be assigned
to the voices generated by the Vocalizer
DDeellaayy LLeevveell::
Delay quantity to be assigned to
the voices generated by the Vocalizer
VViibbrraattoo DDeepptthh::
Intensity of the Vibrato effect on the voices generated by the Vocalizer
VViibbrraattoo RRaattee::
Vibrato effect speed
VViibbrraattoo DDeellaayy::
Delay value of the starting of the Vibrato effect
MMoodduullaattiioonn::
If activated (On), the Vibrato is controlled by the Joystick.
PPiittcchh BBeenndd::
If activated (On), Pitch Bend effects can be achieved on the voices generated, acting on the relevant wheel
LLiimmiitteerr::
A particular effect allowing you to control the level of the input signal in order not to saturate the
DSP. This should always be left' On', especially if the singer has a powerful and dynamic voice.
SSiinnggeerr::
Defines the sounds of the voices generated by the Vocalizer, with male and female options.
F7 Filter: Pressing this function push button displays a number
of parameters to control the three vocal formants for
the same number of voices generated, as well as the
equalizer with three bands for the direct voice and for
the vocalized generated voices. The Vocalizer indeed
works on three bands of formants, in order not to
completely change the timbre when changing it's intonation. The formants theory is a very complex one,
and substantially based on the idea that the human
voice is characterised by fixed frequencies for certain
intonations, so modifying these you obtain different
timbres. The parameters are selected with the
DDAATTAA
CCUURRSSOORR ((UUpp aanndd DDoowwnn))
buttons and the value is ente-
red with the
DDAATTAA CCUURRSSOORR ((LLeefftt aanndd RRiigghhtt))
buttons. To go back to the main page of
VVooccaalliizzeerr
, press once more the
FF77 FFiilltteerr
function button.
In the following the parameters are described in detail:
Formant
11,, 22,, 33::
formant level for voices 1, 2, 3
FFrreeqquueennccyy 11,, 22,, 33::
formant frequency for voices 1, 2, 3
RReessoonnaannccee 11,, 22,, 33::
resonance of the single formant for voices 1, 2, 3
LLooww BBaanndd DDiirreecctt,, VVooccaalliizzeerr::
Low band level of the equalizer for the direct voice and for those generated by
the Vocalizer
MMiidd BBaanndd DDiirreecctt,, VVooccaalliizzeerr::
Mid band level of the equalizer for the direct voice and for those generated by
the Vocalizer
HHiigghh BBaanndd DDiirreecctt,, VVooccaalliizzeerr::
High band level of the equalizer for the direct voice and for those generated by
the Vocalizer.
VVoolluummee 11,, 22,, 33::
Volume of the single voices added by the Vocalizer.
F8 Vocalize To Arranger: the buttons controlling the Arranger may be assigned
a different algorithm to be chosen among those available for the harmonization mode selected in
FF33
MMooddeess
. In the centre of the display the Start, Stop,
Arrange A, B, C, D, Fill and Break sections can be selected with the
DDAATTAA CCUURRSSOORR ((UUpp aanndd DDoowwnn))
buttons, and
one of the available algorithms can be assigned to
them acting on the
DDAATTAA CCUURRSSOORR ((LLeefftt aanndd RRiigghhtt))
but-
tons. Pressing again the
FF88 VVooccaalliizzee TToo AArrrraannggeerr
but-
ton takes you back to the
VVooccaalliizzeerr
menu. The algorithms assigned to the Arrange A, B, C, D buttons are
still valid while replaying a Midi file or a Song. This
allows you to instantly call up a different voice algorithm. The
FF1100 SSttaattuuss
parameter must be set on
IInntteerrnnaall
to avoid confusion or errors, i.e. to avoid that the Vocalizer
SD5
60
Vocalizer
Page 63

SD5
61
is controlled by a MIDI track. Further to assigning an algorithm, you may also select the
OOffff
condition which will disable the Vocalizer for this specific button only. If neither an algorithm nor the 'Off' condition is selected, two dashes
will indicate that for this specific button the general Vocalizer conditions apply. Vocal Set 1, called up when the
Vocalizer is activated, assigns Arrange A and C the Harmony Right mode, and Arrange B and D the Unison mode by
default.
F9 Vocalize Lead On: This is present only on the first ten algorithms of the Automatic Chord 1 and Fixed Interval mode. It tunes the third
voice generated by the Vocalizer in unison with the singer voice. It is deactivated by pressing the
FF99 VVooccaalliizzee LLeeaadd
OOnn
function key again.
F10 Status: pressing repeatedly the
FF1100
button modifies the Vocalizer status switching from
AAccttiivvee
to
IInntteerrnnaall, NNoonneeorIInnaaccttiivvee
.
“
AAccttiivvee
” indicates that the Vocalizer is active and able to receive data from the keyboard, via MIDI and from the
sequencer. “
IInntteerrnnaall
” assures that the Vocalizer is controlled only by the keyboard and by the algorithms assigned
to the control buttons of the Arranger, and not via MIDI and not via the sequencer. “
NN
oonnee
” completely deactivates
the SD5 Vocalizer but still transmits the information for the Vocalizer control to the MIDI Out, to be able to control
a similar external unit. “
IInnaaccttiivvee
” deactivates the Vocalizer control via the keyboard, but not via MIDI.
HARMONIZATION MODES AND DESCRIPTION OF THE ALGORITHMS
After you have selected a harmonization mode using
FF33 MMooddeess
, at the centre of the screen the relevant algorithms you can select using the
DDAATTAA CCUURRSSOORR
push buttons are displayed. Following is a short description of the single algorithms for each mode:
AUTOMATIC CHORD 1
The voices added by the Vocalizer depend on the chord recognised on the keyboard area to the left of the splint point, independently from its
inversion, and on the note sung, of which the intonation and the inversion, if any, will be determined according to the recognised chord. If the
note sung is extraneous to the chord, this note will not be reproduced by the Vocalizer but will be present as a direct audio signal. In this case
the Vocalizer reproduces a voice with a note that is as close as possible to the note sung, but compatible with the chord. If the note sung belongs
to the chord, the Vocalizer creates the harmonization as a function of this note, producing the single inversions. The single algorithms can vary
the position of the note sung within the chord and can place it to the centre, on the third or on the fifth. Modifying the note sung can, as a consequence, also cause the inversions to change. The following algorithms are available for Automatic Chord 1:
Trio Standard: This maintains the note sung in the centre of the chord. If the Vocalize Lead is active (On), the note sung is doubled.
Trio Up: This maintains the note sung in the bass of the chord. If the Vocalize Lead is active (On), the note sung is doubled.
Trio Down: This maintains the note sung in the treble, generating the two voices under it. If the Vocalize Lead is active (On), the
note sung is doubled
Trio Octa 1: This maintains the note sung in the centre, with the keynote of the chord always in the bass. If the Vocalize Lead is
active (On), the note sung is doubled.
Trio Octa 2: This performs a third above the note sung and doubles the note sung in the higher octave. If the Vocalize Lead is
active (On), the note sung is doubled.
Trio Octa 3: This performs a third above and the unison with the note sung and doubles the note sung in the lower octave. If the
Vocalize Lead is active (On), the note sung is doubled
Trio Octa 4: This performs a fifth below the note sung and maintains the fundamental note of the chord in the bass. If the
Vocalize Lead is active (On), the note sung is doubled
Duet Open: This performs only the fifth above the note sung. If the Vocalize Lead is active (On), the note sung is doubled.
Duet Down: This performs the third below the note sung, transposed by one octave downward (lower tenth). If the note sung is
the keynote of the chord, the Vocalizer creates the third in the bass, belonging to the lower octave with regard to
the note sung. If the note sung is the third of the cord, the Vocalizer creates the keynote in the bass, belonging to
the lower octave. If the note sung is the fifth of the chord, the Vocalizer creates the third in the bass, but still belonging to the same octave as the note sung. If the Vocalize Lead is active (On), the note sung is doubled.
Duet Up: Performs the third above the note sung. If the Vocalize Lead is active (On), the note sung is doubled.
3 Open 1: Performs the higher third as well as the lower fifth and octave, compared to the note sung.
3 Open 2: Performs the higher third, as well as the lower third and fifth compared to the note sung.
AUTOMATIC CHORD2
In this mode the Vocalizer always uses all three voices available, so the Vocalize Lead function cannot be activated. The voices generated by
the Vocalizer depend on the chord recognised on the keyboard area to the left of the split point, independently from the position of its inversion, and on the note sung. If the note sung is extraneous to the chord, this note will not be reproduced by the Vocalizer but will be present as
a direct audio signal. The Full algorithms are a reproduction of the recognised chord. The Jazz algorithms are more sophisticated harmonizations to model the chords with sixths and sevenths.
The following algorithms are available for Automatic Chord 2:
Harmony Right:The chord is recognised on the keyboard area to the right of the split point, with all its inversions, regardless of the note sung.
Harmony Left:
The chord is recognised on the keyboard area to the left of the split point, with all its inversions, regardless of the note sung.
Full 1: Similar to Full Trio 1 in Automatic Chord 2 mode, with the difference that instead of the note sung a single note on the keyboard
Vocalizer
Page 64

area to the right of the split point is taken as reference. The chord, instead, is recognised on the keyboard area to the left of
the split point, regardless of the inversion of the note played to the right of the split point.
Full 2: Similar to Full 1, but with the voices generated above the note played to the right of the keyboard split point.
Full 3: Similar to Full 2, but with all the voices generated above the note played to the right of the keyboard split point.
Jazz 1: Applies the harmonization table used for Jazz Trio 1 of Automatic Chord 2, with the difference that the inversions of the chord
played on the keyboard area to the left of the split point are determined by the note played to the right of the split point. The
voices generated remain below the note played to which the unison note is added.
Jazz 2: Similar to Jazz 1 with just one voice generated above the note played on the keyboard area to the right of the split point.
Jazz 3: Similar to Jazz 2 with all voices generated above the note played on the keyboard area to the right of the split point.
MIDI Mode: This is a special mode allowing the musician to control the voices generated by the Vocalizer via the MIDI data, no matter if
these come from a track of a Midi file being reproduced or from a MIDI In 2 input.
When using a Midi file, if the track dedicated to the Vocalizer has been correctly programmed, it is recommended to disable the
FF44 OOccttaavvee
function, in particular to avoid setting it on Automatic. In a Midi file it is sufficient to enter Control Change 16 with
value 0 in the desired track to destine it to the Vocalizer control. If the Midi file is reproduced by an external sequencer, it is
recommended to use the MIDI In 1 input. Vice-versa, in case of control by a MIDI accordion or by another keyboard, you need to
select MIDI In 2. If the Vocalizer track is to work with the internal sequencer, access the GM menu, select the destination track
and reproduce a couple of initial beats. With Part Mode you enable the chosen part selecting Vocalize and confirming the operation pressing the
EENNTTEERR
key.
FIXED INTERVAL
One or a number of voices are added to the note sung at fixed intervals, regardless of the recognised chord. If set in this mode, the Vocalizer
works as a common Pitch Shifter. The
FF99 VVooccaalliizzee LLeeaadd
function can always be activated and allows you to double the note sung with a voice
generated in unison.
The following algorithms are available for Fixed Interval:
Unison: This generates a voice in unison with the note sung. If
FF99 VVooccaalliizzee
is
OOnn
, the note sung is doubled in unison.
Octave Up: This generates a voice in the octave above the note sung. If
FF99 VVooccaalliizzee
is
OOnn
, the note sung is doubled in unison.
Octave Down: This generates a voice in the octave below the note sung. If
FF99 VVooccaalliizzee
is
OOnn
, the note sung is doubled in unison.
Octave Up/Down:
realizza una voce all’ottava superiore e una voce a quella inferiore rispetto alla nota cantata. Se F9 Vocalize è impostato su
On, si ottiene un raddoppio della nota cantata all’unisono.
Lead+Octa. Down:
This generates one voice in the octave below and one voice in unison with the note sung. If
FF99 VVooccaalliizzee
is
OOnn
, the note sung is
doubled in unison.
Lead+Octa. Up:
This generates one voice in the octave above and one voice in the octave below the note sung. If
FF99 VVooccaalliizzee
is
OOnn
, the note
sung is doubled in unison.
5Th Down: This generates one voice in the fifth below the note sung. If
FF99 VVooccaalliizzee
is
OOnn
, the note sung is doubled in unison.
5th Up: This generates one voice in the fifth above the note sung. If
FF99 VVooccaalliizzee
is
OOnn
, the note sung is doubled in unison.
Lead+5Th Down:
This generates one voice in the fifth below and one in unison with the note sung. If
FF99 VVooccaalliizzee
is
OOnn
, the note sung is doubled
in unison.
Lead+5Th Up: This generates one voice in the fifth above and one in unison with the note sung. If
FF99 VVooccaalliizzeeisOOnn
, the note sung is doubled
in unison.
3Th Up: This generates one voice in the third major above the note sung. If
FF99 VVooccaalliizzee
is
OOnn
, the note sung is doubled in unison.
VOCAL EFFECTS
The twelve algorithms of this mode are designed to modify the voice in an amusing and unexpected way. As soon as you select one of these
algorithms, the direct microphone signal is muted so as to allow the effects stand out better. You may restore it pressing
FF11 DDiirreecctt
and the
DDAATTAA
CCUURRSSOORR
push buttons.
Just try and listen to these algorithms: this will be better than any description we can offer in this manual. The algorithm parameters can be
modified using
FF77 FFiilltteerr
and can be saved in a Vocal Set.
SAVING A VOCAL SET IN RAM
Once you have modified any of the Vocal Set parameters, you need to store it in one of the twelve memories available to avoid losing them when
you exit from the
VVooccaalliizzeerr
mode or switch the SD5 off. To activate the saving operation, press the
SSAAVVEE
push button before exiting
VVooccaalliizzeerr
.
The page displayed allows you to enter the name of the Vocal Set using the keys of the keyboard and the
DDAATTAA CCUURRSSOORR
push buttons, as well
as to define the destination memory entering directly the relevant number on the numeric keypad (
SSTTYYLLEESS
push buttons). Then press
FF1100 EExxeecc
to confirm. If you wish to cancel the operation, press
FF55 EEssccaappee
which takes you back to the
VVooccaalliizzeerr EEddiitt
page without storing the modifica-
tions, that are however still active. Another option available on the Save page is
FF99 DDeeffaauulltt
: Pressing this button takes the Vocal set back to it's
original settings.
SAVING A VOCAL SET ON DISK
The whole group of twelve Vocal Set memories can be saved either on a floppy disk or on a hard disk. Only the entire group of Vocal sets can
be saved as one file, but not the independent ones. Proceed as follows:
SD5
62
Vocalizer
Page 65

SD5
63
●
Activate the
DDIISSKK
menu by pressing the special button (the LED lights up)
●
Use
PPAAGGEE ++//--
to select the target disk among Hard and Floppy
●
If you wish to save onto the hard disk, select the target folder by entering it's number with the
SSTTYYLLEESS
push buttons. Press
FF33 SSaavvee
to acti-
vate the saving function.
●
Select the type of file to be saved, in this case
FF1100 OOtthheerrss
.
●
Select
FF33 VVooccaall SSeett
from the next page.
●
This displays a new page where you have to enter the name of the file to be saved, using the keyboard keys and the
DDAATTAA CCUURRSSOORR
buttons,
and confirm the operation pressing
FF1100 EExxeecc..
Press
FF55 EEssccaappee
to exit.
●
After having terminated the operation, the display shows the contents of the target folder.
●
Press
EEXXIITT
twice to go back to the main page.
LOADING A VOCAL SET FROM THE DISK
You may load the complete group of twelve Vocal Sets back from the disk using the following procedure:
●
Activate the DISK menu by pressing the special button (the LED lights up).
●
Use PAGE +/- to select the disk containing the file to be loaded.
●
Select the source folder entering it's number with the STYLES push buttons.
●
Select the type of files to be loaded pressing F5 File Choice; a number of different options appear next to the function buttons. Then select
F10 Others.
●
Select F3 Vocal Set as a file to be loaded.
●
If a number of files is displayed, select the desired one pressing the DATA CURSOR buttons.
●
Confirm the loading procedure pressing F2 Load.
●
Press EXIT twice to go back to the main page.
For further procedures to save and load from disk, please refer to the Disk chapter in this manual.
AUTOMATIC VOCAL SET LOADING USING THE SD5'S POWER ON SETUP
Thanks to the Power On Setup function described in this manual, you may load the desired Vocal set on turning on the SD5. For this purpose,
select the desired Vocal Set from the Vocalizer page and then go back to the main display page pressing the
EEXXIITT ppuusshh bbuuttttoonn
.
●
Start the saving procedure by pressing the
SSAAVVEE
push button.
●
Confirm that you wish to save the Power On Setup pressing the
FF33
function key.
●
On the display, the following four options appear:
F5 Escape cancels the operation.
FF88 DDiisskk SSaavvee
carries out the saving operation of the Power On Setup file with .PON extension either on the floppy disk or on the hard
disk, to be selected with the PAGE +/- buttons. The .PON file will be saved in the folder selected last on the hard disk. It would be
advisable to store this in the first folder of the HD since this is the default folder the SD5 boots up with.
FF99 DDeeffaauulltt
stores the Power On Setup as the one that will be called up on turning the SD5 on.
FF1100 SSaavvee
writes in the Power On Setup memory in the Flash RAM.
VOCAL SET AND REGISTRATION ASSOCIATION
Each registration can store the desired Vocal Set you would want to use, such as to drastically reduce the time required to select the parameters. On the other hand, it might be useful not to load the Vocal Set assigned to the registrations if you wish to use personalised settings without
needing to modify all the registrations. If you wish to prevent a Vocal Set stored within a registration from being called up, proceed as follows:
●
On the first page of the display press F3 Utility.
●
Select F5 Regis. Menu
●
Call up F3 Keyb&Util Page 1/2
●
Using the DATA CURSOR CURSOR buttons select Vocalize and press F10 Select to disable the loading of the Vocal Set stored in a Registration.
Set the value to Off.
●
Press F7 Save to store the settings.
From now on, when calling up a registration, it's associated Vocal Set will not be automatically loaded. To restore the selection of the Vocal Set
associated with each registration when a new registration is called, repeat the procedure just described above, setting the value to On and then
pressing F7 Save.
Vocalizer
Page 66

Effects
The DSPs of the SD5 are capable of producing Reverb, Chorus, Delay and
Modulation effects that can be applied to the Upper and Lower parts, to the
accompaniment tracks and to external audio signals. The SD5 employs up to three
DSPs to generate the global Reverb; and for the Upper parts, an additional three
groups of Chorus, Delay and Distorsor effects that can work both in parallel and in
series in Programs and in parallel for the automatic accompaniment tracks and
the Lower parts.
The assignment of the Delay, Chorus and Distorsion effects is done in the
AArrrraannggee
VViieeww
menu for the automatic accompaniment tracks and the Lower parts.
For the Right section, the effects are assigned with the
LLeeaadd EEffffeeccttss
menu, which
is opened using the related key on the panel or using the Programs.
The levels, the type of effect and all the other parameters related to the DSP are
managed from the
EEFFFFEECCTT
menu, which is opened by pressing function key F2 from
the main page of the display.
The Effects menu is composed of the following:
F1 Global Reverb: This is the Reverb assigned to the whole keyboard and to the whole tone generator, despite the single parts. The value
(modified using
DDAATTAA CCUURRSSOORR
push buttons) establishes the amount of the Reverb applied.
F2 Right Reverb: This is used to specify the quantity of Reverb to be applied separately to the Right part of the keyboard that is dedicated
to the lead. The value is modified using the
DDAATTAA CCUURRSSOORR
buttons.
F3 Reverb Type: This is used to choose the Reverb algorithm among Room, Studio, Club, Hall, Theatre, Stage, Arena. To choose the type of
algorithm use the
CCUURRSSOORR
push buttons.
F6 Eff. Lock:: This allows the user to lock the effect type (Reverb, Chorus, Delay o Distorsor) currently enabled so as to avoid changes
when e.g, you change from one style to another.
F7 Chorus: This is used to select the type of algorithm between Chorus 1, Chorus 2, Chorus 3, Chorus 4, Chorus 5, Flanger, Short Delay,
Feedback and four User Chorus using push buttons
DDAATTAA CCUURRSSOORR
Once the algorithm has been selected, it is edited using
FF1100 EEddiitt
.
F8 Delay: This is used to select between eight types of pre-set Delays and four User Delays using the
DDAATTAA CCUURRSSOORR
push buttons. Once
the algorithm has been selected, it is edited using
FF1100 EEddiitt
.
F9 Distorsion: This is used to select between eight types of distorsion and four User Distorsion using the
DDAATTAA CCUURRSSOORR
push buttons . Once
the algorithm has been selected, it is edited using
FF1100 EEddiitt
.
F10 Edit: This is used to access the menu dedicated to programming the most important parameters of an algorithm.
EFFECT EDIT
The SD5 does not only choose the algorithm to be assigned to the DSPs but it also
allows its substantial modification and saving in dedicated memories. To modify
an algorithm - first of all, it must be selected among Chorus, Delay and Distorsion,
simply by pressing the function push button and choosing the algorithm. Without
doing anything else at this stage press
FF1100 EEddiitt
to access the menu.
No matter what algorithm is to be modified, the Edit page shows some fixed parameters as discussed:
F4 Default: This resets the parameters of the algorithm at their original
values.
F5 Escape: This returns to the Effects menu.
F8 Source: This indicates the current algorithm selected to be modified, however by pressing function push button
FF88
several times, a
different algorithm can be selected.
F9 Destination:
This specifies the destination memory for the algorithm modified. It is selected by pressing the function push button
FF99
repea-
tedly.
SD5
64
Effects
Page 67

SD5
65
F10 Save: This confirms and saves the parameters modified in the memory selected using
FF99 DDeessttiinnaattiioonn
. The single parameters to be
modified are shown in the middle of the display that are selected using the
CCUURRSSOORR ((UUpp aanndd DDoowwnn))
push buttons and are
modified using the
DDAATTAA CCUURRSSOORR ((LLeefftt aanndd RRiigghhtt))
push buttons.
PARAMETERS FOR CHORUS ALGORITHMS
Level: This is the level of the signal.
Delay: This is the length of the delay.
Feedback: This is the repetition degree of the Delay.
Rate: This is the modulation speed.
Depth: This is the modulation intensity.
PARAMETERS FOR DELAY ALGORITHMS
Volume Center: This is the level of the signal repeated in the centre.
Volume Left: This is the level of the signal repeated to the left.
Volume Right: This is the level of the signal repeated to the right.
Delay Center
: This is the delay speed for repeating the signal in the centre.
Delay Left: As above but for the signal to the left.
Delay Right: As above but for the signal to the right.
Feedback: This is the signal regeneration degree.
Filter: This is the LPF filter to cut out the higher frequencies.
PARAMETERS FOR DISTORSOR ALGORITHMS
Level: This is the level of the signal
Tone: This is the timbre variation degree
Resonance: This is the accentuation of the frequencies of the distorted timbre
Effects
Page 68

Registrations
This is one exiting feature of the SD5 that captures the over-all settings of the keyboard at any one time and thanks to these special memory
locations, all the control panel settings and the main parameters that control the SD5 can be called up instantly. Once the Registrations have
been programmed they make it easy to quickly change the Style, the Voice variations, the settings of the effects and above all the automatic
call-up of the TXT files. The programming of a Registration does not entail any special menu with all the parameters and values available and
therefore they are to be modified from the single menus to which they belong. It is usually better to start-off from a default setting and then
set just the Style, the Voices and the other parameters without having to go through all the menus.
The Registrations, once programmed, are extremely useful when playing live, however it takes some time to initially program while at home.
When programming (and also when playing live), it could be necessary to establish which parameter will be recorded or otherwise in the
Registrations. It could indeed be useful to leave one or a number of parameters free or to disable the call-up function of the parameter status
when changing from one registration to another.
Each feature controlled or managed within a Registration can be enabled or disabled via the dedicated
RReeggiissttrraattiioonn mmeennuu
found in
UUttiilliittyy
. A
Register can be called up from a group of 198 registration locations saved in Flash RAM (Block Registration), or from individual registers that
reside on Floppy or Hard Disk (Single Registration).
The first 160 Blocks of Registrations can also be pulled-up using the Multi-Tabs and relative
BBLLOOCCKK RREEGGIISSTTRRAATTIIOONN
function.
The Block Registration and Single Registration parameters are absolutely identical, but their management is quite different:
For a Register in a Block Registration, all the 198 Registers have to be saved in one single BLOCK REGISTRATION file. You can have multiple BLOCK
REGISTRATION files on disk, each one made up of 198 independent registers. The Single Registration on the other hand is individual registers
always saved as single files on the floppy or on the hard disk.
While it is possible to display the Single registrations stored in Hard Disk or in Floppy Disk in a list, this feature is not possible with Block
Registrations, whose registers can only be called up by entering the number using the numeric keypad. It takes less time to load a register from
a Block Registration than that from a Single Registration. The Block Registrations are memorized even when the instrument is turned off, as
they are saved in Flash RAM.
CALLING UP AND SAVING A REGISTER OF THE BLOCK REGISTRATION GROUP
Make sure that Block Registration has been selected as the memory location from
which to load the Registers. For this purpose, from the main display page go to
FF33
UUttiilliittyy
and select (if not yet chosen) Block in
FF77 RReeggiissttrraattiioonn MMooddee
. The Block
Registration group stores 198 Registers in Flash RAM. Each Register can be selected by enabling the
RREEGG
. push button (the LED lights up) and then by entering the
corresponding 3-figure number using the numeric keypad (
SSTTYYLLEESS
push buttons).
The name of the Register called up will be displayed in bold print next to the number in the top left corner of the display.
PULL-UP A REGISTRATION OF THE BLOCK REGISTRATIONS USING THE MULTI-TABS
You can also pull-up the registrations using the
MMuullttii TTaabbss
of the SD5.
In this mode, you can split the various registrations into groups, each containing 16 registrations and activate them simply by pressing one of
the 16 dedicated Multi-tabs.
To activate this mode, select
BBLLOOCCKK RREEGGIISSTTRRAATTIIOONN
from the
MMOODDEE SSEELLEECCTT
menu of the Multi-tabs.
Press the Registration button. The display shows the 16 registrations belonging to the current group at the bottom.
Load the Registration required by simply pressing the related Multi-tab.
The current group of Registrations can be changed by pressing one of the ten
SSTTYYLLEE
buttons.
SAVING A REGISTRATION OF THE BLOCK REGISTRATION
Proceed as follows to save a new Register in a Block Registration, once the desired Style, Tempo, Volumes and Parameters have been set using
the
RREEGG..
push button:
●
Return to the main page of the display using the
EEXXIITT
push button.
●
Press
SSAAVVEE
.
●
Select
FF11 RReeggiissttrraattiioonn
.
●
Enter the name of the Register using the keyboard and the
DDAATTAA CCUURRSSOORR
push buttons.
●
Select the number of the destination memory using the
SSTTYYLLEESS
push buttons.
●
Confirm that the Register is to be saved using
FF1100 SSaavvee
or cancel it using
FF55 EEssccaappee
.
SD5
66
Registrations
Page 69

SD5
67
SAVING THE ENTIRE GROUP OF THE BLOCK REGISTRATION ON DISK
Proceed as follows to save the current 198 registers on board within a Block Registration on disk in one single file with the .REG extension:
●
Press
DDIISSKK
to access the Disk menu.
●
Select the folder on the hard disk by entering the number with the
SSTTYYLLEESS
push buttons, or select the floppy disk with the
PPAAGGEE ++//--
push
buttons.
●
Press
FF33 SSaavvee
to enable the procedure.
●
Select
FF88 RReeggiissttrraattiioonn
.
●
In the page that appears you can enter the name of the file using the keyboard keys and the
DDAATTAA CCUURRSSOORR
push buttons.
●
Confirm the procedure using
FF1100 EExxeecc
. or cancel it using
FF55 EEssccaappee
.
LOADING A BLOCK REGISTRATION FILE
To load a Block Registration file into the Flash RAM of the SD5, proceed as follows:
Press
DDIISSKK
to access the menu and use the
PPAAGGEE ++//--
push buttons to choose between the floppy and the hard disk or press
FF55 FFoollddeerr CChhooiiccee
and then
FF88 RReeggiissttrraattiioonn
. Select the file to be loaded from the folder currently enabled using
DDAATTAA CCUURRSSOORR
and then confirm the procedure
using
FF22 LLooaadd
.
CALLING UP AND SAVING A REGISTER OF THE SINGLE REGISTRATION GROUP
The call-up function of a Single Registration is enabled by setting to Single the
FF77 RReeggiissttrraattiioonn MMooddee
parameter in the F3 Utility menu. Then
enter the number of the Single Registration/Register contained on the floppy disk or in the folder currently selected on the hard disk to call it
up. A Folder or a Floppy Disk may store up to a maximum of 999 Single Registrations, the numbering of which is automatically attributed according to the time order in which the file is created, whereas the file will always be displayed in alphabetical order.
In both cases it is always possible to display the list of Single Registrations stored in the Folder using the
DDIISSKK
menu. From this page you can
find the progressive number attributed to the Single Registrations when the file is created or you can select the Single Registration to be loaded directly using the
DDAATTAA CCUURRSSOORR FF1100 SSeelleecctt
and
FF22 LLooaadd
push buttons.
NNoottee::
The Single Registration cannot be called up using the numeric keypad in the Disk environment; therefore the Single Registration is either
selected using the normal procedures required in the Disk environment or you return to the main page of the display using the EXIT push button and enter the number of the desired Registration with REG. enabled.
To save a Single Registration on disk (.SRG extension) you must first select the target folder on the hard disk or the floppy disk.
●
Press
SSAAVVEE
.
●
Select
FF11 RReeggiissttrr
.
●
From the page that follows enter the name of the Single Registration using the keyboard keys and the
DDAATTAA CCUURRSSOORR
push buttons.
●
Confirm using
FF1100 SSaavvee
or cancel using
FF55 EEssccaappee
.
AUTOMATICALLY LOADING THE TEXT FILE AND MIDI FILE USING REGISTRATIONS
This function is one of the most powerful and useful functions of the SD5. It is used to avoid lots of procedures to load the file required when
playing live. There is no operational difference between a Registration of the Block Registrations and a Single Registration.
To automatically load a text file with .TXT extension or a Midi file with .MID extension all that is needed is for the name of the Registration to
match that of the .TXT or .MID file. The Midi file will be available by enabling
SSOONNGG PPLLAAYY
and then by pressing
SSTTAARRTT
.
DEFINING WHICH PARAMETERS WILL BE CONTROLLED BY THE REGISTRATION
It could prove useful to prevent the Registrations from saving or calling up one or
a number of parameters which they control. For example, you can prevent just the
Vocal Sets or the assignment of the effects from being called up. Each single parameter can be detached from the Registration. These settings are achieved in the
following manner:
●
From the main page of the display press
FF33 UUttiilliittyy
.
●
Select
FF66 RReeggiissttrraattiioonn MMeennuu
The page displayed shows the parameters in the middle, grouped per areas to
which they belong, called up using the function push buttons. For
FF33 KKeeyybb&&UUttiill
and
FF55 AArrrraannggee
a number of parameter pages are foreseen that are called up by pressing the same function push button
again. The parameters in the middle of the display are accessed using the
DDAATTAA
CCUURRSSOORR
push buttons whereas their enabling status is modified from
FF1100 SSeelleecctt
.
The first time you access the
FF66 RReeggiissttrraattiioonn MMeennuu
the Global parameters are shown. Below is the description.
F1 Global: This is used to disable the control of all the parameters related to MIDI, Left Control, Arrange Mode, Drum Mixer, Utility, Play
Control, Effect&Micro, 2nd Voice, Global Transpose and Left Level.
F2 Drum Mixer: This is used to disable the control of the parameters of Drum On/Off, Drum Volume, Drum Reverb, Drum Pan, Manual Drum
Registrations
Page 70

F3 Keyb&Util 1/2: This is used to disable the control of the parameters of Octave,
Portamento, Harmony, Pianist, Vocalizer, 2nd Sustain, 2nd
Split, Velocity Curve, Rotor Wheel
F3 Keyb&Util 2/2:
This is used to disable the control of the parameters of
Accordion, Modulation Assign, Modulation Rate, Tune, Vibrato,
Portamento Time, Bend Parameter, Footswitch, Arabic Menu,
Arabic Mode
F4 Eff&Micro: This is used to disable the control of the parameters of Global
Reverb, Right Reverb, Reverb Type, Chorus Type, Delay Type,
Distortor Type, Microphone Parameter
F5 Arrange 1/4: This is used to disable the control of the parameters of Jump
Intro, Jump Fill, Manual Bass, To Root, To Lowest, Lock, Split,
Interactive On/Off, Interactive Mode
F5 Arrange 2/4: This is used to disable the control of the parameters of
Program Change, Volume, Reverb, Effect, Pan Pot
F5 Arrange 3/4: This is used to disable the control of the parameters of Lower
Hold, Lower Mute, Lower Mode, Bass Sustain, Bass Mono/Poly,
Bass Boost, Bass Octave, Pedal Board, Bass To Pedal, 4Switch
Mode
F5 Arrange 4/4: This is used to disable the control of the parameters of Bass Lock, Lower Lock, Step Tempo, Sync Time, Chord Mode
F6 Tabs: This is used to inhibit the control of the enabling status of the push buttons on the control panel relevant to 2nd Voice, 1
Touch, Key Start and Key Stop.
F7 Save: This is used to save the settings made in the Flash RAM. These settings are stored even after the instrument has been tur-
ned off and are called up when it is turned on again.
F8 Default: This resets the original control status of all the parameters.
F9 Auto Switch: When it is enabled (On) it disables the
RREEGGIISSTTRRAATTIIOONN
push button (LED will go off) after having selected the Registration to
allow the user to select a Style with the numeric keypad.
F10 Select: Once the parameter has been selected
FF1100 SSeelleecctt
is used to modify its enabling status.
NNoottee::
All Registers store the values of the above parameters, however, there are some parameters (e.g. SPLIT, Foot Switch
assignment) which the user might not want to change while they change from one Register to another. This is where the
above feature becomes useful permitting the ability to 'freeze' certain features that need not change as you change from
one Register to anther!
SD5
68
Registrations
Page 71

SD5
69
Utility
The Utility menus are used to control the physical controllers, the MIDI accordions, the pedals and a group of parameters that modify the general performance of the SD5. From the main page of the display, press
FF33 UUttiilliittyy
to access the first page indicated as 1/2 at the top right part of
the display. To select the other page use the
PPAAGGEE ++//--
push buttons. The single groups of parameters, to which other menus correspond, are
enabled using the relative function push buttons.
UTILITY, PAGE 1/2
F1 Accordion: This calls up a new page with the parameters dedicated to the
use of a MIDI accordion. For further details, please refer to the
chapter 'MIDI Accordion' below.
F2 Modulation: This calls up a new menu dedicated to the management of the
Modulation Wheel. The parameters available are the following:
F1 LFO Pitch: When
OOnn
, the Modulation Wheel controls
the entry of the modulation of the LFO on the pitch to
create a cyclic vibrator. It can be set
OOffff
only if at least
one modulation between DCF, DCA, Cutoff and WhaWha
is enabled so that the Modulation Wheel always controls a parameter.
F2 LFO DCF: When
OOnn
, the Modulation Wheel controls
the entry of the modulation on the LFO on the filter
cut-off.
F3 LFO DCA: When
OOnn
, the Modulation Wheel controls
the entry of the modulation on the LFO on the amplitude to create a cyclic tremolo.
F4 Cutoff: When
OOnn
, the Modulation Wheel directly controls the filter cut-off. This proves useful to control the har-
monic richness of a timbre. It cannot be used if
FF66 WWhhaa--WWhhaa
is already enabled.
F5 Escape: This returns to the initial page of the
UUttiilliittyy
menu.
F6 Wha-Wha: When
OOnn
, the Modulation Wheel controls the Wha-Wha effect, typical of electric guitars. It cannot be
used if
FF44 CCuuttooffff
is already enabled.
F7 To Swell: When
OOnn
, it transfers all the parameters controlled by the Modulation Wheel to the optional Volume
pedal.
F8 Mod. Rate: The value entered using the
DDAATTAA CCUURRSSOORR
push buttons defines the velocity of the LFO's used with the
Modulation Wheel
F9 Mod. Amou: The value entered using the
DDAATTAA CCUURRSSOORR
push buttons establishes the modulation depth that can
be obtained using the Modulation Wheel for the LFOs.
F3 Pitch AFTERTOUCH:
This calls up a new menu dedicated to controlling the tuning. The parameters available are the following:
F1 Tune: The value indicated in Hertz, that can be modified +/- 100 Cents using the
DDAATTAA CCUURRSSOORR
push buttons, esta-
blishes the fine tuning of the whole sound generator of the SD5. By pressing the two
DDAATTAA CCUURRSSOORR ((LLeefftt aanndd RRiigghhtt))
push buttons together at the same time the standard tuning of 440 Hz is reset.
FF22 VViibbrraattoo::
When
OOffff
, it disables the vibrato on the timbres that use it. The sampled vibrato of some timbres is not
affected by the setting of this parameter.
FF33 PPoorrttaammeenntt
: The value set using the
DDAATTAA CCUURRSSOORR
push buttons controls the Portamento velocity.
FF44 LLeeggaattoo
: This allows you to choose between Portamento, Legato and Mono by pressing F4 repeatedly. The tied
notes function is extremely interesting to simulate the phrasing of some traditional soloist instruments, such as violins, trumpet, horn and trombone.
FF55 EEssccaappee
: This returns to the initial page of the
UUttiilliittyy
menu.
FF66 BBeenndd VVaalluu
: The value entered using the
CCUURRSSOORR
push buttons establishes the excursion semitones of the Pitch
Bend Wheel.
FF77 BBeenndd LLFFOO
: This assigns the vibrato control created with the LFO to the Pitch Bend Wheel, the intensity of which is
established by the value that can be modified using the
CCUURRSSOORR
push buttons.
FF88 BBeenndd DDCCFF
: This assigns the filter cut-off control to the Pitch Bend Wheel, the intensity of which is established by
Utility
Page 72

the value that can be modified using the
CCUURRSSOORR
push buttons.
FF99 BBeenndd DDCCAA
: This assigns the timbre amplitude control to the Pitch Bend Wheel, the intensity of which is established
by the value that can be modified using the
CCUURRSSOORR
push buttons.
FF1100 AAfftteerrttttoouucchh..::
This calls up a new menu dedicated to controlling the after touch. The parameters available are the
following:
FF11 CCuuttooffff::
When On, by pressing the function push button F1 again, the after touch controls the opening of the
filter that can make the timbre more brilliant.
FF22 LLFFOO DDCCOO::
When On, the after touch controls the vibrato.
FF33 BBeenndd::
The value entered using the
DDAATTAA CCUURRSSOOR
R
push buttons indicates the deviation semitones of the intonation. By entering a value of –1, additional expressiveness is given to the timbres such as the sax.
FF44 SSlliiddee::
This is an effect associated with the keyboard velocity and consists in a very quick tuning adjustment
of the chord during the sound attack, very similar to that encountered normally in the attack of almost all wind
instruments. The Slide can be used successfully to make the sax, trumpet, clarinet and guitar phrasing more
realistic and expressive.
FF55 AAttttaacckk::
When On, it enables the modulations controlled by the after touch with a slight delay. If for example the after touch is used to create a vibrato, with Attack set On the vibrato works only after a few seconds,
creating a more natural sensation.
FF66 LLFFOO DDCCAA::
When On, the after touch controls the tremolo effect.
FF77 LLFFOO DDCCFF::
When On, the after touch controls the modulation of the LFO on the filter cut-off.
FF88 VVoolluummee::
When On, the after touch controls the volume of the timbres of the Right section.
FF99 SSlliiddee TThhrr::
The value entered using the
DDAATTAA CCUURRSSOORR
push buttons establishes the velocity beyond which the
Slide affect is triggered. Lower the value less key dynamics is required to activate the Slide.
FF1
100 SSeennssiittiivv..::
The value entered using the
DDAATTAA CCUURRSSOORR
push buttons establishes the response sensitivity to the
after touch. If modified the control of all the parameters controlled by after touch are also changed.
F4 Footswitch: The SD5 can exploit two types of optional pedals (FS13 with
thirteen switches and FS6 with six switches) to control many
functions, including those already available for the X series.
F4 Footswitch calls up a page that shows the function assigned to each of the switches.
To modify it, use the
DDAATTAA CCUURRSSOORR ((UUpp aanndd DDoowwnn))
push buttons
to select the pedal switch and the
DDAATTAA CCUURRSSOORR (( LLeefftt aanndd
RRiigghhtt))
push buttons to modify the function assigned as desired,
amongst the following:
Sustain
Soft
Sostenuto
Arranger A
Arranger B
Arranger C
Arranger D
In./End. 1
In./End. 2
In./End. 3
Fill 1
Fill 2
Fill 3
Break
Start/Stop
Count In
Hold
Key Start
The Footswitch menu also uses the
FF55 EEssccaappee
function, to return to the initial
UUttiilliittyy
page and
FF1100 DDeeffaauulltt
to reset the origi-
nal settings. Once the modification has been completed, save the settings by pressing
SSAAVVEE
to save in Flash RAM using
FF1100
SSaavvee
. or to cancel the procedure use
FF55 EEssccaappee
or to return to the default Footswitch menu, use
FF44 UUnnddoo
.
F5 Swell: When this parameter is enabled, it allows you to use a volume pedal to control only the volume of the right lead section of
the keyboard. The arranger will not be affected.
F6 Regis. Menu:
MMeennuu::
This calls up the menu to program the control of the single parameters of a Registration, as described in the relevant
chapter.
SD5
70
Utility
Key Stop
Jump Intro
Jump Fill
Voice Down
Voice Up
Registr. Up
Registr. Down
Tempo +
Tempo Tap Tempo
minor
7th
m7th
5+
dim
Manual Bass
Kick Off
Snare Off
Hi-Hat Off
Cymbal Off
Tom/Fx Off
Rimshot Off
Latin1 Off
Latin2 Off
Latin3 Off
Clap/Fx Off
Drum Lock
Bass Lock
Chords Lock
Interactive
Glide
Fall Off
Shake
Overdrive
Delay
Wha-Wha
Chorus
Reverb
Distorsor
Rotor On/Off
Text PageText Page+
Vocalizer
Arabic_1
Arabic_2
Arabic_3
Arabic_4
Arabic_5
Arabic_6
Arabic_7
Arabic_8
Arabic_9
Arabic_10
Arabic_11
Arabic_12
Arabic_13
Arabic_14
Arabic_15
Arabic_16
Arabic_17
Arabic_18
Arabic_19
Arabic_20
FisaLeftDrum
Micro Dry
Dry on stop
Fade Out
Crash
Harmony
Program
Swell
Transposer -
Transposer +
2nd Voice
Bass To Lowes
Lead On/Off
Pianist
6th
7th+
Bassist
Accordion
Accordion
DrumFx Swell
DrumFx Fade
VoiFiltSwell
Page 73

SD5
71
F7 Regis. Mode: This allows you to choose what events should or shouldn't be impacted if a Registration from the Block Registration memo-
ries or a Single Registration is called as described in the relevant chapter.
F8 Test: This enables or disables visualisation in Arranger or Song Play mode of a text file (.TXT).
F9 Song Mode: This selects the access time to a Midi file on Hard Disk between
NNoorrmmaall
, (i.e. beginning with the first beat of the first bar),
and
FFaasstt
(which starts reproduction instantly at the beginning of the Midi file, without keeping in mind the bars that do not
contain any notes). In this way it is possible to play a number of Midi files without interruptions.
F10 Song Expr: If set to Yes, the volume pedal controls the global Song level.
UTILITY, PAGE 2/2
From the initial page of the Utility menu access is gained to the second page by
pressing
PPAAGGEE ++
. The parameters available are the following:
F1 Vocal Ch: This makes it possible to
LLoocckk
the MIDI channel selected to control the Vocalizer no matter what the source Midi file is. In this
way you avoid the need to always set the same MIDI channel for
different Midi files.
F2 Arabic: This calls up a new page to create tunings suitable for the
various countries using the Arabic scale, which is kept even in
the case of transposition. A scale is shown in the middle of the
display, the notes of which are selected using the octave keys
from C5 to B5. Once the note is selected a box appears indicating a value of -50 Cent (a fourth of a tone) that can be modified precisely using the
CCUURRSSOORR
push buttons. By pressing the
same key again the modification is cancelled and the tuning
returns to the original one. The parameters available are the
following:
F1 Left: This establishes whether the intervals of the
Arabic scale are operational also on the Arranger and
Lower parts or otherwise. If set as
NNoo
the Arabic scale
is not cut-out from the whole Left part.
FF55 EEssccaappee::
This returns to the initial page of the Utility menu.
FF66 FFoooo ttsswwiittcchh::
If set as
NNoottee MMaappppiinngg
, the Arabic scale is also applied to the notes played using the pedal. If set as
Arabic Set, the thirteen Arabic scales to be called up instantly are assigned to the pedal switches.
FF1100 NNoorrmmaall::
This resets the standard tuning.
When the modifications have been completed, save the scale in one of the thirteen available memory locations. Press
SSAAVVEE
to access the list of memory locations that can be selected using the
CCUURRSSOORR
push buttons.
FF1100 SSaavvee
saves the
scale in the location selected at the time and
FF55 EEssccaappee
returns to the previous page. The thirteen Arabic scales
saved can be easily called up while playing live using the optional pedal switches FS 6 and FS 13.
F3 Harm. Mode:
This makes it possible to use the
HHAARRMMOONNYY
push button to activate the Arab scale instead of calling up the
HHaarrmmoonnyy
function.
F4 Password: This is used to set a password for those Hard Disk folders requiring it (see chapter Disk, Lock function) to protect data wri-
ting and reading. The password is assigned to the Hard Disk folders by pressing the
FF11 MMooddiiffyy
button. If no password has been
assigned yet, use the keys of the keyboard to write the new name into the
NNeeww
line. The name must consist of no more than
six letters. Press
FF1100 CCoonnffiirrmm
to confirm. If an old password exists and you wish to modify it, first of all write the old name
into the Old line and then the new name into the New line. Finally, press
FF1100 CCoonnffiirrmm
to confirm.
FF55 EEssccaappee
takes you back to
the main page of the display.
F5 Page Memo: This stores the last page of each menu that will be displayed the next time the same menu is called up.
F6 Video: This is used to select the type of video output signal using the
CCUURRSSOORR
push buttons, between
PPAALL
(European television
system),
NNTTSSCC
(American television system),
SSVVHHSS PPaall
(super VHS European),
SSVVHHSS NNTTSSCC
(super VHS American),
MMoonniittoorr
(VGA
monitor for computers),
OOFFFF
(video card disabled).
Utility
Page 74

F7 Disp. Time: The value entered using the
CCUURRSSOORR
push buttons establishes the time that the page in use remains displayed, at the end
of which the SD5 returns to the main page of the display. Set as Off, the page in use remains displayed until another page is
manually accessed or cancelled.
F8 Disp. Mode: When set to
AAuuttoocclloossee
, the page from which the Voices and the Styles are selected, closes after the selection has been car-
ried out and the previous displayed page is shown again.
F9 Style Sel: Defines the Styles selection mode. When set to
GGrroouupp
, the selection is carried out using the Styles groups corresponding to
the relevant push buttons like on the SD1. When set to
NNuummeerriicc
, the Style is called up by entering the three numbers on the
numeric keypad (
SSTTYYLLEESS
push buttons), like on the X-series.
F10 Voice Sel: This is used to select the call-up mode of the Voices. In
MMooddee 11
the last Voice selected within a single family is always auto-
matically called up when that group is selected. To change it, simply select another Voice within the same family. In
MMooddee 22
the Voice is enabled only after it has been selected within the selected group using the function push buttons, so that the
Voice in use is not replaced just by calling up a family, but by the actual selection of the voice to be used.
SD5
72
Utility
Page 75

SD5
73
MIDI Accordions
The SD5 can be managed by an Accordion connected via MIDI, thanks to the fact
that the attribution of the MIDI channels to the single parts of the keyboard, the
bass transposition, the velocity and also the use of the bass voices can be controlled. The controls directly depend on the
MIDI implementation of the Accordion therefore, for very simple MIDI accordions
some of the functions described hereafter may not be available.
CONNECTING A MIDI ACCORDION
The MIDI Out Output of the MIDI Accordion should be connected using a MIDI cable
to the MIDI 2 In input (Keyboard) of the SD5. Enable the Accordion mode on the
SD5.
ENABLING THE ACCORDION AND ITS PARAMETERS
The parameters for the MIDI Accordion are accessed, from the main page of the display, by pressing
FF33 UUttiilliittyy
and, from the first page of the
UUttiilliittyy
menu, by pressing
FF11 AAccccoorrdd
. A new page of dedicated parameters opens. When the Accordion is connected, the Accordion mode is
enabled by pressing F10, which from the disabled mode (denoted by Inactive), becomes enabled (denoted by Active). To disable the Accordion
mode, press the F10 push button again. The Accordion mode calls up a number of MIDI settings that can however be modified as desired.
The following parameters are available in the Utility Accordion menu:
F1 Chord Mode: This is used to select two different methods for acknowledging the chords.
IInntteerrnnaattiioonnaall
is the most widely used system;
BBeellggiiqquuee
is to be used only to acknowledge Belgian chords. Press function push button
FF11
to switch from one system to the
other.
F2 Left Velo: This selects the velocity curve for the notes played manually using the chords of the Accordion. By pressing the
FF22
function
push button repeatedly you can select the response curve. In the case of
FFiixxeedd
curve you can enter the fixed velocity value
applied to the notes played using the
DDAATTAA CCUURRSSOORR
push button.
F3 Right Vel: The same as for
FF22 LLeefftt VVeelloo
but dedicated to the notes played with the right hand, namely the lead.
F4 Left Drum: When set as
OOnn
, it is used to play two percussion sounds of the Drum section of the SD5 with the bass voices of the Accordion
and two more voices with the Accordion chords. The two voices with relative velocity values can be selected for chords and
bass. Using the
DDAATTAA CCUURRSSOORR ((UUpp aanndd DDoowwnn))
push buttons, go to the voice and then select it using the
DDAATTAA CCUURRSSOORR ((LLeefftt aanndd
RRiigghhtt))
push buttons. Moving around again using the
DDAATTAA CCUURRSSOORR ((UUpp aanndd DDoowwnn))
push buttons you can modify the velocity
value using the
DDAATTAA CCUURRSSOORR ((LLeefftt aanndd RRiigghhtt))
push buttons. When a voice is to be completely excluded, set the velocity at 0.
Note: It is advisable to use the Left Drum function when the Arranger is not in use.
F5 Autochord: This excludes the acknowledgement of the chords leaving the Accordion player free to play the bass and the chords manual-
ly, without any automation.
F6 Bas Sust: The value that can be modified using the
DDAATTAA CCUURRSSOORR
push buttons indicates the length of the Sustain on the manual bass,
when the
MMAANNUUAALL BBAASSSS
push button is in use (LED lit).
F7 Bas To Ch: Set as On, it also includes the bass note in the acknowledgement of the chords, to create chords with varied bass using the
BBAASSSS TTOO LLOOWWEESSTT
push button.
F8 Bas Octav:
The value that can be modified using the
DDAATTAA CCUURRSSOORR
push buttons indicates the octave of the manual bass voice, with the
MMAANNUUAALL
BBAASSSS
push button enabled.
F9 Lower Oct: For each voice assigned to Lower 1 and Lower 2, its octave can be modified using the
DDAATTAA CCUURRSSOORR
push buttons and push
button
FF99
to switch between the two parameters.
F10 Accordion Mode:
This enables or disables the use of the parameters for the MIDI Accordion.
SAVING THE PARAMETERS FOR THE MIDI ACCORDION
Thanks to the Power On Set-up function, all the settings of the parameters described can be saved, which will be called up automatically when
the SD5 is turned on. To enable this procedure, press the
SSAAVVEE
push button and then select
FF33 PPoowweerr OOnn SSeett--uupp
. Press
FF1100 SSaavvee
to
save the settings in Flash RAM. Further details on Power On Set-up are given in the dedicated section.
MIDI Accordions
Page 76

THE MIDI PARAMETERS FOR THE ACCORDION
When the Accordion is enabled using
FF1100 AAccttiivvee
, the SD5 calls up the
MMIIDDII
AAccccoorrddiioonn 11
set-up to attribute the MIDI channels to the keyboard sections in MIDI
reception. The MIDI
AAccccoorrddiioonn 11
set-up is that most frequently used with most MIDI
accordions. The attribution of the MIDI reception channels can be modified in
menu
FF66 MMIIDDII
that is accessed from the main page of the display and then using
FF22 CChhaannnneell RReecceeiivvee
.
You will see that, when the Accordion mode is enabled, the MIDI Set-up in
FF1100
is
AAccccoorrddiioonn 11
. To modify the settings of the single sections, move onto one of them
using the
DDAATTAA CCUURRSSOORR ((UUpp aanndd DDoowwnn))
push buttons and then enter the MIDI chan-
nel using the
DDAATTAA CCUURRSSOORR ((LLeefftt aanndd RRiigghhtt))
push buttons. The main sections
involved with the MIDI Accordion are:
Right Channel: This is the setting of the MIDI receiving channel for the part played with the right hand, namely the lead.
Left Channel: This is the setting of the MIDI receiving channel for the part played with the left hand, namely the left section of the SD5
dedicated to the acknowledgement of the chords for the Arranger.
Bass Channel: This is the setting of the MIDI receiving channel for the manual bass section.
Drum Channel: This is the setting of the MIDI receiving channel used to play the percussion timbres when the Left Drum mode is enabled.
To save the settings, press the
SSAAVVEE
push button and then
FF1100 SSaavvee
. Further details are given in the MIDI section.
TIPS TO QUICK CONNECTION OF A MIDI ACCORDION
Connect the MIDI cable to the MIDI Out of the Accordion and the MIDI In 2 of the SD5.
Call up the
FF33 UUttiilliittyy
menu from the main page of the display and then press
FF11 AAccccoorrddiioonn
and then
FF1100
to set the parameter on
AAccttiivvee
.
If the sections of the Accordion (Right, Lower and Chords) do not play correctly, exit using the EXIT push button, press
FF66 MMIIDDII
and then
FF22
CChhaannnneell RReecceeiivvee
to set and match the MIDI channels between the Accordion sections and those of the SD5 using the
DDAATTAA CCUURRSSOORR ((UUpp aanndd
DDoowwnn))
and
DDAATTAA CCUURRSSOORR ((LLeefftt aanndd RRiigghhtt))
push buttons. If the settings have been modified, save them using the
SSAAVVEE
push button then
FF1100 SSaavvee
,
in the
AAccccoorrddiioonn 11
set-up, which is called up each time the Accordion mode is enabled.
The Ketron SD5 is provided with two MIDI set-ups for Accordions.
AAccccoorrddiioonn 11
is dedicated to the use of the Accordion with the SD5 Arranger and
AAccccoorrddiioonn 22
controls all sixteen MIDI parts of the SD5. The settings of the Accordion menu in the Utility menu can be saved in a Registration.
To enable the manual bass, press
LLEEFFTT CCOONNTTRROOLL
and then the
FF33 MMaannuuaall BBaassss
push button.
NNoottee::
Remember that most problems relating to a MIDI Accordion depend on the settings of the MIDI transmitting channels on the MIDI
Accordion. If various MIDI instruments are used and connected to the Accordion, it is preferable to modify the MIDI set-up of the SD5 rather than
to re-program the Accordion MIDI set-up to match the MIDI set-up of the SD5.
SD5
74
MIDI Accordions
Page 77

SD5
75
MIDI
MIDI is a communication protocol used to transmit and receive commands, messages and events that are then translated by the compatible
musical instrument into notes, events and commands. This protocol is used to connect a computer with dedicated programs to the SD5, to control other sound modules or keyboards directly from the SD5 and to connect the SD5 to an Accordion, a Sax or a MIDI guitar. Various books have
been written on the MIDI standard and some simple research via Internet or in any specialised library can help you better understand how it
works. Naturally, again on Internet, you can find sites that attempt to explain what MIDI is, free of charge. In any event a skilled musician will
not mix up the MIDI protocol with the Midi files (often called MIDI improperly): the first is indeed the starting point for the second. The SD5
(thanks to the polyphony) offers 32 independent MIDI parts. Sixteen parts are dedicated to using the keyboard when playing live, with separate parts for the
Arranger and the lead. The other sixteen are reached using the MIDI In 1 input that
exploits the tone generator of the SD5 as a module in independent General MIDI
standard. The same sixteen GM parts are used to reproduce the Midi files in
SSoonngg
PPllaayy
and in the sequencer.
The SD5 parameters are used to control each MIDI part and channel of the 32 available. Remember not to use MIDI cables longer than 5 meters (15 Feet) to avoid running into transmission errors.
The SD5 distinguishes the programming of the parts between those in General MIDI
and those dedicated to the single sections of the SD5. The General MIDI settings
are called up from the main page of the display using
FF11 GGMM
and the MIDI settings
of the keyboard are called up from the main page of the display using
FF66 MMIIDDII
.
USING THE SD5 AS A GENERAL MIDI MODULE
To reach the sixteen independent MIDI channels from the keyboard, you must use a Midi file loaded in
SSoonngg PPllaayy
, or you can exploit the MIDI In
1 input (GM). With regard to
SSoonngg PPllaayy
there is a dedicated menu (
FF11 GGMM PPaarrtt
) that is used to modify the parameters of each single part, which
has already been explained in the
SSoonngg PPllaayy
section (see relative section). With regard to the MIDI In 1 input (GM), the modification page of the
parameters for each single MIDI part is enabled using
FF11 GGMM
from the main page of the display. The parameters modified using
FF11 GGMM
cannot be
saved, on the contrary to what occurs with the same parameters in
SSoonngg PPllaayy
.
MODIFYING A SINGLE GM PART
From the main page, press
FF11 GGMM PPaarrtt
to call up the page dedicated to the parameters of a single GM part. The Part is shown in the middle of the display, the parameters (that can be modified) are assigned to the function push buttons. Right
underneath is the voice assigned to the Part and the effect used. The bottom part
of the display is dedicated to monitoring the activities of the sixteen Parts on the
MIDI In 1 (GM) input, and can be useful when searching for the Part to be modified.
To move around between the single Parts use the
PPAAGGEE ++//--
push buttons. You can
also directly access one of the 16 parts using the
MMuullttii--TTaabbss
of the SD5. Consult
the specific chapter for further information.
The parameters that can be modified must be selected using the dedicated function push button before the value can be modified.
Timbre: Each track can use a voice taken from the Voices and User Voices. To
modify the voice assigned follow the normal procedure using the
VVOOIICCEESS,, UUSSEERR VVOOIICCEESS,, PPAAGGEE ++//--
push buttons and the function push buttons.
Modulation effect: For each single track you can choose the modulation effect to be applied to the voice between Chorus, Distorsor and Delay,
using the
DDAATTAA CCUURRSSOORR
push buttons. The effect entity can be programmed using
FF33 CChhoorruuss//DDiissttoorrssoorr//DDeellaayy
.
F1 Volume: This modifies the volume of the whole track. The value can be changed using the
DDAATTAA CCUURRSSOORR
push buttons which, if pres-
sed together at the same time, reset the value.
F2 Reverb: This modifies the reverb of the complete part. You may vary the value using the
DDAATTAA CCUURRSSOORR
pushbuttons which, if pres-
sed at the same time, put the value to zero.
F3 Chorus/Distorsor/Delay:This modifies the entity of the modulation effect chosen between Chorus, Distorsor and Delay assigned to the track using the
DDAATTAA
CCUURRSSOORR ((UUpp aanndd DDoowwnn))
push buttons. The value can be changed using the
DDAATTAA CCUURRSSOORR ((LLeefftt aanndd RRiigghhtt))
push buttons which, if pres-
sed together at the same time, reset the value. The display shows the type of effect chosen next to
FF33
and also below the timbre.
F4 Panpot:
This modifies the arrangement of the timbre on the stereo panorama. The value can be changed using the DATA CURSOR(Left and
Right) push buttons which, if pressed together at the same time, take the timbre back to the middle of the stereo panorama.
F5 Filter: This calls up the page where some MIDI events can be cut-out. It may occur for example, that the musician wishes to avoid
MIDI
Page 78

using the Modulation or some other MIDI parameter that directly affects the voice. The MIDI filters can also be used to better
control an external MIDI module. The page called up from F5
FFiilltteerr
shows a table of four rows and four columns relative to
the sixteen Parts. To be able to access the MIDI filter of a single
Part use the
FF11
and
FF66
push buttons for Parts 1, 2, 3 and 4 that
are to be selected by pressing the same push buttons repeatedly. Use push buttons
FF22
and
FF77
for Parts 5, 6, 7, and 8.
Use push buttons
FF33
and
FF88
for Parts 9, 10, 11 and 12 and push
buttons
FF44
and
FF99
for Parts 13, 14, 15 and 16. Once the Part to
which the MIDI filter is to be applied has been found, select
which MIDI message is to be cut-out from the reproduction
using the
DDAATTAA CCUURRSSOORR
push buttons and enable the filter
using the
FF1100 OOnn//OOffff
push button. The filter is enabled when “
OONN
” appears next the MIDI message to be filtered. The MIDI mes-
sages that can be filtered are the following:
Notes: all notes within the track
CCoonnttrrooll CChhaannggee
: all Control Changes within the track
PPrrooggrraamm CChhaannggee::
all Program Changes
AAfftteerr TToouucchh::
all After touch events
PPiittcchh BBeenndd::
all Pitch Bend events
VVoolluummee::
only Control Change 07 Volume
PPaann::
only Control Change 10 Pan
RReevveerrbb::
only Control Change Reverb Send
CChhoorruuss::
only Control Change Effect Send
MMoodduullaattiioonn WWhheeeell::
only Control Change 01 Modulation
EExxpprreessssiioonn::
only Control Change 11 Expression
RRPPNN::
only Control Change RPN
NNRRPPNN::
only Control Change NRPN
To exit from
FF55 FFiilltteerr
press
EEXXIITT
or
FF55 EEssccaappee
that send to the main page of
SSoonngg PPllaayy
.
F6 Key Shift: This changes the transposition of the track selected by up to +/- 24 semitones. The value can be changed using the
DDAATTAA
CCUURRSSOORR
push buttons which, if pressed together at the same time, reset the value.
F7 Channel Tx Rx: When push button
FF77
is pressed repeatedly, it switches from
TTXX
(that indicates the transmission MIDI channel of the selec-
ted part) to
RRXX
(that establishes the MIDI receiving channel). The value can be changed using the
DDAATTAA CCUURRSSOORR
push but-
tons. If no value is specified the track receives and transmits on the MIDI channel having the same number as the Part.
F8 Part Mode: This modifies the operational mode of the track, using the
DDAATTAA
push buttons. The possible choices are:
Voice: track dedicated to the use of a voice
DDrruummsseett::
track dedicated to the use of a Drumset
DDrruumm22::
track dedicated to the use of Live Drumsets
VVooccaalliizzee::
track dedicated to the control of the Vocalizer
Based on the choice made, Drumset, Live Drum, Voice and Vocal Set can be called up or otherwise. Whereas in the case of
Voice and Drumset mode the Voice and Drumset are called up normally. For Drum 2 and Vocal Set the Live Drums and Vocal
Sets must be selected using the
VVAALLUUEE ++//--
push buttons. The modification of operational mode of a track can make the song
incompatible with modules in General MIDI.
F9 Mute: If the function is enabled, the track is cut-out from the reproduction.
F10 16 Parts: This enables the display of each single parameter, showing its value for all sixteen Parts.
MODIFYING A PARAMETER FOR THE SIXTEEN GM PARTS
As already mentioned, the status of a single parameter for all sixteen tracks can
be displayed using the
FF1100 1166 PPaarrttss
function. To rapidly access a parameter, select
it from the
GGMM PPaarrtt
page and then press
FF1100 1166 PPaarrttss
to display the status of that
parameter for the sixteen tracks. The page
FF1100 1166 PPaarrttss
structure shows a table
with four lines and four columns relative to the sixteen Parts. To access the single
Part use push buttons
FF11
and
FF66
for Parts 1, 2, 3 and 4 that are selected by pres-
sing the same push buttons repeatedly. Use push buttons
FF22
and
FF77
for Parts 5, 6,
7, and 8. Use push buttons
FF33
and
FF88
for Parts 9, 10, 11 and 12 and push buttons
FF44
and
FF99
for Parts 13, 14, 15 and 16. Once the Part has been found its value can be
modified using the
DDAATTAA CCUURRSSOORR
push buttons which, if pressed together at the
same time, will reset the value.
The parameters that can be modified in this way are distributed over seven pages
SD5
76
MIDI
Page 79

SD5
77
that are called up using push buttons
PPAAGGEE ++//--
, and include Volume, Reverb, Effects, Pan, Shift, Channel Rx and Channel Tx (already explained in
the previous section).
FF1100 MMuuttee
is used to cut-out only the track selected at the time from the reproduction.
THE MIDI PARAMETERS OF THE SD5 SECTIONS
From the main page of the display press
FF66 MMIIDDII
to call up the menus dedicated to the SD5 sections. For each single function the single sections
involved are displayed together with relative value. To move around between the sections use the
DDAATTAA CCUURRSSOORR ((UUpp aanndd DDoowwnn))
push buttons
and use the
DDAATTAA CCUURRSSOORR ((LLeefftt aanndd RRiigghhtt))
push buttons to modify the value.
THE MIDI SET-UPS
To simplify programming, the SD5 uses some memory locations called MIDI Set-up's that are used to save the MIDI settings. When a modification has been completed in these menus, you can save it by pressing the
SSAAVVEE
push button. The options available are the following:
F4 Undo: This returns to the page of MIDI channel settings, restoring the initial situation.
F5 Escape: This returns to the MIDI channel settings page without saving.
F9 Default: This restores the default settings.
F10 Save: This confirms that the settings in the current MIDI set-up are to be saved.
The preferred MIDI set-up can be called up when turning the instrument on using the
PPoowweerr O
Onn SSeettuupp
function. Once the MIDI set-up has been
selected, go back to the initial page of the MIDI menu using
FF55 EEssccaappee
, press the
SSAAVVEE
push button, select
FF33 PPoowweerr OOnn SSeettuupp
and then
confirm using
FF1100 SSaavvee
. More details are given in the Power On Set-up section.
THE PARAMETERS OF THE MIDI MENU
F1 Channel Transmit: This is used to associate a MIDI transmitting channel on the MIDI OUT to each section. The following functions
are also available:
F4: this switches between the Channel
Transmit page and Channel Receive page.
FF55 EEssccaappee
: This returns to the initial page
of the MIDI menu.
FF1100 MMIIDDII SSeettuupp::
This calls up the settings
already put in order and saved to use the
SD5 via MIDI. The MIDI Set-up currently
selected is also that where the settings
will be saved using the
SSAAVVEE
push button.
F2 Channel Receive: This is used to associate a MIDI receiving channel
on MIDI In 2 (Keyboard) to each section. The parameters are the same as
FF11 CChhaannnneell TTrraannssmmiitt
.
F3 Transpose Transmit: The value for each single section identifies the
number of transposition semitones applied to the
notes transmitted on the MIDI Out.
F4 Transpose Receive: The value of each section identifies the number of
transposition semitones applied to the notes
received on the MIDI In 2 (Keyboard).
F5 Filter Tx: Valid for all the sections, the MIDI filters being
transmitted are used to enable or disable the
transmission of some MIDI messages such as the
Pitch Bend, some Control Changes and exclusive
system messages. The type of message to be filtered is selected using the
DDAATTAA CCUURRSSOORR
push but-
tons and is enabled or disabled using the
FF1100
SSeelleecctt
push button. The filter is enabled when the
symbol “*” appears next to the MIDI message.
F6 Filter RX: The same as
FF55 FFiilltteerr TTxx
, but dedicated to the MIDI
messages received on MIDI In 2 (Keyboard).
F7 Program Change Tx: For each section you can establish whether the
MIDI
Page 80

Program Change message associated with the
Voice in use is also to be transmitted to MIDI Out.
The transmission function is enabled or disabled
using the
FF1100 SSeelleecctt
push button. The
22nndd//PPrroogg
section refers to the Second Voice and to the
Program memory, processed as a Single Voice. The
Voice sections 1, 2, 3 and 4 refer to the single
Voices of a Program.
F8 Program Change Rx: The same as
FF77 PPrrooggrraamm CChhaannggee TTXX
, but dedicated
to the Program Changes received on MIDI In 2 (Keyboard).
F9 Clock SoftThru:
The SD5 can receive and transmit the MIDI Clock
that is used to synchronise the Arranger,
SSoonngg PPllaayy
and the Sequencer with other external units. The
function of the
SSTTAARRTT
push button depends on
these settings. The parameters available are selected using the
DDAATTAA CCUURRSSOORR
push buttons and are
enabled using
FF1100 SSeelleecctt
. They are:
Clock Out: When this function is enabled,
the SD5 sends the MIDI Clock to MIDI Out
and therefore it can control the tempo
values during reproduction in external
sequencers.
CClloocckk IInn::
When enabled, the reproduction
controls of the SD5 (including tempo) depend on MIDI Clock inputs received on MIDI In and not on the
push buttons on the control panel.
SSoofftt TThhrruu 11::
When enabled, the MIDI Clock received on MIDI In 1 GM is sent back to MIDI Out.
SSoofftt TThhrruu 22
: When enabled the MIDI Clock received on MIDI In 2 Keyboard is sent back to MIDI Out
F10 Utility: This is the only menu that is to be called up from
the initial page of the MIDI menu and is used to
access some settings dedicated to the MIDI ports.
The parameters (whose values of are called up by
pressing the relative function push button repeatedly) are:
F1 MIDI In 1: This is used to modify the initial setting of the MIDI port from GM to
Keyboard.
FF22 MMIIDDII IInn22//CCoommppuutteerr
: The same as
FF11 MMIIDDII
IInn 11
. The setting also establishes the type
of MIDI input used by the Interface
Computer.
FF33 MMIIDDII OOuutt
: This establishes which group of MIDI channels will be sent to MIDI Out.
FF44 CCoommppuutteerr OOuutt
: This establishes which group of MIDI channels will be sent to the Computer Interface.
FF55 EEssccaappee
: This returns to the initial page of the MIDI menu.
FF66 CCoommppuutteerr
: This selects the type of computer to which the SD5 is connected.
FF77 LLooccaall OOnn//OOffff
: This is a MIDI condition for which, when set as
OOffff
, all the SD5 sections are no longer
controlled by the keyboard but only by the MIDI In input.
CALLING UP THE PROGRAMS, THE ONE TOUCH MEMORIES AND THE REGISTRATIONS VIA MIDI
Program: Send the relative Program Change to the MIDI channel associated to the Right section. To assure good reception, before you send the
Program Change, ensure that the
PPRROOGGRRAAMM
push button is enabled (LED lit).
One Touch: send the relative Program Change on the MIDI channel associated to the Right section. To assure good reception, before you send
the Program Change, ensure that the
11 TTOOUUCCHH
push button is enabled (LED lit).
Registration: Send the relative Program Change on the MIDI channel associated to the Registrations. The status of the
RREEGGIISSTTRRAATTIIOONN
push but-
ton is not important.
SD5
78
MIDI
Page 81

SD5
79
DISK
The SD5 can be supplied with a Hard Disk and has a standard Disk drive for Floppy
Disks of 720 Kb (DD) or 1,4 MB (HD). The SD5 uses the DOS format for the Floppy,
therefore the same floppy disk can be used to exchange files from PC or Mac. The
direct connection to a PC on the back of the control panel is used to directly control the contents of the Hard Disk via PC, by means of KetronFT, a free application
that can be downloaded from the www
.ketron.it internet pages.
HOW IT WORKS AND HOW THE FILES OF THE HARD DISK ARE MANAGED
Likewise for any computer Hard Disk, the SD5 offers the possibility to create folders and to copy, rename and cancel compatible files. The Hard
Disk can store up to a maximum of 99 Folder (or files) each of which may include any type of file for a maximum of 999 files. The files are
displayed in alphabetical order and they are attributed a progressive number according to the time order in which they are created, which will
be required in some cases to load the file directly by entering the number using the numeric keypad (
SSTTYYLLEESS
push buttons) or to call-up a Folder.
GENERAL RULES
●
All the functions relative to the hard disk and to the floppy disk can be accessed by pressing the DISK push button.
●
Press this push button to use the Hard disk:
HHAARRDD ((PPAAGGEE --))
●
Press this push button to use the Floppy disk: FLOPPY
((PPAAGGEE ++))
●
To exit from the Disk menus press the
DDIISSKK
or the
EEXXIITT
push button.
The
DDiisskk
page shows the files or the folders according to the function selected in the middle of the display. Next to the type of disk in use (Hard
or Floppy) you will see the number and the name of the folder selected at the time between brackets. Underneath you will also see the number
of elements whether they be files or folders.
HOW TO MOVE AROUND AMONG FILES
The files within a folder are to be managed as follows:
●
The files are put in alphabetical order in the middle of the display. To scroll the list of files use the
DDAATTAA CCUURRSSOORR ((UUpp aanndd DDoowwnn))
push buttons.
●
To select a file to load into memory, copy, cancel or rename it press the
FF1100 SSeelleecctt
function push button.
●
To select following pages of files, pointed out by arrows, press the
DDAATTAA CCUURRSSOORR ((LLeefftt aanndd RRiigghhtt))
push buttons.
●
To load a file after having selected it using
FF1100 SSeelleecctt
press the
FF22 LLooaadd
function push button
●
To copy a file selected from Hard Disk to Floppy and vice versa, press the
FF44 CCooppyy
function push button.
●
To erase a file selected for good, press the
FF66 DDeelleettee
function push button.
●
To rename a file selected press the
FF77 RReennaammee
function push button.
The Folders are selected only by entering the relative number using the numeric keypad (
SSTTYYLLEESS
push buttons).
If you wish to convert a .KAR Midifile into a .MID Midifile, after having terminated the selection, press
FF33 CCoonnvveerrtt
.
THE DISK FUNCTIONS FOR THE HARD DISK
The SD5 offers some functions used to simplify the loading procedure: It can show the whole contents of a single Folder, find just one type of
file to be shown on the display when many different types of files are stored, select one or a number of files. The SD5 cannot display the whole
contents of the Hard Disk by grouping the files and Folders together but only the contents of one Folder at a time.
F1 Dir: This is used to show the whole contents of the Folder in use on the display, no matter which type of file is involved. When Global
appears on the display it means that all the files are displayed.
F2 Load: This is used to load the file found at the time in the appropriate memory if no file is selected using F10 Select. If on the other
hand one or a number of files have already been selected using
FF1100 SSeelleecctt
, only those pointed out with the '>' symbol will be
loaded. Another very handy possibility for the Folder with just a few files is that of selecting the whole contents by pressing the
DDAATTAA CCUURRSSOORR
push buttons together at the same time.
F3 Save: This calls up a page from which the type of file to be saved on the disk and on the Folder selected can be chosen. The page
DISK
Page 82

displayed by pressing
FF33 SSaavvee
makes it possible to select the file to save. Once this has been selected with the relevant function buttons, a second page showing any files of the same type already stored in the Folder is displayed. In this way you are in
a position to see the name of the files before starting the saving procedure by pressing again
FF33 SSaavvee
. The page displayed by
FF33 SSaavvee::
makes it possible to modify the file name with the keyboard keys,
DDAATTAA CCUURRSSOORR. FF55 EEssccaappee
aborts the operation,
FF1100 EExxeecc
confirms
the saving procedure.
The options are the following:
F1 Global: This returns to the previous page.
FF22 SSiinnggllee PPrrooggrraamm
: This saves the Single Program currently activated.
FF33 SSiinnggllee RReeggiissttrraattiioonn::
This saves the Single Registration
currently activated.
FF44 PPaatttteerrnn::
This saves one of the Patterns loaded in Flash
RAM. To select the Pattern to save, use the DATA CURSOR
push buttons.
FF55 MMiiddiiffiillee::
When a Midi file has been loaded or recorded,
calling up F5 Midifile from function F3 Save enables a special menu that allows you to convert any Midifile in .KAR format (F3 Convert).
FF66 CCuussttoomm SSttyylleess::
This saves just the settings of the Custom Style parameters in one file in Flash RAM and not the single tracks with the MIDI events.
FF77 PPrrooggrraamm::
Saves all the Program memories in one single file.
FF88 RReeggiissttrraattiioonn::
Saves all the Registrations in memory into one single file.
FF99 TTeexxtt::
Not in use.
FF1100 OOtthheerrss::
This displays a page from where you can select:
FF11 UUsseerrddrruumm::
this is used to save the User Drums in memory.
FF22 UUsseerrvvooiiccee::
this is used to save the User Voices in memory.
FF33 VVooccaallsseett::
this is used to save the Vocal Sets in memory.
F4 Copy: This is used to copy one or a number of files from Floppy Disk to Hard Disk and vice versa. The copying procedure from one
Folder to another is found in the F8 Folder section.
COPYING FROM FLOPPY TO HARD DISK
When copying from Floppy to Hard Disk you must first choose the destination
Folder.
●
Enable the
DDIISSKK
menu using the dedicated push button.
●
Choose the Hard Disk using the
PPAAGGEE ++//--
push buttons.
●
Using the numeric keypad (
SSTTYYLLEESS
push buttons) type-in the destination
Folder. If you do not know the number associated with the Folder, press
FF88
FFoollddeerr
to display the list. From the page displayed, you can also create a new
Folder using
FF11 NNeeww
. The Folder selected is enhanced on the first line of the
display.
Once you have chosen the Folder, you can return to the Floppy Disk using the
PPAAGGEE
++//--
push buttons for the next steps.
First of all, select the files to be copied using the following buttons:
●
DATA CURSOR (Up and Down) to go from one file to the next within those displayed.
●
DDAATTAA CCUURRSSOORR ((LLeefftt aanndd RRiigghhtt))
to go to the next group of files, if they exist.
●
FF1100 SSeelleecctt
to confirm the files to be copied, next to which an arrow appears to confirm that the selection has taken place.
Pressing both
DDAATTAA CCUURRSSOORR ((LLeefftt aanndd RRiigghhtt))
buttons at the same time selects all files present o the floppy disk.
If there are many files with different extensions on the floppy disk, function
FF55 FFiillee CChhooiiccee
can become very useful: this function opens a page
from where you may select, using the relevant function buttons, the type of file to display among the different types present.
NNoottee::
Remember that you have to select 'Pattern' and not' Custom Styles' to load a Style.
Once you have selected the files to copy, press
FF33 CCooppyy
to start the operation. The page that appears now displays the original file (Copy) and
the final disk destination
((FFrroomm TToo))
.
In the centre of the display the name of the first file selected appears. This can be modified using the keyboard keys and the
DDAATTAA CCUURRSSOORR
but-
tons.You may copy each single file confirming the copy operation each time by pressing
FF1100 EExxeeccuuttee
. If you have not modified the name, the
copied file will have the same name as the original one. At the end of the copy operation, the next file among those selected will appear. If a
SD5
80
DISK
Page 83

SD5
81
number of files has been selected, you may skip the current file and go to the next one pressing
FF88 SSkkiipp
.
Pressing
FF99 CCooppyy AAllll
copies all the selected files which will maintain their original name.
Pressing
FF99 EEssccaappee
exits this page at any time, even if just some of the selected files have been copied.
COPYING FROM HARD DISK TO FLOPPY
Once you have inserted the Floppy Disk with sufficient free space in the Disk drive,
you may find the Folder from which the files are to be copied within the Hard Disk
using the following procedure:
Enable the
DDiisskk
menu using the dedicated push button.
Select the Folder by typing in its number using the numeric keypad (
SSTTYYLLEESS
push
buttons).
If you do not know the number associated with the Folder, press
FF88 FFoollddeerr
to
display the list of all the Folders stored in the Hard Disk, then choose that required using the numeric keypad and return to the previous page using
FF55 EEssccaappee
.
You can only select one type of file amongst those displayed using
FF55 FFiillee CChhooiiccee
and the relative function push buttons.
First of all, select the files to be copied using the following buttons:
●
DATA CURSOR (Up and Down) to go from one file to the next within those displayed.
●
DATA CURSOR (Left and Right) to go to the next group of files, if existent.
●
F10 Select to confirm the files to be copied, next to which an arrow appears to confirm that the selection has taken place.
Pressing both
DDAATTAA CCUURRSSOORR ((LLeefftt aanndd RRiigghhtt))
buttons at the same time selects all files contained in the folder.
Once you have selected the files to copy, press
FF44 CCooppyy
to start the operation. The page that appears now displays the original file (Copy) and
the final destination disk
((FFrroomm TToo))
and includes a number of options.
In the centre of the display the name of the first file selected appears. This can be modified using the keyboard keys and the
DDAATTAA CCUURRSSOORR
buttons.
You may copy each single file confirming the copy operation each time by pressing
FF1100 EExxeeccuuttee
. If you have not modified the name, the copied
file will have the same name as the original one. At the end of the copy operation, the next file among those selected will appear. If a number
of files has been selected, you may skip the current file and go to the next one pressing
FF88 SSkkiipp
.
Pressing
FF99 C
Cooppyy AAllll
copies all the selected files which will maintain their original name.
Pressing
FF99 EEssccaappee
exits this page at any time, even if just some of the selected files have been copied.
F5 Files Choice:
This is used to select the file type within the Folder currently in use. The options are the same as those indicated in
FF33 SSaavvee
.
F6 Delete: This cancels one or a number of files selected using
FF1100 SSeelleecctt
. Before completing the procedure the SD5 displays a warning
message with the following options:
F5 Escape: This cancels the procedure.
FF1100 EExxeecc::
This confirms the procedure.
F7 Rename: This is used to re-name the file selected or simply identified using the keyboard keys and the
DDAATTAA CCUURRSSOORR
push buttons. The
following remain enabled:
F5 Escape: This cancels the procedure.
FF1100 EExxeecc::
This confirms the procedure.
F8 Folder:
This is used to manage and organise the single Folders, selected by
entering the relative number using the numeric keypad (STYLES
push buttons), calling up a page with the following options:
F1 New: This is used to create a new Folder that will be
identified with the number following the last Folder created and is used to enter the name using the keyboard keys
and the
DDAATTAA CCUURRSSOORR
push buttons. Once the name has
been entered, confirm the procedure using
FF1100 EExxeecc
, or
cancel it using
FF55 EEssccaappee
.
FF22 DDeelleettee::
This is used to cancel the Folder selected using
the pulsanti
DDAATTAA CCUURRSSOORR ((UUpp aanndd DDoowwnn))
push buttons or
by typing in the number and all the files within it. When
you confirm the cancelling procedure a warning message
will appear with the
FF55 EEssccaappee
or
FF1100 EExxeecc
options. If you confirm using
FF1100 EExxeecc
. A second message appears requesting
further confirmation to cancel with
FF1100 EExxeecc
, or to cancel the procedure using
FF55 EEssccaappee
.
FF33 RReennaammee::
This is used to re-name a Folder, selected using the
DDAATTAA CCUURRSSOORR ((UUpp aanndd DDoowwnn))
push buttons or by typing
in the number, writing the name using the keyboard keys and the
DDAATTAA CCUURRSSOORR
push buttons. Confirm the procedure
using F10 Exec or cancel it using
FF55 EEssccaappee
.
FF44 LLoocckk::
This protects the Folder from being Deleted or Re-named. To enable the lock function select the Folder using
DISK
Page 84

the
DDAATTAA CCUURRSSOORR ((UUpp aanndd DDoowwnn))
push buttons or type in its number and then press
FF44 LLoocckk
. The symbol o will appear
next to the Folder. A number of Folders can be locked. To disable the lock function, find the folder protected and then
press
FF44 LLoocckk
again. The degree of protection can be increased using a password to be programmed according to the
instructions given at the end of this chapter.
F5 Escape: This is used to return to the previous page of the
DDiisskk
menu.
F6 Report:
This creates a TXT file on Floppy Disk that shows the whole contents of the Folder currently selected, split-up per extension and in alphabetical order. The file can be read both from Mac and PC and can prove quite useful to have a list of files when there are many files stored.
F7 Copy: This is used to copy the file, selected using the and
FF1100 SSeelleecctt
push buttons from the Folder currently selected and a Folder at
choice within the Hard Disk. The following options are possible:
F5 Escape: This is used to return to the previous page of the
DDiisskk
menu.
F8 Target Folder: This displays the list of Folders in the middle of the display amongst which you can choose that
desired using the
DDAATTAA CCUURRSSOORR
push buttons.
F10 Exec: This confirms that the file selected is to be copied in the chosen Folder using
FF88 TTaarrggeett FFoollddeerr
.
The complete procedure entails the following steps:
●
Select the Folder in which the files to be copied are stored.
●
Press
FF77 CCooppyy
.
●
Select one or a number of files to be copied using the
DDAATTAA CCUURRSSOORR
and
FF1100 SSeelleecctt
push buttons.
●
Press F8 Target Folder and find the destination Folder using the
DDAATTAA CCUURRSSOORR
push buttons from the list that
appears.
●
Confirm the procedure using
FF1100 EExxeecc
, or cancel it using
FF55 EEssccaappee
.
●
Press F10 Exec and a new page appears in which the file being copied can be re-named using the keyboard
keys and the DATA CURSOR push buttons. The options possible are the following:
F5 Escape: This cancels the procedure and returns to the Disk menu.
FF88 SSkkiipp::
This skips the copying procedure of the current file.
FF99 CCooppyy AAllll::
This copies all the files without re-naming them.
FF1100 EExxeeccuuttee
: This confirms that the single file is to be copied.
F9 Utility: This is used to control some parameters such as the Tempo and
the transposition of a Midi file, the formatting of the Hard Disk, the
creation of chains of Midi files and the operational control of the
Hard Disk. The options possible are the following:
FF11 IInnffoo::
This displays the capacity of the Hard Disk, the space available, the number of the Folder and files stored and the percentage of space available.
FF22 TTeemmppoo::
This is used to modify the Tempo of a Midi file stored in
the Folder currently in use. Once the Midi files are displayed, select
that desired using the
DDAATTAA CCUURRSSOORR
push buttons, then press
FF1100
EExxeecc
. A window appears where the difference in steps of 1 can be
entered compared to the original Tempo using the
DDAATTAA CCUURRSSOORR
push buttons. Once the value has been entered, press
FF1100 EExxeecc
that calls up a new window where the original name of the Midi file can be modified. When the modification has been completed, confirm the procedure using
FF1100 EExxeecc
or press
FF55 EEssccaappee
to skip saving it.
FF33 TTrraannssppoosseerr::
This is used to define a negative or positive transposition value for the Midi file selected. Once the Midi files are
displayed, select that desired using the
DDAATTAA CCUURRSSOORR
push buttons, then press
FF1100 EExxeecc
. A window appears where you can defi-
ne whether the transposition applied will be valid only for the Midi file (
SSoonngg
) or whether it will also apply to the keyboard tran-
sposition (
GGlloobbaall
). To select this application mode, cyclically press the
FF99
function push button that shows the application mode
and upon completion press
FF1100 EExxeecc
to confirm or press
FF55 EEssccaappee
to cancel the procedure. Once you have confirmed you can
enter the transposition value to be applied to the Midi file, using the
DDAATTAA CCUURRSSOORR
push buttons. Confirm again using
FF1100 EExxeecc
that will call up the window in which the name can be modified. Confirm the transposition procedure using
FF1100 EExxeecc
or abandon
using
FF55 EEssccaappee..
FF44 FFoorrmmaatt::
This is used to format the Hard Disk and can be done only by disabling the default protection function using the
FF66
LLoocckk FFoorrmmaatt
push button. You will be requested to confirm using
FF1100 EExxeecc
or to abandon using
FF55 EEssccaappee
. Once the protection
function has been disabled you can format the Hard Disk by pressing F4 Format. You will be requested twice to confirm using
FF1100 EExxeecc
. Press
FF55 EEssccaappee
to cancel the procedure. The formatting lock function is enabled each time the SD5 is turned on to
avoid irreversible mistakes. The formatting procedure
ddeelleetteess
the entire contents of the Hard Disk for good so please use spa-
ringly and wisely!!
FF55 EEssccaappee::
This returns to the previous page of the
DDiisskk
menu.
FF66 LLoocckk FFoorrmmaatt
: This locks the
FF44 FFoorrmmaatt
function.
FF77 CChhaaiinn EEddiitt::
This is used to create chains of (no longer than 32) Midi files, to be played back one after the other without having
to call up each file individually. It only works for the Midi files stored in the same Folder, which is called up as already explained
for the
FF33 TTrraannssppoosseerr
. Once
FF77 CChhaaiinn EEddiitt
has been pressed the SD5 displays the Midi files stored in the Folder that can be selec-
SD5
82
DISK
Page 85

SD5
83
ted using the
DDAATTAA CCUURRSSOORR
push buttons. The following options are available:
FF55 EEssccaappee::
This cancels the procedure
FF77 SSaavvee CChhaaiinn::
This creates a file with .CHN extension within the same Folder in which the Midi files relative to the chain pro-
grammed are stored.
F10 Select: This selects the Midi files to be added to the chain.
The procedures required to create a chain of Midi files are the following:
●
Select the Folder in which the Midi files are stored.
●
Press
FF77 CChhaaiinn EEddiitt
.
●
Find the first Midi file of the chain using the
DDAATTAA CCUURRSSOORR
push buttons.
●
Select the Midi file using
FF1100 SSeelleecctt
, a number will appear next to the name that indicates the position within the
chain.
●
Find and select the other Midi files that follow.
●
If you make a mistake, find the wrong Midi file and press
FF1100 SSeelleecctt
again. The Midi file will be removed from the chain
and the following Midi files will move back by one place.
●
Save the chain using
FF77 SSaavvee CChhaaiinn
. From the page called up you can enter the name using the keyboard keys and
the
DDAATTAA CCUURRSSOORR
push buttons. Confirm using
FF1100 EExxeecc
or cancel using
FF55 EEssccaappee
.
The chain thus created is loaded in Song Play using the Load function from the Disk menu or called up directly from the first page of Song Play,
by entering the number associated with the file chain using the numeric keypad (STYLES push buttons). If you then go to Song Play, the title
of the first Midi file will appear. There are three ways of moving along the chain, namely:
●
Let the Midi files come-in as they end normally and the SD5 will load the next file and reproduce it without any further input.
●
Without starting
SSoonngg PPllaayy
using the
SSTTAARRTT
push button, use the
DDAATTAA CCUURRSSOORR
push buttons to select the Midi files of the chain.
●
With Song Play running, press the
CCOOUUNNTT//PPAAUUSSEE//RREESSTTAARRTT
push button and then use the DATA CURSOR push buttons to call up another Midi file.
Once you have found the Midi file, press the
CCOOUUNNTT//PPAAUUSSEE//RREESSTTAARRTT
push button again to start Song Play again with the new Midi file.
Whatever the case, if you stop a Midi file using the
SSTTAARRTT
push button,
SSoonngg PPllaayy
will loose the data of the chain permanently and you will have
to re-load them. The same applies to all Juke-Box controls, disabled when a chain is in use. Just the words can be displayed.
F8 Chain List: This displays all the chains of Midi files already stored within the Folder in use.
F9 Disk Control:
This calls up a number of functions required to control the Hard
Disk. The options available are the following:
F1 Surface Control: This controls the Hard Disk surface
and takes a few minutes for the procedure to be completed. If
FFaattaall EErrrroorr
appears you must contact a Ketron service centre as the Hard Disk is seriously damaged. If the
Hard Disk surface test detects no anomalies the display
will return to the menu once the procedure has been completed.
FF22 SSccaannDDiisskk
: This controls the integrity of the Folders and
the files. When the test ends press
FF1100 EEssccaappee
to return to
the previous page. If errors are found the SD5 automatically moves onto the
RReeppaaiirr
function.
FF33 RReeppaaiirr::
This repairs errors found in damaged files. Press
FF1100 EEssccaappee
once this procedure has been completed.
FF55 EEssccaappee::
This returns to the previous page of the menu.
FF66 DDiisskk CCooppyy
: Using a special cable you can connect a second Hard Disk to the standard one for back-up procedures.
Contact Ketron for further information.
FF77 SSttaannddbbyy
: This is used to set the time in minutes, which can be selected by pressing function push button F7 repeatedly, after which the Hard Disk enters the stand-by status if it is not used. The Hard Disk is immediately available again
as soon as some function that requires it's use is accessed.
FF88 SSyysstteemm FFoollddeerr
: This creates a so-called System Folder dedicated to containing a system file, after having formatted
the hard disk.
THE DISK FUNCTIONS FOR THE FLOPPY DISK
When using the Floppy Disk, the SD5 offers the following functions:
F1 Dir: This displays all the files stored in the Floppy Disk.
F2 Load: Once a file has been selected using the
DDAATTAA CCUURRSSOORR
and
FF1100 SSeelleecctt
push buttons you can load it in RAM.
F3 Save: This calls up the page used to select the type of memory to be saved on Floppy. The options are the same as those described
for
FF33 SSaavvee
.
F4 Copy: This is used to copy the file, selected using the
DDAATTAA CCUURRSSOORR
and
FF1100 SSeelleecctt
push buttons, in the Folder in use. When copying
DISK
Page 86

you must also re-name the file and the
SSkkiipp
commando for single files and Copy All for all files. It works in the exact same man-
ner as the
FF44 CCooppyy
function of the Hard Disk.
F5 File Choice:When a number of files are stored in Floppy disk but with different
extension, you can find only those desired by choosing the type of
file to be displayed. The options are the exact same as those for
the Hard Disk.
F6 Delete: This cancels one or a number of files selected using the
DDAATTAA CCUURR--
SSOORR
and
FF1100 SSeelleecctt
push buttons.
F7 Rename: This is used to re-name a file selected using the DATA CURSOR
push buttons.
F9 Utility: This calls up a page with the following options:
FF22 TTeemmppoo::
This is used to modify the Tempo value of a
Midifile stored in the Folder currently in use. Once the
Midifiles are displayed, choose the one required using the
DDAATTAA CCUURRSSOORR
keys, then press
FF1100 EExxeeccuuttee
. A window
appears where you can enter the difference in steps of 1
compared to the original Tempo using the
DDAATTAA CCUURRSSOORR
keys. Once you have entered the value, press
FF1100 EExxeecc
to
pull-up a new window where you can modify the original
name of the Midifile. Once you have completed the feasible modification, confirm it by pressing
FF1100 EExxeecc
or cancel
it by pressing
FF55 EEssccaappee
.
FF33 TTrraannssppoosseerr
: This is used to define a negative or positive transposition value for the Midifile selected. Once the
Midifiles are displayed, select the one required using the
DDAATTAA CCUURRSSOORR
keys, then press
FF1100 EExxeeccuuttee
. The window that
appears is used to define whether the transposition applied will be valid just for the Midifile (
SSoonngg
) or whether it will
also include the transposition of the keyboard (
GGlloobbaall
). To select the operating mode, press function button F9 that
indicates the operating mode cyclically and upon completion press
FF1100 EExxeecc
to confirm or F5 Escape to cancel the pro-
cedure. Once confirmed, you can enter the transposition value to be applied to the Midifile using the
DDAATTAA CCUURRSSOORR
keys
and confirm again with
FF1100 EExxeecc
that will pull-up the window where you can modify the name. Confirm the transposi-
tion procedure using
FF1100 EExxeecc
or abandon the procedure using
FF55 EEssccaappee
.
FF44 FFoorrmmaatt
: This is used to format the Hard Disk, which can only be done by disabling the default protection, using func-
tion button
FF66 LLoocckk FFoorrmmaatt
after which you will be requested to confirm with
FF1100 EExxeecc
or abandon with
FF55 EEssccaappee
.
Having disabled the protection, you can format the Hard Disk by pressing
FF44 FFoorrmmaatt
after which you will be requested
twice to confirm with
FF1100 EExxeeccuuttee
. Press
FF55 EEssccaappee
to cancel the procedure. The Lock Format function is re-enabled
each time the SD5 is turned on, to prevent irreversible errors. The formatting procedure cancels the entire contents of
the Hard Disk.
FF55 EEssccaappee::
This is used to go back to the previous page of the
DDiisskk
menu.
FF66 LLoocckk FFoorrmmaatt
: This locks the
FF44 FFoorrmmaatt
function.
FF77 CChhaaiinn EEddiitt
: This is used to create chains of Midifiles, of no more than 32 Midifiles, to be played in sequence without
therefore having to pull-up each file individually. It only works for Midifiles stored in the same Folder, which is pulledup as described for
FF33 TTrraannssppoosseerr
. Once you have pressed
FF77 CChhaaiinn EEddiitt
, the SD5 displays the Midifiles stored in the
Folder, which can be selected using the
DDAATTAA CCUURRSSOORR
keys. The options available are the following:
FF55 EEssccaappee
: This cancels the procedure.
FF77 SSaavvee CChhaaiinn
: This creates a file with .CHN extension within the same Folder that contains the Midifiles related
to the chain programmed.
FF1100 SSeelleecctt
: Select the Midifile to be added to the chain.
The procedures required to create a chain of Midifiles are the following:
●
Select the Folder in which the Midifiles are stored.
●
Press
FF77 CChhaaiinn EEddiitt
●
Find the first Midifile of the chain using the
DDAATTAA CCUURRSSOORR
keys. Select the Midifile using F10 Select; a number
will appear next to the name that indicates the position within the chain. Continue identifying and selecting the
next Midifiles.
●
In the case of error, identify the Midifile and press
FF1100 SSeelleecctt
again. The Midifile will be removed from the
chain and the Midifiles after it will move up one position.
●
Save the chain with
FF77 SSaavvee CChhaaiinn
; from the page pulled-up you can enter the name using the keyboard keys
and the
DDAATTAA CCUURRSSOORR
keys. Confirm with
FF1100 EExxeecc
or cancel with F5 Escape.
The chain thus created is loaded in Song Play with the Load function from the Disk menu, or pulled-up directly from the
first page of Song Play, by entering the number associated with the Chain file using the numerical keyboard (STYLES
buttons). When you move onto Song Play, the title of the first Midifile will appear. There are three ways of moving along
the chain:
SD5
84
DISK
Page 87

SD5
85
●
leave the
MMiiddiiffiilleess
to end normally, the SD5 will load the next one and will play it without touching any keys.
●
without starting
SSoonngg PPllaayy
with the
SSTTAARRTT
button, use the
DDAATTAA CCUURRSSOORR
keys to select the Midifiles of the
chain.
●
with
SSoonngg PPllaayy
running, to pull-up another Midifile, press the
CCOOUUNNTT//PPAAUUSSEE//RREESSTTAARRTT
button, then use the
DDAATTAA CCUURRSSOORR
keys. Once you have identified the Midifile, press the
CCOOUUNNTT//PPAAUUSSEE//RREESSTTAARRTT
button again to
start Song Play again with the new Midifile.
In all cases, if you stop a Midifile while it is playing, using the START button, Song Play will loose the data of the
chain permanently and you will have to load it again. The same applies for all the Juke-Box controls, which are
disabled when you use a chain. The words are still displayed however.
FF88 CChhaaiinn LLiisstt
: This displays all the Midifile chains already stored in the Folder in use.
FF1100 EExxeecc
.: This is enabled only if the chains of Midi files are displayed and is used to create a list of the Midi files that make up
the chain.
SETTING THE PASSWORD FOR PROTECTED FOLDERS
The Folder of the Hard Disk that have been protected with the
FF44 LLoocckk
function in
the
FF88 FFoollddeerr
page of the
DDiisskk
menu can be additionally protected by assigning a
password that will be requested when disabling the lock function. The password is
modified in the following manner:
●
From the main page of the display press
FF33 UUttiilliittyy
.
●
Press the
PPAAGGEE ++//--
push buttons to reach page 2/2.
●
Press
FF44 PPaasssswwoorrdd
to access the dedicated menu.
F1 Modify: This is used to modify the password. When you purchase the
instrument there is no initial password therefore changing/creating one will be it's first. The modification command requests the
entry of the old password, using the keyboard keys and the
CCUURRSSOORR ++//--
push buttons and an initial confirmation command using
F10 Confirm. The new name can then be entered and confirmed using
FF1100 CCoonnffiirrmm. FF55 EEssccaappee
is used to return to the main page
of the menu.
MANAGING THE CONTENTS OF THE HD USING AN EXTERNAL COMPUTER
Thanks to the computer serial port at the back of the unit, the files and folders of the hard disk are easy to organise and manage on a PC or
Mac. You can copy all files from/to your SD5 to/from the HD of your computer. Instructions on how to connect and how to use the KetronFT
software are included in the file to be downloaded from the www.ketron.it internet pages.
DISK
Page 88

MidJay Utility
The SD5 allows you to manage many functions of the Ketron MidJay remotely. In particular, you can view the files stored within the MidJay on
the display of the keyboard and access them simply and immediately. You can play Mp3 files, Wave files, Midifiles or pull-up and manage DjLoops
and Grooves in real time.
The MidJay-Sd5 combination is extremely powerful and offers you everything you need to make music; a powerful Arranger, sounds of amazing
quality and a multimedia player with sophisticated Audio/Midi functions means that you always have thousands of audio and midi songs at hand
and ready to use.
HOW THE SD5 - MidJay CONNECTION WORKS
For the MidJay to be able to communicate with the SD5, you need two MIDI cables, arranging a cross connection between the midi In and Out
of the two instruments. In particular you need to connect the Midi Output of the MidJay to the Midi In1 Input (GM) of the SD5 and the Midi Output
of the Sd5 to the Midi Input of the MidJay.
ACCESSING THE DISK OF THE MIDJAY VIA THE SD5
Once you have completed the connection, you can access the disk of the MidJay
directly from the panel of the keyboard.
●
Activate DISK mode by pressing the DISK button on the panel of the keyboard.
●
To use the Hard Disk, press the
HHAARRDD ((PPAAGGEE --))
button.
●
To use the Floppy, press the
FFLLOOPPPPYY ((PPAAGGEE ++))
button.
●
To access the files of the MidJay, press the
HHAARRDD ((PPAAGGEE --))
key again.
MidJay appears at the top of the display to point out that it is connected together
with the current Folder between square brackets. The number of files and the
number of the directories within the current folder appear right underneath. All
the files and sub-folders stored in the current folder of the MidJay appear in the
middle of the display. The files are identified by their extension (.MP3, .WAV, .MID, etc..) whereas the sub-folders have an identification symbol
consisting of an asterisk between two square brackets
[[**]]
.
SELECTING A DIFFERENT SECTION TO THE CURRENT SECTION
The MidJay avails of various sections that can be used simultaneously.
For example, you can open the
WWAAVVEE
folder, select and play a file, then open the
MMPP33
and play another file.
The operating mode just described is also available on the SD5.
To select the various sections of the MidJay, use function keys
FF11....FF55
.
Using key
FF11
, access the
MMIIDDII
section, using
FF22
access the
WWAAVVEE
section, using
FF33
access the
MMPP33
section, using
FF44
access the DjLoops/Sfx
section and using key F5 you can open the folder dedicated to the Play lists.
The MidJay registers the current sub-folder within the various sections. For this purpose, when you go back to a section used previously, the
last folder used is set as the current folder.
Press the function key relative to the current section again and the MidJay sets the default folder for the current section (for example
C:\WAVE for the section with the same name).
MOVING BETWEEN FILES AND PLAYING A FILE
The management of files in a Folder envisages the following rules:
●
The files and the sub-folders are shown in the middle of the display. To scroll the list of files, use the
DDAATTAA CCUURRSSOORR
keys. Using the
DDAATTAA CCUURR--
SSOORR ((LLeefftt aanndd RRiigghhtt))
keys, you scroll the list horizontally and using the
DDAATTAA CCUURRSSOORR ((UUpp aanndd DDoowwnn))
keys you scroll the current column.
●
To play a file after selecting it, simply press the
EENNTTEERR
button or start playing with the
SSTTAARRTT
key.
●
To stop playing the file, press function key
FF1100 SSttoopp
.
●
To pause a file currently being played, press function key
FF99 PPaauussee
.
●
To open a sub-folder, simply select it using the cursor and press
EENNTTEERR
. The new folder will be opened and the files will be displayed.
●
To go back one level in directory root, simply select the first directory identified with two dots ".." and press
EEnntteerr
. The procedure is also cal-
led Cd Parent.
Remember that the Start/Stop and Pause commands relate to the current section. If, for example, you select the WAVE section and play a file,
then you select the MP3 section using function key F3, function keys F9 and F10, Start/Pause and Stop respectively, will not affect the first file
played and started from the WAVE function.
When you view the contents of the HardDisk of the MidJay, you cannot manually modify the current section on the display of the SD5 from the
MidJay panel.
SD5
86
MidJay Utility
Page 89

SD5
87
EXECUTING A DJLOOP
The DjLoops consists of a group of audio loops that the user can link in real time.
The MidJay avails of DjLoops with just drum or complete with harmony and
melody. The SD5 allows you to control the DjLoops directly from the panel of the
machine and you can therefore use it as a "base" when playing live.
To open a DjLoop, select the
GGrroooovvee//DDjjLLoooopp//SSffxx
section using function key
FF44
.
Select the
DDJJ__LLoooopp
folder and press
EENNTTEERR
. Choose the file that you wish to load
and activate it with the
EENNTTEERR
key. The LED of the
SSTTAARRTT//SSTTOOPP
key of the SD5 will
start to flash to point out that the Loop is ready to be played.
You can start playing in the following manners:
●
Press the
IInnttrroo//EEnnddiinngg 11
key if you wish to start from the intro of the DjLoop
●
Press one of the keys related to the arrangements
AArrrr..AA, AArrrr..BB, AArrrr..CC, AArrrr..DD
●
Press one of the
FFiillll
or
BBrreeaakk
keys.
While playing, you can alternate between one loop and another by pressing one of the above-mentioned keys, similar to what you do for normal styles.
If the Cross Fade function is activated, the loops switch immediately, otherwise the MidJay waits for the current loop to end before switching
to the one selected.
To stop playing, press key
FF1100 SSTTOOPP
.
To play another DjLoop, simply press the
EENNTTEERR
key once the new file has been selected.
PLAYING A GROOVE
Grooves are rhythmic/harmonic loops that have the great advantage of possibly
being synchronised with the metronomic tempo of the machine. Their selection
and management is similar to that seen with the DjLoops. The Grooves can be
played in synchronisation with the styles within the SD5 enabling the creation of
interesting sound combinations. In this way, you can exploit the built-in arranger
of the keyboard to play harmonic and melodic parts and the audio grooves on
MidJay to play to rhythmic parts. The two instruments are synchronised by activating the
GGRRVV..SSYYNNCC
function using function key
FF88
.
PLAYING A GROOVE IN SINCRONIZATION WITH AN INTERNAL STYLE
To load a groove, you need to open the
GGrroooovvee//DDjjLLoooopp//SSffxx
section using function key
FF44
. Select the GROOVE folder and press
EENNTTEERR
. Select
the file to be loaded and activate it with the ENTER key. The LED of the START/STOP key of the SD5 will start to flash to point out that the
GGRROOOO--
VVEE
is ready to be played.
Activate the
GGRRVV..SSYYNNCC
function using function key
FF88
(the relative box changes colour).
Select an internal style of the SD5, by first choosing the family using the numerical keys, then by selecting the style required using the function keys of the SD5.
Activate the reproduction of the style in one of the classic methods available (Start/Stop key, Intro Ending 1,2,3, etc.).
The groove of the Midjay simultaneously starts and you can adjust the volume using the dedicated slider on the panel of the Midjay.
While playing, you can modify the tempo using the
TTEEMMPPOO ++
and
TTEEMMPPOO --
keys or change the current style.
OPENING A PLAY LIST
The MidJay allows you to organise the various songs, whether they be MP3's, Waves or Midi's , in groups of ten songs each, called Play Lists. The
SD5 allows you to access the
PPllaayyLLiisstt
section of the MidJay using function key
FF55
PPLLAAYY LLIISSTT
. The contents of the folder are shown on the display of the instrument
in the same way as the other sections. To open a play list, simply select it with the
cursor and press
EENNTTEERR
. All the files stored will appear on the display of the
instrument and can be played in the usual manner.
ACTIVATING THE AUTOPLAY FOLDER
The Auto Play folder function of the MidJay allows you to play all the files within
the current folder one after the other. To activate this function, simply press key
FF66 AAUUTTOOPPLLAAYY
. The box turns black to point out that the function has been activated in which case at the end of the current song the next song will be played
without the user having to do anything.
MidJay Utility
Page 90

ACTIVATING THE CROSS FADE
This function is used to gradually switch from one song to another without interruptions or without sudden variations in volume. The function
works within its own section (for example, between two Midifiles for the MIDI section or between two Waves in the WAVE section) or it can be
activated for all songs of a Play list. When the Cross Fade of a DjLoop is activated, you can switch from one arrangement to another instantly
and without having to wait for the current pattern to end. Press function key
FF88
repeatedly to activate and de-activate the Cross Fade function.
The Cross fade is reset each time the section is changed (MP3, Wave, etc.).
SD5
88
MidJay Utility
Page 91

SD5
89
Multi-Tab
The Multi-Tabs consist of a group of 16 buttons to the left of the keyboard, which are used to activate and control many of the functions offered by the SD5.
In the various operating modes, you can control the mute of the various percussion sections, access the 16 parts of the General Midi directly,
activate and launch sound effects, alter the intonation of the quenched scale or pull-up the various registrations simply be pressing a key.
Furthermore, the functions assigned to these keys can be assigned directly by the user, therefore you can personalise the instrument according to your own specific needs and habits.
MULTI-TABS MENU
Using the
MMOODDEE SSEELLEECCTT
key, you can open the management menu of the MultiTabs.
Using function keys
FF11....FF66
you can activate the various operating modes, which are
described in detail in the section that follows.
F1 DRUM ON/OFF: The DRUM ON/OFF mode is set automatically by the machine
and is used to activate or to rapidly mute the various percussion sections of the SD5. The match between the multi-tab
and the percussion group is the following:
Tab1 Kick
Tab2 Snare ( Snare, Rim Shot )
Tab3 Hi Hat
Tab4 Cymbals ( Crash, Ride, Cup )
Tab5 Toms
Tab6 Rimshot
Tab7 Latin 1 ( Congas , Bongos, Tambora )
Tab8 Latin 2 ( Cowbell, Guiro, Claves, )
Tab9 Latin3/Tamb ( Maracas, Cabaza, Shaker, Guira, Whistle )
Tab10 CLAP/FX
Multi-tab n° 16 acts as a RESET function, in other words it removes the mute function from all the percussion sections presently in such state.
F2 GM PAGE:
This mode is used to access the 16 parts of the General Midi simply
by pressing the related multi-tab. If you use Midifiles, this mode
proves particularly useful because it enables you to rapidly and
directly access all the parameters of the various tracks of the
Midifile. For example, to modify the program change of the bass
and of the drums of a Midifile, simply press the multi-tab related to
the track involved and modify the parameters of the track, as
explained in the
SSoonngg PPllaayy
chapter.
F3 FX: This setting is used to play 16 different special effects, each of
which is associated with a different key. The Key/Effect assignment can be modified by the user. Using the
DDAATTAA CCUURRSSOORR
keys you can select one of the multi-tabs (number enhanced in black in the first column of the table) and, using the
VVAALLUUEE++--
keys, select the special effect to be assigned to the key. You can choose between the following sounds:
Multi-Tab
Page 92

Fx1 Freet Noice
Fx2 Pan Flute
Fx3 Sea
Fx4 Tweet
When you press the multi-tab, the sound is played. Some sounds continue (LED lit) until you press the related key again.
F4 ARAB. SCALE: Using multi-tabs from 1 to 12 you can set the alterations of the 12 notes of the musical scale. When the LED is lit, the note
related to the multi-tab is altered, when the LED is switched off, the note is not altered. You can rapidly restore normal conditions of the entire scale by pressing multi-tab 16 (
RREESSEETT
). The quantity in terms of hundredths of semitones, of the alte-
ration for each single note can be set from the
AARRAABBIICC SSCCAALLEE
menu in the second page of the
UUTTIILLIITTYY
menu (F3).
F5 ASSIGN.TABS: In this mode, you can assign the functions pulled-up from
each of the 16 multi-tabs. You can therefore personalise the
configuration of the multi-tabs and assign the function desired to each of them. To assign the functions, simply select the
multi-tab desired using the
DDAATTAA CCOORRSSOORR
keys and scroll the
various functions available, using the
VVAALLUUEE++--
keys.
The table that follows shows the functions available.
Sustain
Soft
Sostenuto
Arranger A
Arranger B
Arranger C
Arranger D
In./End. 1
In./End. 2
In./End. 3
Fill 1
Fill 2
Fill 3
Break
Start/Stop
Count In
Key Start
Key Stop
F6 REGISTRATION GROUP: This mode is used to have 16 registrations in line
that can be pulled-up simply by pressing one of
the multi-tabs.
Once this function is activated, the first 160 registrations of the SD5 are split-up into 10 groups,
each containing 16 registrations.
To view the contents of the current group and to
select a new one, exit the management menu of
the multi-tabs using the
MMOODDEE SSEELLEECCTT
key or use
the
EEXXIITT
key and activate the
RREEGGIISSTTRRAATTIIOONN
key
(LED lit).
The bottom part of the display changes and it
shows the 16 registrations belonging to the group currently selected.
The registrations displayed correspond to those pulled-up by the 16 multi-tabs.
A different group of registrations is associated with each of the numerical buttons
00....99 ((SSTTYYLLEESS))
.
The current group is modified simply by pressing one of the above-mentioned keys.
To create, modify and save the registrations of the SD5, consult the relative chapter of this manual.
SD5
90
Rotor On/Off
Tap Tempo
Registr. Up
Registr. Down
Tempo +
Tempo minor
7th
m7th
5+
dim
Glide
Kick Off
Snare Off
Hi-Hat Off
Cymbal Off
Tom/Fx Off
Rimshot Off
Latin1 Off
Latin2 Off
Latin3/Tamb Off
Jump intro
Drum Lock
Bass Lock
Chords Lock
Fall Off
Shake
Overdrive
Delay
Wha-Wha
Chorus
Reverb
Distorsor
Text PageText Page+
Vocalizer
Jump Fill
Arabic_1
Arabic_2
Arabic_3
Arabic_4
Arabic_5
Arabic_6
Micro Dry
Fade Out
Crash
Voice Down
Voice Up
Harmony
Program
Swell
Transposer Transposer +
2nd Voice
Hold
Arabic_7
Arabic_8
Arabic_9
Arabic_10
Arabic_11
Arabic_12
Arabic_13
FisaLeft Drum
Interact.Arr
Dry on Stop
Manual Bass
Arabic_14
Arabic_15
Arabic_16
Arabic_17
Arabic_18
Arabic_19
Arabic_20
BassToLowest
Lead On/Off
Pianist
6th
7th+
Bassist
Accordion
DrumFx Swell
DrumFx Fade
VoiFiltSwell
Tap Delay4
Tap Delay8
Fx5 Telephone
Fx6 Elicopter
Fx7 Applause
Fx8 Gun Shot
Fx9 Horn
Fx10 Jew’s harp
Fx11 Whistle
Fx12
Fx13
Fx14 Bell
Fx15 Wind
Fx1 6
MidJay Utility
Page 93

Technical tables
Page 94

Page 95

SD5
183
INDEX
Specifications
Preset program changes
Presets
GM Voices
Drum Sets
Live Drums
(DRUMS 2)
Midi Banks & Prog. Change
Styles
Midi implementation
Vocalizer control list
System exclusive Ketron SD5
Vocalizer System exclusive list
PAGE
185
186
188
189
103
191
192
193
194
195
196
202
Technical Tables
Page 96

Page 97

SD5
185
Specifications
61 keys velocity sensitive. 6 Velocity curves. Pitch & Modulation joystick. Aftertouch.
1-16 multifunction buttons. Mode Select : Drum On/Off, SFX, GM Part access, Free Assignable, Registration Groups,
Arabic scale.
240 x 128 pixel backlit graphic TCF.
3.5 2DD/HD.
292 Orchestral Presets Sounds. More than 1000 Percussive sounds. 32 parts Multitimbral.
110 User Voices. Editing capabilities: A,D,S,R, Cut Off, Resonance, Effects.
60 programmable 1 Touch/Favourite Sounds, assignable to Styles.
10 Digital Drawbar effects.
120 Programs. 4 Voices, 4 splits. Sustain, Portamento, Velocity switch, Duet, Trio, Morphing, Steel, Slide, Harmony
and 2nd voice assign. Single & Global Program loading.
292 Preset & programmable Second Voices.
198 panel/song settings. Single & Block modes. Registration Groups 1-16.
24 New Drum sets. 24 User Drum Sets. 10 Drum sections. Drum Mixer. Manual Drums.
62 Live Drum sets. New Acoustic and Latin audio Loops.
202 Internal Styles. New Real Latin, Unplugged, Ballroom. New features: Riff, Arranger Mute, After Fill, Smart 7th,
Alternate Bass, Swing Bass, Professional Guitar templates. 4 Arrangers: A, B, C, D. 3 Intro/Endings, Fill In, Break.
Manual Bass. Jump. Tap Tempo.
2 Mbyte Flash (up to 50 Patterns approx).
Record, Clear, Copy, Remap.
real time Song Recording to Disk (HD or FD).
Standard & Auto Piano-style arranger playing modes. Sustain On/Off.
1 octave Up/Down.
lower octave coupling.
Full, Jazz, Bluegrass, Trill, Repeat, Folk 1/2.
+/- 24 half tones.
13 arabic setups (footswitch assignable). Tune + / - 99 cents per note.
International, Belgique. Velocity control to Left&Right. Bass&Lower octave. Left Drum to
Bass&Chord.
Multieffect DSP. 60 different effects. Reverberation, Chorus, Flanger, Delay, Tap Delay 4 / 8, Wha Wha,
Distortion, Overdrive, Rotor Slow/Fast , Bass Boost. Portamento. Mono - Legato function.
Input with Gain control. Echo, Reverb., Pan/Pot, Pitch Shift, Talk mode (with no effects).
SMF Song playback with karaoke and Txt files. Converts .kar & Midi type 0 files to 1. Juke box. Intelligent
Transposer. Song Chain. Drum & Bass. Lead On/Off. Drum Remix.
In 1, In2 , Out, Thru. 32 Channels. GM standard.
Left/Mono, Right. Sustain & Volume Pedal. Micro.
Stereo headphone. Micro jack.
PC/Mac host Interface.
New 2x22W RMS Stereo 2 ways amplification. Speaker On/Off switch.
VIDEO INTERFACE (Systems : PAL, NTSC, Super VHS. Monitor, Mirror, Zoom, Karaoke). VOCALIZER (Harmonizer, Vocoder, Melody
types, Midi Vocalizer track, Vocalizer to Arranger, Vocal effects)
Type ATA IDE 2.5” (Up to 24Gbyte max. Readable)
2 Mbyte Flash.
(6 or 13 switches)
115 x 39 x 12,5 cms (46 x 15.6 x 5 inches).
17 Kg. (37.4 lbs)
KEYBOARD
MULTI-TAB
DISPLAY
FLOPPY DISK
VOICES
USER VOICES
1 TOUCH
DRAWBARS
PROGRAMS
2
ND
VOICE
REGISTRATIONS
DRUM 1
DRUM 2
ARRANGER
PATTERN
EDIT FUNCTIONS
SONG RECORDING
PIANIST
OCTAVE
DOUBLE
HARMONY
TRANSPOSER
ARABIC SCALE
ACCORDION
EFFECTS
MICRO
MIDIFILE PLAYER
MIDI
OUTPUTS
INPUTS
COMPUTER
AMPLIFICATION
OPTIONALS
HARD DISK
PATTERN EXPANSION
FOOTSWITCH
DIMENSIONS
WEIGHT
SPECIFICATIONS AND APPEARANCE ARE SUBJECT TO CHANGE WITHOUT NOTICE.
Technical Tables
Page 98

SD5
186
1 Grand PianoMix
2 Rock House Jingle
3 Piano&Strings Piano&Pad
4 Honky Octapiano
5 Rodes Mark Funkypno
6 Dx Piano Vintage Brightpiano
7 Harpsichord Tines Elopiano
8 Clavinet Stage
9 Celesta Mallet
10 Glockenspiel
11 Music Box Chimes
12 Vibraphone
13 Marimba
14 Xylophone
15 Bell
16 Santur
17 16-1 OldTime Tonebar 2nd Perc
18 Jazzorgan 1 Jazzorgan 2 Jazzsplit 3rd Perc
19 RockB3 Rotors Lower 8-4 Poporgan
20 Pipe 3 Pipe 2 Pipe 1 Positive
21 Theater Whiter Cinema Digital
22 Musette Master Italfisa Balera Diatonic Folk Cromatic
23 Harmonica Cassotto Reed Parisienne Valse Steirische Fisa
24 Tango Accordion Classica Bandoneon Bellow 16-8
25 Classic Spanish Nylon Brazilian Manouche
26 Country Django 12Strings Unplugged
27 Jazz Solid Jazoctave Fingpicking
28 Clean Texas Telecast Peadalsteel
29 Stopped 60Muted Tremolo
30 Blues Rocklead Whaguitar
31 Overdrive PowerGtr
32 Strato Hawaiian Popdry Western
33 Jazzbass Warmbass
34 Finger Oberbass
35 Picked
36 Precision
37 Slap
38 Mute
39 Bass&Guit
40 Synbass
41 Violin
42 Viola
43 Gipsy
44 Wiener
45 Tzivago
46 Pizzicato Marcato
47 Harp
48 Symphony
49 Strings Octastings
50 Slowstring
51 Synstrings
52 Digistring
53 Aah Vocals
54 Ooh Choir
55 Dahh
56 Corale
57 Trumpet JazzTpt
58 Trombone Mariachi
59 Golden Tpt Softrumpet
60 Miles MutedTpt
61 DixiTpt Flugelhorn Frenchorn
Preset program changes
P. CH. BANK 0 (A) BANK 1 (B) BANK 10 (C) BANK 11 (D) BANK 12 (E) BANK 13 (F) BANK 14 (G)
Technical Tables
Page 99

SD5
187
62 Brass 1 Octabrass Latinbrass
63 Brass 2 Trombones Growbrass
64 Synbrass Tijuana Falloff
65 Altosoft Soprano
66 Blowtenor
67 Tenor Growlsax
68 Contralto
69 Circus
70 Baritone Englishorn
71 Oboe Bassoon
72 Clarinet
73 Piccolo
74 Flute
75 Recorder
76 Andes
77 Panflute
78 Shakuhashi
79 Whistle
80 Ocarina
81 Tenosynt 1 Tecnosynt 2 Sawbrass Sawlead
82 Synlead Minimug Calliope Brightsaw
83 Square Octasaw Yellowj Synclavi
84 Maxisynth Reso Saw 5th Sweepsine
85 Rave Brassfx Syntbras Breaths
86 Chick FM Lead Acid solo Taurus
87 Pat lead Sequence Sawmix
88 Keith Plate Wha
89 Magicpad Stack
90 Fantasy Airpad
91 Warmness Wiring
92 Digipad Sacral
93 Space Newage
94 Glasspad Flanger
95 Prophet Brightness
96 Picking Softpad
97 Synvoice Sweep
98 Glocks Echodrop
99 Ground Ambience
100 Movie Atmosphere
101 Synfony Startheme
102 Icebreath Morphing
103 Tonewheel
104 Ipersaw
105 Sitar Jungle
106 Banjo Peruvian
107 Shamisen Balama
108 Koto
109 Kalimba
110 Bagpipe Cajun
111 Fiddle
112 Zurna Fife
113 Tinkle
114 Tres
115 Steeldrum
116 Cuatro
117 Bouzouki
118 Fado
119 Hackbrett
120 Mandolin
121 Hits
122 Clackson
123 Stadio
124 Effects 1
125 Effects 2
126 Effects 3 Helicopter
127 Applause
128 Bell&Driin Heo
Technical Tables
Page 100

SD5
188
Wha
Sawlead
Brightsaw
Synclavi
Sweepsine
Breaths
Taurus
EETTHHNNIICC
Sitar
Shamisen
Mandolin
Banjo
Fiddle
Steeldrum
Cuatro
Tre s
Cajun
Peruvian
Santur
Koto
Bagpipe
Zurna
Fado
Hackbrett
Balama
Kalimba
Jungle
Fife
BBAASSSS//FFXX
Jazzbass
Finger
Picked
Slap
Synbass
Hits
Clackson
Stadio
Heo
Applause
Warmbass
Bass&Guit
Oberbass
SSTTRRIINNGGSS
Strings
Violin
Wiener
Octastrings
Digistring
Faststrings
Slowstring
Ooh
Aah
Daah
Synstrings
Viola
Harp
Presets
PPIIAANNOO
Grand Piano
Rock Piano
Honky
Octapiano
Harpsichord
Dx Piano
Rodes
Mark
Vintage
Cavinet
Pianomix
House
Jingle
Piano&Strings
Piano&Pad
Tines
Funkypno
Stage
Brightpiano
Elopiano
CCHHRROOMM
Glockenspiel
Celesta
Vibraphone
Marimba
Tinkle
Chimes
Bell
Xylophone
Mallet
Music Box
OORRGGAANN
Jazzorgan 1
16-1
RockB3
Whiter
Oldtime
Jazzorgan 2
Lower 8-4
Rotors
Tonebar
2nd Perc
Jazzsplit
Cinema
Poporgan
Theater
3rd Perc
Digital
Positive
Pipe 1
Pipe 2
Pipe 3
Growlsax
Oboe
Eglishorn
Recorder
Ocarina
Bassoon
Whistle
Panflute
Piccolo
PPAADD
Magicpad
Fantasy
Warmness
Digipad
Space
Glasspad
Prophet
Picking
Synvoice
Glocks
Ground
Movie
Synfony
Icebreath
Tonewheel
Ipersaw
Stack
Airpad
Wiring
Sacral
Newage
Flanger
Brightness
Softpad
Sweep
Echodrop
Ambience
Atmophere
Startheme
Morphing
SSYYNNTTHH
Tecnosynt 1
Synlead
Square
Maxisynth
Rave
Tecnosynt 2
Chick
Pat lead
Keith
Minimug
Octasaw
Reso
AACCCCOORRDD
Musette
Italfisa
Tango
Balera
Cassotto
Accordion
Diatonic
Reed
Parisienne
Valse
Harmonica
Classica
Folk
Bellow
Bandoneon
16-8
Steirische
Cromatic
Master
Fisa
GGUUIITTAARR
Classic
Country
Strato
Clean
Jazz
Spanish
12Strings
Tex as
Django
Blues
Overdrive
Unplugged
Telecast
60Muted
Pedalsteel
Fingpicking
Solid
Nylon
Rocklead
Whaguitar
PowerGtr
Stopped
Bouzouky
Jazoctave
Hawaiian
Western
Brazialian
Manouche
Tremolo
Popdry
Brassfx
FM Lead
Sequence
Sawbrass
Plate
Calliope
Yellowj
Saw 5th
Syntbras
Acidsolo
Sawmix
Technical Tables
 Loading...