

Page 1
GUIDA RAPIDA
|
QUICK GUIDE | GUIDE PRATIQUE
KURZANLEITUNG
|
GUIA RAPIDA
|
GUIA RÁPIDO
Page 2

Page 3

/1
ISTRUZIONI PER LA SICUREZZA 2
CONNESSIONI 3
PANNELLO FRONTALE 4
INTRODUZIONE 5
PLAYER 6
TESTI 7
PLAYLIST 7
MY FOLDER 7
JUKE BOX 8
PIC & MOVIE 8
DJ 9
ARRANGER 10
MICROFONO/GUITAR 12
HD RECORDING 14
REGISTRATION 15
SUONI 16
USB: CHIAVETTE E COMPUTER 17
Importante: Questa Guida Rapida offre alcune informazioni
essenziali per poter lavorare con il MIDJPRO.
La documentazione completa è disponibile in formato HTML
all’interno dello strumento (Menu MANUAL) e anche sul sito
www.ketron.it
INDICE
Page 4
/2
ISTRUZIONI RIGUARDANTI IL RISCHIO DI INCENDIO, SCOSSE ELETTRICHE O DANNO ALLE PERSONE.
AVVERTENZA: per ridurre il rischio di incendio o scosse elettriche, non esporre lo strumento alla pioggia o umidità.
ISTRUZIONI IMPORTANTI PER LA SICUREZZA E L’INSTALLAZIONE
AVVERTENZA - Usando prodotti elettrici, dovete seguire alcune precauzioni di base tra cui le seguenti:
• Prima di usare lo strumento leggete attentamente il manuale.
• Quando lo strumento viene usato da bambini è necessaria la presenza di un adulto.
• Non usate lo strumento in ambienti dove può essere soggetto a stillicidio o spruzzi d’acqua, come per esempio accanto
ad un lavandino, una piscina, su una superficie bagnata etc. e non appoggiate sopra lo strumento recipienti contenenti liquidi
che potrebbero penetrare al suo interno.
• Lo strumento deve essere usato solo su un supporto raccomandato dal costruttore.
• Non operate per lunghi periodi ad alto volume: il rumore eccessivo è dannoso per la salute.
• Lo strumento deve essere dislocato in modo da consentirne una adeguata ventilazione.
• Lo strumento deve essere dislocato lontano da sorgenti di calore come termosifoni, stufe etc.
• Lo strumento deve essere collegato alla rete elettrica solo usando l’adattatore di rete I dati di identificazione e di alimentazione
sono sotto lo strumento.
• Quando lo strumento non viene usato per lunghi periodi il cavo di alimentazione deve essere disconnesso.
• In caso di necessità, per disconnettere lo strumento dell’alimentazione azionate l’interruttore che si trova nella parte posteriore.
Lo strumento deve essere posizionato in maniera tale che l’interruttore sia facilmente accessibile.
• Lo strumento deve essere portato presso un centro assistenza se:
a. Il cavo di alimentazione o la presa sono danneggiati.
b. All’interno sono caduti degli oggetti o del liquido.
c. É stato esposto alla pioggia.
d. Non sembra funzionare normalmente o dimostra un evidente calo di prestazioni.
e. É caduto o lo chassis è danneggiato.
• Non tentate di riparare da soli lo strumento; qualsiasi operazione deve essere eseguita da personale specializzato.
CONSERVATE QUESTE ISTRUZIONI
COME OVVIARE L’INTERFERENZA ALLA RADIO/TV
Questo strumento funziona nella banda delle radio frequenze e se non si installa correttamente ed in stretta osservanza delle istruzioni
può causare interferenza alla ricezione di apparecchi radiotelevisivi. Sebbene la progettazione sia stata effettuata secondo le norme
vigenti ed abbia previsto ragionevoli protezioni contro tali inconvenienti, non vi sono garanzie un simile evento non può verificarsi.
Per verificare che l’interferenza viene generata proprio dallo strumento, provate a spegnerlo e controllate se l’interferenza scompare.
Poi riaccendetelo e verificate se l’interferenza si ripresenta.
Una volta verificato che lo strumento è la causa dell’interferenza, adottate una delle seguenti misure:
• Orientate l’antenna del ricevitore radio o TV.
• Dislocate diversamente lo strumento rispetto al ricevitore radio o TV.
• Allontanate lo strumento dal ricevitore.
• Collegate la spina dello strumento ad un’altra presa in modo che strumento e ricevitore siano collegati a due circuiti diversi.
• Se necessario, consultate personale specializzato.
ALIMENTAZIONE
• Quando si collega lo strumento ad altre apparecchiature (amplificatore, mixer, altri strumenti MIDI, ecc.), assicurateVi che tutte
le unità siano spente. Leggete i consigli riguardanti l’interferenza alle Radio e TV.
CURA DELLO STRUMENTO
• Le superficie esterne dello strumento debbono essere pulite soltanto con un panno morbido ed asciutto. Non usate mai, benzina
diluenti o solventi in genere.
ALTRE PRECAUZIONI
Se volete usare lo strumento in un paese estero, ed avete dei dubbi riguardante l’alimentazione, consultate precedentemente un tecnico
qualificato. Lo strumento non deve essere mai soggetto a forti scosse.
ADATTATORI DI CORRENTE AC
Per collegare questi strumenti alla presa della rete elettrica, usare esclusivamente l’adattatore di corrente KETRON fornito
con lo strumento stesso. L’uso di altri adattatori per corrente potrebbe comportare danni nei circuiti di alimentazione dello strumento.
È pertanto di primaria importanza usare gli adattatori originali e chiedere del tipo giusto se doveste riordinarlo.
INFORMAZIONE AGLI UTENTI
“Attuazione delle Direttive 2002/95/CE, 2002/96/CE e 2003/108/CE, relative alla riduzione dell’uso di sostanze pericolose
nelle apparecchiature elettriche ed elettroniche, nonchè allo smaltimento dei rifiuti”. Il simbolo del cassonetto barrato riportato
sull’apparecchiatura indica che il prodotto alla fine della propria vita utile deve essere raccolto separatamente dagli altri rifiuti.
L’utente dovrà pertanto, conferire l’apparecchiatura giunta a fine vita agli idonei centri di raccolta differenziata dei rifiuti elettronici
ed elettrotecnici, oppure riconsegnarla al rivenditore al momento dell’acquisto di una nuova apparecchiatura di tipo equivalente,
in ragione di uno a uno. L’adeguata raccolta differenziata per l’avvio successivo dell’apparecchiatura dismessa al riciclaggio,
al trattamento e allo smaltimento ambientale compatibile contribuisce ad evitare possibili effetti negativi sull’ambiente
e sulla salute e favorisce il riciclo dei materiali di cui è composta l’apparecchiatura. Lo smaltimento abusivo del prodotto
da parte dell’utente comporta l’applicazione delle sanzioni amministrative previste.
ISTRUZIONI PER LA SICUREZZA
Page 5

/3
CONNESSIONI
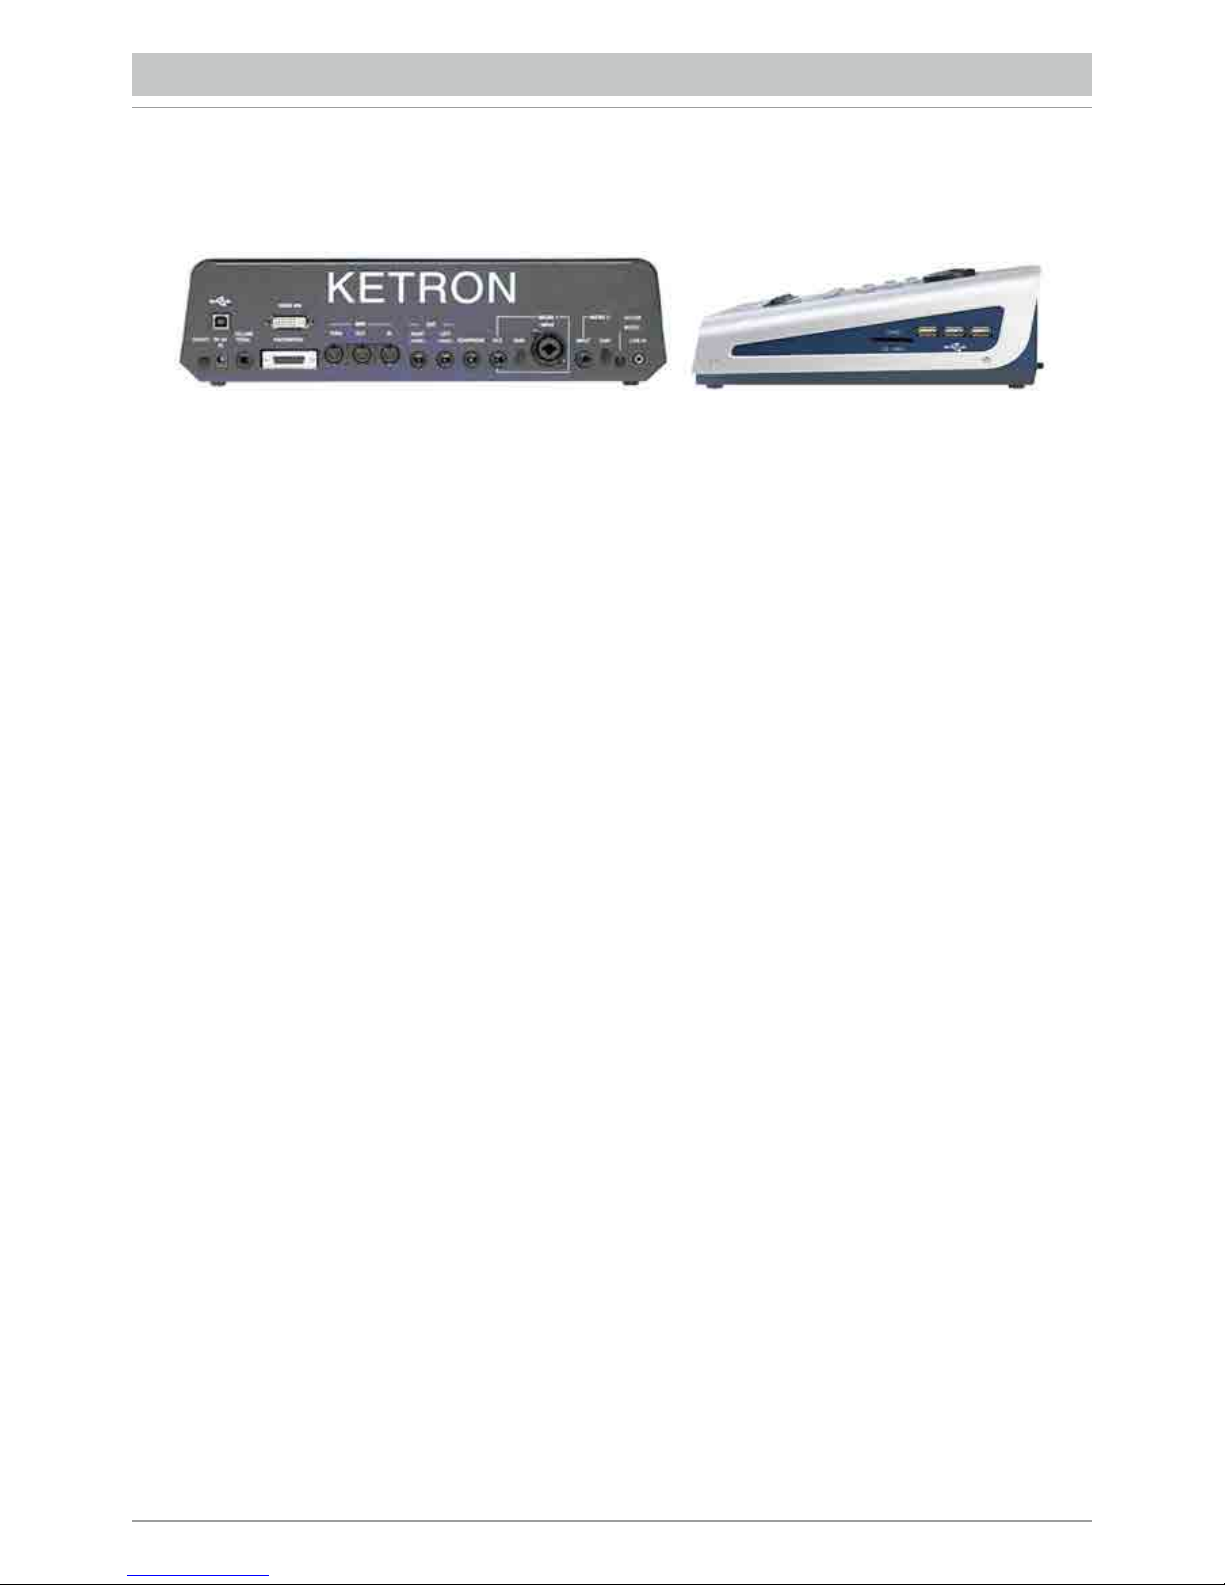
DC 9V 4A Presa di alimentazione della corrente elettrica Output: 9 V, 4 A. Si raccomanda di utilizzare
esclusivamente l’alimentatore fornito con lo strumento.
ON/OFF Pulsante di accensione/spegnimento. L’avvio dello strumento può richiedere sino a 30 secondi.
Per arrestare correttamente lo strumento, premere il tasto ON/OFF ed attendere il completo
spegnimento.
VOLUME PEDAL Presa jack stereo standard per il collegamento di un pedale di Volume (opzionale).
VIDEO DVI Presa video digitale (Digital Video Interface) per il collegamento ad un monitor video esterno.
USB-SD CARD Collegamento USB device per computer .3 prese USB HOST laterali per Pen drive .
Presa per SD CARD esterna.
FOOTSWITCH Presa multipolare standard per il collegamento di un pedale opzionale per il controllo di alcune
funzioni interne. Compatibile con Ketron FS6/FS13.
MIDI Prese per il collegamento MIDI IN, MIDI OUT e MIDI THRU.
MAIN OUT Prese jack mono standard per l’uscita generale da collegare ad un impianto PA STEREO:
sinistra (Left Mono), destra (Right Mono). Vi consigliamo vivamente di utilizzare il collegamento
stereo per la migliore riproduzione dello strumento e dei loro EFX. L’eventuale collegamento mono
(ovvero l’utilizzo della sola uscita Left o Right) darà una riproduzione inferiore a quelle che sono
le proprietà qualitative dei suoni e degli EFX.
HEADPHONE Presa jack stereo standard per la cuffia.
MICRO 1 IN Presa combo (Jack/Xlr) mono standard per il collegamento di un microfono dinamico.
MICRO 1 GAIN Gain (guadagno) del segnale in ingresso alla presa Micro 1.
MICRO 1 OUT Presa jack mono standard dedicata esclusivamente all’uscita Micro 1.
MICRO 2 IN Presa jack mono standard per il collegamento di un microfono dinamico.
MICRO 2 GAIN Gain (guadagno) del segnale in ingresso alla presa Micro 2.
GUITAR/MICRO Interruttore switch per i modi Guitar/Micro in ingresso alla presa Micro 2.
LINE IN Presa mini-jack per l’ingresso di linea stereo (CD Player, etc.).
Page 6
/4
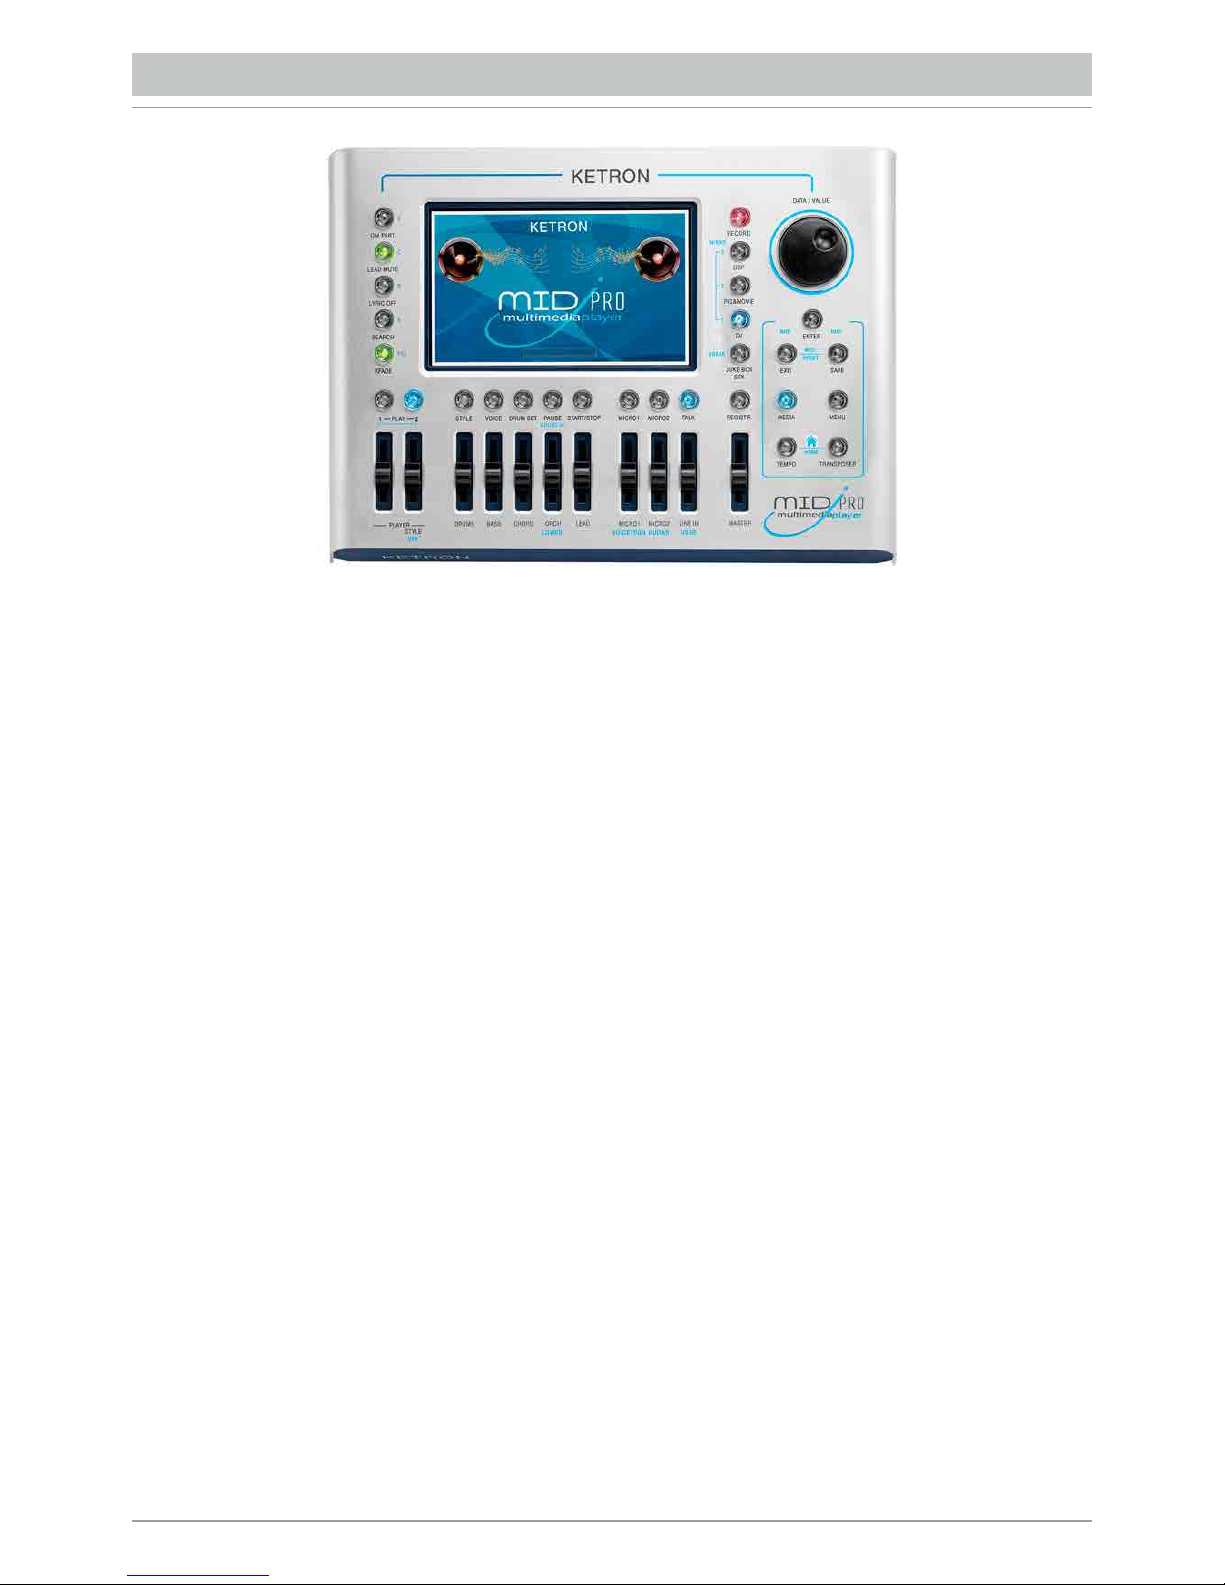
Il pannello frontale dello strumento è dominato da un ampio display Touch Screen a colori che rappresenta il cuore
del sistema interfaccia utente.
La maggior parte delle funzioni, è accessibile con un “tocco del dito” direttamente sullo schermo, in corrispondenza
dei relativi pulsanti.
A sinistra del display partendo dall’alto troviamo dunque i seguenti pulsanti:
• GM PART: Gestione dei suoni assegnati alle tracce MIDI del file caricato.
• LEAD MUTE: Mute per la traccia melodica del midifile oppure, se in esecuzione c’è un file audio, il tasto attenua la linea
vocale del brano originale.
• LYRIC OFF: Attivazione/disattivazione per la visualizzazione del testo del file.
• SEARCH: Menu per la ricerca dei file.
• X-FADE: Esegue la dissolvenza incrociata tra due files musicali.
Più in basso troviamo a partire da sinistra verso destra una serie di pulsanti.
• PLAY 1 e 2: Tasti per la selezione dei due Player. Non è possibile accedere al Player 2 quando lo style è inserito.
• STYLE: E’ il tasto per accedere alla modalità “Arranger” per gli accompagnamenti automatici. Non è possibile accedere
allo style se è inserito il Player 2.
• VOICE: Da accesso alla pagina per la selezione e la modifica dei suoni dello strumento destinati alla mano destra.
• DRUM SET: Attiva la funzione Manual Drum che permette la selezione e la mappatura dei Drum Kit. In ambiente Player
viene mostrato anche il Drum Mixer per la modifica volumi e dell’effetto dei suoni percussivi.
• PAUSE: Tasto per mettere in pausa il Player selezionato o per effettuare la funzione Restart e Count In in ambiente Style.
• MICRO1: Pagina di gestione del microfono 1.
• MICRO2/GUITAR: Pagina di gestione del secondo microfono o della chitarra connessi all’ingresso Micro2/Guitar.
• TALK: Elimina o riduce l’effetto dal microfono 1, per passare dal cantato al parlato.
In basso troviamo i cursori volume per le relative sezioni serigrafate in nero per i Player o in blu per lo Style.
A destra del display partendo dall’alto verso il basso troviamo i seguenti pulsanti:
• RECORD: Accesso alla funzione Recording ovvero alla registrazione di tutto quello che lo strumento sta suonando,
compreso quello che entra dagli ingressi esterni, (microfono, chitarra ecc).
• DSP: Pagina di controllo degli effetti (vedi DSP)
• PIC&MOVIE: Ambiente per la gestione dei file grafici e video.
• DJ: Modalità alternativa per la riproduzione delle song con doppio Player e funzioni varie.
• JUKE BOX: Menu per la gestione facilitata delle song alla maniera “Juke Box”.
• REGISTR: Selezione delle Registration, ovvero delle impostazioni generali dello strumento salvate dall’utente.
• MASTER: Cursore per la regolazione del volume generale del MIDJPRO.
PANNELLO FRONTALE
Page 7
/5
Infine nella parte più a destra troviamo:
• DATA/VALUE detta anche Dial. Consente la selezione dei files, dei parametri e la modifica dei valori selezionati.
• ENTER: Per confermare alcune operazioni o entrare nei folder selezionati
• EXIT: Per abbandonare una operazione o uscire dalla schermata corrente visualizzando la precedente, o anche per uscire
da una cartella passando al livello superiore della directory di navigazione
• SAVE: Per salvare tutte le modifiche effettuate sullo strumento.
Nota: I due tasti EXIT e SAVE premuti contemporaneamente provocano il RESET Midi globale.
• MEDIA: Per visualizzare i dispositivi di memorizzazione installati nello strumento o connessi mediante le porte USB
• MENU: Per visualizzare ed accedere ai vari Menu operativi dello strumento.
• TEMPO e TRANSPOSER: Questi tasti gestiscono rispettivamente la velocità in bpm e la trasposizione di tonalità dei file
musicali e degli stili. Premuti simultaneamente, richiamano la videata principale dello strumento denominata “Home”.
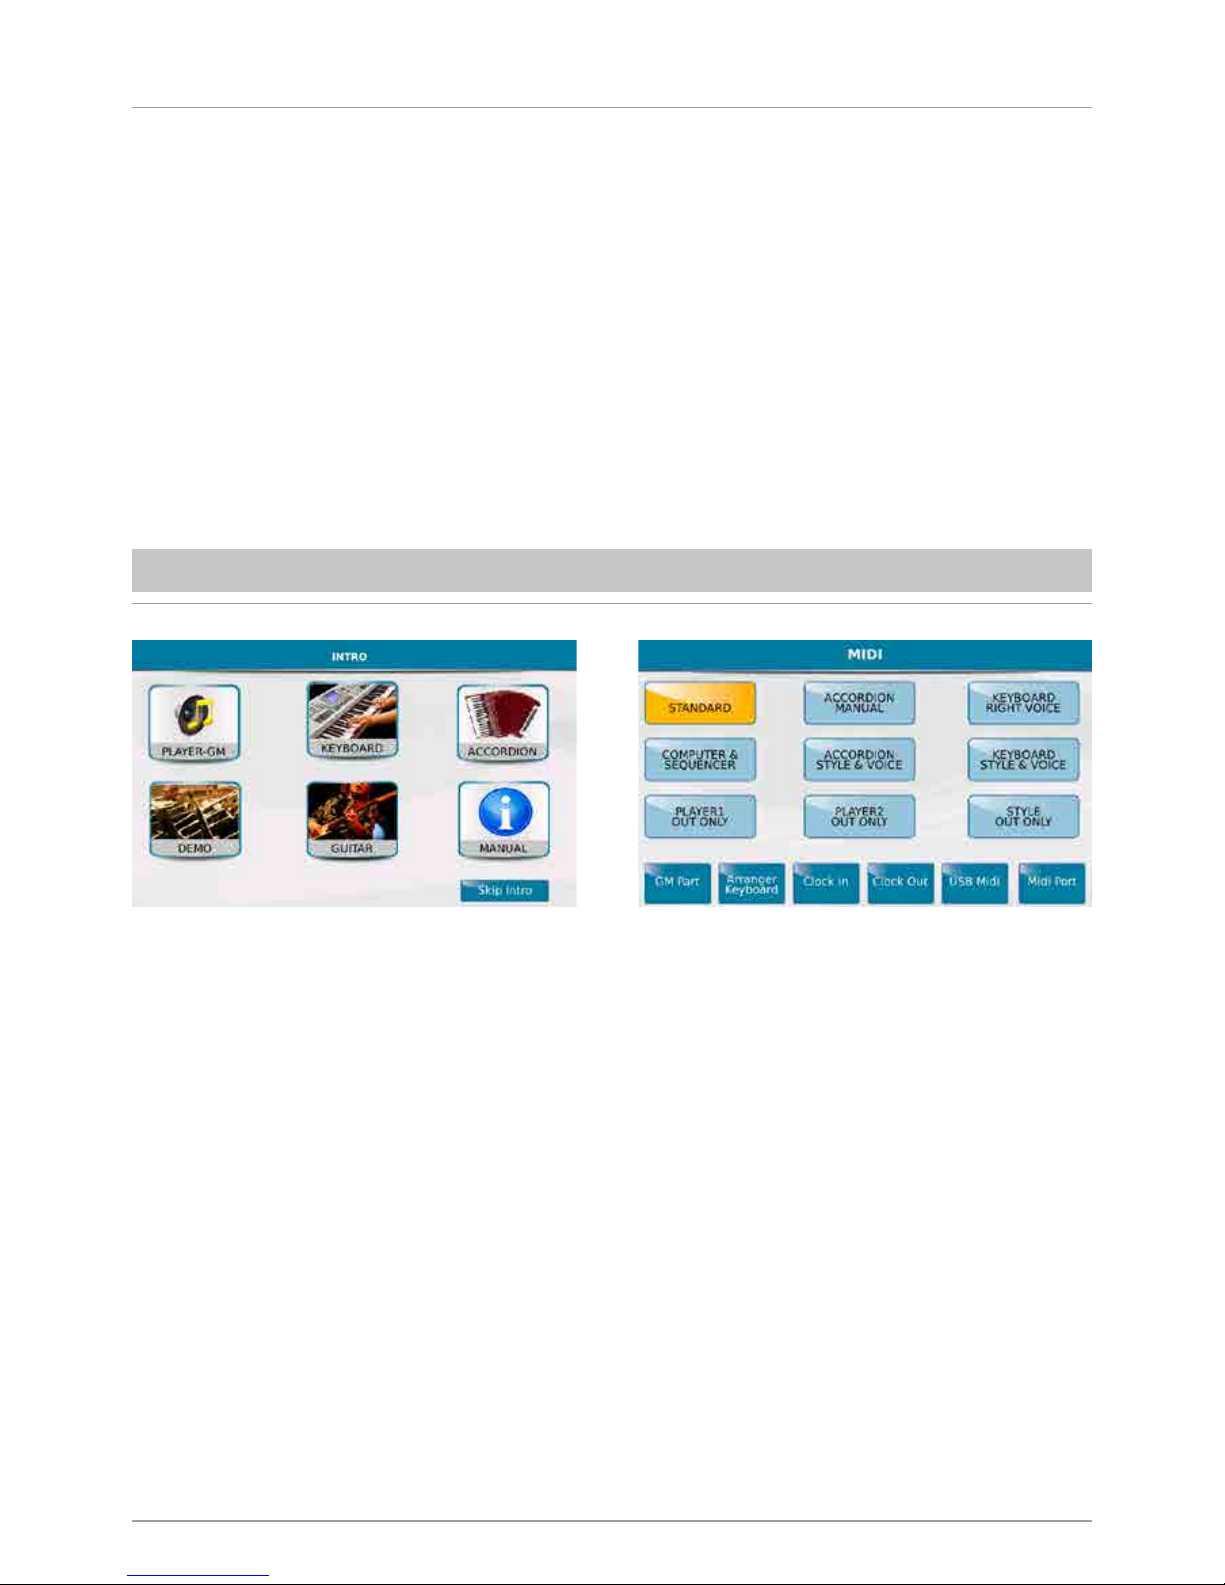
La schermata di Introduzione (INTRO) appare, automaticamente, ad ogni avvio dello strumento e consente di accedere
alle principali funzioni, quali:
• PLAYER-GM: Per utilizzare MIDJPRO come un lettore di file AUDIO e MIDI.
• KEYBOARD: Per pilotare MIDJPRO tramite una Master Keyboard (Tastiera) MIDI.
• ACCORDION: Per pilotare MIDJPRO tramite una Fisarmonica MIDI.
Comunque, anche entrando ad esempio in modalità Player GM, si potrà poi pilotare MIDJPRO con una Master Keyboard
o una fisarmonica, modificando le impostazioni midi, premendo il tasto Menu dal pannello e selezionando le varie funzioni
MIDI dal display.
• STANDARD: Permette di controllare lo strumento con un MIDI controller esterno (attraverso la presa MIDI In)
per suonare gli Styles e le Voices dell’Arranger.
• ACCORDION MANUAL: Per controllare l’Arranger con una Fisarmonica MIDI.
• COMPUTER SEQUENCER: Per collegare MIDJPRO ad un computer come un modulo esterno GM.
Ritornando alla nostra schermata introduttiva troviamo ulteriori pulsanti:
• DEMO: Questo comando vi permetterà di ascoltare delle brevi dimostrazioni.
• GUITAR: Per la gestione di una chitarra o di un secondo microfono, collegati alla presa MICRO 2 IN.
(La selezione delle due sorgenti di ingresso si effettua con l’apposito selettore fisico).
• MANUAL: Per aprire il manuale d’uso dello strumento.
• SKIP INTRO: Elimina la schermata intro iniziale.
INTRODUZIONE
Page 8

/6
Selezionando dalla schermata intro l’icona PLAYER-GM, il display visualizza il contenuto del media selezionato
(SSD, Card, USB, etc.).
Per navigare si può utilizzare:
• TOUCH SCREEN che ci permette di selezionare direttamente il file e di entrare nelle cartelle con un doppio click.
• DIAL DATA/ VALUE per scrollare files, cartelle o variare il valore dei parametri
• EXIT per uscire dalle cartelle e quindi tornare ad un livello superiore (Back Root).
• ENTER per entrare nella cartella selezionata in sostituzione del doppio click del Touch Screen
Il file, appena toccato, viene selezionato evidenziato e caricato nel Player 1.
Premete il tasto START/STOP o ENTER per avviare la riproduzione. Quando il file è in play si accenderà la luce rossa
del pulsante START /STOP. Per caricare il Player 2 basta premere il pulsante PLAY 2 e ripetere la procedura.
N.B: quando è attivata la funzione Auto Play dal menu FUNCTION (in basso a destra), la riproduzione dei brani
contenuti in una cartella procede in modo automatico dal primo all’ultimo.
La schermata della sezione PLAYER mostra i testi (Lyrics o txt se presenti) sul display o su un monitor esterno collegato
all’apposita presa VIDEO DVI situata nel pannello posteriore. La barra superiore mostra: il nome del file in esecuzione,
preceduto da un numero tra parentesi quadre che indica il Player selezionato, il tempo metronomico (solo per i midifile),
la velocità (solo per i midifile), Il valore di trasposizione impostato per il file in esecuzione, i volumi delle sezioni Drum, Bass,
Chord, Orch. (Lower) e Lead. Il riquadro a destra vi consente di scorrere, in alto e in basso, la lista di file e cartelle.
Inoltre, durante l’esecuzione, è presente il contatore di battute/tempo trascorsi. Per ulteriori informazioni sul file
in esecuzione e per andare avanti o indietro, selezionare PLAYBAR. Se dal menu PREFERENCE è stata attivata
la funzione PFL To Player, nella barra a destra comparirà il tasto virtuale PFL che consente di attivare il preascolto
in cuffia del brano musicale corrente.
PLAYER
Page 9
/7
TESTI
Se il file contiene del testo, viene mostrato al centro del display ed anche ad un monitor esterno se collegato.
É però possibile continuare a visualizzare la lista di file premendo il pulsante LYRIC OFF situato nel pannello frontale
a sinistra. Alla successiva pressione del tasto il testo ritornerà ad essere visualizzato. Con i file contenenti il testo
è possibile passare alla modalità Schermo intero, toccando nel centro dello schermo dove scorre il testo.
Toccando una seconda volta si ritorna alla visualizzazione normale. Quando il file non contiene del testo, è possibile
fare in modo che ad esso si associ un file di testo separato con estensione .txt. avente lo stesso nome del file musicale
e che risiede nella stessa cartella (Es. Newyork.mid e il testo Newyork.txt). Nella pagina FUNCTION deve essere
disabilitata la funzione SKIP FILE LINK. É inoltre presente una modalità Mirror (Menu Video) dove è possibile visualizzare
sul monitor esterno la stessa videata corrente nel Display .
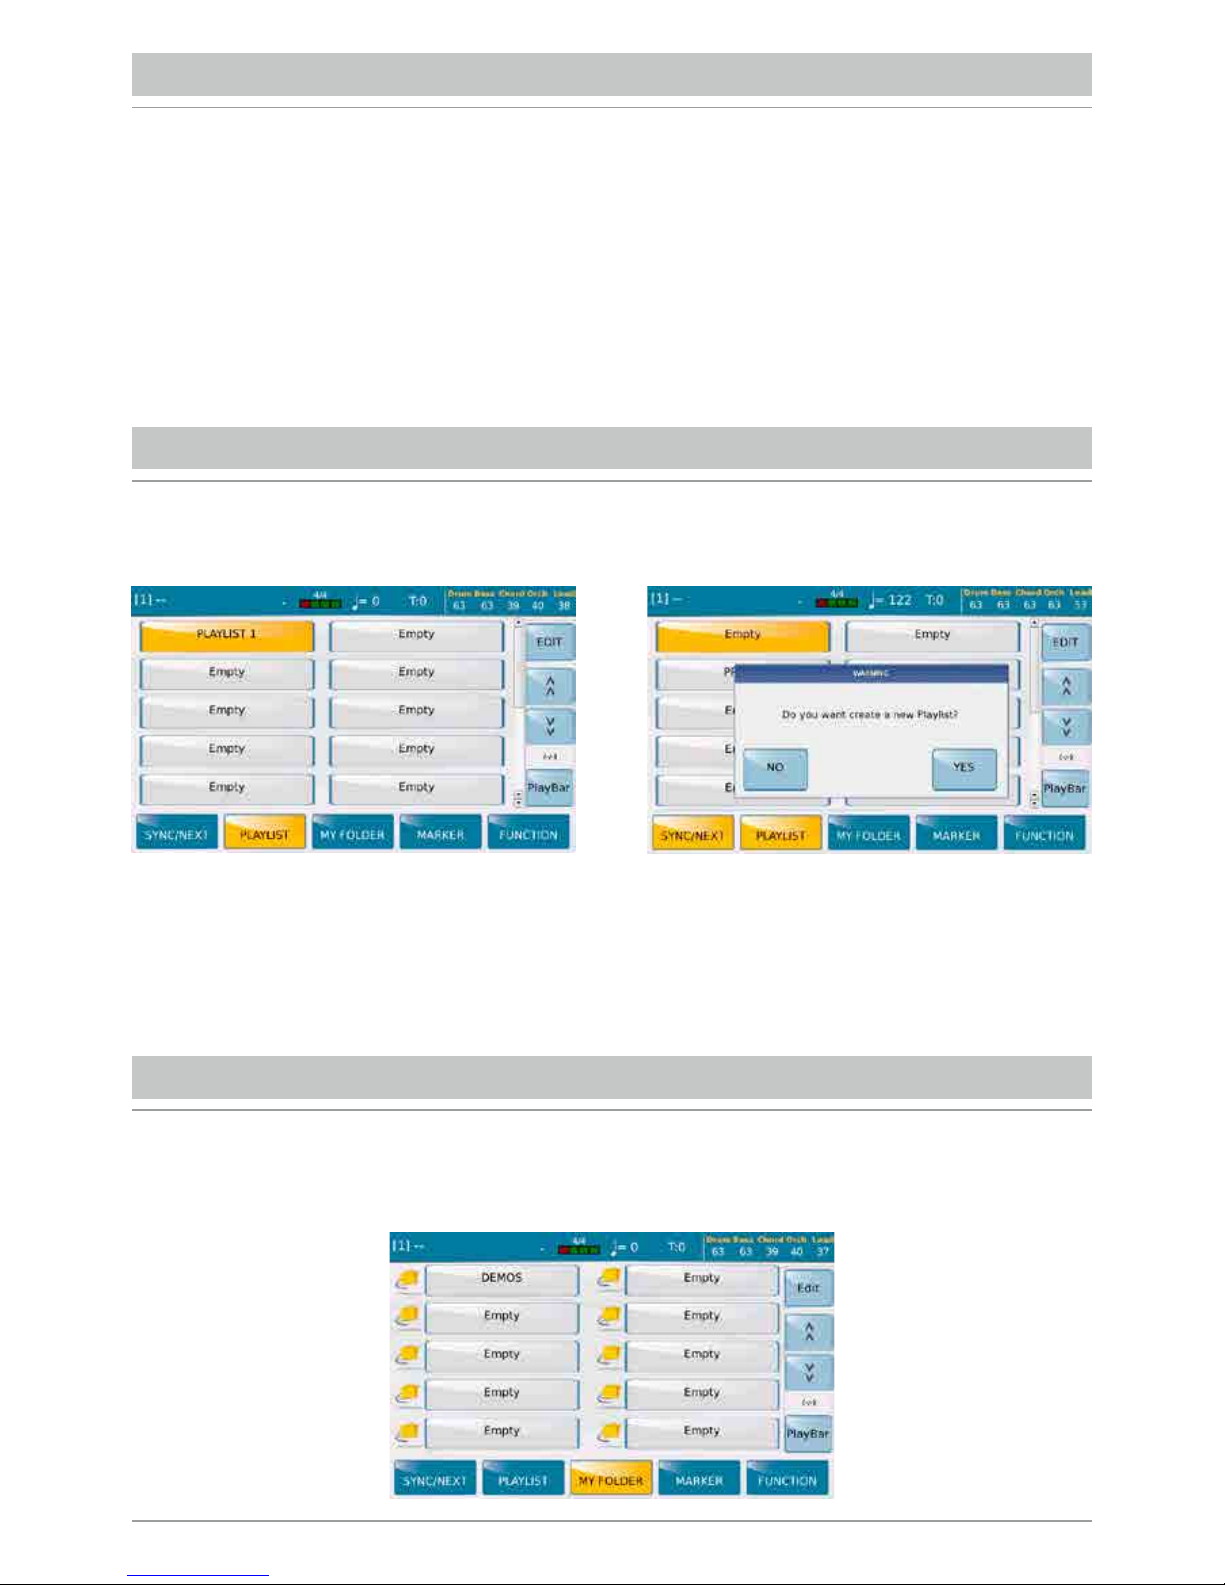
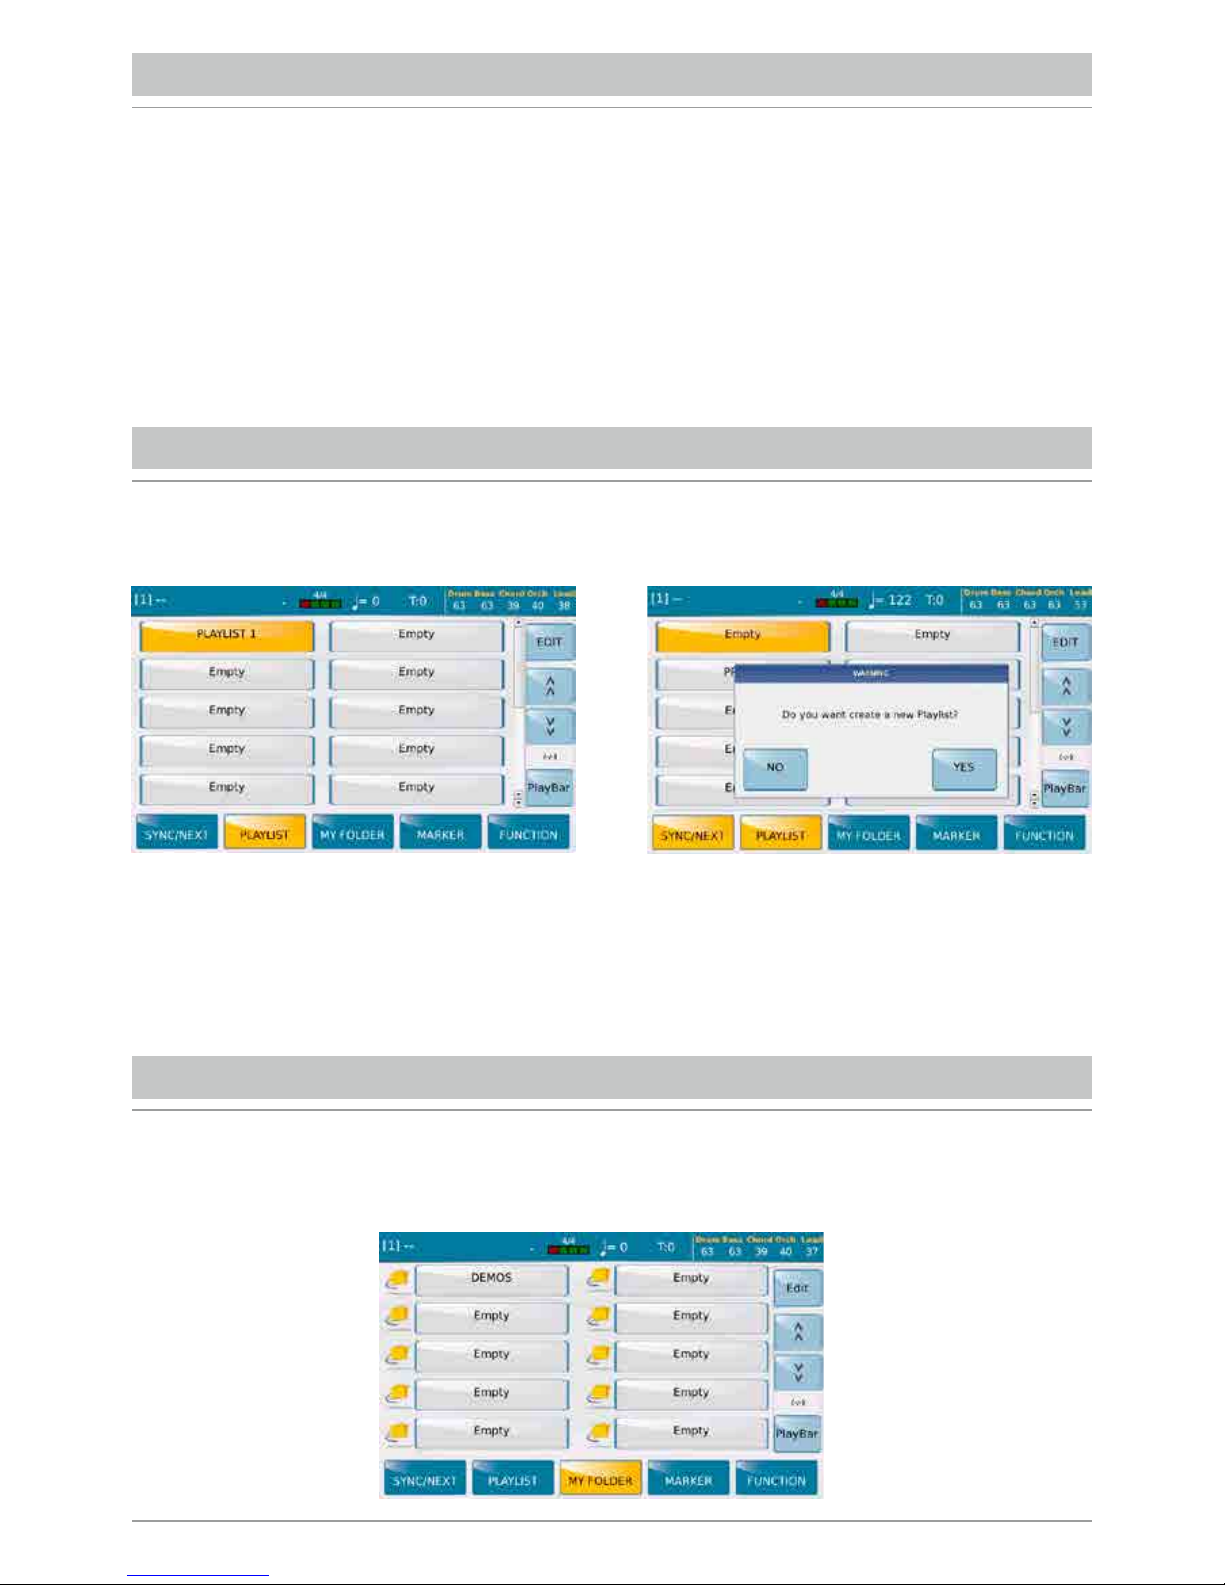
PLAYLIST
Potrete creare una Play list selezionando Empty e confermando con YES nella finestra di dialogo.
Con EDIT si accede alla creazione/gestione della Playlist. Il display mostrerà la directory corrente da dove, utilizzando
lo schermo e i pulsanti ENTER ed EXIT, potete aprire le cartelle e trovare i files da aggiungere alla Playlist.
Trovato il file desiderato premete il tasto INSERT ITEM per aggiungerlo nella nuova Playlist.
Dalla barra inferiore, si accede alla PLAYLIST, con la quale e’ possibile programmare i propri repertori e le proprie scalette
musicali.
Le cartelle MY FOLDER. sono in realtà dei collegamenti rapidi alle cartelle preferite. Se una cartella è stata salvata come
Myfolder apparirà nell’elenco delle cartelle preferite come riportato nel display. Con EDIT si accede alla creazione/gestione
delle cartelle.
MY FOLDER
Page 10
/8
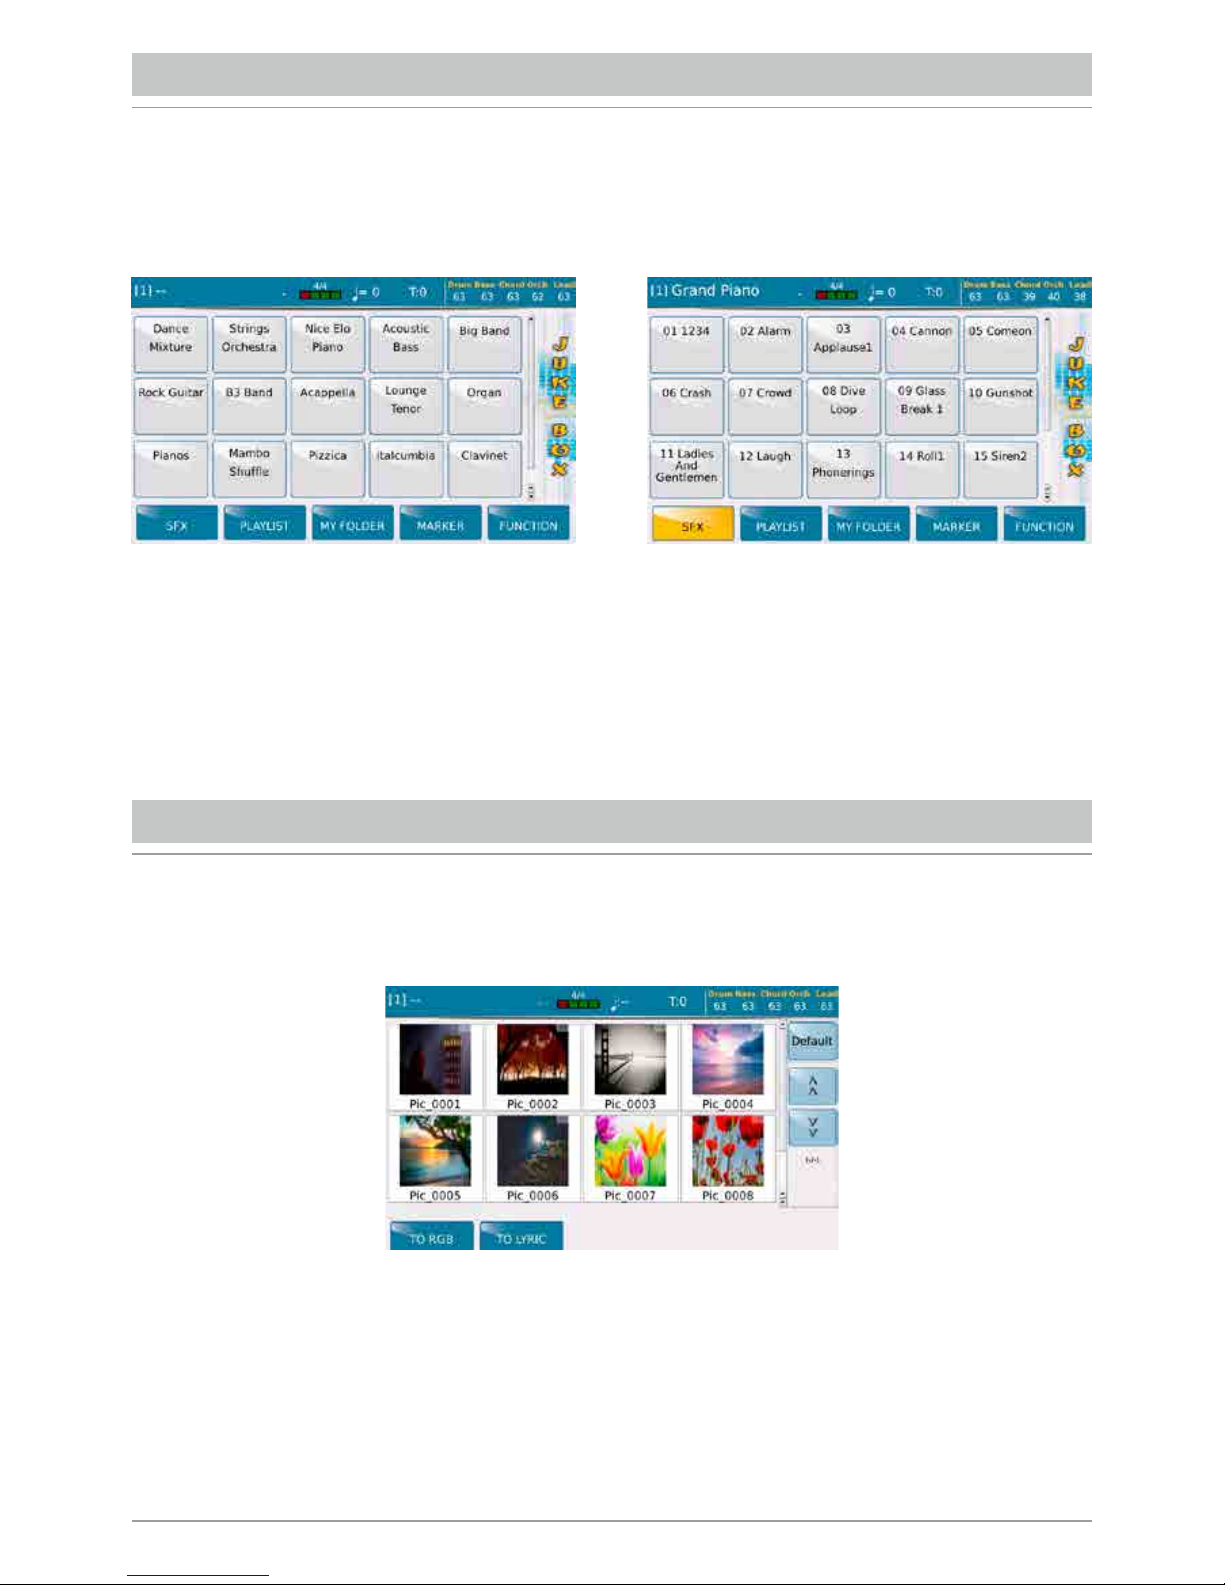
In questo menu potete selezionare le immagini da utilizzare come background ai vostri file di karaoke o simili e per poter
gestire i filmati residenti nel MIDJPRO.
La funzione JUKE BOX e’ una modalità alternativa per la visualizzazione e l’attivazione dei files contenuti in una Playlist
o in un Myfolder..
Tra le varie modalità di utilizzo del Player questa è probabilmente quella più immediata ed intuitiva
Tramite il Dial, si può scrollare la pagina per visualizzare i pad in successione. La schermata offre anche la possibilità
di controllare con il tasto SFX alcuni effetti sonori che possono essere attivati nel corso dell’esecuzione.
JUKE BOX
PIC & MOVIE
Page 11
/9
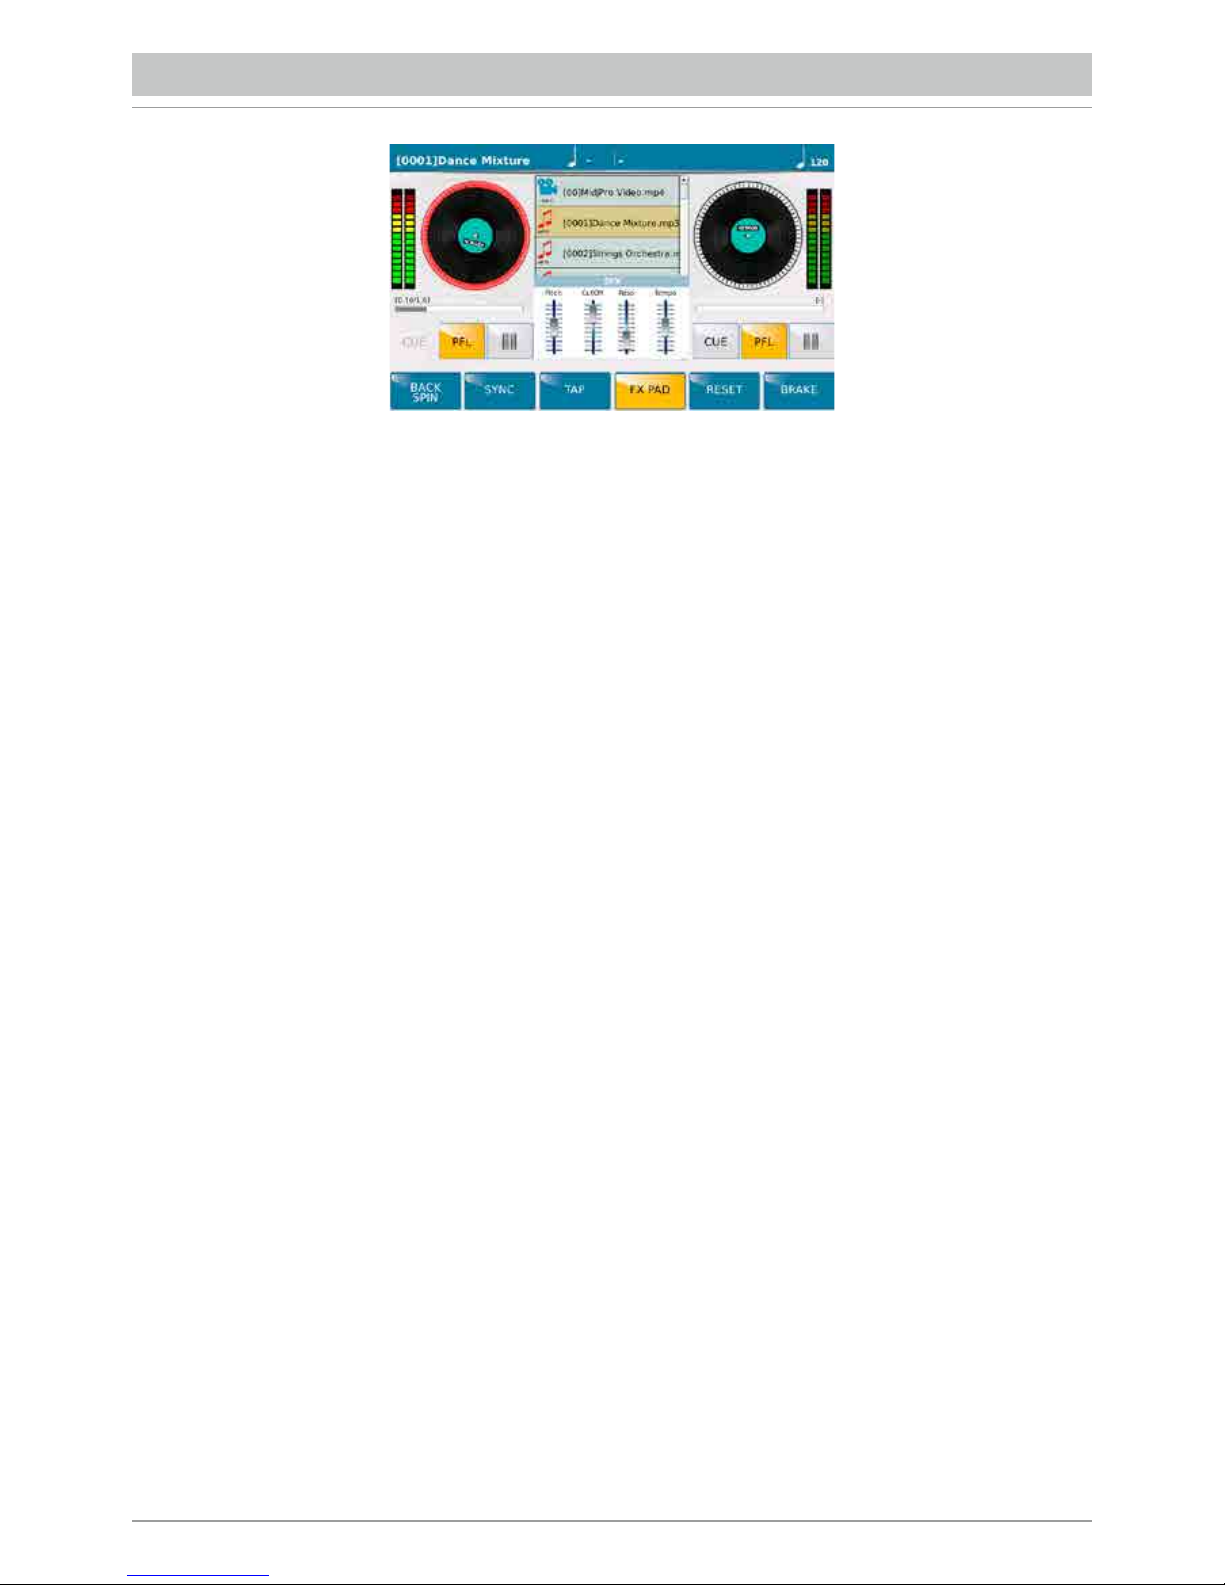
Col tasto DJ si accede ad una modalità alternativa di riproduzione dei brani. Qui i 2 Player sono rappresentati come 2
giradischi. Quello selezionato è evidenziato in rosso. La directory di selezione files e cartelle compare al centro.
Per ogni Player è disponibile una coppia di indicatori di livello e dei pulsanti che andremo a descrivere:
• CUE: É un marker che una volta impostato su un punto della song, se ripremuto fa ripartire la song da quel punto.
Funziona su files Wave e midifile ma non funziona su file mp3.
• PFL: Preascolto in cuffia. Il PFL si seleziona automaticamente portando il relativo slider a 0.
• []>: Pausa.
In basso troviamo una serie di funzioni che agiscono sul player selezionato:
• BACK SPIN: Termina la riproduzione aumentando la velocità e la tonalità.
• SYNC: Sincronizza i due Player. Se suona un midifile sul piatto A e si prepara un altro midifile sul piatto B, premendo
SYNC il secondo midifile inizia “in battere”. Nel caso venga inserito anche il Lock Tempo, il secondo Player mantiene
la velocità in Bpm del primo. Quando il secondo file è un file audio, quest’ultimo partirà all’inizio della successiva misura
del midifile. Se però il primo file è di tipo audio, si attiverà la finestra TAP (vedi sotto) con un pad per avviare il secondo
brano dopo aver fatto 4 colpi sul pad, così se i 4 colpi sono battuti a tempo col primo file, il secondo file sarà
sincronizzato col primo.
• TAP: Apre al centro un pad per sincronizzare il tempo con il “tamburellamento” delle dita
• FX PAD: Funziona solo con i file audio e apre un piccolo riquadro con i seguenti effetti: Pitch, Frequenza di taglio
(Cut Off) e Risonanza del filtro, ed infine la velocità di riproduzione (tempo). Questi effetti possono essere regolati
con i corrispondenti slider presenti nel pannello dello strumento.
• RESET: Riporta il file alle condizioni di default, azzerando le modifiche effettuate in questa pagina.
• BRAKE: Termina la riproduzione diminuendo la velocità e la tonalità come accade all’improvvisa mancanza
di alimentazione ad un giradischi.
DJ
Page 12
/10
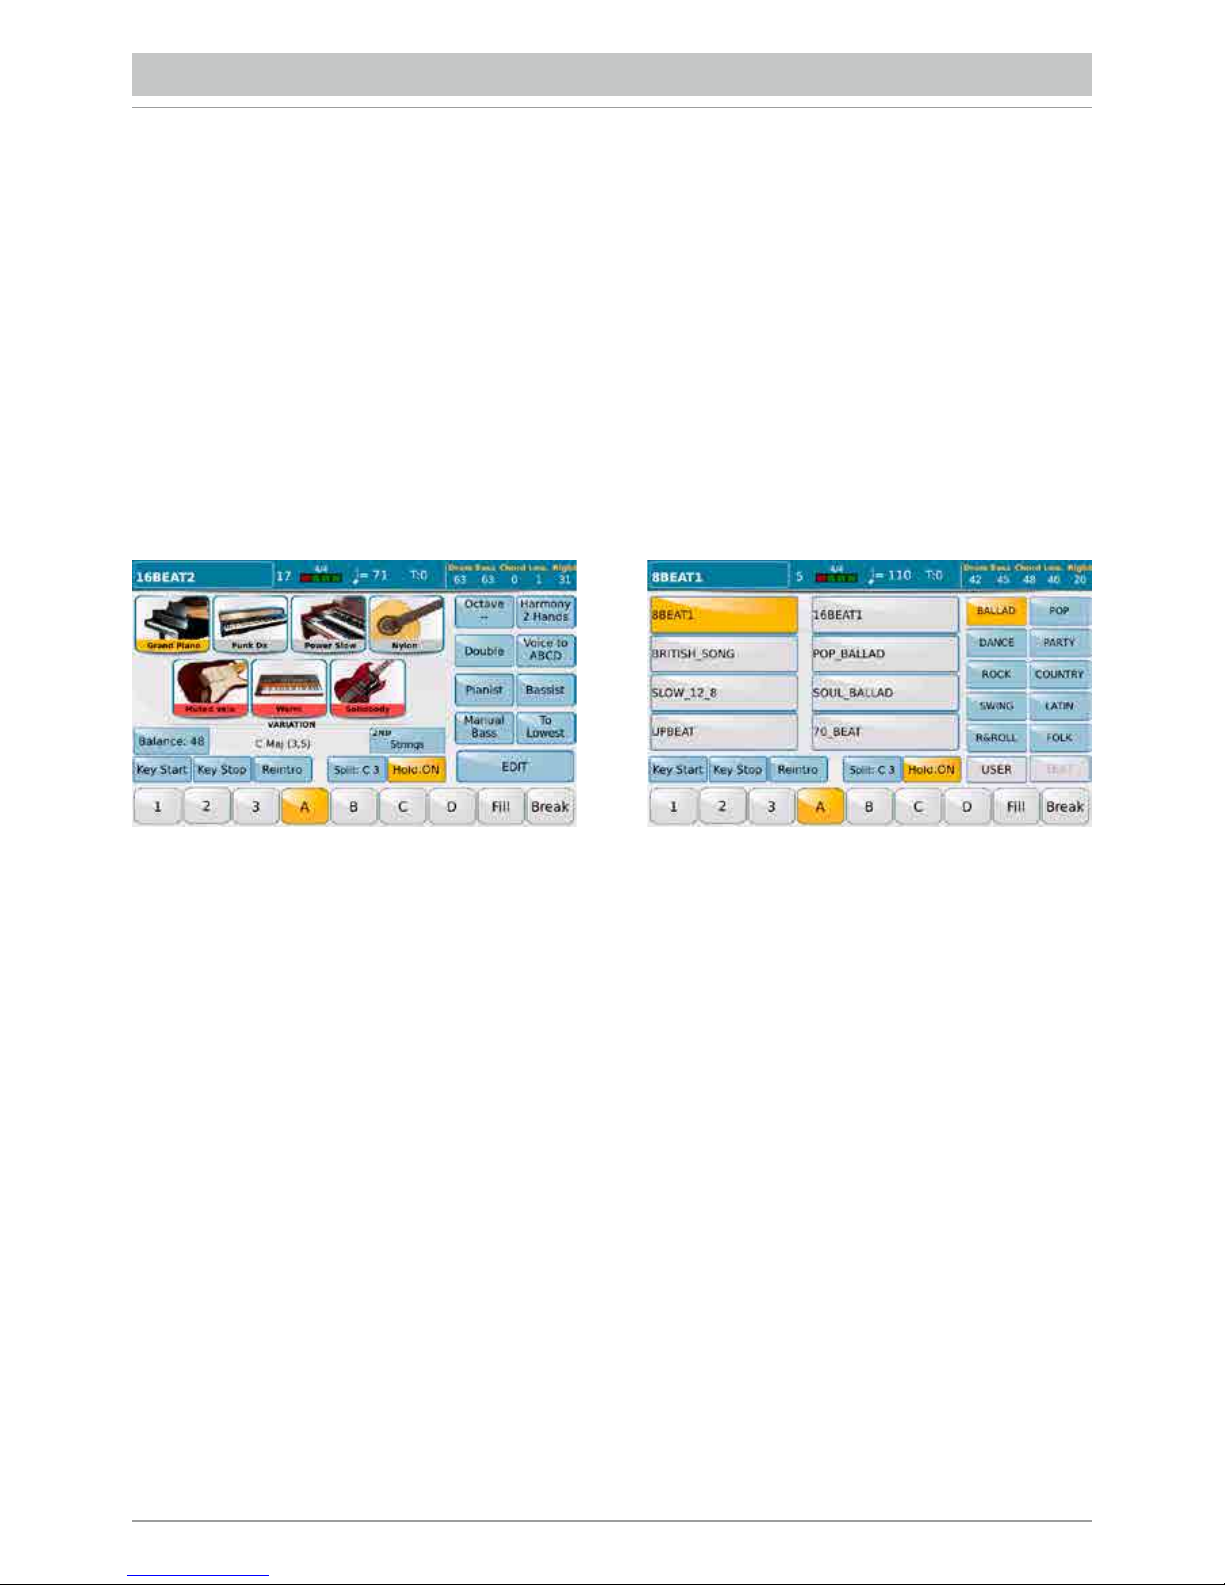
MIDJPRO non è solo un Player ma è anche un Arranger, quindi dispone di un intera sezione dedicata agli
accompagnamenti automatici chiamati stili. Ogni stile ha a sua disposizione:
• Due tracce per batteria e percussioni sul canale MIDI 9 e 10.
• Una traccia di Basso sul canale MIDI 5.5 tracce armoniche CH1, CH2,CH3,CH4,CH5 che lavorano sui canali
MIDI 6,7,8,11,12.
• 2 tracce “Real Time” cioè Lower 1 e Lower 2 da assegnare allo split sinistro della tastiera che lavorano sui canali
MIDI 3 e 4.
• La traccia LEAD che lavora nella sezione Upper cioè nella parte alla destra dello Split della tastiera.
É possibile anche visualizzare un file di testo durante l’esecuzione di uno stile. Quando si desidera associare un file di testo
ad uno style si esce dalla modalità “Style”, si carica il testo, si ritorna nella modalità “Style” e si salva la Registration.
Ogni stile è costituito da diversi elementi: 3 INTRO; 3 ENDING; 4 arrangiamenti (A, B, C, D); 4 FILL; 4 BREAK.
Un ulteriore possibilità di variazione dello stile è costituita dal fatto che le ultime 3 tracce di accompagnamento armonico
cioè CH3, CH4, CH5 possono essere inserite o tolte “al volo” mediante i 3 tasti VARIATION.
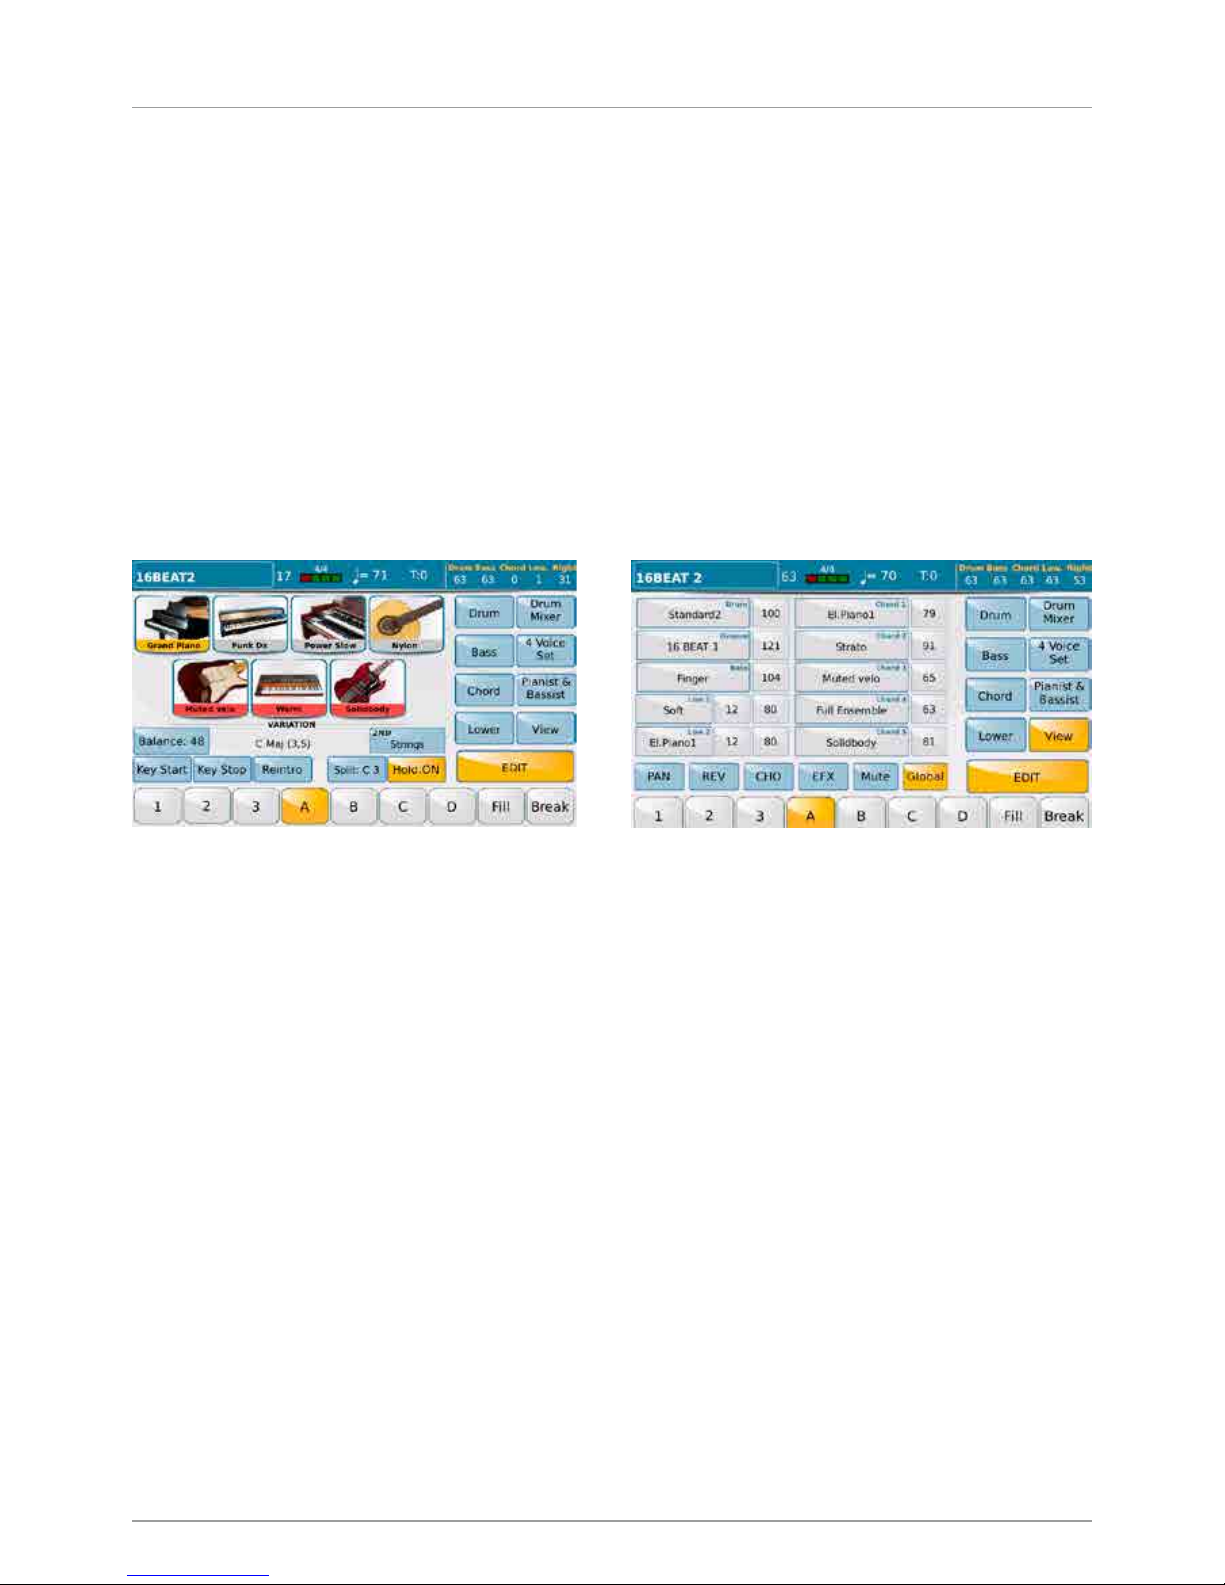
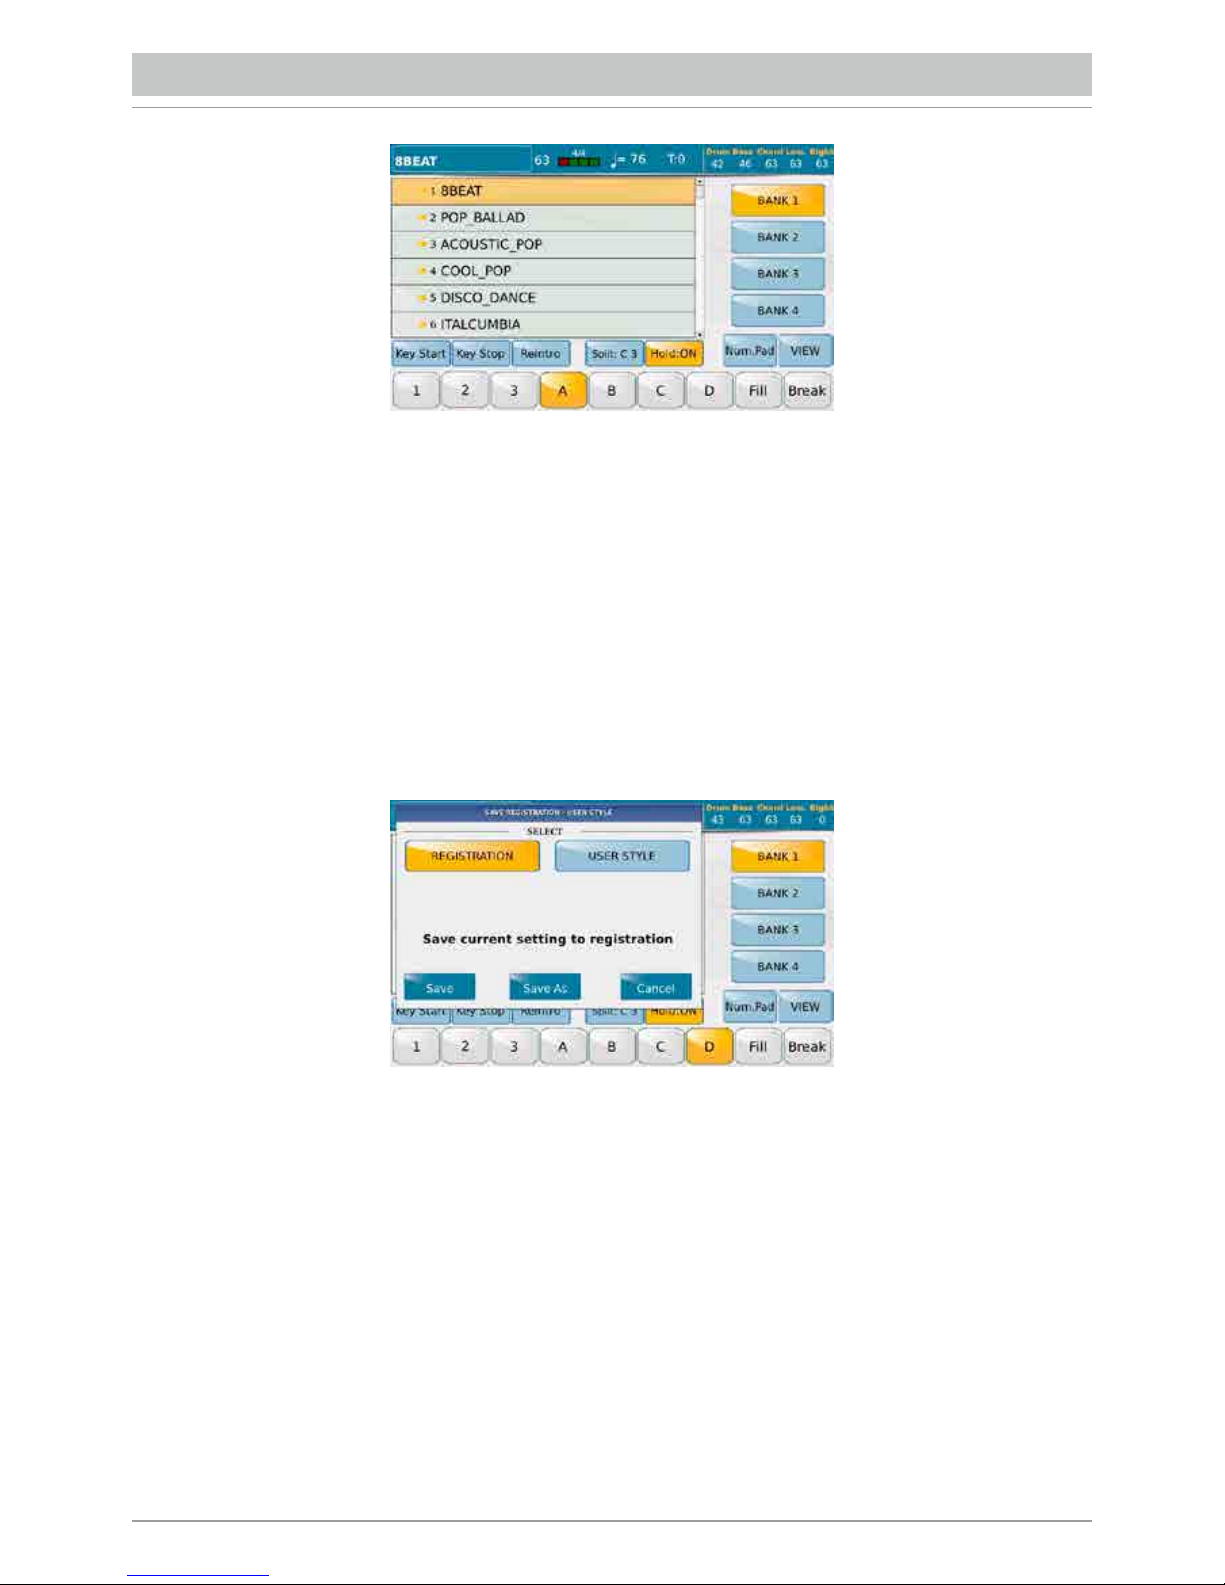
Il display mostra nella colonna a destra le categorie principali degli stili (Ballad, Pop, Dance etc...).
A destra vengono visualizzati gli stili appartenenti alla categoria selezionata. Più in basso appaiono dei tasti che attivano
specifiche funzioni:
- KEY START: Con questo comando si avvia l’esecuzione dello stile appena si suona un accordo nella parte lower
della tastiera collegata al MIDI In dello strumento, senza la necessità di premere START/STOP .
- KEY STOP: Arresta l’accompagnamento quando si stacca la mano dalla sezione Lower della tastiera.
- REINTRO: Fa in modo che quando lo stile è in esecuzione, la pressione del tasto Intro/Ending, anzichè eseguire l’Ending
esegua nuovamente l’Intro. Se il tasto Reintro è attivo in stato di Stop, premendo uno dei tasti Intro/Ending invece di
eseguire l’Intro si passa direttamente all’ Ending.
- SPLIT: Selezionando questo comando (il tastino diventa giallo) e premendo una nota dalla tastiera midi connessa, viene
determinata la zona che divide la sezione Lower (sinistra) dalla sezione Upper (destra) della tastiera che verrà utilizzata.
-HOLD ON: Mantiene attivo l’accompagnamento anche quando si lascia l’accordo con la mano sinistra fino all’inserimento
del successivo accordo.
Premendo l’apposito pulsante STYLE dal pannello frontale si accede alla schermata principale dell’Arranger .
ARRANGER
Page 13
/ 11
- DRUM: Permette di impostare dei parametri relativi alla sezione Drum.
- DRUM MIXER: Apre un mixer dedicato alla batteria dove è possibile attivare o mettere in mute i singoli strumenti
percussivi della batteria e regolarne per ciascuno di essi il volume ed il riverbero.
- BASS: Apre la pagina di regolazione della traccia del Basso.
- 4 VOICE SET: Permette di modificare le 4 Voci per la sezione Upper.
- CHORD: Apre la pagina di regolazione delle tracce armoniche dell’accompagnamento automatico.
- PIANIST & BASSIST: Da accesso alla pagina in cui si impostano in modo dettagliato le modalità di controllo
dell’Arranger mediante la tastiera.
- LOWER: Apre la pagina di regolazione della traccia Lower cioè della zona della tastiera a sinistra del punto di split.
- VIEW: permette la visualizzazione e la modifica delle parti dello style.
Tutte le modifiche apportate sui Factory Style possono essere salvate con Save in un User Style lasciando il nome
esistente oppure rinominando lo stile. Il nuovo User Style andrà a collocarsi nella famiglia User omonima a quella dello
Style Factory di partenza. In ogni caso i Factory Styles originali non possono essere ne sovrascritti e ne modificati.
In basso troviamo i comandi principali dello stile:
- INTRO/ENDING: 1 - 2 - 3
- ARRANGE: A-B-C-D
- FILL: Viene eseguito un fill diverso a secondo dell’arrange attivo.
- BREAK: Viene eseguito un break diverso a secondo dell’arrange attivo.
In alternativa questi comandi possono essere controllati dai pulsanti, con serigrafia in blu, a destra e sinistra del Display,
purchè la funzione ARRANGE TO TABS (nel menu PREFERENCES) sia attiva.
E’ possibile controllare i comandi principali dello style anche attraverso la pedaliera FS6/FS13 (opzionale).
Nel pannello frontale sono sempre attivi i cursori per la regolazione del volume della batteria DRUMS, del basso BASS,
della sezione accompagnamento armonico CHORD, della sezione LOWER e LEAD della tastiera .
Premendo EXIT si torna alla videata che mostra le funzioni per la regolazione dell’Arranger.
Premendo EDIT si accede alla pagina che permette di effettuare modifiche sostanziali alle impostazioni dell’Arranger
Page 14
/12
Il pulsante MICRO 1 posto nel pannello frontale, apre la schermata relativa alla gestione del microfono connesso
all’ingresso MICRO 1 del pannello posteriore.
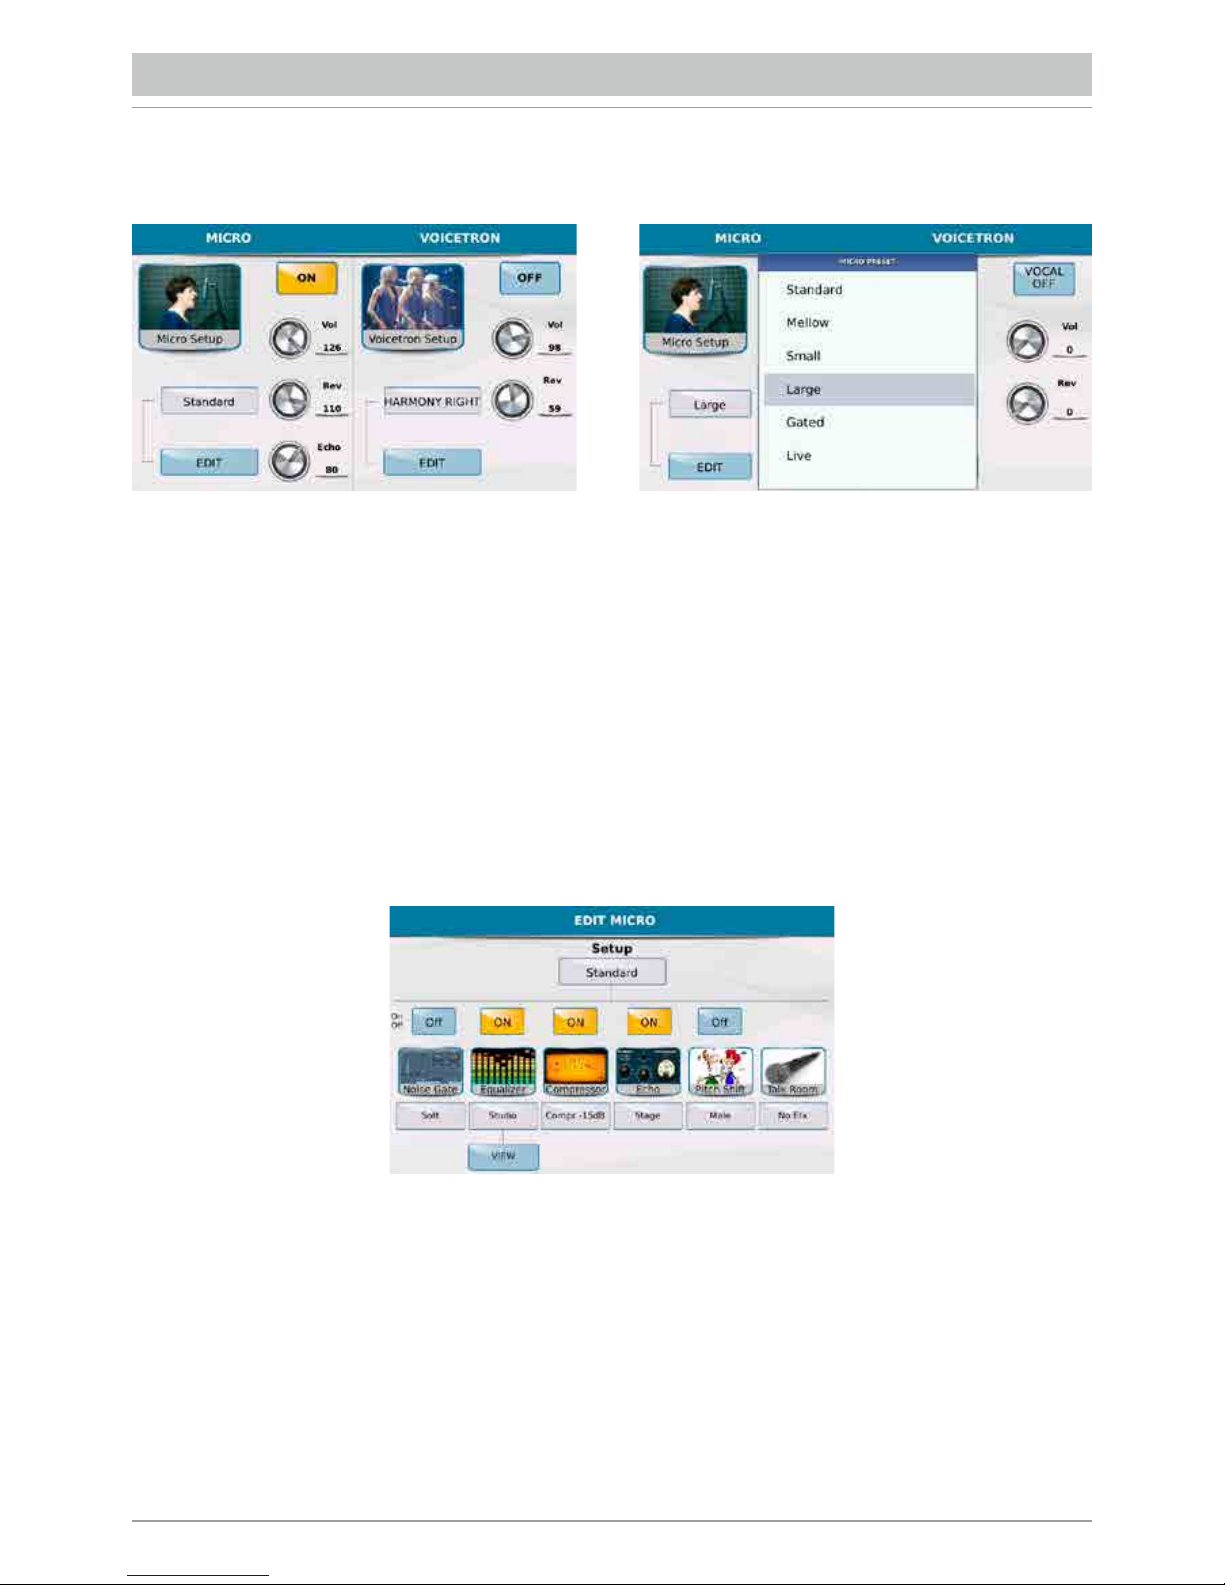
La pagina è divisa in 2 sezioni: MICRO, per la regolazione degli effetti tipicamente utilizzati per la voce, VOICETRON
per la regolazione del processore vocale che crea armonizzazioni ed effetti particolari. Entrambi i DSP possono essere
attivati o disattivati mediante il tasti virtuali MICRO ON/OFF e VOCAL ON/OFF. Iniziando dalla sezione MICRO troviamo
in alto la manopola volume, per la regolazione del livello microfonico che va ad aggiungersi al guadagno in ingresso
regolabile col il potenziometro fisico posto in prossimità dell’ingresso MICRO1. Un ulteriore controllo del volume
del microfono 1 è il cursore MICRO1/ VOICETRON.
Più in basso troviamo un riquadro che riporta il Preset microfonico inserito che per default è “Standard”.
É sufficiente toccare il riquadro per far comparire un menu a tendina con tutti gli altri Preset e scegliere mediante il Touch
Screen quello desiderato.
Accanto al riquadro, la manopola Rev, consente di regolare il livello del riverbero stesso mediante il Dial e la manopola
Echo permette di regolare la quantità dell’effetto Echo con la stessa modalità. Toccando EDIT si accede alla pagina
di modifica del Preset microfonico.
Il Preset microfonico, il cui nome è riportato nel riquadro in alto, è composto da una serie di effetti che possono essere
attivi o disattivati mediante il riquadro ON/OFF posto al di sopra dell’immagine corrispondente. Sotto ciascun effetto
troviamo il riquadro che riporta il nome del Preset utilizzato da ciascun singolo effetto.
É sufficiente toccare il riquadro per far comparire un Pop up con i vari Preset che possono essere scelti col Touch Screen.
L’ equalizzatore ha un livello di edit ulteriore, VIEW, che apre una schermata dedicata per intervenire sulle 4 bande Low,
Mid-Low, Mid Hi , Hi , con la possibilita’ di scegliere per ciascuna di queste la frequenza ed il guadagno.
L’ultimo effetto della lista è quello impiegato per la funzione Talk, attivabile con l’apposito tasto sul pannello frontale,
che serve per passare dal cantato al parlato. Dalla schermata principale di EDIT MICRO, se si preme SAVE dal pannello
si salva tutto il setup microfonico in un User Preset.
MICROFONO/GUITAR
Page 15
/13
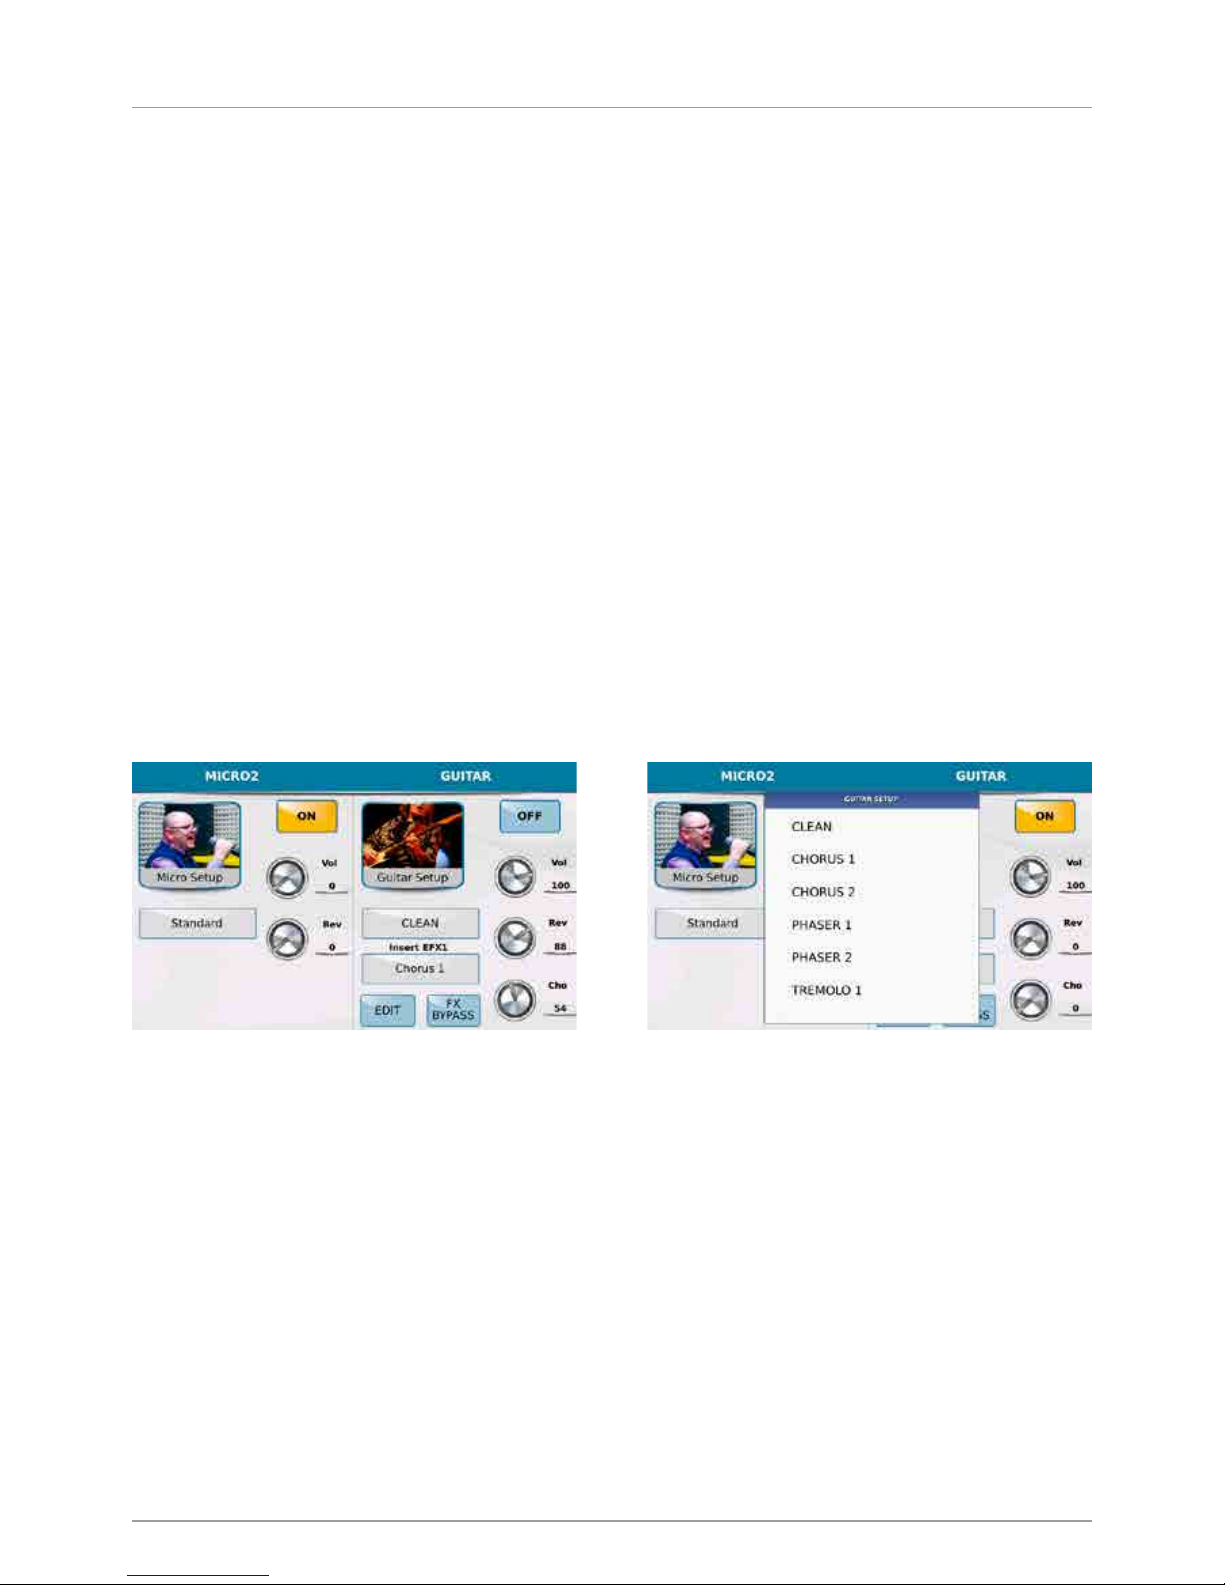
L’ingresso MICRO2/GUITAR può essere utilizzato per il collegamento di un secondo microfono o di una chitarra.
La pagina si presenta anche qui divisa in 2 parti: la prima è MICRO2 ed è dedicata alle impostazioni del microfono,
la seconda è GUITAR ed è dedicata alle impostazioni degli effetti per chitarra. Dal momento che si tratta dello
stesso ingresso audio, non è possibile attivare entrambe le modalità quindi se si imposta su ON la modalità MICRO2,
automaticamente si imposta su OFF la modalità GUITAR e viceversa.
La modalità MICRO2 è identica alla modalità alla modalità MICRO1 in tutti i parametri.Nella modalità GUITAR troviamo
anche qui delle manopole virtuali selezionabili col Touch Screen e modificabili mediante il Dial, che agiscono sul Volume,
Riverbero e Chorus e in aggiunta troviamo una serie di 16 Setup di effetti specifici per la chitarra.
Premendo EXIT si abbandona il menu a tendina e si ritorna alla schermata precedente. Ogni setup scelto porta
con se un effetto insert che verrà riportato nel riquadro INSERT EFX1. E’ possibile cambiare l’effetto insert del setup
toccando il riquadro dedicato e scegliendo un tipo di effetto dal menu a tendina.
L’effetto può essere disinserito con il tasto FX BYPASS dal display. Ciascun Setup chitarristico può essere editato
premendo il tasto EDIT. Alla fine tutte le modifiche dell’effetto possono essere salvate in un setup premendo il tasto SAVE
dal pannello. Il display vi darà la possibilità di scegliere se salvare le modifiche in un setup effetti per microfono o per
chitarra. Una volta effettuata la scelta comparirà la consueta schermata per salvare il setup su se stesso premendo SAVE
oppure con un nome differente grazie alla tastiera alfanumerica che apparirà sullo schermo quando scegliete SAVE AS.
La seconda parte della schermata è dedicata al processore vocale che si occupa di armonizzare la voce cioè
il VOICETRON. Qui troviamo in alto a destra un pulsante VOCAL ON/ OFF per attivare o spegnere il Voicetron,
dei potenziometri virtuali che consentono di regolare il volume e il riverbero mediante la selezione dal display e con l’utilizzo
del Dial. Più in basso troviamo un riquadro indicante il Preset corrente. Toccando su di esso si apre un menu a tendina
che consente la scelta di un altro Preset Voicetron mediante il Touch Screen. Toccando il riquadro in basso a destra
contrassegnato dalla scritta EDIT si accede alla pagina di modifica del Preset Voicetron.
Page 16
/14
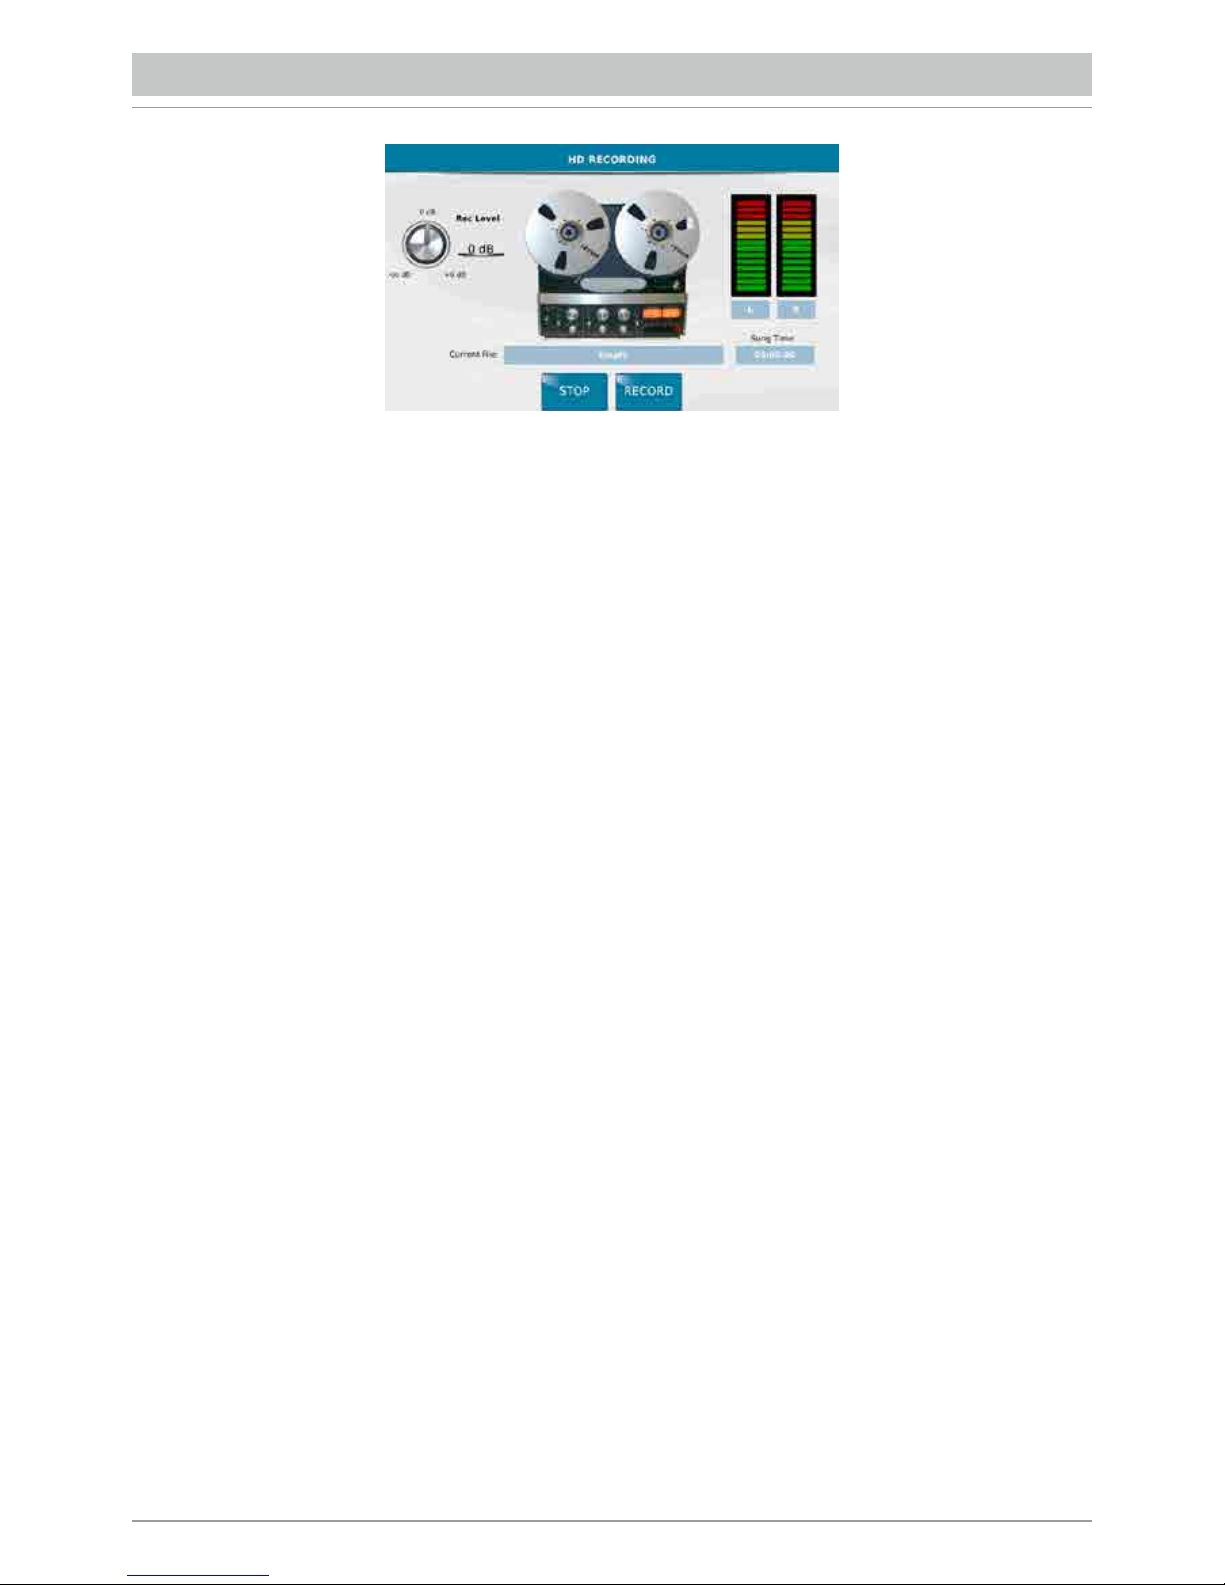
MIDJPRO può registrare in un file audio.wav, tutto quello che viene eseguito con lo strumento e tutto ciò che transita negli
ingressi audio analogici MIC1, MIC2/GUITAR. La registrazione includerà oltre alla parte midi /audio del player
o l’accompagnamento automatico, anche quello che state suonando in tempo reale sulla tastiera collegata utilizzando
il generatore sonoro interno, la vostra voce e la chitarra o la seconda voce in ingresso nello strumento.
Il file audio può essere rieseguito in play e voi potete suonarci sopra sovraincidendo al file ulteriore materiale sonoro.
Premere RECORD per avviare la registrazione. A sinistra il display mostra la manopola REC LEVEL per impostare il livello
di registrazione. E’ sufficiente toccarla e girarla tramite il Dial per variare il livello. Terminata la registrazione basta premere
STOP e salvare il file.
Una volta effettuato il salvataggio, il display mostrerà sotto all’immagine del registratore, il nome del file.
In basso troviamo il tasto EDIT per accedere alla pagina AUDIO EDIT per la modifica del file a livello di:
volume, punto di start , di end ,etc... A seguire i classici pulsanti di trasporto.
- <<: Per scorrere indietro.
- STOP: Per arrestare la riproduzione.
- >>: Per scorrere in avanti.
- RECORD: Per avviare una successiva registrazione.
- PLAY: Per avviare la riproduzione del file.
HARD DISK RECORDING
Page 17
/15
REGISTRATION
Con il termine REGISTRATION si intende il salvataggio della configurazione completa del pannello. In pratica tutte
le impostazioni generali dello strumento, quelle relative agli stili ai suoni, le impostazioni dei 2 ingressi microfonici gli effetti
e le impostazioni midi, possono essere salvate in una Registration. In questo modo l’utente, a casa può preparare e salvare
delle configurazioni molto dettagliate e finalizzate a specifiche esigenze musicali a seconda della tipologia di spettacolo,
poi durante lo spettacolo dal vivo le richiama “al volo” senza perdere tempo.
Lo strumento mette a disposizione 4 banchi su ciascuno dei quali l’utente può salvare fino 1024 Registration.
Per caricarle basta premere il tasto REGISTR. posto nel pannello frontale dello strumento. Dalla seguente schermata
che apparirà nel display basterà selezionare uno dei 4 banchi disponibili e la Registration desiderata utilizzando il Touch
Screen. Per salvare la Registration è sufficiente premere il tasto Save dal pannello e selezionare REGISTRATION
dalla finestra di dialogo che appare.
Quando si salva una Registration, come accennato prima vengono salvate tutte le impostazioni del pannello, senza
nessuna esclusione. Tuttavia quando una Registration viene richiamata è possibile filtrare alcuni parametri, cioè è possibile
fare in modo che il richiamo di una Registration non cancelli alcune impostazioni del pannello che si desidera mantenere
bloccate. Questo blocco è comunque solo in caricamento ma non in salvataggio. Per impostare questo filtro bisogna
premere dal pannello il tasto MENU e selezionare dal disply la funzione REGISTRATION SETUP.
Page 18
/16
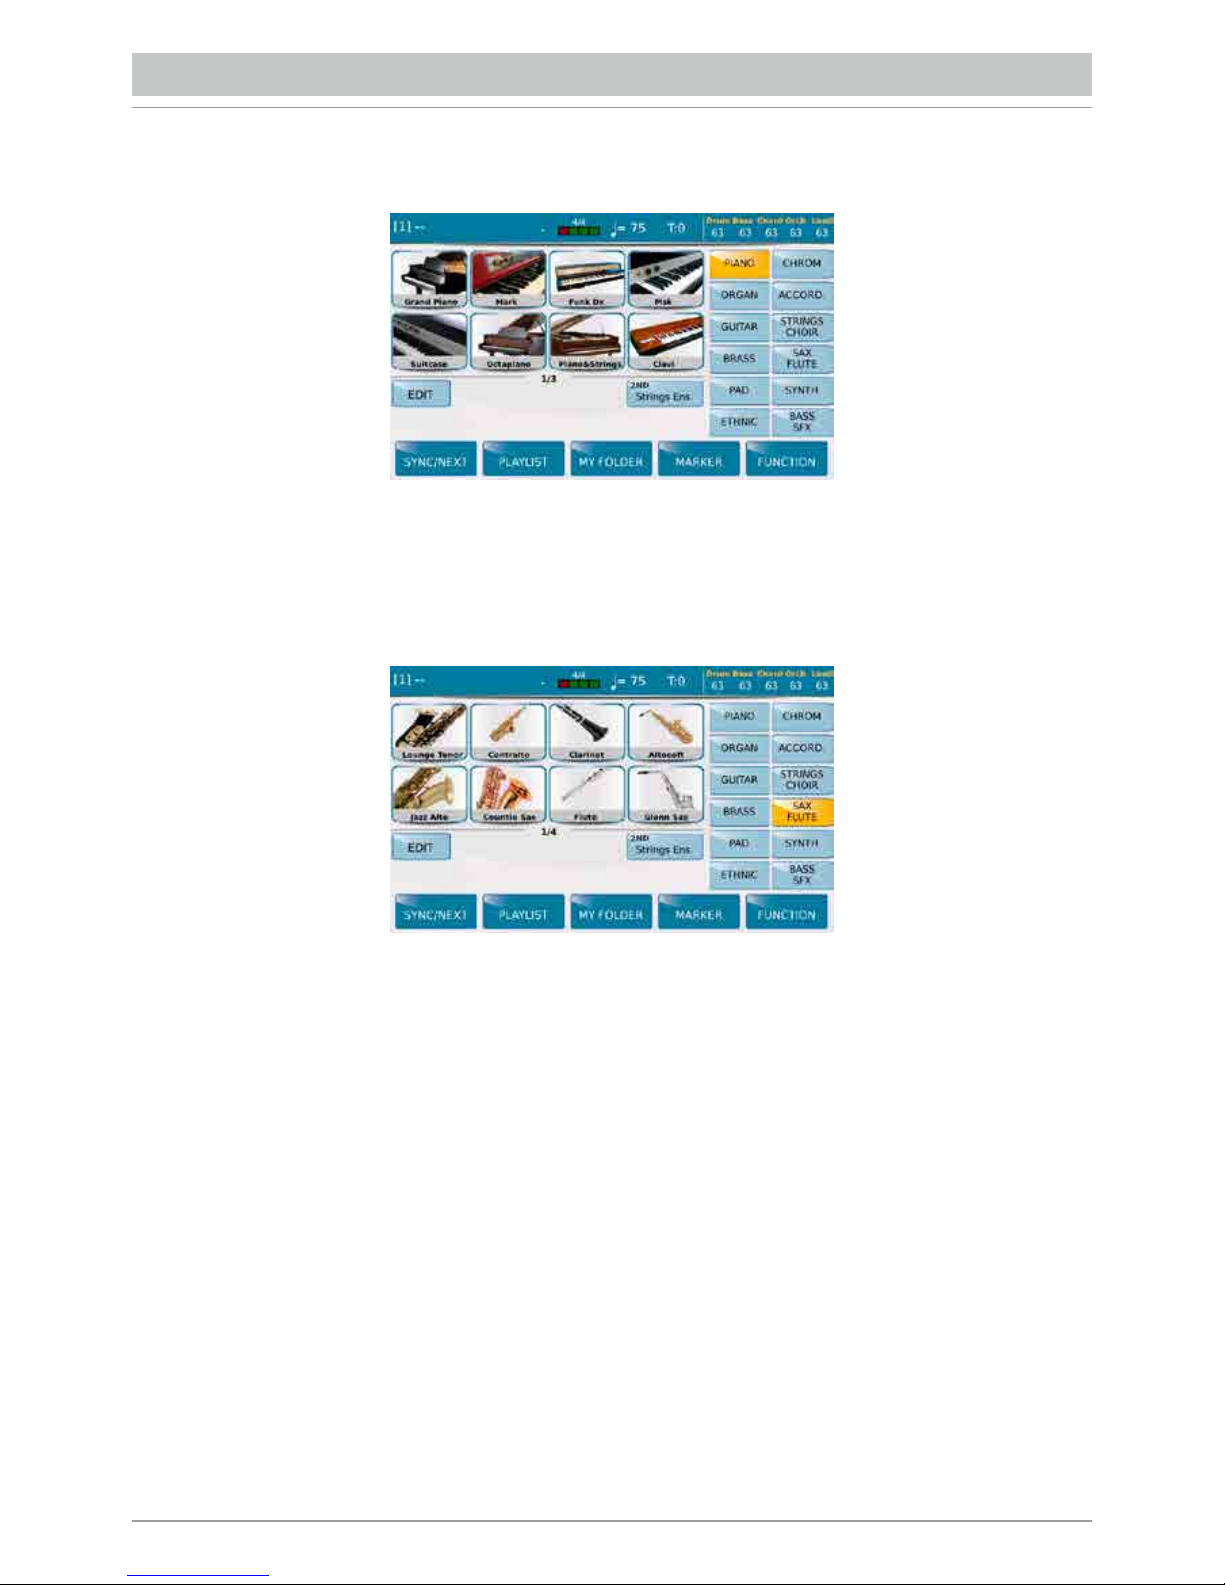
Premendo il tasto VOICE si accede alla modalità che consente la selezione e la gestione dei suoni dello strumento.
Nella schermata principale, a destra vengono riportate le 12 categorie strumentali mentre al centro le 8 figure relative
alle 8 tipologie di strumento della categoria selezionata. Ogni categoria è composta da più pagine ed è possibile passare
da una all’altra tramite il Dial.
Una volta selezionato il timbro o Voice voluto è possibile accedere ad una finestra di modifica selezionando EDIT
dal display.
Selezionando il tasto SPLIT sarà possibile definire, mediante la tastiera connessa all’ingresso Midi In, il punto di split
che divide la sezione Upper dalla sezione Lower. Il valore impostato viene riportato nel pulsante virtuale.
Lo strumento è in grado di sovrapporre fino a 4 suoni lungo l’intera estensione della tastiera o nella zona Upper a destra
del punto di split. Il quarto layer è nominato 2ND VOICE e può essere attivato o disattivato “al volo” direttamente da questa
schermata principale del modo Voice, mediante la selezione del tasto 2ND.
SUONI
Page 19

/ 17
USB: CHIAVETTE E COMPUTER
Tramite i 3 slot USB disponibili nella parte laterale destra dello strumento, il MIDJPRO e’ in grado di eseguire o di gestire
i files presenti nelle Pen drive
Premendo il tasto MEDIA si apre una schermata che mostra i dispositivi installati nello strumento o connessi mediante
le porte USB. In basso nella schermata appaiono le seguenti funzioni:
- EJECT: Rimuove il dispositivo selezionato eccetto la memoria SSD interna allo strumento (User FS).
Si tratta della stessa funzione di rimozione sicura dell’hardware che troviamo nei computer, per proteggere i dispositivi
connessi da danneggiamenti che potrebbero verificarsi qualora venissero rimossi durante la fase di scrittura dei files.
Una volta fatte delle modifiche sulla periferica (salvataggio di un Midifile copia, etc..) prima di togliere la chiavetta premete
Eject, per assicurarsi che tutte le modifiche non siano ancora in fase di scrittura ma siano effettivamente portate a termine.
- PC-CONNECT: Questa funzione consente ad un computer connesso tramite cavo USB alla porta USB Device
di MIDJPRO, di rilevare tutti i dispositivi di memorizzazione di MIDJPRO sia quelli installati internamente che quelli
connessi alle porte USB Host. Il computer, una volta attivata la connessione, sarà in grado di leggere dunque il disco SSD
interno allo strumento, l’Hard Disk interno opzionale, che può essere installato nel MIDJPRO e tutti i dispositivi connessi
allo strumento mediante le porte USB Host, come ad esempio le Pen Drive.
Premendo ulteriormente la funzione PC CONNECT si disattiva la connessione. Un messaggio avviserà di effettuare
la rimozione sicura dell’hardware dal computer onde evitare danneggiamenti.
- DISK EDIT: Attiva, nella barra inferiore, una serie di funzioni che agiscono sui file selezionati.
- INFO: Mostra le principali informazioni relative al drive selezionato.
- REFRESH: Effettua nuovamente lo scan di tutti i dischi e le periferiche USB collegate. Se si dovesse verificare il caso
che la macchina non rilevi automaticamente una pen drive USB collegata, con questa funzione riavvierà nuovamente
il rilevamento delle periferiche e dei dispositivi collegati.
Page 20

/18
Page 21
/19
SAFETY INSTRUCTIONS 20
CONNECTIONS 21
FRONT PANEL 22
INTRODUCTION 23
PLAYER 24
LYRICS 25
PLAYLIST 25
MY FOLDER 25
JUKE BOX 26
PIC & MOVIE 26
DJ 27
ARRANGER 28
MICROPHONE/GUITAR 30
HD RECORDING 32
REGISTRATION 33
SOUNDS 34
USB : PEN DRIVES AND COMPUTER 35
Important: This Quick Guide includes some basic
information enabling you to use the MIDJPRO.
The complete manual is available in HTML format
in the inside of the instrument (MANUAL Menu)
and also on the website www.ketron.it
CONTENTS
Page 22

/20
RISK OF FIRE, ELECTRIC SHOCK OR INJURY TO PERSONS.
Caution: to reduce the risk of fire or electric shock, do not expose the instrument to rain or humidity.
IMPORTANT INSTRUCTIONS FOR SAFETY AND INSTALLATION
CAUTION – When using an electrical product it is important to take a number of precautions such as the following:
• Read the Instruction Manual before using the instrument.
• An adult should always supervise children when they play the instrument.
• Do not use the instrument in areas subject to seepage or water spray, such as next to a sink, a swimming pool, on a damp surfaces
etc.; do not place containers with liquids on the instrument to prevent accidental seepage of liquid into the instrument.
• The instrument should be used only on a stand recommended by the manufacturer.
• Do not use the instrument at a very high volume for long periods of time: very high noise levels are dangerous to health.
• Position the instrument in such a way as to ensure appropriate ventilation.
• Keep the instrument away from heat sources such as central heating radiators, stoves etc.
• Connect the instrument to the mains only with the mains adapter. You will find the identification and power supply details under
the instrument.
• Disconnect the power supply cable if the instrument is not to be used for a long period of time.
• If necessary, disconnect the instrument using the power supply switch on the back panel. When positioning the instrument,
always ensure that this switch is easy to reach.
• Take the instrument to a service centre if:
a. the power supply cable or plug are damaged.
b. objects or liquid have fallen into the instrument.
c. the instrument has been exposed to rain.
d. the instrument is not functioning properly or performance is impaired.
e. the instrument has been dropped or the chassis is damaged.
• Never attempt to repair the instrument on your own; all repairs should be carried out by a qualified technician.
KEEP THIS INSTRUCTION MANUAL IN A SAFE PLACE
PREVENTING RADIO/TV DISTURBANCE
This instrument operates on the radio frequency band. If it is not installed correctly and strictly in compliance with the instructions
provided it may disturb the reception of radio-television appliances. Although the instrument you have purchased has been designed in
compliance with applicable laws and in such a way as to provide reasonable protection against such disturbances, there is no guarantee
that these will not occur. To check whether any disturbance you are experiencing is in fact produced by your instrument, turn it off to
see if the disturbance disappears. Turn the instrument on again to see if the disturbance reappears. Once you are certain that your
instrument is in fact causing the disturbance, take any of the following measures:
• Adjust the antenna of the radio or TV receiver.
• Place the instrument in a different position with respect to the radio or TV receiver.
• Place the instrument further away from the receiver.
• Connect the plug of the instrument to another socket so that the instrument and the receiver are connected to two different circuits.
• If necessary, call in a servicing technician.
POWER SUPPLY
• When you connect the instrument to other appliances (amplifier, mixer, Midi instruments etc.), ensure that all the units are off.
• Read the recommendations regarding Radio and TV disturbances.
INSTRUMENT CARE
• Clean the surfaces of the instrument with a soft dry cloth. Never use gasoline, diluting agents or solvents of any kind.
OTHER PRECAUTIONS
If you wish to use your instrument in a foreign country and have doubts about the power supply, consult a qualified technician before you
leave. The instrument should never be subjected to strong shocks.
CURRENT ADAPTERS
When connecting this instrument to the mains socket, use only the KETRON current adapter supplied with the instrument.
The use of different current adapters may damage the power supply circuits of the instrument. It is therefore of fundamental importance
to use only an original adapter, requesting the correct model when ordering a new adapter.
INFORMATION FOR USERS
“Implementation of Directive 2002/95/CE, 2002/96/CE and 2003/108/CE on reduced use of dangerous substances
in electrical and electronic appliances and waste disposal”.
The crossed bin symbol shown on the appliance means that at the end of its life the instrument must be disposed of separately
from other waste. At the end of its life the user should therefore take the instrument to a separate waste centre for electronic
and electrical products, or return the same to the dealer when purchasing a new and similar instrument, whichever is applicable.
Disposing of the instrument correctly so that it may be consequently recycled and disposed of in an environmentally compatible
manner helps to prevent possible negative effects to the environment and health and ensures that the components of the
instrument are recycled. Unauthorised disposal of the product by the user entails the application of administrative penalties.
SAFETY INSTRUCTIONS
Page 23
/21
CONNECTIONS
DC 9V 4A Mains power supply socket. Please use only the power supply supplied with the instrument.
Output: 9 V, 4 A.
ON/OFF ON/OFF key. This instrument may take up to 30 seconds to start up. To turn off the instrument,
press the ON/OFF key and wait for the instrument to turn off. This may take up to 10 seconds.
VOLUME PEDAL Standard stereo jack to connect a Volume pedal (optional).
VIDEO DVI Digital video interface for connection to an external video monitor.
USB-SD CARD This is used to connect a computer USB device or other devices to manage the MIDJPRO as an
external removable unit. On the right of the instrument you will find a slot for the SD Card and 3 USB
Hosts for connection to external USB devices such as Pen drives, HD etc..
FOOTSWITCH Standard multi-pin plug for connection of an optional pedal to control a number of internal functions.
Compatible with Ketron FS6/FS13.
MIDI Plugs for MIDI IN, MIDI OUT and MIDI THRU connection.
MAIN OUT Standard mono jack for the main output to connect to a PA STEREO system: left (Left Mono), right
(Right Mono). We strongly recommend that you use the stereo connection for best performance
of the instrument and relevant EFXs. A Mono connection (namely use of only the Left or Right output)
will give poorer reproduction with respect to quality of the sounds and EFXs of the instrument.
HEADPHONE Standard stereo jack for connection to a headphone. Thevolume of the headphone is controlled
by the Master section.
MICRO 1 IN Standard mono combo plug (Jack/Xlr) for connection of a dynamic microphone.
MICRO 1 GAIN Potentiometer for adjustment of the Micro 1 input signal gain..
MICRO 1 OUT Standard mono jack dedicated exclusively to the Micro 1 output.
MICRO 2 IN Standard mono jack for connection of a dynamic microphone.
MICRO 2 GAIN Potentiometer for adjustment of the Micro 2 plug input signal gain.
GUITAR/MICRO Turn on this switch when using the instrument with a guitar, turn off the switch when using
the instrument with a microphone.
LINE IN Mini-jack for stereo device line input with line signal (CD Player, etc.).
Page 24

/22
The main feature of the front panel is a wide colour touch screen which is the central point of the user interface system.
Most of the functions may be enabled with just a “touch” of the keys on the screen.
On the left of the display, starting from top to bottom you will find the following keys:
• GM PART: Management of the sounds assigned to the MIDI tracks of the file you have loaded
• LEAD MUTE: Mutes the melody track of the Midi file or, when an audio file is playing, it attenuates the voice line
of the original file.
• LYRIC OFF: Activates/deactivates the lyrics display.
• SEARCH: File search menu.
• X-FADE: Performs cross fading of two musical files.
Lower down, from left to right of the panel you will find the following keys.
• PLAY 1 and 2: Keys to select the two players. Player 2 cannot be selected when the Style is inserted.
• STYLE: Provides access to “Arranger” mode for automatic accompaniments. Style cannot be accessed when Player 2
is inserted.
• VOICE: Provides access to the page where you can select and edit the instrument sounds for the right hand.
• DRUM SET: Enables the Manual Drum function and allows you to select and to map the Drum Kit. In Player mode also
the Drum Mixer is shown to modify volumes and the effect of the percussion sounds.
• PAUSE: This key allows you to pause the Player selected or enable the Restart and Count In function in Style mode.
• MICRO1: Page on which you can manage microphone 1.
• MICRO2/GUITAR: Page on which you can manage the second microphone or the guitar connected to the Micro2/
Guitar input.
• TALK: Eliminates or reduces the effect from microphone 1 to pass from singing to talk.
At the bottom you will find the volume sliders for the sections printed in black for Player mode or blue for Style mode.
On the right of the display, starting from top to bottom you will find the following keys:
• RECORD: Access to the function that allows you to record anything the instrument is playing, including from external
inputs (microphone, guitar etc.).
• DSP: Page that allows you to control the effects (see DSP)
• PIC&MOVIE: Opens a screen on which you can manage graphic and video files
• DJ: Selects a different song replay mode with double Player and various functions.
• JUKE BOX: Menu for an easier song management, in the “Juke Box” mode.
• REGISTR.: Selection of Registrations, in other words of the main instrument settings saved by the user.
• MASTER: Slider to adjust the main volume of the MIDJPRO.
FRONT PANEL
Page 25

/23
Finally, further towards the right you will find:
• DATA/VALUE, also called the Dial. Allows you to select files and parameters and edit the values selected.
• ENTER: Use to confirm different operations or enter the folders selected
• EXIT: Use to cancel an operation or escape from the current screen and display the previous screen, or exit a folder
and back root.
• SAVE: Saves any modifications made on the instrument.
Please note: If you press the EXIT and SAVE keys together, a global Midi RESET is carried out.
• MEDIA: Displays the memory devices installed on the instrument or connected via the USB ports
• MENU: Displays and gives access to different operative menus of the instrument.
• TEMPO and TRANSPOSER: These keys respectively control the speed in bpm and tone transposition of music files
and Styles. Press these keys together to display the main screen of the instrument called “Home”.
INTRODUCTION
The Introduction screen (INTRO) is displayed automatically when you turn on the instrument and provides access to the
main functions, such as:
- PLAYER-GM: To use the MIDJPRO as AUDIO and MIDI file reader.
- KEYBOARD: To control the MIDJPRO by means of a MIDI Master Keyboard.
- ACCORDION: To control the MIDJPRO by means of a MIDI Accordion.
Even if you enter Player GM mode for example, you may control the MIDJPRO with a Master Keyboard or accordion, by
modifying the Midi settings. To do this, press the Menu key on the panel and select the different MIDI functions from the
display.
- STANDARD: Allows you to control the instrument by an external Midi controller (via the Midi In) to play the Styles and
Voices of the Arranger.
- ACCORDION MANUAL: To control the Arranger by means of a MIDI Accordion.
- COMPUTER SEQUENCER: To connect the MIDJPRO to a computer as an external GM module.
You will find the following additional keys on the introduction screen:
- DEMO: Use this control to listen to short demonstrations.
- GUITAR: To control a guitar or a second microphone, connected to the MICRO 2 IN plug. (The two input sources
are selected with the relevant physical selector).
- MANUAL: To open the Instruction Manual of the instrument.
- SKIP INTRO: To skip the initial intro screen.
Page 26

/24
When you select the PLAYER-GM icon from the intro screen, the contents of the media device selected (SSD, Card, USB,
etc) are displayed.
To navigate you may use:
- The TOUCH SCREEN that allows you to select the file directly and enter the folder with a double click.
- The DATA/ VALUE Dial to scroll files, folders or edit the parameter values.
- EXIT to escape from folders and back root.
- ENTER to enter the folder selected rather than double clicking on the Touch screen.
When you touch the file, it will be selected and highlighted and loaded in Player 1.
Press START/STOP or ENTER to start playing the file. When the file is in play, the red light of the START/STOP key
lights up. To load Player 2 simply press PLAY 2 and repeat the steps described previously.
N.B.: when the Auto Play function on the FUNCTION menu (at the bottom on the right) is enabled, the songs
in the folder are reproduced automatically from first to last.
PLAYER
The PLAYER screen views the texts (Lyrics or txt if present) on the display or on an external monitor connected to the
relevant VIDEO DVI plug on the back panel. The upper bar displays: the name of the file playing, preceded by a number
in square brackets that indicates the player selected, the metronome time (only for Midi files), speed (only for Midi files),
the transposition value set for the file playing, the volumes of the Drum, Bass, Chord, Orch. (Lower) and Lead sections.
Using the box on the right, you may scroll the list of files and folders from top to bottom. During execution a beat / time
counter is displayed. For more information regarding the current file and to go back or forwards, select the PLAYBAR .
If the PFL To Player function is enabled on the PREFERENCE menu, the virtual key PFL is displayed on the right hand
bar, which may be used to listen to the song you are playing through the headphones.
Page 27
/25
LYRICS
PLAYLIST
MY FOLDER
If a file contains lyrics, these are shown at the centre of the display and also on an external monitor, if connected.
The list of files may be displayed again by pressing the LYRIC OFF key on the left of the front panel. Press the key again
to display the lyrics. With the lyrics file you can pass to Full screen mode by touching the centre of the screen where
the lyrics are scrolling. Touch a second time to return to normal display mode. If the file does not contain lyrics, a separate
.txt file may be associated to the file. To do this, the .txt file must have the same name as the music file and must be stored
in the same folder (E.g. Newyork.mid and lyrics Newyork.txt).
The SKIP FILE LINK function must however be disabled on the FUNCTION page.
The Mirror mode (Video Menu) allows you to project the current display screen on the external monitor.
From the lower bar you may access the PLAYLIST where you can program your musical repertoires and your own music
playlists.
To create a Playlist, select Empty and confirm with YES on the dialogue window.
Press EDIT to access the mode which allows you to create/manage a Playlist. The display now shows the current
directory from which you may open the folders and find files to add to the Playlist using the screen and the ENTER and
EXIT keys. After selecting the file, press the INSERT ITEM key to add the file to the new Playlist.
The MY FOLDER. directories are nothing else than quick access directory links to the preferred directories.
All the directories that have been saved as Myfolder will be displayed in the list of preferred directories.
Press EDIT to access the mode which allows you to create/manage directories.
Page 28

/26
In this menu you may select the figures to use as a background for your karaoke files or similar and you may manage
movies that are resident in the MIDJPRO.
The JUKE BOX function is a different mode to display and select files contained in a Playlist or in a Myfolder..
Among the different modes to use the Player, this is probably the most immediate and intuitive one.
Use the Dial to scroll the page and display the pads. On this screen you may also use the SFX key to control a number of
sound effects that can be activated while playing.
JUKE BOX
PIC & MOVIE
Page 29

/27
Press the DJ key to access a different song play mode. The 2 Players are shown as 2 turn tables. The one selected is
highlighted in red. The directory for selection of files and folders is displayed at the centre. Each Player has a pair of level
indicators and the keys described below:
- CUE: Is a marker that once it has been set at any point of a song, when it is pressed again the song starts from that
point. It is compatible with Wave files and Midi files but not with Mp3 files.
- PFL: Playback in headphones. The PFL is selected automatically taking the corresponding slider to 0.
- []>: Pause.
The functions for the player selected are displayed at the bottom:
- BACK SPIN: Ends reproduction by suddenly increasing the speed and tone.
- SYNC: Synchronises the two Players. If you are playing a Midi file on turntable A and you prepare another Midi file on
turntable B, when you press SYNC the second Midi file will start in “downbeat”. If Lock Tempo is inserted, the second
Player maintains the same Bpm speed as the first one. If the second file is an audio file, the latter starts at the beginning
of the next Midi file measure. If however the first file is an audio file, the TAP window (see below) will open with a pad to
start the second song after tapping the virtual pad 4 times. If you beat 4 taps in time with the first file, the second file will
be synchronised with the first.
- TAP: Opens a pad at the centre to synchronise the tempo with the “tapping” of your fingers
- FX PAD: This works only with audio files and opens a small box with the following effects: Pitch, (frequency) Cutoff and
Filter Resonance, and finally the tempo. These effects may be regulated with the corresponding sliders on the instrument
panel.
- RESET: Restores the default conditions of the file, cancelling the modifications made on this page.
- BRAKE: Ends reproduction by decreasing speed and tone, giving an effect similar to when power supply of a record
player i suddenly cut off.
DJ
Page 30

/28
MIDJPRO is not only a Player but also an Arranger and therefore features an entire section dedicated to automatic
accompaniments called Styles. Each Style has:
• Two tracks for drums and percussions on MIDI channels 9 and 10.
• One Bass track on Midi channel 5. Five harmonic tracks CH1, CH2,CH3,CH4,CH5 that function on Midi
channels 6,7,8,11,12.
• Two “Real Time” tracks, namely Lower 1 and Lower 2 that are assigned to the left split of the keyboard,
which function on MIDI channels 3 and 4.
• LEAD track that functions on the Upper section, namely on the right of the keyboard Split.
A lyrics file may also be displayed when playing a Style. If you wish to associate a lyrics file to a Style, exit “Style” mode,
load the lyrics file, return to “Style” mode and save the Registration.
Each Style has: 3 INTROs; 3 ENDINGs; 4 ARRANGEMENTS (A, B, C, D); 4 FILLs; 4 BREAKs.
Another way to change the Style is by quickly inserting or removing the last 3 harmonic accompaniment tracks CH3, CH4,
CH5 with the 3 VARIATION keys.
The main styles categories (Ballad, Pop, Dance etc...) are displayed in the column on the right.
The Styles of the category selected are displayed on the right. The keys for specific functions are displayed lower down on
the screen:
- KEY START: With this key, a style plays as soon as you play a chord on the Lower section of the keyboard connected to
the Midi In of the instrument, without having to press START/STOP.
- KEY STOP: This key stops the accompaniment when you lift your hand from the Lower section of the keyboard.
- REINTRO: When a Style is enabled, by pressing the Intro/Ending key, the Intro will be played again instead of the
Ending. If the key Reintro is enabled in Stop mode, press the Intro/Ending keys to skip the Intro and pass directly to the
Ending.
- SPLIT: By selecting this control (the key turns yellow) and then pressing a note on the Midi keyboard connected, you set
the area that divides the Lower section (left) from the Upper section (right) of the keyboard that is used.
-HOLD ON: Keeps the accompaniment playing even when you stop playing the chord with your left hand until you play the
next chord.
By pressing the STYLE key on the front panel, you will access the main screen of the Arranger.
ARRANGER
Page 31

/29
- DRUM: Allows you to set the parameters of the Drum section.
- DRUM MIXER: Opens a mixer for the drum where it is possible to enable or mute the individual percussion instruments
of the drum and adjust the volume and reverb of each.
- BASS: Opens the page on which to regulate the Bass track.
- 4 VOICE SET: Allows you to modify the 4 Voices of the Upper section.
- CHORD: Opens the page to adjust the harmonic tracks of the automatic accompaniment.
- PIANIST & BASSIST: Provides access to a page on which you may set the control mode of Arranger via the keyboard.
- LOWER: Opens the page to adjust the Lower track, namely the section of the keyboard on the left of the split point.
- VIEW: displays the modifications carried out on the Style parts.
All changes made on the Factory Styles may be saved in a User Style with the same name or with a new style name.
The new User Style will be saved in a User family having the same name as the one of the
The main Style controls are at the bottom:
- INTRO/ENDING: 1 - 2 - 3
- ARRANGE: A-B-C-D
- FILL: Plays a different Fill according to the arrangement that has been enabled.
- BREAK: Plays a different Break according to the arrangement that has been enabled.
Alternatively, these controls may be enabled with the blue silk printed keys on the left and right of the Display, provided the
ARRANGE TO TABS function (on the PREFERENCES menu) has been enabled. The main Style controls may also be
controlled from the footswitch FS6/FS13 (optional).
The Sliders used to adjust the volume of the DRUMS, the BASS, the harmonic accompaniment section CHORD and the
LOWER and LEAD section of the keyboard, are always enabled on the Front Panel .
Press EXIT to return to the screen with the Arranger adjustment functions.
Press EDIT to access the page from where you may carry out essential changes to the Arranger settings.
Page 32

/30
The MICRO1 key on the Front Panel opens a window on which you may manage the microphone connected to MICRO 1
input on the back panel.
The page is subdivided into 2 sections: MICRO, on which you may adjust the typical voice effects and VOICETRON on
which you may adjust the voice processor that creates special effects and harmonisations. Both the DSPs may be enabled
or disabled with the virtual keys MICRO ON/OFF and VOCAL ON/OFF. Starting with the MICRO section, you will find
the knob of the volume at the top, to adjust the microphone level that is added to the input gain and may be adjusted with
the physical potentiometer close to the MICRO 1 input. The slider MICRO1/ VOICETRON is another control you may use
to adjust the volume of microphone 1.
Further down you will find a box with the Microphone Preset which by default is the “Standard” Preset. Simply touch the
box to open the drop-down menu with all the other Presets and select your Preset on the Touch Screen.
Next to the box, the knob Rev allows you to adjust the reverb level with the Dial, whereas the Echo knob allows you to
regulate the value of the ECHO effect in the same way. Touch EDIT to open the edit page for the microphone Preset.
The microphone Preset, whose name is displayed in the top box, consists of a number of effects that may be enabled or
disabled using the ON/OFF box above the corresponding image. Under each effect you will find a box with the name
of the Preset used by each effect. Simply touch the box to open a Pop up window with the different Presets that may be
selected on the Touch Screen. The equalizer has an additional edit level, VIEW, which opens a window in which you can
modify the 4 bands, Low, Mid-Low, Mid Hi and Hi , and select the frequency and gain for each of these. The last effect on
the list is that used for the Talk function, which may be enabled with the corresponding key on the Front Panel, to pass
from singing to talk. On the main screen of EDIT MICRO, if you press SAVE on the panel you can save the microphone
setup in a User Preset.
MICROPHONE/GUITAR
Page 33

/31
Use the MICRO2/GUITAR input to connect a second microphone or a guitar.
Here again the page is subdivided into 2 sections: the first is MICRO2 and is for the microphone settings while the
second is GUITAR and is for the guitar effect settings. Considering that this is a single audio input, the modes
cannot be enabled together so that if you switch ON the MICRO2 mode, the GUITAR mode is automatically switched
OFF and vice-versa.
In GUITAR mode you will also find a number of virtual knobs that may be selected on the Touch Screen and modified
with the Dial, that function on the Volume, Reverb and Chorus as well as a series of 16 Setups of effects especially for the
guitar.
By pressing EXIT you escape from the drop-down menu and return to the previous screen. Each setup selected
has an insert effect which is displayed in the box INSERT EFX1. You may change the insert effect of the setup by
touching the corresponding box and selecting the effect you prefer from the drop-down menu.
Each guitar Setup may be edited by pressing the EDIT key. Any the changes made to the effect may be saved in a
setup by pressing the SAVE key on the panel. The display allows you to save your modifications in an effects setup for
microphone or guitar. Once you have made this choice, you may press SAVE to open a window on which to save the setup
with the same file name or you may press SAVE AS to open the alphanumeric keypad on which you may save the setup
with a new file name.
In the second section of the screen you will find the VOICETRON which is a voice harmonisation processor. In the top
right hand section of the screen you will find the VOCAL ON/ OFF key which enables or disables the Voicetron as well as
the virtual potentiometers to adjust volume and reverb which must be selected on the display and adjusted with the Dial.
Lower down you will find a box which displays the current Preset. Touch the box to open a drop-down menu on which you
may select another Voicetron Preset on the Touch Screen. If you touch the bottom right hand box called EDIT you open
the Edit page of the Voicetron Preset.
Page 34

/32
MIDJPRO can record anything which is played on the instrument or transits through the analogical audio inputs MIC1,
MIC2/GUITAR in .wav format. The recording will not only include the Midi or audio part of the Player or the automatic
accompaniment but also what you are playing in real time on the connected keyboard using the internal sound generator,
your voice and guitar or the second incoming voice. The audio file may be reproduced in play and you may play over the
file, recording additional audio material. Press RECORD to start recording. On the left, a REC LEVEL knob shown on the
display allows you to set the recording level. Simply touch it and turn the Dial to change the level. After completing the
recording, simply press STOP and save the file.
After saving the file, the file name is displayed under the image of the recorder.
At the bottom you will find the EDIT key to access the AUDIO EDIT page to modify the file with regard to volume, start
and end points, etc... Next, you will find the following keys:
- <<: Scroll back.
- STOP: Stop playing.
- >>: Scroll forward.
- RECORD: Start another recording.
- PLAY: Start playing the file.
HARD DISK RECORDING
Page 35

/33
REGISTRATION
The term REGISTRATION means saving the configuration of the complete panel configuration. Substantially, all the
main settings of the instruments, including the settings of the Styles, sounds, 2 effects microphone inputs, effects
and Midi settings may all be saved in a Registration. In this way, at home you may prepare and save even very detailed
configurations for special musical requirements you need for your performance. During the performance you can quickly
load them without losing time.
The instruments provides 4 banks each of which may be used to save up to 1024 Registrations. To load the banks, simply
press the REGISTR. key on the Front Panel of the instrument. Select one of the 4 banks and the Registration of your
choice with the Touch Screen on the following window that is displayed. To save your Registration simply press the Save
key on the panel and then select REGISTRATION on the dialogue window displayed.
As previously mentioned, when you save a Registration, all the settings of the panel will be saved, with no exception.
When loading a Registration, however, you may filter a number of its parameters so that they do not affect the other
settings of the panel which you wish to leave unvaried. This block is enabled only in load mode but not in save mode.
To set this filter simply press the MENU key on the panel and then select REGISTRATION SETUP on the display.
Page 36

/34
Press the key VOICE to access the mode which allows you to select and manage the instrument sounds.
The 12 instrument categories are displayed on the right of the main screen while the 8 pictures of 8 different types of
instruments in the category selected are displayed at the centre. Each category consists of several pages and it is possible
to toggle from one to another with the Dial.
After selecting the tone or Voice, you can access an edit window by selecting EDIT on the display.
Select the key SPLIT to set on the keyboard connected to the Midi In input, the split point that divides the Upper section
from the Lower section. The value you set is displayed on the virtual key.
The instrument can overlap up to 4 sounds over the full range of the keyboard or in the Upper section on the right
of the split point. The fourth layer is called 2ND VOICE and may be enabled or disabled quickly directly from the main
screen of Voice mode, by selecting the virtual key 2ND.
SOUNDS
Page 37

/35
USB: PEN DRIVES AND COMPUTER
Via the 3 USB slots on the right hand side of the instrument, the MIDJPRO is able the play or manage files on pen drives.
When you press the key MEDIA a screen is displayed showing the devices installed in the instrument or connected via
the USB ports. The following functions are displayed at the bottom of the screen:
- EJECT: Removes the device selected, except for the internal SSD of the instrument (User FS). This is the same safe
hardware removal function that you have on your computer, which protects devices connected from any damage that may
occur if they are removed when data is being written to a file. Once the modifications have been made on the peripheral
(saving a Midi file, copy, etc..) before removing the pen drive, press Eject to ensure that the modifications have actually
been saved.
- PC-CONNECT: This function permits a computer connected by USB cable to the USB Device of MIDJPRO to read
all the storage devices installed on the MIDJPRO and those connected to the USB Host ports. Once the connection has
been enabled, the computer will read the internal SSD of the instrument and the internal optional Hard Disk that may be
installed in the MIDJPRO as well as any devices connected to the instrument via the USB Host ports, such as a Pen Drive.
Press the PC CONNECT function to disable the connection. A message will appear warning you to remove the hardware
from the computer safely in order to avoid damage.
- DISK EDIT: This enables a number of functions for the files selected in the lower bar.
- INFO: Shows information relevant to the drive selected.
- REFRESH: Carries out another scan of all the disks and USB peripherals connected. If the machine does not
automatically read a connected USB pen drive, this function restarts detection of the peripherals and devices connected.
Page 38

/36
Page 39

/37
INSTRUCTION DE SECURITE 38
CONNEXION 39
PANNEAU FRONTAL 40
INTRODUCTION 41
PLAYER 42
TEXTES 43
PLAYLIST 43
MY FOLDER 43
JUKE BOX 44
PIC & MOVIE 44
DJ 45
ARRANGER 46
MICROPHONE/GUITARE 48
HD RECORDING 50
REGISTRATION 51
SONS 52
USB: CLE ET ORDINATEUR 53
Important: Ce Guide Rapide offre quelques informations
essentielles pour pouvoir travailler avec le MIDJPRO.
La documentation complète est disponible au format HTML
à l’intérieur de l’instrument (Menu MANUAL) ainsi que sur le
site www.ketron.it
INDEX
Page 40

/38
INSTRUCTIONS CONCERNANT LES RISQUES D’INCENDIE, LES DECHARGES ELECTRIQUES OU LES RISQUES
D’ACCIDENTS PERSONNELS
Avis: pour réduire le risque d’incendie ou de décharges électriques ne pas exposer l’instrument à la pluie ou à l’humidité.
INSTRUCTIONS IMPORTANTES DE SECURITE ET D’INSTALLATION
AVIS - Lors de l’utilisation de produits électriques, vous devez suivre des précautions de base et notamment les précautions suivantes:
• Avant d’utiliser l’instrument, lisez attentivement le manuel.
• Si l’instrument est utilisé par des enfants, la présence d’un adulte est nécessaire.
• N’utilisez pas l’instrument dans des sites où il pourrait être exposé à stillation ou à des giclées d’eau, comme par exemple près d’un
évier, d’une piscine, sur une surface mouillée, etc., et ne posez pas sur l’instrument des récipients contenants des liquides qui pourraient
pénétrer dans l’appareil.
• Il ne faut utiliser l’instrument que sur un support recommandé par le producteur.
• Ne jouez pas trop longtemps à plein volume: le bruit excessif est nuisible à la santé.
• Il faut placer l’instrument de telle sorte qu’il puisse avoir une ventilation convenable.
• Il faut placer l’instrument loin de sources de chaleur telles que radieteurs, poêles, etc.
• L’instrument ne doit être branché au réseau qu’en employant l’adaptateur de réseau. Les données d’identification et d’alimentation sont
sous l’instrument.
• Si vous n’utilisez pas l’instrument pendante de longues périodes, débranchez le câble d’alimentation.
• En cas de nécessité, pour débrancher l’instrument de l’alimentation actionnez l’interrupteur logé dans la partie postérieure. Il faut
positionner l’instrument de telle sorte que l’interrupteur soit facilement accessible.
• Il faut porter l’instrument chez un centre après-vente si:
a. le cordon d’alimentation ou la prise son endommagés.
b. des objets ou du liquides sont tombés à l’intérieur.
c. il a été exposé à la pluie.
d. il ne semble pas fonctionner correctement ou s’il est moins performant.
e. il est tombé ou si son châssis est endommagé.
• Ne tentez pas de réparer vous-mêmes l’instrument; toute opération doit être effectuée par du personnel spécialisé.
CONSERVEZ CES INSTRUCTIONS
COMMENT RESOUDRE LES PARASITES RADIO/TV
Cet instrument fonctionne sur la bande des fréquences radio et s’il n’est pas installé correctement et conformément aux instructions,
il peut perturber la réception des appareils radio et télé. Bien qu’il a été conçu conformément aux lois en vigueur et bien que des
protections adéquates aient été prévues contre ces inconvénients, il n’y a pas la garantie que des problèmes de ce genre puissent
se produire. Pour vérifier si les parasites sont bien provoqués par l’instrument, essayez de l’éteindre et contrôlez si les parasites sont
disparus. Ensuite rallumez-le et vérifiez si les parasites sont de nouveau présents. Après avoir vérifié que votre instrument cause les
parasites, procédez comme suit:
• Orientez l’antenne de votre récepteur radio ou TV.
• Changez l’instrument de place par rapport à votre récepteur radio ou TV.
• Eloignez l’instrument du récepteur.
• Branchez la fiche de l’instrument dans une autre prise de manière à ce que l’instrument et le récepteur soient connectés à deux circuits différents.
• Si nécessaire, consultez un professionnel.
ALIMENTATION
• Lorsqu’on connecte l’instrument à d’autres appareils (amplificateur, mixer, autres instruments Midi, etc.), assurez-vous que toutes les
unités soient éteintes.
• Lisez les conseils concernant les parasites Radio et TV.
NETTOYAGE DE L’INSTRUMENT
• Les surfaces externes de l’instrument ne doivent être nettoyées qu’avec un chiffon doux et sec. N’utilisez jamais d’essence, de diluants
ou de solvants en général.
AUTRES PRECAUTIONS
Si vous voulez utiliser l’instrument à l’étranger et vous avez des doutes sur l’alimentation, consultez préalablement un professionnel.
L’instrument ne doit jamais être soumis à de forts coups.
ADAPTATEURS DE COURANT
Pour brancher cet instrument à la prise du réseau électrique, il faut utiliser exclusivement l’adaptateur de courant KETRON fourni avec
l’instrument en question. L’utilisation d’autres adaptateurs de courant pourrait endommager les circuits d’alimentation de l’instrument. Par
conséquent, il est très important d’utiliser les adaptateurs originaux et de demander le type approprié si vous devez le commander à nouveau.
INFORMATIONS AUX UTILISATEURS
“Exécution des Directives 2002/95/CE, 2002/96/CE et 2003/108/CE, concernant la réduction de l’utilisation de substances dangereuses
dans les appareils électriques et électroniques et l’élimination des déchets”. Le symbole du conteneur barré marqué sur l’appareil indique que
le produit à la fin de sa vie utile doit être collecté séparément des autres déchets. Par conséquent l’utilisateur devra collecter
l’appareil inutilisable dans un centre de collecte sélective approprié de déchets électroniques et électrotechniques ou bien il devra le
remettre au revendeur en cas d’achat d’un nouvel appareil de type pareil, en raison d’un contre un. Une collecte sélective adéquate
et le conséquent envoi de l’appareil inutilisable au recyclage, au traitement et à son correcte élimination contribue à éviter de
possibles effets négatifs sur l’environnement et sur la santé et elle favorise le recyclage des matières dont l’appareil est composé.
L’élimination abusive du produit par l’utilisateur comporte l’application des sanctions administratives prévues.
INSTRUCTION DE SECURITE
Page 41

/39
CONNEXIONS
DC 9V 4A Prise d’alimentation du courant électrique. On conseille d’utiliser exclusivement l’alimentateur fourni
avec l’instrument. Output: 9 V, 4 A.
ON/OFF Bouton poussoir d’activation / désactivation La mise en marche de l’instrument peut demander jusqu’à
30 secondes. Pour arrêter correctement l’instrument, enfoncer la touche ON/OFF et attendre sa
complète désactivation. Cette opération peut demander jusqu’à 10 secondes.
VOLUME PEDAL Prise jack stéréo standard pour la connexion d’une pédale de Volume (optionnelle).
VIDEO DVI Prise vidéo numérique (Digital Video Interface) pour la connexion d’un écran externe.
USB-SD CARD Connexion USB device pour ordinateur ou d’autres dispositifs en mesure de gérer MIDJPRO comme
une unité amovible externe. Sur la partie droite de l’instrument nous trouvons un slot pour l’introdution
de la Carte SD et 3 USB Host pour la connexion avec des dispositifs USB externes tels que clé
mémoire HD, etc.
FOOTSWITCH Prise multipolaire standard pour la connexion d’une pédale optionnelle pour le contrôle de certaines
fonctions internes. Compatible avec Ketron FS6/FS13.
MIDI Prise pour la connexion MIDI IN, MIDI OUT et MIDI THRU.
MAIN OUT Prise jack mono standard pour la sortie générale à connecter avec une installation PA STEREO:
gauche (Left Mono), droite (Right Mono). Nous vous conseillons vivement d’employer la connexions
stéréo pour une parfaite reproduction de l’instrument et de ses Efx. Une éventuelle connexion Mono
(c’est-à-dire l’emploi d’une seule sortie Left ou Right) produira une reproduction qui ne reflète pas les
propriétés qualitatives des sons et des Efx..
HEADPHONE Prise jack stéréo standard pour la connexion d’un casque. Le volume du casque sera justement
contrôlé par la section Master
MICRO 1 IN Prise combo (Jack/Xlr) mono standard pour la connexion d’un microphone dynamique.
MICRO 1 GAIN Potentiomètre pour le réglage du gain du signal en entrée à la prise Micro 1.
MICRO 1 OUT Prise jack mono standard consacrée exclusivement à la sortie Micro 1.
MICRO 2 IN Prise jack mono standard pour la connexion d’un microphone dynamique.
MICRO 2 GAIN Potentiomètre pour le réglage du gain du signal en entrée à la prise Micro 2.
GUITAR/MICRO Interrupteur pour la sensibilité du gain du signal en entrée à la prise Micro 2. Activer l’interrupteur pour
utiliser la guitare, désactiver l’interrupteur pour utiliser le microphone.
LINE IN Prise mini-jack pour l’entrée de ligne de dispositif stéréo avec signal de ligne (CD Player, etc.).
Page 42

/40
Le panneau frontal de l’instrument est dominé par un grand afficheur tactile en couleur représentant le coeur
du système interface utilisateur. La plus grande partie des fonctions est accessible directement par un “appui
du doigt” directement sur l’écran, en correspondance aux boutons relatifs. À gauche du display en partant du
haut nous trouvons donc les boutons suivants:
• GM PART: Gestion des sons assignés aux pistes MIDI du fichier chargé.
• LEAD MUTE: Mute pour la piste mélodique du midi file ou, s’il y a un fichier audio en exécution, la
touche atténue la ligne vocale du morceau original.
• LYRIC OFF: Activation/désactivation de la visualisation du texte du fichier.
• SEARCH: Menu pour la recherche des fichiers.
• X-FADE: Exécute une fondu enchainée entre deux fichiers musicaux.
Plus en bas nous trouvons à partir de gauche vers droite une série de poussoirs.
• PLAY 1 et 2: Touches pour la sélection des deux Players. Il n’est pas possible d’accéder au Player 2 quand le style est inséré.
• STYLE: Touche pour accéder au mode “Arranger” pour les accompagnements automatiques. Il n’est pas possible
d’accéder au style si le Player 2 est inséré.
• VOICE: Accès à la page pour la sélection et la modification des sons de l’instrument destinés à la main droite.
• DRUM SET: Active la fonction Manual Drum qui permet la sélection et le mappage des Drum Kit. En milieu Player
le Drum Mixer est également affiché pour la modification des volumes et des effets pour les sons de percussion.
• PAUSE: Touche pour mettre en pause le Player sélectionné ou pour effectuer la fonction Restart et Count In en milieu
Style.
• MICRO1: Page de gestion du microphone 1.
• MICRO2/GUITAR: Page de gestion du second microphone ou de la guitare connectée à l’entrée Micro2/Guitar.
• TALK: Elimine ou réduit l’effet du microphone 1, pour passer du chanté au parlé.
En bas nous trouvons les curseurs volume pour les sections relatives, sérigraphies en noir pour les Player ou en bleu pour
le Style.
À droite du display en partant du haut vers le bas nous trouvons les boutons suivants:
• RECORD: Accède à la fonction Recording c’est-à-dire à l’enregistrement de tout ce que l’instrument est en train
de jouer, y compris les entrées externes, (microphone, guitare etc.).
• DSP: Page de contrôle des effets (voir DSP)
• PIC&MOVIE: Milieu pour la gestion des fichiers graphiques et vidéo
• DJ: Modalité alternative pour la reproduction des song avec double Player et différentes fonctions.
• JUKE BOX: Menu pour la gestion facilitée des song à la manière “Juke Box”.
• REGISTR: Sélection des Registrations, c’est-à-dire des paramètres généraux de l’instrument sauvés par l’utilisateur.
• MASTER: Curseur pour le réglage du volume général du MIDJPRO
PANNEAU FRONTAL
Page 43

/41
Finalement dans la partie plus à droite nous trouvons:
• DATA/VALUE Dit aussi Dial. Il permet la sélection des fichiers, des paramètres et la modification des valeurs
sélectionnées.
• ENTER: Pour confirmer certaines opérations ou entrer dans les dossiers sélectionnés
• EXIT: Pour abandonner une opération ou sortir de l’écran courant et visualiser le précédent, ou aussi pour sortir d’un
dossier en passant au niveau supérieur du répertoire principal de navigation
• SAVE: Pour sauver toutes les modifications effectuées sur l’instrument.
Nota: Les deux touches EXIT et SAVE pressées en même temps provoquent le RESET Midi global.
• MEDIA: Pour visualiser les dispositifs de mémorisation installés dans l’instrument ou connectés sur les ports USB
• MENU: Pour visualiser et accéder aux différents Menus opérationnels de l’instrument.
• TEMPO et TRANSPOSER: Ces touches gèrent respectivement la vitesse en bpm et la transposition de tonalité
des fichiers musicaux et des styles. Pressés simultanément, ils rappellent la page-écran principale de l’instrument
dénommée “Home.”
La page-écran d’introduction (INTRO) est affichée automatiquement à chaque mise en marche de
l’instrument et elle permet d’accéder aux fonctions principales telles que:
• PLAYER-GM: Pour utiliser MIDJPRO comme un lecteur de fichier Audio et Midi.
• KEYBOARD: Pour piloter MIDJPRO à l’aide d’un Master Keyboard (Clavier) Midi, comme un véritable Arranger.
• ACCORDION: Pour piloter MIDJPRO à l’aide d’un accordéon Midi.
De toute façon, même en entrant par exemple en mode Player GM, on pourra piloter le MIDJPRO avec un Master
Keyboard ou un accordéon, en modifiant les paramètres midi, par la touche Menu du panneau en sélectionnant
les différentes fonctions MIDI sur le display.
• STANDARD: Permet de contrôler l’instrument avec un contrôleur MIDI externe (à travers la prise MIDI In) pour jouer
les Styles et les Voices de l’Arranger.
• ACCORDION MANUAL: Pour contrôler l’Arranger avec un accordéon MIDI.
• COMPUTER SEQUENCER: Pour connecter le MIDJPRO à un ordinateur comme un module externe GM.
En revenant à la nôtre écran d’introduction nous trouvons d’autres boutons:
• DEMO: Cette commande vous permettra d’écouter de brèves démonstrations.
• GUITAR: Pour la gestion d’une guitare ou d’un second microphone, connecté à la prise MICRO 2 IN (la sélection des
deux sources d’entrée s’effectue avec le sélecteur physique spécial).
• INFO: Pour ouvrir le manuel d’utilisation de l’instrument.
• SKIP INTRO: Elimine l’écran d’intro initial.
INTRODUCTION
Page 44

/42
En sélectionnant de l’écran d’intro l’icône PLAYER-GM, le display affiche le contenu du média sélectionné
(SSD, Card, USB, etc.).
Pour naviguer on peut utiliser:
• TOUCH SCREEN qui permet de sélectionner le fichier directement et d’entrer dans les dossiers avec un double click.
• DIAL DATA/ VALUE pour faire défier les fichiers, dossiers ou changer la valeur des paramètres
• EXIT pour sortir des dossiers et ensuite revenir à un niveau supérieur (Back Root).
• ENTER pour entrer dans le dossier sélectionné en substitution au click double du Touch Screen
Le fichier, à peine touché est sélectionné, souligné et chargé dans le Player 1.
Presser la touche START/STOP ou ENTER pour lancer la reproduction. Quand le fichier est en lecture la led rouge
du bouton START/STOP s’allume. Pour charger le Player 2 il suffit de presser le poussoir PLAY 2 et répéter la procédure.
N.B: quand la fonction Auto Play est activée du menu FUNCTION, en bas à droite, la reproduction des
morceaux contenus dans un dossier s’effectue de manière automatique du premier au dernier.
L’écran de la section PLAYER affiche les textes (Lyrics ou txt si présents) sur le display ou sur un écran externe relié à
la prise spéciale VIDÉO DVI située sur le panneau arrière. La barre supérieure indique: le nom du fichier en exécution
précédé par un numéro entre crochet qui indique le Player sélectionné, le tempo métronomique (seulement pour les
midifiles) la vitesse (seulement pour les midifiles) La valeur de transposition fixée pour le fichier en exécution, les volumes
des sections Drum, Bass, Chord, Orch. , Lower et Lead. Le carré à droite permet de faire défiler, de haut en bas, la liste
des fichiers et dossiers. En outre, pendant l’exécution, un compteur de battement/temps écoulé est présent. Pour d’autres
renseignements sur le fichier en exécution et pour aller en avant ou en arrière, sélectionner PLAYBAR. Si du menu
PREFERENCE la fonction PFL To Player a été activé, dans la barre à droite apparaîtra la touche virtuelle
PFL qui permet d’activer le pré écoute au casque du passage musical courant.
PLAYER
Page 45

/43
TEXTES
Si le fichier contient du texte, il est affiché au centre du display et aussi sur un écran externe si relié.
Il est cependant possible de continuer à visualiser la liste des fichiers en pressant à gauche le bouton LYRIC OFF situé
sur le panneau frontal. À la pression suivante de la touche le texte reviendra visualisé. Avec les fichiers contenants du
texte il est possible de passer au mode Plein Ecran, en touchant dans le centre de l’écran où le texte défile. En touchant
une deuxième fois on revient à la visualisation normale. Quand le fichier ne contient pas de texte, il est possible de faire
en sorte que lui soit associé un fichier texte séparé avec extension .txt portant le même nom du fichier musical et qui se
trouve dans le même dossier (Ex. Newyork.mid et le texte Newyork.txt). Dans la page FUNCTION la fonction SKIP FILE
LINK doit être désactivée.
En outre un mode Mirror est présent (Menu Vidéo) ou il est possible de visualiser sur l’écran externe la même page-écran
courante que le Display.
PLAYLIST
Vous pourrez créer une Playlist en sélectionnant Empty et en confirmant par YES dans la fenêtre de dialogue.
Avec EDIT on accède à la création/gestion de la Playlist. Le display indiquera le répertoire courant d’où, en utilisant l’écran
et les boutons ENTER et EXIT, vous pouvez ouvrir les dossiers et trouver les fichiers à ajouter à la Playlist. Le fichier
désiré trouvé vous pressez la touche INSERT ITEM pour l’ajouter dans la nouvelle Playlist.
De la barre inférieure, on accède à la PLAYLIST avec laquelle il est possible de programmer ses propres répertoires et ses
propres séquences musicales.
Le dossier MY FOLDER est en réalité une liaison rapide aux dossiers préférés. Si un dossier a été sauvé comme My
folder il apparaitra dans la liste des dossiers préférés comme reporté dans le display. Avec EDIT on accède à la création/
gestion du dossier.
MY FOLDER
Page 46

/44
Dans ce menu vous pouvez sélectionner les images à utiliser comme arrière-plan à vos fichiers karaoké ou semblables
et pour pouvoir gérer les films résidents dans le MIDJPRO.
La fonction JUKE BOX est un mode alternatif pour la visualisation et l’activation des fichiers contenus dans une Playlist
ou dans My folder.
Entre les modalités différentes d’utilisation du Player celle-ci est probablement la plus immédiate et intuitive.
Par le Dial, on peut faire défiler la page pour visualiser les pad en succession. L’écran offre la possibilité aussi de contrôler
avec la touche SFX quelques effets sonores qui peuvent être activés au cours de l’exécution.
JUKE BOX
PIC & MOVIE
Page 47

/45
Avec la touche DJ on accède à une modalité alternative de reproduction des morceaux. Les 2 Player sont représentés ici
comme 2 tourne-disques. Celui sélectionné est souligné en rouge. Le répertoire de sélection fichiers et dossiers apparaît
au centre. Pour chaque Player, un couple d’indicateurs de niveau et des boutons sont disponibles que nous allons décrire:
- CUE: Est un marqueur qui une fois placé sur un point de la chanson, si pressé à nouveau fait repartir la song de ce point.
Il fonctionne sur les fichiers Wave et midifile mais ne fonctionne pas sur les fichiers mp3.
- PFL: Pré écoute au casque. Le PFL se sélectionne automatiquement en portant son curseur à 0.
- []>: Pausa.
En bas nous trouvons une série de fonctions qui agissent sur le player sélectionné:
- BACK SPIN: Termine la reproduction en augmentant la vitesse et la tonalité.
- SYNC: Elle synchronise les deux players. Si un midifle joue sur le plat A et on prépare un autre Midifile sur le plat B,
en enfonçant SYNC le second Midifile commence “en battre”. En cas d’insertion aussi du Lock Tempo, le second player
conservera la vélocité en BPM du premier. Lorsque le second fichier est un fichier audio, ce dernier partira au débout de
la mesure successive du Midifile. Mais si le premier fichier est un fichier de type audio, l’instrument ne pourra pas identifier
le battre de la mesure et par conséquent il activera la fenêtre TAP (voir ci-dessous) avec un pad virtuel pour faire démarrer
le second morceau après avoir fait 4 coups sur le pad virtuel. De cette manière, si les 4 coups sont battus à tempo avec le
premier fichier, le second fichier sera synchronisé avec le premier.
- TAP: Elle ouvre au centre un pad pour synchroniser le tempo avec le “tambourinement” des doigts.
- FX PAD: Elle ne fonctionne qu’avec les fichiers audio et elle ouvre un petit carré avec les effets suivants: Pitch,
Fréquence de coupure (CutOff ) et Résonance du filtre et en fin la vélocité de reproduction (tempo). On pourra régler ces
effets par les curseurs correspondants présents dans le panneau de l’instrument.
- RESET: Elle fait revenir le fichier aux conditions de défaut, en annulant les modifications effectuées en ce page..
- BRAKE: Termine la reproduction en diminuant la vitesse et la tonalité comme cela arrive en cas de manque soudain
d’alimentation sur un tourne-disque.
DJ
Page 48

/46
MIDJPRO n’est pas seulement un Player mais il est aussi un Arranger, donc il est équipé d’une section toute entière
consacrée aux accompagnements automatiques appelés aussi Styles. Chaque Style a à sa disposition:
• Deux traces pour batterie et percussions sur le canal Midi 9 et 10..
• Une trace de Basse sur la canal Midi 5. 5 traces harmoniques CH1, CH2,CH3,CH4,CH5 qui travaillent sur
les canaux Midi 6,7,8,11,12.
• 2 traces “Real Time” c’est-à-dire Lower 1 et Lower 2 à assigner au point de partage gauche du clavier qui
travaillent sur les canaux Midi 3 et 4.
• La trace LEAD qui travaille dans la section Upper c’est-à-dire dans la portion à droite du point de partage
du clavier.
Il est même possible d’afficher un fichier de texte pendant l’exécution d’un Style. Si on désire associer un fichier de texte à
un style il faut sortir du mode “Style”, charger le texte, revenir au mode “Style” et sauvegarder Registration.
Chaque Style comprend de différents éléments: 3 INTRO; 3 ENDING; 4 arrangements (A, B, C, D); 4 FILL; 4 BREAK.
Une autre manière de varier le Style est représentée par la possibilité que les dernières 3 traces d’accompagnement
harmonique c’est-à-dire CH3, CH4, CH5 peuvent être insérées ou supprimées “au vol” à l’aide des touches Variation que
nous étudierons plus avant. VARIATION.
Le display indique dans la colonne à droite les catégories principales des styles (Ballad, Pop, Dance etc...).
À droite les styles appartenant à la catégorie sélectionnée sont visualisés. Plus en bas apparaissent des touches qui
activent des fonctions spécifiques:
- KEY START: Par l’activation de cette commande on fera démarrer l’exécution de l’accompagnement automatique dès
qu’on joue un accord dans la partie Lower du clavier connecté au Midi In de l’instrument, sans enfoncer la touche START/
STOP du panneau..
- KEY STOP: Elle arrête l’accompagnement lorsqu’on soulève la main de la section Lower du clavier.
- REINTRO: Elle permet, durant l’exécution d’un Style, que la pression de la touche Intro/Ending, au lieu d’exécuter
l’Ending, exécute de nouveau l’Intro. En cas de touche Reintro active mais en état de Stop, en enfonçant une des touches
Intro/Ending au lieu d’exécuter l’Intro on passera directement à l’Ending.
- SPLIT: Par la sélection de cette commande (la touche deviendra jaune) et en enfonçant une note du clavier Midi
connecté, on définira la zone partageant la section Lower (gauche) de la section Upper (droite) du clavier qu’on est en
train d’utiliser.
-HOLD ON: Elle conserve actif l’accompagnement même an cas de relâche de l’accord par la main gauche jusqu’à
l’insertion de l’accord suivant.
En pressant le bouton spécial STYLE du panneau frontal on accède à l’écran principal de l’Arranger.
ARRANGER
Page 49

/47
- DRUM: Permet de régler des paramètres relatifs à la section Drum.
- DRUM MIXER: Ouvre un mixer dédié à la batterie où il est possible d’activer ou de mettre en mute les instruments
de percussion unique de la batterie et de régler pour chacun d’eux le volume et la réverbération.
- BASS: Ouvre la page de réglage de la piste de Basse.
- 4 VOICE SET: Permet de modifier les 4 Voix pour la section Upper.
- CHORD: Ouvre la page de réglage des pistes harmoniques de l’accompagnement automatique.
- PIANIST & BASSIST: Accès à la page dans laquelle sont placés de manière détaillée les modes de contrôle
de l’Arranger par le clavier.
- LOWER: Ouvre la page de réglage de la piste Lower c’est-à-dire de la zone du clavier à gauche du point de split
- VIEW: Permet la visualisation et la modification des parties du style.
Toutes les modifications apportées sur les Factory Style peuvent être sauvées avec Save dans un User Style en laissant
le nom existant ou en renommant le style. Le nouveau User Style ira se mettre dans la famille User homonyme à celle
du Style Factory de départ. Dans chaque cas les Factory Styles originaux ne peuvent pas être réinscris ou modifiés.
En bas nous trouverons les commandes principales du Style:
- INTRO/ENDING: 1 - 2 - 3
- ARRANGE: A-B-C-D
- FILL: On exécutera un Fill différent par rapport à l’arrangement actif.
- BREAK: On exécutera un Break différent par rapport à l’arrangement actif.
On pourra aussi contrôler ces commandes à l’aide des poussoirs, avec sérigraphie en bleu, à droite et à gauche de
l’afficheur, à condition que la fonction ARRANGE TO TABS (dans le menu PREFERENCES) soit active. On pourra
contrôler les commandes du style même à l’aide du pédalier FS6/FS13 (optionnel).
Dans le panneau frontal de l’instrument les Curseurs pour le réglage du volume de la batterie DRUMS, de la Basse BASS,
de la section accompagnement harmonique CHORD, de la section LOWER et LEAD du clavier c’est-à-dire respectivement
du split gauche et droite seront toujours actifs.
Par l’appui sur EXIT on revient à la page-écran affichant les fonctions pour le réglage de l’Arranger.
Maintenant nous étudierons les fonctions disponibles après l’activation de la touche EDIT.
Page 50

/48
Le bouton MICRO 1 placé sur le panneau frontal ouvre l’écran relatif à la gestion du microphone connecté à l’entrée
MICRO 1 du panneau arrière.
La page est divisée en 2 sections: MICRO, pour le réglage des effets typiquement utilisés pour la voix, VOICETRON pour
le réglage du processeur vocal qui crée une harmonisation et des effets spéciaux. Les deux DSP peuvent être activés ou
désactivés par les touches virtuelles MICRO ON/OFF et VOCAL ON/OFF. En commençant de la section MICRO nous
trouvons en haut le bouton volume, pour le réglage du niveau microphone qui va s’ajouter au gain d’entrée réglable avec le
potentiomètre physique placé à proximité de l’entrée MICRO1. Un autre contrôle volume du microphone 1 est le curseur
MICRO1 / VOICETRON.
Plus en bas nous trouvons un carré indiquant le Preset microphone inséré qui par défaut est “Standard”. Il suffit de toucher
le carré pour faire apparaître un menu déroulant avec tous les autres Preset et choisir par le Touch Screen celui désiré.
À côté du carré, le bouton Rev permet de régler le niveau de la réverbération même par le Dial et le bouton Echo permet
de régler la quantité de l’effet Echo avec la même modalité. En touchant EDIT on accède à la page de modification du
preset microphone.
Le preset microphone dont le nom est indiqué dans le carré haut, est composé d’une série d’effets qui peuvent être activés
ou désactivés par le carré ON / OFF mis au-dessus de l’image correspondante. Sous chaque effet nous trouvons le carré
qui indique le nom du preset utilisé pour chaque effet unique. Il est suffisant de toucher le carré pour faire paraître un Pop
up avec les preset différents qui peuvent être choisis avec le Touch Screen. L’équaliseur a un autre niveau d’edit, VIEW,
qui ouvre un écran dédiée pour intervenir sur les 4 bandes Low, Mid-Low, Mid Hi, Hi, avec la possibilité de choisir pour
chacune de celles-ci la fréquence et le gain. Le dernier effet de la liste est celui employé pour la fonction Talk, activable
par la touche spéciale sur le panneau frontal qui permet de passer du chanté au parlé. De l’écran principal EDIT MICRO,
si on presse SAVE du panneau tout le setup microphone sera sauver dans un User preset.
La seconde partie de l’écran est dédiée au processeur vocal qui s’occupe d’harmoniser la voix c’est-à-dire le VOICETRON.
MICROPHONE/GUITARE
Page 51

/49
L’entrée MICRO2/GUITAR peut être utilisée pour la liaison d’un second microphone ou d’une guitare.
La page se présente ici aussi uniforme en 2 parties: la première est MICRO2 et elle est dédiée aux paramètres du
microphone, la seconde est GUITAR et elle est dédiée aux paramètres des effets pour guitare.
Du moment qu’il s’agit de la même entrée sonore, il n’est pas possible d’activer les deux modes donc si le mode MICRO2
est placé sur ON, le mode GUITAR sera automatiquement placé sur OFF et vice versa.
Dans le mode GUITAR nous trouvons ici aussi des boutons sélectionnables virtuels avec le Touch Screen et modifiables
par le Dial qui agissent sur le Volume, Réverbération et Chorus et en addition nous trouvons une série de 16 Setup
d’effets spécifiques pour la guitare.
En pressant EXIT on quitte le menu déroulant pour retourner à l’écran précédent. Chaque setup choisi contient un effet
insert qui sera indiqué dans le carré INSERT EFX1. Il est possible de changer l’effet insert du setup en touchant le carré
dédié et en choisissant un type d’effet du menu déroulant.
L’effet peut être débranché avec la touche FX BYPASS du display. Chaque Setup guitariste peut être édité en pressant
la touche EDIT. À la fin toutes les modifications de l’effet peuvent être sauvées dans un setup en pressant la touche SAVE
du panneau.
Le display vous donnera la possibilité de choisir de sauver les modifications dans un setup effets pour microphone
ou pour guitare. Une fois effectuée le choix l’écran habituel apparaîtra pour sauver ce setup en pressant SAVE
ou avec un nom différent grâce au clavier alphanumérique qui apparaîtra sur l’écran quand vous choisissez SAVE AS.
Nous trouvons ici en haut à droite un bouton VOCAL ON / OFF pour activer ou éteindre le Voicetron, des potentiomètres
virtuels qui permettent de régler le volume et la réverbération par la sélection du display et avec l’utilisation du Dial. Plus en
bas nous trouvons un carré indiquant le preset courant. En touchant sur celui ci s’ouvre un menu déroulant qui permet le
choix d’un autre preset Voicetron par le Touch Screen. En touchant le carré en bas à droite marqué par l’inscription EDIT
on accède à la page de modification du preset Voicetron.
Page 52

/50
MIDJPRO est en mesure d’enregistrer comme fichiers audio en format .wav, tout ce qu’on est exécuté par l’instrument et
tout ce qui passe dans les entrées audio analogiques MIC1, MIC2/GUITAR. L’enregistrement inclura en plus de la partie
midi / audio du player ou l’accompagnement automatique, aussi ce qui en train de jouer en temps réel sur le clavier relié
en utilisant le générateur interne sonore, votre voix et la guitare ou la seconde voix en entrée de l’instrument. Les fichiers
audio peuvent être exécutés de nouveau en lecture et vous pouvez rejouer en superposition au fichier une partie sonore
supplémentaire. Presser RECORD pour lancer l’enregistrement.
Le display indique le bouton à gauche REC LEVEL pour régler le niveau d’enregistrement. Il suffit de le toucher et de
le tourner par l’intermédiaire du Dial pour changer le niveau. L’enregistrement terminé il suffit de presser STOP et de
sauvegarder le fichier.
Une fois la sauvegarde effectuée, le display indiquera sous l’image du magnétophone, le nom du fichier.
En bas nous trouvons la touche EDIT pour accéder à la page AUDIO EDIT pour la modification du fichier au niveau de:
volume, point de start, de end, etc.... À suivre les boutons classiques de transport.
- <<: Pour aller en arrière.
- STOP: Pour arrêter la reproduction.
- >>: Pour aller en avant.
- RECORD: Pour faire démarrer l’enregistrement suivant.
- PLAY: Pour faire démarrer la reproduction du fichier.
HARD DISK RECORDING
Page 53

/51
REGISTRATION
Par le terme REGISTRATION on entend la sauvegarde de la configurations de nombreux paramètres de l’instrument.
Pratiquement on pourra sauvegarder dans une Registration toutes les sélections générales de l’instrument, les sélections
concernant les Styles et les sonorités, les sélections des 2 entrées microphoniques, les effets et les sélections Midi..
De cette manière l’utilisateur, à la maison peut préparer et sauver des configurations très détaillées et finalisées aux
exigences musicales spécifiques selon le type de spectacle, puis pendant le spectacle en direct il les rappelle “au vol” sans
perdre de temps.
L’instrument est équipé de 4 bancs sur chacun desquels l’utilisateur pourra sauvegarder jusqu’à 1024 Registrations.
Pour les charger il ne faut qu’enfoncer la touche REGISTR. logée sur le panneau frontal de l’instrument. A partir de la
page-écran affichée, il ne faudra que sélectionner un des 4 bancs disponibles et la Registration désirée en employant
l’écran tactile. Ou bien on pourra sélectionner aussi le Numeric Pad et taper le numéro d’emplacement correspondant à la
REGISTRATION à charger.
Quand une Registration est sauvée, comme mentionné en premier tous les paramètres du panneau sans aucune exclusion
sont sauvés. Cependant quand une Registration est rappelée il est possible de filtrer quelques paramètres, c’est-à-dire qu’il
est possible de faire de manière que le rappel d’une Registration n’efface pas certains paramètres du panneau que l’on
désire maintenir bloquée. Ce blocage de toute façon est seulement en chargement mais pas en sauvegarde. Pour placer
ce filtre il faut presser la touche MENU du panneau et sélectionner du display la fonction REGISTRATION SETUP.
Page 54

/52
Par l’appui sur la touche VOICE on accède dans le mode permettant la sélection et la gestion des sonorités de
l’instrument.
Dans la page-écran principale, à droite vous trouverez les 12 catégories instrumentales et au centre les 8 figures
concernant les 8 typologies d’instrument de la catégorie sélectionnée. Chaque catégorie se compose de plusieurs pages
et il est possible de passer d’une page à l’autre à l’aide du Dial.
Une fois que le timbre ou la Voice voulus ont été sélectionnés, il est possible d’accéder à une fenêtre de modification en
sélectionnant EDIT à partir de l’afficheur.
Par la sélection de la touche virtuelle SPLIT on pourra définir à l’aide du clavier connecté à l’entrée Midi In, le point de
partage entre la section Upper et la section Lower. La valeur définie sera signalée dans la touche virtuelle.
L’instrument peut superposer jusqu’à 4 sonorités le long de l’extension du clavier ou dans la zone Upper à droite du point
de partage. Le quatrième layer est appelé 2ND VOICE et on pourra l’activer ou le désactiver “au vol” directement à partir
de cette page-écran principale du mode Voice, par la sélection de la touche virtuelle 2ND .
SONS
Page 55

/53
USB: CLE ET ORDINATEUR
Par les 3 slot USB disponibles dans la partie droite latérale de l’instrument, le MIDJPRO est apte à exécuter ou de gérer
les fichiers présents dans les clés USB.
Par l’appui sur la touche MEDIA on ouvre une page-écran affichant les dispositifs installés dans l’instrument
ou connectés à l’aide des portes USB. En bas dans la page-écran les fonctions suivantes seront affichées:
- EJECT: Retire le dispositif sélectionné sauf la mémoire SSD interne à l’instrument (User FS). Il s’agit de la même
fonction de déconnection sécurisée qui se trouve dans les ordinateurs pour protéger les dispositifs connectés des
dommages qui pourraient se vérifier si ils étaient enlevés pendant la phase d’écriture des fichiers.
Une fois les modifications effectuées sur le périphérique, sauvegarde d’un Midifile, copie, etc...)
Avant d’enlever la clé presser Eject, pour s’assurer que toutes les modifications ne soient pas encore en phase d’écriture
mais qu’elles soient portées effectivement à terme.
- PC-CONNECT: Cette fonction permet à un ordinateur connecté par câble USB à la porte USB Device de MIDJPRO,
d’identifier tous les dispositifs de mémorisation de MIDJPRO tant les dispositifs internes que les dispositifs connectés
aux portes USB Host. L’ordinateur, un fois que la connexion a été activée, pourra lire le disque SSD interne à l’instrument,
le disque dur optionnel qu’on peut installer dans le MIDJPRO et tous les dispositifs connectés à l’instrument à l’aide
des portes USB Host, tels que par exemple les clés mémoire. Par un second appui sur la fonction PC CONNECT on
désactivera la connexion. Un message vous préviendra d’effectuer l’enlèvement sécurisé des dispositifs de l’ordinateur
pour éviter tout endommagement.
- DISK EDIT: Elle active, dans la barre inférieure, une série de fonctions agissant sur les fichiers sélectionnés.
- INFO: Il affiche les renseignements principaux concernant le drive sélectionné.
- REFRESH: Elle effectue de nouveau le balayage de tous les disques et des périphériques USB connectées.
Si l’instrument n’identifie pas automatiquement une clé mémoire USB connectée, par cette fonction l’identification des
périphériques et des dispositifs connectés sera lancée de nouveau.
Page 56

/54
Page 57

/55
SICHERHEITSHINWEISE 56
ANSCHLÜSSE 57
BEDIENFELD 58
STARTSEITE 59
PLAYER 60
TEXTE 61
PLAYLIST 61
MY FOLDER 61
JUKE BOX 62
PIC & MOVIE 62
DJ 63
ARRANGER 64
MIKROFON/GITARRE 66
HD RECORDING 68
REGISTRATION 69
SOUNDS 70
USB : MEMO-STICKS UND COMPUTER 71
Wichtig: Diese Schnellanleitung bietet Ihnen die
grundlegenden Infos, damit Sie anfangen können, mit Ihrem
MIDJPRO zu arbeiten. Das komplette Handbuch befindet
sich im Inneren des Geräts (im MANUAL Menü) und auf
unserer Webseite www.ketron.it
INHALT
Page 58

/56
HINWEISE ZUR BRAND-, SCHLAG- UND SCHADENSGEFAHR FÜR PERSONEN
VORSICHT: Um das Brand- und Schlagrisiko zu mindern, setzen Sie das Gerät weder Regen noch Feuchtigkeit aus.
WICHTIGE SICHERHEITS- UND INSTALLATIONSHINWEISE
VORSICHT – Beachten Sie beim Gebrauch von elektrischen Geräten folgende Sicherheitsmaßnamen:
“ Lesen Sie sich das Handbuch genau durch, bevor Sie das Gerät in Betrieb nehmen.
“ Wenn Kinder das Gerät benutzen, müssen Erwachsene zugegen sein.
“ Verwenden Sie das Gerät nicht in Umgebungen, in denen es mit Wassertropfen oder -spritzern in Berührung kommen kann, wie bspw.
neben einer Spüle, einem Pool, auf nassen Oberflächen u. dgl., und stellen Sie auf das Gerät keine Behälter, die Flüssigkeiten enthalten,
da diese ins Innere eindringen könnten.
“ Das Gerät darf nur auf einem vom Hersteller empfohlenen Ständer verwendet werden.
“ Stellen Sie die Lautstärke nicht zu hoch ein: Übermäßiger Lärm ist gesundheitsschädlich!
“ Das Gerät muss so aufgestellt werden, dass es ausreichend belüftet wird.
“ Das Gerät muss fern von Wärmequellen wie Heizkörpern, Öfen etc. aufgestellt werden.
“ Das Gerät darf nur mit dem mitgelieferten Adapter an das Stromnetz angeschlossen werden; die Identifikations- und
Versorgungsdaten sind unten am Gerät ausgewiesen.
“ Wenn das Gerät über einen längeren Zeitraum nicht benutzt wird, muss das Netzkabel abgezogen werden.
“ Um das Gerät im Bedarfsfall von der Versorgung abzuhängen, betätigen Sie den Schalter an der Geräterückseite. Das Gerät muss so
aufgestellt werden, dass Sie auf den Schalter leicht zugreifen können.
“ Das Gerät muss zum Service gebracht werden, wenn:
a. das Netzkabel oder die Buchse beschädigt sind;
b. Gegenstände oder Flüssigkeiten ins Innere des Geräts gedrungen sind;
c. das Gerät mit Regen in Berührung gekommen ist;
d. das Gerät nicht richtig zu funktionieren scheint oder einen merklichen Leistungsabfall zeigt;
e. das Gerät heruntergefallen oder das Gehäuse beschädigt ist.
“ Versuchen Sie nicht, das Gerät selbst zu reparieren; Reparaturmaßnahmen sind nur von Fachkräften durchzuführen.
BEWAHREN SIE DIESE SICHERHEITSHINWEISE GUT AUF.
WIE INTERFERENZEN MIT RADIO/TV-GERÄTEN ZU VERMEIDEN SIND
Dieses Gerät funktioniert im Radiofrequenzbereich, und wenn es nicht korrekt und unter Beachtung dieser Hinweise installiert wird,
kann es den Empfang von Radio- und Fernsehgeräten stören. Obschon die Konstruktion den geltenden Normen gemäß erfolgte und
entsprechender Schutz gegen Interferenzen berücksichtigt wurde, ist nicht auszuschließen, dass es dennoch dazu kommen kann. Um
zu prüfen, ob ggf. eine Empfangsstörung durch das Gerät verursacht wird, versuchen Sie es auszuschalten, und kontrollieren Sie, ob
die Störung dadurch beseitigt wird. Schalten Sie es dann wieder ein und prüfen Sie, ob die Störung erneut gegeben ist. Nachdem Sie
festgestellt haben, dass das Gerät die Ursache der Interferenz ist, treffen Sie eine der folgenden Maßnahmen:
“ Richten Sie die Antenne des Radio/TV-Geräts besser aus.
“ Stellen Sie das Gerät anders im Verhältnis zum Radio/TV-Gerät auf.
“ Entfernen Sie das Gerät vom Radio/TV-Empfänger.
“ Schließen Sie den Stecker des Geräts an eine andere Steckdose an, damit das Gerät und der Radio/TV-Empfänger an zwei
verschiedenen Stromkreisen angeschlossen sind.
“ Erforderlichenfalls holen Sie den Rat von Fachkräften ein.
ANSCHLÜSSE
“ Wenn Sie das Gerät an andere Geräte (Verstärker, Mixer, andere MIDI-Geräte etc.) anschließen, stellen Sie sicher, dass alle Geräte
ausgeschaltet sind.
“ Lesen Sie sich die Hinweise in Bezug auf die Interferenzen mit Radio/TV-Geräten durch.
PFLEGE DES GERÄTS
“ Die äußeren Oberflächen des Geräts dürfen nur mit einem weichen, trockenen Tuch gereinigt werden. Verwenden Sie niemals Benzin,
Verdünner oder Lösungsmittel im Allgemeinen.
ANDERE VORSICHTSMASSNAHMEN
Wenn Sie das Gerät im Ausland verwenden wollen und Zweifel hinsichtlich der Versorgung haben, wenden Sie sich im Vorfeld an einen
qualifizierten Techniker. Das Gerät darf keinen starken Erschütterungen ausgesetzt werden.
ADAPTER
Um das Gerät an eine Steckdose anzuschließen, verwenden Sie ausschließlich den mitgelieferten KETRON-Adapter. Der Einsatz
anderer Adapter könnte die Versorgungskreise des Geräts beschädigen. Es ist daher von grundlegender Wichtigkeit, Original-Adapter
zu verwenden und den richtigen Adaptertyp im Bedarfsfall nachzubestellen.
BENUTZERINFORMATION
“Umsetzung der Europäischen Richtlinien 2002/95/EG, 2002/96/EG und 2003/108/EG zur Beschränkung der Verwendung
bestimmter gefährlicher Stoffe in Elektro- und Elektronikgeräten sowie über Elektro- und Elektronik-Altgeräte.”
Das Symbol der durchgestrichenen Mülltonne auf dem Gerät oder dessen Verpackung weist darauf hin, dass das Produkt am Ende
seines Lebenszyklus einer getrennten Abfallentsorgung zuzuführen ist. Der Benutzer muss daher das Gerät bei den entsprechenden
Sammelstellen für Elektro- und Elektronik-Altgeräte abgeben oder beim Kauf eines neuen gleichartigen Geräts dem Händler
zurückzugeben. Die getrennte Sammlung der Altgeräte trägt im Hinblick auf deren Recycling, Aufbereitung und
umweltverträgliche Entsorgung dazu bei, negative Auswirkungen auf die Umwelt und menschliche Gesundheit zu vermeiden,
und fördert die Verwertung bzw. das Recycling der Materialien, aus denen sich das Gerät zusammensetzt. Die nicht rechtmäßige
Entsorgung des Produkts unterliegt den von den geltenden Gesetzen vorgesehenen Verwaltungsstrafen.
SICHERHEITSHINWEISE
Page 59

/57
ANSCHLÜSSE
DC 9V 4A Netzteilbuchse Verwenden Sie ausschließlich das mit dem Gerät gelieferte Netzteil. Output: 9 V, 4 A
ON/OFF Ein/Aus-Taster Das Hochfahren kann bis zu 30 Sekunden dauern. Zum Herunterfahren drücken
Sie den EIN/AUS-Taster und warten dann, bis das Gerät ausgeschaltet wird. Dieser Vorgang kann bis
zu 10 Sekunden dauern..
VOLUME PEDAL Stereo-Klinkenbuchse für den Anschluss eines Volumenpedals (optional)
VIDEO DVI DVI-Buchse für den Anschluss an einen externen Monitor
USB-SD CARD USB-Anschluss für Computer oder andere Geräte, die mit denen der MIDJPRO extern gesteuert
werden kann. Auf der rechten Seite des Geräts findet sich ein SD-Card-Steckplatz und 3 USB
Host-Buchsen für den Anschluss von externen USB-Geräten wie Stick, externe Festplatte usw.
FOOTSWITCH Mehrpolige Standard-Buchse für den Anschluss eines optionalen Fußschalters zur Steuerung
bestimmter residenter Funktionen. Mit Ketron FS6/FS13 kompatibel.
MIDI Buchsen für MIDI IN-, MIDI OUT- und MIDI THRU-Anschlüsse.
MAIN OUT Mono-Klinkenbuchsen für den allgemeinen Ausgang zum Anschluss an eine PA- bzw.
STEREO-Anlage: links (Left Mono), rechts (Right Mono). Wir empfehlen Ihnen, den Stereo-Anschluss
für eine bessere Wiedergabe des Geräts und der Effekte zu verwenden. Der eventuelle
Mono-Anschluss (d.h. die alleinige Verwendung des Left- oder Right-Ausgangs) führt zu einer
minderwertigeren Wiedergabequalität und wird den Merkmalen von Sounds und EFX nicht gerecht.
HEADPHONE Stereo-Klinkenbuchse für den Anschluss von Kopfhörern. Die Lautstärke der Kopfhörer wird von der
Master-Sektion aus gesteuert.
MICRO 1 IN Mono-XLR/Klinkenbuchse für den Anschluss eines dynamischen Mikrofons
MICRO 1 GAIN Potentiometer für die Regelung der Verstärkung des Eingangssignals an der Micro 1-Buchse
MICRO 1 OUT Mono-Klinkenbuchse für den Micro 1 -Ausgang
MICRO 2 IN Mono-Klinkenbuchse für den Anschluss eines dynamischen Mikrofons
MICRO 2 GAIN Potentiometer für die Regelung der Verstärkung des Eingangssignals an Micro 2-Buchse
GUITAR/MICRO Taster für die Empfangsempfindlichkeit des Signals im Eingang an der Micro 2-Buchse. Bei der
Verwendung des Geräts mit einer Gitarre diesen Taster aktivieren. Bei der Verwendung mit einem
Mikrofon deaktivieren.
LINE IN Mini-Klinkenbuchse für den Eingang eines Stereogeräts mit Leitungssignal (CD-Player usw.)
Page 60

/58
Das Bedienfeld des Geräts verfügt über einen groß bemessenen Farb-Touchscreen, der das Herzstück der
Benutzeroberfläche des Systems darstellt. Die meisten Funktionen sind nämlich per “Fingertipp” direkt vom Display
aufrufbar. Links vom Display finden sich von oben nach unten folgende Tasten:
-GM PART: Verwaltung der den MIDI-Spuren der geladenen Datei zugeordneten Sounds.
-LEAD MUTE: Stummschaltung der Melodiespur von MIDI-Dateien. Beim Abspielen einer Audiodatei ist mit dieser
Funktion die Vokalstimme leiser zu stellen
-LYRIC OFF: Hinzuschalten/Abschalten der Textanzeige einer Datei.
-SEARCH: Menü für die Dateisuche.
- X-FADE: Überblendung von zwei Songs.
Unterhalb des Displays finden sich von links nach rechts folgende Tasten.
-PLAY 1 und 2: Tasten zur Auswahl der beiden Players. Wenn Style eingeschaltet ist, kann auf Player 2 kein Zugriff
geschaffen werden.
-STYLE: Mit dieser Taste verschaffen Sie sich Zugriff auf den “Arranger”-Modus für die automatischen Begleitungen. Auf
Style ist kein Zugriff möglich, wenn Player 2 eingeschaltet ist.
-VOICE: Über diese Taste wird die Seite für die Auswahl und Bearbeitung der Sounds der rechten Hand geöffnet.
-DRUM SET: Aktivierung der Manual Drum-Funktion, Möglichkeit der Auswahl und des Mappings der Drum Kits. In der
Player-Umgebung wird auch der Drum Mixer angezeigt, mit dem die Lautstärken und Effekte der Perkussionsklänge
geändert werden können.
-PAUSE: Taste für die Pausenschaltung des ausgewählten Players oder die Aktivierung der Restart- und Count InFunktion in Style-Umgebung.
-MICRO1: Verwaltung von Mikrofon 1.
-MICRO2/GUITAR: Seite für die Verwaltung des zweiten Mikrofons oder der Gitarre, das/die an den Micro2/Guitar-
Eingang angeschlossen ist.
-TALK: Eliminiert oder reduziert den Effekt von Mikrofon 1, um vom Gesang auf die gesprochene Stimme überzugehen.
Unten angeordnet sind die Lautstärkeregler für die (in Player-Umgebung) schwarz und die (in Style-Umgebung) blau
beschrifteten Bereiche.
Rechts vom Display finden sich von oben nach unten folgende Tasten:
-RECORD: Start der Aufnahme-Funktion; d.h. alles, was das Gerät wiedergibt, einschließlich dessen, was über die
externen Eingänge kommt (Mikrofon, Gitarre etc.) kann aufgezeichnet werden.
-DSP: Seite zur Steuerung der Effekte (siehe DSP).
-PIC&MOVIE: Verwaltung von Grafik- und Videodateien.
-DJ: Eine alternative Methode zum Abspielen der Songs mit doppeltem Player und verschiedenen Funktionen.
-JUKE BOX: Menü für eine vereinfachte Verwaltung der Songs nach der “Juke Box”-Methode.
BEDIENFELD
Page 61

/59
- REGISTR: Auswahl der Registrations, d.h. jene allgemeinen Einstellungen des Geräts, die vom Benutzer abgespeichert wurden.
- MASTER: Schieberegler für die allgemeine Lautstärkeeinstellung des MIDJPRO.
Ganz rechts am Bedienfeld angeordnet sind:
- DATA/VALUE, auch Dial genannt. Gestattet die Anwahl der Files, Parameter und die Einstellung der entsprechenden Werte.
- ENTER: Für die Bestätigung von bestimmten Bedienschritten oder das Öffnen der jeweils markierten Ordner.
- EXIT: Für den Abbruch von Bedienvorgängen oder das Verlassen der aktuellen Displayseite und Rückkehr zur
vorhergehenden oder das Verlassen eines Ordners, um sich auf die nächst höhere Ebene im Navigationsverzeichnis zu
bewegen.
- SAVE: Für die Speicherung der am Gerät vorgenommenen Änderungen.
Bitte beachten: Werden die Tasten EXIT und SAVE gleichzeitig betätigt, so wird ein globales MIDI RESET durchgeführt.
- MEDIA: Für die Anzeige der residenten oder über USB-Port angeschlossenen Speichergeräte.
- MENU: Für die Anzeige und Zugang zu den einzelnen operativen Menüs des Geräts.
-TEMPO und TRANSPOSER: Verwalten jeweils das Tempo in BPM und die Transposition der Musikdateien und Styles.
Durch gleichzeitiges Betätigen wird die Ausgangsseite des Geräts, auch “Home” genannt, aufgerufen.
Die Startseite (INTRO) wird automatisch nach Hochfahren des Geräts angezeigt und gestattet den Zugriff auf die
folgenden Hauptfunktionen:
• PLAYER-GM: Hiermit wird der MIDJPRO als Audio- und MIDI-Player verwendet.
• KEYBOARD: Der MIDJPRO wird über ein MIDI-Master Keyboard gesteuert.
• ACCORDION: Der MIDJPRO wird über ein MIDI-Akkordeon gesteuert.
Es ist allerdings auch im GM-Player-Modus möglich, den MIDJPRO über ein Master Keyboard oder ein Akkordeon zu
steuern, indem auf dem Bedienfeld die Menü-Taste betätigt und die MIDI-Einstellungen entsprechend geändert werden.•
• STANDARD: Ermöglicht die Steuerung des Geräts über einen externen MIDI-Controller (über die MIDI IN-Buchse), um
Styles und Voices des Arrangers zu spielen.
• ACCORDION MANUAL: Steuert den Arranger mit einem MIDI - Akkordeon.
• COMPUTER SEQUENCER: Ermöglicht den Anschluss des MIDJPRO an einen Computer, als externes GM-Modul.
Auf der Startseite befinden sich darüber hinaus folgende Buttons:
• DE MO: Gestattet es, kurze Demo-Stücke zu hören.
• GUITAR: Verwaltung einer Gitarre oder eines zweiten Mikrofons, die/das an die MICRO 2 IN - Buchse angeschlossen
wird. (Die beiden Eingangsquellen werden mit dem entsprechenden physikalischen Wahlschalter gewählt).
• MAN UAL: Öffnet das Benutzerhandbuch des Geräts.
• SKIP INTRO: Überspringt die Startseite.
STARTSEITE
Page 62

/60
Nach Anwahl der Ikone PLAYER-GM auf der Startseite wird der Inhalt des jeweils ausgewählten Mediengeräts (SSD,
Card, USB, etc.) angezeigt.
Zur Navigation können Sie Folgendes verwenden:
• den TOUCH SCREEN, der es Ihnen gestattet, die Dateien und Ordner direkt anzuwählen und durch Doppeltipp zu
öffnen.
• das DATA/ VALUE DIAL, zum Scrollen von Dateien und Ordnern oder zum Ändern eines Wertes.
• EXIT zum Verlassen der Ordner und Rückkehren zu einer höheren Navigationsebene (Back Root).
• ENTER zum Öffnen des jeweils markierten Ordners, wenn nicht der Doppeltipp auf dem Touchscreen benutzt wird.
Sowie Sie eine Datei antippen, wird diese gewählt, hervorgehoben und in den Player 1 geladen.
Um die Wiedergabe zu starten, drücken Sie die START/STOP-Taste oder die Enter-Taste.Wenn die Datei auf Play gesetzt
ist, leuchtet die START/STOP-Taste rot auf. Zur Anwahl des Players 2 ist die PLAYER 2 -Taste zu drücken und der
Vorgang zu wiederholen.
Wird im FUNCTION-Menü (Button rechts unten) die Funktion Auto Play aktiviert, so erfolgt automatisch die
Wiedergabe aller in dem jeweiligen Ordner enthaltenen Songs, vom ersten bis zum letzten.
Sofern vorhanden, können vom PLAYER-Bereich aus die Songtexte (Lyrics oder txt) entweder am Display oder auf
einem externen, über den VIDEO DVI Anschluss an der Rückseite angeschlossenen Monitor visualisiert werden. Auf der
oberen Leiste erscheint: der Name der Datei, die abgespielt wird; vorangestellt ist eine Ziffer in eckiger Klammer, die den
gewählten Player anzeigt; das Tempo des Metronoms (nur bei MIDI-Dateien), die Geschwindigkeit (nur bei MIDI-Dateien);
der für die Datei eingestellte Transpositionswert; die Lautstärken der Bereiche Drum, Bass, Chord, Orch. (Lower) und Lead.
In der rechten Leiste können Sie die Datei- und Ordnerliste nach oben und nach unten durchlaufen. Zudem ist während
der Wiedergabe der Schlag/Zeit-Zähler zu sehen. Für weitere Informationen zur wiedergegebenen Datei und um sich
vorwärts oder rückwärts zu bewegen, wählen Sie PLAY BAR. Wurde im PREFERENCE -Menü die Funktion PFL TO
PLAYER aktiviert, erscheint in der Leiste rechts der PFL-Button, mit dem der aktuell gewählte Song vorab im Kopfhörer
gehört werden kann.
PLAYER
Page 63

/61
TEXTE
Wenn die Datei einen Text enthält, wird dieser in der Mitte des Displays und am eventuell angeschlossenen externen
Monitor angezeigt. Durch Druck auf die LYRIC OFF Taste links am Bedienfeld kann die Datei-Liste weiterhin visualisiert
werden Bei erneuter Betätigung derselben Taste wird wieder der Text angezeigt. Bei den Dateien, die Text enthalten, ist
es möglich, auf ganzen Bildschirm zu schalten, indem der Touchscreen in der Mitte da angetippt wird, wo der Text läuft.
Durch ein zweites Antippen kehren Sie zur normalen Ansicht zurück. Wenn eine Datei keinen Text enthält, ist es möglich,
dieser eine Textdatei (Datei mit .txt-Zusatz) zuzuordnen. Hierzu muss diese denselben Namen wie die Musikdatei, der
sie zuzuordnen ist, aufweisen und im selben Ordner abgespeichert sein (z.B. Newyork.mid und Newyork.txt). Auf der
FUNCTION Seite muss außerdem die Funktion SKIP FILE LINK deaktiviert sein.
Darüber hinaus ist eine Mirror-Funktion vorgesehen (im Video-Menü), mit der auf dem externen Monitor die gleiche
Anzeige wie auf dem Display erscheint.
PLAYLIST
Sie können eine Playlist erstellen, indem Sie EMPTY antippen und dann mit YES in dem Dialogfenster, das geöffnet wird,
bestätigen.
Mit EDIT erhalten Sie Zutritt zum Erstellen und Verwalten der Playliste. Es wird nun am Display das aktuelle Verzeichnis
angezeigt, aus dem Sie direkt über den Touchscreen und mit den ENTER- und EXIT-Tasten vom Bedienfeld aus die
Ordner öffnen und die Dateien auswählen können, die Sie der Playlist hinzufügen möchten. Nachdem Sie die gewünschte
Datei gefunden haben, betätigen Sie die Taste INSERT ITEM, um sie der neuen Playliste hinzuzufügen.
Über die untere Leiste gelangen Sie in die PLAYLIST, mit der Sie Ihre Repertoires und Playlisten vorbereiten können.
Die MY FOLDER-Ordner sind im Grunde nichts anderes als Verknüpfungen mit den bevorzugten Ordnern. Wenn ein
Ordner als My Folder gespeichert wurde, wird er in der Liste der bevorzugten Ordner am Display angezeigt. Mit EDIT
erhalten Sie Zutritt zum Erstellen und Verwalten der Ordner.
MY FOLDER
Page 64

/62
In diesem Menü können Sie die Hintergrund-Bilder für Ihre Karaoke-Dateien u. ä. wählen und die im MIDJPRO
enthaltenen Videos verwalten.
Die Funktion JUKE BOX bietet eine alternative Möglichkeit an, um die in einer Playliste oder in einem Myfolder
enthaltenen Dateien anzuzeigen zu aktivieren.
Unter den verschiedenen Benutzungsmöglichkeiten des Players ist dies wohl die intuitivste.
Mit dem Dial können Sie die Seite durchsuchen und die Touchpads eines nach dem anderen angezeigen. Diese Bildseite
bietet auch die Möglichkeit, mit der SFX -Taste einige Klangeffekte zu steuern, die im Laufe der Vorführung aktiviert
werden können.
JUKE BOX
PIC & MOVIE
Page 65

/63
Durch Druck auf die DJ-Taste am Bedienfeld greifen Sie auf einen alternativen Abspielmodus zu. Hier sind die 2
Player-Module in Form von “Plattenspielern” dargestellt. Der jeweils angewählte ist rot hervorgehoben. Das Dateiund Ordnerverzeichnis wird in der Mitte angezeigt. Für jeden Player stehen zwei Lautstärkeanzeiger und Buttons zur
Verfügung, die wie folgt beschrieben werden:
- CUE: Es handelt sich um einen Merker, der, nachdem er auf einen bestimmten Punkt des Songs gesetzt wurde, bei
erneutem Antippen den Song ab diesem Punkt wieder startet. Diese Funktion ist bei WAVE- und MIDI-Files, nicht aber bei
Mp3-Dateien wirksam.
- PFL: Vorhören über Kopfhörer. Das PFL wird automatisch angewählt, wenn der entsprechende Schieberegler auf 0
gestellt wird.
- []>: Pause.
Unten sind für den jeweils ausgewählten Player eine Reihe von Funktionen aufzurufen.
- BACK SPIN: beendet die Wiedergabe bei Erhöhen von Geschwindigkeit und Tonhöhe des Songs.
- SYNC: synchronisiert die beiden Player-Module. Wenn ein MIDI-File auf dem “Plattenspieler” A läuft und ein weiteres
MIDI-File auf dem “Plattenspieler” B vorbereitet wird, beginnt die zweite MIDI-Datei bei Antippen von SYNC mit dem
“Beat-in” zu spielen. Wenn auch die Funktion Lock Tempo aktiviert wird, behält der zweite Player das Tempo des ersten (in
BPM) bei. Wenn die zweite Datei eine Audiodatei ist, startet diese bei Beginn des nachfolgenden Taktes des MIDI-Files.
Wenn jedoch die erste Datei eine Audiodatei ist, wird das TAP-Fenster mit einem Touchpad (siehe unten) geöffnet, um
das zweite Stück nach 4 Schlägen auf das Touchpad zu starten. Wenn die 4 Schläge hierbei im Rhythmus des ersten Files
erfolgen, wird das zweite auf dieses abgestimmt.
- TAP: In der Mitte des Displays wird ein virtuelles Touchpad angezeigt, um das Tempo durch Klopfen mit den Fingern zu
synchronisieren.
- FX PAD: Diese Funktion ist nur für Audiodateien wählbar, wobei ein kleines Fenster mit folgenden Effekten geöffnet
wird: Tonhöhe (Pitch), Schnittfrequenz (Cut Off ), Filterresonanz und Wiedergabegeschwindigkeit (Tempo). Diese Effekte
können mit den entsprechenden Schiebereglern am Bedienfeld eingestellt werden.
- RESET: setzt die Datei auf die Standardeinstellungen zurück, d.h. die auf dieser Seite vorgenommenen Änderungen
werden rückgängig gemacht.
- BRAKE: Beendet die Wiedergabe durch Herunterregeln von Geschwindigkeit und Tonhöhe, als ob plötzlich die
Stromversorgung eines Plattenspieles unterbrochen würde.
DJ
Page 66

/64
Der MIDJPRO ist nicht nur ein Player sondern auch ein Arranger, d.h. er besitzt eine Sektion, die den automatischen
Begleitungen, auch Styles genannt, dediziert ist. Jeder Style hat zu seiner Verfügung:
• 2 Spuren für Schlagzeug und Perkussionsinstrumente auf MIDI-Kanal 9 und 10.
• 1 Bass-Spur auf MIDI-Kanal 5. Fünf Akkordspuren - CH1, CH2, CH3, CH4 und CH5 -, die auf den MIDI-
Kanälen 6,7,8,11 und 12 arbeiten.
• 2 “Real Time”-Spuren, d.h. Lower 1 und Lower 2, die dem Tastaturbereich links vom Splitpunkt zuzuordnen sind
und auf den MIDI-Kanälen 3 und 4 arbeiten.
• Die LEAD-Spur, die dem Upper-Bereich, d.h. dem Bereich rechts vom Splitpunkt der Tastatur, zugeordnet wird.
Es ist auch möglich, eine Textdatei während der Wiedergabe eines Styles zu visualisieren. Wenn Sie eine Textdatei mit
einem Style verbinden möchten, verlassen Sie zunächst den Style-Modus, laden den Text und kehren dann in den StyleModus zurück, um das Ganze schließlich als Registration zu speichern.
Jeder Style besteht aus folgenden möglichen Elementen: 3 INTROS; 3 ENDINGS; 4 ARRANGEMENTS (A, B, C, D); 4
FILLS; 4 BREAKS.
Eine weitere Variationsmöglichkeit des Styles ergibt sich daraus, dass die letzten 3 Akkordspuren, also CH3, CH4 und
CH5 mittels der VARIATION-Tasten zu- oder weggeschaltet werden können.
Am Display angezeigt werden in der rechten Spalte die Hauptkategorien der Styles (Ballad, Pop, Dance etc.).
Rechts werden die Styles angezeigt, die zur gewählten Kategorie gehören. Unterhalb angeordnet sind folgende Buttons:
- KEY START: Hiermit wird die Wiedergabe der Styles gestartet, sobald ein Akkord im Lower-Bereich des an den MIDI
In-Eingang angeschlossenen Keyboards gespielt wird, ohne dass START/STOP gedrückt werden muss.
- KEY STOP: Stoppt die Begleitung, sobald die Hand vom Lower-Bereich des Keyboards genommen wird.
- REINTRO: Hiermit wird bewirkt, dass bei Betätigung eines der Intro/Ending-Buttons anstelle des Endings erneut das
Intro gespielt wird. Wenn der Reintro-Button im Stop-Zustand aktiviert ist und eines der Intro/Ending-Buttons gedrückt
wird, wird anstelle des Intros direkt das Ending gespielt.
- SPLIT: Bei Antippen dieses Buttons (der gelb hinterlegt wird) und Anschlagen einer Taste auf dem angeschlossenen
MIDI-Keyboard wird hiermit der Splitpunkt festgelegt, der den Lower-Bereich (linke Hand) vom Upper-Bereich (rechte
Hand) des Keyboards trennt.
- HOLD ON: Dieser Button sorgt dafür, dass die Begleitung beibehalten wird, auch wenn der Akkord mit der linken Hand
aufgehoben wird, und zwar bis zum Anschlagen des nächsten Akkordes.
Durch Druck auf die STYLE-Taste am Bedienfeld wird die Hauptmenüseite des Arrangers geöffnet.
ARRANGER
Page 67

/65
- DRUM: dient der Einstellung der Parameter der Drum-Sektion.
- DRUM MIXER: öffnet einen Mixer, der dem Schlagzeug dediziert ist; es ist hiermit möglich, die einzelnen
Perkussionsinstrumente zu- bzw. wegzuschalten und für jedes die Lautstärke und den Hall zu regeln.
- BASS: öffnet die Einstellungsseite der Bass-Spur.
- 4 VOICE SET: gestattet die Änderung der 4 Sounds für den Upper-Bereich.
- CHORD: öffnet die Einstellungsseite der Akkordspuren der Begleitautomatik.
- PIANIST & BASSIST: öffnet die Seite, auf der im Detail die Steuerung des Arrangers über Keyboard festgelegt wird.
- LOWER: öffnet die Einstellungsseite der Lower-Spur, d.h. des Tastaturbereichs links vom Splitpunkt.
- VIEW: ermöglicht die Visualisierung und Abänderung von Style-Parts.
Alle Änderungen, die an Factory Styles ausgeführt werden, können mit der Funktion Save in einen User Style
abgespeichert werden, wobei der gleiche Name oder ein neuer verwendet werden kann. Der neue User Style wird in einer
Familie abgelegt, die den gleichen Namen wie der Ausgangs- Factory Style trägt. Die Original-Factory Styles können nicht
überschrieben und die Änderungen können nicht direkt in Ihnen abgespeichert werden.
Ganz unten sind die Schaltflächen für die Steuerungen des Styles zu finden:
- INTRO/ENDING: 1 - 2 - 3
- ARRANGE: A-B-C-D
- FILL: Es wird ein anderes Fill gespielt, je nach aktiviertem Arrangement.
- BREAK: Es wird ein anderes Break gespielt, je nach aktiviertem Arrangement.
In Alternative zu den beschriebenen Buttons können die jeweiligen Steuerungen über die blau beschrifteten Tasten am
Bedienfeld rechts und links vom Display erfolgen, sofern die Funktion ARRANGE TO TABS (im PREFERENCES-Menü)
aktiviert wurde. Ebenso ist es möglich, die wichtigsten Steuerungen der Styles über den Fußschalter FS6/FS13 (optional)
vorzunehmen. Am Bedienfeld des Geräts stehen immer die Lautstärkeregler für die Bereiche DRUMS (Schlagzeug),
BASS (Bass), CHORD (Akkorde), LOWER und LEAD der Keyboard-Tastatur zur Verfügung .
Bei Druck auf EXIT kehren Sie zu der Menüseite zurück, auf der die Funktionen für die Arranger-Einstellungen angezeigt
werden. Durch Druck auf EDIT wird eine Seite geöffnet, auf der wesentliche Arranger-Einstellungen geändert werden
können.
Page 68

/66
Die Taste MICRO1 am Bedienfeld öffnet die Menüseite für die Verwaltung des Mikrofons, das an den MICRO 1-Eingang
an der Geräterückseite angeschlossen wird.
Die Seite gliedert sich in 2 Bereiche: MICRO zur Einstellung der für die Stimme verwendeten Effekte und VOICETRON
für die Einstellung des Stimmprozessors, der die Harmonisierungen und Spezialeffekte herstellt. Beide DSP können mit
den MICRO ON/OFF- und VOCAL ON/OFF-Buttons aktiviert und deaktiviert werden. Im Bereich MICRO finden Sie
oben den Lautstärkeregler, über den die Mikrofonlautstärke einzustellen ist, die zu der über den Potentiometer beim
Micro 1-Eingang regelbaren Verstärkung im Eingang hinzukommt. Die Lautstärke von Mikrofon 1 kann auch mit dem
Schieberegler MICRO1/ VOICETRON abgeändert werden.
Weiter unten auf der Menüseite angeordnet ist die MICRO PRESET-Schaltfläche, die defaultmäßig auf “Standard” gesetzt
ist. Tippen Sie auf die Schaltfläche, damit ein Drop-Down-Fenster mit allen anderen Presets geöffnet wird, die über den
Touchscreen ausgewählt werden können.
Neben der Schaltfläche befindet sich der REV-Regler, der dazu dient, die Hallstärke mittels Jog Dial einzustellen.
Mit dem Echo-Regler wird die Intensität des Echo-Effekts gesteuert. Durch Antippen von EDIT greifen Sie auf die
Bearbeitungsseite des Mikrofon Presets zu.
Das Mikro-Preset, dessen Name in der Schaltfläche oben steht, setzt sich aus einer Reihe von Effekten zusammen, die mit
dem ON/ OFF-Button oberhalb der entsprechenden Ikone aktiviert/deaktiviert werden können. Unter jedem Effekt findet
sich die Schaltfläche mit dem Namen des für den einzelnen Effekt verwendeten Presets. Tippen Sie auf die Schaltfläche,
sodass ein Pop-up-Fenster mit den Presets geöffnet wird, die über den Touchscreen ausgewählt werden können. Für den
Equalizer besteht ein weiteres Edit-Level VIEW, auf dem eine Menüseite mit den 4 Frequenzbändern Low, Mid-Low, MidHi und Hi geöffnet wird. Für jedes besteht die Möglichkeit, Frequenz und Verstärkung einzustellen. Der letzte Effekt der
Liste ist der für die Funktion Talk eingesetzte, der mit der entsprechenden Taste am Bedienfeld aufgerufen wird, um vom
Gesang auf die gesprochene Sprache überzugehen. Von der Hauptmenüseite des EDIT MICRO aus speichern Sie das
gesamte Mikro-Setup in einer User-Preset, wenn Sie am Bedienfeld die SAVE-Taste drücken.
MIKROFON/GITARRE
Page 69

/67
Über den Eingang MICRO2/GUITAR kann ein zweites Mikrofon oder eine Gitarre angeschlossen werden.
Die Seite ist in 2 Bereiche aufgeteilt: MICRO2 für die Einstellungen des Mikrofons und GUITAR für die Einstellung der
Gitarreneffekte. Da es sich um den gleichen Audio-Eingang handelt, können nicht beide Funktionsweisen gleichzeitig
hinzugeschaltet werden. Folglich wird, wenn MICRO2 auf ON gesetzt ist, automatisch der GUITAR-Modus auf OFF
geschaltet und umgekehrt.
Im GUITAR-Bereich sind ebenso virtuelle Regler angeordnet, die über den Touchscreen anzutippen und mit dem Jog Dial
einzustellen sind; geregelt werden damit die Lautstärke, der Hall und der Chorus. Zudem verfügbar sind 16 Setups und
spezielle Gitarreneffekte.
Drücken Sie auf die EXIT-Taste, um das Menü zu verlassen und zur vorhergehenden Seite zurückzukehren. Jedes
gewählte Setup beinhaltet einen Insert-Effekt, der in der Schaltfläche INSERT EFX1 angezeigt wird. Es ist möglich, den
Insert-Effekt des Setups zu ändern, indem die Schaltfläche angetippt und der gewünschte Effekt aus dem DropdownMenü gewählt wird.
Jedes Gitarren-Setup kann schließlich bearbeitet werden, indem der EDIT-Button angetippt wird. Am Ende können alle
Effekt-Änderungen in einem Setup gespeichert werden und zwar durch Betätigung der SAVE-Taste am Bedienfeld.
Sie werden hierbei vor die Wahl gestellt, die Änderungen in einem Setup für Mikrofoneffekte oder für Gitarreneffekte
abzuspeichern. Nach entsprechender Wahl wird die Menüseite für die Speicherung des Setups geöffnet; entweder wird
es mit SAVE unter dem bereits vorhandenen Namen oder durch Eingabe eines neuen Namens über die alphanumerische
Tastatur nach Anwahl von SAVE AS gespeichert.
Der zweite Teil der Menüseite ist dem Stimmprozessor gewidmet, der die Stimme harmonisiert, also dem so genannten
VOICETRON. Hier finden Sie oben rechts den VOCAL ON/OFF-Button, der dazu dient, den Voicetron ein- bzw.
auszuschalten sowie zwei virtuelle Regler zur Einstellung von Lautstärke und Hall durch Antippen der Ikone und
Betätigung des Jog Dials. Weiter unten zu sehen ist eine Schaltfläche, in der das aktuelle Preset angezeigt wird. Bei
Antippen derselben wird ein Drop-Down-Menü geöffnet, in dem ein anderes Voicetron-Preset direkt über den Touchscreen
zu wählen ist. Durch Antippen der EDIT-Schaltfläche rechts unten greifen Sie auf die Bearbeitungsseite des Voicetron
Presets zu.
Page 70

/68
MIDJPRO ist in der Lage, all das, was am Gerät gespielt und über die Audioeingänge MIC1, MIC2/GUITAR gesendet
wird, als .wav Audiodatei aufzuzeichnen. Die Aufzeichnung beinhaltet also neben dem MIDI-, Audio- oder Begleit-Part
auch das, was Sie in Echtzeit auf dem angeschlossenen Keyboard unter Nutzung des internen Klangerzeugers spielen,
Ihre Stimme, die eventuelle Gitarre oder zweite Stimme im Eingang. Die Audiodatei kann im Play-Modus wiedergegeben
werden und Sie können dazu spielen und erneut aufzeichnen. Tippen Sie auf RECORD, um die Aufnahme zu starten.
Links am Display erscheint der Regler REC LEVEL, um die Lautstärke der Aufnahme einzustellen. Hierzu tippen Sie die
Ikone an und drehen das Jog Dial, um den Wert entsprechend zu verändern. Am Ende der Aufnahme betätigen Sie einfach
STOP und speichern die Datei.
Nach dem Speichervorgang ist der Dateiname am Display unter dem Tonbandgerät zu sehen.
Unten befindet sich die Taste EDIT, um die Seite AUDIO EDIT zu öffnen, auf der die Datei in Bezug auf Lautstärke, Start-
und Endpunkt, usw. abgeändert werden kann. Hierauf folgen die üblichen Vor-/Rückspultasten sowie die Stop-Taste.
- <<: zum Zurückspulen.
- STOP: zum Anhalten der Wiedergabe.
- >>: zum Vorspulen.
- RECORD: zum Starten einer weiteren Aufnahme.
- PLAY: zum Starten der Wiedergabe.
HARD DISK RECORDING
Page 71

/69
REGISTRATION
Unter dem Begriff REGISTRATION versteht man die Speicherung der Gesamtkonfiguration des Geräts. Damit können
praktisch alle allgemeinen Einstellungen des Geräts, die Einstellungen bezüglich Styles und Sounds, die Einstellungen der
beiden Mikrofoneingänge, die Effekte und die MIDI-Einstellungen in einer Registration gespeichert werden. Hierdurch
können Sie zu Hause auch sehr detaillierte Konfigurationen ausarbeiten und abspeichern, die Sie für besondere
musikalische Anwendungen und Aufführung benötigen, und dann während der Aufführung selbst sehr schnell aufrufen
können, ohne wertvolle Zeit zu verlieren.
Das Gerät stellt Ihnen 4 Bänke zur Verfügung, auf denen Sie jeweils bis zu 1024 Registrations speichern können. Um
sie zu laden, drücken Sie die REGISTR.-Taste am Bedienfeld. Von der folgenden Menüseite aus, die am Display geöffnet
wird, ist eine der 4 Bänke und die gewünschte Registration per Fingertipp auszuwählen. Zur Speicherung der Registration
drücken Sie die Save-Taste am Bedienfeld und wählen REGISTRATION in dem Dialogfenster, das geöffnet wird.
Wie bereits weiter oben angedeutet, werden beim Speichern einer Registration ausnahmslos sämtliche Einstellungen
am Bedienfeld abgespeichert. Beim Wiederaufrufen einer Registration können jedoch einige Parameter heraus gefiltert
werden, damit bestimmte Einstellungen am Bedienfeld nicht von der Registration gelöscht sondern blockiert und
beibehalten werden. Der jeweilige Filter greift nur im Lademodus, nicht aber im Speichermodus. Um einen Filter zu setzen,
drücken Sie die MENU-Taste am Bedienfeld und wählen direkt am Display die Funktion REGISTRATION SETUP an.
Page 72

/70
Über die VOICE-Taste greifen Sie auf den Modus zu, der die Auswahl und Verwaltung der geräteresidenten Sounds
gestattet.
Auf der Hauptmenüseite werden rechts die 12 Instrumentenkategorien, in der Mitte jeweils 8 Bilder bezüglich der
Instrumente der gewählten Kategorie angezeigt. Jede Gruppe umfasst mehrere Seiten, die Sie mithilfe des Jog Dials
durchblättern.
Nach Wahl des gewünschten Klangs bzw. Sounds ist es möglich, ein Bearbeitungsfenster zu öffnen, indem der EDIT
-Button am Display angetippt wird.
Nach Anwahl des SPLIT-Buttons können Sie nun über das an den MIDI IN-Eingang angeschlossene Keyboard den
Splitpunkt festlegen, der den Upper- vom Lower-Bereich der Tastatur trennt. Der eingestellte Wert wird dann innerhalb des
Buttons visualisiert.
Das Gerät ist in der Lage, bis zu 4 Klänge über die gesamte Tastatur oder über den Upper-Bereich rechts vom Splitpunkt
zu legen. Der vierte Sound wird als 2ND VOICE bezeichnet und kann direkt von dieser Hauptmenüseite des Voice-Modus
durch Antippen des Buttons 2ND in Echtzeit aktiviert bzw. deaktiviert werden.
SOUNDS
Page 73

/71
USB: MEMO-STICKS UND COMPUTER
Über die 3 USB Slots auf der rechten Seite des MIDJPRO können Dateien auf den Speichersticks (Pen Drive) ausgeführt
und verwaltet werden.
Durch Druck auf die MEDIA-Taste wird eine Menüseite geöffnet, auf der die installierten bzw. über USB-Port
angeschlossenen Devices angezeigt werden. Unten auf der Seite sind folgende Funktionen anwählbar:
- EJECT: Hiermit ist das jeweils betreffende Device – unter Ausnahme der internen Festplatte (SSD) – zu entfernen.
Es handelt sich um dieselbe Funktion der sicheren Hardware-Entfernung am Computer; sie dient dem Schutz der
angeschlossen Geräte vor Beschädigungen, die sich bei Entfernen während des Schreibvorgangs der Dateien ereignen
könnten. Nach Vornahme der Änderungen am Peripheriegerät (Speichern eines Midifiles, Kopieren einer Datei etc.)
tippen Sie auf Eject, bevor das Gerät (ein USB-Stick bspw.) entfernt wird, um sicherzugehen, dass sämtliche Vorgänge
abgeschlossen sind.
- PC-CONNECT: Diese Funktion gestattet es einem über USB-Kabel angeschlossenen Computer, sämtliche
Speichergeräte des MIDJPRO, sowohl die internen als auch die über USB-Port angeschlossenen zu erkennen. Der
Computer ist damit nach Herstellen der Verbindung in der Lage, die interne SSD des MIDJPRO, die optionale interne
Festplatte, die installiert werden kann, sowie alle anderen über die USB Host-Anschlüsse angedockten Geräte wie USBSticks auszulesen.
Wird die Schaltfläche PC CONNECT erneut angetippt, wird die Verbindung zum Computer deaktiviert. Eine Meldung weist
Sie darauf hin, die sichere Entfernung der Hardware vorzunehmen, um eine Beschädigung derselben zu vermeiden.
- DISK EDIT: Hiermit werden in der unteren Leiste eine Reihe von Funktionen aufgerufen, die für die jeweils gewählten
Dateien aktivierbar sind.
- INFO: Hiermit werden die wichtigsten Informationen bezüglich des gewählten Laufwerks angezeigt.
- REFRESH: Infolge der Betätigung dieses Buttons werden sämtliche Festplatten und angeschlossenen USB-Geräte
gescannt. Sollte das Gerät nicht automatisch ein angeschlossenes Gerät erkennen, kann mit dieser Funktion die
Erkennung der Peripherie- und über USB-Port angeschlossenen Geräte neu gestartet werden.
Page 74

/72
Page 75

/73
INSTRUCCIONES DE SEGURIDAD 74
CONEXIONES 75
PANEL FRONTAL 76
INTRODUCCION 77
PLAYER 78
TEXTO 79
PLAYLIST 79
MIS CARPETAS 79
JUKE BOX 80
PIC & MOVIE 80
DJ 81
ARRANGER 82
MICROFONO/GUITAR 84
HD RECORDING 86
REGISTRACION 87
SONIDOS 88
USB: LLAVE DE ORDENADOR 89
Importante: Esta Guía de inicio rápido proporciona
información básica para poder trabajar con el MIDJPRO.
Documentación completa y ‘disponible en formato HTML
dentro de la herramienta (Menú MANUAL) y también en el
sitio www.ketron.it
INDICE
Page 76

/74
INSTRUCCIONES DE SEGURIDAD
INSTRUCCIONES RELATIVAS AL RIESGO DE INCENDIOS, DESCARGAS ELÉCTRICAS O LESIONES PERSONALES.
ADVERTENCIA: Para reducir el riesgo de incendio o descarga eléctrica, no exponga el instrumento a la lluvia o la humedad.
INSTRUCCIONES IMPORTANTES PARA LA SEGURIDAD Y LA INSTALACIÓN
ADVERTENCIA - Cuando use productos electrónicos, debe seguir algunas precauciones básicas, incluyendo las siguientes:
• Antes de utilizar el instrumento, lea detenidamente el manual.
• Cuando el instrumento es utilizado por los niños es necesario la presencia de un adulto.
• No utilice el instrumento en ambientes donde pueda estar sujeta a goteos o salpicaduras de agua, por ejemplo cerca de un lavabo,
piscina, etc o en una superficie mojada., Ni coloque recipientes con líquidos sobre el instrumento que puede penetrar su interior.
• El aparato sólo debe ser utilizado en un soporte recomendado por el fabricante.
• No la utilice durante largos períodos de tiempo a un volumen alto: el ruido excesivo es perjudicial para la salud.
• El aparato debe colocarse con el fin de permitir una ventilación adecuada.
• El aparato debe colocarse lejos de fuentes de calor tales como radiadores, estufas, etc
• El equipo debe estar conectado a la red eléctrica con el adaptador de red susministrado por el fabricante.
• Si el instrumento no se utiliza durante mucho tiempo, el cable de alimentación debe ser desconectado.
• En caso de necesidad, desconectar el interruptor de encendido del instrumento que se encuentra en la parte trasera. El aparato debe
estar colocado de manera que el interruptor de fácil acceso.
• El instrumento debe ser llevado a un centro de servicio si:
a. El cable de alimentación o el enchufe están dañados.
b. Si dentro han caído objetos, o líquido.
c. ha sido expuesto a la lluvia.
d. No parece funcionar normalmente o muestra un cambio notable en su rendimiento.
y. se ha caído y el chasis se ha dañado .
• No intente reparar el aparato usted mismo cualquier operación debe ser realizada por personal cualificado.
SIGA ESTAS INSTRUCCIONES
COMO SUPERAR LA INTERFERENCIA DE RADIO / TV
Este instrumento funciona en las frecuencias de radio y, si no se instala correctamente y en estricta conformidad con las instrucciones,
puede causar interferencias en la recepción de radio o televisión. A pesar de que el instrumento ha sido diseñado de acuerdo con
las normas y tienen las protecciones razonables contra estos inconvenientes, no hay garantía de que no se produzca este tipo de
interferencias. Para comprobar que la interferencia es causada por este instrumento, apáguelo y vea si el ruido desaparece.
A continuación, vuelva a encenderlo para ver si se produce la interferencia. Una vez que haya verificado que el dispositivo está causando
la interferencia, tomar una de las siguientes medidas:
• Oriente la antena de la radio o la televisión.
• Colocar el instrumento en diferente lugar a la radio o la televisión.
• Aleje el instrumento del receptor.
• Conecte el equipo a una toma de red diferente de forma que el equipo y el receptor estén en circuitos diferentes.
• Si es necesario, póngase en contacto con personal cualificado.
ENERGÍA
• Al conectar el instrumento a otros dispositivos (amplificadores, mezcladores, otros instrumentos MIDI, etc.), Asegúrese de que todos
los equipos están apagados.
• Lea las instrucciones acerca de la interferencia de radio y TV.
CUIDADO DEL INSTRUMENTO
• La superficie externa del instrumento se deben limpiar con un paño suave y seco. No utilice nunca gasolina, diluyentes o disolventes.
OTRAS PRECAUCIONES
Si desea utilizar el instrumento en un país extranjero, y si tiene alguna duda sobre la alimentación electrica, consulte a un ingeniero
calificado previamente. El instrumento no se debe golpear.
ADAPTADOR DE CORRIENTE
Para conectar el instrumentos a la toma de corriente electrica , utilice sólo el adaptador de corriente suministrado con el instrumento
Ketron. El uso de otros adaptadores podría ocasionar daños en la fuente de alimentación del instrumento. Por tanto, es de suma
importancia utilizar los adaptadores originales y pedir el original si tuviera necesidad de otro
INFORMACIÓN PARA LOS USUARIOS
“Aplicación de las Directivas 2002/95/CE, 2002/96/CE y 2003/108/CE sobre la reducción del uso de sustancias peligrosas en
equipos eléctricos y electrónicos, así como la eliminación de residuos.”
El símbolo del cubo de basura tachado indica que el producto al final de su vida útil debe ser recogido separadamente de otros
residuos. No tire el producto a la basura debe de llevarlo a los centros de recogida adecuados para los residuos eléctricos
y electrónicos, o devolverlo al distribuidor al comprar un nuevo tipo de aparato. La recogida selectiva de su antiguo equipo
para el reciclaje, contribuye a evitar los efectos negativos sobre el medio ambiente y la salud, favoreciendo el reciclaje
de los materiales que componen el producto. La eliminación inadecuada del producto por parte del usuario conlleva
la aplicación de sanciones administrativas.
Page 77

/75
CONEXIONES
DC 9V 4A Conector de alimentacion de la corriente eléctrica. Se recomienda utilizar sólo el adaptador
de corriente suministrado con el instrumento. Salida: 9 V, 4 A
ON/OFF Boton de Encendido apagado. La puesta en marcha puede tardar hasta 30 segundos.
Para apagar correctamente el instrumento, pulse el botón ON / OFF y esperar el cierre completo.
Esto puede tardar hasta 10 segundos...
VOLUME PEDAL Jack estéreo estándar para conectar un pedal de volumen (opcional)..
VIDEO DVI Conector de video (Digital Video Interface) para la conexión a un monitor de vídeo externo..
USB-SD CARD Conector de video (Digital Video Interface) para la conexión a un monitor de vídeo externo.
En el lado derecho del instrumento, hay una ranura para insertar la tarjeta SD y 3 USB Puertos Host
para conectar dispositivos USB externos como pen drive, discos duros HD. etc
FOOTSWITCH Presa multipolare standard per il collegamento di un pedale opzionale per il controllo di alcune
funzioni interne. Compatibile con Ketron FS6/FS13.
MIDI Conector MIDI para conectar MIDI IN, MIDI OUT y MIDI THRU..
MAIN OUT Salida de Jack Mono estándar para la conexión a un sistema de PA. STEREO: Left (Mono Izquierda),
Right (Derecha Mono). Le recomendamos encarecidamente que utilice la conexión estéreo para
la mejor reproduzcion de su instrumento y su EFX Efectos . La posible utilizacion Mono (es decir,
el uso de sólo la salida izquierda o derecha) dará una reproducion inferiores y no apreciara la alta
calidad de los sonidos y del EFX.
HEADPHONE AURICULARES Conector Jack estéreo estándar para conectar lo auriculares. El volumen total
es controlado por la sección Master.
MICRO 1 IN Conector combo de entrada valido para las dos conexiones jack (jack / XLR) norma única para
la conexión de un micrófono dinámico.
MICRO 1 GAIN Potenciómetro para ajustar la ganancia de la señal de entrada a la toma de micro 1.
MICRO 1 OUT Conector estándar jack mono para la salida Micro 1.
MICRO 2 IN Conector de entrada jack estándar mono para la conexión de un micrófono dinámico.
MICRO 2 GAIN Potenciómetro para ajustar la ganancia de la señal de entrada a la toma de micro 2.
GUITAR/MICRO Interrupor para cambiar a la sensibilidad de la ganancia de la señal de entrada en la toma de Micro 2.
Active el interruptor para el uso con guitarras, apague el interruptor para su uso con micrófonos.
LINE IN Conector Mini-jack para la entrada de línea de un dispositivo estereo (In 1) con señalde linea
(reproductor de CD, etc) ..
Page 78

/76
El panel frontal del instrumento está formado por una gran pantalla táctil a color que representa el corazón de la interfaz
del sistema. de usuario . A la mayoría de las funciones se puede acceder con un “toque del dedo” directamente en la
pantalla, en correspondencia de sus botones.
A la izquierda de la pantalla en la parte superior por lo tanto son los siguientes botones:
• GM PART: Gestión de los sonidos asignados a las pistas MIDI del archivo cargado.
• LEAD MUTE: Silencia la pista de melodía del archivo midi y si se está ejecutando es un archivo de audio, el botón
atenúa la línea vocal de la canción original.
• LYRIC OFF: Activar / desactivar la visualización de texto en el archivo.
• SEARCH: Menú para la búsqueda del archivo.
• X-FADE: Realiza cross-fade entre dos archivos de música.
Más abajo encontramos de izquierda a derecha, los siguientes los botones .
• PLAY 1 e 2: Teclas para seleccionar los dos Player. No se puede Acceder al Play 2 cuando el estilo esta activado.
• STYLE : Botón para entrar en el modo “Arranger “ para el acompañamiento automático. No puede acceder a el estilo
si el Player 2 esta activado.
• VOICE: Da acceso a la página de selección y edición de sonidos del instrumento de la mano derecha.
• DRUM SET: Activa la percusión manual que permite la selección y asignación del Drum Kit seleccionado. En este
entorno también se muestra en el mezclador de batería para cambiar el volumen y el efecto de sonidos de percusión.
• PAUSE: Botón para pausar el Player seleccionado o para efectuar la función de reinicio y cuentan con el estilo.
• MICRO1: Página de gestion del micrófono 1.
• MICRO2/GUITAR: Página para la gestión del segundo micrófono o entrada de guitarra conectado Micro2/Guitar.
• TALK: Elimina o reduce el efecto del micrófono 1, para pasar de cantar a hablar.
En la parte inferior del panel nos encontramos con el cursor volumen impreso en negro (cuando estamos en la función
Player) o en azul (cuando estamos en la función Style). A la derecha de la pantalla de arriba a abajo nos encontramos con
los siguientes botones:
• RECORD: Para entrar en las funciones de todo lo referido a las grabaciones, que le permite grabar todo lo que el instrumento
está reproduciendo , incluida lo que proviene de los instrumentos externos (micrófono, guitarra, etc.), en un archivo de audio.
• DSP: Para acceder a la página de la regulación de los efectos (ver DSP)
• PIC&MOVIE: Abre una pantalla para la gestión de archivos de gráficos y video
• DJ: Para seleccionar una forma alternativa de la reproducción de la canción.
• JUKE BOX: Para gestionar las canciones de una manera intuitiva, como en un “Juke Box”.
• REGISTR: Para la selección de registro, es decir, para seleccionar los ajustes de los instrumentos generales guardados por el usuario
• MASTER: Para ajustar el volumen general de MIDJPRO
PANEL FRONTAL
Page 79

/77
Por último, en la parte derecha se encuentran:
• DATA/VALUE El mando o rueda dial que permite la selección de archivos, parámetros y modificar los valores
seleccionados.
• ENTER: Para confirmar algunas operaciones o entrar en la carpeta seleccionada
• EXIT: Para cancelar una operación o salir de la pantalla actual muestra la pantalla anterior, también para salir
de una carpeta a el nivel superior del directorio de navegación.
• SAVE: Para guardar los cambios realizados en el instrumento.
Nota Los dos botones EXIT e SAVE pulsados simultáneamente hacen el RESET Midi global.
• MEDIA: Para mostrar los dispositivos de almacenamiento instalados en el instrumento o conectados a través
de los puertos USB.
• MENU: Para visualizar y acceder a todas las secciones operativas es una herramienta para la organización
del instrumento.
• TEMPO y TRANSPOSER: Para gestionar, respectivamente, la velocidad en rpm y la transposición de tonos,
en los estilos y en los archivos de música. Pulsándolos simultáneamente vamos a la pantalla principal del instrumento
denominada “Home”.
El mensaje de introducción (INTRO) aparece automanticamente de la pantallacada cada vez que inicie el equipo y
proporciona acceso a las funciones principales, tales como:
• PLAYER-GM: para utilizar el MIDJPRO para su uso como un reproductor MIDI.
• KEYBOARD: TECLADO , para controlar el MIDJPRO a trvaves de un teclado maestro y utilizar los ritmos y
acompañamientos automaticos.
• ACCORDION: para controlar MIDJPRO través de un acordeón MIDI, y utilizar los ritmos y acompañamientos automaticos.
Sin embargo, incluso estando en Player GM o en el modo Style usted puede ‘controlar el instrumento, ya sea con
un teclado maestro o con el acordeón modificando la implementación midi, pulsando el botón Menú del panel y
seleccionando las varias funciones MIDI de la pantalla.
• STANDARD: Permite controlar el instrumento con un controlador MIDI externo (vía MIDI In) para reproducir los estilos
y sonidos del Arranger.
• ACCORDION MANUAL: Para controlar El “Arranger” con un Acordeón MIDI.
• COMPUTER SEQUENCER: Para conectar el MIDJPRO a un ordenador como un modulo externo GM.
Volviendo a nuestra pantalla de introducción nos encontramos con más botones:
• DEMO: Este comando le permitirá escuchar algunas demostraciones cortas.
• GUITAR: Para la gestión de una guitarra o un segundo micrófono conectado a la toma MICRO 2 IN.
(La selección de las dos fuentes de entrada se lleva a cabo con el selector de físico).
• INFO: Para abrir el manual del usuario del instrumento.
• SKIP INTRO: Elimina la pantalla inicial de introducción.
INTRODUCCION
Page 80

/78
Seleccionando en la pantalla de introducción icono PLAYER-GM, la pantalla muestra el contenido de los medios de
comunicación seleccionado (SSD, tarjeta, USB, etc.).
Para navegar se puede utilizar:
• TOUCH SCREEN que nos permite seleccionar directamente los archivos y carpetas entrando con un doble clic.
• DIAL DATA/ VALUE para desplazarse a través de archivos, carpetas, o cambiar el valor de los parámetros.
• EXIT para salir de la carpeta y luego regresar a un nivel más alto (Back Root).
• ENTER para entrar en la carpeta seleccionada en vez de hacer doble clic en la pantalla táctil
El archivo apenas es tocado es seleccionado, y se carga en el Player 1.
Pulsar el botón START/STOP o ENTER para iniciar la reproducción. Cuando el archivo se está reproduciendo
la luz roja se enciende en el botón START/STOP. Para cargar el Player 2 sólo tiene que pulsar el botón PLAY 2 y repetir
el procedimiento.
Nota: Cuando la función de reproducción automática se activa desde el menú FUNCTION (abajo a la derecha),
La reproducción de las canciones de una carpeta pasa automáticamente del primero al último.
La pantalla de la sección PLAYER muestra la letra de la sección del reproductor (Letras o texto en su caso) en la pantalla
o en un monitor externo conectado al conector situado en el panel posterior VIDEO DVI La barra superior muestra el
nombre del archivo en reproducción, precedido por un número entre paréntesis que indica el Player seleccionado y el
tiempo (sólo para archivo MIDI), la velocidad (sólo para archivo MIDI) El valor de transposición fijado para ejecutar el
archivo, los volúmenes Batería, secciones, de Bajo, y Acordes Lead. El recuadro de la derecha le permite desplazarse,
hacia arriba y abajo, la lista de archivos y carpetas. Además, durante la ejecución esta presente el contador de compases
y el /tiempo transcurrido. Para obtener más información acerca del archivo seleccionar PLAYBAR. Si en el menú
PREFERENCE esta activada la función PFL To Player, en la barra lateral derecha verá la tecla virtual que activa el PFL
Que consiste en activar la pre-escucha en los auriculares del archivo.
PLAYER
Page 81

/79
TEXTO
Si el archivo contiene el texto, se muestra en el centro de la pantalla y también cuando se conecta a un monitor externo,
sin embargo, puede continuar viendo la lista de archivos pulsando el botón LYRIC OFF situado en el panel frontal hacia
la izquierda. Al pulsar nuevamente volverá el texto a ser visualizado. Con los archivos que contienen texto es posible pasar
a la modalidad Schermo interno. Tocando en el centro de la pantalla en la que fluye el texto. Al tocar una segunda vez
se vuelve a la pantalla normal. Cuando el archivo no contiene el texto, es posible asociar un archivo de texto por separado
con extensión. TXT que debe de tener el mismo nombre que el archivo de música y debe de estar en la misma carpeta
(Ejemplo Newyork.mid y el texto Newyork.txt). En la página FUNCTION debe desactivarse SKIP FILE LINK.
Es también posible en el modo de espejo Mirror (Menú del vídeo), visualizar la misma pantalla del instrumento en la
pantalla del monitor externo.
PLAYLIST
Puede crear un Play list seleccionando Empty y confirmando con YES en la ventana de dialogo.
Con EDIT se accede a la creación / gestión de listas de reproducción. La pantalla mostrará el directorio actual desde
donde, usando la pantalla táctil y los botones ENTER y EXIT, puede abrir la carpeta y encontrar los archivos que desea
agregar a la lista de reproducción. Busque el archivo deseado, pulse el INSERT ITEM para agregar a la nueva lista de
reproducción.
Desde la barra inferior, se accede al PLAYLIST, con la que es posible programar su repertorio y sus propias listas de
reproducción.
Las carpetas MY FOLDER son en realidad accesos directos a tus carpetas favoritas. Si una carpeta se ha guardado como
Mi Carpeta aparecerá en la lista de carpetas favoritas, como se muestra en la pantalla. Con EDIT se accede a la creación
y gestión de la carpeta.
MIS CARPETAS
Page 82

/80
En este menú puede seleccionar las imágenes que desea usar como fondo para sus archivos de karaoke o similares y que
sean capaces de gestionar sus películas residentes en el MIDJPRO.
La función JUKE BOX es un modo alternativo para visualizar y ejecutar los archivos contenidos en un Playlist o en My
folder.
Entre las diversas formas de utilizar el reproductor esta será probablemente la más rápida y fácil.
Mediante el Dial, puede desplazarse por la página para ver los archivos en sucesión. La pantalla también ofrece la
capacidad de controlar la tecla SFX con algunos efectos de sonido que pueden ser activadas durante la reproducción.
JUKE BOX
PIC & MOVIE
Page 83

/81
Con el botón de DJ se accede a una forma alternativa de tocar las canciones. Aquí los 2 Player se representan como 2
platos. El que esta seleccionado se resalta en color rojo. El directorio de seleccionar de archivos y carpetas aparece en el
centro. Para cada Player hay un par de indicadores de nivel y botones que vamos a describir:
- CUE: Es un marcador que, se establece en un punto de la canción, si pulsamos de nuevo se reinicia la canción desde
ese punto. Funciona en archivos Wave y archivos midi, pero no funciona en archivos mp3.- PFL: Preescucha en los
auriculares. El PFL se selecciona de forma automática, poniendo el control deslizante a 0.
- []>: Pausa
En la parte inferior encontramos una serie de funciones que actúan sobre el Player seleccionado:
- BACK SPIN: Finaliza la reproducción aumentando la velocidad y la tonalidad.
- SYNC: Sincronización de los dos Player . Si suena un MidiFile en el plato A y está preparando otro Midi en el plato B,
pulsando SYNC el archivo MIDI comienza de acuerdo con “en el golpe de entrada”. En caso de que también se añade al
tiempo de bloqueo, el segundo Player mantiene la velocidad BPM del primero .Cuando el segundo archivo es un archivo
de audio, se iniciará a principios de la próxima medida el archivo Midi. Sin embargo, si el primero es un archivo de audio,
la herramienta no puede detectar el pulso de la medida por lo tanto, se activará la ventana de TAP (ver más abajo) con un
parche virtual para iniciar la segunda pista después de 4 disparos a la plataforma virtual. De esta forma si los 4 tiempos
son golpeados a tiempo con el primer archivo, el segundo archivo se sincroniza con el primero.
- TAP: Abre una plataforma central para sincronizar de forma manual pulsando con el dedo. –
- FX PAD: Sólo funciona con archivos de audio y se abre una pequeña ventana con los siguientes efectos:
Pitch, la frecuencia de corte (Cutoff) y la resonancia del filtro, y, finalmente, la velocidad de reproducción (tempo).
Estos efectos se pueden ajustar con el control deslizante correspondiente en el panel del instrumento.
- RESET: Restablece el archivo de la configuración de fábrica, restablece los cambios realizados en esta página.
- BRAKE: Terminar la reproducción, disminuyendo la velocidad y el tono como si le faltase potencia a el tocadiscos.
DJ
Page 84

/82
MIDJPRO no solamente es un potente reproductor de archivos Midi – Audio – y video, es ademas un excelente modulo
de sonido con acompañamientos automaticos un Arranger, que tiene una sección entera dedicada al acompañamiento
cada ritmo o Styles.tiene a su disposición :
• 2 pistas de batería y percusión en el canal MIDI 9 y 10.
• 1 pista de bajo en en canal 5
• 5 pistas de acompompañamiento CH1, CH2, CH3, CH4 CH5 en canales 6,7,8,11,12.
• 2 pistas de colchon Lower 1 e Lower 2 asignada aa la mano izquierda canales 3 e 4.
• La pista LEAD para la mano derecha en el Split del teclado
Es también posible visualizar un archivo de texto durante la ejecución de un estilo. Si desea adjuntar un archivo de texto
a un ritmo, se sale de “Style”, se carga el texto, se vuelve a la modalidad “estilo” y guarde el registro .en Registration.
Cada estilo se compone de varios elementos:: 3 Intro; Introducciones 3 Ending; Finales 4 Variaciones (A, B, C, D); 4
Fill; 4 Break.
Otra posibilidad de modificacion del estilo es el hecho de que las ultimas 3 pistas de acompañamiento automaticos es
decir, CH3, CH4 y CH5 se pueden poner o quitar “sobre la marcha” mediante las teclas VARIATION.
La pantalla muestra en la columna derecha las principales categorías de estilos (Balada, Pop, Dance, etc....).
Ala derecha se muestran los estilos en la categoría seleccionada. Mas abajo en la parte inferior se muestran las teclas que
activan funciones específicas:
- KEY START: Con Con este comando activado se inicia la ejecución del acompañamiento automático en cuanto
se ejecuta un acorde en el teclado inferior conectado al MIDI IN del instrumento, sin la necesidad de presionar el botón
START / STOP en el panel .
- KEY STOP: Para el acompañamiento cuando se levanta la mano de la parte izquierda del teclado...
- REINTRO: Cuando esta activado y se esta reproducciendo un el estilo, al pulsar el Intro / Ending, en lugar de ejecutar
el Ending ejecuta de nuevo el Intro. Si el botón reintroducion está activo y estamos en stop parado , al pulsar uno de los
Intro / Ending en lugar de ejecutar el ‘Intro pasa directamente al’ final. Ending.
- SPLIT: Al seleccionar este comando (el pequeño botón se pone amarillo) y al pulsar una nota en el teclado MIDI
conectado, esta determinara el punto de division del teclado el inferior (izquierda) apara acompañamientos y el superior
(derecha) para voz solista.
-HOLD ON: Mantiene acompañamiento en memoria activado incluso cuando levantamos la mano izquierda ,hasta
queponemos el siguiente acorde..
En la parte inferior se encuentran los principales controles de Estilo::
- INTRO/ENDING: 1 - 2 - 3
- ARRANGE: A-B-C-D
Al pulsar el botón STYLE desde el panel frontal se accede a la pantalla principal de la Arreglista.
ARRANGER
Page 85

/83
- DRUM: Permite establecer los parámetros para la sección Drum.
- DRUM MIXER: Abre un mezclador dedicado a la batería donde se puede activar o desactivar los instrumentos
de percusión individuales de la batería y ajuste del volumen y rever para cada uno de ellos.
- BASS: Abre la pista para el ajuste de del bajo.
- 4 VOICE SET: Permite cambiar las 4 voces de la sección superior.
- CHORD: Abre la pagina que permite la regulación de los acordes del acompañamiento automático.
- PIANIST & BASSIST: Da acceso a la página donde se configuran las modalidades de control de la Arranger utilizando
el teclado.
- LOWER: Abre la pagina de ajuate de la mano izquierda del teclado, a la izquierda del punto de Split.
- VIEW: Permite ver y editar las partes del estilo.
Todos los cambios realizados en el estilo original de fábrica se pueden guardar en User Style ritmos de usuario usando
el mismo nombre o con nombre nuevo. El nuevo estilo de usuario se coloca en la misma familia que en fábrica pero
en la de usuario. En cualquier caso, los Estilos de fábrica originales no pueden ser reemplazados ni modificados.
- FILL: Redoble se realiza de manera.
- BREAK: Corte un Break diferente dependiendo de la variación donde estemos...
Por otra parte, estos comandos se pueden controlar con los botones,que se encuentran de izquierda y derecha de la
pantalla con la serigrafía en azul, siempre y cuando la función ARRANGE TO TABS (en el menú Preferencias) estáe
activada. Y es ‘posible tambien controlar los principales comandos del estilo a través de l pedalera FS6/FS13 (opcional).
El panel frontal del instrumento están siempre activos lo cursores para ajustar el volumen de la batería DRUM, del Bajo
BASS, de la seccion de acompañamiento CHORD de la seccion LOWER y LEAD del teclado que es la división izquierda
y derecha respectivamente.
Pulsando EXIT volverá a la pantalla que muestra las funciones para ajustar el Arranger..
- EDIT: Le permite hacer cambios sustanciales en la configuración de la Arreglista presentando una serie de funciones
en la parte derecha de la pantalla, que sustituyen a los presentes con el botón Edit desactivado.
Page 86

/84
El botón MICRO 1 situado en el panel frontal, abre una pantalla para gestionar el micrófono conectado en MICRO 1
en el panel trasero.
La página está dividida en dos secciones: MICRO, para la regulación de los efectos, normalmente utilizados para la voz.
VOICETRON para ajustar el procesador de voz que crea armonías y efectos especiales.
Tanto la DSP se puede activar o desactivar el uso de las teclas virtuales MICRO ON/OFF y VOCAL ON/OFF.
A partir de la sección MICRO Encontramos en la parte superior el botón virtual del volumen, que permite el ajuste del
nivel del micrófono que se añade a la ganancia de entrada ajustable por medio del potenciómetro físico situado en el
panel posterior cerca de la entrada MIicro1. Un control más del volumen del micrófono 1, diseñado para ajustar durante la
ejecución musical en directo es el cursor. MICRO1/ VOICETRON.
Más abajo hay un cuadro que muestra PRESET MICROFONICO que aparece por defecto “Normal”. “Standard”.
Simplemente toque en el cuadro para que aparezca una ventana emergente con el resto de presets y elija el que desee en
la pantalla táctil.
Al lado del recuadro hay un botón virtual REV, que le permite ajustar el nivel de reverberación con el mismo Dial .En la
parte inferior de este mando virtuales hay otro, que sirve para ajustar la cantidad de efecto ECHO de la misma manera que
el modo de la anterior. Tocando EDIT se accede a la página de edición del micrófono predeterminado.
El preset del micrófono, se muestra en el panel superior, se compone de una serie de efectos que pueden estar activados
o desactivados, mediante el recuadro ON / OFF colocado por encima de la imagen que corresponde. Debajo de cada
efecto se encuentra el cuadro que muestra el nombre del preset utilizado por cada efecto individual. Solamente con
tocar en el cuadro aparece una ventana emergente con los presets que se pueden seleccionar en la pantalla táctil. El
ecualizador tiene un nivel de edición más: VIEW, que se abre en una pantalla especial para ajustar las 4 bandas baja,
media-baja, media, agudos, con la posibilidad de escoger para cada uno de ellos la frecuencia y la ganancia. El efecto
último de la lista es el que se utiliza para la función Talk, “Hablar” que se activa con la tecla correspondiente en el panel
frontal. Desde la pantalla principal EDIT MICRO, se si pulsa SAVE en el panel guardara todas las configuraciones para el
micrófono en un preset de usuario.
MICROFONO/GUITAR
Page 87

/85
La entrada MICRO2/GUITAR se puede utilizar para la conexión de un segundo micrófono o de una guitarra.
La página que se presenta esta dividida en 2 partes: la primera es MICRO2 y esta dedica a la configuración del micrófono,
la segunda es GUITAR y esta dedicada a la configuración de efectos de guitarra. Como se trata de la misma entrada de
audio, no se pueden activar dos modos a la vez por lo que si pone en ON la modalidad MICRO2, automáticamente se
pone en OFF la modalidad guitarra GUITAR y viceversa.
En la modalidad GUITAR también nos encontramos aquí las ruedas virtuales seleccionables con la pantalla táctil y
modificables a través del Dial, que actúan en el volumen de, reverberación y coro, y, además, hay una serie de 16
Configuración de los efectos específicos de la guitarra.
Pulsando EXIT salimos del menú desplegable y volvemos a la pantalla anterior. Cada configuración elegida trae consigo
un efecto de inserción que aparecerá en el cuadro INSERT EFX1. Es posible cambiar el efecto de inserción configurado
pulsando en el cuadro dedicado y seleccionar un tipo de efecto de la lista desplegable.
Cada configuración de guitarra se puede editar pulsando EDIT. Al final de los cambios el efecto se puede guardar en una
configuración pulsando SAVE en el panel. La pantalla le dará la oportunidad de elegir si desea guardar los cambios de
configuración en un micrófono o de efectos de guitarra. Una vez que haya hecho su elección, verá la pantalla habitual para
guardar la configuración en la misma pulsando SAVE o puede con otro nombre poniéndolo con el teclado alfanumérico
que aparece en la pantalla cuando se elige SAVE AS.
La segunda parte de la pantalla está dedicada al procesador de voz que se encarga de armonizar la voz en el
VOICETRON. Aquí nos encontramos con un botón en la esquina superior derecha VOCAL ON/ OFF para encender
o apagar el Voicetron, potenciómetros virtuales para ajustar el volumen y la reverberación mediante la selección de la
pantalla y con el uso del Dial. Más abajo se encuentra una casilla que indica el valor preestablecido actual. Al tocar en él
se abre un menú desplegable que permite la elección de un Voicetron preset usando la pantalla táctil. Tocar el cuadro de
abajo a la derecha marcada por la página EDIT se accede a cambiar el Voicetron preestablecido.
Page 88

/86
MIDJPRO es capaz de grabar como archivos de audio. WAV, todo lo que se ejecuta con el instrumento y todo lo que se
conecta en las entradas de audio analógico MIC1, MIC2/GUITAR.
La grabación incluirá además del reproductor midi / audio o acompañamiento automático, incluso todo lo que se este
tocando en tiempo real en un teclado conectado mediante el generador de sonido interno, la voz y la guitarra o la segunda
voz de entrada en el instrumento. El archivo de audio se puede reproducir en el Player y se puede tocar encima a lo largo
de doblaje para presentar un material sonoro adicional. Pulsar RECORD para iniciar la grabación. A la izquierda, la pantalla
muestra el botó REC LEVEL para ajustar el nivel de grabación es suficiente con tocar y girar el dial para variar el nivel.
Cuando haya terminado de grabar, pulse STOP y salvar el archivo
Una vez guardado, la pantalla mostrará debajo de la imagen de la grabadora, el nombre del archivo.
En la parte inferior encontramos el botón EDIT para acceder a la página AUDIO EDIT para la edición de nivel de archivo:
volumen, punto de inicio, de fin, etc. Después los calisicos botones de transporte .
- <<: Para desplazarse hacia atrás.
- STOP: PARADA : Para detener la reproducción..
- >>: Para desplazarse hacia adelante
- RECORD: Para iniciar una grabación posterior...
- PLAY: Para iniciar la reproducción del archivo.
HARD DISK RECORDING
Page 89

/87
REGISTRACION
Con el termino REGISTRATION se entiende la posiblidad de guardar la configuración de varios parámetros
del instrumento. Prácticamente todos los ajustes generales del instrumento, los relativos a los estilos a los sonidos,
los ajustes de las 2 entradas de micrófono y ajustes de efectos MIDI, se pueden guardar en un Registration.
De esta manera el usuario puede preparar en casa y guardar configuraciones muy detalladas y dirigidas a las necesidades
musicales específicas en función del tipo de espectáculo, de esta manera, durante el show en vivo los llama rápido
sin perder tiempo. El instrumento dispone de 4 bancos en cada uno de los cuales el usuario puede guardar hasta
1024 registros. Para cargar una registracion sólo tiene que pulsar el botón REGISTR Situado en el panel frontal
del instrumento. Desde la siguiente pantalla que aparecerá en la pantalla sólo tiene que seleccionar uno de los 4 bancos
disponibles y la opción de registro utilizando la pantalla táctil. O también se puede seleccionar el teclado numérico
e introduzca el número de la registraccion a cargar.
Cuando se guarda una registración, como se mencionó anteriormente se guarda toda la configuración del panel,
sin exclusión. Sin embargo, cuando se invoca un registro, es posible filtrar algunos parámetros, es decir, usted puede
asegurarse de que al llamar a un registro no se anula parte de la configuración de la panel que deseamos mantener
activos. Este bloque es solo cargado, pero no se guarda. Para establecer este filtro en el panel hay que pulsar el botón
MENU y seleccione en la pantalla la función REGISTRATION SETUP.
Page 90

/88
Pulsando el boton VOICE se accede, a la selección que permite la gestión de los sonidos del instrumento.
En la pantalla principal, a la derecha muestra las 12 categorías instrumentales en el centro de las 8 ilustraciones con 8
tipos de instrumentos de la categoría seleccionada. Cada categoría consta de varias páginas, y se puede acceder a ellas
mediante el Dial..
Una vez que haya seleccionado la familia y el sonido se puede acceder a una ventana de edición, EDIT en la pantalla.
Al hacer clic en boton virtual SPLIT será posible definir, mediante el teclado conectado a la entrada MIDI, el punto
de división que divide la parte Izquierda de acompañamiento de la sección superior derecha voz solista .
El valor de ajuste se muestra en el botón virtual.
El instrumento es capaz de juntar hasta 4 sonidos a través de todo el rango del teclado o en la parte superior derecha
del punto de división. La cuarta capa es nombrado 2nd Voice segunda voz y se puede activar o desactivar
“en el momento” directamente desde esta pantalla principal del modo de voz, mediante la tecla virtual. 2ND .
SONIDOS
Page 91

/89
USB: LLAVE DE ORDENADOR
A través de las 3 ranuras USB disponibles en el lado derecho del instrumento, el MIDJPRO es capaz de ejecutar o
administrar los archivos presentes en el Pen Drive
Pulsando el boton MEDIA abre una pantalla que muestra los dispositivos instalados en el equipo o conectados a traves de
los puertos USB
- EJECT: Elimina el dispositivo seleccionado excepto la memoria SSD en el interior del instrumento (User FS). Se trata
de la misma función para quitar hardware con seguridad que encontramos en el ordenador para proteger los dispositivos
conectados de los daños que podrían producirse si se eliminan durante la escritura de archivos. Una vez que se ha
realizado los cambios en el dispositivo (guardar una copia de archivos Midi, etc.)Antes de extraerle pulsar la tecla de
expulsión, para asegurarse de que todos los cambios no están aun en el proceso de la escritura, y en realidad están
terminados.
- PC-CONNECT: Esta característica permite a un ordenador conectado a través del cable USB al dispositivo USB
MIDJPRO, detectar todos los dispositivos de almacenamiento MIDJPRO tanto los instalados internamente como aquellos
conectados a los puertos USB Host. En el equipo, una vez establecida la conexión, usted será capaz de leer el contenido
del SSD d el interior del instrumento, el disco duro interno opcional, que se puede instalar en MIDJPRO y todos los
dispositivos conectados al equipo a través de los puertos USB Host, tales como Pen Drive etc. Pulsando nuevamente la
funcion PC CONNECT Desactiva la conexión. Utilize el mensaje de quitar hardware con seguridad desde su ordenador
para evitar daños..
- DISK EDIT: Activa, en la barra inferior, una serie de funciones que actúan sobre los archivos seleccionados...
- INFO: Muestra la información principal acerca de la unidad seleccionada..
- REFRESH: ACTUALIZACIÓN : Efectua de nuevo el escaneo de todas las unidades y dispositivos USB conectados. Si
se va a verificar que la maquina no detecta automáticamente un pen drive USB conectados, esta función iniciara de nuevo
la detección de dispositivos y dispositivos relacionados...
Page 92

/90
Page 93

/91
INSTRUÇÕES PARA A SEGURANÇA 92
LIGAÇÕES 93
PAINEL FRONTAL 94
INTRODUÇÃO 95
PLAYER 96
TEXTOS 97
PLAYLIST 97
MY FOLDER 97
JUKE BOX 98
PIC & MOVIE 98
DJ 99
ARRANGER 100
MICROFONE/GUITAR 102
HD RECORDING 104
REGISTRATION 105
SONS 106
USB: MEMÓRIAS FLASH E COMPUTADOR 107
Importante: Esta Guia Rápida dá algumas informações
fundamentais para se poder trabalhar com o MIDJPRO.
A documentação completa está disponível no formato
HTML no interior do instrumento (Menu MANUAL)
e também no site www.ketron.it
ÍNDICE
Page 94

/92
RISCO OU INCÊNDIO, CHOQUE ELÉCTRICO OU DANOS A PESSOAS.
ATENÇÃO: para minimizar o risco de incêndio ou choque eléctrico, não expor o instrumento á chuva ou humidade.
IMPORTANTES INSTRUÇÕES PARA UMA INSTALAÇÃO SEGURA
ATENÇÃO -Quando usar um produto eléctrico é importante adoptar um número de precauções, tais como:
“ Ler o Manual de Instruções antes de usar o instrumento.
“ Um adulto deverá ser monitorizar uma criança quando ela está a usar o instrumento.
“ Não usar o instrumento em zonas de infiltrações ou próximo de água, como poços, piscinas, em superfícies húmidas etc; não colocar
recipientes com líquidos no instrumento, para prevenir infiltrações de líquido no instrumento.
“ O instrumento deverá ser usado somente num tripé recomendado pelo fabricante.
“ Não usar o instrumento num volume muito alto e por períodos longos de tempo. Níveis de ruído muito altos são perigosos para a
saúde.
“ Coloque o instrumento numa posição que assegure a sua ventilação.
“ Mantenha o instrumento afastado de fontes de calor, como aquecimentos, radiadores, fogões, fogareiros etc.
“ Ligar o instrumento somente com o adaptador certo. No fundo do instrumento pode encontrar a identificação e a voltagem correcta.
“ Desligar o cabo de alimentação, se o instrumento não for ser usado por longos períodos de tempo.
“ Se necessário, desligar o instrumento usando o botão de ligação que se encontra na parte de trás do painel. Sempre que posicionar o
instrumento certifique-se que esse botão é fácil de chegar.
“ Leve o instrumento a um centro de serviço, se:
a. o cabo de ligação ou ficha estiverem estragados.
b. objectos ou líquidos caírem no instrumento.
c. o instrumento esteve exposto á chuva.
d. o instrumento não está a trabalhar bem ou a sua performance é débil.
e. o instrumento caiu ou o chasis está danificado.
“ Nunca tentar reparar o instrumento por si; as reparações devem ser feitas por um técnico qualificado.
MANTENHA O MANUAL DE INSTRUÇÕES NUM LOCAL SEGURO
PREVENIR RADIO/TV INTERFERÊNCIAS
Este instrumento opera numa banda de frequência de rádio. Se não for instalado correctamente e em estrita concordância com
a instruções fornecidas pode perturbar a recepção do radio - televisão. Contudo o instrumento que adquiriu, foi projectado em
concordância com as normas legais de forma a fornecer uma razoável protecção contra este tipo de distúrbios, tal não é garantido
que não poderão ocorrer. Para verificar se a perturbação é de facto produzida pelo seu instrumento, desligue-o para confirmar se
tal situação desaparece. Ligue novamente o instrumento e verifique se a perturbação reapareceu. Mal tenha a certeza que é o seu
instrumento que provoca a perturbação, deve tomar as seguintes medidas:
“ Ajustar a antena de receptora de radio ou tv.
“ Coloque o instrumento numa posição diferente receptor de radio ou tv.
“ Coloque o instrumento afastado dos receptores.
“ Ligue a ficha do instrumento a outra entrada , de forma ao instrumento e ao receptor ficarem ligados em dois diferentes circuitos.
“ Se necessário ligue a um serviço técnico.
POWER SUPPLY
“ Quando ligar o instrumento a outras aplicações (amplificador, mixer, Midi instrumentos etc.), tenha a certeza que todas as ligações
estão off.
“ Leia as recomendações relativamente aos distúrbios Radio ou Tv.
CUIDADOS A TER COM O INSTRUMENTO
“ Limpe as superfícies do instrumento com um pano macio e seco. Nunca usar gasolina, diluente ou solventes de qualquer espécie.
OUTROS CUIDADOS
Se desejar usar o seu instrumento num país estrangeiro e tiver dúvidas acerca da voltagem, consulte um técnico qualificado antes de
partir. O instrumento nunca deverá ser sujeito a fortes choques.
ADAPTADOR DE CORRENTE
Quando ligar este instrumento, use somente o adaptador fornecido com o aparelho pela KETRON. O uso de um diferente adaptador de
corrente pode danificar os circuitos de ligação do instrumento. É de extrema importância usar somente um adaptador original, solicite o
modelo correcto quando encomendar um novo adaptador.
INFORMAÇÕES PARA OS UTILIZADORES
- Implementação da Directiva 2002/95/CE, 2002/96/CE e 2003/108/CE na redução do uso de substâncias perigosas em
instrumentos eléctricos e electrónicos-.
O simbolo bin cruzado mostrado no aparelho indica que no fim da sua vida o instrumento deverá ser eliminado separado dos outros
resíduos. No final da sua vida útil o instrumento deverá ser levado para um centro de recolha diferenciado para produtos eléctricos
e electrónicos, ou devolver o mesmo ao revendedor na compra de um novo instrumento similar ou o que for aplicável.
A eliminação do instrumento deverá ser a correcta de forma a ser reciclada evitando danos para o meio ambiente
e possibilitando a reciclagem dos componentes. Alienação não autorizada dos utilizadores implica a aplicação de sanções
administrativas.
INSTRUÇÕES PARA A SEGURANÇA
Page 95

/93
LIGAÇÕES
DC 9V 4A Alimentação Elétrica. Por favor usar só o adaptador fornecido com o instrumento. Output: 9 V, 4 A.
ON/OFF ON/OFF Tecla. Este instrumento pode demorar até 30 segundos a iniciar. Para desligar o instrumento
pressione a tecla ON/OFF e aguarde até o instrumento se desligar. Pode demorar até 10 segundos.
VOLUME PEDAL Cabo Jack Stereo standard para ligar ao pedal de volume (opcional).
VIDEO DVI Digital video interface para ligação a um monitor exterior.
USB-SD CARD É usado para ligar a um computador através porta USB ou outras portas para gerir o MIDJPRO como
uma unidade externa. Do lado direito do instrumento encontra a ranhura para SD Card e 3 USB
Hosts para ligações externas USB a dispositivos como Pen drives, HD etc.
FOOTSWITCH Standard multi-pin plug para ligação opcional de um pedal para controlar um número de funções
internas. Compatível com a Ketron FS6/FS13.
MIDI Plugs for MIDI IN, MIDI OUT and MIDI THRU ligações.
MAIN OUT Standard mono jack for the main output to connect to a PA STEREO sistema: esquerda (Left Mono),
direita (Right Mono). Recomendamos fortemente para usar a ligação stereo para uma melhor
performance do instrumento e dos EFXs. A Mono connection (namely use of only the Left or Right
output) will give poorer reproduction with respect to quality of the sounds and EFXs of the instrument.
HEADPHONE Standard stereo jack para ligação aos headphone. O volume dos headphone são controlados pela
Master section.
MICRO 1 IN Standard mono combo plug (Jack/Xlr) para ligação a um microfone dinâmico.
MICRO 1 GAIN Potenciometro de ajuste no ganhoa do sinal de entrada Micro 1.
MICRO 1 OUT Standard mono jack exclusivo para saída do Micro 1.
MICRO 2 IN Standard mono jack para ligação de um microfone dinâmico.
MICRO 2 GAIN Potenciometro de ajuste no ganho do sinal de entrada Micro 2.
GUITAR/MICRO Potenciometro de ajuste no ganho do sinal de entrada no Micro 2 . Ligar este switch quando usar
o instrumento com uma guitarra, desligar este switch quando usar o instrumento com um microfone
LINE IN Mini-jack para linha dispositivo stereo com linha de sinal (CD Player, etc.).
Page 96

/94
O painel frontal do instrumento é dominado por um amplo display Touch Screen a cores que representa o núcleo do
sistema interface utilizador. A maior parte das funções é acessível com “um toque do dedo” diretamente no ecrã, sobre os
relativos botões.
À esquerda do display a partir do topo encontram-se os seguintes botões:
• GM PART: Gestão dos sons atribuídos às pistas MIDI do ficheiro carregado.
• LEAD MUTE: Mute para a pista melódica do midifile ou, se estiver em execução um ficheiro audio, a tecla atenua a linha
vocal do trecho original.
• LYRIC OFF: Ativação/desativação para a visualização do texto do file.
• SEARCH: Menu para pesquisa dos ficheiros.
• X-FADE: Realiza cross-fade entre dois ficheiros musicais.
Mais abaixo encontramos da esquerda para a direita, uma série de botões.
• PLAY 1 e 2: Teclas para a seleção dos dois Players. Não é possível aceder ao Player 2 quando o style está inserido.
• STYLE: É a tecla para aceder ao modo “Arranger” para os acompanhamentos automáticos. Não é possível aceder
ao style se estiver inserido o Player 2.
• VOICE: Permite aceder à página para a selecionar e modificar os sons do instrumento destinados à mão direita.
• DRUM SET: Ativa a função Manual Drum que permite efetuar a seleção e o mapeamento dos Drum Kits. Em ambiente
Player também é mostrado o Drum Mixer para a modificação dos volumes e do efeito dos sons de percussão.
• PAUSE: Tecla para colocar em pausa o Player selecionado ou para efetuar a função Restart e Count In em ambiente Style.
• MICRO1: Página de gestão do microfone 1.
• MICRO2/GUITAR: Página de gestão do segundo microfone ou da guitarra ligados à entrada Micro2/Guitar.
• TALK: Elimina ou reduz o efeito do microfone 1, para mudar do cantado para o falado.
Na parte inferior encontram-se os cursores volume para as relativas seções serigrafadas em negro para o Player ou em
azul para o Style.
À direita do display de cima para baixo encontram-se os seguintes botões:
• RECORD: Acesso à função Recording, isto é, à gravação de tudo aquilo que o instrumento está a tocar, incluindo o que
entra nas entradas externas (microfone, guitarra, etc).
• DSP: Página de controlo dos efeitos (ver DSP)
• PIC&MOVIE: Ambiente para a gestão dos ficheiros gráficos e vídeo.
• DJ: Modo alternativo para a reprodução de songs com duplo Player e várias funções.
• JUKE BOX: Menu para a gestão facilitada das songs no modo “Juke Box”.
• REGISTR: Seleção das Registrations, ou seja das definições gerais do instrumento guardadas pelo utilizador.
• MASTER: Cursor para a regulação do volume geral do MIDJPRO
PAINEL FRONTAL
Page 97

/95
Enfim, na parte mais à direita encontramos:
• DATA/VALUE também chamada Dial. Permite selecionar ficheiros, parâmetros e modificar os valores selecionados.
• ENTER: Para confirmar algumas operações ou entrar nas pastas selecionadas
• EXIT: Para abandonar uma operação ou sair do ecrã atual visualizando o anterior, ou mesmo para sair de uma pasta
passando ao nível superior do directory de navegação
• SAVE: Para guardar todas as modificações efetuadas pelo instrumento.
Nota: As duas teclas EXIT e SAVE pressionadas ao mesmo tempo provocam o RESET Midi global.
• MEDIA: Para visualizar os dispositivos de memorização instalados no instrumento ou ligados por meio das portas USB
• MENU: Para visualizar e aceder aos vários Menu operacionais do instrumento.
• TEMPO e TRANSPOSER: Estas teclas controlam, respectivamente, a velocidade em bpm e a transposição de
tonalidades dos ficheiros musicais e dos estilos. Pressionadas simultaneamente, chamam o ecrã principal do instrumento
denominado “Home”.
O ecrã de Introdução (INTRO) apresenta-se, automaticamente, a cada partida do instrumento e permite o aceso às
funções principais, tais como:
• PLAYER-GM: Para utilizar o MIDJPRO como um leitor de ficheiros AUDIO e MIDI.
• KEYBOARD: Para pilotar o MIDJPRO através de um Master Keyboard (Teclado) MIDI.
• ACCORDION: Para pilotar o MIDJPRO através de um Acordeão MIDI.
Seja como for, mesmo entrando por exemplo no modo Player GM, poder-se-á pilotar sucessivamente o MIDJPRO com um
Master Keyboard ou um acordeão, modificando as definições midi, pressionando a tecla Menu do painel e selecionando as
várias funções MIDI do display.
• STANDARD: Permite controlar o instrumento com um MIDI controller externo (através da tomada MIDI In) para tocar
os Styles e as Voices do Arranger.
• ACCORDION MANUAL: Para controlar o Arranger com um Acordeão MIDI.
• COMPUTER SEQUENCER: Para ligar o MIDJPRO a um computador como um módulo externo GM.
Voltando ao nosso ecrã de introdução encontramos mais botões:
• DEMO: Este comando permitir-lhe-á escutar algumas breves demonstrações.
• GUITAR: Para a gestão de uma guitarra ou de um segundo microfone, ligados à tomada MICRO 2 IN. (A seleção das
duas fontes de entrada efetua-se com o seletor específico).
• MANUAL: Para abrir o manual de utilização do instrumento.
• SKIP INTRO: Elimina o ecrã intro inicial.
INTRODUÇÃO
Page 98

/96
Selecionando o ícone PLAYER-GM a partir do ecrã intro, o display visualiza o conteúdo do media selecionado (SSD, Card,
USB, etc.).
Para navegar pode-se utilizar:
• TOUCH SCREEN que permite selecionar diretamente o ficheiro e entrar nas pastas com um duplo clique.
• DIAL DATA/ VALUE para navegar em ficheiros, pastas ou modificar o valor dos parâmetros
• EXIT para sair das pastas e assim voltar para um nível superior (Back Root).
• ENTER para entrar na pasta selecionada em vez do duplo clique do Touch Screen
O ficheiro, assim que for tocado é selecionado, destacado e carregado no Player 1.
Pressione a tecla START/STOP ou ENTER para iniciar a gravação. Quando o ficheiro está em play acende-se a luz
vermelha do botão START /STOP. Para carregar o Player 2 é suficiente pressionar o botão PLAY 2 e repetir o processo.
Nota: quando se ativa a função Auto Play a partir do menu FUNCTION (em baixo à direita), a reprodução das
canções contidas numa pasta procede automaticamente da primeira à última.
O ecrã da seção PLAYER mostra os textos (Lyrics ou txt se presentes) no display ou num monitor externo ligado à tomada
específica VIDEO DVI que se encontra no painel traseiro. A barra superior mostra: o nome do ficheiro em execução,
antecedido por um número entre parenteses quadrados que indica o Player selecionado, o tempo metronómico (apenas
para os midifile), a velocidade (somente para os midifiles), o valor de transposição definido para o ficheiro em execução, os
volumes das seções Drum, Bass, Chord, Orch. (Lower) e Lead. A caixa à esquerda permite percorrer, em cima e em baixo,
a lista dos ficheiros e das pastas. Além disso, durante a execução, é presente o contador de compasso/tempo passado.
Para mais informações sobre o ficheiro em execução e para ir para frente ou para trás, selecione PLAYBAR. Se a partir
do menu PREFERENCE foi ativada a função PFL To Player, na barra à direita aparecerá a tecla virtual PFL que permite
ativar a pré-audição nos auscultadores do trecho musical atual.
PLAYER
Page 99

/97
TEXTOS
Se o ficheiro contém texto, é apresentado no centro do display e também num monitor externo se estiver ligado. Porém, é
possível continuar a visualizar a lista de ficheiros pressionando o botão LYRIC OFF situado no painel frontal à esquerda.
À sucessiva pressão da tecla, o texto voltará a ser visualizado. Com os ficheiros de texto é possível passar ao modo
Ecrã completo, tocando no centro do ecrã onde corre o texto. Tocando uma segunda vez volta-se à visualização normal.
Quando o ficheiro não contém texto, é possível fazer com que esse se associe um ficheiro de texto separado com
extensão .txt. com o mesmo nome do ficheiro musical e que se encontra na mesma pasta (Ex. Newyork.mid e o texto
Newyork.txt). Na página FUNCTION deve ser desabilitada a função SKIP FILE LINK.
Além disso, é presente um modo Mirror ( Menu Video) onde é possível visualizar no monitor externo o mesmo ecrã atual
no Display .
PLAYLIST
Poderá criar uma Play list selecionando Empty e confirmando com YES na janela de diálogo.
Com EDIT acede-se à criação/gestão da Playlist. O display mostrará o directory atual a partir do qual, utilizando o ecrã e
os botões ENTER e EXIT, poderá abrir as pastas e encontrar os ficheiros a acrescentar à Playlist. Uma vez encontrado o
ficheiro desejado, pressione a tecla INSERT ITEM para adicioná-lo à nova Playlist.
A partir da barra inferior, acede-se à PLAYLIST, com a qual é possível programar os próprios repertórios e listas de
reprodução.
As pastas MY FOLDER. são na realidade ligações rápidas às pastas preferidas. Se uma pasta foi guardada como Myfolder
aparecerá na lista das pastas preferidas como indicado no display. Com EDIT acede-se à criação/gestão das pastas.
MY FOLDER
Page 100

/98
Neste menu poderá selecionar as imagens a utilizar como background dos vossos ficheiros de karaoke ou similares e para
poder gerir os filmes incorporados no MIDJPRO.
A função JUKE BOX é um modo alternativo para a visualização e a ativação dos ficheiros contidos numa Playlist ou num
Myfolder..
Entre os vários modos de utilização do Player este é provavelmente o mais imediato e intuitivo.
Através de Dial, pode-se percorrer a página para visualizar os pads em sucessão. O ecrã permite, com auxílio da tecla
SFX, controlar alguns efeitos sonoros que podem ser ativados durante a execução.
JUKE BOX
PIC & MOVIE
 Loading...