

Page 1
USB PEN DRIVE STYLES 2016
AUDYA SERIES
ISTRUZIONI PER L’INSTALLAZIONE
INSTALL INSTRUCTIONS
INSTALLATIONSANLEITUNG
INSTRUCTIONS POUR L’INSTALLATION
INSTRUCCIONES PARA INSTALAR
INSTRUÇÕES PARA INSTALAÇÃO
Page 2
Questa USB Pen Drive contiene 8 nuovi Styles.
Aggiornamenti necessari sui prodotti della serie AUDYA
Per il corretto utilizzo degli Styles contenuti nella USB P en Drive è necessario che su tutti gli
strumenti siano installati gli aggiornamenti come di seguito indicato:
AUDYA 76 Tasti
- O.S. 5.4B
- Upgrade SOUNDS 2010
- Upgrade STYLES & SOUNDS 2011
AUDYA4 – AUDYA5 – AUDYA8
- O.S. 5.4B
- Upgrade STYLES & SOUNDS 2011
Come vericare l’esistenza dell’Upgrade SOUNDS 2010 su Audya 76 Tasti
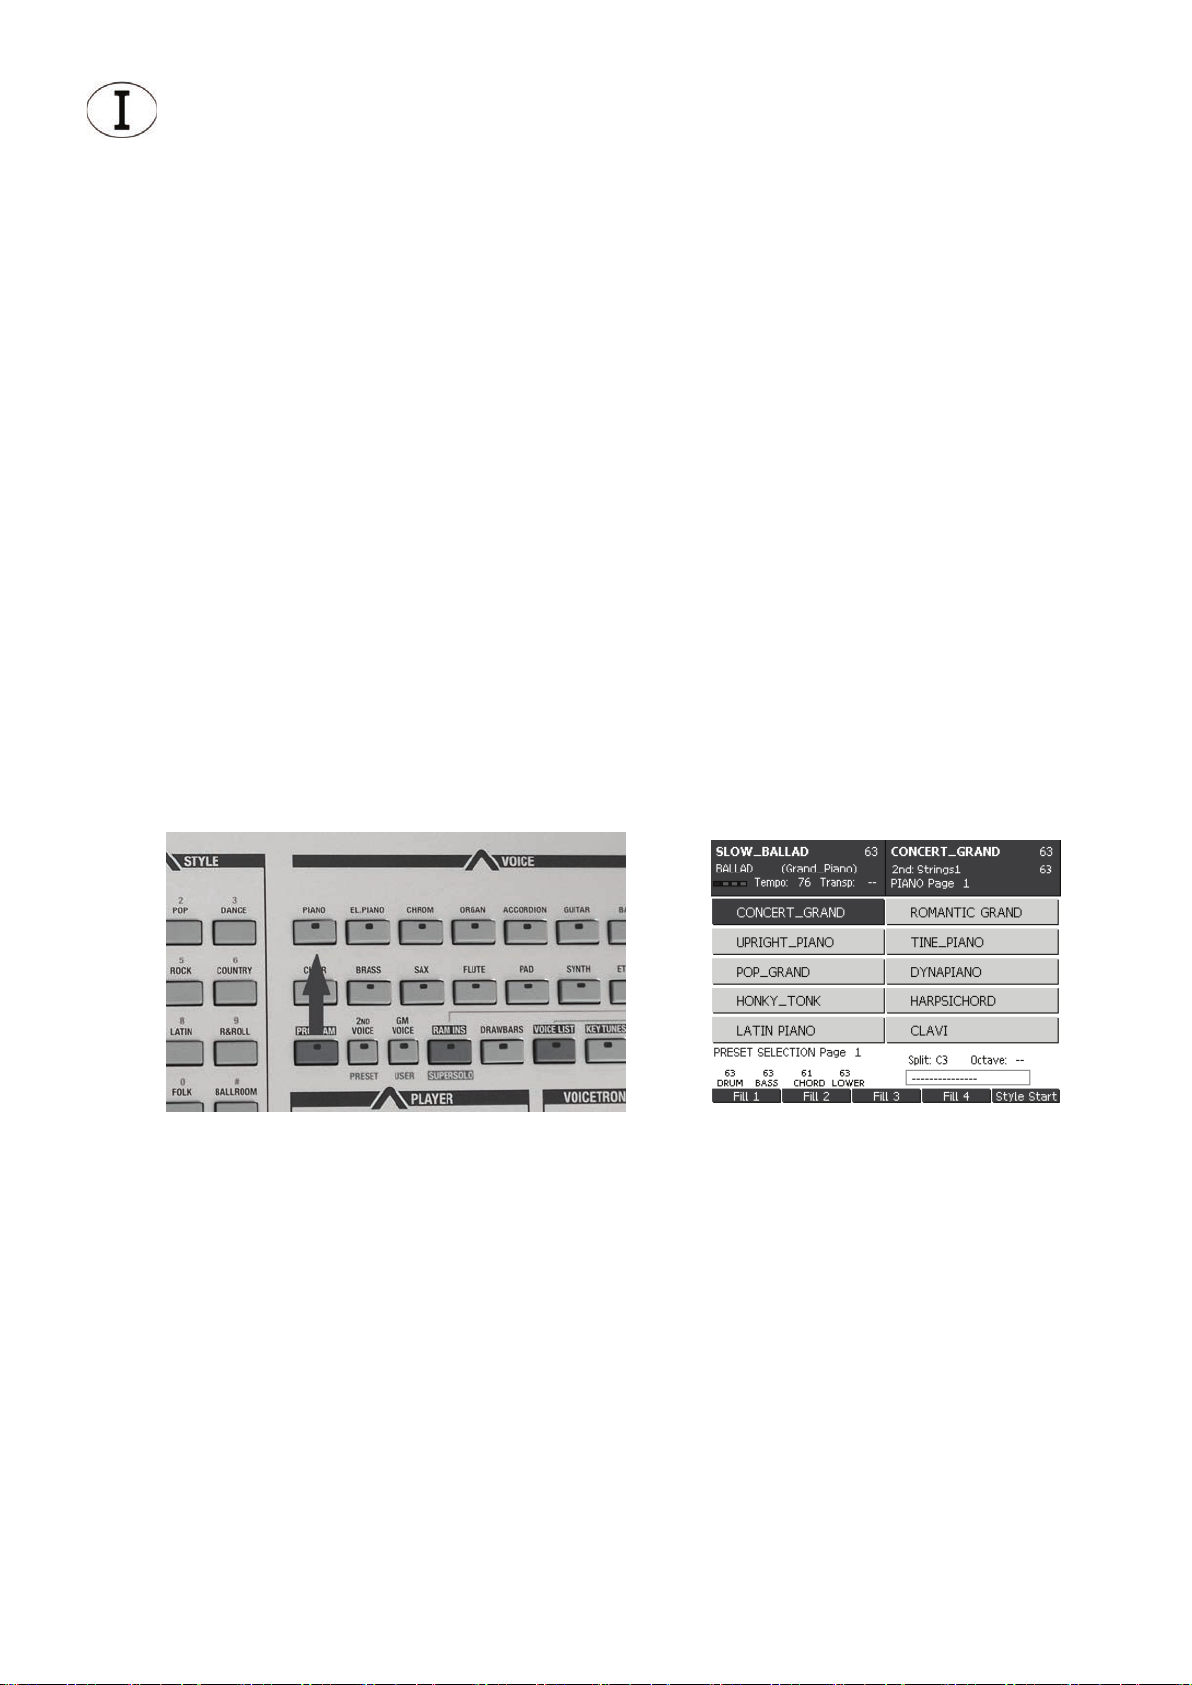
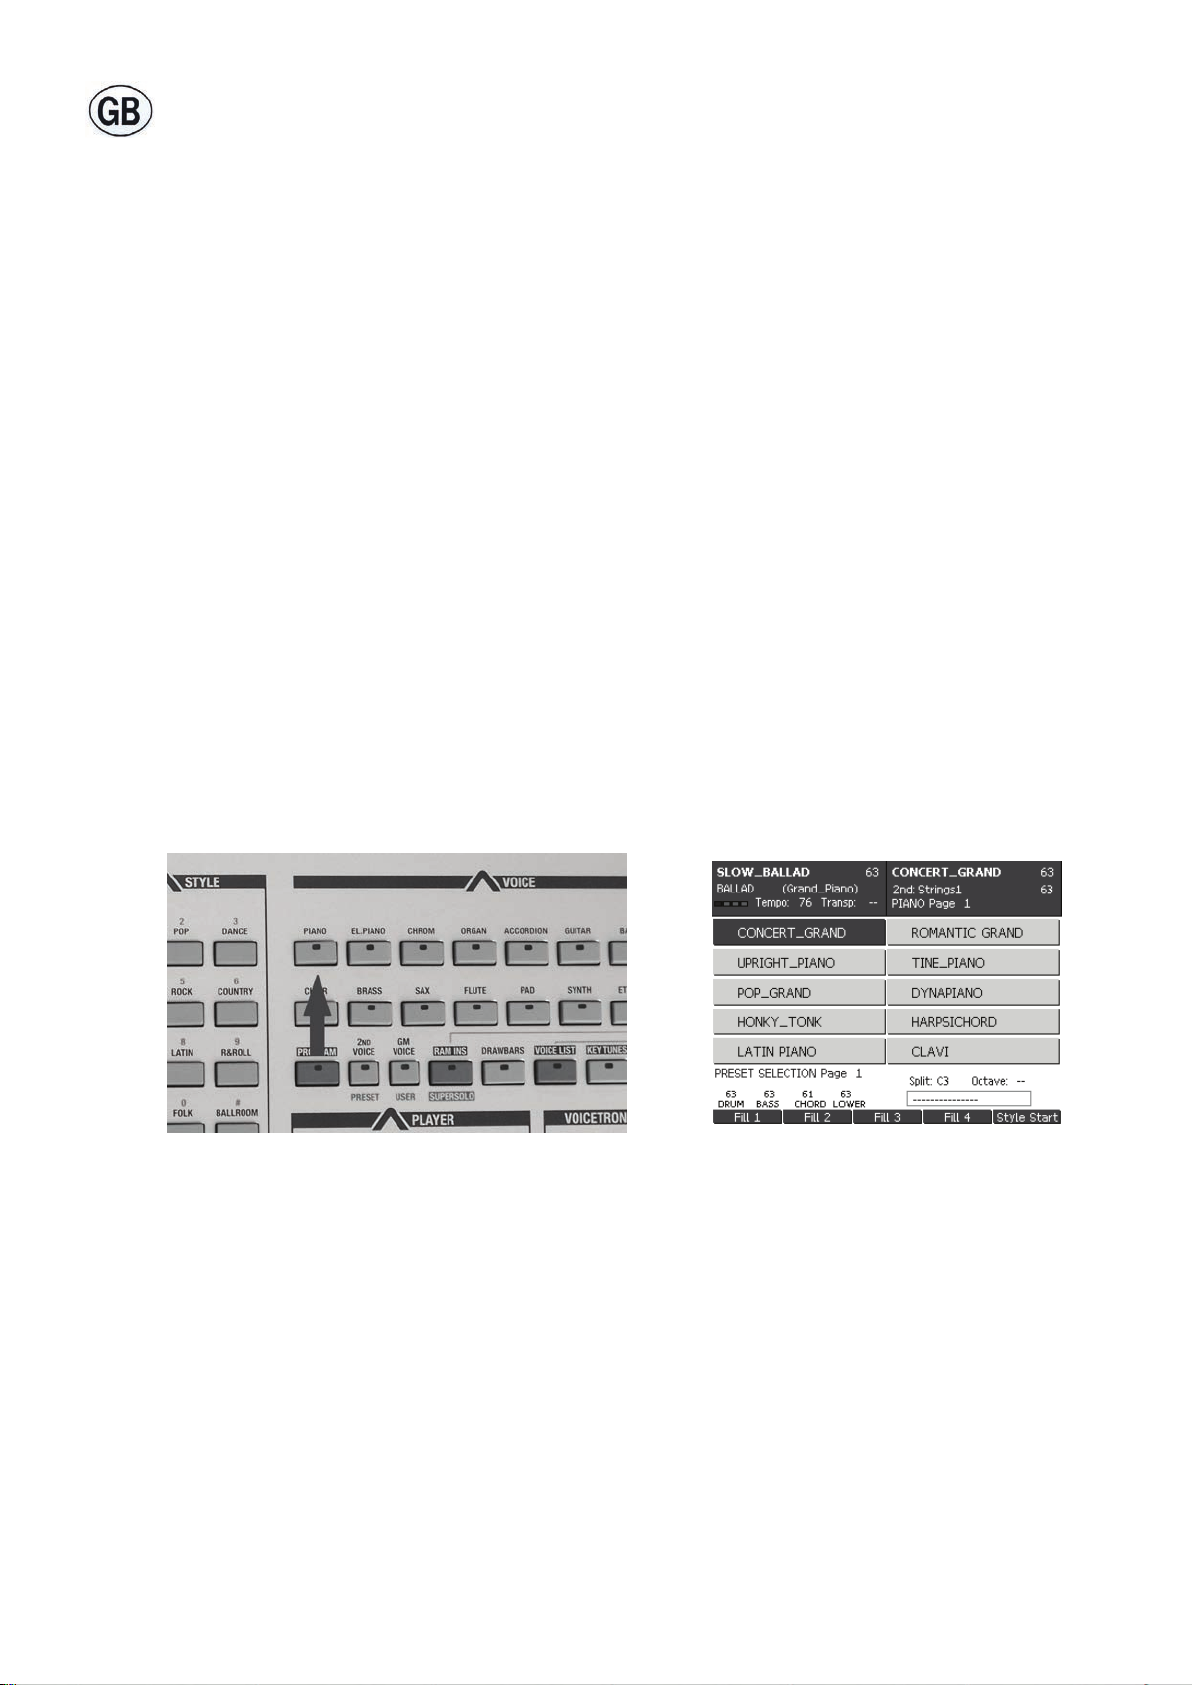
• Selezionare il gruppo di suoni “PIANO” premendo il relativo tasto (Fig. 1).
• Se in corrispondenza di F1 viene visualizzato il timbro “CONCERT_GRAND” (Fig. 2), nella
tastiera è già stato installato il “SOUND UPGRADE 2010”.
• In caso contrario è necessario eettuare l’installazione del pacchetto completo.
Fig. 1 Fig. 2
Page 3
Come vericare l’esistenza dell’Upgrade STYLES & SOUND 2011 su tutti i modelli della serie
AUDYA.
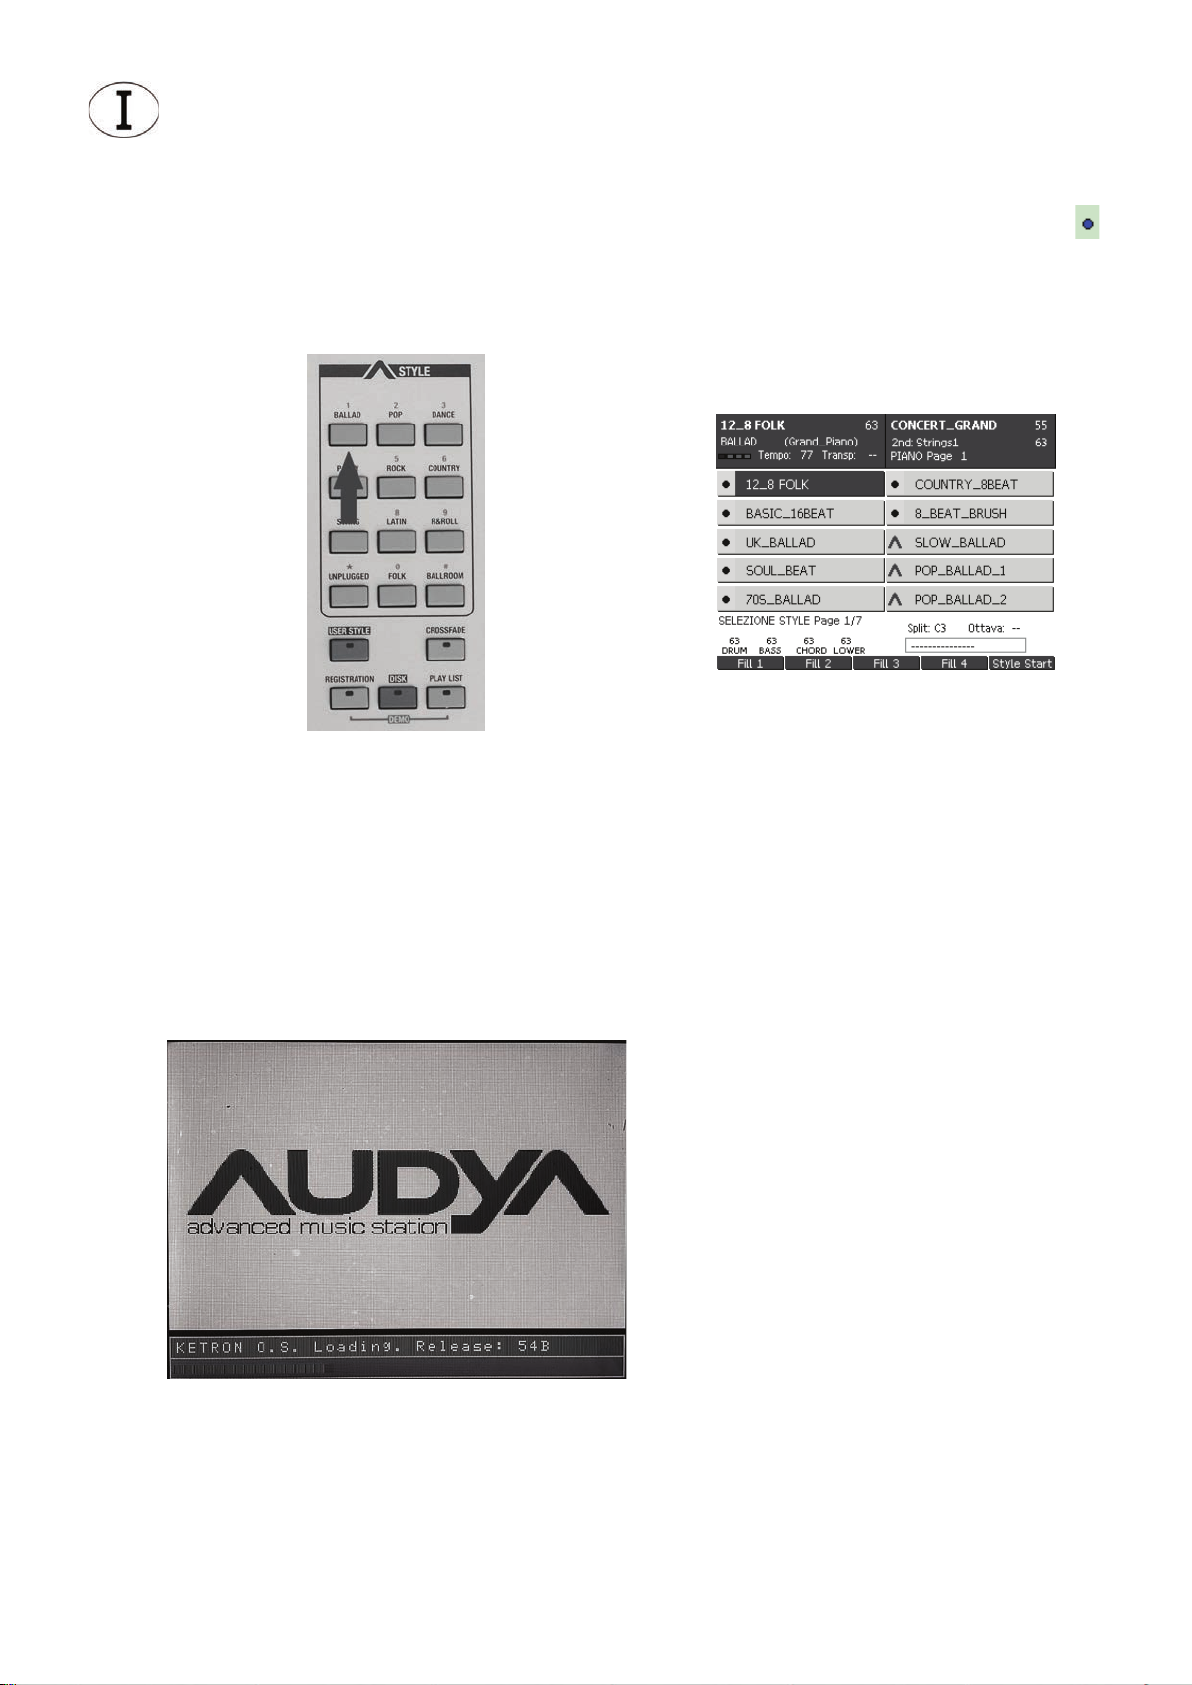
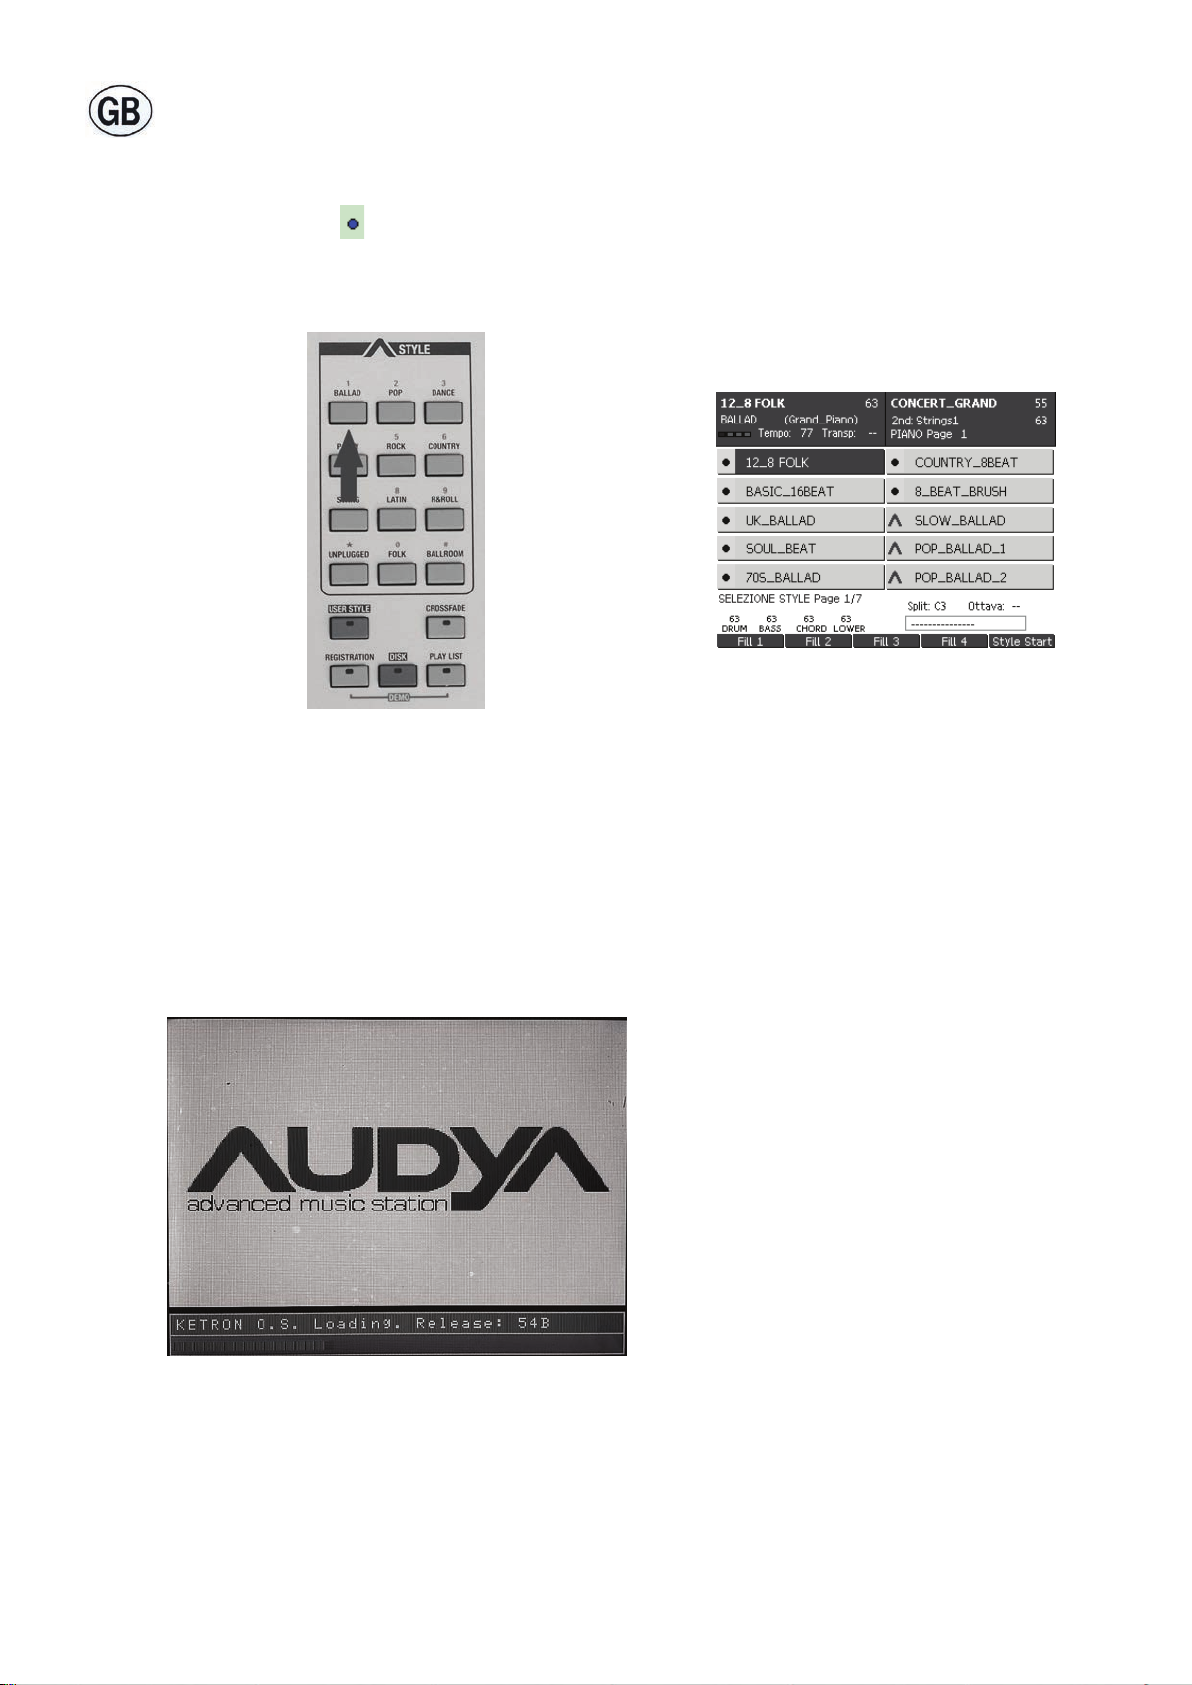
• Selezionare il gruppo di ritmi “BALLAD” (Fig. 3).
• Se sulla schermata sono presenti ritmi contrassegnati da un pallino di colore blu ( )
prima del nome (Fig. 4), l’upgrade richiesto risulta installato.
• In caso contrario è necessario eettuare l’installazione del pacchetto completo.
Fig. 3 Fig. 4
Come vericare quale Sistema Operativo è presente nello strumento
• Spegnere e riaccendere lo strumento.
• La versione del Sistema Operativo apparirà sul display in basso a destra durante la fase
di inizializzazione (Fig. 5).
Fig. 5
Page 4
PROCEDURA DI INSTALLAZIONE DEI NUOVI STYLES
L’installazione completa richiede 19 minuti circa.
Per tutti i modelli della serie AUDYA (AUDYA - AUDYA4 - AUDYA5 - AUDYA8) con Upgrade
2010-2011 e Sistema Operativo 5.4B:
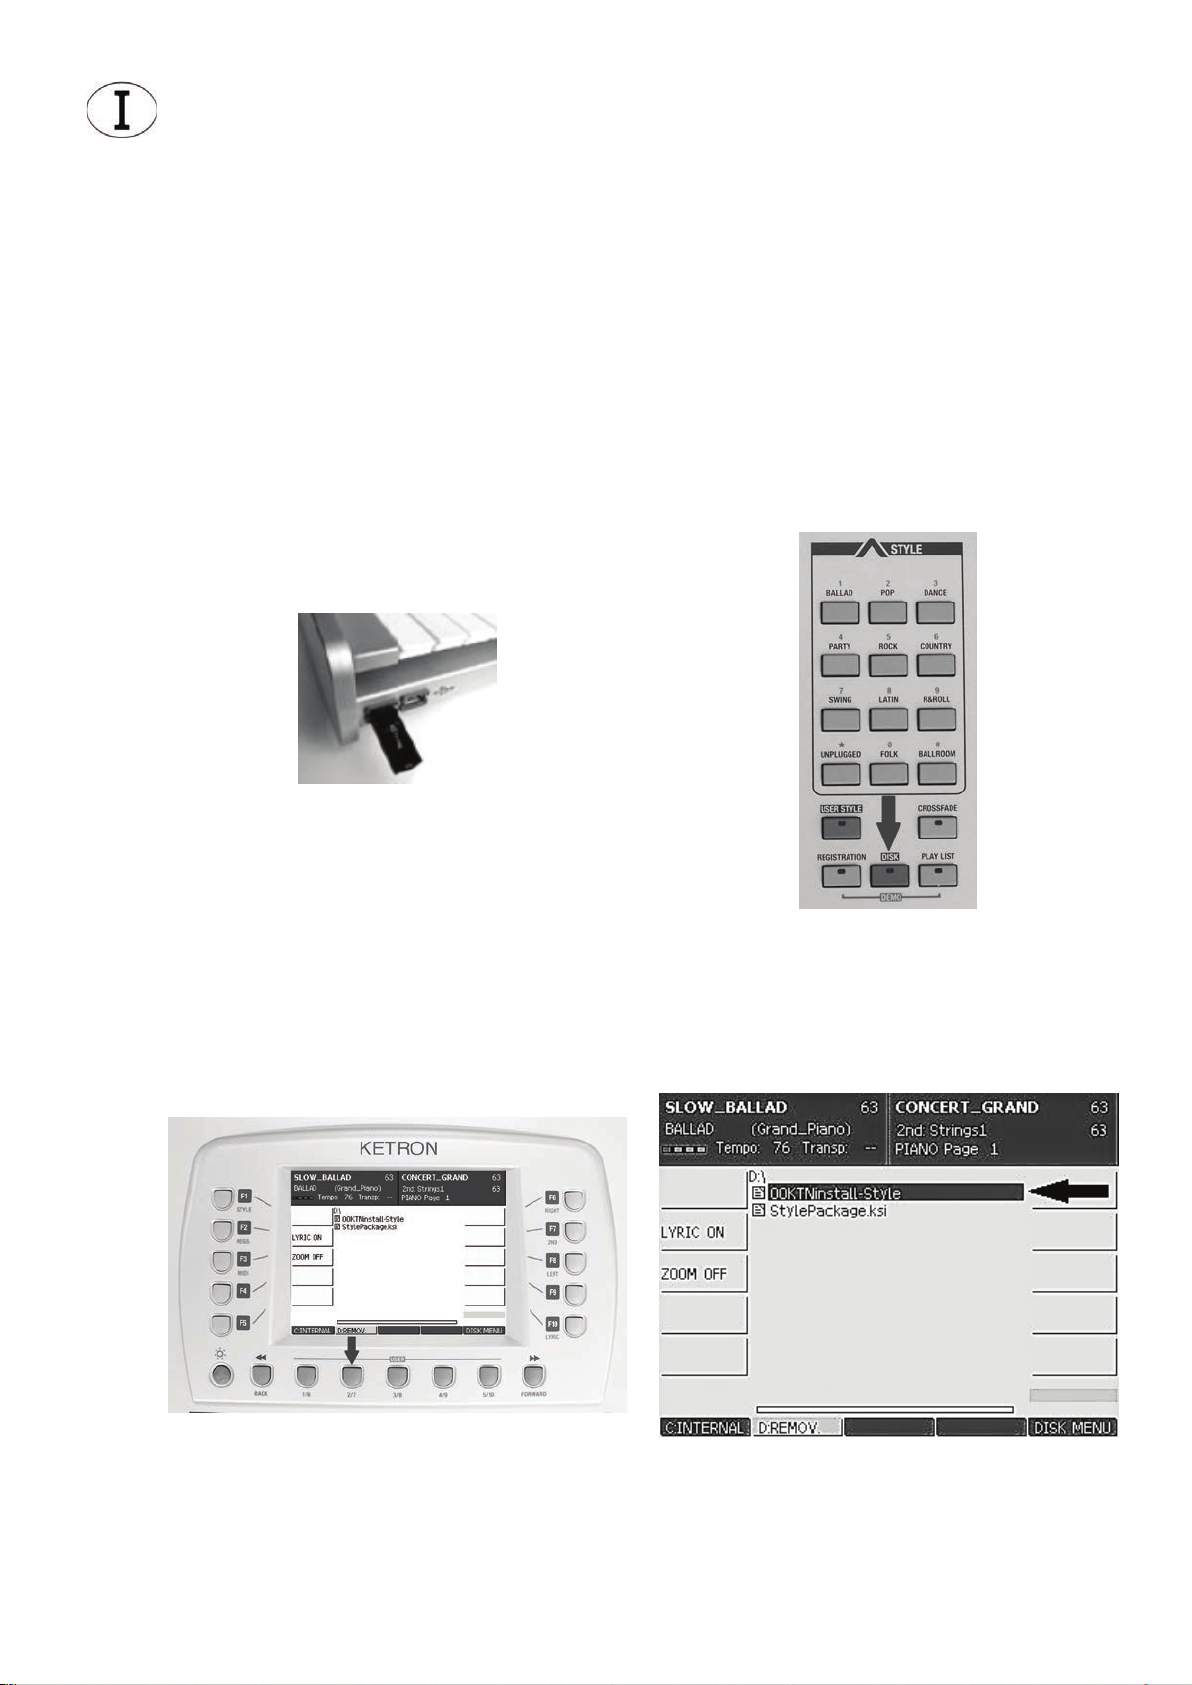
1. Inserire la Pen Drive nell’ingresso USB più esterno a sinistra (Fig. 6)
2. Premere il tasto DISK (Fig. 7)
3. Premere il tasto USER 2/7 (D:REMOV) (Fig. 8)
4. Selezionare il le 00KTNinstall-Style (Fig. 9)
5. Premere il tasto ENTER (Fig. 10)
Fig. 6 Fig. 7
Fig. 8 Fig. 9
Page 5
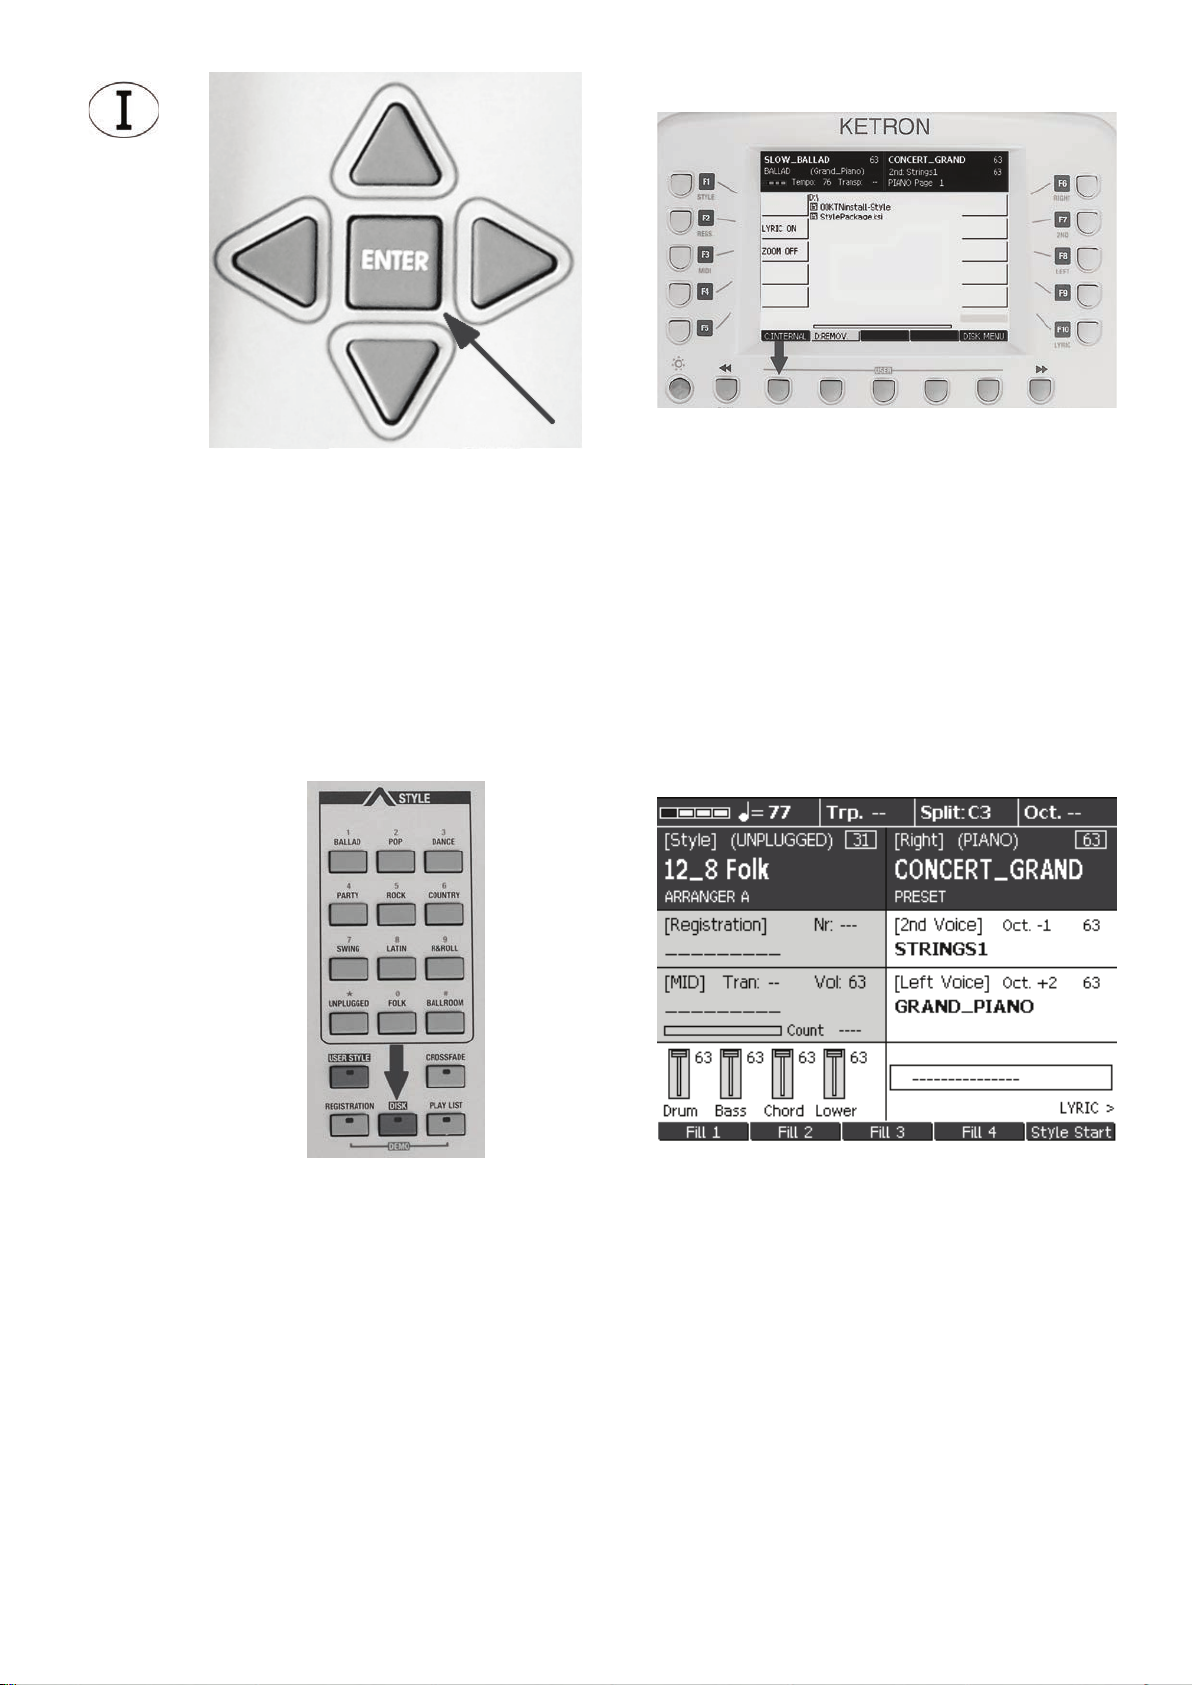
Fig. 10 Fig. 11
Lo strumento installerà tutti i les necessari e al termine della procedura ritornerà alla
schermata visualizzata nella gura 9.
Per ritornare alla schermata principale (Fig. 13) premere prima il tasto USER 1/6 (C:INTERNAL) (Fig. 11), poi il tasto DISK (Fig. 12). Ora è anche possibile rimuovere la USB Pen
Drive.
Fig. 12 Fig. 13
Page 6
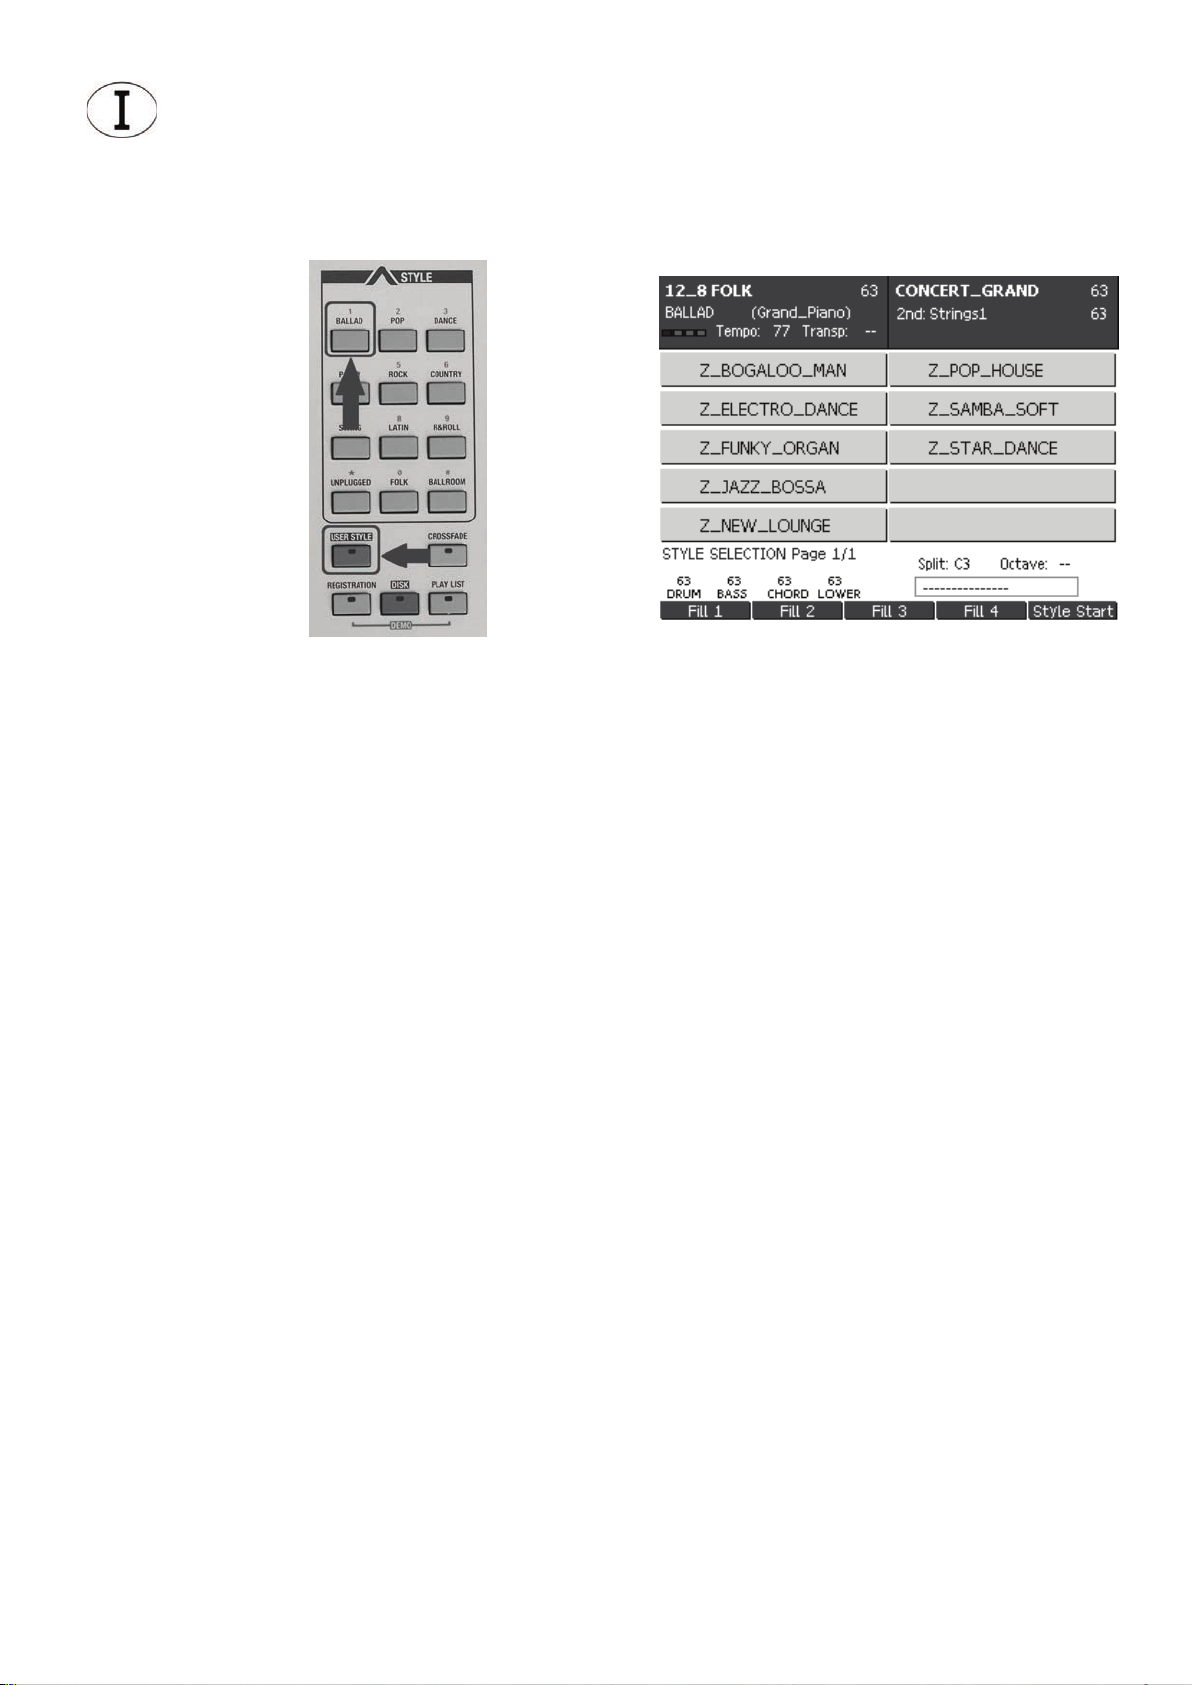
I nuovi Styles sono facilmente identicabili, infatti si trovano alla ne del gruppo USER
STYLE / BALLAD (Fig. 14) e sono contraddistinti dalla lettera Z prima del nome (Fig. 15).
Fig. 14 Fig. 15
ELENCO STYLES
Z_Bogaloo Man
Z_Electro Dance
Z_Funky Organ
Z_Jazz Bossa
Z_New Lounge
Z_Pop House
Z_Samba Soft
Z_Star Dance
Page 7
This USB Pen Drive contains 8 new Styles.
Upgrades required for installation to AUDYA series.
For correct use of the Styles contained on the USB Pen Drive all models must be equipped
with the following upgrades:
AUDYA 76
- O.S. 5.4B
- Upgrade SOUNDS 2010
- Upgrade STYLES & SOUNDS 2011
AUDYA4 – AUDYA5 – AUDYA8
- O.S. 5.4B
- Upgrade STYLES & SOUNDS 2011
How to check if the SOUNDS 2010 Upgrade is installed on the Audya 76 keys:
• Select the “PIANO” sound group and press the relevant key (Fig. 1).
• If “CONCERT_GRAND” appears next to F1 (Fig. 2) the “SOUND UPGRADE 2010” is installed on the keyboard.
• Otherwise the complete package must be installed.
Fig. 1 Fig. 2
Page 8
How to check if the STYLES & SOUND 2011 Upgrade is installed on any model of the AUDYA series.
• Select the style group “BALLAD” (Fig. 3).
• If a blue dot ( ) is displayed before the style name (Fig. 4), the required upgrade is
already installed.
• Otherwise the complete package must be installed.
Fig. 3 Fig. 4
How to check which Operating System is installed on the instrument:
• Switch the instrument o for a few seconds and then turn back on.
• The version of the Operating System is shown in the right lower area of the display during
the initialization phase (Fig. 5).
Fig. 5
Page 9

HOW TO INSTALL THE STYLES
The complete installation of the Styles requires about 19 minutes.
For all models of the AUDYA series (AUDY A - AUD YA4 - AUDY A5 -AUDY A8) with the 2010 2011 Upgrade and the Operating System 5.4B:
1. Insert the pen drive into the front left hand external USB socket (Fig. 6).
2. Press the DISK button (Fig. 7).
3. Press the USER 2/7 (D:REMOV) button (Fig. 8).
4. Select the 00KTNinstall-Style le using the cursor keys (Fig. 9) .
5. Press the ENTER button (Fig. 10).
Fig. 6 Fig. 7
Fig. 8 Fig. 9
Page 10
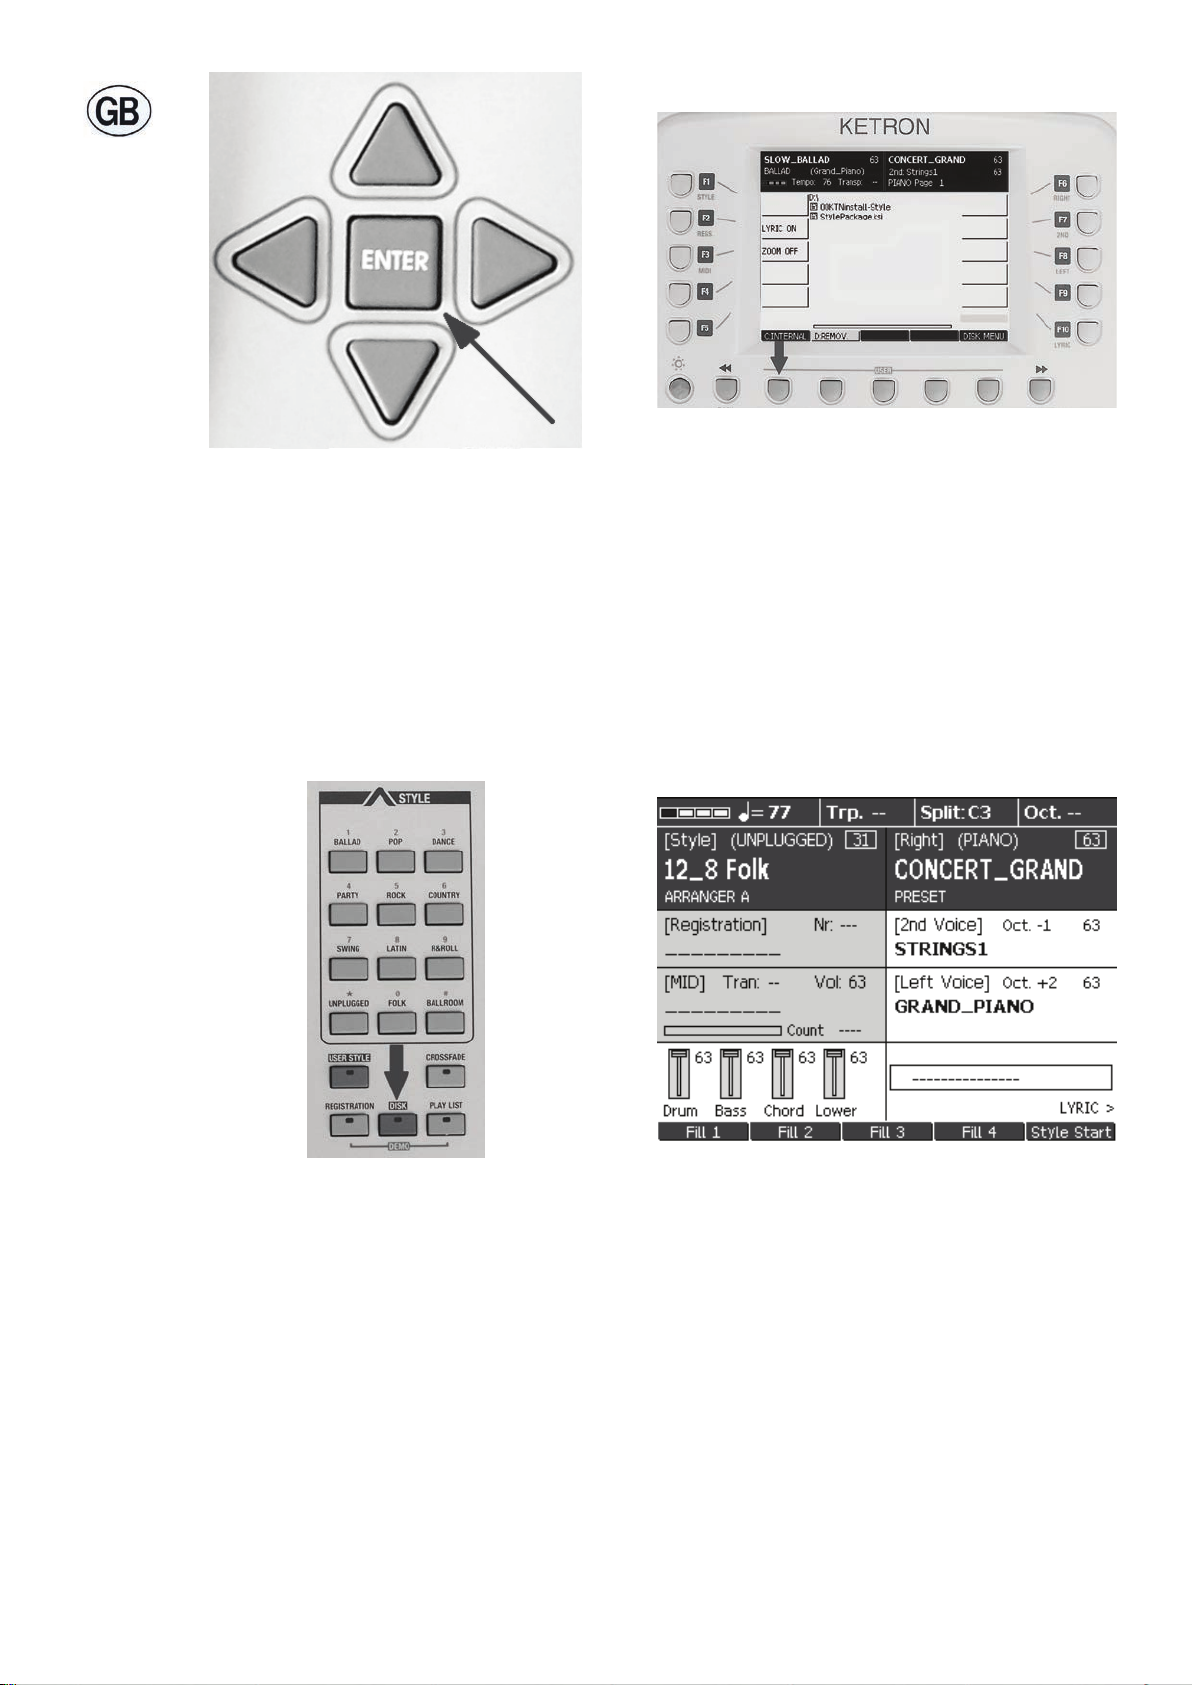
Fig. 10 Fig. 11
The instrument automatically installs the upgrade. Once completed the display reverts back
to the window shown in Fig. 9. To return to the main page (Fig. 13), press the USER 1/6
(C:INTERNAL) button (Fig. 11) followed by the DISK button (Fig. 12). You can now remove
the USB Pen Drive.
Fig. 12 Fig. 13
Page 11

The new Styles are located on the last page of the USER STYLE / BALLAD group (Fig. 14).
They can be recognized by a letter Z before the style name (Fig. 15).
Fig. 14 Fig. 15
LIST OF STYLES
Z_Bogaloo Man
Z_Electro Dance
Z_Funky Organ
Z_Jazz Bossa
Z_New Lounge
Z_Pop House
Z_Samba Soft
Z_Star Dance
Page 12

Dieser USB Pen Drive enthält 8 neue Styles.
Zur korrekten Verwendung der im USB Pen Drive enthaltenen Styles mit der AUDYA-Serie
müssen auf den einzelnen Instrumenten jeweils folgende Updates installiert sein:
AUDYA 76
- O.S. 5.4B
- Upgrade SOUNDS 2010
- Upgrade STYLES & SOUNDS 2011
AUDYA4 – AUDYA5 – AUDYA8
- O.S. 5.4B
- Upgrade STYLES & SOUNDS 2011
Wie wird das Vorhandensein v on Upgrade SOUNDS 2010 auf A udya mit 76 Tasten geprüft?
• Die Soundgruppe “PIANO” durch Betätigen der entsprechenden Taste wählen (Abb. 1).
• Erscheint neben F1 der Sound “CONCERT_GRAND” (Abb. 2), so bedeutet dies, dass im
Keyboard bereits das “SOUND UPGRADE 2010” installiert wurde.
• Anderenfalls ist das gesamte Paket zu installieren.
Fig. 1 Fig. 2
Page 13

Wie wird das Vorhandensein von Upgrade ST YLES & SOUND 2011 auf sämtlichen Modellen
der AUDYA Serie geprüft?
• Wählen Sie die Rhythmus-Gruppe “BALLAD” (Abb. 3).
• Erscheinen auf dem Bildschirm Rhythmen mit einem blauem Punkt ( ) vor dem Namen
(Abb. 4), so ist das Upgrade bereits installiert.
• Anderenfalls ist das gesamte Paket zu installieren.
Fig. 3 Fig. 4
Wie wird geprüft, welches Betriebssystem im Instrument installiert ist?
Gehen Sie bitte bei allen Modellen der Serie Audya wie folgt vor:
• Schalten Sie das Instrument aus und dann wieder ein.
• Die Version des Betriebssystems erscheint unten rechts auf dem Display während der
Initialisierungsphase (Abb. 5).
Fig. 5
Page 14

UND SO WERDEN DIE STYLES INSTALLIERT
Die komplette Installierung der Styles erfordert etwa 19 Minuten.
Bei allen Modellen der Serie AUDYA (AUDYA - AUDYA4 - AUDYA5 -AUDYA8) mit bereits
installiertem Upgrade 2010-2011 und Betriebssystem 5.4B:
1. Stecken Sie den Pen Drive in den ganz außen links liegenden USB Eingang (Abb. 6).
2. Drücken Sie die Taste DISK (Abb. 7).
3. Drücken Sie die Taste USER 2/7 (D:REMOV) (Abb. 8).
4. Markieren Sie die Datei 00KTNinstall-Style (Abb. 9).
5. Drücken Sie die Taste ENTER (Abb. 10).
Fig. 6 Fig. 7
Fig. 8 Fig. 9
Page 15

Fig. 10 Fig. 11
Das Instrument installiert alle notwendigen Dateien und am Ende der Prozedur erscheint
wieder die Seite gemäß Abb. 9.
Um zum Ausgangsbildschirm zurückzukehren (Abb. 13), drücken Sie die Taste USER 1/6
(C:INTERNAL) (Abb. 11), und dann die Taste DISK (Abb. 12). Nun kann der USB Pen Drive
wieder herausgezogen werden.
Fig. 12 Fig. 13
Page 16

Die neuen Styles sind sofort erkennbar, da sie sich am Ende der Gruppe USER STYLE /
BALLAD (Abb. 14) benden und einen Buchstaben Z vor dem Namen aufweisen (Abb. 15).
Fig. 14 Fig. 15
LISTE DER STYLES
Z_Bogaloo Man
Z_Electro Dance
Z_Funky Organ
Z_Jazz Bossa
Z_New Lounge
Z_Pop House
Z_Samba Soft
Z_Star Dance
Page 17

Cette Clé Mémoire USB contient 8 nouveaux Styles.
Mises à jour nécessaires pour les produits de la série AUDYA
Pour un emploi correct des Styles contenus dans la Clé Mémoire USB il est nécessaire que
sur tous les instruments les mises à jour indiquées ci-dessous soient installées:
AUDYA 76
- O.S. 5.4B
- Upgrade SOUNDS 2010
- Upgrade STYLES & SOUNDS 2011
AUDYA4 – AUDYA5 – AUDYA8
- O.S. 5.4B
- Upgrade STYLES & SOUNDS 2011
Comment vérier la présence de l’Upgrade SOUNDS 2010 sur Audya 76 Touches
• Sélectionner le groupe de sons “PIANO” en enfonçant la touche correspondante (Fig. 1).
• Si en correspondance de F1 le timbre “CONCERT_GRAND” (Fig. 2) est aché, le “SOUND
UPGRADE 2010” a déjà été installé dans le clavier.
• Le cas contraire, il est nécessaire d’eectuer l’installation du package logiciel tout entier.
Fig. 1 Fig. 2
Page 18

Comment vérier la présence de l’Upgrade STYLES & SOUNDS 2011 sur tous les modèles
de la série AUDYA
• Sélectionner le groupe de rythmes “BALLAD” (Fig. 3).
• Si sur l’écran des rythmes ayant un point de couleur bleu ( ) avant le nom (Fig. 4) sont
achés, l’upgrade demandé a été déjà installé.
• Le cas contraire, il est nécessaire d’eectuer l’installation du package logiciel tout entier.
Fig. 3 Fig. 4
Comment vérier quel système opérationnel est présent dans l’instrument:
• Eteindre et rallumer l’instrument.
• La version du système opérationnel sera achée à l’écran en bas à droite pendant la
phase d’initialisation (Fig. 5).
Fig. 5
Page 19

PROCEDURE D’INSTALLATION DES STYLES
L’installation complète des Styles comporte une attente d’env. 19 minutes.
Pour tous les modèle de la série AUDYA (AUDYA - AUDYA4 - AUDYA5 -AUDYA8) avec Upgrade 2010-2011 et Système opérationnel 5.4B déjà installé:
1. Introduire la clé mémoire dans l’entrée USB plus externe à gauche (Fig. 6)
2. Enfoncer la touche DISK (Fig. 7)
3. Enfoncer la touche USER 2/7 (D:REMOV) (Fig. 8)
4. Sélectionner le chier 00KTNinstall-Style (Fig. 9)
5. Enfoncer la touche ENTER (Fig. 10)
Fig. 6 Fig. 7
Fig. 8 Fig. 9
Page 20

Fig. 10 Fig. 11
L’instrument installera tous les chiers nécessaires et à la n de la procédure l’instrument
rétablira la page écran comme en gure 9. Pour rétablir la page écran principale (Fig. 13)
enfoncer d’abord la touche USER 1/6 (C:INTERNAL) (Fig. 11), et ensuite la touche DISK
(Fig. 12). Maintenant on pourra enlever la clé mémoire USB.
Fig. 12 Fig. 13
Page 21

Les nouveaux Styles sont facilement identiables: ils se trouvent à la n du groupe USER
STYLE / BALLAD (Fig. 14) et ils sont marqués par la lettre Z avant le nom (Fig. 15).
Fig. 14 Fig. 15
LISTE DES STYLES
Z_Bogaloo Man
Z_Electro Dance
Z_Funky Organ
Z_Jazz Bossa
Z_New Lounge
Z_Pop House
Z_Samba Soft
Z_Star Dance
Page 22

Este lápiz USB contiene 8 Styles nuevos.
Actualizaciones necesarias para los productos de la serie AUDYA
Para poder usar correctamente los Styles contenidas en el lápiz USB , se han de instalar las
actualizaciones en todos los instrumentos de la forma siguiente:
AUDYA 76
- O.S. 5.4B
- Upgrade SOUNDS 2010
- Upgrade STYLES & SOUNDS 2011
AUDYA4 – AUDYA5 – AUDYA8
- O.S. 5.4B
- Upgrade STYLES & SOUNDS 2011
Cómo vericar la existencia de la actualización SOUNDS 2010 en Audya 76 Teclas
• Seleccione el grupo de sonidos “PIANO”, para ello presione la tecla relativa (Fig. 1).
• Si junto a F1 aparece el timbre “CONCERT_GRAND” (Fig. 2), en el teclado está instalada
la actualización “SOUND UPGRADE 2010”.
• De no ser así, ha de instalar el paquete completo.
Fig. 1 Fig. 2
Page 23

Cómo vericar la existencia de la actualización STYLES & SOUND 2011 en todos los modelos de la serie AUDYA
• Seleccione el grupo de ritmos “BALLAD” (Fig. 3).
• Si en la pantalla aparecen ritmos indicados con un punto de color azul ( ) antes del
nombre (Fig. 4), la actualización resulta instalada.
• De no ser así, ha de instalar el paquete completo.
Fig. 3 Fig. 4
Cómo vericar cuál es el sistema operativo presente en el instrumento
• Apague el instrumento y enciéndalo de nuevo.
• La versión del sistema operativo aparecerá en la pantalla en la parte inferior durante la
fase de inicialización (Fig. 5).
Fig. 5
Page 24

PROCEDIMIENTO DE INSTALACIÓN DE LOS STYLES
La instalación completa de los Styles dura 19 minutos aproximadamente.
Para todos los modelos de la serie AUDYA (AUDYA - AUDYA4 - AUDYA5 -AUDYA8) con la
actualización 2010-2011 y el sistema operativo 5.4B instalado:
1. Introduzca el lápiz en el puerto USB más externo de la izquierda (Fig. 6).
2. Presione la tecla DISK (Fig. 7).
3. Presione la tecla USER 2/7 (D:REMOV) (Fig. 8).
4. Seleccione el archivo 00KTNinstall-Style (Fig. 9).
5. Presione la tecla ENTER (Fig. 10).
Fig. 6 Fig. 7
Fig. 8 Fig. 9
Page 25

Fig. 10 Fig. 11
El instrumento instalará todos los archivos necesarios y cuando el procedimiento acabe el
instrumento regresará a la pantalla mostrada en la gura 9.
Para regresar a la pantalla principal (Fig. 13), presione primero la tecla USER 1/6 (C:INTER -
NAL) (Fig. 11) y después la tecla DISK (Fig. 12). Ahora puede quitar también el lápiz USB.
Fig. 12 Fig. 13
Page 26

Los nuevos Styles se identican fácilmente. Aparecen al nal del grupo USER STYLE / BALLAD (Fig. 14) y una carta Z precede el nombre (Fig. 15).
Fig. 14 Fig. 15
LISTA DE LOS STYLES
Z_Bogaloo Man
Z_Electro Dance
Z_Funky Organ
Z_Jazz Bossa
Z_New Lounge
Z_Pop House
Z_Samba Soft
Z_Star Dance
Page 27

Esta USB Pen Drive contém 8 novos Styles.
Atualizações necessárias nos produtos da série AUDYA
Para a correta utilização dos Styles contidos na USB Pen Drive, é necessário que em
todos os instrumentos sejam instaladas as atualizações, tal como indicado a seguir:
AUDYA 76
- O.S. 5.4B
- Upgrade SOUNDS 2010
- Upgrade STYLES & SOUNDS 2011
AUDYA4 – AUDYA5 – AUDYA8
- O.S. 5.4B
- Upgrade STYLES & SOUNDS 2011
Como vericar a presença do Upgrade SOUNDS 2010 no Audya 76 Teclas
• Selecione o grupo de sons “PIANO” pressionando a respectiva tecla (Fig. 1).
• Se junto à F1 é visualizado o timbre “CONCERT_GRAND” (Fig. 2), quer dizer que no teclado já foi instalado o “SOUND UPGRADE 2010”.
• No caso contrário, é necessário efetuar a instalação do pacote completo.
Fig. 1 Fig. 2
Page 28

Como vericar a presença do Upgrade STYLES & SOUND 2011 em todos os modelos
da série AUDYA
• Selecione o grupo de ritmos “BALLAD” (Fig. 3).
• Se no ecrã estão presentes ritmos marcados com uma bolinha azul ( ) antes do nome
(Fig. 4), o upgrade requerido está instalado.
• No caso contrário, é necessário efetuar a instalação do pacote completo.
Fig. 3 Fig. 4
Como vericar qual é o Sistema Operativo presente no instrumento
• Desligue e ligue novamente o instrumento.
• Durante a inicialização aparecerá na parte de baixo à direita do ecrã versão do Sistema
Operativo (Fig. 5).
Fig. 5
Page 29

PROCEDIMENTO PARA INSTALAÇÃO DOS STYLES
A instalação completa dos Styles requer aproximadamente 19 minutos.
Para todos os modelos da série AUDYA (AUDY A - AUD Y A4 - AUDY A5 - AUDY A8) com Upgr ade 2010-2011 e Sistema Operativo 5.4B ou superior já instalado:
1. Introduza a Pen Drive na entrada USB externa à esquerda (Fig. 6).
2. Pressione a tecla DISK (Fig. 7).
3. Pressione a tecla USER 2/7 (D:REMOV) (Fig. 8).
4. Selecione o cheiro 00KTNinstall-Style (Fig. 9).
5. Pressione a tecla ENTER (Fig. 10).
Fig. 6 Fig. 7
Fig. 8 Fig. 9
Page 30

Fig. 10 Fig. 11
O teclado instalará todos os cheiros necessários e no m do procedimento o instrumento
voltará para o ecrã visualizado na gura 9. Para voltar ao ecrã principal (Fig. 13), pressione
primeiro a tecla USER 1/6 (Ca:INTERNAL) (Fig. 11), depois a tecla DISK (Fig. 12). Agora,
também é possível remover a USB Pen Drive.
Fig. 12 Fig. 13
Page 31

Os novos Styles são facilmente identicáveis; de fato, encontram-se no nal do grupo
USER STYLE / BALLAD (Fig. 14) e estão marcados por letra Z antes do nome (Fig. 15).
Fig. 14 Fig. 15
LISTA DOS STYLES
Z_Bogaloo Man
Z_Electro Dance
Z_Funky Organ
Z_Jazz Bossa
Z_New Lounge
Z_Pop House
Z_Samba Soft
Z_Star Dance
Page 32

KETRON s.r.l.
Via Giuseppe Taliercio, 7
60131 Ancona (Italy)
Tel. +39 071 285771
Fax +39 071 2857748
Web www.ketron.it
Email ketron@ketron.it
 Loading...