


 Loading...
KERN & Sohn GmbH
Ziegelei 1 |
Phone: +49-[0]7433- 9933-0 |
D-72336 Balingen |
Fax: +49-[0]7433-9933-149 |
E-Mail: info@kern-sohn.com |
Internet: www.kern-sohn.com |
Operating instructions
Electronic Moisture Analyser
KERN DBS
Version 1.1
03/2013
GB
DBS-BA-e-1311

GB |
KERN DBS |
Version 1.1 03/2013 |
|
|
Operating instructions |
|
Electronic Moisture Analyser |
|
|
|
|
Contents
1 |
Technical data................................................................................................ |
4 |
2 |
Appliance overview ....................................................................................... |
6 |
2.1 |
Overview of display.................................................................................................................. |
8 |
2.1.1 |
Display examples .................................................................................................................................... |
12 |
2.2 |
Keyboard overview................................................................................................................. |
13 |
3 |
Basic Information (General)........................................................................ |
15 |
3.1 |
Proper use............................................................................................................................... |
15 |
3.2 |
Improper Use........................................................................................................................... |
15 |
3.3 |
Warranty .................................................................................................................................. |
15 |
3.4 |
Monitoring of Test Resources............................................................................................... |
15 |
3.5 |
Danger Information ................................................................................................................ |
16 |
3.5.1 |
“Hazard information” sticker.................................................................................................................... |
20 |
4 |
Transport and storage................................................................................. |
21 |
4.1 |
Testing upon acceptance ...................................................................................................... |
21 |
4.2 |
Packaging / return transport ................................................................................................. |
21 |
5 |
Unpacking, Setup and Commissioning ..................................................... |
21 |
5.1 |
Installation Site, Location of Use.......................................................................................... |
21 |
5.2 |
Unpacking and checking ....................................................................................................... |
24 |
5.2.1 |
Scope of delivery / serial accessories..................................................................................................... |
24 |
5.3 |
Placing..................................................................................................................................... |
25 |
5.4 |
Mains connection ................................................................................................................... |
28 |
5.4.1 |
Turning On the Power ............................................................................................................................. |
29 |
5.5 |
Commissioning....................................................................................................................... |
30 |
5.6 |
Connection of peripheral devices......................................................................................... |
30 |
6 |
Adjustment ................................................................................................... |
31 |
6.1 |
Adjust balance ........................................................................................................................ |
31 |
6.2 |
Adjust temperature................................................................................................................. |
33 |
6.3 |
ISO/GLP log............................................................................................................................. |
36 |
7 |
Menu ............................................................................................................. |
37 |
7.1 |
Navigation in the menu.......................................................................................................... |
38 |
7.1.1 |
Numeric entry.......................................................................................................................................... |
39 |
8 |
Moisture analysis......................................................................................... |
40 |
8.1 |
Start drying.............................................................................................................................. |
40 |
8.2 |
Abort drying ............................................................................................................................ |
42 |
8.3 |
Finish drying ........................................................................................................................... |
42 |
8.4 |
Turn off appliance .................................................................................................................. |
42 |
9 |
Drying parameters ....................................................................................... |
43 |
2 |
|
DBS-BA-e-1311 |

9.1 |
Save / access .......................................................................................................................... |
|
44 |
9.2 |
Adjust....................................................................................................................................... |
|
45 |
9.2.1 |
Drying modes .......................................................................................................................................... |
|
45 |
9.2.1.1 |
Drying mode AUTO |
(Standard drying/switch-off criterion “∆M“) ...................... |
45 |
9.2.1.2 |
Drying mode TIME |
(Standard drying/switch-off criterion “Time“) ..................... |
46 |
9.2.1.3 RAPID Drying mode (Rapid drying) .............................................. |
47 |
||
9.2.1.4 |
SLOW Drying mode (Slow drying) ............................................... |
49 |
|
9.2.1.5 STEP Drying mode (Step drying) ................................................ |
51 |
||
9.2.2 |
Result display.......................................................................................................................................... |
|
54 |
9.2.3 |
Start criterion........................................................................................................................................... |
|
56 |
10 |
Miscellaneous settings ............................................................................... |
57 |
|
10.1 |
Enter sample designation...................................................................................................... |
57 |
|
10.2 |
Set date/time for measuring protocol................................................................................... |
58 |
|
10.3 |
Menu Lock............................................................................................................................... |
|
59 |
10.4 |
Change password................................................................................................................... |
|
61 |
10.5 |
Enter identification number................................................................................................... |
62 |
|
10.6 |
Resetting the menu ................................................................................................................ |
|
63 |
11 |
Print, store and call-up measurement results........................................... |
64 |
|
11.1 |
Pin allocation RS232C interface............................................................................................ |
65 |
|
11.2 |
Interface parameters .............................................................................................................. |
|
66 |
11.3 |
Output interval ........................................................................................................................ |
|
68 |
11.4 |
Call up and print out measuring results............................................................................... |
69 |
|
11.5 |
Print out currently preset drying parameters ...................................................................... |
70 |
|
11.6 |
Delete measuring results from memory............................................................................... |
71 |
|
11.7 |
Printout examples .................................................................................................................. |
|
72 |
12 |
General information concerning moisture analysis ................................. |
75 |
|
12.1 |
Application .............................................................................................................................. |
|
75 |
12.2 |
Basics ...................................................................................................................................... |
|
75 |
12.3 |
Adjustment to existing measuring method.......................................................................... |
75 |
|
12.4 |
Preparing a sample................................................................................................................. |
|
76 |
12.5 |
Sample material ...................................................................................................................... |
|
77 |
12.6 |
Sample size / originally weighted in quantity ...................................................................... |
77 |
|
12.7 |
Drying temperature................................................................................................................. |
|
78 |
12.8 |
Recommendations / Guidelines............................................................................................ |
78 |
|
13 |
Service, maintenance, disposal.................................................................. |
83 |
|
13.1 |
Cleaning................................................................................................................................... |
|
83 |
13.2 |
Service, maintenance............................................................................................................. |
84 |
|
13.2.1 |
Remove protective glass guard.......................................................................................................... |
84 |
|
13.2.2 |
Lamp change...................................................................................................................................... |
|
86 |
13.2.3 |
Replacing fuses.................................................................................................................................. |
|
87 |
13.3 |
Disposal................................................................................................................................... |
|
87 |
14 |
Instant help................................................................................................... |
|
88 |
14.1 |
Error messages....................................................................................................................... |
|
89 |
15 |
Declaration of conformity ........................................................................... |
91 |
|
DBS-BA-e-1311 |
3 |

1 Technical data
|
Data |
|
|
|
|
DBS 60-3 |
|
|
|
|
|
|
|
|
|
|
|
|
Radiator |
|
|
|
Halogen (1 x 400 W) |
|
|
|
|
|
|
|
|
|
|
|
|
|
Temperature range |
|
|
|
50°C - 200°C |
|
|
|
|
|
|
|
1°C increments selectable |
|
|||
|
|
|
|
|
|
|||
|
|
|
|
|
|
|
|
|
|
Maximum load (Max) |
|
|
|
|
60 g |
|
|
|
|
|
|
|
|
|
|
|
|
Minimum weight (min) |
|
|
|
|
0.02 g |
|
|
|
|
|
|
|
|
|
|
|
|
Warm-up time |
|
|
|
|
2 h |
|
|
|
|
|
|
|
|
|
|
|
|
Readability (d) |
|
|
Weighing mode |
|
0.001g |
|
|
|
|
|
|
|
|
|
|
|
|
|
|
Moisture analysis mode |
0.01 % |
|
|||
|
|
|
|
|
||||
|
|
|
|
|
|
|
|
|
|
Reproducibility |
|
|
|
|
0.001 g |
|
|
|
„Weighing mode“ |
|
|
|
|
|
|
|
|
|
|
|
|
|
|
|
|
|
|
|
|
|
|
|
|
|
|
|
|
|
|
Initial weight 2 g: |
0.15 % |
|
|
|
Reproducibility |
|
|
|
|
|
|
|
|
|
|
|
Initial weight 5g |
0.05 % |
|
|
|
|
„Weighing mode“ |
|
|
|
|
|
||
|
|
|
|
|
|
|
|
|
|
|
|
|
|
Initial weight 10 g |
0.02 % |
|
|
|
|
|
|
|
|
|
||
|
|
|
|
Standard drying (AUTO / TIME)) |
|
|
||
|
Drying modes |
|
|
Step drying (STEP) |
|
|
|
|
|
|
|
Rapid drying (RAPID) |
|
|
|||
|
|
|
|
|
|
|||
|
|
|
|
Slow drying (SLOW) |
|
|
|
|
|
Linearity |
|
|
|
|
± 0.003 g |
|
|
|
|
|
|
|
|
|
|
|
|
Stabilization time (typical) |
|
|
|
|
3 sec. |
|
|
|
|
|
|
|
|
|
|
|
|
Recommended adjustment |
|
|
|
|
50g (F1) |
|
|
|
weight, not added (class) |
|
|
|
|
|
|
|
|
|
|
|
|
|
|
|
|
|
|
|
|
|
|
|
||
|
Environmental conditions |
|
|
• |
5°C….+40°C ambient temperature |
|
||
|
|
|
• |
max 85% air humidity non-condensing |
|
|||
|
|
|
|
|
||||
4 |
DBS-BA-e-1311 |

Switch-off criterion |
• |
AUTO |
|
|
|
|
The drying is finished when the preset weight loss |
||||
|
|
||||
|
|
(∆M ) remains constant for 30 seconds. |
|||
|
• |
TIME |
|
|
|
|
|
The drying is finished after the preset time, 1 minute |
|||
|
|
– 4 hours (1 minute increments) |
|||
|
|
or 12 hours can be selected |
|||
|
• |
Manual (STOP button) |
|||
|
|
|
|
|
|
Sample dishes included |
Ø 95 mm |
|
|
|
|
|
|
|
|
|
|
Weighing Units |
[M/W] |
|
|
[%] moisture |
|
|
|
|
|
|
|
|
[D/W] |
|
|
[%] dry mass: |
|
|
|
|
|
|
|
|
[M/D] |
|
|
ATRO* dry mass |
|
|
|
|
|
|
|
|
[W/D] |
|
|
ATRO* moisture |
|
|
|
|
|
|
|
|
[GRAM] |
|
|
Gram display |
|
|
|
|
|
||
Internal memory |
Method memory |
|
10 memory locations for drying |
||
|
|
|
|
|
programs, see chap. 9.1 |
|
Sample memory |
|
100 memory locations for measuring |
||
|
|
|
|
|
results, see chap. 11 |
Interface |
|
|
|
|
RS232 |
|
|
|
|
||
Dimensions (B x D x H) |
|
|
Housing 202 x 336 x 157 mm |
||
Available drying room |
|
|
|
Ø 95 mm, 20 mm high |
|
Net weight |
|
|
|
|
4.2 kg |
Electric Supply |
|
|
220 – 240 V AC 50/60 Hz |
||
Power consumption |
|
|
|
|
Rating 430 VA |
Voltage fluctuations |
|
|
|
|
Within ±10 % |
Power line fuse |
|
|
|
|
3.15 A, 250V |
Interrupting rating of fuse |
|
|
|
|
35 A |
Pollution Degree |
|
|
|
2 |
|
|
|
|
|
|
|
Overvoltage Category |
|
|
|
|
Category II |
|
|
|
|
|
|
Altitude |
|
|
|
|
Up to 2000 m |
|
|
|
|
||
Installation Site |
|
|
device may only be used indoors |
||
|
|
|
|
|
|
DBS-BA-e-1311 |
5 |
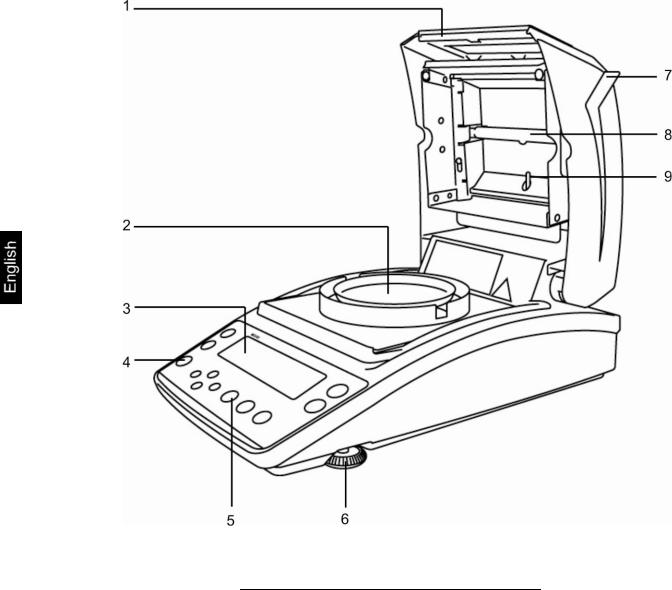
2 Appliance overview
Front view:
Pos. Description
1Viewing panel
2Sample dish
3Display
4Bubble level
5Keyboard
6Adjustable foot
7Heated cover
8Halogen lamp
9Temperature sensor
6 |
DBS-BA-e-1311 |
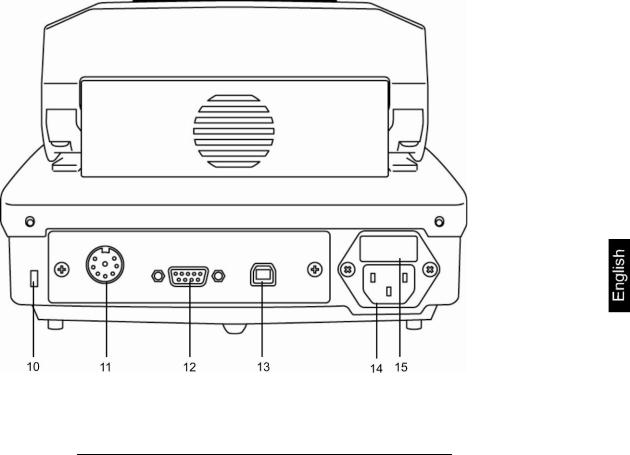
Rear view:
Pos. Description
10Anti-theft protection device connection
11Not documented
12RS232
13USB, not documented
14Mains connection socket
15Fuse box
DBS-BA-e-1311 |
7 |

2.1Overview of display
No. |
Display |
Description |
|
|
|
|
|
1 |
|
Currently loaded drying program, see chap. 9.1 |
|
|
|
|
|
2 |
|
Illuminates during communication with external devices. |
|
|
|
|
|
3 |
|
• The stability display indicates that the weighing value is |
|
|
|
stable. |
|
|
|
• Highlights current setting in the menu. |
|
|
|
|
|
4 |
|
The indicator will mark the measuring result |
|
|
|
|
|
5 |
Drying mode |
Status display during drying |
|
|
|
|
|
|
AUTO |
|
Heating-up period |
|
|
|
|
|
|
|
|
|
+ see chap. 9.2.1.1 |
|
Preset drying temperature is |
|
|
reached. The drying is finished |
|
|
|
|
|
|
|
|
when ∆M constant. |
|
|
|
|
|
TIME |
|
Heating-up period |
|
|
|
|
|
|
|
|
|
+ see chap. 9.2.1.2 |
|
Preset drying temperature is |
|
|
reached. The drying is finished |
|
|
|
|
when the preset drying time has |
|
|
|
expired. |
|
|
|
|
8 |
DBS-BA-e-1311 |

|
RAPID |
|
Heating-up period “pre-heating |
|
|
|
|
|
|
|
step” |
|
|
|
|
|
+ see chap. 9.2.1.3 |
|
The pre-heating step is switched |
|
|
on until “∆M pre-heating step” is |
|
|
|
|
|
|
|
|
constant. |
|
|
|
|
|
|
|
Temperature is lowered to the |
|
|
|
preset drying temperature. |
|
|
|
|
|
|
|
Preset drying temperature is |
|
|
|
reached. |
|
|
|
The drying is finished when the |
|
|
|
preset completion criterion is |
|
|
|
fulfilled. |
|
|
|
|
|
SLOW |
|
Heating-up period |
|
|
|
|
|
|
|
|
|
+ see chap. 9.2.1.4 |
|
Preset drying temperature is |
|
|
reached. |
|
|
|
|
|
|
|
|
The drying is finished when the |
|
|
|
preset completion criterion is |
|
|
|
fulfilled. |
|
|
|
|
|
STEP |
|
Heating-up period step 1 |
|
|
|
|
|
|
|
|
|
|
|
Drying step 1 |
|
+ see chap. 9.2.1.5 |
|
|
|
|
|
|
|
|
|
Heating-up period step 2 |
|
|
|
|
|
|
|
Drying step 2 |
|
|
|
|
|
|
|
Heating-up period step 3 |
|
|
|
|
|
|
|
Drying step 3 |
|
|
|
|
DBS-BA-e-1311 |
9 |
6 |
|
|
Previous drying time |
|
|
|
|
|
|
||
|
|
|
|
|
|
7 |
|
|
Current temperature |
|
|
|
|
|
|
||
|
|
|
|
|
|
8 |
|
|
Result display, see chap. 9.2.2 |
||
|
|
|
|
|
|
|
|
|
|
|
|
|
|
|
|
|
|
|
|
% |
M/W |
|
[%] moisture |
|
|
|
|
|
|
|
|
|
D/W |
|
[%] dry mass: |
|
|
|
|
|
|
|
|
|
M/D |
|
ATRO dry mass |
|
|
|
|
|
|
|
|
|
W/D |
|
ATRO moisture |
|
|
|
|
|
|
|
|
g |
Gram |
|
Gram display |
|
|
|
|
||
|
|
|
|
|
|
9 |
Basic displays |
|
|
|
|
|
|
|
|
|
|
|
|
|
Weight display |
|
|
|
|
|
|
|
|
|
|
|
Display % moisture |
|
|
|
|
|
|
||
|
|
|
Menu access via MENU button |
||
|
|
|
|
||
|
|
|
Equipment is in Ready mode, see chap. 8.4. |
||
|
|
|
|
||
0 |
Current menu selection |
|
|||
|
|
|
|||
|
UNIT |
Equipment is in menu „Display of results“, see chap. 9.2.2 |
|||
|
|
|
|||
|
COMSET |
Equipment is in menu „Interface parameters“, see chap. 11.2 |
|||
|
|
|
|||
|
CODE |
Equipment is in menu „Sample denomination“, see chap. 10.1 |
|||
|
|
|
|||
|
CAL |
Equipment is in menu „Adjustment“, see chap. 6 |
|||
|
|
|
|||
|
Equipment is in menu „Printer“, see chap. 11.3 – 11.5 |
||||
|
|
|
|
|
|
10 |
DBS-BA-e-1311 |
A |
|
Status display „Equipment“ |
||
|
|
|
|
|
|
|
Top |
Is displayed when the heated cover |
|
|
|
|
|
is open. |
|
|
|
|
|
|
|
|
|
Flashes when the heated cover |
|
|
|
|
needs to be closed. |
|
|
|
|
|
|
|
|
|
Goes out when heated cover is |
|
|
|
|
closed |
|
|
|
|
|
|
|
Centre |
|
Is displayed when the heated cover |
|
|
|
|
is open. |
|
|
|
|
|
|
|
|
|
Goes out when heated cover is |
|
|
|
|
closed |
|
|
|
|
|
|
|
|
|
Flashes when drying process is |
|
|
|
|
active |
|
|
|
|
|
|
|
Bottom |
|
Indicates that a sample is in the |
|
|
|
|
sample dish. |
|
|
|
|
|
|
|
|
|
Flashes when a sample needs to be |
|
|
|
|
loaded. |
|
|
|
|
|
|
|
|
|
Goes out if there is no sample in |
|
|
|
|
the sample dish. |
|
|
|
|
|
|
|
|
|
Indicates that a sample is in the |
|
|
|
|
sample dish. |
|
|
|
|
|
|
|
|
|
Flashes if taring is required. |
|
|
|
|
|
|
|
|
|
Goes out if no sample dish is in |
|
|
|
|
place. |
|
|
|
|
|
|
|
|
|
Indicates upon switch-on that the |
|
|
|
|
dish holder is installed. |
|
|
|
|
|
|
|
|
|
Flashes upon switch-on if the dish |
|
|
|
|
holder is not installed. |
|
|
|
|
|
DBS-BA-e-1311 |
11 |

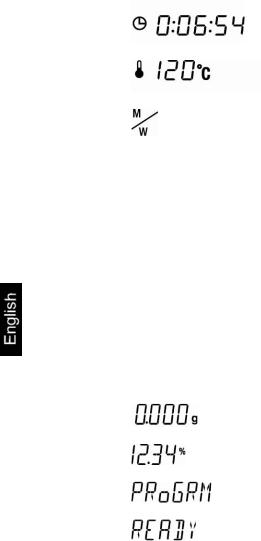
2.1.1 Display examples
During drying:
After drying:
1 Loaded drying program |
+ see chap 9.1 |
2Previous time
3Current temperature
4 |
Unit „Display of results“ |
+ see chap. 9.2.2 |
|
5 |
Preset drying mode / |
|
+ see chap. 9.2.1 |
|
Status display drying |
|
+ see chap. 2.1 |
6 |
Current moisture content in %. |
|
|
|
During drying with |
can be switched in ∆M (see chap. 9.2.1.1). |
|
7 |
Drying process active |
|
+ see chap. 2.1 |
8 |
Measuring result indicator |
|
|
9 |
Measuring value (unit in the preset result display) |
+ see chap. 9.2.2 |
|
12 |
DBS-BA-e-1311 |

2.2Keyboard overview
Turn on/off
• Call up menu
•Selecting a menu item to the left.
•Scroll back
•Scroll to next page
•Selection of a menu item in clockwise direction
•Taring
•Zeroing
•Activate menu item
•Save setting
DBS-BA-e-1311 |
13 |

•Exit menu
•Back to moisture analysis mode
•Quit
Start drying
Complete drying
Numerical input, see chap. 7.1.1
14 |
DBS-BA-e-1311 |

3 Basic Information (General)
3.1Proper use
The device purchased by you is designed for a fast and reliable determination of material moisture in liquid, porous and solid materials by applying the method of thermogravimetrics.
3.2Improper Use
Impacts and overloading exceeding the stated maximum load (max) of the device, minus a possibly existing tare load, must be strictly avoided.
Balance may be damage by this.
Never operate device in explosive environment. The serial version is not explosion protected.
The structure of the balance may not be modified. This may lead to incorrect weighing results, safety-related faults and destruction of the moisture analyser.
The moisture analyser may only be used according to the described conditions. Other areas of use must be released by KERN in writing.
3.3Warranty
Loss of warranty due to
•Our conditions in the operation manual are ignored
•The appliance is used outside the described uses
•The appliance is modified or opened
•mechanical damage and damage caused by media, liquids
•natural wear and tear
•The appliance is improperly set up or incorrectly electrically connected
•The measuring system is overloaded
3.4Monitoring of Test Resources
In the framework of quality assurance the measuring-related properties of the moisture analyser and, if applicable, the testing weight, must be checked regularly.
The responsible user must define a suitable interval as well as type and scope of this test. Information is available on KERN’s home page (www.kern-sohn.com) with regard to the monitoring of balance test substances and the test weights required for this. In KERN's accredited DKD calibration laboratory test weights and balances may be calibrated (return to the national standard) fast and at moderate cost.
DBS-BA-e-1311 |
15 |
3.5Danger Information
 WARNING
!The moisture analyser is used to analyse the moisture content of materials. This instrument must be used exclusively for this purpose. Any other usage may cause a risk to personnel, damage to the equipment or other material damage.
!The moisture analyser should be used mainly for the drying of aqueous substances.
!The moisture analyser may not be used in a hazardous area.
!The appliance may only be operated and maintained by trained personnel.
!Carefully read this operation manual before setup and commissioning, even if you are already familiar with KERN appliances.
!This moisture analyser is a robust precision instrument, however, it must be handled with care to ensure many years of trouble-free operation.
!Never make any modifications or design changes to the equipment whatsoever. Always use original spare parts and accessories.
16 |
DBS-BA-e-1311 |

!Make sure that liquids do not get in contact with the interior of the device, the connections at the rear of the device and the peripherals (connected PC or printer).
If you spill liquid on the device, disconnect it immediately.
Afterwards do not operate the moisture analyzer and have it checked by a competent KERN stockist before any further use.
!Never store materials on the equipment.
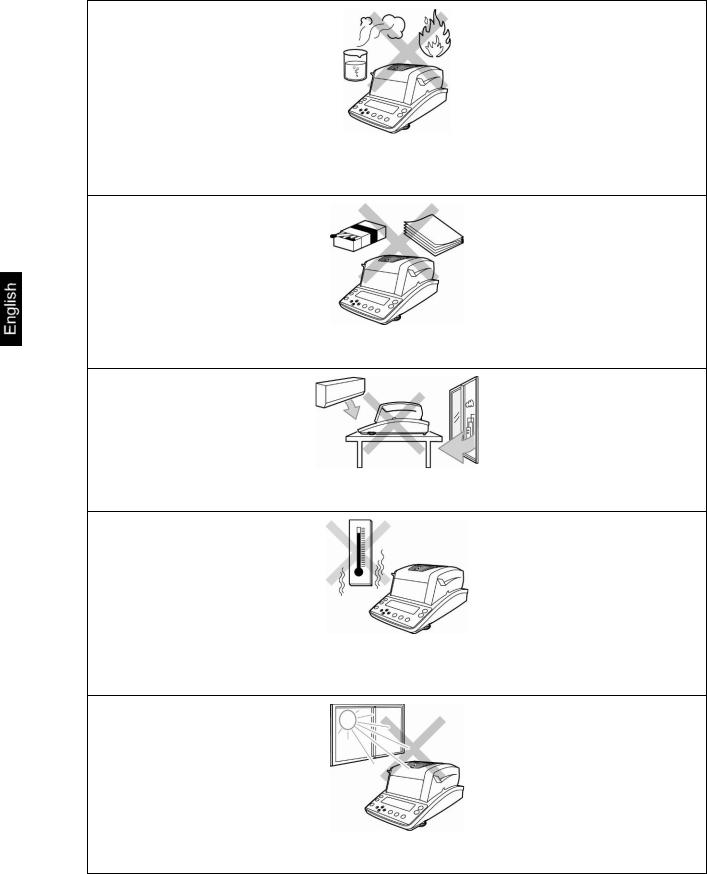
!Never place combustible materials on, under or next to the equipment, as the environment of the instrument heats up to a high temperature.
DBS-BA-e-1311 |
17 |

!Explosive, easily flammable samples and samples that go into a chemical reaction when subjected to heat, may not be analysed with the moisture analyser.
!Sample materials emitting toxic substances must be dried with a special extraction system in place. Create an environment that prevents the inhalation of vapours hazardous to health.
!Sample materials developing aggressive vapours (e. G. Acids) may cause corrosion problems on some parts of the device.
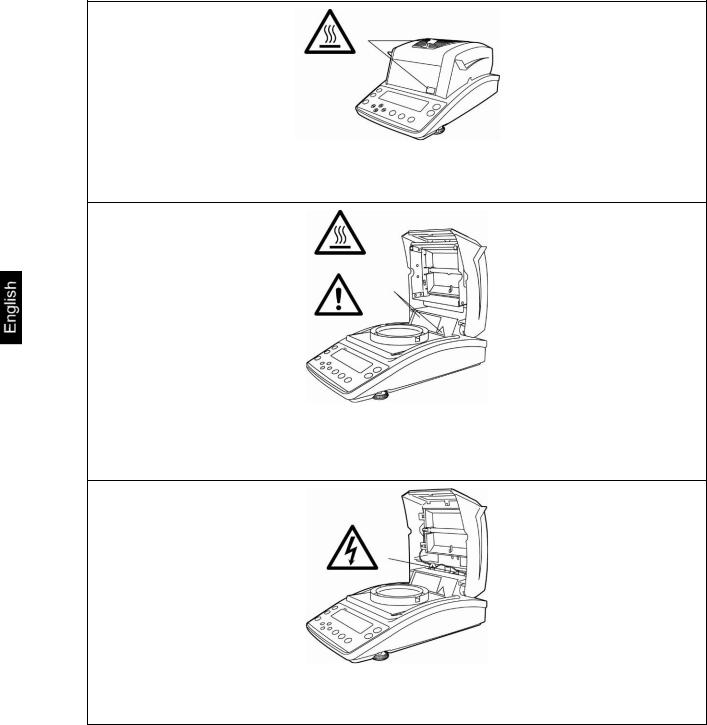
!Careful when removing the sample. The sample itself, the sample dish and the heating unit may be very hot.
!Maintain sufficient space in the environment of the equipment to prevent heat build-up (distance from the equipment 20cm, upwards 1m).
!Do not operate the humidity analyser in areas with hazard of explosion
!Do not place anythin which may interfere the unplugging
!The power plug must be easily accessible
18 |
DBS-BA-e-1311 |

 Hazards during and after measuring
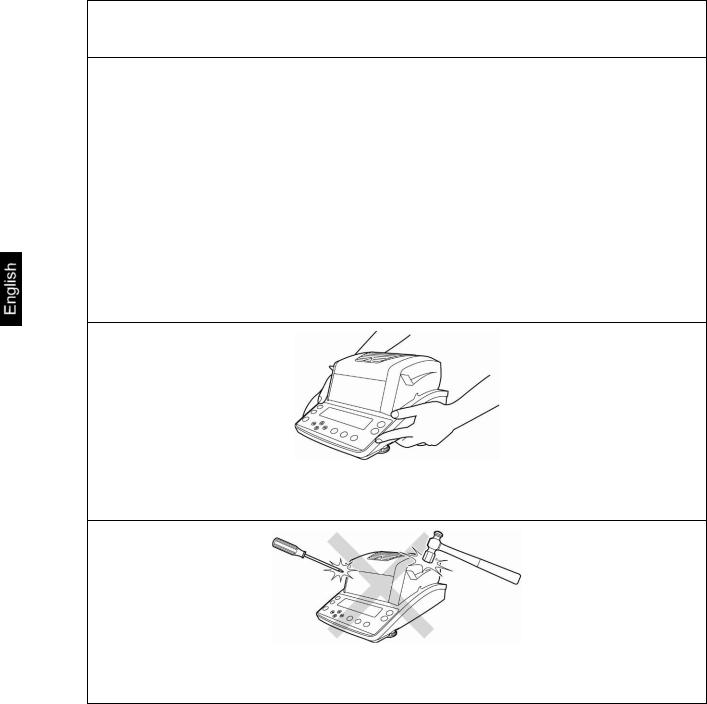
!Ensure correct installation of all components, see chap. 5.3
!Careful when removing the sample. The sample itself, the sample dish and the heating unit may be very hot.
!Use the sample retainer at all times as it allows safe working and prevents burns.
!Individual parts of the case (e. g. the ventilation grids) may heat up considerably during operation. Therefore, only take hold of the equipment by the marked handles.
DBS-BA-e-1311 |
19 |
3.5.1 “Hazard information” sticker
!Ventilation grilles and inspection windows may become very hot during operation
!Always open heated cover completely.
!Do not use any combustible sample materials.
!Disconnect the equipment from the power supply prior to changing a lamp, see chap. 13.2.2.
20 |
DBS-BA-e-1311 |
4 Transport and storage
4.1Testing upon acceptance
When receiving the appliance, please check packaging immediately, and the appliance itself when unpacking for possible visible damage.
4.2Packaging / return transport
Keep all parts of the original packaging for a possibly required return.
Only use original packaging for returning.
Prior to dispatch disconnect all cables and remove loose/mobile parts.
Reattach possibly supplied transport securing devices.
Secure all parts such as the glass wind screen, the weighing platform, power unit etc. against shifting and damage.
5 Unpacking, Setup and Commissioning
5.1Installation Site, Location of Use
The unit is designed to achieve reliable weighing results under normal conditions of use.
You will work accurately and fast, if you select the right location for the appliance.
DBS-BA-e-1311 |
21 |
On the installation site observe the following:
!Remove explosive materials from the immediate vicinity.
Emerging vapours, sample dish and all parts of the sample chamber are hot!
!Remove easily flammable materials from the immediate vicinity.
!Protect the device against direct draughts due to open windows and doors.
!Avoid extreme heat and temperature fluctuations e.g. due to installation next to radiators.
!Avoid direct sunlight
22 |
DBS-BA-e-1311 |

!Never store materials on the equipment.
!Protect the appliance against high humidity, vapours and dust,
!Major display deviations (incorrect weighing results) may be experienced should electromagnetic fields (e.g. due to mobile phones or radio equipment), static electricity accumulations or instable power supply occur. Change location or remove source of interference.
!Avoid static charging of the material to be weighed, weighing container and windshield
!Place the device on a firm, level surface.
!Avoid jarring during weighing.
!Do not expose the device to extreme dampness for longer periods of time. Non-permitted condensation (condensation of air humidity on the appliance) may occur if a cold appliance is taken to a considerably warmer environment. In this case, acclimatize the disconnected appliance for ca. 2 hours at room temperature.
!Operate the device only indoors.
DBS-BA-e-1311 |
23 |
5.2Unpacking and checking
Open package, take out the appliance and accessories. Verify that there has been no damage and that all packing items are present.
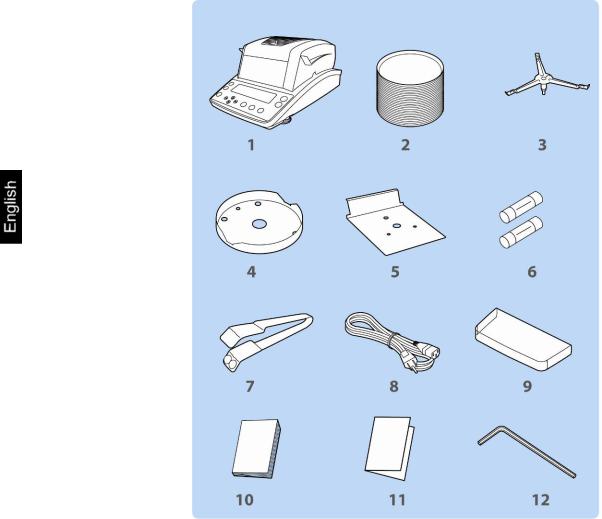
5.2.1 Scope of delivery / serial accessories
1.Instrument
2.50 disposable sample dishes
3.Dish holder
4.Wind protection ring
5.Heat shield
6.Spare fuse
7.Removal aid
8.Power cable
9.Protective cover
10.Operating instructions
11.Menu overview
12.Hexagonal socket wrench
24 |
DBS-BA-e-1311 |

5.3Placing
The moisture analyser is delivered in pieces. Check immediately after unpacking all the parts that the delivery is complete and assemble the individual components as described below.
1. Fit heat shield.
2. Install wind protection ring, ensuring correct positioning, on .
DBS-BA-e-1311 |
25 |
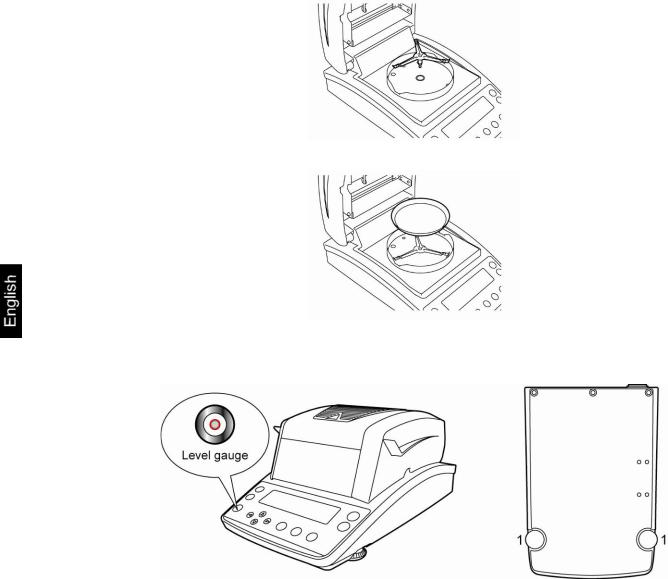
3.Install dish holder, ensuring correct positioning, on .
4.Fit sample dish.
5.Level the equipment with foot screws [1] until the air bubble of the water balance is in the prescribed circle.
26 |
|
DBS-BA-e-1311 |
|
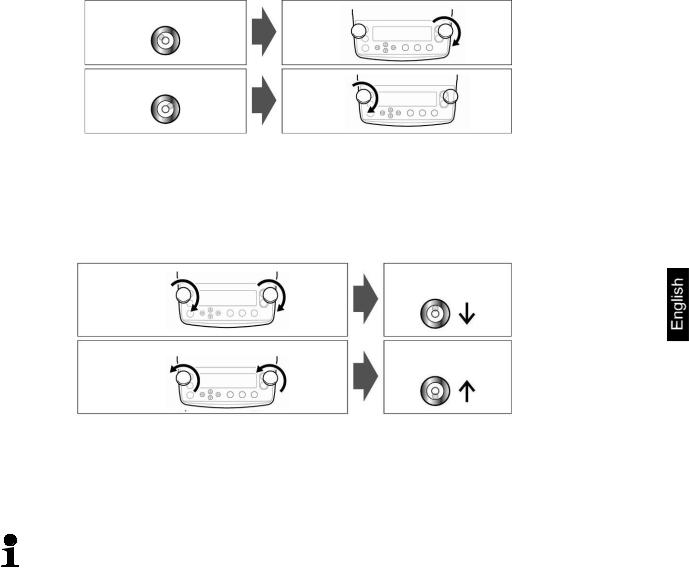
Fig. 1
Fig. 2
If the air bubble is at the lefthand edge, level the equipment with the righthand foot screw, see Fig.1.
If the air bubble is at the righthand edge, level the equipment with the lefthand foot screw, see Fig.2.
Fig. 3
Fig. 4
If both foot screws are turned simultaneously in clockwise direction, the air bubble will move forwards (see Fig.3).
If both foot screws are turned simultaneously in anticlockwise direction, the air bubble will move backwards (see Fig.4).
Check levelling regularly.
DBS-BA-e-1311 |
27 |
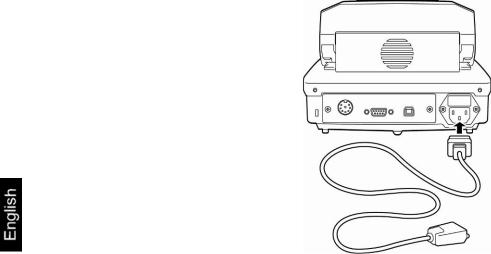
5.4Mains connection
Power supply is provided via the supplied mains cable.
Check, whether the voltage acceptance on the scales is set correctly. Do not connect the appliance to the power grid unless the information on the appliance (sticker) matches the local mains voltage.
Important:
Does the labelling match the local mains voltage?
-
-
Do not connect if mains voltages are different! If matching, connect the scales.
The moisture analyzer must be connected to a standard socket with earth terminal. Do not eliminate the protective effect by using an extension lead without earth terminal. For power supplies from power grids without earth terminals call a specialist to establish equivalent protection according to the relevant installation regulations.
-The power plug must be always accessible.
-Before operating, check all cables for damage.
-Guide the cables so that they cannot become damaged or interfere with the measuring process.
28 |
DBS-BA-e-1311 |
Loading...