

Page 1

KERN & Sohn GmbH
Ziegelei 1
D-72336 Balingen
E-Mail: info@kern-sohn.com
Phone: +49-[0]7433- 9933-0
Fax: +49-[0]7433-9933-149
Internet: www.kern-sohn.com
Operating manual
Analytical balance
KERN ABP
Version 1.0
2018-08
GB
ABP-BA-e-1810
Page 2

2 ABP-BA-e-1810
GB
KERN ABP
Version 1.0 2018-08
Operating manual
Analytical balance
Contents
1 Technical data ................................................................................................ 5
2 Declaration of conformity ............................................................................. 7
3 Appliance overview ....................................................................................... 8
3.1 Components .............................................................................................................................. 8
3.2 Keyboard ................................................................................................................................. 10
3.2.1 Numeric entry ........................................................................................................................... 11
3.3 Display ..................................................................................................................................... 12
4 Basic Information (General ) ........................................................................ 15
4.1 Proper use ............................................................................................................................... 15
4.2 Improper Use .......................................................................................................................... 15
4.3 Warranty .................................................................................................................................. 15
4.4 Monitoring of Test Resources ............................................................................................... 16
5 Basic Safety Precauti on s ............................................................................ 16
5.1 Pay attention to the instructions in the Operation Manual ................................................ 16
5.2 Personnel training .................................................................................................................. 16
6 Transport and storage ................................................................................. 16
6.1 Testing upon acceptance ...................................................................................................... 16
6.2 Packaging / return transport ................................................................................................. 17
7 Unpacking, Setup and Commissioning ..................................................... 19
7.1 Installation Site, Location of Us e .......................................................................................... 19
7.2 Unpacking and checking ....................................................................................................... 19
7.2.1 Placing ...................................................................................................................................... 21
7.3 Mains connection ................................................................................................................... 24
7.3.1 Turning On the Power .............................................................................................................. 25
7.4 Initial Commissioning ............................................................................................................ 25
7.5 Connection of peripheral devices ......................................................................................... 26
8 Adjustment ................................................................................................... 26
8.1 Automatic adjustment via PSC function .............................................................................. 26
8.2 Time-controlled automatic adjustment ................................................................................ 28
8.3 Manual adjustment via key [CAL-key] .................................................................................. 29
8.3.1 Setting adjustment function for CAL-key .................................................................................. 29
8.3.2 Adjustment with internal weight ................................................................................................ 29
8.3.3 Adjustment test with internal weight ......................................................................................... 30
8.3.4 Adjustment with external weight ............................................................................................... 30
8.3.5 Adjustment test with external weight ........................................................................................ 31
8.4 Adjustment log ....................................................................................................................... 32
8.5 Regular inspections ............................................................................................................... 33
9 Verification ................................................................................................... 35
Page 3

ABP-BA-e-1810 3
10 Basic Operation ........................................................................................... 36
10.1 Activate standard weighing mode ........................................................................................ 36
10.2 Simple weighing ..................................................................................................................... 36
10.3 Taring ....................................................................................................................................... 37
10.4 Underfloor weighing ............................................................................................................... 38
10.5 Switch off the balance............................................................................................................ 39
10.6 Switch-over weighing unit ..................................................................................................... 39
10.7 Change readability (1D/10D) (not availab le for verified models) ....................................... 39
10.8 Display Tare / Net / Gross ...................................................................................................... 40
10.9 Display decimal dot as point or comma............................................................................... 41
11 Menu ............................................................................................................. 42
11.1 Navigation in the menu .......................................................................................................... 42
11.1.1 Standard weighing mode ..................................................................................................... 43
11.1.2 Weighing settings ................................................................................................................. 44
11.1.3 System Settings ................................................................................................................... 46
11.1.4 Application settings .............................................................................................................. 48
11.2 Menu overview ........................................................................................................................ 48
11.3 Resetting the menu ................................................................................................................ 49
11.4 Menu Lock ............................................................................................................................... 50
11.5 Log menu settings .................................................................................................................. 51
11.6 Menu history ........................................................................................................................... 52
12 Description of individual functions ............................................................ 53
12.1 Zero setting and tare function ............................................................................................... 53
12.2 Zero tracking function............................................................................................................ 53
12.3 Auto Tare function .................................................................................................................. 54
12.4 Settings for Stability and Response ..................................................................................... 55
12.4.1 Stability and reaction settings via „Smart Setting display“ (without invoking menu) ............ 55
12.5 Dosing...................................................................................................................................... 56
12.5.1 Standstill width ..................................................................................................................... 57
12.6 Weighing Units ....................................................................................................................... 58
12.7 User administration log-in function ...................................................................................... 58
13 Balance settings .......................................................................................... 65
13.1 Screen saver ........................................................................................................................... 65
13.2 Display settings in operating mode ...................................................................................... 65
13.3 Balance identification no. ...................................................................................................... 66
13.4 Entering date and time ........................................................................................................... 66
13.5 Date format .............................................................................................................................. 66
13.6 Brightness of display ............................................................................................................. 67
13.7 Audio signal on pressing key or display of stability .......................................................... 67
13.8 User language ......................................................................................................................... 67
14 Application Functions ................................................................................. 68
14.1 Parts counting ........................................................................................................................ 69
14.1.1 Settings ................................................................................................................................ 69
14.1.2 Setting the display ................................................................................................................ 71
14.1.3 Part counting ........................................................................................................................ 71
14.1.4 Change settings ................................................................................................................... 72
14.1.5 Switching between counting and weighing mode ................................................................ 72
14.2 Percent determination............................................................................................................ 73
14.2.1 Settings ................................................................................................................................ 73
14.2.2 Setting the display ................................................................................................................ 75
14.2.3 Performing calculation of percentage .................................................................................. 76
14.2.4 Change settings ................................................................................................................... 76
14.2.5 Switching between percentage and weighing mode ............................................................ 77
Page 4

4 ABP-BA-e-1810
14.3 Determining the density of solid matter and fluids ............................................................ 77
14.4 Totalization .............................................................................................................................. 78
14.5 Formulation ............................................................................................................................. 81
14.5.1 Free formulating ................................................................................................................... 81
14.5.2 Define and process formulations ......................................................................................... 84
14.5.3 Change recipe ...................................................................................................................... 88
14.5.4 Sample log (KERN YKB-01N): ............................................................................................. 89
14.6 Preparing buffer solutions..................................................................................................... 90
14.7 Sample preparation ................................................................................................................ 93
14.7.1 Changing saved samples ..................................................................................................... 95
14.8 Statistics .................................................................................................................................. 96
14.9 Control weighing and target weighing ................................................................................. 98
14.9.1 Target weighing .................................................................................................................... 98
14.10 Control weighing (Pass / Fail evaluation) ...................................................................... 100
14.11 Minimum sample weight .................................................................................................. 102
15 Interfaces .................................................................................................... 103
15.1 Connect printer ..................................................................................................................... 103
15.2 Connect PC ........................................................................................................................... 103
15.3 Connect serial devices / connect programmable controller (SPS / PLC) ....................... 104
15.4 Interface cable (RS232) ........................................................................................................ 104
15.5 Data transmission format .................................................................................................... 105
15.6 Interface commands............................................................................................................. 106
15.7 Communication parameters ................................................................................................ 110
15.7.1 Select standard setting ....................................................................................................... 110
15.7.2 User defined settings (display example for KERN YKB-01N ............................................. 111
15.8 Issue functions ..................................................................................................................... 113
15.8.1 Automatic data output / Auto Print function ........................................................................ 113
15.8.2 Continuous data output ...................................................................................................... 114
15.8.3 GLP Output Function ......................................................................................................... 116
15.8.4 Defining output details ........................................................................................................ 117
15.10 USB connection ............................................................................................................... 118
15.10.1 Edit weighing data, adjustment logs and screenshots to USB medium ............................ 119
15.10.2 Data transfer by means of barcode reader ........................................................................ 122
16 Servicing, maintenance, disposal ............................................................ 123
16.1 Cleaning ................................................................................................................................ 123
16.2 Servicing, maintenance ....................................................................................................... 124
16.3 Disposal ................................................................................................................................. 125
17 Instant help ................................................................................................. 125
18 Ionizer (factory option) .............................................................................. 126
18.1 General .................................................................................................................................. 126
18.2 Basic Safety Precautions .................................................................................................... 126
18.3 Technical Data ...................................................................................................................... 128
18.4 Commissioning ..................................................................................................................... 128
18.5 Maintenance and cleaning ................................................................................................... 130
Page 5

ABP-BA-e-1810 5
1 Technical data
KERN ABP 100-4M ABP 100-5DM
Item no./ Type TABP 100-4M-A TABP 100-5DM-A
Readability (d) 0.0001 g 0.00001 g / 0.0001 g
Weighing range (max) 120 g 52 g / 120 g
Minimum load (Min) 0.01 g 0.001 g
Verification value (e) 0.001 g 0.001 g
Verification class I I
Reproducibility 0.0001 g 0.00002 g / 0.0001 g
Linearity ± 0.0002 g ± 0.00005 g / 0.0002 g
Stabilization time 2 s 2 s / 8 s
Adjustment weight internal
Warm-up time 8 h
Weighing Units mg, g, ct (unverified)
g, ct (verified)
Smallest component weight
for part counting
1mg (under lab conditions*)
10 mg (under normal conditions**)
Reference quantities at
piece counting
1 - 100
Weighing plate, stainless steel ø 91mm
Dimensions caisse
(l x L x h) [mm]
212 x 367 x 345 212 x 411 x 345
Dimensions
Glass wind screen [mm]
170 x 165 x 220 mm (weighing space)
Net weight (kg) 7 8
Permissible
ambient condition
+5° C to +40° C
Humidity of air 20 ~ 85 % relative (not condensing)
Power pack
Input voltage
AC 100 -240 V, 300 mA 50/60Hz
or
AC 100 -240 V, 320 – 190 mA 50/60Hz
Weighing scales
Input voltage
DC 12 V, 1,0 A
Degree of pollution 2
Overvoltage category Category II
Metres in height Up to 2000 m
Place of installation In sealed rooms only
Interfaces RS-232, USB (type B, PC connection), USB host (type A)
Page 6

6 ABP-BA-e-1810
KERN ABP 200-4M ABP 200-5DM ABP 300-4M
Item no./ Type TABP 200-4M-A TABP 200-5DM-A TABP 300-4M-A
Readability (d) 0.0001 g 0.00001 g / 0.0001 g 0.0001 g
Weighing range (max) 220 g 102 g / 220 g 320 g
Minimum load (Min) 0.01 g 0.001 g 0.01 g
Verification value (e) 0.001 g 0.001 g 0.001 g
Verification class I I I
Reproducibility 0.0001 g 0.00005 g / 0.0001 g 0.00015 g
Linearity ± 0.0002 g ± 0.0001 g / 0.0002 g ± 0.0003 g
Stabilization time 2 s 2 s / 8 s 2 s
Adjustment weight internal
Warm-up time 8 h
Weighing Units mg, g, ct (unverified)
g, ct (verified)
Smallest component weight
for part counting
1mg (under lab conditions*)
10 mg (under normal conditions**)
Reference quantities at
piece counting
1 - 100
Weighing plate, stainless steel ø 91mm
Dimensions caisse
(l x L x h) [mm]
212 x 367 x 345 212 x 411 x 345 212 x 367 x 345
Dimensions
Glass wind screen [mm]
170 x 165 x 220 mm (weighing space)
Net weight (kg) 7 8 7
Permissible
ambient condition
+5° C to +40° C
Humidity of air 20 ~ 85 % relative (not condensing)
Power pack
Input voltage
AC 100 -240 V, 300 mA 50/60Hz
or
AC 100 -240 V, 320 – 190 mA 50/60Hz
Weighing scales
Input voltage
DC 12 V, 1,0 A
Degree of pollution 2
Overvoltage category Category II
Metres in height Up to 2000 m
Place of installation In sealed rooms only
Interfaces RS-232, USB (type B, PC connection), USB host (type A)
Page 7

ABP-BA-e-1810 7
* Smallest component weight for part counting - under lab conditions:
There are ideal ambient conditions for high-resolution counting
The parts to be counted are not scattered
** Smallest component part for part counting – under normal conditions:
There are unsteady ambient conditions (draft, vibrations)
The parts to be counted are being scattered
2 Declaration of conformity
The current EC/EU Conformity declaration can be found online in:
www.kern-sohn.com/ce
For verified weighing scales (= weighing scales assessed for
conformity) a declaration of
conformity is included in the scope of
delivery.
Page 8

8 ABP-BA-e-1810
3 Appliance overview
3.1 Components
Models d = 0.0001 g Mode. d = 0.00001 g/0.0001 g
Pos. Description
1 Keyboard
2 Bubble level
3 Display
4 Windshield
5 Weighing pan
6 Fastening point ionizer (optional)
7 Glass wind screen
8 USB host port
9 Levelling screw
Page 9

ABP-BA-e-1810 9
Rear view:
Models d = 0.0001 g Models d = 0.00001 g/0.0001 g
Pos. Description
10 Serial interface (RS232)
11 USB device
12 Port for ionizer
13 Connector for AC adapter
14 Fastening point for anti-theft device
16 Fastening lug for anti-theft chain or wire
17 Port for power pack
18 External electronics box
Page 10

10 ABP-BA-e-1810
3.2 Keyboard
Button Description
Function
Short key pressing
Long key pressing
In menu
[ON/OFF]
Switching between
operating and
standby mode
-
Return to
weighing mode
[1d/10d]
Readability
change
[CAL]
Start adjustment
Call setup menu
"Adjustment"
-
[PRINT]
Data output to
external device
(weighing mode)
Call setup menu
"Print"
[TARE]
Taring
Zeroing
Call setup "Zero
Setting / Taring"
[MENU]
• Call up menu
• Call application
specific settings
• Call Statistics
[Ionizer]
Ionizer on/off
(Factory option)
Call Setup Menu
Ionizer
(Factory option)
[OK] - -
Confirm
input
Page 11

ABP-BA-e-1810 11
[R]
Change reaction
setting for display
Select menu
item.
Navigation button
[UNIT]
Weighing mode:
Switch-over weighing
unit.
Counting mode:
Display single weight
Calculate
percentage:
Display reference
weight
Call setup menu
"Units"
Scroll forward in
menu
Navigation button
[F]
Switch over
weighing mode /
application mode
Scroll
backwards in
menu
Navigation button
[S]
Change stability
setting of display
Select menu
item.
Navigation button
3.2.1 Numeric entry
Button
Description
Function
Navigation button
Flashing digit (0 – 9) or
increase character (, [blank], -, A – Z)
Navigation button
Flashing digit (0 – 9) or
reduce character (, [blank], -, A – Z)
Navigation button
Digit selection to the right
Navigation button
Digit selection to the left
Navigation button
Confirm entry
ESC Cancel input
Page 12

12 ABP-BA-e-1810
3.3 Display
Apart from the display of the weighing result, all functions of the menu may be
accessed from here. The display will vary, depending on the weighing scale being
either in operating or setting mode.
Special keys (e.g. CAL-, TARE-, PRINT-key) provide fast and purposeful access to
the individual setup menu. The navigation keys allow intuitive control.
Display example operating mode:
The display is sub-divided into four areas.
No.
Status Description
1 Operating
mode
Current application
2 User field Display of logged-in user and current time
Data output to external devices
USB-storage medium is connected
Menu Lock
3 Measuring
Value
Display of weighing result in current weighing unit
Stability display
Net weight
Tare weight
Gross weight
Hold function enabled
Zero indicator
Negative weighed value
Net weight during formulating
Tolerance marker
Capacity display
The non-verified value is given in
brackets in verified scales.
Page 13

ABP-BA-e-1810 13
4
Status display
Current settings
Minimum initial weight
Settings for Stability and Response
Printer settings
Auto Print function active
Flashing during automatic Output
continuous output enabled
Flashing during continuous Output
Weighing settings
Dispensing mode
Zero tracking (Autom. zero point
correction)
Statistics
Error reports
Adjustment required (PSC-function)
Inadequate power supply
Defective USB-connection
Display example setting mode:
After pressing the MENU-key in weighing mode the display will change to setting
mode.
Example of illustration: For calling system settings see chap. 11.1.3
Page 14

14 ABP-BA-e-1810
Symbol Description Application icons
Level 1
Selecting an
application
Weighing mode
Parts counting
Percent determination
Density determination <Solid matter>
Density determination <Fluids>
Totalization
Formulation
Autom. Processing a recipe
Produce a buffer solution
Produce an analysis sample
Symbol Description Application icons
Level 2
Icon of selected
application
Available settings will be shown on level 1.
Level 1
Weighing settings
Dosing
Zero tracking
Level 1
System Settings
System Settings
Settings <Print>
Settings <Save data>
Settings <Communication>
Settings <Adjustment>
Settings <User>
Level 1
History
The last 10 menu steps will be displayed.
For further information about the operation of the display, see chap. 11.1
The icon for the
application selected
will be shown
Page 15

ABP-BA-e-1810 15
4 Basic Information (General)
4.1 Proper use
The balance you purchased is intended to determine the weighing value of material
to be weighed. It is intended to be used as a “non-automatic balance”, i.e. the
material to be weighed is manually and carefully placed in the centre of the weighing
pan. As soon as a stable weighing value is reached the weighing value can be read.
4.2 Improper Use
Do not use balance for dynamic add-on weighing procedures, if small amounts of
goods to be weighed are removed or added. The “stability compensation“ installed in
the balance may result in displaying an incorrect measuring value! (Example: Slowly
draining fluids from a container on the balance.)
Do not leave permanent load on the weighing pan. This may damage the measuring
system.
Impacts and overloading exceeding the stated maximum load (max) of the balance,
minus a possibly existing tare load, must be strictly avoided. Balance may be
damage by this.
Never operate balance in explosive environment. The serial version is not explosion
protected.
The structure of the balance may not be modified. This may lead to incorrect
weighing results, safety-related faults and destruction of the balance.
The balance may only be used according to the described conditions. Other areas of
use must be released by KERN in writing.
4.3 Warranty
Warranty claims shall be voided in case
• Our conditions in the operation manual are ignored
• The appliance is used outside the described uses
• The appliance is modified or opened
• Mechanical damage or damage by media, liquids, natural wear and tear
• The appliance is improperly set up or incorrectly electrically connected
• The measuring system is overloaded
Page 16

16 ABP-BA-e-1810
4.4 Monitoring of Test Resources
In the framework of quality assurance the measuring-related properties of the
balance and, if applicable, the testing weight, must be checked regularly. The
responsible user must define a suitable interval as well as type and scope of this test.
Information is available on KERN’s home page (www.kern-sohn.com with regard to
the monitoring of balance test substances and the test weights required for this. In
KERN's accredited DKD calibration laboratory test weights and balances may be
calibrated (return to the national standard) fast and at moderate cost.
5 Basic Safety Precautions
5.1 Pay attention to the instructions in the Opera tion Manual
Carefully read this operation manual before setup and
commissioning, even if you are already familiar with KERN balances.
All language versions contain a non-binding translation.
The original German is binding.
5.2 Personnel training
The appliance may only be operated and maintained by trained personnel.
6 T ransport and storage
6.1 Testing upon acceptance
When receiving the appliance, please check packaging immediately, and the
appliance itself when unpacking for possible visible damage.
Page 17

ABP-BA-e-1810 17
6.2 Packaging / return transport
Keep all parts of the original packaging for a possibly
required return.
Only use original packaging for returning.
Prior to dispatch disconnect all cables and remove
loose/mobile parts.
Illustration example models d = 0.0001 g
Reattach possibly supplied transport securing devices.
Secure all parts such as the glass wind screen, the
weighing platform, power unit etc. against shifting and
damage.
Put network adapter and accessories in the small box
Lift scale with both hands
Page 18

18 ABP-BA-e-1810
Page 19

ABP-BA-e-1810 19
7 Unpacking, Setup and Commissioning
7.1 Installation Site, Location of Use
The balances are designed in a way that reliable weighing results are achieved in
common conditions of use.
You will work accurately and fast, if you select the right location for your balance.
Therefore, observe the following for the installation site:
• Place the balance on a firm, level surface;
• Avoid extreme heat as well as temperature fluctuation caused by installing
next to a radiator or in the direct sunlight;
• Protect the balance against direct draughts due to open windows and doors;
• Avoid jarring during weighing;
• Protect the balance against high humidity, vapours and dust;
• Do not expose the device to extreme dampness for longer periods of time.
Non-permitted condensation (condensation of air humidity on the appliance)
may occur if a cold appliance is taken to a considerably warmer environment.
In this case, acclimatize the disconnected appliance for ca. 2 hours at room
temperature.
• Avoid static charge of weighed items or weighing container.
If electro-magnetic fields or static charge occur, or if the power supply is unstable
major deviations on the display (incorrect weighing results) are possible. In that case,
the location must be changed.
7.2 Unpacking and checking
Remove device and accessories carefully from packaging, remove packaging
material and place device at the planned work place. Check if that there has been no
damage and that all packing items are present.
Page 20

20 ABP-BA-e-1810
Scope of delivery / serial accessories
Pos. Description
1 Balance
2 Weighing pan
3 Carrier weighing pan
4 Centring ring (Models d = 0.0001 g only)
5 Protective cover
6 Mains adapter
7 Holder for adapter cable (Models d = 0.0001 g only)
8 Operating manual
9 External electronics box
10 Guard plate
11 Windshield
12 Multi-function weighing platform
13 Support multi-function weighing platform
Models d = 0.00001 g/0.0001 g only:
Page 21

ABP-BA-e-1810 21
7.2.1 Placing
The right place is decisive for the accuracy of the weighing results of highresolution precision balances (see chap. 7.1).
1. Attach holder for adapter cable (Models d = 0.0001 g only)
Pull off protective film and attach as shown on image.
2. Installation of weighing plate
Models d = 0.0001 g
Attach centering ring, carrier of weighing plate and weighing plate in order.
Attach the safety hood
Page 22

22 ABP-BA-e-1810
Mode. d = 0.00001 g/0.0001 g
Attach centering ring, carrier of weighing plate and weighing plate in order.
Attach the safety hood
Place the guard plate carefully in the weighing chamber
Page 23

ABP-BA-e-1810 23
3. Install the multi-function weighing platform (Models = 0.00001 g/0.0001 g
only)
Disconnect scale from power
supply.
Remove standard weighing plate as
shown on image.
Install multi-function weighing
platform together with the support.
Pay due attention to centring!
Application examples:
Adjustment will be required after exchanging the weighing platform, for
instructions see chap. 8
Standard weighing platform Support multi-function weighing platform
Page 24

24 ABP-BA-e-1810
4. Levelling
Level balance with foot screws until the air bubble of the water balance is in the
prescribed circle.
Check levelling regularly
7.3 Mains connection
Select a country-specific power plug and insert it in the mains adapter.
Check, whether the voltage acceptance on the scales is set correctly.
Do not connect the scales to the power mains unless the information on
the scales (sticker) matches the local mains voltage.
Only use KERN original mains adapter. Using other makes requires
consent by KERN.
Important:
Before starting your weighing balance, check the mains cable for
damage.
Ensure that the power unit does not come into contact with liquids.
Ensure access to mains plug at all times.
Page 25

ABP-BA-e-1810 25
7.3.1 Turning On the Power
Models d = 0.0001 g Mode. d = 0.00001 g/0.0001 g
Supply power to balance via mains
adapter. The display lights up and the
balance carries out a selftest. Internal
adjustment will be started automatically
(See chap.8.3.2). The motor noise of the
loading system for the internal
adjustment weight will be audible.
You can cancel the adjustment by
pressing the ON/OFF key.
The selftest is completed when „OFF“
appears on the display. From that point
onwards the weighing scale will be in
standby mode. The weighing balance will
remain switched on as long as it is
connected to the power supply.
To turn the display on/off, press the
ON/OFF key.
When the log-in function is enabled, use
the navigation keys to select the
respective user and enter password, see
chap. 12.7
7.4 Initial Commissioning
In order to obtain exact results with the electronic balances, your balance must have
reached the operating temperature (see warming up time chap.1). During this
warming up time the balance must be connected to the power supply (mains,
accumulator or battery). The accuracy of the balance depends on the local
acceleration of gravity. Strictly observe hints in chapter Adjustment.
Page 26

26 ABP-BA-e-1810
7.5 Connection of peripheral devices
Before connecting or disconnecting of additional devices (printer, PC) to the data
interface, always disconnect the balance from the power supply.
With your balance, only use accessories and peripheral devices by KERN, as they
are ideally tuned to your balance.
8 Adjustment
As the acceleration value due to gravity is not the same at every location on earth,
each balance must be coordinated - in compliance with the underlying physical
weighing principle - to the existing acceleration due to gravity at its place of location
(only if the balance has not already been adjusted to the location in the factory). This
adjustment process must be carried out for the first commissioning, after each
change of location as well as in case of fluctuating environment temperature. To
receive accurate measuring values it is also recommended to adjust the balance
periodically in weighing operation.
•
Observe stable environmental conditions. A warming up time
(see chapter 1) is required for stabilization.
• Ensure that there are no objects on the weighing pan.
• Avoid vibration and air flow.
• Always carry out adjustment with the standard weighing platform in place.
• To cancel internal adjustment, press the ON/OFF key.
•
When an optional printer is connected and the GLP function is connected,
the adjustment log will be edited, see chap. 8.4
8.1 Automatic adjustment via PSC function
Force-compensated scales react sensitively to changes in temperature. The higher
the sensitivity of the scale, the more pronounced the effect. The temperature
controlled PSC function enables the scale to automatically correct this effect.
PSC stands for Perfect Self Calibration and facilitates fully automatic internal scale
adjustment by means of an internal weight, based on time and/or temperature
criteria.
Adjustment in weighing mode is carried out automatically under the following
conditions:
(1) If there is a change in ambient temperature (∆t 1°C)
(2) When about four hours has passed since the previous calibration.
(3) When the balance is switched from standby status to weighing mode
and condition (1) or (2) has been met.
Page 27

ABP-BA-e-1810 27
If one of the above conditions was met in
weighing mode, the weight symbol
flashes for about two minutes in order to
notify the pending adjustment; During
operation, the display will automatically
change and the motor sound of the weight
loading system is heard. In order to ensure
proper PSC operation, prevent vibrations and
air flow.
• The PSC function will be enabled throughout in verified models.
• Also, no measurements can be made during automatic adjustment.
• When the weight symbol
starts flashing while the weighing platform is
loaded the following message will appear
Unload weighing plate
• In order to prevent that adjustment is starting during a measuring
sequence, press the ON/OFF key immediately when the following display
appears.
This will cancel the adjustment and you can proceed with the measuring
sequence.
Sometime later adjustment will be requested again by the flashing weight
symbol .
Page 28

28 ABP-BA-e-1810
8.2 Time-controlled automatic adjustment
With the help of its internal adjusting weight and integrated clock the balance can be
set to carry out automatic adjustment at set times (up to three times daily). This
function is a very convenient function, when adjustment reports are desired to be
made for regular adjustments, or when wishing span adjustments during break times
to avoid interruption of measurement work.
The weight symbol blinks for about two minutes as notification of span calibration
before it begins. Automatic adjustment can be stopped by actuating the [ON/OFF]
key during this message.
Parameter setting:
Press and hold the CAL-key for approx.
3 sec. and the menu for <CAL key>
setting will be displayed.
Use the navigation keys to select <Timer
CAL> and confirm using the OK-key.
Select first time <Timer 1> and confirm
using the OK-key.
Select setting [on] or [off] and confirm
using the OK-key.
Select [Setting] to enter time.
Use the navigation keys to enter time
and confirm using the OK-key.
Repeat these operating steps to set the
time for <Timer 2> / <Timer 3>.
Page 29

ABP-BA-e-1810 29
8.3 Manual adjustment via key [CAL-key]
8.3.1 Setting adjustment function for CAL-key
It is possible to start the preset adjustment method without having to access the
menu. The Set Adjustment Procedure may be set by simply pressing the [CAL]-key
when in weighing mode.
Press and hold the CAL-key for approx. 3
sec until the <CAL key> setting menu
appears.
Confirm using the OK-key and the available
settings will be displayed.
Adjustment with internal weight, see chap. 8.3.2
For adjustment test using internal weight,
see chap. 8.3.3
Adjustment using external weight, see chap. 8.3.4
Adjustment test with external weight,
see chap. 8.3.5
Select Settings with the help of the navigation
keys and confirm using the OK-key.
Use the ON/OFF button to return into
weighing mode
8.3.2 Adjustment with internal weight
Ensure that the CAL-key is assigned to the <Internal Weight Calibration> function,
see chap. 8.3.1.
Press CAL key, adjustment is started.
After successful adjustment the balance
automatically returns to weighing mode.
In case of an adjustment error (e.g. objects
on the weighing plate) the display will show
an error message, repeat adjustment.
Page 30

30 ABP-BA-e-1810
8.3.3 Adjustment test with internal weight
During adjustment tests the balance automatically compares the saved value of the
adjustment weight with the actual value. This is only a check, i.e. no values are
changed.
Ensure that the CAL-key is assigned to the <Internal Weight Test> function, see
chap. 8.3.1.
To start the test, press the CAL-key.
The difference to the previous adjustment will
be displayed.
8.3.4 Adjustment with external weight
Ensure that the CAL-key is assigned to the <External Weight Calibration> function,
see chap. 8.3.1.
Press the CAL-key and the weight value for
the adjustment weight will be flashing on the
display. (To change the weight value, follow
the instruction on the display*).
Put the required adjustment weight carefully
in the centre of the weighing pan. Close wind
screen doors completely. Wait until the
request for removing the adjustment weight is
displayed.
Take away adjustment weight.
*The adjustment weight to be used depends on the capacity of the scale.
Carry out adjustment as near as possible to the balance’s maximum weight
(recommended adjustment weight see chap. 1). Weights of different nominal
values may be used for adjustment but are not optimal for technical
measuring. Info about test weights can be found on the Internet at:
http://www.kern-sohn.com
Page 31

ABP-BA-e-1810 31
8.3.5 Adjustment test with exter nal weight
Ensure that the CAL-key is assigned to the <External Weight Test> function,
see chap. 8.3.1.
Press the CAL-key and the weight value for
the adjustment weight will be flashing on the
display. (To change the weight value, follow
the instruction on the display).
Put the required adjustment weight carefully
in the centre of the weighing pan. Close wind
screen doors completely. Wait until the
request for removing the adjustment weight is
displayed.
The difference to the previous adjustment will
be displayed.
Page 32

32 ABP-BA-e-1810
8.4 Adjustment log
If an optional printer is connected and the GLP function enabled, this will be followed
by automatic log output after every adjustment.
Printout example (KERN YKB-01N):
CAL –INTERNAL
Mode of adjustment
KERN & Sohn GmbH
Company
TYPE
ABP 300-4M
Model
SN
D319300002
Serial no.
BALID
1234
Balance identification no
DATE
2018 Aug. 17
Date
TIME
09.14.21
Time
REF
200.0000g
Used adjustment weight
BFR
200.0001g
Before adjustment
AFT
200.0000g
After adjustment
-COMPLETE
-SIGNATURE-
Prepared by
+ For enabling / defining GLP-function see chap. 15.8.3
Page 33

ABP-BA-e-1810 33
8.5 Regular i nspections
The ABP series supports regular inspection of your scale. This function may be used
to check repeatability, off-centre stress (off-centre load errors) and linearity. The
instructions on the display support the implementation of individual steps.
Parameter setting:
Call up menu:
Press and hold the CAL-key for approx.
3 sec. and the menu for <CAL key>
setting will be displayed.
Use the navigation keys to select
<Periodic inspection> and confirm
using the OK-key.
1. Settings Repeatability
Select <Repeatability insp. 1> and
confirm using the OK-key.
Select desired setting and confirm using
the OK-key.
To enter the weight value for the test
weight, select <Weight value> and
confirm using the OK-key.
Use the navigation keys to enter the
value and confirm using the OK-key.
Repeat these operating steps to set all
other settings for
<Tolerance> / <Repeat Counts>.
Return to menu by .
2. Settings off-centre
load
Repeat these operating steps for
Settings as shown for "Item 1
Repeatability".
Page 34
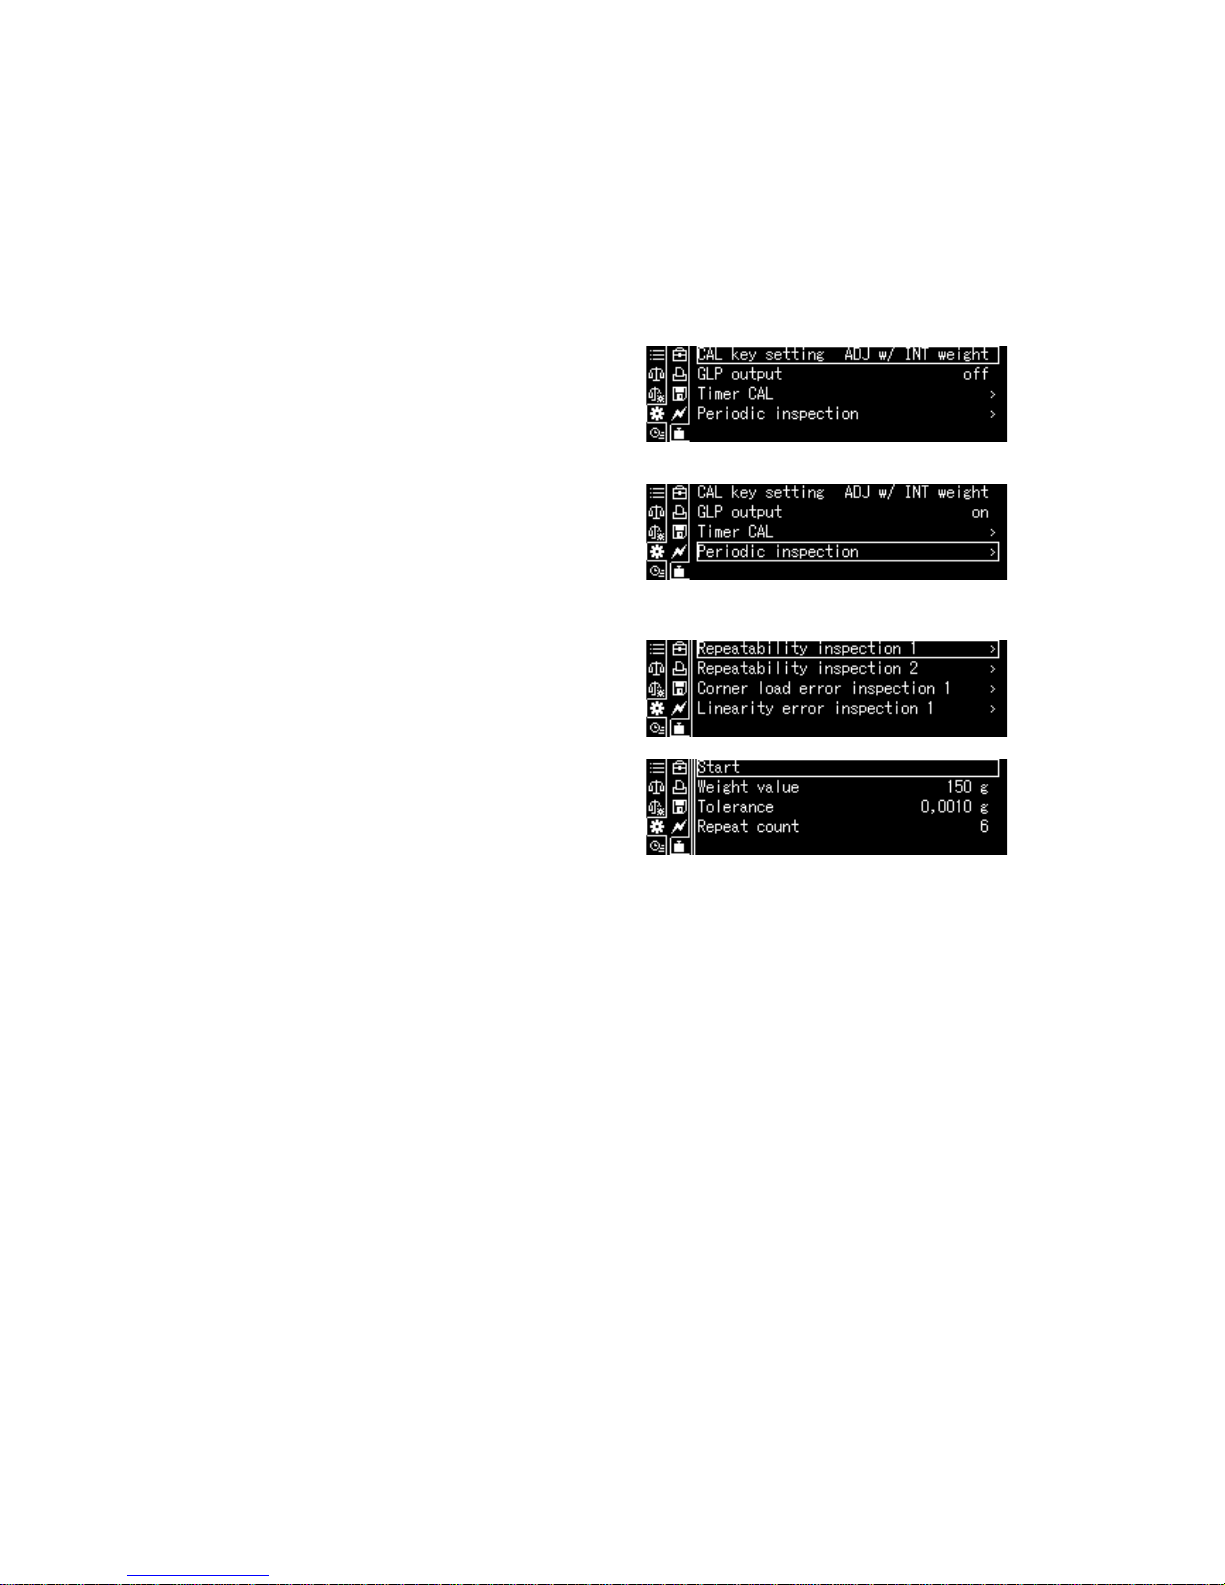
34 ABP-BA-e-1810
3. Settings linearization
Repeat these operating steps for
Settings as shown for "Item 1
Repeatability".
Performing test sequen ce :
Call up menu:
Press and hold the CAL-key for approx.
3 sec, the <CAL key> setting menu will
appear.
Use the navigation keys to select
<Periodic inspection> and confirm
using the OK-key.
Select desired test and confirm using the
OK-key.
Select <Start> and confirm using the
OK-key.
Follow the instructions on the display.
Page 35

ABP-BA-e-1810 35
9 Verification
General introduction:
According to EU directive 2014/31/EC balances must be officially verified if they are
used as follows (legally controlled area):
a) For commercial transactions if the price of goods is determined by weighing.
b) For the production of medicines in pharmacies as well as for analyses in the
medical and pharmaceutical laboratory.
c) For official purposes
d) For manufacturing final packages
In cases of doubt, please contact your local trade in standard.
Verification notes:
An EU type approval exists for balances described in their technical data as
verifiable. If a balance is used where obligation to verify exists as described above, it
must be verified and re-verified at regular intervals.
Re-verification of a balance is carried out according to the respective national
regulations. The validity for verification of balances in Germany is e.g. 2 years.
The legal regulation of the country where the balance is used must be observed!
Verification of the balance is invalid without the seal.
The seal marks attached on verified balances point out that the balance may
only be opened and serviced by trained and authorised specialist staff. If the
seal mark is destroyed, verification looses its validity. Please observe all
national laws and legal regulations. In Germany a re-verification will be
necessary.
Position of the official seals
Page 36

36 ABP-BA-e-1810
10 Basic Operation
10.1 Activate standard weighing mode
Status balance Action
The balance is now in stand-by
mode
Press the ON/OFF button.
Scale is in a different
operating mode
Press F -key
or
[ ] [ ]
Balance is in menu Press the ON/OFF key
After numeric input Repeatedly press the ON/OFF key.
10.2 Simple weighing
A warm-up time is required for stabilisation (see chap. 1).
Wait for zero display, reset to zero using TARE.
Place the goods to be weighed and close the wind screen doors
Wait until the stability display appears ( ).
Read weighing result.
When an optional printer is connected, the weighing value can be edited.
Print-out example with enabled GLP function (see chap. 15.8.3):
KERN & Sohn GmbH
Company
TYPE
ABP 300-4M
Model
SN
D319300002
Serial no.
BALID
1234
Balance identification no. (see chap. 13.3)
DATE
2018 Aug. 17
Date
TIME
09.14.21
Time
19.999[8] g
Measuring Value
-SIGNATURE-
prepared by
Page 37

ABP-BA-e-1810 37
Print-out example with disabled GLP function (see chap. 15.8.3):
19.999[8] g
Measuring Value
10.3 Taring
The dead weight of any weighing container may be tared away by pressing a button,
so that the following weighing procedures show the net weight of the goods to be
weighed.
Put vessel of goods to be weighed on weighing plate and close the wind
screen doors.
Wait until the stability display appears ( ), then press TARE. The weight of
the container is now internally saved.
Weigh the goods to be weighed and close the wind screen doors.
Wait until the stability display appears ( ).
Read net weight.
Note:
• The balance is able to only store one taring value at a time.
• When the balance is unloaded the
saved taring value is displayed with
negative sign.
•
To delete the stored tare value, remove load from weighing pan and
press TARE.
•
The taring process can be repeated any number of times. The limit is
reached when the whole weighing range is exhausted.
Page 38

38 ABP-BA-e-1810
10.4 Underfloor weighing
Objects unsuitable for placing on the weighing scale due to size or shape may be
weighed with the help of the flush-mounted platform.
Proceed as follows:
Switch off the balance.
Open closing cover (1) at the balance bottom.
Place weighing balance over an opening.
Attach weighed good to hook and carry out weighing procedure.
Fig.1: Underfloor weighing device
CAUTION
• Always ensure that all suspended objects are stable enough to hold the desired
goods to be weighed safely (danger of breaking).
• Never suspend loads that exceed the stated maximum load (max) (danger of
breaking)
Always ensure that there are no persons, an
imals or objects that might be damaged
underneath the load.
NOTICE
After completing the underfloor weighing the opening on the bottom of the balance
must always be closed (dust protection).
!
(1)
Page 39

ABP-BA-e-1810 39
10.5 Switch off the balance
Press the ON/OFF button. The balance is in standby
mode, that means that the balance is now in state readyfor-operation. Immediately after switching-on it is ready
for operation (press any key) without warm-up time.
To switch-off the balance completely, separate balance
from power supply.
When you see messages such as [Communication] do not disconnect scale
from power supply.
10.6 Switch-over weighing unit
To return the display to the units previously
enabled in the menu press the UNIT-key,
see chap. 12.6.
When switching-
on the balance, the unit in which the balance has been
switched off, will be displayed.
10.7 Change readability (1D/10D) (not av ailab le f o r veri fi ed mod els)
1d Display
10d Display
Page 40
40 ABP-BA-e-1810
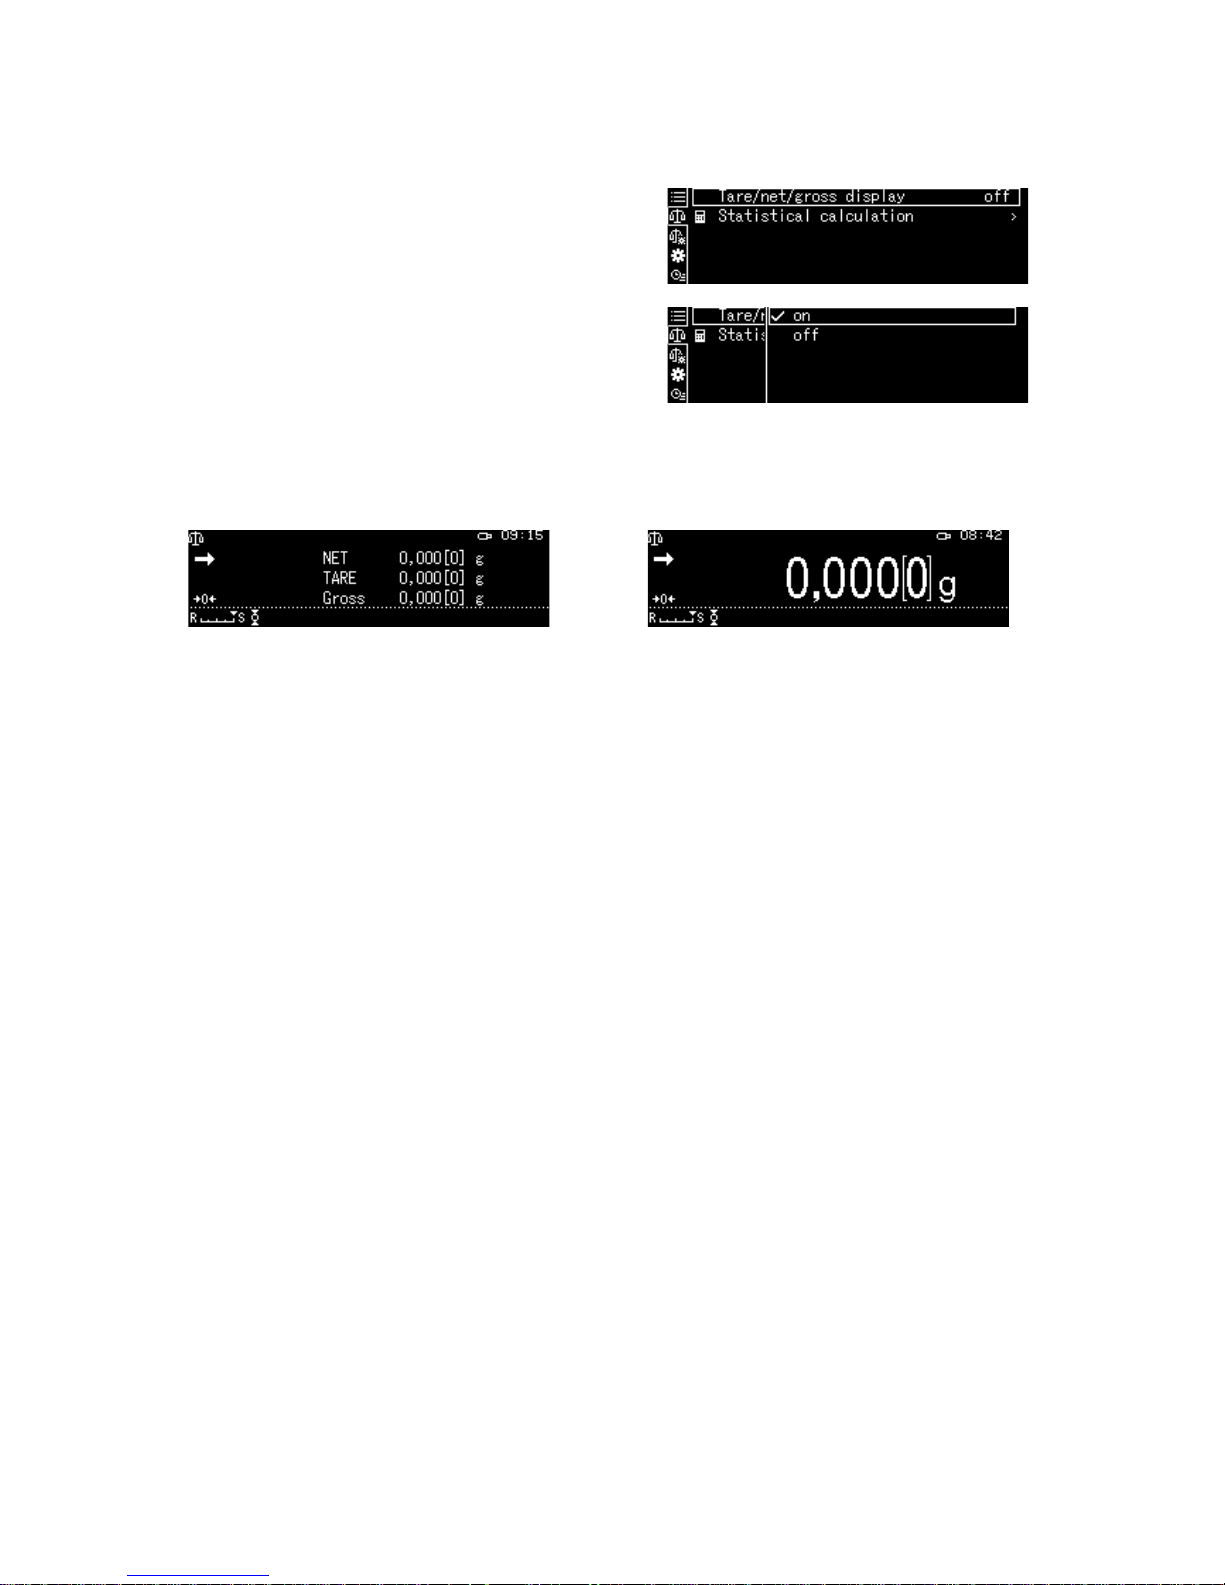
10.8 Display Tare / Net / Gross
In weighing mode press MENU button.
Select <Tare/net/gross display> and
confirm using the OK-key.
To display "Tara / Net / Gross"
Select <on> setting and confirm using the
OK-key.
Setting <on> Setting <off>
Page 41

ABP-BA-e-1810 41
10.9 Display decimal dot as point or comma
Select System Settings and confirm using the
OK-key.
Select <Decimal point setting> and confirm
using the OK-key.
Select desired setting [Period] or [Comma]
and confirm using the OK-key.
Use the ON/OFF button to return into
weighing mode
Page 42
42 ABP-BA-e-1810
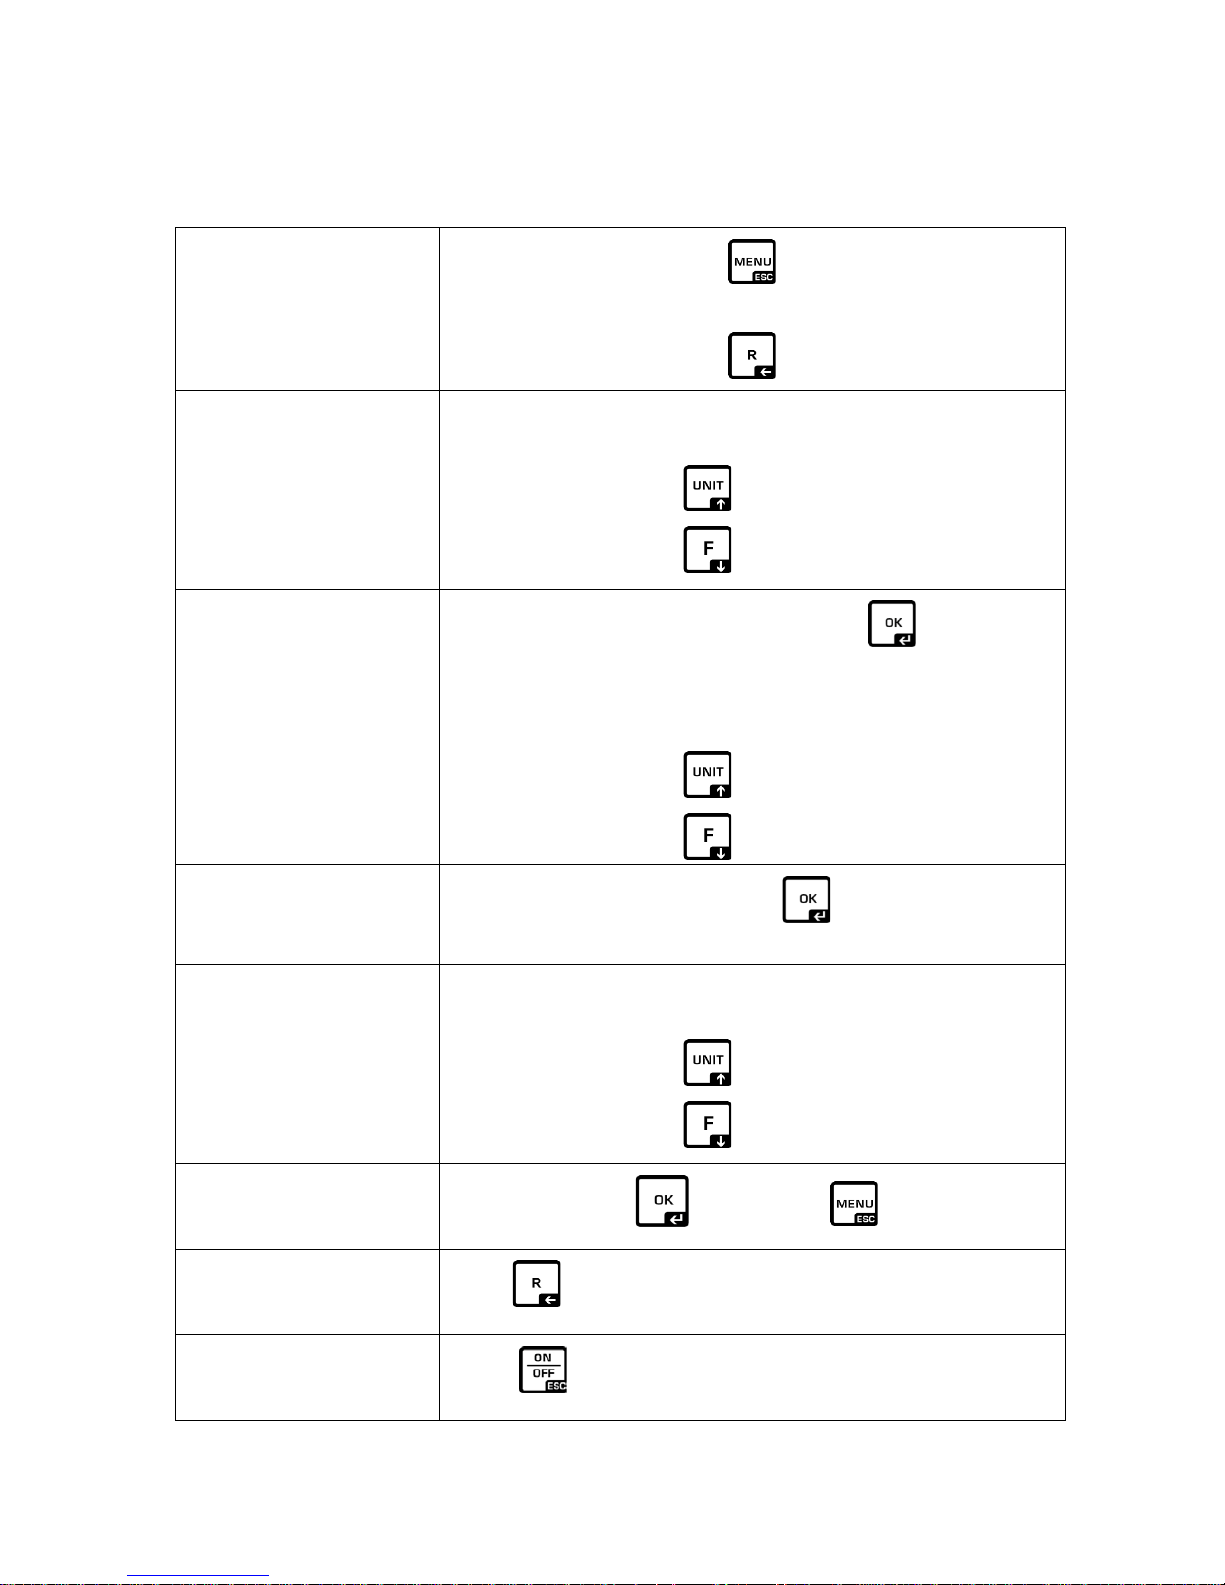
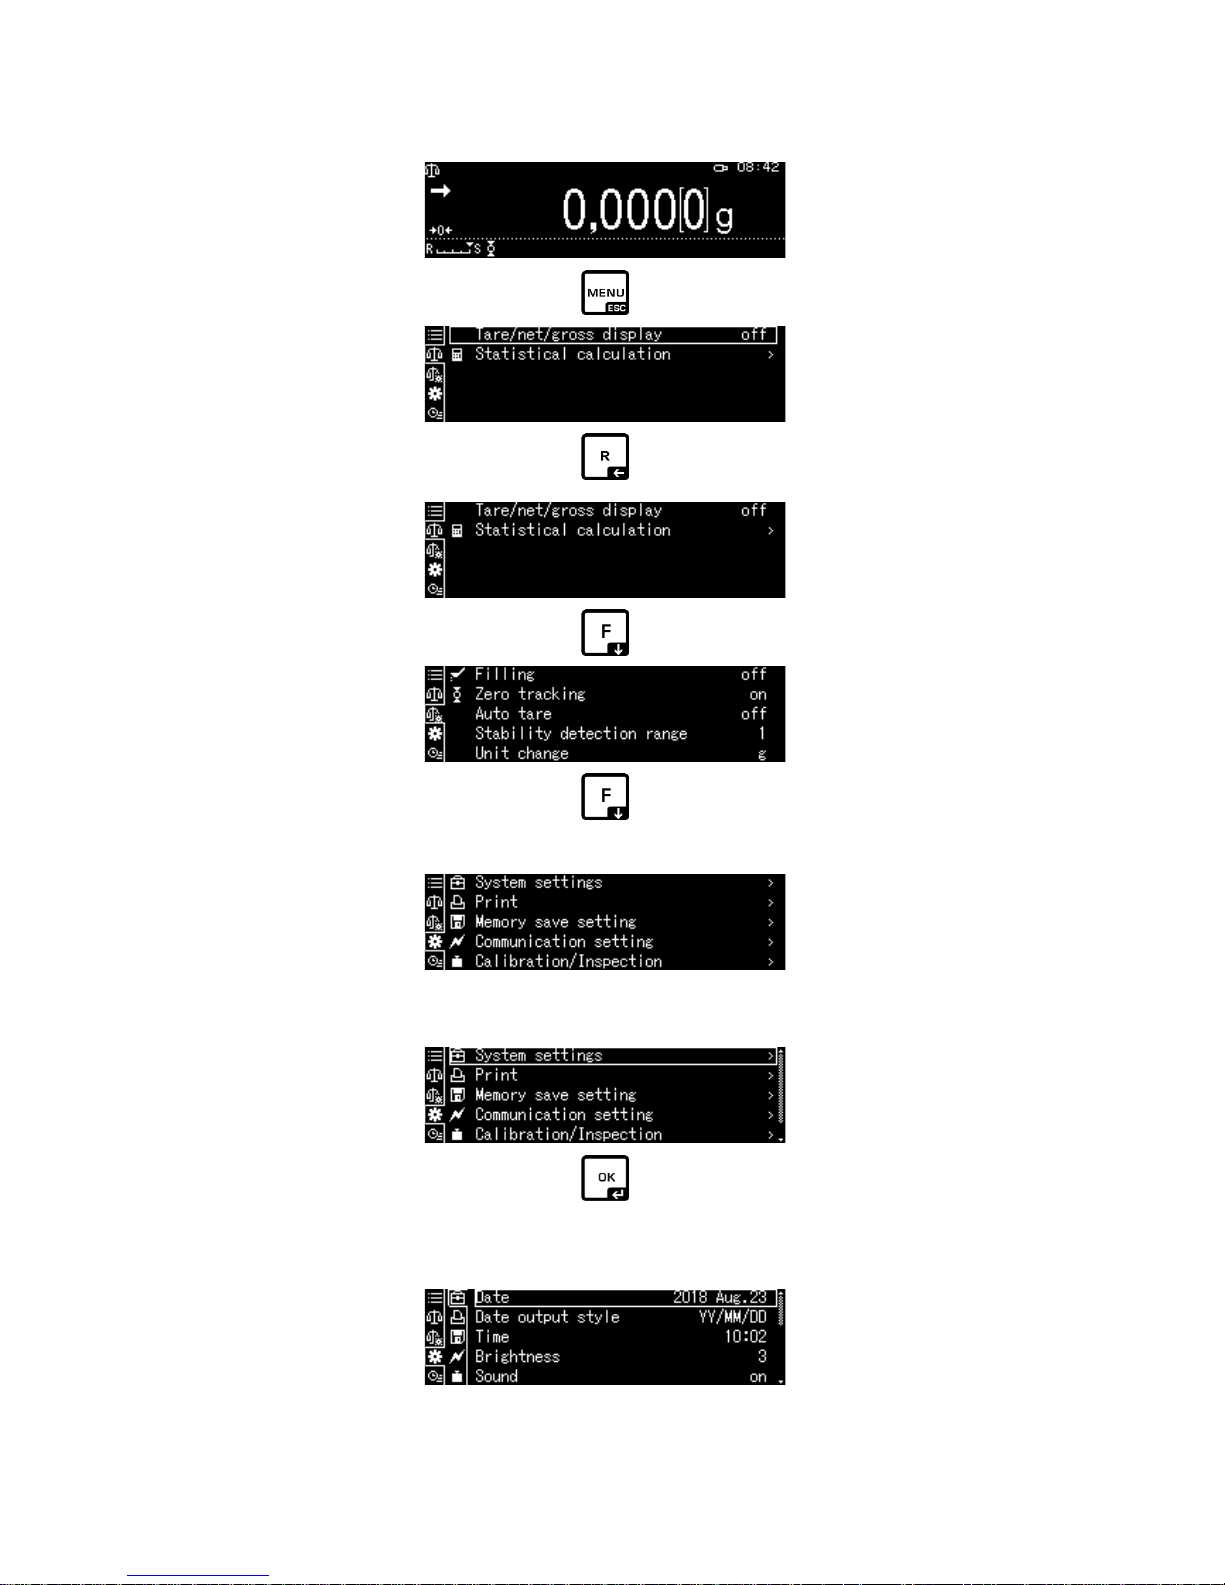
11 Menu
11.1 Navigation in the menu
Call up menu
Select menu block Use the navigation buttons to select the individual menu
blocks one by one.
Use the navigation key to scroll down.
Use the navigation key to scroll up.
Select menu item
Confirm selected menu block by pressing . The first
menu item of the selected menu block will be shown.
Use the navigation buttons to select the individual menu
items one by one.
Use the navigation key to scroll down.
Use the navigation key to scroll up.
Select setting
Confirm selected menu item with and the current
setting will be shown.
Change settings Use the navigation keys to switch over into the available
settings.
Use the navigation key to scroll down.
Use the navigation key to scroll up.
Confirm setting
Acknowledge with or reject with
Return to previous
menu
Press
Return to weighing
mode
Press
Page 43

ABP-BA-e-1810 43
Display examples:
General navigation:
All selectable functions and settings may be accessed by navigating the arrow keys [,
,,] and confirming by pressing the OK-key.
The framing will indicate the current
selection.
When the icon is displayed you can press the S-key to access a submenu.
If a scroll bar is shown, further parameters may be displayed by using the
navigation keys , .
Menu settings surrounded by square brackets are not available.
To return to the previous menu, press the R-key
Numerical input, see chap. 3.2.1.
11.1.1 Standard weighing mode
The list of available settings will be displayed
How to change settings
1. Tare/net/gross display
Use the navigation keys to select the desired
settings
, and confirm using the OK-key.
Page 44

44 ABP-BA-e-1810
2. Statistical calculation
A submenu will be available by pressing
if the icon is displayed.
Use the navigation keys to select the desired
setting
, and confirm using the
OK-key.
Use to return to the previous menu
11.1.2 Weighing settings
Page 45
ABP-BA-e-1810 45
The list of available settings will be displayed.
Confirm using the OK-key. The framing will indicate the current selection.
Select the desired settings using the F-key.
To change your selection, press the OK-key.
Use the navigation keys
, to select the desired settings and confirm using the OK-key.
Press the F-key to select additional settings and make changes as described above.
Page 46
46 ABP-BA-e-1810
11.1.3 System Settings
The list of available menu blocks will be displayed.
Confirm using the OK-key. The framing will indicate the current selection. Use the navigation
keys , to select the desired menu block (such as system settings).
Confirm selection by pressing the OK-key.
The list of available settings will be displayed.
Page 47
ABP-BA-e-1810 47
Use the navigation keys , to select the desired setting (such aus brightness).
To change your selection, press the OK-key.
Use the navigation keys
, to select the desired setting and confirm using the OK-key.
Press the F-key to select additional settings and make changes as described above.
Page 48

48 ABP-BA-e-1810
11.1.4 Application settings
The available applications will be displayed.
Press the S-key and use the navigation keys , to select the desired application, such as
part counting. The framing will indicate the current selection.
Confirm using the OK-key and the application specific settings will be displayed.
The application specific settings are described in the respective chapters, see chap. 14
11.2 Menu overview
The menu overview is part of the scale’s scope of delivery and supplied in
the form of a separate document.
Page 49

ABP-BA-e-1810 49
11.3 Resetting the menu
The <Menu reset> menu may be used to reset all scale settings to default settings.
• Factory settings are marked by a “*” in the menu oversight.
• If user management is enabled, menu resetting may only be made by
an authorised user.
1. Call System Settings
see chap. 11.1.3.
2. Enable/disable function
Confirm using the OK-key.
Use the navigation keys , to select
<Menu reset> and confirm using the OK-key.
Password prompt will be displayed. For how
to enter a password, see chap. 3.2.1
"Numeric input" and confirm using the OK-
key.
Either
Enter user-defined password
or
Enter standard password [9999] (default
setting)
Confirm query by pressing the OK-key
The balance returns automatically into
weighing mode. All user and application
specific settings will be reset to default setting.
Page 50

50 ABP-BA-e-1810
11.4 Menu Loc k
The menu setting operations can be locked so that the settings cannot be
inadvertently changed. This menu lock is set with the following procedure.
1. Call System Settings
see chap. 11.1.3.
2. Enable/disable function
Confirm using the OK-key.
Use the navigation keys , , select <Menu
lock> and confirm using the OK-key.
Password prompt will be displayed. For how
to enter a password, see chap. 3.2.1
"Numeric input" and confirm using the OK-
key.
Either
Enter user-defined password
or
Enter standard password [9999] (default
setting)
Confirm query by pressing the OK-key
Use the navigation keys , to enable (on) /
disable (off) the function and confirm using the
OK-key.
3. Return to weighing mode
Press the ON/OFF key
Page 51
ABP-BA-e-1810 51
• The icon will be displayed while the function is enabled.
• Weighing and adjustment can take place despite menu lock.
• Authorisation for performing this function may be allocated to any
user.
• If a menu item selection is attempted in locked status, the message
“LOCKED” appears and the menu selection is not allowed. To disable
the menu block, select Settings [off].
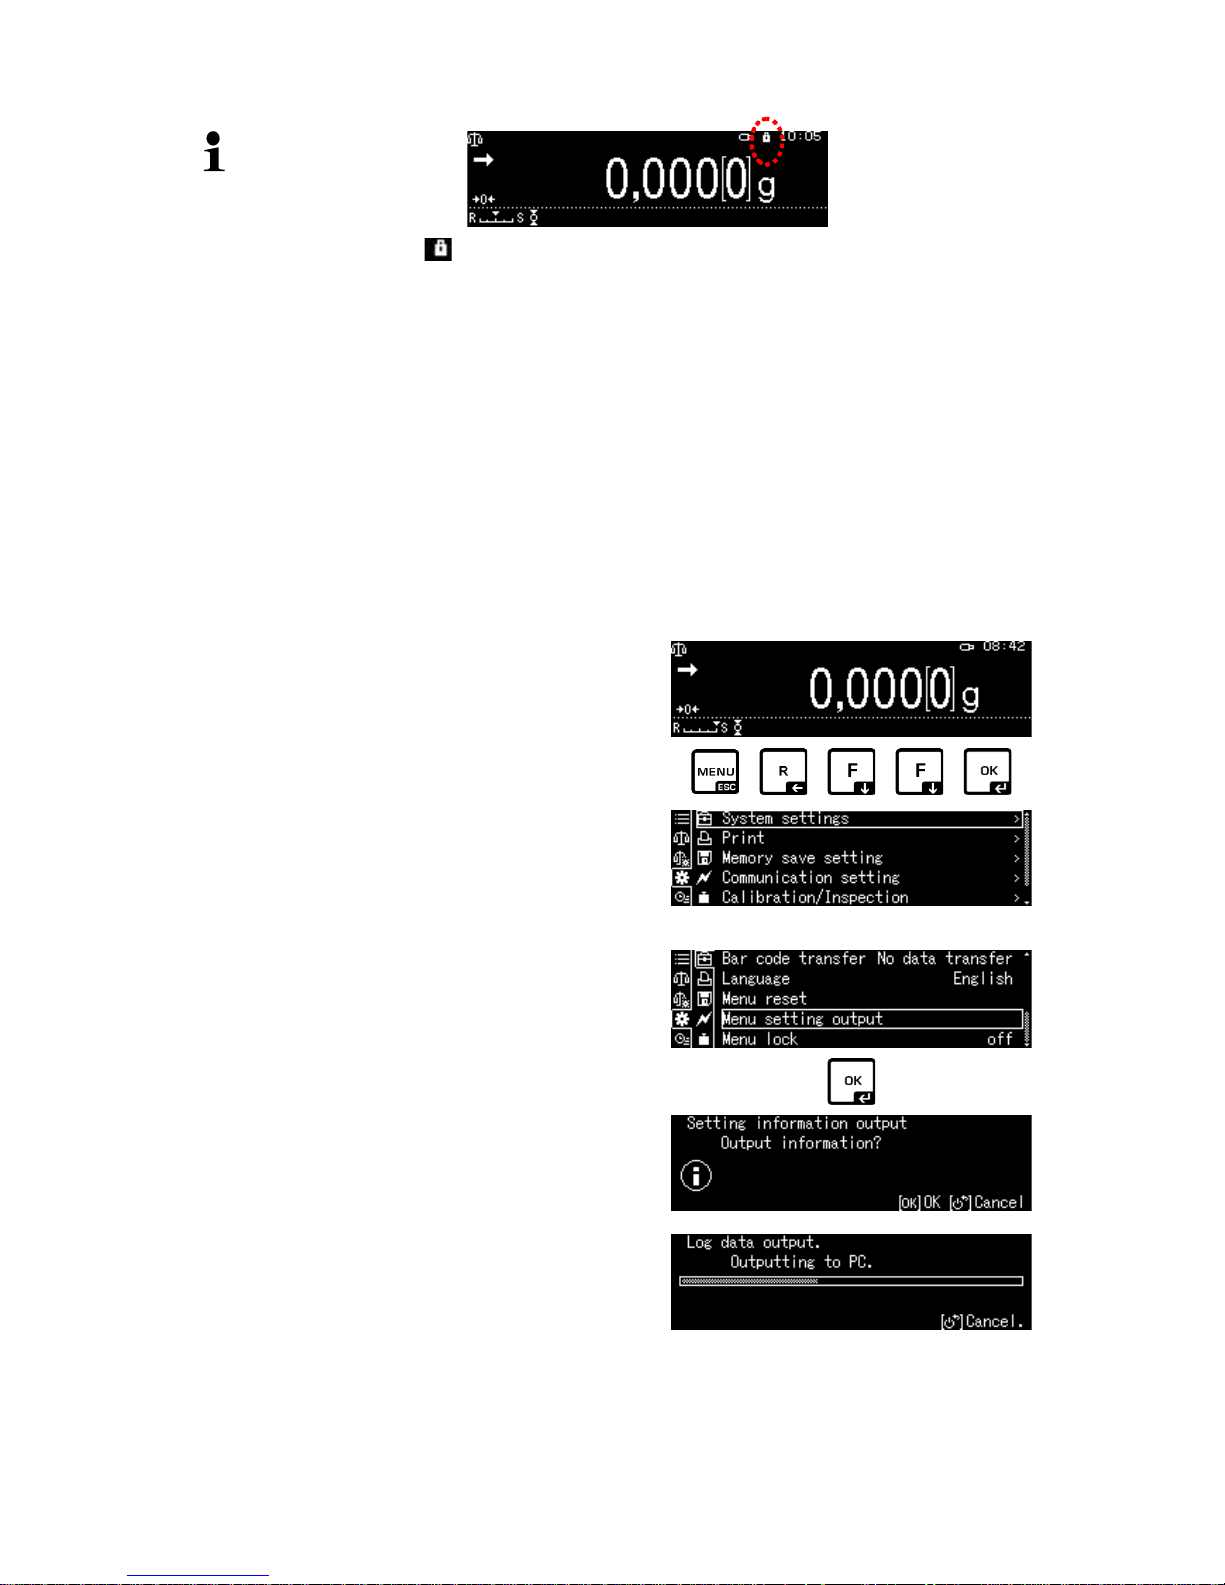
11.5 Log menu settings
When an optional printer is connected, a list of the current menu settings can be
printed out.
1. Call System Settings
see chap. 11.1.3.
2. Activate function
Confirm using the OK-key.
Use the navigation keys , to select
<Menu setting output> and confirm using the
OK-key.
Confirm request by pressing the OK-key and
printing will start.
The balance returns automatically into
weighing mode.
Page 52

52 ABP-BA-e-1810
11.6 Menu history
This function is applied to display the last 10 menu steps.
Use the navigation keys , to select
< > and the last 10 menu steps will be
displayed.
Page 53

ABP-BA-e-1810 53
12 Description of individual funct ions
12.1 Zero setting and tare function
Selectable functions:
Description
1. Zero tracking function
+ see chap. 12.2.
This function is used to correct automatically small
weight variations which appear directly after
switching-on.
In the event that small quantities are removed or added
to the material to be weighed, incorrect weighing results
can be displayed due to the “stability compensation“.
(e.g. slow flow of liquids from a container placed on the
balance, evaporating processes).
When apportioning involves small variations of weight, it
is advisable to switch off this function.
2. Auto tare function
+
see chap. 12.3.
After data output an automatic taring is carried out
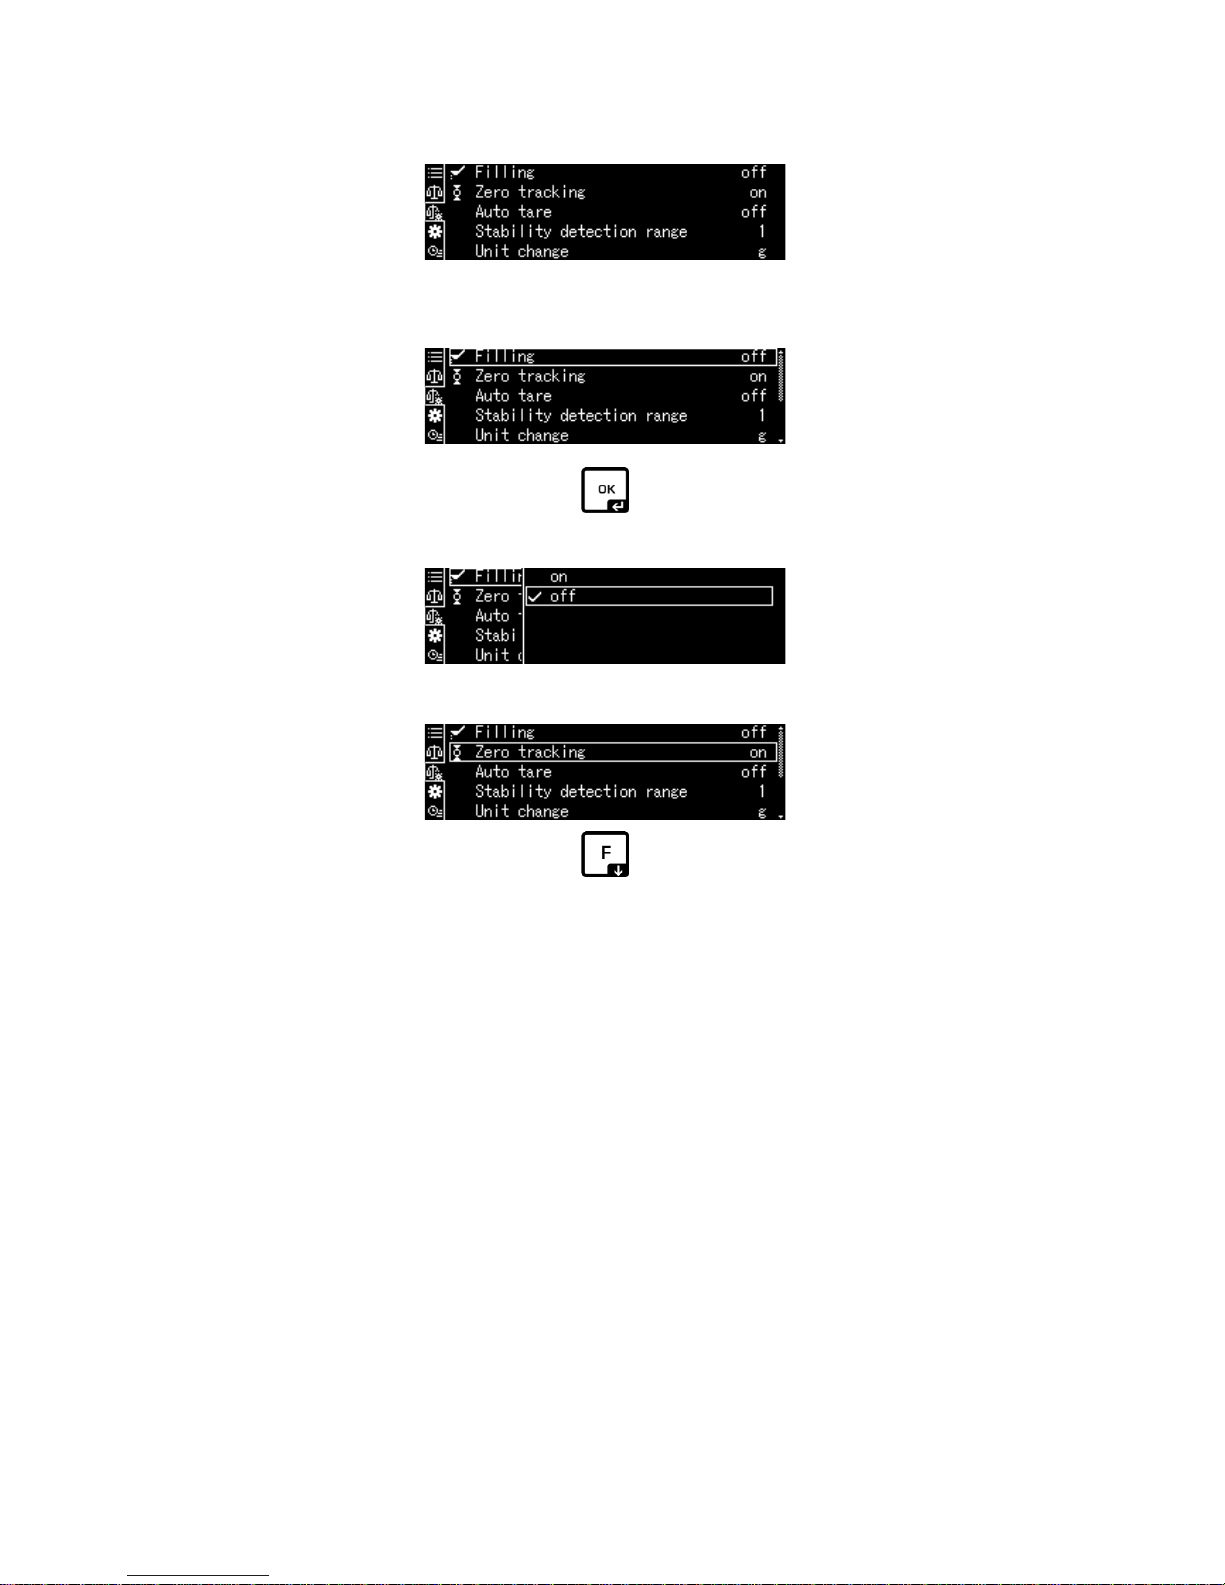
12.2 Zero tracking function
The icon will be displayed while the zero tracking function is enabled.
1. Call function
see chap. 11.1.2.
or
Press and hold the TARE-key for a long time
Use the navigation keys , to select <Zero
tracking> and confirm using the OK-key.
2. Enable/disable function
Use the navigation keys , to enable (on) /
disable (off) the function and confirm using the
OK-key.
3. Return to weighing mode
Press the ON/OFF key
Page 54
54 ABP-BA-e-1810
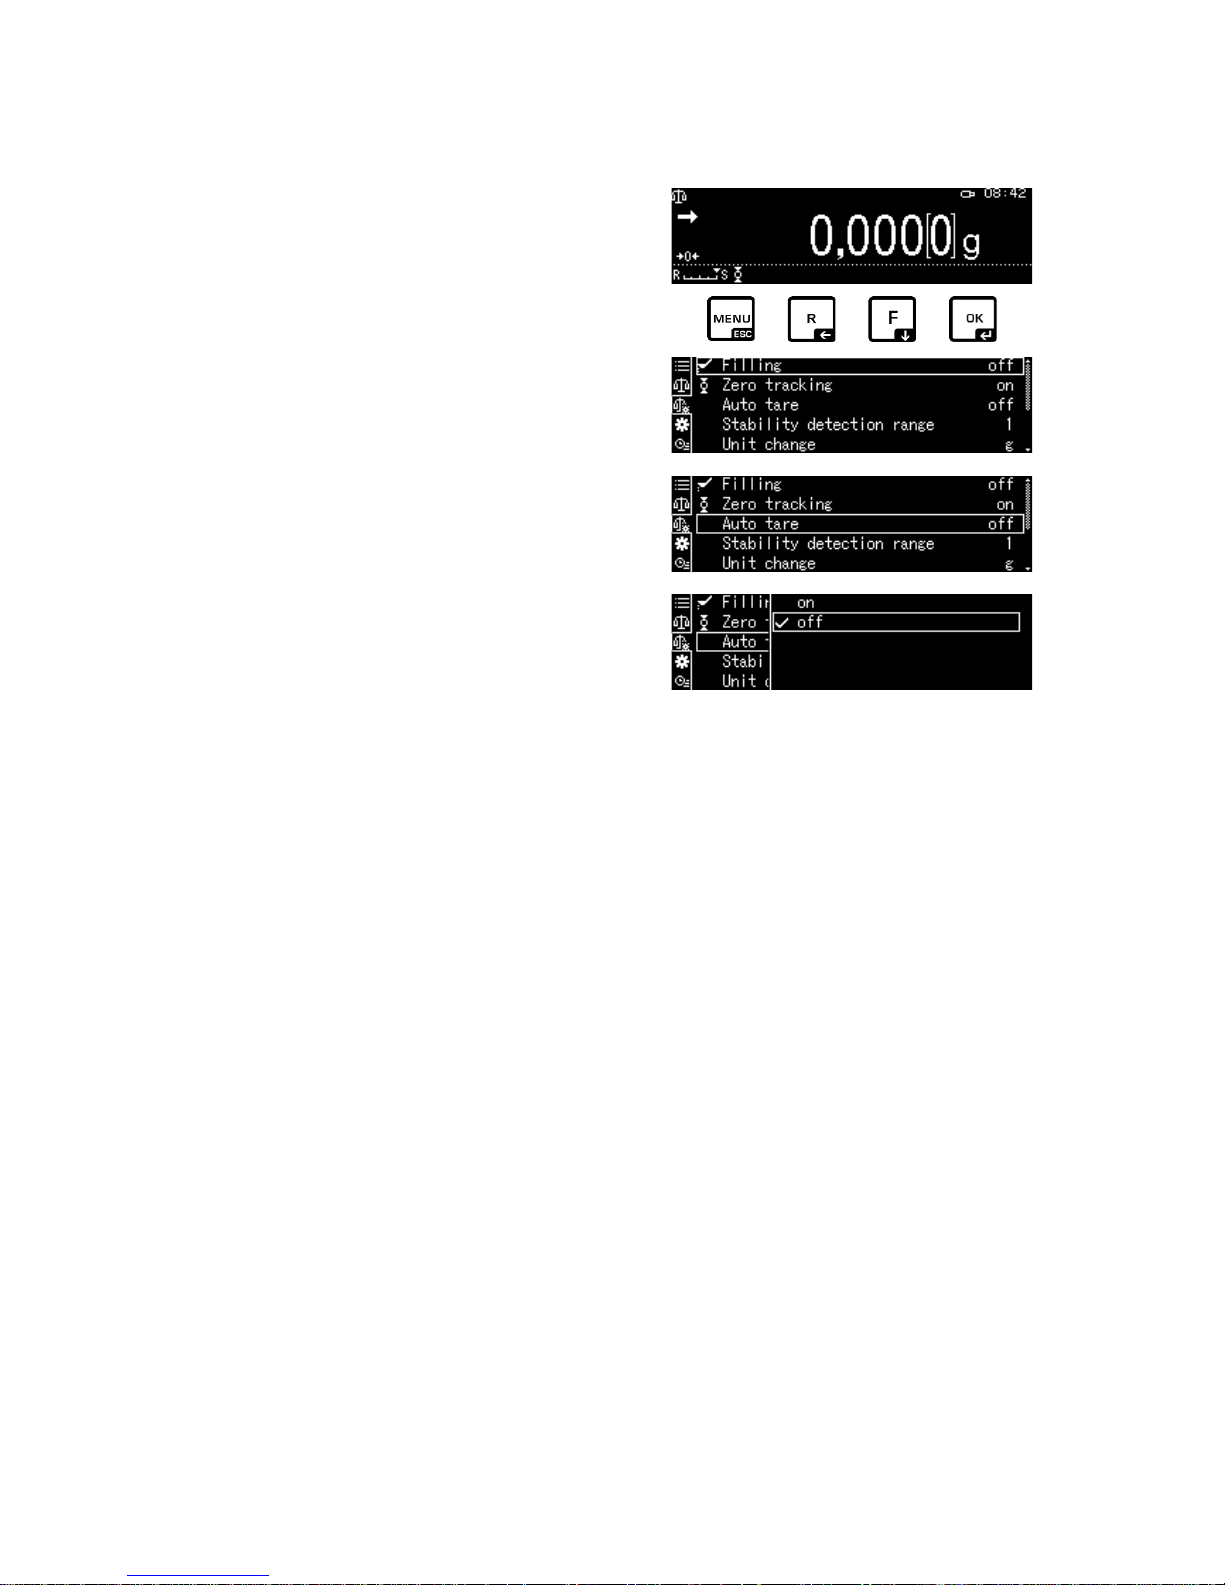
12.3 Auto Tare function
1. Call function
see chap. 11.1.2.
Use the navigation keys , to select
<Auto tare> and confirm using the OK-key.
2. Enable/disable function
Use the navigation keys , to enable (on) /
disable (off) the function and confirm using the
OK-key.
3. Return to weighing mode
Press the ON/OFF key
Page 55

ABP-BA-e-1810 55
Smart setting display
12.4 Settings for Stability and Response
Exists the possibility to tune the stability of the display and the degree of reaction of
the balance to the requirements of certain applications or the environmental
conditions.
Most measurements may be carried out by using default settings. In standard
weighing mode, stability and reaction have the same priority. For certain applications
such as e.g. dosage do use the dosing mode. In dosing mode the reaction degree
has the higher priority.
Beside the selection standard / dosing mode the stability of the display and the
reaction degree of the balance can additionally adapted in the menu.
Please note that in general slowing down reaction times result in higher stability of
the set data handling, while speeding up reaction times have an influence on the
stability deterioration.
12.4.1 Stability and reaction settings via „Smart Setting display“ (without
invoking menu)
If there is a change in ambient conditions the responding qualities or the stability of
the scale may be optimised – even during weighing – by simply pressing the key.
In weighing mode press for Reaction Settings or for Stability
Settings.
Priority on reaction
Priority on stability
Smart setting display
Operation
Every time the key is
pressed, the priority for the
reaction will be increased.
The icon will be moving in
the direction of <R>.
Every time the key is
pressed the priority for the
stability will be increased.
The icon will be moving
in the direction of <S>.
Page 56
56 ABP-BA-e-1810
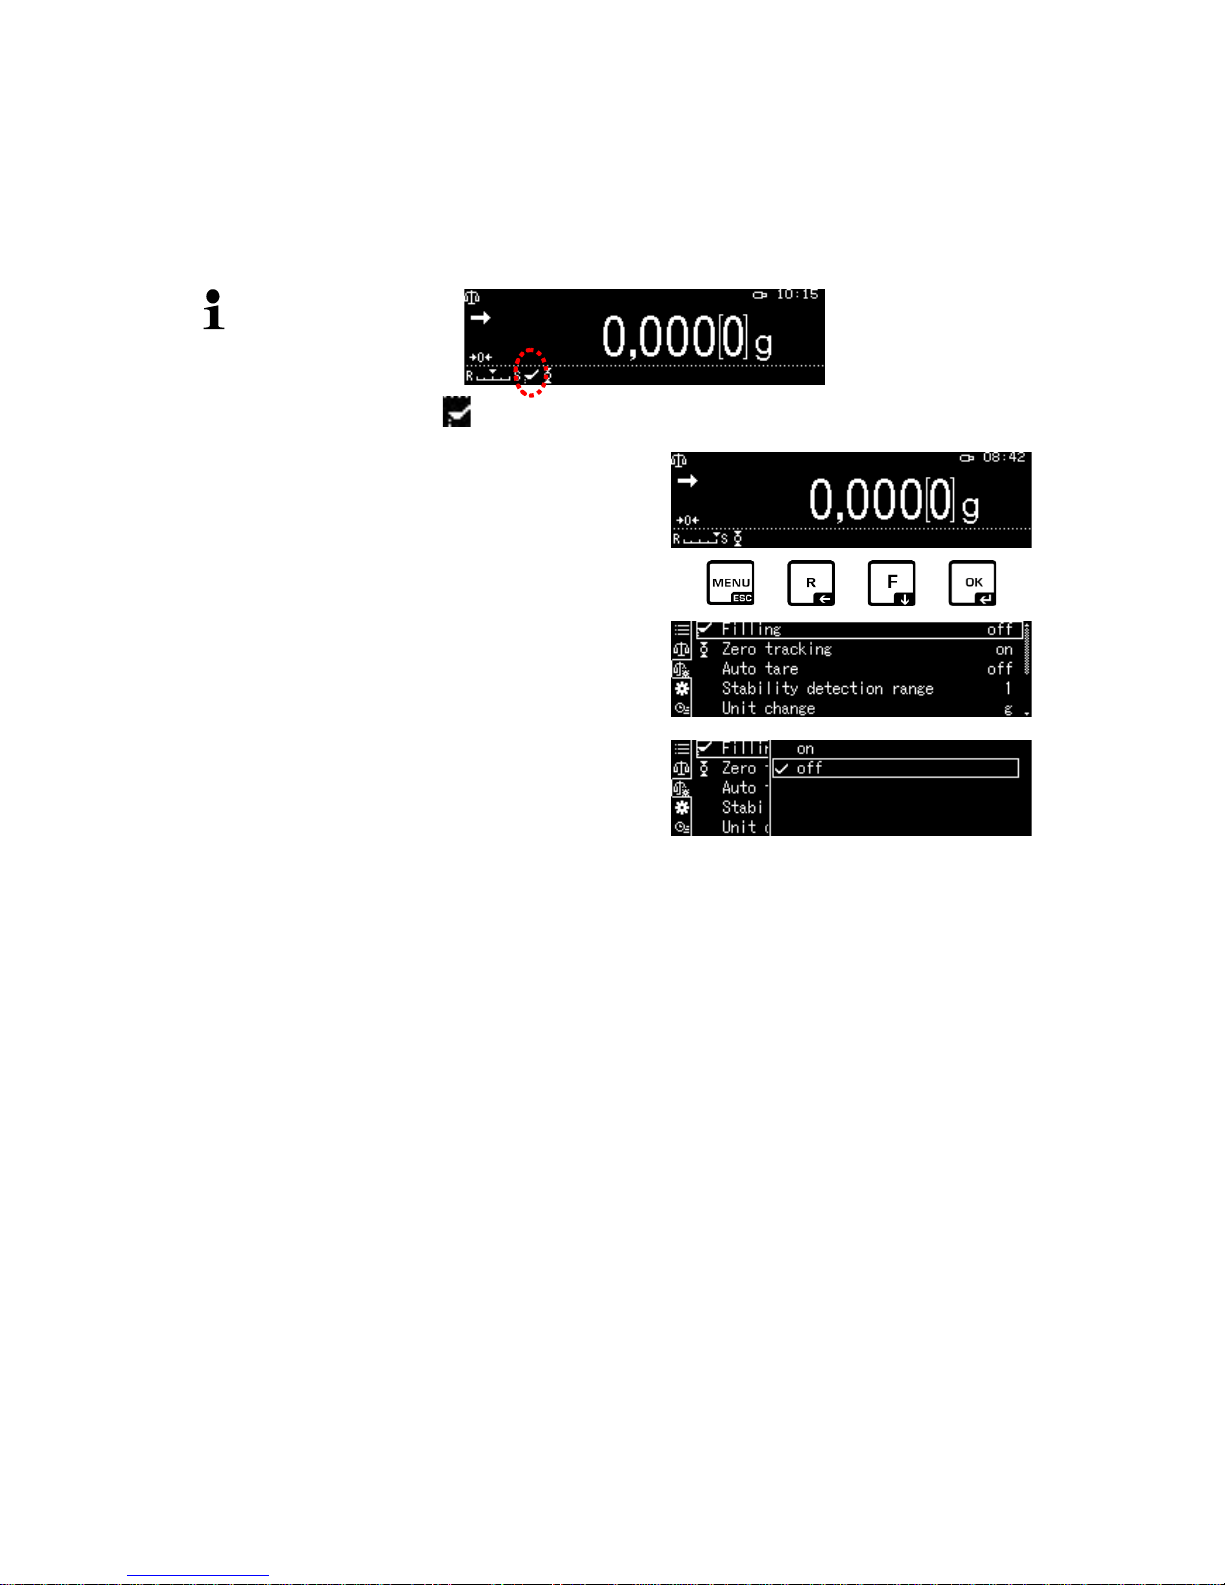
12.5 Dosing
Use this function if you wish to increase display speed, e.g. during apportioning.
However, please note that the balance is very susceptible to ambience conditions.
The icon will be displayed while the function is enabled.
1. Call function
see chap. 11.1.2.
Select<Filling> and confirm using the OK-key.
2. Enable/disable function
Use the navigation keys , to enable (on) /
disable (off) the function and confirm using the
OK-key.
3. Return to weighing mode
Press the ON/OFF key
Page 57

ABP-BA-e-1810 57
12.5.1 Standstill width
If the stability display lights up ( ), the weighing result will be stable within the range
indicated by the standstill width.
Set range for stability determination:
1. Call function
see chap. 11.1.2.
Use the navigation keys , to select
<Stability detection range> and confirm using
the OK-key.
2. Set range for stability determination
Use the navigation keys , to select
Setting and confirm using the OK-key.
0.5d Stability display ( ) very quiet environment
1000d Stability display ( ) busy environment
3. Return to weighing mode
Press the ON/OFF key
Page 58

58 ABP-BA-e-1810
12.6 Weighing Units
The <Unit setting> menu is used to define which weighing units you wish to apply.
By pressing the UNIT key, the display can be switched over to the units enabled
before in the menu.
Scales with type approval allow you to change to the following units:
[g] → [mg] → [ct]
1. Call function
Go to weighing mode and press and hold the
UNIT-key for approx. 3 sec until the
<Unit setting > menu is displayed.
Confirm using the OK-key and the available
units will be displayed.
Use the navigation keys to , select the
unit and confirm using the OK-key.
2. Enable/disable units
Use the navigation keys , to enable (on) /
disable (off) the function and confirm using the
OK-key.
3. Return to weighing mode
Press the ON/OFF key
12.7 User administration log-in function
The scale has a user administration where individual access rights for administrator
and user levels may be defined. The input of a user name and password is required
for access.
The administrator can use all the functions and has all rights. Only the administrator
is authorised to create new user profiles and to grant access rights.
A user on the other hand may not have access to all functions. He/she has limited
rights that are defined in the user profile. The maximum of users is limited to 10.
Page 59

ABP-BA-e-1810 59
a) Enable/disable function
Login function [off] Login function [on]
All users have administrator rights and
full access (default setting).
There is only one administrator and
maximal 10 users.
1. Call System Settings
see chap. 11.1.3.
Use the navigation keys , to select
<User settings> and confirm using the OKkey.
2. Enable/disable function
Use the navigation keys , to enable (on) /
disable (off) the function and confirm using the
OK-key.
Weighing balance returns to menu.
From this point onwards you will be logged-in
as administrator and authorised to change
settings.
Page 60

60 ABP-BA-e-1810
b) Creat ing a user profile
Only the administrator may create new user profiles and grant access rights.
Changes to a user profile, too, may only be made by the administrator.
1. Select administrator or user
Use the navigation keys to , select
Administrator or User <Administrator or User
01 - 10> and confirm using the OK-key.
2. Define user selection to be displayed
on log-in
Use the navigation keys , to select
<User ID> and confirm using the OK-key.
Use the navigation keys , to select
<valid> or <invalid> and confirm using the
OK-key.
When selecting <valid> continue with input as
described in the next step.
When selecting <invalid> use the ON/OFF-
key to return to weighing mode.
3. Changing user name (ID)
Use the navigation keys to , select
<User name> and confirm using the OK-key.
Enter desired user name (For numeric input
see chap.3.2.1)
Confirm selection by pressing the OK-key.
Weighing balance returns to menu.
Here you may change settings as described
below.
Page 61
ABP-BA-e-1810 61
c) Define password
Different passwords are required according to user or administrator.
Type Administrator password User Password
Default setting for
password
9999 0000
Log-in Administrator ID User ID
Access rights All functions and rights Limited rights defined in
user profile.
No password will be
required if default setting
[0000] is used.
Use the navigation keys , to select
<Password > and confirm using the OK-key.
Enter password
(For numeric input see chap. 3.2.1
Confirm selection by pressing the OK-key.
Weighing balance returns to menu.
Here you may change settings as described
below.
Page 62

62 ABP-BA-e-1810
d) Gra nt ing user rights
The administrator defines which of the following activities may be performed by the
user.
Modify settings Make settings in menu
Weighing value
External output
Data output to external devices
Using USB flash
drive
Access to USB storage space
Adjustment Change adjustment settings
Test For performing regular inspections see chap. 8.2
Use the navigation keys , to select
activity such as <Modify setting>, to which
access rights are to be granted or refused.
Confirm selection by pressing the OK-key.
Use the navigation keys , to select the
desired setting and confirm using the OK-key.
Weighing balance returns to menu.
Use the navigation keys , to select the
next menu item such as <Weighing value
EXToutp.> and change settings as described
above.
Repeat this sequence of operations for all five
menu items.
Return to weighing mode:
Press the ON/OFF key
Page 63

ABP-BA-e-1810 63
e) Change user name
Use the navigation keys to , select
<User name> and confirm using the OK-key.
Enter desired user name (For numeric entry
see chap. 3.2.1)
Confirm selection by pressing the OK-key.
Weighing balance returns to menu.
Here you may change settings as described
below.
The user name will be displayed on the top right of the display during
operation and as long as the respective user profile is enabled.
Page 64

64 ABP-BA-e-1810
f) Login
When the log-in function is enabled, the list of
users will be displayed on log-in.
Use the navigation keys , to select User
and confirm using the OK-key.
Password prompt will be displayed.
Enter password and confirm using the OK-key
(For numeric entry see chap. 3.2.1).
When a user logs in using the standard password [0000] no password query
will be made.
The display will change into operating mode,
the selected user will be enabled and will be
shown at the top of the display.
• Apart from administrator or user it is also possible to log-in as "Guest".
• A logged-in guest may merely perform weighing.
Sequence of operations:
Press the ON/OFF-key when list of
users is displayed
The display will then change to
operating mode, the selected user
<GUEST> will be enabled and shown
on the top of the display.
Page 65

ABP-BA-e-1810 65
13 Balance settings
13.1 Screen saver
While this function is enabled the scale will automatically change to standby mode
after a defined time without a change in load or conditions. You can turn off the
function [off] or define a time after which the scale is to change into standby mode.
To restart press the ON/OFF-key.
Call System settings (see chap. 11.1.3).
Use the navigation keys , to select
<Screen saver> and confirm using the OKkey.
Use the navigation keys , to select
switch off time and confirm using the OK-key.
Options: off, 5, 10, 15, 20, 30 min.
Use the ON/OFF button to return into
weighing mode
13.2 Display settings in operating mode
For calling system settings see chap. 11.1.3.
Use the navigation keys , to select
<OP mode setting> and confirm using the
OK-key.
Use the navigation keys , to select
the desired setting and confirm using the OKkey.
Use the ON/OFF button to return into
weighing mode
Page 66

66 ABP-BA-e-1810
13.3 Balance identification no.
This setting is for the balance ID number that is output along with the adjustment
report.
For calling system settings see chap. 11.1.3.
Use the navigation keys , to select
<Balance ID> and confirm using the OK-key.
Use the navigation keys , to enter name
(max. 16 characters ) and confirm using the
OK-key.
Numerical input, see chap. 3.2.1.
Use the ON/OFF button to return into
weighing mode
13.4 Entering date and time
For calling system settings see chap. 11.1.3.
Use the navigation keys , to select
<Date> or <Time> and confirm using the OKkey.
Use the navigation keys , to enter
date or time and confirm using the OK-key.
Numerical input, see chap. 3.2.1.
Use the ON/OFF button to return into
weighing mode
13.5 Date format
For calling system settings see chap. 11.1.3.
Use the navigation keys , to
select <Date output style> and confirm using
the OK-key.
Use the navigation keys , to set the
display format and confirm using the OK-key.
Use the ON/OFF button to return into
weighing mode
Page 67

ABP-BA-e-1810 67
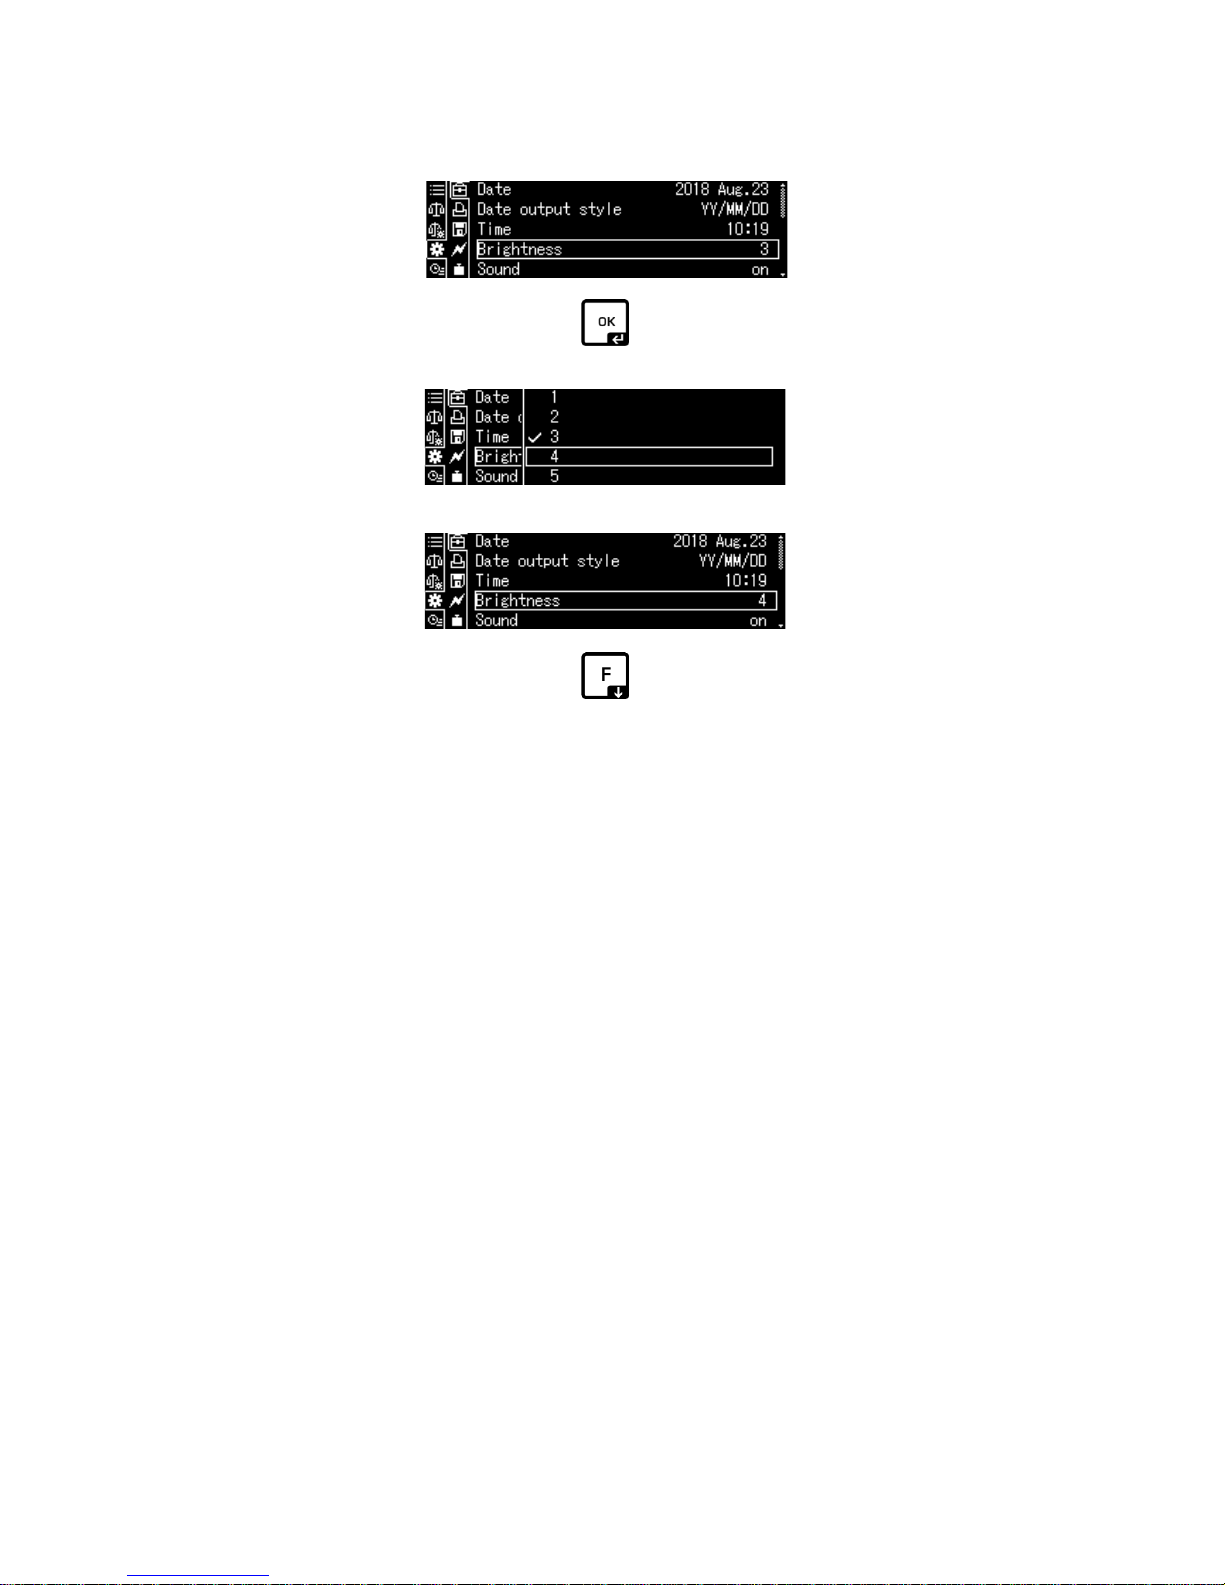
13.6 Brightness of display
For calling system settings see chap. 11.1.3.
Use the navigation keys , to select
<Brightness> and confirm using the OK-key.
Use the navigation keys , to
set brightness and confirm using the OK-key
Use the ON/OFF button to return into
weighing mode
13.7 Audio signal on pressing key or display of stability
For calling system settings see chap. 11.1.3.
Use the navigation keys , to select
<Sound> and confirm using the OK-key.
Use the navigation keys , to select
setting [on] or [off] and confirm using the OKkey
Use the ON/OFF button to return into
weighing mode
13.8 User language
For calling system settings see chap. 11.1.3.
Use the navigation keys , to select
<Language> and confirm using the OK-key.
Use the navigation keys , to select
language and confirm using the OK-key
Use the ON/OFF button to return into
weighing mode
Page 68
68 ABP-BA-e-1810
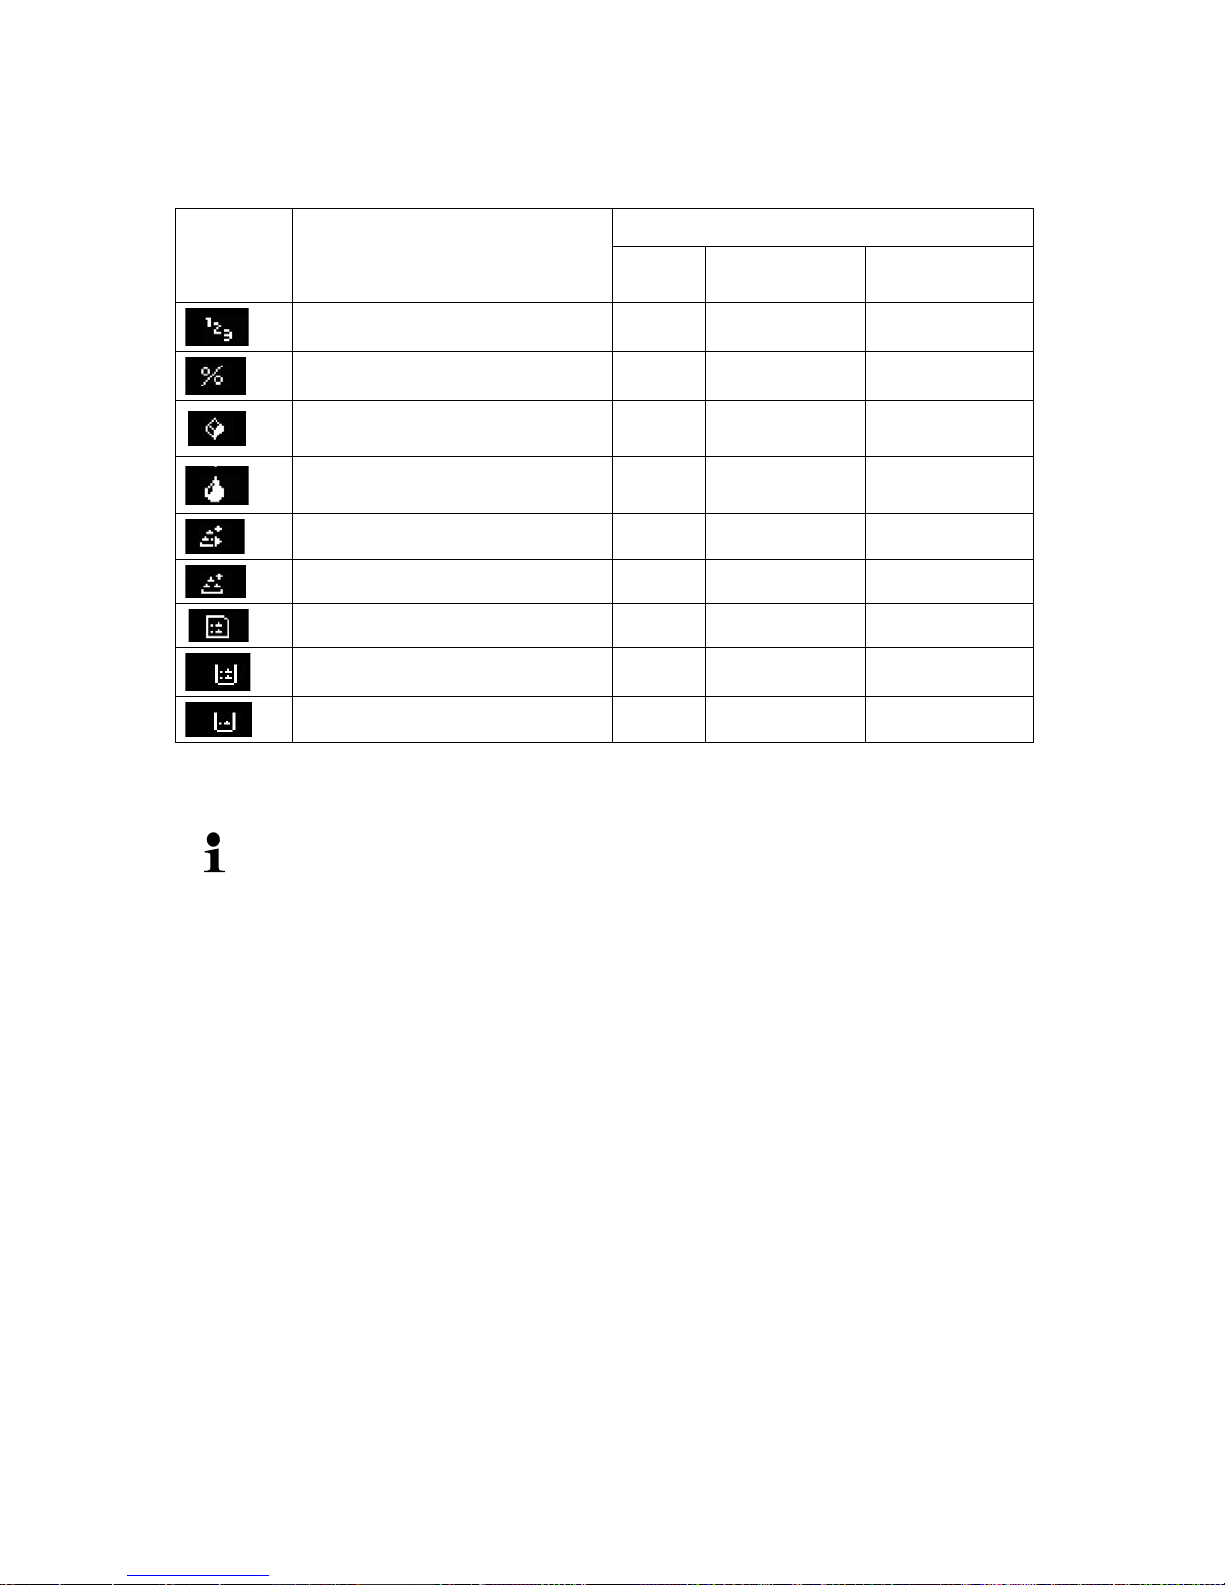
14 Application Functions
Overview of available applications:
Symbol Function
Combinable functions
Statistics Check weighing Minimum initial
weight
Parts counting
Percent determination
Density determination <Solid
matter>
Density determination
<Fluids>
Totalization
- -
Free formulating
- -
Autom. processing a recipe
- -
Produce a buffer solution
- -
Produce an analysis sample
- -
• The balance starts in the mode, in which it has been switched off.
• To switch between application and weighing mode press the F-key
(not available for statistics, check weighing, minimal weight)
Page 69
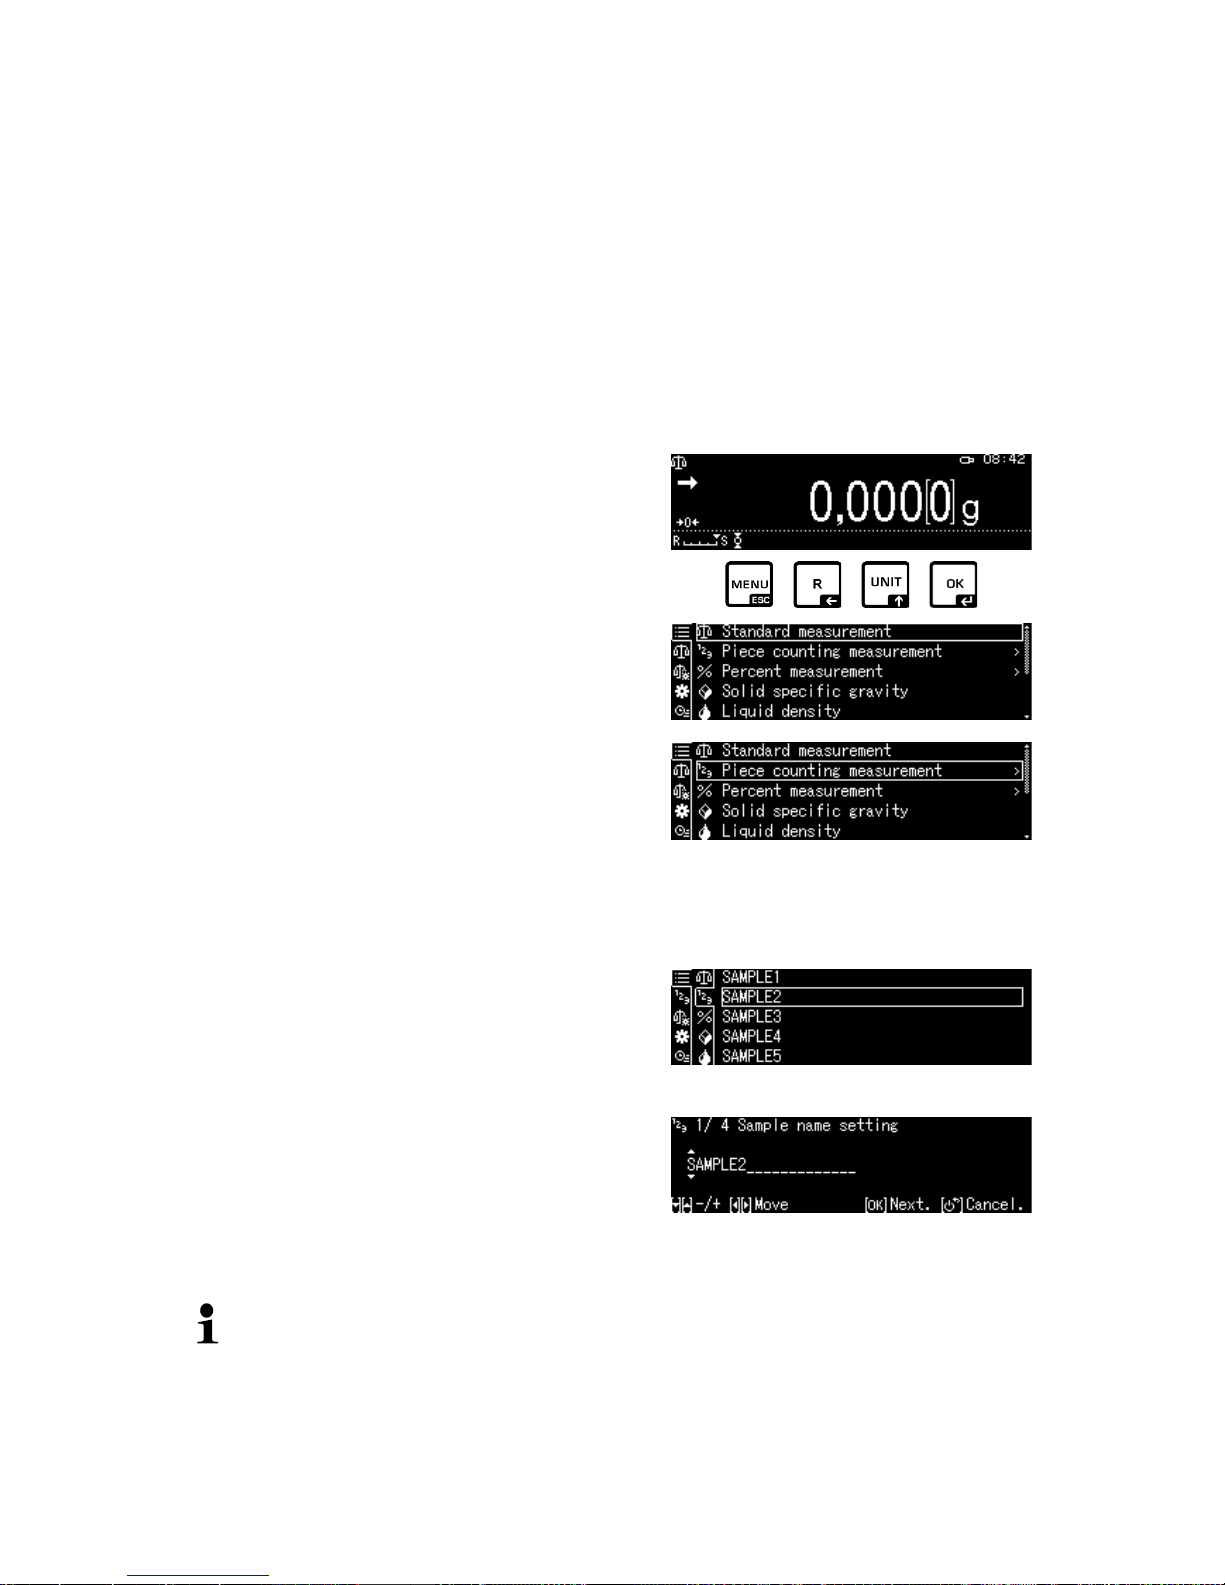
ABP-BA-e-1810 69
14.1 Parts counting
With parts counting you can either count parts into a container or remove parts from
a container. To count a greater number of parts the average weight per part has to
be determined with a small quantity (reference quantity). The larger the reference
quantity, the higher the counting exactness. High reference must be selected for
small parts or parts with considerably different sizes.
14.1.1 Settings
+ Enable function and calculate single weight by weighing a known
reference quantity
Selecting an application (see chap. 11.1.4)
The available applications will be displayed.
Use the navigation keys , to select
<Piece counting measurement>. The framing
will indicate the current selection. Confirm
using the OK-key and the application specific
settings will be displayed.
1. Storage location no. / name for initial
input
Use the navigation keys , to select
storage location and confirm using the OKkey.
During the initial entry there will be a display
where you can enter a storage name.
Use the navigation keys , to select
storage location and confirm using the OK-
key.
If required, change name and confirm using
the OK-key.
To overwrite a stored single weight continue by referring to chap. 14.1.4
Page 70
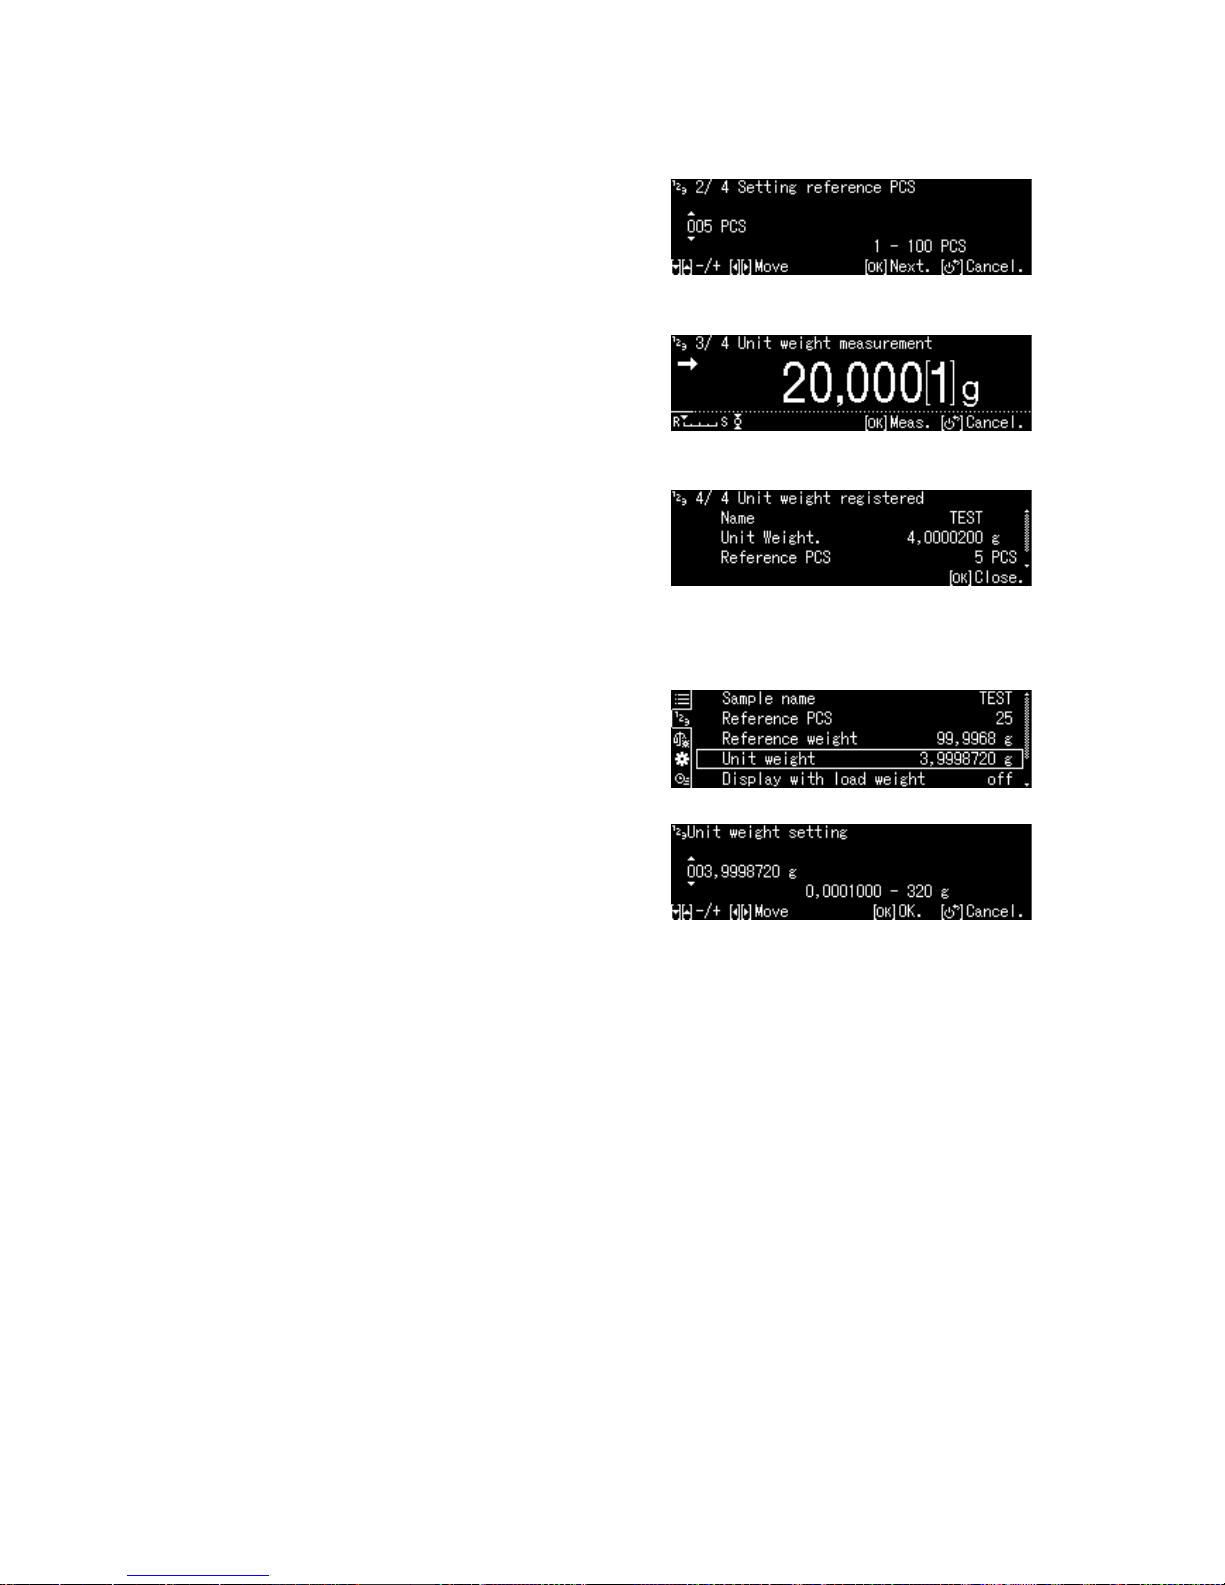
70 ABP-BA-e-1810
2. Set reference
Enter reference quantity and confirm using the
OK-key.
Load the number of parts corresponding to
the selected reference quantity. Wait until
stability display has settled, then confirm
using the OK-key.
The scale will calculate the average single
weight and display the result.
Confirm using the OK-key
+ Enter s i ngle w eight as nume r ic value
In counting mode, press MENU-key.
Use the navigation keys , to
select <Unit weight> and confirm using
the OK-key.
Enter known single weight and confirm
using the OK-key.
Page 71

ABP-BA-e-1810 71
14.1.2 Setting the dis play
In counting mode, press MENU-key.
Use the navigation keys , to select
<Display with load weight> and confirm
using the OK-key.
Select <on> or <off> and confirm using
the OK-key.
Setting <off> Setting <on>
14.1.3 Part counting
In counting mode, select stored single
weight and confirm using the OK-key
(chap. 14.1.1).
Put empty container on the scale and tare.
Fill weighing goods into the container and
read the piece quantity.
Page 72

72 ABP-BA-e-1810
14.1.4 Change se ttings
In counting mode, press Menu-key.
Select <Changing registration> and
confirm using the OK-key.
The following changes may be made:
Product name:
Change name and confirm using the OKkey.
Reference quantity:
Change reference single weight and
confirm using the OK-key.
Weight according to selected reference
quantity:
Load weight and confirm using the OK-
key.
The changes made will be displayed.
To return to counting mode, press the
ON/OFF-key
14.1.5 Switching between counting and weighing mode
Page 73

ABP-BA-e-1810 73
14.2 Percent determination
Percent weighing allows to display weight in percent, in relation to a reference
weight.
The balance offers two possibilities:
1. Loaded reference weight = 100 %
2. Loaded reference weight = user defined
14.2.1 Settings
+ Activate fu n ction
Selecting an application (see chap. 11.1.4)
The available applications will be displayed.
Use the navigation keys , to select
calculation of percentage. The framing will
indicate the current selection.
Confirm using the OK-key and the application
specific settings will be displayed.
100PER1 -3:
Loaded reference weight = 100 %
ANYPER1, 2:
Loaded reference weight = user defined [%]
Page 74

74 ABP-BA-e-1810
During the initial entry there will be a display
where you can enter a storage name.
Use the navigation keys , to select
storage location and confirm using the OK-
key.
If required, change name and confirm using
the OK-key.
To overwrite a stored reference continue by referring to chap. 14.2.4
Further steps:
Loaded reference weight = 100 %
or
Loaded reference weight = user defined [%]
+ Loaded reference weight = 100 %
Select 100PER1, 2 or 3 (or own
description) and confirm using the OK-key
If required, place empty container on
scale and tare.
Load reference weight corresponding to
100 %
(Minimum weight: Readability d x 100).
Wait until stability display ( ) has settled,
then confirm using the OK-key.
The reference will be imported and
displayed.
Confirm using the OK-key
From now on the weight of the sample will
be shown in percent based on the
reference weight
Page 75

ABP-BA-e-1810 75
+ Loaded reference weight = user defined [%]
Select ANYPER1 or 2 (or own
description) and confirm using the OK-key
Use the navigation keys to enter a
percentage value of your choice and
confirm using the OK-key.
If required, place empty container on
scale and tare.
Load reference weight corresponding to
the entered percentage value and confirm
using the OK-key.
The reference will be imported and
displayed.
Confirm using the OK-key
From now on the weight of the sample will
be shown in percent based on the
reference weight
14.2.2 Setting the dis play
In percentage mode, press the MENU-
key.
Use the navigation keys , to select
<Display with load weight> and confirm
using the OK-key.
Select <on> or <off> and confirm using
the OK-key.
Setting <off> Setting <on>
Page 76
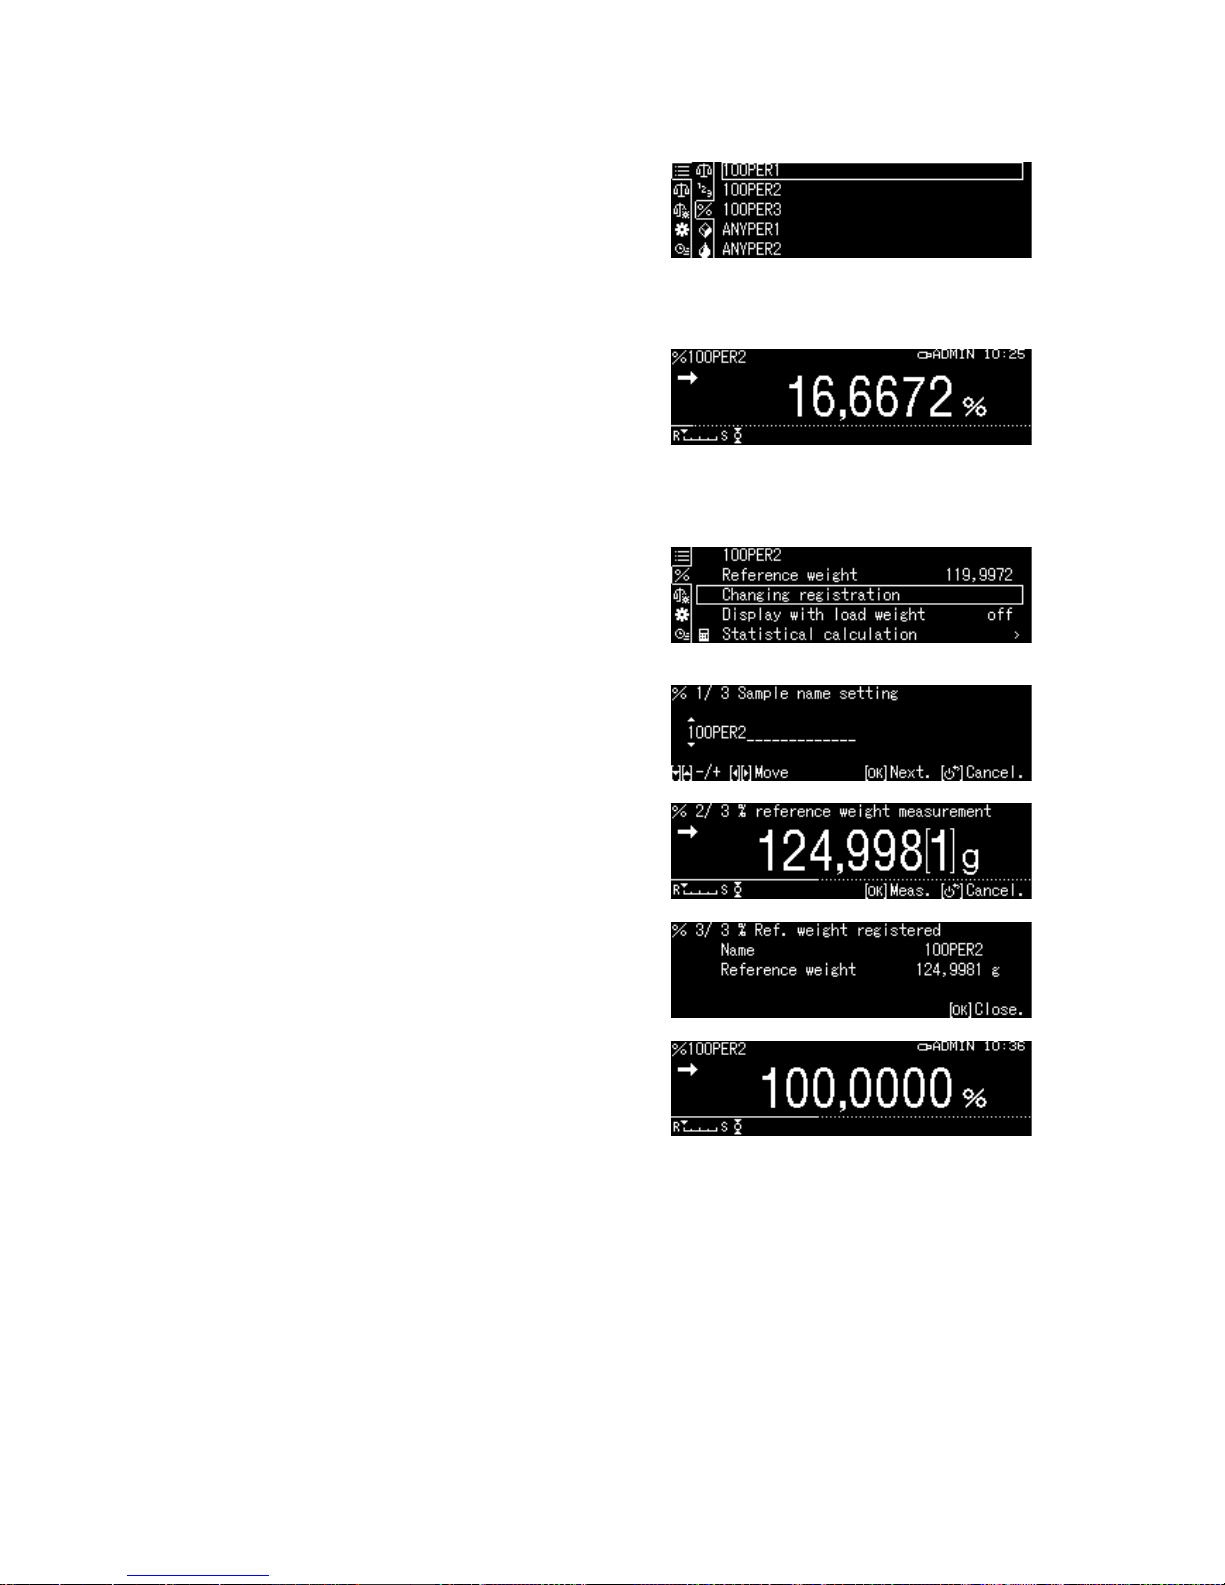
76 ABP-BA-e-1810
14.2.3 Performing cal culation of percentage
In percentage mode, select stored
reference and confirm using the OK-key
(chap. 14.2.1).
Put empty container on the scale and tare.
Fill weighed good into container. The
weight of the weighed good will be
displayed in percent.
14.2.4 Change se ttings
In percentage mode, press the Menu-key.
Select <Changing registration> and
confirm using the OK-key.
The following changes may be made:
Product name:
Change name and confirm using the OKkey.
Reference weight:
Load weight and confirm using the OK-
key.
The changes made will be displayed.
To return to percentage mode, press the
ON/OFF-key.
Page 77

ABP-BA-e-1810 77
14.2.5 Switching between percentage and weighing mode
14.3 Deter m ining the density of solid matter and fluids
For density determination we recommend working with the optionally available
density determination set.
The set contains all the accessories and aids required for easy and precise density
determination.
For instructions please see the operating instructions enclosed with the density
determination set.
Page 78

78 ABP-BA-e-1810
14.4 Totalization
This function is used to automatically add any number of single weighings to a total
sum.
When the standstill control ( is complete the weighing value is automatically issued
to an optional printer or a PC. The displayed value is added into the total adding
memory. Afterwards automatic taring will take place. This is repeated newly every
subsequent time a new sample is placed on the balance. When the last single
weighing process is finished, press the PRINT key to receive the total sum
("TOTAL=").
For selecting an application see chap.
11.1.4
The available application will be displayed.
Use the navigation keys , to select
<Add-on>. The framing will indicate the
current selection.
If required, place the empty container on
the scale and tare.
To start the add-up sequence, press the
OK-key.
If connected to an optional printer, a
header will be issued.
Place first good to be weighed on balance.
When the standstill control ( ) is complete
the weighing value is automatically issued
to the optional printer. The displayed value
is added into the total adding memory.
Afterwards automatic taring will take place.
Page 79

ABP-BA-e-1810 79
Repeat this sequence for each additional
component.
To complete the sequence and to display
the total, press the PRINT-key.
To start another add-up sequence, press
the OK-key.
Data output:
In totalizing mode press MENU button.
Use the navigation keys , to select
<Print> and confirm using the OK-key.
1. Output item number
Use the navigation keys , to select
<Element No. output> and confirm using
the OK-key.
Select <on> or <off> and confirm using
the OK-key.
Sample log
Element No. output <on>
Sample log
Element No. output <off>
ADDON MODE ADDON MODE
N001 = 1.004[1] g 1.004[1] g
N002 = 0.999[2] g 0.999[2] g
N003 = 0.999[0] g 0.999[0] g
N004 = 0.999[1] g 0.999[1] g
N005 = 0.994[8] g 0.994[8] g
TOTAL 4.996[2] g
TOTAL = 4.996[2]g
Page 80

80 ABP-BA-e-1810
2. Output total <TOTAL>
Use the navigation keys , to select
<Total weight output> and confirm using
the OK-key.
Select <on> or <off> and confirm using
the OK-key.
Sample log
Total weight output <on>
Sample log
Total weight output <off>
ADDON MODE ADDON MODE
N001 = 1.004[1] g N001 = 1.004[1] g
N002 = 0.999[2] g N002 = 0.999[2] g
N003 = 0.999[0] g N003 = 0.999[0] g
N004 =
0.999[1] g
N004 =
0.999[1] g
N005 = 0.994[8] g N005 = 0.994[8] g
TOTAL 4.996[2] g
Return to add-on mode by pressing the
ON/OFF-key.
Page 81
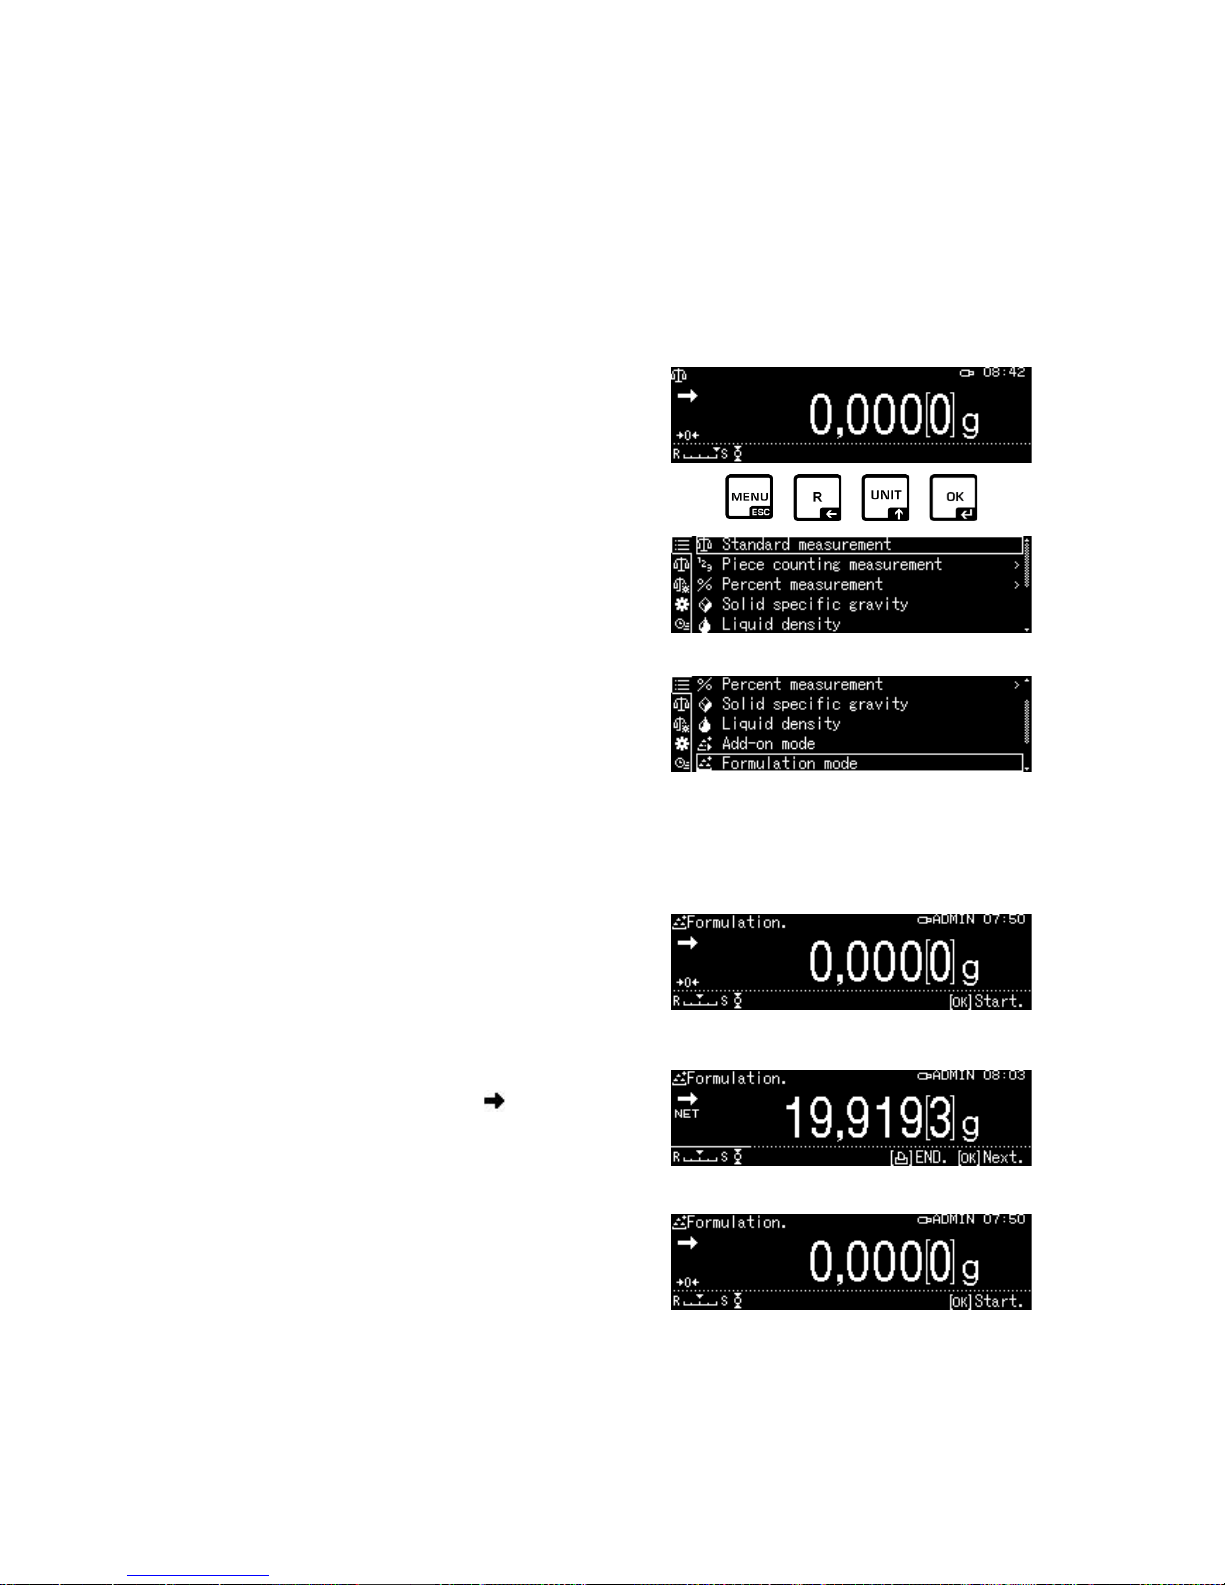
ABP-BA-e-1810 81
14.5 Formulation
14.5.1 Free formulating
This function can be applied to add weighing different components of a compound.
For monitoring purposes the weight of all components (N001, N002 etc.) as well as
the total weight may be issued to an optional printer or PC.
The balance works with a separated memory for the weight of the weighing container
and of the recipe components.
1. Selecting an application
see chap. 11.1.4.
The available applications will be displayed.
Use the navigation keys , to select
<Formulation mode>.
The framing will indicate the current
selection. Confirm using the OK-key.
2. Weighing components
If required, place the empty container on
the scale and tare.
To start the recipe sequence, press the
OK-key.
If connected to an optional printer, a
header will be issued.
Determine initial weight of first component.
Wait until stability display ( ) has settled
down, then press the OK-key. The
weighing result will be issued automatically
and added to the add-on memory.
Afterwards automatic taring will take place.
The balance is ready to weigh-in the
second component.
Page 82

82 ABP-BA-e-1810
Weigh additional components as
described above.
To complete the recipe, press the PRINT-
key. The total will be displayed and issued.
To start a new recipe, press the
OK-key.
Data output:
In recipe mode, press the MENU-key.
Use the navigation keys , to select
<Print setting> and confirm using the OK-
key.
1. Output item number
Use the navigation keys , to select
<Element No. output> and confirm using
the OK-key.
Select <on> or <off> and confirm using
the OK-key.
Sample log
Element No. output <on>
Sample log
Element No. output <off>
FORMULATION MODE FORMULATION MODE
N001 =
49.998[2]g
49,998[2]g
N002 = 19.919[1]g 19,919[1]g
N003 = 4.999[9]g 4,999[9]g
TOTAL = 74.917[2]g
TOTAL = 74,917[2]g
Page 83
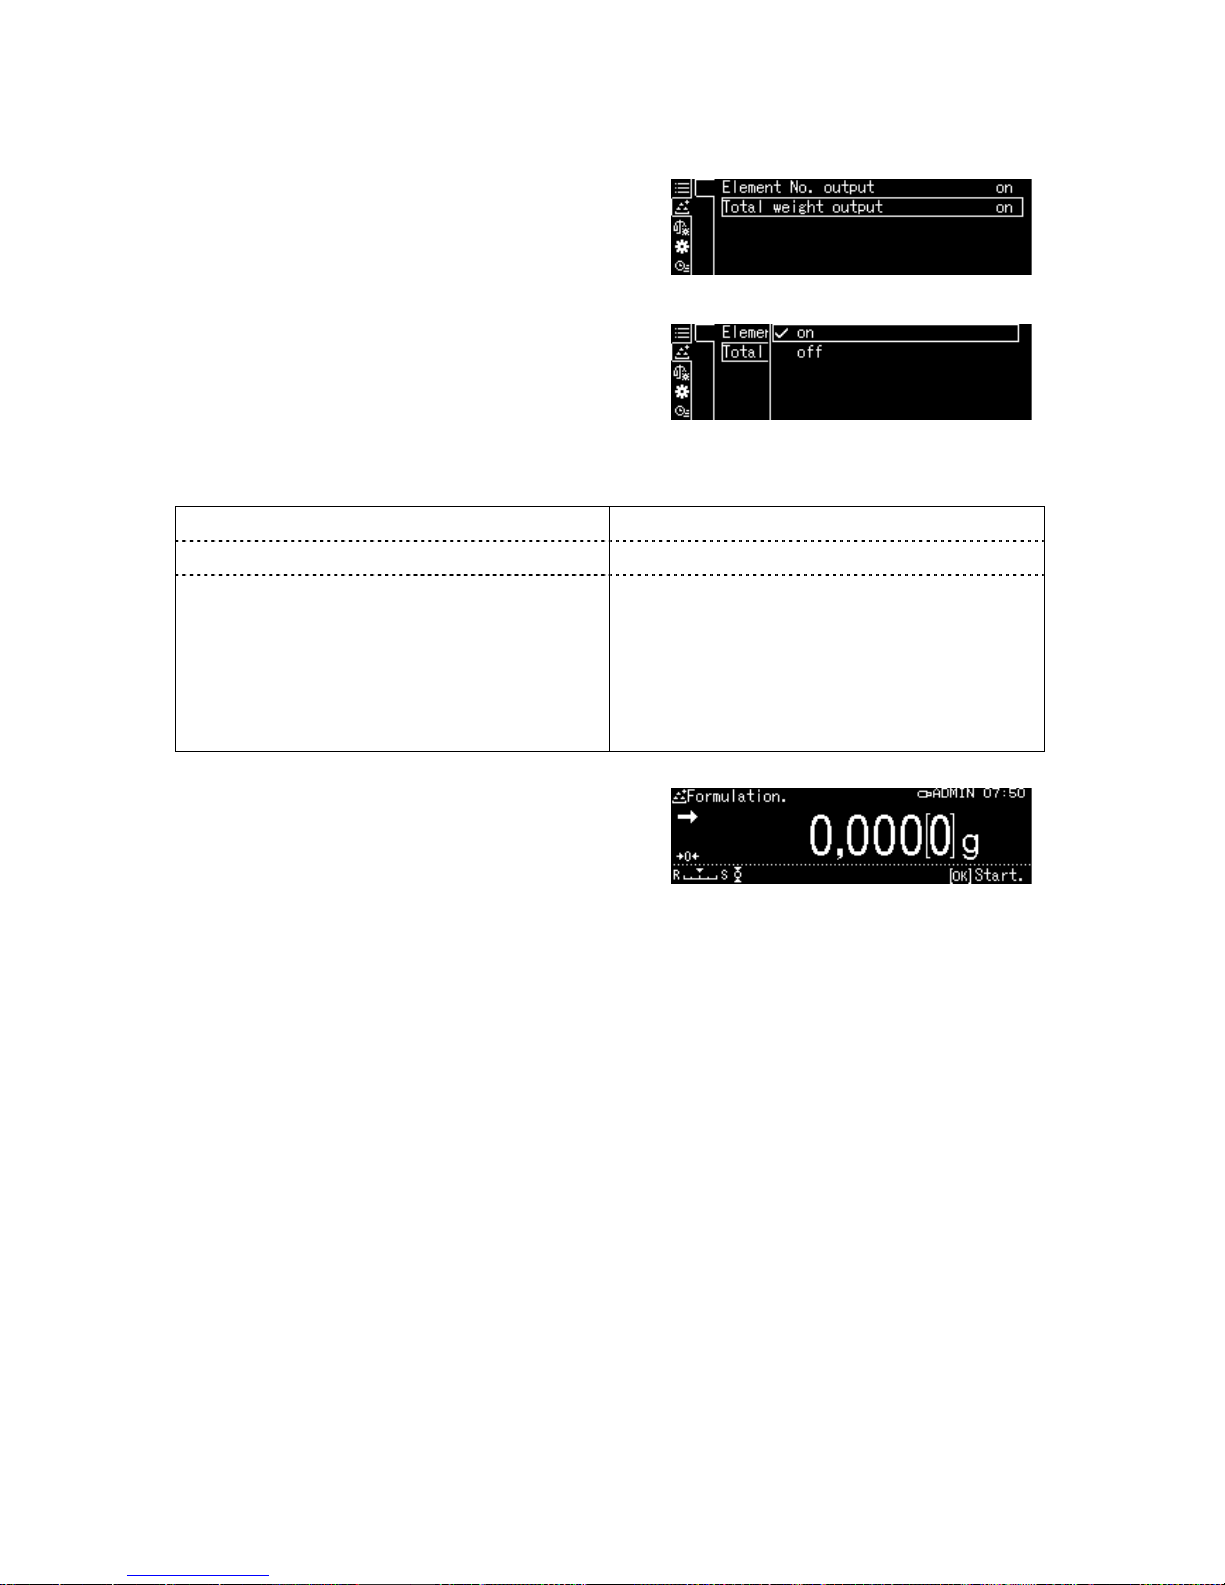
ABP-BA-e-1810 83
2. Output total <TOTAL>
Use the navigation keys , to select
<Total weight output> and confirm using
the OK-key.
Select <on> or <off> and confirm using
the OK-key.
Sample log
Total weight output <on>
Sample log
Total weight output <off>
FORMULATION MODE FORMULATION MODE
N001 = 49.998[2]g 49,998[2]g
N002 = 19.919[1]g 19,919[1]g
N003 = 4.999[9]g 4,999[9]g
TOTAL = 74.917[2]g
To return to recipe mode, press the
ON/OFF-key.
Page 84
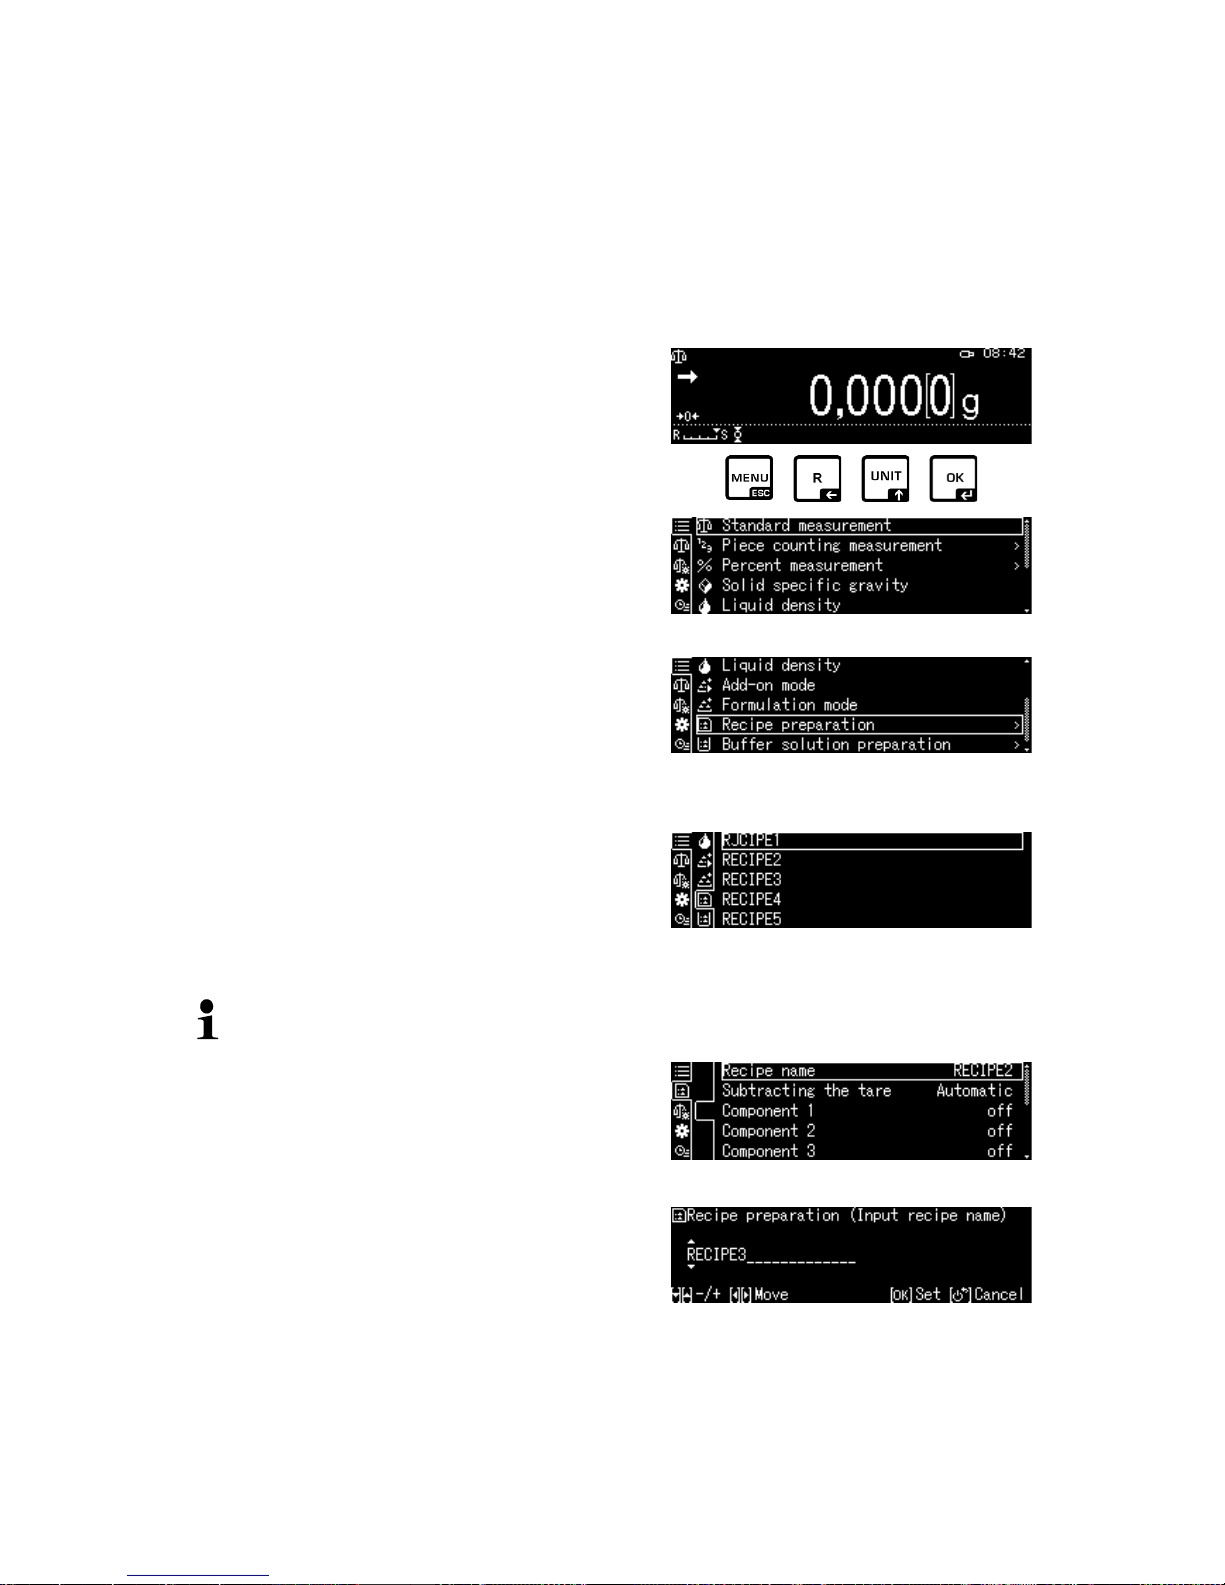
84 ABP-BA-e-1810
14.5.2 Define and process formulations
The scale has an internal memory for complete recipes and their components as well
as the corresponding parameters (such as recipe name, tolerances, automatic taring
etc.). During the processing of these recipes the scale will guide you step-by-step
through the initial weighing process of components.
+ Defining recipes
1. Selecting an application
see chap. 11.1.4.
The available applications will be displayed.
Use the navigation keys , to select
<Recipe preparation> .
The framing will indicate the current
selection. Confirm using the OK-key.
2. Select recipe
Use the navigation keys , select the
desired recipe <RECIPE 1 - 5> and
confirm using the OK-key.
3. Recipe name (at initial input)
To overwrite a saved recipe please refer to chap. 14.1.4
The display used to enter a recipe name will
appear during an initial input.
Confirm <Recipe name> by pressing the OK-
key.
Page 85

ABP-BA-e-1810 85
Enter the recipe name such as MiHo-Creme
and confirm using the OK-key.
4. Manual and automatic taring after importing individual components.
Use the navigation keys , to select
<Subtracting the tare> and confirm using
the OK-key.
Select desired setting
Manual:
After saving the weighing value of a
component by pressing the OK-key taring
will take place after pressing the TARE-
key.
Automatic:
After saving the weighing value of a
component by pressing the OK-key
automatic taring will take place.
5. Define components
Use the navigation keys , to select a
component <Component 1 - 10> and
confirm using the OK-key.
Use the navigation keys , to select
<Setting> and confirm using the OK-key.
Set parameters for component one by one.
Component name
Enter component name such as milk
(max. 20 characters) and confirm using the
OK-key
Page 86

86 ABP-BA-e-1810
Weighing unit
Select weighing unit and confirm using the
OK-key
Component weight
Enter weight and confirm using the OK-
key
Tolerance of components
Enter tolerance and confirm using the OK-
key
Repeat step 5 for all components of the recipe
To return to recipe mode, press the ON/OFF-key
Page 87

ABP-BA-e-1810 87
+ Process recipe
1. Selecting an application
see chap. 11.1.4.
The available applications will be displayed.
Use the navigation keys , to select
<Recipe preparation> .
The framing will indicate the current
selection. Confirm using the OK-key.
2. Select recipe
Use the navigation keys , to select
desired recipe such as MiHo-Creme and
confirm using the OK-key.
The balance is ready for weighing the first
component. The number for the
component (such as 1 of 6), component
name and the target weight will be
displayed.
Load weighing container and tare.
3. Determine initial weight of component
Determine initial weight of first component.
The weighing aid diagram with its
tolerance markers facilitates the
determination of the initial weight as a
target value.
Wait for stability sign ( Apply the
achieved target value by pressing the OK-
key.
Depending on the setting, the display will
be reset to zero either automatically, or by
pressing the TARE-key.
The balance is ready to weigh the second
component.
Page 88

88 ABP-BA-e-1810
Further components can be weighed as
described for the first component.
All determined singles values applied by
OK-key will be saved.
4. Completing a formulation
Once the last component has been
applied, the result of the recipe will be
displayed and issued automatically.
Finish recipe by pressing the OK-key.
The memory will be deleted. A new
formulation may be started.
14.5.3 Change recipe
In recipe mode press MENU button.
Select <Changing registration> and
confirm using the OK-key.
Make changes as described in section
"Define recipe".
Page 89

ABP-BA-e-1810 89
14.5.4 Sample log (KERN YKB-01N):
RECIPE FUNCTION
NAME
MIHO-CREME
Recipe name
N001
MILK
1. Component
TGT=
47.000[0] g
Setpoint
RNG=
0.100[0] g
Tolerance
WEI=
47.014[1] g
Weighed-in quantity
DIF=
0.014[1] g
Deviation from target value
N002
ALMOND OIL
2. Component
TGT=
95.000[0] g
Setpoint
RNG=
0.100[0] g
Tolerance
WEI=
95.005[7] g
Weighed-in quantity
DIF=
0.005[7] g
Deviation from target value
N003
HONEY
3. Component
TGT=
8.000[0] g
Setpoint
RNG=
0.100[0] g
Tolerance
WEI=
7.990[6] g
Weighed-in quantity
DIF=
0.009[4] g
Deviation from target value
N004
BEZOE-OIL
4. Component
TGT=
0.600[0] g
Setpoint
RNG=
0.100[0] g
Tolerance
WEI=
0.600[6] g
Weighed-in quantity
DIF=
0.000[6] g
Deviation from target value
N005
OLIBANUM OIL
5. Component
TGT=
0.600[0] g
Setpoint
RNG=
0.100[0] g
Tolerance
WEI=
0.611[8] g
Weighed-in quantity
DIF=
0.011[8] g
Deviation from target value
TOTAL = 151,222[8]g
Total
For settings for data output, see chap. 14.5.1 "Data output".
Page 90

90 ABP-BA-e-1810
14.6 Preparing buffer solutions
The factory setting provides the scale with the following 13 recipes for preparing
buffer solutions
No.
Substance
amount
concentration
Buffer system
pH value
1
100mM
Phosphoric acid (sodium)
pH = 2.1
2
10 mM
Phosphoric acid (sodium)
pH = 2.6
3
50mM
Phosphoric acid (sodium)
pH = 2.8
4
100mM
Phosphoric acid (sodium)
pH = 6.8
5
10mM
Phosphoric acid (sodium)
pH = 6.9
6
20mM
Citric acid (sodium)
pH = 3.1
7
20mM
Citric acid / caustic soda
pH = 4.6
8
10mM
Tartaric acid (sodium)
pH = 2.9
9
10mM
Tartaric acid (sodium)
pH = 4.2
10
20mM
Acetic acid (ethanolamine)
pH = 9.6
11
100mM
Acetic acid (sodium)
pH = 4.7
12
100mM
Boracic acid (potassium)
pH = 9.1
13
100mM
Boracic acid (sodium)
pH = 9.1
1. Selecting an application
see chap. 11.1.4.
The available applications will be
displayed.
Use the navigation keys , to select
<Buffer solution preparation>.
The framing will indicate the current
selection. Confirm using the OK-key.
Page 91

ABP-BA-e-1810 91
2. Selecting a buffer system
Use the navigation keys , to select the
desired buffer solution from the list and
confirm using the OK-key.
3. Tolerance of components
Press MENU button
Select <Permissible error> and confirm
using the OK-key.
Enter tolerance and confirm using the OK-
key, selectable 0.0001g – 9.9999g.
To return to the previous menu, press the
MENU-key.
4. Enter volume
Enter volume and confirm using the
OK-key.
The balance is ready for weighing the first
component. Displays the component name
and the nominal weight.
Load weighing container and tare.
Page 92
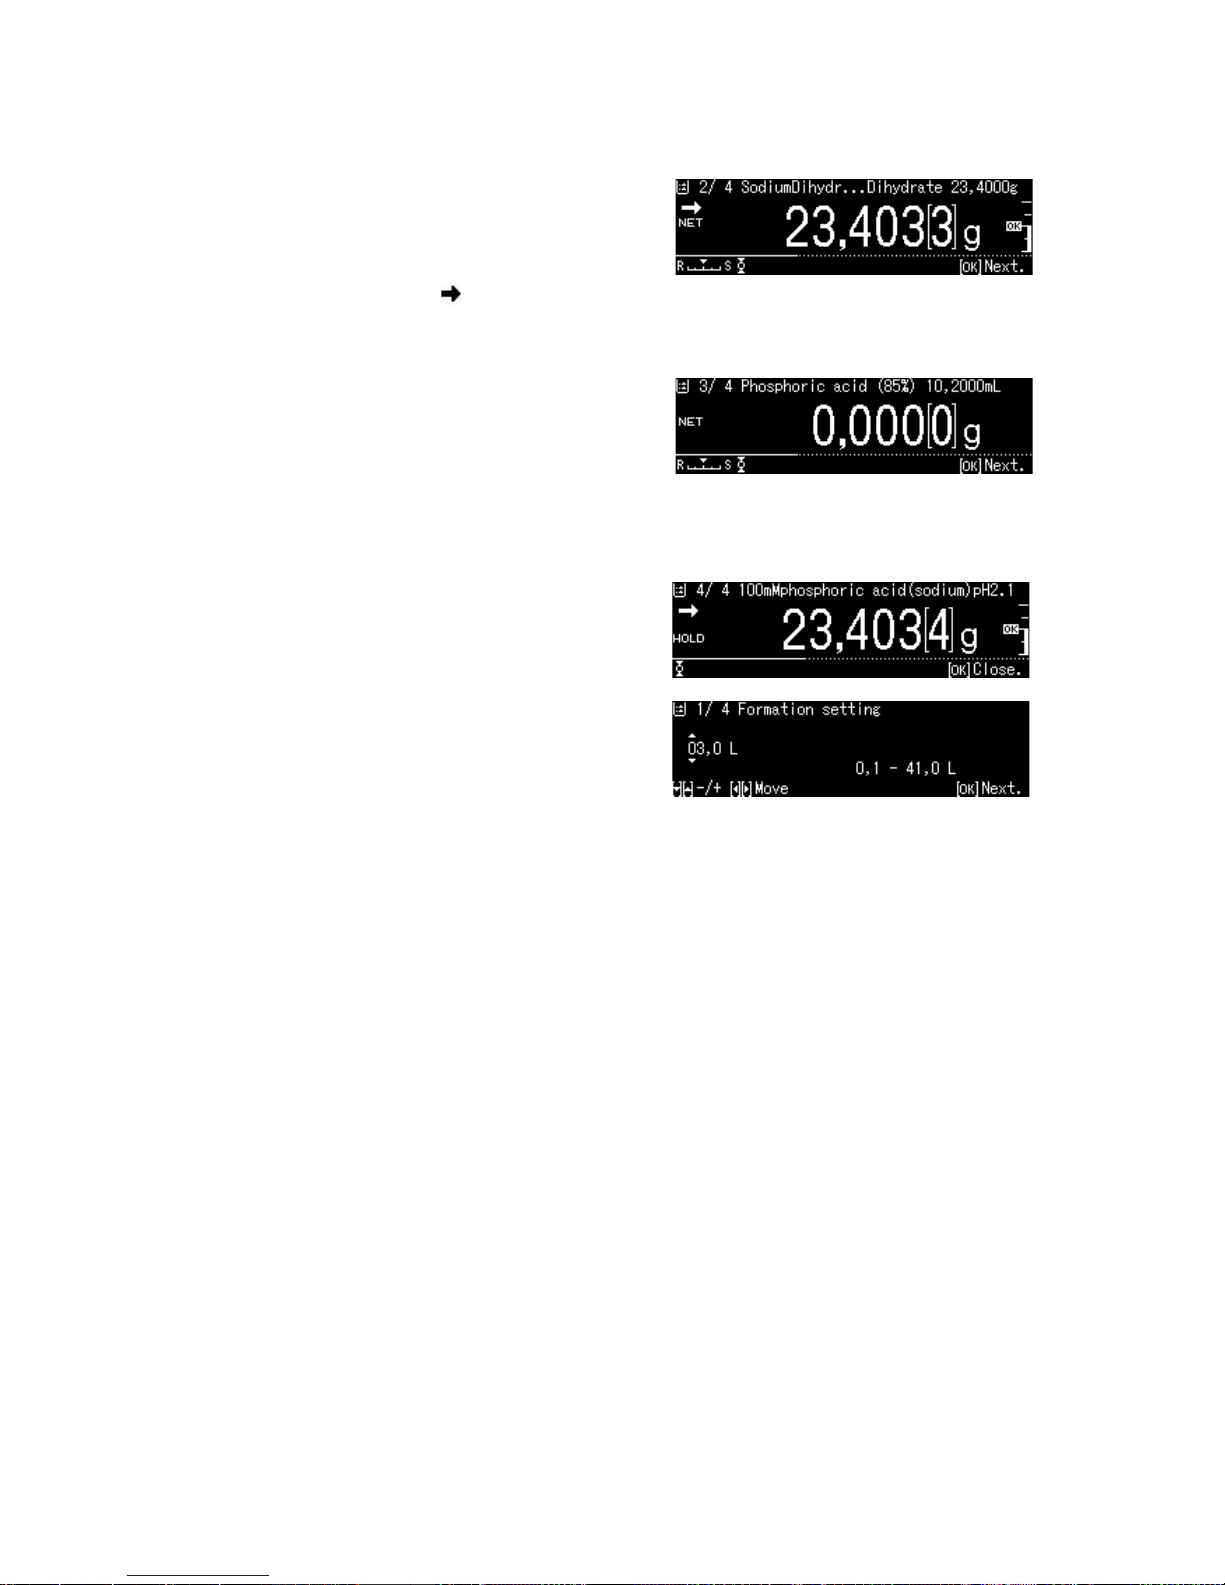
92 ABP-BA-e-1810
5. Add components
Weigh displayed component.
The weighing aid diagram with its tolerance
markers facilitates the determination of the
initial weight as a target value.
Wait for stability sign ( ). Apply the
achieved target value by pressing the
OK-key.
Add the displayed volume of the second
component using a chemical dropper.
Confirm using the OK-key
6. Completing a formulation
Once the last component has been
applied, the result will be displayed and
issued automatically.
Finish by pressing the OK-key.
The memory will be deleted. A new
formulation may be started.
Page 93

ABP-BA-e-1810 93
14.7 Sample preparation
This function is used to calculate and prepare standard solutions with a special
component based on hydrochloride or hydrate.
The following sample types are available.
Salts
(Hydrochloride)
Target weight (g)
=
Molecular weight
x active substance (g)
Molecular weight – weight of salt x 36.45
Molecular weight
Target weight (g)
=
Molecular weight
x active substance (g)
Molecular weight of active substance
Hydrate
Target weight (g)
=
Molecular weight
x active substance (g)
Molecular weight – weight of hydrate x
18.02
Purity
Target weight (g)
=
100%
x active substance (g)
Purity (%)
+ Define sample preparation
For selecting application, see chap. 11.1.4
The available applications will be
displayed.
Use the navigation keys , to select
<Sample preparation>.
The framing will indicate the current
selection. Confirm using the OK-key.
Page 94

94 ABP-BA-e-1810
For a first entry the display for entering a
memory name will appear.
Use the navigation keys , to select a
memory space and confirm using the OK-
key.
If required, change name and confirm
using the OK-key.
To overwrite a saved sample please continue by referring to chap. 0
Use the navigation keys , to select
sample type and confirm using the OK-key.
Options:
<Hydrate>
<Purity>
<Molecular weight>
<Hydrochloride>
Enter the weight for the required active
substance and confirm using the OK-key.
Enter tolerance and confirm using
the OK-key.
Enter molecular weight of component
and confirm using the OK-key.
Enter quantity of chloride groups and
confirm using the OK-key.
Save by pressing the OK-key. The values
for the samples will be displayed.
Page 95

ABP-BA-e-1810 95
+ Preparing a sample
1. Select <Sample preparation>
application
See previous paragraph "Define sample
preparation
2. Select sample
Use the navigation keys , to select
the desired sample and confirm using the
OK-key.
The balance is ready for weighing the first
component. The number for the
component (such as 1 of 6), component
name and the target weight will be
displayed.
Load weighing container and tare.
3. Determine initial weight for component
Weigh the component until the target
weight is identical to the gross weight.
The weighing aid graph with its markers
facilitates matching the initial weight to the
target weight.
14.7.1 Changing saved samples
In sample mode press MENU button.
Select <Register active sample> and
confirm using the OK-key.
Make changes as described in the
previous paragraph.
Target weight
Current measuring value
Active substance
The tolerance marker
"OK" indicates the
achievement of the
target weight.
Page 96

96 ABP-BA-e-1810
14.8 Statistics
The Statistics function facilitates the statistical evaluation of weighing values.
Combinable functions:
Standard weighing mode, parts counting, percentage determination, animal
weighing, density determination <Solids>, density determination <Liquids>
1. Select application to be applied to
statistics
see chap. 11.1.4.
The available applications will be displayed.
Use the navigation keys , to select
the desired application.
The framing will indicate the current selection.
Confirm using the OK-key.
2. Start statistics
Press MENU button.
Select <Statistical calculation> and
confirm using the OK-key.
Start <Start Statistical calculation> and
confirm using the OK-key.
The header will be issued to an optional
printer.
Put first weighed good on weighing
platform and wait for stability sign ( ).
Save weighing value to statistics by
pressing the PRINT-key.
Put additional weighed good on platform
and save each weighing value to statistics
by pressing the PRINT-key.
Each time you save a value it will be
logged automatically.
3. Finish statistics
Press MENU button.
<End Statistical calculation>
The result will be issued automatically.
Page 97

ABP-BA-e-1810 97
Sample log
Printing element No. <on>
STATISTICS
N001 = 1.0047g
1. Weighing Value
N002 = 0.9990g
2. Weighing Value
N003 = 0.9984g
3. Weighing Value
N004 = 0.9983g
4. Weighing Value
N005 =
0.9989g
5. Weighing Value
. . . . . . . <RESULT>. . . . . . .
N = 5
Number of samples
T = 4.9993 g
Sum
MAX = 1.0047 g
Biggest weight value
MIN = 0.9983 g
Smallest weight value
RNG = 0.0064
Difference smallest /
greatest weighing value
MEAN = 0.99986 g
Mean Value
SD = 0.00272 g
Standard Deviation
CV% = 0,00 %
Relative standard deviation
V = 0,00001
Fraction
Calculation:
s: Standard Deviation
n Number
xi: Weighing Value
Page 98
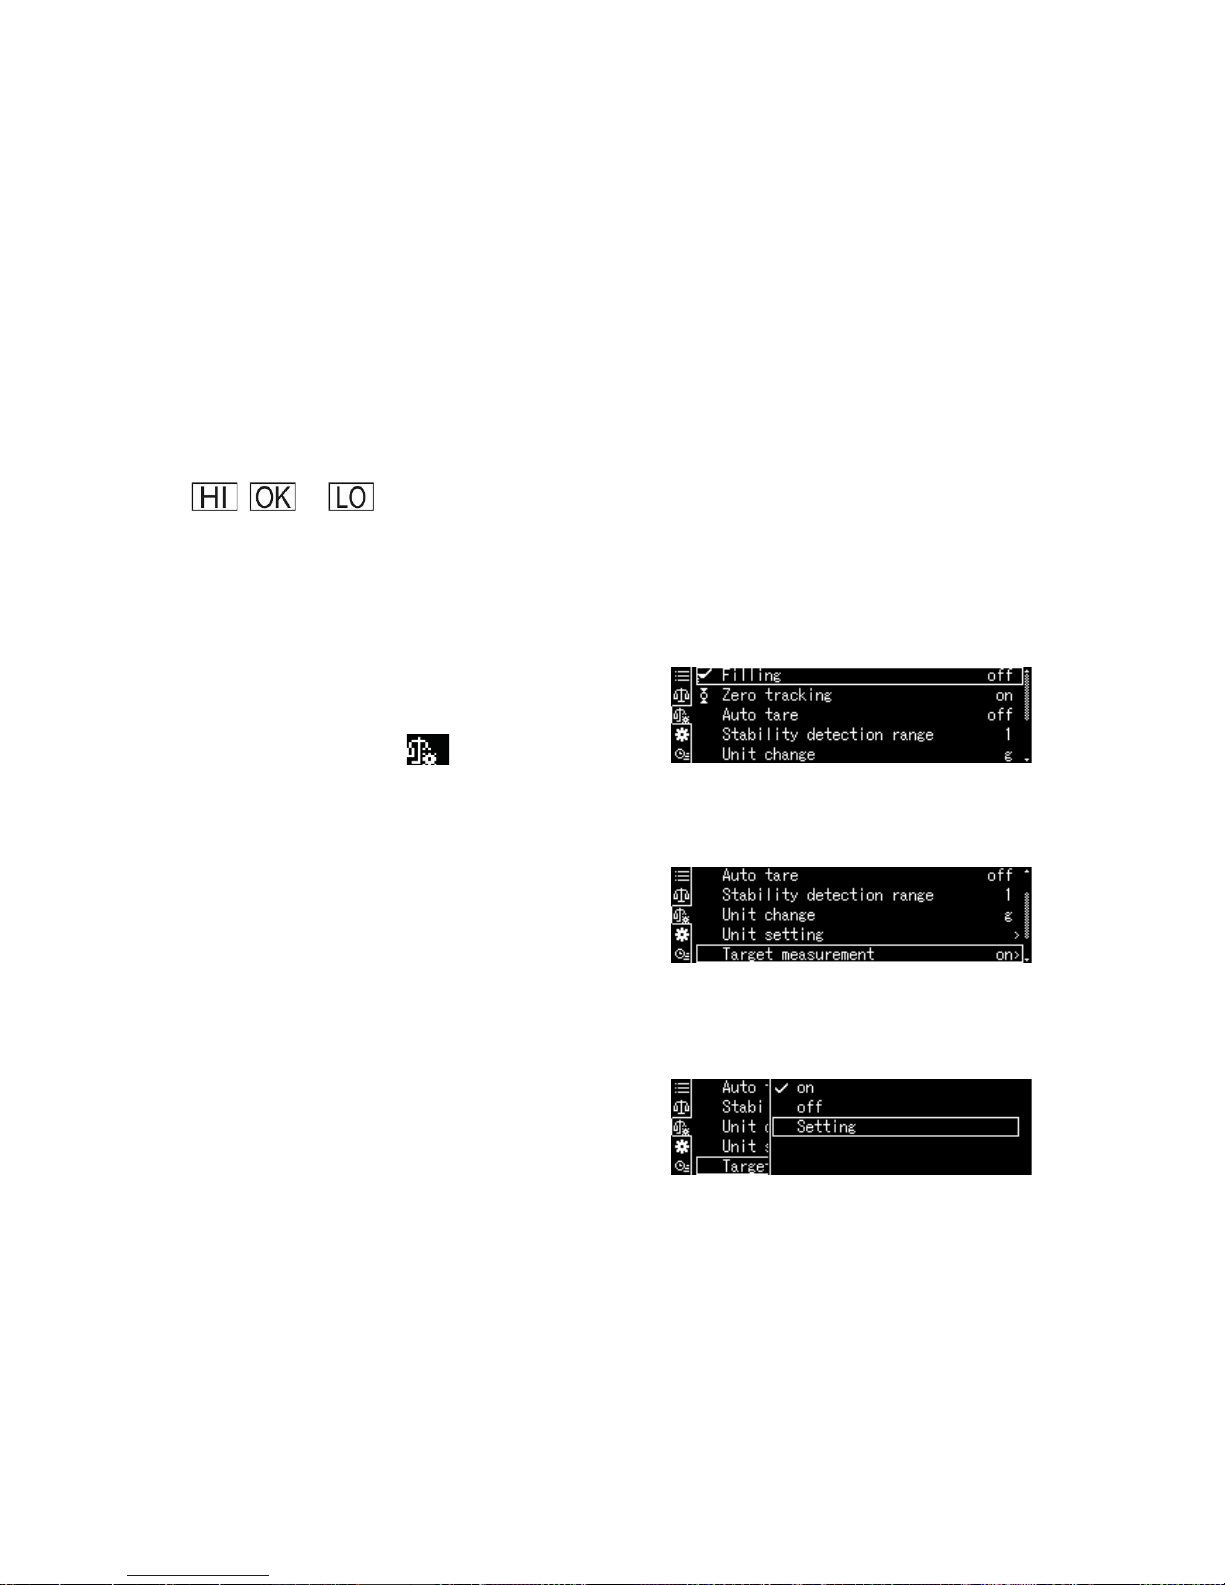
98 ABP-BA-e-1810
14.9 Control weighing and target weighing
This function is used to determine the matching of a weighing value to the specified
control values.
Control values can be exact target values (target weighing) or the limits set for the
tolerance range (control weighing) within which the weighing value is to be kept.
14.9.1 Target weighing
This mode e.g. is used for weighing constant liquid quantities or for assessment of
missing quantities or excess quantities.
The target value is the numeric value which corresponds to the nominal quantity of
the used unit. Beside the target value a tolerance value is entered. This is a
numerical value which is plus/minus over or under the acceptable target value.
Reaching of target value is shown on the diagram. The tolerance marks
, or
indicate whether the weighed good is below, within or above the
specified tolerances.
+ Settings
1. Calling Weigh Settings
In weighing mode press MENU button.
Press the R-Taste key and use the navigation
keys , to select < Weighing
Settings> and confirm using the OK-key.
2. Activate function
Use the navigation keys , to select
<Target measurement> and confirm using
the OK-key.
Select Settings <on> and confirm using
the OK-key.
3. Setting target value
Select <Setting > and confirm using
the OK-key.
Page 99

ABP-BA-e-1810 99
Select <Target value> and confirm using
the OK-key.
Enter target value and confirm using the
OK-key.
4. Setting tolerance
Select <Tolerance range> and confirm
using the OK-key.
Enter tolerance and confirm using the OK-
key.
To return to target weighing mode, press
the ON/OFF-key.
+ Perform target weighing
If required, place empty container on
scale and tare.
Place weighed goods and wait until
the tolerance mark
, or
appears. With the help of the
tolerance mark check if the weighed
goods are under, inside or over the
default tolerance.
Page 100

100 ABP-BA-e-1810
The tolerance marks provide the following information:
Condition Grading Status
Tolerance
mark
Optical signal Example:
Target value 100g
Tolerance 0.0010g
Weight more than
the nominal
weight and above
the upper
tolerance
Great difference
to target value
flashes slowly
(Cycle: 1,5 - 2 s)
< 150 g
Small difference
to target value
(<25 %)
flashes fast
(Cycle: 0.5 - 1 s)
< 125 g
Weight within
tolerance
(target value ±
tolerance)
Target value
accepted
Not flashing 99.9990 – 100.0010 g
Weight less than
nominal weight
and below the
lower tolerance
Great difference
to target value
(> 25 %)
flashes fast
(Cycle: 0.5 - 1 s)
> 75 g
Small difference
to target value
flashes slowly
(Cycle: 1,5 - 2 s)
> 50g
14.10 Control weighing (Pass / Fail evaluation)
In many cases not the nominal value of the weighed goods is the decisive parameter,
but the deviation from this nominal value. Such applications are for example the
weight check of equivalent packages or the process check of parts in a fabrication
process.
By entering the upper and lower limit you can ensure that the weighed weighed good
remains exactly within the set tolerance range at all time.
If the values of limits are exceeded or not reached this will be indicated by the
displayed indicators
, or .
.
 Loading...