

Page 1
KERN & Sohn GmbH
Ziegelei 1 Tel: +49-[0]7433
D-72336 Balingen
E-Mail: info@kern-sohn.com
Operating instruction
Analytical balance
KERN ABS/ABJ
Version 1.9
11/2010
GB
- 9933-0
Fax: +49-[0]7433-9933-149
Internet: www.kern-sohn.com
ABS/ABJ-BA-e-1019
Page 2

GB
KERN ABS/ABJ
Version 1.9 11/2010
Operating instruction
Analytical balance
Table of contents:
1 TECHNICAL DATA ............................................................................................................................. 4
2 KERN ABS/ABJ CONTROL COMPONENTS.................................................................................... 6
2.1 BRIEF DESCRIPTION OF DISPLAY ..................................................................................................... 7
2.2 KEYBOARD DESCRIPTION ............................................................................................................... 8
2.3 IMPORTANT NOTICES...................................................................................................................... 9
2.3.1 Ambient conditions ................................................................................................................. 9
2.3.2 Operating instructions for the balance.................................................................................. 10
2.4 BALANCE INSTALLATION ............................................................................................................... 10
2.4.1 Prepare the weighing chamber............................................................................................. 10
2.4.2 Power connection................................................................................................................. 11
2.4.3 Connection of electrical components (peripherals).............................................................. 11
2.4.4 Levelling the balance with the level...................................................................................... 11
2.5 STARTING THE BALANCE .............................................................................................................. 12
2.5.1 Warm-up time ....................................................................................................................... 12
2.5.2 On and off (standby mode)................................................................................................... 12
2.5.3 Auto-check............................................................................................................................12
2.5.4 Taring.................................................................................................................................... 13
2.5.5 Simple weighing (weight measurement)............................................................................... 13
2.5.6 Unit change-over .................................................................................................................. 13
2.6 DATA INTERFACE ......................................................................................................................... 13
2.7 CARE AND MAINTENANCE ............................................................................................................. 14
2.7.1 Cleaning................................................................................................................................ 14
2.7.2 Safety check ......................................................................................................................... 14
3 DECLARATION OF CONFORMITY ................................................................................................. 15
4 OPERATING MENU OF THE BALANCE......................................................................................... 17
4.1 MODIFYING THE SETTINGS............................................................................................................ 17
4.2 SETTING MODIFICATIONS.............................................................................................................. 17
4.3 MENU CALL ................................................................................................................................. 18
4.4 OPERATING MENU SUMMARY ........................................................................................................ 19
4.4.1 Selection of main menu........................................................................................................ 19
4.4.2 Menu indicator for FUnC.SEL menu option.......................................................................... 20
4.4.3 Menu indicator forUnit.SEL menu option.............................................................................. 21
4.4.4 Menu indicator for SETTinG menu option............................................................................ 23
4.4.5 Menu indicator for intFACE menu option.............................................................................. 24
4.4.6 Menu indicator for iF :USEr menu option ............................................................................. 25
5 ADJUSTMENT .................................................................................................................................. 26
5.1 ADJUSTMENT WITH EXTERNAL WEIGHT.......................................................................................... 26
5.2 CHECKING THE BALANCE WITH THE INTERNAL WEIGHT (ABJ ONLY)................................................. 27
5.3 CHECKING THE BALANCE WITH THE EXTERNAL WEIGHT .................................................................. 27
5.4 CHECKING THE BALANCE WITH THE INTERNAL WEIGHT (ABJ ONLY)................................................. 28
2
ABS/ABJ-BA-e-1019
Page 3

6 APPLICATION PROGRAMS ............................................................................................................29
6.1 AUTO-ZERO FUNCTION................................................................................................................. 29
6.2 FILTER ........................................................................................................................................ 29
6.3 STANDBY RANGE ......................................................................................................................... 30
6.4 CHANGING THE UNITS .................................................................................................................. 31
6.5 PERCENTAGE WEIGHING .............................................................................................................. 32
6.6 COUNTING .................................................................................................................................. 33
6.7 AUTO-PRINT DISPLAY ................................................................................................................... 34
6.8 CAPACITY INDICATOR (ANALOG DISPLAY) ...................................................................................... 35
6.9 SELECTING THE ADJUSTMENT TYPE .............................................................................................. 36
6.10 ADJUSTING THE ADJUSTMENT WEIGHT .......................................................................................... 37
6.11 SETTING THE ID NUMBER ............................................................................................................. 38
6.12 SETTING THE DATE (ABJ ONLY).................................................................................................... 39
6.13 SETTING THE TIME (ABJ ONLY)..................................................................................................... 40
6.13.1 Entering seconds.............................................................................................................. 40
6.13.2 Setting hours and minutes................................................................................................ 41
6.14 PRINTING OFF DATE AND TIME (ABJ ONLY).................................................................................... 42
7 DESCRIPTION OF INTERFACES .................................................................................................... 43
7.1 GENERAL INSTRUCTIONS.............................................................................................................. 43
7.2 GENERAL DATA ........................................................................................................................... 43
7.3 EXAMPLE FOR CABLE WIRING: ...................................................................................................... 43
7.4 FORMATTING INPUT AND OUTPUT DATA ......................................................................................... 44
7.5 ENTERING COMMANDS ................................................................................................................. 45
8 TROUBLESHOOTING ...................................................................................................................... 46
8.1 ERROR DISPLAY........................................................................................................................... 47
9 IMPORTANT INFORMATION...........................................................................................................48
Please read the operating instructions carefully before starting to work with the balance.
After unpacking, check that the apparatus has no visible external damage.
Keep all packing materials for future transport. Unplug all connected cables prior to
shipping to prevent any unnecessary damage.
ABS/ABJ-BA-e-1019
3
Page 4
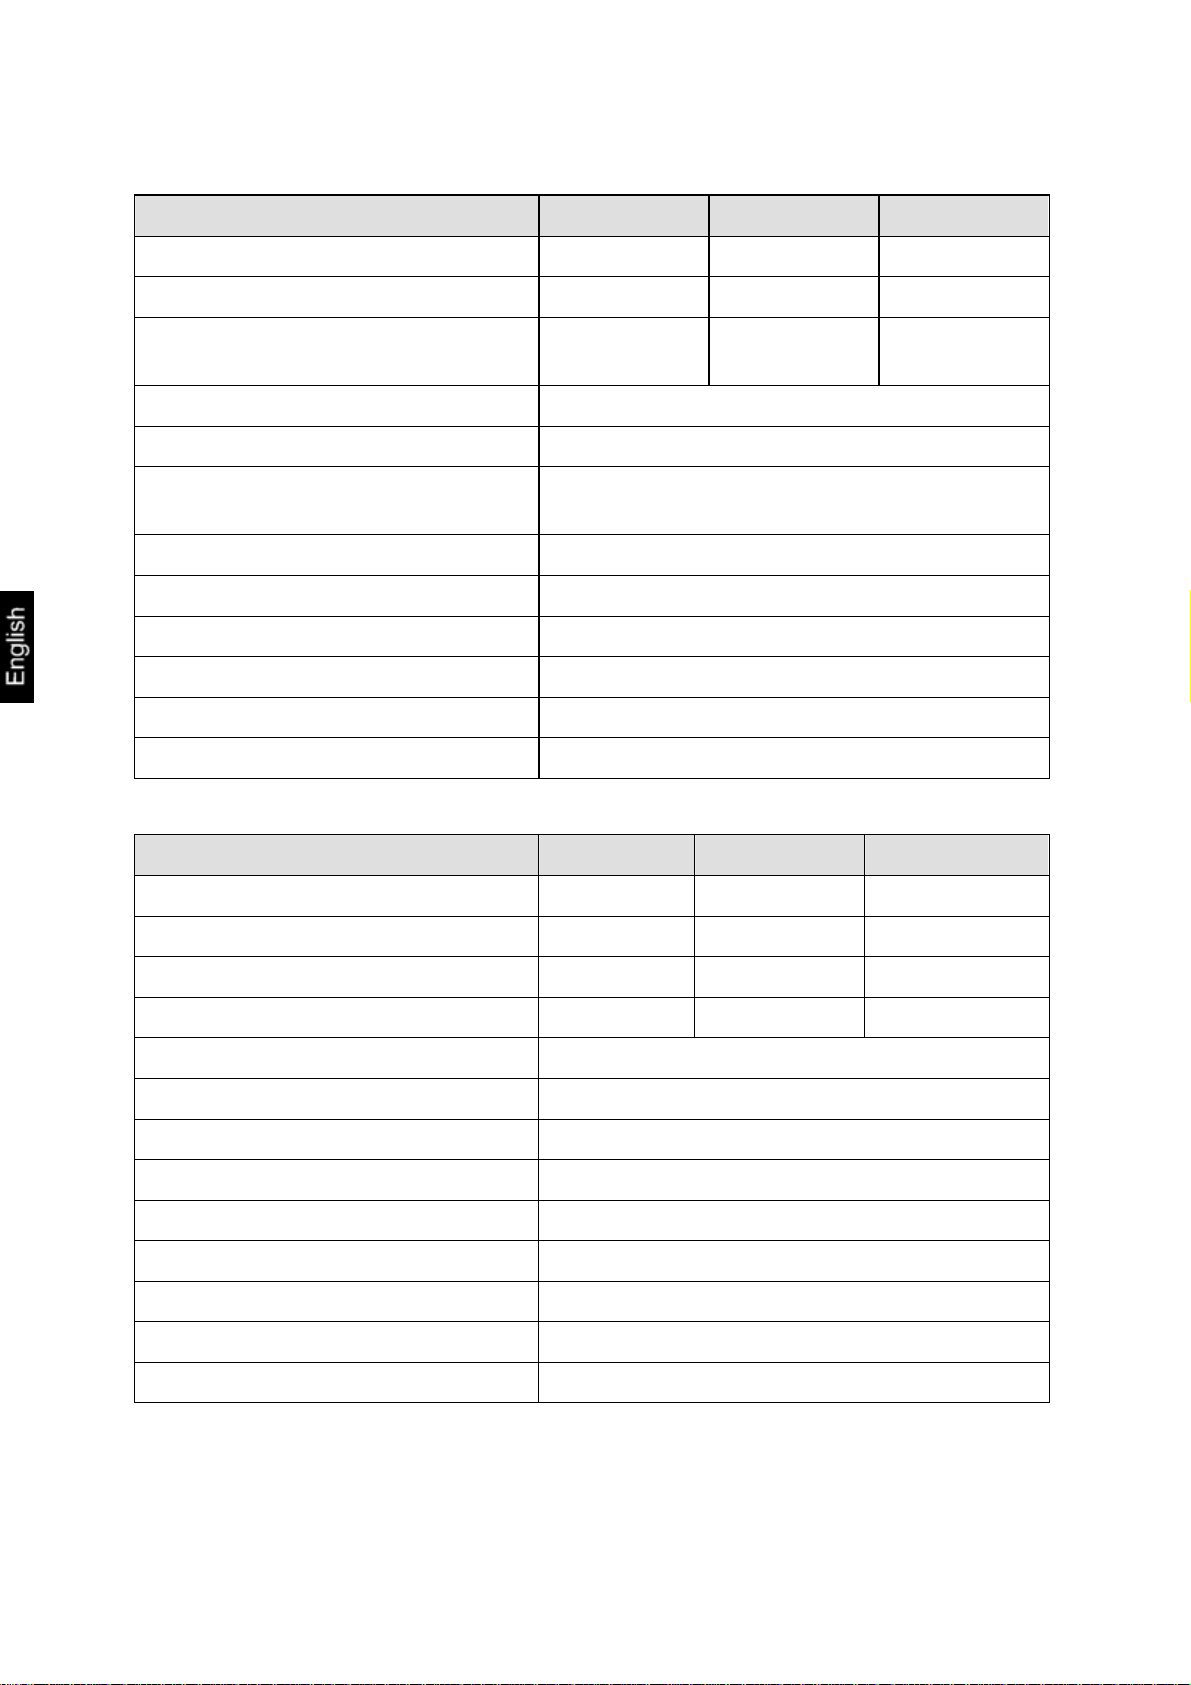
1 Technical data
Model ABS 80-4 ABS 120-4 ABS 220-4
Readout (d) 0.1 mg 0.1 mg 0.1 mg
Weighing range (Max) 83 g 120 g 220 g
Recommended adjusting weight, not
included (class)
Reproducibility 0.1 mg
Linearity ± 0.2 mg
Weighing units ct, dwt, g, gn, lb, mg, mo, oz, ozt,
Response time 3 sec.
Operating temperature + 10° .... + 30° C
Electric power supply 12 VDC
Weighing plate spezial steel Ø 80 mm
Case (W x D x H) mm 225 x 315 x 330
Weight net (aprox.) 7 kg
Model ABJ 80-4M ABJ 120-4M ABJ 220-4M
Readout (d 0.1 mg 0.1 mg 0.1 mg
50 g (E2) 100 g (E2) 200 g (E2)
tl (Cn), tl (HK), tl (Singap, Malays), tl (Tw)
Vertification value (e) 1 mg 1 mg 1 mg
Weighing range (Max) 83 g 120g 220 g
Min. load (Min) 0.01 g 0.01 g 0.01g
Reproducibility 0.1 mg
Linearity ± 0.2 mg
Weighing units g, ct
Response time 3 sec.
Operating temperature + 10° .... + 30° C
Electric power supply 12 VDC
Weighing plate spezial steel Ø 80 mm
Case (W x D x H) mm 225 x 315 x 330
Weight net (aprox.) 7 kg
4
ABS/ABJ-BA-e-1019
Page 5
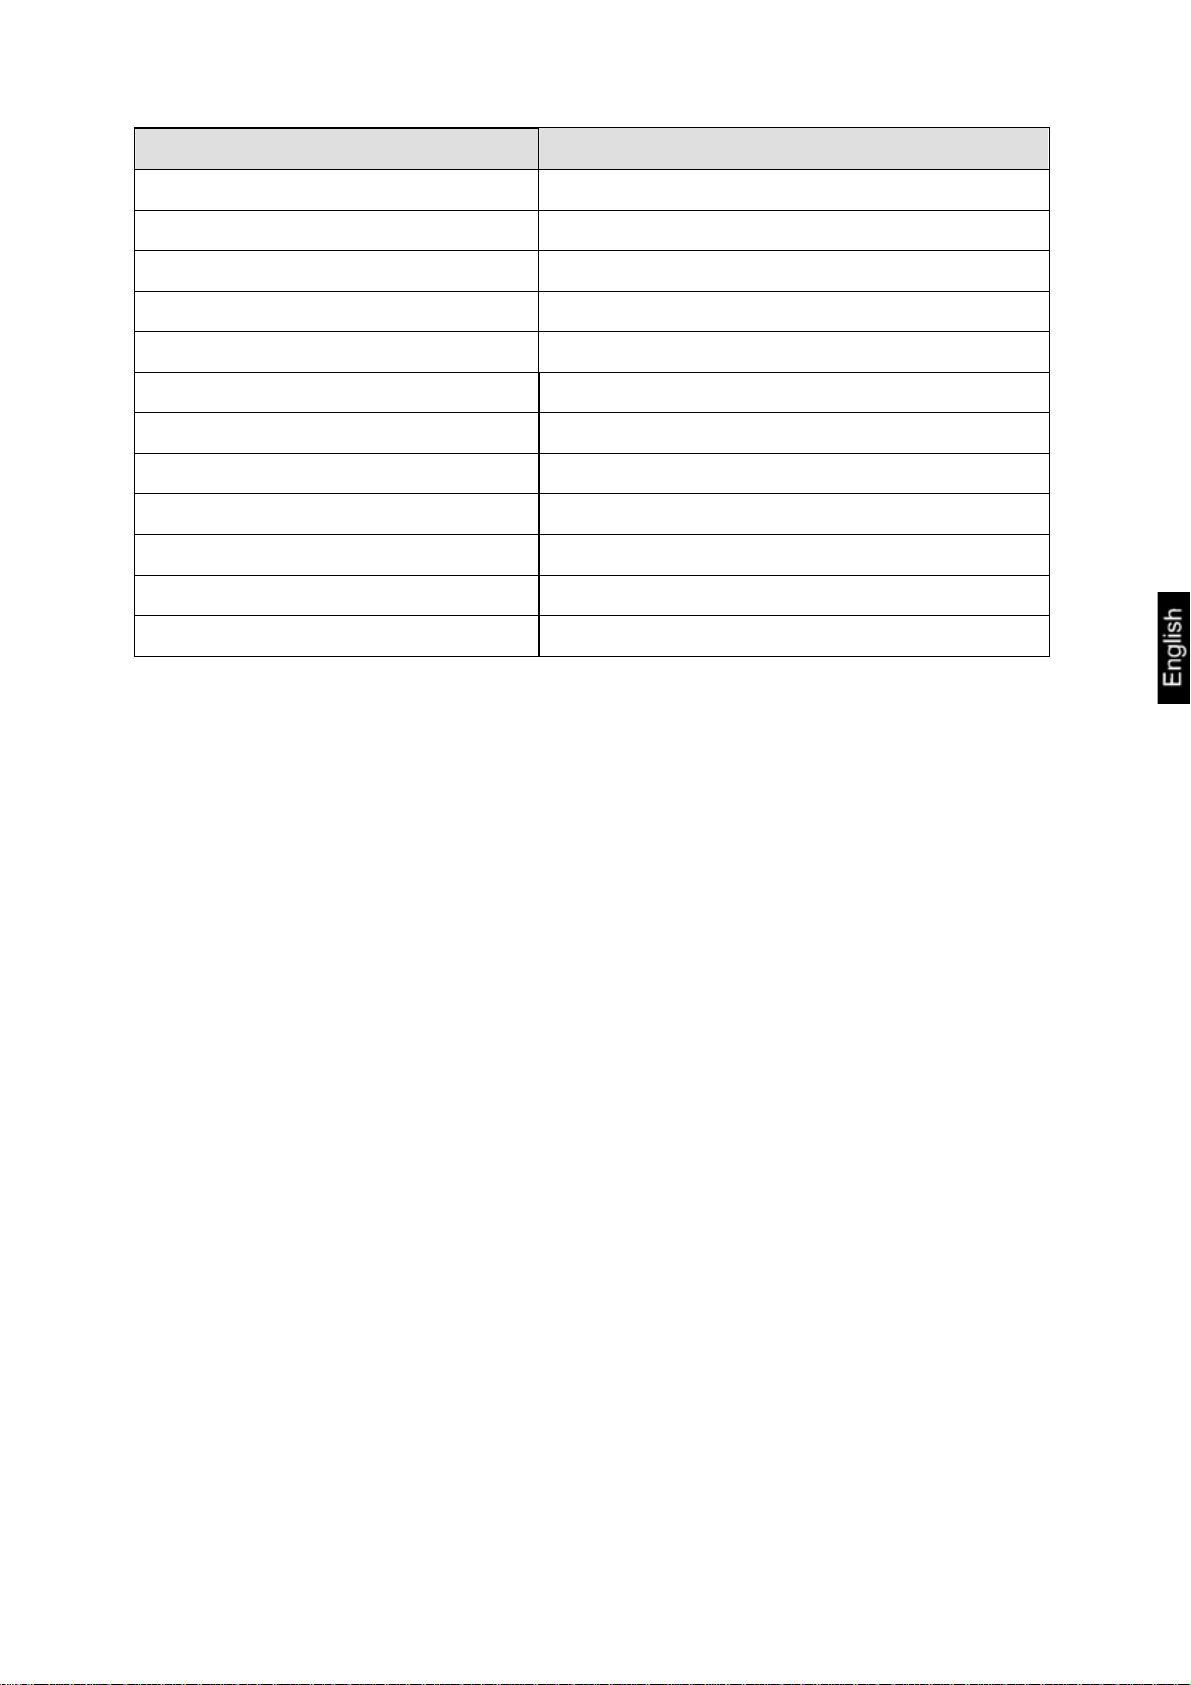
Model ABJ 320-4
Readout (d) 0.1 mg
Weighing range (Max) 320 g
Reproducibility 0.1 mg
Linearity ± 0.2 mg
Weighing units g, ct
Response time 3 sec.
Adjusting weight intern
Operating temperature + 10° .... + 30° C
Electric power supply 220 V – 240 V AC 50 Hz
Weighing plate spezial steel Ø 80 mm
Case (W x D x H) mm 205 x 165 x 240
Weight net (aprox.) 7 kg
ABS/ABJ-BA-e-1019
5
Page 6
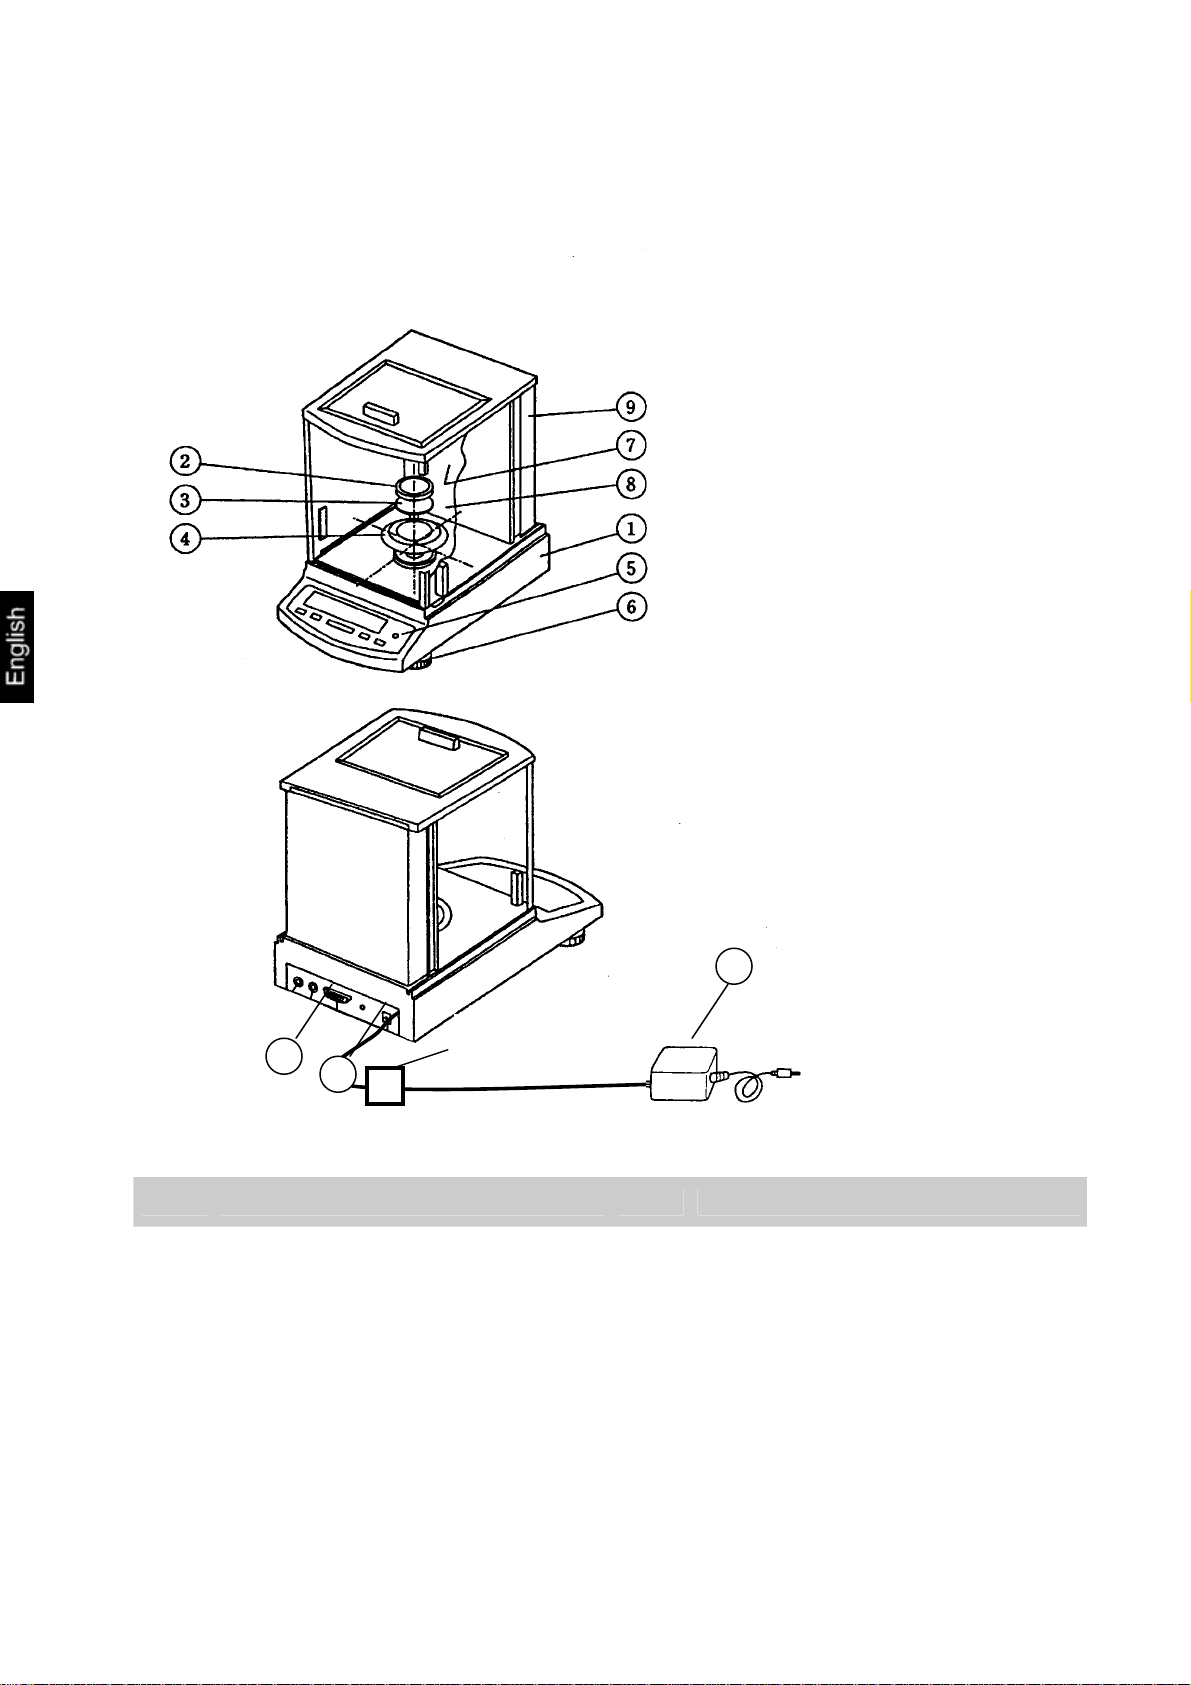
2 KERN ABS/ABJ control components
12
11
10
ferrite core
Pos. Description Pos. Description
1 Balance housing 7 Glass doors
2 Weighing plate 8 Weighing chamber
3 Weighing plate holder 9 Rear wall of balance
4 Protective ring 10 Connection for voltage adapter
5 Level 11 RS232 C data interface
6 Support foot 12 AC power supply
6
ABS/ABJ-BA-e-1019
Page 7
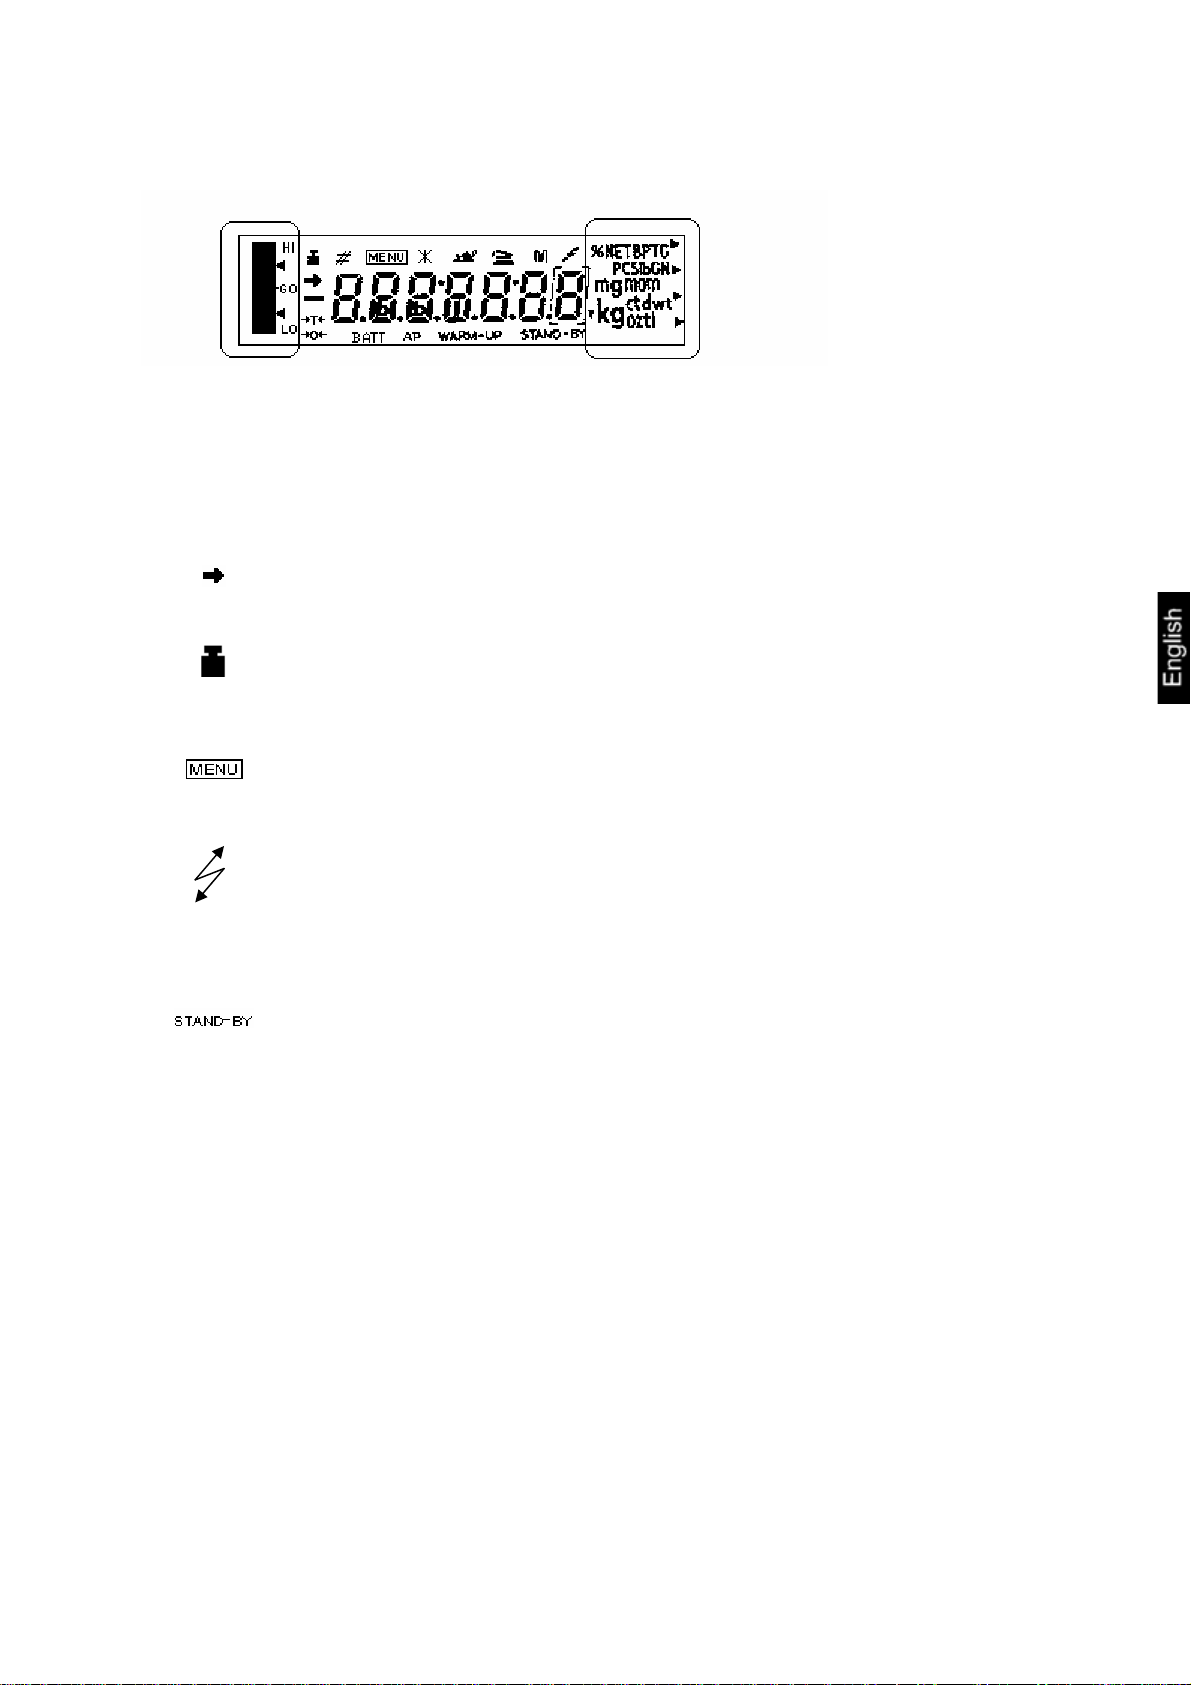
2.1 Brief description of display
Analog display Weight unit display
Display Description
Communication display
AP
Standby indicator
Lights if the weight measurement is stable.
Weight indicator
Lights during calibration
Also lights on the ABJ model when calibration needs to be carried out.
Menu indicator
When the menu is called up, the display is activated.
Lights when an RS-232C or DATA I/O connection has been established
Auto-print display
Lights when Auto-Print is ON
Standby indicator
Lights when the balance is in standby mode
ABS/ABJ-BA-e-1019
7
Page 8
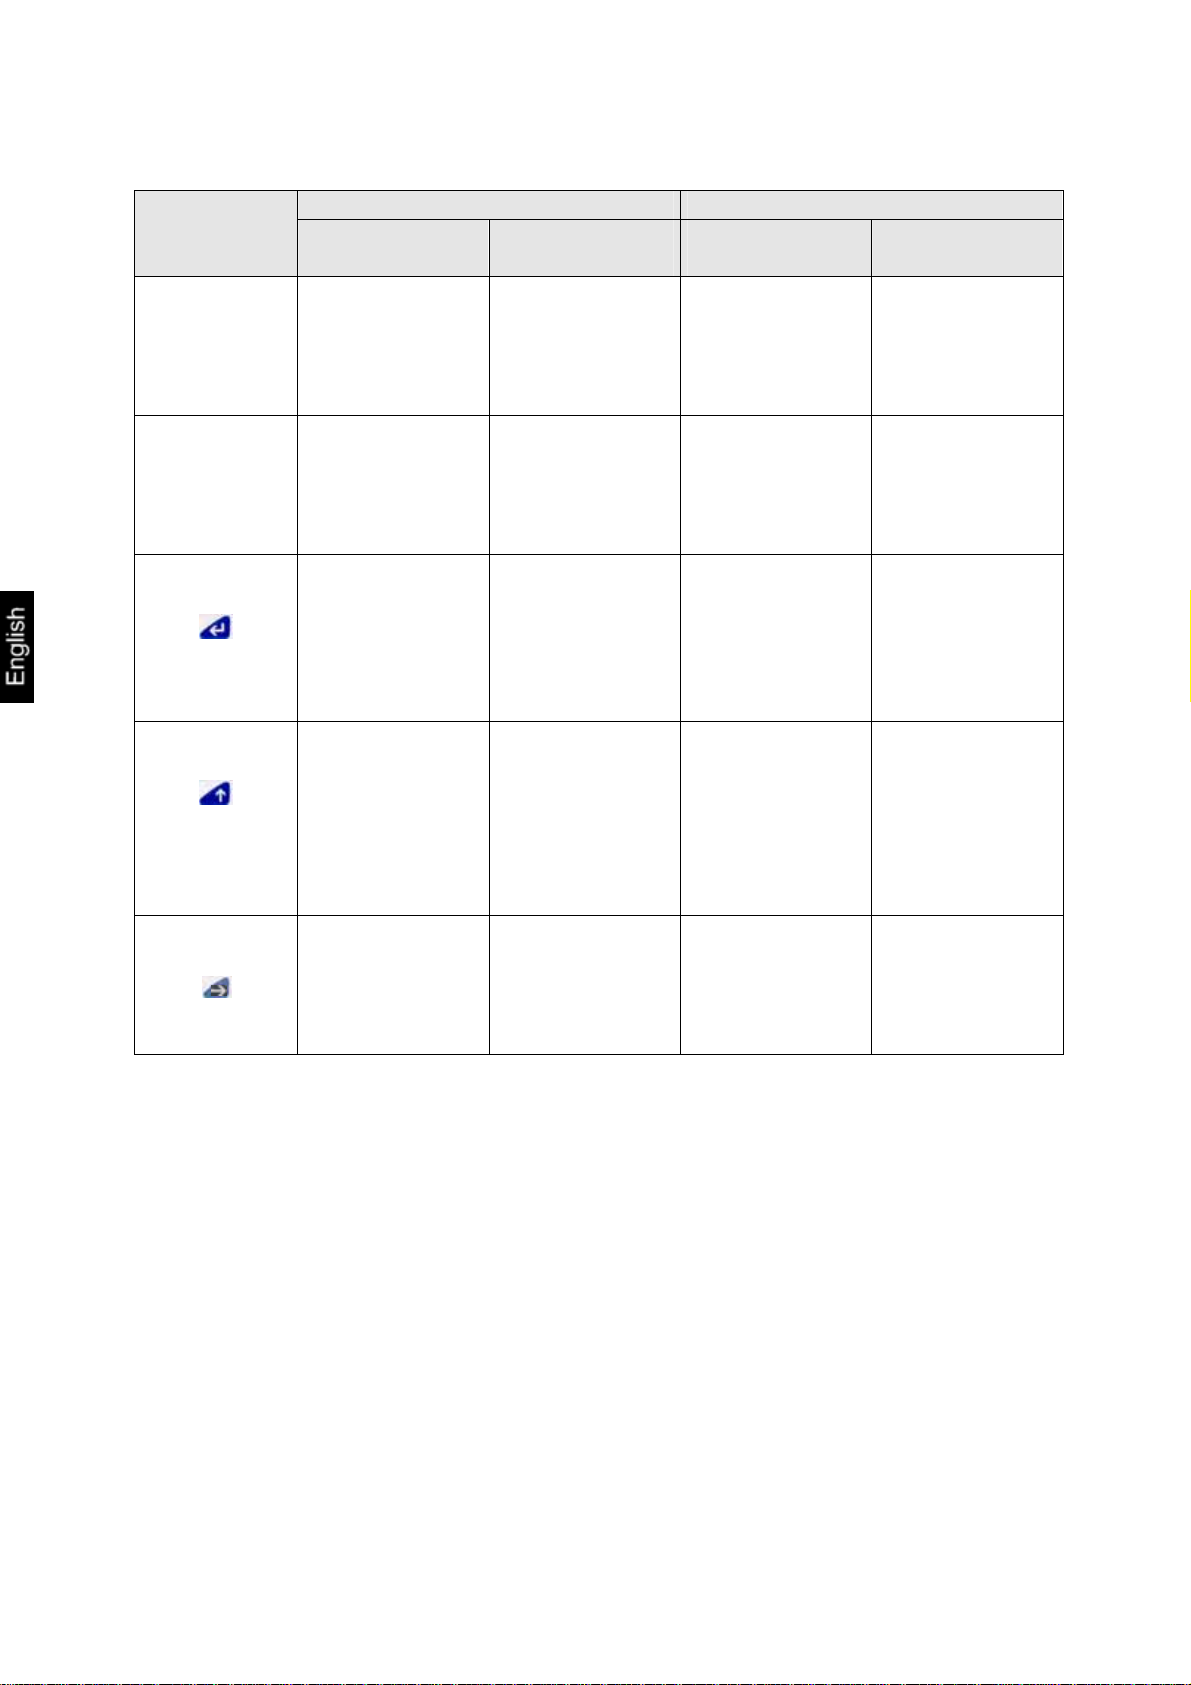
2.2 Keyboard description
During weighing During menu selection Key
Pressed
briefly
ON/OFF/ESC
CAL
MENU
TARE
UNIT
PRINT
Toggles balance
to standby
or cancels
function
e.g., (E CAL)
Tares or
zeros
of weight
display
Toggles of
weight units
(must be set up
in operation
menu of
balance)
Outputs weight
at external
device (printer)
or PC
Pressed
for 3 sec
——
In part and
percentage
mode: selection
menu for part
and %
——
——
Pressed
briefly
Returns to
previous menu
Selects function
values within
function ——
Selects function
or
scrolls one
menu option
toward right in
menu
Increases
numeric value
for selected
figure ——
Selects figure to
be modified
Pressed
for 3 sec
Returns to
weighing mode
——
——
8
ABS/ABJ-BA-e-1019
Page 9

2.3 Important notices
2.3.1 Ambient conditions
The items of equipment are constructed to provide reliable
weighing results under normal ambient conditions in a
functioning laboratory. A suitable location for the balance will
make it easier to obtain fast, reliable results with the balance.
The following steps must be taken when siting the balance:
Place the balance on a flat, stable surface;
Prevent extreme heat due to placement near a heat source
or direct sunlight;
− Protect the balance from direct air currents due to open
doors or windows;
− Prevent strong vibrations during weighing;
− Protect the balance from harsh chemical vapours;
− Do not use the balance in areas where there is any risk of
explosion.
Do not expose the apparatus to high humidity for extended
periods of time. Dew (condensation due to moisture in the
apparatus) may result when transferring the apparatus from
a cold area to a noticeably warmer environment. In this
case, acclimatise the apparatus to the ambient temperature
for about 2 hours.
Avoid magnetic and electric fields around the balance.
Check the balance with the verification weights at least once
a day.
The warranty is voided if the balance is opened.
ABS/ABJ-BA-e-1019
9
Page 10

2.3.2 Operating instructions for the balance
Remove the product from the weighing plate after
weighing it.
Do not force the balance to open.
Do not allow the balance to come into contact with water
or metal shavings.
If the balance is not used for an extended period of time
(7 days), unplug the power supply.
Do not weigh magnetic objects.
Do not exert any pressure on the weighing plate.
2.4 Balance installation
Remove the adhesive sheeting, adhesive strips and foam
material.
2.4.1 Prepare the weighing chamber.
Place the following parts on the balance in sequential
order:
- Protective ring (4)
- Plate holder (3)
- Plate (2)
10
ABS/ABJ-BA-e-1019
Page 11

2.4.2 Power connection
The balance is powered by an external power supply. The
voltage printed on the device must match the local mains
voltage.
Note!
Use only original power supplies. The use of other brands,
even if authorised by official agents, must be approved by a
specialist.
Plug the balance into the power outlet.
Turn on the power supply at the mains voltage.
Make sure there are no objects on the weighing plate.
The balance will work through a check procedure. In
addition, ABJ series balances carry out calibration using a
fitted calibration weight.
The “oFF“ message will appear on the display.
The balance will then be in standby mode. Press the
"ON/OFF" key to turn on the balance.
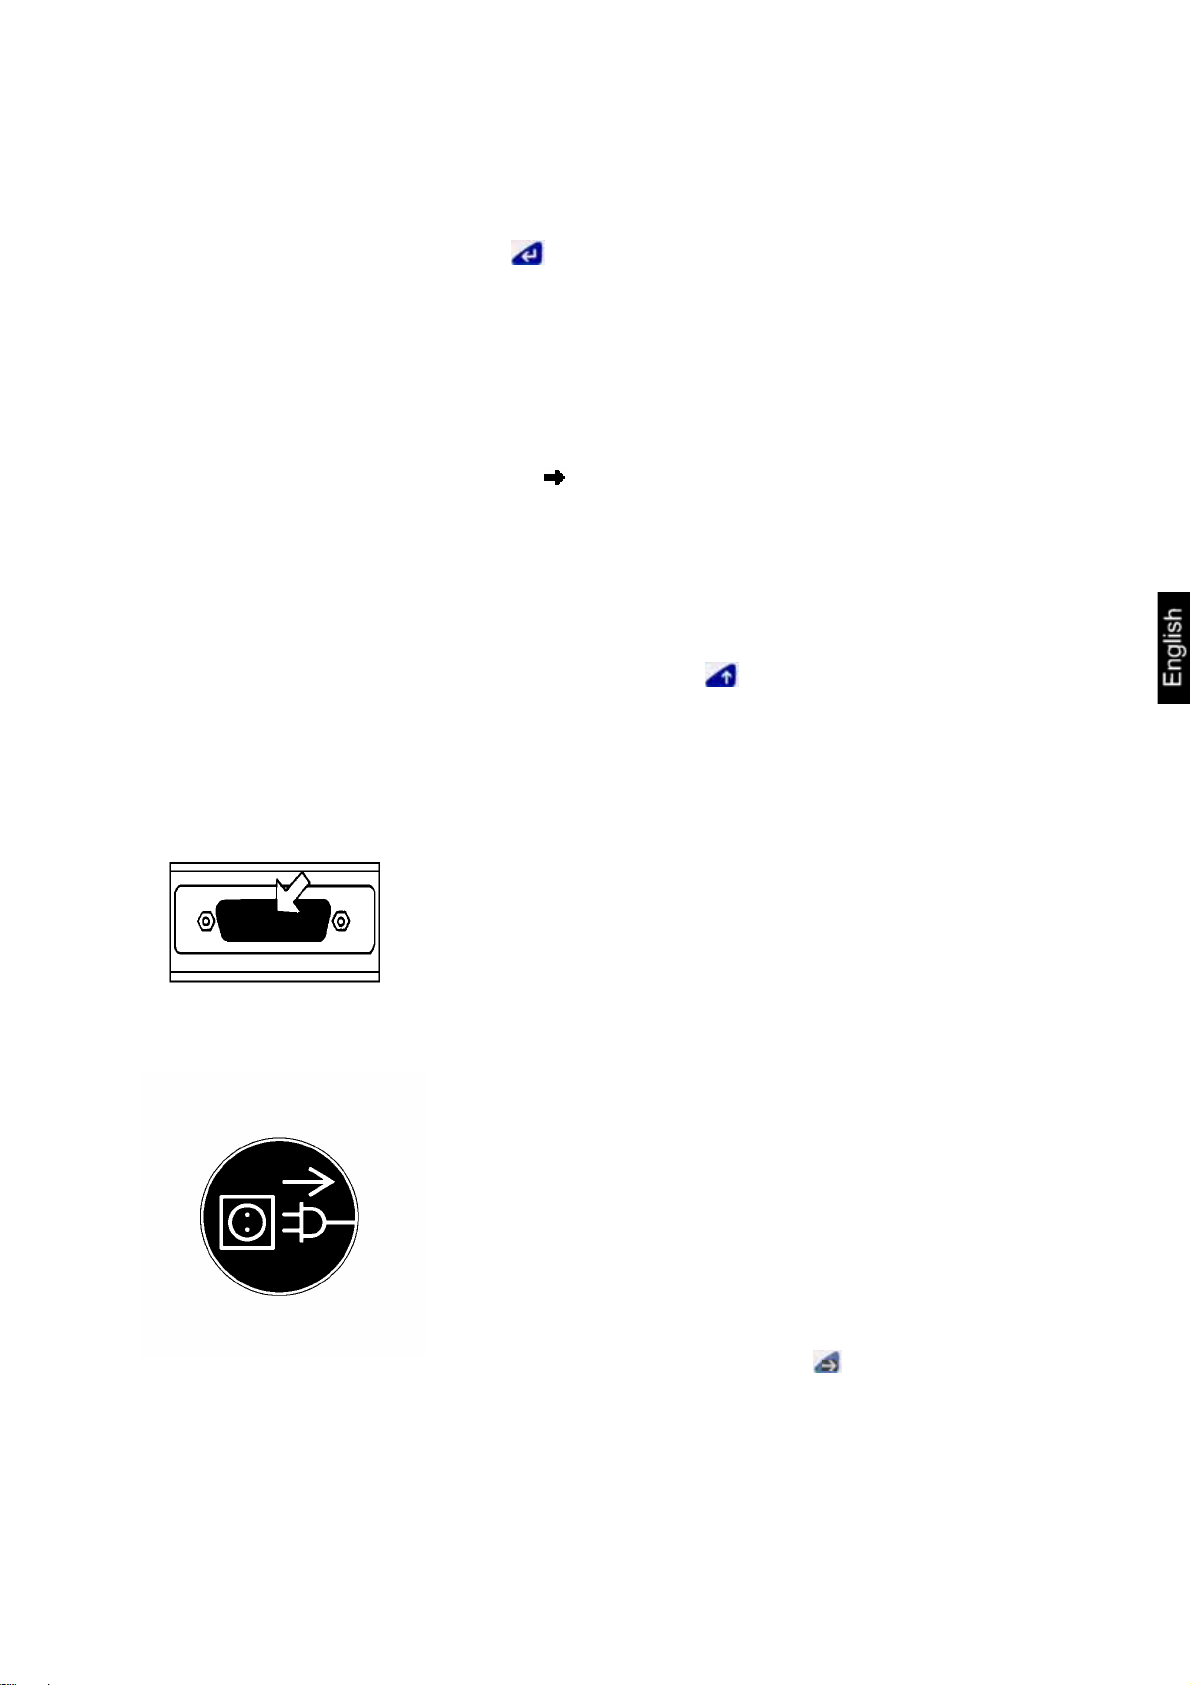
2.4.3 Connection of electrical components (peripherals)
Unplug the balance from the power outlet before connecting
or removing additional devices (printer, PC) from the data
interface.
2.4.4 Levelling the balance with the level
Use the support screws to level the balance until it is
horizontal and the air bubble is inside the red circle.
ABS/ABJ-BA-e-1019
11
Page 12
2.5 Starting the balance
2.5.1 Warm-up time
2.5.2 On and off (standby mode)
2.5.3 Auto-check
oFF
Standby
CHE 5
In order for the balance to provide accurate results, the
device must be warmed up for at least 4 hours after being
plugged for the first time or after an extended power
outage. After this time, the balance will have reached the
necessary operating temperature.
To turn the display on and off, use the ON/OFF/ESC key.
An automatic function test of the balance electronics is
carried out after switching on from standby mode. At the
end of the test, the display will indicate zero. The balance is
now ready to be used.
The following symbols will appear in the display window of
the balance for information purposes:
The balance is in OFF mode.
The balance is not plugged into the power mains.
(New connection, power outage above 1 second)
The balance is in standby mode.
The display was turned off by pressing the ON/OFF/ESC
key and is now available. The balance is ready to run when
turned on and does not require a warm-up period. In
addition, the time is displayed on the ABJ model in standby
mode.
The CHE display appears after the power is turned on.
The balance will work through a check procedure (5, 4, 3, 2,
and then switch to OFF mode.
1)
12
ABS/ABJ-BA-e-1019
Page 13
2.5.4 Taring
2.5.5 Simple weighing (weight measurement)
2.5.6 Unit change-over
Accurate weighing is only possible if the display indicated
0.0000 g before the objects were weighed. Press the
TARE/ key to zero the weight display. Taring can be
done over the entire weight range of the balance.
Place the item to be weighed on the plate. Read the weight
when the standby symbol appears on the display.
The units set in the balance operation menu can be called
up by pressing the UNIT/ key.
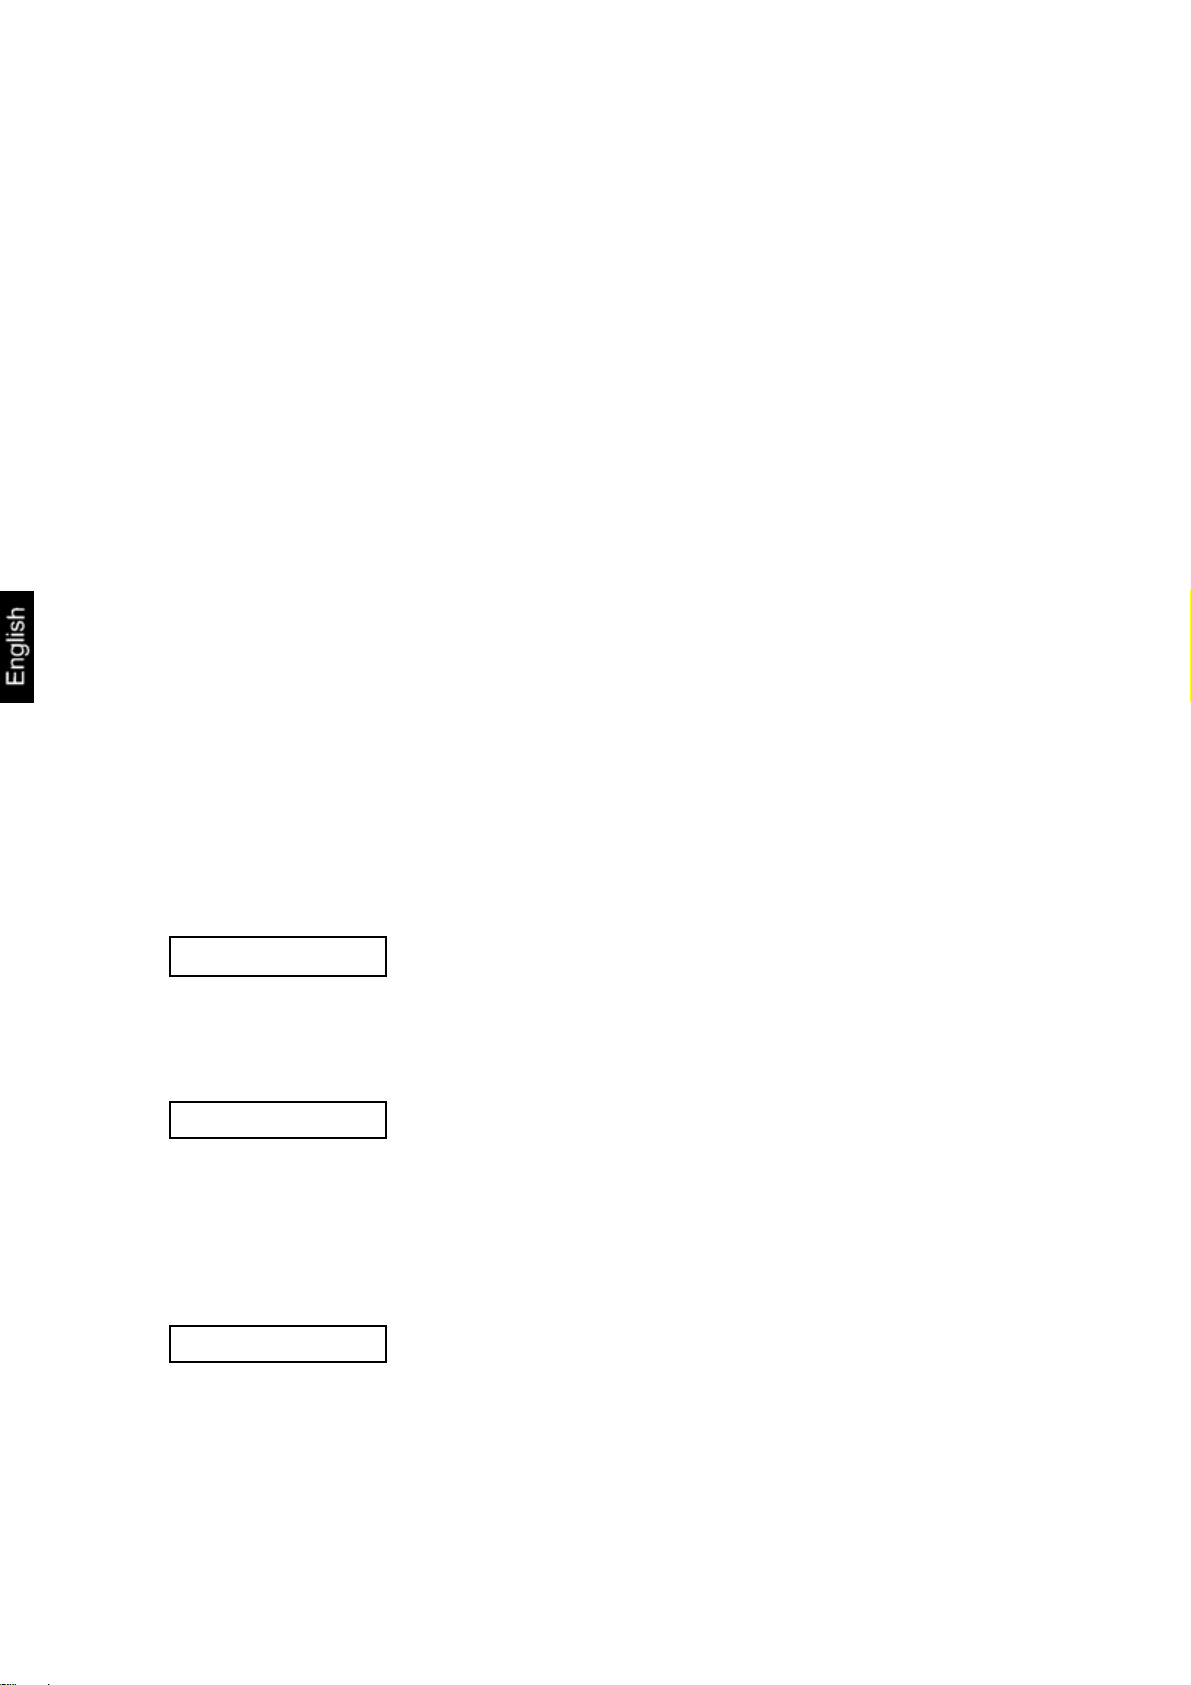
2.6 Data interface
The interface connection is located at the rear of the
balance.
Note!
Unplug the balance from the power outlet before connecting
or removing additional devices (printer, PC) from the data
interface.
To output data, press the PRINT/
Refer to the "Description of interface" chapter for more
information on the data interface.
key.
ABS/ABJ-BA-e-1019
13
Page 14

2.7 Care and maintenance
2.7.1 Cleaning
2.7.2 Safety check
Always unplug the device from the power outlet before
cleaning the apparatus.
Do not use harsh cleaning products (solvents or similar)!
Use a damp cloth, moistened with a mild soapy solution.
Make sure no moisture enters the apparatus, wiping with a
soft, dry towel.
Remove any test residue/dust with care by using a fine
paintbrush or hand vacuum cleaner.
If risk-free service is no longer guaranteed, you must place
the apparatus out of service by unplugging it from the power
outlet and protecting from further use.
Risk-free service of the power supply is no longer
guaranteed in the following cases.
- If the power supply is obviously damaged
- If the power supply no longer works
- After extended storage under adverse conditions.
In such cases, you must contact the supplier.
Any repairs must be performed by specialised technicians
with access to the necessary repair documentation and
instructions.
14
ABS/ABJ-BA-e-1019
Page 15
3 Declaration of Conformity
KERN & Sohn GmbH
D-72322 Balingen-Frommern
Postfach 4052
E-Mail: info@kern-sohn.de
Tel: 0049-[0]7433- 9933-0
Fax: 0049-[0]7433-9933-149
Internet: www.kern-sohn.de
Konformitätserklärung
EC-Konformitätserklärung EC-Declaration of -Conformity
Déclaration de conformité EC-Declaración de Conformidad
ECEC-Dichiarazione di conformità EC-Conformiteitverklaring
EC- Declaração de conformidade EC- Prohlášení o shode
EC-Deklaracja zgodności EC-Заявление о соответствии
D
GB
CZ
E
F
I
NL
P
PL
RUS
Konformitätserklärung
Declaration of
conformity
Prohlášení o
shode
Declaración de
conformidad
Déclaration de
conformité
Dichiarazione di
conformitá
Conformiteitverklaring
Declaração de
conformidade
Deklaracja
zgodności
Заявление о
соответствии
Wir erklären hiermit, dass das Produkt, auf das sich diese Erklärung bezieht,
mit den nachstehenden Normen übereinstimmt.
We hereby declare that the product to which this declaration refers conforms
with the following standards.
Tímto prohlašujeme, že výrobek, kterého se toto prohlášení týká, je v souladu
s níže uvedenými normami.
Manifestamos en la presente que el producto al que se refiere esta
declaración está de acuerdo con las normas siguientes
Nous déclarons avec cela responsabilité que le produit, auquel se rapporte la
présente déclaration, est conforme aux normes citées ci-après.
Dichiariamo con ciò che il prodotto al quale la presente dichiarazione si
riferisce è conforme alle norme di seguito citate.
Wij verklaren hiermede dat het product, waarop deze verklaring betrekking
heeft, met de hierna vermelde normen overeenstemt.
Declaramos por meio da presente que o produto no qual se refere esta
declaração, corresponde às normas seguintes.
Niniejszym oświadczamy, że produkt, którego niniejsze oświadczenie
dotyczy, jest zgodny z poniższymi normami.
Мы заявляем, что продукт, к которому относится данная декларация,
соответствует перечисленным ниже нормам.
Electronic Balance: KERN ABS/ABJ
Mark applied EU Directive Standards
2004/108/EC EN 55022: 2006 (Class B)
2006/95/EC EN 60950: 2001
Date: 25.05.2009 Signature:
Gottl. KERN & Sohn GmbH, Ziegelei 1, D-72336 Balingen, Tel. +49-[0]7433/9933-0,Fax +49-[0]7433/9933-149
ABS/ABJ-BA-e-1019
EN 55024: 1998/A1: 2001/A2: 2003
EN 61000-3-2: 2006
EN 61000-3-3: 1995/A1: 2001/A2: 2005
Gottl. KERN & Sohn GmbH
Management
15
Page 16

Calibration information (Kern ABJ only)
A security mark must be attached in compliance with the following drawing.
Type plate
Security mark
Important type plate information:
There is a counter on the type plate that counts upwards if the internal adjustment
weight is re-adjusted using service mode. This counter is indicated as follows:
“Log. No. A01”. The display indicates the number A01 after the balance has been
connected to the power supply. If the internal adjustment weight has been adjusted
using the service mode, this counter would count upwards and A02 would appear after
the balance is connected to the power supply. This would invalidate any calibration in
calibrated condition.
The counter on the type plate and the number indicated on the display must coincide
after the balance is connected to the power supply!
If these numbers do not coincide, calibration is not valid.
16
ABS/ABJ-BA-e-1019
Page 17

4 Operating menu of the balance
The operating menu of the balance can be used to set up the balance to meet your
specific needs. The operating menu is normally set up during manufacture and does not
require any modifications. Nevertheless, the balance can be customised for special
applications through the operating menu.
4.1 Modifying the settings
To change certain settings, select the respective functions.
A function can be modified by the following three steps:
- Menu call
- Function setting
- Confirm and store
To adjust a function, the ON/OFF/ESC, CAL/MENU and
TARE/ - key are equipped with special functions.
4.2 Setting modifications
CAL/MENU = Menu selection and menu option processing
from top down (↓).
TARE/ = Select function.
Once the display function has been selected with the
CAL/MENU key, perform a call by using the TARE/
for the modification.
CAL/MENU = Select one of the possible function settings.
Processing of menu options from top down.
TARE/
TARE/ - key of current display.
The standby indicator will indicate the setting for the
current function.
ON/OFF/ESC = Exit from function
Press the ON/OFF/ESC key function briefly
to return to previous menu.
Press the ON/OFF/ESC key function for longer
to return to weighing mode.
-key
= Confirmation and storage of setting with
ABS/ABJ-BA-e-1019
17
Page 18

4.3 Menu call
Perform the modification test once. Change the “Auto-Zero“
function to OFF and then to ON.
- Turn the balance on by using the ON/OFF/ESC key.
- Press the CAL/MENU key until FUnC.SEL appears.
- Press the TARE/ - key only once until CAL appears.
- Press the CAL/MENU key once until trC :on appears.
- Press the TARE/ - key once.
The “Auto-Zero“ function is selected.
The standby indicatorindicates the setting of the
current display.
- Press the CAL/MENU key.
This means:
trC :oF Auto-Zero is off.
trC :on Auto-Zero is on
Select trC :oF
- Press the TARE/ key once.
A colon appears when the change is stored.
- Press the ON/OFF/ESC key.
To exit the menu, press the ON/OFF/ESC key at least
2 sec.
Note:
If you wish to store several settings simultaneously on the
operating menu, you do not need to exit the menu each
time. Several settings can be set up before exiting the
menu.
18
ABS/ABJ-BA-e-1019
Page 19

4.4 Operating menu summary
4.4.1 Selection of main menu
Balance display 0.0000
eCAL Balance settings. For more options, see the chapter on “Selecting the adjustment
type“.
St.b1t Display of current settings St Standard mode
SA Sample mode
Hi High Stability Modus
b1 Standby range 0,1 mg
b2 0,5 mg
b10 1,0 mg
trC-on AutoZero ON
trC-of1 Auto Zero OFF
t (displayed)
t (not displayed)
Stnd Standard weighing mode
SAmPLE Sample mode
Hi-Stb High stability mode
FUnC.SEL Function menu. See Chapter 4.4.2, “Menu indicator for FUnc.SEL menu option“
SEttinG Function menu. See Chapter 4.4.4 “ Menu indicator for “SettinG“
intFACE Function menu. See Chapter 4.4.5 “ Menu indicator for “intFACE“
Balance display 0.0000
ABS/ABJ-BA-e-1019
19
Page 20

4.4.2 Menu indicator for FUnC.SEL menu option
FUnC.SEL CAL E CAL Adjustment with external weight
E tESt Adjustment check
I CAL Adjustment with internal weight (ABS only)
I tESt Adjustment check internal weight (ABJ only)
trC:on trC-on Auto-Zero ON
trC-oF Auto-Zero OFF
bAnd:1 b-1 Standby range, 1 = extremely quiet environment
(0.1 mg)
b-5 Standby range, 5 = quiet environment,
(0.5 mg)
b-10 Standby range, 10 = non-quiet environment,
(1.0 mg)
Unit.SEL Access to three menu levels (Unit Selection Mode),
See Chapter 4.4.3, “Unit.SEL" menu option
AtPrt:on Ad-on Auto PRINT ON
AP-oF Auto PRINTOFF
AdiSP:on Ad-on ON capacity indicator
Ad-oF OFF capacity indicator
Addon:on Adon-on Not documented
Adon-oF Not ducumented
20
ABS/ABJ-BA-e-1019
Page 21

4.4.3 Menu indicator forUnit.SEL menu option
Unit.SEL U- g grams
(0.0001 g)
U- mg Milligrams
(0.1 mg)
U- % Percentage
U- PCS Parts
U- ct Carats
(0.001 ct)
U- mom Momme
(0.00005 mom)
U- ,d Not documented
U- d Not documented
U- Lb Pounds
U- Oz Ounce calculation
U- Ozt Troy ounce calculation
U- HK Hong Kong
U- SPorE Singapore
U- tiwAn Taiwan
U- mAL Malaysia
U- CHinA Chinese
U- dwt Pennyweight
U- GN Grain
U- m Mesgal
U- b Boats
U- t Tare
U- o Parts per pounds
ABS/ABJ-BA-e-1019
21
Page 22

Calculation factor 1g:
= 0.001kg
= 1000mg
= 5ct
= 0.266667 mom
= 0.00220462 Lb
= 0.0352740 Oz
= 0.0321507 Ozt
= 0.0267173 TL-HK
= 0.0264555 TL-S'pore
= 0.0266667 TL-Taiwan
= 0.0264600 TL-Malaysia
= 0.0266071 TL-China
= 0.643015 dwt
= 15.4324 GN
= 0.216999 m
= 0.0657895 b
= 0.0857339 t
= 1.128766770
22
ABS/ABJ-BA-e-1019
Page 23

4.4.4 Menu indicator for SETTinG menu option
SEttinG CAL dEF E CAL Adjustment for calibration with external weight
E tEST Adjustment check with external weight.
I CAL Adjustment for calibration with internal weight
(ABJ only)
I tESt Adjustment check with internal weight(ABJ only)
CAL SEt Entry of individual weight
PCAL.SEt.. Not documented
PCAL Not documented
id:1234 Entry of "ID number" for balance,
see Chapter 6.11 "Setting the ID number of the
balance"
GLP: on GLP-on Output- reporting for GLP/GMP.
GLP-oF Output reporting for GLP/GMP.
LSG SEt Not documented
Sv SEt Not documented
d-01.21 Setting the date (ABJ only)
ABS/ABJ-BA-e-1019
23
Page 24

t-16:50 SEC Adj Setting the time (ABJ only)
tm.Adj
Prtdt:on Prdt-on Printing (ABJ only)
Prdt-of
4.4.5 Menu indicator for intFACE menu option
intFACE iF :F1 Format 1 *
iF :F2
iF :F3
iF :F4
iF :win
FUnC.SEL Function menu. See Chapter 4.4.6 “Menu indicator for "USEr
Format 2 *
Format 3 *
Format 4 *
Format WIN *
menu option (always use this setting).
"
* Not documented
24
ABS/ABJ-BA-e-1019
Page 25

4.4.6 Menu indicator for iF :USEr menu option
iF :USEr io.b:**** b300 Transmission speed 300 bps
b- 600 Transmission speed 600 bps
b- 1200 Transmission speed 1200 bps
b- 2400 Transmission speed 2400 bps
b- 4800 Transmission speed 4800 bps
b- 9600 Transmission speed 9600 bps
b-19.2 Transmission speed 19,2 k bps
b-38.4 Transmission speed 38,4 k bps
io.d:**** d-CR Delimiter C/R
d-LF Delimiter L/F
d-CrLF Delimiter C/R+L/F
d-Cn Delimiter comma
io.P:**** P-no No parity, 8 bits
P-odd Odd parity, 7 bits
P-EvEn Even parity, 7 bits
io.S:**** S-S1 Stop bit 1
S-S2 Stop bit 2
io.F:**** F-UF1 Manufacturer's format 1
F-UF2 Manufacturer's format 2
F-UF3 Manufacturer's format 3
F-UF4 Manufacturer's format 4
io.H:**** H-oFF Handshake AA
H-SoFt Software Handshake
H-HArd Hardware Handshake
d-win Delimiter win
ABS/ABJ-BA-e-1019
25
Page 26

5 Adjustment
During the set-up, balance sensitivity is adapted to the ambient conditions.
5.1 Adjustment with external weight
Using the recommended adjusting weight (KERN ABS see Chapter 1 „Technical Data“)
or the internal adjusting weight (KERN ABJ), the accuracy of the balance can be
checked at any time and adjusted.
Adjust your new balance at the balance location after a warm-up period before initial
use. If there is any change in location or ambient conditions (particularly temperature),
the balance must be readjusted. This kind of adjustment should be carried out regularly
at all costs due to the high accuracy of the items of equipment.
The weight symbol
becomes necessary.
Sequence:
(1) Remove the items being weighed from the balance plate and press the
TARE/ - key; the display will indicate zero.
(2) Press the CAL/MENU key until E cal appears.
Note: Balances without automatic internal adjustment are set at “E cal” as a
standard, i.e. set for adjustment using an external weight. This setting can
be checked using the “Setting” menu, see chapter 4.4.4, and altered if
necessary.
(3) Then press the TARE/ -key - The display will indicate 0.0000, along with the
weight symbol.
(4) The zero will be flashing. The weight value required for the setting will start to
flash.
(5) Place the necessary adjustment weight on the balance plate.
(6) Wait until the display flashes, indicating 0.0000.
(7) Then remove the weight from the balance plate.
(8) The display will indicate CAL END for several seconds and then return to normal.
The adjustment has been done successfully.
will appear on the display of the ABJ model if adjustment
26
ABS/ABJ-BA-e-1019
Page 27

5.2 Checking the balance with the internal weight (ABJ only)
Sequence:
(1) Remove the items being weighed from the balance plate and press the TARE/
-
key ; the display will indicate zero.
(2) Press the CAL/MENU key until I CAL appears.
Note: Balances with automatic internal adjustment are set at “I cal” as a
standard, i.e. set for adjustment using an internal weight. This setting can
be checked using the “Setting” menu, see chapter 4.4.4, and altered if
necessary.
(3) Now press the TARE/ -key. The display will indicate CAL 2.
(4) The display will subsequently indicate CAL 1 followed by CAL 0.
(5) The display will indicate CAL END before reverting to weighing mode.
Adjustment has been completed successfully.
5.3 Checking the balance with the external weight
Sequence:
(1) Remove the items being weighed from the balance plate and press the
TARE/ -key; the display will indicate zero.
(2) Press the CAL/MENU key until FUnC.SEL appears.
(3) Then press the TARE/
TARE/
(4) Press the CAL/MENU key until E tESt appears, then press the TARE/ -key;
the check will start.
(5) The zero will be flashing. Following this the weight value will flash for adjustment.
(6) Place the necessary adjustment weight on the balance plate.
(7) The zero weight will now be flashing on the balance.
(8) Remove the weight from the balance plate.
(9) If no error message is issued, the balance will display zero again, thereby
indicating that the check has been successful.
-key. again ( E CAL appears ) .
-key. The display will indicate CAL, then press
ABS/ABJ-BA-e-1019
27
Page 28

5.4 Checking the balance with the internal weight (ABJ only)
(1) Remove the items being weighed from the balance plate and press the
TARE/ - key; the display will indicate zero.
(2) Press the CAL/MENU key until FUnC.SEL appears. Then press the TARE/
key.
(3) When CAL appears, press the TARE/ -key.
(4) Press the CAL/MENU key until itESt appears, then press the TARE/ -key ; the
check will start.
(5) E tESt 2 appears. The zero point is being checked.
(6) E tESt 1 appears. The internal weight is being checked.
(7) E tESt 0 appears. The zero point is being checked again.
(8) The check is finished. The difference to the previous adjustment will be
displayed.
(9) If no error message is issued, the balance displays tEStEND for some seconds
and then it will display zero again, thereby indicating that the check has been
successful.
28
ABS/ABJ-BA-e-1019
Page 29

6 Application Programs
6.1 Auto-Zero function
The Auto-Zero function can be used to automatically tare small deviations from a zero
display.
Auto-Zero ON Deviations from zero are tared automatically.
Auto-Zero OFF Deviations from zero are not tared automatically.
Menu call:
FUnC.SEL CAL
trC:on trC-on Auto-Zero ON
trC-oF Auto-Zero OFF
6.2 Filter
Filter settings can be used to optimise the weight display for special applications.
Menu call:
0.0000
eCAL
St.b1t Display of current adjustments
Stnd Standard weighing mode
SAmPLE Sample mode
Hi Stb High stability mode
ABS/ABJ-BA-e-1019
29
Page 30

6.3 Standby range
The standby signal lights when the weighing result is stable within the indicated standby
range.
b = 1 Extremely quiet environment
b = 5 Quiet environment
b = 10 Non-quiet environment
Menu call:
FUnC.SEL CAL
trC:on
bAnd:1 b-1 Standby range, 1 = extremely quiet environment,
(0.1 mg)
b-5 Standby range, 5 = quiet environment,
(0.5 mg)
b-10 Standby range, 10 = non-quiet environment,
(1.0 mg)
30
ABS/ABJ-BA-e-1019
Page 31

6.4 Changing the units
The basic weight unit is the unit used by the balance for weighing after being turned on.
Menu call
FUnC.SEL CAL
trC:on
band:1
Unit.SEL U- g grams
(0.0001 g)
U- mg Milligrams
(0.1 mg)
U- % Percentage
U- PCS Parts
....... for more units, see the menu
Use the CAL/MENU key to select the desired weight unit. Press the TARE/ - key to
check the new set-up. The standby indicator will appear.
The standby indicator will appear in the case of all selected units.
The actual change in standby units in the weighing mode occurs when the
UNIT/ key is pressed. The selected units appear here.
ABS/ABJ-BA-e-1019
31
Page 32

6.5 Percentage weighing
Display symbol: %
Percentage weighing allows the weight to be expressed as a percentage of the
reference weight. The indicated weight value is accepted as the preset percentage
(standard setting: 100%).
Condition: Perform the change of units in %,
Sequence:
(1) Remove the items being weighed from the balance plate and press the
TARE/ - key; the display will indicate zero.
(2) Place the adjustment weight = 100% on the balance plate.
(3) Use the UNIT/ key to select the change of units in %.
(4) Press and hold the CAL/MENU key (2 sec) until
SEt 100% appears on the display.
(5) The display will indicated 100% when the TARE/ - key is pressed.
see Chapter 6.4 “Changing the units“.
32
ABS/ABJ-BA-e-1019
Page 33

6.6 Counting
Display symbol: PCS
The counting program allows the weight calculation to be converted into number of
parts with respect to a reference weight. The displayed weight will be taken for a preset
number of parts (setting for 10, 20, 50 or 100 parts).
Counting accuracy is higher when there are more parts. The minimum reference weight
is 0.01 g.
Condition: Change the units to PCS,
see Chapter 6.4 “Changing the units“
Sequence:
(1) Remove the items being weighed from the balance plate and press the
TARE/ - key; the display will indicate zero.
(2) Place the parts to be weighed on the plate
(3) Use the UNIT/ key to select the change of units in PCS
(4) Press and hold the CAL/MENU key (2 sec) until SEt 10 appears on the display.
(5) Use the CAL/MENU key to select the respective number of parts, for the parts
located on the balance plate (SEt 10 PCS, SEt 20PCS, SEt 50 PCS,
SEt 100 PCS).
(6) Press the TARE/
may now gradually add more parts to the balance plate; the display is expressed
in number of parts.
Note:
If the “Err 20“ error message is displayed, the reference weight is too small for the
number of parts.
-key to display the number of parts that has selected. You
ABS/ABJ-BA-e-1019
33
Page 34

6.7 Auto-print display
The Auto Print function sends the value on the display after standby to a DATA I/O and
RS232C interface. For subsequent printing, the balance must first be unloaded.
Auto Print ON Printing output to interface
Auto Print OFF No printing output to interface
Menu call:
FUnC.SEL CAL
trC:on
bAnd:1
Unit.SEL
AtPrt:on Ad-on Auto PRINT ON
AP-oF Auto PRINT OFF
34
ABS/ABJ-BA-e-1019
Page 35

6.8 Capacity indicator (analog display)
The capacity is displayed on the left of the display panel. The weight value is displayed
in both digital and analog form.
Weighing field
display
Zero line
If the weight value varies, the analog value is
transmitted to the capacity indicator.
Analog display ON with additional analog display
Analog display OFF without analog display
Menu call:
FUnC.SEL CAL
trC:on
bAnd:1
Unit.SEL
AtPrt:on
AdiSP:on Ad-on Analog display ON
Ad-oF Analog display OFF
ABS/ABJ-BA-e-1019
35
Page 36

6.9 Selecting the adjustment type
The desired adjustment type can be preset .
ECAL Adjustment with external weight
E tESt Adjustment check
I CAL Adjustment with internal weight (ABJ only)
ItESt Adjustment check with internal weight (ABJ only)
Menu call:
SEttinG CAL dEF E CAL Setting for calibration with external weight.
E tEST Calibration check with external weight.
I CAL Setting for calibration with internal weight.
I tESt Calibration check with internal weight
Sequence:
(1) Press and hold the CAL/MENU key until the Function SettinG appears on the
display. Press the TARE/ - key
(2) Appears CALdEF, press TARE/ - key
(3) ECAL,EtESt, I CAL or ItESt can be selected.
(4) Use the CAL/MENU key to select the adjustment type. Press the TARE/ - key.
(5) Use the ON/OFF/ESC key to return to weighing mode.
36
ABS/ABJ-BA-e-1019
Page 37

6.10 Adjusting the adjustment weight
In the case of KERN ABS/ABJ, the external adjustment weight can be displayed
variably. Capture the value of the adjustment weight here.
The selected adjustment weight must be used during the adjustment.
Menu call:
SEttinG CAL dEF
CAL SEt
Sequence:
(1) Press and hold the CAL/MENU key until the function SettinG appears on the
display. Press the TARE/ - key
(2) Press and hold the CAL/MENU key until CAL SEt appears on the display.
Press the TARE/ - key
(3) Use the PRINT/ key to select the figure you wish to change (from left to right).
(4) Use the UNIT/ key to increase the numeric value of the selected figure
(5) If the weight has changed, press the TARE/ - key to check the value weight.
Use the ON/OFF/ESC key to return to weighing mode.
ABS/ABJ-BA-e-1019
37
Page 38

6.11 Setting the ID number
Remarks: The balance ID number will be printed on the printout.
Menüaufruf:
SEttinG CAL dEF
CAL Set
id: 1234
Sequence:
(1) Press and hold the CAL/MENU key until the function SettinG appears on the
display. Press the TARE/
(2) Press and hold the CAL/MENU key until ID e. g. id:1234 appears on the display.
Press the TARE/ - key
(3) Use the PRINT/ key to select the figure you wish to change (from left to right).
(4) Use the UNIT/ key to increase the numeric value of the selected figure
(5) If the weight has changed, press the TARE/ - key to check the value weight.
Use the ON/OFF/ESC key to return to weighing mode.
- key
38
ABS/ABJ-BA-e-1019
Page 39

6.12 Setting the date (ABJ only)
Menu call:
SEttinG CAL dEF
d-MM-DD
YY-MM-DD
Sequence:
(1) Press and hold the CAL/MENU key until the function setting appears. Press the
TARE/ - key
(2) Press and hold the CAL/MENU key until d-MM-DD appears (MM:month, DD:day)
(3) Press the TARE/ - key in order to set the current date /YY: year, MM: month,
DD: day).
(4) Use the PRINT/ key to select the figure you wish to change (from left to right).
(5) Use the UNIT/ key to increase the numeric value of the selected figure.
(6) Use the ON/OFF/ESC key to return to weighing mode. The setting is stored.
ABS/ABJ-BA-e-1019
39
Page 40

6.13 Setting the time (ABJ only)
6.13.1 Entering seconds
Menu call:
SEttinG CAL dEF
t-HH-MM
SEC AdJ
HH-MM-SS
Sequence:
(1) Press and hold the CAL/MENU key until the function setting appears. Press the
TARE/ - key.
(2) Press and hold the CAL/MENU key until t-HH-MM appears (HH:hour, MM:min.)
(3) Press the TARE/ - key, SEC AdJ will appear.
(4) Press the TARE/ - key to set the desired time. If the TARE/ - key is pressed
between 00 and 29 this will be rounded down to zero sec; if pressed between 30
and 59 this will be rounded up to the next full minute.
(5) Use the ON/OFF/ESC key to return to weighing mode. The setting is stored.
40
ABS/ABJ-BA-e-1019
Page 41

6.13.2 Setting hours and minutes
Menu call:
SEttinG CAL dEF
t-HH-MM
SEC AdJ
tm.AdJ
HH-MM-SS
Sequence:
(1) Press and hold the CAL/MENU key until the function setting appears. Press the
TARE/ - key.
(2) Press and hold the CAL/MENU key until t-HH-MM appears (HH:hour, MM:min.)
(3) Press the TARE/ - key, SEC AdJ will appear.
(4) Press the CAL/MENU key, tm.AdJ will appear.
(5) Press the TARE/ - key to set the current time (HH: hour, MM: min., SS: sec.).
(6) Use the PRINT/ key to select the figure you wish to change (from left to right).
The figure to be changed will flash.
(7) Use the UNIT/ key to increase the numeric value of the selected figure.
(8) Use the ON/OFF/ESC key to return to weighing mode. The setting is stored.
ABS/ABJ-BA-e-1019
41
Page 42

6.14 Printing off date and time (ABJ only)
Print off is only carried out when adjusting.
Menu call:
SEttinG CAL dEF
Prtdt :**
Prtdt:on Prtdt-on Print off
Prtdt-oF No print off
Sequence:
(1) Press and hold the CAL/MENU key until the function setting appears. Press the
TARE/ - key .
(2) Press and hold the CAL/MENU key until “Prtdt:**” appears (on:print off, oF: no
print off).
(3) Press the TARE/ - key “Prtdt-on” will appear.
(4) Press the CAL/MENU key to select the desired setting (-on or –oF). The
standstill indicator indicates which setting is currently in function.
(5) Press the TARE/
(6) Use the ON/OFF/ESC key to return to weighing mode. The setting is stored.
- key to save the setting that is currently being displayed.
42
ABS/ABJ-BA-e-1019
Page 43

7 Description of interfaces
7.1 General instructions
7.2 General data
Type of interface Serial
Interface operation Full-duplex asynchronous
Level RS 232 C specification
Transmission speed 300, 600, 1200, 2400, 4800, 9600, 19200,
Character coding ASCII (7-bit or 8-bit)
Character format Start bit 1
This description is addressed to users who wish to connect
the KERN ABS/ABJ unit to a computer or any another
peripheral through the RS232 C interface which is included
in the balance.
The computer can be used to change, start and monitor the
weighing functions.
38400 Baud
7.3 Example for cable wiring:
25-pin balance
Pin 2
Pin 3 Pin 3
Pin 6 Pin 4
Pin 7 Pin 5
Pin 20 Pin 6
Pin 5 Pin 7
Pin 4 Pin 8
Pin 22 Pin 9
9-pin PC
Pin 2
ABS/ABJ-BA-e-1019
43
Page 44

7.4 Formatting input and output data
In the following description, [u] means a blank character and [DL] the end of the
command.
Input data
[COMMAND CODE] + [DL]
See Chapter 7.5, "Entering commands"
Output data
• With measurement display:
S-200.0000 g u [DL]
Polarity positive……. Blank character ( u )
negative...... Menus ( - )
Stability information
Available with stability display and information
stable .......... S
unstable ...... U
• The display will indicate oL or –oL,
U- uuu oL uuu [DL]
Polarity positive……. Blank character ( u )
negative...... Menus ( - )
Stability information
Available with stability display and information
stable .......... S
unstable ...... U
44
ABS/ABJ-BA-e-1019
Page 45

A
7.5 Entering commands
If the balance is connected to a personal computer or printer, the following commands
are available.
See Chapter 7.4, "Formatting input and output data"
If errors not appearing here are transmitted to the balance, proper balance operation is
not guaranteed. In this case, unplug the balance from the power outlet for 10 seconds.
Command code Function Content
D01 Continuous printing Weighing data are issued
continuously (every 230 ms).
D05 Single transmission of data Identical to PRINT key
D06 Automatic output at printer See the respective settings in AUTO
PRINT.
D07 Single output of data with
stability information
D08 Single output of data with
stability status
D09 Output stop
Q ON/OFF Standby and weighing status
T Tare See the respective settings in TARE
TS Wait for stable tare Tare is performed after standby.
CAL Setting
R Restart Reset
The data are issued with
S: If stability indicator is displayed
U: If adjusted without stability
Data output after transmission of
command
UTO PRINT finishes and the
output
key.
ABS/ABJ-BA-e-1019
45
Page 46

8 Troubleshooting
If the cause is marked with an [S], contact your nearest KERN technical service
agent.
when Breakdown Possible causes
before
weighing
during
weighing
No values appear on
the display.
• The weight display
changes constantly.
• The standby
indicator is not
lighted.
• The measurement
value varies
considerably.
• The weight result is
obviously wrong.
• The weight display
indicates CAL d.
• The balance varies
the automatic
setting.
• ERROx error is
displayed.
• Err20 is displayed. • The numeric value entered is wrong.
• Err24 is displayed. • Batteries too weak.
• The AC power supply is not connected.
• The balance is not plugged in.
• There is excessive vibration or air
current.
-> Change the location.
-> Change the standby indicator.
• The product being weighed vaporises.
-> Cover the item being weighed.
• The weighing product is loaded.
-> Place a sample in a metal container and
weigh it.
-> If you must weigh, for example, a plastic
disc or similar item, the plate you are
using is larger than the weighing plate.
• The temperature of the product being
weighed is higher or lower than the one
in the weighing chamber.
-> Bring both to the same temperature.
-> Increase the standby of the balance.
• Influence of electrical noise (mains
voltage) or strong electromagnetic
radiation.
-> Remove the balance from the noise
source.
• Air current inside and outside the
weighing chamber.
-> If the balance is not being used, open
the door of the weighing chamber about
1-2 mm.
• Mechanical interference
-> [S]
• Extreme variations in temperature inside
the room
-> Change the location
• Hardware is missing.
-> [S]
• An attempt was made to delete a
registered unit. This is not allowed.
-> Shown if only one unit or one inverted
weighing unit is registered.
-> Replace the batteries.
46
ABS/ABJ-BA-e-1019
Page 47

when Breakdown Possible causes
During
weighing
During
adjust-
ment
• UtoU10 appears on
the display.
• Constant soft noise. • Such noise is normally caused by blows
• No data can be sent
or received.
• CAL E2 is
displayed.
• CAL E3 is displayed • The reference weight used during
• Command code allowed for modification
-> Unplug the power cord, then plug it
back in after 10 sec. If the balance
displays this for more than 24 hours,
accurate measurement will not be
possible.
when loading the balance. This noise is
completely normal.
• Erroneous report parameter
• There was a weight on the balance
plate during adjustment.
-> Unload the balance and readjust.
adjustment is wrong.
• CAL E4 is displayed • The balance is defective.
-> [S]
8.1 Error display
If the cause is marked with an [S], contact your nearest KERN technical service
agent.
Error
message
CAL E2 The zero points deviates too
CAL E3 Large deviation with respect to
CAL E4 The sensitivity deviates too
CHE x The balance stops on this
Err 0x Abnormal internal balance
Err 20 A wrong value has been
Err21 The necessary conditions and
Err24 The balance does not store the
Possible causes Solution
Empty the balance plate.
much from the adjustment.
Use a proper weight.
PCAL.
Use a proper weight.
much from the adjustment.
->[S]
display.
-> [S]
chamber.
Repetition of numeric value.
entered.
Check the analog mode g.
numeric value have not been
met.
Check the power supply.
settings properly, voltage
fluctuations.
ABS/ABJ-BA-e-1019
47
Page 48

9 Important information
These electronic scales are a precision instrument. Electromagnetic fields can cause
major display discrepancies. The scales must then be repositioned away from
electromagnetic fields. All sources of environmental interference, such as drafts and
vibrations, should be avoided. Sudden changes of temperature should be avoided. The
scales must be reset to match changes in temperature.
The scales are not hermetically sealed, therefore avoid high humidity, steam and dust.
Do not bring liquids into direct contact with the scales, as these can penetrate into the
measuring mechanism. Cleaning material should only be dry or barely damp. Do not
use solvents as these can damage paintwork or other plastic parts. Remove damaged
items immediately from the scales.
The measuring mechanism will be stabilised by allowing the scales to warm up for a few
minutes after switching them on. Place items to be weighed carefully on the scales. Do
not place objects on the weighing platform for any period of time, apart from normal
use. Sudden shocks or overloading the scales beyond the maximum permitted weight
should absolutely be avoided, balance could be damaged.
In case of problems operating the weighing program, switch the scales briefly off and
on. The weighing set-up must then be restarted right from the beginning.
Never operate the scales in areas where there is a danger of explosion, the models in
this series are not protected against explosion.
Check the scales regularly against, known, external test weights.
Opening the scales or failing to use them in accordance with the written
instructions will invalidate the warranty.
Please keep all packaging material for possible return of the scales. Scales must only
be returned in their original packaging.
48
ABS/ABJ-BA-e-1019
 Loading...