

Kenwood WD-K10PBS, WD-K10TR User Manual
.
PTT
PTT
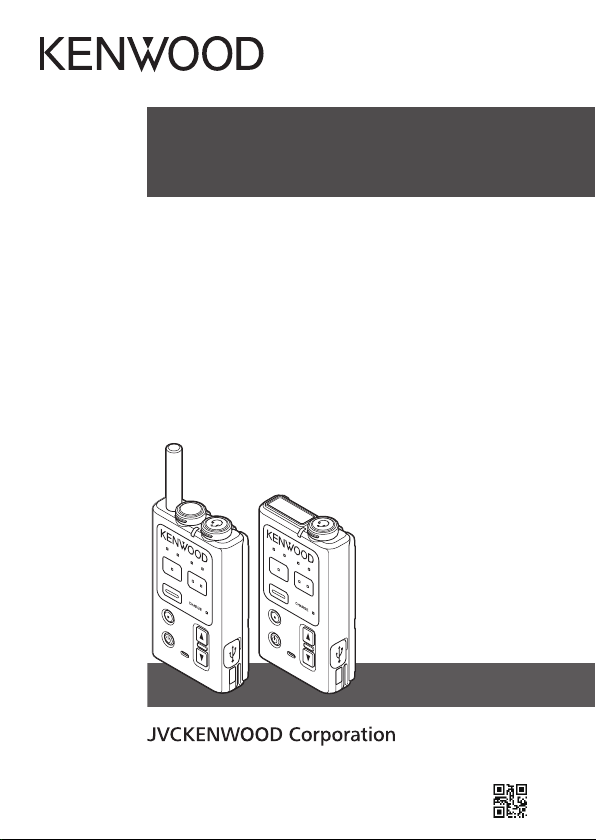
WD-K10PBS
WD-K10TR
USER GUIDE
GUIDE DE L’UTILISATEUR
GUÍA DEL USUARIO
GUIDA PER L’UTENTE
BENUTZERHANDBUCH
GEBRUIKERSHANDLEIDING
.
.
.
B5A-1392-10

Importeur
Amsterdamseweg 37, 1422 AC Uithoorn, Nederland
Importer
12 Priestley Way, London NW2 7BA, United Kingdom
Importeur
Konrad-Adenauer-Allee 1-11, 61118 Bad Vilbel, Deutschland
Importador
Carretera de Rubi, 88 Planta 1A, 08174 Sant Cugat del Vallès Barcelona, España
Importateur
7 Allee des Barbanniers 92230 Gennevilliers, France
Importatore
Via G. Sirtori 7/9, 20129 Milano, Italia
Importeur
Leuvensesteenweg 248J, 1800 Vilvoorde, België
Authorised Representative in Europe
Amsterdamseweg 37, 1422 AC Uithoorn, THE NETHERLANDS
Manufacturer
3-12 Moriyacho, Kanagawa-ku, Yokohama-shi, Kanagawa, 221-0022, JAPAN
.
PORTABLE BASE
WD-K10PBS
TRANSCEIVER
WD-K10TR
USER GUIDE
For detailed operating instructions, please
download the WD-K10 Series USER MANUAL
(PDF file) from the following website for
downloading Instruction Manual:
http://manual.kenwood.com/en_contents/search/keyword
NOTIFICATION
This equipment complies with the essential requirements of
Directive 2014/53/EU.
Firmware Copyrights
The title to and ownership of copyrights for firmware embedded in
KENWOOD product memories are reserved for JVC KENWOOD
Corporation.
Information on Disposal of Old Electrical and
Electronic Equipment and Batteries
(applicable for countries that have adopted
separate waste collection systems)
Products and batteries with the symbol (crossed-out
wheeled bin) cannot be disposed as household waste.
Old electrical and electronic equipment and batteries
should be recycled at a facility capable of handling
these items and their waste byproducts.
Contact your local authority for details in locating a
recycle facility nearest to you.
Proper recycling and waste disposal will help conserve
resources whilst preventing detrimental effects on our
health and the environment.
Notice: The sign “Pb” below the symbol for batteries
indicates that this battery contains lead.

THANK YOU
We are grateful you have chosen KENWOOD for your Digital
Transceiver applications.
CONTENTS
NOTICES TO THE USER ........................................................................................ 2
PRECAUTIONS ....................................................................................................... 3
UNPACKING AND CHECKING EQUIPMENT ...................................................... 10
SUPPLIED ACCESSORIES ................................................................................ 10
PREPARATIONS ................................................................................................... 11
INSTALLING/ REMOVING THE BATTERY PACK .............................................. 11
ATTACHING THE BELT CLIP ............................................................................. 12
CHARGING THE BATTERY PACK (OPTIONAL BATTERY CHARGER) ........... 13
CONNECTING THE (OPTIONAL) CLIP MICROPHONE OR HEADSET ............ 14
STARTING WD-K10PBS IN TRANSCEIVER MODE .......................................... 15
ORIENTATION ...................................................................................................... 16
REGISTERING SUB UNIT TO BASE UNIT ......................................................... 18
BASIC OPERATIONS ........................................................................................... 20
TURNING POWER ON/OFF ............................................................................... 20
ADJUSTING THE RECEIVER VOLUME LEVEL ................................................. 21
DISPLAYING THE REMAINING CAPACITY IN THE BATTERY ......................... 21
MAKING A CALL ................................................................................................. 22
MAKING A CALL IN GROUP CALL MODE ......................................................... 23
MAKING AN ALL CALL ....................................................................................... 23
NOTICES TO THE USER
●
Refer service to qualified technicians only.
Safety: It is important that the operator is aware of and
understands
hazards common to the operation of any transceiver.
2

PRECAUTIONS
●
Do not charge the transceiver and battery pack when they are wet.
●
●
●
●
●
●
●
●
●
●
Turn the transceiver power off in the following locations:
●
●
●
●
●
●
that there are no metallic items located between the transceiver
Ensure
and the battery pack.
Do not use options not specified by KENWOOD.
If the die-cast chassis or other transceiver part is damaged, do not
touch the damaged parts.
If a headset or headphone is connected to the transceiver, reduce the
transceiver volume. Pay attention to the volume level when turning the
squelch off.
Do not place the microphone cable around your neck while near
machinery that may catch the cable.
Do not place the transceiver on unstable surfaces.
Ensure that the end of the antenna does not touch your eyes.
When the transceiver is used for long transmissions, the radiator and
chassis will become hot. Do not touch these locations when replacing
the battery pack.
Always switch the transceiver power off before installing optional
accessories.
The charger is the device that disconnects the unit from the AC mains
line. The AC plug should be readily accessible.
WARNING
Near explosives or blasting sites.
aircrafts. (Any use of the transceiver must follow the instructions
In
and regulations provided by the airline crew.)
Where restrictions or warnings are posted regarding the use of
radio devices, including but not limited to medical facilities.
Near persons wearing pacemakers.
In explosive atmospheres (inflammable gas, dust particles, metallic
powders, grain powders, etc.).
While taking on fuel or while parked at gasoline service stations.
3

CAUTION
●
Do not disassemble or modify the transceiver for any reason.
●
not place the transceiver on or near airbag equipment while the
Do
vehicle is running. When the airbag inflates, the transceiver may be
ejected and strike the driver or passengers.
●
Do not transmit while touching the antenna terminal or if any metallic
parts are exposed from the antenna covering.
Transmitting at such a time may result in a high-frequency burn.
●
If an abnormal odor or smoke is detected coming from the
transceiver, switch the transceiver power off immediately, remove
the battery pack from the transceiver, and contact your KENWOOD
dealer.
●
Use of the transceiver while you are driving may be against traffic
laws. Please check and observe the vehicle regulations in your
area.
●
Do not expose the transceiver to extremely hot or cold conditions.
●
Do not carry the battery pack (or battery case) with metal objects,
as they may short the battery terminals.
●
Danger of explosion if the battery is incorrectly replaced; replace
only with the same type.
●
When attaching a commercial strap to the transceiver, ensure that
the strap is durable. In addition, do not swing the transceiver around
by the strap; you may inadvertently strike and injure another person
with the transceiver.
●
If a commercially available neck strap is used, take care not to let
the strap get caught on nearby machine.
●
When operating the transceiver in areas where the air is dry, it is
easy to build up an electric charge (static electricity).
When using an earphone accessory in such conditions, it is
possible for the transceiver to send an electric shock through the
earphone and to your ear. We recommend you use only a speaker/
microphone in these conditions, to avoid electric shocks.
4

CAUTION
●
frequency band (1.9 GHz band) in which this product operates
The
and it’s average output power (less than 10 mW) are the same as
PHS (Personal Handy-phone System). If this product is to be used
near medical equipments, be sure to conduct sufficient verification
in advance before using.
●
Do not set the volume on the earphones too high
Listening at loud volume continuously for prolonged periods of time
may affect your hearing.
●
Do not turn on/off the portable transceiver or remove/insert the plug
while you are still wearing the earphones
Sudden burst of loud sound can result in hearing loss.
●
Using earphones in a dry environment may cause tingling sensation
in the ears. This is due to the static charges accumulated on the
body and the connected device, not malfunctioning of the
earphones. This is less likely to occur on someone wearing clothes
made from natural materials or preventive actions taken to prevent
the accumulation of static charges on the clothes.
5

Information concerning the battery pack:
The battery pack includes flammable objects such as organic
solvent.
Mishandling may cause the battery to rupture producing
flames or extreme heat, deteriorate, or cause other forms of
damage to the battery. Please observe the following prohibitive
matters.
DANGER
●
Do not disassemble or reconstruct battery!
The battery pack has a safety function and protection circuit to avoid
danger. If they suffer serious damage, the battery may generate
heat or smoke, rupture, or burst into flame.
●
Do not short-circuit the battery!
Do not join the + and - terminals using any form of metal (such as
a paper clip or wire). Do not carry or store the battery pack in
containers holding metal objects (such as wires, chain necklace or
hairpins). If the battery pack is short-circuited, excessive current will
flow and the battery may generate heat or smoke, rupture, or burst
into flame. It will also cause metal objects to heat up.
●
Do not incinerate or apply heat to the battery!
If the insulator is melted, the gas release vent or safety function is
damaged, or the electrolyte is ignited, the battery may generate
heat or smoke, rupture, or burst into flame.
●
Do not leave the battery near fires, stoves, or other heat
generators (areas reaching over 80°C/ 176°F)!
If the polymer separator is melted due to high temperature, an
internal short-circuit may occur in the individual cells and the battery
may generate heat or smoke, rupture, or burst into flame.
●
Avoid immersing the battery in water or getting it wet by other
means!
If the battery becomes wet, wipe it off with a dry towel before use.
If the battery’s protection circuit is damaged, the battery may charge
at extreme current (or voltage) and an abnormal chemical reaction
may occur. The battery may generate heat or smoke, rupture, or
burst into flame.
6

DANGER
●
not charge the battery near fires or under direct sunlight!
Do
If the battery’s protection circuit is damaged, the battery may charge
at extreme current (or voltage) and an abnormal chemical reaction
may occur. The battery may generate heat or smoke, rupture, or
burst into flame.
●
Use only the specified charger and observe charging
requirements!
If the battery is charged in unspecified conditions (under high
temperature over the regulated value, excessive high voltage or
current over regulated value, or with a remodeled charger), it may
overcharge or an abnormal chemical reaction may occur. The
battery may generate heat or smoke, rupture, or burst into flame.
●
Do not pierce the battery with any object, strike it with an
instrument, or step on it!
This may break or deform the battery, causing a short-circuit. The
battery may generate heat or smoke, rupture, or burst into flame.
●
Do not jar or throw the battery!
An impact may cause the battery to leak, generate heat or smoke,
rupture, and/or burst into flame. If the battery’s protection circuit is
damaged, the battery may charge at an abnormal current (or
voltage), and an abnormal chemical reaction may occur.
●
Do not use the battery pack if it is damaged in any way!
The battery may generate heat or smoke, rupture, or burst into
flame.
●
Do not solder directly onto the battery!
If the insulator is melted or the gas release vent or safety function
is damaged, the battery may generate heat or smoke, rupture, or
burst into flame.
●
Do not reverse the battery polarity (and terminals)!
When charging a reversed battery, an abnormal chemical reaction
may occur. In some cases, an unexpected large amount of current
may flow upon discharging. The battery may generate heat or
smoke, rupture, or burst into flame.
●
Do not charge using devices that are not specified
Do not charge using devices other than the Portable Transceiver
WD-K10PBS, WD-K10TR and battery pack charger from
KENWOOD.
The battery pack may rupture or leak resulting in a fire or injuries.
7

DANGER
●
Do not reverse-charge or reverse-connect the battery!
battery pack has positive and negative poles. If the battery pack
The
does not smoothly connect with a charger or operating equipment,
do not force it; check the polarity of the battery. If the battery pack
is reverse-connected to the charger, it will be reverse-charged and
an abnormal chemical reaction may occur. The battery may
generate heat or smoke, rupture, or burst into flame.
●
Do not touch a ruptured and leaking battery!
If the electrolyte liquid from the battery gets into your eyes, wash
your eyes out with fresh water as soon as possible, without rubbing
your eyes. Go to the hospital immediately. If left untreated, it may
cause eye-problems.
WARNING
●
Do not charge the battery for longer than the specified time!
If
the battery pack has not finished charging even after the regulated
time has passed, stop it. The battery may generate heat or smoke,
rupture, or burst into flame.
●
Do not place the battery pack into a microwave or high
pressure container!
The battery may generate heat or smoke, rupture, or burst into
flame.
●
Keep ruptured and leaking battery packs away from fire!
If the battery pack is leaking (or the battery emits a bad odor),
immediately remove it from flammable areas. Electrolyte leaking
from battery can easily catch on fire and may cause the battery to
generate smoke or burst into flame.
●
Do not use an abnormal battery!
If the battery pack emits a bad odor, appears to have color changes,
is deformed, or seems abnormal for any other reason, remove it
from the charger or operating equipment and do not use it. The
battery may generate heat or smoke, rupture, or burst into flame.
8

NOTIFICATION OF WATER-RESISTANT MODEL
Water Resistance and Maintenance
This product has been tested in-house and verified of it’s IP67
dust resistant/water resistant performance. However, the dust
resistant/water resistant performance is not guaranteed for all
situations in actual use.
IP67: The IP standard is the protection level specified by the
international standard IEC 60529. The first numeral indicates the
“dust resistant level” and the second numeral indicates the “water-
resistant” level.
PRECAUTIONS
●
The applicable standards listed above do not assure that the
transceiver can be used in water. The transceiver may be damaged in
a situation in which the maximum depth is over 1 meter or the maximum
submersion time exceeds 2 hours.
●
Observe the following precautions to maintain the transceiver’s waterresistant performance:
a) Do not drop or apply strong physical shocks to the transceiver.
b) Do not disassemble or attempt to modify the transceiver. (If it is
disassembled or modified, its performance is not guaranteed.)
c) Do not soak the transceiver in water that contains a solvent or
surfactant, such as detergent or alcohol.
●
If it is soaked in muddy water or salt water (including sea water), it may
become corroded. Immediately flush with fresh water and then wipe
dry with a soft cloth.
●
If water is splashed onto the microphone, the battery, or the antenna
terminal, clean and dry them with a soft cloth before reconnecting to
the transceiver.
●
When water gets into the microphone opening or the speaker grill, the voice
level may become low or distorted. Lightly shake the transceiver to remove the
water from the speaker and/or microphone before operating the transceiver.
●
Use of any option on the transceiver not specified by KENWOOD, may
reduce or void the water resistant and dust resistant performance.
9

UNPACKING AND CHECKING EQUIPMENT
Note:
●
The
following unpacking instructions are for use by your KENWOOD
dealer, an authorized KENWOOD service facility, or the factory.
Carefully unpack the transceiver. We recommend that you
identify
packing material. If any items are missing or have been damaged
during shipment, file a claim with the carrier immediately.
SUPPLIED ACCESSORIES
Belt clip ................................................................................................. 1
●
Battery pack ......................................................................................... 1
(The battery pack has been pre-installed on this transceiver.)
USER GUIDE ....................................................................................... 1
the items listed in the following table before discarding the
Screws for belt clip .......................................................................... 2
Programming Software WD-ZS10
configure the primary settings for this unit, connect this unit to a PC
To
installed with the Programming Software WD-ZS10.
For details on configuring the settings, please download the WD-K10
Series USER MANUAL (Installation reference) (PDF file) and the WDZS10 USER GUIDE (PDF file) from the following website for
downloading Instruction Manual:
http://manual.kenwood.com/en_contents/search/keyword
10
PREPARATIONS
Connector
Connector
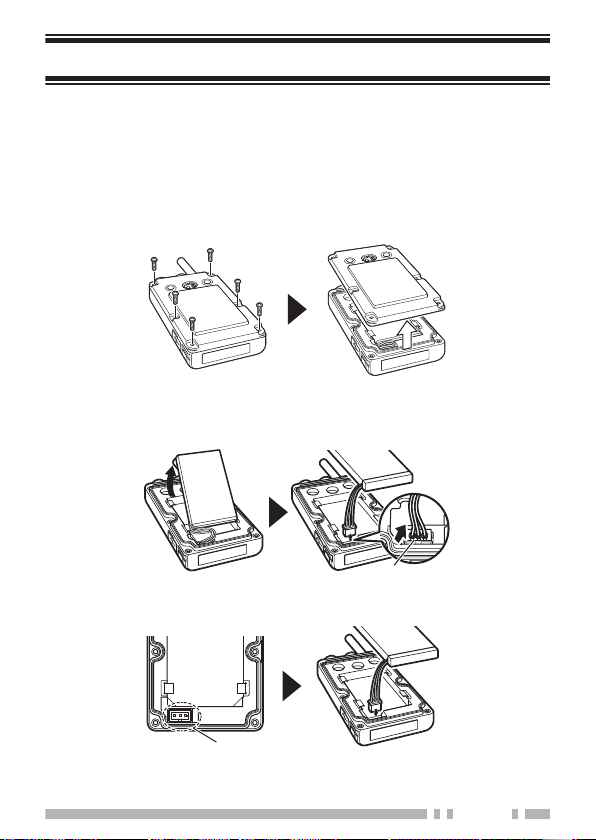
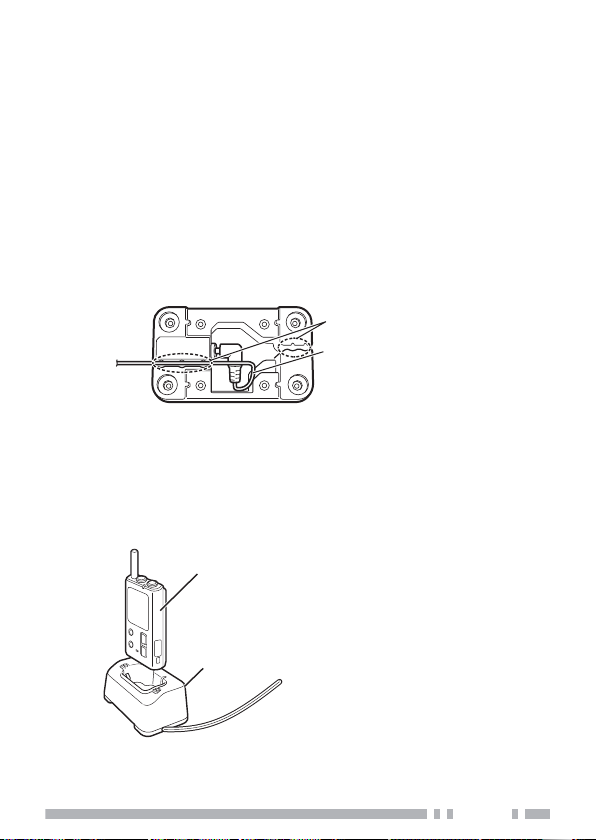
INSTALLING/ REMOVING THE BATTERY PACK
This unit comes with the battery pack already installed in it. To
replace the battery pack, follow the steps below to remove and
install the battery pack.
1
Remove the screws (x6) on the rear of the unit and remove
the rear cover.
2
Take out the battery pack and remove the battery connector.
When removing the connector, hold the base of the connector and
pull it straight up slowly.
3
Connect the battery connector to the connector of the unit.
11
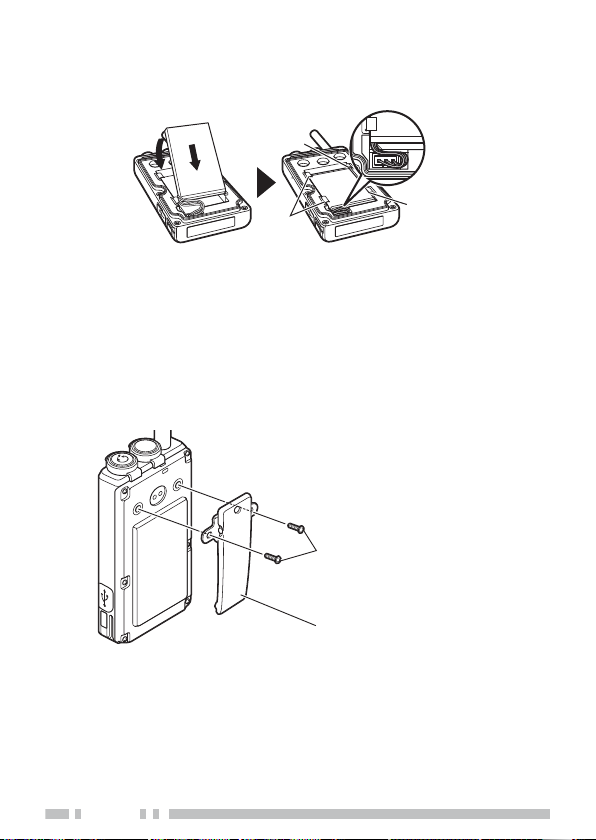
4
Catch
Catch
Catch
Screws (supplied)
Belt clip
The screws can become loose.
Tighten the screws firmly.
Tighten again periodically.
Arrange
the battery cable as shown in the illustration and push
in the battery.
Push in firmly until the catches are sitting on the battery pack.
5
Attach the rear cover and tighten the screws (x6).
After installing the battery pack, attach the battery cover and secure
it
by tightening the screws. When attaching the battery cover, ensure
that no fine foreign material (including fiber, hair and sand) is caught
in between.
ATTACHING THE BELT CLIP
This unit can be attached to a belt using the supplied belt clip.
12
CHARGING THE BATTERY PACK (OPTIONAL BATTERY
* In this illustration, the cable is inserted in the left groove.
Groove
Pull the cable of the
DC plug around as
shown in the
illustration.
Transceiver (WD-K10PBS/WD-K10TR)
Charger (KSC-48CR) (sold separately)
CHARGER)
Be sure to charge this unit using the charger KSC-48CR before
using.
o
Charging the battery
1
Remove the bracket underneath the charger and insert the
DC plug of the AC adapter into the DC IN jack of the charger.
For details on installing and removing the bracket, refer to the
instruction manual of the charger KSC-48CR.
2
Insert the cable into the left or right groove depending on
where the charger is set up.
3
Reinstall the bracket and insert the AC adapter into the AC
outlet.
4
Place the transceiver with the battery pack installed onto the
charger.
13
The battery charge LED lights up in red and charging begins.
PTT
PTT
Insert the connecting plug
into the connecting jack of
the transceiver, and
secure by turning the cap
in the direction of the
arrow.
●
The transceiver turns off automatically if it is placed on the charger
while it is turned on. For safety purpose, turn off the transceiver
during charging.
●
Check that the metal terminals of the transceiver are in firm contact
with the terminals on the charger.
The battery charge LED goes off when charging is complete. Take
out the transceiver.
●
The estimated time required to complete the charging is as
follows:
WD-K10PBS: approx. 6 hours
WD-K10TR: approx. 5 hours
CAUTION
●
Be
sure to use the specified charger KSC-48CR to charge this unit.
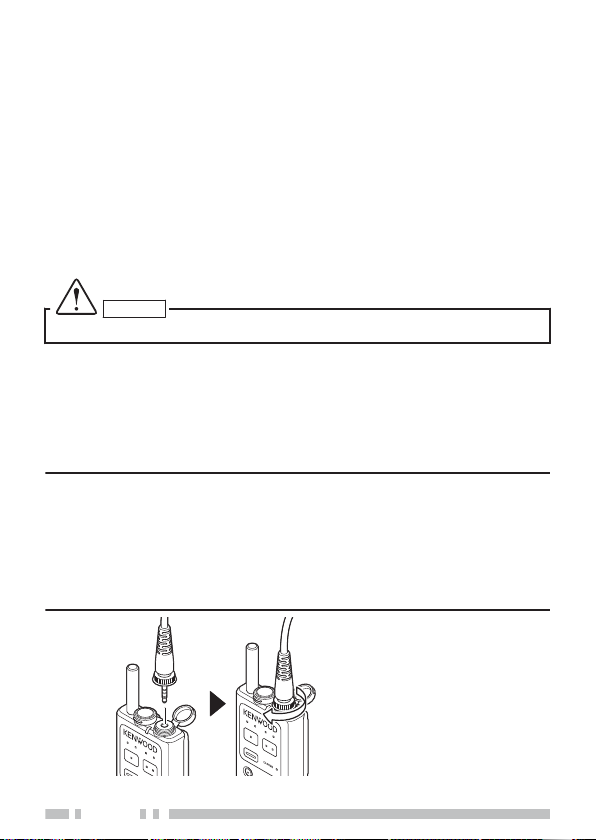
CONNECTING THE (OPTIONAL) CLIP MICROPHONE OR
HEADSET
Connect to the optional clip microphone or headset.
●
Compatible model: EMC-13/ EMC-14/ KHS-37
Note:
●
Be sure to read the instruction manual of the connecting device
before using.
●
Make sure to turn off the transceiver before making a connection.
a connection while the transceiver is turned on activates the
Making
protector which disables operation on the transceiver. The clip
microphone or headset is also disabled.
14

CAUTION
●
Dust resistant/water resistant and environment of use
If the supplied microphone plug mounting bracket is used when
connecting the specified option to the speaker/microphone
terminal, the transceiver meets the IP67 dust resistant/water
resistant specifications. The dust resistant/water resistant
performance of the option vary with each optional product.
If an option other than the above is connected, the transceiver is
not dust resistant/water resistant.
STARTING WD-K10PBS IN TRANSCEIVER MODE
WD-K10PBS can be used as a base unit or sub unit.
To use as a sub unit, perform the following operations and start in
Transceiver Mode.
1
If the unit is turned on, turn off the power by pressing and
holding the [Power] key until the Status LED goes off.
2
Note:
●
●
When the unit changes to Base Station Mode (base unit), the voice
announcement is being played and the Status LED blinks in orange.
pressing the [PF 1] key, press and hold the [Power] key
While
for 2 seconds or more.
The unit enters into Transceiver Mode. Voice announcement is being
played and the Status LED blinks in green.
Once the unit is start in Transceiver Mode (sub unit), it will start in
Transceiver Mode the next time simply by turning on the power.
Performing
changes the unit to Base Station Mode (base unit).
the same operations when in Transceiver Mode (sub unit)
15
<WD-K10PBS>
PTT
1
2
3
4
5
6
7
8
9
0
a
b
c
d
d
PTT
3
4
5
6
7
8
9
0
a
b
c
d
d
<WD-K10TR>
A
B
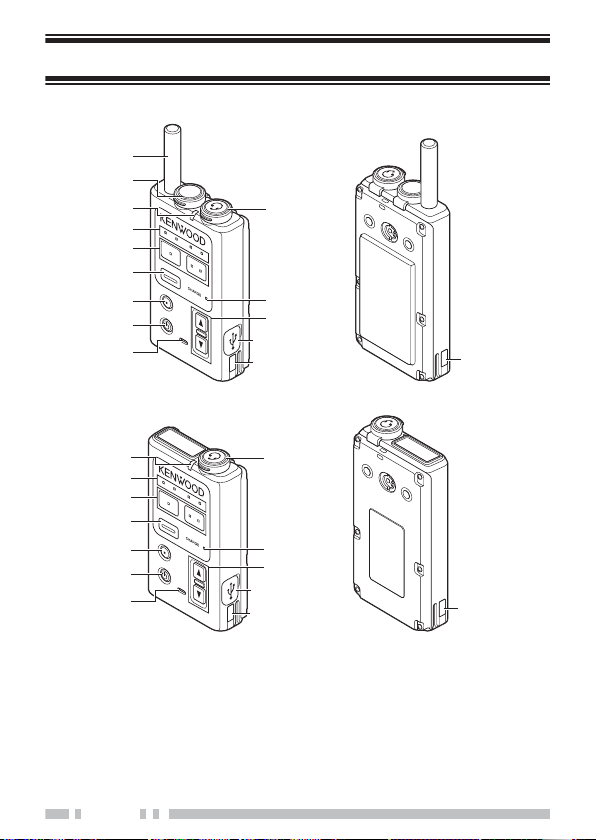
ORIENTATION
Antenna
PMR Link jack
For performing external wireless communication. Single external
wireless trigger jack.
16

C
Status LED
Indicates the status of this unit.
Indicator color
Base Station Mode
Blinking green (slow) -
Status
Transceiver Mode
Normal Mode/
Listening Talk
Blinking green (fast) - Menu Mode
Green Device Registration
Blinking red (slow) Low battery
Blinking red (fast) Very low battery
Red Power ON
Power ON/
No line connection
Blinking blue (slow) - Listening mode
Blinking blue (fast) System error
Blue Wireless setting by the PC
Blinking orange (slow) Normal Mode -
Blinking orange (fast) Menu Mode -
Blinking green and
orange alternately
●
Blinking (Slow): Blinks every 3 seconds / Blinking (Fast): Blinks
Updating Updating
every 1 second
D
Group LED
Indicates the current call group.
E
[PF 1
] key/ [PF 2] key
Press or press and hold to execute the function configured to each
key.
●
Any function can be configured to each key. The unit may come
with different name and function for each button. For details,
please consult the authorized dealer or installer.
F
[PTT] key
Press to make a call.
●
Depending on the setting, this key is disabled when a clip
microphone or headset which is sold separately is connected. For
details, please consult the authorized dealer or installer.
17

G
[All Call
Press and hold to make an All Call.
] key
●
Any function can be configured to the [All Call] key. The unit may
come with a different function for this key. For details, please
consult the authorized dealer or installer.
H
Power key
Press and hold to turn the power on/off. Press to check the remaining
capacity in the battery. The battery charge LED blinks.
I
Microphone
When making a call without using the clip microphone, speak into this
microphone.
●
This key is disabled when a clip microphone or headset which is
sold separately is connected.
J
Microphone/ Earphone jack
For connecting a clip microphone, earphone or headset which is sold
separately. Do not connect any device other than the compatible
models.
K
Battery Charge LED
Indicates the charging status.
●
Light up: Charging in progress
●
Blinking: Charging in preparation, or charging error
●
Light goes off: Charging complete
L
[J]/ [K] key
For adjusting the receiver volume level. The receiver volume changes
with each press of the [J]/[K] key, from level 1 to 15. For details, refer
to “ADJUSTING THE RECEIVER VOLUME LEVEL”.
M
Data setting connector
For registering this unit to the system or changing the settings.
●
Normally not used. Do not open the cover. And do not touch the
connector.
N
Charge contact terminal
REGISTERING SUB UNIT TO BASE UNIT
This unit is used when the transceiver to be used as a sub unit is
registered to the Portable base WD-K10PBS or Base Station WDK10BS that is to be used as the base unit.
This section explains on how to register the sub unit to the base
unit (Portable base WD-K10PBS).
18

Note:
●
The Portable base WD-K10PBS (Transceiver Mode only) or
Transceiver WD-K10TR can be registered as a sub unit.
●
A sub unit can also be registered using the Programming Software
WD-ZS10.
User Guide.
●
For details on registering a sub unit that uses Base Station WD-
For details, refer to the Programming Software WD-ZS10
K10BS, refer to the USER GUIDE of WD-K10BS.
1
If the base and sub units are turned on, turn off the power by
pressing and holding the [Power] key until the Status LED
goes off.
2
While pressing the [All Call] key on the base unit, press and
hold the [Power] key.
The unit enters into registration mode. The Status LED lights up in
green and all the Group LEDs blink.
3
While pressing the [All Call] key on the sub unit, press and
hold the [Power] key.
The sub unit enters into registration mode. The Status LED lights up
in green and all the Group LEDs blink.
The
registration begins automatically when both the base unit and sub
unit are in registration mode.
When registration is successful:
The Status LED of the sub unit lights up in green and all the Group
LEDs light up.
When registration has failed:
The Status LED of the sub unit lights up in green but all the Group
LEDs do not light up. Restart the units in registration mode and
register again.
●
All sub units are registered to the same group (Group A) by default.
4
Turn on the power of the sub unit to restart it.
When registration of sub unit is successful, restart the sub unit.
After the registration is complete, restart the base unit as well.
Note:
●
To exit registration mode, press and hold the [PF 2] key.
●
If registration fails repeatedly, the maximum number of registrations
may have been exceeded.
19

BASIC OPERATIONS
CAUTION
●
Operation marked with * cannot be executed by default.
To execute the operation, it is necessary configure the setting using
the Programming Software WD-ZS10. To configure the setting, use
the Programming Software WD-ZS10 or consult the authorized
dealer or installer.
If the function assigned to a key cannot be executed, a key failed
alert tone is sounded. And if a function is not assigned to the key,
there is no operation tone even when the key is pressed.
●
The default key name or functions assigned to the [PF 1] / [PF 2]
are described in this manual. To assign a function to transceiver or
to configure a setting, use the Programming Software WD-ZS10,
or consult the authorized dealer or installer.
TURNING POWER ON/OFF
o
Turning on the power
1
Press and hold the [Power] key for 2 seconds or more.
The Status LED (red), Group LED and Battery Charge LED lights up.
Base Station Mode:
When the unit is linked to the system, the Status LED blinks in orange
and enters into group call mode.
Transceiver Mode:
When the unit is linked to the system, the Status LED blinks in green
and enters into group call mode.
When the unit is unable to link to the system, the Status LED lights up
in red.
Move to a location where linking is possible.
o
Turning off the power
1
Press and hold the [Power] key until the Status LED goes off.
The unit is turned off.
20

ADJUSTING THE RECEIVER VOLUME LEVEL
Use the [J]/[K] key to adjust to an appropriate volume level.
Use the [J] key to increase the current volume level by 1.
Use the [K] key to lower the current volume level by 1.
●
Pressing and holding the key does not adjust the volume continuously.
o
Lowering the volume level temporarily (Volume
attenuation)
1
Press and hold the [K] key.
The volume level decreases to the value configured.
Pressing the [J] key during volume attenuation cancels the volume
attenuation and restores the original volume level.
DISPLAYING THE REMAINING CAPACITY IN THE
BATTERY
1
Press the [Power].
The battery charge LED blinks and the voice announcement is played
according to the remaining capacity in the battery.
Remaining Capacity in the
30% or more Blinks 3 times Battery high
10% or more to less than 30% Blinks 2 times Battery middle
Less than 10% Blinks 1 time Battery low
Note:
●
Battery
When the remaining capacity in the battery is low, the Status LED
blinks in red and the battery warning tone is sounded at every 10second interval. Please charge the battery.
Battery
Charge LED
Voice
Announcement
21

MAKING A CALL
Use the [PTT] key on this unit or the [PTT] key on the clip
microphone to make a call.
1
Speak into the microphone while pressing the [PTT] key.
●
2
Release the [PTT] key to end the call.
o
Operation on configuring the microphone function
The “PTT”, “PTT Lock” and “VOX” methods of calling are available
using the [PTT] key. The method varies depending on the setting.
The operation method using the “PTT” setting is described in this
manual.
PTT
PTT Lock
VOX
Note:
●
“PTT” is the default setting.
●
The PTT, PTT Lock and VOX settings can be changed using the
“Setup menu mode”. For details, refer to “Configuring each function
(Setup menu mode)”.
You
the setting.
a clip microphone is connected, the built-in microphone on
When
this unit cannot be used.
You can make a call while the [PTT] key on this unit or the
clip microphone is being pressed.
Press the [PTT] key on this unit or the clip microphone to
call. Press it again to end the call. If “PTT-Lock Delay”is
configured, the call ends automatically when the duration
configured elapses.
The microphone automatically turns ON in response to
audio
signals. Hands-free call is possible without having to
press the [PTT] key.
can also use the Programming Software WD-ZS10 to configure
22

MAKING A CALL IN GROUP CALL MODE
The unit enters into Group Call mode immediately after turning on
the power. Press the [PTT] key directly to call everybody in the
same group.
Note:
●
To configure or change the group, use the Programming Software
WD-ZS10, or consult the authorized dealer or installer.
o
Changing the group to make call
Press the [Group Select] key configured in the function key to
change the current group to another group.
When the group is changed, the corresponding Group LED blinks
and the group name is announced.
Note:
●
When this unit is turned off after changing the group, the group to
connect to when the unit is turned on again vary according to the
setting of the unit.
–
If “Resume”
unit belonged to before turning off the power is connected.
–
If a group is specified for “Power On Group”: The specified group
is connected regardless of the group that the unit belonged to
before turning off the power.
is configured for “Power On Group”: The group that the
MAKING AN ALL CALL
You can make a call to everyone in all the groups that the
transceiver in use belongs to.
1
Press and hold the [All Call] key.
A “pee-poo-pee-poo” sound and an All Call tone can be heard from
the earphone.
●
When a call invalid tone is heard, wait for a while and retry again.
2
Speak into the microphone while pressing the [PTT] key.
3
After the All Call has ended, press the [All Call] key again.
A
complete tone is sounded and the unit returns to Group Call mode.
23

o
Noting down the key assignment
Note down the functions assigned to the keys on this unit in the
table below for your convenience.
●
Model name:
Key Function
Press
PF 1
PF 2
All Call
●
Duration for press and hold: seconds
Press and
hold
Press
Press and
hold
Press
Press and
hold
24

BASE PORTATIVE
WD-K10PBS
ÉMETTEUR-RECEPTEUR
WD-K10TR
GUIDE DE L’UTILISATEUR
Pour obtenir des instructions détaillées, veuillez
télécharger le MODE D’EMPLOI de la Série WDK10 (fichier PDF) à partir du site web suivant
pour le téléchargement du Mode d’emploi :
http://manual.kenwood.com/en_contents/search/keyword
NOTIFICATION
Cet équipement est conforme aux exigences essentielles de la
directive 2014/53/UE.
Droits d’auteur du micrologiciel
Le titre et la propriété des droits d’auteur du micrologiciel
intégré dans les mémoires du produit KENWOOD sont
réservés à JVC KENWOOD Corporation.
Information sur la Mise au rebut des anciens équipements
électriques et électroniques et piles électriques
(applicable dans les pays de qui ont adopté des systèmes
de collecte sélective)
Les produits et piles électriques sur lesquels le pictogramme
(poubelle barrée) est apposé ne peuvent pas être éliminés
comme ordures ménagères.
Les anciens équipements et batteries électriques et
électroniques doivent être recyclés sur des sites en mesure
de traiter ces produits et leurs déchets.
Contactez vos autorités locales pour connaître le site de
recyclage le plus proche.
Un recyclage adapté et l’élimination des déchets aideront à
conserver les ressources et à nous préserver des leurs effets
nocifs sur notre santé et sur l’environnement.
Avis : Le symbole “Pb” ci-dessous sur des piles électrique
indique que cette pile contient du plomb.

MERCI
Nous sommes heureux que vous ayez choisi KENWOOD pour
vos applications d’émetteur-récepteur numérique.
TABLE DES MATIÈRES
REMARQUES DESTINÉES À L’UTILISATEUR ..................................................... 2
PRÉCAUTIONS ....................................................................................................... 3
DÉBALLAGE ET VÉRIFICATION DE L’ÉQUIPEMENT ....................................... 10
ACCESOIRES FOURNIS .................................................................................... 10
PRÉPARATION ..................................................................................................... 11
MISE EN PLACE/ RETRAIT DE LA BATTERIE ................................................... 11
FIXATION DU CROCHET DE CEINTURE .......................................................... 12
CHARGEMENT DU BLOC DE BATTERIE (CHARGEUR DE BATTERIE EN
OPTION) ............................................................................................................. 13
CONNEXION DU MICROPHONE À CLIP OU DES ÉCOUTEURS (EN OPTION) ...... 14
DÉMARRAGE DE WD-K10PBS EN MODE ÉMETTEUR-RÉCEPTEUR ............. 15
ORIENTATION ...................................................................................................... 16
ENREGISTRER UNITÉ ESCLAVE VERS UNITÉ DE BASE ............................... 18
FONCTIONNEMENT DE BASE ............................................................................ 20
MISE SOUS/HORS TENSION ............................................................................ 20
RÉGLAGE DU NIVEAU DE VOLUME DU RÉCEPTEUR .................................... 21
AFFICHAGE DE LA CAPACITÉ RESTANTE DANS LA BATTERIE .................... 21
ÉMETTRE UN APPEL ......................................................................................... 22
ÉMETTRE UN APPEL EN MODE APPEL DE GROUPE ..................................... 23
ÉMETTRE UN APPEL TOUS .............................................................................. 23
REMARQUES DESTINÉES À L’UTILISATEUR
●
En ce qui concerne l’entretien, adressez-vous uniquement à des
techniciens qualifiés.
Sécurité : Il est important que l’utilisateur soit conscient et
comprenne les dangers inhérents à l’utilisation d’un émetteurrécepteur.
F-2

PRÉCAUTIONS
●
Ne chargez pas le bloc-piles ou l’émetteur-récepteur s’ils sont mouillés.
●
Assurez-vous qu’aucun élément métallique n’est situé entre
l’émetteur-récepteur et le bloc-piles.
●
Ne pas utiliser les options non spécifiées par KENWOOD.
●
Si le châssis moulé sous pression ou une autre pièce de l’émetteurrécepteur est endommagé, ne touchez pas aux pièces endommagées.
●
Si le casque ou le casque d’écouteurs est connecté à l’émetteurrécepteur, réduisez le volume du transmetteur. Faites attention au
niveau de volume lors de l’activation de la fonction de silencieux.
●
Ne placez le câble du microphone autour de votre cou lorsque vous vous
trouvez à proximité d’installations qui pourraient entraîner le câble.
●
Ne placez pas l’émetteur-récepteur sur des surfaces instables.
●
Assurez-vous que l’extrémité de l’antenne n’entre pas en contact avec
vos yeux.
●
Lorsque l’émetteur-récepteur est utilisé pour une transmission
pendant plusieurs heures, le radiateur et le châssis chauffent. Ne
touchez pas ces zones lors du remplacement du bloc-piles.
●
Veillez à toujours mettre l’émetteur-récepteur hors tension avant
d’installer des accessoires en option.
●
Le chargeur est le dispositif qui sépare l’unité de la ligne de secteur.
La fiche secteur doit être facilement accessible.
AVERTISSEMENT
Mettez l’émetteur-récepteur hors tension lorsque vous vous
trouvez dans les lieux suivants :
●
À proximité d’explosifs ou de sites d’explosion.
●
Dans les avions. (Toute utilisation de l’émetteur-récepteur doit se
faire conformément aux instructions et règlements indiqués par
l’équipage de l’avion.)
●
Là où des restrictions ou des avertissements sont affichés
concernant l’utilisation d’appareils radio, incluant (mais sans être
limité) les bâtiments hospitaliers.
●
A proximité de personnes porteuses d’un stimulateur cardiaque.
●
Dans un milieu déflagrant (gaz inflammable, des particules de
poussière, des poudres métalliques, de la poudre, etc.).
●
Pendant la prise de carburant ou alors qu’elle est garée dans une
station-service.
F-3

ATTENTION
●
Ne démontez et ne modifiez sous aucun prétexte l’émetteurrécepteur.
●
Ne placez pas l’émetteur-récepteur sur ou à proximité d’airbags
lorsque le véhicule roule. Si les airbags se gonflent, l’émetteurrécepteur risque d’être éjecté et d’heurter le conducteur ou les
passagers.
●
Ne procédez à aucune transmission lorsque vous êtes en contact
avec la borne de l’antenne ou si des parties métalliques de
l’antenne ont perdu leur revêtement.
Faute de quoi une brûlure due à la haute fréquence risque d’être
occasionnée.
●
une odeur anormale ou de la fumée est générée par l’émetteur-
Si
récepteur, mettez immédiatement l’émetteur-récepteur hors
tension, retirez le bloc-piles de l’émetteur-récepteur et contactez
votre revendeur KENWOOD.
●
Il est possible que l’utilisation de l’émetteur-récepteur pendant la
conduite soit contraire aux règles de circulation. Veuillez vérifier et
respecter les réglementations routières en vigueur dans la région.
●
N’exposez pas l’émetteur-récepteur à des environnements
extrêmement froids ou chauds.
●
Ne transportez pas le bloc-piles (ou le boîtier piles) avec des objets
métalliques, ils pourraient court-circuiter les bornes des piles.
●
Danger d’explosion si la pile n’est pas correctement remplacée;
remplacez uniquement par le même type.
●
Lors de la fixation de la dragonne de l’émetteur-récepteur vendu
dans le commerce, assurez-vous que la dragonne est durable. En
outre, ne pas faire tourner l’émetteur-récepteur par le cordon ; vous
pouvez par inadvertance frapper et blesser quelqu’un d’autre avec
le transmetteur.
●
Si un tour de cou disponible dans le commerce est utilisé, veillez à
ne pas laisser la dragonne s’accrocher à une machine à proximité.
●
Lors de l’utilisation de l’émetteur-récepteur dans des zones où l’air
est sec, de l’électricité statique peut facilement se produire.
Si vous utilisez une oreillette dans ces conditions d’air sec,
l’émetteur-récepteur risque d’envoyer un choc électrique à votre
oreille à travers cet accessoire. Pour éviter tout risque de choc
électrique nous vous recommandons, dans de telles conditions,
d’utiliser uniquement un microphone à haut parleur.
F-4
 Loading...