

Page 1

144 MHz ALL MODE TRANSCEIVER
430 MHz ALL MODE TRANSCEIVER
TM-255A/E
TM-455A/E
INSTRUCTION MANUAL
KENWOOD CORPORATION
©PRINTED IN JAPAN B62-0415-10(K, M, E)(MC)
94/12 11 10 987654321
Page 2

Models Covered by this Manual:
• TM-255A: 144 MHz All Mode Transceiver
(U.S.A./ Canada/ General)
• TM-255E: 144 MHz All Mode Transceiver
(Europe)
• TM-455A: 430 MHz All Mode Transceiver
(U.S.A./ Canada)
• TM-465E: 430 MHz All Mode Transceiver
(Europe)
Notice to the user:
One or more of the following statements may be
applicable to this equipment.
FCC WARNING
This equipment generates or uses radio frequency energy.
Changes or modifications to this equipment may cause harmfui
interference uniess the modifications are expressiy approved in
the instruction manuai. The user couid iose the authority to
operate this equipment if an unauthorized change or modification
is made.
INFORMATION TO THE DIGITAL DEVICE USER REQUIRED
BY THE FCC
This equipment has been tested and found to comply with the
limits for a Class B digital device, pursuant to Part 15 of the FCC
Rules. These limits are designed to provide reasonable
protection against harmful interference in a residential installation.
This equipment generates, uses and can generate radio
frequency energy and, if not installed and used in accordance
with the instructions, may cause harmful interference to radio
communications. However, there is no guarantee that the
interference will not occur in a particular installation. If this
equipment does cause harmful interference to radio or television
reception,which can be determined by turning the equipment off
and on, the user is encouraged to try to correct the interference
by one or more of the following measures:
• Reorient or relocate the receiving antenna.
• Increase the separation between the equipment and receiver.
• Connect the equipment to an outlet on a circuit different from
that to which the receiver is connected.
• Consult the dealer for technical assistance.
Page 3
l)ITR0l)OeTION
THANK YOU
We are grateful you decided to purchase this
KENWOOD All-Mode transceiver.
The TM-255/TM-455 series of transceivers were
developed to satisfy the requirement for a compact,
all-inclusive rig that's simple to operate yet has
superior performance across the band. VHF/UHF
operators can now enjoy the innovative Menu Setup
method for feature configuration incorporated in other
KENWOOD products.
KENWOOD believes that the compact size coupled
with the reasonable cost will guarantee your
satisfaction with this product.
PRECAUTIONS
Please read all safety and operating instructions
before using this unit. For best results, be aware of all
warnings on the unit and follow the provided operating
instructions. Retain these safety and
operating instructions for future reference.
1 Power Sources
Connect this unit only to the power source
described in the operating instructions or as
marked on the unit itself.
2 Power Cable Protection
7 Water and Moisture
Do not use the unit near water or sources of
moisture. For example, avoid use near bathtubs,
sinks, swimming pools, and in damp basements
and attics.
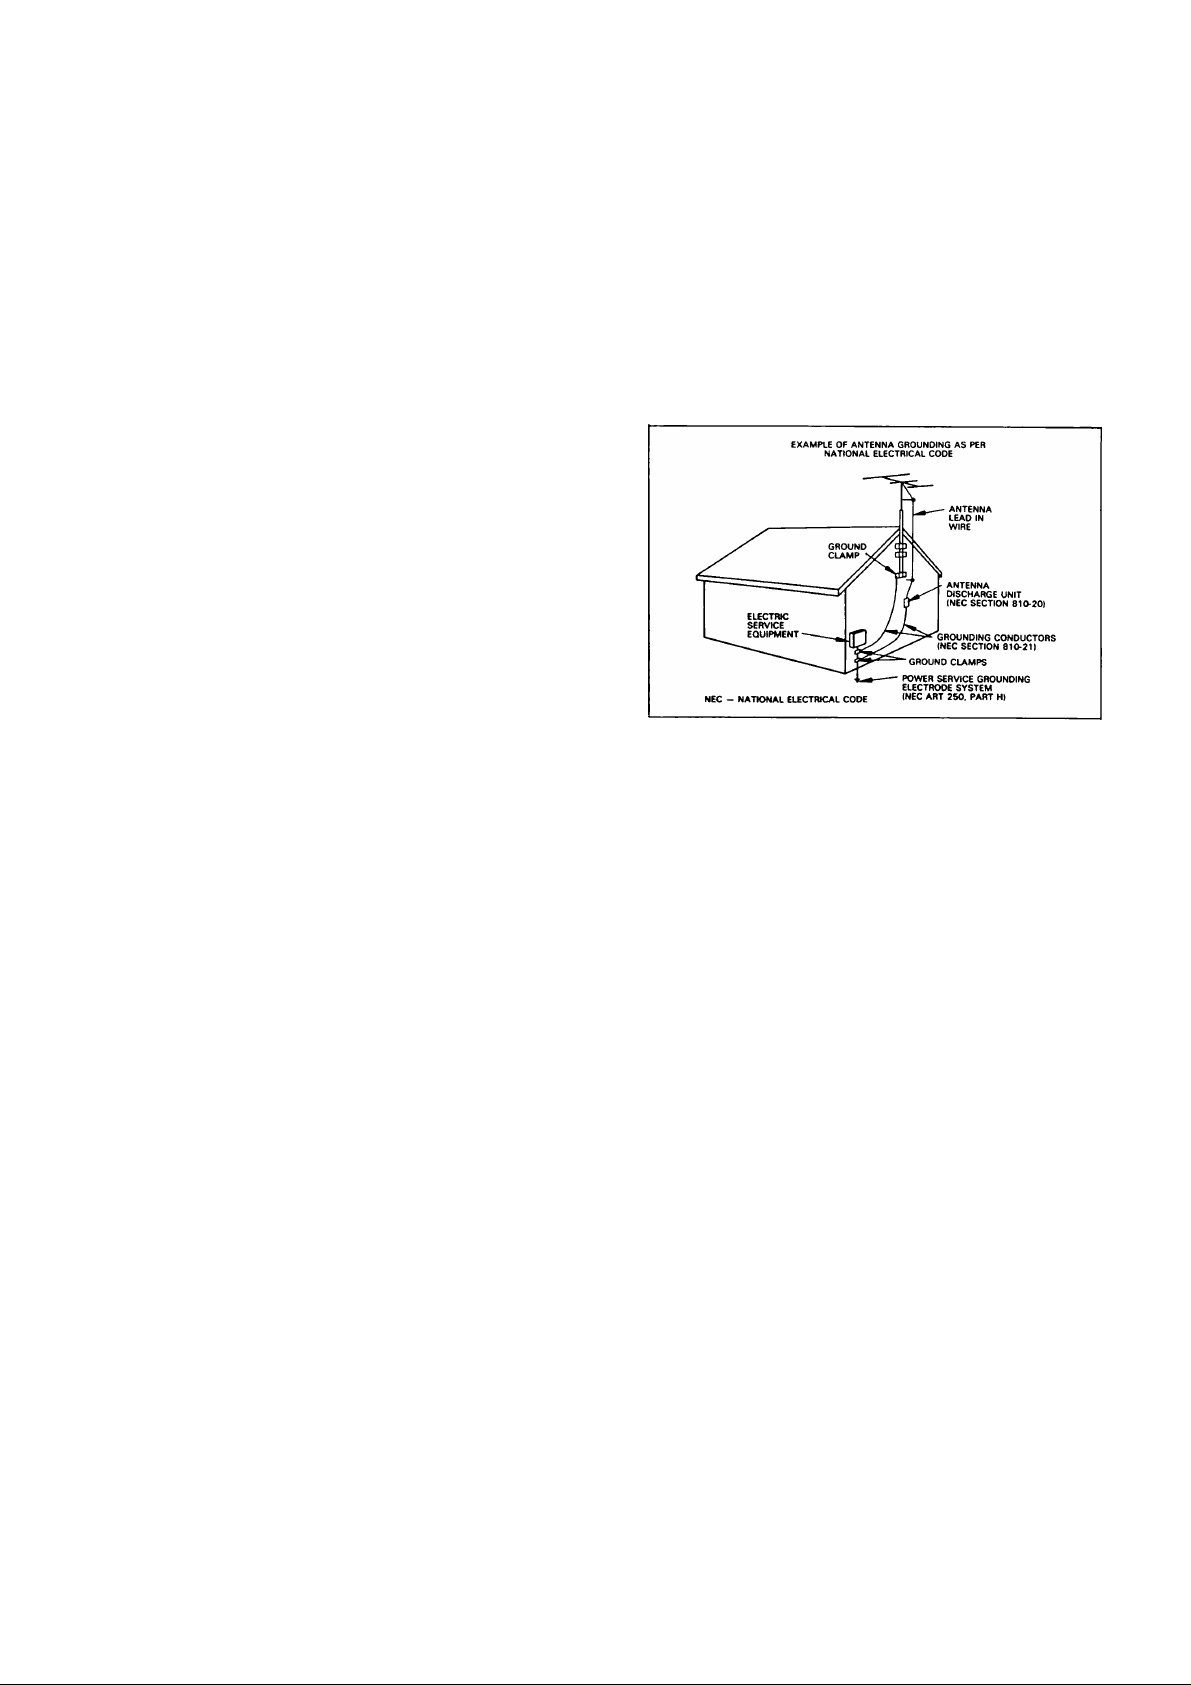
8 Outdoor Antenna Grounding
Adequately ground all outdoor antennas used with
this unit using approved methods. Grounding
helps protect against voltage surges caused
by lightning. It also reduces the chance of a build
up of static charges.
Route all power cables safely. Ensure the power
cables can neither be walked upon nor pinched by
items placed near or against the cables.
Pay particular attention to locations near AC
receptacles, AC extension bars and points of entry
to the unit.
3 Abnormal Odors
The presence of an unusual odor or smoke is often
a sign of trouble. Immediately turn the power OFF
and remove the power cable. Contact a dealer or
the nearest Service Center for advice.
4 Electrical Shocks
Take care not to drop objects or spill liquids into
the unit through enclosure openings. Metal
objects, such as hairpins or needles, inserted into
the unit may contact voltages resulting in serious
electrical shocks. Never permit children to insert
any objects into this unit.
5 Grounding and Polarization
Do not attempt to defeat methods used for
grounding and electrical polarization in the unit,
particularly involving the input power cable.
6 Ventilation
Locate the unit so as not to interfere with its
ventilation. Do not place books or other equipment
on the unit that may impede the free movement of
air. Allow a minimum of 4 inches (10 cm) between
the rear of the unit and the wall or operating desk
shelf.
9 Power Lines
Minimum recommended distance for an outdoor
antenna from power lines is one and one-half times
the vertical height of the associated
antenna support structure. This distance allows
adequate clearance from the power lines if the
support structure should fail for any reason.
10 Heat
Locate the unit away from heat sources such as
radiators, stoves, amplifiers or other devices that
produce substantial amounts of heat.
11 Cleaning
Do not use volatile solvents such as alcohol, paint
thinner, gasoline or benzene to clean the cabinet.
Use a clean, cloth with warm water or a mild
detergent.
12 Periods of Inactivity
Disconnect the input power cable from the power
source when the unit is not used for long periods of
time.
13 Servicing
Remove the unit’s enclosure only to do accessory
installations described by this manual or accessory
manuals. Follow provided instructions carefully to
avoid electrical shocks. If unfamiliar with this type
of work, seek assistance from an experienced
individual, or have a professional technician do the
task.
Page 4

INTRODUCTION
14 Damage Requiring Service
Enlist the services of qualified personnel in the
following cases:
a) The power supply or plug is damaged.
b) Objects have fallen, or liquid has spilled into the
unit.
c) The unit has been exposed to rain.
d) The unit is operating abnormally or
performance has degraded seriously.
e) The unit has been dropped, or the enclosure
damaged.
CONVENTIONS FOLLOWED IN THIS MANUAL
The writing conventions described below have been
followed to simplify key stroke instructions and avoid
unnecessary repetition. This format is less confusing
for the reader. Reviewing the following information
now will reduce your learning period. That means
less time will be spent reading this manual; more time
will be available for operating.
instruction Meaning
Press
[KEY1]+[KEY2].
Press
[KEY1], [KEY2J.
Press
[KEY]+ POWER ON.
Press [F] (N s).
Press [KEY] (N s).
Press the keys
simultaneously.
Press the keys
in sequence.
Press the key
while powering
the transceiver.
Press the
Function key for
longer than
N seconds.
Press the key
for longer than
N seconds.
What to (to;:
Press and hold
KEY1 down, then
press KEY2.
Press KEY1
momentarily,
release KEY1,
then press KEY2.
With the
transceiver power
OFF, press and
hold KEY, then
turn ON the
transceiver
power.
Press and hold
the function key
until the "F"
indicator on the
Display begins
flashing.
Press and hold
KEY until the
function begins.
Note: Basic procedures are numbered sequentially to guide you
step-by-step. Additional information pertaining to a step, but not
essential to complete the procedure, is provided in bulleted form
following many steps for further guidance.
Page 5

INTRODUCTION
FEATURES
• Convenient to transport, install and operate from
either a portable, mobile or fixed station
installation due to the compact size.
• Setting-up transceiver functions is simple with the
easy-to-use Menu System.
• Busy-Frequency Stop automatically stops any of
the scan functions on a busy frequency. Timeoperated and Carrier-operated modes are provided
for further flexibility.
• "Fuzzy logic" controls the frequency step size as
you turn the Main Tuning control. The faster you
turn the control, the larger the step size up to the
maximum step available.
• Automatic Power Off switches OFF the power if
the transceiver has not been used for
approximately 3 hours.
• Up to 4 functions can be assigned to the
Programmable Function (PF) keys on the
microphone allowing you to personally customize
your transceiver's operation.
• Despite the small overall case size, numerous
additional features have been included for the
VHF/UHF enthusiast.
SUPPLIED ACCESSORIES
Accessory
Microphone
U.S.A., Canada, General
Europe, General
Microphone hanger
U.S.A., Canada
Microphone hanger screws
U.S.A., Canada
DC power cable
Fuse, 15 A
• For the transceiver
Mounting bracket
Mounting bracket screws
Wrench
Warranty card
(U.S.A., Canada, Europe
Instruction manual
■' Excluding some General market versions.
^ Excluding some European versions.
Part Number Qty.
T91-0397-XX
T91-0398-XX
J20-0319-XX 1
N46-3010-XX
E30-2111-XX
F51-0017-XX
J29-0422-XX 1
N99-0383-XX
W01-0414-XX 1
-
B62-0415-XX
1
1
1 set
1
1
1 set
1
1
ATTENTION
♦ Noise entering from the DC power supply or static electricity
may disable the buttons or the Tuning controls. If this occurs,
determine the source of the interference and take appropriate
measures to reduce or eliminate the offending noise. If the
transceiver still does not function normally, reset the
microprocessor {page 34}.
♦ Resetting the microprocessor clears the memory channels and
returns the menu settings (described later) to their default
values.
♦ This transceiver contains a cooling fan. As the heat sink
temperature rises because of continuous transmission, the fan
speed accelerates to its maximum speed, and the sound of the
fan will become more noticeable. If the heat sink temperature
becomes excessively high, the temperature protection circuit
will trip and reduce the transmit output power.
Page 6

mmmn
CHAPTER 1 INSTALLATION AND CONNECTION
PREPARATION FOR MOBILE OPERATION
MOBILE INSTALLATION.................................. 1
DC POWER CABLE CONNECTION
ANTENNA CONNECTION
GROUND CONNECTION
IGNITION NOISE
PREPARATION FOR FIXED STATION
OPERATION............................................................3
DC POWER SUPPLY CONNECTION
ANTENNA CONNECTION
GROUND CONNECTION
ACCESSORY CONNECTIONS
EXTERNAL SPEAKER
MICROPHONE...................................................4
KEY OR ELECTRONIC KEYER
PACKET EQUIPMENT
CHAPTER 2 GEHING ACQUAINTED
FRONT PANEL
REAR PANEL..........................................................9
MICROPHONE......................................................10
DISPLAY...............................................................11
CHAPTER 3 MENU SETUP
MENU DESCRIPTION
MENU ACCESS
MENU CONFIGURATION.....................................13
MENU A............................................................13
MENU B............................................................14
CHAPTER 4 COMMUNICATION
CONFIRMATION BEFORE OPERATION.............15
REAR PANEL...................................................15
FRONT PANEL
GETTING STARTED
SWITCHING POWER ON/OFF........................16
VOLUME ADJUST............................................16
SQUELCH ADJUST
Noise Squelch
S-Meter Squelch..........................................16
DUAL DIGITAL VFOs.......................................17
Selecting VFOs............................................17
Equalizing VFO Frequencies
FREQUENCY SELECTION
FREQUENCY STEP SIZE
AUTOMATIC MODE SELECTION
SELECTING OUTPUT POWER.......................18
iv
...............................................
.......................................................
....................................................
................................................
.............................................
.............................................
.................................
..................................
.................................
..................................
..............................
......................................
........................
......................................
..........................................
.........................................
......................
.............................
...............................
.........
................
...............
...................
2
13
13
15
16
16
1
2
2
3
3
4
4
4
4
5
5
7
16
17
17
17
18
FM OPERATION...................................................19
FM REPEATER OPERATION
TRANSMIT OFFSETS
REVERSE FUNCTION
TONE ACCESS................................................20
AUTOPATCH
(U.S.A. AND CANADA VERSIONS)
Enabling the Microphone Keypad
DUAL TONE MULTI-FREQUENCY (DTMF)
CALLS..............................................................21
PACKET OPERATION..........................................22
SSB OPERATION
CW OPERATION
CW PITCH CHANGE
CW KEYING DELAY
CHAPTER 5 MEMORY FEATURES
MICROPROCESSOR MEMORY BACKUP
MEMORY CHANNEL DATA
MEMORY CHANNEL STORAGE
SIMPLEX CHANNEL STORAGE
SPLIT-FREQUENCY CHANNEL STORAGE ... 25
SCAN FREQUENCY LIMITS STORAGE
Programmable VFO Function
CALL CHANNEL STORAGE............................26
MEMORY CHANNEL RECALL
TEMPORARY FREQUENCY CHANGE
MEMORY CONTENTS CONFIRMATION
MEMORY TRANSFER..........................................27
MEMORY/CALL CHANNEL -> VFO
TRANSFER OF TEMPORARY DATA
ERASING MEMORY CHANNELS
FULL RESET....................................................28
CHAPTER 6 SCAN
BUSY-FREQUENCY STOP..................................29
SCAN RESUME METHODS
SCAN HOLD..........................................................29
MEMORY SCAN
GROUP SCAN
ALL-CHANNEL SCAN......................................30
MEMORY CHANNEL LOCK-OUT
PROGRAM SCAN
CONFIRMING LOWER/UPPER FREQUENCY
LIMITS
BASIC SCAN
BAND SCAN....................................................31
MHz SCAN.......................................................32
.............................................................
.................................................
..................................................
...................................................
.................................................
................................................
...................................................
..............................
.....................................
....................................
...............
..............
.......................................
........................................
..........
.................................
.........................
.....................
........
.....................
.............................
..........
............
................
.............
........................
............................
...................
19
19
20
21
21
23
23
23
23
24
24
24
24
25
25
26
26
27
27
28
28
29
31
31
31
30
30
30
Page 7

CONTENTS
VFO/MEMORY/CALL SCAN
SETTING SCAN SPEED.......................................32
CHAPTER 7 AUXILIARY FUNCTIONS
RECEIVING...........................................................33
RECEIVER INCREMENTAL TUNING (RIT)
IF SHIFT...........................................................33
NOISE BLANKER.............................................33
ADVANCED INTERCEPT POINT (AlP)
FUNCTION.......................................................33
TRANSMITTING....................................................34
SPEECH PROCESSOR...................................34
TIME-OUT TIMER (TOT)..................................34
OPERATOR CONVENIENCES.............................34
MICROPROCESSOR RESET
REMOTE FUNCTIONS USING THE
MICROPHONE.................................................35
PROGRAMMABLE FUNCTION (PF) BUTTON 36
LOCK FUNCTIONS..........................................36
Frequency Lock...........................................36
Main Unit Lock.............................................37
Microphone Lock
AUTOMATIC POWER OFF (APO)...................37
CHANNEL DISPLAY
TRANSVERTER FREQUENCY DISPLAY
PEAK METER HOLD
REPROGRAMMING AUTO MODE/
AUTO OFFSET.................................................38
KEY CONFIRMATION BEEP TONE................38
MODULATION MODE AUDIBLE INDICATOR.. 39
MORSE CODE ALARM OUTPUT....................39
DISPLAY DIMMER...........................................39
.................................
.....
.........................
.........................................
........................................
........
.......................................
32
34
37
37
37
33
37
RECEIVING...........................................................43
RECEIVING A CALL WITH YOUR STATION
CODE
...............................................................
RECEIVING A CALL WITH A GROUP CODE.. 43
PAGE CODE AND REPEATERS
LOCKING-OUT CODES........................................44
AUTO PAGE CANCEL
OPEN PAGE..........................................................44
CHAPTER 11 TONE ALERT
ENABLING TONE ALERT.....................................45
CHAPTER 12 MAINTENANCE
GENERAL INFORMATION
SERVICE...............................................................46
SERVICE NOTE....................................................46
CLEANING
INTERNAL ADJUSTMENTS.................................46
CHAPTER 13 TROUBLESHOOTING
CHAPTER 14 OPTIONAL ACCESSORIES...................52
CHAPTER 15 INSTALLING OPTIONS
SPECIFICATIONS........................................................55
GLOSSARY................................................................57
............................................................
..........................................
.........................
...................................
.........................
........................
43
44
44
46
46
48
53
CHAPTER 8 CONTINUOUS TONE CODED SQUELCH
SYSTEM (CTCSS)
SELECTING CTCSS FREQUENCIES
USING CTCSS......................................................40
CHAPTER 9 DUAL TONE SQUELCH SYSTEM (DTSS)
STORING DTSS CODES
ENABLING DTSS
DTSS AND REPEATERS.....................................41
CHAPTER 10 PAGE
OVERVIEW
PAGE CODE MEMORY........................................42
STORING PAGE CODES
CALLING
...............................................................
.................................................
...........................................................
.....................................
.....................................
..................
40
41
41
42
42
43
Page 8

1 HiSTALLATIOtl ANO CÛI^ECTiOK
PREPARATION FOR MOBILE OPERATION
When operating mobile, do not attempt to configure
your transceiver or change Menu settings while
driving because it is simply too dangerous. Stop the
car first, then make the necessary changes. Also, be
aware of local laws pertaining to the use of
headphones/headsets while driving on public roads.
If in doubt, do not wear headphones while mobiling.
MOBILE INSTALLATION
Install the transceiver in a safe, convenient position
inside your vehicle that minimizes danger to your
passengers and yourself while the vehicle is in
motion. For example, consider installing
the transceiver under the dash in front of the
passenger seat so that knees or legs will not strike the
radio during sudden braking of your vehicle.
■ Installation Example
1 Install the mounting bracket using the supplied
flat washers and self-tapping screws.
• The bracket can be mounted with the
bracket opening for the transceiver facing
down for underdash mounting, or with the
opening facing up.
2 Position the transceiver in the bracket to
determine the best viewing angle.
• You have 3 positions from which to choose:
angled up, horizontal, or angled down.
TM-255/TM-455
Use only the top or middle row of holes to
mount the transceiver horizontally.
Note:
♦ If more convenient, you can separate the transceiver Front
Panel from the transceiver. This allows easier mounting of
the panel near the operating position when there is not
enough room for the whole transceiver. The transceiver
can be installed in the trunk or under the seat.
♦ You can also use the optional MB-13 mounting bracket.
For the correct mounting procedure, refer to the instructions
packaged with the MB-13.
3 Insert and tighten the supplied SEMS screws
and washers using the wrench.
• Double check that all hardware is tightened
to prevent vehicle vibration from loosening
the bracket or transceiver.
Page 9
1 INSTALLATION AND CONNECTION
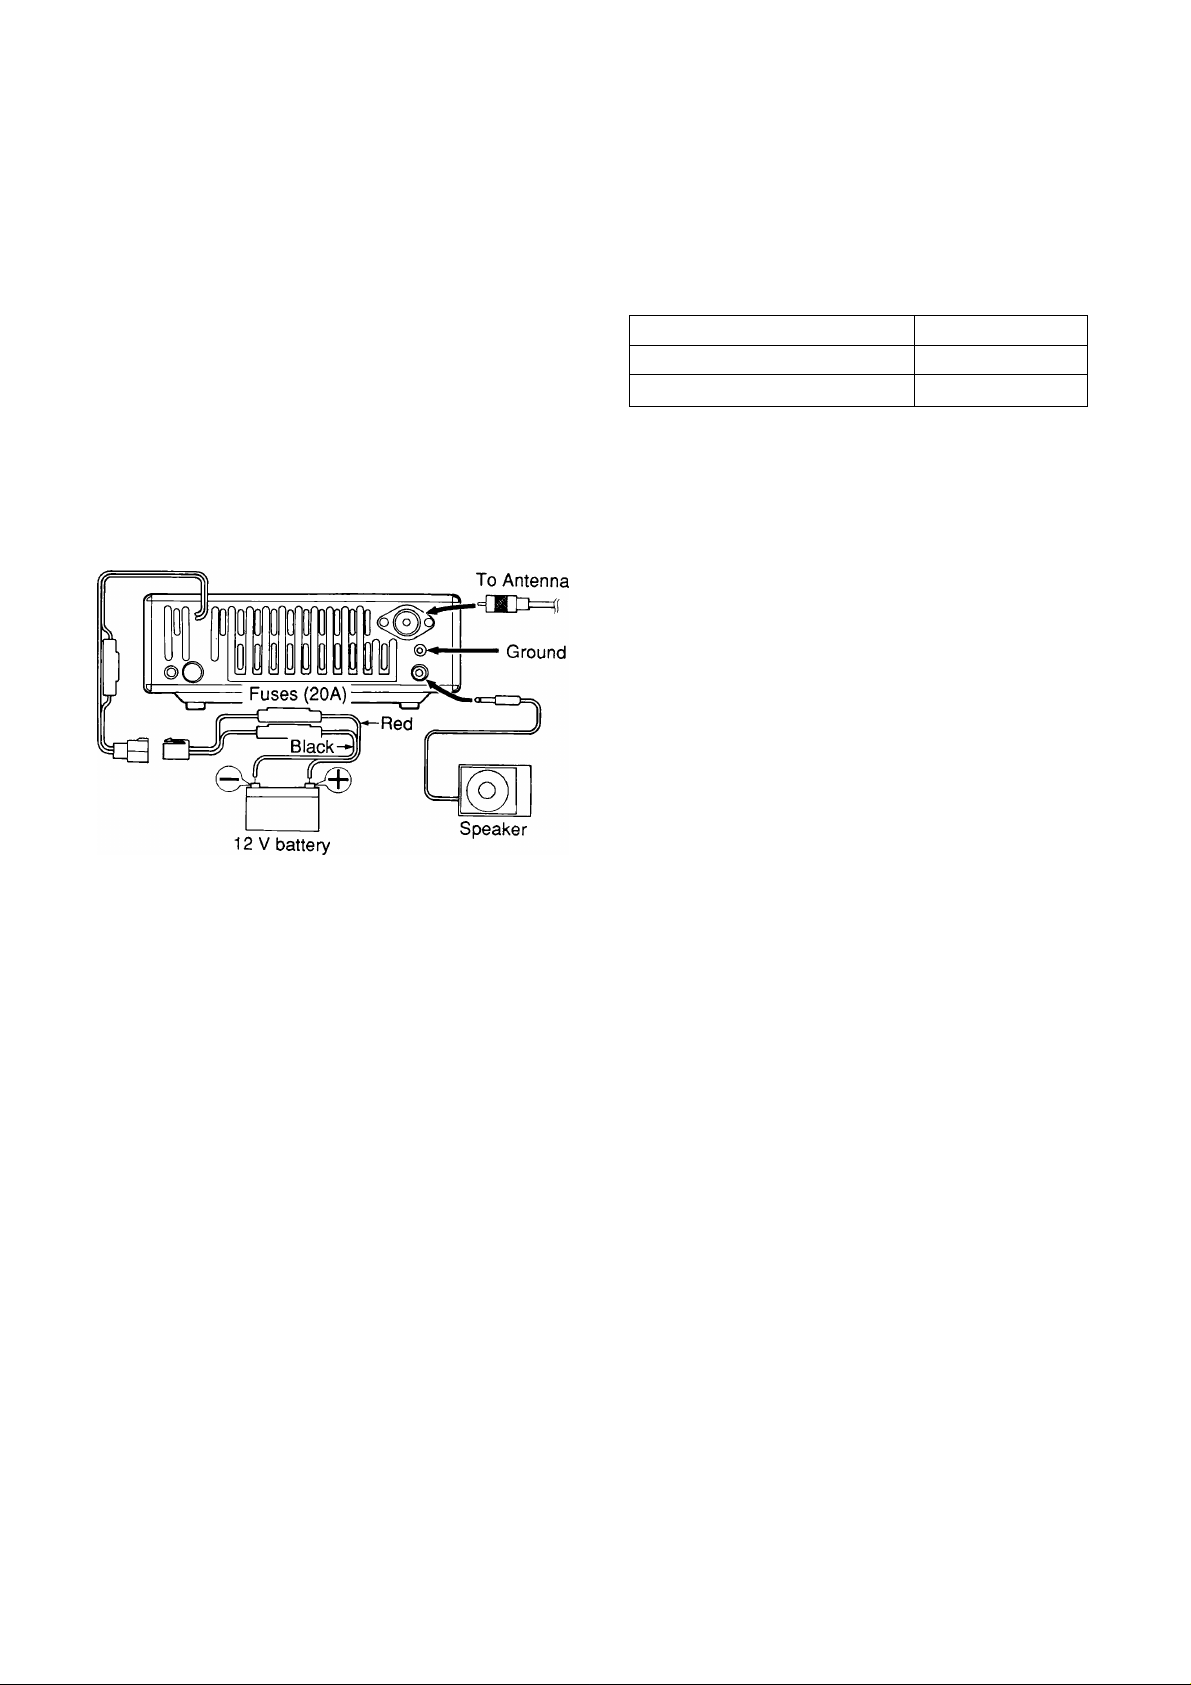
DC POWER CABLE CONNECTION
m
Replacing Fuses
Route the DC power cable directly to the vehicle's
battery terminals using the shortest path from the
transceiver. It is not recommended to use the
cigarette lighter socket since some cigarette lighter
sockets introduce an unacceptable voltage drop.
To prevent the risk of short circuits, disconnect other
wiring from the negative {-) battery terminal before
connecting the transceiver. Confirm the correct
polarity of the connections before attaching the power
cable; red connects to the positive (+) terminal, black
connects to the negative {-) terminal. Use the full
length of the cable without cutting off the excess even
if the cable is longer than required. In particular,
never remove the fuse holder from the cable. After
completing transceiver connections to the battery,
then reconnect any wiring removed from the negative
terminal.
Fuse
(15A)
If the power cable must be routed through a hole in
the vehicle chassis or body, for example in the firewall
at the front of the passenger compartment, use a
rubber grommet to protect the cable from abrasion.
The entire length of the cable must be dressed so it is
isolated from heat and moisture. After the cable is in
place, wind heat-resistant tape around the fuse holder
to protect it from moisture. Tie down the full run of
cable.
The vehicle battery must have a nominal rating of
12 V. Never connect the transceiver to a 24 V
battery. Be sure to use a 12 V vehicle battery that
has sufficient current capacity. If the current to the
transceiver is insufficient, the Display may darken
during transmission (at audio peaks during SSB
operation), or transmitter output power may drop
excessively.
Note:
♦ If you use the transceiver for a long period when the vehicle
battery has not been fully charged, or when the engine has
been stopped, the battery may become discharged, and will not
have sufficient reserves to start the vehicle. Avoid using the
transceiver under these conditions.
♦ Replace blown fuses only after investigating and correcting the
cause of the failed fuse. Always replace a blown fuse by a new
fuse with the specified ratings.
If the fuse blows, determine the cause then correct
the problem. After the problem is resolved, only
then replace the fuse. If newly installed fuses
continue to blow, disconnect the power plug and
contact your dealer or nearest Service Center for
assistance.
Function
Transceiver Power Cable 15 A
DC Power Cable
CAUTION: Only use fuses of the specified type and rating.
Fuse Current
20 A
ANTENNA CONNECTION
Before operating mobile, you must first install an
efficient, well-tuned antenna. The success of your
mobile installation will depend largely on the type of
antenna and its correct installation. The transceiver
can give excellent results if the antenna system and
its installation is given careful attention.
Your choice of 144 MHz or 430 MHz antenna should
have a 50 ohm impedance to match the transceiver
input impedance. Use low-loss coaxial feed line that
also has a characteristic impedance of 50 ohms.
Coupling the antenna to the transceiver via feed line
having an impedance other than 50 ohms reduces the
efficiency of the antenna system, and can cause
interference to nearby broadcast television and radio
receivers.
CAUTION: Transmitting without an antenna or other matched
load connected may damage the transceiver. Always connect the
antenna to the transceiver first before transmitting.
GROUND CONNECTION
The ground, which is the other half of the antenna
system, is very important when using most mobile
antennas. Connect the feed line ground for the
antenna securely to the vehicle's chassis, and be
certain to bond (electrically connect) the vehicle body
to the chassis. The sheet metal will provide the
primary ground plane, so be sure to establish a good
RF connection from the feed line to both the chassis
and the body. For comprehensive information on
mobile antennas and their successful installation and
optimization, refer to any of the publications on the
subject available at dealers handling Amateur
supplies.
If your car has plastic bumpers, make sure to ground
the antenna mount to the body and the chassis of the
car.
Page 10

1 INSTALLATION AND CONNECTION
IGNITION NOISE
This transceiver has been designed with a Noise
Blanker to filter ignition noise. However, some cars
may generate excessive ignition noise, if there is
excessive noise, use suppressor spark plugs (with
resistors), or take other countermeasures as may be
required to reduce these undesired electrically
generated noises.
PREPARATION FOR FIXED STATION
OPERATION
The following diagram illustrates how to connect the
cables to the rear of the transceiver. Connect the
cables securely so they will not come loose if pulled.
Replacing Fuses
If the fuse blows, determine the cause then correct
the problem. After the problem is resolved, only
then replace the fuse. If newly installed fuses
continue to blow, disconnect the power plug and
contact your dealer or nearest Service Center for
assistance.
Function
Transceiver Power Cable
DC Power Cable
CAUTION: Only use fuses of the specified type and rating.
Fuse Current
15 A
20 A
■ Installation Example
For a deluxe installation, take the time to install the
transceiver in the mounting bracket. The diagram
offers some mounting suggestions.
Added benefits of using the mounting bracket in
your fixed station include the following:
• You can angle the transceiver for best visibility
from your operating position.
DC POWER SUPPLY CONNECTION
In order to use this transceiver for fixed station
operation, you will need a separate 13.8 V DC power
supply that must be purchased separately. DO NOT
directly connect the transceiver to an AC outlet! Use
the supplied DC power cable to connect the
transceiver to a regulated power supply. Do not
substitute a cable with smaller gauge wires.
The following table lists the current consumption for
each type of transceiver. Any regulated DC power
supply used should have a current rating higher than
listed in the table.
Transceiver
Mode!
TM-255
TM-455
Current
Consumption
Less than 13 A
Less than 15 A
Plug the connectorized end of the DC power cable
into the DC 13.8 V connector on the rear panel of the
transceiver, and connect the other end of the cable to
the regulated power supply. The red wire must be
connected to the positive (+) terminal and the black
wire to the negative (-) terminal.
Note:
♦ Suitable regulated DC power supplies include the PS-33 and
PS-53. All are available as accessories. Choose a power
supply with a current rating larger than the current requirements
of the transceiver.
♦ Before connecting the DC power supply to the transceiver, be
sure to switch the transceiver and the DC power supply off.
♦ Do not plug the DC power supply into an AC outlet until you
make all connections.
• The transceiver remains stationary when you
attach connectors or use any of the controls.
• The transceiver is quickly detachable from the
bracket if you want to move it to your mobile or
any other alternate operating position.
• The bracket eliminates the risk of anybody
bumping the transceiver off your operating
desk.
If you decide to mount the transceiver in a
horizontal plane instead of angling it up or down,
use the top or middle row of mounting holes on the
bracket. The bottom row of holes cannot be used
to mount the transceiver horizontally.
Use the wrench to
tighten the screws.
Page 11

1 INSTALLATION AND CONNECTION
ANTENNA CONNECTION
The type of the antenna system, consisting of the
antenna, ground, and feed, will greatly affect the
successful performance of the transceiver. Use a
properly adjusted 50 ohm antenna of good quality
designed for operation at 144 MHz or 430 MHz to let
your transceiver perform at its best.
Install low-loss 50 ohm coaxial cable and a first quality
connector for the connection to the transceiver. For
longer feed line runs, especially for operation at UHF
frequencies, you might consider investing in airdielectric transmission line. The lower loss can make
a significant difference for those interested in weak
signal operation. In all cases, match the impedance
of the feed line and antenna so that the SWR is
minimum. Generally, an SWR measurement of 1.5:1
or less is considered satisfactory. All connections
must be clean and tight. Coupling the antenna to the
transceiver via feed line having an impedance other
than 50 ohms reduces the efficiency of the antenna
system. It also can cause interference to nearby
broadcast television receivers, radio receivers, and
other electronic equipment.
CAUTION:
♦ All fixed stations should be equipped with a lightning arrester to
reduce the risk of fire, electric shock, and transceiver damage.
♦ Transmitting without an antenna or other matched load
connected may damage the transceiver. Always connect the
antenna to the transceiver first before transmitting.
GROUND CONNECTION
At the minimum, a good DC ground is required to
reduce the risk of electric shock, and to prevent
interference to other electronic equipment. For
superior communications results, a good RF ground is
required against which the antenna system can
operate. Both of these conditions can be satisfied by
providing a good earth ground for your station. Bury
one or more ground rods, or a large copper plate
under the ground, and connect this to the transceiver
GND terminal. Use heavy gauge wire or a copper
strap, cut as short as possible, for this connection. As
for antenna work, all connections must be clean and
tight.
CAUTION: DO NOT use a gas pipe, an electrical conduit, or a
plastic water pipe for a ground. All are dangerous or poor
practices.
ACCESSORY CONNECTIONS
EXTERNAL SPEAKER
Use an external speaker with 8 ohms impedance.
The jack accepts a 3.5 mm diameter mono (2conductor) plug.
MICROPHONE
To communicate in the voice modes, connect a
microphone having an impedance of 600 ohms.
■ Installing the Microphone
Before beginning to install the microphone, switch
OFF the POWER switch.
1 Press the Release button on the left side of the
Front Panel to unlock the panel. Carefully pull
the Front Panel forward from the left, then
remove it completely.
• Handle the Front Panel carefully to avoid
applying excessive force to the thin cable
joining the Front Panel to the Main Unit.
2 Insert the 8-pin modular microphone connector,
keeping its locking tab upward, into the jack
located at the lower left corner of the Main Unit
front. Push gently inward until the tab "clicks"
into place.
• If using a microphone that does not have a
modular plug, use a conversion cable. For
example, the MJ-88 cable accepts an 8-pin
microphone plug at one end. The other end
has a modular plug that mates with this
transceiver.
3 Reinstall the Front Panel.
• Check that the bushings holding the thin
cable are in place, and the microphone
cable is in the groove before closing the
Front Panel.
• Press firmly on the Front Panel so the
Release button locks.
Page 12

KEY OR ELECTRONIC KEYER
For CW operation, connect your key or electronic
keyer to the KEY jack on the rear panel. Use a 3.5
mm diameter mono (2-conductor) plug. When using
an electronic keyer, ensure the keyer wiring polarity is
correct.
-H5V
Contact current approximately 1 mA
1 INSTALLATION AND CONNECTION
GND GND
-I-
PACKET EQUIPMENT
If you intend to use this transceiver for Packet
operation, you will need the following equipment;
• Personal computer with communications software
(Alternatively, a "dumb" terminal capable of
sending ASCII commands)
• TNC (Terminal Node Controller)
• TNC power supply
• RS-232C cable
• 6-pin mini DIN plug and cable (optional PG-5A)
Refer to the accompanying diagram and the
associated hardware instruction manuals to configure
the equipment as shown. Connect your TNC to the
DATA connector on the transceiver Rear Panel using
a cable equipped with a 6-pin mini DIN plug. You can
use the microphone connector on the Front Panel;
however, the DATA connector is recommended for
the following reasons:
• The DATA connector uses connections at different
modulation/demodulation points depending on the
transmission speed selected via Menu B, No. 77
{page 22}. Therefore, using the DATA connector
will give optimum performance especially if using
9600 bps.
• Using a mini DIN plug with a good-quality shielded
cable will provide better rejection from computer
noise.
• Easier to switch between voice and data modes.
No cable changes necessary therefore less
chance of damaging the connectors.
Do not share a single power supply between the
transceiver and the TNC. Keep as wide a separation
between the transceiver and computer as practical to
reduce noise-pickup by the transceiver.
Page 13

1 INSTALLATION AND CONNECTION
■ DATA Connector Pinout
Pin No.
1 PKD
2 DE
3 PKS 1
4
5
6 SQC
Pin Name
PR9
PR1
Function
Packet Data (input)
• Transmit data from TNG to transceiver
Data Earth
• Ground for TNG output
Packet Standby
• TNG can use this pin to inhibit the transceiver microphone input while transmitting
packet signals.
FM Demodulator Output
• For 9600 bps Packet operation
• Output Level: 500 mVp-p/10 kQ
Demodulator Output
• For 1200 bps Packet and RTTY operation
• Audio output is taken before the VOL control
(VOL control has no effect on audio level)
• Output level: 300 mVp-p/10 kO
Squelch Control or Relay Output ^
Squelch Control
• Inhibits TNG data transmit while transceiver squelch is open. This prevents
interference to voice communications on the same frequency and unwanted retries.
• Output level
Squelch open: +5 V (HIGH)
Squelch closed: 0 V (LOW)
Relay Output
• Alternatively, provides a relay output for accessories such as a linear amplifier.
• The output switches to GND during transmit.
• Current rating: 500 mA maximum
■' It is not necessary to disconnect the microphone if using the DATA connector. The TNG drives this pin LOW which mutes
the microphone.
2 Switch selectable: Set internal switch to "PSQ" for Squelch Control or "RL" for Relay Output {page 47}.
Transceiver
rear panel
Page 14

2 6ETT!li0 ftCQUiUNTED
The following sections describe basic functions of the controls, buttons, and indicators on the Front Panel, the
jacks and connectors on the Rear Panel, and the indicators on the Display. For full explanations of functions
mentioned, refer to the appropriate section elsewhere in the manual.
FRONT PANEL
0
ALTERNATE TUNING control
Provides the following 3 functions:
• Frequency change
• Memory channel select
• Menu number select
(D F.LOCK (Frequency Lock) button
Locks or unlocks many Front Panel and microphone
buttons, keys and controls. Refer to "LOCK
FUNCTIONS" {page 36} for the complete list. Also
used to cycle through menu selections while Menu
Setup is being accessed.
(D LOW button
Toggles the transmitter output power between High
and Low. Also used to cycle through menu selections
while Menu Setup is being accessed.
® AUTO/FM button
Toggles the modulation mode between AUTO and
FM.
(D SSB/CW button
Toggles the modulation mode between SSB and CW.
® CALL button
Recalls the Call channel.
0
POWER switch
Press to switch the transceiver ON or OFF.
®
MR (Memory Recall) button
Selects the Memory Recall function to allow memory
channels to be accessed.
0 M.IN (Memory Input) button
Provides the following 2 functions:
® Microphone cable channel
After connecting the microphone, position the cable in
the channel before closing the Front Panel. Refer to
"Installing the Microphone" (page 4).
(Q) A/B button
Provides the following 4 functions:
• VFO A or VFO B select
• VFO mode restore
• Partial reset
• Menu A or Menu B select
© M>V (Memory ^ VFO) button
Copies the contents of the currently displayed
memory (frequency, modulation mode, etc.) to the
VFO used last, then selects VFO mode.
© MHz button
Provides the following 3 functions:
• VFO mode: Activates 1 MHz Step for the
Alternate Tuning control.
• Memory Recall: Allows programmed memory
channels only (ON) or all
memory channels (OFF) to be
selected.
• Memory Scroll: Allows only empty memory
channels (ON) or all memory
channels (OFF) to be selected.
0 SCAN button
Starts and stops various types of scan functions.
0 RIT button
Toggles Receiver Incremental Tuning between ON
and OFF. The RIT control adjusts the receiver
frequency without affecting the transmitter frequency.
• Memory Store
• Memory Scroll
Page 15

2 GEniNG ACQUAINTED
®
CLR (Clear) button
Provides the following 7 functions:
Program Scan stop
Memory Scan stop
Memory Scroll exit
Memory channel lock-out
Memory channel erase
Menu Setup exit
A=B copy
0 VOL (Volume) control
Adjusts the level of receiver audio from the speaker.
®
SQL (Squelch) control
Adjusts the receiver squelch threshold level. This
allows you to mute speaker output while no stations
are being received.
© RIT control
The Receiver Incremental Tuning control provides
the following 2 functions:
• Receiver frequency shift
With RIT ON, adjusts the receiver frequency
without affecting the transmitter frequency.
• Scan speed change
@ IF SHIFT control
Shifts the IF pass band to attenuate or eliminate
interfering signals on adjacent frequencies.
@
F (Function) button
Provides the following 3 functions:
• Second Function select
• Menu Setup enter
• Menu Setup exit
®
TONE button
Toggles Tone and CTCSS status between ON and
OFF. Also, toggles Tone Alert ON and OFF.
®
SHIFT button
Switches the transmit frequency and receive
frequency when operating with a transmit offset or
split frequency in FM mode. Also, selects DTSS/Page
Code Select.
PROC (Processor) button
Toggles the transmitter Speech Processor between
ON and OFF.
®
AlP button
Toggles the Advanced Intercept Point (AlP) function
between ON and OFF.
@
NB (Noise Blanker) button
Toggles the Noise Blanker ON and OFF.
PF button
The function for this button can be assigned from
Menu B, No. 74. The function can be changed easily
whenever you wish.
(||) ON AIR indicator
Lights red when the transceiver is both in Transmit
mode and tuned to a frequency within the transmit
band.
BUSY indicator
Lights green while receiving signals or when SQL is
turned fully counterclockwise. See "BUSY" indicator
in the DISPLAY section on page 11 for more
information.
®
MAIN TUNING control
In VFO mode, use to select an operating frequency.
The transceiver only transmits on frequencies that lie
within the limits of the transmit band.
If memory channel 99 is recalled, use this control to
tune across the frequency range from the lower
frequency limit to the upper frequency limit stored in
this memory.
Selects transmit offset direction. Also, toggles DTSS
and Page status between ON and OFF while FM
mode is selected.
Page 16

0
Power Input DC 13.8 V
2 GEniNG ACQUAINTED
REAR PANEL
© GND
Connect a 13.8 V DC power source {pages 2 and 3}.
You can use either a 12 V vehicle battery or a
regulated DC power supply with the supplied DC
cable. The TM-255 draws less than 13 A and the
TM-455 draws less than 15 A at full transmitter output
power.
0 ANT
Connect an external antenna designed for operation
on the same band as this transceiver (pages 2 and 4}.
When making test transmissions, connect a dummy
load in place of the antenna. The antenna system or
load should have an impedance of 50 ohms. Accepts
a male PL-259 coaxial plug.
0 KEY
Connect a key or electronic keyer for CW operation.
Accepts a 3.5 mm diameter mono (2-conductor) plug.
Always turn the transceiver power OFF before
inserting the key plug to avoid momentarily
transmitting as the plug is inserted. See page 5 for
connection details.
0
DATA
Connect a Terminal Node Controller (TNC) for Packet
operation. Accepts a 6-pin mini DIN plug. Also can
be used to control external equipment such as a linear
amplifier. See page 5 for further details.
Connect a heavy gauge wire or copper strap between
the ground terminal and the nearest earth ground
(pages 2 and 4}. Do not connect the ground wire to
either your house electrical wiring, or gas or water
pipes. A well-grounded transceiver will reduce the
risk of interference to television or broadcast radio
receivers. It can also reduce receiver noise caused
by static discharges.
0
EXT. SP
Connect an optional 8 Q external speaker for clearer
audio (page 4}. Connecting an external speaker cuts
off audio automatically to the internal speaker.
Accepts a 3.5 mm diameter (2-conductor) plug.
Page 17

2 GETTING ACQUAINTED
MICROPHONE
© [UP] button
© [DWN] button
In general, these buttons perform the same function
as the Alternate Tuning control. They raise or lower
the VFO frequency, the memory channel number, the
Tone/CTCSS frequency, or the DTSS/Page code
digits. Holding either button down causes the action
to be repeated. Also, in Menu Setup, the buttons are
used to switch among available menu selections for
each menu number.
© [PTT] (Push-lo-talk) switch
Press to transmit: release to receive. Also, press to
exit Scan and DTSS/Page code setting.
0 LOCK switch
Locks all microphone functions except [PTT] and, if
equipped, the DTMF keypad. This switch does not
lock Front Panel buttons.
© PF (Programmable Function) keys
These keys do not have fixed functions, i.e. their
functions can be assigned and changed by the
operator {page 35}. By default, the keys have the
following functions:
[CALL] key (MC- 45/45DM)
Recalls the Call channel. Same function as [CALL]
on the Front Panel.
[1750]
key (MC-45E/45DME)
Sends a 1750 Hz tone for repeater access.
0 DTMF keypad (some versions only)
The 16-key keypad is used to transmit DTMF tones.
MICROPHONE CONNECTOR
[PF] key
Accesses the last menu number used in Menu Setup.
[VFO] key
Each press toggles between VFO A or VFO B. Same
function as [A/B] on the Front Panel.
[MR] key
Selects Memory Recall for access to the memory
channels. Same function as [MR] on the Front Panel.
10
Page 18

© MENU
2 GETTING ACQUAINTED
DISPLAY
Appears when accessing Menu Setup or DTSS/Page
Code Select.
© F.LOCK
Appears when the Frequency Lock function is ON.
® MHz
Appears when the MHz function is ON. Also appears
while using Memory Recall when selecting from only
programmed channels, or Memory Scroll when
choosing empty memory channels.
© AVFOB
"A VFO" appears when VFO A is selected, and "VFO
B" appears when VFO B is selected. VFOs are
selected by using [A/B]. "A" and "B" appear while
Menu A and Menu B are being accessed respectively.
© — +
Indicates the transmit offset direction in relation to the
receive frequency. "+" and are used by the
TM-255A/E and TM-455A. "+",and are used
by the TM-455E.
® TONE
Appears when the subaudible tone encoder is ON.
© REV
Appears when Automatic Modulation mode is
selected.
© BELL
Appears when Tone Alert is ON.
© RIT display
Appears when Receiver Incremental Tuning is ON.
Displays the amount and direction of frequency shift
with the RIT ON, and the scan speed value while
scanning.
0 FM
Appears when the FM mode is selected by pressing
[AUTO/FM].
© LSBUSB
Appears when Lower Sideband (LSB) or Upper
Sideband (USB) is selected by pressing [SSB/CW].
© M.CH
Appears when Memory Recall is selected. Memory
Recall is selected by pressing [MR], The memory
channel digits are used while accessing Menu Setup
and DTSS/Page Code Select to indicate the
Menu No. selected. The dot to the lower right of the
memory channel digits indicates the selected memory
channel is locked-out of Memory Scan.
Appears when the Reverse function is ON. Transmit
and receive frequencies are reversed.
® PROC
Appears when the transmit Speech Processor is ON.
® AlP
Appears when the Advanced Intercept Point function
is ON.
© NB
Appears when the Noise Blanker is ON.
© ON AIR
Appears when the transceiver is in the Transmit
mode.
© BUSY
Appears when the squelch is open due to a received
signal or noise that is greater in strength than the
noise squelch threshold level. Also appears when the
noise squelch is set to minimum by turning the SQL
control fully counterclockwise. If using either CTCSS
or DTSS, appears when the squelch is open due to a
received signal that contains a CTCSS frequency or
DTSS code that matches the Tone frequency or
DTSS code programmed in your transceiver.
11
Page 19

г GETTING ACQUAINTED
Ф Ф
1Ф-
MENU
★ М. СН
п п
О О 0*0 о
F.LOCK MHz А VFO В
‘О
----------------
о ^ г7п
и. и. LhU. LhD. О, ~Ш
BUSY I SI 3 5 7 / ,,,
Ion airi
^
STAR
Appears when the selected Page code is locked-out.
@ Meter
In Receive, acts as a Peak Hold S-meter to indicate
the signal strength of received signals from S1 to 40
dB over S9. In Transmit, acts as a Peak Hold RF
meter to indicate approximate transmit output power
on a scale from 1 to 10. The peak hold characteristic
can be disabled by menu selection if desired. The S-
meter is used for setting the squelch threshold of the
S-meter Squelch function.
<g) LOW
Appears when Low transmit output power is selected.
When "LOW" is not visible. High output power is
selected.
llllllllllllilVlIllllllllllllll LOW
RF 2 4 / 6 8 ■'О /
(6) 0
+ TONE REV PROC
------
DTSS CTCss co
M. SCR /PRG SCAN
(8) (|) ® ® ®
AlP
7i_5
-29.
(g) PRG
Appears when memory channel 99 is selected or
during Program Scan.
(g SCAN
Appears during Program Scan or Memory Scan.
(g TOT
Appears when the Time-out Timer function is ON.
® Digital frequency display
Displays the transmit and receive frequencies. Also
displays menus while accessing Menu Setup or
DTSS/Page Code Select, and minutes/seconds for
Tone Alert.
®
DTSS
Appears when the Dual Tone Squelch System is ON
(FM mode only).
© CTCSS
Appears when the Continuous Tone Coded Squelch
System is ON (FM mode only) when the CTCSS unit
is installed.
(g) CO
Appears when Carrier-operated Scan Resume is ON.
When not visible. Time-operated Scan Resume is in
effect.
(g) CW
Appears when the CW mode is selected by pressing
[SSB/CW].
(g M.SCR
Appears when Memory Scroll is selected by pressing
[M.IN].
12
Page 20

3 MENU SETUP
MENU DESCRIPTION
Many functions on this transceiver are selected or
configured via software-controlled menus instead of
physical controls on the transceiver. Once familiar
with the Menu system, you will appreciate the
versatility it offers. No longer is the number and
complexity of features restricted by the physical size
of transceiver.
The Menus are identified as Menu A and Menu B.
Menu A is used to access functions that are frequently
changed while Menu B is used for less frequently
changed functions.
MENU ACCESS
Anytime that you wish to change a function that is
controlled by Menu Setup, use the following
procedure:
1 Press [F] (2 s) or microphone [PF] to enter Menu
Setup.
2 Select Menu A or Menu B by pressing [A/B] or
microphone [VFO].
• The last menu number used and the current
menu selection appear.
3 Select the desired menu number by turning the
Alternate Tuning control.
4 Select the desired menu selection by pressing
[F.LOCK], or [LOW], or microphone [UP] or
[OWN].
• When selecting from a group of numeric menu
selections, [F.LOCK] or microphone [UP]
selects in ascending order, and [LOV\^ or
microphone [DWN] selects in descending
order.
5 After selecting the desired menu selection, press
[F], or [CLR], or microphone [PF] to exit Menu
Setup.
Note:
♦ Accessing menus while the Frequency Lock function is ON
cancels Frequency Lock temporarily. Frequency Lock is
restored after exiting Menu Setup.
♦ The Automatic Power Off timer stops counting while you are in
Menu Setup.
MENU CONFIGURATION
Refer to the following tables when configuring Menu A or Menu B.
MENU A
IMemi No.
00 Display Brightness
• 4 Illumination levels and OFF (d1: brightest)
01 CW Keying Delay
• Delay time in milliseconds
02
CW Receive Pitch
• 50 Hz steps
Busy-Frequency Stop (Program Scan)
03
• Enabled (ON) or Inhibited (OFF)
04
Scan Resume (Program Scan)
• Time-operated (0) or Carrier-operated (1)
Memory Scan
05
• All Memory channels (ON) or specific channel group
only (OFF)
06 SSB/CW Frequency Step Size
• Alternate Tuning control or microphone
• 5 step sizes
07
FM Frequency Step Size
• Alternate Tuning control or microphone
• 8 step sizes
08 AF Level Select
• Low (L) or High (H)
^ TM-455; Full Break-in ("Full") can be selected but this function is not supported.
^ U.S.A. and Canada: 5 kHz
Do$criptid|i
[UP]/[DWN]
[UP]/[DWN]
OFF/d4/d3/ d2/d1 d2
100/ 200/ 300/ 400/ 600/ 800/
1000/1400/1800 ms^
400 to 1000 Hz 800 Hz
10 Hz/100 Hz/1 kHz/5 kHz/
10 Hz/100 Hz/1 kHz/5 kHz/
10 kHz/12.5 kHz/ 20 kHz/ 25 kHz
Selections
ON/OFF
0/1 0
ON/ OFF
10 kHz
L/H
1
Default
600 ms
ON
OFF
10 kHz
TM-255:
12.5 kHz 2
TM-455:
25 kHz
Page
39
23
23
29
29
30
17
17
H
16, 38
13
Page 21

3 MENUSETUP
__
ÎViéliu No^
50 Key Confirmation Beep Tone
51 Modulation Mode Audible Indicator
• Morse (ON) or Beep (OFF)
52
Error Alarm
• Morse (ON) or Beep (OFF)
53
Tone/ CTCSS Frequency Select
54
Peak Meter Hold
55
Main Tuning
56 Program Scan Hold
57
RIT Maximum Frequency Shift
• 1.1 kHz in 10 Hz steps or 2.2 kHz in 20 Hz steps
58
Automatic Power Off
59
Time-Out Timer
FM Microphone Gain
60
• High (H) or Low (L)
61
1 MC-45 and MC-45DM only
2 TM-255A (General version) and TM-455A/E: OFF
SSB Automatic Microphone Gain Control ON/OFF
62
SSB Fine Microphone Gain control
63
Automatic Page Cancel ON/OFF
64 Open Page
65
DTSS/ Page Transmit Delay Time (offset/ split only)
Squelch Select
66
• Noise Squelch (OFF) or S-meter Squelch (ON)
67
S-meter Squelch Hang Time Select
68
Main Tuning
69
[PROCl, [AlP], [NBl, [PF]
Microphone PF1 Key Assignment
70
71
Microphone PF2 Key Assignment
72
Microphone PF3 Key Assignment
Microphone PF4 Key Assignment''
73
74
PF Button Assignment
Channel Display
75
• Frequency Display (ON) or Channel Display (OFF)
76 Transverter Frequency Display
« 1240 to 1299 MHz or 2400 to 2449 MHz in 1 MHz
steps
77
9600 bps Packet Select ON/ OFF
Automatic Offset Select
78
Control Enabled during Memory Recall
Control Lock
Oescrifition
Lock
Selections
ON/OFF
ON/ OFF
ON/OFF
67.5 to 250.3 Hz
ON/OFF
ON/OFF
ON/ OFF
1.1 kHz/2.2 kHz
ON/ OFF
OFF/ 3/ 5/10/ 20/ 30 minutes
U H
-6/ -3/ 0/ 3/ 6 dB
ON/ OFF
350 ms/ 550 ms
ON/ OFF
OFF/125/ 250/ 500 ms
OFF/ F3/ All
ON/ OFF
00 to 99
00 to 99 Memory
00 to 99
00 to 99
00 to 99
ON/OFF
OFF/1240-1299/ 2400-2449
ON/ OFF
Default
ON
ON
ON
88.5 Hz
ON
OFF
OFF
1.1 kHz
OFF
OFF
L
ON
OdB
OFF
OFF
350 ms 41,44
OFF
500 ms
OFF
OFF
Menu Setup
(83)
Recall (33)
VFO mode
(20)
Call channel
Recall (24)
Voice
synthesizer
(85)
ON
OFF
OFF
0№
Page
38
39
39
21,40
37
26
29
33
37
34
19
23
23
44
44
16
16
37
37
35
35
35
35
36
37
37
22
20
14
Page 22

4 COMSWNICATIOiii
CONFIRMATION BEFORE OPERATION
FRONT PANEL
Before proceeding, run through the following checklist
to double check that your transceiver is ready to
operate:
REAR PANEL
■ ANT Connector
• Is the correct antenna actually connected?
• Is a lightning protector installed for a fixed
station?
• Are interconnecting coaxial cables between the
transceiver, accessory station equipment, and
the antenna connected?
• Are all cable connectors well-installed (including
no cold solder joints?) and screwed tight?
• Are coax switches set for the correct antenna?
CAUTION: DO NOT transmit without connecting an antenna
or dummy load to the ANT connector. The transceiver can fail.
m
DC13.8V (DC Power Cable)
• Is the power cable connected and locked in
place? (Do not turn on the transceiver or DC
power supply yet.)
■ Controls
• Are they preset as shown in the diagram?
■ Microphone
• Is a recommended microphone installed
correctly per instructions on page 4?
fully counterclockwise.
■ GND (Ground)
• Is the transceiver actually grounded to your
vehicle chassis and body, if in a mobile, or to an
earth ground using recommended grounding
practices, if in a fixed station?
■ KEY Jack
• Is a key or keyer connected correctly for CW
operation?
■ DATA Connector
• Is a TNC connected correctly for Packet
operation?
to operate CW.
15
Page 23

4 COMMUNICATION
GEHING STARTED
This section provides general information you need to
know regardless which mode you plan to use when
operating.
SWITCHING POWER ON/OFF
Switch ON the DC power supply, then press
[POWER] to switch ON the transceiver.
• If operating mobile, simply press [POWER] on the
transceiver.
• After the "HELLO" message, the frequency and
other indicators appear on the Display.
Q
POWER
___
______
CZ) (3
To switch OFF the transceiver, press [POWER]
again.
• In a fixed installation, after the transceiver has
been switched ON, it can then be switched OFF or
ON by using only the power switch on the DC
power supply.
VOLUME ADJUST
Turn the VOL control clockwise to increase the audio
level, and counterclockwise to decrease the level.
Low
Menu A, No. 08 {page 13} also allows you to change
the received audio level. Toggle between a High or a
Low level setting. The default is High (H).
SQUELCH ADJUST
The purpose of squelch is to silence audio output from
the speaker when no signals are present. When
squelch is set correctly, you will hear sound only when
a station is actually transmitting. The point at which
ambient noise on a frequency just disappears, called
the squelch threshold, depends on the modulation
mode and frequency. Setting the squelch threshold
too high causes squelch to remain closed while a
weak signal is present. The station will not be heard.
You may mistakenly think that receiver sensitivity is
low or you have an audio problem.
Setting the threshold too low allows noise to be heard
between transmissions from other stations. However,
while receiving weak signals, turn the control fully
counterclockwise for most reliable operation. Many
operators prefer leaving the squelch control fully
counterclockwise unless operating full-carrier modes
such as FM.
_
Volume control
Noise Squelch
Turn the SQL control to just eliminate the
background noise when no signal is present, or set
and forget at full counterclockwise rotation.
Threshold
Squelch control
S-Meter Squelch
By using S-meter Squelch, you can set the squelch
threshold so the squelch does not open until a
signal with the same or greater strength than the
S-meter setting is received. Use Menu B, No. 66
(page 14} to select either Noise Squelch or Smeter Squelch. The default is Noise Squelch
(OFF).
After switching S-meter Squelch ON, adjust the
SQL control to set the S-meter for the minimum
signal strength that you want to open the squelch.
If the SQL control is turned fully counterclockwise
while S-meter Squelch is ON, the transceiver will
function as though Noise Squelch is being used
since virtually any signal will open the squelch. As
the SQL control is turned further clockwise, the S-
meter starts to rise indicating the larger signal that
is required to open the squelch. If the SQL control
is turned fully clockwise, a receive signal that is
S9 40 dB must be received before the squelch
will open. If the "BUSY" indicator remains off after
adjusting the SQL control, this means that the level
of noise or signal on the current frequency is lower
than the S-meter setting.
If you want to change the amount of time the
squelch remains open after the received carrier
from the other station drops, choose a new value
for Hang Time Select via Menu B, No. 67
(page 14}. The default is 500 ms.
/
S 1 3 5 7 9
llllllllllllllllll
V
A VFO
U zt zt n
1 Jf Jf. LI
2 4 6 8
n n n
LI
LI. LI
40d6
10
For example, when receiving a weak signal, select
a high value such as 500 ms to prevent the
squelch from closing prematurely. When signals
are strong, use a lower value such as 125 ms or
OFF for quick turnarounds in your conversation.
\
FM
J
16
Page 24

4 COMMUNICATION
DUAL DIGITAL VFOs
The A and B VFOs function independently so that
different or the same frequencies can be selected by
each VFO. Use the following buttons to select or to
copy the frequency data from one VFO to the other.
■ Selecting VFOs
Press [A/B] to toggle between VFO A and VFO B.
1 Assume that you are presently using VFO A.
c
V
A VFO
O zi O Zi
1 J J. c
S 1 3 5 7 9 ^
2 4 6 8
LI
n
40dB
10
n n
LLU
2 Press [A/B].
3 VFO B is selected and the frequency currently
selected by VFO B is displayed.
\
FM
J
FREQUENCY SELECTION
Turn the Main Tuning control clockwise to raise the
operating frequency and counterclockwise to lower
the frequency.
■ Alternate Tuning Control
Use the Alternate Tuning control to change the
frequency using larger steps than the Main Tuning
control. Turn this control clockwise to raise the
frequency and counterclockwise to lower the
frequency. The step size of the Alternate Tuning
control is changed via Menu Setup as explained
below.
■ Microphone Keys
You can also use [UP] or [OWN] on the
microphone to change the frequency. Each press
of [UP] or [OWN] raises or lowers the frequency
1 step from the current frequency.
FREQUENCY STEP SIZE
■ Main Tuning Control
4 Press [A/B] again to toggle back to VFO A.
Equalizing VFO Frequencies
Press this button to transfer the frequency and
modulation mode of the active VFO to the inactive
VFO.
1
Assume that you are presently using VFO A.
f
V
2 Press [A/B].
3 VFO B is selected and the frequency currently
selected by VFO B is displayed.
/
----------
V
A VFO
U zi O zi
1 J J, c
S 1 3
S 1 3 5 7 9 “
VFO B
o n
ZI
O
1 J CL LI
5
4
2
9 “
6 6
2 4 6 6
n n ri
LI
LL LI
40dB
10
n n
c
J LL LI
40dB
10
FM
)
\
C\N
J
The frequency step size automatically varies
depending on how fast the Main Tuning control is
turned due to "fuzzy logic". As the control is turned
more quickly, the frequency step increases through
the range of 5 Hz to 200 Hz. In the FM mode, the
range is from 50 Hz to 2 kHz.
■ Alternate Tuning Control
The frequency step size is selected via Menu A,
No. 06 for SSB and CW modes {page 13}. Use
Menu A, No. 07 for FM mode. There are 5 steps
available for SSB/CW and 8 steps for FM. These
menu selections also affect the step size when
using microphone [UP]/[DWN].
Version
Canada
U.S.A.
Europe
General
FM Mode (kHz)
TM-255 TM-455
5
12.5 25
25
SSB/CW Mode (kHz)
TM-255/455
10
10
MHz Button
1 Press [MHz] if you want to change the
frequency in 1 MHz steps.
4 Press [CLR].
5 Press [A/B] again.
• This selects VFO A again. Note that the
VFO B frequency and the modulation mode
have been copied to VFO A due to Step 4.
• "MHz" appears.
• Turning the Alternate Tuning control or
pressing microphone [UP]/[DWN] causes
the frequency to change in 1 MHz steps.
2 Press [MHz] again to switch OFF the MHz
function when you want to revert back to the
previous step size.
17
Page 25

4 COMMUNICATION
AUTOMATIC MODE SELECTION
Every Amateur band is subject to frequency
allocations plans commonly referred to as Band
Plans. Following these Band Plans helps reduce
interference between stations that want to use
different modulation modes on the same band.
Automatic Mode is a function that automatically
selects the correct mode according to these plans.
For example, if you are currently operating FM and
then move to a frequency that is in the SSB section of
the band, your transceiver mode automatically
changes to the SSB mode.
Automatic Mode is enabled by selecting AUTO with
[AUTO/FM]. You can always override the automatic
selection if you want by pressing either [AUTO/FM] or
[SSB/CW]. Automatic Mode does not work when
changing frequency while using the Receiver
Incremental Tuning (RIT) function.
There is a separate function available that allows you
to re-program the boundaries for Automatic Mode.
Refer to "REPROGRAMMING AUTO MODE"
{page 38} for further information on this function.
■ TM-255A Default Automatic Mode Plan
SELECTING OUTPUT POWER
It's wise, and required by law, to select the lowest
transmit power that allows reliable communication. If
operating from battery power, lower transmit power
will give you more operating time before a charge is
necessary. Reducing power lowers the risk of
interfering with others on the band too. It is possible
to change output power while transmitting.
Press [LOW] to select the transmit power you require.
* Default: High power (no indicator visible)
• Each press of [LOW] toggles the output power
between High and Low ("LOW")
High ^ Low ("LOW")
Model: High
TM-255 40 W
TM-455
35 W
5 W
5 W
144.0
144.1
CWj USB j
FM I j FM j LSB I ™ i FMj
146.0 146.6
145.1 145.8 146.4 147.0
FM i FM
{-) i (+)
147.6
TM-255E Default Automatic Mode Plan
144.0 144.15
CW
144.5 145.6 145.8
USB
PM ■
FM 1
FM
TM-455A (U.S.A. and Canada) Default Automatic
Mode Plan
430.0 435.0
FM USB
438.0
FM
TM-455E Default Automatic Mode Plan
432.15 432.5 435.0
USB
FM USB FM
148.0 MHz
146.0 MHz
440.0 MHz
18
Page 26

4 COMMUNICATION
FM OPERATION
To receive, use the following procedure;
1 Select the desired frequency.
2 Select the FM mode by pressing [AUTO/FM].
• "FM" appears.
A VFO
u ZI n n
1 Jf LI. LI
S 1 3 5 7 9 20
V
____
2 4 6 8
n n n
LI. LI
LI
40dB
10
3 Set the VOL control to a comfortable listening
level.
4 Select the type of squelch you want to use and
adjust as explained earlier {page 16}.
To transmit, proceed to the subsequent steps.
5 Listen. Make sure that your transmission won't
interfere with others.
Press and hold [PTT].
Speak into the microphone.
• As you transmit, verify that the RF meter is
reading upscale confirming transmit output
power.
• FM microphone gain adjustment is via Menu B,
No. 60. The default is Low (L). Normally, Low
is an appropriate selection for most
microphones. Select High if you receive reports
of weak audio.
U Zi n n n n n
1 Jf LI. LI LI LI. LI
lilllilllllllilllllllllllllill
\
FM
J
FM REPEATER OPERATION
Compared to simplex communication, you can usually
transmit over much greater distances by using a
repeater. Repeaters are typically located on a
mountain top or other elevated location. Often they
operate at higher ERP (Effective Radiated Power)
than a typical base station. This combination of
elevation and high ERP allows communications over
considerable distances.
Repeaters are often installed and maintained by radio
clubs, sometimes with the cooperation of local
businesses from communications industries. During
natural emergencies, repeater networks can be a'
valuable aid to officials responsible for coordinating
communications in a community. This assistance may
help save lives.
TRANSMIT OFFSETS
All Amateur Radio voice repeaters use a separate
receive and transmit frequency. The transmit
frequency may be higher or lower than the receive
frequency but the difference in frequencies will be a
standard amount, or "standard split". Most repeater
configurations fall into one of the following categories:
Offset
OirectioR
+
-
--
N/A : Not applicable
Whether using VFO mode. Memory Recall, or the Call
channel, the transmit offset direction can be changed.
■ Selecting Offset Direction
TM-255A/E
+600 kHz +5 MHz
-600 kHz
N/A
TM-455A
-5 MHz
N/A
I
TM-455E
+1.6 MHz
-1.6 MHz
-7.6 MHz
• Speak in a normal tone of voice. The RF meter
will indicate a steady carrier, regardless of voice
peaks. Speaking too close to the microphone,
or too loudly may increase distortion and
reduce intelligibility. If operating through a
repeater, over deviation will cause your signal
to "talk-off" (break up) through the repeater.
8 Release [PTT] to receive again.
This function sets the transmit frequency either
higher (+) or lower (-) than the receive frequency
by a fixed amount.
Press [SHIFT].
• The default is "simplex" (no offset).
• The offset can only be activated when using FM
mode.
• Each press of [SHIFT] changes the offset as
follows:
No
indicator -»-+
TM-255A/E, TM-455A
No
indicator -►+
t
_____
. TM-455E
19
Page 27

4 COMMUNICATION
Example: A positive (+) transmit offset has been
selected.
ij Zt n n n n n
1 J LI. LI LI LI. LI
If the offset transmit frequency falls outside the
transmit band, transmit is inhibited until the
transmit frequency is brought within the band by at
least one of the following methods:
• Move the receive frequency further inside the
band.
• Reverse the offset direction.
■ Automatic Transmit Offset
(U.S.A. and Canada versions)
Automatic Offset for the TM-255A sold in these
markets is programmed according to the standard
ARRL (American Radio Relay League) Band Plan
for repeater offset direction. You can override this
programming by following the "Selecting Offset
Direction" procedure in the preceding section.
Contact your national Amateur Radio association
to obtain up-to-date band plans that explain band
usage by mode and activity.
144.0 145.5 146.4 147.0 147.6
145.1 146.0 146.6 147.4 148.0 MHz
S: Simplex
m
Canceling Automatic Offset
Automatic Offset can be canceled via Menu B,
No. 78 {page 14}. The default is ON for all
versions except TM-255A (General) and TM455A/E.
Note: After turning ON Automatic Offset again from the OFF
status, the feature resumes functioning when a new frequency is
selected. When transferring a memory channel or the Call channel
to a VFO while Automatic Offset is ON. Automatic Offset is applied
to the VFO frequency even if this changes the offset that was
stored in the memory channel or Call channel. To avoid this and
transfer the channel data to the VFO without change, turn Menu B,
No. 78 OFF.
REVERSE FUNCTION
While FM mode is selected, each press of [REV]
switches the receive frequency and the transmit
frequency. When used while monitoring a repeater,
it's possible to check the signal strength of a station
accessing the repeater. If the station's signal is
strong, it's best to move to a simplex frequency to
continue the contact and free-up the repeater.
If reversal would place the receive frequency
outside the receive frequency range, an alarm
sounds when [REV] is pressed. No reversal
occurs.
Reverse cannot be activated while [PTT] is held
down.
Automatic Transmit Offset
(European versions)
The TM-255E Automatic Offset is programmed as
follows:
144.0
S: Simplex
Note: In all versions, while Automatic Offset is ON, a manually
assigned offset is only effective until the frequency is changed.
After Automatic Offset is turned OFF, a manually assigned offset
remains effective even after the frequency is changed.
145.6
145.8
146.0 MHz
When Reverse is ON, the frequency cannot be
changed.
TONE ACCESS
Each press of [TONE] toggles the Tone function ON
and OFF. Tone can only be activated when using FM
mode. When the Tone function is activated, a
subaudible tone is transmitted each time [PTT] is
pressed to transmit.
20
Page 28

4 COMMUNICATION
Often a Tone frequency is required to access
repeaters. For example, 88.5 Hz may be needed in
the U.S.A. or Canada, and 1750 Hz is used in Europe.
The Tone frequencies listed below can be selected.
On the TM-255E/TM-455E, press microphone [1750]
to send a 1750 Hz tone.
Freq.
No.
(Hz)
01 67.0 11 97.4 21
02
71.9 12 100.0 22
74.4
03
04
77.0
79.7
05
06 82.5 16 114.8 26 162.2 36
07
85.4
08
88.5 18 123.0 28
09 91.5
10 94.8 20
Freq.
No.
m
13 103.5 23
14
107.2
15 110.9 25
17
118.8
19 127.3 29
131.8 30
Freq.
No.
(Hz)
136.5
141.3
146.2
24 151.4 34
156.7
27
167.9
173.8 38 250.3
179.9
186.2
No.
i Freq.
(Hz)
31
192.8
32
203.5
33 210.7
218.1
225.7
35
233.6
37
241.8
Any of the available tones can be selected via
Menu B, No. 53 {page 14}.
DUAL TONE MULTI-FREQUENCY (DTMF) CALLS
Hold down the microphone [PTT] and press [0] to [9],
[A], [B], [C], [D], [^], or [#].
• The microphone is muted and the corresponding
DTMF tones are transmitted.
• If two keys are pressed, only the tone combination
for the key pressed first is sent.
AUTOPATCH
(U.S.A. and Canada versions)
Some repeaters offer a service called Autopatch.
This feature allows you to dial a telephone number
from your transceiver and carry on a telephone
conversation. This repeater function cannot be used
for commercial transactions, but it can save lives
when used appropriately during emergencies.
Autopatch requires the use of a DTMF (Dual Tone
Multi-Frequency) keypad on your microphone. The
keypad includes the 12 keys found on a push-button
telephone plus an additional 4 keys (A, B, C, D).
These additional keys are required for various control
operations by some repeater systems.
■ Enabling the Microphone Keypad
Press [PTT]+[DTMF KEYS].
The transceiver remains keyed for approximately
2 seconds after pressing each key. This allows
you to release
DTMF keys.
Freq. (Hz)
697 1
770
852 7
941
[PTT] once you begin entering the
DTMF Tones
1209
1336 1477 1633
2 3
4
5 6
8 9 C
0
A
B
#
D
Note: Some repeaters require a special key sequence to activate
Autopatch. Check with the control operator.
21
Page 29

4 COMMUNICATION
PACKET OPERATION
One of the most exciting benefits of owning a VHF or
UHF transceiver nowadays is being able to use it for
data modes. Due to the ease of setting up a digital
station, even those inexperienced with this type of
operation can be on-the-air enjoying these new
modes quickly.
You can use almost any computer to control one of
the widely available Terminal Node Controllers (TNC)
since the computer primarily serves to input
commands and output received text data to its
display. Little real computing power is needed,
therefore a high-powered processor is not necessary,
and even a "dumb" terminal is satisfactory, at least to
start. As you become more experienced, you will
realize how well your interest in radio meshes with the
world of data communications.
Connecting to one of the many stations with gateways
to HF or satellite links can give you national and
worldwide messaging or conferencing capability with
other Amateurs with nothing more than your single
band VHF/UHF transceiver for the communications
link. Much reference material is available for getting
started in digital communications from any store that
handles Amateur Radio equipment. Or, if more
convenient, check the radio magazines for mail order
bookstores.
The most common mode used on VHF/UHF
frequencies for Packet operation is FM. However,
there is also some SSB PSK activity on the satellites.
Type Of
Keying
OMSK.
G3RUH,
etc.
FSK
PSK
Menu B,
No. 77
OFF
ON
Modulation Mode /
Menu B, No. 77
FM/ON
FM/ON or OFF
SSB/OFF
input Impedance
10 kQ
10 kQ
Transmis
sion Rate
9600 bps
1200 bps
1200 bps
Standard Modulator Input
Consider the following before setting Menu B, No. 77:
• OFF: Transmit data input (PKD) sensitivity is
40 mVp-p. This is suitable for a typical
1200 bps TNC or other data
communications equipment.
• ON: Transmit data input (PKD) sensitivity is
2 Vp-p. This is suitable for most 9600 bps
TNCs. Set Menu B, No. 77 to ON if using a
TNC with dual speed capability that only has
a 2 Vp-p output. However, in this case, FM
mode must be used.
22
Emission
Type
FID
F2D
G2D
40 mVp-p
2 Vp-p
Using a modulator input level that is far different from
the optimum 40 mVp-p / 2 Vp-p specifications may
result in deterioration of S/N ratio or signal distortion.
This could result in increased errors or a complete
failure to connect with other stations.
If the modulator input level rises to approximately
4 Vp-p, the transceiver automatically switches to
Receive to prevent transmitting a distorted signal.
Transmission is not possible until the input level is
reduced by adjusting the TNC modulation level.
To receive after making the necessary connections as
explained in "PACKET EQUIPMENT" {page 5}, use
the following procedure and refer to your TNC manual
for further assistance.
1 Select the desired frequency.
2 Select the correct mode by pressing [AUTO/FM] or
[SSB/CW].
3 Select the correct Menu B, No. 77 (page 14}
selection based on the type of keying, transmission
speed, and TNC that you are using (see charts).
4 Turn the VOL control clockwise to set a
comfortable level if you plan to listen to the data
exchanges. Otherwise, leave the control fully
counterclockwise.
• The VOL control setting does not affect the
receive audio level from the DATA connector on
the Rear Panel.
5 Adjust the SQL control until the "BUSY" indicator
on the Display just disappears (threshold) while the
frequency is clear of any activity.
After beginning to receive stations, use the
Main Tuning control for minor frequency adjustments
to compensate for frequency drift while watching the
tuning indicator on your TNC. Do not use the RIT
control since it is important to keep your receive and
transmit frequencies equal.
To transmit, proceed to the subsequent steps.
6 Commands sent from your communications
terminal (either a computer keyboard or a "dumb"
terminal) to the TNC control your transceiver.
• Refer to your TNC instruction manual.
• Be courteous. Although packet protocol can
handle multiple stations on a single frequency,
overall throughput decreases due to packet
collisions during busy times of the day. Keep
transmissions short at these times.
7 Adjust the output level from the TNC while
watching the RF meter to avoid output power
saturation. Adjust for a maximum meter reading of
10 with a steady mark or space.
Note:
Inputting 9600 bps OMSK signals at too high a level or inputting
significantly distorted signals into the transceiver can cause
errors and a wide transmit bandwidth that may interfere with
other stations.
Always tune your transceiver to the exact frequency of the
station you are contacting. Failure to do so will result in
inaccurate demodulation of received packets and multiple
retries. Use the Main Tuning control (-5 kHz to +5 kHz) for
making fine adjustments as necessary.
Page 30

4 COMMUNICATION
SSB OPERATION
To receive, use the following procedure:
1 Select the desired frequency.
Select the USB or LSB mode by pressing
[SSB/CW].
• Either "USB" or "LSB" appears.
• Each press of [SSB/CW] changes the mode
from USB to LSB to CW in rotation, and
displays the mode selected on the Display.
c—
V
__
3 Set the VOL control to a comfortable listening
level.
4 If the squelch will be used, select the type of
squelch you want, and adjust as explained earlier
{page 16}.
To transmit, proceed to the subsequent steps.
5 Listen. Make sure that your transmission won’t
interfere with others.
6 Press and hold [PTT] on the microphone.
7 Speak into the microphone.
A VFO
ij zi n c
7 Jf /. J
S 1 3 5 7 9 20
2 4 6 8
П П
П
LI. LI
LI
40dB
to
USB
CW OPERATION
To receive, use the following procedure:
1 Select the desired frequency.
2 Select the CW mode by pressing [SSB/CW].
• "CW" appears.
• Each press of [SSB/CW] changes the mode
from USB to LSB to CW in rotation.
r
\
V
J
3 Set the VOL control to a comfortable listening
A VFO
1-/ Z! Cl
1 ZI LI. LI
St 3 5 7 9
2 4 6 6 to
n П П П
1
LI. LI
20 40dB
level.
4 If the squelch will be used, select the type of
squelch you want, and adjust as explained earlier
{page 16}.
To transmit, proceed to the subsequent steps.
5 Listen. Make sure that your transmission won't
interfere with others.
Begin sending using your key or keyer.
As you send, verify that the RF meter is reading
upscale confirming transmit output power.
\
c\w
J
• Speak in a normal tone of voice. The RF meter
should indicate from 7 to 9 on voice peaks
when using High power. The meter will read
lower when using the Low power. Speaking too
close to the microphone, or too loudly may
increase distortion and reduce intelligibility.
8 As you transmit, verify that the RF Meter is reading
upscale confirming transmit output power. The
microphone gain is controlled automatically;
however, if you prefer to set the gain manually,
refer to the following.
• Microphone gain adjustment is via Menu B,
Nos. 61 and 62 {page 14). No. 61 toggles a
circuit ON or OFF to maintain a constant level
regardless of variations in your speech level.
Turning No. 61 OFF sets the microphone gain
to a fixed value. This fixed value is selected
from No. 62 which allows you to control the gain
over a 12 dB range with 5 discrete selections.
Each selection is 3 dB higher than the previous
with the default being the mid-range selection of
OdB.
r
A VFO
О ZI П c
7 Jf 1. J LI
П П П
LI. LI
40dB
10
\
USB
J
U zi о П П П П
I J a LI I LI. LI
liiiiiiiiiiiiiiiiillllilllllli
М?И1;1
CW PITCH CHANGE
The CW receive pitch can be selected from within the
range of 400 Hz to 1000 Hz in 50 Hz steps by
changing Menu A, No. 02 {page 13}. The default is
800 Hz.
You may prefer selecting a higher pitch for easier
copy through interference from other stations. When
copying a strong signal on a clear frequency, you may
find it more pleasant to select a lower pitch. Changing
this setting does not affect the transmit sidetone.
CW KEYING DELAY
Menu A, No. 01 {page 13} allows keying delay time
selection. This is the delay before the transceiver
returns to the receive mode after the key is released.
Various delay values are available . The default is
600 ms.
23
Page 31

$ MEMOBY FEAltlBSS
MICROPROCESSOR MEMORY BACKUP
This transceiver uses a lithium battery to retain the
user-specified memory items. Switching the power
OFF will not erase the Menu Setups or memory
channels. Lithium battery life is approximately 5
years.
If you find the transceiver powers-up with default
settings, and channel and VFO data is erased, have
the lithium battery replaced. Contact an authorized
KENWOOD Service Facility or dealer.
MEMORY CHANNEL DATA
This transceiver has numerous memory channels for
different purposes as follows:
• 50 simplex channels
• 49 split-frequency channels
• 1 Scan Limits channel
• 1 Call channel
Channel
No.
00 to 49
50 to 98
99 Scan
Call
Channel
The following can be stored in memory:
__ Parameter
Receive frequency
Transmit frequency
Lower and upper
Scan frequency
Modulation mode Yes Yes Yes
Tone (CTCSS)
frequency
Tone/CTCSS
status (ON/OFF)
DTSS code
Offset status (+/-)
Reverse(ON/OFF) Yes
AlP (ON/OFF)
Lock-out (ON/OFF)
Yes: Can be stored
No: Cannot be stored
N/A: Not applicable
Channel
Simplex Use for simplex or repeater
communications.
Split-
Frequency
Limits
Quick
Recall
Use for simplex, repeater, or half
duplex communications (different
TX/RX frequencies).
Stores the lower frequency limit
and the upper frequency limit for
tuning in VFO mode or for
Program Scan.
Use as a quick recall simplex
memory channel.
Chans.
0Cit0 49
Yes Yes Yes
N/A Yes
No
Yes
Yes Yes Yes
Yes
Yes No Yes Yes
Yes Yes Yes
Yes
Purpose
Chans.
50 to 98
No Yes
Yes Yes
Yes
No
Yes Yes
Chan.
99
N/A
Yes
Yes
Call
ChannsI
Yes
N/A
No
Yes
Yes
Yes
No
Yes
Yes
No
Note:
♦ When changing Lock-out status after recalling any memory
channel, the newly selected status is stored automatically in
that memory channel.
♦ When changing stored data other than the lower frequency and
upper frequency limits after recalling the Scan Limits channel
99, the new data is stored automatically in that channel.
MEMORY CHANNEL STORAGE
SIMPLEX CHANNEL STORAGE
Store the same transmit and receive frequency in any
memory channel from 00 to 49 with this procedure.
1 Select a frequency, a modulation mode, and other
data (as required) using VFO A.
A VFO
Zl
U Zi zt c
1 Jf c, o
S t 3 5 7 9 2°
\
2 4 6 8
c
40dB
to
C n
Jf. U
2 Press [M.IN].
• The last memory channel selected appears.
c
M. CH
n
U L
V
____________
s
U zt
1 Jf
t 3 s
n o
LI. Cl
2 4
7 9 20
6 ' 8
O Zl n
O Jf. LI
40dB
10 M. SCR
3 Select a memory channel using the
Alternate Tuning control or microphone
[UP]/[DWN].
• Pressing [MHz] allows you to select from empty
memory channels only. Pressing [MHz] again
cancels this function.
4 Press [M.IN] again.
• The data from VFO A is stored in the selected
memory channel, and the transceiver returns to
VFO mode.
Note: Pressing [M.IN] overwrites new data on any previous data
in that channel.
FM
J
\
USB
j
24
Page 32

5 MEMORY FEATURES
SPLIT-FREQUENCY CHANNEL STORAGE
Store a different transmit frequency and receive
frequency in any memory channel from 50 to 98 with
this procedure.
1 Select the receive frequency, modulation mode,
and other data (as required) using VFO A.
/—
2 Press [CLR].
• This step is optional. The purpose is to match
the VFO A and VFO B frequencies. This will
probably make selecting the VFO B frequency
quicker.
3 Press [A/B] to select VFO B.
4 Select the transmit frequency using VFO B.
A VFO
U Zf C zi
1 Jf Jf. J
S 1 3 5 7 9 ^
2 4 6 8
/ n n
/
40dB
10
LLU
USB
y
SCAN FREQUENCY LIMITS STORAGE
The lower and upper frequency limits for tuning in
VFO mode or for Program Scan are stored in memory
channel 99. Store these frequencies with this
procedure.
1 Select the lower frequency limit, modulation mode
and other data using VFO A.
/
V
2 Press [A/B] to select VFO B.
3 Select the upper frequency limit using VFO B.
4 Press [A/B] again to select VFO A.
5 Press [M.IN].
A VFO
O Zi C ZI ZI
1 Jf Cl. L J
2 4 6 8 10
S 1 3 5 7 9 20 40dB
n n
LI. LI
FM
J
5 Press [A/B] to select VFO A.
• The VFO selected here contains the frequency
that will become the memory receive frequency
after completing Step 8 below. The other
VFO's frequency will become the memory
transmit frequency.
6 Press [M.IN].
• The last memory channel selected appears.
• Pressing [MHz] allows you to select from empty
memory channels only. Pressing [MHz] again
cancels this function.
7 Select a memory channel using the
Alternate Tuning control or microphone
[UP]/[DWN].
c
---------------------
M. CH
SS
V
- +
3 5 7 9 2®
S 1
2 4 6 B 10 M. SCR
•
N
>
8 Press [M.IN] again.
* The data selected in Steps 1 through 5 is stored
in the selected memory channel, and the
transceiver returns to the previous mode.
Note:
♦ Shift status and Reverse status cannot be stored in a split-
frequency memory channel.
♦ Pressing [M.IN] overwrites new data on any previous data in
that channel.
• The last memory channel number selected
appears.
6 Select memory channel 99 using the
Alternate Tuning control or microphone
[UP]/[DWN].
7 Press [M.IN] again.
• The data selected in Steps 1 through 4 is stored
in the selected memory channel, and the
transceiver returns to VFO mode.
Note: Pressing [M.IN] overwrites new data on any previous data
in that channel.
■ Programmable VFO Function
After programming a lower frequency limit and an
upper frequency limit into memory channel 99, you
can then select this channel while in Memory
Recall and use the Main Tuning control to tune
within the programmed range as if you were in
VFO mode.
To confirm the current programmed range, press
[F.LOCK], then press microphone [UP] and
[OWN] to check the limits.
25
Page 33

5 MEMORY FEATURES
CALL CHANNEL STORAGE
The Call channel can be used to store any frequency
within your transceiver operating range. The Call
channel always can be selected quickly. You may
wish to dedicate the Call channel on a group-wide
basis as an emergency channel only to be used for
urgent communications. Regardless, it's always best
to move to a different frequency after establishing
contact to free-up the Call channel.
Store your desired frequency for the Call channel with
this procedure.
1 Select a frequency, modulation mode, and other
data (as required).
V
_____
A VFO
U zi O zi
1 J J. J
2 4 6 8
S t 3 5 7 9 ^
n n
n
LI
LI. LI
40d8
10
FM
______________
/
Press [M.iN].
• The last memory channel number selected
appears.
Select the Call channel using the
Alternate Tuning control or microphone
[UP]/[DWN].
• The Call channel is selected as shown below:
MEMORY CHANNEL RECALL
Recall a memory channel with the following
procedure:
1 Press [MR] in VFO mode.
• The last memory channel selected appears.
• When recalling the Call channel, press [M.IN] to
select Memory Scroll before the next step.
n T >J zt o n c
uJ 1 J Cl. LI Cl
^ 2 4 6 8 10
s 1 3 5 7 9 ^
Select a memory channel using the
Alternate Tuning control or microphone
[UP]/[DWN].
• Pressing [MHz] allows you to select only
memory channels that contain data. Pressing
[MHz] again cancels this function.
• If the Call channel was recalled, press [CLR] to
exit Memory Scroll before the next step.
M. CH
u1ZI zt iz
n o
U LI
J C. Cl
5 7 9 ^
S 1 3
2 4 6 8 10
n n
LI. LI
C n
ZI
c
J.LI
40dB
cw
FM
>
J
Call
Channel
99
I
98
U Z! n n n n n
1 J LI. LI LI LI. LI
St 3 5 7
4 Press [M.IN] again.
• The data selected in Step 1 is stored in the Call
channel, and the transceiver returns to VFO
mode.
Note: Pressing [M.IN] overwrites new data on any previous data
in that channel.
3 To return to VFO mode, press either [A/B], or
[M>V] if you wish to transfer the selected memory
data to the VFO last selected.
Note: When using PIT with Memory Recall, the frequency shift as
a result of RIT alters the memory channel frequency only
temporarily. When RIT is turned OFF, the frequency actually stored
In the memory channel is displayed. If RIT shifts the frequency
outside the transceiver's frequency range, the frequency beyond
the frequency limit is displayed; however, after RIT Is turned OFF,
the frequency stored in the memory channel is displayed.
TEMPORARY FREQUENCY CHANGE
It is possible to change the operating frequency by
using the Main Tuning control without affecting the
contents of the recalled memory channel. Select this
operation via Menu B, No.55 {page 14}.
26
Page 34

5 MEMORY FEATURES
MEMORY CONTENTS CONFIRMATION
The contents of a memory channel can be confirmed
in VFO mode or Memory Recall with the following
procedure without changing the receive frequency.
1 Press [M.IN] in VFO mode or Memory Recall.
• "M.SCR" appears indicating Memory Scroll is
selected.
r
-------
n n
U 1
M. CH
ii n o zt
1 Jf Jf. Jf
S 1 3 S 7 9 “
2 4 6 8 10
n n
n
LI LI, LI
40dB
M.SCR
>
FM
J
2 Select the memory channel to be confirmed using
the Alternate Tuning control or microphone
[UP]/[DWN].
T <J Z!
/c* T J
1
_______________2_____
SI 3 5 7
1_
/
L!
/. 1
20 40dB
9
6 10
c
Jf
n n
LI. LI
M.SCR
USB
J
3 To return to the previous mode, press [CLR].
• When you select Memory Scroll, you can
transfer data from one memory to another.
Refer to page 28.
Note: If you select a split-frequency channel, you cannot confirm
the transmit frequency and transmit moduiation mode using this
method. Also this method cannot be used to confirm the contents
of memory channel 99. Refer to "CONFIRMING LOWER/UPPER
FREQUENCY LIMITS" {page 31}.
MEMORY TRANSFER
3 Press [M>V].
The displayed data is transferred to the VFO,
and VFO mode is restored. It is now possible
to change the frequency or any other setting.
Pressing [M>V] clears the current VFO data,
but the memory channel data remains
unchanged.
c
<
Ll
1
Jf Jf.
S 1 3 5 7 9
2
A VFO
zi Cl
4 6
Jf
ZI
20
nLIn ri
LI. LI
40dB
10
FM
J
The following chart shows how transmit and receive
frequencies are transferred:
VFO Selected
BEFORE
dressing M>V
Button
VFO A
VFO B
Type of
Memory
Channel
Simplex
Channel or
Channel 99
Split Channel spilt Memory
Simplex
Channel or
Channel 99
Split Channel
VFO Contents AFTER Pressing
M>V Button
VFO A
Simplex
Channel data
or Channel
99 data
Channel RX
data
No Change Simplex
Split Memory
Channel TX
data
VFO B
No Change
Spiit Memory
Channel TX
data
Channel data
or Channel
99 data
Spiit Memory
Channel RX
data
MEMORY/CALL CHANNEL^ VFO
Transfer the contents of memory channels 00 to 99,
or the Call channel contents, to the current VFO with
the following procedure:
1 Press [MR] to change from VFO mode to Memory
Recall.
• The last memory channel selected appears.
• To transfer the Call channel, press [M.IN]
before the next step.
n n u zi o II n n n
u1 I J J. J LI U. LI
e 4 c 7 Q 20 40dB
2 Select a memory channel using the
Alternate Tuning control or microphone
[UP]/[DWN].
Note:
♦ When [M>V] Is pressed after you have temporarily changed
the contents of the recalled channel, the currently displayed
data is transferred to the VFO.
♦ Automatic Offset takes priority over the transferred shift status.
However, the transferred moduiation mode overrides the
Automatic Moduiation function.
27
Page 35

5 MEMORY FEATURES
TRANSFER OF TEMPORARY DATA
It is possible to alter the displayed data after recalling
a memory channel if Menu B, No. 55 is ON. The
default is OFF. The changed data can be considered
"temporary" since it has not been stored in any
memory. You can then transfer the temporary data to
another memory channel with the following procedure;
1 Recall the desired memory channel.
• Refer to "MEMORY CHANNEL RECALL"
{page 26}.
2 Edit the displayed data as required.
3 Press [M.IN] to select Memory Scroll.
4 Select a memory channel to which the data will be
transferred, using the Alternate Tuning control or
microphone [UP]/[DWN].
5 Press [M.IN].
• The data is transferred and the previous mode
is restored.
The following chart shows how transmit and receive
frequencies are transferred:
Source
Memory Dote
Simplex
Split
Destination
Memory
lij: Channel
Simplex Source simplex data
Split
Simplex Source RX data
Split
bestination Memory
Contents AFTER Pressing
M>V Button
Source simplex data
Source RX and TX
data
ERASING MEMORY CHANNELS
Erase the contents of any memory channel with the
following procedure:
1 Recall the memory channel to be erased.
/
M. CH
U zt O ZI
n n
U 1 1 J Jf. Jf u
1 3 5 7 9 “
S
V
2 4 6 8
n n n
LI. LI
40dB
to
2 Press [CLR] (2 s).
• The memory channel is erased as indicated by
the clearing of the displayed frequency.
/
M.CH
n n
U 1 •
S 1
3 5 7 9 ^
2 4 6 B 10
•
3 To return to VFO mode, press [A/B].
FULL RESET
Do a Full Reset if you want to erase all data in all
memory channels or a Partial Reset (page 34} does
not correct a problem you are experiencing.
Remember that a Full Reset requires that you reenter
any memory channel data again after the initialization
if you wish to use those channels. On the other hand,
initialization is a quick way to erase all data from all
channels.
Press [MR]+ POWER ON.
\
FM
J
J
28
Page 36

S SCAM
Scan is a useful feature for hands-off monitoring of
your favorite frequencies. After becoming comfortable
with how to use all types of Scan, the monitoring
flexibility gained will increase your operating
efficiency.
This transceiver provides 3 types of Scan as follows:
Scan Type
Memory Scan Quick activity update of your favorite
frequencies.
Program Scan General update of activity on the entire
VFO/ Memory/
Call Scan
■' Program Scan has several variations available
{page 31}.
Note:
band or a sub-section of the band while
in VFO mode.
Check the current VFO, Memory
Recall, and Call channel frequencies in
rotation.
♦ Remember to adjust the squelch threshold level {page 16}
before using Scan.
♦ Always turn OFF Tone Alert and Page before using Scan.
♦ For CTCSS operation, Scan stops and the squelch opens only
for signals that contain the same CTCSS tone that is stored in
your transceiver.
♦ For DTSS operation, Scan stops for any signal received;
however, the squelch opens only for signals that contain the
same DTSS code that is stored in your transceiver.
♦ When both CTCSS and DTSS are ON, Scan stops for signals
that contain the matching CTCSS tone. However, the squelch
opens only when the matching DTSS code is received.
Purpose
BUSY-FREQUENCY STOP
When a signal is received while using Program Scan,
the transceiver automatically stops scanning when a
signal is detected if Busy-frequency Stop is ON. The
transceiver remains on the same frequency for either
a short time or until the signal drops depending on
which Scan Resume method is selected. The squelch
must be adjusted to the noise threshold point with no
signals present.
The Busy-frequency Stop function can be turned ON
or OFF via Menu A, No. 03 (page 13}. The default is
ON.
SCAN RESUME METHODS
Time-operated mode: Scan resumes approximately
6 seconds after stopping on a busy frequency
regardless if the signal is still present.
Carrier-operated mode: Scan does not resume until
approximately 2 seconds after the signal drops.
Select the Scan Resume method via Menu A, No. 04
(page 13}. The factory default is the Time-operated
mode (0).
Note: For Scan to stop, the SQL control must be set just beyond
the threshold where the background noise disappears when no
signal is present.
SCAN HOLD
Busy-frequency Stop is useful primarily when
operating in a full-carrier mode such as FM. An
alternative to Busy-frequency Stop that works
especially well for SSB or CW is Scan Hold. Scan
Hold only stops the transceiver from scanning when
you turn the Main Tuning control, turn the
Alternate Tuning control, or press microphone
[UP]/[DWN]. Scan stops on the current frequency
and resumes a short time later.
Enable Scan Hold via Menu B, No. 56 (page 14}. The
default is OFF.
Note: Busy-frequency Stop must be turned OFF to use Scan
Hold.
29
Page 37

6 SCAN
MEMORY SCAN
Memory Scan can be used to scan only a specific
channel group (Group Scan), or to scan all memory
channels containing data (All-channel Scan).
Selection of the desired method is via Menu A, No. 05
{page 13). The default is Group Scan (OFF).
GROUP SCAN
There are 100 memory channels total, divided into
groups of 10 channels each (00 to 09,10 to 19
to 99). When Group Scan is selected, the transceiver
scans only memory channels that belong to the
specified group and contain data.
1 Press [MR] to select Memory Recall.
• The last memory channel selected appears.
2 Select any memory channel belonging to the
desired group using microphone [UP] or [OWN].
u zi zi I I n n
P I I J J. I I U. LI
20 40d6
8 10
......
90
Adjust the SQL control while no signal is present.
• Remember, Menu A, No. 05 must be ON.
Press [SCAN].
• The scan speed appears with "SCAN", and
scan starts.
• To change the scan direction, turn the
Alternate Tuning control clockwise or
counterclockwise.
/
M. CH
55
V
U Zi c
1 J Jf.
S 1 3 5 7 9
2 4 6 8 10
zi I
J 1
20 40d8
- +
n n n 1
U. LI P 1 USB
SCAN J
4 Press [SCAN], [CLR], or the microphone [PTT] to
stop Scan.
• Memory Recall is restored.
5 To restore VFO mode, press [A/B].
Note: If no data is stored in the memory channels, or all memory
channels are locked out, pressing [SCAN] will sound the Morse
code "CHECK" reminder.
3 Adjust the SQL control while no signal is present.
4 Press [SCAN].
• The scan speed appears with "SCAN", and
Scan starts.
• To change channel groups while scanning,
press microphone [UP]/[DWN].
• To change the scan direction, turn the
Alternate Tuning control clockwise or
counterclockwise.
n n „ , ™
a
20
6 8 10
/
LI. LI P 1
1
40dB
SCAN j
r " Ij ZI
I?S' / J
SI 3 5
1
_______________5_____
C n
o.u
1_
5 Press [SCAN], [CLR], or the microphone [PTT] to
stop Scan.
• Memory Recall is restored.
6 To restore VFO mode, press [A/B].
Note: If no data is stored in the memory channels of the specified
group, or all memory channels are locked out, pressing [SCAN] will
sound the Morse code "CHECK" reminder.
ALL-CHANNEL SCAN
The All-channel Scan function scans all memory
channels containing frequency data.
1 Press [MR] to select Memory Recall.
• The last memory channel selected appears.
30
\
____
M. CH
/ C
/ LI
U Zi n n c
1 J LI, 1 J
S 1 3 5 7 9 20 40dB
2 4 6 8 to
n n
LI, LI
USB
>
MEMORY CHANNEL LOCK-OUT
Memory channels that you prefer not to monitor while
scanning can be locked-out. Lock-out any memory
channel with the following procedure:
1 Press [MR] to select Memory Recall.
2 Select the memory channel to be locked-out using
the Alternate Tuning control or microphone
[UP]/[DWN].
>
M. CH . 1
1 o 1
3 Press [CLR].
A dot appears beside the memory channel
number to indicate the channel has been
locked-out.
Pressing [CLR] for more than 2 seconds erases
the contents of the memory channel.
r
M. CH
i o
1 a.
V
4 To restore the VFO, press [A/B].
• The dot disappears.
Lock-out for an individual channel can be canceled by
repeating the above procedure.
ZI ZI u ZI n n
Jf L. 1 C LI, LI
5 7 9 20 40dB
S 1 3
4 6 8 10
1 2
u1ZI ZI
Jf L .
s 1 3 5 7 9
2 4 6
u
1
20
8 10
ZI n n
C LI, LI
40dB
USB
----------
USB
J
>1
J
Page 38

6 SCAN
PROGRAM SCAN
The Program Scan function scans the range between
the lower limit frequency and upper limit frequency
stored in memory channel 99. Scan always begins
scanning upwards in frequency but can be reversed
by turning the Main or the Alternate Tuning control,
or by pressing microphone [UP]/[DWN]. Turning
either control counterclockwise causes Scan to move
downwards in frequency while turning either control
clockwise causes Scan to move upwards in
frequency. Similarly, pressing microphone [UP] or
[DWN] causes Scan to move in the same direction as
the button labels. Menu B, No. 56 must be OFF if the
controls are to function in this manner.
For a refresher on how to store the Scan Limits, refer
to "SCAN FREQUENCY LIMITS STORAGE"
{page 25}.
Program Scan can be broken down into 3 kinds of
scan method.
Type of
Frogram Sean
Basic Scan General update of activity on a selected
Band Scan
MHz Scan
portion of the band. This is a sub-set of all
frequencies tuned during Band Scan.
Monitor all frequencies tuned by the
transceiver.
Monitor any single 1 MHz range of
frequencies.
Purpose
BASIC SCAN
When the lower limit frequency and upper limit
frequency are stored in memory channel 99, the
transceiver scans this range.
1 Press [A/B] to select VFO mode.
2
Select a frequency that is between the lower and
upper frequency limits stored in memory
channel 99.
Adjust the SQL control while no signal is present.
Press [SCAN].
• The transceiver scans upwards from the current
operating frequency.
• To change the scan direction, use the
Main Tuning control. Alternate Tuning control
or microphone [UP]/[DWN].
M. CH
U zt C 7/ 7/ n n n
o o
J J
I J U. L J LI. LI P
5 Press [SCAN], [CLR], or microphone [PTT] to
stop scanning and restore VFO mode.
Note: The modulation mode can be changed while scanning.
BAND SCAN
CONFIRMING LOWER/UPPER FREQUENCY
LIMITS
The lower and upper Scan frequency limits stored in
memory channel 99 can be confirmed with the
following procedure:
1 Press [MR] to select Memory Recall.
2 Select memory channel 99 using the
Alternate Tuning control or microphone
[UP]/[DWN].
/
M. CH
O 0
J J
3 5 9 “
S 1
il n
1 J Ci.C
2 4 6 8 10
3 Press [F.LOCK].
• "F.LOCK" appears.
r n n
J u.u
40dB
n n
PRG
s
FM
J
If the lower limit frequency and upper limit frequency
have not been stored in memory channel 99, or if the
current VFO frequency is outside the range bracketed
by the Scan Limits in memory channel 99, the
transceiver scans the entire band.
Press [A/B] to select VFO mode.
Press [SCAN].
• The transceiver scans upwards from the current
operating frequency.
• To change the scan direction, use the
Main Tuning control, Alternate Tuning control
or microphone [UP]/[DWN].
c
V
M. CH
O Q
Zt Zl
U Zl O Cl c
1 J J. LI J
1 3 S 7 9 20 4M8
S
A VFO
2 4 6 8 10
ri n n / ™
LI. LI P 1
s
PRG SCAN J
3 Press [SCAN], [CLR], or microphone [PTT] to
stop scanning and restore VFO mode.
Note: The modulation mode can be changed while scanning.
4 Display the lower limit frequency by pressing
microphone [DWN] and the upper limit frequency
by pressing microphone [UP].
5 Press [F. LOCK], and then [A/B] to restore VFO
mode.
31
Page 39

6 SCAN MHz SCAN
MHz Scan directs the transceiver to scan a specified
1 MHz range of frequencies. The range is determined
by the 1 MHz digit of the currently selected frequency.
For example, when the current frequency is
436.680 MHz and the frequency step is 25 kHz, the
scan range is from 436.000 to 436.975 MHz.
1
Press
[MHz]
while scanning with Basic Scan or
Band Scan.
• The transceiver scans upwards from the current
operating frequency.
• To change the scan direction, use the
Main Tuning control. Alternate Tuning control
or microphone [UP]/[DWN].
c
---------
M. CH
o o
Jf J
V
MHz A VFO
zt c c
U
1
Jf a Jf
s 1 3 5 7 9 20
2 4 3 6 10
nLIn n n , ™
LI. U P 1
40dB
\
PRO S CA N J
2 Press [MHz] again to restore the previous scan
type.
Note: The modulation mode can be changed while scanning.
VFO/MEMORY/CALL SCAN
This combination scan monitors the current VFO
frequency, the memory channel recalled last, and the
Call channel.
1 Press [CALL] to select the Call channel.
2 Press [SCAN].
3 Scan checks in rotation the Call channel, VFO
frequency, and the memory channel last used.
• If the memory channel selected last has no
frequency stored. Scan skips over the memory
channel and only scans the Call channel and
the VFO frequency.
• Locked-out memory channels are not skipped.
4 Press [SCAN], [CLR], or the microphone [PTT] to
stop scanning.
• The transceiver stays in the current mode.
SETTING SCAN SPEED
Scan speed can be changed through 9 steps using
the RIT control. A weight value of the form "PN"
appears on the Display during Scan. "N" is a number
from 1 to 9 that acts as a speed reference number.
Turning the RiT control clockwise decreases the scan
speed, and counterclockwise increases the speed.
Increase
scan speed.
The Program Scan scan speed can be set
independently from Memory Scan and
VFO/Memory/Call Scan. The same weight value
selected while in Memory Scan or VFO/Memory/Call
Scan represents the same scan speed; however, this
is not true for Program Scan.
M. CH
35
Note: Remember to center the RIT control when finished
scanning to avoid confusion later when RIT is used to vary the
receiver frequency.
A V FO
U ZI C ZI
1 Jf O. L
S 1 3 6 7 8 20
2 4 6 8
ZI
Jf
40d8
10
u. u P 1
This chart shows the time required for the transceiver
to move either 1 step or 1 memory channel depending
on which type of scan is selected. When Busyfrequency Stop (Menu A, No. 03) is ON (default), the
SSB step size is 1 kHz and the FM step size is 20 kHz
while using Program Scan. When Busy-frequency
Stop is OFF, the SSB step size is 10 Hz and the FM
step size is 100 Hz.
Weight Value
1
2
3 110
4
5
6 250
7
8 350
9 400
Program Scan
(msec)
160
200
300
Decrease
scan speed.
n n „ , ™
PRO S CA N J
Memory Scan
(sec)
20
70
0.4
1.8
3.2
4.6
6.0
7.5
9.0
10.5
12.0
32
Page 40

7 AUXILIARY FUMCnONS
The functions described in this section are called
"auxiliary" since none of the functions are mandatory
to use in order to contact other stations on any of the
modes. In some cases, only top-of-the-line
equipment used to include some of these functions.
Learning these functions will make operating more
enjoyable for those plagued by difficult operating
conditions, such as man-made interference, or for
those privileged to have a crowded band due to
strong propagation. Some functions improve on the
convenience of an already easy-to-use transceiver by
allowing remote control of frequently-used functions
via the microphone keys.
IF SHIFT
IF Shift functions only in the SSB or the CW mode.
This allows you to shift the IF filter pass band without
changing the receive frequency.
When the IF pass band is shifted, as shown in the
diagram, it is possible to reduce or completely
eliminate adjacent frequency interference.
Turning IF SHIFT Turning IF SHIFT
counterclockwise clockwise
RECEIVING
RECEIVER INCREMENTAL TUNING (RIT)
RIT provides the ability to vary your receive frequency
by either ±1.1 kHz using 10 Hz steps or ±2.2 kHz
using 20 Hz steps without changing your transmit
frequency. The tuning range is selected via Menu B,
No. 57 {page 14}. The default is ±1.1 kHz. RIT works
equally well with all modulation modes and while
using VFO mode. Memory Recall, or the Call channel.
This function is especially useful while operating SSB
to maintain the best audio when the other station is
drifting in frequency, for example. While operating
CW, combining RIT and IF Shift functions is a quick
way to avoid adjacent frequency interference.
1 Press [RIT].
• "RIT" and the shift frequency value appear.
f
u17/ C
S 1 3 5 7 9
V
A VFO
Jf CLu1
4 6
2
nLIn n
40dB
20
s 10
LL LI
n n
LI. LI
2 Turn the RIT control to change your receive
frequency.
• As the control is turned, the new frequency shift
updates simultaneously both the RIT display
and the transceiver frequency display in 100 Hz
steps.
3 To switch off the RIT function, press [RIT].
It's a good habit to turn OFF the RIT function after a
contact is finished. This returns the receive frequency
to the transmit frequency. It ensures that you don't
listen by mistake on a different frequency from your
transmit frequency on the next contact. When using
Memory Recall, RIT only functions with a memory
channel containing stored data. Since an empty
channel contains no receive frequency, RIT cannot
function.
\
RIT FM
J
Interfering
signal
Desired
signal
BIT IF SHIFT RIT -a- IF SHIFT RIT -O" IF SHIFT
Turn the IF SHIFT control clockwise to eliminate an
interfering signal lower than your receive frequency.
This attenuates interference lower in frequency. Turn
the IF SHIFT control counterclockwise to eliminate an
interfering signal higher than your receive frequency.
This attenuates interference higher in frequency.
After using IF Shift, return the control to the center
detent position to select the normal pass band.
NOISE BLANKER
The Noise Blanker was designed to reduce pulse
noise such as that generated by automobile ignitions.
Press [NB] to toggle the Noise Blanker ON or OFF.
• "NB" appears when the function is ON.
• When receiving a strong signal while the Noise
Blanker is ON, receive audio may sound distorted.
This is due to a "pumping" action caused by the
strong signal. If the signal is strong enough to
cause pumping, it is unlikely that the blanker would
be required anyway. Therefore, eliminate this
distortion by switching OFF the Noise Blanker.
ADVANCED INTERCEPT POINT (AlP) FUNCTION
AlP helps eliminate interference and reduce audio
distortion that is sometimes caused by the presence
of strong signals due to the high receiver sensitivity. It
is especially useful during contest-type conditions on
an extremely crowded band or when propagation is at
a peak and all signals seem to be local quality.
Press [AlP] to toggle the AlP function ON or OFF.
• "AlP" appears when the function is ON.
33
Page 41

7 AUXILIARY FUNCTIONS
TRANSMITTING
SPEECH PROCESSOR
The speech processor functions by leveling the large
fluctuations in your voice that are present when you
speak. This leveling action effectively raises the
average transmit output power resulting in a more
understandable signal when operating SSB or FM.
Particularly under poor receive conditions, you will
notice that using the speech processor makes it
easier to be heard by distant stations.
Press [PROC] to toggle the Speech Processor ON or
OFF.
• "PROC" appears when the function is ON.
r—
О г/ о О
TIME-OUT TIMER (TOT)
It is sometimes necessary or desirable to restrict a
single transmission to a specific maximum time. This
feature can be useful when accessing repeaters to
prevent repeater time-outs as a result of a single
transmission that is longer than the maximum
permitted time. The Time-out Timer also prevents
your transceiver from damage due to excessive
uninterrupted transmissions. If you are trying to
conserve battery power, TOT helps with that task too.
Activate TOT via Menu B, No. 59 {page 14} anytime
you wish to limit your transmit time. There are 5
different timer values available. The default for the
function is OFF. When TOT times out, the transceiver
beeps and automatically returns to Receive. To
resume transmitting, release and then press [PTT]
again.
1 J Jf.
A VFO
SI 3 5 7 9
2 4 6 10
п п п
о и и. и
40d6
20
PROC
USB
J
OPERATOR CONVENIENCES
MICROPROCESSOR RESET
If your transceiver seems to be malfunctioning,
initializing the microprocessor and its memory may
resolve the problem.
■ Initial Settings
Frequency ^ (MHz)
ТМ-255А/Е
ТМ-455А
U.S.A.
Canada
ТМ-455Е
Europe
Memory
Channel
^ Both VFO A and VFO B
2 Some versions: FM
144.000.0 MHz cw
430.000.0 MHz FM
430.000.0 MHz
-
Partial Reset
Do a Partial Reset if a button or control does not
function according to the instructions provided in
this manual. A Partial Reset does not erase any
data in memory channels.
Press [A/B]+ POWER ON.
Full Reset
Do a Full Reset if you want to erase all data in ail
memory channels or a Partial Reset does not
correct a problem you are experiencing.
Remember that a Full Reset requires that you re
enter any memory channel data again after the
initialization if you wish to use those channels. On
the other hand, initialization is a quick way to erase
all data from all channels.
Press [MR]+ POWER ON.
Modulation Mode
CW2
-
34
Page 42

REMOTE FUNCTIONS USING THE MICROPHONE
The 4 keys located on the face of the microphone and
labeled [PF], [MR], [VFO], and [CALL] are called the
Programmable Function (PF) keys. Though labeled
with their default functions, each key can be
reassigned by the operator to perform remote
functions conveniently from the microphone.
Functions that can be assigned to the microphone PF
keys include the following:
• Front Panel buttons
• Menu A or B
• Special Functions: Functions not available on the
Front Panel
7 AUXILIARY FUNCTIONS
No.
80 AFMLTTE
Disables the audio output while the key is held
down.
81 AF ATT
Reduces the audio level while the key is held down.
82
MONITOR
Opens the squelch while the key is held down.
83
MENU ACCESS
Selects the Menu mode.
84
ENTER
Used with the DTMF microphone keypad for direct
entry of the operating frequency or memory
channel.
85 VOICE
Activates the Voice synthesizer (VS-2 option).
TF-SET
86
Displays the transmit frequency in Receive while
the key is held down.
87 AF
Similar to TF-SET except displays the difference of
the transmit frequency from the receive frequency
while the key is held down.
Speeiei Function
Ro, Nlenu A No.
00 Menu 00 20 A/B (VFO) 50 Menu 50
01 Menu 01
02
Menu 02
Menu 03 23 Tone Alert 53 Menu 53
03
04
Menu 04
Menu 05 25
05
Menu 06 26
06
07
Menu 07
08 Menu 08 28
Note: The function of the [1750] key on the MC-45E and
MC45DME cannot be changed.
21 AlP
22
24 CALL 54
27
29
30
31
32 M.IN
33
34 M>V
35
36 PROC
37
38
39
40
41 SSB/CW
42 TONE 78 Menu 78
Front Panel No. Menu B
51 Menu 51
AUTO/FM 52 Menu 52
Menu 54
CLR
CODE
DTSS
F
F.LOCK
LOW
MHz 61
MR 63 Menu 63
NB 65 Menu 65
REV
RIT
SCAN
SHIFT 75 Menu 75
55 Menu 55
56 Menu 56
57 Menu 57
58
Menu 58
59 Menu 59
60 Menu 60
Menu 61
62
Menu 62
64
Menu 64
66 Menu 66
67
Menu 67
68 Menu 68
Menu 69
69
77
Menu 77
Configuring Microphone PF Keys
Key
Label
PF PF1
MR
VFO PF3
CALL
Name
PF2
PF4
Select the menu number from the chart above
that corresponds with the PF key you want to
program.
Select the number that corresponds to the
function that you want to assign to the PF key.
• Press [F.LOCK] or microphone [UP] to
increment the function number.
• Press [LOW] or microphone [OWN] to
decrement the function number.
• The function ranges are as follows:
00-08
20-42
50-78
80-87
99:
3 Press [F] or [CLR] to complete the setting.
General Key
Menu Functid
Menu B, No. 70
Menu B, No. 71
Menu B. No. 72
Menu B, No. 73
ii '
Menu Access
(83)
Memory Recall
(33)
VFO Select (20)
Call Channel (24)
Menu A
Front Panel keys
Menu B
Special Functions
No assigned function
Default Function
35
Page 43

7 AUXILIARY FUNCTIONS
■ Using the ENTER Function
1 Press the microphone key that has been
programmed with the ENTER function
{page 35}.
• The frequency template is displayed in the
format
----------
representing the 1 MHz
digit down to the 100 Hz digit.
A VFO
Ij zi...................................
/ Jf . .
SI 3 5 7 9 ^
2 4 6 6 10
N
FM
J
2 Input the desired frequency sequentially starting
with the 1 MHz digit using the microphone
DTMF numeric keypad.
• After the 100 Hz digit is entered, input mode
automatically ends.
• Pressing the ENTER function key during
input mode causes a zero to be entered in
subsequent digits not entered yet.
PROGRAMMABLE FUNCTION (PF) BUHON
The Front Panel has a Programmable Function button
in the upper right corner of the panel. This button is
similar to the microphone PF keys since it can be
assigned a function by the operator. The same
functions that can be assigned to the microphone PF
keys can also be assigned to the Front Panel PF
button. Refer to "REMOTE FUNCTIONS USING THE
MICROPHONE (page 35}".
1 Select Menu B, No. 74 (page 14}.
2 Select the number that corresponds to the function
that you want to assign to the PF key (page 35}.
• Press [F.LOCK] or microphone [UP] to
increment the function number.
• Press [LOW] or microphone [OWN] to
decrement the function number.
• The function ranges are as follows:
00-08: Menu A
20-42: Front Panel keys
50-78 Menu B
80-87: Special Functions
99: No assigned function
• The default is Voice Synthesizer (85).
3 Press [F] or [CLR] to complete the setting.
LOCK FUNCTIONS
Occasionally, you may want to lock the buttons, keys
and the Tuning controls to prevent accidentally
changing any transceiver settings. This transceiver
has several lock functions to provide maximum
flexibility.
Frequency Lock
Enabling the Frequency Lock function locks the
following:
Main Tuning control
Alternate Tuning control
MR button
A/B button
MHz button
M.IN button
M>V button
SCAN button
CLR button
SHIFT button
TONE button
REV button
AUTO/FM button
SSB/CW button
CALL button
Microphone UP/DWN
Microphone PF2/PF3/PF4 keys
The following controls and buttons are not affected
by enabling Frequency Lock:
VOL/SQL controls
RIT/IF SHIFT controls
F button
RIT button
LOW button
PROC button
AlP button
NB button
PF button
Microphone PTT switch
Microphone PF1 key
Microphone DTMF keypad
Microphone Lock switch
Activate Frequency Lock with the following
procedure:
Press [F.LOCK].
• "F.LOCK" appears when Frequency Lock is
ON.
• Each press of [F.LOCK] toggles the function
ON and OFF.
c
V
____
F. LOCK A VFO
1./ 7/
o
1 Jf /.
SI 3 s
7 9
2 4 5
7/
Jf
20 40dB
8
n c o
/ J/. Cl
10
\
FM
J
36
Page 44

7 AUXILIARY FUNCTIONS
Main Unit Lock
This transceiver allows you to separate the Front
Panel from the Main Unit so you can mount the
Front Panel in the most convenient location for
operating. The Main Unit could be placed in a
vehicle trunk, for example, since there are few
buttons or controls on it. If you separate the two
sections in this way, you may want to lock the Main
Unit buttons and the Main Tuning control. These
can be locked via Menu B, Nos. 68 and 69
{page 14}. The default for both menus is OFF
(unlocked).
Menu B, No. 68 locks or unlocks the Main Tuning
control. Furthermore, No. 68 has 2 types of lock.
It can lock the Main Tuning control only if FM
mode is selected ("F3") or if any mode is selected
("AH"). Menu B, No. 69 locks or unlocks [PROC],
[AlP], [NB], and [PF].
Microphone Lock
The Microphone Lock function disables everything
on the microphone except [PTT] and, if equipped,
the DTMF keypad.
Slide the Lock switch on the rear of the
microphone to "LOCK" to activate Microphone
Lock.
* Slide the Lock switch to the opposite position
when you want to unlock the microphone
buttons and keys.
CHANNEL DISPLAY
When this function is switched ON, the transceiver
data in Memory Recall is displayed by channel
numbers without showing the associated frequencies.
Channel Display is selected via Menu B, No. 75.
The
default is Frequency Display (ON).
/
1
__________^_____!______
M. CH ^
iL
$1 3 5 7 9 “
i.
О
n
6 8 10
40dB
П Г/
LI J
FM
J
TRANSVERTER FREQUENCY DISPLAY
A transverter is a device that converts a range of
frequencies applied to the input of the transverter to a
different range of frequencies. The transverter's
output can be applied to a transceiver's input, and
then the transceiver is used to operate on the new
frequency range.
The Display of this transceiver can be changed to
show frequencies in the 1200 or 2400 MHz band via
Menu B, No. 76. The default is OFF. The new
ranges of frequencies that can be tuned in bands of
1 MHz are 1240 to 1299 MHz or 2400 to 2449 MHz.
AUTOMATIC POWER OFF (APO)
Automatic Power Off is a background function that
monitors whether any buttons have been pressed or
controls have been changed. If 3 hours pass without
either of the preceding, this function turns OFF the
power. The purpose is to save power during
unattended operation. However, 1 minute before the
power turns OFF, "APO" starts blinking and a series
of warning tones sound. Pressing any button or
turning a control during this series of tones stops the
shutdown process and resets the timer.
The function is disabled while scanning or while
accessing either Menu A or B. Activate APO via
Menu B, No. 58. To restore power after APO
activates, press [POWER] twice.
Note: APO turns OFF the power if no key entry is made for 180
minutes even if Tone Alert is ON.
Note: Direct entry of frequency is not possible while using the
Transverter Frequency Display function.
PEAK METER HDLD
This function adds a 2.5 second delay after the S/RF
meter reaches its peak value before dropping back to
0. The purpose of this delay is to allow the operator a
better chance to read the peak value.
Peak Meter Hold is selected via Menu B, No. 54. The
default is ON.
37
Page 45

7 AUXILIARY FUNCTIONS
REPROGRAMMING AUTO MODE/AUTO OFFSET
As explained under "AUTOMATIC MODE
SELECTION" {page 18}, Automatic Mode allows the
transceiver to choose automatically the correct
modulation mode based on the currently selected
frequency. Although your transceiver is initially
programmed according to international agreements,
you have the capability to change this programming.
This includes changing the programming for
Automatic Transmit Offset which shifts your transmit
frequency to allow you to access voice repeaters
(page 19).
Before beginning to reprogram, draw a simple
diagram as shown below to represent the new plan
that you want to store in the transceiver. Substitute
actual frequencies and modes in place of the
variables shown. When you have your drawing
complete, programming will take only a few minutes.
'^lower ^2 *^3 '^N= ^upp(
Mode 1 Mode 2
N>20
->
1" lower
Transceiver's lower frequency limit
Mode 1 First modulation mode
Fi
Mode 2
F2
Mode 3
F3
Mode N
Fn
Fupper
1 Press
—> First mode boundary
->
Second modulation mode
Second mode boundary
Third modulation mode
—> Third mode boundary
Nth modulation mode
-> Nth mode boundary
—>Transceiver's upper frequency limit
[AUTO/FM]+ POWER ON.
Menu No. 01 appears.
Mode 3 Mode N
4 Select the transmit offset you want for this portion
of the band using [SHIFT].
• Transmit offset can only be set if FM mode was
selected in Step 3.
5 If you have entered all the mode boundary
frequencies you want to program, jump to Step 6.
Otherwise, increment the menu number using the
Alternate Tuning control and jump to Step 2 to
enter the next mode boundary frequency, mode,
and transmit offset, when necessary.
• Menus greater than the menu number that
contains the transceiver's upper frequency limit
are ignored by the transceiver.
6 Select Menu No. 00 using the Alternate Tuning
control.
7 Press [F.LOCK], [LOW], or microphone [UP] or
[OWN].
• The data is recorded. The Display shows
"good" if the data was recorded correctly
otherwise "error" appears. If "error" appears,
repeat Steps 6 and 7.
n n
U LI
O . . J
jf a o o
8 Press [CLR] to return to operating mode.
2 Enter the first mode boundary frequency (F-j).
• [F.LOCK] or microphone [UP] or Main Tuning
CW ^ Increments frequency
• [LOW] or microphone [OWN] or Main Tuning
CCW Decrements frequency
• Mode boundary frequencies must be 10 kHz or
more than the boundary stored in the previous
menu number. Menu No. 01 frequency must be
10 kHz or more than the transceiver lower limit
frequency. All mode boundary frequencies
must be iess than the transceiver's upper
frequency limit.
3 Select the first mode (Mode 1) using [AUTO/FM]
or [SSB/CW].
• if SSB or CW is selected in this step, jump to
Step 5.
KEY CONFIRMATION BEEP TONE
The Beep Tone function provides a beep to provide
feedback each time a button is pressed . If you
prefer, this beep tone can be disabled via Menu B,
No. 50. The default is ON.
The volume of the beep level can be changed via
Menu A, No. 08. The default for the volume is High
(H). This setting also affects the levels of the CW
sidetone and the VS-2 Voice Synthesizer option.
Note: There is an interaction between the setting of Menu A, No.
08 and the VOL controi. The VOL control must be at 12 o'clock or
higher before the effect of the menu setting can be noticed.
38
Page 46

MODULATION MODE AUDIBLE INDICATOR
This handy function alerts you audibly by either Morse
code or a single beep each time a new modulation
mode is selected. When Morse code is selected, the
first letter of the selected mode is sent as a
confirmation signal.
Select the audible indicator you prefer via Menu B,
No. 51 {page 14}. The default is Morse code (ON).
Modiiiation Mode Morse Code letter
AUTO
FM
USB
LSB
CW
• _
• • — •
• — ♦ •
MORSE CODE ALARM OUTPUT
The Morse Code Alarm will alert you automatically in
the following cases:
7 AUXILIARY FUNCTIONS
• Attempting to search for a memory channel if all
memory channels are empty.
• Attempting to search for an empty memory
channel if there are no free memory channels.
• Pressing
[SCAN]
while the transceiver is in a
mode that does not allow Scan to be initiated.
Menu B, No. 52 allows you to select either Morse
Code or Beep output for this function. When Morse
Code is selected, the word "CHECK" is sent as the
alarm signal. The default is Morse Code (ON).
DISPLAY DIMMER
Display Brightness is selected using Menu A, No. 00.
There are 4 levels of illumination plus OFF. The
default is d2 (second brightest illumination).
39
Page 47

$ ШТШиои$ TONE СОШ SQUELCH SYSTEM (CTCSS)
The CTCSS feature is available only when the TSU-8
CTCSS unit is installed. Also, CTCSS can only be
activated when using FM mode.
CTCSS functions by using subaudible tones that are
superimposed by a transmitter on a transmitted signal
to control a receiver's squelch. When used in
combination with the noise squelch, CTCSS provides
a simple method to selectively choose which stations
will be heard. This transceiver offers a total of 38
standardized CTCSS frequencies.
Monitoring is less tiring when using CTCSS since you
hear only those stations on a particular frequency that
are transmitting the CTCSS tone that you have
selected.
SELECTING CTCSS FREQUENCIES
The CTCSS frequency is selected via Menu B, No.53
{page 14}. The available frequencies are listed below;
USING CTCSS
To switch ON CTCSS, repeatedly press [TONE] until
both "TONE" and "CTCSS" appear on the Display.
Each press of [TONE] switches the transceiver as
follows:
No indicator-^ Tone ON Tone ON /CTCSS ON
i ("TONE") ("TONE" & "CTCSS")
_______________________f
The CTCSS indicator does not appear if the CTCSS
unit is not installed.
Freq.
Mo.
(Hz)
01
67.0
02
71.9
74.4
03
04
77.0
79.7
05
06 82.5 16
85.4
07
88.5 18
08
09 91.5 19
94.8 20 131.8
10
Note: The frequency selected via Menu B, No. 53 for CTCSS
operation is also used for Tone access of repeaters. After using
CTCSS, remember to select the correct Tone frequency before
trying to access a repeater that requires a subaudible tone. Saving
the correct Tone frequency along with the repeater frequency pair
in a memory channel for each repeater you use will take care of this
situation.
Freq,
Mo.
^ m
11 97.4
12
100.0
13 103.5
14
107.2
15
110.9
114.8 26
17
118.8
123.0 28
127.3 29 179.9
Freq.
No.
(Hz)
21
136.5 31 192.8
22
141.3 32
146.2 33
23
24 151.4 34
25 156.7
162.2
27
167.9 37 241.8
173.8 38 250.3
186.2
30
No.
Freq.
(Hz)
203.5
210.7
218.1
225.7
35
36 233.6
Note:
♦ When using DTSS or Page with CTCSS. the squelch opens
only if the correct CTCSS tone is received and the received
DTSS or Page code matches the code stored in your
transceiver.
♦ If CTCSS and Tone Alert are ON, there is no speaker output
except the aiarm tone even if a signal is received with the
correct CTCSS frequency.
40
Page 48

i DUAL TONE SQUELCH SYSTEM (DTSS)
DTSS provides a more refined method than CTCSS
to selectively communicate with specific stations. A
total of 1000 3-digit DTMF (Dual Tone Multi-
Frequency) codes are available to be used as
addresses for stations with which you want to
communicate. These codes can be changed easily
and regularly as required. Due to the quantity of
different codes, large networks can be set up that use
DTSS for selective calling and receiving. By including
group codes in the network plan, sub-groups within
the network can be contacted without disturbing
others monitoring the same frequency.
If your needs are simpler, DTSS also serves a useful
purpose when you only want direct communication
with a few close friends on your favorite frequency. A
good example of this application is at Hamventions
when a particular frequency can be virtually unusable
due to overcrowding. If your group switches ON
DTSS, your squelch only opens when a call is
received encoded with the same code that is stored in
your transceiver. If no signal is received for more
than 2 seconds after DTSS has opened the squelch,
the squelch then closes. Anytime you want to monitor
all activity on the channel, you simply switch OFF
DTSS.
DTSS can only be activated when using FM mode.
Press [SHIFT].
• The next digit in the code starts blinking.
• This step is not necessary if you are using the
DTMF keypad.
n n
и и
г пУО~1
L unjj
20 40dB I--.'
- J
L U
5 Repeat Steps 3 and 4 for the second and third
digits in the code.
6 Press [CLR] or [PTT].
• The previous mode is restored.
ENABLING DTSS
To switch ON DTSS. press [F], [SHIFT].
• "DTSS" appears when DTSS is ON.
• Each press of [F], [SHIFT] switches the
transceiver as follows;
STORING DTSS CODES
You can store a DTSS code from 000 to 999 by using
the Tuning control or the microphone, if DTMF audio
from other equipment is picked up by your
microphone while you are entering digits, digits
corresponding to the interfering DTMF audio may be
entered instead of the digits entered on your keypad.
1 Press [F], [REV] to activate Code Select.
2 Turn the Alternate Tuning control to select Menu
No. 00.
• The Code Select display appears with the first
digit of the currently selected code blinking.
Select the first digit for the DTSS code using the
following buttons:
• [F.LOCK] or microphone [UP] ^
Increments digit
• [LOW] or microphone [DWN] ^
Decrements digit
• Alternatively, if your microphone is equipped
with a DTMF keypad, you can enter the DTSS
code by using the keypad numeric keys. Press
the numeric key for the first digit of the code
you want. Jump to Step 5.
No indicator
Note:
DTSS ON
("DTSS")
PAGE ON
("PN")
♦ Both DTSS status and a DTSS code can be stored in a memory
channel; however, only a DTSS status can be stored in the Call
channel. Further, when recalling either a memory channel or
the Call channel with DTSS status ON while using the VFO with
Page switched ON, Page is given priority.
♦ The microphone is inhibited while the DTSS code is
transmitted.
♦ If DTSS and Tone Alert are ON, there is no speaker output
except the alarm tone even if a signal is received with the
correct DTSS code.
DTSS AND REPEATERS
Pressing [PTT] transmits the DTSS signal after a
short delay. This delay helps avoid losing DTSS data
when using repeaters with long response times that
may miss receiving a portion of the DTSS code.
The delay time is 250 ms during simplex operation.
When using a transmit offset or a split frequency, you
can change 350 ms (default) to 550 ms via Menu B,
No. 65 {page 14}.
Note: When a repeater ID and a DTSS code are transmitted at
the same time, DTSS may not function.
41
Page 49

ie РАб£
OVERVIEW
Similar to DTSS, Page uses DTMF codes to address
a single station or a group of stations. Page is useful
when waiting to receive a call from a specific station.
A common Group Page code and individual Station
codes should be agreed on in advance. You can
select codes from the range 000 to 999 inclusive.
Unlike DTSS, Page offers the added benefit of
identifying who called you. The calling station's code
appears on the target transceiver's display. If called
with an individual Station code, that station's code
appears; if called with a Group code, the Group code
appears. This characteristic of Page helps reduce the
activity level on a frequency when operators are
temporarily absent from their stations. There is no
longer a need for repeated calls when your target
station is not listening. On return to his or her
operating position, their transceiver display will show
your Station code. They will know immediately that
you called.
Page can only be activated when using FM mode.
PAGE CODE MEMORY
The transceiver has 10 Page memories in total. The
chart below lists all Page memories and the function
they serve.
Page
Mena
. Harnpll:
01
02 0
03-10
11 Allows you to scroll through all
; Page
Memory
A
1-8
Function
Stores your Station code.
Holds a calling station's code.
The transceiver automatically
stores this code after receiving a
code from another station. You
can use the stored code also to
respond to the other station.
Stores Group codes or Station
codes that you want to call.
Page codes that you have stored.
The last Page code viewed in this
menu becomes the current code
after exiting from the menu.
STORING PAGE CODES
To save the desired Page codes, use the following
procedure. If DTMF audio from other equipment is
picked up by your microphone while you are entering
digits, digits corresponding to the interfering DTMF
audio may be entered instead of the digits entered on
your keypad.
1 Press [F], [REV] to activate Code Select.
2 Turn the Alternate Tuning control to select Menu
No. 01.
• "P NNN" appears where "NNN" is the 3-digit
code stored in Page memory A. The first digit
of the code is blinking. "P
codes have been stored previously.
Page Menu Number Page Memory
MENU 1—^—1
1 2
n 1 /-/
и 1 Ч
SI 3 5
7 9 20 40dB
f у ,4
6 8 10
3 Select the first digit for your Station code using the
following buttons:
• [F.LOCK] or microphone [UP]
Increments digit
• [LOW] or microphone [OWN]
Decrements digit
• Alternatively, if your microphone is equipped
with a DTMF keypad, you can enter your
Station code by using the keypad numeric keys.
Press the numeric key for the first digit of the
code you want. Jump to Step 5.
4 Press [SHIFT].
• The next digit in the code starts blinking.
• This step is not necessary if you are using the
DTMF keypad.
/
MENU
n , P P
и 1 Ч •
S 1 3 5 7 9 20
,, 2 4 6 8
40dB
10
-------
О '1' - .
" indicates no
c ct
c d
\
J
\
J
42
Repeat Steps 3 and 4 for the second and third
digits in the code.
To store additional Group or Station codes, repeat
Steps 2 to 5.
Press
[CLR]
or
[PTT].
• The previous mode is restored.
Page 50

10 PAGE
CALLING
Tune to the prearranged frequency.
Press [F], [SHIFT] twice.
• "PN" appears. "N" is the Page memory number
(0 - 8, A) of the currently selected Page
memory.
• If the DTSS function was ON, you only need to
press [F], [SHIFT] one time. This turns DTSS
OFF and Page ON.
n n U Zi c n n n n
I J J.LI LI U.U
Press [F], [REV] to activate Code Select.
Turn the Alternate Tuning control to select Menu
No. 11.
Select the desired Page memory using the
following buttons:
• [F.LOCK] or microphone [UP] ->
Increments digit
• [LOW] or microphone [OWN] -»
Decrements digit
• Alternatively, if your microphone is equipped
with a DTMF keypad, you can enter the Page
memory number by using the keypad numeric
keys or the [A] key.
RECEIVING
1 Tune to the prearranged frequency.
2 Press [F], [SHIFT] twice.
• If the DTSS function was ON, you only need to
press [F], [SHIFT] one time. This turns DTSS
OFF and Page ON.
• Page can only be activated when using FM
mode.
You are ready to receive a call addressed with your
Station code or a Group code. If no signal is received
for more than 2 seconds after a Page has opened the
squelch, the squelch then closes.
RECEIVING A CALL WITH YOUR STATION CODE
When a signal is received encoded with your Station
code, the squelch opens and you hear an alert tone
from the speaker. In addition, "PO" and the calling
station's code appear.
¡2^'
iMiiiiiiiiiiiiiiiiiiimiiiii
Press [PTT] while "P" is blinking to respond to the
calling party.
RECEIVING A CALL WITH A GROUP CODE
' A'v
6 Press [CLR] or [PTT].
• The previous mode is restored.
7 Press and hold [PTT].
• The Group code or target Station code and your
Station code are transmitted.
I u Zf c n n n n
P
Note:
I I J J. LI LI LI. LI
iiiiiimiiiiiiiiillllllilllll
Q2CIII
20 40dB
♦ When Page is ON, Scan cannot be used.
♦ When Page is ON, selecting VFO A/B, a memory channel, or
the Call channel does not affect the Page status provided FM
mode is selected. Page remains ON. However, if SSB or CW
is selected, Page turns OFF automatically.
When a signal is received encoded with the correct
Group code, the squelch opens and you hear an alert
tone from the speaker. In addition, the received
Group code and the Page memory (1 to 8) in which
that Group code has been stored appear.
o zi zi Zi
¡2s'
■niRyl
tlllltllllllllllllllllllllllll
o:tii
* A'
Press [PTT] while "P" is blinking to respond to the
calling party.
Note:
♦ "Err" appears on the Display if your transceiver fails to receive
the Page code correctly.
♦ The microphone is inhibited while the Page code is transmitted.
♦ If Page and Tone Alert are ON, there Is no speaker output
except the alarm tone even if a signal is received with the
correct Page code.
43
Page 51

10 PAGE
PAGE CODE AND REPEATERS
Pressing [PTT] transmits the Page code after a short
delay. This delay helps avoid losing Page data when
using repeaters with long response times that may
miss receiving a portion of the Page code.
The delay time is 250 ms during simplex operation.
When using a transmit offset or a split frequency, you
can change 350 ms (default) to 550 ms via Menu B,
No. 65 {page 14}.
Note: When a repeater ID and a Page code are transmitted at the
same time, Page may not function.
LOCKING-OUT CODES
This function is useful if you wish to inhibit the
transceiver from receiving specific Group Page codes.
Page Lock-out does not inhibit the transceiver from
receiving stations calling your individual Station code.
Although the codes are locked-out from the receiver,
the transmitter still transmits a Page on the locked-out
channels.
Lock-out Page codes with the following procedure.
1 Press [F], [REV] to activate Code Select.
2 Turn the Alternate Tuning control to select the
Page memory that contains the Page code that
you want to lock-out.
3 Press [MR].
• A "star" appears above the Menu No. indicating
the Page code is locked-out.
4 Press [CLR] or [PTT].
• The previous mode is restored.
Note: You cannot lock-out Page memory 0 or A.
AUTO PAGE CANCEL
After successfully paging another station, it is useful
to turn OFF Page to eliminate sending a Page code
each time you transmit. Auto Page Cancel handles
this situation automatically when a station you called
responds using the correct Page code to open your
transceiver's squelch. On your next transmission,
your transceiver then switches OFF your transceiver's
Page function.
Turn this function ON or OFF via Menu B, No. 63
(page 14). The default is OFF.
OPEN PAGE
When both this function and Page are ON, any signal
opens the squelch; however, if a correct Page code is
received, the calling station's code appears on the
Display. This feature is beneficial when you want to
generally monitor activity on a frequency but you want
to be especially sure not to miss a friend's call.
Turn this function ON or OFF via Menu B, No. 64
(page 14}. The default is OFF.
44
Page 52

11 wm fAjm
Tone Alert provides an audible alarm to indicate when
someone is transmitting on the frequency you are
monitoring.
Tone Alert is an effective partner with CTCSS, Page,
or DTSS. When the correct signaling comes through,
your transceiver alerts you of an incoming call from a
specific station. If using any of these functions with
Tone Alert, the CTCSS/Tone frequency and the
DTSS/Page code must match those programmed in
your transceiver or else Tone Alert is not activated.
Tone Alert can only be used with FM mode.
ENABLING TONE ALERT
1 Tune to the prearranged frequency.
Activate CTCSS, Page, or DTSS if you want to use
these together with Tone Alert.
Press [F], [TONE].
• A "bell" icon appears.
• Each time this key combination is pressed.
Tone Alert toggles ON and OFF.
Note:
♦ APO turns OFF the power if no key entry is made for 180
minutes even if Tone Alert is ON.
♦ If Tone Alert is ON, there is no speaker output except the alarm
tone when a signal is received. To hear activity on the
frequency without disabling Tone Alert, program one of the
microphone PF keys or Front Panel [Pf^ for the Monitor
function {page 35}.
♦ For Tone Alert to function correctly with CTCSS, the incoming
signal must be present for approximately 1 second.
♦ If you find Tone Alert does not work reliably, your receive signal
may contain distortion or a high level of ignition noise. One
remedy is to install a TSU-8 CTCSS unit and select a Tone of
141.3 Hz or lower to act as a filter.
r
---
U zi zi
V
1 J J.
S 1 3 5 7 9
2 4 6
A VFO
Ü
o
20
6
u c n ^
1 J. LI
40dB
10
FM
_____j
When the correct signal is received, you hear 5
double beeps, the "bell" icon starts blinking, and
the Call Number increments.
• The Display shows the number of minutes and
seconds elapsed after the last signal was
received. After 59 minutes 59 seconds pass,
the Display changes to 01.00 and continues
counting. After 59 hours 59 minutes pass,
counting stops. When the next signal is
received, the time resets to 00.00 and counting
continues. Each time a new signal is received,
the time resets to 00.00.
• The Call Number records the number of calls
received to a maximum of 99.
n I
I
LI
n n n n
LI LI. LI LI '
5 Exit Tone Alert by pressing [PTT].
45
Page 53

12 MiUiirENftiiCE GENERAL INFORMATION
Your transceiver has been factory aligned and tested
to specification before shipment. Under normal
circumstances, the transceiver will operate in
accordance with these operating instructions. All
adjustable trimmers, coils and resistors in the
transceiver were preset at the factory. They should
only be readjusted by a qualified technician who is
familiar with this transceiver and has the necessary
test equipment. Attempting service or alignment
without factory authorization can void the transceiver
warranty.
When operated properly, the transceiver will provide
years of service and enjoyment without requiring
further realignment. The information in this section
gives some general service procedures requiring little
or no test equipment.
SERVICE
If it is ever necessary to return the equipment to your
dealer or service center for repair, pack the
transceiver in its original box and packing material.
Include a full description of the problems experienced.
Include your telephone number along with your name
and address in case the service technician needs to
call for further explanation while investigating your
problem. Don't return accessory items unless you feel
they are directly related to the service problem.
Note:
♦ Record the date of purchase, serial number and dealer from
whom the transceiver was purchased.
♦ For your own information, retain a written record of any
maintenance performed on the transceiver.
♦ When claiming warranty service, please include a photocopy of
the bill of sale, or other proof-of-purchase showing the date of
sale.
CLEANING
The keys, controls and case of the transceiver are
likely to become soiled after extended use. Remove
the controls from the transceiver and clean them with
a neutral detergent and warm water. Use a neutral
detergent (no strong chemicals) and a damp cloth to
clean the case.
INTERNAL ADJUSTMENTS
REMOVING THE CASE
CAUTION: Always turn OFF the power and unplug the DC power
cable first.
Remove the 9 screws from the case. Lift off the 2
sections of the case.
You may return your transceiver for service to the
authorized KENWOOD Dealer from whom you
purchased it or any authorized KENWOOD Service
Center. A copy of the service report will be returned
with the transceiver. Please do not send
subassemblies or printed circuit boards. Send the
complete transceiver.
Tag all returned items with your name and call sign for
identification. Please mention the model and serial
number of the transceiver in any communication
regarding the problem.
SERVICE NOTE
Dear YL/OM,
If you desire to correspond on a technical or
operational problem, please make your note short,
complete, and to the point. Help us help you by
providing the following:
1 Model and serial number of equipment
2 Question or problem you are having
3 Other equipment in your station pertaining to the
problem
4 Meter readings
5 Other related information
CA UTION: Do not pack the equipment in crushed newspapers for
shipment! Extensive damage may result during rough handling or
shipping.
46
Page 54

USING THE SQC PIN FOR RELAY OUTPUT
The function of the SQC pin located in the DATA
connector {page 6} can be changed to function as a
relay output.
1 Remove the lower case section {page 46}.
2 Move the slide switch located on the bottom rear of
the transceiver to the "RL" position.
In future, if you decide to use the Squelch Control
function, repeat this procedure but select the PSQ
position with the switch.
12 MAINTENANCE
47
Page 55

13 m8U8i£$H06TW6
The problems described in this table are commonly encountered operational malfunctions. These types of
difficulties are usually caused by improper hook-up, accidental incorrect control settings, or operator error due to
incomplete programming, and are not caused by a circuit failure. Please review this table, and the appropriate
section(s) of this Instruction Manual, before assuming your transceiver is defective.
Problem Symptom
The transceiver will not
power up after
connecting a
13.8 V DC power
supply and pressing
[POWER]. Nothing
appears on the
Display.
After switching the
power ON, the
transceiver does not
function normally.
The Display is too dim. 1 The Display Brightness needs
No sound comes from
the speaker even
though the VOL
control is turned
clockwise.
Buttons/keys and the
Tuning control do not
function.
1 The DC power supply is not switched
ON.
2 The power cable is faulty.
3 The power cable is not connected
securely.
4 The power cable fuse is open.
5 The cable connecting the Front Panel
and the Main Unit is disconnected.
1 The input voltage is outside 13.8 V
DC ±15% (11.7 to 15.8 V DC).
2 The microprocessor has
malfunctioned.
changing.
2 The Automatic Power OFF (APO)
function has timed out.
3 The supply voltage is too low.
1 The squelch is closed.
2 DTSS is ON ("DTSS" is visible);
DTSS codes that you are receiving
are different from the code set in
your transceiver.
3 Page is ON ("P" is visible): Page
codes that you are receiving are
different from those set in your
transceiver.
4 If the CTCSS option is installed,
CTCSS is ON ("CTCSS" is visible);
CTCSS tones that you are receiving
are different from the CTCSS tone
frequency set in your transceiver.
5 Tone Alert is ON ("Bell" icon is
visible).
1 The Lock function is ON.
2 Microphone Lock is ON. 2 Slide the Lock switch on the rear of
3 One or more of the Menu Lock
functions are ON.
Probable Cause
Corrective Action
1 Switch the DC power supply ON.
2 Inspect the power cable. Confirm
polarities are correct.
Red: positive (-i-): Black: negative (-).
3 Confirm the power connectors are
pressed together and are locked in
place by the locking tab.
4 Look for the cause of the blown fuse.
After inspecting and correcting any
problems, install a new fuse with the
same rating.
5 Connect the cable.
1 Correct the input voltage.
2 Do a Full Reset by pressing
[MR]+ POWER ON.
1 Change the Display Brightness via
Menu A, No. 00.
2 Press [POWER] twice.
3 The supply voltage requirement is
13.8 V DC ±15% (11.7 to
15.8 V DC). If the input voltage is
outside this range, adjust your
regulated power supply or recharge
your battery.
1 Reset the squelch threshold.
2 To monitor activity, press the key
combination [F], [SHIFT] twice to
turn OFF DTSS. To contact stations
using DTSS, review the "DTSS"
section.
3 To monitor activity, press
[F], [SHIFT] to turn OFF Page. To
contact stations using Page, review
the "Page" section.
4 To monitor activity, press [TONE] to
turn OFF CTCSS. To contact
stations, review the "CTCSS"
section.
5 Press [F], [TONE] to turn OFF Tone
Alert.
1 Press [F.LOCK] to turn Lock OFF.
the microphone to unlock the
microphone.
3 Check the status of Menu B, Nos. 68
and 69.
Page
Ref.
3
2, 3
2, 3
2,3
4
2,3
34
13, 39
37
2,3
16
41
42
40
45
36
37
37
Continued
48
Page 56

13 TROUBLESHOOTING
Problem Symptom
Turning the
Main Tuning control
does not change the
frequency.
Turning the Alternate
Tuning control, or
pressing microphone
[UP]/[DWN], when in
Memory Recall does
not select memory
channels.
The Call channel
cannot be selected by
turning the
Alternate Tuning
control when
attempting to program
new Call channel data.
Previously stored data
is gone when the
transceiver is
powered.
Tone, CTCSS, DTSS,
or Page cannot be
activated.
You cannot access
and use repeaters.
You cannot transmit
even though you press completely in the Front Panel
[PTT].
Attempting to transmit
results in the "HELLO"
message appearing
and the Receive mode
being restored.
SSB/CW receive
sensitivity seems poor.
Received signals are
totally unintelligible.
Memory Recall or the Call channel is
selected.
No data has been saved in any memory
channels.
Memory Recall is selected instead of
Memory Scroll.
The backup lithium battery voltage is too
low.
FM mode is not selected. Press [AUTO/FM] to select FM.
1 The repeater requires a Tone
frequency for access.
2 The repeater requires a Transmit
Offset to be used.
3 Your antenna is not pointed
accurately in the direction of the
repeater.
4 Your transmit power is too low.
1 The microphone plug is not inserted
connector.
2 You have selected a transmit offset
that places the transmit frequency
outside the transmit band.
3 You have selected CW mode instead
of a voice mode.
1 The antenna is not connected 1 Check the antenna connection.
correctly. Correct as necessary.
2 The antenna is not matched correctly
with the transceiver.
3 The input voltage is outside 13.8 V
DC ±15% (11.7 to 15.8 V DC).
4 An inappropriate DC power cable is
being used.
The Advanced Intercept Point function is Press [AlP] to turn OFF the AlP
ON. function.
The wrong modulation mode is selected.
Probable Cause
Corrective Action
Press [A/B] or microphone [VFO].
Store data in some memory channels.
Press [M.IN] to select Memory Scroll
("M.SCR" appears). Press [CLR] to
restore the previous mode.
Obtain a new battery from your dealer or
a KENWOOD Service Center.
1 Review "TONE ACCESS" and select
the correct Tone.
2 Review "TRANSMIT OFFSETS" and
select the correct offset.
3 Re-orient your antenna so it is
beaming toward the repeater.
4 Press [LOW] to select High transmit
power.
1 Turn OFF the power, ensure the
microphone connector on the Front
Panel has no foreign objects in it,
then insert the microphone plug until
the locking tab clicks in place.
2 Press [SHIFT] one or two times so
neither"+" norare visible.
3 Press [AUTO/FM] or [SSB/CW] to
select a voice mode.
2 Improve the match between the
antenna and the transceiver.
3 Correct the input voltage.
4 Use the provided or optional DC
power cable.
Press [AUTO/FM] or [SSB/CW] to
select the correct modulation mode.
Continued
Page
Ref.
17
24
26
24
19
20
19
—
18
4
19
19, 23
2,4
2,4
2,3
2,3
33
19,23
49
Page 57

13 TROUBLESHOOTING
Profilem Symptom
Turning the RIT control
has no affect on the
receive frequency.
SSB audio quality is
very poor; the high or
low audio frequencies
are absent.
The frequency display
is showing frequencies
far outside the range
of the transceiver.
Scan doesn't work.
Program Scan doesn't
stop when signals are
received.
Band Scan only scans
a narrow range of
frequencies: the entire
band cannot be
scanned.
Scan Hold doesn't
work even though
Menu B, No. 56 is ON.
Memory Scan doesn't
work.
The transceiver
switches OFF for no
apparent reason.
The transceiver does
not respond correctly
after you press button
combinations per
instructions in this
manual.
Probable Cause
The Receive Incremental Tuning
function is turned OFF.
The IF SHIFT control is set incorrectly.
The Transverter Frequency Display
function is ON.
Squelch is not set correctly.
The Busy-Frequency Stop function is
OFF.
You are actually using Basic Scan
because you have selected a VFO
frequency within the limits for Basic
Scan and you have set the Basic Scan
Limits in memory channel 99.
Busy-frequency Stop has not been
turned OFF.
1 Data is not stored in 2 or more
memory channels.
2 All memory channels are locked out.
3 With Group Scan selected, the
channel you want to scan is in a
different group.
1 The Automatic Power Off function is
ON.
2 No key entry was made for 180
minutes when both APO and Tone
Alert were ON.
1 Buttons are not being pressed in the
correct manner.
2 The microprocessor and its memory
need resetting.
porrective Action
Press [RIT] to turn ON the function.
Return the IF SHIFT control to the
center detent position.
Turn OFF Menu B, No. 76.
Adjust the SQL control to just eliminate
background noise.
Turn ON Menu A, No. 03.
Select a frequency that is outside the
limits set for Basic Scan, then press
[SCAN]. Or, you could erase the
frequency limits stored in memory
channel 99 by selecting that channel
and pressing [CLR] (2 s).
Turn OFF Menu A, No. 3.
1 Store frequency data in at least 2
memory channels.
2 Unlock the memory channels you
want to scan.
3 Select All-channel Scan, or program
the desired frequency within the
current group.
1 Turn OFF the APO function via
Menu B, No. 58.
2 Switch the power ON again.
1 Review "CONVENTIONS
FOLLOWED IN THIS MANUAL".
Different functions are selected
depending on how long a button is
held down or whether a button is
released before the next button is
pressed,etc.
2 First review "MICROPROCESSOR
RESET". After understanding what
data will be lost, do a Partial Reset.
If the problem remains, do a Full
Reset.
Page
ReL
33
33
37
16
29
31
29
24, 25
30
30, 24
37
37, 16
ii
34
Continued
50
Page 58

13 TROUBLESHOOTING
Problem Symptom
Packet operation
results in no connects
with other stations.
Probable Cause
1 Physical connections between the
transceiver, computer, and TNC are
incorrect, or software settings in the
TNC are wrong.
2 Different transmit and receive
frequencies are being used. You
must use the same transmit and
receive frequency for packet.
3 The modulation level from the TNC is
incorrect.
4 The 9600 bps rate setting is set
incorrectly.
5 The transmitted signal is too weak.
6 Tone, CTCSS, DTSS, or Page are
ON.
Corrective Action
1 Re-check all connections using this
manual, your TNC manual and your
computer hardware manual as
references.
2 Store the desired operating
frequency in a memory channel
using the "Simplex Channel Storage"
procedure.
3 Adjust the TNC modulation level per
instructions in "PACKET
OPERATION" and your TNC
manual.
4 Refer to "PACKET OPERATION" for
information on setting Menu B,
No. 77 correctly.
5 Reorient your antenna or increase
your antenna gain to improve your
signal strength at the other station.
6 Turn OFF Tone, CTCSS, DTSS, and
Page. Set the noise squelch
threshold as you would for voice
communications.
5
24
22
22
20,
40,
41,
43, 16
51
Page 59

14
MC-45/45E
Multifunction Microphone
MC-45DM/45DME
Multifunction Microphone
with DTMF keys
PS-33
Regulated DC Power
Supply
PS-53
Regulated DC Power
Supply
PG-2N
DC Power Cable
VS-2
Voice Synthesis Unit
DFK-7A
Detachable Front Panel
Kit (7 m)
PG-3G
DC Line Noise Filter
PG-5A
Data Cable
MC-60A
Unidirectional Dynamic
Desk Microphone
MB-13 TSU-8
Mobile Mounting Bracket CTCSS Unit
DFK-3
Detachable Front Panel Detachable Front Panel
Kit (3 m)
MC-80
Unidirectional Electret
Condenser Desk
Microphone
DFK-4
Kit (4 m)
MC-85
Unidirectional Electret
Condenser Desk
Microphone
MJ-88
Microphone Plug
Adaptor''
MJ-88 is required to use MC-60A, MC-80, or MC-85.
SP-41
Mobile Speaker
\
SP-50B
Communications Speaker
52
Page 60

1$ iHSTALLMQ OPtlONS
DETACHABLE FRONT PANEL KITS
(DFK-3, DFK-4, DFK-7A)
INSTALLATION
CAUTION: Always turn OFF the power and unplug the DC power
cable first.
1 Remove the Front Panel.
Press the Release button on the left side of the
Front Panel to unlock the panel. Carefully pull the
Front Panel forward from the left, then remove it
completely.
• Handle the Front Panel carefully to avoid
applying excessive force to the thin cable
joining the Front Panel to the Main Unit.
Connect the microphone cable
(DFK-4/DFK-7A only).
Plug the microphone cable plug into the
microphone connector on the Main Unit. Press the
plug firmly into the connector until the locking tab
clicks into place.
Installation Example
2 Remove the covers.
Remove Cover A from the Main Unit, and Cover B
from the Front Panel.
• To remove the covers, insert a flat-blade
screwdriver into the gap, and pry the cover off
using the minimum force necessary.
Cover B
3 Replace the interconnecting cable.
Remove the 2 connectors, then replace the cable
with the optional cable. Reinstall Cover A on the
Main Unit and Cover B on the Front Panel by
positioning the cover's tab, then press the cover
into position.
OPERATION
After separating the Front Panel from the Main Unit,
the Main Tuning control will not be accessible if the
Main Unit is stored in a location that is removed from
the operating position. Therefore, if using SSB or
CW, it is necessary to change the frequency step of
the Alternate Tuning control.
The frequency step for SSB and CW is changed via
Menu A, No. 06. If you assign this function to the
microphone PF key, it will be easy to modify the step
size at any time. With this function assigned to the
microphone PF key, it is quite quick to select a large
frequency step, then change frequency by hundreds
of kHz with the Alternate Tuning control. Then
reduce the step size, and fine tune with the new
smaller step size selected.
Lock the Main Tuning control via Menu B, No. 68.
Also, lock the buttons controlled via Menu B, No. 69.
Note:
♦ Refer to tthe Detachable Front Panel Kit manuals for additional
information.
♦ The DFK-7 kit cannot be used with this transceiver. Use the
DFK-7A kit instead.
♦ Use only the supplied cables; do not use substitutions.
53
Page 61

15 INSTALLING OPTIONS
TSU-8 CTCSS UNIT
CAUTION: Always turn OFF the power and unplug the DC power
plug first.
Remove the entire transceiver case .
• Refer to "REMOVING THE CASE" {page 46}.
Remove the Front Panel.
• Remove the 4 screws that fasten the Front
Panel to the Main Unit, and pull the Front Panel
forward slightly.
• Insert the TSU-8 into the connector as shown in
the diagram making sure the 1C on the TSU-8 is
facing toward the front of the transceiver.
4 Re-install the Front Panel.
• Reposition the Front Panel and replace the
4 screws.
5 Re-install the transceiver case.
• Replace the transceiver case and case screws.
VS-2 VOICE SYNTHESIS UNIT
CAUTION: Always turn OFF the power and unplug the DC power
plug first.
1 Remove the transceiver case.
Refer to "REMOVING THE CASE" (page 46).
2 Attach the connector.
Plug the connectorized cable from the Main Unit
into the connector on the VS-2.
3 Attach the VS-2 unit.
Remove the backing from the cushion provided
with the VS-2, and attach the cushion to the top of
the IC on the VS-2. Remove the backing from the
other side of the cushion.
Press the VS-2 onto the shield, and attach the
protective cover over the VS-2 using a single
screw as shown in the diagram.
54
Page 62

General
^ ||;||p : ' ' : ^ „«ix: x r
Frequency range
Mode
Number of memory channels
Antenna impedance
Usable temperature range
Power supply
Grounding method
Current
Frequency stability
Dimensions (W x H x D)
(projections included)
Weight
144 MHz - 148 MHz
J3E (LSB/USB), AIA(CW),
-20°C - +60°C
DC 13.8 V ±15%
Negative ground
Transmit (max.) 13.0 A or less
Receive
(no signal)
-10°C~+50°C
-20°C ~ +60°C
-20°C ~ +60°C
(FM transmit)
Within ±2.5 X 10“®
Within ±10 X 10“®
180 mm X 60 mm x 215.5 mm
(180 mm X 68.5 mm x 250 mm)
Approx. 2.7 kg
144 MHz - 146 MHz
F3E (FM)
100
50 Q
0.9 A or less
—
TM>255E
TNf-^5A^455E
430 MHz - 440 MHz
J3E (LSB/USB), A1A (CW),
F3E (FM)
100
50
-20°C - +60°C
DC 13.8 V ±15%
Negative ground
15.0 A or less
0.9 A or less
Within ±1 X 10“®
Within ±2 X 10“®
Within ±5 X 10“®
180 mm X 60 mm x 215.5 mm
(180 mm X 68.5 mm x 250 mm)
Approx. 2.8 kg
Transmitter
Power output
Modulation
Spurious emissions
Carrier suppression
Unwanted sideband suppression
Maximum frequency deviation (FM)
Transmit frequency characteristics (SSB)
Audio distortion (at 60 % modulation)
Microphone impedance
High
Low
SSB
FM
TM-255A
Approx. 40 W
Approx. 5 W
-60 dB or less
40 dB or more
40 dB or more
±5 kHz or less
400 Hz to 2600 Hz
(Within -6 dB)
Balanced
Reactance
7% or less
600 Q
TM*255E
TM-455A/455E
Approx. 35 W
Approx. 5 W
Balanced
Reactance
-60 dB or less
40 dB or more
40 dB or more
±5 kHz or less
400 Hz to 2600 Hz
(Within -6 dB)
7% or less
600 Q
55
Page 63

SPECIFICATIONS
Receiver
Circuitry
Intermediate frequency 1st
Sensitivity SSB, CW
Selectivity (-6 dB) SSB, CW
Selectivity (-60 dB)
Squelch sensitivity SSB, CW
Audio output (8 ohms, 5% distortion)
Audio output impedance
BIT shift frequency range
SSB/CW
FM
2nd
3rd
(10 dB (S+N)/N)
FM (12 dB SINAD)
FM
SSB, CW
FM
FM
10 Hz steps
20 Hz steps ±2.2 kHz or more
TM-255A ,
Single conversion superheterodyne
Double conversion superheterodyne
10.695 MHz
455 kHz (FM only)
—
0.13 |xV or less
0.20 |iV or less
2.1 kHz or more
12 kHz or more
4.8 kHz or less
28 kHz or less
0.13 fiV or less
0.09 nV or less
2 W or more
8Q
±1.1 kHz or more
TM-455A/455E
Double conversion
superheterodyne
Triple conversion
superheterodyne
41.415 MHz
10.695 MHz
455 kHz (FM only)
0.11 nV or less
0.18 [iV or less
2.1 kHz or more
12 kHz or more
4.8 kHz or less
28 kHz or less
0.13 |xV or less
0.09 |iV or less
2 W or more
8Q
±1.1 kHz or more
±2.2 kHz or more
56
Page 64

SlOSSAflY
Autopatch
Keypad
A service available widely in the U.S.A. and Canada
that allows portable or mobile stations to access the
public telephone network by connecting through a
local repeater. Telephone numbers are sent via
DTMF signals by using the microphone DTMF
keypad. Only non-commercial communication is
authorized.
Automatic Level Control (ALC)
A circuit that automatically varies its gain to keep
microphone audio input to the transceiver at a
constant level.
Call channel
A frequency intended for establishing contact with
other stations. A microphone key is dedicated to the
Call channel so the frequency can be recalled quickly.
CTCSS (Continuous Tone Coded Squelch System)
Also referred to as Tone Squelch. A method of
receiver squelch control that uses a subaudible tone
superimposed by the transmitter on the transmitted
signal. Only signals received with a subaudible tone
that matches the tone selected at the receiver can
open the receiver squelch.
CTCSS frequency
The subaudible frequencies used by CTCSS.
Default settings
The values selected for VFO frequency, Call channel
frequency, Frequency Step, etc. by the transceiver
after it is reset. All transceivers are shipped from the
factory with default settings.
DTMF (Dual Tone Multi-Frequency) signal
A signal created by combining two discrete audio
frequencies. Generally used for sending digits for
repeater control or Autopatch applications.
DTSS (Dual Tone Squelch System)
A squelch control system that relies on a burst of data
from the transmitter to open the receiver squelch.
Only when the transmitted code matches the code
programmed in the receiver will the squelch open.
The collection of keys on the microphone used to
send DTMF tones.
Locked-out channel
An electronically marked memory channel that will be
skipped during Memory Scan. This is a quick way to
configure your Memory Scan without actually erasing
data from memory channels that you may want to
keep.
Memory channel
A "storage" location where you record an operating
frequency and many other associated parameters for
quick recall later. Normally, all commonly used
frequencies including those of local repeaters would
be saved in memory channels to eliminate manually
selecting frequently-used frequencies.
Menu Setup
This is a newer term introduced with the creation of a
Menu system for configuring transceiver features.
Menu Set-up allows functions to be turned ON or
OFF, or values to be set, through software rather than
physical buttons or controls. Once you learn how to
access the Menu, the standardized method of
configuring features simplifies operation.
Microphone PF (Programmable Function) keys
Keys located on the microphone that can have
transceiver functions assigned to them. Key
assignments can be changed as necessary.
Non-standard offset
Refers to a transmit frequency offset used to access
repeaters that is some value or direction other than
that stipulated by existing band plans for a particular
region. See "Transmit offset".
Packet
This transceiver is equipped with a connector on the
Rear Panel designed specifically for Packet operation.
Packet is a data communications mode used to
exchange digital information that is typically created
using a personal computer. In other words. Packet
provides a method to link computers together via
radio.
Frequency step
The size of frequency change produced by turning a
tuning control one position or pressing microphone
[UP] or [DWN] one time while in VFO mode. Group code
When using Page, a group will commonly agree on a
single code that will be used for calls targeted for all
members. This code is the Group code. See "Station
code".
Hang Time
See Squelch Hang Time.
Page code memory
A memory channel dedicated to storing only Page
codes. See "Page".
PTT (Push-to-talk)
Refers to the non-latching switch on the microphone
that changes the transceiver from Receive to Transmit
mode.
57
Page 65

GLOSSARY
Repeater
A station, usually installed in a central location at a
high elevation, designed to receive and re-transmit
signals. The purpose of a repeater is to increase the
receive and transmit range of stations able to access
the repeater.
Reset (initialization)
The act of restarting the transceiver microcomputer.
Depending on the type of reset done, some or all
memory may be erased and set to default values. A
reset can be done as a last resort when the
transceiver appears to be malfunctioning.
Simplex channel
Refers to a communications channel where the
receive and transmit frequencies are equal.
SWR (standing wave ratio)
An antenna that is not correctly matched in
impedance with a transmission line and transmitter
will reflect some portion of the transmitted signal back
toward the transmitter. This causes a standing wave
pattern to develop. The ratio of maximum to minimum
voltage (VSWR) on the transmission line when such a
condition exists is commonly referred to as the SWR.
Tone frequency
See "Subaudible Tone".
Transmit offset (shift)
All Amateur voice repeaters operate on separate
transmit and receive frequencies. Transmit offset is
the amount that a transmit frequency is different from
a receive frequency. See "Transmit offset direction".
Split channel
Refers to a communications channel where the
receive and transmit frequencies are not equal.
Squelch
A function that automatically mutes a receiver's
speaker output when no receive signal is present.
Squelch Hang Time
The time that the squelch remains open after a carrier
drops out.
Squelch threshold level
The receive level at which a receiver's speaker output
is muted. This level is usually adjustable, either
manually or automatically by the transceiver
microcomputer.
Standard offset
Refers to a transmit frequency offset used to access
repeaters that is equal to the amount and direction
stipulated by existing band plans for a particular
region. See "Transmit offset".
Transmit offset (shift) direction
Refers to the direction, either plus {+) or minus (-),
that a transmit frequency is with respect to a receive
frequency. Both the direction and amount of offset
must be selected correctly to access a repeater. See
"Transmit offset".
VFO (variable frequency oscillator) mode
The mode that allows any individual frequency to be
selected within the range of the VFO only restricted by
frequency step limitations. When in VFO mode,
frequencies are selected using the Tuning control or
microphone
[UP]/[DWN].
Station Page code
When using Page, each station must be assigned a
unique code that no other station uses. This is your
Station code. Only the squelch of the targeted station
will open when a transmission with this Station code is
made. See "Group code".
Subaudible Tone
A low-frequency signal superimposed by a transmitter
on a transmitted signal for the purpose of accessing
some types of repeaters.
58
Page 66

KENWOOD
 Loading...