


KTC-V500P
TV TUNER
INSTRUCTION MANUAL
© PRINTED IN JAPAN B64-2142-10 (M) (DT)
Installation
2
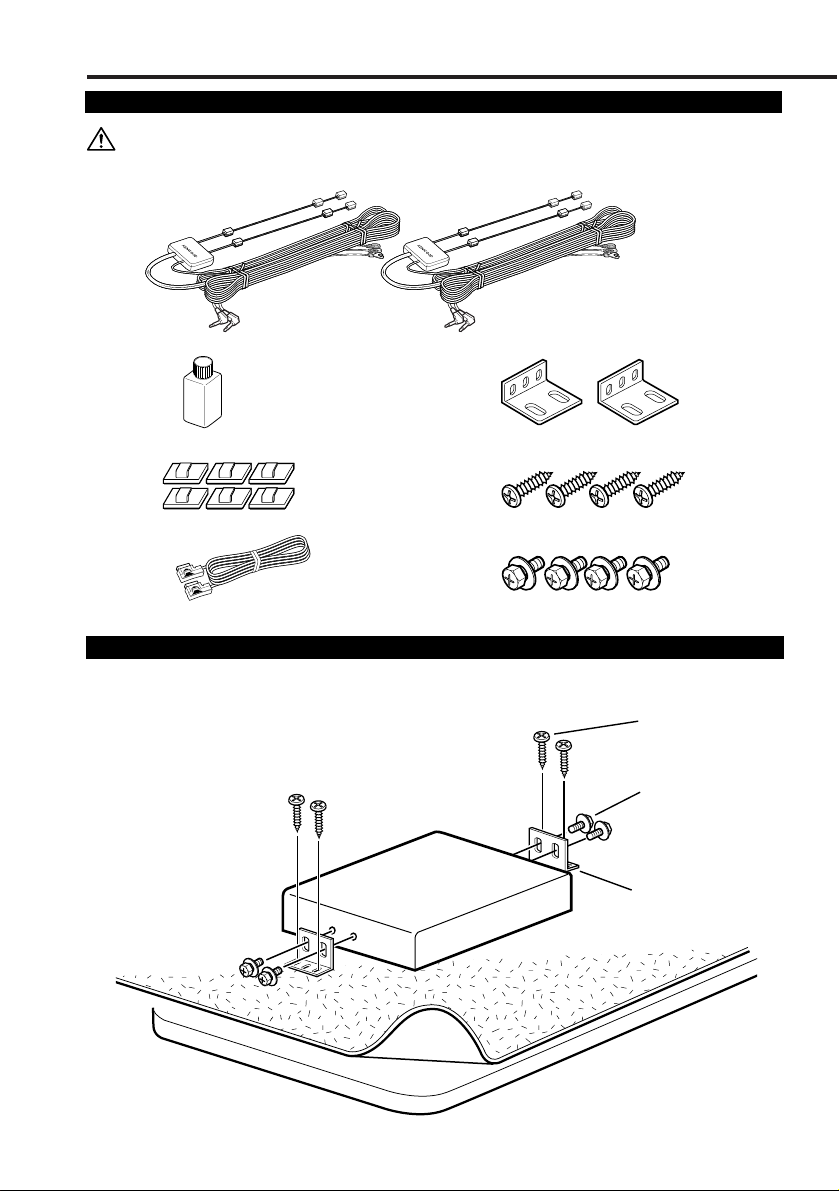
■ Securing to audio board
Installation the TV Tuner Unit
Accessories
G
F
E
A
B
C
D
The use of any accessories except for those provided might result in damage to the unit.
Make sure only to use the accessories shipped with the unit, as shown above.
(Accessory F)
(Accessory G)
(Accessory E)

3
Installing the Antenna Units
• Attach the antenna to the inner glass surface of the rear window using double-sided
tape. Carefully check the installation location as the tape can only be stuck on once.
• If the surface temperature of the glass of the rear window is low, warm it by turning
on the power of the rear defogger.
A cold window glass surface will weaken the adhesive strength of the double-sided
tape.
Also, if installation inside the cabin is performed on a day with high humidity or when
it is raining, the high humidity level will weaken the adhesive strength of the doublesided tape.
• Do not install the antenna in a location where it may obstruct the field of view during
driving, such as on the windshield.
Check the location where the antenna is to be
attached.Clean off any grease or dirt from the
installation location using the supplied glass
cleaner
(Accessory B), clean the area with water
and allow to dry.
Clean the glass thoroughly as failure to
clean the glass can not only weaken the
adhesive strength of the double-sided
tape, but may also cause it to come loose.
Remove the protective strips from the antenna
parts and the back of the antenna unit.
Attach the double-sided tape of the antenna
parts and the antenna unit to the rear windshield
glass. Attach the double-sided tape by firmly
pressing down from the top. Secure cables
using the supplied clampers.
After attaching the antenna with the doublesided tape, allow it to sit undisturbed for 24
hours. Take care not to apply force to the
antenna or allow it to get wet during this time.
Wire the antenna cable to TV tuner unit.
5
4
3
2
1
Rear seat
Rear window
Bundle cables with the
clamper bar
(Accessory C)
Antenna parts
Antenna unit
Incar antennas have a lower reception sensitivity than antennas intended for outside
mounting. The picture may not appear or may be disturbed if the signal in your area is
weak.
Installation
4
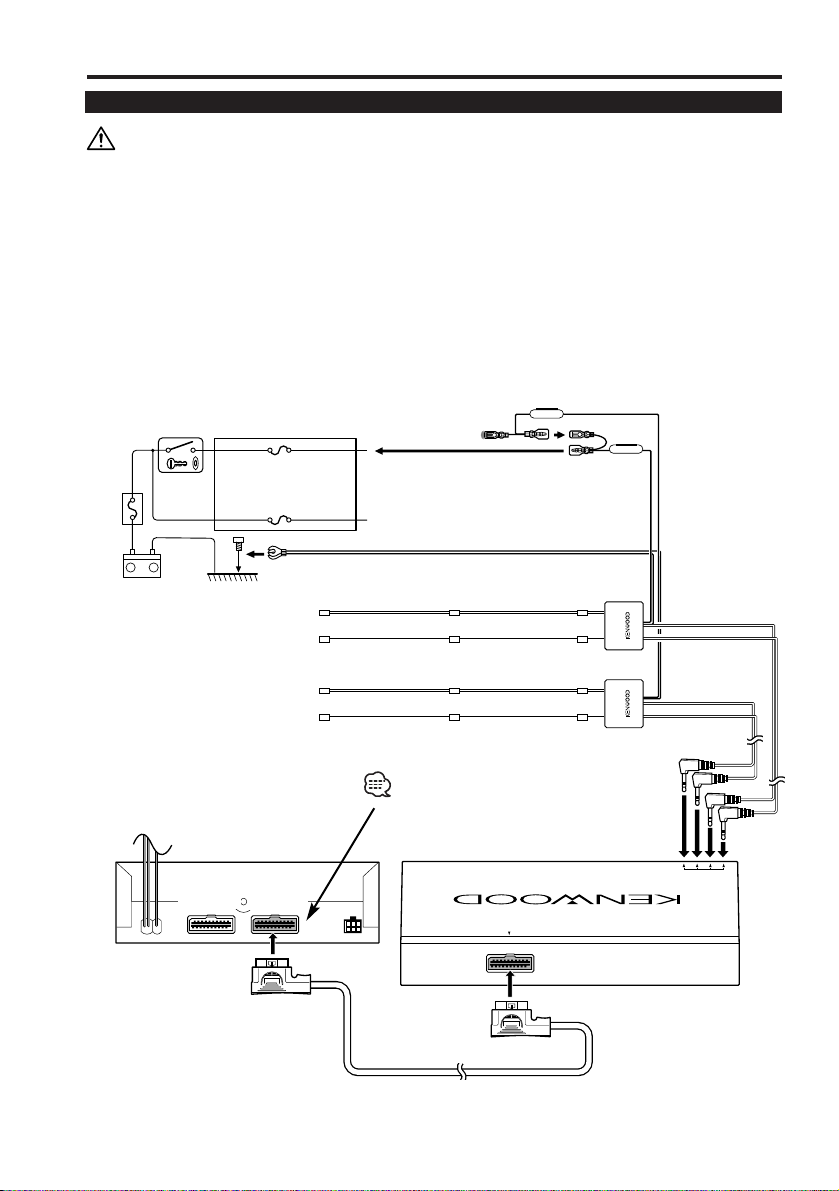
Connection
(Accessory A)
(Accessory D)
Ignition wire (Red) ª12V
ACC
Ignition key switch
Ground wire (Black) · (To car chassis)
Battery
Car fuse box
(Main fuse)
•Make sure to ground the unit to a negative 12V DC power supply.
• If your car's ignition does not come with an ACC position, connect the ignition wires
to a power source that can be turned on and off with the ignition key. If you connect
the ignition wire to a power source that receives a constant voltage supply, as with
battery wires, the battery may die.
• If the fuse blows, first make sure that the wires have not caused a short circuit, then
replace the old fuse with one with the same rating.
• After the unit is installed, check whether the brake lamps, blinkers, wipers, etc. on the
car are working properly.
• Thoroughly wipe away oil and other dirt from the installation surface.
Please avoid installation on uneven surfaces.
(Black)
Remove the protective sheet on
the black connector before the
KTC-V500P is connected.
(White)
–
+
( 1A )
( 1A )
TV ANTENNA INPUT
TO MONITOR UNIT

5
Specifications subject to change without notice.
Specifications
TV Tuner Section
Color system ..................................................................................................PAL
Television system & Channel converge
Television system PAL-B/G PAL-I PAL-D
Channel converge VHF 2 - 12ch 1A - 11ch 0 - 12ch 1-12ch
UHF 21-69ch 21-69ch 28-69ch 21-69ch 13-57ch
Channel selection system................................PLL frequency synthesizer system
Demoduration system ............................................................Split carrier system
Antenna input ................................................4-ch diversity (75 Ω /3.5 ø mini jack)
General
Operating voltage ..............................................................14.4 V DC (11 to 16 V)
Consumed current ....................................................................................280 mA
Operational temperature range ....................................................–10°C to +60°C
Storage temperature range ..........................................................–30°C to +85°C
Size ..........................................................................192(W) x 30(H) x 147(D) mm
Mass ............................................................................................................730 g
TV Antenna
Output impedance ................................................................75 Ω /3.5 ø mini plug
Operating voltage ..............................................................14.4 V DC (11 to 16 V)
Consumed current ....................................................................................200 mA
Cable length ....................................................................................................5 m
Size ............................................................................50(W) x 15(H) x 452(D) mm
Mass ......................................................................................................300 g x 2

安装安装
安装
安装安装
配件
如果不使用那些提供的配件,可能导致对本机的损害。请仅使用如上所示的与本机一起装运
的配件。
A
B
C
D
安装电视调谐器
■固定音频板
E
F
G
( 配件F)
( 配件G)
( 配件E)
6

安装和连接天线
车内天线的接收灵敏度比伸出车外安装天线的接收灵敏度要低。如果您所在地区的信号太
弱,则图像可能不会出现或可能受到干扰。
• 用双面粘带将天线连到後挡风玻璃的内表面上。仔细核对安装位置,因为粘带只能粘一
次。
• 如果後挡风玻璃的表面温度太低,打开後除雾器的电源使後挡风玻璃加热。
冷的挡风玻璃表面会使双面粘带的粘合强度减弱。另外,如果在高湿度的天气或雨天在
车内安装,则高的湿度会使双面粘带的粘合强度减弱。
• 不要将天线安装在行车时会妨碍视野的位置,例如挡风玻璃上。
核对要连接天线的位置。用随机附带的清洁剂
1
(配件 B)清除安装位置上的油脂或灰尘,再用
水清洁该区域,然後晾乾。
不仅会使双面粘带的粘合强度减弱,而且会
使天线松动。
2
撕去天线零件和天线背後的保护带。
将天线零件和天线的双面粘带连到後挡风玻璃上。
3
从顶上牢牢地往下按粘牢双面粘带。用随机附带
的夹头固牢电缆。
用双面粘带连接天线後,让它不受干扰的放置24
4
小时。注意,在此期间不要对天线施加力或使它
受潮。
将天线电缆连到电视调谐器。
5
天线零件
天线零
後挡风玻璃
用夹条捆住电缆
( 配件C)
後座
7

安装安装
安装
安装安装
电源连接
• 请以 - 接地线的 12V 电源向本装置供电。
• 如果汽车的点火没有 ACC 位置时,请以点火开关钥匙将点火导线连接在可 ON/OFF 的
电源上。将点火导线连接到与蓄电池导线同时供给一般电压的电源时,蓄电池将会出现
过负荷现象。
• 保险丝烧断时,应检查导线等有无短路,然後更换规定容量相同的保险丝。
• 安装结束後,请确认汽车制动器灯、方向指示灯和刮水器等是否正常动作。
• 将安装表面的油迹和其他污垢彻底清洗乾净。
请避免安装在不平整之处。
汽车保险丝盒
(主保险丝)
–
+
电池
(白)
(黑)
ACC点火开关
点火装置电线(红) ª12V
接地线(黑)-(连接到汽车底盘)
( 1A )
( 1A )
( 配件 A)
在连接 KTC-V500P 之前,取下黑色
连接器上的保护纸。
TV ANTENNA INPUT
TO MONITOR UNIT
8
( 配件 D)

规格规格
规格
规格规格
规格若有变更,恕不另行通知。
电视调谐器部分
彩色系统 ................................................................................................................PAL
电视系统/频道收集
电视系统 PAL-B/G PAL-I PAL-D
频道收集 VHF 2-12ch 1A-11ch 0-12ch 1-12ch
UHF 21-69ch 21-69ch 28-69ch 21-69ch 13-57ch
频道选择系统 .............................................................................. PLL 频率合成器系统
解调系统 .................................................................................................... 分裂载波制
天线输入 ............................................................... 4-ch分集(75 Ω /直径3.5 型插座)
共同
工作电压 ................................................................................ 14.4VDC(11 至16V)
电流消耗 .......................................................................................................... 280mA
工作温度范围 ......................................................................................... -10℃至 +60℃
存储温度范围 ......................................................................................... -30℃至 +85℃
尺寸 ............................................................................. 192(宽)x30(高)x147(深)mm
质量 ..................................................................................................................... 730g
电视天线
输出阻抗 ................................................................................ (75 Ω /直径3.5 型插座)
工作电压 ................................................................................ 14.4VDC(11 至16V)
消耗的电流 ...................................................................................................... 200mA
电缆长度 ................................................................................................................ 5m
尺寸 .............................................................................. 50(宽)x15(高)x452(深)mm
质量 ............................................................................................................... 300gx2
9


 Loading...