

Page 1

KTC-HR100
HD RADIO TUNER
INSTRUCTION MANUAL
SYNTONISEUR HD RADIO
MODE D’EMPLOI
SINTONIZADOR DE HD RADIO
MANUAL DE INSTRUCCIONES
Take the time to read through this instruction manual. Familiarity with
installation and operation procedures will help you obtain the best performance
from your new HD Radio tuner.
For your records
Record the serial number, found on the back of the unit, in the spaces designated on
the warranty card, and in the space provided below. Refer to the model and serial
numbers whenever you call upon your KENWOOD dealer for information or service
on the product.
Model KTC-HR100 Serial number
© PRINTED IN JAPAN B64-2644-00 / 00 (K) (DT)
Page 2
Contents What is the HD Radio?
What is the HD Radio? .......................................2
Safety precautions.............................................3
English
Operations ..........................................................4
Tuning
Tuning Mode
Receive Mode
Station Preset Memory
Auto Memory Entry
Preset Tuning
Switching Display
Text Scroll
In HD Radio source
Accessories ........................................................7
Installation Procedure........................................7
Connecting Wires to Terminals .........................8
Mounting the HD Radio tuner unit..................10
Troubleshooting Guide ....................................11
Specifications ..................................................11
HD Radio is a technology that enables to send digital
broadcasting as well as analog one using existing frequencies
for FM or AM broadcasting.
Quality of broadcast is improved to the level of music CD in
digital FM and that of analog FM in digital AM.
Moreover, if receiving condition is good, you can listen to
programs in stereo with the digital AM broadcast.
Digital broadcasting can send other information than audio, so
you can display data such as title of music.
— 2 —
Page 3

Safety precautions
2WARNING
To prevent injury and/or fire, take the
following precautions:
•Insert the unit all the way until it is fully
locked in place. Otherwise it may fly out of
place during collisions and other jolts.
•To prevent short circuits, never put or leave
any metallic objects (e.g., coins or metal
tools) inside the unit.
•If the unit starts to emit smoke or strange
smells, turn off the power immediately and
consult your Kenwood dealer.
• Be careful not to drop the unit or subject it to
strong shock.
2CAUTION
To prevent damage to the machine,
take the following precautions:
• Do not open the top or bottom covers of the
unit.
• Do not install the unit in a spot exposed to
direct sunlight or excessive heat or humidity.
Also avoid places with too much dust or the
possibility of water splashing.
• During installation, do not use any screws
except for the ones provided. The use of
improper screws might result in damage to
the main unit.
• When drilling a hole in the car to fix the
brackets, make sure not to damage the fuel
tank, brake tube, wiring harnesses, etc. on
the other side.
NOTE
• If you experience problems during
installation, consult your Kenwood dealer.
• If the unit does not seem to be working
right, try pressing the reset button on the
control unit first. If that does not solve the
problem, consult your Kenwood dealer.
FCC WARNING
This equipment may generate or use radio
frequency energy. Changes or modifications
to this equipment may cause harmful
interference unless the modifications are
expressly approved in the instruction manual.
The user could lose the authority to operate
this equipment if an unauthorized change or
modification is made.
NOTE
This Class B digital apparatus complies with
Canadian ICES-003.
Cleaning the Unit
If the faceplate of this unit is stained, wipe it
with a dry soft cloth such as a silicon cloth.
If the faceplate is stained badly, wipe the stain
off with a cloth moistened with neutral
cleaner, then wipe neutral detergent off.
Applying spray cleaner directly to the unit may
affect its mechanical parts. Wiping the
faceplate with a hard cloth or using a volatile
liquid such as thinner or alcohol may scratch
the surface or erases characters.
IMPORTANT INFORMATION
Control Units that can be Connected
As for connectable control units that have
been sold since July 2003, operation of HD
Radio is explained in the manual of the control
unit.
The control units (as of July, 2003)
KDC-X969
#1,2
, KDC-X869
#1,2
, KDC-MP922
#1,2
,
KDC-MP822, KDC-V7022#2, KDC-X769#2,
KDC-722
NOTE
• Use of the tuner function built into the control unit
will be no longer possible. A portion of the setting
methods including the Tuning Mode will change.
• The setting of the CRSC is always ON. Switching to
OFF is not possible.
• #1 The RDS function will be no longer possible. Also
note that the "SYNC" and "TI" items in the menu
will be displayed, but will not function.
• #2 The HD Radio cannot be selected as a dual zone
source.
About CD players/disc changers
connected to this unit:
KENWOOD disc changers/ CD players
released in 1998 or later can be connected to
this unit.
Note that any KENWOOD disc changers/ CD
players released in 1997 or earlier and disc
changers made by other makers cannot be
connected to this unit.
Unsupported connection may result in
damage.
Setting the "O-N" Switch to the "N" position for
the applicable KENWOOD disc changers/ CD
players.
— 3 —
Page 4
Operations
Tuning
Selecting the station.
English
1 Select HD Radio source
Press the [SRC] button.
Select the "HD Radio"/"HD RADIO" display.
2 Select the band
Press the [FM] or [AM] button.
Each time the [FM] button is pressed it switches between the
HF1, HF2, and HF3 bands.
Press the [AM] button to select the HA band.
3 Tune up or down band
Press the [4] or [¢] button.
• During reception of stereo stations the "ST" indicator is ON.
• Using <Receive Mode> the modes can be switched to digital
broadcast automatic switching, analog broadcast only, or digital
broadcast only.
• When "Digital" has been set with <Receive Mode>, the seek time
will be longer to allow a check of whether the transmission is a
digital broadcast.
Tuning Mode
Sets the tuning mode.
1 Enter Menu mode
Press the [MENU] button for at least 1 second.
"MENU" is displayed.
2 Select the tuning mode
Press the [FM] or [AM] button.
Select the "Seek Mode"/"Auto1"/"Auto2"/"Manual" display.
3 Set the tuning mode
Press the [4] or [¢] button.
Each time the button is pressed the Tuning mode switches as
shown below.
Tuning mode Display Operation
Auto seek "Auto 1" Automatic search for a station.
Preset station seek "Auto 2" Search in order of the stations in
the Preset memory.
Manual "Manual" Normal manual tuning control.
4 Exit Menu mode
Press the [MENU] button.
Receive Mode
Sets the receive mode.
1 Enter Menu mode
Press the [MENU] button for at least 1 second.
"MENU" is displayed.
2 Select the Receive mode
Press the [FM] or [AM] button.
Select the "Receive Mode" display.
3 Open Receive mode
Press the [4] or [¢] button for at least 1 second.
4 Set the Receive mode
Press the [FM] or [AM] button.
Each time the button is pressed the Receive mode switches as
shown below.
Receive mode Display Operation
Auto mode "Auto" Analog broadcasts and digital
broadcasts will be switched
automatically. When both are being
transmitted, the digital broadcast will
— 4 —
Page 5
have priority.
Digital "Digital" Digital broadcasts only.
Analog "Analog" Analog broadcasts only.
5 Exit Receive mode
Press the [MENU] button.
6 Exit Menu mode
Press the [MENU] button.
Even in the "Auto" setting, an analog broadcast will be received
during the reception of a ball game mode (non-delayed broadcast
program).
Station Preset Memory
Putting the station in the memory.
1 Select the band
Press the [FM] or [AM] button.
2 Select the frequency to put in the memory
Press the [4] or [¢] button.
3 Select the key function section
Press the [NEXT] button.
Repeatedly press the button until "[1]" — "[6]" are displayed above
the [1] — [6] buttons. (KDC-X969/KDC-X869/KDC-MP922)
Repeatedly press the button until the function item is not
displayed above the [2] — [5] button. (KDC-MP822/KDCV7022/KDC-X769/KDC-722)
4 Put the frequency in the memory
Press the desired [1] — [6] button for at least 2 seconds.
The preset number display blinks 1 time.
On each band, 1 station can be put in the memory on each [1] —
[6] button.
Auto Memory Entry
Putting a station with good reception in the memory
automatically.
1 Select the band for Auto Memory Entry
Press the [FM] or [AM] button.
2 Enter Menu mode
Press the [MENU] button for at least 1 second.
"MENU" is displayed.
3 Select the Auto Memory Entry mode
Press the [FM] or [AM] button.
Select the "Auto Memory"/"Auto-Memory" display.
4 Open Auto Memory Entry
Press the [4] or [¢] button for at least 2 seconds.
When 6 stations that can be received are put in the memory
Auto Memory Entry closes.
5 Exit Menu mode
Press the [MENU] button.
The receiving method can be switched with the setting of <Receive
Mode>.
— 5 —
Page 6
Operations
Preset Tuning
Calling up the stations in the memory.
English
1 Select the band
Press the [FM] or [AM] button.
2 Select the key function section
Press the [NEXT] button.
Repeatedly press the button until "[1]" — "[6]" are displayed above
the [1] — [6] buttons. (KDC-X969/KDC-X869/KDC-MP922)
Repeatedly press the button until the function item is not
displayed above the [2] — [5] button. (KDC-MP822/KDCV7022/KDC-X769/KDC-722)
3 Call up the station
Press the desired [1] — [6] button.
When the preset broadcast station is transmitting either an analog
broadcast or a digital broadcast, the sound will not be output unless
the broadcast mode matches the setting of <Receive Mode>.
Switching Display
When you are listening to the HD Radio, you can switch over the
display information as follows.
For operations, see the <Switching Display> page of the
instruction manual of your control unit.
What is displayed may partly depend on control units to be
connected.
HD Radio mode
Information Display
Station Name
Song title/Artist name/Album name/Genre
Receive Frequency "Frequency"/
"Station Name"/"NAME"
"Title"/"TITLE"
• Displayed information except "Frequency" are shown only when
you receive text in digital broadcasting. If text cannot be displayed,
frequency will be shown.
• Though some models have two lines in the display, you cannot
display the same information in both the Upper Part and the
Lower Part.
Text Scroll
Setting the displayed text scroll.
For operations, see the <Text Scroll> page of the instruction
manual of your control unit.
In HD Radio source (Function of remote)
[FM]/ [AM] buttons
Select the band.
Each time the [FM] button is pressed it switches between the
HF1, HF2, and HF3 bands.
Press the [AM] button to select the HA band.
[4]/ [¢] buttons
Tune up or down band.
[0] — [9] buttons
Press buttons [1] — [6] to recall preset stations.
— 6 —
Page 7
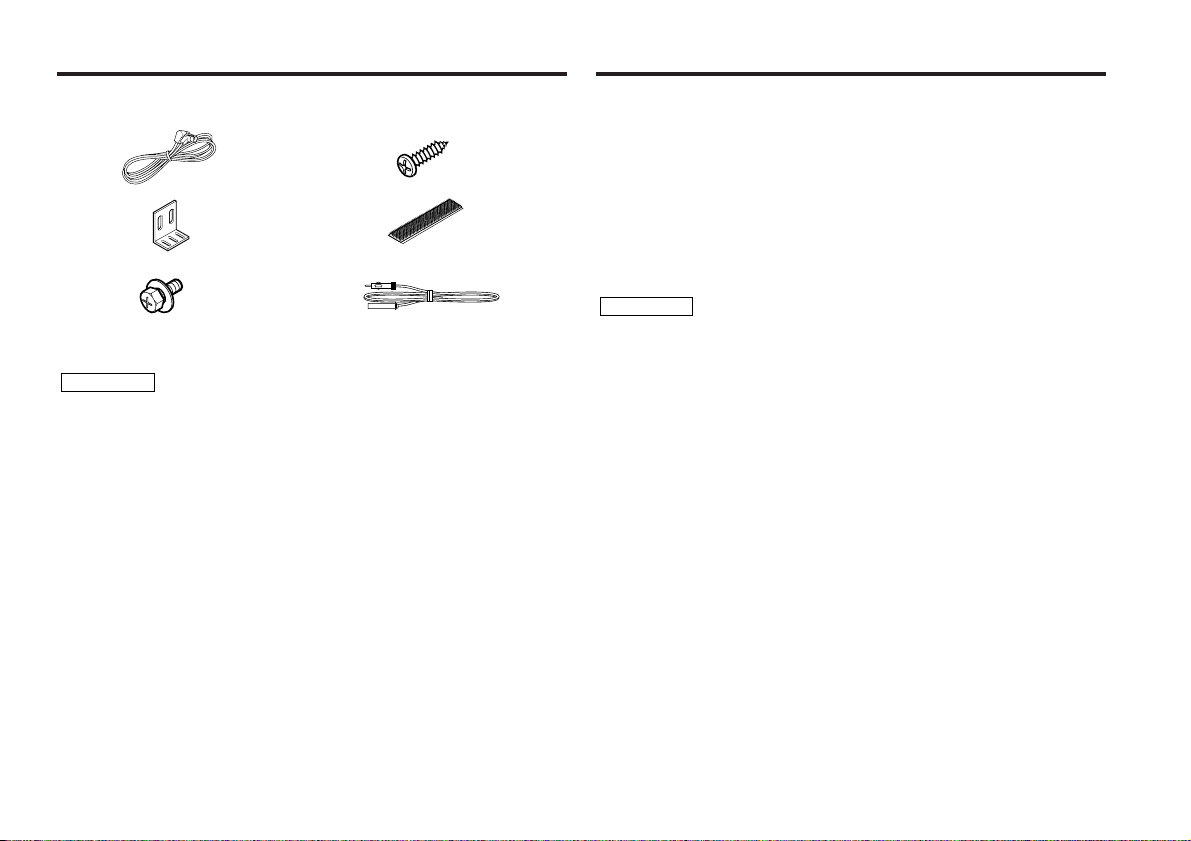
Accessories
External view
......... Number of items
1
.........1
.........2
.........4
2CAUTION
The use of any accessories except for those provided might result in damage
to the unit. Make sure only to use the accessories shipped with the unit, as
shown above.
External view
......... Number of items
4
.........4
52
.........2
63
.........1
Installation Procedure
1. To prevent short circuits, remove the key from the ignition and
disconnect the - terminal of the battery.
2. Install the FM/AM antenna and connect the antenna wire to the
HD Radio tuner.
3. Connect the HD Radio tuner and the control unit using the
provided connection wire.
4. Make the proper input and output wire connections for each unit.
5. Install the unit in your car.
6. Reconnect the - terminal of the battery.
7. Press the reset button on the control unit.
2CAUTION
• Do not connect the control wire while the control unit is turned ON.
• Be sure to press the reset button on the control unit after installation.
• If your car is not prepared for this special connection-system, consult your
Kenwood dealer.
• Make sure that all wire connections are securely made by inserting jacks
until they lock completely.
• Do not let unconnected wires or terminals touch metal on the car or
anything else conducting electricity. To prevent short circuits, also do not
remove the caps on the ends of the unconnected wires or the terminals.
• Insulate unconnected wires with vinyl tape or other similar material.
•Take care so that the antenna wire and other connection wires are not
caught by mobile parts. Otherwise wire disconnection or other trouble may
result.
• Do not apply too much force on the antenna wire, other connection wires
and connectors by bending a wire, etc. Otherwise wire disconnection or
other trouble may result.
• After the unit is installed, check whether the brake lamps, indicators, wipers,
etc. on the car are working properly.
— 7 —
Page 8

Connecting Wires to Terminals
■ If you want to connect the Control unit
English
Control unit
Connection wire
(Accessory1)
To control unit
(Front side)
(Rear side)
Disc changer, etc.
To KENWOOD disc changer/
External optional accessory
To connect these leads, refer to the
relevant instruction manuals.
To KENWOOD disc changer/
HD Radio control input
HD Radio tuner
When connecting multiple units (such as the CD
Changer and KCA-S210A), connect the KTC-HR100
directly to the control unit.
FM/AM antenna
Antenna cable
(Accessory6)
When the control unit is connected, you cannot use this
"TO CONTROLLER" input terminal.
When you use Controller unit (optional accessory), refer
to <If you want to connect the Controller> of the next
page and connect Controller unit.
— 8 —
Page 9

■ If you want to connect the Controller
Car Audio unit
Audio input
Audio output
(Left: White, Right: Red)
Power cable input
(optional accessory)
(Front side)
(Rear side)
■ If you want to connect KCA-S210A
Control unit
TO SLAVE UNIT
TO
HEAD UNIT
HD Radio tuner
HD Radio
tuner
]“N”
OFF ON
ON
PROTOCOL
AUX
SWITCH
SWITCH
TO
H/U
KCA-S210A
TO
CHANGER 1
AUX
IN
TO
CHANGER 2
FM/AM antenna
Antenna cable
(Accessory6)
Controller unit (optional accessory) input
When the controller unit is connected, you cannot use
this "TO SLAVE UNIT" input terminal.
Please keep the total extension of the
control cable from the control unit to
the disc changer to 13 m or less.
Control cable lengths in excess of 13
m will cease to function properly.
• When connecting multiple units (such
as the CD Changer and KCA-S210A),
Disc changer
connect the KTC-HR100 directly to
the control unit.
• Set the PROTOCOL selection switch
to "N" position.
— 9 —
Page 10

Mounting the HD Radio tuner unit
2CAUTION
• Install the HD Radio tuner unit in a well-ventilated location and do not place
objects on top of it.
English
• When installing to the car, the unit should be securely fastened at a location
that will not interfere with driving.
• When making a hole in the chassis, check that the gas tank, break pipe, wire
harness, or other part is not located on the other side, and be careful not to
cause scratches.
• When attaching the mounting fittings (Accessory2) to the HD Radio tuner
unit, use only the supplied mounting screws (Accessory3) (M4 x 8 mm).
Use of screws other than those supplied may result in internal damage or
insecure mounting and is very dangerous.
■ Installation using the self-tapping screws
Accessory2
Accessory4 (Ø5 × 20 mm)
Accessory3
(M4 × 8 mm)
Carpet
Board etc.
thickness: 20 mm or more
■ Installation using the velcro tapes
Accessory5
Carpet
2CAUTION
Please do not install the unit near the dashboard, the rear tray, or other
important components. Doing so could lead to injury or accident should the
unit come off due to a shock and strike a person or an important component.
Tapping screws should be used for mounting. (Attachment with velcro strips,
although easy, can come off with a shock.)
— 10 —
Page 11

Troubleshooting Guide
What might appear to be a malfunction in your unit may
just be the result of slight misoperation or miswiring.
Before calling service, first check the following table for
possible problems.
? The HD Radio mode cannot be selected.
✔ The connection wire is not connected.
☞ Use the connection wire to connect the control unit and the HD
Radio tuner.
✔ HD Radio tuner is connected to KCA-S210A or other units.
☞ Connect the HD Radio tuner directly to the control unit.
? Nothing happens when the buttons are pressed.
✔ The computer chip in the unit is not functioning normally.
☞ Press the reset button on the Control/Controller unit .
? No sound can be heard, or the volume is low.
✔ The input/output wires or wiring harness are connected incorrectly.
☞ Reconnect the input/output wires and/or the wiring harness
correctly. See the section on <Connecting Wires to Terminals>.
✔ The preset broadcast station is not transmitting in the mode that was
set with <Receive Mode>.
☞ Please set <Receive Mode> to "Auto".
✔ In digital AM broadcasting, receive mode switches between stereo and
monaural too often.
☞ Receiving condition is bad or unstable. Stereo is chosen when
receiving condition is good, and it switches to monaural when the
condition becomes bad.
✔ HD Radio tuner is connected to KCA-S210A or other units.
☞ Connect the HD Radio tuner directly to the control unit.
? Radio reception is poor.
✔ The car antenna is not extended.
☞ Pull the antenna out all the way.
✔ The antenna control wire is not connected.
☞ Connect the wire correctly, referring to the section on <Connecting
Wires to Terminals>.
Specifications
Specifications subject to change without notice.
Analog FM tuner section
Frequency range (200 kHz space) ............87.9 MHz – 107.9 MHz
Usable sensitivity (S/N = 30dB) ....................9.3dBf (0.8 µV/75 Ω)
Quieting Sensitivity (S/N = 50dB) ...............15.2dBf (1.6 µV/75 Ω)
Frequency response (±3 dB).................................30 Hz – 15 kHz
Signal to Noise ratio (MONO)..............................................70 dB
Selectivity (±400 kHz).......................................................≥ 80 dB
Stereo separation (1 kHz) ....................................................40 dB
Digital FM tuner section
Frequency range (200 kHz space) ............87.9 MHz – 107.9 MHz
Frequency response (±3 dB).................................30 Hz – 15 kHz
Signal to Noise ratio (STEREO)............................................70 dB
Analog AM tuner section
Frequency range (10 kHz space) ...................530 kHz – 1700 kHz
Usable sensitivity (S/N = 20dB) .............................28 dBµ (25 µV)
Digital AM tuner section
Frequency range (10 kHz space) ...................530 kHz – 1700 kHz
Frequency response (±3 dB).................................30 Hz – 15 kHz
Signal to Noise ratio (STEREO)............................................70 dB
General
Operating voltage .............................14.4 V (11 – 16 V allowable)
Current consumption........................................................500 mA
Operating Environment .......................................-20 °C – +70 °C
Installation size (W × H × D) .................188.5 × 30.0 × 145.5 mm
7-7/16 × 1-3/16 × 5-3/4 in.
Weight .................................................................1.65 lbs (750 g)
— 11 —
Page 12

Table des matiéres
Qu’est ce que la HD Radio ? ............................12
Précautions de sécurité ...................................13
Opérations........................................................14
Accord
Mode d'accord
Mode de réception
Mémoire de station pré-réglée
Entrée en mémoire automatique
Français
Accord pré-réglé
Mode de commutation de l'affichage
Défilement du texte
En source HD Radio
Accessoires ......................................................17
Procédure d’installation ..................................17
Connexion des câbles sur les prises ...............18
Montage de l’unité HD Radio ..........................20
Guide de depannage ........................................21
Spécifications ..................................................21
Qu’est ce que la HD Radio ?
La radio HD est une technologie permettant d’envoyer des
émissions numériques ainsi que des émissions analogiques en
utilisant les fréquences existantes des émissions FM ou AM.
Cela permet d’améliorer la qualité du son d’émission la
rendant comparable à la qualité d’un CD musical en FM
numérique ou à la qualité d’un son d’émission FM analogique
pour ce qui est de l’émission AM numérique.
Du reste, si les conditions de réception sont bonnes, il est
possible d’écouter des programmes en stéréo avec l’émission
AM numérique.
L’émission numérique peut envoyer des informations autres
qu’audio, ainsi, il est possible d’afficher des données comme
le titre de la musique.
— 12 —
Page 13

Précautions de sécurité
2AVERTISSEMENT
Pour éviter toute blessure et/ou
incendie, veuillez prendre les
précautions suivantes:
•Insérez l’appareil à fond jusqu’à ce qu’il soit
complètement calé. Sinon, il risquerait d’être
projeté en cas de collisions ou de cahots.
• Pour éviter les court-circuits, ne jamais
mettre ou laisser d’objets métalliques
(comme une pièce de monnaie ou un outil
en métal) à l’intérieur de l’appareil.
• Si l’appareil commence à émettre de la
fumée ou une odeur bizarre, mettez
immédiatement l’appareil hors tension et
consultez un revendeur Kenwood.
• Faites attention de ne pas laisser tomber
l’appareil ou lui faire subir de chocs
importants.
2ATTENTION
Pour éviter tout dommage à l'appareil,
veuillez prendre les précautions
suivantes:
• N'ouvrez pas le couvercle supérieur ou
inférieur de l'appareil.
• N'installez pas l'appareil dans un endroit
exposé directement à la lumière du soleil, à
une chaleur excessive ou à l'humidité. Evitez
aussi les endroits trop poussiéreux et où
l'appareil risque d'être éclaboussé.
• Pendant l'installation, n'utilisez aucunes
autres vis que celles fournies. L'utilisation de
vis incorrectes pourrait endommager
l'appareil.
• En perçant les trous de fixation des serrures,
prendre grand soin de ne pas endommager
ce qui peut se trouver sur l’autre face
(réservoir de carburant, flexibles de frein, fils
électriques, etc.).
REMARQUE
• Si vous rencontrez des problèmes pendant
l’installation, consultez votre revendeur
Kenwood.
• Si l'appareil ne fonctionne pas correctement,
appuyez sur la touche de réinitialisation.
L'appareil retourne aux réglages de l'usine
quand la touche de réinitialisation est
pressée.
Si l'appareil ne fonctionne toujours pas
correctement après avoir appuyé sur la
touche de réinitialisation, contactez votre
revendeur local KENWOOD pour une
assistance.
REMARQUE
Cet appareil numérique de la classe B est
conforme à la morme NMB-003 du Canada.
Nettoyage de l’appareil
Si le panneau avant de cet appareil est taché,
essuyez-le avec un chiffon sec et doux
comme ceux au silicone. Si le panneau avant
est très taché, essuyez-le avec un chiffon
imbibé d'un produit de nettoyage neutre et
ensuite essuyez toute trace de ce produit.
La pulvérisation directe de produit de
nettoyage sur l'appareil risque d'affecter les
pièces mécaniques. L'utilisation d'un chiffon
rugueux ou d'un liquide volatile tel que solvant
ou alcool pour essuyer le panneau avant peut
rayer la surface ou effacer des caractères.
INFORMATION IMPORTANTE
Unités de commande pouvant être
— 13 —
connectées
En ce qui concerne les unités de commande
connectables vendues depuis juillet 2003, le
fonctionnement de la radio HD est expliqué
dans le manuel de l’unité de commande.
Unités de commande (à partir de juin
2003)
KDC-X969
KDC-MP822, KDC-V7022#2, KDC-X769#2,
KDC-722
#1,2
, KDC-X869
#1,2
, KDC-MP922
#1,2
,
REMARQUE
• L’utilisation de la fonction de tuner intégrée dans
l’unité de commande ne sera plus possible. Une
partie des méthodes de réglage, y compris le mode
d’accord, sera modifiée.
• Le réglage du CRSC est toujours activé. L’inactivation
n’est pas possible.
• #1 La fonction RDS ne sera plus possible. Noter
également que les éléments "SYNC" et "TI" du
menu seront affichés mais ne fonctionneront pas.
• #2 La fonction "HD Radio" ne peut pas être
sélectionnée comme source double zone.
Au sujet des lecteurs de CD/changeurs
de disque connectée à cet appareil:
Les changeurs de disque/lecteurs de CD
KENWOOD commercialisés en 1998 ou
ultérieurement peuvent être connectés à cet
appareil.
Veuillez prendre note que tous les changeurs
de disque/lecteurs de CD KENWOOD
commercialisés en 1997 ou précédemment et
les changeurs de disque d’autres fabricants ne
peuvent être connectés à cet appareil.
Les connections non préconisées peuvent
causer des dommages.
Réglage du commutateur O-N sur la position
"N" pour les chargeurs de disque KENWOOD /
lecteurs de CD KENWOOD applicables.
Page 14

Opérations
Accord
Sélectionner la station.
1 Sélectionnez la source HD Radio
Appuyez sur la touche [SRC].
Sélectionnez l'affichage "HD Radio"/"HD RADIO".
2 Sélectionnez la bande
Appuyez sur la touche [FM] ou [AM].
Chaque fois que l'on appuie sur la touche [FM] la gamme d'onde
Français
change parmi HF1, HF2 et HF3.
Appuyez sur la touche [AM] pour choisir la gamme d'onde HA.
3 Réglez une bande supérieure ou inférieure
Appuyez sur la touche [4] ou [¢].
• Pendant la réception de stations stéréo, l'indicateur "ST" est
allumé.
• En utilisant le <Mode de réception>, les modes peuvent basculer
sur la commutation automatique d’émission numérique, sur
l’émission analogique uniquement ou sur l’émission numérique
uniquement.
• Lorsque "Digital" a été réglé avec le <Mode de réception>, le
temps de recherche sera plus long afin de vérifier si la
transmission est une émission numérique.
Mode d'accord
Choisissez le mode d'accord.
1 Entrez en mode menu
Appuyez sur la touche [MENU] pendant au moins 1 seconde.
"MENU" est affiché.
2 Sélectionner le mode d'accord
Appuyez sur la touche [FM] ou [AM].
Sélectionnez l'affichage "Seek Mode"/"Auto1"/"Auto2"/"Manual".
3 Régler le mode d’accord
Appuyez sur la touche [4] ou [¢].
Chaque fois que l'on appuie sur la touche, le mode d'accord
change de la manière suivante.
Mode d'accord Affichage Opération
Recherche
automatique
Recherche de
station préréglée
Manual
"Auto 1" Recherche automatique d'une
"Auto 2" Recherche dans l'ordre des
"Manual" Contrôle de l'accord manuel
4 Sortez du mode menu
Appuyez sur la touche [MENU].
Mode de réception
Règle le mode de réception.
1 Entrez en mode menu
Appuyez sur la touche [MENU] pendant au moins 1 seconde.
"MENU" est affiché.
2 Sélectionner le mode de réception
Appuyez sur la touche [FM] ou [AM].
Sélectionnez l'affichage "Receive Mode".
3 Ouvrir le mode de réception
Appuyez sur la touche [4] ou [¢] pendant au moins 1
seconde.
4 Régler le mode de réception
Appuyez sur la touche [FM] ou [AM].
Chaque fois que la touche est enfoncée, le mode de réception
commute comme indiqué ci-dessous.
— 14 —
station.
stations présentes dans la
mémoire de pré-réglage.
normal
Page 15

Mode de réception Affichage Opération
Mode automatique
Numérique "Digital" Emissions numériques uniquement.
Analogique "Analog" Emissions analogiques uniquement.
"Auto" Les émissions analogiques et
numériques seront
automatiquement commutées.
Lorsque les deux sont transmises,
l’émission numérique est prioritaire.
5 Quitter le mode de réception
Appuyez sur la touche [MENU].
6 Sortez du mode menu
Appuyez sur la touche [MENU].
Même lorsque le réglage “Auto” est effectué, une émission
analogique sera reçue lors de la réception du mode ball game
(programme d’émission sans différé)
Mémoire de station pré-réglée
Mettre la station en mémoire.
1 Sélectionnez la bande
Appuyez sur la touche [FM] ou [AM].
2 Sélectionnez la fréquence à mettre en mémoire
Appuyez sur la touche [4] ou [¢].
Sélectionner la section de touches de fonction
3
Appuyez sur la touche [NEXT].
Appuyez plusieurs fois sur la touche jusqu'à ce que "[1]" — "[6]"
s'affichent au-dessus des touches [1] — [6]. (KDC-X969/KDCX869/KDC-MP922)
Appuyez à plusieurs reprises sur la touche jusqu'à ce que
l'élément de fonction ne soit plus affiché au-dessus de la touche
[2] — [5]. (KDC-MP822/KDC-V7022/KDC-X769/KDC-722)
4 Mettez en mémoire la fréquence
Appuyez sur la touche souhaitée [1] — [6] pendant au moins
2 secondes.
Le numéro pré-réglé affiché clignote 1 fois.
Sur chaque bande, 1 station peut être mise en mémoire sur
chaque touche [1] — [6].
Entrée en mémoire automatique
Mettre automatiquement en mémoire les stations dont la
réception est bonne.
1 Sélectionnez la bande pour l'entrée en mémoire automatique
Appuyez sur la touche [FM] ou [AM].
2 Entrez en mode menu
Appuyez sur la touche [MENU] pendant au moins 1 seconde.
"MENU" est affiché.
3 Sélectionnez le mode d'entrée en mémoire automatique
Appuyez sur la touche [FM] ou [AM].
Sélectionnez l'affichage "Auto Memory"/"Auto-Memory".
4 Ouvrez le mode entrée en mémoire automatique
Appuyez sur la touche [4] ou [¢] pendant au moins 2
secondes.
Lorsque 6 stations qui peuvent être captées sont mises en
mémoire, le mode entrée en mémoire automatique est fermé.
5 Sortez du mode menu
Appuyez sur la touche [MENU].
La méthode de réception peut être commutée en utilisant le réglage
du <Mode de réception>.
— 15 —
Page 16

Opérations
Accord pré-réglé
Rappeler les stations mises en mémoire.
1 Sélectionnez la bande
Appuyez sur la touche [FM] ou [AM].
2 Sélectionner la section de touches de fonction
Appuyez sur la touche [NEXT].
Appuyez plusieurs fois sur la touche jusqu'à ce que "[1]" — "[6]"
s'affichent au-dessus des touches [1] — [6]. (KDC-X969/KDC-
Français
X869/KDC-MP922)
Appuyez à plusieurs reprises sur la touche jusqu'à ce que
l'élément de fonction ne soit plus affiché au-dessus de la touche
[2] — [5]. (KDC-MP822/KDC-V7022/KDC-X769/KDC-722)
3 Rappelez la station
Appuyez sur la touche souhaitée [1] — [6].
Lorsqu’une station pré-réglée transmet soit une émission analogique
soit une émission numérique, le son ne sera pas émis, à moins que
le mode d’émission corresponde au réglage du <Mode de
réception>.
Mode de commutation de l'affichage
Lorsque vous écoutez la HD Radio, vous pouvez commuter les
informations d’affichage comme ceci:
Pour le fonctionnement, voir la page <Commutation de
l’affichage> du manuel d’utilisation de l’unité de commande.
Il se peut que ce qui est affiché dépende en partie des unités de
commande à connecter.
Mode HD Radio
Information Affichage
Nom de la station "Station Name"/"NAME"
Titre de chanson/Nom d’artiste/
Nom d’album/Genre
Fréquence de réception "Frequency"/
• A part "Frequency", les informations affichées sont indiquées
uniquement lorsque le texte est reçu en émission numérique. Si le
texte ne peut pas être affiché, la fréquence sera indiquée.
• Bien que certains modèles présentent deux lignes d’affichage, il
est impossible d’afficher la même information à la fois dans la
partie supérieure et dans la partie inférieure.
"Title"/"TITLE"
Défilement du texte
Régler le défilement du texte affiché.
Pour le fonctionnement, voir la page <Défilement du texte>
du manuel d’utilisation de l’unité de commande.
En source HD Radio
(Fonction de commande à distance)
Touches [FM]/ [AM]
Sélectionnez la bande.
Chaque fois que l'on appuie sur la touche [FM] la gamme d'onde
change parmi HF1, HF2 et HF3.
Appuyez sur la touche [AM] pour choisir la gamme d'onde HA.
Touches [4]/ [¢]
Réglez une bande supérieure ou inférieure.
Touches [0] — [9]
Appuyez sur les touches [1] — [6] pour rappeler des stations préréglées.
— 16 —
Page 17

Accessoires
Vue externe
......... Nombre d’éléments
1
.........1
.........2
.........4
2ATTENTION
L’utilisation d’accessoires autres que les accessoires fournis pourrait
endommager l’appareil. Assurez-vous d’utiliser les accessoires fournis,
indiqués ci-dessus.
Vue externe
......... Nombre d’éléments
4
52
63
.........4
.........2
.........1
Procédure d’installation
1. Pour éviter les courts-circuits, retirez la clef de contact et
déconnectez la borne · de la batterie.
2. Installez l’antenne FM/AM et connectez le fil de l’antenne au
tuner de la HD Radio.
3. Connectez le tuner HD Radio et l’unité de commande en utilisant
le câble de connexion fourni.
4. Effectuez les connexions d’entrée et sortie correctement pour
chaque appareil.
5. Installez l’appareil dans votre voiture.
6. Reconnectez la borne · de la batterie.
7. Appuyez sur la touche de réinitialisation.
2ATTENTION
• Ne branchez pas le câble de commande aussi longtemps que l'unité de
commande est en service.
• Assurez-vous d’appuyer sur la touche reset située sur l’unité de commande
après l’installation.
• Si votre véhicule n’est pas prévu pour ce type de connection, consultez votre
revendeur KENWOOD.
• Assurez-vous que toutes les connexions de câble sont faites correctement
en insérant les fiches jusqu'à ce qu'elles soient verrouillées.
• Ne laissez pas des câbles non-connectés ou des prises toucher les parties
métalliques de la voiture ou autres conducteurs électriques. Pour éviter, les
courts-circuits, ne retirez pas non plus les capuchons à l’extrémité des
câbles non-connectés ou des prises.
• Isolez les câbles non-connectés avec un ruban vinyle ou autre matériel
similaire.
•Prenez soin que le câble de l’antenne et tout autre câble de connexion ne se
prennent pas dans les organes en mouvement. Sinon, le câble pourrait se
déconnecter ou d’autres problèmes pourraient apparaître.
• Ne forcez pas trop sur le câble de l’antenne, les autres câbles de connexion
ou connecteurs, par exemple en pliant un câble etc. Sinon, le câble pourrait
se déconnecter ou d’autres problèmes pourraient apparaître.
• Après avoir installé l’appareil, vérifiez si les lampes de frein, les indicateurs,
les clignotants, etc de la voiture fonctionnent correctement.
— 17 —
Page 18

Connexion des câbles sur les prises
■ Si vous souhaitez connecter l’unité de commande
Français
Vers le KENWOOD changeur de disque/
Entrée d’asservissement de la HD Radio
Unité de
commande
Câble de connexion
(Accessoire1)
A l’unité de commande
(Avant)
(Arrière)
Changeur de disque, etc.
Vers le changeur de disque KENWOOD/
Accessoire optionnel externe
Pour la connexion de ces fils, veuillez consulter les
manuels d'utilisation appropriés.
Lors de la connexion de plusieurs unités
(comme le changeur de CD et le KCAS210A), connectez le KTC-HR100
directement sur l’unité de commande.
Antenne FM/AM
Syntoniseur
HD Radio
Câble d'antenne
(Accessoire6)
Lorsque l’unité de commande est connectée, vous ne
pouvez pas utiliser cette borne d’entrée "TO
CONTROLLER".
Lorsque vous utilisez l’unité de commande (accessoire
en option), reportez-vous à la section <Si vous souhaitez
connecter l’unité de commande> sur la page suivante et
connectez l’unité de commande.
— 18 —
Page 19

■ Si vous souhaitez connecter l’unité de commande
Equipement audio
pour voiture
Entrée audio
Sortie audio
(Gauche: Blanc, Droite: Rouge)
Entrée du câble
d’alimentation
(accessoire en option)
(Avant)
(Arrière)
■ Si l’on souhaite connecter un KCA-S210A
Unité de
commande
TO SLAVE UNIT
TO
HEAD UNIT
Syntoniseur HD Radio
KCA-S210A
]“N”
ON
PROTOCOL
SWITCH
Syntoniseur
HD Radio
OFF ON
AUX
SWITCH
TO
TO
CHANGER 1
H/U
AUX
IN
TO
CHANGER 2
— 19 —
Antenne FM/AM
Câble d'antenne
(Accessoire6)
Entrée de l’unité de commande (accessoire en option)
Lorsque l’unité de commande est connectée, vous ne
pouvez pas utiliser cette borne d’entrée "TO SLAVE
UNIT".
Veiller à ce que l’extension totale du
câble de commande allant de l’unité
de commandes au changeur de disque
soit inférieure à 13 m. Les câbles de
commande de plus de 13 m ne
fonctionneront pas correctement.
Changeur de
disque
• Lors de la connexion de plusieurs
unités (comme le changeur de CD et
le KCA-S210A), connectez le KTCHR100 directement sur l’unité de
commande.
• Réglé le commutateur PROTOCOL
sur la position "N".
Page 20

Montage de l’unité HD Radio
2ATT ENTION
• Installez l’unité HD Radio à un endroit bien ventilé et ne posez pas d’objet
sur le boîtier.
• Lors de son installation sur la voiture, le boîtier doit être soigneusement
attaché à un endroit où il ne gênera pas la conduite.
• Lorsque vous faites des trous dans le châssis, assurez-vous que le réservoir
d’essence, la tuyauterie de frein, le dispositif d’attache des câbles, ni aucune
autre pièce ne se trouvent de l’autre côté du châssis, et faites bien attention
de ne pas faire d’égratignures.
• Lorsque vous attachez les dispositifs de fixation (Accessoire 2) à l’unité HD
Radio, utilisez uniquement les vis de fixation fournies (Accessoire 3) (M4 x
Français
8 mm). L’utilisation d’autres vis que celles qui ont été fournies pourrait
entraîner des dommages internes ou une fixation incertaine, ce qui est très
dangereux.
■ Installation à l’aide de vis autotaraudeuses
Accessoire2
Accessoire4 (Ø5 × 20 mm)
Accessoire3
(M4 × 8 mm)
Moquette
Planche, etc.
Epaisseur : 20 mm ou plus
■ Installation à l’aide de rubans velcro
Accessoire5
Moquette
2ATTENTION
Prière de ne pas installer près du tableau de bord, de la plage arrière ou
d'éléments importants. Cela pourrait occasionner une blessure ou un accident
si l'appareil devait se détacher à cause d'un choc, et heurter une personne ou
un élément important.
Des vis taraudeuses doivent être utilisées pour le montage. (Une fixation à
l'aide d'une bande velcro est facile, mais peut se détacher lors d'un choc.)
— 20 —
Page 21

Guide de depannage
Ce qui peut apparaître comme un mauvais
fonctionnement de votre appareil n’est peut être que le
résultat d’une mauvaise opération ou d’une mauvaise
connexion. Avant d’appeler un centre de service, vérifiez
d’abord dans le tableau suivant les problèmes possibles.
? Le mode HD Radio ne peut pas être sélectionné.
✔ Le câble de connexion n’est pas raccordé.
☞ Utilisez le câble de connexion pour raccorder l’unité de commande au
syntoniseur HD Radio.
✔ Le tuner de radio HD est connecté au KCA-S210A ou à d’autres appareils.
☞ Connecter le tuner de radio HD directement sur l’unité de
commandes.
? Rien ne se passe quand les touches sont pressées.04
✔ Le microprocesseur dans l’appareil ne fonctionne pas correctement.
☞ Appuyez sur la touche Reset de l’unité de commande.
? Aucun son ne peut être entendu, ou le volume est faible. 20
✔ Les câbles d’entrée/sortie ou le faisceau de câbles sont connectés
incorrectement.22
☞ Reconnectez les câbles d’entrée/sortie et/ou le faisceau de câbles
correctement. Voir la section sur la <Connexion des câbles sur les
prises>.
✔ La station d’émission pré-réglée ne transmet pas dans le mode
sélectionné au moyen du <Mode de réceptio>.
☞ Régler le <Mode de réception> sur "Auto".
✔ En mode d’émission AM numérique, le mode de réception change trop
fréquemment entre stéréo et monaural.
☞ Les conditions de réception sont mauvaises ou instables. Le mode
stéréo est choisi lorsque les conditions de réception sont bonnes. Le
mode bascule ensuite sur monaural lorsque les conditions de
réception se dégradent.
✔ Le tuner de radio HD est connecté au KCA-S210A ou à d’autres appareils.
☞ Connecter le tuner de radio HD directement sur l’unité de
commandes.
? La réception radio est mauvaise.39
✔ L’antenne de la voiture n’est pas sortie.
☞ Sortez l’antenne complètement.
✔ Le câble de commande de l’antenne n’est pas connecté.40
☞ Connectez le câble correctement en vous référant à la section
<Connexion des câbles sur les prises>.
Spécifications
Les spécifications sont sujettes à changements sans
notification.
Section tuner FM analogique
Plage de fréquence (espacement de 200 kHz)
.......................................................87,9 MHz – 107,9 MHz
Sensibilité utilisable (S/N = 30dB) .................9,3dBf (0,8 µV/75 Ω)
Sensibilité silencieuse (S/N = 50dB) ..........15,2 dBf (1,6 µV/75 Ω)
Réponse en fréquence (±3 dB) .............................30 Hz – 15 kHz
Taux de Signal/Bruit (MONO) ..............................................70 dB
Sélectivité (±400 kHz).......................................................≥ 80 dB
Séparation stéréo (1 kHz) ....................................................40 dB
Section tuner FM numérique
Plage de fréquence (espacement de 200 kHz)
.......................................................87,9 MHz – 107,9 MHz
Réponse en fréquence (±3 dB) .............................30 Hz – 15 kHz
Taux de Signal/Bruit (Stéréo) ...............................................70 dB
Section tuner AM analogique
Plage de fréquence (espacement de 10 kHz)
............................................................530 kHz – 1700 kHz
Sensibilité utilisable (S/N = 20dB)..........................28 dBµ (25 µV)
Section tuner AM numérique
Plage de fréquence (espacement de 10 kHz)
............................................................530 kHz – 1700 kHz
Réponse en fréquence (±3 dB) .............................30 Hz – 15 kHz
Taux de Signal/Bruit (Stéréo) ...............................................70 dB
Général
Tension de fonctionnement ............14,4 V (11 – 16 V admissible)
Courant absorbé...............................................................500 mA
Milieu de fonctionnement ....................................-20 °C – +70 °C
Taille d’installation (L x H x P)...............188,5 × 30,0 × 145,5 mm
7-7/16 × 1-3/16 × 5-3/4 in.
Masse ..................................................................1,65 lbs (750 g)
— 21 —
Page 22

Índice
¿Que es el HD Radio?.......................................22
Precauciones de Seguridad .............................23
Operación .........................................................24
Sintonización
Modo de Sintonización
Modo de recepción
Memoria de presintonización de emisoras
Entrada de Memoria Automática
Sintonización preajustada
Cambio de Visualización
Despliegue de Texto
En fuente HD Radio
Accesorios........................................................27
Procedimiento de instalación..........................27
Conexión de cables a los terminals ................28
Español
Montaje de la unidad HD Radio.......................30
Guia Sobre Localización De Averias ...............31
Especificaciones ..............................................31
¿Que es el HD Radio?
"HD Radio" es una tecnología que permite emitir programas
digitales y analógicos utilizando las frecuencias existentes para
radiodifusión en FM o AM. Esto permite mejorar la calidad de
las emisiones equiparándola a la de los CDs musicales en FM
digital, y a la de emisiones FM analógicas en AM digital.
Asimismo, si las condiciones de recepción son buenas, se
pueden escuchar programas en modo estereofónico al recibir
una emisión de AM digital.
La radiodifusión digital puede trasmitir otra información aparte
del sonido, por lo que es posible visualizar datos tales como el
títulos de una canción, etc.
— 22 —
Page 23

Precauciones de Seguridad
2ADVERTENCIA
Para evitar el riesgo de lesiones y/o
fuego, observe las siguientes
precauciones:
•Inserte la unidad hasta el fondo, de manera
que quede firmemente bloqueada en su
sitio. De lo contrario, podría salir despedida
con fuerza durante un choque u otras
sacudidas.
• Para evitar cortocircuitos, nunca coloque ni
deje objetos metálicos (por ejemplo,
monedas o herramientas metálicas) dentro
de la unidad.
• Si nota que la unidad emite humos u olores
extraños, desconecte inmediatamente la
alimentación y consulte con su distribuidor
Kenwood.
•Preste atención para no dejar caer ni aplicar
un golpe fuerte a la unidad.
2PRECAUCIÓN
Para evitar daños en la unidad, tome
las siguientes precauciones:
• No abra las cubiertas superior o inferior de la
unidad.
• No instale la unidad en un sitio expuesto a la
luz directa del sol, o excesivamente húmedo
o caluroso. Asimismo evite los lugares muy
polvorientos o sujetos a salpicaduras de
agua.
• Durante la instalación, no utilice otros
tornillos que no sean los suministrados. El
uso de tornillos diferentes podría causar
daños en la unidad principal.
• Si instala la unidad cerca de los altavoces, la
vibración de los altavoces podrá ser la causa
de que salte el sonido. Instale la unidad tan
alejada como sea posible de los altavoces.
NOTA
• Si tiene problemas durante la instalación,
consulte con su distribuidor KENWOOD.
• Si la unidad no opera correctamente, pulse el
botón RESET. La unidad se reposiciona a los
ajustes de fábrica al pulsar el botón RESET.
Si la unidad no funciona correctamente aun
después de haber pulsado el botón RESET,
acuda a su concesionario KENWOOD.
Limpieza de la unidad
Si la placa frontal de esta unidad está
manchada, límpiela con un paño seco tal como
un paño de silicona. Si la placa frontal está
muy sucia, límpiela con un paño humedecido
en jabón neutro, y luego aclárelo.
Si se aplica algún spray para limpiar
directamente a la unidad puede que afecte a
sus partes mecánicas. Si se limpia la placa
frontal con un paño duro o utilizando líquido
volátil tal como disolvente o alcohol puede que
se raye la superficie o que se borren algunos
caracteres.
INFORMACION IMPORTANTE
Unidades de control que se pueden
conectar
En lo que concierne a las unidades de control
conectables que se han vendido desde julio de
2003, el funcionamiento de la radio HD se
explica en el manual de la unidad de control
correspondiente.
— 23 —
Unidades de control (apartir de Junio
del 2003)
KDC-X969
KDC-MP822, KDC-V7022#2, KDC-X769#2,
KDC-722
#1,2
, KDC-X869
#1,2
, KDC-MP922
#1,2
,
NOTA
• No será posible utilizar la función de sintonizador
incorporada en la unidad de control.Una parte de los
métodos de ajuste incluyendo el modo de
sintonización serán modificados.
• El ajuste del CRSC está siempre activo. No es posible
la desactivación.
• #1 La función RDS no será posible. También tenga en
cuenta que los ítems "SYNC" y "TI" en el menú
serán visualizados, pero no funcionarán.
• #2 El "HD Radio" no se puede seleccionar como una
fuente de zona dual.
Acerca de los reproductores de
CD/cambiadores de discos conectados
a esta unidad:
Pueden conectarse a esta unidad los
cambiadores de discos/reproductores de CD
KENWOOD comercializados en 1998 o
posterior.
Observe que cualquier cambiador de
discos/reproductor de CD comercializado en
1997 o anterior y los cambiadores de discos
de otros fabricantes no pueden conectarse a
esta unidad.
Una conexión de productos sin soporte puede
ocasionar daños.
Ajuste del interruptor O-N a la posición "N"
para cambiadores de disco/reproductures de
CD KENWOOD que corresponda.
Page 24

Operación
Sintonización
Selección de la emisora.
1 Seleccione la fuente de HD Radio
Pulse el botón [SRC].
Seleccione la visualización "HD Radio"/"HD RADIO".
2 Seleccione la banda
Pulse el botón [FM] o [AM].
Cada vez que pulse el botón [FM] cambiará entre las bandas HF1,
HF2, y HF3.
Pulse el botón [AM] y seleccione la banda de HA.
3 Sintonice la banda hacia arriba o hacia abajo
Pulse el botón [4] o [¢].
• Durante la recepción de emisoras en estéreo, el indicador "ST" se
activa.
• Al utilizar < Modo de recepción >, los modos se pueden conmutar
Español
Modo de Sintonización
Elija el modo de sintonización.
1 Acceda al modo de Menús
2
al cambio automático de emisiones digitales, solo emisiones
analógicas, o solo emisiones digitales.
• Cuando se ha ajustado "Digital" con <Modo de recepción>, el
tiempo de búsqueda será más largo con el fin de permitir verificar
si la transmisión es una emision digital.
Pulse el botón [MENU] durante más de 1 segundo.
Se visualiza "MENU".
Seleccione el modo de sintonización
Pulse el botón [FM] o [AM].
Seleccione la visualización "Seek Mode"/"Auto1"/"Auto2"/"Manual".
3 Ajuste el modo de sintonización
Pulse el botón [4] o [¢].
Cada vez que se pulse el botón, el modo de Sintonización
cambiará como se indica a continuación.
Modo de Sintonización Visualización Funcionamiento
Búsqueda automática "Auto 1" Búsqueda automática
de una emisora.
Búsqueda de emisora "Auto 2" Búsqueda de emisoras
predefinida por orden en la
memoria de preajuste.
Manual "Manual" Control de sintonización
manual normal.
4 Salga del modo de Menús
Pulse el botón [MENU].
Modo de recepción
Ajusta el modo de recepción.
1 Acceda al modo de Menús
Pulse el botón [MENU] durante más de 1 segundo.
Se visualiza "MENU".
2 Seleccione el modo de recepción
Pulse el botón [FM] o [AM].
Seleccione la visualización "Receive Mode".
3 Abra modo de recepción
Pulse el botón [4] o [¢] durante más de 1 segundo.
4 Ajuste el modo de recepción
Pulse el botón [FM] o [AM].
Cada vez que se pulsa el botón, el modo de recepción cambia
como se indica a continuación.
— 24 —
Page 25

Modo de recepción Visualización Funcionamiento
Modo automático "Auto" Las emisiones analógicas y
digitales se conmutarán
automáticamente. Cuando se
transmiten ambas, le emision
digital tendrá prioridad.
Digital "Digital" Solo emisiones digitales.
Analógico "Analog" Solo emisiones analógicas.
5 Salga del modo de recepción
Pulse el botón [MENU].
6 Salga del modo de Menús
Pulse el botón [MENU].
Incluso si se selecciona el ajuste "Auto", las emisiones analógicas se
recibirán durante la recepción en modo de juego de pelota
(programa de transmisión en directo).
Memoria de presintonización de emisoras
Almacenamiento de la emisora en la memoria.
1 Seleccione la banda
Pulse el botón [FM] o [AM].
2 Seleccione la frecuencia para guardarla en la memoria
Pulse el botón [4] o [¢].
3 Seleccione la sección de función de tecla
Pulse el botón [NEXT].
Pulse repetidamente el botón hasta que se visualice "[1]" — "[6]"
encima de los botones [1] — [6]. (KDC-X969/KDC-X869/KDCMP922)
Pulse repetidamente el botón hasta que el elemento de función
no se visualice encima del botón [2] — [5]. (KDC-MP822/KDCV7022/KDC-X769/KDC-722)
4 Guarde la frecuencia en la memoria
Pulse el botón [1] — [6] deseado durante al menos 2
segundos.
La visualización del número predefinido parpadea 1 vez.
En cada banda, se puede guardar 1 emisora en la memoria de
cada botón [1] — [6].
Entrada de Memoria Automática
Almacenamiento automático de emisoras con buena recepción
en la memoria.
1 Seleccione la banda de la entrada de memoria automática
Pulse el botón [FM] o [AM].
2 Acceda al modo de menú
Pulse el botón [MENU] durante más de 1 segundo.
Se visualiza "MENU".
3 Seleccione el modo de Entrada de Memoria Automática
Pulse el botón [FM] o [AM].
Seleccione la visualización "Auto Memory"/"Auto-Memory".
4 Abra la Entrada de Memoria Automática
Pulse el botón [4] o [¢] durante más de 2 segundos.
Cuando se guardan en memoria 6 emisoras que pueden
recibirse, la Entrada de Memoria Automática se cierra.
5 Salga del modo de Menús
Pulse el botón [MENU].
El método de recepción se puede conmutar con el ajuste del
<Modo de recepción>.
— 25 —
Page 26

Operación
Sintonización preajustada
Recuperación de las emisoras de la memoria
1 Seleccione la banda
Pulse el botón [FM] o [AM].
2 Seleccione la sección de función de tecla
Pulse el botón [NEXT].
Pulse repetidamente el botón hasta que se visualice "[1]" — "[6]"
encima de los botones [1] — [6]. (KDC-X969/KDC-X869/KDCMP922)
Pulse repetidamente el botón hasta que el elemento de función
no se visualice encima del botón [2] — [5]. (KDC-MP822/KDCV7022/KDC-X769/KDC-722)
3 Recupere la emisora
Pulse el botón [1] — [6] deseado.
Cuando la emisora preajustada está transmitiendo ya sea una
Español
emisión analógica o una emisión digital, el sonido no se emitirá a
menos el modo de emisión coincida con el ajuste del <Modo de
recepción>.
Título de la canción/ Nombre del Artista/
Nombre del albúm/ Género
Frecuencia de recepción "Frequency"/
• La información visualizada, excepto "Frequency", se muestra sólo
durante la recepción de texto en modo de radiodifusión digital. Si
el texto no puede visualizarse, se visualiza la frecuencia en su
lugar.
• Aun cuando algunos modelos tienen dos líneas en la pantalla, no
es posible visualizar la misma información en la parte superior e
inferior de la pantalla.
"Title"/"TITLE"
Despliegue de Texto
Ajuste del Despliegue de texto visualizado.
Para el funcionamiento, consulte la página <Cambio de
pantalla> del manual de instrucciones de su unidad de
control.
Cambio de Visualización
Cuando escuche el HD Radio, podrá cambiar la información de la
pantalla de la siguiente manera.
Para el funcionamiento, consulte la página <Cambio de
pantalla> del manual de instrucciones de su unidad de
control.
Lo que se visualiza puede depender en parte de las unidades de
control que se conectan.
Modo de HD Radio
Información Visualización
Nombre de la emisora "Station Name"/"NAME"
En fuente HD Radio
(Función del mando a distancia)
Botones [AM]/ [FM]
Seleccione la banda.
Cada vez que pulse el botón [FM] cambiará entre las bandas HF1,
HF2, y HF3.
Pulse el botón [AM] y seleccione la banda de HA.
Botones [4]/ [¢]
Sintonice la banda hacia arriba o hacia abajo.
Botones [0] — [9]
Pulses los botones [1] — [6] para recuperar las emisoras
predefinidas.
— 26 —
Page 27

Accesorios
Vista exterior
......... Número de ítems
1
.........1
.........2
.........4
2 PRECAUCIÓN
El uso de accesorios distintos de los suministrados podría causar daños en la
unidad. Asegúrese de utilizar únicamente los accesorios entregados con la
unidad, mencionados arriba.
Vista exterior
......... Número de ítems
4
.........4
52
.........2
63
.........1
Procedimiento de instalación
1. Para evitar cortocircuitos, retire la llave del encendido y
desconecte el terminal · de la batería.
2. Instale la antena FM/AM y conecte el cable de antena al
sintonizador de HD Radio.
3. Conecte el sintonizador de HD Radio y la unidad de control
utilizando el cable de conexión suministrado.
4. Conecte correctamente los cables de entrada y de salida de cada
unidad.
5. Instale la unidad en su automóvil.
6. Vuelva a conectar el terminal · de la batería.
7. Pulse el botón de reposición.
2 PRECAUCIÓN
• No conecte el cable de control mientras está encendida la unidad de control.
• No olvide pulsar el botón de reinicio de la unidad de control después de la
instalación.
• Si su vehiculo no está preparado para este sistema de conexion, consulte
por favor a su distribuidor KENWOOD.
• Asegúrese de efectuar correctamente las conexiones de los cables,
insertando los jacks hasta que queden firmemente bloqueados.
•No permita que los cables o terminales no conectados entren en contacto
con las partes metálicas del automóvil o con cualquier otra parte conductora
de electricidad. Para evitar cortocircuitos, no retire las tapas de los extremos
de los cables o terminales no conectados.
• Enrolle los cables no conectados con una cinta de vinilo u otro material
similar para que queden aislados.
•Tenga cuidado de que el cable de la antena y demás cables de conexión no
queden atrapados en las piezas móviles. De lo contrario pueden producirse
desconexiones y otros problemas.
• No aplique demasiada fuerza sobre el cable de la antena y los demás cables
y conectores y ni los doble, etc., de lo contrario pueden producirse
desconexiones y otros problemas.
• Después de instalar la unidad, compruebe que las lámparas de freno, las
lámparas de destello, el limpiaparabrisas, etc. funcionen satisfactoriamente.
— 27 —
Page 28

Conexión de cables a los terminals
■ Si desea conectar la unidad de control
Español
Unidad de
control
Cable de conexión
(Accesorio1)
Para controlar la unidad
(Lado delantero)
(Lado trasero)
Cambiador de Discos, etc.
A cambiador de discos KENWOOD/
Accesorio opcional externo
Para conectar estos cables, remítase a los
manuales de instrucciones relacionados.
Cambiador de discos KENWOOD/
Entrada de control de HD Radio
Sintonizador de
HD Radio
Cuando realice la conexión de múltiples unidades
(como por ejemplo el cambiador de CD y el KCAS210A), conecte el KTC-HR100 directamente a la
unidad de control.
Antena FM/AM
Cable de la antena
(Accesorio6)
Cuando se conecta la unidad del controlador, no se
puede utilizar este terminal de entrada "TO
CONTROLLER".
Cuando utilice la unidad del controlador (accesorio
opcional), consulte <Si desea conectar el controlador>
de la página siguiente y conecte la unidad del
controlador.
— 28 —
Page 29

■ Si desea conectar el controlador
Unidad de radio
para automóvil
Entrada de audio
Salida de audio
(Izquierda: Blanco,
Derecha: Rojo)
Entrada del cable de
alimentación
(accesorio opcional)
(Lado delantero)
(Lado trasero)
■ Si l’on souhaite connecter un KCA-S210A
Unidad de
control
TO SLAVE UNIT
TO
HEAD UNIT
Sintonizador de
HD Radio
KCA-S210A
]“N”
ON
PROTOCOL
SWITCH
TO
H/U
Sintonizador
de HD Radio
OFF ON
AUX
SWITCH
TO
CHANGER 1
AUX
IN
CHANGER 2
— 29 —
Cable de la antena
(Accesorio6)
TO
Antena FM/AM
Entrada de la unidad del controlador (accesorio opcional)
Cuando se conecta la unidad del controlador, no se
puede utilizar este terminal de entrada "TO SLAVE UNIT".
Mantenga la extensión total del cable
de control desde la unidad de control
hasta el cambiador de discos en 13 m
o menos. Un cable de control que
sobrepase los 13 metros dejará de
funcionar adecuademente.
Cambiador
de Discos
• Cuando realice la conexión de
múltiples unidades (como por
ejemplo el cambiador de CD y el
KCA-S210A), conecte el KTC-HR100
directamente a la unidad de control.
• Ajuste el interruptor PROTOCOL a la
posición “N”.
Page 30

Montaje de la unidad HD Radio
2 PRECAUCIÓN
• Instale la unidad HD Radio en un sitio bien ventilado y no coloque objetos
encima del mismo.
• Durante la instalación en el vehiculo, la unidad debe quedar firmemente
sujeta en un sitio que no interfiera con la conducción.
• Al realizar un orificio en el chásis, compruebe que el depósito de gasolina, el
tubo de los frenos, el mazo de cables u otras piezas no se encuentran del
otro lado, ademas de tener cuidado de no dejar arañazos.
• Al colocar los accesorios de montaje (Accesorio 2) a la unidad HD Radio
utilice sólo los tornillos de montaje suministrados (Accesorio 3) (M4 x 8
mm). Si utiliza otros tornillos que no sean los suministrados pueden
producirse daños internos o el montaje puede resultar inseguro, lo que
puede ser muy peligroso.
■ Instalación con los tornillos autoroscados
Accesorio4 (Ø5 × 20 mm)
Accesorio3
(M4 × 8 mm)
Alfombra
Placa, etc.
Espesor: 20 mm o más
Español
Accesorio2
■ Instalación con las cintas de velcro
Accesorio5
Alfombra
2 PRECAUCIÓN
No instale esta unidad cerca del tablero de instrumentos, ni de la bandeja
trasera, ni de ningún componente importante. Esto podría causar lesiones a
personas o accidentes en el caso que la unidad se aflojara y se saliera de su
posición golpeando a alguien o impactando algún componente importante.
Para montar esta unidad debe utilizar tornillos de rosca cortante. (Realizar la
instalación con una cinta de cintas de velcro ser fácil, pero también fácilmente
la unidad se aflojará y se saldrá con un impacto.)
— 30 —
Page 31

Guia Sobre Localización De Averias
Lo que podría parecer una falla de funcionamiento de su
unidad podría ser simplemente el resultado de un
pequeño error de operación o de un defecto de
conexión. Antes de acudir al servicio, verifique primero
el siguiente cuadro sobre los problemas que se podrían
presentar.
? No se puede seleccionar el HD Radio.
✔ El cable de conexión no está conectado.
☞ Utilice el cable de conexión para conectar la unidad de control y el
sintonizador HD Radio.
✔ El sintonizador de radio HD se conecta al KCA-S210A o a otras unidades.
☞ Conecte el sintonizador de radio HD directamente a la unidad de control.
? No ocurre nada al pulsar los botones.04
✔ El chip de computadora en la unidad no está funcionando de la manera
habitual.
☞ Pulse el botón de reinicio de la unidad de control/controlador.
? No se escucha el sonido, o el volumen es bajo.20
✔ Los cables de entrada/salida o el mazo de conductores están
conectados incorrectamente.22
☞ Vuelva a conectar correctamente los cables de entrada/salida y/o el
mazo de conductores. Consulte la sección de <Conexión de cables a los
terminals>.
✔ La emisora preajustada no está realizando la transmisión en el modo que
fue ajustado con <Modo de recepción>.
☞ Ajuste <Modo de recepción> a "Auto".
✔ Durante una emisión de AM digital, el modo de recepción cambia entre
estéreo y monoauricular con demasiada frecuencia.
☞ Las condiciones de recepción son malas o inestables.
Se selecciona estéreo cuando las condiciones de recepción son buenas,
y cambia a monoauricular cuando las condiciones de recepción se
vuelven malas o inestables.
✔ El sintonizador de radio HD se conecta al KCA-S210A o a otras unidades.
☞ Conecte el sintonizador de radio HD directamente a la unidad de control.
? Recepción de radio deficiente.39
✔ No está extendida la antena del automóvil.
☞ Extraiga completamente la antena.
✔ El cable de control de antena no está conectado.40
☞ Conecte el cable correctamente, refiriéndose a la sección <Conexión de
cables a los terminals>.
Especificaciones
Las especificaciones se encuentran sujetas a cambios
sin previo aviso.
Sección del sintonizador FM analógico
Gama de frecuencias (intervalo 200 kHz)
.......................................................87,9 MHz – 107,9 MHz
Sensibilidad útil (Relación señal / ruido: 30dB)
............................................................9,3dBf (0,8 µV/75 Ω)
Sensibilidad de silenciamiento (Relación señal / ruido : 50dB)
.........................................................15,2 dBf (1,6 µV/75 Ω)
Respuesta de frecuencia (±3 dB) ..........................30 Hz – 15 kHz
Relación señal a ruido (MONO) ...........................................70 dB
Selectividad (±400 kHz) ....................................................≥ 80 dB
Separación estéreo (1 kHz)..................................................40 dB
Sección del sintonizador FM digital
Gama de frecuencias (intervalo 200 kHz)
.......................................................87,9 MHz – 107,9 MHz
Respuesta de frecuencia (±3 dB) ..........................30 Hz – 15 kHz
Relación señal a ruido (MONO) ...........................................70 dB
Sección del sintonizador AM analógico
Gama de frecuencias (intervalo 10 kHz) ........530 kHz – 1700 kHz
Sensibilidad útil (Relación señal / ruido : 20dB) .....28 dBµ (25 µV)
Sección del sintonizador AM digital
Gama de frecuencias (intervalo 10 kHz) ........530 kHz – 1700 kHz
Respuesta de frecuencia (±3 dB) ..........................30 Hz – 15 kHz
Relación señal a ruido (MONO) ...........................................70 dB
General
Tensión de funcionamiento.............14,4 V (11 – 16 V admisibles)
Consumo..........................................................................500 mA
Ambiente de funcionamiento...............................-20 °C – +70 °C
Tamaño de instalación (An x Al x F) ......188,5 × 30,0 × 145,5 mm
7-7/16 × 1-3/16 × 5-3/4 in.
Peso ...................................................................1,65 lbs (750 g)
— 31 —
Page 32

 Loading...