

Page 1
KMM-X30
KMM-X10
DIGITAL MEDIA RECEIVER
INSTRUCTION MANUAL
• “Made for iPod,” and “Made for iPhone” mean that an electronic accessory has been designed to connect specifically to iPod, or iPhone, respectively, and has
been certified by the developer to meet Apple performance standards. Apple is not responsible for the operation of this device or its compliance with safety and
regulatory standards. Please note that the use of this accessory with iPod or iPhone may affect wireless performance.
• iPhone, iPod, iPod classic, iPod nano, and iPod touch are trademarks of Apple Inc., registered in the U.S. and other countries.
• Lightning is a trademark of Apple Inc.
• Pandora, the Pandora logo, and the Pandora trade dress are trademarks or registered trademarks of Pandora Media, Inc., used with permission.
• Android is trademark of Google Inc.
GET0959-001A (MN)© 2013 JVC KENWOOD Corporation
Page 2
CONTENTS BEFORE USE
BEFORE USE 2
BASICS 3
GETTING STARTED 4
RADIO 5
USB / iPod 6
AUX 8
Pandora®
(for
)
9
KMM-X30
DISPLAY SETTINGS 9
AUDIO SETTINGS 10
MORE INFORMATION 11
TROUBLESHOOTING 12
SPECIFICATIONS 13
INSTALLATION /
CONNECTION 14
How to read this manual
• Operations are explained mainly
using buttons on the faceplate.
•
[XX]
indicates the selected items.
•
( XX)
indicates references are
available on the stated page.
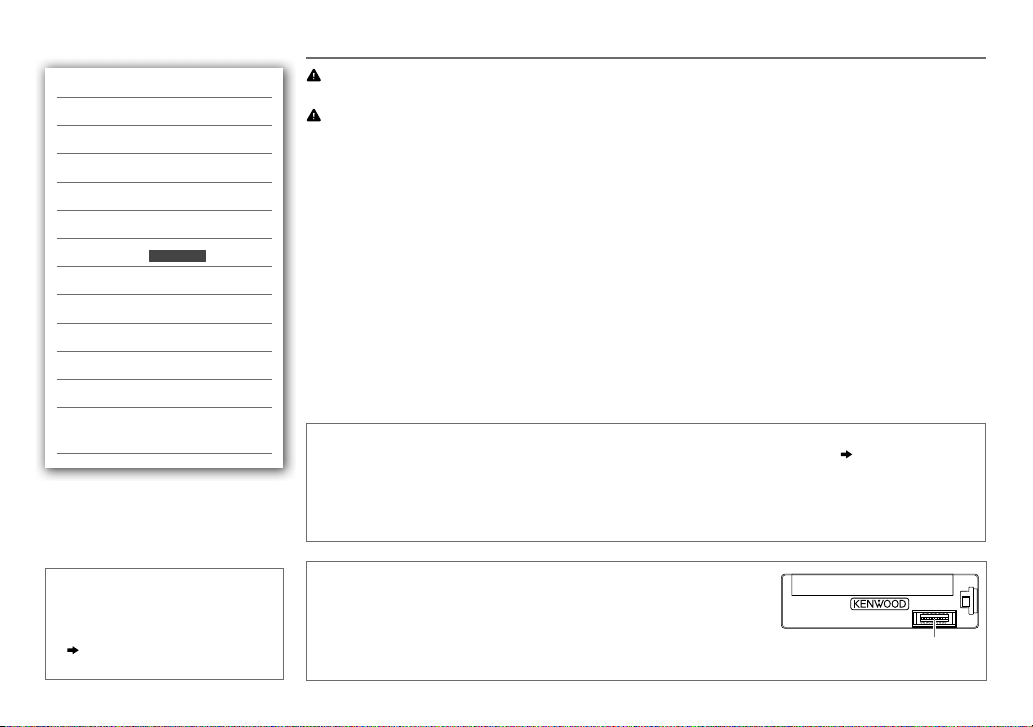
Warning
Do not operate any function that takes your attention away from safe driving.
Caution
Volume setting:
• Adjust the volume so that you can hear sounds outside the car to prevent accidents.
• Lower the volume before playing digital sources to avoid damaging the speakers by the sudden increase of
the output level.
General:
• Avoid using the USB device or iPod/iPhone if it might hinder safe driving.
• Make sure all important data has been backed up. We shall bear no responsibility for any loss of recorded
data.
• Never put or leave any metallic objects (such as coins or metal tools) inside the unit, to prevent a short
circuit.
Remote control (RC-406):
• Do not leave the remote control in hot places such as on the dashboard.
• The Lithium battery is in danger of explosion if replaced incorrectly. Replace it only with the same or
equivalent type.
• The battery pack or batteries shall not be exposed to excessive heat such as sunshine, fire or the like.
• Keep the battery out of reach of children and in its original packaging when not in used. Dispose of used
batteries promptly. If swallowed, contact a physician immediately.
Muting upon the reception of a phone call
Connect the MUTE wire to your telephone using a commercial telephone accessory.
When a call comes in, “CALL” appears. (The audio system pauses.)
• To continue listening to the audio system during a call, press B SRC. “CALL” disappears and the audio
system resumes.
When the call ends, “CALL” disappears. (The audio system resumes.)
( 15)
Maintenance
Cleaning the unit: Wipe off dirt on the faceplate with a dry silicone or soft
cloth.
Cleaning the connector: Detach the faceplate and clean the connector
gently with a cotton swab, being careful not to damage the connector.
Connector (on the reverse
side of the faceplate)
2
Page 3
BASICS
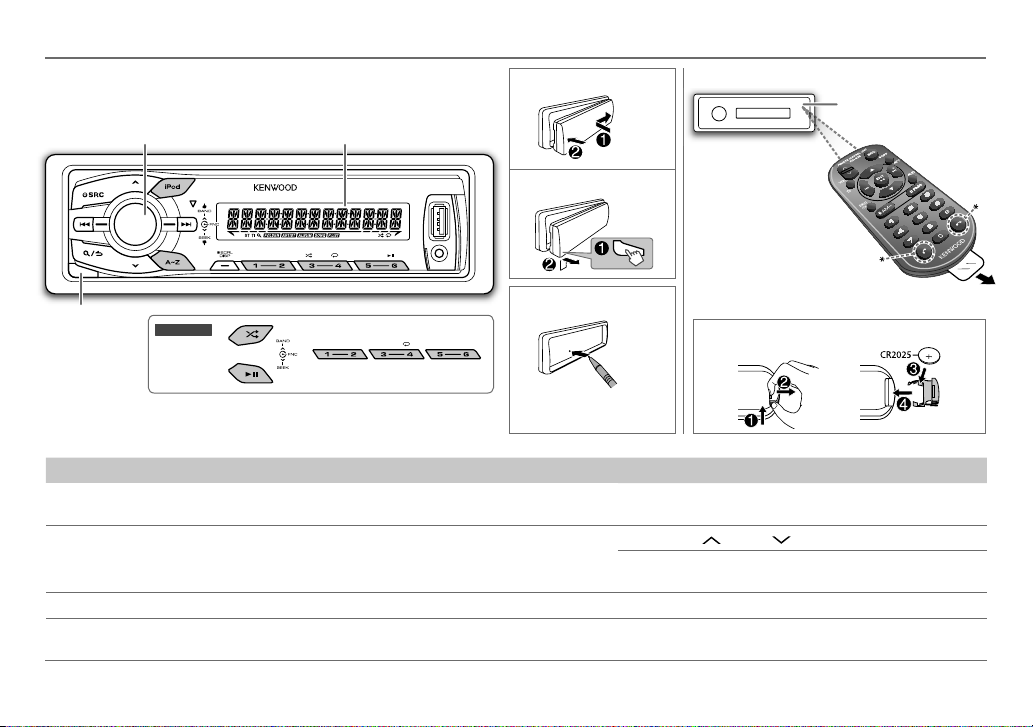
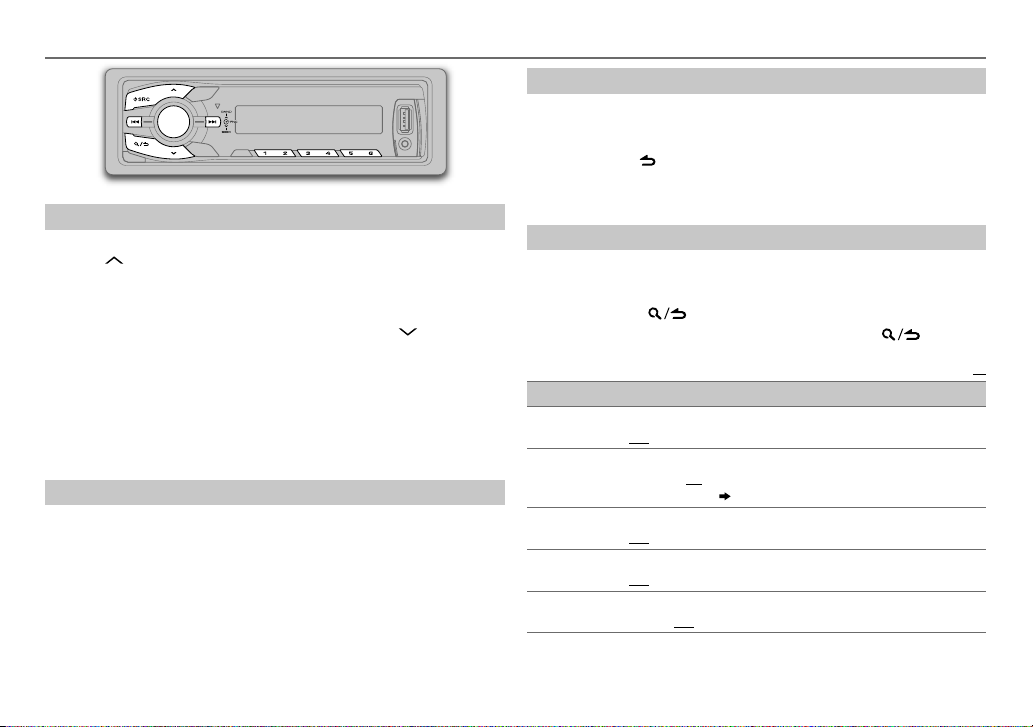
Faceplate
Volume knob
(turn/press)
Display window
Attach
Detach
Remote control (RC-406)
Remote sensor (Do
not expose to bright
sunlight.)
* Not used.
Pull out the insulation sheet
when using for the first time.
Detach button
KMM-X10
How to reset
How to replace the battery
Your preset adjustments
will also be erased.
To Do this (on the faceplate) Do this (on the remote control)
Turn on the power
Adjust the volume Turn the volume knob. Press VOL
Select a source
Change the display
information
Press B SRC.
• Press and hold to turn off the power.
Press B SRC repeatedly.
Press DISPSCRL repeatedly.
• Press and hold to scroll the current display information.
Press and hold SRC to turn off the power.
( Pressing SRC does not turn on the power. )
or VOL .
Press ATT during playback to attenuate the sound.
• Press again to cancel.
Press SRC repeatedly.
( not available )
ENGLISH |
3
Page 4
GETTING STARTED
1
Cancel the demonstration
When you turn on the power (or after you reset the unit), the
display shows: “CANCELDEMO”
1 Press the volume knob.
[YES]
is selected for the initial setup.
2 Press the volume knob again.
“DEMOOFF” appears.
2
Set the clock
Press the volume knob to enter
1
2 Turn the volume knob to select
3 Turn the volume knob to select
knob.
4 Turn the volume knob to make the settings, then press the
knob.
Day
Hour Minute
5 Turn the volume knob to select
the knob.
6 Turn the volume knob to select
knob.
7 Press and hold to exit.
To return to the previous setting item or hierarchy, press .
While in clock display screen...
Press and hold DISP SCRL to enter clock adjustment mode
directly.
Then, perform step
4 to set the clock.
4
“PRESS” “VOLUMEKNOB”
[FUNCTION]
[CLOCK]
[CLOCK ADJUST]
[CLOCK FORMAT]
[12H]
.
, then press the knob.
, then press the
, then press
or
[24H]
, then press the
3
Set the initial settings
Press B SRC to enter STANDBY.
1
2 Press the volume knob to enter
3
Turn the volume knob to make a selection (see the following table), then press
the knob.
[FUNCTION]
.
4 Press and hold to exit.
To return to the previous setting item or hierarchy, press .
Default:
AUDIO CONTROL
SWITCH
PREOUT
SP SELECT OFF/ 5/4/ 6 × 9/6/ OEM
TUNER SETTING
PRESET TYPE
SYSTEM
KEY BEEP
TDF ALARM ON
SOURCE SELECT
PANDORA SRC
BUILT-IN AUX
F/W UPDATE
UPDATE SYSTEM
F/W UP xx.xx
REAR/ SUB-W
line out terminals on the rear (through an external amplifier).
6×9inches or 6inches) or OEM speakers for optimum performance.
NORMAL
FM3/ MW/ SW1/ SW2). ;
regardless of the selected band.
ON
OFF.;
ON
ON
YES
For details on how to update the firmware, see: www.kenwood.com/cs/ce/
: Selects whether rear speakers or a subwoofer are connected to the
: Selects according to the speaker size (5inches or 4inches,
: Memorizes one station for each preset button in each band (FM1/ FM2/
:Activates the keypress tone.;
:Activates the alarm if you forget to detach the faceplate when ACC is set to
OFF
:Deactivates.
:Enables PANDORA in source selection.;
:Enables AUX in source selection.;
:Starts upgrading the firmware.; NO:Cancels (upgrading is not activated).
MIX
: Memorizes one station for each preset button,
OFF
:Deactivates.
OFF
:Disables.
( 9)
OFF
:Disables.
( 8)
XX
Page 5
RADIO
Search for a station
Press B SRC to select TUNER.
1
2 Press BAND repeatedly (or press
select FM1/ FM2/ FM3/ MW/ SW1/ SW2.
3 Press S / T (or press S / T(+) on RC-406) to search for a
station.
• To change the searching method for S / T : Press
repeatedly.
AUTO1: Automatically search for a station.
AUTO2: Automatically search for a preset station.
MANUAL: Manually search for a station.
• To store a station: Press and hold one of the number buttons (1to6).
• To select a stored station: Press one of the number buttons (1to6) (or
press one of the number buttons (1to6) on RC-406).
Change the frequency steps
You can change the frequency step of:
FM: 50 kHz to 200 kHz
MW: 9 kHz to 10 kHz
1 Press and hold B SRC to turn off the power.
2 While pressing number buttons 1 and 5, press LSRC.
Release your fingers from the buttons after the display appears.
• To restore the initial setting, repeat the same procedure.
• When the frequency step is changed, the previously stored stations in
the memory are deleted.
AM–/#FM+ on RC-406) to
*
SEEK
Direct Access Tuning (using RC-406)
Press DIRECT to enter Direct Access Tuning.
1
2 Press the number buttons to enter a frequency.
3 Press ENT IW to search for a station.
• To cancel, press or DIRECT.
• If no operation is done for 10seconds after step
is automatically canceled.
2, Direct Access Tuning
Other settings
Press the volume knob to enter
1
[FUNCTION]
.
2 Turn the volume knob to make a selection (see the following table),
then press the knob.
3 Press and hold to exit.
To return to the previous setting item or hierarchy, press .
Default:
TUNER SETTING
LOCAL SEEK
AUTO MEMORY YES
MONO SET
NEWS SET ON
REGIONAL ON
ON
:Searches only MW/ SW1/ SW2 stations with good reception.;
OFF
:Cancels.
:Automatically starts memorizing 6 stations with good
reception.;
NO
[PRESETTYPE]
ON
OFF
OFF
control.;
:Cancels. (Selectable only if
.) (
4)
:Improves the FM reception, but the stereo effect may be lost.;
:Cancels.
:The unit will temporarily switch to News Programme if available.;
:Cancels.
:Switches to another station only in the specific region using the “AF”
OFF
:Cancels.
[NORMAL]
is selected for
XX
ENGLISH |
5
Page 6
RADIO
Default:
AF SET ON
TI ON
PTY SEARCH
CLOCK
TIME SYNC
•
[MONO SET]/ [NEWS SET]/ [REGIONAL]/ [AF SET]/ [TI]/ [PTY SEARCH]
only when the band is FM1/ FM2/ FM3.
• Available Program Type:
SPEECH
MUSIC: POP M (music), ROCK M (music), EASY M (music), LIGHT M (music),
The unit will search for the Program Type categorized under
[MUSIC]
• If the volume is adjusted during reception of traffic information, alarm
or news bulletin, the adjusted volume is memorized automatically. It
will be applied the next time traffic information, alarm or news bulletin
function is turned on.
:Automatically searches for another station broadcasting the same
program in the same Radio Data System network with better reception when
the current reception is poor.;
:Allows the unit to temporarily switch to Traffic Information.;
OFF
:Cancels.
Press the volume knob to enter PTY language selection. Turn the volume
knob to select the PTY language (
the knob.
Selects the available Program Type (see the following), then, press
S / T
to start.
ON
:Synchronizes the unit’s time to the Radio Data System station time.;
OFF
:Cancels.
: NEWS
, AFFAIRS
SCIENCE
IN
, TRAVEL
CLASSICS
FOLK M (music)
if selected.
, INFO (information), SPORT
, VARIED
, WEATHER
, LEISURE
, DOCUMENT
, OTHER M (music), JAZZ
OFF
:Cancels.
ENGLISH/ FRENCH/ GERMAN
, FINANCE
, CHILDREN
, COUNTRY
, EDUCATE
, DRAMA
, SOCIAL
, NATION M (music), OLDIES
), then press
is selectable
, CULTURE
, RELIGION
[SPEECH]
, PHONE
or
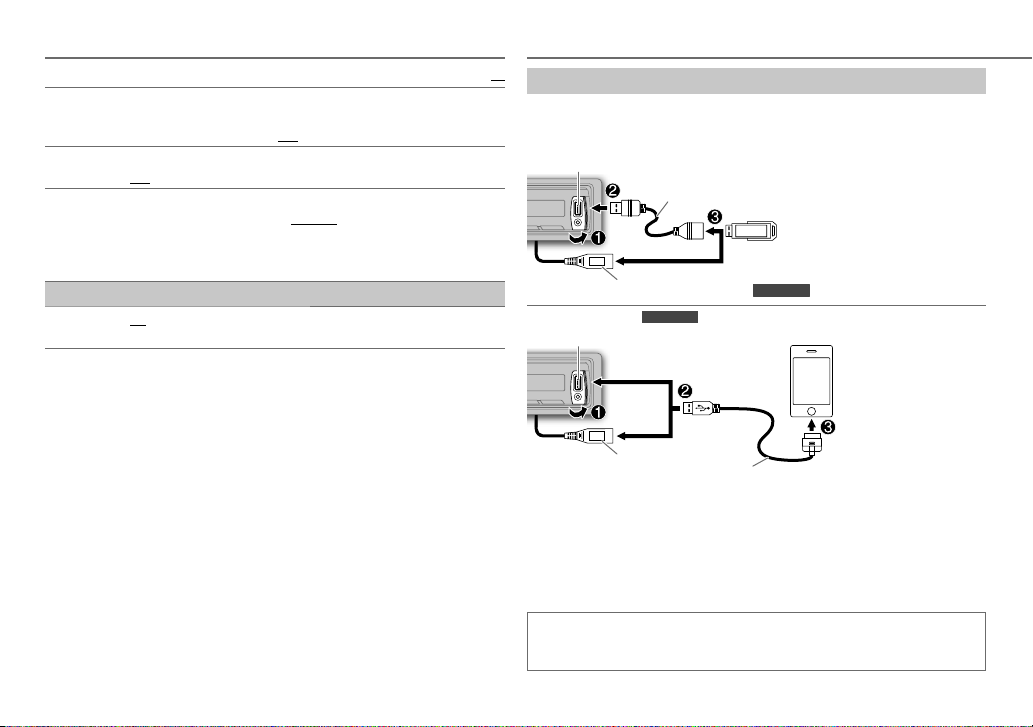
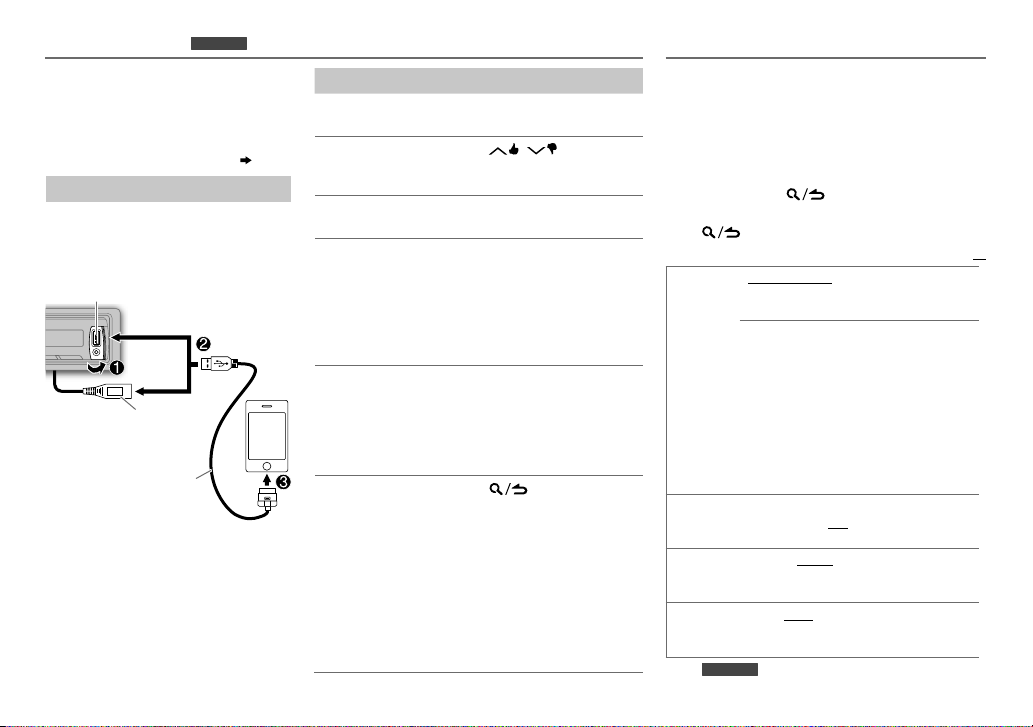
USB / iPod
XX
Start playback
The source changes automatically and playback starts.
USB
USB input terminal
CA-U1EX (max.: 500mA) (optional accessory)
and/or
USB cable from the rear of the unit (for
iPod/iPhone
USB input terminal
,
USB cable from the rear of
,
the unit
• You can also change the source from the other source to iPod FRONT/
iPod REAR by pressing iPod.
Press and hold iPod to select the control mode while in iPod source.
MODE ON:
From the iPod
MODE OFF:
If you connect the iPod/iPhone to the USB input terminal or USB cable
of the unit (while listening to TuneIn, TuneIn Radio Pro or Aupeo), the
unit will output the sound from these apps.
KMM-X30
(for
and/or
From the unit.
1
*
.
KMM-X30
)
KCA-iP102 (optional accessory)
)
6
Page 7
USB / iPod
KMM-X10
To Do this
Pause or resume
Press 6 IW or IW (or press ENT IW on RC-406).
playback
Select a file
Select a folder
Reverse/
Fast-forward
Repeat play
Press S / T (or press S / T(+) on RC-406).
2
*
Press / (or press
AM– / #FM+ on RC-406).
*
Press and hold S / T (or press and hold
S / T(+) on RC-406).
3
*
Press 4 repeatedly.
• MP3/WMA/WAV/FLAC file or iPod: FILEREPEAT,
FOLDERREPEAT, REPEATOFF
• KENWOOD Music Editor Light (KME Light)/
KENWOOD Music Control (KMC) file
( 11)
:
FILEREPEAT, REPEATOFF
3
Random play
*
Press 3 or repeatedly.
• MP3/WMA/WAV/FLAC file or iPod or KME Light/ KMC
file: FOLDERRANDOM, RANDOMOFF
Press and hold 3 or to select “ALLRANDOM”.
1
*
You can still play/pause, file skip, fast-forward or reverse files from the unit.
2
*
Only for MP3/WMA/WAV/FLAC files. This does not work for iPod.
3
*
For iPod: Applicable only when
[MODE OFF]
is selected.
Select a file from a list
For iPod: Applicable only when
[MODE OFF]
is selected.
( 6)
1 Press .
2 Turn the volume knob to make a selection, then press the knob.
• MP3/WMA/WAV/FLAC file: Select the desired folder, then a file.
• iPod or KME Light/ KMC file: Select the desired file from the list
(PLAYLISTS, ARTISTS, ALBUMS, SONGS, PODCASTS*, GENRES,
COMPOSERS*).
*
Only for iPod.
• To return to the root folder (or first file), press number button 5.
• To return to the previous setting item or hierarchy, press
• To cancel, press and hold
.
.
If you have many files....
You can search through them quickly (on step 2 above) at a preset
skip search ratio by pressing S / T.
• See also “Set the skip search ratio.”
( 8)
• Pressing and holding S / T skip songs at the maximum ratio
(10
%
) regardless of the setting made.
• For USB: Only for files registered in the database created with KME
Light/ KMC.
Direct Music Search (using RC-406)
Press DIRECT.
1
2 Press the number buttons to enter a file number.
3 Press ENT IW to search for music.
• To cancel, press .
• Not available if Random Play is selected.
• Not applicable for iPod, KME Light/ KMC file.
ENGLISH |
7
Page 8
Select a song by name
While listening to iPod...
1 Press .
2 Turn the volume knob to select a
category, then press the knob.
3 Turn the volume knob quickly or
press
to enter character search.
4 Turn the volume knob to select the
character to be searched for.
5 Press S / T to move to the entry
position.
You can enter up to 3characters.
6 Press the volume knob to start
searching.
7 Turn the volume knob to make a
selection, then press the knob.
Repeat step
selected.
• To search for a character other than A to
Z and 0 to 9, enter only “
• To return to the previous hierarchy,
press
• To return to the top menu, press
number button 5.
• To cancel, press and hold
7 until the desired item is
”.
*
.
.
USB / iPod
Set the skip search ratio
While listening to iPod or KME Light/ KMC file...
1 Press the volume knob to enter
2 Turn the volume knob to select
the knob.
3 Turn the volume knob to select
then press the knob.
4 Turn the volume knob to make a selection, then
press the knob.
0.5%
(default)/ 1%/ 5%/
the total files.
10%
5 Press and hold to exit.
Change the USB drive
When a smartphone (Mass Storage Class) is
connected to the USB input terminal (or USB cable
KMM-X30
for
external memory (such as an SD card) to playback
the stored songs.
You can also select the desired drive to playback
when a multiple drives device is connected.
Press number button 5 repeatedly to select the
desired drive.
(or)
), you can select its internal memory or
1 Press the volume knob to enter
2 Turn the volume knob to select
the knob.
3 Turn the volume knob to select
then press the knob.
4 Press the volume knob to select
The next drive is selected automatically.
Repeat steps 1 to 4 to select the following drives.
Selectable items:
[DRIVE1]
to
[FUNCTION]
[USB]
[SKIP SEARCH]
: Skip search ratio over
[FUNCTION]
[USB]
[MUSIC DRIVE]
[DRIVE CHANGE]
[DRIVE5]
.
, then press
.
, then press
,
,
.
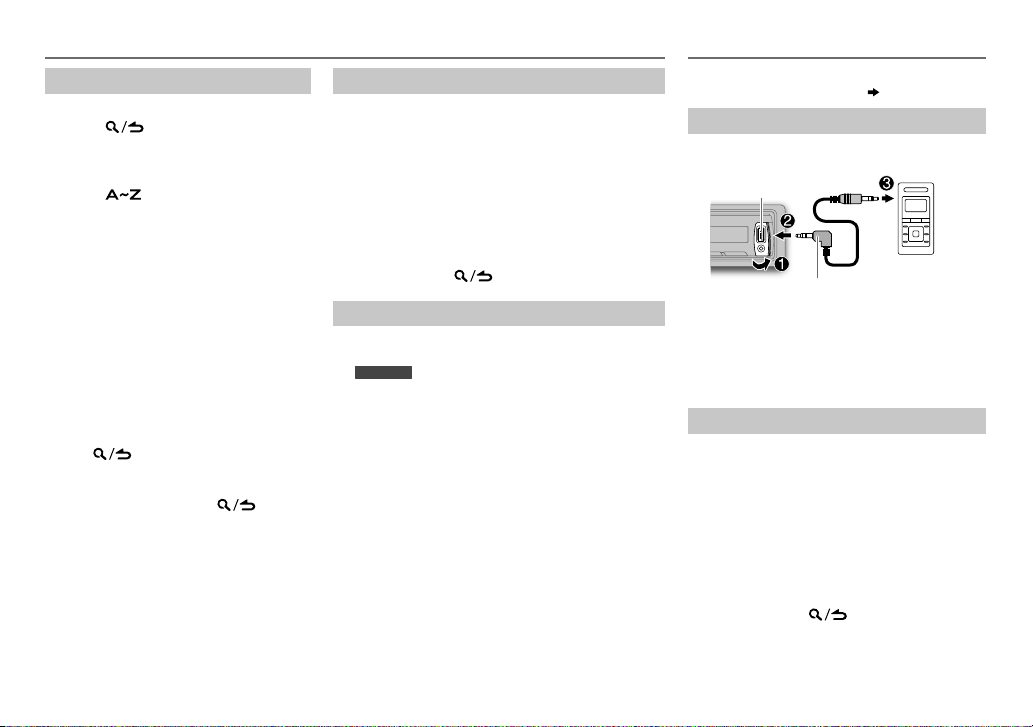
AUX
Preparation:
Select
[ON]
for
[BUILT-IN AUX]. ( 4)
Start listening
Connect a portable audio player
1
(commercially available).
Auxiliary input jack
Portable audio
3.5mm stereo mini plug with “L”
shaped connector (commercially
available)
2 Press B SRC to select AUX.
3 Turn on the portable audio player and
start playback.
Set the AUX name
While listening to a portable audio player
connected to the unit...
1 Press the volume knob to enter
2 Turn the volume knob to select
then press the knob.
3 Turn the volume knob to select
SET]
, then press the knob.
4 Turn the volume knob to make a selection,
then press the knob.
AUX
(default)/
DVD/ PORTABLE/ GAME/ VIDEO/ TV
5 Press and hold to exit.
player
[FUNCTION]
[SYSTEM]
[AUX NAME
,
.
8
Page 9
Pandora®
Preparation:
Install the latest version of the Pandora
application onto your device (iPhone/
iPod touch), then create an account
and log in to Pandora.
• Select
[ON]
for
KMM-X30
(for
[PANDORA SRC]. ( 4)
)
Start listening
Open the Pandora application on
1
your device.
2 Connect your device to the USB
input terminal or USB cable.
USB input terminal
and/or
USB cable from the rear
of the unit
KCA-iP102
(optional accessory)
The source changes to PANDORA
FRONT/ PANDORA REAR and
broadcast starts.
To Do this
Pause or resume
playback
Thumbs up or
thumbs down
Skip a track
Create a new
station
Press 6 IW (or press
ENT IW on RC-406).
Press
• If thumbs down is selected,
/ .
the current track is skipped.
Press T (or press T(+) on
RC-406).
1 Press and hold the volume
knob.
2 Turn the volume knob to
select
[FROM TRACK]
ARTIST]
A new station is created based
Save a station Press and hold one of the
• To select a stored station,
Search for a
registered
station
1 Press .
2 Turn the volume knob to
, then press the knob.
on the current song or artist.
number buttons (1to5) to
store.
press one of the number
buttons (1to5).
make a selection, then press
the knob (or press J / K on
RC-406).
[BY DATE]:
registered date.
[A-Z]:
Alphabetical order.
or
[FROM
According to the
3 Turn the volume knob to the
desired station, then press
the knob.
DISPLAY SETTINGS
1 Press the volume knob to enter
2 Turn the volume knob to select
press the knob.
3 Turn the volume knob to make a selection
(see the following table), then press the knob.
Repeat step
or activated.
3 until the desired item is selected
4 Press and hold to exit.
To return to the previous setting item or hierarchy,
press
COLOR
SELECT*
DIMMER ON:
BRIGHTNESS LVL 0
TEXT SCROLL AUTO/ ONCE:
* For
.
VARIABLE SCAN/ COLOR 01
USER
: Selects your preferred button
illumination color.
You can create your own color (when
[COLOR 01]
—
selected). The color you have created can be
selected when you select
1
Press and hold the volume knob to enter the
detailed color adjustment.
2
Press
B
3
Turn the volume knob to adjust the level
(
illumination*).
the
[BRIGHTNESS]
brightness level for display illumination (and
button illumination*).
display information automatically, or scroll only
once.
KMM-X30
[COLOR 24]
S / T
) to adjust.
0—9
), then press the knob.
Dims the display illumination (and button
; OFF:
—
LVL 31
: Selects your preferred
Selects whether to scroll the
; OFF:
Cancels.
[FUNCTION]
[DISPLAY]
Default:
—
COLOR 24
or
[USER]
[USER]
.
to select the color (R/ G/
Illuminates according to
settings.
.
, then
/
is
XX
ENGLISH |
9
Page 10

AUDIO SETTINGS
While listening to any source...
1 Press the volume knob to enter
2 Turn the volume knob to select
3 Turn the volume knob to make a selection (see the following table),
then press the knob.
Repeat step
3 until the desired item is selected or activated.
4 Press and hold to exit.
(or using RC-406)
1 Press AUD to enter
[AUDIO CONTROL]
2 Press J / K to make a selection, then press ENT IW.
To return to the previous setting item or hierarchy, press
SUB-W LEVEL –15 to +15 (0)
BASS LEVEL –8 to +8 (+6)
MID LEVEL –8 to +8 (+5)
TRE LEVEL
EQ PRO
BASS ADJUST BASS CTR FRQ
MID ADJUST MID CTR FRQ
TRE ADJUST
–8 to +8 (0)
BASS LEVEL
BASS Q FACTOR 1.00/ 1.25/ 1.50/ 2.00
BASS EXTEND
MID LEVEL
MID Q FACTOR
TRE CTR FRQ
TRE LEVEL
[FUNCTION]
[AUDIO CONTROL]
Adjusts the subwoofer output level.
Adjusts the level to memorize for each source. (Before
making an adjustment, select the source you want to
adjust.)
60/ 80/ 100/ 200
–8 to +8 (+6)
ON
: Turns on the extended bass. ;
0.5/ 1.0/ 1.5/ 2.5K
–8 to +8 (+5)
0.75/ 1.00/ 1.25
10.0/ 12.5/ 15.0/ 17.5K
–8 to +8 (0)
.
, then press the knob.
.
: Selects the center frequency.
: Adjusts the level.
:Adjusts the quality factor.
: Selects the center frequency.
: Adjusts the level.
: Adjusts the quality factor.
: Selects the center frequency.
: Adjusts the level.
OFF
.
Default:
: Cancels.
PRESET EQ DRIVE EQ/ TOP40/ POWERFUL/ ROCK/ POPS/ EASY/ JAZZ
BASS BOOST
LOUDNESS LV1/ LV2
SUBWOOFERSET ON
LPFSUBWOOFER THROUGH
XX
SUB-WPHASE REVERSE
FADER R15
BALANCE L15
VOLUMEOFFSET
(Default:0)
SOUNDRECNSTR
(Sound
reconstruction)
•
[SUB-W LEVEL]/ [SUBWOOFER SET]/ [LPF SUBWOOFER]/ [SUB-W PHASE]
selectable only if
•
[SUB-W LEVEL]/ [LPF SUBWOOFER]/ [SUB-W PHASE]
[SUBWOOFER SET]
NATURAL/ USER
genre. (Select
settings.)
[DRIVE EQ]
LV1/ LV2/ LV3
OFF
: Cancels.
produce a well-balanced sound at a low volume level.;
:Turns on the subwoofer output.;
160HZ
160Hz are sent to the subwoofer.
output to be in line with the speaker output for optimum
performance. (Selectable only if a setting other than
selected for
to
to
–8
to +8(for AUX) ; –8 to 0(for other sources):Presets the volume
adjustment level of each source. (Before adjustment, select the
source you want to adjust.)
ON
:Creates realistic sound by compensating the high-frequency
components and restoring the rise-time of the waveform that are
lost in audio data compression.;
[SWITCH PREOUT]
is set to
:Selects a preset equalizer suitable to the music
[USER]
to use the customized bass, middle, and treble
is a preset equalizer that reduces noise from the road.
: Selects your preferred bass boost level. ;
:Selects your preferred low and high frequencies boost to
OFF
:All signals are sent to the subwoofer.;
:Audio signals with frequencies lower than 85Hz/ 120Hz/
(180°)/
NORMAL
(0°):Selects the phase of the subwoofer
[LPF SUBWOOFER]
F15 (0
):Adjusts the rear and front speaker output balance.
R15 (0
):Adjusts the left and right speaker output balance.
is set to
[ON]
.
.)
OFF
:Cancels.
[SUB-W]. ( 4)
is selectable only if
:Cancels.
/
OFF
:Cancels.
85HZ/ 120HZ
[THROUGH]
is
/
is
10
Page 11

MORE INFORMATION
General
Detailed information and notes about the playable audio files
are stated in an online manual on the following web site:
www.kenwood.com/cs/ce/audiofile/
Playable files
• Playable audio file: MP3 (.mp3), WMA (.wma), WAV(.wav),
FLAC (.flac)
• Playable USB device file system: FAT12, FAT16, FAT32
Even when audio files comply with the standards listed
above, playback may be impossible depending on the types
or conditions of media or device.
About USB devices
• This unit can play MP3/WMA/WAV/FLAC files stored on a
USB mass storage class device.
• You cannot connect a USB device via a USB hub.
• Connecting a cable whose total length is longer than 5m
may result in abnormal playback.
• This unit cannot recognize a USB device whose rating is
other than 5V and exceeds 1A.
About KENWOOD Music Editor Light and
KENWOOD Music Control
• This unit supports the PC application KENWOOD Music
Editor Light and Android™ application KENWOOD Music
Control.
• When you play audio files with song data added using the
KENWOOD Music Editor Light or KENWOOD Music Control,
you can search for audio files by Genres, Artists, Albums,
Playlists, and Songs.
• KENWOOD Music Editor Light and KENWOOD Music Control
are available on the following web site:
www.kenwood.com/cs/ce/
About iPod/iPhone
Made for
- iPod touch (1st, 2nd, 3rd, 4th, and 5th generation)
- iPod classic
- iPod nano (3rd, 4th, 5th, 6th, and 7th generation)
- iPhone, iPhone 3G, 3GS, 4, 4S, 5
• For the latest compatible list and software versions of
iPhone/iPod, see: www.kenwood.com/cs/ce/ipod
• To connect devices featuring Lightning connector, both
KCA-iP102 (optional accessory) and Apple Lightning to
30-pin Adapter (accessory of the iPod/iPhone) are required.
Do not leave the Apple Lightning to 30-pin Adapter inside
the car to prevent damages caused by the hot temperature.
• You cannot operate iPod if “KENWOOD” or “
” is displayed
on iPod.
About Pandora
• Pandora is available only in the U.S., Australia and New
Zealand.
• Because Pandora is a third-party service, the specifications
are subject to change without prior notice. Accordingly,
compatibility may be impaired, or some or all of the
services may become unavailable.
• Some functions of Pandora cannot be operated from this
unit.
• For issues using the application, please contact Pandora at
pandora-support@pandora.com.
libFLAC
Copyright (C) 2000,2001,2002,2003,2004,2005,2006,2007,
2008,2009 Josh Coalson
Redistribution and use in source and binary forms, with
or without modification, are permitted provided that the
following conditions are met:
- Redistributions of source code must retain the above
copyright notice, this list of conditions and the following
disclaimer.
- Redistributions in binary form must reproduce the above
copyright notice, this list of conditions and the following
disclaimer in the documentation and/or other materials
provided with the distribution.
- Neither the name of the Xiph.org Foundation nor the names
of its contributors may be used to endorse or promote
products derived from this software without specific prior
written permission.
THIS SOFTWARE IS PROVIDED BY THE COPYRIGHT HOLDERS
AND ONTRIBUTORS “AS IS” AND ANY EXPRESS OR IMPLIED
WARRANTIES, INCLUDING, BUT NOT LIMITED TO, THE IMPLIED
WARRANTIES OF MERCHANTABILITY AND FITNESS FOR A
PARTICULAR PURPOSE ARE DISCLAIMED. IN NO EVENT SHALL
THE FOUNDATION OR CONTRIBUTORS BE LIABLE FOR ANY
DIRECT, INDIRECT, INCIDENTAL, SPECIAL, EXEMPLARY, OR
CONSEQUENTIAL DAMAGES (INCLUDING, BUT NOT LIMITED
TO, PROCUREMENT OF SUBSTITUTE GOODS OR SERVICES; LOSS
OF USE, DATA, OR PROFITS; OR BUSINESS INTERRUPTION)
HOWEVER CAUSED AND ON ANY THEORY OF LIABILITY,
WHETHER IN CONTRACT, STRICT LIABILITY, OR TORT (INCLUDING
NEGLIGENCE OR OTHERWISE) ARISING IN ANY WAY OUT OF THE
USE OF THIS SOFTWARE, EVEN IF ADVISED OF THE POSSIBILITY
OF SUCH DAMAGE.
ENGLISH |
11
Page 12

TROUBLESHOOTING
Symptom Remedy
Sound cannot be heard. • Adjust the volume to the optimum level.
“PROTECT” appears and no
operations can be done.
• Sound cannot be heard.
• The unit does not turn on.
• Information shown on the
display is incorrect.
The unit does not work at
all.
• Radio reception is poor.
• Static noise while listening
to the radio.
“NA FILE” appears. Make sure the media contains supported audio files.
“READ ERROR” appears. Copy the files and folders onto the USB device again. If this
“NO DEVICE” appears. Connect a USB device, and change the source to USB again.
“COPY PRO” appears. A copy-protected file is played.
“NA DEVICE” appears. Connect a supported USB device, and check the
“NO MUSIC” appears. Connect a USB device that contains playable audio files.
“iPod ERROR” appears. • Reconnect the iPod.
“READING” keeps flashing. Do not use too many hierarchical levels or folders.
Elapsed playing time is not
correct.
Correct characters are not
displayed (e.g. album
name).
• Check the cords and connections.
Check to be sure the terminals of the speaker wires are
insulated properly, then reset the unit. If this does not
solve the problem, consult your nearest service center.
Clean the connectors.
Reset the unit.
• Connect the antenna firmly.
• Pull the antenna out all the way.
( 11)
does not solve the problem, reset the USB device or use
another USB device.
connections.
• Reset the iPod.
This is caused by how the tracks are recorded.
This unit can only display uppercase letters, numbers, and
a limited number of symbols.
( 2)
( 3)
12
Symptom Remedy
“ADDERROR”
“SEARCHERROR”
“CHECKDEVICE” Check the Pandora application on your device.
“NOSKIPS” The skip limit has been reached.
“NOSTATIONS” No stations are found.
“STATIONLIMIT” The number of registered stations has reached its limit. Retry
Pandora
“UPGRADEAPP” Make sure you have installed the latest version of the Pandora
“CONNECT ERROR” Communication is unstable.
“RATING ERROR” Registration of thumbs up/thumbs down has failed.
“LICENSE ERROR”
For Turkey
Bu ürün 28300 sayılı Resmi Gazete’de yayımlanan Atik Elektrikli ve Elektronik Eşyalarin Kontrolü
Yönetmeliğe uygun olarak üretilmiştir.
Eski Elektrik ve Elektronik Ekipmanların İmha Edilmesi Hakkında Bilgi (ayrı atık
toplama sistemlerini kullanan ülkeleri için uygulanabilir)
New station creation is unsuccessful.
after deleting unnecessary stations from your device.
application on your device.
You try to access from a country which Pandora is not deliverable.
Sembollü (üzerinde çarpı işareti olan çöp kutusu) ürünler ev atıkları olarak
atılamaz.
Eski elektrik ve elektronik ekipmanlar, bu ürünleri ve ürün atıklarını geri
dönüştürebilecek bir tesiste değerlendirilmelidir. Yaşadığınız bölgeye en
yakın geri dönüşüm tesisinin yerini öğrenmek için yerel makamlara müracaat
edin. Uygun geri dönüşüm ve atık imha yöntemi sağlığımız ve çevremiz
üzerindeki zararlı etkileri önlerken kaynakların korunmasına da yardımcı
olacaktır.
Page 13

SPECIFICATIONS
FM Frequency Range 87.5MHz — 108.0MHz (50kHz space)
Channel Space Selection 50kHz/ 200kHz
Usable Sensitivity (S/N=26dB) 8.2dBf (0.71μV/75Ω)
Quieting Sensitivity
(DINS/N=46dB)
Frequency Response (±3dB) 30Hz — 15kHz
Signal-to-Noise Ratio (MONO) 64dB
Stereo Separation (1kHz) 40dB
Frequency Range Band 1 (MW) 531 kHz to 1 611 kHz (9 kHz space)
MW/
Tuner
SW1/
SW2
Channel Space
Selection
Usable Sensitivity
(S/N=20dB)
USB Standard USB1.1, USB2.0 (Full speed)
File System FAT12/16/32
Maximum Supply Current DC5V
Frequency Response (±1dB) 20Hz — 20kHz
Signal-to-Noise Ratio (1kHz) 105dB
USB
Dynamic Range 88dB
Channel Separation 90dB
MP3 Decode Compliant with MPEG-1/2 Audio Layer-3
WMA Decode Compliant with Windows Media Audio
Band 2 (SW1) 2 940 kHz to 7 735 kHz (5 kHz space)
Band 3 (SW2) 9 500 kHz to 10 135 kHz/
Band 1 9 kHz/10 kHz
Band 2/ 3 5 kHz
MW 29.0 Bμ (28.2 μV)
SW 30 dBμ (32μV)
87.9MHz — 107.9MHz (200kHz space)
17.2dBf (2.0μV/75Ω)
530 kHz to 1 700 kHz (10 kHz space)
11 580 kHz to 18 135 kHz (5 kHz space)
1A
WAV Decode RIFF waveform Audio Format
USB
FLAC Decode FLAC files
Maximum Output Power 50W×4
Full Bandwidth Power 22W×4 (at less than 1% THD)
Speaker Impedance 4Ω—8Ω
Tone Action Bass 200Hz±8dB
Audio
Preout Level/Load 2500mV/10kΩ (USB)
Preout Impedance ≤600Ω
Frequency Response (±3dB) 20Hz—20kHz
Input Maximum Voltage 1200mV
Auxiliary
Input Impedance 30kΩ
Operating Voltage 14.4V (10.5V—16V allowable)
Maximum Current Consumption 10A
Operational Temperature Range 0°C—+40°C
General
Installation Size (W×H×D) 182mm×53mm×107mm
Weight 0.54kg
Subject to change without notice.
(Linear PCM only)
Middle 2.5kHz±8dB
Treble 12.5kHz±8dB
ENGLISH |
13
Page 14

Warning
• The unit can only be used with a 12V DC power supply, negative
ground.
• Disconnect the battery’s negative terminal before wiring and
mounting.
• Do not connect Battery wire (yellow) and Ignition wire (red) to the
car chassis or Ground wire (black) to prevent a short circuit.
• Insulate unconnected wires with vinyl tape to prevent a short circuit.
• Be sure to ground this unit to the car’s chassis again after
installation.
Caution
• For safety’s sake, leave wiring and mounting to professionals.
Consult the car audio dealer.
• Install this unit in the console of your vehicle. Do not touch the metal
parts of this unit during and shortly after use of the unit. Metal parts
such as the heat sink and enclosure become hot.
• Do not connect the
wire (black), or connect them in parallel.
•
Mount the unit at an angle of less than 30º.
• If your vehicle wiring harness does not have the ignition terminal,
connect Ignition wire (red) to the terminal on the vehicle’s fuse box
INSTALLATION / CONNECTION
which provides 12 V DC power supply and is turned on and off by the
ignition key.
• After the unit is installed, check whether the brake lamps, blinkers,
wipers, etc. on the car are working properly.
• If the fuse blows, first make sure the wires are not touching car’s
chassis, then replace the old fuse with one that has the same rating.
[
wires of speakers to the car chassis or Ground
Basic procedure
1
Remove the key from the ignition switch, then
disconnect the
[
terminal of the car battery.
2 Connect the wires properly.
See Wiring connection.
( 15)
3 Install the unit to your car.
See Installing the unit (in-dash mounting).
4 Connect the
5 Reset the unit.
[
terminal of the car battery.
( 3)
Installing the unit (in-dash mounting)
Hook on the top side
Orientate the trim plate as
illustrated before fitting.
Bend the appropriate tabs to hold the
mounting sleeve firmly in place.
When installing without the mounting sleeve
1
Remove the mounting sleeve and trim plate from
the unit.
2 Align the holes in the unit (on both sides) with the
vehicle mounting bracket and secure the unit with
screws (commercially available).
Use only the specified screws. Using wrong screws might damage the unit.
How to remove the unit
1
Detach the faceplate.
2 Fit the catch pin on the extraction keys
into the holes on both sides of the trim
plate, then pull it out.
3 Insert the extraction keys deeply into the
slots on each side, then follow the arrows
as shown on the right.
Do the required wiring.
( 15)
Dashboard of
your car
14
Page 15

Wiring connection
To front speaker (left)
To front speaker (right)
To rear speaker (left)
To rear speaker (right)
Ignition switch
Car fuse box
Car fuse box
Battery
Fuse (10A) Rear/ subwoofer output
White
White/Black
Gray
Light blue/yellow
(Steering remote
control wire)
Gray/Black
Green
Green/Black
Blue/White
(Power control wire)
Purple
Purple/Black
Brown
(Mute control wire)
Red
(Ignition wire)
Yellow
(Battery wire)
Black (Ground wire)
To the metallic body or chassis
of the car
USB cable (for
KMM-X30
Antenna terminal
If no connections are made, do not let the wire
come out from the tab.
STEERING WHEEL
REMOTE INPUT
REMOTE CONT
To the steering wheel remote control
adapter
To the power control terminal when using
the optional power amplifier, or to the
antenna control terminal in the vehicle.
To the terminal that is grounded when the
telephone rings or during conversation.
(To connect the Kenwood navigation system,
refer your navigations manual.)
Part list for installation
(A)
)
Faceplate
(B)
Trim plate
(C)
Mounting sleeve
(D)
Wiring harness
(E)
Extraction key
ENGLISH |
15
Page 16

ﺭﺎﻴﻐﻟﺍ ﻊﻄﻗ ﺔﻤﺋﺎﻗ
ﺐﻴﻛﺮﺘﻟﺍ ﻲﻓ ﺔﻣﺪﺨﺘﺴﻤﻟﺍ
ﺯﺎﻬﺠﻟﺍ ﺔﻬﺟﺍﻭ (A)
(ﺮﻴﺒﻣﺃ ١٠) ﺔﻴﺋﺎﺑﺮﻬﻛ ﺔﻣﺎﻤﺻ ﺮﻓﻭﻮﺒﺼﻟﺍ ﺝﺮﺧ/ﺔﻴﻔﻠﺨﻟﺍ ﻞﻴﺻﻮﺘﻟﺍ ﻑﺍﺮﻃﺃ
ﻲﺋﺍﻮﻬﻟﺍ ﻞﻴﺻﻮﺗ ﻑﺮﻃ
KMM-X30
(
ﻙﻼﺳﻷﺍ ﻞﻴﺻﻮﺗ
ـﻟ) USB ﻞﺑﺎﻛ
ﺔﻨﻳﺰﻟﺍ ﺔﺣﻭ (B)
ﺐﻴﻛﺮﺘﻟﺍ ﺭﺎﻃﺇ (C)
ﻙﻼﺳﻷﺍ ﺓﺮﻴﻔﺿ (D)
ﺔﻴﻣﺎﻣﻷﺍ ﺔﻋﺎﻤﺴﻟﺍ ﻰﻟﺇ
(ﻯﺮﺴﻴﻟﺍ)
ﺔﻴﻣﺎﻣﻷﺍ ﺔﻋﺎﻤﺴﻟﺍ ﻰﻟﺇ
(ﻰﻨﻤﻴﻟﺍ)
ﺔﻴﻔﻠﺨﻟﺍ ﺔﻋﺎﻤﺴﻟﺍ ﻰﻟﺇ
(ﻯﺮﺴﻴﻟﺍ)
ﺔﻴﻔﻠﺨﻟﺍ ﺔﻋﺎﻤﺴﻟﺍ ﻰﻟﺇ
(ﻰﻨﻤﻴﻟﺍ)
ﻝﺎﻌﺘﺷﻻﺍ ﺡﺎﺘﻔﻣ
ﺓﺭﺎﻴﺴﻟﺍ ﺕﺍﺯﻮﻴﻓ ﻕﻭﺪﻨﺻ
ﺾﻴﺑﺃ
ﺀﺍﺩﻮﺳ/ﺀﺎﻀﻴﺑ
ﻱﺩﺎﻣﺭ
ﺀﺍﺩﻮﺳ/ﺔﻳﺩﺎﻣﺭ
ﺮﻀﺧﺃ
ﺀﺍﺩﻮﺳ/ﺀﺍﺮﻀﺧ
ﺔﻴﻧﺍﻮﺟﺭﺃ
ﺀﺍﺩﻮﺳ/ﺔﻴﻧﺍﻮﺟﺭﺃ
ﺮﻤﺣﺃ
ﺮﻔﺻﺃ/ﺢﺗﺎﻓ ﻕﺭﺯﺃ
ﻢﻜﺤﺘﻟﺍ ﺯﺎﻬﺟ ﻚﻠﺳ)
ﺔﻠﺠﻋ ﻲﻓ ﺪﻌﺑ ﻦﻋ
ﻲﻓ ﻢﻜﺤﺘﻟﺍ ﻚﻠﺳ)
ﻲﻓ ﻢﻜﺤﺘﻟﺍ ﻚﻠﺳ)
(ﺕﻮﺼﻟﺍ ﻢﺘﻛ
ﻞﻌﺠﺗ ﻼﻓ ،ﺕﻼﻴﺻﻮﺗ ﺔﻳﺃ ﻞﻤﻋ ﻢﺘﻳ ﻢﻟ ﺍﺫﺇ
.ﻂﻳﺮﺸﻟﺍ ﻦﻣ ﺯﺮﺒﻳ ﻚﻠﺴﻟﺍ
STEERING WHEEL
REMOTE INPUT
REMOTE CONT
ﺔﻠﺠﻋ ﻲﻓ ﺪﻌﺑ ﻦﻋ ﻢﻜﺤﺘﻟﺍ ﺯﺎﻬﺟ ﻝﻮﺤﻣ ﻰﻟﺇ
(ﺓﺩﺎﻴﻘﻟﺍ
ﺾﻴﺑﺃ/ﻕﺭﺯﺃ
ﻑﺮﻄﺑ ﻭﺃ ،ﻱﺭﺎﻴﺘﺧﻻﺍ ﺓﺭﺪﻘﻟﺍ ﻢﺨﻀﻣ ﻡﺍﺪﺨﺘﺳﺍ
(ﺔﻗﺎﻄﻟﺍ
ﻲﻨﺑ
ﻚﻴﻠﻋ ،Kenwood ﻦﻣ ﺔﺣﻼﻤﻟﺍ ﻡﺎﻈﻧ ﻞﻴﺻﻮﺘﻟ)
ﺓﺩﺎﻴﻘﻟﺍ
ﺔﻟﺎﺣ ﻲﻓ ﺔﻗﺎﻄﻟﺍ ﻲﻓ ﻢﻜﺤﺘﻟﺍ ﻑﺮﻃ ﻰﻟﺇ
.ﺓﺭﺎﻴﺴﻟﺎﺑ ﻲﺋﺍﻮﻬﻟﺍ ﻲﻓ ﻢﻜﺤﺘﻟﺍ
ﺎﻣﺪﻨﻋ ﻪﻀﻳﺭﺄﺗ ﻢﺘﻳ ﻱﺬﻟﺍ ﻞﻴﺻﻮﺘﻟﺍ ﻑﺮﻃ ﻰﻟﺇ
.ﺔﺛﺩﺎﺤﻤﻟﺍ ﺀﺎﻨﺛﺃ ﻭﺃ ﻒﺗﺎﻬﻟﺍ ﻥﺮﻳ
.(ﺔﺣﻼﻤﻟﺍ ﻞﻴﻟﺩ ﻰﻟﺇ ﻉﻮﺟﺮﻟﺎﺑ
(ﻝﺎﻌﺷﻹﺍ ﻚﻠﺳ)
ﺝﺍﺮﺨﺘﺳﻻﺍ ﺡﺎﺘﻔﻣ (E)
ﺓﺭﺎﻴﺴﻟﺍ ﺕﺍﺯﻮﻴﻓ ﻕﻭﺪﻨﺻ
ﺮﻔﺻﺃ
(ﺔﻳﺭﺎﻄﺒﻟﺍ ﻚﻠﺳ)
(ﻲﺿﺭﻷﺍ ﻚﻠﺳ) ﺩﻮﺳﺃ
ﻞﻜﻴﻫ ﻭﺍ ﻲﻧﺪﻌﻤﻟﺍ ﻢﺴﺠﻟﺍ ﻰﻟﺍ
ﻲﻧﺪﻌﻤﻟﺍ ﺓﺭﺎﻴﺴﻟﺍ
ﺔﻳﺭﺎﻄﺒﻟﺍ
| ﻲﺑﺮﻋ
١٥
Page 17

(ﺓﺭﺎﻴﺴﻟﺍ ﻮﻠﺑﺎﺗ ﻞﺧﺍﺩ) ﺓﺪﺣﻮﻟﺍ ﺐﻴﻛﺮﺗ
ﺐﻧﺎﺠﻟﺍ ﻲﻓ ﻑﺎﻄﺨﻟﺍ
ﻱﻮﻠﻌﻟﺍ
ﺔﻨﻳﺰﻟﺍ ﺔﺣﻮﻟ ﻪﻴﺟﻮﺗ ﻢﺘﻳ
ﺢﺿﻮﻣ ﻮﻫ ﺎﻤﻛ ﺔﻴﻣﺎﻣﻷﺍ
.ﺐﻴﻛﺮﺘﻟﺍ ﻞﺒﻗ
ﺖﻴﺒﺜﺘﻟ ﺔﺒﺳﺎﻨﻤﻟﺍ ﺔﻨﺴﻟﻷﺍ ﻲﻨﺜﺑ ﻢﻗ
.ﻪﻧﺎﻜﻣ ﻲﻓ ﻡﺎﻜﺣﺈﺑ ﺐﻴﻛﺮﺘﻟﺍ ﺭﺎﻃﺇ
ﺐﻴﻛﺮﺘﻟﺍ ﺭﺎﻃﺇ ﻥﻭﺪﺑ ﺐﻴﻛﺮﺘﻟﺍ ﺪﻨﻋ
.ﺓﺪﺣﻮﻟﺍ ﻦﻣ ﺔﺌﻴﻬﺘﻟﺍ ﺔﺣﻮﻟﻭ ﺐﻴﻛﺮﺘﻟﺍ ﺭﺎﻃﺇ ﻉﺰﻧﺍ ١
ﻑﺭ ﻊﻣ (ﻦﻴﺒﻧﺎﺠﻟﺍ ﻼﻛ ﻲﻓ) ﺯﺎﻬﺠﻟﺍ ﻲﻓ ﺓﺩﻮﺟﻮﻤﻟﺍ ﻒﻳﻭﺎﺠﺘﻟﺍ ﺓﺍﺫﺎﺤﻤﺑ ﻢﻗ
ﻲﻓ ﺓﺮﻓﻮﺘﻤﻟﺍ) ﻲﻏﺍﺮﺒﻟﺍ ﻡﺍﺪﺨﺘﺳﺎﺑ ﺯﺎﻬﺠﻟﺍ ﺖﻴﺒﺜﺘﺑ ﻢﻗﻭ ﺓﺭﺎﻴﺴﻟﺎﺑ ﺐﻴﻛﺮﺘﻟﺍ
ﺮﻴﻏ ﻲﻏﺍﺮﺒﻟﺍ ﻡﺍﺪﺨﺘﺳﺍ ﺐﺒﺴﻳ ﺪﻘﻓ .ﻂﻘﻓ ﺓﺩﺪﺤﻤﻟﺍ ﻲﻏﺍﺮﺒﻟﺍ ﻡﺪﺨﺘﺳﺍ
ﻲﻓ ﺝﺍﺮﺨﺘﺳﻻﺍ ﺢﻴﺗﺎﻔﻣ ﻲﻓ ﻙﺎﺴﻣﻹﺍ ﻦﺳ ﺩﺍﺪﻋﺈﺑ ﻢﻗ
ﺎﻬﺒﺤﺳﺍ ﻢﺛ ،ﺔﺌﻴﻬﺘﻟﺍ ﺔﺣﻮﻟ ﻲﺒﻧﺎﺟ ﻦﻣ ﻞﻛ ﻲﻓ ﺕﺎﺤﺘﻔﻟﺍ
ﺓﺩﻮﺟﻮﻤﻟﺍ ﺕﺎﺤﺘﻔﻟﺍ ﻲﻓ ﻖﻤﻌﺑ ﺝﺍﺮﺨﺘﺳﻻﺍ ﺢﻴﺗﺎﻔﻣ ﻞﺧﺩﺃ
ﺢﺿﻮﻣ ﻮﻫ ﺎﻤﻛ ﻢﻬﺳﻷﺍ ﺕﺎﻤﻴﻠﻌﺗ ﻊﺒﺗﺍ ﻢﺛ ،ﺐﻧﺎﺟ ﻞﻛ ﻲﻓ
ﻙﻼﺳﻷﺍ ﻞﻴﺻﻮﺘﺑ ﻢﻗ
(١٥ )
.ﺔﺑﻮﻠﻄﻤﻟﺍ
ﺓﺭﺎﻴﺴﻟﺍ ﻩﻮﻠﺑﺎﺗ
.(ﻕﻮﺴﻟﺍ
.ﺯﺎﻬﺠﻠﻟ ﺎﹰﻔﻠﺗ ﺔﺤﻴﺤﺼﻟﺍ
ﺓﺪﺣﻮﻟﺍ ﺔﻟﺍﺯﺇ ﺔﻴﻔﻴﻛ
.ﺯﺎﻬﺠﻟﺍ ﺔﻬﺟﺍﻭ ﻚﻔﺑ ﻢﻗ ١
.ﺝﺭﺎﺨﻠﻟ
.ﺭﺎﺴﻴﻟﺍ ﻰﻠﻋ
١٢ ﺮﺷﺎﺒﻣ ﺭﺎﻴﺗ ﺭﺪﺼﻣ ﺎﻬﺑ ﺓﺭﺎﻴﺳ ﻲﻓ ﻂﻘﻓ ﺓﺪﺣﻮﻟﺍ ﻡﺍﺪﺨﺘﺳﺍ ﻦﻜﻤﻳ •
.ﺐﻴﻛﺮﺘﻟﺍﻭ ﻙﻼﺳﻷﺍ ﻞﻴﺻﻮﺗ ﻞﺒﻗ ﺔﻳﺭﺎﻄﺒﻠﻟ ﻲﺒﻠﺴﻟﺍ ﻑﺮﻄﻟﺍ ﻞﺼﻔﺑ ﻢﻗ •
(ﺮﻤﺣﻷﺍ) ﻝﺎﻌﺷﻹﺍ ﻚﻠﺳﻭ (ﺮﻔﺻﻷﺍ) ﺔﻳﺭﺎﻄﺒﻟﺍ ﻚﻠﺳ ﻞﻴﺻﻮﺘﺑ ﻢﻘﺗ ﻻ •
.ﻲﺋﺎﺑﺮﻬﻛ ﺱﺎﻣ ﺙﻭﺪﺣ ﻊﻨﻤﻟ (ﺀﺍﺩﻮﺳ) ﻲﺿﺭﻷﺍ ﻚﻠﺴﻟﺍ ﻭﺃ ﺓﺭﺎﻴﺴﻟﺍ ﻪﻴﺳﺎﺸﺑ
ﻊﻨﻤﻟ ﻞﻴﻨﻴﻔﻟﺍ ﻦﻣ ﻂﻳﺮﺷ ﺔﻄﺳﺍﻮﺑ ﺔﻠﺻﻮﻤﻟﺍ ﺮﻴﻏ ﻙﻼﺳﻷﺍ ﻝﺰﻌﺑ ﻢﻗ •
.ﺐﻴﻛﺮﺘﻟﺍ ﺪﻌﺑ ﺔﻴﻧﺎﺛ ﺓﺮﻣ ﺓﺭﺎﻴﺴﻟﺍ ﻪﻴﺳﺎﺷ ﻊﻣ ﺓﺪﺣﻮﻟﺍ ﺾﻳﺭﺄﺗ ﻦﻣ ﺪﻛﺄﺗ •
ﻦﻴﻴﻨﻔﻠﻟ ﺐﻴﻛﺮﺘﻟﺍﻭ ﻙﻼﺳﻷﺍ ﻞﻴﺻﻮﺗ ﺔﻤﻬﻣ ﻙﺮﺗﺍ ،ﺔﻣﻼﺴﻟﺍ ﻲﻋﺍﻭﺪﻟ •
.ﺕﺍﺭﺎﻴﺴﻟﺎﺑ ﺔﺻﺎﺨﻟﺍ ﺕﺎﻴﺗﻮﺼﻟﺍ ﺓﺰﻬﺟﺃ ﻊﺋﺎﺑ ﺮﻴﺸﺘﺳﺍ .ﻦﻴﺼﺘﺨﻤﻟﺍ
ﺀﺍﺰﺟﻷﺍ ﺲﻤﻠﺗ ﻻﻭ .ﻚﺗﺭﺎﻴﺴﺑ ﺓﺰﻬﺟﻷﺍ ﻞﻣﺎﺣ ﻲﻓ ﺓﺪﺣﻮﻟﺍ ﻩﺬﻫ ﺐﻛﺭ •
ﺎﻬﻣﺍﺪﺨﺘﺳﺍ ﺪﻌﺑ ﻭﺃ ﺎﻬﻣﺍﺪﺨﺘﺳﺍ ﺀﺎﻨﺛﺃ ﺓﺪﺣﻮﻟﺍ ﻩﺬﻫ ﻦﻣ ﺔﻴﻧﺪﻌﻤﻟﺍ
ﺓﺭﺍﺮﺤﻟﺍ ﺩﺪﺒﻣ ﻞﺜﻣ ﺓﺪﺣﻮﻠﻟ ﺔﻴﻧﺪﻌﻤﻟﺍ ﺀﺍﺰﺟﻷﺍ ﻥﻮﻜﺗ ﺚﻴﺣ .ﺓﺮﻴﺼﻗ ﺓﺮﺘﻔﺑ
ﻚﻠﺳ ﻭﺃ ﺓﺭﺎﻴﺴﻟﺍ ﻪﻴﺳﺎﺸﺑ ﺕﺎﻋﺎﻤﺴﻟﺍ ﻙﻼﺳﺃ [ ﻞﻴﺻﻮﺘﺑ ﻢﻘﺗ ﻻ •
،ﻝﺎﻌﺷﺇ ﻑﺮﻃ ﺓﺭﺎﻴﺴﻟﺎﺑ ﺔﻴﺋﺎﺑﺮﻬﻜﻟﺍ ﻙﻼﺳﻷﺍ ﺔﻜﺒﺷ ﻚﻠﺘﻤﺗ ﻢﻟ ﺍﺫﺇ •
ﻕﻭﺪﻨﺻ ﻲﻓ ﺩﻮﺟﻮﻤﻟﺍ ﻑﺮﻄﻟﺎﺑ (ﺮﻤﺣﻷﺍ) ﻝﺎﻌﺷﻹﺍ ﻚﻠﺳ ﻞﻴﺻﻮﺘﺑ ﻢﻗ
ﻪﻠﻴﻐﺸﺗ ﻢﺘﻳﻭ ﺖﻟﻮﻓ ١٢ ﺮﺷﺎﺒﻣ ﺭﺎﻴﺗ ﺭﺪﺼﻣ ﺮﻓﻮﻳ ﻱﺬﻟﺍ ﺓﺭﺎﻴﺴﻟﺍ ﺕﺍﺯﻮﻴﻓ
٢
ﺮﻴﻴﻐﺗ ﺕﺍﺭﺎﺷﺇﻭ ﻞﻣﺍﺮﻔﻟﺍ ﺢﻴﺑﺎﺼﻣ ﻞﻤﻋ ﻦﻣ ﺪﻛﺄﺗ ﺯﺎﻬﺠﻟﺍ ﺐﻴﻛﺮﺗ ﺪﻌﺑ •
ﻙﻼﺳﻷﺍ ﺲﻣﻼﺗ ﻡﺪﻋ ﻦﻣ ﹰﻻﻭﺃ ﺪﻛﺄﺗ ،ﺮﻬﺼﻨﻤﻟﺍ ﻕﺍﺮﺘﺣﺍ ﺔﻟﺎﺣ ﻲﻓ •
ﺲﻔﻨﺑ ﺮﺧﺁ ﺮﻬﺼﻨﻤﺑ ﻢﻳﺪﻘﻟﺍ ﺮﻬﺼﻨﻤﻟﺍ ﻝﺪﺒﺘﺳﺍ ﻢﺛ ﺓﺭﺎﻴﺴﻟﺍ ﻪﻴﺳﺎﺸﻟ
ﻦﻣ [ ﻑﺮﻄﻟﺍ ﻞﺼﻓﺍ ﻢﺛ ،ﻝﺎﻌﺷﻹﺍ ﺡﺎﺘﻔﻣ ﻦﻣ ﺡﺎﺘﻔﻤﻟﺍ ﻉﺰﻧﺍ ١
٢
٣
.ﻱﺯﺍﻮﺘﻟﺍ ﻰﻠﻋ ﺎﻬﻠﻴﺻﻮﺗ ﻭﺃ (ﺀﺍﺩﻮﺳ) ﺾﻳﺭﺄﺘﻟﺍ
.º٣٠ ﻦﻣ ﻞﻗﺃ ﺔﻳﻭﺍﺯ ﺪﻨﻋ ﺯﺎﻬﺠﻟﺍ ﺐﻴﻛﺮﺘﺑ ﻢﻗ
.ﻝﺎﻌﺷﻹﺍ ﺡﺎﺘﻔﻣ ﺔﻄﺳﺍﻮﺑ ﻪﻓﺎﻘﻳﺇﻭ
.ﻢﻴﻠﺳ ﻞﻜﺸﺑ ﻪﻓﻼﺧﻭ ﺕﺎﺣﺎﺴﻤﻟﺍﻭ ﻩﺎﺠﺗﻻﺍ
.ﺢﻴﺤﺻ ﻞﻜﺸﺑ ﻙﻼﺳﻷﺍ ﻞﻴﺻﻮﺗ
(١٥ )
.ﻙﻼﺳﻷﺍ ﻞﻴﺻﻮﺗ ﺮﻈﻧﺍ
.(ﺓﺭﺎﻴﺴﻟﺍ ﻮﻠﺑﺎﺗ ﻞﺧﺍﺩ) ﺓﺪﺣﻮﻟﺍ ﺐﻴﻛﺮﺗ ﺮﻈﻧﺍ
.ﻚﺗﺭﺎﻴﺳ ﻲﻓ ﺯﺎﻬﺠﻟﺍ ﺐﻛﺭ
.ﺓﺭﺎﻴﺴﻟﺍ ﺔﻳﺭﺎﻄﺒﺑ [ ﻑﺮﻃ ﻞﻴﺻﻮﺗ
(٣ )
ﺮﻳﺬﺤﺗ
ﻞﻴﺻﻮﺘﻟﺍ / ﺐﻴﻛﺮﺘﻟﺍ
.ﻲﺒﻠﺳ ﺾﻳﺭﺄﺗﻭ ،ﺖﻟﻮﻓ
.ﻰﺋﺎﺑﺮﻬﻛ ﺱﺎﻣ ﺙﻭﺪﺣ
ﺮﻳﺬﺤﺗ
.ﻦﻴﻨﺧﺎﺳ ﺔﻳﻭﺎﺤﻟﺍﻭ
•
.ﺭﺎﻴﺘﻟﺍ ﺓﺪﺷ
ﻲﺳﺎﺳﻷﺍ ﺀﺍﺮﺟﻹﺍ
.ﺓﺭﺎﻴﺴﻟﺍ ﺔﻳﺭﺎﻄﺑ
٢
٣
٤
.ﺓﺪﺣﻮﻟﺍ ﻂﺒﺿ ﺪﻋﺃ ٥
١٤
Page 18

ﺕﺎﻔﺻﺍﻮﻤﻟﺍ
WMA ﺓﺮﻔﺷ ﻚﻓWindows Media Audio ﺔﻐﻴﺻ ﻊﻣ ﻖﻓﺍﻮﺘﻣ
(ﻂﻘﻓ ﻲﻄﺧ PCM)
(ﺕﻮﺼﻟﺍ ﺖﺘﺸﺗ
ﻞﺒﻴﺴﻳﺩ
ﻞﺒﻴﺴﻳﺩ
ﻢﻣ ١٠٧ x ﻢﻣ ٥٣ x ﻢﻣ ١٨٢
| ﻲﺑﺮﻋ
١٣
ﺔﻴﻄﺳﻮﻟﺍ ٨ ± ﺰﺗﺮﻫﻮﻠﻴﻛ ٢٫٥
(ﺖﻟﻮﻓ ١٦ —
ﻞﻣﺎﻜﻟﺍ ﺚﺒﻟﺍ ﻕﺎﻄﻧ ﺔﻌﺳ ﺓﺭﺪﻗ ﻲﻟﺎﻤﺟﺇ ٪ ١ ﻦﻣ ﻞﻗﺃ ﺪﻨﻋ) ٤ × ﺕﺍﻭ ٢٢
ﺓﺪﺤﻟﺍ ٨ ± ﺰﺗﺮﻫﻮﻠﻴﻛ ١٢٫٥
ﻞﻤﺤﻟﺍ / ﻲﺋﺍﺪﺘﺑﻻﺍ ﺝﺮﺨﻟﺍ ﻯﻮﺘﺴﻣ(USB) ﻡﻭﺃ ﻮﻠﻴﻛ ١٠/ﺖﻟﻮﻓ ﻲﻠﻠﻣ ٢ ٥٠٠
ﻲﺋﺍﺪﺘﺑﻻﺍ ﺕﻮﺼﻟﺍ ﺝﺮﺧ ﺔﻗﻭﺎﻌﻣﻡﻭﺍ ٦٠٠ ≥
(ﻞﺒﻴﺴﻳﺩ ٣±) ﺩﺩﺮﺘﻟﺍ ﺔﺑﺎﺠﺘﺳﺍﺰﺗﺮﻫ ﻮﻠﻴﻛ ٢٠ — ﺰﺗﺮﻴﻫ ٢٠
ﺱﻮﻳﺰﻠﺳ
WAV ﺓﺮﻔﺷ ﻚﻓ waveform RIFF ﺕﻮﺻ ﻖﻴﺴﻨﺗ
FLAC ﺓﺮﻔﺷ ﻚﻓFLAC ﺕﺎﻔﻠﻣ
ﻯﻮﺼﻘﻟﺍ ﺝﺮﺨﻟﺍ ﺓﺭﺪﻗ٤ x ﻁﺍﻭ ٥٠
ﺕﺎﻋﺎﻤﺴﻟﺍ ﺔﻗﻭﺎﻌﻣﻡﻭﺃ ٨ — ﻡﻭﺃ ٤ ﻦﻣ
ﺔﻴﺗﻮﺼﻟﺍ ﺕﺍﺮﻴﺛﺎﺘﻟﺍﻖﻤﻌﻟﺍﻞﺒﻴﺴﻳﺩ ٨ ± ﺰﺗﺮﻴﻫ ٢٠٠
ﻞﺧﺪﻠﻟ ﻰﺼﻗﻷﺍ ﺪﻬﺠﻟﺍﺖﻟﻮﻓ ﻲﻠﻠﻣ ١ ٢٠٠
ﻞﺧﺪﻟﺍ ﺔﻗﻭﺎﻌﻣﻡﻭﺃ ﻮﻠﻴﻛ ٣٠
ﻞﻴﻐﺸﺘﻟﺍ ﺔﻴﻄﻟﻮﻓ ﺖﻟﻮﻓ ١٠٫٥ ﺡﻮﻤﺴﻣ) ﺖﻟﻮﻓ ١٤٫٤
ﺭﺎﻴﺘﻠﻟ ﻙﻼﻬﺘﺳﺍ ﻰﺼﻗﺃﺮﻴﺒﻣﺃ ١٠
ﻞﻴﻐﺸﺘﻟﺍ ﺓﺭﺍﺮﺣ ﺕﺎﺟﺭﺩ ﻯﺪﻣ ﺔﺟﺭﺩ ٤٠+ — ﺱﻮﻳﺰﻠﺳ ﺔﺟﺭﺩ ٠
ﺐﻴﻛﺮﺘﻟﺍ ﻢﺠﺣ
(ﻉﺎﻔﺗﺭﺍ × ﻝﻮﻃ × ﺽﺮﻋ)
ﻥﺯﻮﻟﺍﻢﺠﻛ ٠٫٥٤
.ﻖﺒﺴﻣ ﺭﺎﻄﺧﺇ ﻥﻭﺩ ﺮﻴﻴﻐﺘﻠﻟ ﻊﻀﺨﻳ
(ﺰﺗﺮﻫ ﻮﻠﻴﻛ ٥٠ ﺔﻓﺎﺴﻤﻟ) ﺰﺗﺮﻫ ﺎﺠﻴﻣ ١٠٨٫٠ — ﺰﺗﺮﻫ ﺎﺠﻴﻣ ٨٧٫٥
USB
(ﺰﺗﺮﻫ ﻮﻠﻴﻛ ٢٠٠ ﺔﻓﺎﺴﻤﻟ) ﺰﺗﺮﻫ ﺎﺠﻴﻣ ١٠٧٫٩ — ﺰﺗﺮﻫ ﺎﺠﻴﻣ ٨٧٫٩
٠٫
(ﻡﻭﺍ ٧٥/ﺖﻟﻮﻓ ﻭﺮﻜﻴﻣ
(ﻡﻭﺍ ٧٥/ﺖﻟﻮﻓ ﻭﺮﻜﻴﻣ ٢٫٠) dBf ١٧٫٢
ﺕﻮﺻ
(ﺰﺗﺮﻫ ﻮﻠﻴﻛ ٩ ﺔﻓﺎﺴﻤﻟ) ﺰﺗﺮﻫ ﻮﻠﻴﻛ ١ ٦١١ ﻰﻟﺇ ﺰﺗﺮﻫ ﻮﻠﻴﻛ ٥٣١
(ﺰﺗﺮﻫ ﻮﻠﻴﻛ ١٠ ﺔﻓﺎﺴﻤﻟ) ﺰﺗﺮﻫ ﻮﻠﻴﻛ ١ ٧٠٠ ﻰﻟﺇ ﺰﺗﺮﻫ ﻮﻠﻴﻛ ٥٣٠
(ﺰﺗﺮﻫ ﻮﻠﻴﻛ ٥ ﺔﻓﺎﺴﻤﻟ) ﺰﺗﺮﻫ ﻮﻠﻴﻛ ٧ ٧٣٥ ﻰﻟﺇ ﺰﺗﺮﻫ ﻮﻠﻴﻛ ٢ ٩٤٠
(ﺰﺗﺮﻫ ﻮﻠﻴﻛ ٥ ﺔﻓﺎﺴﻤﻟ) ﺰﺗﺮﻫ ﻮﻠﻴﻛ ١٨ ١٣٥ ﻰﻟﺇ ﺰﺗﺮﻫ ﻮﻠﻴﻛ ١١ ٥٨٠
ﺔﻴﻓﺎﺿﺇ ﺓﺪﻋﺎﺴﻣ
(ﺖﻟﻮﻓ ﻮﻴﻣ ٢٨٫٢) ﻮﻴﻣ ﻞﺒﻴﺴﻳﺩ ٢٩٫٠
(ﺖﻟﻮﻓ ﻮﻴﻣ ٣٢) ﻮﻴﻣ ﻞﺒﻴﺴﻳﺩ ٣٠
ﻡﺎﻋ
٧١) ﻞﺒﻴﺴﻳﺩ ٨٫٢
ﺖﻟﻮﻓ ٥ ﺮﺷﺎﺒﻣ ﺭﺎﻴﺗ
ﺔﻣﺪﺨﺘﺴﻤﻟﺍ ﺔﻴﺳﺎﺴﺤﻟﺍ ﺔﺟﺭﺩ
(ﻞﺒﻴﺴﻳﺩ ٤٦ = DIN S/N)
(ﻞﺒﻴﺴﻳﺩ ٣±) ﺩﺩﺮﺘﻟﺍ ﺔﺑﺎﺠﺘﺳﺍﺰﺗﺮﻫ ﻮﻠﻴﻛ ١٥ — ﺰﺗﺮﻴﻫ ٣٠
(ﻱﺩﺎﺣﺃ) ﺀﺎﺿﻮﻀﻟﺍ ﻰﻟﺇ ﺓﺭﺎﺷﻹﺍ ﺔﺒﺴﻧﻞﺒﻴﺴﻳﺩ ٦٤
(ﺰﺗﺮﻫ ﻮﻠﻴﻛ ١) ﻮﻳﺮﺘﺳﻻﺍ ﻞﺼﻓﻞﺒﻴﺴﻳﺩ ٤٠
(SW1) ٢ ﺔﺟﻮﻤﻟﺍ
(SW2) ٣ ﺔﺟﻮﻤﻟﺍﺰﺗﺮﻫ ﻮﻠﻴﻛ ١٠ ١٣٥ ﻰﻟﺍ ﺰﺗﺮﻫ ﻮﻠﻴﻛ ٩ ٥٠٠
٣ /٢ ﺔﺟﻮﻤﻟﺍﺰﺗﺮﻫ ﻮﻠﻴﻛ ٥
MW
SW
32 /16 /FAT12
(ﺰﺗﺮﻫ ﻮﻠﻴﻛ ١) ﺀﺎﺿﻮﻀﻟﺍ ﻰﻟﺇ ﺓﺭﺎﺷﻹﺍ ﺔﺒﺴﻧﻞﺒﻴﺴﻳﺩ ١٠٥
ﺩﺩﺮﺘﻟﺍ ﻕﺎﻄﻧ
ﺓﺎﻨﻘﻟﺍ ﺔﻌﺳ ﺪﻳﺪﺤﺗﺰﺗﺮﻫ ﻮﻠﻴﻛ ٢٠٠/ﺰﺗﺮﻫ ﻮﻠﻴﻛ ٥٠
(ﻞﺒﻴﺴﻳﺩ ٢٦ = S/N)
ﺔﻴﺳﺎﺴﺤﻟﺍ ﺔﺋﺪﻬﺗ
ﺩﺩﺮﺘﻟﺍ ﻕﺎﻄﻧ(MW) ١ ﺔﺟﻮﻤﻟﺍ
ﺓﺎﻨﻘﻟﺍ ﺔﻌﺳ ﺪﻳﺪﺤﺗ١ ﺔﺟﻮﻤﻟﺍﺰﺗﺮﻫ ﻮﻠﻴﻛ ١٠/ﺰﺗﺮﻫ ﻮﻠﻴﻛ ٩
ﺔﻴﺳﺎﺴﺤﻟﺍ ﺔﺟﺭﺩ
ﺔﻣﺪﺨﺘﺴﻤﻟﺍ
(ﻞﺒﻴﺴﻳﺩ ٢٠ = S/N)
ﺭﺎﻴﺘﻟﺎﺑ ﺩﺍﺪﻣﻺﻟ ﻰﺼﻗﻷﺍ ﺪﺤﻟﺍﺮﻴﺒﻣﺃ ١
(ﻞﺒﻴﺴﻳﺩ ١±) ﺩﺩﺮﺘﻟﺍ ﺔﺑﺎﺠﺘﺳﺍﺰﺗﺮﻫ ﻮﻠﻴﻛ ٢٠ — ﺰﺗﺮﻴﻫ ٢٠
ﻲﻜﻴﻣﺎﻨﻳﺪﻟﺍ ﻝﺎﺠﻤﻟﺍﻞﺒﻴﺴﻳﺩ ٨٨
MP3 ﺓﺮﻔﺷ ﻚﻓMPEG-1/2 Audio Layer-3 ﻊﻣ ﻖﻓﺍﻮﺘﻣ
FM
ﻒﻟﺍﻮﻤﻟﺍ
/MW
/SW1
SW2
USB ﺭﺎﻴﻌﻣ(ﻯﻮﺼﻗ ﺔﻋﺮﺳ) USB 2.0 ,USB 1.1
ﺕﺎﻔﻠﻤﻟﺍ ﻡﺎﻈﻧ
USB
ﺕﺍﻮﻨﻘﻟﺍ ﻞﺼﻓﻞﺒﻴﺴﻳﺩ ٩٠
Page 19

ﺡﻼﺻﻻﺍﻭ ﻝﺎﻄﻋﻻﺍ ﻦﻋ ﺚﺤﺒﻟﺍ
.ﺓﺪﻳﺪﺟ ﺔﻄﺤﻣ ﺀﺎﺸﻧﺇ ﺢﺠﻨﻳ ﻢﻟ
.ﻙﺯﺎﻬﺟ ﻰﻠﻋ Pandora ﻖﻴﺒﻄﺗ ﻦﻣ ﻖﻘﺤﺗ
.ﻲﻄﺨﺘﻟﺍ ﺪﺣ ﻰﻟﺇ ﻝﻮﺻﻮﻟﺍ ﻢﺗ
.ﺕﺎﻄﺤﻣ ﻰﻠﻋ ﺭﻮﺜﻌﻟﺍ ﻢﺘﻳ ﻢﻟ
ﺪﻌﺑ ﺔﻟﻭﺎﺤﻤﻟﺍ ﺪﻋﺃ .ﺔﻠﺠﺴﻤﻟﺍ ﺕﺎﻄﺤﻤﻟﺍ ﺩﺪﻋ ﺪﺣ ﻰﻟﺇ ﻝﻮﺻﻮﻟﺍ ﻢﺗ
ﻰﻠﻋ Pandora ﻖﻴﺒﻄﺗ ﻦﻣ ﺭﺍﺪﺻﺇ ﺙﺪﺣﺃ ﺖﻴﺒﺜﺘﺑ ﺖﻤﻗ ﻚﻧﺃ ﻦﻣ ﺪﻛﺄﺗ
.ﺎﻬﺑ
Pandora
.ﻙﺯﺎﻬﺟ ﻦﻣ ﺔﻳﺭﻭﺮﻀﻟﺍ ﺮﻴﻏ ﺕﺎﻄﺤﻤﻟﺍ ﻑﺬﺣ
.ﻙﺯﺎﻬﺟ
.ﺮﻘﺘﺴﻣ ﺮﻴﻏ ﻝﺎﺼﺗﻻﺍ
.ﺎﺿﺮﻟﺍ ﻡﺪﻋ/ﺎﺿﺮﻟﺍ ﺔﻣﻼﻋ ﻞﻴﺠﺴﺗ ﻞﺸﻓ
ﺔﻣﺪﺧ ﻢﻳﺪﻘﺗ ﻢﺘﻳ ﻻ ﺪﻠﺑ ﻦﻣ ﻝﻮﺻﻮﻟﺍ ﻝﻭﺎﺤﺗ ﺖﻧﺃ
ﺽﺍﺮﻋﻻﺍ ﻝﺎﻄﻋﻷﺍ ﺔﺠﻟﺎﻌﻣ
“ADD ERROR”
“SEARCH ERROR”
“CHECK DEVICE”
“NO SKIPS”
“NO STATIONS”
“STATION LIMIT”
“UPGRADE APP”
“CONNECT ERROR”
“RATING ERROR”
“LICENSE ERROR”
.ﺕﻼﻴﺻﻮﺘﻟﺍﻭ ﻙﻼﺳﻻﺍ ﺺﺤﻓﺍ •
ﻝﺯﺎﻋ ﻂﻳﺮﺸﺑ ﺓﺎﻄﻐﻣ ﺔﻋﺎﻤﺴﻟﺍ ﻙﻼﺳﺃ ﻑﺍﺮﻃﺃ ﻥﺃ ﻦﻣ ﺪﻛﺄﺗ
ﻞﺣ ﻢﺘﻳ ﻢﻟ ﺍﺫﺇﻭ .ﺓﺪﺣﻮﻟﺍ ﻂﺒﺿ ﺪﻋﺃ ﻢﺛ ،ﺐﺳﺎﻨﻣ ﻞﻜﺸﺑ
Pandora
(١١ )
ﻡﺪﺨﺘﺳﺍ ﻭﺃ USB ﺯﺎﻬﺟ ﻂﺒﺿ ﺓﺩﺎﻋﺈﺑ ﻢﻗ ،ﺔﻠﻜﺸﻤﻟﺍ ﺍﺬﻫ ﻞﺤﻳ
.ﺍﹰﺪﺟ ﺓﺮﻴﺜﻛ ﻆﻓﺍﻮﺣﻭ ﺔﻴﻣﺮﻫ ﺕﻼﺴﻠﺴﺗ ﻦﻣ ﺕﺎﻳﻮﺘﺴﻣ ﻞﻤﻌﺘﺴﺗ ﻻ
.ﺔﻧﺍﻮﻄﺳﻻﺍ ﻰﻠﻋ ﺕﺍﺭﺎﺴﻤﻟﺍ ﻞﻴﺠﺴﺗ ﺔﻴﻔﻴﻛ ﻮﻫ ﻚﻟﺫ ﺐﺒﺳ
(ﺓﺮﻴﺒﻜﻟﺍ) ﺔﻴﺋﺎﺠﻬﻟﺍ ﻑﻭﺮﺤﻟﺍ ﺽﺮﻋ ﻂﻘﻓ ﺓﺪﺣﻮﻟﺍ ﻩﺬﻫ ﻊﻴﻄﺘﺴﺗ
.ﻚﻟ ﺔﻣﺪﺧ ﺰﻛﺮﻣ ﺏﺮﻗﺃ ﺮﺸﺘﺳﺎﻓ ،ﺔﻠﻜﺸﻤﻟﺍ
(٢ )
.ﺕﻼﺻﻮﻤﻟﺍ ﻒﻈﻧ
(٣ )
.ﺓﺪﺣﻮﻟﺍ ﻂﺒﺿ ﺪﻋﺃ
.ﺔﻤﻜﺤﻣ ﺓﺭﻮﺼﺑ ﻲﺋﺍﻮﻬﻟﺍ ﻞﺻﻭﺍ •
.ﺔﻳﺎﻬﻨﻟﺍ ﻰﺘﺣ ﻲﺋﺍﻮﻬﻟﺍ ﻊﻓﺭﺍ •
.ﺕﻮﺼﻟﺍ ﺕﺎﻔﻠﻣ ﻢﻋﺪﺗ ﻂﺋﺎﺳﻮﻟﺍ ﺕﺎﻳﻮﺘﺤﻣ ﻥﺃ ﻦﻣ ﺪﻛﺄﺗ
.ﺮﺧﺃ USB ﺯﺎﻬﺟ
.ﻯﺮﺧﺃ ﺓﺮﻣ USB
.iPod ﻂﺒﺿ ﺪﻋﺃ •
.ﺯﻮﻣﺮﻟﺍ ﻦﻣ ﺩﻭﺪﺤﻣ ﺩﺪﻋﻭ ﻡﺎﻗﺭﻷﺍﻭ
ﺽﺍﺮﻋﻻﺍ ﻝﺎﻄﻋﻷﺍ ﺔﺠﻟﺎﻌﻣ
.ﺕﻮﺼﻟﺍ ﻉﺎﻤﺳ ﻦﻜﻤﻳ ﻻ .ﻦﻜﻤﻣ ﻯﻮﺘﺴﻣ ﻞﻀﻓﺍ ﻰﻠﻋ ﺕﻮﺼﻟﺍ ﺓﻮﻗ ﻯﻮﺘﺴﻣ ﻂﺒﺿﺍ •
ﻦﻜﻤﻳ ﻻﻭ “PROTECT” ﺮﻬﻈﺗ
.ﺔﻴﻠﻤﻋ ﻱﺃ ﺀﺍﺮﺟﺇ
.ﺕﻮﺼﻟﺍ ﻉﺎﻤﺳ ﻦﻜﻤﻳ ﻻ •
.ﻞﻤﻌﻳ ﻻ ﺯﺎﻬﺠﻟﺍ •
ﻰﻠﻋ ﺔﺿﻭﺮﻌﻤﻟﺍ ﺕﺎﻣﻮﻠﻌﻤﻟﺍ •
.ﺔﺤﻴﺤﺻ ﺮﻴﻏ ﺔﺷﺎﺸﻟﺍ
ﻞﺒﻘﺘﺴﻤﻟﺍ ﺍﺬﻫ ﻞﻐﺘﺸﻳ ﻻ
.ﺎﻘﻠﻄﻣ
.ﺀﻱﺩﺭ ﻮﻳﺩﺍﺮﻟﺍ ﻝﺎﺒﻘﺘﺳﺍ •
ﻲﻜﻴﺗﺎﺘﺳﺍ ﺞﻴﺠﺿ ﺪﻟﻮﺘﻳ •
.ﻮﻳﺩﺍﺮﻟﺍ ﻰﻟﺍ ﻉﺎﻤﺘﺳﻻﺍ ﺀﺎﻨﺛﺍ
.“NA FILE” ﺮﻬﻈﺗ
.“READ ERROR” ﺮﻬﻈﺗ ﻢﻟ ﺍﺫﺇ .ﻯﺮﺧﺃ ﺓﺮﻣ USB ﺯﺎﻬﺟ ﻰﻠﻋ ﺕﺍﺪﻠﺠﻤﻟﺍﻭ ﺕﺎﻔﻠﻤﻟﺍ ﺦﺴﻧﺍ
.“NO DEVICE” ﺮﻬﻈﺗ ﻰﻟﺇ ﻞﻴﻐﺸﺘﻟﺍ ﺭﺪﺼﻣ ﺮﻴﻴﻐﺘﺑ ﻢﻗ ﻢﺛ ،USB ﺯﺎﻬﺟ ﻞﻴﺻﻮﺘﺑ ﻢﻗ
.“COPY PRO” ﺮﻬﻈﺗ .ﺦﺴﻨﻟﺍ ﺪﺿ ﻲﻤﺤﻣ ﻒﻠﻣ ﻞﻴﻐﺸﺗ ﻢﺗ
.“NA DEVICE” ﺮﻬﻈﺗ .ﺕﻼﺻﻮﻟﺍ ﺺﺤﻔﺑ ﻢﻗﻭ ،ﻡﻮﻋﺪﻣ USB ﺯﺎﻬﺟ ﻞﺻﻭ
.“NO MUSIC” ﺮﻬﻈﺗ ﺔﻠﺑﺎﻗ ﺕﻮﺻ ﺕﺎﻔﻠﻣ ﻰﻠﻋ ﻱﻮﺘﺤﺗ ﻲﺘﻟﺍ USB ﺯﺎﻬﺟ ﻞﻴﺻﻮﺘﺑ ﻢﻗ
.ﻞﻴﻐﺸﺘﻠﻟ
.“iPod ERROR” ﺮﻬﻈﺗ .iPod ـﻟﺍ ﺯﺎﻬﺟ ﻞﻴﺻﻮﺗ ﺪﻋﺃ •
.ﺾﻴﻣﻮﻟﺍ “READING” ﻞﺻﺍﻮﻳ
ﻲﻀﻘﻨﻤﻟﺍ ﻞﻴﻐﺸﺘﻟﺍ ﺖﻗﻭ
.ﺢﻴﺤﺻ ﺮﻴﻏ
ﻑﻭﺮﺤﻟﺍ ﺽﺮﻋ ﻢﺘﻳ ﻻ
ﻢﺳﺍ ،ﻼﺜﻣ) ﺔﺤﻴﺤﺼﻟﺍ
.(ﻡﻮﺒﻟﻻﺍ
١٢
Page 20

ﺕﺎﻣﻮﻠﻌﻤﻟﺍ ﻦﻣ ﺪﻳﺰﻣ
libFLAC
Copyright (C) 2000,2001,2002,2003,2004,2005,
2006,2007,2008,2009 Josh Coalson
Redistribution and use in source and binary forms, with
or without modification, are permitted provided that the
following conditions are met:
- Redistributions of source code must retain the above
copyright notice, this list of conditions and the following
disclaimer.
- Redistributions in binary form must reproduce the above
copyright notice, this list of conditions and the following
disclaimer in the documentation and/or other materials
provided with the distribution.
- Neither the name of the Xiph.org Foundation nor the
names of its contributors may be used to endorse or
promote products derived from this software without
specific prior written permission.
THIS SOFTWARE IS PROVIDED BY THE COPYRIGHT HOLDERS
AND ONTRIBUTORS “AS IS” AND ANY EXPRESS OR IMPLIED
WARRANTIES, INCLUDING, BUT NOT LIMITED TO, THE IMPLIED
WARRANTIES OF MERCHANTABILITY AND FITNESS FOR
A PARTICULAR PURPOSE ARE DISCLAIMED. IN NO EVENT
SHALL THE FOUNDATION OR CONTRIBUTORS BE LIABLE FOR
ANY DIRECT, INDIRECT, INCIDENTAL, SPECIAL, EXEMPLARY,
OR CONSEQUENTIAL DAMAGES (INCLUDING, BUT NOT
LIMITED TO, PROCUREMENT OF SUBSTITUTE GOODS OR
SERVICES; LOSS OF USE, DATA, OR PROFITS; OR BUSINESS
INTERRUPTION) HOWEVER CAUSED AND ON ANY THEORY OF
LIABILITY, WHETHER IN CONTRACT, STRICT LIABILITY, OR TORT
(INCLUDING NEGLIGENCE OR OTHERWISE) ARISING IN ANY
WAY OUT OF THE USE OF THIS SOFTWARE, EVEN IF ADVISED OF
THE POSSIBILITY OF SUCH DAMAGE.
iPhone/iPod ﺯﺎﻬﺟ ﻝﻮﺣ
(5th generation ﻭ 4th ،3rd ،2nd ،1st) iPod touch -
(7th generation ﻭ 6th ،5th ،4th ،3rd) iPod nano -
5 ،4S ،4 ،3GS ،iPhone 3G ،iPhone -
ﺙﺪﺣﺃ ﻰﻟﺇ ﺔﻓﺎﺿﻹﺎﺑ ﺔﻘﻓﺍﻮﺘﻣ ﺔﻤﺋﺎﻗ ﺙﺪﺣﺃ ﻰﻠﻋ ﻝﻮﺼﺤﻠﻟ •
:ﺮﻈﻧﺍ ،iPod/iPhone ﺓﺰﻬﺟﺃ ﺞﻣﺍﺮﺑ ﻦﻣ ﺕﺍﺭﺍﺪﺻﻹﺍ
www.kenwood.com/cs/ce/ipod
ﻡﺰﻠﻳ ،Lightning ﻞﺻﻮﻣ ﻰﻠﻋ ﻱﻮﺘﺤﺗ ﻲﺘﻟﺍ ﺓﺰﻬﺟﻷﺍ ﻞﻴﺻﻮﺘﻟ •
ﻭ (ﻱﺭﺎﻴﺘﺧﺍ ﺭﺍﻮﺴﺴﻛﺇ) KCA-iP102 ﺮﻓﻮﺗ
ـﻟ ﺭﺍﻮﺴﺴﻛﺇ) Apple Lightning to 30-pin Adapter
ﺓﺭﺎﻴﺴﻟﺍ ﻞﺧﺍﺩ Apple Lightning to 30-pin Adapter ﻙﺮﺘﺗ ﻻ
.ﺓﺭﺍﺮﺤﻟﺍ ﺔﺟﺭﺩ ﻉﺎﻔﺗﺭﺍ ﻦﻋ ﺞﺗﺎﻨﻟﺍ ﻑﻼﺗﻹﺍ ﺐﻨﺠﺘﻟ
“KENWOOD” ﺭﻮﻬﻇ ﺔﻟﺎﺣ ﻲﻓ iPod ﺯﺎﻬﺟ ﻞﻴﻐﺸﺗ ﻚﻨﻜﻤﻳ ﻦﻟ •
.iPod ﺯﺎﻬﺟ ﻲﻓ “
Made for
iPod classic -
.(iPhone/iPod
” ﻭﺃ
Pandora ﻝﻮﺣ
ﺎﻴﻟﺍﺮﺘﺳﺃﻭ ﺓﺪﺤﺘﻤﻟﺍ ﺕﺎﻳﻻﻮﻟﺍ ﻲﻓ ﻻﺇ Pandora ﻖﻴﺒﻄﺗ ﺮﻓﻮﺘﻳ ﻻ •
،ﺔﻴﺟﺭﺎﺧ ﺔﻬﺟ ﺎﻬﻣﺪﻘﺗ ﺔﻣﺪﺧ ﻮﻫ Pandora ﻖﻴﺒﻄﺗ ﻥﻷ ﺍﹰﺮﻈﻧ •
ﺀﺎﻨﺑﻭ .ﻖﺒﺴﻣ ﺭﺎﻌﺷﺇ ﻥﻭﺩ ﺮﻴﻴﻐﺘﻠﻟ ﻊﻀﺨﺗ ﺕﺎﻔﺻﺍﻮﻤﻟﺍ ﻥﺈﻓ
ﻭﺃ ﺕﺎﻣﺪﺨﻟﺍ ﺾﻌﺑ ﺮﻓﻮﺘﺗ ﻻ ﺪﻗ ﻭﺃ ﻖﻓﺍﻮﺘﻟﺍ ﻞﻘﻳ ﺪﻘﻓ ،ﻪﻴﻠﻋ
.ﺓﺪﺣﻮﻟﺍ ﻩﺬﻫ ﻦﻣ Pandora ﻒﺋﺎﻇﻭ ﺾﻌﺑ ﻞﻤﻌﺗ ﻻ ﺪﻗ •
،ﻖﻴﺒﻄﺘﻟﺍ ﻡﺍﺪﺨﺘﺳﺍ ﻦﻣ ﺄﺸﻨﺗ ﻲﺘﻟﺍ ﺕﻼﻜﺸﻤﻠﻟ ﺔﺒﺴﻨﻟﺎﺑ •
ﻰﻠﻋ Pandora ـﺑ ﻝﺎﺼﺗﻻﺍ ﻰﺟﺮﻳ
.pandora-support@pandora.com
.ﺍﺪﻨﻟﺯﻮﻴﻧﻭ
.ﺎﻬﻌﻴﻤﺟ
ﺔﻴﺗﻮﺼﻟﺍ ﺕﺎﻔﻠﻤﻟﺍ ﻝﻮﺣ ﺔﻴﻠﻴﺼﻔﺗ ﺕﺎﻈﺣﻼﻣﻭ ﺕﺎﻣﻮﻠﻌﻣ ﻙﺎﻨﻫ
ﻡﺎﻋ
ﺐﻳﻮﻟﺍ ﻊﻗﻮﻣ ﻰﻠﻋ ﺖﻧﺮﺘﻧﻹﺍ ﻰﻠﻋ ﻞﻴﻟﺩ ﻲﻓ ﻞﻴﻐﺸﺘﻠﻟ ﺔﻠﺑﺎﻘﻟﺍ
www.kenwood.com/cs/ce/audiofile/ :ﻲﻟﺎﺘﻟﺍ
ﻞﻴﻐﺸﺘﻠﻟ ﺔﻠﺑﺎﻗ ﺕﺎﻔﻠﻣ
:ﻞﻴﻐﺸﺘﻠﻟ ﻞﺑﺎﻘﻟﺍ ﻮﻳﺩﻭﺃ ﺕﺎﻴﺗﻮﺼﻟﺍ ﻒﻠﻣ •
(flac.) FLAC ،(wav.) WAV ،(wma.) WMA ،(mp3.) MP3
:ﻞﻴﻐﺸﺘﻠﻟ ﻞﺑﺎﻘﻟﺍ USB ﺯﺎﻬﺟ ﺕﺎﻔﻠﻣ ﻡﺎﻈﻧ •
FAT32 ،FAT16 ،FAT12
ﺓﺭﻮﻛﺬﻤﻟﺍ ﺮﻴﻳﺎﻌﻤﻟﺍ ﻊﻣ ﺔﻴﺗﻮﺼﻟﺍ ﺕﺎﻔﻠﻤﻟﺍ ﻖﻓﺍﻮﺗ ﺪﻨﻋ ﻰﺘﺣ
ﺕﻻﺎﺣ ﻭﺃ ﻉﺍﻮﻧﺃ ﻰﻠﻋ ﺍﹰﺩﺎﻤﺘﻋﺍ ﻞﻴﻐﺸﺘﻟﺍ ﺭﺬﻌﺘﻳ ﺪﻗ ،ﻩﻼﻋﺃ
.ﺯﺎﻬﺠﻟﺍ ﻭﺃ ﻂﺋﺎﺳﻮﻟﺍ
USB ﺓﺰﻬﺟﺃ ﻝﻮﺣ
ﺕﺎﻔﻠﻣ ﻞﻴﻐﺸﺗ ﺓﺪﺣﻮﻟﺍ ﻩﺬﻫ ﻊﻴﻄﺘﺴﺗ •
ﻲﻟﺎﻋ ﻦﻳﺰﺨﺗ ﺯﺎﻬﺟ ﻰﻠﻋ ﺔﻧﺰﺨﻤﻟﺍ FLAC/WAV/WMA/MP3
.USB ﺔﺌﻓ ﻦﻣ ﺔﻌﺴﻟﺍ
.USB ﻱﺰﻛﺮﻣ ﻊﻤﺠﻣ ﻖﻳﺮﻃ ﻦﻋ USB ﺯﺎﻬﺟ ﻞﻴﺻﻮﺗ ﻚﻨﻜﻤﻳ ﻻ •
ﺮﺘﻣ ٥ ﻰﻠﻋ ﻲﻟﺎﻤﺟﻹﺍ ﻪﻟﻮﻃ ﺪﻳﺰﻳ ﻞﺑﺎﻛ ﻞﻴﺻﻮﺗ ﺐﺒﺴﺘﻳ ﺪﻗ •
.ﻞﻴﻐﺸﺘﻟﺍ ﻲﻓ ﺔﻴﻌﻴﺒﻃ ﺮﻴﻏ ﻞﻛﺎﺸﻣ ﺭﻮﻬﻇ ﻲﻓ
ﻪﻟﺪﻌﻣ ﻥﻮﻜﻳ USB ﺯﺎﻬﺟ ﻰﻠﻋ ﻑﺮﻌﺘﻟﺍ ﺓﺪﺣﻮﻠﻟ ﻦﻜﻤﻳ ﻻ •
.ﺮﻴﺒﻣﺃ ١ ﺯﻭﺎﺠﺘﻳﻭ ﺖﻟﻮﻓ ٥
ﻭ KENWOOD Music Editor Light ﻝﻮﺣ
KENWOOD Music Control
ﺮﺗﻮﻴﺒﻤﻜﻟﺍ ﻖﻴﺒﻄﺗ ﺓﺪﺣﻮﻟﺍ ﻩﺬﻫ ﻢﻋﺪﺗ •
ﻖﻴﺒﻄﺗﻭ KENWOOD Music Editor Light
.Android™ KENWOOD Music Control
ﺕﺎﻧﺎﻴﺑ ﺔﻓﺎﺿﺇ ﻊﻣ ﺔﻴﺗﻮﺻ ﺕﺎﻔﻠﻣ ﻞﻴﻐﺸﺘﺑ ﻚﻣﺎﻴﻗ ﺪﻨﻋ •
KENWOOD Music Editor Light ﻖﻴﺒﻄﺗ ﻡﺍﺪﺨﺘﺳﺎﺑ ﺔﻴﻨﻏﻷﺍ
ﺕﺎﻔﻠﻤﻟﺍ ﻦﻋ ﺚﺤﺒﻟﺍ ﻚﻨﻜﻤﻳ ،KENWOOD Music Control ﻭﺃ
،ﻞﻴﻐﺸﺘﻟﺍ ﺔﻤﺋﺎﻗﻭ ،ﻡﻮﺒﻟﻷﺍﻭ ،ﻥﺎﻨﻔﻟﺍﻭ ،ﻉﻮﻨﻟﺍ ﺐﺴﺣ ﺔﻴﺗﻮﺼﻟﺍ
.ﺔﻴﻨﻏﻷﺍﻭ
ﻭ KENWOOD Music Editor Light ﻦﻣ ﻞﻛ ﺡﺎﺘﻳ •
:ﻲﻟﺎﺘﻟﺍ ﺐﻳﻮﻟﺍ ﻊﻗﻮﻣ ﻰﻠﻋ KENWOOD Music Control
www.kenwood.com/cs/ce/
| ﻲﺑﺮﻋ
١١
Page 21

ﺕﻮﺼﻟﺍ ﺕﺍﺩﺍﺪﻋﺇ
/
JAZZ /EASY /POPS /ROCK /POWERFUL /TOP40 /DRIVE EQ
ﻉﻮﻨﻟ ﺐﺳﺎﻨﻤﻟﺍﻭ ﹰﺎﻘﺒﺴﻣ ﻁﻮﺒﻀﻤﻟﺍ ﻝﹺﺩﺎﻌﹸﻤﻟﺍ ﺩﺪﺤﻳ :
ﺕﻮﺼﻠﻟ ﺔﺼﺼﺨﻤﻟﺍ ﺕﺍﺩﺍﺪﻋﻹﺍ ﻡﺍﺪﺨﺘﺳﻻ
ﺓﺭﺩﺎﺼﻟﺍ ﺀﺎﺿﻮﻀﻟﺍ ﻦﻣ ﻞﻠﻘﻳ ﺎﹰﻘﺒﺴﻣ ﻁﻮﺒﻀﻣ ﻝﺩﺎﻌﻣ ﻮﻫ
.ﺀﺎﻐﻟﺍ :
OFF
؛ .ﺏﻮﻠﻄﻤﻟﺍ ﺮﻴﻬﺠﻟﺍ ﻊﻓﺭ ﻯﻮﺘﺴﻣ ﺩﺪﺤﻳ :
ﺔﻠﻀﻔﻤﻟﺍ ﺔﻴﻟﺎﻌﻟﺍﻭ ﺔﻀﻔﺨﻨﻤﻟﺍ ﺕﺍﺩﺩﺮﺘﻟﺍ ﺰﻳﺰﻌﺗ ﺪﻳﺪﺤﺗ :
؛ .ﺾﻔﺨﻨﻣ ﺕﻮﺻ ﻯﻮﺘﺴﻤﺑ ﺪﻴﺟ ﻞﻜﺸﺑ ﻥﺯﺍﻮﺘﻣ ﺕﻮﺻ ﺝﺎﺘﻧﻹ
.ﺀﺎﻐﻟﺍ :
ﺕﺍﺫ ﺮﻓﻭﻮﺒﺻ ﻰﻟﺇ ﺕﻮﺼﻟﺍ ﺕﺍﺭﺎﺷﺇ ﻝﺎﺳﺭﺇ ﻢﺘﻳ :
.ﺀﺍﺩﺃ ﻞﻀﻓﺃ ﻰﻠﻋ ﻝﻮﺼﺤﻠﻟ ﺔﻋﺎﻤﺴﻟﺍ ﺝﺮﺨﻟ ﺎﹰﻘﺑﺎﻄﻣ ﻥﻮﻜﻴﻟ ﺮﻓﻭﻮﺒﺼﻟﺍ
[THROUGH]
.ﺔﻴﻣﺎﻣﻷﺍﻭ ﺔﻴﻔﻠﺨﻟﺍ ﻦﻴﺘﻋﺎﻤﺴﻟﺍ ﺝﺮﺧ ﻥﺯﺍﻮﺗ ﻂﺒﻀﻳ :(0)
.ﻯﺮﺴﻴﻟﺍﻭ ﻰﻨﻤﻴﻟﺍ ﻦﻴﺘﻋﺎﻤﺴﻟﺍ ﺝﺍﺮﺧﺇ ﻥﺯﺍﻮﺗ ﻂﺒﻀﻳ :(0)
ﻞﻜﺑ ﺹﺎﺨﻟﺍ ﺕﻮﺼﻟﺍ ﻢﺠﺣ ﻂﺒﺿ ﻯﻮﺘﺴﻤﻟ ﻖﺒﺴﻤﻟﺍ ﻂﺒﻀﻟﺍ :(ﻯﺮﺧﻷﺍ
ﺩﺩﺮﺘﻟﺍ ﺔﻴﻟﺎﻋ ﺕﺎﻧﻮﻜﻤﻟﺍ ﺾﻳﻮﻌﺗ ﻖﻳﺮﻃ ﻦﻋ ﺎﹰﻴﻌﻗﺍﻭ ﺎﹰﺗﻮﺻ ﻖﻠﺨﻳ :
ﺔﻟﺎﺣ ﻲﻓ ﻂﻘﻓ
؛ .ﺮﻓﻭﻮﺒﺼﻟﺍ ﻰﻟﺇ ﺕﺍﺭﺎﺷﻹﺍ ﻞﻛ ﻝﺎﺳﺭﺇ ﻢﺘﻳ :
ﺝﺮﺨﻟ ﺭﻮﻄﻟﺍ ﺔﻳﻭﺍﺯ ﺩﺪﺤﻳ :(°٠)
ﺮﻴﻏ ﺮﺧﺁ ﻂﺒﺿ ﺪﻳﺪﺤﺗ ﺔﻟﺎﺣ ﻲﻓ ﻂﻘﻓ ﻩﺪﻳﺪﺤﺗ ﻦﻜﻤﻳ)
ﺭﺩﺎﺼﻤﻠﻟ ﺔﺒﺴﻨﻟﺎﺑ)
(.ﻪﻄﺒﺿ ﺪﻳﺮﺗ ﻱﺬﻟﺍ ﺭﺪﺼﻤﻟﺍ ﺮﺘﺧﺍ ،ﻂﺒﻀﻟﺍ ﻞﻤﻋ ﻞﺒﻗ) .ﺭﺪﺼﻣ
ﻂﻐﺿ ﺪﻨﻋ ﺖﻋﺎﺿ ﻲﺘﻟﺍ ﺔﺟﻮﻤﻟﺍ ﻞﻜﺸﻟ ﺩﻮﻌﺼﻟﺍ ﻦﻣﺯ ﺓﺩﺎﻌﺘﺳﺍﻭ
[LPF SUBWOOFER] /[SUBWOOFER SET] /[SUB-W LEVEL]
/
(٤ ) .[SUB-W]
[SUB-W PHASE] /[LPF SUBWOOFER] /[SUB-W LEVEL]
(.ﺔﻘﺒﻄﻟﺍ ﻲﻟﺎﻋﻭ ﻂﺳﻮﺘﻤﻟﺍﻭ ﺮﻴﻬﺠﻟﺍ
OFF
؛ .ﺮﻓﻭﻮﺒﺼﻟﺍ ﺝﺮﺧ ﻞﻴﻐﺸﺘﺑ ﻡﻮﻘﻳ :
.ﺰﺗﺮﻴﻫ ١٦٠/ ﺰﺗﺮﻴﻫ ١٢٠ / ﺰﺗﺮﻴﻫ ٨٥ ﻦﻣ ﻞﻗﺃ ﺩﺩﺮﺗ
0
ﻰﻟﺇ –8 ؛ (AUX ـﻟ ﺔﺒﺴﻨﻟﺎﺑ)
ﻰﻠﻋ
[SWITCH PREOUT]
USER /NATURAL
[USER]
ﺩﺪﺤﻳ) .ﻰﻘﻴﺳﻮﻤﻟﺍ
LV3 /LV2 /LV1
160HZ /120HZ /85HZ
NORMAL
/(°١٨٠)
(.
[LPF SUBWOOFER]
.ﺀﺎﻐﻟﺍ :
OFF
؛ .ﺔﻴﺗﻮﺼﻟﺍ ﺕﺎﻧﺎﻴﺒﻟﺍ
ﻂﺒﺿ ﺔﻟﺎﺣ ﻲﻓ ﻂﻘﻓ
.
F15
R15
[ON]
[DRIVE EQ]
.ﻖﻳﺮﻄﻟﺍ ﻦﻣ
LV2 /LV1
.ﺀﺎﻐﻟﺍ :
THROUGH
REVERSE
ﻊﺿﻮﻟ
ﻰﻟﺇ
ﻰﻟﺇ
+8
ﻰﻟﺇ
ﻰﻠﻋ
OFF
R15
L15
[SUBWOOFER SET]
ON
–8
ON
PRESET EQ
BASS BOOST
LOUDNESS
SUBWOOFER
LPF SUBWOOFER
VOLUME OFFSET
SOUND RECNSTR
[SUB-W PHASE]
SUB-W PHASE
FADER
BALANCE
(0 :ﻲﺿﺍﺮﺘﻓﺍ)
ﻦﻳﻮﻜﺗ ﺓﺩﺎﻋﺇ)
(ﺕﻮﺼﻟﺍ
ﺪﻳﺪﺤﺗ ﻦﻜﻤﻳ •
ﺪﻳﺪﺤﺗ ﻦﻜﻤﻳ •
ﻂﺒﺿ
.
.ﺹﺮﻘﻟﺍ ﻰﻠﻋ ﻂﻐﺿﺍ ﻢﺛ ،
.ﺹﺮﻘﻟﺍ ﻰﻠﻋ ﻂﻐﺿﺍ ﻢﺛ ،(ﻩﺎﻧﺩﺃ ﻝﻭﺪﺠﻟﺍ ﺮﻈﻧﺍ) ﺪﻳﺪﺤﺘﻠﻟ ﺕﻮﺼﻟﺍ ﻯﻮﺘﺴﻣ ﺹﺮﻗ ﺮﻳﻭﺪﺘﺑ ﻢﻗ
SET
XX
:ﻲﺿﺍﺮﺘﻓﺍ
.ﺕﻮﺼﻟﺍ ﻢﺨﻀﻣ ﺝﺍﺮﺧﺇ ﻯﻮﺘﺴﻣ ﻂﺒﻀﻳ
،ﻂﺒﻀﻟﺍ ﻞﻤﻋ ﻞﺒﻗ) .ﺭﺪﺼﻣ ﻞﻛ ﻆﻔﺤﻟ ﻯﻮﺘﺴﻤﻟﺍ ﻂﺒﺿ
.ﻂﺳﻭﻷﺍ ﺩﺩﺮﺘﻟﺍ ﺩﺪﺤﻳ :
.ﺓﺩﻮﺠﻟﺍ ﻞﻣﺎﻋ ﻂﺒﺿ :
.ﺀﺎﻐﻟﺍ :
OFF
؛ .ﺪﺘﻤﻤﻟﺍ ﺮﻴﻬﺠﻟﺍ ﺕﻮﺼﻟﺍ ﻞﻴﻐﺸﺘﺑ ﻡﻮﻘﻳ :
.ﻂﺳﻭﻷﺍ ﺩﺩﺮﺘﻟﺍ ﺩﺪﺤﻳ :
.ﺓﺩﻮﺠﻟﺍ ﻞﻣﺎﻋ ﻂﺒﺿ :
.ﻂﺳﻭﻷﺍ ﺩﺩﺮﺘﻟﺍ ﺩﺪﺤﻳ :
[FUNCTION]
.ﻪﻄﻴﺸﻨﺗ ﻭﺃ ﺏﻮﻠﻄﻤﻟﺍ ﺮﺼﻨﻌﻟﺍ ﺪﻳﺪﺤﺗ ﻢﺘﻳ ﻰﺘﺣ ٣ ﺓﻮﻄﺨﻟﺍ ﺭﺮﻛ
.ENT IW ﻰﻠﻋ ﻂﻐﺿﺍ ﻢﺛ ،ﺪﻳﺪﺤﺗ ﺀﺍﺮﺟﻹ K / J ﻰﻠﻋ ﻂﻐﺿﺍ
ﻰﻠﻋ ﻂﻐﺿﺍ ،ﻖﺑﺎﺴﻟﺍ ﻲﻣﺮﻬﻟﺍ ﻪﻠﺴﻠﺴﺗ ﻭﺃ ﺩﺍﺪﻋﻹﺍ ﺮﺼﻨﻋ ﻰﻟﺇ ﺓﺩﻮﻌﻠﻟ
.
(.ﻪﻄﺒﺿ ﺪﻳﺮﺗ ﻱﺬﻟﺍ ﺭﺪﺼﻤﻟﺍ ﺮﺘﺧﺍ
.ﻯﻮﺘﺴﻤﻟﺍ ﻂﺒﻀﻳ :
2.00 /1.50 /1.25 /1.00
2.5K /1.5 /1.0 /0.5
.ﻯﻮﺘﺴﻤﻟﺍ ﻂﺒﻀﻳ :
17.5K /15.0 /12.5 /10.0
.ﻯﻮﺘﺴﻤﻟﺍ ﻂﺒﻀﻳ :
ﻰﻟﺇ ﻝﻮﺧﺪﻠﻟ ﺕﻮﺼﻟﺍ ﻯﻮﺘﺴﻣ ﺹﺮﻗ ﻰﻠﻋ ﻂﻐﺿﺍ ١
[AUDIO CONTROL]
.ﺀﺎﻬﻧﻹﺍ ﻞﺟﺃ ﻦﻣ
.
[AUDIO CONTROL]
200 /100 /80 /60
(+6) +8
ﻰﻟﺇ
–8
ON
(+5) +8
ﻰﻟﺇ
8–
1.25 /1.00 /0.75
(0) +8
ﻰﻟﺇ
–8
...ﺭﺪﺼﻣ ﻱﺃ ﻰﻟﺇ ﻉﺎﻤﺘﺳﻻﺍ ﺀﺎﻨﺛﺃ
ﺪﻳﺪﺤﺘﻟ ﺕﻮﺼﻟﺍ ﻯﻮﺘﺴﻣ ﺹﺮﻗ ﺭﺩﺃ ٢
ﺭﺍﺮﻤﺘﺳﻻﺍ ﻊﻣ ﻂﻐﺿﺍ ٤
(RC-406 ﻡﺍﺪﺨﺘﺳﺍ ﻭﺃ)
ﻊﺿﻭ ﻰﻟﺇ ﻝﻮﺧﺪﻠﻟ AUD ﻂﻐﺿﺍ ١
(0) +15
ﻰﻟﺇ
–15
(+6) +8
ﻰﻟﺇ
–8
(+5) +8
ﻰﻟﺇ
–8
(0) +8
ﻰﻟﺇ
–8
BASS ADJUSTBASS CTR FRQ
BASS LEVEL
BASS Q FACTOR
BASS EXTEND
MID LEVEL
MID Q FACTOR
TRE LEVEL
٣
٢
SUB-W LEVEL
BASS LEVEL
MID LEVEL
TRE LEVEL
EQ PRO
MID ADJUSTMID CTR FRQ
TRE ADJUSTTRE CTR FRQ
١٠
Page 22

ﺔﺷﺎﺸﻟﺍ ﺕﺍﺩﺍﺪﻋﺇ
.
[FUNCTION]
XX
/
ﻦﻜﻤﻳ .(ﻡﺪﺨﺘﺴﻤﻟﺍ)
ﺕﻮﺼﻟﺍ ﻯﻮﺘﺴﻣ ﺹﺮﻗ ﻰﻠﻋ ﺭﺍﺮﻤﺘﺳﺎﺑ ﻂﻐﺿﺍ ١
ﺓﺪﺣﺍﻭ ﺓﺮﻣ ﺭﺮﻤﺘﺳ ﻭﺃ ،ﺎﹰﻴﺋﺎﻘﻠﺗ ﺔﺷﺎﺸﻟﺍ ﺕﺎﻣﻮﻠﻌﻣ
ﻰﻟﺇ ﻝﻮﺧﺪﻠﻟ ﺕﻮﺼﻟﺍ ﻯﻮﺘﺴﻣ ﺹﺮﻗ ﻰﻠﻋ ﻂﻐﺿﺍ ١
ﻂﻐﺿﺍ ﻢﺛ ،
ﻂﻐﺿﺍ ،ﻖﺑﺎﺴﻟﺍ ﻲﻣﺮﻬﻟﺍ ﻪﻠﺴﻠﺴﺗ ﻭﺃ ﺩﺍﺪﻋﻹﺍ ﺮﺼﻨﻋ ﻰﻟﺇ ﺓﺩﻮﻌﻠﻟ
:ﻲﺿﺍﺮﺘﻓﺍ
COLOR 24
[USER]
ﻯﻮﺘﺴﻤﻟﺍ ﻂﺒﻀﻟ ﺕﻮﺼﻟﺍ ﻯﻮﺘﺴﻣ ﺹﺮﻗ ﺭﺩﺃ ٣
[DISPLAY]
ﺪﻳﺪﺤﺘﻟ ﺕﻮﺼﻟﺍ ﻯﻮﺘﺴﻣ ﺹﺮﻗ ﺭﺩﺃ ٢
ﻝﻭﺪﺠﻟﺍ ﺮﻈﻧﺍ) ﺪﻳﺪﺤﺘﻠﻟ ﺕﻮﺼﻟﺍ ﻯﻮﺘﺴﻣ ﺹﺮﻗ ﺮﻳﻭﺪﺘﺑ ﻢﻗ
ﻭﺃ ﺏﻮﻠﻄﻤﻟﺍ ﺮﺼﻨﻌﻟﺍ ﺪﻳﺪﺤﺗ ﻢﺘﻳ ﻰﺘﺣ ٣ ﺓﻮﻄﺨﻟﺍ ﺭﺮﻛ
.ﺀﺎﻬﻧﻹﺍ ﻞﺟﺃ ﻦﻣ
—
.ﻚﻟ ﻞﻀﻔﻤﻟﺍ ﺭﺰﻟﺍ ﺓﺀﺎﺿﺇ ﻥﻮﻟ ﺩﺪﺤﻳ :
ﻢﺘﻳ ﺎﻣﺪﻨﻋ) ﺹﺎﺨﻟﺍ ﻚﻧﻮﻟ ﺪﻳﺪﺤﺗ ﻚﻨﻜﻤﻳ
ﻥﻮﻟ)
[COLOR 24]
ﺩﺪﺤﺗ ﺎﻣﺪﻨﻋ ﻪﺗﺄﺸﻧﺃ ﻱﺬﻟﺍ ﻥﻮﻠﻟﺍ ﺪﻳﺪﺤﺗ
.ﻞﻴﺼﻔﺘﻟﺎﺑ ﻥﻮﻠﻟﺍ ﻂﺒﺿ ﻝﺎﺧﺩﻹ
ﻥﻮﻠﻟﺍ ﺪﻳﺪﺤﺘﻟ T / S ﻰﻠﻋ ﻂﻐﺿﺍ ٢
.ﻂﺒﻀﻠﻟ (ﻲﻨﺑ/ﺮﻀﺧﺃ/ﺮﻤﺣﺃ) (
.ﺹﺮﻘﻟﺍ ﻰﻠﻋ ﻂﻐﺿﺍ ﻢﺛ ،(
؛ .(*ﺭﺰﻟﺍ ﺓﺀﺎﺿﺇﻭ) ﺔﺷﺎﺸﻟﺍ ﺓﺀﺎﺿﺇ ﻢﺘﻌﻳ :
.
[BRIGHTNESS]
ﻉﻮﻄﺴﻟﺍ ﻯﻮﺘﺴﻣ ﺩﺪﺤﻳ :
.(*ﺭﺰﻟﺍ ﺓﺀﺎﺿﺇﻭ) ﺔﺷﺎﺸﻟﺍ ﺓﺀﺎﺿﻹ ﻞﻀﻔﻤﻟﺍ
ﺭﺮﻤﺘﺳ ﺖﻨﻛ ﺍﺫﺇ ﺎﻣ ﺩﺪﺤﻳ :
.ﺹﺮﻘﻟﺍ ﻰﻠﻋ ﻂﻐﺿﺍ ﻢﺛ ،(ﻩﺎﻧﺩﺃ
COLOR 01 /VARIABLE SCAN
—
[COLOR 01]
[USER]
ﻭﺃ (٢٤ ﻥﻮﻟ) - (٠١
.(ﻡﺪﺨﺘﺴﻤﻟﺍ)
B /G /R
9
ﻰﻟﺇ 0 ﻦﻣ)
ﺕﺍﺩﺍﺪﻋﻹ ﺎﹰﻘﻓﻭ ﺀﻲﻀﻳ :
LVL 31
ONCE /AUTO
.ﺀﺎﻐﻟﺍ
:OFF ؛
.ﺹﺮﻘﻟﺍ ﻰﻠﻋ
.ﻪﻄﻴﺸﻨﺗ
ﺭﺍﺮﻤﺘﺳﻻﺍ ﻊﻣ ﻂﻐﺿﺍ ٤
.
USER
ﺪﻳﺪﺤﺗ
)
ON
OFF
LVL 0
.ﻂﻘﻓ
KMM-X30
BRIGHTNESS
TEXT SCROLL
ﻲﻠﻳﺩﻮﻤﻟ
—
ﻰﻠﻋ
COLOR
*SELECT
DIMMER
ﻰﻠﻋ ﻂﻐﺿﺍ ﻭﺃ) 6 IW ﻰﻠﻋ ﻂﻐﺿﺃ
٣
ﺪﻳﺪﺤﺘﻟ ﺕﻮﺼﻟﺍ ﻯﻮﺘﺴﻣ ﺹﺮﻗ ﻒﻠﺑ ﻢﻗ
ﻡﺎﻗﺭﻷﺍ ﺭﺍﺭﺯﺃ ﻦﻣ ﺪﺣﺍﻭ ﺭﺍﺮﻤﺘﺳﻻﺍ ﻊﻣ ﻂﻐﺿﺍ
،ﺪﻳﺪﺤﺗ ﺀﺍﺮﺟﻹ ﺕﻮﺼﻟﺍ ﻯﻮﺘﺴﻣ ﺹﺮﻗ ﺭﺩﺃ
ﻰﻠﻋ ﻂﻐﺿﺍ ﻭﺃ) ﺹﺮﻘﻟﺍ ﻰﻠﻋ ﻂﻐﺿﺍ ﻢﺛ
ﻝﻮﺻﻮﻠﻟ ﺕﻮﺼﻟﺍ ﻯﻮﺘﺴﻣ ﺹﺮﻗ ﻒﻠﺑ ﻢﻗ
*
.(RC-406 ﻲﻓ ENT IW
.
/ ﻰﻠﻋ ﻂﻐﺿﺍ
،ﺎﺿﺮﻟﺍ ﻡﺪﻋ ﺔﻣﻼﻋ ﺪﻳﺪﺤﺗ ﻢﺗ ﺍﺫﺇ •
.ﻲﻟﺎﺤﻟﺍ ﺭﺎﺴﻤﻟﺍ ﻲﻄﺨﺗ ﻢﺘﻴﺴﻓ
.(RC-406 ﻲﻓ (+) T
ﺹﺮﻗ ﻰﻠﻋ ﺭﺍﺮﻤﺘﺳﻻﺍ ﻊﻣ ﻂﻐﺿﺍ
ﻭﺃ (ﺭﺎﺴﻤﻟﺍ ﻦﻣ)
ﻢﺛ ،(ﻥﺎﻨﻔﻟﺍ ﻦﻣ)
ﻰﻠﻋ ﺀﺎﻨﺑ ﺓﺪﻳﺪﺟ ﺔﻄﺤﻣ ﺀﺎﺸﻧﺇ ﻢﺘﻳ
.ﻦﻳﺰﺨﺘﻠﻟ (5 ﻰﻟﺇ 1 ﻦﻣ) ﺔﻴﻟﺎﺘﻟﺍ
ﻰﻠﻋ ﻂﻐﺿﺍ ،ﺔﻧﺰﺨﻣ ﺔﻄﺤﻣ ﺪﻳﺪﺤﺘﻟ •
.(5 ﻰﻟﺇ 1 ﻦﻣ) ﻡﺎﻗﺭﻷﺍ ﺭﺍﺭﺯﺃ ﺪﺣﺃ
.ﻞﺠﺴﻤﻟﺍ ﺦﻳﺭﺎﺘﻟﺍ ﺐﺴﺣ
ﻂﻐﺿﺍ ﻢﺛ ،ﺔﺑﻮﻠﻄﻤﻟﺍ ﺔﻄﺤﻤﻟﺍ ﻰﻟﺇ
.ﺕﻮﺼﻟﺍ ﻯﻮﺘﺴﻣ
[FROM TRACK]
[FROM ARTIST]
.ﺹﺮﻘﻟﺍ ﻰﻠﻋ ﻂﻐﺿﺍ
.ﻲﻟﺎﺤﻟﺍ ﻥﺎﻨﻔﻟﺍ ﻭﺃ ﺔﻴﻨﻏﻷﺍ
.
ﻰﻠﻋ ﻂﻐﺿﺍ ١
.(RC-406 ﻲﻓ K / J
:[BY DATE]
.ﻱﺪﺠﺑﺃ ﺐﻴﺗﺮﺘﺑ
.ﺹﺮﻘﻟﺍ ﻰﻠﻋ
:[A-Z]
ﻞﻴﻐﺸﺘﻟﺍ ﻑﺎﻘﻳﺇ
ﺔﻣﻼﻋ ﻞﻴﺠﺴﺗ
ﻡﺪﻋ ﻭﺃ ﺎﺿﺮﻟﺍ
ﺭﺎﺴﻣ ﻲﻄﺨﺗ ﻰﻠﻋ ﻂﻐﺿﺍ ﻭﺃ) T ﻰﻠﻋ ﻂﻐﺿﺃ
١
ﺔﻄﺤﻣ ﺀﺎﺸﻧﺇ
٢
ﺔﻄﺤﻣ ﻆﻔﺣ
ﻦﻋ ﺚﺤﺒﻟﺍ
ﺔﻠﺠﺴﻣ ﺔﻄﺤﻣ
٢
٣
ﻰﻟﺇ ﻚﻟﺫ ﺀﺍﺮﺟﺈﺑ ﻢﻗ
ﻭﺃ ﺎﹰﺘﻗﺆﻣ
ﻪﻓﺎﻨﺌﺘﺳﺍ
ﺎﺿﺮﻟﺍ
ﺓﺪﻳﺪﺟ
KMM-X30
(
Pandora ﻖﻴﺒﻄﺗ ﻦﻣ ﺭﺍﺪﺻﺇ ﺙﺪﺣﺃ ﺖﻴﺒﺜﺘﺑ ﻢﻗ
ﻢﻗ ﻢﺛ ،(iPod touch /iPhone) ﻙﺯﺎﻬﺟ ﻰﻠﻋ
.Pandora ﻰﻟﺇ ﻝﻮﺧﺪﻟﺍ ﻞﻴﺠﺴﺗﻭ ﺏﺎﺴﺣ ﺀﺎﺸﻧﺈﺑ
(٤ ) .[PANDORA SRC]
ـﻟ)
®Pandora
ـﻟ
:ﺮﻴﻀﺤﺘﻟﺍ
[ON]
ﺩﺪﺣ •
ﻉﺎﻤﺘﺳﻻﺍ ﺀﺪﺑ
.ﻙﺯﺎﻬﺟ ﻰﻠﻋ Pandora ﻖﻴﺒﻄﺗ ﺢﺘﻔﺑ ﻢﻗ ١
ﻭﺃ USB ﻝﺎﺧﺩﺇ ﻑﺮﻄﺑ ﻙﺯﺎﻬﺟ ﻞﻴﺻﻮﺘﺑ ﻢﻗ
USB ﻝﺎﺧﺩﺇ ﻞﻴﺻﻮﺗ ﻑﺮﻃ
ﺀﺰﺠﻟﺍ ﻦﻣ USB ﻞﺒﻛ
ﺓﺪﺣﻮﻟﺎﺑ ﻲﻔﻠﺨﻟﺍ
KCA-iP102
(ﻱﺭﺎﻴﺘﺧﺍ ﺭﺍﻮﺴﺴﻛﺇ)
/PANDORA FRONT ﻰﻟﺇ ﺭﺪﺼﻤﻟﺍ ﺮﻴﻐﺘﻳ
/ﻲﻣﺎﻣﻷﺍ PANDORA) PANDORA REAR
.ﺚﺒﻟﺍ ﺃﺪﺒﻳﻭ (ﻲﻔﻠﺨﻟﺍ PANDORA
.USB ﻞﺑﺎﻛ
ﻭﺃ /ﻭ
٢
| ﻲﺑﺮﻋ
٩
Page 23

AUX
(٤ ) .[BUILT-IN AUX]
.(ﺀﺍﺮﺸﻠﻟ ﺡﺎﺘﻣ) ﻝﻮﻤﺤﻤﻟﺍ ﺕﻮﺼﻟﺍ ﻞﻐﺸﻣ ﺯﺎﻬﺠﺑ ﻝﺎﺼﺗﻻﺍ ١
ﻲﻓﺎﺿﻹﺍ ﺯﺎﻬﺠﻟﺍ ﻞﻴﺻﻮﺗ ﺲﺒﻘﻣ
ﻢﺴﺠﻤﻟﺍ ﺕﻮﺼﻠﻟ ﺮﻴﻐﺻ ﺲﺑﺎﻗ
ﻞﻜﺷ ﻰﻠﻋ ﻞﺻﻮﻣ ﻊﻣ ﻢﻣ ٣٫٥
(ﺀﺍﺮﺸﻠﻟ ﺡﺎﺘﻣ) “L” ﻑﺮﺣ
.AUX ﻰﻟﺍ ﺭﺎﻴﺘﺧﻻ B SRC ﺭﺰﻟﺍ ﻂﻐﺿﺍ ٢
ﺀﺪﺑﻭ ﻝﻮﻤﺤﻤﻟﺍ ﺕﻮﺼﻟﺍ ﻞﻐﺸﻣ ﺯﺎﻬﺟ ﻞﻴﻐﺸﺘﺑ ﻢﻗ
...ﺯﺎﻬﺠﻟﺎﺑ ﻞﺼﺘﻣ ﻝﻮﻤﺤﻣ ﺕﻮﺻ ﻞﻐﺸﻣ ﻰﻟﺇ ﻉﺎﻤﺘﺳﻻﺍ ﺀﺎﻨﺛﺃ
ﻰﻟﺇ ﻝﻮﺧﺪﻠﻟ ﺕﻮﺼﻟﺍ ﻯﻮﺘﺴﻣ ﺹﺮﻗ ﻰﻠﻋ ﻂﻐﺿﺍ
ﻂﻐﺿﺍ ﻢﺛ ،
ﻢﺛ ،
[SYSTEM]
ﺪﻳﺪﺤﺘﻟ ﺕﻮﺼﻟﺍ ﻯﻮﺘﺴﻣ ﺹﺮﻗ ﺭﺩﺃ ٢
[AUX NAME SET]
ﻰﻠﻋ ﻂﻐﺿﺍ ﻢﺛ ،ﺪﻳﺪﺤﺗ ﺀﺍﺮﺟﻹ ﺕﻮﺼﻟﺍ ﻯﻮﺘﺴﻣ ﺹﺮﻗ ﺭﺩﺃ
/
VIDEO /GAME /PORTABLE /DVD
.ﺀﺎﻬﻧﻹﺍ ﻞﺟﺃ ﻦﻣ ﺭﺍﺮﻤﺘﺳﻻﺍ ﻊﻣ ﻂﻐﺿﺍ ٥
ﺪﻳﺪﺤﺘﻟ ﺕﻮﺼﻟﺍ ﻯﻮﺘﺴﻣ ﺹﺮﻗ ﺭﺩﺃ ٣
:ﺮﻴﻀﺤﺘﻟﺍ
ﻞﺟﺃ ﻦﻣ
[ON]
ﻉﺎﻤﺘﺳﻻﺍ ﺀﺪﺑ
ﺕﻮﺻ ﻞﻐﺸﻣ
ﻝﻮﻤﺤﻣ
.ﻞﻴﻐﺸﺘﻟﺍ
AUX ﻢﺳﺍ ﻂﺒﺿ
.
[FUNCTION]
.ﺹﺮﻘﻟﺍ ﻰﻠﻋ
.ﺹﺮﻘﻟﺍ ﻰﻠﻋ ﻂﻐﺿﺍ
.ﺹﺮﻘﻟﺍ
/(ﻲﺿﺍﺮﺘﻓﺍ)
AUX
TV
iPod
/
USB
ﺩﺪﺣ
...KMC ﻒﻠﻣ/KME Light ﻭﺃ iPod ﻰﻟﺇ ﻉﺎﻤﺘﺳﻻﺍ ﺪﻨﻋ
.
[FUNCTION]
ﻰﻠﻋ ﻂﻐﺿﺍ ﻢﺛ ،
ﻂﻐﺿﺍ ﻢﺛ ،
.ﺹﺮﻘﻟﺍ ﻰﻠﻋ ﻂﻐﺿﺍ ﻢﺛ ،ﺪﻳﺪﺤﺗ ﺀﺍﺮﺟﻹ ﺕﻮﺼﻟﺍ ﻯﻮﺘﺴﻣ ﺹﺮﻗ ﺭﺩﺃ
ﺕﺎﻓﻭﺬﺤﻤﻟﺍ ﺚﺤﺑ ﺔﺒﺴﻧ :
ﺕﺎﻓﻭﺬﺤﻤﻟﺍ ﺚﺤﺑ ﺔﺒﺴﻧ ﻂﺒﺿ
ﻰﻟﺇ ﻝﻮﺧﺪﻠﻟ ﺕﻮﺼﻟﺍ ﻯﻮﺘﺴﻣ ﺹﺮﻗ ﻰﻠﻋ ﻂﻐﺿﺍ ١
[USB]
ﺪﻳﺪﺤﺘﻟ ﺕﻮﺼﻟﺍ ﻯﻮﺘﺴﻣ ﺹﺮﻗ ﺭﺩﺃ ٢
[SKIP SEARCH]
ﺪﻳﺪﺤﺘﻟ ﺕﻮﺼﻟﺍ ﻯﻮﺘﺴﻣ ﺹﺮﻗ ﺭﺩﺃ ٣
10% /5% /1%
.ﺀﺎﻬﻧﻹﺍ ﻞﺟﺃ ﻦﻣ
USB ﺹﺍﺮﻗﺃ ﻙﺮﺤﻣ ﺮﻴﻴﻐﺗ
ﻭﺃ) USB ﻝﺎﺧﺩﺇ ﻑﺮﻄﺑ (ﺮﻴﺒﻛ ﻦﻳﺰﺨﺗ ﺔﺌﻓ) ﻲﻛﺫ ﻒﺗﺎﻫ ﻞﻴﺻﻮﺗ ﺪﻨﻋ
ﺔﻴﻠﺧﺍﺪﻟﺍ ﺓﺮﻛﺍﺬﻟﺍ ﺪﻳﺪﺤﺗ ﻚﻨﻜﻤﻴﻓ ،(
٣
ﻲﻧﺎﻏﻷﺍ ﻞﻴﻐﺸﺘﻟ (SD ﺔﻗﺎﻄﺒﻛ) ﻪﺑ ﺔﺻﺎﺨﻟﺍ ﺔﻴﺟﺭﺎﺨﻟﺍ ﺓﺮﻛﺍﺬﻟﺍ ﻭﺃ
ﻞﻴﺻﻮﺗ ﺪﻨﻋ ﻪﻠﻴﻐﺸﺗ ﻲﻓ ﺐﻏﺮﺗ ﻱﺬﻟﺍ ﺹﺮﻘﻟﺍ ﺪﻳﺪﺤﺗ ﻚﻨﻜﻤﻳ ﺎﻤﻛ
.ﺏﻮﻠﻄﻤﻟﺍ ﺹﺮﻘﻟﺍ ﺪﻳﺪﺤﺘﻟ ﺭﺍﺮﻜﺘﺑ 5 ﻢﻗﺭ ﺭﺯ ﻰﻠﻋ ﻂﻐﺿﺍ
١
.
[FUNCTION]
ﻂﻐﺿﺍ ﻢﺛ ،
٤
ﻰﻟﺇ ﻝﻮﺧﺪﻠﻟ ﺕﻮﺼﻟﺍ ﻯﻮﺘﺴﻣ ﺹﺮﻗ ﻰﻠﻋ ﻂﻐﺿﺍ ١
ﻰﻠﻋ ﻂﻐﺿﺍ ﻢﺛ ،
.
[DRIVE CHANGE]
[USB]
ﺪﻳﺪﺤﺘﻟ ﺕﻮﺼﻟﺍ ﻯﻮﺘﺴﻣ ﺹﺮﻗ ﺭﺩﺃ ٢
[MUSIC DRIVE]
.ﺔﻴﻟﺎﺘﻟﺍ ﺹﺍﺮﻗﻷﺍ ﺪﻳﺪﺤﺘﻟ
[DRIVE 5]
ﺪﻳﺪﺤﺘﻟ ﺕﻮﺼﻟﺍ ﻯﻮﺘﺴﻣ ﺹﺮﻗ ﺭﺩﺃ ٣
ﺪﻳﺪﺤﺘﻟ ﺕﻮﺼﻟﺍ ﻯﻮﺘﺴﻣ ﺹﺮﻗ ﻂﻐﺿﺍ ٤
.ﺎﹰﻴﺋﺎﻘﻠﺗ ﻲﻟﺎﺘﻟﺍ ﺹﺮﻘﻟﺍ ﺪﻳﺪﺤﺗ ﻢﺘﻳ
ﻰﻟﺇ
[DRIVE 1]
.ﺹﺮﻘﻟﺍ
.ﺹﺮﻘﻟﺍ ﻰﻠﻋ
/(ﻲﺿﺍﺮﺘﻓﺍ)
.ﺕﺎﻔﻠﻤﻟﺍ ﻲﻟﺎﻤﺟﺇ ﻲﻓ
ﺭﺍﺮﻤﺘﺳﻻﺍ ﻊﻣ ﻂﻐﺿﺍ ٥
KMM-X30
0.5%
ـﻟ USB ﻞﺑﺎﻛ
.ﺔﻧﺰﺨﻤﻟﺍ
.ﺹﺍﺮﻗﻷﺍ ﺩﺪﻌﺘﻣ ﺯﺎﻬﺟ
(ﻭﺃ)
.ﺹﺮﻘﻟﺍ
.ﺹﺮﻘﻟﺍ ﻰﻠﻋ
4 ﻰﻟﺇ 1 ﻦﻣ ﺕﺍﻮﻄﺨﻟﺍ ﺭﺮﻛ
:ﺪﻳﺪﺤﺘﻠﻟ ﺔﻠﺑﺎﻘﻟﺍ ﺮﺻﺎﻨﻌﻟﺍ
ﻢﺳﻻﺍ ﻖﻳﺮﻃ ﻦﻋ ﺔﻴﻨﻏﻷﺍ ﺪﻳﺪﺤﺗ
...iPod ﺯﺎﻬﺟ ﻰﻟﺇ ﻉﺎﻤﺘﺳﻻﺍ ﺪﻨﻋ
ﻢﺛ ،ﺔﺌﻔﻟﺍ ﺪﻳﺪﺤﺘﻟ ﺕﻮﺼﻟﺍ ﻯﻮﺘﺴﻣ ﺹﺮﻗ ﺭﺩﺃ
ﻂﻐﻀﻟﺍ ﻭﺃ ﺎﹰﻌﻳﺮﺳ ﺕﻮﺼﻟﺍ ﻯﻮﺘﺴﻣ ﺹﺮﻗ ﻒﻠﺑ ﻢﻗ
٤
ﺚﺤﺒﻟﺍ ﺩﺍﺮﻤﻟﺍ ﻑﺮﺤﻟﺍ ﺪﻳﺪﺤﺘﻟ ﺕﻮﺼﻟﺍ ﺡﺎﺘﻔﻣ ﻝﹼﺪﺑ
.ﻝﺎﺧﺩﻹﺍ ﻊﺿﻮﻣ ﻰﻟﺇ ﻝﺎﻘﺘﻧﻼﻟ T / S ﻂﻐﺿﺍ
ﻦﻣ ﻡﺎﻗﺭﻷﺍﻭ ﺔﻳﺪﺠﺑﻷﺍ ﻑﻭﺮﺤﻟﺍ ﻑﻼﺨﺑ ﺰﻣﺭ ﻦﻋ ﺚﺤﺒﻠﻟ •
ﻰﻠﻋ ﻂﻐﺿﺍ ،ﻖﺑﺎﺴﻟﺍ ﻲﻣﺮﻬﻟﺍ ﻞﺴﻠﺴﺘﻟﺍ ﻰﻟﺇ ﺓﺩﻮﻌﻠﻟ •
.5 ﻢﻗﺭ ﺭﺯ ﻰﻠﻋ ﻂﻐﺿﺍ ﺔﻳﻮﻠﻌﻟﺍ ﺔﻤﺋﺎﻘﻟﺍ ﻰﻟﺇ ﺓﺩﻮﻌﻠﻟ •
.ﻑﺮﺣ ﻦﻋ ﺚﺤﺑ ﻝﺎﺧﺩﻹ
.ﺚﺤﺒﻟﺍ ﺀﺪﺒﻟ ﺕﻮﺼﻟﺍ ﺡﺎﺘﻔﻣ ﻂﻐﺿﺍ
ﻢﺛ ،ﺪﻳﺪﺤﺗ ﺀﺍﺮﺟﻹ ﺕﻮﺼﻟﺍ ﻯﻮﺘﺴﻣ ﺹﺮﻗ ﺭﺩﺃ
ﺮﺼﻨﻌﻟﺍ ﺪﻳﺪﺤﺗ ﻢﺘﻳ ﻰﺘﺣ ٧ ﺓﻮﻄﺨﻟﺍ ﺭﺮﻛ
.
. ﻰﻠﻋ ﻂﻐﺿﺍ ١
.ﺹﺮﻘﻟﺍ ﻰﻠﻋ ﻂﻐﺿﺍ
.ﻑﺮﺣﺃ ﺔﺛﻼﺛ ﻰﺘﺣ ﻝﺎﺧﺩﻹﺍ ﻚﻨﻜﻤﻳ
.ﺹﺮﻘﻟﺍ ﻰﻠﻋ ﻂﻐﺿﺍ
.“ * ” ﻝﺎﺧﺩﺈﺑ ﻂﻘﻓ ﻢﻗ ،٩ ﻰﺘﺣﻭ ٠
ﻰﻠﻋ ﺭﺍﺮﻤﺘﺳﻻﺍ ﻊﻣ ﻂﻐﺿﺍ ،ﺀﺎﻐﻟﻺﻟ •
٢
٣
ﻰﻠﻋ
٤
.ﻪﻨﻋ
٥
٦
٧
.ﺏﻮﻠﻄﻤﻟﺍ
.
٨
Page 24

iPod
/
USB
ﺔﻤﺋﺎﻘﻟﺍ ﻦﻣ ﺎﹰﻔﻠﻣ ﺩﺪﺣ
(٦ ) .[MODE OFF]
.ﺹﺮﻘﻟﺍ ﻰﻠﻋ ﻂﻐﺿﺍ ﻢﺛ ،ﺪﻳﺪﺤﺗ ﺀﺍﺮﺟﻹ ﺕﻮﺼﻟﺍ ﻯﻮﺘﺴﻣ ﺹﺮﻗ ﺭﺩﺃ
.ﻒﻠﻤﻟﺍ ﻚﻟﺫ ﺪﻌﺑ ﻢﺛ ،ﺏﻮﻠﻄﻤﻟﺍ ﺪﻠﺠﻤﻟﺍ ﺩﺪﺣ :FLAC/WAV/WMA/MP3 ﻒﻠﻣ •
ﺔﻤﺋﺎﻘﻟﺍ ﻦﻣ ﺏﻮﻠﻄﻤﻟﺍ ﻒﻠﻤﻟﺍ ﺩﺪﺣ :ﻒﻠﻣ KMC /KME Light ﻭﺃ iPod •
،GENRES ،*PODCASTS ،SONGS ،ALBUMS ،ARTISTS ،PLAYLISTS)
.
ﺕﺎﻓﻭﺬﺤﻣ ﺚﺤﺑ ﺔﺒﺴﻧ ﺪﻨﻋ (ﻩﻼﻋﺃ 2 ﺓﻮﻄﺨﻟﺍ ﻉﺎﺒﺗﺎﺑ) ﺔﻋﺮﺴﺑ ﺎﻬﻟﻼﺧ ﺚﺤﺒﻟﺍ ﻚﻨﻜﻤﻳ
ﻯﻮﺼﻘﻟﺍ ﺔﺒﺴﻨﻟﺎﺑ ﻲﻧﺎﻏﻷﺍ ﻲﻄﺨﺗ ﻰﻠﻋ ﻞﻤﻌﻳ T / S ﻰﻠﻋ ﺭﺍﺮﻤﺘﺳﻻﺍ ﻊﻣ ﻂﻐﻀﻟﺍ •
ﻊﻣ ﺎﻫﺅﺎﺸﻧﺇ ﻢﺗ ﻲﺘﻟﺍ ﺕﺎﻧﺎﻴﺒﻟﺍ ﺓﺪﻋﺎﻗ ﻲﻓ ﺔﻠﺠﺴﻤﻟﺍ ﺕﺎﻔﻠﻤﻠﻟ ﻂﻘﻓ :USB ﻲﻠﻳﺩﻮﻤﻟ •
ﺪﻳﺪﺤﺗ ﻢﺘﻳ ﺎﻣﺪﻨﻋ ﻂﻘﻓ ﻪﻘﻴﺒﻄﺗ ﻦﻜﻤﻳ :iPod ﻲﻠﻳﺩﻮﻤﻟ
.5 ﻢﻗﺭ ﺭﺯ ﻰﻠﻋ ﻂﻐﺿﺍ ،(ﻒﻠﻣ ﻝﻭﺃ ﻭﺃ) ﻲﻠﺻﻷﺍ ﺪﻠﺠﻤﻟﺍ ﻰﻟﺇ ﺓﺩﻮﻌﻠﻟ •
ﻰﻠﻋ ﻂﻐﺿﺍ ،ﻖﺑﺎﺴﻟﺍ ﻲﻣﺮﻬﻟﺍ ﻪﻠﺴﻠﺴﺗ ﻭﺃ ﺩﺍﺪﻋﻹﺍ ﺮﺼﻨﻋ ﻰﻟﺇ ﺓﺩﻮﻌﻠﻟ •
.
.T / S ﻰﻠﻋ ﻂﻐﻀﻟﺎﺑ ﺎﹰﻘﺒﺴﻣ ﺔﻃﻮﺒﻀﻣ
(٨ )
.ﺎﹰﻀﻳﺃ “ﺕﺎﻓﻭﺬﺤﻤﻟﺍ ﺚﺤﺑ ﺔﺒﺴﻧ ﻂﺒﺿ” ﻊﺟﺍﺭ •
.
ﻰﻠﻋ ﻂﻐﺿﺍ ١
.(*COMPOSERS
.iPod ﺓﺰﻬﺟﻷ ﻂﻘﻓ
ﻰﻠﻋ ﺭﺍﺮﻤﺘﺳﻻﺍ ﻊﻣ ﻂﻐﺿﺍ ،ﺀﺎﻐﻟﻺﻟ •
...ﺕﺎﻔﻠﻣ ﺓﺪﻋ ﻚﻳﺪﻟ ﻥﺎﻛ ﺍﺫﺇ
.ﻩﺅﺍﺮﺟﺇ ﻢﺗ ﻱﺬﻟﺍ ﺩﺍﺪﻋﻹﺍ ﻥﺎﻛ ﺎﹰﻳﺃ (
.KMC /KME Light
*
%
١٠)
(RC-406 ﻡﺍﺪﺨﺘﺳﺎﺑ) ﺮﺷﺎﺒﻤﻟﺍ ﻰﻘﻴﺳﻮﻤﻟﺍ ﺚﺤﺑ
.ﻒﻠﻤﻟﺍ ﻢﻗﺭ ﻝﺎﺧﺩﻹ ﻡﺎﻗﺭﻷﺍ ﺭﺍﺭﺯﺃ ﻂﻐﺿﺍ
.ﻰﻘﻴﺳﻮﻤﻟﺍ ﻦﻋ ﺚﺤﺒﻠﻟ ENT IW ﻂﻐﺿﺍ
.ﻲﺋﺍﻮﺸﻌﻟﺍ ﻞﻴﻐﺸﺘﻟﺍ ﺪﻳﺪﺤﺗ ﺔﻟﺎﺣ ﻲﻓ ﺡﺎﺘﻣ ﺮﻴﻏ •
.ﻒﻠﻣ KMC /KME Light ،iPod ﺯﺎﻬﺟ ﻰﻠﻋ ﻪﻘﻴﺒﻄﺗ ﻦﻜﻤﻳ ﻻ •
.DIRECT ﻰﻠﻋ ﻂﻐﺿﺍ ١
. ﻰﻠﻋ ﻂﻐﺿﺍ ،ﺀﺎﻐﻟﻺﻟ •
KMM-X10
٢
.(RC-406 ﻲﻓ ENT IW ﻰﻠﻋ ﻂﻐﺿﺍ ﻭﺃ)
IW ﻭﺃ 6 IW ﻰﻠﻋ ﻂﻐﺿﺃ
ﻞﻴﻐﺸﺘﻟﺍ ﻑﺎﻘﻳﺇ
ﻲﻓ #FM+ /
ﺭﺍﺮﻤﺘﺳﻻﺍ ﻊﻣ ﻂﻐﺿﺍ ﻭﺃ) T / S ﻰﻠﻋ ﺭﺍﺮﻤﺘﺳﻻﺍ ﻊﻣ ﻂﻐﺿﺍ
،FILE REPEAT :iPod ﻭﺃ FLAC/WAV/WMA/MP3 ﻒﻠﻣ •
٢
KMC /KME Light ﻭﺃ iPod ﻭﺃ FLAC/WAV/WMA/MP3 ﻒﻠﻣ •
٣
.”ALL RANDOM” ﺪﻳﺪﺤﺘﻟ
ﺕﺎﻔﻠﻤﻟﺍ ﻊﻴﺟﺮﺗ ﻭﺃ ﻊﻳﺮﺴﻟﺍ ﻢﻳﺪﻘﺘﻟﺍ ﻭﺃ ﻒﻠﻤﻟﺍ ﻲﻄﺨﺗ ﻭﺃ ،ﺖﻗﺆﻤﻟﺍ ﻑﺎﻘﻳﻹﺍ/ﻞﻴﻐﺸﺘﻟﺍ ﻚﻨﻜﻤﻳ ﻝﺍﺯﺎﻣ
AM– ﻰﻠﻋ ﻂﻐﺿﺍ ﻭﺃ) / ﻰﻠﻋ ﻂﻐﺿﺃ
*
.(RC-406 ﻲﻓ (+) T / S ﻰﻠﻋ
/(KME Light) KENWOOD Music Editor Light •
:
(١١ )
REPEAT OFF ،FOLDER REPEAT
ﻒﻠﻣ (KMC) KENWOOD Music Control
RANDOM OFF ،FOLDER RANDOM :ﻒﻠﻣ
.
[MODE OFF]
REPEAT OFF ،FILE REPEAT
.ﺭﺍﺮﻜﺘﺑ
ﻭﺃ 3 ﻰﻠﻋ ﺭﺍﺮﻤﺘﺳﺎﺑ ﻂﻐﺿﺍ
.iPod ﻊﻣ ﺍﺬﻫ ﻖﻓﺍﻮﺘﻳ ﻻ .FLAC/WAV/WMA/MP3 ﺕﺎﻔﻠﻤﻟ ﻂﻘﻓ
ﺪﻳﺪﺤﺗ ﻢﺘﻳ ﺎﻣﺪﻨﻋ ﻂﻘﻓ ﻪﻘﻴﺒﻄﺗ ﻦﻜﻤﻳ :iPod ﻲﻠﻳﺩﻮﻤﻟ
.(RC-406
.ﺭﺍﺮﻜﺘﺑ
4 ﻂﻐﺿﺍ
ﻭﺃ 3 ﻂﻐﺿﺍ
٢* ﺪﻠﺠﻣ ﺪﻳﺪﺤﺗ
ﻢﻳﺪﻘﺘﻟﺍ/ﻊﻴﺟﺮﺘﻟﺍ
ﺐﻴﺗﺮﺘﺑ ﻞﻴﻐﺸﺘﻟﺍ
ﻰﻟﺇ ﻚﻟﺫ ﺀﺍﺮﺟﺈﺑ ﻢﻗ
ﻭﺃ ﺎﹰﺘﻗﺆﻣ
ﻪﻓﺎﻨﺌﺘﺳﺍ
ﻒﻠﻣ ﺪﻳﺪﺤﺗ.(RC-406 ﻲﻓ (+) T / S ﻭﺃ) T / S ﻰﻠﻋ ﻂﻐﺿﺃ
ﻊﻳﺮﺴﻟﺍ
ﺭﺍﺮﻜﺗ
٣* ﻞﻴﻐﺸﺘﻟﺍ
٣* ﻲﺋﺍﻮﺸﻋ
.ﺯﺎﻬﺠﻟﺍ ﻦﻣ
١
*
٢
*
٣
*
| ﻲﺑﺮﻋ
٧
Page 25

iPod / USB
ﻞﻴﻐﺸﺘﻟﺍ ﺀﺪﺑ
.ﻞﻴﻐﺸﺘﻟﺍ ﺃﺪﺒﻳﻭ ﺎﹰﻴﺋﺎﻘﻠﺗ ﺭﺪﺼﻤﻟﺍ ﺮﻴﻐﺘﻳ
USB ﻝﺎﺧﺩﺇ ﻞﻴﺻﻮﺗ ﻑﺮﻃ
(ﻱﺭﺎﻴﺘﺧﺍ ﺭﺍﻮﺴﺴﻛﺇ) (mA ٥٠٠ :ﻰﺼﻗﻷﺍ ﺪﺤﻟﺍ) CA-U1EX
ﻭﺃ /ﻭ
KMM-X30
(
USB ﻝﺎﺧﺩﺇ ﻞﻴﺻﻮﺗ ﻑﺮﻃ
ﺓﺪﺣﻮﻟﺎﺑ ﻲﻔﻠﺨﻟﺍ ﺀﺰﺠﻟﺍ ﻦﻣ USB ﻞﺒﻛ
iPod) iPod REAR /iPod FRONT ﻰﻟﺇ ﺮﺧﻵﺍ ﺭﺪﺼﻤﻟﺍ ﻦﻣ ﺭﺪﺼﻤﻟﺍ ﺮﻴﻴﻐﺗ ﺎﹰﻀﻳﺃ ﻚﻨﻜﻤﻳ •
ﻲﻓ ﻩﺩﻮﺟﻭ ﺀﺎﻨﺛﺃ ﻢﻜﺤﺘﻟﺍ ﻊﺿﻭ ﺪﻳﺪﺤﺘﻟ iPod ﻰﻠﻋ ﺭﺍﺮﻤﺘﺳﻻﺍ ﻊﻣ ﻂﻐﺿﺍ
ـﻟ) ﺓﺪﺣﻮﻟﺎﺑ ﻲﻔﻠﺨﻟﺍ ﺀﺰﺠﻟﺍ ﻦﻣ USB ﻞﺒﻛ
KMM-X30
(
ﻭﺃ /ﻭ
(ﻱﺭﺎﻴﺘﺧﺍ ﺭﺍﻮﺴﺴﻛﺇ) KCA-iP102
.iPod ﻰﻠﻋ ﻂﻐﻀﻟﺎﺑ (ﻲﻔﻠﺧ iPod/ﻲﻣﺎﻣﺃ
ﻞﻳﺩﻮﻤﻠﻟ
)
iPhone/iPod
.١*iPod ﺯﺎﻬﺟ ﻦﻣ
.ﺓﺪﺣﻮﻟﺍ ﻦﻣ
.iPod ﺯﺎﻬﺟ
:MODE ON
:MODE OFF
XX
:ﻲﺿﺍﺮﺘﻓﺍ
ﺔﻜﺒﺷ ﺲﻔﻧ ﻲﻓ ﺞﻣﺎﻧﺮﺒﻟﺍ ﺲﻔﻧ ﺚﺒﺗ ﻯﺮﺧﺃ ﺔﻄﺤﻣ ﻦﻋ ﺎﹰﻴﺋﺎﻘﻠﺗ ﺚﺤﺒﻳ :
؛ .ﺊﻴﺳ ﻲﻟﺎﺤﻟﺍ ﻝﺎﺒﻘﺘﺳﻻﺍ ﻥﻮﻜﻳ ﺎﻣﺪﻨﻋ ﻞﻀﻓﺃ ﻝﺎﺒﻘﺘﺳﺎﺑ Radio Data System
USB
.ﺀﺎﻐﻟﺍ :
OFF
؛ .ﺭﻭﺮﻤﻟﺍ ﺕﺎﻣﻮﻠﻌﻣ ﻰﻟﺇ ﺖﻗﺆﻤﻟﺍ ﻝﻮﺤﺘﻟﺎﺑ ﺯﺎﻬﺠﻠﻟ ﺡﺎﻤﺴﻟﺍ :
ﺹﺮﻗ ﺭﺩﺃ .PTY ﺔﻐﻟ ﺭﺎﻴﺘﺧﺍ ﻰﻟﺇ ﻝﻮﺧﺪﻠﻟ ﺕﻮﺼﻟﺍ ﻯﻮﺘﺴﻣ ﺹﺮﻗ ﻰﻠﻋ ﻂﻐﺿﺍ
ﻢﺛ ،(
GERMAN /FRENCH /ENGLISH
ﺀﺪﺒﻟ T / S ﻰﻠﻋ ﻂﻐﺿﺍ ﻢﺛ ،(ﻲﻟﺎﺘﻟﺍ ﻊﺟﺍﺭ) ﺔﺣﺎﺘﻤﻟﺍ ﺞﻣﺍﺮﺒﻟﺍ ﻉﻮﻧ ﺩﺪﺤﻳ
؛ .ﻮﻳﺩﺍﺮﻟﺍ ﺕﺎﻧﺎﻴﺑ ﻡﺎﻈﻧ ﺔﻄﺤﻣ ﺖﻗﻭ ﻊﻣ ﺯﺎﻬﺠﻟﺍ ﺖﻗﻮﻟ ﺔﻨﻣﺍﺰﻣ ﻞﻤﻋ ﻢﺘﻳ :
[PTY SEARCH] /[TI] /[AF SET] /[REGIONAL] /[NEWS SET] /[MONO SET]
،
CULTURE ،DRAMA ،EDUCATE ،SPORT
،
RELIGION ،SOCIAL ،CHILDREN ،FINANCE ،WEATHER ،VARIED ،SCIENCE
LIGHT M
NATION M ،COUNTRY ،JAZZ
.ﻩﺪﻳﺪﺤﺗ ﻢﺗ ﺍﺫﺇ
ﺕﺍﺮﺸﻨﻟﺍ ﻭﺃ ﺕﺎﻬﻴﺒﻨﺘﻟﺍ ﻭﺃ ،ﺭﻭﺮﻤﻟﺍ ﺕﺎﻣﻮﻠﻌﻣ ﻝﺎﺒﻘﺘﺳﺍ ﺀﺎﻨﺛﺃ ﺕﻮﺼﻟﺍ ﻯﻮﺘﺴﻣ ﻂﺒﺿ ﺔﻟﺎﺣ ﻲﻓ •
ﺔﻴﻟﺎﺘﻟﺍ ﺓﺮﻤﻟﺍ ﻲﻓ ﻪﻘﻴﺒﻄﺗ ﻢﺘﻳ ﻑﻮﺳﻭ .ﺎﹰﻴﺋﺎﻘﻠﺗ ﻝﺪﻌﻤﻟﺍ ﺕﻮﺼﻟﺍ ﻯﻮﺘﺴﻣ ﻆﻔﺣ ﻢﺘﻳ ،ﺓﺪﻳﺪﺠﻟﺍ
،(ﻰﻘﻴﺳﻮﻣ)
[MUSIC]
ﻭﺃ
[SPEECH]
ﺓﺪﻳﺪﺠﻟﺍ ﺓﺮﺸﻨﻟﺍ ﺔﻔﻴﻇﻭ ﻭﺃ ﺕﺎﻬﻴﺒﻨﺘﻟﺍ ﻭﺃ ،ﺭﻭﺮﻤﻟﺍ ﺕﺎﻣﻮﻠﻌﻣ ﺔﻔﻴﻇﻭ ﻞﻴﻐﺸﺘﻟ
) PTY ﺔﻐﻟ ﺪﻳﺪﺤﺘﻟ ﺕﻮﺼﻟﺍ ﻯﻮﺘﺴﻣ
DOCUMENT
EASY M
،(ﻰﻘﻴﺳﻮﻣ)
،(ﻰﻘﻴﺳﻮﻣ)
(ﻰﻘﻴﺳﻮﻣ)
ﺖﺤﺗ ﻒﻨﺼﻤﻟﺍ ﺞﻣﺎﻧﺮﺒﻟﺍ ﻉﻮﻧ ﻦﻋ ﺓﺪﺣﻮﻟﺍ ﺚﺤﺒﺗ ﻑﻮﺳ
.ﺹﺮﻘﻟﺍ ﻰﻠﻋ ﻂﻐﺿﺍ
.ﻂﻘﻓ FM3 /FM2 /FM1 ﻕﺎﻄﻨﻟﺍ ﻥﺎﻛ ﺍﺫﺇ
،(ﺕﺎﻣﻮﻠﻌﻣ)
INFO ،AFFAIRS ،NEWS :SPEECH
،
LEISURE ،TRAVEL ،PHONE IN
ROCK M
OTHER M ،CLASSICS
،(ﻰﻘﻴﺳﻮﻣ)
FOLK M ،OLDIES
ON
.ﺀﺎﻐﻟﺍ :
OFF
ON
.ﻞﻴﻐﺸﺘﻟﺍ
ON
.ﺀﺎﻐﻟﺍ :
OFF
ﺪﻳﺪﺤﺗ ﻦﻜﻤﻳ •
:ﺡﺎﺘﻤﻟﺍ ﺞﻣﺎﻧﺮﺒﻟﺍ ﻉﻮﻧ •
POP M :MUSIC
،(ﻰﻘﻴﺳﻮﻣ)
،(ﻰﻘﻴﺳﻮﻣ)
ﻮﻳﺩﺍﺭ
AF SET
TI
PTY SEARCH
CLOCK
TIME SYNC
ﻉﺎﻤﺘﺳﻻﺍ ﺀﺎﻨﺛﺃ) ﺓﺪﺣﻮﻠﻟ USB ﻞﺑﺎﻛ ﻭﺃ USB ﻝﺎﺧﺩﺇ ﻑﺮﻄﺑ iPhone/iPod ﻞﻴﺻﻮﺘﺑ ﺖﻤﻗ ﺍﺫﺇ
ﺕﻮﺼﻟﺍ ﺝﺍﺮﺧﺇ ﻰﻠﻋ ﺓﺪﺣﻮﻟﺍ ﻞﻤﻌﺘﺴﻓ ،(Aupeo ﻭﺃ TuneIn Radio Pro ﻭﺃ TuneIn ﻰﻟﺇ
.ﺕﺎﻘﻴﺒﻄﺘﻟﺍ ﻩﺬﻫ ﻦﻣ
٦
Page 26

(RC-406 ﻡﺍﺪﺨﺘﺳﺎﺑ) ﺮﺷﺎﺒﻤﻟﺍ ﻝﻮﺻﻮﻟﺍ ﻒﻴﻟﻮﺗ
.ﺮﺷﺎﺒﻤﻟﺍ ﻝﻮﺻﻮﻟﺍ ﻒﻴﻟﻮﺗ ﻰﻟﺇ ﻝﻮﺧﺪﻠﻟ DIRECT ﻂﻐﺿﺍ ١
ﻝﻮﺻﻮﻟﺍ ﻒﻴﻟﻮﺗ ﺀﺎﻐﻟﺇ ﻢﺘﻳ ،٢ ﺓﻮﻄﺨﻟﺍ ﺪﻌﺑ ﹴﻥﺍﻮﺛ ١٠ ﺓﺪﻤﻟ ﺔﻴﻠﻤﻋ ﻱﺃ ﺀﺍﺮﺟﺇ ﻡﺪﻋ ﺔﻟﺎﺣ ﻲﻓ •
.ﺩﺩﺮﺘﻟﺍ ﻝﺎﺧﺩﻹ ﻡﺎﻗﺭﻷﺍ ﺭﺍﺭﺯﺃ ﻂﻐﺿﺍ
.ﺔﻄﺤﻣ ﻦﻋ ﺚﺤﺒﻠﻟ ENT IW ﻂﻐﺿﺍ
.DIRECT ﻭﺃ ﻰﻠﻋ ﻂﻐﺿﺍ ،ﺀﺎﻐﻟﻺﻟ •
.ﺎﹰﻴﺋﺎﻘﻠﺗ ﺮﺷﺎﺒﻤﻟﺍ
ﻯﺮﺧﺃ ﺕﺍﺩﺍﺪﻋﺇ
.
.ﺹﺮﻘﻟﺍ ﻰﻠﻋ ﻂﻐﺿﺍ ﻢﺛ ،(ﻩﺎﻧﺩﺃ ﻝﻭﺪﺠﻟﺍ ﺮﻈﻧﺍ) ﺪﻳﺪﺤﺘﻠﻟ ﺕﻮﺼﻟﺍ ﻯﻮﺘﺴﻣ ﺹﺮﻗ ﺮﻳﻭﺪﺘﺑ ﻢﻗ
ﺪﻴﺠﻟﺍ ﻝﺎﺒﻘﺘﺳﻻﺍ ﺕﺍﺫ SW2 /SW1 /MW ﺕﺎﻄﺤﻤﻟﺍ ﻦﻋ ﺚﺤﺒﻟﺍ :
ﻞﺑﺎﻗ) .ﺀﺎﻐﻟﺍ :NO ؛ .ﺪﻴﺟ ﻝﺎﺒﻘﺘﺳﺍ ﺕﺍﺫ ﺕﺎﻄﺤﻣ ٦ ﻆﻔﺣ ﺎﹰﻴﺋﺎﻘﻠﺗ ﺃﺪﺒﻳ :
(.
[PRESET TYPE]
؛ .ﻩﺪﻘﻓ ﻢﺘﻴﺳ ﻮﻳﺮﺘﺴﻟﺍ ﺕﻮﺼﻟﺍ ﺮﻴﺛﺄﺗ ﻦﻜﻟﻭ FM ﻝﺎﺒﻘﺘﺳﺍ ﻦﺴﺤﻳ :
؛ .ﺎﹰﺣﺎﺘﻣ ﻥﺎﻛ ﺍﺫﺇ ﺭﺎﺒﺧﻷﺍ ﺞﻣﺎﻧﺮﺑ ﻰﻟﺇ ﺎﹰﺘﻗﺆﻣ ﺓﺪﺣﻮﻟﺍ ﻝﻮﺤﺘﺗ ﻑﻮﺳ :
ﻡﺍﺪﺨﺘﺳﺎﺑ ﺓﺩﺪﺤﻤﻟﺍ ﺔﻘﻄﻨﻤﻟﺍ ﻲﻓ ﻂﻘﻓ ﻯﺮﺧﺃ ﺔﻄﺤﻣ ﻰﻟﺇ ﻝﻮﺤﺘﻳ :
[FUNCTION]
. ﻰﻠﻋ ﻂﻐﺿﺍ ،ﻖﺑﺎﺴﻟﺍ ﻲﻣﺮﻬﻟﺍ ﻪﻠﺴﻠﺴﺗ ﻭﺃ ﺩﺍﺪﻋﻹﺍ ﺮﺼﻨﻋ ﻰﻟﺇ ﺓﺩﻮﻌﻠﻟ
ﻊﺿﻭ ﻊﻣ
ﻰﻟﺇ ﻝﻮﺧﺪﻠﻟ ﺕﻮﺼﻟﺍ ﻯﻮﺘﺴﻣ ﺹﺮﻗ ﻰﻠﻋ ﻂﻐﺿﺍ ١
.ﺀﺎﻬﻧﻹﺍ ﻞﺟﺃ ﻦﻣ
.ﺀﺎﻐﻟﺍ :
OFF
؛ .ﻂﻘﻓ
[NORMAL]
ﺪﻳﺪﺤﺗ ﺔﻟﺎﺣ ﻲﻓ ﻂﻘﻓ ﺪﻳﺪﺤﺘﻠﻟ
.ﺀﺎﻐﻟﺍ :
OFF
؛ .“ﺕﻮﺼﻟﺍ ﺩﺩﺮﺗ“ ﻲﻓ ﻢﻜﺤﺘﻟﺍ
(٤ )
.ﺀﺎﻐﻟﺍ :
.ﺀﺎﻐﻟﺍ :
ﺭﺍﺮﻤﺘﺳﻻﺍ ﻊﻣ ﻂﻐﺿﺍ ٣
XX
TUNER SETTING
LOCAL SEEK
ON
AUTO MEMORY
YES
ON
OFF
ON
OFF
ON
:ﻲﺿﺍﺮﺘﻓﺍ
MONO SET
NEWS SET
REGIONAL
٢
٣
ﺔﻄﺤﻣ ﻦﻋ ﺚﺤﺒﻟﺍ
ﻰﻠﻋ #FM+ /
٢
ﺚﺤﺒﻠﻟ (RC-406 ﻲﻓ (+) T / S ﻰﻠﻋ ﻂﻐﺿﺍ ﻭﺃ) T / S ﻰﻠﻋ ﻂﻐﺿﺍ
.(6 ﻰﻟﺇ 1 ﻦﻣ) ﺔﻴﻟﺎﺘﻟﺍ ﻡﺎﻗﺭﻷﺍ ﺭﺍﺭﺯﺃ ﻦﻣ ﺪﺣﺍﻭ ﺭﺍﺮﻤﺘﺳﻻﺍ ﻊﻣ ﻂﻐﺿﺍ :ﺔﻄﺤﻤﻟﺍ ﻆﻔﺤﻟ •
ﻂﻐﺿﺍ ﻭﺃ) (6 ﻰﻟﺇ 1 ﻦﻣ) ﺔﻴﻟﺎﺘﻟﺍ ﻡﺎﻗﺭﻷﺍ ﺭﺍﺭﺯﺃ ﺪﺣﺃ ﻰﻠﻋ ﻂﻐﺿﺍ :ﺔﻧﺰﺨﻤﻟﺍ ﺔﻄﺤﻤﻟﺍ ﺪﻳﺪﺤﺘﻟ •
AM– ﻂﻐﺿﺍ ﻭﺃ) ﺓﺭﺮﻜﺘﻣ ﺔﻘﻳﺮﻄﺑ BAND ﻰﻠﻋ ﻂﻐﺿﺍ ٢
*
.SW2 /SW1 /MW /FM3 /FM2 /FM1 ﺪﻳﺪﺤﺘﻟ (RC-406
.ﺭﺍﺮﻜﺘﺑ SEEK
.(RC-406 ﻲﻓ (6 ﻰﻟﺇ 1 ﻦﻣ) ﺔﻴﻟﺎﺘﻟﺍ ﻡﺎﻗﺭﻷﺍ ﺭﺍﺭﺯﺃ ﺪﺣﺃ ﻰﻠﻋ
.TUNER ﻰﻟﺍ ﺭﺎﻴﺘﺧﻻ B SRC ﺭﺰﻟﺍ ﻂﻐﺿﺍ ١
ﻂﻐﺿﺍ : T / S ـﻟ ﺚﺤﺒﻟﺍ ﺔﻘﻳﺮﻃ ﺮﻴﻴﻐﺘﻟ •
.ﺔﻄﺤﻣ ﻦﻋ ﹰﺎﻴﺋﺎﻘﻠﺗ ﺚﺤﺒﻳ :AUTO1
.ﺎﹰﻘﺒﺴﻣ ﺔﻃﻮﺒﻀﻣ ﺔﻄﺤﻣ ﻦﻋ ﺎﹰﻴﺋﺎﻘﻠﺗ ﺚﺤﺒﺗ :AUTO2
.ﺔﻄﺤﻣ ﻦﻋ ﺎﹰﻳﻭﺪﻳ ﺚﺤﺒﻳ :MANUAL
ﺩﺩﺮﺘﻟﺍ ﺕﺎﺟﺭﺩ ﺮﻴﻴﻐﺗ
:ﻦﻣ ﺩﺩﺮﺗ ﺔﺟﺭﺩ ﺮﻴﻴﻐﺗ ﻚﻨﻜﻤﻳ
ﺰﺗﺮﻫ ﻮﻠﻴﻛ ٢٠٠ ﻰﻟﺍ ﺰﺗﺮﻫ ﻮﻠﻴﻛ ٥٠ :FM
ﺰﺗﺮﻫ ﻮﻠﻴﻛ ١٠ ﻰﻟﺍ ﺰﺗﺮﻫ ﻮﻠﻴﻛ ٩ :MW
.ﺯﺎﻬﺠﻟﺍ ﻑﺎﻘﻳﻹ B SRC ﻰﻠﻋ ﺭﺍﺮﻤﺘﺳﻻﺍ ﻊﻣ ﻂﻐﺿﺍ
.L SRC ﻂﻐﺿﺍ ،5ﻭ 1 ﻡﺎﻗﺭﻷﺍ ﻱﺭﺯ ﻰﻠﻋ ﻂﻐﻀﻟﺍ ﺀﺎﻨﺛﺃ
.ﺽﺮﻌﻟﺍ ﺔﺷﺎﺷ ﺭﻮﻬﻇ ﺪﻌﺑ ﺭﺍﺭﺯﻷﺍ ﻕﻮﻓ ﻦﻣ ﻚﻌﺑﺎﺻﺃ ﻊﻓﺭﺍ
.ﺓﺮﻛﺍﺬﻟﺍ ﻲﻓ ﺓﺩﻮﺟﻮﻤﻟﺍ ﺎﹰﻘﺑﺎﺳ ﺔﻧﺰﺨﻤﻟﺍ ﺕﺎﻄﺤﻤﻟﺍ ﻮﺤﻣ ﻢﺘﻳ ،ﺩﺩﺮﺘﻟﺍ ﺔﺟﺭﺩ ﺮﻴﻴﻐﺗ ﺪﻨﻋ •
.ﺀﺍﺮﺟﻹﺍ ﺲﻔﻧ ﺭﺮﻛ ،ﻲﻟﻭﻷﺍ ﺩﺍﺪﻋﻹﺍ ﺓﺩﺎﻌﺘﺳﻻ •
ﻮﻳﺩﺍﺭ
٣
.ﺔﻄﺤﻣ ﻦﻋ
١
٢
| ﻲﺑﺮﻋ
٥
Page 27

ﻞﻤﻌﻟﺍ ﻲﻓ ﻉﻭﺮﺸﻟﺍ
ﺔﻴﺋﺪﺒﻤﻟﺍ ﺕﺍﺩﺍﺪﻋﻹﺍ ﻂﺒﺿ
.ﺹﺮﻘﻟﺍ ﻰﻠﻋ ﻂﻐﺿﺍ ﻢﺛ ،(ﻩﺎﻧﺩﺃ ﻝﻭﺪﺠﻟﺍ ﺮﻈﻧﺍ) ﺪﻳﺪﺤﺘﻠﻟ ﺕﻮﺼﻟﺍ ﻯﻮﺘﺴﻣ ﺹﺮﻗ ﺮﻳﻭﺪﺘﺑ ﻢﻗ
XX
:ﻲﺿﺍﺮﺘﻓﺍ
ﻑﺍﺮﻃﺄﺑ ﻦﻴﻠﺻﻮﻣ ﺮﻓﻭﻮﺒﺻ ﻭﺃ ﺔﻴﻔﻠﺨﻟﺍ ﺕﺎﻋﺎﻤﺴﻟﺍ ﺖﻧﺎﻛ ﺍﺫﺇ ﺎﻣ ﺩﺪﺣ :
ﻭﺃ ﺔﺻﻮﺑ-٥) ﺕﺎﻋﺎﻤﺴﻟﺍ ﻢﺠﺤﻟ ﺎﹰﻘﻓﻭ ﺪﻳﺪﺤﺘﻟﺍ ﻢﺘﻳ :
.ﻞﺜﻣﻷﺍ ﺀﺍﺩﻷﺍ ﻰﻠﻋ ﻝﻮﺼﺤﻠﻟ OEM ﺕﺎﻋﺎﻤﺳ ﻭﺃ (ﺔﺻﻮﺑ-٦ ﻭﺃ ﺔﺻﻮﺑ-٩×٦ ،ﺔﺻﻮﺑ-٤
/FM2 /FM1) ﻕﺎﻄﻧ ﻞﻛ ﻲﻓ ﻖﺒﺴﻣ ﺩﺍﺪﻋﺇ ﺭﺯ ﻞﻜﻟ ﺓﺪﺣﺍﻭ ﺔﻄﺤﻣ ﺮﻛﺬﺘﻳ :
ﺾﻐﺑ ﻖﺒﺴﻣ ﺩﺍﺪﻋﺇ ﺭﺯ ﻞﻜﻟ ﺓﺪﺣﺍﻭ ﺔﻄﺤﻣ ﺮﻛﺬﺘﻳ :
؛ .OFF ﻰﻠﻋ ACC ﻂﺒﺿ ﺪﻨﻋ ﺯﺎﻬﺠﻟﺍ ﺔﻬﺟﺍﻭ ﻞﺼﻓ ﺖﻴﺴﻧ ﺍﺫﺇ ﺮﻳﺬﺤﺘﻟﺍ ﻂﺸﻨﻳ :
.(ﻲﺟﺭﺎﺧ ﺕﻮﺻ ﺮﺒﻜﻣ ﻝﻼﺧ ﻦﻣ) ﺯﺎﻬﺠﻟﺍ ﺓﺮﺧﺆﻣ ﻲﻓ ﻂﺨﻟﺍ ﺝﺮﺨﻣ
.ﻂﻴﺸﻨﺘﻟﺍ ﺀﺎﻐﻟﺇ :
(٩ ) .ﻞﻄﻌﻣ :
(٨ ) .ﻞﻄﻌﻣ :
.(ﺔﻄﺸﻨﻣ ﺮﻴﻏ ﺔﻴﻗﺮﺘﻟﺍ) ﻲﻐﻠﻳ :NO ؛ .ﺖﺑﺎﺜﻟﺍ ﺞﻣﺎﻧﺮﺒﻟﺍ ﺔﻴﻗﺮﺗ ﺃﺪﺒﻳ :
:ﺮﻈﻧﺍ ،ﺖﺑﺎﺜﻟﺍ ﺞﻣﺎﻧﺮﺒﻟﺍ ﺚﻳﺪﺤﺗ ﺔﻴﻔﻴﻛ ﻝﻮﺣ ﻞﻴﺻﺎﻔﺗ ﻰﻠﻋ ﻝﻮﺼﺤﻠﻟ
.
. ﻰﻠﻋ ﻂﻐﺿﺍ ،ﻖﺑﺎﺴﻟﺍ ﻲﻣﺮﻬﻟﺍ ﻪﻠﺴﻠﺴﺗ ﻭﺃ ﺩﺍﺪﻋﻹﺍ ﺮﺼﻨﻋ ﻰﻟﺇ ﺓﺩﻮﻌﻠﻟ
OFF
OFF
.STANDBY ﻊﺿﻭ ﻰﻟﺇ ﻝﻮﺧﺪﻠﻟ B SRC ﻂﻐﺿﺍ ١
[FUNCTION]
؛ .ﺭﺪﺼﻤﻟﺍ ﺪﻳﺪﺤﺗ ﻲﻓ PANDORA ﻦﻴﻜﻤﺗ :
ﻰﻟﺇ ﻝﻮﺧﺪﻠﻟ ﺕﻮﺼﻟﺍ ﻯﻮﺘﺴﻣ ﺹﺮﻗ ﻰﻠﻋ ﻂﻐﺿﺍ ٢
.ﺀﺎﻬﻧﻹﺍ ﻞﺟﺃ ﻦﻣ
SUB-W /REAR
OEM /6/6 × 9 /4/5 /OFF
MIX
؛ .(SW2 /SW1 /MW /FM3
.ﺩﺪﺤﻤﻟﺍ ﻕﺎﻄﻨﻟﺍ ﻦﻋ ﺮﻈﻨﻟﺍ
؛ .ﺡﺎﺘﻔﻤﻟﺍ ﻰﻠﻋ ﻂﻐﻀﻟﺍ ﺔﻤﻐﻧ ﻂﻴﺸﻨﺗ :
.ﻂﻴﺸﻨﺘﻟﺍ ﺀﺎﻐﻟﺇ :
OFF
؛ .ﺭﺪﺼﻤﻟﺍ ﺪﻳﺪﺤﺗ ﻲﻓ AUX ﻦﻴﻜﻤﺗ :
www.kenwood.com/cs/ce/
ﺭﺍﺮﻤﺘﺳﻻﺍ ﻊﻣ ﻂﻐﺿﺍ ٤
AUDIO CONTROL
SP SELECT
TUNER SETTING
ON
ON
OFF
SOURCE SELECT
PANDORA SRC
ON
BUILT-IN AUX
ON
UPDATE SYSTEM
F/W UP xx.xx
YES
PRESET TYPE
KEY BEEP
TDF ALARM
F/W UPDATE
NORMAL
٣
SWITCH
PREOUT
SYSTEM
٣
.ﺹﺮﻘﻟﺍ ﻰﻠﻋ ﻂﻐﺿﺍ ﻢﺛ ،
.ﺹﺮﻘﻟﺍ ﻰﻠﻋ ﻂﻐﺿﺍ ﻢﺛ ،
ﺽﺍﺮﻌﺘﺳﻻﺍ ﺔﻴﻠﻤﻋ ﺀﺎﻐﻟﺇ
:ﻲﻠﻳ ﺎﻣ ﺔﺷﺎﺸﻟﺍ ﺽﺮﻌﺘﺳ ،(ﺯﺎﻬﺠﻟﺍ ﻂﺒﺿ ﺓﺩﺎﻋﺇ ﺪﻌﺑ ﻭﺃ) ﺔﻗﺎﻄﻟﺍ ﻞﻴﻐﺸﺗ ﺪﻨﻋ
“VOLUME KNOB”
.ﻯﺮﺧﺃ ﺓﺮﻣ ﺕﻮﺼﻟﺍ ﻯﻮﺘﺴﻣ ﺹﺮﻗ ﻂﻐﺿﺍ
“PRESS” “CANCEL DEMO”
.ﺕﻮﺼﻟﺍ ﻯﻮﺘﺴﻣ ﺹﺮﻗ ﻂﻐﺿﺍ ١
.ﻲﺋﺪﺒﻣ ﺩﺍﺪﻋﺈﻛ
[YES]
ﺪﻳﺪﺤﺗ ﻢﺘﻳ
.“DEMO OFF” ﺮﻬﻈﺗ
ﺔﻋﺎﺴﻟﺍ ﻂﺒﺿ
.
[FUNCTION]
.ﺹﺮﻘﻟﺍ ﻰﻠﻋ ﻂﻐﺿﺍ ﻢﺛ ،
.ﺹﺮﻘﻟﺍ ﻰﻠﻋ ﻂﻐﺿﺍ ﻢﺛ ،ﺕﺍﺩﺍﺪﻋﻹﺍ ﺪﻳﺪﺤﺘﻟ ﺕﻮﺼﻟﺍ ﻯﻮﺘﺴﻣ ﺹﺮﻗ ﺭﺩﺃ
.ﺹﺮﻘﻟﺍ ﻰﻠﻋ ﻂﻐﺿﺍ ﻢﺛ ،
.
ﻰﻠﻋ ﻂﻐﺿﺍ ،ﻖﺑﺎﺴﻟﺍ ﻲﻣﺮﻬﻟﺍ ﻪﻠﺴﻠﺴﺗ ﻭﺃ ﺩﺍﺪﻋﻹﺍ ﺮﺼﻨﻋ ﻰﻟﺇ ﺓﺩﻮﻌﻠﻟ
.ﺓﺮﺷﺎﺒﻣ ﺔﻋﺎﺴﻟﺍ ﻂﺒﺿ ﻊﺿﻭ ﻝﻮﺧﺪﻟ DISP SCRL ﺭﺍﺮﻤﺘﺳﻻﺍ ﻊﻣ ﻂﻐﺿﺍ
ﻰﻟﺇ ﻝﻮﺧﺪﻠﻟ ﺕﻮﺼﻟﺍ ﻯﻮﺘﺴﻣ ﺹﺮﻗ ﻰﻠﻋ ﻂﻐﺿﺍ ١
[CLOCK]
[CLOCK ADJUST]
[CLOCK FORMAT]
[24H]
ﺪﻳﺪﺤﺘﻟ ﺕﻮﺼﻟﺍ ﻯﻮﺘﺴﻣ ﺹﺮﻗ ﺭﺩﺃ ٢
ﺪﻳﺪﺤﺘﻟ ﺕﻮﺼﻟﺍ ﻯﻮﺘﺴﻣ ﺹﺮﻗ ﺭﺩﺃ ٣
ﺔﻘﻴﻗﺩ
ﺪﻳﺪﺤﺘﻟ ﺕﻮﺼﻟﺍ ﻯﻮﺘﺴﻣ ﺹﺮﻗ ﺭﺩﺃ ٥
ﻭﺃ
[12H]
ﺪﻳﺪﺤﺘﻟ ﺕﻮﺼﻟﺍ ﻯﻮﺘﺴﻣ ﺹﺮﻗ ﺭﺩﺃ ٦
.ﺀﺎﻬﻧﻹﺍ ﻞﺟﺃ ﻦﻣ
...ﺔﻋﺎﺴﻟﺍ ﺭﺍﺪﻣ ﻰﻠﻋ ﺽﺮﻌﻟﺍ ﺔﺷﺎﺷ ﻲﻓ ﺎﻤﻨﻴﺑ
.ﺔﻋﺎﺴﻟﺍ ﻂﺒﻀﻟ ﻩﻼﻋﺃ ٤ ﺓﻮﻄﺨﻟﺍ ﺬﻔﻧ ،ﻢﺛ
ﺔﻋﺎﺳ ﻡﻮﻳ
ﺭﺍﺮﻤﺘﺳﻻﺍ ﻊﻣ ﻂﻐﺿﺍ ٧
١
٢
٢
٤
٤
Page 28

(RC-406) ﻢﻜﺤﺘﻟﺍ ﺕﻮﻤﻳﺭ
ﺪﻌﺑ ﻦﻋ ﻢﻜﺤﺘﻟﺍ ﺱﺎﺴﺣ
ﺀﻮﻀﻟ ﺾﻳﺮﻌﺘﻟﺍ ﺐﻨﺠﺗ)
(.ﻊﻃﺎﺴﻟﺍ ﺲﻤﺸﻟﺍ
ﻞﻴﺻﻮﺗ
ﻞﺼﻓ
ﺕﻮﺼﻟﺍ ﻯﻮﺘﺴﻣ ﺹﺮﻗ
(ﻂﻐﻀﻟﺍ/ﻥﺍﺭﻭﺪﻟﺍ)
ﺕﺎﹼﻴﹺﺳﺎﺳﹶﺃ
ﺯﺎﻬﺠﻟﺍ ﺔﻬﺟﺍﻭ
ﺽﺮﻌﻟﺍ ﺓﺬﻓﺎﻧ
.ﻡﺪﺨﺘﺴﻣ ﺮﻴﻏ
٣
*
ﺪﻨﻋ ﺀﺎﺑﺮﻬﻜﻟﺍ ﻝﺯﺎﻋ ﺀﺎﻄﻏ ﺐﺤﺴﺑ ﻢﻗ
.ﺓﺮﻣ ﻝﻭﻷ ﻡﺍﺪﺨﺘﺳﻻﺍ
ﺔﻳﺭﺎﻄﺒﻟﺍ ﻝﺍﺪﺒﺘﺳﺍ ﻦﻜﻤﻳ ﻒﻴﻛ
.ﺯﺎﻬﺠﻟﺍ ﻑﺎﻘﻳﻹ SRC ﻰﻠﻋ ﺭﺍﺮﻤﺘﺳﻻﺍ ﻊﻣ ﻂﻐﺿﺍ
( .ﺯﺎﻬﺠﻟﺍ ﻞﻴﻐﺸﺗ ﻰﻠﻋ ﻞﻤﻌﻳ ﻻ SRC ﻰﻠﻋ ﻂﻐﻀﻟﺍ )
.ﺕﻮﺼﻟﺍ ﻯﻮﺘﺴﻣ ﻒﻴﻔﺨﺘﻟ ﻞﻴﻐﺸﺘﻟﺍ ﺀﺎﻨﺛﺃ ATT ﻂﻐﺿﺍ
| ﻲﺑﺮﻋ
ﻂﺒﻀﻟﺍ ﺕﺎﻴﻠﻤﻋ ﺔﻟﺍﺯﺇ ﻢﺘﻳ ﻑﻮﺳ
VOL ﻭﺃ VOL ﻂﻐﺿﺍ
.ﺯﺎﻬﺠﻟﺍ ﻞﻴﻐﺸﺗ ﻒﻗﻮﻟ ﻯﺮﺧﺃ ﺓﺮﻣ ﻂﻐﺿﺍ •
( ﺡﺎﺘﻣ ﺮﻴﻏ )
ﺓﺩﺎﻋﺇ ﻦﻜﻤﻳ ﻒﻴﻛ
ﻂﺒﻀﻟﺍ
.ﹰﺎﻘﺒﺴﻣ ﺎﻬﻄﺒﺿ ﻢﺗ ﻲﺘﻟﺍ
.ﺔﻴﻟﺎﺤﻟﺍ ﺔﺷﺎﺸﻟﺍ ﺕﺎﻣﻮﻠﻌﻣ ﺮﻳﺮﻤﺘﻟ ﺭﺍﺮﻤﺘﺳﻻﺍ ﻊﻣ ﻂﻐﺿﺍ •
ﻞﺼﻔﻟﺍ ﺭﺯ
.ﺯﺎﻬﺠﻟﺍ ﻑﺎﻘﻳﻹ ﺭﺍﺮﻤﺘﺳﻻﺍ ﻊﻣ ﻂﻐﺿﺍ •
KMM-X10
ﻰﻟﺇ(ﺔﺣﻮﻠﻟﺍ ﻝﻼﺧ ﻦﻣ) ﻚﻟﺫ ﺀﺍﺮﺟﺈﺑ ﻢﻗ(ﻢﻜﺤﺘﻟﺍ ﺕﻮﻤﻳﺭ ﻝﻼﺧ ﻦﻣ) ﻚﻟﺫ ﺀﺍﺮﺟﺈﺑ ﻢﻗ
ﺔﻴﺋﺎﺑﺮﻬﻜﻟﺍ ﺔﻗﺎﻄﻟﺍ ﻞﺻﻭﺍ.B SRC ﻰﻠﻋ ﻂﻐﺿﺍ
ﺕﻮﺼﻟﺍ ﻯﻮﺘﺴﻣ ﻂﺒﺿ.ﺕﻮﺼﻟﺍ ﻯﻮﺘﺴﻣ ﺹﺮﻗ ﺭﺩﺃ.
ﻞﻴﻐﺸﺘﻟﺍ ﺭﺪﺼﻣ ﺪﻳﺪﺤﺗ.ﺭﺍﺮﻜﺘﺑ B SRC ﻂﻐﺿﺍ.ﺭﺍﺮﻜﺘﺑ SRC ﻂﻐﺿﺍ
ﺔﺷﺎﺸﻟﺍ ﺕﺎﻣﻮﻠﻌﻣ ﺮﻴﻴﻐﺗ.ﺭﺍﺮﻜﺘﺑ DISP SCRL ﻂﻐﺿﺍ
Page 29

.ﺔﻨﻣﻵﺍ ﺓﺩﺎﻴﻘﻟﺍ ﻦﻋ ﹰﺍﺪﻴﻌﺑ ﻚﻫﺎﺒﺘﻧﺍ ﺏﺬﺠﺗ ﺪﻗ ﺔﻔﻴﻇﻭ ﻱﺃ ﺀﺍﺮﺟﺈﺑ ﻢﻘﺗ ﻻ
ﺮﻳﺬﺤﺗ
ﺮﻳﺬﺤﺗ
.ﺝﺮﺨﻟﺍ ﻯﻮﺘﺴﻣ ﻲﻓ ﺔﺌﺟﺎﻔﻤﻟﺍ ﺓﺩﺎﻳﺰﻟﺍ ﻝﻼﺧ ﻦﻣ ﺕﻮﺼﻟﺍ ﺮﺒﻜﻣ ﺭﺮﺿ ﺐﻨﺠﺘﻟ ﺔﻴﻤﻗﺭ ﺭﺩﺎﺼﻣ ﻱﺃ ﻞﻴﻐﺸﺗ ﻞﺒﻗ ﺕﻮﺼﻟﺍ ﻯﻮﺘﺴﻣ ﺾﻴﻔﺨﺗ •
.ﺙﺩﺍﻮﺤﻟﺍ ﺐﻨﺠﺗ ﻦﻣ ﻦﻜﻤﺘﺗ ﻰﺘﺣ ﺓﺭﺎﻴﺴﻟﺍ ﺝﺭﺎﺧ ﺕﺍﻮﺻﻷﺍ ﻉﺎﻤﺳ ﻚﻟ ﺢﻴﺘﻳ ﺚﻴﺤﺑ ﺕﻮﺼﻟﺍ ﻯﻮﺘﺴﻣ ﻂﺒﺿﺍ •
.ﺓﺩﺎﻴﻘﻟﺍ ﺔﻣﻼﺳ ﺽﺮﺘﻌﻳ ﻥﺃ ﻦﻜﻤﻳ iPhone/iPod ﻭﺃ USB ﺯﺎﻬﺟ ﻡﺍﺪﺨﺘﺳﺍ ﺐﻨﺠﺗ •
ﻢﺗ ﻲﺘﻟﺍ ﺕﺎﻧﺎﻴﺒﻠﻟ ﺓﺭﺎﺴﺧ ﺔﻳﺃ ﻦﻋ ﺔﻴﻟﻭﺆﺴﻣ ﺔﻳﺃ ﻞﻤﺤﺘﻧ ﻻﺃ ﺐﺠﻳ .ﺎﻬﻟ ﻲﻃﺎﻴﺘﺣﺍ ﺦﺴﻧ ﻞﻤﻋ ﻢﺗ ﺪﻗ ﺔﻣﺎﻬﻟﺍ ﺕﺎﻧﺎﻴﺒﻟﺍ ﻊﻴﻤﺟ ﻥﺃ ﻦﻣ ﺪﻛﺄﺗ •
.ﺭﺎﻴﺘﻟﺍ ﻉﺎﻄﻘﻧﺍ ﺙﻭﺪﺣ ﻊﻨﻤﻟ ﺓﺪﺣﻮﻟﺍ ﻞﺧﺍﺩ (ﺔﻴﻧﺪﻌﻤﻟﺍ ﺕﺍﻭﺩﻷﺍ ﻭﺃ ﺕﻼﻤﻌﻟﺍ ﻞﺜﻣ) ﺔﻴﻧﺪﻌﻣ ﻡﺎﺴﺟﺃ ﻱﺃ ﻙﺮﺘﺗ ﻭﺃ ﻊﻀﺗ ﻻ •
:(RC-406) ﻢﻜﺤﺘﻟﺍ ﺕﻮﻤﻳﺭ
.ﻥﺎﻴﺒﻟﺍﻭ ﺱﺎﻴﻘﻟﺍ ﺓﺰﻬﺟﺃ ﺔﺣﻮﻟ ﻞﺜﻣ ﺔﻨﺧﺎﺳ ﻦﻛﺎﻣﺃ ﻰﻠﻋ ﻢﻜﺤﺘﻟﺍ ﺕﻮﻤﻳﺭ ﻊﻀﺗ ﻻ •
ﻦﻣ ﻭﺃ ﻉﻮﻨﻟﺍ ﺲﻔﻧ ﻦﻣ ﻯﺮﺧﺄﺑ ﺔﻳﺭﺎﻄﺒﻟﺍ ﻝﺪﺒﺘﺳﺍ .ﺢﻴﺤﺻ ﺮﻴﻏ ﻞﻜﺸﺑ ﺎﻬﻟﺍﺪﺒﺘﺳﺍ ﺔﻟﺎﺣ ﻲﻓ ﺭﺎﺠﻔﻧﺍ ﺙﻭﺪﺣ ﻰﻟﺇ ﻡﻮﻴﺜﻴﻟ ﺔﻳﺭﺎﻄﺑ ﻱﺩﺆﺗ ﻥﺃ ﻦﻜﻤﻳ •
.ﻪﺑﺎﺷ ﺎﻣ ﻭﺃ ﺐﻬﻠﻟﺍ ﻭﺃ ﺲﻤﺸﻟﺍ ﺀﻮﺿ ﻞﺜﻣ ﺔﻃﺮﻔﻤﻟﺍ ﺓﺭﺍﺮﺤﻠﻟ ﺕﺎﻳﺭﺎﻄﺒﻟﺍ ﻭﺃ ﺔﻳﺭﺎﻄﺒﻟﺍ ﺓﻮﺒﻋ ﺾﻳﺮﻌﺗ ﻡﺪﻋ ﺐﺠﻳ •
.ﺍﹰﺭﻮﻓ ﺔﻣﺪﺨﺘﺴﻤﻟﺍ ﺕﺎﻳﺭﺎﻄﺒﻟﺍ ﻦﻣ ﺺﻠﺨﺗ .ﻡﺍﺪﺨﺘﺳﻻﺍ ﺪﻴﻗ ﻥﻮﻜﺗ ﻻ ﺎﻣﺪﻨﻋ ﺔﻴﻠﺻﻷﺍ ﺎﻬﺗﻮﺒﻋ ﻞﺧﺍﺩﻭ ﻝﺎﻔﻃﻷﺍ ﻝﻭﺎﻨﺘﻣ ﻦﻋ ﺍﹰﺪﻴﻌﺑ ﺔﻳﺭﺎﻄﺒﻟﺍ ﻖﺑﺃ •
.ﺭﻮﻔﻟﺍ ﻰﻠﻋ ﺐﻴﺒﻄﺑ ﻝﺎﺼﺗﻻﺎﺑ ﻢﻗ ،ﺎﻬﻋﻼﺘﺑﺍ ﺔﻟﺎﺣ ﻲﻓﻭ
:ﺕﻮﺼﻟﺍ ﺩﺍﺪﻋﺇ
:ﻡﺎﻋ
.ﺎﻬﻠﻴﺠﺴﺗ
.ﺊﻓﺎﻜﻣ ﻉﻮﻧ
ﺔﻴﻔﺗﺎﻫ ﺔﻤﻟﺎﻜﻣ ﻝﺎﺒﻘﺘﺳﺍ ﺪﻨﻋ ﺕﻮﺼﻟﺍ ﻢﺘﻛ
(٥١ )
.ﻕﺍﻮﺳﻷﺍ ﻲﻓ ﺓﺮﻓﻮﺘﻤﻟﺍ ﻒﺗﺎﻬﻟﺍ ﺕﺎﻘﺤﻠﻣ ﺪﺣﺃ ﺎﹰﻣﺪﺨﺘﺴﻣ ﻒﺗﺎﻬﻟﺎﺑ MUTE ﻚﻠﺳ ﻞﻴﺻﻮﺘﺑ ﻢﻗ
.ﻪﻠﻤﻋ ﺕﻮﺼﻟﺍ ﻡﺎﻈﻧ ﻒﻧﺄﺘﺴﻳﻭ ”CALL” ﻲﻔﺘﺨﺗ .B SRC ﻂﻐﺿﺍ ،ﺔﻤﻟﺎﻜﻣ ﺀﺍﺮﺟﺇ ﺀﺎﻨﺛﺃ ﻮﻳﺩﺍﺮﻟﺍ ﻡﺎﻈﻧ ﻰﻟﺇ ﻉﺎﻤﺘﺳﻻﺍ ﺔﻠﺻﺍﻮﻤﻟ •
(.ﺖﻗﺆﻣ ﻞﻜﺸﺑ ﺕﻮﺼﻟﺍ ﻡﺎﻈﻧ ﻑﺎﻘﻳﺇ ﻢﺘﻳ) .“CALL“ ﺮﻬﻈﺗ ،ﺔﻤﻟﺎﻜﻣ ﻝﺎﺒﻘﺘﺳﺍ ﺔﻟﺎﺣ ﻲﻓ
(.ﻪﻠﻤﻋ ﺕﻮﺼﻟﺍ ﻡﺎﻈﻧ ﻒﻧﺄﺘﺴﻳ) .“CALL“ ﻲﻔﺘﺨﺗ ،ﺔﻤﻟﺎﻜﻣ ﺀﺎﻬﺘﻧﺍ ﺪﻨﻋ
ﺕﺎﻳﻮﺘﺤﻤﻟﺍﻡﺍﺪﺨﺘﺳﻻﺍ ﻞﺒﻗ
٢ ﻡﺍﺪﺨﺘﺳﻻﺍ ﻞﺒﻗ
٣ ﺕﺎﹼﻴﹺﺳﺎﺳﹶﺃ
٤ ﻞﻤﻌﻟﺍ ﻲﻓ ﻉﻭﺮﺸﻟﺍ
٥ ﻮﻳﺩﺍﺭ
٦ iPod / USB
٨ AUX
KMM-X30
٩
(
٩ ﺔﺷﺎﺸﻟﺍ ﺕﺍﺩﺍﺪﻋﺇ
١٠ ﺕﻮﺼﻟﺍ ﺕﺍﺩﺍﺪﻋﺇ
١١ ﺕﺎﻣﻮﻠﻌﻤﻟﺍ ﻦﻣ ﺪﻳﺰﻣ
١٢ ﺡﻼﺻﻻﺍﻭ ﻝﺎﻄﻋﻻﺍ ﻦﻋ ﺚﺤﺒﻟﺍ
١٣ ﺕﺎﻔﺻﺍﻮﻤﻟﺍ
١٤ ﻞﻴﺻﻮﺘﻟﺍ / ﺐﻴﻛﺮﺘﻟﺍ
ـﻟ)
®Pandora
ﻦﻣ ﻲﻔﻠﺨﻟﺍ ﺐﻧﺎﺠﻟﺍ ﻲﻓ) ﻞﺻﻮﻤﻟﺍ
(ﺯﺎﻬﺠﻟﺍ ﺔﻬﺟﺍﻭ
ﺵﺎﻤﻗ ﺔﻌﻄﻗ ﻭﺃ ﻑﺎﺟ ﻥﻮﻜﻴﻠﺳ ﻡﺍﺪﺨﺘﺳﺎﺑ ﺔﺣﻮﻠﻟﺍ ﻦﻣ ﺏﺍﺮﺘﻟﺍ ﺢﺴﻣﺍ :ﺯﺎﻬﺠﻟﺍ ﻒﻴﻈﻨﺗ
ﺔﻧﺎﻴﺼﻟﺍ
.ﺔﻤﻋﺎﻧ
ﻰﻠﻋ ﺹﺮﺤﻟﺍ ﻊﻣ ،ﻦﻄﻗ ﺔﻌﻄﻘﺑ ﻖﻓﺮﺑ ﻞﺻﻮﻤﻟﺍ ﻒﻈﻧﻭ ﺯﺎﻬﺠﻟﺍ ﺔﻬﺟﺍﻭ ﻚﻓ :ﻞﺻﻮﻤﻟﺍ ﻒﻴﻈﻨﺗ
.ﻞﺻﻮﻤﻟﺍ ﻑﻼﺗﺇ ﻡﺪﻋ
ﻞﻜﺸﺑ ﺯﺎﻬﺠﻟﺍ ﻞﻴﻐﺸﺗ ﺕﺎﻴﻠﻤﻋ ﺖﺤﺿﻭﺃ •
ﻞﻴﻟﺪﻟﺍ ﺍﺬﻫ ﺃﺮﻘﺗ ﻒﻴﻛ
ﻰﻠﻋ ﺪﺟﺍﻮﺘﻣ ﺭﺍﺭﺯﻷﺍ ﻡﺍﺪﺨﺘﺳﺍ ﻥﺃ ﻲﺴﻴﺋﺭ
.ﺓﺩﺪﺤﻤﻟﺍ ﺮﺻﺎﻨﻌﻟﺍ ﻰﻟﺇ ﺮﻴﺸﺗ
ﻲﻓ ﺓﺮﻓﻮﺘﻣ ﻊﺟﺍﺮﻤﻟﺍ ﻥﺃ ﻰﻟﺇ ﺮﻴﺸﺗ
.ﺔﺣﻮﻠﻟﺍ
[XX]
(XX )
.ﺓﺩﺪﺤﻤﻟﺍ ﺔﺤﻔﺼﻟﺍ
•
•
٢
Page 30

KMM-X30
KMM-X10
ﺔﻴﻤﻗﺮﻟﺍ ﻂﺋﺎﺳﻮﻟﺍ ﻝﺎﺒﻘﺘﺳﺍ ﺯﺎﻬﺟ
ﺕ ﺎﻤﻴﻠﻌﺘﻟﺍ ﻞﻴﻟﺩ
• “Made for iPod,” and “Made for iPhone” mean that an electronic accessory has been designed to connect specifically to iPod, or iPhone, respectively, and has
been certified by the developer to meet Apple performance standards. Apple is not responsible for the operation of this device or its compliance with safety and
regulatory standards. Please note that the use of this accessory with iPod or iPhone may affect wireless performance.
• iPhone, iPod, iPod classic, iPod nano, and iPod touch are trademarks of Apple Inc., registered in the U.S. and other countries.
• Lightning is a trademark of Apple Inc.
• Pandora, the Pandora logo, and the Pandora trade dress are trademarks or registered trademarks of Pandora Media, Inc., used with permission.
• Android is trademark of Google Inc.
GET0959-001A (MN) © 2013 JVC KENWOOD Corporation
 Loading...