

Page 1

KMM-U51BT
DIGITAL MEDIA RECEIVER
INSTRUCTION MANUAL
B5A-0168-00 (MN)© 2014 JVC KENWOOD Corporation
Page 2

libFLAC
Copyright (C) 2000,2001,2002,2003,2004,2005,2006,2007,2008,2009 Josh Coalson
Redistribution and use in source and binary forms, with or without modification, are
permitted provided that the following conditions are met:
- Redistributions of source code must retain the above copyright notice, this list of
conditions and the following disclaimer.
- Redistributions in binary form must reproduce the above copyright notice, this list of
conditions and the following disclaimer in the documentation and/or other materials
provided with the distribution.
- Neither the name of the Xiph.org Foundation nor the names of its contributors may be
used to endorse or promote products derived from this software without specific prior
written permission.
THIS SOFTWARE IS PROVIDED BY THE COPYRIGHT HOLDERS AND ONTRIBUTORS “AS IS”
AND ANY EXPRESS OR IMPLIED WARRANTIES, INCLUDING, BUT NOT LIMITED TO, THE
IMPLIED WARRANTIES OF MERCHANTABILITY AND FITNESS FOR A PARTICULAR PURPOSE
ARE DISCLAIMED. IN NO EVENT SHALL THE FOUNDATION OR CONTRIBUTORS BE LIABLE FOR
ANY DIRECT, INDIRECT, INCIDENTAL, SPECIAL, EXEMPLARY, OR CONSEQUENTIAL DAMAGES
(INCLUDING, BUT NOT LIMITED TO, PROCUREMENT OF SUBSTITUTE GOODS OR SERVICES;
LOSS OF USE, DATA, OR PROFITS; OR BUSINESS INTERRUPTION) HOWEVER CAUSED AND ON
ANY THEORY OF LIABILITY, WHETHER IN CONTRACT, STRICT LIABILITY, OR TORT (INCLUDING
NEGLIGENCE OR OTHERWISE) ARISING IN ANY WAY OUT OF THE USE OF THIS SOFTWARE, EVEN
IF ADVISED OF THE POSSIBILITY OF SUCH DAMAGE.
i
Page 3

• “Made for iPod,” and “Made for iPhone” mean that an electronic accessory has been designed to
connect specifically to iPod, or iPhone, respectively, and has been certified by the developer to
meet Apple performance standards. Apple is not responsible for the operation of this device or
its compliance with safety and regulatory standards. Please note that the use of this accessory
with iPod or iPhone may affect wireless performance.
• iPhone, iPod, iPod classic, iPod nano, and iPod touch are trademarks of Apple Inc., registered in
the U.S. and other countries.
• Lightning is a trademark of Apple Inc.
•
The “AAC” logo is a trademark of Dolby Laboratories.
• Pandora, the Pandora logo, and the Pandora trade dress are trademarks or registered
trademarks of Pandora Media, Inc., used with permission.
•
Android is trademark of Google Inc.
•
The Bluetooth® word mark and logos are registered trademarks owned by Bluetooth
SIG, Inc. and any use of such marks by JVC KENWOOD Corporation is under license. Other
trademarks and trade names are those of their respective owners.
ii
Page 4
CONTENTS BEFORE USE
BEFORE USE 2
BASICS 3
GETTING STARTED 4
RADIO 5
USB / iPod / ANDROID 7
Pandora® 9
BLUETOOTH® 10
AUX 16
AUDIO SETTINGS 16
DISPLAY SETTINGS 17
MORE INFORMATION 18
TROUBLESHOOTING 19
SPECIFICATIONS 21
INSTALLATION /
CONNECTION 22
Warning
Do not operate any function that takes your attention away from safe driving.
Caution
Volume setting:
• Adjust the volume so that you can hear sounds outside the car to prevent accidents.
• Lower the volume before playing digital sources to avoid damaging the speakers by the sudden increase of
the output level.
General:
• Avoid using the external device if it might hinder safe driving.
• Make sure all important data has been backed up. We shall bear no responsibility for any loss of recorded
data.
•
Never put or leave any metallic objects (such as coins or metal tools) inside the unit, to prevent a short circuit.
• USB rating is indicated on the main unit. To view, detach the faceplate.
Remote control (RC-406):
• Do not leave the remote control in hot places such as on the dashboard.
• The Lithium battery is in danger of explosion if replaced incorrectly. Replace it only with the same or
equivalent type.
• The battery pack or batteries shall not be exposed to excessive heat such as sunshine, fire or the like.
• Keep the battery out of reach of children and in its original packaging when not in used. Dispose of used
batteries promptly. If swallowed, contact a physician immediately.
( 3)
How to read this manual
• Operations are explained mainly
using buttons on the faceplate.
• [
XX
] indicates the selected items.
• (
XX) indicates references are
available on the stated page.
2
Maintenance
Cleaning the unit: Wipe off dirt on the faceplate with a dry silicone or
soft cloth.
Cleaning the connector: Detach the faceplate and clean the connector
gently with a cotton swab, being careful not to damage the connector.
Connector (on the reverse
side of the faceplate)
Page 5
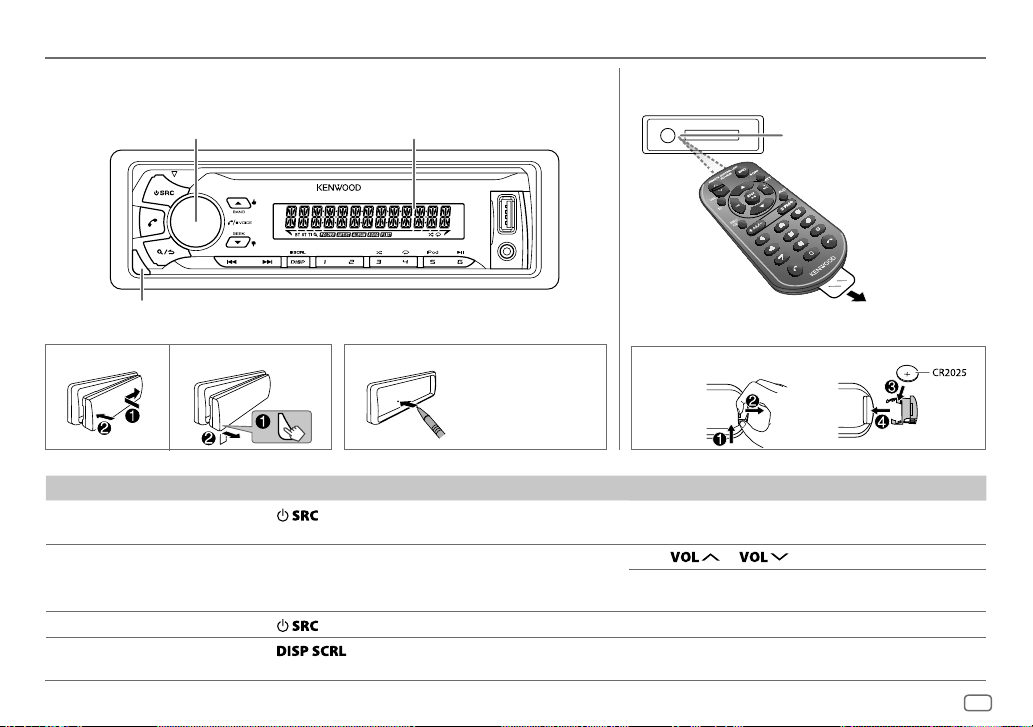
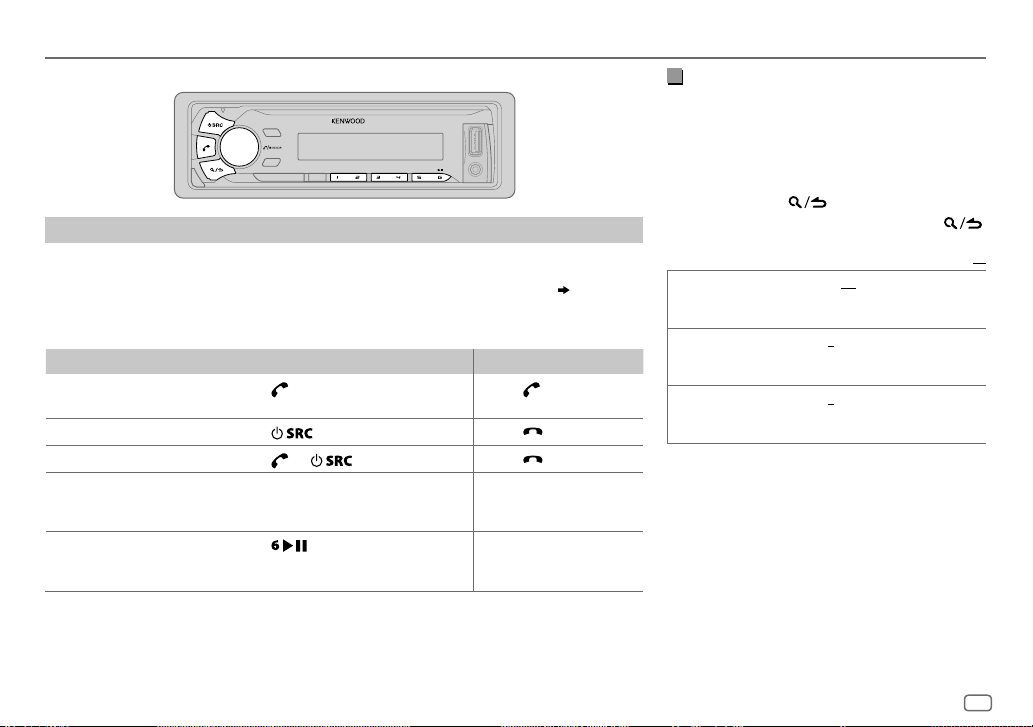
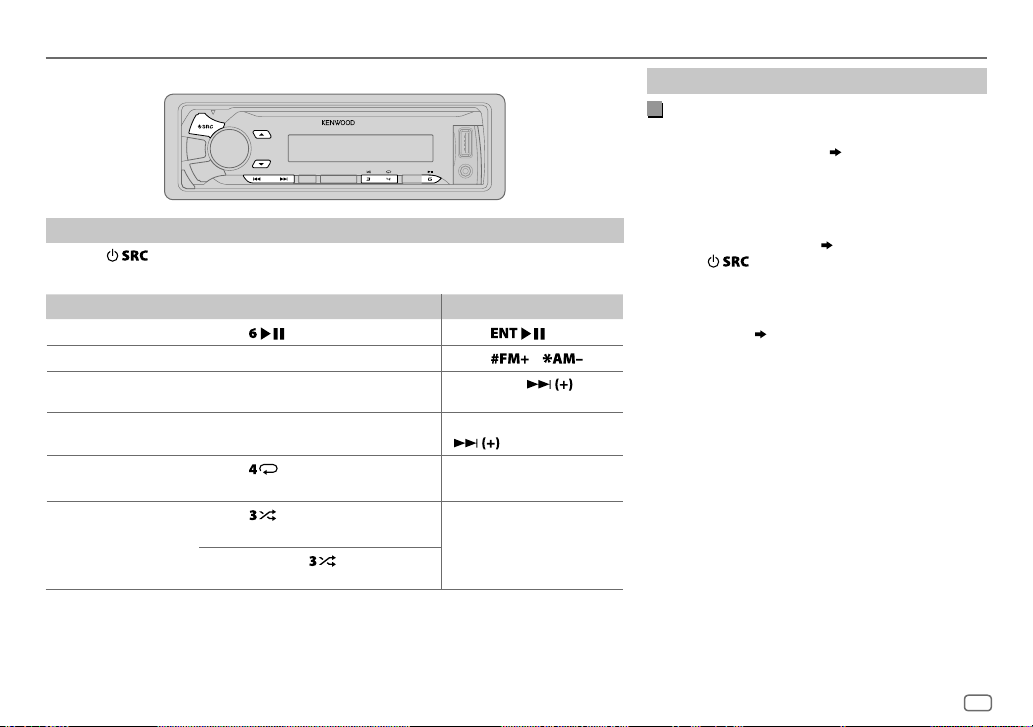
BASICS
Faceplate
Remote control (RC-406)
Volume knob
(turn/press)
Detach button
To On the faceplate On the remote control
Turn on the power
Adjust the volume Turn the volume knob. Press
Select a source
Change the display
information
Press
• Press and hold to turn off the power.
Press
Press
• Press and hold to scroll the current display information.
Display window
How to resetAttach Detach
.
repeatedly.
repeatedly.
How to replace the battery
Your preset
adjustments will
also be erased.
Press and hold SRC to turn off the power.
( Pressing SRC does not turn on the power. )
or .
Press ATT during playback to attenuate the sound.
• Press again to cancel.
Press SRC repeatedly.
( not available )
Remote sensor (Do not
expose to bright sunlight.)
Pull out the
insulation sheet
when using for the
first time.
ENGLISH
3
Page 6
GETTING STARTED
1
Cancel the demonstration
When you turn on the power (or after you reset the unit), the display
shows: “CANCELDEMO”
1 Press the volume knob.
[
YES
] is selected for the initial setup.
2 Press the volume knob again.
“DEMOOFF” appears.
2
Set the clock
Press the volume knob to enter [
1
2 Turn the volume knob to select [
3 Turn the volume knob to select [
knob.
4 Turn the volume knob to make the settings, then press the knob.
Day
Hour Minute
5 Turn the volume knob to select [
knob.
6 Turn the volume knob to select [
7 Press and hold to exit.
To return to the previous setting item, press .
While in clock display screen...
Press and hold to enter clock adjustment mode directly.
Then, perform step
“PRESS” “VOLUMEKNOB”
FUNCTION
CLOCK
CLOCK ADJUST
CLOCK FORMAT
12H
4 to set the clock.
].
], then press the knob.
], then press the
], then press the
] or [
24H
], then press the knob.
3
Set the initial settings
Press repeatedly to enter STANDBY.
1
2 Press the volume knob to enter [
FUNCTION
].
3 Turn the volume knob to make a selection (see the following table),
then press the knob.
4 Repeat step 3 until the desired item is selected or activated.
5 Press and hold to exit.
To return to the previous setting item, press .
Default:
AUDIO CONTROL
SWITCH
PREOUT
SP SELECT OFF/ 5/4/ 6 × 9/6/ OEM
TUNER SETTING
PRESET TYPE
SYSTEM
KEY BEEP
TDF ALARM ON
SOURCE SELECT
PANDORA SRC
BUILT-IN AUX ON
REAR/ SUB-W: Selects whether rear speakers or a subwoofer are connected
to the line out terminals on the rear (through an external amplifier).
or 4inches, 6×9inches or 6inches) or OEM speakers for optimum
performance.
NORMAL
:Memorizes one station for each preset button in each band
(
5).;
MIX
the selected band.
ON
set to OFF.;
ON
:Memorizes one station for each preset button, regardless of
:Activates the keypress tone.;
:Activates the alarm if you forget to detach the faceplate when ACC is
OFF
:Enables PANDORA in source selection.;
:Enables AUX in source selection.;
: Selects according to the speaker size (5inches
OFF
:Deactivates.
:Deactivates.
OFF
:Disables. ( 9)
OFF
:Disables. ( 16)
XX
4
Page 7
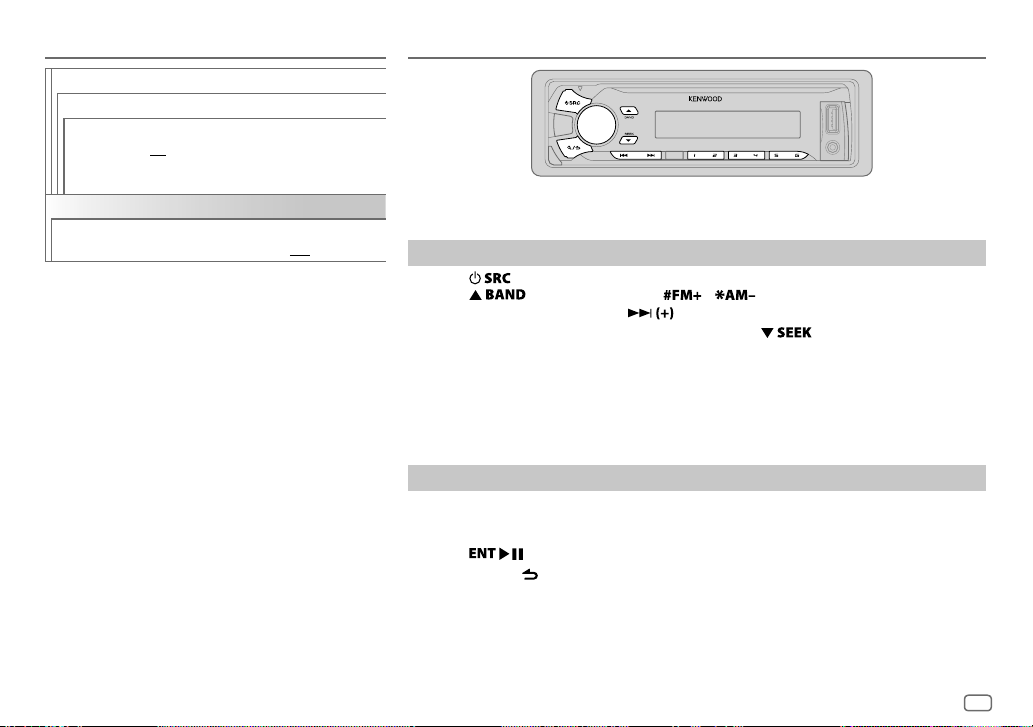
GETTING STARTED RADIO
F/W UPDATE
UPDATE SYSTEM/ UPDATE BT
F/W UP xx.xx
CLOCK
CLOCK DISPLAY
YES
:Starts upgrading the firmware.;
NO
:Cancels (upgrading is not activated).
For details on how to update the firmware, see:
www.kenwood.com/cs/ce/
ON
:The clock time is shown on the display even
when the unit is turned off.;
OFF
:Cancels.
Supported band: FM1/ FM2/ FM3/ AM/ SW1/ SW2
Search for a station
Press repeatedly to select TUNER.
1
2 Press repeatedly (or press / on RC-406) to select the band.
3 Press S/T (or press S/ on RC-406) to search for a station.
• To change the searching method for S/T: Press repeatedly.
AUTO1 : Automatically search for a station.
AUTO2 : Search for a preset station.
MANUAL : Manually search for a station.
• To store a station: Press and hold one of the number buttons (1to6).
• To select a stored station: Press one of the number buttons (1to6) (or press one of the
number buttons (1to6) on RC-406).
Direct Access Tuning (using RC-406)
Press DIRECT to enter Direct Access Tuning.
1
“– – – • –” (for FM), “– – – –” (for AM/ SW1) or “– – – – –” (for SW2) appears on the display.
2 Press the number buttons to enter a frequency.
3 Press to search for a station.
• To cancel, press or DIRECT.
• If no operation is done for 10seconds after step
canceled.
2, Direct Access Tuning is automatically
ENGLISH
5
Page 8
RADIO
Other settings
Press the volume knob to enter [
1
FUNCTION
].
2 Turn the volume knob to make a selection (see the following table), then
press the knob.
3 Repeat step 2 until the desired item is selected or activated.
4 Press and hold to exit.
To return to the previous setting item, press .
Default:
TUNER SETTING
LOCAL SEEK
AUTO MEMORY YES
MONO SET ON
NEWS SET ON
REGIONAL ON
AF SET ON
TI ON
PTY SEARCH
*
ON
:Searches only stations with good reception.;
•
Settings made are applicable only to the selected source/station. Once you
change the source/station, you need to make the settings again.
:Automatically starts memorizing 6 stations with good reception.; NO:Cancels.
•
Selectable only if [
:Improves the FM reception, but the stereo effect may be lost.;
:The unit will temporarily switch to News Programme if available.;
OFF
:Cancels.
: Switches to another station only in the specific region using the “AF” control.;
OFF
:Cancels.
: Automatically searches for another station broadcasting the same program
in the same Radio Data System network with better reception when the current
reception is poor.;
: Allows the unit to temporarily switch to Traffic Information if available (“TI”
lights up).;
Press the volume knob to enter PTY language selection. Turn the volume knob to
select the PTY language (
Selects the available Program Type (see below), then, press
OFF
NORMAL
] is selected for [
OFF
:Cancels.
:Cancels.
ENGLISH/ FRENCH/ GERMAN
OFF
:Cancels.
PRESET TYPE
), then press the knob.
]. ( 4)
S
/T to start.
OFF
:Cancels.
CLOCK
TIME SYNC
*
Only for AM/ SW1/ SW2 source.
• [
MONO SET
selectable only when the band is FM1/ FM2/ FM3.
• Available Program Type:
XX
SPEECH
MUSIC: POP M (music), ROCK M (music), EASY M (music), LIGHT M
The unit will search for the Program Type categorized under
[
SPEECH
• If the volume is adjusted during reception of traffic
information, alarm or news bulletin, the adjusted volume is
memorized automatically. It will be applied the next time traffic
information, alarm or news bulletin is turned on.
ON
:Synchronizes the unit’s time to the Radio Data System
station time.;
]/ [
NEWS SET
: NEWS
, AFFAIRS
CULTURE
SOCIAL
, RELIGION
(music), CLASSICS
(music), OLDIES
] or [
MUSIC
OFF
:Cancels.
]/ [
REGIONAL
, INFO (information), SPORT
, SCIENCE
, VARIED
, WEATHER
, PHONE IN
, TRAVEL
, OTHER M (music), JAZZ
, FOLK M (music)
] if selected.
]/ [
AF SET
]/ [TI]/ [
, EDUCATE
, FINANCE
, LEISURE
, COUNTRY
PTY SEARCH
, CHILDREN
, DOCUMENT
, NATION M
] is
, DRAMA
,
,
6
Page 9
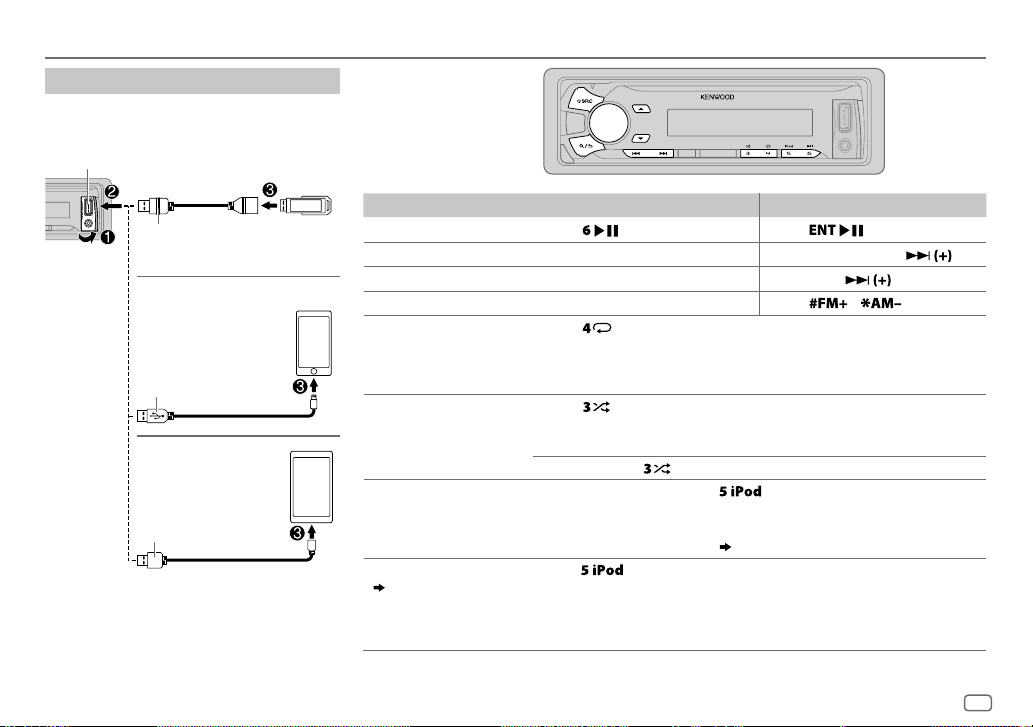
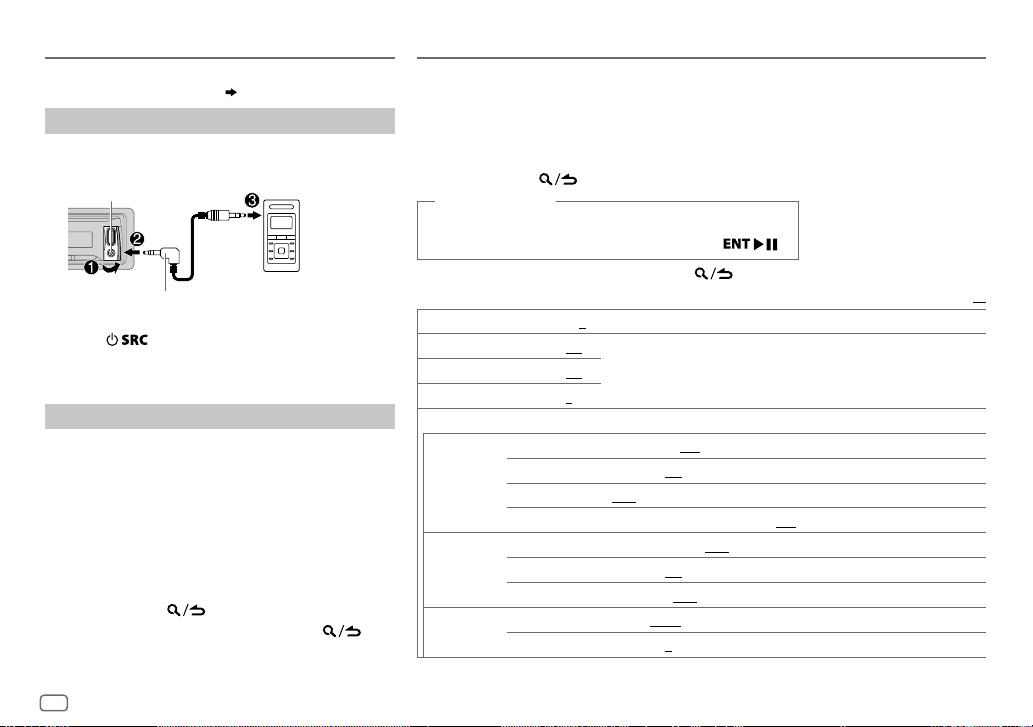
USB / iPod / ANDROID
Start playback
The source changes automatically and
playback starts.
USB input terminal
USB
CA-U1EX (max.: 500mA)
(optional accessory)
iPod/iPhone
KCA-iP102 / KCA-iP103 (optional
1
*
accessory)
of the iPod/iPhone
1
*
KCA-iP102 : 30-pin type, KCA-iP103 : Lightning type
2
*
Do not leave the cable inside the car when not using.
or accessory cable
2
*
3
ANDROID
Micro USB 2.0 cable
*
*
(commercially available)
2
To On the faceplate On the remote control
Playback / pause Press .
4
Reverse / Fast-forward
Select a file
Select a folder
6
Repeat play
*
*
Press and hold S/T. Press and hold S/ .
Press S/T. Press S/
5
*
Press J/K.
Press repeatedly.
FILE REPEAT/ FOLDER REPEAT/ REPEAT OFF
Press
Press
.
/ .
: MP3/WMA/AAC/WAV/FLAC file,
iPod or ANDROID
Random play
FILE REPEAT/ REPEAT OFF
6
*
Press repeatedly.
FOLDER RANDOM/ RANDOM OFF
: KME Light/ KMC file
: MP3/WMA/AAC/WAV/FLAC file, KME
Light/ KMC file, iPod or ANDROID
Press and hold
Select control mode While in iPod source, press
MODE ON
: Control from the iPod
MODE OFF
: Control from the unit
While in ANDROID source,
Select music drive
(
8, [
MUSIC DRIVE]
)
Press
The stored songs in the following start playback.
to select
repeatedly.
ALL RANDOM
8
*
( 8, [
ANDROID SETUP])
.
repeatedly.
• Selected internal or external memory of a smartphone (Mass Storage
Class).
• Selected drive of a multiple drives device.
.
7
*
ENGLISH
7
Page 10
USB / iPod / ANDROID
3
*
When connecting an Android device, “Press [VIEW] to install KENWOOD MUSIC PLAY APP” is
shown. Follow the instructions to install the application. You can also install the latest version
of KENWOOD MUSIC PLAY application on your Android device before connecting. (
4
*
For ANDROID: Applicable only when [
5
*
Only for MP3/WMA/AAC/WAV/FLAC files. This does not work for iPod/ ANDROID.
6
*
For iPod/ ANDROID: Applicable only when [
7
*
KME Light : KENWOOD Music Editor Light, KMC : KENWOOD Music Control ( 18)
8
*
You can still play/pause, file skip, fast-forward or reverse files from the unit.
Select a file from a folder/list
Press .
1
2 Turn the volume knob to select a folder/list, then press the knob.
3 Turn the volume knob to select a file, then press the knob.
Quick Search
If you have many files, you can search through them quickly.
For USB (for KME Light/ KMC files):
Press S/T to search at a preset skip search ratio. (
Press and hold S/T to search at a 10
• Not applicable for MP3/WMA/AAC/WAV/FLAC files.
For iPod:
You can search for a file according to the first character.
Turn the volume knob quickly to enter character search.
Turn the volume knob to select the character.
To search for a character other than A to Z and 0to9, enter only
“
”.
*
Press S/T to move to the entry position.
• You can enter up to 3characters.
Press the volume knob to start searching.
• To return to the root folder/ first file/ top menu, press
• To return to the previous setting item, press
• To cancel, press and hold
• For iPod, applicable only when [
• For ANDROID, applicable only when [
(
[
ANDROID SETUP
])
8
BROWSE MODE
MODE OFF
.
MODE OFF
BROWSE MODE
] is selected. ( [
]/ [
BROWSE MODE
%
ratio.
.
] is selected. ( 7)
] is selected.
ANDROID SETUP
] is selected.
[
SKIP SEARCH
.
18)
Direct Music Search (using RC-406)
Press DIRECT.
1
2 Press the number buttons to enter a file number.
])
3 Press to search for music.
• To cancel, press or DIRECT.
• Not available if Random Play is selected.
• Not applicable for iPod, ANDROID, KME Light/ KMC file.
Listen to TuneIn Radio/ TuneIn Radio Pro/ Aupeo
While listening to TuneIn Radio, TuneIn Radio Pro or Aupeo, connect
the iPod/iPhone to the USB input terminal of the unit.
• The unit will output the sound from these applications.
Other settings
Press the volume knob to enter [
1
FUNCTION
].
2 Turn the volume knob to make a selection (see the following
])
table), then press the knob.
3 Repeat step 2 until the desired item is selected or activated.
4 Press and hold to exit.
To return to the previous setting item, press .
ANDROID SETUP
BROWSE MODE
HAND MODE
(without using KENWOOD MUSIC PLAY application). However, you can still play/pause
and file skip from the unit.
USB
MUSIC DRIVE DRIVE CHANGE
SKIP SEARCH 0.5%/ 1%/ 5%/ 10%
: Control from the unit (using KENWOOD MUSIC PLAY application).;
:Control other media player applications from the Android device
automatically and playback starts.
Repeat steps
Light/ KMC file, selects the skip search ratio over the total files.
:The next drive ([
1
to 3 to select the following drives.
DRIVE 1
: While listening to iPod, ANDROID or KME
] to [
DRIVE 5
Default:
]) is selected
XX
Page 11
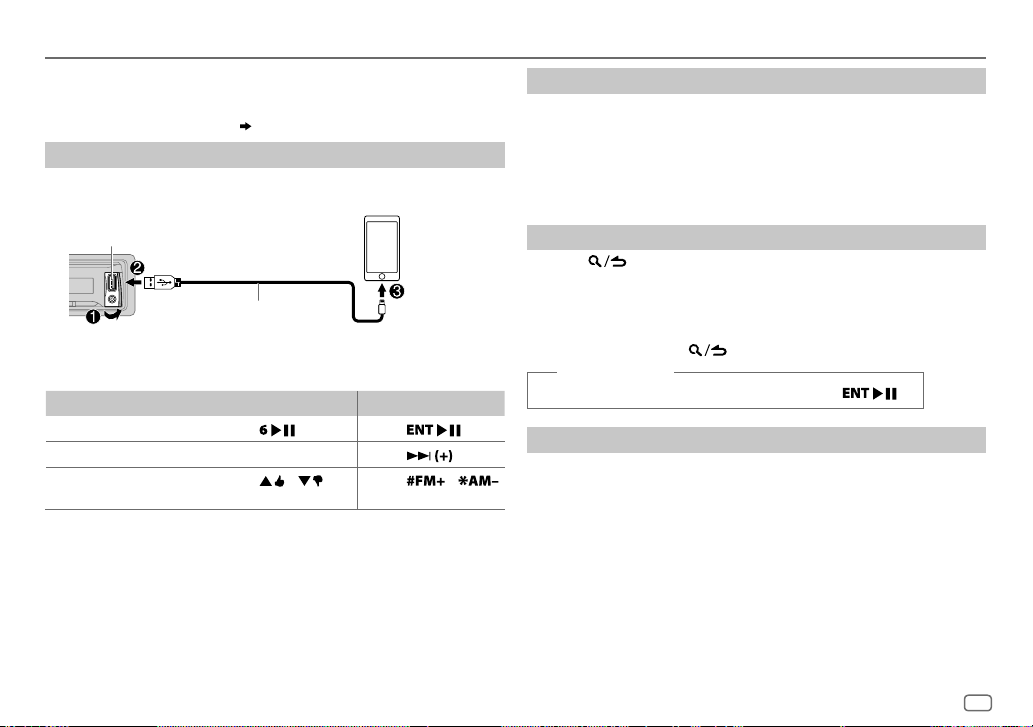
Pandora®
Preparation:
Install the latest version of the Pandora application on your device
(iPhone/ iPod touch), then create an account and log in to Pandora.
• Select [
ON
] for [
PANDORA SRC
Start listening
Open the Pandora application on your device.
1
2 Connect your device to the USB input terminal.
]. ( 4)
Create and save a new station
Press and hold the volume knob.
1
2 Turn the volume knob to select [
press the knob.
A new station is created based on the current song or artist.
FROM TRACK
] or [
FROM ARTIST
], then
3 Press and hold one of the number buttons (1to5) to store.
To select a stored station, press one of the number buttons (1to5).
USB input terminal
KCA-iP102 / KCA-iP103 (optional
1
*
The source changes to PANDORA and broadcast starts.
To On the faceplate On the remote control
Playback / pause
Skip a track
Thumbs up or thumbs
3
*
down
1
*
KCA-iP102 : 30-pin type, KCA-iP103 : Lightning type
2
*
Do not leave the cable inside the car when not using.
3
*
If thumbs down is selected, the current track is skipped.
accessory)
the iPod/iPhone
or accessory cable of
2
*
Press
Press T.
Press / .
. Press
Press
Press
.
/ .
Search for a registered station
Press .
1
2 Turn the volume knob to make a selection, then press the knob.
[
BY DATE
[
]:According to the registered date
A-Z
]:Alphabetical order
3 Turn the volume knob to the desired station, then press the knob.
To cancel, press and hold .
(or using RC-406)
Press J / K to search for a station, then press .
.
Bookmark a song or artist information
Press and hold J.
1
2 Turn the volume knob to make a selection, then press the knob.
[
THIS TRACK
[
THIS ARTIST
“BOOKMARKED” appears and the information is stored to your device.
The bookmark is available on your Pandora account but not on this
unit.
]:Current song information
]:Current artist information
ENGLISH
9
Page 12
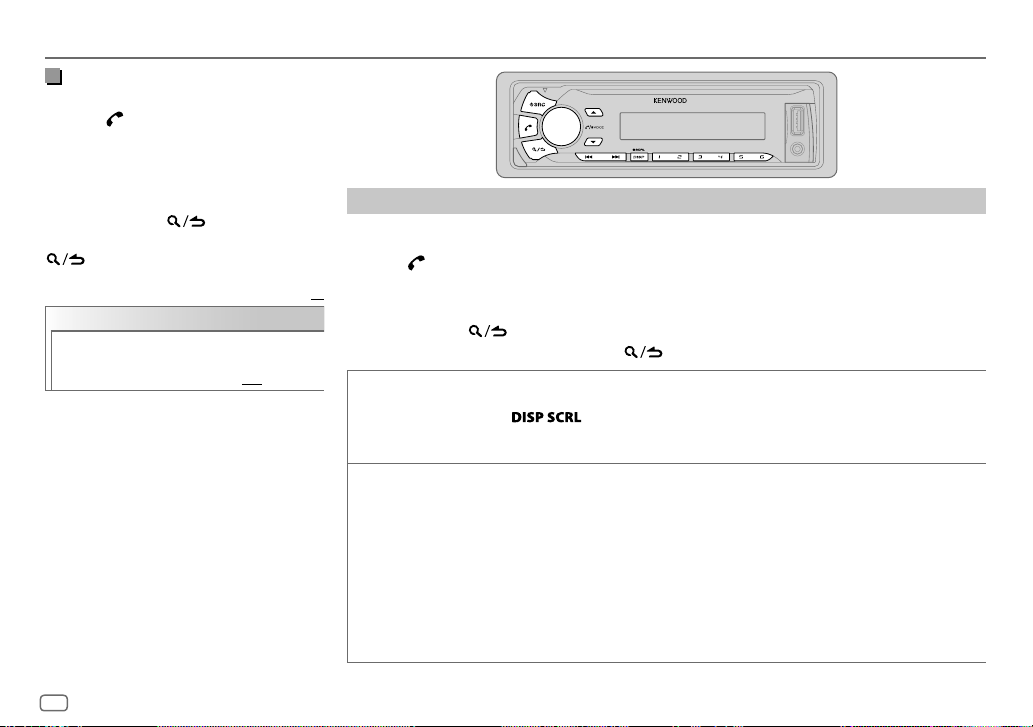
BLUETOOTH®
BLUETOOTH — Connection
Supported Bluetooth profiles
– Hands-Free Profile (HFP)
– Serial Port Profile (SPP)
– Phonebook Access Profile (PBAP)
– Advanced Audio Distribution Profile (A2DP)
– Audio/Video Remote Control Profile (AVRCP)
Supported Bluetooth codecs
– Sub Band Codec (SBC)
– Advanced Audio Coding (AAC)
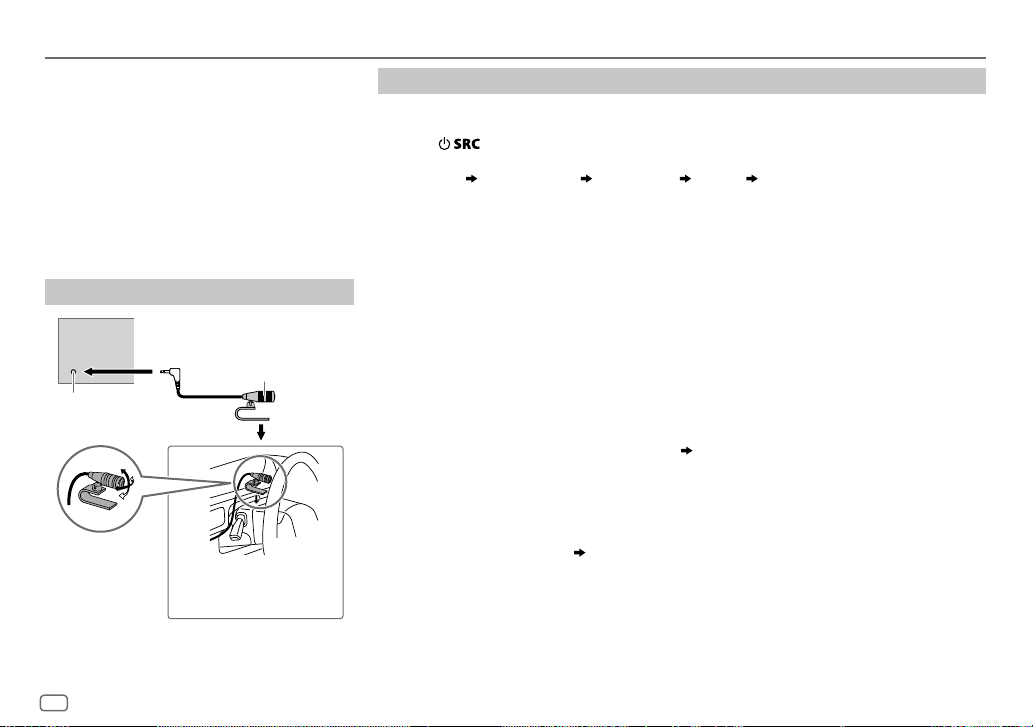
Connect the microphone
Rear panel
Microphone
(supplied)
Microphone input
jack
Adjust the microphone
angle
Secure using cord clamps (not
supplied) if necessary.
Pair a Bluetooth device
When connecting a Bluetooth device to the unit for the first time, perform pairing between the
unit and the device.
1 Press to turn on the unit.
2 Search and select this unit model name (KMM-U5
“PAIRING”
display.
“PASS XXXXXX” Device name “PRESS” “VOLUME KNOB” scrolls on the
BT) on the Bluetooth device.
*
• For some Bluetooth devices, you may need to enter the Personal Identification Number
(PIN) code immediately after searching.
• Refer also to the manual supplied with your Bluetooth device.
3 Press the volume knob to start pairing.
“PAIRING OK” appears when pairing is completed and “BT” will light up when the Bluetooth
connection is established.
• Up to five devices can be registered (paired) in total.
• Only one Bluetooth device can be connected at any time.
• This unit supports Secure Simple Pairing (SSP).
• Some Bluetooth devices may not automatically connect to the unit after pairing. Connect the
device to the unit manually. Refer to the instruction manual of the Bluetooth device for more
information.
• Once the pairing is completed, the Bluetooth device will remain registered in the unit even if
you reset the unit. To delete the paired device,
• When you connect iPhone/ iPod touch/ Android device to the USB input terminal, pairing
request (via Bluetooth) is automatically activated. Press the volume knob to pair once you have
confirmed the device name.
Automatic pairing request is activated only if:
– Bluetooth function of the connected devcie is turned on.
– [
AUTO PAIRING
– KENWOOD MUSIC PLAY application is installed on the Android device.
] is set to [ON]. ( 14)
14, [
DEVICE DELETE
].
10
Page 13
BLUETOOTH®
BLUETOOTH — Mobile phone
Receive a call
When there is an incoming call:
– All the buttons flash.
– The unit answers the call automatically if [
During a call:
– If you turn off the unit or detach the faceplate, the Bluetooth connection is disconnected.
To On the faceplate On the remote control
Answer a call
Reject a call
End a call
Adjust the phone volume
[00]
to
[35]
(Default:
Switch between handsfree and private talk
modes
*
Not applicable for iPhone. During a call, the unit synchronizes the phone volume on the iPhone to the unit.
Press
of the number buttons (1 to 6).
Press
Press
Turn the volume knob during a call.
[15]*
)
• This adjustment will not affect the
volume of the other sources.
Press
• Operations may vary according to
the connected Bluetooth device.
AUTO ANSWER
or the volume knob or one
.
or .
during a call.
] is set to a selected time. ( 12)
Press .
Press
Press
.
.
—
—
Improve the voice quality
While talking on the phone...
1 Press the volume knob to enter [
FUNCTION
].
2 Turn the volume knob to make a selection
(see the following table), then press the knob.
3 Repeat step 2 until the desired item is
selected or activated.
4 Press and hold to exit.
To return to the previous setting item, press .
Default:
MIC GAIN –10
NR LEVEL –5
ECHO CANCEL –5
—
+10(–4
the microphone increases as the number
increased.
—+5(0):Adjust the noise reduction
level until the least noise is being heard
during a phone conversation.
—+5(0):Adjust the echo cancellation
delay time until the least echo is being heard
during a phone conversation.
):The sensitivity of
XX
ENGLISH
11
Page 14
BLUETOOTH®
Make the settings for receiving a
call
1
Press to enter Bluetooth mode.
2 Turn the volume knob to make a
selection (see the following table), then
press the knob.
3 Repeat step 2 until the desired item is
selected or activated.
4 Press and hold to exit.
To return to the previous setting item, press
.
Default:
SETTINGS
AUTO ANSWER
1
—30:The unit answers incoming
call automatically in the selected
time (in seconds).;
OFF
:Cancels.
Make a call
You can make a call from the call history, phonebook, or dialing the number. Call by voice is also
possible if your mobile phone has the feature.
1 Press to enter Bluetooth mode.
2 Turn the volume knob to make a selection (see the following table), then press the knob.
XX
3 Repeat step 2 until the desired item is selected/activated or follow the instructions stated on
the selected item.
4 Press and hold to exit.
To return to the previous setting item, press .
CALL HISTORY
PHONE BOOK
1
Press the volume knob to select a name or a phone number.
• “I” indicates call received, “O” indicates call made, “M” indicates call missed.
• Press
• “NO DATA” appears if there is no recorded call history.
2
Press the volume knob to call.
1
Turn the volume knob quickly to enter alphabet search mode (if the phonebook contains many contacts).
The first menu (ABCDEFGHIJK) appears.
• To go to the other menu (LMNOPQRSTUV or WXYZ1
• To select the desired first letter, turn the volume knob or press
Select “1” to search with numbers and select “
2
Turn the volume knob to select a name, then press the knob.
3
Turn the volume knob to select a phone number, then press the knob to call.
•
If the phone supports PBAP, the phonebook of the connected phone is automatically transferred to the unit
when pairing.
•
Contacts are categorized as: MO (mobile), HM (home), OF (office), OT (others), GE (general)
•
This unit can display only non-accent letters. (Accent letters such as “Ú” is showns as “U”.)
to change the display category (NUMBER or NAME).
), press
J / K
*
” to search with symbols.
*
S / T
.
, then press the knob.
12
Page 15
BLUETOOTH®
NUMBER DIAL1 Turn the volume knob to select a number (0 to 9) or
VOICE
*
BATT
*
SIGNAL
*
Functionality depends on the type of the phone used.
character (
2
Press
Repeat steps
number.
3
Press the volume knob to call.
(or using RC-406)
1
Press the number buttons (0 to 9) to enter the phone
number.
2
Press to call.
Speak the name of the contact you want to call or the voice
command to control the phone functions.
using voice recognition
LOW/ MID/ FULL
NO SIGNAL/ LOW/ MID/ MAX
current received signal.
, #, +).
*
S / T
to move the entry position.
1
and 2 until you finish entering the phone
)
:Shows the strength of the battery.
:Shows the strength of the
(
Make a call
Make a call using voice recognition
Press and hold to activate the connected phone.
1
2 Speak the name of the contact you want to call or the
voice command to control the phone functions.
• Supported Voice Recognition features vary for each phone.
Refer to the instruction manual of the connected phone for
details.
• This unit also supports the intelligent personal assistant
function of iPhone.
Delete a contact
Press to enter Bluetooth mode.
1
2 Turn the volume knob to select [
CALL HISTORY
], then press the knob.
3 Turn the volume knob to select a contact.
4 Press and hold the volume knob to enter delete mode.
5 Turn the volume knob to select [
knob.
DELETE ONE
DELETE ALL:
: Selected name or phone number in step 3 is deleted.
All names or phone numbers in [
6 Turn the volume knob to select [
DELETE ONE
YES
] or [
DELETE ALL
CALL HISTORY
], then press the knob.
], then press the
] in step 2 is deleted.
7 Press and hold to exit.
• To return to the previous setting item, press .
• Not applicable for mobile phone that supports PBAP.
Settings in memory
Store a contact in memory
You can store up to 6 contacts into the number buttons (1to6).
1 Press to enter Bluetooth mode.
2 Turn the volume knob to select [
then press the knob.
CALL HISTORY
], [
PHONE BOOK
], or [
NUMBER DIAL
3 Turn the volume knob to select a contact or enter a phone number.
If a contact is selected, press the volume knob to show the phone number.
4 Press and hold one of the number buttons (1 to 6).
“STORED” appears when the contact is stored.
To erase a contact from the preset memory, select [
a blank number.
NUMBER DIAL
] in step 2 and store
Make a call from memory
Press to enter Bluetooth mode.
1
2 Press one of the number buttons (1 to 6).
3 Press the volume knob to call.
“NO MEMORY” appears if there is no contacts stored.
],
ENGLISH
13
Page 16
BLUETOOTH®
Other settings
Press the volume knob to enter
1
[FUNCTION
].
2 Turn the volume knob to make a selection (see the following table), then press the knob.
3 Repeat step 2 until the desired item is selected/activated or follow the instructions stated
on the selected item.
4 Press and hold to exit.
To return to the previous setting item, press .
Default:
BT MODE
PHONE SELECT
AUDIO SELECT
DEVICE DELETE
PIN CODE EDIT
(0000)
RECONNECT ON
AUTO PAIRING ON
INITIALIZE YES
Selects the phone or audio device to connect or disconnect.
“
” appears in front of the device name when connected.
*
•
You can only connect another Bluetooth device by disconnecting the connected Bluetooth device
first.
“
” disappears when disconnected.
*
1
Turn the volume knob to select a device to delete, then press the knob.
2
Turn the volume knob to select [
Changes the PIN code (up to 6 digits).
1
Turn the volume knob to select a number.
2
Press S/T to move the entry position.
Repeat steps
3
Press the volume knob to confirm.
:The unit automatically reconnect when the last connected Bluetooth device is within range.;
OFF
:Cancels.
:The unit automatically pair supported Bluetooth device (iPhone/ iPod touch/ Android device)
when it is connected through USB input terminal.Depending on the operating system of the
connected device, this function may not work. ;
:Initializes all the Bluetooth settings (including stored pairing, phonebook, and etc.).;
NO
:Cancels.
1
and 2 until you finish entering the PIN code.
YES
] or [NO], then press the knob.
OFF
:Cancels.
Bluetooth test mode
You can check the connectivity of the supported
profile between the Bluetooth device and the
unit.
• Make sure there is no Bluetooth device paired.
1 Press and hold .
“PLEASE PAIR YOUR PHONE PIN 0000”
appears.
2 Search and select this unit model name
XX
(KMM-U5
3 Operate the Bluetooth device to confirm
pairing.
“TESTING” flashes on the display.
The connectivity result (OK or NG) appears after
the test.
PAIRING: Pairing status
HF CNT: Hands-Free Profile (HFP) compatibility
AUD CNT: Advanced Audio Distribution Profile
PB DL: Phonebook Access profile (PBAP)
To cancel test mode, press and hold
turn off the unit.
BT) on the Bluetooth device.
*
(A2DP) compatibility
compatibility
to
14
Page 17
BLUETOOTH®
BLUETOOTH — Audio
Audio player via Bluetooth
Press repeatedly to select BTAUDIO (or press SRC on RC-406).
1
2 Operate the Bluetooth audio player to start playback.
To On the faceplate On the remote control
Playback / pause
Select group or folder
Reverse /
Forward skip
Reverse /
Fast-forward
Repeat play Press
Random play Press
Operations and display indications may differ according to their availability on the
connected device.
Press
Press J / K.
Press S/T. Press S/
Press and hold S/T. Press and hold S/
ALL REPEAT, FILE REPEAT, REPEAT OFF
FOLDER RANDOM, RANDOM OFF
Press and hold to select
ALL RANDOM
. Press
Press
repeatedly.
repeatedly.
.
/ .
.
—
—
Internet radio via Bluetooth
Listen to Pandora
Preparation:
Select [
ON
] for [
PANDORA SRC
You can listen to Pandora on your smart phone
(Android OS) through Bluetooth on this unit.
]. ( 4)
1 Open the Pandora application on your device.
2 Connect your Bluetooth audio player via
Bluetooth connection. (
10)
3 Press repeatedly to select PANDORA.
The source switches and broadcast starts
automatically.
You can operate Pandora in the same way as Pandora
.
.
for iPod/iPhone. (
9)
ENGLISH
15
Page 18
AUX
Preparation:
Select [
ON
] for [
BUILT-IN AUX
Start listening
Connect a portable audio player (commercially
1
available).
Auxiliary input jack
3.5mm stereo mini plug with “L” shaped
connector (commercially available)
2 Press repeatedly to select AUX.
3 Turn on the portable audio player and start
playback.
Set the AUX name
While listening to a portable audio player connected to
the unit...
1 Press the volume knob to enter [
2 Turn the volume knob to select [
press the knob.
3 Turn the volume knob to select [
then press the knob.
4 Turn the volume knob to make a selection, then
press the knob.
AUX
(default)/
5 Press and hold to exit.
To return to the previous setting item, press .
]. ( 4)
Portable audio
player
FUNCTION
SYSTEM
], then
AUX NAME SET
DVD/ PORTABLE/ GAME/ VIDEO/ TV
].
],
AUDIO SETTINGS
While listening to any source...
1 Press the volume knob to enter [
2 Turn the volume knob to select [
3 Turn the volume knob to make a selection (see the following table), then press the
knob.
4 Repeat step 3 until the desired item is selected or activated.
5 Press and hold to exit.
(or using RC-406)
1 Press AUD to enter [
AUDIO CONTROL
2 Press J / K to make a selection, then press .
To return to the previous setting item, press
SUB-W LEVEL –15
BASS LEVEL –8
MID LEVEL –8
TRE LEVEL –8
EQ PRO
BASS ADJUST BASS CTR FRQ
MID ADJUST MID CTR FRQ 0.5K/ 1.0K/ 1.5K/ 2.5K
TRE ADJUST TRE CTR FRQ 10.0K/ 12.5K/ 15.0K/ 17.5K
to
+15 (0
) Adjusts the subwoofer output level.
to +8 (+6)
to +8 (+5)
to +8 (0)
BASS LEVEL –8
BASS Q FACTOR 1.00/ 1.25/ 1.50/ 2.00
BASS EXTEND ON
MID LEVEL –8
MID Q FACTOR 0.75/ 1.00/ 1.25
TRE LEVEL –8
FUNCTION
].
AUDIO CONTROL
].
Adjusts the level to memorize for each source. (Before making an adjustment,
select the source you want to adjust.)
60/ 80/ 100/ 200
to +8 (+6):Adjusts the level.
:Turns on the extended bass.;
to +8 (+5):Adjusts the level.
to +8 (0):Adjusts the level.
], then press the knob.
.
:Selects the center frequency.
:Adjusts the quality factor.
OFF
:Cancels.
:Selects the center frequency.
:Adjusts the quality factor.
:Selects the center frequency.
Default:
XX
16
Page 19
AUDIO SETTINGS
PRESET EQ DRIVE EQ/ TOP40/ POWERFUL/ ROCK/ POPS/ EASY/ JAZZ/ NATURAL
BASS BOOST LV1/ LV2/ LV3
LOUDNESS LV1/ LV2
SUBWOOFER SET ON
LPF SUBWOOFER THROUGH
SUB-W PHASE REVERSE
HPF THROUGH
FADER R15
BALANCE L15
VOLUME OFFSET
SOUND RECNSTR
(Sound
reconstruction)
• [
SUB-W LEVEL
if [
SWITCH PREOUT
• [
SUB-W LEVEL
[
SUBWOOFER SET
USER
:Selects a preset equalizer suitable to the music genre. (Select [
the customized settings.)
[
DRIVE EQ] is a preset equalizer that reduces noise outside the car or running
noise of the tyres.
:Selects your preferred bass boost level.;
:Selects your preferred low and high frequencies boost to produce a
well-balanced sound at a low volume level.;
:Turns on the subwoofer output.;
:All signals are sent to the subwoofer.;
signals with frequencies lower than 85Hz/ 120Hz/ 160Hz are sent to the
subwoofer.
(180°)/
in line with the speaker output for optimum performance. (Selectable only if a
setting other than [
signals with frequencies higher than 100Hz/ 120Hz/ 150Hz are sent to the
speakers.
to
to
For AUX:
level of each source. (Before adjustment, select the source you want to adjust.)
ON
:Creates realistic sound by compensating the high-frequency components and
restoring the rise-time of the waveform that are lost in audio data compression.;
OFF
:Cancels.
]/ [
SUBWOOFER SET
] is set to [
]/ [
LPF SUBWOOFER
] is set to [ON].
NORMAL
THROUGH
:All signals are sent to the speakers.;
F15 (0
):Adjusts the rear and front speaker output balance.
R15 (0
):Adjusts the left and right speaker output balance.
–8
to +8(0) ; For other sources: –8 to 0:Presets the volume adjustment
]/ [
LPF SUBWOOFER
SUB-W
]. ( 4)
]/ [
SUB-W PHASE
OFF
:Cancels.
(0°):Selects the phase of the subwoofer output to be
] is selected for [
]/ [
SUB-W PHASE
] is selectable only if
OFF
:Cancels.
OFF
:Cancels.
85HZ/ 120HZ/ 160HZ
LPF SUBWOOFER
100HZ/ 120HZ/ 150HZ
] is selectable only
].)
USER
/
] to use
:Audio
:Audio
DISPLAY SETTINGS
1 Press the volume knob to enter [
2 Turn the volume knob to select [
knob.
3 Turn the volume knob to make a selection (see the following
table), then press the knob.
4 Repeat step 3 until the desired item is selected/activated.
5 Press and hold to exit.
To return to the previous setting item, press .
DIMMER ON
BRIGHTNESS 0
TEXT SCROLL AUTO/ ONCE
:Dims the display illumination.;
— 31: Selects your preferred brightness level for display
illumination.
:Selects whether to scroll the display information
automatically, or scroll only once.;
FUNCTION
DISPLAY
], then press the
OFF
OFF
].
Default:
:Cancels.
:Cancels.
XX
ENGLISH
17
Page 20

MORE INFORMATION
General
Detailed information and notes about the playable audio files are stated in an online manual
on the following web site: www.kenwood.com/cs/ce/audiofile/
Playable files
•
Playable audio file: MP3 (.mp3), WMA (.wma), AAC (.m4a), WAV (.wav), FLAC (.flac)
•
Playable USB device file system: FAT12, FAT16, FAT32
Even when audio files comply with the standards listed above, playback may be impossible
depending on the types or conditions of media or device.
About USB devices
•
This unit can play MP3/WMA/AAC/WAV/FLAC files stored on a USB mass storage class device.
•
You cannot connect a USB device via a USB hub.
•
Connecting a cable whose total length is longer than 5m may result in abnormal playback.
•
This unit cannot recognize a USB device whose rating is other than 5V and exceeds 1A.
About KENWOOD Music Editor Light and KENWOOD Music Control
•
This unit supports the PC application KENWOOD Music Editor Light and Android™ application
KENWOOD Music Control.
•
When you play audio files with song data added using the KENWOOD Music Editor Light or
KENWOOD Music Control, you can search for audio files by Genres, Artists, Albums, Playlists,
and Songs.
•
KENWOOD Music Editor Light and KENWOOD Music Control are available on the following
web site: www.kenwood.com/cs/ce/
About iPod/iPhone
Made for
-
iPod touch (2nd, 3rd, 4th, and 5th generation)
-
iPod classic
-
iPod nano (3rd, 4th, 5th, 6th, and 7th generation)
-
iPhone 3G, 3GS, 4, 4S, 5, 5S, 5C
•
For the latest compatible list and software versions of iPhone/iPod, see:
www.kenwood.com/cs/ce/ipod
•
You cannot operate iPod if “KENWOOD” or “ ” is displayed on iPod.
About Android device
•
This unit supports Android OS 4.1 and above.
•
Some Android devices (with OS 4.1 and above) may not fully support Android Open Accessory
(AOA) 2.0.
•
If the Android device supports both mass storage class device and AOA 2.0, this unit always
playback via AOA 2.0 as priority.
•
For more information and the latest compatible list, see: www.kenwood.com/cs/ce/
About Pandora
•
Pandora is available only in the U.S., Australia and New Zealand.
•
Because Pandora is a third-party service, the specifications are subject to change without
prior notice. Accordingly, compatibility may be impaired, or some or all of the services may
become unavailable.
•
Some functions of Pandora cannot be operated from this unit.
•
For issues using the application, please contact Pandora at pandora-support@pandora.com.
About Bluetooth
•
Depending on the Bluetooth version of the device, some Bluetooth devices may not be able
to connect to this unit.
•
This unit may not work with some Bluetooth devices.
•
Signal conditions vary, depending on the surroundings.
•
For more information about Bluetooth, visit the following website:
www.kenwood.com/cs/ce/
18
Page 21
TROUBLESHOOTING
Symptom Remedy
Sound cannot be heard.
“MISWIRING CHECK WIRING
THEN PWR ON” appears.
“PROTECTING SEND SERVICE”
appears.
General
•
Sound cannot be heard.
•
The unit does not turn on.
•
Information shown on the
display is incorrect.
The unit does not work at all. Reset the unit. (
•
Radio reception is poor.
•
Static noise while listening to
Radio
the radio.
“READING” keeps flashing. Do not use too many hierarchical levels or folders.
Elapsed playing time is not
correct.
Correct characters are not
displayed (e.g. album name).
“NA FILE” Make sure the media contains supported audio files.
USB / iPod
“READ ERROR” Copy the files and folders onto the USB device again. If
“NO DEVICE” Connect a USB device, and change the source to USB
•
Adjust the volume to the optimum level.
•
Check the cords and connections.
Turn the power off, then check to be sure the terminals of
the speaker wires are insulated properly. Turn the power
on again.
Send the unit to the nearest service center.
Clean the connectors. (
•
Connect the antenna firmly.
•
Pull the antenna out all the way.
This is caused by how the files are recorded.
This unit can only display uppercase letters, numbers,
and a limited number of symbols.
(
18)
this does not solve the problem, reset the USB device or
use another USB device.
again.
2)
3)
Symptom Remedy
“COPY PRO” A copy-protected file is played.
“NA DEVICE” Connect a supported USB device, and check the
“NO MUSIC” Connect a USB device that contains playable audio
USB / iPod
“iPod ERROR”
•
Sound cannot be heard
during playback.
•
Sound output only from
the Android device.
Cannot playback at
[
BROWSE MODE
ANDROID
“NO DEVICE” or “READING”
keeps flashing.
].
connections.
files.
•
Reconnect the iPod.
•
Reset the iPod.
•
Reconnect the Android device.
•
If in [
HAND MODE
application on the Android device and start
playback.
•
If in [
HAND MODE
player application or use another media player
application.
•
Restart the Android device.
•
If this does not solve the problem, the connected
Android device is unable to route the audio signal
to unit. (
•
Make sure KENWOOD MUSIC PLAY APP is installed
on the Android device. (
•
Reconnect the Android device and make the
appropriate setting in [
•
If this does not solve the problem, the connected
Android device does not support [
MODE
•
Switch off the developer options on the Android
device.
•
Reconnect the Android device.
•
If this does not solve the problem, the connected
Android device does not support [
MODE
], launch any media player
], relaunch the current media
18)
8)
ANDROID SETUP
]. ( 18)
]. ( 18)
]. ( 8)
BROWSE
BROWSE
ENGLISH
19
Page 22

TROUBLESHOOTING
Symptom Remedy
Playback is intermittent or
sound skips.
“ANDROID ERROR” /
ANDROID
“NADEVICE”
“ADDERROR” /
“SEARCHERROR”
“CHECKDEVICE” Check the Pandora application on your device.
“NOSKIPS” The skip limit has been reached.
“NOSTATIONS” No stations are found.
“STATIONLIMIT” The number of registered stations has reached its
Pandora
“CONNECT ERROR” Communication is unstable.
“RATING ERROR” Registration of thumbs up/thumbs down has
“LICENSE ERROR” You try to access from a country which Pandora is
No Bluetooth device is
detected.
Bluetooth pairing cannot
be made.
Bluetooth®
Echo or noise is heard during a
phone conversation.
Turn off the power saving mode on the Android
device.
•
Reconnect the Android device.
•
Restart the Android device.
New station creation is unsuccessful.
limit. Retry after deleting unnecessary stations
from your device.
failed.
not deliverable.
•
Search from the Bluetooth device again.
•
Reset the unit. ( 3)
•
Make sure you have entered the same PIN code
to both the unit and Bluetooth device.
•
Delete pairing information from both the unit
and the Bluetooth device, then perform pairing
again. (
10)
•
Adjust the microphone unit’s position. ( 10)
•
Check the [
ECHO CANCEL
] setting. ( 11)
Symptom Remedy
Phone sound quality
is poor.
Voice calling method is
not successful.
Sound is being
interrupted or skipped
during playback of a
Bluetooth audio player.
The connected
Bluetooth audio player
cannot be controlled.
Bluetooth®
“DEVICE FULL” The number of registered devices has reached its limit. Retry
“N/A VOICE TAG” Make sure the same voice as the registered voice tag is used.
“NOT SUPPORT” The connected phone does not support Voice Recognition
“NO ENTRY” /
“NO PAIR”
“ERROR” Try the operation again. If “ERROR” appears again, check if the
“NO INFO” Bluetooth device cannot get the contact information.
“HF ERROR XX” /
“BT ERROR”
•
Reduce the distance between the unit and the Bluetooth
device.
•
Move the car to a place where you can get a better signal
reception.
•
Use voice calling method in a more quiet environment.
•
Reduce the distance from the microphone when you speak the
name.
•
Make sure the same voice as the registered voice tag is used.
•
Reduce the distance between the unit and the Bluetooth
audio player.
•
Turn off, then turn on the unit and try to connect again.
•
Other Bluetooth devices might be trying to connect to the
unit.
•
Check whether the connected Bluetooth audio player supports
Audio/Video Remote Control Profile (AVRCP). (Refer to the
instructions of your audio player.)
•
Disconnect and connect the Bluetooth player again.
after deleting an unnecessary device. (
feature.
There is no registered device connected/found via Bluetooth.
device supports the function you have tried.
Reset the unit and try the operation again. If this does not solve
the problem, consult your nearest service center.
14,
DEVICE DELETE
)
20
Page 23

SPECIFICATIONS
FM Frequency Range 87.5 MHz — 108.0 MHz (50 kHz space)
Channel Space Selection 50 kHz
Usable Sensitivity (S/N=26dB) 8.2 dBf (0.71 μV/75 Ω)
Quieting Sensitivity (DINS/N=46dB)
Frequency Response (±3dB) 30Hz — 15kHz
Signal-to-Noise Ratio (MONO) 64dB
Stereo Separation (1kHz) 40dB
AM Frequency Range Band 1 (MW)
Tuner
Channel Space Selection Band 1
Usable Sensitivity
(S/N = 20dB)
USB Standard USB1.1, USB2.0 (Full speed)
File System FAT12/16/32
Maximum Supply Current DC5V
Frequency Response (±1dB) 20 Hz — 20 kHz
Signal-to-Noise Ratio (1kHz) 105 dB
Dynamic Range 90 dB
USB
Channel Separation 85 dB
MP3 Decode Compliant with MPEG-1/2 Audio Layer-3
WMA Decode Compliant with Windows Media Audio
AAC Decode AAC-LC “.m4a” files
WAV Decode
FLAC Decode FLAC files
17.2 dBf (2.0 μV/75 Ω)
531kHz — 1611kHz
Band 2 (SW1)
Band 3 (SW2)
Band 2/ 3
MW
SW
RIFF waveform Audio Format (Linear PCM only)
(9kHz space)
2940kHz — 7735kHz
(5kHz space)
9500 kHz — 10135 kHz/
11580 kHz — 18135 kHz
(5kHz space)
9kHz
5kHz
29.0dBμ (28.2μV)
30dBμ (32μV)
1A
Version Bluetooth Ver.2.1+EDR / Bluetooth 3.0
Frequency Range 2.402GHz — 2.480GHz
Output Power +4dBm (MAX), 0dBm (AVE) Power Class 2
Maximum Communication Range Line of sight approx. 10m (32.8ft)
Profile HFP (Hands-Free Profile)
Bluetooth
Maximum Output Power 50W×4
Full Bandwidth Power 22W× 4 (at less than 1% THD)
Speaker Impedance 4Ω—8Ω
Tone Action Bass
Audio
Preout Level/Load (USB) 2500mV/10kΩ
Preout Impedance ≤600Ω
Frequency Response (±3dB) 20Hz—20kHz
Input Maximum Voltage 1000mV
Auxiliary
Input Impedance 30kΩ
Operating Voltage 14.4V (10.5V—16V allowable)
Maximum Current Consumption 10A
Operational Temperature Range 0°C—+40°C
General
Installation Size (W×H×D) 182mm×53mm×107mm
Weight 0.62kg
Subject to change without notice.
SPP (Serial Port Profile)
PBAP (Phonebook Access Profile)
A2DP (Advanced Audio Distribution Profile)
AVRCP (Audio/Video Remote Control Profile)
200Hz±8dB
Middle
Treble
2.5kHz±8dB
12.5kHz±8dB
ENGLISH
21
Page 24

Warning
•
The unit can only be used with a 12V DC power supply, negative
ground.
•
Disconnect the battery’s negative terminal before wiring and
mounting.
•
Do not connect Battery wire (yellow) and Ignition wire (red) to the
car chassis or Ground wire (black) to prevent a short circuit.
•
Insulate unconnected wires with vinyl tape to prevent a short circuit.
•
Be sure to ground this unit to the car’s chassis again after
installation.
Caution
•
For safety’s sake, leave wiring and mounting to professionals.
Consult the car audio dealer.
•
Install this unit in the console of your vehicle. Do not touch the
metal parts of this unit during and shortly after use of the unit.
Metal parts such as the heat sink and enclosure become hot.
•
Do not connect the [ wires of speakers to the car chassis or Ground
wire (black), or connect them in parallel.
•
Mount the unit at an angle of less than 30º.
•
If your vehicle wiring harness does not have the ignition terminal,
connect Ignition wire (red) to the terminal on the vehicle’s fuse box
INSTALLATION / CONNECTION
which provides 12 V DC power supply and is turned on and off by
the ignition key.
•
Keep all cables away from heat dissipate metal parts.
•
After the unit is installed, check whether the brake lamps, blinkers,
wipers, etc. on the car are working properly.
•
If the fuse blows, first make sure the wires are not touching car’s
chassis, then replace the old fuse with one that has the same rating.
Basic procedure
1
Remove the key from the ignition switch, then
disconnect the [ terminal of the car battery.
2 Connect the wires properly.
See Wiring connection. (
23)
3 Install the unit to your car.
See Installing the unit (in-dash mounting).
4 Connect the [ terminal of the car battery.
5 Reset the unit. (
3
)
22
Installing the unit (in-dash mounting)
Hook on the top side
Orientate the trim plate as
illustrated before fitting.
When installing without the mounting sleeve
1
Remove the mounting sleeve and trim plate from
the unit.
2 Align the holes in the unit (on both sides) with the
vehicle mounting bracket and secure the unit with
screws (commercially available).
Use only the specified screws. Using wrong screws might damage the unit.
How to remove the unit
1
Detach the faceplate.
2 Fit the catch pin on the extraction keys into
the holes on both sides of the trim plate,
then pull it out.
3 Insert the extraction keys deeply into the
slots on each side, then follow the arrows as
shown on the right.
Do the required wiring.
(
23)
Dashboard of
your car
Bend the appropriate tabs to hold the
mounting sleeve firmly in place.
Page 25

Wiring connection
To front speaker (left)
To front speaker (right)
To rear speaker (left)
To rear speaker (right)
Ignition switch
Car fuse box
Microphone input jack
(
10)
Red (Ignition wire)
Fuse (10A) Front/ Rear/ subwoofer output
White
White/Black
Gray
Gray/Black
Green
Green/Black
Purple
Purple/Black
If no connections are made, do not let the wire come out from the tab.
Brown
(Mute control wire)
Blue/White
(Power control wire/
Antenna control wire)
Antenna terminal
To connect the Kenwood navigation system,
refer your navigation manual
To the power control terminal when using
the optional power amplifier or to the
antenna control terminal in the vehicle
Part list for installation
(A)
Faceplate
(B)
Trim plate
(C)
Mounting sleeve
(D)
Wiring harness
Yellow (Battery wire)
Car fuse box
Black (Ground wire)
To the metallic body or chassis of the car
Battery
When connecting to an external amplifier, connect its ground wire to the car’s chassis to avoid damaging the unit.
Light blue/yellow
(Steering remote
control wire)
To the steering wheel remote control
adapter
(E)
Extraction key
ENGLISH
23
Page 26

ﺐﺼﻧ یﺍﺮﺑ ﺕﺎﻌﻄﻗ ﺖﺳﺮﻬﻓ
ﺏﺎﻗ
(A)
ﻥﻮﻓﻭﺮﻜﻴﻣ یﺩﻭﺭﻭ ﺶﻴﻓ
(
10
)
(ﺮﭙﻣﺁ 10) ﺯﻮﻴﻓ
ﯽﺸﻛ ﻢﻴﺳ ﻝﺎﺼﺗﺍ
ﺮﻓﻭﻭ ﺏﺎﺳ /ﺐﻘﻋ /ﻮﻠﺟ ﯽﺟﻭﺮﺧ
ﻦﺘﻧﺁ ﻝﺎﻨﻴﻣﺮﺗ
23
ﻰﺳﺭﺎﻓ
ﻂﺒﺿ ﺭﻭﺩ ﺏﺎﻗ
ﺐﺼﻧ ﻑﻼﻏ
ﻢﻴﺳ ﻪﺘﺳﺩ
ﺝﺍﺮﺨﺘﺳﺍ ﺪﻴﻠﻛ
(B)
(ﭗﭼ) ﻮﻠﺟ یﻮﮔﺪﻨﻠﺑ ﻪﺑ
(ﺖﺳﺍﺭ) ﻮﻠﺟ یﻮﮔﺪﻨﻠﺑ ﻪﺑ
(C)
(ﭗﭼ) ﺐﻘﻋ یﻮﮔﺪﻨﻠﺑ ﻪﺑ
(ﺖﺳﺍﺭ) ﺐﻘﻋ یﻮﮔﺪﻨﻠﺑ ﻪﺑ
ﺕﺭﺎﺘﺳﺍ ﭻﻴﺋﻮﺳ
(D)
(E)
یﺮﺗﺎﺑ
ﻦﻴﺷﺎﻣ ﺯﻮﻴﻓ ﻪﺒﻌﺟ
ﻦﻴﺷﺎﻣ ﺯﻮﻴﻓ ﻪﺒﻌﺟ
ﻩﺎﻴﺳ/ﺪﻴﻔﺳ
ﻩﺎﻴﺳ/یﺮﺘﺴﻛﺎﺧ
ﻩﺎﻴﺳ/ﯽﻧﺍﻮﻏﺭﺍ
(ﺕﺭﺎﺘﺳﺍ ﻢﻴﺳ) ﺰﻣﺮﻗ
(یﺮﺗﺎﺑ ﻢﻴﺳ) ﺩﺭﺯ
(ﻦﻴﻣﺯ ﻝﺎﺼﺗﺍ ﻢﻴﺳ) ﻩﺎﻴﺳ
ﯽﺷﺎﻣ ﯽﺳﺎﺷ ﺎﻳ یﺰﻠﻓ ﻪﻧﺪﺑ ﻪﺑ
ﺪﻴﻔﺳ
یﺮﺘﺴﻛﺎﺧ
ﺰﺒﺳ
ﻩﺎﻴﺳ/ﺰﺒﺳ
ﯽﻧﺍﻮﻏﺭﺍ
(ﻥﺎﻣﺮﻓ ﺭﻭﺩ ﻩﺍﺭ ﺯﺍ ﻝﺮﺘﻨﻛ ﻢﻴﺳ)
.ﺪﻨﻴﺒﻧ ﺐﻴﺳﺁ ﻩﺎﮕﺘﺳﺩ ﺎﺗ ﺪﻴﻨﻛ ﻞﺼﺘﻣ ﻭﺭﺩﻮﺧ ﯽﺳﺎﺷ ﻪﺑ ﺍﺭ ﻥﺁ ﻪﻧﺪﺑ ﻝﺎﺼﺗﺍ ﻢﻴﺳ ،ﯽﺟﺭﺎﺧ ﺮﻳﺎﻓ ﯽﻠﭙﻣﺁ ﻪﺑ ﻝﺎﺼﺗﺍ ﻡﺎﮕﻨﻫ
.ﺪﻳﺎﻴﺑ ﻥﻭﺮﻴﺑ ﻪﻧﺎﺑﺯ ﺯﺍ ﻢﻴﺳ ﺪﻴﻫﺪﻧ ﻩﺯﺎﺟﺍ ،ﺖﺳﺍ ﻩﺪﺸﻧ ﺭﺍﺮﻗﺮﺑ ﯽﻟﺎﺼﺗﺍ ﭻﻴﻫ ﺮﮔﺍ
یﺍ ﻩﻮﻬﻗ
(ﺍﺪﺼﻴﺑ ﺖﻟﺎﺣ ﻝﺮﺘﻨﻛ ﻢﻴﺳ)
ﺪﻴﻔﺳ/ﯽﺑﺁ
/ﻕﺮﺑ ﻝﺮﺘﻨﻛ ﻢﻴﺳ)
(ﻦﺘﻧﺁ ﻝﺮﺘﻨﻛ ﻢﻴﺳ
ﺩﺭﺯ/ﯽﺑﺁ ﻍﺍﺮﭼ
enwood ﺶﻳﺎﻤﻴﭘ ﻢﺘﺴﻴﺳ ﻝﺎﺼﺗﺍ یﺍﺮﺑ
ﻪﺑ K
ﺪﻴﻨﻛ ﻪﻌﺟﺍﺮﻣ ﺎﻫ ﺶﻳﺎﻤﻴﭘ یﺎﻤﻨﻫﺍﺭ ﻪﭼﺮﺘﻓﺩ
ﯽﻠﭙﻣﺁ ﺯﺍ ﻪﻛ ﯽﻧﺎﻣﺯ ﻝﺮﺘﻨﻛ ﻪﻧﺎﻳﺎﭘ ﻕﺮﺑ ﻪﺑ
ﺎﻳ ،ﺪﻴﻨﻛ ﯽﻣ ﻩﺩﺎﻔﺘﺳﺍ یﺭﺎﻴﺘﺧﺍ ﻕﺮﺑ ﺮﻳﺎﻓ
ﻦﻴﺷﺎﻣ ﺭﺩ ﻦﺘﻧﺁ ﻝﺮﺘﻨﻛ ﻪﻧﺎﻳﺎﭘ ﻪﺑ
ﻥﺎﻣﺮﻓ ﺭﻭﺩ ﻩﺍﺭ ﺯﺍ ﻝﺮﺘﻨﻛ ﺭﻮﺘﭘﺍﺩﺁ ﻪﺑ ﻝﺎﺼﺗﺍ
Page 27

ﺭﺩ ﺖﺳﺍﺭ ﺖﻤﺳ یﻭﺭ
ﺪﻴﻨﻛ ﺩﺎﺠﻳﺍ ﺏﻼﻗ ﻻﺎﺑ
ﻩﺩﺍﺩ ﻥﺎﺸﻧ ﻪﻛ ﺭﻮﻄﻧﺎﻤﻫ ﺵﺮﺑ ﻪﺤﻔﺻ ﻪﺑ
.ﺪﻴﻫﺩ ﺖﻬﺟ ﺐﺼﻧ ﺯﺍ ﻞﺒﻗ ﺖﺳﺍ ﻩﺪﺷ
ﺯﺍﺮﺗ ﻦﻴﺷﺎﻣ ﻝﺎﺼﺗﺍ ﺏﻼﻗ ﺎﺑ ﺍﺭ (ﺖﻤﺳ ﻭﺩ ﺮﻫ ﺭﺩ) ﻩﺎﮕﺘﺳﺩ ﺭﺩ ﺩﻮﺟﻮﻣ یﺎﻫ ﺥﺍﺭﻮﺳ 2
ﺖﺳﺍ ﻦﻜﻤﻣ ﻩﺎﺒﺘﺷﺍ یﺎﻫ ﭻﻴﭘ ﺯﺍ ﻩﺩﺎﻔﺘﺳﺍ .ﺪﻴﻨﻛ ﻩﺩﺎﻔﺘﺳﺍ ﻩﺪﺷ ﺺﺨﺸﻣ یﺎﻫ ﭻﻴﭘ ﺯﺍ ﻂﻘﻓ
(ﺩﺭﻮﺒﺷﺍﺩ ﺭﺩ ﻥﺩﺮﻛ ﺐﺼﻧ) ﻩﺎﮕﺘﺳﺩ ﺐﺼﻧ
ﺍﺭ ﺯﺎﻴﻧ ﺩﺭﻮﻣ یﺎﻫ ﯽﺸﻛ ﻢﻴﺳ
(
23
) .ﺪﻴﻫﺪﺑ ﻡﺎﺠﻧﺍ
ﻦﻴﺷﺎﻣ ﺩﺭﻮﺒﺷﺍﺩ
ﺢﻄﺳ ﺪﻴﻧﺍﻮﺘﺑ ﺎﺗ ﺪﻴﻨﻛ ﻢﺧ ﺍﺭ ﻪﻃﻮﺑﺮﻣ یﺎﻫ ﻪﻧﺎﺑﺯ
.ﺪﻳﺭﺍﺪﻬﮕﻧ ﺩﻮﺧ ﻞﺤﻣ ﺭﺩ ﻢﻜﺤﻣ ﺍﺭ ﻝﺎﺼﺗﺍ
ﺐﺼﻧ ﻑﻼﻏ ﺯﺍ ﻩﺩﺎﻔﺘﺳﺍ ﻥﻭﺪﺑ ﺐﺼﻧ ﻡﺎﮕﻨﻫ
.ﺪﻴﻨﻛ ﺍﺪﺟ ﻩﺎﮕﺘﺳﺩ ﺯﺍ ﺍﺭ ﺵﺮﺑ ﻪﺤﻔﺻ ﻭ ﻩﺩﺮﻛ ﺍﺪﺟ ﺍﺭ ﺐﺼﻧ ﻞﺤﻣ 1
.ﺪﻴﻨﻛ ﻢﻜﺤﻣ (ﺖﺳﺍ ﺩﻮﺟﻮﻣ ﺪﻳﺮﺧ یﺍﺮﺑ) ﺎﻫ ﭻﻴﭘ ﮏﻤﻛ ﺎﺑ ﺍﺭ ﻩﺎﮕﺘﺳﺩ ﻭ ﻩﺩﺮﻛ
.ﺪﻨﻛ ﺩﺭﺍﻭ ﺐﻴﺳﺁ ﻩﺎﮕﺘﺳﺩ ﻪﺑ
ﻩﺎﮕﺘﺳﺩ ﻥﺩﺮﻛ ﺍﺪﺟ ﻩﻮﺤﻧ
ﺥﺍﺭﻮﺳ ﻥﻭﺭﺩ ﺍﺭ یﺯﺎﺳﺍﺪﺟ یﺎﻫﺪﻴﻠﻛ یﻭﺭ ﺮﺑ ﺩﻮﺟﻮﻣ ﻝﺎﺼﺗﺍ ﻦﻴﭘ 2
ﻥﻭﺮﻴﺑ ﺲﭙﺳ ﻭ ﺪﻳﺭﺍﺬﮕﺑ ﺵﺮﺑ ﻪﺤﻔﺻ ﺖﻤﺳ ﻭﺩ ﺮﻫ ﺭﺩ ﺩﻮﺟﻮﻣ یﺎﻫ
ﺭﺍﺮﻗ ﺖﻤﺳ ﺮﻫ ﺭﺩ ﺎﻫ ﻑﺎﻜﺷ ﻥﻭﺭﺩ ﹰﺎﻘﻴﻤﻋ یﺯﺎﺳﺍﺪﺟ یﺎﻫﺪﻴﻠﻛ
ﺖﺳﺍﺭ ﺖﻤﺳ ﺭﺩ ﻩﺪﺷ ﻩﺩﺍﺩ ﻥﺎﺸﻧ یﺎﻫ ﺶﻠﻓ ﺯﺍ ﻦﻳﺍﺮﺑﺎﻨﺑ ،ﺪﻧﺭﺍﺩ
.ﺪﻴﻨﻛ ﺍﺪﺟ ﺍﺭ ﯽﻳﻮﻠﺟ ﻪﺤﻔﺻ 1
.ﺪﻴﺸﻜﺑ
.ﺪﻴﻨﻛ ﺖﻴﻌﺒﺗ
.ﺩﻮﺷ ﻩﺩﺎﻔﺘﺳﺍ ﻦﻴﻣﺯ ﯽﻔﻨﻣ DC ﺖﻟﻭ 12 ﻪﻳﺬﻐﺗ ﻊﺒﻨﻣ ﺎﺑ ﺪﻧﺍﻮﺗ ﯽﻣ ﻂﻘﻓ ﻩﺎﮕﺘﺳﺩ ﻦﻳﺍ
ﻪﺑ ﺍﺭ (ﺰﻣﺮﻗ) ﺕﺭﺎﺘﺳﺍ ﻢﻴﺳ ﻭ (ﺩﺭﺯ) یﺮﺗﺎﺑ ﻢﻴﺳ ،ﻩﺎﺗﻮﻛ ﻝﺎﺼﺗﺍ ﮏﻳ ﺯﺍ یﺮﻴﮔﻮﻠﺟ یﺍﺮﺑ
.ﺪﻴﻨﻛ ﻖﻳﺎﻋ ﻕﺮﺑ ﺐﺴﭼ ﺎﺑ ﺍﺭ ﻩﺪﺸﻧ ﻞﺻﻭ یﺎﻫ ﻢﻴﺳ ،ﻩﺎﺗﻮﻛ ﻝﺎﺼﺗﺍ ﺯﺍ یﺮﻴﮔﻮﻠﺟ یﺍﺮﺑ
.ﺪﻳﺍ ﻩﺩﺮﻛ ﻞﺻﻭ ﻭﺭﺩﻮﺧ ﯽﺳﺎﺷ ﻪﺑ ﺍﺭ ﻩﺎﮕﺘﺳﺩ ﻦﻳﺍ ﻪﻛ ﺪﻳﻮﺷ ﻦﺌﻤﻄﻣ ،ﺐﺼﻧ ﺯﺍ ﺪﻌﺑ
ﺎﺑ .ﺪﻳﺭﺎﭙﺴﺑ یﺍ ﻪﻓﺮﺣ ﺩﺍﺮﻓﺍ ﻪﺑ ﺍﺭ ﺐﺼﻧ ﻭ ﯽﺸﻛ ﻢﻴﺳ ﺭﺎﻛ ،ﯽﻨﻤﻳﺍ ﺖﻳﺎﻋﺭ ﺭﻮﻈﻨﻣ ﻪﺑ
ﺪﻌﺑ ﯽﻛﺪﻧﺍ ﺎﻳ ﻩﺩﺎﻔﺘﺳﺍ ﻦﻴﺣ ﺭﺩ .ﺪﻴﻨﻛ ﺐﺼﻧ ﺩﻮﺧ یﻭﺭﺩﻮﺧ ﻝﻮﺴﻨﻛ ﺭﺩ ﺍﺭ ﻩﺎﮕﺘﺳﺩ ﻦﻳﺍ
یﺰﻠﻓ یﺎﻫ ﺖﻤﺴﻗ .ﺪﻴﻧﺰﻧ ﺖﺳﺩ ﻩﺎﮕﺘﺳﺩ یﺰﻠﻓ یﺎﻫ ﺖﻤﺴﻗ ﻪﺑ ،ﻩﺎﮕﺘﺳﺩ ﺯﺍ ﻩﺩﺎﻔﺘﺳﺍ ﺯﺍ
ﺪﻴﻨﻛ یﺭﺍﺩﺩﻮﺧ (ﻩﺎﻴﺳ) ﻦﻴﻣﺯ ﻢﻴﺳ ﺎﻳ ﻦﻴﺷﺎﻣ ﯽﺳﺎﺷ ﻪﺑ ﻮﮔﺪﻨﻠﺑ
ﻪﺑ ﺍﺭ (ﺰﻣﺮﻗ) ﺕﺭﺎﺘﺳﺍ ﻢﻴﺳ ،ﺩﺭﺍﺪﻧ ﺕﺭﺎﺘﺳﺍ ﻝﺎﻨﻴﻣﺮﺗ ﺎﻤﺷ یﻭﺭﺩﻮﺧ ﻢﻴﺳ ﻪﺘﺳﺩ ﺮﮔﺍ
ﺎﺑ ﻭ ﺪﻨﻛ ﯽﻣ ﻢﻫﺍﺮﻓ DC ﺖﻟﻭ 12 ﻪﻳﺬﻐﺗ ﻎﺒﻨﻣ ﻪﻛ ﻭﺭﺩﻮﺧ ﺯﻮﻴﻓ ﻪﺒﻌﺟ ﺭﺩ ﺩﻮﺟﻮﻣ ﻝﺎﻨﻴﻣﺮﺗ
کﺎﭘ ﻑﺮﺑ ،ﺎﻤﻨﻫﺍﺭ یﺎﻬﻏﺍﺮﭼ ،ﺰﻣﺮﺗ یﺎﻬﻏﺍﺮﭼ ﻪﻛ ﺪﻴﻨﻛ ﯽﺳﺭﺮﺑ ،ﻩﺎﮕﺘﺳﺩ ﺐﺼﻧ ﺯﺍ ﺪﻌﺑ
،ﺪﻨﺘﺴﻴﻧ ﺱﺎﻤﺗ ﺭﺩ ﯽﺳﺎﺷ ﺎﺑ ﺎﻫ ﻢﻴﺳ ﻪﻛ ﺪﻳﻮﺷ ﻦﺌﻤﻄﻣ ﺪﻳﺎﺑ ﺍﺪﺘﺑﺍ ،ﺩﺯﻮﺴﺑ ﺯﻮﻴﻓ ﺮﮔﺍ
.ﺪﻴﻨﻛ ﺍﺪﺟ ﺍﺭ یﺮﺗﺎﺑ ﯽﻔﻨﻣ ﻝﺎﻨﻴﻣﺮﺗ ،ﺐﺼﻧ ﺎﻳ ﯽﺸﻛ ﻢﻴﺳ ﺯﺍ ﻞﺒﻗ
.ﺪﻴﻨﻜﻧ ﻞﺻﻭ (ﻩﺎﻴﺳ) ﻦﻴﻣﺯ ﻪﺑ ﻝﺎﺼﺗﺍ ﻢﻴﺳ ﺎﻳ ﻭﺭﺩﻮﺧ ﯽﺳﺎﺷ
.ﺪﻳﺮﻴﮕﺑ ﺱﺎﻤﺗ ﻭﺭﺩﻮﺧ ﺕﻮﺻ ﻂﺒﺿ ﻩﺪﻨﺷﻭﺮﻓ
.ﺪﻧﻮﺷ ﯽﻣ ﻍﺍﺩ ﻩﺎﮕﺘﺳﺩ ﺏﺎﻗ ﻭ ﺭﻮﺧﺎﻣﺮﮔ ﺪﻨﻧﺎﻣ
[
.ﺪﻴﻨﻛ ﻞﺼﺘﻣ ﺮﮕﻳﺪﻜﻳ یﺯﺍﻮﻣ ﺕﺭﻮﺻ ﻪﺑ ﺍﺭ ﺎﻬﻧﺁ ﻪﻜﻨﻳﺍ ﺎﻳ
.ﺪﻴﻨﻛ ﺐﺼﻧ ﻪﺟﺭﺩ 30 ﺯﺍ ﺮﺘﻤﻛ یﺍ ﻪﻳﻭﺍﺯ ﺭﺩ ﺍﺭ ﻩﺎﮕﺘﺳﺩ
.ﺪﻴﻨﻛ ﻞﺻﻭ ،ﺩﻮﺷ ﯽﻣ ﺵﻮﻣﺎﺧ ﻭ ﻦﺷﻭﺭ ﺕﺭﺎﺘﺳﺍ ﺪﻴﻠﻛ ﺯﺍ ﻩﺩﺎﻔﺘﺳﺍ
.ﺪﻴﻨﻛ ﺭﻭﺩ ﺍﺯﺎﻣﺮﮔ یﺰﻠﻓ ﺕﺎﻌﻄﻗ ﺯﺍ ﺍﺭ ﺎﻫ ﻞﺑﺎﻛ ﻪﻴﻠﻛ
.ﺪﻨﻨﻛ ﺭﺎﻛ ﺢﻴﺤﺻ ﺯﺮﻃ ﻪﺑ ﻭﺭﺩﻮﺧ ﺭﺩ ﺩﻮﺟﻮﻣ ﺩﺭﺍﻮﻣ ﺮﻳﺎﺳ ﻭ ﺎﻬﻨﻛ
.ﺪﻴﻨﻛ ﺾﻳﻮﻌﺗ ،ﻪﺑﺎﺸﻣ ﺕﺎﺼﺨﺸﻣ ﺎﺑ ﺪﻳﺪﺟ ﺯﻮﻴﻓ ﮏﻳ ﺎﺑ ﺍﺭ ﯽﻤﻳﺪﻗ ﺯﻮﻴﻓ ﺲﭙﺳ
ﻰﻠﺻﺍ ﺎﻫﺭﺎﻛ ﺭﻮﺘﺳﺩ
ﺍﺭ ﻭﺭﺩﻮﺧ یﺮﺗﺎﺑ [ ﻝﺎﻨﻴﻣﺮﺗ ﺲﭙﺳ ،ﻩﺩﺮﻛ ﺍﺪﺟ ﺕﺭﺎﺘﺳﺍ ﭻﻴﺋﻮﺳ ﺯﺍ ﺍﺭ ﺪﻴﻠﻛ 1
(23 ) .ﺪﻴﻨﻛ ﻉﻮﺟﺭ ﯽﺸﻛ ﻢﻴﺳ ﻝﺎﺼﺗﺍ ﺖﻤﺴﻗ ﻪﺑ
.ﺪﻴﻨﻛ ﻉﻮﺟﺭ (ﺩﺭﻮﺒﺷﺍﺩ ﺭﺩ ﻥﺩﺮﻛ ﺐﺼﻧ) ﻩﺎﮕﺘﺳﺩ ﺐﺼﻧ ﺖﻤﺴﻗ ﻪﺑ
3
.ﺪﻴﻨﻛ ﻞﺻﻭ ﯽﺘﺳﺭﺩ ﻪﺑ ﺍﺭ ﺎﻫ ﻢﻴﺳ
.ﺪﻴﻨﻛ ﺐﺼﻧ ﺩﻮﺧ یﻭﺭﺩﻮﺧ ﺭﺩ ﺍﺭ ﻩﺎﮕﺘﺳﺩ
.ﺪﻴﻨﻛ ﻞﺻﻭ ﺍﺭ ﻭﺭﺩﻮﺧ یﺮﺗﺎﺑ [ ﻝﺎﻨﻴﻣﺮﺗ
(3 ) .ﺪﻴﻨﻛ ﺖﺳ ﺭ ﺍﺭ ﻩﺎﮕﺘﺳﺩ 5
ﺭﺎﻄﺧﺍ
ﻁﺎﻴﺘﺣﺍ
یﺎﻫ ﻢﻴﺳ ﻝﺎﺼﺗﺍ ﺯﺍ
.ﺪﻴﻨﻛ ﻊﻄﻗ
ﻝﺎﺼﺗﺍ / ﺐﺼﻧ
•
•
•
•
•
•
•
•
•
•
•
•
•
2
3
4
22
Page 28

ﺕﺎﺤﻴﺿﻮﺗ
Bluetooth 3.0 / Bluetooth Ver.2.1+EDR
ﺰﺗﺮﻫﺎﮕﻴﮔ 2.480 — ﺰﺗﺮﻫﺎﮕﻴﮔ 2.402
Power Class 2 (AVE) 0 dBm ،(MAX) +4 dBm
(32.8 ft) ﺮﺘﻣ 10 ﹰﺎﺒﻳﺮﻘﺗ ﺪﻳﺩ ﻂﺧ
(یﺮﻓﺯﺪﻨﻫ ﻞﻳﺎﻓﻭﺮﭘ) HFP
(ﻝﺎﻳﺮﺳ ﺕﺭﻮﭘ ﻞﻳﺎﻓﻭﺮﭘ) SPP
(ﻦﻔﻠﺗ ﻪﭼﺮﺘﻓﺩ ﻪﺑ ﯽﺳﺮﺘﺳﺩ ﻞﻳﺎﻓﻭﺮﭘ) PBAP
(ﻪﺘﻓﺮﺸﻴﭘ ﯽﺗﻮﺻ ﻊﻳﺯﻮﺗ ﻞﻳﺎﻓﻭﺮﭘ) A2DP
(ﺮﻳﻮﺼﺗ/ﺍﺪﺻ ﺭﻭﺩ ﻩﺍﺭ ﺯﺍ ﻝﺮﺘﻨﻛ ﻞﻳﺎﻓﻭﺮﭘ) AVRCP
(1% THD ﺯﺍ ﺮﺘﻤﻛ ﺎﺑ) 4 × ﺕﺍﻭ 22
ﻢﻫﺍ 8 — ﻢﻫﺍ 4
ﻞﺒﻴﺳﺩ ±8 ﺰﺗﺮﻫ 200
ﻞﺒﻴﺳﺩ ±8 ﺰﺗﺮﻫ ﻮﻠﻴﻛ 2.5
ﻞﺒﻴﺳﺩ ±8 ﺰﺗﺮﻫ ﻮﻠﻴﻛ 12.5
ﺰﺗﺮﻫ ﻮﻠﻴﻛ 20 — ﺰﺗﺮﻫ 20
(ﺯﺎﺠﻣ ﺖﻟﻭ 16 — ﺖﻟﻭ 10.5) ﺖﻟﻭ 14.4
ﺩﺍﺮﮕﻴﺘﻧﺎﺳ ﻪﺟﺭﺩ +40 — ﺩﺍﺮﮕﻴﺘﻧﺎﺳ ﻪﺟﺭﺩ 0
ﺮﺘﻣ ﻰﻠﻴﻣ 107 × ﺮﺘﻣ ﻰﻠﻴﻣ 53 × ﺮﺘﻣ ﻰﻠﻴﻣ 182
ﻰﺳﺭﺎﻓ
21
4 × ﺕﺍﻭ 50
ﻂﺳﻭ
ﺮﻳﺯ ﺍﺪﺻ
ﻢﻫﺍ 600 ≥
1 000 mV
ﻢﻫﺍﻮﻠﻴﻛ 30
10 A
ﻡﺮﮔ ﻮﻠﻴﻛ 0.62
ﻪﺨﺴﻧ
ﺲﻧﺎﻛﺮﻓ ﻩﺯﻮﺣ
ﯽﺟﻭﺮﺧ ﺕﺭﺪﻗ
ﯽﻃﺎﺒﺗﺭﺍ ﻩﺩﻭﺪﺤﻣ ﺮﺜﻛﺍﺪﺣ
ﻞﻳﺎﻓﻭﺮﭘ
ﯽﺟﻭﺮﺧ ﺕﺭﺪﻗ ﺮﺜﻛﺍﺪﺣ
ﻞﻣﺎﻛ ﺪﻧﺎﺑ یﺎﻨﻬﭘ ﺕﺭﺪﻗ
ﻮﮔﺪﻨﻠﺑ ﺲﻧﺍﺪﭙﻣﺍ
ﺍﺪﺻ ﺩﺮﻜﻠﻤﻋﻢﺑ ﺍﺪﺻ
(USB) ﺭﺎﺑ/ﻪﻴﻟﻭﺍ ﯽﺟﻭﺮﺧ ﺢﻄﺳﻢﻫﺍﻮﻠﻴﻛ 10/2 500 mV
ﻪﻴﻟﻭﺍ ﯽﺟﻭﺮﺧ ﺲﻧﺍﺪﭙﻣﺍ
(ﻞﺒﻴﺳﺩ 3±) ﺲﻧﺎﻛﺮﻓ ﺦﺳﺎﭘ
یﺩﻭﺭﻭ ژﺎﺘﻟﻭ ﺮﺜﻛﺍﺪﺣ
یﺩﻭﺭﻭ ﺲﻧﺍﺪﭙﻣﺍ
ﺩﺮﻛﺭﺎﻛ ژﺎﺘﻟﻭ
ﻕﺮﺑ ﻑﺮﺼﻣ ﻥﺍﺰﻴﻣ ﺮﺜﻛﺍﺪﺣ
ﯽﺗﺎﻴﻠﻤﻋ یﺎﻣﺩ ﻩﺩﻭﺪﺤﻣ
(ﻖﻤﻋ ﺭﺩ ﺪﻨﻠﺑ ﺭﺩ ﺎﻨﻬﭘ) ﺐﺼﻧ ﻩﺯﺍﺪﻧﺍ
ﻥﺯﻭ
.ﺪﻨﻛ ﺮﻴﻴﻐﺗ ﯽﻠﺒﻗ ﻡﻼﻋﺍ ﻥﻭﺪﺑ ﺖﺳﺍ ﻦﻜﻤﻣ
(ﺰﺗﺮﻫ ﻮﻠﻴﻛ 50 یﺎﻀﻓ) ﺰﺗﺮﻫ ﺎﮕﻣ 108.0 — ﺰﺗﺮﻫ ﺎﮕﻣ 87.5
Bluetooth
ﺰﺗﺮﻫ ﻮﻠﻴﻛ 1 611 — ﺰﺗﺮﻫ ﻮﻠﻴﻛ 531
ﺰﺗﺮﻫ ﻮﻠﻴﻛ 7 735 — ﺰﺗﺮﻫ ﻮﻠﻴﻛ 2 940
/ﺰﺗﺮﻫ ﻮﻠﻴﻛ 10 135 — ﺰﺗﺮﻫ ﻮﻠﻴﻛ 9 500
ﺰﺗﺮﻫ ﻮﻠﻴﻛ 18 135 — ﺰﺗﺮﻫ ﻮﻠﻴﻛ 11 580
ﯽﺗﻮﺻ
ﯽﻜﻤﻛ
ﻰﻣﻮﻤﻋ
(ﺰﺗﺮﻫ ﻮﻠﻴﻛ 9 یﺎﻀﻓ)
(ﺰﺗﺮﻫ ﻮﻠﻴﻛ 5 یﺎﻀﻓ)
(ﺰﺗﺮﻫ ﻮﻠﻴﻛ 5 یﺎﻀﻓ)
ﺰﺗﺮﻫ ﻮﻠﻴﻛ 9
ﺰﺗﺮﻫ ﻮﻠﻴﻛ 5
(28.2 μV) 29.0 dBμ
(32 μV) 30 dBμ
32 /16 /FAT12
ﺮﭙﻣﺁ 1
50 kHz
ﻞﺑ ﻰﺳﺩ 64
(MW) 1 ﺪﻧﺎﺑ
(SW1) 2 ﺪﻧﺎﺑ
(SW2) 3 ﺪﻧﺎﺑ
1 ﺪﻧﺎﺑ
3/2 ﺪﻧﺎﺑ
DC ﺖﻟﻭ 5
ﻞﺑ ﻰﺳﺩ 90
ﻞﺑ ﻰﺳﺩ 85
ﺲﻧﺎﻛﺮﻓ ﻩﺯﻮﺣ
ﻝﺎﻧﺎﻛ یﺎﻀﻓ ﺏﺎﺨﺘﻧﺍ
(ﻞﺒﻴﺳﺩ 26 = S/N) ﻩﺩﺎﻔﺘﺳﺍ ﻞﺑﺎﻗ ﺖﻴﺳﺎﺴﺣ(75 Ω/0.71 μV) 8.2 dBf
(ﻞﺒﻴﺳﺩ 46 = DIN S/N) ﺕﻮﻜﺳ ﺖﻴﺳﺎﺴﺣ(75 Ω/2.0 μV) 17.2 dBf
(ﻞﺒﻴﺳﺩ ±3) ﺲﻧﺎﻛﺮﻓ ﺦﺳﺎﭘﺰﺗﺮﻫ ﻮﻠﻴﻛ 15 — ﺰﺗﺮﻫ 30
(ﻮﻧﻮﻣ) ﺖﻳﺯﺍﺭﺎﭘ ﻪﺑ ﻝﺎﻨﮕﻴﺳ ﺖﺒﺴﻧ
(ﺰﺗﺮﻫﻮﻠﻴﻛ 1) ﻮﻳﺮﺘﺳﺍ یﺯﺎﺳﺍﺪﺟﻞﺑ ﻰﺳﺩ 40
ﺲﻧﺎﻛﺮﻓ ﻩﺯﻮﺣ
ﻝﺎﻧﺎﻛ یﺎﻀﻓ ﺏﺎﺨﺘﻧﺍ
(ﻞﺒﻴﺳﺩ 20 = S/N)ﻩﺩﺎﻔﺘﺳﺍ ﻞﺑﺎﻗ ﺖﻴﺳﺎﺴﺣMW
SW
ﻕﺮﺑ ﻥﺎﻳﺮﺟ ﺮﺜﻛﺍﺪﺣ
(ﻞﺒﻴﺳﺩ ±1) ﺲﻧﺎﻛﺮﻓ ﺦﺳﺎﭘﺰﺗﺮﻫ ﻮﻠﻴﻛ 20 — ﺰﺗﺮﻫ 20
(ﺰﺗﺮﻫﻮﻠﻴﻛ 1) ﺖﻳﺯﺍﺭﺎﭘ ﻪﺑ ﻝﺎﻨﮕﻴﺳ ﺖﺒﺴﻧﻞﺑ ﻰﺳﺩ 105
USB ﺩﺭﺍﺪﻧﺎﺘﺳﺍ(ﻻﺎﺑ ﺖﻋﺮﺳ) USB 2.0 ،USB 1.1
ﻞﻳﺎﻓ ﻢﺘﺴﻴﺳ
ﮏﻴﻣﺎﻨﻳﺩ ﻪﻨﻣﺍﺩ
ﻝﺎﻧﺎﻛ یﺯﺎﺳﺍﺪﺟ
MP3 ﯽﻳﺎﺸﮔﺰﻣﺭMPEG-1/2 Audio Layer-3 ﺎﺑ ﺭﺎﮔﺯﺎﺳ
WMA ﯽﻳﺎﺸﮔﺰﻣﺭWindows Media Audio ﺎﺑ ﺭﺎﮔﺯﺎﺳ
AAC ﯽﻳﺎﺸﮔﺰﻣﺭ“.m4a” یﺎﻫ ﻞﻳﺎﻓ AAC-LC
WAV ﯽﻳﺎﺸﮔﺰﻣﺭ(ﯽﻄﺧ PCM ﻂﻘﻓ) RIFF ﻞﻜﺷ ﯽﺟﻮﻣ ﻡﺮﻓ ﯽﺗﻮﺻ ﺖﻣﺮﻓ
FLA
C ﯽﻳﺎﺸﮔﺰﻣﺭیﺎﻫ ﻞﻳﺎﻓ FLAC
FM
ﺮﻧﻮﻴﺗ
AM
USB
Page 29

ﻲﺑﺎﻳ ﺐﻴﻋ
ﺮﺘﻬﺑ ﺍﺭ ﺎﻫ ﻝﺎﻨﮕﻴﺳ ﺪﻴﻧﺍﻮﺗ ﯽﻣ ﺎﺠﻧﺁ ﺭﺩ ﻪﻛ ﺪﻳﺮﺒﺑ ﯽﻧﺎﻜﻣ ﻪﺑ ﺍﺭ ﻭﺭﺩﻮﺧ
ﺶﻫﺎﻛ ﺍﺭ ﻥﻮﻓﻭﺮﻜﻴﻣ ﺯﺍ ﻪﻠﺻﺎﻓ ،ﺮﻈﻧ ﺩﺭﻮﻣ ﻡﺎﻧ ﻥﺩﺮﻛ ﻮﮔﺯﺎﺑ ﻡﺎﮕﻨﻫ
.ﺩﻮﺷ ﯽﻣ ﻩﺩﺎﻔﺘﺳﺍ ﻩﺪﺷ ﺖﺒﺛ یﺍﺪﺻ ﻥﺎﻤﻫ ﺯﺍ ﻪﻛ ﺪﻳﻮﺷ ﻦﺌﻤﻄﻣ
.ﺪﻴﻫﺪﺑ ﺶﻫﺎﻛ ﺍﺭ ﺭﺍﺩ ﺙﻮﺗﻮﻠﺑ ﻩﺪﻨﻨﻛ ﺶﺨﭘ ﻭ ﻩﺎﮕﺘﺳﺩ ﻦﻴﺑ ﻪﻠﺻﺎﻓ
.ﺪﻴﻨﻛ ﻞﺻﻭ ﺍﺩﺪﺠﻣ ﺍﺭ ﻥﺁ ﻭ ،ﻩﺩﺮﻛ ﻦﺷﻭﺭ ﻭ ﺵﻮﻣﺎﺧ ﺍﺭ ﻩﺎﮕﺘﺳﺩ
ﻩﺎﮕﺘﺳﺩ ﻦﻳﺍ ﻪﺑ ﺪﻨﻨﻛ ﯽﻌﺳ ﺙﻮﺗﻮﻠﺑ یﺎﻫ ﻩﺎﮕﺘﺳﺩ ﺮﻳﺎﺳ ﺖﺳﺍ ﻦﻜﻤﻣ
ﺯﺍ ﻝﺮﺘﻨﻛ ﻞﻳﺎﻓﻭﺮﭘ ﻩﺪﺷ ﻞﺻﻭ ﺙﻮﺗﻮﻠﺑ ﻩﺪﻨﻨﻛ ﺶﺨﭘ ﺎﻳﺁ ﻪﻛ ﺪﻴﻨﻛ ﯽﺳﺭﺮﺑ
ﻪﺑ) .ﺮﻴﺧ ﺎﻳ ﺪﻨﻛ ﯽﻣ ﯽﻧﺎﺒﻴﺘﺸﭘ ﺍﺭ (A
ﺯﺍ ﺲﭘ .ﺖﺳﺍ ﻩﺪﻴﺳﺭ ﺩﻮﺧ ﺯﺎﺠﻣ ﺪﺣ ﻪﺑ ﻩﺪﺷ ﺖﺒﺛ یﺎﻫ ﻩﺎﮕﺘﺳﺩ ﺩﺍﺪﻌﺗ
.ﺖﺳﺍ ﻩﺪﺸﻧ ﺍﺪﻴﭘ ﺎﻳ ﻞﺼﺘﻣ Bluetooth ﻖﻳﺮﻃ ﺯﺍ یﺍ ﻩﺪﺷ ﺖﺒﺛ ﻩﺎﮕﺘﺳﺩ ﭻﻴﻫ
ﺮﻫﺎﻇ “ERROR” ﺕﺭﺎﺒﻋ ﺮﮕﻳﺩ ﺭﺎﺑ ﺮﮔﺍ .ﺪﻴﻨﻛ ﻥﺎﺤﺘﻣﺍ ﺍﺩﺪﺠﻣ ﺍﺭ ﻞﻤﻋ ﻦﻳﺍ
ﯽﻧﺎﺒﻴﺘﺸﭘ ﺍﺭ ﺎﻤﺷ ﺮﻈﻧ ﺩﺭﻮﻣ ﺖﻴﻠﺑﺎﻗ ﻩﺎﮕﺘﺳﺩ ﻪﻛ ﺪﻴﻨﻛ ﯽﺳﺭﺮﺑ ﺪﻳﺎﺑ ،ﺩﻮﺷ
،ﺩﻮﺸﻧ ﻞﺣ ﻞﻜﺸﻣ ﺮﮔﺍ .ﺪﻴﻨﻛ ﻥﺎﺤﺘﻣﺍ ﺍﺩﺪﺠﻣ ﻭ ﻩﺩﺮﻛ ﺖﺴﻳﺭ ﺍﺭ ﻩﺎﮕﺘﺳﺩ
.ﺪﻴﻫﺪﺑ ﺶﻫﺎﻛ ﺍﺭ ﺙﻮﺗﻮﻠﺑ ﻭ ﻩﺎﮕﺘﺳﺩ ﻦﻴﺑ ﻪﻠﺻﺎﻓ
.ﺪﻴﻨﻛ ﺖﻓﺎﻳﺭﺩ
.ﺪﻴﻨﻛ ﻩﺩﺎﻔﺘﺳﺍ ﺮﺗ ﻡﺍﺭﺁ ﻂﻴﺤﻣ ﮏﻳ ﺭﺩ ﯽﺗﻮﺻ ﺱﺎﻤﺗ ﺵﻭﺭ ﺯﺍ
.ﺪﻴﻫﺪﺑ
.ﺪﻧﻮﺷ ﻞﺻﻭ
(.ﺪﻴﻨﻛ ﻉﻮﺟﺭ ﺩﻮﺧ ﯽﺗﻮﺻ ﻩﺪﻨﻨﻛ ﺶﺨﭘ ﻞﻤﻌﻟﺍﺭﻮﺘﺳﺩ
.ﺪﻴﻨﻛ ﻞﺻﻭ ﺍﺩﺪﺠﻣ ﻭ ﻩﺩﺮﻛ ﺍﺪﺟ ﺍﺭ ﺙﻮﺗﻮﻠﺑ ﻩﺪﻨﻨﻛ ﺶﺨﭘ
.ﺩﻮﺷ ﯽﻣ ﻩﺩﺎﻔﺘﺳﺍ ﻩﺪﺷ ﺖﺒﺛ یﺍﺪﺻ ﻥﺎﻤﻫ ﺯﺍ ﻪﻛ ﺪﻳﻮﺷ ﻦﺌﻤﻄﻣ
.ﺪﻨﻛ ﯽﻤﻧ ﯽﻧﺎﺒﻴﺘﺸﭘ ﺍﺭ ﺍﺪﺻ ﺺﻴﺨﺸﺗ ﺖﻴﻠﺑﺎﻗ ﻩﺪﺷ ﻞﺻﻭ ﻦﻔﻠﺗ
.ﺖﺴﻴﻧ ﺐﻃﺎﺨﻣ ﺕﺎﻋﻼﻃﺍ ﺖﻓﺎﻳﺭﺩ ﻪﺑ ﺭﺩﺎﻗ Bluetooth ﻩﺎﮕﺘﺳﺩ
VRCP) یﺮﻳﻮﺼﺗ/ﯽﺗﻮﺻ ﺭﻭﺩ ﻩﺍﺭ
.ﺪﻴﻨﻛ ﯽﻌﺳ ﺍﺩﺪﺠﻣ ،یﺭﻭﺮﺿﺮﻴﻏ ﻩﺎﮕﺘﺳﺩ ﻑﺬﺣ
.ﺪﻳﺮﻴﮕﺑ ﺱﺎﻤﺗ ﺕﺎﻣﺪﺧ ﺰﻛﺮﻣ ﻦﻳﺮﺘﻜﻳﺩﺰﻧ ﺎﺑ ﺪﻳﺎﺑ
(
DEVICE DELETE ،14
.ﺮﻴﺧ ﺎﻳ ﺪﻨﻛ ﯽﻣ
)
ﻦﻴﻳﺎﭘ ﻦﻔﻠﺗ یﺍﺪﺻ ﺖﻴﻔﻴﻛ
•
•
ﺱﺎﻤﺗ ﺵﻭﺭ ﺯﺍ ﻩﺩﺎﻔﺘﺳﺍ
•
ﯽﻤﻧ ﺰﻴﻣﺁ ﺖﻴﻘﻓﻮﻣ ﯽﺗﻮﺻ
•
•
ﺯﺍ ﺍﺪﺻ ﺶﺨﭘ ﯽﻃ ﺭﺩ
•
ﯽﺗﻮﺻ ﻩﺪﻨﻨﻛ ﺶﺨﭘ
•
ﯽﻣ ﻊﻄﻗ ﺍﺪﺻ ،ﺭﺍﺩ ﺙﻮﺗﻮﻠﺑ
•
.ﺩﺭﺍﺩ ﺵﺮﭘ ﺎﻳ ﺩﻮﺷ
ﺭﺍﺩ ﺙﻮﺗﻮﻠﺑ ﻩﺪﻨﻨﻛ ﺶﺨﭘ
•
ﻥﺍﻮﺗ ﯽﻤﻧ ﺍﺭ ﻩﺪﺷ ﻞﺻﻭ
•
“DEVICE FULL”
“N/A VOICE TAG”
“NOT SUPPORT”
“NO PAIR”/ “NO ENTRY”
/
“HF ERROR XX”
.ﺖﺳﺍ
.ﺪﺷﺎﺑ
.ﺩﺮﻛ ﻝﺮﺘﻨﻛ
“ERROR”
“NO INFO”
“BT ERROR”
“NA DEVICE”
“ADD ERROR”
“NO SKIPS”
.ﺩﺭﺍﺪﻧ ﺩﻮﺟﻭ
.ﺩﻮﺷ ﯽﻣ ﻩﺪﻴﻨﺷ
ﺽﺭﺍﻮﻋﺮﻴﻤﻌﺗ ﻩﻮﺤﻧ
ANDROID
Pandora
Bluetooth®
ﺽﺭﺍﻮﻋﺮﻴﻤﻌﺗ ﻩﻮﺤﻧ
ﺪﻳﻭﺭﺪﻧﺍ ﻩﺎﮕﺘﺳﺩ ﺭﺩ ﺍﺭ یﺮﺗﺎﺑ ﯽﻳﻮﺟ ﻪﻓﺮﺻ ﺖﻟﺎﺣ
.ﺪﻴﻨﻛ ﻞﺻﻭ ﻩﺭﺎﺑﻭﺩ ﻭ ﻊﻄﻗ ﻩﺭﺎﺑﻭﺩ ﺍﺭ ﺪﻳﻭﺭﺪﻧﺍ ﻩﺎﮕﺘﺳﺩ
.ﺪﻴﻨﻛ ﺩﺪﺠﻣ یﺯﺍﺪﻧﺍ ﻩﺍﺭ ﺍﺭ ﺪﻳﻭﺭﺪﻧﺍ ﻩﺎﮕﺘﺳﺩ
.ﺪﺷ ﺩﺎﺠﻳﺍ ﺖﻴﻘﻓﻮﻣ ﺎﺑ ﺪﻳﺪﺟ ﻩﺎﮕﺘﺴﻳﺍ
.ﺪﻴﻨﻛ ﯽﺳﺭﺮﺑ ﺩﻮﺧ ﻩﺎﮕﺘﺳﺩ ﺭﺩ ﺍﺭ Pandora ﻪﻣﺎﻧﺮﺑ
.ﺪﻳﺍ ﻩﺪﻴﺳﺭ ﻥﺪﺷ ﺩﺭ ﻩﺩﻭﺪﺤﻣ ﻪﺑ
.ﺪﺸﻧ ﺍﺪﻴﭘ ﯽﻫﺎﮕﺘﺴﻳﺍ ﭻﻴﻫ
ﻩﺪﻴﺳﺭ ﺩﻮﺧ ﻩﺩﻭﺪﺤﻣ ﻪﺑ ﻩﺪﺷ ﺖﺒﺛ یﺎﻫ ﻩﺎﮕﺘﺴﻳﺍ ﺩﺍﺪﻌﺗ
Bluetooth®
ﺯﺍ یﺭﻭﺮﺿﺮﻴﻏ یﺎﻫ ﻩﺎﮕﺘﺴﻳﺍ ﻑﺬﺣ ﺯﺍ ﺲﭘ .ﺖﺳﺍ
.ﺪﺸﻧ ﻡﺎﺠﻧﺍ “ﻦﺘﺷﺍﺪﻧ ﺖﺳﻭﺩ/ﻦﺘﺷﺍﺩ ﺖﺳﻭﺩ” ﺖﺒﺛ
ﺭﺩ Pandora ﻪﻛ ﺪﻴﺘﺴﻫ یﺭﻮﺸﻛ ﺯﺍ ﯽﺳﺮﺘﺳﺩ ﻝﺎﺣ ﺭﺩ ﺎﻤﺷ
ﻭ ﻂﺒﺿ ﺭﺩ ﺍﺭ ﻥﺎﺴﻜﻳ PIN ﺪﻛ ﮏﻳ ﻪﻛ ﺪﻳﻮﺷ ﻦﺌﻤﻄﻣ
ﺙﻮﺗﻮﻠﺑ ﻩﺎﮕﺘﺳﺩ ﻭ ﻂﺒﺿ ﺯﺍ ﺍﺭ ﻥﺩﺮﻛ ﺖﻔﺟ ﺕﺎﻋﻼﻃﺍ
ﻡﺎﺠﻧﺍ ﺍﺭ ﻥﺩﺮﻛ ﺖﻔﺟ ﻞﻤﻋ ﺍﺩﺪﺠﻣ ﺲﭙﺳ ،ﺪﻴﻨﻛ ﻑﺬﺣ
(
11
) .ﺪﻴﻨﻛ ﯽﺳﺭﺮﺑ ﺍﺭ [
.ﺪﻴﻨﻛ ﻥﺎﺤﺘﻣﺍ ﻩﺭﺎﺑﻭﺩ ﺩﻮﺧ ﻩﺎﮕﺘﺳﺩ
.ﺖﺴﻴﻧ ﺕﺎﺒﺛ یﺍﺭﺍﺩ ﻁﺎﺒﺗﺭﺍ
.ﺖﺴﻴﻧ ﯽﺳﺮﺘﺳﺩ ﻞﺑﺎﻗ ﻥﺁ
.ﺪﻴﻨﻛ ﻮﺠﺘﺴﺟ ﺙﻮﺗﻮﻠﺑ ﻩﺎﮕﺘﺳﺩ ﺯﺍ ﻩﺭﺎﺑﻭﺩ
3
) .ﺪﻴﻨﻛ ﺖﺳ ﺭ ﺍﺭ ﻩﺎﮕﺘﺳﺩ
(
.ﺪﻳﺍ ﻩﺩﺮﻛ ﺩﺭﺍﻭ ﺙﻮﺗﻮﻠﺑ ﻩﺎﮕﺘﺳﺩ
(
10
) .ﺪﻴﻨﻛ ﻢﻴﻈﻨﺗ ﺍﺭ ﻥﻮﻓﻭﺮﻜﻴﻣ ﺖﻴﻌﻗﻮﻣ
ECHO CANCEL
.ﺪﻴﻨﻛ ﻝﺎﻌﻓﺮﻴﻏ
(
10
) .ﺪﻴﻫﺩ
ﺩﻮﺷ ﯽﻣ ﻞﺻﻭ ﻭ ﻊﻄﻗ ﺍﺪﺻ ﺶﺨﭘ
•
•
.ﺪﺸﻧ ﻪﺘﺧﺎﻨﺷ ﺙﻮﺗﻮﻠﺑ ﻩﺎﮕﺘﺳﺩ
•
•
•
Bluetooth
•
ﺰﻳﻮﻧ ﺎﻳ ﻮﻛﺍ ،ﯽﻨﻔﻠﺗ ﻪﻤﻟﺎﻜﻣ ﻦﻴﺣ ﺭﺩ
•
•
] ﺖﻟﺎﺣ
.ﺩﺭﺍﺩ ﺵﺮﭘ ﺍﺪﺻ ﺎﻳ
/
“ANDROID ERROR”
/
“SEARCH ERROR”
“CHECK DEVICE”
“NO STATIONS”
“STATION LIMIT”
“CONNECT ERROR”
“RATING ERROR”
“LICENSE ERROR”
ﻥﺪﺷ ﺖﻔﺟ ﻥﺎﻜﻣﺍ
20
Page 30

ﻲﺑﺎﻳ ﺐﻴﻋ
.ﺩﻮﺷ ﯽﻣ ﺶﺨﭘ ﯽﭙﻛ ﺮﺑﺍﺮﺑ ﺭﺩ ﺖﻈﻓﺎﺤﻣ ﺎﺑ ﻞﻳﺎﻓ ﮏﻳ
ﺎﻫ ﻝﺎﺼﺗﺍ ﻭ ﻩﺩﺮﻛ ﻞﺼﺘﻣ ﺍﺭ ﻩﺪﺷ ﯽﻧﺎﺒﻴﺘﺸﭘ USB ﻩﺎﮕﺘﺳﺩ ﮏﻳ
ﯽﺗﻮﺻ یﺎﻫ ﻞﻳﺎﻓ یﻭﺎﺣ ﻪﻛ ﺪﻴﻨﻛ ﻞﺼﺘﻣ USB ﻩﺎﮕﺘﺳﺩ ﮏﻳ
.ﺪﻴﻨﻛ ﻞﺻﻭ ﻩﺭﺎﺑﻭﺩ ﻭ ﻊﻄﻗ ﻩﺭﺎﺑﻭﺩ ﺍﺭ ﺪﻳﻭﺭﺪﻧﺍ ﻩﺎﮕﺘﺳﺩ
ﻪﻣﺎﻧﺮﺑ ﮏﻳ ،ﺪﻴﺘﺴﻫ [
ﻩﺩﺮﻛ ﺍﺮﺟﺍ ﺪﻳﻭﺭﺪﻧﺍ ﻩﺎﮕﺘﺳﺩ یﻭﺭ ﺍﺭ یﺍ ﻪﻧﺎﺳﺭ ﺪﻨﭼ ﺶﺨﭘ
ﺶﺨﭘ ﻪﻣﺎﻧﺮﺑ ،ﺪﻴﺘﺴﻫ [
ﻪﻣﺎﻧﺮﺑ ﺯﺍ ﺎﻳ ،ﺪﻴﻨﻛ ﺍﺮﺟﺍ ﹰﺍﺩﺪﺠﻣ ﺍﺭ ﯽﻠﻌﻓ یﺍ ﻪﻧﺎﺳﺭ ﺪﻨﭼ
ﻞﺼﺘﻣ ﻪﻛ یﺪﻳﻭﺭﺪﻧﺍ ﻩﺎﮕﺘﺳﺩ ،ﺪﺸﻧ ﻞﺣ ﻞﻜﺸﻣ ﺮﮔﺍ
ﻩﺎﮕﺘﺳﺩ ﻪﺑ ﯽﺗﻮﺻ یﺎﻫ ﻝﺎﻨﮕﻴﺳ ﻝﺎﺳﺭﺍ ﻪﺑ ﺭﺩﺎﻗ ﺪﻳﺍ ﻩﺩﺮﻛ
KENWOOD MUSIC PLAY APP ﻪﻣﺎﻧﺮﺑ ﻪﻛ ﺪﻳﻮﺷ ﻦﺌﻤﻄﻣ
(
8
) .ﺪﺷﺎﺑ ﻩﺪﺷ ﺐﺼﻧ ﺎﻤﺷ ﺪﻳﻭﺭﺪﻧﺍ ﻩﺎﮕﺘﺳﺩ یﻭﺭ
ﻭ ،ﺪﻴﻨﻛ ﻞﺻﻭ ﹰﺍﺩﺪﺠﻣ ﻭ ﻊﻄﻗ ﺍﺭ ﺪﻳﻭﺭﺪﻧﺍ ﻩﺎﮕﺘﺳﺩ
ﻡﺎﺠﻧﺍ [
ANDROID SETUP
ﻩﺩﺮﻛ ﻞﺼﺘﻣ ﻪﻛ یﺪﻳﻭﺭﺪﻧﺍ ﻩﺎﮕﺘﺳﺩ ،ﺪﺸﻧ ﻞﺣ ﻞﻜﺸﻣ ﺮﮔﺍ
.ﺪﻨﻛ ﯽﻤﻧ ﯽﻧﺎﺒﻴﺘﺸﭘ [
ﺍﺭ ﺪﻳﻭﺭﺪﻧﺍ ﻩﺎﮕﺘﺳﺩ یﻭﺭ ﺲﻳﻮﻧ ﻪﻣﺎﻧﺮﺑ یﺎﻫ ﻪﻨﻳﺰﮔ
.ﺪﻴﻨﻛ ﻞﺻﻭ ﻩﺭﺎﺑﻭﺩ ﻭ ﻊﻄﻗ ﻩﺭﺎﺑﻭﺩ ﺍﺭ ﺪﻳﻭﺭﺪﻧﺍ ﻩﺎﮕﺘﺳﺩ
ﻩﺩﺮﻛ ﻞﺼﺘﻣ ﻪﻛ یﺪﻳﻭﺭﺪﻧﺍ ﻩﺎﮕﺘﺳﺩ ،ﺪﺸﻧ ﻞﺣ ﻞﻜﺸﻣ ﺮﮔﺍ
.ﺪﻨﻛ ﯽﻤﻧ ﯽﻧﺎﺒﻴﺘﺸﭘ [
ﻰﺳﺭﺎﻓ
19
HAND MODE
.ﺪﻴﻨﻛ ﺶﺨﭘ ﹰﺍﺩﺪﺠﻣ ﺍﺭ ﻞﻳﺎﻓ ﻭ
HAND MODE
.ﺪﻴﻳﺎﻤﻧ ﻩﺩﺎﻔﺘﺳﺍ یﺮﮕﻳﺩ یﺍ ﻪﻧﺎﺳﺭ ﺪﻨﭼ
.ﺪﻴﻨﻛ ﺩﺪﺠﻣ یﺯﺍﺪﻧﺍ ﻩﺍﺭ ﺍﺭ ﺪﻳﻭﺭﺪﻧﺍ ﻩﺎﮕﺘﺳﺩ
BROWSE MODE
BROWSE MODE
.ﺪﻴﻨﻛ ﯽﺳﺭﺮﺑ ﺍﺭ
.ﺪﺷﺎﺑ ﺶﺨﭘ ﻞﺑﺎﻗ
.ﺪﻴﻨﻛ ﻞﺻﻭ ﺍﺩﺪﺠﻣ ﺍﺭ iPod
.ﺪﻴﻨﻛ ﻲﻧﺎﺸﻧﺯﺎﺑ ﺍﺭ iPod
] ﺖﻟﺎﺣ ﺭﺩ ﺮﮔﺍ
] ﺖﻟﺎﺣ ﺭﺩ ﺮﮔﺍ
(
18
) .ﺖﺴﻴﻧ
] ﺭﺩ ﺍﺭ ﺐﺳﺎﻨﻣ ﺕﺎﻤﻴﻈﻨﺗ
(
8
) .ﺪﻴﻫﺩ
] ﺖﻟﺎﺣ ﺯﺍ ﺪﻳﺍ
(
18
)
.ﺪﻴﻨﻛ ﻝﺎﻌﻓﺮﻴﻏ
] ﺖﻟﺎﺣ ﺯﺍ ﺪﻳﺍ
(
18
)
•
•
•
ﻪﺑ ﺶﺨﭘ ﻦﻴﺣ ﺭﺩ ﯽﻳﺍﺪﺻ
•
•
•
•
•
•
•
•
•
•
.ﺪﺳﺭ ﯽﻤﻧ ﺵﻮﮔ
ﻩﺎﮕﺘﺳﺩ ﺯﺍ ﻂﻘﻓ ﯽﺟﻭﺮﺧ
.ﺩﻮﺷ ﯽﻣ ﺝﺭﺎﺧ ﺪﻳﻭﺭﺪﻧﺍ
ﻥﺎﻜﻣﺍ [
BROWSE MODE
“READING”
“COPY PRO”
“NA DEVICE”
“NO MUSIC”
“iPod ERROR”
ﺖﻟﺎﺣ ﺭﺩ ﺶﺨﭘ
.ﺖﺴﻴﻧ ﺮﻳﺬﭘ
ﺎﻳ
“NO DEVICE”
.ﺪﻧﺯ ﯽﻣ ﮏﻤﺸﭼ
ﺽﺭﺍﻮﻋﺮﻴﻤﻌﺗ ﻩﻮﺤﻧ
•
•
]
.ﺪﻴﻳﺎﻤﻧ ﻢﻴﻈﻨﺗ ﻥﺁ ﻪﻨﻴﻬﺑ ﻥﺍﺰﻴﻣ ﻭﺭ ﺮﺑ ﺍﺭ ﺍﺪﺻ ﻩﺯﺍﺪﻧﺍ
iPod / USB
یﺎﻫ ﻪﻧﺎﻳﺎﭘ ﻪﻛ ﺪﻴﻳﺎﻤﻧ ﻞﺻﺎﺣ ﻥﺎﻨﻴﻤﻃﺍ ﺲﭙﺳ ،ﺪﻴﻨﻛ ﻊﻄﻗ ﺍﺭ ﻕﺮﺑ
ﺍﺭ ﻕﺮﺑ .ﺪﻨﺷﺎﺑ ﻩﺪﺷ یﺪﻨﺑ ﻖﻳﺎﻋ ﺐﺳﺎﻨﻣ ﺭﻮﻃ ﻪﺑ ﻮﮔﺪﻨﻠﺑ یﺎﻫ ﻢﻴﺳ
.ﺪﻴﻳﺎﻤﻧ ﻝﺎﺳﺭﺍ ﺕﺎﻣﺪﺧ ﺰﻛﺮﻣ ﻦﻳﺮﺗ ﮏﻳﺩﺰﻧ ﻪﺑ ﺍﺭ ﻩﺎﮕﺘﺳﺩ
ﺐﺗﺍﺮﻣ ﻪﻠﺴﻠﺳ ﺎﺑ ﻒﻠﺘﺨﻣ یﺎﻫ ﻪﺷﻮﭘ ﺎﻳ ﺡﻮﻄﺳ یﺩﺎﻳﺯ ﺩﺍﺪﻌﺗ ﺯﺍ
ANDROID
.ﺩﻮﺷ ﯽﻣ ﻁﻮﺑﺮﻣ ﺎﻫ ﻞﻳﺎﻓ ﻥﺪﺷ ﻂﺒﺿ ﻩﻮﺤﻧ ﻪﺑ ﻞﻜﺸﻣ ﻦﻳﺍ
ﺩﺍﺪﻌﺗ ﻭ ﻡﺎﻗﺭﺍ ،ﺎﺒﻔﻟﺍ گﺭﺰﺑ ﻑﻭﺮﺣ ﺪﻧﺍﻮﺗ ﯽﻣ ﻂﻘﻓ ﻩﺎﮕﺘﺳﺩ ﻦﻳﺍ
ﯽﻧﺎﺒﻴﺘﺸﭘ ﻞﺑﺎﻗ ﯽﺗﻮﺻ یﺎﻫ ﻞﻳﺎﻓ یﻭﺎﺣ ﻪﻧﺎﺳﺭ ﻊﺒﻨﻣ ﺪﻴﻨﻛ ﺖﻗﺩ
ﺎﺑ ﺮﮔﺍ .ﺪﻴﻨﻛ ﯽﭙﻛ USB ﻩﺎﮕﺘﺳﺩ ﺭﺩ ﹰﺍﺩﺪﺠﻣ ﺍﺭ ﺎﻫ ﻪﺷﻮﭘ ﻭ ﺎﻫ ﻞﻳﺎﻓ
ﺩﺪﺠﻣ یﺯﺍﺪﻧﺍ ﻩﺍﺭ ﺍﺭ USB ﻩﺎﮕﺘﺳﺩ ،ﺪﺸﻧ ﻑﺮﻃﺮﺑ ﻞﻜﺸﻣ ﺭﺎﻛ ﻦﻳﺍ
ﺮﻴﻴﻐﺗ USB ﻪﺑ ﹰﺍﺩﺪﺠﻣ ﺍﺭ ﻊﺒﻨﻣ ﻭ ﻩﺩﺮﻛ ﻞﺼﺘﻣ ﺍﺭ USB ﻩﺎﮕﺘﺳﺩ ﮏﻳ
.ﺪﻴﻨﻛ ﻰﺳﺭﺮﺑ ﺍﺭ ﺕﻻﺎﺼﺗﺍ ﻭ ﺎﻬﻠﺑﺎﻛ
(2 ) .ﺪﻴﻨﻛ ﺰﻴﻤﺗ ﺍﺭ ﺎﻫ ﻂﺑﺍﺭ
3
) .ﺪﻴﻨﻛ ﺖﺳ ﺭ ﺍﺭ ﻩﺎﮕﺘﺳﺩ
(
.ﺪﻴﻨﻛ ﻞﺻﻭ ﻢﻜﺤﻣ ﺭﻮﻄﺑ ﺍﺭ ﻰﻳﺍﻮﻫ ﻦﺘﻧﺁ
.ﺪﻳﺭﻭﺎﻴﺑ ﻥﻭﺮﻴﺑ ﻞﻣﺎﻛ ﺭﻮﻃ ﻪﺑ ﺍﺭ ﻦﺘﻧﺁ
.ﺪﻫﺩ ﻥﺎﺸﻧ ﺍﺭ ﻢﺋﻼﻋ ﺯﺍ یﺩﻭﺪﺤﻣ
.ﺪﻴﻨﻛ ﻩﺩﺎﻔﺘﺳﺍ ﺮﮕﻳﺩ USB ﻩﺎﮕﺘﺳﺩ ﮏﻳ ﺯﺍ ﺎﻳ ﻩﺩﺮﻛ
.ﺪﻴﻨﻛ ﻞﺻﻭ ﹰﺍﺩﺪﺠﻣ
.ﺪﻴﻨﻜﻧ ﻩﺩﺎﻔﺘﺳﺍ ﻒﻠﺘﺨﻣ
18
) .ﺪﺷﺎﺑ
(
.ﺪﻴﻫﺩ
•
•
•
•
.ﺪﺳﺭ ﯽﻤﻧ ﺵﻮﮕﺑ ﯽﻳﺍﺪﺻ
“MISWIRING CHECK WIRING
.ﺩﻮﺷ ﯽﻣ ﺮﻫﺎﻇ
“PROTECTING SEND SERVICE”
یﻭﺭ ﺮﺑ ﻩﺪﺷ ﻩﺩﺍﺩ ﻥﺎﺸﻧ ﺕﺎﻋﻼﻃﺍ
.ﺪﻨﺘﺴﻫ ﻩﺎﺒﺘﺷﺍ ﺶﻳﺎﻤﻧ ﻪﺤﻔﺻ
.ﺪﻨﻛ ﻰﻤﻧ ﺭﺎﻛ ﻰﻠﻛ ﺭﻮﻄﺑ ﻩﺎﮕﺘﺳﺩ
ﻒﻴﻌﺿ ﯽﻳﻮﻳﺩﺍﺭ ﺝﻮﻣ ﺖﻓﺎﻳﺭﺩ
ﻪﺑ ﻥﺩﺍﺩ ﺵﻮﮔ ﻡﺎﮕﻨﻫ ﻰﺘﺑﺎﺛ ﺰﻳﻮﻧ
(ﻥﺪﻧﺍﻮﺧ ﻝﺎﺣ ﺭﺩ)
ﺢﻴﺤﺻ ﻩﺪﺷ ﺮﭙﺳ ﺶﺨﭘ ﻥﺎﻣﺯ
ﻰﻤﻧ ﻩﺩﺍﺩ ﻥﺎﺸﻧ ﺖﺳﺭﺩ ﺎﻫﺮﺘﻛﺍﺭﺎﻛ
.(ﻡﻮﺒﻟﺁ ﻢﺳﺍ :ﻝﺎﺜﻣ ﺍﺮﺑ) ﺪﻧﻮﺷ
THEN PWR ON”
.ﺩﻮﺷ ﯽﻣ ﺮﻫﺎﻇ
.ﺪﺳﺭ ﯽﻤﻧ ﺵﻮﮕﺑ ﯽﻳﺍﺪﺻ
.ﺩﻮﺷ ﯽﻤﻧ ﻦﺷﻭﺭ ﻩﺎﮕﺘﺳﺩ
.ﺩﻮﺷ ﻰﻣ ﻩﺪﻴﻨﺷ ﻮﻳﺩﺍﺭ
.ﺪﻧﺯ ﯽﻣ ﮏﻤﺸﭼ
“READ ERROR”
“NO DEVICE”
.ﺖﺳﺍ
“READING”
.ﺖﺴﻴﻧ
“NA FILE”
ﺽﺭﺍﻮﻋﺮﻴﻤﻌﺗ ﻩﻮﺤﻧ
ﻰﻣﻮﻤﻋ
•
•
•
•
ﻮﻳﺩﺍﺭ
•
iPod / USB
Page 31

.ﺪﻨﻛ ﯽﻣ ﯽﻧﺎﺒﻴﺘﺸﭘ ﺮﺗﻻﺎﺑ ﻭ 4.1 ﻪﺨﺴﻧ ﺪﻳﻭﺭﺪﻧﺍ ﻞﻣﺎﻋ ﻢﺘﺴﻴﺳ ﺯﺍ ﻩﺎﮕﺘﺳﺩ ﻦﻳﺍ
ﺯﺍ ﻞﻣﺎﻛ ﺭﻮﻃ ﻪﺑ ﺖﺳﺍ ﻦﻜﻤﻣ (ﺮﺗﻻﺎﺑ ﻭ 4.1 ﻪﺨﺴﻧ ﺎﺑ) ﺪﻳﻭﺭﺪﻧﺍ یﺎﻫ ﻩﺎﮕﺘﺳﺩ ﯽﺧﺮﺑ
AOA 2.0 ﻭ (ﻢﻴﺠﺣ ﻪﻈﻓﺎﺣ) mass storage ﻉﻮﻧ یﺎﻫ ﻩﺎﮕﺘﺳﺩ ﺯﺍ ﺎﻤﺷ ﺪﻳﻭﺭﺪﻧﺍ ﻩﺎﮕﺘﺳﺩ ﻪﻛ ﯽﺗﺭﻮﺻ ﺭﺩ
.ﺪﻫﺩ ﯽﻣ ﺭﺍﺮﻗ ﺖﻳﻮﻟﻭﺍ ﺭﺩ ﺍﺭ A
:ﻪﺑ ﺪﻴﻨﻛ ﻪﻌﺟﺍﺮﻣ ،ﺭﺎﮔﺯﺎﺳ یﺎﻫ ﻩﺎﮕﺘﺳﺩ ﺖﺴﻴﻟ ﻦﻳﺮﺧﺁ ﻩﺪﻫﺎﺸﻣ ﻭ ﺮﺘﺸﻴﺑ ﺕﺎﻋﻼﻃﺍ یﺍﺮﺑ
.ﺪﻨﻛ ﯽﻣ ﺮﻴﻴﻐﺗ ﯽﻠﺒﻗ ﻡﻼﻋﺍ ﻥﻭﺪﺑ ﻥﺁ ﺕﺎﺼﺨﺸﻣ ،ﺖﺳﺍ ﺚﻟﺎﺛ ﺺﺨﺷ ﺲﻳﻭﺮﺳ ﮏﻳ Pandora ﻪﻜﻨﻳﺍ ﻞﻴﻟﺩ ﻪﺑ
ﺮﻴﻏ ﺎﻫ ﺲﻳﻭﺮﺳ ﻡﺎﻤﺗ ﺎﻳ ﻭ ﯽﺧﺮﺑ ﺎﻳ ﺪﺷﺎﺒﻧ ﺮﻳﺬﭘ ﻥﺎﻜﻣﺍ ﯽﺑﻮﺧ ﻪﺑ ﺖﺳﺍ ﻦﻜﻤﻣ یﺭﺎﮔﺯﺎﺳ ﺱﺎﺳﺍ ﻦﻴﻤﻫ ﺮﺑ
ﻞﻴﻤﻳﺍ ﻖﻳﺮﻃ ﺯﺍ ﹰﺎﻔﻄﻟ ،ﻪﻣﺎﻧﺮﺑ ﺯﺍ ﻩﺩﺎﻔﺘﺳﺍ ﺭﺩ ﻩﺪﺷ ﺩﺎﺠﻳﺍ ﺕﻼﻜﺸﻣ ﺎﺑ ﻪﻄﺑﺍﺭ ﺭﺩ
.ﺪﻧﻮﺷ ﻞﺻﻭ ﻩﺎﮕﺘﺳﺩ ﻦﻳﺍ ﻪﺑ ﺪﻨﻧﺍﻮﺗ ﯽﻤﻧ ﺙﻮﺗﻮﻠﺑ یﺎﻫ ﻩﺎﮕﺘﺳﺩ ﺯﺍ ﯽﻀﻌﺑ ،ﻩﺎﮕﺘﺳﺩ ﺙﻮﺗﻮﻠﺑ ﻪﺨﺴﻧ ﻪﺑ ﻪﺘﺴﺑ
:ﺪﻴﻳﺎﻤﻧ ﻥﺪﻳﺩ ﻞﻳﺫ ﺖﻳﺎﺳ ﺏﻭ ﺯﺍ ،ﺙﻮﺗﻮﻠﺑ ﻩﺭﺎﺑﺭﺩ ﺮﺘﺸﻴﺑ ﺕﺎﻋﻼﻃﺍ ﺐﺴﻛ ﺖﻬﺟ
.ﺪﻨﻨﻜﻧ ﯽﻧﺎﺒﻴﺘﺸﭘ 2.0 ﻪﺨﺴﻧ (AOA) Android Open Accessory
OA 2.0 ﻖﻳﺮﻃ ﺯﺍ ﺶﺨﭘ ﻪﺸﻴﻤﻫ ﻩﺎﮕﺘﺳﺩ ﻦﻳﺍ ،ﺪﻨﻜﻧ ﯽﻧﺎﺒﻴﺘﺸﭘ
.ﺖﺳﺍ ﻩﺩﺎﻔﺘﺳﺍ ﻞﺑﺎﻗ ﺪﻨﻠﻳﺯﻮﻴﻧ ﻭ ﺎﻴﻟﺍﺮﺘﺳﺍ ،ﻩﺪﺤﺘﻣ ﺕﻻﺎﻳﺍ ﺭﺩ ﻂﻘﻓ Pandora
.ﺪﻨﺘﺴﻴﻧ ﺍﺮﺟﺍ ﻞﺑﺎﻗ ﻩﺎﮕﺘﺳﺩ ﻦﻳﺍ ﺯﺍ P
.ﺪﻳﺮﻴﮕﺑ ﺱﺎﻤﺗ Pandora ﺎﺑ pandora-support@pandora.com
.ﺪﻨﻜﻧ ﺭﺎﻛ ﺙﻮﺗﻮﻠﺑ یﺎﻫ ﻩﺎﮕﺘﺳﺩ ﺯﺍ ﯽﻀﻌﺑ ﺎﺑ ﺖﺳﺍ ﻦﻜﻤﻣ ﻩﺎﮕﺘﺳﺩ ﻦﻳﺍ
.ﺖﺳﺍ ﺮﻴﻐﺘﻣ ﻑﺍﺮﻃﺍ ﻂﻴﺤﻣ ﻪﺑ ﻪﺘﺴﺑ ﯽﻟﺎﻨﮕﻴﺳ ﻂﻳﺍﺮﺷ
ﺪﻳﻭﺭﺪﻧﺍ ﻩﺎﮕﺘﺳﺩ ﻩﺭﺎﺑﺭﺩ
www.kenwood.com/cs/ce/
Pandora ﻩﺭﺎﺑﺭﺩ
.ﺪﻨﺷﺎﺑ ﯽﺳﺮﺘﺳﺩ ﻞﺑﺎﻗ
andora یﺎﻫﺩﺮﻜﻠﻤﻋ ﺯﺍ ﯽﺧﺮﺑ
ﺙﻮﺗﻮﻠﺑ ﻩﺭﺎﺑﺭﺩ
w
ww.kenwood.com/cs/ce/
ﺕﺎﻋﻼﻃﺍ ﺮﻳﺎﺳ
•
ﺖﻳﺎﺳ ﺏﻭ ﻦﻳﺍ ﺭﺩ ﺩﻮﺟﻮﻣ ﻦﻳﻼﻧﺁ ﻪﭼﺮﺘﻓﺩ ﺭﺩ ﺍﺮﺟﺍ ﻞﺑﺎﻗ ﯽﺗﻮﺻ یﺎﻫ ﻞﻳﺎﻓ ﻪﺑ ﻁﻮﺑﺮﻣ ﺕﺎﻜﻧ ﻭ ﻖﻴﻗﺩ ﺕﺎﻋﻼﻃﺍ
•
•
(.flac) FLAC ،(.wav) WAV ،(.m4a) AAC ،(.wma) WMA ،(.mp3) MP3 :ﺶﺨﭘ ﻞﺑﺎﻗ ﯽﺗﻮﺻ ﻞﻳﺎﻓ
•
ﻪﺑ ﻪﺘﺴﺑ ﺖﺳﺍ ﻦﻜﻤﻣ ،ﺪﻧﺭﺍﺩ ﺖﻴﻌﺒﺗ ﻻﺎﺑ ﺭﺩ ﻩﺪﺷ ﺖﺴﻴﻟ یﺎﻫﺩﺭﺍﺪﻧﺎﺘﺳﺍ ﺯﺍ ﯽﺗﻮﺻ یﺎﻫ ﻞﻳﺎﻓ ﻪﻛ ﯽﻧﺎﻣﺯ ﯽﺘﺣ
•
ﻩﻮﺒﻧﺍ ﻩﺮﻴﺧﺫ ﻩﺎﮕﺘﺳﺩ ﮏﻳ ﺭﺩ ﻩﺪﺷ ﻩﺮﻴﺧﺫ FLAC/WAV/AAC/WMA/MP3 یﺎﻬﻠﻳﺎﻓ ﺪﻧﺍﻮﺗ ﯽﻣ ﻩﺎﮕﺘﺳﺩ ﻦﻳﺍ
•
•
•
•
•
•
ﯽﺗﻮﺻ یﺎﻫ ﻞﻳﺎﻓ ﺪﻴﻧﺍﻮﺗ ﯽﻣ ،ﺪﻴﻨﻛ ﯽﻣ ﺶﺨﭘ KENWOOD Music Control ﺎﻳ KENWOOD Music Editor Light
•
:ﺪﻨﺘﺴﻫ ﯽﺳﺮﺘﺳﺩ ﻞﺑﺎﻗ ﺮﻳﺯ ﺖﻳﺎﺳ ﺏﻭ ﺭﺩ KENW
.ﺩﻮﺷ ﺍﺪﺻ یﺩﺎﻋﺮﻴﻏ ﺶﺨﭘ ﺚﻋﺎﺑ ﺮﺘﻣ 5 ﺯﺍ ﺮﺘﺸﻴﺑ ﻝﻮﻃ ﺎﺑ ﻞﺑﺎﻛ ﮏﻳ ﻝﺎﺼﺗﺍ ﺖﺳﺍ ﻦﻜﻤﻣ
ﺍﺭ ﺪﺷﺎﺑ ﺮﭙﻣﺁ 1 ﺯﺍ ﺮﺗﻻﺎﺑ ﻭ ﺖﻟﻭ 5 ﺯﺍ ﺮﻴﻏ ﻪﺑ ﻥﺁ یﺪﻨﺑ ﻪﺟﺭﺩ ﻪﻛ USB ﻩﺎﮕﺘﺳﺩ ﺪﻧﺍﻮﺗ ﯽﻤﻧ ﻩﺎﮕﺘﺳﺩ ﻦﻳﺍ
KENWOOD Music Control ﻪﻣﺎﻧﺮﺑ ﻭ KENWOOD Music Editor Light یﺮﺗﻮﻴﭙﻣﺎﻛ ﻪﻣﺎﻧﺮﺑ ﺯﺍ ﻩﺎﮕﺘﺳﺩ ﻦﻳﺍ
ﺯﺍ ﻩﺩﺎﻔﺘﺳﺍ ﺎﺑ ﻩﺪﺷ ﻪﻓﺎﺿﺍ ﮓﻨﻫﺁ یﺎﻫ ﻩﺩﺍﺩ ﺎﺑ ﺍﺭ ﯽﺗﻮﺻ یﺎﻫ ﻞﻳﺎﻓ ﻪﻛ ﯽﻣﺎﮕﻨﻫ
:ﻪﺑ ﺪﻴﻨﻛ ﻪﻌﺟﺍﺮﻣ iPhone/iPod ﺭﺍﺰﻓﺍ ﻡﺮﻧ یﺎﻫ ﻪﺨﺴﻧ ﻭ ﺭﺎﮔﺯﺎﺳ ﺖﺴﻴﻟ ﻦﻳﺮﺗﺪﻳﺪﺟ ﺯﺍ ﻉﻼﻃﺍ یﺍﺮﺑ
.ﺩﺭﺍﺪﻧ ﺩﻮﺟﻭ iPod یﺍﺮﺟﺍ ﻥﺎﻜﻣﺍ ،ﺩﻮﺸﻧ ﻩﺩﺍﺩ ﺶﻳﺎﻤﻧ iP
www.kenwood.com/cs/ce/audiofile/ :ﺖﺳﺍ ﯽﺳﺮﺘﺳﺩ ﻞﺑﺎﻗ
ﺍﺮﺟﺍ ﻞﺑﺎﻗ یﺎﻫ ﻞﻳﺎﻓ
FAT32 ،FAT16 ،FAT12 :ﺶﺨﭘ ﻞﺑﺎﻗ USB ﻩﺎﮕﺘﺳﺩ ﻞﻳﺎﻓ ﻢﺘﺴﻴﺳ
.ﺪﺷﺎﺒﻧ ﺮﻳﺬﭘ ﻥﺎﻜﻣﺍ ﺶﺨﭘ ،ﻩﺎﮕﺘﺳﺩ ﺎﻳ ﻪﻧﺎﺳﺭ ﻂﻳﺍﺮﺷ ﺎﻳ ﻉﻮﻧ
USB یﺎﻫ ﻩﺎﮕﺘﺳﺩ ﻩﺭﺎﺑﺭﺩ
.ﺪﻳﺎﻤﻧ ﺶﺨﭘ ﺍﺭ USB ﺕﺎﻋﻼﻃﺍ
.ﺪﻴﻨﻛ ﻞﺼﺘﻣ ﺍﺭ USB ﻩﺎﮕﺘﺳﺩ ﮏﻳ ﺪﻴﻧﺍﻮﺗ ﯽﻤﻧ USB ﺏﺎﻫ ﻖﻳﺮﻃ ﺯﺍ
.ﺪﻫﺩ ﺺﻴﺨﺸﺗ
ﻭ KENWOOD Music Editor Light ﻩﺭﺎﺑﺭﺩ ﯽﺗﺎﻜﻧ
KENWOOD Music Control
.ﺪﻨﻛ ﯽﻣ ﯽﻧﺎﺒﻴﺘﺸﭘ Android™ ﻪﺑ ﻖﻠﻌﺘﻣ
.ﺪﻴﻨﻛ ﻮﺠﺘﺴﺟ ﮓﻨﻫﺁ ﻭ ﺶﺨﭘ ﺖﺴﻴﻟ ،ﻡﻮﺒﻟﺁ ،ﺪﻨﻣﺮﻨﻫ ،ﺮﻧﺍژ ﺱﺎﺳﺍ ﺮﺑ ﺍﺭ
OOD Music Control ﻭ KENWOOD Music Editor Light
www.kenwood.com/cs/ce/
iPhone/iPod ﻩﺭﺎﺑﺭﺩ
(5th generation ﻭ 4th ،3rd ،2nd) iPod touch
(7th generation ﻭ 6th ،5th ،4th ،3rd) iPod nano
5C ،5S ،5 ،4S ،4 ،3GS ،iPhone 3G
www.kenwood.com/cs/ce/ipod
od یﻭﺭ ﺮﺑ “ ” ﺎﻳ “KENWOOD” ﺮﮔﺍ
ﻰﻣﻮﻤﻋ
Made for
iPod classic
•
•
•
•
•
•
•
•
•
-
-
-
-
•
•
18
Page 32

ﺶﻳﺎﻤﻧ ﺕﺎﻤﻴﻈﻨﺗ
.ﺪﻴﻫﺩ ﺭﺎﺸﻓ ﺍﺭ ﻪﻤﻛﺩ ﺲﭙﺳ ،ﺪﻴﻧﺎﺧﺮﭽﺑ ﺍﺭ ﻡﻮﻟﻭ ﻪﻤﻛﺩ ،[
ﺲﭙﺳ ،ﺪﻴﻧﺎﺧﺮﭽﺑ ﺍﺭ ﻡﻮﻟﻭ ﻪﻤﻛﺩ ،(ﺪﻴﻨﻛ ﻉﻮﺟﺭ ﻞﻳﺫ ﻝﻭﺪﺟ ﻪﺑ) ﻪﻨﻳﺰﮔ ﮏﻳ ﺏﺎﺨﺘﻧﺍ ﺖﻬﺟ 3
.ﺪﺷﺎﺑ ﻩﺪﺷ ﻝﺎﻌﻓ ﺎﻳ ﻩﺪﺷ ﺏﺎﺨﺘﻧﺍ ﻩﺍﻮﺨﻟﺩ ﺩﺭﻮﻣ ﻪﻛ ﯽﻧﺎﻣﺯ ﺎﺗ ﺪﻴﻨﻛ ﺭﺍﺮﻜﺗ ﺍﺭ
XX
:ﺽﺮﻓ ﺶﻴﭘ
.ﺩﻮﺷ ﻰﻣ ﻮﻐﻟ :
ﺏﺎﺨﺘﻧﺍ ﻪﺤﻔﺻ ﯽﻳﺎﻨﺷﻭﺭ یﺍﺮﺑ ﺍﺭ ﺎﻤﺷ ﻩﺪﻳﺰﮔﺮﺑ ﯽﻳﺎﻨﺷﻭﺭ ﺢﻄﺳ :31 —
ﺕﺭﻮﺻ ﻪﺑ ﻪﺤﻔﺻ ﺕﺎﻋﻼﻃﺍ ﺎﻳﺁ ﻪﻛ ﺪﻨﻛ ﯽﻣ ﺏﺎﺨﺘﻧﺍ :
.ﺩﻮﺷ ﻰﻣ ﻮﻐﻟ :
.ﺪﻴﻫﺩ ﺭﺎﺸﻓ ﺍﺭ ﺍﺪﺻ ﻢﻴﻈﻨﺗ ﭻﻴﭘ [
.ﺪﻳﺭﺍﺪﻬﮕﻧ ﻭ ﺪﻴﻫﺩ ﺭﺎﺸﻓ ﺝﻭﺮﺧ یﺍﺮﺑ ﺍﺭ 5
.ﺪﻴﻫﺩ ﺭﺎﺸﻓ ﺍﺭ ،ﯽﻠﺒﻗ ﻢﻴﻈﻨﺗ ﺩﺭﻮﻣ ﻪﺑ ﺖﺸﮔﺯﺎﺑ یﺍﺮﺑ
OFF
؛ .ﺪﻨﻛ ﯽﻣ ﺩﺎﻳﺯ ﻭ ﻢﻛ ﺍﺭ ﺶﻳﺎﻤﻧ ﻪﺤﻔﺻ ﺭﻮﻧ :
OFF
؛ .ﺩﻮﺷ ﺶﻳﺎﻤﻴﭘ ﺭﺎﺑ ﮏﻳ ﻂﻘﻓ ﺎﻳ ﺭﺎﻛﺩﻮﺧ
FUNCTION
DISPLAY
.ﺪﻴﻫﺩ ﺭﺎﺸﻓ ﺍﺭ ﻪﻤﻛﺩ
.ﺪﻨﻛ ﯽﻣ
ONCE /AUTO
] ﻪﺑ ﺩﻭﺭﻭ یﺍﺮﺑ 1
] ﺏﺎﺨﺘﻧﺍ ﺖﻬﺟ 2
3 ﻪﻠﺣﺮﻣ 4
ON
BRIGHTNESS
0
TEXT SCROLL
DIMMER
/
NATURAL /JAZZ /EASY /POPS /ROCK /POWERFUL /TOP40 /DRIVE EQ
ﻩﺩﺎﻔﺘﺳﺍ یﺍﺮﺑ) .ﺪﻨﻛ ﯽﻣ ﺏﺎﺨﺘﻧﺍ ﺍﺭ ﯽﻘﻴﺳﻮﻣ ﺮﻧﺍژ ﺎﺑ ﺐﺳﺎﻨﺘﻣ ﻢﻴﻈﻨﺗ ﺶﻴﭘ ﺭﺰﻳﻻﻮﻛﺍ ﮏﻳ :
ﻞﻴﺒﻣﻮﺗﺍ ﺯﺍ ﺝﺭﺎﺧ ﯽﻓﺎﺿﺍ یﺎﻫﺍﺪﺻ ﻪﻛ ﺖﺳﺍ ﻩﺪﺷ ﻦﻴﻴﻌﺗ ﺶﻴﭘ ﺯﺍ ﺭﺰﻳﻻﻮﻛﺍ ﮏﻳ [DRIVE EQ
؛ .ﺪﻨﻛ ﯽﻣ ﺏﺎﺨﺘﻧﺍ ﺍﺭ ﺎﻤﺷ ﻩﺍﻮﺨﻟﺩ ﺩﺭﻮﻣ ﺱﺎﺑ یﺍﺪﺻ ﺖﻳﻮﻘﺗ ﺢﻄﺳ :
ﺎﺑ ﺍﺪﺻ ﮏﻳ ﺎﺗ ﺪﻨﻛ ﯽﻣ ﺏﺎﺨﺘﻧﺍ ﺍﺭ ﺎﻤﺷ ﻩﺪﻳﺰﮔﺮﺑ ﺩﺎﻳﺯ ﻭ ﻢﻛ یﺎﻫ ﺲﻧﺎﻛﺮﻓ ﺖﻳﻮﻘﺗ :
.ﺩﻮﺷ ﻰﻣ ﻮﻐﻟ :
/
120HZ /85HZ
ﻪﺑ ﺰﺗﺮﻫ 160 /ﺰﺗﺮﻫ 120 /ﺰﺗﺮﻫ 85 ﺯﺍ ﺮﺘﻤﻛ یﺎﻫ ﺲﻧﺎﻛﺮﻓ ﺎﺑ ﯽﺗﻮﺻ یﺎﻫ ﻝﺎﻨﮕﻴﺳ :
ﻡﺎﮕﻤﻫ ﺎﺗ ﺪﻨﻛ ﯽﻣ ﺏﺎﺨﺘﻧﺍ ﺍﺭ ﺮﻓﻭﻮﺑﺎﺳ ﯽﺟﻭﺮﺧ ﻪﻠﺣﺮﻣ :(0°)
ﻪﻛ ﺖﺳﺍ ﺏﺎﺨﺘﻧﺍ ﻞﺑﺎﻗ ﯽﻧﺎﻣﺯ ﻂﻘﻓ) .ﺩﻮﺷ ﻪﺋﺍﺭﺍ ﺩﺮﻜﻠﻤﻋ ﻦﻳﺮﺘﻬﺑ ﻭ ﺪﺷﺎﺑ ﻮﮔﺪﻨﻠﺑ ﯽﺟﻭﺮﺧ ﺎﺑ
/
120HZ /100HZ
ﻪﺑ ﺰﺗﺮﻫ 150 /ﺰﺗﺮﻫ 120 /ﺰﺗﺮﻫ 100 ﺯﺍ ﺮﺗﻻﺎﺑ ﺲﻧﺎﻛﺮﻓ ﺎﺑ ﯽﺗﻮﺻ یﺎﻫ ﻝﺎﻨﮕﻴﺳ :
.ﺪﻨﻛ ﯽﻣ ﻢﻴﻈﻨﺗ ﺍﺭ ﻮﻠﺟ ﻭ ﺐﻘﻋ یﻮﮔﺪﻨﻠﺑ ﯽﺟﻭﺮﺧ ﻥﺯﺍﻮﺗ ﻥﺍﺰﻴﻣ :(0)
ﺯﺍ ﺍﺭ ﻊﺒﻨﻣ ﺮﻫ یﺍﺪﺻ ﻢﻴﻈﻨﺗ ﺢﻄﺳ :0 ﺎﺗ –8 :ﻊﺑﺎﻨﻣ ﺮﻳﺎﺳ یﺍﺮﺑ ؛ (0) +8 ﺎﺗ –8 :AUX یﺍﺮﺑ
(.ﺪﻴﻳﺎﻤﻧ ﺏﺎﺨﺘﻧﺍ ﺍﺭ ﺪﻴﻨﻛ ﻢﻴﻈﻨﺗ ﺪﻴﻫﺍﻮﺧ ﯽﻣ ﻪﻛ ﻊﺒﻨﻣ ،ﻢﻴﻈﻨﺗ ﺯﺍ ﻞﺒﻗ) .ﺪﻨﻛ ﯽﻣ ﻢﻴﻈﻨﺗ ﺶﻴﭘ
ﻩﺩﺮﺸﻓ ﺭﺩ ﻪﻛ ﻞﻜﺷ ﯽﺟﻮﻣ ﻡﺮﻓ ﺝﻭﺍ ﻥﺎﻣﺯ ﯽﺑﺎﻳﺯﺎﺑ ﻭ ﻻﺎﺑ ﺲﻧﺎﻛﺮﻓ یﺎﻫ ﻪﻔﻟﺆﻣ ﻥﺍﺮﺒﺟ ﺎﺑ :
ﻰﻣ ﻮﻐﻟ :
OFF
ﻞﺑﺎﻗ ﯽﺗﺭﻮﺻ ﺭﺩ ﺎﻬﻨﺗ [
ﻪﻛ ﺖﺳﺍ ﺏﺎﺨﺘﻧﺍ ﻞﺑﺎﻗ ﯽﺗﺭﻮﺻ ﺭﺩ ﺎﻬﻨﺗ [
OFF
.ﺩﻮﺷ ﻰﻣ ﻮﻐﻟ :
؛ .ﺪﻧﻮﺷ ﯽﻣ ﻝﺎﺳﺭﺍ ﺮﻓﻭﻭ ﺏﺎﺳ ﻖﻳﺮﻃ ﺯﺍ ﺎﻬﻟﺎﮕﻨﻴﺳ ﻪﻴﻤﻫ :
(.ﺪﺷﺎﺑ ﻩﺪﺷ ﺏﺎﺨﺘﻧﺍ [
.ﺪﻴﻨﻛ ﻢﻴﻈﻨﺗ ﺍﺭ ﺖﺳﺍﺭ ﻭ ﭗﭼ ﻮﮔﺪﻨﻠﺑ ﯽﺟﻭﺮﺧ ﺲﻧﻻﺎﺑ :(0)
؛ .ﺪﻨﻛ ﯽﻣ ﺩﺎﺠﻳﺍ ﺍﺭ ﯽﻌﻗﺍﻭ ﯽﻳﺎﻫﺍﺪﺻ ،ﺪﻧﺍ ﻪﺘﻓﺭ ﻦﻴﺑ ﺯﺍ ﺍﺪﺻ یﺎﻫ ﻩﺩﺍﺩ یﺯﺎﺳ
SUB-W PHASE
(.ﺪﻴﻨﻛ ﺏﺎﺨﺘﻧﺍ ﺍﺭ [
؛ .ﺩﻮﺷ ﺩﺎﺠﻳﺍ ﻦﻴﻳﺎﭘ یﺍﺪﺻ ﺡﻮﻄﺳ ﺭﺩ ﺐﺳﺎﻨﻣ ﻥﺯﺍﻮﺗ ﺖﻟﺎﺣ
OFF
؛ .ﺪﻨﻛ ﯽﻣ ﻦﺷﻭﺭ ﺍﺭ ﺮﻓﻭﻭ ﺏﺎﺳ ﯽﺟﻭﺮﺧ :
LPF SUBWOOFER
؛ .ﺩﻮﺷ ﯽﻣ ﻝﺎﺳﺭﺍ ﺎﻫﻮﮔﺪﻨﻠﺑ ﻪﺑ ﺎﻫ ﻝﺎﻨﮕﻴﺳ ﻡﺎﻤﺗ :
] /[
(
LPF SUBWOOFER
4
) .ﺪﺷﺎﺑ ﻩﺪﺷ ﻢﻴﻈﻨﺗ [
USER
] ،ﯽﺷﺭﺎﻔﺳ ﺕﺎﻤﻴﻈﻨﺗ ﺯﺍ
.ﺪﻫﺩ ﯽﻣ ﺶﻫﺎﻛ ﺍﺭ ﺎﻫ ﮏﻴﺘﺳﻻ یﺍﺪﺻ ﺎﻳ
.ﺪﻧﻮﺷ ﯽﻣ ﻩﺩﺎﺘﺳﺮﻓ ﺮﻓﻭﻭ ﺏﺎﺳ
NORMAL
/(180°)
] یﺍﺮﺑ [
THROUGH
.ﺩﻮﺷ ﯽﻣ ﻩﺩﺎﺘﺳﺮﻓ ﺎﻫﻮﮔﺪﻨﻠﺑ
] /[
SUBWOOFER SET
SUB-W
SUB-W PHASE
] یﻭﺭ [
] /[
LPF SUBWOOFER
.ﺪﺷﺎﺑ ﻩﺪﺷ ﻢﻴﻈﻨﺗ [
LV3 /LV2 /LV1
.ﺩﻮﺷ ﻰﻣ ﻮﻐﻟ :
LV2 /LV1
THROUGH
160HZ
REVERSE
] ﺰﺠﺑ ﯽﻤﻴﻈﻨﺗ
THROUGH
150HZ
F15
ﺎﺗ
R15
ﺎﺗ
SWITCH PREOUT
ON
] یﻭﺭ [
USER
]
OFF
SUBWOOFER SET
ON
LPF SUBWOOFER
R15
L15
VOLUME OFFSET
SOUND RECNSTR
ON
.ﺩﻮﺷ
] /[
SUB-W LEVEL
] ﻪﻛ ﺖﺳﺍ ﺏﺎﺨﺘﻧﺍ
] /[
SUB-W LEVEL
SUBWOOFER SET
ﺍﺪﺻ ﺕﺎﻤﻴﻈﻨﺗ
PRESET EQ
BASS BOOST
LOUDNESS
SUB-W PHASE
HPF
FADER
BALANCE
(ﺍﺪﺻ یﺯﺎﺳﺯﺎﺑ)
] •
] •
]
17
ﻰﺳﺭﺎﻓ
Page 33

.ﺪﻴﻫﺩ ﺭﺎﺸﻓ ﺍﺭ ﻪﻤﻛﺩ ﺲﭙﺳ ،ﺪﻴﻧﺎﺧﺮﭽﺑ ﺍﺭ ﻡﻮﻟﻭ ﻪﻤﻛﺩ ،(ﺪﻴﻨﻛ ﻉﻮﺟﺭ ﻞﻳﺫ ﻝﻭﺪﺟ ﻪﺑ) ﻪﻨﻳﺰﮔ ﮏﻳ ﺏﺎﺨﺘﻧﺍ ﺖﻬﺟ 3
XX
:ﺽﺮﻓ ﺶﻴﭘ
ﺩﺭﻮﻣ ﻊﺒﻨﻣ ،ﺕﺎﻤﻴﻈﻨﺗ ﻡﺎﺠﻧﺍ ﺯﺍ ﻞﺒﻗ) .ﺩﻮﺷ ﻩﺮﻴﺧﺫ ﻊﺒﻨﻣ ﺮﻫ یﺍﺮﺑ ﺎﺗ ﺪﻴﻨﻛ ﻢﻴﻈﻨﺗ ﺍﺭ ﺢﻄﺳ
.ﺩﻮﺷ ﻰﻣ ﻮﻐﻟ :
.ﺪﻨﻛ ﯽﻣ ﺏﺎﺨﺘﻧﺍ ﺍﺭ ﺲﻧﺎﻛﺮﻓ ﺰﻛﺮﻣ :
.ﺪﻨﻛ ﯽﻣ ﺏﺎﺨﺘﻧﺍ ﺍﺭ ﺲﻧﺎﻛﺮﻓ ﺰﻛﺮﻣ :
.ﺪﻴﻫﺩ ﺭﺎﺸﻓ ﺍﺭ ﻪﻤﻛﺩ ﺲﭙﺳ ،ﺪﻴﻧﺎﺧﺮﭽﺑ ﺍﺭ ﻡﻮﻟﻭ ﻪﻤﻛﺩ ،[
.ﺪﺷﺎﺑ ﻩﺪﺷ ﻝﺎﻌﻓ ﺎﻳ ﻩﺪﺷ ﺏﺎﺨﺘﻧﺍ ﻩﺍﻮﺨﻟﺩ ﺩﺭﻮﻣ ﻪﻛ ﯽﻧﺎﻣﺯ ﺎﺗ ﺪﻴﻨﻛ ﺭﺍﺮﻜﺗ ﺍﺭ 3 ﻪﻠﺣﺮﻣ 4
.ﺪﻴﻫﺩ ﺭﺎﺸﻓ ﺍﺭ ﺲﭙﺳ ﻭ ﺪﻴﻫﺩ ﺭﺎﺸﻓ ﻥﺩﺮﻛ ﺏﺎﺨﺘﻧﺍ یﺍﺮﺑ ﺍﺭ K / J 2
.ﺪﻨﻛ ﯽﻣ ﻢﻴﻈﻨﺗ ﺍﺭ ﺮﻓﻭﻭ ﺏﺎﺳ ﻰﺟﻭﺮﺧ ﺢﻄﺳ
(.ﺪﻴﻨﻛ ﺏﺎﺨﺘﻧﺍ ﺍﺭ ﻢﻴﻈﻨﺗ یﺍﺮﺑ ﺮﻈﻧ
.ﺪﻨﻛ ﯽﻣ ﺏﺎﺨﺘﻧﺍ ﺍﺭ ﺲﻧﺎﻛﺮﻓ ﺰﻛﺮﻣ :
.ﺪﻨﻛ ﯽﻣ ﻢﻴﻈﻨﺗ ﺍﺭ ﺢﻄﺳ :(+6) +8 ﺎﺗ
.ﺪﻨﻛ ﯽﻣ ﻢﻴﻈﻨﺗ ﺍﺭ ﺖﻴﻔﻴﻛ ﺭﻮﺘﻛﺎﻓ :
OFF
؛ .ﺪﻨﻛ ﯽﻣ ﻝﺎﻌﻓ ﺍﺭ ﻪﺘﻓﺎﻳ ﺵﺮﺘﺴﮔ ﻢﺑ یﺍﺪﺻ :
.ﺪﻨﻛ ﯽﻣ ﻢﻴﻈﻨﺗ ﺍﺭ ﺢﻄﺳ :(+5) +8 ﺎﺗ
.ﺪﻨﻛ ﯽﻣ ﻢﻴﻈﻨﺗ ﺍﺭ ﺖﻴﻔﻴﻛ ﺭﻮﺘﻛﺎﻓ :
17.5K /15.0K /12.5K /10.0K
.ﺪﻨﻛ ﯽﻣ ﻢﻴﻈﻨﺗ ﺍﺭ ﺢﻄﺳ :(0) +8 ﺎﺗ
.ﺪﻴﻫﺩ ﺭﺎﺸﻓ ﺍﺭ ﺍﺪﺻ ﻢﻴﻈﻨﺗ ﭻﻴﭘ [
.ﺪﻳﺭﺍﺪﻬﮕﻧ ﻭ ﺪﻴﻫﺩ ﺭﺎﺸﻓ ﺝﻭﺮﺧ یﺍﺮﺑ ﺍﺭ 5
.ﺪﻴﻫﺩ ﺭﺎﺸﻓ [
.ﺪﻴﻫﺩ ﺭﺎﺸﻓ ﺍﺭ ،ﯽﻠﺒﻗ ﻢﻴﻈﻨﺗ ﺩﺭﻮﻣ ﻪﺑ ﺖﺸﮔﺯﺎﺑ یﺍﺮﺑ
200 /100 /80 /60
2.00 /1.50 /1.25 /1.00
2.5K /1.5K /1.0K /0.5K
1.25 /1.00 /0.75
AUDIO CONTROL
AUDIO CONTROL
(0)
(+6) +8 ﺎﺗ
(+5) +8 ﺎﺗ
(0) +8 ﺎﺗ
BASS LEVEL
–8
BASS Q FACTOR
ON
BASS EXTEND
–8
MID Q FACTOR
–8
ﺍﺪﺻ ﺕﺎﻤﻴﻈﻨﺗ
...ﯽﻌﺒﻨﻣ ﺮﻫ ﻪﺑ ﻥﺩﺮﻛ ﺵﻮﮔ ﻦﻴﺣ ﺭﺩ
FUNCTION
] ﻪﺑ ﺩﻭﺭﻭ یﺍﺮﺑ 1
] ﺏﺎﺨﺘﻧﺍ ﺖﻬﺟ 2
(ﺪﻴﻨﻛ ﻩﺩﺎﻔﺘﺳﺍ RC-406 ﺯﺍ ﺎﻳ)
] ﻪﺑ ﺩﻭﺭﻭ یﺍﺮﺑ ﺍﺭ AUD 1
+15
MID LEVEL
TRE LEVEL
SUB-W LEVEL
ﺎﺗ
–15
BASS LEVEL
–8
MID LEVEL
–8
TRE LEVEL
–8
EQ PRO
BASS ADJUSTBASS CTR FRQ
MID ADJUSTMID CTR FRQ
TRE ADJUSTTRE CTR FRQ
AUX
(
4
) .ﺪﻴﻨﻛ ﺏﺎﺨﺘﻧﺍ [
BUILT-IN AUX
ﺪﻴﻨﻛ ﻥﺩﺮﻛ ﺵﻮﮔ ﻪﺑ ﻉﻭﺮﺷ
ﻞﺻﻭ ﺍﺭ (ﺖﺳﺍ ﺩﻮﺟﻮﻣ ﺪﻳﺮﺧ یﺍﺮﺑ ﻪﻛ) ﻞﻤﺣ ﻞﺑﺎﻗ ﯽﺗﻮﺻ ﻩﺪﻨﻨﻛ ﺶﺨﭘ ﮏﻳ 1
ﯽﻜﻤﻛ یﺩﻭﺭﻭ ﻪﻳﺎﭘ
ﺪﻨﻧﺎﻣ “L” ﻂﺑﺍﺭ ﺎﺑ یﺮﺘﻣ ﯽﻠﻴﻣ 3.5 ﻮﻳﺮﺘﺳﺍ ﯽﻨﻴﻣ ﺶﻴﻓ
ﻞﺼﺘﻣ ﻩﺎﮕﺘﺳﺩ ﻪﺑ ﻪﻛ ﯽﻧﺪﺷﺍﺪﺟ یﺍﺪﺻ ﻩﺪﻨﻨﻛ ﺶﺨﭘ ﮏﻳ ﻪﺑ ﻥﺩﺮﻛ ﺵﻮﮔ ﻦﻴﺣ ﺭﺩ
ﺭﺎﺸﻓ ﺍﺭ ﻪﻤﻛﺩ ﺲﭙﺳ ،ﺪﻴﻧﺎﺧﺮﭽﺑ ﺍﺭ ﻡﻮﻟﻭ ﻪﻤﻛﺩ ،[
ﻪﻤﻛﺩ ﺲﭙﺳ ،ﺪﻴﻧﺎﺧﺮﭽﺑ ﺍﺭ ﻡﻮﻟﻭ ﻪﻤﻛﺩ ،[
ﺭﺎﺸﻓ ﺍﺭ ﻪﻤﻛﺩ ﺲﭙﺳ ،ﺪﻴﻧﺎﺧﺮﭽﺑ ﺍﺭ ﻡﻮﻟﻭ ﻪﻤﻛﺩ ،ﻪﻨﻳﺰﮔ ﮏﻳ ﺏﺎﺨﺘﻧﺍ ﺖﻬﺟ
TV /VIDEO /GAME /PORTABLE /DVD
(ﺖﺳﺍ ﺩﻮﺟﻮﻣ ﺪﻳﺮﺧ یﺍﺮﺑ)
.ﺪﻴﻫﺩ ﺭﺎﺸﻓ ﺭﺎﺑﺪﻨﭼ ﺍﺭ
.ﺪﻴﻨﻛ ﺶﺨﭘ ﺍﺭ ﺍﺪﺻ ﻭ ﻦﺷﻭﺭ ﺍﺭ ﻞﻤﺣ ﻞﺑﺎﻗ ﯽﺗﻮﺻ ﻩﺪﻨﻨﻛ ﺶﺨﭘ 3
.ﺪﻴﻫﺩ ﺭﺎﺸﻓ ﺍﺭ ﺍﺪﺻ ﻢﻴﻈﻨﺗ ﭻﻴﭘ [
.ﺪﻳﺭﺍﺪﻬﮕﻧ ﻭ ﺪﻴﻫﺩ ﺭﺎﺸﻓ ﺝﻭﺮﺧ یﺍﺮﺑ ﺍﺭ
.ﺪﻴﻫﺩ ﺭﺎﺸﻓ ﺍﺭ ،ﯽﻠﺒﻗ ﻢﻴﻈﻨﺗ ﺩﺭﻮﻣ ﻪﺑ ﺖﺸﮔﺯﺎﺑ یﺍﺮﺑ
FUNCTION
SYSTEM
AUX NAME SET
:ﺎﻫ ﺯﺎﺳ ﻩﺩﺎﻣﺁ
] یﺍﺮﺑ ﺍﺭ [ON]
.ﺪﻴﻨﻛ
ﻩﺪﻨﻨﻛ ﺶﺨﭘ
ﻞﻤﺣ ﻞﺑﺎﻗ ﯽﺗﻮﺻ
،AUX ﺏﺎﺨﺘﻧﺍ یﺍﺮﺑ 2
ﺪﻴﻨﻛ ﻢﻴﻈﻨﺗ ﺍﺭ AUX ﻡﺎﻧ
...ﺖﺳﺍ ﻩﺪﺷ
] ﻪﺑ ﺩﻭﺭﻭ یﺍﺮﺑ 1
] ﺏﺎﺨﺘﻧﺍ ﺖﻬﺟ 2
.ﺪﻴﻫﺩ
] ﺏﺎﺨﺘﻧﺍ ﺖﻬﺟ 3
.ﺪﻴﻫﺩ ﺭﺎﺸﻓ ﺍﺭ
/(ﺽﺮﻓ ﺶﻴﭘ)
.ﺪﻴﻫﺩ
AUX
4
5
16
Page 34

ﺙﻮﺗﻮﻠﺑ ﻖﻳﺮﻃ ﺯﺍ ﯽﺘﻧﺮﺘﻨﻳﺍ ﻮﻳﺩﺍﺭ
Pandora ﻪﺑ ﻥﺩﺍﺩ ﺵﻮﮔ
(
4
) .ﺪﻴﻨﻛ ﺏﺎﺨﺘﻧﺍ [
ﺙﻮﺗﻮﻠﺑ ﻖﻳﺮﻃ ﺯﺍ ﺪﻴﻧﺍﻮﺗ ﯽﻣ (Android ﻞﻣﺎﻋ ﻢﺘﺴﻴﺳ) ﺩﻮﺧ ﺪﻨﻤﺷﻮﻫ ﻦﻔﻠﺗ ﺭﺩ
.ﺪﻴﻨﻛ ﺯﺎﺑ ﺩﻮﺧ ﻩﺎﮕﺘﺳﺩ ﺭﺩ ﺍﺭ Pandora ﻪﻣﺎﻧﺮﺑ
(10 ) .ﺪﻴﻨﻛ ﻞﺻﻭ ﺙﻮﺗﻮﻠﺑ ﻖﻳﺮﻃ ﺯﺍ ﺍﺭ ﺩﻮﺧ ﯽﺗﻮﺻ ﻩﺪﻨﻨﻛ ﺶﺨﭘ 2
.ﺪﻴﻫﺩ ﺭﺎﺸﻓ ﺭﺎﺑﺪﻨﭼ ﺍﺭ ،PANDORA ﺏﺎﺨﺘﻧﺍ یﺍﺮﺑ 3
.ﺩﺩﺮﮔ ﯽﻣ ﺯﺎﻏﺁ ﺭﺎﻛﺩﻮﺧ ﺕﺭﻮﺻ ﻪﺑ ﺶﺨﭘ ﻭ ﺩﻮﺷ ﯽﻣ ﺎﺠﺑﺎﺟ ﻊﺒﻨﻣ
.ﺪﻴﻨﻛ ﺍﺮﺟﺍ ﻩﺎﮕﺘﺳﺩ ﻦﻳﺍ ﺭﺩ ﺍﺭ Pandora ﺪﻴﻧﺍﻮﺗ ﯽﻣ iPhone/iPod ﺪﻨﻧﺎﻤﻫ
PANDORA SRC
.ﺪﻴﻫﺩ ﺵﻮﮔ Pandora ﻪﺑ ،ﻩﺎﮕﺘﺳﺩ ﻦﻳﺍ
:ﺎﻫ ﺯﺎﺳ ﻩﺩﺎﻣﺁ
] یﺍﺮﺑ ﺍﺭ [ON]
(
9
)
1
BLUETOOTH®
ﺍﺪﺻ ﺶﺨﭘ — BLUETOOTH
ﺙﻮﺗﻮﻠﺑ ﻖﻳﺮﻃ ﺯﺍ ﯽﺗﻮﺻ ﻩﺪﻨﻨﻛ ﺶﺨﭘ
.(ﺪﻴﻫﺩ ﺭﺎﺸﻓ ﺍﺭ SRC ﻪﻤﻛﺩ ،RC-406 ﻝﺪﻣ یﺍﺮﺑ) ﺪﻴﻨﻛ ﺏﺎﺨﺘﻧﺍ ﺍﺭ BT AUDIO ﺎﺗ ﺪﻴﻫﺩ ﺭﺎﺸﻓ ﺭﺎﺑﺪﻨﭼ ﺍﺭ 1
.ﺪﻴﻫﺩ ﺭﺎﺸﻓ ﺍﺭ
.ﺪﻴﻫﺩ ﺭﺎﺸﻓ ﺍﺭ
/
/ S
/ S
.ﺪﻳﺭﺍﺩ ﻪﮕﻧ
—
—
REPEAT OFF ،FILE REPEAT ،ALL REPEAT
ALL RANDOM
.ﺪﻨﻛ ﯽﻣ ﻕﺮﻓ ﻩﺪﺷ ﻞﺼﺘﻣ ﻩﺎﮕﺘﺳﺩ ﺭﺩ ﻥﺁ ﻥﺩﻮﺑ ﺩﻮﺟﻮﻣ ﻪﺑ ﻪﺘﺴﺑ ﺶﻳﺎﻤﻧ ﻪﺤﻔﺻ ﺕﺎﻳﻮﺘﺤﻣ ﻭ ﺎﻫﺩﺮﻜﻠﻤﻋ
.ﺪﻴﻨﻛ ﻝﺎﻌﻓ ﺍﺭ ﺭﺍﺩ ﺙﻮﺗﻮﻠﺑ ﯽﺗﻮﺻ ﻩﺪﻨﻨﻛ ﺶﺨﭘ ،ﺍﺪﺻ ﺶﺨﭘ ﺖﻬﺟ 2
.ﺪﻴﻫﺩ ﺭﺎﺸﻓ ﺍﺭ
.ﺪﻴﻫﺩ ﺭﺎﺸﻓ ﺍﺭ K / J
.ﺪﻴﻫﺩ ﺭﺎﺸﻓ ﺍﺭ T / S.ﺪﻴﻫﺩ ﺭﺎﺸﻓ ﺍﺭ
.ﺪﻳﺭﺍﺩ ﻪﮕﻧ ﻭ ﻩﺩﺍﺩ ﺭﺎﺸﻓ ﺍﺭ T / S ﻭ ﻩﺩﺍﺩ ﺭﺎﺸﻓ ﺍﺭ
.ﺪﻴﻫﺩ ﺭﺎﺸﻓ ﺭﺮﻜﻣ ﺭﻮﻄﺑ ﺍﺭ
.ﺪﻴﻫﺩ ﺭﺎﺸﻓ ﺭﺮﻜﻣ ﺭﻮﻄﺑ ﺍﺭ
RANDOM OFF ،FOLDER RANDOM
ﺎﺗ ﺪﻳﺭﺍﺪﻬﮕﻧ ﻭ ﺪﻴﻫﺩ ﺭﺎﺸﻓ ﺍﺭ
.ﺩﻮﺷ ﺏﺎﺨﺘﻧﺍ
ﺭﺪﻟﻮﻓ ﺎﻳ ﻩﻭﺮﮔ ﺏﺎﺨﺘﻧﺍ
ﻊﻳﺮﺳ ﻥﺩﺮﺑ ﻮﻠﺟ /ﺐﻘﻋ ﻪﺑ
ﻪﺑﯽﻳﻮﻠﺟ ﻪﺤﻔﺻ یﻭﺭﺭﻭﺩ ﻩﺍﺭ ﺯﺍ ﻝﺮﺘﻨﻛ یﻭﺭ
ﺚﻜﻣ /ﺶﺨﭘ
ﻮﻠﺟ /ﺐﻘﻋ ﻪﺑ ﺵﺮﭘ
ﺶﺨﭘ ﺭﺍﺮﻜﺗ
ﻰﻓﺩﺎﺼﺗ ﺶﺨﭘ
15
ﻰﺳﺭﺎﻓ
Page 35

BLUETOOTH®
Bluetooth ﺖﺴﺗ ﺖﻟﺎﺣ
ﻦﻳﺍ ﻭ ﺙﻮﺗﻮﻠﺑ ﻩﺎﮕﺘﺳﺩ ﺎﺑ ﻩﺪﺷ ﯽﻧﺎﺒﻴﺘﺸﭘ ﻞﻳﺎﻓﻭﺮﭘ ﻝﺎﺼﺗﺍ ﺖﻴﻠﺑﺎﻗ ﺪﻴﻧﺍﻮﺗ ﯽﻣ
ﻩﺪﺸﻧ یﺯﺎﺳ ﺖﻔﺟ ﯽﺛﻮﺗﻮﻠﺑ ﻩﺎﮕﺘﺳﺩ ﭻﻴﻫ ﻪﻛ ﺪﻴﻨﻛ ﻞﺻﺎﺣ ﻥﺎﻨﻴﻤﻃﺍ •
ﯽﻣ ﺮﻫﺎﻇ “PLEASE PAIR YOUR PHONE PIN 0000”
ﻩﺎﮕﺘﺳﺩ ﺭﺩ ﺍﺭ (KMM-U5
.ﺪﻴﻨﻛ ﺏﺎﺨﺘﻧﺍ ﺲﭙﺳ ﻭ ﻮﺠﺘﺴﺟ Bluetooth
.ﺪﻴﻨﻛ ﻝﺎﻌﻓ ﺍﺭ ﺙﻮﺗﻮﻠﺑ ﻩﺎﮕﺘﺳﺩ ،یﺯﺎﺳ ﺖﻔﺟ ﺪﻴﻳﺄﺗ ﺭﻮﻈﻨﻣ ﻪﺑ
ﺪﻫﺍﻮﺧ ﮏﻤﺸﭼ ﻪﺤﻔﺻ یﻭﺭ “TESTING” ﺕﺭﺎﺒﻋ ﻡﺎﮕﻨﻫ ﻦﻳﺍ ﺭﺩ
.ﺩﻮﺷ ﯽﻣ ﺮﻫﺎﻇ ﺖﺴﺗ ﻡﺎﺠﻧﺍ ﺯﺍ ﺲﭘ (NG ﺎﻳ OK) ﻝﺎﺼﺗﺍ ﻪﺠﻴﺘﻧ
(HFP) یﺮﻓﺯﺪﻨﻫ ﻞﻳﺎﻓﻭﺮﭘ ﺎﺑ یﺭﺎﮔﺯﺎﺳ : HF CNT
(A2DP) ﻪﺘﻓﺮﺸﻴﭘ ﯽﺗﻮﺻ ﻊﻳﺯﻮﺗ ﻞﻳﺎﻓﻭﺮﭘ ﺎﺑ یﺭﺎﮔﺯﺎﺳ : AUD CNT
(PBAP) ﻦﻔﻠﺗ ﺮﺘﻓﺩ ﻪﺑ ﯽﺳﺮﺘﺳﺩ ﻞﻳﺎﻓﻭﺮﭘ ﺎﺑ یﺭﺎﮔﺯﺎﺳ : PB DL
ﻩﺎﮕﺘﺳﺩ ﺎﺗ ﺪﻳﺭﺍﺩ ﻪﮕﻧ ﻭ ﺪﻴﻫﺩ ﺭﺎﺸﻓ ﺍﺭ
.ﺪﻴﻨﻛ ﯽﺳﺭﺮﺑ ﺍﺭ ﻩﺎﮕﺘﺳﺩ
.ﺪﺷﺎﺒﻧ
.ﺪﻳﺭﺍﺩ ﻪﮕﻧ ﻭ ﻩﺩﺍﺩ ﺭﺎﺸﻓ ﺍﺭ
BT) ﻩﺎﮕﺘﺳﺩ ﻦﻳﺍ ﻝﺪﻣ ﻡﺎﻧ 2
*
ﻥﺪﺷ ﺖﻔﺟ ﺖﻴﻌﺿﻭ : PAIRING
.ﺩﻮﺷ
.ﺩﺯ
،ﺖﺴﺗ ﺖﻟﺎﺣ ﻮﻐﻟ یﺍﺮﺑ
.ﺩﻮﺷ ﺵﻮﻣﺎﺧ
.ﺪﻴﻨﻛ ﻝﺎﺒﻧﺩ ﺍﺭ ﯽﺑﺎﺨﺘﻧﺍ ﻢﺘﻳﺁ ﺭﺩ ﺭﻮﻛﺬﻣ یﺎﻫ ﻞﻤﻌﻟﺍﺭﻮﺘﺳﺩ ﺎﻳ ،ﺪﻴﻳﺎﻤﻧ ﻝﺎﻌﻓ/ﺏﺎﺨﺘﻧﺍ ﺍﺭ ﺮﻈﻧ ﺩﺭﻮﻣ ﻢﺘﻳﺁ ﻪﻜﻨﻳﺍ ﺎﺗ ﺪﻴﻨﻛ ﺭﺍﺮﻜﺗ ﺍﺭ 2 ﻪﻠﺣﺮﻣ 3
.ﺪﻴﻫﺩ ﺭﺎﺸﻓ ﺍﺭ ﻪﻤﻛﺩ ﺲﭙﺳ ،ﺪﻴﻧﺎﺧﺮﭽﺑ ﺍﺭ ﻡﻮﻟﻭ ﻪﻤﻛﺩ ،(ﺪﻴﻨﻛ ﻉﻮﺟﺭ ﻞﻳﺫ ﻝﻭﺪﺟ ﻪﺑ) ﻪﻨﻳﺰﮔ ﮏﻳ ﺏﺎﺨﺘﻧﺍ ﺖﻬﺟ 2
1
XX
:ﺽﺮﻓ ﺶﻴﭘ
3
ﻊﻄﻗ ﺍﺭ ﻩﺪﺷ ﻞﺼﺘﻣ ﻩﺎﮕﺘﺳﺩ ﺍﺪﺘﺑﺍ ﻪﻛ ﺪﻴﻳﺎﻤﻧ ﻞﺼﺘﻣ ﺙﻮﺗﻮﻠﺑ ﻖﻳﺮﻃ ﺯﺍ ﺍﺭ یﺮﮕﻳﺩ ﻩﺎﮕﺘﺳﺩ ﺪﻴﻧﺍﻮﺗ ﯽﻣ ﯽﻧﺎﻣﺯ ﺎﻬﻨﺗ
.ﺪﻴﻫﺩ ﺭﺎﺸﻓ ﺍﺭ ﻪﻤﻛﺩ ﺲﭙﺳ ،ﺪﻴﻧﺎﺧﺮﭽﺑ ﺍﺭ ﻡﻮﻟﻭ ﻪﻤﻛﺩ ،ﻑﺬﺣ یﺍﺮﺑ ﻩﺎﮕﺘﺳﺩ ﮏﻳ ﺏﺎﺨﺘﻧﺍ ﺭﻮﻈﻨﻣ ﻪﺑ 1
ﺭﺎﻛﺩﻮﺧ ﺕﺭﻮﺻ ﻪﺑ ﻩﺎﮕﺘﺳﺩ ،ﺪﺷﺎﺑ ﻩﺩﻭﺪﺤﻣ ﺭﺩ ﺪﻳﺍ ﻩﺪﺷ ﻞﺼﺘﻣ ﻥﺁ ﻪﺑ ﺭﺎﺑ ﻦﻳﺮﺧﺁ ﻪﻛ ﯽﺛﻮﺗﻮﻠﺑ ﻩﺎﮕﺘﺳﺩ ﺮﮔﺍ :
ﻪﻧﺎﻳﺎﭘ ﻖﻳﺮﻃ ﺯﺍ (Android ﻩﺎﮕﺘﺳﺩ /iPod touch /iPhone) ﺪﻨﻛ ﯽﻣ ﯽﻧﺎﺒﻴﺘﺸﭘ ﺙﻮﺗﻮﻠﺑ ﺯﺍ ﻪﻛ یﺍ ﻪﻠﻴﺳﻭ ﯽﺘﻗﻭ :
ﻩﺎﮕﺘﺳﺩ ﻞﻣﺎﻋ ﻢﺘﺴﻴﺳ ﻉﻮﻧ ﻪﺑ ﻪﺘﺴﺑ .ﺩﻮﺷ ﯽﻣ یﺯﺎﺳ ﺖﻔﺟ ﻥﺁ ﺎﺑ ﺭﺎﻛﺩﻮﺧ ﺭﻮﻃ ﻪﺑ ﻩﺎﮕﺘﺳﺩ ،ﺩﻮﺷ ﻞﺼﺘﻣ USB یﺩﻭﺭﻭ
؛ .ﺪﻫﺩ ﯽﻣ ﻡﺎﺠﻧﺍ ﺍﺭ (ﻩﺮﻴﻏ ﻭ ،ﻩﺪﺷ ﻩﺮﻴﺧﺫ ﻦﻔﻠﺗ ﻪﭼﺮﺘﻓﺩ ،ﻥﺩﺮﻛ ﺖﻔﺟ ﻪﻠﻤﺟ ﺯﺍ ) ﺙﻮﺗﻮﻠﺑ ﺕﺎﻤﻴﻈﻨﺗ ﻡﺎﻤﺗ :
.ﺪﻨﻛ ﯽﻣ ﺏﺎﺨﺘﻧﺍ ﻝﺎﺼﺗﺍ ﻊﻄﻗ ﺎﻳ ﻥﺪﺷ ﻞﺼﺘﻣ یﺍﺮﺑ ﺍﺭ ﯽﺗﻮﺻ ﻩﺎﮕﺘﺳﺩ ﺎﻳ ﻦﻔﻠﺗ
.ﺩﻮﺷ ﯽﻣ ﺮﻫﺎﻇ ﻥﺁ ﻡﺎﻧ یﻮﻠﺟ ﺭﺩ “
.ﺪﻴﻫﺩ ﺭﺎﺸﻓ ﺍﺭ ﻪﻤﻛﺩ ﺲﭙﺳ ،ﺪﻴﻧﺎﺧﺮﭽﺑ ﺍﺭ ﻡﻮﻟﻭ ﻪﻤﻛﺩ ،[
.ﺪﻴﻫﺩ ﺭﺎﺸﻓ ﺍﺭ T / S ﺎﻫ ﻞﺧﺪﻣ ﺯﺍ ﮏﻳ ﺮﻫ یﺎﺟ ﺮﻴﻴﻐﺗ ﺖﻬﺟ 2
.ﺪﻴﻧﺎﺧﺮﭽﺑ ﺍﺭ ﻡﻮﻟﻭ ﻪﻤﻛﺩ ،ﻩﺭﺎﻤﺷ ﮏﻳ ﺏﺎﺨﺘﻧﺍ ﺖﻬﺟ 1
.ﺩﻮﺷ ﺩﺭﺍﻭ PIN ﺪﻛ ﺎﺗ ﺪﻴﻨﻛ ﺭﺍﺮﻜﺗ ﺍﺭ
.ﺩﻮﺷ ﻰﻣ ﻮﻐﻟ :
.ﺩﻮﺷ ﻰﻣ ﻮﻐﻟ :
OFF
؛ .ﺪﻨﻜﻧ ﺭﺎﻛ ﺖﺳﺍ ﻦﻜﻤﻣ ﺩﺮﻜﻠﻤﻋ ﻦﻳﺍ ،ﻩﺪﺷ ﻞﺼﺘﻣ
.ﺪﻴﻫﺩ ﺭﺎﺸﻓ ﺍﺭ ﺍﺪﺻ ﻢﻴﻈﻨﺗ ﭻﻴﭘ [
.ﺪﻳﺭﺍﺪﻬﮕﻧ ﻭ ﺪﻴﻫﺩ ﺭﺎﺸﻓ ﺝﻭﺮﺧ یﺍﺮﺑ ﺍﺭ 4
.ﺪﻴﻫﺩ ﺭﺎﺸﻓ ﺍﺭ ،ﯽﻠﺒﻗ ﻢﻴﻈﻨﺗ ﺩﺭﻮﻣ ﻪﺑ ﺖﺸﮔﺯﺎﺑ یﺍﺮﺑ
” ،ﻩﺎﮕﺘﺳﺩ ﻥﺪﺷ ﻞﺼﺘﻣ ﻡﺎﮕﻨﻫ
*
.ﺩﻮﺷ ﯽﻣ ﻮﺤﻣ “
” ،ﻝﺎﺼﺗﺍ ﻊﻄﻗ ﺯﺍ ﺲﭘ
*
NO
] ﺎﻳ [
YES
] ﺏﺎﺨﺘﻧﺍ ﺖﻬﺟ 2
.(ﻢﻗﺭ 6 ﺎﺗ) ﺪﻫﺩ ﯽﻣ ﺮﻴﻴﻐﺗ ﺍﺭ PIN ﺪﻛ
2 ﻭ 1 ﻞﺣﺍﺮﻣ ﺭﺪﻘﻧﺁ
.ﺪﻴﻫﺩ ﺭﺎﺸﻓ ﺍﺭ ﻡﻮﻟﻭ ﻪﻤﻛﺩ ﺪﻴﻳﺎﺗ یﺍﺮﺑ 3
OFF
؛ .ﺩﻮﺷ ﯽﻣ ﻞﺼﺘﻣ ﻥﺁ ﻪﺑ ﻩﺭﺎﺑﻭﺩ
.ﺪﻴﻨﻛ
.ﺩﻮﺷ ﻰﻣ ﻮﻐﻟ :
FUNCTION]
ON
ON
YES
NO
•
ﺕﺎﻤﻴﻈﻨﺗ ﺮﻳﺎﺳ
ﻪﺑ ﺩﻭﺭﻭ یﺍﺮﺑ 1
BT MODE
PHONE SELECT
AUDIO SELECT
DEVICE DELETE
PIN CODE EDIT
(0000)
RECONNECT
AUTO PAIRING
INITIALIZE
14
Page 36

BLUETOOTH®
.ﺪﻴﻫﺩ ﺭﺎﺸﻓ ﺍﺭ ﻪﻤﻛﺩ ﺲﭙﺳ ،ﺪﻴﻧﺎﺧﺮﭽﺑ ﺍﺭ ﻡﻮﻟﻭ ﻪﻤﻛﺩ ،[
.ﺪﻴﻫﺩ ﺭﺎﺸﻓ ﺍﺭ ﻪﻤﻛﺩ ﺲﭙﺳ ،ﺪﻴﻧﺎﺧﺮﭽﺑ ﺍﺭ ﻡﻮﻟﻭ ﻪﻤﻛﺩ ،[
.ﺪﻧﻮﺷ ﯽﻣ ﻑﺬﺣ
ﻪﻤﻛﺩ ﺲﭙﺳ ،ﺪﻴﻧﺎﺧﺮﭽﺑ ﺍﺭ ﻡﻮﻟﻭ ﻪﻤﻛﺩ ،[
ﻩﺭﺎﻤﺷ ﮏﻳ ﻭ ﺏﺎﺨﺘﻧﺍ ﺍﺭ 2 ﻪﻠﺣﺮﻣ ﺭﺩ [
ﻰﺳﺭﺎﻓ
13
.ﺖﺳﺍ ﻩﺪﺷ ﻑﺬﺣ 3 ﻪﻠﺣﺮﻣ ﺭﺩ ﻩﺪﺷ ﺏﺎﺨﺘﻧﺍ ﻦﻔﻠﺗ ﻩﺭﺎﻤﺷ ﺎﻳ ﻡﺎﻧ :
2 ﻪﻠﺣﺮﻣ ﺭﺩ [
.ﺪﻴﻧﺎﺧﺮﭽﺑ ﺍﺭ ﻡﻮﻟﻭ ﻪﻤﻛﺩ ،ﻦﻔﻠﺗ ﻩﺭﺎﻤﺷ ﻥﺩﺮﻛ ﺩﺭﺍﻭ ﺎﻳ ﺐﻃﺎﺨﻣ ﮏﻳ ﺏﺎﺨﺘﻧﺍ ﺖﻬﺟ
.ﺩﻮﺷ ﻩﺩﺍﺩ ﻥﺎﺸﻧ ﻦﻔﻠﺗ ﻩﺭﺎﻤﺷ ﺎﺗ ﺪﻴﻫﺩ ﺭﺎﺸﻓ ﺍﺭ ﻡﻮﻟﻭ ﻪﻤﻛﺩ ،ﺐﻃﺎﺨﻣ ﺏﺎﺨﺘﻧﺍ ﺯﺍ ﺲﭘ
.ﺩﻮﺷ ﯽﻣ ﻩﺩﺍﺩ ﻥﺎﺸﻧ ﻪﺤﻔﺻ یﻭﺭ “STORED” ﺕﺭﺎﺒﻋ ،ﺐﻃﺎﺨﻣ ﻩﺮﻴﺧﺫ ﺕﺭﻮﺻ ﺭﺩ
.ﺩﻮﺷ ﯽﻣ ﺮﻫﺎﻇ ﻪﺤﻔﺻ یﻭﺭ “NO MEMORY” ،ﺪﺷﺎﺑ ﻩﺪﺸﻧ ﻩﺮﻴﺧﺫ ﯽﺒﻃﺎﺨﻣ ﭻﻴﻫ ﺮﮔﺍ
ﺐﻃﺎﺨﻣ ﮏﻳ ﻑﺬﺣ
.ﺪﻴﻫﺩ ﺭﺎﺸﻓ ﺍﺭ ،ﺙﻮﺗﻮﻠﺑ ﺖﻟﺎﺣ ﻪﺑ ﺩﻭﺭﻭ یﺍﺮﺑ 1
.ﺪﻳﺭﺍﺩ ﻪﮕﻧ ﻭ ﺪﻴﻫﺩ ﺭﺎﺸﻓ ﺍﺭ ﺍﺪﺻ ﻢﻴﻈﻨﺗ یﺮﺳ ،ﻑﺬﺣ ﺖﻟﺎﺣ ﻪﺑ ﺩﻭﺭﻭ یﺍﺮﺑ 4
CALL HISTORY
.ﺪﻴﻫﺩ ﺭﺎﺸﻓ ﺍﺭ ﻪﻤﻛﺩ ﺲﭙﺳ ،ﺪﻴﻧﺎﺧﺮﭽﺑ ﺍﺭ ﻡﻮﻟﻭ ﻪﻤﻛﺩ ،[
.ﺩﺭﺍﺪﻧ ﺩﺮﺑﺭﺎﻛ ،ﺪﻨﻨﻛ ﯽﻤﻧ ﯽﻧﺎﺒﻴﺘﺸﭘ PBAP ﺯﺍ ﻪﻛ ﯽﻫﺍﺮﻤﻫ یﺎﻫ ﻦﻔﻠﺗ ﺩﺭﻮﻣ ﺭﺩ •
.ﺪﻴﻧﺎﺧﺮﭽﺑ ﺍﺭ ﻡﻮﻟﻭ ﻪﻤﻛﺩ ،ﺐﻃﺎﺨﻣ ﺏﺎﺨﺘﻧﺍ ﺖﻬﺟ 3
DELETE ALL
] ﺯﺍ ﻦﻔﻠﺗ یﺎﻫ ﻩﺭﺎﻤﺷ ﺎﻳ ﺎﻫ ﻡﺎﻧ ﻡﺎﻤﺗ :
.ﺪﻳﺭﺍﺪﻬﮕﻧ ﻭ ﺪﻴﻫﺩ ﺭﺎﺸﻓ ﺝﻭﺮﺧ یﺍﺮﺑ ﺍﺭ 7
.ﺪﻴﻫﺩ ﺭﺎﺸﻓ ﺍﺭ ،ﯽﻠﺒﻗ ﻢﻴﻈﻨﺗ ﺩﺭﻮﻣ ﻪﺑ ﺖﺸﮔﺯﺎﺑ یﺍﺮﺑ •
CALL HISTORY
] ﺎﻳ [
DELETE ONE
] ﺏﺎﺨﺘﻧﺍ ﺖﻬﺟ 2
] ﺏﺎﺨﺘﻧﺍ ﺖﻬﺟ 5
DELETE ONE
DELETE ALL
YES
] ﺏﺎﺨﺘﻧﺍ ﺖﻬﺟ 6
ﻪﻈﻓﺎﺣ ﺕﺎﻤﻴﻈﻨﺗ
ﻪﻈﻓﺎﺣ ﺭﺩ ﺐﻃﺎﺨﻣ ﻩﺮﻴﺧﺫ
.ﺪﻴﻨﻛ ﻩﺮﻴﺧﺫ (6 ﺎﺗ 1) یﺩﺪﻋ یﺎﻫ ﻪﻤﻛﺩ یﻭﺭ ﺍﺭ ﺐﻃﺎﺨﻣ 6 ﺮﺜﻛﺍﺪﺣ ﺪﻴﻧﺍﻮﺗ ﯽﻣ
NUMBER DIAL
.ﺪﻳﺭﺍﺩ ﻪﮕﻧ ﻭ ﺪﻴﻫﺩ ﺭﺎﺸﻓ ﺍﺭ (6 ﺎﺗ 1) ﺭﺍﺩ ﻩﺭﺎﻤﺷ یﺎﻫ ﻪﻤﻛﺩ ﺯﺍ ﯽﻜﻳ
NUMBER DIAL
.ﺪﻴﻫﺩ ﺭﺎﺸﻓ ﺍﺭ
] ﺎﻳ ،[
PHONE BOOK
] ﻪﻨﻳﺰﮔ ،ﻩﺪﺷ ﻦﻴﻴﻌﺗ ﺶﻴﭘ ﺯﺍ ﻪﻈﻓﺎﺣ ﺯﺍ ﺐﻃﺎﺨﻣ ﮏﻳ ﻑﺬﺣ ﺖﻬﺟ
،ﺙﻮﺗﻮﻠﺑ ﺖﻟﺎﺣ ﻪﺑ ﺩﻭﺭﻭ یﺍﺮﺑ 1
] ،[
CALL HISTORY
] ﺏﺎﺨﺘﻧﺍ یﺍﺮﺑ 2
.ﺪﻴﻫﺩ ﺭﺎﺸﻓ ﺍﺭ
.ﺪﻴﻨﻛ ﻩﺮﻴﺧﺫ ﺍﺭ ﯽﻟﺎﺧ
ﻪﻈﻓﺎﺣ ﺯﺍ ﻁﺎﺒﺗﺭﺍ یﺭﺍﺮﻗﺮﺑ
.ﺪﻴﻫﺩ ﺭﺎﺸﻓ ﺍﺭ ،ﺙﻮﺗﻮﻠﺑ ﺖﻟﺎﺣ ﻪﺑ ﺩﻭﺭﻭ یﺍﺮﺑ 1
.ﺪﻴﻫﺩ ﺭﺎﺸﻓ ﺍﺭ (6 ﺎﺗ 1) ﺭﺍﺩ ﻩﺭﺎﻤﺷ یﺎﻫ ﻪﻤﻛﺩ ﺯﺍ ﯽﻜﻳ 2
.ﺪﻴﻫﺩ ﺭﺎﺸﻓ ﺍﺭ ﻡﻮﻟﻭ ﻪﻤﻛﺩ ﯽﻨﻔﻠﺗ ﺱﺎﻤﺗ یﺭﺍﺮﻗﺮﺑ یﺍﺮﺑ 3
ﻪﻤﻛﺩ ،(+ ،# ،*) ﺮﺘﻛﺍﺭﺎﻛ ﺎﻳ (9 ﺎﺗ 0) ﻩﺭﺎﻤﺷ ﮏﻳ ﺏﺎﺨﺘﻧﺍ ﺖﻬﺟ 1
ﺭﺎﺸﻓ ﺍﺭ T / S ﺎﻫ ﻞﺧﺪﻣ ﺯﺍ ﮏﻳ ﺮﻫ یﺎﺟ ﺮﻴﻴﻐﺗ ﺖﻬﺟ 2
.ﺩﻮﺷ ﺩﺭﺍﻭ ﻦﻔﻠﺗ ﻩﺭﺎﻤﺷ ﺎﺗ ﺪﻴﻨﻛ ﺭﺍﺮﻜﺗ ﺍﺭ
.ﺪﻴﻫﺩ ﺭﺎﺸﻓ ﺍﺭ ﻡﻮﻟﻭ ﻪﻤﻛﺩ ﯽﻨﻔﻠﺗ ﺱﺎﻤﺗ یﺭﺍﺮﻗﺮﺑ یﺍﺮﺑ 3
ﺍﺭ (9 ﺎﺗ 0) یﺩﺪﻋ یﺎﻫ ﻪﻤﻛﺩ ،ﻦﻔﻠﺗ ﻩﺭﺎﻤﺷ ﻥﺩﺮﻛ ﺩﺭﺍﻭ یﺍﺮﺑ 1
ﻝﺮﺘﻨﻛ یﺍﺮﺑ ﺎﻳ ﺮﻈﻧ ﺩﺭﻮﻣ ﺐﻃﺎﺨﻣ ﻡﺎﻧ ﺱﺎﻤﺗ یﺭﺍﺮﻗﺮﺑ یﺍﺮﺑ
یﺭﺍﺮﻗﺮﺑ
ﯽﻠﻌﻓ ﯽﺘﻓﺎﻳﺭﺩ ﻝﺎﻨﮕﻴﺳ ﺕﺭﺪﻗ :
.ﺪﻴﻫﺩ ﺭﺎﺸﻓ ﺍﺭ
) . ﺪﻳﺭﻭﺎﻴﺑ ﻥﺎﺑﺯ ﻪﺑ ﺍﺭ ﯽﺗﻮﺻ ﻥﺎﻣﺮﻓ ،ﻦﻔﻠﺗ یﺎﻫﺩﺮﻜﻠﻤﻋ
(ﺍﺪﺻ ﺺﻴﺨﺸﺗ ﺩﺮﻜﻠﻤﻋ ﻩﺩﺎﻔﺘﺳﺍ ﺎﺑ ﺱﺎﻤﺗ
.ﺪﻫﺩ ﯽﻣ ﻥﺎﺸﻧ ﺍﺭ یﺮﺗﺎﺑ ﺕﺭﺪﻗ :
.ﺪﻴﻧﺎﺧﺮﭽﺑ ﺍﺭ ﻡﻮﻟﻭ
.ﺪﻴﻫﺩ
2 ﻭ 1 ﻞﺣﺍﺮﻣ ﺭﺪﻘﻧﺁ
(ﺪﻴﻨﻛ ﻩﺩﺎﻔﺘﺳﺍ
MAX /MID /LOW /NO SIGNAL
RC-406
ﺯﺍ ﺎﻳ)
.ﺪﻴﻫﺩ ﺭﺎﺸﻓ
ﻪﻤﻛﺩ ،ﺱﺎﻤﺗ یﺍﺮﺑ 2
FULL /MID /LOW
.ﺪﻫﺩ ﯽﻣ ﻥﺎﺸﻧ ﺍﺭ
.ﺩﺭﺍﺩ ﯽﮕﺘﺴﺑ ﻩﺩﺎﻔﺘﺳﺍ ﺩﺭﻮﻣ ﻦﻔﻠﺗ ﻉﻮﻧ ﻪﺑ ،ﺩﺮﻜﻠﻤﻋ
ﺍﺪﺻ ﺺﻴﺨﺸﺗ ﺩﺮﻜﻠﻤﻋ ﻩﺩﺎﻔﺘﺳﺍ ﺎﺑ ﺱﺎﻤﺗ یﺭﺍﺮﻗﺮﺑ
3
ﻥﺎﻣﺮﻓ ،ﻦﻔﻠﺗ یﺎﻫﺩﺮﻜﻠﻤﻋ ﻝﺮﺘﻨﻛ یﺍﺮﺑ ﺎﻳ ﺮﻈﻧ ﺩﺭﻮﻣ ﺐﻃﺎﺨﻣ ﻡﺎﻧ ﺱﺎﻤﺗ یﺭﺍﺮﻗﺮﺑ یﺍﺮﺑ 2
.ﺖﺳﺍ ﺕﻭﺎﻔﺘﻣ ﺎﻫ ﻦﻔﻠﺗ ﺯﺍ ﮏﻳ ﺮﻫ ﺭﺩ ﻩﺪﺷ ﯽﻧﺎﺒﻴﺘﺸﭘ یﺍﺪﺻ ﺺﻴﺨﺸﺗ ﺖﻴﻠﺑﺎﻗ یﺎﻫ ﯽﮔﮋﻳﻭ •
4
.ﺪﻴﻨﻛ ﻪﻌﺟﺍﺮﻣ ﻩﺪﺷ ﻞﺼﺘﻣ ﻦﻔﻠﺗ ﻩﺩﺎﻔﺘﺳﺍ یﺎﻤﻨﻫﺍﺭ ﻪﺑ ﺮﺘﺸﻴﺑ ﺕﺎﻋﻼﻃﺍ ﺐﺴﻛ یﺍﺮﺑ
.ﺪﻨﻛ ﯽﻣ ﯽﻧﺎﺒﻴﺘﺸﭘ ﺰﻴﻧ iPhone ﺪﻨﻤﺷﻮﻫ ﯽﺼﺨﺷ ﺭﺎﻴﺘﺳﺩ ﺩﺮﻜﻠﻤﻋ ﺯﺍ ﻩﺎﮕﺘﺳﺩ ﻦﻳﺍ •
.ﺪﻳﺭﺍﺩ ﻪﮕﻧ ﻭ ﺪﻴﻫﺩ ﺭﺎﺸﻓ ﺍﺭ ،ﻞﺼﺘﻣ ﻦﻔﻠﺗ ﻥﺩﺮﻛ ﻝﺎﻌﻓ یﺍﺮﺑ 1
. ﺪﻳﺭﻭﺎﻴﺑ ﻥﺎﺑﺯ ﻪﺑ ﺍﺭ ﯽﺗﻮﺻ
NUMBER DIAL
VOICE
BATT
SIGNAL
*
*
*
Page 37

ﯽﻨﻔﻠﺗ ﺱﺎﻤﺗ یﺭﺍﺮﻗﺮﺑ
ﻪﻛ ﯽﻃﺮﺷ ﻪﺑ ﺖﺳﺍ ﺮﻳﺬﭘ ﻥﺎﻜﻣﺍ ﺰﻴﻧ ﯽﺗﻮﺻ ﺭﻮﺘﺳﺩ ﺎﺑ ﺱﺎﻤﺗ .ﺪﻳﺮﻴﮕﺑ یﺍ ﻩﺭﺎﻤﺷ ﺎﻳ ﺪﻴﻨﻛ ﺭﺍﺮﻗﺮﺑ ﻦﻔﻠﺗ ﻪﭼﺮﺘﻓﺩ ﺎﻳ ﺎﻫ ﺱﺎﻤﺗ ﺖﺳﺮﻬﻓ ﺯﺍ ﺍﺭ ﯽﺳﺎﻤﺗ ﺪﻴﻧﺍﻮﺗ ﯽﻣ
.ﺪﻴﻨﻛ ﻝﺎﺒﻧﺩ ﺍﺭ ﯽﺑﺎﺨﺘﻧﺍ ﻢﺘﻳﺁ ﺭﺩ ﺭﻮﻛﺬﻣ یﺎﻫ ﻞﻤﻌﻟﺍﺭﻮﺘﺳﺩ ﺎﻳ ،ﺪﻴﻳﺎﻤﻧ ﻝﺎﻌﻓ/ﺏﺎﺨﺘﻧﺍ ﺍﺭ ﺮﻈﻧ ﺩﺭﻮﻣ ﻢﺘﻳﺁ ﻪﻜﻨﻳﺍ ﺎﺗ ﺪﻴﻨﻛ ﺭﺍﺮﻜﺗ ﺍﺭ 2 ﻪﻠﺣﺮﻣ 3
.ﺪﻫﺩ ﯽﻣ ﻥﺎﺸﻧ ﺍﺭ ﺦﺳﺎﭘ ﻥﻭﺪﺑ یﺎﻫ ﺱﺎﻤﺗ “M” ﻭ ،ﯽﻟﺎﺳﺭﺍ یﺎﻫ ﺱﺎﻤﺗ “O” ،ﯽﺘﻓﺎﻳﺭﺩ یﺎﻫ ﺱﺎﻤﺗ “I” •
.ﺩﻮﺷ ﻝﺎﻌﻓ ﯽﻳﺎﺒﻔﻟﺍ یﻮﺠﺘﺴﺟ ﺖﻟﺎﺣ ﺎﺗ ﺪﻴﻧﺎﺧﺮﭽﺑ ﺖﻋﺮﺳ ﻪﺑ ﺍﺭ ﺍﺪﺻ ﻢﻴﻈﻨﺗ یﺮﺳ ،ﺖﺳﺍ یﺩﺎﻳﺯ ﻥﺎﺒﻃﺎﺨﻣ یﻭﺎﺣ ﻦﻔﻠﺗ ﺮﺘﻓﺩ ﺮﮔﺍ
ﺍﺭ یﺮﺳ ﺲﭙﺳ ﻭ ﺪﻴﻫﺩ ﺭﺎﺸﻓ ﺍﺭ T / S ﺎﻳ ﺪﻴﻧﺎﺧﺮﭽﺑ ﺍﺭ ﺍﺪﺻ ﻢﻴﻈﻨﺗ یﺮﺳ ،ﺮﻈﻧ ﺩﺭﻮﻣ ﻑﺮﺣ ﻦﻴﻟﻭﺍ ﺏﺎﺨﺘﻧﺍ یﺍﺮﺑ •
.ﺪﻴﻫﺩ ﺭﺎﺸﻓ ﺍﺭ ﻪﻤﻛﺩ یﺮﻴﮔ ﻩﺭﺎﻤﺷ ﺖﻬﺟ ﺲﭙﺳ ،ﺪﻴﻧﺎﺧﺮﭽﺑ ﺍﺭ ﻡﻮﻟﻭ ﻪﻤﻛﺩ ،ﻦﻔﻠﺗ ﻩﺭﺎﻤﺷ ﮏﻳ ﺏﺎﺨﺘﻧﺍ یﺍﺮﺑ 3
ﻪﺑ ﺭﺎﻛﺩﻮﺧ ﺕﺭﻮﺻ ﻪﺑ یﺯﺎﺳ ﺖﻔﺟ ﻡﺎﮕﻨﻫ ﻞﺼﺘﻣ ﻦﻔﻠﺗ ﻪﺑ ﻁﻮﺑﺮﻣ ﻦﻔﻠﺗ ﻪﭼﺮﺘﻓﺩ ،ﺪﻨﻛ ﯽﻣ ﯽﻧﺎﺒﻴﺘﺸﭘ PBAP ﺯﺍ ﻦﻔﻠﺗ ﺮﮔﺍ
(ﯽﻣﻮﻤﻋ) GE ،(ﺩﺭﺍﻮﻣ ﺮﻳﺎﺳ) OT ،(ﺭﺎﻛ ﻞﺤﻣ) OF ،(ﻝﺰﻨﻣ) HM ،(ﻞﻳﺎﺑﻮﻣ) MO :ﺪﻧﻮﺷ ﯽﻣ ﻢﻴﺴﻘﺗ ﺎﻫ یﺪﻨﺑ ﻪﺘﺳﺩ ﻦﻳﺍ ﻪﺑ ﻥﺎﺒﻃﺎﺨﻣ
ﻩﺩﺍﺩ ﻥﺎﺸﻧ “U” ﺕﺭﻮﺻ ﻪﺑ “Ú” ﺮﻴﻈﻧ ﺭﺍﺩ ﺖﻣﻼﻋ ﻑﻭﺮﺣ) .ﺪﻫﺩ ﻥﺎﺸﻧ ﺍﺭ ﺖﻣﻼﻋ ﻥﻭﺪﺑ ﻑﻭﺮﺣ ﺪﻧﺍﻮﺗ ﻰﻣ ﻂﻘﻓ ﻩﺎﮕﺘﺳﺩ ﻦﻳﺍ
.ﺪﻴﻫﺩ ﺭﺎﺸﻓ ﺍﺭ ﻪﻤﻛﺩ ﺲﭙﺳ ،ﺪﻴﻧﺎﺧﺮﭽﺑ ﺍﺭ ﻡﻮﻟﻭ ﻪﻤﻛﺩ ،(ﺪﻴﻨﻛ ﻉﻮﺟﺭ ﻞﻳﺫ ﻝﻭﺪﺟ ﻪﺑ) ﻪﻨﻳﺰﮔ ﮏﻳ ﺏﺎﺨﺘﻧﺍ ﺖﻬﺟ 2
.ﺪﻴﻫﺩ ﺭﺎﺸﻓ ﺍﺭ ،ﯽﻠﺒﻗ ﻢﻴﻈﻨﺗ ﺩﺭﻮﻣ ﻪﺑ ﺖﺸﮔﺯﺎﺑ یﺍﺮﺑ
.ﺪﻴﻫﺩ ﺭﺎﺸﻓ ﺍﺭ ﻡﻮﻟﻭ ﻪﻤﻛﺩ ،ﻦﻔﻠﺗ ﻩﺭﺎﻤﺷ ﺎﻳ ﻡﺎﻧ ﺏﺎﺨﺘﻧﺍ ﺖﻬﺟ 1
.ﺪﻴﻫﺩ ﺭﺎﺸﻓ ﺍﺭ
.ﺩﻮﺷ ﯽﻣ ﺮﻫﺎﻇ
.ﺪﻴﻫﺩ ﺭﺎﺸﻓ ﺍﺭ K / J ﻪﻤﻛﺩ ،( WXYZ1
.ﺪﻴﻨﻛ ﺏﺎﺨﺘﻧﺍ ﺍﺭ “
“NO DATA”
” ،ﻢﺋﻼﻋ ﺎﺑ ﻮﺠﺘﺴﺟ یﺍﺮﺑ ﻭ ﺪﻴﻨﻛ ﺏﺎﺨﺘﻧﺍ ﺍﺭ “1” ،ﺎﻫ ﻩﺭﺎﻤﺷ ﺎﺑ ﻮﺠﺘﺴﺟ یﺍﺮﺑ
*
.ﺪﻴﻫﺩ ﺭﺎﺸﻓ ﺍﺭ ﻪﻤﻛﺩ ﺲﭙﺳ ،ﺪﻴﻧﺎﺧﺮﭽﺑ ﺍﺭ ﻡﻮﻟﻭ ﻪﻤﻛﺩ ،ﻡﺎﻧ ﮏﻳ ﺏﺎﺨﺘﻧﺍ ﺖﻬﺟ 2
ﻪﻤﻛﺩ ،(NAME ﺎﻳ NUMBER) ﺶﻳﺎﻤﻧ ﻉﻮﻧ ﺮﻴﻴﻐﺗ یﺍﺮﺑ •
،ﺪﺷﺎﺑ ﻩﺪﺸﻧ ﺖﺒﺛ ﺱﺎﻤﺗ ﻪﭽﺨﻳﺭﺎﺗ ﺭﺩ ﯽﻨﻔﻠﺗ ﺱﺎﻤﺗ ﭻﻴﻫ ﺮﮔﺍ •
.ﺪﻴﻫﺩ ﺭﺎﺸﻓ ﺍﺭ ﻡﻮﻟﻭ ﻪﻤﻛﺩ ﯽﻨﻔﻠﺗ ﺱﺎﻤﺗ یﺭﺍﺮﻗﺮﺑ یﺍﺮﺑ 2
.ﺩﻮﺷ ﯽﻣ ﺮﻫﺎﻇ (ABCDEFGHIJK) ﻝﻭﺍ یﻮﻨﻣ
ﺎﻳ LMNOPQRSTUV) ﺮﮕﻳﺩ یﻮﻨﻣ ﻪﺑ ﺩﻭﺭﻭ یﺍﺮﺑ •
*
.ﺪﺷﺎﺑ ﻪﺘﺷﺍﺩ ﺍﺭ ﯽﮔﮋﻳﻭ ﻦﻳﺍ ﺎﻤﺷ ﻩﺍﺮﻤﻫ ﻦﻔﻠﺗ
.ﺪﻴﻫﺩ ﺭﺎﺸﻓ ﺍﺭ
.ﺪﻳﺭﺍﺪﻬﮕﻧ ﻭ ﺪﻴﻫﺩ ﺭﺎﺸﻓ ﺝﻭﺮﺧ یﺍﺮﺑ ﺍﺭ 4
،ﺙﻮﺗﻮﻠﺑ ﺖﻟﺎﺣ ﻪﺑ ﺩﻭﺭﻭ یﺍﺮﺑ 1
.ﺪﻴﻫﺩ ﺭﺎﺸﻓ
.ﺩﺩﺮﮔ ﯽﻣ ﻞﻘﺘﻨﻣ ﻩﺎﮕﺘﺳﺩ
(.ﺪﻧﻮﺷ ﯽﻣ
CALL HISTORY
PHONE BOOK
1
•
•
•
BLUETOOTH®
ﯽﺘﻓﺎﻳﺭﺩ یﺎﻫ ﺱﺎﻤﺗ یﺍﺮﺑ ﺕﺎﻤﻴﻈﻨﺗ ﻦﻳﺍ ﻡﺎﺠﻧﺍ
.ﺪﻴﻫﺩ ﺭﺎﺸﻓ ﺍﺭ ،ﺙﻮﺗﻮﻠﺑ ﺖﻟﺎﺣ ﻪﺑ ﺩﻭﺭﻭ یﺍﺮﺑ 1
،(ﺪﻴﻨﻛ ﻉﻮﺟﺭ ﻞﻳﺫ ﻝﻭﺪﺟ ﻪﺑ) ﻪﻨﻳﺰﮔ ﮏﻳ ﺏﺎﺨﺘﻧﺍ ﺖﻬﺟ 2
.ﺪﻴﻫﺩ ﺭﺎﺸﻓ ﺍﺭ ﻪﻤﻛﺩ ﺲﭙﺳ ،ﺪﻴﻧﺎﺧﺮﭽﺑ ﺍﺭ ﻡﻮﻟﻭ ﻪﻤﻛﺩ
ﺏﺎﺨﺘﻧﺍ ﻩﺍﻮﺨﻟﺩ ﺩﺭﻮﻣ ﻪﻛ ﯽﻧﺎﻣﺯ ﺎﺗ ﺪﻴﻨﻛ ﺭﺍﺮﻜﺗ ﺍﺭ
.ﺪﻳﺭﺍﺪﻬﮕﻧ ﻭ ﺪﻴﻫﺩ ﺭﺎﺸﻓ ﺝﻭﺮﺧ یﺍﺮﺑ ﺍﺭ
.ﺪﻴﻫﺩ ﺭﺎﺸﻓ ﺍﺭ ،ﯽﻠﺒﻗ ﻢﻴﻈﻨﺗ ﺩﺭﻮﻣ ﻪﺑ ﺖﺸﮔﺯﺎﺑ یﺍﺮﺑ
XX
:ﺽﺮﻓ ﺶﻴﭘ
ﻦﻴﻴﻌﺗ ﻥﺎﻣﺯ ﺭﺩ ﻩﺎﮕﺘﺳﺩ :30 —
ﻪﺑ ﺭﺎﻛﺩﻮﺧ ﺕﺭﻮﺻ ﻪﺑ (ﻪﻴﻧﺎﺛ ﻪﺑ) ﻩﺪﺷ
؛ .ﺪﻫﺩ ﯽﻣ ﺦﺳﺎﭘ یﺩﻭﺭﻭ یﺎﻫ ﺱﺎﻤﺗ
.ﺩﻮﺷ ﻰﻣ ﻮﻐﻟ :
.ﺪﺷﺎﺑ ﻩﺪﺷ ﻝﺎﻌﻓ ﺎﻳ ﻩﺪﺷ
OFF
AUTO ANSWER
1
2 ﻪﻠﺣﺮﻣ 3
4
SETTINGS
12
Page 38

ﺍﺪﺻ ﺖﻴﻔﻴﻛ یﺎﻘﺗﺭﺍ
.ﺪﻴﻫﺩ ﺭﺎﺸﻓ ﺍﺭ ﺍﺪﺻ ﻢﻴﻈﻨﺗ ﭻﻴﭘ [
ﺍﺭ ﻡﻮﻟﻭ ﻪﻤﻛﺩ ،(ﺪﻴﻨﻛ ﻉﻮﺟﺭ ﻞﻳﺫ ﻝﻭﺪﺟ ﻪﺑ) ﻪﻨﻳﺰﮔ ﮏﻳ ﺏﺎﺨﺘﻧﺍ ﺖﻬﺟ 2
ﺎﻳ ﻩﺪﺷ ﺏﺎﺨﺘﻧﺍ ﻩﺍﻮﺨﻟﺩ ﺩﺭﻮﻣ ﻪﻛ ﯽﻧﺎﻣﺯ ﺎﺗ ﺪﻴﻨﻛ ﺭﺍﺮﻜﺗ ﺍﺭ
.ﺪﻳﺭﺍﺪﻬﮕﻧ ﻭ ﺪﻴﻫﺩ ﺭﺎﺸﻓ ﺝﻭﺮﺧ یﺍﺮﺑ ﺍﺭ
.ﺪﻴﻫﺩ ﺭﺎﺸﻓ ﺍﺭ ،ﯽﻠﺒﻗ ﻢﻴﻈﻨﺗ ﺩﺭﻮﻣ ﻪﺑ ﺖﺸﮔﺯﺎﺑ یﺍﺮﺑ
XX
:ﺽﺮﻓ ﺶﻴﭘ
،ﺎﻫ ﻩﺭﺎﻤﺷ ﻦﺘﻓﺭ ﻻﺎﺑ ﺎﺑ :(–4)
.ﺪﻨﻛ ﯽﻣ ﺍﺪﻴﭘ ﺶﻳﺍﺰﻓﺍ ﻥﻮﻓﻭﺮﻜﻴﻣ ﺖﻴﺳﺎﺴﺣ
ﺪﻴﻨﻛ ﻢﻴﻈﻨﺗ ﺍﺭ ﺰﻳﻮﻧ ﺶﻫﺎﻛ ﺢﻄﺳ :(0) +5 —
ﯽﻨﻔﻠﺗ ﻪﻤﻟﺎﻜﻣ ﯽﻃ ﺭﺩ ﺰﻳﻮﻧ ﻥﺍﺰﻴﻣ ﻦﻳﺮﺘﻤﻛ ﻪﻜﻴﻳﺎﺟ ﺎﺗ
ﻢﻴﻈﻨﺗ ﺍﺭ ﻮﻛﺍ ﻮﻐﻟ ﯽﻧﺎﻣﺯ ﺰﻴﺧﺎﺗ :(0) +5 —
ﻪﻤﻟﺎﻜﻣ ﯽﻃ ﺭﺩ ﻮﻛﺍ ﻥﺍﺰﻴﻣ ﻦﻳﺮﺘﻤﻛ ﻪﻜﻴﻳﺎﺟ ﺎﺗ ﺪﻴﻨﻛ
...ﻦﻔﻠﺗ ﺎﺑ ﻥﺩﺮﻛ ﺖﺒﺤﺻ ﻡﺎﮕﻨﻫ
FUNCTION
] ﻪﺑ ﺩﻭﺭﻭ یﺍﺮﺑ 1
.ﺪﻴﻫﺩ ﺭﺎﺸﻓ ﺍﺭ ﻪﻤﻛﺩ ﺲﭙﺳ ،ﺪﻴﻧﺎﺧﺮﭽﺑ
2 ﻪﻠﺣﺮﻣ 3
.ﺪﺷﺎﺑ ﻩﺪﺷ ﻝﺎﻌﻓ
+10
—
–10
.ﺩﻮﺷ ﻩﺪﻴﻨﺷ
.ﺩﻮﺷ ﻩﺪﻴﻨﺷ ﯽﻨﻔﻠﺗ
–5
–5
MIC GAIN
NR LEVEL
ECHO CANCEL
BLUETOOTH®
ﻩﺍﺮﻤﻫ ﻦﻔﻠﺗ — BL
4
:ﺪﻴﺷﺎﺑ ﻪﺘﺷﺍﺩ یﺩﻭﺭﻭ ﺱﺎﻤﺗ ﯽﺘﻗﻭ
(
12
) .ﺪﻫﺩ ﯽﻣ ﺦﺳﺎﭘ ﺱﺎﻤﺗ ﻪﺑ ﺭﺎﻛﺩﻮﺧ ﺭﻮﻃ ﻪﺑ ﻩﺎﮕﺘﺳﺩ ،ﺪﺷﺎﺑ ﻩﺪﺷ ﻦﻴﻴﻌﺗ [
.ﺪﺷ ﺪﻫﺍﻮﺧ ﻊﻄﻗ ﺙﻮﺗﻮﻠﺑ ﻝﺎﺼﺗﺍ ،ﺪﻴﻨﻛ ﺍﺪﺟ ﺍﺭ ﯽﻳﻮﻠﺟ ﻪﺤﻔﺻ ﺎﻳ ﻩﺩﺮﻛ ﺵﻮﻣﺎﺧ ﺍﺭ ﻩﺎﮕﺘﺳﺩ ﺮﮔﺍ –
.ﺪﻴﻫﺩ ﺭﺎﺸﻓ ﺍﺭ
.ﺪﻴﻫﺩ ﺭﺎﺸﻓ ﺍﺭ
.ﺪﻴﻫﺩ ﺭﺎﺸﻓ ﺍﺭ
—
—
.ﺪﻨﻛ ﯽﻣ یﺯﺎﺳ ﻡﺎﮕﻤﻫ ﻩﺎﮕﺘﺳﺩ ﺎﺑ ﺍﺭ iPhone یﺍﺪﺻ ﻥﺍﺰﻴﻣ ،ﺱﺎﻤﺗ ﻦﻴﺣ ﺭﺩ ،ﻩﺎﮕﺘﺳﺩ .ﺖﺴﻴﻧ ﻩﺩﺎﻔﺘﺳﺍ ﻞﺑﺎﻗ iPhone یﺍﺮﺑ
یﺎﻫ ﻪﻤﻛﺩ ﺯﺍ ﯽﻜﻳ ﺎﻳ ﺍﺪﺻ ﻢﻴﻈﻨﺗ یﺮﺳ ﺎﻳ
.ﺪﻴﻧﺎﺧﺮﭽﺑ ﺍﺭ ﻡﻮﻟﻭ ﻪﻤﻛﺩ ﯽﻨﻔﻠﺗ ﺱﺎﻤﺗ ﯽﻃ ﺭﺩ
ﺮﻴﺛﺎﺗ ﻊﺑﺎﻨﻣ ﺮﻳﺎﺳ یﺍﺪﺻ ﻥﺍﺰﻴﻣ ﺮﺑ ﺕﺎﻤﻴﻈﻨﺗ ﻦﻳﺍ •
.ﺪﻴﻫﺩ ﺭﺎﺸﻓ ﺍﺭ
Bluetooth ﻩﺎﮕﺘﺳﺩ ﻪﺑ ﺩﻮﺷ ﯽﻣ ﻡﺎﺠﻧﺍ ﻪﻛ ﯽﻳﺎﻫﺭﺎﻛ •
.ﺪﻴﻫﺩ ﺭﺎﺸﻓ ﺍﺭ (6 ﺎﺗ 1) یﺩﺪﻋ
.ﺪﻴﻫﺩ ﺭﺎﺸﻓ ﺍﺭ
.ﺪﻴﻫﺩ ﺭﺎﺸﻓ ﺍﺭ
ﻪﻤﻛﺩ ﯽﻨﻔﻠﺗ ﺱﺎﻤﺗ ﻦﻴﺣ ﺭﺩ
.ﺩﺭﺍﺩ ﯽﮕﺘﺴﺑ ﻩﺎﮕﺘﺳﺩ ﻦﻳﺍ ﻪﺑ ﻞﺼﺘﻣ
ﻪﻤﻛﺩ
ﺎﻳ
.ﺖﺷﺍﺩ ﺪﻫﺍﻮﺨﻧ
.ﺪﻨﻧﺯ ﯽﻣ ﮏﻤﺸﭼ ﺎﻫ ﻪﻤﻛﺩ ﻪﻤﻫ –
AUTO ANSWER
(
[15]*
ﺱﺎﻤﺗ ﻪﺑ یﺮﻓﺯﺪﻨﻫ ﺖﻟﺎﺣ ﺯﺍ ﺮﻴﻴﻐﺗ
UETOOTH
ﯽﻨﻔﻠﺗ ﺱﺎﻤﺗ ﺖﻓﺎﻳﺭﺩ
] یﺍﺮﺑ ﯽﻧﺎﻣﺯ ﺮﮔﺍ –
:ﯽﻨﻔﻠﺗ ﺱﺎﻤﺗ ﻦﻴﺣ
ﯽﻨﻔﻠﺗ ﺱﺎﻤﺗ ﻪﺑ ﺦﺳﺎﭘ
ﯽﻨﻔﻠﺗ ﺱﺎﻤﺗ ﺩﺭ
ﯽﻨﻔﻠﺗ ﺱﺎﻤﺗ ﻪﺑ ﻥﺩﺍﺩ ﻥﺎﻳﺎﭘ
ﻦﻔﻠﺗ یﺍﺪﺻ ﻥﺍﺰﻴﻣ ﻢﻴﻈﻨﺗ
:ﺽﺮﻓ ﺶﻴﭘ)
[35]
ﺎﺗ
ﺲﻜﻌﻟﺎﺑ ﻭ ﯽﺻﻮﺼﺧ
ﻪﺑﯽﻳﻮﻠﺟ ﻪﺤﻔﺻ یﻭﺭﺭﻭﺩ ﻩﺍﺭ ﺯﺍ ﻝﺮﺘﻨﻛ یﻭﺭ
[00]
*
11
ﻰﺳﺭﺎﻓ
Page 39

ﺙﻮﺗﻮﻠﺑ ﻩﺎﮕﺘﺳﺩ ﻥﺩﺮﻛ ﺖﻔﺟ
.ﺪﻴﻫﺪﺑ ﻡﺎﺠﻧﺍ ﻩﺎﮕﺘﺳﺩ ﻭﺩ ﻦﻳﺍ ﻦﻴﺑ ﺍﺭ (pairing) ﻥﺩﺮﻛ ﺖﻔﺟ ﻞﻤﻋ ،ﺭﺎﺑ ﻦﻴﻟﻭﺍ یﺍﺮﺑ ﻂﺒﺿ ﻪﺑ ﺙﻮﺗﻮﻠﺑ ﻩﺎﮕﺘﺳﺩ ﻝﺎﺼﺗﺍ ﻡﺎﮕﻨﻫ
.ﺪﻨﻛ ﯽﻣ ﺖﻛﺮﺣ ﺮﮕﺸﻳﺎﻤﻧ یﻭﺭ “VOLUME KNOB” “PRESS” ﻩﺎﮕﺘﺳﺩ ﻡﺎﻧ “PASS XXXXXX” “PAIRING”
.ﺪﻴﻨﻛ ﺏﺎﺨﺘﻧﺍ ﺲﭙﺳ ﻭ ﻮﺠﺘﺴﺟ Bluetooth ﻩﺎﮕﺘﺳﺩ ﺭﺩ ﺍﺭ (KMM-U5*BT) ﻩﺎﮕﺘﺳﺩ ﻦﻳﺍ ﻝﺪﻣ ﻡﺎﻧ 2
ﺩﺭﺍﻭ ﺍﺭ (PIN) ﯽﺼﺨﺷ ﯽﻳﺎﺳﺎﻨﺷ ﻩﺭﺎﻤﺷ ﻪﻠﺻﺎﻓﻼﺑ ﻮﺠﺘﺴﺟ ﺯﺍ ﺪﻌﺑ ﻪﻛ ﺪﺷﺎﺑ ﺯﺎﻴﻧ ﺖﺳﺍ ﻦﻜﻤﻣ ،ﺙﻮﺗﻮﻠﺑ یﺎﻫ ﻩﺎﮕﺘﺳﺩ ﺯﺍ ﯽﻀﻌﺑ ﺭﺩ •
ﻦﺷﻭﺭ “BT” ﺰﻴﻧ ﺙﻮﺗﻮﻠﺑ ﻝﺎﺼﺗﺍ یﺭﺍﺮﻗﺮﺑ ﻡﺎﮕﻨﻫ ﻭ ﺩﻮﺷ ﯽﻣ ﺮﻫﺎﻇ ﻪﺤﻔﺻ یﻭﺭ “PAIRING OK” ﺕﺭﺎﺒﻋ ،ﺩﻮﺷ ﻡﺎﻤﺗ ﻥﺩﺮﻛ ﺖﻔﺟ ﯽﺘﻗﻭ
ﻪﺑ ﯽﺘﺳﺩ ﺕﺭﻮﺻ ﻪﺑ ﺍﺭ ﻩﺎﮕﺘﺳﺩ .ﺪﻧﻮﺸﻧ ﻞﺼﺘﻣ ﻩﺎﮕﺘﺳﺩ ﻪﺑ ﺭﺎﻛﺩﻮﺧ ﺭﻮﻃ ﻪﺑ ﻥﺩﺮﻛ ﺖﻔﺟ ﺯﺍ ﺪﻌﺑ ﺙﻮﺗﻮﻠﺑ یﺎﻫ ﻩﺎﮕﺘﺳﺩ ﺯﺍ ﯽﻀﻌﺑ ﺖﺳﺍ ﻦﻜﻤﻣ •
.ﺪﻴﻨﻛ ﻉﻮﺟﺭ ﺙﻮﺗﻮﻠﺑ ﻩﺎﮕﺘﺳﺩ ﺯﺍ ﻩﺩﺎﻔﺘﺳﺍ یﺎﻤﻨﻫﺍﺭ ﻪﺑ ،ﺮﺘﺸﻴﺑ ﺕﺎﻋﻼﻃﺍ ﺐﺴﻛ ﺖﻬﺟ .ﺪﻴﻨﻛ ﻞﺻﻭ ﻂﺒﺿ
ﻩﺎﮕﺘﺳﺩ ﻥﺩﺮﻛ ﻑﺬﺣ یﺍﺮﺑ .ﺪﺷ ﺪﻫﺍﻮﺧ ﺖﺒﺛ ﺎﻤﺷ ﻂﺒﺿ ﺭﺩ ﺕﻮﺛﻮﻠﺑ ﻩﺎﮕﺘﺳﺩ ﻡﺎﻧ ﺪﻴﻨﻛ ﺖﺴﻳﺭ ﺍﺭ ﻂﺒﺿ ﺮﮔﺍ ﯽﺘﺣ ،ﺪﻧﺪﺷ ﺖﻔﺟ ﺎﻫ ﻩﺎﮕﺘﺳﺩ ﯽﺘﻗﻭ •
ﻖﻳﺮﻃ ﺯﺍ) یﺯﺎﺳ ﺖﻔﺟ ﺖﺳﺍﻮﺧﺭﺩ ،ﺪﻴﻨﻛ ﯽﻣ ﻞﺼﺘﻣ USB یﺩﻭﺭﻭ ﻪﻧﺎﻳﺎﭘ ﻪﺑ ﺍﺭ Android /iPod touch /iPhone ﻩﺎﮕﺘﺳﺩ ﯽﺘﻗﻭ •
.ﺪﻴﻫﺩ ﺭﺎﺸﻓ ﺍﺭ ﻡﻮﻟﻭ ﻪﻤﻛﺩ ،ﻩﺎﮕﺘﺳﺩ ﻡﺎﻧ ﺪﻴﻳﺄﺗ ﺯﺍ ﺲﭘ یﺯﺎﺳ ﺖﻔﺟ یﺍﺮﺑ .ﺩﻮﺷ ﯽﻣ ﻝﺎﻌﻓ ﺭﺎﻛﺩﻮﺧ ﺭﻮﻃ ﻪﺑ (ﺙﻮﺗﻮﻠﺑ
.ﺪﺷﺎﺑ ﻩﺪﺷ ﺐﺼﻧ ﺎﻤﺷ ﺪﻳﻭﺭﺪﻧﺍ ﻩﺎﮕﺘﺳﺩ یﻭﺭ KENWOOD MUSIC PLAY ﻪﻣﺎﻧﺮﺑ –
.ﺪﻴﻫﺩ ﺭﺎﺸﻓ ﺍﺭ
.ﺪﻴﻨﻛ ﻉﻮﺟﺭ ﺙﻮﺗﻮﻠﺑ ﻩﺎﮕﺘﺳﺩ ﺎﺑ ﻩﺍﺮﻤﻫ یﺎﻤﻨﻫﺍﺭ ﻪﭼﺮﺘﻓﺩ ﻪﺑ ﻦﻴﻨﭽﻤﻫ •
.ﺪﻨﻛ ﯽﻣ ﯽﻧﺎﺒﻴﺘﺸﭘ (SSP) Secure Simple Pairing ﺯﺍ ﻩﺎﮕﺘﺳﺩ ﻦﻳﺍ •
.ﺪﻴﻫﺩ ﺭﺎﺸﻓ ﺍﺭ ﻡﻮﻟﻭ ﻪﻤﻛﺩ ،ﻥﺩﺮﻛ ﺖﻔﺟ ﻉﻭﺮﺷ ﺖﻬﺟ 3
.ﺩﺮﻛ (ﺖﻔﺟ) ﺖﺒﺛ ﺍﺭ ﻩﺎﮕﺘﺳﺩ ﺞﻨﭘ ﺮﺜﻛﺍﺪﺣ ﻥﺍﻮﺗ ﯽﻣ ﻞﻛ ﺭﺩ •
.ﺖﺳﺍ ﻝﺎﺼﺗﺍ ﻞﺑﺎﻗ ﺙﻮﺗﻮﻠﺑ ﻩﺎﮕﺘﺳﺩ ﮏﻳ ﻂﻘﻓ ﺭﺎﺑﺮﻫ ﺭﺩ •
:ﻪﻛ ﺩﻮﺷ ﯽﻣ ﻝﺎﻌﻓ ﯽﻧﺎﻣﺯ ﺎﻬﻨﺗ ﺭﺎﻛﺩﻮﺧ یﺯﺎﺳ ﺖﻔﺟ ﺖﺳﺍﻮﺧﺭﺩ
(
14
) .ﺪﺷﺎﺑ ﻩﺪﺷ ﻢﻴﻈﻨﺗ [ON] یﻭﺭ [
ﻪﻤﻛﺩ ،ﻩﺎﮕﺘﺳﺩ ﻥﺩﺮﻛ ﻦﺷﻭﺭ ﺖﻬﺟ 1
.ﺪﻴﻨﻛ
.ﺪﺷ ﺪﻫﺍﻮﺧ
.[
DEVICE DELETE
.ﺪﺷﺎﺑ ﻩﺪﺷ ﻦﺷﻭﺭ ﻞﺼﺘﻣ ﻩﺎﮕﺘﺳﺩ ﺙﻮﺗﻮﻠﺑ –
] ،14 ،ﻩﺪﺷ یﺯﺎﺳ ﺖﻔﺟ
AUTO PAIRING
] –
ﻥﻮﻓﻭﺮﻜﻴﻣ یﺩﻭﺭﻭ ﺶﻴﻓ
ﻥﻮﻓﻭﺮﻜﻴﻣ ﻪﻳﻭﺍﺯ ﻢﻴﻈﻨﺗ
BLUETOOTH®
ﻝﺎﺼﺗﺍ — BLUETOOTH
ﺪﻨﻛ ﯽﻣ ﯽﻧﺎﺒﻴﺘﺸﭘ ﺍﺭ ﺎﻬﻧﺁ ﺙﻮﺗﻮﻠﺑ ﻪﻛ ﯽﻳﺎﻫ ﻞﻳﺎﻓﻭﺮﭘ
(HFP) یﺮﻓﺯﺪﻨﻫ ﻞﻳﺎﻓﻭﺮﭘ –
(SPP) ﻝﺎﻳﺮﺳ ﺕﺭﻮﭘ ﻞﻳﺎﻓﻭﺮﭘ –
(PBAP) ﻦﻔﻠﺗ ﻪﭼﺮﺘﻓﺩ ﻪﺑ ﯽﺳﺮﺘﺳﺩ ﻞﻳﺎﻓﻭﺮﭘ –
(A2DP) ﻪﺘﻓﺮﺸﻴﭘ ﯽﺗﻮﺻ ﻊﻳﺯﻮﺗ ﻞﻳﺎﻓﻭﺮﭘ –
(AVR CP) ﺮﻳﻮﺼﺗ/ﺍﺪﺻ ﺭﻭﺩ ﻩﺍﺭ ﺯﺍ ﻝﺮﺘﻨﻛ ﻞﻳﺎﻓﻭﺮﭘ –
ﺪﻧﻮﺷ ﯽﻣ ﯽﻧﺎﺒﻴﺘﺸﭘ ﺙﻮﺗﻮﻠﺑ ﺎﺑ ﻪﻛ ﯽﻳﺎﻫ کﺪﻛ
(SBC) ﯽﻋﺮﻓ ﺪﻧﺎﺑ کﺪﻛ –
(AAC) ﻪﺘﻓﺮﺸﻴﭘ ﯽﺗﻮﺻ یﺭﺍﺬﮔﺪﻛ –
ﻥﻮﻓﻭﺮﻜﻴﻣ ﻥﺩﺮﻛ ﻞﺻﻭ
ﯽﺘﺸﭘ ﻞﻧﺎﭘ
ﻥﻮﻓﻭﺮﻜﻴﻣ
(ﺩﻮﺷ ﯽﻣ ﻪﺿﺮﻋ)
ﯽﻨﻤﻳﺍ یﺍﺮﺑ ﻭ ﺯﺎﻴﻧ ﺕﺭﻮﺻ ﺭﺩ
(ﺩﻮﺷ ﯽﻤﻧ ﻪﺿﺮﻋ) ﻩﺮﻴﮔ ﺯﺍ ﺮﺘﺸﻴﺑ
.ﺪﻴﻨﻛ ﻩﺩﺎﻔﺘﺳﺍ
10
Page 40

ﺪﻳﺪﺟ ﻩﺎﮕﺘﺴﻳﺍ ﮏﻳ ﻩﺮﻴﺧﺫ ﻭ ﺩﺎﺠﻳﺍ
.ﺪﻳﺭﺍﺪﻬﮕﻧ ﻭ ﺪﻴﻫﺩ ﺭﺎﺸﻓ ﺍﺭ ﺍﺪﺻ ﻢﻴﻈﻨﺗ ﭻﻴﭘ 1
ﺍﺭ ﭻﻴﭘ ﺲﭙﺳ ﻭ ﺩﻮﺷ ﺏﺎﺨﺘﻧﺍ [
FROM ARTIST
] ﺎﻳ [
FROM TRACK
] ﺎﺗ ﺪﻴﻧﺎﺧﺮﭽﺑ ﺍﺭ ﺍﺪﺻ ﻢﻴﻈﻨﺗ ﭻﻴﭘ 2
.ﺪﻴﻫﺩ ﺭﺎﺸﻓ
.ﺩﻮﺷ ﯽﻣ ﺩﺎﺠﻳﺍ ﯽﻠﻌﻓ ﺪﻨﻣﺮﻨﻫ ﺎﻳ ﮓﻨﻫﺁ ﺱﺎﺳﺍ ﺮﺑ ﺪﻳﺪﺟ ﻩﺎﮕﺘﺴﻳﺍ ﮏﻳ
.ﺪﻳﺭﺍﺩ ﻪﮕﻧ ﻭ ﺪﻴﻫﺩ ﺭﺎﺸﻓ ﺍﺭ (5 ﺎﺗ 1) ﺭﺍﺩ ﻩﺭﺎﻤﺷ یﺎﻫ ﻪﻤﻛﺩ ﺯﺍ ﯽﻜﻳ ،ﻩﺮﻴﺧﺫ یﺍﺮﺑ
.ﺪﻴﻫﺩ ﺭﺎﺸﻓ ﺍﺭ (5 ﺎﺗ 1) یﺩﺪﻋ یﺎﻫ ﻪﻤﻛﺩ ﺯﺍ ﯽﻜﻳ ،ﻩﺪﺷ ﻩﺮﻴﺧﺫ ﻩﺎﮕﺘﺴﻳﺍ ﮏﻳ ﺏﺎﺨﺘﻧﺍ یﺍﺮﺑ
ﺪﻴﻨﻛ ﻮﺠﺘﺴﺟ ﺍﺭ ﻩﺪﺷ ﺖﺒﺛ ﻩﺎﮕﺘﺴﻳﺍ ﮏﻳ
.ﺪﻴﻫﺩ ﺭﺎﺸﻓ ﺍﺭ 1
.ﺪﻴﻫﺩ ﺭﺎﺸﻓ ﺍﺭ ﻪﻤﻛﺩ ﺲﭙﺳ ،ﺪﻴﻧﺎﺧﺮﭽﺑ ﺍﺭ ﻡﻮﻟﻭ ﻪﻤﻛﺩ ،ﻪﻨﻳﺰﮔ ﮏﻳ ﺏﺎﺨﺘﻧﺍ ﺖﻬﺟ 2
ﻩﺪﺷ ﺖﺒﺛ ﺦﻳﺭﺎﺗ ﻪﺑ ﻪﺟﻮﺗ ﺎﺑ :[
BY DATE
ﯽﻳﺎﺒﻔﻟﺍ ﺐﻴﺗﺮﺗ :[
A-Z
.ﺪﻴﻫﺩ ﺭﺎﺸﻓ ﺍﺭ ﭻﻴﭘ ﺲﭙﺳ ﻭ ﺪﻴﻧﺎﺧﺮﭽﺑ ﺮﻈﻧ ﺩﺭﻮﻣ ﻩﺎﮕﺘﺴﻳﺍ ﺖﻤﺳ ﻪﺑ ﺍﺭ ﺍﺪﺻ ﻢﻴﻈﻨﺗ ﭻﻴﭘ
.ﺪﻳﺭﺍﺪﻬﮕﻧ ﻭ ﺪﻴﻫﺩ ﺭﺎﺸﻓ ﺍﺭ ،ﻥﺩﺮﻛ ﻮﻐﻟ یﺍﺮﺑ
(ﺪﻴﻨﻛ ﻩﺩﺎﻔﺘﺳﺍ RC-406 ﺯﺍ ﺎﻳ)
.ﺪﻴﻫﺩ ﺭﺎﺸﻓ ﺍﺭ ﺲﭙﺳ ﻭ K / J ،ﺎﻫ ﻩﺎﮕﺘﺴﻳﺍ یﻮﺠﺘﺴﺟ یﺍﺮﺑ
ﺪﻴﻨﻛ ﻩﺮﻴﺧﺫ ﺏﺎﻳ ﻞﺤﻣ ﻥﺍﻮﻨﻋ ﻪﺑ ﺍﺭ ﺪﻨﻣﺮﻨﻫ ﺕﺎﻋﻼﻃﺍ ﺎﻳ ﮓﻨﻫﺁ ﮏﻳ
.ﺪﻳﺭﺍﺩ ﻪﮕﻧ ﻭ ﻩﺩﺍﺩ ﺭﺎﺸﻓ ﺍﺭ J 1
.ﺪﻴﻫﺩ ﺭﺎﺸﻓ ﺍﺭ ﻪﻤﻛﺩ ﺲﭙﺳ ،ﺪﻴﻧﺎﺧﺮﭽﺑ ﺍﺭ ﻡﻮﻟﻭ ﻪﻤﻛﺩ ،ﻪﻨﻳﺰﮔ ﮏﻳ ﺏﺎﺨﺘﻧﺍ ﺖﻬﺟ 2
ﯽﻠﻌﻓ ﮓﻨﻫﺁ ﺕﺎﻋﻼﻃﺍ :[
ﯽﻠﻌﻓ ﺪﻨﻣﺮﻨﻫ ﺕﺎﻋﻼﻃﺍ :[
THIS TRACK
THIS ARTIST
.ﺩﻮﺷ ﯽﻣ ﻩﺮﻴﺧﺫ ﺎﻤﺷ ﻩﺎﮕﺘﺳﺩ ﺭﺩ ﺕﺎﻋﻼﻃﺍ ﻭ ﺩﻮﺷ ﯽﻣ ﻩﺩﺍﺩ ﺶﻳﺎﻤﻧ “BOOKMARKED” ﺕﺭﺎﺒﻋ
.ﺖﺴﻴﻧ ﯽﺳﺮﺘﺳﺩ ﻞﺑﺎﻗ ﻩﺎﮕﺘﺳﺩ ﻦﻳﺍ ﺭﺩ ﺎﻣﺍ ﺖﺳﺍ ﺩﻮﺟﻮﻣ ﺎﻤﺷ Pandora ﺏﺎﺴﺣ ﺭﺩ ﺏﺎﻳ ﻞﺤﻣ
ﺲﭙﺳ (iPod touch /iPhone) ﺪﻴﻨﻛ ﺐﺼﻧ ﺩﻮﺧ ﻩﺎﮕﺘﺳﺩ ﺭﺩ ﺍﺭ Pandora ﻪﻣﺎﻧﺮﺑ ﻪﺨﺴﻧ ﻦﻳﺮﺗﺪﻳﺪﺟ
.ﺪﻳﻮﺷ ﺩﺭﺍﻭ Pandora ﻪﺑ ﻭ ﻩﺩﺮﻛ ﺩﺎﺠﻳﺍ ﺍﺭ ﺏﺎﺴﺣ ﮏﻳ
(
4
) .ﺪﻴﻨﻛ ﺏﺎﺨﺘﻧﺍ [
3
.ﺪﻴﻨﻛ ﺯﺎﺑ ﺩﻮﺧ ﻩﺎﮕﺘﺳﺩ ﺭﺩ ﺍﺭ Pandora ﻪﻣﺎﻧﺮﺑ 1
PANDORA SRC
.ﺪﻴﻨﻛ ﻞﺼﺘﻣ USB یﺩﻭﺭﻭ ﻝﺎﻨﻴﻣﺮﺗ ﻪﺑ ﺍﺭ ﺩﻮﺧ ﻩﺎﮕﺘﺳﺩ 2
USB ﺩﻭﺭﻭ ﻝﺎﻨﻴﻣﺮﺗ
]
]
3
.ﺩﻮﺷ ﯽﻣ ﻉﻭﺮﺷ ﺶﺨﭘ ﻭ ﺪﻫﺩ ﯽﻣ ﺖﻟﺎﺣ ﺮﻴﻴﻐﺗ PANDORA ﻪﺑ ﻊﺒﻨﻣ
.ﺪﻴﻫﺩ ﺭﺎﺸﻓ ﺍﺭ
.ﺪﻴﻫﺩ ﺭﺎﺸﻓ ﺍﺭ
ﺍﺭ /
ﯽﺒﻧﺎﺟ ﺯﺍﻮﻟ) KCA-iP103 / KCA-iP102
2
*
iPhone/iPod ﯽﺒﻧﺎﺟ ﻞﺑﺎﻛ ﺎﻳ
.ﺪﻴﻫﺩ ﺭﺎﺸﻓ ﺍﺭ
.ﺪﻴﻫﺩ ﺭﺎﺸﻓ ﺍﺭ T
.ﺪﻴﻫﺩ ﺭﺎﺸﻓ ﺍﺭ
/
1
*
3
*
ﻦﺘﺷﺍﺪﻧ ﺖﺳﻭﺩ ﺎﻳ ﻦﺘﺷﺍﺩ ﺖﺳﻭﺩ
.ﺪﻴﻫﺩ ﺭﺎﺸﻓ
]
]
.ﺪﻳﻮﺷ ﯽﻣ ﺩﺭ ﯽﻠﻌﻓ کﺍﺮﺗ ﺯﺍ ﺪﻴﻨﻛ ﺏﺎﺨﺘﻧﺍ ﺍﺭ (ﻦﺘﺷﺍﺪﻧ ﺖﺳﻭﺩ) ﻦﻴﻳﺎﭘ ﻪﺑ ﻭﺭ ﺖﺸﮕﻧﺍ ﺖﻣﻼﻋ ﺮﮔﺍ
Lightning ﻉﻮﻧ : KCA-iP103 ،ﯽﻧﺯﻮﺳ 30 ﻉﻮﻧ : KCA-iP102
.ﺪﻴﻨﻜﻧ ﺎﻫﺭ ﻭﺭﺩﻮﺧ ﻞﺧﺍﺩ ﺍﺭ ﻞﺑﺎﻛ ،ﺪﻴﻨﻛ ﯽﻤﻧ ﻩﺩﺎﻔﺘﺳﺍ ﻩﺎﮕﺘﺳﺩ ﺯﺍ ﯽﺘﻗﻭ
Pandora®
:ﺎﻫ ﺯﺎﺳ ﻩﺩﺎﻣﺁ
] یﺍﺮﺑ ﺍﺭ [ON] •
ﺪﻴﻨﻛ ﻥﺩﺮﻛ ﺵﻮﮔ ﻪﺑ ﻉﻭﺮﺷ
(یﺭﺎﻴﺘﺧﺍ
ﺚﻜﻣ /ﺶﺨﭘ
کﺍﺮﺗ ﺯﺍ ﻥﺪﺷ ﺩﺭ
ﻪﺑﯽﻳﻮﻠﺟ ﻪﺤﻔﺻ یﻭﺭﺭﻭﺩ ﻩﺍﺭ ﺯﺍ ﻝﺮﺘﻨﻛ یﻭﺭ
*1
*2
*3
ﻰﺳﺭﺎﻓ
9
Page 41

(RC-406 ﺯﺍ ﻩﺩﺎﻔﺘﺳﺍ) Direct Music Search
.ﺪﻴﻫﺩ ﺭﺎﺸﻓ ﺍﺭ DIRECT 1
.ﺪﻴﻫﺩ ﺭﺎﺸﻓ ﻞﻳﺎﻓ ﻩﺭﺎﻤﺷ ﻥﺩﺮﻛ ﺩﺭﺍﻭ یﺍﺮﺑ ﺍﺭ یﺩﺪﻋ یﺎﻫ ﻪﻤﻛﺩ 2
.ﺪﻴﻫﺩ ﺭﺎﺸﻓ ﯽﻘﻴﺳﻮﻣ یﻮﺠﺘﺴﺟ یﺍﺮﺑ ﺍﺭ 3
.ﺪﻴﻫﺩ ﺭﺎﺸﻓ ﺍﺭ DIRECT ﺎﻳ ،ﻥﺩﺮﻛ ﻮﻐﻟ یﺍﺮﺑ •
.ﺖﺴﻴﻧ ﻩﺩﺎﻔﺘﺳﺍ ﻞﺑﺎﻗ ﺖﺳﺍ ﻩﺪﺷ ﺏﺎﺨﺘﻧﺍ ﯽﻓﺩﺎﺼﺗ ﺶﺨﭘ ﻪﻛ ﯽﻣﺎﮕﻨﻫ •
.ﺖﺴﻴﻧ ﻩﺩﺎﻔﺘﺳﺍ ﻞﺑﺎﻗ KMC /KME Light ﻞﻳﺎﻓ ،ANDROID ،iPod یﺍﺮﺑ •
Aupeo /TuneIn Radio Pro /TuneIn Radio ﻪﺑ ﻥﺩﺍﺩ ﺵﻮﮔ
/iPod ﻩﺎﮕﺘﺳﺩ ،Aupeo ﺎﻳ TuneIn Radio Pro ،TuneIn Radio ﻪﺑ ﻥﺩﺍﺩ ﺵﻮﮔ ﻦﻴﺣ
.ﺪﻴﻨﻛ ﻞﺻﻭ ﻩﺎﮕﺘﺳﺩ USB یﺩﻭﺭﻭ ﻪﻧﺎﻳﺎﭘ ﻪﺑ ﺍﺭ iPhone
.ﺖﻓﺮﮔ ﺪﻫﺍﻮﺧ ﯽﺟﻭﺮﺧ ﺎﻫ ﻪﻣﺎﻧﺮﺑ ﻦﻳﺍ یﺍﺪﺻ ﺯﺍ ﻩﺎﮕﺘﺳﺩ •
ﺕﺎﻤﻴﻈﻨﺗ ﺮﻳﺎﺳ
ﺍﺭ ﻪﻤﻛﺩ ﺲﭙﺳ ،ﺪﻴﻧﺎﺧﺮﭽﺑ ﺍﺭ ﻡﻮﻟﻭ ﻪﻤﻛﺩ ،(ﺪﻴﻨﻛ ﻉﻮﺟﺭ ﻞﻳﺫ ﻝﻭﺪﺟ ﻪﺑ) ﻪﻨﻳﺰﮔ ﮏﻳ ﺏﺎﺨﺘﻧﺍ ﺖﻬﺟ 2
.ﺪﻴﻫﺩ ﺭﺎﺸﻓ ﺍﺭ ﺍﺪﺻ ﻢﻴﻈﻨﺗ ﭻﻴﭘ [
.ﺪﺷﺎﺑ ﻩﺪﺷ ﻝﺎﻌﻓ ﺎﻳ ﻩﺪﺷ ﺏﺎﺨﺘﻧﺍ ﻩﺍﻮﺨﻟﺩ ﺩﺭﻮﻣ ﻪﻛ ﯽﻧﺎﻣﺯ ﺎﺗ ﺪﻴﻨﻛ ﺭﺍﺮﻜﺗ ﺍﺭ
FUNCTION
] ﻪﺑ ﺩﻭﺭﻭ یﺍﺮﺑ 1
.ﺪﻴﻫﺩ ﺭﺎﺸﻓ
2 ﻪﻠﺣﺮﻣ 3
.ﺪﻳﺭﺍﺪﻬﮕﻧ ﻭ ﺪﻴﻫﺩ ﺭﺎﺸﻓ ﺝﻭﺮﺧ یﺍﺮﺑ ﺍﺭ 4
.ﺪﻴﻫﺩ ﺭﺎﺸﻓ ﺍﺭ ،ﯽﻠﺒﻗ ﻢﻴﻈﻨﺗ ﺩﺭﻮﻣ ﻪﺑ ﺖﺸﮔﺯﺎﺑ یﺍﺮﺑ
XX
:ﺽﺮﻓ ﺶﻴﭘ
ANDROID SETUP
؛ .(KENWOOD MUSIC PLAY ﻪﻣﺎﻧﺮﺑ ﺯﺍ ﻩﺩﺎﻔﺘﺳﺍ ﺎﺑ) ﻩﺎﮕﺘﺳﺩ یﻭﺭ ﺯﺍ ﻝﺮﺘﻨﻛ :
ﺯﺍ ﻩﺩﺎﻔﺘﺳﺍ ﻥﻭﺪﺑ) ﺪﻳﻭﺭﺪﻧﺍ ﻩﺎﮕﺘﺳﺩ یﻭﺭ ﺯﺍ یﺍ ﻪﻧﺎﺳﺭ ﺪﻨﭼ یﺎﻫ ﻪﻣﺎﻧﺮﺑ ﺮﮕﻳﺩ ﻝﺮﺘﻨﻛ :
BROWSE MODE
HAND MODE
/ﺶﺨﭘ ﺕﺎﻴﻠﻤﻋ ﻩﺎﮕﺘﺳﺩ یﻭﺭ ﺯﺍ ﺪﻴﻧﺍﻮﺗ ﯽﻣ ﻥﺎﻨﭽﻤﻫ ،ﻝﺎﺣ ﻦﻳﺍ ﺎﺑ .(KENWOOD MUSIC PLAY ﻪﻣﺎﻧﺮﺑ
.ﺪﻴﻫﺩ ﻡﺎﺠﻧﺍ ﻩﺎﮕﺘﺳﺩ یﻭﺭ ﺯﺍ ﺍﺭ ﺵﺮﭘ ﻭ ﺚﻜﻣ
USB
ﺕﺭﻮﺻ ﻪﺑ ([
DRIVE 5
] ﺎﺗ [
DRIVE 1
]) یﺪﻌﺑ ﻮﻳﺍﺭﺩ :
DRIVE CHANGE
MUSIC DRIVE
.ﺩﻮﺷ ﯽﻣ ﻉﻭﺮﺷ ﺶﺨﭘ ﻭ ﺏﺎﺨﺘﻧﺍ ﺭﺎﻛﺩﻮﺧ
.ﺪﻴﻨﻛ ﺭﺍﺮﻜﺗ ﺍﺭ
،iPod ﻞﺧﺍﺩ یﺎﻫ ﻞﻳﺎﻓ ﻪﺑ ﻥﺩﺍﺩ ﺵﻮﮔ ﻦﻴﺣ :
3 ﺎﺗ 1 ﻞﺣﺍﺮﻣ ﺮﻳﺯ یﺎﻫﻮﻳﺍﺭﺩ ﺏﺎﺨﺘﻧﺍ یﺍﺮﺑ
10% /5% /1% /0.5%
SKIP SEARCH
ﺎﻫ ﻞﻳﺎﻓ ﻞﻛ یﺍﺮﺑ ﺍﺭ ﻮﺠﺘﺴﺟ ﻥﺩﺮﻛ ﺩﺭ ﺖﺒﺴﻧ ،KMC /KME Light ﺎﻳ ANDROID
.ﺪﻨﻛ ﯽﻣ ﺏﺎﺨﺘﻧﺍ
ANDROID / iPod / USB
ﻩﺩﺍﺩ ﺶﻳﺎﻤﻧ “Press [VIEW] to install KENWOOD MUSIC PLAY APP” ﻡﺎﻴﭘ ،ﺪﻴﻨﻛ ﻞﺼﺘﻣ ﺍﺭ یﺪﻳﻭﺭﺪﻧﺍ ﻩﺎﮕﺘﺳﺩ ﻪﻛ ﯽﻣﺎﮕﻨﻫ
ﻦﻳﺮﺧﺁ ،ﻩﺎﮕﺘﺳﺩ ﻥﺩﺮﻛ ﻞﺼﺘﻣ ﺯﺍ ﻞﺒﻗ ﺪﻴﻧﺍﻮﺗ ﯽﻣ ﻦﻴﻨﭽﻤﻫ .ﺪﻴﻨﻛ ﻝﺎﺒﻧﺩ ﺍﺭ ﺎﻫ ﻞﻤﻌﻟﺍﺭﻮﺘﺳﺩ ،ﻪﻣﺎﻧﺮﺑ ﺐﺼﻧ یﺍﺮﺑ .ﺩﻮﺷ ﯽﻣ
([
ANDROID SETUP
.ﺪﺷﺎﺑ ﻩﺪﺷ ﺏﺎﺨﺘﻧﺍ [BROWSE MODE] /[MODE OFF] ﻪﻛ ﺖﺳﺍ ﻩﺩﺎﻔﺘﺳﺍ ﻞﺑﺎﻗ ﯽﻧﺎﻣﺯ ﻂﻘﻓ :ANDROID /iPod یﺍﺮﺑ
ﺍﺭ ﻞﻳﺎﻓ ﺎﻳ ﺪﻴﻨﻛ ﺵﺮﭘ ﻞﻳﺎﻓ ﺯﺍ ،ﺪﻴﻨﻛ ﻒﻗﻮﺘﻣ ﹰﺎﺘﻗﻮﻣ ﺍﺭ ﻞﻳﺎﻓ ﺶﺨﭘ ،ﺪﻴﻨﻛ ﺶﺨﭘ ﺍﺭ ﻞﻳﺎﻓ ﻩﺎﮕﺘﺳﺩ یﻭﺭ ﺯﺍ ﺪﻴﻧﺍﻮﺗ ﯽﻣ ﻥﺎﻨﭽﻤﻫ
ﻡﺎﺠﻧﺍ ﺪﻳﺍ ﻩﺩﺮﻛ ﻦﻴﻴﻌﺗ ﺶﻴﭘ ﺯﺍ ﻪﻛ ﯽﻳﻮﺠﺘﺴﺟ ﻥﺩﺮﻛ ﺩﺭ ﺖﺒﺴﻧ ﺎﺑ ﺍﺭ ﻮﺠﺘﺴﺟ ﺎﺗ ﺪﻴﻫﺩ ﺭﺎﺸﻓ ﺍﺭ T / S
.ﺪﺷﺎﺑ ﻩﺪﺷ ﺏﺎﺨﺘﻧﺍ [
(18 )
.ﺪﻴﻨﻛ ﺐﺼﻧ ﺩﻮﺧ ﺪﻳﻭﺭﺪﻧﺍ ﻩﺎﮕﺘﺳﺩ یﻭﺭ ﺍﺭ KENWOOD MUSIC PLAY ﻪﻣﺎﻧﺮﺑ ﻪﺨﺴﻧ
] )
.ﺪﺷﺎﺑ ﻩﺪﺷ ﺏﺎﺨﺘﻧﺍ [BROWSE MODE] ﻪﻛ ﺖﺳﺍ ﻩﺩﺎﻔﺘﺳﺍ ﻞﺑﺎﻗ ﯽﻧﺎﻣﺯ ﻂﻘﻓ :ANDROID ﺍﺮﺑ
.ﺪﻨﻛ ﯽﻤﻧ ﺭﺎﻛ ANDROID /iPod یﺍﺮﺑ ﺩﺭﻮﻣ ﻦﻳﺍ .FLAC/WAV/AAC/WMA/MP3 یﺎﻫ ﻞﻳﺎﻓ یﺍﺮﺑ ﻂﻘﻓ
(18 )
KENWOOD Music Control : KMC ،KENWOOD Music Editor Light : KME Light
.ﺪﻳﺮﺒﺑ ﺐﻘﻋ ﺎﻳ ﻮﻠﺟ ﻪﺑ ﻊﻳﺮﺳ
ﺖﺴﻴﻟ/ﻪﺷﻮﭘ ﺯﺍ ﻞﻳﺎﻓ ﮏﻳ ﺏﺎﺨﺘﻧﺍ
.ﺪﻴﻫﺩ ﺭﺎﺸﻓ ﺍﺭ 1
.ﺪﻴﻫﺩ ﺭﺎﺸﻓ ﺍﺭ ﻪﻤﻛﺩ ﺲﭙﺳ ،ﺪﻴﻧﺎﺧﺮﭽﺑ ﺍﺭ ﻡﻮﻟﻭ ﻪﻤﻛﺩ ،ﺖﺴﻴﻟ/ﻪﺷﻮﭘ ﮏﻳ ﺏﺎﺨﺘﻧﺍ ﺖﻬﺟ 2
.ﺪﻴﻫﺩ ﺭﺎﺸﻓ ﺍﺭ ﻪﻤﻛﺩ ﺲﭙﺳ ،ﺪﻴﻧﺎﺧﺮﭽﺑ ﺍﺭ ﻡﻮﻟﻭ ﻪﻤﻛﺩ ،ﻞﻳﺎﻓ ﮏﻳ ﺏﺎﺨﺘﻧﺍ ﺖﻬﺟ 3
.ﺪﻴﻨﻛ ﻮﺠﺘﺴﺟ ﺖﻋﺮﺳ ﻪﺑ ﺎﻬﻧﺁ ﻦﻴﺑ ﺭﺩ ﺪﻴﻧﺍﻮﺗ ﯽﻣ ،ﺖﺳﺍ ﺩﺎﻳﺯ ﺭﺎﻴﺴﺑ ﺎﻤﺷ یﺎﻫ ﻞﻳﺎﻓ ﺩﺍﺪﻌﺗ ﺮﮔﺍ
ﻊﻳﺮﺳ یﻮﺠﺘﺴﺟ
:(KMC /KME Light یﺎﻫ ﻞﻳﺎﻓ یﺍﺮﺑ) USB یﺍﺮﺑ
SKIP SEARCH
.ﺪﻴﻫﺩ ﻡﺎﺠﻧﺍ 10% ﺖﺒﺴﻧ ﺎﺑ ﺍﺭ ﻮﺠﺘﺴﺟ ﺎﺗ ﺪﻳﺭﺍﺩ ﻪﮕﻧ ﻭ ﺪﻴﻫﺩ ﺭﺎﺸﻓ ﺍﺭ T / S
.ﺩﻮﺷ ﯽﻤﻧ ﻁﻮﺑﺮﻣ FLAC/WAV/AAC/WMA/MP3 یﺎﻫ ﻞﻳﺎﻓ ﻪﺑ •
([
.ﺪﻴﻫﺩ ﻡﺎﺠﻧﺍ ﺰﻴﻧ ﻞﻳﺎﻓ ﻝﻭﺍ ﻑﺮﺣ ﺱﺎﺳﺍ ﺮﺑ ﺍﺭ ﻮﺠﺘﺴﺟ ﺪﻴﻧﺍﻮﺗ ﯽﻣ
] ) .ﺪﻴﻫﺩ
:iPod یﺍﺮﺑ
.ﺪﻳﻮﺷ ﺩﺭﺍﻭ ﻪﺴﻳﻮﻧ یﻮﺠﺘﺴﺟ ﻪﺑ ﺎﺗ ﺪﻴﻧﺎﺧﺮﭽﺑ ﹰﺎﻌﻳﺮﺳ ﺍﺭ ﺍﺪﺻ ﻥﺍﺰﻴﻣ ﭻﻴﭘ
.ﺪﻴﻧﺎﺧﺮﭽﺑ ﺍﺭ ﻡﻮﻟﻭ ﻪﻤﻛﺩ ،ﺮﻈﻧ ﺩﺭﻮﻣ ﻑﺮﺣ ﺏﺎﺨﺘﻧﺍ ﺖﻬﺟ
.ﺪﻴﻨﻛ ﺩﺭﺍﻭ ﺍﺭ “ * ” ﺖﺴﻴﻓﺎﻛ ،9 ﺎﺗ 0 ﻭ Z ﺎﺗ A ﺰﺠﺑ ﻪﺴﻳﻮﻧ ﮏﻳ یﻮﺠﺘﺴﺟ یﺍﺮﺑ
.ﺪﻳﻭﺮﺑ یﺩﻭﺭﻭ ﺖﻤﺴﻗ ﻪﺑ ﺎﺗ ﺪﻴﻫﺩ ﺭﺎﺸﻓ ﺍﺭ T / S
.ﺪﻴﻨﻛ ﺩﺭﺍﻭ ﺪﻴﻧﺍﻮﺗ ﯽﻣ ﺍﺭ ﻪﺴﻳﻮﻧ 3 ﺮﺜﻛﺍﺪﺣ •
.ﺪﻴﻫﺩ ﺭﺎﺸﻓ ﺍﺭ ﺍﺪﺻ ﻥﺍﺰﻴﻣ ﭻﻴﭘ ،ﻮﺠﺘﺴﺟ ﻉﻭﺮﺷ یﺍﺮﺑ
.ﺪﻴﻫﺩ ﺭﺎﺸﻓ ﺍﺭ ﻪﻤﻛﺩ ،ﻻﺎﺑ یﻮﻨﻣ/ﻝﻭﺍ ﻞﻳﺎﻓ/ﻪﺸﻳﺭ ﻪﺷﻮﭘ ﻪﺑ ﺖﺸﮔﺯﺎﺑ یﺍﺮﺑ •
(
7
) .ﺪﺷﺎﺑ ﻩﺪﺷ ﺏﺎﺨﺘﻧﺍ [
BROWSE MODE
.ﺪﻴﻫﺩ ﺭﺎﺸﻓ ﺍﺭ
.ﺪﻳﺭﺍﺪﻬﮕﻧ ﻭ ﺪﻴﻫﺩ ﺭﺎﺸﻓ ﺍﺭ
MODE OFF
] ﻪﻛ ﺖﺳﺍ ﺍﺮﺟﺍ ﻞﺑﺎﻗ ﯽﻧﺎﻣﺯ ﻂﻘﻓ iPod ﻩﺎﮕﺘﺳﺩ یﺍﺮﺑ •
] ﻪﻛ ﺖﺳﺍ ﺍﺮﺟﺍ ﻞﺑﺎﻗ ﯽﻧﺎﻣﺯ ﻂﻘﻓ ANDROID یﺎﻫ ﻩﺎﮕﺘﺳﺩ یﺍﺮﺑ •
،ﯽﻠﺒﻗ ﻢﻴﻈﻨﺗ ﺩﺭﻮﻣ ﻪﺑ ﺖﺸﮔﺯﺎﺑ یﺍﺮﺑ •
،ﻥﺩﺮﻛ ﻮﻐﻟ یﺍﺮﺑ •
([
ANDROID SETUP
] )
*3
*4
*5
*6
*7
*8
8
Page 42

ANDROID / iPod / USB
ﺶﺨﭘ ﻉﻭﺮﺷ
.ﺩﻮﺷ ﯽﻣ ﻉﻭﺮﺷ ﺶﺨﭘ ﻭ ﺪﻨﻛ ﯽﻣ ﺮﻴﻴﻐﺗ ﺭﺎﻛﺩﻮﺧ ﺕﺭﻮﺻ ﻪﺑ ﻊﺒﻨﻣ
USB ﺩﻭﺭﻭ ﻝﺎﻨﻴﻣﺮﺗ
USB
.ﺪﻴﻫﺩ ﺭﺎﺸﻓ ﺍﺭ
.ﺪﻴﻫﺩ ﺭﺎﺸﻓ ﺍﺭ
/
/ S
/ S
.ﺪﻳﺭﺍﺩ ﻪﮕﻧ ﻭ ﻩﺩﺍﺩ ﺭﺎﺸﻓ ﺍﺭ T / S.ﺪﻳﺭﺍﺩ ﻪﮕﻧ ﻭ ﻩﺩﺍﺩ ﺭﺎﺸﻓ ﺍﺭ
.ﺪﻴﻫﺩ ﺭﺎﺸﻓ ﺍﺭ
.ﺪﻴﻫﺩ ﺭﺎﺸﻓ ﺍﺭ T / S.ﺪﻴﻫﺩ ﺭﺎﺸﻓ ﺍﺭ
.ﺪﻴﻫﺩ ﺭﺎﺸﻓ ﺍﺭ K / J
.ﺪﻴﻫﺩ ﺭﺎﺸﻓ ﺭﺮﻜﻣ ﺭﻮﻄﺑ ﺍﺭ
/WAV/AAC/WMA/MP3 یﺎﻫ ﻞﻳﺎﻓ :
ANDROID ﺎﻳ iPod ﺎﻳ FLAC
7
*
KMC /KME Light یﺎﻫ ﻞﻳﺎﻓ :
REPEAT OFF /FOLDER REPEAT /FILE REPEAT
REPEAT OFF /FILE REPEAT
.ﺪﻴﻫﺩ ﺭﺎﺸﻓ ﺭﺮﻜﻣ ﺭﻮﻄﺑ ﺍﺭ
،FLAC/WAV/AAC/WMA/MP3 یﺎﻫ ﻞﻳﺎﻓ :
RANDOM OFF /FOLDER RANDOM
ﺎﻳ iPod ﻩﺎﮕﺘﺳﺩ ،KMC /KME Light یﺎﻫ ﻞﻳﺎﻓ
ANDROID
.ﺩﻮﺷ ﺏﺎﺨﺘﻧﺍ
ALL RANDOM
.ﺪﻴﻫﺩ ﺭﺎﺸﻓ ﺭﺎﺑﺪﻨﭼ ﺍﺭ
ﺎﺗ ﺪﻳﺭﺍﺪﻬﮕﻧ ﻭ ﺪﻴﻫﺩ ﺭﺎﺸﻓ ﺍﺭ
،iPod ﻊﺒﻨﻣ ﻥﺩﻮﺑ ﺯﺎﺑ ﻡﺎﮕﻨﻫ
8
*
iPod یﻭﺭ ﺯﺍ ﻝﺮﺘﻨﻛ :
ﻩﺎﮕﺘﺳﺩ یﻭﺭ ﺯﺍ ﻝﺮﺘﻨﻛ :
([
ANDROID SETUP
] ،8 ) ،ANDROID ﻊﺒﻨﻣ ﻥﺩﻮﺑ ﺯﺎﺑ ﻡﺎﮕﻨﻫ
.ﺪﻴﻫﺩ ﺭﺎﺸﻓ ﺭﺮﻜﻣ ﺭﻮﻄﺑ ﺍﺭ
.ﺪﻧﻮﺷ ﯽﻣ ﺶﺨﭘ ﹰﺍﺩﺪﺠﻣ ﺪﺷﺎﺑ ﻩﺪﺷ ﻩﺮﻴﺧﺫ ﺮﻳﺯ یﺎﻫ ﻩﺎﮕﺘﺳﺩ ﺭﺩ ﻪﻛ ﯽﻳﺎﻫ ﮓﻨﻫﺁ
.(Mass Storage ﻉﻮﻧ) ﺪﻨﻤﺷﻮﻫ ﯽﺷﻮﮔ ﮏﻳ ﺯﺍ ﻩﺪﺷ ﺏﺎﺨﺘﻧﺍ ﯽﺟﺭﺎﺧ ﺎﻳ ﯽﻠﺧﺍﺩ ﻪﻈﻓﺎﺣ •
.یﻮﻳﺍﺭﺩ ﺪﻨﭼ ﻩﺎﮕﺘﺳﺩ ﮏﻳ ﺯﺍ ﻩﺪﺷ ﺏﺎﺨﺘﻧﺍ ﻮﻳﺍﺭﺩ •
ﻰﺳﺭﺎﻓ
7
MODE ON
MODE OFF
ﺚﻜﻣ /ﺶﺨﭘ
4
*
ﻊﻳﺮﺳ ﻥﺩﺮﺑ ﻮﻠﺟ/ﺐﻘﻋ ﻪﺑ
ﻞﻳﺎﻓ ﮏﻳ ﺏﺎﺨﺘﻧﺍ
5
*
ﺪﻴﻨﻛ ﺏﺎﺨﺘﻧﺍ ﻪﺷﻮﭘ ﮏﻳ
6
*
ﺶﺨﭘ ﺭﺍﺮﻜﺗ
6
*
ﻰﻓﺩﺎﺼﺗ ﺶﺨﭘ
ﻝﺮﺘﻨﻛ ﺖﻟﺎﺣ ﺏﺎﺨﺘﻧﺍ
ﯽﻘﻴﺳﻮﻣ ﻮﻳﺍﺭﺩ ﺏﺎﺨﺘﻧﺍ
([
MUSIC DRIVE
] ،8 )
ﻪﺑﯽﻳﻮﻠﺟ ﻪﺤﻔﺻ یﻭﺭﺭﻭﺩ ﻩﺍﺭ ﺯﺍ ﻝﺮﺘﻨﻛ یﻭﺭ
(ﺮﭙﻣﺁ ﯽﻠﻴﻣ 500 :ﺮﺜﻛﺍﺪﺣ) CA-U1EX
(یﺭﺎﻴﺘﺧﺍ ﯽﺒﻧﺎﺟ ﻡﺯﺍﻮﻟ)
iPhone/iPod
KCA-iP103 / KCA-iP102
1
*
(یﺭﺎﻴﺘﺧﺍ ﯽﺒﻧﺎﺟ ﺯﺍﻮﻟ)
2
*
iPhone/iPod ﯽﺒﻧﺎﺟ ﻞﺑﺎﻛ ﺎﻳ
3
ANDROID
*
2
*
USB 2.0 ﻭﺮﻜﻴﻣ ﻞﺑﺎﻛ
(ﺖﺳﺍ ﺩﻮﺟﻮﻣ ﺪﻳﺮﺧ یﺍﺮﺑ)
Lightning ﻉﻮﻧ : KCA-iP103 ،ﯽﻧﺯﻮﺳ 30 ﻉﻮﻧ : KCA-iP102
ﺎﻫﺭ ﻭﺭﺩﻮﺧ ﻞﺧﺍﺩ ﺍﺭ ﻞﺑﺎﻛ ،ﺪﻴﻨﻛ ﯽﻤﻧ ﻩﺩﺎﻔﺘﺳﺍ ﻩﺎﮕﺘﺳﺩ ﺯﺍ ﯽﺘﻗﻭ
*1
*2
.ﺪﻴﻨﻜﻧ
Page 43

ﻮﻳﺩﺍﺭ
CLOCK
ﯽﻣ ﻡﺎﮕﻤﻫ ﯽﻳﻮﻳﺩﺍﺭ ﻩﺩﺍﺩ ﻢﺘﺴﻴﺳ ﻩﺎﮕﺘﺴﻳﺍ ﻥﺎﻣﺯ ﺎﺑ ﺍﺭ ﻩﺎﮕﺘﺳﺩ ﻥﺎﻣﺯ :
[
PTY SEARCH
،
COUNTRY ،
ﺍﺭ [
ﻩﺪﺷ ﻢﻴﻈﻨﺗ ﺎﻫﺮﺒﺧ ﻪﺤﻔﺻ ﺎﻳ ﺭﺍﺪﺸﻫ ﻭ ﯽﻜﻴﻓﺍﺮﺗ ﺕﺎﻋﻼﻃﺍ ﺖﻓﺎﻳﺭﺩ ﻦﻴﺣ ﺭﺩ ﺍﺪﺻ ﻥﺍﺰﻴﻣ ﺮﮔﺍ •
ﻪﻛ یﺪﻌﺑ ﺖﺻﺮﻓ ﺭﺩ .ﺩﻮﺷ ﯽﻣ ﻩﺮﻴﺧﺫ ﺭﺎﻛﺩﻮﺧ ﺕﺭﻮﺻ ﻪﺑ ﻩﺪﺷ ﻢﻴﻈﻨﺗ یﺍﺪﺻ ﻥﺍﺰﻴﻣ ،ﺪﺷﺎﺑ
.ﺪﻧﻮﺷ ﯽﻣ ﻝﺎﻤﻋﺍ ﺩﺭﺍﻮﻣ ﻦﻳﺍ ،ﺩﻮﺷ ﯽﻣ ﻝﺎﻌﻓ ﺎﻫﺮﺒﺧ ﻪﺤﻔﺻ ﺎﻳ ﺭﺍﺪﺸﻫ ﻭ ﮏﻴﻓﺍﺮﺗ ﺕﺎﻋﻼﻃﺍ
،
DRAMA ،
،
CHILDREN ،
DOCUMENT ،
،
JAZZ ،
MUSIC
] ﺎﻳ [
] /[TI] /[
AF SET
.ﺪﺷﺎﺑ FM3 /FM2 /FM1 ﺪﻧﺎﺑ ﻪﻛ ﺖﺳﺍ ﺏﺎﺨﺘﻧﺍ ﻞﺑﺎﻗ ﯽﻧﺎﻣﺯ ﻂﻘﻓ
EDUCATE ،
SPORT ،(ﺕﺎﻋﻼﻃﺍ) INFO ،
FINANCE ،
WEATHER ،
LEISURE ،
EASY M (ﻚﻳﺯﻮﻣ) ،
TRAVEL ،
OTHER M (ﻚﻳﺯﻮﻣ) ،
FOLK M (ﻚﻳﺯﻮﻣ) ،
SPEECH
] ﺭﺩ ﻩﺪﺷ یﺪﻨﺑ ﻪﻘﺒﻃ ﻪﻣﺎﻧﺮﺑ ﻉﻮﻧ ﻩﺎﮕﺘﺳﺩ ،ﺏﺎﺨﺘﻧﺍ ﺕﺭﻮﺻ ﺭﺩ
.ﺩﻮﺷ ﻰﻣ ﻮﻐﻟ :
] /[
REGIONAL
] /[
VARIED ،
PHONE IN ،
ROCK M (ﻚﻳﺯﻮﻣ) ،
CLASSICS ،
OLDIES ،
SCIENCE ،
RELIGION ،
NATION M (ﻚﻳﺯﻮﻣ)
ON
OFF
.SW2/SW1/AM ﻊﺒﻨﻣ یﺍﺮﺑ ﻂﻘﻓ
NEWS SET
AFFAIRS ،
POP M
LIGHT M (ﻚﻳﺯﻮﻣ)
TIME SYNC
؛ .ﺪﻨﻛ
] /[
MONO SET
:ﺩﻮﺟﻮﻣ ﻪﻣﺎﻧﺮﺑ ﻉﻮﻧ •
NEWS :
CULTURE
SPEECH
SOCIAL
(ﻚﻳﺯﻮﻣ) :
.ﺪﻨﻛ ﯽﻣ ﻮﺠﺘﺴﺟ
MUSIC
.ﺪﻴﻫﺩ ﺭﺎﺸﻓ ﺍﺭ ﻪﻤﻛﺩ ﺲﭙﺳ ،ﺪﻴﻧﺎﺧﺮﭽﺑ ﺍﺭ ﻡﻮﻟﻭ ﻪﻤﻛﺩ ،(ﺪﻴﻨﻛ ﻉﻮﺟﺭ ﻞﻳﺫ ﻝﻭﺪﺟ ﻪﺑ) ﻪﻨﻳﺰﮔ ﮏﻳ ﺏﺎﺨﺘﻧﺍ ﺖﻬﺟ 2
*
] •
XX
:ﺽﺮﻓ ﺶﻴﭘ
.ﺩﻮﺷ ﻰﻣ ﻮﻐﻟ :
/ﻊﺒﻨﻣ ﯽﺘﻗﻭ .ﺪﺷﺎﺑ ﯽﻣ ﻝﺎﻤﻋﺍ ﻞﺑﺎﻗ ﯽﺑﺎﺨﺘﻧﺍ ﻩﺎﮕﺘﺴﻳﺍ/ﻊﺒﻨﻣ یﺍﺮﺑ ﻂﻘﻓ ﻩﺪﺷ ﻡﺎﺠﻧﺍ ﺕﺎﻤﻴﻈﻨﺗ
.ﺩﻮﺷ ﻰﻣ ﻮﻐﻟ :NO ؛ .ﺪﻨﻛ ﯽﻣ ﻩﺮﻴﺧﺫ ﺍﺭ ﺩﻮﺧ ﺖﻓﺎﻳﺭﺩ ﺎﺑ ﻩﺎﮕﺘﺴﻳﺍ 6 ﺭﺎﻛﺩﻮﺧ ﺕﺭﻮﺻ ﻪﺑ :
ﻩﺪﺷ ﺏﺎﺨﺘﻧﺍ [
یﺮﮕﻳﺩ ﻩﺎﮕﺘﺴﻳﺍ ﺭﺎﻛﺩﻮﺧ ﺭﻮﻃ ﻪﺑ ،ﺪﺷﺎﺑ ﻒﻴﻌﺿ ﺩﻮﺟﻮﻣ ﯽﻳﻮﻳﺩﺍﺭ ﺝﻮﻣ ﺖﻓﺎﻳﺭﺩ ﺕﺭﺪﻗ ﺮﮔﺍ :
یﺎﻫ ﻩﺩﺍﺩ ﻢﺘﺴﻴﺳ) Radio Data System ﻪﻜﺒﺷ ﻥﺎﻤﻫ ﺭﺩ ﺍﺭ ﻪﻣﺎﻧﺮﺑ ﻥﺎﻤﻫ ﻪﻛ ﺪﻨﻛ ﯽﻣ ﻮﺠﺘﺴﺟ ﺍﺭ
PRESET TYPE
ﻮﻐﻟ :
OFF
؛ .ﺩﻭﺮﺑ ﻦﻴﺑ ﺯﺍ ﺖﺳﺍ ﻦﻜﻤﻣ ﻮﻳﺮﺘﺳﺍ ﻩﻮﻠﺟ ﺎﻣﺍ ﺪﺸﺨﺑ ﯽﻣ ﺩﻮﺒﻬﺑ ﺍﺭ FM ﺖﻓﺎﻳﺭﺩ :
ﺶﺨﭘ ﺩﻮﺟﻭ ﺕﺭﻮﺻ ﺭﺩ ﺍﺭ (ﺭﺎﺒﺧﺍ) News Programme یﻮﻳﺩﺍﺭ ﺖﻗﻮﻣ ﺭﻮﻃ ﻪﺑ ﻩﺎﮕﺘﺳﺩ :
ﺶﺨﭘ ﺍﺭ ﺮﮕﻳﺩ ﯽﻳﻮﻳﺩﺍﺭ ﻩﺎﮕﺘﺴﻳﺍ ﮏﻳ ،“AF” ﻝﺮﺘﻨﻛ ﺯﺍ ﻩﺩﺎﻔﺘﺳﺍ ﺎﺑ ﻭ ﺹﺎﺧ ﻪﻘﻄﻨﻣ ﺭﺩ ﻂﻘﻓ :
ﯽﻜﻴﻓﺍﺮﺗ ﺕﺎﻋﻼﻃﺍ ﻪﺑ ﺖﻗﻮﻣ ﺭﻮﻃ ﻪﺑ ،ﻥﺎﻜﻣﺍ ﺕﺭﻮﺻ ﺭﺩ ﻪﻛ ﺪﻫﺩ ﯽﻣ ﻩﺯﺎﺟﺍ ﻩﺎﮕﺘﺳﺩ ﻪﺑ :
ﺍﺭ ﺍﺪﺻ ﻥﺍﺰﻴﻣ ﭻﻴﭘ .ﺪﻳﻮﺷ ﺩﺭﺍﻭ PTY ﻥﺎﺑﺯ ﺏﺎﺨﺘﻧﺍ ﺶﺨﺑ ﻪﺑ ﺎﺗ ﺪﻴﻫﺩ ﺭﺎﺸﻓ ﺍﺭ ﺍﺪﺻ ﻥﺍﺰﻴﻣ ﭻﻴﭘ
ﺍﺭ ﭻﻴﭘ ﺲﭙﺳ ﻭ (
ﻉﻭﺮﺷ یﺍﺮﺑ ﺲﭙﺳ ،(ﺪﻴﻨﻛ ﻪﻌﺟﺍﺮﻣ ﺮﻳﺯ ﺶﺨﺑ ﻪﺑ) ﺪﻨﻛ ﯽﻣ ﺏﺎﺨﺘﻧﺍ ﺍﺭ ﺩﻮﺟﻮﻣ ﻪﻣﺎﻧﺮﺑ ﻉﻮﻧ
.ﺪﺷﺎﺑ ﻩﺪﺷ ﻝﺎﻌﻓ ﺎﻳ ﻩﺪﺷ ﺏﺎﺨﺘﻧﺍ ﻩﺍﻮﺨﻟﺩ ﺩﺭﻮﻣ ﻪﻛ ﯽﻧﺎﻣﺯ ﺎﺗ ﺪﻴﻨﻛ ﺭﺍﺮﻜﺗ ﺍﺭ 2 ﻪﻠﺣﺮﻣ 3
OFF
؛ .ﺪﻨﻛ ﯽﻣ ﻮﺠﺘﺴﺟ ﺍﺭ ﺏﻮﺧ ﺖﻓﺎﻳﺭﺩ ﺎﺑ ﯽﻳﺎﻫ ﻩﺎﮕﺘﺴﻳﺍ ﻂﻘﻓ :
.ﺪﻴﻫﺩ ﻡﺎﺠﻧﺍ ﻩﺭﺎﺑﻭﺩ ﺍﺭ ﺕﺎﻤﻴﻈﻨﺗ ﺖﺳﺍ ﻡﺯﻻ ،ﺪﻴﻨﻛ ﺽﻮﻋ ﺍﺭ ﻩﺎﮕﺘﺴﻳﺍ
] یﺍﺮﺑ [
.ﺩﻮﺷ ﻰﻣ ﻮﻐﻟ :
.ﺩﻮﺷ ﻰﻣ ﻮﻐﻟ :
GERMAN /FRENCH /ENGLISH
.ﺪﻴﻫﺩ ﺭﺎﺸﻓ ﺍﺭ ﺍﺪﺻ ﻢﻴﻈﻨﺗ ﭻﻴﭘ [
.ﺪﻳﺭﺍﺪﻬﮕﻧ ﻭ ﺪﻴﻫﺩ ﺭﺎﺸﻓ ﺝﻭﺮﺧ یﺍﺮﺑ ﺍﺭ 4
.ﺪﻴﻫﺩ ﺭﺎﺸﻓ ﺍﺭ ،ﯽﻠﺒﻗ ﻢﻴﻈﻨﺗ ﺩﺭﻮﻣ ﻪﺑ ﺖﺸﮔﺯﺎﺑ یﺍﺮﺑ
NORMAL
] ﻪﻛ ﺖﺳﺍ ﺏﺎﺨﺘﻧﺍ ﻞﺑﺎﻗ ﯽﺗﺭﻮﺻ ﺭﺩ ﻂﻘﻓ
.ﺩﻮﺷ ﻰﻣ ﻮﻐﻟ :
.ﺩﻮﺷ ﻰﻣ ﻮﻐﻟ :
OFF
؛ .ﺪﻨﻛ ﯽﻣ ﺶﺨﭘ ﺮﺗ یﻮﻗ ﺝﻮﻣ ﺖﻓﺎﻳﺭﺩ ﺎﺑ (ﻮﻳﺩﺍﺭ
OFF
؛ .(ﺩﻮﺷ ﯽﻣ ﻦﺷﻭﺭ “TI” ﻍﺍﺮﭼ) ﺪﻨﻛ ﺮﻴﻴﻐﺗ
) ﺩﻮﺷ ﺏﺎﺨﺘﻧﺍ PTY ﻥﺎﺑﺯ ﺎﺗ ﺪﻴﻧﺎﺧﺮﭽﺑ
.ﺪﻴﻫﺩ ﺭﺎﺸﻓ ﺍﺭ T / S
(
4
) .ﺪﺷﺎﺑ
OFF
؛ .ﺩﺮﻛ ﺪﻫﺍﻮﺧ
OFF
FUNCTION
YES
.ﺩﻮﺷ ﻰﻣ
؛ .ﺪﻨﻛ ﯽﻣ
.ﺪﻴﻫﺩ ﺭﺎﺸﻓ
ON
•
•
ON
ON
ON
ON
ON
ﺕﺎﻤﻴﻈﻨﺗ ﺮﻳﺎﺳ
] ﻪﺑ ﺩﻭﺭﻭ یﺍﺮﺑ 1
TUNER SETTING
LOCAL SEEK
AUTO MEMORY
MONO SET
NEWS SET
REGIONAL
AF SET
PTY SEARCH
*
TI
6
Page 44

SW2 /SW1 /AM /FM3 /FM2 /FM1 :ﻩﺪﺷ ﯽﻧﺎﺒﻴﺘﺸﭘ ﺪﻧﺎﺑ
ﯽﻳﻮﻳﺩﺍﺭ ﻩﺎﮕﺘﺴﻳﺍ ﮏﻳ یﻮﺠﺘﺴﺟ
.ﺩﻮﺷ ﺏﺎﺨﺘﻧﺍ ﺪﻧﺎﺑ ﺎﺗ (ﺪﻴﻫﺩ ﺭﺎﺸﻓ RC-406 ﺭﺩ ﺍﺭ / ﻪﻜﻨﻳﺍ ﺎﻳ) ﺪﻴﻫﺩ ﺭﺎﺸﻓ ﹰﺍﺭﺮﻜﻣ ﺍﺭ 2
.(ﺪﻴﻫﺩ ﺭﺎﺸﻓ RC-406 ﺭﺩ ﺍﺭ / S ﺎﻳ) ﺪﻴﻫﺩ ﺭﺎﺸﻓ ﺍﺭ T / S ،ﻩﺎﮕﺘﺴﻳﺍ ﮏﻳ یﻮﺠﺘﺴﺟ یﺍﺮﺑ 3
.ﺪﻴﻫﺩ ﺭﺎﺸﻓ ﺭﺮﻜﻣ ﺭﻮﻄﺑ ﺍﺭ :T / S یﺍﺮﺑ ﻮﺠﺘﺴﺟ ﺵﻭﺭ ﺮﻴﻴﻐﺗ یﺍﺮﺑ •
.ﺪﻳﺭﺍﺩ ﻪﮕﻧ ﻭ ﺪﻴﻫﺩ ﺭﺎﺸﻓ ﺍﺭ (6 ﺎﺗ 1) ﺭﺍﺩ ﻩﺭﺎﻤﺷ یﺎﻫ ﻪﻤﻛﺩ ﺯﺍ ﯽﻜﻳ :ﻩﺎﮕﺘﺴﻳﺍ ﮏﻳ ﻩﺮﻴﺧﺫ یﺍﺮﺑ •
ﺍﺭ (6 ﺎﺗ 1) یﺩﺪﻋ یﺎﻫ ﻪﻤﻛﺩ ﺯﺍ ﯽﻜﻳ ﺎﻳ) ﺪﻴﻫﺩ ﺭﺎﺸﻓ ﺍﺭ (6 ﺎﺗ 1) یﺩﺪﻋ یﺎﻫ ﻪﻤﻛﺩ ﺯﺍ ﯽﻜﻳ :ﻩﺪﺷ ﻩﺮﻴﺧﺫ ﻩﺎﮕﺘﺴﻳﺍ ﮏﻳ ﺏﺎﺨﺘﻧﺍ یﺍﺮﺑ •
.ﺪﻴﻫﺩ ﺭﺎﺸﻓ ﺭﺎﺑﺪﻨﭼ ﺍﺭ ،TUNER ﺏﺎﺨﺘﻧﺍ یﺍﺮﺑ 1
.ﺪﻴﻨﻛ ﻮﺠﺘﺴﺟ ﺍﺭ ﻩﺎﮕﺘﺴﻳﺍ ﮏﻳ ﺭﺎﻛﺩﻮﺧ ﺕﺭﻮﺻ ﻪﺑ : AUTO1
.ﺪﻴﻨﻛ ﻮﺠﺘﺴﺟ ﺍﺭ ﻩﺪﺷ ﻦﻴﻴﻌﺗ ﺶﻴﭘ ﺯﺍ ﻩﺎﮕﺘﺴﻳﺍ ﮏﻳ : AUTO2
.ﺪﻴﻨﻛ ﻮﺠﺘﺴﺟ ﺍﺭ ﻩﺎﮕﺘﺴﻳﺍ ﮏﻳ ﯽﺘﺳﺩ ﺕﺭﻮﺻ ﻪﺑ : MANUAL
.(ﺪﻴﻫﺩ ﺭﺎﺸﻓ RC-406 ﺭﺩ
(RC-406 ﺯﺍ ﻩﺩﺎﻔﺘﺳﺍ) Direct Access Tuning
ﯽﻣ ﻩﺩﺍﺩ ﻥﺎﺸﻧ ﻪﺤﻔﺻ یﻭﺭ ﺮﺑ (SW2 یﺍﺮﺑ) “– – – – –” ﺎﻳ (SW1 /AM یﺍﺮﺑ) “– – – –” ،(FM یﺍﺮﺑ) “– – – • –”
ﯽﻣ ﻮﻐﻟ ﺭﺎﻛﺩﻮﺧ ﺕﺭﻮﺻ ﻪﺑ Direct Access Tuning ،ﺪﺸﻧ ﻡﺎﺠﻧﺍ یﺭﺎﻛ ﭻﻴﻫ
.ﺪﻴﻫﺩ ﺭﺎﺸﻓ Direct Access Tuning ﻪﺑ ﺩﻭﺭﻭ یﺍﺮﺑ ﺍﺭ DIRECT 1
.ﺩﻮﺷ
.ﺪﻴﻫﺩ ﺭﺎﺸﻓ ﺲﻧﺎﻛﺮﻓ ﮏﻳ ﻥﺩﺮﻛ ﺩﺭﺍﻭ یﺍﺮﺑ ﺍﺭ یﺩﺪﻋ یﺎﻫ ﻪﻤﻛﺩ
.ﺪﻴﻫﺩ ﺭﺎﺸﻓ ﻩﺎﮕﺘﺴﻳﺍ ﮏﻳ یﻮﺠﺘﺴﺟ یﺍﺮﺑ ﺍﺭ 3
.ﺪﻴﻫﺩ ﺭﺎﺸﻓ ﺍﺭ DIRECT ﺎﻳ ،ﻥﺩﺮﻛ ﻮﻐﻟ یﺍﺮﺑ •
2 ﻪﻠﺣﺮﻣ ﺯﺍ ﺲﭘ ﺎﻳ ﻪﻴﻧﺎﺛ 10 ﻥﺎﻣﺯ ﺕﺪﻣ یﺍﺮﺑ ﺮﮔﺍ •
.ﺩﻮﺷ
؛ .ﺪﻨﻛ ﯽﻣ ﻉﻭﺮﺷ ﺍﺭ ﺭﺍﺰﻓﺍ ﻥﺎﻴﻣ یﺎﻘﺗﺭﺍ :
.(ﺖﺴﻴﻧ ﻝﺎﻌﻓ ﺎﻘﺗﺭﺍ) ﺪﻨﻛ ﯽﻣ ﻮﻐﻟ :
ﻥﺎﻴﻣ ﯽﻧﺎﺳﺭ ﺯﻭﺭ ﻪﺑ ﻩﺭﺎﺑﺭﺩ ﺕﺎﻴﺋﺰﺟ ﺯﺍ ﻉﻼﻃﺍ یﺍﺮﺑ
www.kenwood.com/cs/ce/ :ﻪﺑ ﺪﻴﻨﻛ ﻪﻌﺟﺍﺮﻣ ،ﺭﺍﺰﻓﺍ
ﺖﻋﺎﺳ ،ﺖﺳﺍ ﺵﻮﻣﺎﺧ ﻩﺎﮕﺘﺳﺩ ﻪﻜﻴﻧﺎﻣﺯ ﯽﺘﺣ :
.ﺩﻮﺷ ﻰﻣ ﻮﻐﻟ :
OFF
2
UPDATE SYSTEM/ UPDATE BT
YES
NO
ON
؛ .ﺩﻮﺷ ﯽﻣ ﻩﺩﺍﺩ ﺶﻳﺎﻤﻧ
ﺭﺎﻜﺑ ﻉﻭﺮﺷﻮﻳﺩﺍﺭ
F/W UPDATE
F/W UP xx.xx
CLOCK
CLOCK DISPLAY
ﻰﺳﺭﺎﻓ
5
Page 45

ﺭﺎﻜﺑ ﻉﻭﺮﺷ
ﺪﻴﻫﺩ ﻡﺎﺠﻧﺍ ﺍﺭ ﻪﻴﻟﻭﺍ ﺕﺎﻤﻴﻈﻨﺗ
.ﺪﻴﻫﺩ ﺭﺎﺸﻓ ﺭﺎﺑﺪﻨﭼ ﺍﺭ ،STANDBY ﺖﻟﺎﺣ ﻪﺑ ﺩﻭﺭﻭ یﺍﺮﺑ 1
ﺭﺎﺸﻓ ﺍﺭ ﻪﻤﻛﺩ ﺲﭙﺳ ،ﺪﻴﻧﺎﺧﺮﭽﺑ ﺍﺭ ﻡﻮﻟﻭ ﻪﻤﻛﺩ ،(ﺪﻴﻨﻛ ﻉﻮﺟﺭ ﻞﻳﺫ ﻝﻭﺪﺟ ﻪﺑ) ﻪﻨﻳﺰﮔ ﮏﻳ ﺏﺎﺨﺘﻧﺍ ﺖﻬﺟ 3
.ﺪﺷﺎﺑ ﻩﺪﺷ ﻝﺎﻌﻓ ﺎﻳ ﻩﺪﺷ ﺏﺎﺨﺘﻧﺍ ﻩﺍﻮﺨﻟﺩ ﺩﺭﻮﻣ ﻪﻛ ﯽﻧﺎﻣﺯ ﺎﺗ ﺪﻴﻨﻛ ﺭﺍﺮﻜﺗ ﺍﺭ
XX
:ﺽﺮﻓ ﺶﻴﭘ
یﺎﻫ ﻪﻧﺎﻳﺎﭘ ﻪﺑ ﺮﻓﻭﻮﺑﺎﺳ ﺎﻳ ﺐﻘﻋ یﺎﻫﻮﮔﺪﻨﻠﺑ ﻪﻛ ﺪﻴﻨﻛ ﺏﺎﺨﺘﻧﺍ :SUB-W /REAR
.ﺪﻫﺩ ﯽﻣ ﻡﺎﺠﻧﺍ ﺍﺭ ﺏﺎﺨﺘﻧﺍ ،ﻪﻨﻴﻬﺑ ﺩﺮﻜﻠﻤﻋ یﺍﺮﺑ OEM یﺎﻫﻮﮔﺪﻨﻠﺑ ﺎﻳ (ﭻﻨﻳﺍ 6 ﺎﻳ ﭻﻨﻳﺍ 9×6
(5 ) ﺪﻧﺎﺑ ﺮﻫ ﺭﺩ ﻩﺪﺷ ﻢﻴﻈﻨﺗ ﺶﻴﭘ ﺯﺍ ﻪﻤﻛﺩ ﺮﻫ یﺍﺮﺑ ﺍﺭ ﻩﺎﮕﺘﺴﻳﺍ ﮏﻳ :
ﺮﻫ یﺍﺮﺑ ﺍﺭ ﻩﺎﮕﺘﺴﻳﺍ ﮏﻳ ،ﻩﺪﺷ ﺏﺎﺨﺘﻧﺍ ﺪﻧﺎﺑ ﻪﺑ ﻪﺟﻮﺗ ﻥﻭﺪﺑ :
ﺍﺭ ﯽﻳﻮﻠﺟ ﻪﺤﻔﺻ ،ﺵﻮﻣﺎﺧ یﻭﺭ ACC ﻢﻴﻈﻨﺗ ﻡﺎﮕﻨﻫ ﺭﺩ ﺪﻳﺩﺮﻛ ﺵﻮﻣﺍﺮﻓ ﺮﮔﺍ :
(9 ) .ﺪﻨﻛ ﯽﻣ ﻝﺎﻌﻓﺮﻴﻏ :
.(ﯽﺟﺭﺎﺧ ﺮﻳﺎﻓ ﯽﻠﭙﻣﺁ ﻖﻳﺮﻃ ﺯﺍ) ﺪﻨﺷﺎﺑ ﻞﺼﺘﻣ ﺖﺸﭘ ﺭﺩ ﯽﺟﻭﺮﺧ
،ﭻﻨﻳﺍ 4 ﺎﻳ ﭻﻨﻳﺍ 5) ﻮﮔﺪﻨﻠﺑ ﻩﺯﺍﺪﻧﺍ ﻪﺑ ﻪﺟﻮﺗ ﺎﺑ :OEM /6/9 × 6 /4/5 /OFF
.ﺪﻨﻛ ﯽﻣ ﻝﺎﻌﻓﺮﻴﻏ :
.ﺪﻨﻛ ﯽﻣ ﻝﺎﻌﻓﺮﻴﻏ :
OFF
(16 ) .ﺪﻨﻛ ﯽﻣ ﻝﺎﻌﻓﺮﻴﻏ :
.ﺪﻴﻫﺩ ﺭﺎﺸﻓ ﺍﺭ ﺍﺪﺻ ﻢﻴﻈﻨﺗ ﭻﻴﭘ [
.ﺪﻳﺭﺍﺪﻬﮕﻧ ﻭ ﺪﻴﻫﺩ ﺭﺎﺸﻓ ﺝﻭﺮﺧ یﺍﺮﺑ ﺍﺭ 5
.ﺪﻴﻫﺩ ﺭﺎﺸﻓ ﺍﺭ ،ﯽﻠﺒﻗ ﻢﻴﻈﻨﺗ ﺩﺭﻮﻣ ﻪﺑ ﺖﺸﮔﺯﺎﺑ یﺍﺮﺑ
.ﺪﻨﻛ ﯽﻣ ﻩﺮﻴﺧﺫ ﻩﺪﺷ ﻢﻴﻈﻨﺗ ﺶﻴﭘ ﺯﺍ ﻪﻤﻛﺩ
OFF
؛ .ﺪﻨﻛ ﻰﻣ ﻝﺎﻌﻓ ﺍﺭ ﺪﻴﻠﻛ ﺲﻤﻟ ﺍﺪﺻ :
OFF
؛ .ﺪﻨﻛ ﯽﻣ ﻝﺎﻌﻓ ﺍﺭ ﺭﺍﺪﺸﻫ ،ﺪﻴﻨﻛ ﻞﺼﺘﻣ
؛ .ﺪﻨﻛ ﯽﻣ ﻝﺎﻌﻓ ﻊﺒﻨﻣ ﺏﺎﺨﺘﻧﺍ ﺭﺩ ﺍﺭ PANDORA :
OFF
؛ .ﺪﻨﻛ ﯽﻣ ﻝﺎﻌﻓ ﻊﺒﻨﻣ ﺏﺎﺨﺘﻧﺍ ﺭﺩ ﺍﺭ AUX :
MIX
؛ .ﺪﻨﻛ ﯽﻣ ﻩﺮﻴﺧﺫ
FUNCTION
NORMAL
] ﻪﺑ ﺩﻭﺭﻭ یﺍﺮﺑ 2
AUDIO CONTROL
TUNER SETTING
ON
ON
SOURCE SELECT
PANDORA SRC
ON
ON
.ﺪﻴﻫﺩ
3 ﻪﻠﺣﺮﻣ 4
SWITCH
PREOUT
SP SELECT
PRESET TYPE
SYSTEM
KEY BEEP
TDF ALARM
BUILT-IN AUX
3
ﺶﻳﺎﻤﻧ ﺡﺮﻃ ﻮﻐﻟ
:ﺪﻫﺩ ﯽﻣ ﻥﺎﺸﻧ ﺍﺭ ﺩﺭﺍﻮﻣ ﻦﻳﺍ ﻪﺤﻔﺻ ،(ﻩﺎﮕﺘﺳﺩ ﯽﻧﺎﺸﻧﺯﺎﺑ ﺯﺍ ﺲﭘ ﺎﻳ) ﺪﻴﻨﻛ ﯽﻣ ﻦﺷﻭﺭ ﺍﺭ ﻩﺎﮕﺘﺳﺩ ﻪﻛ ﯽﻣﺎﮕﻨﻫ
.ﺪﻴﻫﺩ ﺭﺎﺸﻓ ﺍﺭ ﻪﻤﻛﺩ ﺲﭙﺳ ،ﺪﻴﻧﺎﺧﺮﭽﺑ ﺍﺭ ﻡﻮﻟﻭ ﻪﻤﻛﺩ ،[
.ﺪﻴﻫﺩ ﺭﺎﺸﻓ ﺍﺭ ﻪﻤﻛﺩ ﺲﭙﺳ ،ﺪﻴﻧﺎﺧﺮﭽﺑ ﺍﺭ ﻡﻮﻟﻭ ﻪﻤﻛﺩ ،[
.ﺪﻴﻫﺩ ﺭﺎﺸﻓ ﺍﺭ ﭻﻴﭘ ﺲﭙﺳ ﻭ ﺪﻧﻮﺷ ﻡﺎﺠﻧﺍ ﺕﺎﻤﻴﻈﻨﺗ ﺎﺗ ﺪﻴﻧﺎﺧﺮﭽﺑ ﺍﺭ ﺍﺪﺻ ﻥﺍﺰﻴﻣ ﭻﻴﭘ 4
.ﺪﻴﻫﺩ ﺭﺎﺸﻓ ﺍﺭ ﻪﻤﻛﺩ ﺲﭙﺳ ،ﺪﻴﻧﺎﺧﺮﭽﺑ ﺍﺭ ﻡﻮﻟﻭ ﻪﻤﻛﺩ ،[
.ﺪﻴﻫﺩ ﺭﺎﺸﻓ ﺍﺭ ﻪﻤﻛﺩ ﺲﭙﺳ ،ﺪﻴﻧﺎﺧﺮﭽﺑ ﺍﺭ ﻡﻮﻟﻭ ﻪﻤﻛﺩ ،[
ﻭ ﺪﻴﻫﺩ ﺭﺎﺸﻓ ﺍﺭ ﻪﻤﻛﺩ ،ﻢﻴﻘﺘﺴﻣ ﺕﺭﻮﺻ ﻪﺑ ﺖﻋﺎﺳ ﻢﻴﻈﻨﺗ ﺖﻟﺎﺣ ﻪﺑ ﻥﺪﺷ ﺩﺭﺍﻭ یﺍﺮﺑ
“VOLUME KNOB”
“PRESS” “CANCEL DEMO”
.ﺪﻴﻫﺩ ﺭﺎﺸﻓ ﺍﺭ ﻡﻮﻟﻭ ﻪﻤﻛﺩ
.ﺩﻮﺷ ﯽﻣ ﺏﺎﺨﺘﻧﺍ ﻪﻴﻟﻭﺍ ﻢﻴﻈﻨﺗ یﺍﺮﺑ [
.ﺪﻴﻫﺩ ﺭﺎﺸﻓ ﺍﺭ ﺍﺪﺻ ﻥﺍﺰﻴﻣ ﭻﻴﭘ ﹰﺍﺩﺪﺠﻣ
.ﺩﻮﺷ ﯽﻣ ﺮﻫﺎﻇ “DEMO OFF”
ﺖﻋﺎﺳ ﻥﺩﺮﻛ ﻢﻴﻈﻨﺗ
.ﺪﻴﻫﺩ ﺭﺎﺸﻓ ﺍﺭ ﺍﺪﺻ ﻢﻴﻈﻨﺗ ﭻﻴﭘ [
.ﺪﻳﺭﺍﺪﻬﮕﻧ ﻭ ﺪﻴﻫﺩ ﺭﺎﺸﻓ ﺝﻭﺮﺧ یﺍﺮﺑ ﺍﺭ 7
.ﺪﻴﻫﺩ ﺭﺎﺸﻓ ﺍﺭ ،ﯽﻠﺒﻗ ﻢﻴﻈﻨﺗ ﺩﺭﻮﻣ ﻪﺑ ﺖﺸﮔﺯﺎﺑ یﺍﺮﺑ
.ﺪﻴﻫﺩ ﻡﺎﺠﻧﺍ ﺖﻋﺎﺳ ﻢﻴﻈﻨﺗ یﺍﺮﺑ ﺍﺭ
FUNCTION
CLOCK
CLOCK ADJUST
ﻪﻘﻴﻗﺩ ﺖﻋﺎﺳ ﺯﻭﺭ
CLOCK FORMAT
24H
] ﺎﻳ [
12H
...ﺖﻋﺎﺳ ﺶﻳﺎﻤﻧ ﻪﺤﻔﺻ ﻥﺩﻮﺑ ﺯﺎﺑ ﻦﻴﺣ
1
YES
]
2
] ﻪﺑ ﺩﻭﺭﻭ یﺍﺮﺑ 1
] ﺏﺎﺨﺘﻧﺍ ﺖﻬﺟ 2
] ﺏﺎﺨﺘﻧﺍ ﺖﻬﺟ 3
] ﺏﺎﺨﺘﻧﺍ ﺖﻬﺟ 5
] ﺏﺎﺨﺘﻧﺍ ﺖﻬﺟ 6
.ﺪﻳﺭﺍﺩ ﻪﮕﻧ
4 ﻪﻠﺣﺮﻣ ﺲﭙﺳ
1
2
4
Page 46

(RC-406) ﺭﻭﺩ ﻩﺍﺭ ﺯﺍ ﻝﺮﺘﻨﻛ
ﺮﺑﺍﺮﺑ ﺭﺩ) ﺭﻭﺩ ﻩﺍﺭ ﺯﺍ ﺭﻮﺴﻨﺳ
(.ﺪﻴﻫﺪﻧ ﺭﺍﺮﻗ ﺪﻴﺷﺭﻮﺧ ﺭﻮﻧ
ﻩﺩﺎﻔﺘﺳﺍ ﺕﺭﻮﺻ ﺭﺩ
ﻕﺭﻭ ،ﺭﺎﺑ ﻦﻴﻟﻭﺍ یﺍﺮﺑ
.ﺪﻳﺭﻭﺎﻴﺑ ﻥﻭﺮﻴﺑ ﺍﺭ ﻖﻳﺎﻋ
(ﺪﻴﻫﺩ ﺭﺎﺸﻓ/ﺪﻴﻧﺎﺧﺮﭽﺑ)
یﺯﺎﺳﺍﺪﺟ ﻪﻤﻛﺩ
ﻪﻴﻟﻭﺍ ﺕﺎﻜﻧ
ﺏﺎﻗ
ﻡﻮﻟﻭ ﻪﻤﻛﺩ
ﺶﻳﺎﻤﻧ ﻩﺮﺠﻨﭘ
یﺮﺗﺎﺑ ﺾﻳﻮﻌﺗ ﻩﻮﺤﻧ
ﻪﻛ ﻰﻜﺴﻳﺩ ﺭﻮﻄﭼ
.ﺪﻴﻨﻛ ﺝﺭﺎﺧ ﺍﺭ ﻩﺩﺮﻛﺮﻴﮔ
.ﺪﻳﺭﺍﺪﻬﮕﻧ ﻭ ﺪﻴﻫﺩ ﺭﺎﺸﻓ ﺍﺭ SRC ،ﻊﺒﻨﻣ ﻥﺩﺮﻛ ﺵﻮﻣﺎﺧ یﺍﺮﺑ
ﻰﺳﺭﺎﻓ
3
( .ﺩﻮﺷ ﯽﻤﻧ ﻦﺷﻭﺭ ﻩﺎﮕﺘﺳﺩ SRC ﻥﺩﺮﺸﻓ ﺎﺑ )
.ﺪﻴﻫﺩ ﺭﺎﺸﻓ ﺍﺭ
.ﺪﻴﻫﺩ ﺭﺎﺸﻓ ﺍﺭ AT T ،ﺶﺨﭘ ﻦﻴﺣ ﺭﺩ ﺍﺪﺻ ﻥﺩﺮﻛ ﻢﻛ یﺍﺮﺑ
.ﺪﻴﻫﺩ ﺭﺎﺸﻓ ﺍﺭ ﻪﻤﻛﺩ ﻦﻳﺍ ﻩﺭﺎﺑﻭﺩ ،ﻮﻐﻟ ﺖﻬﺟ •
.ﺪﻴﻫﺩ ﺭﺎﺸﻓ ﺭﺮﻜﻣ ﺭﻮﻄﺑ ﺍﺭ SRC
ﺎﻳ
( ﺖﺴﻴﻧ ﺱﺮﺘﺳﺩ ﺭﺩ )
ﻩﺩﺍﺩ ﺶﻳﺎﻤﻧ یﺭﺍﻮﻧ ﺕﺭﻮﺼﺑ ﺶﻳﺎﻤﻧ ﻪﺤﻔﺻ ﺭﺩ ﺩﻮﺟﻮﻣ ﺕﺎﻋﻼﻃﺍ ﺎﺗ ﺪﻳﺭﺍﺩ ﻪﮕﻧ ﺭﺪﻘﻧﺁ •
ﺩﺪﺠﻣ ﻢﻴﻈﻨﺗ ﻩﻮﺤﻧ
.ﺪﻴﻫﺩ ﺭﺎﺸﻓ ﺍﺭ
.ﺩﻮﺷ ﺵﻮﻣﺎﺧ ﻩﺎﮕﺘﺳﺩ ﺎﺗ ﺪﻳﺭﺍﺩ ﻪﮕﻧ ﺭﺪﻘﻧﺁ •
.ﺪﻴﻫﺩ ﺭﺎﺸﻓ ﺭﺮﻜﻣ ﺭﻮﻄﺑ ﺍﺭ
.ﺪﻴﻫﺩ ﺭﺎﺸﻓ ﺭﺮﻜﻣ ﺭﻮﻄﺑ ﺍﺭ
.ﺪﻧﻮﺷ
ﻝﺎﺼﺗﺍیﺯﺎﺳﺍﺪﺟ
ﻪﺑﯽﻳﻮﻠﺟ ﻪﺤﻔﺻ یﻭﺭﺭﻭﺩ ﻩﺍﺭ ﺯﺍ ﻝﺮﺘﻨﻛ یﻭﺭ
ﺪﻴﻨﻛ ﻦﺷﻭﺭ ﺍﺭ ﻩﺎﮕﺘﺳﺩ
ﺪﻴﻨﻛ ﻢﻴﻈﻨﺗ ﺍﺭ ﺍﺪﺻ ﻥﺍﺰﻴﻣ.ﺪﻴﻧﺎﺧﺮﭽﺑ ﺍﺭ ﻡﻮﻟﻭ ﻪﻤﻛﺩ
ﺪﻴﻨﻛ ﺏﺎﺨﺘﻧﺍ ﺍﺭ ﻊﺒﻨﻣ ﮏﻳ
ﺮﻴﻴﻐﺗ ﺍﺭ ﺶﻳﺎﻤﻧ ﻪﺤﻔﺻ یﻭﺭ ﺕﺎﻋﻼﻃﺍ
ﺪﻫﺩ ﯽﻣ
Page 47

.ﺪﻴﻨﻛ یﺭﺍﺩﺩﻮﺧ ،ﺩﺯﺍﺪﻧﺍ ﯽﻣ ﺮﻄﺧ ﻪﺑ ﺍﺭ ﺎﻤﺷ ﯽﻨﻤﻳﺍ ﻭ ﺩﻮﺷ ﯽﻣ ﯽﮔﺪﻨﻧﺍﺭ ﻦﻴﺣ ﺭﺩ ﺎﻤﺷ ﻪﺟﻮﺗ ﺶﻫﺎﻛ ﺚﻋﺎﺑ ﻪﻛ ﯽﻳﺎﻫﺩﺮﻜﻠﻤﻋ ﺯﺍ ﻩﺩﺎﻔﺘﺳﺍ ﺯﺍ
ﻁﺎﻴﺘﺣﺍ
ﺭﺎﻄﺧﺍ
.ﺪﻳﻮﻨﺸﺑ ﺍﺭ ﻞﻴﺒﻣﻮﺗﺍ ﺯﺍ ﺝﺭﺎﺧ یﺍﺪﺻ ﺪﻴﻧﺍﻮﺘﺑ ﻪﻛ ﺪﻴﻨﻛ ﻢﻴﻈﻨﺗ یﺭﻮﻃ ﺍﺭ ﻡﻮﻟﻭ ،ﺕﺎﻓﺩﺎﺼﺗ ﺯﻭﺮﺑ ﺯﺍ یﺮﻴﮔﻮﻠﺟ یﺍﺮﺑ •
.ﺪﻨﻨﻴﺒﻧ ﻪﻣﺪﺻ ﺎﻫﻮﮔﺪﻨﻠﺑ ،ﯽﺟﻭﺮﺧ ﺢﻄﺳ ﯽﻧﺎﻬﮔﺎﻧ ﺶﻳﺍﺰﻓﺍ ﻞﻴﻟﺪﺑ ﺎﺗ ﺪﻴﻨﻛ ﻢﻛ ﺍﺭ ﻡﻮﻟﻭ ،ﻝﺎﺘﻴﺠﻳﺩ ﻊﺑﺎﻨﻣ ﻦﻳﺍ ﺶﺨﭘ ﺯﺍ ﻞﺒﻗ •
.ﺖﺷﺍﺩ ﻢﻴﻫﺍﻮﺨﻧ ﻩﺪﺷ ﻂﺒﺿ ﻩﺩﺍﺩ ﻪﻧﻮﮔ ﺮﻫ ﻥﺪﺷ کﺎﭘ ﻝﺎﺒﻗ ﺭﺩ ﯽﺘﻴﻟﻮﺌﺴﻣ ﭻﻴﻫ ﺎﻣ .ﺪﻳﺍ ﻩﺩﺮﻛ ﻪﻴﻬﺗ ﻰﻧﺎﺒﻴﺘﺸﭘ ﻞﻳﺎﻓ ﻢﻬﻣ ﺕﺎﻋﻼﻃﺍ ﻪﻤﻫ ﺯﺍ ﺪﻳﻮﺷ ﻦﺌﻤﻄﻣ •
.ﺩﻮﺷ ﺾﻳﻮﻌﺗ ﻝﺩﺎﻌﻣ ﺎﻳ ﻪﺑﺎﺸﻣ ﻉﻮﻧ ﺎﺑ ﻂﻘﻓ .ﺖﺷﺍﺩ ﺪﻫﺍﻮﺧ ﺩﻮﺟﻭ ﺭﺎﺠﻔﻧﺍ ﺮﻄﺧ ،ﺩﻮﺷ ﺾﻳﻮﻌﺗ ﻩﺎﺒﺘﺷﺍ ﺯﺮﻃ ﻪﺑ ﻡﻮﻴﺘﻴﻟ یﺮﺗﺎﺑ ﻪﻛ ﯽﺗﺭﻮﺻ ﺭﺩ •
ﺭﻭﺩ ﻪﺑ ﺍﺭﻮﻓ ﺍﺭ ﺎﻫ یﺮﺗﺎﺑ .ﺪﻴﻨﻛ یﺭﺍﺪﻬﮕﻧ ﺩﻮﺧ ﯽﻠﺻﺍ یﺪﻨﺑ ﻪﺘﺴﺑ ﻥﻭﺭﺩ ﺪﻴﻨﻛ ﯽﻤﻧ ﻩﺩﺎﻔﺘﺳﺍ ﻥﺁ ﺯﺍ ﻪﻛ ﯽﻣﺎﮕﻨﻫ ﻭ ﺪﻳﺭﺍﺪﻬﮕﻧ ﺭﻭﺩ ﻥﺎﻛﺩﻮﻛ ﺱﺮﺘﺳﺩ ﺯﺍ ﺍﺭ یﺮﺗﺎﺑ •
.ﺪﻴﻨﻜﻧ ﻩﺩﺎﻔﺘﺳﺍ ﻥﺁ ﺯﺍ ،ﺪﺷﺎﺑ ﻪﺘﺷﺍﺩ ﺮﻄﺧ ﯽﮔﺪﻨﻧﺍﺭ ﻦﻴﺣ ﺭﺩ ﺎﻤﺷ ﯽﻨﻤﻳﺍ ﺍﺮﺑ ﯽﺟﺭﺎﺧ ﻩﺎﮕﺘﺳﺩ ﺯﺍ ﻩﺩﺎﻔﺘﺳﺍ ﺩﺭﺍﺩ ﻝﺎﻤﺘﺣﺍ ﺮﮔﺍ •
.ﺪﻴﻫﺪﻧ ﺭﺍﺮﻗ ﻩﺎﮕﺘﺳﺩ ﻞﺧﺍﺩ ﺭﺩ ﺍﺭ (یﺰﻠﻓ ﺭﺍﺰﺑﺍ ﺎﻳ ﻪﻜﺳ ﻞﻴﺒﻗ ﺯﺍ) یﺰﻠﻓ ﺎﻴﺷﺍ ﺰﮔﺮﻫ ،ﻩﺎﺗﻮﻛ ﻝﺎﺼﺗﺍ ﺩﺎﺠﻳﺍ ﺯﺍ یﺮﻴﮔﻮﻠﺟ یﺍﺮﺑ
(
3
) .ﺪﻴﻨﻛ ﺍﺪﺟ ﺍﺭ ﺏﺎﻗ ،ﻥﺁ ﻩﺪﻫﺎﺸﻣ یﺍﺮﺑ .ﺖﺳﺍ ﻩﺪﺷ ﺺﺨﺸﻣ ﯽﻠﺻﺍ ﻩﺎﮕﺘﺳﺩ یﻭﺭ USB یﺪﻨﺑ ﻪﺟﺭﺩ •
.ﺪﻴﻫﺪﻧ ﺭﺍﺮﻗ ﺩﺭﻮﺒﺷﺍﺩ ﻞﻴﺒﻗ ﺯﺍ ﻡﺮﮔ یﺎﻫ ﻥﺎﻜﻣ ﺭﺩ ﺍﺭ ﺭﻭﺩ ﻩﺍﺭ ﺯﺍ ﻝﺮﺘﻨﻛ •
.ﺪﻧﺮﻴﮔ ﺭﺍﺮﻗ ﻥﺁ ﺪﻨﻧﺎﻣ ﺎﻳ ﺶﺗﺁ ،ﺪﻴﺷﺭﻮﺧ ﺭﻮﻧ ﺮﻴﻈﻧ ﺪﺣ ﺯﺍ ﺶﻴﺑ یﺎﻣﺮﮔ ﺽﺮﻌﻣ ﺭﺩ ﺪﻳﺎﺒﻧ ﺎﻫ یﺮﺗﺎﺑ ﺎﻳ یﺮﺗﺎﺑ ﻪﺘﺴﺑ •
.ﺪﻳﺮﻴﮕﺑ ﺱﺎﻤﺗ ﮏﺷﺰﭘ ﮏﻳ ﺎﺑ ﺍﺭﻮﻓ ،یﺮﺗﺎﺑ ﻥﺪﻴﻌﻠﺑ ﺕﺭﻮﺻ ﺭﺩ .ﺪﻳﺯﺍﺪﻧﺎﻴﺑ
:(RC-406) ﺭﻭﺩ ﻩﺍﺭ ﺯﺍ ﻝﺮﺘﻨﻛ
:ﻡﻮﻟﻭ ﻢﻴﻈﻨﺗ
:ﻰﻣﻮﻤﻋ
ﺐﻟﺎﻄﻣ ﺖﺳﺮﻬﻓﻩﺩﺎﻔﺘﺳﺍ ﺯﺍ ﻞﺒﻗ
2
3
4
5
7 ANDROID / iPod / USB
9 Pandora®
10 BLUETOOTH®
•
16 AU X
16
17
18
19
21
22
ﻩﺩﺎﻔﺘﺳﺍ ﺯﺍ ﻞﺒﻗ
ﻪﻴﻟﻭﺍ ﺕﺎﻜﻧ
ﺭﺎﻜﺑ ﻉﻭﺮﺷ
ﻮﻳﺩﺍﺭ
ﺍﺪﺻ ﺕﺎﻤﻴﻈﻨﺗ
ﺶﻳﺎﻤﻧ ﺕﺎﻤﻴﻈﻨﺗ
ﺕﺎﻋﻼﻃﺍ ﺮﻳﺎﺳ
ﻲﺑﺎﻳ ﺐﻴﻋ
ﺕﺎﺤﻴﺿﻮﺗ
ﻝﺎﺼﺗﺍ / ﺐﺼﻧ
(ﺏﺎﻗ ﺖﺸﭘ ﺭﺩ) ﻂﺑﺍﺭ
کﺎﭘ ﻡﺮﻧ ﻪﭼﺭﺎﭘ ﮏﻳ ﺎﻳ ﯽﻧﻮﻜﻴﻠﻴﺳ ﮏﺸﺧ ﻝﺎﻤﺘﺳﺩ ﮏﻳ ﺎﺑ ﺍﺭ ﺏﺎﻗ یﻭﺭ کﺎﺧ ﻭ ﺩﺮﮔ :ﻩﺎﮕﺘﺳﺩ ﻥﺩﺮﻛ ﺰﻴﻤﺗ
ﺭﺍﺪﻬﮕﻧ
.ﺪﻴﻨﻛ
ﺪﻴﺷﺎﺑ ﺐﻗﺍﺮﻣ ﻭ ﺪﻴﻨﻛ کﺎﭘ ﺍﺭ ﻂﺑﺍﺭ ﯽﻣﺍﺭﺁ ﻪﺑ ﻦﻛ کﺎﭘ ﺵﻮﮔ ﮏﻳ ﺎﺑ ﻭ ﻩﺩﺮﻛ ﺍﺪﺟ ﺍﺭ ﺏﺎﻗ :ﻂﺑﺍﺭ ﻥﺩﺮﻛ ﺰﻴﻤﺗ
.ﺪﻨﻴﺒﻧ ﻪﻣﺪﺻ ﻂﺑﺍﺭ
ﺪﻧﺍﻮﺧ ﺪﻳﺎﺑ ﺍﺭ ﺎﻤﻨﻫﺍﺭ ﻪﭼﺮﺘﻓﺩ ﻦﻳﺍ ﺭﻮﻄﭼ
یﺎﻫ ﻪﻤﻛﺩ ﺯﺍ ﻩﺩﺎﻔﺘﺳﺍ ﺎﺑ ﺎﻫﺩﺮﻜﻠﻤﻋ ،ﻩﺪﻤﻋ ﺭﻮﻃ ﻪﺑ •
.ﺪﻫﺩ ﯽﻣ ﻥﺎﺸﻧ ﺍﺭ ﻩﺪﺷ ﺏﺎﺨﺘﻧﺍ یﺎﻫ ﻪﻨﻳﺰﮔ [
.ﺪﻧﺍ ﻩﺪﺷ ﻩﺩﺍﺩ ﺢﻴﺿﻮﺗ ﺏﺎﻗ یﻭﺭ
ﺭﺩ ﻪﻛ ﺖﺳﺍ ﯽﻳﺎﻫ ﻊﺟﺮﻣ ﻩﺪﻨﻫﺩ ﻥﺎﺸﻧ (
.ﺪﻨﺘﺴﻫ ﯽﺳﺮﺘﺳﺩ ﻞﺑﺎﻗ ﻩﺪﺷ ﻥﺍﻮﻨﻋ ﻪﺤﻔﺻ
XX
XX
] •
) •
2
Page 48

ﺭﺎﻴﻐﻟﺍ ﻊﻄﻗ ﺔﻤﺋﺎﻗ
ﺐﻴﻛﺮﺘﻟﺍ ﻲﻓ ﺔﻣﺪﺨﺘﺴﻤﻟﺍ
ﺯﺎﻬﺠﻟﺍ ﺔﻬﺟﺍﻭ
ﺐﻴﻛﺮﺘﻟﺍ ﺭﺎﻃﺇ
ﻙﻼﺳﻷﺍ ﺓﺮﻴﻔﺿ
ﺔﻨﻳﺰﻟﺍ ﺔﺣﻭ
( A)
( B)
( C)
( D)
(
10
) ﻥﻮﻓﻭﺮﻜﻴﻤﻟﺍ ﻞﻴﺻﻮﺗ ﺲﺒﻘﻣ
ﺔﻴﻣﺎﻣﻷﺍ ﺔﻋﺎﻤﺴﻟﺍ ﻰﻟﺇ
ﺔﻴﻣﺎﻣﻷﺍ ﺔﻋﺎﻤﺴﻟﺍ ﻰﻟﺇ
ﺔﻴﻔﻠﺨﻟﺍ ﺔﻋﺎﻤﺴﻟﺍ ﻰﻟﺇ
ﺔﻴﻔﻠﺨﻟﺍ ﺔﻋﺎﻤﺴﻟﺍ ﻰﻟﺇ
(ﻯﺮﺴﻴﻟﺍ)
(ﻰﻨﻤﻴﻟﺍ)
(ﻯﺮﺴﻴﻟﺍ)
(ﻰﻨﻤﻴﻟﺍ)
ﻝﺎﻌﺘﺷﻻﺍ ﺡﺎﺘﻔﻣ
ﺓﺭﺎﻴﺴﻟﺍ ﺕﺍﺯﻮﻴﻓ ﻕﻭﺪﻨﺻ
ﻙﻼﺳﻷﺍ ﻞﻴﺻﻮﺗ
(ﺮﻴﺒﻣﺃ 10) ﺔﻴﺋﺎﺑﺮﻬﻛ ﺔﻣﺎﻤﺻ ﻲﻋﺮﻔﻟﺍ ﺔﻀﻴﻔﺨﻟﺍ ﺕﺍﺩﺩﺮﺘﻟﺍ ﺭﺎﻬﺠﻤﻟ /ﻲﻔﻠﺨﻟﺍ /ﻲﻣﺎﻣﻷﺍ ﺝﺮﺨﻟﺍ
ﻲﺋﺍﻮﻬﻟﺍ ﻞﻴﺻﻮﺗ ﻑﺮﻃ
ﺾﻴﺑﺃ
ﺩﻮﺳﺃ/ﺾﻴﺑﺃ
ﻱﺩﺎﻣﺭ
ﺩﻮﺳﺃ/ﻱﺩﺎﻣﺭ
ﺮﻀﺧﺃ
ﺩﻮﺳﺃ/ﺮﻀﺧﺃ
ﺔﻴﻧﺍﻮﺟﺭﺃ
ﺩﻮﺳﺃ/ﺔﻴﻧﺍﻮﺟﺭﺃ
(ﻝﺎﻌﺷﻹﺍ ﻚﻠﺳ) ﺮﻤﺣﺃ
.ﻂﻳﺮﺸﻟﺍ ﻦﻣ ﺯﺮﺒﻳ ﻚﻠﺴﻟﺍ ﻞﻌﺠﺗ ﻼﻓ ،ﺕﻼﻴﺻﻮﺗ ﺔﻳﺃ ﻞﻤﻋ ﻢﺘﻳ ﻢﻟ ﺍﺫﺇ
ﻲﻨﺑ
ﻲﻓ ﻢﻜﺤﺘﻟﺍ ﻚﻠﺳ)
(ﺕﻮﺼﻟﺍ ﻢﺘﻛ
ﺾﻴﺑﺃ/ﻕﺭﺯﺃ
ﻢﻜﺤﺘﻟﺍ ﻚﻠﺳ)
ﻚﻠﺳ/ﺀﺎﺑﺮﻬﻜﻟﺍ ﻲﻓ
(ﻲﺋﺍﻮﻬﻟﺍ ﻲﻓ ﻢﻜﺤﺘﻟﺍ
،Kenwood ﻦﻣ ﺔﺣﻼﻤﻟﺍ ﻡﺎﻈﻧ ﻞﻴﺻﻮﺘﻟ
ﺔﺣﻼﻤﻟﺍ ﻞﻴﻟﺩ ﻰﻟﺇ ﻉﻮﺟﺮﻟﺎﺑ ﻚﻴﻠﻋ
ﺔﻟﺎﺣ ﻲﻓ ﺔﻗﺎﻄﻟﺍ ﻲﻓ ﻢﻜﺤﺘﻟﺍ ﻑﺮﻃ ﻰﻟﺇ
ﻭﺃ ،ﻱﺭﺎﻴﺘﺧﻻﺍ ﺓﺭﺪﻘﻟﺍ ﻢﺨﻀﻣ ﻡﺍﺪﺨﺘﺳﺍ
ﺓﺭﺎﻴﺴﻟﺎﺑ ﻲﺋﺍﻮﻬﻟﺍ ﻲﻓ ﻢﻜﺤﺘﻟﺍ ﻑﺮﻄﺑ
23
ﺝﺍﺮﺨﺘﺳﻻﺍ ﺡﺎﺘﻔﻣ
ﻲﺑﺮﻋ
( E)
ﺓﺭﺎﻴﺴﻟﺍ ﺕﺍﺯﻮﻴﻓ ﻕﻭﺪﻨﺻ
ﺔﻳﺭﺎﻄﺒﻟﺍ
.ﻒﻠﺘﻠﻟ ﺓﺪﺣﻮﻟﺍ ﺽﺮﻌﺗ ﻱﺩﺎﻔﺘﻟ ﻡﺎﻜﺣﺈﺑ ﺓﺭﺎﻴﺴﻟﺍ ﻪﻴﺳﺎﺷ ﻰﻟﺍ ﻪﺑ ﺹﺎﺨﻟﺍ ﺾﻳﺭﺄﺘﻟﺍ ﻚﻠﺳ ﻞﺻ ،ﻲﺟﺭﺎﺧ ﺕﻮﺻ ﻢﺨﻀﻣ ﻰﻟﺍ ﻞﻴﺻﻮﺘﻟﺍ ﺪﻨﻋ
(ﺔﻳﺭﺎﻄﺒﻟﺍ ﻚﻠﺳ) ﺮﻔﺻﺃ
ﻦﻋ ﻢﻜﺤﺘﻟﺍ ﺯﺎﻬﺟ ﻚﻠﺳ)
(ﻲﺿﺭﻷﺍ ﻚﻠﺳ) ﺩﻮﺳﺃ
ﻲﻧﺪﻌﻤﻟﺍ ﺓﺭﺎﻴﺴﻟﺍ ﻞﻜﻴﻫ ﻭﺍ ﻲﻧﺪﻌﻤﻟﺍ ﻢﺴﺠﻟﺍ ﻰﻟﺍ
(ﺓﺩﺎﻴﻘﻟﺍ ﺔﻠﺠﻋ ﻲﻓ ﺪﻌﺑ
ﺮﻔﺻﺃ/ﺢﺗﺎﻓ ﻕﺭﺯﺃ
ﻲﻓ ﺪﻌﺑ ﻦﻋ ﻢﻜﺤﺘﻟﺍ ﺯﺎﻬﺟ ﻝﻮﺤﻣ ﻰﻟﺇ
ﺓﺩﺎﻴﻘﻟﺍ ﺔﻠﺠﻋ
Page 49

ﻱﻮﻠﻌﻟﺍ ﺐﻧﺎﺠﻟﺍ ﻲﻓ ﻑﺎﻄﺨﻟﺍ
ﺔﻴﻣﺎﻣﻷﺍ ﺔﻨﻳﺰﻟﺍ ﺔﺣﻮﻟ ﻪﻴﺟﻮﺗ ﻢﺘﻳ
.ﺐﻴﻛﺮﺘﻟﺍ ﻞﺒﻗ ﺢﺿﻮﻣ ﻮﻫ ﺎﻤﻛ
ﺯﺎﻬﺠﻟﺍ ﺖﻴﺒﺜﺘﺑ ﻢﻗﻭ ﺓﺭﺎﻴﺴﻟﺎﺑ ﺐﻴﻛﺮﺘﻟﺍ ﻑﺭ ﻊﻣ (ﻦﻴﺒﻧﺎﺠﻟﺍ
ﺮﻴﻏ ﻲﻏﺍﺮﺒﻟﺍ ﻡﺍﺪﺨﺘﺳﺍ ﺐﺒﺴﻳ ﺪﻘﻓ .ﻂﻘﻓ ﺓﺩﺪﺤﻤﻟﺍ ﻲﻏﺍﺮﺒﻟﺍ ﻡﺪﺨﺘﺳﺍ
(ﺓﺭﺎﻴﺴﻟﺍ ﻮﻠﺑﺎﺗ ﻞﺧﺍﺩ) ﺓﺪﺣﻮﻟﺍ ﺐﻴﻛﺮﺗ
ﻙﻼﺳﻷﺍ ﻞﻴﺻﻮﺘﺑ ﻢﻗ
(
23
) .ﺔﺑﻮﻠﻄﻤﻟﺍ
ﺓﺭﺎﻴﺴﻟﺍ ﻩﻮﻠﺑﺎﺗ
ﺖﻴﺒﺜﺘﻟ ﺔﺒﺳﺎﻨﻤﻟﺍ ﺔﻨﺴﻟﻷﺍ ﻲﻨﺜﺑ ﻢﻗ
.ﻪﻧﺎﻜﻣ ﻲﻓ ﻡﺎﻜﺣﺈﺑ ﺐﻴﻛﺮﺘﻟﺍ ﺭﺎﻃﺇ
ﺐﻴﻛﺮﺘﻟﺍ ﺭﺎﻃﺇ ﻥﻭﺪﺑ ﺐﻴﻛﺮﺘﻟﺍ ﺪﻨﻋ
.ﺓﺪﺣﻮﻟﺍ ﻦﻣ ﺔﺌﻴﻬﺘﻟﺍ ﺔﺣﻮﻟﻭ ﺐﻴﻛﺮﺘﻟﺍ ﺭﺎﻃﺇ ﻉﺰﻧﺍ 1
ﻼﻛ ﻲﻓ) ﺯﺎﻬﺠﻟﺍ ﻲﻓ ﺓﺩﻮﺟﻮﻤﻟﺍ ﻒﻳﻭﺎﺠﺘﻟﺍ ﺓﺍﺫﺎﺤﻤﺑ ﻢﻗ 2
.(ﻕﻮﺴﻟﺍ ﻲﻓ ﺓﺮﻓﻮﺘﻤﻟﺍ) ﻲﻏﺍﺮﺒﻟﺍ ﻡﺍﺪﺨﺘﺳﺎﺑ
.ﺯﺎﻬﺠﻠﻟ ﺎﹰﻔﻠﺗ ﺔﺤﻴﺤﺼﻟﺍ
ﺓﺪﺣﻮﻟﺍ ﺔﻟﺍﺯﺇ ﺔﻴﻔﻴﻛ
ﺢﻴﺗﺎﻔﻣ ﻲﻓ ﻙﺎﺴﻣﻹﺍ ﻦﺳ ﺩﺍﺪﻋﺈﺑ ﻢﻗ 2
ﻲﺒﻧﺎﺟ ﻦﻣ ﻞﻛ ﻲﻓ ﺕﺎﺤﺘﻔﻟﺍ ﻲﻓ ﺝﺍﺮﺨﺘﺳﻻﺍ
.ﺝﺭﺎﺨﻠﻟ ﺎﻬﺒﺤﺳﺍ ﻢﺛ ،ﺔﺌﻴﻬﺘﻟﺍ ﺔﺣﻮﻟ
ﺕﺎﺤﺘﻔﻟﺍ ﻲﻓ ﻖﻤﻌﺑ ﺝﺍﺮﺨﺘﺳﻻﺍ ﺢﻴﺗﺎﻔﻣ ﻞﺧﺩﺃ 3
ﺕﺎﻤﻴﻠﻌﺗ ﻊﺒﺗﺍ ﻢﺛ ،ﺐﻧﺎﺟ ﻞﻛ ﻲﻓ ﺓﺩﻮﺟﻮﻤﻟﺍ
.ﺭﺎﺴﻴﻟﺍ ﻰﻠﻋ ﺢﺿﻮﻣ ﻮﻫ ﺎﻤﻛ ﻢﻬﺳﻷﺍ
.ﺯﺎﻬﺠﻟﺍ ﺔﻬﺟﺍﻭ ﻚﻔﺑ ﻢﻗ 1
ﺮﺷﺎﺒﻣ ﺭﺎﻴﺗ ﺭﺪﺼﻣ ﺎﻬﺑ ﺓﺭﺎﻴﺳ ﻲﻓ ﻂﻘﻓ ﺓﺪﺣﻮﻟﺍ ﻡﺍﺪﺨﺘﺳﺍ ﻦﻜﻤﻳ
.ﺐﻴﻛﺮﺘﻟﺍﻭ ﻙﻼﺳﻷﺍ ﻞﻴﺻﻮﺗ ﻞﺒﻗ ﺔﻳﺭﺎﻄﺒﻠﻟ ﻲﺒﻠﺴﻟﺍ ﻑﺮﻄﻟﺍ ﻞﺼﻔﺑ ﻢﻗ
(ﺮﻤﺣﻷﺍ) ﻝﺎﻌﺷﻹﺍ ﻚﻠﺳﻭ (ﺮﻔﺻﻷﺍ) ﺔﻳﺭﺎﻄﺒﻟﺍ ﻚﻠﺳ ﻞﻴﺻﻮﺘﺑ ﻢﻘﺗ ﻻ
.ﻲﺋﺎﺑﺮﻬﻛ ﺱﺎﻣ ﺙﻭﺪﺣ ﻊﻨﻤﻟ (ﺀﺍﺩﻮﺳ) ﻲﺿﺭﻷﺍ ﻚﻠﺴﻟﺍ ﻭﺃ ﺓﺭﺎﻴﺴﻟﺍ ﻪﻴﺳﺎﺸﺑ
ﻞﻴﻨﻴﻔﻟﺍ ﻦﻣ ﻂﻳﺮﺷ ﺔﻄﺳﺍﻮﺑ ﺔﻠﺻﻮﻤﻟﺍ ﺮﻴﻏ ﻙﻼﺳﻷﺍ ﻝﺰﻌﺑ ﻢﻗ
.ﺐﻴﻛﺮﺘﻟﺍ ﺪﻌﺑ ﺔﻴﻧﺎﺛ ﺓﺮﻣ ﺓﺭﺎﻴﺴﻟﺍ ﻪﻴﺳﺎﺷ ﻊﻣ ﺓﺪﺣﻮﻟﺍ ﺾﻳﺭﺄﺗ ﻦﻣ ﺪﻛﺄﺗ
.ﻲﺒﻠﺳ ﺾﻳﺭﺄﺗﻭ ،ﺖﻟﻮﻓ 12
.ﻰﺋﺎﺑﺮﻬﻛ ﺱﺎﻣ ﺙﻭﺪﺣ ﻊﻨﻤﻟ
ﺮﻳﺬﺤﺗ
ﺮﻳﺬﺤﺗ
ﻦﻴﻴﻨﻔﻠﻟ ﺐﻴﻛﺮﺘﻟﺍﻭ ﻙﻼﺳﻷﺍ ﻞﻴﺻﻮﺗ ﺔﻤﻬﻣ ﻙﺮﺗﺍ ،ﺔﻣﻼﺴﻟﺍ ﻲﻋﺍﻭﺪﻟ
.ﺕﺍﺭﺎﻴﺴﻟﺎﺑ ﺔﺻﺎﺨﻟﺍ ﺕﺎﻴﺗﻮﺼﻟﺍ ﺓﺰﻬﺟﺃ ﻊﺋﺎﺑ ﺮﻴﺸﺘﺳﺍ .ﻦﻴﺼﺘﺨﻤﻟﺍ
ﺀﺍﺰﺟﻷﺍ ﺲﻤﻠﺗ ﻻﻭ .ﻚﺗﺭﺎﻴﺴﺑ ﺓﺰﻬﺟﻷﺍ ﻞﻣﺎﺣ ﻲﻓ ﺓﺪﺣﻮﻟﺍ ﻩﺬﻫ ﺐﻛﺭ
ﺎﻬﻣﺍﺪﺨﺘﺳﺍ ﺪﻌﺑ ﻭﺃ ﺎﻬﻣﺍﺪﺨﺘﺳﺍ ﺀﺎﻨﺛﺃ ﺓﺪﺣﻮﻟﺍ ﻩﺬﻫ ﻦﻣ ﺔﻴﻧﺪﻌﻤﻟﺍ
ﺩﺪﺒﻣ ﻞﺜﻣ ﺓﺪﺣﻮﻠﻟ ﺔﻴﻧﺪﻌﻤﻟﺍ ﺀﺍﺰﺟﻷﺍ ﻥﻮﻜﺗ ﺚﻴﺣ .ﺓﺮﻴﺼﻗ ﺓﺮﺘﻔﺑ
ﻭﺃ ﺓﺭﺎﻴﺴﻟﺍ ﻪﻴﺳﺎﺸﺑ ﺕﺎﻋﺎﻤﺴﻟﺍ ﻙﻼﺳﺃ
،ﻝﺎﻌﺷﺇ ﻑﺮﻃ ﺓﺭﺎﻴﺴﻟﺎﺑ ﺔﻴﺋﺎﺑﺮﻬﻜﻟﺍ ﻙﻼﺳﻷﺍ ﺔﻜﺒﺷ ﻚﻠﺘﻤﺗ ﻢﻟ ﺍﺫﺇ
ﺖﻟﻮﻓ 12 ﺮﺷﺎﺒﻣ ﺭﺎﻴﺗ ﺭﺪﺼﻣ ﺮﻓﻮﻳ ﻱﺬﻟﺍ ﺓﺭﺎﻴﺴﻟﺍ ﺕﺍﺯﻮﻴﻓ ﻕﻭﺪﻨﺻ
.ﺓﺭﺍﺮﺤﻟﺍ ﺩﺪﺒﺗ ﻲﺘﻟﺍ ﺔﻴﻧﺪﻌﻤﻟﺍ ﺀﺍﺰﺟﻻﺍ ﻦﻋ ﺓﺪﻴﻌﺑ ﺕﻼﺒﻜﻟﺍ ﻊﻴﻤﺠﺑ ﻆﻔﺘﺣﺍ
ﺕﺍﺭﺎﺷﺇﻭ ﻞﻣﺍﺮﻔﻟﺍ ﺢﻴﺑﺎﺼﻣ ﻞﻤﻋ ﻦﻣ ﺪﻛﺄﺗ ﺯﺎﻬﺠﻟﺍ ﺐﻴﻛﺮﺗ ﺪﻌﺑ
ﻪﻴﺳﺎﺸﻟ ﻙﻼﺳﻷﺍ ﺲﻣﻼﺗ ﻡﺪﻋ ﻦﻣ ﹰﻻﻭﺃ ﺪﻛﺄﺗ ،ﺮﻬﺼﻨﻤﻟﺍ ﻕﺍﺮﺘﺣﺍ ﺔﻟﺎﺣ ﻲﻓ
.ﺭﺎﻴﺘﻟﺍ ﺓﺪﺷ ﺲﻔﻨﺑ ﺮﺧﺁ ﺮﻬﺼﻨﻤﺑ ﻢﻳﺪﻘﻟﺍ ﺮﻬﺼﻨﻤﻟﺍ ﻝﺪﺒﺘﺳﺍ ﻢﺛ ﺓﺭﺎﻴﺴﻟﺍ
.ﻱﺯﺍﻮﺘﻟﺍ ﻰﻠﻋ ﺎﻬﻠﻴﺻﻮﺗ ﻭﺃ (ﺀﺍﺩﻮﺳ) ﺾﻳﺭﺄﺘﻟﺍ ﻚﻠﺳ
.30º ﻦﻣ ﻞﻗﺃ ﺔﻳﻭﺍﺯ ﺪﻨﻋ ﺯﺎﻬﺠﻟﺍ ﺐﻴﻛﺮﺘﺑ ﻢﻗ
ﻲﻓ ﺩﻮﺟﻮﻤﻟﺍ ﻑﺮﻄﻟﺎﺑ (ﺮﻤﺣﻷﺍ) ﻝﺎﻌﺷﻹﺍ ﻚﻠﺳ ﻞﻴﺻﻮﺘﺑ ﻢﻗ
.ﻝﺎﻌﺷﻹﺍ ﺡﺎﺘﻔﻣ ﺔﻄﺳﺍﻮﺑ ﻪﻓﺎﻘﻳﺇﻭ ﻪﻠﻴﻐﺸﺗ ﻢﺘﻳﻭ
.ﻢﻴﻠﺳ ﻞﻜﺸﺑ ﻪﻓﻼﺧﻭ ﺕﺎﺣﺎﺴﻤﻟﺍﻭ ﻩﺎﺠﺗﻻﺍ ﺮﻴﻴﻐﺗ
.ﻦﻴﻨﺧﺎﺳ ﺔﻳﻭﺎﺤﻟﺍﻭ ﺓﺭﺍﺮﺤﻟﺍ
[
ﻞﻴﺻﻮﺘﺑ ﻢﻘﺗ ﻻ
ﻲﺳﺎﺳﻷﺍ ﺀﺍﺮﺟﻹﺍ
ﻑﺮﻄﻟﺍ ﻞﺼﻓﺍ ﻢﺛ ،ﻝﺎﻌﺷﻹﺍ ﺡﺎﺘﻔﻣ ﻦﻣ ﺡﺎﺘﻔﻤﻟﺍ ﻉﺰﻧﺍ 1
.ﺢﻴﺤﺻ ﻞﻜﺸﺑ ﻙﻼﺳﻷﺍ ﻞﻴﺻﻮﺗ 2
.(ﺓﺭﺎﻴﺴﻟﺍ ﻮﻠﺑﺎﺗ ﻞﺧﺍﺩ) ﺓﺪﺣﻮﻟﺍ ﺐﻴﻛﺮﺗ ﺮﻈﻧﺍ
.ﺓﺭﺎﻴﺴﻟﺍ ﺔﻳﺭﺎﻄﺒﺑ [ ﻑﺮﻃ ﻞﻴﺻﻮﺗ 4
.ﺓﺭﺎﻴﺴﻟﺍ ﺔﻳﺭﺎﻄﺑ ﻦﻣ [
23
) .ﻙﻼﺳﻷﺍ ﻞﻴﺻﻮﺗ ﺮﻈﻧﺍ
(
.ﻚﺗﺭﺎﻴﺳ ﻲﻓ ﺯﺎﻬﺠﻟﺍ ﺐﻛﺭ 3
3
) .ﺓﺪﺣﻮﻟﺍ ﻂﺒﺿ ﺪﻋﺃ 5
(
ﻞﻴﺻﻮﺘﻟﺍ / ﺐﻴﻛﺮﺘﻟﺍ
•
•
•
•
•
•
•
•
•
•
•
•
•
22
Page 50

ﺕﺎﻔﺻﺍﻮﻤﻟﺍ
،(ﻰﺼﻗﺃ ﺪﺤﻛ) ﺕﺍﻭ ﻲﻠﻠﻣ ﻞﺒﻴﺴﻳﺩ
2 ﺔﻗﺎﻄﻟﺍ ﺔﺌﻔﻟ (ﻂﺳﻮﺘﻣ) ﺕﺍﻭ ﻲﻠﻠﻣ ﻞﺒﻴﺴﻳﺩ 0
(ﻲﻠﺴﻠﺴﺘﻟﺍ ﺬﻔﻨﻤﻟﺍ ﻊﺿﻭ) SPP
(ﻒﺗﺎﻬﻟﺍ ﻞﻴﻟﺩ ﻰﻟﺇ ﻝﻮﺻﻮﻟﺍ ﻊﺿﻭ) PBAP
(ﻡﺪﻘﺘﻤﻟﺍ ﺕﻮﺼﻟﺍ ﻊﻳﺯﻮﺗ ﻊﺿﻭ) A2DP
/ﺕﻮﺼﻟﺍ ﻲﻓ ﺪﻌﺑ ﻦﻋ ﻢﻜﺤﺘﻟﺍ ﻊﺿﻭ) AVRCP
ﺖﺘﺸﺗ ﻲﻟﺎﻤﺟﺇ 1% ﻦﻣ ﻞﻗﺃ ﺪﻨﻋ) 4 × ﻁﺍﻭ 22
ﻞﺒﻴﺴﻳﺩ ± 8 ﺰﺗﺮﻴﻫ 200
ﻞﺒﻴﺴﻳﺩ ± 8 ﺰﺗﺮﻫ ﻮﻠﻴﻛ 2.5
ﻞﺒﻴﺴﻳﺩ ± 8 ﺰﺗﺮﻫ ﻮﻠﻴﻛ 12.5
ﻡﻭﺃ ﻮﻠﻴﻛ 10/ﺖﻟﻮﻓ ﻲﻠﻠﻣ 2 500
(ﺖﻟﻮﻓ 16 — ﺖﻟﻮﻓ 10.5 ﺡﻮﻤﺴﻣ) ﺖﻟﻮﻓ 14.4
ﻢﻣ 107 × ﻢﻣ 53 × ﻢﻣ 182
ﻲﺑﺮﻋ
21
+4
(ﻮﻳﺪﻴﻔﻟﺍ
(ﺕﻮﺼﻟﺍ
ﺔﻴﻄﺳﻮﻟﺍ
ﺓﺪﺤﻟﺍ
ﺭﺍﺪﺻﻹﺍBluetooth 3.0 / 2.1+EDR ﺭﺍﺪﺻﻹﺍ Bluetooth
ﺩﺩﺮﺘﻟﺍ ﻕﺎﻄﻧﺰﺗﺮﻫﺎﺠﻴﺟ 2.480 — ﺰﺗﺮﻴﻫﺎﺠﻴﺟ 2.402
ﺝﺮﺨﻟﺍ ﺓﺭﺪﻗ
ﻝﺎﺼﺗﻻﺍ ﻕﺎﻄﻨﻟ ﻰﺼﻗﻷﺍ ﺪﺤﻟﺍﺎﹰﺒﻳﺮﻘﺗ (32.8 ft) ﺭﺎﺘﻣﺃ 10 ﺔﻳﺅﺮﻟﺍ ﻂﺧ
ﻊﺿﻮﻟﺍ(ﻦﻳﺪﻴﻟﺍ ﻡﺍﺪﺨﺘﺳﺍ ﻡﺪﻋ ﻊﺿﻭ) HFP
ﻯﻮﺼﻘﻟﺍ ﺝﺮﺨﻟﺍ ﺓﺭﺪﻗ4 × ﻁﺍﻭ 50
ﻞﻣﺎﻜﻟﺍ ﺚﺒﻟﺍ ﻕﺎﻄﻧ ﺔﻌﺳ ﺓﺭﺪﻗ
ﺕﺎﻋﺎﻤﺴﻟﺍ ﺔﻗﻭﺎﻌﻣﻡﻭﺃ 8 — ﻡﻭﺃ 4
ﺔﻴﺗﻮﺼﻟﺍ ﺕﺍﺮﻴﺛﺎﺘﻟﺍﻖﻤﻌﻟﺍ
/ ﻲﺋﺍﺪﺘﺑﻻﺍ ﺝﺮﺨﻟﺍ ﻯﻮﺘﺴﻣ
(USB) ﻞﻤﺤﻟﺍ
ﻲﺋﺍﺪﺘﺑﻻﺍ ﺕﻮﺼﻟﺍ ﺝﺮﺧ ﺔﻗﻭﺎﻌﻣﻡﻭﺍ 600 ≥
(ﻞﺒﻴﺴﻳﺩ ±3) ﺩﺩﺮﺘﻟﺍ ﺔﺑﺎﺠﺘﺳﺍﺰﺗﺮﻫ ﻮﻠﻴﻛ 20 — ﺰﺗﺮﻴﻫ 20
ﻞﺧﺪﻠﻟ ﻰﺼﻗﻷﺍ ﺪﻬﺠﻟﺍﺖﻟﻮﻓ ﻲﻠﻠﻣ 1 000
ﻞﺧﺪﻟﺍ ﺔﻗﻭﺎﻌﻣﻡﻭﺃ ﻮﻠﻴﻛ 30
ﻞﻴﻐﺸﺘﻟﺍ ﺔﻴﻄﻟﻮﻓ
ﺭﺎﻴﺘﻠﻟ ﻙﻼﻬﺘﺳﺍ ﻰﺼﻗﺃﺮﻴﺒﻣﺃ 10
ﻞﻴﻐﺸﺘﻟﺍ ﺓﺭﺍﺮﺣ ﺕﺎﺟﺭﺩ ﻯﺪﻣﺱﻮﻳﺰﻠﺳ ﺔﺟﺭﺩ +40 — ﺱﻮﻳﺰﻠﺳ ﺔﺟﺭﺩ 0
(ﻉﺎﻔﺗﺭﺍ × ﻝﻮﻃ × ﺽﺮﻋ) ﺐﻴﻛﺮﺘﻟﺍ ﻢﺠﺣ
ﻥﺯﻮﻟﺍﻢﺠﻛ 0.62
.ﻖﺒﺴﻣ ﺭﺎﻄﺧﺇ ﻥﻭﺩ ﺮﻴﻴﻐﺘﻠﻟ ﻊﻀﺨﻳ
(ﺰﺗﺮﻫ ﻮﻠﻴﻛ 50 ﺔﻓﺎﺴﻤﻟ) ﺰﺗﺮﻫ ﺎﺠﻴﻣ
(ﻡﻭﺍ 75 /ﺖﻟﻮﻓ ﻭﺮﻜﻴﻣ 0.71) 8.2 dBf
Bluetooth
ﺰﺗﺮﻫ ﻮﻠﻴﻛ
/ﺰﺗﺮﻫ ﻮﻠﻴﻛ
ﺰﺗﺮﻫ ﻮﻠﻴﻛ
ﺕﻮﺻ
(ﺖﻟﻮﻓ ﻮﻴﻣ 28.2) ﻮﻴﻣ ﻞﺒﻴﺴﻳﺩ 29.0
ﺔﻴﻓﺎﺿﺇ ﺓﺪﻋﺎﺴﻣ
ﻡﺎﻋ
(ﻂﻘﻓ ﻲﻄﺧ PCM) RIFF waveform ﺕﻮﺻ ﻖﻴﺴﻨﺗ
(ﻡﻭﺍ 75 /ﺖﻟﻮﻓ ﻭﺮﻜﻴﻣ 2.0) 17.2 dBf
ﺰﺗﺮﻫ ﻮﻠﻴﻛ 1 611 — ﺰﺗﺮﻫ ﻮﻠﻴﻛ
(ﺰﺗﺮﻫ ﻮﻠﻴﻛ 9 ﺔﻓﺎﺴﻤﻟ)
7 735
— ﺰﺗﺮﻫ ﻮﻠﻴﻛ
(ﺰﺗﺮﻫ ﻮﻠﻴﻛ 5 ﺔﻓﺎﺴﻤﻟ)
10 135
— ﺰﺗﺮﻫ ﻮﻠﻴﻛ
18 135
— ﺰﺗﺮﻫ ﻮﻠﻴﻛ
(ﺰﺗﺮﻫ ﻮﻠﻴﻛ 5 ﺔﻓﺎﺴﻤﻟ)
ﺰﺗﺮﻫ ﻮﻠﻴﻛ 9
ﺰﺗﺮﻫ ﻮﻠﻴﻛ 5
(ﺖﻟﻮﻓ ﻮﻴﻣ 32) ﻮﻴﻣ ﻞﺒﻴﺴﻳﺩ 30
ﺖﻟﻮﻓ 5 ﺮﺷﺎﺒﻣ ﺭﺎﻴﺗ
108.0
531
2 940
9 500
11 580
— ﺰﺗﺮﻫ ﺎﺠﻴﻣ
ﻞﺒﻴﺴﻳﺩ 64
2 ﺔﺟﻮﻤﻟﺍ
3 ﺔﺟﻮﻤﻟﺍ
3 /2 ﺔﺟﻮﻤﻟﺍ
87.5
ﺓﺎﻨﻘﻟﺍ ﺔﻌﺳ ﺪﻳﺪﺤﺗﺰﺗﺮﻫ ﻮﻠﻴﻛ 50
ﺔﻣﺪﺨﺘﺴﻤﻟﺍ ﺔﻴﺳﺎﺴﺤﻟﺍ ﺔﺟﺭﺩ
(ﻞﺒﻴﺴﻳﺩ 46 = DIN S/N)
(ﻞﺒﻴﺴﻳﺩ ±3) ﺩﺩﺮﺘﻟﺍ ﺔﺑﺎﺠﺘﺳﺍﺰﺗﺮﻫ ﻮﻠﻴﻛ 15 — ﺰﺗﺮﻴﻫ 30
(ﻱﺩﺎﺣﺃ) ﺀﺎﺿﻮﻀﻟﺍ ﻰﻟﺇ ﺓﺭﺎﺷﻹﺍ ﺔﺒﺴﻧ
(ﺰﺗﺮﻫ ﻮﻠﻴﻛ 1) ﻮﻳﺮﺘﺳﻻﺍ ﻞﺼﻓﻞﺒﻴﺴﻳﺩ 40
(MW)
(SW1)
(SW2)
ﺓﺎﻨﻘﻟﺍ ﺔﻌﺳ ﺪﻳﺪﺤﺗ1 ﺔﺟﻮﻤﻟﺍ
MW
ﺔﻣﺪﺨﺘﺴﻤﻟﺍ ﺔﻴﺳﺎﺴﺤﻟﺍ ﺔﺟﺭﺩ
SW
(ﺰﺗﺮﻫﻮﻠﻴﻛ 1) ﺀﺎﺿﻮﻀﻟﺍ ﻰﻟﺇ ﺓﺭﺎﺷﻹﺍ ﺔﺒﺴﻧﻞﺒﻴﺴﻳﺩ 105
(ﻞﺒﻴﺴﻳﺩ 20 = S/N)
ﺭﺎﻴﺘﻟﺎﺑ ﺩﺍﺪﻣﻺﻟ ﻰﺼﻗﻷﺍ ﺪﺤﻟﺍﺮﻴﺒﻣﺃ 1
(ﻞﺒﻴﺴﻳﺩ ±1) ﺩﺩﺮﺘﻟﺍ ﺔﺑﺎﺠﺘﺳﺍﺰﺗﺮﻫ ﻮﻠﻴﻛ 20 — ﺰﺗﺮﻴﻫ 20
ﺩﺩﺮﺘﻟﺍ ﻕﺎﻄﻧ
(ﻞﺒﻴﺴﻳﺩ 26 = S/N)
ﺔﻴﺳﺎﺴﺤﻟﺍ ﺔﺋﺪﻬﺗ
ﺩﺩﺮﺘﻟﺍ ﻕﺎﻄﻧ 1 ﺔﺟﻮﻤﻟﺍ
USB ﺭﺎﻴﻌﻣ(ﻯﻮﺼﻗ ﺔﻋﺮﺳ) USB 2.0 ،USB 1.1
ﺕﺎﻔﻠﻤﻟﺍ ﻡﺎﻈﻧ32 /16 /FAT12
ﻲﻜﻴﻣﺎﻨﻳﺪﻟﺍ ﻝﺎﺠﻤﻟﺍﻞﺒﻴﺴﻳﺩ 90
ﺕﺍﻮﻨﻘﻟﺍ ﻞﺼﻓﻞﺒﻴﺴﻳﺩ 85
MP3 ﺓﺮﻔﺷ ﻚﻓMPEG-1/2 Audio Layer-3 ﻊﻣ ﻖﻓﺍﻮﺘﻣ
WMA ﺓﺮﻔﺷ ﻚﻓWindows Media Audio ﺔﻐﻴﺻ ﻊﻣ ﻖﻓﺍﻮﺘﻣ
AAC ﺓﺮﻔﺷ ﻚﻓ“.m4a” AAC-LC ﺕﺎﻔﻠﻣ
WAV ﺓﺮﻔﺷ ﻚﻓ
FLAC ﺓﺮﻔﺷ ﻚﻓFLAC ﺕﺎﻔﻠﻣ
FM
ﻒﻟﺍﻮﻤﻟﺍ
AM
USB
Page 51

ﺡﻼﺻﻻﺍﻭ ﻝﺎﻄﻋﻻﺍ ﻦﻋ ﺚﺤﺒﻟﺍ
.Bluetooth ﺯﺎﻬﺟﻭ ﺓﺪﺣﻮﻟﺍ ﻦﻴﺑ ﺔﻓﺎﺴﻤﻟﺍ ﻞﻴﻠﻘﺘﺑ ﻢﻗ
ﺓﺭﺎﺷﻹﺍ ﻝﺎﺒﻘﺘﺳﺍ ﻚﻨﻜﻤﻳ ﺚﻴﺣ ﻥﺎﻜﻣ ﻰﻟﺇ ﺓﺭﺎﻴﺴﻟﺍ ﻙﺮﺣ
.ﺍﹰﺀﻭﺪﻫ ﺮﺜﻛﺃ ﺔﺌﻴﺑ ﻲﻓ ﻲﺗﻮﺼﻟﺍ ﻝﺎﺼﺗﻻﺍ ﺔﻘﻳﺮﻃ ﻡﺪﺨﺘﺳﺍ
ﻖﻄﻧ ﺪﻨﻋ ﻥﻮﻓﻭﺮﻜﻴﻤﻟﺍ ﻦﻴﺑﻭ ﻚﻨﻴﺑ ﺔﻓﺎﺴﻤﻟﺍ ﻞﻴﻠﻘﺘﺑ ﻢﻗ
ﺲﻔﻧ ﻮﻫ ﻢﺳﻻﺍ ﻪﺑ ﻕﻮﻄﻨﻤﻟﺍ ﺕﻮﺼﻟﺍ ﻥﻮﻜﻳ ﻥﺃ ﻰﻠﻋ ﺹﺮﺣﺍ
.Bluetooth ﺕﻮﺻ ﻞﻐﺸﻣﻭ ﺓﺪﺣﻮﻟﺍ ﻦﻴﺑ ﺔﻓﺎﺴﻤﻟﺍ ﻞﻴﻠﻘﺘﺑ ﻢﻗ
ﻝﺎﺼﺗﻻﺍ ﻝﻭﺎﺣﻭ ﺎﻬﻠﻴﻐﺸﺗ ﻢﺛ ﺓﺪﺣﻮﻟﺍ ﻞﻴﻐﺸﺗ ﻑﺎﻘﻳﺈﺑ ﻢﻗ
.ﺓﺪﺣﻮﻟﺎﺑ ﻝﺎﺼﺗﻻﺍ ﻯﺮﺧﺃ Bluetooth ﺓﺰﻬﺟﺃ ﻝﻭﺎﺤﺗ ﺪﻗ
ﻢﻋﺪﻳ ﻞﺼﺘﻤﻟﺍ Bluetooth ﺕﻮﺻ ﻞﻐﺸﻣ ﻥﺎﻛ ﺍﺫﺇ ﺎﻤﻣ ﻖﻘﺤﺗ
ﻊﺟﺍﺭ) .(AVRCP) ﻮﻳﺪﻴﻔﻟﺍ/ﺕﻮﺼﻟﺍ ﻲﻓ ﺪﻌﺑ ﻦﻋ ﻢﻜﺤﺘﻟﺍ ﻊﺿﻭ
.(ﻚﺑ ﺹﺎﺨﻟﺍ ﺕﻮﺼﻟﺍ ﻞﻐﺸﻤﺑ ﺔﺻﺎﺨﻟﺍ ﺕﺎﻤﻴﻠﻌﺘﻟﺍ
.ﻯﺮﺧﺃ ﺓﺮﻣ ﻪﻠﻴﺻﻮﺗﻭ Bluetooth ﻞﻐﺸﻣ ﻞﺼﻔﺑ ﻢﻗ
ﺔﻟﻭﺎﺤﻤﻟﺍ ﺪﻋﺃ .ﻰﺼﻗﻷﺍ ﺪﺤﻟﺍ ﻰﻟﺇ ﺔﻠﺠﺴﻤﻟﺍ ﺓﺰﻬﺟﻷﺍ ﺩﺪﻋ ﻞﺻﻭ
(
DEVICE DELETE
ﺲﻔﻧ ﻮﻫ ﻢﺳﻻﺍ ﻪﺑ ﻕﻮﻄﻨﻤﻟﺍ ﺕﻮﺼﻟﺍ ﻥﻮﻜﻳ ﻥﺃ ﻰﻠﻋ ﺹﺮﺣﺍ
.“ﺕﻮﺼﻟﺍ ﻰﻠﻋ ﻑﺮﻌﺘﻟﺍ” ﺓﺰﻴﻣ ﻞﺼﺘﻤﻟﺍ ﻒﺗﺎﻬﻟﺍ ﻢﻋﺪﻳ ﻻ
.Bluetooth ﺮﺒﻋ ﻪﻴﻠﻋ ﺭﻮﺜﻌﻟﺍ ﻢﺗ/ﻞﺻﻮﻣ ﻞﺠﺴﻣ ﺯﺎﻬﺟ ﺪﺟﻮﻳ ﻻ
“ERROR” ﺔﻟﺎﺳﺮﻟﺍ ﺕﺮﻬﻇ ﺍﺫﺇ .ﻯﺮﺧﺃ ﺓﺮﻣ ﺔﻴﻠﻤﻌﻟﺍ ﺀﺍﺮﺟﺇ ﺪﻋﺃ
ﺔﻔﻴﻇﻮﻟﺍ ﻢﻋﺪﻳ ﺯﺎﻬﺠﻟﺍ ﻥﺎﻛ ﺍﺫﺇ ﺎﻤﻣ ﻖﻘﺤﺘﻓ ،ﻯﺮﺧﺃ ﺓﺮﻣ (ﺄﻄﺧ)
ﺔﻬﺟ ﺕﺎﻣﻮﻠﻌﻣ ﻰﻠﻋ ﻝﻮﺼﺤﻟﺍ Bluetooth ﺯﺎﻬﺟ ﻊﻴﻄﺘﺴﻳ ﻻ
ﻢﻟ ﺍﺫﺇﻭ .ﻯﺮﺧﺃ ﺓﺮﻣ ﺔﻴﻠﻤﻌﻟﺍ ﺀﺍﺮﺟﺇ ﻝﻭﺎﺣﻭ ﺓﺪﺣﻮﻟﺍ ﻂﺒﺿ ﺪﻋﺃ
.ﻚﻟ ﺔﻣﺪﺧ ﺰﻛﺮﻣ ﺏﺮﻗﺃ ﺮﺸﺘﺳﺎﻓ ،ﺔﻠﻜﺸﻤﻟﺍ ﻞﺣ ﻢﺘﻳ
،14 ) .ﻱﺭﻭﺮﺿ ﺮﻴﻏ ﺯﺎﻬﺟ ﻑﺬﺣ ﺪﻌﺑ
.ﻞﻀﻓﺃ ﻞﻜﺸﺑ
.ﻢﺳﻻﺍ
.ﻞﺠﺴﻤﻟﺍ ﺕﻮﺼﻟﺍ
.ﻯﺮﺧﺃ ﺓﺮﻣ
.ﻞﺠﺴﻤﻟﺍ ﺕﻮﺼﻟﺍ
.ﺎﻫﺀﺍﺮﺟﺇ ﻝﻭﺎﺤﺗ ﻲﺘﻟﺍ
.ﻝﺎﺼﺗﻻﺍ
•
ﻒﺗﺎﻬﻟﺍ ﺕﻮﺻ ﺓﺩﻮﺟ
•
•
ﻲﺗﻮﺼﻟﺍ ﻝﺎﺼﺗﻻﺍ ﺔﻘﻳﺮﻃ
•
•
•
•
•
•
•
.ﺔﺤﺟﺎﻧ ﺮﻴﻏ
ﺕﻮﺼﻟﺍ ﺔﻌﻃﺎﻘﻣ ﻢﺘﺗ
ﺀﺎﻨﺛﺃ ﻪﻴﻄﺨﺗ ﻭﺃ
ﺕﻮﺻ ﻞﻐﺸﻣ ﻞﻴﻐﺸﺗ
.Bluetooth
ﻢﻜﺤﺘﻟﺍ ﻦﻜﻤﻳ ﻻ
ﺕﻮﺻ ﻞﻐﺸﻤﺑ
.ﻞﺼﺘﻤﻟﺍ Bluetooth
“DEVICE FULL”
“N/A VOICE TAG”
“NOT SUPPORT”
/ “NO ENTRY”
“NO PAIR”
“NO INFO
/ “HF ERROR XX”
“BT ERROR”
ﺽﺍﺮﻋﻻﺍﻝﺎﻄﻋﻷﺍ ﺔﺠﻟﺎﻌﻣ
.ﺔﺌﻴﺳ
“ERROR”
.Android ﺯﺎﻬﺟ ﻰﻠﻋ ﺔﻗﺎﻄﻟﺍ ﺮﻴﻓﻮﺗ ﻊﺿﻭ ﺊﻔﻃﺍ
.Android ﺯﺎﻬﺟ ﻞﻴﺻﻮﺗ ﺪﻋﺃ
.Android ﺯﺎﻬﺟ ﻞﻴﻐﺸﺗ ﺪﻋﺍ
.ﺓﺪﻳﺪﺟ ﺔﻄﺤﻣ ﺀﺎﺸﻧﺇ ﺢﺠﻨﻳ ﻢﻟ
.ﻙﺯﺎﻬﺟ ﻰﻠﻋ Pandora ﻖﻴﺒﻄﺗ ﻦﻣ ﻖﻘﺤﺗ
.ﻲﻄﺨﺘﻟﺍ ﺪﺣ ﻰﻟﺇ ﻝﻮﺻﻮﻟﺍ ﻢﺗ
.ﺕﺎﻄﺤﻣ ﻰﻠﻋ ﺭﻮﺜﻌﻟﺍ ﻢﺘﻳ ﻢﻟ
.ﺔﻠﺠﺴﻤﻟﺍ ﺕﺎﻄﺤﻤﻟﺍ ﺩﺪﻋ ﺪﺣ ﻰﻟﺇ ﻝﻮﺻﻮﻟﺍ ﻢﺗ
ﺮﻴﻏ ﺕﺎﻄﺤﻤﻟﺍ ﻑﺬﺣ ﺪﻌﺑ ﺔﻟﻭﺎﺤﻤﻟﺍ ﺪﻋﺃ
Bluetooth®
.ﺎﺿﺮﻟﺍ ﻡﺪﻋ/ﺎﺿﺮﻟﺍ ﺔﻣﻼﻋ ﻞﻴﺠﺴﺗ ﻞﺸﻓ
ﺔﻣﺪﺧ ﻢﻳﺪﻘﺗ ﻢﺘﻳ ﻻ ﺪﻠﺑ ﻦﻣ ﻝﻮﺻﻮﻟﺍ ﻝﻭﺎﺤﺗ ﺖﻧﺃ
.ﻯﺮﺧﺃ ﺓﺮﻣ Bluetooth ﺯﺎﻬﺟ ﻦﻣ ﺚﺤﺒﻟﺍ
ﻒﻳﺮﻌﺘﻟﺍ ﻢﻗﺭ ﺰﻣﺭ ﺲﻔﻧ ﻝﺎﺧﺩﺇ ﻦﻣ ﺪﻛﺄﺗ
.Bluetooth ﺯﺎﻬﺟﻭ ﺓﺪﺣﻮﻟﺍ ﻦﻣ ﻞﻜﻟ ﻲﺼﺨﺸﻟﺍ
ﻦﻣ ﻞﻛ ﻦﻣ ﻥﺍﺮﻗﻹﺍ ﺕﺎﻣﻮﻠﻌﻣ ﻑﺬﺤﺑ ﻢﻗ
ﺓﺮﻣ ﻥﺍﺮﻗﻹﺍ ﺀﺍﺮﺟﺇ ﻢﺛ ،Bluetooth ﺯﺎﻬﺟﻭ ﺓﺪﺣﻮﻟﺍ
(10 ) .ﻥﻮﻓﻭﺮﻜﻴﻤﻟﺍ ﺓﺪﺣﻭ ﻊﺿﻮﻣ ﻂﺒﻀﺑ ﻢﻗ
”
(11 ) .[
(3 ) .ﺓﺪﺣﻮﻟﺍ ﻂﺒﺿ ﺪﻋﺃ
ECHO CANCEL
.ﻙﺯﺎﻬﺟ ﻦﻣ ﺔﻳﺭﻭﺮﻀﻟﺍ
.ﺮﻘﺘﺴﻣ ﺮﻴﻏ ﻝﺎﺼﺗﻻﺍ
.ﺎﻬﺑ P
andora
(
10
) .ﻯﺮﺧﺃ
] ﺩﺍﺪﻋﺇ ﺺﺤﻓﺍ
ﻢﺘﻳ ﻭﺃ ﻞﻴﻐﺸﺘﻟﺍ ﻊﻄﻘﺘﻳ
.ﺕﻮﺼﻟﺍ ﻲﻄﺨﺗ
•
•
•
•
•
•
•
•
/ “ANDROID ERROR”
/ “ADD ERROR”
“SEARCH ERROR”
“CHECK DEVICE”
“NO STATIONS”
“STATION LIMIT”
“CONNECT ERROR”
“RATING ERROR”
“LICENSE ERROR”
ﺯﺎﻬﺟ ﻰﻠﻋ ﻑﺮﻌﺘﻟﺍ ﻢﺘﻳ ﻢﻟ
ﻥﺍﺮﻗﺍ ﺀﺍﺮﺟﺇ ﻦﻜﻤﻳ ﻻ
ﺀﺎﺿﻮﺿ ﻭﺍ ﻯﺪﺻ ﻉﺎﻤﺳ ﻢﺘﻳ
.ﻒﺗﺎﻬﻟﺍ ﺮﺒﻋ ﺙﺪﺤﺘﻟﺍ ﺀﺎﻨﺛﺍ
ﺽﺍﺮﻋﻻﺍﻝﺎﻄﻋﻷﺍ ﺔﺠﻟﺎﻌﻣ
“NA DEVICE”
“NO SKIPS”
.Bluetooth
.Bluetooth
ANDROID
Pandora
Bluetooth®
20
Page 52

ﺡﻼﺻﻻﺍﻭ ﻝﺎﻄﻋﻻﺍ ﻦﻋ ﺚﺤﺒﻟﺍ
.ﺦﺴﻨﻟﺍ ﺪﺿ ﻲﻤﺤﻣ ﻒﻠﻣ ﻞﻴﻐﺸﺗ ﻢﺗ
.ﺕﻼﺻﻮﻟﺍ ﺺﺤﻔﺑ ﻢﻗﻭ ،ﻡﻮﻋﺪﻣ USB ﺯﺎﻬﺟ ﻞﺻﻭ
ﺕﺎﻔﻠﻣ ﻰﻠﻋ ﻱﻮﺘﺤﺗ ﻲﺘﻟﺍ USB ﺯﺎﻬﺟ ﻞﻴﺻﻮﺘﺑ ﻢﻗ
ﻞﻴﻐﺸﺘﺑ ﻢﻗ ،[
ﻞﻴﻐﺸﺗ ﺪﻋﺃ ،[
ﻡﺪﺨﺘﺳﺍ ﻭﺃ ﻂﺋﺎﺳﻮﻟﺍ ﻞﻐﺸﻤﻟ ﻲﻟﺎﺤﻟﺍ ﻖﻴﺒﻄﺘﻟﺍ
ﻥﺍ ﻲﻨﻌﻳ ﺍﺬﻫ ،ﺔﻠﻜﺸﻤﻟﺍ ﻞﺤﻟ ﻚﻟﺫ ﻱﺩﺆﻳ ﻢﻟ ﺍﺫﺇ
ﻪﻴﺟﻮﺗ ﻰﻠﻋ ﺭﺩﺎﻗ ﺮﻴﻏ ﻝﻮﺻﻮﻤﻟﺍ Android ﺯﺎﻬﺟ
KENWOOD MUSIC PLAY APP ﻖﻴﺒﻄﺘﻟﺍ ﺖﻴﺒﺜﺗ ﻦﻣ ﺪﻛﺄﺗ
ﺩﺍﺪﻋﻹﺍ ﻦﻣ ﺪﻛﺄﺗﻭ Android ﺯﺎﻬﺟ ﻞﻴﺻﻮﺗ ﺪﻋﺍ
ﻲﻨﻌﻳ ﺍﺬﻫ ،ﺔﻠﻜﺸﻤﻟﺍ ﻞﺤﻟ ﻚﻟﺫ ﻱﺩﺆﻳ ﻢﻟ ﺍﺫﺇ
BROWSE
ﻲﻨﻌﻳ ﺍﺬﻫ ،ﺔﻠﻜﺸﻤﻟﺍ ﻞﺤﻟ ﻚﻟﺫ ﻱﺩﺆﻳ ﻢﻟ ﺍﺫﺇ
BROWSE
HAND MODE
ﺯﺎﻬﺟ ﻰﻠﻋ ﻂﺋﺎﺳﻮﻟﺍ ﻞﻐﺸﻤﻟ ﻖﻴﺒﻄﺗ ﻱﺍ
HAND MODE
(
18
(8 ) .[
ANDROID SETUP
] ﻢﻋﺪﻳ ﻻ ﻝﻮﺻﻮﻤﻟﺍ Android ﺯﺎﻬﺟ ﻥﺍ
.Android ﺯﺎﻬﺟ ﻰﻠﻋ ﺭﻮﻄﻤﻟﺍ ﺕﺍﺭﺎﻴﺧ ﺊﻔﻃﺍ
] ﻢﻋﺪﻳ ﻻ ﻝﻮﺻﻮﻤﻟﺍ Android ﺯﺎﻬﺟ ﻥﺍ
.ﻞﻴﻐﺸﺘﻠﻟ ﺔﻠﺑﺎﻗ ﺕﻮﺻ
.iPod ـﻟﺍ ﺯﺎﻬﺟ ﻞﻴﺻﻮﺗ ﺪﻋﺃ
.iPod ﻂﺒﺿ ﺪﻋﺃ
.Android ﺯﺎﻬﺟ ﻞﻴﺻﻮﺗ ﺪﻋﺃ
] ﻊﺿﻭ ﻲﻓ ﺖﻨﻛ ﺍﺫﺇ
.ﻞﻴﻐﺸﺘﻟﺍ ﺃﺪﺑﺍﻭ Android
] ﻊﺿﻭ ﻲﻓ ﺖﻨﻛ ﺍﺫﺇ
.ﻂﺋﺎﺳﻮﻟﺍ ﻞﻐﺸﻤﻟ ﺮﺧﺍ ﻖﻴﺒﻄﺗ
.Android ﺯﺎﻬﺟ ﻞﻴﻐﺸﺗ ﺪﻋﺍ
) .ﺓﺪﺣﻮﻟﺍ ﻰﻟﺍ ﺕﻮﺼﻟﺍ ﺓﺭﺎﺷﺍ
(8 )
.Android ﺯﺎﻬﺟ ﻲﻓ
] ﻲﻓ ﺐﺳﺎﻨﻤﻟﺍ
(
18
) .[
MODE
.Android ﺯﺎﻬﺟ ﻞﻴﺻﻮﺗ ﺪﻋﺃ
(
18
) .[
MODE
“COPY PRO”
“NA DEVICE”
“NO MUSIC”
•
•
•
ﺕﻮﺼﻟﺍ ﻉﺎﻤﺳ ﻦﻜﻤﻳ ﻻ
•
ﺯﺎﻬﺟ ﻦﻣ ﺕﻮﺼﻟﺍ ﺝﺮﺨﻳ
•
•
•
•
•
•
•
•
•
“iPod ERROR”
.ﻞﻴﻐﺸﺘﻟﺍ ﺀﺎﻨﺛﺍ
.ﻂﻘﻓ Android
ﻲﻓ ﻞﻴﻐﺸﺘﻟﺍ ﻦﻜﻤﻳ ﻻ
.[
BROWSE MODE
ﻭﺃ “NO DEVICE” ﻞﺻﺍﻮﻳ
.ﺾﻴﻣﻮﻟﺍ “READING”
ﺽﺍﺮﻋﻻﺍﻝﺎﻄﻋﻷﺍ ﺔﺠﻟﺎﻌﻣ
] ﻊﺿﻭ
.ﻦﻜﻤﻣ ﻯﻮﺘﺴﻣ ﻞﻀﻓﺍ ﻰﻠﻋ ﺕﻮﺼﻟﺍ ﺓﻮﻗ ﻯﻮﺘﺴﻣ ﻂﺒﺿﺍ
iPod / USB
ﻙﻼﺳﺍ ﻞﻴﺻﻮﺗ ﻑﺮﻃﺍ ﻥﺍ ﻦﻣ ﺪﻛﺄﺗ ﻢﺛ ،ﺔﻗﺎﻄﻟﺍ ﻊﻄﻗﺍ
ﻞﻴﻐﺸﺘﺑ ﻢﻗ .ﺢﻴﺤﺻ ﻞﻜﺸﺑ ﺔﻟﻮﺻﻮﻣ ﺔﻋﺎﻤﺴﻟﺍ
•
•
ﻆﻓﺍﻮﺣﻭ ﺔﻴﻣﺮﻫ ﺕﻼﺴﻠﺴﺗ ﻦﻣ ﺕﺎﻳﻮﺘﺴﻣ ﻞﻤﻌﺘﺴﺗ ﻻ
ANDROID
ﺔﻴﺋﺎﺠﻬﻟﺍ ﻑﻭﺮﺤﻟﺍ ﺽﺮﻋ ﻂﻘﻓ ﺓﺪﺣﻮﻟﺍ ﻩﺬﻫ ﻊﻴﻄﺘﺴﺗ
.ﺕﻮﺼﻟﺍ ﺕﺎﻔﻠﻣ ﻢﻋﺪﺗ ﻂﺋﺎﺳﻮﻟﺍ ﺕﺎﻳﻮﺘﺤﻣ ﻥﺃ ﻦﻣ ﺪﻛﺄﺗ
.ﻯﺮﺧﺃ ﺓﺮﻣ USB ﺯﺎﻬﺟ ﻰﻠﻋ ﺕﺍﺪﻠﺠﻤﻟﺍﻭ ﺕﺎﻔﻠﻤﻟﺍ ﺦﺴﻧﺍ
USB ﺯﺎﻬﺟ ﻂﺒﺿ ﺓﺩﺎﻋﺈﺑ ﻢﻗ ،ﺔﻠﻜﺸﻤﻟﺍ ﺍﺬﻫ ﻞﺤﻳ ﻢﻟ ﺍﺫﺇ
ﻞﻴﻐﺸﺘﻟﺍ ﺭﺪﺼﻣ ﺮﻴﻴﻐﺘﺑ ﻢﻗ ﻢﺛ ،USB ﺯﺎﻬﺟ ﻞﻴﺻﻮﺘﺑ ﻢﻗ
.ﺕﻼﻴﺻﻮﺘﻟﺍﻭ ﻙﻼﺳﻻﺍ ﺺﺤﻓﺍ
.ﺔﻣﺪﺧ ﺰﻛﺮﻣ ﺏﺮﻗﺍ ﻰﻟﺍ ﺓﺪﺣﻮﻟﺍ ﻞﺳﺭﺍ
.ﺔﻤﻜﺤﻣ ﺓﺭﻮﺼﺑ ﻲﺋﺍﻮﻬﻟﺍ ﻞﺻﻭﺍ
.ﺔﻳﺎﻬﻨﻟﺍ ﻰﺘﺣ ﻲﺋﺍﻮﻬﻟﺍ ﻊﻓﺭﺍ
.ﺕﺎﻔﻠﻤﻟﺍ ﻞﻴﺠﺴﺗ ﺔﻴﻔﻴﻛ ﻮﻫ ﻚﻟﺫ ﺐﺒﺳ
.ﺯﻮﻣﺮﻟﺍ ﻦﻣ ﺩﻭﺪﺤﻣ ﺩﺪﻋﻭ ﻡﺎﻗﺭﻷﺍﻭ ﺓﺮﻴﺒﻜﻟﺍ
.ﺮﺧﺃ USB ﺯﺎﻬﺟ ﻡﺪﺨﺘﺳﺍ ﻭﺃ
.ﻯﺮﺧﺍ ﺓﺮﻣ ﺔﻗﺎﻄﻟﺍ
(2 ) .ﺕﻼﺻﻮﻤﻟﺍ ﻒﻈﻧ
(3 ) .ﺓﺪﺣﻮﻟﺍ ﻂﺒﺿ ﺪﻋﺃ
.ﺍﹰﺪﺟ ﺓﺮﻴﺜﻛ
(
18
)
.ﻯﺮﺧﺃ ﺓﺮﻣ USB ﻰﻟﺇ
•
.ﺕﻮﺼﻟﺍ ﻉﺎﻤﺳ ﻦﻜﻤﻳ ﻻ
•
“MISWIRING CHECK ﺮﻬﻈﺗ
.WIRING THEN PWR ON”
“PROTECTING SEND ﺮﻬﻈﺗ
.ﺕﻮﺼﻟﺍ ﻉﺎﻤﺳ ﻦﻜﻤﻳ ﻻ
.ﻞﻤﻌﻳ ﻻ ﺯﺎﻬﺠﻟﺍ
ﻰﻠﻋ ﺔﺿﻭﺮﻌﻤﻟﺍ ﺕﺎﻣﻮﻠﻌﻤﻟﺍ
.ﺔﺤﻴﺤﺻ ﺮﻴﻏ ﺔﺷﺎﺸﻟﺍ
.ﺎﻘﻠﻄﻣ ﻞﺒﻘﺘﺴﻤﻟﺍ ﺍﺬﻫ ﻞﻐﺘﺸﻳ ﻻ
•
.ﺀﻱﺩﺭ ﻮﻳﺩﺍﺮﻟﺍ ﻝﺎﺒﻘﺘﺳﺍ
•
ﻲﻜﻴﺗﺎﺘﺳﺍ ﺞﻴﺠﺿ ﺪﻟﻮﺘﻳ
.ﻮﻳﺩﺍﺮﻟﺍ ﻰﻟﺍ ﻉﺎﻤﺘﺳﻻﺍ ﺀﺎﻨﺛﺍ
.ﺾﻴﻣﻮﻟﺍ “READING”ﻞﺻﺍﻮﻳ
ﺮﻴﻏ ﻲﻀﻘﻨﻤﻟﺍ ﻞﻴﻐﺸﺘﻟﺍ ﺖﻗﻭ
ﻑﻭﺮﺤﻟﺍ ﺽﺮﻋ ﻢﺘﻳ ﻻ
.(ﻡﻮﺒﻟﻻﺍ ﻢﺳﺍ ،ﻼﺜﻣ) ﺔﺤﻴﺤﺼﻟﺍ
“READ ERROR”
“NO DEVICE”
ﺽﺍﺮﻋﻻﺍﻝﺎﻄﻋﻷﺍ ﺔﺠﻟﺎﻌﻣ
.SERVICE”
.ﺢﻴﺤﺻ
“NA FILE”
ﻡﺎﻋ
•
•
•
ﻮﻳﺩﺍﺮﻟﺍ
•
•
iPod / USB
19
ﻲﺑﺮﻋ
Page 53

.ﻰﻠﻋﺍﻭ Android OS 4.1ﻞﻴﻐﺸﺘﻟﺍ ﻡﺎﻈﻧ ﻢﻋﺪﺗ ﺓﺪﺣﻮﻟﺍ ﻩﺬﻫ
Android ﺯﺎﻬﺟ ﺹﻮﺼﺨﺑ
ﺔﻔﻴﻇﻭ ﻢﻋﺪﺗ ﻻ ﺪﻗ (ﻰﻠﻋﺍﻭ OS 4.1 ﻞﻴﻐﺸﺘﻟﺍ ﻡﺎﻈﻨﺑ ﺓﺰﻬﺠﻤﻟﺍ) Android ﺓﺰﻬﺟﺍ ﺾﻌﺑ
.2.0 (AOA) Android Open Accessory ﻞﻣﺎﻛ ﻞﻜﺸﺑ
ﻩﺬﻫ ﻡﻮﻘﺗ ،AOA 2.0 ﻭ ﺮﻴﺒﻜﻟﺍ ﻦﻳﺰﺨﺘﻟﺍ ﺔﺌﻓ ﺯﺎﻬﺟ ﻦﻣ ﻞﻛ ﻢﻋﺪﻳ Android ﺯﺎﻬﺟ ﻥﺎﻛ ﺍﺫﺇ
.ﺎﻤﺋﺍﺩ ﺔﻳﻮﻟﻭﺄﻛ AOA 2.0 ﺮﺒﻋ ﻞﻴﻐﺸﺘﻟﺎﺑ ﺓﺪﺣﻮﻟﺍ
www.kenwood.com/cs/ce/ :ﻊﺟﺍﺭ ،ﺔﻘﻓﺍﻮﺘﻤﻟﺍ ﺓﺰﻬﺟﻻﺎﺑ ﺔﻤﺋﺎﻗ ﺙﺪﺣﺍﻭ ﺕﺎﻣﻮﻠﻌﻤﻟﺍ ﻦﻣ ﺪﻳﺰﻤﻟ
Pandora ﻝﻮﺣ
.ﺍﺪﻨﻟﺯﻮﻴﻧﻭ ﺎﻴﻟﺍﺮﺘﺳﺃﻭ ﺓﺪﺤﺘﻤﻟﺍ ﺕﺎﻳﻻﻮﻟﺍ ﻲﻓ ﻻﺇ Pandora ﻖﻴﺒﻄﺗ ﺮﻓﻮﺘﻳ ﻻ
ﻊﻀﺨﺗ ﺕﺎﻔﺻﺍﻮﻤﻟﺍ ﻥﺈﻓ ،ﺔﻴﺟﺭﺎﺧ ﺔﻬﺟ ﺎﻬﻣﺪﻘﺗ ﺔﻣﺪﺧ ﻮﻫ Pandora ﻖﻴﺒﻄﺗ ﻥﻷ ﺍﹰﺮﻈﻧ
ﺕﺎﻣﺪﺨﻟﺍ ﺾﻌﺑ ﺮﻓﻮﺘﺗ ﻻ ﺪﻗ ﻭﺃ ﻖﻓﺍﻮﺘﻟﺍ ﻞﻘﻳ ﺪﻘﻓ ،ﻪﻴﻠﻋ ﺀﺎﻨﺑﻭ .ﻖﺒﺴﻣ ﺭﺎﻌﺷﺇ ﻥﻭﺩ ﺮﻴﻴﻐﺘﻠﻟ
.ﺎﻬﻌﻴﻤﺟ ﻭﺃ
.ﺓﺪﺣﻮﻟﺍ ﻩﺬﻫ ﻦﻣ Pandora ﻒﺋﺎﻇﻭ ﺾﻌﺑ ﻞﻤﻌﺗ ﻻ ﺪﻗ
ﻰﻠﻋ Pandora ـﺑ ﻝﺎﺼﺗﻻﺍ ﻰﺟﺮﻳ ،ﻖﻴﺒﻄﺘﻟﺍ ﻡﺍﺪﺨﺘﺳﺍ ﻦﻣ ﺄﺸﻨﺗ ﻲﺘﻟﺍ ﺕﻼﻜﺸﻤﻠﻟ ﺔﺒﺴﻨﻟﺎﺑ
.pandora-support@pandora.com
Bluetooth ﺔﻴﻨﻘﺗ ﻝﻮﺣ ﺓﺬﺒﻧ
Bluetooth ﺭﺍﺪﺻﺇ ﺐﺴﺣ ﺓﺪﺣﻮﻟﺍ ﻩﺬﻬﺑ ﻝﺎﺼﺗﻻﺍ ﻦﻣ Bluetooth ﺓﺰﻬﺟﺃ ﺾﻌﺑ ﻦﻜﻤﺘﺗ ﻻ ﺪﻗ
.ﺯﺎﻬﺠﻟﺎﺑ ﺹﺎﺨﻟﺍ
.Bluetooth ﺓﺰﻬﺟﺃ ﺾﻌﺑ ﻊﻣ ﺓﺪﺣﻮﻟﺍ ﻩﺬﻫ ﻞﻤﻌﺗ ﻻ ﺪﻗ
.ﺔﻄﻴﺤﻤﻟﺍ ﻑﻭﺮﻈﻟﺍ ﺐﺴﺣ ﺓﺭﺎﺷﻹﺍ ﻑﻭﺮﻇ ﻒﻠﺘﺨﺗ
:ﻲﻟﺎﺘﻟﺍ ﺐﻳﻮﻟﺍ ﻊﻗﻮﻣ ﺓﺭﺎﻳﺰﺑ ﻞﻀﻔﺗ ،Bluetooth ﺔﻴﻨﻘﺗ ﻝﻮﺣ ﺕﺎﻣﻮﻠﻌﻤﻟﺍ ﻦﻣ ﺪﻳﺰﻤﻟ
www.kenwood.com/cs/ce/
ﺕﺎﻣﻮﻠﻌﻤﻟﺍ ﻦﻣ ﺪﻳﺰﻣ
ﻞﻴﻟﺩ ﻲﻓ ﻞﻴﻐﺸﺘﻠﻟ ﺔﻠﺑﺎﻘﻟﺍ ﺔﻴﺗﻮﺼﻟﺍ ﺕﺎﻔﻠﻤﻟﺍ ﻝﻮﺣ ﺔﻴﻠﻴﺼﻔﺗ ﺕﺎﻈﺣﻼﻣﻭ ﺕﺎﻣﻮﻠﻌﻣ ﻙﺎﻨﻫ
•
•
•
•
•
•
ﺯﺎﻬﺟ ﻰﻠﻋ ﺔﻧﺰﺨﻤﻟﺍ FLAC/WAV/AAC/WMA/MP3 ﺕﺎﻔﻠﻣ ﻞﻴﻐﺸﺗ ﺓﺪﺣﻮﻟﺍ ﻩﺬﻫ ﻊﻴﻄﺘﺴﺗ
•
•
•
Android™ ﻖﻴﺒﻄﺗﻭ KENWOOD Music Editor Light ﺮﺗﻮﻴﺒﻤﻜﻟﺍ ﻖﻴﺒﻄﺗ ﺓﺪﺣﻮﻟﺍ ﻩﺬﻫ ﻢﻋﺪﺗ
•
•
•
ﺕﺎﻔﻠﻤﻟﺍ ﻦﻋ ﺚﺤﺒﻟﺍ ﻚﻨﻜﻤﻳ ،KENWOOD Music Control ﻭﺃ KENWOOD Music Editor Light
ﺐﻳﻮﻟﺍ ﻊﻗﻮﻣ ﻰﻠﻋ KENWOOD Music Control ﻭ KENWOOD Music Editor Light ﻦﻣ ﻞﻛ ﺡﺎﺘﻳ
ﺓﺰﻬﺟﺃ ﺞﻣﺍﺮﺑ ﻦﻣ ﺕﺍﺭﺍﺪﺻﻹﺍ ﺙﺪﺣﺃ ﻰﻟﺇ ﺔﻓﺎﺿﻹﺎﺑ ﺔﻘﻓﺍﻮﺘﻣ ﺔﻤﺋﺎﻗ ﺙﺪﺣﺃ ﻰﻠﻋ ﻝﻮﺼﺤﻠﻟ
www.kenwood.com/cs/ce/audiofile/ :ﻲﻟﺎﺘﻟﺍ ﺐﻳﻮﻟﺍ ﻊﻗﻮﻣ ﻰﻠﻋ ﺖﻧﺮﺘﻧﻹﺍ ﻰﻠﻋ
،(.m4a) AAC ،(.wma) WMA ،(.mp3) MP3 :ﻞﻴﻐﺸﺘﻠﻟ ﻞﺑﺎﻘﻟﺍ ﻮﻳﺩﻭﺃ ﺕﺎﻴﺗﻮﺼﻟﺍ ﻒﻠﻣ
ﻞﻴﻐﺸﺘﻟﺍ ﺭﺬﻌﺘﻳ ﺪﻗ ،ﻩﻼﻋﺃ ﺓﺭﻮﻛﺬﻤﻟﺍ ﺮﻴﻳﺎﻌﻤﻟﺍ ﻊﻣ ﺔﻴﺗﻮﺼﻟﺍ ﺕﺎﻔﻠﻤﻟﺍ ﻖﻓﺍﻮﺗ ﺪﻨﻋ ﻰﺘﺣ
ﺮﻴﻏ ﻞﻛﺎﺸﻣ ﺭﻮﻬﻇ ﻲﻓ ﺮﺘﻣ 5 ﻰﻠﻋ ﻲﻟﺎﻤﺟﻹﺍ ﻪﻟﻮﻃ ﺪﻳﺰﻳ ﻞﺑﺎﻛ ﻞﻴﺻﻮﺗ ﺐﺒﺴﺘﻳ ﺪﻗ
.ﺮﻴﺒﻣﺃ 1 ﺯﻭﺎﺠﺘﻳﻭ ﺖﻟﻮﻓ 5 ﻪﻟﺪﻌﻣ ﻥﻮﻜﻳ USB ﺯﺎﻬﺟ ﻰﻠﻋ ﻑﺮﻌﺘﻟﺍ ﺓﺪﺣﻮﻠﻟ ﻦﻜﻤﻳ ﻻ
ﻖﻴﺒﻄﺗ ﻡﺍﺪﺨﺘﺳﺎﺑ ﺔﻴﻨﻏﻷﺍ ﺕﺎﻧﺎﻴﺑ ﺔﻓﺎﺿﺇ ﻊﻣ ﺔﻴﺗﻮﺻ ﺕﺎﻔﻠﻣ ﻞﻴﻐﺸﺘﺑ ﻚﻣﺎﻴﻗ ﺪﻨﻋ
.iPod ﺯﺎﻬﺟ ﻲﻓ “
FAT32 ،FAT16 ،FAT12 :ﻞﻴﻐﺸﺘﻠﻟ ﻞﺑﺎﻘﻟﺍ USB ﺯﺎﻬﺟ ﺕﺎﻔﻠﻣ ﻡﺎﻈﻧ
.ﺯﺎﻬﺠﻟﺍ ﻭﺃ ﻂﺋﺎﺳﻮﻟﺍ ﺕﻻﺎﺣ ﻭﺃ ﻉﺍﻮﻧﺃ ﻰﻠﻋ ﺍﹰﺩﺎﻤﺘﻋﺍ
.USB ﻱﺰﻛﺮﻣ ﻊﻤﺠﻣ ﻖﻳﺮﻃ ﻦﻋ USB ﺯﺎﻬﺟ ﻞﻴﺻﻮﺗ ﻚﻨﻜﻤﻳ ﻻ
KENWOOD Music Control ﻭ KENWOOD Music Editor Light ﻝﻮﺣ
.ﺔﻴﻨﻏﻷﺍﻭ ،ﻞﻴﻐﺸﺘﻟﺍ ﺔﻤﺋﺎﻗﻭ ،ﻡﻮﺒﻟﻷﺍﻭ ،ﻥﺎﻨﻔﻟﺍﻭ ،ﻉﻮﻨﻟﺍ ﺐﺴﺣ ﺔﻴﺗﻮﺼﻟﺍ
(5th generation ﻭ 4th ،3rd ،2nd) iPod touch
(7th generation ﻭ 6th ،5th ،4th ،3rd) iPod nano
www.kenwood.com/cs/ce/ipod :ﺮﻈﻧﺍ ،iPod/iPhone
” ﻭﺃ “KENWOOD” ﺭﻮﻬﻇ ﺔﻟﺎﺣ ﻲﻓ iPod ﺯﺎﻬﺟ ﻞﻴﻐﺸﺗ ﻚﻨﻜﻤﻳ ﻦﻟ
ﻞﻴﻐﺸﺘﻠﻟ ﺔﻠﺑﺎﻗ ﺕﺎﻔﻠﻣ
(.flac) FLAC ،(.wav) WAV
USB ﺓﺰﻬﺟﺃ ﻝﻮﺣ
.USB ﺔﺌﻓ ﻦﻣ ﺔﻌﺴﻟﺍ ﻲﻟﺎﻋ ﻦﻳﺰﺨﺗ
.ﻞﻴﻐﺸﺘﻟﺍ ﻲﻓ ﺔﻴﻌﻴﺒﻃ
.KENWOOD Music Control
www.kenwood.com/cs/ce/ :ﻲﻟﺎﺘﻟﺍ
iPhone/iPod ﺯﺎﻬﺟ ﻝﻮﺣ
5C ،5S ،5 ،4S ،4 ،3GS ،iPhone 3G
ﻡﺎﻋ
Made for
iPod classic
•
•
•
•
•
•
•
•
•
-
-
-
-
•
•
18
Page 54

ﺔﺷﺎﺸﻟﺍ ﺕﺍﺩﺍﺪﻋﺇ
.[
FUNCTION
ﻰﻠﻋ ﻂﻐﺿﺍ ﻢﺛ ،[
،(ﻩﺎﻧﺩﺃ ﻝﻭﺪﺠﻟﺍ ﺮﻈﻧﺍ) ﺪﻳﺪﺤﺘﻠﻟ ﺕﻮﺼﻟﺍ ﻯﻮﺘﺴﻣ ﺹﺮﻗ ﺮﻳﻭﺪﺘﺑ ﻢﻗ 3
.ﻪﻄﻴﺸﻨﺗ ﻭﺃ ﺏﻮﻠﻄﻤﻟﺍ ﺮﺼﻨﻌﻟﺍ ﺪﻳﺪﺤﺗ ﻢﺘﻳ ﻰﺘﺣ 3 ﺓﻮﻄﺨﻟﺍ ﺭﺮﻛ 4
XX
:ﻲﺿﺍﺮﺘﻓﺍ
.ﺔﺷﺎﺸﻟﺍ ﺓﺀﺎﺿﻹ ﻞﻀﻔﻤﻟﺍ ﻉﻮﻄﺴﻟﺍ ﻯﻮﺘﺴﻣ ﺩﺪﺤﻳ :31 —
ﺔﺷﺎﺸﻟﺍ ﺕﺎﻣﻮﻠﻌﻣ ﺭﺮﻤﺘﺳ ﺖﻨﻛ ﺍﺫﺇ ﺎﻣ ﺩﺪﺤﻳ :
] ﻰﻟﺇ ﻝﻮﺧﺪﻠﻟ ﺕﻮﺼﻟﺍ ﻯﻮﺘﺴﻣ ﺹﺮﻗ ﻰﻠﻋ ﻂﻐﺿﺍ 1
DISPLAY
] ﺪﻳﺪﺤﺘﻟ ﺕﻮﺼﻟﺍ ﻯﻮﺘﺴﻣ ﺹﺮﻗ ﺭﺩﺃ 2
.ﺀﺎﻬﻧﻹﺍ ﻞﺟﺃ ﻦﻣ
ﻰﻠﻋ ﻂﻐﺿﺍ ،ﻖﺑﺎﺴﻟﺍ ﺩﺍﺪﻋﻹﺍ ﺮﺼﻨﻋ ﻰﻟﺇ ﻉﻮﺟﺮﻠﻟ
.
.ﺀﺎﻐﻟﺍ :
OFF ؛
.ﺔﺷﺎﺸﻟﺍ ﺓﺀﺎﺿﺇ ﻢﺘﻌﻳ :
.ﺀﺎﻐﻟﺍ :
OFF
؛ .ﻂﻘﻓ ﺓﺪﺣﺍﻭ ﺓﺮﻣ ﺭﺮﻤﺘﺳ ﻭﺃ ،ﺎﹰﻴﺋﺎﻘﻠﺗ
.ﺹﺮﻘﻟﺍ ﻰﻠﻋ ﻂﻐﺿﺍ ﻢﺛ
ﺭﺍﺮﻤﺘﺳﻻﺍ ﻊﻣ ﻂﻐﺿﺍ 5
ONCE /AUTO
ON
0
.ﺹﺮﻘﻟﺍ
BRIGHTNESS
TEXT SCROLL
DIMMER
/
NATURAL /JAZZ /EASY /POPS /ROCK /POWERFUL /TOP40 /DRIVE EQ
ﺮﺘﺧﺍ) .ﻰﻘﻴﺳﻮﻤﻟﺍ ﻉﻮﻨﻟ ﺐﺳﺎﻨﻤﻟﺍﻭ ﹰﺎﻘﺒﺴﻣ ﻁﻮﺒﻀﻤﻟﺍ ﻝﹺﺩﺎﻌﹸﻤﻟﺍ ﺩﺪﺤﻳ :
ﺓﺭﺩﺎﺼﻟﺍ ﺀﺎﺿﻮﻀﻟﺍ ﻞﻴﻠﻘﺘﺑ ﻡﻮﻘﻳ ﻖﺒﺴﻣ ﻂﺒﺿ ﻦﺴﺤﻣ ﻮﻫ [DRIVE EQ
.ﺀﺎﻐﻟﺍ :
ﺕﻮﺻ ﺝﺎﺘﻧﻹ ﺔﻠﻀﻔﻤﻟﺍ ﺔﻴﻟﺎﻌﻟﺍﻭ ﺔﻀﻔﺨﻨﻤﻟﺍ ﺕﺍﺩﺩﺮﺘﻟﺍ ﺰﻳﺰﻌﺗ ﺪﻳﺪﺤﺗ :
/
120HZ /85HZ
/ ﺰﺗﺮﻴﻫ 120 / ﺰﺗﺮﻴﻫ 85 ﻦﻣ ﻞﻗﺃ ﺩﺩﺮﺗ ﺕﺍﺫ ﺕﻮﺼﻟﺍ ﺕﺍﺭﺎﺷﺇ ﻞﺳﺮﹸﺗ :
ﻥﻮﻜﻴﻟ ﺮﻓﻭﻮﺒﺼﻟﺍ ﺝﺮﺨﻟ ﺭﻮﻄﻟﺍ ﺔﻳﻭﺍﺯ ﺩﺪﺤﻳ :(0°)
ﻲﻓ ﻂﻘﻓ ﻩﺪﻳﺪﺤﺗ ﻦﻜﻤﻳ) .ﺀﺍﺩﺃ ﻞﻀﻓﺃ ﻰﻠﻋ ﻝﻮﺼﺤﻠﻟ ﺔﻋﺎﻤﺴﻟﺍ ﺝﺮﺨﻟ ﺎﹰﻘﺑﺎﻄﻣ
(.[
LPF SUBWOOFER
/
120HZ /100HZ
/ ﺰﺗﺮﻴﻫ 120 / ﺰﺗﺮﻴﻫ 100 ﻦﻣ ﻰﻠﻋﺃ ﺩﺩﺮﺗ ﺕﺍﺫ ﺕﻮﺼﻟﺍ ﺕﺍﺭﺎﺷﺇ ﻞﺳﺮﹸﺗ :
.ﺔﻴﻣﺎﻣﻷﺍﻭ ﺔﻴﻔﻠﺨﻟﺍ ﻦﻴﺘﻋﺎﻤﺴﻟﺍ ﺝﺮﺧ ﻥﺯﺍﻮﺗ ﻂﺒﻀﻳ :(0)
.ﻯﺮﺴﻴﻟﺍﻭ ﻰﻨﻤﻴﻟﺍ ﻦﻴﺘﻋﺎﻤﺴﻟﺍ ﺝﺍﺮﺧﺇ ﻥﺯﺍﻮﺗ ﻂﺒﻀﻳ :(0)
:0 ﻰﻟﺇ –8 :ﻯﺮﺧﻷﺍ ﺭﺩﺎﺼﻤﻠﻟ ﺔﺒﺴﻨﻟﺎﺑ ؛ (0) +8 ﻰﻟﺇ
ﻞﺒﻗ) .ﺭﺪﺼﻣ ﻞﻜﺑ ﺹﺎﺨﻟﺍ ﺕﻮﺼﻟﺍ ﻢﺠﺣ ﻂﺒﺿ ﻯﻮﺘﺴﻤﻟ ﻖﺒﺴﻤﻟﺍ ﻂﺒﻀﻟﺍ
ﺓﺩﺎﻌﺘﺳﺍﻭ ﺩﺩﺮﺘﻟﺍ ﺔﻴﻟﺎﻋ ﺕﺎﻧﻮﻜﻤﻟﺍ ﺾﻳﻮﻌﺗ ﻖﻳﺮﻃ ﻦﻋ ﺎﹰﻴﻌﻗﺍﻭ ﺎﹰﺗﻮﺻ ﻖﻠﺨﻳ :
؛ .ﺔﻴﺗﻮﺼﻟﺍ ﺕﺎﻧﺎﻴﺒﻟﺍ ﻂﻐﺿ ﺪﻨﻋ ﺖﻋﺎﺿ ﻲﺘﻟﺍ ﺔﺟﻮﻤﻟﺍ ﻞﻜﺸﻟ ﺩﻮﻌﺼﻟﺍ ﻦﻣﺯ
ﻂﻘﻓ [
SUB-W PHASE
ﻂﺒﺿ ﺔﻟﺎﺣ ﻲﻓ ﻂﻘﻓ [
(.ﺐﻠﻄﻟﺍ ﺐﺴﺣ ﺔﺌﻴﻬﻤﻟﺍ ﺕﺍﺩﺍﺪﻋﻹﺍ ﻡﺍﺪﺨﺘﺳﻻ [
.ﺕﺍﺭﺎﻃﻻﺍ ﻥﺍﺭﻭﺩ ﺀﺎﺿﻮﺿ ﻭﺃ ﺓﺭﺎﻴﺴﻟﺍ ﺝﺭﺎﺧ ﻦﻣ
OFF ؛
.ﺏﻮﻠﻄﻤﻟﺍ ﺮﻴﻬﺠﻟﺍ ﻊﻓﺭ ﻯﻮﺘﺴﻣ ﺩﺪﺤﻳ :
.ﺀﺎﻐﻟﺍ :
OFF ؛
.ﺾﻔﺨﻨﻣ ﺕﻮﺻ ﻯﻮﺘﺴﻤﺑ ﺪﻴﺟ ﻞﻜﺸﺑ ﻥﺯﺍﻮﺘﻣ
.ﺀﺎﻐﻟﺍ :
OFF ؛
.ﺮﻓﻭﻮﺒﺼﻟﺍ ﺝﺮﺧ ﻞﻴﻐﺸﺘﺑ ﻡﻮﻘﻳ :
؛ .ﺮﻓﻭﻮﺒﺼﻟﺍ ﻰﻟﺇ ﺕﺍﺭﺎﺷﻹﺍ ﻞﻛ ﻝﺎﺳﺭﺇ ﻢﺘﻳ :
.ﺮﻓﻭﻮﺒﺼﻟﺍ ﻰﻟﺇ ﺰﺗﺮﻴﻫ 160
NORMAL
] ﻊﺿﻮﻟ [
THROUGH
] ﺮﻴﻏ ﺮﺧﺁ ﻂﺒﺿ ﺪﻳﺪﺤﺗ ﺔﻟﺎﺣ
؛ .ﺕﺎﻋﺎﻤﺴﻟﺍ ﻰﻟﺇ ﺕﺍﺭﺎﺷﻹﺍ ﻞﻛ ﻝﺎﺳﺭﺇ ﻢﺘﻳ :
.ﺕﺎﻋﺎﻤﺴﻟﺍ ﻰﻟﺇ ﺰﺗﺮﻴﻫ 150
(.ﻪﻄﺒﺿ ﺪﻳﺮﺗ ﻱﺬﻟﺍ ﺭﺪﺼﻤﻟﺍ ﺮﺘﺧﺍ ،ﻂﺒﻀﻟﺍ ﻞﻤﻋ
] /[
LPF SUBWOOFER
SUB-W PHASE
(
4
] /[
) .[
] /[
SUBWOOFER SET
SUB-W
LPF SUBWOOFER
/(180°)
–8
:AUX ﻰﻟﺍ ﺔﺒﺴﻨﻟﺎﺑ
] ﻰﻠﻋ [
USER
USER
] ﺪﻨﺒﻟﺍ
LV3 /LV2 /LV1
LV2 /LV1
THROUGH
160HZ
REVERSE
THROUGH
150HZ
F15
ﻰﻟﺇ
R15
ﻰﻟﺇ
.ﺀﺎﻐﻟﺍ :
] /[
SUB-W LEVEL
SWITCH PREOUT
] /[
SUB-W LEVEL
.[
ON
] ﻰﻠﻋ [
ﺕﻮﺼﻟﺍ ﺕﺍﺩﺍﺪﻋﺇ
PRESET EQ
]
BASS BOOST
LOUDNESS
SUBWOOFER SET
ON
LPF SUBWOOFER
SUB-W PHASE
HPF
R15
L15
ON
OFF
SUBWOOFER SET
FADER
BALANCE
VOLUME OFFSET
SOUND RECNSTR
ﻦﻳﻮﻜﺗ ﺓﺩﺎﻋﺇ)
(ﺕﻮﺼﻟﺍ
] ﺪﻳﺪﺤﺗ ﻦﻜﻤﻳ •
] ﻂﺒﺿ ﺔﻟﺎﺣ ﻲﻓ
] ﺪﻳﺪﺤﺗ ﻦﻜﻤﻳ •
]
17
ﻲﺑﺮﻋ
Page 55

ﺕﻮﺼﻟﺍ ﺕﺍﺩﺍﺪﻋﺇ
...ﺭﺪﺼﻣ ﻱﺃ ﻰﻟﺇ ﻉﺎﻤﺘﺳﻻﺍ ﺀﺎﻨﺛﺃ
FUNCTION
.ﺹﺮﻘﻟﺍ ﻰﻠﻋ ﻂﻐﺿﺍ ﻢﺛ ،(ﻩﺎﻧﺩﺃ ﻝﻭﺪﺠﻟﺍ ﺮﻈﻧﺍ) ﺪﻳﺪﺤﺘﻠﻟ ﺕﻮﺼﻟﺍ ﻯﻮﺘﺴﻣ ﺹﺮﻗ ﺮﻳﻭﺪﺘﺑ ﻢﻗ 3
XX
:ﻲﺿﺍﺮﺘﻓﺍ
ﺭﺪﺼﻤﻟﺍ ﺮﺘﺧﺍ ،ﻂﺒﻀﻟﺍ ﻞﻤﻋ ﻞﺒﻗ) .ﺭﺪﺼﻣ ﻞﻛ ﻆﻔﺤﻟ ﻯﻮﺘﺴﻤﻟﺍ ﻂﺒﺿ
.ﺹﺮﻘﻟﺍ ﻰﻠﻋ ﻂﻐﺿﺍ ﻢﺛ ،[
.ﺀﺎﻐﻟﺍ :
OFF ؛
.ﻂﺳﻭﻷﺍ ﺩﺩﺮﺘﻟﺍ ﺩﺪﺤﻳ :
.[
.ﻪﻄﻴﺸﻨﺗ ﻭﺃ ﺏﻮﻠﻄﻤﻟﺍ ﺮﺼﻨﻌﻟﺍ ﺪﻳﺪﺤﺗ ﻢﺘﻳ ﻰﺘﺣ 3 ﺓﻮﻄﺨﻟﺍ ﺭﺮﻛ 4
.
.ﺕﻮﺼﻟﺍ ﻢﺨﻀﻣ ﺝﺍﺮﺧﺇ ﻯﻮﺘﺴﻣ ﻂﺒﻀﻳ
.ﻂﺳﻭﻷﺍ ﺩﺩﺮﺘﻟﺍ ﺩﺪﺤﻳ :
.ﻯﻮﺘﺴﻤﻟﺍ ﻂﺒﻀﻳ :(+6) +8 ﻰﻟﺇ
.ﺓﺩﻮﺠﻟﺍ ﻞﻣﺎﻋ ﻂﺒﺿ :
.ﺪﺘﻤﻤﻟﺍ ﺮﻴﻬﺠﻟﺍ ﺕﻮﺼﻟﺍ ﻞﻴﻐﺸﺘﺑ ﻡﻮﻘﻳ :
.ﻂﺳﻭﻷﺍ ﺩﺩﺮﺘﻟﺍ ﺩﺪﺤﻳ :
.ﻯﻮﺘﺴﻤﻟﺍ ﻂﺒﻀﻳ :(+5) +8 ﻰﻟﺇ
.ﺓﺩﻮﺠﻟﺍ ﻞﻣﺎﻋ ﻂﺒﺿ :
] ﻰﻟﺇ ﻝﻮﺧﺪﻠﻟ ﺕﻮﺼﻟﺍ ﻯﻮﺘﺴﻣ ﺹﺮﻗ ﻰﻠﻋ ﻂﻐﺿﺍ 1
AUDIO CONTROL
AUDIO CONTROL
.[
ﻰﻠﻋ ﻂﻐﺿﺍ ﻢﺛ ،ﺪﻳﺪﺤﺗ ﺀﺍﺮﺟﻹ K / J ﻰﻠﻋ ﻂﻐﺿﺍ 2
200 /100 /80 /60
2.00 /1.50 /1.25 / 1.00
2.5K /1.5K /1.0K /0.5K
17.5K /15.0K /12.5K /10.0K
.ﻯﻮﺘﺴﻤﻟﺍ ﻂﺒﻀﻳ :(0) +8 ﻰﻟﺇ
] ﺪﻳﺪﺤﺘﻟ ﺕﻮﺼﻟﺍ ﻯﻮﺘﺴﻣ ﺹﺮﻗ ﺭﺩﺃ 2
.ﺀﺎﻬﻧﻹﺍ ﻞﺟﺃ ﻦﻣ
] ﻊﺿﻭ ﻰﻟﺇ ﻝﻮﺧﺪﻠﻟ AUD ﻂﻐﺿﺍ 1
ﻰﻠﻋ ﻂﻐﺿﺍ ،ﻖﺑﺎﺴﻟﺍ ﺩﺍﺪﻋﻹﺍ ﺮﺼﻨﻋ ﻰﻟﺇ ﻉﻮﺟﺮﻠﻟ
.
(.ﻪﻄﺒﺿ ﺪﻳﺮﺗ ﻱﺬﻟﺍ
1.25 /1.00 / 0.75
ﺭﺍﺮﻤﺘﺳﻻﺍ ﻊﻣ ﻂﻐﺿﺍ 5
(0) +15 ﻰﻟﺇ –15
(+6) +8 ﻰﻟﺇ
(+5) +8 ﻰﻟﺇ
(0) +8 ﻰﻟﺇ
BASS CTR FRQ
BASS LEVEL
–8
BASS Q FACTOR
BASS EXTEND
ON
MID CTR FRQ
MID LEVEL
–8
MID Q FACTOR
–8
TRE LEVEL
(RC-406 ﻡﺍﺪﺨﺘﺳﺍ ﻭﺃ)
–8
–8
–8
SUB-W LEVEL
BASS LEVEL
BASS ADJUST
MID ADJUST
TRE ADJUSTTRE CTR FRQ
MID LEVEL
TRE LEVEL
EQ PRO
AUX
(
4
) .[
BUILT-IN AUX
.(ﺀﺍﺮﺸﻠﻟ ﺡﺎﺘﻣ) ﻝﻮﻤﺤﻤﻟﺍ ﺕﻮﺼﻟﺍ ﻞﻐﺸﻣ ﺯﺎﻬﺠﺑ ﻝﺎﺼﺗﻻﺍ
ﻲﻓﺎﺿﻹﺍ ﺯﺎﻬﺠﻟﺍ ﻞﻴﺻﻮﺗ ﺲﺒﻘﻣ
ﻊﻣ ﻢﻣ 3.5 ﻢﺴﺠﻤﻟﺍ ﺕﻮﺼﻠﻟ ﺮﻴﻐﺻ ﺲﺑﺎﻗ
(ﺀﺍﺮﺸﻠﻟ ﺡﺎﺘﻣ) “L” ﻑﺮﺣ ﻞﻜﺷ ﻰﻠﻋ ﻞﺻﻮﻣ
.AUX ﺭﺎﻴﺘﺧﻻ ﺭﺮﻜﺘﻣ ﻞﻜﺸﺑ
ﺀﺪﺑﻭ ﻝﻮﻤﺤﻤﻟﺍ ﺕﻮﺼﻟﺍ ﻞﻐﺸﻣ ﺯﺎﻬﺟ ﻞﻴﻐﺸﺘﺑ ﻢﻗ 3
...ﺯﺎﻬﺠﻟﺎﺑ ﻞﺼﺘﻣ ﻝﻮﻤﺤﻣ ﺕﻮﺻ ﻞﻐﺸﻣ ﻰﻟﺇ ﻉﺎﻤﺘﺳﻻﺍ ﺀﺎﻨﺛﺃ
ﻰﻟﺇ ﻝﻮﺧﺪﻠﻟ ﺕﻮﺼﻟﺍ ﻯﻮﺘﺴﻣ ﺹﺮﻗ ﻰﻠﻋ ﻂﻐﺿﺍ 1
ﻢﺛ ،[
SYSTEM
] ﺪﻳﺪﺤﺘﻟ ﺕﻮﺼﻟﺍ ﻯﻮﺘﺴﻣ ﺹﺮﻗ ﺭﺩﺃ 2
ﻢﺛ ،[
AUX NAME SET
ﻂﻐﺿﺍ ﻢﺛ ،ﺪﻳﺪﺤﺗ ﺀﺍﺮﺟﻹ ﺕﻮﺼﻟﺍ ﻯﻮﺘﺴﻣ ﺹﺮﻗ ﺭﺩﺃ 4
TV /VIDEO /GAME /PORTABLE /DVD
.ﺀﺎﻬﻧﻹﺍ ﻞﺟﺃ ﻦﻣ
] ﺪﻳﺪﺤﺘﻟ ﺕﻮﺼﻟﺍ ﻯﻮﺘﺴﻣ ﺹﺮﻗ ﺭﺩﺃ 3
. ﻰﻠﻋ ﻂﻐﺿﺍ ،ﻖﺑﺎﺴﻟﺍ ﺩﺍﺪﻋﻹﺍ ﺮﺼﻨﻋ ﻰﻟﺇ ﻉﻮﺟﺮﻠﻟ
.ﺹﺮﻘﻟﺍ ﻰﻠﻋ ﻂﻐﺿﺍ
.ﺹﺮﻘﻟﺍ ﻰﻠﻋ ﻂﻐﺿﺍ
ﺭﺍﺮﻤﺘﺳﻻﺍ ﻊﻣ ﻂﻐﺿﺍ 5
:ﺮﻴﻀﺤﺘﻟﺍ
] ﻞﺟﺃ ﻦﻣ [ON] ﺩﺪﺣ
ﻉﺎﻤﺘﺳﻻﺍ ﺀﺪﺑ
ﺕﻮﺻ ﻞﻐﺸﻣ
ﻝﻮﻤﺤﻣ
ﻂﻐﺿﺍ 2
.ﻞﻴﻐﺸﺘﻟﺍ
AUX ﻢﺳﺍ ﻂﺒﺿ
.[
FUNCTION
.ﺹﺮﻘﻟﺍ ﻰﻠﻋ
/(ﻲﺿﺍﺮﺘﻓﺍ)
AUX
1
]
16
Page 56

Bluetooth ﻖﻳﺮﻃ ﻦﻋ ﺖﻧﺮﺘﻧﻹﺍ ﻮﻳﺩﺍﺭ
Pandora ﻰﻟﺇ ﻉﺎﻤﺘﺳﻻﺍ
(
4
) .[
PANDORA SRC
ﻞﻴﻐﺸﺗ ﻡﺎﻈﻧ) ﻲﻛﺬﻟﺍ ﻒﺗﺎﻬﻟﺍ ﻰﻠﻋ Pandora ﻰﻟﺇ ﻉﺎﻤﺘﺳﻻﺍ ﻚﻨﻜﻤﻳ
.PANDORA ﺭﺎﻴﺘﺧﻻ ﺭﺮﻜﺘﻣ ﻞﻜﺸﺑ
ﻰﻠﻋ Pandora ﻞﻴﻐﺸﺗ ﺔﻘﻳﺮﻃ ﺲﻔﻨﺑ Pandora ﻞﻴﻐﺸﺗ ﻚﻨﻜﻤﻳ
.ﺓﺪﺣﻮﻟﺍ ﻩﺬﻫ ﻰﻠﻋ Bluetooth ﻖﻳﺮﻃ ﻦﻋ (Android
.ﻙﺯﺎﻬﺟ ﻰﻠﻋ Pandora ﻖﻴﺒﻄﺗ ﺢﺘﻔﺑ ﻢﻗ 1
ﻞﻴﺻﻮﺗ ﺮﺒﻋ Bluetooth ﺕﻮﺼﻟﺍ ﻞﻐﺸﻣ ﻞﺻ 2
(
10
.ﹰﺎﻴﺋﺎﻘﻠﺗ ﺚﺒﻟﺍ ﺃﺪﺒﻳﻭ ﺭﺪﺼﻤﻟﺍ ﺮﻴﻐﺘﻳ
:ﺮﻴﻀﺤﺘﻟﺍ
] ـﻟ [ON] ﺩﺪﺣ
) .Bluetooth
ﻂﻐﺿﺍ 3
(
9
) .iPhone/iPod
.(RC-406 ﻰﻠﻋ SRC ﻂﻐﺿﺍ ﻭﺃ) BT AUDIO ﺭﺎﻴﺘﺧﻻ ﺍﺭﺮﻜﺘﻣ ﺎﻄﻐﺿ ﻂﻐﺿﺍ 1
ﻦﻋ ﻢﻜﺤﺘﻟﺍ ﺓﺪﺣﻭ ﻰﻠﻋ
ﻰﻠﻋ ﻂﻐﺿﺍ
/ ﻂﻐﺿﺍ
.
/ S ﻰﻠﻋ ﻂﻐﺿﺍ
.
ﻰﻠﻋ ﺭﺍﺮﻤﺘﺳﻻﺍ ﻊﻣ ﻂﻐﺿﺍ
.
/ S
—
—
.ﺀﺪﺒﻠﻟ Bluetooth ﺕﻮﺻ ﻞﻐﺸﻣ ﻞﻴﻐﺸﺘﺑ ﻢﻗ 2
ﺪﻌﺑ
.
.T / S ﻰﻠﻋ ﻂﻐﺿﺍ
ﻰﻠﻋ ﺭﺍﺮﻤﺘﺳﻻﺍ ﻊﻣ ﻂﻐﺿﺍ
REPEAT OFF ،FILE REPEAT ،ALL REPEAT
.ﺭﺍﺮﻜﺘﺑ
RANDOM OFF ،FOLDER RANDOM
ﺪﻳﺪﺤﺘﻟ ﻰﻠﻋ ﺭﺍﺮﻤﺘﺳﺎﺑ ﻂﻐﺿﺍ
.ﻞﺼﺘﻤﻟﺍ ﺯﺎﻬﺠﻟﺎﺑ ﺎﻫﺮﻓﺍﻮﺗ ﺐﺴﺣ ﺔﺷﺎﺸﻟﺍ ﺕﺍﺮﺷﺆﻣﻭ ﺕﺎﻴﻠﻤﻌﻟﺍ ﻒﻠﺘﺨﺗ ﺪﻗ
BLUETOOTH®
ﺕﻮﺻ — BLUETOOTH
Bluetooth ﺮﺒﻋ ﺕﻮﺼﻟﺍ ﻞﻐﺸﻣ
ﻰﻠﻋ ﻂﻐﺿﺍ.
.K / J ﻂﻐﺿﺍ
.T / S
ﻂﻐﺿﺍ
.
ALL RANDOM
ﺖﻗﺆﻣ ﻒﻗﻮﺗ /ﻞﻴﻐﺸﺗ
ﻭﺃ ﺔﻋﻮﻤﺠﻣ ﺪﻳﺪﺤﺗ
ﻢﻳﺪﻘﺘﻟﺍ/ﻊﻴﺟﺮﺘﻟﺍ
ﺐﻴﺗﺮﺘﺑ ﻞﻴﻐﺸﺘﻟﺍ
ﻰﻟﺇﺔﻳﺎﻤﺤﻟﺍ ﺀﺎﻄﻏ ﻰﻠﻋ
ﺪﻠﺠﻣ
/ﻢﻳﺪﻘﺘﻟﺍ ﻲﻄﺨﺗ
ﻉﺎﺟﺭﻹﺍ
ﻊﻳﺮﺴﻟﺍ
ﻞﻴﻐﺸﺘﻟﺍ ﺭﺍﺮﻜﺗ.ﺭﺍﺮﻜﺘﺑ ﻂﻐﺿﺍ
ﻲﺋﺍﻮﺸﻋ
15
ﻲﺑﺮﻋ
Page 57

BLUETOOTH®
Bluetooth ﺭﺎﺒﺘﺧﺍ ﻊﺿﻭ
Bluetooth ﺯﺎﻬﺟ ﻦﻴﺑ ﻡﻮﻋﺪﻤﻟﺍ ﻊﺿﻮﻟﺍ ﻝﺎﺼﺗﺍ ﺺﺤﻓ ﻚﻨﻜﻤﻳ
.ﻥﺭﺎﻘﻣ Bluetooth ﺯﺎﻬﺟ ﺩﻮﺟﻭ ﻡﺪﻋ ﻦﻣ ﺪﻛﺄﺗ •
.
“PLEASE PAIR YOUR PHONE PIN 0000” ﺮﻬﻈﺗ
(KMM-U5
.ﻥﺍﺮﻗﻹﺍ ﺪﻴﻛﺄﺘﻟ Bluetooth ﺯﺎﻬﺟ ﻞﻴﻐﺸﺘﺑ ﻢﻗ 3
ﺮﻴﻏ ﻭﺃ ﺓﺪﻴﺟ) (NG ﻭﺃ OK) ﻞﻴﺻﻮﺘﻟﺍ ﺔﺠﻴﺘﻧ ﺮﻬﻈﺗ
(HFP) ﻦﻳﺪﻴﻟﺍ ﻡﺍﺪﺨﺘﺳﺍ ﻡﺪﻋ ﻊﺿﻭ ﻖﻓﺍﻮﺗ :HF CNT
(A2DP) ﻡﺪﻘﺘﻤﻟﺍ ﺕﻮﺼﻟﺍ ﻊﻳﺯﻮﺗ ﻊﺿﻭ ﻖﻓﺍﻮﺗ :AUD CNT
(PBAP) ﻒﺗﺎﻬﻟﺍ ﻞﻴﻟﺩ ﻰﻟﺇ ﻝﻮﺻﻮﻟﺍ ﻊﺿﻭ ﻖﻓﺍﻮﺗ :PB DL
ﻰﻠﻋ ﻂﻐﻀﻟﺎﺑ ﺭﺍﺮﻤﺘﺳﻻﺍ ﻊﻣ ﻂﻐﺿﺍ ،ﺺﺤﻔﻟﺍ ﻊﺿﻭ ﺀﺎﻐﻟﻹ
ﻰﻠﻋ ﺭﺍﺮﻤﺘﺳﻻﺍ ﻊﻣ ﻂﻐﺿﺍ 1
BT) ﺓﺪﺣﻮﻟﺍ ﺯﺍﺮﻃ ﻢﺳﺍ ﻦﻋ ﺚﺤﺑﺍ 2
*
.Bluetooth ﺯﺎﻬﺟ ﻰﻠﻋ ﻩﺩﺪﺣﻭ
.ﺔﺷﺎﺸﻟﺍ ﻰﻠﻋ “TESTING” ﺔﻟﺎﺳﺮﻟﺍ ﺾﻣﻮﺗ
.ﺭﺎﺒﺘﺧﻻﺍ ﺪﻌﺑ (ﺓﺪﻴﺟ
ﻥﺍﺮﻗﻹﺍ ﺔﻟﺎﺣ :PAIRING
.ﺓﺪﺣﻮﻟﺍ ﺀﺎﻔﻃﻹ
.ﺓﺪﺣﻮﻟﺍﻭ
ﻯﺮﺧﺃ ﺕﺍﺩﺍﺪﻋﺇ
.[
FUNCTION]
.ﺹﺮﻘﻟﺍ ﻰﻠﻋ ﻂﻐﺿﺍ ﻢﺛ ،(ﻩﺎﻧﺩﺃ ﻝﻭﺪﺠﻟﺍ ﺮﻈﻧﺍ) ﺪﻳﺪﺤﺘﻠﻟ ﺕﻮﺼﻟﺍ ﻯﻮﺘﺴﻣ ﺹﺮﻗ ﺮﻳﻭﺪﺘﺑ ﻢﻗ 2
.ﺭﺎﺘﺨﻤﻟﺍ ﺪﻨﺒﻟﺎﺑ ﺔﻘﻠﻌﺘﻤﻟﺍ ﺕﺎﻤﻴﻠﻌﺘﻟﺍ ﻊﺒﺗﺍ ﻭﺍ ﺏﻮﻏﺮﻤﻟﺍ ﺪﻨﺒﻟﺍ ﺭﺎﻴﺘﺧﺍ ﻢﺘﻳ ﻥﺍ ﻰﻟﺍ 2 ﺓﻮﻄﺨﻟﺍ ﺭﺮﻛ 3
XX
:ﻲﺿﺍﺮﺘﻓﺍ
.ﻝﺎﺼﺗﻻﺍ ﻊﻄﻗ ﻭﺃ ﻝﺎﺼﺗﻻﺍ ﻞﺟﺃ ﻦﻣ ﺕﻮﺼﻟﺍ ﺯﺎﻬﺟ ﻭﺃ ﻒﺗﺎﻬﻟﺍ ﺩﺪﺣ
.ﻞﺒﻗ ﻦﻣ ﻝﻮﺻﻮﻤﻟﺍ Bluetooth ﺯﺎﻬﺟ ﻞﺼﻓ ﺔﻄﺳﺍﻮﺑ ﺮﺧﺍ Bluetooth ﺯﺎﻬﺟ ﻞﻴﺻﻮﺗ ﻦﻜﻤﻳ ﺎﻤﻛ
.ﺹﺮﻘﻟﺍ ﻰﻠﻋ ﻂﻐﺿﺍ ﻢﺛ ،ﻑﺬﺤﻠﻟ ﺯﺎﻬﺟ ﺪﻳﺪﺤﺘﻟ ﺕﻮﺼﻟﺍ ﻯﻮﺘﺴﻣ ﺹﺮﻗ ﺭﺩﺃ
.ﺹﺮﻘﻟﺍ ﻰﻠﻋ ﻂﻐﺿﺍ ﻢﺛ ،(ﻻ) [NO] ﻭﺃ (ﻢﻌﻧ) [
.ﻲﺼﺨﺸﻟﺍ ﻒﻳﺮﻌﺘﻟﺍ ﻢﻗﺭ ﺰﻣﺭ ﻝﺎﺧﺩﺇ ﻦﻣ ﻲﻬﺘﻨﺗ ﻰﺘﺣ 2 ﻭ 1 ﻦﻴﺗﻮﻄﺨﻟﺍ ﺪﻋﺃ
ﻞﺧﺍﺩ ﻝﻮﺻﻮﻣ Bluetooth ﺯﺎﻬﺟ ﺮﺧﺍ ﻥﻮﻜﻳ ﺎﻣﺪﻨﻋ ﺎﹰﻴﺋﺎﻘﻠﺗ ﻝﺎﺼﺗﻻﺍ ﺓﺩﺎﻋﺈﺑ ﺓﺪﺣﻮﻟﺍ ﻡﻮﻘﺗ :
/iPod touch /iPhone) ﺯﺎﻬﺟ ﻞﺜﻣ Bluetooth ﺔﻴﻨﻘﺗ ﻢﻋﺪﻳ ﻱﺬﻟﺍ ﺯﺎﻬﺠﻟﺎﺑ ﻥﺍﺮﻗﻹﺎﺑ ﺓﺪﺣﻮﻟﺍ ﻡﻮﻘﺗ :
ﻰﻠﻋ ﺍﺀﺎﻨﺑ ﺔﻔﻴﻇﻮﻟﺍ ﻩﺬﻫ ﻞﻤﻌﺗ ﻻ ﺪﻗ .USB ﻝﺎﺧﺩﻻﺍ ﻑﺮﻃ ﺮﺒﻋ ﻪﻠﻴﺻﻮﺗ ﺪﻨﻋ ﺎﹰﻴﺋﺎﻘﻠﺗ (ﺯﺎﻬﺟ Android
؛ .(ﺦﻟﺇ ،ﻒﺗﺎﻬﻟﺍ ﻞﻴﻟﺩﻭ ﻥﺰﺨﻤﻟﺍ ﻥﺍﺮﻗﻹﺍ ﻚﻟﺫ ﻲﻓ ﺎﻤﺑ) Bluetooth ﺕﺍﺩﺍﺪﻋﺇ ﻊﻴﻤﺟ ﺔﺌﻴﻬﺗ :
.ﻻﻮﺻﻮﻣ ﻥﻮﻜﻳ ﺎﻣﺪﻨﻋ ﺯﺎﻬﺠﻟﺍ ﻢﺳﺍ ﻡﺎﻣﺃ “
.ﻝﺎﺧﺩﻹﺍ ﻊﺿﻮﻣ ﻚﻳﺮﺤﺘﻟ T / S ﻰﻠﻋ ﻂﻐﺿﺍ
ﻰﻟﺇ ﻝﻮﺧﺪﻠﻟ ﺕﻮﺼﻟﺍ ﻯﻮﺘﺴﻣ ﺹﺮﻗ ﻰﻠﻋ ﻂﻐﺿﺍ 1
.ﺀﺎﻬﻧﻹﺍ ﻞﺟﺃ ﻦﻣ
. ﻰﻠﻋ ﻂﻐﺿﺍ ،ﻖﺑﺎﺴﻟﺍ ﺩﺍﺪﻋﻹﺍ ﺮﺼﻨﻋ ﻰﻟﺇ ﻉﻮﺟﺮﻠﻟ
.ﺯﺎﻬﺠﻟﺍ ﻞﺼﻓ ﺪﻨﻋ “*” ﺮﺷﺆﻤﻟﺍ ﻲﻔﺘﺨﻳ
YES
] ﺪﻳﺪﺤﺘﻟ ﺕﻮﺼﻟﺍ ﻯﻮﺘﺴﻣ ﺹﺮﻗ ﺭﺩﺃ
.(ﻡﺎﻗﺭﺃ 6 ﻰﺘﺣ) ﻲﺼﺨﺸﻟﺍ ﻒﻳﺮﻌﺘﻟﺍ ﻢﻗﺭ ﺮﻴﻴﻐﺗ
.ﻢﻗﺭ ﺪﻳﺪﺤﺘﻟ ﺕﻮﺼﻟﺍ ﻯﻮﺘﺴﻣ ﺹﺮﻗ ﺮﻳﻭﺪﺘﺑ ﻢﻗ
.ﺪﻴﻛﺄﺘﻠﻟ ﺕﻮﺼﻟﺍ ﻯﻮﺘﺴﻣ ﺹﺮﻗ ﻰﻠﻋ ﻂﻐﺿﺍ
.ﺀﺎﻐﻟﺍ :
.ﺀﺎﻐﻟﺍ :
OFF ؛
.ﻝﻮﺻﻮﻤﻟﺍ ﺯﺎﻬﺠﻟﺍ ﻞﻴﻐﺸﺗ ﻡﺎﻈﻧ
ﺭﺍﺮﻤﺘﺳﻻﺍ ﻊﻣ ﻂﻐﺿﺍ 4
” ﺮﺷﺆﻤﻟﺍ ﺮﻬﻈﻳ
*
ON
OFF ؛
.ﻕﺎﻄﻨﻟﺍ
ON
YES
.ﺀﺎﻐﻟﺍ :
NO
•
1
2
1
2
3
PHONE SELECT
AUDIO SELECT
DEVICE DELETE
PIN CODE EDIT
AUTO PAIRING
BT MODE
(0000)
RECONNECT
INITIALIZE
14
Page 58

BLUETOOTH®
ﻝﺎﺼﺗﺍ ﺔﻬﺟ ﻑﺬﺣ
.Bluetooth ﻊﺿﻭ ﻰﻟﺇ ﻝﻮﺧﺪﻠﻟ ﻰﻠﻋ ﻂﻐﺿﺍ 1
.ﺹﺮﻘﻟﺍ ﻰﻠﻋ ﻂﻐﺿﺍ ﻢﺛ ،[
.ﻑﺬﺤﻟﺍ ﻊﺿﻭ ﻰﻟﺇ ﻝﻮﺧﺪﻠﻟ ﺕﻮﺼﻟﺍ ﻯﻮﺘﺴﻣ ﺹﺮﻗ ﻰﻠﻋ ﺭﺍﺮﻤﺘﺳﻻﺍ ﻊﻣ ﻂﻐﺿﺍ 4
ﻰﻠﻋ ﻂﻐﺿﺍ ﻢﺛ ،[
.2 ﺓﻮﻄﺨﻟﺍ ﻲﻓ [
DELETE ALL
.3 ﺓﻮﻄﺨﻟﺍ ﻲﻓ ﺩﺪﺤﻤﻟﺍ ﻒﺗﺎﻬﻟﺍ ﻢﻗﺭ ﻭﺃ ﻢﺳﻻﺍ ﻑﺬﺣ ﻢﺘﻳ :
CALL HISTORY
.ﺹﺮﻘﻟﺍ ﻰﻠﻋ ﻂﻐﺿﺍ ﻢﺛ ،[
CALL HISTORY
.ﻝﺎﺼﺗﺍ ﺔﻬﺟ ﺪﻳﺪﺤﺘﻟ ﺕﻮﺼﻟﺍ ﻯﻮﺘﺴﻣ ﺹﺮﻗ ﺮﻳﻭﺪﺘﺑ ﻢﻗ 3
] ﻭﺃ [
DELETE ONE
] ﻦﻣ ﻒﺗﺎﻬﻟﺍ ﻡﺎﻗﺭﺃ ﻭﺃ ﺀﺎﻤﺳﻷﺍ ﻊﻴﻤﺟ ﻑﺬﺣ ﻢﺘﻳ :
.ﺀﺎﻬﻧﻹﺍ ﻞﺟﺃ ﻦﻣ
] ﺪﻳﺪﺤﺘﻟ ﺕﻮﺼﻟﺍ ﻯﻮﺘﺴﻣ ﺹﺮﻗ ﺭﺩﺃ 2
] ﺪﻳﺪﺤﺘﻟ ﺕﻮﺼﻟﺍ ﻯﻮﺘﺴﻣ ﺹﺮﻗ ﺭﺩﺃ 5
YES
] ﺪﻳﺪﺤﺘﻟ ﺕﻮﺼﻟﺍ ﻯﻮﺘﺴﻣ ﺹﺮﻗ ﺭﺩﺃ 6
.
ﻰﻠﻋ ﻂﻐﺿﺍ ،ﻖﺑﺎﺴﻟﺍ ﺩﺍﺪﻋﻹﺍ ﺮﺼﻨﻋ ﻰﻟﺇ ﻉﻮﺟﺮﻠﻟ •
.PBAP ﻢﻋﺪﻳ ﻱﺬﻟﺍ ﻝﺍﻮﺠﻟﺍ ﻒﺗﺎﻬﻟﺍ ﻰﻠﻋ ﻖﺒﻄﻨﻳ ﻻ •
ﺭﺍﺮﻤﺘﺳﻻﺍ ﻊﻣ ﻂﻐﺿﺍ 7
ﺓﺮﻛﺍﺬﻟﺍ ﻲﻓ ﺕﺍﺩﺍﺪﻋﺇ
ﺓﺮﻛﺍﺬﻟﺍ ﻲﻓ ﻝﺎﺼﺗﺍ ﺔﻬﺟ ﻦﻳﺰﺨﺗ
.(6 ﻰﻟﺇ 1 ﻦﻣ) ﻡﺎﻗﺭﻻﺍ ﺭﺍﺭﺯﻻ ﻝﺎﺼﺗﺍ ﺕﺎﻬﺟ 6 ﻰﻟﺍ ﻞﺼﻳ ﺎﻣ ﻦﻳﺰﺨﺗ ﻦﻜﻤﻳ
،[
NUMBER DIAL
.ﻍﺭﺎﻓ ﻢﻗﺭ ﻦﻳﺰﺨﺘﺑ ﻢﻗﻭ 2 ﺓﻮﻄﺨﻟﺍ ﻲﻓ [
] ﻭﺃ ،[
PHONE BOOK
.ﻒﺗﺎﻫ ﻢﻗﺭ ﻝﺎﺧﺩﺇ ﻭﺃ ﻝﺎﺼﺗﺍ ﺔﻬﺟ ﺪﻳﺪﺤﺘﻟ ﺕﻮﺼﻟﺍ ﻯﻮﺘﺴﻣ ﺹﺮﻗ ﺮﻳﻭﺪﺘﺑ ﻢﻗ 3
.ﻒﺗﺎﻬﻟﺍ ﻢﻗﺭ ﺽﺮﻌﻟ ﺕﻮﺼﻟﺍ ﻯﻮﺘﺴﻣ ﺹﺮﻗ ﻰﻠﻋ ﻂﻐﺿﺍ ،ﻝﺎﺼﺗﺍ ﺔﻬﺟ ﺪﻳﺪﺤﺗ ﺔﻟﺎﺣ ﻲﻓ
.(6 ﻰﻟﺇ 1 ﻦﻣ) ﺔﻴﻟﺎﺘﻟﺍ ﻡﺎﻗﺭﻷﺍ ﺭﺍﺭﺯﺃ ﻦﻣ ﺪﺣﺍﻭ ﺭﺍﺮﻤﺘﺳﻻﺍ ﻊﻣ ﻂﻐﺿﺍ 4
.Bluetooth ﻊﺿﻭ ﻰﻟﺇ ﻝﻮﺧﺪﻠﻟ
] ﻭﺃ ،[
CALL HISTORY
.ﻝﺎﺼﺗﻻﺍ ﺔﻬﺟ ﻦﻳﺰﺨﺗ ﺪﻨﻋ (ﻦﻳﺰﺨﺘﻟﺍ ﻢﺗ) “STORED” ﺔﻤﻠﻛ ﺮﻬﻈﺗ
NUMBER DIAL
] ﺪﻳﺪﺤﺘﻟ ﺕﻮﺼﻟﺍ ﻯﻮﺘﺴﻣ ﺹﺮﻗ ﺭﺩﺃ
] ﺩﺪﺣ ،ﺎﹰﻘﺒﺴﻣ ﺔﻃﻮﺒﻀﻤﻟﺍ ﺓﺮﻛﺍﺬﻟﺍ ﻦﻣ ﻝﺎﺼﺗﺍ ﺔﻬﺟ ﺢﺴﻤﻟ
.ﺹﺮﻘﻟﺍ ﻰﻠﻋ ﻂﻐﺿﺍ ﻢﺛ
ﺓﺮﻛﺍﺬﻟﺍ ﻦﻣ ﺔﻤﻟﺎﻜﻣ ﺀﺍﺮﺟﺇ
.Bluetooth ﻊﺿﻭ ﻰﻟﺇ ﻝﻮﺧﺪﻠﻟ ﻰﻠﻋ ﻂﻐﺿﺍ 1
(6 ﻰﻟﺇ 1 ﻦﻣ) ﺔﻴﻟﺎﺘﻟﺍ ﻡﺎﻗﺭﻷﺍ ﺭﺍﺭﺯﺃ ﻦﻣ ﺪﺣﺍﻭ ﻂﻐﺿﺍ 2
.ﻝﺎﺼﺗﻼﻟ ﺕﻮﺼﻟﺍ ﻯﻮﺘﺴﻣ ﺹﺮﻗ ﻰﻠﻋ ﻂﻐﺿﺍ 3
13
.ﺔﻧﺰﺨﻣ ﻝﺎﺼﺗﺍ ﺕﺎﻬﺟ ﺔﻳﺃ ﺩﻮﺟﻭ ﻡﺪﻋ ﺔﻟﺎﺣ ﻲﻓ “NO MEMORY” ﺔﻟﺎﺳﺮﻟﺍ ﺮﻬﻈﺗ
ﻲﺑﺮﻋ
.ﺹﺮﻘﻟﺍ
DELETE ONE
DELETE ALL
ﻰﻠﻋ ﻂﻐﺿﺍ 1
ﻢﻗﺭ ﺪﻳﺪﺤﺘﻟ ﺕﻮﺼﻟﺍ ﻯﻮﺘﺴﻣ ﺹﺮﻗ ﺮﻳﻭﺪﺘﺑ ﻢﻗ
.ﻝﺎﺧﺩﻹﺍ ﻊﺿﻮﻣ ﻚﻳﺮﺤﺘﻟ
ﻢﻗﺭ ﻝﺎﺧﺩﺇ ﻦﻣ ﻲﻬﺘﻨﺗ ﻰﺘﺣ 2 ﻭ 1 ﻦﻴﺗﻮﻄﺨﻟﺍ ﺪﻋﺃ
.ﻝﺎﺼﺗﻼﻟ ﺕﻮﺼﻟﺍ ﻯﻮﺘﺴﻣ ﺹﺮﻗ ﻰﻠﻋ ﻂﻐﺿﺍ
ﻝﺎﺧﺩﻹ (
9
ﻰﻟﺇ 0 ﻦﻣ) ﺔﻴﻟﺎﺘﻟﺍ ﻡﺎﻗﺭﻷﺍ ﺭﺍﺭﺯﺃ ﻰﻠﻋ ﻂﻐﺿﺍ
ﻭﺃ ﺎﻬﺑ ﻝﺎﺼﺗﻻﺍ ﺪﻳﺮﺗ ﻲﺘﻟﺍ ﻝﺎﺼﺗﻻﺍ ﺔﻬﺟ ﻢﺳﺍ ﻖﻄﻨﺑ ﻢﻗ
ﺀﺍﺮﺟﺍ
)
(
ﺕﻮﺼﻟﺍ ﻰﻠﻋ ﻑﺮﻌﺘﻟﺍ ﺓﺰﻴﻣ ﺔﻄﺳﺍﻮﺑ ﺔﻤﻟﺎﻜﻣ
ﻲﺘﻟﺍ ﺓﺭﺎﺷﻹﺍ ﺓﻮﻗ ﺽﺮﻌﻳ :
.(+ ،# ،*) ﻑﺮﺣ ﻭﺃ (9 ﻰﻟﺇ 0)
T / S
(RC-406 ﻡﺍﺪﺨﺘﺳﺍ ﻭﺃ)
.ﻝﺎﺼﺗﻼﻟ
.ﻒﺗﺎﻬﻟﺍ ﻒﺋﺎﻇﻭ ﻲﻓ ﻢﻜﺤﺘﻠﻟ ﻲﺗﻮﺼﻟﺍ ﺮﻣﻷﺍ
.ﺔﻳﺭﺎﻄﺒﻟﺍ ﺓﻮﻗ ﺽﺮﻌﻳ :
MAX /MID /LOW /NO SIGNAL
FULL /MID /LOW
.ﹰﺎﻴﻟﺎﺣ ﺎﻬﻟﺎﺒﻘﺘﺳﺍ ﻢﺘﻳ
.ﻡﺪﺨﺘﺴﻤﻟﺍ ﻒﺗﺎﻬﻟﺍ ﻉﻮﻧ ﻰﻠﻋ ﻒﺋﺎﻇﻮﻟﺍ ﻒﻗﻮﺘﺗ
ﻰﻠﻋ ﻂﻐﺿﺍ
.ﻒﺗﺎﻬﻟﺍ ﻢﻗﺭ
ﻰﻠﻋ ﻂﻐﺿﺍ
1
2
.ﻒﺗﺎﻬﻟﺍ
3
1
2
ﺕﻮﺼﻟﺍ ﻰﻠﻋ ﻑﺮﻌﺘﻟﺍ ﺓﺰﻴﻣ ﺔﻄﺳﺍﻮﺑ ﺔﻤﻟﺎﻜﻣ ﺀﺍﺮﺟﺍ
2
ﻒﺗﺎﻬﻟﺍ ﻂﻴﺸﻨﺘﻟ ﻰﻠﻋ ﻂﻐﻀﻟﺎﺑ ﺭﺍﺮﻤﺘﺳﻻﺍ ﻊﻣ ﻂﻐﺿﺍ 1
ﺮﻣﻷﺍ ﻭﺃ ﺎﻬﺑ ﻝﺎﺼﺗﻻﺍ ﺪﻳﺮﺗ ﻲﺘﻟﺍ ﻝﺎﺼﺗﻻﺍ ﺔﻬﺟ ﻢﺳﺍ ﻖﻄﻨﺑ ﻢﻗ 2
ﺔﻌﺟﺍﺮﻣ ﻰﺟﺮﹸﻳ .ﻒﺗﺎﻫ ﻞﻛ ﻲﻓ ﺔﻣﻮﻋﺪﻤﻟﺍ ﺕﻮﺼﻟﺍ ﻰﻠﻋ ﻑﺮﻌﺘﻟﺍ ﺕﺍﺰﻴﻣ ﻒﻠﺘﺨﺗ •
.ﻞﻴﺻﺎﻔﺘﻟﺍ ﻰﻠﻋ ﻉﻼﻃﻼﻟ ﻞﺻﻮﻤﻟﺍ ﻒﺗﺎﻬﻟﺎﺑ ﺹﺎﺨﻟﺍ ﺕﺎﻤﻴﻠﻌﺘﻟﺍ ﻞﻴﻟﺩ
.iPhone ﺯﺎﻬﺠﻟ ﻲﻛﺬﻟﺍ ﻲﺼﺨﺸﻟﺍ ﺪﻋﺎﺴﻤﻟﺍ ﺔﻔﻴﻇﻭ ﺎﹰﻀﻳﺃ ﺓﺪﺣﻮﻟﺍ ﻩﺬﻫ ﻢﻋﺪﺗ •
.ﻒﺗﺎﻬﻟﺍ ﻒﺋﺎﻇﻭ ﻲﻓ ﻢﻜﺤﺘﻠﻟ ﻲﺗﻮﺼﻟﺍ
NUMBER DIAL
SIGNAL
.ﻝﻮﺻﻮﻤﻟﺍ
VOICE
BATT
*
*
*
Page 59

ﺔﻤﻟﺎﻜﻣ ﺀﺍﺮﺟﺍ
ﺍﺫﺍ ﺕﻮﺼﻟﺍ ﺔﻄﺳﺍﻮﺑ ﻝﺎﺼﺗﻻﺍ ﺔﻔﻴﻇﻭ ﺮﻓﻮﺘﺗ ﺎﻤﻛ .ﻢﻗﺮﻟﺎﺑ ﻝﺎﺼﺗﻻﺍ ﻭﺃ ﻒﺗﺎﻬﻟﺍ ﻞﻴﻟﺩ ﻦﻣ ﻭﺃ ﺕﺎﻤﻟﺎﻜﻤﻟﺍ ﻞﺠﺳ ﻦﻣ ﺔﻤﻟﺎﻜﻣ ﺀﺍﺮﺟﺍ ﻦﻜﻤﻳ
.ﺹﺮﻘﻟﺍ ﻰﻠﻋ ﻂﻐﺿﺍ ﻢﺛ ،(ﻩﺎﻧﺩﺃ ﻝﻭﺪﺠﻟﺍ ﺮﻈﻧﺍ) ﺪﻳﺪﺤﺘﻠﻟ ﺕﻮﺼﻟﺍ ﻯﻮﺘﺴﻣ ﺹﺮﻗ ﺮﻳﻭﺪﺘﺑ ﻢﻗ 2
.ﺭﺎﺘﺨﻤﻟﺍ ﺪﻨﺒﻟﺎﺑ ﺔﻘﻠﻌﺘﻤﻟﺍ ﺕﺎﻤﻴﻠﻌﺘﻟﺍ ﻊﺒﺗﺍ ﻭﺍ ﺏﻮﻏﺮﻤﻟﺍ ﺪﻨﺒﻟﺍ ﺭﺎﻴﺘﺧﺍ ﻢﺘﻳ ﻥﺍ ﻰﻟﺍ 2 ﺓﻮﻄﺨﻟﺍ ﺭﺮﻛ 3
“M” ﺰﻣﺮﻟﺍ ﺮﻴﺸﻳﻭ ﺎﻫﺅﺍﺮﺟﺇ ﻢﺗ ﺔﻤﻟﺎﻜﻣ ﻰﻟﺇ “O” ﺰﻣﺮﻟﺍ ﺮﻴﺸﻳﻭ ﺎﻬﻴﻘﻠﺗ ﻢﺗ ﺔﻤﻟﺎﻜﻣ ﻰﻟﺇ “I” ﺰﻣﺮﻟﺍ ﺮﻴﺸﻳ •
.ﺕﺎﻤﻟﺎﻜﻤﻠﻟ ﺔﻠﺠﺴﻣ ﺕﺎﻇﻮﻔﺤﻣ ﺩﻮﺟﻭ ﻡﺪﻋ ﺔﻟﺎﺣ ﻲﻓ “NO DATA” ﺔﻟﺎﺳﺮﻟﺍ ﺮﻬﻈﺗ •
ﻞﻴﻟﺩ ﻥﺎﻛ ﺍﺫﺍ) ﺔﻳﺪﺠﺑﻻﺍ ﻑﻭﺮﺤﻟﺍ ﺐﺴﺣ ﺚﺤﺒﻟﺍ ﻊﺿﻭ ﻲﻓ ﻝﻮﺧﺪﻠﻟ ﺔﻋﺮﺴﺑ ﺕﻮﺼﻟﺍ ﻯﻮﺘﺴﻣ ﺹﺮﻗ ﺭﺩﺃ
.
.ﺹﺮﻘﻟﺍ ﻂﻐﺿﺍ ﻢﺛ ،
.ﻥﺍﺮﻗﻹﺍ ﺪﻨﻋ ﺓﺪﺣﻮﻟﺍ ﻰﻟﺇ ﺎﹰﻴﺋﺎﻘﻠﺗ ﻞﺼﺘﻤﻟﺍ ﻒﺗﺎﻬﻟﺍ ﻞﻴﻟﺩ ﻞﻘﻧ ﻢﺘﻳ ﻪﻧﺈﻓ ،PBAP ﻊﺿﻭ ﻢﻋﺪﻳ ﻒﺗﺎﻬﻟﺍ ﻥﺎﻛ ﺍﺫﺇ
(ﻡﺎﻋ) GE ،(ﺮﺧﺁ) OT ،(ﺐﺘﻜﻣ) OF ،(ﻝﺰﻨﻣ) HM ،(ﻝﺍﻮﺟ ﻒﺗﺎﻫ) MO :ﻲﻟﺎﺘﻟﺎﻛ ﻝﺎﺼﺗﻻﺍ ﺕﺎﻬﺟ ﺐﻴﺗﺮﺗ ﻢﺘﻳ
.ﻦﻴﻌﻣ ﻖﻄﻨﺑ ﺔﺻﺎﺧ ﻞﻴﻜﺸﺗ ﺕﺎﻣﻼﻋ ﻱﺃ ﺎﻬﻴﻠﻋ ﺖﺴﻴﻟ ﻲﺘﻟﺍ ﻑﻭﺮﺤﻟﺍ ﻯﻮﺳ ﺽﺮﻋ ﺓﺪﺣﻮﻟﺍ ﻩﺬﻬﻟ ﻦﻜﻤﻳ ﻻ
K / J
T / S
.ﻝﺎﺼﺗﻻﺍ ﺀﺍﺮﺟﻹ ﺹﺮﻘﻟﺍ ﻰﻠﻋ ﻂﻐﺿﺍ ﻢﺛ ،ﻒﺗﺎﻫ ﻢﻗﺭ ﺪﻳﺪﺤﺘﻟ ﺕﻮﺼﻟﺍ ﻯﻮﺘﺴﻣ ﺹﺮﻗ ﺭﺩﺃ
.ﻒﺗﺎﻬﻟﺍ ﻢﻗﺭ ﻭﺃ ﻢﺳﻻﺍ ﺪﻳﺪﺤﺘﻟ ﺕﻮﺼﻟﺍ ﻯﻮﺘﺴﻣ ﺹﺮﻗ ﻰﻠﻋ ﻂﻐﺿﺍ
.(NAME ﻭﺃ NUMBER) ﺽﺮﻌﻟﺍ ﺔﺌﻓ ﺮﻴﻴﻐﺘﻟ
.(ﻝﺎﺼﺗﻻﺍ ﺕﺎﻬﺟ ﻦﻣ ﺪﻳﺪﻌﻟﺍ ﻰﻠﻋ ﻱﻮﺘﺤﻳ ﻒﺗﺎﻬﻟﺍ
ﻰﻠﻋ ﻂﻐﺿﺍ ،(WXYZ1* ﻭﺃ LMNOPQRSTUV) ﻯﺮﺧﻷﺍ ﺔﻤﺋﺎﻘﻟﺍ ﻰﻟﺇ ﻝﺎﻘﺘﻧﻼﻟ •
ﻂﻐﺿﺍ ﻭﺃ ﺕﻮﺼﻟﺍ ﻯﻮﺘﺴﻣ ﺹﺮﻗ ﺭﺩﺍ ،ﺏﻮﻏﺮﻤﻟﺍ ﻝﻭﻻﺍ ﻑﺮﺤﻟﺍ ﺭﺎﻴﺘﺧﻻ •
.ﻑﻭﺮﺤﻟﺍ “
” ﺔﻄﺳﺍﻮﺑ ﺚﺤﺒﻠﻟ ﺮﺘﺧﺍﻭ ﻡﺎﻗﺭﻻﺍ ﺔﻄﺳﺍﻮﺑ ﺚﺤﺒﻠﻟ “1” ﺮﺘﺧﺍ
*
.ﺹﺮﻘﻟﺍ ﻰﻠﻋ ﻂﻐﺿﺍ ﻢﺛ ،ﻢﺳﺍ ﺪﻳﺪﺤﺘﻟ ﺕﻮﺼﻟﺍ ﻯﻮﺘﺴﻣ ﺹﺮﻗ ﺭﺩﺃ
.Bluetooth ﻊﺿﻭ ﻰﻟﺇ ﻝﻮﺧﺪﻠﻟ
.ﺀﺎﻬﻧﻹﺍ ﻞﺟﺃ ﻦﻣ
.ﺎﻬﻴﻠﻋ ﺩﺮﻟﺍ ﻢﺘﻳ ﻢﻟ ﺔﻤﻟﺎﻜﻣ ﻰﻟﺇ
.ﻝﺎﺼﺗﻼﻟ ﺕﻮﺼﻟﺍ ﻯﻮﺘﺴﻣ ﺹﺮﻗ ﻰﻠﻋ ﻂﻐﺿﺍ
.(ABCDEFGHIJK) ﻰﻟﻭﻷﺍ ﺔﻤﺋﺎﻘﻟﺍ ﺮﻬﻈﺘﺳ
(.“U” ﻞﻜﺷ ﻲﻓ “Ú” ﻑﺮﺣ ﺮﻬﻈﻳ ،ﹰﻼﺜﻣ)
.ﺔﻔﻴﻇﻮﻟﺍ ﻩﺬﻬﺑ ﺰﻬﺠﻣ ﻝﻮﻤﺤﻤﻟﺍ ﻒﺗﺎﻬﻟﺍ ﻥﺎﻛ
ﻰﻠﻋ ﻂﻐﺿﺍ 1
ﺭﺍﺮﻤﺘﺳﻻﺍ ﻊﻣ ﻂﻐﺿﺍ 4
. ﻰﻠﻋ ﻂﻐﺿﺍ ،ﻖﺑﺎﺴﻟﺍ ﺩﺍﺪﻋﻹﺍ ﺮﺼﻨﻋ ﻰﻟﺇ ﻉﻮﺟﺮﻠﻟ
CALL HISTORY
1
ﻰﻠﻋ ﻂﻐﺿﺍ •
2
PHONE BOOK
1
2
3
•
•
•
BLUETOOTH®
ﺔﻤﻟﺎﻜﻣ ﻡﻼﺘﺳﻻ ﺕﺍﺩﺍﺪﻋﻹﺍ ﺬﻴﻔﻨﺗ
ﻊﺿﻭ ﻰﻟﺇ ﻝﻮﺧﺪﻠﻟ ﻰﻠﻋ ﻂﻐﺿﺍ 1
ﺪﻳﺪﺤﺘﻠﻟ ﺕﻮﺼﻟﺍ ﻯﻮﺘﺴﻣ ﺹﺮﻗ ﺮﻳﻭﺪﺘﺑ ﻢﻗ 2
ﻰﻠﻋ ﻂﻐﺿﺍ ﻢﺛ ،(ﻩﺎﻧﺩﺃ ﻝﻭﺪﺠﻟﺍ ﺮﻈﻧﺍ)
ﺮﺼﻨﻌﻟﺍ ﺪﻳﺪﺤﺗ ﻢﺘﻳ ﻰﺘﺣ 2 ﺓﻮﻄﺨﻟﺍ ﺭﺮﻛ 3
ﻞﺟﺃ ﻦﻣ
.
ﻰﻠﻋ ﻂﻐﺿﺍ ،ﻖﺑﺎﺴﻟﺍ ﺩﺍﺪﻋﻹﺍ ﺮﺼﻨﻋ ﻰﻟﺇ ﻉﻮﺟﺮﻠﻟ
XX
:ﻲﺿﺍﺮﺘﻓﺍ
ﻰﻠﻋ ﺓﺪﺣﻮﻟﺍ ﺩﺮﺗ :30 —
ﺖﻗﻮﻟﺍ ﻲﻓ ﹰﺎﻴﺋﺎﻘﻠﺗ ﺓﺩﺭﺍﻮﻟﺍ ﺔﻤﻟﺎﻜﻤﻟﺍ
.ﺀﺎﻐﻟﺍ :
OFF ؛
.ﻪﻄﻴﺸﻨﺗ ﻭﺃ ﺏﻮﻠﻄﻤﻟﺍ
ﺭﺍﺮﻤﺘﺳﻻﺍ ﻊﻣ ﻂﻐﺿﺍ 4
.(ﻥﺍﻮﺛ ﻲﻓ) ﺩﺪﺤﻤﻟﺍ
.Bluetooth
AUTO ANSWER
1
.ﺹﺮﻘﻟﺍ
.ﺀﺎﻬﻧﻹﺍ
SETTINGS
12
Page 60

ﺕﻮﺼﻟﺍ ﺓﺩﻮﺟ ﻦﻴﺴﺤﺗ
ﻰﻟﺇ ﻝﻮﺧﺪﻠﻟ ﺕﻮﺼﻟﺍ ﻯﻮﺘﺴﻣ ﺹﺮﻗ ﻰﻠﻋ ﻂﻐﺿﺍ 1
ﺮﻈﻧﺍ) ﺪﻳﺪﺤﺘﻠﻟ ﺕﻮﺼﻟﺍ ﻯﻮﺘﺴﻣ ﺹﺮﻗ ﺮﻳﻭﺪﺘﺑ ﻢﻗ 2
XX
ﻦﻣ ﺪﺤﻟﺍ ﻯﻮﺘﺴﻣ ﻂﺒﺿﺍ :(0) +5 —
.ﺹﺮﻘﻟﺍ ﻰﻠﻋ ﻂﻐﺿﺍ ﻢﺛ ،(ﻩﺎﻧﺩﺃ ﻝﻭﺪﺠﻟﺍ
ﺮﺼﻨﻌﻟﺍ ﺪﻳﺪﺤﺗ ﻢﺘﻳ ﻰﺘﺣ 2 ﺓﻮﻄﺨﻟﺍ ﺭﺮﻛ 3
.ﺀﺎﻬﻧﻹﺍ ﻞﺟﺃ ﻦﻣ
. ﻰﻠﻋ ﻂﻐﺿﺍ ،ﻖﺑﺎﺴﻟﺍ ﺩﺍﺪﻋﻹﺍ ﺮﺼﻨﻋ ﻰﻟﺇ ﻉﻮﺟﺮﻠﻟ
:ﻲﺿﺍﺮﺘﻓﺍ
ﺔﻴﺳﺎﺴﺣ ﺪﻳﺰﺗ :(–4)
.ﻢﻗﺮﻟﺍ ﺩﺍﺯ ﺎﻤﻠﻛ ﻥﻮﻓﻭﺮﻜﻴﻤﻟﺍ
ﺀﺎﺿﻮﺿ ﻞﻗﺃ ﻉﺎﻤﺳ ﻢﺘﻳ ﻰﺘﺣ ﺀﺎﺿﻮﻀﻟﺍ
.ﺔﻴﻔﺗﺎﻫ ﺔﺛﺩﺎﺤﻣ ﺀﺎﻨﺛﺃ
ﺮﻴﺧﺄﺗ ﺖﻗﻭ ﻂﺒﻀﺑ ﻢﻗ :(0) +5 —
ﻯﺪﺻ ﻞﻗﺃ ﻉﺎﻤﺳ ﻢﺘﻳ ﻰﺘﺣ ﻯﺪﺼﻟﺍ ﺀﺎﻐﻟﺇ
.ﺔﻴﻔﺗﺎﻬﻟﺍ ﺔﺛﺩﺎﺤﻤﻟﺍ ﺀﺎﻨﺛﺃ ﻦﻜﻤﻣ
...ﻒﺗﺎﻬﻟﺍ ﻲﻓ ﺙﺪﺤﺘﻟﺍ ﺀﺎﻨﺛﺃ
.[
FUNCTION
.ﻪﻄﻴﺸﻨﺗ ﻭﺃ ﺏﻮﻠﻄﻤﻟﺍ
ﺭﺍﺮﻤﺘﺳﻻﺍ ﻊﻣ ﻂﻐﺿﺍ 4
+10
—
–10
–5
ECHO CANCEL
–5
]
MIC GAIN
NR LEVEL
BLUETOOTH®
ﻝﻮﻤﺤﻣ ﻒﺗﺎﻫ — BLUETOOTH
ﺔﻠﻣﺎﻜﻣ ﻲﻘﻠﺗ
:ﺓﺩﺭﺍﻭ ﺔﻤﻟﺎﻜﻣ ﺪﺟﻮﺗ ﺎﻣﺪﻨﻋ
(
12
) .ﺭﺎﺘﺨﻤﻟﺍ ﺖﻗﻮﻟﺍ ﻰﻠﻋ ﻁﻮﺒﻀﻣ [
.Bluetooth ﺔﻔﻴﻇﻭ ﻞﺼﻓ ﻢﺘﻴﺳ ،ﺯﺎﻬﺠﻟﺍ ﺔﻬﺟﺍﻭ ﻞﺼﻓ ﻭﺃ ﺯﺎﻬﺠﻟﺍ ﺀﺎﻔﻃﺈﺑ ﺖﻤﻗ ﺍﺫﺇ –
ﺪﻌﺑ ﻦﻋ ﻢﻜﺤﺘﻟﺍ ﺓﺪﺣﻭ ﻰﻠﻋ
. ﻰﻠﻋ ﻂﻐﺿﺍ
.
ﻰﻠﻋ ﻂﻐﺿﺍ
ﻰﻠﻋ ﻂﻐﺿﺍ
.
ﺀﺎﻨﺛﺃ ﺕﻮﺼﻟﺍ ﻯﻮﺘﺴﻣ ﺹﺮﻗ ﺮﻳﻭﺪﺘﺑ ﻢﻗ
—
—
.ﺓﺪﺣﻮﻟﺍ ﻰﻟﺍ iPhone ﺯﺎﻬﺟ ﻰﻠﻋ ﻒﺗﺎﻬﻟﺍ ﺕﻮﺻ ﻯﻮﺘﺴﻣ ﺔﻨﻣﺍﺰﻤﺑ ﺓﺪﺣﻮﻟﺍ ﻡﻮﻘﺘﺳ ،ﺔﻤﻟﺎﻜﻣ ﺀﺎﻨﺛﺍ .iPhone ﻰﻠﻋ ﻖﺒﻄﻨﻳ ﻻ
AUTO ANSWER
ﻭﺍ ﺕﻮﺼﻟﺍ ﻯﻮﺘﺴﻣ ﺭﺯ ﻭﺍ
.(6 ﻰﻟﺍ 1 ﻦﻣ) ﻡﺎﻗﺭﻻﺍ ﺭﺍﺭﺯﺍ ﺪﺣﺍ
ﻯﻮﺘﺴﻣ ﻰﻠﻋ ﻩﺬﻫ ﻂﺒﻀﻟﺍ ﺔﻴﻠﻤﻋ ﺮﺛﺆﺗ ﻦﻟ •
ﺀﺍﺮﺟﺇ ﺀﺎﻨﺛﺃ
ﺯﺎﻬﺟ ﺐﺴﺣ ﺕﺎﻴﻠﻤﻌﻟﺍ ﻒﻠﺘﺨﺗ ﺪﻗ •
] ﻥﺎﻛ ﺍﺫﺇ ﹰﺎﻴﺋﺎﻘﻠﺗ ﺔﻤﻟﺎﻜﻤﻟﺍ ﻰﻠﻋ ﺔﺑﺎﺟﻻﺎﺑ ﺯﺎﻬﺠﻟﺍ ﻡﻮﻘﻳ –
ﻂﻐﺿﺍ
.
ﻰﻠﻋ ﻂﻐﺿﺍ
. ﻭﺃ ﻂﻐﺿﺍ
.ﺔﻤﻟﺎﻜﻣ ﺀﺍﺮﺟﺇ
.ﻯﺮﺧﻷﺍ ﺭﺩﺎﺼﻤﻟﺍ ﺕﻮﺻ
ﻰﻠﻋ ﻂﻐﺿﺍ
.ﺔﻤﻟﺎﻜﻣ
.ﻞﺼﺘﻤﻟﺍ Bluetooth
.ﺭﺍﺭﺯﻻﺍ ﻊﻴﻤﺟ ﺾﻣﻮﺗ –
:ﺔﻤﻟﺎﻜﻣ ﺀﺍﺮﺟﺍ ﺀﺎﻨﺛﺍ
ﻰﻟﺇﺔﻳﺎﻤﺤﻟﺍ ﺀﺎﻄﻏ ﻰﻠﻋ
ﺔﻤﻟﺎﻜﻣ ﻰﻠﻋ ﺔﺑﺎﺟﻻﺍ
ﺔﻤﻟﺎﻜﻣ ﺾﻓﺭ
ﺔﻤﻟﺎﻜﻣ ﺀﺎﻬﻧﺇ
ﺕﻮﺻ ﻯﻮﺘﺴﻣ ﻂﺒﺿ
[35]
ﻰﻟﺇ
[00]
ﻒﺗﺎﻬﻟﺍ
(
[15]*
:ﻲﺿﺍﺮﺘﻓﺍ)
ﻲﻌﺿﻭ ﻦﻴﺑ ﻞﻳﺪﺒﺘﻟﺎﺑ ﻢﻗ
ﺙﺪﺤﺘﻟﺍﻭ ﺮﺤﻟﺍ ﺙﺪﺤﺘﻟﺍ
ﻲﺼﺨﺸﻟﺍ
*
11
ﻲﺑﺮﻋ
Page 61

Bluetooth ﺯﺎﻬﺟ ﻥﺍﺮﻗﺇ
.ﺯﺎﻬﺠﻟﺍﻭ ﺓﺪﺣﻮﻟﺍ ﻦﻴﺑ ﻥﺍﺮﻗﺇ ﺀﺍﺮﺟﺈﺑ ﻢﻗ ،ﻰﻟﻭﻷﺍ ﺓﺮﻤﻠﻟ ﺓﺪﺣﻮﻟﺎﺑ Bluetooth ﺯﺎﻬﺟ ﻞﻴﺻﻮﺗ ﺪﻨﻋ
.ﺔﺷﺎﺸﻟﺍ ﻰﻠﻋ ﻞﻘﻨﺘﻠﻟ “VOLUME KNOB”
.ﺓﺮﺷﺎﺒﻣ ﺚﺤﺒﻟﺍ ﺪﻌﺑ (PIN) ﻲﺼﺨﺸﻟﺍ ﻒﻳﺮﻌﺘﻟﺍ ﻢﻗﺭ ﺰﻣﺭ ﻝﺎﺧﺩﺇ ﻰﻟﺇ ﺝﺎﺘﺤﺗ ﺪﻗ ،Bluetooth ﺓﺰﻬﺟﺃ ﺾﻌﺑ ﻰﻟﺇ ﺔﺒﺴﻨﻟﺎﺑ •
.Bluetooth ﻝﺎﺼﺗﺍ ﺀﺎﺸﻧﺇ ﺪﻨﻋ “BT” ﺰﻣﺮﻟﺍ ﺀﻲﻀﻳﻭ ﻥﺍﺮﻗﻹﺍ ﻝﺎﻤﺘﻛﺍ ﺪﻨﻋ (ﻥﺍﺮﻗﻹﺍ ﻢﺗ) “PAIRING OK” ﺔﻟﺎﺳﺮﻟﺍ ﺮﻬﻈﺗ
ﻞﻴﻟﺩ ﺮﻈﻧﺍ .ﺎﹰﻳﻭﺪﻳ ﺓﺪﺣﻮﻟﺎﺑ ﺯﺎﻬﺠﻟﺍ ﻞﻴﺻﻮﺘﺑ ﻢﻗ .ﻥﺍﺮﻗﻹﺍ ﺪﻌﺑ ﺎﹰﻴﺋﺎﻘﻠﺗ ﺓﺪﺣﻮﻟﺎﺑ Bluetooth ﺓﺰﻬﺟﺃ ﺾﻌﺑ ﻞﺼﺘﺗ ﻻ ﺪﻗ •
ﻱﺬﻟﺍ ﺯﺎﻬﺠﻟﺍ ﻑﺬﺤﻟ .ﺎﻬﻠﻴﻐﺸﺗ ﺓﺩﺎﻋﺈﺑ ﺖﻤﻗ ﺍﺫﺇ ﻰﺘﺣ ﺓﺪﺣﻮﻟﺍ ﻲﻓ ﹰﻼﺠﺴﻣ Bluet
(Bluetooth ﺮﺒﻋ) ﻥﺍﺮﻗﻹﺍ ﺐﻠﻃ ﻞﻴﻌﻔﺗ ﻢﺘﻳ ،USB ﻝﺎﺧﺩﻻﺍ ﻑﺮﻃ ﻰﻟﺍ Android /iPod touch /iPhone ﺯﺎﻬﺟ ﻞﻴﺻﻮﺗ ﺪﻨﻋ
.Bluetooth ﺯﺎﻬﺟ ﻰﻠﻋ ﻩﺩﺪﺣﻭ (KMM-U5
(
“PRESS” ﺯﺎﻬﺠﻟﺍ ﻢﺳﺍ “PASS XXXXXX” “PAIRING”
.ﻲﻟﺎﻤﺟﺇ ﻞﻜﺸﺑ (ﺎﻬﻧﺍﺮﻗﺇ ﻢﺗ) ﺓﺰﻬﺟﺃ ﺔﺴﻤﺧ ﻰﺘﺣ ﻞﻴﺠﺴﺗ ﻦﻜﻤﻳﻭ •
.ﺯﺎﻬﺠﻟﺍ ﻢﺳﺍ ﺪﻴﻛﺄﺗ ﺩﺮﺠﻤﺑ ﻥﺍﺮﻗﻺﻟ ﺕﻮﺼﻟﺍ ﻯﻮﺘﺴﻣ ﺹﺮﻗ ﻰﻠﻋ ﻂﻐﺿﺍ .ﹰﺎﻴﺋﺎﻘﻠﺗ
.ﻞﻴﻐﺸﺘﻟﺍ ﻊﺿﻭ ﻲﻓ ﻝﻮﺻﻮﻤﻟﺍ ﺯﺎﻬﺠﻟﺎﺑ ﺔﺻﺎﺨﻟﺍ Bluetooth ﺔﻔﻴﻇﻭ ﺖﻧﺎﻛ –
14
) .(ﻞﻴﻐﺸﺘﻟﺍ) [ON] ﻊﺿﻭ ﻰﻠﻋ ﻁﻮﺒﻀﻣ (ﻲﺋﺎﻘﻠﺘﻟﺍ ﻥﺍﺮﻗﻹﺍ) [
.Android ﺯﺎﻬﺟ ﻰﻠﻋ ﺐﻛﺮﻣ KENWOOD MUSIC PLAY ﻖﻴﺒﻄﺘﻟﺍ –
.ﺓﺪﺣﻮﻟﺍ ﻞﻴﻐﺸﺘﻟ
BT) ﺓﺪﺣﻮﻟﺍ ﺯﺍﺮﻃ ﻢﺳﺍ ﻦﻋ ﺚﺤﺑﺍ 2
*
.Bluetooth ﺯﺎﻬﺟ ﻊﻣ ﻖﻓﺮﻤﻟﺍ ﻞﻴﻟﺪﻟﺍ ﹰﺎﻀﻳﺍ ﻊﺟﺍﺭ •
.ﻥﺍﺮﻗﻹﺍ ﺀﺪﺒﻟ ﺕﻮﺼﻟﺍ ﻯﻮﺘﺴﻣ ﺹﺮﻗ ﻰﻠﻋ ﻂﻐﺿﺍ 3
.ﺖﻗﻭ ﻱﺍ ﻲﻓ ﻂﻘﻓ ﺪﺣﺍﻭ Bluet
.(SSP) ﻦﻣﻵﺍ ﻂﻴﺴﺒﻟﺍ ﻥﺍﺮﻗﻹﺍ ﺓﺪﺣﻮﻟﺍ ﻩﺬﻫ ﻢﻋﺪﺗ •
.ﺕﺎﻣﻮﻠﻌﻤﻟﺍ ﻦﻣ ﺪﻳﺰﻤﻟ Bluetooth ﺯﺎﻬﺠﺑ ﺹﺎﺨﻟﺍ ﺕﺎﻤﻴﻠﻌﺘﻟﺍ
ooth ﺯﺎﻬﺟ ﻞﻈﻴﺳ ،ﻥﺍﺮﻗﻹﺍ ﻝﺎﻤﻛﺇ ﺩﺮﺠﻤﺑﻭ •
.[
DEVICE DELETE
:ﺍﺫﺍ ﻂﻘﻓ ﹰﺎﻴﺋﺎﻘﻠﺗ ﻥﺍﺮﻗﻹﺍ ﺐﻠﻃ ﻞﻴﻌﻔﺗ ﻢﺘﻳ
ﻰﻠﻋ ﻂﻐﺿﺍ 1
ooth ﺯﺎﻬﺟ ﻞﻴﺻﻮﺗ ﻦﻜﻤﻳ •
] ،14 ،ﻪﻧﺍﺮﻗﺍ ﻢﺗ
AUTO PAIRING
] –
•
BLUETOOTH®
ﻞﻴﺻﻮﺘﻟﺍ — BLUETOOTH
ﺔﻣﻮﻋﺪﻤﻟﺍ Bluetooth ﻉﺎﺿﻭﺃ
(HFP) ﻦﻳﺪﻴﻟﺍ ﻡﺍﺪﺨﺘﺳﺍ ﻡﺪﻋ ﻊﺿﻭ –
(SPP) ﻲﻠﺴﻠﺴﺘﻟﺍ ﺬﻔﻨﻤﻟﺍ ﻊﺿﻭ –
(PBAP) ﻒﺗﺎﻬﻟﺍ ﻞﻴﻟﺩ ﻰﻟﺇ ﻝﻮﺻﻮﻟﺍ ﻊﺿﻭ –
(AVR CP) ﻮﻳﺪﻴﻔﻟﺍ/ﺕﻮﺼﻟﺍ ﻲﻓ ﺪﻌﺑ ﻦﻋ ﻢﻜﺤﺘﻟﺍ ﻊﺿﻭ –
ﻞﻴﺻﻮﺗ ﺲﺒﻘﻣ
ﻥﻮﻓﻭﺮﻜﻴﻤﻟﺍ
ﺔﻳﻭﺍﺯ ﻂﺒﻀﺑ ﻢﻗ
ﻥﻮﻓﻭﺮﻜﻴﻤﻟﺍ
(A2DP) ﻡﺪﻘﺘﻤﻟﺍ ﺕﻮﺼﻟﺍ ﻊﻳﺯﻮﺗ ﻊﺿﻭ –
ﺔﻣﻮﻋﺪﻤﻟﺍ Bluetooth ﺰﻴﻣﺮﺗ ﺞﻣﺍﺮﺑ
(SBC) ﺔﻴﻋﺮﻔﻟﺍ ﺔﺟﻮﻤﻟﺍ ﺰﻴﻣﺮﺗ –
(AAC) ﻡﺪﻘﺘﻤﻟﺍ ﺕﻮﺼﻟﺍ ﺰﻴﻣﺮﺗ –
ﻥﻮﻓﻭﺮﻜﻴﻤﻟﺍ ﻞﻴﺻﻮﺗ
ﺔﻴﻔﻠﺨﻟﺍ ﺔﺣﻮﻠﻟﺍ
ﻥﻮﻓﺮﻜﻴﻣ
(ﻖﻓﺮﻣ)
ﻡﺍﺪﺨﺘﺳﺎﺑ ﺖﻴﺒﺜﺘﻟﺎﺑ ﻢﻗ
(ﺔﻘﻓﺮﻣ ﺮﻴﻏ) ﻚﻠﺴﻟﺍ ﺕﺎﻄﻣﺎﻗ
.ﺮﻣﻷﺍ ﻡﺰﻟ ﺍﺫﺇ
10
Page 62

ﺓﺪﻳﺪﺟ ﺔﻄﺤﻣ ﻆﻔﺣﻭ ﺀﺎﺸﻧﺍ
.ﺕﻮﺼﻟﺍ ﻯﻮﺘﺴﻣ ﺹﺮﻗ ﻰﻠﻋ ﺭﺍﺮﻤﺘﺳﻻﺍ ﻊﻣ ﻂﻐﺿﺍ 1
ﻭﺃ (ﺭﺎﺴﻤﻟﺍ ﻦﻣ) [
FROM TRACK
] ﺪﻳﺪﺤﺘﻟ ﺕﻮﺼﻟﺍ ﻯﻮﺘﺴﻣ ﺹﺮﻗ ﻒﻠﺑ ﻢﻗ 2
.ﺹﺮﻘﻟﺍ ﻰﻠﻋ ﻂﻐﺿﺍ ﻢﺛ ،(ﻥﺎﻨﻔﻟﺍ ﻦﻣ) [
FROM ARTIST
]
.ﻲﻟﺎﺤﻟﺍ ﻥﺎﻨﻔﻟﺍ ﻭﺃ ﺔﻴﻨﻏﻷﺍ ﻰﻠﻋ ﺀﺎﻨﺑ ﺓﺪﻳﺪﺟ ﺔﻄﺤﻣ ﺀﺎﺸﻧﺇ ﻢﺘﻳ
.ﻦﻳﺰﺨﺘﻠﻟ (5 ﻰﻟﺇ 1 ﻦﻣ) ﺔﻴﻟﺎﺘﻟﺍ ﻡﺎﻗﺭﻷﺍ ﺭﺍﺭﺯﺃ ﻦﻣ ﺪﺣﺍﻭ ﺭﺍﺮﻤﺘﺳﻻﺍ ﻊﻣ ﻂﻐﺿﺍ 3
.(5 ﻰﻟﺇ 1 ﻦﻣ) ﻡﺎﻗﺭﻷﺍ ﺭﺍﺭﺯﺃ ﺪﺣﺃ ﻰﻠﻋ ﻂﻐﺿﺍ ،ﺔﻧﺰﺨﻣ ﺔﻄﺤﻣ ﺪﻳﺪﺤﺘﻟ
Pandora®
ﻢﺛ ،(iPod touch /iPhone) ﻙﺯﺎﻬﺟ ﻰﻠﻋ Pandora ﻖﻴﺒﻄﺗ ﻦﻣ ﺭﺍﺪﺻﺇ ﺙﺪﺣﺃ ﺖﻴﺒﺜﺘﺑ ﻢﻗ
.Pandora ﻰﻟﺇ ﻝﻮﺧﺪﻟﺍ ﻞﻴﺠﺴﺗﻭ ﺏﺎﺴﺣ ﺀﺎﺸﻧﺈﺑ ﻢﻗ
(
4
) .[
PANDORA SRC
.ﻙﺯﺎﻬﺟ ﻰﻠﻋ Pandora ﻖﻴﺒﻄﺗ ﺢﺘﻔﺑ ﻢﻗ 1
.USB ﻝﺎﺧﺩﺇ ﻑﺮﻄﺑ ﻙﺯﺎﻬﺟ ﻞﻴﺻﻮﺘﺑ ﻢﻗ 2
:ﺮﻴﻀﺤﺘﻟﺍ
] ـﻟ [ON] ﺩﺪﺣ •
ﻉﺎﻤﺘﺳﻻﺍ ﺀﺪﺑ
ﺔﻠﺠﺴﻣ ﺔﻄﺤﻣ ﻦﻋ ﺚﺤﺒﻟﺍ
. ﻰﻠﻋ ﻂﻐﺿﺍ 1
.ﺹﺮﻘﻟﺍ ﻰﻠﻋ ﻂﻐﺿﺍ ﻢﺛ ،ﺪﻳﺪﺤﺗ ﺀﺍﺮﺟﻹ ﺕﻮﺼﻟﺍ ﻯﻮﺘﺴﻣ ﺹﺮﻗ ﺭﺩﺃ 2
ﻞﺠﺴﻤﻟﺍ ﺦﻳﺭﺎﺘﻟﺍ ﺐﺴﺣ :[
BY DATE
ﻱﺪﺠﺑﺃ ﺐﻴﺗﺮﺘﺑ :[
ﻢﺛ ،ﺔﺑﻮﻠﻄﻤﻟﺍ ﺔﻄﺤﻤﻟﺍ ﻰﻟﺇ ﻝﻮﺻﻮﻠﻟ ﺕﻮﺼﻟﺍ ﻯﻮﺘﺴﻣ ﺹﺮﻗ ﻒﻠﺑ ﻢﻗ 3
.ﺹﺮﻘﻟﺍ ﻰﻠﻋ ﻂﻐﺿﺍ
.
ﻰﻠﻋ ﺭﺍﺮﻤﺘﺳﻻﺍ ﻊﻣ ﻂﻐﺿﺍ ،ﺀﺎﻐﻟﻺﻟ
(RC-406 ﻡﺍﺪﺨﺘﺳﺍ ﻭﺃ)
. ﻂﻐﺿﺍ ﻢﺛ ،ﺔﻄﺤﻣ ﻦﻋ ﺚﺤﺒﻠﻟ K / J ﻂﻐﺿﺍ
ﻥﺎﻨﻓ ﻭﺃ ﺔﻴﻨﻏﺃ ﺕﺎﻣﻮﻠﻌﻣ ﻰﻠﻋ ﺔﻴﻌﺟﺮﻣ ﺓﺭﺎﺷﺇ ﻊﺿﻭ
.J ﻰﻠﻋ ﺭﺍﺮﻤﺘﺳﻻﺍ ﻊﻣ ﻂﻐﺿﺍ 1
.ﺹﺮﻘﻟﺍ ﻰﻠﻋ ﻂﻐﺿﺍ ﻢﺛ ،ﺪﻳﺪﺤﺗ ﺀﺍﺮﺟﻹ ﺕﻮﺼﻟﺍ ﻯﻮﺘﺴﻣ ﺹﺮﻗ ﺭﺩﺃ 2
ﺔﻴﻟﺎﺤﻟﺍ ﺔﻴﻨﻏﻻﺍ ﺕﺎﻣﻮﻠﻌﻣ :[
ﻲﻟﺎﺤﻟﺍ ﻥﺎﻨﻔﻟﺍ ﺕﺎﻣﻮﻠﻌﻣ :[
THIS TRACK
THIS ARTIST
ﻰﻠﻋ ﺕﺎﻣﻮﻠﻌﻤﻟﺍ ﻦﻳﺰﺨﺗ ﻢﺘﻳﻭ (ﺔﻴﻌﺟﺮﻣ ﺓﺭﺎﺷﺇ ﻊﺿﻭ ﻢﺗ) “BOOKMARKED” ﺮﻬﻈﺗ
ﺲﻴﻟﻭ ﻚﺑ ﺹﺎﺨﻟﺍ Pandora ﺏﺎﺴﺣ ﻰﻠﻋ ﺔﻴﻌﺟﺮﻤﻟﺍ ﺕﺍﺭﺎﺷﻹﺍ ﺮﻓﻮﺘﺗ .ﻚﺑ ﺹﺎﺨﻟﺍ ﺯﺎﻬﺠﻟﺍ
.ﺓﺪﺣﻮﻟﺍ ﻩﺬﻫ ﻰﻠﻋ
ﻲﺑﺮﻋ
9
]
A-Z
]
]
]
USB ﻝﺎﺧﺩﺇ ﻞﻴﺻﻮﺗ ﻑﺮﻃ
ﻢﻜﺤﺘﻟﺍ ﺓﺪﺣﻭ ﻰﻠﻋ
ﺪﻌﺑ ﻦﻋ
. ﻰﻠﻋ ﻂﻐﺿﺍ
. / ﻂﻐﺿﺍ
.ﻲﻟﺎﺤﻟﺍ ﺭﺎﺴﻤﻟﺍ ﻲﻄﺨﺗ ﻢﺘﻴﺴﻓ ،ﺎﺿﺮﻟﺍ ﻡﺪﻋ ﺔﻣﻼﻋ ﺪﻳﺪﺤﺗ ﻢﺗ ﺍﺫﺇ
KCA-iP103 / KCA-iP102
1
*
ﻖﺤﻠﻣ ﻞﺒﻛ
(ﻱﺭﺎﻴﺘﺧﺍ ﻖﺤﻠﻣ)
2
*
iPhone/iPod ﺯﺎﻬﺠﻟ
.ﺚﺒﻟﺍ ﺃﺪﺒﻳﻭ PANDORA ﻰﻟﺇ ﺭﺪﺼﻤﻟﺍ ﺮﻴﻐﺘﻳ
ﺔﻳﺎﻤﺤﻟﺍ ﺀﺎﻄﻏ ﻰﻠﻋ
.
ﻰﻠﻋ ﻂﻐﺿﺍ
ﺖﻗﺆﻣ ﻒﻗﻮﺗ /ﻞﻴﻐﺸﺗ
ﺭﺎﺴﻣ ﻲﻄﺨﺗ.T ﻰﻠﻋ ﻂﻐﺿﺍ. ﻰﻠﻋ ﻂﻐﺿﺍ
/ ﻂﻐﺿﺍ
.
ﻭﺃ ﺎﺿﺮﻟﺍ ﺔﻣﻼﻋ ﻞﻴﺠﺴﺗ
*
ﺓﺀﺎﺿﻻﺍ ﻉﻮﻧ : KCA-iP103 ،ﺱﻮﺑﺩ 30 ﻉﻮﻨﻟﺍ : KCA-iP102
.ﻪﻣﺍﺪﺨﺘﺳﺍ ﻡﺪﻋ ﺪﻨﻋ ﺓﺭﺎﻴﺴﻟﺍ ﻞﺧﺍﺪﺑ ﻞﺑﺎﻜﻟﺍ ﻙﺮﺘﺗ ﻻ
3
ﺎﺿﺮﻟﺍ ﻡﺪﻋ
ﻰﻟﺇ
*1
*2
*3
Page 63

(RC-406 ﻡﺍﺪﺨﺘﺳﺎﺑ) ﺮﺷﺎﺒﻤﻟﺍ ﻰﻘﻴﺳﻮﻤﻟﺍ ﺚﺤﺑ
.DIRECT ﻰﻠﻋ ﻂﻐﺿﺍ 1
.ﻒﻠﻤﻟﺍ ﻢﻗﺭ ﻝﺎﺧﺩﻹ ﻡﺎﻗﺭﻷﺍ ﺭﺍﺭﺯﺃ ﻂﻐﺿﺍ 2
.ﻰﻘﻴﺳﻮﻤﻟﺍ ﻦﻋ ﺚﺤﺒﻠﻟ
ﻂﻐﺿﺍ 3
.DIRECT ﻭﺃ ﻰﻠﻋ ﻂﻐﺿﺍ ،ﺀﺎﻐﻟﻺﻟ •
.ﻲﺋﺍﻮﺸﻌﻟﺍ ﻞﻴﻐﺸﺘﻟﺍ ﺪﻳﺪﺤﺗ ﺔﻟﺎﺣ ﻲﻓ ﺡﺎﺘﻣ ﺮﻴﻏ •
.KMC /KME Light ﻒﻠﻣ ،ANDROID ،iPod ﺯﺎﻬﺟ ﻰﻠﻋ ﻪﻘﻴﺒﻄﺗ ﻦﻜﻤﻳ ﻻ •
Aupeo /TuneIn Radio Pro /TuneIn Radio ﻮﻳﺩﺍﺭ ﻰﻟﺍ ﻉﺎﻤﺘﺳﻻﺍ
ﺯﺎﻬﺟ ﻞﺻ ،Aupeo ﻭﺃ TuneIn Radio Pro ﻭﺃ TuneIn Radio ﻰﻟﺍ ﻉﺎﻤﺘﺳﻻﺍ ﺀﺎﻨﺛﺍ
.ﺓﺪﺣﻮﻟﺍ ﻰﻠﻋ USB ﻝﺎﺧﺩﻻﺍ ﻑﺮﻃ ﻰﻟﺍ iPhone/iPod
.ﺕﺎﻘﻴﺒﻄﺘﻟﺍ ﻩﺬﻫ ﻦﻣ ﺕﻮﺼﻟﺍ ﺝﺍﺮﺧﺎﺑ ﺓﺪﺣﻮﻟﺍ ﻡﻮﻘﺘﺳ •
ﻯﺮﺧﺃ ﺕﺍﺩﺍﺪﻋﺇ
.[
FUNCTION
] ﻰﻟﺇ ﻝﻮﺧﺪﻠﻟ ﺕﻮﺼﻟﺍ ﻯﻮﺘﺴﻣ ﺹﺮﻗ ﻰﻠﻋ ﻂﻐﺿﺍ 1
ﻢﺛ ،(ﻩﺎﻧﺩﺃ ﻝﻭﺪﺠﻟﺍ ﺮﻈﻧﺍ) ﺪﻳﺪﺤﺘﻠﻟ ﺕﻮﺼﻟﺍ ﻯﻮﺘﺴﻣ ﺹﺮﻗ ﺮﻳﻭﺪﺘﺑ ﻢﻗ 2
.ﺹﺮﻘﻟﺍ ﻰﻠﻋ ﻂﻐﺿﺍ
.ﻪﻄﻴﺸﻨﺗ ﻭﺃ ﺏﻮﻠﻄﻤﻟﺍ ﺮﺼﻨﻌﻟﺍ ﺪﻳﺪﺤﺗ ﻢﺘﻳ ﻰﺘﺣ 2 ﺓﻮﻄﺨﻟﺍ ﺭﺮﻛ 3
.ﺀﺎﻬﻧﻹﺍ ﻞﺟﺃ ﻦﻣ
ﺭﺍﺮﻤﺘﺳﻻﺍ ﻊﻣ ﻂﻐﺿﺍ 4
. ﻰﻠﻋ ﻂﻐﺿﺍ ،ﻖﺑﺎﺴﻟﺍ ﺩﺍﺪﻋﻹﺍ ﺮﺼﻨﻋ ﻰﻟﺇ ﻉﻮﺟﺮﻠﻟ
XX
:ﻲﺿﺍﺮﺘﻓﺍ
ANDROID SETUP
؛ .( KENWOOD MUSIC PLAY ﻖﻴﺒﻄﺘﻟﺍ ﻡﺍﺪﺨﺘﺳﺎﺑ) ﺓﺪﺣﻮﻟﺍ ﻦﻣ ﻢﻜﺤﺗ :
Android ﺯﺎﻬﺟ ﻦﻣ ﻂﺋﺎﺳﻮﻟﺍ ﻞﻐﺸﻤﻟ ﻯﺮﺧﻻﺍ ﺕﺎﻘﻴﺒﻄﺘﻟﺎﺑ ﻢﻜﺤﺗ :
BROWSE MODE
HAND MODE
ﺬﻴﻔﻨﺗ ﻦﻜﻤﻳ ﻝﺍﺰﻳ ﻻ ،ﻦﻜﻟ .( KENWOOD MUSIC PLAY ﻖﻴﺒﻄﺘﻟﺍ ﻡﺍﺪﺨﺘﺳﺍ ﻥﻭﺪﺑ)
.ﻖﻴﺒﻄﺘﻟﺍ ﻦﻣ ﻒﻠﻤﻟﺍ ﻲﻄﺨﺗﻭ ﺖﻗﺆﻤﻟﺍ ﻒﻗﻮﺘﻟﺍ/ﻞﻴﻐﺸﺘﻟﺍ
ﻰﻟﺇ [
DRIVE 1
]) ﻲﻟﺎﺘﻟﺍ ﻞﻐﺸﻤﻟﺍ ﺭﺎﻴﺘﺧﺍ ﻢﺘﻳ :
.ﻞﻴﻐﺸﺘﻟﺍ ﺃﺪﺒﻳﻭ ﹰﺎﻴﺋﺎﻘﻠﺗ ([
.ﺔﻴﻟﺎﺘﻟﺍ ﺹﺍﺮﻗﻷﺍ ﺪﻳﺪﺤﺘﻟ
3
ﻭﺃ ANDROID ﻭﺃ iPod ﻒﻠﻤﻟ ﻉﺎﻤﺘﺳﻻﺍ ﺀﺎﻨﺛﺍ :
DRIVE CHANGE
ﻰﻟﺇ 1 ﻦﻣ ﺕﺍﻮﻄﺨﻟﺍ ﺭﺮﻛ
10% /5% /1% / 0.5%
DRIVE 5
MUSIC DRIVE
]
SKIP SEARCH
.ﺕﺎﻔﻠﻤﻟﺍ ﻊﻴﻤﺠﻟ ﻲﻄﺨﺘﻟﺍ ﺚﺤﺑ ﺔﺒﺴﻧ ﺭﺎﺘﺨﻳ ،KMC ﻭﺃ KME Light
ANDROID / iPod / USB
.“Press [VIEW] to install KENWOOD MUSIC PLAY APP” ﺽﺮﻋ ﻢﺘﻳ ،Android ﺯﺎﻬﺟ ﻞﻴﺻﻮﺗ ﺪﻨﻋ
ﻖﻴﺒﻄﺘﻟﺍ ﻦﻣ ﺭﺍﺪﺻﺍ ﺙﺪﺣﺍ ﺐﻴﻛﺮﺗ ﻦﻜﻤﻳ ﺎﻤﻛ .ﻖﻴﺒﻄﺘﻟﺍ ﺐﻴﺼﻨﺘﻟ ﺕﺎﻤﻴﻠﻌﺘﻟﺍ ﻊﺒﺗﺍ
([
ANDROID SETUP
] ) .[
.ANDROID /iPod ﻊﻣ ﺍﺬﻫ ﻖﻓﺍﻮﺘﻳ ﻻ .FLAC/WAV/AAC/WMA/MP3 ﺕﺎﻔﻠﻤﻟ ﻂﻘﻓ
.[BROWSE MODE
] /[
MODE OFF
(18 ) KENWOOD Music Control : KMC ،KENWOOD Music Editor Light : KME Light
.ﺯﺎﻬﺠﻟﺍ ﻦﻣ ﺕﺎﻔﻠﻤﻟﺍ ﻊﻴﺟﺮﺗ ﻭﺃ ﻊﻳﺮﺴﻟﺍ ﻢﻳﺪﻘﺘﻟﺍ ﻭﺃ ﺕﺎﻔﻠﻤﻟﺍ ﻲﻄﺨﺗ ﻭﺃ ،ﺖﻗﺆﻤﻟﺍ ﻑﺎﻘﻳﻹﺍ/ﻞﻴﻐﺸﺘﻟﺍ ﻚﻧﺎﻜﻣﺈﺑ ﻝﺍﺰﻳ ﻻ
.ﺾﺒﻘﻤﻟﺍ ﻂﻐﺿﺍ ﻢﺛ ،ﺔﻤﺋﺎﻗ /ﺪﻠﺠﻣ ﺭﺎﻴﺘﺧﻻ ﺕﻮﺼﻟﺍ ﻯﻮﺘﺴﻣ ﺾﺒﻘﻣ ﺭﺩﺍ 2
.ﺾﺒﻘﻤﻟﺍ ﻂﻐﺿﺍ ﻢﺛ ،ﻒﻠﻣ ﺭﺎﻴﺘﺧﻻ ﺕﻮﺼﻟﺍ ﻯﻮﺘﺴﻣ ﺾﺒﻘﻣ ﺭﺩﺍ 3
([
SKIP SEARCH
. ”*“ ﻝﺎﺧﺩﺈﺑ ﻂﻘﻓ ﻢﻗ ،9 ﻰﺘﺣﻭ 0 ﻦﻣ ﻡﺎﻗﺭﻷﺍﻭ ﺔﻳﺪﺠﺑﻷﺍ ﻑﻭﺮﺤﻟﺍ ﻑﻼﺨﺑ ﺰﻣﺭ ﻦﻋ ﺚﺤﺒﻠﻟ
USB
.
(
7
([
ANDROID SETUP
) .[
] ) .[
(
18
BROWSE MODE
) .ﻞﻴﺻﻮﺘﻟﺍ ﻞﺒﻗ ﺯﺎﻬﺟ ﻰﻠﻋ KENWOOD MUSIC PLAY
] ﺪﻳﺪﺤﺗ ﻢﺘﻳ ﺎﻣﺪﻨﻋ ﻂﻘﻓ ﻪﻘﻴﺒﻄﺗ ﻦﻜﻤﻳ :
] ﺪﻳﺪﺤﺗ ﻢﺘﻳ ﺎﻣﺪﻨﻋ ﻂﻘﻓ ﻪﻘﻴﺒﻄﺗ ﻦﻜﻤﻳ :
ﺔﻤﺋﺎﻗ /ﺪﻠﺠﻣ ﻦﻣ ﻒﻠﻣ ﺮﺘﺧﺍ
. ﻰﻠﻋ ﻂﻐﺿﺍ 1
.ﺔﻋﺮﺴﺑ ﺎﻬﻟﻼﺧ ﺚﺤﺒﻟﺍ ﻦﻜﻤﻳ ،ﺕﺎﻔﻠﻤﻟﺍ ﻦﻣ ﺮﻴﺜﻜﻟﺍ ﻚﻳﺪﻟ ﺖﻧﺎﻛ ﺍﺫﺇ
:(KMC /KME Light ﺕﺎﻔﻠﻤﻟ) USB ﻰﻟﺍ ﺔﺒﺴﻨﻟﺎﺑ
] ) .ﻲﻟﺎﺤﻟﺍ ﻲﻄﺨﺘﻟﺍ ﺚﺤﺑ ﻝﺪﻌﻤﺑ ﺚﺤﺒﻠﻟ T / S ﻂﻐﺿﺍ
.10% ﻝﺪﻌﻤﺑ ﺚﺤﺒﻠﻟ ﺮﻤﺘﺴﻣ ﻞﻜﺸﺑ T / S ﻂﻐﺿﺍ
.FLAC/WAV/AAC/WMA/MP3 ﺕﺎﻔﻠﻤﻟ ﻖﻴﺒﻄﺘﻠﻟ ﻞﺑﺎﻗ ﺮﻴﻏ •
.ﻝﻭﻻﺍ ﻑﺮﺤﻟﺍ ﺐﺴﺣ ﻒﻠﻣ ﻦﻋ ﺚﺤﺒﻟﺍ ﻦﻜﻤﻳ
.ﻲﻓﺮﺣ ﺚﺤﺑ ﻝﺎﺧﺩﻹ ﺔﻋﺮﺴﺑ ﺕﻮﺼﻟﺍ ﻯﻮﺘﺴﻣ ﺹﺮﻗ ﺭﺩ ﺃ
.ﻑﺮﺤﻟﺍ ﺭﺎﻴﺘﺧﻻ ﺕﻮﺼﻟﺍ ﻯﻮﺘﺴﻣ ﺾﺒﻘﻣ ﺭﺩﺍ
.ﻝﺎﺧﺩﻹﺍ ﻊﺿﻮﻣ ﻰﻟﺇ ﻝﺎﻘﺘﻧﻼﻟ T / S ﻂﻐﺿﺍ
.ﻑﺮﺣﺃ ﺔﺛﻼﺛ ﻰﺘﺣ ﻝﺎﺧﺩﻹﺍ ﻚﻨﻜﻤﻳ •
.ﺚﺤﺒﻟﺍ ﺀﺪﺒﻟ ﺕﻮﺼﻟﺍ ﺡﺎﺘﻔﻣ ﻂﻐﺿﺍ
ﻂﻐﺿﺍ ،ﺔﻴﺴﻴﺋﺮﻟﺍ ﺔﻤﺋﺎﻘﻟﺍ /ﻝﻭﻻﺍ ﻒﻠﻤﻟﺍ /ﻲﻠﺻﻻﺍ ﺪﻠﺠﻤﻟﺍ ﻰﻟﺍ ﻉﻮﺟﺮﻠﻟ •
ﻰﻠﻋ ﻂﻐﺿﺍ ،ﻖﺑﺎﺴﻟﺍ ﺩﺍﺪﻋﻹﺍ ﺮﺼﻨﻋ ﻰﻟﺇ ﻉﻮﺟﺮﻠﻟ •
MODE OFF
BROWSE MODE
.
] ﺭﺎﻴﺘﺧﺍ ﺪﻨﻋ ﻂﻘﻓ ﻖﻴﺒﻄﺘﻠﻟ ﻞﺑﺎﻗ ،iPod ﺯﺎﻬﺠﻟ ﺔﺒﺴﻨﻟﺎﺑ •
] ﺭﺎﻴﺘﺧﺍ ﺪﻨﻋ ﻂﻘﻓ ﻖﻴﺒﻄﺘﻠﻟ ﻞﺑﺎﻗ ،
ﻰﻠﻋ ﺭﺍﺮﻤﺘﺳﻻﺍ ﻊﻣ ﻂﻐﺿﺍ ،ﺀﺎﻐﻟﻺﻟ •
.
ANDROID
ANDROID /iPod
ﻊﻳﺮﺳ ﺚﺤﺑ
:iPod ﻲﻠﻳﺩﻮﻤﻟ
ANDROID
ﻲﻠﻳﺩﻮﻤﻟ
ﻲﻠﻳﺩﻮﻤﻟ
ﺯﺎﻬﺠﻟ ﺔﺒﺴﻨﻟﺎﺑ
*3
*4
*5
*6
*7
*8
•
8
Page 64

ANDROID / iPod / USB
ﻞﻴﻐﺸﺘﻟﺍ ﺀﺪﺑ
.ﻞﻴﻐﺸﺘﻟﺍ ﺃﺪﺒﻳﻭ ﺎﹰﻴﺋﺎﻘﻠﺗ ﺭﺪﺼﻤﻟﺍ ﺮﻴﻐﺘﻳ
USB ﻝﺎﺧﺩﺇ ﻞﻴﺻﻮﺗ ﻑﺮﻃ
USB
ﻰﻠﻋ ﻂﻐﺿﺍ
.
ﻰﻠﻋ ﺭﺍﺮﻤﺘﺳﻻﺍ ﻊﻣ ﻂﻐﺿﺍ
. / S
/ S ﻰﻠﻋ ﻂﻐﺿﺍ
.
/ ﻂﻐﺿﺍ
،FLAC/WAV/AAC/WMA/MP3 ﻒﻠﻣ
ANDROID ﻭﺃ iPod
7
*
KMC /KME Light ﻒﻠﻣ :
:
REPEAT OFF /FOLDER REPEAT / FILE REPEAT
ﻒﻠﻣ ﻭﺃ FLAC/WAV/AAC/WMA/MP3 ﻒﻠﻣ :
ANDROID ﻭﺃ iPod ﻭﺃ KMC /KME Light
.
ALL RANDOM
ﺪﻳﺪﺤﺘﻟ ﻰﻠﻋ ﺭﺍﺮﻤﺘﺳﺎﺑ ﻂﻐﺿﺍ
ﻂﻐﺿﺍ ،iPod ﺭﺪﺼﻤﻟﺍ ﻥﻮﻜﻳ ﺎﻣﺪﻨﻋ
([
ANDROID SETUP
] ،8 ) ،ANDROID ﺭﺪﺼﻤﻟﺍ ﻥﻮﻜﻳ ﺎﻣﺪﻨﻋ
.(Mass Storage Class) ﻲﻛﺬﻟﺍ ﻒﺗﺎﻬﻠﻟ ﺔﻴﺟﺭﺎﺨﻟﺍ ﻭﺃ ﺔﻴﻠﺧﺍﺪﻟﺍ ﺓﺮﻛﺍﺬﻟﺍ •
ﻲﺑﺮﻋ
7
.
ﻰﻠﻋ ﻂﻐﺿﺍ
ﻰﻠﻋ ﺭﺍﺮﻤﺘﺳﻻﺍ ﻊﻣ ﻂﻐﺿﺍ
.T / S
REPEAT OFF / FILE REPEAT
.ﺭﺍﺮﻜﺘﺑ
ﻂﻐﺿﺍ
RANDOM OFF / FOLDER RANDOM
8
*
iPod ﺯﺎﻬﺟ ﻦﻣ ﻢﻜﺤﺗ :
ﺓﺪﺣﻮﻟﺍ ﻦﻣ ﻢﻜﺤﺗ :
.ﺭﺍﺮﻜﺘﺑ
MODE ON
MODE OFF
ﻂﻐﺿﺍ
.ﺐﻴﺗﺮﺘﻟﺎﺑ ﺔﻧﺰﺨﻤﻟﺍ ﺕﺎﻔﻠﻤﻟﺍ ﻞﻴﻐﺸﺗ ﺃﺪﺒﻳ
.ﻂﺋﺎﺳﻮﻟﺍ ﺩﺪﻌﺘﻣ ﺯﺎﻬﺠﻟ ﺭﺎﺘﺨﻤﻟﺍ ﻞﻐﺸﻤﻟﺍ •
ﻰﻟﺇﺔﻳﺎﻤﺤﻟﺍ ﺀﺎﻄﻏ ﻰﻠﻋﺪﻌﺑ ﻦﻋ ﻢﻜﺤﺘﻟﺍ ﺓﺪﺣﻭ ﻰﻠﻋ
ﺖﻗﺆﻣ ﻒﻗﻮﺗ /ﻞﻴﻐﺸﺗ
ﻢﻳﺪﻘﺘﻟﺍ /ﻊﻴﺟﺮﺘﻟﺍ
4
*
ﻊﻳﺮﺴﻟﺍ
ﻒﻠﻣ ﺪﻳﺪﺤﺗ.T / S ﻰﻠﻋ ﻂﻐﺿﺍ.
5
*
ﺪﻠﺠﻣ ﺪﻳﺪﺤﺗ.K / J ﻂﻐﺿﺍ
6
*
ﻞﻴﻐﺸﺘﻟﺍ ﺭﺍﺮﻜﺗ.ﺭﺍﺮﻜﺘﺑ ﻂﻐﺿﺍ
ﺐﻴﺗﺮﺘﺑ ﻞﻴﻐﺸﺘﻟﺍ
6
*
ﻲﺋﺍﻮﺸﻋ
ﻢﻜﺤﺘﻟﺍ ﻊﺿﻭ ﺮﺘﺧﺍ.ﺭﺮﻜﺘﻣ ﻞﻜﺸﺑ
ﻰﻘﻴﺳﻮﻣ ﻞﻐﺸﻣ ﺮﺘﺧﺍ
(
MUSIC DRIVE]
] ،
8
)
(500 mA :ﻰﺼﻗﻷﺍ ﺪﺤﻟﺍ) CA-U1EX
(ﻱﺭﺎﻴﺘﺧﺍ ﻖﺤﻠﻣ)
iPhone/iPod
KCA-iP103 / KCA-iP102
1
*
ﻞﺒﻛ
2
*
ANDROID
(ﻱﺭﺎﻴﺘﺧﺍ ﻖﺤﻠﻣ)
iPhone/iPod ﺯﺎﻬﺠﻟ ﻖﺤﻠﻣ
3
*
2
*
USB 2.0 ﻞﺒﻛ
(ﺀﺍﺮﺸﻠﻟ ﺡﺎﺘﻣ)
ﺓﺀﺎﺿﻻﺍ ﻉﻮﻧ : KCA-iP103 ،ﺱﻮﺑﺩ 30 ﻉﻮﻨﻟﺍ : KCA-iP102
.ﻪﻣﺍﺪﺨﺘﺳﺍ ﻡﺪﻋ ﺪﻨﻋ ﺓﺭﺎﻴﺴﻟﺍ ﻞﺧﺍﺪﺑ ﻞﺑﺎﻜﻟﺍ ﻙﺮﺘﺗ ﻻ
*1
*2
Page 65

ﻮﻳﺩﺍﺭ
CLOCK
ﻡﺎﻈﻧ ﺔﻄﺤﻣ ﺖﻗﻭ ﻊﻣ ﺯﺎﻬﺠﻟﺍ ﺖﻗﻮﻟ ﺔﻨﻣﺍﺰﻣ ﻞﻤﻋ ﻢﺘﻳ :
/[
TI
] /[
AF SET
] /[
REGIONAL
.ﻂﻘﻓ FM3 /FM2 /FM1 ﻕﺎﻄﻨﻟﺍ ﻥﺎﻛ ﺍﺫﺇ [
،
DRAMA ،
EDUCATE ،
،
CHILDREN ،
،
EASY M
،
JAZZ ،
] ﻭﺃ [
FINANCE ،
LEISURE ،
(ﻰﻘﻴﺳﻮﻣ) ،
OTHER M
(ﻰﻘﻴﺳﻮﻣ) ،
SPEECH
] ﺖﺤﺗ ﻒﻨﺼﻤﻟﺍ ﺞﻣﺎﻧﺮﺒﻟﺍ ﻉﻮﻧ ﻦﻋ ﺓﺪﺣﻮﻟﺍ ﺚﺤﺒﺗ ﻑﻮﺳ
DOCUMENT ،
FOLK M
ﺍﺫﺇ [
MUSIC
ﻭﺃ ﺕﺎﻬﻴﺒﻨﺘﻟﺍ ﻭﺃ ،ﺭﻭﺮﻤﻟﺍ ﺕﺎﻣﻮﻠﻌﻣ ﻝﺎﺒﻘﺘﺳﺍ ﺀﺎﻨﺛﺃ ﺕﻮﺼﻟﺍ ﻯﻮﺘﺴﻣ ﻂﺒﺿ ﺔﻟﺎﺣ ﻲﻓ •
ﺎﻬﻘﻴﺒﻄﺗ ﻢﺘﻴﺳ .ﺎﹰﻴﺋﺎﻘﻠﺗ ﻝﺪﻌﻤﻟﺍ ﺕﻮﺼﻟﺍ ﻯﻮﺘﺴﻣ ﻆﻔﺣ ﻢﺘﻳ ،ﺓﺪﻳﺪﺠﻟﺍ ﺕﺍﺮﺸﻨﻟﺍ
.ﺔﻣﺩﺎﻘﻟﺍ ﺓﺮﻤﻟﺍ ﻲﻓ ﺭﺎﺒﺧﻻﺍ ﺕﺍﺮﺸﻧ ﻭﺃ ﻪﺒﻨﻤﻟﺍ ﻭﺃ ﺭﻭﺮﻤﻟﺍ ﺕﺎﻣﻮﻠﻌﻣ ﻞﻴﻐﺸﺗ ﺪﻨﻋ
.ﺀﺎﻐﻟﺍ :
OFF ؛
] /[
NEWS SET
SPORT ،(ﺕﺎﻣﻮﻠﻌﻣ) INFO ،
WEATHER ،
VARIED ،
TRAVEL ،
PHONE IN ،
ROCK M
OLDIES ،
(ﻰﻘﻴﺳﻮﻣ) ،
CLASSICS ،
NATION M
(ﻰﻘﻴﺳﻮﻣ) ،
.ﻮﻳﺩﺍﺮﻟﺍ ﺕﺎﻧﺎﻴﺑ
.SW2 /SW1 /AM ﺭﺪﺼﻤﻟ ﻂﻘﻓ
] /[
MONO SET
AFFAIRS ،
SCIENCE ،
RELIGION ،
POP M
LIGHT M
(ﻰﻘﻴﺳﻮﻣ) ،
TIME SYNC
ON
] ﺪﻳﺪﺤﺗ ﻦﻜﻤﻳ •
PTY SEARCH
:ﺡﺎﺘﻤﻟﺍ ﺞﻣﺎﻧﺮﺒﻟﺍ ﻉﻮﻧ •
NEWS :
SPEECH
CULTURE
SOCIAL
(ﻰﻘﻴﺳﻮﻣ) :
(ﻰﻘﻴﺳﻮﻣ)
COUNTRY
MUSIC
.ﻩﺪﻳﺪﺤﺗ ﻢﺗ
.[
FUNCTION
ﻰﻠﻋ ﻂﻐﺿﺍ ﻢﺛ ،(ﻩﺎﻧﺩﺃ ﻝﻭﺪﺠﻟﺍ ﺮﻈﻧﺍ) ﺪﻳﺪﺤﺘﻠﻟ ﺕﻮﺼﻟﺍ ﻯﻮﺘﺴﻣ ﺹﺮﻗ ﺮﻳﻭﺪﺘﺑ ﻢﻗ 2
*
]
XX
:ﻲﺿﺍﺮﺘﻓﺍ
ﺓﺭﺎﺘﺨﻤﻟﺍ ﺔﻄﺤﻤﻟﺍ/ﺭﺪﺼﻤﻟﺍ ﻰﻠﻋ ﻖﻴﺒﻄﺘﻠﻟ ﺔﻠﺑﺎﻗ ﺎﻫﺬﻴﻔﻨﺗ ﻢﺘﻳ ﻲﺘﻟﺍ ﺕﺍﺩﺍﺪﻋﻹﺍ
ﺓﺮﻣ ﺕﺍﺩﺍﺪﻋﻹﺍ ﺬﻴﻔﻨﺘﺑ ﻡﻮﻘﺗ ﻥﺍ ﺐﺠﻳ ،ﺔﻄﺤﻤﻟﺍ/ﺭﺪﺼﻤﻟﺍ ﺮﻴﻴﻐﺗ ﺩﺮﺠﻤﺑ .ﻂﻘﻓ
(4
) .[
.ﺀﺎﻐﻟﺍ :
ﻢﻜﺤﺘﻟﺍ ﻡﺍﺪﺨﺘﺳﺎﺑ ﺓﺩﺪﺤﻤﻟﺍ ﺔﻘﻄﻨﻤﻟﺍ ﻲﻓ ﻂﻘﻓ ﻯﺮﺧﺃ ﺔﻄﺤﻣ ﻰﻟﺇ ﻝﻮﺤﺘﻳ :
ﺔﻜﺒﺷ ﺲﻔﻧ ﻲﻓ ﺞﻣﺎﻧﺮﺒﻟﺍ ﺲﻔﻧ ﺚﺒﺗ ﻯﺮﺧﺃ ﺔﻄﺤﻣ ﻦﻋ ﺎﹰﻴﺋﺎﻘﻠﺗ ﺚﺤﺒﻳ :
؛ .ﺊﻴﺳ ﻲﻟﺎﺤﻟﺍ ﻝﺎﺒﻘﺘﺳﻻﺍ ﻥﻮﻜﻳ ﺎﻣﺪﻨﻋ ﻞﻀﻓﺃ ﻝﺎﺒﻘﺘﺳﺎﺑ Radio Data System
ﺀﺎﻀﻳ) ﺓﺮﻓﻮﺘﻣ ﺖﻧﺎﻛ ﺍﺫﺇ ﺭﻭﺮﻤﻟﺍ ﺕﺎﻣﻮﻠﻌﻣ ﻰﻟﺍ ﹰﺎﺘﻗﺆﻣ ﻝﻮﺤﺘﻟﺎﺑ ﺓﺪﺣﻮﻠﻟ ﺢﻤﺴﻳ :
ﺹﺮﻗ ﺭﺩﺃ .PTY ﺔﻐﻟ ﺭﺎﻴﺘﺧﺍ ﻰﻟﺇ ﻝﻮﺧﺪﻠﻟ ﺕﻮﺼﻟﺍ ﻯﻮﺘﺴﻣ ﺹﺮﻗ ﻰﻠﻋ ﻂﻐﺿﺍ
ﻂﻐﺿﺍ ﻢﺛ ،(
.ﻞﻴﻐﺸﺘﻟﺍ ﺀﺪﺒﻟ T / S ﻰﻠﻋ ﻂﻐﺿﺍ ﻢﺛ ،(ﻲﻟﺎﺘﻟﺍ ﺮﻈﻧﺍ) ﺔﺣﺎﺘﻤﻟﺍ ﺞﻣﺍﺮﺒﻟﺍ ﻉﻮﻧ ﺩﺪﺤﻳ
.ﻪﻄﻴﺸﻨﺗ ﻭﺃ ﺏﻮﻠﻄﻤﻟﺍ ﺮﺼﻨﻌﻟﺍ ﺪﻳﺪﺤﺗ ﻢﺘﻳ ﻰﺘﺣ 2 ﺓﻮﻄﺨﻟﺍ ﺭﺮﻛ 3
.ﺀﺎﻐﻟﺍ :
OFF ؛
.ﻂﻘﻓ ﺪﻴﺠﻟﺍ ﻝﺎﺒﻘﺘﺳﻻﺍ ﺕﺍﺫ ﺕﺎﻄﺤﻤﻟﺍ ﻦﻋ ﺚﺤﺒﻟﺍ :
.ﺀﺎﻐﻟﺍ :NO ؛ .ﺪﻴﺟ ﻝﺎﺒﻘﺘﺳﺍ ﺕﺍﺫ ﺕﺎﻄﺤﻣ 6 ﻆﻔﺣ ﺎﹰﻴﺋﺎﻘﻠﺗ ﺃﺪﺒﻳ :
PRESET TYPE
؛ .ﻩﺪﻘﻓ ﻢﺘﻴﺳ ﻮﻳﺮﺘﺴﻟﺍ ﺕﻮﺼﻟﺍ ﺮﻴﺛﺄﺗ ﻦﻜﻟﻭ FM ﻝﺎﺒﻘﺘﺳﺍ ﻦﺴﺤﻳ :
OFF ؛
] ﻊﺿﻭ ﻊﻣ [
.ﺎﹰﺣﺎﺘﻣ ﻥﺎﻛ ﺍﺫﺇ ﺭﺎﺒﺧﻷﺍ ﺞﻣﺎﻧﺮﺑ ﻰﻟﺇ ﺎﹰﺘﻗﺆﻣ ﺯﺎﻬﺠﻟﺍ ﻝﻮﺤﺘﻳ ﻑﻮﺳ :
GERMAN /FRENCH /ENGLISH
] ﻰﻟﺇ ﻝﻮﺧﺪﻠﻟ ﺕﻮﺼﻟﺍ ﻯﻮﺘﺴﻣ ﺹﺮﻗ ﻰﻠﻋ ﻂﻐﺿﺍ 1
.ﺀﺎﻬﻧﻹﺍ ﻞﺟﺃ ﻦﻣ
ﻰﻠﻋ ﻂﻐﺿﺍ ،ﻖﺑﺎﺴﻟﺍ ﺩﺍﺪﻋﻹﺍ ﺮﺼﻨﻋ ﻰﻟﺇ ﻉﻮﺟﺮﻠﻟ
.
NORMAL
] ﺪﻳﺪﺤﺗ ﺔﻟﺎﺣ ﻲﻓ ﻂﻘﻓ ﺪﻳﺪﺤﺘﻠﻟ ﻞﺑﺎﻗ
.ﺀﺎﻐﻟﺍ :
) PTY ﺔﻐﻟ ﺪﻳﺪﺤﺘﻟ ﺕﻮﺼﻟﺍ ﻯﻮﺘﺴﻣ
ﺭﺍﺮﻤﺘﺳﻻﺍ ﻊﻣ ﻂﻐﺿﺍ 4
.ﻯﺮﺧﺍ
.ﺀﺎﻐﻟﺍ :
.ﺀﺎﻐﻟﺍ :
OFF ؛
.“AF” ﻲﻓ
.ﺀﺎﻐﻟﺍ :
OFF ؛
.(“TI” ﺮﺷﺆﻤﻟﺍ
.ﺹﺮﻘﻟﺍ ﻰﻠﻋ
YES
OFF
OFF
ﻯﺮﺧﺃ ﺕﺍﺩﺍﺪﻋﺇ
.ﺹﺮﻘﻟﺍ
TUNER SETTING
LOCAL SEEK
ON
•
AUTO MEMORY
•
MONO SET
ON
NEWS SET
ON
REGIONAL
ON
ON
ON
PTY SEARCH
*
AF SET
TI
6
Page 66

SW2 /SW1 /AM /FM3 /FM2 / FM1 :ﻡﻮﻋﺪﻤﻟﺍ ﻕﺎﻄﻨﻟﺍ
ﺔﻄﺤﻣ ﻦﻋ ﺚﺤﺒﻟﺍ
.ﻕﺎﻄﻨﻟﺍ ﺪﻳﺪﺤﺘﻟ (RC-406 ﻲﻓ
.ﺔﻄﺤﻣ ﻦﻋ ﺚﺤﺒﻠﻟ (RC-406 ﻲﻓ
.(6 ﻰﻟﺇ 1 ﻦﻣ) ﺔﻴﻟﺎﺘﻟﺍ ﻡﺎﻗﺭﻷﺍ ﺭﺍﺭﺯﺃ ﻦﻣ ﺪﺣﺍﻭ ﺭﺍﺮﻤﺘﺳﻻﺍ ﻊﻣ ﻂﻐﺿﺍ :ﺔﻄﺤﻤﻟﺍ ﻆﻔﺤﻟ •
ﺭﺍﺭﺯﺃ ﺪﺣﺃ ﻰﻠﻋ ﻂﻐﺿﺍ ﻭﺃ) (6 ﻰﻟﺇ 1 ﻦﻣ) ﺔﻴﻟﺎﺘﻟﺍ ﻡﺎﻗﺭﻷﺍ ﺭﺍﺭﺯﺃ ﺪﺣﺃ ﻰﻠﻋ ﻂﻐﺿﺍ :ﺔﻧﺰﺨﻤﻟﺍ ﺔﻄﺤﻤﻟﺍ ﺪﻳﺪﺤﺘﻟ •
.TUNER ﻒﻟﺍﻮﻤﻟﺍ ﺭﺎﻴﺘﺧﻻ ﺭﺮﻜﺘﻣ ﻞﻜﺸﺑ ﻂﻐﺿﺍ 1
/ ﻰﻠﻋ ﻂﻐﺿﺍ ﻭﺃ) ﺭﺍﺮﻜﺘﺑ ﻰﻠﻋ ﻂﻐﺿﺍ 2
/ S ﻰﻠﻋ ﻂﻐﺿﺍ ﻭﺃ) T / S ﻰﻠﻋ ﻂﻐﺿﺍ 3
.ﺭﺍﺮﻜﺘﺑ ﻂﻐﺿﺍ :T / S ـﻟ ﺚﺤﺒﻟﺍ ﺔﻘﻳﺮﻃ ﺮﻴﻴﻐﺘﻟ •
.ﺔﻄﺤﻣ ﻦﻋ ﹰﺎﻴﺋﺎﻘﻠﺗ ﺚﺤﺒﻳ : AUTO1
.ﺎﻘﺒﺴﻣ ﺓﺪﻌﻣ ﺔﻄﺤﻣ ﻦﻋ ﺚﺤﺒﻟﺍ : AUTO2
.ﺔﻄﺤﻣ ﻦﻋ ﺎﹰﻳﻭﺪﻳ ﺚﺤﺒﻳ : MANUAL
.(RC-406 ﻲﻓ (6 ﻰﻟﺇ 1 ﻦﻣ) ﺔﻴﻟﺎﺘﻟﺍ ﻡﺎﻗﺭﻷﺍ
(RC-406 ﻡﺍﺪﺨﺘﺳﺎﺑ) ﺮﺷﺎﺒﻤﻟﺍ ﻝﻮﺻﻮﻟﺍ ﻒﻴﻟﻮﺗ
(SW2ﻰﻠﻋ ﻝﻮﺼﺤﻠﻟ) “– – – – –” ﻭﺃ (SW1 /AM ﻰﻠﻋ ﻝﻮﺼﺤﻠﻟ) “– – – –” ،(FM ﻰﻠﻋ ﻝﻮﺼﺤﻠﻟ) “– – – • –”
.ﺎﹰﻴﺋﺎﻘﻠﺗ ﺮﺷﺎﺒﻤﻟﺍ ﻝﻮﺻﻮﻟﺍ ﻒﻴﻟﻮﺗ ﺀﺎﻐﻟﺇ ﻢﺘﻳ ،2 ﺓﻮﻄﺨﻟﺍ ﺪﻌﺑ ﹴﻥﺍﻮﺛ 10 ﺓﺪﻤﻟ ﺔﻴﻠﻤﻋ ﻱﺃ ﺀﺍﺮﺟﺇ ﻡﺪﻋ ﺔﻟﺎﺣ ﻲﻓ •
.ﺮﺷﺎﺒﻤﻟﺍ ﻝﻮﺻﻮﻟﺍ ﻒﻴﻟﻮﺗ ﻰﻟﺇ ﻝﻮﺧﺪﻠﻟ DIRECT ﻂﻐﺿﺍ 1
.ﺩﺩﺮﺘﻟﺍ ﻝﺎﺧﺩﻹ ﻡﺎﻗﺭﻷﺍ ﺭﺍﺭﺯﺃ ﻂﻐﺿﺍ 2
.ﺔﻄﺤﻣ ﻦﻋ ﺚﺤﺒﻠﻟ
.ﺔﺷﺎﺸﻟﺍ ﻰﻠﻋ ﺮﻬﻈﺗ ﻲﺘﻟﺍ
ﻂﻐﺿﺍ 3
.DIRECT ﻭﺃ ﻰﻠﻋ ﻂﻐﺿﺍ ،ﺀﺎﻐﻟﻺﻟ •
ﻞﻤﻌﻟﺍ ﻲﻓ ﻉﻭﺮﺸﻟﺍﻮﻳﺩﺍﺭ
UPDATE SYSTEM/ UPDATE BT
؛ .ﺖﺑﺎﺜﻟﺍ ﺞﻣﺎﻧﺮﺒﻟﺍ ﺔﻴﻗﺮﺗ ﺃﺪﺒﻳ :
.(ﺔﻄﺸﻨﻣ ﺮﻴﻏ ﺔﻴﻗﺮﺘﻟﺍ) ﻲﻐﻠﻳ :
ﺔﻴﻔﻴﻛ ﻝﻮﺣ ﻞﻴﺻﺎﻔﺗ ﻰﻠﻋ ﻝﻮﺼﺤﻠﻟ
:ﺮﻈﻧﺍ ،ﺖﺑﺎﺜﻟﺍ ﺞﻣﺎﻧﺮﺒﻟﺍ ﺚﻳﺪﺤﺗ
www.kenwood.com/cs/ce/
ﺔﺷﺎﺸﻟﺍ ﻰﻠﻋ ﺔﻋﺎﺴﻟﺍ ﺖﻗﻭ ﺽﺮﻋ ﻢﺘﻳ :
؛ .ﺓﺄﻔﻄﻣ ﺓﺪﺣﻮﻟﺍ ﻥﻮﻜﺗ ﺎﻣﺪﻨﻋ ﻰﺘﺣ
.ﺀﺎﻐﻟﺍ :
F/W UP xx.xx
YES
NO
CLOCK DISPLAY
ON
OFF
F/W UPDATE
CLOCK
ﻲﺑﺮﻋ
5
Page 67

ﻞﻤﻌﻟﺍ ﻲﻓ ﻉﻭﺮﺸﻟﺍ
ﺔﻴﺋﺪﺒﻤﻟﺍ ﺕﺍﺩﺍﺪﻋﻹﺍ ﻂﺒﺿ
. ﺩﺍﺪﻌﻨﺘﺳﻻﺍ ﻊﺿﻭ ﻲﻓ ﻝﻮﺧﺪﻠﻟ ﺭﺮﻜﺘﻣ ﻞﻜﺸﺑ ﻂﻐﺿﺍ 1
.[
FUNCTION
ﻂﻐﺿﺍ ﻢﺛ ،(ﻩﺎﻧﺩﺃ ﻝﻭﺪﺠﻟﺍ ﺮﻈﻧﺍ) ﺪﻳﺪﺤﺘﻠﻟ ﺕﻮﺼﻟﺍ ﻯﻮﺘﺴﻣ ﺹﺮﻗ ﺮﻳﻭﺪﺘﺑ ﻢﻗ 3
.ﻪﻄﻴﺸﻨﺗ ﻭﺃ ﺏﻮﻠﻄﻤﻟﺍ ﺮﺼﻨﻌﻟﺍ ﺪﻳﺪﺤﺗ ﻢﺘﻳ ﻰﺘﺣ 3 ﺓﻮﻄﺨﻟﺍ ﺭﺮﻛ 4
XX
:ﻲﺿﺍﺮﺘﻓﺍ
ﺮﻓﻭﻮﺒﺻ ﻭﺃ ﺔﻴﻔﻠﺨﻟﺍ ﺕﺎﻋﺎﻤﺴﻟﺍ ﺖﻧﺎﻛ ﺍﺫﺇ ﺎﻣ ﺩﺪﺣ :SUB-W /REAR
ﺕﻮﺻ ﺮﺒﻜﻣ ﻝﻼﺧ ﻦﻣ) ﺯﺎﻬﺠﻟﺍ ﺓﺮﺧﺆﻣ ﻲﻓ ﻂﺨﻟﺍ ﺝﺮﺨﻣ ﻑﺍﺮﻃﺄﺑ ﻦﻴﻠﺻﻮﻣ
ﺕﺎﻋﺎﻤﺴﻟﺍ ﻢﺠﺤﻟ ﺎﹰﻘﻓﻭ ﺪﻳﺪﺤﺘﻟﺍ ﻢﺘﻳ :
OEM ﺕﺎﻋﺎﻤﺳ ﻭﺃ (ﺔﺻﻮﺑ-6 ﻭﺃ ﺔﺻﻮﺑ-9×6 ،ﺔﺻﻮﺑ-4 ﻭﺃ ﺔﺻﻮﺑ-5)
ﻕﺎﻄﻧ ﻞﻛ ﻲﻓ ﻖﺒﺴﻣ ﺩﺍﺪﻋﺇ ﺭﺯ ﻞﻜﻟ ﺓﺪﺣﺍﻭ ﺔﻄﺤﻣ ﺮﻛﺬﺘﻳ :
ﺮﻈﻨﻟﺍ ﺾﻐﺑ ﻖﺒﺴﻣ ﺩﺍﺪﻋﺇ ﺭﺯ ﻞﻜﻟ ﺓﺪﺣﺍﻭ ﺔﻄﺤﻣ ﺮﻛﺬﺘﻳ :
.ﻂﻴﺸﻨﺘﻟﺍ ﺀﺎﻐﻟﺇ :
ACC ﻂﺒﺿ ﺪﻨﻋ ﺯﺎﻬﺠﻟﺍ ﺔﻬﺟﺍﻭ ﻞﺼﻓ ﺖﻴﺴﻧ ﺍﺫﺇ ﺮﻳﺬﺤﺘﻟﺍ ﻂﺸﻨﻳ :
(9 ) .ﻞﻄﻌﻣ :
(16 ) .ﻞﻄﻌﻣ :
] ﻰﻟﺇ ﻝﻮﺧﺪﻠﻟ ﺕﻮﺼﻟﺍ ﻯﻮﺘﺴﻣ ﺹﺮﻗ ﻰﻠﻋ ﻂﻐﺿﺍ 2
.ﺹﺮﻘﻟﺍ ﻰﻠﻋ
.ﺀﺎﻬﻧﻹﺍ ﻞﺟﺃ ﻦﻣ
. ﻰﻠﻋ ﻂﻐﺿﺍ ،ﻖﺑﺎﺴﻟﺍ ﺩﺍﺪﻋﻹﺍ ﺮﺼﻨﻋ ﻰﻟﺇ ﻉﻮﺟﺮﻠﻟ
OEM /6/9 × 6 /4/5 /OFF
.ﻞﺜﻣﻷﺍ ﺀﺍﺩﻷﺍ ﻰﻠﻋ ﻝﻮﺼﺤﻠﻟ
OFF ؛
.ﺡﺎﺘﻔﻤﻟﺍ ﻰﻠﻋ ﻂﻐﻀﻟﺍ ﺔﻤﻐﻧ ﻂﻴﺸﻨﺗ :
.ﻂﻴﺸﻨﺘﻟﺍ ﺀﺎﻐﻟﺇ :
OFF ؛
.ﺭﺪﺼﻤﻟﺍ ﺪﻳﺪﺤﺗ ﻲﻓ PANDORA ﻦﻴﻜﻤﺗ :
OFF ؛
.ﺭﺪﺼﻤﻟﺍ ﺪﻳﺪﺤﺗ ﻲﻓ AUX ﻦﻴﻜﻤﺗ :
ﺭﺍﺮﻤﺘﺳﻻﺍ ﻊﻣ ﻂﻐﺿﺍ 5
.(ﻲﺟﺭﺎﺧ
NORMAL
MIX
؛ .(5 )
.ﺩﺪﺤﻤﻟﺍ ﻕﺎﻄﻨﻟﺍ ﻦﻋ
ON
OFF ؛
ON
.OFF ﻰﻠﻋ
ON
ON
AUDIO CONTROL
TUNER SETTING
SOURCE SELECT
PANDORA SRC
3
SWITCH
PREOUT
SP SELECT
PRESET TYPE
SYSTEM
KEY BEEP
TDF ALARM
BUILT-IN AUX
ﺽﺍﺮﻌﺘﺳﻻﺍ ﺔﻴﻠﻤﻋ ﺀﺎﻐﻟﺇ
:ﻲﻠﻳ ﺎﻣ ﺔﺷﺎﺸﻟﺍ ﺽﺮﻌﺘﺳ ،(ﺯﺎﻬﺠﻟﺍ ﻂﺒﺿ ﺓﺩﺎﻋﺇ ﺪﻌﺑ ﻭﺃ) ﺔﻗﺎﻄﻟﺍ ﻞﻴﻐﺸﺗ ﺪﻨﻋ
“VOLUME KNOB”
.ﻯﺮﺧﺃ ﺓﺮﻣ ﺕﻮﺼﻟﺍ ﻯﻮﺘﺴﻣ ﺹﺮﻗ ﻂﻐﺿﺍ 2
“PRESS” “CANCEL DEMO”
.ﺕﻮﺼﻟﺍ ﻯﻮﺘﺴﻣ ﺹﺮﻗ ﻂﻐﺿﺍ 1
.ﻲﺋﺪﺒﻣ ﺩﺍﺪﻋﺈﻛ [
YES
.“DEMO OFF” ﺮﻬﻈﺗ
] ﺪﻳﺪﺤﺗ ﻢﺘﻳ
ﺔﻋﺎﺴﻟﺍ ﻂﺒﺿ
.[
FUNCTION
.ﺹﺮﻘﻟﺍ ﻰﻠﻋ ﻂﻐﺿﺍ ﻢﺛ ،[
.ﺹﺮﻘﻟﺍ ﻰﻠﻋ ﻂﻐﺿﺍ ﻢﺛ ،[CLOCK ADJUST] ﺪﻳﺪﺤﺘﻟ ﺕﻮﺼﻟﺍ ﻯﻮﺘﺴﻣ ﺹﺮﻗ ﺭﺩﺃ
.ﺹﺮﻘﻟﺍ ﻰﻠﻋ ﻂﻐﺿﺍ ﻢﺛ ،ﺕﺍﺩﺍﺪﻋﻹﺍ ﺪﻳﺪﺤﺘﻟ ﺕﻮﺼﻟﺍ ﻯﻮﺘﺴﻣ ﺹﺮﻗ ﺭﺩﺃ 4
.ﺹﺮﻘﻟﺍ ﻰﻠﻋ ﻂﻐﺿﺍ ﻢﺛ ،[
.ﺹﺮﻘﻟﺍ ﻰﻠﻋ ﻂﻐﺿﺍ ﻢﺛ ،[
.ﺓﺮﺷﺎﺒﻣ ﺔﻋﺎﺴﻟﺍ ﻂﺒﺿ ﻊﺿﻭ ﻰﻟﺇ ﻝﻮﺧﺪﻠﻟ ﻰﻠﻋ ﺭﺍﺮﻤﺘﺳﻻﺍ ﻊﻣ ﻂﻐﺿﺍ
] ﻰﻟﺇ ﻝﻮﺧﺪﻠﻟ ﺕﻮﺼﻟﺍ ﻯﻮﺘﺴﻣ ﺹﺮﻗ ﻰﻠﻋ ﻂﻐﺿﺍ 1
CLOCK
] ﺪﻳﺪﺤﺘﻟ ﺕﻮﺼﻟﺍ ﻯﻮﺘﺴﻣ ﺹﺮﻗ ﺭﺩﺃ 2
ﺔﻘﻴﻗﺩ
CLOCK FORMAT
24H
.ﺀﺎﻬﻧﻹﺍ ﻞﺟﺃ ﻦﻣ
] ﺪﻳﺪﺤﺘﻟ ﺕﻮﺼﻟﺍ ﻯﻮﺘﺴﻣ ﺹﺮﻗ ﺭﺩﺃ
] ﻭﺃ [
12H
] ﺪﻳﺪﺤﺘﻟ ﺕﻮﺼﻟﺍ ﻯﻮﺘﺴﻣ ﺹﺮﻗ ﺭﺩﺃ
. ﻰﻠﻋ ﻂﻐﺿﺍ ،ﻖﺑﺎﺴﻟﺍ ﺩﺍﺪﻋﻹﺍ ﺮﺼﻨﻋ ﻰﻟﺇ ﻉﻮﺟﺮﻠﻟ
ﺭﺍﺮﻤﺘﺳﻻﺍ ﻊﻣ ﻂﻐﺿﺍ 7
...ﺔﻋﺎﺴﻟﺍ ﺽﺮﻋ ﺔﺷﺎﺷ ﻲﻓ ﺩﻮﺟﻮﻟﺍ ﺀﺎﻨﺛﺃ
.ﺔﻋﺎﺴﻟﺍ ﻂﺒﻀﻟ 4 ﺓﻮﻄﺨﻟﺍ ﺬﻔﻧ ﻢﺛ
ﺔﻋﺎﺳ ﻡﻮﻳ
1
2
3
5
6
4
Page 68

(RC-406) ﻢﻜﺤﺘﻟﺍ ﺕﻮﻤﻳﺭ
ﺕﺎﹼﻴﹺﺳﺎﺳﹶﺃ
ﺯﺎﻬﺠﻟﺍ ﺔﻬﺟﺍﻭ
ﺐﻨﺠﺗ) ﺪﻌﺑ ﻦﻋ ﻢﻜﺤﺘﻟﺍ ﺱﺎﺴﺣ
(.ﻊﻃﺎﺴﻟﺍ ﺲﻤﺸﻟﺍ ﺀﻮﻀﻟ ﺾﻳﺮﻌﺘﻟﺍ
ﺀﺎﻄﻏ ﺐﺤﺴﺑ ﻢﻗ
ﺪﻨﻋ ﺀﺎﺑﺮﻬﻜﻟﺍ ﻝﺯﺎﻋ
.ﺓﺮﻣ ﻝﻭﻷ ﻡﺍﺪﺨﺘﺳﻻﺍ
ﺔﻳﺭﺎﻄﺒﻟﺍ ﻝﺍﺪﺒﺘﺳﺍ ﻦﻜﻤﻳ ﻒﻴﻛ
ﺕﺎﻴﻠﻤﻋ ﺔﻟﺍﺯﺇ ﻢﺘﻳ ﻑﻮﺳ
ﺎﻬﻄﺒﺿ ﻢﺗ ﻲﺘﻟﺍ ﻂﺒﻀﻟﺍ
.ﺯﺎﻬﺠﻟﺍ ﻑﺎﻘﻳﻹ SRC ﻰﻠﻋ ﺭﺍﺮﻤﺘﺳﻻﺍ ﻊﻣ ﻂﻐﺿﺍ
( .ﺯﺎﻬﺠﻟﺍ ﻞﻴﻐﺸﺗ ﻰﻠﻋ ﻞﻤﻌﻳ ﻻ SRC ﻰﻠﻋ ﻂﻐﻀﻟﺍ )
ﻭﺃ ﻂﻐﺿﺍ
.ﺕﻮﺼﻟﺍ ﻯﻮﺘﺴﻣ ﻒﻴﻔﺨﺘﻟ ﻞﻴﻐﺸﺘﻟﺍ ﺀﺎﻨﺛﺃ AT T ﻂﻐﺿﺍ
ﻲﺑﺮﻋ
3
.ﺯﺎﻬﺠﻟﺍ ﻞﻴﻐﺸﺗ ﻒﻗﻮﻟ ﻯﺮﺧﺃ ﺓﺮﻣ ﻂﻐﺿﺍ •
.ﺭﺍﺮﻜﺘﺑ SRC ﻂﻐﺿﺍ
( ﺡﺎﺘﻣ ﺮﻴﻏ )
ﺕﻮﺼﻟﺍ ﻯﻮﺘﺴﻣ ﺹﺮﻗ
(ﻂﻐﻀﻟﺍ/ﻥﺍﺭﻭﺪﻟﺍ)
ﻞﺼﻔﻟﺍ ﺭﺯ
ﻂﺒﻀﻟﺍ ﺓﺩﺎﻋﺇ ﻦﻜﻤﻳ ﻒﻴﻛ ﻞﻴﺻﻮﺗﻞﺼﻓ
.ﹰﺎﻘﺒﺴﻣ
.
.ﺯﺎﻬﺠﻟﺍ ﻑﺎﻘﻳﻹ ﺭﺍﺮﻤﺘﺳﻻﺍ ﻊﻣ ﻂﻐﺿﺍ •
.ﺭﺍﺮﻜﺘﺑ
.ﺭﺍﺮﻜﺘﺑ
.ﺔﻴﻟﺎﺤﻟﺍ ﺔﺷﺎﺸﻟﺍ ﺕﺎﻣﻮﻠﻌﻣ ﺮﻳﺮﻤﺘﻟ ﺭﺍﺮﻤﺘﺳﻻﺍ ﻊﻣ ﻂﻐﺿﺍ •
ﺽﺮﻌﻟﺍ ﺓﺬﻓﺎﻧ
ﻰﻠﻋ ﻂﻐﺿﺍ
ﻂﻐﺿﺍ
ﻂﻐﺿﺍ
ﻰﻟﺇﺔﻳﺎﻤﺤﻟﺍ ﺀﺎﻄﻏ ﻰﻠﻋﺪﻌﺑ ﻦﻋ ﻢﻜﺤﺘﻟﺍ ﺓﺪﺣﻭ ﻰﻠﻋ
ﺔﻴﺋﺎﺑﺮﻬﻜﻟﺍ ﺔﻗﺎﻄﻟﺍ ﻞﺻﻭﺍ
ﺕﻮﺼﻟﺍ ﻯﻮﺘﺴﻣ ﻂﺒﺿ.ﺕﻮﺼﻟﺍ ﻯﻮﺘﺴﻣ ﺹﺮﻗ ﺭﺩﺃ.
ﻞﻴﻐﺸﺘﻟﺍ ﺭﺪﺼﻣ ﺪﻳﺪﺤﺗ
ﺔﺷﺎﺸﻟﺍ ﺕﺎﻣﻮﻠﻌﻣ ﺮﻴﻴﻐﺗ
Page 69

.ﺔﻨﻣﻵﺍ ﺓﺩﺎﻴﻘﻟﺍ ﻦﻋ ﹰﺍﺪﻴﻌﺑ ﻚﻫﺎﺒﺘﻧﺍ ﺏﺬﺠﺗ ﺪﻗ ﺔﻔﻴﻇﻭ ﻱﺃ ﺀﺍﺮﺟﺈﺑ ﻢﻘﺗ ﻻ
ﺮﻳﺬﺤﺗ
ﺮﻳﺬﺤﺗ
.ﺝﺮﺨﻟﺍ ﻯﻮﺘﺴﻣ ﻲﻓ ﺔﺌﺟﺎﻔﻤﻟﺍ ﺓﺩﺎﻳﺰﻟﺍ ﻝﻼﺧ ﻦﻣ ﺕﻮﺼﻟﺍ ﺮﺒﻜﻣ ﺭﺮﺿ ﺐﻨﺠﺘﻟ ﺔﻴﻤﻗﺭ ﺭﺩﺎﺼﻣ ﻱﺃ ﻞﻴﻐﺸﺗ ﻞﺒﻗ ﺕﻮﺼﻟﺍ ﻯﻮﺘﺴﻣ ﺾﻴﻔﺨﺗ •
ﻢﺗ ﻲﺘﻟﺍ ﺕﺎﻧﺎﻴﺒﻠﻟ ﺓﺭﺎﺴﺧ ﺔﻳﺃ ﻦﻋ ﺔﻴﻟﻭﺆﺴﻣ ﺔﻳﺃ ﻞﻤﺤﺘﻧ ﻻﺃ ﺐﺠﻳ .ﺎﻬﻟ ﻲﻃﺎﻴﺘﺣﺍ ﺦﺴﻧ ﻞﻤﻋ ﻢﺗ ﺪﻗ ﺔﻣﺎﻬﻟﺍ ﺕﺎﻧﺎﻴﺒﻟﺍ ﻊﻴﻤﺟ ﻥﺃ ﻦﻣ ﺪﻛﺄﺗ •
ﻦﻣ ﻭﺃ ﻉﻮﻨﻟﺍ ﺲﻔﻧ ﻦﻣ ﻯﺮﺧﺄﺑ ﺔﻳﺭﺎﻄﺒﻟﺍ ﻝﺪﺒﺘﺳﺍ .ﺢﻴﺤﺻ ﺮﻴﻏ ﻞﻜﺸﺑ ﺎﻬﻟﺍﺪﺒﺘﺳﺍ ﺔﻟﺎﺣ ﻲﻓ ﺭﺎﺠﻔﻧﺍ ﺙﻭﺪﺣ ﻰﻟﺇ ﻡﻮﻴﺜﻴﻟ ﺔﻳﺭﺎﻄﺑ ﻱﺩﺆﺗ ﻥﺃ ﻦﻜﻤﻳ •
.ﺍﹰﺭﻮﻓ ﺔﻣﺪﺨﺘﺴﻤﻟﺍ ﺕﺎﻳﺭﺎﻄﺒﻟﺍ ﻦﻣ ﺺﻠﺨﺗ .ﻡﺍﺪﺨﺘﺳﻻﺍ ﺪﻴﻗ ﻥﻮﻜﺗ ﻻ ﺎﻣﺪﻨﻋ ﺔﻴﻠﺻﻷﺍ ﺎﻬﺗﻮﺒﻋ ﻞﺧﺍﺩﻭ ﻝﺎﻔﻃﻷﺍ ﻝﻭﺎﻨﺘﻣ ﻦﻋ ﺍﹰﺪﻴﻌﺑ ﺔﻳﺭﺎﻄﺒﻟﺍ ﻖﺑﺃ •
.ﺙﺩﺍﻮﺤﻟﺍ ﺐﻨﺠﺗ ﻦﻣ ﻦﻜﻤﺘﺗ ﻰﺘﺣ ﺓﺭﺎﻴﺴﻟﺍ ﺝﺭﺎﺧ ﺕﺍﻮﺻﻷﺍ ﻉﺎﻤﺳ ﻚﻟ ﺢﻴﺘﻳ ﺚﻴﺤﺑ ﺕﻮﺼﻟﺍ ﻯﻮﺘﺴﻣ ﻂﺒﺿﺍ •
.ﺔﻨﻣﻵﺍ ﺓﺩﺎﻴﻘﻟﺍ ﻖﻴﻌﻳ ﻥﺍ ﻞﻤﺘﺤﻤﻟﺍ ﻦﻣ ﻥﺎﻛ ﺍﺫﺇ ﻲﺟﺭﺎﺨﻟﺍ ﺯﺎﻬﺠﻟﺍ ﻡﺍﺪﺨﺘﺳﺍ ﺐﻨﺠﺗ •
.ﺭﺎﻴﺘﻟﺍ ﻉﺎﻄﻘﻧﺍ ﺙﻭﺪﺣ ﻊﻨﻤﻟ ﺓﺪﺣﻮﻟﺍ ﻞﺧﺍﺩ (ﺔﻴﻧﺪﻌﻤﻟﺍ ﺕﺍﻭﺩﻷﺍ ﻭﺃ ﺕﻼﻤﻌﻟﺍ ﻞﺜﻣ) ﺔﻴﻧﺪﻌﻣ ﻡﺎﺴﺟﺃ ﻱﺃ ﻙﺮﺘﺗ ﻭﺃ ﻊﻀﺗ ﻻ
.ﻪﺑﺎﺷ ﺎﻣ ﻭﺃ ﺐﻬﻠﻟﺍ ﻭﺃ ﺲﻤﺸﻟﺍ ﺀﻮﺿ ﻞﺜﻣ ﺔﻃﺮﻔﻤﻟﺍ ﺓﺭﺍﺮﺤﻠﻟ ﺕﺎﻳﺭﺎﻄﺒﻟﺍ ﻭﺃ ﺔﻳﺭﺎﻄﺒﻟﺍ ﺓﻮﺒﻋ ﺾﻳﺮﻌﺗ ﻡﺪﻋ ﺐﺠﻳ •
(
3
) .ﺔﻬﺟﺍﻮﻟﺍ ﺔﺣﻮﻟ ﻞﺼﻓﺍ ،ﻪﺗﺪﻫﺎﺸﻤﻟ .ﺔﻴﺴﻴﺋﺮﻟﺍ ﺓﺪﺣﻮﻟﺍ ﻰﻠﻋ ﺢﺿﻮﻣ USB ﻒﻴﻨﺼﺗ •
.ﻥﺎﻴﺒﻟﺍﻭ ﺱﺎﻴﻘﻟﺍ ﺓﺰﻬﺟﺃ ﺔﺣﻮﻟ ﻞﺜﻣ ﺔﻨﺧﺎﺳ ﻦﻛﺎﻣﺃ ﻰﻠﻋ ﻢﻜﺤﺘﻟﺍ ﺕﻮﻤﻳﺭ ﻊﻀﺗ ﻻ •
.ﺭﻮﻔﻟﺍ ﻰﻠﻋ ﺐﻴﺒﻄﺑ ﻝﺎﺼﺗﻻﺎﺑ ﻢﻗ ،ﺎﻬﻋﻼﺘﺑﺍ ﺔﻟﺎﺣ ﻲﻓﻭ
:(RC-406) ﻢﻜﺤﺘﻟﺍ ﺕﻮﻤﻳﺭ
:ﺕﻮﺼﻟﺍ ﺩﺍﺪﻋﺇ
:ﻡﺎﻋ
.ﺎﻬﻠﻴﺠﺴﺗ
.ﺊﻓﺎﻜﻣ ﻉﻮﻧ
ﺕﺎﻳﻮﺘﺤﻤﻟﺍﻡﺍﺪﺨﺘﺳﻻﺍ ﻞﺒﻗ
2 ﻡﺍﺪﺨﺘﺳﻻﺍ ﻞﺒﻗ
3 ﺕﺎﹼﻴﹺﺳﺎﺳﹶﺃ
4 ﻞﻤﻌﻟﺍ ﻲﻓ ﻉﻭﺮﺸﻟﺍ
5 ﻮﻳﺩﺍﺭ
7 ANDROID / iPod / USB
9 Pandora®
10 BLUETOOTH®
16 AUX
•
16 ﺕﻮﺼﻟﺍ ﺕﺍﺩﺍﺪﻋﺇ
17 ﺔﺷﺎﺸﻟﺍ ﺕﺍﺩﺍﺪﻋﺇ
18 ﺕﺎﻣﻮﻠﻌﻤﻟﺍ ﻦﻣ ﺪﻳﺰﻣ
19 ﺡﻼﺻﻻﺍﻭ ﻝﺎﻄﻋﻻﺍ ﻦﻋ ﺚﺤﺒﻟﺍ
21 ﺕﺎﻔﺻﺍﻮﻤﻟﺍ
22 ﻞﻴﺻﻮﺘﻟﺍ / ﺐﻴﻛﺮﺘﻟﺍ
ﻲﻔﻠﺨﻟﺍ ﺐﻧﺎﺠﻟﺍ ﻲﻓ) ﻞﺻﻮﻤﻟﺍ
(ﺯﺎﻬﺠﻟﺍ ﺔﻬﺟﺍﻭ ﻦﻣ
ﺵﺎﻤﻗ ﺔﻌﻄﻗ ﻭﺃ ﻑﺎﺟ ﻥﻮﻜﻴﻠﺳ ﻡﺍﺪﺨﺘﺳﺎﺑ ﺔﺣﻮﻠﻟﺍ ﻦﻣ ﺏﺍﺮﺘﻟﺍ ﺢﺴﻣﺍ :ﺯﺎﻬﺠﻟﺍ ﻒﻴﻈﻨﺗ
ﺔﻧﺎﻴﺼﻟﺍ
.ﺔﻤﻋﺎﻧ
ﻰﻠﻋ ﺹﺮﺤﻟﺍ ﻊﻣ ،ﻦﻄﻗ ﺔﻌﻄﻘﺑ ﻖﻓﺮﺑ ﻞﺻﻮﻤﻟﺍ ﻒﻈﻧﻭ ﺯﺎﻬﺠﻟﺍ ﺔﻬﺟﺍﻭ ﻚﻓ :ﻞﺻﻮﻤﻟﺍ ﻒﻴﻈﻨﺗ
.ﻞﺻﻮﻤﻟﺍ ﻑﻼﺗﺇ ﻡﺪﻋ
ﻞﻜﺸﺑ ﺯﺎﻬﺠﻟﺍ ﻞﻴﻐﺸﺗ ﺕﺎﻴﻠﻤﻋ ﺖﺤﺿﻭﺃ •
ﻞﻴﻟﺪﻟﺍ ﺍﺬﻫ ﺃﺮﻘﺗ ﻒﻴﻛ
ﻰﻠﻋ ﺪﺟﺍﻮﺘﻣ ﺭﺍﺭﺯﻷﺍ ﻡﺍﺪﺨﺘﺳﺍ ﻥﺃ ﻲﺴﻴﺋﺭ
.ﺓﺩﺪﺤﻤﻟﺍ ﺮﺻﺎﻨﻌﻟﺍ ﻰﻟﺇ ﺮﻴﺸﺗ [
ﻲﻓ ﺓﺮﻓﻮﺘﻣ ﻊﺟﺍﺮﻤﻟﺍ ﻥﺃ ﻰﻟﺇ ﺮﻴﺸﺗ (
.ﺔﺣﻮﻠﻟﺍ
XX
.ﺓﺩﺪﺤﻤﻟﺍ ﺔﺤﻔﺼﻟﺍ
) •
XX
] •
2
Page 70

KMM-U51BT
ﺔﻴﻤﻗﺮﻟﺍ ﻂﺋﺎﺳﻮﻟﺍ ﻝﺎﺒﻘﺘﺳﺍ ﺯﺎﻬﺟ
ﺕﺎﻤﻴﻠﻌﺘﻟﺍ ﻞﻴﻟﺩ
ﻝﺎﺘﻴﺠﻳﺩ ﻪﻧﺎﺳﺭ ﻩﺪﻧﺮﻴﮔ
ﻩﺩﺎﻔﺘﺳﺍ یﺎﻤﻨﻫﺍﺭ
 Loading...