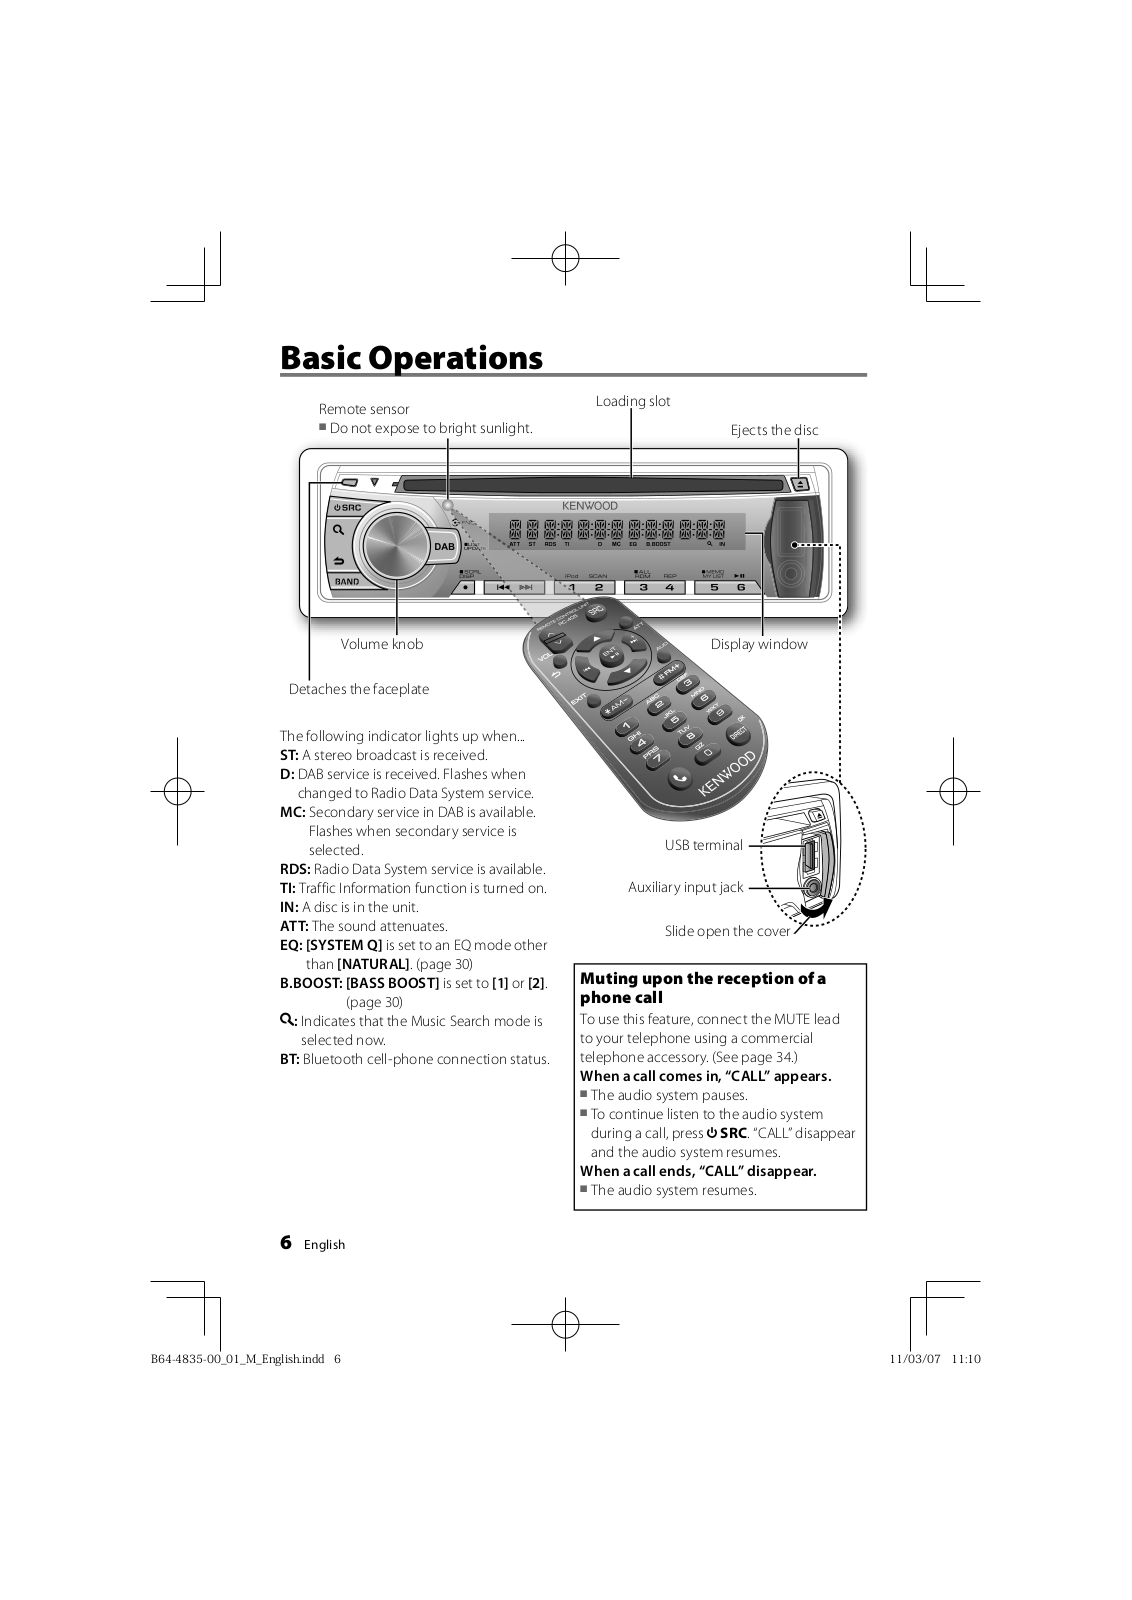
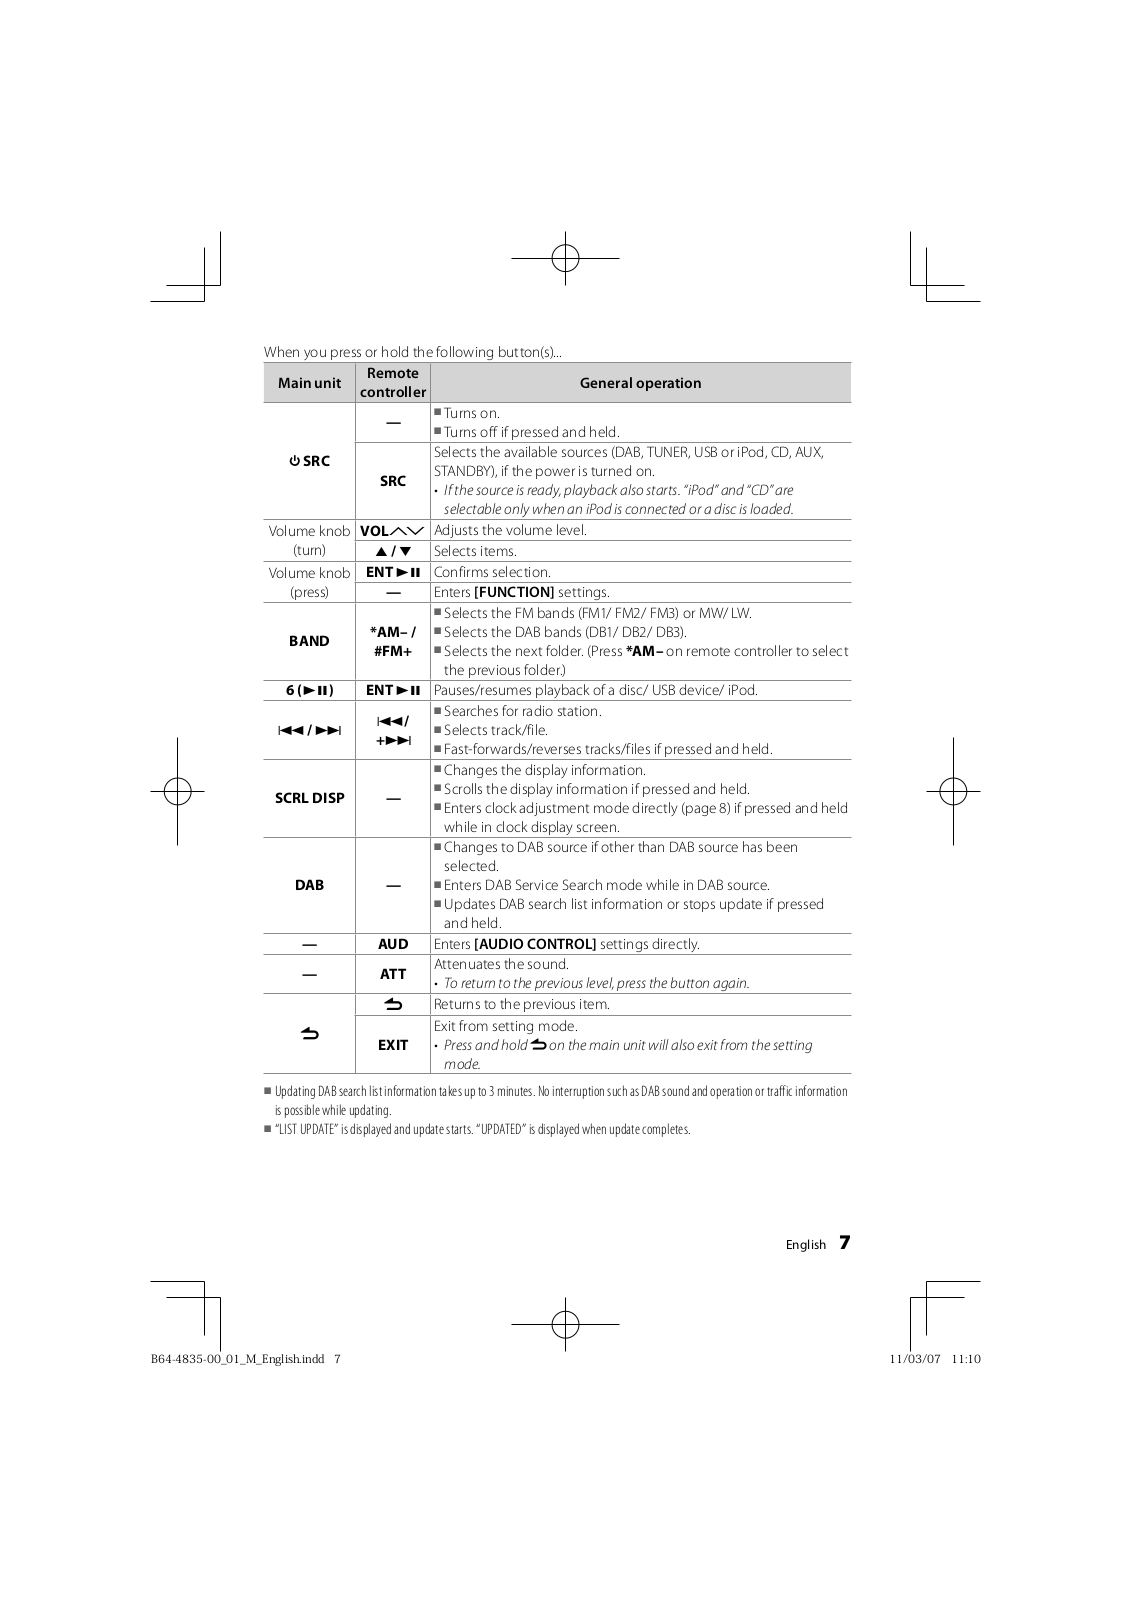
Kenwood KDC-U5049DAB User Manual

KDC-U5049DAB

CD-RECEIVER

INSTRUCTION MANUAL

© 2011 Kenwood Corporation All Rights Reserved.

B64-4835-00/01 (MW)

CONTENTS

Safety

3

My Playlist for iPod

Maintenance


iPod control by Hand mode

The marking of products using lasers


Adjust [SETTINGS] mode settings

Preparation

4

Operation of Hands-Free Phoning20

How to attach/detach the faceplate How to reset your unit

How to prepare the remote controller (RC-405)

Basic Operations

6

Muting upon the reception of a phone call

Getting Started

Making a Call

Receiving a Call

During a Call

Call Waiting

Clearing the Disconnection Message

Downloading the Phone Book

Getting Started

Canceling the display demonstration Setting the demonstration mode Adjusting the clock

Initial settings before operations

8 Bluetooth Setup

24


Registering Bluetooth Device (Pairing)

Selecting the Bluetooth Device

Setting a Voice Command

Bluetooth Setup

Listening to the DAB

10 SMS (Short Message Service)

28


Selecting a service

Alphabet Search for service

Updating Service List information

Display Selection

Adjust [SETTINGS] mode settings

Listening to the Radio

12

Display Selection


Adjust [SETTINGS] mode settings


Listening to a Disc/


USB device/ iPod

14

Start playing a disc

Start playing a USB device or iPod Removing the USB device or iPod

Start playing the disc changer (optional accessory)

Selecting Repeat Play

Selecting Random Play All Random Play

Selecting Magazine Random Play

Selecting Scan Play

Selecting a folder/track/file Alphabet Search for iPod

Direct Music Search using the remote controller (RC-405)

Direct Disc Search using the remote controller (RC-405)

Downloading the SMS

Display the SMS

Listening to the other external


components

29

Function settings

30

Installation/connection

32

Troubleshooting

39

Specifications

42

2 English

Safety

WARNING

Stop the car before operating the unit.

Important to know...

To prevent a short circuit, never put or leave any metallic objects (such as coins or metal tools) inside the unit.

Caution: Adjust the volume so that you can hear sounds outside the car. Driving with the volume too high may cause an accident.

Condensation: When the car is airconditioned, moisture may collect on the laser lens. This may cause disc read errors. In this case, remove the disc and wait for the moisture to evaporate.

The illustrations in this manual are examples used to explain more clearly how the controls are used. Therefore, what appears on the illustrations may differ from what appears on the actual equipment.

If you experience problems during installation, consult your Kenwood dealer.

When you purchase external components, check with your Kenwood dealer to make sure that they work with your model and in your area.

Maintenance

Cleaning the unit: Wipe off the dirt on the panel with a dry silicon or soft cloth. Failure to observe this precaution may result in damage to the monitor or unit.

Cleaning the connector: Wipe off dirt on the connector of the unit and faceplate. Use a cotton swab or cloth.

The marking of products using lasers

CLASS 1

LASER PRODUCT

The label is attached to the chassis/case and says that the component uses laser beams that have been classified as Class 1.

It means that the unit is utilizing laser beams that are of a weaker class. There is no danger of hazardous radiation outside the unit.

English 3

Preparation

How to attach/detach the faceplate

1

1

2

2

Do not expose the faceplate to direct sunlight, excessive heat, or humidity. Also avoid places with too much dust or the possibility of water splashing.

Keep the faceplate in its casing while detached.

The faceplate is a precision piece of equipment and can be damaged by shocks or jolts.

To prevent deterioration, do not touch the terminals of the unit and faceplate with your fingers.

How to reset your unit


If this unit fails to operate

1

properly, press the reset

button.


2 The unit returns to factory


settings when the reset

3

button is pressed.


Reset button

How to prepare the remote controller (RC-405)

When you use the remote controller for the first time, pull out the insulation sheet.

Insulation sheet

If the effectiveness of the remote controller decreases, replace the battery.

2

4


3

1


¤Caution:

Do not set the remote control in hot places such as on the dashboard.

Lithium battery.

Danger of explosion if the battery is incorrectly replaced. Replace only with the same or equivalent type.

The battery pack or batteries shall not be exposed to excessive heat such sunshine, fire or the like.

Keep battery out of reach of children and in original package until ready to use. Dispose of used batteries promptly. If swallowed contact physician immediately.

4 English

“Made for iPod” and “Made for iPhone” mean that an electronic accessory has been designed to connect specifically to iPod or iPhone, respectively, and has been certified by the developer to meet

Apple performance standards. Apple is not responsible for the operation of this device or its compliance with safety and regulatory standards. Please note that the use of this accessory with iPod or iPhone may affect wireless performance.

iPhone, iPod, iPod classic, iPod nano, and iPod touch are trademarks of Apple Inc., registered in the U.S. and other countries.

This symbol mark indicates that Kenwood manufactured this product so as to decrease harmful influence on the environment.

English 5

Basic Operations

Remote sensor

Loading slot


Do not expose to bright sunlight.


Ejects the disc


ST

TE

Volume knob

Detaches the faceplate

The following indicator lights up when...

ST: A stereo broadcast is received.

D:DAB service is received. Flashes when changed to Radio Data System service.

MC: Secondary service in DAB is available. Flashes when secondary service is selected.

RDS: Radio Data System service is available. TI: Traffic Information function is turned on. IN: A disc is in the unit.

ATT: The sound attenuates.

EQ: [SYSTEM Q] is set to an EQ mode other than [NATURAL]. (page 30)

B.BOOST: [BASS BOOST] is set to [1] or [2]. (page 30)

: Indicates that the Music Search mode is selected now.

BT: Bluetooth cell-phone connection status.

Display window

USB terminal

Auxiliary input jack

Slide open the cover

Muting upon the reception of a phone call

To use this feature, connect the MUTE lead to your telephone using a commercial telephone accessory. (See page 34.)

When a call comes in, “CALL” appears.

The audio system pauses.

To continue listen to the audio system during a call, press SRC. “CALL” disappear and the audio system resumes.

When a call ends, “CALL” disappear.

The audio system resumes.

6 English

When you press or hold the following button(s)...

Main unit

Remote

General operation

controller


Turns on.


Turns off if pressed and held.


SRC


Selects the available sources (DAB, TUNER, USB or iPod, CD, AUX,


SRC

STANDBY), if the power is turned on.


• If the source is ready, playback also starts. “iPod” and “CD” are


selectable only when an iPod is connected or a disc is loaded.

Volume knob

VOLud Adjusts the volume level.

(turn)

5 /

Selects items.

Volume knob

ENT 38

Confirms selection.

(press)

Enters [FUNCTION] settings.


Selects the FM bands (FM1/ FM2/ FM3) or MW/ LW.

BAND

*AM– /

Selects the DAB bands (DB1/ DB2/ DB3).

#FM+

Selects the next folder. (Press *AM– on remote controller to select


the previous folder.)

6 (38)

ENT 38

Pauses/resumes playback of a disc/ USB device/ iPod.


4/

Searches for radio station.

4 / ¢

Selects track/file.

+¢


Fast-forwards/reverses tracks/files if pressed and held.


Changes the display information.

SCRL DISP

Scrolls the display information if pressed and held.

Enters clock adjustment mode directly (page 8) if pressed and held


while in clock display screen.


Changes to DAB source if other than DAB source has been


selected.


DAB

Enters DAB Service Search mode while in DAB source.

Updates DAB search list information or stops update if pressed and held.

AUD Enters [AUDIO CONTROL] settings directly.

ATT

Attenuates the sound.

• To return to the previous level, press the button again.


Returns to the previous item.


Exit from setting mode.


EXIT

• Press and hold on the main unit will also exit from the setting


mode.

Updating DAB search list information takes up to 3 minutes. No interruption such as DAB sound and operation or traffic information is possible while updating.

“LIST UPDATE” is displayed and update starts. “UPDATED” is displayed when update completes.

English 7

Getting Started

Canceling the display

Adjusting the clock

demonstration

1

Press the volume knob to enter

The display demonstration is always turned


[FUNCTION] mode.

on unless you cancel it.

2

Turn the volume knob to select


[SETTINGS], then press to enter.

When you turn on the power (or after you

3

Turn the volume knob to select [CLOCK],

reset the unit), the display shows:


then press to enter.

[CANCEL DEMO] \ [PRESS] \ [VOLUME

4

Turn the volume knob to select [CLOCK

KNOB]


ADJUST], then press to enter.

1 Press the volume knob.


Clock hour flashes on the display.

[YES] is selected as the initial setup.

5

Turn the volume knob to adjust the hour,

2 Press the volume knob again to confirm.


then press to enter minute adjustment.

[DEMO OFF] appears.


Clock minutes flashes on the display.

If no operation is done for about 15 seconds

6

Turn the volume knob to adjust the

or if you turn the volume knob to select


minute, then press to confirm.

[NO] in step 2, [DEMO MODE] appears and


Press 4 / ¢ to move between the

the display demonstration starts.


hour and minute adjustment.

Setting the demonstration mode

7

Hold

to finish the procedure.

Initial settings before operations

1 Press the volume knob to enter

[FUNCTION].

1

Press


SRC to enter [STANDBY] mode.


2 Turn the volume knob to select [DEMO

2

Press the volume knob to enter

MODE], then press to enter.


[FUNCTION] mode.

3 Turn the volume knob to select [ON] or

3

Turn the volume knob to select [INITIAL

[OFF].


SET], then press to enter.

If [ON] is selected, display demonstration

4

Turn the volume knob to make a

starts if no operation is done for about 20


selection, then press to confirm.

seconds.


See table below for selection.

4 Hold to finish the procedure.


Repeat step 3 until the desired item is


selected/activated.


Press

to return to the previous item.


5

Hold

to finish the procedure.

8 English


Item

Selectable setting (Preset: *)

PRESET TYPE

NORMAL *: Memorizes one station or channel for each preset button in each band (FM1/ FM2/ FM3/ AM/ DB1/


DB2/ DB3). ; MIX: Memorizes one station or channel for each preset button regardless of the selected band (FM1/


FM2/ FM3/ AM/ DB1/ DB2/ DB3).

KEY BEEP

ON */ OFF: Activates/deactivates the keypress tone.

TDF ALARM

ON: Activates the alarm if you forgot to detach the faceplate when ACC is set to OFF. ; OFF *: Cancels.

BUILT-IN AUX

ON1 *: Outputs sound of the connected external component through the car speakers when “AUX” is selected as


the source. ; ON2: Outputs sound from the connected external component when “AUX” is selected as the source.


When you turn on the power, the sound attenuates (to prevent noise when no external component is connected).


Turn the volume knob clockwise to return to the previous volume level. ; OFF: Disables “AUX” in source selection.

CD READ

1 *: Automatically distinguishes between audio file disc and music CD. ; 2: Forces to play as a music CD. No sound


can be heard if an audio file disc is played.

SWITCH PREOUT

REAR */ SUB-W: Selects whether rear speakers or a subwoofer are connected to the line out terminals on the


rear of the unit (through an external amplifier).

SP SELECT

OFF */ 5/4/ 6 × 9/6/ OEM: Selects the speaker size for optimum performance.

DAB ANT POWER

ON *: Supplies power to the DAB antenna. Set when using the accessory antenna. ;


OFF: Does not supply power. Set when using passive antenna without booster.

TUN ANT CONT

The motor-driven antenna extends to enable the Radio Data System function.


AUTO *: Extends antenna when the source other than Stand-by mode is selected. ;


MANU: Extends antenna when the tuner source is selected.

DAB L-BAND

ON: Receives L-BAND ensemble with DAB source. ; OFF *: Set when there is no L-BAND broadcast station.


Ensemble search and service list information update will be faster.

F/W


UPDATE

The current firmware version is displayed.

UPDATE

SYS

Press the volume knob to update DAB or system firmware.


UPDATE

YES: Starts upgrading the firmware. ; NO *: Cancels (upgrading is not activated).


DAB

For details on how to update the firmware, see: www.kenwood.com/cs/ce/

English 9

Kenwood KDC-U5049DAB User Manual

Listening to the DAB

Hold to turn on or off the Traffic Information function.

LIST

UPDATE

Changes to DAB source if other than DAB source has been selected.

Press briefly to enter DAB service search mode

Updates DAB search list information or stops update if pressed and held.

Hold for about 2 seconds to memorize the current service or the selected Program Type. (Refer to [PTY SEARCH] on the table below to select the Program Type.)

Press briefly to recall memorized service (or Program Type after entering the PTY search mode).

1Press SRC to select “DAB”.

2Press BAND repeatedly to select a band (DB1, DB2, DB3).

3Press and hold 4 / ¢ to search for an ensemble.

4Press 4 / ¢ to select an ensemble, service or component to listen.

Press ¢ to receive ensemble, then select service > component in sequence. When 4 is pressed, primary service is selected when ensemble changes and primary is selected when service changes.


Ensemble

: Press 4.

Service

: Press ¢.

Primary

Secondary


Service


Service

Selecting a service

The service list information must be obtained first.

1Press DAB to enter Service Search mode.

“SERVICE LIST” appears.

2Turn the volume knob to select a service, then press to confirm.

To skips character, press 4/ ¢.

To cancel the Service Search mode, press

and hold .

“NO LIST” is displayed when no service list is obtained.

Alphabet Search for service

1Press DAB to enter Service Search mode.

“SERVICE LIST” appears.

2Pressto enter alphabet search mode.

“< ABCDEFG >” appears.

3Turn the volume knob to select the character to be searched for.

To move to the next row, press BAND.

To skips character, press 4/ ¢.

4Press the volume knob to start searching.

To return to the Service Search mode, press

.

To cancel the Service Search mode, press

and hold .

To search for a character other than A to Z and 0 to 9, enter only “ * ”.

10 English

Updating Service List information

Press and hold DAB to start Service list update.

Press and hold DAB to cancel service list update.

There is no DAB sound and no operation can be performed while service list is updating. It may take as long as three minutes.

Display Selection

Press DISP repeatedly to select an information.

SERVICE LABEL (Service label) ; DYNAMIC LABEL (Dynamic label ) ; PTY LABEL (PTY label ) ; ENSEMBLE (Ensemble label) ; DAB LEVEL (Signal strength ; “LV STRONG”: Good ; “LV WEAK”: Bad ; “NO SIG”: No signal) ; BIT RATE (Transmission speed of the audio service) ; FREQUENCY ; CLOCK

Using the remote controller (RC-405)

#FM+

: Selects band.

4 / +¢

: Selects service.

1 – 6

: Selects preset service.

Adjust [SETTINGS] mode settings

While listening to the service...

1Press the volume knob to enter

[FUNCTION] mode.

2Turn the volume knob to select [SETTINGS], then press to enter.

3Turn the volume knob to make a selection, then press to confirm.

See table below for selection.

4Holdto finish the procedure.

Item


Selectable setting (Preset: *)

SEEK MODE

Selects the tuning mode for 4 / ¢ buttons.


Press 4 / ¢.

Press and hold 4 / ¢.


AUTO1 *

Select an ensemble, service or component

Automatically search for an ensemble.


AUTO2

Search in the order of the services in the preset memory.


MANUAL

Select an ensemble, service or component

Manually search for an ensemble.


PRIORITY

ON *: Switches automatically to FM and enables listening of same program when DAB signal strength becomes


weak. In DAB to FM case, the unit keeps DAB source. And it returns DAB sound when DAB reception becomes good


again. Also, when listening to FM, switches to DAB source if there is same program in DAB. ;


OFF: Cancels (Does not switch automatically).


DRC

ON: Adjusts the dynamic range of the sound when the program has Dynamic Range Control (DRC). ;


OFF *: Does not adjust the dynamic range.


ASW SELECT

Sets the interrupting announcement (page 12).


Turn the volume knob to select the announcement. Press the volume knob to turn on (“*” appears) or off.


• Exiting the interruption: Switch the setting of the interruption of the item being interrupted from permission to


prohibition.


• Set the displayed language with [LANGUAGE SEL]. (page 12)


DAB LIST UPDT

AUTO *: Automatically updates the DAB service list when ACC is turned ON. ;


MANU: Updates the DAB service list when DAB button is pressed.


PTY SEARCH

Selects the available Program Type (page 12). Then, press 4 / ¢ to start searching.


• Set the displayed language with [LANGUAGE SEL]. (page 12)


Continued to next page


English 11

Item

Selectable setting (Preset: *)

PTY WATCH After registering a desired programme type, when the programme in the registered type starts in the Ensemble being received, the Service is automatically switched.

PTY WATCH OFF: Cancels (does not change) ; Selects the available Program Type (page 12). (except SPEECH and MUSIC)

• Set the displayed language with [LANGUAGE SEL].

LANGUAGE SEL Sets the language to be used for DAB source [ASW SELECT/ PTY SEARCH/ PTY WATCH], and TUNER source

[PTYSEARCH].

ENGLISH */ FRENCH/ GERMAN

[PRIORITY/ ASW SELECT/ DAB LIST UPDT] If other playback source is selected, these settings are selectable under [DAB SET] item. (page 31)

Available Program Type:

SPEECH; MUSIC; NEWS; AFFAIRS; INFO; SPORT; EDUCATE; DRAMA; CULTURE; SCIENCE; VARIED; POP M (music); ROCK M (music); EASY M (music); LIGHT M (music); CLASSICS; OTHER M (music); WEATHER; FINANCE; CHILDREN; SOCIAL; RELIGION; PHONE IN; TRAVEL; LEISURE; JAZZ; COUNTRY; NATION M (music); OLDIES; FOLK M (music); DOCUMENT

The unit will search for the Program type categorized under [SPEECH] or [MUSIC] if selected. [SPEECH] : Roman typeface item. ; [MUSIC] : Italic typeface item.

Available Announcement:

TRAVEL NEWS, WARNING, NEWS, WEATHER, EVENT, SPECIAL, RAD INF (information), SPORTS, FINANCE.

If the volume is adjusted during reception of announcement, the adjusted volume is memorized automatically. It will be applied the next time announcement function is turned on.

Listening to the Radio

Hold to turn on or off the Traffic Information function.

LIST

UPDATE

Hold for about 2 seconds to memorize the current station or the selected Program Type. (Refer to [PTY SEARCH] on the table below to select the Program Type.)

Press briefly to recall memorized station (or Program Type after entering the PTY search mode).

1Press SRC to select “TUNER”.

2Press BAND repeatedly to select a band (FM1, FM2, FM3, MW/LW).

3Press 4 / ¢ to search for a station.

Display Selection

Press DISP repeatedly to select an information.

FM: FREQUENCY/PS (Frequency or Program Service name) ; TITLE/ARTIST *1 (Song title or artist name) ; STATION NAME *1 ;

12 English

RADIO TEXT+ *1 ; RADIO TEXT ; CLOCK AM: FREQUENCY ; CLOCK

• *1 Information of Radio text plus is displayed.

Using the remote controller (RC-405)

#FM+ / *AM–

: Selects band.

4 / +¢

: Selects station.

1 – 6

: Selects preset station.

Adjust [SETTINGS] mode settings

While listening to the radio...

1Press the volume knob to enter

[FUNCTION] mode.

2Turn the volume knob to select [SETTINGS], then press to enter.

3Turn the volume knob to make a selection, then press to confirm.

See table below for selection.

4Holdto finish the procedure.

Item

Selectable setting (Preset: *)

LOCAL SEEK

ON: Searches only FM stations with good reception. ; OFF *: Cancels.

SEEK MODE

Selects the tuning mode for 4 / ¢ buttons.


AUTO1 *: Automatically search for a station. ; AUTO2: Search in the order of the stations in the preset memory. ;


MANUAL: Manually search for a station.

AUTO MEMORY

YES: Automatically starts memorizing 6 stations with good reception. ; NO *: Cancels (automatic memorizing is


not activated). (Selectable only if [NORMAL] is selected for [PRESET TYPE].) (page 9)

MONO SET

ON: Improves the FM reception (but the stereo effect may be lost). ; OFF *: Cancels (stereo effect resumes).

PTY SEARCH

Selects the available Program Type (page 13). Then, press 4 / ¢ to start searching.


• Set the displayed language with [LANGUAGE SEL].

LANGUAGE SEL

Sets the language to be used for DAB source [ASW SELECT/ PTY SEARCH/ PTY WATCH], and TUNER source


[PTYSEARCH].


ENGLISH */ FRENCH/ GERMAN

NEWS SET

00M – 90M: Sets the time for receiving the next news bulletin. ; OFF *: Cancels.

AF SET

ON *: Automatically searches for another station broadcasting the same program in the same Radio Data System


network with better reception when the current reception is poor. ; OFF: Cancels.

REGIONAL

ON *: Switches to another station only in the specific region using the “AF” control. ; OFF: Cancels.

AUTO TP SEEK

ON *: Automatically searches for a station with better reception when the traffic information’s reception is poor.


; OFF: Cancels.

[LOCAL SEEK/ MONO SET/ PTY SEARCH/ LANGUAGE SEL] is selectable only when the source is “FM”.

[NEWS SET/ AF SET/ REGIONAL/ AUTO TP SEEK] is selectable only when the source is “FM”. If other playback source is selected, these settings are selectable under [TUNER SET] item. (page 31)

Available Program Type:

SPEECH; MUSIC; NEWS; AFFAIRS; INFO; SPORT; EDUCATE; DRAMA; CULTURE; SCIENCE; VARIED; POP M (music); ROCK M (music); EASY M (music); LIGHT M (music); CLASSICS; OTHER M (music); WEATHER; FINANCE; CHILDREN; SOCIAL; RELIGION; PHONE IN; TRAVEL; LEISURE; JAZZ; COUNTRY; NATION M (music); OLDIES; FOLK M (music); DOCUMENT

The unit will search for the Program type categorized under [SPEECH] or [MUSIC] if selected. [SPEECH] : Roman typeface item. ; [MUSIC] : Italic typeface item.

The Radio Data System feature won’t work where the service is not supported by any broadcasting station.

If the volume is adjusted during reception of traffic information, the adjusted volume is memorized automatically. It will be applied the next time Traffic Information function is turned on.

English 13

Listening to a Disc/ USB device/ iPod


Ejects the disc.

Detach the faceplate

(“NO DISC” appears and “IN” indicator goes off.)


LIST

UPDATE

Press to select track/file.

Hold to fast-forwards/reverses.

Press to select next folder of Audio File/iPod.

Press to select next disc of CD changer (optional accessory).

Start playing a disc

USB terminal

Press to pause. Press again to resume playback.

1Press SRC to turn on the power.

2Insert a disc into the loading slot.

Playback starts automatically.

Start playing a USB device or iPod

Apple iPod (commercially available)

1Press SRC to turn on the power.

2Slide the cover to open it.

3Connect a USB device or iPod to the USB terminal.

The source automatically switches, and playback starts.

USB device (commercially available)

CA-U1EX

(optional accessory)

KCA-iP102 (optional accessory)

Removing the USB device or iPod

1Press SRC to select a source other than “USB” or “iPod”.

2Remove the USB device or iPod.

Start playing the disc changer (optional accessory)

Only with the optional accessory CD changer connected.

1Press SRC to turn on the power.

2Press SRC to select “CD CHANGER”.

14 English

Loading...
+ 30 hidden pages