

Page 1

KDC-U40R
KDC-U30R
CD-RECEIVER
INSTRUCTION MANUAL
CD-RECEIVER
BEDIENUNGSANLEITUNG
РAДИОПРИЕMНИК С KOMПAKT–ДИСKAMИ
ИHCTPУKЦИЯ ПO ЭKCПЛУATAЦИИ
АВТОМАГНІТОЛА
ІНСТРУКЦІЯ З ЕКСПЛУАТАЦІЇ
Изделие изготовлено в Индонезии
GET0751-001A (E0)© 2011 JVC KENWOOD Corporation
Page 2
CONTENTS
Safety
Safety 2
Preparation 4
How to attach/detach the faceplate
How to reset your unit
Basic operations 4
Getting started 6
Canceling the display demonstration
Setting the demonstration mode
Adjusting the clock
Initial settings before operations
Listening to the radio 8
Adjust [SETTINGS] mode settings
Listening to the other external
components 9
Listening to a disc/ USB device/ iPod 10
Start playing a disc
Connecting a USB device
Connecting an iPod
Selecting Repeat Play
Selecting Random Play
Selecting a folder/track/file
Functions of
Selecting a song by alphabet
Selecting App & iPod Control Mode
Adjust [SETTINGS] mode settings
(for )
with iPod
Function settings 13
Troubleshooting 14
Installation/connection 16
Basic procedure
Warning
Caution
Wiring connection
Installing the unit
Removing the unit
Specifications 19
WARNING
Stop the car before operating the unit.
Important to know...
To prevent a short circuit, never put or
leave any metallic objects (such as coins or
metal tools) inside the unit.
Caution: Adjust the volume so that you
can hear sounds outside the car. Driving
with the volume too high may cause an
accident.
Condensation: When the car is air-
conditioned, moisture may collect on the
laser lens. This may cause disc read errors.
In this case, remove the disc and wait for
the moisture to evaporate.
This unit can only play the CDs with:
The illustrations in this manual are
examples used to explain more clearly
how the controls are used. Therefore, what
appears on the illustrations may differ from
what appears on the actual equipment.
A USB connection cable, CA-U1EX
(max.: 500 mA) (optional accessory) is
required for connecting a USB device.
You can connect an Apple iPod/iPhone
with .
The word “iPod” appearing in this manual
indicates the iPod or iPhone connected
to this unit with a connection cable,
KCA-iP102 (optional accessory).
If you experience problems during
installation, consult your Kenwood dealer.
When you purchase external components,
check with your Kenwood dealer to make
sure that they work with your model and in
your area.
Detailed information and notes about the
playable audio files are stated in an online
manual on the following site:
www.kenwood.com/cs/ce/audiofile/
2
Page 3
Declaration of Conformity with regard
to the EMC Directive 2004/108/EC
Manufacturer:
JVC KENWOOD Corporation
3-12, Moriyacho, Kanagawa-ku, Yokohamashi, Kanagawa, 221-0022, Japan
EU Representative’s:
Kenwood Electronics Europe BV
Amsterdamseweg 37, 1422 AC UITHOORN,
The Netherlands
This Product is not installed by the
manufacturer of a vehicle on the
production line, nor by the professional
importer of a vehicle into an EU Member
State.
The marking of products using lasers
The label is attached to the chassis/case
and says that the component uses laser
beams that have been classified as Class 1.
It means that the unit is utilizing laser
beams that are of a weaker class. There is
no danger of hazardous radiation outside
the unit.
Information on Disposal of Old
Electrical and Electronic Equipment and
Batteries (applicable for EU countries
that have adopted separate waste
collection systems)
Products and batteries with the
symbol (crossed-out wheeled
bin) cannot be disposed as
household waste.
Old electrical and electronic
equipment and batteries should
be recycled at a facility capable
of handling these items and
their waste byproducts.
Contact your local authority
for details in locating a recycle
facility nearest to you. Proper
recycling and waste disposal
will help conserve resources
whilst preventing detrimental
effects on our health and the
environment.
Notice: The sign “Pb” below the
symbol for batteries
indicates that this
battery contains lead.
ENGLISH
For Turkey
Bu ürün 26891sayılı Resmi Gazete’de
yayımlanan Elektrikli ve Elektronik Eşyalarda
Bazı Zararlı Maddelerin Kullanımının
Sınırlandırılmasına Dair Yönetmeliğe uygun
olarak üretilmiştir.
This product complies with Directive,
Number 26891 regarding “REGULATION ON
THE RESTRICTION OF THE USE OF CERTAIN
HAZARDOUS SUBSTANCES IN ELECTRICAL
AND ELECTRONIC EQUIPMENT”.
3
Page 4
Preparation
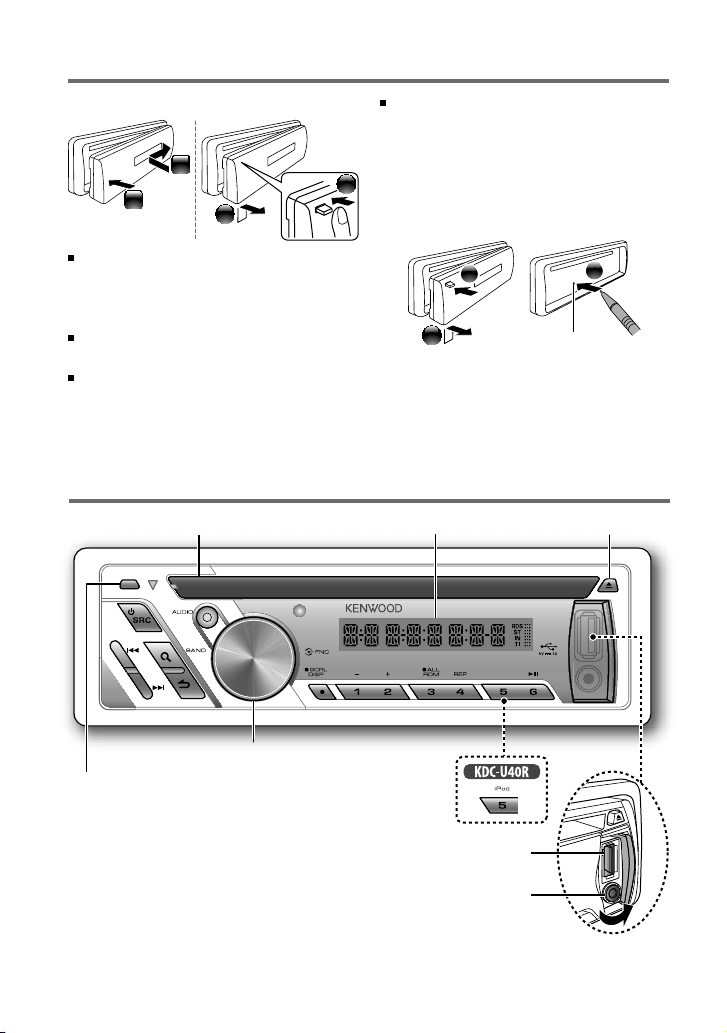
How to attach/detach the faceplate
1
2
Do not expose the faceplate to direct
sunlight, excessive heat, or humidity. Also
avoid places with too much dust or the
possibility of water splashing.
Keep the faceplate in its casing while
detached.
The faceplate is a precision piece of
equipment and can be damaged by shocks
or jolts.
2
Basic operations
Loading slot Ejects the disc
To prevent deterioration, do not touch the
terminals of the unit and faceplate with
your fingers.
1
How to reset your unit
If this unit fails to operate properly, press the
reset button.
1
2
The unit returns to factory settings when the
reset button is pressed.
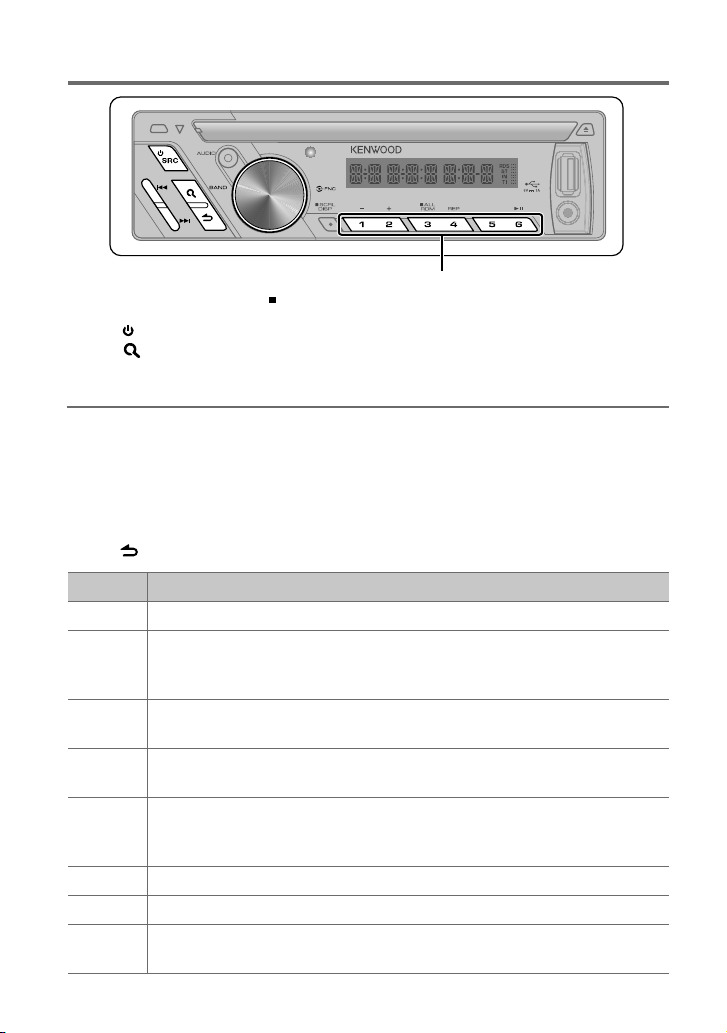
Display window
Reset button
3
Volume knob
Detaches the faceplate
The following indicator lights up when...
RDS : Radio Data System service is available.
ST : A stereo broadcast is received (FM).
IN : A disc is in the unit.
TI : Traffic Information function is turned on.
4
USB terminal
Auxiliary input jack
Page 5
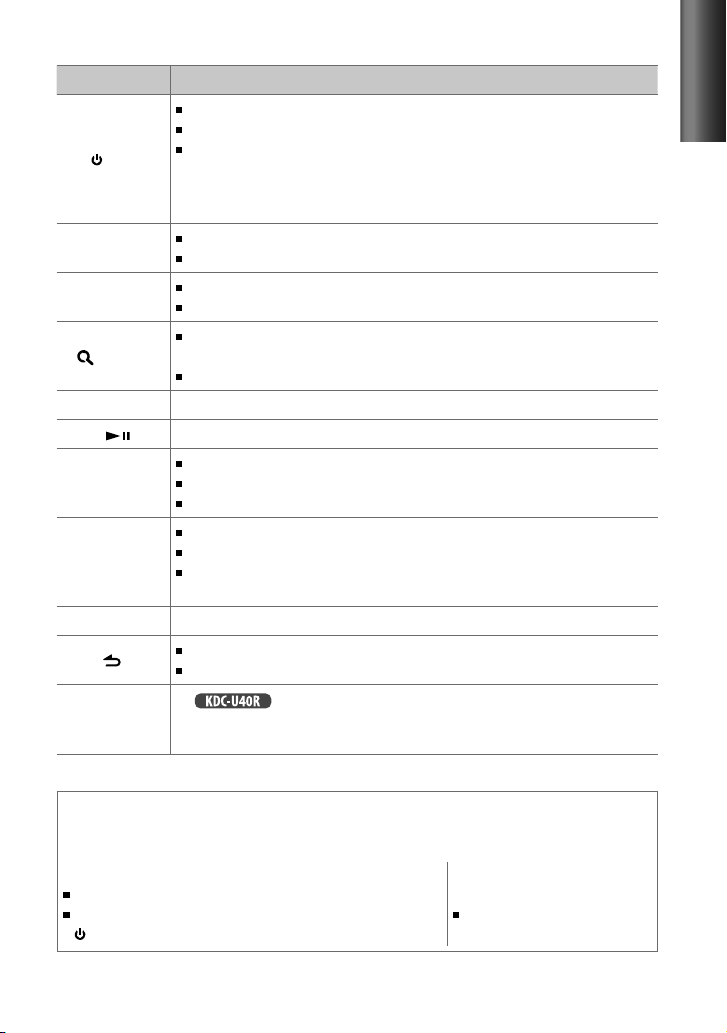
When you press or hold the following button(s)...
Button General operation
Turns on.
Turns off if pressed and held.
SRC
Volume knob
(turn)
Volume knob
(press)
(BAND)
1 (–) / 2 (+) Selects the previous/next folder.
6 ( ) Pauses/resumes playback of a disc/ USB device/ iPod.
4
/
¢
SCRL DISP
AUDIO Enters [AUD CTRL] settings directly. (page 13)
5 (iPod)
Selects the available sources (TUNER, USB/ iPod, CD, AUX, STANDBY), if the
power is turned on.
• If the source is ready, playback also starts.
• “iPod” or “CD” is selectable only when an iPod is connected or a disc is loaded.
Adjusts the volume level.
Selects items.
Confirms selection.
Enters [FUNCTION] settings.
Selects the FM bands (FM1/ FM2/ FM3) or MW/LW when “TUNER” is
selected as the source.
Enters Music Search mode.
Searches for radio station.
Selects track/file.
Fast-forwards/reverses tracks if pressed and held.
Changes the display information.
Scrolls the display information if pressed and held.
Enters clock adjustment mode directly (page 6) if pressed and held while
in clock display screen.
Returns to the previous item.
Exit from setting mode if pressed and held.
For :
Enters the controlling mode (MODE ON/ MODE OFF) for iPod playback.
(page 12)
ENGLISH
Muting upon the reception of a phone call
To use this feature, connect the MUTE lead to your telephone using a commercial telephone
accessory. (page 17)
When a call comes in, “CALL” appears.
The audio system pauses.
To continue listen to the audio system during a call, press
SRC. “CALL” disappear and the audio system resumes.
When a call ends, “CALL”
disappear.
The audio system resumes.
5
Page 6

Getting started
Canceling the display demonstration
The display demonstration is always turned on unless you cancel it.
When you turn on the power (or after you reset the unit), the display shows:
[CANCEL] \ [DEMO] \ [PRESS] \ [VOLUME] \ [KNOB]
1
Press the volume knob.
[ <Y>/ N ] is selected as the initial setup.
2
Press the volume knob again to confirm.
[DEMO OFF] appears.
If no operation is done for about 15 seconds or if you turn the volume knob to select
[Y/ <N>] in step 2, [DEMOMODE] appears and the display demonstration starts.
Setting the demonstration mode
1
Press the volume knob to enter [FUNCTION] mode.
2
Turn the volume knob to select [DEMO], then press to enter.
3
Turn the volume knob to select [DEMO ON] or [DEMO OFF].
If [DEMO ON] is selected, display demonstration starts if no operation is done for about
20 seconds.
4
Hold to finish the procedure.
Adjusting the clock
1
Press the volume knob to enter [FUNCTION] mode.
2
Turn the volume knob to select [SETTINGS], then press to enter.
3
Turn the volume knob to select [CLOCK], then press to enter.
4
Turn the volume knob to select [CLK ADJ], then press to enter.
Clock hour flashes on the display.
5
Turn the volume knob to adjust the hour, then press to enter minute adjustment.
Clock minutes flashes on the display.
6
Turn the volume knob to adjust the minute, then press to confirm.
Press 4
7
Hold to finish the procedure.
/
¢ to move between the hour and minute adjustment.
Initial settings before operations
1
Press SRC to enter [STANDBY] mode.
2
Press the volume knob to enter [FUNCTION] mode.
3
Turn the volume knob to select [INITIAL], then press to enter.
4
Turn the volume knob to make a selection, then press to confirm.
See table on page 7 for selection.
5
Hold to finish the procedure.
6
Page 7
Item Selectable setting (Preset: *)
PRESET TYPE NML *: Memorizes one station for each preset button in each band (FM1/ FM2/ FM3/ MW/ LW). ;
TYPE MIX: Memorizes one station for each preset button regardless of the selected band (FM1/ FM2/ FM3/
MW/ LW).
KEY BEEP BEEP ON */ BEEP OFF: Activates/deactivates the keypress tone.
RUSSIAN RUS ON: Folder name, file name, song title, artist name, album name are displayed in Russian (if applicable). ;
RUS OFF *: Cancels.
OFF WAIT Sets the duration when the unit will automatically turns off (while in standby mode) to save the battery.
OFF ––– : Cancels ; OFF 20M *: 20 minutes ; OFF 40M: 40 minutes ; OFF 60M: 60 minutes
AUX SET AUX ON *: Enables “AUX” in source selection. Sound of the connected external component is produce through
the car speakers. ; AUX OFF: Disables “AUX” in source selection.
CD READ CD READ1 *: Automatically distinguishes between audio file disc and music CD. ; CD READ2:
a music CD. No sound can be heard if an audio file disc is played.
SWPRE SWPRE R */ SWPRE SW: Selects whether rear speakers or a subwoofer are connected to the line out
terminals on the rear of the unit (through an external amplifier).
SPEAKER SP OFF */ SP 5/4/ SP 6 × 9/6/ SP OEM: Selects the speaker size for optimum performance.
F/W xx.xx <Y>/ N *: Starts upgrading the firmware. ; Y /<N>: Cancels (upgrading is not activated).
For details on how to update the firmware, see: www.kenwood.com/cs/ce/
Forces to play as
Maintenance
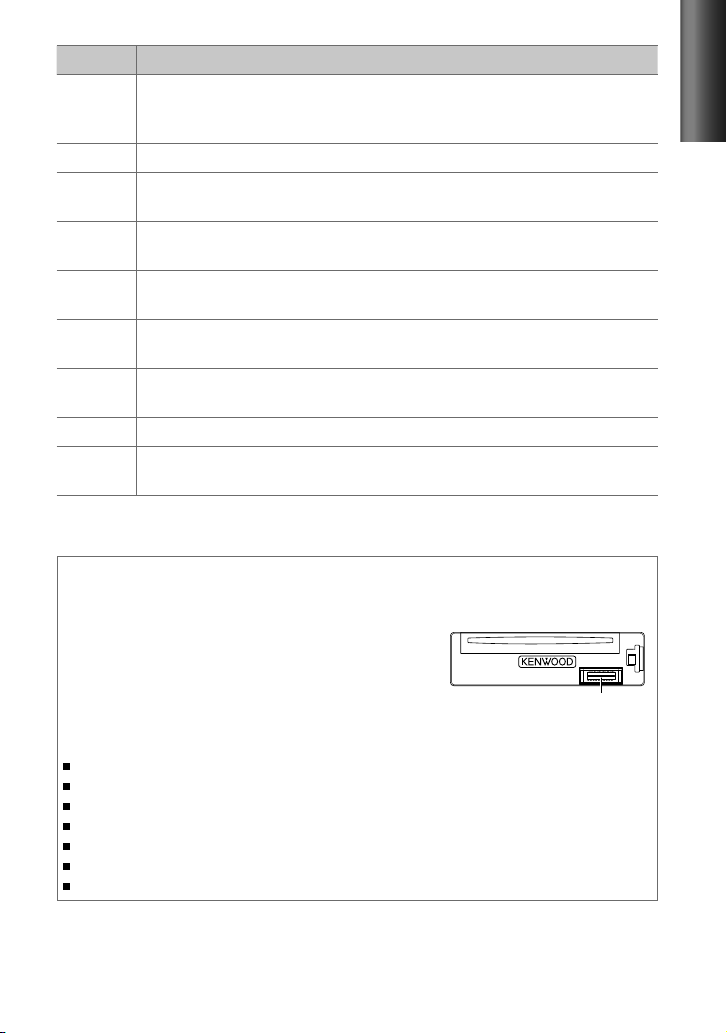
Cleaning the unit: Wipe off the dirt on the panel with a dry silicon or soft cloth. Failure to
observe this precaution may result in damage to the monitor or unit.
Cleaning the connector: The unit may not function
properly if the connectors between the unit and faceplate
are dirty. Detach the faceplate and clean the connector
with a cotton swab gently, being careful not to damage
the connector.
Handling discs
Do not touch the recording surface of the disc.
Do not stick tape etc. on the disc, or use a disc with tape stuck on it.
Do not use any accessories for the disc.
Clean from the center of the disc and move outward.
Clean the disc with a dry silicon or soft cloth. Do not use any solvents.
When removing discs from this unit, pull them out horizontally.
Remove the rims from the center hole and disc edge before inserting a disc.
Connector (on the reverse
side of the faceplate)
ENGLISH
7
Page 8
Listening to the radio
Hold for about 2 seconds to memorize the current station.
Press briefly to recall memorized station.
1
Press SRC to select “TUNER.”
2
Press (BAND) repeatedly to select a band (FM1/ FM2/ FM3/ MW/ LW).
“F1” / “F2” / “F3” / “MW” / “LW” appears on the display.
3
Press 4
Adjust [SETTINGS] mode settings
While listening to the radio...
1
Press the volume knob to enter [FUNCTION] mode.
2
Turn the volume knob to select [SETTINGS], then press to enter.
3
Turn the volume knob to make a selection, then press to confirm.
See table below for selection.
4
Hold to finish the procedure.
LO.SEEK LO.S ON: Searches only FM stations with good reception. ; LO.S OFF *: Cancels.
SEEKMODE Selects the tuning mode for 4 / ¢ buttons.
A-MEMORY <Y>/ N *: Automatically starts memorizing 6 stations with good reception. ; Y /<N>: Cancels (automatic
MONO SET MONO ON: Improve the FM reception (but the stereo effect may be lost). ; MONO OFF *: Cancels (stereo
PTY SRCH Selects the available Program Type (see table on page 9). Then, press
TI TI ON: Allows the unit to temporarily switch to Traffic Information. ; TI OFF *: Cancels.
NEWS SET NEWS 00M – NEWS 90M: Sets the time for receiving the next news bulletin. ; NEWS OFF *: Cancels.
AF SET AF ON *: Automatically searches for another station broadcasting the same program in the same Radio Data
/
¢ to search for a station.
Item Selectable setting (Preset: *)
AUTO1 *: Automatically search for a station. ; AUTO2: Search in the order of the stations in the preset
memory. ; MANUAL: Manually search for a station.
memorizing is not activated). (Selectable only if [TYPE NML] is selected for [PRESET].) (page 6, 7)
effect resumes).
4
Press the volume knob to enter PTY language selection. Turn the volume knob to select the PTY language
(ENGLISH */ FRENCH/ GERMAN), then press to confirm.
System network with better reception when the current reception is poor. ; AF OFF: Cancels.
/ ¢ to start searching.
8
Page 9
Item Selectable setting (Preset: *)
REGIONAL REG ON *: Switches to another station only in the specific region using the “AF” control. ; REG OFF: Cancels.
ATP SEEK ATPS ON *: Automatically searches for a station with better reception when the traffic information‘s reception
is poor. ; ATPS OFF: Cancels.
[MONO SET/ PTY SRCH] is selectable only when the source is “FM.”
[TI/ NEWS SET/ AF SET/ REGIONAL/ ATP SEEK] is selectable only when the source is “FM.” If other playback source is
selected, these settings are selectable under [TUNERSET] item. (page 14)
Available Program Type ([SPEECH]
SPEECH MUSIC NEWS AFFAIRS INFO SPORT EDUCATE
DRAMA CULTURE SCIENCE VARIED POP M (music) ROCK M (music) EASY M (music)
LIGHT M (music) CLASSICS
RELIGION PHONE IN TRAVEL LEISURE JAZZ COUNTRY
OLDIES FOLK M (music) DOCUMENT
The unit will search for the Program type categorized under
The Radio Data System feature won't work where the service is not supported by any
broadcasting station.
If the volume is adjusted during reception of traffic information, the adjusted volume is
memorized automatically. It will be applied the next time Traffic Information function is
turned on.
: White character item. ;
OTHER M (music)
WEATHER FINANCE CHILDREN SOCIAL
[MUSIC]
: Black character item)
[SPEECH]
or
[MUSIC]
:
NATION M (music)
if selected.
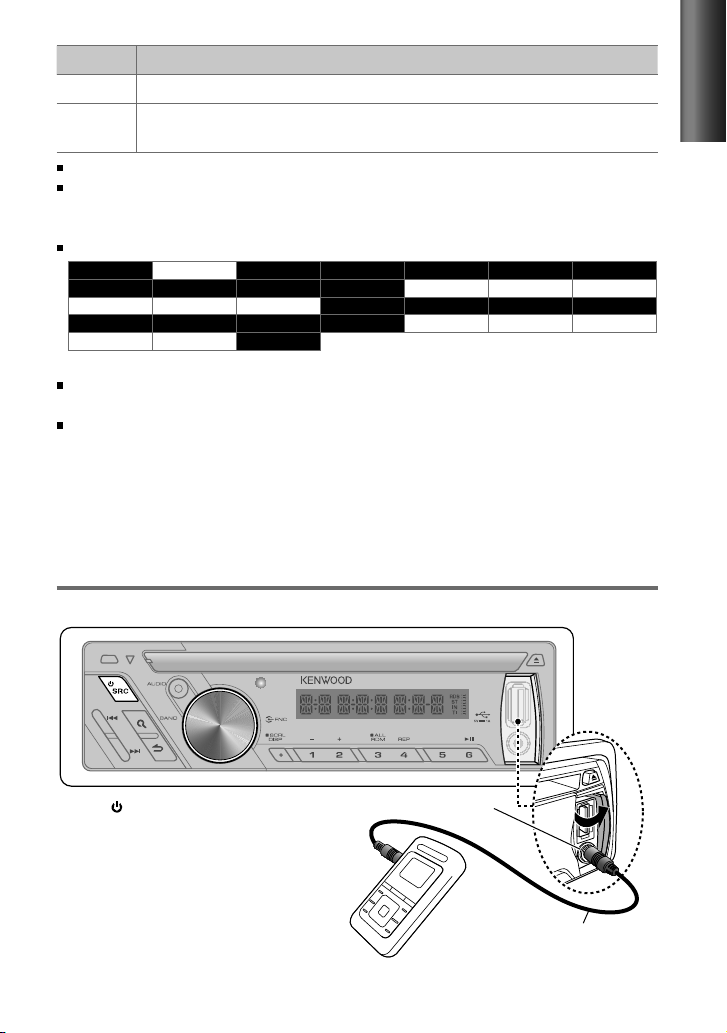
Listening to the other external
components
Preparation : Make sure [AUX ON] is selected for [AUX SET]. (page 6, 7)
ENGLISH
1
Press SRC to select “AUX.”
2
Turn on the external component and
start playing.
3
Turn the volume knob to adjust the
volume.
Portable audio device
(commercially available)
Auxiliary input jack
3.5 mm stereo mini plug
(commercially available)
9
Page 10
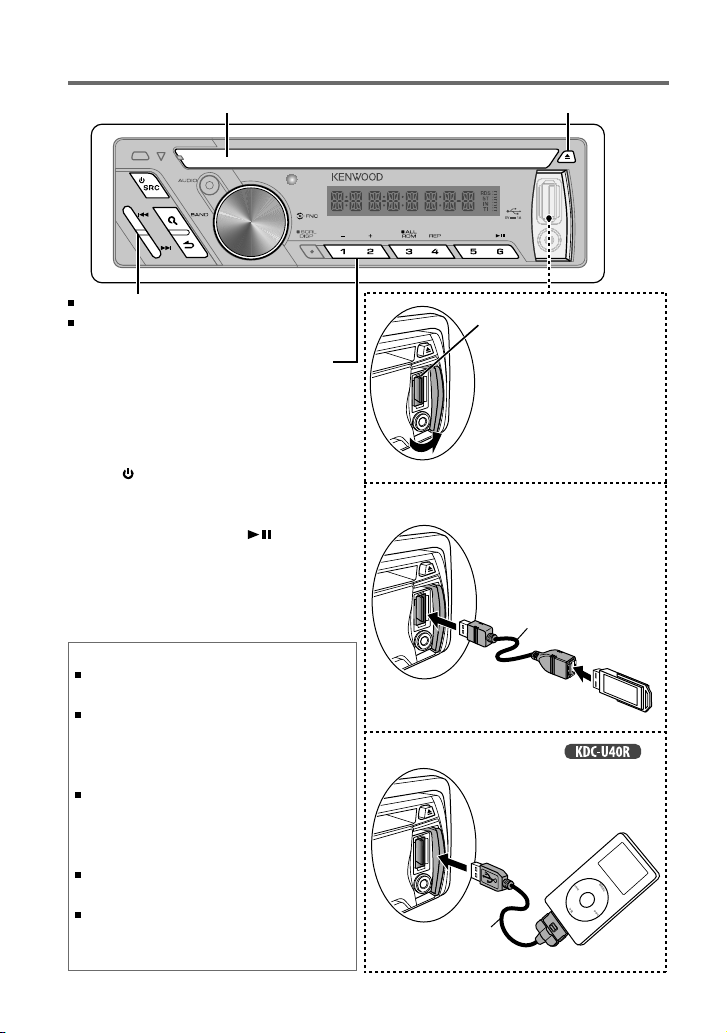
Listening to a disc/ USB device/ iPod
Ejects the disc. (“NO DISC” appears and “IN” indicator goes off.)Loading slot
Press to select track/file.
Hold to fast-forwards/reverses.
Press to select previous/next folder.
• Not available if “ALL RDM” is selected.
Start playing a disc
1
Press SRC to turn on the power.
2
Insert a disc into the loading slot.
Playback starts automatically.
3
Press number button 6 ( ) to resume/
pause playback (if necessary).
About “KENWOOD Music Editor”
This unit supports the PC application “KENWOOD Music
Editor Light ver1.1” or later.
When you use the audio file with database information
added by the “KENWOOD Music Editor Light ver1.1,”
you can search a file by title, album or artist name using
Music Search.
In the Instruction manual, the term “USB device” is
used to mean the device that contains audio files with
database information added with KENWOOD Music
Editor.
“KENWOOD Music Editor Light ver1.1” is available from
the following web site: www.kenwood.com/cs/ce/
For further information on “KENWOOD Music Editor
Light ver1.1,” refer to the site above or the application
help.
USB terminal
Slide open the cover,
then make the following
connection.
The source automatically
switches, and playback
starts.
Connecting a USB device
CA-U1EX (Max.: 500 mA)
(optional accessory)
USB device (commercially available)
Connecting an iPod
KCA-iP102
(optional accessory)
(for )
Apple iPod
(commercially available)
10
Page 11
Selecting Repeat Play
Press number button 4 (REP) repeatedly
to make a selection.
Audio CD : TRAC REP (track repeat), REP OFF
(repeat off)
AAC/MP3/WMA : FILE REP (file repeat),
FOLD REP (folder repeat), REP OFF
(repeat off)
iPod : FILE REP (file repeat), REP OFF
(repeat off)
Selecting Random Play
Press number button 3 (RDM)
repeatedly to make a selection.
Audio CD : DISC RDM (disc random),
RDM OFF (random off)
AAC/MP3/WMA/iPod : FOLD RDM (folder
random), RDM OFF (random off)
For AAC/MP3/WMA/iPod : Press and
hold number button 3 (RDM) to select
“ALL RDM” (all random).
– Applicable only if “RDM OFF” (random
off) is selected initially.
–
For :
browsing item to “songs.”
Changes the iPod
Selecting a folder/track/file
1
Press (BAND) to enter Music Search
mode.
“SEARCH” appears, then the current file
name appears on the display.
2
Turn the volume knob to select a folder/
track/file, then press to confirm.
To return to the root folder (or first track for
audio CD), press number button 5 (iPod)
or 5.
To return to the previous folder, press .
To cancel the Music Search mode, press
and hold .
< or > on the display indicates that
preceded/next item is available.
For USB device * and ipod: To skip search,
press 4 / ¢.
* This operation is effective only for the files
registered in the database created with
Kenwood Music Editor. (See the rear cover.)
Discs that cannot be used
Discs that are not round.
Discs with coloring on the recording surface or discs
that are dirty.
You cannot play a Recordable/ReWritable disc that has
not been finalized. (For the finalization process refer
to your disc writing software, and your disc recorder
instruction manual.)
8 cm CD cannot be used. Attempt to insert using an
adapter can cause malfunction.
About Audio file
Playable Audio file:
AAC-LC (.m4a), MP3 (.mp3), WMA (.wma)
Playable disc media: CD-R/RW/ROM
Playable disc file format: ISO 9660 Level 1/2, Joliet,
Romeo, Long file name.
Playable USB device file system: FAT16, FAT32
Although the audio files are complied with the standards
listed above, the play maybe impossible depending on the
types or conditions of media or device.
About USB device
This unit can play the following files stored on a USB
mass storage class device:
AAC-LC (.m4a), MP3 (.mp3), WMA (.wma)
Install the USB device in the place where it will not
prevent you from driving your vehicle properly.
You cannot connect a USB device via a USB hub and
Multi Card Reader.
Make sure all important data has been backed up to
avoid losing the data.
Connecting a cable whose total length is longer than
5 m can result in abnormal playback.
ENGLISH
11
Page 12
Functions of with iPod
Selecting a song by alphabet
1
Press (BAND) to enter Music Search
mode.
“SEARCH” appears.
2
Turn the volume knob to select a
category, then press to confirm.
3
Press (BAND) again to enter alphabet
search mode.
“SRCH
4
Turn the volume knob to select the
character to be searched for.
5
Press 4 / ¢ to move to the entry
position.
You can enter up to three characters.
6
Press the volume knob to start
searching.
7
Turn the volume knob to select a folder/
track/file, then press to confirm.
To return to the previous folder, press .
To return to the top menu, press number
button 5 (iPod).
To cancel the Alphabet Search mode, press
and hold .
A longer searching time is required if there
are many songs or playlists in the iPod.
To search for a character other than A to Z
and 0 to 9, enter only “ * ”.
The article (a, an, the) of songs name will
be skipped during search.
– – –
” appears.
Selecting App & iPod Control Mode
Press 5 (iPod) to make a selection.
MODE ON: Control iPod from the iPod *.
“APP&iPod” appears.
MODE OFF: Control iPod from the unit.
* You can still control play/pause, select files,
fast-forward/reverse files from the unit.
Adjust [SETTINGS] mode settings
While listening to an iPod...
1
Press the volume knob to enter
[FUNCTION] mode.
2
Turn the volume knob to select
[SETTINGS], then press to enter.
3
Turn the volume knob to select
[SKIPSRCH], then press to enter.
4
Turn the volume knob to make a
selection, then press to confirm.
SKIP 0.5% (initial)/ SKIP 1%/ SKIP 5%/
SKIP 10% : Sets the ratio of skip when
searching for a song in Music Search
mode.
(Holding 4 / ¢ skips songs at 10%
regardless of the setting made.)
5
Hold to finish the procedure.
About compatible iPod/iPhone
Made for
– iPod touch (1st, 2nd, 3rd, and 4th generation)
– iPod classic
– iPod with video
– iPod nano (1st, 2nd, 3rd, 4th, 5th, and 6th generation)
– iPhone 4
– iPhone 3GS
– iPhone 3G
– iPhone
For the latest compatible list and software version of
iPod/iPhone, see: www.kenwood.com/cs/ce/ipod
If you start playback after connecting the iPod, the
music that has been played by the iPod is played first.
In this case, “RESUMING” is displayed without
displaying a folder name, etc. Changing the browse
item will display a correct title, etc.
You cannot operate iPod if “KENWOOD” or “✓”
displayed on iPod.
12
Page 13
Function settings
1
To enter [AUD CTRL] menu (see table below): Press AUDIO.
To enter [SETTINGS] menu (page 14): Press the volume knob to enter [FUNCTION]
mode. Turn the volume knob to select [SETTINGS], then press to enter.
2
Turn the volume knob to make a selection, then press to confirm.
Repeat this step until the desired item is selected/activated.
Press to return to the previous item.
3
Hold to finish the procedure.
[AUD CTRL] : While listening to any source except in STANDBY state...
Item Selectable setting (Preset: *)
SW LEVEL SW L –15 — SW L +15 (Preset: SW L 0): Adjusts the subwoofer output level.
BASS LVL –8 — +8 (Preset: BAS L 0/ MID L 0/ TRE L 0): Source tone memory: Adjusts the level to memorize in each
MID LVL
TRE LVL
EQ PRO
BASS ADJ BASS FRQ BAS F 60/ BAS F 80/ BAS F100 */ BAS F200: Selects the center frequency.
MID ADJ MID FRQ MID F0.5K/ MID F1.0K */ MID F1.5K/ MID F2.5K: Selects the center frequency.
TRE ADJ TRE FRQ TRE 10.0K/ TRE 12.5K */ TRE 15.0K/ TRE 17.5K: Selects the center frequency.
EQ NATURAL */ USER/ ROCK/ POPS/ EASY/ TOP40/ JAZZ/ POWERFUL: Selects a preset sound mode suitable
B. BOOST BB-L LV1/ BB-L LV2/ BB-L LV3: Selects your preferred bass boost level. ; BB-L OFF *:
LOUDNESS LOUD LV1 */ LOUD LV2: Selects your preferred low and high frequencies boost to produce a well-balanced
BALANCE BAL L15 — BAL R15 (Preset: BAL 0): Adjusts the left and right speaker output balance.
FADER FAD R15 — FAD F15 (Preset: FAD 0): Adjusts the rear and front speaker output balance.
SW SET SW ON *: Turns on the subwoofer output. ; SW OFF: Cancels.
source. (Before making an adjustment, select the source you want to adjust.)
BASS LVL BAS L –8 — BAS L +8 (Preset: BAS L 0): Adjusts the level.
BASS Q BAS Q1.00 */ BAS Q1.25/ BAS Q1.50/ BAS Q2.00: Adjusts the quality factor.
BASS EXT B-EX ON: Turns on the extended bass. ; B-EX OFF *: Cancels.
MID LVL MID L –8 — MID L +8 (Preset: MID L 0): Adjusts the level.
MID Q MID Q0.75/ MID Q1.00 */ MID Q1.25: Adjusts the quality factor.
TRE LVL TRE L –8 — TRE L +8 (Preset: TRE L 0): Adjusts the level.
to the music genre. (Selects [USER] to use the customized bass, middle, and treble settings.)
Cancels.
sound at a low volume level. ; LOUD OFF: Cancels.
ENGLISH
Continued...
13
Page 14
Item Selectable setting (Preset: *)
DTIL SET
LPF SW LPF THRU *: All signals are sent to the subwoofer. ; LPF 85H/ LPF 120H/ LPF 160H: Frequencies higher
than 85 Hz/ 120 Hz/ 160 Hz are cut off.
SW PHASE PHAS REV
SPRM SET SPRM ON *: Creates realistic sound by interpolating the high-frequency components that are lost in AAC/
V-OFFSET
(Preset:
V-OFF 0)
[SW LEVEL/ SW SET/ LPF SW/ SW PHASE] is selectable only if [SWPRE] is set to [SWPRE SW]. (page 6, 7)
[SW LEVEL/ LPF SW/ SW PHASE] is selectable only if [SW SET] is set to [SW ON].
[SETTINGS]
Item Selectable setting (Preset: *)
AUX NAME AUX */ DVD/ PORTABLE/ GAME/ VIDEO/ TV: Selects the desired name for the connected component.
CLOCK
CLK ADJ (For details, see page 6.)
TIMESYNC SYNC ON *: Synchronizes the Radio Data System station time data and the unit’s clock. ; SYNC OFF: Cancels.
DISPLAY
DISP DIM DIM ON: Dims the display illumination. ; DIM OFF *: Cancels.
TEXTSCRL SCL AUTO */ SCL ONCE: Selects to scroll the display information automatically, or scroll only once. ;
TUNERSET TI/ NEWS SET/ AF SET/ REGIONAL/ ATP SEEK: Selectable only if any source other than tuner source is
(180°)/ PHAS NML * (0°): Selects the phase angle of the subwoofer output to be in line with the
speaker output for optimum performance. (Selectable only if a setting other than [LPF THRU] is selected for
[LPF SW].)
MP3/WMA audio compression. ; SPRM OFF: Cancels. (Selectable only when playback an AAC/MP3/WMA
disc or a USB device.)
V-OFF –8 — V-OFF +8 (for AUX) ; V-OFF –8 — V-OFF 0 (for other sources)
adjustment level of each source. The volume level will automatically increase or decrease when you change
the source. (Before making an adjustment, select the source you want to adjust.)
(Selectable only if “AUX” is selected as the source.)
SCL OFF: Cancels.
selected. (For details, see pages 8 and 9.)
:
Presets the volume
Troubleshooting
Symptom Remedy/Cause
Sound cannot be heard. Adjust the volume to the optimum level. / Check the cords and connections.
“PROTECT” appears and no
operations can be done.
Sound cannot be heard. / The unit
does not turn on. / Information
shown on the display is incorrect.
14
Check to be sure the terminals of the speaker leads are covered with insulating tape
properly, then reset the unit. If “PROTECT” does not disappear, consult your nearest
service center.
The connectors are dirty. Clean the connectors. (page 7)
Page 15

Symptom Remedy/Cause
The unit does not work at all. Reset the unit. (page 4)
[OFF WAIT]
does not work. Turn off the demonstration mode. (page 6)
Radio reception is poor. / Static
noise while listening to the radio.
“IN” flashes. The CD player is not operating properly. Reinsert the disc properly. If the condition did not
CD-R/CD-RW cannot be played
back and tracks cannot be skipped.
Disc sound is sometimes
interrupted.
“NA FILE” appears. The unit is playing an unsupported audio file.
“NO DISC” appears. Insert a playable disc into the loading slot.
“TOC ERR” appears. The CD is quite dirty. / The CD is upside-down. / The CD is scratched a lot. Try another
“ERROR 99” appears. The unit is malfunctioning for some reason. Press the reset button on the unit. If the
“COPY PRO” appears. A copy-protected file is played.
“READ ERR” appears. Copy the files and folders for the USB device again. If the error message is still
“NO DVICE” appears. No USB device is connected. Connect an USB device, and change the source to USB again.
“NO MUSIC” appears. The connected USB device contains no playable audio file.
“NA DVICE” appears. Connect a supported USB device, and check the connections.
“USB ERR” appears. Remove the USB device, turn the unit off, then turn it on again. If the unit still showing
“iPod ERR” appears. Reconnect the iPod. / Reset the iPod.
Noise is generated. Skip to another track or change the disc.
Tracks cannot play back as you have
intended them to play.
“READING” keeps flashing. Longer readout time is required. Do not use too many hierarchies and folders.
Elapsed playing time is not correct. This is caused by how the tracks are recorded.
The number of songs contained
in “SONGS” category of this unit
is different from that contained in
“SONGS” category of iPod.
Correct characters are not displayed
(e.g. album name).
Connect the antenna firmly. / Pull the antenna out all the way.
improve, turn off the unit and consult your nearest service center.
Insert a finalized CD-R/CD-RW (finalize with the component which you used for
recording).
Stop playback while driving on rough roads. / Change the disc. / Check the cords and
connections.
disc instead.
“ERROR 99” code does not disappear, consult your nearest service center.
displayed, initialize the USB device or use other USB devices.
the same display, try to connect another USB device.
Playback order is determined when files are recorded.
Podcast files are not counted in this unit as this unit does not support the playback of
podcast files.
This unit can only display letters (upper case), numbers, and a limited number of
symbols. Cyrillic alphabets (upper case) can also be displayed if [RUSSIAN] is set to
[RUS ON]. (page 6, 7)
ENGLISH
15
Page 16

Installation/connection
Part list:
A Faceplate.............................................................. (×1)
B Escutcheon ......................................................... (×1)
C Mounting sleeve ............................................. (×1)
D Casing for faceplate ...................................... (×1)
E Wiring harness .................................................. (×1)
F Removal tool ..................................................... (×2)
Basic procedure
1
Remove the key from the ignition
switch, then disconnect the · terminal
of the car battery.
2
Make proper input and output wire
connections.
\ “Wiring connection” (page 17)
3
Install the unit to your car.
\ “Installing the unit” (page 18)
4
Reconnect the · terminal of the car
battery.
5
Reset the unit. (page 4)
Warning
The unit can only be installed in a car with
a 12 V DC power supply, negative ground.
If you connect the ignition wire (red) and
the battery wire (yellow) to the car chassis
(ground), you may cause a short circuit,
that in turn may start a fire. Always connect
those wires to the power source running
through the fuse box.
Disconnect the battery’s negative terminal
and make all electrical connections before
installing the unit.
Insulate unconnected wires with vinyl tape
or other similar material. To prevent a short
circuit, do not remove the caps on the ends
of the unconnected wires or the terminals.
Be sure to ground this unit to the car’s
chassis again after installation.
Caution
If your car’s ignition does not have an ACC
position, connect the ignition wires to a
power source that can be turned on and
off with the ignition key. If you connect
the ignition wire to a power source with
a constant voltage supply, as with battery
wires, the battery may die.
Do not use your own screws. Use only the
screws provided.
Install this unit in the console of your
vehicle. Make sure the faceplate will not hit
the lid of the console (if any) when closing
and opening.
After the unit is installed, check whether
the brake lamps, blinkers, wipers, etc. on
the car are working properly.
Mount the unit so that the mounting angle
is 30° or less.
If the fuse blows, first make sure the wires
aren’t touching to cause a short circuit,
then replace the old fuse with one with the
same rating.
Connect the speaker wires correctly to the
terminals to which they correspond. The
unit may be damaged or fail to work if you
share the · wires or ground them to any
metal part in the car.
When only two speakers are being
connected to the system, connect the
connectors either to both the front output
terminals or to both the rear output
terminals (do not mix front and rear).
Do not touch the metal part of this unit
during and shortly after the use of the
unit. Metal part such as the heat sink and
enclosure become hot.
Mounting and wiring this product requires
skills and experience. For safety’s sake, leave
this work to professionals.
If you experience problems during
installation, consult your Kenwood dealer.
16
Page 17
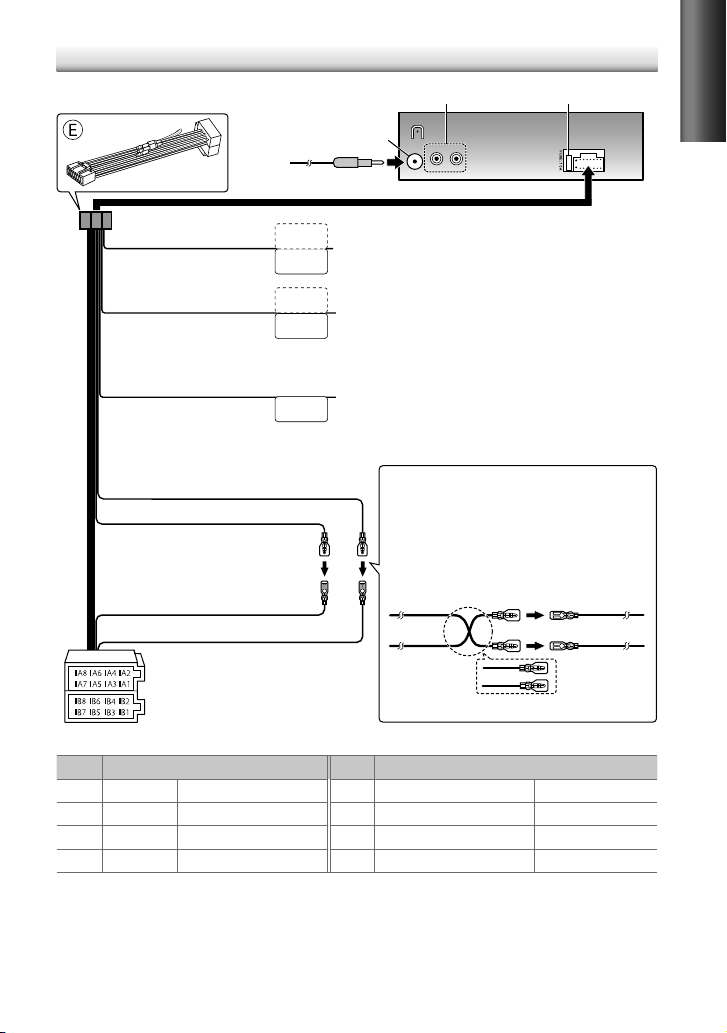
Wiring connection
Light blue/yellow
(Steering remote control wire)
Blue/White
(Power control wire/ Antenna
control wire)
Brown
(Mute control wire)
Yellow (Battery wire)
Red (Ignition wire)
Red (A7)
Yellow (A4)
ISO connectors
Rear/subwoofer output terminals
Antenna terminal (JASO)
STEERING WHEEL
REMOTE INPUT
REMOTE CONT
To the steering wheel remote control adapter
ANT CONT
To the power control terminal when using the optional power
amplifier, or to the antenna control terminal in the vehicle.
P. CONT
To the terminal that is grounded when either the telephone rings
or during conversation. (To connect the Kenwood navigation
MUTE
system, consult your navigation manual.)
Fuse (10 A)
REAR/SW
RL
Connecting the ISO connectors on some VW/Audi or
Opel (Vauxhall) automobiles
You may need to modify the wiring of the supplied
wiring harness as illustrated below.
Ignition wire
(Red)
Unit
Battery wire
A7 (Red)
Vehicle
A4 (Yellow)
(Yellow)
Default wiring
ENGLISH
Pin
Color and function
Pin
A4 Yellow Battery B1 / B2 Purple
A5 Blue/White Power control B3 / B4 Gray
A7 Red Ignition (ACC) B5 / B6 White
A8 Black Earth (ground) connection B7 / B8 Green
Color and function
ª
/ Purple/black · Rear speaker (right)
ª
/ Gray/black · Front speaker (right)
ª
/ White/black · Front speaker (left)
ª
/ Green/black · Rear speaker (left)
17
Page 18
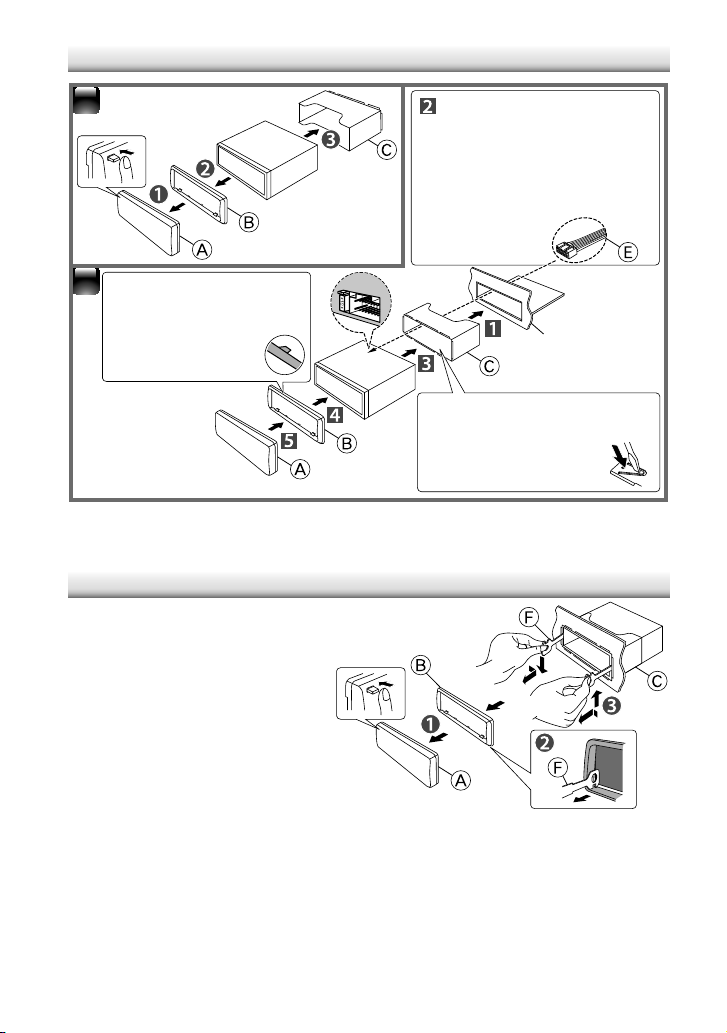
Installing the unit
1
2
Before attaching, make
sure the direction of the
escutcheon is correct.
(Wider hooks on the
top side.)
Removing the unit
1
Detach the faceplate.
2
Engage the catch pin on the
removal tools into the holes on
both sides of the escutcheon, then
pull it out.
3
Insert the removal tools deeply into
the slots on each side, then follow
the arrows instructions as shown
on the right.
Connect the wiring harness
to the unit. Other wiring
connection has been completed
earlier. (page 17)
Dashboard of your car
Bend the appropriate tabs
to hold the mounting
sleeve firmly in place.
18
Page 19

Specifications
FM tuner section
Frequency range (50 kHz space):
87.5 MHz — 108.0 MHz
Usable sensitivity (S/N = 26 dB):
Quieting sensitivity (DIN S/N = 46 dB):
Frequency response (±3 dB):
Signal-to-Noise ratio (MONO):
Stereo separation (1 kHz):
30 Hz — 15 kHz
63 dB
40 dB
MW tuner section
Frequency range (9 kHz space):
531 kHz — 1 611 kHz
Usable sensitivity (S/N = 20 dB):
LW tuner section
Frequency range:
Usable sensitivity (S/N = 20 dB):
153 kHz — 279 kHz
CD player section
Laser diode:
Digital filter (D/A):
D/A converter:
Spindle speed:
Wow & Flutter:
Frequency response (±1 dB):
Total harmonic distortion (1 kHz):
Signal-to-Noise ratio (1 kHz):
Dynamic range:
AAC decode: AAC-LC “.m4a” files
MP3 decode:
WMA decode:
GaAIAs
8 Times Over Sampling
24 Bit
500 rpm — 200 rpm (CLV)
Below Measurable Limit
20 Hz — 20 kHz
105 dB
90 dB
Compliant with MPEG-1/2 Audio
Layer-3
Compliant with Windows
Media Audio
1.0 μV/75 Ω
2.5 μV/75 Ω
36 μV
57 μV
0.01 %
USB interface
USB standard:
Maximum supply current:
File system:
AAC decode: AAC-LC “.m4a” files
MP3 decode:
Layer-3
WMA decode:
Media Audio
USB1.1/ 2.0 (Full speed)
DC 5 V 1 A
FAT16/ 32
Compliant with MPEG-1/2 Audio
Compliant with Windows
Audio section
Maximum output power:
Output power (DIN 45324, +B = 14.4 V):
Speaker impedance:
Tone action: Bass:
Preout level / load (CD) :
Preout impedance:
50 W × 4
4 Ω — 8 Ω
100 Hz ±8 dB
Middle:
1 kHz ±8 dB
Treble:
12.5 kHz ±8 dB
2 500 mV/10 kΩ
≤ 600 Ω
30 W × 4
Auxiliary input section
Frequency response (±3 dB):
Input maximum voltage:
Input impedance:
20 Hz — 20 kHz
1 200 mV
10 kΩ
General
Operating voltage (11 V — 16 V allowable):
Maximum current consumption:
Installation size (W × H × D):
182 mm × 53 mm × 158 mm
Weight:
1.3 kg
Subject to change without notice.
10 A
ENGLISH
14.4 V
19
Page 20
INHALT
Sicherheit 2
Vorbereitung 4
Anbringen/Abnehmen der Frontblende
Wissenswertes über die Rückstellung Ihres
Gerätes
Grundbedienung 4
Erste Schritte 6
Abbrechen der Display-Demonstrationen
Einstellen des Demonstrationsmodus
Uhr einstellen
Werkseitige Einstellungen vor dem Betrieb
Rundfunkempfang 8
Anpassen der Einstellungen im [SETTINGS]-
Modus
Hören von den anderen externen
Komponenten 9
Hören von Disc/ USB-Gerät/ iPod 10
Starten des Abspielens einer Disc
Anschließen eines USB-Geräts
Anschließen eines iPod
Auswählen der Wiederholwiedergabe
Auswählen der Zufallswiedergabe
Auswählen eines Ordners/Tracks/Datei
Funktionen von
Wählen eines Musikstücks nach Alphabet
Wählen von App & iPod-Steuermodus
Anpassen der Einstellungen im
[SETTINGS]-Modus
Funktionseinstellungen 13
Störungssuche 14
Einbau/Anschluss 16
Grundlegendes Verfahren
Warnung
Vorsicht
Verdrahtungsanschluss
Einbau der Einheit
Ausbau des Geräts
Technische Daten 19
2
(für )
mit iPod
Sicherheit
WARNUNG
Halten Sie das Fahrzeug vor der Bedienung
des Geräts an.
Wichtige Hinweise...
Stellen Sie sicher, dass keine
Metallgegenstände (Münzen, Nadeln,
Werkzeuge usw.) ins Innere des Geräts
gelangen und Kurzschlüsse verursachen.
Vorsicht: Stellen Sie die Lautstärke so
ein, dass Sie immer noch Geräusche von
außerhalb des Fahrzeugs hören können.
Fahren mit zu hoher Lautstärke kann
Unfälle verursachen.
Kondensation: Wenn das Fahrzeug eine
Klimaanlage hat, kann sich Beschlag auf der
Laserlinse bilden. Dadurch können DiscLesefehler verursacht werden. Nehmen
Sie in diesem Fall die CD aus dem Gerät
und warten Sie eine Zeit lang, bis die
Kondensation getrocknet ist.
Dieses Gerät kann nur CDs mit der
folgenden Kennung wiedergeben:
Die in dieser Bedienungsanleitung
dargestellten Abbildungen dienen der
Veranschaulichung der Bedienung Ihres
Geräts. Daher können die Abbildungen
von der tatsächlichen Anzeige am Gerät
abweichen.
Ein USB-Verbindungskabel, CA-U1EX
(max.: 500 mA) (optionales Zubehör) ist zum
Anschließen eines USB-Geräts erforderlich.
Sie können einen Apple iPod/iPhone mit
Die in diesem Handbuch verwendete
Bezeichnung “iPod” weist auf den über
das iPod-Anschlusskabel, KCA-iP102
angeschlossenen iPod oder das iPhone hin
(optionales Zubehör).
Sollten Sie Probleme bei der Installation
des Geräts haben, lassen Sie sich bitte von
Ihrem Kenwood-Fachhändler beraten.
Lassen Sie sich beim Kauf von externer
Komponenten von Ihrem KenwoodHändler beraten um sicherzustellen, dass
das Zubehör von Ihrem Modell und in
Ihrem Bereich unterstützt wird.
Detailinformationen und Hinweise über
abspielbare Audiodateien werden im
Online-Handbuch auf der folgenden Website
gegeben: www.kenwood.com/cs/ce/audiofile/
anschließen.
Page 21
Konformitätserklärung in Bezug auf die
EMC-Vorschrift 2004/108/EC
Hersteller:
JVC KENWOOD Corporation
3-12, Moriyacho, Kanagawa-ku, Yokohamashi, Kanagawa, 221-0022, Japan
EU-Vertreter:
Kenwood Electronics Europe BV
Amsterdamseweg 37, 1422 AC UITHOORN,
Niederlande
Dieses Produkt wird weder vom Hersteller
eines Fahrzeugs während der Produktion
noch von einem professionellen Importeur
eines Fahrzeugs in einen EU-Mitgliedsstaat
eingebaut.
Kennzeichnung von Geräten mit LaserAbtastern
Das Etikett ist am Chassis/Gehäuse
angebracht und besagt, dass sich die
Komponente Laserstrahlen bedient, die
als Laserstrahlen der Klasse 1 klassifiziert
wurden. Dies weist darauf hin, dass sich
das Gerät Laserstrahlen bedient, die einer
schwächeren Klasse angehören. Das
bedeutet, dass durch den sehr schwachen
Laserstrahl keine Gefahr durch gefährliche
Strahlungen außerhalb des Geräts besteht.
Entsorgung von gebrauchten
elektrischen und elektronischen
Geräten und Batterien (anzuwenden in
den Ländern der Europäischen Union
und anderen europäischen Ländern mit
einem separaten Sammelsystem für
solche Geräte)
Das Symbol (durchgestrichene
Mülltonne) auf dem Produkt
oder seiner Verpackung
weist darauf hin, dass dieses
Produkt nicht als normaler
Haushaltsabfall behandelt
werden darf, sondern an
einer Annahmestelle für das
Recycling von elektrischen und
elektronischen Geräten und
batterien abgegeben werden
muss.
Durch Ihren Beitrag zur
korrekten Entsorgung dieses
Produktes schützen Sie die
Umwelt und die Gesundheit
Ihrer Mitmenschen.
Unsachgemässe oder falsche
Entsorgung gefährden Umwelt
und Gesundheit. Weitere
Informationen über das
Recycling dieses Produktes
erhalten Sie von Ihrer Gemeinde
oder den kommunalen
Entsorgungsbetrieben.
Achtung: Das Zeichen “Pb”
unter dem Symbol
fur Batterien zeigt an,
dass diese Batterie Blei
enthalt.
DEUTSCH
3
Page 22

Vorbereitung
Anbringen/Abnehmen der
Frontblende
Um Beschädigungen zu vermeiden,
berühren Sie die Anschlüsse des Geräts
nicht mit den Fingern.
1
2
Setzen Sie die Frontblende nicht direktem
Sonnenlicht, extremer Wärme oder
Luftfeuchtigkeit aus. Schützen Sie beides
darüber hinaus vor Staub und Spritzwasser.
Bewahren Sie die Frontblende in ihrem Etui
auf, wenn sie abgenommen wurde.
Bei der Frontblende handelt es sich
um ein Präzisionsbauteil, das durch
Erschütterungen oder Stöße beschädigt
werden kann.
2
Grundbedienung
Ladeschlitz Disc auswerfen
Wissenswertes über die
Rückstellung Ihres Gerätes
1
Sollte das Gerät nicht richtig funktionieren,
drücken Sie die Rückstelltaste.
1
2
Die Rückstelltaste löscht alle individuellen
Eingaben und stellt das Gerät auf die
werkseitige Grundeinstellung zurück.
Displayfenster
Rückstelltaste
3
Lautstärke-Regler
Frontblende abnehmen
Die folgende Anzeige leuchtet auf, wenn...
RDS : Ein Radio Data System-Service
verfügbar ist.
ST : Eine Stereosendung wird empfangen
(UKW).
IN : Sich eine Disc im Gerät befindet.
TI : Die Verkehrsfunk-Funktion
eingeschaltet ist.
4
USB-Anschluss
Auxiliary-Eingabebuchse
Page 23

Wenn Sie die folgende(n) Taste(n) drücken oder gedrückt halten...
Taste Allgemeine Bedienung
Schaltet ein.
Schaltet aus, wenn gedrückt gehalten.
Wählt die verfügbaren Quellen (TUNER, USB/ iPod, CD, AUX, STANDBY),
SRC
Lautstärke-Regler
(drehen)
Lautstärke-Regler
(drücken)
(BAND)
1 (–) / 2 (+) Wählt den vorherigen/nächsten Ordner.
6 (
/
¢
4
SCRL DISP
AUDIO Schaltet direkt auf [AUD CTRL]-Einstellungen. (Seite 13)
5 (iPod)
wenn die Stromversorgung eingeschaltet ist.
• Wenn die gewählte Quelle startbereit ist, startet auch die Wiedergabe.
• “iPod” oder “CD” sind nur wählbar, wenn ein iPod angeschlossen oder eine Disc
eingelegt ist.
Zum Einstellen des Lautstärkepegels.
Wählen Sie Gegenstände.
Bestätigt die Auswahl.
Schaltet auf die [FUNCTION]-Einstellungen.
Wählt die UKW-Frequenzbänder (FM1/ FM2/ FM3) oder MW/ LW, wenn
“TUNER” als Quelle gewählt ist.
Schaltet auf Musiksuche.
Schaltet Wiedergabe einer Disc/ eines USB-Geräts/ eines iPod auf Pause/
)
Fortsetzen.
Sucht nach einem Radiosender.
Wählt Track/Datei.
Läuft in Tracks schnell vor/zurück, wenn gedrückt gehalten.
Ändert die Display-Information.
Scrollt die Display-Informationen, wenn gedrückt gehalten.
Schaltet direkt auf Uhreinstellmodus (Seite 6), wenn gedrückt gehalten,
während der Uhr-Anzeigebildschirm erscheint.
Kehrt zum vorherigen Element zurück.
Verlässt den Einstellmodus, wenn gedrückt gehalten.
Bei :
Schaltet auf den Steuermodus (MODE ON/ MODE OFF) für iPodWiedergabe um. (Seite 12)
DEUTSCH
Stummschaltung beim Empfang eines Telefonanrufs
Zur Verwendung dieses Merkmals schließen Sie die MUTE-Leitung an Ihr Telefon mit einem
im Handel erhältlichen Telefonzubehör an. (Seite 17)
Wenn ein Anruf ankommt, wird “CALL” angezeigt.
Die Audiowiedergabe wird unterbrochen.
Um die Audioanlage auch während eines Anrufs zu
höhren, drücken Sie
Wiedergabe vom Audiosystem wird fortgesetzt.
SRC. “CALL” verschwindet und die
Wenn ein Anruf beendet
wird, verschwindet “CALL”.
Die Audiowiedergabe wird
fortgesetzt.
5
Page 24

Erste Schritte
Abbrechen der Display-Demonstrationen
Die Display-Demonstration ist immer eingeschaltet, ausgenommen wenn Sie sie abbrechen.
Wenn Sie die Stromversorgung einschalten (nach dem Rücksetzen des Geräts), erscheint
folgende Anzeige im Display:
[CANCEL] \
1
Drücken Sie den Lautstärke-Regler.
[ <Y>/ N ] ist als ursprüngliches Setup gewählt.
2
Drücken Sie den Lautstärke-Regler erneut zum Bestätigen.
[DEMO
Wenn etwa 15 Sekunden lang keine Bedienung vorgenommen wird, oder wenn Sie den
Lautstärke-Regler drehen, um [Y/ <N>] in Schritt
die Display-Demonstration beginnt.
Einstellen des Demonstrationsmodus
1
Drücken Sie den Lautstärke-Regler, um auf den [FUNCTION]-Modus zu schalten.
2
Drehen Sie den Lautstärkeregler zum Wählen von [DEMO], und drücken Sie dann zum
Eingeben.
3
Drehen Sie den Lautstärke-Regler, um [DEMO ON] oder [DEMO OFF] zu wählen.
Wenn [DEMO ON] gewählt ist, beginnt die Display-Demonstration, wenn etwa
20 Sekunden lang keine Bedienung vorgenommen wird.
4
Halten Sie gedrückt, um den Vorgang fertigzustellen.
Uhr einstellen
1
Drücken Sie den Lautstärke-Regler, um auf den [FUNCTION]-Modus zu schalten.
2
Drehen Sie den Lautstärkeregler zum Wählen von [SETTINGS], und drücken Sie dann
zum Eingeben.
3
Drehen Sie den Lautstärkeregler zum Wählen von [CLOCK], und drücken Sie dann zum
Eingeben.
4
Drehen Sie den Lautstärkeregler zum Wählen von [CLK ADJ], und drücken Sie dann
zum Eingeben.
Die Stunden-Uhranzeige blinkt im Display.
5
Drehen Sie den Lautstärkeregler zum Einstellen der Stunde, und drücken Sie dann für
die Minuteneinstellung.
Die Minuten-Uhranzeige blinkt im Display.
6
Drehen Sie den Lautstärke-Regler zum Einstellen der Minute, und drücken Sie dann zum
Bestätigen.
Drücken Sie 4
7
Halten Sie gedrückt, um den Vorgang fertigzustellen.
[
DEMO] \ [PRESS] \ [VOLUME] \ [KNOB]
OFF] erscheint.
/
¢, um zwischen der Stunden- und Minuteneinstellung umzuschalten.
2
zu wählen, erscheint [DEMOMODE], und
Werkseitige Einstellungen vor dem Betrieb
1
Drücken Sie SRC, um auf [STANDBY]-Modus zu schalten.
2
Drücken Sie den Lautstärke-Regler, um auf den [FUNCTION]-Modus zu schalten.
3
Drehen Sie den Lautstärkeregler zum Wählen von [INITIAL], und drücken Sie dann zum
Eingeben.
4
Drehen Sie den Lautstärke-Regler, um eine Auswahl vorzunehmen, und drücken Sie
dann zum Bestätigen.
Siehe Tabelle auf Seite 7 zur Auswahl.
5
Halten Sie gedrückt, um den Vorgang fertigzustellen.
6
Page 25

Gegenstand
PRESET TYPE NML *: Speichert einen Sender für jede Sendespeichertaste in jedem Frequenzband (FM1/ FM2/ FM3/
KEY BEEP BEEP ON */ BEEP OFF: Aktiviert/deaktiviert den Tastendruck-Signalton.
RUSSIAN RUS ON: Ordnername, Dateiname, Songtitel, Interpretenname, Albumname werden auf russisch angezeigt
OFF WAIT Stellt die Zeitdauer ein, bis das Gerät automatisch ausschaltet (im Standby-Modus), um Batteriestrom zu
AUX SET AUX ON *: Aktiviert Sie “AUX” in der Quellenwahl. Ton von der angeschlossenen externen Komponente wird
CD READ CD READ1 *: Hiermit wird automatisch zwischen Discs mit Audiodateien und Musik-CDs unterschieden. ;
SWPRE SWPRE R */ SWPRE SW: Wählt, ob hintere Lautsprecher oder ein Subwoofer an die Line-Out-Buchsen an der
SPEAKER SP OFF */ SP 5/4/ SP 6 × 9/6/ SP OEM: Wählt die Lautsprechergröße für optimale Leistung.
F/W xx.xx <Y>/ N *: Startet die Aktualisierung der Firmware. ; Y /<N>:
MW/ LW). ; TYPE MIX: Speichert einen Sender für jede Sendespeichertaste ungeachtet des Frequenzbands
(FM1/ FM2/ FM3/ MW/ LW).
(wo zutreffend). ; RUS OFF *: Hebt auf.
sparen.
OFF ––– : Hebt auf ; OFF 20M *: 20 Minutes ; OFF 40M: 40 Minutes ; OFF 60M: 60 Minutes
über die Fahrzeuglautsprecher ausgegeben. ; AUX OFF: Deaktivieren Sie “AUX” in der Quellenwahl.
CD READ2:
Hiermit wird die Wiedergabe zwangsweise als Musik-CD durchgeführt. Es kommt kein Ton, wenn
eine Disc mit Audiodateien abgespielt wird.
Rückseite des Geräts angeschlossen sind (über einen externen Verstärker).
ausgeführt).
Einzelheiten darüber, wie Sie die Firmware aktualisieren können, siehe: www.kenwood.com/cs/ce/
Wählbare Einstellung (Preset: *)
Bricht ab (Aktualisierung wird nicht
Wartung
Reinigung des Geräts: Wischen Sie das Äußere des Systems mit einem trockenen
Silikonlappen oder weichen Lappen sauber. Wenn diese Vorsichtsmaßregel missachtet wird,
besteht die Gefahr von Schäden am Monitor oder Gerät.
Reinigung des Steckverbinders: Das Gerät arbeitet
möglicherweise nicht richtig, wenn die Anschlüsse
zwischen Gerät und Frontblende verschmutzt sind. Die
Frontblende abnehmen und den Anschluss sanft mit
einem Wattetupfer oder Lappen reinigen, wobei darauf
geachtet werden muss, die Anschlusskontakte nicht zu
beschädigen.
Handhabung von Discs
Berühren Sie nicht die Aufnahme-Oberfläche der Disc.
Kleben Sie keine Aufkleber oder ähnliches auf eine Disc. Verwenden Sie dem
entsprechend auch keine Discs, auf denen sich bereits ein Aufkleber befindet.
Verwenden Sie kein Zubehör für die Disc.
Reinigen Sie CDs stets von der Mitte einer Disc nach außen hin.
Reinigen Sie die Disc mit einem trockenen Silikonlappen oder weichen Lappen.
Verwenden Sie keine Lösungsmittel.
Ziehen Sie Discs beim Entfernen aus dem Gerät horizontal heraus.
Nehmen Sie vor dem Einsetzen einer Disc die Ränder vom Mittenloch und der Disc-Kante
ab.
Anschluss (an der Rückseite
der Frontblende)
DEUTSCH
7
Page 26

Rundfunkempfang
Halten Sie für etwa 2 Sekunden gedrückt, um den aktuellen Sender zu speichern.
Drücken Sie kurz, um den gespeicherten Sender aufzurufen.
1
Drücken Sie SRC zum Wählen von “TUNER“.
2
Drücken Sie (BAND) wiederholt, um ein Frequenzband auzuwählen (FM1/ FM2/
FM3/ MW/ LW).
“F1” / “F2” / “F3” / “MW” / “LW” erscheint im Display.
3
Drücken Sie 4
Anpassen der Einstellungen im [SETTINGS]-Modus
Während des Rundfunkempfangs...
1
Drücken Sie den Lautstärke-Regler, um auf den [FUNCTION]-Modus zu schalten.
2
Drehen Sie den Lautstärkeregler zum Wählen von [SETTINGS], und drücken Sie dann
zum Eingeben.
3
Drehen Sie den Lautstärke-Regler, um eine Auswahl vorzunehmen, und drücken Sie
dann zum Bestätigen.
Siehe Tabelle unten zur Auswahl.
4
Halten Sie gedrückt, um den Vorgang fertigzustellen.
/
¢, um einen Sender zu suchen.
Gegenstand
LO.SEEK LO.S ON: Sucht nur UKW-Sender mit gutem Empfang. ; LO.S OFF *: Hebt auf.
SEEKMODE Wählt den Abstimmmodus für
A-MEMORY <Y>/ N *: Beginnt automatisch die Speicherung von 6 Sendern mit gutem Empfang. ; Y /<N>:
MONO SET MONO ON: Verbessern Sie den UKW-Empfang (aber der Stereoeffekt kann verloren gehen). ;
PTY SRCH Wählt die verfügbare Programmart (siehe Tabelle auf Seite 9). Dann
TI TI ON: Lassen Sie das kurzzeitig auf Verkehrsinformation schalten. ; TI OFF *: Hebt auf.
NEWS SET NEWS 00M – NEWS 90M: Stellt die Zeit zum Empfang der nächsten Nachrichtensendung ein. ;
AF SET AF ON *: Sucht automatisch einen anderen Sender auf, der das gleiche Programm im gleichen Radio Data
AUTO1 *: Sucht automatisch nach einem Sender. ; AUTO2: Suche nach den im Senderspeicher abgelegten
Sendern. ; MANUAL: Sucht manuell nach einem Sender.
(automatische Speicherung ist nicht aktiviert). (Nur wählbar, wenn [TYPE NML] für [PRESET] gewählt ist.)
(Seite 6, 7)
MONO OFF *: Hebt auf (Stereoeffekt wird wieder hergestellt).
zu starten.
Drücken Sie den Lautstärkeregler zum Einschalten der PTY-Sprachauswahl. Drehen Sie den Lautstärkeregler
zum Wählen der PTY-Sprache (ENGLISH */ FRENCH/ GERMAN), und drücken Sie dann zum Bestätigen.
NEWS OFF *: Hebt auf.
System-Netzwerk sendet und einen besseren Empfang aufweist, falls der aktuelle Empfang schlecht ist. ;
AF OFF:
Hebt auf.
Wählbare Einstellung (Preset: *)
4
/ ¢-Tasten.
4
Hebt auf
/ ¢ drücken, um den Suchlauf
8
Page 27

Gegenstand
REGIONAL REG ON *: Schaltet auf einen anderen Sender in der spezifischen Region nur mit der “AF”-Steuerung. ;
ATP SEEK ATPS ON *: Sucht automatisch einen Sender mit besserem Empfang auf, wenn der Empfang eines
[MONO SET/ PTY SRCH] ist nur wählbar, wenn die Quelle “FM” ist.
[TI/ NEWS SET/ AF SET/ REGIONAL/ ATP SEEK] ist nur wählbar, wenn die Quelle “FM” ist. Wenn eine andere
Wiedergabequelle gewählt ist, sind diese Einstellungen unter dem Element [TUNERSET] wählbar. (Seite 14)
Verfügbare Programmart
(
[SPEECH]
SPEECH MUSIC NEWS AFFAIRS INFO SPORT EDUCATE
DRAMA CULTURE SCIENCE VARIED POP M (Musik) ROCK M (Musik) EASY M (Musik)
LIGHT M (Musik) CLASSICS
RELIGION PHONE IN TRAVEL LEISURE JAZZ COUNTRY
OLDIES FOLK M (Musik) DOCUMENT
Das Gerät sucht den Programmtyp, der unter
gewählt.
Die Radio Data System-Funktion funktioniert nur dort, wo der Dienst durch einen Sender
unterstützt wird.
Wenn die Lautstärke während des Empfangs von Verkehrsinformationen eingestellt wird,
wird die eingestellte Lautstärke automatisch gespeichert. Wird die Verkehrsfunk-Funktion
das nächste Mal aufgerufen, wird diese Einstellung übernommen.
REG OFF: Hebt auf.
Verkehrsinformationen-Senders schlecht ist. ; ATPS OFF: Hebt auf.
: Elemente in weißer Schrift. ;
Wählbare Einstellung (Preset: *)
[MUSIC]
: Elemente in schwarzer Schrift)
OTHER M (Musik)
WEATHER FINANCE CHILDREN SOCIAL
[SPEECH]
oder
[MUSIC]
kategorisiert ist, wenn
:
NATION M (Musik)
Hören von den anderen externen
Komponenten
Vorbereitung : Stellen Sie sicher, dass [AUX ON] für [AUX SET] gewählt ist. (Seite 6, 7)
DEUTSCH
1
Drücken Sie SRC zum Wählen von
“AUX“.
2
Schalten Sie die externe Komponente
ein und starten Sie die Wiedergabe.
3
Drehen Sie den Lautstärke-Regler, um
die Lautstärke einzustellen.
Tragbares Audiogerät
(im Handel erhältlich)
Auxiliary-Eingabebuchse
3,5-mm-Stereo-Ministecker
(im Handel erhältlich)
9
Page 28

Hören von Disc/ USB-Gerät/ iPod
Disc auswerfen. (“NO DISC” erscheint,
und die Anzeige “IN” erlischt.)Ladeschlitz
Drücken, um ein Musikstück/eine
Datei auszuwählen.
Halten, um vor/zurück zu laufen.
Drücken, um den vorherigen/
nächsten Ordner zu wählen.
• Nicht verfügbar, wenn “ALL RDM”
gewählt ist.
Starten des Abspielens einer Disc
1
Drücken Sie SRC, um das Gerät
einzuschalten.
2
Setzen Sie eine Disc in den Ladeschlitz
ein.
Wiedergabe beginnt automatisch.
3
Drücken Sie die Zifferntaste 6 ( ) zum
Fortsetzen/Pausieren der Wiedergabe
(wenn erforderlich).
Wissenswertes über den “KENWOOD
Music Editor”
Dieses Gerät unterstützt die PC-Anwendung
“KENWOOD Music Editor Light ver1.1” oder höher.
Wenn Sie eine Audiodateien verwenden, der
mit “KENWOOD Music Editor Light ver1.1”
Dateiinformationen beigefügt wurden, können Sie
mit der Funktion Musiksuche nach Titeln, Alben oder
Interpreten suchen.
In der Bedienungsanleitung werden mit dem Begriff
“USB device” Geräte bezeichnet, die Audiodateien
enthalten, denen mit KENWOOD Music Editor
Dateiinformationen beigefügt wurden.
“KENWOOD Music Editor Light ver1.1” ist auf der
folgenden Webseite erhältlich:
www.kenwood.com/cs/ce/
Näheres über “KENWOOD Music Editor Light ver1.1”
finden Sie auf der oben genannten Webseite oder in der
Hilfe-Datei der Anwendung.
10
USB-Anschluss
Die Abdeckung
offenschieben, und dann
die folgende Verbindung
herstellen.
Die Quelle wird
automatisch umgeschaltet,
und die Wiedergabe startet.
Anschließen eines USB-Geräts
CA-U1EX (Max.: 500 mA)
(optionales Zubehörteil)
USB-Gerät (im Handel erhältlich)
Anschließen eines iPod
KCA-iP102
(optionales Zubehörteil)
(für )
Apple iPod
(im Handel erhältlich)
Page 29

Auswählen der
Wiederholwiedergabe
Drücken Sie die Zifferntaste 4 (REP)
wiederholt, um eine Auswahl zu treffen.
Audio CD : TRAC REP (Track-Wiederholung),
REP OFF (Wiederholung aus)
AAC/MP3/WMA : FILE REP (Datei-
Wiederholung), FOLD REP (OrdnerWiederholung), REP OFF (Wiederholung
aus)
iPod : FILE REP (Datei-Wiederholung),
REP OFF (Wiederholung aus)
Auswählen der Zufallswiedergabe
Drücken Sie die Zifferntaste 3 (RDM)
wiederholt, um eine Auswahl zu treffen.
Audio CD : DISC RDM (Disc-Zufall),
RDM OFF (Zufall aus)
AAC/MP3/WMA/iPod : FOLD RDM (Ordner-
Zufall), RDM OFF (Zufall aus)
Für AAC/MP3/WMA/iPod : Halten Sie die
Zifferntaste 3 (RDM) gedrückt, um um
“ALL RDM” (alles zufällig) zu wählen.
– Trifft nur zu, wenn “RDM OFF” (Zufall aus)
anfänglich gewählt ist.
–
Bei :
Anzeigeelement des iPods auf “songs”
um.
Schaltet das
Auswählen eines Ordners/Tracks/
Datei
1
Drücken Sie (BAND), um auf
Musiksuche zu schalten.
“SEARCH” erscheint, und dann erscheint
der aktuelle Dateiname im Display.
2
Drehen Sie den Lautstärke-Regler, um
einen Ordner/ein Musikstück/eine Datei
zu wählen, und drücken Sie dann zum
Bestätigen.
Zum Zurückkehren zur obersten
Ordnerebene (oder dem ersten Musikstück
auf einer Audio CD) drücken Sie die
Zifferntaste 5 (iPod) oder 5.
Zum Zurückkehren zum vorherigen Ordner
drücken Sie
Zum Beenden Sie des Musiksuche-Modus
halten Sie
< oder > im Display zeigt an, dass das
vorherige/nächste Element verfügbar ist.
.
gedrückt.
Für USB-Gerät * und iPod: Zum
Überspringen der Suche 4 / ¢
drücken.
* Dieser Vorgang ist nur für Dateien möglich,
die in einer mit dem KENWOOD Music
Editor erstellten Datenbank registriert sind.
(Siehe Rückabdeckung.)
Discs, die nicht verwendet werden
können
Discs mit nicht runder Form.
Discs die auf der Aufnahme-Oberfläche eingefärbt oder
verschmutzt sind.
Eine Recordable/ReWritabel Disc, die nicht
abgeschlossen (finalisiert) wurde, kann nicht
wiedergegeben werden. (Einzelheiten hinsichtlich der
Finalisierung finden Sie in den Bedienungsanleitungen
Ihrer Brennsoftware sowie Ihres Disc-Recorders.)
8-cm-CDs können nicht verwendet werden. Falls Sie
dennoch versuchen, eine solche CD mit einem Adapter
zu verwenden, kann es zu einer Fehlfunktion kommen.
Über Audiodateien
Wiederzugebende Audiodateien:
AAC-LC (.m4a), MP3 (.mp3), WMA (.wma)
Abspielbare Disc-Medien: CD-R/RW/ROM
Abspielbare Disc-Dateiformate: ISO 9660 Level 1/2,
Joliet, Romeo, Lange Dateinamen.
Mögliche Dateisysteme auf USB-Geräten: FAT16, FAT32
Obwohl die Audiodateien den oben aufgeführten
Standards entsprechen, kann das Abspielen unter
Umständen auf Grund von Typ oder Zustand der Medien
bzw. Geräte nicht möglich sein.
Wissenswertes über USB-Geräte
Diese Einheit kann die folgenden Dateien abspielen, die
auf einem USB-Massenspeichergerät gespeichert sind:
AAC-LC (.m4a), MP3 (.mp3), WMA (.wma)
Installieren Sie das USB-Gerät an einer Stelle, an der
es Sie nicht beim sicheren Fahren Ihres Fahrzeuges
behindert.
Sie können kein USB-Gerät über einen USB-Hub und ein
Multi Card Reader-Gerät anschließen.
Stellen Sie sicher, dass alle wichtigen Daten mit Backup
gesichert sind, um Datenverlust zu vermeiden.
Der Anschluss eines Kabels mit einer Gesamtlänge
von mehr als 5 m kann eine fehlerhafte Wiedergabe
verursachen.
DEUTSCH
11
Page 30

Funktionen von mit iPod
Wählen eines Musikstücks nach
Alphabet
1
Drücken Sie (BAND), um auf
Musiksuche zu schalten.
“SEARCH” erscheint.
2
Drehen Sie den Lautstärke-Regler, um
eine Kategorie zu wählen, und drücken
Sie dann zum Bestätigen.
3
Drücken Sie (BAND) erneut, um auf
alphabetische Musiksuche zu schalten.
“SRCH
4
Drehen Sie den Lautstärke-Regler, um
das Zeichen auswählen, nach dem
gesucht werden soll.
5
Drücken Sie 4 / ¢, um auf die
Eingabeposition umzuschalten.
Sie können bis zu drei Zeichen eingeben.
6
Drücken Sie den Lautstärke-Regler zum
Starten der Suche.
7
Drehen Sie den Lautstärke-Regler, um
einen Ordner/ein Musikstück/eine Datei
zu wählen, und drücken Sie dann zum
Bestätigen.
Zum Zurückkehren zum vorherigen Ordner
drücken Sie
Zum Zurückschalten zum Top-Menü
drücken Sie die Zifferntaste 5 (iPod).
Zum Beenden Sie des Alphabetsuche-
Modus halten Sie
Eine längere Suchzeit ist erforderlich, wenn
viele Musikstücke oder Wiedergabelisten
im iPod sind.
Um nach einem anderen Zeichen als die
Buchstaben A bis Z oder die Zahlen 0 bis 9
zu suchen, geben Sie nur “
Der Artikel (ein, eine, einer, der) des
Namens des Musikstücks wird bei der
Suche übersprungen.
– – –
” erscheint.
.
gedrückt.
*
” ein.
Wählen von App & iPodSteuermodus
Drücken Sie 5 (iPod), um eine Wahl zu
treffen.
MODE ON: Steuern Sie den iPod vom iPod *.
“APP&iPod” erscheint.
MODE OFF: Steuern Sie den iPod vom Gerät.
* Sie können weiterhin Wiedergabe/
Pause, Auswahl von Dateien, Vorspulen/
Zurückspulen von Dateien vom Gerät steuern.
Anpassen der Einstellungen im
[SETTINGS]-Modus
Während des Hörens von einem iPod...
1
Drücken Sie den Lautstärke-Regler, um
auf den [FUNCTION]-Modus zu schalten.
2
Drehen Sie den Lautstärkeregler zum
Wählen von [SETTINGS], und drücken
Sie dann zum Eingeben.
3
Drehen Sie den Lautstärkeregler zum
Wählen von [SKIPSRCH], und drücken
Sie dann zum Eingeben.
4
Drehen Sie den Lautstärke-Regler,
um eine Auswahl vorzunehmen, und
drücken Sie dann zum Bestätigen.
SKIP 0.5% (Anfänglich)/ SKIP 1%/
SKIP 5%/ SKIP 10% :
Überspringens bei der Suche nach einem
Musikstück im Musiksuche-Modus ein.
(Wenn 4 / ¢ gedrückt gehalten
wird, werden Musikstücke bei 10%
übersprungen, ungeachtet der
Einstellung.)
5
Halten Sie gedrückt, um den Vorgang
fertigzustellen.
Über kompatible iPod/iPhone Geräte
Made for
– iPod touch (1st, 2nd, 3rd und 4th generation)
– iPod classic
– iPod with video
– iPod nano (1st, 2nd, 3rd, 4th, 5th und 6th generation)
– iPhone 4
– iPhone 3GS
– iPhone 3G
– iPhone
Für die neueste Kompatibilitätsliste und Software-
Version des iPod/iPhone siehe:
www.kenwood.com/cs/ce/ipod
Wenn Sie die Wiedergabe nach dem Anschließen
des iPod starten, werden zuerst die bereits vom iPod
abgespielten Musiktitel gespielt.
In diesem Fall erscheint die Anzeige “RESUMING”
ohne Anzeige von Ordnername usw. Durch Ändern
des Anzeigeelements wird der korrekte Titel usw.
angezeigt.
Sie können den iPod nicht bedienen, wenn “KENWOOD”
oder “✓” auf dem iPod angezeigt wird.
Stellt den Grad des
12
Page 31

Funktionseinstellungen
1
Zum Umschalten [AUD CTRL]-Menü (siehe Tabelle unten): Drücken Sie AUDIO.
Zum Aufrufen des [SETTINGS]-Menüs (Seite 14): Drücken Sie den Lautstärke-Regler, um
auf den [FUNCTION]-Modus zu schalten. Drehen Sie den Lautstärkeregler zum Wählen
von [SETTINGS], und drücken Sie dann zum Eingeben.
2
Drehen Sie den Lautstärke-Regler, um eine Auswahl vorzunehmen, und drücken Sie
dann zum Bestätigen.
Wiederholen Sie diesen Schritt, bis der gewünschte Gegenstand gewählt/aktiviert ist.
Zum Zurückkehren zum vorherigen Element drücken Sie .
3
Halten Sie gedrückt, um den Vorgang fertigzustellen.
[AUD CTRL] : Beim Hören einer beliebigen Quelle außer im STANDBY-Betrieb...
Gegenstand
SW LEVEL SW L –15 — SW L +15 (Preset: SW L 0): Stellt den Subwoofer-Ausgangspegel ein.
BASS LVL –8 — +8 (Preset: BAS L 0/ MID L 0/ TRE L 0):
MID LVL
TRE LVL
EQ PRO
BASS ADJ BASS FRQ BAS F 60/ BAS F 80/ BAS F100 */ BAS F200: Wählt die Mittenfrequenz.
MID ADJ MID FRQ MID F0.5K/ MID F1.0K */ MID F1.5K/ MID F2.5K: Wählt die Mittenfrequenz.
TRE ADJ TRE FRQ TRE 10.0K/ TRE 12.5K */ TRE 15.0K/ TRE 17.5K: Wählt die Mittenfrequenz.
EQ NATURAL */ USER/ ROCK/ POPS/ EASY/ TOP40/ JAZZ/ POWERFUL: Wählt einen Vorwahl-Klangmodus,
B. BOOST BB-L LV1/ BB-L LV2/ BB-L LV3: Wählt Ihren bevorzugten Bass-Boost-Pegel. ; BB-L OFF *:
LOUDNESS LOUD LV1 */ LOUD LV2: Wählt Ihre bevorzugten niedrigen und hohen Frequenzen, um eine gute
BALANCE BAL L15 — BAL R15 (Preset: BAL 0): Stellt die Balance zwischen linkem und rechtem Lautsprecherausgang
FADER FAD R15 — FAD F15 (Preset: FAD 0): Stellt die Ausgangsbalance zwischen vorderen und hinteren
SW SET SW ON *: Schaltet den Subwoofer-Ausgang ein. ; SW OFF: Hebt auf.
Speichern in jeder Quelle ein. (Bevor Sie eine Einstellung vornehmen, wählen Sie eine anzupassende Quelle
aus.)
BASS LVL BAS L –8 — BAS L +8 (Preset: BAS L 0): Stellt den Pegel ein.
BASS Q BAS Q1.00 */ BAS Q1.25/ BAS Q1.50/ BAS Q2.00: Stellt den Qualitätsfaktor ein.
BASS EXT B-EX ON: Schaltet den erweiterten Bass ein. ; B-EX OFF *: Hebt auf.
MID LVL MID L –8 — MID L +8 (Preset: MID L 0): Stellt den Pegel ein.
MID Q MID Q0.75/ MID Q1.00 */ MID Q1.25: Stellt den Qualitätsfaktor ein.
TRE LVL TRE L –8 — TRE L +8 (Preset: TRE L 0): Stellt den Pegel ein.
der für das Musikgenre geeignet ist. (Wählt [USER] zur Verwendung der benutzerangepassten Einstellungen
für Tiefen, Mitten und Höhen.)
Klangwirkung auch bei niedriger Lautstärke zu erhalten. ; LOUD OFF:
ein.
Lautsprechern ein.
Wählbare Einstellung (Preset: *)
Klangeinstellung nach Quelle: Stellen Sie den Pegel zum
Hebt auf.
Hebt auf.
Fortsetzung...
DEUTSCH
13
Page 32

Gegenstand
DTIL SET
LPF SW LPF THRU *: Alle Signale werden zum Subwoofer gesendet. ; LPF 85H/ LPF 120H/ LPF 160H: Höhere
SW PHASE PHAS REV
SPRM SET SPRM ON *: Erzeugt realistischen Klang durch Interpolation der Hochfrequenzkomponenten erzeugt, die bei
V-OFFSET
(Preset:
V-OFF 0)
[SW LEVEL/ SW SET/ LPF SW/ SW PHASE] ist nur wählbar, wenn [SWPRE] is auf [SWPRE SW] gestellt ist. (Seite 6, 7)
[SW LEVEL/ LPF SW/ SW PHASE] ist nur wählbar, wenn [SW SET] is auf [SW ON] gestellt ist.
[SETTINGS]
Gegenstand
AUX NAME AUX */ DVD/ PORTABLE/ GAME/ VIDEO/ TV: Wählt den gewünschten Namen für die angeschlossene
CLOCK
CLK ADJ (Einzelheiten siehe Seite 6.)
TIMESYNC SYNC ON *: Synchronisiert die Radio Data System-Senderzeitdaten und die Uhr des Geräts. ;
DISPLAY
DISP DIM DIM ON: Blendet die Displaybeleuchtung Geräts ab. ; DIM OFF *: Hebt auf.
TEXTSCRL SCL AUTO */ SCL ONCE: Wählt automatisches Scrollen der Displayinformationen, oder einmaliges Scrollen. ;
TUNERSET TI/ NEWS SET/ AF SET/ REGIONAL/ ATP SEEK: Nur wählbar, wenn eine andere Quelle als Tuner-Quelle
Frequenzen als 85 Hz/ 120 Hz/ 160 Hz werden abgeschnitten.
(180°)/ PHAS NML * (0°): Wählt den Phasenwinkel des Subwoofer-Ausgangs so, dass er dem
Lautsprecher-Ausgang für optimale Leistung entspricht. (Nur wählbar, wenn eine andere Einstellung als
[LPF THRU] für [LPF SW] gewählt ist.)
AAC/ MP3/ WMA-Audiokompression verlorengehen. ; SPRM OFF: Hebt auf. (Nur wählbar bei Wiedergabe
einer AAC/ MP3/ WMA-Disc oder eines USB-Geräts.)
V-OFF –8 — V-OFF +8 (für AUX) ; V-OFF –8 — V-OFF 0 (für andere Quellen)
Lautstärkepegeleinstellung jeder Quelle als Vorwahl. Der Lautstärkepegel wird automatisch angehoben
oder abgesenkt, wenn Sie die Quelle ändern. (Bevor Sie eine Einstellung vornehmen, wählen Sie eine
anzupassende Quelle aus.)
Komponente. (Nur wählbar, wenn “AUX” als Quelle gewählt ist.)
SYNC OFF: Hebt auf.
SCL OFF: Hebt auf.
gewählt ist. (Einzelheiten siehe Seite 8 und 9.)
Wählbare Einstellung (Preset: *)
Wählbare Einstellung (Preset: *)
:
Speichert die
Störungssuche
Symptom Abhilfe/Ursache
Es wird kein Ton gehört. Die Lautstärke auf den optimalen Pegel einstellen. / Prüfen Sie die Kabel und
“PROTECT” erscheint, und es können
keine Bedienungen vorgenommen
werden.
Es wird kein Ton gehört. / Die Einheit
schaltet nicht ein. / Die im Display
gezeigte Information ist falsch.
14
Verbindungen.
Prüfen Sie, um sicherzustellen, dass die Klemmen der Lautsprecherkabel richtig mit
Isolierband abgedeckt sind, und setzen Sie dann das Gerät zurück. Wenn “PROTECT”
nicht erscheint, wenden Sie sich an den Kundendienst.
Die Anschlüsse sind verschmutzt. Reinigen Sie die Anschlüsse. (Seite 7)
Page 33

Symptom Abhilfe/Ursache
Das Gerät funktioniert überhaupt
nicht.
[OFF WAIT]
Der Radioempfang ist schlecht. /
Statikrauschen beim Radiohören.
“IN” blinkt. Der CD-Player funktioniert nicht ordnungsgemäß. Setzen Sie die Disc erneut richtig ein.
CD-R/CD-RW kann nicht abgespielt
werden, und Musikstücke können
nicht übersprungen werden.
Der Disc-Klang ist manchmal
unterbrochen.
“NA FILE” erscheint. Das Gerät gibt eine nicht unterstützte Audiodatei wieder.
“NO DISC” erscheint. Setzen Sie eine abspielbare Disc in den Ladeschlitz ein.
“TOC ERR” erscheint. Die CD ist sehr verschmutzt. / Die CD ist verkehrt herum eingelegt. / Die CD ist stark
“ERROR 99” erscheint. Das Gerät arbeitet aufgrund eines internen Fehlers nicht ordnungsgemäß. Drücken Sie
“COPY PRO” erscheint. Eine kopiergeschützte Datei wird wiedergegeben.
“READ ERR” erscheint. Kopieren Sie die Dateien und Ordner für das USB-Gerät erneut. Wenn die Fehlermeldung
“NO DVICE” erscheint. Es ist kein USB-Gerät angeschlossen. Schließen Sie ein US-Gerät an und schalten Sie die
“NO MUSIC” erscheint. Auf dem angeschlossenen USB-Gerät befinden sich keine wiederzugebenden
“NA DVICE” erscheint. Schließen Sie ein unterstütztes USB-Gerät an und prüfen Sie die Anschlüsse.
“USB ERR” erscheint. Nehmen Sie das USB-Gerät ab und schalten Sie das Gerät aus und dann wieder ein. Falls
“iPod ERR” erscheint. Erneutes Anschließen des iPod. / Setzen Sie den iPod erneut zurück.
Rauschen wird erzeugt. Springen Sie zu einem anderen Musikstück oder wechseln Sie die Disc.
Tracks können nicht so abgespielt
werden, wie Sie es wollten.
“READING” blinkt weiter Längere Auslesezeit ist erforderlich. Verwenden Sie nicht zu viele Hierarchien und Ordner.
Verflossene Spielzeit ist nicht
richtig.
Die Anzahl der in der Kategorie
“SONGS” des Geräts enthaltenen
Titel entspricht nicht der Anzahl der
Titel, die in der Kategorie “SONGS”
des iPods enthalten sind.
Richtige Zeichen werden nicht
angezeigt (z.B. Albumname).
funktioniert nicht. Schalten Sie den Demonstrationsmodus aus. (Seite 6)
Setzen Sie das Gerät zurück. (Seite 4)
Schließen Sie das Antennenkabel fest an. / Ziehen Sie die Antenne vollständig heraus.
Wenn sich der Zustand nicht verbessert, schalten Sie das Gerät ein und wenden sich an
den Kundendienst.
Setzen Sie eine finalisierte CD-R/CD-RW (mit der zur Aufnahme verwendeten
Komponente finalisieren) ein.
Stoppen Sie die Wiedergabe beim Fahren auf einer holperigen Straße. / Ändern Sie die
Disc. / Prüfen Sie die Kabel und Verbindungen.
zerkratzt. Tauschen Sie die Disc aus.
die Rückstelltaste am Gerät. Erlischt die Meldung “ERROR 99” nicht, wenden Sie sich an
den Kundendienst.
weiterhin angezeigt wird, initialisieren Sie das USB-Gerät oder verwenden Sie andere
USB-Geräte.
Quelle erneut zu USB um.
Audiodateien.
das Gerät weiterhin dieselbe Anzeige zeigt, verwenden Sie bitte ein anderes USB-Gerät.
Die Wiedergabe-Reihenfolge wird bestimmt, wenn die Dateien aufgezeichnet werden.
Dies liegt daran, wie die Titel aufgezeichnet sind.
Podcast-Dateien werden in diesem Gerät nicht gezählt, da es die Wiedergabe von
Podcast-Dateien nicht unterstützt.
Dieses Gerät kann nur Buchstaben (Großbuchstaben), Zahlen und eine begrenzte
Anzahl von Symbolen anzeigen. Kyrillische Buchstaben (Großbuchstaben) können auch
angezeigt werden, wenn [RUSSIAN] auf [RUS ON] gestellt ist. (Seite 6, 7)
DEUTSCH
15
Page 34

Einbau/Anschluss
Teileliste:
A Frontblende ....................................................... (×1)
B Wappenschild................................................... (×1)
C Einbauhalterung ............................................. (×1)
D Gehäuse für Frontblende .......................... (×1)
E Kabelbaum ......................................................... (×1)
F Ausbauwerkzeug ............................................ (×2)
Grundlegendes Verfahren
1
Ziehen Sie den Schlüssel aus dem
Zündschloss, und trennen Sie dann den
·-Pol der Autobatterie ab.
2
Schließen Sie die Eingangs- und
Ausgangskabel richtig an.
\ “Verdrahtungsanschluss” (Seite 17)
3
Bauen Sie das Autoradio in Ihrem
Fahrzeug ein.
\ “Einbau der Einheit” (Seite 18)
4
Schließen Sie den ·-Pol der
Autobatterie an.
5
Setzen Sie das Gerät zurück. (Seite 4)
Warnung
Das Gerät kann nur in einem Fahrzeug mit
12 V Gleichstromsystem und negativer
Masse eingebaut werden.
Wenn Sie das Zündkabel (rot) und
das Batteriekabel (gelb) mit dem
Fahrzeugchassis (Masse) in Berührung
kommen lassen, können Sie einen
Kurzschluss verursachen, der zu einem
Brand führen kann. Schließen Sie immer
diese Kabel über den Sicherungskasten an
die Stromversorgung an.
Trennen Sie den negativen
Batterieanschluss abtrennen und stellen
alle elektrischen Anschlüsse her, bevor das
Gerät eingebaut wird.
Isolieren Sie nicht angeschlossene Kabel
mit Vinylband oder ähnlichem Material.
Entfernen Sie die Schutzhülsen von den
Enden nicht angeschlossener Kabel und
Anschlüsse nicht, damit keine Kurzschlüsse
entstehen.
Sicherstellen, daß das Gerät nach dem
Einbau a Chassis des Fahrzeugs geerdet
wird.
16
Vorsicht
Wenn die Zündung Ihres Fahrzeugs
keine ACC-Position hat, schließen Sie die
Zündkabel an eine Stromquelle an, die mit
dem Zündschlüssel ein- und ausgeschaltet
werden kann. Falls Sie das Zündkabel an
eine Stromquelle mit Konstantspannung wie
beispielsweise ein Batteriekabel anschließen,
kann die Batterie verbraucht werden.
Verwenden Sie für den Einbau
ausschließlich die mitgelieferten
Schrauben. Verwenden Sie ausschließlich
die mitgelieferten Schrauben.
Montieren Sie dieses Gerät in der Konsole
Ihres Fahrzeugs. Stellen Sie sicher dass die
Frontblende nicht den Deckel der Konsole
(falls vorhanden) beim Schließen und
Öffnen anstößt.
Überprüfen Sie nach der Montage des
Geräts, ob die Bremslichter, Blinker,
Scheibenwischer usw. ordnungsgemäß
funktionieren.
Installieren Sie das Gerät so, dass der
Montagewinkel 30˚ oder weniger beträgt.
Wenn die Sicherung durchbrennt,
überprüfen Sie zuerst, dass die Drähte sich
nicht berühren und einen Kurzschluss
verursachen. Ersetzen Sie dann die
durchgebrannte Sicherung durch eine neue
Sicherung mit den gleichen Nenngrößen.
Schließen Sie beide Pole der Lautsprecher
an den Lautsprecherausgängen am Gerät
an. Das Gerät kann beschädigt werden
oder den Dienst versagen, wenn Sie die
·-Pole zusammenführen oder über
Metallteile des Fahrzeugs erden.
Wenn nur zwei Lautsprecher am Gerät
angeschlossen werden, schließen Sie die
Steckverbinder entweder an beide vorderen
Ausgänge oder beide hinteren Ausgänge an
(mischen Sie nicht vorne und hinten).
Berühren Sie die Metallteile des Geräts
während oder kurz nach der Benutzung
nicht. Metallteile wie der Kühlkörper und
das Gehäuse werden heiß.
Die Montage sowie die Verkabelung dieses
Gerätes macht besondere Fähigkeiten und
Erfahrung erforderlich. Überlassen Sie diese
Arbeiten ausgewiesenem Fachpersonal.
Sollten Sie Probleme bei der Installation
des Geräts haben, lassen Sie sich bitte von
Ihrem Kenwood-Fachhändler beraten.
Page 35

Verdrahtungsanschluss
Hellblau/Gelb
(Lekungs-Fernbedienungskabel)
Blau/Weiß
(Stromsteuerungskabel/
Antennensteuerungskabel)
Braun
(Stummschaltungs-Steuerkabel)
Gelb (Batteriekabel)
Rot (Zündkabel)
Rot (A7)
Gelb (A4)
ISO-Anschlüsse
Hintere Ausgang/Subwoofer-Ausgangsbuchsen
Antennenanschluss (JASO)
STEERING WHEEL
REMOTE INPUT
REMOTE CONT
Zum Lenkrad-Fernbedienungsadapter.
Bei Verwendung des optionalen Leistungsverstärkers entweder
ANT CONT
einen Anschluss an den Stromsteuerungsanschluss oder an den
P. CONT
Antennensteuerungsanschluss des Fahrzeugs durchführen.
REAR/SW
An den geerdeten Anschluss anschließen, während das Telefon
klingelt oder während Sie einen Anruf erledigen. (Lesen Sie
hinsichtlich des Anschlusses an das Kenwood-Navigationssystem
MUTE
die Bedienungsanleitung des betreffenden Geräts.)
Anschluss des ISO-Anschlusses an manche VW/Audi
oder Opel (Vauxhall) Automobile.
Sie müssen möglicherweise die Verkabelung des
mitgelieferten Kabelbaums modifizieren, wie unten
gezeigt.
Zündkabel
Gerät
Batteriekabel
(Gelb)
RL
(Rot)
Standardverkabelung
Sicherung (10 A)
DEUTSCH
A7 (Rot)
Fahrzeug
A4 (Gelb)
Stift
Farbe und Funktion
Stift
A4 Gelb Batterie B1 / B2 Lila
A5 Blau/Weiß Stromsteuerung B3 / B4 Grau
A7 Rot Zündung (ACC) B5 / B6 Weiß
A8 Schwarz Erdungsanschluss (Masse) B7 / B8 Grün
Farbe und Funktion
ª
/ Lila/Schwarz · Hinterer Lautsprecher (rechts)
ª
/ Grau/Schwarz · Vorderer Lautsprecher (rechts)
ª
/ Weiß/Schwarz · Vorderer Lautsprecher (links)
ª
/ Grün/Schwarz · Hinterer Lautsprecher (links)
17
Page 36

Einbau der Einheit
1
2
Vor dem Anbringen stellen
Sie sicher, dass die Richtung
des Wappenschilds korrekt
ist.
(Breitere Haken auf der
Oberseite.)
Ausbau des Geräts
1
Nehmen Sie die Frontblende ab.
2
Lassen Sie den Vorsprung am
Ausbauwerkzeug in die Löcher an
beiden Seiten des Wappenschilds
eingreifen.
3
Setzen Sie das Ausbauwerkzeug
tief in die Schlitze an jeder Seite
ein und folgen dann den mit Pfeil
gekennzeichneten Anweisungen
wie rechts gezeigt.
Den Verdrahtungskabelbaum an
den Einheit anschließen. Andere
Verkabelungsverbindungen
wurden vorher fertiggestellt.
(Seite 17)
Armaturenbrett Ihres
Autos
Biegen Sie die
entsprechenden
Metalllaschen, um die
Einbauhalterung sicher
festzuhalten.
18
Page 37

Technische Daten
UKW-Tuner
Frequenzbereich (50 kHz-Abstimmschritte):
87,5 MHz — 108,0 MHz
Empfindlichkeit (Rauschabstand = 26 dB):
1,0 μV/75 Ω
Empfindlichkeitsschwelle (DIN S/N = 46 dB):
2,5 μV/75 Ω
Frequenzgang (±3 dB):
Rauschabstand (MONO):
Kanaltrennung (1 kHz):
30 Hz — 15 kHz
63 dB
40 dB
MW-Tuner
Frequenzbereich (9 kHz-Abstimmschritte):
531 kHz — 1 611 kHz
Empfindlichkeit (Rauschabstand = 20 dB):
36 μV
LW-Tuner
Frequenzbereich:
Empfindlichkeit (Rauschabstand = 20 dB):
153 kHz — 279 kHz
57 μV
CD-Player
Laserdiode:
Digitalfilter (D/A):
D/A-Wandler:
Spindeldrehzahl:
Tonhöhenschwankung:
Frequenzgang (±1 dB):
Gesamtklirrfaktor (1 kHz):
Rauschabstand (1 kHz):
Dynamikbereich:
AAC-Decodierung: AAC-LC “.m4a”-Dateien
MP3-Decodierung:
WMA-Decodierung:
GaAIAs
8-faches Oversampling
24 Bit
500 U/min — 200 U/min
(CLV)
Unterhalb der
Messgrenze
20 Hz — 20 kHz
0,01 %
105 dB
90 dB
Unterstützt MPEG-1/2
Audio Layer-3
Unterstützt Windows
Media Audio
USB-Schnittstelle
USB Standard:
USB1.1/ 2.0 (Höchstgeschwindigkeit)
Maximaler Versorgungsstrom:
Dateisystem:
AAC-Decodierung: AAC-LC “.m4a”-Dateien
MP3-Decodierung:
WMA-Decodierung:
FAT16/ 32
Audio Layer-3
Media Audio
DC 5 V 1 A
Unterstützt MPEG-1/2
Unterstützt Windows
DEUTSCH
Audio-Bereich
Maximale Ausgangsleistung:
Ausgangsleistung (DIN 45324, +B = 14,4 V):
30 W × 4
Lautsprecherimpedanz:
Klangregler: Bass:
Vorverstärkerpegel/Last (CD):
Vorverstärkungsimpedanz:
Mitten:
Höhen:
50 W x 4
4 Ω — 8 Ω
100 Hz ±8 dB
1 kHz ±8 dB
12,5 kHz ±8 dB
2 500 mV/10 kΩ
≤ 600 Ω
Zusatzeingangssektion
Frequenzgang (±3 dB):
Maximaler Spannungseingang:
Eingangsimpedanz:
20 Hz — 20 kHz
1 200 mV
10 kΩ
Allgemeines
Betriebsspannung (11 V — 16 V zulässig):
Maximale Stromaufnahme:
Einbaumaße (B × H × T):
182 mm × 53 mm × 158 mm
Gewicht:
1,3 kg
Änderungen ohne Vorankündigung bleiben
vorbehalten.
10 A
14,4 V
19
Page 38

CОДЕРЖАНИЕ
Безопасность 2
Подготовка 4
Подключение и отключение передней
панели
Перенастройка устройства
Основные операции 4
Начало работы 6
Отмена демонстрации функций дисплея
Установка демонстрационного режима
Настройка часов
Начальные настройки перед
выполнением операций
Прослушивание радио 8
Изменение настроек режима [SETTINGS]
Прослушивание с других внешних
устройств 9
Прослушивание с диска/ устройства
USB/ iPod 10
Начало воспроизведения диска
Подключение устройства USB
Подключение iPod
Выбор повторного воспроизведения
Выбор произвольного воспроизведения
Выбор папки, дорожки или файла
Функции модели
воспроизведении с проигрывателя
iPod
Выбор песни по алфавиту
Выбор режима управления “App & iPod”
Изменение настроек режима [SETTINGS]
Настройки функций 13
Устранение проблем 14
Установка и подключение 16
Стандартная процедура
Предупреждение
Внимание
Подключение проводов
Установка устройства
Удаление устройства
Технические характеристики 19
(для )
при
Безопасность
ПРЕДУПРЕЖДЕНИЯ
Остановите автомобиль перед началом
работы с устройством.
Важные замечания...
Bо избежание коротких замыканий
никогда не оставляйте металлические
предметы (например, монеты или
металлические инструменты) внутри
устройства.
Предостережение: Отрегулируйте
громкость таким образом, чтобы
слышать звуки за пределами автомобиля.
Слишком высокая громкость во время
вождения может стать причиной аварии.
Конденсация: Если автомобиль
оборудован установкой для
кондиционирования воздуха, возможна
конденсация влаги на оптической линзе.
Это может приводить к ошибкам при
чтении диска. В этом случае извлеките
диск и дождитесь испарения влаги.
Данное устройство обеспечивает
воспроизведение только компактдисков, имеющих следующие отметки:
Рисунки, содержащиеся в данном
руководстве, являются примерами,
необходимыми для создания
более четкого представления об
использовании элементов управления.
Поэтому элементы, изображенные на
рисунках, могут отличаться от элементов
действительного оборудования.
Соединительный кабель USB, CA-U1EX
(макс.: 500 мА) (дополнительная
принадлежность) требуется для
подключения USB-устройства.
Устройства Apple iPod или iPhone можно
подключить с помощью
Слово “iPod”, используемое в данной
инструкции, означает устройство iPod
или iPhone, подключенное с помощью
кабеля для подключения KCA-iP102
(дополнительная принадлежность).
В случае возникновения проблем при
установке обратитесь к дилеру компании
Kenwood.
.
2
Page 39

При приобретении внешних устройств
уточните у дилера компании Kenwood,
являются ли эти компоненты
совместимыми с данной моделью и
данным регионом.
Подробные сведения и примечания
относительно звуковых файлов,
доступных для воспроизведения,
представлены в интерактивном
руководстве на следующем веб-сайте:
www.kenwood.com/cs/ce/audiofile/
При Правильном соблюдении всех
условий эксплуатации и техническких
требований, указанных в данной
инструкций, срок службы купленного
Baм изделия составляет 7 лет.
Гарантийный срок эксплуатации изделия
соответевует сpоку, указанному в
гaрантийном талоне. В период срока
службы эксплуатация и хранение
изделия не может представлять
oпасность для Вашей жизни, здоровья,
причинять вред Вашему имуществу или
окружающей срeде.
Маркировка изделий, использующих
лазеры
К корпусу устройства прикреплена
табличка, указывающая, что устройство
использует лазерные лучи класса 1. Это
означает, что в устройстве используются
лазерные лучи слабой интенсивности.
Они не представляют опасности и не
распространяют опасную радиацию вне
устройства.
РУССКИЙ
3
Page 40

Подготовка
Подключение и отключение
передней панели
Во избежание загрязнения не
прикасайтесь к выводам и передней
панели устройства и пальцами.
1
2
Не подвергайте переднюю панель
воздействию прямых солнечных лучей,
избыточных температур или высокой
влажности. Также избегайте сильно
запыленных мест и попадания воды.
После снятия передней панели храните
ее в чехле.
Передняя панель является
прецизионным устройством, и ее можно
повредить механически.
2
Перенастройка устройства
Если устройство не функционирует
1
надлежащим образом, нажмите кнопку
Reset (Сброс).
После нажатия кнопки сброса
устройство возвращается к параметрам,
установленным на заводе.
Основные операции
Загрузочный отсек Извлеките диск.
Окно дисплея
1
2
Кнопка сброса
3
Ручка регулировки громкости
Снимите переднюю панель
Следующий индикатор загорается, когда...
RDS : Доступна служба Radio Data System.
ST : Получен стереофонический сигнал
(FM).
IN : Диск находится в устройстве.
TI : Включена функция информирования о
дорожной ситуации.
4
Порт USB
Дополнительный
входной разъем
Page 41

При нажатии и удерживании следующих кнопок...
Кнопка Общие операции
Включение.
Выключение при нажатии и удерживании.
Выбор доступных источников (TUNER, USB/ iPod, CD, AUX, STANDBY),
SRC
Ручка регулировки
громкости
(поворот)
Ручка регулировки
громкости
(нажатие)
(BAND)
1 (–) / 2 (+) Выбор следующей/предыдущей папки.
)
6 (
4
/
¢
SCRL DISP
AUDIO Непосредственный переход в настройки [AUD CTRL]. (стр. 13)
5 (iPod)
если питание включено.
• Если источник готов, начинается воспроизведение.
• “iPod” или “CD” можно выбрать только тогда, когда подключен iPod
или загружен диск.
Настройка уровня звука.
Выбор элементов.
Подтверждение выбора.
Переход к настройкам [FUNCTION].
Выбор диапазонов частот FM (FM1/ FM2/ FM3) или MW/ LW, когда в
качестве источника выбрано: “TUNER”.
Переход в режим поиска музыки.
Приостановка/возобновление воспроизведения диска/ устройства
USB/ iPod.
Поиск радиостанции.
Выбор дорожки/файла.
Быстрая перемотка дорожек вперед или назад при нажатии и
удерживании.
Изменение отображаемой информации.
Прокрутка отображаемой информации при нажатии и
удерживании.
Непосредственный переход в режим настройки часов (стр. 6) при
нажатии и удерживании на экране отображения часов.
Возврат к предыдущему элементу.
Выход из режима настроек при нажатии и удерживании.
Для :
Включение режима управления (MODE ON/ MODE OFF) для
воспроизведения iPod. (стр. 12)
Отключение звука при приеме телефонного вызова
Чтобы воспользоваться данной функцией, подключите провод MUTE к телефону
с использованием имеющейся в продаже дополнительной принадлежности для
телефона. (стр. 17)
При поступлении входящего вызова отображается
сообщение “CALL”.
Аудиосистема устанавливается на паузу.
Чтобы продолжить использование аудиосистемы
во время вызова нажмите кнопку
Сообщение “CALL” исчезает, и работа аудиосистемы
возобновляется.
SRC.
При завершении вызова
сообщение “CALL” исчезает.
Работа аудиосистемы
возобновляется.
РУССКИЙ
5
Page 42

Начало работы
Отмена демонстрации функций дисплея
Демонстрация функций дисплея всегда включена, если пользователь не отменил ее.
При включении питания (или после сброса устройства) на дисплее отображается
следующая информация:
[CANCEL] \
1
Нажмите ручку регулировки громкости.
В качестве начальной настройки выбрано значение [ <Y>/ N ].
2
Нажмите ручку регулировки громкости еще раз для подтверждения.
Отображается надпись [DEMO OFF].
Если в течение 15 секунд не выполнена ни одна операция или если пользователь
повернул ручку регулировки громкости для выбора значения [Y/ <N>] в действии
появляется сообщение [DEMOMODE] и начинается демонстрация функций дисплея.
Установка демонстрационного режима
1
Нажмите ручку регулировки громкости для перехода в режим [FUNCTION].
2
Поверните ручку регулировки громкости для выбора элемента [DEMO], а затем
нажмите ее для ввода.
3
Поверните ручку регулировки громкости для выбора элемента [DEMO ON] или
[DEMO OFF].
Если выбрано значение [DEMO ON] и в течение 20 секунд не выполнена ни одна
операция, начнется демонстрация функций дисплея.
4
Удерживайте нажатой кнопку для завершения процедуры.
Настройка часов
1
Нажмите ручку регулировки громкости для перехода в режим [FUNCTION].
2
Поверните ручку регулировки громкости для выбора элемента [SETTINGS], а затем
нажмите ее для ввода.
3
Поверните ручку регулировки громкости для выбора элемента [CLOCK], а затем
нажмите ее для ввода.
4
Поверните ручку регулировки громкости для выбора элемента [CLK ADJ], а затем
нажмите ее для ввода.
На экране мигает поле часов.
5
Поверните ручку регулировки громкости для настройки значения часов, а затем
нажмите ее для настройки значения минут.
На экране мигает поле минут.
6
Поверните ручку регулировки громкости для регулировки значения минут, а затем
нажмите ее для подтверждения.
Нажмите 4
7
Удерживайте нажатой кнопку для завершения процедуры.
[
DEMO] \ [PRESS] \ [VOLUME] \ [KNOB]
/
¢ для перехода между настройками часов и минут.
2
,
Начальные настройки перед выполнением операций
1
Нажмите кнопку SRC для перехода в режим [STANDBY].
2
Нажмите ручку регулировки громкости для перехода в режим [FUNCTION].
3
Поверните ручку регулировки громкости для выбора элемента [INITIAL], а затем
нажмите ее для ввода.
4
Чтобы сделать выбор, поверните ручку регулировки громкости, а затем нажмите
ее для подтверждения.
Элементы, доступные для выбора, см. в таблице на стр. 7.
5
Удерживайте нажатой кнопку для завершения процедуры.
6
Page 43

Элемент Доступная настройка (запрограммированная настройка: *)
PRESET TYPE NML *: Запоминание одной радиостанции для каждой запрограммированной кнопки в каждом
KEY BEEP BEEP ON */ BEEP OFF: Включение/выключение сигнала нажатия клавиш.
RUSSIAN RUS ON: Имя папки, имя файла, название композиции, имя исполнителя и название альбома
OFF WAIT Выбор времени автоматического выключения устройства (в режиме ожидания) в целях экономии
AUX SET AUX ON *: Включение варианта “AUX” при выборе источника. Звук от подключенного внешнего
CD READ CD READ1 *: Автоматическое распознавание диска с аудиофайлами и музыкального компакт-диска. ;
SWPRE SWPRE R */ SWPRE SW: Выбор подключения задних динамиков или низкочастотного динамика к
SPEAKER SP OFF */ SP 5/4/ SP 6 × 9/6/ SP OEM: Выбор размера динамика для обеспечения оптимальной
F/W xx.xx <Y>/ N *: Запуск обновления встроенного программного обеспечения. ; Y /<N>:
диапазоне частот (FM1/ FM2/ FM3/ MW/ LW). ; TYPE MIX: Запоминание одной радиостанции для
каждой запрограммированной кнопки вне зависимости от выбранного диапазона частот (FM1/ FM2/
FM3/ MW/ LW).
отображаются на русском языке (если применимо). ; RUS OFF *: Отмена.
аккумулятора.
OFF ––– : Отмена ; OFF 20M *: 20 минут; OFF 40M: 40 минут; OFF 60M: 60 минут
устройства воспроизводится через динамики автомобиля. ; AUX OFF: Отключение варианта “AUX” при
выборе источника.
CD READ2:
Принудительное воспроизведение в качестве музыкального компакт-диска. Во время
воспроизведения диска с аудиофайлами звук не слышен.
разъемам “line out” на задней панели устройства (через внешний усилитель).
производительности.
(обновление не запущено).
Подробнее об обновлении встроенного программного обеспечения см.: www.kenwood.com/cs/ce/
Отмена
Обслуживание
Чистка устройства: В случае загрязнения протрите панель сухой силиконовой или
иной мягкой тканью. Несоблюдение данной меры предосторожности может привести к
повреждению монитора или устройства.
Очистка разъема: Устройство может работать
неправильно, если разъемы между устройством и
лицевой панелью загрязнены. Отсоедините лицевую
панель и аккуратно протрите разъем ватной палочкой.
Соблюдайте осторожность, чтобы не повредить разъем.
Обращение с дисками
Не касайтесь записанной поверхности диска.
Не приклеивайте на диск клейкую ленту и т. п. и не используйте диск с приклеенной
на него лентой.
Не используйте никакие дополнительные принадлежности для диска.
Проводите чистку по направлению от центра диска к его краю.
Для очистки диска используйте сухую силиконовую или иную мягкую ткань. Не
используйте какие-либо растворители.
При извлечении дисков из устройства держите их горизонтально.
Перед установкой диска устраните любые неровности центрального отверстия или
внешнего края диска.
Разъем (на обратной
стороне лицевой панели)
РУССКИЙ
7
Page 44

Прослушивание радио
Удерживайте в течение приблизительно 2 секунд для сохранения текущей радиостанции.
Кратковременно нажмите для выбора сохраненной радиостанции.
1
Нажмите кнопку SRC для выбора источника “TUNER”.
2
Нажмите кнопку (BAND) несколько раз для выбора диапазона (FM1/FM2/ FM3/
MW/ LW).
На дисплее появляется надпись “F1” / “F2” / “F3” / “MW” / “LW”.
3
Нажмите 4
Изменение настроек режима [SETTINGS]
При прослушивании радио...
1
Нажмите ручку регулировки громкости для перехода в режим [FUNCTION].
2
Поверните ручку регулировки громкости для выбора элемента [SETTINGS], а затем
нажмите ее для ввода.
3
Чтобы сделать выбор, поверните ручку регулировки громкости, а затем нажмите
ее для подтверждения.
Элементы, доступные для выбора, см. в следующей таблице.
4
Удерживайте нажатой кнопку для завершения процедуры.
Элемент Доступная настройка (запрограммированная настройка: *)
LO.SEEK LO.S ON: Поиск только радиостанций FM-диапазона с хорошим качеством приема. ; LO.S OFF *: Отмена.
SEEKMODE Выбор режима настройки для кнопок
A-MEMORY <Y>/ N *: Aвтоматический запуск запоминания 6 станций с хорошим качеством приема. ;
MONO SET MONO ON: Улучшение качества приема в FM-диапазона (при этом стереоэффект может быть утрачен). ;
PTY SRCH
TI TI ON: Позволяет временно переключить устройство в режим приема сообщений о движении на
NEWS SET NEWS 00M – NEWS 90M: Задание времени приема следующей сводки новостей. ; NEWS OFF *: Отмена.
AF SET AF ON *: Автоматический поиск другой станции, транслирующей эту же программу в данной сети
/
¢, чтобы выполнить поиск радиостанции.
4
Отмена.
/ ¢.
AUTO1 *: Автоматический поиск станции. ; AUTO2: Поиск станций в порядке фиксирования станций в
памяти. ; MANUAL: Поиск станции вручную.
Y /<N>:
Отмена (отключение автоматического сохранения). (Доступно только в том случае, если для
параметра [PRESET] выбрано значение [TYPE NML].) (стр. 6, 7)
MONO OFF *: Отмена (возобновление стереоэффекта).
Выбор доступного типа программы (см. таблицу на стр. 9). Затем нажмите 4 / ¢, чтобы начать поиск.
Нажмите ручку регулировки громкости для входа в меню выбора языка функции PTY. Поверните
ручку регулировки громкости для выбора языка функции PTY (ENGLISH */ FRENCH/ GERMAN), а затем
нажмите ее для подтверждения.
дорогах. ; TI OFF *: Отмена.
Radio Data System с более высоким качеством приема, если текущее качество приема является
неудовлетворительным. ; AF OFF:
8
Page 45

Элемент Доступная настройка (запрограммированная настройка: *)
REGIONAL REG ON *: Переключение на другую станцию только в определенном регионе с помощью элемента
ATP SEEK ATPS ON *: Автоматический поиск станции, обеспечивающей более высокое качества приема,
Элемент
вариант “FM”.
Элемент [TI/ NEWS SET/ AF SET/ REGIONAL/ ATP SEEK] доступен для выбора только в том случае, если в качестве
источника выбран вариант “FM”. Если выбран другой источник воспроизведения, эти настройки можно выбрать для
элемента [TUNERSET]. (стр. 14)
Доступный тип программы ([SPEECH]
[MUSIC]
SPEECH MUSIC NEWS AFFAIRS INFO SPORT EDUCATE
DRAMA CULTURE SCIENCE VARIED
LIGHT M (музыка)
RELIGION PHONE IN TRAVEL LEISURE JAZZ COUNTRY
OLDIES
Устройство выполняет поиск типа программы, выбранного в функциях
[MUSIC]
Функция Radio Data System не будет работать там, где станции трансляции не
поддерживают данную службу.
В случае регулировки громкости в процессе приема информации о дорожной ситуации
настроенная громкость фиксируется в памяти автоматически. Настройка будет
применена при следующем включении функции информирования о дорожной ситуации.
управления “AF”. ; REG OFF: Отмена.
если текущее качество приема сведений о дорожной ситуации является неудовлетворительным. ;
ATPS OFF: Отмена.
[MONO SET/ PTY SRCH] доступен для выбора только в том случае, если в качестве источника выбран
: Символьный индикатор черного цвета)
CLASSICS
FOLK M (музыка)
(если тип выбран).
: Символьный индикатор белого цвета. ;
OTHER M (музыка)
DOCUMENT
:
POP M (музыка) ROCK M (музыка) EASY M (музыка)
WEATHER FINANCE CHILDREN SOCIAL
[SPEECH]
NATION M (музыка)
или
Прослушивание с других внешних
устройств
Подготовка: Для параметра [AUX SET] необходимо установить значение [AUX ON].
(стр. 6, 7)
РУССКИЙ
Дополнительный входной разъем
1
Нажмите кнопку SRC для выбора
источника “AUX”.
2
Включите внешнее устройство и
начните воспроизведение.
3
Поворачивайте ручку регулировки
громкости, чтобы настроить
громкость.
Переносное аудиоустройство
(приобретается отдельно)
Стерео мини-разъем 3,5 мм
(приобретается отдельно)
9
Page 46

Прослушивание с диска/
устройства USB/ iPod
Извлеките диск. (Отображается сообщение
“NO DISC” и индикатор “IN” гаснет.)Загрузочный отсек
Нажмите для выбора дорожки или файла.
Нажмите для быстрой перемотки
вперед или назад.
Нажмите для выбора предыдущей/
следующей папки.
• Недоступно, если выбрано “ALL RDM”.
Начало воспроизведения диска
1
Нажмите кнопку SRC для включения
питания.
2
Поместите диск в загрузочный отсек.
Воспроизведение начинается
автоматически.
3
Нажмите нумерованную кнопку
6 (
), чтобы возобновить/
приостановить воспроизведение (при
необходимости).
О приложении “KENWOOD Music Editor”
Данным устройством поддерживается приложение
для ПК “KENWOOD Music Editor Lite ver1.1” или более
поздней версии.
В случае прослушивания аудиофайлов с информацией
базы данных, добавленной приложением “KENWOOD
Music Editor Lite ver1.1”, возможен поиск файла по
названию, альбому или исполнителю с применением
функции поиска музыки.
В инструкции по эксплуатации термин “USB
device” используется для обозначения устройства,
содержащего аудиофайлы с введенной при помощи
приложения KENWOOD Music Editor информацией
базы данных.
Приложение “KENWOOD Music Editor Lite ver1.1”
доступно для загрузки с Интернет-сайта по адресу
www.kenwood.com/cs/ce/
Более подробную информацию о “KENWOOD Music
Editor Lite ver1.1” см. на вышеприведенном сайте
либо в справке приложения.
10
Порт USB
Сдвиньте для открытия
крышки, затем
выполните следующее
подключение.
Происходит
автоматическая смена
источника, и начинается
воспроизведение.
Подключение устройства USB
CA-U1EX (макс. 500 мА)
(дополнительная принадлежность)
USB-устройство (приобретается отдельно)
Подключение iPod
KCA-iP102 (дополнительная принадлежность)
(для )
Apple iPod
(приобретается отдельно)
Page 47

Выбор повторного воспроизведения
Нажмите нумерованную кнопку 4 (REP)
несколько раз, чтобы сделать выбор.
Звуковой компакт-диск : TRAC REP (повтор
дорожек), REP OFF (выключение повтора)
AAC/MP3/WMA : FILE REP (повтор файлов),
FOLD REP (повтор папок), REP OFF
(выключение повтора)
iPod : FILE REP (повтор файлов), REP OFF
(выключение повтора)
Выбор произвольного воспроизведения
Нажмите нумерованную кнопку 3 (RDM)
несколько раз, чтобы сделать выбор.
Звуковой компакт-диск : DISC RDM
(воспроизведение диска в случайном
порядке), RDM OFF (выключение
воспроизведения в случайном порядке)
AAC/MP3/WMA/iPod : FOLD RDM
(воспроизведение папки в случайном
порядке), RDM OFF (выключение
воспроизведения в случайном порядке)
Для AAC/MP3/WMA/iPod : Нажмите и
удерживайте нажатой нумерованную
кнопку 3 (RDM) для выбора функции
“ALL RDM” (воспроизведение всего в
случайном порядке).
–
Применимо, только если изначально
выбрано “RDM OFF” (выключение
воспроизведения в случайном порядке).
–
Для :
просмотра iPod на “songs”.
изменяет элемент
Выбор папки, дорожки или файла
1
Нажмите кнопку (BAND) для
перехода в режим поиска музыки.
Отображается сообщение “SEARCH”,
а затем на экране отображается имя
текущего файла.
2
Поверните ручку регулировки
громкости, чтобы выбрать папку,
дорожку или файл, а затем нажмите ее
для подтверждения.
Для возврата в корневую папку (или на
первую дорожку для звукового компактдиска) нажмите цифровую кнопку
5 (iPod) или 5.
Для возврата к предыдущей папке
нажмите кнопку
Для отмены режима поиска музыки нажмите
и удерживайте нажатой кнопку
Отображение индикатора < или >
на экране означает, что доступен
предыдущий или следующий элемент.
.
.
Для устройства USB * и iPod: Чтобы
пропустить поиск, нажмите 4 / ¢.
* Данная операция применима только
к файлам, зарегистрированным базе
данных, которая создана приложением
KENWOOD Music Editor. (См. заднюю
обложку.)
Диски, которые нельзя использовать
Диски некруглой формы.
Диски, записанная поверхность которых окрашена,
или диски со следами загрязнений.
Воспроизведение записываемых и
перезаписываемых дисков, которые не были
финализированы, невозможно. (Информацию о
финализации см. в руководстве по программе
записи на диски и в руководстве по эксплуатации
записывающего устройства.)
Использование компакт-дисков диаметром 8 см
запрещено. Попытка вставки диска с помощью
адаптера может привести к неисправности
устройства.
Об аудиофайлах
Воспроизводимый звуковой файл:
AAC-LC (.m4a), MP3 (.mp3), WMA (.wma)
Воспроизводимые диски: CD-R/RW/ROM
Воспроизводимый формат файлов на дисках: ISO
9660, уровень 1/2, Joliet, Romeo, длинные имена
файлов.
Воспроизводимая файловая система устройств USB:
FAT16, FAT32
Несмотря на соответствие аудиофайлов
указанным выше стандартам, при некоторых
типах или состояниях носителей или устройств их
воспроизведение может оказаться невозможным.
Об устройстве USB
Данное устройство может воспроизводить
следующие файлы, сохраненные на запоминающем
устройстве USB большой емкости:
AAC-LC (.m4a), MP3 (.mp3), WMA (.wma)
Устройство USB следует установить в месте,
в котором оно не помешает надлежащему
управлению автомобилем.
Запрещается подключать USB-носитель через USB-
концентратор и многоформатное устройство для
считывания карт памяти.
Во избежание потери данных убедитесь в том, что
создана резервная копия всех важных данных.
Подключение кабеля, общая длина которого
превышает 5 м, может привести к некорректному
воспроизведению.
РУССКИЙ
11
Page 48

Функции модели при воспроизведении с проигрывателя iPod
Выбор песни по алфавиту
1
Нажмите кнопку (BAND) для
перехода в режим поиска музыки.
Отображается надпись “SEARCH”.
2
Чтобы выбрать категорию, поверните
ручку регулировки громкости, а затем
нажмите ее для подтверждения.
3
Нажмите кнопку (BAND) еще раз
для перехода в режим поиска музыки
по алфавиту.
Отображается надпись “SRCH
4
Поверните ручку регулировки
громкости, чтобы выбрать символ для
поиска.
5
Нажмите 4 / ¢ для перемещения
положения записи.
Предусмотрен ввод не более трех
символов.
6
Нажмите ручку регулировки
громкости, чтобы запустить поиск.
7
Поверните ручку регулировки
громкости, чтобы выбрать папку,
дорожку или файл, а затем нажмите ее
для подтверждения.
Для возврата к предыдущей папке
нажмите кнопку
Для возврата в меню верхнего уровня
нажмите цифровую кнопку 5 (iPod).
Для отмены режима поиска музыки
по алфавиту нажмите и удерживайте
нажатой кнопку
Если на устройстве iPod записано много
песен или списков воспроизведения,
потребуется больше времени для поиска.
Для поиска по символам, отличным от
A – Z и 0 – 9, введите только “
Артикли (a, an, the) в названиях песен
будут опускаться во время поиска.
.
.
*
– – –
”.
”.
Выбор режима управления
“App & iPod”
Нажмите 5 (iPod) для выполнения
выбора.
MODE ON: Управление iPod с устройства
iPod *. Отображается надпись
“APP&iPod”.
MODE OFF: Управление iPod с устройства.
* С помощью устройства по-
прежнему можно управлять паузой/
воспроизведением, выбирать файлы,
выполнять быструю перемотку вперед/
назад.
Изменение настроек режима
[SETTINGS]
При прослушивании с iPod...
1
Нажмите ручку регулировки
громкости для перехода в режим
[FUNCTION].
2
Поверните ручку регулировки
громкости для выбора элемента
[SETTINGS], а затем нажмите ее для
ввода.
3
Поверните ручку регулировки
громкости для выбора элемента
[SKIPSRCH], а затем нажмите ее для
ввода.
4
Чтобы сделать выбор, поверните
ручку регулировки громкости, а затем
нажмите ее для подтверждения.
SKIP 0.5% (По умолчанию)/ SKIP 1%/
SKIP 5%/ SKIP 10% :
коэффициента пропуска во время
поиска песни в режиме поиска музыки.
(При удерживании 4 / ¢ значение
коэффициента пропуска песен
составляет 10% независимо от значения
настройки.)
5
Удерживайте нажатой кнопку для
завершения процедуры.
Совместимые устройства iPod/iPhone
Made for
– iPod touch (1st, 2nd, 3rd и 4th generation)
– iPod classic
– iPod with video
– iPod nano (1st, 2nd, 3rd, 4th, 5th и 6th generation)
– iPhone 4
– iPhone 3GS
– iPhone 3G
– iPhone
Сведения о последнем списке совместимых
устройств и версии программного обеспечения
iPod/iPhone см. по адресу:
www.kenwood.com/cs/ce/ipod
При запуске воспроизведения после подключения
iPod композиция, которая воспроизводилась на
iPod, воспроизводится первой.
В этом случае отображается текст “RESUMING”
и не отображается имя папки и т.д. Правильное
название и т.п. информация отображается при
изменении элемента просмотра.
Управление iPod невозможно, если на нем
отображается текст “KENWOOD” или “✓”.
установка
12
Page 49

Настройки функций
1
Для перехода в меню [AUD CTRL] (см. таблицу ниже): Нажмите кнопку AUDIO.
Для перехода в меню [SETTINGS] (стр. 14): Нажмите ручку регулировки громкости
для перехода в режим [FUNCTION]. Поверните ручку регулировки громкости для
выбора элемента [SETTINGS], а затем нажмите ее для ввода.
2
Чтобы сделать выбор, поверните ручку регулировки громкости, а затем нажмите
ее для подтверждения.
Повторяйте это действие до тех пор, пока не будет выбран/активирован
необходимый элемент.
Нажмите для возврата к предыдущему элементу.
3
Удерживайте нажатой кнопку для завершения процедуры.
[AUD CTRL] : При воспроизведении звука с любого источника (за исключением
состояния STANDBY)...
Элемент Доступная настройка (запрограммированная настройка: *)
SW LEVEL SW L –15 — SW L +15 (запрограммированная настройка: SW L 0): Настройте уровень выходного
BASS LVL -8 — +8 (запрограммированная настройка: BAS L 0/ MID L 0/ TRE L 0):
MID LVL
TRE LVL
EQ PRO
BASS ADJ BASS FRQ BAS F 60/ BAS F 80/ BAS F100 */ BAS F200: Выбор центральной частоты.
MID ADJ MID FRQ MID F0.5K/ MID F1.0K */ MID F1.5K/ MID F2.5K: Выбор центральной частоты.
TRE ADJ TRE FRQ TRE 10.0K/ TRE 12.5K */ TRE 15.0K/ TRE 17.5K: Выбор центральной частоты.
EQ NATURAL */ USER/ ROCK/ POPS/ EASY/ TOP40/ JAZZ/ POWERFUL: Выбор режима звучания,
B. BOOST BB-L LV1/ BB-L LV2/ BB-L LV3: Выбор предпочитаемого уровня подъема нижних частот. ;
LOUDNESS LOUD LV1 */ LOUD LV2: Выбор предпочитаемых низких и высоких частот для получения хорошо
BALANCE BAL L15 — BAL R15 (запрограммированная настройка: BAL 0): Настройка выходного баланса
FADER FAD R15 — FAD F15 (запрограммированная настройка: FAD 0): Настройка выходного баланса
SW SET SW ON *: Включение выходного сигнала низкочастотного динамика. ; SW OFF:
сигнала низкочастотного динамика.
Настройка уровня для сохранения в каждом источнике. (Перед выполнением настройки выберите
источник, который необходимо настроить.)
BASS LVL BAS L –8 — BAS L +8 (запрограммированная настройка: BAS L 0): Настройте
BASS Q BAS Q1.00 */ BAS Q1.25/ BAS Q1.50/ BAS Q2.00: Настройка коэффициента качества.
BASS EXT B-EX ON: Включение усиленных нижних частот. ; B-EX OFF *: Отмена.
MID LVL MID L –8 — MID L +8 (запрограммированная настройка: MID L 0): Настройте
MID Q MID Q0.75/ MID Q1.00 */ MID Q1.25: Настройка коэффициента качества.
TRE LVL TRE L –8 — TRE L +8 (запрограммированная настройка: TRE L 0): Настройте
соответствующего музыкальному жанру. (Выберите [USER] для использования пользовательских
настроек низких, средних и высоких частот.)
BB-L OFF *:
сбалансированного звучания при низком уровне громкости. ; LOUD OFF:
левых и правых динамиков.
передних и задних динамиков.
уровень.
уровень.
уровень.
Отмена.
Память источника сигнала:
Отмена.
Отмена.
Продолжение...
РУССКИЙ
13
Page 50

Элемент Доступная настройка (запрограммированная настройка: *)
DTIL SET
LPF SW LPF THRU *: Все сигналы передаются в низкочастотный динамик. ; LPF 85H/ LPF 120H/
SW PHASE PHAS REV
SPRM SET SPRM ON *: Достижение реалистичного звучания путем интерполяции высокочастотных
V-OFFSET
(запрограммированная
настройка: V-OFF 0)
[SW LEVEL/ SW SET/ LPF SW/ SW PHASE] можно выбрать, только если для параметра [SWPRE] установлено
значение [SWPRE SW]. (стр. 6, 7)
[SW LEVEL/ LPF SW/ SW PHASE] можно выбрать, только если для параметра [SW SET] установлено значение [SW ON].
[SETTINGS]
Элемент Доступная настройка (запрограммированная настройка: *)
AUX NAME AUX */ DVD/ PORTABLE/ GAME/ VIDEO/ TV: Выбор требуемого названия подключенного устройства.
(Доступно только в том случае, если в качестве источника выбран вариант “AUX”.)
CLOCK
CLK ADJ (Более подробную информацию см на стр. 6.)
TIMESYNC SYNC ON *: Синхронизация данных времени станции Radio Data System и часов устройства. ;
SYNC OFF: Отмена.
DISPLAY
DISP DIM DIM ON: Затемнение подсветки дисплея. ; DIM OFF *: Отмена.
TEXTSCRL SCL AUTO */ SCL ONCE: Выбор автоматической прокрутки отображаемой информации или
единовременной прокрутки. ; SCL OFF: Отмена.
TUNERSET TI/ NEWS SET/ AF SET/ REGIONAL/ ATP SEEK: Можно выбрать, если выбран любой источник, кроме
тюнера. (Более подробную информацию см. на стр. 8 и 9.)
LPF 160H: Частоты выше 85 Гц/120 Гц/160 Гц не воспроизводятся.
(180°)/ PHAS NML * (0°): Выбор угла фазы выходного сигнала
низкочастотного динамика в соответствии с выходным сигналом динамика в целях
обеспечения оптимальной производительности. (Доступно только в том случае, если для
параметра [LPF SW] выбрано значение, отличное от [LPF THRU].)
компонентов, которые были утрачены при аудиокомпрессии AAC/ MP3/ WMA. ;
SPRM OFF: Отмена. (Доступно для выбора только при воспроизведении дисков с
файлами в формате AAC/ MP3/ WMA или устройства USB.)
V-OFF –8 — V-OFF +8 (для AUX) ; V-OFF –8 — V-OFF 0 (для других источников)
Программирование уровня регулировки громкости каждого источника. Уровень
громкости автоматически увеличивается или уменьшается при смене источника. (Перед
выполнением настройки выберите источник, который необходимо настроить.)
:
Устранение проблем
Симптомы Способы устранения/Причины
Звук не слышен. Установите оптимальный уровень громкости. / Проверьте кабели и соединения.
Отображается сообщение
“PROTECT”, и операции
выполняться не могут.
Звук не слышен. / Устройство
не включается. / На дисплее
отображается неправильная
информация.
14
Убедитесь, что выводы проводов динамика обмотаны изоляционной лентой
правильно, затем сбросьте устройство. Если сообщение “PROTECT” продолжает
отображаться, обратитесь в ближайший центр обслуживания.
Разъемы загрязнены. Почистите разъемы. (стр. 7)
Page 51

Симптомы Способы устранения/Причины
Приемник не работает. Выполните сброс устройства. (стр. 4)
[OFF WAIT]
не работает. Выйдите из демонстрационного режима. (стр. 6)
Слабый радиоприем. / Статические
помехи при прослушивании радио.
Мигает надпись “IN”. Проигрыватель компакт-дисков не работает должным образом. Установите диск
Воспроизведение диска CD-R/
CD-RW невозможно; пропуск
дорожек не осуществляется.
Звук, записанный на диске, иногда
прерывается.
Отображается надпись “NA FILE”. Устройство воспроизводит неподдерживаемый аудиофайл.
Отображается надпись “NO DISC”. Вставьте в загрузочный отсек диск, который можно воспроизвести.
Отображается надпись “TOC ERR”. Kомпакт-диск сильно загрязнен. / Kомпакт-диск перевернут. / Kомпакт-диск
Отображается надпись “ERROR 99”. По какой-либо причине возникло нарушение функционирования устройства.
Отображается надпись “COPY PRO”. Воспроизводится защищенный от копирования файл.
Отображается надпись “READ ERR”. Повторите копирование данных на USB-устройство. Если сообщение об ошибке
Отображается надпись “NO DVICE”. Устройство USB не подключено. Подсоедините устройство USB, и снова смените
Отображается надпись “NO MUSIC”.
Отображается надпись “NA DVICE”. Подключите поддерживаемое устройство USB и проверьте подключение.
Отображается надпись “USB ERR”. Отсоедините устройство USB, выключите устройство, а затем снова включите
Отображается надпись “iPod ERR”. Повторно выполните подключение iPod. / Перезапустите iPod.
Слышен шум. Пропустите дорожку или смените диск.
Дорожки невозможно воспроизвести
намеченным образом.
Продолжает мигать текст
“READING”.
Время от начала воспроизведения
неправильное.
Количество композиций в категории
“SONGS” (“КОМПОЗИЦИИ”) данного
устройства отлично от количества
композиций в категории “SONGS”
(“КОМПОЗИЦИИ”) проигрывателя iPod.
Не отображаются правильные
символы (т.е. название альбома).
Плотно вставьте антенну. / Полностью выдвиньте антенну.
должным образом. Если проблему не удается устранить, выключите устройство
и обратитесь в ближайший центр обслуживания.
Установите финализированный диск CD-R/CD-RW (выполните финализацию с
помощью устройства, которое использовалось для записи).
Остановите воспроизведение на время езды по неровной дороге. / Смените
диск. / Проверьте кабели и соединения.
сильно поцарапан. Попробуйте другой компакт-диск.
Нажмите кнопку сброса на устройстве. Если код “ERROR 99” продолжает
отображаться, обратитесь в ближайший центр обслуживания.
отображается по-прежнему, следует инициализировать устройство USB или
использовать другие устройства USB.
источник на устройство USB.
На подключенном устройстве USB нет доступных для воспроизведения аудиофайлов.
его. Если на экране устройства отображается то же сообщение, попробуйте
подключить другое устройство USB.
Порядок воспроизведения определяется при записи файлов.
На считывание требуется больше времени. Не используйте слишком сложную
иерархию с большим количеством папок.
Причиной является способ записи дорожек.
В данном устройства в общее количество не включаются файлы подкастов,
поскольку устройством не поддерживается воспроизведение файлов подкастов.
Приемник может отображать только буквы (верхнего регистра), цифры и
ограниченное число символов. Кириллица (прописной шрифт) может также
отображаться, если для параметра [RUSSIAN] установлено значение [RUS ON].
(стр. 6, 7)
РУССКИЙ
15
Page 52

Установка и подключение
Комплект поставки:
A Передняя панель .......................................... (×1)
B Щиток .................................................................... (×1)
C Посадочный корпус ................................... (×1)
D Чехол для передней панели ................ (×1)
E Жгут кабелей .................................................... (×1)
F Инструмент для снятия ............................ (×2)
Стандартная процедура
1
Извлеките ключ из замка зажигания,
затем отсоедините разъем “·”
автомобильного аккумулятора.
2
Выполните надлежащие проводные
подключения к входным и выходным
разъемам.
\ “Подключение проводов” (стр. 17)
3
Установите устройство в вашем
автомобиле.
\ “Установка устройства” (стр. 18)
4
Снова подсоедините разъем “·”
автомобильного аккумулятора.
5
Выполните сброс устройства. (стр. 4)
Предупреждение
Устройство можно устанавливать только
в автомобиле с источником питания
12 В постоянного тока, отрицательное
заземление.
Если Вы подключаете провод зажигания
(красный) и провод аккумулятора
(желтый) к ходовой части автомобиля
(заземление), это может привести к
возникновению короткого замыкания
и последующему возгоранию.
Всегда подключайте эти провода к
источнику питания через блок плавких
предохранителей.
Отсоедините отрицательный вывод
аккумулятора и установите все
электрические соединения перед
установкой устройства.
Изолируйте свободные кабели
виниловой лентой или подобным
материалом. Во избежание короткого
замыкания не снимайте колпачки со
свободных кабелей или выводов.
После установки обязательно заземлите
данное устройство на шасси автомобиля.
16
Внимание
Если зажигание автомобиля не имеет
положения “аккумулятор”, подключите
провода зажигания к источнику питания,
включение и выключение которого можно
осуществлять с помощью ключа зажигания.
Подключение провода зажигания к
источнику питания с постоянной подачей
напряжения, то есть с подключенными
проводами аккумулятора, может привести
к разрядке аккумулятора.
Не используйте сторонние винты. Применяйте
только винты из комплекта поставки.
Данное устройство подлежит установке в
консоль автомобиля. Убедитесь, что передняя
панель не касается крышки консоли (при
наличии) при закрытии или открытии.
После установки устройства, убедитесь
в том, что все осветительные и
электронные приборы вашего
автомобиля работают в прежнем режиме.
Установите устройство таким образом,
чтобы угол его наклона не превышал 30°.
Если предохранитель сгорел, первым
делом убедитесь в том, что кабели не
касаются друг друга, потому что их
качание может привести к короткому
замыканию, после чего замените
предохранитель на аналогичный новый.
Правильно подключите кабели
акустической системы к соответствующим
выводам. Устройство может выйти из
строя, если вы разделите · кабели, либо
же заземлите их путем присоединения к
любой металлической части автомобиля.
Если к системе подключаются только два
динамика, подключите разъемы либо к
двум передним гнездам вывода сигнала,
либо к двум задним гнездам вывода
сигнала (не используйте сочетание
заднего и переднего гнезда).
Не прикасайтесь к металлическим деталям
устройства в процессе и на протяжении
некоторого времени после завершения
эксплуатации устройства. Температура
металлических деталей, таких как радиатор
охлаждения и кожух, существенно повышается.
Установка и подключение данного
изделия требует умений и опыта. В целях
безопасности данная работа должна
выполняться специалистами.
В случае возникновения проблем при
установке обратитесь к дилеру компании
Kenwood.
Page 53

Подключение проводов
Выходные разъемы задних динамиков/низкочастотного динамика
Лампа синяя/желтая
(Провод дистанционного
управления с руля)
Синий/белый
(Провод управления
питанием / провод
управления антенной)
Коричневый
(Провод управления
отключением звука)
Жёлтый (кабель батареи)
Kрасный (Kабель зажигания)
Kрасный (A7)
Жёлтый (A4)
Разъемы ISO
Разъем антенны (JASO)
STEERING WHEEL
REMOTE INPUT
REMOTE CONT
К адаптеру дистанционного управления с руля
К гнезду управления питанием, если Вы используете
ANT CONT
дополнительный усилитель мощности, или к гнезду
P. CONT
управления антенной в автомобиле.
К гнезду, которое заземлено, когда звонит телефон или во
время разговора. (Для подключения навигационной системы
Kenwood ознакомьтесь с прилагаемым к ней руководством
MUTE
пользователя.)
Предохранитель (10 A)
REAR/SW
RL
Подключение разъемов ISO на некоторых
автомобилях VW/Audi или Opel (Vauxhall)
Возможно, потребуется изменить схему соединений
для прилагаемого жгута проводов, как показано
на рисунке.
Kабель
зажигания
(Kрасный)
Устройство
Kабель
A7 (Красный)
Автомобиль
A4 (Жёлтый)
батареи
(жёлтый)
Схема соединений по умолчанию
РУССКИЙ
Контакт
Цвет и функция
Контакт
A4 Жёлтый Аккумулятор B1 / B2 Фиолетовый
чёрный
A5 Синий/белый Управление питанием B3 / B4 Cерый
A7 Kрасный Зажигание (АCC) B5 / B6 Белый
A8 Чёрный Заземляющее соединение
B7 / B8 Зелёный
(земля)
Цвет и функция
ª
/ Фиолетовый/
·
ª
/ Серый/чёрный · Передний динамик
Задний динамик
(справа)
(справа)
ª
/ Белый/чёрный · Передний динамик
(слева)
ª
/ Зелёный/чёрный · Задний динамик
(слева)
17
Page 54

Установка устройства
1
2
Перед подключением
проверьте правильность
направления панели.
(Более широкие
фиксаторы вверху.)
Удаление устройства
1
Снимите переднюю панель.
2
Вставьте соединительный штифт
на инструментах для демонтажа
в отверстия на обеих сторонах
щитка, затем извлеките его.
3
Введите инструменты для
демонтажа в прорези на
каждой стороне, затем следуйте
инструкциям со стрелками, как
показано справа.
Подключите жгут проводов к
устройству. Другие проводные
подключения были выполнены
ранее. (стр. 17)
Приборная панель
автомобиля
Отогните соответствующие
фиксаторы,
предназначенные для
прочной установки
посадочного корпуса.
18
Page 55

Технические характеристики
Cекция FM-приемника
Диапазон частот (с интервалом 50 кГц):
87,5 МГц — 108,0 МГц
Полезная чувствительность (отношение сигнал/
шум = 26 дБ):
Пороговая чувствительность (ДИН отношение
сигнал/шум = 46 дБ):
Частотная характеристика (±3 дБ):
30 Гц — 15 кГц
Отношение сигнал/шум (MONO):
Разделение стереозвука (1 кГц):
1,0 мкВ/75 Ом
2,5 мкВ/75 Ом
63 дБ
40 дБ
Cекция MW-тюнера
Диапазон частот (с интервалом 9 кГц):
531 кГц — 1 611 кГц
Полезная чувствительность (отношение сигнал/
шум = 20
дБ):
36 μВ
Cекция LW-тюнера
Диапазон частот:
Полезная чувствительность (отношение сигнал/
шум = 20
153 кГц — 279 кГц
дБ):
57 μВ
Секция проигрывателя компактдисков
Лазерный диод:
Цифровой фильтр (D/A):
8-кратная дискретизация
Цифро-аналоговый преобразователь:
Скорость вращения дисковода:
500 об/мин — 200 об/мин (CLV)
Коэффициент детонации:
Ниже измерительных возможностей
Частотная характеристика (±1 дБ):
20 Гц — 20 кГц
Суммарное нелинейное искажение (1 кГц):
0,01 %
Отношение сигнал/шум (1 кГц):
Динамический диапазон:
Декодирование AAC: Файлы AAC-LC “.m4a”
MP3-декодирование:
аудиоуровнем-3 стандарта MPEG- 1/2
WMA-декодирование:
Windows Media Audio
GaAIAs
24 бит
105 дБ
90 дБ
В соответствии с
Совместимо с
Интерфейс USB
USB-стандарт:
USB1.1/ 2.0 (полноскоростной)
Максимальный ток источника питания:
5 В пост. тока 1 A
Система файлов:
Декодирование AAC: Файлы AAC-LC “.m4a”
MP3-декодирование:
аудиоуровнем-3 стандарта MPEG- 1/2
WMA-декодирование:
Windows Media Audio
FAT16/ 32
В соответствии с
Совместимо с
Секция звукового канала
Mаксимальная выходная мощность:
Выходная мощность (ДИН 45324, +B = 14,4 В):
30 Bт x 4
Полное сопротивление катушки
громкоговорителя:
Тоновоспроизведение:
Низкие частоты:
Средние частоты:
Bысокие частоты:
Уровень/нагрузка предусилителя (CD):
2 500 мВ/10 кОм
Полное сопротивление выхода предусилителя:
≤ 600 Ом
4 Ом — 8 Ом
100 Гц ±8 дБ
1 кГц ±8 дБ
12,5 кГц ±8 дБ
50 Bт x 4
Дополнительный входной
сигнал
Частотная характеристика (±3 дБ):
20 Гц — 20 кГц
Максимальное напряжение на входе:
Полное сопротивление на входе:
1 200 mV
10 кОм
Общие характеристики
Рабочее напряжение (допускается 11 B – 16 B):
14,4 V
Максимальное текущее потребление:
Установочные размеры (Ш × B × Г):
182 мм × 53 мм × 158 мм
Вес:
1,3 кг
Данные могут быть изменены без
уведомления.
10 A
РУССКИЙ
19
Page 56

ЗМІСТ
Застереження щодо
Застереження щодо дотримання
безпеки 2
Підготовка 4
Встановлення/зняття передньої панелі
Скасування налаштувань приладу
Основні операції 4
Початок роботи 6
Скасування показів на дисплеї
Встановлення параметрів
демонстраційного режиму
Налаштування годинника
Встановлення вихідних значень параметрів
настройки до початку експлуатації
Прослуховування радіо 8
Встановлення параметрів режиму роботи
([SETTINGS])
Прослуховування інших зовнішніх
компонентів 9
Прослуховування диску/
USB-пристрою/ iPod 10
Початок програвання диску
Підключення USB-пристрою
Підключення iPod
Встановлення режиму “Повтор
відтворювання” (“Repeat Play”)
Встановлення режиму “Відтворювання у
випадковому порядку” (“Random Play”)
Вибір папки / доріжки / файлу
Функції
Вибір композиції за алфавітними символами
Вибір режиму контролю програм та iPod
Встановлення параметрів режиму
роботи ([SETTINGS])
Налаштування параметрів функцій
(для )
з iPod
13
Пошук та усунення несправностей 14
Встановлення та підключення
автомагнітоли 16
Основні процедури
Попередження
Застереження
Підключення проводів
Встановлення автомагнітоли у відсік
панелі приладів автомобіля
Виймання приладу
Технічні характеристики 19
2
дотримання безпеки
ПОПЕРЕДЖЕННЯ
Перед тим, як працювати з пристроєм,
зупиніть автомобіль.
Важливі застереження...
Щоб запобігти короткому замиканню, не
кладіть і не залишайте всередині приладу
жодних металічних предметів (таких як
монети чи металічні інструменти).
Застереження: Рівень гучності має бути
таким, щоб можна було чути звуки ззовні
автомобіля. Надмірна гучність під час їзди
за кермом може спричинити аварію.
Конденсація вологи: Якщо автомобіль
обладнаний кондиціонером, на лінзах
лазера може конденсуватись волога.
Це може бути причиною збоїв при
відтворюванні компакт-диска. У такому
випадку вийміть диск і зачекайте, доки
волога випарується.
Автомагнітола може відтворювати лише
диски, які мають подані нижче позначки:
Малюнки в цьому посібнику користувача
є лише прикладами, які наведені з метою
більш наочно пояснити, як користуватися
органами керування. Тому зображення
на малюнках, можуть відрізнятися
від реальної картини під час роботи
автомагнітоли.
Кабель для підключення до USB, CA-U1EX
(макс.: 500 мА) необхідний для
підключення USB-пристрою (не входить
до основної комплектації).
Передбачено з’єднання Apple iPod/
iPhone з
Слово “iPod”, що зустрічається в
даному посібнику, позначає iPod або
iPhone, підключені до цього приладу
за допомогою з’єднувального кабелю
KCA-iP102 (додатковий аксесуар).
Якщо у вас виникли проблеми під час
установки, проконсультуйтесь зі своїм
дилером Kenwood.
.
Page 57

Перед тим, як придбати зовнішні
компоненти, проконсультуйтесь з
ділером компанії Kenwood щодо того,
чи придатні вони до підключення до
конкретної моделі автомагнітоли, та чи
будуть вони діяти у конкретному регіоні.
Детальна інформація та роз’яснення
щодо типів файлів, які може відтворювати
автомагнітола, подані в онлайновому
посібнику користувача на сайті:
www.kenwood.com/cs/ce/audiofile/
Декларація про Відповідність Вимогам Технічного Регламенту Обмеження Використання
деяких Небезпечних Речовин в електричному та електронному обладнанні
(затвердженого Постановою №1057 Кабінету Міністрів України)
Виріб відповідає вимогам Технічного Регламенту Обмеження Використання деяких Небезпечних
Речовин в електричному та електронному обладнанні (ТР ОВНР).
Вміст небезпечних речовин у випадках, не обумовлених в Додатку №2 ТР ОВНР:
1. свинець(Pb) – не перевищує 0.1 % ваги речовини або в концентрації до 1000 частин на
мільйон;
2. кадмій (Cd)– не перевищує 0.01 % ваги речовини або в концентрації до 100 частин на
мільйон;
3. ртуть(Hg) – не перевищує 0.1 % ваги речовини або в концентрації до 1000 частин на
мільйон;
4. шестивалентний хром (Cr 6+) – не перевищує 0.1 % ваги речовини або в концентрації до
1000 частин на мільйон;
5. полібромбіфеноли (PBB) – не перевищує 0.1% ваги речовини або в концентрації до 1000
частин на мільйон;
6. полібромдефенілові ефіри (PBDE) – не перевищує 0.1 % ваги речовини або в концентрації
до 1000 частин на мільйон.
Цей продукт не є встановленим
продуктом виробничої лінії ні виробника
транспортного засобу, ані професійного
постачальника транспортного засобу до
держави-члена ЄС.
Маркування виробів, обладнаних
лазером
На каркас/корпус поміщається наклейка,
в якій зазначається, що даний виріб
випромінюєє лазерні промені Класу 1. Це
означає, що даний апарат використовує
лазерні промені слабшого класу.
За межами даного апарату не існує
небезпеки лазерного випромінювання.
УКРАЇНА
3
Page 58

Підготовка
Встановлення/зняття передньої
панелі
1
2
Передню панель необхідно захищати від
дії прямого сонячного світла, надмірного
тепла та вологи. Також уникайте
забруднення та можливості потрапляння
на прилад води.
Зняту передню панель необхідно
тримати у спеціальному футлярі.
Передня панель є точною деталлю
обладнання і може бути пошкоджена
внаслідок ударів чи поштовхів.
2
1
Основні операції
Завантажувальний отвір Викидання диску
З метою запобігання забрудненню не
торкайтесь з’єднувачів пристрою та
передньої панелі руками.
Скасування налаштувань
приладу
У випадку наявності порушень у
функціонуванні приладу натисніть кнопку
скидання.
1
2
Кнопка скасування
При натисненні кнопки скидання
прилад повертається до налаштувань за
замовчуванням.
Вікно дисплея
3
Регулятор гучності
Зняття передньої панелі
Індикатори на дисплеї світяться у таких випадках...
RDS : “Radio Data System” — приймається сигнал
радіостанції з цифровими службовими
даними.
ST : Приймається стереосигнал радіостанції
(FM).
IN : “Диск вставлений” — в програвач
вставлений компакт-диск.
TI : “Ситуація на дорозі” — увімкнено функцію
“Інформування про ситуацію на дорозі”.
4
USB-роз’єм
Додаткове
вхідне гніздо
Page 59

Коли ви натискаєте або утримуєте наступну кнопку(кнопки)...
Кнопка Загальні функції
Вмикання.
При натисканні та утриманні – вимкнення живлення.
Якщо живлення увімкнуто, натискаючи цю кнопку можна обрати
SRC
Регулятор
гучності (при
повертанні)
Регулятор
гучності
(натиснення)
(BAND)
1 (–) / 2 (+) Вибір наступної або попередньої папки.
6 (
4
/
¢
SCRL DISP
AUDIO
5 (iPod)
джерело сигналу: (TUNER, USB/ iPod, CD, AUX, STANDBY).
• Якщо джерело програвання готове, також почнеться й його програвання.
• Можна вибрати “iPod” або “CD” лише, коли iPod підключений або диск
вставлений в пристрій.
Регулювання рівня гучності.
Вибір пунктів.
Підтвердження вибору.
Активує режим налаштування параметрів функцій ([FUNCTION]).
Оберіть діапазони FM (FM1/ FM2/ FM3) або MW/ LW, якщо в якості
джерела обрано “TUNER” (Тюнер).
Перехід в режим Пошук музики (Music Search).
В режимі відтворення компакт-диска/USB-пристрою/iPod вмикає режим
)
паузи/відновлює відтворення.
В режимі прослуховування радіо використовуються для пошуку
радіостанції.
Використовуються для вибору доріжки/файла.
При утриманні цих кнопок в натиснутому положенні здійснюється
перехід на наступну/попередню доріжку.
Змінює інформацію, що відображається на дисплеї.
При утриманні цієї кнопки в натиснутому положенні вмикається
прокрутка даних на дисплеї.
Якщо натиснути і утримувати цю кнопку, коли на дисплеї відображається
час, активується режим настройки таймера (стор. 6).
Активує режим налаштування параметрів керування звуком ([AUD CTRL]).
(стор. 13)
Повернення до попереднього елемента.
Якщо натиснути і утримувати цю кнопку, відбудеться вихід з режиму
налаштування.
Для :
Входить в режим управління (MODE ON/ MODE OFF) для відтворення з
iPod. (стор. 12)
УКРАЇНА
Автоматичне приглушення звуку при надходженні телефонного дзвінка
Щоб скористатися цією функцією, підключіть кабель “MUTE” до телефону за допомогою
спеціального з’єднувача, які є у продажу. (стор. 17)
При надходженні виклику на табло з’являється
повідомлення “CALL”.
Аудіосистема призупиняється.
Щоб під час телефонної розмови продовжувати
прослуховувати аудіосистему, натисніть кнопку
Повідомлення “CALL” зникне, і аудіосистема відновить
роботу.
По завершенні телефонної
розмови повідомлення
“CALL” зникає.
Аудіосистема відновлює
роботу.
SRC.
5
Page 60

Початок роботи
Скасування показів на дисплеї
На дисплеї, завжди відтворюється заставка, якщо цей режим не скасувати.
При включенні живлення (або після скасування параметрів настройки) на дисплеї
відображається повідомлення:
[CANCEL] \
1
Натисніть регулятор гучності.
За промовчанням встановлений варіант [ <Y>/ N ].
2
Ще раз натисніть регулятор гучності для підтвердження.
На дисплеї з’являється [DEMO OFF].
Якщо протягом приблизно 15 секунд не виконувалося жодної дії, або якщо на
кроці
демонстраційний режим [DEMOMODE], і на дисплеї з’являється заставка.
Встановлення параметрів демонстраційного режиму
1
Натисніть регулятор гучності, активується режим налаштування параметрів
функцій ([FUNCTION]).
2
Поворотом регулятора гучності виберіть [DEMO] і натисніть регулятор для
введення вибору.
3
Поворотом регулятора оберіть [DEMO ON] або [DEMO OFF].
При виборі [DEMO ON], заставка буде починати відтворюватися на дисплеї, якщо
протягом приблизно 20 секунд не виконувалася жодна дія.
4
Щоб завершити процедуру налаштування параметрів функцій, натисніть і утримуйте
Налаштування годинника
1
Натисніть регулятор гучності, активується режим налаштування параметрів
функцій ([FUNCTION]).
2
Поворотом регулятора гучності виберіть [SETTINGS] і натисніть регулятор для
введення вибору.
3
Поворотом регулятора гучності виберіть [CLOCK] і натисніть регулятор для
введення вибору.
4
Поворотом регулятора гучності виберіть [CLK ADJ] і натисніть регулятор для
введення вибору.
На дисплеї блимають цифри годин.
5
Поворотом регулятора гучності встановіть години, а потім натисніть регулятор для
введення значення хвилин.
На дисплеї блимають цифри хвилин.
6
Поворотом регулятора гучності встановіть хвилини, і натисніть регулятор для
підтвердження завершення налаштування таймера.
Натисніть 4
7
Щоб завершити процедуру налаштування параметрів функцій, натисніть і утримуйте
Встановлення вихідних значень параметрів настройки до початку
експлуатації
1
Щоб увімкнути режим очікування ([STANDBY]), натисніть SRC.
2
Натисніть регулятор гучності, активується режим налаштування параметрів
функцій ([FUNCTION]).
3
Поворотом регулятора гучності виберіть [INITIAL] і натисніть регулятор для
введення вибору.
4
Вибір значення параметра здійснюється поворотом регулятора гучності, для
підтвердження вибору необхідно натиснути регулятор.
Див. таблицю на стор. 7, де наводиться опис значень.
5
Щоб завершити процедуру налаштування параметрів функцій, натисніть і утримуйте
6
[
DEMO] \ [PRESS] \ [VOLUME] \ [KNOB]
2
поворотом регулятора гучності було обрано варіант [Y/ <N>], вмикається
/
¢, щоб перейти між налаштуванням годин та хвилин.
.
.
.
Page 61

Режим
PRESET TYPE NML *: В пам’ять вноситься одна радіостанція для кожної кнопки фіксованої настройки у кожному
KEY BEEP BEEP ON */ BEEP OFF: Вмикає/вимикає видачу звукового сигналу при натисканні кнопок.
RUSSIAN RUS ON: Вмикає відображення російською мовою імені папки, файлу, назви пісні, імені виконавця та
OFF WAIT Встановлює проміжок часу, через який автомагнітола в режимі очікування (STANDBY), автоматично
AUX SET AUX ON *: Включення “AUX” у виборі джерела. Звук з підключеного зовнішнього компонента
CD READ CD READ1 *: Активується функція автоматичного розпізнання типу запису на компакт-диску: аудіофайли
SWPRE SWPRE R */ SWPRE SW: Якщо до вихідних з’єднувачів на задній стінці автомагнітоли (через зовнішній
SPEAKER SP OFF */ SP 5/4/ SP 6 × 9/6/ SP OEM: Щоб якість звучання була оптимальною, оберіть варіант, який
F/W xx.xx <Y>/ N *: Оновлює вбудоване ПЗ. ; Y /<N>:
Доступні для вибору значення параметрів (позначає попередньо
встановлене значення *)
з діапазонів (FM1/ FM2/ FM3/ MW/ LW). ; TYPE MIX: В пам’ять вноситься одна радіостанція для кожної
кнопки фіксованої настройки незалежно від обраного діапазону (FM1/ FM2/ FM3/ MW/ LW).
назви альбому (якщо такі є). ; RUS OFF *: Відміняє.
вимкнеться, щоб не витрачати енергію акумулятора.
OFF ––– : Відміняє ; OFF 20M *: 20 хвилин; OFF 40M: 40 хвилин; OFF 60M: 60 хвилин
відтворюється через динаміки автомобіля. ; AUX OFF: Відключення “AUX” у виборі джерела.
або музичний компакт-диск. ; CD READ2:
компакт-диска. При програванні диску із аудіофайлом немає звуку.
підсилювач) підключені задні динаміки — оберіть (“REAR”*), якщо підключений сабвуфер — оберіть
(“SUB-W”).
відповідає розміру динаміків.
Детальнішу інформацію щодо оновлення ПЗ див.: www.kenwood.com/cs/ce/
Примусово вмикається режим відтворення музичного
Скасування (оновлення не активоване).
Обслуговування
Чищення приладу: Забруднення з панелі видаляють сухим силіконом або м’якою
тканиною. Недотримання цієї вимоги може спричинити пошкодження монітора або
автомагнітоли.
Очищення з’єднувача: Цей пристрій може працювати
некоректно, якщо з’єднання між пристроєм та
передньою панеллю забруднені. Зніміть передню
панель та обережно витріть з’єднувач ватною паличкою
так, щоб не пошкодити його.
Правила поводження з дисками
Не торкайтеся робочої сторони диска.
Не наклеюйте на диски етикетки і т.п., а також не використовуйте диски з наклейками.
Не використовуйте з дисками жодних допоміжних засобів.
Чистити диски слід у відцентровому напрямі.
Для чищення дисків використовуйте сухий силікон або м’яку тканину. Не
використовуйте розчинників.
Виймаючи диск з програвача, тримайте його горизонтально, не перекошуючи.
Якщо на зовнішньому краю диска або у центральному отворі є обідок, його необхідно
зняти перед тим, як вставляти диск.
З’єднувач (на задній
стороні передньої панелі)
УКРАЇНА
7
Page 62

Прослуховування радіо
Утримуйте протягом приблизно 2 секунд, щоб запам’ятати поточну станцію.
Натисніть, щоб повернути станцію, яка буда запам’ятована.
1
Натисніть SRC для вибору “TUNER”.
2
Натискаючи необхідну кількість разів кнопку (BAND), оберіть потрібний
діапазон (FM1/ FM2/ FM3/ MW/ LW).
На дисплеї з’являється “F1” / “F2” / “F3” / “MW” / “LW”.
3
Для пошуку радіостанції натисніть кнопку 4
Встановлення параметрів режиму роботи ([SETTINGS])
В режимі відтворення сигналу радіостанції...
1
Натисніть регулятор гучності, активується режим налаштування параметрів
функцій ([FUNCTION]).
2
Поворотом регулятора гучності виберіть [SETTINGS] і натисніть регулятор для
введення вибору.
3
Вибір значення параметра здійснюється поворотом регулятора гучності, для
підтвердження вибору необхідно натиснути регулятор.
Параметри настройки і доступні для вибору значення подані у таблиці нижче.
4
Щоб завершити процедуру налаштування параметрів функцій, натисніть і утримуйте .
/
¢.
Режим
LO.SEEK
SEEKMODE Задає варіант налаштування радіоприймача при натисканні кнопок
A-MEMORY <Y>/ N *: Автоматичний запис у пам’ять 6 станцій з якісним рівнем сигналу. ; Y /<N>:
MONO SET MONO ON: Покращує якість відтворювання сигналу радіостанції FM (але стереоефект при цьому може
PTY SRCH
TI TI ON: Дозволяє тимчасово перемикнути пристрій на відтворення інформації про рух транспорту. ;
NEWS SET NEWS 00M – NEWS 90M: Встановлює час приймання наступного огляду новин. ; NEWS OFF *: Відміняє.
AF SET AF ON *: Встановлюється режим автоматичного пошуку іншої радіостанції, яка транслює таку саму
Доступні для вибору значення параметрів (позначає попередньо
встановлене значення *)
LO.S ON:
Встановлюється режим пошуку тільки FM радіостанцій з якісним рівнем сигналу. ; LO.S OFF *: Відміняє.
4
AUTO1 *: Автоматичний пошук радіостанції. ; AUTO2: Пошук відповідно до станцій, збарежених у
попередньо встановленій пам’яті. ; MANUAL: Пошук радіостанції вручну.
(автоматичний запис в пам’ять не активований). (Цей пункт доступний для вибору тільки, якщо у
початкових настройках для функції запису у пам’ять фіксованих настроювань на радіостанції ([PRESET])
був обраний варіант [TYPE NML]). (стор. 6, 7)
зникнути). ; MONO OFF *: Скасовує цей режим (стереоефект відновлюється).
Обирає доступний тип програми (див. таблицю на стор. 9). Потім натисніть 4 / ¢, щоб розпочати пошук.
Натисніть регулятор гучності, щоб перейти до вибору мови PTY. Поверніть регулятор гучності, щоб обрати мову
PTY (ENGLISH */ FRENCH/ GERMAN (Англійська/французька/німецька)), потім натисніть для підтвердження.
TI OFF *: Відміняє.
програму у тій самій мережі Radio Data System, але з кращою якістю сигналу, у випадку незадовільної
якості сигналу радіостанції, який приймається. ; AF OFF:
Відміняє.
/ ¢.
Скасування
8
Page 63

Режим
REGIONAL REG ON *: Встановлюється режим перемикання на іншу станцію тільки у заданому регіоні з
ATP SEEK ATPS ON *: Встановлюється режим автоматичного пошуку радіостанції з кращою якістю сигналу у
Вибір типу програм ([MONO SET/ PTY SRCH]) доступний тільки, якщо джерелом сигналу обрано “FM”.
Параметри [TI/ NEWS SET/ AF SET/ REGIONAL/ ATP SEEK] доступні для вибору тільки якщо джерелом сигналу
обрано “FM”. Якщо обрано інше джерело сигналу, ці параметри доступні через пункт [TUNERSET] в режимі
налаштування параметрів функцій. (стор. 14)
Доступні для вибору типи програм ([SPEECH]
SPEECH MUSIC NEWS AFFAIRS INFO SPORT EDUCATE
DRAMA CULTURE SCIENCE VARIED POP M (музика)
LIGHT M (музика)
RELIGION PHONE IN TRAVEL LEISURE JAZZ COUNTRY
OLDIES
Автомагнітола буде шукати тип програми, який підпадає під категорію
або
[MUSIC]
Функція Radio Data System недоступна на території, де обслуговування не підтримується
жодною з радіостанцій.
Якщо гучність була налаштована під час прийняття інформації про дорожню ситуацію,
вона зберігається автоматично. Цей рівень гучності буде встановлений при наступній
активації функції “Інформування про ситуацію на дорозі” (Traffic Information).
Доступні для вибору значення параметрів (позначає попередньо
встановлене значення *)
використанням функції “AF”. ; REG OFF: Відміняє.
випадку, коли якість приймання огляду ситуації на дорозі незадовільна. ; ATPS OFF: Відміняє.
CLASSICS
FOLK M (музика)
(Музика), якщо вона обрана.
OTHER M (музика)
DOCUMENT
: Білі символи. ;
WEATHER FINANCE CHILDREN SOCIAL
[MUSIC]
: Чорні символи)
ROCK M (музика) EASY M (музика)
NATION M (музика)
[SPEECH]
:
(Розмови)
Прослуховування інших зовнішніх
компонентів
Підготовка : Переконайтеся, що параметр [AUX ON] вибрано в якості джерела сигналу
для входу [AUX SET]. (стор. 6, 7)
1
Натисніть SRC для вибору “AUX”.
2
Увімкніть зовнішній пристрій у
запустіть відтворювання.
3
Відрегулюйте гучність звуку
регулятором гучності.
Портативний аудіопристрій
(доступний на ринку)
Додаткове вхідне гніздо
Мініатюрний стереофонічний
штекер 3,5 мм (доступний на ринку)
УКРАЇНА
9
Page 64

Прослуховування диску/
USB-пристрою/ iPod
Завантажувальний отвір
При натискання цієї кнопки диск видаляється. (На дисплеї при
цьому з’являється повідомлення “NO DISC”, і індикатор “IN” згасає.)
Натискаючи ці кнопки, вибирають
потрібну доріжку/файл.
Якщо натиснути та утримувати ці
кнопки, здійснюється прискорений
перехід вперед/назад.
Натисніть, щоб вибрати наступну
або попередню папку.
• Недоступно, якщо вибрано
“ALL RDM” (У випадковому порядку).
Початок програвання диску
1
Натисніть кнопку SRC, щоб увімкнути
живлення.
2
Вставте диск у призначений для цього
проріз.
Відтворення почнеться автоматично.
3
Щоб відновити/призупинити
відтворення, натисніть кнопку 6 (
(якщо необхідно).
Про програму KENWOOD Music Editor
Цей пристрій підтримує прикладну програму для ПК
“KENWOOD Music Editor Light ver1.1” або пізнішої версії.
При використанні аудіофайлів з внесеною
інформацією бази даних за допомогою “KENWOOD
Music Editor Light ver1.1” доступна можливість
пошуку файла за назвою, альбомом або ім’ям
виконавця за допомогою функції <Пошук музики>.
В Інструкції з експлуатації термін “USB device”
означає пристрій, який містить аудіофайли з
інформацією бази даних, внесеною за допомогою
програми KENWOOD Music Editor.
Програма “KENWOOD Music Editor Light ver1.1”
доступна для завантаження з Інтернет-сайту за
наступною адресою: www.kenwood.com/cs/ce/
Більш детальну інформацію про “KENWOOD Music
Editor Light ver1.1” див. на вищезазначеному сайті
або у довідці програми.
10
USB-роз’єм
Зніміть кришку, а потім
виконайте наступні
з’єднання.
Джерело вмикається
автоматично,
починається відтворення.
Підключення USB-пристрою
CA-U1EX (макс.: 500 мА)
(не входить до основної
)
Пристрій USB (доступний на ринку)
комплектації)
Підключення iPod
Програвач Apple iPod
(доступний на ринку)
KCA-iP102 (не входить до
основної комплектації)
(для )
Page 65

Встановлення режиму “Повтор
відтворювання” (“Repeat Play”)
Щоб обрати потрібний варіант
натисніть відповідну кількість разів
кнопку з цифрою 4 (REP).
Аудіо компакт-диск : TRAC REP (повтор
доріжки), REP OFF (вимкнути повтор)
AAC/MP3/WMA : FILE REP (повтор файлу),
FOLD REP (повтор папки), REP OFF
(вимкнути повтор)
iPod : FILE REP (повтор файлу), REP OFF
(вимкнути повтор)
Встановлення режиму
“Відтворювання у випадковому
порядку” (“Random Play”)
Щоб обрати потрібний варіант
натисніть відповідну кількість разів
кнопку з цифрою 3 (RDM).
Аудіо компакт-диск : DISC RDM
(відтворення диску у випадковому
порядку), RDM OFF (вимкнути
відтворення у випадковому порядку)
AAC/MP3/WMA/iPod : FOLD RDM
(відтворення папки у випадковому
порядку), RDM OFF (вимкнути
відтворення у випадковому порядку)
Для AAC/MP3/WMA/iPod : Щоб обрати
режим “Відтворення усіх доріжок у
випадковому порядку” (“ALL RDM”),
натисніть та утримуйте кнопку 3 (RDM).
– Передбачено, лише якщо спочатку
обирається “RDM OFF” (вимкнути
відтворення у випадковому порядку).
–
Для :
iPod на “songs” (композиції).
Зміна елементу пошуку
Вибір папки / доріжки / файлу
1
Щоб запустити режим “Пошук аудіофайла”
(“Music Search”), натисніть кнопку
На дисплеї з’являється повідомлення
“SEARCH” і ім’я поточного файлу.
2 Поворотом регулятора гучності оберіть
потрібну папку/доріжку/файл і натисніть
на регулятор для підтвердження вибору.
Щоб повернутися до кореневої папки (або
першої доріжки для аудіо компакт-диску),
натисніть цифрову кнопку
Щоб повернутися до попередньої папки,
натисніть кнопку
Щоб вийти з режиму пошуку аудіофайла (“Music
Search”), натисніть та утримуйте кнопку
Повідомлення <або> на дисплеї
з’являється, якщо попередній/наступний
елемент доступний для вибору.
.
5 (iPod)
(BAND).
або 5.
.
Для пристрою USB * і iPod: Щоб
пропустити пошук, натисніть кнопку
4 / ¢.
* Ця операція може застосовуватись
лише до файлів, які зареєстровано в
базі даних, створеній за допомогою
програми KENWOOD Music Editor. (Див.
задню сторінку обкладинки).
Диски, які непридатні до
використання
Диски з відхиленням від кругової форми.
Диски з забарвленням робочої поверхні, а також
забруднені диски.
Диски для одноразового / багаторазового запису
не відтворюються, якщо після запису на них не
було сформовано закриваючий службовий блок
(диск не фіналізований — “незакрита сесія”).
(Інформація щодо того, як фіналізувати диск після
запису, подана у інструкції користувача записуючого
пристрою та у програмі для запису дисків.)
Не можна використовувати СD-диски розміром
8 см. Спроба використання адаптера може
призвести до виникнення несправностей.
Про аудіофайл
Формати відтворення аудіофайлів:
AAC-LC (.m4a), MP3 (.mp3), WMA (.wma)
Формати відтворення дисків CD-R/RW/ROM
Формати відтворення дискових файлів: ISO 9660
Level 1/2, Joliet, Romeo, Long file name.
Система файлів відтворюваного USB-пристрою:
FAT16, FAT32
Навіть якщо аудіофайли відповідають стандартам,
переліченим вище, відтворення може не
здійснюватися, залежно від типів або стану носіїв та
пристрою.
Про USB-пристрій
Пристрій може відтворювати наступні файли, що
збережені на пристрої зберігання даних USB.
AAC-LC (.m4a), MP3 (.mp3), WMA (.wma)
Установіть USB-пристрій у місці, в якому він не
заважатиме вам вести машину належним чином.
Не можна підключати USB-пристрій через
концентратор USB або Multi Card Reader.
Щоб запобігти втраті інформації, впевніться в тому,
що для всіх важливих даних було створено резервні
копії.
Підключення кабеля, довжина якого перевищує 5 м
може спричинити неправильне відтворення.
УКРАЇНА
11
Page 66

Функції з iPod
Вибір композиції за
алфавітними символами
1
Щоб запустити режим “Пошук
аудіофайла” (“Music Search”), натисніть
кнопку
На дисплеї з’являється “SEARCH”.
2
Щоб обрати категорію, поверніть
регулятор гучності, для підтвердження
вибору натисніть регулятор.
3
Щоб запустити режим пошуку за
алфавітними символами, ще раз
натисніть кнопку
На дисплеї з’являється “SRCH
4
Щоб вибрати шуканий символ,
поверніть регулятор гучності.
5
Натисніть 4 / ¢, щоб перемістити
положення запису.
Передбачено введення не більше 3 символів.
6
Щоб активувати режим пошуку,
натисніть регулятор гучності.
7
Поворотом регулятора гучності
оберіть потрібну папку/доріжку/
файл і натисніть на регулятор для
підтвердження вибору.
Щоб повернутися до попередньої папки,
натисніть кнопку
Для того, щоб повернутись до
попереднього меню, натисніть цифрову
кнопку 5 (iPod).
Щоб вийти з режиму пошуку за
алфавітними символами (“Alphabet
Search”), натисніть та утримуйте кнопку
Якщо в iPod міститься велика кількість
композицій або переліків відтворення,
необхідно більше часу для пошуку.
Для пошуку за символами, відмінними від
A – Z та 0 – 9, введіть лише “
Артикль (a, an, the) у назві композиції не
враховуватиметься під час пошуку.
(BAND).
(BAND).
.
.
”.
– – –
”.
*
Вибір режиму контролю програм
та iPod
Натисніть кнопку 5 (iPod), щоб
зробити вибір.
MODE ON: Керування iPod з iPod *. На
дисплеї з’являється “APP&iPod”.
MODE OFF: Керування iPod із приладу.
* Ви зможете контролювати відтворення/
паузу, вибір файлів, перемотку вперед/
назад з пристрою.
Встановлення параметрів
режиму роботи ([SETTINGS])
Під час прослуховування iPod...
1
Натисніть регулятор гучності,
активується режим налаштування
параметрів функцій ([FUNCTION]).
2
Поворотом регулятора гучності
виберіть [SETTINGS] і натисніть
регулятор для введення вибору.
3
Поворотом регулятора гучності
виберіть [SKIPSRCH] і натисніть
регулятор для введення вибору.
4
Вибір значення параметра
здійснюється поворотом регулятора
гучності, для підтвердження вибору
необхідно натиснути регулятор.
SKIP 0.5% (Первісна)/ SKIP 1%/
SKIP 5%/ SKIP 10% :
співвідношення пропусків під час
пошуку композиції у режимі пошуку
музики.
(При утриманні кнопки 4 / ¢
відбувається пропуск на 10% незалежно
від налаштування.)
5
Щоб завершити процедуру
налаштування параметрів функцій,
натисніть і утримуйте
Інформація про сумісні iPod/iPhone
Made for
– iPod touch (1st, 2nd, 3rd та 4th generation)
– iPod classic
– iPod with video
– iPod nano (1st, 2nd, 3rd, 4th, 5th та 6th generation)
– iPhone 4
– iPhone 3GS
– iPhone 3G
– iPhone
Інформацію щодо останнього списку сумісності та
версій програмного забезпечення для iPod/iPhone
див. на сайті: www.kenwood.com/cs/ce/ipod
Якщо ви починаєте відтворення після підключення
до iPod, першою відтворюється музика з iPod.
У такому випадку на дисплей виводиться напис
“RESUMING” без показу назви папки тощо. Зміна
елементу перегляду покаже відповідний заголовок
тощо.
Ви не можете використовувати “KENWOOD” або
“✓”, коли вони виводяться на iPod.
Налаштування
.
12
Page 67

Налаштування параметрів функцій
1
Щоб увійти до меню керування звуком [AUD CTRL] (див. таблицю нижче): Натисніть
AUDIO.
Щоб увійти в меню налаштувань [SETTINGS] (стор. 14): Натисніть регулятор гучності,
активується режим налаштування параметрів функцій ([FUNCTION]). Поворотом
регулятора гучності виберіть [SETTINGS] і натисніть регулятор для введення вибору.
2
Вибір значення параметра здійснюється поворотом регулятора гучності, для
підтвердження вибору необхідно натиснути регулятор.
Повторіть цей крок, щоб обрати/активувати бажаний пункт.
Щоб повернутися до попереднього пункту, натисніть кнопку .
3
Щоб завершити процедуру налаштування параметрів функцій, натисніть і
утримуйте
[AUD CTRL] : Під час прослуховування будь-якого джерела сигналу, за винятком режиму
очікування (“STANDBY”)...
Режим
SW LEVEL SW L –15 — SW L +15 (позначає попередньо встановлене значення: SW L 0): Встановлює рівень
BASS LVL –8 — +8 (позначає попередньо встановлене значення: BAS L 0/ MID L 0/ TRE L 0):
MID LVL
TRE LVL
EQ PRO
BASS ADJ BASS FRQ BAS F 60/ BAS F 80/ BAS F100 */ BAS F200: Встановлює центральну частоту.
MID ADJ MID FRQ MID F0.5K/ MID F1.0K */ MID F1.5K/ MID F2.5K: Встановлює центральну частоту.
TRE ADJ TRE FRQ TRE 10.0K/ TRE 12.5K */ TRE 15.0K/ TRE 17.5K: Встановлює центральну частоту.
EQ NATURAL */ USER/ ROCK/ POPS/ EASY/ TOP40/ JAZZ/ POWERFUL: Встановлює попередньо обраний
B. BOOST BB-L LV1/ BB-L LV2/ BB-L LV3: Встановлює рівень підйому низьких частот. ; BB-L OFF *:
LOUDNESS LOUD LV1 */ LOUD LV2: Вибір підсилення низьких та високих частот для отримання гарно
BALANCE BAL L15 — BAL R15 (позначає попередньо встановлене значення: BAL 0): Регулює баланс
FADER FAD R15 — FAD F15 (позначає попередньо встановлене значення: FAD 0): Регулює баланс
SW SET SW ON *: Вмикає вихідний сигнал сабвуфера. ; SW OFF:
.
Доступні для вибору значення параметрів (позначає попередньо
встановлене значення *)
гучності сабвуфера.
Запам’ятовування параметрів сигналу джерела: Налаштування рівня запам’ятовування кожного
джерела. (Перш ніж робити налаштування, оберіть джерело, яке ви бажаєте налаштувати.)
BASS LVL BAS L –8 — BAS L +8 (позначає попередньо встановлене значення: BAS L 0):
BASS Q BAS Q1.00 */ BAS Q1.25/ BAS Q1.50/ BAS Q2.00: Встановлення коефіцієнта якості.
BASS EXT B-EX ON: Вмикає розширений режим відтворення низьких частот. ; B-EX OFF *: Відміняє.
MID LVL MID L –8 — MID L +8 (позначає попередньо встановлене значення: MID L 0):
MID Q MID Q0.75/ MID Q1.00 */ MID Q1.25: Встановлення коефіцієнта якості.
TRE LVL TRE L –8 — TRE L +8 (позначає попередньо встановлене значення: TRE L 0):
режим звучання відповідно до музичного жанру. (Для встановлення налаштованих заздалегідь
параметрів відтворення низьких, середніх та високих частот, оберіть [USER]).
збалансованого звучання на малій гучності. ; LOUD OFF:
звучання лівого та правого динаміків.
звучання задній і передніх динаміків.
Встановлює рівень гучності низьких частот.
Встановлює рівень гучності низьких частот.
Встановлює рівень гучності низьких частот.
Відміняє.
Відміняє.
Відміняє.
Продовження...
13
УКРАЇНА
Page 68

Режим
DTIL SET
LPF SW LPF THRU *: Всі сигнали посилаються до низькочастотного динаміка. ;
SW PHASE PHAS REV
SPRM SET SPRM ON *:
V-OFFSET
(позначає
попередньо
встановлене
значення:
V-OFF 0)
[SW LEVEL/ SW SET/ LPF SW/ SW PHASE] можна обрати, лише коли параметр [SWPRE] встановлено в значення
[SWPRE SW]. (стор. 6, 7)
[SW LEVEL/ LPF SW/ SW PHASE] можна обрати, лише коли параметр [SW SET] встановлено в значення [SW ON].
[SETTINGS]
Режим
AUX NAME AUX */ DVD/ PORTABLE/ GAME/ VIDEO/ TV: Встановлює ім’я підключеного зовнішнього пристрою.
CLOCK
CLK ADJ (Детальну інформацію наведено на стор. 6.)
TIMESYNC SYNC ON *: Синхронізує таймер автомагнітоли за сигналами часу станції Radio Data System. ;
DISPLAY
DISP DIM DIM ON: Затемнює освітленість дисплею ; DIM OFF *: Відміняє.
TEXTSCRL SCL AUTO */ SCL ONCE: Встановлює режим автоматичної або разової прокрутки зображення на дисплеї. ;
TUNERSET TI/ NEWS SET/ AF SET/ REGIONAL/ ATP SEEK: Доступно для вибору лише, якщо обране джерело, відмінне
Доступні для вибору значення параметрів (позначає попередньо
встановлене значення *)
LPF 85H/ LPF 120H/ LPF 160H: Частоти, вищі за 85 Гц/120 Гц/160 Гц обрізаються.
(180°)/ PHAS NML * (0°): Регулює зсув фази сигналу сабвуфера, щоб узгодити його з
динаміком для оптимальної якості звучання. (Доступно для вибору за винятком випадку, коли для
параметра [LPF SW] обрано значення [LPF THRU].)
складових, які втрачаються під час стискання аудіосигналу у форматах AAC/ MP3/ WMA.
SPRM OFF: Відміняє. (Доступно для вибору лише при відтворенні диска AAC/ MP3/ WMA або USBпристрою).
V-OFF –8 — V-OFF +8 (для лінійного входу (“AUX”)) ; V-OFF –8 — V-OFF 0 (для інших джерел
сигналу)
джерела сигналу рівень гучності буде автоматично підвищуватись або зменшуватись. (Перш ніж
робити налаштування, оберіть джерело, яке ви бажаєте налаштувати.)
(Доступно для вибору, тільки якщо джерелом сигналу обрано лінійний вхід (“AUX”)).
SYNC OFF: Відміняє.
SCL OFF: Відміняє.
від тюнера. (Для більш детального ознайомлення дивіться сторінки 8 та 9).
Створює реалістичне звучання за рахунок відновлення методом інтерполяції високочастотних
:
Встановлює попередньо задані рівні гучності для кожного джерела сигналу. При зміні
Доступні для вибору значення параметрів (позначає попередньо
встановлене значення *)
;
Пошук та усунення несправностей
Симптом Засоби виправлення/Причини
Звук не відтворюється. Налаштуйте гучність до оптимального рівня. / Перевірте шнури та з’єднання.
З’являється повідомлення
“PROTECT”, і робота пристрою
блокується.
Звук не відтворюється. / Пристрій
не вмикається. / Інформація, що
відображається на дисплеї, невірна.
14
Перевірте, чи клеми динаміків добре захищені ізоляційною стрічкою, а потім
перезапустіть пристрій. Якщо повідомлення “PROTECT” не зникає, необхідно
звернутися до найближчого сервісного центру.
З’єднувачі забруднені. Очистіть з’єднувачі. (стор. 7)
Page 69

Симптом Засоби виправлення/Причини
Пристрій не працює взагалі. Перезавантажте пристрій. (стор. 4)
Параметр [OFF WAIT]
Нечітка трансляція. /
Статичні перешкоди під час
прослуховування радіо.
Миготить “IN”. Порушення у роботі програвача компакт-дисків. Вийміть диск і правильно
Не відтворюються диски типу
CD-R/CD-RW, і неможливо перейти
на іншу доріжку.
Звук диску інколи переривається. Зупиняйте відтворення на поганих ділянках доріг. / Змініть диск. / Перевірте
На дисплеї з’являється “NA FILE”. Пристрій намагається відтворити аудіофайл, формат якого не підтримується.
На дисплеї з’являється “NO DISC”. Вставте у завантажувальний отвір диск, що може програватися.
На дисплеї з’являється “TOC ERR”. CD-диск брудний. / CD-диск вставлено зворотним боком. / CD-диск дуже
На дисплеї з’являється “ERROR 99”. Прилад не працює з невідомих причин. Натисніть кнопку скасування. Якщо код
На дисплеї з’являється “COPY PRO”. Формат файла захищений від копіювання.
На дисплеї з’являється “READ ERR”. Повторно скопіюйте файли та папки до USB-пристрою. Якщо повідомлення
На дисплеї з’являється “NO DVICE”. Не підключено пристрій USB. Підключіть USB-пристрій та знову змініть джерело
На дисплеї з’являється “NO MUSIC”. Підключений пристрій USB не має аудіофайлів для відтворення.
На дисплеї з’являється “NA DVICE”. Підключіть пристрій USB, який підтримується, та перевірте з’єднання.
На дисплеї з’являється “USB ERR”. Видаліть пристрій USB, вимкніть прилад, потім увімкніть знову. Якщо зображення
На дисплеї з’являється “iPod ERR”. Ще раз підключіть iPod. / Перезавантажте iPod.
Чути шум. Перейдіть на іншу доріжку або змініть диск.
Доріжки програються не в тому
порядку, у якому ви передбачали
їхнє програвання.
Блимає повідомлення “READING”. Зчитування вимагає більше часу. Не використовуйте дуже багато ієрархій та
Час, що минув з початку
відтворення, показується невірно.
Кількість композицій, що
містяться у категорії “SONGS”
(“КОМПОЗИЦІЇ”) цього пристрою,
відрізняється від кількості
композицій у категорії “SONGS”
програвача iPod.
Символи відображаються
некоректно (наприклад, назва
альбому).
не діє. Вимкніть демонстраційний режим. (стор. 6)
Надійно підключіть антену. / Висуньте антену на всю довжину.
вставте його в програвач. Якщо ситуація не змінилася, вимкніть автомагнітолу та
зверніться до найближчого сервісного центру.
Вставте фіналізований компакт-диск CD-R/CD-RW (для фіналізації необхідно
використовувати той же пристрій (програму), за допомогою якої диск був
записаний).
шнури та з’єднання.
подряпаний. Спробуйте вставити інший диск.
помилки “ERROR 99” не зникає, зверніться до найближчого сервісного центру.
про помилку не зникає, відформатуйте USB-пристрій або використайте ішний
USB-пристрій.
на USB.
не змінилося, спробуйте під’єднати інший пристрій USB.
Порядок програвання визначається під час запису файлів.
папок.
Все залежить від того, як доріжки були записані на диск.
Файлі подкастів не враховуються у цьому пристрої у зв’язку з тим, що пристроєм
не підтримується відтворення файлів подкастів.
Ця система може відображати тільки літери (у верхньому регістрі), цифри
та обмежену кількість символів. Кириличний алфавіт (великі літери) може
відтворюватись, якщо параметр [RUSSIAN] встановлено в значення [RUS ON].
(стор. 6, 7)
УКРАЇНА
15
Page 70

Встановлення та підключення автомагнітоли
Перелік деталей:
A Передня панель ............................................ (×1)
B Декоративна накладка передньої
панелі .................................................................... (×1)
C Монтажний кожух ........................................ (×1)
D Футляр для передньої панелі .............. (×1)
E Пучок проводів .............................................. (×1)
F Інструмент для демонтажу ..................... (×2)
Основні процедури
1
Вийміть ключ з замка запалювання,
потім відключіть · клему
акумулятора автомобіля.
2
Правильно підключіть вхідні та вихідні
провідні з’єднання.
\ “Підключення проводів” (стор. 17)
3
Встановіть прилад у своєму автомобілі.
\ “Встановлення автомагнітоли у
відсік панелі приладів автомобіля”
(стор. 18)
4
Знов підключіть · клему акумулятора
автомобіля.
5
Перезавантажте пристрій. (стор. 4)
Попередження
Автомагнітола призначена лише для
встановлення на автомобілях з джерелом
живлення 12 В постійного струму і
підключенням мінусового проводу до маси.
Контакт проводу, який призначений
для підключення до замка запалення
(червоний колір), та проводу, який
призначений для підключення до
акумулятора (жовтий колір), з корпусом
автомобіля може призвести до короткого
замикання і, як наслідок, до займання.
Ці проводи необхідно обов’язково
підключати до джерела живлення через
блок запобіжників.
Відключіть негативну клему батареї та
виконайте всі електричні з’єднання
перед встановленням пристрою.
Ізолюйте непідключені кабелі
за допомогою вінілової стрічки
або подібного матеріалу. Щоб
запобігти короткому замиканню, не
знімайте захисних ковпачків з кінців
непідключених кабелів та роз’ємів.
Переконайтеся у тому, що після
закінчення встановлення пристрою,
виконано його заземлення на шасі авто.
16
Застереження
Якщо замок запалювання автомобіля не
має положення ACC, підключіть проводи,
призначені для підключення до замка
запалювання, до джерела живлення, яке
вмикається і вимикається при повороті
ключа запалювання. Якщо провід,
призначений для підключення до замка
запалювання, підключити до джерела
живлення, яке включене постійно,
акумулятор може вийти з ладу.
Не використовуйте власні гвинти.
Використовуйте лише гвинти, що надані
у комплекті.
Цей пристрій призначений для встановлення
до консолі автомобіля. Перевірте, щоб
кришка панелі приладів (за наявності) під
час закривання і відкривання не стикалася з
передньою панеллю автомагнітоли.
Після установки приладу слід перевірити
справність стоп-сигналів, сигнальних
вогнів, двірників тощо.
Встановлюйте прилад під кутом не більше 30°.
Якщо запобіжник перегорить, спочатку
переконайтеся, що кабелі не дотикаються
і на спричинять до короткого замикання,
а потім замініть старий запобіжник на
новий з такими ж характеристиками.
Правильно підключіть кабелі динаміків
до відповідних роз’ємів. Прилад
може пошкодитися або працювати
неправильно, якщо ви переплутаєте
· кабелі або заземлите їх до будь-якої
металічної частини автомобіля.
Якщо до пристрою підключаються лише
два динаміки, необхідно підключити їх
до виходів, призначених або для двох
передніх, або для двох задніх динаміків
(не можна підключати один динамік як
задній, а інший при цьому — як передній).
Не торкайтеся металевих деталей цього
пристрою у процесі та протягом певного
часу після завершення експлуатації.
Температура металевих деталей,
наприклад, радіатора охолодження та
кожуху, значно підвищується.
Установка та підключення цього продукту
вимагає уміння та досвіду. Задля безпеки,
доручіть цю роботу фахівцям.
Якщо у вас виникли проблеми під час
установки, проконсультуйтесь зі своїм
дилером Kenwood.
Page 71

Підключення проводів
З’єднувачі для підключення задніх динаміків/сабвуфера
Гніздо для підключення
штекера антени (JASO)
Голубий/жовтий
(Провід для підключення пристрою
дистанційного керування на кермі)
Синій/білий
(Провід живлення/провід
антени)
Коричневий
(Провід керування
вимкненням звуку)
Жовтий (Кабель акумулятора)
Червоний (Кабель запалювання)
Червоний (A7)
Жовтий (A4)
З’єднувачі ISO
STEERING WHEEL
REMOTE INPUT
REMOTE CONT
ANT CONT
P. CONT
MUTE
Запобіжник (10 A)
REAR/SW
RL
До перехідника пристрою дистанційного керування на
кермі
До контакту вимикача живлення, якщо використовується
додатковий підсилювач, або до контакту пристрою
керування приводом антени автомобіля.
До контакту, який під час надходження телефонного
дзвінка або під час телефонної розмови з’єднаний з
“землею”. (Для підключення до навігаційної системи
Kenwood, дивіться інструкцію з її використання.)
Особливості підключення з’єднувачів ISO на
деяких марках автомобілів Фольксваген / Ауді
та Опель (Vauxhall)
Можливо, виявиться необхідним змінити, як
зображено на малюнку, схему джгута проводів,
який входить до комплекту.
Кабель
запалювання
(Червоний)
Прилад
Кабель
A7 (Червоний)
Автомобіль
A4 (Жовтий)
акумулятора
(Жовтий)
Стандартний варіант схеми
підключення проводів
УКРАЇНА
Контакт
Колір та призначення
Контакт
A4 Жовтий Акумулятор B1 / B2 Багряний
A5 Синій/білий Регулювання живлення B3 / B4 Сірий
A7 Червоний Запалювання (ACC) B5 / B6 Білий
A8 Чорний З’єднання заземлення B7 / B8 Зелений
Колір та призначення
ª
/ Багряний/чорний · Задній динамік (права)
ª
/ Сірий/чорний · Передній динамік (права)
ª
/ Білий/чорний · Передній динамік (ліва)
ª
/ Зелений/чорний· Задній динамік (ліва)
17
Page 72

Встановлення автомагнітоли у відсік панелі приладів автомобіля
1
Перед тим, як встановлювати
2
декоративну накладку
передньої панелі, перевірте її
належну орієнтацію.
(Гачки більшої ширини мають
бути на верхній стороні).
Виймання приладу
1
Зніміть передню панель.
2
Вставте ключі для демонтажу
у отвори з обох сторін
декоративної накладки передньої
панелі і витягніть її.
3
Вставте ключі для демонтажу
глибоко у прорізи з обох боків і
витягніть автомагнітолу, діючи, як
позначено стрілками на малюнку
праворуч.
Підключіть пучок проводів
до приладу. Інші провідні
з’єднання вже мають бути
виконані. (стор. 17)
Панель приладів
автомобіля
Зігніть відповідні лапки
так, щоб монтажний
кожух був надійно
закріплений у відсіку
панелі приборів.
18
Page 73

Технічні характеристики
Секція FM-приймача
Діапазон частот (50 кГц просторових):
87,5 МГц — 108,0 МГц
Реальна чутливість (сигнал/шум = 26 дБ):
1,0 мкВ/75 Ом
Гранична чутливість (ДІН сигнал/шум = 46 дБ):
2,5 мкВ/75 Ом
Частотна характеристика (±3 дБ):
30 Гц — 15 кГц
Відношення сигнал/шум (MONO):
Розподіл стереозвука (1 кГц):
63 дБ
40 дБ
Секція MW-приймача
Діапазон частот (9 кГц просторових):
531 кГц — 1 611 кГц
Реальна чутливість (сигнал/шум = 20 дБ):
36 мкВ
Секція LW-приймача
Діапазон частот:
Реальна чутливість (сигнал/шум = 20 дБ):
153 кГц — 279 кГц
57 мкВ
Секція програвача компактдисків
Лазерний діод:
Цифровий фільтр (цифро-аналогове
перетворення):
Цифро-аналоговий перетворювач:
Швидкість вала:
Детонація:
можливостей
Частотна характеристика (±1 дБ):
20 Гц — 20 кГц
Коефіціент нелінійних викривлень (1 кГц):
0,01 %
Відношення сигнал/шум (1 кГц):
Динамічний діапазон:
Декодування AAC:
Декодування MP3:
MPEG-1/2 Audio Layer-3
Декодування WMA:
Windows Media Audio
GaAIAs
8-кратна дискредитація
24 біт
500 об/хв — 200 об/хв (CLV)
Нижче вимірювальних
105 дБ
90 дБ
Файли AAC-LC “.m4a”
Відповідає стандарту
Відповідає стандарту
USB-інтерфейс
Стандарт USB:
USB1.1/ 2.0 (повношвидкісний)
Максимальний рівень струму живлення:
5 В постійного струму
Файлова система:
Декодування AAC:
Декодування MP3:
MPEG-1/2 Audio Layer-3
Декодування WMA:
Windows Media Audio
FAT16/ 32
Файли AAC-LC “.m4a”
Відповідає стандарту
Відповідає стандарту
Секція аудіосистеми
Максимальна вихідна потужність:
Вихідна потужність (DIN 45324, +B = 14,4В):
30 Вт × 4
Номінальний опір динаміка:
Дія тембра: Низькі частоти:
Рівень/навантаження попереднього підсилювача
(програвач компакт-дисків):
Повний опір попереднього підсилювача:
≤ 600 Ом
Середні частоти:
Високі частоти:
4 Ом — 8 Ом
100 Гц ±8 дБ
1 кГц ±8 дБ
12,5 кГц ±8 дБ
Блок підключення додаткового
пристрою
Частотна характеристика (±3 дБ):
20 Гц — 20 кГц
Максимальна напруга на вході:
Опір на вході:
10 кОм
Загальні характеристики
Робоча напруга (допустима 11 В — 16 В):
Максимальний струм споживання:
Габарити установки (Ш × В × Г):
182 мм × 53 мм × 158 мм
Маса:
1,3 кг
Внесення змін до специфікацій
здійснюється без додаткового
повідомлення.
1 A
50 Вт × 4
2 500 мВ/10 кОм
1 200 мВ
14,4 В
10 A
УКРАЇНА
19
Page 74

“Made for iPod,” and “Made for iPhone” mean that an electronic accessory has been designed to connect
specifically to iPod, or iPhone, respectively, and has been certified by the developer to meet Apple
performance standards. Apple is not responsible for the operation of this device or its compliance with safety
and regulatory standards. Please note that the use of this accessory with iPod or iPhone may affect wireless
performance.
iPhone, iPod, iPod classic, iPod nano, and iPod touch are trademarks of Apple Inc., registered in the U.S. and
other countries.
The “AAC” logo is a trademark of Dolby Laboratories.
 Loading...