

Page 1

KDC-PS907
©B64-0989-00 (KW)
COMPACT
DIGITAL AUDIO
Take the time to read through this instruction manual.
Familiarity with installation and operation procedures will help you obtain the
best performance from your new CD-tuner.
For your records
Record the serial number, found on the back of the unit, in the spaces designated on
the warranty card, and in the space provided below. Refer to the model and serial
numbers whenever you call upon your KENWOOD dealer for information or service on
the product.
Model KDC-PS907 Serial number
CD-TUNER
INSTRUCTION MANUAL
COMBINÉ TUNER CD
MODE D’EMPLOI
REPRODUCTOR DE DISCOS COMPACTOS
MANUAL DE INSTRUCCIONES
Page 2

Contents
2
English
Before use
Warning.........................................................................................3
Safety precautions ........................................................................5
Handling Compact discs................................................................7
Buttons and Display ......................................................................8
Basic operations
Stealth Retraction Mechanism....................................................12
Volume........................................................................................13
Attenuator ...................................................................................13
Attenuator Gain Selection ...........................................................13
Loudness ....................................................................................13
Basic operations of remote ........................................14
Tuner features
Tuning .........................................................................................15
Switching Display for Tuner ........................................................16
Direct Access Tuning ..................................................................16
Station Preset Memory...............................................................16
Auto Memory Entry.....................................................................16
Station Name Preset (SNPS).......................................................17
Station Name Preset Play (SNPP) ...............................................18
Clean Reception System Circuit (CRSC) .....................................18
Frequency Step Setting...............................................................18
RBDS features
RBDS (Radio Broadcast Data System)........................................19
Alarm...........................................................................................19
Radio Text ...................................................................................19
Traffic Information Function........................................................19
Program Type (PTY) Function......................................................20
CD player features
Playing CDs.................................................................................21
Switching Display for CDs...........................................................22
Fast Forwarding and Reversing Disc Play...................................22
Track Search................................................................................22
Direct Track Search.....................................................................22
Track Repeat ..............................................................................22
Track Scan...................................................................................23
Random Play ...............................................................................23
Disc changer control features
Playing Discs Using a Disc Changer............................................23
Fast Forwarding and Reversing Disc Play...................................23
Switching Display for Discs.........................................................24
Track Search................................................................................24
Direct Track Search.....................................................................24
Disc search..................................................................................24
Direct Disc Search.......................................................................25
Track /Disc Repeat ......................................................................25
Random Play ...............................................................................25
Magazine Random Play...............................................................26
Track Scan...................................................................................26
Disc Scan ....................................................................................26
Presetting Disc Names ...............................................................27
Disc Name Preset Play (DNPP)...................................................28
Other features
Audio Control Setting..................................................................28
Table of Audio Control Setting ....................................................29
Clock Display...............................................................................29
Adjusting Time ............................................................................29
Selectable Illumination ................................................................30
Non-fading Preout .......................................................................30
Balanced Output .........................................................................30
Security Code..............................................................................30
Valet Mode..................................................................................31
Installation
Accessories.................................................................................32
Installation Procedure..................................................................32
Connecting Wires to Terminals...................................................33
Installation (non-Japanese cars) ..................................................34
Installation (Japanese-cars) .........................................................34
Removing the Unit ......................................................................36
Troubleshooting Guide ................................................37
Specifications ................................................................40
Page 3
English
3
2Warning
Selecting fine audio equipment such as the unit you’ve just
purchased is only the start of your musical enjoyment. Now
it’s time to consider how you can maximize the fun and
excitement your equipment offers. This manufacturer and the
Electronic Industries Association’s Consumer Electronics
Group want you to get the most out of your equipment by
playing it at a safe level. One that lets the sound come through
loud and clear without annoying blaring or distortion — and,
most importantly, without affecting your sensitive hearing.
Sound can be deceiving. Over time your hearing “comfort
level” adapts to higher volumes of sound. So what sounds
“normal” can actually be loud and harmful to your hearing.
Guard against this by setting your equipment at a safe level
BEFORE your hearing adapts.
To establish a safe level:
• Start your volume control at a low setting.
• Slowly increase the sound until you can hear it comfortably
and clearly, and without distortion.
Once you have established a comfortable sound level:
• Set the dial and leave it there.
Taking a minute to do this now will help to prevent hearing
damage or loss in the future. After all, we want you listening
for a lifetime.
We Want You Listening For A Lifetime
Used wisely, your new sound equipment will provide a lifetime of
fun and enjoyment. Since hearing damage from loud noise is often
undetectable until it is too late, this manufacturer and the Electronic
Industries Association’s Consumer Electronics Group recommend you
avoid prolonged exposure to excessive noise. This list of sound levels
is included for your protection.
Decible
Level Example
30 Quiet library, soft whispers
40 Living room, refrigerator, bedroom away from traffic
50 Light traffic, normal conversation, quiet office
60 Air conditioner at 20 feet, sewing machine
70 Vacuum cleaner, hair dryer, noisy restaurant
80 Average city traffic, garbage disposals, alarm clock at
two feet.
THE FOLLOWING NOISES CAN BE DANGEROUS
UNDER CONSTANT EXPOSURE
90 Subway, motorcycle, truck traffic, lawn mower
100 Garbage truck, chain saw, pneumatic drill
120 Rock band concert in front of speakers, thunderclap
140 Gunshot blast, jet plane
180 Rocket launching pad
Information courtesy of the Deafness Research Foundation.
E
L
E
C
T
R
O
N
I
C
·
A
S
S
O
C
I
A
T
I
O
N
·
EST. 1924
I
N
D
U
S
T
R
I
E
S
We
Want You
LISTENING
For A Lifetime
E
L
E
C
T
R
O
N
I
C
·
A
S
S
O
C
I
A
T
I
O
N
·
EST. 1924
I
N
D
U
S
T
R
I
E
S
We
Want You
LISTENING
For A Lifetime
Page 4

2Warning
4
English
Use of controls or adjustments or
performance of procedures other than those
specified herein may result in hazardous
radiation exposure.
In compliance with Federal Regulations,
following are reproductions of labels on, or
inside the product relating to laser product
safety.
Location : Bottom Panel
FCC WARNING
This equipment may generate or use radio
frequency energy. Changes or modifications
to this equipment may cause harmful
interference unless the modifications are
expressly approved in the instruction manual.
The user could lose the authority to operate
this equipment if an unauthorized change or
modification is made.
2CAUTION
KENWOOD CORPORATION
2967-3, ISHIKAWA-CHO,
HACHIOJI-SHI
TOKYO, JAPAN
KENWOOD CORP. CERTIFIES THIS EQUIPMENT
CONFORMS TO DHHS REGULATIONS N0.21 CFR
1040. 10, CHAPTER I, SUBCHAPTER J.
This equipment has been tested and found to
comply with the limits for a Class B digital
device, pursuant to Part 15 of the FCC Rules.
These limits are designed to provide
reasonable protection against harmful
interference in a residential installation. This
equipment may cause harmful interference
to radio communications, if it is not installed
and used in accordance with the instructions.
However, there is no guarantee that
interference will not occur in a particular
installation. If this equipment does cause
harmful interference to radio or television
reception, which can be determined by
turning the equipment off and on, the user is
encouraged to try to correct the interference
by one or more of the following measures:
• Reorient or relocate the receiving antenna.
• Increase the separation between the
equipment and receiver.
• Connect the equipment into an outlet on a
circuit different from that to which the
receiver is connected.
• Consult the dealer or an experienced radio/TV
technician for help.
This Class B digital apparatus meets all
requirements of the Canadian interferenceCausing Equipment Regulations.
NOTE
NOTE
Page 5
English
5
Safety precautions
To prevent injury or fire, take the
following precautions:
• Insert the unit all the way in until it is fully
locked in place. Otherwise it may fall out of
place when jolted.
• When extending the ignition, battery, or
ground wires, make sure to use automotivegrade wires or other wires with a 0.75mm
2
(AWG18) or more to prevent wire
deterioration and damage to the wire coating.
• To prevent a short circuit, never put or leave
any metallic objects (such as coins or metal
tools) inside the unit.
• If the unit starts to emit smoke or strange
smells, turn off the power immediately and
consult your Kenwood dealer.
• Make sure not to get your fingers caught
between the faceplate and the unit.
• Be careful not to drop the unit or subject it to
strong shock.
The unit may break or crack because it
contains glass parts.
• Do not touch the liquid crystal fluid if the LCD
is damaged or broken due to shock. The
liquid crystal fluid may be dangerous to your
health or even fatal.
If the liquid crystal fluid from the LCD
contacts your body or clothing, wash it off
with soap immediately.
2WARNING
To prevent damage to the machine,
take the following precautions:
• Make sure to ground the unit to a negative
12V DC power supply.
• Do not open the top or bottom covers of the
unit.
• Do not install the unit in a spot exposed to
direct sunlight or excessive heat or humidity.
Also avoid places with too much dust or the
possibility of water splashing.
• Do not subject the faceplate to excessive
shock, as it is a piece of precision equipment.
• When replacing a fuse, only use a new one
with the prescribed rating. Using a fuse with
the wrong rating may cause your unit to
malfunction.
• To prevent a short circuit when replacing a
fuse, first disconnect the wiring harness.
• Do not place any object between the
faceplate and the unit.
• Do not use your own screws. Use only the
screws provided. If you use the wrong
screws, you could damage the unit.
2CAUTION
IMPORTANT INFORMATION
You cannot connect the unit directly to the
following CD automatic changers. If you want
to use older changers with the unit, follow
the directions below according to the type of
changer you own:
• KDC-C200 / KDC-C300 / KDC-C400
Use the extension cable and the control box
attached to the CD changer, and the optional
CA-DS100 converter cord.
• KDC-C301 / KDC-C600 / KDC-C800 / KDC-C601 /
KDC-C401
Use the extension cable attached to the CD
changer, and the optional CA-DS100
converter cord.
• C705i / C705si
Use the extension cable attached to the CD
changer, and the optional CA-K300 converter
cord.
• KDC-C100 / KDC-C302 / C205 / C705 /
non-Kenwood CD changers
Cannot be used with this model.
You can damage both your unit and
the CD changer if you connect them
incorrectly.
2CAUTION
Page 6
Safety precautions
6
English
• If you experience problems during
installation, consult your Kenwood dealer.
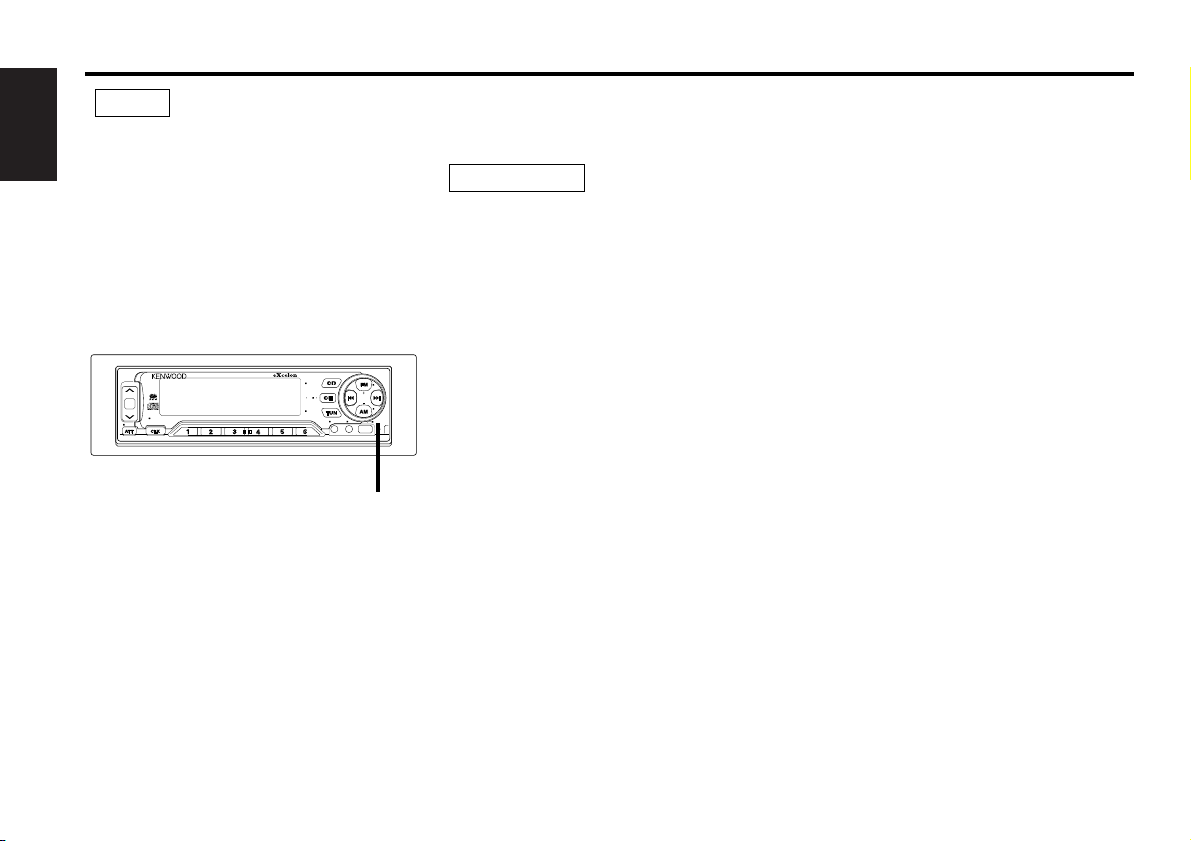
• If the unit fails to operate properly, press the
RESET button. When the faceplate is not
visible, press "the touch-sensitive spot" at the
rear of the faceplate (as illustrated on p.12) to
make the faceplate control appear. The unit
returns to factory settings when the RESET
button is pressed. If the unit still fails to
operate properly after the RESET button has
been pressed, contact your local KENWOOD
dealer for assistance.
• We recommend the use of the Security Code
function (see p.30) to prevent theft.
NOTE
RESET button
Cleaning the Unit
If the front panel gets dirty, turn off the
power and wipe the panel with a dry silicon
cloth or soft cloth.
Do not wipe the panel with a hard cloth or a
cloth dampened by volatile solvents such as
paint thinner and alcohol. They can scratch
the surface of the panel and/or cause the
indicator letters to peel off.
2CAUTION
Lens Fogging
Right after you turn on the car heater in cold
weather, dew or condensation may form on
the lens in the CD player of the unit. Called
lens fogging, CDs may be impossible to play.
In such a situation, remove the disc and wait
for the condensation to evaporate. If the unit
still does not operate normally after a while,
consult your Kenwood dealer.
8V
PREOUT
D.R.I.V.E
NAME S.
PS/RT
LOUD
KDC-PS907 Balanced Output
DISP SCAN RDM REP D.SCN M.RDM
CD MD 1 2
EJECT
CLOSE/
PWR OFF
AUTO AME PTY TI
CRSC
DISC
NF
ILLUM
AUD
Page 7
English
7
Handling Compact discs
Playing a CD that is dirty, scratched
or warped can cause the sound to
skip and the unit to operate
incorrectly, resulting in worsened
sound quality. Take the following
precautions to prevent your CDs from
getting scratched or damaged.
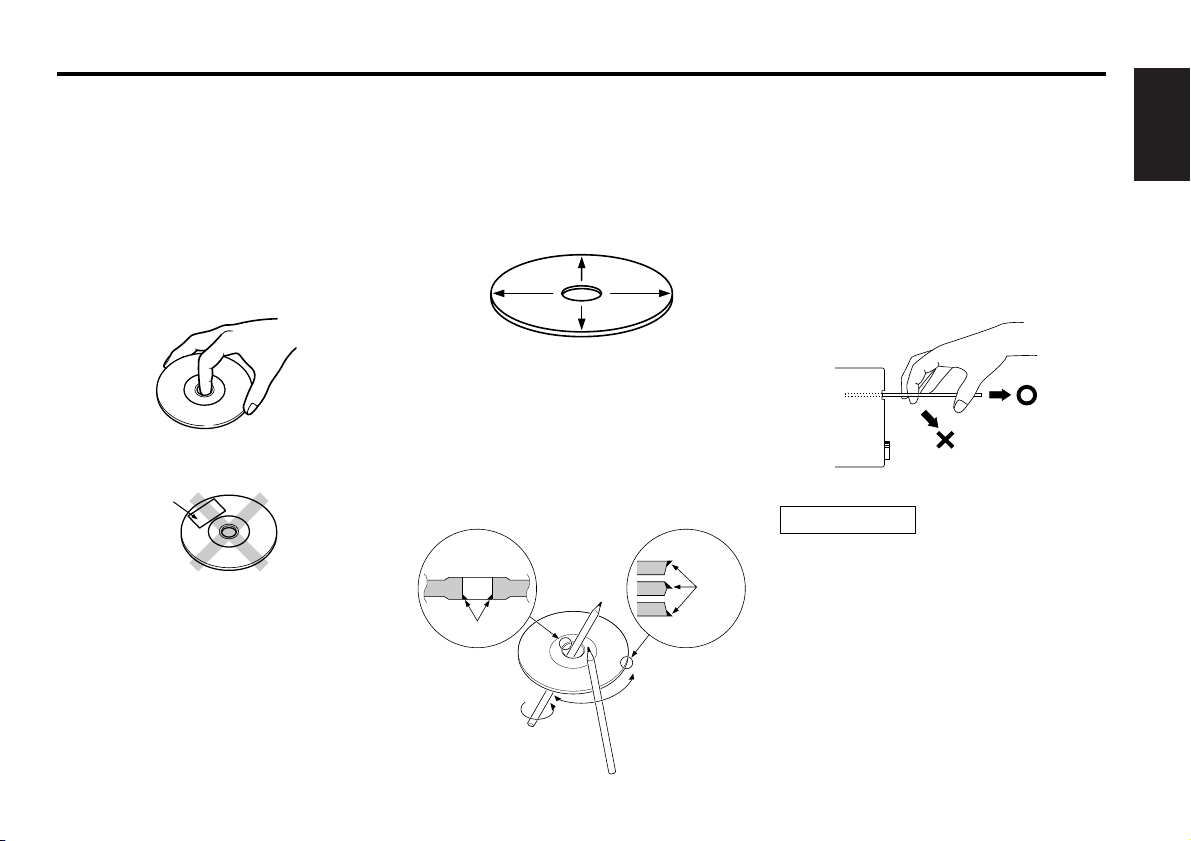
Handling CDs
• Do not touch the recorded side of the CD
(the side opposite the label) when holding it.
• Do not stick tape on either side of the CD.
Storing CDs
• Do not store CDs in areas exposed to direct
sunlight (such as a car seat or the
dashboard) or other hot places.
• Remove CDs from the unit when not
listening to them for a while, and put them
back in their cases. Do not pile up CDs that
are removed from their cases or prop them
against something.
Cleaning CDs
If a CD has gotten dirty, wipe it off gently
using a commercially available cleaning cloth
or a soft cotton cloth, starting from the
center of the disc and moving outward.
Do not clean CDs with conventional record
cleaners, anti-static formulas, or chemicals
such as paint thinner or benzene.
Checking New CDs for Burrs
When playing a new CD for the first time,
check that there are not any burrs stuck to
the perimeter of the disc or in the central
hole. CDs with burrs stuck on them may not
load properly or may skip while playing.
Remove burrs using a ballpoint pen or a
similar utensil.
Do Not Load CD Accessories
Do not use commercially available CD
accessories that can be loaded into the CD
slot, such as stabilizers, protective sheets, or
CD cleaning discs, since they can cause the
unit to malfunction.
Removing the CD
Only remove the CD from the machine in a
horizontal direction, holding it flat. You may
damage the surface of the CD if you try
pulling it down as it ejects.
Do Not Load 3-in. CDs in the CD slot
If you try to load a 3 in. CD with its adapter
into the unit, the adapter might separate
from the CD and damage the unit.
2CAUTION
Tape
Burrs
Burrs
Page 8
Buttons and Display
8
English
AUD
DISP SCAN RDM REP D.SCN M.RDM
AUTO AME PTY TI
ILLUM
DISC
CRSC
EJECT
CD MD 1 2
CLOSE/
PWR OFF
NAME S.
PS/RT
LOUD
KDC-PS907 Balanced Output
PREOUT
8V
D.R.I.V.E
NF
du
ATT
LOUD
TUN
CLOSE/PWR OFF
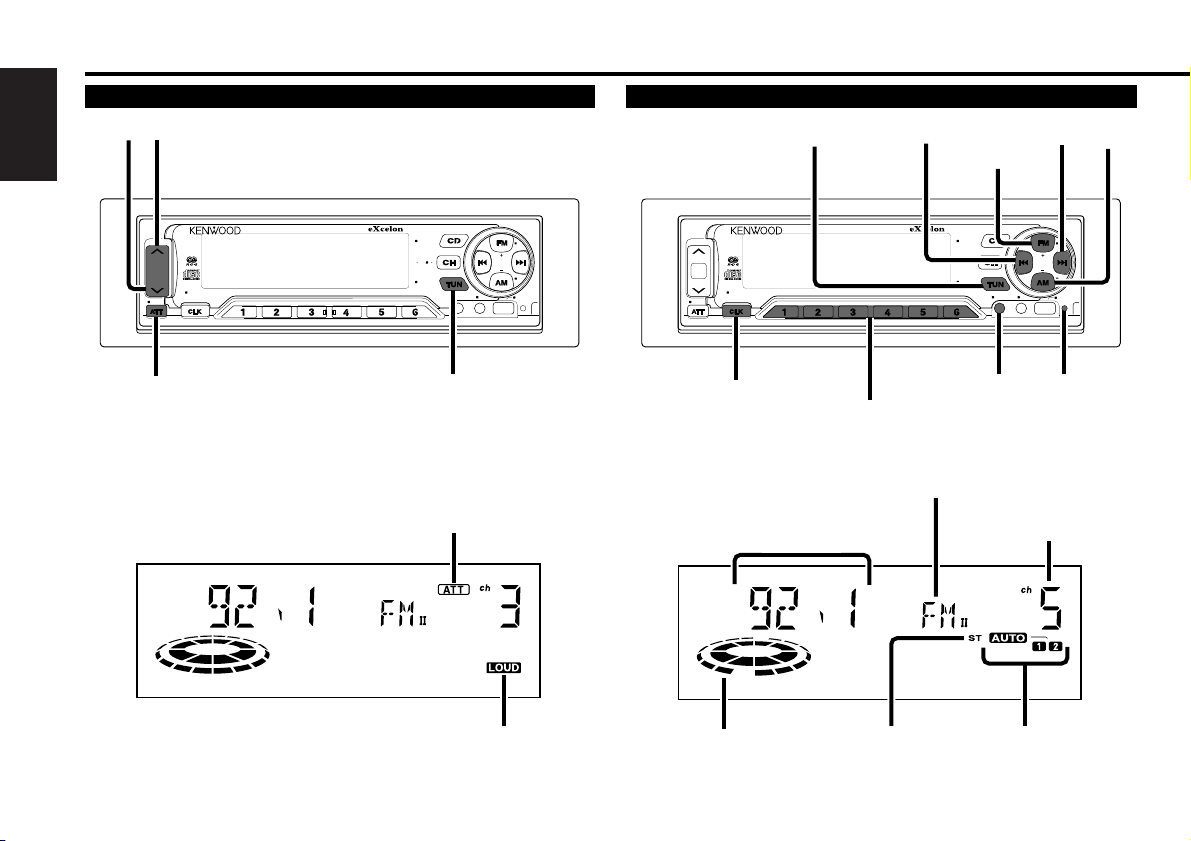
Basic operations
LOUD indicator
AUD
DISP SCAN RDM REP D.SCN M.RDM
AUTO AME PTY TI
ILLUM
DISC
CRSC
EJECT
CD MD 1 2
CLOSE/
PWR OFF
NAME S.
PS/RT
LOUD
KDC-PS907 Balanced Output
PREOUT
8V
D.R.I.V.E
NF
CLK
NAME.S
TUN
#1~6
AUTO
AME
AM
FM
CRSC
4¢
AUTO indicator
Frequency
Tuner features
ST indicator
Band display
ATT indicator
Preset Station Number
Seek indicator
RESET button
Page 9
English
9
AUD
DISP SCAN RDM REP D.SCN M.RDM
AUTO AME PTY TI
ILLUM
DISC
CRSC
EJECT
CD MD 1 2
CLOSE/
PWR OFF
NAME S.
PS/RT
LOUD
KDC-PS907 Balanced Output
PREOUT
8V
D.R.I.V.E
NF
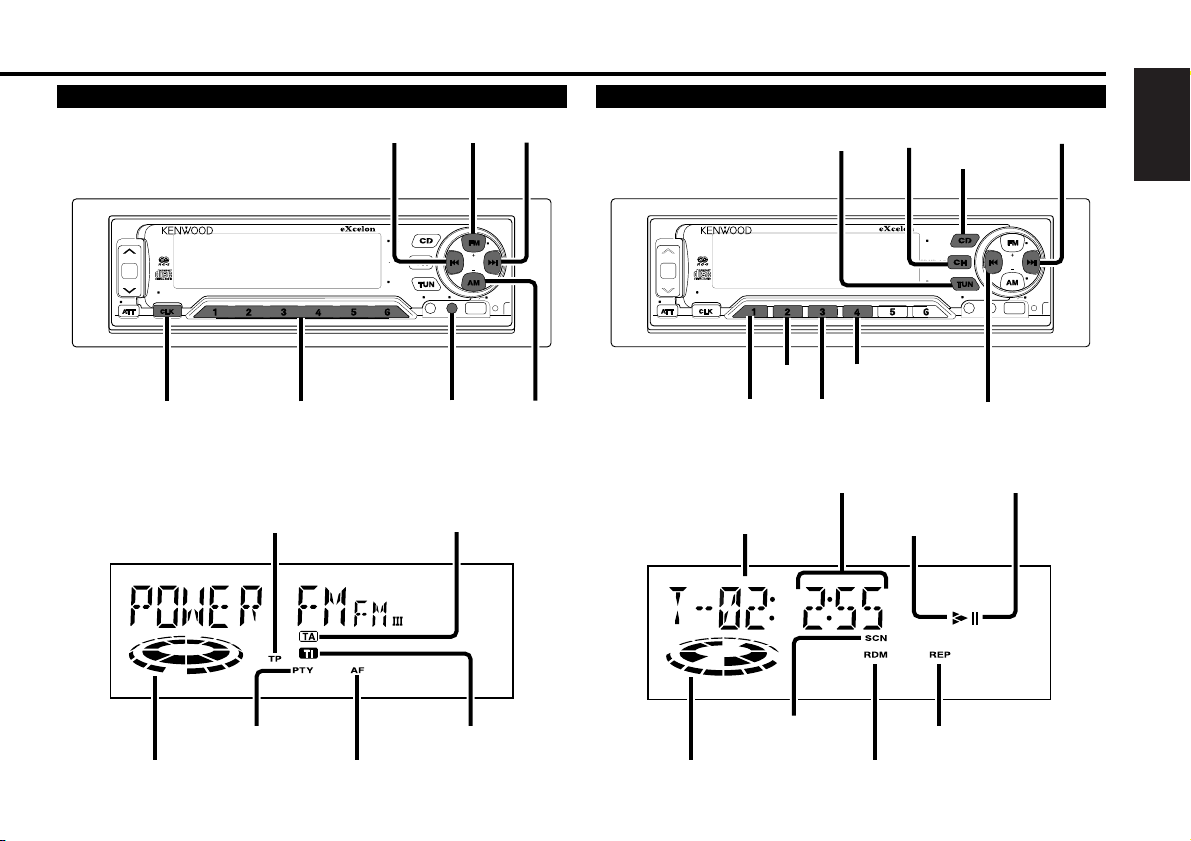
CLK
PS/RT
PTY
TI
AM
FM
4¢
#1~6
RBDS features
TI indicator
CD player features
REP indicator
SCN indicator
Track number
Track time/
Direct inputted track number
RDM indicator
AF indicator
PTY indicator
TP indicator
TA indicator
Seek indicator Play indicator
3 indicator
8 indicator
TUN
CH
CD
¢
EJECT
8V
PREOUT
D.R.I.V.E
LOUD
KDC-PS907 Balanced Output
DISP SCAN RDM REP D.SCN M.RDM
NAME S.
PS/RT
SCAN
DISP
RDM
REP
EJECT
CD MD 1 2
CLOSE/
PWR OFF
AUTO AME PTY TI
4
CRSC
DISC
NF
ILLUM
AUD
Page 10
10
English
Buttons and Display
DISP SCAN RDM REP D.SCN M.RDM
AUTO AME PTY TI
ILLUM
DISC
CRSC
EJECT
CD MD 1 2
CLOSE/
PWR OFF
NAME S.
PS/RT
LOUD
KDC-PS907 Balanced Output
PREOUT
8V
D.R.I.V.E
NF
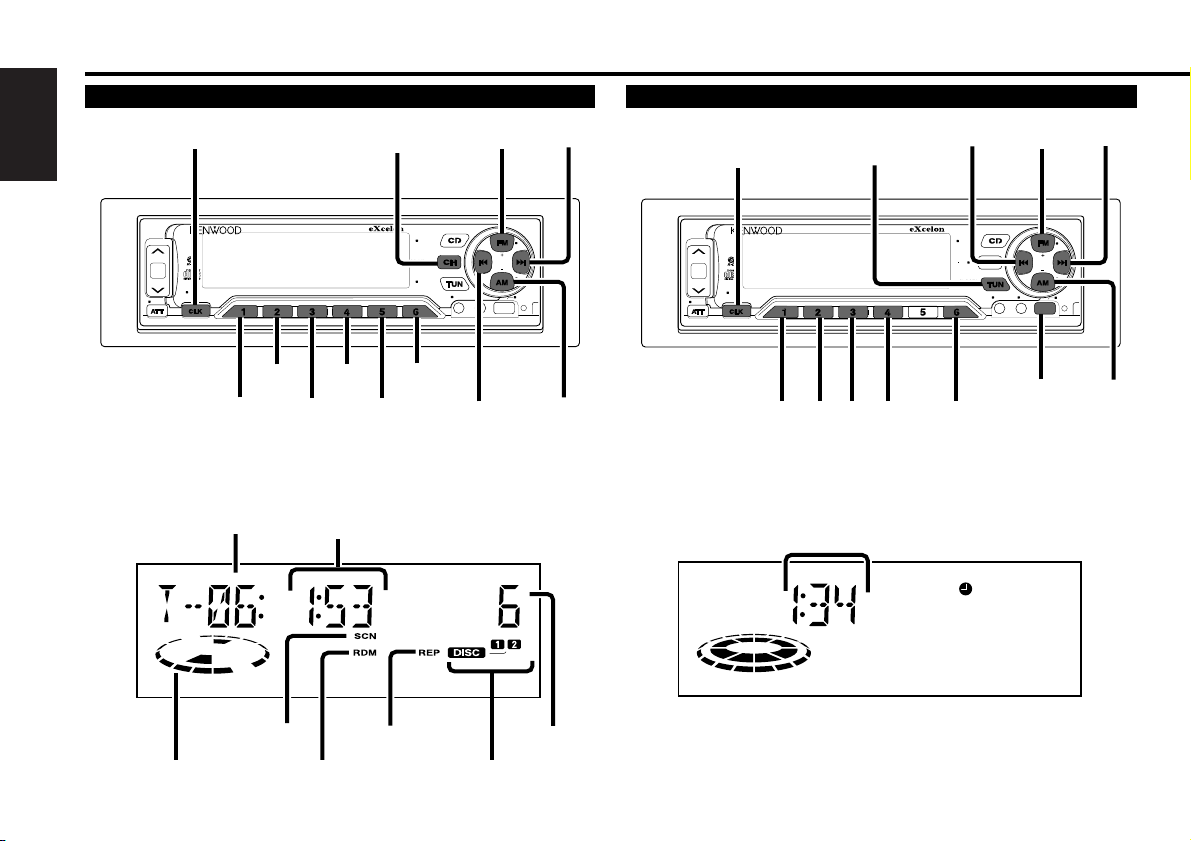
CLK
NAME.S
TUN
CLOSE/PWR OFF
4
¢
FM
AUD
ILLUM
#1
#3 #4
AM
NF
#6
#2
AUD
Other features
Clock display
AUD
DISP SCAN RDM REP D.SCN M.RDM
AUTO AME PTY TI
ILLUM
DISC
CRSC
EJECT
CD MD 1 2
CLOSE/
PWR OFF
NAME S.
PS/RT
LOUD
KDC-PS907 Balanced Output
PREOUT
8V
D.R.I.V.E
NF
DISP
SCAN
DISC–
DISC+
4
¢
RDM
REP
D.SCN
M.RDM
NAME.S
CH
SCN indicator
Disc changer control features
RDM indicator
REP indicator
Disc number
Track time/
Direct inputted track number/
Direct inputted disc number
Track number
Disc indicatorPlay indicator
Page 11

VOL.
TUNE
TRACK
REMOTE CONTROL UNIT
DISC
REW FF
#0~9
A~Z
TUNE
+
TRACK +
TUNE –
TRACK –
AM
DISC
–
FM
DISC +
TUNER
CD
CD・MD CH
DIRECT
OK
u
d
DNPP
38
1 2 3
4 5 6
7 8 9
0
DEF
MNOJKLGHI
WXYTUVPRS
QZ
ABC
TUNER
TAPE
FM
+
PROG
–
+
CD
CD·MD
CH
DIRECT
OK
DNPP
AM
–
English
11
Remote
Page 12
Basic operations (See page 8)
12
English
Stealth Retraction Mechanism
You can help prevent theft of the unit by reversing the
faceplate so that the control panel cannot be seen, hiding the
unit, and shutting off the audio.
Power ON/OFF:
When you turn your vehicle's ignition on, the unit's power will
also turn on, with the faceplate reversing to show the control
panel.
When you turn your vehicle's ignition off, the faceplate will
reverse to hide the control panel, and the unit's power will turn
off.
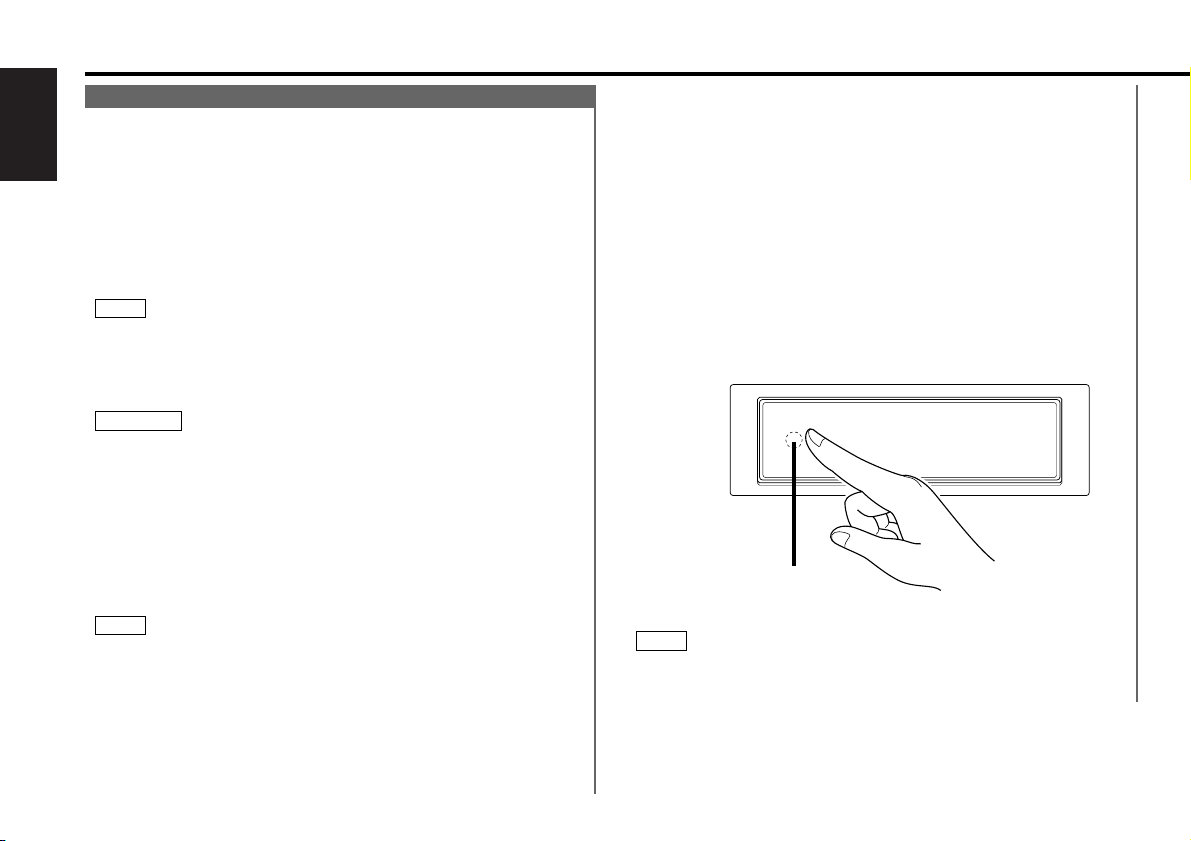
• The first time you use the unit, you need to press “the touchsensitive spot” at the rear of the faceplate. (as illustrated)
• When the moving faceplate is hit by an object, it will stop and
return to its original state. Remove the object and repeat the
action.
Using the Unit in Vehicles with Covered Consoles
• Make sure the console is uncovered while the faceplate is
reversed.
• Do not exert any excess force on the movable parts of the unit,
including the faceplate, as it can cause failure in the unit’s
mechanism.
Hiding the unit with the ignition turned on (forced closing):
Keep pressing the CLOSE/PWR OFF button for at least one
second.
The faceplate will reverse, hiding the unit. The unit will turn
off.
• When the closing faceplate is hit by an object, the unit will turn
off without the faceplate closing all the way. Remove the object
and press the TUN button to turn the unit back on, then turn it
off again to have it close properly.
• While the control panel is moving, pressing the buttons will not
have any effect. Do not try to press the buttons on the control
panel as the faceplate is moving, as excessive force may
damage the unit.
• During the forced closing of the unit (i.e., having the unit left
NOTE
2CAUTION
NOTE
closed while ignition is turned on), the faceplate will not open
no matter how often the ignition is turned on or off, unless "the
touch-sensitive spot" at the rear of the faceplate is pressed in
order to open it. You can prevent tampering of the unit when
letting someone else drive your car by keeping it closed this
way.
To cancel the stealth retraction mechanism’s forced closing of
unit and open control panel:
Press “the touch-sensitive spot” at the rear of the faceplate.
(as illustrated)
Selecting the standby mode:
Press the TUN button repeatedly and switch to "ALL OFF."
When "ALL OFF" is displayed, the standby mode is activated.
The standby mode turns all functions off while leaving the
power to the unit on. Use this mode when you want to have
the display illuminated but don't want to listen to anything.
Touch sensitive spot
The invisible switch is hiding behind the touch-sensitive spot.
Press the hollow spot (invisible switch) to open.
NOTE
Touch-sensitive spot
Page 13

English
13
Volume
Increasing Volume:
Press the u button to turn up the volume.
Decreasing Volume:
Press the d button to turn down the volume.
Attenuator
This function allows you to turn down the volume quickly.
Turning Attenuator On/Off:
Press the ATT button to switch the attenuator on and off.
When the attenuator is on, the ATT indicator blinks.
When the attenuator is off, the volume returns to the original
level.
Turning the volume all the way down deactivates the attenuator
function.
NOTE
Loudness
This function amplifies low and high tones when the volume
is turned down.
The LOUD indicator lights up when the loudness function is
on.
Turning Loudness On/Off:
Press the LOUD button for at least one second to switch the
loudness on and off.
Attenuator Gain Selection
The attenuator gain can be switched to either -20 dB or -60 dB.
Choose the -60dB setting when using a high-output amplifier.
The factory default is -20dB.
Press the TUN button repeatedly and switch the display to
“ALL OFF” to enter the standby mode.
If you hold the ATT button down for at least two seconds, the
attenuator gain will change.
When "ATT HIGH" is displayed, the attenuator gain is set at
-60dB. When "ATT LOW" is displayed, the attenuator gain is set
at -20dB.
2
1
Page 14
14
English
All Modes
• VOL. buttons
Press the u button to turn the volume up.
Press the d button to turn the volume down.
• TUNER button
Selects the tuner mode. Pressing this button again selects the
standby mode.
• CD button
Selects the CD mode.
• CD•MD CH button
Selects the disc changer mode. When two disc changers are
connected to the unit, the disc changer mode will be split into
disc changer mode 1 and disc changer mode 2, and each press
Tuner Mode
• Number/ letter entry buttons
Press buttons #1-6 to recall preset stations.
During direct access tuning, use these buttons to input the
frequency of the station.
Use to enter letters (alphabetical) during station name preset.
• TUNE buttons
Press the TUNE
– button to make decreasing seeks (using the
preset tuning mode).
Press the TUNE+ button to make increasing seeks (using the
preset tuning mode).
Use to move the cursor left or right during station name input.
• AM/FM button
Press the AM button to select the AM band.
Press the FM button to select and switch between FM1, FM2,
and FM3 bands.
During station name input, selects digits and symbols.
• DIRECT/OK button
Selects the direct access tuning mode, used to input
frequencies directly. Press this button again to cancel the mode
while it is operating.
During station name input, stores the already input data in
memory and ends the input mode.
During Station name preset play mode, selects station.
• DNPP button
Enters and cancels the Station Name Preset Play mode.
Basic operations of remote (See page11)
Do not set the remote on hot places such as above the
dashboard.
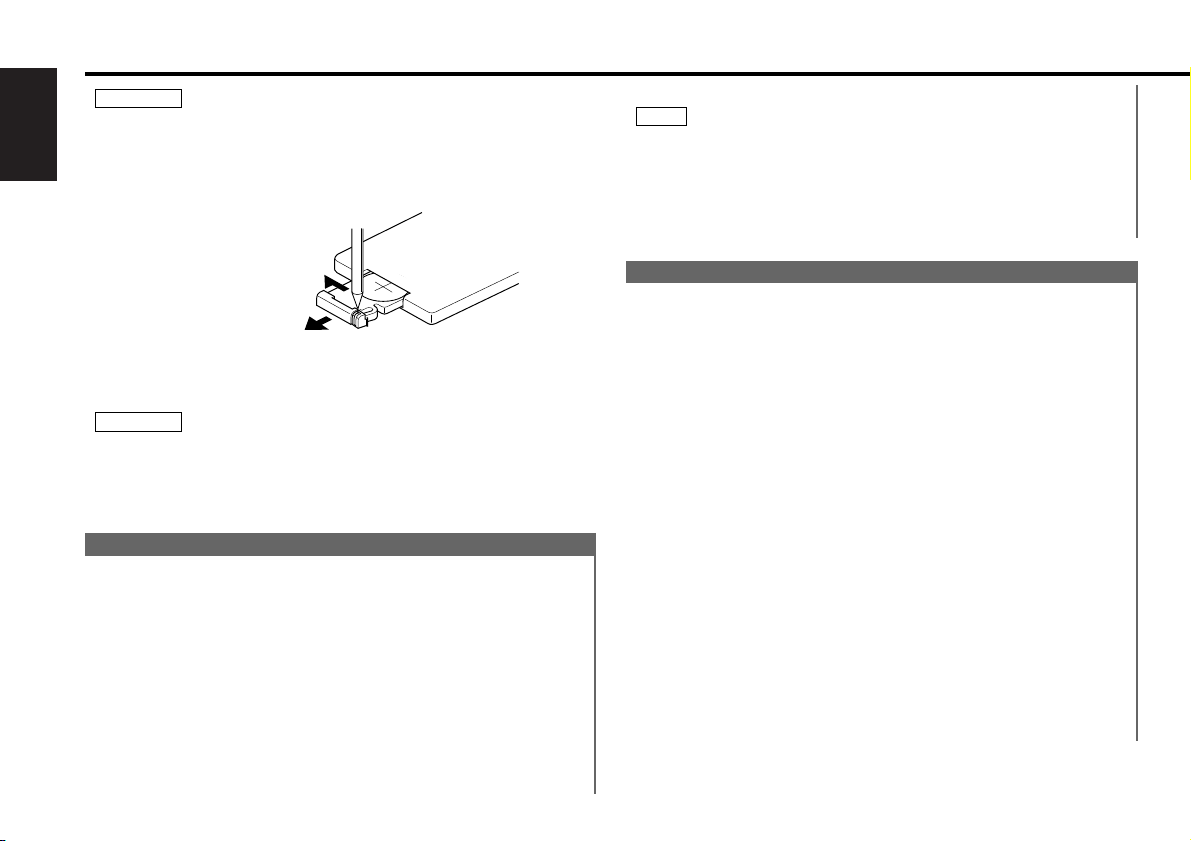
Replacing the Lithium Battery:
Use one lithium battery (CR2025).
Remove the case following the instructions as illustrated.
Insert the battery with the
+ and – poles aligned properly,
following the illustration inside the case.
Store unused lithium batteries out of the reach of children.
Contact a doctor immediately if the battery is accidentally
swallowed.
2WARNING
2CAUTION
To open
1 Keep on slide
2 Pull out.
of this button switches between them.
The KCA-S200, which is sold separately, must be used when two
disc changer units are connected.
When the KDC-C810 is the directly connected disc changer (disc
changer 1), two units may be controlled even without the KCAS200.
NOTE
1
2
Page 15
English
15
Disc Changer Mode
• Number/ letter entry buttons
Used to specify the track (disc) number used in direct track
(disc) searches.
Use to enter letters during disc name preset.
• TRACK buttons
Press the TRACK
– button to search through the tracks
backward.
Press the TRACK+ button to search through the tracks forward.
Use to move the cursor while entering disc name.
• DISC buttons
Press the DISC
– button to search through the discs backward.
Press the DISC+ button to search through the discs forward.
Select numbers and symbols while entering disc name.
• 38 button
When a disc is playing, this button pauses the play.
Press the same button again to start play again.
• OK button
During disc name input, stores the already input data in memory
and ends the input mode.
Selects disc during the disc name preset play mode.
• DNPP button
Enters and cancels the Disc Name Preset Play mode.
CD Mode
• Number buttons
Used to specify the track number used in direct track searches.
• TRACK buttons
Press the TRACK
– button to search through the tracks
backward.
Press the TRACK+ button to search through the tracks forward.
• 38 button
When a CD is playing, this button pauses the play.
Press the same button again to start play again.
Tuner features (See page 8)
Tuning
You can choose from three tuning modes: auto seek, preset
station seek, and manual. The "Auto1" indicator lights up
when auto seek tuning is selected, and the "Auto2" indicator
lights when preset station seek tuning is selected.
Selecting Tuning Mode:
Press the AUTO button.
Each time you press the AUTO button, the mode switches as
follows.
▼
AUTO 1 (Auto Seek Tuning)
▼
AUTO 2 (Preset Station Seek Tuning)
▼
MANUAL (Manual Tuning)
Tuning:
Press the TUN button to turn the radio on.
Press either the FM or AM button to select the band.
Each time you press the FM button, the band switches
between the FM1, FM2 and FM3 (which are used for groups of
preset stations).
Press the AM button to select the AM band.
• Auto Seek Tuning
Press the ¢ button to seek higher frequencies.
Press the 4 button to seek lower frequencies.
• Preset station seek tuning
Press the ¢ button to move to the next preset station (i.e.,
the one with the next highest number), and the 4 button to
move to the last preset station (i.e., the one with the next
lowest number).
• Manual Tuning
Press the ¢ button to increase the frequency by one step.
Press the 4 button to decrease the frequency by one step.
The ST indicator lights up when stereo broadcasts are being
received.
NOTE
3
2
1
Page 16
16
English
Tuner features (See page 8)
Switching Display for Tuner
You can change the display used when listening to the radio.
Changing the Display:
Each time you press the CLK button, the display changes as
follows:
▼
Station frequency
▼
Program Service name (during RBDS station reception) /
SNPS name (only when being preset)
▼
Radio text (only during RBDS station reception)
▼
Clock
Station Preset Memory
Store the frequency of a station. You can then recall that
station with a single touch of a button.
Select the band/station that you want to have stored.
Press the button (#1-6) that you want to use for the station, for
at least two seconds.
The button number blinks once in the display to indicate that
the data has been stored.
Recalling a Preset Station:
Press the preset station button (#1-6) for the desired station.
The number of the recalled station is displayed.
You can store six stations in each of the FM1, FM2, FM3, and
AM bands.
NOTE
2
1
Auto Memory Entry
You can automatically store all the receivable frequencies in
the band currently being listened to, and then recall them with
the touch of a button later. This function is especially useful
when you are travelling and do not know what stations are
available. Up to six frequencies can be stored this way.
Select the band for which you want to store stations.
Press the AME button for at least two seconds to start auto
memory entry.
The numbers of the preset station buttons are shown in order.
When all the stations in a certain band are stored in the preset
memory, the auto memory entry stops. The tuner then plays
the last station received.
Recalling a Preset Station:
Press the preset station button (#1-6) for the desired station.
The number of the recalled station is displayed.
2
1
Canceling Direct Access Tuning:
Press the DIRECT button again.
Direct Access Tuning
When you know the frequency of the station that you want to
listen to, you can input it directly for quick access.
(Function of remote)
Select the band by pressing the FM or AM button.
Press the DIRECT button.
In the display, "----" blinks for 10 seconds.
If you make no input in the 10-second period, direct access
tuning is automatically canceled.
Enter the frequency of the desired station while the display is
blinking.
If you want to listen to an FM station at 92.1 MHz, for
example, press 0, 9, 2, and 1.
If you want to listen to an AM station at 810 kHz, for example,
press 0, 8, 1, and 0.
When a frequency which cannot be received is input, this
frequency is not verified and operation returns to the original
frequency input mode.
NOTE
3
2
1
Function of Remote (See page 11)
Page 17

English
17
Station Name Preset (SNPS)
You can assign names to radio stations with the Station
Preset Memory. Up to 25 FM stations and 8 AM stations can
be assigned names.
Adjust the frequency to the station whose name you want to
enter.
Press the NAME.S button for at least two seconds.
“NAME SET” is displayed once the station name preset mode
is entered.
The cursor will blink in the position where letters are entered.
Press either the 4 or ¢ button to move the cursor to the
desired position.
The 4 button moves the cursor to the left, and the ¢
button to the right.
You can also move the cursor left or right by pressing the 4
or ¢ buttons, respectively, on the remote.
Press the FM or AM button to display the desired character.
Besides the alphabet (capital letters only) and numerals, you
can choose the following characters: /,
+, –, *, =, <, >, [ and ].
Direct Input
Direct input can made of letters (alphabetical) with the letter
entry buttons on the remote.
Example: Use the following table to enter the name "DANCE".
Continue steps 3 and 4 until all the characters are chosen for
the name.
5
NOTE
4
3
2
1
You can enter up to 8 characters for each name.
• Assigning Names
Press the NAME.S button on the unit or the OK button on the
remote.
The name of the station is stored in memory, and the Station
Name Preset mode ends.
• Assigning Name and Storing Frequency with Station Preset
Memory
Hold down the desired preset button for at least two
seconds.
The name of the station is stored and the frequency for the
current station is stored in the selected preset button. The
Station Name Preset mode ends.
Also, if you make no input for 10 seconds, the name will be
stored up to the point that you have entered, and the mode
ends.
• You can assign names to up to 25 FM stations and 8 AM
stations. If you try to enter more than that, the station name
stored the earliest will be the first one erased.
However, the station names stored in the preset button will be
retained in the memory preferentially.
• All the station names will be erased if you press the RESET
button.
• If you want to change the name of a station, first display the
name of the station (following steps 1 and 2 above), then
change the letter(s) that you want by following steps 3 and 4.
• You cannot assign names to RBDS stations.
NOTE
6
NOTE
Button to press # Times pressed
Character
#3 1“D”
1“A” #2
#6“N” 2
#2 3“C”
#3“E” 2
Page 18
18
English
Tuner features (See page 8)
Function of Remote (See page 11)
Station Name Preset Play (SNPP)
You can search for the station for any station if its name has
been preset using Station Name Preset.
Press the DNPP button on the remote.
“SNP PLAY” will be displayed once the station name preset
play mode is entered.
The names of the stations preset in the band currently listened
to are displayed for five seconds each. The display band
switches in the following order:
= FM1 Ô FM2 Ô FM3 Ô AM +
Each time you press the ¢ button, the station display
switches in the forward direction.
Each time you press the 4 button, the station display
switches in the reverse direction.
Stations whose names have not been stored will be displayed
as frequencies.
The program service name will appear for RBDS stations.
Changing the Displayed Band
Pressing the FM button switches between the FM1, FM2, FM3
and AM displays, in that order.
Pressing the AM button switches between the displays in the
reverse direction.
Once the name is displayed for the station you want to listen
to
Press the OK button.
Reception starts of the displayed station, and the station name
preset play mode ends.
Canceling mode during input:
Press the DNPP button.
The station name preset play mode is canceled.
2
NOTE
1
Frequency Step Setting
Switch the frequency step used in seeks. The factory defaults
are 200 kHz for FM and 10 kHz for AM.
Switching the Frequency step:
While pressing buttons #1 and #5 at the same time, press the
RESET button.
The frequency step settings will be changed to 50 kHz for FM
and 9 kHz for AM.
When you change the frequency step settings, all memory
contents will be erased.
Returning Frequency Step Settings to Original Values:
Press the RESET button.
NOTE
Clean Reception System Circuit (CRSC)
Temporarily have reception switched from stereo to mono to
reduce multi-path noise when listening to the FM station.
The factory default for this function is ON.
Turning CRSC On/Off:
Press the CRSC button for at least one second to turn the
function on/off. "CRSC ON" is displayed when CRSC is on.
Strong electrical fields (such as from power lines) may cause
unstable sound quality when CRSC is turned on. In such a
situation, turn it off.
NOTE
Page 19
English
19
RBDS features (See page 9)
RBDS (Radio Broadcast Data System)
RBDS is a service used by radio stations to transmit data
outside normal radio broadcast signals.
When an RBDS station is received, you can immediately find
out what kind of data is being transmitted by looking at the
program service name, which appears in the display after the
frequency.
The AF indicator turns on when an RBDS station is being
received.
Alarm
When an emergency transmission (announcing disasters, etc.)
is made, the current function will be interrupted to allow the
warning to be received under the following conditions:
during tuner reception, or when the Traffic Information
function is turned on.
Radio Text
You can display textual information being transmitted by
RBDS stations. The text is scrolled in the display.
Turning on Radio Text Display Mode:
Pressing the PS/RT button switches the display as follows.
Select the Radio Text Display mode.
▼
Station frequency
▼
Program Service name
▼
Radio text
▼
Clock
If the RBDS station currently tuned to is transmitting no text
while the Radio Text Display mode is turned on, "NO TEXT" will
appear in the display. While awaiting reception, "WAITING" will
scroll across the display.
NOTE
To prevent accidents, drivers should not look at the display while
on the road.
2WARNING
Traffic Information Function
You can listen to traffic information. If you are listening to
tapes or discs, they will continue playing until a traffic bulletin
is broadcast.
Turning TI function On/Off:
Press the TI button for at least one second to turn the function
on and off.
When the function is on, the TI indicator is turned on.
When a traffic information station is being received, the TP
indicator will turn on. When none is being received, the TI
indicator will blink on and off.
When a traffic bulletin begins to be broadcast, the TA indicator
will turn on.
If you are listening to a tape or disc when a traffic bulletin
begins, they will automatically be turned off. When the
bulletin ends or poor reception is experienced, the tape or disc
will begin playing again.
Pressing the TI button while in the AM band automatically
switches reception to the FM band. However, the AM band is
not returned to when the TI button is pressed again.
Switching to a Different Traffic Information Station:
Use the 4 / ¢ buttons to make an auto seek of the TI
stations in a certain band.
When you are listening to a tape or disc, you cannot change to
another TI station.
NOTE
NOTE
Page 20

RBDS features (See page 9)
20
English
Seeking the Selected Program Type
Press the 4 or ¢ button to make a seek of frequencies
with your selected type of program.
The display blinks and the seek starts.
If your selected type of program is found, the name or the
frequency of the station is displayed and the station is tuned
into.
The PTY indicator blinks in the display for about 30 seconds.
If you make no key input in 30 seconds, the PTY selection
mode will turn off automatically.
If no program can be found, "NO PTY" is displayed.
If you want to select another type of program, repeat steps 2 and
3 above.
Switching to Other Stations with the Same Type of Program:
When the PTY indicator is blinking in the display, perform auto
seek tuning.
The tuner scans for another station with the same type of
program.
Canceling Program Type Function During Its Operation:
Press the PTY button.
To register a non-RBDS station as a program type:
Tune your radio to the non-RBDS station that you want to
register as the program type.
Press the PTY button to enter the program type selection
mode.
Press the FM/AM button to select the program type you want
to register. Follow the instructions in 2 to enter the program
type selection mode.
Press the CLK button for at least two seconds.
The station will be registered as a program type, allowing it to
be the target of frequency seeks just as RBDS stations are.
You can store up to 32 stations.
If you try to store a 33rd station, the frequency and program type
NOTE
4
3
2
1
NOTE
3
Program Type (PTY) Function
Conduct auto seek tuning only on those stations with selected
kinds of programs.
To enter the program type selection mode:
Press the PTY button.
The PTY indicator lights up once the program type selection
mode is entered.
You cannot use this function while the traffic information function is turned on.
Select the type of program to be received
• Press either the FM or AM buttons repeatedly to select the
type of program you want to listen to.
The selection includes:
Speech ↔ 1.News(NEWS) ↔ 2.Information(INFORM) ↔
3.Sports(SPORTS) ↔ 4.Talk(TALK) ↔ 5.Rock(ROCK) ↔
6.Classic Rock(CLS ROCK) ↔ 7.Adult Hits(ADLT HIT) ↔
8.Soft Rock(SOFT RCK) ↔ 9.Top 40(TOP 40) ↔
10.Country(COUNTRY) ↔ 11.Oldies(OLDIES) ↔
12.Soft(SOFT) ↔ 13.Nostalgia(NOSTALGA) ↔ 14.
Jazz(JAZZ) ↔ 15.Classical(CLASSICL) ↔ 16.R&B(R&B) ↔
17.Soft R&B(SOFT R&B) ↔ 18.Language(LANGUAGE) ↔
19.Religious Music(REL MUSC) ↔ 20.Religious Talk(REL
TALK) ↔ 21.Personality(PERSNLTY) ↔ 22.Public(PUBLIC)
↔ Music ↔ Speech ↔
(Speech.....1~4, 18, 20~22, Music.....5~17, 19)
• You can select the type of program directly by pressing a
preset button. The buttons are factory-set to the following
type of programs:
1. Music 2. Speech 3. News
4. Sports 5. Classical 6. Jazz
Changing the Preset Button Settings for Program Type
After selecting the type of program to be stored in a certain
preset button, hold down that button for at least two seconds.
The previously stored data for that button are erased and the
new program type is stored.
NOTE
2
NOTE
1
Page 21
English
21
CD player features (See page 9)
will appear alternately in the display.
In that case, press the FM/AM button to change the display to a
station that you want to erase, and then press the CLK button
again for at least two seconds. The newly entered station will
thus be stored.
Press the PTY button to end the program type selection mode.
Confirming Program Type You Registered:
Press the CLK button.
The program type of the station currently tuned to will be
displayed for five seconds. During that time, "E" will blink in the
display.
• If you tune to frequencies for which no program type has been
stored, "NO ENTRY" will be displayed.
• All the program type you registered will be erased if you press
the RESET button.
NOTE
5
Play:
Press the CD button to slide open the faceplate, showing the
CD (insertion) slot. Holding the CD with the labeled side facing
up, insert it in the slot. The faceplate will show the control
panel, and the CD will start playing.
The 3 indicator lights up when a CD is being played.
Playing CDs Already Inserted:
The 32 indicator will light when a CD has been inserted.
Press the CD button to start play.
Pausing and Restarting CD Play:
Press the CD button to make the disc pause.
The 8 indicator lights up.
Press the same button again to start play again.
Stop / Eject:
Press the EJECT button for at least one second to stop CD
play. The faceplate will slide to eject the CD.
Press the CD, CH or TUN button to show the control panel.
• Do not attempt to insert a CD into the slot if another one is
already there.
• The unit can only play 5 in. CDs. If you insert a 3 in. CD, it will
get stuck inside and can cause the unit to malfunction.
• The sound will be temporarily muted while the faceplate is
moving.
• The only buttons that will work during the eject state are the
CD, CH, and TUN buttons, as well as the volume control button.
• When you load a CD and eject it right away, the next time you
try to insert the CD may not load. In such a situation, take the
CD out for a moment and then reinsert it.
• The faceplate is a piece of precision equipment.
Do not keep the faceplate open and subject it to excessive
force during its opening and moving.
NOTE
2CAUTION
Playing CDs
Page 22
CD player features (See page 9)
22
English
Switching Display for CDs
Switch the display that appears while discs are playing.
Switching Display for CDs:
Each time you press the DISP button, the display during CD
play switches as follows:
▼
Track time
▼
Total disc playing time
Fast Forwarding and Reversing Disc Play
Fast Forwarding Disc Play:
Hold down on the ¢ button.
Release your finger to play the disc at that point.
Reversing Disc Play:
Hold down on the 4 button.
Release your finger to play the disc at the point.
Track Search
Search forward or backward through the tracks on the disc
until you reach the one that you want to listen to.
Making a Reverse Track Search:
Press the 4 button to display the desired track number.
Press once to search back to the beginning of the current
track, twice to search back to the beginning of the previous
track, and so forth.
Play starts at the beginning of the displayed track number.
Making a Forward Track Search:
Press the ¢ button to display the desired track number.
Press once to fast forward to the next track, twice to fast
forward to the track after that, and so forth.
Play starts at the beginning of the displayed track number.
Function of Remote (See page 11)
Direct Track Search
Using the remote, directly input the track number that you
want to listen to.
Using the number buttons on the remote, input the number of
the track that you want to listen to.
The selected track number will blink in the display for 10
seconds.
If you make no further input in the 10-second period, the
number entry mode will automatically be canceled.
Press either the TRACK
+ or TRACK– button while the track
number is blinking.
The track starts playing.
Canceling Direct Track Search While It Is Operating:
Press the 38 button.
You cannot use the direct track search function while doing track
scans or using random play.
NOTE
2
1
Repeat playing the track currently being listened to.
Turning Repeat Play On/Off:
Press the REP button to switch repeat play on and off.
The REP indicator lights up when repeat play is turned on.
The track number currently being heard blinks in the display.
Repeat play is canceled when you stop playing the disc.
NOTE
Track Repeat
Page 23
English
23
Disc changer control features (See page 10)
Track Scan
Successively play the beginning of each track on a disc until
you find the track that you want to listen to.
Turning Track Scan On/Off:
Press the SCAN button to switch track scan on and off.
The SCN indicator lights up when track scan is turned on.
The first 10 seconds of each track will be played, in order.
The track number currently being heard blinks in the display.
Stopping to Listen to the Track Being Scanned:
Press the SCAN button again to stop the scan and keep on
listening to a track normally.
• Track scan is canceled when you stop playing a disc.
• Track scan only scans each track on a disc once.
NOTE
Random Play
Play all the tracks on the current disc in random order.
Press the RDM button to switch random play on and off.
The RDM indicator lights up when random play is turned on.
The track number will change over and over in the display as
the next track is being selected.
When the track has been selected, play will begin.
The selected track number blinks in the display as it is being
played.
To change the track being heard, press the ¢ button.
Another track will be selected and played.
Random play is canceled when you stop playing a disc.
NOTE
2
1
Playing Discs Using a Disc Changer
Playing Discs:
Press the CH button.
The disc indicator lights up during disc changer mode.
When one disc has finished playing its last track, the next disc
in the changer will start playing. When the last disc in the
changer has finished, the player will return to the first disc and
start playing it.
Disc #10 is displayed as "0".
Switching Between Disc Changers:
When two disc changers are connected to the unit, press the
CH button for at least one second to switch from one to the
other.
The KCA-S200, which is sold separately, must be installed when
two disc changers are connected.When the KDC-C810 is the
directly connected disc changer (disc changer 1), two units may
be controlled even without the KCA-S200.
Pausing and Restarting Disc Play:
Press the CH button to make the disc pause.
Press the same button again to start play again.
NOTE
Fast Forwarding and Reversing Disc Play
Fast Forwarding Disc Play:
Hold down on the ¢ button.
Release your finger to play the disc at that point.
Reversing Disc Play:
Hold down on the 4 button.
Release your finger to play the disc at the point.
You cannot use reverse play between tracks when listening to an
MD on the MD changer. Instead, the reverse play function is
canceled when it reaches the beginning of a track, at which point
normal play will automatically resume.
NOTE
Page 24
24
English
Disc changer control features (See page 10)
Switching Display for Discs
Switch the display that appears while discs are playing.
Switching Display for Discs:
Each time you press the DISP button, the display during disc
play switches as follows:
▼
Track time
▼
Total disc playing time (CD only)
▼
Disc name
▼
Disc title (MD only)
▼
Track title (MD only)
• You can give names to discs through the presetting disc name
function (see p. 27).
• If you try to display the name of a disc that doesn't have one,
"NO NAME" is displayed instead.
• When the source you are listening to is finished or interrupted
(ex. switching the ignition position, changing the sources), the
initial display will return.
NOTE
Track Search
Search forward or backward through the tracks on the disc
until you reach the one that you want to listen to.
Making a Reverse Track Search:
Press the 4 button to display the desired track number.
Press once to search back to the beginning of the current
track, twice to search back to the beginning of the previous
track, and so forth.
Play starts at the beginning of the displayed track number.
Pressing the 4 button while listening to track 1 will only search
back to the beginning of that track. The reverse search is not
NOTE
"recycled" to the last track on the disc.
Making a Forward Track Search:
Press the ¢ button to display the desired track number.
Press once to fast forward to the next track, twice to fast
forward to the track after that, and so forth.
Play starts at the beginning of the displayed track number.
You cannot make a forward track search when listening to the
last track on a disc.
NOTE
Direct Track Search
Using the remote, directly input the track number that you
want to listen to.
Using the number buttons on the remote, input the number of
the track that you want to listen to.
The selected track number will blink in the display for 10
seconds.
If you make no further input in the 10-second period, the
number entry mode will automatically be canceled.
Press either the TRACK
+ or TRACK– button while the track
number is blinking.
The track starts playing.
Canceling Direct Track Search While It Is Operating:
Press the 38 button.
You cannot use the direct track search function while doing track
or disc scans or using random or magazine-random play.
NOTE
2
1
Function of Remote (See page 11)
Disc Search
Search forward or backward through the discs in a disc
changer.
Making a Reverse Disc Search:
Press the DISC
– button to display the desired disc number.
Page 25

English
25
Turning Repeat Play On/Off:
Press the REP button to switch repeat track/disc play on and
off as follows:
▼
Track Repeat ON
▼
Disc Repeat ON
▼
Track/Disc Repeat OFF
The REP indicator lights up when repeat play is turned on.
The track number blinks in the display when track repeat is on.
The disc number blinks in the display when disc repeat is on.
Repeat play is canceled when you stop playing the disc.
NOTE
Each time the button is pressed, the displayed disc number
decreases by one.
Play starts at the beginning of the displayed disc.
Making a Forward Disc Search:
Press the DISC
+ button to display the desired disc number.
Each time the button is pressed, the displayed disc number
increases by one.
Play starts at the beginning of the displayed disc.
"LOAD" is displayed when discs are being exchanged on the disc
changer.
NOTE
Direct Disc Search
Using the remote, directly input the disc number that you
want to listen to.
Using the number buttons on the remote, input the number of
the disc that you want to listen to.
The selected disc number will blink in the display for 10
seconds.
If you make no further input in the 10-second period, the
number entry mode will automatically be canceled.
• Input "0" to select disc 10.
• If you input more than two numbers all at once, a search will be
made only of the last number input.
Press either the DISC
+ or DISC– button while the number
inputted is blinking.
The disc starts playing.
Canceling Direct Disc Search While It Is Operating:
Press the 38 button.
2
NOTE
1
Function of Remote (See page 11)
Random Play
Play all the tracks on the current disc in random order.
Press the RDM button to switch random play on and off.
The RDM indicator lights up when random play is turned on.
The track number will change over and over in the display as
the next track is being selected.
When the track has been selected, play will begin.
The selected track number blinks in the display as it is being
played.
When all the tracks on a certain disc have been played using
random play, the next disc on the changer will start playing using
the same function.
To change the track being heard, press the ¢ button.
Another track will be selected and played.
Random play is canceled when you stop playing a disc.
NOTE
2
NOTE
1
Repeat playing the track or the disc currently being listened
to.
Track / Disc Repeat
Page 26
Disc changer control features (See page 10)
26
English
Disc Scan
Successively play the beginning of each disc on a changer
until you find the one that you want to listen to.
Turning Disc Scan On/Off:
Press the D.SCN button to switch disc scan on and off.
The SCN indicator lights up when disc scan is turned on.
The first 10 seconds of each disc will be played, in the order
they are loaded on the changer.
The disc number currently being heard blinks in the display.
Stopping to Listen to the Disc Being Scanned:
Press the CH or D.SCN button again to stop the scan and keep
on listening to the disc normally.
• Disc scan is canceled when you stop playing a disc.
• Disc scan only scans each disc on the changer once.
• "LOAD" is displayed when discs are being exchanged on the
disc changer.
NOTE
Track Scan
Successively play the beginning of each track on a disc until
you find the track that you want to listen to.
Turning Track Scan On/Off:
Press the SCAN button to switch track scan on and off.
The SCN indicator lights up when track scan is turned on.
The first 10 seconds of each track will be played, in order.
The track number currently being heard blinks in the display.
Stopping to Listen to the Track Being Scanned:
Press the CH or SCAN button again to stop the scan and keep
on listening to a track normally.
• Track scan is canceled when you stop playing a disc.
• Track scan only scans each track on a disc once.
NOTE
Magazine Random Play
Play the tracks on all the discs in the disc changer in random
order.
Press the M.RDM button to switch magazine random play on
and off.
The RDM indicator lights up when magazine random play is
turned on.
The disc and track numbers will change over and over in the
display as the next track is being selected.
When the disc/track has been selected, play will begin.
The selected disc/ track number blinks in the display as it is
being played.
This function is not available with the following models:
KDC-C200/C300/C400/C301/C401
To change the track being heard, press the ¢ button.
Another disc/track will be selected and played.
• Magazine random play is canceled when you stop playing a
disc.
• The time needed for random selection depends on the number
of discs loaded in the disc magazine.
NOTE
2
NOTE
1
Page 27
English
27
Presetting Disc Names
Store the names of discs to be displayed when played.
Play the disc whose name you want to preset.
• This function is not available for disc changers that do not
feature the Disc Name Preset function.
• This procedure is not to be used to store the disc and track
titles for MDs that you record.
Press the NAME.S button for at least two seconds.
"NAME SET" is displayed and the disc name preset mode is
entered.
The cursor blinks in the position where character input can be
made.
Press either the 4 or ¢ button to move the cursor to the
desired position.
The 4 button moves the cursor to the left, and the ¢
button to the right.
You can also move the cursor left or right by pressing the
TRACK
+ or TRACK– buttons, respectively, on the remote
control.
Press the DISC
+ or DISC– button to display the desired
character.
Besides the alphabet (capital letters only) and numbers, you
can choose the following characters: /, +, –, *, =, <, >, [ and ].
Direct Input
For units with KDC-C810, KDC-C710, KDC-C660 or KDC-C660C
attached, you can directly input letters using the number/letter
entry buttons on the remote.
Example: Use the following table to enter the name "DANCE".
NOTE
4
3
2
NOTE
1
Continue steps 3 and 4 until all the characters are chosen for
the name.
You can enter up to eight characters for each name.
Press either the NAME.S button on the main unit or the OK
button on the remote.
The disc name is stored and the disc name preset mode is
canceled.
If you make no entry in a 10-second period, the name will be
stored with the characters input so far.
• With the CD changer, you can only store names for up to 100
CDs (The KDC-C710, KDC-C660 and KDC-C660C disc changers
can store names for up to 50 discs.), and with the MD
changer,you can only store names for up to 30 MDs. If you
store the name for a 101st (51st) CD or 31st MD, the first name
stored for the type of disc will be erased automatically.
• Discs are identified by their total length and number of tracks. If
another disc happens to have the same specifications as one
that you have already stored a name for, the name will be
displayed for it, too.
• If you want to change the name of a disc, repeat steps 1 and 2
to display the name, and then repeat steps 3 and 4 to input the
changes.
• Pressing the RESET button does not erase the disc names
stored in a disc changer.
NOTE
6
NOTE
5
Button to press # Times pressed
Character
#3 1“D”
1“A” #2
#6“N” 2
#2 3“C”
#3“E” 2
Page 28
▼
Bass N-F
Level
▼▲
Treble Fader
▼▲
Balance
Disc changer control features (See page 10)
28
English
Disc Name Preset Play (DNPP)
If you have preset the name of a disc that you want to listen
to in the disc changer, you can look for it by name and start
playing it.
Press the DNPP button on the remote.
"DNP PLAY" will appear in the display, and the disc name
preset play mode is entered.
The names of all the discs in the disc changer will appear
successively in the display for five seconds each. Discs whose
names have not been preset will appear as "NO NAME" in the
display.
Discs in the disc changer that have never been played before will
appear as "NO ACCES" when the disc names are displayed.
When you cannot identify a disc because of the "NO ACCES"
display after inserting a disc magazine, try playing it using the
disc scan or a similar function to display the disc name.
Rapid display (forward / reverse):
Press the DISC
+ or DISC
– button.
Pressing the DISC
+ button will rapidly display the preset
names/disc titles in order.
Pressing the DISC– button will rapidly display the preset
names/disc titles in reverse order.
When the name appears for the disc you want to play
Press the OK button.
The disc whose name is displayed will be recalled, and the disc
name preset play (DNPP) mode will end.
To cancel DNPP mode:
Press the DNPP button.
The disc name preset play (DNPP) mode will be canceled.
2
NOTE
1
Function of Remote (See page 11)
Audio Control Setting
Adjust various parameters of sound quality.
Press the AUD button to enter the control mode.
Press either the FM or AM button.
Each time the button is pressed, the adjustment mode will
change as follows:
Pressing the FM button advances the display, and pressing the
AM button reverses it.
• When preout is switched to unbalanced
• When preout is switched to balanced
Source tone memory
Each source (CD, FM, AM and disc changer) has its own memory
in which to store the bass and treble tone settings.
The settings made for a particular source are recalled
automatically whenever you use that source (for example, FM
mode uses the tone settings made for FM, AM for AM, etc.).
Press the 4/¢ button.
Look at the table (See page 29) to adjust the mode being
displayed.
Press the AUD button to end the control mode.
4
3
NOTE
2
1
Other features (See page 10)
▼
Bass Sub-preout
level
▼▲
Treble Balance
▲
Only when monaural output is
set to on
()
Only when Non-fading output is
set to on
()
Page 29
English
29
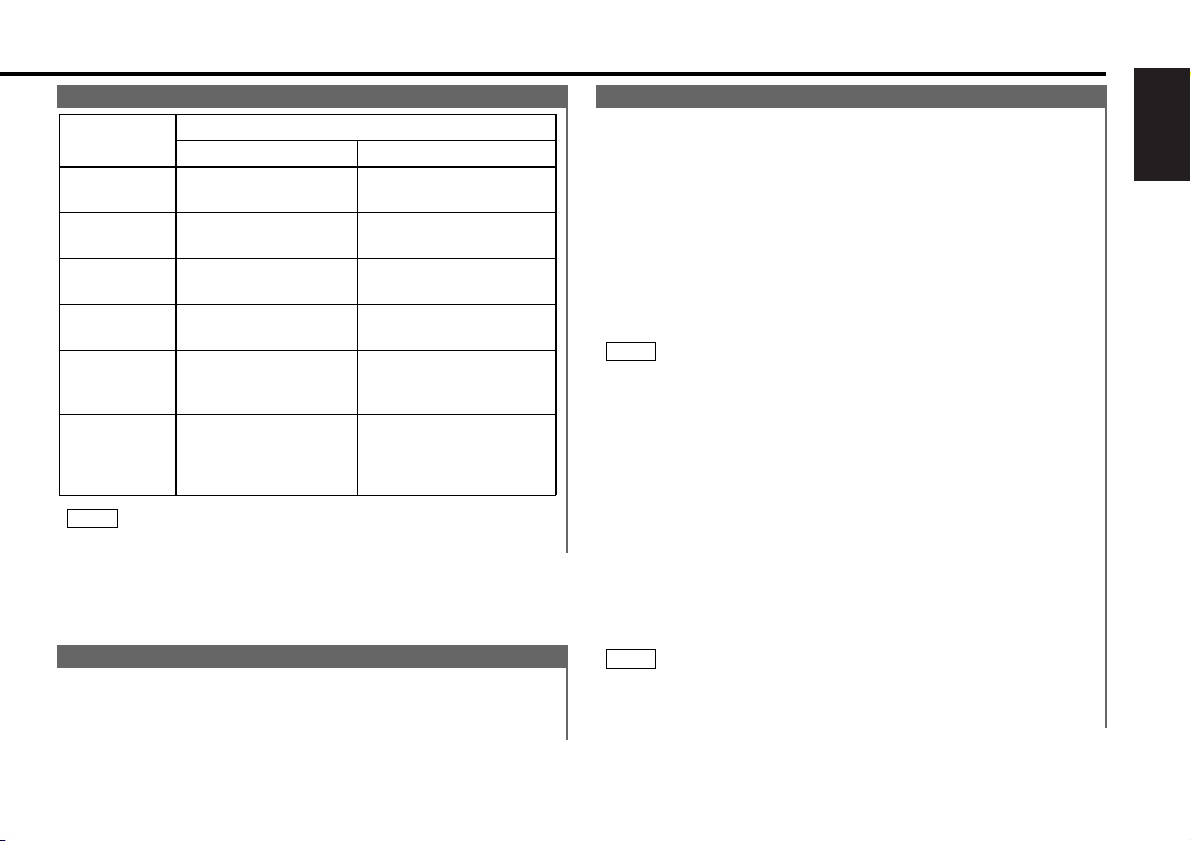
The balance of the non-fading sound cannot be adjusted.
NOTE
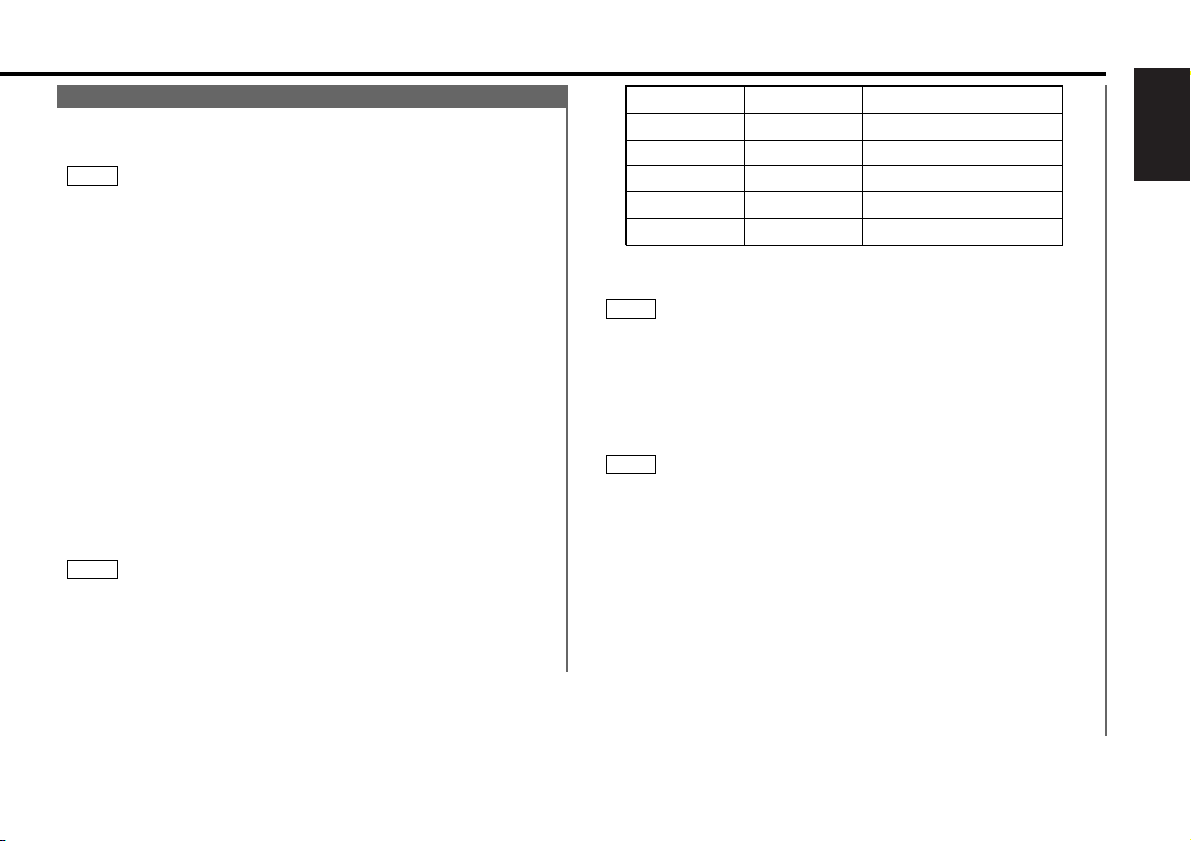
Table of Audio Control Setting
Bass
(“BAS”)
Treble
(“TRE”)
Balance
(“BAL”)
Fader
(“FAD”)
Non-Fading
Preout Level
(“NF”)
Bass decreased.
Treble decreased.
Left channel
emphasized.
Rear channel
increased.
Non-fading sound is
reduced.
Bass increased.
Treble increased.
Front channel
increased.
Non-fading sound
emphasized.
Right channel
emphasized.
Adjustment
mode
(Display)
4 button ¢ button
Operation of Audio control button
Balanced
monaural
preout level
(“SUB”)
Monaural sound is
reduced.
Monaural sound
emphasized.
Clock Display
Display the time.
Switching to Time Display:
Keep pressing the CLK button until the clock is displayed.
Adjusting Time
You can adjust the time manually. Also, with the automatic
time adjustment function set at ON, you can set the clock time
automatically according to time data sent from RBDS stations
(after receiving RBDS signals for several minutes). The factory
default is manual time adjustment.
Adjusting Time Manually:
When the time is not displayed, first press the CLK button to
display the time.
While holding down the CLK button, press the 4 or ¢
buttons to adjust the time.
The 4 button adjusts the hour and the ¢ button adjusts
the minutes.
Do not press the CLK button for two seconds or more, as it will
change to the name preset mode.
Press the 4 or ¢ button quickly to adjust the clock.
Turning Automatic Time Adjustment On/Off:
Press the TUN button repeatedly and switch the display to
"ALL OFF" to enter the standby mode.
Press the #1 button for at least three seconds.
Each time you press the button, the automatic time
adjustment function switches on and off.
"SYNC ON" (automatic time adjustment is on.)
"SYNC OFF" (automatic time adjustment is off.)
Adjusting Time Automatically:
Tune to a RBDS station and receive the signal for several
minutes.
The clock will adjust automatically to the local time.
The clock will not adjust automatically if the RBDS station tuned
to is not transmitting time data. In such a case, try another
RBDS station.
NOTE
2
1
NOTE
2
1
Page 30
30
English
Other features (See page 10)
Selectable Illumination
You can switch the setting of the button illumination between
green and amber, or turn the illumination off.
Switching the illumination:
Press the ILLUM button for at least one second to switch the
illumination setting as follows:
▼
Green
▼
Amber
▼
Light Off
Non-fading Preout
The non-fading sound output can be set to either ON or OFF.
The factory default is set to ON.
Turning non-fading output On/Off:
Press the NF button for at least one second to set the function
ON or OFF.
"NF ON" is displayed when the non-fading output is set ON.
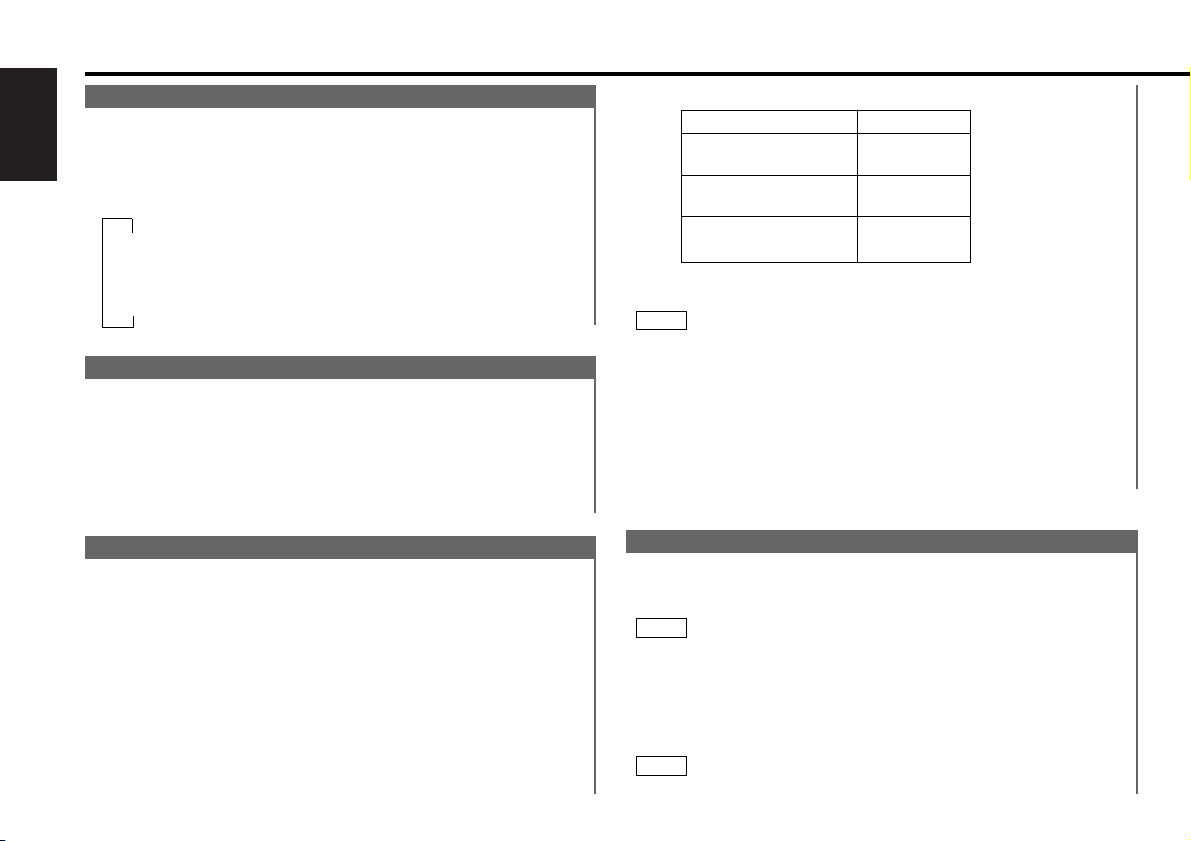
monaural (mono) sounds during balanced output.
You can switch between balanced and unbalanced output by
repeating steps 1 and 2 above.
• The audio control returns to factory default settings each time
you switch between balanced and unbalanced output.
• The non-fading output/ balanced monaural output setting turns
ON each time you switch the output between balanced and
unbalanced.
Turning monaural output ON/OFF:
Press the NF button for at least one second to set the function
ON or OFF.
"SUB ON" is displayed when the monaural output is set ON.
NOTE
UNBALANCED BALANCED
Left Left Right Right -
Left Left +
Right Right +
Left Monaural +
Right Monaural -
FRONT
REAR
NON-FADING
Security Code
When the battery is removed from the unit's power switch,
you cannot turn on the unit again unless the preset security
code is input. This function helps prevent theft.
You must follow steps 1 to 7 to be able to use the Code Security
function. Turning off the power during the procedure will
deactivate the security code setting.
You cannot turn off the function after having completed these
steps.
Select the four digits to use in your security code.
The four-digit security code is very important, as you will need it
NOTE
1
NOTE
Balanced Output
You can change preouts to balanced outputs, which allows
you to reduce noise if the amplifier being connected has
balanced input.
The balanced monaural sound output can be set to either ON
or OFF. The factory default is set to ON.
Switching balanced / unbalanced output:
Press the TUN button repeatedly and switch the display to
"ALL OFF" to enter the standby mode.
Press the #3 button for at least three seconds.
Balanced output is selected when "BALANCED" appears in the
display.
The front/rear output corresponds to the L/R channels during
balanced output. The non-fading preout will change to
2
1
Page 31

English
31
to turn the unit on again when the code security function is on.
Choose the number carefully and do not forget it (write it down
and keep it separately in a safe place).
Press the TUN button repeatedly and switch the display to
"ALL OFF" to enter the standby mode.
Press button #6 for at least three seconds.
"ENTER" will appear in the display for one second, indicating
the code setting mode has been entered. When "CODE"
appears in the display, you can start inputting the code.
Press the preset button and enter the security code that you
have selected in step 1.
Example: Use "3510" as the security code.
Press the NAME.S button for at least three seconds.
The security code will be set.
"RE-ENTER" will appear in the display for one second, asking
you to enter the code once again for confirmation. When
"CODE" appears in the display, you can start inputting the
code.
Press the Preset button and input the security code again.
Press the NAME.S button again for at least three seconds.
"APPROVED" will appear in the display, with the code security
function turning on. From this point on, if the unit is
disconnected from the battery, the security code must be
entered the first time that the unit's power is turned on.
"CODE" will appear in the display, asking you to input the code.
If you input an incorrect security code, the display ask you once
more to input the correct one. Follow the procedure in step 3
above.
NOTE
7
6
5
4
3
2
Step Button to press
# Times
pressed
Display
1
#1 4 “3”
3
6 “5”#2
2
#3 “1”2
4
#4 1 “0”
If you press the RESET button or remove the battery:
The first time you turn the unit on again, "CODE" will appear in
the display, asking you to input the security code.
Repeat steps 6 and 7 above, and input the security code.
You can start operating the unit again when "APPROVED"
appears in the display.
If you enter the incorrect code, the power will turn off. Enter
the correct code to turn the unit on.
Valet Mode
The faceplate will not appear as long as the switch is not
changed, preventing tampering with the unit when you let
someone else drive the car.
Connecting Valet Cable:
Connect the pink valet cable to the ON/OFF switch, while
grounding the other side of the switch.
• Make sure the unit is grounded properly, or else the unit may
not operate correctly.
• We suggest you install the valet cable in a place where the
ON/OFF switch is difficult to find.
Turning Valet Mode on:
Turn the ON/OFF switch on.
Turn the power off either by turning off the ignition or by
pressing the CLOSE/PWR OFF button for at least one second.
The valet function will turn on, and the faceplate will reverse to
hide the control panel. In this condition, the unit cannot be
turned on until the valet function is turned off.
You can reverse the order of steps 1 and 2 and still activate the
valet mode.
Canceling Valet Mode:
Turn the ON/OFF switch off.
Turn the ignition on, or press "the touch-sensitive spot" at the
rear of the faceplate (see p.12) to make the control panel
appear.
NOTE
2
1
NOTE
Page 32

32
English
Do not use any accessories other than those provided with your
unit. If you use other accessories, you may damage the unit.
2CAUTION
Accessories
............................................1
............................................1
............................................2
............................................1
............................................2
............................................2
R
TN
T
N
L
TN
T
N
............................................1
............................................1
1
2
3
4
5
6
7
8
External view Number of items
1. To prevent a short circuit, remove the key from the ignition and
disconnect the - battery.
2. Make the proper input and output wire connections for each unit.
3. Connect the wiring harness wires in the following order: ground,
battery, ignition.
4. Connect the wiring harness connector to the unit.
5. Install the unit in your car.
6. Reconnect the - battery.
7. Press “the touch-sensitive spot” at the rear of the faceplate (see
p.12) to make the faceplate control panel appear. Then press the
RESET button.
• If your car's ignition does not have an ACC position, connect
the ignition wires to a power source that can be turned on and
off with the ignition key. If you connect the ignition wire to a
power source with a constant voltage supply, as with battery
wires, the battery may die.
• If the console has a lid, make sure to install the unit so that the
faceplate will not hit the lid when closing and opening.
• If the fuse blows, first make sure the wires aren’t touching to
cause a short circuit, then replace the old fuse with one with
the same rating.
• Do not let unconnected wires or terminals touch metal on the
car or anything else conducting electricity. To prevent a short
circuit, do not remove the caps on the ends of the unconnected
wires or the terminals.
• After the unit is installed, check whether the brake lamps,
blinkers, wipers, etc. on the car are working properly.
• Insulate unconnected wires with vinyl tape or other similar
material.
• Some disc changers need conversion cords for connection. See
the section on "Safety Precautions" for details.
2CAUTION
Installation Procedure
............................................1
9
Page 33

English
33
Connecting Wires to Terminals
–
+
P.CONT.OUT
VALET
NON-FADING
FRONT
REAR
If you connect the ignition wire
(red) and the battery wire (yellow)
to the car chassis (ground), you
may cause a short circuit, that in
turn may start a fire. Always
connect those wires to the
power source running through
the fuse box.
2WARNING
FM/AM antenna input
Rear left/ Balanced left
+ output (White)
Rear right/ Balanced right
+ output (Red)
Front left/
Balanced left
- output (White)
Front right/
Balanced right
- output (Red)
Fuse
KENWOOD disc
changer control input
Wiring harness
(Accessory1)
Ignition wire (Red)
Battery wire (Yellow)
Ground wire (Black) - (To car chassis)
Ignition key
switch
Car fuse box
(Main fuse)
ACC
Car fuse box
Battery
If no connections are made, do not
let the wire come out from the tab.
To connect the Disc
changer, consult your
Disc changer manual.
NOTE
Valet wire (Pink)
Ground to any metal part of the
car through the switch.
Power control wire (Blue/White)
When using the optional power amplifier,
connect to its power control terminal.
Non-fading left/ Balanced monaural
+ output (White)
Non-fading right/ Balanced monaural
- output (Red)
UNBALANCED BALANCED
Left Left Right Right -
Left Left +
Right Right +
Left Monaural +
Right Monaural -
FRONT
REAR
NON-FADING
Page 34

34
English
Make sure that the unit is installed securely in place. If the unit is
unstable, it may malfunction (for example, the sound may skip).
NOTE
Bend the tabs of the
mounting sleeve with a
screwdriver or similar
utensil and attach it in
place.
Accessory2
Phillips truss
head sheet
metal screw
(commercially
available)
Firewall or metal support
Accessory4
Installation
■
Installation (non-Japanese cars)
Removing the hard rubber frame
■
Engage the catches on the removal tool3 and remove the two
locks on the lower level, leaving the removal tool9 inserted on
the upper level.
Lower the frame and pull it forward as shown in the figure.
2
You will feel (not hear) a click when the tabs lock securely.
NOTE
Lock
Insert the removal tool9 deeply with the cut placed to the
right to remove the upper locks at an angle as shown below.
1
Accessory9
Removal tool
Catch
Lock
Installation (Japanese-cars)
Accessory3
Removal tool
Cut
Page 35

English
35
R
TN
T
N
L
TN
T
N
Installing Radio Bracket in Japanese-made Cars (J-Cars)
■
On the factory-installed radio bracket, flatten all
the tabs or holes that are not flush (except
those used for screws), using a hammer or
similar utensil.
After aligning the J-Car bracket
with the factory-installed radio
bracket, tighten the screws.
Installing in Toyota cars
If necessary, neatly cut the frame of the trim plate
with an engarving knife or similar utensil, following
the inner grooves on the top and bottom of the plate.
You may have to cut the factory trim bezel as well if it
interferes with the movement of the face plate.
NOTE
Damage to the unit will result
from using screws other than
those provided.
2CAUTION
Accessory6
for Toyota car
Accessory5
for Nissan car
Tab
Hole
Once you have affixed the factory-installed radio bracket
with the screws, use a standard-tipped screwdriver (not
Philips) or similar utensil to pry the tabs of the J-Car
bracket to make them fit into the holes in the factoryinstalled radio bracket (depending on the car make).
Tab
N … Nissan car
T … Toyota car
Factory trim bezel
Accessory7
J-Car Bracket
(follow indications for L/R)
Accessory8
J-Car Trim Plate
(place thick part on
bottom)
Factory-installed
Radio Bracket
Factory-installed
Radio Bracket
5mm
8mm
8mm
5mm
Page 36

36
English
Removing the Unit
■
Accessory4
Push downward on the lefthand tool and the upward
on the right-hand tool, as
shown, and pull the unit
toward you until it is
halfway out. The unit may
drop if you pull it out
completely.
4
Pull the unit all the way out
with your hands, being
careful not to drop it.
5
Be careful to avoid injury from the catch pins on the removal tool.
2CAUTION
Refer to the section “Removing the hard rubber frame” (p.34)
and then remove the hard rubber frame.
Remove the hex head machine screw with washer (M4×8) on
the back panel.
Insert the two removal tools at an angle and push them deeply
into the slots on each side, as shown.
3
2
1
Accessory3
Removal tool
Removing the Unit
Page 37

English
37
What might seem to be a malfunction in your unit may just be the result of slight misoperation or miswiring. Before
calling service, first check the following table for possible problems.
SOLUTIONPOSSIBLE CAUSEPROBLEM
No sound can be heard, or the
volume is low.
The fader or balance settings are set all the way to one
side.
Reset the fader or balance settings.
The input/output wires or wiring harness are connected
incorrectly.
Reconnect the input/output wires or the wiring harness
correctly. See the section on "Connecting Wires to
Terminals".
Nothing happens when the
buttons are pressed.
The computer chip in the unit is not functioning normally. Press the RESET button on the unit (see p. 6).
The sound quality is poor or
distorted.
The speakers are not wired correctly. Reconnect the speaker wires so that each output terminal is
connected to a different speaker.
One of the speaker wires is being pinched by a screw in
the car.
Check the speaker wiring.
The antenna control wire is not connected. Connect the wire correctly, referring to the section on
"Connecting Wires to Terminals".
Radio reception is poor. The car antenna is not extended. Pull the antenna out all the way.
The power does not turn on. The fuse has blown. After checking for short circuits in the wires, replace the
fuse with one with the same rating.
Attenuator is turned on. Turn off Attenuator.
Troubleshooting Guide
The memory is erased when
the ignition is turned off.
The battery wire has not been connected to the proper
terminal.
The faceplate does not open or
close.
The ambient temperature is too low. Warm up your car.
The valet mode is ON. Turn off the valet mode.
Connect the wire correctly, referring to the section on
"Connecting Wires to Terminals".
The beep does not sound from
rear preout.
The beep sound can be output only from front preout.
The unbalanced/balanced setting of preouts have not
corresponded with the setting of your amplifier.
Check both the settings.
Page 38

38
English
SOLUTIONPOSSIBLE CAUSEPROBLEM
A CD ejects as soon as it is
loaded.
The CD is upside-down. Load the CD with the labeled side up.
The CD is quite dirty. Clean the CD, referring to the section on "Cleaning CDs" (see
p. 7).
The sound skips on a CD. The CD is scratched or dirty. Clean the CD, referring to the section on "Cleaning CDs" (see
p. 7).
A track will not play. Random play has been selected. Turn off random play.
Troubleshooting Guide
Disc Changer
The computer chip in the unit is not functioning normally. Press the RESET button on the unit (see p. 6).
The disc changer mode cannot
be selected.
No cable has been connected to the disc changer input
terminal on the unit.
Connect the cable to the disc changer input terminal on the
unit.
The specified disc does not
play, but another one plays
instead.
The specified CD is quite dirty. Clean the CD.
The CD is upside-down. Load the CD with the labeled side up.
The disc is loaded in a different slot from that specified. Eject the disc magazine and check the number for the
specified disc.
The disc is severely scratched. Try another disc instead.
The sound skips. Something is touching the disc changer. Remove whatever is touching it.
The CD is scratched or dirty. If skipping happens at the same place when the car is
stopped, something with the CD is wrong. Clean the CD.
The display shows that the
changer is being played, but no
sound can be heard.
The specified track will not
play.
Random play or magazine random play has been selected. Turn off random play or magazine random play.
SOLUTIONPOSSIBLE CAUSEPROBLEM
Page 39

English
39
The following messages are displayed when certain problems are occurring in your system. Take the recommended
actions.
Nothing has been recorded on the MD.
The next MD will automatically be played.
]
BLANK
No disc magazine has been loaded in the changer. The disc magazine is not completely loaded.
Load the disc magazine properly.
]
EJECT
No disc has been loaded in the disc magazine.
Load a disc into the disc magazine.
The CD is quite dirty. The CD is upside-down. The CD is scratched a lot.
Clean the CD and load it correctly.
]
]
E-04
No tracks are recorded on the MD, although it has a title.
The next MD will automatically be played.
]
NO TRACK
The unit is malfunctioning for some reason.
Press the RESET button on the unit. If the "E- 77", "E- 99" code does not disappear, consult your nearest service center.
]
E-77
The protective circuit in the unit activates when the temperature inside the automatic disc changer exceeds 60°C (140°F), stopping
all operation.
Cool down the unit by opening the windows or turning on the air conditioner. As the temperature falls below 60°C (140°F), the
disc will start playing again.
]
HOLD
No disc has been loaded in the disc magazine.
Load a disc into the disc magazine.
]
NO DISC
E-99
Page 40

40
English
FM tuner section
Frequency range (200 kHz space) ............87.9 MHz – 107.9 MHz
Frequency range (50 kHz space) ..............87.5 MHz – 108.0 MHz
Usable sensitivity (S/N = 30dB) ....................9.3dBf (0.8 µV/75 Ω)
Quieting Sensitivity (S/N = 50dB)................15.2dBf (1.6 µV/75 Ω)
Frequency response (±3.0 dB) ..............................30 Hz – 15 kHz
Signal to Noise ratio (MONO) ..............................................75 dB
Selectivity (±400 kHz) ......................................................≥ 80 dB
Stereo separation (1 kHz) ....................................................40 dB
AM tuner section
Frequency range (10 kHz space) ....................530 kHz – 1700 kHz
Frequency range (9 kHz space)......................531 kHz – 1611 kHz
Usable sensitivity (S/N = 20dB) ............................28 dBµ (25 µV)
CD player section
Laser diode ....................................................GaAlAs (λ=780 nm)
Digital filter (D/A)......................................8 Times Over Sampling
D/A Converter ......................................................................1 Bit
Spindle speed ..............................................500 – 200 rpm (CLV)
Wow & Flutter ........................................Below Measurable Limit
Frequency response (±1 dB) ................................10 Hz – 20 kHz
Total harmonic distortion (1 kHz) ......................................0.01 %
Signal to Noise ratio................................................105 dB (1kHz)
Dynamic range ..................................................................100 dB
Channel separation..............................................................85 dB
Audio section
Tone action
Bass: ..........................................................100 Hz ±10 dB
Treble: ........................................................10 kHz ±10 dB
Preout level / Load (During CD/disc play)
Unbalanced ................................................4000 mV/10 kΩ
Balanced..............................................8000 mV(P-P)/10 kΩ
Preout impedance ................................................................80 Ω
General
Operating voltage..............................14.4 V (11 – 16 V allowable)
Current consumption ..................................5.0 A at Rated power
Installation size (W × H × D) ..........................182 × 53 × 162 mm
7-3/16 × 2-1/16 × 6-3/8 in.
Weight..................................................................4.0 Lbs (1.8 kg)
Specifications subject to change without notice.
Specifications
Page 41

Page 42

Table des matiéres
42
Français
Avant l’utilisation
Précautions de sécurité...............................................................43
Manipulation des disques compacts...........................................45
Touches et affichage...................................................................46
Opérations de base
Mécanisme à rétraction furtive ...................................................50
Volume........................................................................................51
Atténuateur .................................................................................51
Sélection du gain de l’atténuateur...............................................51
Loudness ....................................................................................51
Opérations de base de la télécommande
..............52
Fonctions du tuner
Accord d’une station ...................................................................53
Affichage de commutation du tuner ...........................................54
Accord direct...............................................................................54
Mémorisation des stations (préréglage)......................................54
Mémorisation automatique.........................................................54
Préréglage du nom de la station (SNPS) .....................................55
Préréglage de nom de station (SNPP).........................................56
Fonction CRSC (Clean Reception System Circuit) ......................56
Réglage du pas de fréquence .....................................................56
Fonctions RBDS
RBDS (Radio Broadcast Data System)........................................57
Alarm...........................................................................................57
Radiotexte...................................................................................57
Fonction d’informations routières (TI) .........................................57
Fonction de type de programmes (PTY)......................................58
Fonctions du lecteur de CD
Lecture de CD.............................................................................59
Commutation de l’affichage pour les CD ....................................60
Lecture rapide d’un disque vers l’avant et vers l’arrière .............60
Recherche de plages ..................................................................60
Recherche directe de plages ......................................................60
Fonction de répétition de la lecture d’une plage.........................60
Fonction de balayage de plages..................................................60
Fonction de lecture aléatoire.......................................................61
Fonctions de commande du changeur de disque
Lecture de disques en utilisant le changeur de disques .............61
Lecture rapide d’un disque vers l’avant et vers l’arrière .............61
Commutation de l’affichage pour les disques.............................62
Recherche de plages ..................................................................62
Recherche directe de plages ......................................................62
Recherche de disques ................................................................62
Recherche directe de disques ....................................................63
Fonction de répétition de la lecture d’une plage/d’un disque .....63
Fonction de lecture aléatoire.......................................................63
Fonction de lecture aléatoire du magasin ...................................64
Fonction de balayage de plages..................................................64
Fonction de balayage de disques................................................64
Préréglage du nom des disques .................................................65
Lecture de disque par nom préréglé (DNPP) ..............................66
Autres fonctions
Réglage des commandes de l’audio ...........................................66
Tableau des réglages de commande audio.................................67
Horloge........................................................................................67
Ajustement de l’heure.................................................................67
Eclairage sélectionnable..............................................................68
Préamplification sans fading .......................................................68
Sortie symétrique........................................................................68
Fonction de code de sécurité......................................................68
Fonction Valet .............................................................................69
Installation
Accessoires.................................................................................70
Procédure d’installation...............................................................70
Connexion des cables sur les prises...........................................71
Installation (voiture non-japonaise)..............................................72
Installation (voiture japonaise).....................................................72
Retrait de l’appareil .....................................................................74
Guide de depannage ....................................................
75
Spécifications ................................................................78
Page 43

Français
43
Pour éviter toute blessure et/ou
incendie, veuillez prendre les
précautions suivantes:
• Insérez l'appareil à fond jusqu'à ce qu'il soit
complètement calé. Sinon, il risquerait d'être
projeté en cas de collisions ou de cahots.
• Si vous prolongez un câble d'alimentation, de
batterie ou de masse, assurez vous d'utiliser
un câble pour automobile ou un câble avec
une section de 0,75mm
2
(AWG18) afin
d'éviter tous risques de détérioration ou
d'endommagement du revêtement des
câbles.
• Pour éviter les court-circuits, ne jamais
mettre ou laisser d'objets métalliques
(comme une pièce de monnaie ou un outil en
métal) à l'intérieur de l'appareil.
• Si l'appareil commence à émettre de la
fumée ou une odeur bizarre, mettez
immédiatement l'appareil hors tension et
consultez un revendeur Kenwood.
• Faites attention de ne pas vous prendre les
doigts entre la façade et l'appareil.
• Faites attention de ne pas laisser tomber
l'appareil ou lui faire subir de chocs
importants. L'appareil risque de se casser ou
de se fêler car il contient des parties en verre.
• Ne touchez pas le cristal liquide si l'affichage
LCD était endommagé ou cassé à cause d'un
choc. Le cristal liquide peut être dangereux
pour votre santé et même mortel. Si le cristal
liquide de l'affichage LCD entrait en contact
avec votre corps ou un vêtement, lavez-le
immédiatement avec du savon.
Cet appareil numérique de la classe B
respecte toutes les exigences du Reglement
sur le matériel brouilleur du Canada.
REMARQUE
2AVERTISSEMENT
Pour éviter tout dommage à l'appareil,
veuillez prendre les précautions
suivantes:
• Assurez-vous de mettre l'appareil à la masse
sur une alimentation négative de 12V CC.
• N'ouvrez pas le couvercle supérieur ou
inférieur de l'appareil.
• N'installez pas l'appareil dans un endroit
exposé directement à la lumière du soleil, à
une chaleur excessive ou à l'humidité. Evitez
aussi les endroits trop poussiéreux et où
l'appareil risque d'être éclaboussé.
• Ne faites pas subir de chocs excessifs à la
façade car elle fait partie d'un équipement de
précision.
• Lors du remplacement d'un fusible, utilisez
seulement un fusible neuf avec la valeur
indiquée. L'utilisation d'un fusible d'une
valeur différente peut être la cause d'un
mauvais fonctionnement de votre appareil.
• Pour éviter les courts-circuits lors du
remplacement d'un fusible, déconnectez
d'abord le faisceau de câbles.
• Ne placez aucun objet entre la façade et
l'appareil.
• Pendant l'installation, n'utilisez aucunes
autres vis que celles fournies. L'utilisation de
vis incorrectes pourrait endommager
l'appareil.
2ATTENTION
INFORMATION IMPORTANTE
Vous ne pouvez pas connecter directement
l'appareil aux changeurs automatique de CD
suivants. Si vous souhaitez utiliser un vieux
modèle de changeur avec cet appareil, suivez
les instructions ci-dessous en fonction du
type de changeur que vous possédez:
• KDC-C200 / KDC-C300 / KDC-C400
Utilisez le câble d'extension et le
boîtier de commande attachés au changeur
de CD ainsi que le convertisseur de câble
optionnel CA-DS100.
• KDC-C301 / KDC-C401 / KDC-C600 / KDC-C601 /
KDC-C800
Utilisez le câble d'extension fourni avec le
changeur de CD ainsi que le convertisseur de
câble optionnel CA-DS100.
• C705i / C705si
Utilisez le câble d'extension fourni avec le
changeur de CD ainsi que le convertisseur de
câble optionnel CA-K300.
• KDC-C100 / KDC-C302 / C205 / C705 /
changeurs de CD non-Kenwood
Ne peuvent pas être utilisé avec ce modèle.
Vous pouvez endommager à la fois
votre appareil et le changeur de CD si
vous les connectez incorrectement.
2ATTENTION
Précautions de sécurité
Page 44

Précautions de sécurité
44
Français
• Si vous rencontrez des problèmes pendant
l'installation, consultez votre revendeur
Kenwood.
• Si l'appareil ne fonctionne pas correctement,
appuyez sur la touche de réinitialisation.
Quand la façade n'est pas visible, appuyez
sur le “point tactile” à l'arrière de la façade
(comme illustré à p.50) pour faire apparaître
les commandes de la façade. L'appareil
retourne aux réglages de l'usine quand la
touche de réinitialisation est pressée. Si
l'appareil ne fonctionne toujours pas
correctement après avoir appuyé sur la
touche de réinitialisation, contactez votre
revendeur local KENWOOD pour une
assistance.
• Nous vous recommandons d'utiliser la
fonction de code de sécurité (voir p.68) pour
empêcher tout vol.
REMARQUE
Touche de réinitialisation
Nettoyage de l’appareil
Si le panneau avant devient sale, mettez
l'appareil hors tension et essuyez le panneau
avec un tissu sec ou un tissu doux.
N'essuyez pas le panneau avec un tissu
rugueux ou imprégné de dissolvant volatile
comme un diluant à peinture ou de l'alcool. Il
pourrait rayer la surface du panneau et/ou
écailler les lettres d'informations.
2ATTENTION
Condensation sur la lentille
Juste après avoir mis le chauffage de la
voiture par temps froid, de l'humidité risque
de se former sur la lentille à l'intérieur du
lecteur CD (voile). La reproduction de CD
peut être impossible. Dans ce cas, retirez le
disque et attendez que l'humidité s'évapore.
Si l'appareil ne fonctionne toujours pas
normalement après quelques temps,
consultez votre revendeur Kenwood.
KDC-PS907 Balanced Output
8V
PREOUT
D.R.I.V.E
DISP SCAN RDM REP D.SCN M.RDM
NAME S.
PS/RT
LOUD
CD MD 1 2
EJECT
CLOSE/
PWR OFF
AUTO AME PTY TI
CRSC
DISC
NF
ILLUM
AUD
Page 45

Français
45
Manipulation des disques compacts
La reproduction d'un CD sale, rayé ou
gondolé peut être la cause d'un son
qui saute et d'un mauvais
fonctionnement provoquant une
qualité sonore de plus en plus
mauvaise. Prenez les précautions
suivantes pour éviter de rayer ou
d'endommager vos CD.
Manipulation des CD
• Ne touchez pas la face enregistrée du CD (la
face opposée à la face imprimée) quand
vous le prenez.
• Ne collez pas de ruban adhésif sur aucune
des faces du CD.
Rangement des CD
• Ne rangez pas les CD dans un endroit
directement exposé à la lumière du soleil —
comme sur le siège d'une voiture ou son
tableau de bord— ou dans d'autres endroits
chauds.
• Retirez les CD de l'appareil quand vous ne
les écoutez pas et remettez les dans leur
boîte. N'empilez pas des CD qui ont été
retirés de leur boîte et ne les posez pas
contre quelque chose.
Nettoyage des CD
Si un CD devient sale, essuyez-le
délicatement en utilisant un tissu de
nettoyage disponible dans le commerce ou
un tissu en coton doux, en commençant du
centre du disque et en allant vers l'extérieur.
Ne nettoyez pas les CD avec un nettoyant
conventionnel pour disque analogique, de
type antistatique ou chimique comme un
diluant à peinture ou du benzine.
Recherche de bavures sur les
nouveaux CD
Lors de la reproduction d'un nouveau CD
pour la première fois, vérifiez qu'il n'y a
aucunes bavures collées sur le périmètre du
disque ou sur le trou central. Les CD avec
des bavures collées peuvent ne pas être
chargés correctement ou sauter lors de la
reproduction. Retirez les bavures en utilisant
un stylo-bille ou un objet similaire.
Ne chargez pas d'accessoires de CD
N'utilisez pas d'accessoires de CD
disponibles dans le commerce qui peuvent
être introduits dans la fente à CD comme
des stabilisateurs, des feuilles de protection
ou des disques de nettoyage de CD car ils
pourraient être la cause d'un mauvais
fonctionnement de l'appareil.
Retrait du CD
Retirez à l'horizontal et à plat le CD de
l'appareil. Vous pourriez endommager la
surface du CD si vous essayez de le tirer
vers le bas losqu'il est éjecté.
Ne chargez pas de CD de 8 cm (3
pouces) dans la fenêtre à CD
Si vous essayez de charger un CD de 8 cm
avec son adaptateur dans l'appareil,
l'adaptateur peut se séparer du CD et
endommager l'appareil.
2ATTENTION
Ruban adhésif
Bavures
Bavures
Page 46

Touches et affichage
46
Français
AUD
DISP SCAN RDM REP D.SCN M.RDM
AUTO AME PTY TI
ILLUM
DISC
CRSC
EJECT
CD MD 1 2
CLOSE/
PWR OFF
NAME S.
PS/RT
LOUD
KDC-PS907 Balanced Output
PREOUT
8V
D.R.I.V.E
NF
du
ATT
LOUD
TUN
CLOSE/PWR OFF
Opérations de base
Indicateur de LOUD
AUD
DISP SCAN RDM REP D.SCN M.RDM
AUTO AME PTY TI
ILLUM
DISC
CRSC
EJECT
CD MD 1 2
CLOSE/
PWR OFF
NAME S.
PS/RT
LOUD
KDC-PS907 Balanced Output
PREOUT
8V
D.R.I.V.E
NF
CLK
NAME.S
TUN
#1~6
AUTO
AME
AM
FM
CRSC
4¢
Indicateur de AUTO
Fréquence
Fonctions du tuner
Indicateur de ST
Affichage de la
gamme d'onde
Indicateur de ATT
Numéro de station
préréglée
Indicateur d’accord automatique
Touche de
réinitialisation
Page 47

Français
47
AUD
DISP SCAN RDM REP D.SCN M.RDM
AUTO AME PTY TI
ILLUM
DISC
CRSC
EJECT
CD MD 1 2
CLOSE/
PWR OFF
NAME S.
PS/RT
LOUD
KDC-PS907 Balanced Output
PREOUT
8V
D.R.I.V.E
NF
CLK
PS/RT
PTY
TI
AM
FM
4¢
#1~6
Fonctions RBDS
AUD
DISP SCAN RDM REP D.SCN M.RDM
AUTO AME PTY TI
ILLUM
DISC
CRSC
EJECT
CD MD 1 2
CLOSE/
PWR OFF
NAME S.
PS/RT
LOUD
KDC-PS907 Balanced Output
PREOUT
8V
D.R.I.V.E
NF
DISP
SCAN
4
¢
RDM
REP
CH
CD
EJECT
TUN
Fonctions du lecteur de CD
Indicateur de TI
Indicateur de AF
Indicateur de PTY
Indicateur de TP
Indicateur de TA
Indicateur d’accord
automatique
Indicateur de REP
Indicateur de SCN
Numéro de plage
Durée de la plage/
Numéro de plage entré directement
Indicateur de RDM
Indicateur de lecture
Indicateur de 3
Indicateur de 8
Page 48

Français
48
Touches et affichage
DISP SCAN RDM REP D.SCN M.RDM
AUTO AME PTY TI
ILLUM
DISC
CRSC
EJECT
CD MD 1 2
CLOSE/
PWR OFF
NAME S.
PS/RT
LOUD
KDC-PS907 Balanced Output
PREOUT
8V
D.R.I.V.E
NF
CLK
NAME.S
TUN
CLOSE/PWR OFF
4
¢
FM
AUD
ILLUM
#1
#3 #4
AM
NF
#6
#2
AUD
Autres fonctions
Affichage de l'horloge
AUD
DISP SCAN RDM REP D.SCN M.RDM
AUTO AME PTY TI
ILLUM
DISC
CRSC
EJECT
CD MD 1 2
CLOSE/
PWR OFF
NAME S.
PS/RT
LOUD
KDC-PS907 Balanced Output
PREOUT
8V
D.R.I.V.E
NF
DISP
SCAN
DISC–
DISC+
4
¢
RDM
REP
D.SCN
M.RDM
NAME.S
CH
Fonctions de commande du changeur de disque
Indicateur de SCN
Indicateur de RDM
Indicateur de REP
Numéro de
disque
Durée de la plage/
Numéro de plage entré directement/
Numéro de disque entré directement
Numéro de plage
Indicateur de
disque
Indicateur de lecture
Page 49

Français
VOL.
TUNE
TRACK
REMOTE CONTROL UNIT
DISC
REW FF
#0~9
A~Z
TUNE
+
TRACK +
TUNE –
TRACK –
AM
DISC
–
FM
DISC +
TUNER
CD
CD・MD CH
DIRECT
OK
u
d
DNPP
38
1 2 3
4 5 6
7 8 9
0
DEF
MNOJKLGHI
WXYTUVPRS
QZ
ABC
TUNER
TAPE
FM
+
PROG
–
+
CD
CD·MD
CH
DIRECT
OK
DNPP
AM
–
49
Télécommande
Page 50

l'appareil.
• Pendant la fermeture forcée de l'appareil (c. à d., laisser l'appareil
fermé quand le contact est mis), la façade ne s'ouvrira pas que
l'on coupe le contact et le remette aussi souvent que l'on veut, à
moins que le “point tactile” à l'arrière de la façade soit pressé
pour l'ouvrir. Vous pouvez éviter que l'on touche à l'appareil quand
vous laissez quelqu'un d'autre conduire votre voiture en fermant
l'appareil de cette façon.
Pour annuler la fermeture forcé du mécanisme à rétraction
furtive et ouvrir le panneau de commande:
Appuyez sur “le point tactile” à l'arrière de la façade (comme
illustré).
Sélection du mode d’attente:
Appuyez répétitivement sur la touche TUN pour choisir "ALL
OFF".
Quand "ALL OFF" est affiché, c'est que l'appareil est en mode
d'attente.
Le mode d'attente met toutes les fonctions hors service bien que
l'appareil soit sous tension. Utilisez ce mode quand vous
souhaitez que l'affichage soit allumé mais ne souhaitez pas
écouter quoi que ce soit.
Point tactile
L’interrupteur est caché par le point tactile. Appuyer à
l’emplacement creux (celui de l’interrupteur invisible) pour
provoquer l’ouverture.
REMARQUE
Opérations de base (Voir page 46)
50
Français
Point tactile
Mécanisme à rétraction furtive
Vous pouvez empêcher le vol de l'appareil en retournant la
façade de manière que le panneau de commande ne puisse pas
être vu, cachant l'appareil et coupant le son.
Mise sous/hors tension (ON/OFF):
Quand vous mettez le contact de votre véhicule, l'appareil est
aussi mis sous tension, et la façade se retourne pour montrer le
panneau de commande.
Quand vous coupez le contact de votre véhicule, la façade se
retourne pour cacher le panneau de commande et l'appareil est
mis hors tension.
• Lorsque l’appareil est utilisé pour la première fois, le ”point
tactile” à l’arrière de la façade (voir l’illustration) doit être pressé.
• Quand la façade, dans son mouvement, touche un objet, elle
s'arrête et retourne dans sa position d'origine. Retirez l'objet et
recommencez l'opération que vous réalisiez.
Utilisation de l'appareil dans des véhicules avec
consoles couvertes
• Assurez-vous que la console est ouverte quand la façade se
retourne.
• N'exercez aucune pression excessive sur les parties mobile de
l'appareil, y-compris la façade, car cela pourrait provoquer une
panne dans le mécanisme de l'appareil.
Pour cacher l'appareil quand le contact est mis (fermeture
forcée):
Maintenez pressé la touche CLOSE/PWR OFF pendant au moins
une seconde.
La façade se retourne, cachant l'appareil. L'appareil se met hors
tension.
• Quand la façade, se refermant, touche un objet, l'appareil se met
hors tension sans que la façade soit complètement fermée.
Retirez l'objet et appuyez sur la touche TUN pour remettre
l'appareil sous tension, puis remettez le hors tension pour le
fermer correctement.
• Pendant que le panneau de commande est en mouvement,
appuyer sur ses touches n'aura aucun effet. N'essayez pas
d'appuyer sur les touches du panneau de commande, quand la
façade bouge car une pression excessive risque d'endommager
REMARQUE
2ATTENTION
REMARQUE
Page 51

Français
51
Volume
Augmentation du volume:
Appuyez sur u pour augmenter le volume.
Réduction du volume:
Appuyez sur d pour réduire le volume.
Atténuateur
Cette fonction permet de réduire le volume rapidement.
Mise en/hors service de l’atténuateur:
Appuyez sur la touche ATT pour mettre en/hors service
l'atténuateur
Quand l'atténuateur est en service, l'indicateur ATT clignote.
Quand l'atténuateur est hors service, le volume retourne à son
niveau original.
Réduire le volume complètement met hors service l'atténuateur.
REMARQUE
Loudness
Cette fonction amplifie les graves et les aigus quand le volume
est réduit.
L'indicateur LOUD s'allume quand la fonction est en service.
Mise en/hors service du loudness:
Maintenez pressée la touche LOUD pendant une seconde ou
plus pour mettre le loudness en et hors service.
L’atténuateur de gain peut être réglé sur -20 dB ou -60 dB.
Choisissez le réglage -60dB lors de l'utilisation d'un
amplificateur de puissance. Le réglage par défaut est de -20dB.
Appuyez répétitivemente sur la touche TUN et choisissez “ALL
OFF” pour entrer en mode d’attente.
Si vous maintenez pressée la touche ATT pendant au moins
deux secondes, le gain de l'atténuateur sera changé.
Quand “ATT HIGH” est affiché, le gain de l'atténuateur est
réglé sur -60dB. Quand “ATT LOW” est affiché, le gain de
l'atténuateur est réglé sur -20dB.
2
1
Sélection du gain de l’atténuateur
Page 52

Français
52
Tous les modes
• Touches VOL.
Maintenez pressée la touche u pour augmenter le volume.
Maintenez pressée la touche d pour réduire le volume.
• Touche TUNER
Choisit le mode tuner. Appuyer de nouveau sur cette touche
choisit le mode d'attente.
• Touche CD
Choisit le mode CD.
• Touche CD•MD CH
Choisit le mode changeur de disques. Quand deux changeurs de
disques sont connectés à l'appareil, le mode changeur de
disques est séparé en deux modes: le mode changeur de
disques 1 et le mode changeur de disques 2. Appuyez sur la
touche pour commuter entre les deux.
Mode tuner
• Touches d’entrée de chiffres/lettres
Appuyez sur les touches 1-6 pour rappeler les stations
préréglées.
Pendant l'accord direct, utilisez ces touches pour entrer la
fréquence de la station.
Utilisez pour entrer les lettres (alphabétiquement) pendant le
préréglage du nom de station.
• Touches TUNE
Appuyez sur la touche TUNE
– pour faire une recherche
descendante (utilisation du mode d'accord automatique).
Appuyez sur la touche TUNE + pour faire une recherche
ascendante (utilisation du mode d'accord automatique).
Utilisées pour déplacer le curseur vers la gauche ou vers la
droite lors de l’entrée du nom de la station.
• Touche AM/FM
Appuyez sur la touche AM pour choisir la gamme d’onde AM.
Appuyer sur la touche FM pour choisir et commuter entre les
gammes d’onde FM1, FM2 et FM3.
Pendant l'entrée d'un nom de station, choisit les chiffres et les
symboles.
• Touche DIRECT/OK
Choisit le mode d'accord direct, utilisé pour entrer les
fréquences directement. Appuyez de nouveau sur cette touche
pour annuler ce mode pendant qu'il est en service.
Pendant l'entrée d'un nom de station, mémorise les données
entrées en mémoire et quitte le mode d'entrée.
Pendant le mode de préréglage de nom de station, choisit la
station.
• Touche DNPP
Entre et annule le mode de lecture de préréglage du nom de
station.
Opérations de base de la télécommande (Voir page 49)
Ne laissez pas la télécommande dans des endroits chauds
comme sur le tableau de bord.
Remplacement de la pile au lithium:
Utilisez une pile au lithium (CR2025).
Retirez le coffret en suivant les instructions illustrées.
Insérez la pile avec les pôles
+ et – alignés correctement, en
suivant l’illustration à l’intérieur du compartiment.
Conservez les piles au lithium non-utilisées hors de la portée des
enfants. Contactez un docteur immédiatement si la pile était
avalée.
2AVERTISSEMENT
2ATTENTION
Pour ouvrir
1 Faites glisser.
2 Tirez.
Le KCA-S200, vendu séparément, doit être utilisé quand deux
changeurs de disques sont connectés.
Si le KDC-C810 est le changeur de disques directement connecté
(changeur de disques 1), les deux appareils peuvent être
commandés même sans le KCA-S200.
REMARQUE
1
2
Page 53

Vous pouvez choisir parmi trois mode d'accord: l'accord
automatique, l'accord de stations préréglées et l'accord
manuel. L'indicateur “Auto1” s'allume quand l'accord
automatique est choisi et l'indicateur “Auto2” s'allume quand
l'accord de stations préréglées est choisi.
Sélection du mode d’accord:
Appuyez sur la touche AUTO.
Chaque fois que vous appuyez sur la touche AUTO, le mode
change comme suit:
▼
AUTO 1 (Accord automatique)
▼
AUTO 2 (Accord de stations préréglées)
▼
MANUAL (Accord manuel)
Accord d’une station:
Appuyez sur la touche TUN pour entrer en mode tuner.
Appuyez sur la touche FM ou AM pour choisir la gamme d'onde.
Chaque fois que vous appuyez sur la touche FM la gamme
d'onde change parmi FM1, FM2 et FM3.
Appuyez sur la touche AM pour choisir la gamme d'onde AM.
• Accord automatique
Appuyez sur la touche ¢ pour rechercher dans le sens des
fréquences croissantes.
Appuyez sur la touche 4 pour rechercher dans le sens des
fréquences décroissantes.
• Accord de stations préréglées
Appuyez sur la touche ¢ pour aller jusqu'à la station préréglée
suivante (c. à d., la station avec le numéro supérieur suivant) et
sur la touche 4 pour aller jusqu'à la station préréglée
précédente (c. à d., la station avec le numéro inférieur précédent).
• Accord manuel
Appuyez sur la touche ¢ pour augmenter la fréquence
d'une unité.
Appuyez sur la touche 4 pour diminuer la fréquence d'une
unité.
L'indicateur ST s'allume quand une émission stéréo est reçue.
REMARQUE
3
2
1
Français
53
Fonctions du tuner (Voir page 46)
Mode changeur de disques
• Touches d’entrée de chiffres/lettres
Utilisées pour spécifier le numéro de plage (de disque) et utilisées pour
la recherche directe de plage (disque).
Utilisée pour entrer les lettres pendant la présélection du nom du
disque.
• Touches TRACK
Appuyez sur la touche TRACK– pour rechercher parmi les plages vers
l’arrière.
Appuyez sur la touche TRACK+ pour rechercher parmi les plages vers
l’avant.
Utilisée pour déplacer le curseur lors de l’entrée du nom du disque.
• Touches DISC
Appuyez sur la touche DISC– pour rechercher un disque vers l’arrière.
Appuyez sur la touche DISC+ pour rechercher un disque vers l’avant.
Choisit les chiffres et les symboles lors de l’entrée du nom du disque.
• Touche 38
Quand un disque est en cours de lecture, cette touche arrête
momentanément la lecture.
Appuyez de nouveau sur la même touche pour reprendre la lecture.
• Touche OK
Pendant l'entrée du nom d'un disque, mémorise les données entrées
dans la mémoire et quitte le mode d'entrée.
Choisit le disque pendant le mode de préréglage de nom de disque.
• Touche DNPP
Entre et annule le mode de lecture de préréglage du nom du disque.
• Touches numériques
Utilisées pour spécifier le numéro de plage pour l'accord direct de
plages.
• Touches TRACK
Appuyez sur la touche TRACK– pour rechercher une plage vers l’arrière.
Appuyez sur la touche TRACK+ pour rechercher une plage vers l’avant.
• Touche 38
Quand un CD est en cours de lecture, cette touche arrête la lecture
momentanément.
Appuyez de nouveau sur la même touche pour reprendre la lecture.
Mode CD
Accord d’une station
Page 54

Français
54
Fonctions du tuner (Voir page 46)
Annulation de l’accord direct:
Appuyez de nouveau sur la touche DIRECT.
Affichage de commutation du tuner
L’affichage peut être modifié pendant l’écoute de la radio.
Changement de l’affichage:
Chaque fois que la touche CLK est enfoncée, l’affichage
change comme suit:
▼
Fréquence de la station
▼
Nom du service de programme pendant la réception d’une
station RBDS/Nom SNPS (seulement s’il est préréglé)
▼
Radiotexte (seulement pendant la réception d'une station RBDS)
▼
Horloge
Fonction de télécommande (Voir page 49)
Accord direct
Quand vous connaissez déjà la fréquence de la station que
vous souhaitez écouter, vous pouvez entrer directement cette
fréquence pour un accés rapide.
(Fonctions de télécommande)
Choisissez la gamme d'ondes en appuyant sur la touche FM ou
AM.
Appuyez sur la touche DIRECT.
Sur l’affichage, “– – – –” clignote pendant 10 secondes.
Si vous n'entrez rien pendant cette période de 10 secondes,
l'accord direct est automatiquement annulé.
Entrez la fréquence de la station souhaitée pendant que
l'affichage clignote.
Si vous souhaitez, par exemple, écouter une station FM à la
fréquence 92,1 MHz, appuyez sur 0, 9, 2 et 1.
Si vous souhaitez, par exemple, écouter une station AM à la
fréquence 810 kHz, appuyez sur 0, 8, 1 et 0.
Quand une fréquence qui ne peut pas être reçue est entrée,
cette fréquence n’est pas vérifiée et l’opération retourne au
mode d’entrée de fréquence original.
REMARQUE
3
2
1
Mémorise la fréquence de la station en cours d'écoute. Vous
pouvez ensuite rappeler cette station en appuyant sur une
simple touche.
Choisissez la gamme d'ondes/station que vous souhaitez
mémoriser.
Maintenez pressée, pendant deux secondes ou plus, la touche
(#1-6) que vous souhaitez utiliser pour la station.
Le numéro de la touche clignote une fois sur l'affichage pour
indiquer que les données ont été mémorisées.
Rappel d’une station mémorisée:
Appuyez sur la touche de préréglage (#1-6) de la station souhaitée.
Le numéro de la station rappelée est affiché.
Vous pouvez mémoriser 6 stations pour chaque gamme d'ondes:
FM1, FM2, FM3 et AM.
REMARQUE
2
1
Mémorisation des stations (préréglage)
Mémorisation automatique
Vous pouvez mémoriser automatiquement toutes les fréquences
recevables de la gamme d’onde actuellement écoutée, et les
rappeler plus tard en appuyant sur une seule touche. Cette
fonction est particulièrement pratique quand vous voyagez et que
vous ne connaissez pas les stations disponibles. Un maximum de
six stations peut être mémorisé de cette façon.
Choisissez la gamme d'ondes pour la mémorisation automatique.
Maintenez pressée la touche AME pendant deux secondes ou
plus pour commencer la mémorisation automatique.
Les numéros des touches de préréglage sont montrés dans
l'ordre.
Quand toutes les stations de la gamme d'ondes sont mémorisées
dans la mémoire de préréglage, la mémorisation automatique
s'arrête. Le tuner accorde alors la dernière station reçue.
Rappel d’une station mémorisée (préréglée):
Appuyez sur la touche de préréglage (#1-6) de la station souhaitée.
Le numéro de la station rappelée est affiché.
2
1
Page 55

Français
55
Préréglage du nom de la station (SNPS)
Des noms peuvent être attribués aux stations de radio à l’aide
de la mémoire de préréglage de noms de station. Jusqu’à 25
stations FM et 8 stations AM peuvent avoir des noms attribués.
Ajustez la fréquence pour la station dont vous voulez entrer le nom.
Appuyez sur la touche NAME.S pendant au moins deux
secondes.
“NAME SET” est affiché en mode de préréglage de nom de
station.
Le curseur clignote à la position ou les lettres sont entrées.
Appuyer sur la touche 4 ou ¢ pour déplacer le curseur sur
la position souhaitée. La touche 4 déplace le curseur vers la
gauche et la touche ¢ vers la droite.
Vous pouvez aussi déplacer le curseur vers la gauche ou vers
la droite en appuyant respectivement sur la touche 4 ou ¢
sur la télécommande.
Appuyez sur la touche FM ou AM jusqu’à ce que le caractère
souhaité soit affiché.
En plus de l'alphabet (lettres capitale seulement) et des
chiffres, vous pouvez choisir les caractères suivants: /,
+
, –,
*, =, <, >, [ et ].
Entrée directe
Une entrée directe des lettres peut être réalisée (alphabétique)
avec les touches d'entrée de lettre de la télécommande.
Exemple: Utiliser les indications suivantes pour entrer le nom “DANCE”
REMARQUE
4
3
2
1
Répétez les étapes 3 et 4 ci-dessus pour terminer l'entrée du
nom de la station affichée.
Vous pouvez entrer un maximum de 8 caractères pour chaque nom.
• Attribution des noms
Appuyez sur la touche NAME.S de l’appareil ou sur la touche
OK de la télécommande.
Le nom de la station est mémorisé et le mode de préréglage
du nom de la station est annulé.
• Attribution du nom et de la fréquence mémorisée à l’aide de
la mémoire préréglée de la station
Maintenez la touche préréglée désirée enfoncée pendant au
moins deux secondes.
Le nom de la station est mémorisé et la fréquence de la station
actuelle est mémorisée dans la touche préréglée sélectionnée.
Le mode de préréglage du nom de la station est annulé.
Aussi, si aucune entrée n’est effectuée pendant 10 secondes, le
nom sera mémorisé jusqu’au point entré et le mode est annulé.
• Jusqu’à 25 stations FM et 8 stations AM peuvent avoir des
noms attribués. Si vous essayez d’entrer plus de noms, le nom
de la station mémorisé en premier sera effacé en premier.
Toutefois, les noms de station mémorisés dans la touche
préréglée seront conservés en priorité dans la mémoire.
• Tous les noms de station seront effacés si vous appuyez sur la
touche de réinitialisation.
• Si vous souhaitez changer un nom de station, affichez d'abord
le nom de la station (en suivant les étapes 1 et 2 ci-dessus),
puis changer les lettres souhaitée en suivant les étapes 3 et 4.
• Il n’est pas possible de nommer une station RBDS.
REMARQUE
6
REMARQUE
5
APPUYEZ SUR
NOMBRE DE FOIS A APPUYER
CARACTÈRE
#3 1“D”
1“A” #2
#6“N” 2
#2 3“C”
#3“E” 2
Page 56

Français
56
Fonctions du tuner (Voir page 46)
Fonction de télécommande (Voir page 49)
Il est possible de rechercher la station, ou une station
quelconque, si son nom a été mis en mémoire au moyen de la
fonction prévue à cet effet.
Appuyez sur la touche DNPP sur la télécommande.
“SNP PLAY” est affiché une fois que l'on est en mode de
préréglage de nom de station.
Les noms des stations réinitialisées de la gamme en cours
d’écoute sont affichés pendant 5 secondes chacune.
L’affichage de gamme commute dans l’ordre suivant:
= FM1 Ô FM2 Ô FM3 Ô AM +
Chaque fois que la touche ¢ est enfoncée, l’affichage de la
station défile en sens normal.
Chaque fois que la touche 4 est enfoncée, l’affichage de la
station défile en sens inverse.
Les fréquences des stations dont les noms n’ont pas été
mémorisés seront affichées.
Le nom du programme apparaît pour les stations RBDS.
Changement de la gamme affichée
Lorsque la touche FM est enfoncée, l’affichage passe à FM1,
FM2, FM3 et AM.
Lorsque la touche AM est enfoncée, les affichages commutent
dans l’ordre inverse.
Une fois que le nom de la station que vous souhaitez écouter
est affiché
Appuyez sur la touche OK.
La réception de la station affichée commence et l'appareil sort
du mode de préréglage de nom de station.
Annulation du mode pendant l'entrée:
Appuyez sur la touche DNPP.
Le mode de préréglage de nom de station est annulé.
2
REMARQUE
1
Préréglage de nom de station (SNPP)
La réception est commutée temporairement de stéréo à
monaural pour réduire les parasites par trajet multiple lors de
l'écoute de la station FM.
Le réglage par défaut (à l'usine) est ON (en service).
Mise en/hors tension de la fonction CRSC:
Maintenez pressée la touche CRSC pendant une seconde ou
plus pour mettre la fonction en et hors service.
"CRSC ON" est affiché quand la fonction CRSC est en service.
Les forts champs électriques (comme les lignes à haute tension)
peuvent provoquer un son de qualité instable quand la fonction
CRSC est en service. Dans ce cas là, mettez la fonction hors service.
REMARQUE
Fonction CRSC (Clean Reception System Circuit)
Commute le pas de fréquence utilisé dans les recherches. Le
réglage par défaut d'usine est 200 kHz pour la gamme FM et
10 kHz pour la gamme AM.
Commutation du pas de fréquence:
Appuyez sur la touche de réinitialisation tout en maintenant
pressées les touches #1 et #5.
Le réglage du pas de fréquence change sur 50 kHz pour la
gamme FM et sur 9 kHz pour la gamme AM.
Quand vous changez le réglage du pas de fréquence, tout le
contenu de la mémoire est effacé.
Remise du réglage du pas de fréquence sur les valeurs
originales:
Appuyez sur la touche de réinitialisation.
REMARQUE
Réglage du pas de fréquence
Page 57

Français
57
Fonctions RBDS (Voir page 47)
RBDS (Radio Broadcast Data System)
RBDS est un service utilisé par des stations radio pour
transmettre des données en plus du signal radio ordinaire.
Quand une station RBDS est reçue, vous pouvez savoir
immédiatement quelles sortes de données sont transmises en
regardant le nom du programme qui apparaît sur l'affichage
après la fréquence. L'indicateur AF s'allume quand une station
RBDS est reçue.
Alarm
Lorsqu’une émission d’urgence (annonçant des catastrophes,
etc.) est diffusée, la fonction actuelle sera interrompue pour
ralentir l’avertissement reçu dans les conditions suivantes:
pendant la réception du tuner, ou lorsque la fonction
d’informations routières est activée.
Pour éviter les accidents, les conducteurs ne doivent pas
regarder l'affichage quand ils sont sur la route.
2AVERTISSEMENT
Radiotexte
Des informations diffusées par les stations RBDS peuvent être
affichés. Le texte défile sur l’affichage.
Activation du mode d’affichage de texte radio:
Lorsque la touche PS/RT est enfoncée, l’affichage change
comme suit:
Sélectionnez le mode d’affichage de texte radio:
▼
Fréquence de la station
▼
Nom de service de programme
▼
Radiotexte
▼
Horloge
Si la station RBDS réglée actuellement ne diffuse aucun texte
pendant le mode d’affichage de texte radio, “NO TEXT” (pas de
texte) apparaît sur l’affichage. Pendant l’attente de la réception,
“WAITING” (attente) défile sur l’affichage.
REMARQUE
Vous pouvez écouter les informations routières. Si vous
écoutez des cassettes ou des disques, ils continueront d’être
reproduits jusqu’à ce qu’un bulletin d’informations routières
soit diffusé.
Mise en/hors service de la fonction TI:
Appuyez sur la touche TI pendant au moins une seconde pour
activer et désactiver la fonction.
Quand la fonction est en service, l’indicateur TI est allumé.
Si une station diffusant des informations routières est reçue,
l’indicateur TP s’allume.
Si rien n’est reçu, l’indicateur TI clignote.
Quand un bulletin d’informations routières commence à être
diffusé, l’indicateur TA s’allume.
Si vous écoutez une cassette ou un disque quand le bulletin
d’informations routières commence, la cassette ou le disque
s’arrête automatiquement. Quand le bulletin se termine ou si la
réception devient mauvaise, la lecture de la cassette ou du
disque reprend.
Appuyer sur la touche TI en gamme d'ondes AM commute
automatique la réception sur la gamme FM. Cependant, le tuner
ne retourne pas sur la gamme AM quand vous appuyez de
nouveau sur la touche TI.
Commutation sur une différente station d’informations
routières:
Utilisez les touches 4/¢ pour effectuer un accord
automatique des stations TI dans une certaine gamme
d'ondes.
Quand vous écoutez une cassette ou un disque, vous ne pouvez
pas passer sur une autre station TI.
REMARQUE
REMARQUE
Fonction d’informations routières (TI)
Page 58

Fonctions RBDS (Voir page 47)
58
Français
Recherche du type de programmes choisi
Appuyez sur la touche 4 ou ¢ pour rechercher une
fréquence diffusant le type de programmes choisi.
L'affichage clignote et la recherche commence.
Si le type de programmes que vous avez choisi est trouvé, le
nom de la station est affiché et la station est accordée.
L’indicateur PTY clignote sur l'affichage pendant environ 30
secondes. Si vous appuyez sur aucune touche pendant 30
secondes, le mode de sélection de programme PTY se met
automatiquement hors service.
Si aucun programme n’est trouvé, “NO PTY” est affiché.
Si vous souhaitez choisir un autre type de programmes, répétez
les étapes 2 et 3 ci-dessus.
Commutation sur d'autres stations diffusant le même type de
programmes:
Quand l’indicateur PTY clignote sur l'affichage, réalisez un
accord automatique.
Le tuner recherche une autre station avec le même type de
programmes.
Annulation de la fonction de type de programmes pendant son
fonctionnement:
Appuyez sur la touche PTY.
Pour enregistrer une station non-RBDS comme un type de
programme:
Accordez la station que vous souhaitez enregistrer comme
type de programme.
Appuyez sur la touche PTY pour entrer en mode de sélection
de type de programme.
Appuyez sur la touche FM/AM pour choisir le type de
programme que vous souhaitez enregistrer.
Suivez les instructions de l'étape 2 pour entrer en mode de
sélection de type de programme.
Appuyez sur la touche CLK pendant au moins deux secondes.
La station est enregistrée comme un type de programme, lui
permettant d'être la cible des recherches de fréquence,
exactement de la même manière que les stations RBDS le sont.
4
3
2
1
REMARQUE
3
Fonction de type de programmes (PTY)
Réalise une recherche automatique des stations diffusant un
certain type de programmes.
Pour entrer en mode de sélection du type de programme:
Appuyez sur la touche PTY.
L'indicateur PTY s'allume pendant le mode de sélection du
type de programme.
Vous ne pouvez pas utiliser cette fonction quand la fonction
d'informations routières est en service.
Sélection du type de programmes à être reçu
• Appuyez répétitivement sur la touche FM ou AM pour choisir
le type de programmes que vous souhaitez écouter. Les
choix possibles sont:
SPEECH(Discours) ↔ 1.NEWS(informations) ↔
2.INFORM(Information) ↔ 3.SPORTS(Sports) ↔ 4.TALK
(Conversation) ↔ 5. ROCK ↔ 6. CLS ROCK (Rock classique)
↔ 7.ADLT HIT (Hits adultes) ↔ 8. SOFT RCK ↔ 9. TOP 40
↔ 10. COUNTRY (Musique “Country”) ↔ 11. OLDIES
(Chansons populaires (“Oldies”)) ↔
12. SOFT ↔ 13. NOSTALGIA (Musique nostalgique) ↔
14. JAZZ ↔ 15. CLASSIC (Musique classique) ↔
16. R & B ↔ 17. SOFT R & B ↔
18. LANGUAGE (Langage) ↔ 19. REL MUSIC (Musique
religieuse) ↔ 20. REL TALK (Discours religieux) ↔
MUSIC(Musique) ↔ SPEECH(Discours) ↔
(Discours.....1~4, 18, 20~22, Musique.....5~17, 19)
• Vous pouvez choisir le type de programmes directement en
appuyant sur une touche préréglée. Les touches sont
préréglées à l'usine pour les types de programmes suivants:
1. Musique 2. Discours 3. Informations
4. Sports 5. Musique classique 6. Musique jazz
Modification des réglages des touches préréglées pour le type de programmes
Après avoir choisi le type de programmes à mémoriser dans une
certaine touche préréglée, maintenez pressée cette touche
pendant deux secondes ou plus.
Les données précédemment mémorisées pour cette touche sont
effacées et le nouveau type de programmes est mémorisé.
REMARQUE
2
REMARQUE
1
Page 59

Français
59
Fonctions du lecteur de CD (Voir page 47)
Vous pouvez mémoriser jusqu’a 32 stations.
Si vous essayez de mémoriser une 33ème station, la fréquence
et le type de programme apparaissent alternativement sur
l’affichage.
Si cela se produit, appuyez sur la touche FM/AM pour passer
l’affichage à une station à effacer, et ensuite appuyez à nouveau
sur la touche CLK pendant au moins deux secondes. La station
récemment entrée sera ainsi mémorisée.
Appuyez sur la touche PTY pour sortir du mode de sélection du
type de programme.
Vérification du type de programme choisi:
Appuyez sur la touche CLK.
Le type de programme de la station actuelle sera affiché
pendant cinq secondes. Pendant ce temps, “E” clignote sur
l’affichage.
• Si les fréquences pour lesquelles aucun type de programme n’a
été mémorisé sont réglées, “NO ENTRY” (pas d’entrée) est
affiché.
• Le contenu de la mémoire des types d’émission est effacé
quand on appuie sur le touch de réinitialisation.
REMARQUE
5
REMARQUE
Lecture:
Appuyez sur la touche CD pour ouvrir la façade et dégager la
fente (d'insertion ) de CD. En tenant le CD avec la face imprimée
dirigée vers le haut, insérez-le dans la fente. La façade se
referme et montre le panneau de commande et la lecture du CD
commence.
L'indicateur 3 s'allume quand un CD est en train d'être reproduit.
Lecture de CD déjà insérés:
L'indicateur 32 s'allume quand un CD a été inséré.
Appuyez sur la touche CD pour commencer la lecture.
Arrêt momentané (pause) et reprise de la lecture d’un CD:
Appuyez sur la touche CD pour arrêter momentanément la
lecture du CD. L'indicateur 8 s'allume.
Appuyez de nouveau sur la même touche pour reprendre la
lecture.
Arrêt/Ejection:
Appuyez sur la touche EJECT pendant au moins une seconde
pour arrêter la lecture du CD. La façade s'ouvre et le CD est
éjecté.
Appuyez sur la touche CD, CH ou TUN pour exposer le panneau
de commande.
• N'essayez pas d'insérer un CD dans la fenêtre si un autre CD se
trouve déjà à l'intérieur.
• L'appareil ne peut reproduire que les CD de 12 cm (5 pouces). Si
vous insérez un CD de 8 cm (3 pouces) avec un adaptateur, il peut
être pris à l'intérieur et provoquer un mauvais
fonctionnement de l'appareil.
• Le son est rendu silencieux momentanément pendant le
mouvement du panneau avant.
• Les seules touches qui fonctionnent pendant l’éjection sont les
touches CD, CH, et TUN, ainsi que la commande de volume.
• Si vous insérez un CD et l'éjectez aussitôt, et que vous essayez
de l'insérer de nouveau juste après, il se peut que ce ne soit pas
possible. Dans ce cas, attendez un moment avant de le ré-insérer.
• La façade avant fait partie de l’équipement de précision.
Ne laissez pas la façade ouverte et ne la forcez pas
excessivement pendant l’ouverture et le déplacement.
REMARQUE
2ATTENTION
Lecture de CD
Page 60

Français
Fonctions du lecteur de CD (Voir page 47)
60
Commute l'affichage qui apparaît pendant la lecture d'un
disque.
Commutation de l’affichage pour les CD:
Chaque fois que vous appuyez sur la touche DISP pendant la
lecture d'un CD, l'affichage change comme suit:
▼
Durée de la plage
▼
Durée de lecture totale du disque
Commutation de l’affichage pour les CD
Lecture rapide d’un disque vers l’avant:
Maintenez pressée la touche ¢.
Relâchez la touche pour reproduire le disque à partir de ce point.
Lecture d’un disque vers l’arrière:
Maintenez pressée la touche 4.
Relâchez la touche pour reproduire le disque à partir de ce point.
Lecture rapide d’un disque vers l’avant et vers
l’arrière
Recherche vers l'avant ou vers l'arrière parmi les plages du
disque jusqu'à ce que vous atteignez la plage que vous
souhaitez écouter.
Recherche de plages vers l’arrière:
Appuyez sur la touche 4 pour afficher le numéro de plage
souhaité.
Appuyez une fois pour revenir jusqu'au début de la plage
actuelle, deux fois pour revenir jusqu'au début de la plage
précédente, etc.
La lecture commence au début du numéro de plage affiché.
Recherche de plages vers l’avant:
Appuyez sur la touche ¢ pour afficher le numéro de plage
souhaité.
Appuyez une fois avancer rapidement jusqu'à la plage suivante,
deux fois pour avancer rapidement jusqu'à la plage d'après, etc.
La lecture commence au début du numéro de plage affiché.
Recherche de plages
Fonction de télécommande (Voir page 49)
Recherche directe de plages
Utilisez la télécommande pour entrer directement le numéro de
plage que vous souhaitez écouter.
En utilisant les touche numériques de la télécommande, entrez le
numéro de la plage que vous souhaitez écouter.
Le numéro de la plage choisie clignote sur l'affichage pendant 10
secondes.
Si vous n'entrez rien d'autre pendant la période de 10 secondes,
le mode d'entrée de numéro est annulé automatiquement.
Appuyez sur TRACK
+
ou TRACK– pendant que le numéro de
plage clignote.
La lecture de la plage spécifiée dans l'étape 1 commence.
Annulation de la recherche directe de plages pendant son
fonctionnement:
Appuyez sur la touche 38.
Vous ne pouvez pas utiliser la fonction de recherche directe de
plages pendant le balayage de plages ou pendant l'utilisation de la
lecture aléatoire.
REMARQUE
2
1
Répète la lecture de la plage actuelle.
Mise en/hors service de la fonction de répétition de la lecture:
Appuyez sur la touche REP pour mettre la fonction de
répétition de la lecture en et hors service.
L'indicateur REP s'allume quand la fonction de répétition de la
lecture est en service.
Le numéro de la plage actuellement écoutée clignote sur
l’affichage.
La fonction de répétition de la lecture est annulée quand vous
arrêtez la lecture du disque.
REMARQUE
Fonction de répétition de la lecture d’une plage
Reproduit successivement le début de chaque plage d'un disque
jusqu'à ce que vous trouviez la plage que vous souhaitez écouter.
Fonction de balayage de plages
Page 61

Français
61
Fonctions de commande du changeur de
disque (Voir page 48)
Mise en/hors service de la fonction de balayage de plages:
Appuyez sur la touche SCAN pour mettre en et hors service la
fonction de balayage de plages.
L'indicateur SCN s'allume quand la fonction de balayage de
plages est en service.
Les 10 premières secondes de chaque plage sont reproduites
et les plages sont reproduites dans l'ordre.
Le numéro de la plage actuellement écoutée clignote sur
l'affichage.
Arrêt pour écouter la plage en train d’être balayée:
Appuyez de nouveau sur la touche SCAN pour arrêter le
balayage et pour reprendre la lecture normale.
• La fonction de balayage de plages est annulée quand vous
arrêtez la lecture d'un disque.
• La fonction de balayage de plages ne balaie qu'une fois les
plages d'un disque.
REMARQUE
Reproduit toutes les plages du disques courant dans un ordre
aléatoire.
Appuyez sur la touche RDM pour mettre en et hors service la
fonction de lecture aléatoire.
L'indicateur RDM s'allume quand la fonction de lecture
aléatoire est en service.
L'affichage du numéro de plage change continuellement quand
la plage suivante est en train d'être choisie.
Quand la plage a été choisie, la lecture commence.
Le numéro de la plage choisie clignote sur l'affichage quand
celle-ci est reproduite.
Pour changer la plage en train d'être écoutée, appuyez sur la
touche ¢.
Une autre plage est choisie et reproduite.
La fonction de lecture aléatoire est annulée quand vous arrêtez la
lecture d'un disque.
REMARQUE
2
1
Fonction de lecture aléatoire
Lecture rapide d’un disque vers l’avant et vers
l’arrière
Lecture rapide d’un disque vers l’avant:
Maintenez pressée la touche ¢.
Relâchez la touche pour reproduire le disque à partir de ce point.
Lecture d’un disque vers l’arrière:
Maintenez pressée la touche 4.
Relâchez la touche pour reproduire le disque à partir de ce point.
Vous ne pouvez pas utiliser la lecture rapide vers l'arrière entre les
plages lors de l'écoute d'un MD sur le changeur de MD. La lecture
rapide vers l'arrière est annulé quand elle atteint le début d'une
plage et la lecture normale reprend automatiquement de ce point.
REMARQUE
Lecture de disques:
Appuyez sur la touche CH.
L’indicateur de disque s’allume pendant le mode changeur de
disques.
Quand la lecture de la dernière plage d'un disque est terminée, le
disque suivant du changeur de disques est reproduit. Quand le
dernier disque du changeur a été reproduit, le lecteur retourne au
premier disque et commence à le reproduire.
Le disque #10 est affiché comme “0”.
Commutation entre les changeurs de disques:
Quand deux changeurs de disques (1 et 2) sont connectés à
l'appareil, maintenez pressée la touche CH pendant une seconde
ou plus pour commuter de l'un à l'autre.
Le KCA-S200, vendu séparément, doit être utilisé quand deux
changeur de disques sont connectés.
Si le KDC-C810 est le changeur de disques directement connecté(
changeur de disques 1 ),les deux appareils peuvent être
commandés même sans le KCA-S200.
Arrêt momentané et reprise de la lecture de disques:
Appuyez sur la touche CH pour arrêter momentanément la
lecture de disques.
Appuyez de nouveau sur la même touche pour reprendre la lecture.
REMARQUE
Lecture de disques en utilisant le changeur de disques
Page 62

Français
62
Fonctions de commande du changeur de disque (Voir page 48)
Recherche de plages
Recherche vers l'avant ou vers l'arrière parmi les plages du disque
jusqu'à ce que vous atteignez la plage que vous souhaitez écouter.
Recherche de plages vers l’arrière:
Appuyez sur la touche 4 pour afficher le numéro de plage
souhaité.
Appuyez une fois pour revenir jusqu'au début de la plage actuelle,
deux fois pour revenir jusqu'au début de la plage précédente, etc.
La lecture commence au début du numéro de plage affiché.
Appuyer sur la touche 4 lors de la lecture de la plage 1, fait
revenir la bande seulement jusqu'au début cette plage.
La recherche ne passe pas à la dernière plage du disque.
Recherche de plages vers l’avant:
Appuyez sur la touche ¢ pour afficher le numéro de plage
souhaité soit affiché.
REMARQUE
Appuyez une fois avancer rapidement jusqu'à la plage suivante,
deux fois pour avancer rapidement jusqu'à la plage d'après, etc.
La lecture commence au début du numéro de plage affiché.
Vous ne pouvez pas faire de recherche vers l'avant lors de l'écoute
de la dernière plage du disque.
REMARQUE
Recherche directe de plages
Utilisez la télécommande pour entrer directement le numéro de
plage que vous souhaitez écouter.
En utilisant les touche numériques de la télécommande, entrez le
numéro de la plage que vous souhaitez écouter.
Le numéro de la plage choisie clignote sur l'affichage pendant 10
secondes.
Si vous n'entrez rien d'autre pendant la période de 10 secondes,
le mode d'entrée de numéro est annulé automatiquement.
Appuyez sur TRACK
+ ou TRACK
– pendant que le numéro de
plage clignote.
La lecture de la plage spécifiée dans l’étape 1 commence.
Annulation de la recherche directe de plages pendant son
fonctionnement:
Appuyez sur la touche 38.
Vous ne pouvez pas utiliser la fonction de recherche directe de plages
pendant le balayage de plages ou de disques ou pendant l'utilisation
de la lecture aléatoire ou de la lecture aléatoire de magasin.
REMARQUE
2
1
Fonction de télécommande (Voir page 49)
Recherche de disques
Recherche vers l'avant ou vers l'arrière parmi les disques d'un
changeur de disques jusqu'à ce que vous atteignez celui que
vous souhaitez écouter.
Recherche de disques vers l’arrière:
Appuyez sur la touche DISC
– jusqu’à ce que le numéro du
disque souhaité soit affiché.
Chaque fois que la touche est pressée, le numéro de disque
affiché diminue d'une unité.
Commute l’affichage qui apparaît pendant la lecture d’un disque.
Commutation de l’affichage pour les disques
Chaque fois que vous appuyez sur la touche DISP pendant la
lecture d’un disque, l’affichage change comme suit:
▼
Durée de la plage/Nº. de la plage
▼
Nom du disque
▼
Titre du disque (MD seulement)
▼
Titre de la plage (MD seulement)
• Vous pouvez donner des noms aux disques avec la fonction de
préréglage des noms de disques (voir page 65).
• Si vous essayez d'afficher le nom d'un disque qui n'en a pas, "NO
NAME" est affiché à la place.
• Lorsque la source en cours d’écoute est terminée, ou interrompue
(ex. par commutation de la position d’allumage, le changement de
sources), l’affichage initial revient.
REMARQUE
Commutation de l’affichage pour les disques
Page 63

Français
63
▼
Répétition de plage en service
▼
Répétition de disque en service
▼
Répétition de plage/disque hors service
L'indicateur REP s'allume quand la fonction de répétition de la
lecture est en service.
Le numéro de plage clignote sur l'affichage quand la fonction de
répétition de plages est en service.
Le numéro de disque clignote sur l'affichage quand la fonction de
répétition de disque est en service.
La fonction de répétition de la lecture est annulée quand vous
arrêtez la lecture du disque.
REMARQUE
La lecture commence au début du numéro de disque affiché.
Recherche de disques vers l’avant:
Appuyez sur la touche DISC
+ jusqu’à ce que le numéro du
disque souhaité soit affiché.
Chaque fois que la touche est pressée, le numéro de disque
affiché augmente d'une unité.
La lecture commence au début du numéro de disque affiché.
"LOAD" est affiché quand des disques sont en train d'être échangés
dans le changeur de disques.
REMARQUE
Recherche directe de disques
Utilisez la télécommande pour entrer directement le numéro de
disque que vous souhaitez écouter.
En utilisant les touche numériques de la télécommande, entrez le
numéro du disque que vous souhaitez écouter.
Le numéro du disque choisi clignote sur l'affichage pendant 10
secondes.
Si vous n'entrez rien d'autre pendant la période de 10 secondes,
le mode d'entrée de numéro est annulé automatiquement.
• Entrez “0” pour choisir le disque 10.
• Si vous entrez plus de deux chiffres à la fois, la recherche ne se
fera que sur le dernier chiffre entré.
Appuyez la touche DISC
+ ou DISC– pendant que le numéro
entré clignote.
La lecture du disque spécifiée à l’étape 1 commence.
Annulation de la recherche directe de disque pendant son
fonctionnement:
Appuyez sur la touche 38.
2
REMARQUE
1
Fonction de télécommande (Voir page 49)
Fonction de lecture aléatoire
Reproduit toutes les plages du disques courant dans un ordre
aléatoire.
Appuyez sur la touche RDM pour mettre en et hors service la
fonction de lecture aléatoire.
L'indicateur RDM s'allume quand la fonction de lecture
aléatoire est en service.
L'affichage du numéro de plage change continuellement quand
la plage suivante est en train d'être choisie.
Quand la plage a été choisie, la lecture commence.
Le numéro de la plage choisie clignote sur l'affichage quand
celle-ci est reproduite.
Quand toutes les plages d'un certain disque ont été reproduites
avec la fonction de lecture aléatoire, le disque suivant du
changeur commence à être reproduit (avec la fonction de lecture
aléatoire toujours en service).
Pour changer la plage en train d'être écoutée, appuyez sur la
touche ¢.
Une autre plage est choisie et reproduite.
La fonction de lecture aléatoire est annulée quand vous arrêtez la
lecture d'un disque.
REMARQUE
2
REMARQUE
1
Répète la lecture de la plage ou du disque actuelle.
Mise en/hors service de la fonction de répétition de la lecture:
Appuyez sur la touche REP pour mettre la fonction de répétition
de la lecture en et hors service comme suit:
Fonction de répétition de la lecture d’une plage/d’un disque
Page 64

Fonctions de commande du changeur de disque (Voir page 48)
64
Français
Fonction de balayage de disques
Reproduit successivement le début de chaque disque jusqu'à ce
que vous trouviez celui que vous souhaitez écouter.
Mise en/hors service de la fonction de balayage de disques:
Appuyez sur la touche D.SCN pour mettre en et hors service la
fonction de balayage de disques.
L'indicateur SCN s'allume quand la fonction de balayage est en
service.
Les 10 premières secondes de chaque disque sont reproduites
dans l'ordre dans lequel les disques sont insérés dans le changeur.
Le numéro du disque actuellement écouté clignote sur l'affichage.
Arrêt pour écouter le disque en train d’être balayé:
Appuyez sur la touche CH ou de nouveau sur D.SCN pour arrêter
le balayage et pour reprendre la lecture normale.
• La fonction de balayage de disques est annulée quand vous
arrêtez la lecture d'un disque.
• La fonction de balayage de disques ne balaie qu'une fois chaque
disque du changeur.
• "LOAD" est affiché quand des disques sont échangés dans le
changeur de disque.
REMARQUE
Arrêt pour écouter la plage en train d’être balayée:
Appuyez sur la touche CH ou de nouveau sur SCAN pour arrêter
le balayage et pour reprendre la lecture normale.
• La fonction de balayage de plages est annulée quand vous arrêtez
la lecture d'un disque.
• La fonction de balayage de plages ne balaie qu'une fois les plages
d'un disque.
REMARQUE
Fonction de balayage de plages
Reproduit successivement le début de chaque plage d'un disque
jusqu'à ce que vous trouviez la plage que vous souhaitez écouter.
Mise en/hors service de la fonction de balayage de plages:
Appuyez sur la touche SCAN pour mettre en et hors service la
fonction de balayage de plages.
L'indicateur SCN s'allume quand la fonction de balayage de
plages est en service.
Les 10 premières secondes de chaque plage sont reproduites et
les plages sont reproduites dans l'ordre.
Le numéro de la plage actuellement écoutée clignote sur l'affichage.
Fonction de lecture aléatoire du magasin
Reproduit les plages de tous les disques dans le changeur à
disques dans un ordre aléatoire.
Appuyez sur la touche M.RDM pour mettre en et hors service la
fonction de lecture aléatoire de magasin de disques.
L'indicateur RDM s'allume quand la fonction de lecture aléatoire
de magasin à disques est en service.
L'affichage du numéro de disque et de plage change
continuellement pendant que la plage suivante est en train d'être
choisie.
Quand le disque/plage suivant/suivante a été choisi, la lecture
commence.
Le numéro du disque/plage choisi clignote sur l'affichage pendant
que celui-ci est reproduit.
Cette fonction n'est pas disponible avec les modèles suivants:
KDC-C200/C300/C400/C301/C401
Pour changer la plage en cours de reproduction, appuyez sur la
touche ¢.
Un autre disque/plage est choisi et reproduit.
• La fonction de lecture aléatoire du magasin est annulée quand
vous arrêtez la lecture d'un disque.
• Le temps nécessaire pour la sélection aléatoire dépend du
nombre de disques insérés dans le magasin.
REMARQUE
2
REMARQUE
1
Page 65

Français
65
Préréglage du nom des disques
Mémorise le nom des disques qui sera affiché lors de la lecture.
Reproduisez le disque pour lequel vous souhaitez prérégler un nom.
• Cette fonction n’est pas disponible pour les changeurs de disques
qui ne possèdent pas la fonction Préréglage du nom du disque.
• Cette procédure n’est pas utilisé pour mémorisé les titres des
disques et des plages pour les MD que vous enregistrez.
Maintenez pressée la touche NAME.S pendant deux secondes
ou plus.
“NAME SET” est affiché et vous entrez en mode de
préréglage de nom de disques.
Le curseur clignote à la position où un caractère peut être entré.
Appuyer sur la touche 4 ou ¢ pour déplacer le curseur sur
la position souhaitée. La touche 4 déplace le curseur vers la
gauche et la touche ¢ vers la droite.
Vous pouvez aussi déplacer le curseur vers la gauche ou vers
la droite en appuyant respectivement sur la touche TRACK
+
ou TRACK– sur la télécommande.
Appuyez sur la touche DISC
+ ou DISC– jusqu’à ce que le
caractère souhaité soit affiché.
En plus de l'alphabet (lettres capitale seulement) et des
chiffres, vous pouvez choisir les caractères suivants: /, +, –,
*, =, <, >, [ et ].
Entrée directe
Pour les appareils connectés à un KDC-C810,KDC-C710, KDC-C660 ou
KDC-C660C, vous pouvez entrer directement les lettres en utilisant les
touches d’entrée de chiffres/lettres sur la télécommande.
Exemple: Utiliser les indications suivantes pour entrer le nom “DANCE”
REMARQUE
4
3
2
REMARQUE
1
Recommencez les étapes 3 et 4 jusqu'à ce que tous les
caractères du nom soient choisis.
Vous pouvez entrer un maximum de 8 caractères pour chaque nom.
Appuyer sur la touche NAME.S de l’appareil ou sur la touche
OK de la télécommande.
Le nom du disque est mémorisé et le mode de préréglage de
nom de disques est annulé.
Si vous n'entrez rien pendant 10 secondes, le nom sera
mémorisé dans l'état où il se trouve.
• Avec le changeur de CD vous pouvez seulement mémoriser des
noms pour un maximum de 100 CD (Les changeurs de disques
KDC-C710, KDC-C660 et KDC-C660C peuvent mémoriser des
noms pour un maximum de 50 disques.). et seulement 30 MD
avec le changeur de MD. Si vous mémorisez un nom pour un
101ème (51ème) CD ou un 31ème MD, le nom du disque N°1
sera effacé automatiquement.
• Les disque sont identifiés par leur longueur totale et par le
nombre de plage. Si vous reproduisez un autre disque qui a
exactement les mêmes spécifications qu’un autre disque dont
le nom a été mémorisé, un nom erroné sera affiché pour lui.
• Si vous souhaitez modifier le nom d’un disque, répétez les
étapes 1 et 2 pour afficher le nom et répétez ensuite les étapes
3 et 4 pour modifier le nom
• Appuyer sur la touche de réinitialisation n'efface pas les noms
de disques mémorisés dans un changeur de disque.
REMARQUE
6
REMARQUE
5
APPUYEZ SUR
NOMBRE DE FOIS A APPUYER
CARACTÈRE
#3 1“D”
1“A” #2
#6“N” 2
#2 3“C”
#3“E” 2
Page 66

Ajuste divers paramètres de la qualité sonore.
Appuyez sur la touche AUD pour entrer en mode de
commande.
Appuyez sur la touche FM ou AM.
Chaque fois que la touche est pressée, le mode d'ajustement
change comme suit:
Appuyer sur la touche FM fait avancer l'affichage et appuyer
sur la touche AM le fait avancer dans le sens inverse.
• Si la sortie au niveau préamplificateur est asymétrique
• Si la sortie au niveau préamplificateur est symétrique
Mémoire pour la tonalité de la source
Chaque source (CD, FM, AM et changeur de disques) a sa propre
mémoire dans laquelle est mémorisé les réglages des graves et
des aigus.
Les réglages fait pour une source particulière sont rappelés
automatiquement chaque fois que vous utilisez cette source (ex:
le mode FM utilise la tonalité réglée pour la FM, le mode AM
celle pour la AM, etc.)
Appuyez sur la touche 4 / ¢.
Référez-vous au tableau (Voir page 67)pour ajuster le mode
affiché.
Appuyez sur la touche AUD pour sortir du mode de commande.
4
3
REMARQUE
2
1
Français
▼
Graves
NF
Niveau
▼▲
Aigus Fader
▼▲
Balance
Fonctions de commande du changeur de
disque (Voir page 48)
66
Réglage des commandes de l’audio
Autres fonctions (Voir page 48)
▼
Graves Niveau de sortie
préamplificateur
▼▲
Aigus Balance
▲
Uniquement si la sortie
monophonique est en service
()
Uniquement si la sortie sans
fading est en service
()
Lecture de disque par nom préréglé (DNPP)
Si vous avez préréglé le nom du disque que vous souhaitez
écouter dans le changeur de disques, vous pouvez le
rechercher par son nom et commencer sa lecture.
Appuyez sur la touche DNPP sur la télécommande.
“DNP PLAY” apparaît sur l'affichage et l'appareil entre en
mode de lecture de disque par nom préréglé.
Les noms de tous les disques dans le changeur de disques
apparaissent successivement sur l'affichage, à raison de cinq
secondes par disque.
Les disques pour lesquels aucun nom n'a été préréglé
apparaîtront comme “NO NAME” sur l'affichage.
Les disques dans le changeur de disques qui n'ont jamais été
reproduit auparavant apparaîtront comme “NO ACCES” quand
leur nom de disque devra être affiché. Lorsqu’un disque ne peut
pas être identifié, à cause de l’affichage “NO ACCES” (pas
d’accès) après l’insertion d’un magasin de disque, essayez de le
lire à l’aide de la fonction de balayage du disque ou une fonction
similaire pour afficher le nom du disque.
Affichage rapide (vers l'avant/vers l'arrière):
Appuyez sur la touche DISC
+ ou DISC–.
Appuyer sur la touche DISC+ affiche rapidement les noms
préréglés/titres de disques dans l'ordre.
Appuyez sur la touche DISC– affiche rapidement les noms
préréglés/titres de disques dans l'ordre inverse.
Quand le nom du disque que vous souhaitez reproduire apparaît
Appuyez sur la touche OK.
Le disque dont le nom est affiché est rappelé et l'appareil sort
du mode de lecture de disque par nom préréglé (DNPP).
Pour annuler le mode DNPP:
Appuyez sur la touche DNPP.
Le mode de lecture de disque par nom préréglé (DNPP) est annulé.
2
REMARQUE
1
Fonction de télécommande (Voir page 49)
Page 67

Français
67
L'équilibre du son sans fading ne peut pas être ajusté.
REMARQUE
Tableau des réglages de commande audio
Graves
(“BAS”)
Aigus
(“TRE”)
Balance
(“BAL”)
Fader
(“FAD”)
Niveau de préamplification
sans fading
(“NF”)
Les graves
diminuent.
Les aigus diminuent.
Accentuation du
canal gauche.
Accentuation du
canal arrière.
Le son sans fading
est réduit.
Les graves
augmentent.
Les aigus
augmentent.
Accentuation du
canal avant.
Le son sans fading
est amélioré.
Accentuation du canal
droit.
Mode d’ajustement
(Affichage)
Touche 4 Touche ¢
Utilisation de la touche de commande de l'audio
Niveau de
sortie
symétrique
préamplificateur
(“SUB”)
Les sons
monophoniques sont
atténués.
Les sons
monophoniques sont
accentués.
Ajustement de l’heure
Vous pouvez ajuster l'heure manuellement. Aussi, avec
l'ajustement automatique de l'heure en service (ON), vous
pouvez ajuster l'heure de l'horloge automatiquement à l'aide des
données de l'heure envoyées par les stations RBDS (après avoir
reçu une station RBDS pendant plusieurs minutes). Vous pouvez
aussi régler l'heure manuellement si la fonction d'ajustement
automatique de l'heure est mise hors service. Le réglage par
défaut est l'ajustement manuel de l'heure.
Ajustement de l'heure manuelle:
Si l’heure n’est pas affiché, appuyez d’abord sur la touche CLK
pour afficher l’heure.
En maintenant pressée la touche CLK, appuyez sur la touche 4
ou ¢ pour ajuster l’heure.
La touche 4 ajuste les heures et la touche ¢ ajuste les
minutes.
Ne pas appuyer sur la touche CLK pendant deux secondes ou plus,
car l’affichage changera sur le mode de préréglage de nom.
Appuyer sur la touche 4 ou ¢ pour ajuster rapidement l’horloge.
Mise en/hors service de l'ajustement automatique de l'heure:
Appuyez répétitivemente sur la touche TUN et choisissez “ALL
OFF” pour entrer en mode d’attente.
Appuyez sur la touche #1 pendant au moins trois secondes.
Chaque fois que vous appuyez sur la touche, la fonction
d'ajustement automatique de l'heure est mise en et hors service.
“SYNC ON” (l'ajustement automatique de l'heure est en service.)
“SYNC OFF” (l'ajustement automatique de l'heure est hors
service.)
Ajustement automatique de l'heure:
Accordez une station RBDS et recevez le signal pendant
plusieurs minutes.
L'horloge est ajustée automatiquement sur l'heure locale.
L'horloge ne sera pas ajustée automatiquement si la station RBDS
accordée ne transmet pas de donnée d'heure. Dans ce cas,
essayez une autre station RBDS.
REMARQUE
2
1
REMARQUE
2
1
Affichage de l’heure.
Commutation de l’affichage de l’heure:
Presser la touche CLK jusqu’à ce que l’horloge soit affichée.
Horloge
Page 68

Français
68
Autres fonctions (Voir page 48)
Eclairage sélectionnable
Vous pouvez choisir la couleur de l’éclairage des touches (vert
ou ambre), ou mettre l’éclairage hors service.
Commutation de l’éclairage:
Maintenez pressée la touche ILLUM pendant une seconde ou
plus pour commuter l’éclairage comme suit:
▼
Vert
▼
Ambre
▼
Éteint
Préamplification sans fading
Le son de la sortie sonore sans fading peut être réglé soit en
ou hors service.
Par défaut, la sortie est en service.
Mise en/hors service la sortie sans fading:
Maintenez pressée la touche NF pendant plus d’une seconde
pour mettre la fonction en ou hors service.
“NF ON” est affiché quand la sortie sans fading est en service.
Vous pouvez commuter entre une sortie symétrique et
asymétrique en répétant les étapes 1 et 2.
• Les commandes audio retournent aux réglages par défaut
chaque fois que vous commutez entre une sortie symétrique et
asymétrique.
• Chaque fois que vous choisissez la sortie symétrique ou la sortie
asymétrique, la sortie sans fading/sortie monophonique
symétrique est mise en service.
Mise en service, ou hors service, de la sortie monophonique:
Maintenez pressée la touche NF pendant plus d’une seconde
pour mettre la fonction en ou hors service.
L’indication “SUB ON” s’affiche lorsque la sortie monophonique
est en service.
REMARQUE
Asymétrique Symétrique
Gauche Gauche Droite Droite -
Gauche Gauche +
Droite Droite +
Gauche Monophonique +
Droite Monophonique -
Avant
Arriere
Sans Fading
Fonction de code de sécurité
Quand la batterie est débranchée du commutateur
d'alimentation de l'appareil, vous ne pouvez pas remettre
l'appareil sous tension sans que le code de sécurité préréglé
ne soit entré. Cette fonction dissuade les vols.
Vous devez suivre les étapes 1 à 7 pour pouvoir utiliser la fonction de
code de sécurité. Mettre l'appareil hors tension pendant la procédure
désactivera le réglage du code de sécurité. La fonction ne peut pas
être désactivée après avoir effectué ces étapes.
Choisissez les quatre chiffres que vous souhaitez utiliser dans
votre code de sécurité.
Le code de sécurité à quatre chiffres est très important car vous
REMARQUE
1
REMARQUE
Sortie symétrique
Vous pouvez faire en sorte que les sorties au niveau
préamplificateur soient symétriques; cette disposition, qui ne
peut être utilisée que si l’amplificateur possède des entrées
symétriques, permet de réduire le bruit.
La sortie monophonique symétrique peut être mise en service,
ou hors service. Par défaut, la sortie est en service.
Commutation de la sortie symétrique/asymétrique:
Appuyez répétitivemente sur la touche TUN et choisissez “ALL
OFF” pour entrer en mode d’attente.
Appuyez sur la touche #3 pendant au moins trois secondes.
La sortie symétrique est choisie quand “BALANCED” apparaît
sur l'affichage.
La sortie avant/arrière correspond aux canaux L/R
(gauche/droit) pendant la sortie symétrique. La sortie sans
fading, au niveau préamplificateur, devient une sortie
monophonique lorsqu’elle est symétrique.
2
1
Page 69

Français
69
en aurez besoin pour remettre l'appareil sous tension quand la
fonction de sécurité est en service. Choisissez le nombre
attentivement et ne l'oubliez pas (écrivez-le quelque part et
conservez-le séparément dans un endroit sûr).
Appuyez répétitivemente sur la touche TUN et choisissez “ALL
OFF” pour entrer en mode d’attente.
Appuyez sur la touche #6 pendant au moins trois secondes.
“ENTER” apparaît sur l'affichage pendant une seconde,
indiquant que vous êtes en mode de réglage du code. Quand
“CODE” apparaît sur l'affichage, vous pouvez commencer à
entrer le code.
Appuyez sur les touches de préréglage et entrez le code de
sécurité que vous avez choisi à l'étape 1.
Exemple: Utilisez “3510” comme code de sécurité.
Appuyez sur la touche NAME.S pendant au moins trois secondes.
Le code de sécurité est réglé.
“RE-ENTER” apparaît sur l'affichage pendant une seconde vous
demandant d'entrer de nouveau le code pour confirmation. Quand
“CODE” apparaît, vous pouvez commencer à entrer le code.
Appuyez sur les touches de préréglage et entrez de nouveau le
code de sécurité.
Appuyez de nouveau sur la touche NAME.S pendant au moins
trois secondes.
“APPROVED” apparaît sur l'affichage et la fonction de code de
sécurité est mise en service. A partir de ce point, si l'appareil est
déconnecté de la batterie, le code de sécurité doit être entré la
première fois que l'appareil est mis sous tension. “CODE”
apparaisse sur l'affichage vous demandant d'entrer le code.
Si vous entrez un code de sécurité incorrect, l'affichage vous
demande d'entrer de nouveau le code correct. Suivez la
procédure de l'étape 3.
REMARQUE
7
6
5
4
3
2
Si vous appuyez sur la touche de réinitialisation ou retirez la
batterie:
Lorsque l’appareil est mis sous tension la première fois,
“CODE” apparaît sur l’affichage, vous demandant d’entrer le
code de sécurité.Répétez les étapes 6 et 7 ci-dessus et entrez
le code de sécurité. Vous pouvez recommencer à utiliser
l'appareil quand “APPROVED” apparaît sur l'affichage.
Si vous entrez un code incorrect, l'appareil est mis hors
tension. Entrez le code correct pour mettre l'appareil sous
tension.
Fonction Valet
La façade n'apparaît pas aussi longtemps que la position du
commutateur n'est pas changée, empêchant de toucher à
l'appareil quand vous laissez quelqu'un d'autre conduire la voiture.
Connexion du câble Valet:
Connectez le câble valet rose au commutateur ON/OFF et mettez
à la masse l'autre côté du commutateur.
• Assurez-vous que l'appareil est correctement mis à la masse, ou
l'appareil risquerait de ne pas fonctionner correctement.
• Nous conseillons d'installer le câble valet dans un endroit ou le
commutateur ON/OFF est difficile à trouver.
Mise en service du mode valet:
Mettez le commutateur ON/OFF sur ON.
Mettez l'appareil hors tension en coupant le contact ou en appuyant
sur la touche CLOSE/PWR OFF pendant au moins une seconde.
La fonction valet est mise en service et la façade se retourne pour
cacher le panneau de commande. Dans cet état, l'appareil ne peut
pas être mis sous tension jusqu'à ce que la fonction valet ne soit
annulée.
Vous pouvez inverser l'ordre des étapes 1 et 2 et mettre quand
même en service la fonction valet.
Annulation de la fonction valet:
Mettez le commutateur ON/OFF sur OFF.
Mettez le contact ou appuyez sur le “point tactile” à l'arrière de la
façade (voir p.50) pour faire apparaître le panneau de commande.
REMARQUE
2
1
REMARQUE
APPUYEZ
NOMBRE
PAS
SUR
DE FOIS A AFFICHAGE
APPUYER
1 #1 4 “3”
2 #2 6 “5”
3 #3 2 “1”
4 #4 1 “0”
Page 70

Français
70
L’utilisation d’accessoires autres que les accessoires fournis
pourrait endommager l’appareil. Assurez-vous d’utiliser les
accessoires fournis, indiqués ci-dessus.
2ATTENTION
Accessoires
............................................1
............................................1
............................................2
............................................1
............................................2
............................................2
R
TN
T
N
L
TN
T
N
............................................1
............................................1
1
2
3
4
5
6
7
8
Vue externe Nombre d’éléments
1. Pour éviter les courts-circuits, retirez la clef de contact et
déconnectez la borne · de la batterie.
2. Effectuez les connexions d’entrée et sortie correctement pour
chaque appareil.
3. Connectez les câbles du faisceau dans l’ordre suivant: masse,
batterie, allumage.
4. Connectez le connecteur du faisceau à l’appareil.
5. Installez l’appareil dans votre voiture.
6. Reconnectez la borne · de la batterie.
7. Appuyez sur le “point de la touche sensitive” à l'arrière de la
façade (voir p.50) pour faire apparaître le panneau de commande
de la façade. Appuyez ensuite sur la touche de réinitialisation.
• Si l’allumage de votre voiture n’a pas de position ACC, connectez
le câble d’allumage à une source d’alimentation qui peut être mise
sous et hors tension avec la clef de contact. Si vous connectez le
câble d’allumage à une source d’alimentation constante, comme
un câble de batterie, la batterie risque de se décharger.
• Si la console est équipée d’un couvercle, assurez-vous
d’installer l’appareil de façon à ce que la façade ne frappe pas le
couvercle lors de la fermeture ou de l’ouverture.
• Si un fusible grille, assurez-vous d’abord que les câbles n’ont
pas causé de court-circuit puis remplacez le vieux fusible par un
nouveau de même valeur.
• Ne laissez pas des câbles non-connectés ou des prises toucher les
parties métalliques de la voiture ou autres conducteurs électriques.
Pour éviter, les courts-circuits, ne retirez pas non plus les
capuchons à l’extrémité des câbles non-connectés ou des prises.
• Après avoir installé l’appareil, vérifiez si les lampes de frein, les
indicateurs, les clignotants, etc de la voiture fonctionnent
correctement.
• Isolez les câbles non-connectés avec un ruban vinyle ou autre
matériel similaire.
• Certains changeurs de disques nécessitent un câble de
conversion pour la connexion. Voir la section sur les “Précautions
de sécurité” pour les détails.
2ATTENTION
Procédure d’installation
............................................1
9
Page 71

Français
71
Connexion des cables sur les prises
–
+
P.CONT.OUT
VALET
NON-FADING
FRONT
REAR
Si vous connectez le câble
d’allumage (rouge) et le câble de
batterie (jaune) au châssis de la
voiture (masse), vous risquez de
causer un court-circuit qui peut
provoquer un incendie.
Connectez toujours ces câbles à
la source d’alimentation de la
boîte à fusible.
2AVERTISSEMENT
Entrée de l’antenne AM/FM
Sortie arrière gauche/symétrique gauche + (blanc)
Sortie arrière droite/symétrique droite + (rouge)
Sortie avant gauche/
symétrique gauche - (blanc)
Sortie avant droite/
symétrique droite - (rouge)
Fusible
Entrée de commande du
changeur de disque
KENWOOD
Faisceau de câbles
(Accessoire1)
Câble d’allumage (Rouge)
Câble de batterie (Jaune)
Câble de masse (Noir) · (Au châssis de la voiture)
Interrupteur
d’allumage
Boîte á fusibles
de la voiture
(Fusible principal)
ACC
Boîte á fusibles de la voiture
Batterie
Si aucune connexion n'est faite, ne
laissez pas le câble sortir à
l'extérieur.
Pour connecter le
changeur de disques,
consultez le mode
d’emploi du changeur.
REMARQUE
Câble valet (rose)
Mettez-le à la masse sur n’importe
quelle partie métallique de la
voiture par le commutateur.
Câble de commande de l’alimentation
(Bleu/Blanc)
Lors de l'utilisation de l'amplificateur de puissance
optionnel, connectez à sa prise de commande
d'alimentation.
Sortie sans fading gauche/
symétrique monophonique - (blanc)
Sortie sans fading droite/
symétrique monophonique - (rouge)
Asymétrique Symétrique
Gauche Gauche Droite Droite -
Gauche Gauche +
Droite Droite +
Gauche Monophonique +
Droite Monophonique -
Avant
Arriere
Sans Fading
Page 72

Français
72
Assurez-vous que l’appareil est solidement installé. Si l’appareil
est instable, il risque de mal fonctionner (ex. le son risque de
sauter).
REMARQUE
Installation
■
Installation (voiture non-japonaise)
Retrait du cadre en caoutchouc dur
■
Engagez les crochets sur l’outil de démontage 3 et retirez les
deux plaquettes de verrouillage inférieures, tout en conservant
l’outil de démontage 9 introduit à la partie supérieure.
Baissez le cadre et tirez-le vers l'avant comme montré sur
l'illustration.
2
Vous devez sentir (pas entendre) un “clic” quand les pattes se
verrouillent fermement.
REMARQUE
crochet
Introduire à fond l’outil de démontage 9 dans la découpe de
droite, comme le montre l’illustration ci-dessous, de manière à
retirer les plaquettes de verrouillage supérieures.
1
Accessoire9
Outil de démontage
loquet
crochet
Installation (voiture japonaise)
Accessoire3
Outil de démontage
Découpe
Tordre les pattes du
manchon de montage
avec un tournevis ou
un outil similaire et
fixer.
Accessoire2
Vis à tôle
(disponibles
dans le
commerce)
Tôle pare-feu ou support
métallique
Accessoire4
Page 73

Français
73
Installation d'une applique radio dans une voiture de fabrication japonaise (J-Cars)
■
Sur l'applique installée à l'usine, aplanir toutes
les pattes ou trous qui ne sont pas à niveau (à
l'exception de ceux utilisés pour les vis), en
utilisant un marteau ou un outil similaire.
Après avoir aligné l'applique JCar avec l'applique audio
installée à l'usine, serrez les vis.
Installation sur des voitures Toyota
Si nécessaire, coupez proprement le cadre de la plaque
d'ajustement avec un cutter ou un outil similaire, en
suivant les sillons intérieurs en haut et en bas de la plaque.
Il se peut que vous ayez à couper aussi la collerette
d'ajustage de l'usine si elle gène le mouvement de façade.
REMARQUE
L'appareil risque d'être
endommagé si vous utilisez des
vis, autres que les vis fournis.
2ATTENTION
Accessoire6 pour
les voitures Toyota
Accessoire5 pour
les voitures Nissan
patte
trou
Une fois que vous avez fixé l'applique installée à l'usine
avec les vis, utilisez un tournevis plat standard (pas le
Philips) ou un outil similaire pour plier les pattes de
l'applique J-car de façon à ce qu'ils s'ajustent dans les
trous de l'applique radio installée à l'usine (selon la
fabrication de la voiture).
patte
N … Nissan
T … Toyota
Chanfrein de
découpage usine
Accessoire7
Applique J-car (Suivez les
indications pour L/R)
Accessoire8
Plaque d'ajustage J-
car (Placez la partie
épaisse en bas)
Applique
installée à l'usine
Applique
installée à l'usine
N
T
TN
L
N
T
TN
R
8mm
5mm
8mm
5mm
Page 74

Français
74
Retrait de l’appareil
■
Accessoire4
Poussez vers le bas sur
l'outil gauche et vers le
haut sur l'outil droit,
comme montré, et tirez
l'appareil vers vous jusqu'à
ce qu'il sorte à moitié.
L'appareil risque de tomber
si vous le sortez
complètement.
4
Sortez l’appareil
entièrement avec les mains,
en faisant attention de ne
pas le faire tomber.
5
Faites attention de ne pas vous blesser avec le loquet de l'outil
de démontage.
2ATTENTION
Référez vous à la section “Retrait du cadre en caoutchouc
dur” (voir p.72) puis retirez le cadre en caoutchouc dur.
Retirez la Vis á tête hexagonale avec rondelle intégrale (M4 × 8
mm) sur le panneau arrière.
Insérez les deux outils de retrait à un angle et poussez-les
profondément dans les fentes de chaque côté, comme
montré.
3
2
1
Accessoire3
Outil de démontage
Retrait de l’appareil
Page 75

Français
75
Guide de depannage
Ce qui peut apparaître comme un mauvais fonctionnement de votre appareil n’est peut être que le résultat d’une
mauvaise opération ou d’une mauvaise connexion. Avant d’appeler un centre de service, vérifiez d’abord dans le
tableau suivant les problèmes possibles.
SOLUTIONCAUSE POSSIBLEPROBLEME
Le son est de mauvaise qualité
ou déformé.
Les réglages du fader et/ou de l’équilibre sont réglés
complètement d’un côté.
Réglez de nouveau les réglages du fader et/ou de la balance.
Les câbles d’entrée/sortie ou le faisceau de câbles sont
connectés incorrectement.
Reconnectez les câbles d’entrée/sortie et/ou le faisceau de
câbles correctement. Voir la section sur la “Connexion des
câbles sur les prises”.
Rien ne se passe quand les
touches sont pressées.
Le microprocesseur dans l’appareil ne fonctionne pas
correctement.
Appuyez sur la touche de réinitialisation sur l’appareil.
(Voir page 44 )
Les enceintes ne sont pas connectées correctement.
Reconnectez les câbles de haut-parleurs de manière que
chaque prise de sortie soit connectée à un haut-parleur
différent.
Un câble de haut-parleur a peut être été pincé par une vis
dans la voiture.
Vérifiez la connexion des haut-parleurs.
Le câble de commande de l’antenne n’est pas connecté. Connectez le câble correctement en vous référant à la
section “Connexion des câbles sur les prises”.
La réception radio est
mauvaise.
L’antenne de la voiture n’est pas sortie. Sortez l’antenne complètement.
L’appareil ne se met pas sous
tension.
Le fusible a grillé. Après avoir vérifiez qu'il n'y a pas de court-circuits dans les
câbles, remplacez le fusible par un de la même valeur.
Aucun son ne peut être
entendu, ou le volume est
faible.
La fonction d'atténuation est en service. Mettez la fonction d'atténuation hors service.
La mémoire est effacée quand
le contact est mis.
Le câble de batterie n’a pas été connecté correctement. Connectez le câble correctement en vous référant à la
section “Connexion des câbles sur les prises”.
Le panneau avant ne s’ouvre ou
ne se ferme pas.
La température ambiante est trop faible. Chauffez votre voiture.
La fonction valet est en service. Mettez la fonction valet hors service.
Les sorties asymétriques/symétriques au niveau
préamplificateur ne correspondent pas aux entrées de
l’amplificateur.
Vérifiez les réglages.
Le bip n’est pas présent sur la
sortie préamplificateur arrière.
Le bip ne peut être émis que par la sortie préamplificateur
avant.
Page 76

Français
76
SOLUTIONCAUSE POSSIBLEPROBLEME
Guide de depannage
Le CD est éjecté aussitôt après
être introduit.
Le CD est à l’envers. Insérez le CD avec la partie imprimée dirigée vers le haut.
Le CD est très sale. Nettoyez le CD en vous référant à la section “Nettoyage des
CD”. (Voir page 45)
Le son du CD saute. Le CD est rayé ou sale. Nettoyez le CD en vous référant à la section “Nettoyage des
CD”. (Voir page 45)
La plage spécifiée n'est pas
reproduite.
La lecture aléatoire a été choisie. Mettre la fonction de lecture aléatoire hors service.
Changeur de disques
SOLUTIONCAUSE POSSIBLEPROBLEME
L’affichage indique que le
changeur est en train d’être
reproduit mais aucun son n’est
entendu.
Le microprocesseur de l’appareil ne fonctionne pas
correctement.
Appuyez sur la touche de réinitialisation sur l’appareil (voir
page 44)
Le mode de changeur de
disques ne peut pas être choisi.
Aucun câble n’a été connecté à la prise d’entrée du
changeur de disque sur cet appareil.
Connectez le câble sur la prise d’entrée du changeur de
disques sur l’appareil.
Le disque spécifié n’est pas
reproduit mais un autre est
reproduit à sa place.
Le disque spécifié est très sale. Nettoyez le CD.
Le CD est à l’envers. Insérez un CD avec la face imprimée dirigée vers le haut.
Le disque a été inséré dans une autre fente que celle
spécifiée.
Ejectez le magasin et vérifiez le numéro du disque spécifié.
Le disque est très rayé. Essayez un autre disque.
Le son saute. Quelque chose touche le changeur de disque. Retirez ce qui le touche.
Le CD est rayé ou sale. Si le son saute toujours à la même place quand la voiture est
arrêtée, c’est que quelque ne va pas avec le CD. Nettoyez le
CD.
La plage spécifiée n’est pas
reproduite.
La lecture aléatoire ou la lecture aléatoire de magasin a
été choisie.
Mettez hors service la lecture aléatoire ou la lecture aléatoire
de magasin.
Page 77

Français
77
Les messages suivants sont affichés quand certains problèmes se produisent dans votre système. Suivez les
recommandations.
Rien n’a été enregistré sur le MD.
Le MD suivant est automatiquement reproduit.
]
BLANK
Aucun magasin à disque n’a été inséré dans le changeur. Le magasin à disque n’est pas complètement inséré.
Insérez le magasin à disques correctement.
]
EJECT
Aucun disque n’a été inséré dans le magasin à disque.
Insérez un disque dans le magasin à disques.
Le CD est très sale. Le CD est à l’envers. Le CD est très rayé.
Nettoyez le CD et insérez-le correctement.
]
]
E-04
Aucune plage n’est enregistrée sur le MD bien qu’il y ait un titre.
Le MD suivant est automatiquement reproduit.
]
NO TRACK
L’appareil fonctionne mal pour certaines raisons.
Appuyez sur la touche de réinitialisation sur l’appareil. Si le code “E-77”, “E-99” ne disparaît pas, consultez la station technique la
plus proche.
]
E-77
E-99
Le circuit de protection de l’appareil se met en service quand la température à l’intérieur du changeur de disques automatique
dépasse 60°C (140°F), arrêtant toutes les opérations.
Refroidir l’appareil en ouvrant les fenêtres ou en mettant en service l’air conditionné. Quand la température descend au dessous
de 60°C (140°F), la lecture du disque reprend de nouveau.
]
HOLD
Aucun disque n’a été inséré dans le magasin à disque.
Insérez un disque dans le magasin à disques.
]
NO DISC
Page 78

Français
78
Section Tuner FM
Plage de fréquence
(espacement de 200 kHz) ....................87,9 MHz – 107,9 MHz
(espacement de 50 kHz)
) ..................87,5 MHz – 108,0 MHz
Sensibilité utilisable (S/N=30 dB) ....................9,3dBf (0,8 µV/75 Ω)
Sensibilité silencieuse (S/N=50 dB) ..............15,2dBf (1,6 µV/75 Ω)
Réponse en fréquence (±3,0 dB)............................30 Hz – 15 kHz
Rapport signal sur bruit (MONO) ..........................................75 dB
Sélectivité (±400 kHz) ......................................................≥ 80 dB
Séparation stéréo (1 kHz) ....................................................40 dB
Section tuner AM
Plage de fréquence(espacement de 10 kHz) ....530 kHz – 1700 kHz
(espacement de 9 kHz) ......531 kHz – 1611 kHz
Sensibilité utilisable (S/N=20 dB) ..........................28 dBµ (25 µV)
Section Disque Compact
Diodes laser ..................................................GaAlAs (λ=780 nm)
Filtre numérique (A/N)............................8 fois suréchantillonnage
Convertisseur A/N ................................................................1 Bit
Vitesse de l’axe............................................500 ~ 200 rpm (CLV)
Pieurage et scintillement ....................................Non mesurables
Réponse en fréquence (±1 dB)..............................10 Hz – 20 kHz
Distorsion harmonique totale (1 kHz) ................................0,01 %
Rapport signal sur bruit..........................................105 dB (1 kHz)
Gamme dynamique ..........................................................100 dB
Séparation de canaux ..........................................................85 dB
Section audio
Action en tonalité
Graves: ........................................................100 Hz ±10 dB
Aiguës: ........................................................10 kHz ±10 dB
Niveau de préamplification/charge
Asymétrique ..............................................4000 mV/10 kΩ
Symétrique..........................................8000 mV(P-P)/10 kΩ
Impédance de sortie préamplificateur ..................................80 Ω
Général
Tension de fonctionnement ............14,4 V (11 – 16 V admissible)
Courant absorbé ............................5,0 A à la puissance nominale
Taille d’installation (L × H × P) ........................182 × 53 × 162 mm
7-3/16 × 2-1/16 × 6-3/8 in.
Masse ..................................................................4,0LBS (1,8 kg)
..........................................................................................
Les spécifications sont sujettes à changements sans notification.
Spécifications
Page 79

Page 80

Índice
80
Español
Antes del uso
Precauciones de Seguridad.........................................................81
Manipulación de los Discos Compactos .....................................83
Botones y visualización ...............................................................84
Operaciones básicas
Mecanismo de Retracción contra el Robo ..................................88
Volumen......................................................................................89
Atenuador....................................................................................89
Selección de la ganancia del atenuador ......................................89
Sonoridad ....................................................................................89
Operaciones básicas del control remoto ................90
Características del sintonizador
Sintonía .......................................................................................91
Cambio de visualización para el temporizador.............................92
Sintonía de Acceso Directo.........................................................92
Memoria de Preajuste de las Emisoras.......................................92
Entrada de Memoria Automática ................................................92
Preajuste del nombre de las emisoras........................................93
Reproducción de preajuste del nombre de las emisoras (SNPP) .....
94
CRSC (Circuito del Sistema de Recepción Nítida).......................94
Ajuste de los Pasos de la Frecuencia..........................................94
Características de RBDS
RBDS (Sistema de Datos de Radiodifusión)................................95
Alarma.........................................................................................95
Radiotexto...................................................................................95
Función de Información sobre el Tráfico.....................................95
Función de Tipo de Programa (PTY)............................................96
Características del reproductor de discos
compactos
Reproducción de los discos CD ..................................................97
Cambio de la visualización para los discos CD............................98
Avance y Retroceso Rápidos del Disco.......................................98
Búsqueda de Pista ......................................................................98
Búsqueda Directa de Pistas ........................................................98
Función de Repetición de Pista...................................................98
Función de Exploración de Pistas................................................99
Función de Reproducción al Azar................................................99
Características de control del cambiador de discos
Reproducción de Discos Utilizando el Cambiador de Discos......99
Avance y Retroceso Rápidos del Disco.......................................99
Cambio de la visualización para los discos................................100
Búsqueda de Pista ....................................................................100
Búsqueda Directa de Pistas ......................................................100
Búsqueda de Discos .................................................................100
Búsqueda Directa de Discos.....................................................101
Función de Repetición de Pista/Disco.......................................101
Función de Reproducción al Azar..............................................101
Función de Reproducción al Azar de Cartucho .........................102
Función de Exploración de Pistas..............................................102
Función de Exploración de Discos ............................................102
Preajuste de los Nombres de los Discos ..................................103
Reproducción de preajuste del nombre de los discos (DNPP)
.......104
Características de otros
Ajuste de Control de Audio .......................................................104
Tabla de ajustes de control de audio.........................................105
Visualización del Reloj ...............................................................105
Ajuste de la Hora.......................................................................105
Iluminación Seleccionable.........................................................106
Salida de preamplificador sin desvanecimiento ........................106
Salida equilibrada.......................................................................106
Función del Código de Seguridad .............................................106
Función de ”Valet” ...................................................................107
Instalación
Accesorios.................................................................................108
Procedimiento de instalación ....................................................108
Conexión de cables a los terminals...........................................109
Instalación (automóviles no japoneses).....................................110
Instalación (automóviles japoneses)..........................................110
Desmontaje de la unidad...........................................................112
Guia Sobre Localización De Averias ......................
113
Especificaciones ..........................................................116
Page 81

Para evitar el riesgo de lesiones y/o
fuego, observe las siguientes
precauciones:
• Inserte la unidad hasta el fondo, de manera
que quede firmemente bloqueada en su sitio.
De lo contrario, podría salir despedida con
fuerza durante un choque u otras sacudidas.
• Cuando extienda los cables del encendido, de
la batería o de masa, asegúrese de utilizar
cables para automóviles u otros cables que
tengan un área de 0,75mm
2
(AWG18) o más,
para evitar el deterioro del cable y daños en
su revestimiento.
• Para evitar cortocircuitos, nunca coloque ni
deje objetos metálicos (por ejemplo,
monedas o herramientas metálicas) dentro
de la unidad.
• Si nota que la unidad emite humos u olores
extraños, desconecte inmediatamente la
alimentación y consulte con su distribuidor
Kenwood.
• Asegúrese de que sus dedos no queden
atrapados entre la placa frontal y la unidad.
• Preste atención para no dejar caer ni aplicar
un golpe fuerte a la unidad. Los
componentes de vidrio de la unidad podrían
romperse o agrietarse.
• Si se daña o rompe la LCD debido a un golpe,
no toque nunca el fluido de cristal líquido
contenido en su interior. El fluido de cristal
líquido podría ser perjudicial e incluso fatal
para su salud. Si el fluido de cristal líquido
entrara en contacto con su cuerpo o
vestimenta, lave inmediatamente con agua y
jabón.
2ADVERTENCIA
Para evitar daños en la unidad, tome
las siguientes precauciones:
• Asegúrese de utilizar para la unidad una
fuente de alimentación de 12V CC con masa
negativa.
• No abra las cubiertas superior o inferior de la
unidad.
• No instale la unidad en un sitio expuesto a la
luz directa del sol, o excesivamente húmedo
o caluroso. Asimismo evite los lugares muy
polvorientos o sujetos a salpicaduras de
agua.
• Evite aplicar golpes fuertes a la placa frontal,
dado que se trata de un componente de
precisión.
• Cuando tenga que reemplazar un fusible,
utilice únicamente uno del régimen prescrito.
El uso de un fusible de régimen incorrecto
podría ocasionar un funcionamiento
defectuoso de la unidad.
• Para evitar cortocircuitos mientras sustituye
el fusible, desconecte previamente el mazo
de conductores.
• No coloque ningún objeto entre la placa
frontal y la unidad.
• Durante la instalación, no utilice otros
tornillos que no sean los suministrados. El
uso de tornillos diferentes podría causar
daños en la unidad principal.
2PRECAUCIÓN
INFORMACION IMPORTANTE
No podrá conectar directamente la unidad a
de acuerdo con la cambiador de discos
compactos. Para los usuarios que deseen
utilizar estos cambiadores antiguos junto con
la unidad, siga las instrucciones indicadas a
continuación, que correspondan al tipo de su
cambiador:
•
KDC-C200 / KDC-C300 / KDC-C400
Utilice el cable de extensión y la caja de
control provistos con el cambiador de CD, y
el cable convertidor CA-DS100 opcional.
•
KDC-C301 / KDC-C600 / KDC-C800 / KDCC601 / KDC-C401
Utilice el cable de extensión provisto con el
cambiador de CD, y el cable del convertidor
CA-DS100 opcional.
•
C705i / C705si
Utilice el cable de extensión provisto con el
cambiador de discos, y el cable convertidor
CA-K300 opcional.
•
KDC-C100 / KDC-C302 / C205 / C705 / y
cambiadores de CD que no sean de
Kenwood
No podrán usarse con este modelo.
Una conexión incorrecta podrá
producir daños tanto en la unidad
como en el cambiador de CD.
2PRECAUCIÓN
Español
81
Precauciones de Seguridad
Page 82

Precauciones de Seguridad
82
Español
• Si tiene problemas durante la instalación,
consulte con su distribuidor Kenwood.
• Si la unidad no opera correctamente, pulse el
botón de reposición. Cuando la carátula
frontal no esté visible, presione el "punto
sensible al toque" en la parte posterior de la
placa frontal (Mostrado en la página 88) para
hacer que aparezca el panel de control de la
placa frontal. La unidad se reposiciona a los
ajustes de fábrica al pulsar el botón de
reposición. Si la unidad no funciona
correctamente aun después de haber
pulsado el botón de reposición, acuda a su
concesionario KENWOOD.
• Para evitar el robo, recomendamos usar la
función de Código de Seguridad
(véase pág.106).
NOTA
Botón de reposición
Limpieza de la unidad
Si se ensucia el panel delantero, desconecte
la alimentación y limpie el panel con un paño
de silicona seco o un paño suave.
No limpie el panel con un paño áspero o
humedecido con disolventes volátiles tales
como diluyente de pintura o alcohol. Su uso
podría rayar la superficie del panel y/o hacer
que se despeguen las letras indicadoras.
2PRECAUCIÓN
Empañamiento de la lente
Inmediatamente después de encender el
calefactor del automóvil en épocas de frío, se
podría formar condensación o vaho sobre la
lente de la reproductora de CD. Este
empañamiento de la lente podría hacer
imposible la reproducción de los discos
compactos. En tal caso, retire el disco y
espere hasta que se evapore la
condensación. Si la unidad no opera de la
manera normal después de un tiempo,
consulte con su distribuidor Kenwood.
KDC-PS907 Balanced Output
8V
PREOUT
D.R.I.V.E
NAME S.
PS/RT
LOUD
DISP SCAN RDM REP D.SCN M.RDM
CD MD 1 2
EJECT
CLOSE/
PWR OFF
AUTO AME PTY TI
CRSC
DISC
NF
ILLUM
AUD
Page 83

Español
83
Manipulación de los Discos Compactos
La reproducción de un CD sucio,
rayado o doblado podría ocasionar
saltos de sonido o impedir que la
unidad funcione correctamente,
degradando la calidad del sonido.
Observe las siguientes precauciones
para evitar que se rayen o dañen sus
discos compactos.
Manipulación de los discos CD
• No toque el lado grabado del CD (o sea, el
lado opuesto a la etiqueta).
• No pegue etiquetas en ninguno de los lados
del CD.
Almacenamiento de los discos CD
• No guarde los CD en lugares expuestos a la
luz solar directa - tales como sobre el asiento
del automóvil o sobre el cubretablero - u
otros lugares calientes.
• Retire los CD de la unidad cuando no los va a
escuchar por un tiempo, y guárdelos en sus
estuches. No apile los CD extraídos de sus
estuches ni los deje recostados sobre algún
objeto.
Limpieza de los discos CD
Cuando se ensucie un CD, límpielo frotando
suavemente desde el centro del disco hacia
afuera, utilizando un paño limpiador
disponible en el comercio o un paño de
algodón suave. No limpie los CD con
limpiadores de discos convencionales,
fórmulas antiestáticas ni sustancias químicas
tales como diluyente o bencina.
Inspección de rebabas en los CD
nuevos
Antes de reproducir un CD nuevo por
primera vez, compruebe la inexistencia de
rebabas sobre el perímetro del disco o
alrededor del orificio central. Las rebabas
existentes en los CD podrían impedir que
sean correctamente cargados o podrían
ocurrir saltos de sonido durante la
reproducción. Si hay rebabas, sáquelas
utilizando un bolígrafo u objeto similar.
No cargue accesorios de CD en la
ranura
No utilice accesorios de CD disponibles en el
comercio y que pueden cargarse en la ranura
del CD, tales como los estabilizadores, las
hojas protectoras o los discos limpiadores de
CD, pues podrían ocasionar fallos de
funcionamiento.
Extracción del CD
Extraiga el CD de la unidad únicamente en
sentido horizontal y recto. La superficie del
CD se podría dañar si intenta sacarlo
mientras es expulsado.
No cargue discos compactos de
8 cm (3 pulg.) en la ranura del CD.
Si intenta cargar en la unidad un CD de 8 cm
con su adaptador, éste podría separarse del
CD y dañar la unidad.
2PRECAUCIÓN
Etiquetas
Rebabas
Rebabas
Page 84

Botones y visualización
84
Español
AUD
DISP SCAN RDM REP D.SCN M.RDM
AUTO AME PTY TI
ILLUM
DISC
CRSC
EJECT
CD MD 1 2
CLOSE/
PWR OFF
NAME S.
PS/RT
LOUD
KDC-PS907 Balanced Output
PREOUT
8V
D.R.I.V.E
NF
du
ATT
LOUD
TUN
CLOSE/PWR OFF
Operaciones básicas
Indicador LOUD
AUD
DISP SCAN RDM REP D.SCN M.RDM
AUTO AME PTY TI
ILLUM
DISC
CRSC
EJECT
CD MD 1 2
CLOSE/
PWR OFF
NAME S.
PS/RT
LOUD
KDC-PS907 Balanced Output
PREOUT
8V
D.R.I.V.E
NF
CLK
NAME.S
TUN
#1~6
AUTO
AME
AM
FM
CRSC
4¢
Indicador AUTO
Frecuencia
Características del sintonizador
Indicador ST
Visualización de la banda
Indicador ATT
Número de la emisora
preajustada
Indicador de búsqueda
Botón de
reposición
Page 85

Español
85
AUD
DISP SCAN RDM REP D.SCN M.RDM
AUTO AME PTY TI
ILLUM
DISC
CRSC
EJECT
CD MD 1 2
CLOSE/
PWR OFF
NAME S.
PS/RT
LOUD
KDC-PS907 Balanced Output
PREOUT
8V
D.R.I.V.E
NF
CLK
PS/RT
PTY
TI
AM
FM
4¢
#1~6
Características de RBDS
Indicador TI
Características del reproductor de discos compactos
Indicador REP
Indicador SCN
Número de pista
Tiempo de pista/
Número de pista introducido directamente
Indicador RDM
Indicador AF
Indicador PTY
Indicador TP
Indicador TA
Indicador de búsqueda Indicador de reproducción
Indicador 3
Indicador 8
TUN
CH
CD
¢
EJECT
8V
PREOUT
D.R.I.V.E
LOUD
KDC-PS907 Balanced Output
DISP SCAN RDM REP D.SCN M.RDM
NAME S.
PS/RT
SCAN
DISP
RDM
REP
EJECT
CD MD 1 2
CLOSE/
PWR OFF
AUTO AME PTY TI
4
CRSC
DISC
NF
ILLUM
AUD
Page 86

Español
86
Botones y visualización
DISP SCAN RDM REP D.SCN M.RDM
AUTO AME PTY TI
ILLUM
DISC
CRSC
EJECT
CD MD 1 2
CLOSE/
PWR OFF
NAME S.
PS/RT
LOUD
KDC-PS907 Balanced Output
PREOUT
8V
D.R.I.V.E
NF
CLK
NAME.S
TUN
CLOSE/PWR OFF
4
¢
FM
AUD
ILLUM
#1
#3 #4
AM
NF
#6
#2
AUD
Características de otros
Visualización del reloj
AUD
DISP SCAN RDM REP D.SCN M.RDM
AUTO AME PTY TI
ILLUM
DISC
CRSC
EJECT
CD MD 1 2
CLOSE/
PWR OFF
NAME S.
PS/RT
LOUD
KDC-PS907 Balanced Output
PREOUT
8V
D.R.I.V.E
NF
DISP
SCAN
DISC–
DISC+
4
¢
RDM
REP
D.SCN
M.RDM
NAME.S
CH
Indicador SCN
Características de control del cambiador de discos
Indicador RDM
Indicador REP
Número de
disco
Tiempo de pista/
Número de pista introducido directamente/
Número de disco introducido directamente
Número de pista
Indicador de DISCIndicador de reproducción
Page 87

Español
VOL.
TUNE
TRACK
REMOTE CONTROL UNIT
DISC
REW FF
#0~9
A~Z
TUNE
+
TRACK +
TUNE –
TRACK –
AM
DISC
–
FM
DISC +
TUNER
CD
CD・MD CH
DIRECT
OK
u
d
DNPP
38
1 2 3
4 5 6
7 8 9
0
DEF
MNOJKLGHI
WXYTUVPRS
QZ
ABC
TUNER
TAPE
FM
+
PROG
–
+
CD
CD·MD
CH
DIRECT
OK
DNPP
AM
–
87
Control remoto
Page 88

Operaciones básicas (véase página 84)
88
Español
Mecanismo de Retracción contra el Robo
Para evitar que le roben la unidad, invierta la placa frontal de
manera que el panel de control no quede expuesto a la vista y
que la unidad quede oculta, y apague el sonido.
Conexión y desconexión de la alimentación (ON/OFF):
Al conectar el encendido de su vehículo, también se enciende
la unidad, invirtiéndose la placa frontal para dejar el panel de
control expuesto a la vista.
Al desconectar el encendido del vehículo, la placa frontal se
invierte para dejar oculto el panel de control, y la unidad se
apaga.
• La primera vez que utilice la unidad, necesita presionar el “punto
sensible al toque” detrás de la placa frontal (según se ilustra).
• Si mientras se está moviendo la placa frontal golpea contra
algún objeto, la placa se detiene y regresa a su estado original.
Saque el objeto y vuelva a repetir la acción efectuada
previamente.
Uso de la unidad en vehículos con consolas cubiertas
• Asegúrese de que la consola no esté cubierta mientras está
invertida la placa frontal.
• No aplique ninguna fuerza excesiva sobre las partes móviles de
la unidad, incluyendo la placa frontal, pues podrían ocurrir
anomalías en el mecanismo de la unidad.
Para dejar oculta la unidad con el encendido conectado (cierre
forzado):
Mantenga pulsado el botón CLOSE/PWR OFF por lo menos
durante un segundo.
La placa frontal se invierte, y la unidad queda oculta. La unidad
se apaga.
• Si mientras se está cerrando la placa frontal golpea contra algún
objeto, la unidad se apaga y la placa frontal no queda cerrada
del todo. Saque el objeto y pulse el botón TUN para volver a
encender la unidad, y luego apáguela otra vez para que se cierre
debidamente.
• La pulsación de los botones del panel de control mientras se
NOTA
2 PRECAUCIÓN
NOTA
está moviendo la placa frontal no producirá ningún efecto. No
pulse los botones del panel de control mientras se está
movimiento la placa frontal, ya que una fuerza excesiva podría
producir daños a la unidad.
• Durante el cierre forzado de la unidad (o sea, cierre de la unidad
con el encendido conectado), la placa frontal no se abre
indiferentemente de que se efectúe la conexión o desconexión
del encendido, a menos que presione el "punto sensible al
toque" de la parte posterior de la placa frontal para abrirla.
Dejando la unidad cerrada de este modo, podrá evitar que sea
manipulada por otros cuando preste el vehículo a alguien.
Para cancelar el cierre forzado del mecanismo de retracción para
prevención del robo y abrir el panel de control:
Presione el "punto sensible al toque" de la parte posterior de la
placa frontal. (tal como se muestra en la ilustración)
Selección de la modalidad de reserva:
Pulse reiteradas veces el botón TUN y seleccione "ALL OFF".
Al visualizarse "ALL OFF", se activa la modalidad de reserva.
La modalidad de reserva desactiva todas las funciones pero
deja conectada la alimentación de la unidad. Utilice esta
modalidad cuando desea dejar el visualizador iluminado sin
escuchar nada.
Punto sensible al toque
El interruptor invisible se encuentra escondido detrás del punto
sensible al toque. Presione el punto hueco (interruptor invisible)
para abrir.
NOTA
Punto sensible al toque
Page 89

Español
89
Volumen
Aumento de Volumen:
Pulse el botón u para aumentar el volumen.
Disminución de Volumen:
Pulse el botón d para disminuir el volumen.
Atenuador
Esta función permite disminuir rápidamente el volumen.
Para activar/desactivar el atenuador:
Pulse el botón ATT para conmutar entre activación y
desactivación del atenuador.
Cuando el atenuador está activado, parpadea el indicador ATT.
Cuando el atenuador está desactivado, el volumen regresa al
nivel original.
Al reducir el volumen al mínimo se desactiva la función del
atenuador.
NOTA
Sonoridad
Esta función acentúa los tonos bajos y altos a bajos niveles de
volumen.
El indicador LOUD se enciende cuando está activada la función
de sonoridad.
Para activar/desactivar la función de sonoridad:
Pulse el botón LOUD para activar y desactivar la función de
sonoridad.
Selección de la ganancia del atenuador
La ganancia del atenuador puede ajustarse ya sea a -20 dB o
-60 dB.
Seleccione el ajuste de -60dB cuando utilice un amplificador
de alta potencia. El ajuste de fábrica es -20dB.
Pulse reiteradas veces el botón TUN y seleccione “ALL OFF” y
active la modalidad de reserva de desactivado total.
Si mantiene pulsado el botón ATT por lo menos durante dos
segundos, cambiará la ganancia del atenuador.
Cuando se visualiza "ATT HIGH", significa que la ganancia del
atenuador está ajustada a -60dB. Cuando se visualiza "ATT
LOW", significa que está ajustada a -20dB.
2
1
Page 90

Español
90
Todas las Modalidades
• Botones VOL.
Mantenga pulsado el botón u para aumentar el volumen.
Mantenga pulsado el botón d para disminuir el volumen.
• Botón TUNER
Selecciona la modalidad de sintonizador. Pulsando este botón
otra vez se selecciona la modalidad de reserva.
• Botón CD
Selecciona la modalidad de CD.
• Botón CD•MD CH
Selecciona la modalidad de cambiador de discos. Cuando hay
dos cambiadores de discos conectados a la unidad, la modalidad
de cambiador de discos se divide en dos modalidades:
modalidad de cambiador de discos 1 y modalidad de cambiador
Modalidad de Sintonizador
• Botones de entrada de números/letras
Pulse los botones #1-6 para llamar las emisoras preajustadas.
Durante la sintonía de acceso directo, utilice estos botones para
introducir la frecuencia de la emisora.
Utilice para introducir letras (alfabéticas) durante el preajuste del
nombre de las emisoras.
• Botones TUNE
Pulse el botón TUNE
– para efectuar búsquedas descendentes
(en el modo de sintonización de preajuste).
Pulse el botón TUNE+ para efectuar búsquedas ascendentes
(en el modo de sintonización de preajuste).
Utilice para desplazar el cursor hacia la izquierda o la derecha
durante la entrada del nombre de las emisoras.
• Botón AM/FM
Pulse el botón AM y seleccione la banda de AM.
Pulse el botón FM para seleccionar y conmutar entre las bandas
FM1, FM2 y FM3.
Durante la entrada del nombre de las emisoras, seleccione
dígitos y símbolos.
• Botón DIRECT/ OK
Selecciona la modalidad de sintonía de acceso directo, usada
para la entrada directa de las frecuencias. Pulse este botón otra
vez para cancelar la modalidad durante la operación.
Durante la entrada del nombre de las emisoras, almacena los
datos ya introducidos en la memoria y da fin al modo de entrada.
Durante el modo de reproducción de preajuste del nombre de
las emisoras, selecciona la emisora.
• Botón DNPP
Introduce y cancela el modo de reproducción del nombre de
emisora presintonizada.
Operaciones básicas del control remoto (véase página 87)
No deje el control remoto en lugares calientes tal como encima
del cubretablero.
Sustitución de la pila de litio:
Utilice una pila de litio (CR2025).
Saque la caja siguiendo las instrucciones de la figura.
Inserte la pila con los polos
+ y – orientados en la dirección
correcta, de acuerdo con la ilustración provista en el interior de
la caja.
Almacene las pilas de litio fuera del alcance de los niños. Si es
ingerida accidentalmente, acuda inmediatamente a un médico.
2ADVERTENCIA
2PRECAUCIÓN
Para abrir
1 Deslice
2 Extraiga.
de discos 2. Cada pulsación de este botón permite conmutar
entre ambas modalidades.
Si se van a conectar dos cambiadores de discos, se deberá
utilizar la unidad KCA-S200 vendida por separado.
Cuando el cambiador de discos conectado directamente
(cambiador de discos 1) es el KDC-C810, se podrían controlar dos
unidades incluso sin el KCA-S200.
NOTA
1
2
Page 91

Español
91
Modalidad de Cambiador de Discos
• Botones de entrada de números/letras
Se utilizan para especificar el número de pista (disco) usado en las
búsquedas directas de pista (disco).
Se utiliza para introducir letras durante el preajuste del nombre del disco.
• Botones TRACK
Pulse el botón TRACK
– para buscar a través de las pistas hacia atrás.
Pulse el botón TRACK
+ para buscar a través de las pistas hacia
adelante.
Se utiliza para mover el cursor mientras se introduce el nombre del
disco.
• Botones DISC
Pulse el botón DISC
– para buscar a través de los discos hacia atrás.
Pulse el botón DISC
+ para buscar a través de los discos hacia adelante.
Selecciona números y símbolos mientras se introduce el nombre del
disco.
• Botón 38
Pulse este botón para hacer una pausa durante la reproducción del
disco.
Pulse otra vez el mismo botón para reanudar la reproducción.
• Botón OK
Durante la entrada del nombre de los discos, almacena en la memoria
los datos ya introducidos y da fin al modo de entrada.
Seleccione discos durante el modo de reproducción de preajuste del
nombre de los discos.
• Botón DNPP
Introduce y cancela el modo de reproducción del nombre de disco
preseleccionado
Modalidad de CD
• Botones numéricos
Se utiliza para especificar el número de pista utilizado en las búsquedas
directas de pista.
• Botones TRACK
Pulse el botón TRACK
– para buscar a través de las pistas hacia atrás.
Pulse el botón TRACK
+ para buscar a través de las pistas hacia
adelante.
• Botón 38
Pulse este botón para hacer una pausa durante la reproducción del CD.
Pulse otra vez el mismo botón para reanudar la reproducción.
Características del sintonizador (véase página 84)
Sintonía
Ud. podrá escoger entre tres modos de sintonización: búsqueda
automática, búsqueda de emisoras preajustadas, y manual. El
indicador "Auto1" se enciende cuando se selecciona la
sintonización de búsqueda automática, y el indicador "Auto2" se
enciende cuando se selecciona la sintonización de búsqueda de
emisoras preajustadas.
Selección de la Modalidad de Sintonía:
Pulse el botón AUTO.
Cada vez que pulsa el botón AUTO, la modalidad cambia de la
siguiente manera:
▼
AUTO 1 (Sintonización de búsqueda automática)
▼
AUTO 2 (Sintonización de búsqueda de emisoras preajustadas)
▼
MANUAL (Sintonización manual)
Sintonía:
Pulse el botón TUN para encender la radio.
Pulse el botón FM o AM para seleccionar la banda.
Cada vez que pulsa el botón FM, la banda cambia entre FM1,
FM2 y FM3.
Pulse el botón AM y seleccione la banda de AM.
• Sintonía de Búsqueda Automática
Pulse el botón ¢ para buscar frecuencias ascendentes.
Pulse el botón 4 para buscar frecuencias descendentes.
• Sintonización de búsqueda de emisoras preajustadas
Pulse el botón ¢ para moverse a la siguiente emisora
preajustada (o sea, a la del siguiente número superior), y el
botón 4 para moverse a la última emisora preajustada (o sea,
a la del siguiente número inferior).
• Sintonía Manual
Pulse el botón ¢ para aumentar la frecuencia paso por paso.
Pulse el botón 4 para disminuir la frecuencia paso por paso.
El indicador ST se enciende cuando se están recibiendo programas
estereofónicos.
NOTA
3
2
1
Page 92

Español
92
Características del sintonizador (véase página 84)
Para cancelar la sintonía de acceso directo:
Pulse otra vez el botón DIRECT.
Puede cambiar el visualizador que utilice para escuchar la radio
Cambio de visualizador
Cada vez que presiona el botón CLK, el visualizador cambia del modo
siguiente:
▼
Frecuencia de la emisora
▼
Nombre del programa de servicio (durante la recepción de una
emisora RBDS) /
Nombre de SNPS (sólo durante el preajuste)
▼
Radiotexto (solamente durante la recepción de la emisora RBDS)
▼
Reloj
Cambio de visualización para el temporizador
Función del control remoto (véase página 87)
Sintonía de Acceso Directo
Cuando conoce cuál es la frecuencia de la emisora que desea
escuchar, podrá introducirla directamente para un rápido
acceso. (Función del control remoto)
Seleccione la banda pulsando el botón FM o AM.
Pulse el botón DIRECT.
En el visualizador, parpadea “----” durante 10 segundos.
Si no introduce nada en el plazo de diez segundos, la sintonía
de acceso directo se cancela automáticamente.
Introduzca la frecuencia de la emisora deseada mientras el
visualizador está parpadeando.
Si desea escuchar una emisora de FM en 92,1 MHz, por
ejemplo, pulse 0, 9, 2 y 1.
Si desea escuchar una emisora de AM en 810 kHz, por
ejemplo, pulse 0, 8, 1 y 0.
Cuando se introduzca una frecuencia que no se puede recibir, la
misma no será verificada y la operación regresará al modo de
entrada de frecuencia original.
NOTA
3
2
1
Permite almacenar la frecuencia de la emisora que se está escuchando.
Luego podrá llamar esa emisora al simple toque de un botón.
Seleccione la banda/emisora que desea almacenar.
Mantenga pulsado el botón (#1-6) que desea asignar a la emisora
durante dos segundos o más.
El número del botón parpadea una vez en el visualizador para indicar
que se han almacenado los datos.
Para llamar una emisora preajustada:
Pulse el botón (#1-6) de emisora preajustada correspondiente a la
emisora deseada.
Se visualiza el número de la emisora llamada.
Usted podrá almacenar 6 emisoras en cada una de las bandas de FM1,
FM2, FM3 y AM.
NOTA
2
1
Memoria de Preajuste de las Emisoras
Entrada de Memoria Automática
Ud. podrá almacenar automáticamente todas las frecuencias que se
pueden recibir en la banda que está escuchando actualmente, y
llamarlas posteriormente al toque de un botón. Esta función es
especialmente conveniente cuando tiene que viajar y no sabe cuáles
son las emisoras disponibles. Se pueden almacenar seis frecuencias
de esta manera.
Seleccione la banda para la entrada de memoria automática.
Pulse el botón AME durante dos segundos o más para comenzar la
entrada de memoria automática.
Aparecen en orden los números de botones de las emisoras
preajustadas.
Cuando se hayan almacenado todas las emisoras de una determinada
banda en la memoria de preajuste, finalizará la entrada de memoria
automática. Entonces se escuchará la última emisora recibida.
Para llamar una emisora preajustada:
Pulse el botón (#1-6) de emisora preajustada correspondiente a la
emisora deseada.
Se visualiza el número de la emisora llamada.
2
1
Page 93

Español
93
Preajuste del nombre de las emisoras
Puede asignar nombres a emisoras de radio con la memoria de
preajuste de emisora. Hasta un total de 25 emisoras de FM y 8
de AM pueden ser nombres asignados.
Ajuste a la frecuencia de la emisora cuyo nombre desea
introducir.
Pulse el botón NAME.S por lo menos durante dos segundos.
Se visualiza "NAME SET" una vez que entre al modo de preajuste
del nombre de las emisoras.
El cursor parpadeará en la posición de introducción de las letras.
Pulse ya sea el botón 4 o ¢ para mover el cursor hasta la
posición deseada.
El botón 4 mueve el cursor hacia la izquierda, y el botón ¢
hacia la derecha.
También podrá mover el cursor hacia la izquierda o la derecha
pulsando los botones 4 o ¢, respectivamente, del control
remoto.
Pulse el botón FM o AM hasta visualizar el carácter deseado.
Aparte de las letras alfabéticas (sólo mayúsculas) y números,
podrá escoger entre los siguientes caracteres: /, +, –, *, =, <, >,
[ y ].
Entrada directa
Se podrá efectuar la entrada directa de letras (alfabéticas) con los
botones de entrada de letras del control remoto.
Ejemplo: Utilice la siguiente tabla para introducir el nombre
“DANCE”.
Repita los pasos 3 y 4 hasta introducir el nombre que desea
darle al disco.
5
NOTA
4
3
2
1
Se pueden introducir hasta 8 caracteres para el nombre.
• Asignación de nombre
Presione el botón NAME.S en la unidad o el botón OK en el
control remoto.
El nombre de la emisora queda registrado, y termina el modo
de preajuste de nombre de emisora.
• Asignación de nombre y frecuencia de registro con memoria
de preajuste de emisora
Mantenga presionado el botón de preajuste deseado por lo
menos durante dos segundos.
El nombre de la emisora es registrado y la frecuencia de la
emisora que esté siendo sintonizada es registrada en los
botones de preajuste seleccionado. Termina el modo de
preajuste de nombre de emisora.
Además, si no hace entrada alguna durante 10 segundos, el
nombre será registrado hasta donde lo haya introducido, y el
modo terminará.
• Puede asignar nombres hasta un total de 25 emisoras de FM y 8
de AM. Si desea introducir más de esto, el nombre de emisora
almacenado en primer lugar será el primero en ser borrado.
No obstante, los nombres de emisora registrados en el botón de
preajuste serán retenidos en la memoria con preferencia.
• Se borrarán todos los nombres de las emisoras si presiona el
botón de reposición.
• Si desea modificar el nombre de una emisora, visualice primero el
nombre de la emisora (siguiendo los pasos 1 y 2 de arriba), y luego
cambie la(s) letra(s) deseada(s) por medio de los pasos 3 y 4.
• No puede asignar nombres a las emisoras RBDS.
NOTA
6
NOTA
Botón a pulsar # Veces Pulsadas
Caracteres
#3 1“D”
1“A” #2
#6“N” 2
#2 3“C”
#3“E” 2
Page 94

Español
94
Características del sintonizador (véase página 84)
Función del control remoto (véase página 87)
Podrá buscar cualquier emisora si su nombre ha sido
preajustado utilizando el Preajuste del nombre de las
emisoras.
Pulse el botón DNPP del control remoto.
Se visualiza "SNP PLAY" después de entrar al modo de
reproducción de preajuste del nombre de las emisoras. Los
nombres de las emisoras que se van escuchando se van
visualizando cada uno durante 5 segundos.
El visualizador de banda cambia en el orden siguiente.
= FM1 Ô FM2 Ô FM3 Ô AM +
Cada vez que presiona el botón ¢, el indicador de emisora
cambia hacia adelante.
Cada vez que presiona el botón 4, el indicador de emisora
cambia hacia detrás.
Las emisoras cuyos nombres no hayan sido registrados se
visualizarán como frecuencias.
Aparece el nombre del servicio de programa para las emisoras
RBDS.
Cambio de la banda visualizada
Presionando el botón FM se cambia entre las indicaciones de
FM1, FM2, FM3 y AM, en ese orden.
Presionando el botón AM cambia entre los visualizadores en
orden inverso.
Después que se visualice el nombre de la emisora que desea
escuchar
Pulse el botón OK.
Comienza a recibirse la emisora visualizada, y finaliza el modo
de reproducción de preajuste del nombre de las emisoras.
Para cancelar el modo durante la entrada:
Pulse el botón DNPP.
Se cancela el modo de reproducción de preajuste del nombre
de las emisoras.
2
NOTA
1
Reproducción de preajuste del nombre de las
emisoras (SNPP)
Cambia temporalmente de recepción estereofónica a monofónica
para reducir los ruidos por trayectoria múltiple cuando está
escuchando la emisora de FM.
Esta función viene de fábrica ajustada a ACTIVADA.
Para activar/desactivar la función CRSC:
Pulse el botón CRSC durante un segundo o más para activar y
desactivar la función.
Se visualiza "CRSC ON" cuando está activada la función CRSC.
Los campos eléctricos intensos (tales como las líneas de alimentación)
podrían ocasionar una calidad acústica inestable cuando está activada la
función CRSC. En tal caso, desactívela.
NOTA
CRSC (Circuito del Sistema de Recepción Nítida)
Utilícelo para cambiar el paso de la frecuencia para las
búsquedas. El ajuste de fábrica es 200 kHz para FM y 10 kHz
para AM.
Conmutación de pasos de la frecuencia:
Pulse el botón de reposición mientras pulsa simultáneamente
los botones #1 y #5.
Los ajustes de pasos de la frecuencia serán cambiados a 50
kHz para FM y 9 kHz para AM.
Cuando usted cambia los ajustes de pasos de la frecuencia,
todos los contenidos de la memoria serán borrados.
Para reposicionar los ajustes de los pasos de la frecuencia a sus
valores originales:
Pulse el botón de reposición.
NOTA
Ajuste de los Pasos de la Frecuencia
Page 95

Español
95
Características de RBDS (véase página 85)
Radiotexto
Puede visualizar información textual que esté siendo transmitida
por emisoras RBDS. El texto se desliza por el visualizador.
Encendido del modo de visualización de radiotexto:
Al presionar el botón PS/RT el visualizador cambia de la manera
siguiente. Seleccione el modo de visualización de radiotexto.
▼
Frecuencia de la emisora
▼
Nombre del programa de servicio
▼
Radiotexto
▼
Reloj
Si la emisora RBDS que esté siendo sintonizada no está
transmitiendo texto mientras está encendido el modo de
visualización de radiotexto, en el visualizador aparecerá "NO
TEXT". Mientras se espera la recepción, "WAITING" se deslizará a
través del visualizador.
NOTA
Para evitar accidentes, los conductores no deben mirar la pantalla
mientras conducen.
2ADVERTENCIA
RBDS (Sistema de Datos de Radiodifusión)
El RBDS es un servicio utilizado por las emisoras de radio para
transmitir datos distintos de las señales de radiodifusión
normal. Cuando se recibe una emisora RBDS, podrá saber al
instante qué tipo de datos se están transmitiendo en base al
nombre de servicio de programa, que se visualiza en la
pantalla después de la frecuencia.
El indicador AF se enciende cuando se está recibiendo una
emisora RBDS.
Alarma
Cuando se realiza una transmisión de emergencia (el anuncio
de catástrofes, etc.), la función en curso será interrumpida
para permitir la recepción de la advertencia en las condiciones
siguientes:
durante la recepción de sintonizador, o cuando esté activada
la función de información de tráfico.
Ud. podrá escuchar la información del tráfico. Si está
escuchando cintas o discos, continuarán reproduciéndose
hasta que se transmita un boletín del tráfico.
Para activar/desactivar la función de TI:
Presione el botón TI por lo menos durante un segundo para
encender y apagar la función.
Cuando está activada la función, se enciende el indicador TI.
Cuando se está recibiendo una emisora de información sobre
el tráfico, se enciende el indicador TP. Cuando no se está
recibiendo nada, el indicador TI parpadeará.
Cuando comience a transmitirse un boletín del tráfico, se
encenderá el indicador TA.
Si está escuchando una cinta o disco al comenzar a
transmitirse el boletín del tráfico, serán automáticamente
desactivados. Al finalizar el boletín o si la recepción es
deficiente, comenzará a reproducirse nuevamente la cinta o el
disco.
Pulsando el botón TI estando en la banda de AM, la recepción
cambia automáticamente a la banda de FM. Sin embargo, no
regresará a la banda de AM pulsando otra vez el botón TI.
Para conmutar a una emisora de información sobre el tráfico
diferente:
Utilice los botones 4 / ¢ para efectuar una búsqueda
automática de las emisoras TI en una determinada banda.
Cuando está escuchando una cinta o un disco, no podrá cambiar
a otra emisora TI.
NOTA
NOTA
Función de Información sobre el Tráfico
Page 96

Características de RBDS (véase página 85)
96
Español
Para buscar el tipo de programa seleccionado
Pulse el botón 4 o ¢ para efectuar la búsqueda de las
frecuencias correspondientes al tipo de programa seleccionado por
usted.
El visualizador parpadea y comienza la búsqueda.
Al encontrar el tipo de programa seleccionado por usted, se visualiza
el nombre de la emisora, sintonizándola.
Parpadea el indicador "PTY" en el visualizador durante unos 30
segundos.
Si no activa ninguna tecla en el lapso de 30 segundos, la modalidad
de selección de PTY se desactivará automáticamente.
Si no consigue localizar ningún programa, se visualiza “NO PTY”.
Si desea seleccionar otro tipo de programa, repita los pasos 2 y 3 de
arriba.
Para conmutar a otras emisoras que ofrecen el mismo tipo de
programa:
Mientras está parpadeando el indicador “PTY” en el visualizador,
efectúe la sintonía de búsqueda automática.
El sintonizador busca otras emisoras que ofrezcan el mismo tipo de
programa.
Para cancelar la función del tipo de programa mientras está en curso:
Pulse el botón PTY.
Para registrar una emisora no RBDS como tipo de programa:
Sintonice su radio a la emisora no RBDS que desea registrar como
tipo de programa.
Pulse el botón PTY para entrar al modo de selección del tipo de
programa.
Pulse el botón FM / AM para seleccionar el tipo de programa que
desea registrar.
Siga las instrucciones de 2 para entrar al modo de selección del tipo
de programa.
Pulse el botón CLK por lo menos durante dos segundos.
La emisora queda registrada como tipo de programa, y será objeto de
las búsquedas de frecuencia tal como si fuera una emisora RBDS.
Puede memorizar hasta 32 emisoras.
Si intenta registrar una 33 emisora, la frecuencia y el tipo de programa
NOTA
4
3
2
1
NOTA
3
Función de Tipo de Programa (PTY)
Limita la sintonía de búsqueda automática solamente en las
emisoras que ofrecen los tipos de programas seleccionados.
Para entrar al modo de selección del tipo de programa:
Pulse el botón PTY.
El indicador PTY se enciende al entrar al modo de selección del tipo
de programa.
No podrá utilizar esta función mientras esté activada la función de
información sobre el tráfico.
Cada pulsación del botón FM o AM permite seleccionar el tipo de
programa, de la siguiente manera
• Pulse reiteradas veces los botones FM o AM para seleccionar el
tipo de programa que desea escuchar.
La selección incluye:
SPEECH(Discurso) ↔ 1.NEWS(Noticieros) ↔
2.INFORM(Información) ↔ 3.SPORTS(Deportes) ↔
4.TALK(Habla) ↔ 5.ROCK(Rock) ↔ 6.CLS ROCK(Rock clásico) ↔
7.ADLT HIT(Éxitos adultos) ↔ 8.SOFT RCK(Rock suave) ↔ 9.TOP
40(Top 40) ↔ 10.COUNTRY(Country) ↔ 11.OLDIES(Éxitos de
siempre) ↔ 12.SOFT(Suave) ↔ 13.NOSTALGA(Nostalgia) ↔ 14.
JAZZ(Jazz) ↔ 15.CLASSICL(Música clásica) ↔
16.R&B(Rythm&Blues) ↔ 17.SOFT R&B(Rythm&Blues suave) ↔
18.LANGUAGE(Idioma) ↔ 19.REL MUSC(Música religiosa) ↔
20.REL TALK(Habla religiosa) ↔ 21.PERSNLTY(Personalidad) ↔
22.PUBLIC(Público) ↔ Music(Música) ↔ SPEECH(Discurso) ↔
(Discurso.....1~4, 18, 20~22, Música.....5~17, 19)
• Puede seleccionar el tipo de programa directamente presionando
un botón de preajuste. Los botones vienen ajustados de fábrica en
los siguientes programas:
1. Música 2. Discurso 3. Noticieros
4. Deportes 5. Música clásica 6. Jazz
Para cambiar los ajustes de tipo de programa en los botones
de preajuste
Después de seleccionar el tipo de programa a asignarse a un
determinado botón de preajuste, pulse ese botón durante 2 segundos o
más.
Se borran los datos asignados previamente a ese botón y se almacena
el nuevo tipo de programa.
NOTA
2
NOTA
1
Page 97

Español
97
Características del reproductor
de discos compactos
(véase página 85)
aparecerán alternadamente en el visualizador.
En ese caso, presione el botón AM/FM para cambiar el visualizador a
una emisora que quiera borrar, y presione el botón CLK de nuevo por lo
menos durante dos segundos. De este modo quedará registrada la
emisora introducida más recientemente.
Pulse el botón PTY para dar fin al modo de selección del tipo de
programa.
Confirmación del tipo de programa que haya registrado:
Presione el botón CLK.
El tipo de programa de la emisora que esté siendo sintonizada se
visualizará durante 5 segundos. En ese tiempo, en el visualizador
destellará "E".
• Si sintoniza frecuencias para las que no se haya registrado tipo de
programa alguno se visualizará "NO ENTRY".
• Todos los tipos de programa que haya registrado se borrarán si usted
pulsa el botón de reposición.
NOTA
5
Reproducción:
Pulse el botón CD para abrir la placa frontal, quedando al
descubierto la ranura de inserción del CD. Sosteniendo el CD con
el lado de la etiqueta hacia arriba, insértelo en la ranura. La placa
frontal visualiza el panel de control y el CD comienza a
reproducirse.
El indicador 3 se enciende mientras se está reproduciendo un
CD.
Reproducción de CDs ya insertados:
El indicador 32 se enciende cuando hay un CD insertado.
Presione el botón CD para empezar la reproducción.
Para hacer una pausa y reanudar la reproducción del CD:
Pulsando el botón CD se enciende el indicador 8 y se efectúa
una pausa en la reproducción del disco.
Pulse otra vez el mismo botón para reanudar la reproducción.
Parada/expulsión:
Pulse el botón EJECT por lo menos durante un segundo para
detener la reproducción del CD.
La placa frontal se desliza y el CD es expulsado.
Pulse el botón CD, CH o TUN para visualizar el panel de control.
• No intente insertar un CD en la ranura cuando hay otro cargado en
la misma.
• La unidad puede reproducir solamente CD de 12 cm (5 pulg.). Si
inserta un CD de 8 cm (3 pulg.) dentro de an adaptador podría
quedar atascado en el interior y causar fallas de funcionamiento.
• El sonido quedará temporalmente silenciado mientras la placa
frontal se esté moviendo.
• Los únicos botones que funcionarán durante el estado de
expulsión son los botones CD, CH y TUN, además del botón de
control de volumen
• Si expulsa un CD inmediatamente después de insertarlo, podría
ocurrir que no quede cargado al intentar insertarlo otra vez. En tal
caso, extraiga el CD por un momento y vuélvalo a introducir.
• La placa frontal es una pieza de un mecanismo de precisión.
No mantenga la placa frontal abierta ni la someta a una fuerza
excesiva al abrirla o cerrarla.
NOTA
2 PRECAUCIÓN
Reproducción de los discos CD
Page 98

Español
Características del reproductor de discos compactos (véase página 85)
98
Permite cambiar la visualización durante la reproducción de
los discos.
Para cambiar la visualización para los discos CD:
Cada vez que pulsa el botón DISP, la visualización que aparece
durante la reproducción del CD cambia de la
siguiente manera.
▼
Tiempo de pista
▼
Tiempo de reproducción total del disco
Cambio de la visualización para los discos CD
Para avanzar rápidamente el disco:
Pulse y mantenga pulsado el botón ¢.
Al soltar el dedo, comenzará a reproducirse el disco.
Para retroceder rápidamente:
Pulse y mantenga pulsado el botón 4.
Al soltar el dedo, comenzará a reproducirse el disco.
Avance y Retroceso Rápidos del Disco
Efectúa la búsqueda hacia adelante o atrás a través de las pistas
de un disco hasta hallar la que desea escuchar.
Para buscar pistas hacia atrás:
Pulse el botón 4 hasta visualizar el número de pista deseado.
Pulse una vez para regresar al comienzo de la pista actual, dos
veces para regresar al comienzo de la pista anterior, y así
sucesivamente.
La reproducción comienza desde el comienzo del número de
pista visualizado.
Para buscar pistas hacia adelante:
Pulse el botón ¢ para visualizar el número de pista deseado.
Pulse una vez para avanzar rápidamente hasta la próxima pista,
dos veces para avanzar rápidamente hasta la
siguiente, y así sucesivamente.
La reproducción comienza desde el comienzo del número de
pista visualizado.
Búsqueda de Pista
Función del control remoto (véase página 87)
Búsqueda Directa de Pistas
Por medio del control remoto, introduzca directamente el
número de pista que desea escuchar.
Por medio de los botones numéricos del control remoto,
introduzca el número de la pista que desea escuchar.
El número de pista seleccionado parpadeará en el visualizador
durante 10 segundos.
Si no efectúa ninguna entrada adicional en el plazo de 10
segundos, se cancelará automáticamente la búsqueda.
Pulse ya sea el botón TRACK
+ o TRACK– mientras está
parpadeando el número de pista.
Comienza a reproducirse la pista especificada en el paso 1.
Para cancelar la búsqueda directa de pista mientras está en
curso:
Pulse el botón 38.
No podrá efectuar la búsqueda directa de pistas mientras está
efectuando la exploración de pistas o la reproducción al azar.
NOTA
2
1
Efectúa la reproducción repetida de la pista actual.
Para activar/desactivar la función de repetición:
Pulse el botón REP para conmutar entre activación y
desactivación de la función de repetición.
Se enciende el indicador REP al activarse la función de
repetición.
En el visualizador destella el número de pista que se está
escuchando.
La función de repetición se cancela cuando usted deja de
reproducir el disco.
NOTA
Función de Repetición de Pista
Page 99

Español
99
Características de control del cambiador de
discos
(véase página 86)
Reproduce en sucesión el principio de cada pista de un disco
para ayudarle a hallar la que desea escuchar.
Para activar/desactivar la función de exploración de pistas:
Pulse el botón SCAN para conmutar entre activación y
desactivación de la función de exploración de pistas.
El indicador SCN se enciende al activarse la función de
exploración de pistas.
Se reproducen los 10 primeros segundos de cada pista, en orden
secuencial.
El número de pista que se está escuchando parpadea en el
visualizador.
Para detener la exploración y escuchar la pista que se ha
explorado:
Pulse otra vez el botón SCAN para detener la exploración y
escuchar la pista de la manera habitual.
• La función de exploración de pistas se cancela cuando usted deja
de reproducir el disco.
• La función de exploración de pistas se cancela después de
explorar todas las pistas de un disco.
NOTA
Función de Exploración de Pistas
Reproduce todas las pistas del disco que se está escuchando en
orden aleatorio.
Pulse el botón RDM para conmutar entre activación y
desactivación de la función de reproducción al azar.
El indicador RDM se enciende al activarse la función de
reproducción al azar.
Los números de pistas cambian continuamente en el
visualizador mientras se está seleccionando la siguiente pista.
Al seleccionarse la pista, comenzará la reproducción.
El número de pista seleccionado parpadea en el
visualizador mientras se está reproduciendo.
Para cambiar la pista que está escuchando, pulse el botón ¢.
Se seleccionará y reproducirá otra pista.
La función de reproducción al azar se cancela cuando usted deja de
reproducir el disco.
NOTA
2
1
Función de Reproducción al Azar
Para reproducir discos:
Pulse el botón CH.
El indicador de disco se enciende durante la modalidad del
cambiador de discos.
Al terminar de reproducirse la última pista de un disco,
comenzará a reproducirse el siguiente disco del cambiador de
discos. Después de reproducirse el último disco del cambiador, la
reproductora comienza a reproducir nuevamente desde el primer
disco.
El disco #10 se visualiza como “0”.
Para conmutar entre cambiadores de discos:
Cuando hay dos cambiadores de discos (1 y 2) conectados a la
unidad, mantenga pulsado el botón CH durante un segundo o
más para conmutar entre los cambiadores.
Si se van a conectar dos cambiadores de discos, se deberá utilizar
la unidad KCA-S200 vendida por separado. Cuando el cambiador de
diccos conectado directamente(cambiador de diccos) es el KDCC810, se podrÍan controlar dos unidades incluso sin el KCA-S200.
Para hacer una pausa y reanudar la reproducción del disco:
Pulse el botón CH para interrumpir temporalmente la
reproducción del disco.
Pulse otra vez el mismo botón para reanudar la reproducción.
NOTA
Reproducción de Discos Utilizando el Cambiador de
Discos
Para avanzar rápidamente el disco:
Pulse y mantenga pulsado el botón ¢.
Al soltar el dedo, comenzará a reproducirse el disco.
Para retroceder rápidamente:
Pulse y mantenga pulsado el botón 4.
Al soltar el dedo, comenzará a reproducirse el disco.
No se podrá efectuar el retroceso rápido entre las pistas cuando
está escuchando un MD en el cambiador de MD. En lugar de ello, al
retroceder hasta el comienzo de una pista, se cancela la función de
retroceso rápido y se reanuda automáticamente la reproducción
normal.
NOTA
Avance y Retroceso Rápidos del Disco
Page 100

Español
100
Características de control del cambiador de discos (véase página 86)
Búsqueda de Pista
Efectúa la búsqueda hacia adelante o atrás a través de las pistas
de un disco hasta hallar la que desea escuchar.
Para buscar pistas hacia atrás:
Pulse el botón 4 hasta visualizar el número de pista deseado.
Pulse una vez para regresar al comienzo de la pista actual, dos
veces para regresar al comienzo de la pista anterior, y así
sucesivamente.
La reproducción comienza desde el comienzo del número de
pista visualizado.
Pulsando el botón 4 mientras está escuchando la pista 1,
solamente hará regresar al comienzo de esa pista. La búsqueda de
retroceso no permite “reciclar” a la última pista del disco.
NOTA
Para buscar pistas hacia adelante:
Pulse el botón ¢ para visualizar el número de pista deseado.
Pulse una vez para avanzar rápidamente hasta la próxima pista,
dos veces para avanzar rápidamente hasta la
siguiente, y así sucesivamente.
La reproducción comienza desde el comienzo del número de
pista visualizado.
No podrá efectuar una búsqueda de pistas hacia adelante mientras
escucha la última pista de un disco.
NOTA
Búsqueda de Discos
Efectúa la búsqueda hacia adelante o atrás a través de los discos
hasta hallar el que desea escuchar.
Para buscar discos hacia atrás:
Pulse el botón DISC
– para visualizar el número de disco deseado.
El número de disco visualizado disminuye de a uno por cada
pulsación del botón.
Permite cambiar la visualización durante la reproducción de
los discos.
Para cambiar la visualización para los discos:
Cada vez que pulsa el botón DISP, la visualización que aparece
durante la reproducción del disco cambia de la
siguiente manera.
▼
Tiempo de pista/No. de pista
▼
Nombre del disco
▼
Título del disco (Sólo MD)
▼
Título de la pista (Sólo MD)
• Podrá poner nombres a sus disco mediante la función de
preajuste del nombre del disco (véase página 103).
• Si intenta visualizar el nombre de un disco al que no se ha
asignado ningún nombre, se visualizará “NO NAME”.
• Cuando la fuente que esté escuchando se acabe o si se
interrumpe (p.ej. cambiando la posición de encendido, o
cambiando las fuentes) volverá el visualizador inicial.
NOTA
Cambio de la visualización para los discos
Función del control remoto (véase página 87)
Búsqueda Directa de Pistas
Por medio del control remoto, introduzca directamente el
número de pista que desea escuchar.
Por medio de los botones numéricos del control remoto,
introduzca el número de la pista que desea escuchar.
El número de pista seleccionado parpadeará en el visualizador
durante 10 segundos.
Si no efectúa ninguna entrada adicional en el plazo de 10
segundos, se cancelará automáticamente la búsqueda.
Pulse ya sea el botón TRACK
+ o TRACK– mientras está
parpadeando el número de pista.
Comienza a reproducirse la pista especificada en el paso 1.
Para cancelar la búsqueda directa de pista mientras está en
curso:
Pulse el botón 38.
No podrá efectuar la búsqueda directa de pistas mientras está
efectuando la exploración de pistas o la reproducción al azar.
NOTA
2
1
 Loading...