


XR-5S
KAC-X5D
FIVE CHANNEL DIGITAL POWER AMPLIFIER
INSTRUCTION MANUAL
AMPLIFICATEUR 5 CANAUX DIGITAL
MODE D'EMPLOI
AMPLIFICADOR DE POTENCIA DIGITAL DE CINCO CANALES
MANUAL DE INSTRUCCIONES
Kenwood Corporation
Take
Familiarity
performance from your new power amplifier.
For
Record
warranty
whenever you call upon your Kenwood dealer for information or service on the
Model
US
© 864-4543-00/00 (KV/EV)
the
timetoread through this instruction manual.
with
installation and operation procedures will help you obtain
your
records
the
serial
number, found on the backofthe unit,inthe
card,
andinthe space provided below.
XR-5S/KAC-X5D
Residence
Only
Serial
number _
Refer
to the model and
spaces
designated on the
serial
the
numbers
product
best
Safetyprecautions
IA
WARNING
To
preventinjuryorfire, take the following
precautions:
Mounting and wiring this product requires skills and
experience.
wiring work to professionals.
• When extending the ignition, battery, or ground wires,
suretouse
make
with the range
to prevent wire deterioration and damage to the wire
coating.
To
prevent a short circuit, never
·
objects (such
Ifthe unit starts to emit smoke or strange
off
the power immediately and consult your Kenwood
dealer.
not
• Do
the unit becomes
IA
To
precautions:
•Besure
with a negative ground connection.
• Do
Do
sunlight or excessive heat or humidity. Also avoid places
with
• When replacing a
prescribed rating. Using afuse
may cause your unit
To
•
disconnect the wiring harness.
touch the unit during
CAUTION
preventdamagetothe machine, take the following
the unitisconnected to a
not
open the
not
install the unitina spot exposed to direct
too
prevent a short circuit when replacing a
I
For
safety's
of14mm2(AWG6)to21mm2(AWG
as
coins or metal tools) inside the unit.
I
much dust or the possibilityofwater splashing.
sake,
leave
the
mounting
automotive-grade wires or other wires
put
or
leave
smells,
use
because the surface
hot
and may cause burnsiftouched.
12VDCpower supply
toporbottom
fuse,
only
to
malfunction.
covers
useanew
with
the wrong rating
of
the unit.
one
and
4)
any metallic
turn
with
the
fuse,
first
I NOTE I
Ifyou experience problems during installation, consult
your Kenwood dealer.
not
Ifthe unit does
your Kenwood dealer.
Cleaning
Ifthe front panel gets dirty, turn
the panel with adry silicon cloth or soft cloth.
I
ACAUTION
Do not wipe the panel
dampened by volatile solvents such
alcohol. They can scratch the surface
cause the indicator letters
To
prevent
When the unitisusedinthe
turning the engine
starting the engine.
the
battery
seem tobeworking right, consult
unit
off
the power and wipe
I
with
a hard cloth or a cloth
as
paint thinner and
of
the
to
peel off.
rise
ACCONposition
ON,
it depletes the battery.
panel and/or
without
Use
it after
of
Protection function
The protection functionisactivated in the following
situations:
is
This unit
protecting this unit and your speakers from various
accidents or problems that
When the protection function
indicator lights and the amplifier stops operating.
· When a speaker wire may
• When a speaker
• When the unit malfunctions and a
the speaker output.
equipped with a protection function for
can
occur.
is
output
triggered, the
be
short-circuited.
contacts ground.
DC
PROTECTION
signalissent
• Wiring
•
Take
the battery wire for this unit directly from the
when the
of
the
be
going to
harness,
car
the
battery. If it's connected to the vehicle's wiring
can
cause blown
If a buzzing noise
engine
each
Do not allow the wire to directly contact the edge
iron plate by using Grommets.
Connect the ground wire to a metal part
chassis
electricity to the battery's negative
turn the power on ifthe ground wire
Be
near the battery. The protective fuse should
capacityasthe unit's fuse capacity or somewhat larger.
For
proof) power wiring cord with a current capacity greater
than the unit's
with the range
When more than one power amplifier
used,
fuse
maximum current drawn by each amplifier.
is
running, connect a line noise filter (optional) to
of
the battery wire.
that actsasan
sure
to install a protective
the power cord and ground,
use
a power supply wiring wire and protective
of
greater current-handling capacity than the total
fuses
etc.
is
heard from the
electrical ground passing
speakers
8 terminal. Do not
is
not connected.
fuse
in the power cord
use
avehicle type (fire-
fuse
capacity.
of14mm2(AWG6)to21mm2(AWG
(Use
a power wiring cord
are
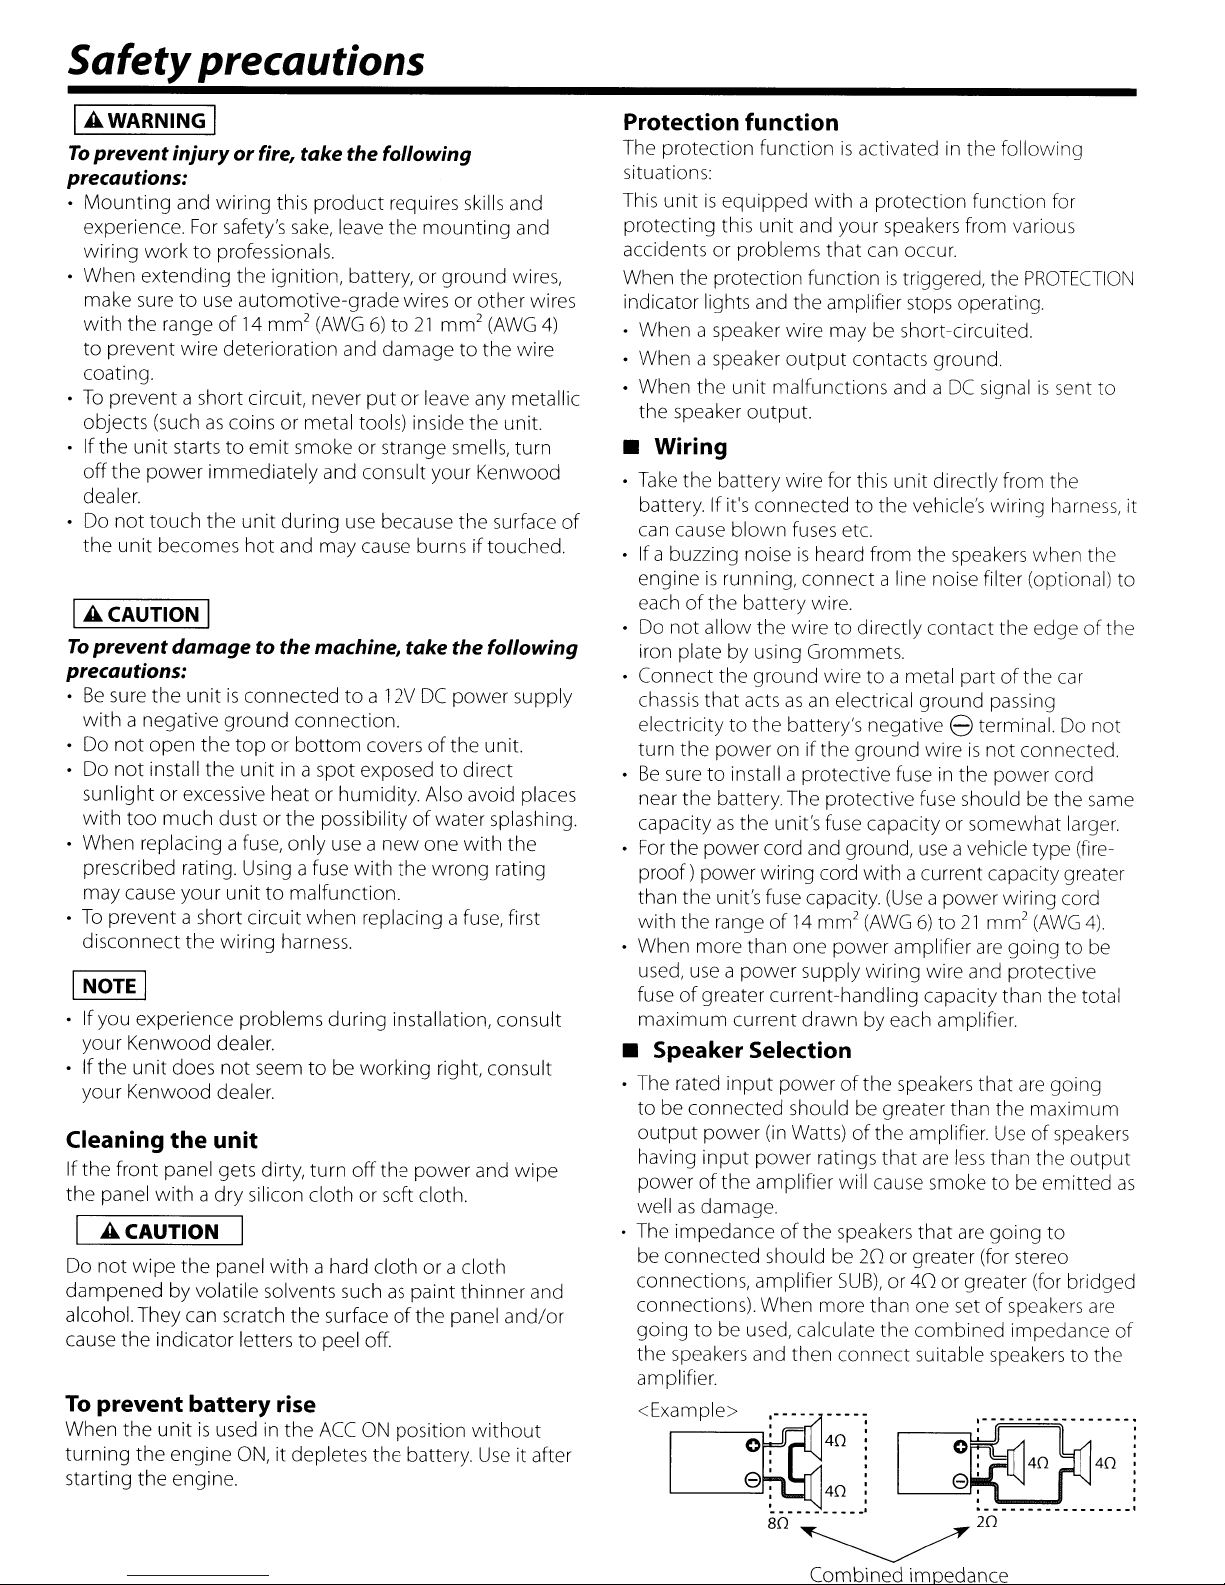
• Speaker Selection
•
The
rated input powerofthe speakers that
to
be
connected should be greater than the maximum
output
having
powerofthe amplifier will cause smoke tobeemitted
wellasdamage.
• The impedance
be
connections, amplifier
connections). When more than one
going to be used, calculate the combined impedance
the speakers and then connect suitable
amplifier.
<Example>
power
input
connected should be20or greater (for stereo
...-------,
(in
Watts)ofthe amplifier.
power ratings that
of
the
speakers
SUB),or40
.-----
-_
..
_~
.
40
:
·
·
·
40
: .
---------_
·
..
-
are
less
that
are
or greater (for bridged
setofspeakers
80~20
are
going
Useofspeakers
than the
going to
speakers
output
to the
to
of
the
same
4)
be
are
it
as
of
Combined impedance
Installation / Installation /lnstalaci6n
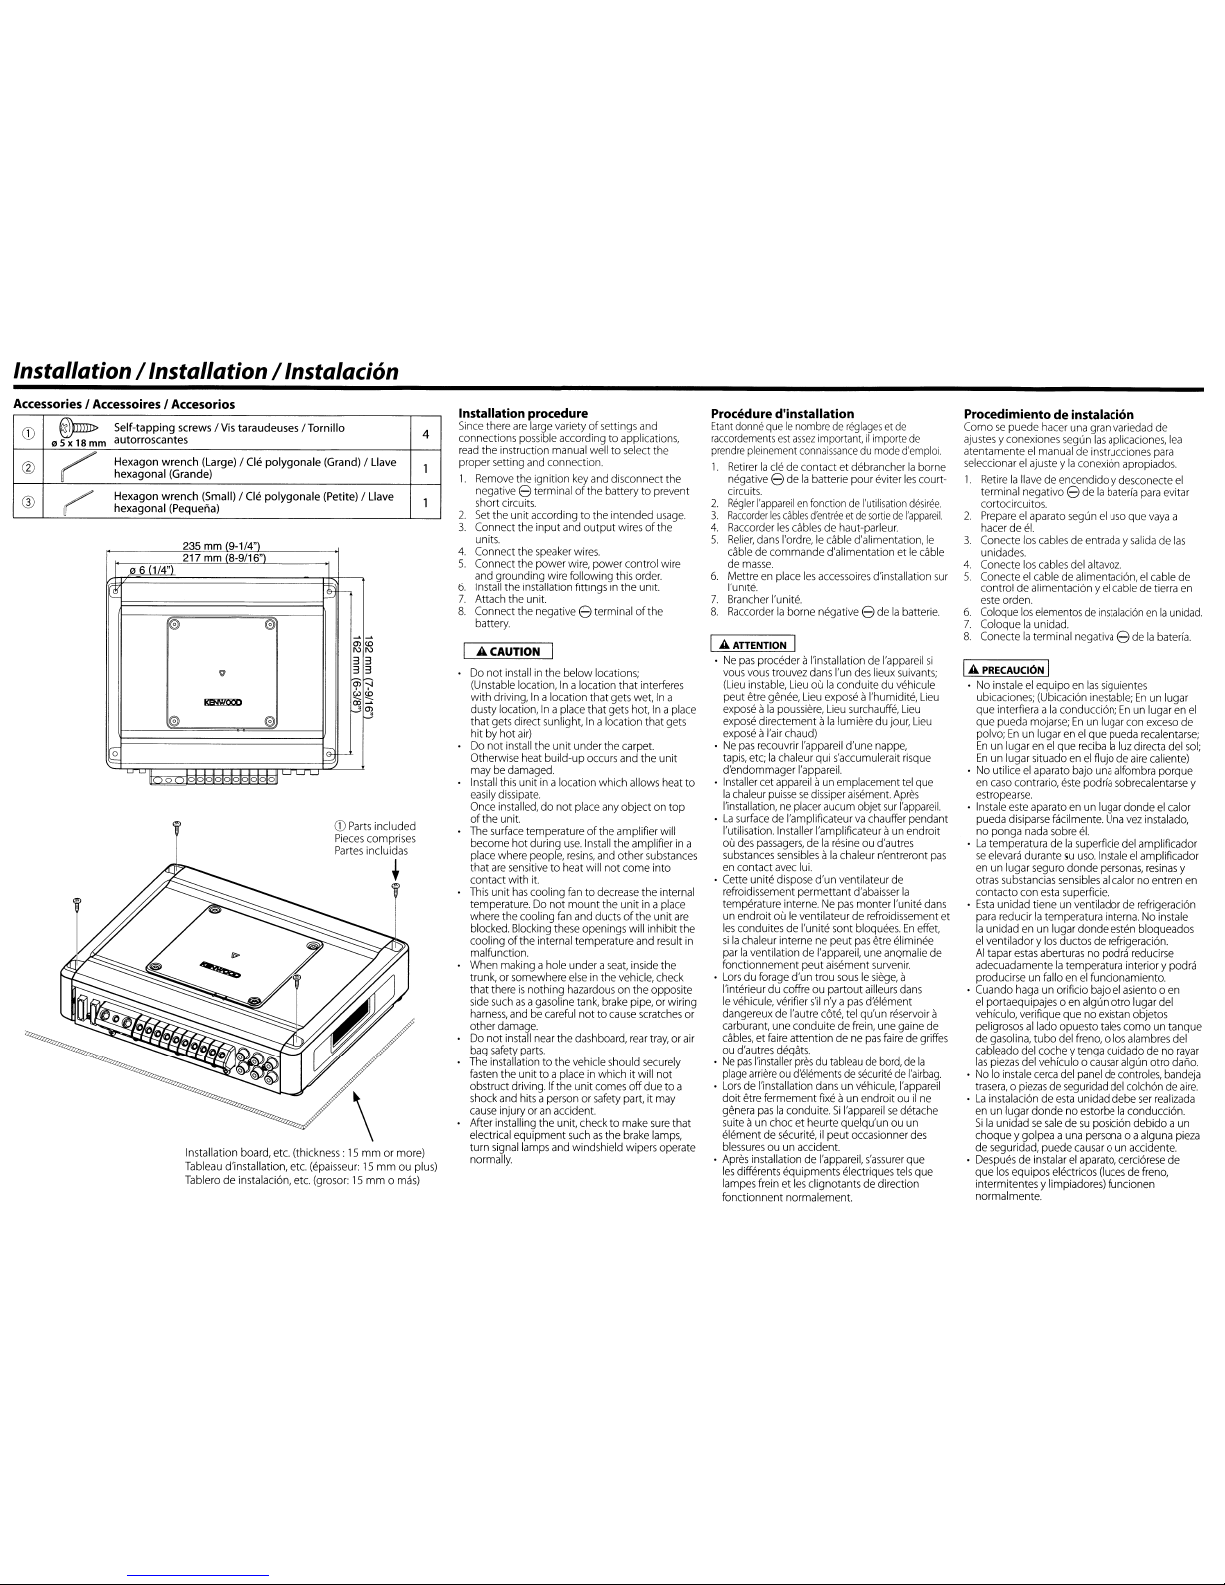
Accessories I Accessoires I Accesorios
CD
@mID>
Self-tapping
screws/Vis
taraudeuses / Tornillo
4
llSX
18mm
autorroscantes
(1)
~
Hexagon wrench (Large) /
(Ie
polygonale
(Grand)/L1ave
1
hexagonal (Grande)
®
r'
Hexagon wrench (Small) /
(Ie
polygonale (Petite) /
L1ave
1
hexagonal (Pequena)
235mm(9-1/4")
217 mm (8-9/16")
I
06
(1/4"
I
@'
[B
r--c
0
0
~~
O"><!J
1\>1\>
3 3
11
3 3
0;1::)
ml\!IlXD
~~
CXl~
...J0l
0
@
f-'
[,.---
18=
0
f-
a
a~~L.J
<D
Parts
included
Pieces
comprises
Partes
incluidas
t
Installation
board,
etc.
(thickness:15mm
or more)
Tableau
d'installation,
etc.
(epaisseur:15mmouplus)
Tablero
de instalaci6n,
etc.
(grosor:15mm 0
mas)
Installation procedure
Since
there
are
large
variety of settings
and
connections
possible
accordingtoapplications,
read
the instruction
manual
welltoselect
the
proper setting
and
connection.
1.
Remove
the ignition
key
and
disconnect the
negative
8 terminal of the battery to
prevent
short
circuits.
2.
Set
the unit
according
to the intended
usage.
3.
Connect the input
and
output
wiresofthe
units.
4.
Connect the
speaker
wires.
5.
Connect the power
wire,
power control
wire
and
grounding wire following this
order.
6.
Install
the installation fittingsinthe unit.
7.
Attach
the unit.
8.
Connect the
negative
8 terminal ofthe
battery.
....
CAUTION
Do
not
installinthe below
locations;
(Unstable
location,Inalocation that
interferes
with driving,Inalocationthat
gets
wet,Ina
dusty location,
Inaplace
that
gets
hot,Ina
place
that
gets
direct sunlight,Inalocationthat
gets
hitbyhot
air)
Do
not
install
the
unit under the
carpet.
Otherwise
heat
build-up
occurs
and
the unit
maybedamaged.
Install
this
unitinalocationwhich
allows
heat
to
easily
dissipate.
Once
installed,
do not
place
any
objectontop
of the unit.
The
surface
temperature oftheamplifierwill
become hot during
use.
Install
the amplifierina
place
where
people,
resins,
and
other
substances
that
are
sensitivetoheat
will not come into
contact with
it.
This
unit
has
cooling
fantodecrease
the
internal
temperature.Donot mount the unitina
place
where
the cooling
fan
and
ducts
of the unit
are
blocked.
Blocking
these
openings will inhibit the
cooling ofthe
internal
tern
perature
and
result
in
malfunction.
When
makingahole
under a
seat,
inside
the
trunk,orsomewhere
elseinthe
vehicle,
check
that thereisnothing
hazardousonthe opposite
side
suchasa
gasoline
tank,
brake
pipe,orwiring
harness,
andbecareful
not to
cause
scratches
or
other
damage.
Do
not
install
near
the
dashboard,
rear
tray,orair
bag
safety
parts.
The
installation to the
vehicle
should
securely
fasten
the unittoa
placeinwhich it will not
obstruct driving. Ifthe unit
comes
offduetoa
shock
and
hitsapersonorsafety
part,itmay
cause
injuryoran
accident.
After
installing
the unit,
checktomake
sure
that
electrical
equipment
suchasthe
brake
lamps,
turn
signal
lamps
and
windshield wipers
operate
normally.
Procedure d'installation
Etant
donne
queIenombredereglagesetde
raccordements
est
assez
important,ilimporte
de
prendre
pleinement
connaissancedumode
d'emploi.
1.
Retirerlac1edecontact et debrancherlaborne
negative
8
delabatterie pour eviter
les
court-
circuits.
2.
Regier
I'appareilenfonctiondeI'utilisation
desiree.
3.
Raccorder
les
cables
d'entreeetde
sortiedeI'apparei!
4.
Raccorder
les
cablesdehaut-parleur.
5.
Relier,
dans
I'ordre,Iecable
d'alimentation,
Ie
cable
de commande d'alimentation etIecable
de
masse.
6.
Mettreenplace
les
accessoires
d'installation
sur
I'unite.
7.
Brancher
I'unite.
8.
Raccorderlaborne negative 8dela
batterie.
I
....
ATTENTION
I
•Nepas
proceder aI'installation
de
I'appareil
si
vous vous
trouvez
dans
I'un
des
lieux
suivants;
(Lieu
instable,
Lieuoula
conduiteduvehicule
peut
etre
genee,
Lieu
expose
aI'humidite,
Lieu
exposeala
poussiere,
Lieu
surchauffe,
Lieu
expose
directement alalumiere du
jour,
Lieu
exposeaI'air
chaud)
·Nepas
recouvrir
I'appareil
d'une
nappe,
tapis,
etc;lachaleur qui
s'accumulerait
risque
d'endommager I'apparei!
Installer
cet
appareilaun
emplacement
tel
que
la
chaleur
puissesedissiper
aisement.
Apres
11nstallation,neplacer
aucum
objet
sur
I'apparei!
La
surfacedeI'arnplificateurvachauffer
pendant
I'utilisation.
Installer
I'amplificateur a
un
endroit
ou
des
passagers,dela
resineoud'autres
substances
sensiblesala
chaleur
n'entreront
pas
en
contact
avec
lui.
•
Cette
unite
dispose
d'un ventilateur
de
refroidissement
permettant
d'abaisser
la
temperature interne.Nepas
monter I'unite
dans
un
endroitouIe
ventilateurderefroidissement
et
les
conduitesdeI'unite sont
bloquees.Eneffet.
silachaleur
internenepeut
pas
etre
eliminee
parlaventilationdeI'appareil,
une
anQmalie
de
fonctionnement peut
aisement
survenir.
•
Lorsduforage
d'un trou
sousIesiege,
a
I'interieur du
coffreoupartout
ailleurs
dans
Ie
vehicule,
verifier
s'il
n'ya
pas
d'element
dangereuxdeI'autre
cote,
tel
qu'un
reservoir
a
carburant,
une
conduitedefrein,
une
gaine
de
cables,etfaire
attentiondene
pas
fairedegriffes
ou
d'autres
degats.
•Nepas
I'installer
presdutableaudebard,dela
plage
arriereoud'elementsdesecuritedeI'airbag.
•
LorsdeI'installation
dansunvehicule,
I'appareil
doit
etre
fermement
fixeaun
endroitouil
ne
genera
paslaconduite.SiI'appareilsedetache
suiteaun
chocetheurte quelqu'unouun
elernentdesecurite,ilpeut
occasionner
des
blessuresouun
accident.
•
Apres
installationdeI'appareil,
s'assurer
que
les
differents equipments electriques
tels
que
lampes
freinetles
c1ignotantsdedirection
fonctionnent normalement.
Procedimientodeinstalacion
Comosepuede
hacer
una
gran
variedad
de
ajustes
yconexiones
segun
las
aplicaciones,
lea
atentamenteelmanualdeinstrucciones
para
seleccionarelajusteyla
conexi6n
apropiados.
1.
RetirelalIavedeencendido ydesconecte
el
terminal negativo 8 delabateria
para
evitar
cortocircuitos.
2.
Prepareelaparato
seguneluso
que
vaya
a
hacerde e!
3.
Conecte
los
cablesdeentradaysalidadelas
unidades.
4.
Conecte
los
cables
del
altavoz.
5.
Conecteelcabledealimentaci6n,elcable
de
control
de
alimentaci6n yelcabledetierra
en
este
orden.
6.
Colaque
los
elementosdeinstalaci6nenla
unidad.
7.
Coloquelaunidad.
8.
Conectelaterminal
negativa8delabateria.
I
....
PRECAUCION
I
•Noinstaleelequipoenlas
siguientes
ubicaciones;
(Ubicaci6n
inestable;Enun
lugar
que interfiera alaconducci6n;Enun
lugarenel
que
pueda
mojarse;Enun
lugar
con
exceso
de
polvo;Enun
lugarenel
que
pueda
recalentarse;
Enunlugarenel
que
recibalaluz
directa
del
sol;
Enunlugar situadoenel
fiujodeaire
caliente)
No
utiliceelaparato
bajo
una
alfombra
porque
en
caso
contrario,
este
pod
ria
sobrecalentarse
y
estropearse.
Instale
este
aparatoenun
lugar
dondeelcalor
pueda
disiparse
facilmente.
Una
vez
instalado,
no ponga
nada
sobre
el.
La
temperatura delasuperficie
del
amplificador
se
elevara
durantesuuso.
Instaleelamplificador
enunlugar
seguro
donde
personas,
resinas
y
otras
substancias
sensiblesalcalor
no entren
en
contacto
con
esta
supenficie.
•
Esta
unidad tieneunventiladorderefrigeraci6n
para
reducirlatemperatura
interna.Noinstale
la
unidadenun
lugar
donde
esten
bloqueados
el
ventilador y
los
ductosderefrigeraci6n.
AI
tapar
estas
aberturasnopodra
reducirse
adecuadamentelatemperatura interior y
podra
producirseunfalloenel
funcionamiento.
•
Cuando
hagaunorificio
bajoelasiento0en
el
portaequipajes 0enalgun
otro
lugar
del
vehiculo,
verifique
quenoexistan
objetos
peligrosos
allado opuesto
tales
comountanque
de
gasolina,
tubo
del
freno,0los
alambres
del
cableado
del
cocheytenga
cuidadodeno
rayar
las
piezas
del
vehiculo 0
causar
algun
otro
dano.
•No10
instale
cerca
del
paneldecontroles,
bandeja
trasera,o
piezasdeseguridad
del
colch6ndeaire
•Lainstalaci6n de
esta
unidad
debe
ser
realizada
enunlugar dondenoestorbelaconducci6n.
Silaunidadsesaledesu
posici6n
debido a
un
choque y golpea a
una
persona
0 a
alguna
pieza
de
seguridad,
puede
causar0un
accidente.
•
Despuesdeinstalarelaparato,
cerci6rese
de
que
los
equipos
electricos
(Iucesdefreno,
intermitentes y
limpiadores)
funcionen
normal
mente.
 Loading...