

Page 1

MICRO HI-FI COMPONENT SYSTEM
HD-7
INSTRUCTION MANUAL
KENWOOD CORPORATION
B60-5276-08 00 C (K, T) OC 0204
Page 2

2
Before applying power
Caution : Read this page carefully to ensure safe operation.
Units are designed for operation as follows.
U.S.A. and Canada .............................AC 120 V only
Europe and U.K.................................. AC 230 V only
For the United Kingdom
Factory fitted moulded mains plug
1. The mains plug contains a fuse. For replacement,
use only a 3-Amp ASTA-approved (BS1362) fuse.
2. The fuse cover must be refitted when replacing the
Preparation
fuse in the moulded plug.
3. Do not cut off the mains plug from this equipment.
If the plug fitted is not suitable for the power points
in your home or the cable is too short to reach a
power point, then obtain an appropriate safety approved extension lead or adapter, or consult your
dealer.
If nonetheless the mains plug is cut off, remove the
fuse and dispose of the plug immediately, to avoid a
possible shock hazard by inadvertent connection to
the mains supply.
IMPORTANT : The wires in the mains lead are coloured
Do not connect those leads to the earth terminal of a
three-pin plug.
in accordance with the following code:
Blue : Neutral
Brown : Live
HD-7/EN
Safety precautions
WARNING : TO PREVENT FIRE OR ELECTRIC SHOCK, DO NOT EXPOSE THIS APPLIANCE TO RAIN OR MOISTURE.
CAUTION
RISK OF ELECTRIC SHOCK
DO NOT OPEN
THE LIGHTNING FLASH WITH ARROWHEAD SYMBOL, WITHIN AN EQUILATERAL TRIANGLE, IS INTENDED TO ALERT THE USER TO THE PRESENCE OF UNINSULATED "DANGEROUS VOLTAGE"
WITHIN THE PRODUCT’S ENCLOSURE THAT MAY BE OF SUFFICIENT MAGNITUDE TO CONSTITUTE
A RISK OF ELECTRIC SHOCK TO PERSONS.
THE EXCLAMATION POINT WITHIN AN EQUILATERAL TRIANGLE IS INTENDED TO ALERT THE
USER TO THE PRESENCE OF IMPORTANT OPERATING AND MAINTENANCE (SERVICING) INSTRUCTIONS IN THE LITERATURE ACCOMPANYING THE APPLIANCE.
CLASS 1
LASER PRODUCT
The marking of this product has been classified as Class 1. It means
that there is no danger of hazardous radiation outside the product.
Location: Back panel
CAUTION: TO REDUCE THE RISK OF ELECTRIC SHOCK, DO NOT
REMOVE COVER (OR BACK). NO USER-SERVICEABLE PARTS INSIDE. REFER SERVICING TO QUALIFIED SERVICE PERSONNEL.
Page 3
Special features
Playback of CD-R/RW discs
Before applying power
HD-7/EN
3
The CD player is capable of playing both CD-R and CD-RW music discs, which have been
recorded on a CD recorder.
"Linear T.R.A.I.T." (for Europe and U.K.), "K-STAT" (for USA)
power transistors
Kenwood's amplifiers now feature Linear T.R.A.I.T., the world's first power transistor with
built-in temperature detection and compensation circuitry. This advanced technology assures minimal distortion across all frequencies and gives an excellent three-dimensional
sonic image.
High-performance 24-bit D.R.I.V.E. II
Kenwood's innovative high-resolution 24-bit D.R.I.V.E. II technology features two types
of low pass filter that removes quantization distortion.
The result is an exceptionally pure and detailed sound from the loudest notes to the most
subtle of harmonics.
Preparation
Page 4

4
Before applying power
Accessories
Unpacking
Unpack the unit carefully and make sure that all the accessories are present.
FM indoor antenna (1)AM loop antenna (1) Remote control unit (1) Batteries (R6/AA) (2)
Preparation
Speaker cords (2)
(provided in the speaker package)
If any accessories are missing, or if the unit is damaged or fails to operate, notify your dealer immediately. If the unit
was shipped to you directly, notify your shipper immediately. Kenwood recommends that you retain the original carton
and packing materials in case you need to move or ship the unit in the future.
Keep this manual handy for future reference.
HD-7/EN
For the U.S.A.
FCC WARNING
This equipment may generate or use radio frequency
energy. Changes or modifications to this equipment
may cause harmful interference unless the modifications are expressly approved in the instruction manual.
The user could lose the authority to operate this equipment if an unauthorized change or modification is
made.
NOTE:
This equipment has been tested and found to comply
with the limits for a Class B digital device, pursuant to
Part 15 of the FCC Rules. These limits are designed to
provide reasonable protection against harmful interference in a residential installation. This equipment may
cause harmful interference to radio communications, if
it is not installed and used in accordance with the instructions. However, there is no guarantee that interference will not occur in a particular installation. If this
equipment does cause harmful interference to radio or
television reception, which can be determined by turning the equipment off and on, the user is encouraged to
try to correct the interference by one or more of the
following measures:
–
Reorient or relocate the receiving antenna.
–
Increase the separation between the equipment
and receiver.
–
Connect the equipment into an outlet on a circuit
different from that to which the receiver is connected.
–
Consult the dealer or an experienced radio / TV
technician for help.
For the U.S.A.
CAUTION
Use of controls or adjustments or performance of procedures other than those specified herein may result in
hazardous radiation exposure.
In compliance with Federal Regulations, the following are
reproductions of labels on, or inside the product relating
to laser product safety.
KENWOOD CORPORATION
2967-3, ISHIKAWA-MACHI,
HACHIOJI-SHI,
TOKYO, JAPAN
KENWOOD CORP. CERTIFIES THIS EQUIPMENT
CONFORMS TO DHHS REGULATIONS NO. 21
CFR 1040.10, CHAPTER 1, SUBCHAPTER J.
Location: Back Panel
Page 5
Contents
Caution : Read the pages marked carefully to ensure safe operation.
Before applying power
HD-7/EN
5
Preparation section
Before applying power ........................................2
Safety precautions ................................................. 2
Special features ........................................................... 3
Accessories .................................................................. 4
Contents ......................................................................... 5
IMPORTANT SAFEGUARDS......................................6
System connections .................................................. 8
Connection of accessory antennas ......................... 8
Connection of FM outdoor antenna ......................... 9
Connection of the speaker system ...........................9
Connection of a subwoofer
(sold separately) ...................................................10
Connection of a cassette deck
(sold separately) ...................................................10
Connection to an external source
(audio equipment) ................................................ 11
Controls and indicators...........................................12
Main unit ......................................................................12
Display.......................................................................... 13
Remote control unit ................................................... 14
Operation of remote control unit ...........................15
Basic section
Basic use method.....................................................16
Adjusting the tone ...................................................... 18
Playback of CD ......................................................... 20
Receiving broadcast station ..................................22
Channel space setting ...............................................23
RDS (Radio Data System) (For U.K. and Europe) ........ 25
Listening to an AUX/TAPE input soarce...............28
Application section
Various CD playback features ...............................30
Listening to the desired sequence (program
playback) .............................................................. 30
Repeated playback .................................................... 32
Listening in random order (random mode) ............ 33
Setting auto power save (A.P.S.) ............................. 34
Adjusting the brightness of the display part
(DIMMER).............................................................. 34
Clock adjustment ..................................................... 35
Timer operation ........................................................36
Sleep timer (SLEEP) ................................................... 36
Setting the timer program (PROG. TIMER) ............. 37
Knowledge sections
Important Items.........................................................40
Maintenance ...............................................................40
Reference .................................................................... 40
In case of difficulty ..................................................42
Specifications...........................................................44
Preparation
As an ENERGY STAR® Partner,
Kenwood Corporation has determined that this products meets the
energy efficiency. This product can save energy.
Saving energy reduces air pollution and lowers utility
bills.
ENERGY STAR® guidelines for
Page 6
6
IMPORTANT SAFEGUARDS
Please read all of the safety and operating instructions before
operating this appliance. Adhere to all warnings on the appliance
and in the instruction manual. Follow all the safety and operating
instructions. These safety and operating instructions should be
retained for future reference.
1. Power sources – The appliance should be connected to a
power supply only of the type described in the instruction
manual or as marked on the appliance. If you are not sure of
the type of power supply to your home, consult your appliance
dealer or local power company. For appliances intended to
operate from battery power, or other sources, refer to the
Preparation
instruction manual.
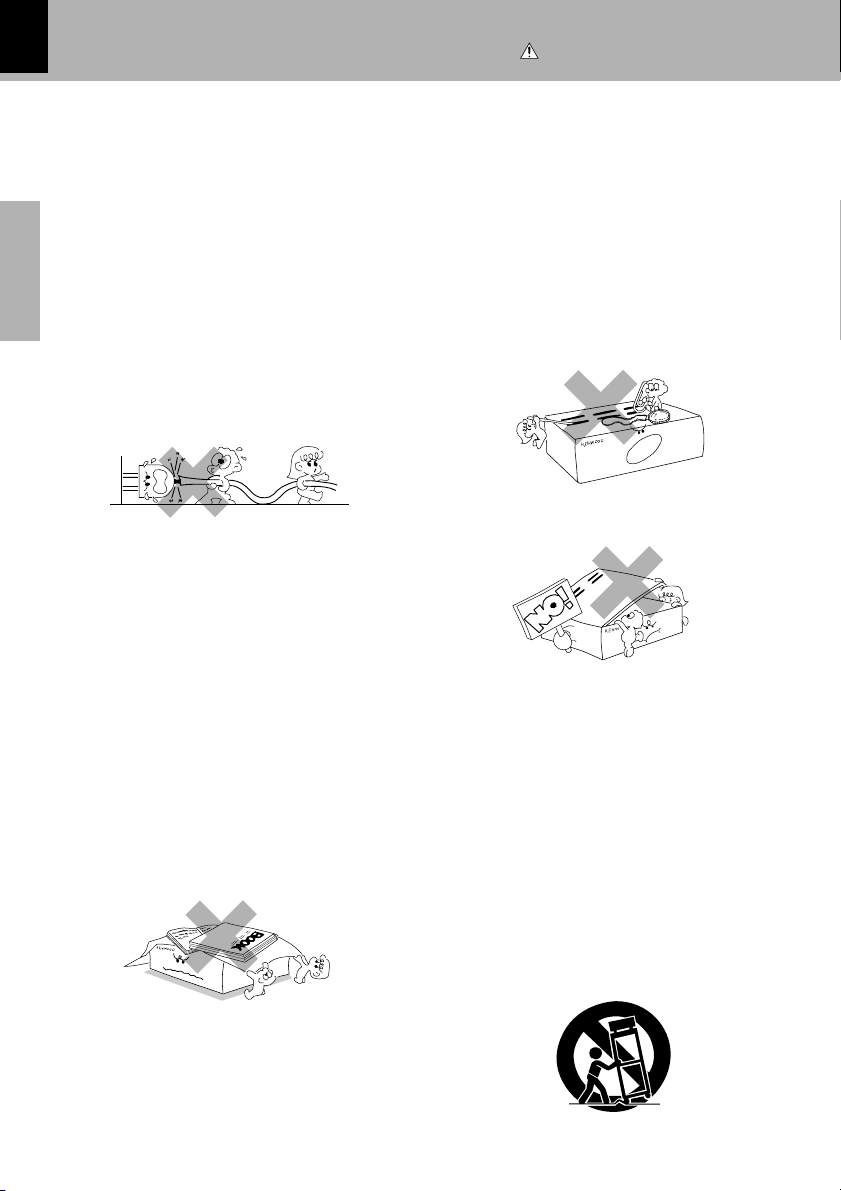
2. Power-cord protection – Power-supply cords should be
routed so that they are not likely to be walked on or pinched by
items placed upon or against them, pay particular attention to
cords at plugs, convenience receptacles, and the point where
they exit from the appliance.
Never pull or stretch
the cord.
3. CAUTION – Polarization – This appliance may be equipped
with a polarized alternating-current line plug (a plug having one
blade wider than the other). This plug will fit into the power
outlet only one way. This is a safety feature. If you are unable
to insert the plug fully into the outlet, try reversing the plug. If
the plug should still fail to fit, contact your electrician to replace
your obsolete outlet. Do not defeat the safety purpose of the
polarized plug.
4. Ventilation – Slots and openings in the cabinet are provided
for ventilation and to ensure reliable operation of the appliance
and to protect it from overheating, and these openings must
not be blocked or covered. The appliance should be situated so
that its location or position does not interfere with its proper
ventilation.
To maintain good ventilation, do not put records or a table-cloth
on the appliance. Place the appliance at least 10 cm away from
the walls.
Do not use the appliance on a bed, sofa, rug or similar surface
that may block the ventilation openings. This appliance should
not be placed in a built-in installation such as a bookcase or rack
unless proper ventilation is provided or the manufacturer’s
instructions have been adhered to.
Caution : Read this page carefully to ensure
6. Temperature – The appliance may not function properly if
used at extremely low, or freezing temperatures. The ideal
ambient temperature is above +5°C (41°F).
7. Heat – The appliance should be situated away from heat
sources such as radiators, heat registers, stoves, or other
appliances (including amplifiers) that produce heat. Do not
place a flaming object, such as a candle or lantern, on or near
the appliance.
8. Electric shock – Care should be taken so that objects do not
fall and liquid is not spilled into the enclosure through openings.
If a metal objects, such as a hair pin or a needle, comes into
contact with the inside of this appliance, a dangerous electric
shock may result. For families with children, never permit
children to put anything, especially metal, inside this appliance.
9. Enclosure removal – Never remove the enclosure. If the
internal parts are touched accidentally, a serious electric shock
might occur.
10. Magnetic fields – Keep the appliance away from sources of
magnetic fields such as TV sets, speaker systems, radios,
motorized toys or magnetized objects.
11. Cleaning – Unplug this appliance from the wall outlet before
cleaning. Do not use volatile solvents such as alcohol, paint
thinner, gasoline, or benzine, etc. to clean the cabinet. Use a
clean dry cloth.
12. Accessories – Do not place this appliance on an unstable cart,
stand, tripod, bracket, or table. The appliance may fall, causing
serious injury to a child or adult, and serious damage to the
appliance. Use only with a cart, stand, tripod, bracket, or table
recommended by the manufacturer, or sold with the appliance.
Any mounting of the appliance should follow the manufacturer’s
instructions, and should use a mounting accessory
recommended by the manufacturer. An appliance and cart
combination should be moved with care. Quick stops, excessive
force, and uneven surfaces may cause the appliance and cart
combination to overturn.
safe operation.
HD-7/EN
5. Water and moisture – The appliance shall not be exposed to
dripping and splashing - for example, near a bathtub, washbowl,
kitchen sink, laundry tub, in a wet basement, or near a
swimming pool, etc. Do not place an object containing liquid,
such as a flower vase, on the appliance.
Page 7
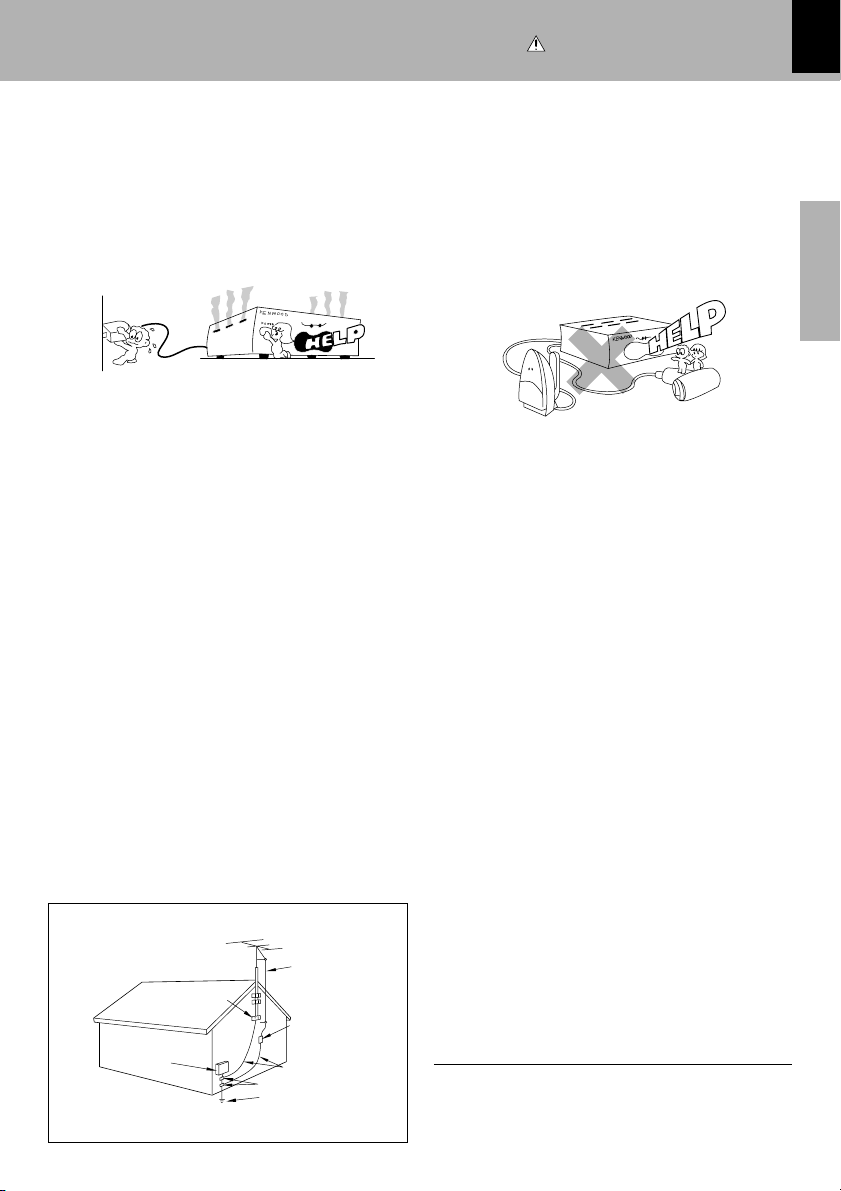
13.Lightning – For added protection for this appliance during a
lightning storm, or when it is left unattended and unused for
long periods of time, unplug it from the wall outlet and
disconnect the antenna or cable system. This will prevent
damage to the appliance due to lightning and power-line
surges.
14.Abnormal smell – If an abnormal smell or smoke is
detected, immediately turn the power OFF and unplug
the appliance from the wall outlet. Contact your dealer or
nearest service center.
15.Damage requiring service – The appliance should be
serviced by qualified service personnel when:
A. The power-supply cord or the plug has been damaged.
B. Objects have fallen, or liquid has been spilled into
the appliance.
C. The appliance has been exposed to rain or water.
D. The appliance does not appear to operate normally
by following the instruction manual. Adjust only those controls
that are covered by the instruction manual as an improper
adjustment of other controls may result in damage and will
often require extensive work by a qualified technician to
restore the appliance to its normal operation.
E. The appliance has been dropped, or the enclosure
damaged.
F. The appliance exhibits a marked change in performance.
16.Servicing – The user should not attempt to service the
appliance beyond that described in the instruction
manual. All other servicing should be referred to qualified
service personnel.
17.Outdoor antenna grounding – If an outside antenna is
connected to the appliance, be sure the antenna system
is grounded so as to provide some protection against
voltage surges and built up static charges. Article 810 of
the National Electrical Code ANSI/NFPA 70, provides
information with respect to proper grounding of the
mast and supporting structure, grounding of the lead-in
wire to an antenna discharge unit, size of grounding
conductors, location of antenna discharge unit,
connection to grounding electrodes, and requirements
for the grounding electrode. See Figure.
Caution : Read this page carefully to en-
18.Power lines – An outside antenna system should not be
located in the vicinity of overhead power lines or other electric
light or power circuits, or where it can fall into such power lines
or circuits. When installing an outside antenna system, extreme
care should be taken to keep from touching such power lines
or circuits as contact with them might be fatal.
19.AC outlets – Do not connect other audio equipment
with a power consumption larger than that specified to
the AC outlet on the rear panel. Never connect other
electrical appliances, such as an iron or toaster, to it to
prevent fire or electric shock.
20. Overloading – Do not overload wall outlets, extension cords,
or integral convenience receptacles as this can result in a risk
of fire or electric shock.
21. Attachment – Do not use attachments not recommended by
the appliance manufacturer as they may cause hazards.
22. Replacement parts – When replacement parts are required,
be sure the service technician has used replacement parts
specified by the manufacturer or have the same characteristics
as the original parts. Unauthorized substitutions may result in
fire, electric shock, or other hazards.
23. Safety check – Upon completion of any service or repairs to
this appliance, ask the service technician to perform safety
checks to determine that the appliance is in proper operating
condition.
sure safe operation.
HD-7/EN
7
Preparation
EXAMPLE OF ANTENNA GROUNDING AS PER NATIONAL
ELECTRIC
SERVICE
EQUIPMENT
NEC – NATIONAL ELECTRICAL CODE
ELECTRICAL CODE
GROUND
CLAMPS
GROUND CLAMP
POWER SERVICE GROUNDING
ELECTRODE SYSTEM
(NEC ART 250, PART H)
ANTENNA
LEAD IN WIRE
ANTENNA
DISCHARGE UNIT
(NEC SECTION 810-20)
GROUNDING CONDUCTORS
(NEC SECTION 810-21)
Notes:
1. Item 3 is not required except for grounded or polarized equipment.
2. Item 17 and 18 are not required except for units provided with antenna
terminals.
3. Item 17 complies with UL in the U.S.A.
Page 8
8
System connections
HD-7/EN
Make connections as shown below.
When connecting the related system components, refer also to the instruction manuals of the related components.
CAUTION
Do not plug in the power lead until all connections are
completed.
Malfunction of microcomputer
If operation is not possible or erroneous display
appears even though all connections have been
made properly, reset the microcomputer by
referring to "In case of difficulty". w
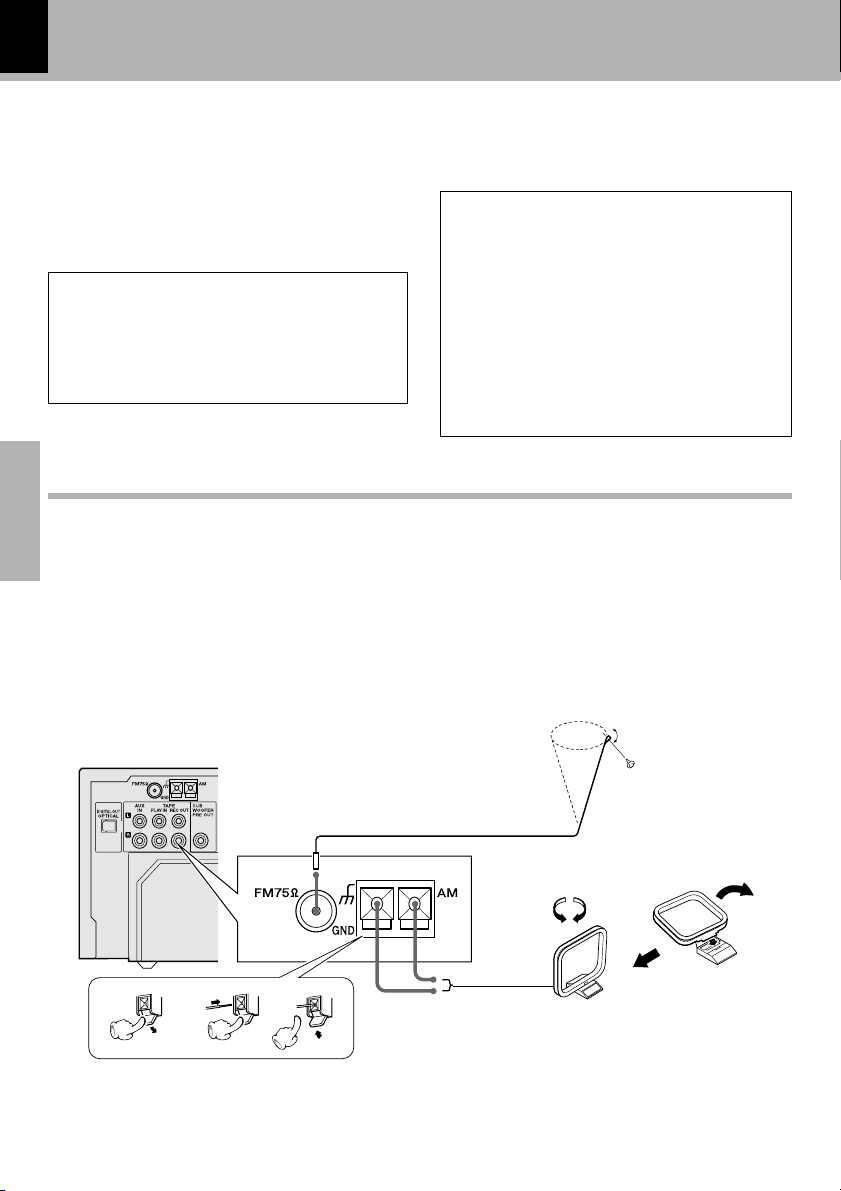
Connection of accessory antennas
Basic
FM indoor antenna
The supplied antenna is for temporary indoor use only. For stable signal
reception, we recommend to use an outdoor antenna. Remove the indoor antenna if you connect to an outdoor antenna.
1 Connect the antenna to the antenna terminal.
2 Locate the position providing good recep-
tion condition.
3 Fix the antenna.
CAUTION
Be sure to adhere followings. Or proper ventilation
will be blocked causing damage or fire hazard.
÷ Do not place any objects impairing heat radiation
onto the top of the unit.
÷ Leave some space around the unit (from the larg-
est outside dimension including projection) equal
to or greater than, shown below.
Top panel : 50 cm
Back panel : 10 cm
1
23
AM loop antenna
The supplied antenna is for indoor use. Place it as
far as possible from the main system, TV set,
speaker cords and power cord, and set it to a direction which provides the best reception.
Page 9
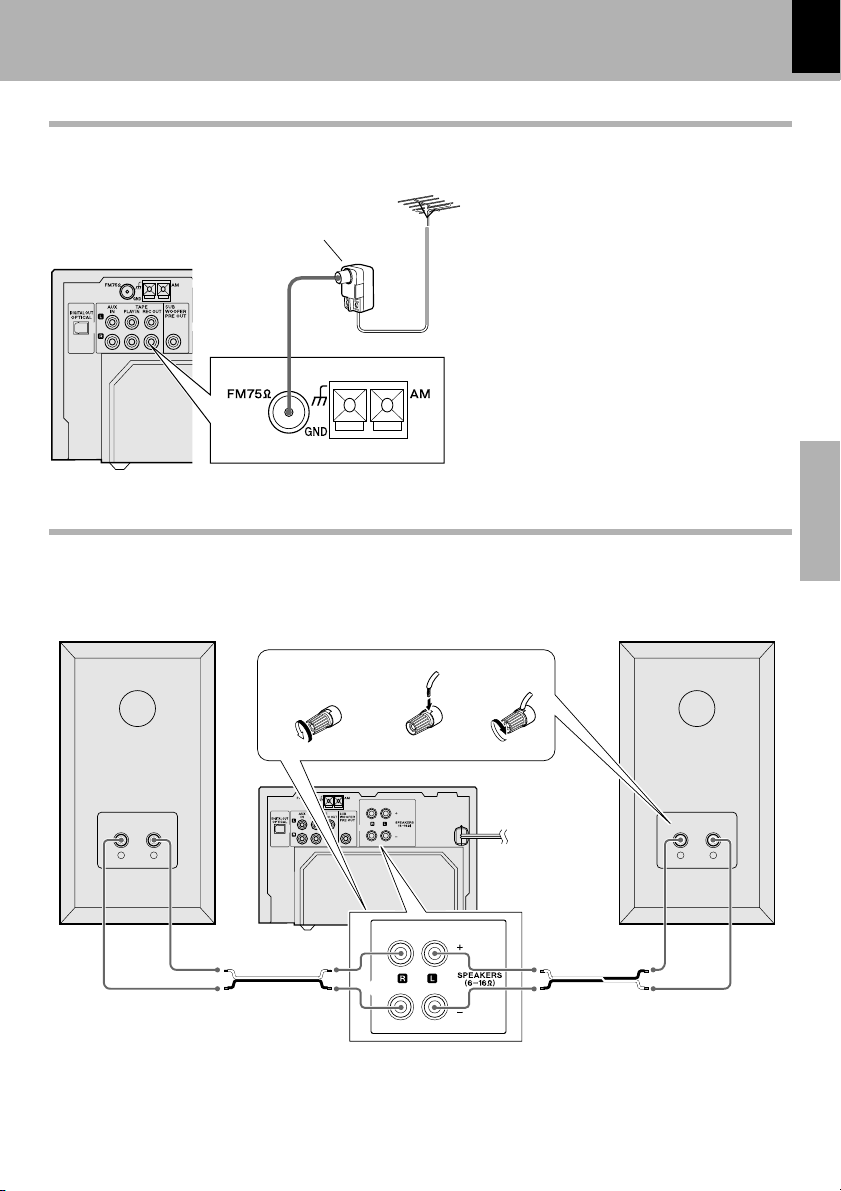
Connection of FM outdoor antenna (sold separately)
System connection
HD-7/EN
9
Antenna adaptor
(Commercially
Available Parts)
FM outdoor antenna
Lead the 75 Ω coaxial cable connected to
the FM outdoor antenna into the room
and connect it to the FM 75 Ω terminal.
Please remove the indoor antenna after
an outdoor antenna has been installed.
Connection of the speaker system
Speaker (Right) Speaker (Left)
1
2
3
Basic
−
+
POWER cord
TO WALL AC
OUTLET
−
+
Main unit
Speaker cord
÷ Never short-circuit the + and – speaker cords.
÷ If the left and right speakers are connected inversely or if the speaker cords are connected with reversed polarity,
the sound becomes unnatural with ambiguous acoustic image positioning. Be sure to connect the speakers and
speaker cords correctly.
Speaker cord
Page 10
10
System connection
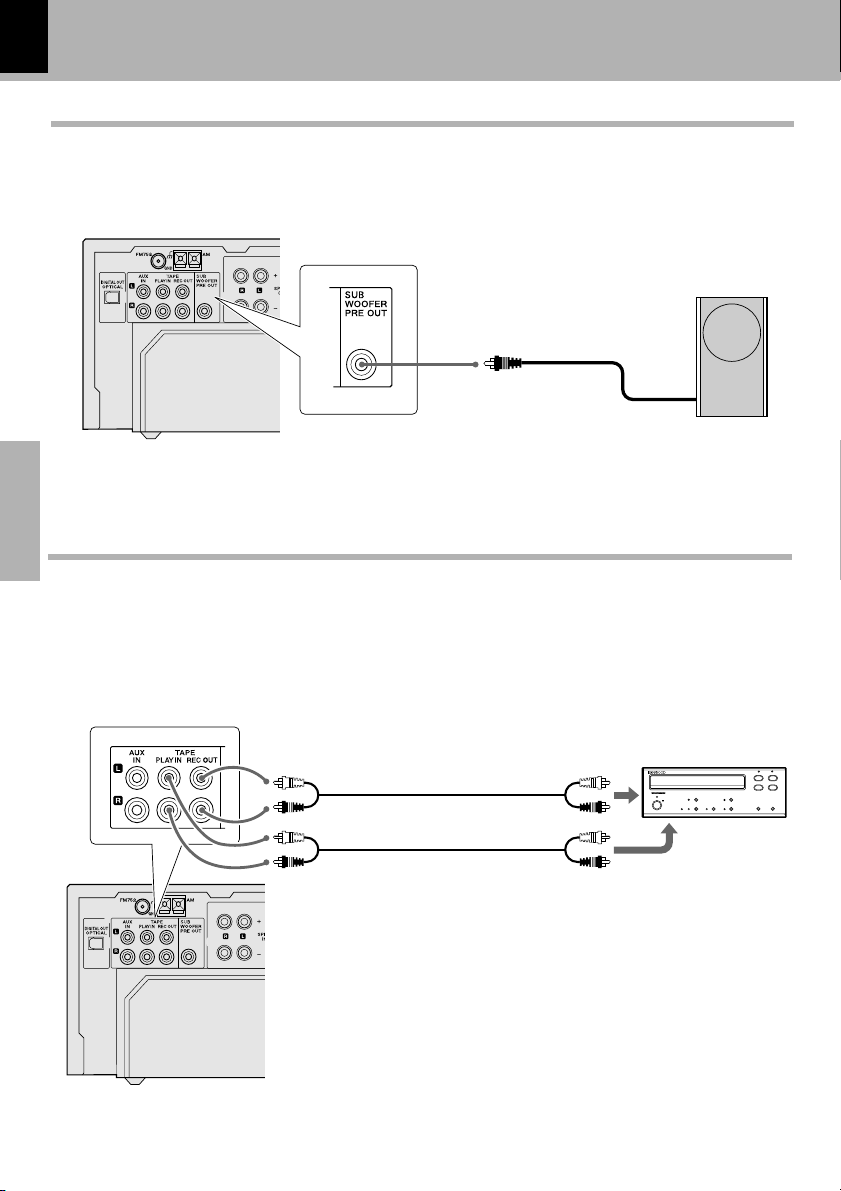
Connection of a subwoofer (sold separately)
A subwoofer provides powerful playback of the very low range. It can be used with all types of playback.
Subwoofer
Basic
Connection of a cassette deck (sold separately)
Connect a separately sold cassette deck with the accessory audio cord to the terminals TAPE PLAY IN
and REC OUT at the rear of this unit. Please refer also to the operation instructions supplied with the
cassette deck.
HD-7/EN
KENWOOD
Audio code
Audio code
To RECORD IN
To PLAY OUT
cassette deck
8
¶
027
1
3
¡
Page 11
System connection
HD-7/EN
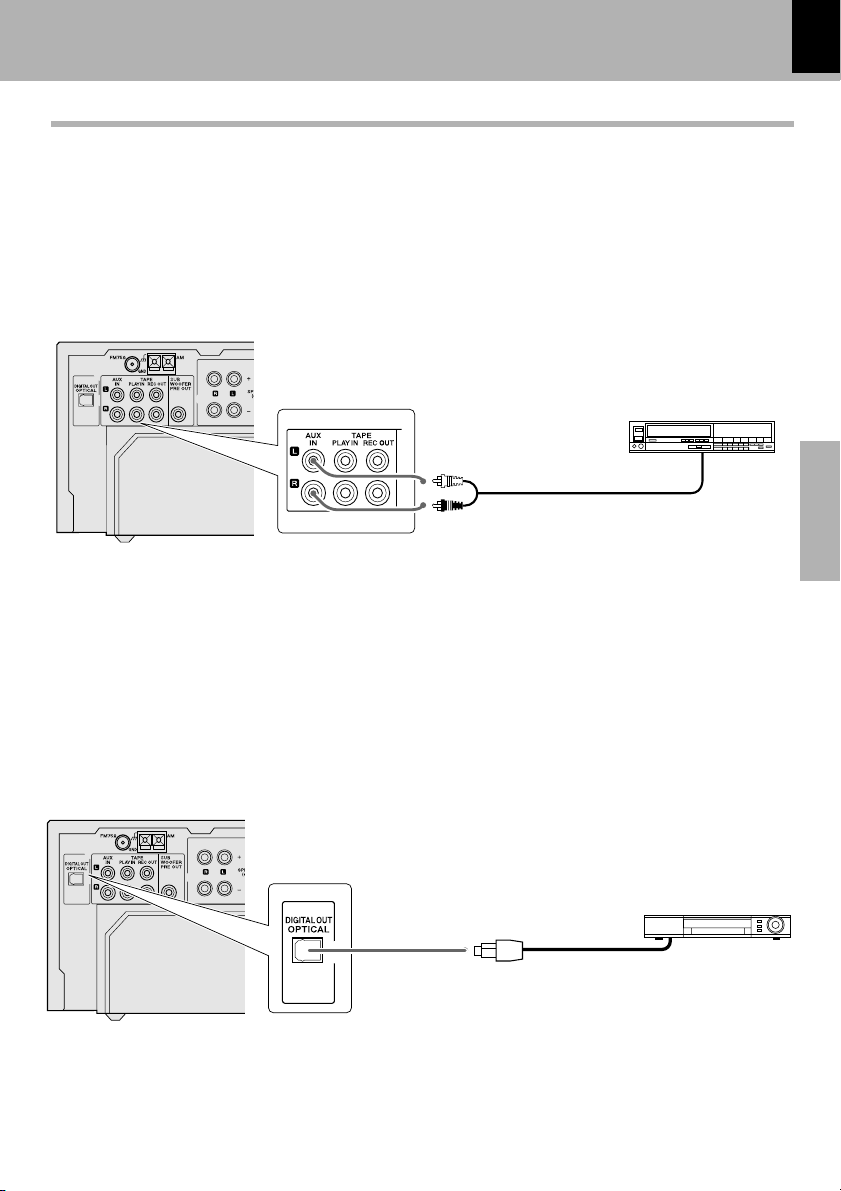
Connection to an external source (audio equipment)
In case of analog connection
You can use the input terminal AUX at the rear of this unit to connect a video deck or a record player (P-
110) (sold separately) with built-in RIAA equalizer amplifier.
video deck or
a record player
11
Audio code
In case of digital connection
You can use the digital output terminal OPTICAL at the rear of this unit.
Square optical
connector plug
Basic
Audio OUTPUT
MD recorder etc.
Page 12
12
Controls and indicators
Main unit
1
2
HD-7/EN
8
9
0
3
4
5
6
7
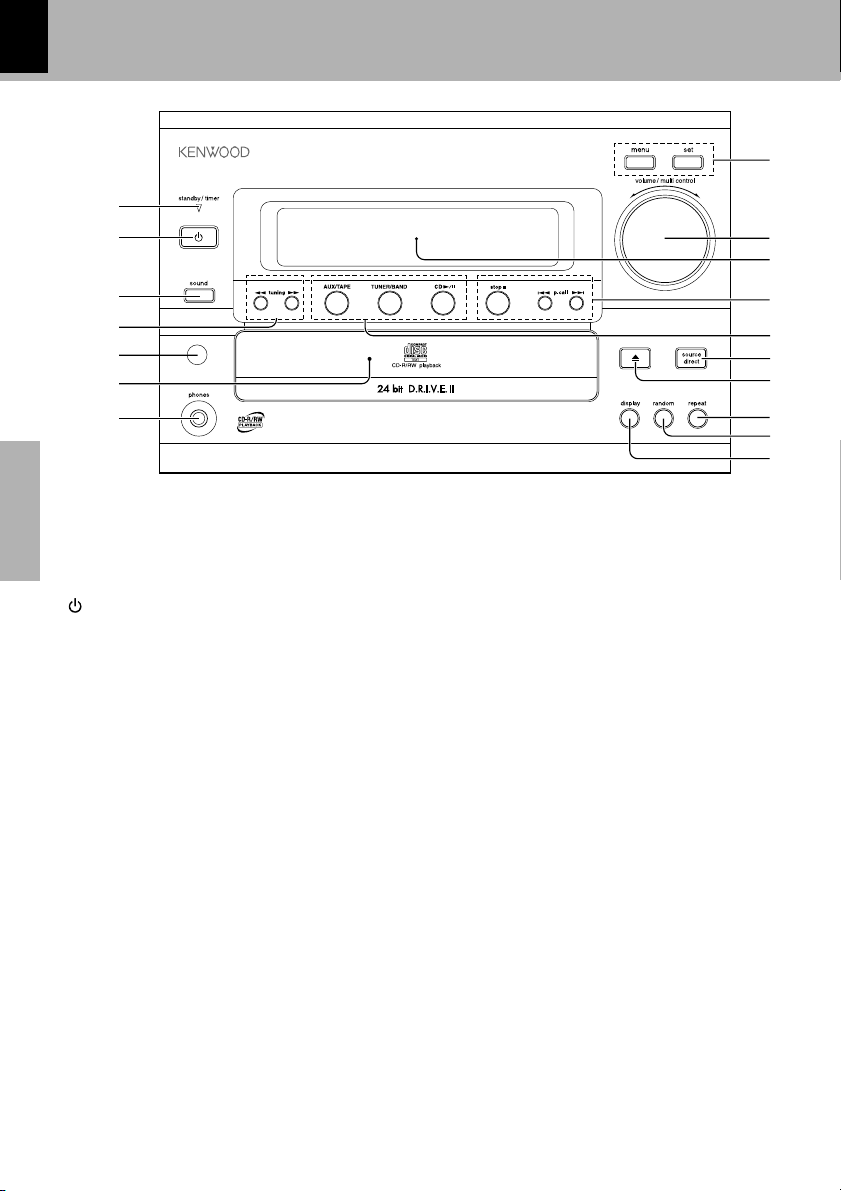
1 standby/timer indicator
Basic
Standby status (power OFF): Red
Timer standby status (power OFF): Green
Energized (power ON): Not lit
key ^
2
Press to set the unit to On or Standby.
3 sound key &
Used to switch the sound.
4 1 TUNING ¡ keys
CD : ¡
Used to fast-forward or fast-reverse the played
audio.
TUNER : ¢
Used to select a radio station.
5 Remote sensor %
This window receives signals from the remote
control unit.
6 CD tray )
7 Headphone jack ^
Connect headphone with a stereo mini-plug (optionally available).
8 menu key &
Used for application operations for each source.
set key &
Used to confirm a function selected in the
menu.
9 volume/multi control knob ^&
Used for volume adjustment and to select items
in the setting menus.
!
@
#
$
%
^
&
0 Display panel
! stop 7 key )
Press to stop a disc.
When this is pressed in standby mode, the
present time is displayed for 5 seconds.
4 p.call ¢ key
CD : skip CD tracks ¡
TUNER : select a preset radio station ™
@ Input selection keys
AUX/TAPE •
Selection of AUX (externally connected equipment) or tape.
TUNER/BAND ™
Used to switch the broadcasting band (AM or
FM) when listening to the radio.
CD 6 )
Used to select CD for playback and for pausing.
# source direct key &
Key for listening with high sound quality by
eliminating additional circuits as far as possible.
$ 0 key )
To load or eject a CD.
% repeat key ¤
Press for setting repeated playback.
^ random key ‹
Press for setting playback of tracks in a random
orde.
& display key ¡
The display contents of the display are switched.
Page 13
Display
Controls and indicators
HD-7/EN
13
123 4 56 7 8
^
1
RANDOM
MUTE
N.B.
S.DIRECT
FM
AM
PM
PGM
1 2
REMAIN
TOTAL AUTO
TUNED
%
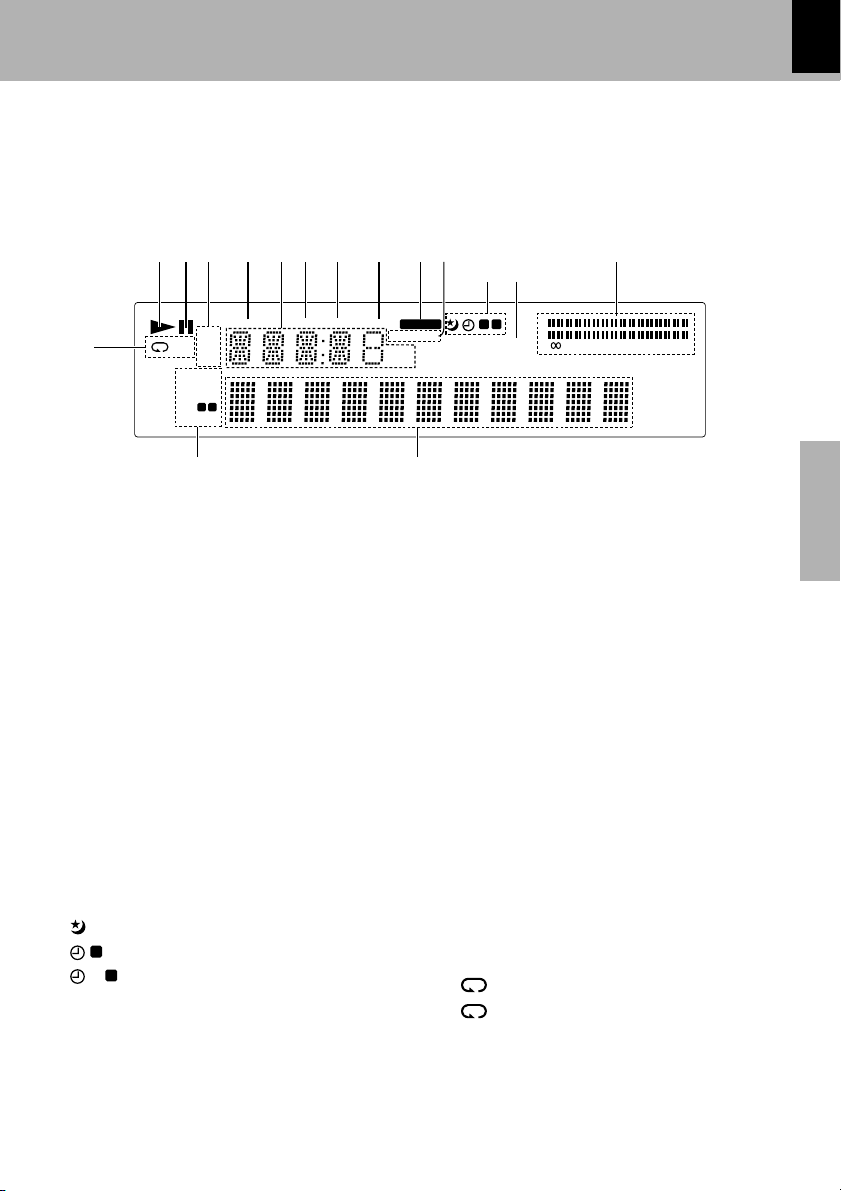
1 Playback indication
2 Playback pause indication
3 AM/FM (reception band) indication
AM/PM (morning/afternoon) indication
4 REMAIN (remaining time) indication
5 Numerical display of frequency, time, track
No., program No., etc.
6 TOTAL(total recording time) indication
7 AUTO (auto tuning) indication
8 TUNED (radio broadcast tuned) indication
9 STEREO (stereo broadcast reception)
indication
0 R·D·S (Radio Data System) indication,
PTY (Program Type Identification) indication
(For UK and Europe)
!
(sleep timer) indication
1
(timer 1) indication
2
(timer 2) indication
@ A.P.S. indication
Indication of automatic power saving status.
# Level indication
0
STEREO
R.D.S
kHz
MHz
9
PTY
!
1 2
@
A.P.S.
L
R
$
$ Character information display
Character information like the name of the received radio station (at the time of FM auto preset), CD title, etc. is displayed.
% PGM indication
Indication at the time of program playback.
RANDOM indication
Indication at the time of random playback.
MUTE indication
Indication at the time of mute (no sound).
N.B.1/N.B.2 indication
Indication when the N.B. (natural bass) function
is selected.
S.DIRECT indication
Indication when the source direct function is
ON.
^ Repeat mode indication
: Indication of one track repeat.
1
: Indication of all repeat
#
10 5 3 1 0 (–dB)
30
24
DIGITAL
Basic
Page 14
14
Remote control unit
POWER
3
1
2
456
1
2
3
4
5
6
7
789
0 +10
DISPLAY TIME CLEAR
TUNER/BAND
AUX
/TAPE
P.CALL
4¢7
¡
TUNING
1
DOWN
UP
SLEEP REPEAT
TIMER SOUND MUTE
DOWN UP
STOP
AUTO/MONO
RANDOM
/PTY
VOLUME
SET
ENTER
CD
6
P.MODE
/RDS DISP.
Basic
Infrared ray system
Model : RC-F0701 (For U.S.A. and Canada)
: RC-F0701E (For UK and Europe)
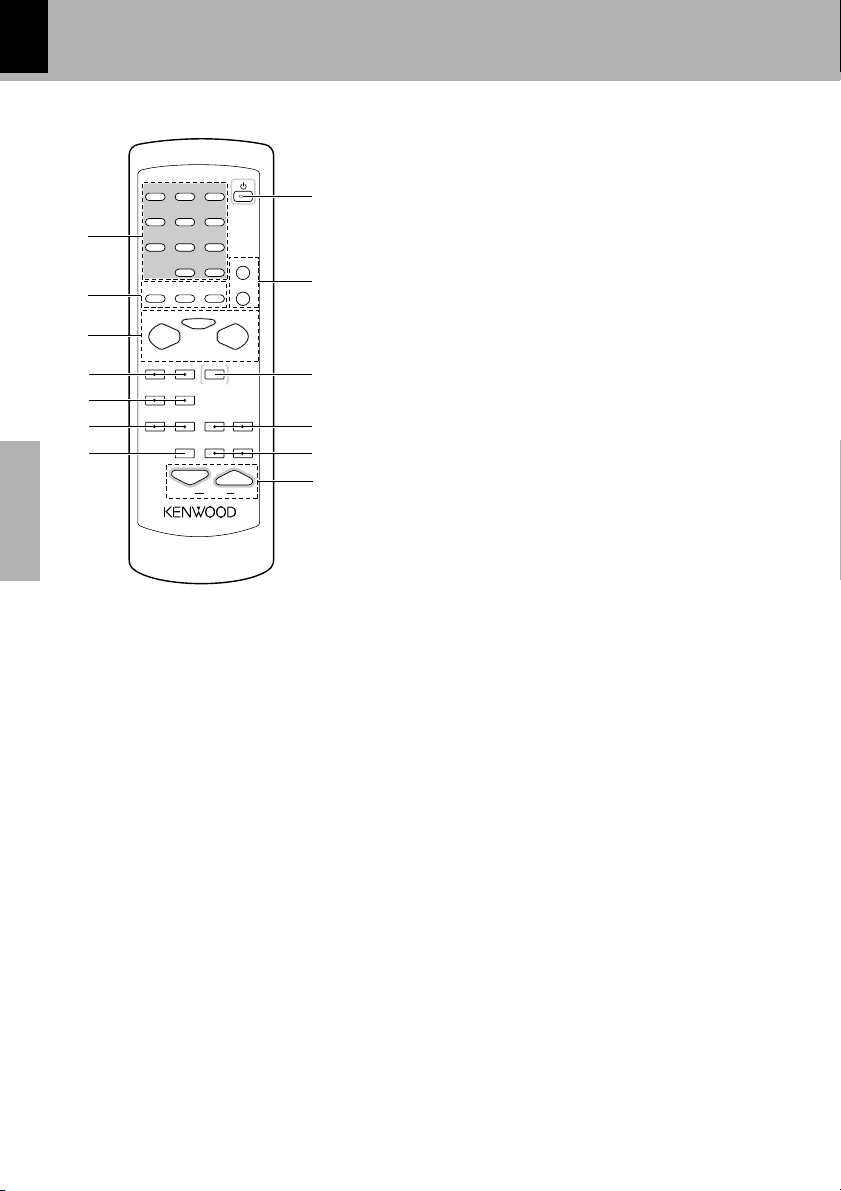
1 Numeric keys ¡¢
Used to select a CD track number or recall a preset station of the tuner.
2 DISPLAY key ¡
Used for display switching.
TIME key ¡
Used for time display switching.
CLEAR key ⁄
Used to delete a program.
3 Basic operation keys (input selectors, play/
pause)
CD 6 key )
TUNER/BAND key ™
AUX/TAPE key •
4 4 P.CALL ¢ keys ¡™
5 1 TUNING ¡ keys ¡¢
6 SLEEP key fl
Press to set the sleep timer
REPEAT key ¤
Press for setting repeated playback.
8
9
0
!
@
#
Controls and indicators
HD-7/EN
The keys on the remote control unit with the same names as on
the main unit have the same function as the keys on the main unit.
7 TIMER key ·
Used for execution and cancellation of the various timers.
8 POWER key ^
Press to set the unit to On or Standby.
9 SET key º
Used for programmsetting. At the time of
standby, used for clock display.
ENTER key £
Used for confirmation of setting.
0 7 STOP/AUTO/MONO key
CD :
Press to stop a disc. )
TUNER :
Used to switch AUTO tuning or MANUAL tuning (Monaural reception) ¢
Standby mode :
When this is pressed in standby mode, the
present time is displayed for 5 seconds.
! RANDOM/PTY key (For Europe and U.K.)
CD : ‹
Press for setting playback of tracks in a random order.
TUNER : §
Used at the time of PTY reception.
RANDOM key (For U.S.A. and Canada) ‹
Press for setting playback of tracks in a random
order.
P.MODE/RDS DISP. key (For Europe and U.K.)
CD : º
Press to program tracks in the desired sequence.
TUNER : ¶
Used at the time of RDS reception.
P.MODE key (For U.S.A. and Canada) º
Press to program tracks in the desired sequence.
@ SOUND key &
Press to switch the sound effect.
MUTE key &
Press to mute the audio temporarily.
# VOLUME keys ^
Press to adjust the volume.
Page 15

30˚
6m
30˚
Operation of remote control unit
Loading batteries
1 Remove the cover.
2 Insert batteries. 3 Close the cover.
÷ Insert two R6 ("AA"-size) batteries
following the polarity indications.
15
HD-7/EN
Operation
After plugging the power cord of this unit,
press the POWER (
trol unit to turn the system ON. When the system is turned ON, press the key of the function
to be operated.
÷ When pressing more than one remote control
keys successively, press the keys securely by
leaving an interval of 1 second or more between
keys.
÷ The provided batteries are intended for use in operation checking, and their service life may be short.
÷ When the remote controllable distance becomes short, replace both of the batteries with new ones.
÷ If direct sunlight or the light of a high-frequency fluorescent lamp (inverter type, etc.) is incident to the remote
sensor, malfunction may occur. In such a case, change the installation position to avoid malfunction.
) key of the remote con-
Operating range (approx.)
Remote sensor
Basic
Page 16

16
Basic use method
1
2
3
456
789
0+10
DISPLAY TIME CLEAR
TUNER/BAND
AUX
/TAPE
STOP
P.CALL
4¢7
AUTO/MONO
¡
TUNING
1
DOWN
UP
SLEEP REPEAT RANDOM P.MODE
SOUND
TIMER SOUND MUTE
DOWN UP
VOLUME
HD-7/EN
POWER
1
SET
ENTER
CD
2
6
MUTE
3
11
sound
22
II
33
Basic
Decrease
Increase
phones
source
direct
1 Power ON (OFF)
When the power is ON and the key is pressed, the power becomes OFF (standby).
It takes a little time from power OFF operation until the power is
switched off.
÷ For about five seconds after power ON, mute (no sound) status is
applied for circuit protection.
One-touch operation function
When one of the following keys is operated in power OFF (standby) condition, the power will be switched on, the source will be selected, and
playback will start in case of CD.
CD6 key, TUNER/BAND key, AUX/TAPE key.
2. Select the source to be listened to.
CD )
TUNER ™
AUX/TAPE ¢
* The source can also be selected by pressing TUNER/BAND, CD 6, or
AUX/TAPE on the remote control. (Playback will start automatically
when CD 6 is pressed.)
L
R
10 5310(–dB)
30
DIGITAL
3. Adjust the volume.
÷ Rapid turning produces a
large change in volume. (AI
VOLUME function)
÷ A guide value (0 to MAX) is shown on the display.
L
R
10 5 3 1 0 (–dB)
30
DIGITAL
Listening through headphone
÷ Insert the headphone plug into the headphone jack.
÷ The sound from all speakers are cut off.
÷ Turn the volume/multi control knob to adjust the volume.
÷ Lower the volume before you connect or disconnect plugs.
÷ Headphone with a stereo mini plug can be connected.
Page 17

Muting the sound temporarily
Remote control unit only
MUTE
Blinks
MUTE
Basic use method
HD-7/EN
÷ Press again to resume the original volume.
÷ This is also canceled when the volume is changed.
17
Adjust the left/right volume balance
Main unit only
1 Select "BALANCE" as follows.
1
2
3
2 Adjust the left/right volume balance with
the "volume/multi" control knob.
The right volume
decreases.
1 Press the "menu" key.
2 Select "BALANCE" with the
"volume/multi control" knob.
When the "volume/multi control "
knob is turned, switching is done
as follows.
"AUX INPUT ?"
"TONE ?"
"BALANCE ?"
"TIME ADJUST ?"
"TIMER SET ?"
"A.P.S. SET ?"
"DIMMER ?"
Return to the original status is
made when no operation is performed within 20 seconds.
2 Press the "set" key.
The left volume
decreases.
Listening to the original sound of the
source (source direct)
The sound from CD or another source can be heard
as faithful as possible to the original sound by not
passing it though the sound adjustment circuits
of this unit.
Main unit only
1 Press the "sound" key repeatedly to select
"S.DIRECT".
Each press switches the modes as follows.
"N.B.1"
"N.B.2"
* "TONE 1"
* "TONE 2"
* "TONE 3"
"SOURCE DIRECT"
"SOUND MODE OFF"
* "TONE 1(2,3)" is not displayed when "BASS"
and "TREBLE" both are set to "0".
÷ When source direct is selected, N.B1, N.B2,
and TONE1, TONE2, TONE3 are cancelled.
÷ To return to normal mode, press the "sound"
key repeatedly to select "SOUND MODE
OFF".
S.DIRECT
Lit
Basic
2 Press the "set" key.
Direct selection of the source direct function
Main unit only
S.DIRECT
Lit
÷ To return to normal mode,
press the "sound" key repeatedly to select "SOUND
MODE OFF".
Page 18

18
Adjusting the tone
TONE CONTROL
The low range (BASS) and the high range (TREBLE) each can be set to a desired level.
Three types of tone control can be set in advance.
Basic use method
HD-7/EN
TONE CONTROL setting
Main unit only
1 Select "TONE ?" as follows.
1
2
Basic
3
2 Select "TONE 1 ?" (or 2, 3) with the "vol-
ume/multi control" knob and press the
"set" key.
3 Adjust the level for the low range (BASS)
with the volume/multi control knob and
press the "set" key.
4 Adjust the level for the high range (TREBLE)
with the volume/multi control knob and
press the "set" key.
÷ When the setting has been completed, re-
turn to the original display is made after display of "COMPLETE".
1 Press the "menu" key.
2 Select "TONE ?" with the
"volume/multi control"
knob.
3 Press the "set" key.
Change is made in steps of 2
from -8 to +8.
Change is made in steps of 2
from -8 to +8.
L
R
L
R
10 5310(–dB)
30
10 5310(–dB)
30
Listening with use of TONE CONTROL
Select and set the desired tone control setting set
in advance.
Main unit only
1 Press the "sound" key repeatedly to select
"TONE 1", "TONE 2" or "TONE 3".
Each press switches the modes as follows.
DIGITAL
"N.B.1"
"N.B.2"
* "TONE 1"
* "TONE 2"
* "TONE 3"
"SOURCE DIRECT"
"SOUND MODE OFF"
* "TONE 1(2,3)" is not displayed when
"BASS" and "TREBLE" both are set to "0".
÷ To return to normal mode, press the "sound"
key repeatedly to select "SOUND MODE
OFF".
N.B. circuit (natural bass)
NB1 : The low range will be emphasized.
NB2 : The low range will be emphasized still further.
Main unit only
1 Press the "sound" key repeatedly to select
"N.B.1" or "N.B.2".
DIGITAL
DIGITAL
÷ To return to normal mode, press the "sound"
Each press switches the modes as follows.
"N.B.1"
"N.B.2"
* "TONE 1"
* "TONE 2"
* "TONE 3"
"SOURCE DIRECT"
"SOUND MODE OFF"
* "TONE 1(2,3)" is not displayed when
"BASS" and "TREBLE" both are set to "0".
key repeatedly to select "SOUND MODE
OFF".
Page 19

Basic use method
HD-7/EN
19
Basic
Page 20

20
Playback of CD
HD-7/EN
Basic
1
456
¡
789
DISPLAY TIME CLEAR
AUX
/TAPE
P.CALL
4¢7
TUNING
1
DOWN
SLEEP REPEAT RANDOM P.MODE
DISPLAY
/CHARAC
4¢
P.CALL
TUNING
1
3
2
0 +10
TUNER/BAND
STOP
AUTO/MONO
¡
UP
TIMER SOUND MUTE
DOWN UP
VOLUME
POWER
SET
SET
ENTER
CD
2
CD6
6
7STOP
1. Load a disc.
1 Open the CD tray.
2 Place a disc.
3 Close the CD tray.
÷ Always press the 0 key to close the
÷ Do not touch the played side of disc.
÷ Be sure to place a disc horizontally.
CD6
22
II
stop7 display
Label side
CD tray.
Placing it with an inclination will result
in malfunction.
4¢
P.CALL
set
11
Recess for
single CD (8 cm)
2. Start playback.
÷ After a few seconds, play
starts from track No.1.
To pause playbackTo stop playback
Playback
indication
Elapsed time of
track being played
Track No. being played
Lit
÷ Each press pauses and plays the CD
alternately.
L
R
10 5 3 1 0 (–dB)
30
Level
indication
DIGITAL
Page 21

To fast forward and backward
Remote controlMain unit
tuning
1
DOWN UP
TUNING
¡
÷ Press and hold one of the keys during play-
back. Normal playback resumes at the point
where the key is released.
Playback from desired track
Remote control unit only
Select the desired track No.
0 +10
3
Press the numeric keys as
shown below....
To select track No. 23
+10 +10 3
:
To select track No. 30
+10 +10
:
,,
+10 0
,,
,
12
456
789
Playback of CD
HD-7/EN
Skipping tracks
Remote controlMain unit
4¢
P.CALL
÷ The track in the direction of the key pressed
is skipped, and the selected track will be
played from the beginning.
÷ When the 4 key is pressed once during
playback, the track being played will be
played from the beginning.
÷ To skip further to a track located before the
current track, press the 4 key quickly.
21
Basic
In regard to display of the CD time
Each time the "TIME/SPACE" key is pressed
during CD playback, the time display on the
display is switched.
Remote control unit only
TIME
1 Elapsed time of the track
: 1:23
2 Remaining time of the track
: REMAIN display 2:37
3 Total elapsed time of the disc
: TOTAL display 23:50
4 Total remaining time of the disc
:REMAIN TOTAL display 36:50
÷ Only 1 and 2 are displayed during random
playback and single track repeat.
÷ At the time of program playback, 4 be-
comes the display of the total time for the
programmed tracks.
In regard to title display
When a disc conforming to CD TEXT is played
and the display key is pressed during CD
playback (or during stop), the character information recorded on the CD can be displayed
on the display. Each time the display key is
pressed, switching is done between the following items.
Remote controlMain unit
DISPLAY
→Track No. → Track title
Disc title
*1
The disc title is displayed during stop.
The track title is scrolled during playback.
*1
*1
Page 22

22
Receiving broadcast station
POWER
3
1
2
456
789
SET
3
0 +10
DISPLAY TIME CLEAR
TUNER/BAND
AUX
/TAPE
STOP
4¢7
P.CALL
AUTO/MONO
¡
TUNING
1
DOWN
UP
SLEEP REPEAT RANDOM P.MODE
TIMER SOUND MUTE
DOWN UP
VOLUME
ENTER
ENTER
CD
1
6
AUTO/MONO
DISPLAY
/CHARAC
4¢
P.CALL
¡
TUNING
1
11
4¢
P.CALL
33
II
HD-7/EN
Basic
1
TUNING
¡
display
1. Select the tuner input.
Each press of the TUNER/band key switches the band as follows.
FM
AM
2. Preset a radio station in memory.
Collective presetting of stations £
Follow the procedure in "Collective presetting of stations" to preset
automatically the tunable radio stations in your area.
÷ Once the stations are stored by auto presetting, you are not required
to repeat this procedure the next time you listen to radio. However
when you shift to another location whereby the broadcast station
frequencies are different, you will have to re-execute the presetting
of stations.
One-by-one presetting (Manual preset) ¢
A station can also be tuned even when it is not preset. For details,
read "Tuning to a non-preset radio station (Auto tuning, Manual
tuning)".
3. Tuning (Preset Call)
÷ If radio stations have al-
ready been stored with
auto presetting or manual
presetting, select a station
using the 4, ¢ key.
Each press of the same
key switches the preset
stations in sequence.
When ¢ is pressed : 1=2=3 ... 38=39=40=1...
When 4 is pressed : 40 = 39 = 38 ..... 3 = 2 = 1 = 40.....
÷ When a key is held depressed, preset stations will be skipped at an inter-
val of about 0.5 second.
÷ To select a preset station from the remote, use the 4 P.CALL ¢ key
or numeric keys.
Auto tuning
indication
Tuned
indication
AUTO
FM
Stereo broadcast
reception indication
TUNED
STEREO
MHz
L
R
10 5310(–dB)
30
DIGITAL
Page 23

Collective presetting of stations
AUTO PRESET ........ For U.S.A. and Canada
AUTO MEMORY ..... For U.K. and Europe
Remote control unit only
1 Select the tuner input.
TUNER/BAND
Receiving broadcast station
HD-7/EN
23
2 Press the "ENTER" key for more than 2 sec-
onds
ENTER
AUTO
FM
MHz
STEREO
L
R
10 5310(–dB)
30
÷ A maximum of 40 stations of the band presently
being received will be preset.
÷ When there are many stations and the intended
station has not been preset, please also use
"One-by-one presetting (Manual preset)".
Channel space setting
The space between radio channels has been set to the one that prevails in the area to which the system is shipped.
However, if the current channel space setting does not match the setting in the area where the system is to be
used, for instance when you move from area 1 or area 2 shown in the following table or vice versa, proper reception of AM/FM broadcasts cannot be expected. In this case, change the channel space setting in accordance with
your area by referring to the following table.
Main unit only
1 Select the tuner input.
2 Press the "stop 7" key for more than 2sec-
onds.
Each press the "stop 7" key for more than 2 seconds switches the modes as follows.
1 FM 50 k
2 FM 100 k
÷ At FM 50 kHz, the corresponding AM frequency is
9 kHz.
At FM 100 kHz, the corresponding AM frequency
is 10 kHz.
Basic
Area
USA, Canada and South
1
American countries
2
Other countries
CHANNEL
Space Frequency
FM: 100 kHz
AM: 10 kHz
FM: 50 kHz
AM: 9 kHz
Page 24

24
Tuning to a non-preset radio station (Auto tuning, Manual tuning)
Select the tuning mode according to the radio
wave receiving condition.
When the receiving condition is good:
AUTO mode
When it is poor due to weak radio waves:
MANUAL mode
Receiving broadcast station
HD-7/EN
1 Press the " 7 STOP (AUTO/MONO)" key
during TUNER input.
Remote controlMain unit
STOP
7
AUTO/MONO
2 Tune a station.
tuning
1
DOWN UP
TUNING
¡
Basic
One-by-one presetting (Manual preset)
Remote control unit only
1 Perform the procedure in "Tuning to a non-
preset radio station (Auto tuning, Manual
tuning)" to receive the station to be preset.
2 Press the ENTER key during reception.
ENTER
Each press alternates the mode.
1 "AUTO" : Stereo reception
2 "MANUAL" : Monaural reception
÷ In MANUAL mode, FM stations are received
in monaural.
In AUTO mode :
The next preset station can be received automatically every time the TUNING (1 or ¡) key is
pressed.
In MANUAL mode :
Press the TUNING (1 or ¡) key repeatedly until
the desired station is received. The desired station
can also be received by holding the TUNING (1 or
¡) key depressed until its frequency is displayed.
÷ A maximum of 40 stations of the band presently
being received will be preset.
3 Select one of the preset numbers from 1 to 40.
3
or
12
456
789
0 +10
4¢
P.CALL
4 Press the ENTER key again.
(Repeat steps 1, 2, 3 and 4 to preset other
stations)
÷ If several stations are preset under the same num-
ber, the previous memory is replaced with the latest
memory contents.
Page 25

RDS (Radio Data System)
(For U.K. and Europe)
HD-7/EN
RDS is a system which transmits useful information (digital data) for FM broadcasts together with the broadcast signal. Tuners and receivers designed for RDS reception can extract the information from the broadcast signal for use with various functions such as automatic display of the station name.
This unit is equipped with the following functions utilizing RDS data :
PTY (Program Type Identification) Search :
§
The tuner automatically searches for a station which is
currently broadcasting a specified program type
(genre).
FM
TUNED
L
STEREO
R
PTY
R·D·S
MHz
10 5310(–dB)
30
25
PS (Program Service Name) Display :
When an RDS broadcast is received, the station
÷ Some functions may not be provided or be given
different names depending on countries or areas.
name is automatically displayed.
Before using RDS
For reception of RDS stations, the auto memory function must be used to preset the stations. During
the auto memory function, the presetting sequence priority will be given to the RDS stations.
Basic
Page 26

26
RDS (Radio Data System) (For U.K. and Europe)
Searching for a desired program type (PTY search)
By specifying the type of program (genre) you want to listen to, the tuner automatically searches for a
station which is currently broadcasting a program of the specified type.
However, if a station is not preset by auto memory, "NO DATA" will light instead of the program (genre)
type and PTY search is not available.
HD-7/EN
Set the reception band to FM. Preset RDS stations with the auto memory function.
1. Select the PTY search mode.
Remote control unit only
RANDOM
/PTY
When an RDS broadcast is received, the program
type is shown on the display. If no PTY data is
available, or if the station is not an RDS station,
"NONE" is displayed.
2. Select the desired program type.
Basic
Use program type table on the right for your convenience.
Selection with the 4 or ¢ key.
4¢
P.CALL
Select while "PTY" is lit.
The desired program type can be selected
with the 4 or ¢ key from 29 types. Press
the key and release it when the desired type is
displayed.
Program type table
4, ¢ keys
4
DOWN
UP
¢
Program Type Name Display
Pop Music
Rock Music
Easy Listening Music
Light Classical
Serious Classical
Other Music
News
Current Affairs
Information
Sport
Education
Drama
Culture
Science
Varied
Weather
Finance
Children's programs
Social Affairs
Religion
Phone In
Travel
Leisure
Jazz Music
Country Music
National Music
Oldies Music
Folk Music
Documentary
¢
Lit
TUNED
FM
R·D·S
MHz
STEREO
PTY
L
R
10 5310(–dB)
30
POP M
ROCK M
EASY M
LIGHT M
CLASSICS
OTHER M
NEWS
AFFAIRS
INFO
SPORT
EDUCATE
DRAMA
CULTURE
SCIENCE
VARIED
WEATHER
FINANCE
CHILDREN
SOCIAL
RELIGION
PHONE IN
TRAVEL
LEISURE
JAZZ
COUNTRY
NATION M
OLDIES
FOLK M
DOCUMENT
Page 27

3. Start the search.
RANDOM
/PTY
RDS (Radio Data System) (For U.K. and Europe)
When searching for a Rock Music broadcast
Display while the tuner is searching.
Lit
TUNED
FM
R·D·S
MHz
Program type name display.
STEREO
L
R
PTY
10 5310(–dB)
30
27
HD-7/EN
÷ No sound is heard while "PTY" is blinking.
÷ If a program of the desired type cannot be found,
"NO PROG" is displayed, then after several seconds
the display returns to the original display.
÷ If a program of the desired type is found, that pro-
gram is received and the program type name display
changes to the station name display.
To change to a different program type :
Repeat steps 1., 2., 3.
Using the RDS display function
Remote control unit only
Press the P.MODE/RDS DISP. key
P.MODE
/RDS DISP.
When a station is received.
Goes off
FM
TUNED
R·D·S
MHz
Station name display.
Each press alternates the mode.
1 PS display
2 Preset number display
STEREO
L
R
PTY
10 5310(–dB)
30
Basic
Page 28

28
DOWN UP
VOLUME
1
POWER
2
456
789
0 +10
3
SET
ENTER
DISPLAY TIME CLEAR
TUNER/BAND
AUX
/TAPE
CD
6
1
¡
4¢7
P.CALL
TUNING
DOWN
SLEEP REPEAT RANDOM P.MODE
TIMER SOUND MUTE
UP
STOP
AUTO/MONO
II
11
22
1,2
menu
set
volume/multi control
44
VOLUME
Listening to an AUX/TAPE input source
1. Press the AUX/TAPE key.
When the AUX/TAPE key is pressed, the unit switches to external input or tape.
Basic
2. Select external input or tape.
When the AUX/TAPE key is pressed for at least two seconds, the
input is switched as follows.
1 AUX : Playback of the equipment connected to the
2 TAPE : Playback of the equipment connected to the
AUX terminal at the rear.
TAPE terminal at the rear.
HD-7/EN
3. Start playback of the external source.
4. Adjust the volume.
Adjustment of the input level at the time of AUX selection
When the output level of the source equipment connected to the AUX terminal does not match the input
level of this unit (when the volume is too high or too low), it can be adjusted.
1 Select "AUX INPUT ?" as follows.
1 Press the "menu" key.
2 Select "AUX INPUT ?" with the volume/
multi control knob.
3 Press the "set" key.
2 Adjust the input level with the volume/
multi control knob.
The input level can be adjusted from -5 to +2.
3 Press the "set" key to confirm the input
level.
Page 29

Listening to an AUX/TAPE input source
HD-7/EN
29
Basic
Page 30

30
Various CD playback features
Listening to the desired sequence (program playback)
It is possible to listen to selected tracks from a disc in the desired order. (Max. 32 tracks)
Set the source CD in advance to stop status.
)
Remote control unit only
1 Press the "P.MODE" key
P.MODE
2 Pres the numeric keys or the
4, ¢ key to select the track.
12
456
789
3
0 +10
÷ "PGM" will light and PGM
mode will be reached.
PGM
PGM
÷ Return to the original status is made when
no operation is performed within 20 seconds.
L
R
L
R
HD-7/EN
Lit
PGM
10 5 3 1 0 (–dB)
30
10 5310(–dB)
30
DIGITAL
DIGITAL
Application
3 Press the "SET" key to confirm
the selected track.
SET
4 Repeat the steps 2 to 3 to con-
tinue programming.
5 Press the CD 6 key to start
program playback.
CD
6
÷ When no operation is performed for some
time after confirmation, program stop status
will be reached. To continue programming,
follow the procedure for "To add a track to an
existing program".
L
R
10 5310(–dB)
PGM
30
DIGITAL
÷ Up to 32 tracks can be programed. When
"PGM FULL" is displayed, no more tracks
can be programed.
÷ If you made a mistake, press the CLEAR key
and enter the track No. again.
÷ When a track No. is entered, the track will be
added to the end of the existing program.
÷ Tracks will be played in the order they were
programed (following the program numbers).
÷ When the "REPEAT" key is pressed during
PGM mode playback or stop, the PGM mode
playback can be repeated.
Page 31

To add a track to an existing program
Remote control unit only
Press in stop mode
1 Select the track number to be
added with the numeric keys.
3
12
456
789
0 +10
2 Press the "SET" key.
SET
Various CD playback features
HD-7/EN
÷ Up to 32 tracks can be programed. When
"PGM FULL" is displayed, no more tracks
can be programed.
÷ If you made a mistake, press the CLEAR key
and enter the track No. again.
÷ When a track No. is entered, the track will be
added to the end of the existing program.
31
To clear a programed track
Remote control unit only
Press in stop mode
CLEAR
÷ Each time the key is pressed, the last track
in the program is cleared.
Changing to the next track during playback of a track
Remote controlMain unit
4¢
P.CALL
÷ When the ¢ key is pressed during play-
back, play will skip to the next track in the
program.
÷ When the 4 key is pressed once during
playback, the track being played will be
played from the beginning.
To clear the entire program
Remote control unit only
Press in stop mode
P.MODE
Confirmation of the contents of the programmed tracks
Press the 4, ¢ keys after completion of
programming.
Press in stop mode
Remote controlMain unit
4¢
P.CALL
÷ Each time a key is pressed, the programmed
tracks will be displayed sequentially.
Application
Page 32

32
1
Repeated playback
You can repeatedly listen to a favorite track or disc.
1 track repeat ............ The selected track will be repeated.
All repeat ................... The entire disc will be repeated.
Set the source CD in advance to stop status.
)
Press the "REPEAT" key ("repeat" key) during
playback or stop.
Remote controlMain unit
REPEAT
Various CD playback features
HD-7/EN
Each press switches the repeat mode.
1 Off : .......... Repeat deactivated
One track repeat
2 "
3 "
÷ To cancel repeat mode, press the "REPEAT"
key ("repeat" key) repeatedly to make the repeat indication disappear.
" : ..
1
All repeat
" :......
Repeat mode
indication
Changing to the next track during playback of a track
Remote controlMain unit
4¢
Application
÷ When the ¢ key is pressed during play-
back, play will skip to the next track.
÷ When the 4 key is pressed once during
playback, the track being played will be
played from the beginning.
P.CALL
Repeat playback of programmed tracks
1 Perform programming. º
2 Press the "REPEAT" key.
REPEAT
Each press switches the repeat mode.
1 Program repeat ON.
2 Program repeat OFF.
Page 33

Listening in random order (random mode)
The tracks can be played back in random order.
Set the source CD in advance to stop status.
)
Press the "random" key ("RANDOM key) during playback or stop.
Remote controlMain unit
Each press switches the mode.
1 "RANDOM" off ......Normal playback
2 "RANDOM" lid ...... Random playback
Various CD playback features
HD-7/EN
33
RANDOM
Changing to the next track during playback of a track
Remote controlMain unit
4¢
P.CALL
÷ When the ¢ key is pressed during play-
back, the next track will be selected at random and will be played.
÷ When the 4 key is pressed once during
playback, the track being played will be
played from the beginning.
DISC
Random mode
indication
÷ To cancel random mode, press the "random"
key ("RANDOM key) to make the RANDOM
indication disappear.
RANDOM
Repeated random playback
1 Perform the operation for random play-
back.
2 Press the "REPEAT" key.
REPEAT
Each press switches the repeat mode.
1 Random repeat ON.
2 Random repeat OFF.
Application
Page 34

34
Setting auto power save (A.P.S.)
When the auto power save function is set to ON,
the power is switched off (standby) automatically
when about 30 minutes without any operation
have passed after the end of CD playback.
Various CD playback features
HD-7/EN
Adjusting the brightness of the
display part (DIMMER)
When the display is felt to be too bright or too dim
at night etc., the brightness can be adjusted.
1 Select "A.P.S, SET ?" as follows.
1
1 Press the "menu" key.
2 Select "A.P.S, SET ?" with
the "volume/multi control"
knob.
2
When the "volume/multi control"
knob is turned, switching is done
as follows.
"AUX INPUT ?"
"TONE ?"
3
"BALANCE ?"
"TIME ADJUST ?"
"TIMER SET ?"
"A.P.S. SET ?"
"DIMMER ?"
Return to the original status is
made when no operation is performed within 20 seconds.
3 Press the "set" key.
2 Turn the "volume/multi control" knob to
select ON or OFF and press the "set" key.
OFF
Application
ON
Lit when ON
A.P.S.
1 Select "DIMMER ?" as follows.
1
1 Press the "menu" key.
2 Select "DIMMER ?" with the
"volume/multi control" knob.
2
When the "volume/multi control
knob" is turned, switching is done
as follows.
"AUX INPUT ?"
"TONE ?"
"BALANCE ?"
3
"TIME ADJUST ?"
"TIMER SET ?"
"A.P.S. SET ?"
"DIMMER ?"
Return to the original status is
made when no operation is performed within 20 seconds.
3 Press the "set" key.
2 Turn the "volume/multi control" knob to
select the desired brightness and press the
"set" key.
Darker
Brighter
Auto power save operates when there is no operation for about 30 minutes after the following
events.
When the input is CD
During stop
When the input is tuner, tape, or external input
When the volume/multi control level
is the minimum level or mute.
L
R
10 5 3 1 0 (–dB)
30
DIGITAL
When the brightness has been
increased
L
R
10 5 3 1 0 (–dB)
30
DIGITAL
When the brightness has been
decreased
÷ Adjustment is not possible when the power
is off.
Page 35

Clock adjustment
As the clock is not only used to show the time of
the day but also used in timer operations, be sure
to set the clock in advance.
Main unit only
1 Select "TIME ADJUST ?" as follows.
1
2
3
2 Turn the "volume/multi control" knob to
select "12H ?" (12-hour display) or "24H ?"
(24-hour display) and press the "set" key.
1 Press the "menu" key.
2 Select "TIME ADJUST ?"
with the "volume/multi control" knob.
"AUX INPUT ?"
"TONE ?"
"BALANCE ?"
"TIME ADJUST ?"
"TIMER SET ?"
"A.P.S. SET ?"
"DIMMER ?"
Return to the original status is
made when no operation is performed within 20 seconds.
HD-7/EN
If you have made a mistake during the setting,
start again from step 1.
L
R
10 5 3 1 0 (–dB)
L
R
30
10 5310(–dB)
30
DIGITAL
AM
AM
35
3 Turn the "volume/multi control" knob to
adjust the "hour" setting.
When "hour" has set, press the "set" key.
4 Turn the "volume/multi control" knob to
adjust the "minute" setting.
When "minute" has set, press the "set"
key.
L
R
10 5310(–dB)
30
L
R
10 5310(–dB)
30
÷ When the "set" key in step 4 is pressed with
a time signal, accurate setting can be made.
Application
Page 36

36
Timer operation
Sleep timer (SLEEP)
The unit is turned OFF automatically after the
specified period has elapsed.
Timer playback
(PROG. 1, PROG. 2)
Playback of the selected input source of the CD,
TUNER or AUX input starts at the specified time.
‡
AI timer playback (PROG. 1, PROG. 2)
When timer playback starts, the volume level increases gradually until the set volume level is
reached.
Sleep timer (SLEEP)
Set the number of minutes after which the unit is
to be turned OFF.
Remote control unit only
Press the "SLEEP" key during CD playback,
tuner reception, etc.
‡
HD-7/EN
Adjust the clock before setting the timer fi
L
R
10 5310(–dB)
30
SLEEP
÷ The unit is turned OFF automatically af-
Application
ter the set time has elapsed.
To cancel
Turn the unit OFF or press the SLEEP key until
the sleep timer is canceled.
When the power fails or the plug of the power cable is disconnected from the receptacle during
power off (standby) after timer setting, the standby/timer indicator will flash green. In this
case, repeat the time setting.
÷ Each press increases the timer period by 10
minutes. The sleep timer can be set up to 90
minutes.
=10 = 20 = 30 ..... 70 = 80 = 90 = Cancel
The system has been set up so that the display
is dimmed automatically while the sleep timer
is activated.
Page 37

Timer operation
HD-7/EN
Setting the timer program (PROG. TIMER)
In each of PROG.1 and PROG.2, the timer data including the operating period and played contents can be
program and set to be activated or deactivated.
37
÷ Two timer settings can be reserved inde-
pendently in two programs PROG.1 and
PROG.2.
÷ Please make reservations with an interval of
at least one minute, so that the operation
times of PROG.1 and PROG.2 do not overlap.
1. Make preparations for the play.
Insert a disc.
(Program playback is not possible.)
)
The station should be preset
prior.
™
2. Set the timer setting program number.
Main unit only
1 Press the "menu" key.
2 Turn the "volume/multi control" knob and
select "TIMER SET?".
Press the "set" key to confirm.
3 Turn the "volume/multi control" knob and
select "PROG.1 SET (or 2)".
Press the "set" key to confirm.
3. Select EVERYDAY or ONETIME execution of the programed timer.
1 Turn the "volume/multi control" knob and
select "EVERYDAY" or "ONE TIME".
Press the "set" key to confirm.
Adjust the clock before setting the timer fi
Playing the auxiliary input sourceTo listen to radioTo listen to CD
Make timer setting of the component connected to the AUX/
TAPE input jacks.
•
1 2
1
1
REC
L
R
10 5310(–dB)
30
L
R
10 5310(–dB)
30
L
R
10 5310(–dB)
30
Application
4. Set the ON time.
1 Turn the "volume/multi control" knob to
adjust the "hour" setting.
When "hour" has set, press the "set" key.
2 Turn the "volume/multi control" knob to
adjust the "minute" setting.
When "minute" has set, press the "set" key.
L
1
R
10 5310(–dB)
30
L
1
R
10 5310(–dB)
30
Page 38

38
5. Set the OFF time.
1 Turn the "volume/multi control" knob to
adjust the "hour" setting.
When "hour" has set, press the "set" key.
2 Turn the "volume/multi control" knob to
adjust the "minute" setting.
When "minute" has set, press the "set" key.
Timer operation
HD-7/EN
6. Select "PLAY" or "AI PLAY".
1 Turn the "volume/multi control" knob and
select "PLAY" or "AI PLAY".
Press the "set" key to confirm.
7. Make the desired reservation
1 Turn the "volume/multi control" knob to
select the volume at the time of timer ON.
Press the "set" key to confirm.
2 Turn the "volume/multi control" knob to
select the source to be play,
Press the "set" key to confirm.
Application
3 When TUNER has been selected, turn the
"volume/multi control" knob to select the
preset number and press the "set" key to
confirm.
L
1
R
10 5 3 1 0 (–dB)
30
1 "PLAY" : (Timer play)
2 "AI PLAY" : (Timer play with gradually in-
creasing volume)
1 "TUNER" : (Broadcasts)
2 "CD"
3 "AUX" : (External input / video, etc.)
4 "TAPE"
4 Press the "set" key to confirm the source.
Timer setting will be completed and
"COMPLETE" will be displayed.
L
1
R
10 5310(–dB)
30
Continued on next page
Page 39

8. Put the unit in standby mode.
When the timer setting has been completed,
confirm that the power is off (standby).
Setting the PROG. timer again to the
same contents
Timer operation
HD-7/EN
÷ The standby/timer indicator lights green.
÷ The SLEEP timer cannot be used when the
timer function is being used for playback.
÷ When the time has not been set, the timer
function cannot be used.
÷ The timer function will not operate when the
same time is set for the ON time and the OFF
time.
39
Press the TIMER key on the remote control and
light "
1
Remote control unit only
", "
2
", or "21".
TIMER
÷ The PROG. contents set last will be executed.
÷ Make the preparations for CD.
When timer operation is not desired
While the power is on, press the TIMER key on
the remote control to extinguish "
Remote control unit only
TIMER
When the power fails or the plug of the power cable is disconnected from the receptacle during power off
(standby) after timer setting, the standby/timer indicator will flash green. In this case, repeat the time setting.
".
÷ The PROG. contents will be kept as long as
no resetting is done.
Application
Page 40

40
Important Items
Maintenance
HD-7/EN
Maintenance of the unit
When the front panel or case becomes dirty, wipe with
a soft, dry cloth. Do not use thinner, benzine, alcohol,
etc. for these agents may cause discoloration.
Reference
Caution on condensation
Condensation (of dew) may occur inside the unit when
there is a great difference in temperature between this
unit and the outside.
This unit may not function properly if condensation occurs. In this case, leave the unit for a few hours and
restart the operation after the condensation has dried
up.
Be specially cautious against condensation in a following circumstances:
When this unit is carried from one place to another
across a large difference in temperature, when the humidity in the room where this unit is installed increases, etc.
Note related to transportation and movement
Before transporting or moving this unit, carry out
the following operations.
1 Remove the CD from the unit.
2 Press the CD 6 key.
In regard to contact cleaner
Do not use contact cleaners because it could cause a
malfunction. Be specially careful not to use contact
cleaners containing oil, for they may deform the
plastic component.
Memory backup function
Stored contents which are cleared immediately
when power plug is unplugged from power outlet :
Clock display
N.B. function
Stored contents which will back-up after power
plug is unplugged from power outlet:
State of power (on or standby), A, P, S, Last input
selection, AUX level, Volume control value, Balance
control, Receiving band, Frequency, Preset station,
Program Timer, TONE
3 Wait for some time and verify that the dis-
play appears as above.
4 Wait a few seconds and turn the unit OFF.
Knowledge
Page 41

Important Items
HD-7/EN
41
Disc handling precautions
Handling
Hold the disc so that you do not touch
the playing surface.
Label side
Playing side
Sticker
Do not attach paper or tape to either
the playing side or the label side of the
disc.
Sticky paste
Cleaning
If there are fingerprint marks or foreign
matter found on the disc, lightly wipe
the disc with a soft cotton cloth (or similar) from the center of the disc outwards
in a radial manner.
Storage
When a disc is not to be played for a long period of
time, remove it from the player and store it in its case.
Never play a cracked or warped disc
During playback, the disc rotates at high speed in the
player. Therefore, to avoid danger, never use a
cracked or deformed disc or a disc repaired with tape
or adhesive agent. Please do not use discs which are
not round because they may cause malfunction.
Discs which can be played with this unit
CD (12 cm, 8 cm), CD-R, CD-RW, and the audio part of
CDV, CD-G, CD-EG and CD-EXTRA. Use discs that
comply with the IEC standard, for example a disc car-
rying the
marking on the label surface.
Disc accessories
The disc accessories (stabilizer, protection sheet, protection ring, etc.) which are marketed for improving
the sound quality or protecting discs as well as the
disc cleaner should not be used with this system because they may cause malfunction.
Knowledge
Page 42

42
In case of difficulty
What seems to be a malfunction is not always so. Before calling for service, check the following table
according to the symptom of your trouble.
Operation to reset
The microcomputer may fall into malfunction (impossibility to operate, erroneous display, etc.) when the
power cord is unplugged while unit is ON or due to an
external factor. In this case, execute the following procedure to reset the microcomputer and return it to normal condition.
÷ Please note that resetting the microcomputer
clears the contents stored in and it returns to condition when it left the factory.
Unplug the power cord from the power outlet, then
while holding the set key on the main unit depressed,
plug the power cord again.
Amplifier section/Speakers
RemedyCauseSymptom
Sound is not produced.
The "standby/timer" indicator blinks in
red and no sound is output.
The "standby/timer" indicator blinks in
green.
No sound from the headphones.
Sound is not produced from the left or
right speakers.
Power is suddenly interrupted.
The clock display blinks without changing the figures.
Timer operation is not possible.
Knowledge
÷ The speaker cords are disconnected.
÷ The volume control of this set is not ad-
justed properly.
÷ The MUTE switch of remote control unit is
switched ON.
÷ The headphone plug is inserted into the
jack.
÷ The speaker cord is short-circuited.
÷ There was a power failure.
÷ The power cord was unplugged from the
outlet.
÷ The headphone plug is inserted incom-
pletely.
÷ The speaker cords are disconnected.
÷ Left/right volume balance is not adjusted
properly.
÷ The A.P.S. function is activated
÷ The power plug was unplugged from the
outlet while the power switch was ON, or
there was a power failure.
÷ The present time has not been adjusted or
there was a power failure.
÷ The timer ON time and OFF time have not
been set.
÷ The same setting is used for the timer ON
time and the timer OFF time.
÷ The timer execution was not set up.
÷ Connect properly referring to “System con-
nection”.
÷ Set the sound volume to an appropriate
÷ Switch MUTE OFF.
÷ Unplug the headphone plug.
÷ Turn power off and re-connect the speaker
cord.
÷ Adjust the present time again.
÷ Adjust the present time again.
÷ Insert correctly.
÷ Connect properly referring to “System con-
nection”.
÷ Adjust the left/right volume balance.
÷ Cancel the A.P.S. function.
÷ Adjust the present time referring to “Clock
adjustment”.
÷ Adjust the present time referring to “Clock
adjustment”.
÷ Set the timer ON time and OFF time.
÷ Set the timer OFF time later than the timer
ON time.
÷ Refer to "Setting the timer program (PROG.
TIMER)" and select "ON" for "PROG. 1" or
"PROG. 2".
HD-7/EN
8
&
^
9
fi
fi
^
8
&
›
fi
fi
‡
‡
‡
Page 43

Tuner section
Symptom
Radio stations cannot be received.
Noise interferes.
A station has been preset but it cannot be received by pressing the P.CALL
key.
CD player
A CD is placed in the player but it cannot be played.
Sound is not produced.
Sound skips.
Remote control unit
Symptom
Remote control operation is not possible.
Cause Remedy
÷ The antennas have not been connected.
÷ A proper broadcasting band has not been
selected.
÷ The frequency of the station to be received
is not tuned.
÷ The space between radio channels is not
suitable for the area where you live.
÷ Car ignition noise.
÷ Influence of an electric appliance.
÷ A TV set is installed near the system.
÷ The frequency of the preset station is not
tunable.
÷ The preset memory has been cleared be-
cause the power cord has been unplugged
for a long period.
÷ The disc is placed upside down.
÷ The disc position is displaced.
÷ The disc is extremely dirty.
÷ The disc is scratched.
÷ Dew is condensed on the optics lens.
÷ The disc has not been placed.
÷ The player is not put to the play mode.
÷ The disc is extremely dirty.
÷ The disc is scratched.
÷ The disc is dirty.
÷ The disc is scratched.
÷ The player is subject to vibration.
Cause Remedy
÷ Batteries are exhausted.
÷ The remote control is too far away from the
system, the controlling angle is deviated or
there is an obstacle in between.
÷ There is no CD set in the component to be
played.
In case of difficulty
÷ Connect antennas.
÷ Select a band.
÷ Tune to the frequency of the desired sta-
tion.
÷ Refer to "Channel space setting" and reset
the channel space.
÷ Install the outdoor antenna in an apart posi-
tion from the road.
÷ Switch the suspected electric appliance OFF.
÷ Install the TV or the system at an increased
distance between them.
÷ Preset stations with tunable frequencies.
÷ Preset stations again.
RemedyCauseSymptom
÷ Place the disc properly, with the label side
facing upward.
÷ Place the disc properly.
÷ Clean the disc referring to “Disc handling
precautions”.
÷ Try another disc.
÷ Refer to “Caution on condensation” and
remove the condensation by evaporation.
÷ Place a disc in the CD player.
÷ Press the CD 6 key.
÷ Clean the disc referring to “Disc handling
precautions”.
÷ Try another disc.
÷ Clean the disc referring to “Disc handling
precautions”.
÷ Try another disc.
÷ Install the unit in a place not subject to
vibrations.
÷ Replace with new batteries.
÷ Operate the unit inside the remote control-
lable range.
÷ Set a CD in the component to be played.
HD-7/EN
8
™
™
£
9
£
£
)
)
q
‚
)
)
q
q
%
%
)
43
Knowledge
For the U.S.A.
Note to CATV system installer
This reminder is provided to call the CATV system installer's attention to Article 820-40 of the NEC
that provides guidelines for proper grounding and, in particular, specifies that the cable ground shall
be connected to the grounding system of the building, as close to the point of cable entry as practical.
Page 44

44
Specifications
Main unit
HD-7/EN
[Amplifier section]
(For U.S.A. and Canada)
Rated output power during STEREO operation (FTC)
22 watts per channel minimum RMS, both channels driven, at 6 Ω from 40 Hz to 20 kHz with no
more than 0.7% total harmonic distortion.
(For U.K. and Europe)
Effective output power during STEREO operation
(1 kHz, 10% T.H.D., at 6 Ω) ................. 35 W + 35 W
Rated output power during STEREO operation (DIN)
(1 kHz, 0.7% T.H.D., at 6 Ω) ................. 25W + 25 W
Total harmonic distortion
(1 kHz, 17.5W, at 6 Ω) .................................... 0.008%
Frequency response ........ 30Hz ~ 100kHz (+0dB, -3dB)
[CD player section]
Laser ....................................... Semiconductor laser
D/A Conversion ...............................................................
1 Bit D/A converter achieving a 24bit resolution
Over sampling ....................................... 8 fs (352.8 kHz)
Frequency response ....... 20Hz ~ 20kHz (+0.5dB, -1dB)
Signal to noise ratio .............................................. 98dB
Digital output
Optical .......................................... -15dBm ~ -21dBm
[Tuner section]
FM tuner section
Tuning frequency range ......... 87.5 MHz ~ 108 MHz
AM tuner section
(For U.S.A. and Canada)
Tuning frequency range ..........530 kHz ~ 1,700 kHz
Application
(For U.K. and Europe)
Tuning frequency range ..........531 kHz ~ 1,602 kHz
[General]
Power consumption .............................................. 80 W
Dimensions ............................... W : 220 mm (8-11/16”)
.................................................... H: 145 mm (5-11/16”)
.................................................... D: 356 mm (14”)
Weight (net)........................................... 5.9 kg (13.0 lb)
Speakers
Enclosure ... Bass-reflex type (Magnetically shielded)
Speaker configuration
Woofer ...................................... 120 mm, cone type
Tweeter ..................................... 25 mm, dome type
Impedance ................................................................ 6 Ω
Maximum input power ......................................... 60 W
Dimensions .................................... W: 155 mm (6-1/8”)
........................................................ H: 270 mm (10-5/8”)
........................................................ D: 263 mm (10-3/8”)
Weight (net) ................................ 4.5kg (9.9 lb) (1 piece)
KENWOOD follows a policy of continuous advancements in development. For this reason
specifications may be changed without notice.
÷ Sufficient performance may not be exhibited
at extremely cold locations (where water
freezes).
For your records
Record the serial number, found on the back of the unit, in
the spaces designated on the warranty card, and in the
space provided below. Refer to the model and serial
numbers whenever you call upon your dealer for information or service on this product.
Model Serial Number
 Loading...