

Page 1

MICRO HI-FI COMPONENT SYSTEM
HD-5MD
INSTRUCTION MANUAL
KENWOOD CORPORATION
B60-5270-08 00 C (T/M) OC 0204
Page 2

2
Before applying power
Caution : Read this page carefully to ensure safe operation.
Units are designed for operation as follows.
U.S.A. and Canada .............................AC 120 V only
Other countries ................... AC 110-120 / 220-240 V
Europe and U.K.................................. AC 230 V only
For the United Kingdom
Factory fitted moulded mains plug
1. The mains plug contains a fuse. For replacement,
use only a 3-Amp ASTA-approved (BS1362) fuse.
2. The fuse cover must be refitted when replacing the
Preparation
fuse in the moulded plug.
3. Do not cut off the mains plug from this equipment.
If the plug fitted is not suitable for the power points
in your home or the cable is too short to reach a
power point, then obtain an appropriate safety approved extension lead or adapter, or consult your
dealer.
If nonetheless the mains plug is cut off, remove the
fuse and dispose of the plug immediately, to avoid a
possible shock hazard by inadvertent connection to
the mains supply.
IMPORTANT : The wires in the mains lead are coloured
Do not connect those leads to the earth terminal of a
three-pin plug.
in accordance with the following code:
Blue : Neutral
Brown : Live
* AC voltage selection
The AC voltage selector switches on the rear panel are
set to the voltage that prevails in the area to which the
unit is shipped. Before connecting the power cord to
your AC outlet, make sure that the setting positions of
these switches match your line voltage. If not, they
must be set to your voltage in accordance with the following direction.
Note : Our warranty does not cover damage caused by
excessive line voltage due to improper setting of the AC
voltage selector switch.
HD-5MD/EN
switchable*
AC voltage selector switches
Move switch lever to match your line voltage
with a small screwdriver or other pointed tool.
Safety precautions
WARNING : TO PREVENT FIRE OR ELECTRIC SHOCK, DO NOT
EXPOSE THIS APPLIANCE TO RAIN OR MOISTURE.
CAUTION
RISK OF ELECTRIC SHOCK
DO NOT OPEN
THE LIGHTNING FLASH WITH ARROWHEAD SYMBOL, WITHIN AN EQUILATERAL TRIANGLE, IS INTENDED TO ALERT THE USER TO THE PRESENCE OF UNINSULATED "DANGEROUS VOLTAGE"
WITHIN THE PRODUCT’S ENCLOSURE THAT MAY BE OF SUFFICIENT MAGNITUDE TO CONSTITUTE
A RISK OF ELECTRIC SHOCK TO PERSONS.
THE EXCLAMATION POINT WITHIN AN EQUILATERAL TRIANGLE IS INTENDED TO ALERT THE
USER TO THE PRESENCE OF IMPORTANT OPERATING AND MAINTENANCE (SERVICING) INSTRUCTIONS IN THE LITERATURE ACCOMPANYING THE APPLIANCE.
CLASS 1
LASER PRODUCT
The marking of this product has been classified as Class 1. It means
that there is no danger of hazardous radiation outside the product.
Location: Back panel
CAUTION: TO REDUCE THE RISK OF ELECTRIC SHOCK, DO NOT
REMOVE COVER (OR BACK). NO USER-SERVICEABLE PARTS INSIDE. REFER SERVICING TO QUALIFIED SERVICE PERSONNEL.
Page 3
Before applying power
HD-5MD/EN
Special features
Equipped with ATRAC 3 for long digital recording/playback
functions (LP2, LP4).
Enables long digital recording and playback up to two times longer (about 160 minutes)
or four times longer (about 320 minutes) than the standard time. (Times based on use of
an 80-minute disc.)
Supports CD to MD high-speed (4X) dubbing
High-speed CD to MD dubbing function reduces dubbing time to about 1/4 the normal
time.
Playback of CD-R/RW discs
The CD player is capable of playing both CD-R and CD-RW music discs, which have been
recorded on a CD recorder.
Equipped with a sampling rate converter
3
Preparation
Equipped with an optical digital input terminal that can be hooked up to a BS/CS tuner for
digital recording.
A 3-disc CD changer and MD player in one slim unit
A 3-disc CD changer and MD player in one compact unit is now a reality. This unit not only
allows you to enjoy hours of CD music as BGM, but it also makes recording music on a
single CD a snap.
Page 4
4
Before applying power
HD-5MD/EN
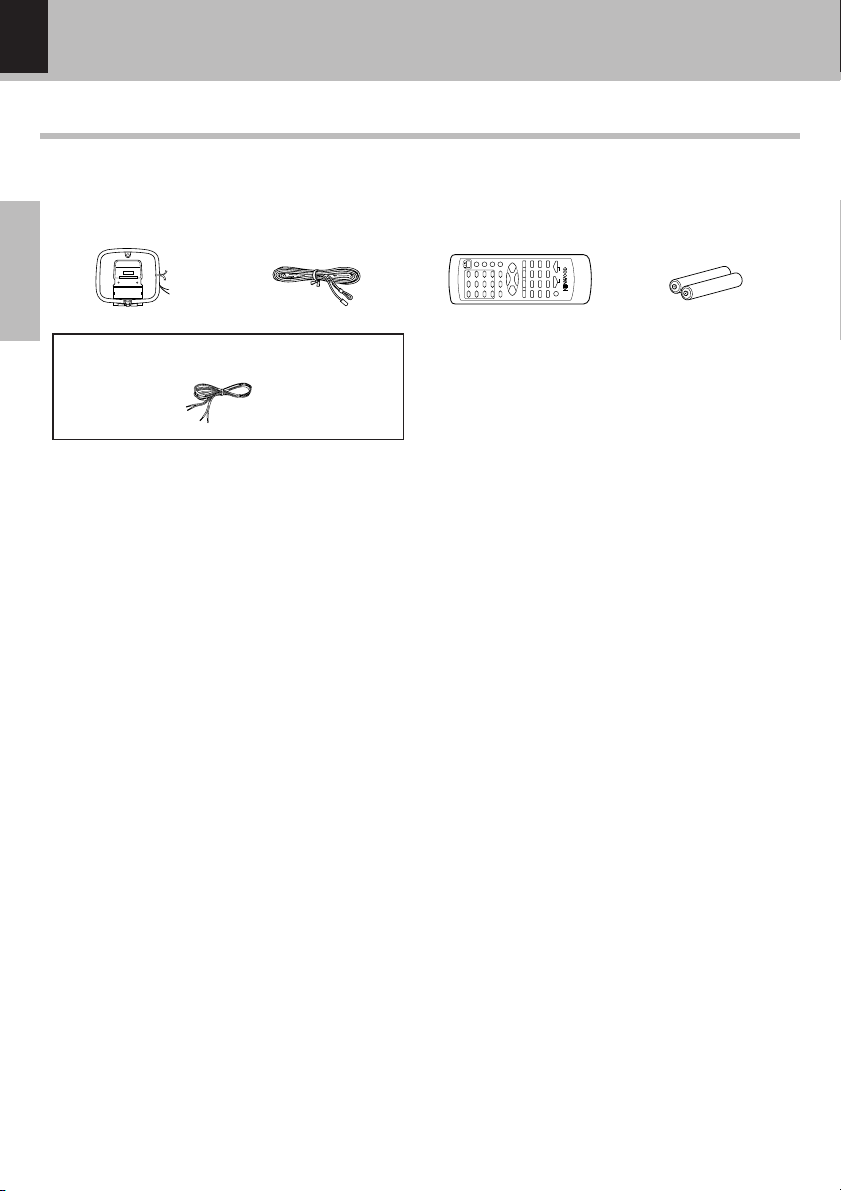
Accessories
Unpacking
Unpack the unit carefully and make sure that all the accessories are present.
FM indoor antenna (1)AM loop antenna (1) Remote control unit (1) Batteries (R6/AA) (2)
RC-M0506
Preparation
Speaker cords (2)
(provided in the speaker package)
If any accessories are missing, or if the unit is damaged or fails to operate, notify your dealer immediately. If the unit
was shipped to you directly, notify your shipper immediately. Kenwood recommends that you retain the original carton
and packing materials in case you need to move or ship the unit in the future.
Keep this manual handy for future reference.
Page 5

Contents
Caution : Read the pages marked carefully to ensure safe operation.
Before applying power
HD-5MD/EN
5
Preparation section
Before applying power ........................................2
Safety precautions ................................................. 2
Special features ........................................................... 3
Accessories .................................................................. 4
Contents ......................................................................... 5
IMPORTANT SAFEGUARDS ................................ 6
System connections .................................................. 8
Connection of accessory antennas ......................... 8
Connection of FM outdoor antenna
(sold separately) ....................................................9
Connection of the speaker system ...........................9
Connection of a subwoofer (sold separately) ....... 10
Connection of a cassette deck (sold separately) .... 10
Connection to an external source
(audio equipment) ............................................... 11
Controls and indicators...........................................12
Main unit ......................................................................12
Display.......................................................................... 13
Remote control unit ................................................... 14
Operation of remote control unit ...........................15
Basic section
Basic use method.....................................................16
Adjusting the tone ...................................................... 18
Playback of CD ......................................................... 20
Playback of MD ........................................................22
Receiving broadcast station ..................................24
Channel space setting ...............................................25
RDS (Radio Data System) (For U.K. and Europe)..... 27
Listening to an AUX/TAPE input source...............30
In regard to long-play MD stereo recording
and playback ....................................................... 31
Recording to MD ...................................................... 32
Application section
Repeated playback .................................................... 38
Listening in random order (random mode) ............ 39
Playback only the first track of selected CDs
(BEST HITS program playback) ........................ 40
Convenient recording methods ............................. 41
Recording of all tracks or a single track of a CD by
one-touch recording (O.T.E.) .............................. 42
Recording only the first track of selected CDs
(BEST HITS program recording) ....................... 45
MD Edit Functions ....................................................46
Selection of the type of edit function ..................... 46
Recording by groups (GROUP) ................................. 47
Dividing a recorded MD into groups ...................... 48
Deleting group information ...................................... 49
Changing the range of a group ................................ 50
Group selection for playback .................................. 51
Moving individual tracks (MOVE) ........................... 52
Dividing tracks (DIVIDE) ........................................... 54
Combining tracks (COMBINE) ................................. 56
Erasing individual tracks (ERASE)/Erasing all
tracks on an MD (ALL ERASE) ........................... 58
Assigning a title (name) to a minidisc or a track .60
Use of title memo (TITLE MEMO) ............................ 63
Deletion of the edited contents (EDIT CANCEL) ....... 64
Convenient functions...............................................65
Setting auto power save (A.P.S.) .............................65
Adjusting the brightness of the display part
(DIMMER).............................................................. 65
Clock adjustment ..................................................... 66
Timer operation ........................................................67
Sleep timer (SLEEP) ................................................... 67
Setting the timer program (PROG. TIMER) ............. 68
Knowledge sections
Important Items.........................................................71
Maintenance ............................................................... 71
Reference .................................................................... 71
In case of difficulty ..................................................74
Specifications...........................................................79
Preparation
Various CD/MD playback features ....................... 36
Listening to the desired sequence
(program playback) .............................................36
Page 6
6
IMPORTANT SAFEGUARDS
Please read all of the safety and operating instructions before
operating this appliance. Adhere to all warnings on the appliance
and in the instruction manual. Follow all the safety and operating
instructions. These safety and operating instructions should be
retained for future reference.
1. Power sources – The appliance should be connected to a
power supply only of the type described in the instruction
manual or as marked on the appliance. If you are not sure of
the type of power supply to your home, consult your appliance
dealer or local power company. For appliances intended to
operate from battery power, or other sources, refer to the
Preparation
instruction manual.
2. Power-cord protection – Power-supply cords should be
routed so that they are not likely to be walked on or pinched by
items placed upon or against them, pay particular attention to
cords at plugs, convenience receptacles, and the point where
they exit from the appliance.
Never pull or stretch
the cord.
3. CAUTION – Polarization – This appliance may be equipped
with a polarized alternating-current line plug (a plug having one
blade wider than the other). This plug will fit into the power
outlet only one way. This is a safety feature. If you are unable
to insert the plug fully into the outlet, try reversing the plug. If
the plug should still fail to fit, contact your electrician to replace
your obsolete outlet. Do not defeat the safety purpose of the
polarized plug.
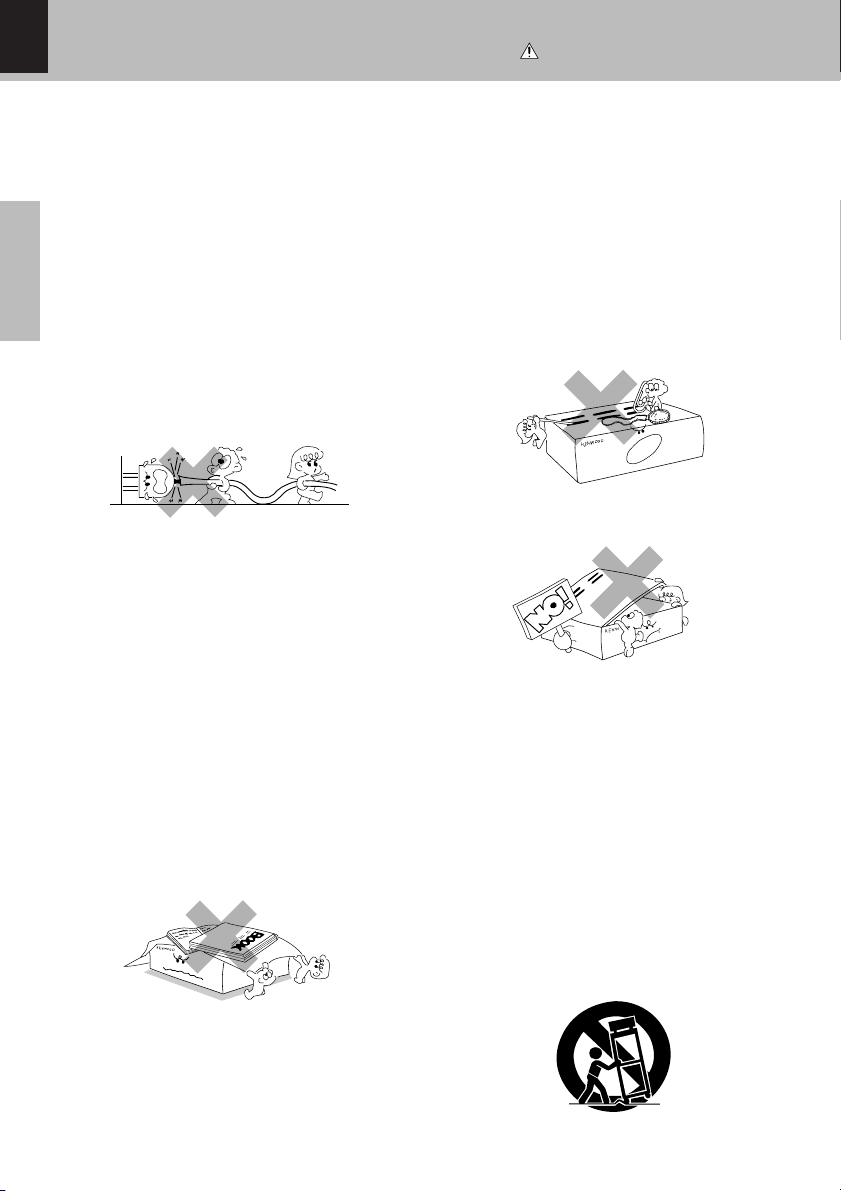
4. Ventilation – Slots and openings in the cabinet are provided
for ventilation and to ensure reliable operation of the appliance
and to protect it from overheating, and these openings must
not be blocked or covered. The appliance should be situated so
that its location or position does not interfere with its proper
ventilation.
To maintain good ventilation, do not put records or a table-cloth
on the appliance. Place the appliance at least 10 cm away from
the walls.
Do not use the appliance on a bed, sofa, rug or similar surface
that may block the ventilation openings. This appliance should
not be placed in a built-in installation such as a bookcase or rack
unless proper ventilation is provided or the manufacturer’s
instructions have been adhered to.
Caution : Read this page carefully to ensure
6. Temperature – The appliance may not function properly if
used at extremely low, or freezing temperatures. The ideal
ambient temperature is above +5°C (41°F).
7. Heat – The appliance should be situated away from heat
sources such as radiators, heat registers, stoves, or other
appliances (including amplifiers) that produce heat. Do not
place a flaming object, such as a candle or lantern, on or near
the appliance.
8. Electric shock – Care should be taken so that objects do not
fall and liquid is not spilled into the enclosure through openings.
If a metal objects, such as a hair pin or a needle, comes into
contact with the inside of this appliance, a dangerous electric
shock may result. For families with children, never permit
children to put anything, especially metal, inside this appliance.
9. Enclosure removal – Never remove the enclosure. If the
internal parts are touched accidentally, a serious electric shock
might occur.
10. Magnetic fields – Keep the appliance away from sources of
magnetic fields such as TV sets, speaker systems, radios,
motorized toys or magnetized objects.
11. Cleaning – Unplug this appliance from the wall outlet before
cleaning. Do not use volatile solvents such as alcohol, paint
thinner, gasoline, or benzine, etc. to clean the cabinet. Use a
clean dry cloth.
12. Accessories – Do not place this appliance on an unstable cart,
stand, tripod, bracket, or table. The appliance may fall, causing
serious injury to a child or adult, and serious damage to the
appliance. Use only with a cart, stand, tripod, bracket, or table
recommended by the manufacturer, or sold with the appliance.
Any mounting of the appliance should follow the manufacturer’s
instructions, and should use a mounting accessory
recommended by the manufacturer. An appliance and cart
combination should be moved with care. Quick stops, excessive
force, and uneven surfaces may cause the appliance and cart
combination to overturn.
safe operation.
HD-5MD/EN
5. Water and moisture – The appliance shall not be exposed to
dripping and splashing - for example, near a bathtub, washbowl,
kitchen sink, laundry tub, in a wet basement, or near a
swimming pool, etc. Do not place an object containing liquid,
such as a flower vase, on the appliance.
Page 7
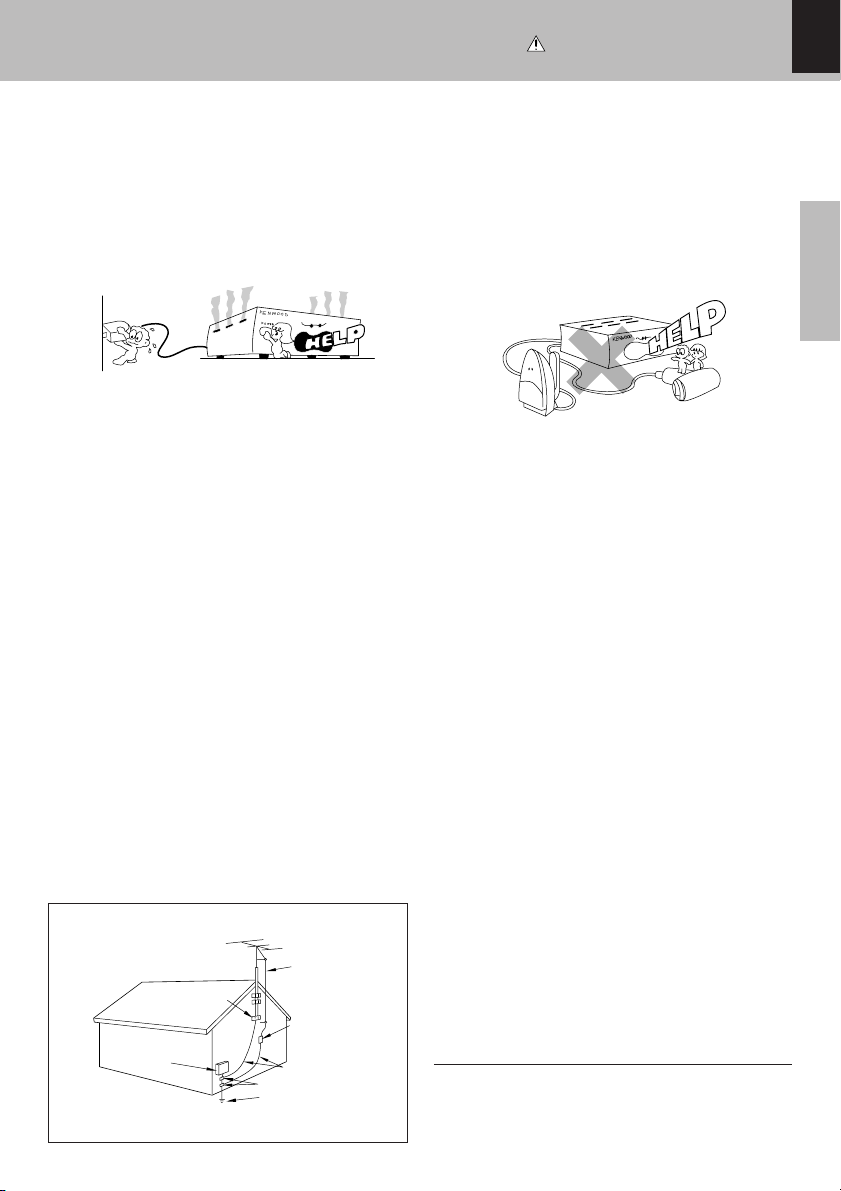
13.Lightning – For added protection for this appliance during a
lightning storm, or when it is left unattended and unused for
long periods of time, unplug it from the wall outlet and
disconnect the antenna or cable system. This will prevent
damage to the appliance due to lightning and power-line
surges.
14.Abnormal smell – If an abnormal smell or smoke is
detected, immediately turn the power OFF and unplug
the appliance from the wall outlet. Contact your dealer or
nearest service center.
15.Damage requiring service – The appliance should be
serviced by qualified service personnel when:
A. The power-supply cord or the plug has been damaged.
B. Objects have fallen, or liquid has been spilled into
the appliance.
C. The appliance has been exposed to rain or water.
D. The appliance does not appear to operate normally
by following the instruction manual. Adjust only those controls
that are covered by the instruction manual as an improper
adjustment of other controls may result in damage and will
often require extensive work by a qualified technician to
restore the appliance to its normal operation.
E. The appliance has been dropped, or the enclosure
damaged.
F. The appliance exhibits a marked change in performance.
16.Servicing – The user should not attempt to service the
appliance beyond that described in the instruction
manual. All other servicing should be referred to qualified
service personnel.
17.Outdoor antenna grounding – If an outside antenna is
connected to the appliance, be sure the antenna system
is grounded so as to provide some protection against
voltage surges and built up static charges. Article 810 of
the National Electrical Code ANSI/NFPA 70, provides
information with respect to proper grounding of the
mast and supporting structure, grounding of the lead-in
wire to an antenna discharge unit, size of grounding
conductors, location of antenna discharge unit,
connection to grounding electrodes, and requirements
for the grounding electrode. See Figure.
Caution : Read this page carefully to en-
18.Power lines – An outside antenna system should not be
located in the vicinity of overhead power lines or other electric
light or power circuits, or where it can fall into such power lines
or circuits. When installing an outside antenna system, extreme
care should be taken to keep from touching such power lines
or circuits as contact with them might be fatal.
19.AC outlets – Do not connect other audio equipment
with a power consumption larger than that specified to
the AC outlet on the rear panel. Never connect other
electrical appliances, such as an iron or toaster, to it to
prevent fire or electric shock.
20. Overloading – Do not overload wall outlets, extension cords,
or integral convenience receptacles as this can result in a risk
of fire or electric shock.
21. Attachment – Do not use attachments not recommended by
the appliance manufacturer as they may cause hazards.
22. Replacement parts – When replacement parts are required,
be sure the service technician has used replacement parts
specified by the manufacturer or have the same characteristics
as the original parts. Unauthorized substitutions may result in
fire, electric shock, or other hazards.
23. Safety check – Upon completion of any service or repairs to
this appliance, ask the service technician to perform safety
checks to determine that the appliance is in proper operating
condition.
sure safe operation.
HD-5MD/EN
7
Preparation
EXAMPLE OF ANTENNA GROUNDING AS PER NATIONAL
ELECTRIC
SERVICE
EQUIPMENT
NEC – NATIONAL ELECTRICAL CODE
ELECTRICAL CODE
GROUND
CLAMPS
GROUND CLAMP
POWER SERVICE GROUNDING
ELECTRODE SYSTEM
(NEC ART 250, PART H)
ANTENNA
LEAD IN WIRE
ANTENNA
DISCHARGE UNIT
(NEC SECTION 810-20)
GROUNDING CONDUCTORS
(NEC SECTION 810-21)
Notes:
1. Item 3 is not required except for grounded or polarized equipment.
2. Item 17 and 18 are not required except for units provided with antenna
terminals.
3. Item 17 complies with UL in the U.S.A.
Page 8
8
System connections
HD-5MD/EN
Make connections as shown below.
When connecting the related system components, refer also to the instruction manuals of the related components.
CAUTION
Do not plug in the power lead until all connections are
completed.
Malfunction of microcomputer
If operation is not possible or erroneous display
appears even though all connections have been
made properly, reset the microcomputer by
referring to "In case of difficulty". f
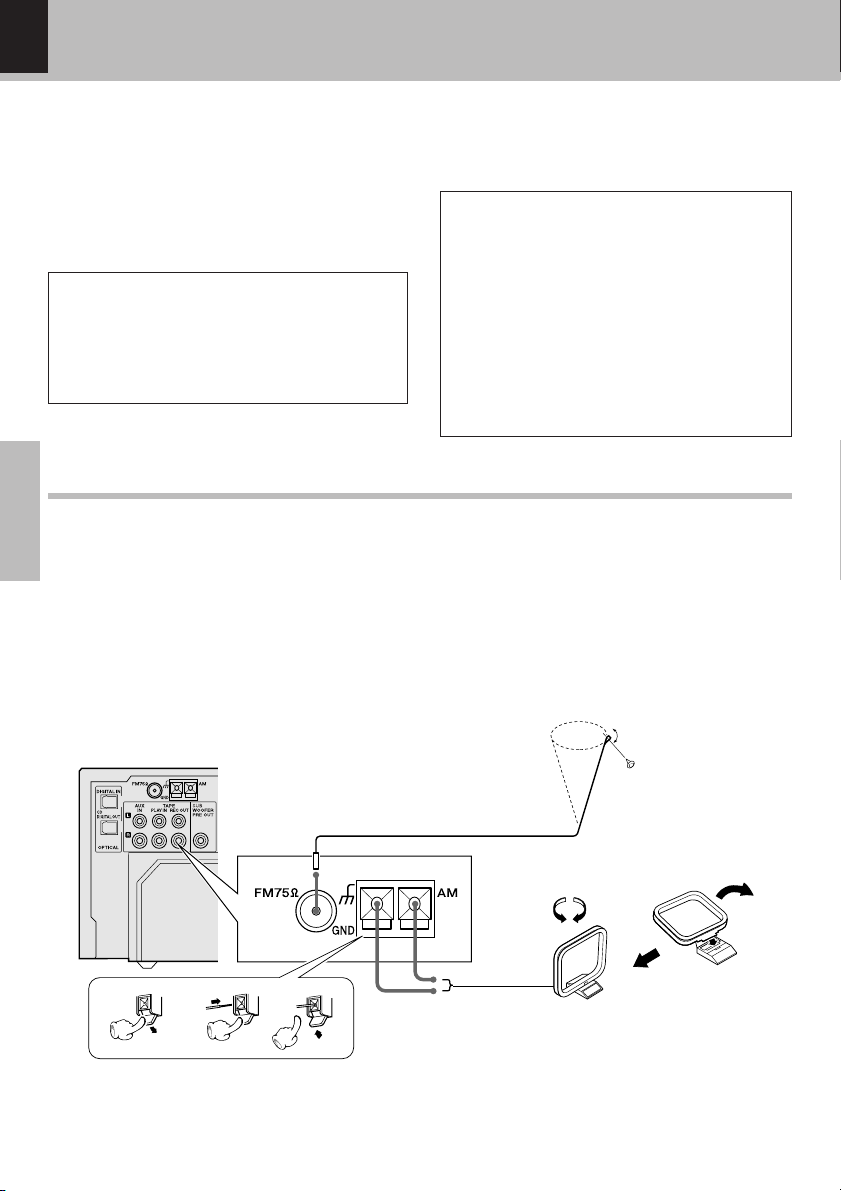
Connection of accessory antennas
Basic
FM indoor antenna
The supplied antenna is for temporary indoor use only. For stable signal
reception, we recommend to use an outdoor antenna. Remove the indoor antenna if you connect to an outdoor antenna.
1 Connect the antenna to the antenna terminal.
2 Locate the position providing good recep-
tion condition.
3 Fix the antenna.
CAUTION
Be sure to adhere followings. Or proper ventilation
will be blocked causing damage or fire hazard.
÷ Do not place any objects impairing heat radiation
onto the top of the unit.
÷ Leave some space around the unit (from the larg-
est outside dimension including projection) equal
to or greater than, shown below.
Top panel : 50 cm
Back panel : 10 cm
1
23
AM loop antenna
The supplied antenna is for indoor use. Place it as
far as possible from the main system, TV set,
speaker cords and power cord, and set it to a direction which provides the best reception.
Page 9
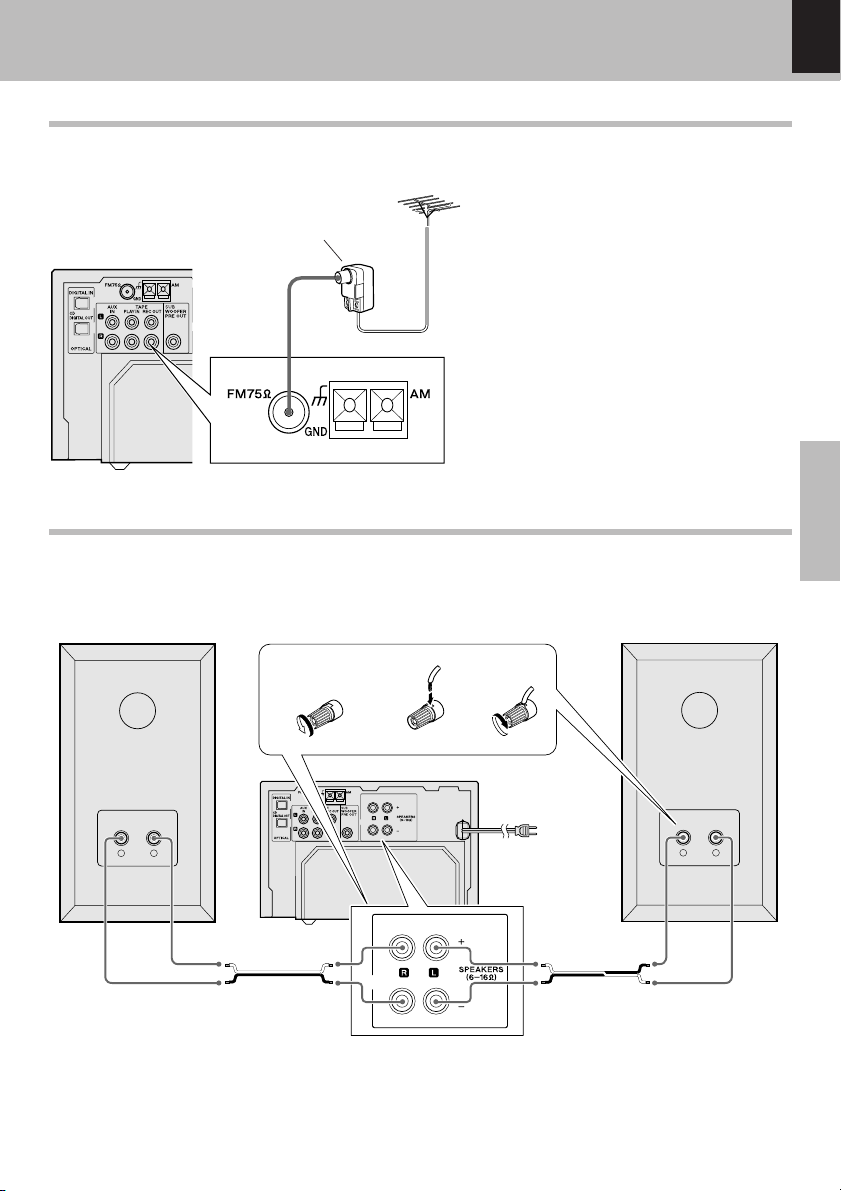
Connection of FM outdoor antenna (sold separately)
System connection
HD-5MD/EN
9
Antenna adaptor
(Commercially
Available Parts)
FM outdoor antenna
Lead the 75 Ω coaxial cable connected to
the FM outdoor antenna into the room
and connect it to the FM 75 Ω terminal.
Please remove the indoor antenna after
an outdoor antenna has been installed.
Connection of the speaker system
Speaker (Right) Speaker (Left)
1
2
3
Basic
−
−
+
POWER cord
TO WALL AC
OUTLET
+
Main unit
Speaker cord
÷ Never short-circuit the + and – speaker cords.
÷ If the left and right speakers are connected inversely or if the speaker cords are connected with reversed polarity,
the sound becomes unnatural with ambiguous acoustic image positioning. Be sure to connect the speakers and
speaker cords correctly.
Speaker cord
Page 10
10
System connection
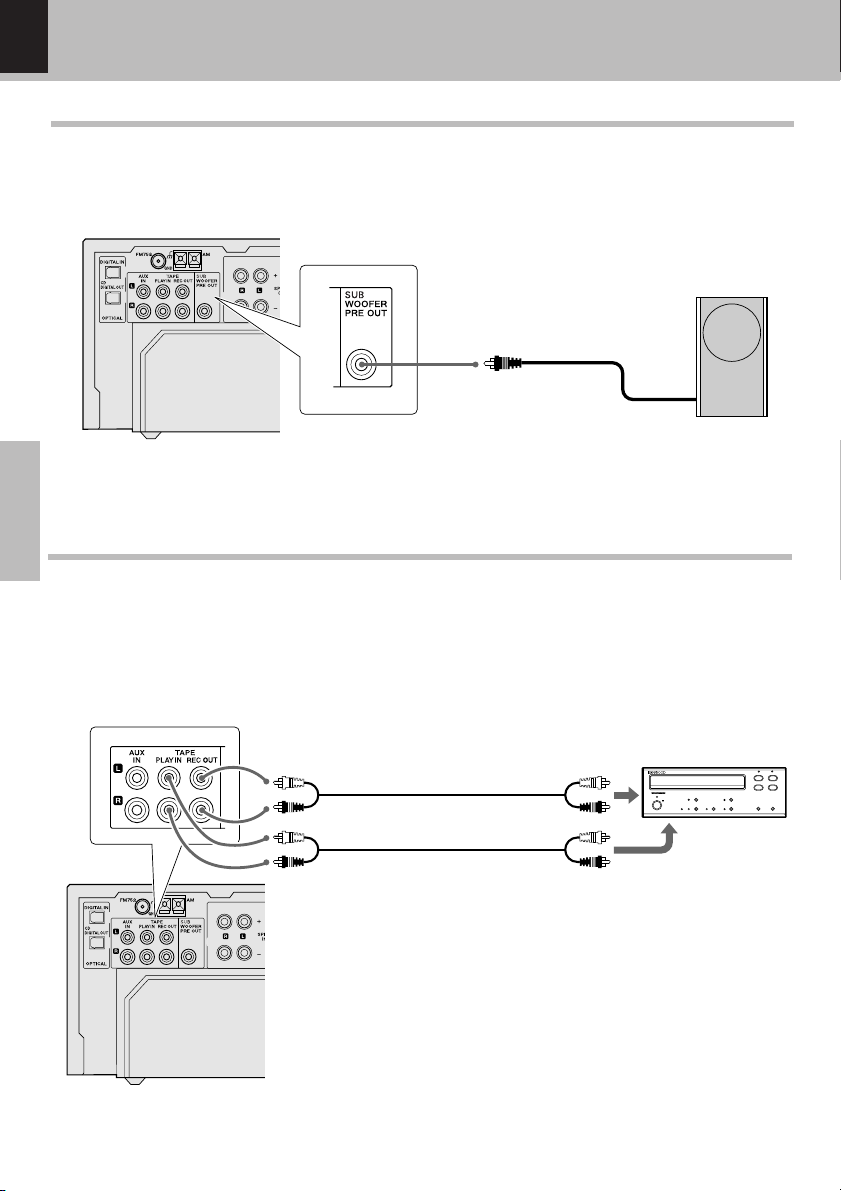
Connection of a subwoofer (sold separately)
A subwoofer provides powerful playback of the very low range. It can be used with all types of playback.
Subwoofer
Basic
Connection of a cassette deck (sold separately)
Connect a separately sold cassette deck with the accessory audio cord to the terminals TAPE PLAY IN
and REC OUT at the rear of this unit. Please refer also to the operation instructions supplied with the
cassette deck.
HD-5MD/EN
KENWOOD
Audio code
Audio code
To RECORD IN
To PLAY OUT
cassette deck
8
¶
027
1
3
¡
Page 11
System connection
HD-5MD/EN
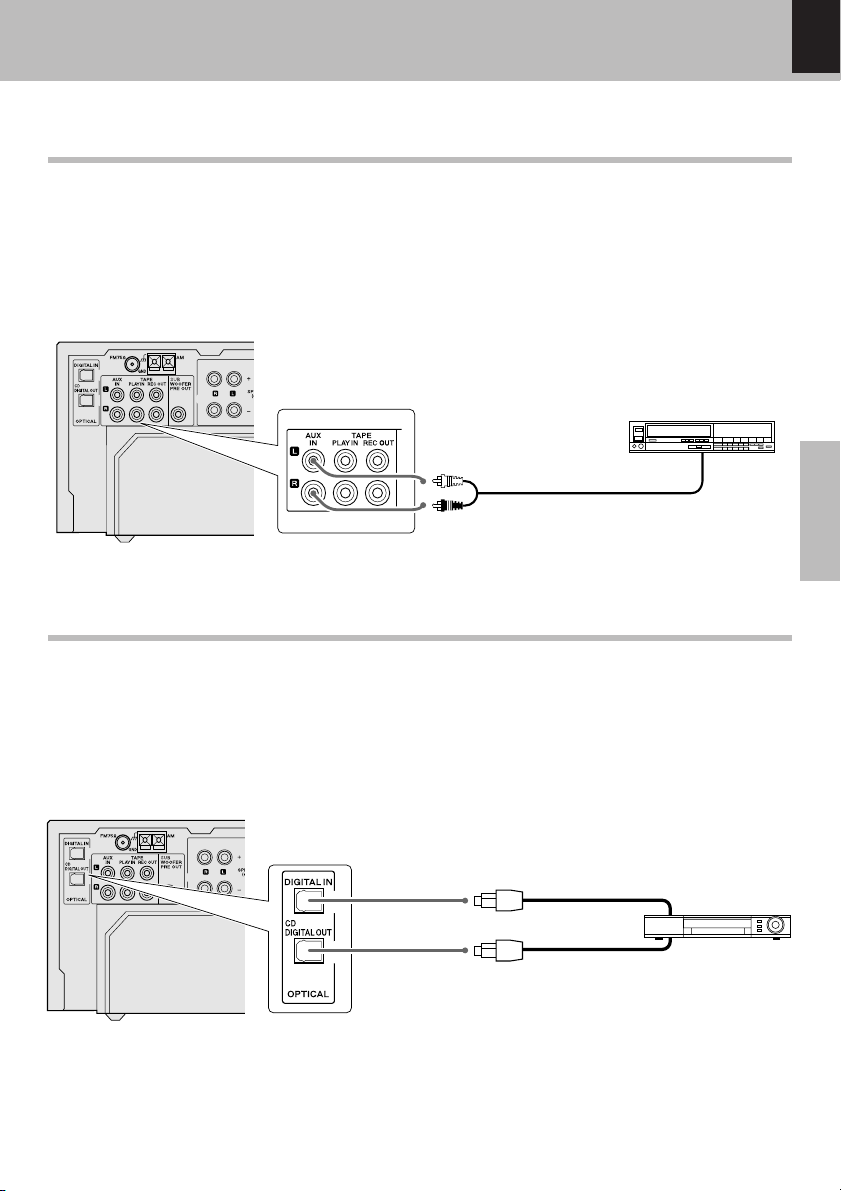
Connection to an external source (audio equipment)
In case of analog connection
You can use the input terminal AUX at the rear of this unit to connect a video deck or a record player (P-
110) (sold separately) with built-in RIAA equalizer amplifier.
video deck or
a record player
11
Audio code
Audio OUTPUT
In case of digital connection
You can use the digital I/O terminals OPTICAL at the rear of this unit to connect a BS/CS tuner or other
digital equipment for digital input to this unit and output of the digital signal from the CD of this unit to
external equipment.
Square optical
connector plug
BS/CS tuner etc. or
digital recorder
Optical digital out
Optical digital in
Basic
Page 12
12
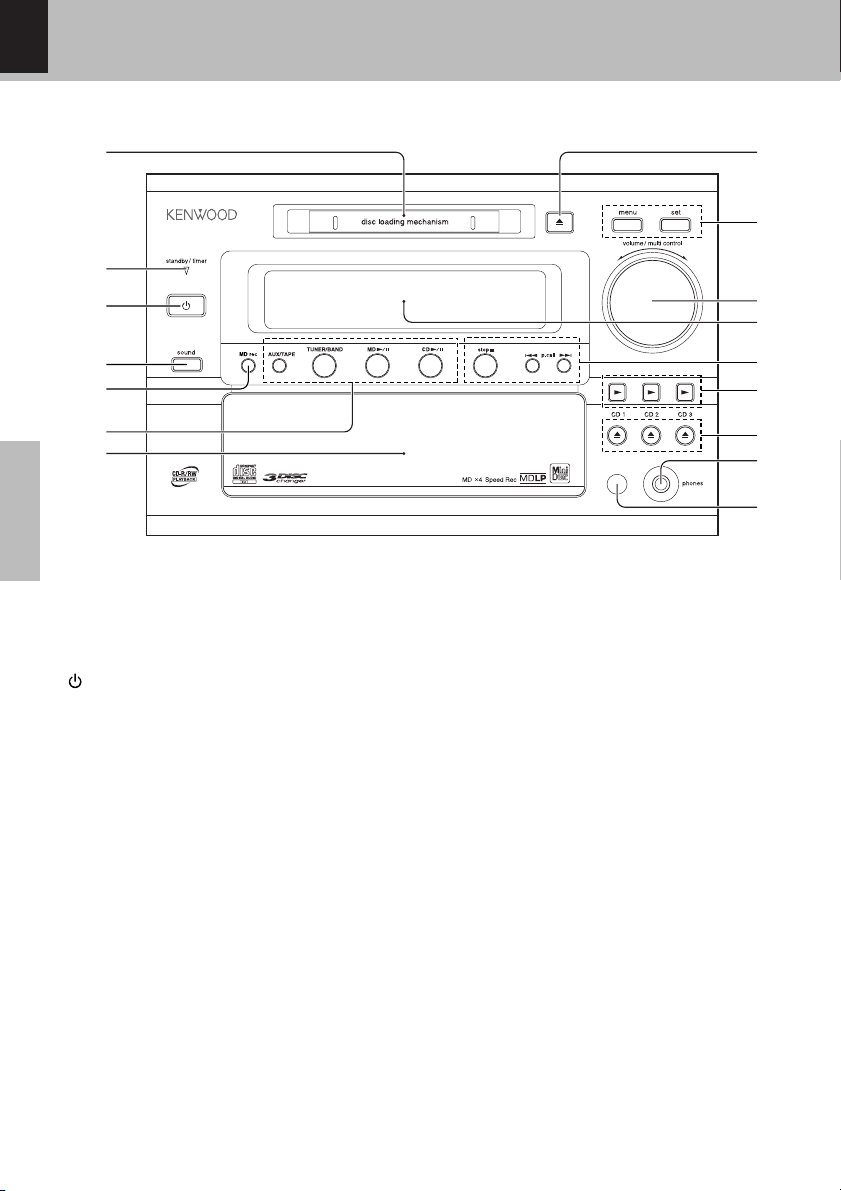
Controls and indicators
Main unit
HD-5MD/EN
1
2
3
4
5
6
7
Basic
1 Mini Disc insertion slot
2 standby/timer indicator
Standby status (power OFF): Red
Timer standby status (power OFF): Green
Energized (power ON): Not lit
key ^
3
Press to set the unit to On or Standby.
4 sound key &
Used to switch the sound.
5 MD rec (record) key ‹
Used to record to Mini Disc.
6 Input selection keys
AUX/TAPE º
Selection of AUX (externally connected equipment) or tape.
TUNER/BAND ¢
Used to switch the broadcasting band (AM or
FM) when listening to the radio.
MD 6 ™
Used to select MD for playback and for pausing.
CD 6 )
Used to select CD for playback and for pausing.
7 CD tray )
8 0 key ™
To eject a MD.
8
9
0
!
@
#
$
%
^
9 menu key &
Used for application operations for each source.
set key &
Used to confirm a function selected in the
menu.
0 volume/multi control knob ^&
Used for volume adjustment and to select items
in the setting menus.
! Display panel
@ stop 7 key )™
Press to stop a disc.
When this is pressed in standby mode, the
present time is displayed for 5 seconds.
4 p.call ¢ key
CD, MD : skip CD or MD tracks ¡£
TUNER : select a preset radio station ¢
# 3 keys ¡
Select the CD1, CD2 or CD3 and start playback.
$ 0 keys )
Open or close the CD1, CD2 or CD3 tray to load
or eject a CD.
% Headphone jack ^
Connect headphone with a stereo mini-plug (optionally available).
^ Remote sensor %
This window receives signals from the remote
control unit.
Page 13
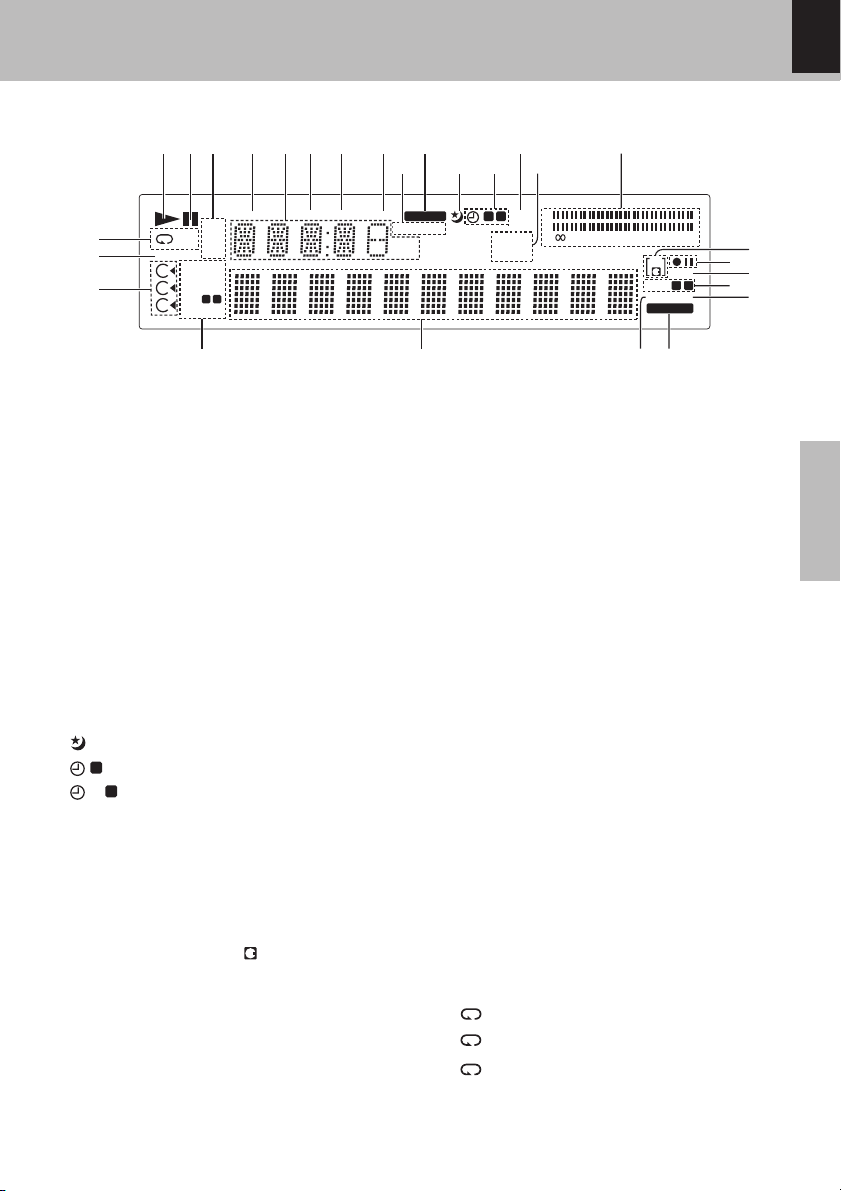
Display
123 4 56 7 8
0
9
#%
!@ $
Controls and indicators
HD-5MD/EN
13
¶
§
∞
1ALL
DISC
BEST HITS
1
RANDOM
MUTE
2
N.B.
3
S.DIRECT
FM
AM
PM
PGM
1 2
REMAIN
TOTAL AUTO
TUNED
1 Playback indication
2 Playback pause indication
3 AM/FM (reception band) indication
AM/PM (morning/afternoon) indication
4 REMAIN (remaining time) indication
5 Numerical display of frequency, time, track
No., program No., etc.
6 TOTAL(total recording time) indication
7 AUTO (auto tuning) indication
8 TUNED (radio broadcast tuned) indication
9 R·D·S (Radio Data System) indication,
PTY (Program Type Identification) indication
(For UK and Europe)
0 STEREO (stereo broadcast reception)
indication
!
(sleep timer) indication
1
@
(timer 1) indication
2
(timer 2) indication
# REC (recording timer) indication
$ A.P.S. indication
Indication of automatic power saving status.
GROUP (MD group function) indication
% Level indication
^ MD indication
When an MD is set, the
indication on the in-
side appears.
& ¶ (MD recording) indication
8 (MD recording pause) indication
* O.T.E. (one-touch edit) indication
( LP2 indication
Indication with stereo 2x recording/playback.
LP4 indication
Indication with stereo 4x recording/playback.
REC
L
STEREO
R.D.S
kHz
MHz
PTY
1 2
GROUP
A.P.S.
R
30
) HIGH indication
Indication at the time of CD high-speed dubbing.
¡ DIGITAL indication
Indication at the time of digital recording.
™ MONO indication
Indication of monaural long-time recording.
£ Character information display
Character information like the name of the received radio station (at the time of FM auto preset), CD title, MD title, etc. is displayed.
¢ PGM indication
Indication at the time of program playback.
RANDOM indication
Indication at the time of random playback.
MUTE indication
Indication at the time of mute (no sound).
N.B.1/N.B.2 indication
Indication when the N.B. (natural bass) function
is selected.
S.DIRECT indication
Indication when the source direct function is
ON.
∞ CD loading indications
§ BEST HITS indication
¶ Repeat mode indication
: Indication of one track repeat.
1
1
: Indication of one disc repeat
DISC
ALL
: Indication of all discs repeat
DISC
10 5 3 1 0 (–dB)
MD
O.T.E
2 4
LP
MONO HIGH
DIGITAL
¡™£¢
^
&
.
*
(
)
Basic
Page 14
14
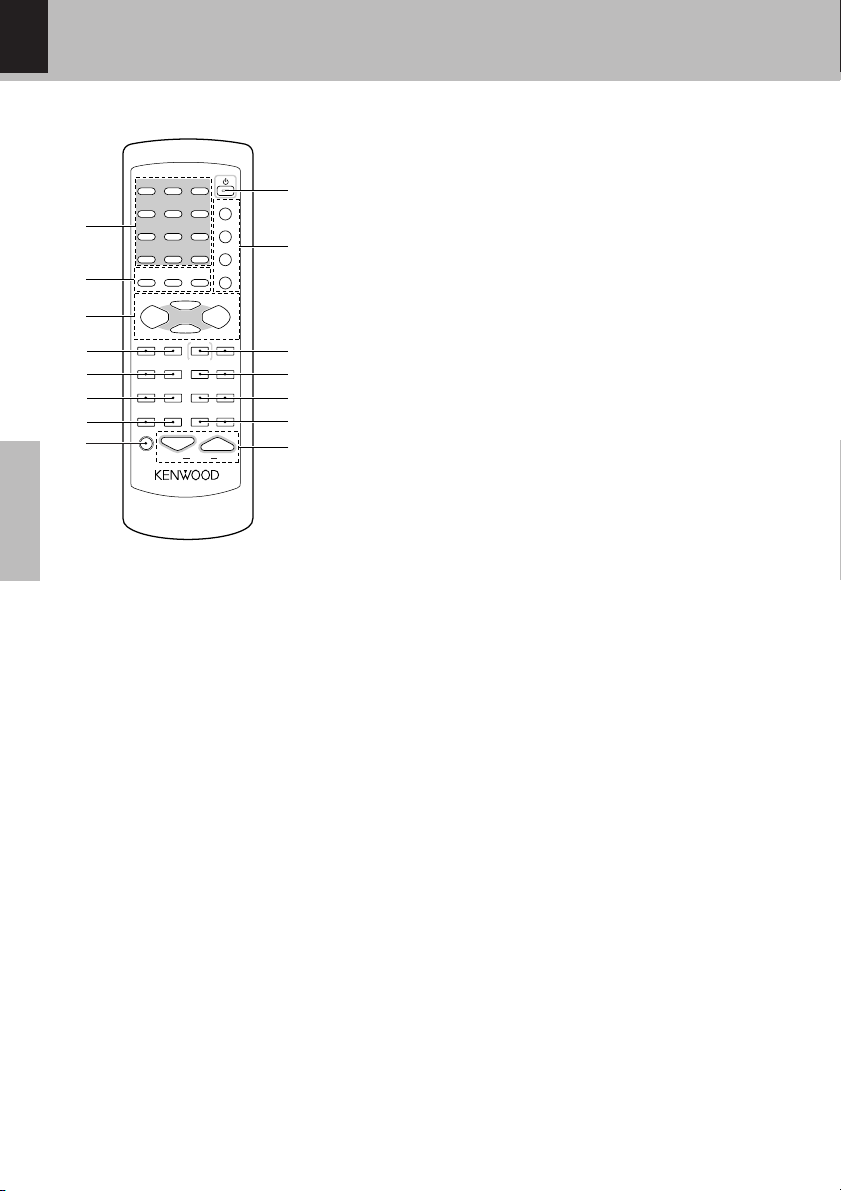
Remote control unit
2 ABC
3 DEF
MNO
8
TUV9WXYZ
0 +10',:
TIME
CLEAR
/SPACE
/DELETE
TUNER/BAND
MD
6
STOP
AUTO/MONO
¡
PERV.–GROUP–NEXT
UP
RANDOM
/PTY
DOWN UP
VOLUME
POWER
TITLE INPUT
TRACK EDIT
SET
ENTER
CD
6
P.MODE
/RDS DISP.
9
0
!
@
#
$
%
1
4 GHI 5 JKL 6
7
1
2
3
4
5
6
7
8
PQRS
&( )-
+100
DISPLAY
/CHARAC.
AUX
/TAPE
P.CALL DISC SKIP
4¢7
1
TUNING
DOWN
SLEEP REPEAT
BEST HITS TIMER SOUND MUTE
O.T.E.
Basic
Infrared ray system
Model : RC-F0700E (For UK and Europe)
: RC-F0700M (For other countries)
1 Numeric keys ¡£
Used to select a CD/MD track number or recall a
preset station of the tuner.
2 DISPLAY/CHARAC. key ¡£
Used for display switching and for selection of
the group of input characters.
TIME/SPACE key ¡£
Used for adjustment of the present time and for
input of a space at the time of MD editing.
CLEAR/DELETE key ‡
Used to delete a program or input characters.
3 Basic operation keys (input selectors, play/
pause)
CD 6 key )
MD 6 key ™
TUNER/BAND key ¢
AUX/TAPE key º
4 4 P.CALL ¢ keys ¡£¢
5 1 TUNING ¡ keys ¡£§
6 SLEEP key ¨
Press to set the sleep timer
REPEAT key °
Press for setting repeated playback.
Controls and indicators
HD-5MD/EN
The keys on the remote control unit with the same names as on
the main unit have the same function as the keys on the main unit.
7 BEST HITS key t
Used for BEST HITS recording or BEST HITS
playback.
TIMER key ∏
Used for execution and cancellation of the various timers.
8 O.T.E. key w
When this key is pressed during CD playback,
only the track being played will be copied to MD,
while the entire CD will be copied when it is
pressed while the CD is stopped.
9 POWER key ^
Press to set the unit to On or Standby.
0 TITLE INPUT key P
Used for disc/track title input.
TRACK EDIT key i
Used for MD editing.
SET key i
When the source is CD or MD
Used for setting, confirmation, etc. at the
time of MD editing.
Used to switch the title indication etc.
When the source is the tuner
Used to change the auto-preset station.
At the time of standby
Used for clock display.
ENTER key i
When the source is MD
Used for MD editing and for confirmation of
the entered title etc.
When the source is the tuner
Used for confirmation of manual presetting.
! 7 STOP/AUTO/MONO key
CD, MD : )™
Press to stop a disc.
TUNER : §
Used to switch AUTO tuning or MANUAL tuning (Monaural reception)
Standby mode :
When this is pressed in standby mode, the
present time is displayed for 5 seconds.
DISC SKIP key
Each time this key is pressed, the unit switches
to CD1, CD2, or CD3 respectively.
Page 15
@ PREV.-GROUP- NEXT key Q
Used for MD group editing.
# RANDOM/PTY key (For Europe and U.K.)
CD, MD : Press for setting playback of tracks
in a random order. ·
TUNER : Used at the time of PTY reception.
•
RANDOM key (For other countries) ·
Press for setting playback of tracks in a random order.
P.MODE/RDS DISP. key (For Europe and U.K.)
CD, MD : Press to program tracks in the de
sired sequence. fl
Operation of remote control unit
Controls and indicators
HD-5MD/EN
TUNER : Used at the time of RDS reception.
ª
P.MODE key (For other countries) fl
Press to program tracks in the desired sequence.
@ SOUND key &
Press to switch the sound effect.
MUTE key &
Press to mute the audio temporarily.
# VOLUME keys ^
Press to adjust the volume.
15
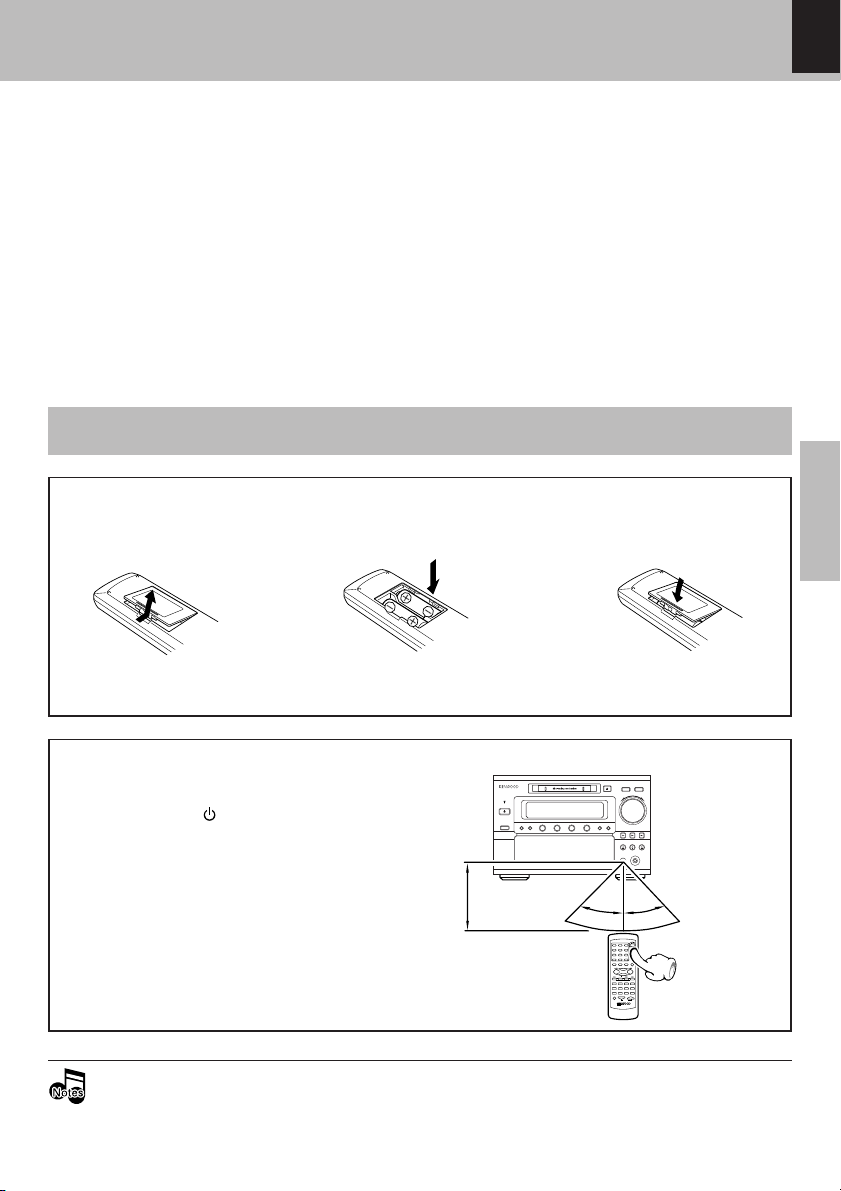
Loading batteries
1 Remove the cover.
2 Insert batteries. 3 Close the cover.
÷ Insert two R6 ("AA"-size) batteries
following the polarity indications.
Operation
After plugging the power cord of this unit,
press the POWER (
trol unit to turn the system ON. When the system is turned ON, press the key of the function
to be operated.
÷ When pressing more than one remote control
keys successively, press the keys securely by
leaving an interval of 1 second or more between
keys.
) key of the remote con-
Operating range (approx.)
6m
30˚
Basic
Remote sensor
30˚
¡
÷ The provided batteries are intended for use in operation checking, and their service life may be short.
÷ When the remote controllable distance becomes short, replace both of the batteries with new ones.
÷ If direct sunlight or the light of a high-frequency fluorescent lamp (inverter type, etc.) is incident to the remote
sensor, malfunction may occur. In such a case, change the installation position to avoid malfunction.
Page 16
16
Basic use method
1
ア
2
カABC
3
サDEF
4
タGHI5ナJKL6ハ
MNO
7
マPQRS
8
ヤ
TUV9ラWXYZ
&( )-
+100
0
ワヲン
+10
',:
DISPLAY
TIME
CLEAR
/CHARAC.
/SPACE
/DELETE
TUNER/BAND
AUX
/TAPE
6
MD
STOP
4¢7
P.CALL DISC SKIP
AUTO/MONO
¡
1
TUNING
PERV.–GROUP–NEXT
DOWN
UP
SLEEP REPEAT RANDOM P.MODE
SOUND
BEST HITS TIMER SOUND MUTE
O.T.E.
DOWN UP
VOLUME
Basic
HD-5MD/EN
POWER
1
TITLE INPUT
TRACK EDIT
SET
ENTER
2
CD
6
MUTE
3
11
sound
22
33
phones
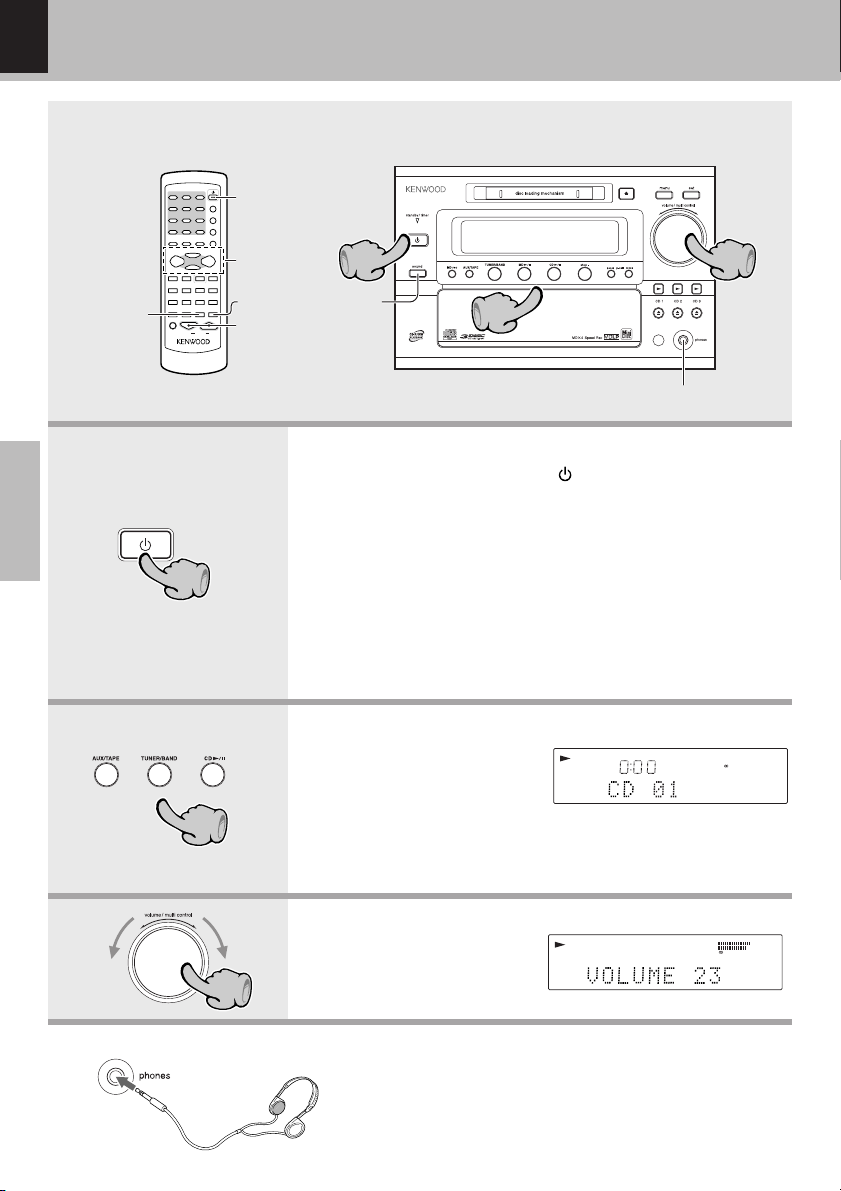
1 Power ON (OFF)
When the power is ON and the key is pressed, the power becomes OFF (standby).
It takes a little time from power OFF operation until the power is
switched off.
÷ For about five seconds after power ON, mute (no sound) status is
applied for circuit protection.
One-touch operation function
When one of the following keys is operated in power OFF (standby) condition, the power will be switched on, the source will be selected, and
playback will start in case of CD.
CD6 key, MD 6 key, TUNER/BAND key, AUX/TAPE key.
Decrease
Increase
Listening through headphone
2. Select the source to be listened to.
CD )
MD ™
TUNER ¢
AUX/TAPE º
* The source can also be selected by pressing TUNER/BAND, CD 6,
MD 6 or AUX/TAPE on the remote control. (Playback will start automatically when CD 6 or MD 6 key is pressed.)
L
R
3. Adjust the volume.
÷ Rapid turning produces a
large change in volume. (AI
VOLUME function)
÷ A guide value (0 to MAX) is shown on the display.
÷ Insert the headphone plug into the headphone jack.
÷ The sound from all speakers are cut off.
÷ Turn the volume/multi control knob to adjust the volume.
÷ Lower the volume before you connect or disconnect plugs.
÷ Headphone with a stereo mini plug can be connected.
L
R
30
10 5310(–dB)
30
10 5 3 1 0 (–dB)
DIGITAL
DIGITAL
Page 17
Muting the sound temporarily
Remote control unit only
MUTE
Blinks
MUTE
Basic use method
HD-5MD/EN
÷ Press again to resume the original volume.
÷ This is also canceled when the volume is changed.
17
Adjust the left/right volume balance
Main unit only
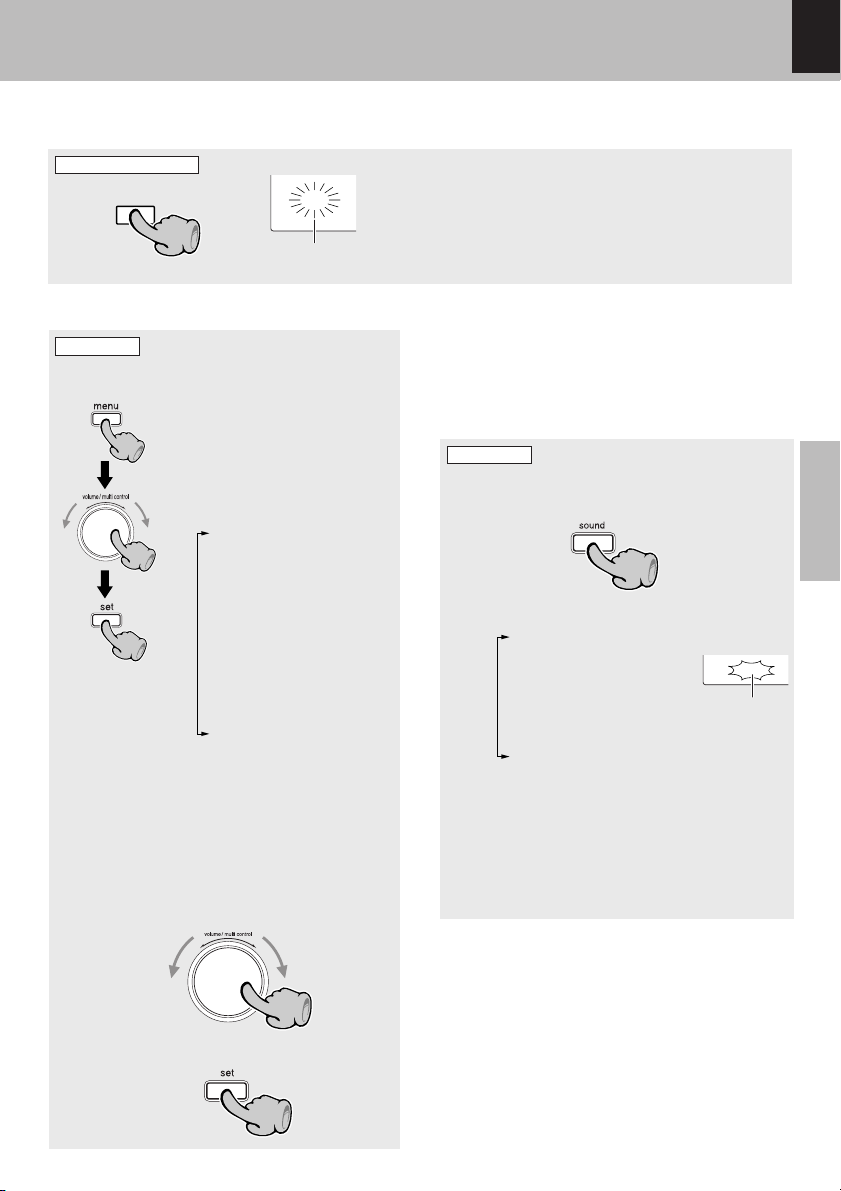
1 Select "BALANCE" as follows.
1
2
3
2 Adjust the left/right volume balance with
the "volume/multi" control knob.
The right volume
decreases.
1 Press the "menu" key.
2 Select "BALANCE" with the
"volume/multi control" knob.
When the "volume/multi control "
knob is turned, switching is done
as follows.
"MD REC MODE ?"
"GROUP MAKE ?"
"REC SPEED ?"
"REC LEVEL ?"
"AUX INPUT ?"
"TONE ?"
"BALANCE ?"
"TIME ADJUST ?"
"TIMER SET ?"
"A.P.S. SET ?"
"DIMMER ?"
Return to the original status is
made when no operation is performed within 20 seconds.
2 Press the "set" key.
The left volume
decreases.
Listening to the original sound of the
source (source direct)
The sound from CD, MD or another source can be
heard as faithful as possible to the original sound
by not passing it though the sound adjustment
circuits of this unit.
Main unit only
1 Press the "sound" key repeatedly to select
"S.DIRECT".
Each press switches the modes as follows.
"N.B.1"
"N.B.2"
* "TONE 1"
* "TONE 2"
* "TONE 3"
"SOURCE DIRECT"
"SOUND MODE OFF"
* "TONE 1(2,3)" is not displayed when "BASS"
and "TREBLE" both are set to "0".
÷ When source direct is selected, N.B1, N.B2,
and TONE1, TONE2, TONE3 are cancelled.
÷ To return to normal mode, press the "sound"
key repeatedly to select "SOUND MODE
OFF".
S.DIRECT
Lit
Basic
2 Press the "set" key.
Page 18
18
Adjusting the tone
TONE CONTROL
The low range (BASS) and the high range (TREBLE) each can be set to a desired level.
Three types of tone control can be set in advance.
Basic use method
HD-5MD/EN
TONE CONTROL setting
Main unit only
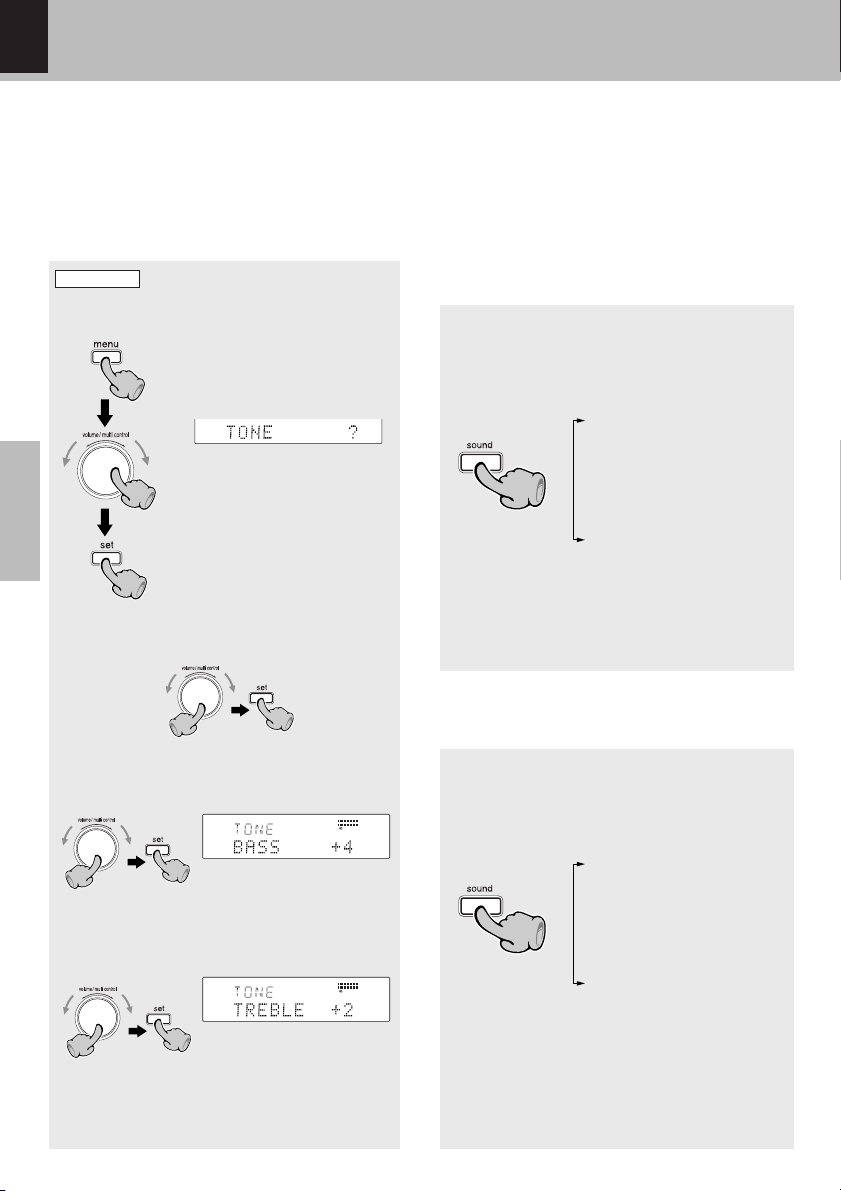
1 Select "TONE ?" as follows.
1
2
Basic
3
2 Select "TONE 1 ?" (or 2, 3) with the "vol-
ume/multi control" knob and press the
"set" key.
3 Adjust the level for the low range (BASS)
with the volume/multi control knob and
press the "set" key.
4 Adjust the level for the high range (TREBLE)
with the volume/multi control knob and
press the "set" key.
÷ When the setting has been completed, re-
turn to the original display is made after display of "COMPLETE".
1 Press the "menu" key.
2 Select "TONE ?" with the
"volume/multi control"
knob.
3 Press the "set" key.
Change is made in steps of 2
from -8 to +8.
Change is made in steps of 2
from -8 to +8.
L
R
L
R
10 5310(–dB)
30
10 5310(–dB)
30
Listening with use of TONE CONTROL
Select and set the desired tone control setting set
in advance.
1 Press the "sound" key repeatedly to select
"TONE 1", "TONE 2" or "TONE 3".
Each press switches the modes as follows.
DIGITAL
"N.B.1"
"N.B.2"
* "TONE 1"
* "TONE 2"
* "TONE 3"
"SOURCE DIRECT"
"SOUND MODE OFF"
* "TONE 1(2,3)" is not displayed when
"BASS" and "TREBLE" both are set to "0".
÷ To return to normal mode, press the "sound"
key repeatedly to select "SOUND MODE
OFF".
N.B. circuit (natural bass)
NB1 : The low range will be emphasized.
NB2 : The low range will be emphasized still further.
1 Press the "sound" key repeatedly to select
"N.B.1" or "N.B.2".
DIGITAL
DIGITAL
÷ To return to normal mode, press the "sound"
Each press switches the modes as follows.
"N.B.1"
"N.B.2"
* "TONE 1"
* "TONE 2"
* "TONE 3"
"SOURCE DIRECT"
"SOUND MODE OFF"
* "TONE 1(2,3)" is not displayed when
"BASS" and "TREBLE" both are set to "0".
key repeatedly to select "SOUND MODE
OFF".
Page 19

Basic use method
HD-5MD/EN
19
Basic
Page 20
20
Playback of CD
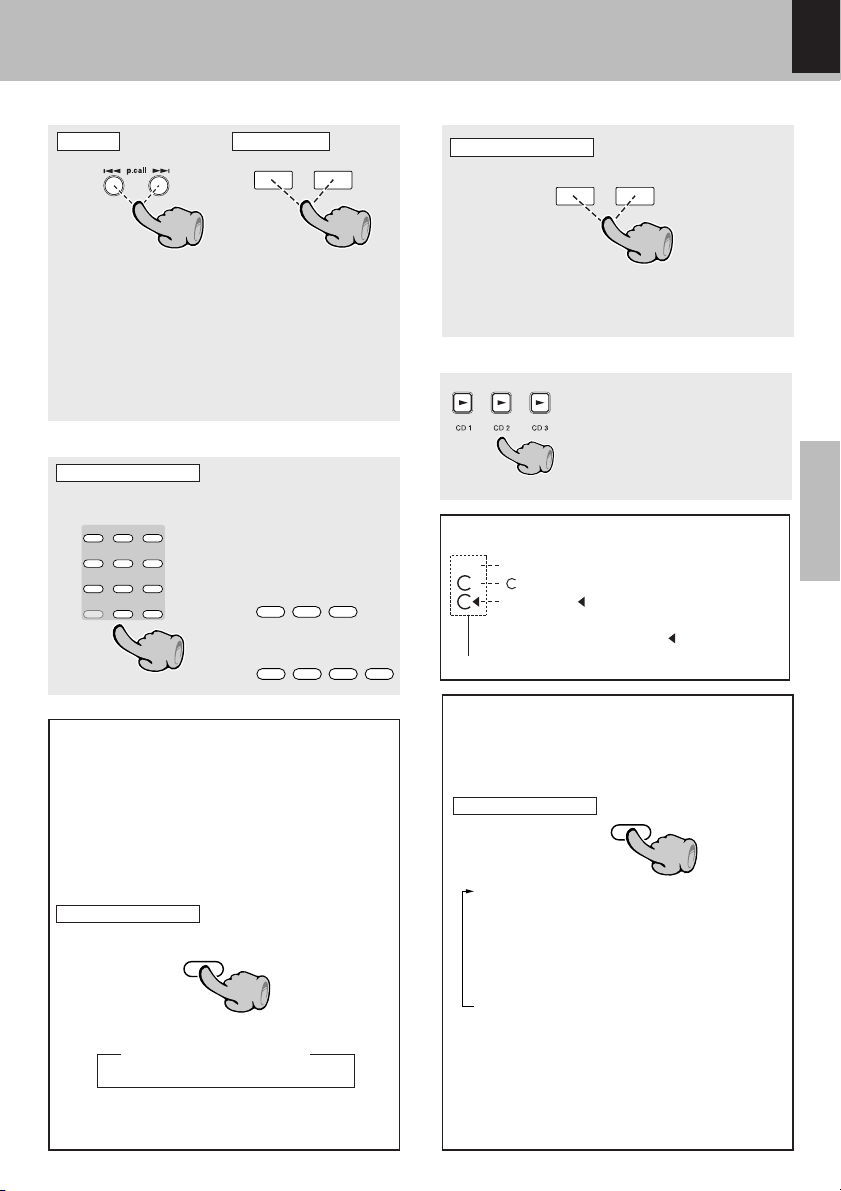
HD-5MD/EN
DISPLAY
/CHARAC
4¢
P.CALL
¡
TUNING
1
Basic
When one of the keys CD1 to CD3 is
pressed, the CD tray with that number
will open, and when the key is pressed
again, the tray will close. When a key
with a different number is pressed
while a tray is open, the open tray will
close and then the CD tray corresponding to the pressed key will open.
1
ア
2
カABC
3
4
タGHI5ナJKL6ハ
7
マPQRS
8
ヤ
TUV9ラWXYZ
&( )-
+100
0
ワヲン
+10
DISPLAY
TIME
CLEAR
/CHARAC.
/SPACE
/DELETE
TUNER/BAND
AUX
/TAPE
MD
6
4¢7
P.CALL DISC SKIP
AUTO/MONO
¡
TUNING
1
PERV.–GROUP–NEXT
DOWN
UP
SLEEP REPEAT RANDOM P.MODE
BEST HITS TIMER SOUND MUTE
O.T.E.
DOWN UP
VOLUME
POWER
サDEF
TITLE INPUT
MNO
TRACK EDIT
SET
',:
SET
ENTER
CD
2
CD6
6
STOP
7STOP
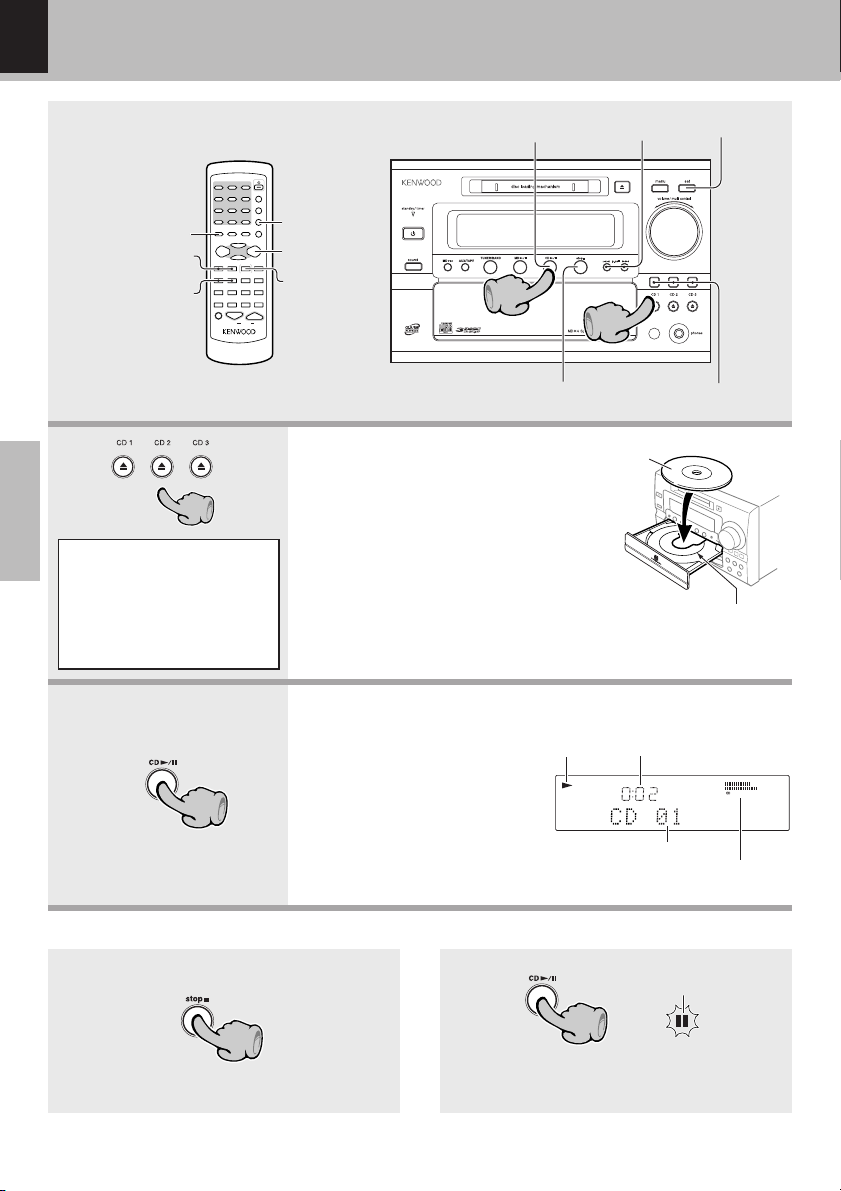
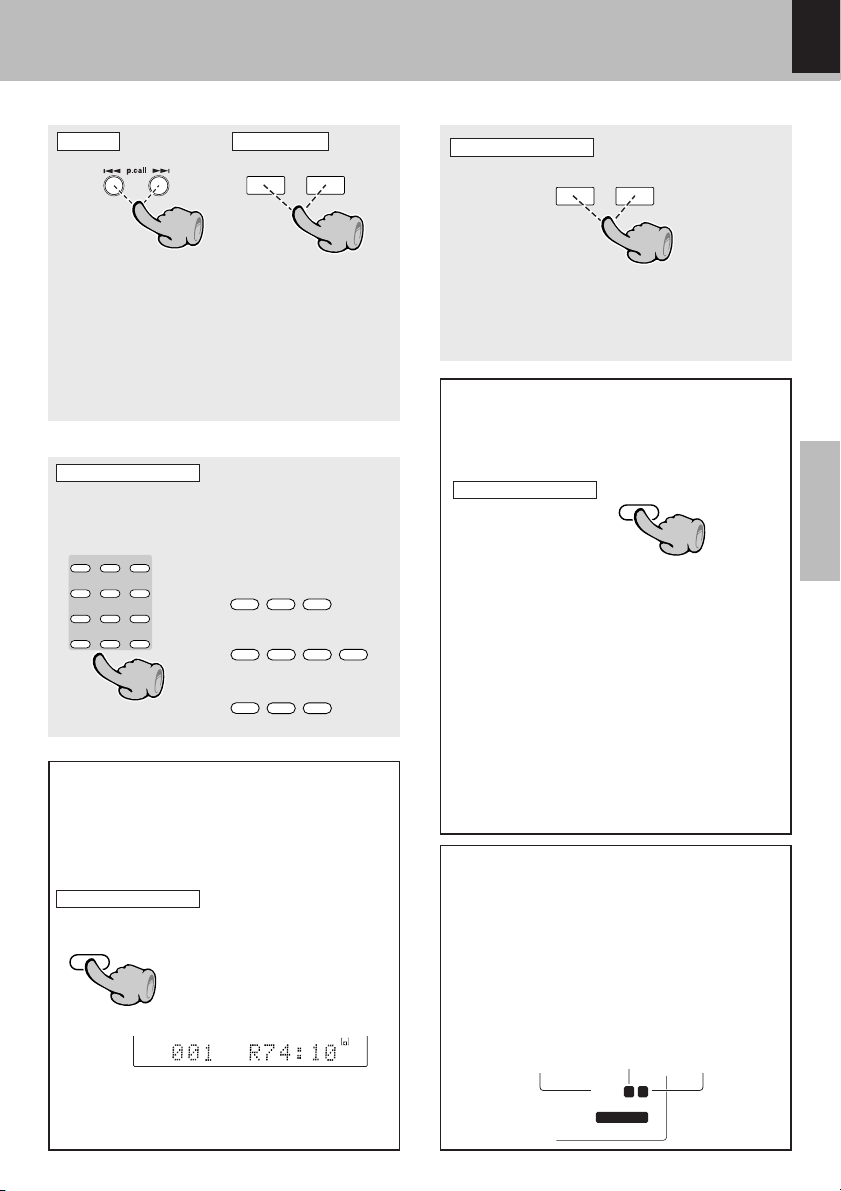
1. Load a disc.
CD6
4¢
22
11
7STOP
Label side
1 Open the CD tray.
2 Place a disc.
3 Close the CD tray.
Repeat 1 to 3 to set up to three discs.
÷ Always press the 0 key to close the CD tray.
÷ Do not touch the played side of disc.
÷ Be sure to place a disc horizontally. Placing it
with an inclination will result in malfunction.
P.CALL
CD1, CD2, CD3
Recess for
single CD (8 cm)
SET
2. Start playback.
÷ After a few seconds, play
starts from track No.1.
÷ When more than one disc has
been set in this unit, the next
disc will be played automatically when playback of one
disc ends. Playback will stop
when all discs have been
played. (Relay playback)
To pause playbackTo stop playback
÷ Each press pauses and plays the CD
alternately.
Playback
indication
Elapsed time of
track being played
Track No. being played
L
R
10 5 3 1 0 (–dB)
30
DIGITAL
Level
indication
Lit
Page 21
Skipping tracks
Remote controlMain unit
4¢
P.CALL
Playback of CD
To fast forward and backward
Remote control unit only
TUNING
¡
1
DOWN UP
21
HD-5MD/EN
÷ The track in the direction of the key pressed
is skipped, and the selected track will be
played from the beginning.
÷ When the 4 key is pressed once during
playback, the track being played will be
played from the beginning.
÷ To skip further to a track located before the
current track, press the 4 key quickly.
Playback from desired track
Remote control unit only
Select the desired track No.
12
ABC
3
DEF
Press the numeric keys as
4
GHI5JKL6MNO
7
PQRS
8
TUV9WXYZ
&( )-
+100
0 +10
shown below....
',:
To select track No. 23
+10
',:
+10
',:3DEF
,,
:
To select track No. 30
+10
',:
+10
',:
+10
:
,,
',:
In regard to title display
When a disc conforming to CD TEXT is played
and the "DISPLAY/CHARAC." key is pressed
during CD playback (or during stop), the character information recorded on the CD can be
displayed on the display. Each time the display key is pressed, switching is done between the following items.
Remote control unit only
DISPLAY
/CHARAC.
→Track No. → Track title
Disc title
*1
The disc title is displayed during stop.
The track title is scrolled during playback.
*1
*1
÷ Press and hold one of the keys during play-
back. Normal playback resumes at the point
where the key is released.
Start of playback from a desired disc
÷ Press the key for the de-
sired disc.
÷ When no disc has been
set for the selected tray,
playback will start from
the next disc.
Basic
In regard to display of the disc indication
Disc number indication.
1
is displayed when the disc information is read in.
2
The symbol lights at the selected disc number.
3
When the CD 0 key is pressed, playback starts
from the disc with the symbol .
0
,
Disc indication
In regard to display of the CD time
Each time the "TIME/SPACE" key is pressed
during CD playback, the time display on the
display is switched.
Remote control unit only
1 Elapsed time of the track
: 1:23
2 Remaining time of the track
: REMAIN display 2:37
3 Total elapsed time of the disc
: TOTAL display 23:50
4 Total remaining time of the disc
:REMAIN TOTAL display 36:50
÷ Only 1 and 2 are displayed during random
playback and single track repeat.
÷ At the time of program playback, 4 be-
comes the display of the total time for the
programmed tracks.
TIME
/SPACE
Page 22
22
Playback of MD
HD-5MD/EN
4¢
1
Basic
Insert in arrow direction.
To remove the disc
DISPLAY
/CHARAC
P.CALL
TUNING
¡
1
ア
2
カABC
3
4
タGHI5ナJKL6ハ
7
マPQRS
8
ヤ
TUV9ラWXYZ
&( )-
+100
0
ワヲン
+10
DISPLAY
TIME
CLEAR
/CHARAC.
/SPACE
/DELETE
TUNER/BAND
AUX
/TAPE
MD
6
P.CALL DISC SKIP
4¢7
AUTO/MONO
¡
TUNING
1
PERV.–GROUP–NEXT
UP
DOWN
SLEEP REPEAT RANDOM P.MODE
BEST HITS TIMER SOUND MUTE
O.T.E.
DOWN UP
VOLUME
POWER
サDEF
TITLE INPUT
MNO
TRACK EDIT
SET
',:
SET
ENTER
CD
2
MD6
6
STOP
7STOP
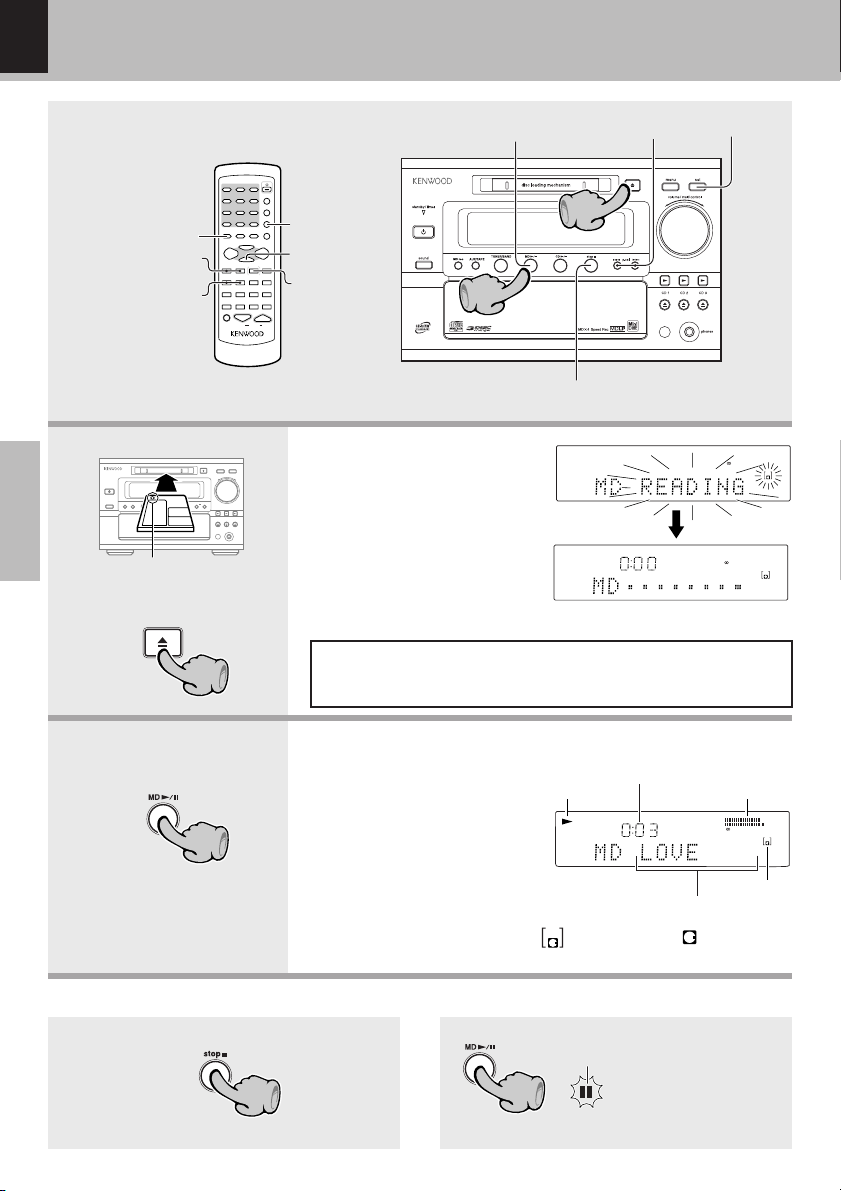
1. Insert a minidisc.
÷ Insert a minidisc correctly
into the slot.
Minidiscs cannot be inserted or ejected when the power is OFF
(standby). Always switch on the power and then insert a minidisc.
Forced insertion of a disc in standby condition can cause defects.
22
MD6
4¢
P.CALL
SET
11
7STOP
L
R
10 5 3 1 0 (–dB)
30
MD
DIGITAL
L
R
10 5310(–dB)
30
MD
DIGITAL
Display example when there is no title
2. Start playback.
÷ Playback starts in the recorded
mode (standard, 2x, 4x).
÷ During playback, the track title
is displayed at the start of the
track.
÷ When a track not on the
minidisc is selected while
"READING" flashes, the last
track of the minidisc will be
played.
To pause playbackTo stop playback
Elapsed time of
Playback
indication
track being played
Track title
MD
MD indication : The mark is lit when
Lit
a disc has been set.
÷ Each press pauses
and plays the CD
alternately.
Level
indication
L
R
10 5 3 1 0 (–dB)
30
MD
indication
MD
DIGITAL
Page 23
Skipping tracks
2 4
LP
DIGITAL
Remote controlMain unit
4¢
P.CALL
To fast forward and backward
Remote control unit only
TUNING
¡
1
DOWN UP
23
HD-5MD/EN
÷ The track in the direction of the key pressed
is skipped, and the selected track will be
played from the beginning.
÷ When the 4 key is pressed once during
playback, the track being played will be
played from the beginning.
÷ To skip further to a track located before the
current track, press the 4 key quickly.
Playback from desired track
Remote control unit only
Select the desired track No.
Press the numeric keys as
12ABC
4GHI 5JKL 6
7
PQRS
8
TUV9WXYZ
&( )-
+100
0 +10',:
shown below....
3DEF
MNO
To select track No. 23
+10
',:
+10
+10
&( )-
+100
',:
',:3DEF
,,
+10
',:
+10
,,
+10
',:
3
DEF
,,
',:
0
,
:
To select track No. 30
:
To select track No. 113
:
In regard to title display
When the display key is pressed during MD
playback (or during stop), the character information recorded on the minidisc can be displayed on the display.
Remote control unit only
DISPLAY
/CHARAC.
1 Track title (during playback)
Disc title (during stop)
2 Track No. display
3 Display of the remaining re-
cording time (see below)
Number of recorded tracks
Remaining recordable
time
MD
DIGITAL
÷ Press and hold one of the keys during play-
back.
÷ Normal playback resumes at the point
where the key is released.
In regard to display of the MD time
Each time the "TIME/SPACE" key is pressed
during MD playback, the time display on the
display is switched.
Remote control unit only
TIME
/SPACE
1 Elapsed time of the track
: 1:23
2 Remaining time of the track
: REMAIN display 2:37
3 Total elapsed time of the disc
: TOTAL display 23:50
4 Total remaining time of the disc
:REMAIN TOTAL display 36:50
÷ Only 1 and 2 are displayed during random
playback and single track repeat.
÷ At the time of program playback, 4 be-
comes the display of the total time for the
programmed tracks.
In regard to the MD playback mode
(recording mode) (
MD tracks are played back according to the recording
mode (REC MODE).
MDLP uses the new audio compression standard
ATRAC3, and it is shown on MD recorders and MD
players with long-time recording and/or playback
function for stereo 2x (or 4x), as well as on MD media
recorded with ATRAC3 (MDs only for playback).
Indication of the
long-time recording mode
‹
Indication of
2x recording
)
Indication of
4x recording
Basic
Page 24
24
Receiving broadcast station
POWER
1ア
2カABC
3サDEF
TITLE INPUT
4タGHI 5ナJKL 6
ハ
MNO
TRACK EDIT
7
マPQRS
8ヤ
TUV9ラWXYZ
&( )-
SET
+100
3
3
0ワヲン +10 ',:
DISPLAY
TIME
CLEAR
/CHARAC.
/SPACE
/DELETE
TUNER/BAND
AUX
/TAPE
6
MD
4¢7
P.CALL DISC SKIP
AUTO/MONO
¡
TUNING
1
PERV.–GROUP–NEXT
DOWN
UP
SLEEP REPEAT RANDOM P.MODE
BEST HITS TIMER SOUND MUTE
O.T.E.
DOWN UP
VOLUME
ENTER
CD
6
STOP
ENTER
1,2
AUTO/MONO
DISPLAY
/CHARAC
P.CALL
4¢
TUNING
¡
1
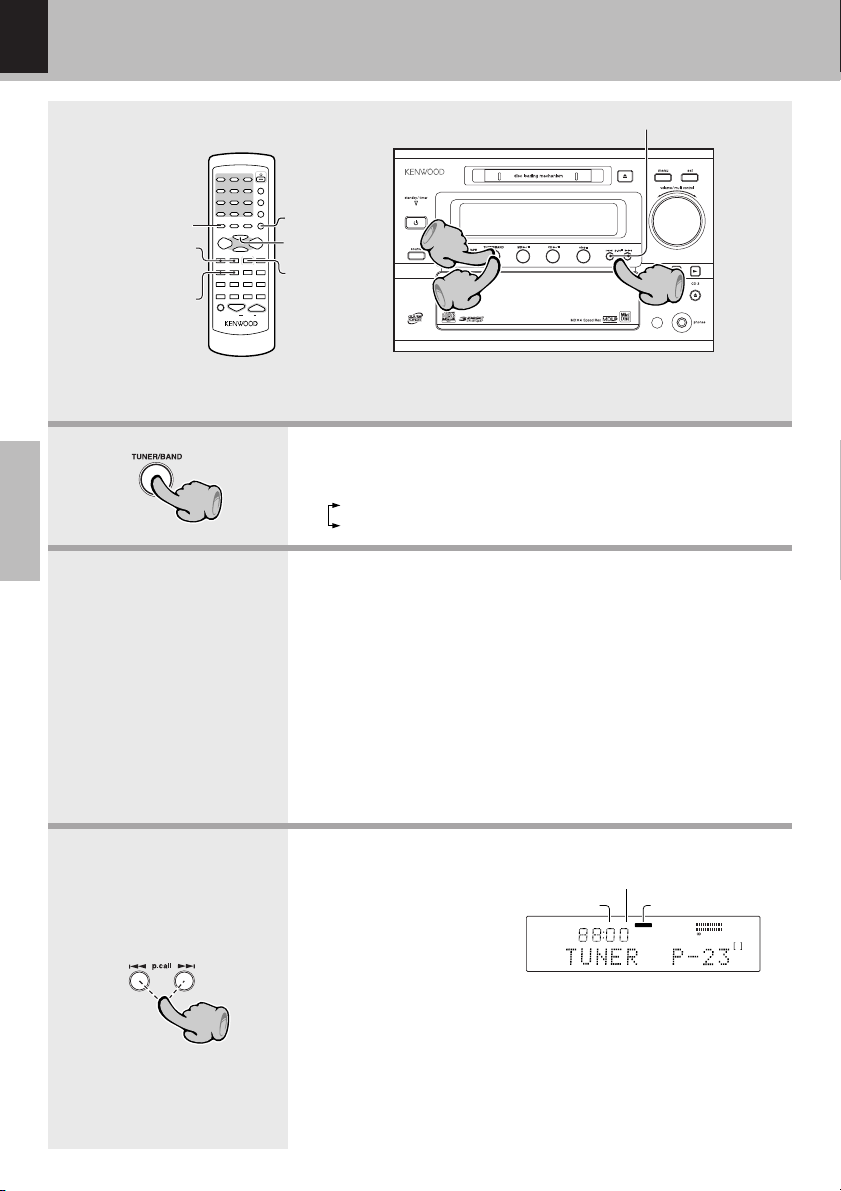
1. Select the tuner input.
Each press of the TUNER/band key switches the band as follows.
Basic
2. Preset a radio station in memory.
Collective presetting of stations ∞
One-by-one presetting (Manual preset) §
HD-5MD/EN
4¢
P.CALL
11
22
FM
AM
Follow the procedure in "Collective presetting of stations" to preset
automatically the tunable radio stations in your area.
÷ Once the stations are stored by auto presetting, you are not required
to repeat this procedure the next time you listen to radio. However
when you shift to another location whereby the broadcast station
frequencies are different, you will have to re-execute the presetting
of stations.
A station can also be tuned even when it is not preset. For details,
read "Tuning to a non-preset radio station (Auto tuning, Manual
tuning)".
33
3. Tuning (Preset Call)
÷ If radio stations have al-
ready been stored with
auto presetting or manual
presetting, select a station
using the 4, ¢ key.
Auto tuning
indication
Tuned
indication
AUTO
FM
Stereo broadcast
reception indication
TUNED
STEREO
MHz
L
R
10 5310(–dB)
30
MD
DIGITAL
Each press of the same
key switches the preset
stations in sequence.
When ¢ is pressed : 1=2=3 ... 38=39=40=1...
When 4 is pressed : 40 = 39 = 38 ..... 3 = 2 = 1 = 40.....
÷ When a key is held depressed, preset stations will be skipped at an inter-
val of about 0.5 second.
÷ To select a preset station from the remote, use the 4 P.CALL ¢ key
or numeric keys.
Page 25

Collective presetting of stations
Remote control unit only
1 Select the tuner input.
TUNER/BAND
Receiving broadcast station
HD-5MD/EN
25
2 Press the "ENTER" key for more than 2 sec-
onds
ENTER
AUTO
FM
MHz
STEREO
L
R
10 5310(–dB)
30
MD
÷ A maximum of 40 stations of the band presently
being received will be preset.
÷ When there are many stations and the intended
station has not been preset, please also use
"One-by-one presetting (Manual preset)".
Channel space setting
The space between radio channels has been set to the one that prevails in the area to which the system is shipped.
However, if the current channel space setting does not match the setting in the area where the system is to be
used, for instance when you move from area 1 or area 2 shown in the following table or vice versa, proper reception of AM/FM broadcasts cannot be expected. In this case, change the channel space setting in accordance with
your area by referring to the following table.
Main unit only
1 Select the tuner input.
2 Press the "stop 7" key for more than 2sec-
onds.
Each press the "stop 7" key for more than 2 seconds switches the modes as follows.
1 FM 50 k
2 FM 100 k
÷ At FM 50 kHz, the corresponding AM frequency is
9 kHz.
At FM 100 kHz, the corresponding AM frequency
is 10 kHz.
Basic
Area
USA, Canada and South
1
American countries
2
Other countries
CHANNEL
Space Frequency
FM: 100 kHz
AM: 10 kHz
FM: 50 kHz
AM: 9 kHz
Page 26

26
Tuning to a non-preset radio station (Auto tuning, Manual tuning)
Select the tuning mode according to the radio
wave receiving condition.
When the receiving condition is good:
AUTO mode
When it is poor due to weak radio waves:
MANUAL mode
Receiving broadcast station
HD-5MD/EN
1 Press the " 7 STOP (AUTO/MONO)" key
during TUNER input.
Remote controlMain unit
STOP
7
AUTO/MONO
2 Tune a station.
tuning
1
DOWN UP
TUNING
¡
Basic
One-by-one presetting (Manual preset)
Remote control unit only
1 Perform the procedure in "Tuning to a non-
preset radio station (Auto tuning, Manual
tuning)" to receive the station to be preset.
2 Press the ENTER key during reception.
ENTER
Each press alternates the mode.
1 "AUTO" : Stereo reception
2 "MANUAL" : Monaural reception
÷ In MANUAL mode, FM stations are received
in monaural.
In AUTO mode :
The next preset station can be received automatically every time the TUNING (1 or ¡) key is
pressed.
In MANUAL mode :
Press the TUNING (1 or ¡) key repeatedly until
the desired station is received. The desired station
can also be received by holding the TUNING (1 or
¡) key depressed until its frequency is displayed.
÷ A maximum of 40 stations of the band presently
being received will be preset.
3 Select one of the preset numbers from 1 to 40.
4¢
P.CALL
12
ABC
3
DEF
4
GHI5JKL6MNO
or
7
PQRS
8
TUV9WXYZ
&( )-
+100
0 +10
',:
4 Press the ENTER key again.
(Repeat steps 1, 2, 3 and 4 to preset other
stations)
÷ If several stations are preset under the same num-
ber, the previous memory is replaced with the latest
memory contents.
Page 27

RDS (Radio Data System)
(For U.K. and Europe)
HD-5MD/EN
RDS is a system which transmits useful information (digital data) for FM broadcasts together with the broadcast signal. Tuners and receivers designed for RDS reception can extract the information from the broadcast signal for use with various functions such as automatic display of the station name.
This unit is equipped with the following functions utilizing RDS data :
PTY (Program Type Identification) Search :
•
The tuner automatically searches for a station which is
currently broadcasting a specified program type
(genre).
FM
TUNED
R·D·S
MHz
STEREO
L
R
PTY
10 5310(–dB)
30
MD
27
PS (Program Service Name) Display :
When an RDS broadcast is received, the station
÷ Some functions may not be provided or be given
different names depending on countries or areas.
name is automatically displayed.
Before using RDS
For reception of RDS stations, the auto memory function must be used to preset the stations. During
the auto memory function, the presetting sequence priority will be given to the RDS stations.
Basic
Page 28

28
RDS (Radio Data System) (For U.K. and Europe)
Searching for a desired program type (PTY search)
By specifying the type of program (genre) you want to listen to, the tuner automatically searches for a
station which is currently broadcasting a program of the specified type.
However, if a station is not preset by auto memory, "NO DATA" will light instead of the program (genre)
type and PTY search is not available.
HD-5MD/EN
Set the reception band to FM. Preset RDS stations with the auto memory function.
1. Select the PTY search mode.
Remote control unit only
RANDOM
/PTY
When an RDS broadcast is received, the program
type is shown on the display. If no PTY data is
available, or if the station is not an RDS station,
"NONE" is displayed.
2. Select the desired program type.
Basic
Use program type table on the right for your convenience.
Selection with the 4 or ¢ key.
4¢
P.CALL
Select while "PTY" is lit.
The desired program type can be selected
with the 4 or ¢ key from 29 types. Press
the key and release it when the desired type is
displayed.
Program type table
4, ¢ keys
4
DOWN
UP
¢
Program Type Name Display
Pop Music
Rock Music
Easy Listening Music
Light Classical
Serious Classical
Other Music
News
Current Affairs
Information
Sport
Education
Drama
Culture
Science
Varied
Weather
Finance
Children's programs
Social Affairs
Religion
Phone In
Travel
Leisure
Jazz Music
Country Music
National Music
Oldies Music
Folk Music
Documentary
∞
Lit
TUNED
FM
R·D·S
MHz
STEREO
PTY
L
R
10 5310(–dB)
30
MD
POP M
ROCK M
EASY M
LIGHT M
CLASSICS
OTHER M
NEWS
AFFAIRS
INFO
SPORT
EDUCATE
DRAMA
CULTURE
SCIENCE
VARIED
WEATHER
FINANCE
CHILDREN
SOCIAL
RELIGION
PHONE IN
TRAVEL
LEISURE
JAZZ
COUNTRY
NATION M
OLDIES
FOLK M
DOCUMENT
Page 29

3. Start the search.
RANDOM
/PTY
RDS (Radio Data System) (For U.K. and Europe)
HD-5MD/EN
When searching for a Rock Music broadcast
Display while the tuner is searching.
Lit
TUNED
FM
R·D·S
MHz
Program type name display.
STEREO
L
R
PTY
10 5310(–dB)
30
29
MD
÷ No sound is heard while "PTY" is blinking.
÷ If a program of the desired type cannot be found,
"NO PROG" is displayed, then after several seconds
the display returns to the original display.
÷ If a program of the desired type is found, that pro-
gram is received and the program type name display
changes to the station name display.
To change to a different program type :
Repeat steps 1., 2., 3.
Using the RDS display function
Remote control unit only
Press the P.MODE/RDS DISP. key
P.MODE
/RDS DISP.
When a station is received.
Goes off
FM
TUNED
R·D·S
MHz
Station name display.
Each press alternates the mode.
1 PS display
2 Preset number display
STEREO
L
R
PTY
10 5310(–dB)
30
Basic
MD
Page 30

30
DOWN UP
VOLUME
1ア
POWER
2カABC
4タGHI 5ナJKL 6
ハ
MNO
7
マPQRS
&( )-
8ヤ
TUV9ラWXYZ
+100
0ワヲン +10 ',:
3サDEF
TITLE INPUT
TRACK EDIT
SET
ENTER
DISPLAY
/CHARAC.
TIME
/SPACE
CLEAR
/DELETE
TUNER/BAND
MD
6
AUX
/TAPE
CD
6
1
¡
4¢7
P.CALL DISC SKIP
TUNING
DOWN
SLEEP REPEAT RANDOM P.MODE
BEST HITS TIMER SOUND MUTE
PERV.–GROUP–NEXT
UP
STOP
AUTO/MONO
O.T.E.
11
22
1,2
menu
set
volume/multi control
44
VOLUME
Listening to an AUX/TAPE input source
1. Press the AUX/TAPE key.
When the AUX/TAPE key is pressed, the unit switches to external input or tape.
Basic
2. Select external input or tape.
When the AUX/TAPE key is pressed for at least two seconds, the
input is switched as follows.
1 AUX : Playback of the equipment connected to the
2 TAPE : Playback of the equipment connected to the
3 DIGITAL IN : Playback of the equipment connected to the
AUX terminal at the rear.
TAPE terminal at the rear.
DIGITAL IN terminal at the rear.
HD-5MD/EN
3. Start playback of the external source.
4. Adjust the volume.
Adjustment of the input level at the time of AUX selection
When the output level of the source equipment connected to the AUX terminal does not match the input
level of this unit (when the volume is too high or too low), it can be adjusted.
1 Select "AUX INPUT ?" as follows.
1 Press the "menu" key.
2 Select "AUX INPUT ?" with the volume/
multi control knob.
3 Press the "set" key.
2 Adjust the input level with the volume/
multi control knob.
The input level can be adjusted from -5 to +2.
3 Press the "set" key to confirm the input
level.
Page 31

In regard to long-play MD stereo recording and playback
HD-5MD/EN
This unit is compatible with long-play MD stereo recording and playback (compatible with MDLP).
The recording modes are stereo recording, monaural long-play recording, stereo 2x long-play record-
ing, and stereo 4x long-play recording, and use is possible for all music sources which can be recorded by
this MD.
Mixed recording of tracks with different recording modes into the same MD also is possible.
Set the recording mode in advance, and then perform the recording operation.
In regard to long-play stereo recording (LP2, LP4)
Stereo long-play recording permits long-play recording by further increasing the digital compression
ratio for the audio signal in comparison with stereo recording and monaural recording. The LP4 mode
has a higher compression ratio than the LP2 mode and can record for a longer time.
÷ Tracks recorded on an MD with stereo 2x long-play recording (LP2) or stereo 4x long-play recording (LP4) with
this unit can be played back on other equipment compatible with MDLP.
÷ With stereo recording on MD, the quality changes with increasing recording time. Use stereo recording (STE-
REO) for recording with the best quality.
Stamp function (STAMP)
This is a function which automatically adds "LP:" in front of the titles of tracks recorded with stereo 2x
long-play recording (LP2) or stereo 4x long-play recording (LP4) with this unit. When the stamp function is used, "LP:" will be displayed in front of the track title.
"LP:" will not be displayed during playback with this unit. It is displayed only at the time of title editing.
"LP:" is displayed as the title only in case of playback on equipment not compatible with MDLP, when tracks
recorded by stereo long-play recording are being played.
With this unit, the stamp function (STAMP) can be switched ON ("LP:" is added) or OFF ("LP:" is not added).
Types of record mode
Stereo recording (STEREO):
The possible recording time is the time shown on the MD cartridge.
Stereo 2x long-play recording (LP2):
The recording is in stereo, but the recording time is approximately double the time shown on the MD cartridge.
Stereo 4x long-play recording (LP4):
The recording is in stereo, but the recording time is approximately four times the time shown on the MD cartridge.
Monaural long-play recording (MONO):
The recording is monaural, but the recording time is approximately double the time shown on the MD cartridge.
31
Basic
In case of playback of an MD recorded in stereo long-play mode on equipment not compatible with stereo long-play mode
When it is tried to play tracks recorded in stereo long-play mode on equipment not compatible with stereo longplay mode, playback status will be reached, but no sound will be put out. When an MD with mixed stereo or mono
recordings and stereo long-play recordings is played on such equipment, sound will be put out only for the stereo
or mono recordings.
When such an MD is played and the volume is turned up excessively during a portion where no sound is put out,
sound with a large volume will be put out suddenly when a track recorded with stereo or mono is reached. Take
care not to turn up the volume excessively.
The MD editing functions have limitations in regard to tracks recorded in different recording modes.
"Combining tracks" (COMBINE)"
Page 32

32
Recording to MD
All recording functions can be used for long-play recording with ATRAC3 (MDLP) to MD.
The recording method using the MD rec key explained here is convenient mainly for recording from
the tuner or from an external source. "Convenient recording methods" is recommended for recording
from CD. q
POWER
1ア
2カABC
3サDEF
TITLE INPUT
4タGHI 5ナJKL 6
ハ
MNO
TRACK EDIT
7
マPQRS
8ヤ
TUV9ラWXYZ
0ワヲン +10 ',:
TIME
CLEAR
/SPACE
/DELETE
TUNER/BAND
MD
6
AUTO/MONO
¡
PERV.–GROUP–NEXT
UP
DOWN UP
VOLUME
SET
ENTER
CD
6
STOP
TRACK EDIT
7
STOP
44
55
11
44
MD 6
&( )-
+100
DISPLAY
/CHARAC.
AUX
/TAPE
4¢7
P.CALL DISC SKIP
TUNING
1
DOWN
SLEEP REPEAT RANDOM P.MODE
BEST HITS TIMER SOUND MUTE
O.T.E.
22
HD-5MD/EN
33
Basic
Example: Selection of
TUNER
Insert in arrow direction.
MD rec
CD6
stop7
1. Make the MD recording preparations.
÷ Insert a recordable minidisc correctly into the minidisc insertion slot.
÷ If a minidisc is being played, press the STOP 7 key.
÷ It is not necessary to find the start of the unrecorded part.
÷ When the minidisc has only little unrecorded space left, use the
"ERASE" function (I) to create sufficient unrecorded space, and
then start recording.
Minidiscs cannot be inserted or ejected when the power is
OFF (standby). Always switch on the power and then insert
a minidisc. Forced insertion of a disc in standby condition
can cause defects.
2. Select the source to be recorded.
Recording of radio broadcasts (analog recording)
Press the TUNER key. ( Receive the desired station. ¢
Recording from a CD (digital/analog recording*)
Press the CD 6| key. ( Pause the CD at the start of the track to be
recorded. )
Recording from tape (analog recording)
Press "TAPE". ( Pause the tape at the start of the title to be recorded.
º
Recording from external equipment (AUX) (analog recording)
Press "AUX". ( Make the required preparations like finding the start of
the title etc. º
Digital recording from external equipment(AUX)
Select "DIGITAL" ( Make the required preparations like finding the start
of the title etc. º
Please refer to page 30 for switching between tape and external inpu
÷ The default recording method for CDs is set to digital at the
time of purchase. If required, switch to analog.
t.
Page 33

3. Set the recording mode.
1 Select "BALANCE" as follows.
1 Press the "menu" key.
2 Select "MD REC MODE ?" with the "volume/multi control"
knob.
When the "volume/multi control " knob is turned, switching is done
as follows.
"MD REC MODE ?"
"GROUP MAKE ?"
33
HD-5MD/EN
1
"DIMMER ?"
Return to the original status is made when no operation is performed within 20 seconds.
2 Press the "set" key.
2
2 Select the desired recording mode.
1 Select the desired recording mode with the volume/
Basic
multi control knob.
"STEREO" ...... Stereo recording: Recording is possible for
3
"LP2" .............. Stereo 2x long-play recording: Recording is
"LP4" .............. Stereo 4x long-play recording: Recording is
"MONO" ........ Monaural recording: Monaural recording is
the time shown on the MD cartridge.
possible for approximately double the time
shown on the MD cartridge.
possible for approximately four times the
time shown on the MD cartridge.
possible for approximately double the time
shown on the MD cartridge.
2 Press the "set" key.
3 When LP2 or LP4 has been selected in step {2}, turn the
volume/multi control knob, select "ON" or "OFF" for
LP:STAMP, and press the set key.
"LP:STAMP ON" : "LP:" is inserted in front of the track title.
"LP:STAMP OFF": "LP:" is not inserted in front of the track title.
4. Start recording.
1 Press the MD rec key. (Recording pause status will be en-
tered.)
2 When the preparations have been completed, press the MD
rec key again. (Recording will start.)
÷ When the source is a CD, pressing the 6 key will start CD
or
(CD synchronized recording)
playback and MD recording. (CD synchro-recording)
2 Start playback of the source (sound).
This step is not required in case of recording from a tuner or in case
of CD synchro-recording.
÷ When adjustment of the recording level is required, adjust while
the recording is paused.
Page 34

34
To pause recording
To pause recording
HD-5MD/EN
Remote controlMain unit
MD 6
Remote controlMain unit
÷ To start recording again, press the MD 6 key.
At this time, the track number will be increased
by "1".
÷ When the CD 6 is pressed during CD record-
ing, the recording and the CD playback can be
paused. Press the CD 6 key again to continue
the recording.
Eject the minidisc after completion of the
recording.
STOP
7
÷ Always eject the minidisc after completion of the
recording.
AUTO/MONO
Basic
In case of a CD with CD-TEXT recording, the
TEXT data will not be recorded.
In regard to display messages
Recording is not possible when one of the following messages is displayed.
"DISC FULL" : The minidisc is full.
Delete unwanted titles.
"PROTECTED" : The slider for prevention of er-
"PLAY ONLY" : This is a minidisc only for play-
roneous erasure is open.
Close the slider. k
back.
Insert a recordable minidisc.
k
k
While "MD WRITING" is displayed, information
is being written to the minidisc, and the unit
should not be subjected to vibrations or shocks.
In regard to the track number at the time of recording
When recording from a CD, the track number is
increased when the track changes.
When recording from external equipment, the
track number automatically is increased by "1"
when the input level again exceeds a specific
level after having dropped for at least 2 sec below this level. In case of classic music, the track
number may be increased by "1"when there are
longer passages with very low level. Unnecessary track numbers can be deleted later. ("Combining tracks (COMBINE)" Y)
÷ In case of tuner recording, the track number auto-
matically increases every 10 minutes. Please edit
as required. ("Dividing tracks (DIVIDE)" R,
"Combining tracks (COMBINE)" Y)
If you want to increment the track number during a recording, press the TRACK EDIT key on
the remote control during the recording to set a
track number at that position.
The track numbers can be used to find the start
of a track at the time of playback, for programming, etc.
Press during
the recording
TRACK EDIT
Page 35

Select the CD recording format and the recording
L
R
30
10 5310(–dB)
MD
DIGITAL
1
L
R
30
10 5310(–dB)
MD
DIGITAL
level.
(When the source is a CD)
When recording from a commercial CD to an MD,
select the recording format as "DIGITAL" (digital
recording), the default setting at the time of purchase. However, when recording from CD to MD,
digital recording may not be possible because of
SCMS*. In such a case, switch the recording format to "ANALOG" (analog recording).
÷ For details, refer to "In regard to SCMS". d
1 Select CD input
35
HD-5MD/EN
Adjust the recording level.
1 Play the input source to be recorded.
2 Press the MD rec key to enter recording
pause status. In recording pause status,
the recording level can be adjusted while
looking at the level indication.
3 Select "REC LEVEL ?" as follows.
1 Press the "menu" key.
2 Select "REC LEVEL ?" with
the "volume/multi control"
knob.
"MD REC MODE ?"
"GROUP MAKE ?"
"REC SPEED ?"
"REC LEVEL ?"
1 Select "REC LEVEL ?" as follows.
1 Press the "menu" key.
2 Select "REC LEVEL ?" with
the "volume/multi control"
knob.
"MD REC MODE ?"
"GROUP MAKE ?"
"REC SPEED ?"
"REC LEVEL ?"
"DIMMER ?"
Return to the original status is
made when no operation is performed within 20 seconds.
2 Press the "set" key.
2 Select "ANALOG" or "DIGITAL" with the
"volume/multi control" knob and press the
"set" key.
"DIMMER ?"
Return to the original status is
made when no operation is performed within 20 seconds.
2 Press the "set" key.
2 Turn the volume/multi control knob to ad-
just the recording level and press the set
key.
Analog or digital recording is selected automatically according to the input source.
Adjust so that the level indication does not
exceed "0" frequently.
Display example in case of
digital recording
Display example in case of
analog recording
÷ The analog recording level can be adjusted from -12
to 0. The initial setting is 0.
÷ The digital recording level can be adjusted from -6 to
+6. The initial setting is 0.
÷ At the time of CD 4x speed O.T.E. recording (w),
recording is done at the recording level "0" (standard
value), independent of the level set value.
Level
indication
Basic
Once recording has been completed, the recording level returns to the initial set value ("0").
Page 36

36
Various CD/MD playback features
Listening to the desired sequence (program playback)
It is possible to listen to selected tracks from a disc in the desired order. (Max. 32 tracks)
Set the source CD or MD in advance to stop status. )™
Remote control unit only
1 Press the "P.MODE"
(P MODE/RDS DISP) key
Application
P.MODE
/RDS DISP.
2 (At the time of CD program)
Pres the DISC SKIP keys to select the disc.
DISC SKIP
3 Pres the numeric keys to select
the track.
12
ABC
3
DEF
4
GHI5JKL6MNO
7
PQRS
8
TUV9WXYZ
&( )-
+100
0 +10
',:
4 Press the "SET" key to confirm
the selected track.
SET
÷ "PGM" will light and PGM
mode will be reached.
÷ Numbers not on a disc can not be selected.
PGM
1
2
3
PGM
1
2
3
÷ Return to the original status is made when no opera-
tion is performed within 20 seconds.
÷ When no operation is performed for some time after
confirmation, program stop status will be reached. To
continue programming, follow the procedure for "To
add a track to an existing program".
PGM
Disc Number
HD-5MD/EN
Lit
PGM
L
R
10 5 3 1 0 (–dB)
30
L
R
10 5310(–dB)
30
L
R
10 5310(–dB)
30
MD
DIGITAL
MD
DIGITAL
MD
DIGITAL
5 Repeat the steps 2 to 3 to con-
tinue programming.
6 Press the CD 6 (MD 6 ) key
to start program playback.
CD
MD
6
6
÷ Up to 32 tracks can be programed. When "PGM
FULL" is displayed, no more tracks can be programed.
÷ If you made a mistake, press the CLEAR key and en-
ter the track No. again.
÷ When a track No. is entered, the track will be added
to the end of the existing program.
÷ Tracks will be played in the order they were pro-
gramed (following the program numbers).
÷ When the "REPEAT" key is pressed during PGM
mode playback or stop, the PGM mode playback can
be repeated.
Page 37

To add a track to an existing program
Remote control unit only
Press in stop mode
2 (At the time of CD program)
Pres the DISC SKIP keys to select the disc.
1 Select the track number to be
added with the numeric keys.
12
ABC
3
DEF
4
GHI5JKL6MNO
7
PQRS
8
TUV9WXYZ
&( )-
+100
0 +10
',:
2 Press the "SET" key.
SET
Various CD /MD playback features
HD-5MD/EN
÷ Up to 32 tracks can be programed. When "PGM
FULL" is displayed, no more tracks can be programed.
÷ If you made a mistake, press the CLEAR key and
enter the track No. again.
÷ When a track No. is entered, the track will be added to
the end of the existing program.
37
To clear a programed track
Remote control unit only
Press in stop mode
CLEAR
/DELETE
÷ Each time the key is pressed, the last track
in the program is cleared.
Changing to the next track during playback of a track
Remote controlMain unit
4¢
P.CALL
÷ When the ¢ key is pressed during play-
back, play will skip to the next track in the
program.
÷ When the 4 key is pressed once during
playback, the track being played will be
played from the beginning.
To clear the entire program
Remote control unit only
Press in stop mode
P.MODE
/RDS DISP.
Confirmation of the contents of the programmed tracks
Press the 4, ¢ keys after completion of
programming.
Press in stop mode
Remote controlMain unit
4¢
P.CALL
÷ Each time a key is pressed, the programmed
tracks will be displayed sequentially.
Application
Page 38

38
Repeated playback
You can repeatedly listen to a favorite track or disc.
1 track repeat ............ The selected track will be repeated.
All repeat ................... The entire disc will be repeated.
Set the source CD or MD in advance to stop status. )™
Various CD /MD playback features
HD-5MD/EN
Press the "REPEAT" key ("repeat" key) during
playback or stop.
Remote controlMain unit
REPEAT
Changing to the next track during playback of a track
Application
Remote controlMain unit
4¢
P.CALL
Each press switches the repeat mode.
(At MD)
1 Off : .......... Repeat deactivated
One track repeat
2 "
3 "
" : ....
1
" : .......
All repeat
(At CD)
1 Off : .......... Repeat deactivated
One track repeat
2 "
3 "
4 "
÷ To cancel repeat mode, press the "REPEAT" key ("re-
peat" key) repeatedly to make the repeat indication
disappear.
" : ....
1
1
" :
DISC
ALL
" :
DISC
Repeat mode
indication
One disc repeat
All disc repeat
1
Repeat playback of programmed tracks
1 Perform programming. º
2 Press the "REPEAT" key.
REPEAT
÷ When the ¢ key is pressed during play-
back, play will skip to the next track.
÷ When the 4 key is pressed once during
playback, the track being played will be
played from the beginning.
Each press switches the repeat mode.
1 Program repeat ON.
2 Program repeat OFF.
Page 39

Various CD /MD playback features
HD-5MD/EN
Listening in random order (random mode)
The tracks of one disc or all discs can be played back in random order.
(1 disc) random ..... All tracks of one disc will be played and then playback will stop.
When an MD group has been selected, all tracks in that group will be played in random
order. (u)
All discs random ... After all tracks of one CD have been played in random order, the tracks of CD2 and CD3
Set the source CD or MD in advance to stop status. )™
Press the "random" key ("RANDOM" or "RANDOM/PTY" key) during playback or stop.
will be played in random order, and then the playback will stop.
Each press switches the mode.
Remote controlMain unit
(MD)
1 "RANDOM" off ......Normal playback
2 "RANDOM" lid ...... Random playback
(CD)
1 "RANDOM" off
Normal playback
2 "1 DISC RANDOM" lid
RANDOM
/PTY
3 "ALL DISC RANDOM" lid
Random playback
Random playback
39
Changing to the next track during playback of a track
Remote controlMain unit
4¢
P.CALL
÷ When the ¢ key is pressed during play-
back, the next track will be selected at random and will be played.
÷ When the 4 key is pressed once during
playback, the track being played will be
played from the beginning.
DISC
Random mode
indication
÷ To cancel random mode, press the "random" key
("RANDOM key) to make the RANDOM indication
disappear.
RANDOM
Repeated random playback
1 Perform the operation for random play-
back.
2 Press the "REPEAT" key.
REPEAT
Each press switches the repeat mode.
1 Random repeat ON.
2 Random repeat OFF.
Application
Page 40

40
HD-5MD/EN
Playback only the first track of selected CDs (BEST HITS program
playback)
Only the first track of the set CDs will be played.
As it is possible to exchange the CDs in the other trays while one CD is being recorded, this can be used
conveniently to continue playback or recording the hits of single CDs.
(BEST HITS program recording. t )
Remote control unit only
1 Set a disc into the CD tray.)
2 Enter CD stop status. )
3 Press the "BEST HITS" key.
BEST HITS
Lit
BEST HITS
1 Press the CD 6 key.
CD
6
Stop the BEST HITS program playback.
Application
STOP
7
AUTO/MONO
Cancel the BEST HITS program playback.
BEST HITS
÷ The first track of the selected disc will be played,
and then the unit will switch to the first track of the
next disc.
÷ BEST HITS program playback in combination with
repeat playback is not possible.
Playback in sequential order can be continued by sequentially replacing the discs.
Press the BEST HITS key in the BEST HITS program mode.
Goes off
BEST HITS
Page 41

Convenient recording methods
HD-5MD/EN
This unit provides the following recording features in addition to normal recording. Select the appropriate method according to the purpose of recording.
Recording to MD is possible with long-play recording (MD LP2, LP4) with all recording functions.
41
To record CD with a simplified method
All-track recording (O.T.E.)
Single-track recording (O.T.E.)
When "REC SPEED" is set to "HIGH", recording to MD can be done with 4 times of
the normal speed. w
To record desired CD tracks by reordering them
Program recording
To record only the first track of selected CDs ( Best hits program recording (BEST HITS)
BEST HITS program recording
(One-touch edit recording) w
\
\
\
\
Records all tracks in a CD onto a tape.
Records only one CD track being played onto a tape.
(This is convenient for recording of desired tracks from a
disc being heard for the first time.)
(Program recording) r
Recording of programed tracks in the programed order.
(Convenient for recording only the desired CD tracks in
the desired order.)
The tracks played by the BEST HITS program will be recorded. (This is convenient for producing an original selection of hits.)
t
Application
To record all tracks of a CD as one group ( Group recording (GROUP MAKE + O.T.E.)
Group recording
After recording to a minidisc, always press the 0 key to eject the disc.
\
The tracks of a recorded CD are recorded as one group.
(When many tracks are recorded on an MD, grouping by
artists or by albums is convenient for easy genre selection.)
u
Page 42

42
HD-5MD/EN
Recording of all tracks or a single track of a CD by one-touch recording (O.T.E.)
All tracks of a CD can be recorded by one-touch recording (normal speed, 4x speed)
(all tracks O.T.E.)
Main unit only
1 Select "REC SPEED ?" as follows.
1 Press the "menu" key.
2 Select "REC SPEED ?" with the "volume/
multi control" knob.
3 Press the "set" key.
2 Select the desired recording speed.
1 Select the desired recording speed
with the "volume/multi control" knob.
3 Press the "set" key.
When the "volume/multi control " knob is turned, switching
is done as follows.
"MD REC MODE ?"
"GROUP MAKE ?"
"REC SPEED ?"
"DIMMER ?"
Return to the original status is made when no operation is performed within 20 seconds.
When the "volume/multi control " knob is turned, switching
is done as follows.
"CD > MD NORM"
: Recording with normal speed.
"CD > MD HIGH"
: Recording with 4 times of normal speed.
3 Set a recordable minidisc. ¤
Application
4 Set a disc into the CD tray. )
5 Enter CD stop status. )
6 Set the recording mode (STEREO, LP2,
LP4, or MONO).
Perform the operation of step 4 on page 33.
7 Press the "O.T.E." key on
the remote control unit.
8 After completion of recording, press the 0
key to eject the minidisc.
(Main unit)
O.T.E.
÷ Recording will start from the first track of the CD,
and all tracks will be recorded.
÷ When either the CD playback or the MD record-
ing stops, the other operation also will stop.
÷ When the possible recording time or the possible
number of tracks on the MD is exceeded, "DISC
FULL" will be displayed and the recording will
stop.
÷ Eject the minidisc after completion of the re-
cording.
Always eject the minidisc after completion of
the recording.
Page 43

HD-5MD/EN
A single track of a CD can be recorded by one-touch recording (normal speed, 4x
speed) (Single track O.T.E.)
1 Set a recordable minidisc. ¤
2 Play a desired track. )
3 Press the "O.T.E." key on the remote con-
trol unit.
O.T.E.
4 After completion of recording, press the 0
key to eject the minidisc.
(Main unit)
÷ When you want to record a track during playback
of a CD, return to the start of that track will be
made and playback and recording will be started
just by pressing the O.T.E. key during playback.
÷ Recording will be done with the recording mode
and the recording speed set in advance.
Perform the operation of step 3 on page 33 to
change the recording speed.
÷ At the end of the recording, the CD will enter
pause status.
÷ In the same way, other desired tracks can be re-
corded.
÷ When the possible recording time or the possible
number of tracks on the MD is exceeded, "DISC
FULL" will be displayed and the recording will
stop.
÷ Eject the minidisc after completion of the re-
cording.
Always eject the minidisc after completion of
the recording.
43
Application
In case of CD-R/RW, depending on the disc recording condition and the characteristics, sound skipping or inclusion of noise may occur on rare occasions with recording to MD at 4x speed (CD > MD
HIGH), and normal recording may not be possible.
In such a case, we recommend recording at normal speed (CD > MD NORM).
Page 44

44
Recording in changed order (PGM mode playback + O.T.E.)
It is possible to program the CD tracks and to
record this program to an MD. The tracks of three
CDs can be programmed and recorded to one MD.
HD-5MD/EN
1 Select the desired recording speed.w
2 Set a recordable minidisc. ¤
3 Set the disc(s) to the CD tray(s). 0
4 Bring the CD to stop status.
5 Program the tracks to be recorded. fl
6 Press the "O.T.E." key on the remote con-
trol unit.
O.T.E.
Application
4 After completion of recording, press the 0
key to eject the minidisc.
Perform the operations of steps 1and 2 on page
42 to select normal speed or 4x speed.
Perform the steps 1 to 5 of "Listening to the de-
sired sequence (program playback)" on page 36
to program the tracks.
÷ Recording will be done with the recording mode
and the recording speed set in advance.
Perform the operation of step 3 on page 33 to
change the recording speed.
÷ Recording of the programmed CDs starts.
÷ When either the CD playback or the MD recording
stops, the other operation also will stop.
÷ When this unit changes the CD automatically ac-
cording to the program, the recording also is
paused automatically and no unnecessary recording (parts without sound) is made.
÷ When the possible recording time or the possible
number of tracks on the MD is exceeded, "DISC
FULL" will be displayed and the recording will
stop.
÷ O.T.E. recording in combination with repeat play-
back is not possible.
(Main unit)
÷ Eject the minidisc after completion of the recording.
Always eject the minidisc after completion of
the recording.
Cancel PGM mode playback. Interrupting a recording
PGM mode can be canceled by the procedure for "To clear the entire program".‡
When the STOP 7 key is pressed, the
playback and the recording are ended.
Page 45

HD-5MD/EN
Recording only the first track of selected CDs (BEST HITS program
recording)
Only the first track of the set CDs will be recorded.
As it is possible to exchange the CDs in the other trays while one CD is being recorded, this can be used
conveniently to continue recording the hits of single CDs.
Remote control unit only
1 Select the desired recording
speed.w
2 Set a recordable minidisc.
¤
3 Set a disc into the CD tray.)
4 Enter CD stop status. )
5 Press the "BEST HITS" key.
BEST HITS
6 Press the "O.T.E." key to start
recording.
O.T.E.
÷ Recording will be done with the recording mode
and the recording speed set in advance.
Perform the operation of step 3 on page 33 to
change the recording speed.
÷ Recording of only the first track of the CDs will
start.
÷ The first track of the selected disc will be re-
corded, and then the unit will switch to the first
track of the next disc. (BEST HITS program recording)
÷ When this unit changes the CD automatically ac-
cording to the BEST HITS program, the recording
also is paused automatically and no unnecessary
recording (parts without sound) is made.
÷ When the BEST HITS program playback or the
MD recording stops, the other operation also
stops automatically.
÷ When the possible recording time or the possible
number of tracks on the MD is exceeded, "DISC
FULL" will be displayed and the recording will
stop.
÷ BEST HiTS program recording in combination with
repeat playback is not possible.
45
Application
Stop the BEST HITS program playback.
STOP
7
AUTO/MONO
When discs are replaced sequentially, recording in sequential order can be continued without interruptions.
Cancel the BEST HITS program playback.
BEST HITS
Page 46
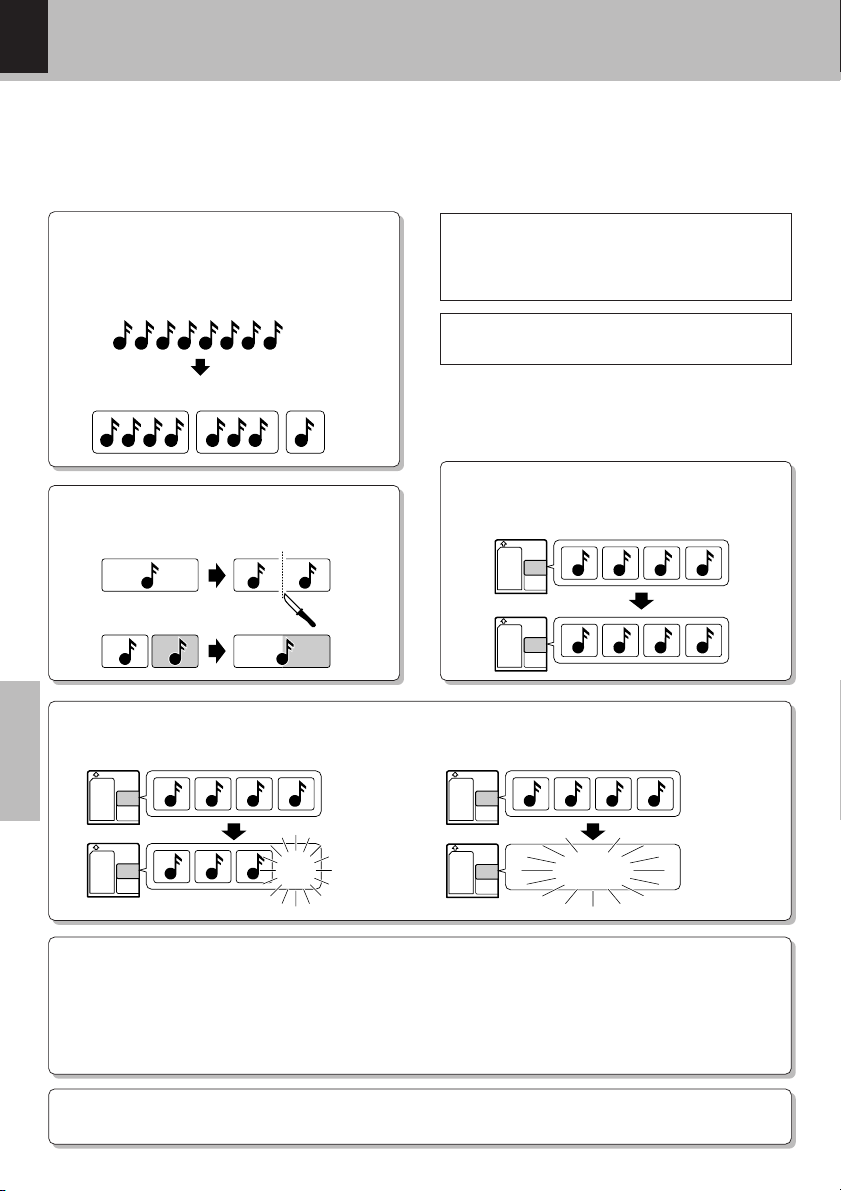
46
MD Edit Functions
Selection of the type of edit function
When commercial minidiscs for recording are used, various types of editing can be performed after recording. Minidiscs with commercial software only for playback cannot be edited.
HD-5MD/EN
Grouping of tracks
Tracks can be divided into groups, and these
groups can be used for editing, repeat playback,
etc.uQ
1 43 6 872
Group 1 Group 2 Group 3
1 432
5
6 75
8
Function limitations because of the MD standard
Some functions are limited because of the MD
standard. Please check these before you assume
a malfunction. hk
When editing, please set the protection tab to the
position where recording is possible. s
Moving tracks
Dividing and combining tracks
Dividing tracks (DIVIDE) R
Combining tracks (COMBINE)
Y
Moving individual tracks (MOVE) W
Erasing tracks
Erasing individual tracks (ERASE) I Erasing all tracks on an MD (ALL ERASE) I
Application
DCBA
A
DCBA
DABC
DCB
CBA
Assigning a name to a minidisc or
(only remote control) P
a track
Copying or memorizing a title and
assigning it to a different minidisc
or track (TITLE MEMO)
(only remote control) ´
Names can be entered simply by selecting characters sequentially from
the characters shown on the display. As the entered titles have compatibility between models, they will be displayed when that minidisc is set to a
different MD recorder (player). (Depending on the types of characters and
the number of characters which can be displayed, there may be some limitations for the title compatibility.)
Deletion of the edited contents (EDIT CANCEL)
‰
Page 47

MD Edit Functions
HD-5MD/EN
Recording by groups (GROUP)
As this unit permits long-play recording with 2x and 4x of the standard capacity, a large number of tracks
can be recorded onto one MD. When setting for group recording is done before MD O.T.E. recording (page
42), recording by groups, for example by artist or by album, becomes possible. These groups also can be
selected for playback, editing by group, repeat [playback, etc.
Grouping also can be done for a recorded MD. (i)
Group recording image Image of division into groups
CD
3
1
4
2
7
5
6
8
10
9
1 43 672
5
16 18 21 2217 2019
47
Group 1 Group 2 Group 3
1 432 6 75 6 75
MD
Main unit only
1 Select "GROUP MAKE ?" as follows.
1 Press the "menu" key.
2 Select "GROUP MAKE ?" with the "vol-
ume/multi control" knob.
3 Press the "set" key.
2 Select "GROUP MAKE ON" as follows.
1 Select "GROUP MAKE ON" with the "vol-
ume/multi control" knob.
2 Press the "set" key.
3 Perform the operation for "All tracks of a
CD can be recorded by one-touch recording (normal speed, 4x speed) (all tracks
O.T.E.)" and start recording. (w)
O.T.E.
Group 1 Group 2 Group 3 Group 8
1 432
6 75
8
21 2220
When the "volume/multi control " knob is turned, switching
is done as follows.
"MD REC MODE ?"
"GROUP MAKE ?"
"REC SPEED ?"
"REC LEVEL ?"
"DIMMER ?"
Return to the original status is made when no operation
is performed within 20 seconds.
÷ The group recording setting remains unchanged until
it is changed again.
÷ All tracks from the track with which O.T.E. recording
was started to the last recorded track will be one group.
÷ When the MD to be used for the recording already has
99 groups registered, group recording will not be
executed even when the group recording setting is ON.
÷ When an MD recorded on different equipment
compatible with the group function is used on this
unit, it may not operate correctly.
÷ When an MD with group recording is played on
equipment not compatible with the group function,
the tracks will be played in the order in which they
have been recorded.
÷ When an MD with group recording is edited on other
equipment, it may not operate correctly.
Application
Page 48

48
Dividing a recorded MD into groups
Create and register groups of consecutive tracks.
Up to 99 groups can be created.
Even a single track can be made a group.
Select MD and obtain stopped condition.
Remote control unit only
1 Press the "TRACK EDIT" key.
TRACK EDIT
MD Edit Functions
HD-5MD/EN
÷ When the editing is to be abandoned, press
the "TRACK EDIT" key to stop the editing and
to return to the original condition.
÷ When an item which cannot be edited is se-
lected, an
of the display.
÷ MD edit mode is reached.
will be shown at the beginning
L
R
10 5310(–dB)
30
MD
DIGITAL
Application
2 Press the 4P.CALL¢ keys re-
peatedly to select "EDIT GROUP"
and press the "SET" key.
4¢
P.CALL
SET
3 Press the "SET" key when "GRP
START ?" flashes.
SET
4 Press the 4 P.CALL ¢ keys
to select the first track of the
group and press the "SET" key.
4¢
P.CALL
SET
5 Press the 4 P.CALL ¢ keys
to select the last track of the
group and press the "SET" key.
4¢
P.CALL
SET
6 Press the "ENTER" key to deter-
mine the group.
7 After editing has been com-
pleted, press the 0 key to eject
the minidisc.
Return to the original status is made when no operation is performed within 20 seconds.
L
R
10 5310(–dB)
30
MD
DIGITAL
L
R
10 5310(–dB)
30
MD
DIGITAL
L
R
10 5310(–dB)
30
MD
DIGITAL
L
R
10 5 3 1 0 (–dB)
30
MD
DIGITAL
÷ When all tracks already have been registered in groups,
or when there are already 99 groups, no more groups can
be created. Even when there are fewer than 99 groups, it
may not be possible to create a new group when much
character information has been entered for the MD.
The editing may be aborted when the MD is removed or
the power is switched off while "EDIT NOW" is being displayed.
÷ Remove the minidisc after the editing information has been
written to the minidisc with display of "MD WRITING".
While "MD WRITING" is displayed, information
is being written to the minidisc, and the unit
should not be subjected to vibrations or shocks.
Page 49

Deleting group information
Information in regard to group registration can be
deleted.
The information and the group name for the selected group or all groups of the MD can be erased.
Select MD and obtain stopped condition.
Remote control unit only
1 Press the "TRACK EDIT" key.
TRACK EDIT
MD Edit Functions
HD-5MD/EN
÷ When the editing is to be abandoned, press
the "TRACK EDIT" key to stop the editing and
to return to the original condition.
÷ When an item which cannot be edited is se-
lected, an
of the display.
÷ MD edit mode is reached.
will be shown at the beginning
L
R
10 5310(–dB)
30
49
MD
DIGITAL
2 Press the 4P.CALL¢ keys re-
peatedly to select "EDIT GROUP"
and press the "SET" key.
4¢
P.CALL
SET
3 Press the 4P.CALL¢ keys re-
peatedly to select "GROUP CANCEL" and press the "SET" key.
4¢
P.CALL
SET
4 Press the 4 P.CALL ¢ keys
to select the group to be deleted and press the "SET" key.
4¢
P.CALL
SET
6 Press the "ENTER" key.
ENTER
7 After editing has been com-
pleted, press the 0 key to eject
the minidisc.
Return to the original status is made when no operation is performed within 20 seconds.
L
R
10 5310(–dB)
30
MD
DIGITAL
L
R
10 5310(–dB)
30
MD
DIGITAL
"ALL GROUP" :
All groups on the MD will be deleted.
"Track No. ___ Track No." :
The information for the selected group will be
deleted.
L
R
10 5 3 1 0 (–dB)
30
MD
DIGITAL
The editing may be aborted when the MD is removed or
the power is switched off while "EDIT NOW" is being displayed.
L
R
10 5310(–dB)
30
MD
DIGITAL
÷ Remove the minidisc after the editing information has been
written to the minidisc with display of "MD WRITING".
While "MD WRITING" is displayed, information
is being written to the minidisc, and the unit
should not be subjected to vibrations or shocks.
Application
Page 50
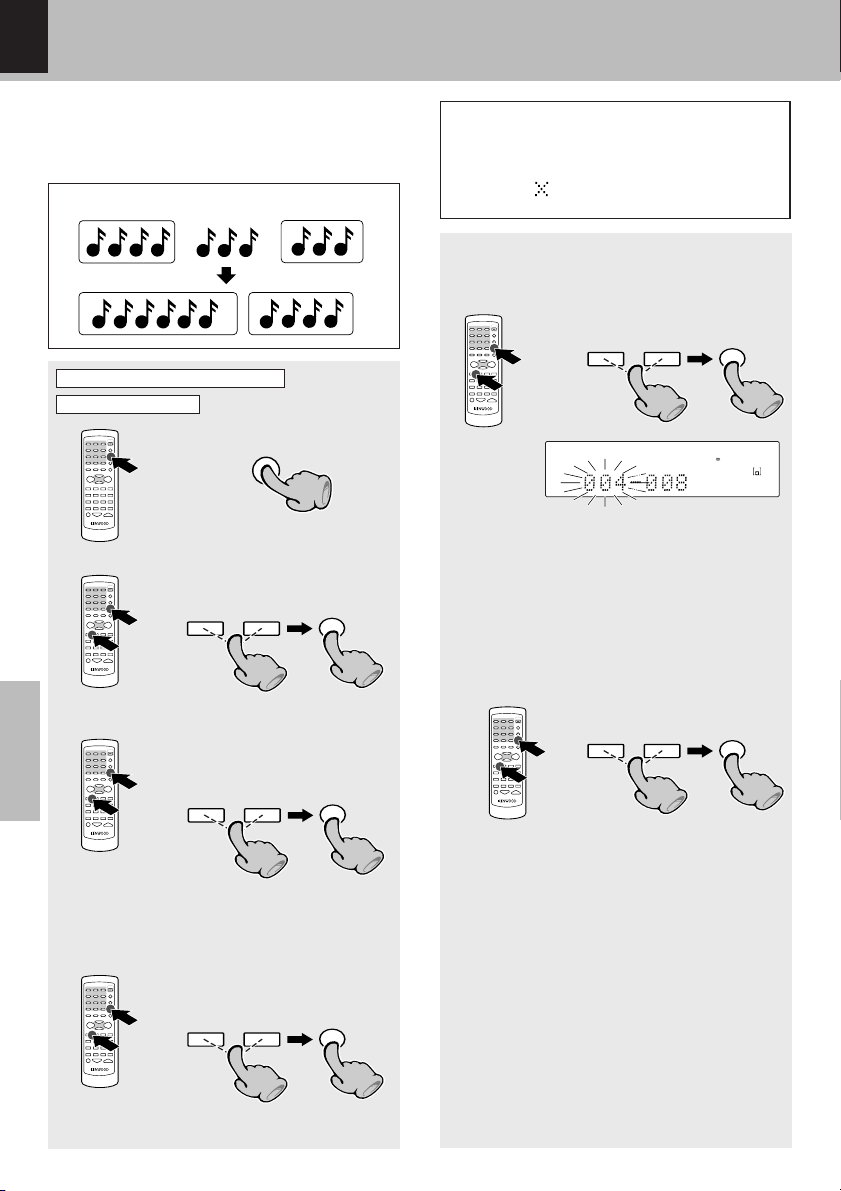
50
4¢
P.CALL
SET
4¢
P.CALL
SET
Changing the range of a group
The range of an already registered group can be
changed.
Group 1 Group 2
MD Edit Functions
HD-5MD/EN
÷ When the editing is to be abandoned, press
the "TRACK EDIT" key to stop the editing and
to return to the original condition.
÷ When an item which cannot be edited is se-
lected, an
of the display.
will be shown at the beginning
1 432
Group 1 Group 2
1 43 5 6 72
Select MD and obtain stopped condition.
Remote control unit only
1 Press the "TRACK EDIT" key.
2 Press the 4 P.CALL ¢ keys
repeatedly to select "EDIT
GROUP" and press the "SET" key.
4¢
3 Press the 4P.CALL¢ keys re-
peatedly to select "GROUP EDIT"
and press the "SET" key.
Application
4¢
6 75
P.CALL
P.CALL
TRACK EDIT
9108
5 Press the 4P.CALL¢ keys re-
peatedly to select the first track
number of the group and press
21 2220
SET
the "SET" key.
L
R
10 5 3 1 0 (–dB)
30
MD
The characters will scroll and the
group title numbers will be displayed.
When the track number is not to be
changed, press the "SET" key in this
condition.
Tracks registered to a different group
can not be selected.
6 Press the 4P.CALL¢ keys re-
peatedly to select the last track
number of the group and press
the "SET" key.
SET
4 Press the 4 P.CALL ¢ keys to
select the group to be changed
and press the "SET" key.
SET
4¢
P.CALL
When the track number is not to be
changed, press the "SET" key in this
condition.
Tracks registered to a different group
can not be selected.
7 Press the "ENTER" key to deter-
mine the group.
The editing may be aborted when the MD
is removed or the power is switched off
while "EDIT NOW" is being displayed.
7 After editing has been com-
pleted, press the 0 key to eject
the minidisc.
÷ Remove the minidisc after the editing in-
formation has been written to the minidisc
with display of "MD WRITING".
Page 51

Group selection for playback
A group of the MD can be selected to play only the
tracks of that group
Select MD and obtain stopped condition.
Remote control unit only
1 Press the P.MODE key to light
the "GROUP" indicator.
P.MODE
MD Edit Functions
HD-5MD/EN
For a minidisc with group settings, the mode will change
as shown below each time the "P.MODE" key is
pressed.
Lit
GROUP
1 Group mode
2 Program mode
3 Cancel
51
2 Press the "GROUP PREV.",
"NEXT" keys to select the
group to be played.
PERV.–GROUP–NEXT
3 Press the MD 6 key to start
playback.
MD 6
Playback of a different group during playback
2 Press the "GROUP PREV.",
"NEXT" keys to select the
group to be played.
PERV.–GROUP–NEXT
The characters will scroll.
When an MD with group recordings is played
on equipment not compatible with the group
function, numbers or symbols may be displayed in the disk name and correct display may
not be possible. In such a case, it should be
noted that the group information will be lost
when the disk name is edited on such equipment not compatible with the group function.
÷ When an MD recorded on different equip-
ment compatible with the group function is
used on this unit, it may not operate correctly.
To stop group playback
Remote controlMain unit
7
AUTO/MONO
STOP
L
R
10 5310(–dB)
30
GROUP
MD
DIGITAL
L
R
10 5310(–dB)
30
GROUP
MD
DIGITAL
Application
A group also can be selected for repeat playback
or random playback of that group.
Repeat mode °
Random mode ·
Return to normal playback
Press the "P.MODE" key repeatedly while in
stop condition, until "GROUP" goes out.
P.MODE
Page 52

52
MD Edit Functions
Moving individual tracks (MOVE)
Tracks can be moved to (inserted at) any desired position. When the rearrangement has been completed,
all track numbers automatically will be renumbered consecutively. Changing to the desired track order
is possible by repeated MOVE operations.
Tracks divided into groups also can be moved. In that case, the track will be registered with the same
group as the immediately preceding track at the new position. When the immediately preceding track at
the new position is not registered to a group, the moved track also will not belong to any group.
Image for individual moving of tracks
1
2
3
4
5
6
7
A
B
C
D
E
F
1
2
3
4
5
6
7
A
B
E
C
D
F
Select a track to be
G
move
Select the movement
G
destination
HD-5MD/EN
Perform the operation after the display of
"GROUP" and "PGM" has been extinguished.
Remote control unit only
1 Press the "TRACK EDIT" key.
TRACK EDIT
2 Confirm that "EDIT TRACK" is
being displayed and press the
"SET" key.
Application
SET
3 Press the 4P.CALL¢ keys re-
peatedly to select "MOVE ?".
4¢
P.CALL
4 Press the ENTER key to deter-
mine the "MOVE".
SET
÷ When the editing is to be abandoned, press
the "TRACK EDIT" key to stop the editing and
to return to the original condition.
÷ When an item which cannot be edited is se-
lected, an
will be shown at the beginning
of the display.
÷ MD edit mode is reached.
Return to the original status is made when no operation is performed within 20 seconds.
L
R
10 5310(–dB)
30
MD
DIGITAL
÷ When something else is being displayed, press the
4 P.CALL ¢ keys to switch, and then press the
"SET" key.
L
R
10 5310(–dB)
30
MD
DIGITAL
Continued on next page
Page 53

5 Press the 4P.CALL¢ keys to
select the track to be moved, and
then press the "SET" key.
4¢
P.CALL
SET
MD Edit Functions
HD-5MD/EN
L
R
10 5310(–dB)
30
MD
DIGITAL
53
6 Press the 4P.CALL¢ keys to
select the movement destination
and press the "SET" key.
4¢
P.CALL
SET
7 Press the "ENTER" key to de-
termine the movement destination.
ENTER
÷ The movement destination is shown by the directly
preceding and the directly following track number,
and it moves forward or back each time the key is
pressed.
L
R
10 5310(–dB)
30
MD
DIGITAL
L
R
10 5310(–dB)
30
MD
DIGITAL
L
R
10 5310(–dB)
30
MD
DIGITAL
8 After editing has been com-
pleted, press the 0 key to eject
the minidisc.
(Main unit)
÷ Remove the minidisc after the editing information has been
written to the minidisc with display of "MD WRITING".
While "MD WRITING" is displayed, information
is being written to the minidisc, and the unit
should not be subjected to vibrations or shocks.
Even after minidisc editing has been completed, it is possible to delete the editing up to that point and to
return to the condition at the time of disc insertion. ‰
Image of moving grouped tracks
Group 1 Group 2 Group 3
1
2
3
4
5
6
7
8
Application
A
B
C
D
E
F
Group 1 Group 2 Group 3
1
2
3
4
5
6
A
B
E
C
D
F
G
H
8
7
H
G
Page 54

54
MD Edit Functions
Dividing tracks (DIVIDE)
Tracks can be divided by adding a track number (track number) somewhere in a track. When a track track
number is added at a position you like, this is convenient for skipping to that position at the time of playback. The tracks after the divided track will be renumbered automatically in consecutive order. The preview function can be used for repeated listening to the part where the track is to be divided in order to
perform fine adjustment.
Tracks registered in a group also can be divided.
Image of dividing a track
(Example: In case of STEREO mode)
About 2 sec or
more required
12 3
A B C
12 43
Preview playback image
Point selected by fine adjustment for
the division point (playback for 3 sec).
Point where the "EDIT"
key has been pressed
HD-5MD/EN
A B C
Divided track (latter part)
Divided track (first part)
Perform the operation after the display of
"GROUP" and "PGM" has been extinguished.
Remote control unit only
1 Press the "TRACK EDIT" key
during playback at the desired
division location.
TRACK EDIT
Application
2 Confirm that "DIVIDE ?" is dis-
played and press the "SET" key.
SET
Fine adjustment range
÷ When the editing is to be abandoned, press
the "TRACK EDIT" key to stop the editing and
to return to the original condition.
÷ When an item which cannot be edited is se-
lected, an
will be shown at the beginning
of the display.
÷ The unit will pause in MD edit mode.
Return to the original status is made when no operation is performed within 20 seconds.
L
R
10 5310(–dB)
30
MD
DIGITAL
÷ When something else is being displayed, press the
4 P.CALL ¢ keys to switch, and then press the
"SET" key.
÷ When a title is to be divided, set the division point
at least 2 seconds from the start of the title.
Division into titles of about 2 seconds or less is not
possible. (4 seconds in case of LP2/MONO mode
and 8 seconds in case of LP4 mode)
÷ No unrecorded part will be created at the end of
the divided title and the beginning of the newly
created title (before and after the division point).
Continued on next page
Page 55
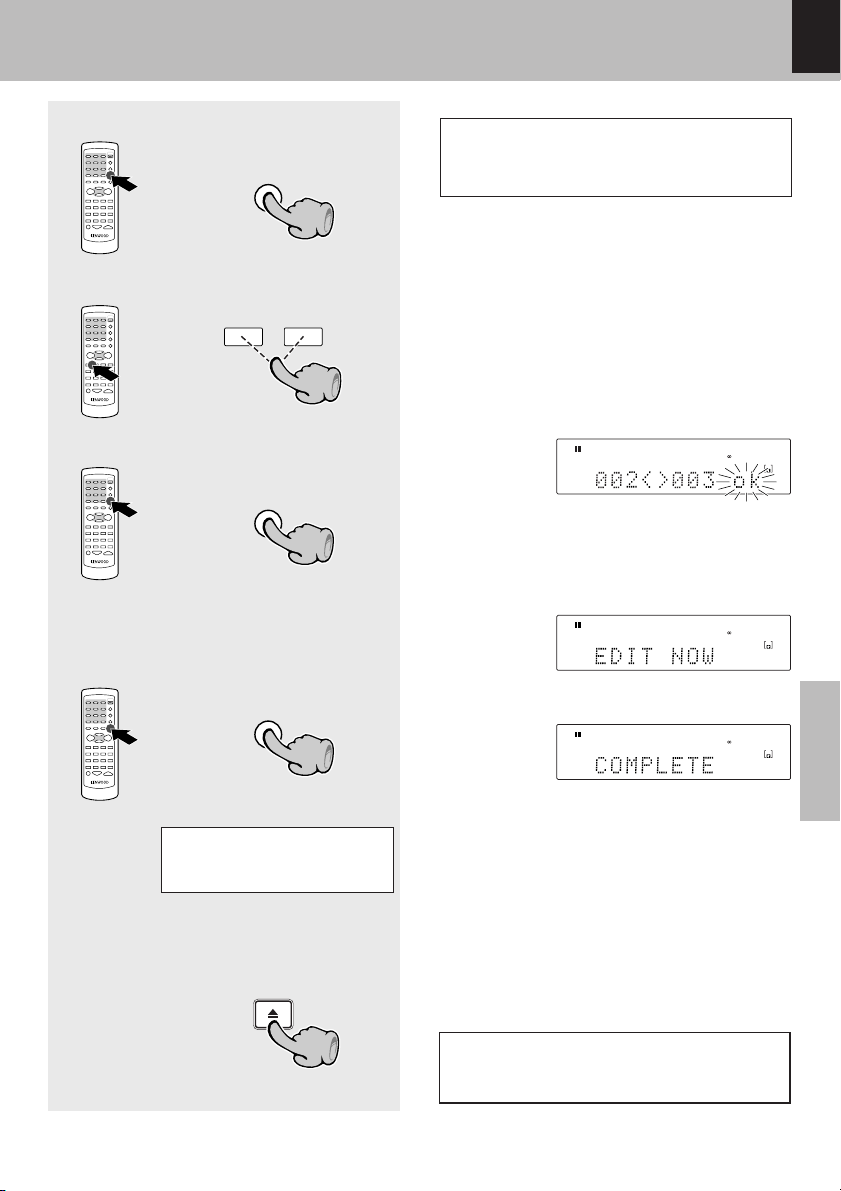
MD Edit Functions
HD-5MD/EN
55
3 Press the "SET" key and start pre-
view playback.
SET
4 Press the 4P.CALL¢ keys
and select the division point.
4¢
P.CALL
5 Press the "SET" key to deter-
mine the division point.
SET
6 Press "ENTER" to determine
the division.
ENTER
When fine adjustment of the division point with
preview playback is not done, press the SET key
after step 2 to determine the division point.
(Step 5)
÷ The approximately 3 seconds following the pause
point will be played back repeatedly.
÷ Each time a key is pressed, the division point is moved
one step (6/100 sec) forward or back. (Fine adjustment
is possible in the range from -31 to +31 steps.)
L
R
10 5310(–dB)
30
MD
DIGITAL
L
R
10 5310(–dB)
30
MD
DIGITAL
The editing may be aborted when the MD is removed or
the power is switched off while "EDIT NOW" is being displayed.
L
R
10 5310(–dB)
30
MD
DIGITAL
Application
÷ The unit pauses at the beginning of the track created
The steps 1 to 6 can be repeated to divide a track into a
maximum of 254 tracks.
newly by the division.
÷ The editing may be aborted when the MD is removed or
the power is switched off while "EDIT NOW" is being
displayed.
8 After editing has been com-
pleted, press the 0 key to eject
the minidisc.
÷ Remove the minidisc after the editing information has been
(Main unit)
written to the minidisc with display of "MD WRITING".
While "MD WRITING" is displayed, information
is being written to the minidisc, and the unit
should not be subjected to vibrations or shocks.
Even after minidisc editing has been completed, it is possible to delete the editing up to that point and to
return to the condition at the time of disc insertion. ‰
Page 56

56
MD Edit Functions
Combining tracks (COMBINE)
Two tracks can be combined to one track. It is possible to combine several tracks or a track with fine subdivisions. After tracks have been combined, all track numbers will be renumbered consecutively.
As long as the tracks are next to each other, they can be combined even when they belong to different
groups. The combined track is registered to the group of the first part.
Image for combining tracks
Combining the fourth and the first track
HD-5MD/EN
1 2
A B D
1 2
B
C D
The track number and the title of
the first half remain.
Perform the operation after the display of
"GROUP" and "PGM" has been extinguished.
Remote control unit only
1 Press the "TRACK EDIT" key
while playing the track to be at
the beginning after combining.
TRACK EDIT
2 Press the 4P.CALL¢ keys re-
Application
peatedly to select "COMBINE ?".
4¢
P.CALL
5
43
C
3
A
6
E
F
4
5
E
The track numbers
F
are adjusted.
The track number and the name of the
last half are lost.
÷ When the editing is to be abandoned, press
the "TRACK EDIT" key to stop the editing and
to return to the original condition.
÷ When an item which cannot be edited is se-
lected, an
will be shown at the beginning
of the display.
÷ The unit will pause in MD edit mode.
L
R
10 5310(–dB)
30
MD
DIGITAL
Return to the original status is made when no operation is performed within 20 seconds.
L
R
10 5310(–dB)
30
MD
DIGITAL
2 Press the "SET" key.
SET
L
R
10 5310(–dB)
30
MD
DIGITAL
Continued on next page
Page 57

4 Press the 4P.CALL¢ keys
to select the track number to
become the rear part after combining.
4¢
P.CALL
5 Press the "SET" key to determine
the track.
SET
MD Edit Functions
HD-5MD/EN
L
R
10 5310(–dB)
30
MD
DIGITAL
57
6 Press the "ENTER" key to deter-
mine the combination.
ENTER
÷ The unit will pause at the start of the new combined
track.
L
R
10 5310(–dB)
30
MD
DIGITAL
The editing may be aborted when the MD is removed or
the power is switched off while "EDIT NOW" is being displayed.
L
R
10 5310(–dB)
30
MD
DIGITAL
7 After editing has been com-
pleted, press the 0 key to eject
the minidisc.
(Main unit)
÷ Remove the minidisc after the editing information has been
written to the minidisc with display of "MD WRITING".
While "MD WRITING" is displayed, information
is being written to the minidisc, and the unit
should not be subjected to vibrations or shocks.
Even after minidisc editing has been completed, it is possible to delete the editing up to that point and to
return to the condition at the time of disc insertion. ‰
Image for combining grouped tracks
Group 1 Group 2 Group 3
1
2
3
4
5
6
7
8
A
B
C
D
E
F
G
H
Group 1 Group 2 Group 3
Application
1
2
3
4
5
A
B
C
D
E
F
7
6
H
G
Page 58

58
MD Edit Functions
HD-5MD/EN
Erasing individual tracks (ERASE)/Erasing all tracks on an MD (ALL ERASE)
While the unit is stopped, it is possible to erase all tracks or only a selected track. When one track is erased,
the track numbers of the tracks after it all will be reduced by one.
It is also possible to erase tracks registered in a group.
Image for eraseing a track
1
2
3
4
5
6
7
A
B
C
D
E
F
G
1
2
3
4
A
B
C
D
5
6
F
G
Perform the operation after the display of
"GROUP" and "PGM" has been extinguished.
Remote control unit only
1 Press the "TRACK EDIT" key.
TRACK EDIT
2 Press the "SET" key.
Application
SET
3 Press the 4P.CALL¢ keys re-
peatedly to select "ERASE ?".
4¢
P.CALL
4 Press the "SET key.
SET
÷ When the editing is to be abandoned, press
the "TRACK EDIT" key to stop the editing and
to return to the original condition.
÷ When an item which cannot be edited is se-
lected, an
will be shown at the beginning
of the display.
÷ MD edit mode is reached.
÷ When something else is being displayed, press the
4 P.CALL ¢ keys to switch, and then press the
"SET" key.
Return to the original status is made when no operation is performed within 20 seconds.
L
R
L
R
L
R
10 5310(–dB)
30
10 5310(–dB)
30
10 5310(–dB)
30
MD
DIGITAL
MD
DIGITAL
MD
DIGITAL
Continued on next page
Page 59

4 Press the 4P.CALL¢ keys
to select the track number to be
erased.
4¢
P.CALL
5 Press the "SET" key to determine
the track.
SET
MD Edit Functions
HD-5MD/EN
÷ Select "ALL ERASE" to delete all tracks on an MD.
÷ In case of operation during playback, only erasing of
the track being played can be selected.
L
R
10 5310(–dB)
30
MD
DIGITAL
L
R
10 5310(–dB)
30
MD
DIGITAL
59
6 Press the "ENTER" key to de-
termine the erasure.
ENTER
÷ The unit will pause at the start of the title following the
erased track.
L
R
10 5310(–dB)
30
MD
DIGITAL
The editing may be aborted when the MD is removed or
the power is switched off while "EDIT NOW" is being displayed.
L
R
10 5310(–dB)
30
MD
DIGITAL
7 After editing has been com-
pleted, press the 0 key to eject
the minidisc.
(Main unit)
÷ Remove the minidisc after the editing information has been
written to the minidisc with display of "MD WRITING".
While "MD WRITING" is displayed, information
is being written to the minidisc, and the unit
should not be subjected to vibrations or shocks.
Even after minidisc editing has been completed, it is possible to delete the editing up to that point and to
return to the condition at the time of disc insertion. ‰
Application
Page 60

60
MD Edit Functions
Assigning a title (name) to a minidisc or a track
It is possible to give a title to a minidisc or a track. The same method can be used to change or erase a
title which has been entered. When ON has been selected for the STAMP function in extended recording
mode (LP2 or LP4), LP: will be displayed automatically in front of the title.
It is also possible to give a title to a group. (Group title)
In addition, there is a memo function for storing characters for repeated input.
Preparations for assigning a title
Assigning a disc title:
A title can be assigned when the unit is stopped in group playback mode.
If "GROUP" or "PGM" is lit, press the P.MODE key to make it go out.
Assigning a group title:
A title can be assigned in stopped condition in group playback mode.
1 Press the P.MODE key and light the "GROUP" indication.
2 Press the PREV. or the NEXT key to select the group which is to be given a group title or a track title.
Assigning a track title:
In normal stop mode, titles can be given to all tracks.
When the unit is stopped in group playback mode, titles can be given to the tracks in the group.
Input of a title memo:
Title memo can be selected in any of the above modes.
HD-5MD/EN
Remote control unit only
Application
1 Press the "TITLE INPUT" key.
TITLE INPUT
2 Press the 4P.CALL¢ keys re-
peatedly to select the title to be
edited.
4¢
P.CALL
When the editing is to be abandoned, press the
"TITLE INPUT" key to stop the editing.
÷ Title input is not possible while the minidisc read/write
indication is flashing.
L
R
10 5310(–dB)
30
MD
DIGITAL
"...." will be displayed when no name
has been assigned.
÷ The name to be edited will be switched each time
the key is pressed.
"DISC" : (DISC TITLE)
"001" : (TRACK TITLE)
"002" : (TRACK TITLE)
"[1]" : (TITLE MEMO 1)
"[2]" : (TITLE MEMO 2)
"[3]" : (TITLE MEMO 3)
When a group has been selected, the group number will
be displayed.
Continued on next page
Page 61

3 Press the "SET" key to deter-
mine the track (or disc, title
memo number) to be given a
title.
SET
4 Enter the title.
1 Press the DISPLAY/CHARAC.
key repeatedly to select the
character group.
DISPLAY
/CHARAC.
2 Press the character input
keys (10keys) to select the
character.
12
ABC
3
DEF
4
GHI5JKL6MNO
7
PQRS
8
TUV9WXYZ
&( )-
+100
0 +10
',:
3 Press the "SET" key to deter-
mine (enter) the character.
MD Edit Functions
HD-5MD/EN
L
R
10 5310(–dB)
30
MD
DIGITAL
L
R
10 5 3 1 0 (–dB)
30
MD
DIGITAL
The character groups
The character groups are as shown below.
"Aa" group
A to z, symbols, and name memos ("[1]", "[2]",
"[3]")
"12" group
0 to 9 and symbols
When the same key is pressed repeatedly, the character
will change.
Example: Pressing
Each time the key is pressed, the character will
change as shown: A → B → C → a → b → c
÷ The input location (cursor) can be moved left and right
with the 1, ¡ keys.
÷ Input errors can be deleted with the "CLEAR/DE-
LETE" key.
÷ Press the "TIME/SPACE" key to enter a space.
÷ The input is determined when a different character
key, the ¡ key, the "DISPLAY/CHARAC." key, etc.
is pressed.
2ABC
61
Application
SET
4 Repeat the steps 1 to 3.
5 Press the ENTER key to deter-
mine the entered title.
ENTER
L
R
10 5310(–dB)
30
MD
DIGITAL
÷ After the litle display has been scrolled, return is made
to the display of step 2 with the next title selected.
÷ When the power is switched off (standby) or the
"TITLE INPUT" key is pressed to cancel the setting,
the entered contents will be erased.
Continued on next page
Page 62

62
HD-5MD/EN
6 Press the "TITLE INPUT" key to
finish the edit.
TITLE INPUT
7 After editing has been com-
pleted, press the 0 key to eject
the minidisc.
(Main unit)
Deleting or changing characters
1 Press the 1 or the ¡ key to
move the cursor to the target
character (to be deleted or
changed).
TUNING
CLEAR
/DELETE
¡
1
DOWN UP
2 Press the "CLEAR/DELETE"
key to delete the character.
When the steps 2 to 5 are repeated before
advancing to step 6, titles (disc title and
track titles ) can be given to the entire disc.
÷ Remove the minidisc after the editing information has been
written to the minidisc with display of "MD WRITING".
While "MD WRITING" is displayed, information
is being written to the minidisc, and the unit
should not be subjected to vibrations or shocks.
÷ When a character is to be inserted without deleting a
character (step {2}), set the cursor to the character
directly following the desired insertion location.
÷ When all characters are to be deleted, this can be
done by pressing the CLEAR/DELETE key repeatedly.
Application
In regard to the number of characters which can
be entered
A maximum of 1792 characters, max. 80 per
track, can be entered for the entire MD.
A space requires the same amount of data as a
character.
When deleting a title, do no enter spaces, but
delete the characters (press the "CLEAR/DELETE" key).
In regard to the key functions
1 or ¡ key:
Shifts the position of the cursor.
CLEAR/DELETE key:
Deletes the character at the cursor position and
advances the characters after this position by one
space. Names can be deleted easily by pressing
the key repeatedly (or by keeping it pressed).
TIME/SPACE key:
Inserts a space.
Page 63

HD-5MD/EN
Use of title memo (TITLE MEMO)
Characters to be entered repeatedly can be stored in the title memos 1, 2, and 3 ([1], [2], or [3]), and can
be called at the time of input for easy input.
For example, in case of input of "SONG:A", "SONG:B", "SONG:C":
Store "SONG:" in the title memo 1, and at the time of track title input, "SONG:A" will be entered with
title memo 1 (indication of [1]) and input of "A".
Input of a name memo
63
1 Select title memo [1], [2], or [3] during the
title editing procedure.
(Steps 2 and 3 on page 60)
"[1]" : (title memo 1)
"[2]" : (title memo 2)
"[3]" : (title memo 3)
2 Enter the characters.
(Steps 4 and 5 on page 61)
Use of a title memo
1 Select the character group "Aa" with title in-
put operation.
2 Press the character key (numeric key) "1"
and select [1], [3], or [3].
3 Press the "SET" key
Name editing character table
The following types of letters and symbols can be selected.
12
ABC
4
GHI5JKL6MNO
7
PQRS
8
TUV9WXYZ
&( )-
+100
0 +10
Group
1 space [1] [2] [3] 1
2ABC ABC abc or abc ABC 2
3DEF DEF def or def DEF 3
3
DEF
4GHI GHI ghi or ghi GHI 4
5JKL JKL jkl or jkl JKL 5
6MNO MNO mno or mno MNO 6
',:
7PQRS PQRS pqrs or pqrs PQRS 7
8TUV TUV tuv or tuv TUV 8
9WXYZ WXYZ wxyz or wxyz WXYZ 9
00
+10' , : ' , : ? ! ; . * _ ` $ space
+100&()- & ( ) - / + ✶ = < > # % @
"Aa"
"12"
L
R
L
R
10 5310(–dB)
30
10 5310(–dB)
30
MD
DIGITAL
MD
DIGITAL
Application
Page 64

64
Deletion of the edited contents (EDIT CANCEL)
When the following operation is performed in stopped condition, all editing performed since insertion of
the disc can be canceled. Cancellation will not be possible once the disc has been removed or recording
has been done.
Please do this before removing the disc after
editing.
Remote control unit only
1 Press the "TRACK EDIT" key.
TRACK EDIT
2 Press the 4 P.CALL ¢ keys
repeatedly to select "EDIT
CANCEL ?".
4¢
P.CALL
3 Press the "SET" key.
SET
÷ MD edit mode is reached.
Return to the original status is made when no operation is performed within 20 seconds.
÷ When X is displayed in front of the indication, the
editing up to that time can not be canceled.
HD-5MD/EN
L
R
10 5310(–dB)
30
L
R
10 5310(–dB)
30
L
R
10 5310(–dB)
30
MD
DIGITAL
MD
DIGITAL
MD
DIGITAL
Application
4 Press the "ENTER" key to cancel
the editing.
ENTER
5 After editing has been com-
pleted, press the 0 key to eject
the minidisc.
(Main unit)
L
R
10 5310(–dB)
30
MD
DIGITAL
The editing may be aborted when the MD is removed or
the power is switched off while "EDIT NOW" is being displayed.
L
R
10 5310(–dB)
30
MD
DIGITAL
÷ Remove the minidisc after the editing information has been
written to the minidisc with display of "MD WRITING".
While "MD WRITING" is displayed, information
is being written to the minidisc, and the unit
should not be subjected to vibrations or shocks.
Page 65

Convenient functions
Setting auto power save (A.P.S.)
When the auto power save function is set to ON,
the power is switched off (standby) automatically
when about 30 minutes without any operation
have passed after the end of CD or MD playback.
65
HD-5MD/EN
Adjusting the brightness of the
display part (DIMMER)
When the display is felt to be too bright or too dim
at night etc., the brightness can be adjusted.
1 Select "A.P.S, SET ?" as follows.
1
1 Press the "menu" key.
2 Select "A.P.S, SET ?" with
the "volume/multi control"
knob.
2
When the "volume/multi control"
knob is turned, switching is done
as follows.
"MD REC MODE ?"
"GROUP MAKE ?"
3
"TIME ADJUST ?"
"DIMMER ?"
Return to the original status is
made when no operation is performed within 20 seconds.
3 Press the "set" key.
2 Turn the "volume/multi control" knob to
select ON or OFF and press the "set" key.
OFF
ON
Lit when ON
A.P.S.
1 Select "DIMMER ?" as follows.
1
1 Press the "menu" key.
2 Select "DIMMER ?" with the
"volume/multi control" knob.
2
When the "volume/multi control
knob" is turned, switching is done
as follows.
"MD REC MODE ?"
"GROUP MAKE ?"
3
"TIME ADJUST ?"
"DIMMER ?"
Return to the original status is
made when no operation is performed within 20 seconds.
3 Press the "set" key.
2 Turn the "volume/multi control" knob to
select the desired brightness and press the
"set" key.
Darker
Brighter
Application
Auto power save operates when there is no operation for about 30 minutes after the following
events.
When the input is CD
During stop
When the input is tuner, tape, or external input
When the volume/multi control level
is the minimum level or mute.
L
R
10 5310(–dB)
30
DIGITAL
When the brightness has been
increased
L
R
10 5310(–dB)
30
DIGITAL
When the brightness has been
decreased
÷ Adjustment is not possible when the power
is off.
Page 66

66
Clock adjustment
As the clock is not only used to show the time of
the day but also used in timer operations, be sure
to set the clock in advance.
Main unit only
1 Select "TIME ADJUST ?" as follows.
1
1 Press the "menu" key.
2 Select "TIME ADJUST ?"
with the "volume/multi control" knob.
2
"MD REC MODE ?"
"GROUP MAKE ?"
"TIME ADJUST ?"
3
"DIMMER ?"
Return to the original status is
made when no operation is performed within 20 seconds.
2 Turn the "volume/multi control" knob to
select "12H ?" (12-hour display) or "24H ?"
(24-hour display) and press the "set" key.
HD-5MD/EN
If you have made a mistake during the setting,
start again from step 1.
L
R
10 5 3 1 0 (–dB)
L
R
30
10 5310(–dB)
30
MD
DIGITAL
AM
AM
MD
DIGITAL
3 Turn the "volume/multi control" knob to
adjust the "hour" setting.
When "hour" has set, press the "set" key.
Application
4 Turn the "volume/multi control" knob to
adjust the "minute" setting.
When "minute" has set, press the "set"
key.
L
R
10 5310(–dB)
30
MD
L
R
10 5310(–dB)
30
MD
÷ When the "set" key in step 4 is pressed with
a time signal, accurate setting can be made.
Page 67

Timer operation
Sleep timer (SLEEP)
The unit is turned OFF automatically after the
specified period has elapsed.
Timer playback
(PROG. 1, PROG. 2)
Playback of the selected input source of the CD,
TUNER or AUX input starts at the specified time.
AI timer playback (PROG. 1, PROG. 2)
When timer playback starts, the volume level increases gradually until the set volume level is
reached.
Sleep timer (SLEEP)
Set the number of minutes after which the unit is
to be turned OFF.
Remote control unit only
Press the "SLEEP" key during CD playback,
tuner reception, etc.
HD-5MD/EN
Adjust the clock before setting the timer fi
L
R
10 5310(–dB)
AM
30
MD
DIGITAL
67
SLEEP
÷ Each press increases the timer period by 10
minutes. The sleep timer can be set up to 90
minutes.
=10 = 20 = 30 ..... 70 = 80 = 90 = Cancel
÷ The unit is turned OFF automatically af-
ter the set time has elapsed.
To cancel
Turn the unit OFF or press the SLEEP key until
the sleep timer is canceled.
When the power fails or the plug of the power cable is disconnected from the receptacle during
power off (standby) after timer setting, the standby/timer indicator will flash green. In this
case, repeat the time setting.
The system has been set up so that the display
is dimmed automatically while the sleep timer
is activated.
Application
Page 68

68
Timer operation
Setting the timer program (PROG. TIMER)
In each of PROG.1 and PROG.2, the timer data including the operating period and played contents can be
program and set to be activated or deactivated.
HD-5MD/EN
÷ Two timer settings can be reserved inde-
pendently in two programs PROG.1 and
PROG.2.
÷ Please make reservations with an interval of
at least one minute, so that the operation
times of PROG.1 and PROG.2 do not overlap.
1. Make preparations for the play.
Playing the auxiliary
input source
Make timer setting of
the component connected to the AUX or
TAPE input jacks.
º
To listen to CD
Insert discs.
(Program playback is
not possible.)
)
Insert a MD.
(Program playback is
not possible.)
2. Set the timer setting program number.
Main unit only
1 Press the "menu" key.
2 Turn the "volume/multi control" knob and
select "TIMER SET?".
Press the "set" key to confirm.
3 Turn the "volume/multi control" knob and
select "PROG.1 SET (or 2)".
Press the "set" key to confirm.
Application
3. Select EVERYDAY or ONETIME execution of the programed timer.
1 Turn the "volume/multi control" knob and
select "EVERYDAY" or "ONE TIME".
Press the "set" key to confirm.
To listen to MD
™
Adjust the clock before setting the timer fi
To listen to radio
The station should be
preset prior.
º
To record
Preparations for assigning MD recording
¤
REC
L
1 2
R
10 5310(–dB)
30
MD
DIGITAL
L
1
R
10 5310(–dB)
30
MD
DIGITAL
L
1
R
10 5310(–dB)
30
MD
DIGITAL
4. Set the ON time.
1 Turn the "volume/multi control" knob to
adjust the "hour" setting.
When "hour" has set, press the "set" key.
2 Turn the "volume/multi control" knob to
adjust the "minute" setting.
When "minute" has set, press the "set" key.
L
1
R
10 5310(–dB)
30
MD
DIGITAL
L
1
R
10 5310(–dB)
30
MD
DIGITAL
Page 69

5. Set the OFF time.
1 Turn the "volume/multi control" knob to
adjust the "hour" setting.
When "hour" has set, press the "set" key.
2 Turn the "volume/multi control" knob to
adjust the "minute" setting.
When "minute" has set, press the "set" key.
Timer operation
HD-5MD/EN
69
6. Select "PLAY" or "AI PLAY".
1 Turn the "volume/multi control" knob and
select "PLAY" or "AI PLAY".
Press the "set" key to confirm.
7. Make the desired reservation
(Timer play)
1 Turn the "volume/multi control" knob to
select the volume at the time of timer ON,
then press the "set" key to confirm.
2 Turn the "volume/multi control" knob to
select the source to be play,
1 "TUNER" : (Broadcasts)
2 "CD"
3 "MD"
4 "AUX" : (External input / video, etc.)
5 "TAPE"
6 "DIGITAL IN"
Press the "set" key to confirm.
3 When TUNER has been selected, turn the
"volume/multi control" knob to select the
preset number and press the "set" key to
confirm.
4 Press the "set" key to confirm the source.
Timer setting will be completed and
"COMPLETE" will be displayed.
L
R
10 5310(–dB)
30
MD
DIGITAL
L
1
R
10 5 3 1 0 (–dB)
30
1 "PLAY" : (Timer play)
2 "AI PLAY" : (Timer play with gradually in-
creasing volume)
7. Make the desired reservation
(Timer recording)
1 Turn the "volume/multi control" knob to
select the volume at the time of timer ON,
then press the "set" key to confirm.
2 Turn the "volume/multi control" knob to
select the source to be record.
1 "TUNER" : (Broadcasts)
2 "AUX" : (External input / video, etc.)
3 "TAPE"
4 "DIGITAL IN"
Press the "set" key to confirm.
3 When TUNER has been selected, turn the
"volume/multi control" knob to select the
preset number and press the "set" key to
confirm.
4 Turn the "volume/multi control" knob to
select the recording mode.
1 "STEREO"
2 "LP2"
3 "LP4"
4 "MONO"
4 Press the "set" key to confirm the source.
Timer setting will be completed and
"COMPLETE" will be displayed.
Continued on next page
MD
DIGITAL
Application
Page 70

70
8. Put the unit in standby mode.
When the timer setting has been completed,
confirm that the power is off (standby).
Setting the PROG. timer again to the
same contents
Timer operation
HD-5MD/EN
÷ The standby/timer indicator lights green.
÷ The SLEEP timer cannot be used when the
timer function is being used for playback.
÷ When the time has not been set, the timer
function cannot be used.
÷ The timer function will not operate when the
same time is set for the ON time and the OFF
time.
Press the TIMER key on the remote control and
light "
1
", "2", or "21".
Remote control unit only
TIMER
When timer operation is not desired
Application
While the power is on, press the TIMER key on
the remote control to extinguish "
Remote control unit only
TIMER
÷ When the power fails or the plug of the power cable is disconnected from the receptacle during power off
(standby) after timer setting, the standby/timer indicator will flash green. In this case, repeat the time
setting.
÷ When the standby/timer indicator flashes green after completion of program timer recording, the recording
may not have been possible. In that case, set the time again.
".
÷ The PROG. contents set last will be executed.
÷ Make the preparations for CD.
÷ The PROG. contents will be kept as long as
no resetting is done.
Page 71

Important Items
Maintenance
71
HD-5MD/EN
Maintenance of the unit
When the front panel or case becomes dirty, wipe with
a soft, dry cloth. Do not use thinner, benzine, alcohol,
etc. for these agents may cause discoloration.
Reference
Caution on condensation
Condensation (of dew) may occur inside the unit when
there is a great difference in temperature between this
unit and the outside.
This unit may not function properly if condensation occurs. In this case, leave the unit for a few hours and
restart the operation after the condensation has dried
up.
Be specially cautious against condensation in a following circumstances:
When this unit is carried from one place to another
across a large difference in temperature, when the humidity in the room where this unit is installed increases, etc.
Note related to transportation and movement
Before transporting or moving this unit, carry out
the following operations.
1 Remove the CD and MD from the unit.
2 Press the CD 6 key.
3 Press the MD 6 key.
4 Wait for some time and verify that the dis-
play appears as above.
5 Wait a few seconds and turn the unit OFF.
In regard to contact cleaner
Do not use contact cleaners because it could cause a
malfunction. Be specially careful not to use contact
cleaners containing oil, for they may deform the
plastic component.
Memory backup function
Stored contents which are cleared immediately
when power plug is unplugged from power outlet :
Clock display
N.B. function
Stored contents which will back-up after power
plug is unplugged from power outlet:
State of power (on or standby), A, P, S, Last input
selection, AUX level, Volume control value, Balance
control, Receiving band, Frequency, Preset station,
Program Timer, TONE
MD section
When the power is off (standby) or the power
cable is disconnected from the receptacle, the
memory contents will be held for about three
days. In case of an extended power failure, disconnection of the power cable, etc., the information in regard to recording or editing (recorded
when the minidisc is removed) may be lost or
destroyed before recording to the minidisc. Once
this information has been lost, it cannot be recovered.
After recording or editing, always remove the
minidisc to have this information recorded.
Knowledge
Page 72

72
Important Items
HD-5MD/EN
Disc handling precautions
Handling
Hold the disc so that you do not touch
the playing surface.
Label side
Playing side
Sticker
Do not attach paper or tape to either
the playing side or the label side of the
disc.
Sticky paste
Cleaning
If there are fingerprint marks or foreign
matter found on the disc, lightly wipe
the disc with a soft cotton cloth (or similar) from the center of the disc outwards
in a radial manner.
Storage
When a disc is not to be played for a long period of
time, remove it from the player and store it in its case.
Never play a cracked or warped disc
During playback, the disc rotates at high speed in the
player. Therefore, to avoid danger, never use a
cracked or deformed disc or a disc repaired with tape
or adhesive agent. Please do not use discs which are
not round because they may cause malfunction.
Discs which can be played with this unit
CD (12 cm, 8 cm), CD-R, CD-RW, and the audio part of
CDV, CD-G, CD-EG and CD-EXTRA. Use discs that
comply with the IEC standard, for example a disc car-
rying the
marking on the label surface.
Disc accessories
The disc accessories (stabilizer, protection sheet, protection ring, etc.) which are marketed for improving
the sound quality or protecting discs as well as the
disc cleaner should not be used with this system because they may cause malfunction.
Handling of MD
As the MD is accommodated inside a cartridge, it can be handled without caring about dust or fingerprint.
However, stained or soiled cartridge may cause malfunction. To enjoy beautiful sound for extended period
of time, take care on the following points.
Do not touch the disc directly.
Do not touch the disc by opening the
shutter with your hand. The cartridge
will be damaged if it is forced open.
Storage position
Do not leave MDs in places where
the temperature and/or humidity are extremely high
(for example, in places subjected to direct sunlight).
Dust countermeasure
The shutter of the disc cartridge is permanently
open while the disc is loaded in the set. Therefore,
to prevent dust from penetrating inside the disc,
take the disc out of the unit immediately after completion of recording or playback.
Care
Knowledge
Periodically wipe off dust and dirt on the cartridge
with a dry cloth.
Note on disc accessories
Do not use lens cleaner for this may lead to malfunction of the unit.
Caution on MD-Clip data
Do not attempt to record or edit a disc in which MDClip data (still images, etc.) have been recorded.
Otherwise, the Clip data may be lost.
Note on the cartridge labels
Apply each label firmly to every corner so that it will
not peel off.
Write protect tab
To protect recorded contents against accidental erasure, set the write protect tab of the disc open. Return the tab to the original position when you want
to record signals on the disc.
Back side of the disc
Write protect tab
Slide open.
(Recording disabled)
Slide close.
(Recording enabled)
Page 73

SCMS (Serial Copy Management System)
For copyright protection, the serial
copy management system specifies
that recording of digital signals as digital signals between various digital audio devices shall be possible only for the
first generation of recordings.
Copying by
digital input
Copying by
analog input
Copying by
digital input
Copying by
analog input
73
HD-5MD/EN
Digital copying
cannot be repeated.
Copying by
analog input
Copying by
digital input
Copying by
digital input
In regard to the sampling frequency
Normally, there are the three following types of digital signals, and they are called sampling frequencies. The sampling frequencies are divided as follows according to the type of the digital equipment.
48 kHz : Standard mode for DAT, B-mode transmission of BS tuners, etc.
44.1 kHz : Standard mode for DAT, CD, MD, etc.
32 kHz : Standard and long-time mode for DAT, A-mode transmission of BS tuners, etc.
(DAT: Digital Audio Tapedeck)
As this unit has a built-in sampling rate converter, 48 kHz and 32 kHz digital signals can be recorded
converted to 44.1 kHz.
Knowledge
Page 74
74
In case of difficulty
What seems to be a malfunction is not always so. Before calling for service, check the following table
according to the symptom of your trouble.
Operation to reset
The microcomputer may fall into malfunction (impossibility to operate, erroneous display, etc.) when the
power cord is unplugged while unit is ON or due to an
external factor. In this case, execute the following procedure to reset the microcomputer and return it to normal condition.
÷ Please note that resetting the microcomputer
clears the contents stored in and it returns to condition when it left the factory.
Unplug the power cord from the power outlet, then
while holding the set key on the main unit depressed,
plug the power cord again.
Amplifier section/Speakers
RemedyCauseSymptom
Sound is not produced.
The "standby/timer" indicator blinks in
red and no sound is output.
The "standby/timer" indicator blinks in
green.
No sound from the headphones.
Sound is not produced from the left or
right speakers.
Power is suddenly interrupted.
The clock display blinks without changing the figures.
Timer operation is not possible.
Knowledge
÷ The speaker cords are disconnected.
÷ The volume control of this set is not ad-
justed properly.
÷ The MUTE switch of remote control unit is
switched ON.
÷ The headphone plug is inserted into the
jack.
÷ The speaker cord is short-circuited.
÷ There was a power failure.
÷ The power cord was unplugged from the
outlet.
÷ The headphone plug is inserted incom-
pletely.
÷ The speaker cords are disconnected.
÷ Left/right volume balance is not adjusted
properly.
÷ The A.P.S. function is activated
÷ The power plug was unplugged from the
outlet while the power switch was ON, or
there was a power failure.
÷ The present time has not been adjusted or
there was a power failure.
÷ The timer ON time and OFF time have not
been set.
÷ The same setting is used for the timer ON
time and the timer OFF time.
÷ The timer execution was not set up.
÷ Connect properly referring to “System con-
nection”.
÷ Set the sound volume to an appropriate
÷ Switch MUTE OFF.
÷ Unplug the headphone plug.
÷ Turn power off and re-connect the speaker
cord.
÷ Adjust the present time again.
÷ Adjust the present time again.
÷ Insert correctly.
÷ Connect properly referring to “System con-
nection”.
÷ Adjust the left/right volume balance.
÷ Cancel the A.P.S. function.
÷ Adjust the present time referring to “Clock
adjustment”.
÷ Adjust the present time referring to “Clock
adjustment”.
÷ Set the timer ON time and OFF time.
÷ Set the timer OFF time later than the timer
ON time.
÷ Refer to "Setting the timer program (PROG.
TIMER)" and select "ON" for "PROG. 1" or
"PROG. 2".
HD-5MD/EN
8
&
^
9
Á
Á
^
8
&
ˇ
Á
Á
ˆ
Ø
ˆ
Page 75

Tuner section
Symptom
Radio stations cannot be received.
Noise interferes.
A station has been preset but it cannot be received by pressing the P.CALL
key.
CD player
A CD is placed in the player but it cannot be played.
Sound is not produced.
Sound skips.
Remote control unit
Symptom
Remote control operation is not possible.
Cause Remedy
÷ The antennas have not been connected.
÷ A proper broadcasting band has not been
selected.
÷ The frequency of the station to be received
is not tuned.
÷ The space between radio channels is not
suitable for the area where you live.
÷ Car ignition noise.
÷ Influence of an electric appliance.
÷ A TV set is installed near the system.
÷ The frequency of the preset station is not
tunable.
÷ The preset memory has been cleared be-
cause the power cord has been unplugged
for a long period.
÷ The disc is placed upside down.
÷ The disc position is displaced.
÷ The disc is extremely dirty.
÷ The disc is scratched.
÷ Dew is condensed on the optics lens.
÷ The disc has not been placed.
÷ The player is not put to the play mode.
÷ The disc is extremely dirty.
÷ The disc is scratched.
÷ The disc is dirty.
÷ The disc is scratched.
÷ The player is subject to vibration.
Cause Remedy
÷ Batteries are exhausted.
÷ The remote control is too far away from the
system, the controlling angle is deviated or
there is an obstacle in between.
÷ There is no CD or MD set in the component
to be played.
In case of difficulty
÷ Connect antennas.
÷ Select a band.
÷ Tune to the frequency of the desired sta-
tion.
÷ Refer to "Channel space setting" and reset
the channel space.
÷ Install the outdoor antenna in an apart posi-
tion from the road.
÷ Switch the suspected electric appliance OFF.
÷ Install the TV or the system at an increased
distance between them.
÷ Preset stations with tunable frequencies.
÷ Preset stations again.
RemedyCauseSymptom
÷ Place the disc properly, with the label side
facing upward.
÷ Place the disc properly.
÷ Clean the disc referring to “Disc handling
precautions”.
÷ Try another disc.
÷ Refer to “Caution on condensation” and
remove the condensation by evaporation.
÷ Place a disc in the CD player.
÷ Press the CD 6 key.
÷ Clean the disc referring to “Disc handling
precautions”.
÷ Try another disc.
÷ Clean the disc referring to “Disc handling
precautions”.
÷ Try another disc.
÷ Install the unit in a place not subject to
vibrations.
÷ Replace with new batteries.
÷ Operate the unit inside the remote control-
lable range.
÷ Set a CD or MD in the component to be
played.
HD-5MD/EN
8
¢
¢
∞
9
∞
∞
)
)
s
s
)
)
s
s
%
%
™
75
Knowledge
Page 76

76
MD section (MD standard symptoms etc.)
"DISC FULL" is displayed although the max. recordable time has not been reached.
The recordable time does not increase when short
titles are deleted.
Titles cannot be combined.
The sum of the recorded time and the recordable time
does not coincide with the total recording time for
the MD.
"READING" is displayed for an abnormally long time.
When titles created by editing are played back fast
in forward or reverse direction, the sound becomes
interrupted.
The track (title) numbers are not assigned correctly.
Input of 1792 title characters is not possible.
HD-5MD/EN
CauseSymptom
÷ More than 255 titles (track No. 256 and up) can not be recorded even when the max.
recordable time has not been reached.
(Recording may be impossible even before track No. 256 has been reached.)
÷ When emphasis ON/OFF etc. is repeated often within a title, this is handled in the
same way as a break between titles, and "DISC FULL" will be displayed independent
of the time and the number of titles.
In this case, the main timer indication on the display becomes "0:00".
÷ When the remaining time for the entire minidisc becomes less than 24 sec (MONO,
LP2) or 48 sec (LP4), the main timer indication on the display becomes "0:00". When
the total time of the deleted titles becomes more than 24 sec (MONO, LP2) or 48
sec (LP4), the indication of the recordable time changes.
÷ In case of a frequently edited minidisc, the remaining time may not increase even
when a short title is erased.
÷ Sometimes it may not be possible to combine titles created by editing.
÷ Titles with different recording modes cannot be combined.
÷ As recording is done with 4 sec (MONO, LP2) or 8 sec (LP4) as the min unit, the
indicated time may not coincide.
÷ When a new minidisc for recording (completely unrecorded) is inserted, "READING"
will be displayed longer than normal.
÷ When a minidisc is inserted which has been edited frequently or which has very
many tracks, "READING" will be displayed longer than normal.
÷ Interrupted sound can be caused by a combination of various conditions, but this is
no defect.
÷ Depending on the recorded source, the track numbers may not be assigned
correctly.
÷ As the title input area is used in units of 7 characters, it may not be possible to enter
1792 characters.
Knowledge
Page 77
MD section (other symptoms)
No sound is heard even when the MD
6 key is pressed.
Recording is not possible.
The sound is distorted.
There is much noise.
A recorded MD cannot be played on
other equipment (equipment not compatible with ATRAC3).
4LP recordings have much noise.
÷ No minidisc inserted.
÷ An unrecorded minidisc has been inserted.
÷ The minidisc is write-protected.
÷ Digital recording of a source with digital
copy prohibition by SCMS has been tried.
÷ The recording level is low at the time of
AUX recording.
÷ A playback-only minidisc has been inserted.
÷ There is no recordable area.
÷ The source is set to MD.
÷ The recording time is too short.
÷ The unit is in menu mode.
÷ The recording level has not been set at the
time of recording.
÷ A minidisc recorded with distorted sound is
being played back.
÷ External noise is being introduced.
÷ LP2 or LP4 recording has been performed.
÷ The disc has many scratches.
HD-5MD/EN
RemedyCauseSymptom
÷ Insert a minidisc.
÷ Insert a recorded minidisc or a playback-
only minidisc.
÷ Return the write protection knob to its
original position or replace the disc by a
recordable disc.
÷ Record after switching the recording mode
to "ANALOG".
÷ Adjust the input level.
÷ Insert a minidisc for recording.
÷ Replace the minidisc.
÷ Set to the source to be recorded.
÷ Record for at least one second.
÷ Press the set key to cancel menu mode.
÷ Adjust the recording input level.
÷ Record again.
÷ Move away from electric devices, TVs, etc.
÷ Record in STEREO or MONO.
÷ Record at normal speed.
77
™
™
s
fi
fi
‹
w
Knowledge
Page 78

78
MD section (list of displayed messages)
CountermeasuresMeaningDisplay indication
NO DISC
SCMS
UNLOCK
DISC FULL
FULL
BLANK DISC
READING
MD WRITING
UTOC ERROR
CAN'T EDIT
"ok" is flashing.
PROTECTED
PLAY ONLY
NOT AUDIO
WAIT XX min.
CAN'T PLAY
PL: SET
Knowledge
÷ No minidisc inserted.
÷ Digital copying of a source with digital copy
prohibition by SCMS has been tried.
÷ The square optical connector has become
disconnected or the connection is imperfect.
÷ An external source with a sampling fre-
quency other than 38 kHz, 44.1 kHz, is 48
kHz is connected.
÷ There is no recordable area.
÷ Recording of the 256th title has been tried.
÷ Title input in excess of the max. character
number has been tried.
÷ This is a blank minidisc with nothing re-
corded on it.
÷ TOC *1, UTOC *2 information is being
read.
÷ Various information is being written at the
tome of editing or recording.
÷ The TOC *1, UTOC *2 contents are abnor-
mal.
÷ Deletion of too short titles or other editing
exceeding the limitations has been tried.
÷ The disc has been removed after recording
or editing and the editing information has
not been recorded.
÷ This is the confirmation method asking "Is
it OK to execute editing?".
÷ The minidisc is write-protected (PROTECT).
÷ This is a play-only minidisc.
÷ The input is a digital signal other than an
audio signal.
÷ After the start of CD double-speed record-
ing, double-speed recording of the same
disc has been tried within 74 minutes.
÷ Playback of a minidisc which cannot be
played because it is unrecorded or for other
reasons has been tried.
÷ Title input processing is performed with an
increase in the track number.
*1: All minidiscs have information called TOC (Table of Contents) recorded in addition to the audio signal.
The TOC corresponds to the table of contents of a book, and it contains the information which cannot be
rewritten out of the number of titles, the playback time, character information, etc.
*2: The information characteristic for a minidisc for recording, other than the TOC, is called UTOC.
This UTOC contains the information which can be rewritten out of the number of titles, the playback time,
character information, etc.
÷ Insert a minidisc.
÷ Digital recording is not possible.
÷ Record after switching the recording mode
to "ANALOG".
÷ Connect the square optical connector cor-
rectly.
÷ Connect an external source with a sam-
pling frequency suitable for this unit.
÷ Replace by a minidisc for recording.
÷ It is not possible to record 256 titles or more
onto one minidisc.
÷ Refer to "In regard to umber of characters
which can be entered".
÷ For playback, replace by a recorded minidisc.
÷ This is no defect.
÷ This is no defect.
÷ Perform "ALL ERASE". When this is not
possible, replace the disc.
÷ Perform editing within the limitations.
÷ Press the 0 key and remove the disc.
÷ Editing will be executed when the ENTER
key is pressed.
÷ Bring the minidisc to recordable condition
(cancel the protection).
÷ Insert a minidisc for recording.
÷ Provide an audio digital signal as output
from the connected external source.
÷ Start double-speed recording after the indi-
cated time has elapsed.
÷ Replace by a minidisc which can be played
back.
÷ Set the LP: Stamp function to OFF.
HD-5MD/EN
¢
d
fi
!
„
I
s
Page 79

Specifications
Main unit
79
HD-5MD/EN
[Amplifier section]
Effective output power during STEREO operation
(1 kHz, 10% T.H.D., at 6 Ω) ................. 25 W + 25 W
Rated output power during STEREO operation (DIN)
(1 kHz, 0.7% T.H.D., at 6 Ω) ................. 20W + 20 W
Frequency response .......... 30Hz ~ 60kHz (+0dB, -3dB)
[MD recordre section]
Laser ....................................... Semiconductor laser
D/A Conversion .............................. 1 Bit D/A converter
Sampling frequency ........................................ 44.1 kHz
Audio compression ............................ ATRAC, ATRAC3
Digital input
Optical .......................................... -15dBm ~ -21dBm
[CD player section]
Laser ....................................... Semiconductor laser
D/A Conversion .............................. 1 Bit D/A converter
Over sampling ....................................... 8 fs (352.8 kHz)
Frequency response ....... 20Hz ~ 20kHz (+0.5dB, -1dB)
Digital output
Optical .......................................... -15dBm ~ -21dBm
[Tuner section]
FM tuner section
Tuning frequency range ......... 87.5 MHz ~ 108 MHz
AM tuner section
(For U.K. and Europe)
Tuning frequency range ..........531 kHz ~ 1,602 kHz
(For other countries)
Tuning frequency range
9 kHz step ............................531 kHz ~ 1,602 kHz
10 kHz step ..........................530 kHz ~ 1,610 kHz
[General]
Power consumption .............................................. 70 W
Dimensions .................................................. W: 220 mm
....................................................................... H: 145 mm
....................................................................... D: 356 mm
Weight (net).......................................................... 6.8 kg
Speakers
Enclosure ... Bass-reflex type (Magnetically shielded)
Speaker configuration
Woofer ...................................... 120 mm, cone type
Tweeter ..................................... 25 mm, dome type
Impedance ................................................................ 6 Ω
Maximum input power ......................................... 60 W
Dimensions ................................................... W: 155 mm
....................................................................... H: 270 mm
....................................................................... D: 263 mm
Weight (net) ............................................. 4.5kg (1 piece)
KENWOOD follows a policy of continuous advancements in development. For this reason
specifications may be changed without notice.
÷ Sufficient performance may not be exhibited
at extremely cold locations (where water
freezes).
Application
Page 80

For your records
Record the serial number, found on the back of the unit, in
the spaces designated on the warranty card, and in the
space provided below. Refer to the model and serial
numbers whenever you call upon your dealer for information or service on this product.
Model Serial Number
 Loading...