


Kenwood Limited, New Lane, Havant, Hampshire PO9 2NH, UK
www.kenwood.co.uk
2851/2
ES581 series
®
Club

English 2 - 3
Français 4 - 6
Dansk 7 - 9
Svenska 10 - 12
Norsk 13 - 14
Suomi 15 - 17
UNFOLD
´¸∂w
19
- 18
21

2
safety
● Never remove the filter holder while the coffee button is on or while coffee is
brewing - steam could shoot out and burn you.
● Don’t get burnt by:
●●
hot parts, especially the maxi-cappucino nozzle
●●
steam or hot water coming out of the maxi-cappucino nozzle or liquid
coffee outlet.
● Keep children away from the machine. And never let the cord hang down
where a child could grab it.
● Never use a damaged machine. Get it checked or repaired: see ‘service’.
● Never put the machine in water or let the cord or plug get wet - you could get
an electric shock.
● Unplug:
●●
before filling with water
●●
before cleaning
●●
after use.
● Never leave the machine on unattended.
● Don’t let the cord touch hot parts.
● Don’t let infirm people use the machine without supervision.
● Don’t let children play with this machine.
important
● Never use without water - the pump will burn out.
● Keep the machine above 0°C - otherwise any water in the machine will freeze
and cause damage.
● Only use the machine for its intended domestic use.
● Never use without the drip tray and cup stand.
before plugging in
● Make sure your electricity supply is the same as the one shown on the
underside of your machine.
Important (UK only)
● The wires in the cord are coloured as follows:
Green and yellow = Earth, Blue = Neutral, Brown = Live.
● Your machine complies with European Economic Community Directive
89/336/EEC.
before using for the first time
1 Remove all packaging.
2 Wash the parts: see ‘cleaning’.
3 Flush the machine through: see ‘before making coffee for the first time’.
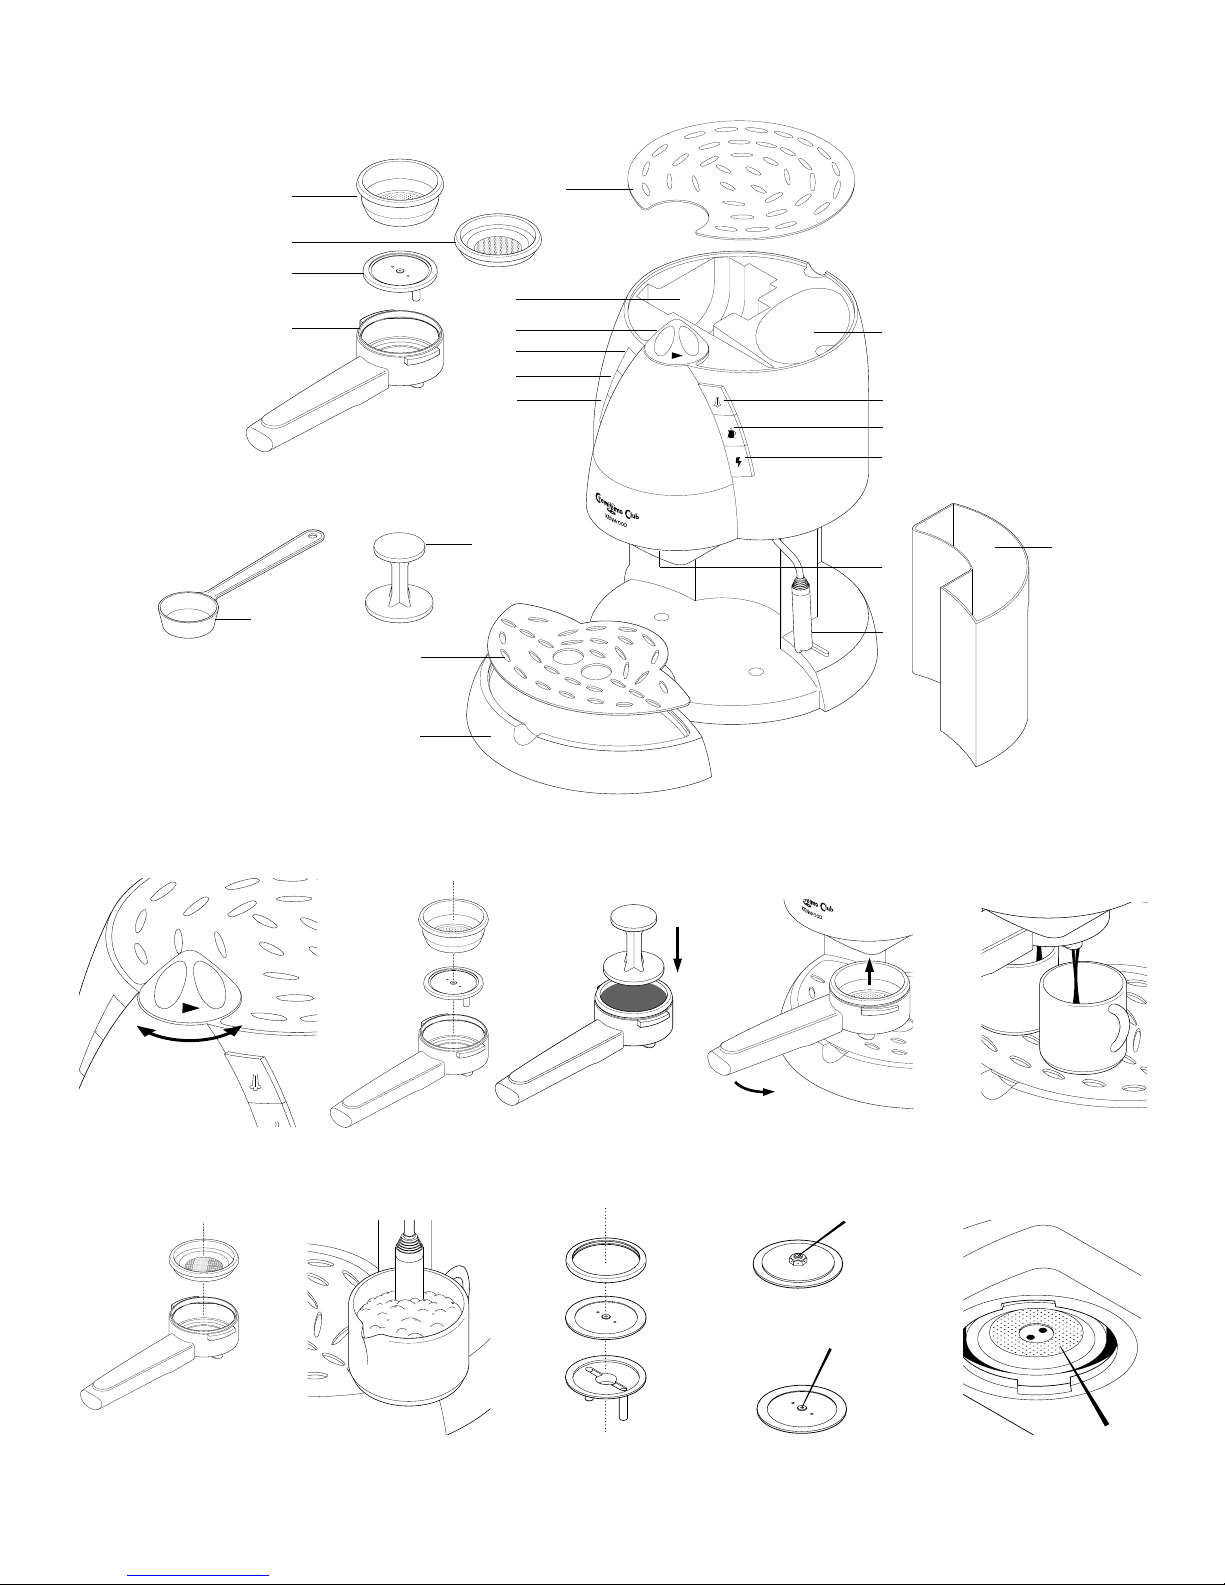
know your Kenwood espresso machine
tank filling chamber
steam button
coffee button
on/off button
tank
liquid coffee outlet
maxi-cappucino nozzle (hot water/steam nozzle)
drip tray
cup stand
pusher
on/off light
coffee light
steam light
hot water/steam knob
storage compartment
cup warming shelf
filter
filter for coffee pads
thermocream
® disc
filter holder
measuring spoon
before making coffee for the first time
1 Put all buttons in the ‘out’ (off) position.
2 Lift off the cup warming shelf and pour cold water into the tank. Always make
sure the water is above the line marked on the tank, but never overfill.
● Use cold water. We recommend using filtered water from a Kenwood water
filter as it produces better coffee and reduces limescale. Never use fizzy water.
3 Close the hot water/steam knob by turning clockwise (don’t overtighten) .
4 Swing out the maxi-cappucino nozzle and put a jug underneath.
5 Put a bowl under the liquid coffee outlet. (Don’t fit the filter holder.)
6 Switch the on-off button on. (The on-off and coffee lights will come on.)
7 Switch the coffee button on for 30 seconds or till one cup of water runs into the
bowl. (Allow a few seconds for the water to appear.)
8 Open the hot water/steam knob by turning anti-clockwise till one cup of
water runs into the jug.
9 Switch the coffee button off (the coffee light will stay on). Close the hot
water/steam knob by turning clockwise. Switch the on-off button off.
● Repeat these steps if you haven’t made coffee for a few days.
to make espresso
1 Put all buttons in the ‘out’ (off) position. Check that the hot water/steam knob is
closed by turning clockwise.
2 Pour water into the tank.
3 Ensure the thermocream
® disc is in the filter holder. Insert the filter .
(The thermocream
® disc has a valve that ensures the flow of coffee is
maintained at a constant pressure and closes automatically once the coffee has
been poured. This allows you to obtain a very creamy espresso with an intense
aroma and full bodied flavour.)
4 Add the coffee (one level spoon per cup, maximum 2 cups) and gently press it
down with the pusher . More coffee and firmer tapping will give you a
stronger brew. Less coffee and a light tap will produce a milder espresso. Wipe
off any excess coffee around the rim.
● When buying ground coffee make sure it is suitable for espresso machines.
5 Lift the filter holder into the liquid coffee outlet. Turn it firmly to lock it .
6 Put one or two cups underneath. If making 1 cup of coffee centre your cup in
the middle. Generally 1 cup of espresso is equal to 45 ml/1
1
⁄2 fl.oz.
7 Switch the on-off button on and wait for the coffee light to go out. When
making your first cup of espresso leave the machine for an additional 8-10
minutes to warm up. This will ensure your first cup of coffee is hot. Each time
you make a cup of coffee make sure that the coffee light is off.
8 Switch the coffee button on. After a few seconds, espresso will come out .
9 When you’ve enough espresso - not too much, otherwise it’ll be too weak -
switch the coffee button off. Unless you’re making more, switch the on-off
button off.
● There’ll be water on the filter when you remove it: this is normal.
10 To make more, always clean out the used coffee and then start at step 1.
important
Never remove the filter holder while the coffee button is on or while coffee is
brewing - steam could shoot out and burn you.
to use coffee pads
1 Put all buttons in the ‘out’ (off) position. Check that the hot water/steam knob is
closed by turning clockwise.
2 Pour water into the tank.
3 Remove the filter and thermocream
® disc from the filter holder.
4 Fit the filter for coffee pads into the filter holder .
5 Place the coffee pad onto the filter, ensuring that the side marked ‘down’ is
towards the bottom.
6 Press the coffee pad into the bottom of the filter ensuring that the edges of the
paper are tight against the interior of the filter.
● The coffee pad must be completely inside the filter and centrally positioned. It is
advisable to turn the corners inwards.
7 Follow steps 5 – 10 ‘to make espresso.’
● If the coffee pad is not correctly inserted, or if the filter is not fully locked in
position, a few drops of water may leak from the filter holder.
● When removing the filter holder after use, the coffee pad may remain attached
to the upper part of the machine. To remove it, hold the filter holder at an angle
against the coffee pads and allow it to fall into the holder.
● To ensure good quality coffee, only use pads bearing the E.S.E. compatibility
mark.
English
21

3
to froth milk for capuccino
1 Put all buttons in the ‘out’ (off) position.
2 Important: Remove the filter holder. Don’t remove it during the
frothing process as steam will shoot out and could burn you.
3 Place coffee cups on cup warming shelf.
4 Close the hot water/steam knob by turning clockwise (don’t overtighten) .
5 Swing out the maxi-cappucino nozzle and put an empty jug underneath.
6 Switch the on-off button on, then the steam button on. (The steam light will
flash and the on-off and coffee lights will come on. Water may drip from the
liquid coffee outlet.)
7 When the coffee light goes out, slowly open the hot water/steam knob by
turning anti-clockwise till steam comes out (a little water will come out first) .
Close it after a few seconds.
● important: if steam fails to appear, or stops, switch the coffee button on for
2-3 seconds - watch out for steam coming out of the liquid coffee outlet.
8 Part-fill your jug with milk - the milk may increase up to three times in volume.
Dip the maxi-cappucino nozzle into the milk. Open the hot water/steam knob
by turning anti clockwise and move the jug around . Never allow the milk to
boil as this will spoil the flavour of the coffee.
9 Close the hot water/steam knob by turning clockwise . Switch the steam and
on-off buttons off.
10 Spoon the milk onto your espresso.
● If you’re making espresso straight after frothing milk, you need to get rid of any
over-hot water that could burn your coffee. Here’s how:
1 Close the hot water/steam knob by turning clockwise (don’t overtighten) .
2 Swing out the maxi-cappucino nozzle and put an empty jug underneath.
3 Switch the on-off and coffee buttons on.
4 Open the hot water/steam knob by turning anti-clockwise . Allow a good
cupful of water to come out, then close the hot water/steam knob .
5 Switch the coffee and on-off buttons off.
to boil water for other hot drinks, eg tea, fruit drinks
1 Put all buttons in the ‘out’ (off) position.
2 Pour water into the tank.
3 Close the hot water/steam knob (don’t overtighten) .
4 Swing out the maxi-cappucino nozzle and put a cup underneath.
5 Switch the on-off button on.
6 When the coffee light goes out, slowly open the hot water/steam knob by
turning anti-clockwise , then switch the coffee button on. Some liquid may
come out of the liquid coffee outlet.
7 Let the cup fill with water.
● If the coffee light comes on, the water needs re-heating, so switch the coffee
button off and close the hot water/steam knob by turning clockwise . When
the light goes out, slowly open the hot water/steam knob by turning anti-
clockwise, then switch the coffee button on.
8 To switch off, switch the coffee button off, close the hot water/steam knob
and switch the on-off button off.
important
Never remove the filter holder while the coffee button is on - steam could shoot
out and burn you.
troubleshooting
No steam’s coming out
●
Is there water in the tank?
● Have you switched the steam button on?
● Is the coffee light on? If yes, wait for it to go out.
● The maxi-cappucino nozzle may be blocked: see ‘cleaning’.
No water’s coming out
● Is there water in the tank?
● Is the tank fitted correctly?
● Air may be trapped inside: repeat the steps under ‘Before making coffee for the
first time’.
No coffee’s coming out, or there’s just a trickle
● The filter holes may be blocked: see ‘cleaning’.
● The liquid coffee outlet may be blocked. Switch off and put a bowl underneath.
Remove the filter holder and switch on again. If water doesn’t flow evenly from
all the holes, clean it: see ‘cleaning’.
● The thermocream® disc may need cleaning: see ‘cleaning’.
● The coffee may be ground too finely.
● Is there water in the tank?
The filter’s overflowing
● Is the filter holder on properly? Switch off before checking.
● Have you used too much coffee (more than two measuring spoonfuls)?
● The liquid coffee outlet may be clogged with coffee grains: see ‘cleaning’.
● If using coffee pads has the correct filter been used?
The coffee’s weak and cold
● The coffee may not be finely ground enough.
● You may have let too much water through.
● The coffee light may have been on when the coffee button was pressed.
● Is the thermocream®
disc in the filter holder?
cleaning
● Before cleaning, unplug and let everything cool.
● Pull out the tank, empty and dry after use.
maxi-cappucino nozzle
1 Pull off the rubber nozzle and wash after every use - otherwise the milk will dry
on.
2 Wipe the metal pipe with a damp cloth and clear the hole with a needle.
filter
Remove and wash. Unblock the holes with a small brush. Then dry.
thermocream
® disc
1 Pop it out: turn the filter holder over and tap it on a hard surface. Wash.
2 Periodically remove the seal and separate the two black discs . Wash under
the tap. Use a pin to clear the holes in the sides and top of the nut . Clear
the centre hole on the other side .
cup stand, drip tray, filter holder, tank
Wash, then dry.
liquid coffee outlet
● Remove built-up coffee grains with a toothpick .
● Periodically allow water to pass through without attaching the filter holder.
service and customer care
If the cord is damaged it must, for safety reasons, be replaced by Kenwood or
an authorised Kenwood repairer.
UK
If you need help with:
● using your machine or
● servicing, spare parts or repairs (in or out of guarantee)
call Kenwood on 023 92392333 and ask for Customer Care. Have your
model number ready - it’s on the underside of your machine. Alternatively,
contact your authorised Kenwood repairer: look in YELLOW PAGES under
‘Electrical appliance repairs’.
Eire
See our advertisement in Golden Pages.
other countries
Contact the shop where you bought your machine.
guarantee (UK only)
If your espresso machine goes wrong within one year from the date you bought
it, we will repair it (or replace it if necessary) free of charge provided:
● you have not misused, neglected or damaged it;
● it has not been modified (unless by Kenwood);
● it is not second-hand;
● it has not been used commercially;
● you have not fitted a plug incorrectly; and
● you supply your receipt to show when you bought it.
This guarantee does not affect your statutory rights.

Français
sécurité
● Ne retirez jamais le support pour filtre lorsque le bouton café est allumé ou
lorsque le café est en train de se faire. De la vapeur pourrait s’échapper et vous
brûler.
● Ne vous brûlez pas avec :
●●
les éléments chauds de l’appareil, en particulier avec le tuyau maxicappucino
●●
la vapeur ou l’eau chaude s’échappant du tuyau maxi-cappucino ou de la
sortie café liquide
● Conservez l’appareil hors de portée des enfants et ne laissez jamais le cordon
pendre de telle façon qu’un enfant puisse s’en saisir.
● N’utilisez jamais un appareil endommagé ou en mauvais état. Faites-le vérifier
et réparer. Pour cela, reportez-vous à la rubrique “Service après-vente”.
● Ne mettez jamais l’appareil dans l’eau et ne laissez jamais le cordon
d’alimentation ou la prise électrique se mouiller. Vous risqueriez de vous
électrocuter.
● Débranchez :
●●
avant de remplir l’appareil d’eau
●●
avant de nettoyer l’appareil
●●
après utilisation.
● Ne laissez jamais l’appareil en marche sans surveillance.
● Ne laissez pas le cordon entrer en contact avec les éléments chauds de
l’appareil.
● Ne laissez pas des personnes infirmes utiliser l’appareil sans surveillance.
● Ne laissez pas les enfants jouer avec cet appareil.
important
● N’utilisez jamais l’appareil sans eau, au risque de griller la pompe.
● Conservez l’appareil à une température supérieure à 0°C, sans quoi l’eau
présente dans l’appareil pourrait geler et endommager ce dernier.
● Cet appareil est réservé à un usage exclusivement domestique.
● N’utilisez jamais l’appareil sans son plateau d’égouttement et son support à
tasses.
avant de brancher l’appareil
● Assurez-vous que le courant électrique que vous utilisez est le même que celui
indiqué sous votre appareil.
● Votre appareil est conforme à la directive 89/336 de la C.E.
avant d’utiliser votre appareil pour la première fois
1 Retirez tous les emballages.
2 Lavez les différents éléments de l’appareil : voir “Nettoyage”.
3 Purgez l’appareil : voir “Avant de faire un premier café”.
faites connaissance avec votre machine à expresso
Kenwood
chambre de remplissage du réservoir
bouton vapeur
bouton café
bouton marche/arrêt
réservoir
sortie café liquide
tuyau maxi-cappucino (tuyau eau chaude/vapeur)
plateau d’égouttement
support à tasses
poussoir
voyant marche/arrêt
voyant café
voyant vapeur
bouton eau chaude/vapeur
compartiment de rangement
plateau de réchauffage
filtre
filtre pour sachets de café
disque thermocream®
support pour filtre
cuillère à mesurer
avant de faire un premier café
1 Mettez tous les boutons en position « arrêt ».
2 Enlevez le plateau de réchauffage et versez de l’eau froide dans le réservoir.
Veillez toujours à ce que le niveau d’eau dépasse la ligne inscrite sur le réservoir
mais ne remplissez pas trop.
● Utilisez de l’eau froide. Nous vous recommandons d’utiliser de l’eau filtrée par
le filtre à eau Kenwood. La qualité du café sera meilleure et le dépôt de tartre
réduit. N’utilisez jamais d’eau gazeuse.
3 Fermez le bouton eau chaude/vapeur en le tournant dans le sens des aiguilles
d’une montre (ne pas trop serrer) .
4 Faites basculer le tuyau maxi-cappucino vers l’extérieur et placez un pichet en
dessous.
5 Placez un bol sous la sortie café liquide. (Ne fixez pas le support pour filtre.)
6 Mettez le bouton marche/arrêt en position marche. (Les voyants marche/arrêt
et café s’allument.)
7 Allumez le bouton café pendant 30 secondes ou jusqu’à ce que l’équivalent
d’une tasse d’eau remplisse le bol. (Laissez quelques secondes à l’eau pour
apparaître.)
8 Ouvrez le bouton eau chaude/vapeur en le tournant dans le sens inverse des
aiguilles d’une montre , jusqu’à ce que l’équivalent d’une tasse d’eau
remplisse le pichet.
9 Éteignez le bouton café (le voyant café reste allumé). Fermez le bouton eau
chaude/vapeur ) en le tournant dans le sens des aiguilles d’une montre.
Éteignez le bouton marche/arrêt.
● Répétez ces opérations si vous n’avez pas fait de café pendant plusieurs jours.
pour faire un expresso
1 Mettez tous les boutons en position « arrêt ». Vérifiez que le bouton eau
chaude/vapeur est bien fermé en le tournant dans le sens des aiguilles d’une
montre.
2 Versez l’eau dans le réservoir.
3 Assurez-vous que le disque thermocream® se trouve bien dans le support pour
filtre. Insérez le filtre . (Le disque thermocream® dispose d’une valve
permettant de maintenir l’écoulement du café à pression constante et se
fermant automatiquement une fois le café versé. Cela vous permet d’obtenir un
expresso très crémeux, avec un arôme et une saveur intenses.)
4 Ajoutez le café (une cuillerée rase par tasse, maximum 2 tasses) et tassez-le
délicatement à l’aide du poussoir . Pour un goût plus prononcé, ajoutez du
café et tassez plus fermement. Pour un expresso plus léger, réduisez la
quantité de café et tassez moins fermement. Retirez le café débordant du filtre.
● Lorsque vous achetez du café moulu, assurez-vous qu’il convient bien aux
machines à expresso.
5 Amenez le support pour filtre à la sortie café liquide. Tournez-le fermement afin
de le fixer .
6 Placez une ou deux tasses en dessous. Si vous ne faites qu’une tasse de café,
placez-la au centre. De manière générale, une tasse d’expresso équivaut à 45
ml.
7 Allumez le bouton marche/arrêt et attendez que le voyant café s’éteigne. Pour
votre premier expresso, laissez l’appareil chauffer pendant 8 à 10 minutes
supplémentaires. Ainsi, vous serez sûr d’obtenir une première tasse de café
bien chaude. À chaque nouvelle tasse de café, veillez à ce que le voyant café
soit éteint.
8 Allumez le bouton café. Après quelques secondes, l’expresso sortira .
9 Lorsque vous aurez assez d’expresso (mais pas trop, sans quoi il sera trop
léger), éteignez le bouton café. À moins que vous utilisiez encore l’appareil,
éteignez également le bouton marche/arrêt.
● Il y aura de l’eau sur le filtre lorsque vous le retirerez : ceci est normal.
10 Pour faire à nouveau du café, nettoyez le café ayant déjà servi et recommencez
à partir de l’étape 1.
important
Ne retirez jamais le support pour filtre lorsque le bouton café est allumé ou
lorsque le café est en train de se faire. De la vapeur pourrait s’échapper et vous
brûler.
4
Veuillez déplier les illustrations de la première page
21
 Loading...