

Kenwood Cuisine KM120, Cuisine KM150, Cuisine KM180 User Manual

Kenwood Cuisine KM120, KM150, KM180

Pack Contents
KM120 KM150 KM180
Cuisine Cuisine Cuisine
Solo 3 in 1 3 in 1 plus
mixing
mixing bowl ✓✓✓
whisk ✓✓✓
dough kneaders ✓✓✓
stirrer ✓✓✓
blending
liquidiser ✘ ✓✓
food processing
attachment bowl, lid and pushers ✘ ✓✓
knife blade
✘ ✓✓
3 slicer/shredder/chipper plates
✘ ✓✓
citrus juicer
✘✘✓
centrifugal juicer
✘✘✓
spatula ✓✓✓
cover
✘✘✘
KENWOOD CUISINE
introduction
Your Kenwood kitchen machine will help you with a multitude of tasks.
Whether you're making bread or a soufflé, meringues or a cake,
Kenwood makes it easier. And with such a wide range of attachments
available, there's no limit to what it can do for you.
GB

KENWOOD CUISINE
know your Kenwood kitchen machine
please refer to pack content guide opposite
safety
●
Keep your fingers away from moving parts and fitted attachments.
●
Handle blades and cutting plates with care - they are extremely sharp.
●
Never leave the machine on unattended.
●
Never use a damaged machine. Get it checked or repaired: see
‘service’, page
7.
●
Never use an unauthorised attachment or more than one attachment
at once (except the dough kneaders).
●
This machine is for domestic use only.
●
Never exceed the maximum capacities on page 2.
●
Switch off and unplug before fitting or removing tools/attachments, after
use and before cleaning.
●
This machine is not intended for use by young children or infirm persons
without supervision.
●
Don’t let children play with this machine.
before plugging in
●
Make sure your electricity supply is the same as the one shown on
the underside of your machine.
important - UK only●The wires in the cord are coloured as follows:
Blue = Neutral, Brown = Live
●
This machine complies with European Economic Community Directive
89/336/EEC.
before using for the first time
1 Remove all packaging including the plastic blade covers from the knife
blade. These covers should be discarded as they are to protect the
blade during manufacture and transit only.
2
Wash the parts: see ‘cleaning’, page 7
.
3 Wind excess cord around the bracket at the back of the machine.
know your Kenwood kitchen machine
outlet cover
on/off and head-lift switch
power unit
speed switch
pushers
attachment lid
attachment bowl
mixing bowl
bracket for excess cord
mixer tool release button
mixer head
mixer tool sockets
attachments available
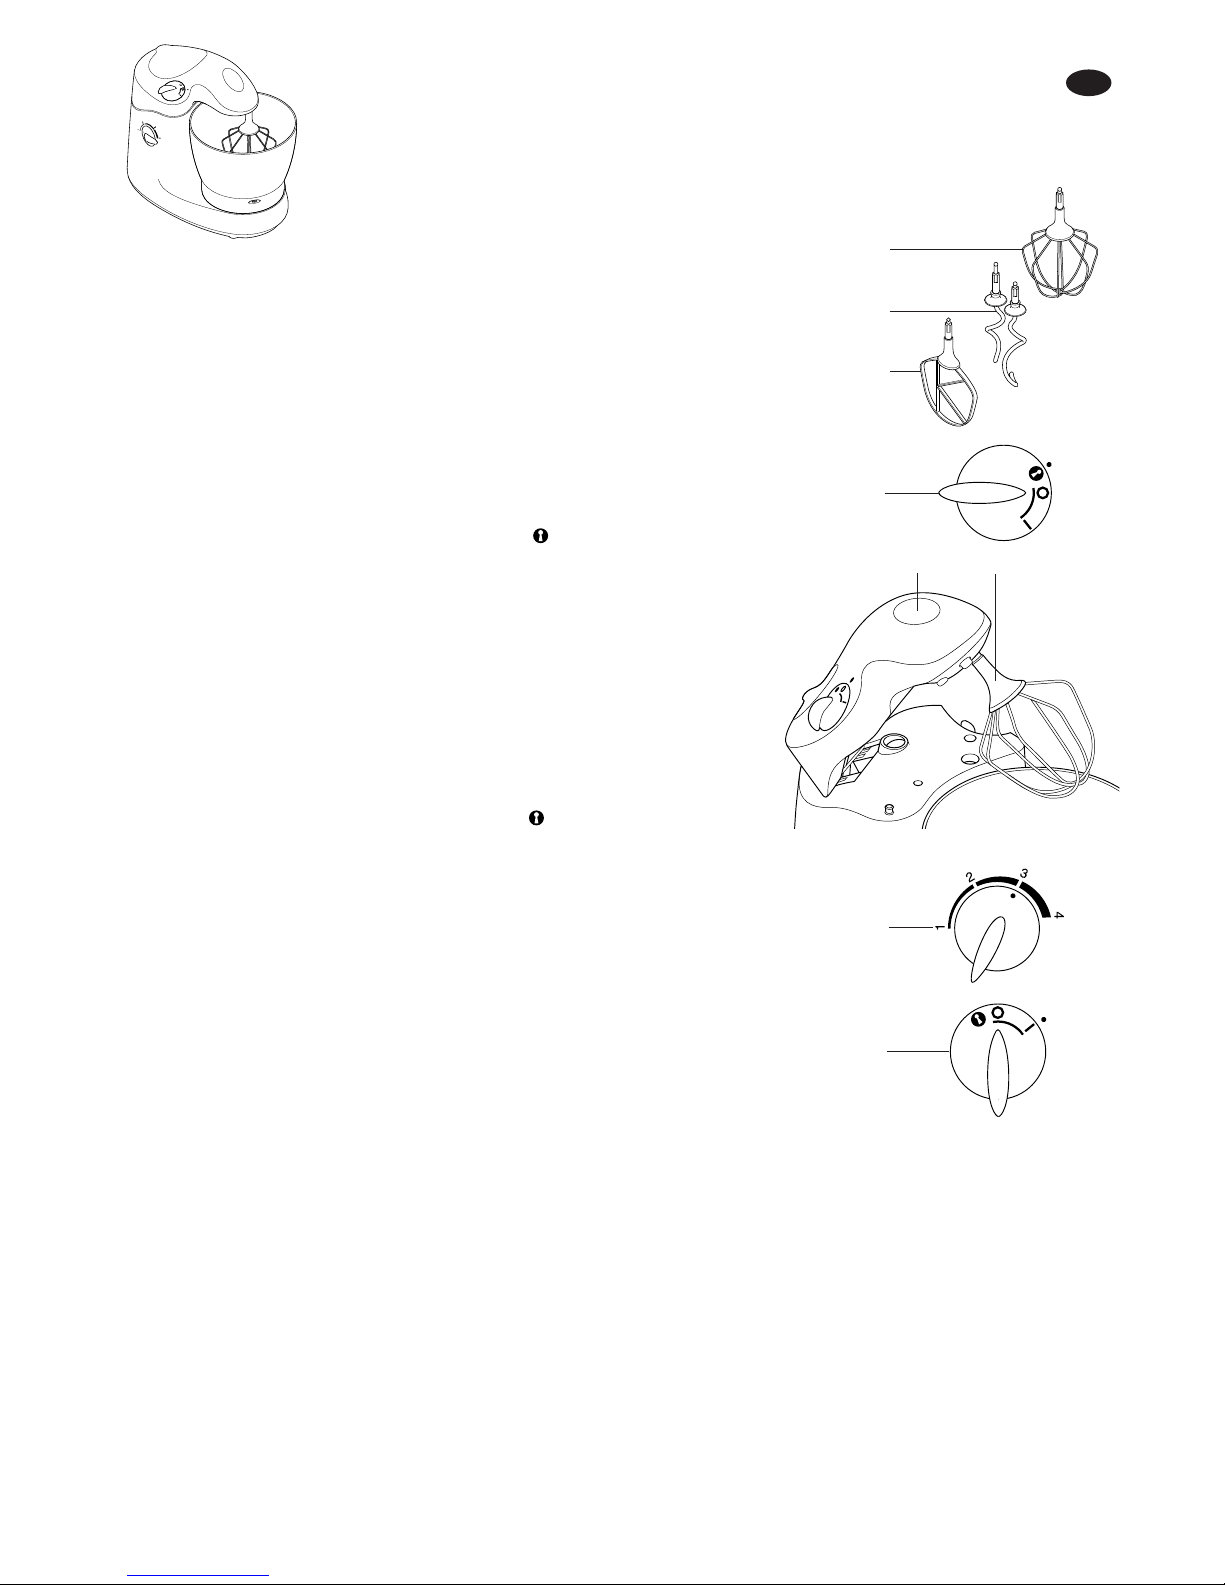
mixer whisk page 2
dough kneaders page 2
stirrer
page 2
liquidiser
page 3
food processing attachments knife blade page 4
slicer/shredder/chipper page 5
citrus juicer page
6
centrifugal juicer
page 6
spatula
cover part number 492239
To buy an attachment not included in your pack, call your
KENWOOD
repairer: look in Yellow Pages under ‘Electrical Appliance Repairs’.
Or call
KENWOOD on 023 92392333 and ask for Customer Care.
●
The food processing attachments all use the same bowl. So a pack
containing more than one attachment comes with only one bowl.
1
GB
Use the mixer for cakes, bread, pastry and meringues
the mixing tools and some of their uses
whisk for whisking egg whites; cream; instant puddings; all-in-one cake
mixes; creaming margarine and sugar (use a block margarine at
room temperature); mixing eggs into sponge and fruit cakes.
dough kneaders
for all yeast mixtures. Use both kneaders together.
stirrer
for stirring flour or fruit into cake mixes; making shortcrust pastry.
important
●
Never run the mixer for longer than 10 minutes - it will overheat.
●
Don’t use the whisk for heavy mixtures - you could damage it.
●
After cleaning, re-fit the bowl. This keeps the mechanism
underneath covered.
to use the mixer
1 Turn the on/off switch to ‘ ’ to raise the mixer head
2 Put your ingredients into the mixing bowl, then fit the bowl onto the
base. If necessary, turn it slightly until it drops into place.
3 The tools are colour-marked and so are the sockets they go into.
Choose a tool, find the socket that matches its colour, then insert turn and push
●
Use both dough kneaders together; use the other tools singly.
4 Lower the mixer head until it clicks shut - otherwise the
mixer won’t work.
5 Select a speed
6 Plug in, then turn the on/off switch to ‘I’
7
To switch off, turn the switch back to ‘
0’.
to remove a tool
1 Switch off.
2 Release the mixer head
3
Press the tool release button
●
Remove the tool before removing the bowl.
hints
●
If you’ve got something in the mixing bowl that might splash (eg cream
or flour), start on the lowest speed, then increase it if necessary.
●
If you hear the machine labouring, increase the speed.
choosing a speed
for all functions
●
whisking high
●
kneading high
●
stirring flour/fruit into cake mixes low to medium
●
making pastry low to medium
●
liquidiser high
●
knife blade medium to high
●
slicer/shredder/chipper medium to high
●
citrus juicer low to medium
●
centrifugal juicer high
maximum capacities
●
egg whites 8
●
liquidiser 1 litre (1
3/
4
pt)
●
one-stage sponge cake total weight 1.2kg (2lb 10oz)
●
fruit cake total weight 1.75kg (3lb 14oz)
●
pastry flour weight 300g (10oz)
●
bread dough flour weight 1kg (2lb 3oz) - but only if the liquid
content is at least 500ml (18fl oz). If the mixture is drier than this,
mix it in two batches. Otherwise you’ll strain the mixer.
●
chopping meat 340g (12oz)
for
cleaning see page 7
2
KENWOOD CUISINE
the mixer
GB

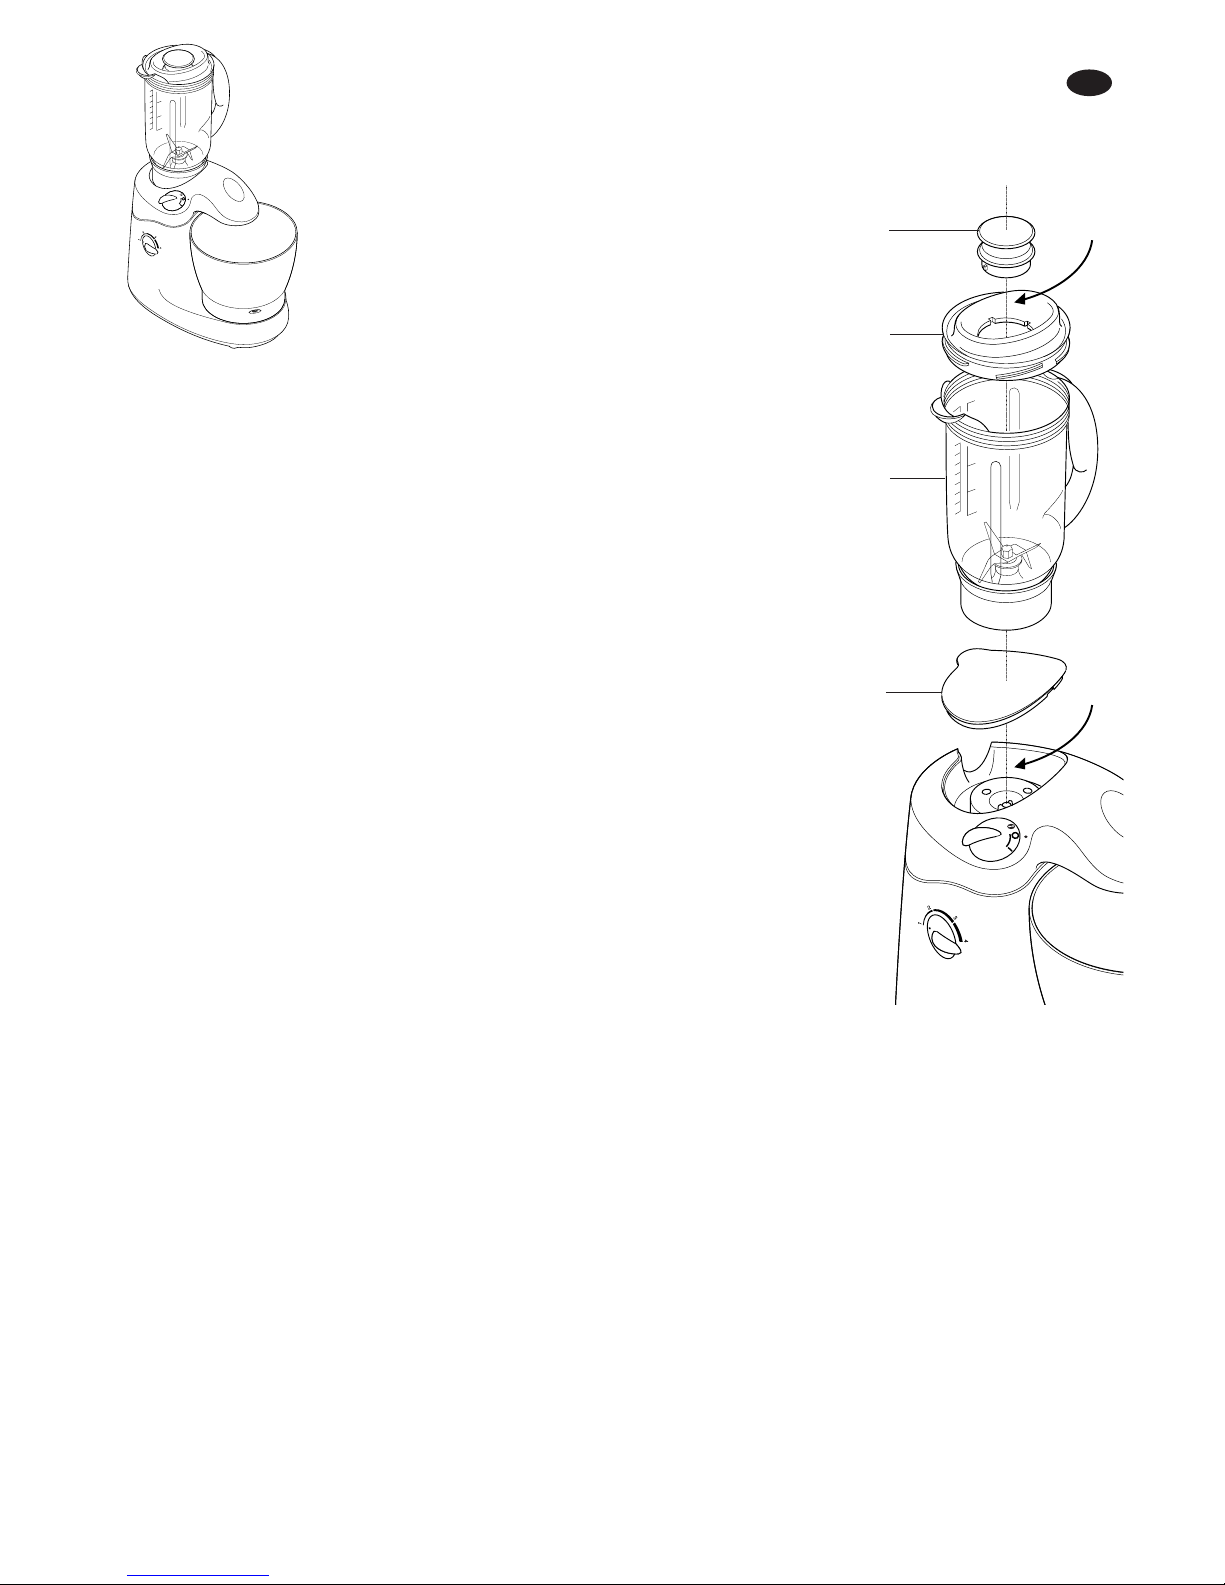
Use the liquidiser for soups, drinks, pâtés, mayonnaise, breadcrumbs,
biscuit crumbs and chopping nuts.
filler cap. You can remove this and add ingredients while the machine
is running (eg oil for mayonnaise or bread for breadcrumbs).
lid
jug
safety
●
Never remove the liquidiser, or its lid, until the blades have completely
stopped.
●
Never blend very hot liquids.
important
●
Never run the liquidiser for longer than one minute - it will overheat.
All foods are fully processed within one minute.
●
Don’t put dry ingredients into the liquidiser before switching on.
Cut them into cubes and drop them through the filler cap while the
machine is running.
●
Don’t process spices such as cloves, dill and cumin seeds as they
damage the liquidiser plastic.
●
The liquidiser isn’t suitable as a storage container. Don’t leave
ingredients to stand inside it either before or after processing.
●
Never exceed the maximum capacity of 1 litre (1
3
/
4
pt).
to use the liquidiser
1 Lower the mixer head until it clicks shut.
2
Remove the outlet cover
3
Put your ingredients into the jug.
4 Screw the lid and filler cap onto the jug.
5 Screw the jug onto the outlet
6
Switch on.
hint
●
When making mayonnaise, put all the ingredients, except the oil, into
the liquidiser. Then, with the machine running, remove the filler cap
and add the oil slowly and evenly.
for
cleaning see page 7
KENWOOD CUISINE
the liquidiser
3
GB

KENWOOD CUISINE
the food processing attachment
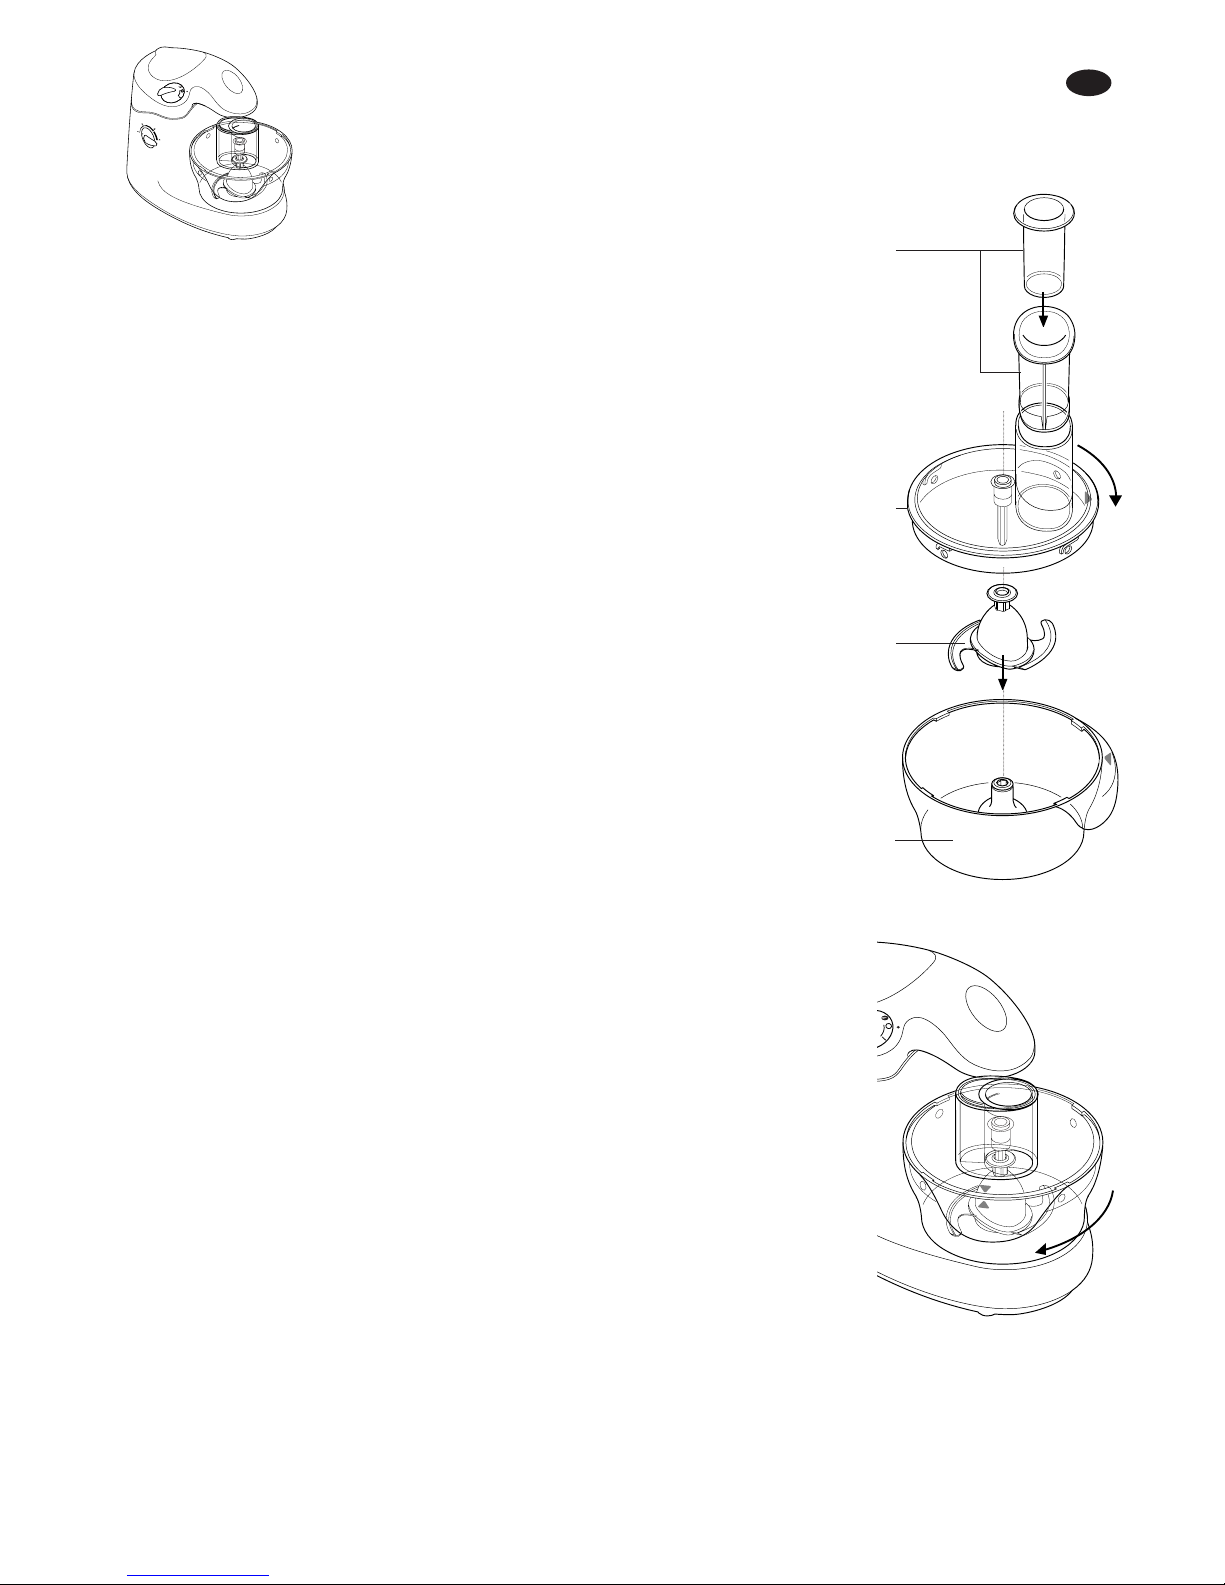
use the food processing attachment to chop, slice, shred and chip
knife blade
Use the knife blade to chop raw and cooked meat, cooked eggs,
vegetables, nuts, pâtés and dips and to also make crumbs from bread
and biscuits. It can also be used to make shortcrust pastry and
crumble toppings.
pushers: large and small
attachment lid
knife blade
attachment bowl
safety●Never remove the lid until the knife blade has completely
stopped.
●
The blades are sharp, handle with care. Hold the knife blade by the finger
grip at the top away from the cutting edge, both in use and when
cleaning.
●
Always remove the knife blade before pouring contents from the bowl.
important
●
Don't chop ice cubes or other hard foods, such as spices, they may
damage the attachment.
●
Don't use the knife blade to mix heavy loads such as bread dough
otherwise you may damage your machine. Use the dough kneaders in
the mixing bowl.
●
Don't blend liquid ingredients as they may leak from around the lid use the liquidiser.
●
Some movement may occur when chopping raw meat, this is normal.
to use the knife blade
1
Lower the mixer head until it clicks shut.
2 Place the knife blade in the attachment bowl
3 Cut the food up and place into the bowl ensuring that the food does not
fall down the central hole in the blade shaft.
4 Fit the lid onto the bowl - bowl handle to the right, feed tube behind
then turn clockwise until the indicating arrows line up
●
If you experience difficulty in fitting the shaft in the lid into the knife blade,
turn the top of the knife blade slightly, then try again.
5 Fit the feed tubes
6 Fit the unit onto the mixer base - handle towards the back - and turn
clockwise until it clicks into position
7
Switch on and process until the desired result has been achieved.
hints
●
Cut food up before placing into the attachment. Meat, bread,
vegetables and other foods of a similar texture should be cut into
cubes approximately 2cm/
3
⁄4 in. Biscuits should be broken into pieces
and added down the feed tube whilst the machine is operating.
●
When making pastry, use firm fat cut into cubes from the fridge. Mix
with the flour until breadcrumb stage is reached. Gradually add
sufficient water down the feed tube to form a dough. Switch off
immediately ingredients combine together.
●
During processing some foods may collect around the rim of the lid. To
prevent this, stop half way through the operation, scrape down, then
resume.
●
Take care not to over process when using the knife blade.
maximum capacities
●
pastry (flour weight) 300g (10oz)
●
meat 340g (12oz)
for
cleaning see page 7
4
GB

KENWOOD CUISINE
the food processing attachment
continued .....
slicer/shredder/chipper
Use the slicer/shredder to slice or shred fruit, vegetables and cheese
and the chipper to cut vegetables eg potatoes and fruit.
pushers: large and small
feed tube
attachment lid
attachment bowl
inclusive cutting plates
thick slicer/shredder
thin slicer/shredder
thin (julienne style) chipper
optional cutting plates
extra-coarse shredder part number 639021
rasping plate part number 639150
standard chipper part number 639083
To buy a cutting plate not included in your pack, call Kenwood customer
care on
023 92392333 and ask for Customer Care. Have your
model number ready it’s on the underside of your machine.
what the cutting plates do
slicer/shredders Plates and are reversible: one side slices, the other side shreds.
You can slice cheese, carrot, potato, cabbage, cucumber, courgette,
beetroot, onion. You can shred cheese, carrot, potato and foods of a
similar texture.Your chosen cutting side must be uppermost.
thin (julienne style) chipper
cuts: potatoes for Julienne style French fries; firm ingredients for salads,
garnishes, casseroles and stir fries (eg carrot, swede, courgette,
cucumber).
extra-coarse shredder
coarsely shreds cheese and carrot.
rasping plate
grates: parmesan cheese; potato for German potato dumplings.
standard chipper
cuts: potatoes for thin French fries; firm ingredients for salads and dips
(eg swede, cucumber).
safety
●
never remove the lid until the cutting plate has completely
stopped.
●
Handle the cutting plates with care - they are extremely sharp.
●
Don’t let the bowl fill up as far as the cutting plate: empty it regularly.
to use the slicer/shredder/chipper
1 Lower the mixer head until it clicks shut.
2
Fit the bowl onto the base - handle towards the back - and turn
clockwise until it clicks into position
3 Push your cutting plate onto the shaft inside the lid. The cutting side
must be uppermost
4 Fit the lid onto the bowl - feed tube towards the right - and turn clockwise
until the arrows align.
5
Choose which feed tube you want to use. The pusher contains a smaller
feed tube for processing individual items or thin ingredients.
to use the
small feed tube
●
First put the large pusher inside the feed tube
to use the large feed tube●Use both pushers together
6 Put the food into the feed tube.
7
Switch on and push down evenly with the pusher -
never put your
fingers in the feed tube.
hints●Use fresh ingredients.
●
Don’t cut food up too small. Fill the width of the large feed tube fairly full.
This prevents the food from slipping sideways during processing.
Alternatively, use the small feed tube.
●
When using a chipper plate, place thin ingredients horizontally.
●
When slicing or shredding: food placed upright comes out shorter than
food placed horizontally.
●
After using a cutting plate there will always be a small amount of waste
on the plate or in the food.
for
cleaning see page 7
5
GB

KENWOOD CUISINE
the citrus & centrifugal juicer
citrus juicer
Use the citrus juicer to squeeze the juice from citrus fruits
(eg oranges, lemons, limes, grapefruits).
cone
sieve
attachment bowl
to use the citrus juicer
1 Lower the mixer head until it clicks shut.
2 Fit the bowl onto the base - handle towards the back - and turn
clockwise
3 Put the sieve inside the bowl, then add the cone
4 Cut the fruit in half. Then switch on and press it onto the cone.
centrifugal juicer
Use the centrifugal juicer for making juice from firm fruit and
vegetables.
pusher
lid
strainer
inner bowl
attachment bowl
safety
●
Never use the centrifugal juicer without its lid on.
important
●
If the machine vibrates, switch off and empty the strainer.
(The machine vibrates if the pulp becomes unevenly distributed.)
●
Process small amounts at a time (454g (1lb) maximum) and empty
the strainer and inner bowl regularly.
●
Before processing, remove stones and pips (eg pepper, melon, plum)
and tough skins (eg melon, pineapple). You don’t need to peel or core
apples or pears.
to use the centrifugal juicer
1
Lower the mixer head until it clicks shut.
2 Fit the bowl onto the base - handle towards the back - and turn
clockwise
3
Fit the strainer inside the inner bowl, engaging the tabs
4 Fit the inner bowl inside the main bowl
5 Fit the lid onto the bowl - feed tube towards the right - and turn
clockwise
6 Cut your food up. Then put one or two pieces into the feed tube.
7 Switch on and push down evenly with the pusher - never put your
fingers in the feed tube
. Process fully before adding more.
8 After adding the last of the food, let the machine run for 20 seconds to
extract all the juice from the strainer.
hints
●
Use firm, fresh ingredients.
●
Citrus fruit juice will be bitter and frothy because its peel and pith get
processed too. Use the citrus juicer instead.
for
cleaning see page 7
6
GB

KENWOOD CUISINE
cleaning and service
cleaning
●
Always switch off and unplug before cleaning.
●
Never let the power unit, cord or plug get wet.
●
Handle all blades and cutting plates with care - they are extremely sharp.
●
Some foods will discolour the plastic. This is perfectly normal. It won’t
harm the plastic or affect the flavour of your food. Rubbing with a cloth
dipped in vegetable oil helps remove discolouring.
●
Don't wash the parts in the dishwasher.
power unit/mixer
●
Wipe with a damp cloth, then dry.
●
Never use abrasives or immerse in water.
liquidiser
1 Fill with warm water, fit the lid and filler cap, then switch on top speed for
20 - 30 seconds.
2
Empty, then rinse. If it’s still dirty, use a brush.
3 Wipe, then leave to air-dry.
●
Don’t leave the liquidiser in water to soak. And don’t leave water inside it.
all other parts
●
Wash by hand, then dry thoroughly.
service and customer care
●
Use the machine only for its intended use.
●
If the cord is damaged it must, for safety reasons, be replaced by
KENWOOD or an authorised
KENWOOD repairer.
If you need help with:
●
using your machine
●
ordering another attachment
●
servicing or repairs
Contact the shop where you bought your machine.
7
GB

KENWOOD CUISINE
recipes
winter warmer soup
ingredients●carrots, potatoes and onions: sixteen 2cm (3⁄4”) cubes of each
●
bacon stock
●
100g (4oz) red lentils, washed
●
250ml (1⁄2pt) vegetable stock
●
one 400g (14oz) tin chopped tomatoes
●
salt and pepper
●
200g (8oz) cooked bacon joint cut into 1cm (1⁄2”) cubes
method
1 Put the carrots, potatoes and onions into the liquidiser in that order.
2 Add bacon stock up to the 1 litre (1
3
⁄4pt) mark.
3 Blend for no more than 10 seconds.
4 Pour into a saucepan. Then add the lentils, tomatoes, vegetable stock
and seasoning.
5 Bring to the boil, stirring constantly. Then simmer for about 1 hour,
stirring regularly, until the ingredients are cooked.
6 Add the bacon cubes and heat through for 5 - 10 minutes. Serve
immediately.
white bread - loaf or rolls
ingredients
●
500g (1lb 2oz) strong plain flour
●
5ml (1tsp) salt
●
15g (1⁄
2oz) lard
●
15g (1⁄2oz) fresh yeast; or 10ml (2tsp) dried yeast + 5ml (1tsp) caster
sugar
●
300ml (11fl oz) warm water: 43˚C (110˚F). Use a thermometer or add
100ml (3
1
⁄2fl oz) boiling water to 200ml (71⁄2 fl oz) cold water
●
never exceed the maximum capacities on page 2.
method
1 dried yeast (the type that needs reconstituting): pour the warm water
into the bowl. Then add the yeast and the sugar and leave to stand for
5 - 10 minutes until frothy.
fresh yeast: crumble into the flour.
other types of yeast: follow the manufacturer’s instructions.
2
Pour the liquid into the bowl. Then add the flour (with fresh yeast if
used), salt and lard.
3 Fit the dough kneaders, then fit the bowl.
4 Switch on, gradually increasing the speed to maximum.
5 Knead until the dough looks elastic - never run the mixer for
longer than 10 minutes - it will overheat.
6 Put the dough into a greased polythene bag or a bowl covered with a
tea towel. Then leave it somewhere warm until it has doubled in size.
7
Put the dough onto a lightly floured surface. Then knead it by hand for
2 - 3 minutes to knock out the air. Do this by hand because the
increased dough size could damage your mixer.
8
Shape the dough into a loaf or about 15 rolls and place on greased
baking trays. Then leave it somewhere warm until it has doubled in
size.
9
Bake at 230˚C/450˚F/Gas Mark 8 for 20 - 25 minutes (for a loaf) or 10 15 minutes (for rolls).
10
When ready, the bread should sound hollow when tapped on the base.
8
GB

Inhoud verpakking
KM120 KM150 KM180
Cuisine Cuisine Cuisine
Solo 3 in 1 3 in 1 plus
mixen
mixerkom ✓✓✓
garde ✓✓✓
deegkneders ✓✓✓
roerlepel ✓✓✓
blenden
blender ✘ ✓✓
voedselverwerking
hulpstukken kom, deksel en stampers ✘ ✓✓
mes
✘ ✓✓
3 snijbladen voor schaven/raspen/versnipperen
✘ ✓✓
citruspers
✘✘✓
sapcentrifuge
✘✘✓
spatel ✓✓✓
afsluiting
✘✘✘
KENWOOD CUISINE
inleiding
Uw Kenwood mixer helpt u met het bereiden van talloze gerechten.
Wat u ook wilt maken, brood, soufflé’s, schuimgebak of cake,
met Kenwood is het zó gebeurd. En dankzij de vele verschillende
hulpstukken, zijn de mogelijkheden onbegrensd.
NL
9

veiligheid
●
Houd uw vingers uit de buurt van bewegende onderdelen en
hulpstukken.
●
Pas op met messen en snijplaten: deze zijn erg scherp.
●
Laat de machine nooit onbeheerd achter.
●
Gebruik nooit een beschadigd apparaat. Laat het apparaat in
dergelijke gevallen nakijken of repareren: zie paragraaf ‘service’.
●
Gebruik nooit andere hulpstukken dan die voor het apparaat bestemd
zijn, en gebruik nooit meerdere hulpstukken tegelijk (geldt niet voor de
deeghaken).
●
Hat apparaat is uitsluitend geschikt voor huishoudelijk gebruik.
●
Overschrijd nooit de maximum aanduidingen, zoals omschreven op
pagina 11.
●
Schakel het apparaat uit en haal de stekker uit het stopcontact voordat
u instrumenten/hulpstukken aanbrengt of verwijdert, na ieder gebruik
en alvorens het apparaat te reinigen.
●
Laat kinderen niet met dit apparaat spelen.
voordat u de stekker in het stopcontact steekt
●
Zorg dat het voltage van het stopcontact overeenkomt met de
gegevens onderop het apparaat.
●
Dit apparaat voldoet aan EG richtlijn 89/336/EEC.
●
Kinderen of zieke personen mogen deze machine uitsluitend onder
toezicht gebruiken.
voordat u het apparaat voor de eerste keer gebruikt
1 Verwijder de gehele verpakking, inclusief de plastic
messenbeschermers. Deze beschermers moeten worden weggegooid
aangezien ze het mes uitsluitend beschermen tijdens de productie en
het vervoer.
2
Was de onderdelen af: zie paragraaf “Reiniging” op pagina 16.
3 Draai overtollig snoer rond de klem aan de achterkant van het
apparaat.
uw Kenwood keukenmachine
Deksel uitloopgedeelte
AAN/UIT-schakelaar/liftschakelaar voor kop
aandrijfgedeelte
standenschakelaar
stamper
afneembaar deksel
uitneembare kom
mixerkom
haak voor ongebruikt snoer
knop voor loskoppelen mix-accessoires
mixerkop
houder mix-accessoires
leverbare hulpstukken
garde pagina 11
deeghaken pagina 11
klopper pagina 11
mengbeker pagina 12
hulpstukken voor
voedselverwerking
mes pagina 13
schaaf/rasp/versnipperaar pagina 14
citruspers pagina 15
centrifugepers pagina 15
spatel
afdekking onderdeelnummer 492239
Wanneer een hulpstuk niet is meegeleverd, neem dan contact op met
de dealer bij wie u het apparaat heeft gekocht.
●
De hulpstukken voor voedselverwerking kunnen allemaal met dezelfde
kom gebruikt worden. Een pakket met meer dan één hulpstuk wordt
dus met slechts één kom geleverd.
KENWOOD CUISINE
wat u moet weten over uw Kenwood keukenmachine
Raadpleeg a.u.b. het overzicht van de verpakkingsinhoud op de achterzijde van deze pagina.
10
NL

Gebruik de mixer voor het bereiden van cakes, brood, gebak en
schuimgebak.
mix-hulpstukken en mogelijkheden
garde voor het kloppen van eiwit, room, instant pudding, kant-en-klare
cakemix, margarine met suiker (gebruik margarine op kamertemperatuur) en het schuimig kloppen van eiwit en vruchtencakes.
deeghaken
voor alle gistmengsels. Gebruik beide haken tegelijkertijd.
k-klopper
om meel of fruit door cakemix te mengen, en voor het
maken van korstdeeg.
belangrijk
●
Gebruik de mixer nooit langer dan 10 minuten achter elkaar:
het apparaat raakt dan oververhit.
●
Gebruik de garde niet voor zware mengsels; deze kan dan
beschadigd raken.
●
Plaats de kom na het schoonmaken weer terug. Daardoor wordt
het mechanisme dat eronder zit, beschermd.
gebruik van de mixer
1 Draai de AAN/UIT-schakelaar op stand ‘ ’ om de mixerkop
omhoog te tillen
2
Doe de ingrediënten in de mixerkom en pas de kom vervolgens
op het onderstel. Draai indien nodig licht aan de kom totdat hij
op zijn plaats vastzit.
3 De hulpstukken zijn gemerkt met een kleur, evenals de
aansluitopeningen waarin ze bevestigd moeten worden.
Kies een hulpstuk, zoek de opening met de
corresponderende kleur, steek het hulpstuk daarin,
draai het rond en druk het vast
●
Gebruik beide deeghaken tegelijkertijd; de andere
hulpstukken moet u afzonderlijk gebruiken.
4 Zet de mixerkop omlaag, totdat deze vastklikt. Wanneer
de kop niet vastzit, werkt de mixer niet.
5 Selecteer de gewenste stand
6
Steek de stekker in het stopcontact en zet de AAN/UITschakelaar op stand ‘
I’
7
Om het apparaat uit te schakelen, zet u de schakelaar op stand ‘
0’.
tips
●
Als u iets in de mixerkom heeft gedaan dat kan gaan spatten (bijv.
room of meel), moet u op de laagste stand beginnen en vervolgens,
indien nodig, de snelheid geleidelijk opvoeren.
●
Als u kunt horen dat de machine moeizaam de werkzaamheden
verricht, moet u de snelheid opvoeren.
Kies een snelheid
voor alle functies
●
kloppen hoog
●
kneden hoog
●
meel/fruit door cakebeslag roeren laag tot medium
●
gebak maken laag tot medium
●
blender hoog
●
mes medium tot hoog
●
schaaf/rasp/versnipperaar medium tot hoog
●
citruspers laag tot medium
●
centrifugepers hoog
maximumcapaciteit
●
eiwitten 8
●
mengbeker 1 liter
●
luchtige cake zonder ingrediënten totaal gewicht 1,2kg
●
vruchtencake totaal gewicht 1,75kg
●
deeg meelgewicht 300g
●
brooddeeg meelgewicht 1kg - uitsluitend wanneer het vochtgehalte
minimaal 500ml is. Wanneer het mengsel droger van structuur is, mix
het dan in twee etappes. Anders loopt de mixer vast.
●
vlees hakken 340 g
zie pagina 16 voor
reiniging
11
KENWOOD CUISINE
mixer
NL
Gebruik de mengbeker voor soepen, dranken, paté’s, mayonaise, het
maken van paneermeel van brood en beschuit en het hakken van
noten.
Afsluitdop vulgedeelte. Deze dop kunt u verwijderen om het
apparaat te vullen, terwijl het is ingeschakeld (bijv. olie voor
mayonaise of brood dat u wilt verkruimelen).
Deksel
kan
veiligheid
●
Verwijder nooit de mengbeker of het deksel, voordat de messen
volledig tot stilstand zijn gekomen.
●
Meng nooit hete vloeistoffen.
belangrijk
●
Schakel de mengbeker nooit langer dan 1 minuut in - de beker kan
dan oververhit raken. Alle soorten voedsel zijn na 1 minuut helemaal
verwerkt.
●
Doe geen ingrediënten in de mengbeker, voordat deze is ingeschakeld.
Snijd de ingrediënten in blokjes en duw deze door de vuldop, terwijl
het apparaat is ingeschakeld.
●
Gebruik het apparaat niet voor kruiden zoals bijvoorbeeld kruidnagel,
dille of komijnzaadjes: deze kruiden kunnen het plastic van de
mengbeker aantasten.
●
De mengbeker is niet geschikt als bewaarkan. Laat voor of na het
verwerken geen ingrediënten in de beker staan.
●
Overschrijd nooit de maximumcapaciteit van 1 liter.
Gebruik van de mengbeker
1 Zet de mixerkop omlaag, totdat deze vastklikt.
2
Verwijder de klep van het uitloopgedeelte
3 Doe de ingrediënten in de kan
4 Draai het deksel dicht en zet de vuldop op de kan
5
Draai de kan op het onderstel
6 Schakel het apparaat in
tip
●
Wanneer u mayonaise maakt, doe dan alle ingrediënten in de kan,
behalve de olie. Wanneer het apparaat is ingeschakeld, verwijder
dan de vuldop en voeg de olie langzaam en gelijkmatig toe.
zie pagina 16 voor
reiniging
KENWOOD CUISINE
mengbeker
12
NL
KENWOOD CUISINE
de hulpstukken voor voedselverwerking
Gebruik de hulpstukken voor voedselverwerking om te hakken, plakjes te snijden, te
raspen en te versnipperen.
mes
Gebruik het mes om rauw en gebakken vlees, gekookte eieren,
groenten, noten, patés en ingrediënten voor dipsauzen te hakken en
om brood en koekjes te verkruimelen. Het kan ook gebruikt worden
voor het bereiden van zandgebak en een kruimellaagje voor op gebak.
stampers: groot en klein
afneembaar deksel
mes
uitneembare kom
veiligheid
●
Verwijder de deksel nooit voordat het mes volledig tot
stilstand is gekomen.
●
De messen zijn scherp, dus wees voorzichtig. Houd het mes vast
bovenaan de vingergreep, weg van de scherpe kant, zowel tijdens het
gebruik als het reinigen.
●
Verwijder het mes altijd voordat u de inhoud uit de kom giet.
belangrijk
●
Hak geen ijsklontjes of ander hard voedsel zoals kruiden, aangezien
deze het mes kunnen beschadigen.
●
Gebruik het mes niet om zware massa’s zoals brooddeeg te mixen,
omdat u zo de machine kunt beschadigen. Gebruik hiervoor de
deegkneders in de mixerkom.
●
Meng geen vloeibare ingrediënten aangezien deze rondom de deksel
kunnen weglekken - gebruik hiervoor de blender.
●
Er kunnen lichte bewegingen optreden wanneer u rauw vlees hakt; dit
is normaal.
gebruik van het mes
1
Breng de mixerkop naar beneden totdat deze dichtklikt.
2 Plaats het mes in de uitneembare kom .
3
Snijd het voedsel in stukken en doe deze in de kom; let er hierbij op
dat het voedsel niet in het middelste gat van het mes valt.
4 Pas de deksel op de kom - met het handvat van de kom naar rechts en
de vulbuis achteraan- en draai hem met de klok mee totdat de pijltjes
in dezelfde richting wijzen
.
●
Als u moeite heeft om de schacht in de deksel en het mes in elkaar te
passen, draai de bovenzijde van het mes dan licht en probeer het
opnieuw.
5 Bevestig de vulbuizen .
6 Plaats het geheel op het onderstel van de mixer -met het handvat naar
achteren- en draai het met de klok mee totdat het geheel vastklikt
.
7 Schakel de machine in en verwerk het voedsel tot u het gewenste
resultaat bereikt heeft.
tips
●
Snijd voedsel in stukken voordat u het hulpstuk gaat gebruiken. Vlees,
brood, groenten en ander voedsel met een vergelijkbare structuur
moeten in blokjes van circa 2 cm worden gesneden. Koekjes moeten
in stukjes worden gebroken en via de vulbuis worden toegevoegd
terwijl de machine aanstaat.
●
Als u gebak bereidt, moet u harde, in blokjes gesneden boter uit de
koelkast gebruiken. Meng dit met het meel totdat er een soort
broodkruimels ontstaan. Voeg geleidelijk voldoende water toe via de
vulbuis zodat er deeg ontstaat. Schakel de machine onmiddellijk uit als
de ingrediënten volledig vermengd zijn.
●
Gedurende het verwerken kunnen sommige etenswaren zich rond de
rand van de deksel ophopen. Om dit te voorkomen, moet u halverwege
de verwerking stoppen, het voedsel naar beneden schrapen en weer
verder gaan.
●
Zorg ervoor dat u niet te veel voedsel tegelijk verwerkt als u het mes
gebruikt.
maximale capaciteit
●
gebak (gewicht meel) 300 g.
●
vlees 340 g.
zie pagina 16 voor
reiniging
13
NL
 Loading...