

Page 1

CAW-CANUN2
Universal Steering Wheel Remote Control Adaptor
Universal-Lenkradfernbedienungsadapter
Interface Universelle pour télécommande au volant d'origine
Interfaccia Universale per comandi al volante d’origine
Interfase Universal para mandos de volante originales
rev 1.0 14
Please make sure
the connection
details in the
instruction manual
of the receiver.
WARRANTY
THIS PRODUCT IS COVERED BY TWO-YEAR GUARANTEE FOR ANY
MANUFACTURING TROUBLES. THE WARRANTY IS VALID IF
ACCOMPAINED BY THE INVOICE OF PURCHASE
The information in this guide are purely for information purposes, therefore, are subject to change without notice.
At the time of publication the information is correct and reliable.
However the distributor can not be held responsible for any consequences resulting from errors or omissions in this
manual. We reserves the right to improve / change the product or manual without obligation to notify users.
Radio protocol selection procedure
PRESS SEEK +
PRESS VOLUME + FOLLOWED BY SEEK +
Page 2
Self-Learning / Selbstlern-Funktion
Auto-apprentissage / Auto-apprendimento / Auto-aprendizaje
To select one of the sub menu voices press SRC button.
In the example below we visualize HOUR.
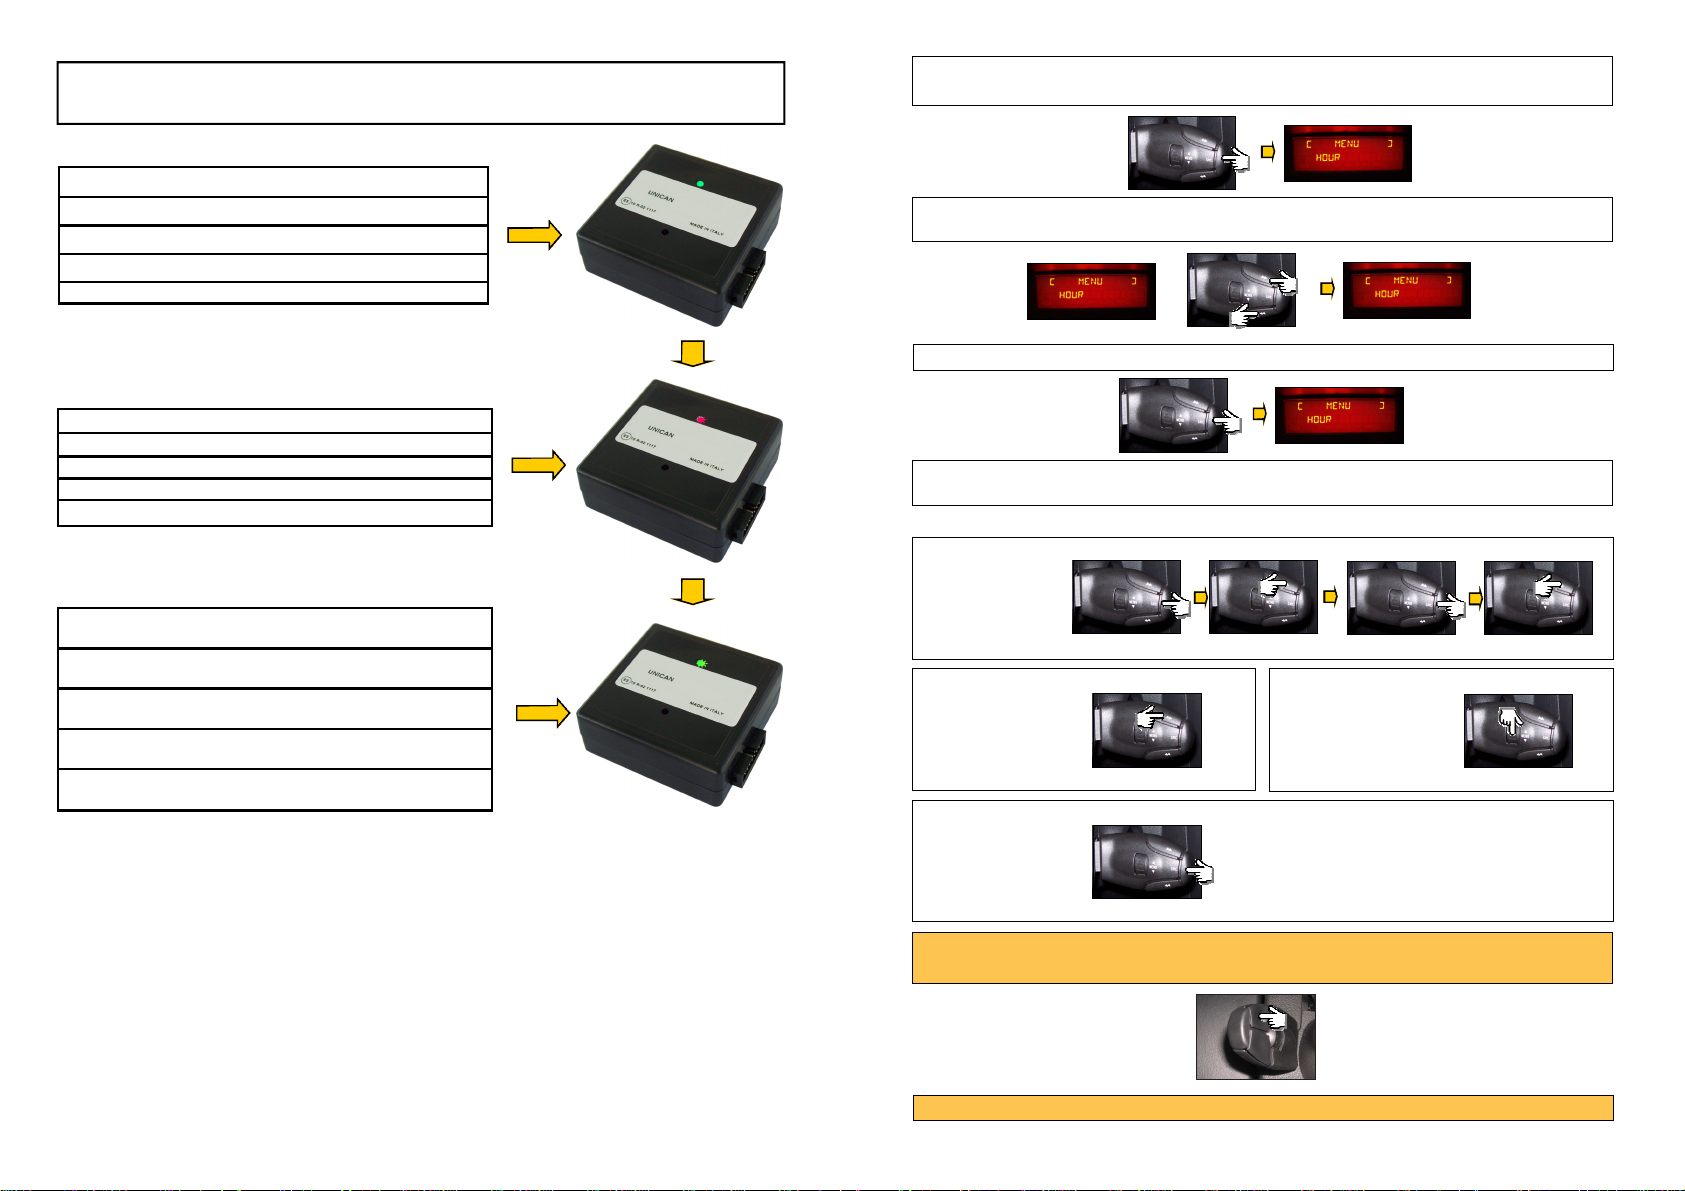
Power Plug.
Stromanschluss.
Branchement.
Alimentare l’Unità.
Conexión de alimentación.
LED blinks red for few seconds.
Die LED blinkt für einige Sekunden rot.
Le LED clignote en rouge quelques secondes.
Il LED lampeggia rosso qualche secondo.
El LED rojo parpadea unos segundos.
LED blinks green: it must to select the radio
protocol
Wenn die LED grün blinkt, wählen Sie bitte das entsprechende Radioprotokoll (siehe Seite 1) aus.
LED clignote en vert: il doit choisir le protocole de la
radio
Il LED lampeggia verde, bisogna selezionare il protocollo radio.
LED parpadea en verde: se debe seleccionar el protocolo de la radio
Each time we will press SEEK >> button, we will increase the HOUR.
To decrease press SEEK << button.
10
To confirm press SRC button.
11
The menu selection logic is the same for all sub menu voices.
Below a simplified description.
Enter menu
Scroll Main Menu
Scroll Sub Menu
Confirm selection
11
2
Menu setting it’s under time, if any button is pressed within 30 seconds the system exit automatically. To re-activate the menu just press volume +
Once ended the setting switch OFF the ignition and extract the key.
Page 3
PSA MENU SETTING
UNICAN allows you to set some functions that usually are managed with the OEM head unit .
By making a simple and intuitive procedure it’s possible to set functions such as:
Hour
Date
Language
General Setting
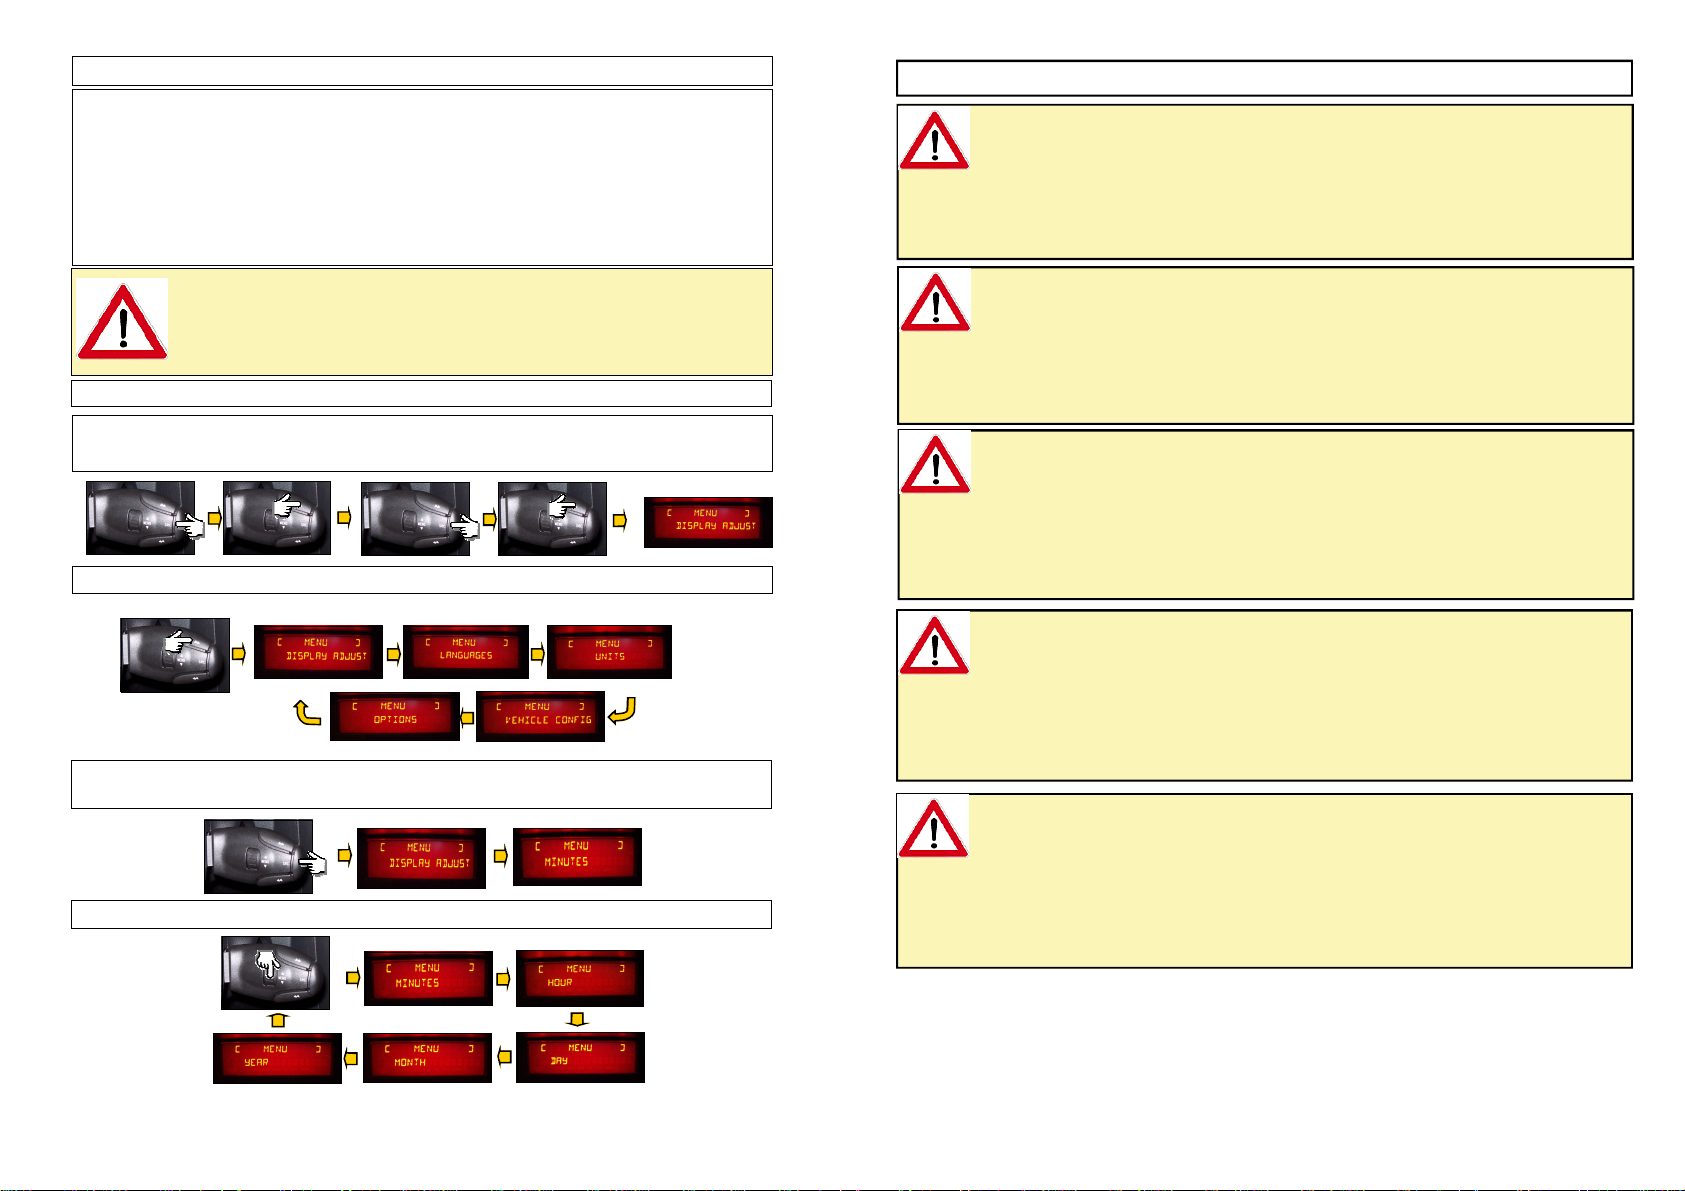
To enter the menu setting just turn on the ignition, switch OFF the radio, then press the sequence of buttons MODE and SEEK >> twice. Once done this operation the car display will visualize
the voice MENU.
Each time we will press SEEK >> button, we will navigate the Main Menu.
To select one of the Sub Menu press SRC button.
In the example below we visualize DISPLAY ADJUST in which we can modify hours and date.
Each time we will press MEMO V button, we will navigate the DIPLAY ADJUST sub menu.
ATTENTION
THE MENU’ AVAILABILITY IT’S UNDER TIME, IF ANY BUTTONS IS PRESSED
WITHIN 30 SECONDS, THE SYSTEM EXIT AUTOMATICALLY.
TO RESET THE SETTING FUNCTION ONCE ENDED THE MODIFICATIONS,
DISCONNECT THE IGNITION KEY. ,
How to enter the menu setting
Reset Procedure
WARNING!
IF YOU NEED TO RESET THE UNIT OR RE-INSTALL IT IN A NEW CAR (EVEN IF IN A
SAME GROUP MODEL) IT IS NECESSARY TO RESET THE MODULE.
RESET:
1. WITH THE UNIT POWERED, PRESS AND KEEP PRESSED THE UNIT BUTTON TILL THE
2. WITH THE LED SWITCHED OFF RELEASE THE BUTTON, THE RESET IS DONE.
1. Zunächst den Adapter anschliessen und in Betrieb nehmen, dann den Taster in der
2. Nachdem die LED erloschen ist, den Taster loslassen und fertig ist das Zurücksetzen.
RESET:
1. AVEC LA UNITE ALIMENTEE, APPUYER ET MAINTENIR APPUYE SUL LE BOUTON JU-
2. AVEC LA LUMIERE ÉTEINT RELACHEZ LE BOUTON, LA REINITIALISATION EST TERMI-
RESET:
1. CON L’UNITA’ ALIMENTATA PREMERE E TENERE PREMUTO IL PULSANTE DEL MODU-
2. CON IL LED SPENTO RILASCIARE IL PULSANTE, IL RESET E ESEGUITO.
RESET:
1. CONECTAR LA UNIDAD, PULSAR Y MANTENER PULSADO EL BOTON DEL MODULO
2. CON EL LED APAGADO SOLTAR EL BOTON, EL RESET SE HACE.
LED SWITCH OFF.
Achtung!
Bitte stellen Sie den Ausgangzustand, was auch bei einer Verwendung des Adapters in
einem anderen Fahrzeug, selbst bei gleicher Marke und Modell, gemacht werden soll,
wie folgt her:
Gehäusemitte des Adapters drücken und gedrückt halten bis die LED erlischt.
ATTENTION!
Si VOUS DEVEZ REINITIALISER L’APPAREIL OU RE-INSTALLER DANS UN NEUF
VEHICULE (MÊME SI DANS UN MEME GROUPE / MODEL), IL FAUT REINITIALISER
KE MODULE.
SQU’A DA LUMIERE D’UNICAN S’ETEINT.
ATTENZIONE!
SE SI VUOLE INSTALLARE LA STESSA INTERFACCIA SU UNA NUOVA
VETTURA (ANCHE SE DI UNO STESSO GRUPPO) E’ NECESSARIOESEGUIRE IL
RESET DEL MODULO.
LO FINO A CHE IL LED SI SPENGA.
ADVERTENCIA!
SI USTED NECESITA REINICIAR LA UNIDAD O RE-INSTALAR EN UN NUEVO VEHÍCULO (AUNQUE EN
UN MISMO GRUPO MODELO), ED NECESARIO REINICIAR EL MODULO.
HASTA EL LED SE APAGA.
18
3
Page 4

Functions / Funktionen / Fonction / Funzioni / Funciones
RADIO CASSETTE CD
1 INCREASE VOLUME
2 DECREASE VOLUME
3 SEEK + NEXT TRACK
4 SEEK — PREVIOUS TRACK
5 FM
6 AM
7
8 MUTE
9 ANSWER CALL
10 CLOSE CALL
1 - 2 2 - 3
JUMPERS
J1
J2
1 2 3
J1
J2
J3
J4
J5
J3
J4
J5 K-BUS HANDLING CAN-BUS HANDLING
SOURCE / CLOSE CALL
In the example the minutes are 08.
If we want to increase press SEEK Λ button.
If we want to decrease press SEEK V button.
09
09
07
07
Once the HOUR setting is done by pressing the ◄► button will be displayed the MENU voice
for the DATE setting DD MM YEAR.
In the example the day is 24th.
If we want to increase press SEEK Λ button.
If we want to decrease press SEEK V button.
25
TECHNICAL CHARACTERISTICS
POWER SUPPLY 10/16 VDC
ABSORPTION AT REST 0,001 A
ABSORPTION WHEN WORKING 0,040 A
MAX CHARGE IGNITION OUTPUT 2,000 A
MAX CHARGE SIDELIGHTS / HANDBRAKE / REVERSE
GEAR OUTPUT / ODOMETRIC SIGNAL
0,040 A
4
25
Once the DAY setting is done by pressing the ◄► button we will display the MENU
DD MM YEAR that is the MONTH setting, by pressing the ◄► button again will be displayed
DD MM YEAR that is the YEAR setting.
The setting are managed always with SEEK Λ button to increase or SEEK V button to
decrease.
Other MENU voices are available after TIME and DATE :
IGN LOGIC OFF
LANGUAGE
To change them just press SEEK Λ or SEEK V buttons.
Once the setting is done wait the automatic exit from the MENU, then switch OFF the ignition
and extract the car key.
17
Page 5

OPEL MENU SETTING
UNICAN allows you to set some functions that usually are managed with the OEM head unit .
This function was tested with ANTARA model 2009.
By making a simple and intuitive procedure it’s possible to set functions such as:
Hour
Date
Language
General Setting
To enter the menu setting just turn on the ignition, switch OFF the radio, then press the sequence of buttons ◄► and MODE twice. Once done this operation the car display will visualize the
voice MENU.
ATTENTION
THE MENU’ AVAILABILITY IT’S UNDER TIME, IF ANY BUTTONS IS PRESSED
WITHIN 30 SECONDS, THE SYSTEM EXIT AUTOMATICALLY.
TO RESET THE SETTING FUNCTION ONCE ENDED THE MODIFICATIONS,
DISCONNECT THE IGNITION KEY.
How to enter the menu setting
FUNCTIONS SETTING
The module on default manage some functions. However sometime the enduser prefers other functions instead of those chosen by JVC KENWOOD. For this reason it was inserted a new procedure
that allows to set a series of functions. First of all it is important that the unit had recognised a car
canbus protocol. So the LED must be light GREEN.
Now press 3 times the module button and you will see that the LED will flash RED.
The number of flashes are to determinate which car protocol was selected byt the unit.
LED
Now by pressing ◄► button will be diplayed the first MENU voice CLOCK SYNC OFF.
Jump this function by pressing ◄► once again in order to display the MENU voice HH MM
that allows to set the HOURS.
In the example it’s 11 o’clock.
If we want to increase press SEEK Λ button.
If we want to decrease press SEEK V button.
12
12
10
10
Now by pressing ◄► button will be displayed the second voice of the MENU HH MM
That allows to set the MINUTES.
LED
LED
3
Now turn the ignition ON of the car 3 times.The LED will flash YELLOW with intervals of 1 flash and
one pause.
ON
LED
X 3
The number of the flashes means the number of the options we can change, by pressing quickly
the module button, we will jump to the second option available and so on for all the options available
in this module version. If we need to change the default state of an option, make a long press on
the unit till the led change its state. After a little switch off , the led will light fixed green
5
Page 6

OPTION AND FLASH
DEFAULT OPTION
NUMBERS
1 SEEK ALWAYS
2 HANDBRAKE
3 SEEK ALWAYS
4 SPEED PULSE FREQUENCY
5 SEEK AVAILABLE IN AUDIO MENU (Mercedes)
6
7 PARKING SENSOR BUZZER
8 AMPLIWAKE UP ON AMPLIWAKE UP OFF
9 RESISTIVE RADIO CODE IMPULSED RESISTIVE RADIO CODE
10 IGNITION INTERRUPTED WHEN KEY IS OFF
11 HAND BRAKE OUTPUT FIAT BLUE&ME MUTE AVAILABLE ON THE
12 SEEK ALWAYS AVAILABLE SEEK AVAILABLE IN AUDIO MENU
13
14
ONLY FOR OPEL ZAFIRA 1C
ONLY FOR OPEL ZAFIRA 1C
15
16
AVAILABLE
AVAILABLE WHEN HANDBRAKE IS ON
AVAILABLE
26000 PULSE PER MILE
TELEPHONE BUTTONS ACTIVE
(ONLY FOR RADIOS COMPATIBLE)
(ONLY JEEP GRAND CHEROKEE)
HANDBRAKE OUTPUT
AVAILABLE WHEN HANDBRAKE ON
REVERSE GEAR OUTPUT
REVERSE GEAR INSERTED
SIGNAL DISABLED
N/A
N/A N/A
AVAILABLE WHEN
SEEK AVAILABLE FOR 10 SEC
AFTER A VOLUME PRESS
ODOMETRIC HANDBRAKE AVAILABLE
WHEN THE CAR IS UNDER 3 Km/h OF
ODOMETRIC SEEK AVAILABLE WHEN THE
SPEED PULSE FREQUENCY
TELEPHONE BUTTONS NOT ACTIVE
(ONLY FOR RADIOS COMPATIBLE)
PARKING SENSOR BUZZER SIGNAL ENA-
IGNITION INTERRUPTED WHEN KEY IS
(ONLY JEEP GRAND CHEROKEE)
SPEED
CAR IS OVER
3 Km/h OF SPEED
4000 PULSE PER MILE
SEEK ALWAYS AVAILABLE
BLED ON
HANDBRAKE OUTPUT
CONTINUOUS
PULLED OUT
HANDBRAKE OUTPUT
(Volkswagen)
N/A
GND OUTPUT WHEN CAR
REMOTE CONTROL IS OFF
12V OUTPUT WHEN
CAR DOOR OPEN
PROFILE 7 HANDBREAK OUTPUT CONNECTIONS
To Yellow / White wire
12 VDC
CAW-CANUN2 wires side view
Connect the buzzer to the black wire of the buzzer with the yellow / white
wire from the CAW-CANUN2
Car / Fahrzeug
Véhicule / Veicolo
Vehículo
MERCEDES
SL From 2006
NEW CLASS C From 2007
SPRINTER From 2006
OPEL
CORSA From 2004
ASTRA H From 2004
MERIVA From 2004
NEW VECTRA From 2004
SIGNUM From 2004
TIGRA From 2004
NEW ZAFIRA From 2004
ANTARA From 2006
PEUGEOT
107 From 2007
207 From 2006
307 From 2006
308 From 2008
407 From 2006
PORSCHE
CAYENNE TURBO From 2006
BOXTER From 2006
CAYENNE From 2010
RENAULT
MODUS From 2006
CLIO From 2006
MEGANE From 2006
LAGUNA From 2006
ESPACE From 2006
LAGUNA III From 2009
MEGANE III From 2009
KOLEOS From 2009
SEAT
ALTEA From 2004
CORDOBA From 2004
LEON From 2004
IBIZA 2009 From 2009
SKODA
OCTAVIA II From 2006
YETI From 2010
SUPERB From 2010
VOLKSWAGEN
GOLF V From 2004
GOLFPLUS From 2004
TOURAN From 2004
PASSAT From 2004
TOUAREG From 2004
NEW TOUAREG From 2007
EOS From 2007
MULTIVAN From 2007
TIGUAN From 2007
PASSAT CC From 2008
GOLF VI From 2008
SCIROCCO From 2008
POLO From 2009
Year Baujahr
Année / Anno
Año
O O O x x x x O
O O O O O O x O
O O O O O O x O
O O O O O x x x
O O O O O x x x
O O O O O x x x
O O O O O x x x
O O O O O x x x
O O O O O x x x
O O O O O x x x
O O O O O x x x
O O O O O O x x
O O O O O O x x
O O O O O O x x
O O O O O O x x
O O O O O O x x
O O O O O x x x
O O O O O O x x
O O O x O O x x
O x x x x x x x
O x x x x x x x
O x x x x x x x
O x x x x x x x
O x x x x x x x
O O O O O x x x
O O O O O x x x
O O O O O x x x
O O O O O x x O
O O O O O x x O
O O O O O x x O
O O O O O x x O
O O O O O x x O
O O O O O O O O
O O O O O O O O
O O O O O O x O
O O O O O O x O
O O O O O O x O
O O O O O O x O
O O O O O O x O
O O O O O O x O
O O O O O O x O
O O O O O x x O
O O O O O O x O
O O O O O O x O
O O O O O O x O
O O O O O O x O
O O O O O O x O
12V
SPEED
R
AMPLI
WAKE
UP
6
15
Page 7

Compatibility Kompatibilität Compatibilite Compatibilità Compatibilidad
Car / Fahrzeug
Véhicule / Veicolo
Vehículo
ALFA ROMEO
159 From 2005
BRERA From 2006
SPIDER From 2006
MITO From 2008
AUDI
A3 From 2004
A4 From 2004
A6 From 2004
Q7 From 2006
A5 From 2007
TT From 2007
A1 From 2011
BMW
SERIES 1 - 3 - 5 -
X5 - X6
MINI
X3 - X5 - MINI
(K-BUS)
SERIES 5 GT From 2010
CHRYSLER / DODGE
JEEP GRAND CHE-
ROKEE
300C From 2005
COMPASS From 2006
NITRO From 2007
CALIBER From 2008
VOYAGER From 2008
CITROËN
C2 From 2006
C3 From 2006
C4 From 2006
C4 PICASSO From 2006
C5 From 2008
FIAT
IDEA From 2005
NEW CROMA From 2005
GRANDE PUNTO From 2006
SCUDO From 2007
STILO From 2006
BRAVO From 2007
500 From 2007
LANCIA
YPSILON From 2006
NEW DELTA From 2008
MERCEDES
CLASS A From 2003
CLASS B From 2004
CLASS C From 2003
CLASS E From 2004
CLK From 2003
SLK From 2003
CLASS R From 2006
NEW SERIES S From 2006
ML From 2004
NEW ML From 2005
GL From 2006
GLK From 2010
Year Baujahr
Année / Anno
From 2005
From 2008
From 2010
From 2003
From 2005
Año
12V
SPEED
R
O O O O O O x
O O O O O O x
O O O O O O x
O O O O O O x
O O O O O O x
O O O O O O x
O O O O O x x
O O O O O x x
O O O O O O x
O O O O O x x
O O O O O O x
O
O
O
O
O
O x x x x x x
O O O x O x x
O O O O O O
O O O O O O
O O O O O O
O O O O O O
O O O O O O
O O O O O O
O O O O O O x
O O O O O O x
O O O O O O x
O O O O O O x
O O O O O O x
O O O O O O x
O O O O O O x
O O O O O O x
O O O O O O x
O O O O O O x
O O O O O O x
O O O O O O x
O O O O O O x
O O O O O O x
O O O O O O x
O O O O O O x
O O O O O O x
O O O O O x x
O O O O O O x
O O O O O O x
O O O O O O x
O O O O x x x
O O O O O O x
O O O O O O x
O O O O O O x
O O O O O O x
O
AMPLI
WAKE
UP
x
FROM 08
FROM 08
FROM 08
FROM 08
FROM 08
FROM 08
1 - LED RED FAST BLINKING
- No car selected
- Reading CANBUS line
CAW-CANUN2 LED STATUS
x
x
x
x
x
x
x
x
x
x
x
O
x
x
2 - LED RED SLOW BLINKING
- Manual car selection
3 - LED GREEN SLOW BLINKING
- Car selected but radio profile not selected
4 - LED YELLOW SLOW BLINKING
- Manual options selection
5 - LED YELLOW FAST BLINKING
- Upgrading in progress
6 - LED FIXED RED
- Found CANBUS line but it can’t associate a car profile
7 - LED FIXED GREEN
- Car selected
x
x
x
x
x
x
x
x
x
x
x
x
x
x
x
x
x
x
x
x
O
O
O
O
O
O
O
O
O
O
O
O
- Radio selected
+ 12 V
GND
CAN H
CAN L
12V
SPEED
R
7
Page 8

BUTTONS
FUNCTIONS
CANBUS CONNECTIONS
(SEEN FROM CABLE OUPUT OF CONNECTORS) rev 2.13
ALFA ROMEO
159 - BRERA - SPIDER
+
1 2 3 4 6 5 8
CAN H
GREEN
CAN L
WHITE
SCR
7
CANBUS CONNECTIONS
(SEEN FROM CABLE OUPUT OF CONNECTORS) rev 2.13
ISO CONNECTOR
AUTORADIO
SPEAKER
BUT-
TONS
FUN-
CTIONS
ALTEA - CORDOBA - LEON
+
1 2 4 3 7 8
CAN H
GREEN
CAN L
WHITE
CANBUS CONNECTIONS
ON FAKRA SEAT
AUDI
A3 A4 A5 A6 TT Q7
BUTTONS
FUN-
CTIONS
+
1 2 3 4
AUDI
A1 Q3
CONNECTORS ARE BACK THE
RADIO
SERIES
1 3 5
SERIE 5 GT 2010
BUTTONS
FUNCTIONS
+
1 2 3 4
CAN H
GREEN
CAN L
WHITE
CANBUS CONNECTIONS
ON ISO AUDI
CAN H
GREEN
CAN L
WHITE
CAN H
GREEN
CAN L
WHITE
CANBUS CONNECTIONS
ON FAKRA AUDI
CANBUS CONNECTIONS
ON FAKRA AUDI
SERIES
1 3 5
OCTAVIA II - YETI - SUPERB
CAN H
GREEN
BUTTONS
FUN-
CTIONS
+
1 2 4 3 7 8
CAN L
WHITE
GREEN CH WHITE / GREEN (POS 6)
FORTWO
WHITE CL GREEN (POS 9)
WIRES ARE UNDER THE DASHBOARD NEAR THE STEERING WHEEL
BUTTONS
FUN-
CTIONS
POLO 2009 - GOLF V - GOLFPLUS -
+
1 2 4 3 7 8
TOURAN
PASSAT - TOUAREG
NEW TOUAREG - EOS
MULTIVAN - TIGUAN
GOLF VII
CAN H
GREEN
CAN L
CAN H
GREEN
CAN L
WHITE
WHITE
CANBUS CONNECTIONS
ON FAKRA SKODA
CANBUS CONNECTIONS
ON FAKRA VW
BUTTONS
FUNCTIONS
K-BUS PROTOCOL
+
1 2 3 4
OLD K BUS
8
K BUS
VIOLET BLACK
X3 X5 MINI
BUTTONS
FUNCTIONS
CONNECTORS ARE BACK THE RADIO
V70
+
1 2 4 3
CAN H
GREEN
CAN L
WHITE
CANBUS CONNECTIONS
ON FAKRA
Page 9

CANBUS CONNECTIONS
(SEEN FROM CABLE OUPUT OF CONNECTORS) rev 2.13
A - SPRINTER
VIANO - VITO
CONNECTORS ARE BACK THE RADIO
CORSA - ASTRA H - MERIVA
NEW VECTRA
BUTTONS
FUNCTIONS
CAYENNE TURBO
BUTTONS
FUN-
CTIONS
BUTTONS
FUNCTIONS
SIGNUM - TIGRA - NEW ZAFIRA
VOL + VOL
1 2 4 3 7 8
+
1 2 4 3 7
MODUS - CLIO - MEGANE
+
1 2 4 3 8 7
ANTARA
—
LAGUNA - ESPACE
KOLEOS
CAN H
GREEN
CAN L
WHITE
CAN L
WHITE
CAN H
GREEN
MUTE
8
SCR
CAN H
GREEN
CAN L
WHITE
CAN H
GREEN
CAN L
WHITE
CAN L
WHITE
CAN H
GREEN
CLASSE A
CON ISO
CANBUS CONNECTIONS
ON FAKRA OPEL
ISO PORSCHE
CAN L
WHITE
CAN H
GREEN
CANBUS CONNECTIONS
ON FAKRA RENAULT
BUTTONS
FUNCTIONS
LEFT LEVER BEHIND
ST. WHEEL
4
7
3
LEFT LEVER BEHIND
ST. WHEEL
4
7
3
BUTTONS
FUNCTIONS
CANBUS CONNECTIONS
(SEEN FROM CABLE OUPUT OF CONNECTORS) rev 2.13
FAKRA
C2 - C3 - C4
207 - 307 - 407- 508
VOL + VOL
KNOB KNOB
—
1 2 4 3 6 5
CH WHITE/ORANGE (POS 5)
CL WHITE (POS 6)
RIGHT LEVER
BEHIND ST. WHEEL
CAN H
GREEN
CAN L
WHITE
CAN H
GREEN
CAN L
WHITE
VOL
+ & —
8
MODE
7
1
8
2
NITRO
COMPASS 2012
CL WHITE/ORANGE (POS 2)
CH WHITE/GREY(POS 13)
RIGHT LEVER
BEHIND ST. WHEEL
1
8
2
GRANDE PUNTO
IDEA - CROMA - STILO - BRAVO
500-PANDA 2013
YPSILON
+
CAN L
WHITE
CAN H
GREEN
SCR
CAN H
GREEN
CAN L
WHITE
J. GRAND CHEROKEE
COMPASS
300 C
NITRO
COMPASS 2012
1 2 3 4 8 7
ISO AUTORADIO
CONNECTOR
SPEAKER
12
CONNECTORS ARE BACK THE RADIO
FREEMONT
CAN H
GREEN
CAN L
WHITE
Page 10

CANBUS CONNECTIONS
(SEEN FROM CABLE OUPUT OF CONNECTORS) rev 2.13
SMAX - CMAX - FOCUS - KUGA -
TOURNEO
MONDEO - TRANSIT
CONNECTORS
ARE BACK THE
RADIO
SMAX - CMAX - FOCUS
2011
CONNECTORS ARE BACK THE
RADIO
GREEN CH WHITE/ORANGE (POS 13)
WHITE CL WHITE (POS 2)
WRANGLER
RANGE ROVER - EVOQUE
Fiesta 2008
CONNECTORS ARE BACK THE RADIO
ONLY SERVICE
CAN H
GREEN
CAN L
WHITE
CAN H
GREEN
CAN L
WHITE
CAN H
GREEN
CAN L
WHITE
ford FAKRA
CAN H
GREEN
CAN L
WHITE
ONLY SERVICE
CONNECTORS ARE BACK
THE RADIO
(SEEN FROM CABLE OUPUT OF CONNECTORS) REV 4.11
LEFT LEVER BEHIND
ST. WHEEL
4
7
3
CAYENNE TURBO
AUTO
+
KEYS
FUN-
CTIONS
RANGE ROVER VOGUE
AUTO KEYS
FUNCTIONS
1 2 4 3 7
+
CANBUS CONNECTIONS
NITRO
CL WHITE/ORANGE (POS 2)
CH WHITE/GREY(POS 13)
RIGHT LEVER
BEHIND ST. WHEEL
1
8
2
CAN H
GREEN
CAN L
WHITE
CAN H
VERDE
CAN L
BIANCO
MUTE
MODE
1 2 4 3 7
8
CAN L
WHITE
CAN H
GREEN
NITRO
ISO PORSCHE
CANBUS CONNECTIONS
IN OEM CONNECTOR
AUTO
KEYS
FUN-
CTIONS
OCTAVIA II
YETI
SUPERB
+
1 2 4 3 7 8
A - B - C - CLK - ML - R
E - SPRINTER
CAN H
GREEN
CAN L
WHITE
CANBUS CONNECTIONS
ON FAKRA SKODA
10
BUTTONS
FUN-
CTIONS
BUTTONS
FUN-
CTIONS
+
1 2 3 4
E - SLK - SPRINTER
+
1 2 3 4
CAN H
GREEN
CAN L
WHITE
E - SLK
CAN H
GREEN
CAN L
WHITE
A - B - C - CLK - ML - R
 Loading...