

Kensington KS-TB-100 User Manual

User Manual
KS-TB-100 | Portable Turbidity
Meter
Kensington Scientific
22a Cavan Rd, Dry Creek
South Australia, 5094
helpme@kensingtonscientific.com.au
www.kensingtonscientific.com.au
OVERVIEW
Below are the steps you need to follow to begin using your Kensington KS-TB-100 portable turbidity meter. This
manual provides a step-by-step guide to help you operate the meter.
UNPACKING METER CONTENTS
Before unpacking the meter and its contents, ensure that the working conditions meet the following conditions:
1. Relative humidity is less than 80%.
2. Ambient temperature is greater than °C and less than 60°C
3. No potential electromagnetic interference.
INCLUDED ACCESSORIES
The KS-TB-100 portable turbidity meter includes;
1. Glass sample vials
2. Calibration standards 0, 10, 200 and 1000 NTU
3. Lint-free cloth
4. 9V battery
OPERATING PRINCIPLES
The KS-TB-100 portable turbidity meter operates on the nephelometric principle of turbidity measurement and is
designed to meet the criteria specified in ISO 7027.
The following figure shows basic optical system of the meter. It includes a light source and a detector to monitor the
light scattered at 90° with respect to the incident beam.

User Manual
KS-TB-100 | Portable Turbidity
Meter
Kensington Scientific
22a Cavan Rd, Dry Creek
South Australia, 5094
helpme@kensingtonscientific.com.au
www.kensingtonscientific.com.au
OVERVIEW
The KS-TB-100 measures turbidity from 0 to 1100 NTU/FNU, or 0 to 275 EBC, or 0 to 9999 ASBC. The setup menu
contains the 7 optional parameters. Data can be stored and transferred to the computer by USB interface.
INDEX
Number
Description
1
Sample chamber
2
USB Interface
3
Alignment arrow
4
Measurement module
5
Battery Compartment
User Manual
KS-TB-100 | Portable Turbidity
Meter
Kensington Scientific
22a Cavan Rd, Dry Creek
South Australia, 5094
helpme@kensingtonscientific.com.au
www.kensingtonscientific.com.au
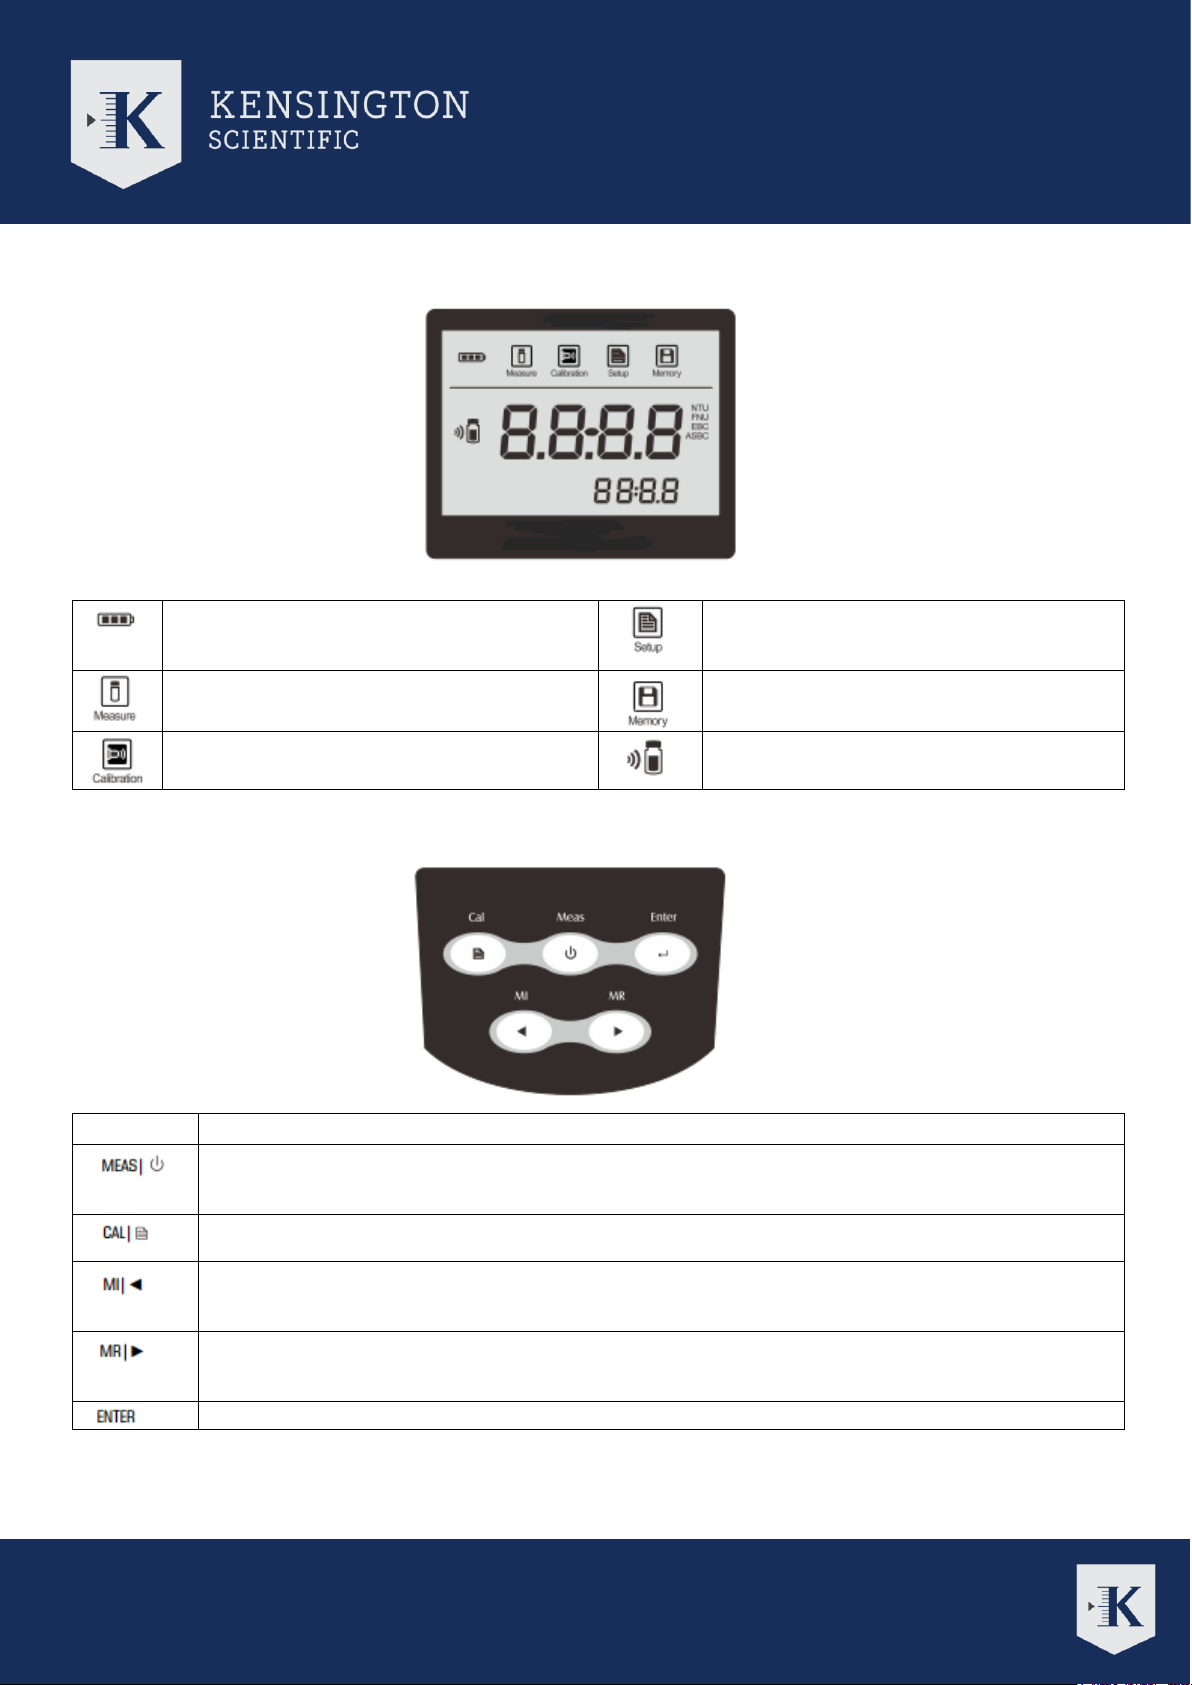
DISPLAY
Low Battery Alarm:
When battery is depleted, the icon will
disappear
Setup mode icon: Indicates meter is in
SETUP mode
Measurement mode icon: Indicates meter is in
the measurement mode
Memory mode icon: Indicates data is stored
into memory
Calibration mode icon: Indicates meter is in
the calibration mode
Calibration icon: Indicates meter is
calibrating
KEYPAD
Key
Description
1. Switching the turbidity meter On or Off.
2. Press the key to perform a measurement.
3. In the calibration or setting mode, exits current mode and returns to measurement.
1. Press the key to enter the calibration mode.
2. Press and hold the key to enter the setup menu.
1. Press the key to store current measured value.
2. Press ◄ key in setup mode to scroll up through menu.
3. Press ◄ key in setting mode to increase the setting value.
1. Press the key to view stored data.
2. Press ► key in setup mode to scroll down through menu.
3. Press ► key in setting mode to decrease the setting value.
Confirms the calibration, setting value or displayed option

User Manual
KS-TB-100 | Portable Turbidity
Meter
Kensington Scientific
22a Cavan Rd, Dry Creek
South Australia, 5094
helpme@kensingtonscientific.com.au
www.kensingtonscientific.com.au
SETUP MENU
The KS-TB-100 portable turbidity meter contains an integrated setup menu that allows users to customize each
displayed option for their measurement needs.
Parameter
Description
Options
Description
DATE
Date and Time
Sets the data and time
UNIT
Sets the measurement unit
NTU (Default)
Nephelometric Turbidity
Unit
FNU
Formazin Nephelometric
Unit
EBC
European Brewery
Convention
ASBC
American Society if
Brewing Chemistries
RESO
Sets the resolution for
measurement
0.1
Resolution at 0.1
0.01 (Default)
Resolution at 0.01
CLR
Clear all stored data
YES
Enable
NO (Default)
Disable
OFF
Automatically turns off the
meter
YES
Enable
NO (Default)
Disable
RST
Restore Factory Settings
YES
Enable
NO (Default)
Disable
TEST
Measurement mode
1 (Default)
Single measurement
2
Continuous
SETTING THE DATE AND TIME
1. Press and hold the CAL key to enter setup mode. The first option should be the date settings. The display should
show ‘DATE/P-1’.
2. Press ENTER key to confirm, the meter shows current year.
 Loading...