

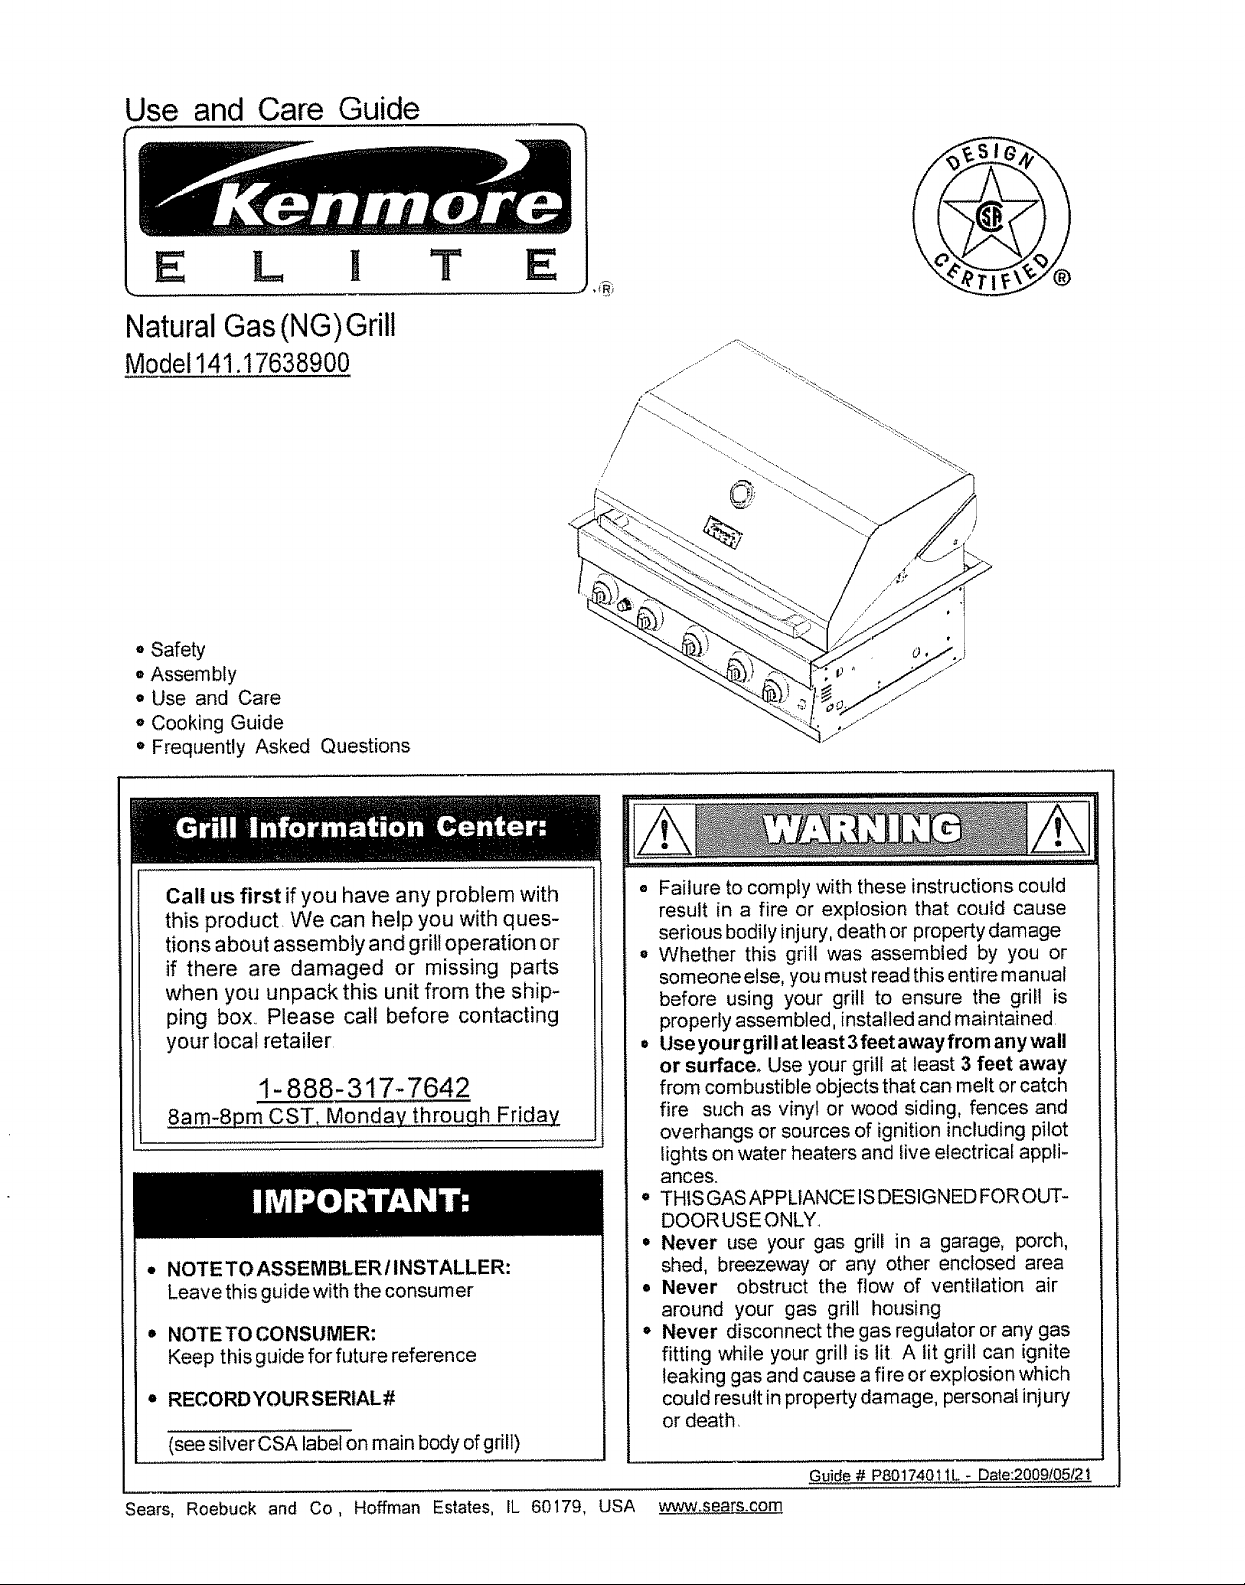
Use and Care Guide
E L I
Natural Gas(NG)Grill
Model 141.17638900
o Safety
• Assembly
• Use and Care
o Cooking Guide
• Frequently Asked Questions
3=
E
/
/'
Call us first if you have any problem with
this product We can help you with ques-
tions about assembly and grill operation or
if there are damaged or missing parts
when you unpack this unit from the ship-
ping box, Please call before contacting
your local retailer
1-888-317-7642
8am-8pm CST, Monday throuqh E[jday
• NOTE TO ASSEMBLER IINSTALLER:
Leave this guide with the consumer
NOTETO CONSUMER:
Keep this guide for future reference
• RECORDYOURSERIAL#
(see silver CSA label on main body of grill)
Sears, Roebuck and Co, Hoffman Estates, IL 60179, USA www.sears.com
• Failure to comply with these instructions could
result in a fire or explosion that could cause
serious bodily injury, death or property damage
o Whether this gritl was assembled by you or
someone else, you must read this entire manual
before using your grill to ensure the gril! is
properly assembled, installed and maintained
• Useyour grill at least 3feet away from any wall
or surface° Use your grill at least 3 feet away
from combustible objects that can melt or catch
fire such as vinyl or wood siding, fences and
overhangs or sources of ignition including pilot
lights on water heaters and live electrical appli-
ances.
• THIS GAS APPLIANCE ISDESIGNED FOROUT-
DOORUSEONLY.
• Never use your gas grill in a garage, porch,
shed, breezeway or any other enclosed area
• Never obstruct the flow of ventilation air
around your gas grill housing
Never disconnect the gas regulator or any gas
fitting while your grill is lit A litgrill can ignite
leaking gas and cause a fire or explosion which
could result in property damage, personal injury
or death.
Guide # P80174011L - Date:2009/05!21

Primary Safety Warnings .............. 1-3
Warranty Terms and Conditions ........ 2
Pre-Assembty Instructions ........................ 3
Part Diagrams and Lists .............. 4-8
Assembly Instructions ........................ 9-11
Use & Care Instructions:
• Natura! Gas connection ..... !2
• Lighting Instructions ................. 14
• Troubleshooting .............. 15
• Rotisserie Instruction .......... 16-18
Cleaning and Maintenance ...... 19-20
Cooking Guide ................. A1-A5
Frequently Asked Questions .......... A7-A8
Repair Protection Agreements ............. A9
Kenmore Elite Full Warranty
If this grill fails due to a defect in material or
workmanship within two years fro_,, the date of
purchase, calf 1-800-4-MY-HOME to arrange for
free repair (or' replacement if repair proves impos-
sible)
Limited Warranty on Stainless Steel Burners
Arty stainless steel burner that ever rusts through
will be replaced free of charge After the second
year from the date of purchase you must pay the
labor cost to have it installed,
Limited Warranty on Selected Grill Parts
For three years from the date of purchase, any
stainless or painted steel part will be replaced free
of charge if it rusts through After the second
year from the date of purchase you must pay the
labor cost to have it installed,
If you smell gas:
1. Shut off gas to the appliance.
2. Extinguish any open flame.
3, Open lid,
4, If odor continues, keep away from
the appliance and immediately call
your gas supplier or your fire
department,
.................................. ,111,11,!1,!1!ii L[L ±
Natural Gas models must be used with Natural
Gas only LPG models must be used with
Liquid Propane Gas and the regulator' assem*
bly supplied Any attempt to convert the grill
from one fuel type to another is hazardous and
must be performed by a qualified gas techni-
cian only, using a LP Gas Conversion _t
purchased from Sears at 1-8004-MY-HOME
Keep gas regulator hose away from hot grill
surfaces and dripping grease Avoid unneces-
sary twisting of hose Visually inspect hose
prior to each use for cuts, cracks, excessive
wear or other damage. If the hose appears
damaged do not use@the gas grill. Call Sears
at 1-8004-MY-HOME for a certified replace-
ment hose.
California Proposition 65
Combustion byproducts produced when using
this product contain chemicals known to the
State of California to cause cancer, birth
defects, or other reproductive harm
All warranty coverage excludes ignitor batteries
and grill part paint toss or rusting (except for rust-
through as specified above), which are either
expendable parts that can wear out from normal
use in less than a year, or are conditions that
can be the result of normal use, accident or
improper maintenance
All warranty coverage is void if this grill is ever
used for commercial or' rental purposes
All warranty coverage applies only if this grill is
used in the United States
This warranty gives you specific legal rights, and
you may have other rights which vary from state
to state
Sears, Roebuck and Co., Hoffman Estates, IL
© Sears Brands, LLC
Brass components on the grill, such as hose
fittings, propane cylinder valves (sold sepa-
rately) and burner valve stems, contain lead
which is known to the State of California to
cause cancer, birth defects, or other repro-
ductive harm
Never use charcoal or lighter fluid in this gas
grill. Failure to comply with these instructions
could result in a grease fire or' explosion that
could cause serious bodily injury, death or
property damage
The Grease Draining Tray and Grease Recep-
tacle must be visually inspected before each
grill use RemoveanygreaseandwashGrease
Draining Tray and Grease Receptacle with a
mild soapand warm watersolution Failureto
comply with these instructions co uid result
in a grease fire or explosion that could
cause serious bodily injury, death or prop-
erty damage.

Failure to comply with these instructions may result
in a hazardous situation which, if not avoided, may
result in injury°
Spiders and small insects can spin webs and
nest in the transit and
warehousing gas flow
obstruction around the
Burner FIRE"
can an
unsafe
To
as fo do this
at fall or
wheneve: and if
your grill extended
period of time
1 Remove the screws trom the rear oTeach Main Burner
using a Phillips Head Screwdriver
2 Carefully lift each Burner up and away from the Gas
Valve Orifice
3. Check and clean BurneriVenturi Tubes for insects and
insect nests A clogged tube can lead to a fire beneath
the grill
4 Refer to the figure below and perform one of these
3 cleaning methods:
[] METHOD 1: Bend a stiff wire or wire coat hanger
into a small hook as shown and run the hook
through the Burner Tube and inside the Burner
several times to remove debris
TO CLEAN BURNER TUBE,
INSERT HOOK
HERE
Burner Port
Foot
..\
To expedite the assembly process follow these
general guidelines:
[] Tools Required forAssembly :
= protective work gloves
" Phillips Head Screwdriver
[] For your safety, obtain assistance from another person
when assembling this gas grill
[] Use the Hardware and Part Diagrams to ensure all items
are included and free of damage
[]
Do not assemble or operate the grill if it appears dam-
aged, If there are damaged or missing parts when you
unpack the shipping box or you have questions during
the assembly process, call the:
Grill Information Center 1-888-317-7642
8am-8pm CST, Monday throuqh Friday
Grill Installation Codes
The installation must conform with local codes or, in the
absence of local codes, with the National Fuel Gas Code,
ANSI Z223, !/NFPA 54, Storage and Handling of Liquefied
Petroleum Gases, ANSf/NFPA 58,Natural Gas and Propane
Installation Code, CSA B 149 I, Propane Storage and Han-
dfingCode, BI492
1. Do not store or use gasoline or other
flammable liquids or vapors in the vi-
cinity of this or any other appliances.
2. An LP cylinder not connected for use
shall not be stored in the vicinity ofthis
or any other appliance.
....Burner Tube
[] METHOD 2: Use a bottle brush with a flexible handle
and run the brush through the Burner Tube and
inside the Burner several times to remove any
debris
[] METHOD 3: Use an air hose to force air through
each Burner Tube. The forced air should pass
debris or obstructions through the Burner and out
the Ports
For safe operation ensure the Gas Valve Assembly
Orifice is inside the Burner Tube before using your
grill See figure. If the Orifice is not inside the Burner
Tube, lighting the Burner may cause explosion and!
or fire resulting in serious bodily injury andfor
property damage
Gas Valve Assembly Orifice
Burner Tube
When using electrical appliances, basic safety
precautions should always be used,
• This appliance, when installed, must be electri-
cally grounded in accordance with local codes
or, in the absence of local codes, with the
National Electrical Code, ANSI/NFPA 70, or the
Canadian Electrical Code, CSA C22 t
• Keep any electrical supply cord and the fuel
supply hose away from any heated surfaces
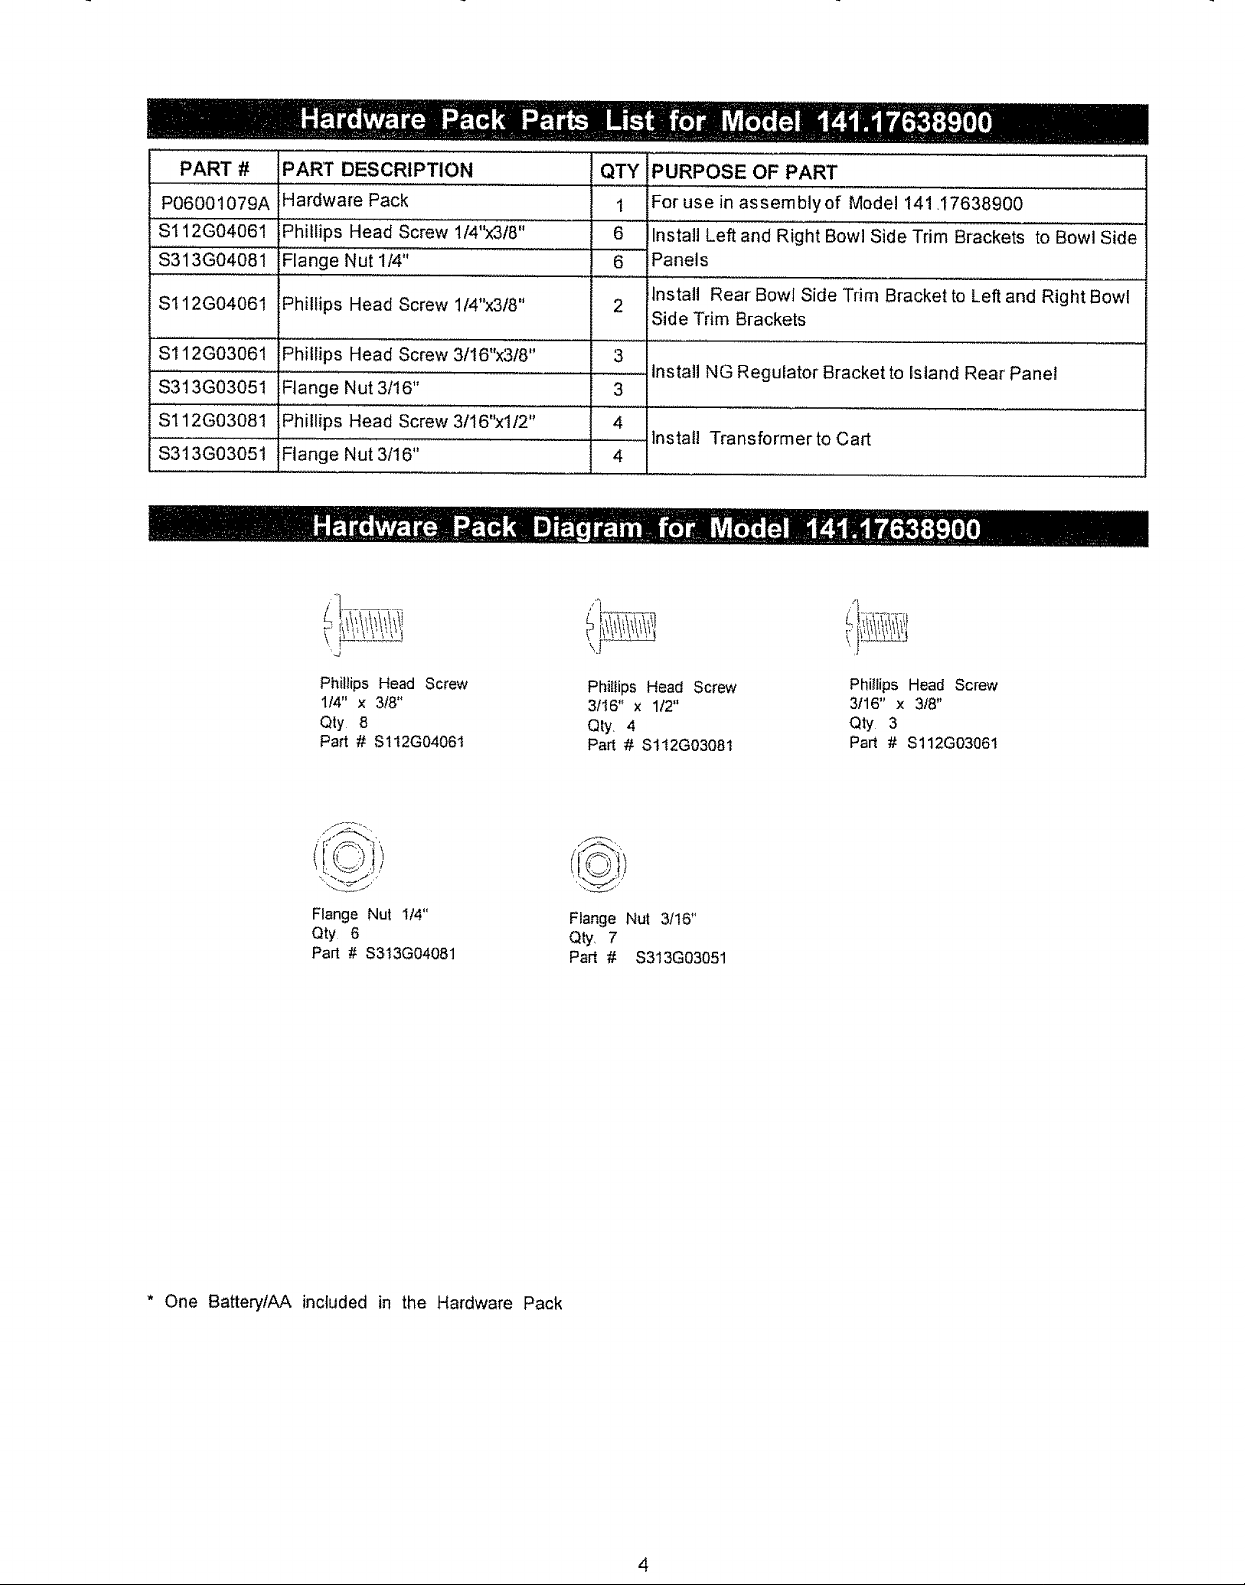
PART #
P06001079A
$112G04061
$313G04081
PART DESCRIPTION QTY PURPOSE OF PART
Hardware Pack 1 For use in assemblyof Model 141,17638900
Phillips Head Screw 1/4"x318" 6 Install Left and Right Bowl Side Trim Brackets to Bowl Side
Flange Nut 114" 6 Panels
$I 12G04061
$112G03061
$3t3G03051
"Sil GO3O81
$313G03051
Phillips Head Screw 114"x3t8" 2
Phillips Head Screw 3f16"x3t8"
Flange Nut 3116"
Phillips Head Screw 3116"xlt2" 4
Flange Nut 3f16" 4
install Rear Bowl Side Trim Bracket to Left and Right Bowl
Side Trim Brackets
3
...........Install NG Regulator Bracket to Island Rear Panel
3
.................. lnstatl Transformer to Cart
;! ii
Phillips Head Screw Phillips Head Screw Phillips Head Screw
1/4" x 3!8" 3116" x 112" 3116" x 3/8"
Qty 8 Qty. 4 Qty 3
Part # $112G0406I Part # $tt2G0308t Part # S112G03061
Flange Nut 114"
Qty 6
Part # S313G04081
* One BatteryfAA included in the Hardware Pack
Flange Nut 3/16"
Qty, 7
Part # S313G03051

29
43
24_
22.
23
25
27
48
KEY DESCRIPTION PART# • QTY
1 Lid Assembly ...................................................................... P001473034 1 ..........
2 Temperature Gauge ............. P00601287c 1
3 .Temperature Gauge Sea! P00614027c 1
4 Name Plate P004 I0039C i
I' 5 Protective Pad ............ P055t80021 4
....i ............. ,............................
• 6 Lid Handle P00205106R 1
7 Cooking Rack')Secondary ........................................... ' P01507020G ............ 1
8 Cooking Grid 13" P01604013B 1
9 Cooking Gr'id,,,,6:5" P01604031B 1
9a Cooking Grid/Infrared Burner P01615030F 1
............................. i ...........................
.................... z .................... ,, ,
10 Heat Diffuser P017080364 3
11 Heat Diffuser Bracket, Front P033280154 3
12 Heat Diffuser Bracket, Rear P033280174 3
13 Burner P020080324 3
..................... i ..................................
I4 Bowl Assembly P0071366B4 1
15 Burner Bracket P0:_20'34244 ........ 1 ........
16 Grease Draining Plate P069020184 2
17 Electric Wire, 5-contact P02627006A 1
18 Gas Collector Box with Electrode P02609010B 3 .......
19 Electric Wire Set P02615163A 3
20 Lighting Stick Assembly P05507008A 1
21 Gas Valve/Manifold Assem,bl _............................... Y0060646 1
22 Electric,,,,Ignitor,5-port ...................................................... P02502298€ ............ !
23 Electric ignitor Protector P055450027 1
24 Control Panel UpPer......................................................... P0291519FI 1 __
25 Control Panel P0291520FI 1
26 Control Panel Heat Shield P06919001B 1
27 Control Knob Seat P03413023J 5
......................... .................................. ,,,,,_,...........
28 Control Knob Spring P05504021A
29 Control Knob/Main Burner P03426393J
30 Control Knob P03426403J
2
31 Infrared Burner Thermoc0uP,!e Biacket ......... P033430164
32 Grease Tr,ay Heat Shield, Upper P069030564
33 Rotisserie Burner Wind Shield P069060464
34 Rotisserie Burnei AsSembly ................... P02007'0704
35a ....L!..gh.t..,!.2V,10W ................................. '...................................................i....... P05383002B ..............
2
35b Light Cover Set P05383003B
35c Light Wire Set P05352005B
36 Rotisserie Burner Electrode P02614025A
37 Rotisserie Burner Orifice
38 Rotisserie Burner Thermoc;'u'pie ........................... ..... P05305051A
39 Rotisserie Burner Thermocouple Bracket P03328047C
.... 40 Bowl Pa.neL Reartupper ...................... P069060214
4! ;Rotisserie Burner Extension Tube P03717050B
42 Burner Heat Shield P069060454
43 Infrared Burner Assembly P020050114
P06534009A 1
1
1
1
I
1
1
5
3
1
1
1
1
1
1
1
6
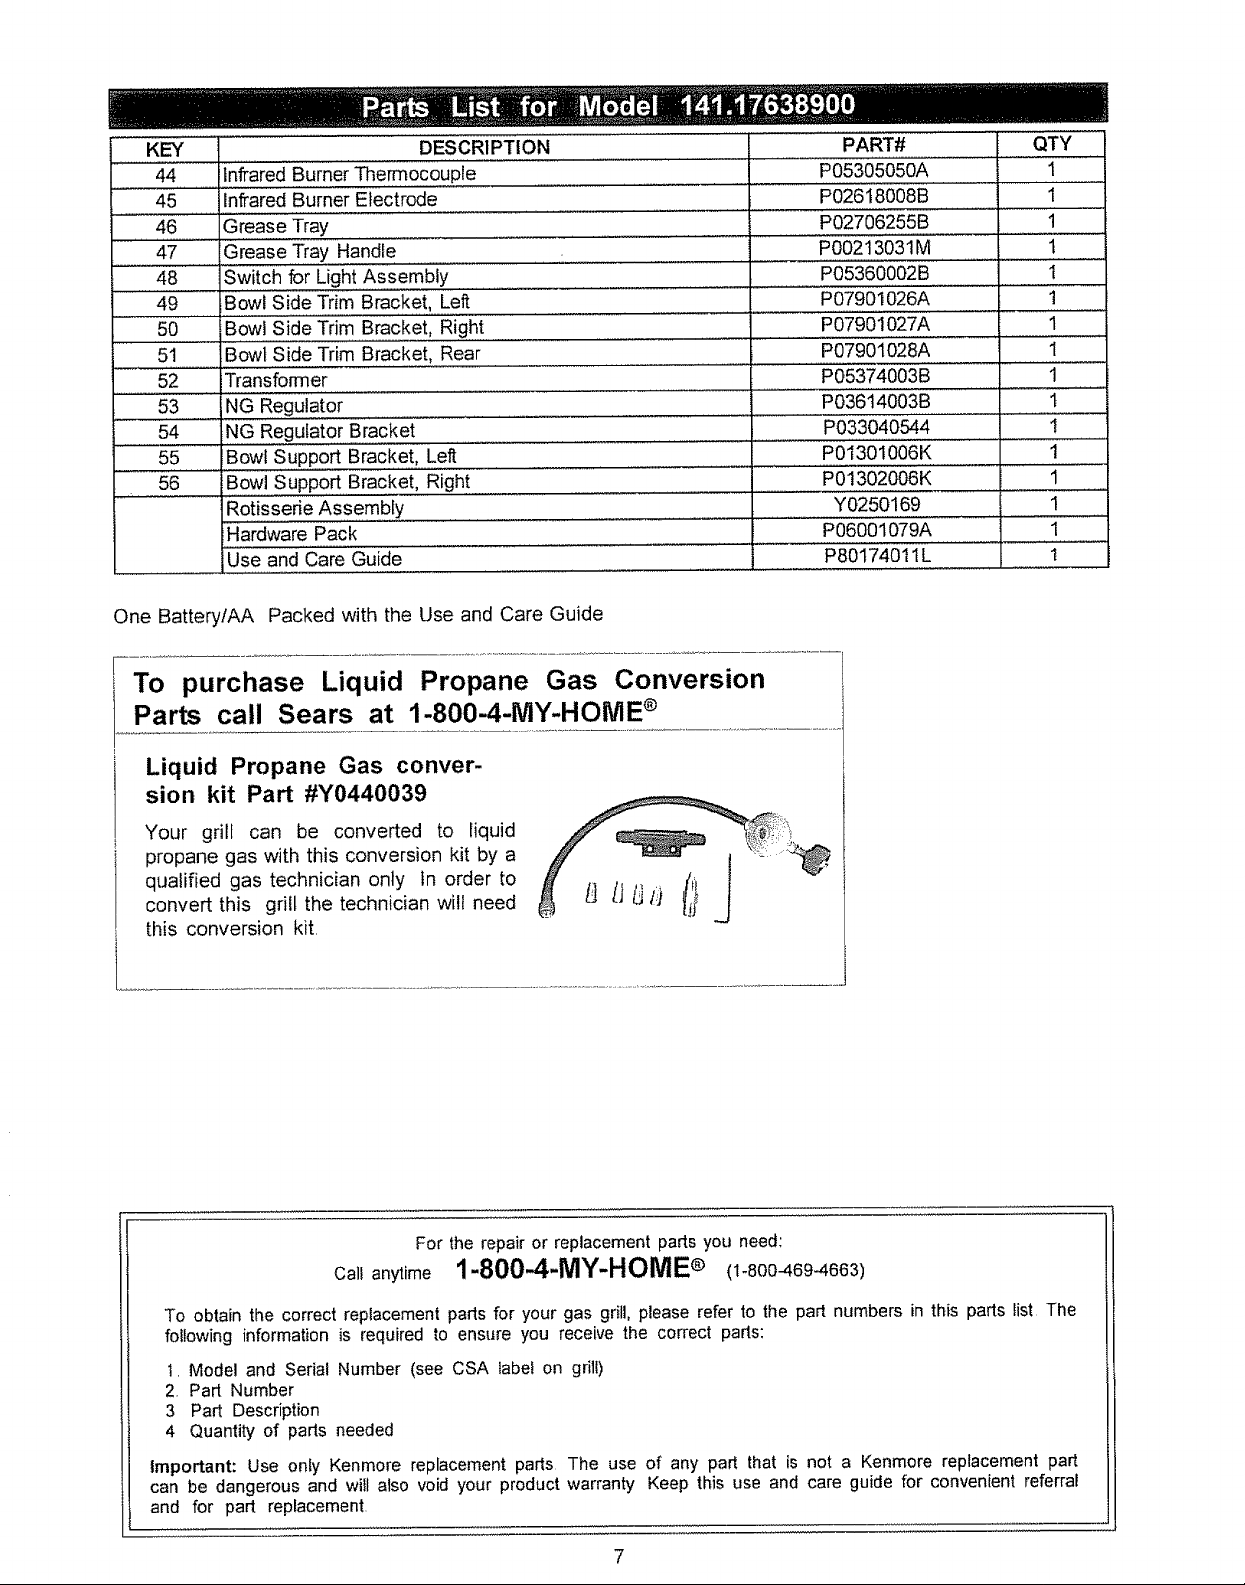
KEY
44 iinfraredBurner_e_oco,uple...................... PO5305050A..............
DESCRIPTION PART# QTY
.......................... i .............
45 ilnfrared Burner Electrode P02618008B
..... 46 Grease Tray ....................... ......... , ......P02706255B
47 Grease Tray Handle - P00213031M
...... 48 ,Sw,itch ,for Light Assembly ...................... '.......,.........."! ........ P05360002B
49 Bowl Side Trim Bracket, Left P07901026A
..................... t ............................. t
..... 50 Bowl Side Trim Bracket, Right .............. P07901027A
51 Bowl Side Trim Bracket, Rear P07901028A
52 Transformer P05374003B
53 NG Regulator ................. P03614003B
54 _NG Regulator Bracket P033040544
55 Bowl Support Bracket, Left P01301006K
56 Bowl Support Bracket, Righ!......... P01302006K
Rotisserie Assembly
Hardware Pack
Use and Care Guide
Y0250169 I
P06001079A 1
P80174011L 1
One BatterylAA Packed with the Use and Care Guide
To purchase Liquid Propane Gas Conversion
Parts call Sears at 1-800-4-MY-HONIE ®
1
1
1
1
1
1
1
1
1
1
!
1
1
Liquid Propane Gas conver-
sion kit Part #Y0440039
Your grill can be converted to liquid
propane gas with this conversion kit by a
qualified gas technician only tn order to ijl lconvert this grill the technician will need L_ lJ _ _'_ _'l
this conversion kit,
For the repair or replacement parts you need:
Call anytime 1-8004-MY-HOME® (1-8oo-469_e63)
To obtain the correct replacement parts for your gas grill, please refer to the part numbers in this parts list The
following information is required to ensure you receive the correct pads:
1. Model and Serial Number (see CSA label on grill)
2. Part Number
3 Part Description
4 Quantity of parts needed
t
.J
Important: Use only Kenmore replacement parts The use of any part that is not a Kenmore replacement part
can be dangerous and will also void your product warranty Keep this use and care guide for convenient referral
and for part replacement.
7
./
/
%
7
0
5
8
_jJ j/
9
1o
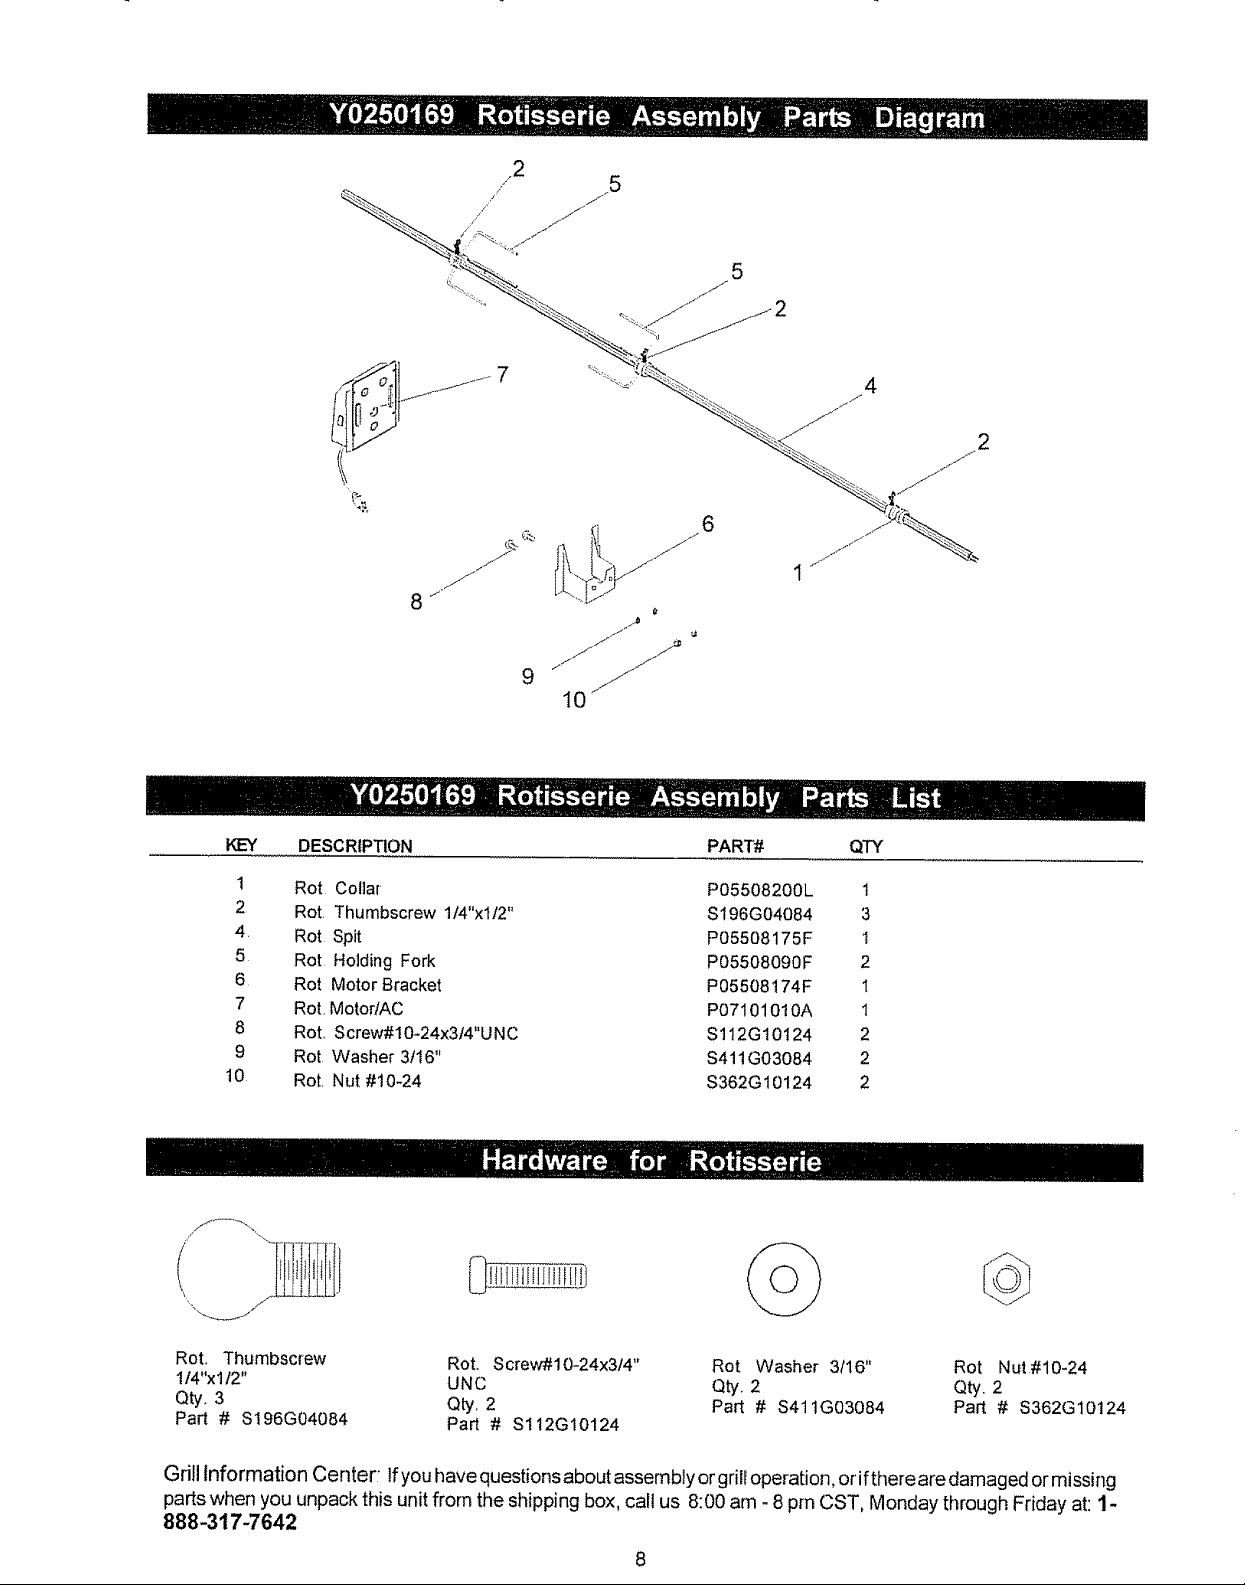
KEY DESCRIPTION PART# Q'rY
#
,.b
1 Rot Collar P05508200L 1
2 Rot. Thumbscrew 1t4"x112" $196G04084 3
4. Rot Spit P05508175F I
5 Rot HoJding Fork P05508090F 2
6 Rot Motor Bracket P05508 !74F t
7 Rot. MotortAC P07101010A 1
8 Rot,, Screw#10-24x3t4"UNC S112G10124 2
9 Rot Washer 3116" S411G03084 2
10 Rot. Nut #10-24 $362G10124 2
Rot, Thumbscrew Rot. Screw#10-24x314" Rot Washer 3f16" Rot Nut#10-24
1/4"x112" UNC Qty, 2 Qty. 2
Qty. 3 Qty, 2 Part # $411G03084 Part # $362G10124
Part # $196G04084 Part # $112G10124
Grill Information Center IfyouhavequestionsaboutassembJyorgrilloperation,oriftherearedamagedormissing
partswhen you unpackthisunitfromtheshippingbox,callus 8:00am -8pm CST, Monday throughFridayat:I-
888-317-7642
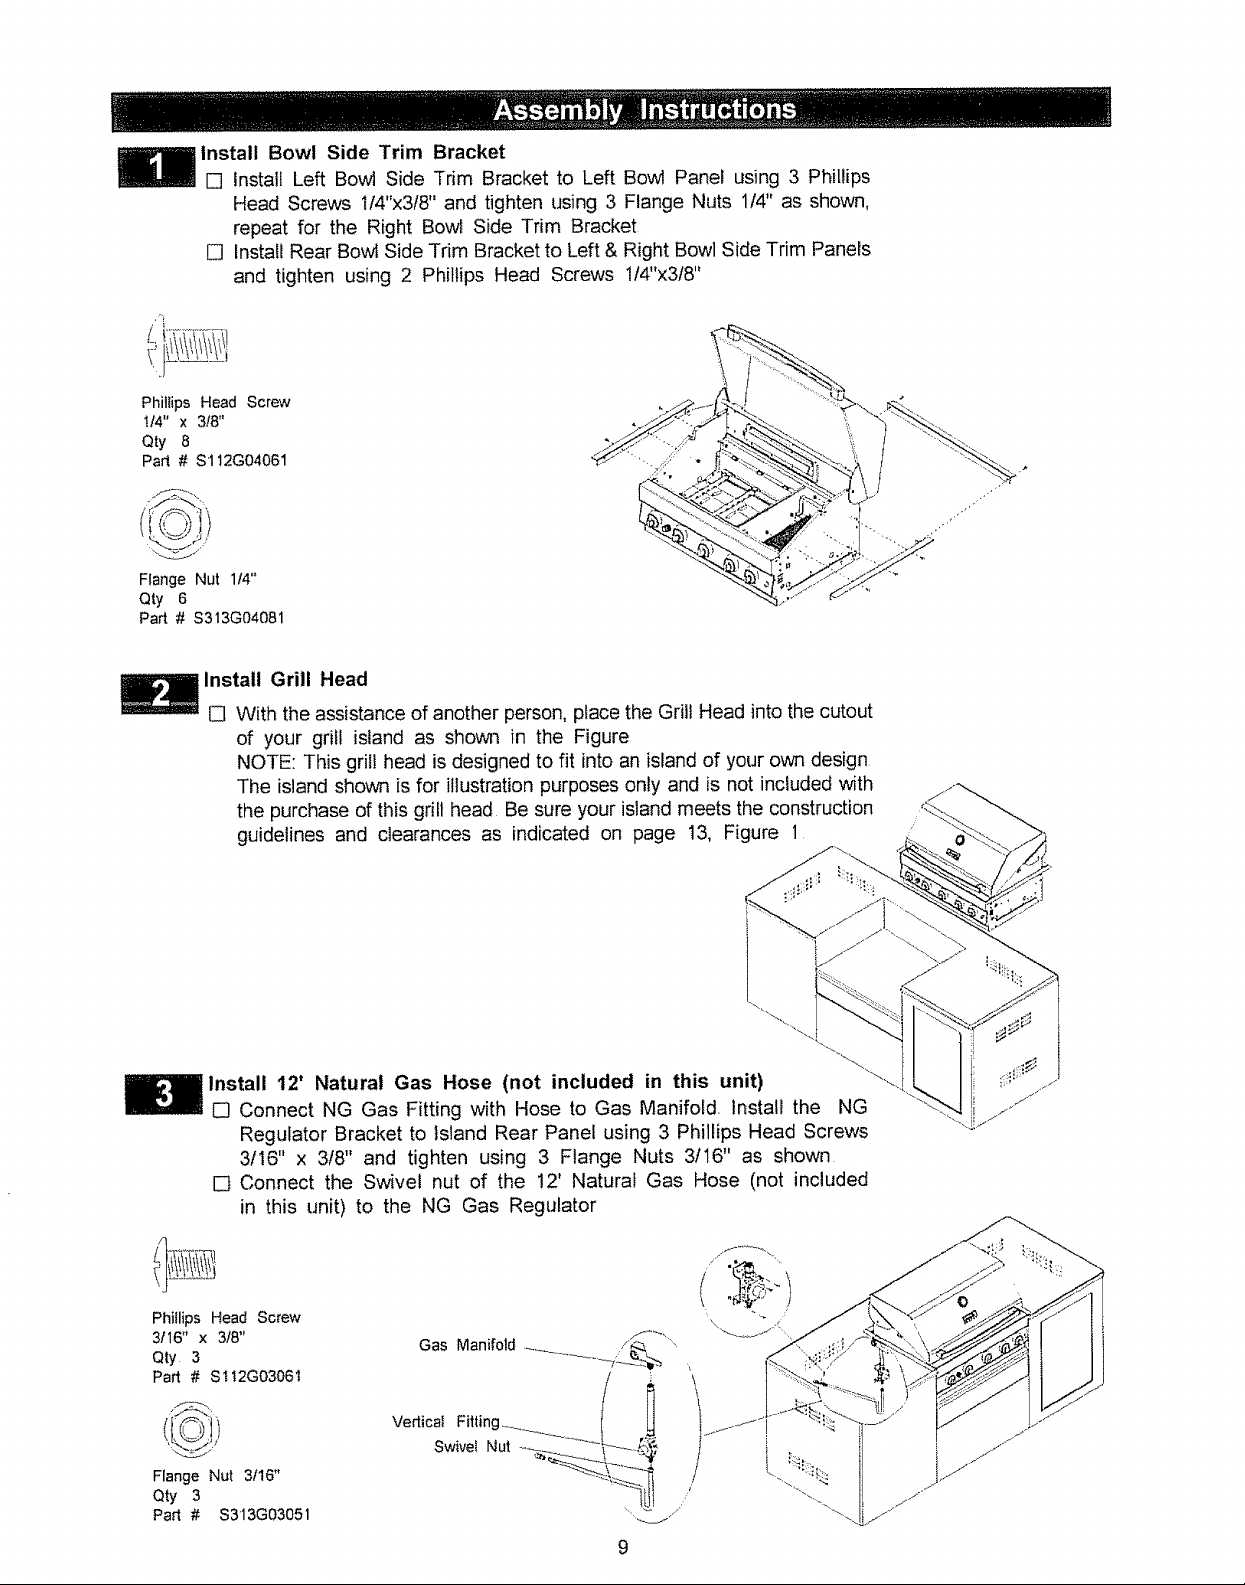
install Bowl Side Trim Bracket
[] Install Left Bowl Side Trim Bracket to Left Bowl Panel using 3 Phillips
Head Screws t/4"x3/8" and tighten using 3 Flange Nuts 1f4" as shown,
repeat for the Right Bowl Side Trim Bracket
[] Install Rear Bowl Side Trim Bracket to Left & Right Bowl Side Trim Panels
and tighten using 2 Phillips Head Screws 1t4"x3t8"
Phitiips Head Screw
t/4" x 3!8"
Qty 8
Pad # $112G04061
Flange Nut 114"
Qty 6
Part # $313G04081
Install Grill Head
[] With the assistance of another person, place the Grill Head into the cutout
of your grill island as shown in the Figure
NOTE: This grill head is designed to fit into an island of your own design
The island shown is for illustration purposes only and is not included with
the purchase of this grill head Be sure your island meets the construction
guidelines and clearances as indicated on page 13, Figure 1
Install 12' Natural Gas Hose (not included in this unit)
[] Connect NG Gas Fitting with Hose to Gas Manifold, Install the NG
Regulator Bracket to Island Rear Panel using 3 Phillips Head Screws
3/16" x 3/8" and tighten using 3 Flange Nuts 3/16" as shown
[] Connect the Swivel nut of the 12' Natural Gas Hose (not included
in this unit) to the NG Gas Regulator
Phillips Head Screw
3116" x 3!8"
aty 3
Part # $tt2G03061
Flange Nut 3116"
Qty 3
Part # $313G03051
Gas Manifold ._.... _. :._._'/
Vertical Fitting__ I i
9

Install Transformer
[] Instati Transformer-Plug into Transformer-Socket and tighten securely,
(See Fig 1)
[] lnstat! Transformer to the Rear Cart Panel by using 4 Phillips Head
Screws 3t16"x1/2" and tighten using 4 Ftange Nuts 3116", (See Fig 2)
(You need to make 4 holes on your Rear Cart Panel first)
Pull the Transformer Cord out through the gap between the Rear Cart
Panel and the floor,
[] Plug Transformer Cord into a properly grounded outlet
Note: In case of light bulb failure replace with 12 volt 10W bulb only to avoid
damaging the electrical transformer
Phillips Head Screw
3It6'_ x tt2"
Qty, 4
Part # $112G03081
Fiange Nut 3116"
Qty_ 4
Part # $313G03051
Wire --,,
Transformer-socket ..... '"_t._!
Transformer-plug ---,
Fig
Install ignitor Battery
[] Unscrew Ignitor Cap from Control Panel
[] Place supplied AA battery into the Ignitor Slot with positive pole
facing you,
[] Position the Cap and Spring over the AA battery and tighten onto
Control Panel,
AA Batter
Ignitor
Spring
Ignitor Slot
10
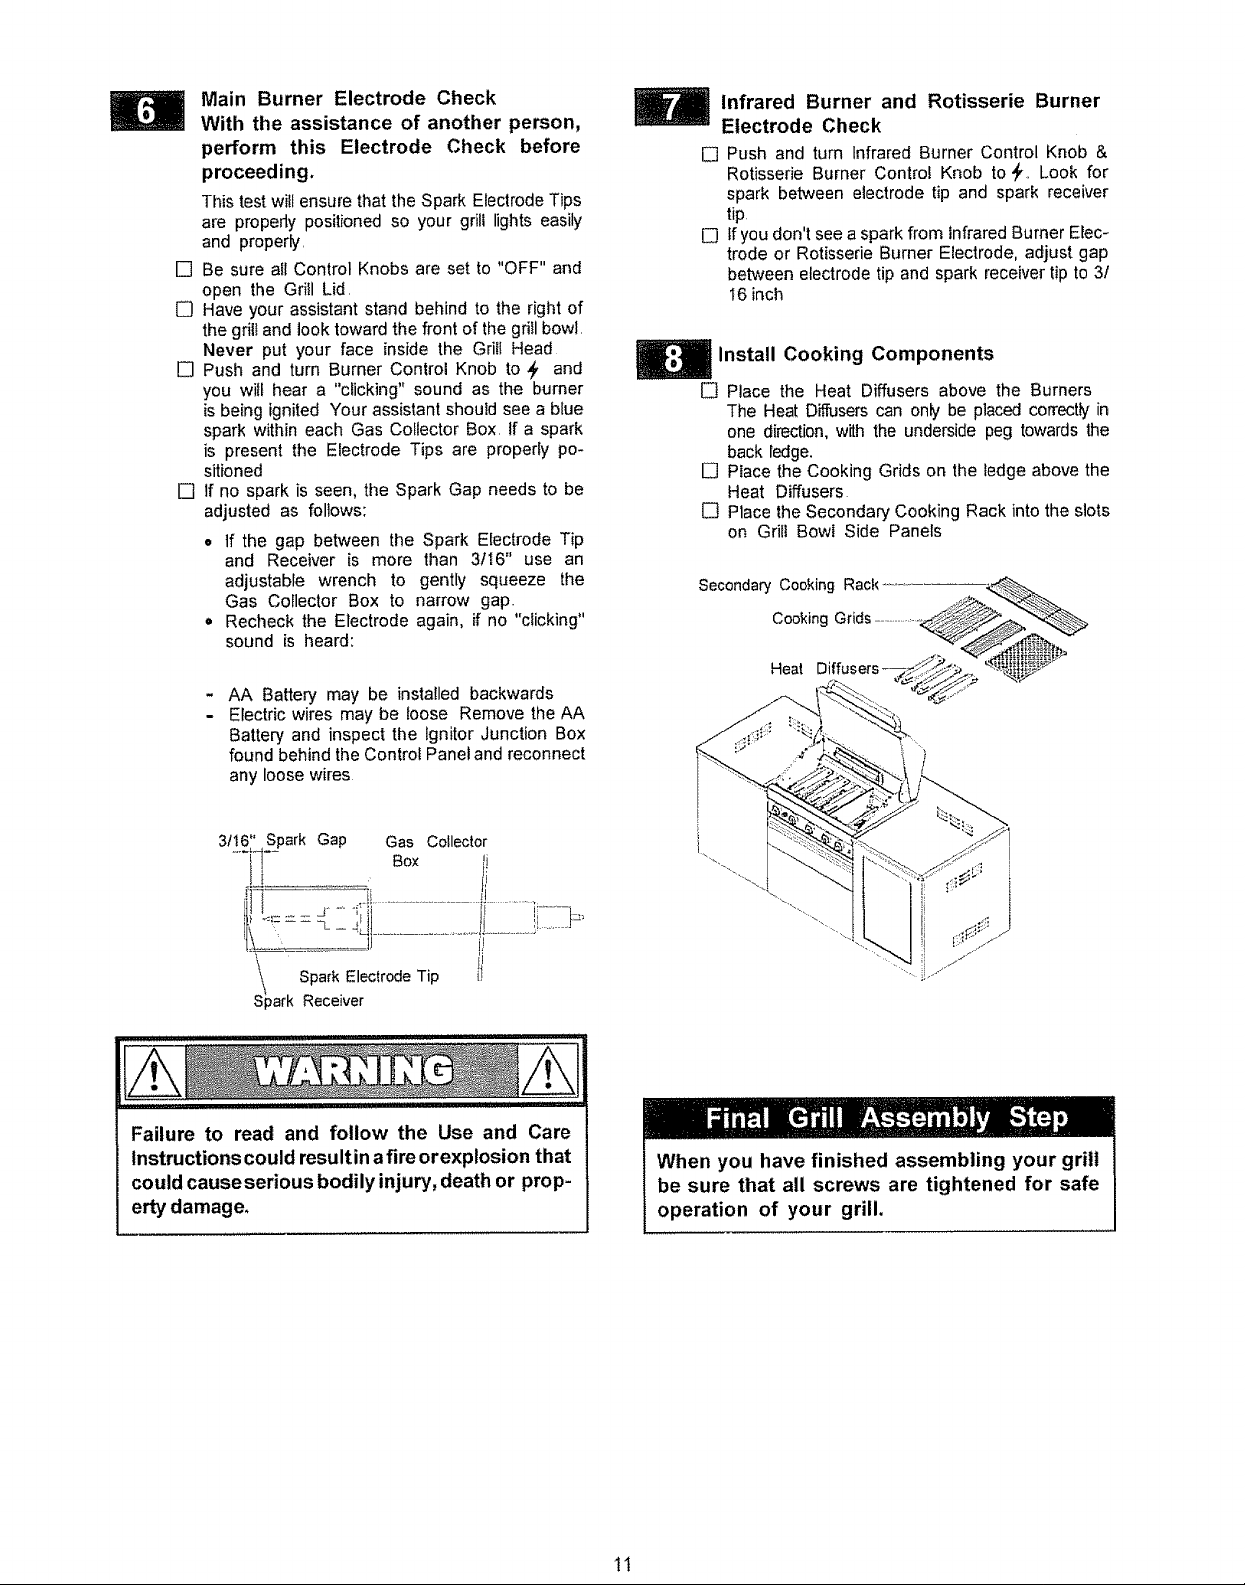
Main Burner Electrode Check
With the assistance of another person,
perform this Electrode Check before
proceeding.
This test wilt ensure that the Spark Electrode Tips
are propedy positioned so your grill lights easily
and properly.
[]
Be sure a!l Control Knobs are set to "OFF" and
open the Grill Lid.
[]
Have your assistant stand behind to the right of
the grill and look toward the front of the grill bowl.
Never put your face inside the Grill Head
[]
Push and turn Burner Control Knob to _. and
you wilt hear a "clicking" sound as the burner
is being ignited Your assistant should see a blue
spark within each Gas Collector Box. If a spark
is present the Electrode Tips are properly po-
sitioned
[]
if no spark is seen, the Spark Gap needs to be
adjusted as follows:
o tf the gap between the Spark Electrode Tip
and Receiver is more than 3!t6" use an
adjustable wrench to gently squeeze the
Gas Collector Box to narrow gap..
= Recheck the Electrode again, if no "clicking"
sound is heard:
AA Battery may be installed backwards
Electric wires may be loose Remove the AA
Battery and inspect the Ignitor Junction Box
found behind the Control Panel and reconnect
any loose wires
Infrared Burner and Rotisserie Burner
Electrode Check
[] Push and turn Infrared Burner Control Knob &
Rotisserie Burner Control Knob to,_.. Look for
spark between electrode tip and spark receiver
tip
[] If you don't see a spark from infrared Burner Elec-
trode or Rotisserie Burner Electrode, adjust gap
between electrode tip and spark receiver tip to 31
16 inch
Install Cooking Components
[] Place the Heat Diffusers above the Burners
The Heat Diffusers can only be placed corr_tty in
one direction, with the underside peg towards the
back ledge.
[] Place the Cooking Grids on the ledge above the
Heat Diffusers
[] Place the Secondary Cooking Rack into the slots
on Grill Bowl Side Panels
Secondary Cooking Rack
Cooking Grids ..................
Heat
31161'_Spark Gap Gas Collecto!
ilill.........lit21)!!illilll
t,\............... tJ ........... j!
tp Spark ElectrodeTip
ark Receiver
Failure to read and follow the Use and Care
Instructions could result inafire orexplosion that
could causeserious bodily injury, death or prop-
erty damage,
When you have finished assembling your grill
be sure that all screws are tightened for safe
operation of your grill,
11
Natural Gas Model only:
Fig. 1
Connecting Natural Gas To Your Grill
[] Connect the Swivel nut of the I2' Natural Gas Hose
to the vertical fitting of NG Regulator as shown in
Fig_ 1 Connect the other hose end (male plug) to
the gas supply line from house.. Also, read and foiow
all natural gas safety instructions below.
Natural Gas Safety Instructions
[]
Your natural gas grill is designed to operate on natural
gas only, at a pressure of 4" water column (WC) with
natural gas regulator The gas pressure Regulator sup*
plied with this appfance must be used This Regulatoris
set for an outlet pressure of 4" WC
[]
Instal a ShutoffValve at the gas supply source outdoors
at a point after the gas pipe exits the outside wall and
before the quick-disconnect hose..Or install itat the point
before the gas line piping enters the ground. See Fig., 2
[] Pipe sealing compound or pipe thread tape resistant to
the action of natural gas must be used on all mate pipe
thread connections.
[]
Disconnect your gas grill from fuel source when the gas
supply is being tested at high pressures This gas grill
and its individual shutoff valve must be disconnected
from the gas supply pipe system during any pressure
testing of that system at pressure in excess of 1/2 psi
(35kpa)
[] Tu rn offyour gas grill when the gas supply is being tested
at low pressures The grill must be isolated from the gas
supply pipe system by closing its individual manual
shutoff valve during any pressure testing of the gas
supply pipe system at pressures equal to or less than t!
2 psi (35kpa).
_,-J_!>) 12ft NG Hose _
_.m, L.,.JI,i _*_/"
l_ _ (not included with grill) <_:_"
• • • _-_/ ,!IFJ -'-
Vertical filrng ..... ":_i_" ;>/_//
i-, _,tI_;_ .... _G__
Swivel nut _-ii_,)
Check all connections for NG Leaks
Never test for' leaks with a lame Prior to first use and
at the beginning of each season, you must check for gas
leaks Follow these three steps:
[] Make a soap solution by mixing one part liquid
detergent and one part water
[] Turn the grill Control Knobs to the full OFF position,
then turn the gas ON at source
[]
Apply the soap solution to al gas connections indi-
cated by the arrows. See Fig. 3 if bubbles appear
in the soap solution the connections are not properly
seated. Check each fitting and tighten or repair as
necessary
Fig, 3 / ........
/
/,
Fig. 2
_i_o Grill
Inside Wall
Outside Wall
Male Fitting Disconnect
Gas/Supply
Shut Off
Locking
Shut Off
--- Quick
if you have a gas leak that cannot be repaired by
tightening, turn off the gas at the source, disconne_
fuel line from your grill and call 1-800-.4-MY-HOME
or your gas supplier for repair assistance
Never disconnect the gas regulator or any gas
filing while your gdl is lit. A lit grill can ignite
leaking gas and cause a fire or explosion which
could result in property damage, personal injury
or death
12
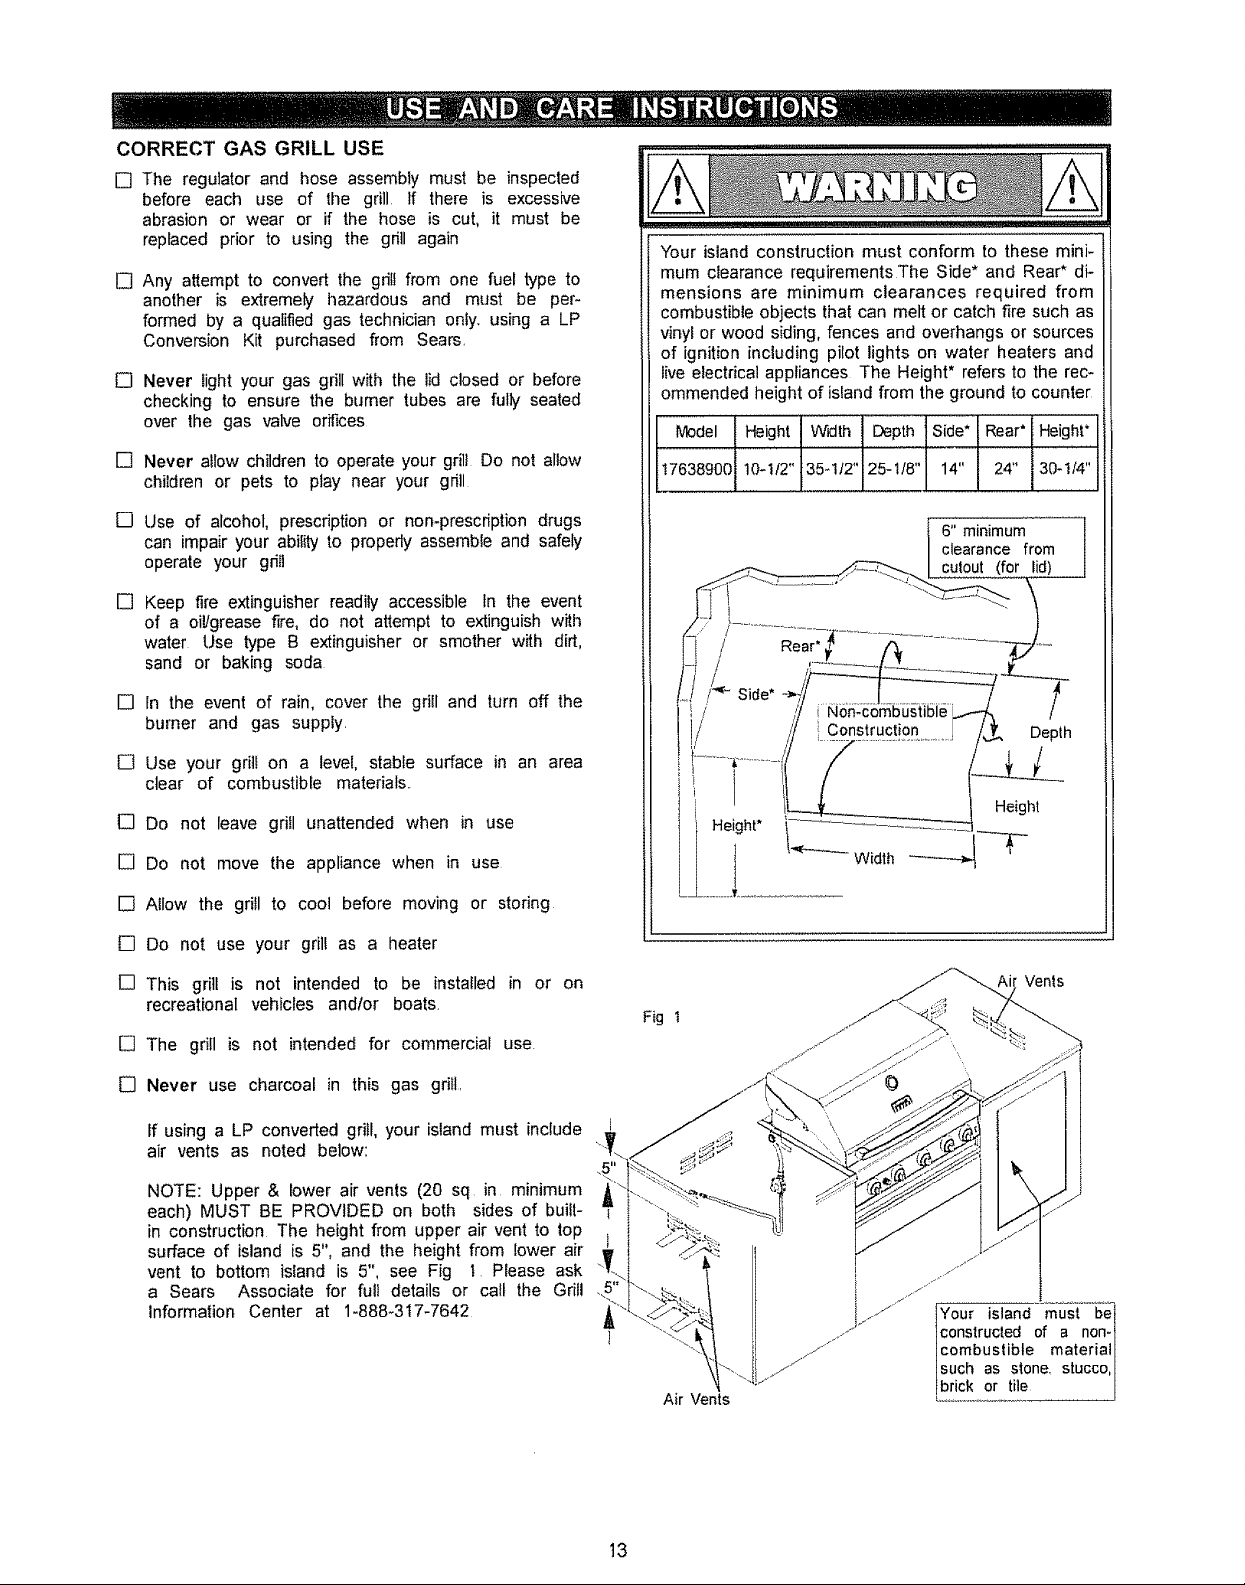
CORRECT GAS GRILL USE
E3 The regulator and hose assembly must be inspected
before each use of the grill tf there is excessive
abrasion or wear or if the hose is cut, it must be
replaced prior to using the gd]l again
[] Any attempt to convert the grill from one fuel type to
another is extremely hazardous and must be per-
formed by a qualified gas technician only. using a LP
Conversion Kit purchased from Sears.
[] Never light your gas grill with the lid closed or before
checking to ensure the burner tubes are fully seated
over the gas valve oril;ces
[] Never allow children to operate your grill Do not allow
children or pets to play near your gri]l
Your island construction must conform to these mini-
mum clearance requirements The Side* and Rear* di-
mensions are minimum clearances required from
combustible objects that can melt or catch fire such as
vinyl or wood siding, fences and overhangs or sources
of ignition including pilot lights on water heaters and
live electrical appliances The Height* refers to the rec-
ommended height of island from the ground to counter
Model'' He'ight'l"'W_dth I Depth 1Side* Rear" Height*
Ii76389001i02'i="laS'l'q=S-"a"l'"::1=4,, 13o-i:4"1
[] Use of alcohol, prescription or non-prescription drugs
can impair your ability to properly assemble and safely
operate your grill
[] Keep fire extinguisher readily accessible In the event
of a oi!!grease fire, do not attempt to extinguish with
water Use type B extinguisher or smother with dirt,
sand or baking soda
[] In the event of rain, cover the grill and turn off the
burner and gas supply.
[] Use your grill on a level, stable surface in an area
clear of combustible materials..
[] Do not leave grill unattended when in use
[] Do not move the appliance when in use
[] Allow the grill to cool before moving or storing
[] Do not use your grill as a heater
[] This grill is not intended to be installed in or on
recreational vehicles andtor boats.
[] The grill is not intended for commercial use.
[] Never use charcoal in this gas grill.
Fig I
/
Height*
Rear"
Construction
Width
6" minimum
clearance from
cutout (for lid)
!
Depth
/
Height
Vents
If using a LP converted grill, your island must include
air vents as noted below:
NOTE: Upper & lower air vents (20 sq in. minimum
each) MUST BE PROVIDED on both sides of built-
in construction The height from upper air vent to top
surface of island is 5", and the height from lower air
vent to bottom island is 5", see Fig I Please ask
a Sears Associate for full details or call the Grill
Information Center at 1-888-317-7642
i,j_
Your island must be
constructed of a non-I
combustible material
such as stone, stucco,
Air Vents
brick or tile
t3
Grill Lighting Instructions
1 Before each use, check all hoses for cracks, nicks, cuts,
burns or abrasions, tf a hose is damaged in any way, do not
use your gdll before replacing the hose with an authorized
part from the Parts List Also make sure all gas supply
connections are securely tightened
2 Familiarize yourself with the safety and Use and Care
instructions in this guide. Do not smoke while lighting grill
or checking gas supply connections.
3 Be sure the Natural Gas Line is attached to the gas source
(or if using a professionally converted LP grill, be sure the
LP Gas tank is filled )
4 Open the Grill Lid
Failure to replace a faulty hose, secure gas supply
connections or to open the Lid before proceeding to
the Lighting Procedures could result in a fire or
explosion that could cause serious bodily injury,
death, or property damage.
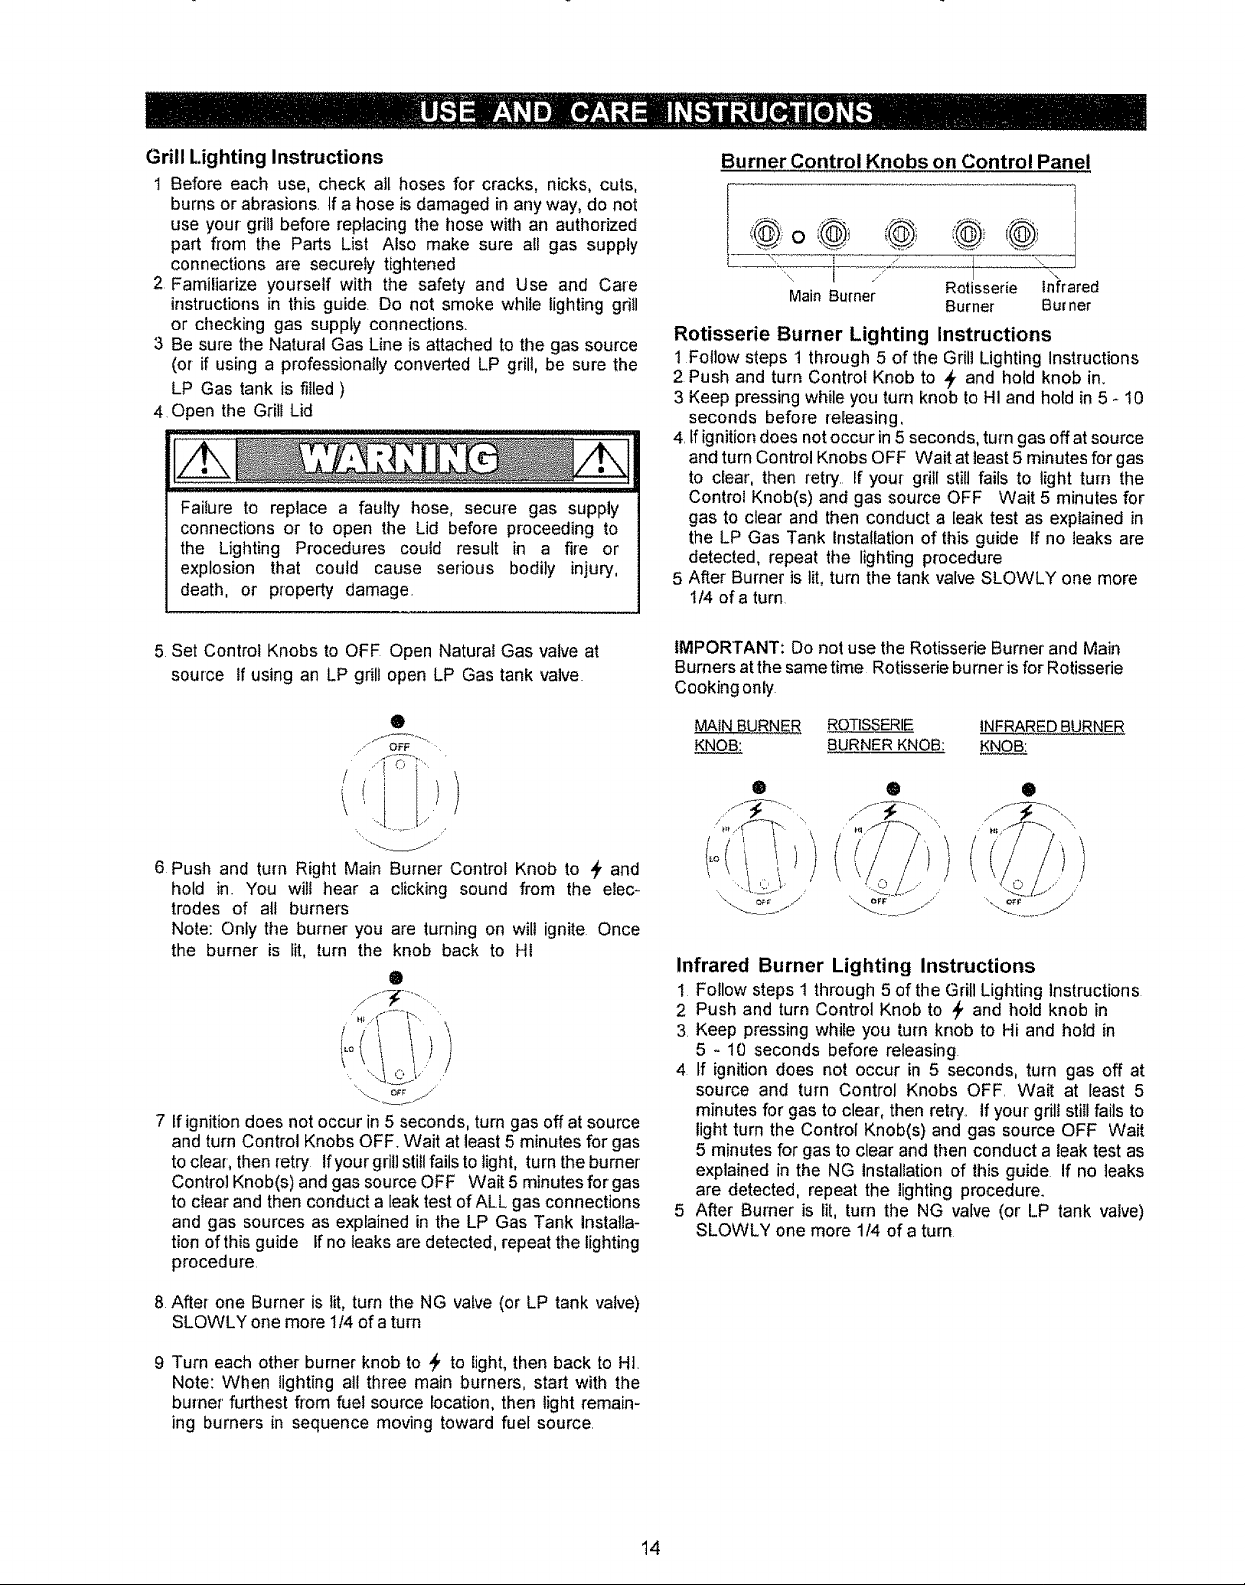
Burner Control Knobs on Control Panel
,@o @i
,\
Main Burner
Rotisserie Burner Lighting Instructions
1Follow steps 1 through 5 of the Grill Lighting Instructions
2 Push and turn Control Knob to ÷ and hold knob in.
3 Keep pressing while you turn knob to HI and hold in 5 _ 10
seconds before releasing,
4.If ignition does not occur in 5 seconds, turn gas off at source
and turn Control Knobs OFF Wait at least 5 minutes for gas
to clear, then retry., if your- grill still fails to light turn the
Control Knob(s) and gas source OFF Wait 5 minutes for
gas to clear and then conduct a leak test as explained in
the LP Gas Tank #]stallation of this guide if no leaks are
detected, repeat the lighting procedure
5 After Burner is lit, turn the tank valve SLOWLY one more
1/4 of a turn
Rotisserie Infrared
Burner Bur ner
\
5 Set Control Knobs to OFF Open Natural Gas valve at
source if using an LP grill open LP Gas tank valve.
®
....%7;:--.
t
i .....i j)',)
6 Push and turn Right Main Burner Control Knob to _, and
hold in.. You will hear a clicking sound from the elec-
trodes of all burners
Note: Only the burner you are turning on will ignite Once
the burner is lit, turn the knob back to Hi
O
/"__/_ -''¸_¸,¸, ,
7 Ifignitiondoes not occur in 5 seconds, turn gas off at source
and turn Control Knobs OFF. Wait at least 5 minutes for gas
to clear, then retry If your grit]stillfails to light, turn the burner
Control Knob(s) and gas source OFF Wait 5 minutes for gas
to clear and then conduct a leak test of ALL gas connections
and gas sources as explained in the LP Gas Tank Installa-
tion of this guide If no leaks are detected, repeat the lighting
procedure.
IMPORTANT: Do not use the Rotisserie Burner and Main
Burners at the same time Rotisserie burner is for Rotisserie
Cooking only
MAIN BURNER ROTISSERIE
KNOB: ,BURNER KNOB:
Infrared Burner Lighting Instructions
1 Follow steps 1 through 5 of the Grill Lighting Instructions
2 Push and turn Control Knob to ÷ and hold knob in
3. Keep pressing while you turn knob to Hi and hold in
5 - 10 seconds before releasing
4 If ignition does not occur in 5 seconds, turn gas off at
source and turn Control Knobs OFF. Wait at least 5
minutes for gas to clear, then retry., if your grilt stiIIfails to
light turn the Control Knob(s) and gas source OFF Wait
5 minutes for gas to clear and then conduct a leak test as
explained in the NG Installation of lhis guide If no leaks
are detected, repeat the lighting procedure.
5 After Burner is Iit, turn the NG valve (or LP tank valve)
SLOWLY one more 1/4 of a turn
INFRARED BURNER
KNOB:
8 After one Burner is lit, turn the NG valve (or LP tank valve)
SLOWLY one more 1/4 of a turn
9 Turn each other burner knob to _ to light, then back to Ht.
Note: When lighting all three main burners, start with the
burner' furthest from fuel source location, then light remain-
ing burners in sequence moving toward fuel source,
14
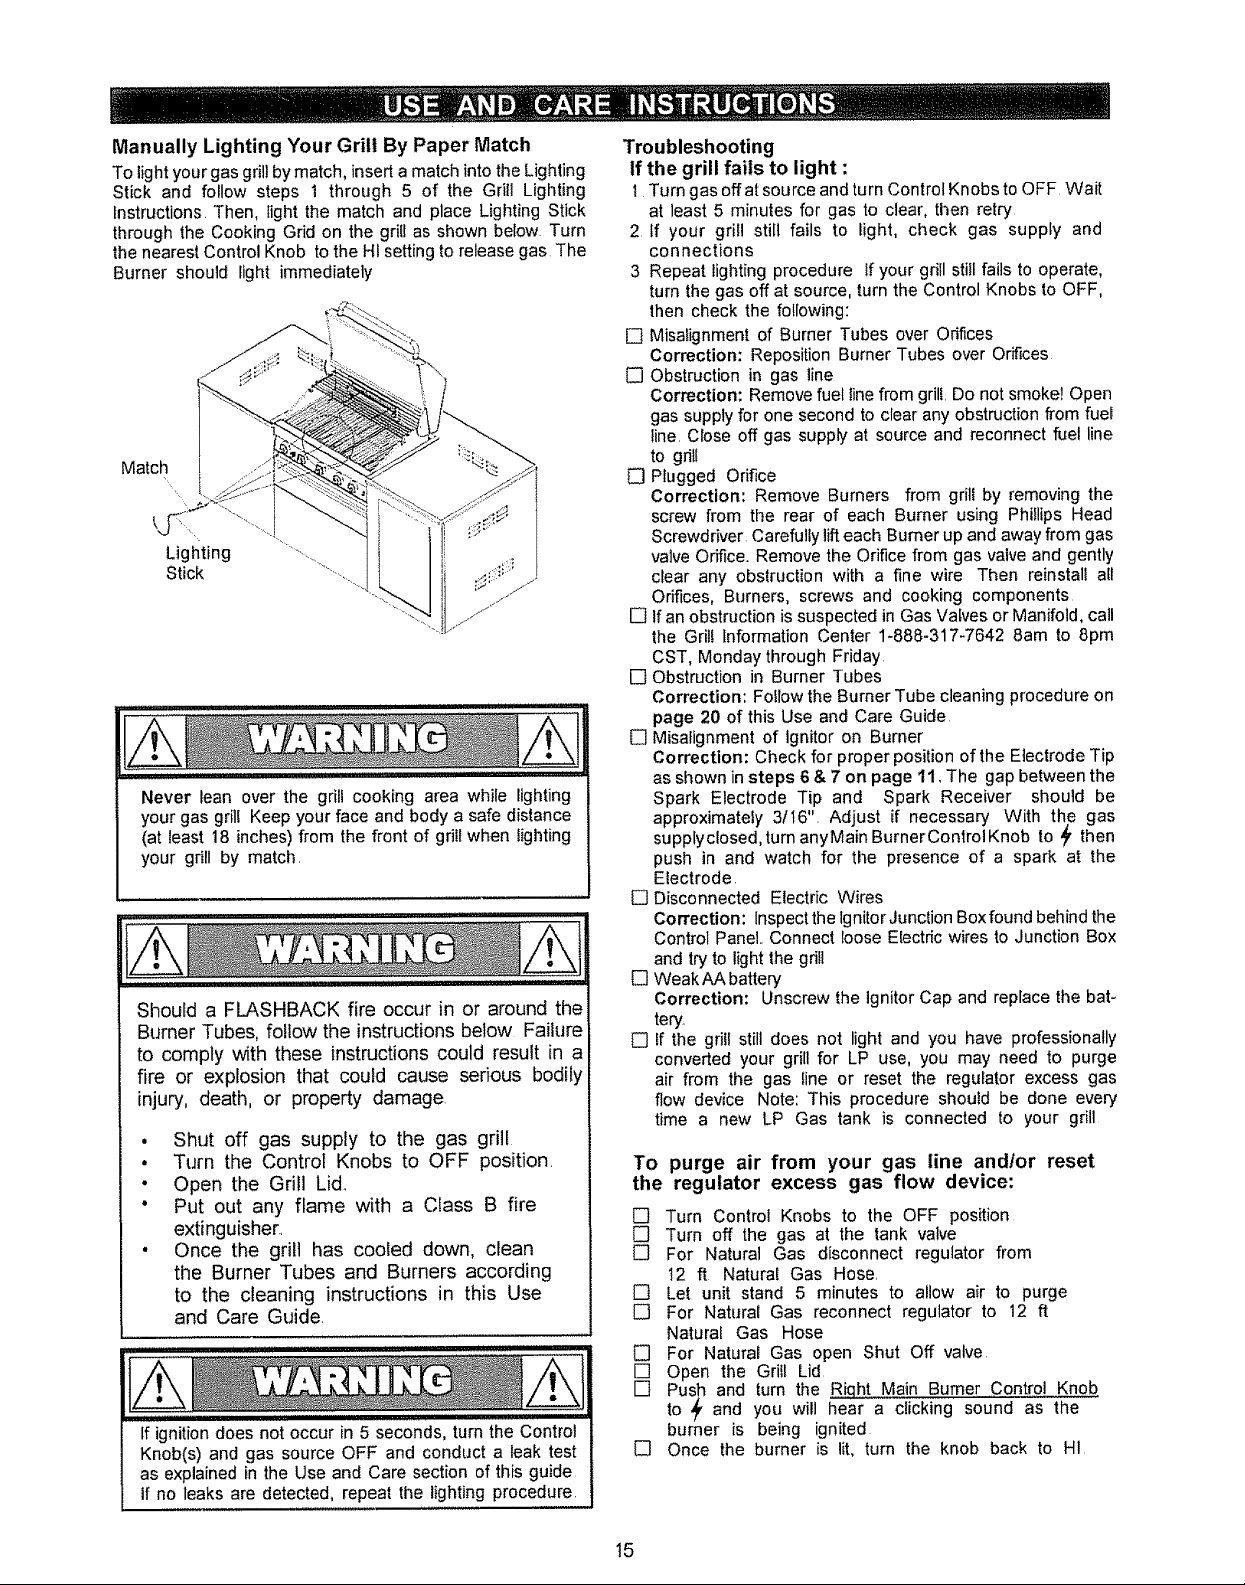
Manually Lighting Your Grill By Paper Match
To light your gas grill by match, insert a match into the Lighting
Stick and follow steps 1 through 5 of the Grill Lighting
Instructions. Then, tight the match and place Lighting Stick
through the Cooking Gdd on the grill as shown below Turn
the nearest Control Knob to the Ht setting to release gas The
Burner should fight immediately
Match !
k._F(
Lighting
Stick ...........
Never lean over the grill cooking area while lighting
your gas grill Keep your face and body a safe distance
(at least 18 inches) from the front of grill when lighting
your grill by match.
Should a FLASHBACK fire occur in or around the i
Burner Tubes, follow the instructions below Failure _
to comply _th these instructions could result in a
fire or explosion that could cause serious bodily
injury, death, or property damage
• Shut off gas supply to the gas grill
• Turn the Control Knobs to OFF position,
• Open the Grill Lid,,
° Put out any flame with a Class B fire
extinguisher.,
, Once the grill has cooled down, clean
the Burner Tubes and Burners according
to the cleaning instructions in this Use
and Care Guide.
If ignition does not occur in 5 seconds, turn the Control
Knob(s) and gas source OFF and conduct a leak test
as explained in the Use and Care section of this guide
if no leaks are detected, repeat the lighting procedure.
Troubleshooting
tf the grill fails to light :
1 Turn gas off at source and turn Control Knobs to OFF Wait
at least 5 minutes for gas to clear, then retry
2 if your grill still fails to light, check gas supply and
connections
3 Repeat lighting procedure If your grill sti!l fails to operate,
turn the gas off at source, turn the Control Knobs to OFF,
then check the following:
[] Misalignment of Burner Tubes over Orifices
Correction: Reposition Burner Tubes over OriSces
[] Obstruction in gas line
Correction: Remove fuel line from grill. Do not smoke! Open
gas supply for one second to clear any obstruction from fuel
line. Close off gas supply at source and reconnect fuel line
to gnll
[] Plugged Orifice
Correction', Remove Burners from grilI by removing the
screw from the rear of each Burner using PhiIlips Head
Screwdriver CarefuUy lift each Burner up and away from gas
valve Orifice. Remove the Orifice from gas valve and gently
clear any obstruction with a fine wire Then reinstall all
Orifices, Burners, screws and cooking components
[] If an obstruction is suspected in Gas Valves or Manifold, call
the Grilf Information Center 1-888-317-7642 8am to 8pm
CST, Monday through Friday
[] Obstruction in Burner Tubes
Correction: Foflow the Burner Tube cleaning procedure on
page 20 of this Use and Care Guide
[] Misatignment of Ignitor on Burner
Correction: Check for proper position of the Electrode Tip
as shown in steps 6 & 7 on page 11. The gap between the
Spark Electrode Tip and Spark Receiver should be
approximately 3116". Adjust if necessary With the gas
supplyclosed, turn anyMain BurnerControl Knob to _' then
push in and watch for the presence of a spark at the
Electrode.
[] Disconnected Electric Wires
Correction: Inspect the Ignitor Junction Box found behind the
Control Panel.. Connect loose Electric wires to Junction Box
and try to light the grill
[] WeakAA battery
i
Correction: Unscrew the Ignitor Cap and replace the bat-
tery.
[] If the grill still does not light and you have professionally
converted your grill for LP use, you may need to purge
air from the gas fine or reset the regulator excess gas
flow device Note: This procedure should be done every
time a new LP Gas tank is connected to your grill
To purge air from your gas line and/or reset
the regulator excess gas flow device:
[] Turn Control Knobs to the OFF position
[] Turn off the gas at the tank valve
[] For Natural Gas disconnect regulator from
12 ft Natural Gas Hose.
[] Let unit stand 5 minutes to allow air to purge
[] For Natural Gas reconnect regulator to 12 ft
Natural Gas Hose
[] For Natural Gas open Shut Off valve
[] Open the Grill Lid
[] Push and turn the Riqht Main Burner Control Knob
to _' and you will hear a clicking sound as the
burner is being ignited
[] Once the burner is lit, turn the knob back to H1
15

CORRECT ROTISSERIE USE
Read all instructions before initialuse
IMPORTANT: When using electrical appliances, basic safety
precautions should always be used
The Rotisserie Motor is set for 120V, 60Hz AC current
The Rotisserie is for outdoor use only
Do not let children operate or play near your grill or Rotis-
serie,
Connecting Rotisserie
Always attach the assembled Rotisserie to your grill first
and then plug the Cord into a properly grounded outlet
Operating Rotisserie
Do not operate the Rotisserie if the cord or plug becomes
damaged, or if the Rotisserie malfunctions or has been
damaged in any manner
The use of accessory attachments is not recommeded by
the manufacturer- and may cause injuries. Only use this
Rotisserie for its intended use
Do not immerse Etectdcal Cord, Plug or Motor in water or
expose to rain, as this may result in an electdcai shock,
Discon nect Rotisserie
Be careful as all surfaces witt be hot, both gdlland Rotis-
serie paris. Use protective mitts to handle the Rotisserie
Unplug the Rotissede from electrical outlet when not in use
and before cteaning Aliow to cool before adding or remov-
ing parts
When Roitsserie cooking place a Cooking Pan under the
food to be cooked as this wilf capture the drippings and
keep your grill clean of excess grease which could cause
a fire,
CAUTION: Handle with care when moving a Cooking Pan
with hot oils
Should a grease fire occur, turn the burners and gas off and
leave the grill lid Closed until the fire is out
Store the Rotisserie indoors
When Rotisserie isnot in use, store it indoors in a dry place,
To protect against electrical shock, do not immerse
electrical cord, plugs or motor in water or expose to
rain Protect electrical elements from burners, hot
grill surfaces and grease
To protect against shock hazard risk, connect
only to properly Grounded Outlet
ELECTRICAL EQUIPMENT USE
To protect against electric shock, do not immerse
cord or plugs in water or other liquid
2 Unplug from the outlet when not in use and before
cleaning Allow to cool before putting on or taking off
parts,
3 Do not operate any outdoor cooking gas appliance
with a damaged cord, plug, or after the appliance
malfunctions or has been damaged in any manner
Call 1-800-4-MY-HOM E®for repair
4
Do not let the cord hang over the edge of a table
or touch hot surfaces
5,
Do not use an outdoor cooking gas appliance for
purposes other than intended
6 When connecting, first connect plug to the
outdoor cooking gas appliance then plug appli-
ance into the outlet
7 Use only a Ground Fault Interrupter (GFI) protected
circuit with this outdoor cooking gas appliance
8. Never' remove the grounding plug or' use with an
adapter of 2 prongs
9, Use only extension cords with a 3 prong grounding
plug, rated for tile power of the equipment, and
approved for outdoor use with a W-A marking
', This appliance, when installed, must be electri-
cally grounded in accordance with local codes
or', in the absence of local codes, with the
National Electrical Code, ANSI/NFPA 70, or the
Canadian Electrical Code, CSA C22 1
• Keep any electrical supply cord and the fuel
supply hose away from any heated surfaces,
California Proposition 65
The electrical supply cord and plug of the rotis-
serie contain chemicals, including lead, known to
the State of California to cause cancer, and birth
defects or other reproductive harm, Wash hands
after handling
16
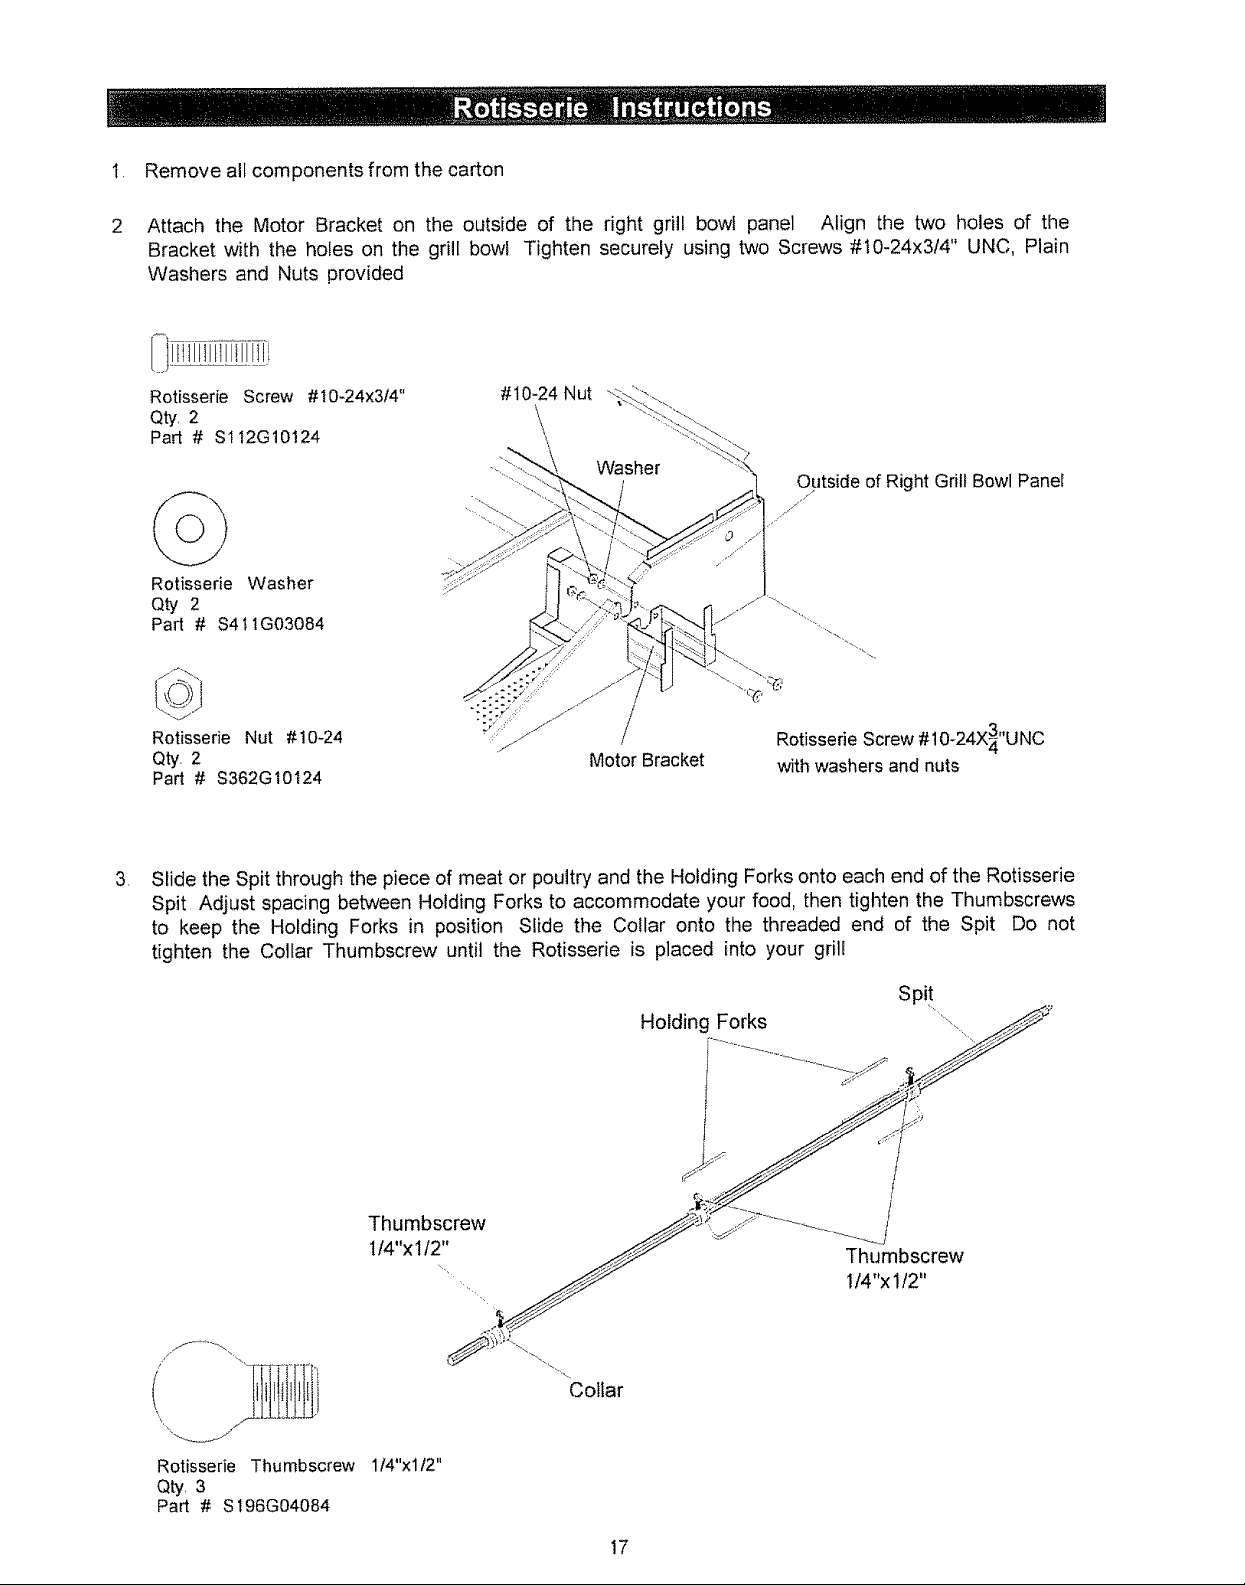
I, Remove all components from the carton
2 Attach the Motor Bracket on the outside of the right grill bowl panel Align the two holes of the
Bracket with the holes on the grill bowl Tighten securely using two Screws #t0-24x314" UNC, Plain
Washers and Nuts provided
'}jIIllllltIlltlllIl'!
Rotisserie Screw #i0-24x3f4" #10-24Nut
Qty, 2 \_
Part # $I!2G10124
Outside of Right Grill Bowl Panel
./
/
/
Rotisserie Washer
/>;"
Qty 2
Part # $4 t tG03084
. _. *. %. • ::v .i
Rotisserie Nut #t0-24 /
//
Qty, 2 Motor Bracket
Part # $362G10124
,
Slide the Spit through the piece of meat or poultry and the Holding Forks onto each end of the Rotisserie
/
Rotisserie Screw #10-24X_"UNC
with washers and nuts
"4
Spit Adjust spacing between Holding Forks to accommodate your food, then tighten the Thumbscrews
to keep the Holding Forks in position Slide the Collar onto the threaded end of the Spit Do not
tighten the Collar Thumbscrew until the Rotisserie is placed into your grill
spi!
Holding Forks .....,.........
Thumbscrew
t/4"x !/2" Thumbscrew
Rotisserie Thumbscrew 114"x112"
Qty, 3
Part # $I96G04084
I/4"x 1t2"
Collar
17

4, InstalltheAC(alternatingcurrent)RotisserieMotorontotheMotorBracketasshownbelow,Be sure
the Motorattachesto the Bracketwiththe electricalcorddown,Thisinstallationinsuresthatonce
the Spit is insertedinto the Motorit will alsorest securelyinto theslotof yourgrill bowl
RotisserieSpitmustrestsecurely
thesfotofyourgrillbowl
MotorBracket
inserttheassembledRotisserieintothe MotorasshownbelowThe Motorshouldbe on the right
sideofyourgrill PlacetheCollarintotheslotopeningontheleftsideofyourgrillbowl,thentighten
theCollarThumbscrewto therightof theCollar TheCollarwill stabilizethe Rotisserieduringthe
cookingprocessandallowstheRotisserieSpitto turnsmoothlyPlugtheRotisserieintoan outlet
andturn on to test
Cottar
%,,
\
Thumbscrew
\
4\
Holding Forks
/
S
Thumbscrew
Motor
/"
/,/
The Collar must always be used with this Rotisserie.
BEFORE rotisserie cooking you will need to remove the Cooking Grid(s) and possibly the Heat Diffusers
from your' grill When rotisserie cooking place a Cooking Pan under the food to be cooked, This will
capture the drippings and keep your grill clean of excess grease which could cause a fire Use caution
when moving a Cooking Pan containing hot oils
18

Proper care and maintenance will keep your grill in top operating
condition and prolong itslife. Follow these cleaning procedures on
a timely basis and your grill will stay clean and operate with
minimum effort
CAUTION: Be sure your grill is OFF and cool before cleaning
Cleaning the Cooking Grids
[] Before initial use, and periodically, wash your Cooking
Grids in a mild soap and warm water solution You can use
a wash cloth or vegetable brush to clean your Cooking
Grids
Cleaning the Heat Diffusers
[] Periodically you should wash the Heat Diffusers in a soap
and warm water solution.. Use a vegetable brush to remove
stubborn burnt-on cooking residue Dry the Heat Diffusers
thoroughly before you reinstall them into the cooking bowl
Cleaning The Grease Tray
[] To reduce the chance of fire, the Grease Draining Tray
should be visually inspected before each grill use Remove
any grease and wash Grease Tray with a mild soap and
warm water solution.
Cleaning the Inside of the Grill Lid
[] Grease can have atendencyto build up on the inside of the
Grill Lid and could drip onto deck or patio when the lid is
opened. Visually inspect the inside of the Grill Lid before
each grill use. Remove any grease and wash with a mild
soap and warm water solution
Routine Cleaning of The Grill Interior
[] Burning-off excess food after every cookout will keep it
ready for instant use However,at least every 3 months you
must give the entire grill a thorough cleaning to minimize
your risk of grease fire and keep the grill intop shape. Follow
these steps:
1 Turn all Burner Valves to the full OFF position
2 Turn the gas supply OFF at the source
3 Disconnect the fuel hose from the gdll Inspect the hose
with regulator assembly for cracking, cuts or any other
damage, and replace as neccessary Refer to the Paris
List in this Use and Care Guide.
4 Remove and clean the Heat Diffusers, Cooking Grids,
Cooking Rack and Grill Burners
5. Cover each Gas Valve Orifice with aluminum foil.
6 Brush the inside and bottom of the grill with a fiber pad or
nylon brush and wash with a mild soap and warm water
solution.. Rinse thoroughly and let dry
7 Remove aluminum foil from Orifices and check each
Orifice for obstruction
8. Check each Spark Electrode, adjusting as needed The
space between the Spark Electrode Tip and Spark Re-
ceiver should be approximately 3t16"
Replace the Burners and adjust the Gas Collector Box
9 The edge of the collector box should be overlapping the
Burner Port
tO Replace Heat Diffusers and Cooking Grids
1t .Reconnect the gas source and observe the Burner flame
Cleaning Exterior Stainless Steel Surfaces:
[] Routine care and maintenance is required to preserve the
appearance and corrosion resistance of stainless steel The
fact is stainless steel can corrode, rust and discolor under
certain conditions Rust is caused when regular steel par-
ticles in the atmosphere become attached to the stainless
steel surface Steel particles can also become attached to
your grill if you use steel wool or stiffwire brushes to clean
the grill insteadof non-abrasive cloth, sponge or nylon clean-
ing tools Incoastal areas rust pits can develop on stainless
surfaces that cannot be fully removed Bleach and other
chlorine based solutions used for household and pool clean-
ingcan also cause corrosion to stainless steel Weathering,
extreme heat, smoke from cooking and machine oils used
in the manufacturing process of stainless steel can cause
stainless steel to turn tan in color Although there are many
factors which can affect the surface appearance of stain-
less steel, they do not affect the integrity of the steel or the
performanceof the gril!
[] To help maintain the finish of stainless steel follow these
cleaning procedures for the best results:
1..After every use (after your grill has cooled down), wipe
stainless surfaces with a soft, soapy cloth or sponge
then rinse with water Be sure to remove all food par-
ticles, sauces or marinades from stainless steel because
these can be highly acidic and damaging to stainless
surfaces.
2 Never use abrasive cleaners, scrubbers or stiff wire
brushes of any type on your grill
3 Use a heat resistant Stainless Steel Cleaner and rub or
wipe in the direction of the stainless steel grain or polish
lines NOT against the grain
Failure to comply with these instructions could
result in a fire or explosion that could cause
serious bodily injury, death or property damage.
Keep grill area clear and free from combustible
materials, gasoline and other flammable vapors and
liquids.
o
Do not obstruct the flow of air for combustion and
ventilation.
o
Keep the ventilation openings of the tank enclosure
cabinet free and clear of debris
o
Visually check burner flames occasionally to ensure
proper flame _attem as shown below
19
........ii.......
MAGNIFIEDVIEW OF GRILL MAIN BURNER, INFRARED
BURNERAND ROTISSERIE BURNERFLAME THROUGH
OPENLID

To reduce the chance of FLASHBACK FIRE you must clean
the Burner Tubes as follows at least once a month in summer
and fall or whenever spide[s are active inyour area, and ifyour
gdll has not been used for an extended period of time
1 Turn alI Burner Valves to the futt OFF position
2. Turn the gas supply OFF at the source
3 Disconnect the fuel hose from the grill
4 Remove tile Cooking Grids, Heat Diffusers and Grease
Tray from your grill
5 Remove the screws from the rear of each Main Burner
using a Phillips Head Screwdriver. Remove screws
along all sides of the infrared Burner using a Phillips
Head Screwdriver
6 Carefully lift each Burner up and away from tile Gas
Valve Orifice
7 Check and clean burnerlventuri tubes for insects and
insect nests A clogged tube can lead to a fire beneath
the grill
8 Refer to Figure 1 and perform one of these three
cleaning methods:
[] METHOD 1: Bend a stiff wire or wire coat hanger
into a smatt hook as shown and run the hook
through the Burner Tube and inside the Burner
several times to remove debris.
[] METHOD 2: Use a bottle brush with a flexible
handle and run the brush through the Burner Tube
and inside the Burner several times to remove any
debris
Regardless of which Burner cleaning procedure you
use, we recommend you also complete the following
steps to help prolong Burner life
1
After each use of the main gdll or infrared cooking zone
it is necessary to burn off food particles and drippings
which can clog Burner pods and reduce Burner perfo[:
mance OPEN the gdll Lid, ignite the burner(s) and
operate grill on Hi setting for 3 to 5 minutes. You carl
close the Lid if only main Burners are fit, but NEVER
close the Lid over a lit Infrared Burner
2, Use a nylon brush, blower or vacuum to remove accu-
mulated ash from the outer surface of each Burner
Clogged tube style Burner ports can be cleaned with a
stiff wire, such as an open paper clip DO NOT use a stiff
brush or sharp tool of any type on the fragile infrared
Burner
3..
tnspect each Burner for damage (cracks or holes) and if
such damage is found, order and install a new Burner
After installation,check to ensure that the Gas Valve
Orifices are correctly placed inside the ends of the
BumerTubes Also check the position of your Spark
Electrode.
For safe operation ensure the Gas Valve Assembly
Orifice is inside the Burner Tube before using your
gritl See figure. If the Orifice is not inside the
Burner Tube, lighting the Burner may cause explo-
sion andlor fire resulting in serious bodily injury
andlor property damage
Tube Burner
[] METHOD 3: Use an air hose to force air through
each Burner Tube The forced air should pass
debris or obstructions through the Burner and out
the Pods.
Figure 1
TO CLEAN BURNER
TUBE, INSERTHOOK
ASINDICATEDBYTHE
ARROW
2O
Gas Valve Assembiy
Infrared Burner
Gas Valve Assembly Orifice
/_ Burner Port
" BurnerTube
Orifice BurnerTube
"\
\
Burner Tube
,Foot

Burn-Off
[] Before cooking on your gas grill for the first time, you
should "burn off' the grill to eliminate any odor or foreign
matter Ignite the main burners, lower the Lid, and oper-
ate grill on Hi setting for 3 to 5 minutes The Lid must be
open if the infrared burner is lit
CAUTION: Operating your grill on the Hi setting for longer
than five minutes may damage certain parts of your grill
Do not leave your grill unattended when in use
Preheating
[] To preheat main burners, light your grit! on Hi. lower the
Lid and follow this timetable To preheat the infrared
burner the Lid must be open
• For high temperature cooking, preheat grill 3 to 5
minutes
• For low temperature cooking, preheat grill 3 minutes
° To slow cook, preheating is not necessary
Cooking Temperatures
[] High setting: The Hi Control Knob setting should only be
used to pre-heat your grill the first 3-5 minutes and for
burning food residue off the grill for 3-5 minutes after
cooking is complete Never use the Hi setting for ex-
tended cooking
[] Medium to Low Settings: Most recipes specify medium
to low settings, including all smoking, serie cooking and
cooking lean cuts such as fish
An important Note About Cooking Temperatures
[] The suggested heat settings and cooking times shown
in the following pages are approximate Unlike the con-
trolled environment inside your kitchen, variables includ-
ing outside temperatures, direction and conditions of
wind. as well as grill location will affect your grill's heat
distribution Because these condition vary, and no two
backyards are alike, we offer this guide as a convenience
We recommend you monitor your grill closely and rotate
foods as needed to prevent overcooking and ensure the
most delicious results every time
. The infrared cooking area is for quick seadng. Once
seared, reduce heat and continue cooking or move food
to the primary cooking area to finishcooking
• The middle and back primary cooking areas offer high
heat for grilling
• The Secondary Cooking Rack offers medium heat for
preparing breads and firm vegetables
• The front primary cooking area offers less heat and is
ideal for preparing delicate foods and for keeping cooked
foods warm
Direct Cooking using Main Burners or infrared Burner
[] The direct cooking method can be used with the supplied
Cooking Grids and food placed directly overthe lit grill
Burners Direct Cooking requires the Grill Lid to be
open This method is ideal for searing and grilling when
you want an open-flame barbecued taste
Indirect Cooking using Main Burners
E_ The indirect cooking method can also be used with the
supplied Cooking Grids To cook indirectly, the food
should be placed on the left or right side of your grill with
the main Burner lit on the opposite side Or place your
food on the Secondary Cooking Rack and light the outer
main Burners Either way, indirect cooking must be
done with the Lid down
Prepare Cooking Grids for Grilling
[] Greasing the cooking surface will help keep foods from
sticking during the cookout and reduces the amount of
cleanup required Use a brush to apply a thin layer of
cooking oil or vegetable shortening onto each Cooking
Grid before each cookout We do not suggest spray type
oils unless they are specified for high4emperature
cooking Be sure to coat the entire cooking surface
Flare-Ups
[] The fats and juices dripping from grilled food can cause
flare-ups which impart a favorably, distinctive taste and
color to food They should be accepted up to a point To
minimize flare-ups:
" Use a drip pan under foods that produce a lot of grease
• Trim excess fat from meats and poultry
• Preheat the grill properly
• Clean grill regularly to remove food and grease build-
up
• Reposition your food often to avoid flare-ups
Failure to comply with these instructions could result
in a fire or explosion that could cause serious bodily
injury, death or property damage
Never cover the cooking grids, Heat Diffusers. bot-
tom of grill bowl or Grease Draining Tray with char-
coal, aluminum foil. sand or any substance that can
absorb grease
Before each use ofyour grill: Pull out the Grease Tray
and remove all grease and food debris to prevent
grease fire hazard
Use your grill at least 3 feet away from any wall
or surface. Use your grill at least 3 feet away from
combustible objects that can melt or catch fire
(such as vinyl or wood siding, fences and over-
hangs) or sources of ignition including pilot lights
on water heaters and live electrical appliances
Never use your gas grill in a garage, porch, shed,
breezeway or any other enclosed area
Your grill will get very hoL Always wear a flame
retardant BBQ Mitt when cooking on your grill Never
lean over cooking areas while using grill Do not touch
cooking surfaces. Lid, grill housing or other parts
while grill is in operation, or until the grill has cooled
down after use
A-1

Grilling Steak and Ribs
Turn the grUl Burners on Hi, close the Lid and preheat your
grill 3 to 5 minutes Open Lid and place the meat on the
Cooking Grid directly above the litBurners Cook the meat on
both sides until seared. Reduce the heat to MEDIUM and
cook meat until done. Grilling times will vary according to
meat thickness
Grilling Hamburgers and Sausages
Turn the grill Burners on Hi, close Lid and preheat your gd!l
3 to 5 minutes. Open Lid and place the meat on the Cooking
Grid directly above the lit Burners Cook the meat on both
sides until seared Reduce the heat to MEDIUM and cook the
meat until done Gdlling times will vary according to meat
thickness
Grilling Poultry
Turn the grill Burners on Hi, close Lid and preheat your grill
2 to 3 minutes. Then raise the Lid, reduce heat to MEDIUM and
cook poultry directly over lit Burners until done Poultry skin is
fatty so you should expect some flare-ups when using this
direct method
To minimize flare-ups, try grilling poultry using the indirect
method Place the poultry on one side of the grill with the
opposing Burners on MEDIUM heat, and lower the grifl Lid.
Grilling times will vary based on the size of your poultry
Cut of Meat
T-bone steak
Sirtoin steak
Beef spare ribs
Porterhouse steak
New York strip steak
Hamburgers
Sausages
Chicken breast
(cook with bone down)
Chicken wings
Drumsticks
Whole bird
(cook with breast up)
Approximate Cooking Times
Rare: 4-8 minutes
Medium: 10-14 minutes
Well done: 15-20 minutes
Rare: 4-6 minutes
Medium: 8-10 minutes
Well done: 10-15 minutes
Direct method:
approximately 15 minutes
Indirect method:
up to 30 minutes
Indirect method:
approximately I hour
Grilling Pork
Turn Burners on Hi and preheat your grill 3 to 5 minutes with
the Lid closed Raise Lid, place pork on Cooking Grid and
cook until seared Reduce heat to MEDIUM and cook until
done Grilling times will vary according to meat thickness
Whole Fish and Whole Fillets
Preheat your gdll on Hi for 2-3 minutes with the Lid down
Raise tid and turn Burners to MEDIUM heat Place fish (skin
down) on grill and cook over direct heat until done Use
cooking time as a guide or until fish isopaque but still moist.
Smatler Fish Fillets and Cubes
Follow the directions from above, using approximate cooking
times shown at right. Place a smafl piece of aluminum foil on
the Cooking Grids if the fish pieces are smaU enough to drop
between the Cooking Grids
Vegetables and Fruit
Prepare your fruit or vegetables and brush with butter or
basting sauce if desired To cook indirectly, the food should
be placed on the left or dght side of your gdll with the Burner
lit on the opposite side and the grill lid down Or center your
food on the Secondary Cooking Rack and light the outer grill
Burners Eitherway, indirect cooking must be done with the
Lid down.
In some instances, you may want to gdil vegetables and fruit
directly over the heat, using the supplied Cooking Grids.
Foods that work best with direct heat are relatively soft and
require a short cooking time: mushrooms, zucchini, toma-
toes and skewered fruit such as apricots, peaches, pine-
apple, strawberries and k_is Remember the Grill Lid must
remain up when cooking directly.,
Chops
Loins
Cutlets
Whole fish
Whole fish fillets
Fish fillets
Boneless cubes
For very firm vegetables-particularly potatoes and yams, we
recommend that you partially boil until almost cooked,
before placing them on the gdl!. Cooking times using the
indirect method with the lid down will be similar tothose for
your kitchen oven. However, there are many factors such as
outside temperature, wind condffions and location of grill
that affect your grill performance so we suggest you watch
the temperature gauge and adjust the heat accordingly
Cooking times for foods prepared with the direct method
will be much shorter mainly because of the direct heat
source and softness of the food. Timing will be comparable
to normal pan frying or gdlling
Medium: 10-14 minutes
Well done: 15-20 minutes
10 - 12 minutes per pound or
until fish is opaque
4 - 5 minutes each side
or until fish is opaque
A-2

Important notes about using the Infrared Burner
Whether you are a seasoned chef or a newcomer to gas
grilling, infrared cooking is quite different than grilling over a
traditional burner. Although the primary grill burners will also
sear meat, the infrared Burner produces a more intense and
concentrated heat that sears the meat more quickly This
quick searing produces a crisp and flavorful outer crust and
locks in the meat's natural flavor and juices
Follow the cooking guidelines provided Then take some
time to experiment with your infraredcooking zone Also, read
the Cooking instructions on page A-1 so you understand the
importance of pre-heating, cooking temperatures and safety
warnings
The Lid must always be open when the Infrared Burner
is lit
infrared cooking times will be much shorter than tradi-
tional grilling so do not leave the grill unattended
Searing Steak and Ribs
Turn the infrared Burner on Hi and preheat for 3 to 5 minutes
with the Lid open. Then place the meat on the Cooking Grid
and sear each side for approximately 2 minutes Reduce the
Infrared Burner to LOW or move meat to the primary grilling
area and finish cooking Grilling times will vary according to
meat thickness
Searing Hamburgers and Sausages
Once lit, leave the Infrared Burner on High and sear both
sides of meat using the guidelines below.
Once seared, adjust the Infrared Burner to Low and
continue cooking until desired doneness You can also
move the seared meat to the primary griiling area to finish
cooking This method allows you to sear and prepare
larger amounts of meat
NEVER attempt to douse a flare-up with water which can
damage the Burner To control flare*ups:
a Trim excess fat from meats and poultry.
o Preheat the Burner properly
- Clean the Burner regularly to remove food and grease
build-up See Burner Tube cleaning instructions in
this manual.
,, Reposition your food often and consider moving the
seared meat to the primary grilling area to finish
cooking
Cut of Meat
T-bone steak
Sidoin steak
Beef spare ribs
Porterhouse steak
New York strip steak
Approximate Total Cooking
Time
Rare; 4 minutes
Medium: 6-7 minutes
Well done: 8-10 minutes
Turn the infrared Burner on Hi and preheat for 3 to 5 minutes
with the Lid open. Then place the meat on the Cooking Grid
and sear each side for approximately 2 minutes. Reduce the
infrared Burner to LOW or move food to the primary grilling
area and finish cooking Grilling times will vary according to
meat thickness
Hamburgers and sausages are fatty so you should expect
some ffare-ups when cooking these foods
To minimize flare-ups follow the instructions on page A-I..
You may also consider grilling these and other fatty foods
using the primary gdll area and the indirect cooking method
WARNING: To ensure that it is safe to eat, food must
be cooked to the minimum internal temperatures listed
in the table below
USDA* Safe Minimum Internal TemperatL_res
Fish 145° F
Pork i60 _ F
_Egg Dishes 160° F
Steaks and Roasts of Beef, Veal or Lamb t45 ° F
Ground Beef, Veal or Lamb 160 ° F
Whole Poultry (Turkey, Chicken, Duck, etc.) 165° F
Ground orPieces Poultry (Chicken'BreasL etc) 165° F
Hamburgers
Sausages
Rare: 4 minutes
Medium: 5 minutes
Well done: 6-7 minutes
United States Department of Agriculture
A_3

An important Note About Heat Settings
The suggested heat settings shown are approximate There
are many factors such as outside temperature, wind condi-
tions and grill location that affect your gritl performance We
offer these cooking times as a convenience, but suggest you
watch the temperature gauge and adjust the heat accord-
ingly
Preparing to Roast
Roasting uses the indirect cooking method. Therefore, the
food should be placed on the left or right side of your gdll with
the Bumer lit on the opposite side You can also use the
supplied Cooking Grid with an aluminum drip pan underneath
allowing you to collect juices for making gravies Remember,
indirectcooking requires the Lid of your grill to be down
Preheating your grill is not required for slow cooking methods
such as roasting If you do choose to preheat your gnll before
roasting, turn the Burners on Hi and close Lid for approximately
2-3 minutes
Food preparation
Trim meat of excess fat Truss meat and poultrywith cooking
string to retain shape if desired. Bacon strips can be used to
cover the outside surface of lean meat and poultry to help
prevent it from drying out Another method for keeping food
moist during roasting is to put water in a cooking pan, then
cover with foil The foil should be removed for the first or the
last part of the cooking time to ensure proper browning
Tips for roasting
Except when roasting with water in a roasting pan, the juices
that collect inthe pan can be used asthe base for a tasty sauce
or gravy Place a cooking pandirectly over the heat, add extra
butter ifneeded, then add several spoonfuls of flour to thicken
sauce. Finally, add sufficient chicken or beef stock to obtain
the desired consistency
Once the meat iscooked, remove it from your grill and cover
with a piece of foil Allow it to stand for 1045 minutes which
allows the juices to settle This will make carving easier and
ensure a tender, juicy roast
Type of Food How Cooked
Beef Rare 18 minutes per pound
Approximate Cooking Times
Medium 23 minutes per pound
Wef! done 27 minutes per pound
Lamb Medium 18 minutes per pound
Well done 23 minutes per pound
Veal 27 minutes per' pound
Pork 30-33 minutes per pound
Chicken 20-25 minutes per pound
Duck 25 minutes per pound
Fish 10 minutes per pound
Turkey, under 16 pounds 20-25 per pound + 30 minutes
Turkey, over I6 pounds 18-23 per pound + 15 minutes
BAKING TECHNIQUES
From casseroles and combread to delicious desserts like
fondue fruit skewers or crumb cake, baking on the gril! is as
easy as baking in the kitchen
Preparing to Bake
To bake in your new grill you'll need a baking dish or cast-
iron cooking pan, and a pair of flame retardant BBQ Mitts If
the cooking pan is cast-iron be sure to season the pan
before use.
Preheat your grill 3-5 minutes, then lower heat to achieve
the baking temperature desired Baking uses the indirect
placed on the left or right side of your gdll with the burner lit
on the opposite side.
Tips for Baking
Prepare your favorite recipe as you would in the kitchen.
Foods cooked in the grill for long periods of time should
always be covered in aluminum foil to retain moisture You
will need to stir the food several times as it bakes, and add
additional liquid if required
Watch the temperature, and adjust to cook according to
your recipe directions
cooking method Therefore, your' cooking pan should be
Oven Temperature Recommended Grill Setting
Stow 300° - 340° F Both outside Burners on LOW
Moderate 355° - 390° F 1 outside Burner on Hi and 1 outside Burner' on LOW
.......................................High 410_ 480_E- ...................................................................Both outs!de Burners on Hi ..........................
Warning: Do not use the infrared burner when indirect cooking (roasting and baking) or anytime when the grill lid is down
A-4

Slow Cooking with a Rotisserie
Rotisserie cooking produces foods that are moist, flavor-
ful and attractive The rotisserie system is most com-
monly used for cooking meat or poultry and is designed
to cook food slowly You can place a cooking pan beneath
the food to collect juices for basting and gravy To flavor the
contents of the cooking pan you may add herbs, onions,
or other spices of your choice
The cooking times on a rotisserie wi!l be approximately the
same as for oven cooking
Balancing the Food
In rotisserie cooking, balancing the food is of utmost
importance The rotisserie must turn evenly or the stop-
ping and starting action will cause the food to cook
unevenly and possibly burn the heavier side
The easiest foods to balance are those of uniform shape
and texture. To test if the food is balanced correctly when
secured, place the ends of the rotisserie spit loosely in the
palms of your hands.. If there is no tendency to roll, give the
spit a quarter turn. If it is still stabie, give it a final quarter
turn It should rest without turning in each of these posi-
tions It can then be attached to your grill.
Food Preparation
When preparing poultry, truss the birds tightly so that wings
and drumsticks are close to the body of the bird The cavity of
the bird may be stuffed prior to this Pull the neck skin down
and, using a small skewer, fix it to the back of the bird Push
the rotisserie spit through lengthwise, catching the bird in the
fork of the wishbone Center the bird and tighten with the
hotding forks. Test the balance as described before
A rolled piece of meat requires the rotisserie skewer to be
inseded through the center of the length of meat, then se-
cured and balanced.
For meats that contain bones, it is best to secure the rotis-
serie skewer diagonally through the meaty sections If pro-
truding bones or wings brown too quickly, cover with pieces
of foil
Preparing to Smoke
Smoking gives food a distinctive, delicious flavor You will find
a variety of wood chips available for use in smoking grilled
foods Pre-soaking of wood chips may be required so read
and follow the manufacturers instructions for preparing
smoking chips prior to use
Note: It is our experience that many smoking chip products
do not actually produce a smoke but instead infuses the
food with flavor Please read product labels carefully and if
in doubt, ask your retailer for details
Using A Smoker Box
There are many optional smoker boxes available for pur-
chase.. Follow these guidelines and always refer to the
label of your smoking chips for specific directions
Raise your Grill Lid and light the grill. Lower the Grill Lid
allowing your grill to reach the desired cooking tempera-
ture for the food you are grilling.. Fifl your smoker box with
your prepared smoking chips. Dried herbs and spices may
also be added to produce different flavors Wear a flame
retardant BBQ Mitt and place your smoker box on a Cook-
ing Grid or Heat Diffuser directly above a lit grill Burner. The
heated smoking chips wi!l flavor your foods
Tips for Smoking
You can reduce the strength of the smoke flavor by only
smoking for half or three quarters of the cooking time. The
heat required for smoking is normalIy LOW to MEDIUM.
Foods naturally high in oils lend themselves well to smok-
ing, while drier foods benefit from a marinade
o Tuna steaks, marinated in Asian flavors of sesame
oil, soy sauce and sherry
_, Pork fillets, rubbed with ginger, orange rind and
brushed with maple syrup.
= Mussels, brushed with lemon rind and chili oil
• Lamb cutlets, marinated in virgin olive oi1, lemon,
oregano and black pepper The same marinade can
be used for a whole leg or rack of lamb.
• Chicken, boneless chicken pieces--especially sliced
breasts..
=' Fish, sliced fillets of firm fish, assorted seafood such
as prawns, scallops and calamad
o Pork, sliced fillets, diced or minced pork, sliced leg
steak, sliced chops
o Beef, sliced fillet, rib-eye, round, rump, sirloin
o Lamb, sliced fillet, round, loin
Vegetables are generally easy to cook on the grill The
Cooking Rack makes it convenient because you can still use
the main cooking area while the vegetables are suspended
above the grids
Pre-cook hard vegetables by briefly boiling or microwaving
them before cooking on the grill Wrap vegetables in a double
thickness of foil to protect them while cooking on the grill
Then, remove the foil if desired, 10215 minutes before the
end of cooking, brush vegetables with butter or oii and finish
cooking
The Cooking Rack can be used for purposes other than just
the obvious Consider using the rack for warming French
bread, garlic bread, croissants or even bagels
A small whole fish wrapped in foil also cooks well on the
Cooking Rack Parcels of seafood such as scallops, prawns
and sliced fish fillets prepared in a sauce and portioned into
sma!l foil wraps cook well this way, too
A-5

Anything you enjoy cooking indoors can be prepared
outdoors as well. These optional grill accessories make
it easy to enjoy your new Kenmore Elite grill as an outdoor
kitchen
Not all locations carry all accessories and the fit will vary
by grill model, so please ask a sales associate for
details
GriiI accessories are offered at most larger Sears full line
stores, Sears Grand, Sears Hardware, The Great Indoors
and sears corn
Versatile cast-iron Pan and Lid
set is ideal for preparing
stir-fry, deep dish pizza,
cornbread, casseroles
and deserts
Reversible cast-iron
Griddle offers a flat side for
grilling breakfast, fish and
fajitas and a ribbed side for
cooking bacon, sausages
and burgers
Call the Gril! Information Center if you have any problem with this product We can help with questions about
assembly, grill operation, accessory availability or if there are damaged or missing parts when you unpack this
unit from the shipping box Please call us before contacting your local retailer
Quality 304 grade stainless
steel grill tools offer long
reach handles for easier
outdoor cooking
Load this Smoker Box with
your favorite chips and add
flavor to grilled foods
GRILL INFORMATION CENTER
Call 8am to 8pro CST 1-888-3"|7-7642 Monday through Friday
A_6

Question:
Can I convert my grill from one fuel type to another
in other words from NG to LPG or vice versa?
Answer:
Yes, however any attempt to convert the grill from one fuel
type to another is extremely hazardous and must be
performed by a qualified gas technician only, using a LP
Conversion Kit purchased from Sears at 1-800-4-MY-
HOME _-,
Question:
Are the serial and model numbers of my grill
tistedsomewhere for reference?
Answer:
The serial and model numbers are listed on a silver CSA
label placed on the grill Depending on the grill model the
silver CSA label will be located on the left or right side bowl
panel underneath the side shelf, under-neath the right side
of the control panel, outside left or right of control panel or
on the back of the grill cabinet
Question:
My grill wilt no{ light properly° Why?
Answer:
Always light the Main Burner farthest from the fuel source
first,,This will draw gas across the manifold helping prevent
air pockets which obstruct gas-flow and prevent proper grill
lighting Also try this procedure:
1, Turn gas off at source and turn Control Knobs OFF.
Wait at least 5 minutes for gas to clear, then retry
If your grill stitl fails to light, turn the Burner Control
Knob(s) and gas source OFF and conduct a leaktest of
ALL gas connections and gas sources as explained in
the Use and Care section of this guide
If no leaks are detected, wait 5 minutes for any gas to
clear and repeat the lighting procedure
Question:
If my ignitor or battey is not working how can I light my
gril manually?And - Why would ! need the silver
lighting stick that hangs from the side of my grill?
Answer:
Ifyour ignitionfails to work or your battery needs replacing,
you can manually light your gdll by paper match insert a
paper match into the silver Lighting Stick and follow the
Manual Grill Lighting Instructions,, Then, lightthe match and
place Lighting Stick through a Cooking Grid, Turn the near-
est Control Knob to the Ht setting to release gas The Burner
should light immediately
Never lean over the grill cooking area while
lighting your gas grill Keep your face and body
a safe distance (at least 18 inches) from the front
of grill when lighting your grill by match.
Question:
Sometimes I heara humming sound coming from my
regulator. What causes this? And- My grill has a low
flame and sometimes will not light,, Why?
Answer:
The humming sound is gas flowing through the regulator
A low volume of sound is normal and will not interferewith
the operation of your grill Loud or excessive regulator
humming andlor low flow and intermittent lighting may be
caused bythe regulator's excess gasflow device Opening
the tank valve allthe way or too quickly iswhat triggersthe
regulator's safety device to restrict gas flow, preventing
excess gas flow to your grill Lighting the main Burner
farthest from the fuel source every time will help eliminate
air pockets in the manifold Note: This procedure should
be done every time a new LP Gas tank is connected to
your grill
[]
Tum at! Control Knobs to the OFF position
[]
Turn off the LP Gas tank at the tank valve
[]
For Natural Gas disconnect regulator
from t2 ft,, Natural Gas Hose
[]
Let unit stand for 5 minutes
[]
For Natural Gas reconnect regulator to 12 ft
[]
Open grill Lid (or Side Burner Lid if you are lighting
the Side Burner)
[] For Natural Gas open Shut Off valve,
[] Light main Burner farthest from fuel source
[] Turn the tank valve slowly one more ¼ of one turn
for ½ of one complete turn
[] Continue to light Burners moving towards the fuel
source
[] Once the burner is lit, turn the knob back to HI
Question:
Where do I use my grill for safer operation and better
performance?
Answer:
[]
Strong winds and low temperatures can affect the
heating and performance of your gas grill so factor in
these elements when positioning your grill outdoors
for cooking
[]
In windy conditions, always position the front of grill
to face oncoming wind to reduce smoke and heat
blowing inyour face and prevent potential hazards to
self and grill
[]
Useyour grillat least 3feet awayfrom anywalt or
surface
[]
Use your grill at least 3 feet away from combustible
objects that can melt or catch fire (such as vinyl or
wood siding, fences and (overhangs) or sources of
ignitionincludingpilot lights on water heaters and live
electrical appliances
[]
Never use your gas grill in a garage, porch, shed,
breezeway or any other enclosed area
[] Never obstruct the flow of ventilationair around
your gas grill housing
A_7

Question:
ts it safe to clean my porcelain coated cooking grids
in the dishwasher?
Answer:
Clean your cooking grids by hand ifthere are any chips
or cracks in the porcelain finish and dry them thoroughly
If no chips or cracks are present itshould be safe to use
the dishwasher Remember to dry the cooking grids tho-
roughly before placing back onto your gdll to minimize
rusting
After every use (after yourgrill has cooled down), wipe stain-
less surfaces with a soft, soapy cloth or sponge then dnse
with water. Be sure to remove all food particles, sauces or
marinades from stainless steel because these can be highly
acidic and damaging to stainless surfaces
Neveruse abrasive cleaners, scrubbers or stiffwire brushes
of any type on your grill
Use a heat resistant StainlessSteel Cleaner and rub or wipe
in the direction of the stainless steet grain or polish lines
NOT against the grain
Question:
What causes grill parts to rust and what affect does
it have on my grill?
Answer:
Rusting is a natural oxidation process and wil! not affect
the short term performance of your grill
To slow the rusting process on Cooking Grids, we
recommend greasing the grids before and after each
cookout. Use a brush to apply a thin layer of cooking oil
or vegetable shortening onto each grid. We do not
suggest spray type oils unless they are specified for
high-temperature cooking If your Cooking Grids are
Porcelain coated, be sure to coat the entire cooking
surface including edges and any areas with chipped
porcelain
Routine care and maintenance is required to preservethe
appearance and corrosion resistance of stainless steel The
fact is stainless steel can corrode, rust and discolor under
certain conditions Rust is caused when regular steel par-
ticles in the atmosphere become attached to the stainless
steel surface Steel particlescan also become attached to
your grifl ifyou use steel wool or stiffwire brushes to clean
the grill insteadof non-abrasive cloth, sponge or nylon clean-
ing tools Incoastal areas rust pits can develop on stainless
surfaces that cannot be fully removed Bleach and other
chlorine based solutions used for household and pool clean-
ing can also cause corrosion to stainless steel
Weathering, extreme heat, smoke from cooking and ma-
chine oils used in the manufacturing process of stainless
steel can cause stainless steel to turn tan in color Although
there are many factors which can affect the surface appear-
ance of stainless steel, they do not affect the integrity of the
steel or the performance of the grill. To help maintain the
finish of stainless steel follow these cleaning procedures for
the best results:
Question:
Which is a better cooking surface to grill on;
porcelain coated steel /cast-iron cooking grids or
stainless steel grids?
Answer:
Theyall have theiradvantages. For traditionalgdllingand
searing meats, cast-iron or steel grids offer better heat
conductivity To protect against tile natural rusting
process, steelor cast-iron cooking grids offera porcelain
finish which requires routine maintenance to keep the
grids welI seasoned,
Stainless steel is popular with those who prefer less
maintenance
A new innovative solution isavailable on select models
called Stainless Clad Therma-Core _ This Cooking Grid
combines a heat conducting steel core with an easy-
to-clean stainless outer shell..
You may also review FAQ's, Troubleshooting
and Care & Maintenance Tips online at
wwvv.qra ndhall.com.
A-8

Congratulations on making a smart purchase Your new Kenmore ® product is designed and manufactured for years of
dependable operation But like all products, it may require repair from time to time That's when having a Repair Protection
Agreement can save you money and aggravation
Here's what the Repair Protection Agreement* includes:
[]
[]
[]
[]
[]
Once you purchase the Repair Protection Agreement, a simple phone call is all that it takes for you to schedule service You
can call anytime day or night, or schedule a service appointment online
The Repair Protection Agreement is a risk-free purchase. If you cancel for any reason during the product warranty period,
we will provide a full refund Or, a prorated refund anytime after the product warranty period expires Purchase your Repair
Protection Agreement today!
Some limitations and exclusions apply,,For prices and additional information in the U.S.Ao call t-800-827-6655o
* Coverage in Canada varies on some items. For full details call Sears Canada at 1-800_361-6665,,
Sears Installation Service
For Sears professional installation of home appliances, garage door openers, water heaters, and other major home items,
in the USA, or Canada call 1-800-4-MY-HOME®o
Expert service by our t0,000 professional repair specialists.
Unlimited service and no charge for parts and labor on all covered repairs
Product replacement up to $1500 if your covered product can't be fixed
Discount of 10% from regular price of service and related installed parts not covered by the agreement;
also, 10% off regular price of preventative maintenance check
Fast help by phone - we call it Rapid Resolution - phone support from a Sears representative Think of us
as a "talking Use and Care Guide"
A-9

Guia para el uso y cuidado
E L I E
Isla Barbacoa de Gas Propano
Liquido (LPG)
Modelo 141.17638900
• Seguridad
• Ensamblaje
• Uso y cuidado
• Guia para cocinar
• Preguntas frecuentes
/
Llamenos primero si tiene cualquier problema
con el producto, Nosotros podemos ayudarle
con sus preguntas del ensamblaje y operaciSn
de la parritla, o si hay daSos o partes que faltan
cuando desempaca esta unidad de la caja de
envio Favor, ll&menos antes de ponerse en
contacto con su vendedor local
1-888-317-7642
8am - 8Drn,,,,,C,ST,Lunes a Viernes
NOTAAL ENSAMBLADOR/!NSTALADOR:
Deje este manual con el consumidor.
NOTAAL CONSUMIDOR:
Guarde este manual para futuras consuitas.
Escriba su # de serie:
(Yea la placa CSA de identificaci6n en la
parrilla)
Falloen cumplir con estas instfuccionespuede producir
una explosi6n o incendio que pueden causar lesiones
serias, muerte o dahos a la propiedad
o Aunque usted u otra persona hayan ensamblado esta
pardlla, usted debe leer el manual pot entero antes de
usarla para asegurarse que la pardila estL' correctamente
ensamblada, instafada y mantenida.
Use su parrilla por io menos a 3 pies de distancia
de cuaIquier pared o superficie Use su parrilla
pot Io menos 3 pies de distancia de objetos
combustibles que pueden derretirse o incendiarse
(como vinilo o tablas de madera forrada, cercas y
techos) o fuentes inflamabies incluyendo I&mparas,
llamas deI piloto de calentadores de agua y aparatos
electricos encedidos
o ESTE APARATO DE GAS HA SIDO DISEI_ADO
PARA USO AL AIRE LIBRE SOLAMENTE
• Nunca use su parrilla de gas en un garaje, porche,
cobertizo, pasajes o cualqu[er otra _rea cerrada
• Nunca obstruya la circufaci6n de aire alrededor de
la armazSn de la pardlla de gas.
• Nunca desconecte ei regulador de gas o cualquier
encaje de gas mientras que su pardIlaesta encendida
Una pardlla encendida puede encender cualquier es-
cape de gas y causar un incendio o explosiSn que
pueden resultar en daSos a la propiedad, lesiones
personales o muerte
Guide # P80174011L - Date:2009!05/2!
Sears, Roebuck and Co, Hoffman Estates, IL 60197, USA www.sears,com

Advertencias de seguridad principates 1-3
Terminos y condiciones de la garantia 2
Instrucciones para antes det ensamblaje. 3
Diagramas de partes y listas ......... 4-7
lnstrucciones para el ensamblaje ,, 8-9
lnstrucciones para uso y cuidado:
• Conexiones de gas natural ........... t0
. Instrucciones para encender ....... 12
• Reparaci6n tecnica ............. 13
• lnstrucci6n del rotisor ........... 14-16
Limpieza y mantenimiento ............ I7-18
Guia para cocinar ............ AI-A5
Preguntas frecuentes ........... A7-A8
Acuerdos de protecci6n de reparos ..... A9
Garantia completa del Kenmore Elite
Siesta parrifla falla en funcionar debido a un defecto
en el material o trabajo de obra dentro del periodo
de uno afio de la fecha de compra,llame a Sears al
1-800-8-MY-HOME ® (1-800-469-4663) para
organizar la reparacion gratuita (o sustituci6n si la
reparaci6n prueba ser imposible)
Garantia limitada de los fogones de acero
inoxidable
Cuatquier fog6n de acero inoxidable que se oxide
se cambiara sin coste Pasado el se_)undo afio
desde la fecha de compra debe cubrir los gastos
de mano de obra para instalarlo
Garantia Limitada en partes selectas de la parrilla
Durante los tres aSos siguientes a la fecha de
compra, cualquier pieza de acero inoxidabfe o
acero pintado se cambiar_ sin cargo si se oxida
Pasado el segundo afio desde la fecha de compra
debe cubrir los gastos de mano de obra para
instalarto
Toda cobertura de garantia exctuye tas baterias del
encendedor y pCrdida de pintura en partes de fa
parrilta o corrosi6n (excepto por corrosi6n a trav6s
como se especifica arriba), las cuales son partes
prescindibles por el desgaste def uso normal en
menos de un afio, o son condiciones que pueden
resultar por uso normal, accidente o mantenimiento
incorrecto
Se anula toda la Garantia si la parrilla es puesta en
usos comerciales o es alquilada,
Esta garantia aplica solamente cuando la parrilta es
usada en los Estados Unidos,
Esta garantia le confiere derechos legales
especificos y pueda ser que tenga otros derechos
que varian de un estado al otto
Sears, Roebuck and Co., Hoffman Estates, IL
© Sears Brands, LLC
Sl
HAY OLOR A GAS:
1.
Cierre la fuente de gas
2,
Apague cualquier llama
Abra la tapa
4_
Si el olor continua, al6jese del
aparato y Ilame inmediatamente a
su suplidor de gas o al
departamento de bomberos
Los modelos de la parrilla de LPG deben usarse
con Gas Propano Liquido y el regulador del ensambte
proporcionado con la parrilla, Cualquier intento de
convertir la barbacoa de un tipo de combustible a
otro es peligroso, y debe ser realizado
exclusivamente por un tecnico de gas, usando un
kit de conversi6n NG adquirido de Sears en el I-
8004-MY_HOME e
Mantenga la manguera del regulador fuera de superfi*
cies catientes y goteos de grasa Evite retorcer la
manguera fnspeccione visuatmente las mangueras
antes de cada uso por cortes, rajaduras y dafios
causador por uso excesivo Si la manguera aparece
daSada no use la parrilla de gas Ltame a Sears al t-
888-3t7W642 para la manguera de recambio
certificada
Proposicibn 65 de California
Los subproductos de combusti6n producidos al
usar este producto contienen agentes quimicos
conocidos por el Estado de California por causar
c&ncer, defectos congenitos, u otros daSos al
sistema reproductor
Los componentes de laton en la pardlla, como los
accesorios de la manguera, valvulas del cilindro de
propano (vendida por separado) y vastagos de las
valvutas de los fogones, contienen plomo que et
Estado de California reconoce pueden causar
c,¢ncer, defectos cong_nilos, u otros daSos al
sistema reproductor
Nunca use en esta parrilla carb6n o liquido
encendedoroFatlo en cumplir con estas instrucciones
puede resuttar en un fuego de grasa o explosi6n que
puede causar serias lesiones al cuerpo, muerte o
dafios a la propiedad
La bandeja para el drenaje de la grasa y el
receptaculo para la grasa deben set inspec-
cionados visualmente cada vez que va a usar
la parrilla Debe remover cualquier grasa y lavar
Ia bandeja de drenaje y el receptaculo para la
grasa con una soFuci6n de agua tibia enjabon-
ada. Fallo en cumplir con estas instrucciones
puede resultar en un fuego de grasa o explo-
si6n que pueden causar serias lesiones al
cuerpo, muerte o daSos a la propiedado

Fallo en cumplir con estas instrucciones puede
producir una explosibn o incendio que pueden
causar lesiones serias, muerte o dafios a la
propiedad.
AraSas e tejer y anidar
telarafias en te el tr_nsito
resuftando iSn del gas
causando fog6n_
Este DE
LLAMA" i y
para el
Para
DE fog0n
de la sigl de su
pardllm Ta _s una vez
at mes en la no ha sido
usada por un rolongado
1 Retire el tornillo de ta parte trasera de cada fog0n
usando un destomitlador de cabeza de Phillips
2 Levante cada fog0n hacia arriba alejbndolo
cuidadosamente del orificio de la v_tvula de gas
3 Verifique y timpie los tubos del fog0n y los tubos
Venturipornidoseinsectos Untuboobstruido puede
resullar en un fuego debajo de la parrilta
4 Refierase a la figura de abajo y oficie uno de los
3 m0todos de limpieza:
D MC:TODO 1: Use un atambre rigido, o una percha
de atambre, doblada en forma de gancho pequefio
como se muestra en el dibujo y entre el gancho
por el tubo de fog6n varias veces para limpiar los
escombros
PARA LIMPtAR EL [ ......... _ ......
TUBO DEL FOGON INSERTE EL Puerto def fogOn
GA.c,oAOUl
Para apresurar el proceso de ensamblaje siga las
siguientes instrucciones generales:
[] Herramientas requeridas para el ensamble:
• Guantesdetrabajo protectivos
,, Destomillador con cabeza Phillips
[] Necesitara ayuda de otra persona para manipular
esta barbacoa e isla
[] Esta isla ba_bacoa se entrega en dos cajas Necesita
las dos cajas para finalizar el montaje,
C3 Use el diagramas de partes y ferreteria para
asegurarse que todas las partes estan incluidas y
libres de dafios.
[] No ensamble u opere la parrilla si parece que algo
iesta daSado Si hay da_,os o partes que faltan cuando
desempaca la pardtlade la caja de envio ousted tiene
preguntas sobre el p[oceso del ensambtaje, Itame al:
Centro de informaci6n de Parrillas 1-888-317-7642
8area 8pm. CST, lunes a.viernes
Cbdigos para la instalacibn de la pardlfa
La instalacbn debe estar de acuerdo con los c0digos
!ocateso en ausencia de cOdigos locales, deben estar bajo
el C0digo Nacional del Combustible de Gas ANSI Z223 1/
NFPA 54, o con el c0digo de instalaci6n de Gas Natural
y Propano CSA B1491 y el C6digo de Alnacenamiento y
Manejo, B149 2
1, N'entreposez ni n'utilisez d'essence
ou toute vapeur ou liquide inflam-
mable _ proximit_ de cet appareil.
2. Un tanque de gas LP desconectado no
se debe almacenar en la vecinad de este
o cualquier otro aparato.
[] METODO 2: Use un cepi]lo cFe botella con un
FoqOn Pie
mango flexible y corralo dentro del tubo del fog6n
varias veces para sacar los escombros..
[] METODO 3: Use una manguera de aire a presi6n
para forzar aire dentro de los tubos de cada fog6n
hasta asegurarse que esten comptetamente limpios
y que los escombros hayan salido de los tubos a
traves de los puertos
Para una operaci0n sin peiigro asegurese que et
odficio det ensamble de fa valvula de gas est0
dentro dei tubo de fog0n antes de usar su parrilta,
Vea ta figura Si el odficio no esta dentro del tubo
del fog0n, al encender el fog0n podria causar una
explosion ylo incendio resultando en lesiones coF
porales serias yto dafios matedales
Ensamble/' Vafvula de gas Odficio Tubo det fog6n
Cuando use aparatos el6ctricos siempre se
deben seguir unas precauciones de seguridad
b_sicas
Este aparato, cuando se ha instalado, puede
conectarse electdcamente a tierra segen los
c6digos locales o en ausencia de los c6digos
locales con el c6digo electrico nacional, ANSI/
NFPA 70 o el c6digo et6ctrico canadiense CSA
C22,1
Mantenga cualquier cable electrico y la
manguera de suministro de combustible lejos
de las superficies calientes
3

PARTE # DEscRiPcloN DE LAS PARTES
UNIDADES USO DE LAS PARTIES
P06001079A Paquete de ferreteda t
$1t2G04061 Torniflodecabeza Phillips 114"x3f8" 6
$313G04081 Tuerca de reborde 1/4" 6
$t t2G04061 Tornilio de cabeza Phillips 1!4"x3f8" 2
$112G0306I Torniilo de cabeza Phillips 3!16"x3t8" 3
$313G03051 Tuerca de reborde 3116" 3
$1 !2G03081 Tornillo de cabeza Phillips 3t16"xlf2" 4
"°$3t 3G03051 Tuerca de reborde 3!!6" 4
Tomillo de cabeza Phillips Torni!lo de cabeza PhiIlips Torni!lo de cabeza Phi!tips
1/4" x 318" 3t16" x 1!2' 3/16" x 3/8"
Unidade 8 Unidade 4 Unidade 3
Pad # $t!2G04061 Part # $112G03081 Part # $1!2G0306t
Para usarse en el ensamblaje def Modelo 141 17638900
fnstalar los soportes de la decoraci6n lateral del recipiente
izquierdo yderecho en los paneles faterales del recipiente
lnstalar el soporte decorativo lateral trasero del recipiente
yel soporte decorativo lateral derecho del recipiente
Instale et soporte del regufador de GN en el panel trasero
de la isla
lnstale el transformador en el carro
,"7
Tuerca de reborde 1/4"
Unidade 6
Parle # $3t3G04081
Tuerca de reborde 3tt6"
Unidade 7
Parle # $313G03051
* Una bateria IAA incluida en el paquete de ferreteria
4

30j
33
54
//
48
47
5

COD GO
1
2
3
4
5
6
Montaje de la tapa
indicador de temperatura
Base para el calibrador de temperatura
Placa con et nombre
Material protector
Manija de la puerta
DESCRIPCION DE LAS PARTES
i ......PARTE# .......UNiDADES
i .................
P001473034 1
P00601287C 1
P00614027C 1
PO04100390 1
i P055t80021 4
P00205106R 1
........7 Reja secundaria .para asar ...................... P01507020G
8 Cuadriculo para asar de 13" P01604013B
9 Cuadriculo para asar de 6.5" '........ P01604031B
9a Reja para asadFog6n infrarrojo PO1615030F
10 Difusor de calor P017080364
1! .Soporte de difusor de calorl delantero '. P033280t,54 ........... 3......
t2 Soporte de difusor de calor, trasero
13 Fogon
14 Taz6n
15 Soporte det fogbn
16 Plato para drenaje de grasa
17 Cable et6ctrico de 5_ontactos
18 Caja colectora de gas con electrodo
19
20
21
22
23
24
25
26
Juego de cables et¢ctricos
Ensamblaje de! palil!o encendedor
V,51vulade gastensambie del mQftiple
Encendedor electrico, 5-puertos
Protector det encededor electrico
Control det panel, superior P029! 519FI t
Tablero de control PO291520FI 1
Protector del calor, tablero de control PO6919001B 1
....... = ..... =
P033280174
P020080324
P0071366B4
P022034244
P069020184
P02627006A
P02609010B 3
P02615163A 3
P05507008A I
Y0060646 1
P02502298C i
P055450027 1
27 Base de ta perifla de control PO3413023J 5
...... 28 Resorte de la periila de control P05504021A : 5
29
30
31
32
33
34
35a
35b
35c
36
37
38
39
40
4i
42
43
iPedlta de control para el fogon principal PO3426393J 3
tPerit'la de control PO3426403J 2
Soporte del Termopar det fog6n infrarrojo P033430164 t
Protector susperior para et calor de la bandeja de grasa P069030564 1
Protector de viento del fog6n del rotisor P069060464 1
iEnsa.mb!e .de!fog6n del rotisor P020070704 ...... 1.....
iLuz, 12V, 10W P05383002B 2
Lit de tapa de ta luz P05383003B 1
Kit de Cable de la luz P05352005B 1
Ensambie del eiectrodo del fog6n deiioiisor ........ PO26i4025A ...................... i ' '
orificio del fog6n del rotisor
Termopar del fog6n del rotisor
Soporte det terrnopar del fog6n det rotisor
Panel de1tazon, t,raseroisuperior
Tubo de extensi6n del fog6n del rotisor
Protector de calor para fogones
Ensamble del Fog6n infrarrojo
...... = .....
P06534009A
P05305051A
P03328047C
P069060214
P03717050B
P069060454
P0200501t4
1
I
1
1
3
3
3
1
1
2
t
1
1
1
1
1
1
I

CODIGO DESCRIPCtON DE LAS PARTES
44 ......Termopa r rog6n infrarrojo
del ..........
...... !............................... , ..............
45 :Electrodo del fog6n infrarrojo
46
47
48
49
50
51
52
53
54
55
56
Bandeja para fa grasa P02706255B 1
Manija de ta bandeja de grasa P002i 3031M t
Interruptor para la luz _, , P05360002B , 1 ......
Sop,orte decoraci6n lateral recipiente, izquierda P07901026A 1
S0Porte decoraci6n lateral recipiente, derecha .............. .................P07901027A I....
ISoporte decoraci6n lateral recipiente, posterior P07901028A 1
Transform ador P05374003B 1
Regulador GN .................... P03614003B 1
...... 4 ..... : .....
Soporte del regulador de GN ................... P033040544 1
Soporte del taz6n, Izquierdo P01301006K 1
ISo'porte del taz6n, Derech0 P01302006K 1
!Estructura de asado Y0250169 i
[Paquete de ferret.eria ..... ......... ....... P06001079A 1 ..........
IGuia Para el uso y cuidado ......... P80174011L ......... 1 "'
Una bateriatAA incluida con la guia de uso y cuidados
Para adquirir las piezas de conversibn a gas natural
Iiame a Sears en el 1-800-4-MY-HOME ®
PARTE# UNIDADES
P05305050A 1
P02618008B ............ 1....
Kit de conversi6n a gas propano
liquido Pieza n°YO440039
La barbacoa puede convertirse a gas
propano liquido con este kit de conversi6n
exclusivamente por un t_cnico de gas i_i 1
cuafificado Para convertir esta barbacoa _ LJ_
el tecnico necesitara este kit de conversi6n
!
J
Para reparacioneso reemplazode partes necesariasllamedurantecualquier hora dia o noche
1-800-4-MY-HOMEe (!-800-469-4663)
Para obtener las partes correctas de reemplazo para ta carreta de servir, por favor a los nl3meros de partes indicados
en esta lista La siguiente informacion es requedda para asegurarse que recibira tas partes correctas:
1 Modelo y Numero de Sede (Ver la placa CSA en la parrilla)
2 N_mero de la parte
3 Descdpci6n de ta parte
4 Cantidad de partes requeridas
lmportante: S6to use partes autorizadas por la fabrica El uso de cualquier parte que no sea autorizada puede ser
peligroso y le anular,€ la garantia det producto Mantenga el Manual de Operacion en un [ugar conveniente para su
referencia y lista de partes
7

CODIGO DESCRIPION #DE PARTE UNIDADES
1 Rot Cuefto P05508200L
2 Rot Tornilio madposa !t4"xtf2" SI96G04084
4 Rot, Brocheta P05508'I75F
5 Rot Tenedores para apresar P05508169F
6 Rot. Soporte del motor P03307010A
7 Motor del rotisor P07101045A
8 Rot Tornillo #10-24x314" UNC $tt2G10124
9 Rot Arandela simple S411G03084
10 Rot Nut #10-24 $362G10124
Rot Tornillo manposa Rot Tornilio Rot Arandela simple Rot.. Tuerca #10-24
!t4"x112" #10-24x314" UNC Unidades 2 Unidades 2
Unidades 3 Unidades 2 Parle # $411G03084 Parle # $362G10124
Parte # $I96G04084 Parte # $1t2Gt0124
t
3
1
2
t
1
2
2
2
Centro de Informaci6n de parrillas: Si tienealguna preguntas sobree! ensamblaje olaoperaci6n de la parrilfa,
o si hay partes dafiadas o que faltan a!desempacar launidad de la caja de envio, llamenos de fas 8:00 am -
8 pm CST, lunes a viemes al: 1- 888-3 ! 7-7642.

lnstale el soporte decorativo del recipiente
[] Instafar el soporte decorativo lateral izquierdo del recipiente al panel izquierdo
del recipiente usando 3 tornillos de cabezal Phillips de 1/4"x3f8" y fije con
3 roscas estriadas de 1/4" como se indica, repetir para el soporte decorativo
del lado derecho del recipiente.
[] Instalar los soportes decorativos laterales izquierdo y derecho de! recipiente
usando 2 tomilfos de cabezal Phillips de 1/4"x3/8" y fije
Tornillo de cabeza Phillips
1f4" x 318"
Unidade 8
Parte # $112G04061
Tuerca de reborde 1t4"
Unidade 6
Parte # S313G04081
Instale e! cabezal de barbacoa
[]
Con la ayuda de otra persona, ponga e! cabezal de ia
barbacoa en la ranura de la isla corno se indica en la imagen
NOTA" Este cabezal de barbacoa est& diseSado para que
encaje en una isla que haya preparado usted La isla
mostrada sSIo tiene fines itustrativos, y no se incluye con
ta compra de este cabezal de barbacoa Asegt_rese de que
su isia cumpla con tas normas de construcci6n y los
espacios indicados en la pagina 13, figura 1
Instale la manguera de gas natural de 12' (no
incluida con la unidad)
[] Conecte la toma de Gas natural con una manguera a
la toma de gas. Instale el soporte del regulador de GN
en el panel trasero de la isla usando 3 tomillos de cabezal
Phillips de 3/16" x 3/8", y apri6telos con 3 roscas de
3/16" como se indica.
[] Conecte la rosca oscilante de la manguera de gas natural
de 12' (no incluida con la unidad) al regulador de gas
natural.
_ Colector de gas _'-
Tornitlo3f16.x de318.cabezaPhillips / i
Unidade 3 Ajuste vertical
Parte # $112G03061 Rosca oscilante--%_ -'_ ....
Tuerca de reborde 3116" "......_/
Unidade 3
Parle # S313G03051

Instalar el transformador
lnstalar et transformador - Instale el enchufe del transformador en la toma del
transformador y aprietelo bien (Ver Fig I)
[] Instale el transformador en el panel trasero del carro usando 4 tornilfos Phillips
de 3t16"x112" y apriete con 4 roscas de 3116" (ver Fig 2) (Necesita taladrar
4 agujeros en et panel trasero del carro pdmero)
Tire del cable del transformador por el hueco entre el panel trasero det carro
y el suelo,
[] Conecte et cable dei transformador a una toma de cordente con toma de tierra
adecuada
Nora: en caso de averia de la bombilla, c&mbila por una bombilla de 12voltios y
10 W exclusivamente, para evitar daSar el transformador
Toma de transformador.... ,_
Enchufe de transformador.............
Tornillo de cabeza Phillips
3116" x 1f2"
Unidade. 4
Part # $tI2G03081
Alambre--,
Tuerca de reborde 3!16"
Unidade 4
Parle # S313G03051
lnstale la bateria del encendedor
[] Remueva la tapa del encendedor dei panel de control.
[] Coloque las baterlas AA en la ranura det encendedor con el polo positivo
cara a usted
[] Posicione la tapa y et resorte por encima de las baterias AA y apri6te-
las contra el panel de control
Enchufe CA ..........
Fig 1
Bateda AA
Tapa del
encendedor Resorte
Raja del encendedor
I0

tnspecci6n de los electrodos de losfogones
principales° Ejecute esto con la ayuda de
otra persona
Esta prueba leasegura que taspuntas del electrodo
de chispa esten correctamente posicionadas para
que su parrilla encienda sin dificultad
[]
Asegurese que todas las perillas de Control est_n
puestas en "OFF" y abra la tapa de ta parrilla
[]
Su ayudante debe pararse detras a la derecha de
la parrilta y mifar hacia el frente del tazbn de la
parrilla Nunca ponga la cara dentro del cabezal
de la parrilla
[]
Presione la tapa del encendedor Debe escuchar
un sonido de "ctic" Su ayudante debe vet una
chispa azul dentro de cada Caja colectora de gas
Si hay chispa las puntas del electrodo estan
correctamente posicionadas
[]
Si NO ve chispa, la distancia entre los electrodos
tiene que ajustarse asi:
• Usando una Uave ingtesa, afloje ta tuerca interior
hasta que la caja colectora de gas pueda girarse
hacia arriba
Si el espacio entre la punta del electrodo de chispa
¥el [ecibidor esmas de 3116"use un aticate de boca
targa para apretar suavemente la caja colectora de
gas para reducir el espacio
,, Devuelva la caja coiectora de gas a su puesto
original, asegure latuerca intema y pruebe lachispa
del electrodo de nuevo Si no escucha ning_n
sonido de un "clic":
= Las baterias AA est&n instaladas al reves
Los atambres electronicos est_n sueltos
,= Remueva tas baterias AA e inspeccione lacaja
de juntura del encendedor que se en-cuentra
detr_s del Panel de control y vuelvaa reconectar
cualquier aiambre suelto
Comprobaci6n de electrodo de fog6n
infrarrojo y de asado
[] Presione y gire el mando de control del fog6n
infrarrojo y el mando de control del fog6n de
asado para encenderlos _, Compruebe que
haya chispa entre la punta det electrodo y la
punta de recepci6n de chispa
[] Si no ve chispa en el electrodo del fogon
infi'arrojo o de asado, ajuste e! espacio entre
las puntas del electrodo y del receptor a 3/16
de pulgada
Instale los componentes para cocinar
[_ Coloque los Difusoresde catorde ceramica sobre
el reborde encima de los fogones
Los d_sores de calor s61o pueden colocarse
correctamente en una direccbn, con el tope inferbr
hacia la ranura trasera
D Coloque las rejas para asar en la saliente encima
del Difusores de calo de ceramica,
[] Coloque tas rejas secundarias dentro de tas
ranuras en los paneles laterales del taz6n
de la parrilla
Rejas de asar secundarias
Rejas para asar
Difusores de caior
Reja para asart
Fog6n infrarrojo
Espaciode
chispa
Punta del electrodo
de chispa
Recibidorde chispa
Cajacolectorade gas
Falloen leeryseguirlasinstrucciones del uso
y cuidado de la parritla puede causar una
explosibn que puede producirserias lesiones
al cuerpo, muerte o daSos a la propiedad.
Cuando haya terminado de ensamblar su
parrilla aseg_irese que todos los tornillos
estdn bien apretados para una operaci6n
segura,
11

S61o para el modelo de gas natural:
Conectando el gas natural a su parrilla
[] Conecte la rosca giratoria de acopiamiento de la
manguera de t2' de Gas natural at encaje vertical
como se muestra en la
Fig,, 1 Conecte el otro final de ta manguera (encaje
macho) a la linea proveedora de gas de la
manguera Lea y siga estas instrucciones
Instrucciones de seguridad para Gas Natual:
[] Su parrilla de gas natural esta dise_ada para usarse
con gas natural solamente, a una presion de (VVC )
de columna de agua 4" con un regulador de gas
natural Debe usar el regulador de presi6n de gas
proporcionado con este aparato El regulador esta
puesto para 4" W C
lnstale una v&lvuta de Cierre al aire libre en la fuente
[]
de suministro de gas en un punto despues de que el
tubo de gas sale de la pared exterior y antes de la
manguera con desconexi6n rapida O inst,_leen un
punto antes de que el tubo entre bajo la tierra Ver la
Fig,,2
[] Coloque un compuesto seltador o cinta selladora que
sea resistente a la accion natural del gas debe set
usada en todas las lfneas con tubos de rosca ma-
chos
[]
Desconecte su parrilla de gas de la fuente de com-
bustible cuando el suministro de gas esta siendo
evaluado Esta parrilla de gas y su valvula de cierre
individual deben estar desconectadas def sistema de
suministro degas durante cualquier prueba de presiOn
igual o menorde 1f2 psi (3 5kpa)
[]
Desconecte su parrilla de gas de ta fuente de com-
bustible cuando el suministro de gas est& siendo
evatuado, Esta parrilla de gas y su v&ivuta de cierre
individual deben estar desconectadas del sistema de
suministro de gasdurante cualquier prueba de presiOn
igual o menor de 1f2 psi (3 5kpa)
Fig° 1
Verifique todas las conexiones por escapes
de gas NG
Nunca haga pruebas usando una llama viv& Antes de
usado por primera vez y despu6s de cada estacion del
aSo, debe chequear por escapes de gas Siga estos
pasos:
[] Prepare una soluci6n de agua con jab6n 1:1 una
parte de jabbn a una parle de agua
E] Gire las perilfas de control del fog6n a la posici6n
OFF luego deje fluir et gas en la posici6n ON dende
se origina la fuente
[] Aptique la soluci6n de agua con jabon a todas las
junturas como se indican por las flechas Ver la
Fig,, 3 Si se forman burbujas la conexi6n no esta
propiamente sellada Debe chequear todas las
junturas y asegurarlas
Fig. 3
Fig. 2
Si usted tiene un escape de gas que no se puede
reparar apretando la tuerca, cierre et gas en su punto
de suministro, desconecte la finea det combustible
a su parri!la y llame 1-800-4-MY-HOME® o a su
suplidor de gas para que le ayude,
t2

USO CORRECTO DE LA BARBACOA DE GAS
[] El regulador y el ensamble de las mangueras se
pueden ver al abrir las puertas (sies aplicable) y deben
ser inspeccionados antes de cada uso de la pardlla
Si hay cortadas, daOos excesivos o si la manguera ha
sido muy doblada, deben set reemplazado antes de
usar la parrilla otra vez
[_ Cuaiquier intento de convertir el grill de tipo combustible
a uno de otro tipo es extremadamente peligroso y deber
set reatizado solamente pot un t_cnicode gas cualificado,
usando un conjunto de conversi6n NG que puede
comprar a Grand Hai!
[] Nunca encienda su pardtla de gas con ta tapa cerTada
o antes de asegurarse que fos tubos de los fogones
esten bien colocados dentro del oriflcio de la valvula
de gas
[] Nunca permita que nitrosoperen su parrilla No permJta
que niOos o mascotas jueguen cerca de su parrilla
[] El uso de alcohol, recetado o en medicamentos
vendidos sin prescdpci6n puede afectar su habitidad
para apropiadamente ensamblar y operar su parrilia sin
peligro
[] Mantenga el extintor facitmente accesible En caso de
un fuego de grasa, no trate de extinguirfo con agua
[] Use un extintor tipo B o use tierra, arena o bicarbonato
[] En el evento de lluvia, apague et fogbn y el suministro
de gas y cubra la pardlla
[] Use su parrilla sobre una superficie horizontal y estable
en un area lejos de materiales combustibles
No deje la parrilla desatendida cuando es_ e_} uso
[] No rnueva el aparato cuando est_ en uso.
[] Permita que la pardlla se enfrie antes de la moverta
o almacenarla
[] No use su parrilla como un calentador.
[] Esta parrilla no es para ser instalada en caravanas,
bores ylo vehfculos de recreo.
[] El grill no est_ previsto para usos comerciales
[] Nunca use carbon en esta pardlia
Si usa una barbacoa convertida a PL, la isla debe
incluir rejillas de aireado como se indica a
continuaciOn:
.........."",!t
La construcciOn de su isiadebe cumplir con estos requisitos
minimos de espacio. Las dimensiones lateral* y posterior*
son los espacios mfnimos requeridos para objetos corn-
bust bles que puedan fundirse o encenderse, como paneles,
rejas ycolgadores de vinitoo madera, ofuentes de ignici6n,
como llamas piloto o calentadores de agua, y aparatos
electricos conectados La allura* se refiere a ta altura
recomendada de ta isla del suelo al mostractor
Modelo Altura Anchura ProfundidadLado* Atr_s* Altura*
t7638900i 10-112"35-112 25418" 14" 24" 30-114"
I Espacio mtnimo de]
6" del recorte (para/
Profundidad
I Altura
_ Anchura
Aberturas
de aire
Fig 1
NOTA: Las rejiltas superior e inferior (cada una de un
minimo de 20 pulgadas cuadradas) DEBEN ESTAR en
ambos lados de la construcciOn La altura de ta rejilla
superior hasta la superficie superior de la ista es de
5", y la allura de la reji!ta inferior al suelo de la isla
es de 5", ver fig 1 Solicite a un Socio Seats para
m,_s detalles o pregunte en el Centro de tnfo{maci6n
de Barbacoas en el 1-888-317-7642
13
Aberturas
de aire
Su isladebeestar hecha]
con materialno combus-t
tible, como piedra.._
estuco, ladritto ot
azutejos __j

instrucciones para encender la parrilla
t Antes de usarse, examine todas mangueras en busca de
rajaduras, cortes, reducciones, quemaduras o rasguSos Si
una manguera esta daSada, no use su pardlla antes de
reemplazarla manguera con una pieza autorizada Tambien
aseg_rese que todas tas conexiones de suministro de gas
2 esten bien apretadas
Familiaricese con la seguridad, uso y cuidado en este
manual. No fume mientras enciende la pardlla o esta
cheque,_ndo lasconexiones de gas
3.Aseg_rese de que la tinea de gas natural este acoplada a la
fuente de gas (o, si usa una barbacoa PL convertida
profesionalmente, asegurese de que el dep6sito de gas PL
este !leno).
4. Abra fata de la parrilla.
Fallo en reemplazar una manguera defectuosa, asegurar
las conexiones del suministro de gas o en abrir ta tapa
antes de seguir el proceso para encender pueden
resuttar en un fuego o explosi6n que pueden causar
lesiones serias ylo dafios materiates.
5 Empuje y gire las perillas de control a OFF y gire ta
v_lvula de gas DESPAClO 1/4 de vuelta
O
_J OFF ....
(,',!>'
.I .l
6. Empuje y gire la perilta de control del dog6n a_ y usted
oir& un sonido clic cuando et fog6n se est& encendiendo
Una vez encendido el fog6n gire la perilla de nuevo a Hi
Perillas de control dei panel de control de los
foqones
Fog6nprincipal fog6ndel fog6n
rotisor infrarrojo
tnstrucciones de encendido del fogbn para rotisor
1. Siga los pasos 1 hasta el 5 de las instrucciones de
encendido det Grill.
2 Presionar y girar el mando de control de los fogones
a _, y mantener el mando apretado
3 Mantenga la pres_n mientras gira Ia pepdl_ahacia Hi y
sost6ngala entre 5-t0 segundos antes de solta_
4 Sino nenciende en 5 segundos, cierre el gas en elorigen
de suministro y gire las perillas de control a OFF Espere
por!omenos 5minutos para aclarar el gas, y vuelva a tratar
Si su parri!la aun no enciende gire las perillasde control del
fog6n y el suministro de gas a OFF y realize una prueba de
escapes en TODAS las conexiones de gas y odgenes del
suministro de gas como se explica en la secci6n de "Uso
y Cuidado" If no leaks are detected, repeat the lighting
procedure
5 Despues que elfog6n est& encendido gire la peri]la de
nuevo a Hi a y gire lav_lvula deftanque DESPACIO otro
t/4 de vuelta.
MPORTANTE: No use el fog6n trasero y el fog6n
principal al mismo tiempoo E! fogbn trasero es s61o para
cocinar con el rotisor.
Peril!a de controlde1 Perilla de control..._eJ
foq6ndel rotisor f 6n del infrarrdo
O O
O
_,\ I ! )
7 Si no nenciende en 5 segundos, cierre et gas en el
origen de suministro y gire las perillas de control a OFF
Espere por 1omenos 5 rninutos para aclarar el gas, y vuelva
a tratar. Si su parrilla a0n no enciende gire las perillas de
control det fog6n y el surninistro de gas a OFF y realize una
prueba de escapes en TODAS las conexiones de gas y
origenes del suministro de gas como se explica en la secci6n
de "Uso y Cuidado" Si no hay escapes, espere 5 minutos
para aclarar el gas y repita e! procedimiento
8 Despues que el fog6n est& encendido gire laperitla de nuevo
a Hi a y gire la v&tvuladel tanque DESPACIO otro U4 de
vuefta
9 Gire la perilla de cada fog6n alternativo y enciendalos a
medida que se acerca af origen del suministro de gas_
Instrucciones para encender el fogbn infrarrojo
1 Siga los pasos 1 hasta el 5 de las instrucciones de
encendido del Grill
2 Presionar y girar el mando de control de los fogones
a _ y mantener el mando apretado.
3 Mantenga la presi6n m_ntras gira la pepri_a hacia Hi y
sost6ngala entre 5-t0 segundos antes de soltarla
4 Sino nenciende en 5 segundos, cierre el gas en el origen
de suministro y gire tas periilas de control a OFF Espere
por Io menos 5 minutos para aclarar el gas, y vuelva a
tratar Si su parrilla at'_nno enciende gire las perillas de
control det fog6n y el suministro de gas a OFF y realize
una prueba de escapes en TODAS tas conexiones de
gas y orfgenes del suministro de gas como se expiica en
la secci6n de "Uso y Cuidado" Si no hay escapes,
espere 5 minutos para aclarar el gas y repita el
procedimiento
5 Despu_s que et fog6n esta encendido gire la perilla de
nuevo a Hia y gire lav&lvuta del tanque DESPACIO otto
1/4 de vuelta
14

Encendiendo la parrilla man ualmente con f6sforos
Para encender su pardllade gas con fbsforos, inserte un
f6sforo en el palillo encendedor y siga los pasos det 1 af5 de
lasinstruccionesparaencenderlapardlla Luego, encienda et
fosforo y coloque et palitlo encendedor a trav6s del agujero
para encender situado a la derecha de la patfilla como se
muestra abajo Gire la peritta de Control mas cercano ai
tanque abierto a Hi para dejar salir el gas El fogbn debe
encenderse de inmediato
F6s_m
\
Pali/to
encendedor
(Nota: la barra de encendido se coloca
en e! caj6n )
Nunca se recline sobre el &rea de cocinar de la pardlla
mientras enciende et gas. Mantenga su cara y cuerpo
a una distancia segura (al menos I8 pulgadas -46 cm-
) de la parte delantera de la barbacoa cuando encienda
la barbacoa con cedllas
Si ocurdese un RETROCESO DE LLAMA eno atrededor
de los tubos del fog6n, debe seguir las instrucciones de
abajo. Fallo en obedecer estas instrucciones podrfa
resultar en un fuego o una explosi6n que podria causar
lesiones serias, muerte, o dafios materia]es
• C[erre el surninistro de gas que va a la patdlla.
• Gire Ias periltas de Control hacia la posici6n OFF.
• Abra la tapa de la patfitla
• Apague cualquier llama con un extintor ctase B
• Una vez que la pardtla se haya enfdado, timpie los
tubos de fog6n y los fogones de acuerdo con las
instrucciones indicadas en este Guia
Si no seenciende en 5 segundos, gire la perilla de Control
a OFF y tasalida de la fuente de gas a OFF y haga una
ptueba de escapes como se indica en la secci6n de este
manual de Uso y Cuidado Si no hay escapes espere 5
minutos y trate de nuevo.
Reparacibn t_cnica - Si la parrilla no enciende
1. Apague elgas en lafuente y gire las ped!las de control a OFF,
Esperese al menos cinco minutos para que se disperse el
gas, y vuelva a tratar
2 Si su pardlla todavta no enciende, verifique et suministro de
gas y las conexiones..
3 Repita el procedimiento para encender. Si su parritla todavia
no opera, apague el gas en la fuente, gire las peritlas deControl
a OFFy vedfique Io siguiente:
[] Mala alineacbn de los tubos de los fogones sobre bs orificos
Correcci6n: Reposicbne bs tubos sobre los orflicios,
[] Obstruccbn en la lineade gas:
Correcci6n: Retire la linea de combustible de la parri]la
tNofume! Abrael suministrode gas porun segundo paradespejar
cualquierobs_culo de lalineade combustible Cierreelsuministro
de gasen etpunto de origen y
reconecte la lineade combustible a la parri]la
[] O_cio obstruido
Correcci6n: retire los fogones de la parrilla removiendo la
presilla cotter de ta parte trasera de cada fogon usando un
alicate de boca targa. Levante cada fog6n y alejelos
cuidadosamente del orificio de la valvuta de gas. Retire el
orificio de la v_lvula de gas y remueva cualquier obst_culo
suavemente con un cable fino Luego reinstale todos los
odficios, fogones, presitlas Cotter y componentes de asar.
[] Si sospecha que hay un obs_cub en lasv&lvuiasde gas o en el
mL_ltiple,gamealCentro de Informacbn de Parriltasal 1.-888-317-
7642 de 8 a m a tas8 p m CST, de lunes a v[emes
[] Obstaculo dentro de lostubos de los fogones
Correccibn: Proceda a limpiar el tubo del fogbn usando el
procedimiento en lap&g[na27 delmanual de Operad6n
[] Mala anniaci6ndelencendedor sobre elfog6n
Correcci6n: examine la punta ychequ_e la posici6n correcta de!
electrodocomo semuest_aenelpaso 6,p&gina 14deesteManual
El espacb entre la Punta del electrodo y el recbidor debe set
approximadamentede 3116" Debecambiarb sinecesitaajustarse,
Con el suministro de gas cerrado, gire cualquier perUlade control
delfog6npdncipal a Hi hegoempujehaciaadentroyesteatento
a la presenciade una chispa azulen eletectrodo
[] Cables electricos desconectados
Correcci6n: inspeccbne lacajadelencendedorque seencuentra
detras de!paneldecontrol Conecte cua_quiercabledesconectado
alacaja ytrate de nuevo de encender
la pardlla
[] BateriasAAdebiles
Correction: Destape el encendedory reemplaze las baterias
[] Sila parrillatodaviano seenciende usted puede necesitarpurgar el
airede fatubedade gaso volver aponereldisposigvoreguladordei
exceso de circulacbn de gas Nora: estepn3cedirnientodebe set
hecho cada vez que un nuevo tanque de gas LP se conecta asu
parrilla
Purgando et aire de la linea de gas y/o ajustando el
dispositivo del regulador por exceso de gas:
[] Gire las pedltas de control a la posici6n OFF
[] Apague el gas en la v&lvula del tanque.
[] Si desconecte el tegulader del tanque de gas LP.
[] Deje la unidad descansar 5 minutos para permitir
que eI aire se purgue
[] Reconecte er regulador al tanque de gas LP
[] Gire DESPAC10 la v_ivula del tanque un 1/4 de veutta
[] Abra la tapa de la parrilla,
[] Empuje y gire la pedlta de control de! Foclon 13rincipaj
DERECHO hacia _'.
[] Presione el encendedor electrico entre 3-4 segundos para
encender el fog6n
15

USO CORRECTO DEL ROTISOR
Lea todas las instrucciones antes de su uso inicial
IMPORTANTE: Cuando usa aparatos electrodom6sticos,
siempre se deben usar las precauciones b_fisicas de
seguridad
El motor del rotisor est& fijado en 120V, 60Hz AC
Este rotisor es sofamente para ser usado al aire tibre
No permita que los niSos jueguen cerca de ta parrilla o del
rotisor
Conectando el rotisor
Siempre fije primero el rotisor ya ensamblado a la parrilla y
Iuego conecte et enchufe det cable a un tomacorriente
Operando el rotisor
No opere el rotisor si lacuerda o el enchufe se encuentran
daSados, o si malfunciona el rotisor o ha tenido un da#,o
cuatquiera que sea
El uso de accesorios no es recomendado por elfabricante
debidoaquepueden causarlesiones Nodebeexponereste
rotisor a ningun otro uso que no sea el intentado
No permita que se moje la cuerda el6ctrica, el enchufe o el
motor, y tampoco los exponga a la l[uvia, lo cual puede
resultar en una descarga electrica
Desconectando el rotisor
Tenga cuidado ya que todas las superficies de ambos la
parrilla y el rotisor estaran muy calientes Use guantes
contra el ca[or para manejar et rotisor
Desenchufe el rotisor det tomacorrientes cuando no esta en
uso o antes de limpiarlo D_je que se enffie antes de
remover las partes
Cuando va a cocinar con el rotisor coloque un recipiente de
metal debajo de la comida para capturar tagrasa y mantener
la parriIla fibre de exceso de grasa la que puede causar un
incendio
CUIDADO: tratecon cuidado cualquier receptaculo decocinar
con grasa caliente
Si ocurriese un fuego causado por grasa caliente, cierre los
fogones y et gas a "OFF" y deje la tapa de la parrilta cerrada
hasta que se apague elfuego
Guarde el rotisor dentro de la casa
Cuando el rotisor no esta en uso, gu_rdelo dentro de la casa
en un lugar seco
Para protegerse contra las descargas electricas, no
sumerja la cuerda electrica, el enchufe o motor en
agua o exponerlos a la Iluvia Proteja los elementos
electricos de los fogones, superficies calientes de la
parrilla y de la grasa
Para protegerse contra descargas electricas, debe
conectarse s61o a un tomacorrientes que este
correctamente puestos a tierra
USO DE LOS EQUIPOS ELr=CTRICAS
1 Para protegerse contra choque electrico No moje la cuerda,
enchufes, o la parrilla con ningLm liquido
2
Desconecte del enchufe antes de limpiar Permita que la
parritla se enfrie antes de remover o colocar partes
No use aparatos de coccion a gas de exterior con el cable o
el enchufe dafiados, ni si et aparato funciona incorrectamente
o se ha da£_adode cuatquier modo P6ngase en contacto con
el fabricante para repararlo
4 No permita que la cuerda cuelgue del borde de la mesa, area
de trabajo, o que toque las supeprficies ca[ientes
5
No use aparatos de cocci6n a gas de exterior para fines
distintos a los que les corresponden
6
AIconectar, conecte primero elenchufe at aparato de cocci6n
a gas de exterior y luego enchufe el aparato a la toma
7
Use exclusivamente un circuito protegido con lnterrupci6n de
Fafto a Tierra (GF1)con este aparato de cocci6n a gas de
exterior
8
No saque nunca el enchufe con toma de tierra ni use un
adaptador de 2 patillas
9
Use exctusivamente cables extensores de 3 patillas con toma
de tierra, adecuados para la atimentack_n del equipo, y
aprobados para su uso en exterior con la marca W-A
= Este aparato, cuando se ha instalado, puede
conectarse electricamente a tierra segun los
c6digos locales o en ausencia de los c6digos
locales con el c6digo e!_ctrico nacionat, ANSI/
NFPA 70 o et c6digo et6ctrico canadiense CSA
C22 1,
° Mantenga cualquier cable el6ctrico y ta manguera
de suministro de combustible lejos de las su-
perficies calientes
Proposici6n 65 de California
El cable de alimentaci6n electdca y el enchufe de
la barbacoa contienen quimicos, incluyendo plomo,
que es sabido por el Estado de California que
provoca c&ncer y defectos de nacimiento u otros
daSos reproduclivos Lavese las manos despues de
manipularlos
t6

1 Removertodaslasparesdelcart6ndeenvio,
2 Adjunteel sopo[tedelmotorafexteriordel panelizquierdodeltaz6nde ta parrilla Alinielosdos
agujerosdel soporteconloshoyosenrroscadossobreel taz6nde la parrillaAjestelobienapretado
usandodostorniflos10-24x3t4"UNCy arandelas
}I11IHrt1HIEHt[,tJj
Rot Tornillo #10-24x314" UNC x2
Rot Arandela x2
Rot Tuerca #10-24 x2 -:::
Deslice la presa de carneo pollo a traves de la espada Coloque los tenedors en ambos tados contra
la presa manteniendola estable en el rotisor Ajuste el espaciador entre ellos para acomodar la presa
de came, ajuste los tornillos de rnariposa, para mantener los tenedores en posicion, destice el cuello
al final de la brocheta No ajuste el tornillo de orejas del cuello basra que el Rotisor este colocado
en la ranu[a de la parrilla Atornille el manguillo al final de la brocheta como se muestra en el dibujo..
Rot Tuerca #10-24
Soporte del motor
Exterior izquierda del
panel del tazon de la
parrilla
jj,'_
/
Tornillo de Asado #10-24x314"
UNC con arandelas y roscas
Tornillo mariposa
114"x1/2"
Rot Tornilfo de mariposa 1!4"x112" x3
Tenedores para
apresar
Cuello
17
Brocheta
'\
\
Tornillo mariposa
1/4"x1/2"

lnstaleel Motordel rotisorde (corrientealterna)ACal soportedelmotorcomose muestraabajo
Aseguresequeel motorest¢adjuntoal soporteconel cableel6ctricohaciaabajoEstainstataci6n
aseguraquecuandotabrochetahasidoinsertadadentrodetmotortambicnseapoyaraconseguridad
en la ranuradeltazSnde fa parritla
Motor del rotisor
..........?-
E1 espet&q de asado debe apoyarse con
firmeza en la ranura de la parrilla
Sopode del motor
Inserte el rotisor ensamblado dentro del motor como se muestra abajo El motor debe estar al lado
izquierdo de su parrilta y la manguillo al lado derecha Coloque el cuello en ta ranura al lado derecha
del tazSn de la parrilta, ajuste el tornifto mariposa de1 Cuello y luego a la derecha del cuello El cuello
estabitizar& et rotisor durante et proceso de cocinar permite que la brocheta gire suavemente Conecte
e! rotisor a un enchufe y 3ruebe que trabaje correctamente
Tornillo Tenedor para
Cuello
mariposa apresar Tornillo Motor
mariposa ......
.....""s-)!', _'\, """'"........... III f!_:"" l
i!i Broccheta H
/
//
!:I l:i
I:l
Deben usarse siempre el cuello con este rotisor.
ANTES de cocinar con el rotisor debe remover de la parrilla las rejas de asar y posiblemente los
Difusores de calor Cuando cocina con et rotisor coloque una bandeja de aluminio debajo dela comida
para que reciba el goteo de la grasa y jugos de la came Esto mantendr& su parritta limpia y libre
de exceso de grasa lo cual puede causar un incendio. Use cuidado cuando mueve un utensilio con
grasa caliente
I8

Un cuidado correcto y mantenimiento mantendr_n su parril{a en una
condici_n operativa superior y prolongar_n su vida Siga estos
procedimientos de limpieza con regularidad y su parril{a se mantendr_
limpia y trabajar_ con mlnimo esfuerzo
CUIDADO: Asegt)rese que su parritla est_en OFF yfrla antes de limpiada
Limpiando las rejas de cocinar
[] Antes de su uso {nicial y periSdicamente, lave las rejas con una
soluci6n de jabEn y agua tibia Usando un trapo o una cepitlo de
verduras
Lirnpiando los difusores de calor
[] Periodicamente usted debe lavar los difusores de calor en una
solucibn de agua tibiaenjabonada Puede usar un trapo para favar
o un cepillo para verduras Seque por completo el d[fusor de cafor
antes de re_instalado en el tazEn para coc{nar
Limpiando la bandeja de grasa
[] Para reducir la oportunidad de fuego, la bandeja para la grasa de
grasa (a{gunos modetos) deben set inspeccionados visualmente
antes de cada uso de ta parfitla Retire cuatquier grasa y lave la
bandeja de grasa con una soluciEn enjabonada con agua caliente
Limpiar el interior de la tapa de ta parriila
[] Lagrasa puede toner una tendencia de acumutarse en el interior de
la tapa de taparri{la y podfla gotear en laterraza o patio cuando la
tapa est_ abierta lnspeccione e! interior de ta tapa de ta parriIIa
visua{mente antes de cada uso Retire cuatquier grasa y lave con
una soluciEn de jabEn y agua tibia
Limpieza frecuente del interior' de la parrilla
[] Quemando el exceso de comida despues de cada uso al aire tibre
dejar&laparritlalistapara otrouso Sin embargo porlomenoscada
3 meses usted debe dar una limpieza minuciosa a la parrilla entera
para minimizar su riesgo de fuego pot grasa y mantenet la parriHa
en la mejor forma Siga estos pasos:
1. Gire todas las v&lvulas de {as fogones a la posiciEn OFF
2 Gire ta v_lvula de gas LP a la posici_}n OFF
3 Desconecteelreguladordeltanquedegas lnspeccionelamanguera
y ensamble del regulador pot gdetas, cortadas o cualquier otto
darto, y reemplaze como sea necesario Consulte ta lista de partes
en este Manual de operacibn
4 Retire y limpie los difusores de calor, rejas para asar y fogones de
la parrilla
5 Cubra cada orificio de la v_Jvutade gas con papel de aluminio
6 Cepilte el interiory la parte inferior de la parfilla con una
aImohadilta fibra e cepillo de nilbn y _avecon agua enjabenada tibia
y debe enjuagarto y dejado secar
7. Retire el papel de aluminio de los ofificios y examine cada
orificio en busca de obstrucciones
8. inspeccione cada electrodo de chispa ajust&ndolo como sea
necesar[o Et espacio entre ta punta de] Electrodo de chispa y el
recibidor de chispa debe ser de 3/16" aproximadamente
9 Reemplace los fogones y ajuste Ia caja colectora de gas
10. El borde de ia caja coIectora de gas debe estar traslapando e l
puedo del fogEn
Reemplace los difusores de ca]or y fas rejas
1t Reconecte el origen de gas y observe la llama del fog_q para una
operaciEn correcta
Limpieza de superficies de piedra artificial:
[] Si es necesario, recomendamos que fimpie la superficie de piedra
artificial solamente con una sotuci&.qdejabbn suave y agua cafiente
Puede usar un trapo suave enjabonado o una esponja y enjuagar
luego con agua No use nunca limpiadores abrasivos timpiadores
con lejta, polvos de limpieza ni cepillos rtgidosen la superficie de
piedra Pueden provocar deco!oraciEn yio desconchar la supedicie
pintada
Limpiando el exterior del acero inoxidable
[] Cuidado rutinarioy mantenimiento es requerido para mantener
la aparencia y la resistencia a la corrosiEn de! acero
inoxidable El hecho es que el acero inoxidable puede
corroerse oxidaci6n y p_rdida de ca]or pueden set causadas
bajo ciertas condiciones. Et {5xido es causado cuando las
partlculas de acero regulares en la atmEsfera se f[jan a ta
supe_cie de acero inoxldable Partlcuias de acero tambi_n
pueden fijarse a su parrilia con et uso de lana de acero o
cepiltos de metal rtgidos para Iimpiar la parriila en tugar de
materiales o telas no-abrasivas, esponja o niIEn las que son
mejores para ]impiar En _reas de la costa descarche de _xido
pueden desarrollarse sobre superficies inoxidables que no
pueden set removidas pot completo Blanqueadores y otras
so_uciones a base de ctoro usadas para la limpieza de la
casa y piscinas tambien pueden causar corrosiSn a[ acero
inoxidable
La intemperie, el calor extremo, el humo al cocinar y aceites
de maquinaria usados en ef proceso de fabficar el acero
inoxidable pueden causar que el acero inoxidabie se vuelva
color caramelo. Aunque hay muchos factores que pueden
afectar ta apariencia de _a superficie del acero inoxidable,
estos no afectan laintegridad del acero o e_ rendimiento de la
parri!la
[] Para ayudar en manlener et terminado de acero inoxidable,
siga los siguientes procedimientos para obtener los mejores
resultados:
1 Despubs de cada uso (despues de que su parritla se ha
enfriado), paso un trapo a cuberter[a de acero inoxidable que
las superficies con un paso blando y jabonoso o esponja
entonceslluego enjuagan con el agua Sea sure retirar todas
part[culas de comida, salsas o escabeches de acero inoxidable
porque _stos pueden ser muy ac_dicos y perjudicial para las
superficies inoxidables
2 No use tintorerta abrasiva depuradores de airees o cepillos
de cable r[gidos de ningen tipo nunca sobre su parrilta
3. Use un calor Fimpiador de acero inoxidable contrario y la
frotaciEn o la timpieza en direcciEn a el grano de acero
inoxidable o saque lustre a Ilneas no contra el cereal
Fallo en cumptir con estas instrucciones puede
causar una situaciEn peligrosa la que si no se
observa puede resuttar en lesiones.
= Mantenga et _rea de la parri]la Ilbre de materiales
combustibles, gasotina, otros vapores y lfquidos
inftamables
No obstruya la circulaciEn de ake para buen_
ventitaci_m
= Mantenga las aperturas de ventilaci_n del gabinete
de] tanque fibres y despejadas de escombros
t Visualmente inspeccione de vez en cuando ]as llamas del fogb_
para asegurar que tiene et tipo de I_ama correcto como se in
dica abajo
\
_,MPLIAC_EN DE LA VISTA DEL QUEMADOR PRINCIPAL DEL GRILL
QUEMADOR fNFRARROJO Y LLAMA DEL GUEMADOR LATERAL
rRAV$S DE LA TAPA A_IERTA, LLAMA DEL QUEMADOR DE LA
PLANCHA A TRAVES OEL AGUJERO DE LA REJILLA DE VENTILAC{_N
SOBRE EL PANEL TRASERO DEL CARR_TO DEL RANGE.
19

Para reducir el chance de FUEGO DE RETROCESO debe
limpiar los tubes de los fogones de la siguiente manera per lo
menos una vez a! mes en el verano y otoSo o cuando las
arab,as esten activas en su area, o si su parrilla no ha side
usada per un tiempo
+
Gire todas las v=flvulasdel fog6n a la posici6n OFF
2
Gire la v&lvula de tanque de gas LP a la posicion
3
Remueva el ensambte det regulador de gas LP
4
Remueva de su parritla las rejas de cocinar, los
difusores de calory las bandejas para la grasa
Remueva eltornit!o en laparle de arras de cada fog6n
usando un destornillador con cabeza Phillips
6
Levante con cuidado cada fogon y alejelos del orificio
de la vatvula de gas
Fijese que esten limpios o limpie en los fogones los
tubes Venturi de insecto y hides Un tube obstruido
puede causar un fuego debajo de fa parrilla
8
Refierase a la Fig ura 1y tleve acabo uno de estos tres
m6todos de limpieza:
[]
MleTODO 1: Doble un alambre rlgido o percha de
alambre en forma de gancho pequefio come se
muestra en el dibujo y entre el gancho per el tube
del fog6n varias veces para limpiar los escombros
tapa del grill, encienda eltlos quemador(es) y haga
funcionar el grill en el ajuste Hi durante 3
a 5 minutes Puede cerrar la tapa si s61o estan
encendidos los quemadores principales, pete NUNCA
cierre la tapa sobre el quemador infrarrojo
encendido
2
Use un cepil!o de nylon, spray o aspiradora para
quitar la ceniza acumulada en la superficie exterior
de cada quemador Los puertos de !os quemadores
que tengan el tube atascado se pueden limpiar con
un alambre duro, come un clip abierto para papet
NO use un cepillo duro o una herramienta afilada
de ning0n tipo en el fr=figil quemador infrarrojo
lnspeccione cada fogon per daf_os (per huecos o
grietas) si encuentra daftos debe ordenar e instalar un
nuevo fog6n Debe hacer una inspecci6n para
asegurarse que los orificios de la valvula de gas est&n
correctamente colocados dentro def final del tube de1
fogOn Tambi6n debe verificar la posici6n de la chispa
de1efectrodo de que est6 funcionando correctamente
[_%.--+-.-.-_-+.= ............................
[]
MI_TODO 2: Use un cepillo de bote!la con un
mango flexible y dirija el cepillo a trav6s de1
tube det fegOn y entr&ndolo y sacandolo varias
veces para remover cualquier escombro
[] Mt_TODO 3: Use una manguera de aire a
presi6n para forzar aire a trav6s det tube del
fogOn El aire debe forzar los escombros a
trav6s del fogOn y fuera de los puertos
Sin importar que ripe de timpieza de los fogones usa,
lerecomendamos quetambien complete los siguientes
pasos para ayudarte a protongar tavida del fogOn
Despu_s de cada use del grill principal o de la zona
de cocci6n infrarroja es necesario que quite las
particulas quemadas y las gotas que pueden
atascar los puerios del quemador y reducir el
rendimiento del quemador ABRA la
Figura 1
PARA LIMPIAR EL TUBe DEL FOGON,
INSERTE ELGANCHO DONDE INDICA
LA FLECHA
Para una operaci6n sin peligro asegt_rese que el
orificio del ensamble de la valvula de gas est6 dentro
del tube del fog6n antes de usar su parrilla Vea la
Figura I+ Si el orificio no est,_ dentro del tube del
fogOn, al encender el fog6n podria causar una
explosion, incendio que resuttarian en lesiones
corporales serias
y/o da_os materiales
Quemador de
Ensamble de la valvula Orificio Tube del fog6n
de gas / / /
infrarrojo ,i'_mj/ / r-_........ -/............
Puerto del fog6n Pie
,f
2O
Tu6o del fogen

Quemando los residuos
[]
Antes de cocinar en su parriUapot pdmera vez, debe
quemar los residuos para eliminar cualquier olor o o
aceites de la fabrica. Encienda elfog6n principal, baje la
tapa y opere la pardlra en Hi entre 3 y 5 minutos.
The Lid must be open if the burner rslit
ADVERTENCtA: Si opera TODOS los fogones
princ]pales en Hi por mas de 5 minutos puede causarle
daSo a ciertas partes de su parrilla No descuide su
parriUa cuando est& en uso
Preheating
[] Para precalentar los fogones principales, encienda su
parrilla en Hi, baje la tapa y siga las instrucciones
• Para cocinar con temperaturas attas, caliente la parritfa
entre 3 y 5 minutos
• Para cocinar a bajas temperaturas, precatiente laparrilla
pot 3 minutos.
° Paracocinarlentamente el precalentdonoes necesario
Temperaturaspara asar
[] Temperaturas attas: La perillapuesta en Hi, s61odebe
usarse para precalentar la pardtla entre 3-5 rninutos y
para quemarlos residuos de comidas Nunca use Hi para
cocinar por largo tiempo
[] Temperaturas medianas y bajas:
La mayoria de las recetas piden el cator entre medio y
bajo, incluyendo las cames ahumadas, cocinando con e!
rotisor, carries sin grasa o pescado
Una nota importante sobre las temperturas para asar
Los ajustes de cator indicados y lostiempos para cocinar
mostrados en las siguientes paginas son aproximados
Hay algunas diferencia en etambiente controlado dentro
de su cocina, y variables incluyendo las temperaturas
exteriores, direcci6n y condiciones del viento, tanto como
Iaubicaci6n de la parriliaque pueden afectar ladistribuciSn
de calor de su pardlla Porque estas condiciones varian,
y no hay dos jardines o patios iguales, ofrecemos estas
guias para su conveniencia Recomendamos que usted
vigile su parrilia atentamente y le de vuella a la comida
como se necesila para prevenir cocinarla demasiado y
asegurar los mejores resultados todo el tiempo
• The infrared cooking area is for quick searing Once
seared, reduce heat and continue cooking or move food
to the primary cooking area to finish cooking.
• Las zonas de cocci6n media y trasera ofrecen alias
temperaturas para asar
Las rajas secundarias paraasarbrindan untcaJormediano
para preparar panes y verduras firmes
• El area dei frente es la pdmaria para cocinar comidas
delicadas y para mantener la comida caliente
Para cocci6n directa use et quemador en forma de
plancha
[]
El metodo de cocinar directo puede hacerse sobre las
rejas inctuidasy comida cotocada directamente sobre los
fogones. El cocinado directo requiere que la tapa de
la parrilla estL= abierta. Este m,_todo es ideal para
quemar y asar cuando quiere et sabot a barbacoa de
llama abierta
Hornillas principales qua usan que cocinan Zndirectas
[] El mbtodo de cocina indirecto tambien puede ser usado
con las rejas de cocinar proporcionadas Para cocinar
indirectamente, la comida debe ser puesta sobre el tado
izquierdo o derecho de su
parrilla con el fogSn principalencendido aJlado opuesto
Debe colocar la comida sobre las rajas secundarias y
encenderlos fogones principales exteriores. Decualquier
manera, para cocinar de una manera indirecta la tapa
tiene que estar cerradm
Preparando las rejas para asar
[] Engrasando Jasuperficie de cocinar ayudar_ a prevenir
que las comidas sepeguen durante la cocinada yreducir_
la cantidad de la [impieza a fondo requerida Use una
brochapara apticar una capa fina de aceite de cocina o
manteca vegetal en cada reja de asar antes de cada
comida al aire fibre No sugerimos aceites de tipo de
aerosol a menos que sean especificadas para cocinar en
tempuratura alia Asegurese cubrir con aceite todas Fas
partes para asar
Llamaradas
[]La grasa y jugos que gotean de los atimentos
asados pueden causar fuegos que proporcionan un
sabor favorable y distintivo y color a los alimentos
Deberian aceptarse hasta cierto punto Para
minimizar las llamas:
• Corte el exceso de grasa de cames y ayes
• Precaliente e! grill adecuadamente
• Limpie et grill regularmente para quitar los alimentos
y grasa incrustados
• Cambie de posici6n los alimentos para evitar las
llamas continuas
t Fallo en Cumplir con estas instrucciones puede causar
un incendio o explosi6n que pueden causar lesiones
sedas, muerte o da,fios a Fapropiedad.
e Nunca cubra tas cuadricutas, difusores de calor, ta
parte inferior del taz6n de la parrilla o de la bandeja para
drenar la grasa con carbon, papal de aluminio, arena o
cualquier substancia qua pueda absorber grasa
Antes de cada uso de su parrilla: remueva la bandeja
de grasa yretire toda la grasa ycomida para prevenir un
peligroso fuego de grasa
Use su parrilla por io menos a 3 pies de distancia de
cualquier pared o superficieo Use su parrilla pot Io
menos a 3 pies de distancia de objetos combustibles
que pueden derretirse o captar incendios(como vinilo o
tabla de forTo de madera, cercas y salientes) o fuentes
encendidas como la llamadel piloto de cafentadores de
agua y aparatos electricos encendidos.
Nunca use su parriIla de gas en un garaje, porche,
cobertizo, pasabrisas o cualquier otra ,_rea cercada
Su parrilla se pondra muy caliente.. Use siempre un
guante para parriilas protector de llamas cuando va a
cocinar en su parriila Nunca se recline sobre fa
superficie de la parrilla cuando est_tcocinando. Todas
las superficies guardan mucho cator cuando laparrilla
esta en operaci(_n Pare limpiarla espere que la parrilla
se enfrie
A-1

AsandoBistecs y costillas
Gire el control de los fogones a Hi, cierre ta tapa y
precaliente su parrilla entre 3 y 5 minutes Abra ta tapa y
coloque la came sobre las rejas directamente per encima
del fog6n encendido, Cocine la came en ambos lades
hasta que se dore Reduzca el calor a MEDIO y cocine
hasta que est6 al punto deseado El tiempo de asar
depende del grosor de la came
Asando hamburguesas ysalchichas
Gire el control de los fogones a Hi, cierre la tapa y
precatiente su parrilla entre 3 y 5 minutes Abra la tapa y
cotoque ta came sobre las rejas directamente per encima
del fog6n encendido. Cocine la carne en ambos lades
hasta que se dore Reduzca el calor a MEDIO y cocine
hasta que est6 al punto deseado El tiempo de asar
depende del grosor de fa came
AsandoPollo
Gire el control de los fogones a Hi, cierre la tapa y
precaliente su parrilta entre 2 y 3 minutes, luego abra la
tapa y reduzca el calor a MEDIO, y cocine fas ayes
directamente sobre losfogones hasta que est6n cocinadas
La piel de las ayes es muy grasosa asi es que debe esperar
una que otra flamarada af usar este metodo directo
Para minimizar las Ilamaradas, trate de asar el polio
usando e!m6todo indirecto Coloque el polfo en un lade de
la parrifla usando e!fog6n opuesto en calor MEDIO, ybaje
la tapa de la parrilla El tiempo de asar varia dependiendo
del tamafio de la presa
Asando Puerco
Corte de came
Bistec T-bone
Bistec Sirloin
Costiflas de res
Bistec Porterhouse
Bistec New York strip
Hamburgusas
Salchichas
Pechuga de potlo
(asar con el hueso hacia
abajo)
Alas de potlo
Patas
Pollo entero
(Cocinar con ta pechuga
hacia arriba)
Costillas
Solomo de res
Chuletas
Tiempo aproximado para asar
Casi crude: 4-8 minutes
Mediano: t0-14 minutes
Bien cocinado: 15-20 minutes
Casi crude: 4-6 minutes
Mediano: 8-10 minutes
Bien cocinado: 10-15 minutes
M6todo directo:
Aproximadamente 15 minutes
M6todo Indirecto:
hasta 30 minutes
M6todo indirecto:
Aproximadamente una hera
Medio: t0-t4 minutes
Bien cocinado: 15-20 minutes
Ponga el fog6n en Hi, y precaliente ta parrilla entre
3-5 minutes con Ia tapa cerrada Abra la tapa, coloque el
puerco sobre las rejas y dore hasta cellar los jubos
Reduzca el calor a MEDIO coclnandose hasta que est6
hecho El tiempo de asar cambia de acuerdo con et
tamafio y grosor de tapresa
Pescado y filetes enteros
Precaliente Iaparrillaentre 2-3 minutes con la tapa cerrada
Luego abra la tapay baje latemperatura a MEDIO Coloque
el pescado (piet hacia abajo) en la parrillasobre et calor
directo hasta que se cocine Use el tiempo para cocinarfo
come una guia0 o hasta que el pescado este opaco pero
todavtajugoso
Filetes peque6os y cubitos de pescado
Siga las direcciones de ardba usando aproximadamente
los tiempos de cocinar indicados a la derecha Coloque un
pedazo pequefio de papet de aluminio sobre las rejas de
asar si los pedazos de pescado son tan pequefios que se
pueden caer a traves de las rejas
Verduras y Frutas
Prepare las verduras y frutas pint,_ndolas con mantequilla
o con alguna salsa si 1odesea Para el cocinado indirecto
10 - t2 minutes per libra o
Pescado entero
Filetes enteros
de pescado
Filete de pescado
Cubes sin huesos
Algunas veces, usted desea asar vegetales y frutas
directamente sobre el calor, usando las rejas proporcionadas
Las comidas mejores para asar directamente son
relativamente suaves y demoran menos tiempo: setas,
zucchini, tomates, y frutas en brocheta come albadcoques,
duraznos, pina, fresas y kiwis Recuerde que para cocinar
con el m6todo directo debe mantener la tapa abierta,
Para verduras firmes--en especial papas, yuca, camote,
recomendamos hervirtas parcialmente hasta que est6n casi
cocinadas, antes de colocarlas en la parrilla El liempo de
cocinar con tatapa baja es aproximadamente 1omismo queen
su cocina regular Sin embargo, hay touches factores come la
temperatura de afuera, condiciones de viento, y donde este
situada la parriila, per eso sugefimos que mantenga el ojo
puesto en la temperatura de la parrilta para ajustar el calor
come se necesite, Et tiempo del cocinado para comidas
preparadas con el m6,todo directo ser_ touche m_s corto
debido a que la temperatura es mas alia y la comida es mas
blanda Eltiempo sepuede comparar affeiro asar normalmente
hasta que et pescado se yea
bien cocinado
4 - 5 minutes cada lade
hasta que el pescado se vea
opaco
A-2

Notas importantes sobre el uso del quemador infrarrojo
Si es un cocinero experimentado o un novato en la cocci6n
con grill, la cocci6n infrarroja es bastante diferente a asar
sobre un quemador tradicional. Aunque los quemadores
primarios pueden tostar la came, los quemadores infrarrojos
producen un calor m,_s intenso y concentrado que tuesta
la came mas r_pido. Este tostado rapido produce un exterior'
crujiente y tleno de sabor y retiene los aromas y jugos
naturales de la came
Siga las pautas de cocciSn proporcionadas. Despues t6mese
alg0n tiempo para experimentar con su zona de cocci6n
infrarroja Tambi_n, lea ias instrucciones de cocci6n en la
pagina A-1 para que entienda la importancia del
precaientamiento, temperaturas de cocci,Sn y advertencias de
seguridad
• Una vezencendido deje el quemador infrarrojoalmaximo
y tueste ambos lados de la came usando las pautas de
abajo
• Una vez tostado, ajuste el quemador infrarrojo al
minimo y continue cocinandolo hasta el punto de
cocciOn deseado Puede cambiar la came ya tostada
a la zona de gdll pdmaria para acabar la cocci6n. Este
metodo permite tostar y preparar grandes cantidades
de alimentos
• NUNCA intente mojar las llamas con agua que
podria daSar el quemador Para controlar las
llamas:
•' Corte el exceso de grasa de carnes y aves
= Precaliente el grilt adecuadamente
• La tapa siempre debe estar abierta cuando este encendido
e]quemador infrarrojo.
• Los tiempos en la cocina infrarroja son mucho mas cortos
que tacocciSn tradicional asi que no deje el gritl sin aten
Tostando bistec y costillaso
Gire el quemador infrarrojo a Hi y precali_ntelo durante 3 a
5 minutos con la tapa abierta. Entonces coloque la came
en ta parritla y tueste cada lado durante 2 minutos
aproximadamente. Reduzca el quemador infrarrojo a MINIMO
o mueva la came hacia la zona de grill prima.rio y finalice
la cocciOn Los tiempos de cocciSn variaran dependiendo del
grosor de ta came
Tostando hamburguesas y salchichaso
Gire el quemador infrarrojo a Hi y precalientelo durante 3 a
5 minutos con la tapa abierta Entonces coloque la came
en la parrilia y tueste cada lado durante 2 minutos
aproximadamente. Reduzca elquemador infrarrojo a MINIMO
o mueva la came hacia la zona de grill primaria y finalice
ta cocci6n Los tiempos de cocci6n variar_n dependiendo del
grosor de fa came
Limpie et grill regularmente para quitar los
atimentos y grasa incorporados Consulte las
inslrucciones de limpieza del tubo de quemador
en este manual
• Cambie de posicion los alimentos para evitar las
continuas llamas
Corte de came
Bistec T-bone
Bistec Sirloin
Costiltas de res
Bistec Porterhouse
Bistec New York strip
Hamburgusas
Salchichas
Tiempo total aproximado de
coccion
Poco hecho: 4 minutos
Medio: 6-7 minutos
Hecho: 8-!0 minutos
Poco hecho: 4 minutos
Medio: 5 minutos
Hecho: 6-7 minutos
Las hamburguesas y satchichas tienen mucha grasa asl que
puede esperaralgunas IFamascuando iascocina Para minimizar
fas llamas siga las instrucciones de la p_gina A-1 Tambi_n
puede considerar asar _stos y otros alimentos grasos en el area
de grill primaria y el metodo de cocciSn indirecto.
ATENCI(_N: Para garantizar que sean seguros para
comer, los alimentos deben cocinarse atas
temperaturas mfnimas internas indicadas en la tabla
siguiente
USDA* Temperaturas intemas minimas seguras
Pescado
Cerdo
Pfatos de hue_s
"Bistec y rustido de res, ternera 0 cordero
Carne picada de res, temera o cordero
Ayes enteras (pavo,'"pol!o, pato, etc.)
Came de aw picada (pechuga de polio, etc.)
n
* Departamento de Agricultura de los Estados Unidos
A-3
145°F
160 OF
160 OF
145 OF
160 OF
165oF......
165 OF

Una nota importante sobre el calor deseado
Los ajustes de calor indicados son aproximados Hay muchos
factores come Ia temperatura exterior, las condiciones de
vienlo y la ubicaci6n de lapardlla afectan el rendimiento de su
parrilla Ofrecemos las indicaciones de calor como un
mecanismo _til, pero sugerimos que usted mire el calibrador
de temperatura y ajuste el calor come desea
Prepar_ndose pars ssar
Para asar se usa et m6todo de cocinar indirecto Por totanto,
la comida debe ser puesta sobre elequipo izquierdooderecho
de su pardllacon un fog6n encendido en ellado opuesto Usted
tsmbien puede usarlas rejas pars assr colocando un utensilio
para el goteo debajo de las rejas para colectar los jugos para
hacer salsas Recuerde, lacocina indirectarequiere que latapa
de su parrilla est6 cerrada
Precalentar su parrilla no es requerido para los m6todos de
cocina lentos como asar Si usted decide precalentsr su parrilla
antesde usarla, ponga los fogones en Hi y la pardllacon latapa
cerrada mas o menos de 2-3 minutos
Preparaci6n de la comida
Remueva la grasa excesiva de la came Ate las ayes con una
cuerda para conservar ia forma deseada Puede usar tiras de
tocino para cubrir la came de ave impidiendo que se seque,
Otro metodo para mantener fa comida sin secarse durante el
asado,es poner aguaen unaollaycubrirla con papeldealiminio
El papet se debe remover al principio o al fina! de del cocinado,
para asegurar que la came se ha dorado lo suficiente
Consejos para assr
Excepto cuando se est_ asando con liquido en una utensilio
para asar, tosjugos se reOnen en el utensilio para ser usados
como la base para una salsa sabrosa o jugo de came Ponga
laollade cocinar directamente sobre elcalor, afiada mantequilla
adicional si la necesita, afisda vadas cucharaditas de hsrina
para espesar la salsa Finalmente, afiada poflo suficiente o
caldo de came de res para obtener laregulsridad deseada
Una vez cocinada la came, retirela del fuego y tapela con un
pedazode papel de aluminio, Deje lacame descansar entre 10-
t5 minutos para permitir que losjugos se asienten
Res
Cordero Medio 18 minutos por libra
Ternera 27 mimitos por libra
Puerco 30-33 minutos pot tibra
Polio 20-25 minutes por libra
Pato 25 minutos por libra
Pescado 10 minutos por libra
Pavo, menos de 16 libras 20-25 por libra + 30 minutos
Pavo, m&s de I6 libras 18-23 por libra + 15 minutos
TI_CNICAS PARA HORNEAR
Desde caserolas a pan de maiz, a deliciosos postres, como un
fondue de frutas o biscocho se pueden homear en su pardllatan
f_cil como en su propia cocina
Prepar&ndose para homear
Para homesr en su nueva psrrilta usted necesitar_ un utensilio
para poner dentro de la pardlla,y un par de guantes para
protegerse del cafor de taparrilla Debe secar la caserola antes
de usarla, Si es de hierro fundido debe secarla muy bien antes
de usarfa,
Precalientesu parriflaentre 3-5 minutos, luego baje elcalor hasta
conseguir la temperaturs de hornear deseada, Para homear
Temperatura del Horno
B_aja 300 ° - 340 ° F
Modersda 355° - 390 ° F
Alta 410 ° - 480 ° F
Casi Crudo 18 minutos por libra
Medio 23 minutos por libra
Cocinado 27 minutos por libra
Cocinado 23 minutos per libra
use el m6todo de cocinar indirecto..Por 1otanto, el utensilio para
homear debe coiocarse al lado derecho o izquierdo opuesto a!
fog6n encendido
Consejos para hornear
Prepare su receta fsvodta como usted lo harta en la cocins Las
comidas cocinadas en la parrilla por largos periodos detiempo
deben estar cubiertas con papel de aluminio para conservar la
humedad Usted necesitara revolver o voltear la comida varias
veces cuando cocina al homo, y aSadir liquido adicional para
obtener el espesor deseado
Vea la temperatura, y adapte el cocinado de scuerdo con !as
instrucciones de su receta
Niveles de calor recomendados
Ambos fogones exteriores en LOW
I f£g6n exterior en Hi y un f 6n exterior en LOW
Ambos fogones exteriores en Hi
A-4

Asar despacio con el rotisor
Cocinando con el rotisor produce comidas atractivas ysabrosas
El sistema de rotiseria se usa m_s para carnes y ayes y est_fi
diseSado para cocinardespacio Prepare lasaves uniendo las
alas y las paras al cuerpo del ave. Tambien lacavidad del ave
se puede relienar antes de cocinada Usted puede colocar una
casuela, para atrapar Ios juegos de la came y hacer salsas
Para darles sabor alas cames puede usar especies y hierbas
de olor.
Cocinando con el rotisor se demora Io mismo que asando al
homo
Balanceando las carnes en el rotisor
Poner el peso de la came de una manera bien balanceada en
ta brocheta del rotisor es de mucha importancia La came se
debe coiocar de tal manera que esl peso est_ bien distribuido.
El rotisor debe girar uniformemente para al pararo arrancar no
causequela comida pierdaelbatanceysecocinedesigualmente
lo puede quemar el lado m&s pesado.
Las comidas m&s faciles para balancear son _.sasde forma
uniforme y textura Evaluar si la comida se baianceada
correctamente antes de aseguraria a la brocheta Cotoque los
finales de labrocheta en cada palma de sus manos. Si no hay
ninguna tendencia de rodar, d_le 1/4 de vuelta Si todavia esta
estable, d_le otro cuarto de vuelta Debe descansar sin giraren
cada uno de estas posiciones Despu6s deesta prueba puede
colocarla la brocheta en su parrilla
Preparacibn de comida
Cuando est_ preparando ayes, amarre bien todas tas partes
contra el cuerpo del ave, de tal manera que parezca una bola
Jale lapiei del cuelto y usando una brocheta pequeSa, am_rrela
ala parte posteriordel ave. Arregle los dos tenedores y m_tatos
dentro del cuerpo det
ave para sostener bien ta presa Antes de entrar lostenedores
haga la aprueba de balance.
Un pedazo de came enrollado requiere que la brocheta del
rotisor sea insertada a tray, s del centro a 1olargo del rollo de la
came, luego siendo asegurado su balance
Para carnes que contienen huesos, es mejor asegurar la
brocheta del rotisor diagonaimente a traves de las secciones
con m_s came Si tos huesos sobresalientes o las alas se
broncean demasiado r&pido, puede cubrirlas con papel de
aluminio._
Preparandose para Ahuimar
El ahumador da un sabor distintivo y delicioso a comida
Usted encontrara una variedad de astiilas de madera
disponible para uso en el ahumador Hay que remojar las
astitlas de madera con anterioridad, siga las instruccionesdel
fabricante
Nota: Es nuestra experiencia que muchas de los productos
para ahumar no producen humo, pero inculcan sabor a la
comida Lea las etiquetas con cuidado y si tiene dudas
inf0fmese con el vendedor del producto
Usando una caja ahumadora
Hay muchas cajas ahumadoras disponibles en el mercado.
Siga estas pautas y siempre refi_rase a fa
etiqueta de sus fichas ahumadoras para los detaUes del
ahumado Llene la caja para ahumar con las fichas o et
producto que haya comprado Puede aS&dir hierbas
secas y especies para producir diferentes sabores Use un
guante de BBQ que retarda FasUamasy coloque la
caja de ahumar sobre las rejas para cocinar o sobre los
difusores decalordirectamente encima de unfog6n encendido
Las astilIas le prestar_n sabor a su comida
Consejos para ahumar
Usted puede reducir un fuerte sabor a humo cocinando fa
comida en el ahumador s61olamitad o tres cuartos del tiempo
total
Las comidas naturatmente altas en aceites se prestan bien
para ahurnar, mientras que las comidas secas se benefician
de un escabeche Usted tambi_npuede adobar lacomida con
hierbas, especias o aceites sazonados Muchas comidas
pueden set ahumadas con resuttados increibles con muy
poco esfuerzo Sugerencias:
• Filetes de at_3n,adobado en los sabores asiaticos de
aceite de ajonjoli, salsa de soy yjer_z..
° Filetes de cerdo, adobado con cascara de jengibre,
naranja y pintado con sabor de "Maple"
• Mejillones, enjugados con c_scara de lim6n y aceite de
chile.
• Chuletas de cordero, adobado en aceite de oliva
virgen, iimon, oregano y pimienta negra El mismo
escabeche puede ser usado para una pierna entera o un
Iomo de cordero
• Pollo, sin huesos, piezas cortadas en filetes o cortes
pequeSos, ahumadas con sabores orientales
• Pescado, de came firmes y mariscos surtidos como
langostinos, mejillones y caiamarL
• Puerco, cortado en dados o cerdo picado, filete, piema,
costiilas ahumadas
• Came de res filete cortado en chutetas, costiUas, tomo,
bistec
• Cordero, Iomo de cordero, filete, piema y costillas
Las verduras son en general f_ciles cocinar sobre la parrilia
Las rejas para asar 1ohacen conveniente porque usted puede
usar el area de asar principal mientras fas verduras se est_n
as_ndo encima de las rejas.
Precocine fas verduras firmes hirviendo brevemente o
cocinandolas en el homo de microondas antes de cocinadas
sobre la parritla Envuelva ias verduras en un grosor doble de
papel de aluminio para protegerlas mientras se cocinan sobre
iaparrilla Luego, s&quetas del envoltorio de papel si desea, 10-
15 minutos antes de finatizar el tiempo de cocinar, pinte las
verduras con mantequilta o aceite y termine de cocinarias
Las rejas de asar pueden ser utitizadas de otras maneras.
Considere usar las rejas para calentar el pan franc_s, hacer
pan de ajo, medialunas o inciuso rosqui31asde pan.
Un pez entero pequeSo envuelto en papel de aluminio se
puede asar sobre las rejas Los paquetes de mariscos como
mejillones, tangostinosy filetes de pez cortados cofocados en
envoltorios de papel individuatesse cocinan bien de esta
manera
A-5

Cualquier cosa que usted gusta preparar en su cocina la puede preparar al aire libreo Estos accesorios opcionales le
facilitan usar su nueva parrilla, como si fuera una estufa at aire fibre, ya sean las pardllas Premium de Kenmore o Elite de
Kenmore
No todos loselementos estan disponibles entodos los lugares El encaje del accesorio varia dependiendo det modelo de parri!la
que usted tiene, pot eso debe preguntar ai vendedor detalfes espectflcos.
Los accesorios se encuentran en tastiendas grandes de Sears donde venden todas las lineas. Sears Grand, Sears Hardware,
the Great Indoors y searscom
Utensilio de hierro fundido
con tapa Ideal para preparar
pizza profunda, lasagna, pan
de mafz, caserolas y postres
Parrilla reversible de
hierro fundido con un
lado liso para cocinar el
desayuno y et otro lado
acanalado para carnes,
tocino, safchichas y
hamburguesas
Liame al Centro de informaci6n de Parri|las si tiene algun problema con este producto Nosotros podemos ayudarle
con sus preguntas sobre el ensambfaje y operaci6n de la parri!lao si hay partes dafiadas o que fattan at desempacar
la unidad de la caja de envio Por favor IIame antes de ponerse en contacto su vendedor local
Calidad 304 de acero
inoxidable las
herramientas para
cocinar ofrecen
manguillos largos para
facititar el asado
LIene esta caja de ahumar
con sus fichas de ahumar
favoritas y dele sabot alas
comidas asadas
CENTRO de INFORMAClON de PARRILLAS
Llame entre las 8am y las 8pro CST 1-888-317-7642 de lunes a viernes
A-6

Pregunta:
Puedo convertir mi parrilta de un tipo de gas a otro,
es decir, de Gas LPG a NG o vice-versa?
Respuesta:
Si, sin embargo, cualquier intento de convertir la pardlla de
un tipo de combustible a otto es muy peligroso y debe ser
feaiizado por un t6cnico de gas cualificado exclusivamente,
usando un kit de conversi6n NG adquirido de Sears en el 1-
800-4-MY-HOME _,
Pregunta:
Estan los nOmeros de Serie y modelo listados en alg_tn lugar
en ta parrilla para mi referencia?
Respuesta:
La serie y los n_meros del modelo estan puestos en la
placacolor plateado de CSA que se encuentra sobre ta pardlla
Dependiendo de! mode!o ta ptaca CSA estar& ubicada a fa
izquierda o derecha del taz6n debajo de fa_episa del fado o
abajo o los tados derecho o izquierdo det panel de control o
detr_s del gabinete de la parrilla
Pregunta:
Mi pardtla no enciende bien, pot qua?
Respuesta:
Siempre encienda primero el fog6n principal mas lejos de la
fuente de combustible Esto atraera et gas al otro lado def
grupo colector que ayuda a prevenir espacios de aire que
obstruyen ia circulaci6n de gas y previenen el encender la
parrilla correctamente Tambi_n pruebe usar este
procedfmiento:
1 Apague el gas en ta fuente y gire tasperiltas de control a
OFF Espere por Io menos 5 minutos para que se dis-
perse el gas, y vuelva a tratar,
2 Si su pardlla todavia no enciende, Ponga todos los
controtes y la fuente de gas en OFF, y pruebe Is
conexiones por escapes de gas como se indica en ta
Secci6n de Uso y Cuidado de este manual
3 Si no encuentra escapes de gas espere 5 minutos y
vuelva a tratar de encender ta pardlla
Pregunta:
Si et encendedor o baterias no est&n trabajando, cbmo
puedo encender mi parrilla manualmente, y si voy a
necesitar el paliilo plateado que cuelga del tado de mi
pardlla?
Respuesta:
Sila igniciSn no funciona o necesita cambiar labateria, puede
encender manualmente la barbacoa con una cerilla de papel
lntroduzca una cerilta de papet en el bast6n de encendido y
siga tasinstrucciones de encendido manual de ta barbacoa
Luego, encienda la cerilta y ponga el bast6n de encendido
por la parriilade cocci6n, Gire la perilla de Control del fogon
p[incipat mas cercano hacia Hi para dejar satir el gas El
fog6n debe encenderse de lnmediato
Nunca se recline sobre el ,_rea de cocinar de la parrilla
mientras enciende el gas. Mantenga su cara y cuerpo
a una distancia segura (al menos 18 pulgadas) de ta
parle delantera de la barbacoa cuando encienda la
barbacoa con cerittas,
Pregunta:
Aveces oigo un murmullo que sale de mi regulador,
Cr3al es la causa? y - mi parrilla tiene una llama baja
y aveces no enciende, LPorqu_?
Respuesta:
El sonido activo es gasolina que fluye a traves del
regulador Un volOmen bajo de sonido es normal y no
obstruir& laoperaci6n de su parrilla El regulador con un
volumen de sonido fuerte o excesivo y un encendido ir-
regular podria ser causado por el dispositivo de
circutaci6n con gas excesivo del reguFado_ Puede set
causado al abrir la v,_lvuta de tanque muy r&pido o
demasiado 1ocual causa que eldispositivo de seguridad
del regutador retenga la circulaci6n de gas, impidiendo
la circulaci6n de gas a su pardlla Siempre encienda el
fog6n principal m&s lejos de la fuente de combustible
que le ayudar,_ a eliminar los espacios de aire en la
manguera def colector Nota: este procedimiento debe
ser hecho cada vez que un tanque nuevo de gas LP se
conecta a su parrilla
[] Gire las perillas de control a la posici6n OFF
[] Cierre el tanque de gas por la v,_lvula de gas
[] Desconecte el regulador del tanque de gas LP
[] Deje que el aparato descanse por 5 minutos,,
[] Reconecte el regulador attanque de gas LP
[] Abra la puerta de la parrilla(o la puerta del fog6n
Fateralsi usted est_ encendiendo el fog6n lateral)
[] Gire DESPACIO la valvula a I14 de vuelta
[]
Encienda et fog6n m&s lejano a tafuente de gas
[] Gire la valvula de gas otro 1/4 de vuetla para
completar media vuelta completa
[] Contin0e encendiendo los fogones moviendose
hacia la fuente de gas
[] No gire la valvuJa del tanque mas 1f2 de una vuelta
en modelos LPG
Pregunta:
A donde uso mi parrilla para una mejor seguridad y
funcionamiento?
Respuesta:
[] Los vientos fuertes y tas temperaturas bajas pueden
afectar la calefacci6n y el rendimiento de su parritla
de gas locual es un factor en los elementos cuando
coloca su parrilla de cocinar at aire libre
[]
En condiciones de vientos fuertes, siempre co!oque el
delantero de la parrilta cara hacia el vienlo para reducir
que el humo y calor le peguen a su cara y prevenir
posibles petigros hacia usted y la parrilla
[]
Use su parriIla por Io menos 3 pies atejada de
cualquier pared o superficie
[]
Use su parrilla por 1o menos a 3 pies de objetos
combustibles que se pueden derretir o incendiar
[]
Nunca use use su paprrilla en un garaje, porche,
pasabrisas, o cualquier otra area cerrada
[] Nunca obstruya la corriente de aire que ventila al
rededor de su parrilla
A-7

Pregunta:
LPor qu6 no le quedan a mi tanque viejo de gas LP
el regutador y la manguera proporcionadas con mi
nueva parrilla de gas?
Respuesta:
Et gobierno de EE.UU. regula los aparatos de gas y
tanques de gas LP Cuando las reglas cambian los
accesorios de tanque de gas de LP son modificados para
asegurar el cumplimiento de la ley Si a su tanque de gas
LP no le queda el regulador y la manguera proporcionada
con su nueva pardlla, el tanque es anticuado y debe set
reemptazado Nota: en vigencia a partir de 1 de abril de
2002 todos lostanques de gas LP vendidos deben incfuir
el dispositk, o de prevencbn de sobrellenado "OPD". Los
tanques de OPD se pueden identif_car por la rueda de la
valvula en forma triangular. Este dispositivo intemo impide
que el tanque de gas LP sea sobreltenado. Los tanques
que no tienen una valvula de OPD no se pueden vofver
a llenar
Pregunta:
LQu6 causa que se oxiden ciertas partes de la
parrilla y que efecto tienen?
Respuesta:
E1herrumbre es un proceso natural y puede aparecer
en partes de hierro fundido y de acero inoxidabte tas
partes no afectaran la operaci6n de tiempo corto de su
pardlla
Para reducir el proceso de oxidaci6n en tas rejas para
cocinar en (modelos selectos) recomendamos engrasar
las las rejas para cocinar antes y despues de cada
comida al aire libre Use un cepillo para apticar una capa
fina de aceite de cocina o manteca vegetal en cada reja
para cocinar No sugerimos aceites de tipo de rociador a
menos que sean especificadospara cocinar on altas
temperaturas Aseg_rese de engrasar la superficie de
cocinar incluyendo bordes y cualquier areas con
porcelana escarchada
Cuidadorut]nadoy mantenimientoesrequefido paramantener
laaparenciay laresistenciaalacorrosi6n delacero inoxidabte
Elhechoes que elaceroinoxidablepuedecorroerse,oxidacbn
y perdida de color pueden ser causadas bajo ciertas
condiciones Et6xido es causado cuando las particulas de
acero regulares en fa atm6sfera se _an a la super_cie de
acero inoxidableParticulasde acero tambi_npueden 6jarse
a su parrillacon el uso de lana de acero o cepilbs de metal
rfgidosparalimpiarlaparrii_aen lugar de materials otelasno-
abrask,as, esponja o nibn las que son mejores para limpiar
Enareasdela costa descarchede6xido puedendesarrollarse
sobre superficies inoxidables que no pueden set removidas
por completo Blanqueadores y otras soluciones a base de
cloro usadas para la limpieza de la casa y piscinas tambi6n
pueden causar corrosi6n al acero inoxidabie
La intemperie,el ca!orexlremo, el humo al cocinar y aceites
de maquinaria usados en el proceso de fabricar el acero
inoxidable pueden causar que etacero inoxidable se vueiva
color caramelo. Aunque hay muchos factores que pueden
afectarlaaparienda detasuperr_ciedelacero inoxidabfe,estos
no afectanla intecjridaddelacero oelrendimientode _apamlla
Para ayudaren mantener el terrninado de acero inoxidable,
siga lossiguientes procedimientos paraobtener losmejores
resultados:
Despues de cada uso (despues de que su parrilla se ha
enfriado), pase un trapo a cuberteda de acero inoxidable
que lassuperficies con un paso blando yjabonose oesponja
entonceMuego enjuagan con elagua Seasure retirartodas
particulas de comida, salsas o escabeches de acero
inoxidable porque 6stos pueden ser muy acidicos y
perjudicial para las superficies inoxidables
No usetintoreria abrasiva, depuradores de airees o cepillos
de cable rigidos de ningun tipo nunca sobre su parrilla
Use un calor iimpiador de acero inoxidable contrarb y la
frotaci6n o la limpieza en direcci6n a el grano de acero
inoxidabfe o saque lustre a lineas no contra el cereal
Pregunta:
_,Ct_ales fa mejor superficie para asar; Acerocubierto en
porcelana t rejas hechas de hierro fundido o de acero
inoxidable?
Respuesta:
Todos tienen sus ventajas Para asado tradicional de
came a la parrilla, hierro fundido o rejas de acero brindan
el mejor conducto de calor Para proteger contra el
proceso natural de oxidaci6n, acero o rejas para cocinar
de hierro fundido poseen un terminado de porcelana que
requiere un mantenimiento rutinario de las rejas las cuales
hay que secarlas muy bien
Etacero inoxidable es popular con aqueltos que
prefieren hacer menos mantenimiento,
Una nueva soluci6n innovativa esta disponible para
ciertosmodelos Itamado Therma - Core®inoxidable Esta
rejas paracocinarcombinan un centro deacero inox'_ablecon
una capa de acero inox_dablefaci!de limpiar
Puede tambien revisar las preguntas m&s frecuentes,
soluciones y los consejos de cuidado y mantenimiento
en www, qrandhal!,com.
A-8

Felicitaciones por hace[ una compra tan inteligente Su nuevo producte Kenmore ® esta disefiado y fabricado para tener
afios de una operaci6n confiable, Pero como todo producto, puede !tegar el dfa que requiera reparaciones de vez en
cuando Eso es cuando se debe tener un Acuerdo de protecci6n de reparos para ahorrarle dinero e irritaci6n
Esto es !o que es el Acuerdo de proteccibn de reparos* incluye:
[]
[]
[]
[]
[]
Una vez comprado el Acuerdo de protecci6n de reparos, una simple Ilamada telefonica es todo 1oque necesita hacer
para obtener una cita del servicio Usted puede llamar en cualquier momento dia o noche, o programar una cita para
servicio por el internet
El Acuerdo de proteccion de reparos es una compra ]ibre de riesgo Si usted cancela por cuatquier raz6n durante el
periodo de garantia del producto, proveeremos un reembolso completo. Puede tambi_n recibir un reembolso profTateado
en cuafquier momento despues que et periodo de garantta expira iCompre su Acuerdo de protecci6n de reparos hey
mismo!
Atgunas limitacionesy exctusiones son aplicable Para precios e informaci6n adicional en U,S,A, Ilame 1-800-827-6655.
*La cobertura en Canad_ varia en algunos articulos, Para obtener m,_s detalles Uamea Sears Canada en 1-800-361-
6665.
Servicio expertes por uno de nuestos 10,000 especialistas en reparos
Ser,ticio sin limites con partes y labor gratis para todas las reparaciones que est_n cubiertas
Reemplazo de producto hasta $1,500 dolares si el producto cubierto no se puede reparar,
Descuento de 10% del precio regular de servicio y partes relacionadas instaladas no cubiertas por el Acuerdo;
tambi6n, 10% deducido del precio regular del cheque de mantenimiento preventivo
Ayuda rapida por te!6fono- nosotros ta llamamos Soluci6n r_pida -Ayuda por telefono de un representante de
Sears Piense como si nosotros fueramos una "Guia de Uso y Cuidado hablada"
Servicio de instalaci6n de Sears
Para una instalaci6n profesionai de Sears de electrodomesticos, abridores de puertas de garajes, calentadores de
agua, y otros importantes aparatos e]ectrodomesticos, en U SA o Canada !lame al 1-800-4 MY- HOME®.
A-9

Your Home
For expert troubleshooting and home solutions advice:
manage
www, managemyhome,com
For repair - in your home - of all major brand appliances,
lawn and garden equipment, or heating and cooling systems,
no matter who made it, no matter who sold it!
For the replacement parts, accessories and
owner's manuals that you need to do-it-yourself_
For Sears professional installation of home appliances
and items like garage door openers and water heater&
1-800-4-MY-HOME ® (1-800-469-4663)
Call anytime, day or night(USA, and Canada)
www.sears.com www°sears°ca
Our Home
For repair of carry-in items like vacuums, lawn equipment,
and electronics, call anytime for the location of your nearest
Sears Parts & Repair Service Center
1-800-488-1222 (usA,) 1-800-469-4663 (Canada)
vvww.sears.com www.sears.ca
To purchase a protection agreement on a product serviced by Sears:
1-800-827-6655 (USA) 1-800-361-6665 (Canada)
Para pedir servicio de reparaci6n
a domicilio, y para ordenar piezas:
1-888-SU-HOGAR ®
(1-888-784-6427)
Au Canada pour service en frangais:
1-800-LE-FOYER Mc
(1-800_533-6937)
WWWsears ca
® Registered Trademark / T_,_Trademark / s_._Service Mark of Sears Brands. LLC
® Marca Registrada 1TM Marca de Fabrica I s_ Marca de Servicio de Sears Brands. LLC
_c Marque de commerce t r,_DMarque depos6e de Sears Brands. LLC © Sears Brands. LLC
 Loading...