

Page 1

Dryer
User Instructions
Sécheuse
Instructions pour l’utilisateur
Table of Contents / Table des matières ...................... 2
W10034970B Sears Canada Inc., Toronto, Ontario, Canada M5B 2B8 www.sears.ca
Page 2

Table of Contents / Table des matières
DRYER SAFETY ....................................................... 2
DRYER USE.............................................................. 5
DRYER CARE ........................................................... 6
TROUBLESHOOTING.............................................. 8
PROTECTION AGREEMENTS ................................ 9
WARRANTY............................................................10
SERVICE NUMBERS..........................BACK COVER
SÉCURITÉ DE LA SÉCHEUSE .................................... 11
UTILISATION DE LA SÉCHEUSE................................ 14
ENTRETIEN DE LA SÉCHEUSE .................................. 15
DÉPANNAGE................................................................. 17
CONTRATS DE PROTECTION .................................... 19
GARANTIE..................................................................... 19
NUMÉROS DE SERVICE....... COUVERTURE ARRIÈRE
PRODUCT RECORD
In the space below, record your complete model number, serial
number, and purchase date. You can find this information on the
model and serial number label located on the product.
Have this information available to help you obtain assistance or
service more quickly whenever you contact Sears concerning
your appliance.
Model number __ __ __.__________________________________________
Serial number __________________________________________________
Purchase date __________________________________________________
Save these instructions and your sales receipt for future
reference.
DRYER SAFETY
Your safety and the safety of others are very important.
We have provided many important safety messages in this manual and on your appliance. Always read and obey all safety
messages.
This is the safety alert symbol.
This symbol alerts you to potential hazards that can kill or hurt you and others.
All safety messages will follow the safety alert symbol and either the word “DANGER” or “WARNING.”
These words mean:
You can be killed or seriously injured if you don't immediately
DANGER
WARNING
follow instructions.
can be killed or seriously injured if you don't
You
instructions.
follow
All safety messages will tell you what the potential hazard is, tell you how to reduce the chance of injury, and tell you what can
happen if the instructions are not followed.
2
Page 3
IMPORTANT SAFETY INSTRUCTIONS
WARNING:
including the following:
■
Read all instructions before using the dryer.
■
Do not place items exposed to cooking oils in your dryer.
Items contaminated with cooking oils may contribute to
a chemical reaction that could cause a load to catch fire.
■
Do not dry articles that have been previously cleaned in,
washed in, soaked in, or spotted with gasoline, drycleaning solvents, or other flammable or explosive
substances as they give off vapors that could ignite or
explode.
■
Do not allow children to play on or in the dryer. Close
supervision of children is necessary when the dryer is
used near children.
■
Before the dryer is removed from service or discarded,
remove the door to the drying compartment.
■
Do not reach into the dryer if the drum is moving.
■
Do not install or store the dryer where it will be exposed
to the weather.
■
Do not tamper with controls.
To reduce the risk of fire, electric shock, or injury to persons when using the dryer, follow basic precautions,
SAVE THESE INSTRUCTIONS
■
Do not repair or replace any part of the dryer or attempt
any servicing unless specifically recommended in this
Use and Care Guide or in published user-repair
instructions that you understand and have the skills to
carry out.
■
Do not use fabric softeners or products to eliminate static
unless recommended by the manufacturer of the fabric
softener or product.
■
Do not use heat to dry articles containing foam rubber or
similarly textured rubber-like materials.
■
Clean lint screen before or after each load.
■
Keep area around the exhaust opening and adjacent
surrounding areas free from the accumulation of lint, dust,
and dirt.
■
The interior of the dryer and exhaust vent should be
cleaned periodically by qualified service personnel.
■
See installation instructions for grounding requirements.
WARNING: For your safety, the information in this manual must be followed to minimize
the risk of fire or explosion, or to prevent property damage, personal injury, or death.
– Do not store or use gasoline or other flammable vapors and liquids in the vicinity of this
or any other appliance.
– WHAT TO DO IF YOU SMELL GAS:
Do not try to light any appliance.
•
Do not touch any electrical switch; do not use any phone in your building.
•
Clear the room, building, or area of all occupants.
•
Immediately call your gas supplier from a neighbor's phone. Follow the gas supplier's
•
instructions.
If you cannot reach your gas supplier, call the fire department.
•
– Installation and service must be performed by a qualified installer, service agency, or
the gas supplier.
3
Page 4
Checking Your Vent
Your dryer must be properly installed and vented to achieve
maximum drying efficiency and shorten drying times. Use the
minimum recommended installation clearances found in the
Installation Instructions. See the Installation Instructions for more
information.
WARNING
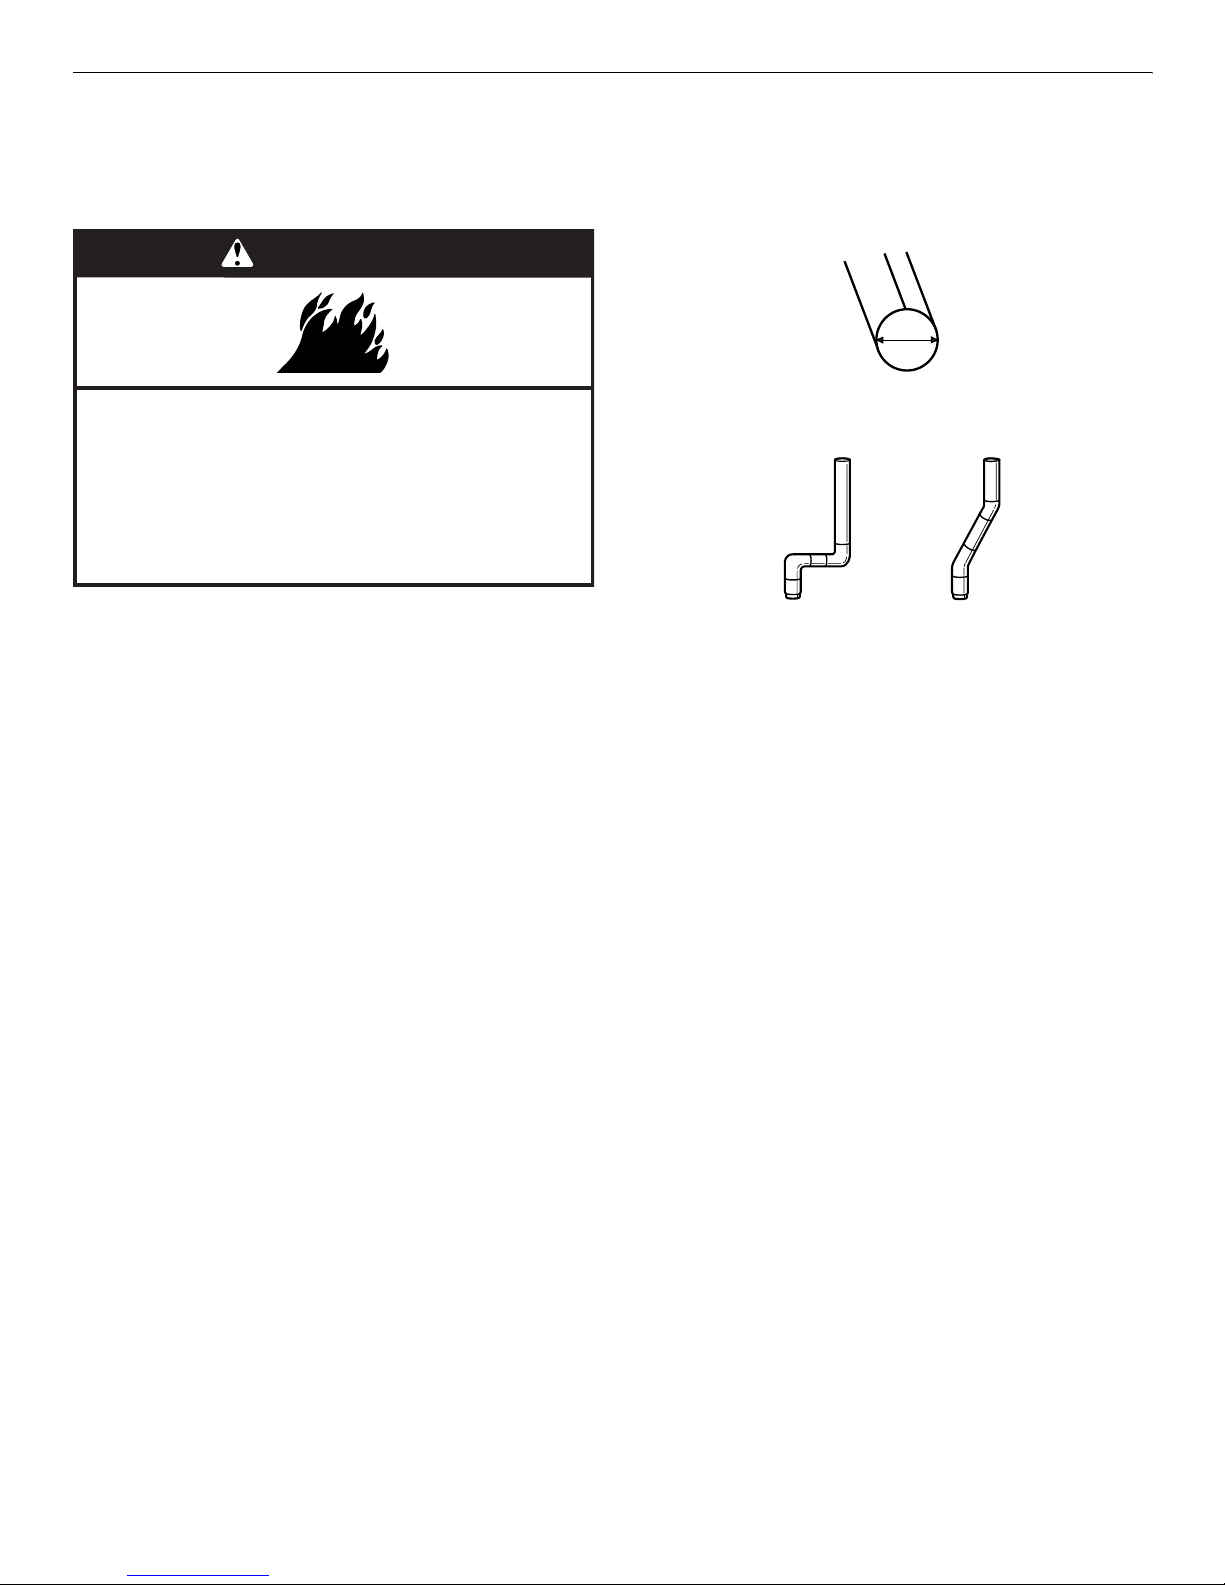
1. Do not use plastic vent or metal foil vent. Use 4" (10.2 cm)
metal or flexible metal vent. Do not kink or crush flexible
metal vent. It must be completely extended to allow adequate
exhaust air to flow. Check vent after installation. Refer to the
Installation Instructions for proper length requirements of
vent.
4"
10.2 cm
Fire Hazard
Use a heavy metal vent.
Do not use a plastic vent.
Do not use a metal foil vent.
Failure to follow these instructions can result in death
or fire.
If the dryer is not properly installed and vented, it will not be
covered under the warranty. Proper venting of your dryer is
important for satisfactory drying results. See the Installation
Instructions for more detail.
NOTE: Service calls caused by improper venting will be paid for
by the customer, whether it was a paid installation or selfinstalled.
2. Use a 4" (10.2 cm) exhaust hood.
3. Use the straightest path possible when routing the vent.
Good Better
4. Use clamps to seal all joints. Do not use duct tape, screws or
other fastening devices that extend into the interior of the
vent to secure vent.
5. Clean exhaust vent periodically, depending on use, but at
least every 2 years, or when installing your dryer in a new
location. When cleaning is complete, be sure to follow the
Installation Instructions supplied with your dryer for final
product check.
4
Page 5
DRYER USE
Starting Your Dryer
WARNING
Explosion Hazard
Keep flammable materials and vapors, such as
gasoline, away from dryer.
Do not dry anything that has ever had anything
flammable on it (even after washing).
Failure to follow these instructions can result in death,
explosion, or fire.
This booklet covers several different models. Your dryer may not
have all of the cycles and features described.
Before using your dryer, wipe the dryer drum with a damp cloth to
remove dust from storing and shipping.
1. Clean lint screen before each load. See “Cleaning the Lint
Screen.”
2. Load clothes loosely into the dryer and close the door. Do not
pack the dryer. Allow space for clothes to tumble freely.
3. Turn the Cycle Selector Control to the recommended cycle
for the type of load being dried. ENERGY PREFERRED
automatic dry settings are indicated by an asterisk (*) on the
timer dial, next to the words NORMAL DRY. Use this Normal
Dry cycle to dry most heavy- to medium-weight fabrics.
4. Set the Temperature control to the recommended setting for
the type of fabric being dried. See Dryer Cycle Descriptions
(separate sheet) for temperature suggestions.
5. (OPTIONAL) Your dryer may have a WRINKLE GUARD
feature selector. When you are unable to remove a load from
the dryer as soon as it stops, wrinkles can form. This feature
periodically tumbles, rearranges and fluffs the load without
heat to help avoid wrinkling.
6. (OPTIONAL) If you want the dryer to sound a signal when the
cycle is finished, set the END OF CYCLE SIGNAL control to
ON, or to the volume level you prefer (on some models). The
signal is helpful when you are drying permanent press,
synthetics and other items that should be removed from the
dryer as soon as it stops.
7. If desired, add a fabric softener sheet. Follow package
instructions.
8. Press PUSH TO START.
®
WARNING
Fire Hazard
No washer can completely remove oil.
Do not dry anything that has ever had any type of oil on
it (including cooking oils).
Items containing foam, rubber, or plastic must be dried
on a clothesline or by using an Air Cycle.
Failure to follow these instructions can result in death
or fire.
Stopping and Restarting
You can stop your dryer anytime during a cycle.
To stop your dryer
Open the dryer door or turn the Cycle Selector Control to OFF.
NOTE: The Cycle Selector Control should point to an Off area
when the dryer is not in use.
To re st art yo ur d rye r
1. Close the door.
2. Select a new cycle and temperature (if desired).
3. Press the PUSH TO START button.
How Automatic Drying Works
During the Automatic Drying Cycle, the exhaust temperature of
the dryer determines the drying time and dryness levels. A
thermostat signals the Cycle Control Knob when to move into
Cool Down. The drying time for an Automatic Drying Cycle
depends on load type and load size. When drying a large or
heavy load, the Cycle Control Knob may take a long time before it
begins to advance into Cool Down. Automatic Drying Cycle takes
the guesswork out of drying time and enhances fabric care. The
amount of time that is displayed is the estimated time remaining
in the cycle.
5
Page 6
Dryer Rack Option
Use the dryer rack to dry items such as sweaters and pillows
without tumbling. The drum turns, but the rack does not move.
If your model does not have a dryer rack, you may be able to
purchase one. To find out whether your model allows dryer rack
usage and to obtain ordering information, please refer to the back
page of this manual or contact the dealer from whom you
purchased your dryer.
NOTE: You must remove dryer rack for normal tumbling. Do not
use automatic cycles with the dryer rack.
TUMBLE FREE™ Non-Heated Dryer Rack
Use with 29" (73.7 cm) wide dryers. Air circulates in a
concentrated pattern over and around clothes to allow efficient
and uniform drying.
TUMBLE FREE™ Heated Dryer Rack
Use with 27" (69 cm) wide dryers. Air circulates in a concentrated
pattern over, under and through clothes, significantly reducing
drying time.
To use the dryer rack:
1. 29" (73.7 cm) Wide Dryer
Slide rear pegs into the dimples on the back wall of the dryer.
Lower the front legs to rest on the dryer opening.
DRYER CARE
27" (69 cm) Wide Dryer
Do not remove lint screen. Slide dryer rack over the bottom of
the dryer door opening. Push down to secure it on the frame.
2. Put wet items on the rack. Leave space between items so air
can reach all surfaces. Do not allow items to hang over the
edge of the rack. Close the door.
3. Select cycle and temperature to match the fabrics in your
load. Items containing foam, rubber, or plastic must be dried
on a clothesline or by using an air cycle. Refer to the following
table.
4. Start the dryer. Reset time to complete drying, if needed.
Rack Dry Cycle Temp Time
Washable wool items (block
to shape and lay flat on rack)
Stuffed toys or pillows (cotton
or polyester fiber filled)
Stuffed toys/pillows (foam
rubber filled)
Timed
Dry
Timed
Dry
Air
(no heat)
Low 20 min.
Low 20 min.
None 20 - 50
min.
Cleaning the Dryer Location
Keep dryer area clear and free from items that would obstruct the
flow of combustion and ventilation air.
WARNING
Explosion Hazard
Keep flammable materials and vapors, such as
gasoline, away from dryer.
Place dryer at least 18 inches (46 cm) above the floor
for a garage installation.
Failure to do so can result in death, explosion, or fire.
Cleaning the Lint Screen
Clean lint screen before each load. A screen blocked by lint can
increase drying time.
IMPORTANT:
■ Do not run the dryer with the lint screen loose, damaged,
blocked, or missing. Doing so can cause overheating and
damage to both the dryer and fabrics.
■ If lint falls off the screen into the dryer during removal, check
the exhaust hood and remove the lint.
Every Load Cleaning
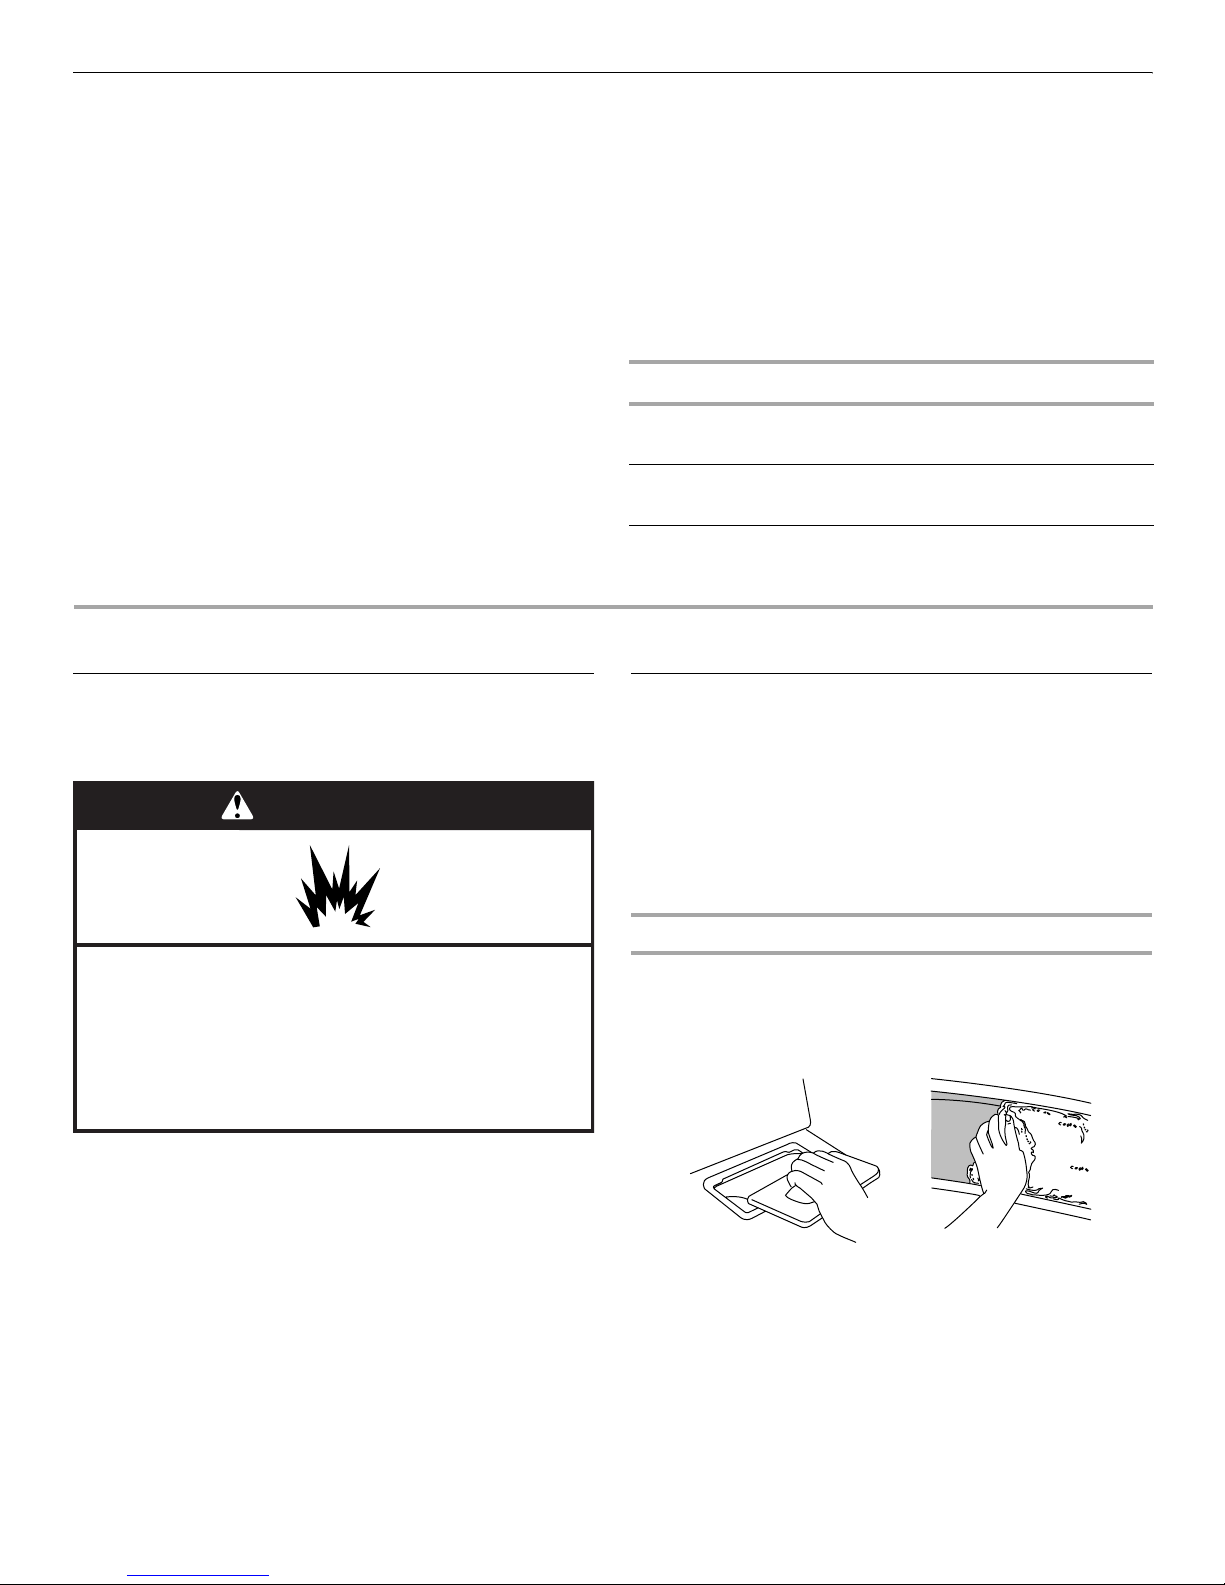
Style 1:
1. The lint screen is located on top of the dryer. Pull the lint
screen toward you. Roll lint off the screen with your fingers.
Do not rinse or wash screen to remove lint. Wet lint is hard to
remove.
2. Push the lint screen firmly back into place.
6
Page 7

Style 2:
1. The lint screen is located in the door of the dryer. Pull the lint
screen straight up. Roll lint off the screen with your fingers.
Do not rinse or wash screen to remove lint. Wet lint is hard to
remove.
Vacation and Moving Care
Vacation care
Operate your dryer only when you are at home. If you will be on
vacation or not using your dryer for an extended period of time,
you should:
1. Unplug dryer or disconnect power.
2. If you have a gas dryer, close shutoff valve in gas supply line.
3. Clean lint screen. See “Cleaning the Lint Screen.”
Moving care - Electric Dryers
2. Push the lint screen firmly back into place.
As Needed Cleaning
1. Roll lint off the screen with your fingers.
2. Wet both sides of lint screen with hot water.
3. Wet a nylon brush with hot water and liquid detergent. Scrub
lint screen with the brush to remove residue buildup.
4. Rinse screen with hot water.
5. Thoroughly dry lint screen with a clean towel. Replace screen
in dryer.
Cleaning the Dryer Interior
1. Apply a liquid, nonflammable household cleaner to the
stained area of the drum and rub with a soft cloth until stain is
removed.
2. Wipe drum thoroughly with a damp cloth.
3. Tumble a load of clean cloths or towels to dry the drum.
NOTE: Garments that contain unstable dyes, such as denim blue
jeans or brightly colored cotton items, may discolor the dryer
interior. These stains are not harmful to your dryer and will not
stain future loads of clothes. Dry unstable dye items inside-out to
avoid transfer of dye.
Removing Accumulated Lint
1. Unplug dryer or disconnect power.
2. Make sure leveling legs are secure in dryer base.
3. Use masking tape to secure dryer door.
Moving care - Gas Dryers
1. Unplug the power supply cord.
2. Close shutoff valve in gas supply line.
3. Disconnect gas supply line pipe and remove fittings attached
to dryer pipe.
4. Cap the open fuel supply line.
5. Make sure leveling legs are secure in dryer base.
6. Use masking tape to secure dryer door.
Changing the Drum Light
1. Unplug dryer or disconnect power.
2. Open the dryer door. Locate the light bulb cover on the back
wall of the dryer. Remove the screw located in the lower righthand corner of the cover. Remove the cover.
From Inside the Dryer Cabinet
Lint should be removed every 2 years, or more often, depending
on dryer usage. Cleaning should be done by a qualified person.
From Inside the Exhaust Vent
Lint should be removed every 2 years, or more often, depending
on dryer usage.
3. Turn bulb counterclockwise. Replace the bulb with a 10-watt
appliance bulb only. Replace the cover and secure with the
screw.
4. Plug in dryer or reconnect power.
7
Page 8

TROUBLESHOOTING
First try the solutions suggested here and possibly avoid the cost of a service call...
Dryer Operation
Dryer will not run
■ Has a household fuse blown, or has a circuit breaker
tripped?
There may be 2 fuses or circuit breakers for the dryer. Check
that both fuses are intact and tight, or that both circuit
breakers have not tripped. Replace the fuse or reset the
circuit breaker. If the problem continues, call an electrician.
■ Is the correct power supply available?
Electric dryers require 240-volt power supply. Check with a
qualified electrician.
■ Was a regular fuse used?
Use a time-delay fuse.
■ Is the dryer door firmly closed?
■ Was the Start button firmly pressed?
■ Is a cycle selected?
The dryer will not start in the Wrinkle Guard
the dial past OFF.
No heat
■ Has a household fuse blown, or has a circuit breaker
tripped?
Electric dryers use 2 household fuses or circuit breakers. The
drum may be turning, but you may not have heat. Replace the
fuse or reset the circuit breaker. If the problem continues, call
an electrician.
■ For gas dryers, is the valve open on the supply line?
Unusual sounds
■ Has the dryer had a period of non-use?
If the dryer hasn’t been used for a while, there may be a
thumping sound during the first few minutes of operation.
■ Is a coin, button, or paper clip caught between the drum
and front or rear of the dryer?
Check the front and rear edges of the drum for small objects.
Clean out pockets before laundering.
■ Is it a gas dryer?
The gas valve clicking is a normal operating sound.
■ Are the four legs installed, and is the dryer level front to
back and side to side?
The dryer may vibrate if not properly installed. See the
Installation Instructions.
■ Is the clothing knotted or balled up?
When balled up, the load will bounce, causing the dryer to
vibrate. Separate the load items and restart the dryer.
Timer does not noticeably advance
■ Is the dryer set to Timed or Air Dry?
The timer moves slowly and continuously for the time setting.
■ Is the dryer set to Automatic Drying?
The timer moves only when the clothing is mostly dry. See
“How Automatic Drying Works” in “Dryer Use.”
®
position. Move
Dryer Results
Clothes are not drying satisfactorily, drying times are too
long, or load is too hot
■ Is the lint screen clogged with lint?
Lint screen should be cleaned before each load.
WARNING
Fire Hazard
Use a heavy metal vent.
Do not use a plastic vent.
Do not use a metal foil vent.
Failure to follow these instructions can result in death
or fire.
■ Is the exhaust vent or outside exhaust hood clogged with
lint, restricting air movement?
Run the dryer for 5-10 minutes. Hold your hand under the
outside exhaust hood to check air movement. If you do not
feel air movement, clean exhaust system of lint or replace
exhaust vent with heavy metal or flexible metal vent. See the
Installation Instructions.
■ Are fabric softener sheets blocking the grille?
Use only one fabric softener sheet, and use it only once.
■ Is the exhaust vent the correct length?
Check that the exhaust vent is not too long or has too many
turns. Long venting will increase drying times. See the
Installation Instructions.
■ Is the exhaust vent diameter the correct size?
Use 4" (10.2 cm) diameter vent material.
WARNING
Explosion Hazard
Keep flammable materials and vapors, such as
gasoline, away from dryer.
Place dryer at least 18 inches (46 cm) above the floor
for a garage installation.
Failure to do so can result in death, explosion, or fire.
■ Is the dryer located in a room with temperature below
45ºF (7ºC)?
Proper operation of dryer cycles requires temperatures above
45ºF (7ºC).
8
Page 9

■ Is the dryer located in a closet?
Closet doors must have ventilation openings at the top and
bottom of the door. The rear of the dryer requires 5" (12.7 cm)
of airspace, and 1" (2.5 cm) is recommended for the sides
and front of the dryer. See the Installation Instructions.
■ Has an air dry cycle been selected?
Select the right cycle for the types of garments being dried.
■ Is the load too large and heavy to dry quickly?
Separate the load to tumble freely.
Stains on load or drum
■ Was dryer fabric softener properly used?
Add dryer fabric softener sheets at the beginning of the cycle.
Fabric softener sheets added to a partially dried load can
stain your garments.
Drum stains are caused by dyes in clothing (usually blue
jeans). This will not transfer to other clothing.
Cycle time too short
■ Is the automatic cycle ending early?
Change the dryness level setting on Automatic Cycles.
Increasing or decreasing the dryness level will change the
amount of drying time in a cycle.
Lint on load
■ Is the lint screen clogged?
Lint screen should be cleaned before each load.
PROTECTION AGREEMENTS
Master Protection Agreements
Congratulations on making a smart purchase. Your new
Kenmore
dependable operation. But like all products, it may require
preventive maintenance or repair from time to time. That’s when
having a Master Protection Agreement can save you money and
aggravation.
The Master Protection Agreement also helps extend the life of
your new product. Here’s what the Agreement* includes:
✔ Parts and labor needed to help keep products operating
✔ Expert service by a force of more than 10,000 authorized
✔ Unlimited service calls and nationwide service, as often as
✔ “No-lemon” guarantee – replacement of your covered
✔ Product replacement if your covered product can’t be fixed.
✔ Annual Preventive Maintenance Check at your request – no
✔ Fast help by phone – we call it Rapid Resolution – phone
®
product is designed and manufactured for years of
properly under normal use, not just defects. Our coverage
goes well beyond the product warranty. No deductibles, no
functional failure excluded from coverage— real protection.
Sears service technicians, which means someone you can
trust will be working on your product.
you want us, whenever you want us.
product if four or more product failures occur within twelve
months.
extra charge.
support from a Sears representative on all products. Think of
us as a “talking owner’s manual.”
Loads are wrinkled
■ Was the load removed from dryer at the end of the cycle?
■ Was the dryer overloaded?
Dry smaller loads that can tumble freely.
Odors
■ Have you recently been painting, staining or varnishing in
the area where your dryer is located?
If so, ventilate the area. When the odors or fumes are gone
from the area, rewash and dry the clothing.
■ Is the electric dryer being used for the first time?
The new electric heating element may have an odor. The odor
will be gone after the first cycle.
✔ Power surge protection against electrical damage due to
power fluctuations.
✔ $250 Food Loss Protection annually for any food spoilage
that is the result of mechanical failure of any covered
refrigerator or freezer.
✔ Rental reimbursement if repair of your covered product takes
longer than promised.
✔ 10% discount off the regular price of any non-covered repair
service and related installed parts.
Once you purchase the Agreement, a simple phone call is all that
it takes for you to schedule service. You can call anytime day or
night, or schedule a service appointment online.
The Master Protection Agreement is a risk free purchase. If you
cancel for any reason during the product warranty period, we will
provide a full refund. Or, a prorated refund anytime after the
product warranty period expires. Purchase your Master
Protection Agreement today!
Some limitations and exclusions apply. For prices and
additional information in the U.S.A. call 1-800-827-6655.
*Coverage in Canada varies on some items. For full details
call Sears Canada at 1-800-361-6665.
Sears Installation Service
For Sears professional installation of home appliances, garage
door openers, water heaters, and other major home items, in the
U.S.A. or Canada call 1-800-4-MY-HOME
®
.
9
Page 10

KENMORE APPLIANCE WARRANTY
ONE YEAR LIMITED WARRANTY
When installed, operated and maintained according to all
instructions supplied with the product, if this appliance fails due
to a defect in material or workmanship within one year from the
date of purchase, call 1-800-4-MY-HOME
repair.
If this appliance is used for other than private family purposes,
this warranty applies for only 90 days from the date of purchase.
THIS WARRANTY COVERS ONLY DEFECTS IN MATERIAL
AND WORKMANSHIP. SEARS WILL NOT PAY FOR:
1. Expendable items that can wear out from normal use,
including but not limited to filters, belts, light bulbs, and bags.
2. A service technician to instruct the user in correct product
installation, operation or maintenance.
3. A service technician to clean or maintain this product.
4. Damage to or failure of this product if it is not installed,
operated or maintained according to all instructions supplied
with the product.
5. Damage to or failure of this product resulting from accident,
abuse, misuse or use for other than its intended purpose.
6. Damage to or failure of this product caused by the use of
detergents, cleaners, chemicals or utensils other than those
recommended in all instructions supplied with the product.
7. Damage to or failure of parts or systems resulting from
unauthorized modifications made to this product.
®
to arrange for free
DISCLAIMER OF IMPLIED WARRANTIES; LIMITATION OF
REMEDIES
Customer’s sole and exclusive remedy under this limited
warranty shall be product repair as provided herein. Implied
warranties, including warranties of merchantability or fitness for a
particular purpose, are limited to one year or the shortest period
allowed by law. Sears shall not be liable for incidental or
consequential damages. Some states and provinces do not allow
the exclusion or limitation of incidental or consequential
damages, or limitations on the duration of implied warranties of
merchantability or fitness, so these exclusions or limitations may
not apply to you.
This warranty applies only while this appliance is used in the
United States and Canada.
This warranty gives you specific legal rights, and you may also
have other rights which vary from state to state.
Sears, Roebuck and Co.
Dept. 817WA, Hoffman Estates, IL 60179
Sears Canada Inc.
Toronto, Ontario, Canada M5B 2B8
10
Page 11

INSTRUCTIONS POUR L’UTILISATEUR DE LA SÉCHEUSE
ENREGISTREMENT DU PRODUIT
Dans l'espace ci-dessous, inscrire les numéros de modèle et de
série complets et la date d'achat. Vous trouverez ces
renseignements sur l'étiquette des numéros de modèle et de
série située sur le produit.
Gardez ces renseignements à disposition pour obtenir plus
rapidement assistance ou service lorsque vous communiquez
avec Sears au sujet de votre appareil ménager.
Numéro de modèle __ __ __. _____________________________________
Numéro de série ________________________________________________
Date d'achat____________________________________________________
Conservez ces instructions et votre reçu de vente pour
référence ultérieure.
SÉCURITÉ DE LA SÉCHEUSE
Votre sécurité et celle des autres est très importante.
Nous donnons de nombreux messages de sécurité importants dans ce manuel et sur votre appareil ménager. Assurez-vous de
toujours lire tous les messages de sécurité et de vous y conformer.
Voici le symbole d’alerte de sécurité.
Ce symbole d’alerte de sécurité vous signale les dangers potentiels de décès et de blessures graves à vous
et à d’autres.
Tous les messages de sécurité suivront le symbole d’alerte de sécurité et le mot “DANGER” ou
“AVERTISSEMENT”. Ces mots signifient :
Risque possible de décès ou de blessure grave si vous ne
DANGER
AVERTISSEMENT
suivez pas immédiatement les instructions.
Risque possible de décès ou de blessure grave si vous
ne suivez pas les instructions.
Tous les messages de sécurité vous diront quel est le danger potentiel et vous disent comment réduire le risque de blessure et
ce qui peut se produire en cas de non-respect des instructions.
IMPORTANTES INSTRUCTIONS DE SÉCURITÉ
Pour réduire le risque d'incendie, de choc électrique ou de blessure lors de l'utilisation de
AVERTISSEMENT :
la sécheuse, il convient d'observer certaines précautions élémentaires dont les suivantes :
■
Lire toutes les instructions avant d'utiliser la sécheuse.
■
Ne pas placer des articles exposés aux huiles de cuisson
dans votre sécheuse. Les articles contaminés par des
huiles de cuisson peuvent contribuer à une réaction
chimique qui pourrait causer à la charge de s'enflammer.
■
Ne pas faire sécher dans la machine des articles qui ont
déjà été nettoyés, lavés, imbibés, ou tachés d'essence,
de solvants pour nettoyage à sec, d'autres substances
inflammables, ou de substances explosives puisqu'elles
dégagent des vapeurs qui peuvent provoquer un
incendie ou une explosion.
■
Ne pas permettre à des enfants de jouer sur ou à
l'intérieur de la sécheuse. Une surveillance étroite est
nécessaire lorsque la sécheuse est utilisée près d'eux.
■
Avant d'enlever la sécheuse du service ou la jeter, enlever
la porte du compartiment de séchage.
Ne pas mettre la main dans la sécheuse si le tambour est
■
en mouvement.
■
Ne pas installer ni entreposer la sécheuse où elle sera
exposée aux intempéries.
■
Ne pas jouer avec les commandes.
CONSERVEZ CES INSTRUCTIONS
11
Page 12

IMPORTANTES INSTRUCTIONS DE SÉCURITÉ
■
Ne pas réparer ni remplacer une pièce de la sécheuse ou
essayer d'en faire l'entretien à moins d'une recommandation
spécifique dans le guide d'utlilisation et d'entretien, ou
publiée dans les instructions de réparation par l'utilisateur
que vous comprenez et pouvez exécuter avec compétence.
■
Ne pas utiliser un produit assouplissant de tissu ou des
produits pour éliminer la statique à moins qu'ils ne soient
recommandés par le fabricant du produit assouplissant de
tissu ou du produit.
■
Ne pas utiliser la chaleur pour faire sécher des articles
fabriqués avec du caoutchouc mousse ou des matériaux
semblables.
■
Nettoyer le filtre à charpie avant et après chaque charge.
■
Ne pas laisser la charpie, la poussière, ou la saleté
s'accumuler autour du système d'évacuation ou autour de
l'appareil.
■
Un nettoyage périodique de l'intérieur de la sécheuse et du
conduit d'évacuation doit être effectué par une personne
qualifiée.
■
Voir les instructions d'installation pour les exigences de
liaison de l'appareil à la terre.
CONSERVEZ CES INSTRUCTIONS
AVERTISSEMENT : Pour votre sécurité, les renseignements dans ce manuel doivent
être observés pour réduire au minimum les risques d’incendie ou d’explosion ou pour
éviter des dommages au produit, des blessures ou un décès.
– Ne pas entreposer ou utiliser de l’essence ou d’autres vapeurs ou liquides
inflammables à proximité de cet appareil ou de tout autre appareil électroménager.
– QUE FAIRE DANS LE CAS D’UNE ODEUR DE GAZ :
Ne pas tenter d’allumer un appareil.
•
Ne pas toucher à un commutateur électrique; ne pas utiliser le téléphone se trouvant
•
sur les lieux.
Évacuer tous les gens de la pièce, de l’édifice ou du quartier.
•
Appeler immédiatement le fournisseur de gaz d’un téléphone voisin. Suivre ses
•
instructions.
À défaut de joindre votre fournisseur de gaz, appeler les pompiers.
•
– L’installation et l’entretien doivent être effectués par un installateur qualifié, une
agence de service ou le fournisseur de gaz.
12
Page 13

Vérification du conduit d’évacuation
La sécheuse doit être bien installée et munie d’un système
adéquat d’évacuation de l’air pour donner une efficacité
maximale de séchage et un temps de séchage plus court. Utiliser
les dégagements minimums recommandés pour l’installation que
vous trouverez dans vos Instructions d’installation. Voir les
Instructions d’installation pour plus de renseignements.
AVERTISSEMENT
1. Ne pas utiliser un conduit d’évacuation en plastique ou en
feuille de métal. Utiliser un conduit de 4" (10,2 cm) en métal
lourd ou flexible. Ne pas déformer ni écraser le conduit
d’évacuation en métal flexible. Il doit être complètement
déployé pour permettre l’évacuation adéquate de l’air. Vérifier
le système d’évacuation après l’installation. Se référer aux
Instructions d’installation pour la bonne longueur du conduit
d’évacuation.
4"
10,2 cm
Risque d’incendie
Utiliser un conduit d’évacuation en métal lourd.
Ne pas utiliser un conduit d’évacuation en plastique.
Ne pas utiliser un conduit d’évacuation en feuille
de métal.
Le non-respect de ces instructions peut causer
un décès ou un incendie.
Si la sécheuse n’est pas bien installée et munie d’un système
adéquat d’évacuation de l’air, elle ne sera pas couverte en vertu
de la garantie. Pour obtenir les meilleurs résultats de séchage,
l'évacuation de l'air doit être adéquate. Voir les Instructions
d'installation pour plus de renseignements.
REMARQUE : Les visites de service causées par une évacuation
inadéquate seront aux frais du client peu importe s’il a fait faire
l’installation ou s’il l’a faite lui-même.
2. Utiliser un clapet d’évacuation de 4" (10,2 cm).
3. Utiliser l’acheminement le plus rectiligne possible lors de
l’installation du conduit.
Bon Meilleur
4. Utiliser des brides pour sceller tous les joints. Ne pas utiliser
de ruban adhésif pour conduit, des vis ou autres dispositifs
de fixation qui se prolongent à l'intérieur du conduit pour fixer
celui-ci.
5. Nettoyer périodiquement le conduit d’évacuation, selon
l’utilisation, mais au moins à tous les 2 ans ou lors de
l’installation de la sécheuse à un nouvel endroit. Après le
nettoyage, veuillez suivre les Instructions d’installation
fournies avec la sécheuse pour une vérification finale de
l’appareil.
13
Page 14

UTILISATION DE LA SÉCHEUSE
Mise en marche de la sécheuse
AVERTISSEMENT
Risque d'explosion
Garder les matières et les vapeurs inflammables, telle
que l’essence, loin de la sécheuse.
Ne pas faire sécher un article qui a déjà été touché par
un produit inflammable (même après un lavage).
Le non-respect de ces instructions peut causer
un décès, une explosion ou un incendie.
Ce manuel couvre plusieurs modèles différents. Votre modèle
peut ne pas avoir tous les programmes ou toutes les
caractéristiques décrits.
Avant d’utiliser la sécheuse, essuyer le tambour de la sécheuse
avec un linge humide pour enlever la poussière accumulée au
cours de l’entreposage et de l'expédition.
1. Nettoyer le filtre à charpie avant chaque charge. Voir
“Nettoyage du filtre à charpie.”
2. Charger les vêtements sans les tasser dans la sécheuse et
fermer la porte. Ne pas surcharger la sécheuse. Prévoir
suffisamment d'espace pour que les vêtements puissent
culbuter librement.
3. Tourner la commande de sélection de programme au
programme recommandé pour le type de charge que vous
séchez. Les réglages de séchage automatique ENERGY
PREFERRED (éconergiques) sont indiqués par un
astérisque (*) sur le cadran, à côté des mots NORMAL DRY
(séchage normal). Utiliser le réglage Normal Dry pour sécher
la plupart des charges lourdes et de poids moyen.
4. Régler la commande de température au réglage recommandé
pour le type de tissu que vous séchez. Consulter
Descriptions des programmes de la sécheuse (feuille
séparée) pour obtenir des suggestions de température.
5. (FACULTATIF) Votre sécheuse peut disposer d’un sélecteur
de la caractéristique WRINKLE GUARD
pas enlever une charge de la sécheuse dès qu’elle s’arrête,
des faux plis peuvent se former. Cette caractéristique fournit
un culbutage à intervalles, réarrange et aère les charges pour
éviter les faux plis.
6. (FACULTATIF) Si vous voulez que la sécheuse émette un
signal lorsque le programme est terminé, régler la commande
END OF CYCLE SIGNAL (signal de fin de programme) sur ON
(marche), ou au niveau de volume que vous préférez (sur
certains modèles). Le signal est utile lorsque vous faites
sécher des tissus de pressage permanent, synthétiques et
autres articles qui doivent être enlevés de la sécheuse
aussitôt qu’elle s’arrête.
7. Si désiré, ajouter une feuille d’assouplissant de tissu. Suivre
les instructions sur l’emballage.
8. Appuyer sur PUSH TO START (enfoncer pour mettre en
marche).
®
. Lorsqu’on ne peut
AVERTISSEMENT
Risque d’incendie
Aucune laveuse ne peut complètement enlever l’huile.
Ne pas faire sécher des articles qui ont été salis par
tout genre d’huile (y compris les huiles de cuisson).
Les articles contenant mousse, caoutchouc ou
plastique doivent être séchés sur une corde à linge
ou par le programme de séchage à l’air.
Le non-respect de ces instructions peut causer
un décès ou un incendie.
Arrêt et remise en marche
On peut arrêter la sécheuse à tout moment au cours d'un
programme.
Pour arrêter la sécheuse
Ouvrir la porte de la sécheuse ou tourner la commande de
sélection de programme à arrêt (OFF).
REMARQUE : Le bouton de commande de programme doit
pointer vers une zone d’arrêt (Off) quand la sécheuse n’est pas
utilisée.
Pour remettre la sécheuse en marche
1. Fermer la porte.
2. Choisir un nouveau programme et une nouvelle température
(si désiré).
3. Appuyer sur PUSH TO START (enfoncer pour mettre en
marche).
Fonctionnement du programme de séchage automatique
Au cours du programme Auto Dry (séchage automatique), la
température de l'air évacué par la sécheuse détermine la durée et
les niveaux de séchage. Un thermostat indique au bouton de
commande de programme à quel moment passer à la période de
refroidissement. La durée de séchage pour un programme de
séchage automatique dépend du type de charge et de son
volume. Pour le séchage d'une charge lourde ou importante, le
bouton de commande de programme peut prendre du temps
avant de passer à la période de refroidissement. Le programme
Auto Dry supprime la nécessité de calculer la durée de séchage
et apporte davantage de soin aux vêtements. La durée affichée
correspond à la durée résiduelle estimée du programme.
14
Page 15

Option de grille de séchage
Utiliser la grille de séchage pour faire sécher sans culbutage des
articles tels que chandails et oreillers. Le tambour tourne, mais la
grille ne bouge pas.
Si votre modèle ne dispose pas d'une grille de séchage, vous
pouvez en acheter une. Pour savoir si votre modèle permet
l’utilisation d’une grille de séchage et pour obtenir des
renseignements pour commander, veuillez consulter le dos de la
couverture de ce manuel ou contacter le marchand chez qui vous
avez acheté votre sécheuse.
REMARQUE : Vous devez enlever la grille de séchage pour le
culbutage normal. Ne pas utiliser les programmes automatiques
avec la grille de séchage.
Grille de séchage sans chaleur TUMBLE FREE™
Utiliser avec une sécheuse de 29" (73,7 cm) de large. L’air circule
de façon concentrée sur et autour des vêtements pour un
séchage efficace et uniforme.
Grille de séchage avec chaleur TUMBLE FREE™
Utiliser avec une sécheuse de 27" (69 cm) de large. L’air circule
de façon concentrée sur, en dessous et à travers les vêtements
en réduisant la durée de séchage de façon significative.
Utilisation de la grille de séchage :
1. Sécheuse de 29" (73,7 cm) de large
Glisser les chevilles à l’arrière dans les alvéoles sur la paroi
arrière de la sécheuse. Abaisser les pieds à l’avant pour qu'ils
reposent sur l’ouverture de la sécheuse.
Sécheuse de 27" (69 cm) de large
Ne pas retirer le filtre à charpie. Glisser la grille de séchage
par-dessus le bas de l’ouverture de la porte de la sécheuse.
Appuyer pour la fixer en place sur le cadre.
2. Placer les articles mouillés sur la grille. Laisser de l’espace
entre les articles pour que l’air puisse atteindre toutes les
surfaces. Ne pas laisser un article pendre par-dessus le bord
de la grille. Fermer la porte.
3. Sélectionner le programme et la température correspondant
aux tissus de la charge. Les articles contenant mousse,
caoutchouc ou plastique doivent être séchés sur une corde à
linge ou par le programme de séchage à l’air. Consulter le
tableau suivant.
4. Mettre la sécheuse en marche. Régler de nouveau la durée
pour compléter le séchage, si nécessaire.
Séchage sur grille Pro-
Articles en laine lavables
(former la taille et étaler à
plat sur la grille)
Jouets ou oreillers
rembourrés (garnissage de
coton ou de polyester)
Jouets/oreillers rembourrés
(garnissage de caoutchouc
mousse)
gramme
Séchage
minuté
Séchage
minuté
À l’air
(sans
chaleur)
Te mp . D ur ée
Basse 20 min.
Basse 20 min.
Aucune 20 - 50
min.
ENTRETIEN DE LA SÉCHEUSE
Nettoyage de l’emplacement de la
sécheuse
Éviter de laisser des éléments qui pourraient obstruer le débit de
combustion et empêcher une bonne ventilation autour de la
sécheuse.
AVERTISSEMENT
Risque d'explosion
Garder les matières et les vapeurs inflammables, telle
que l’essence, loin de la sécheuse.
Placer la sécheuse au moins 46 cm (18 po) au-dessus
du plancher pour une installation dans un garage.
Le non-respect de ces instructions peut causer
un décès, une explosion ou un incendie.
Nettoyage du filtre à charpie
Nettoyer le filtre à charpie avant chaque charge. Un filtre obstrué
de charpie peut augmenter le temps de séchage.
IMPORTANT :
■ Ne pas faire fonctionner la sécheuse avec un filtre à charpie
déplacé, endommagé, bloqué ou manquant. Une telle action
peut causer une surchauffe et des dommages à la sécheuse
et aux tissus.
■ Si de la charpie tombe dans la sécheuse au moment du
retrait du filtre, vérifier le conduit d'évacuation et retirer la
charpie.
Nettoyage avant chaque charge
Style 1 :
1. Le filtre à charpie est situé au sommet de la sécheuse. Tirer le
filtre à charpie vers vous. Enlever la charpie du filtre en la
roulant avec les doigts. Ne pas rincer ni laver le filtre pour
enlever la charpie. La charpie mouillée s’enlève difficilement.
2. Remettre le filtre à charpie en le poussant fermement en
place.
15
Page 16

Style 2 :
1. Le filtre à charpie se trouve dans la porte de la sécheuse.
Tirer le filtre à charpie vers le haut. Enlever la charpie du filtre
en la roulant avec les doigts. Ne pas rincer ni laver le filtre
pour enlever la charpie. La charpie mouillée s'enlève
difficilement.
2. Remettre le filtre à charpie en le poussant fermement en
place.
Nettoyage au besoin
Précautions à prendre pour les vacances et
avant un déménagement
Entretien avant les vacances
On ne doit faire fonctionner la sécheuse que lorsqu'on est
présent. Si l'utilisateur doit partir en vacances ou n'utilise pas la
sécheuse pendant une période prolongée, il convient d'exécuter
les opérations suivantes :
1. Débrancher la sécheuse ou déconnecter la source de courant
électrique.
2. Pour les sécheuses à gaz, fermer le robinet d'arrêt de la
canalisation de gaz.
3. Nettoyer le filtre à charpie. Voir “Nettoyage du filtre à
charpie”.
Entretien avant un déménagement - Sécheuses
électriques
1. Enlever la charpie du filtre en la roulant avec les doigts.
2. Mouiller les deux côtés du filtre à charpie avec de l’eau
chaude.
3. Mouiller une brosse en nylon avec de l’eau chaude et du
détergent liquide. Frotter le filtre avec la brosse pour enlever
l’accumulation de résidus.
4. Rincer le filtre à l’eau chaude.
5. Bien sécher le filtre à charpie avec une serviette propre.
Replacer le filtre dans la sécheuse.
Nettoyage de l’intérieur de la sécheuse
1. Appliquer un nettoyant ménager ininflammable sur la zone
tachée du tambour et frotter avec un linge doux jusqu’à ce
que la tache s’enlève.
2. Essuyer complètement le tambour avec un linge humide.
3. Faire culbuter une charge de linge ou de serviettes propres
pour sécher le tambour.
REMARQUE : Les vêtements contenant des teintures instables,
tels que jeans en denim ou articles en coton de couleur vive,
peuvent décolorer l’intérieur de la sécheuse. Ces taches ne sont
pas nuisibles à votre sécheuse et ne tacheront pas les vêtements
des charges futures. Faire sécher les articles fabriqués d’une
teinture instable en les tournant à l’envers pour empêcher le
transfert de la teinture.
Comment enlever la charpie accumulée
1. Débrancher le cordon d'alimentation.
2. Veiller à ce que les pieds de nivellement soient fixés
solidement à la base de la sécheuse.
3. Utiliser du ruban masque pour fixer la porte de la sécheuse.
Entretien avant un déménagement - Sécheuses à gaz
1. Débrancher le cordon d'alimentation électrique.
2. Fermer le robinet d'arrêt de la canalisation de gaz.
3. Débrancher le tuyau de la canalisation de gaz et retirer les
raccords fixés sur le tuyau de la sécheuse.
4. Recouvrir la canalisation de gaz ouverte.
5. Veiller à ce que les pieds de nivellement soient fixés
solidement à la base de la sécheuse.
6. Utiliser du ruban adhésif de masquage pour fixer la porte de
la sécheuse.
Changement de l’ampoule du tambour
1. Débrancher la sécheuse ou déconnecter la source de courant
électrique.
2. Ouvrir la porte de la sécheuse. Trouver le couvercle de
l’ampoule d’éclairage sur la paroi arrière de la sécheuse.
Enlever la vis située au coin inférieur droit du couvercle.
Enlever le couvercle.
À l’intérieur de la sécheuse
La charpie devrait être enlevée tous les 2 ans, ou plus souvent,
selon l’utilisation de la sécheuse. Le nettoyage devrait être
effectué par une personne qualifiée.
À l’intérieur du conduit d'évacuation
La charpie devrait être enlevée tous les 2 ans, ou plus souvent,
selon l’utilisation de la sécheuse.
16
3. Tourner l’ampoule dans le sens antihoraire. Remplacer
l’ampoule seulement par une ampoule de 10 watts pour
appareil électroménager. Réinstaller le couvercle et le fixer
avec la vis.
4. Brancher la sécheuse ou reconnecter la source de courant
électrique.
Page 17

DÉPANNAGE
Essayer d’abord les solutions suggérées ici, ce qui vous évitera peut-être le coût d’une visite de service...
Fonctionnement de la sécheuse
La sécheuse ne fonctionne pas
■ Un fusible est-il grillé ou un disjoncteur s'est-il
déclenché?
Il peut y avoir 2 fusibles ou disjoncteurs pour la sécheuse.
Vérifier que les deux fusibles sont intacts et serrés ou que les
deux disjoncteurs ne sont pas déclenchés. Remplacer le
fusible ou réenclencher le disjoncteur. Si le problème
persiste, appeler un électricien.
■ Une alimentation électrique correcte est-elle disponible?
Les sécheuses électriques nécessitent une alimentation
électrique de 240 V. Vérifier avec un électricien qualifié.
■ A-t-on utilisé un fusible ordinaire?
Utiliser un fusible temporisé.
■ La porte de la sécheuse est-elle bien fermée?
■ A-t-on bien enfoncé le bouton Start (mise en marche)?
■ A-t-on sélectionné un programme?
La sécheuse ne se mettra pas en marche à la position
WRINKLE GUARD®. Tourner le cadran après OFF (arrêt).
Absence de chaleur
■ Un fusible est-il grillé ou un disjoncteur s'est-il
déclenché?
Les sécheuses électriques utilisent 2 fusibles ou disjoncteurs.
Le tambour peut tourner, mais sans chaleur. Remplacer le
fusible ou réenclencher le disjoncteur. Si le problème
persiste,appeler un électricien.
■ Pour les sécheuses à gaz, le robinet de la conduite
d'alimentation est-il ouvert?
Bruits inhabituels
■ La sécheuse est-elle restée hors service pendant un
certain temps?
Si la sécheuse n'a pas été utilisée depuis quelque temps, il
est possible qu'elle émette des bruits saccadés au cours des
premières minutes de fonctionnement.
■ Une pièce de monnaie, un bouton ou un trombone sont-
ils coincés entre le tambour et l'avant ou l'arrière de la
sécheuse?
Vérifier les bords avant et arrière du tambour pour voir si de
petits objets y sont coincés. Vider les poches avant de faire la
lessive.
■ S'agit-il d'une sécheuse à gaz?
Le déclic du robinet de gaz est un bruit de fonctionnement
normal.
■ Les quatre pieds sont-ils installés et la sécheuse est-elle
d'aplomb de l'avant vers l'arrière et transversalement?
La sécheuse peut vibrer si elle n'est pas correctement
installée. Voir les Instructions d'installation.
■ Les vêtements sont-ils emmêlés ou en boule?
Une charge en boule rebondit, ce qui fait vibrer la sécheuse.
Séparer les articles de la charge et remettre la sécheuse en
marche.
La minuterie ne progresse pas visiblement
■ Séchage minuté ou séchage à l'air?
La minuterie progresse lentement et de façon continue au
cours de la durée réglée.
■ Séchage automatique?
La minuterie ne progresse que lorsque le linge est
pratiquement sec. Voir “Fonctionnement du programme de
séchage automatique” dans “Utilisation de la sécheuse”.
Résultats de la sécheuse
Le séchage des vêtements n'est pas satisfaisant, les
durées de séchage sont trop longues, la charge est trop
chaude
■ Le filtre à charpie est-il obstrué de charpie?
Le filtre à charpie doit être nettoyé avant chaque charge.
AVERTISSEMENT
Risque d’incendie
Utiliser un conduit d’évacuation en métal lourd.
Ne pas utiliser un conduit d’évacuation en plastique.
Ne pas utiliser un conduit d’évacuation en feuille
de métal.
Le non-respect de ces instructions peut causer
un décès ou un incendie.
■ Le conduit d'évacuation ou le clapet d'évacuation à
l'extérieur est-il obstrué de charpie, restreignant le
mouvement de l'air?
Faire fonctionner la sécheuse pendant 5 à 10 minutes. Tenir la
main sous le clapet d'évacuation à l'extérieur pour vérifier le
mouvement de l'air. Si vous ne ressentez pas de l'air en
mouvement, nettoyer le système d'évacuation ou remplacer
le conduit d'évacuation par un conduit en métal lourd ou
flexible en métal. Voir les Instructions d'installation.
■ Des feuilles d'assouplissant de tissus bloquent-elles la
grille de sortie?
Utiliser seulement une feuille d'assouplissant par charge et
ne l'utiliser qu’une seule fois.
■ Le conduit d'évacuation a-t-il la longueur appropriée?
Vérifier que le conduit d'évacuation n'est pas trop long ou ne
comporte pas trop de changements de direction. Un long
conduit augmentera les durées de séchage. Voir les
Instructions d'installation.
■ Le diamètre du conduit d'évacuation a-t-il la taille
correcte?
Utiliser un composant de 4" (10,2 cm) de diamètre.
17
Page 18

AVERTISSEMENT
Temps de programme trop court
■ Le programme automatique se termine-t-il trop tôt?
Modifier le réglage du degré de séchage pour les
programmes automatiques. L'augmentation ou la diminution
du degré de séchage modifiera la durée de séchage d'un
programme.
Risque d'explosion
Garder les matières et les vapeurs inflammables, telle
que l’essence, loin de la sécheuse.
Placer la sécheuse au moins 46 cm (18 po) au-dessus
du plancher pour une installation dans un garage.
Le non-respect de ces instructions peut causer
un décès, une explosion ou un incendie.
■ La sécheuse se trouve-t-elle dans une pièce où la
température ambiante est inférieure à 45ºF (7ºC)?
Le bon fonctionnement des programmes de la sécheuse
nécessite une température ambiante supérieure à 45°F (7°C).
■ La sécheuse est-elle installée dans un placard?
Les portes du placard doivent comporter des ouvertures
d'aération au sommet et en bas de la porte. Un espace
minimum de 1" est nécessaire sur les côtés et à l'avant de la
sécheuse, et un espace de 5" est nécessaire à l'arrière de la
sécheuse. Voir les Instructions d'installation.
■ A-t-on sélectionné un programme de séchage à l'air?
Choisir le bon programme pour les types de vêtements à
sécher.
■ La charge est-elle trop grosse et trop lourde pour sécher
rapidement?
Séparer la charge pour qu'elle culbute librement.
Charpie sur la charge
■ Le filtre à charpie est-il obstrué?
Nettoyer le filtre à charpie avant chaque charge.
Taches sur la charge ou sur le tambour
■ L'assouplissant de tissus pour sécheuse a-t-il été utilisé
correctement?
Ajouter les feuilles d'assouplissant de tissus au début du
programme. Les feuilles d'assouplissant de tissus ajoutées à
une charge partiellement sèche peuvent tacher les
vêtements.
Les taches sur le tambour sont dues aux teintures contenues
dans les vêtements (les jeans en général). Il n'y aura pas de
transfert sur les autres vêtements.
Charges froissées
■ La charge a-t-elle été retirée de la sécheuse à la fin du
programme?
■ La sécheuse a-t-elle été surchargée?
Faire sécher de plus petites charges qui peuvent culbuter
librement.
Odeurs
■ Avez-vous récemment employé peinture, teinture ou
vernis dans la pièce où est installée votre sécheuse?
Si c'est le cas, aérer la pièce. Une fois les odeurs ou
émanations disparues, laver et sécher à nouveau les
vêtements.
■ La sécheuse est-elle utilisée pour la première fois?
Le nouvel élément de séchage électrique peut émettre une
odeur. L'odeur disparaîtra après le premier programme.
18
Page 19

CONTRATS DE PROTECTION
Contrats principaux de protection
Nous vous félicitons d'avoir fait un achat judicieux. Votre nouvel
appareil Kenmore® est conçu et fabriqué pour vous procurer des
années de fonctionnement fiable. Mais comme pour tous les
produits, il pourra à l'occasion nécessiter un entretien préventif
ou une réparation. Le cas échéant, un Contrat principal de
protection peut vous épargner de l'argent et des soucis.
Le Contrat principal de protection contribue aussi à prolonger la
vie utile de votre nouvel appareil ménager. Le Contrat* inclut :
✔ Pièces et main-d'œuvre nécessaires pour conserver les
appareils en état de fonctionnement correct pendant une
utilisation normale, pas uniquement les défaillances. Notre
couverture va bien au-delà de la garantie du produit.
Aucune franchise, aucune anomalie de fonctionnement ne
sont exclues de ce contrat - protection réelle.
✔ Un service d'expert proposé par plus de 10 000 techniciens
d'entretien Sears autorisés, ce qui signifie que quelqu'un de
confiance prendra soin de votre produit.
✔ Appels de service illimités et service national, aussi souvent
que vous en avez besoin et quand vous en avez besoin.
✔ Garantie “Anti-citron” - remplacement de votre produit
couvert si quatre pannes ou plus se produisent en deçà de
douze mois.
✔ Remplacement du produit si votre produit couvert ne peut
être réparé.
✔ Vérification annuelle d'entretien préventif sur demande -
sans frais supplémentaires.
✔ Aide rapide par téléphone - nous appelons cela Résolution
rapide - support téléphonique d'un agent de Sears sur tous
les produits. Considérez nous comme un “manuel d'utilisateur
parlant”.
✔ Protection contre les sautes de puissance pour prévenir les
dommages électriques attribuables aux fluctuations de
courant.
✔ Couverture pour la perte de nourriture de 250 $ par an sur
tout aliment altéré en raison d'une défaillance mécanique sur
tout réfrigérateur ou congélateur couvert.
✔ Remboursement de location si la réparation du produit
couvert prend plus de temps que promis.
✔ 10 % de réduction sur le prix courant de toute intervention de
réparation non couverte et pièces de rechange.
Dès que vous achetez le Contrat, il suffit d'un appel téléphonique
pour obtenir un rendez-vous de service. Vous pouvez appeler en
tout temps jour et nuit ou prendre un rendez-vous de service en
direct.
Le contrat principal de protection constitue un investissement
sans risque. Si vous annulez pour une quelconque raison
pendant la période de garantie du produit, nous vous
rembourserons intégralement ou nous vous verserons un
remboursement au prorata après l'expiration de la période de
garantie. Achetez votre Contrat principal de protection
aujourd'hui même!
Certaines limitations et exclusions s'appliquent. Pour des
prix et renseignements supplémentaires aux États-Unis,
composez le 1-800-827-6655.
*Le contrat de couverture au Canada varie pour certains
articles. Pour des informations détaillées, appelez Sears
Canada au 1-800-361-6665.
Service d'installation Sears
Pour l'installation professionnelle garantie par Sears d'appareils
ménagers et d'articles tels que les ouvre-portes de garage,
chauffe-eau, et autres gros appareils ménagers, aux É.-U. ou au
Canada, composez le 1-800-4-MY-HOME
®
.
GARANTIE DES APPAREILS MÉNAGERS KENMORE
GARANTIE LIMITÉE DE UN AN
Lorsqu'il est installé, utilisé et entretenu conformément à toutes
les instructions fournies avec le produit, si cet appareil ménager
fait défaut par suite d'un vice de matériau ou de fabrication au
cours de l'année qui suit la date d'achat, composer le
1-800-4-MY-HOME
Si cet appareil ménager fonctionne à toute autre fin que
l'utilisation familiale privée, la présente garantie ne s'appliquera
que pendant 90 jours à partir de la date d'achat.
LA PRÉSENTE GARANTIE COUVRE UNIQUEMENT LES
VICES DE MATÉRIAUX ET DE FABRICATION. SEARS NE
PAIERA PAS POUR :
1. Les pièces courantes qui peuvent s'user suite à une
utilisation normale, notamment les filtres, courroies,
ampoules et sacs.
2. L'intervention d'un technicien pour montrer à l'utilisateur
comment installer, utiliser et entretenir correctement le
produit.
3. L'intervention d'un technicien pour nettoyer ou entretenir ce
produit.
4. L'endommagement ou les défauts du produit si celui-ci n'est
pas installé, utilisé ou entretenu conformément à toutes les
instructions fournies avec le produit.
5. L'endommagement ou les défauts du produit résultant
d'accident, usage impropre ou abusif ou utilisation autre que
pour laquelle il est destiné.
®
pour obtenir une réparation gratuite.
6. L'endommagement ou les défauts du produit causés par
l'utilisation de détergents, agents de nettoyage, produits
chimiques ou ustensiles autres que ceux recommandés dans
toutes les instructions fournies avec le produit.
7. L'endommagement ou les défauts des pièces ou systèmes
résultant d'une modification non autorisée faite au produit.
CLAUSE D'EXONÉRATION DE RESPONSABILITÉ AU TITRE
DES GARANTIES IMPLICITES; LIMITATION DES RECOURS
Le seul et exclusif recours du client dans le cadre de la présente
garantie limitée consiste en la réparation prévue ci-dessus. Les
garanties implicites, y compris les garanties applicables de
qualité marchande et d'aptitude à un usage particulier, sont
limitées à un an ou à la plus courte période autorisée par la loi.
Sears n'assume aucune responsabilité pour les dommages
fortuits ou indirects. Certains États ou certaines provinces ne
permettent pas l'exclusion ou la limitation des dommages fortuits
ou indirects, ou la limitation de la durée des garanties implicites
de qualité marchande ou d'aptitude à un usage particulier, de
sorte que cette exclusion ou limitation peut ne pas être
applicable dans votre cas.
Cette garantie s'applique seulement lorsque cet appareil
ménager est utilisé aux États-Unis et au Canada.
Cette garantie vous confère des droits juridiques spécifiques et
vous pouvez également jouir d'autres droits qui peuvent varier
d'un État à l'autre.
Sears, Roebuck and Co.
Dept. 817WA, Hoffman Estates, IL 60179
Sears Canada Inc.
Toronto, Ontario, Canada M5B 2B8
19
Page 20

W10034970B
© 2007 Sears Brands, LLC
® Registered Trademark /
® Marque déposée /
TM
TM
Marque de commerce / SM Marque de service de Sears Brands, LLC
Trademark / SMService Mark of Sears Brands, LLC
Printed in U.S.A.
3/07
Imprimé aux É.-U.
 Loading...