

Page 1
OWNER'S MANUAL
KGnmorG
Undersink Water Filter
Housing System
MODEL NO. 625.384540
Caution:
Read and follow all safety rules and operating
instructions before first use of this product.
Questions ?
Visit WWW.KenmoreWater.com
or call toll free 1-800426-9345 (M - F, 7 AM - 8 PM CST)
Repair or Parts ? Call toll free 1-800-469-4663
See back cover for other Sears service numbers.
SAVE THIS MANUAL
Warranty
Installation
How It Works
Care Of
Specifications
Repair Parts
D:
System Tested and Certified by NSF International against
NSF/ANSI Standard 42. See performance data sheet for details.
Sears, Roebuck and Co., 3333 Beverly Road, Hoffman Estates, IL 60179 U.S.A.
PRINTED IN U.S.A.
www.KenmoreWater.com
Part No.7266657 (Rev. D 8/22/08)
Page 2

uioo'jaieA/vajouluax i.isia jo Sfr£6"9Zfr"008"l- эиц JSPM sjoujuayi ащ цвэ ¿suoijsanQ
6/Ю9 11 ‘sapjsg ивш^оц ‘ оэ pue >|onqaoy ‘sjBag
•0}B}s 01 01B1S Luojj Ajba цэщлл siqßu j0L|io влвц Ablu noA рив ‘siLißu |Bß0| oupBds noA s0A|ß A;ubjjbm s!L|i
'врвивэ JO S01B1S p0i!un ЭЩ u| 0sn u| s| pnpojd spi впцлл A|uo s0||ddB A;ubjjbm spi
■SLU01! 0|qBpu0dx0 ojb цэщлл ‘soßpupBO joim opnpu! lou S0op A;ubjjbm spi ’(0|q
HssoduJ! s0AOJd jjBdoj j| luoujooBidoj jo) jpdoj 00JJ jo; oßuBJJB o; 31Л1ОН-Л1Л!-17-008-|- ||вэ ‘osBqojnd ]o opp
0qi Luojj JB0A 0UO uiqiiM d!qsuBLU>|JOM jo |ви0}вш u| popp в о; onp süb] ßuisnoH J01l!d Щ^М\ >|U!SJ0pun
s|qi 1! ‘pnpojd 0qi рцлл ponddns suoipnjpu! ||b 01 ßupjoooB poupiupuj рив popjodo ‘р0цври! U0q/y\
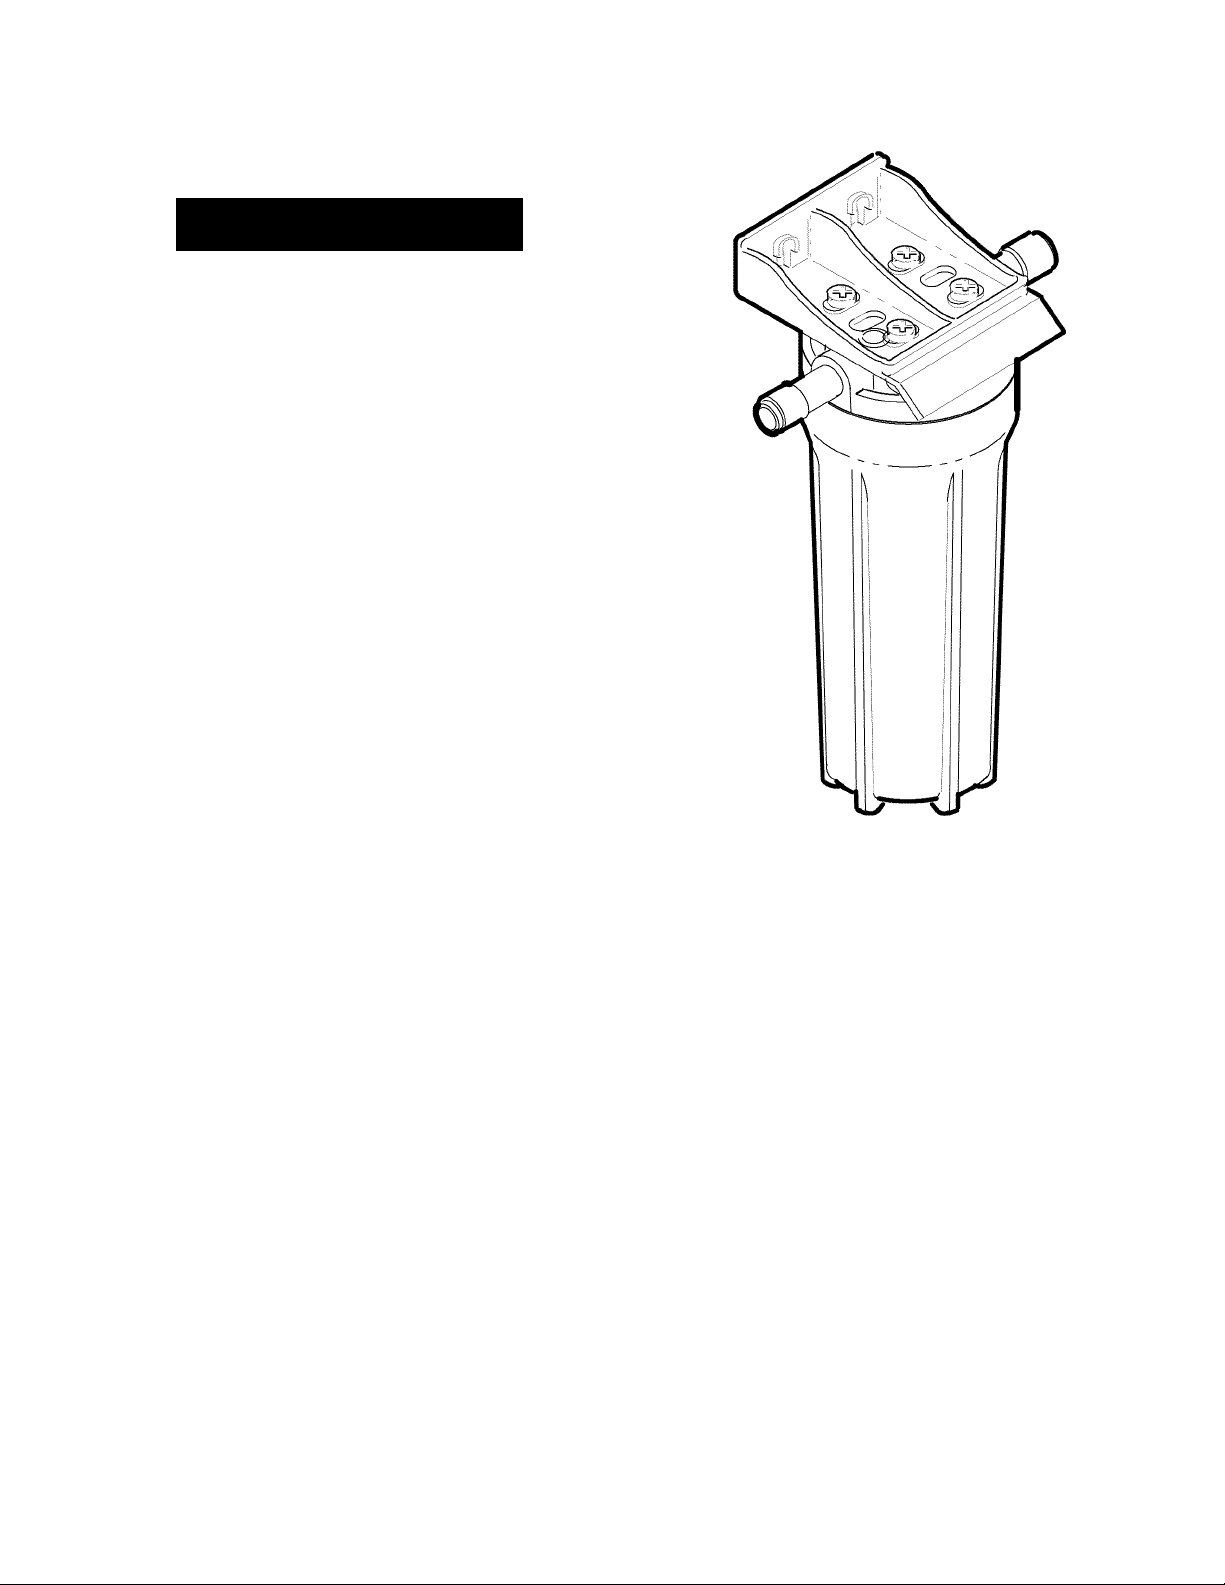
lAiaiSAS ONisnoH Ш11И yaivM yiNis^aoNn
3Hi NO AiNVyyVM l~\ñú ШЗА 3N0
A^uejJBM
jsa; Aq papquEisqns pue рэриэл se suirep SDUEUiiojjsd Dijpads aq; loj zf ISNV/dSN suiiojuoa uiajsAs siqp
isd 09 (6) шdS 9'0.................................................................................................................. ээтлдэд рэр^
рэрпрщ 'Suiqni 25» sSuipij pauuop qoinf)
....................................................................................
ppno - Piuj
(Эо Ot-e) do ooi-ot........................................................................................siimp ajniBjadmai jsibm Ajddng
(B<d>[ 689-Z02) îsd oOl-Oe............................................................................... вршц amsssid дэргм Ä^ddug
suo!|eoy!oad9
•lajEM ;oq uo пщзщ ;ou oq '¿„oOX pue ¿„ОР uaaMjaq
aq isnui uiajsAg Suisnop jaqij lajEyvl quisiapup
aqi o; A|ddns lajEM aq; jo ajiijEjaduiap 'sam;
-Ejaduia; ppa 10 joq amaijxa ш jo 'apisjno uiajsAg
Suisnop jaqij JajEyVl quisiapup aq; qEisui ;ou oq
•majsAg
Suisnop Jaqiq JajE/q^ quisjapup aqj oj adid A|ddns
jajEM aqi ui алрл Supnpaj ajnssaid e qEisui 'шпш
-ТХЕШ aqi laAO si ainssajd lajEM asnoq ino A jj '(шпш
inoA Moqoj 'uiaisAs aqj qEjsui noA se sapmS iiaqj
Moqoj jsnui no^ 'sapoa uotjejiues puE Suiqmnjd
loj luamjiEdap sqiOM aqqnd paoj inoA qjiAa qaaqp
•uiajsAs aqi laijE 10 aiojaq uoqaaj
-uisip aiEnbapE inoqiiM АщепЬ UMOuqun jo laiEM 10
'laiEM ajESun AqEaiSo|oiqoiaiui uo шар As aqi asn lou
OQ 'saainos laiEM ajqEiod-uou moij аарм Suiquiip
ajES а^Еш 01 lanpojd siqi asn 01 idmaip lou oq
-тхЕш) isd OOX 01 (шпштшш) isd q£ jo sainssaid lajEM
uo sqjOM uiajsAg Suisnop laqij iajEyv\ quisiapup aqq
•jaqmnjd pasuaaq e qjiM qnsuop 'Oj paiaqpE aq jpqs
sjiasnqDESSEpi jo sapoa Suiqmnjd 'spasupaESSEpi uj
•jEnuEui siqi Ш sapmS qjiM lajjip Aaqj ji sapoa paoj
Suisnop jaipj аардх quisjapup aqi moij sqjauaq
aqi ||E laS 01 noA dpq osje qiM |еппеш siqi SuipEa^j
•qEisui Apaaiioa 01 ApaExa sdap це Avoqoj 'uiaisAg
Suisnop iai|iq JaiEyv\ quisjapuQ inoA Suisn puE
SuiqEisui aiojaq AqnjaiEa sapinS puE sdap це pEa^j
•epp
•mapAg
sapino Aiajes
Page 3

Table of Contents
Planning Your Installation ............................................................................................................................................................3
Tools and Materials Needed......................................................................................................................................................... 3
Typical Undersink Installation..................................................................................................................................................... 4
Installation Steps..........................................................................................................................................................................5-7
Step 1 - Install Cold Water Supply Fitting....................................................................................................................... 5
Step 2 - Make Hole for Filtered Water Faucet....................................................................................................................6
Step 3 - Assemble and Install Filtered Water Faucet ....................................................................................................... 6
Step 4 - Make Tubing Connections....................................................................................................................................7
Filter Cartridge Installation / Replacement ................................................................................................................................8
Using the System ........................................................................................................................................................................... 9
Filter Cartridge Life .......................................................................................................................................................................9
Exploded View & Parts List ..................................................................................................................................................10-11
Planning Your Installation
When planning your installation, use the drawings on pages 4 & 5 to guide you. There are many things to consider
as you plan:
The water filter housing inlet and outlet connections
are 1/4" Quick Connect (push-to-connect)
Existing plumbing type (copper, threaded, etc.) and
nominal size (1/4", 3/8", etc.)
Tools required (see below)
Make a simple sketch of your proposed installation, and a list of plumbing materials you will need. Obtain every
thing you need before starting the installation. Be sure you have the tools required.
Your plumbing skills
Cost of materials needed
Space available for installing the filter housing
The possibility of water spilling from sump when
replacing filter cartridges
Tools and Materials Needed
Plumbers' Putty
Slotted and Phillips Screwdrivers
▼ Tubing Cutter
▼ Sandpaper or Emery Cloth
Pliers and Adjustable Jaw Wrench
▼ Electric Drill & 3/4" Drill Bit, if mounting hole is
needed for the faucet
Questions? Call The Kenmore Water Line 1-800-426-9345 or visit KenmoreWater.com
Page 4
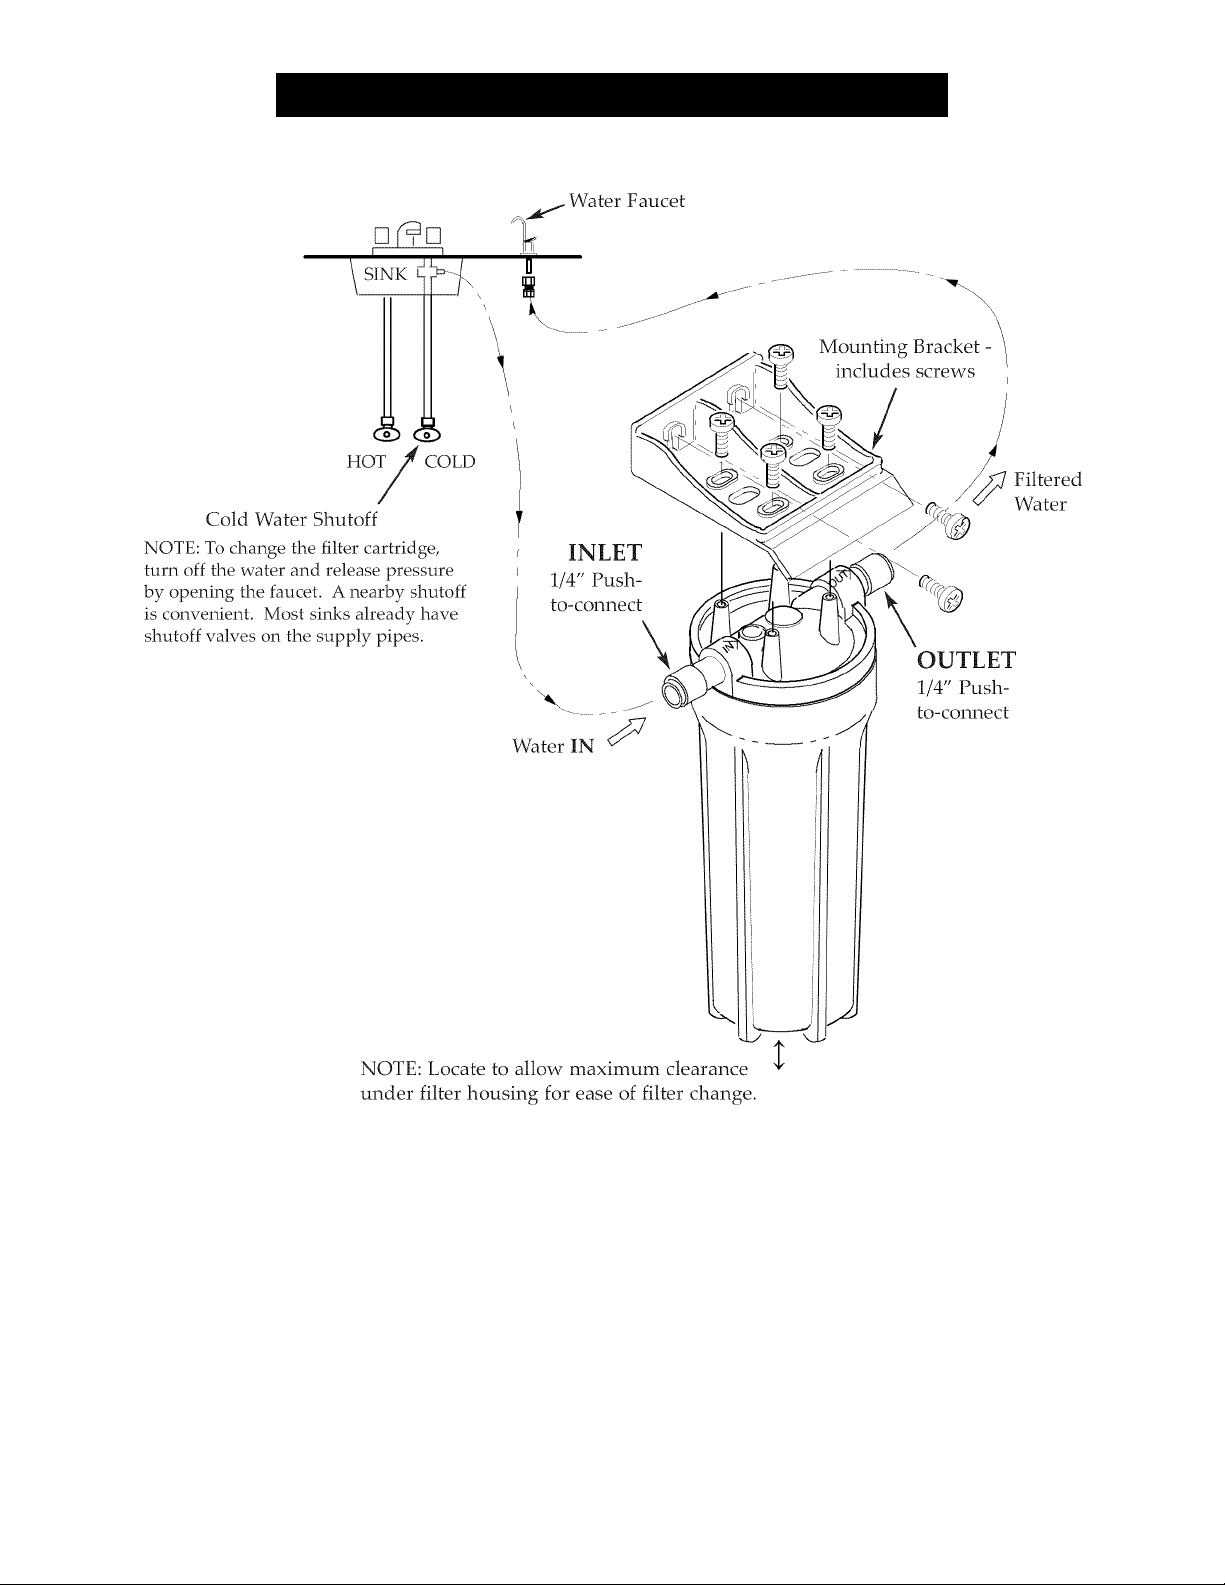
Typical Undersink Installation
Filtered
A minimum of 1-1/2" is required.
NOTE: Codes in the state of Massachusetts require installation by a licensed plumber.
If you live in the state of Massachusetts, review plumbing code 248-CMR of the Commonwealth of Massachusetts
before proceeding with the installation.
Questions? Call The Kenmore Water Line 1-800-426-9345 or visit KenmoreWater.com
Figure 1
Page 5

step 1 - Install Cold Water Supply Fitting
Check and comply with local plumbing codes.
Install a cold water supply fitting. The fitting must provide a leak-tight connection to the water filter 1/4" tubing. If
additional tubing is required, see parts list at the end of this manual. A typical connection using the included water
supply fitting is shown in Figure 2-A. An optional connection using standard plumbing fittings (not included) is
shown in Figure 2-B. In Massachusetts, plumbing codes of Massachusetts shall be adhered to. Consult with a
licensed plumber
A. WATER SUPPLY FITTING (included)
1. Shut off the water supply and open faucets to drain
water from the sink cold water pipe.
2. Loosen nut that connects the cold water faucet to cold
water plumbing.
3. Thread water supply fitting onto pipe and reconnect
nut to bottom of fitting. Be sure to use a light coating
of pipe joint compound or Teflon tape (included) on
outside threads. Care should be taken to prevent
cross-threading the plastic fitting.
WATER SUPPLY CONNECTION
USING INCLUDED WATER SUPPLY FITTING
B. OPTIONAL PIPE FITTINGS
(compression type shown)
1. Shut off the water supply and open faucets to drain
water from the sink cold water pipe.
2. Complying with plumbing codes, install a fitting on
the cold water pipe to adapt 1/4" OD tubing. A typical
connection is shown in Figure 2-B. If threaded fittings
are used, be sure to use pipe joint compound or Teflon
tape on outside threads.
WATER SUPPLY TYPICAL CONNECTION
USING COMPRESSION TYPE FITTING
shutoff valve
Figure 2-A
Questions? Call The Kenmore Water Line 1-800-426-9345 or visit KenmoreWater.com
Figure 2-B
Page 6

step 2 - Make Hole for Filtered Water Faucet
Select one of the following options to install the faucet.
Be sure there is room underneath to make the needed
connections.
• Use an existing sink top hole for spray hose or
soap dispenser.
• Drill a new hole in the sink top.
• Drill a hole in the countertop next to the sink.
CAUTION: Drilling holes into countertops made of
stone or solid surface materials such as granite, marble,
Corian^“ or other plastic resin products should only be
performed by a qualified installer. Drilling these types
of surfaces by any other means may cause permanent,
irreparable damage to the countertop surface.
Step 3 - Assemble and Install Faucet
FAUCET (Refer to Figure 4)
1. If not already assembled, install the rubber gasket,
spacer, flat (or lock) washer and hex nut onto the
threaded faucet stud.
2. Turn the tubing adapter onto the stud and hand tight
en, then wrench tighten 1/4 turn only. BE CAREFUL
NOT TO CROSS-THREAD OR OVERTIGHTEN.
3. If the faucet is not assembled, slide the lever over the
cylindrical nut. Wet the o-ring seals on the faucet
spout. Remove and discard the short piece of tubing
from the faucet body and insert the spout in its place.
4. Connect tubing to faucet as described on page 7.
5. Lower the faucet into the sink or countertop hole.
6. On the underside of the sink or countertop, insert the
large steel washer between the mounting hole and the
spacer on the faucet stud (see assembled view). Then
turn the hex nut up to the spacer and tighten. Tighten
the hex nut so the faucet cannot move, but do not
overtighten.
1. If drilling is needed, make a 3/4" dia. (minimum) hole
for the faucet.
2. Place plumbers' putty around the drilled hole to pre
vent water leaks around the faucet.
3/4" dia. hole
through sink
or countertop
plumbers'
putty
Figure 3
Questions? Call The Kenmore Water Line 1-800-426-9345 or visit KenmoreWater.com
Page 7

step 4 - Make Tubing Connections
This system includes push-to-connect fittings for quick
tubing connections at most locations. To make tubing
connections with the fittings, do the following:
1. Allowing some slack, measure and cut a length of 1/4"
tubing to connect between the supply fitting and the
filter system inlet (See Figure 1). Use a sharp cutter or
knife to cut the end of tubing square.
2. Inspect the tubing, about 1" from end, to be sure there
are no nicks, scratches or other rough spots. If needed
cut the tubing again.
3. Push tubing through the collet and all the way into fit
ting. Full engagement is 11/16" for 1/4" tubing. Pull
on the tubing to be sure that it is held firmly in the fit
ting.
If more tubing is required, see parts list at the end of this
manual.
TO DISCONNECT TUBING:
Push the collet and hold, then pull the tubing out (See
Figure 8).
Push-to-connect Fitting
Tube.
Cut tubing square with end of tubing round,
smooth, with no cuts, nicks or flat spots.
Tube Correctly Cut
Collet
Tube Partially Engaged With Fitting
Collet
O-Ring
O-Rlng
Figure 5
Figure 6
NOTE:
Tube Fully Engaged With Fitting
DO NOT USE VINEGAR, OR OTHER ACID
BASED CLEANERS ON THIS SYSTEM.
THEY WILL DEGRADE SOME SYSTEM
PARTS. ALWAYS USE SOAP AND WATER.
Push Collet to
Remove Tubing)
Tubing
Disconnect Tubing
To complete the installation, turn to page 8 and follow the filter cartridge installation steps.
Figure 7
Figure 8
Questions? Call The Kenmore Water Line 1-800-426-9345 or visit KenmoreWater.com
Page 8

Filter Cartridge Installation / Replacement
CAUTION: Never remove the sump with water
pressure in the filter.
1. Close the nearest shutoff valve on the water supply to
the filter. To relieve pressure in the filter, open the fil
tered water faucet.
2. Turn the sump off of the filter head, to the left. Be
careful, as the sump is full of water. Do not lose the
large o-ring seal.
NOTE: A special wrench is included for removing the
sump. See the parts list on page 10. Use only the
included wrench on the sump (or loosen and tighten the
sump by hand).
3. If replacing the filter cartridge, remove used cartridge
from sump and use warm, soapy water to clean sump.
4. Remove the wrapper from the new filter cartridge
and, with clean or gloved hands, insert the filter car
tridge into the sump. Some cartridges fit turned either
way, while others fit only one way. Check the car
tridge to see if orientation is indicated.
5. When changing filter, lightly lubricate the o-ring seal
in the sump with silicone grease. Be sure the o-ring is
fully seated in the groove.
6. Hold the sump up to the filter head, and align the cen
ter hole in the cartridge with the protrusion on the
bottom of the head.
NOTE: If the sump will not tighten up to the head by
hand, you may have the cartridge in upside down or
misaligned. Take the cartridge out and check for correct
orientation.
7. Being careful not to overtighten or cross-thread, turn
the sump to the right onto the filter head and tighten
securely by hand. Make sure to check for leaks, as
described below.
8. Open the filtered water faucet. Slowly open the water
supply shutoff valve and allow the filter housing to
fill. Close the filtered water faucet.
Head
9. Check for leaks between the sump and the head.
Leaks may not be immediately visible. Check periodi
cally for the next 24 hours.
NOTE: If a leak occurs, turn off the water supply and
open the filtered water faucet to depressurize the filter.
Disassemble the filter and check the o-ring and sealing
surface for cuts, flat spots, or foreign material. Clean the
o-ring and lubricate with silicone grease. Carefully press
o-ring into the groove in the sump.
10. If using a Taste and Odor Cartridge: A taste and
odor cartridge contains activated carbon, a black
powder. After the new cartridge is installed, open
the filtered water faucet and allow carbon particles to
purge from the cartridge. Close the faucet when you
no longer see "fines" (discoloration) in the filtered
water, or after approximately 2-3 minutes.
Questions? Call The Kenmore Water Line 1-800-426-9345 or visit KenmoreWater.com
Page 9

Using the System
The filtered water faucet dispenses the filtered water
when opened. It has a hand operated lever, which is
spring loaded. You can lock the faucet open by pushing
the lever all the way upward.
Filter Cartridge Li
filtered water
Several variables determine how long a cartridge will
last. These include:
1. How much water you use.
2. How much sediment, taste and/or odor, or other
unwanted substance, is in the water.
Use the following information as a guide. No matter
which type of filter cartridge you are using, it may be
time to change the cartridge:
▼ When you first notice the return of the unwanted sub
stance (sediment, taste and odor) in your water.
▼ When you notice a decrease in water flow from the
filtered water faucet.
▼ When six months have elapsed.
Kenmore Undersink Water Filter Housing System model
625.384540 with replacement filter 42-34373 has been
tested and certified by NSF International for the reduc
tion of chlorine, taste and odors. The rated capacity for
this system is 4500 gallons.
Other filter cartridges are available from Sears to remove
sediments, tastes and odors. Consult your Sears store.
Taste and Odor Cartridges: Many bad tastes and/or
odors are removed from water by an activated carbon
cartridge. It is most often used to remove chlorine taste
and smell.
NOTE: Small amounts of hydrogen sulfide (noticeable
as "rotten egg" odor) may be reduced by taste and odor
filters for a short time, quickly exhausting the carbon
media. Consult your Sears store for proper continuous
treatment.
Questions? Call The Kenmore Water Line 1-800-426-9345 or visit KenmoreWater.com
Page 10

1
Exploded View
10
Questions? Call The Kenmore Water Line 1-800-426-9345 or visit KenmoreWater.com
Page 11

Repair Parts List
Key No. Part No. Description
1 7231296 Mounting Bracket (includes screws)
2 7266699 Connector, 3/8” NPT x 1/4” Quick Connect (2 req.)
3 7156535 Head
4 7170246 0-ring, 3-3/8” I.D. X 3-5/8” O.D.
5 7156577 Sump
6 7227310 Tee Feed Adaptor
7 7228510 Faucet
8 7267174 Faucet Adaptor
9 7193066 Sump Removal Wrench
10 7253866 Tubing, 1/4” O.D. x 72” long
■
■
■
■
* Not included with the Undersink Water Filter Housing System.
■ Not illustrated.
7161823
7161784
42-34373 Premium Taste & Odor Cartridge, 98% Chlorine Reduction *
7266657 Owner’s Manual
Tubing, 1/4” O.D. x 20’ long *
Tubing, 1/4” O.D. x 100’ long *
Questions? Call The Kenmore Water Line 1-800-426-9345 or visit KenmoreWater.com
11
Page 12

Get it fixed, at your home or ours!
Your Home
For expert troubleshooting and home solutions advice:
www.managemyhome.com
For repair - in your home - of all major brand appliances,
lawn and garden equipment, or heating and cooling systems,
no matter who made it, no matter who sold it!
For the replacement parts, accessories and
owner’s manuals that you need to do-it-yourself.
For Sears professional installation of home appliances
and items like garage door openers and water heaters.
1-800-4-MY-HOME® (1-800-469-4663)
Call anytime, day or night (U.S.A. and Canada)
www.sears.comwww.sears.ca
Our Home
For repair of carry-in items like vacuums, lawn equipment,
and electronics, call anytime for the location of your nearest
Sears Parts & Repair Service Center
1 -800-488-1222 (U.S.A.) 1 -800-469-4663 (Canada)
www.sears.com
To purchase a protection agreement on a product serviced by Sears:
www.sears.ca
1-800-827-6655 (U.S.A.) 1-800-361-6665 (Canada)
Para pedir servicio de reparación
a domicilio, y para ordenar piezas:
1-888-SU-HOGAR®
(1-888-784-6427)
Au Canada pour service en français:
1-800-LE-FOYER“"
(1-800-533-6937)
www.sears.ca
) Registered Trademark / ™ Trademark / Service Mark of Sears Brands, LLC
) Marca Registrada / ™ Marca de Fábrica / Marca de Servicio de Sears Brands, LLC
" Marque de commerce / Marque déposée de Sears Brands, LLC
) Sears Brands, LLC
 Loading...