

Page 1
Part No.7293890 (Rev. A 5/14/07)
Deluxe Multi-Purpose
Water Filter
Sears, Roebuck and Co., 3333 Beverly Road, Hoffman Estates, IL 60179 U.S.A.
www.KenmoreWater.com
MODEL NO. 625.384450
OWNER'S MANUAL
PRINTED IN U.S.A.
• Warranty
• Installation
• How It Works
• Care Of
• Specifications
• Repair Parts
Repair or Parts ? Call toll free 1-800-469-4663
See back cover for other Sears service numbers.
Caution:
Read and follow all safety rules and operating
instructions before first use of this product.
SAVE THIS MANUAL
Questions ?
Visit www.KenmoreWater.com
or call toll free 1-800-426-9345 (M - F, 7 AM - 8 PM CST)
Page 2
2
Questions? Call The Kenmore Water Line 1-800-426-9345 or visit KenmoreWater.com
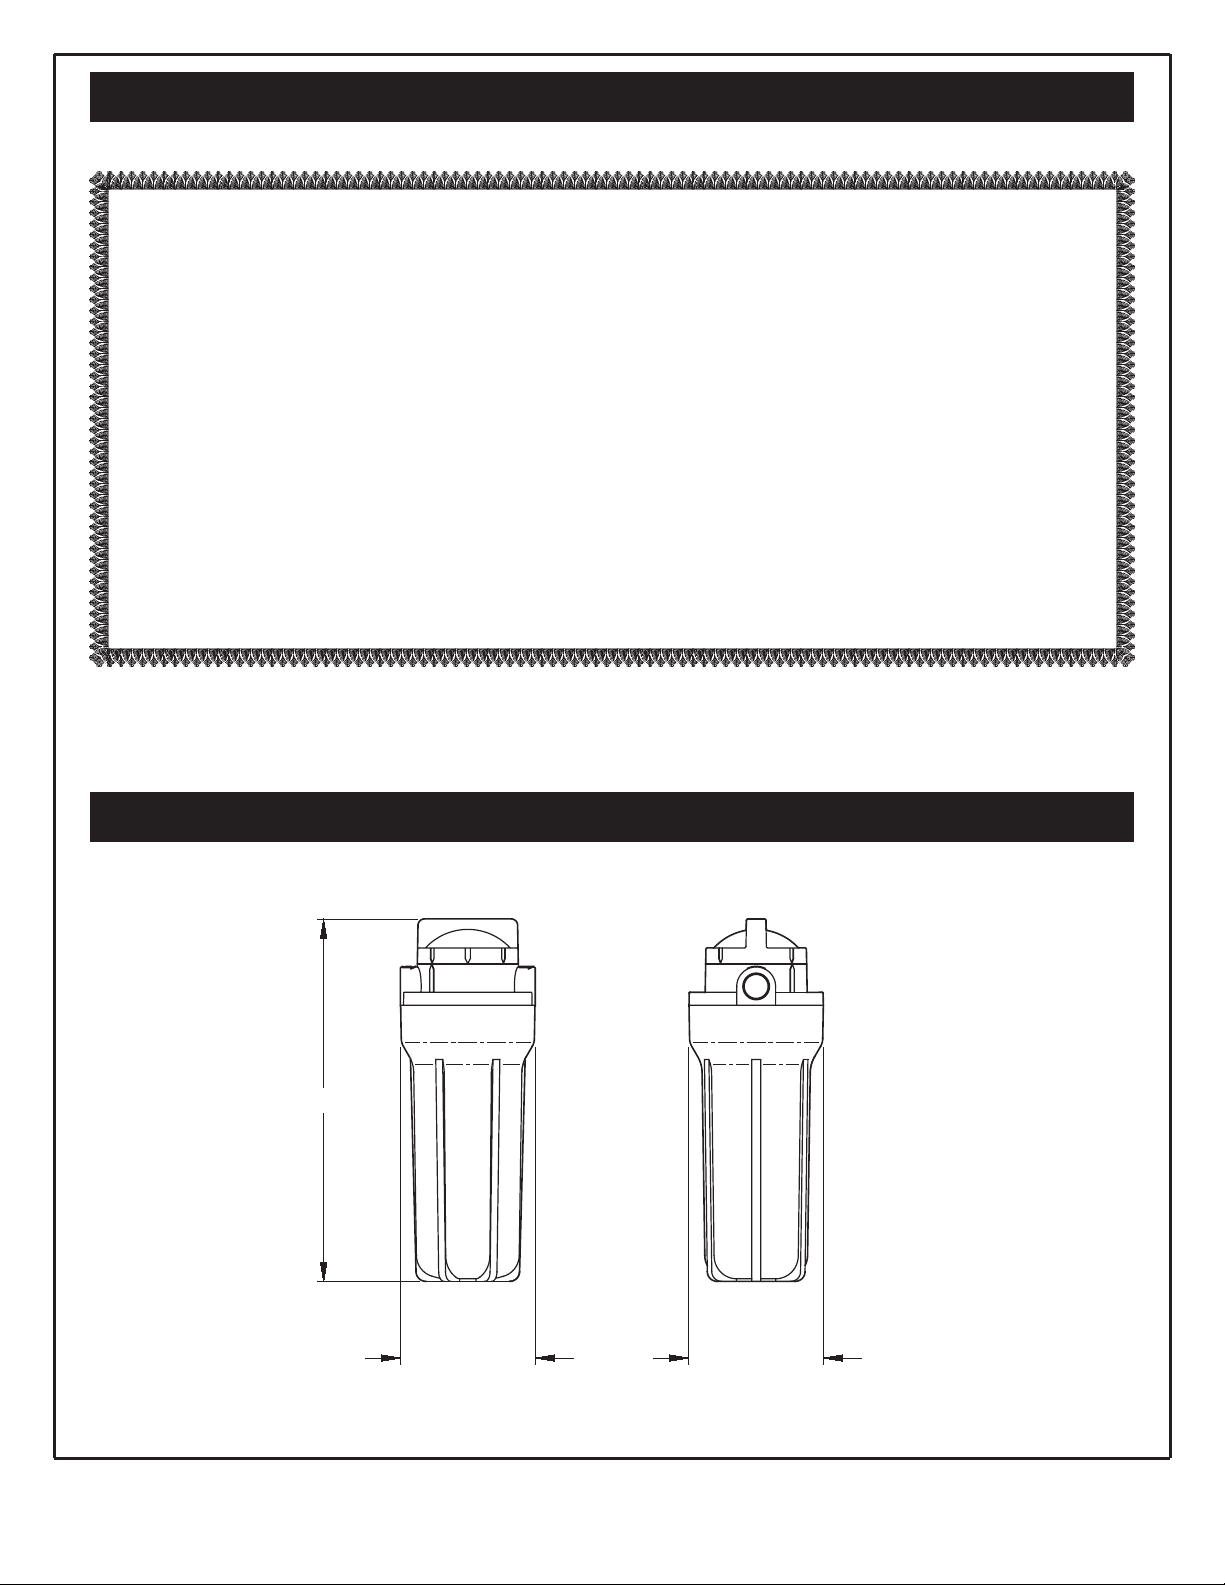
Dimensions
Warranty
ONE YEAR FULL WARRANTY ON THE
DELUXE MULTI-PURPOSE WATER FILTER
When installed, operated and maintained according to all instructions supplied with the product, if this Deluxe
Multi-Purpose Water Filter fails due to a defect in material or workmanship within one year from the date of
purchase, Sears will replace this Deluxe Multi-Purpose Water Filter free of charge. This warranty does not
include filter cartridges, which are expendable items.
This warranty is available by simply returning the Deluxe Multi-Purpose Water Filter to the nearest Sears
store throughout the United States.
This warranty applies only while this product is in use in the United States or Canada.
This warranty gives you specific legal rights, and you may have other rights which vary from state to state
.
Sears, Roebuck and Co., Hoffman Estates, IL 60179
14-1/4"
5-1/4"5-1/4"
Page 3

3
Questions? Call The Kenmore Water Line 1-800-426-9345 or visit KenmoreWater.com
Table of Contents
Safety Guides
Unpack and Check Shipment . . . . . . . . . . . . . . . . . . . . . . . . . . . . . . . . . . . . . . . . . . . . . . . . . . . . . . . . . . . . . . . . . . . . . . . . . . . . .4
Plan Your Installation . . . . . . . . . . . . . . . . . . . . . . . . . . . . . . . . . . . . . . . . . . . . . . . . . . . . . . . . . . . . . . . . . . . . . . . . . . . . . . . . . . .5
Typical Installations . . . . . . . . . . . . . . . . . . . . . . . . . . . . . . . . . . . . . . . . . . . . . . . . . . . . . . . . . . . . . . . . . . . . . . . . . . . . . . . . . . . . .6
Installation . . . . . . . . . . . . . . . . . . . . . . . . . . . . . . . . . . . . . . . . . . . . . . . . . . . . . . . . . . . . . . . . . . . . . . . . . . . . . . . . . . . . . . . . . . .7-9
Water Treatment Filter Cartridges . . . . . . . . . . . . . . . . . . . . . . . . . . . . . . . . . . . . . . . . . . . . . . . . . . . . . . . . . . . . . . . . . . . . . . . .10
Filter Cartridge Life . . . . . . . . . . . . . . . . . . . . . . . . . . . . . . . . . . . . . . . . . . . . . . . . . . . . . . . . . . . . . . . . . . . . . . . . . . . . . . . . . . . .10
Filter Cartridge Replacement . . . . . . . . . . . . . . . . . . . . . . . . . . . . . . . . . . . . . . . . . . . . . . . . . . . . . . . . . . . . . . . . . . . . . . . . . . . .11
Adjustable Filter Wrench . . . . . . . . . . . . . . . . . . . . . . . . . . . . . . . . . . . . . . . . . . . . . . . . . . . . . . . . . . . . . . . . . . . . . . . . . . . . . . . .12
Specifications . . . . . . . . . . . . . . . . . . . . . . . . . . . . . . . . . . . . . . . . . . . . . . . . . . . . . . . . . . . . . . . . . . . . . . . . . . . . . . . . . . . . . . . . . .13
Exploded View & Parts List . . . . . . . . . . . . . . . . . . . . . . . . . . . . . . . . . . . . . . . . . . . . . . . . . . . . . . . . . . . . . . . . . . . . . . . . . . . . .14
Read this entire manual carefully before installing and
using your Deluxe Multi-Purpose Water Filter.
Follow all steps exactly to correctly install.
Check with your local public works department for
plumbing and sanitation codes. You must follow
their guides as you install the system. Follow your
local codes if they differ with guides in this manual.
In Massachusetts, plumbing codes of Massachusetts
shall be adhered to. Consult with a licensed plumber.
Maximum operating pressure: 100 psi.
Maximum temperature: 100°F.
For cold water use only. Do not install on a hot water
line.
Not to be used on water that is microbiologically
unsafe or of unknown quality without adequate disinfection before or after the system.
Keep solvents and sprays away from the clear sump
housing material. Surface cracking and failure can
result.
Do not install where pressure surges exceed 100 psi.
Install a pressure regulator before the filter if needed.
Do not install outdoors in direct sunlight.
Do not install where freezing may occur.
Misapplication of clear housing voids your warranty.
It is important to properly seat the o-ring in the
groove of the sump housing, or a water leak could
occur.
Page 4
4
Questions? Call The Kenmore Water Line 1-800-426-9345 or visit KenmoreWater.com
Unpack and Check Your Carton
INSPECT SHIPMENT
Your Deluxe Multi-Purpose Water Filter is shipped complete in one carton. Remove all items from your shipping carton.
Check all items against the packing list below. Note any
items lost or damaged in shipment. Note any damage to
the shipping carton. Refer to the exploded view and
parts list in the back of the manual for the part names
and numbers of missing or damaged items. If problems
exist, refer to the website or the toll free number listed
throughout this manual.
NOTE: Codes in the state of Massachusetts require
installation by a licensed plumber.
If you live in the state of Massachusetts, review plumbing code 248-CMR of the Commonwealth of
Massachusetts before proceeding with the installation.
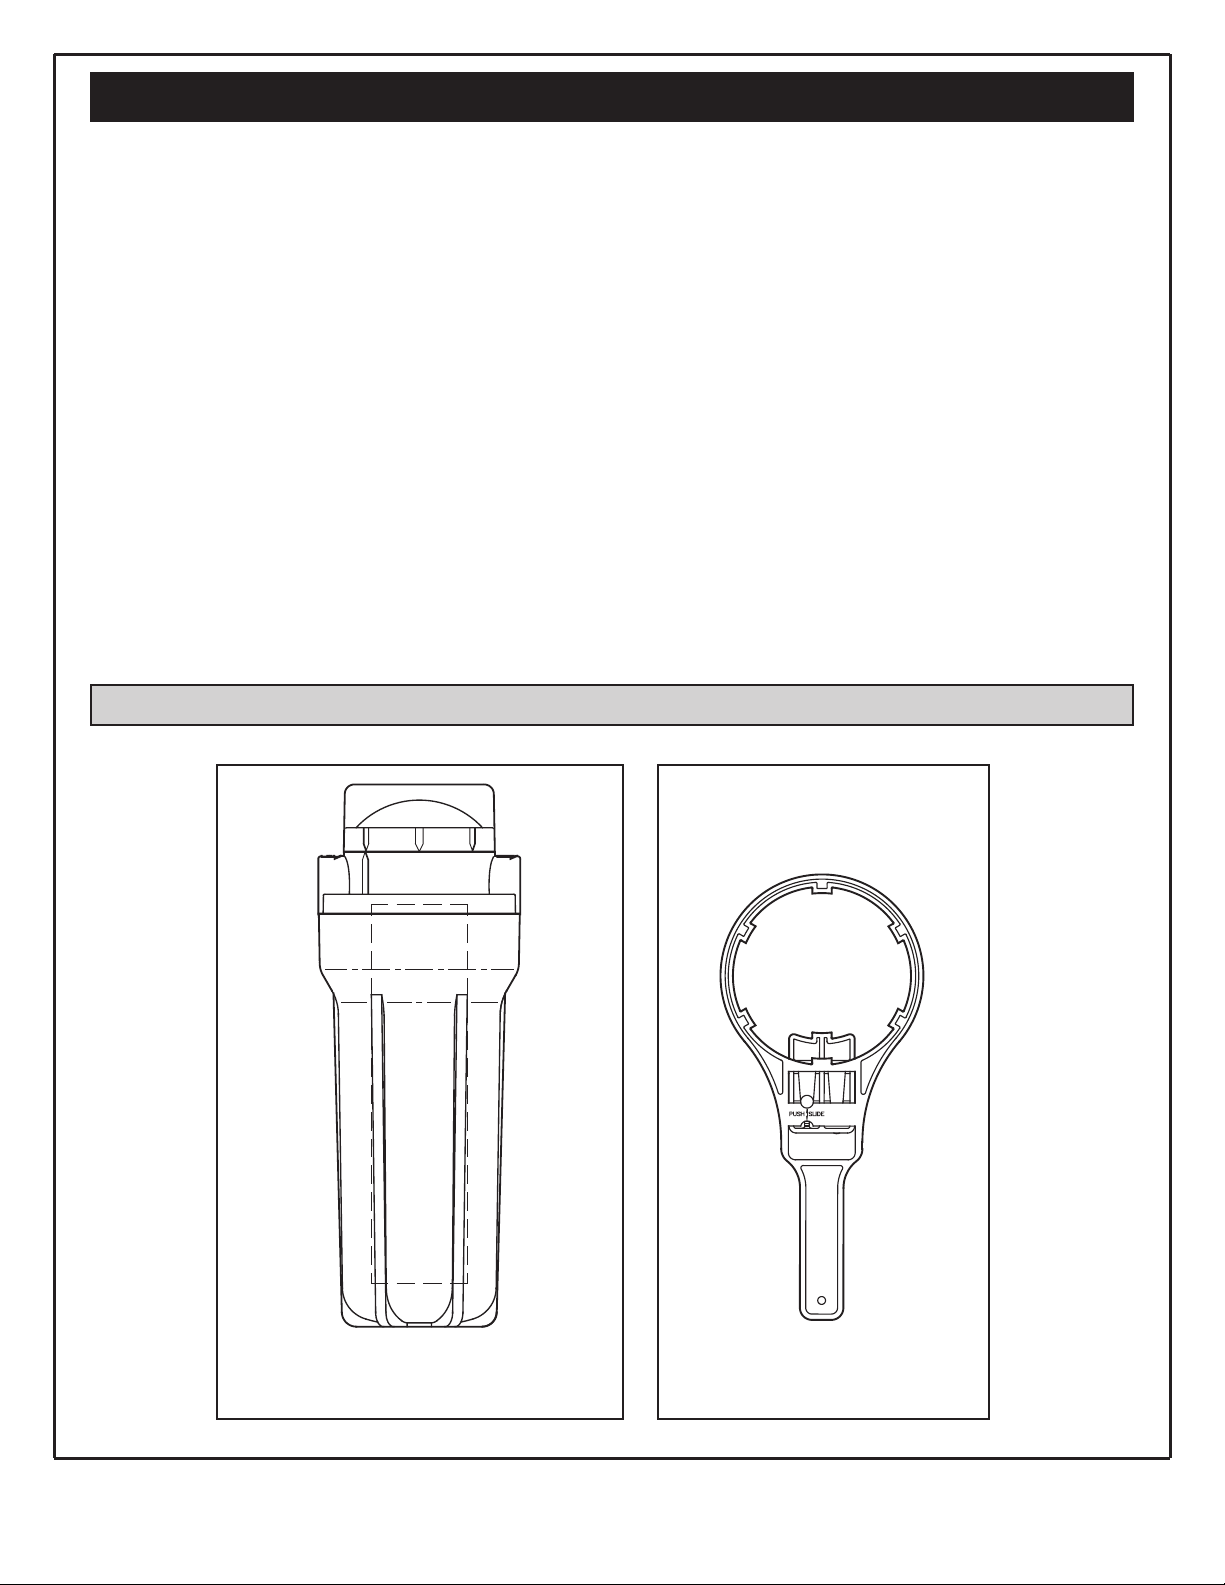
Packing List
Adjustable Filter Wrench
Deluxe Multi-Purpose Water Filter,
including 25 micron Sediment Cartridge
Page 5
5
Questions? Call The Kenmore Water Line 1-800-426-9345 or visit KenmoreWater.com
Plan Your Installation
INSTALLATION LOCATION
To filter sediments from all house water, locate the
Deluxe Multi-Purpose Water Filter on the main water
supply pipe (See Figure 1). Please ask your Sears associate about products that will remove taste and odor from
your water throughout your home. You can also filter
water to one faucet. For example, install the filter under
the kitchen sink to filter the cold drinking water (See
Figure 2).
PLANNING YOUR INSTALLATION
When planning the installation, first read the “Water
Treatment Filter Cartridges” section on Page 10 to determine where to locate the water filter housing. Then, use
the drawings on Page 6 as a guide. There are many variables to consider as you plan. Some of these are:
The Deluxe Multi-Purpose Water Filter inlet and out-
let internal threads are 3/4" NPT
Existing plumbing type (copper, threaded, etc.) and
nominal size (1/2", 3/4", etc.)
Tools you have, and your plumbing skills
Space available for installing the Deluxe Multi-
Purpose Water Filter
Make a simple sketch of your proposed installation, and
a list of plumbing materials you will need. Obtain
everything you need before starting the installation.
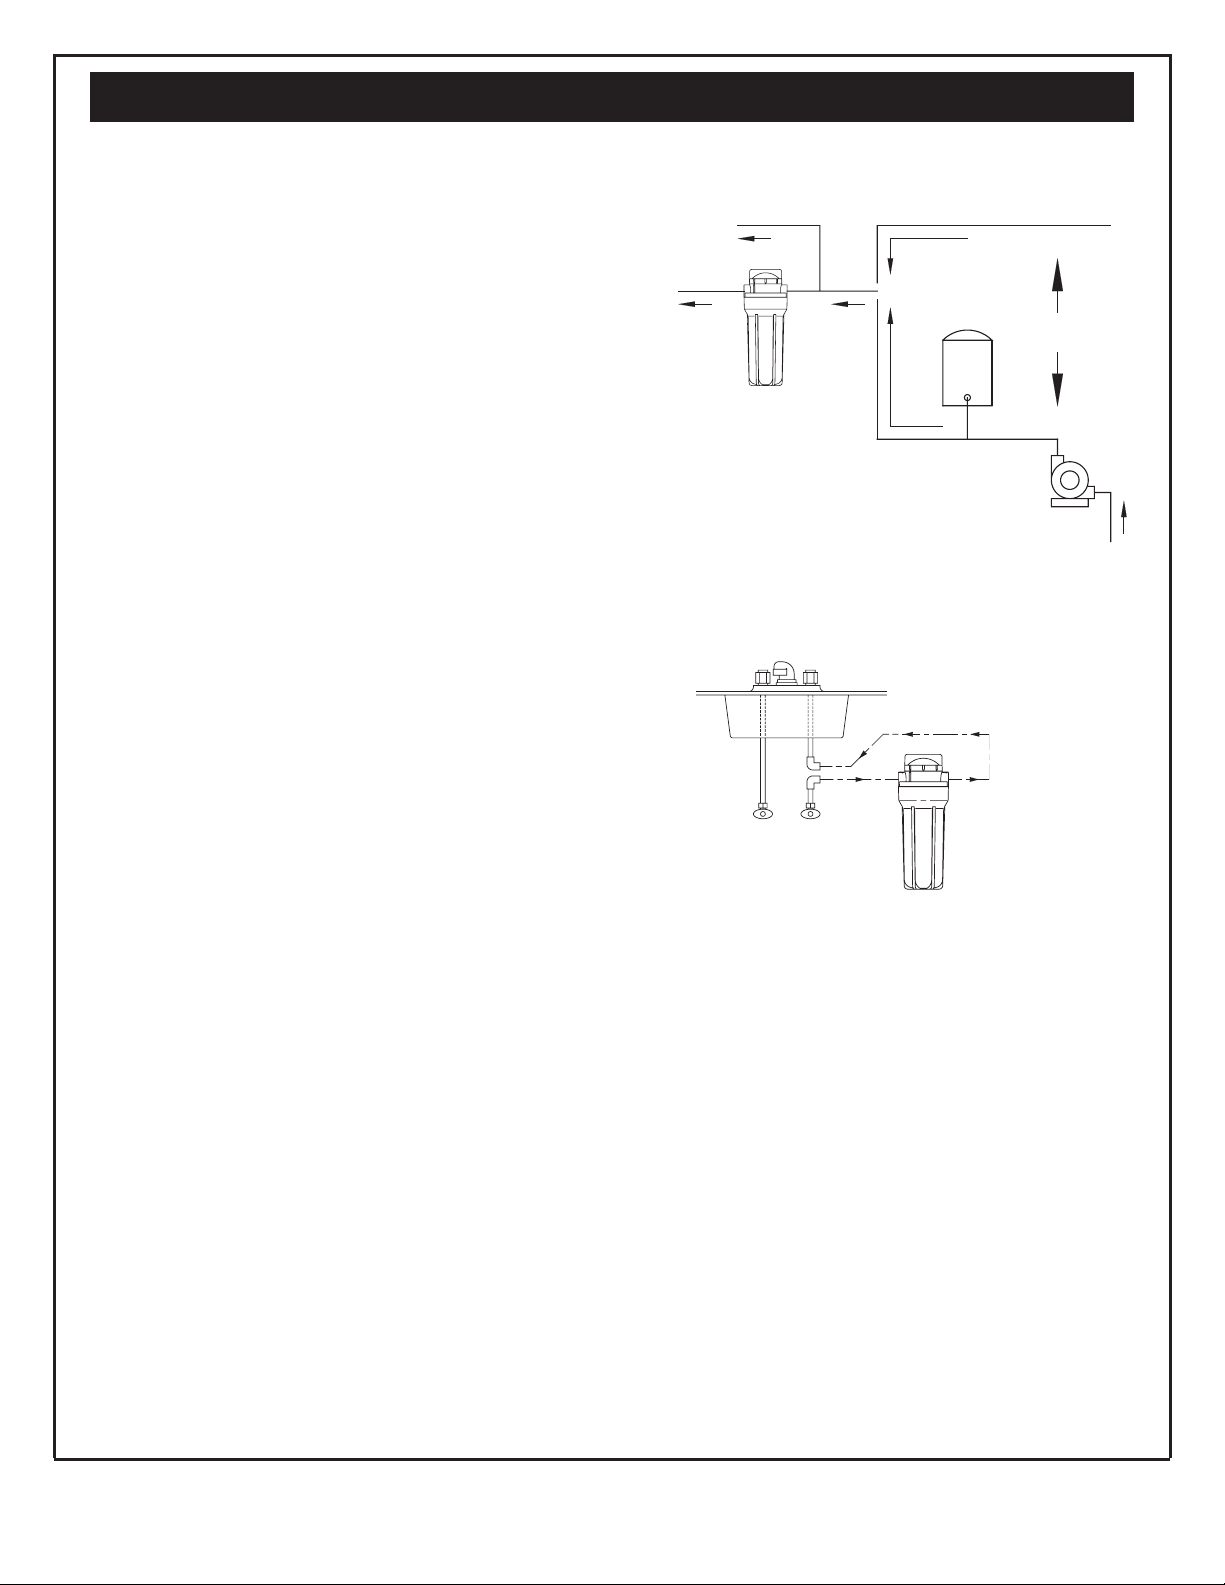
Filtering All House Water
Figure 2
Figure 1
Filtering Water to One Faucet
Kitchen Sink
Multi-Purpose
Water Filter
HOT
COLD
Multi-Purpose
Water Filter
Well Water Supply
To Outside Faucets
Cold Water
to House
Faucets &
Water Heater
City Water Supply
OR
Pressure
Tank
Well
Pump
Page 6

6
Questions? Call The Kenmore Water Line 1-800-426-9345 or visit KenmoreWater.com
Typical Installations
NOTE: Be sure to allow a minimum space of 2” under the
filter for removing the sump (to change the cartridge).
WATER
IN
WATER
OUT
Nut
Figure 6
Optional
Shutoff
Valve
Brass
Ferrule
Compression
Adaptor
INLET
3/4” NPT
MATERIALS & TOOLS NEEDED
2 compression adaptors, 3/4” NPT x com-
pression end to fit existing copper pipe
Teflon tape
Tubing cutter
Sandpaper or emery cloth
2 wrenches, either open end or adjustable
jaw, sized to fit compression adaptors
A. INSTALLATION ON COPPER PLUMBING USING COMPRESSION FITTINGS
Figure 3
B. SOLDERED COPPER INSTALLATION
C. THREADED INSTALLATION
D. UNDERSINK INSTALLATION
(Filtering Water to One Faucet)
Figure 4
Figure 5
IN OUT
IN OUT
IN OUT
Optional
Shutoff
Valve (2)
Optional
Shutoff
Valve (2)
WATER
IN
WATER
OUT
3/4” Copper
Pipe, as
required
Adaptor, 3/4” NPT
x Sweat (Apply
4 wraps of
Teflon Tape)
WATER
IN
WATER
OUT
3/4”
Nipple
(2)
3/4” Hex
Nipple
(2)
Union
Fitting
(2)
NOTE: To change the filter
cartridge, refer to
the instructions on
Pages 11 & 12 in
this manual.
COLD
Shutoff Valve
SINK
NOTE: Be sure to allow
a minimum
space of 2” under
the filter for
removing the
sump (to change
the cartridge).
See Note in Figure 3
See Note in Figure 3
Optional
Shutoff Valve
Apply 4 wraps of
Teflon Tape
Page 7

7
Questions? Call The Kenmore Water Line 1-800-426-9345 or visit KenmoreWater.com
Installation - Type A
INSTALLATION STEPS
1. Apply 4 wraps of Teflon tape to the threads of both
compression fittings.
2. Carefully turn the compression fittings into the water
filter head inlet and outlet and tighten. Do not crossthread and damage the threads. Do not overtighten
and crack the head.
3. Remove the nut and brass ferrule from both compres-
sion fittings and set aside. Using a tape measure or
ruler, measure the distance “D” as shown in Figure 7).
Mark this dimension at right so you do not forget.
4. IMPORTANT: Turn off the water supply to the main
pipe. Open a high and low faucet in the water system
to drain the pipe.
5. On the main water pipe, where you will install the fil-
ter, mark the dimension “D”. You will remove this
section of pipe. Before you begin to cut, double-check
your measurement.
6. Use a tubing cutter to remove the section of pipe.
Remove all burrs and rough edges with the sandpaper
or emery cloth.
7. Place a nut and brass ferrule from compression fittings
onto both pipe ends (See Figure 8).
8. With the IN side of the water filter toward incoming
water, spread the pipes apart and fit both pipe ends
into the compression fittings. Move a ferrule and nut
up to the fitting (See Figure 9). Then, turn on and
tighten the nut. Hold the fitting with one wrench
while tightening the nut with the other. Repeat on the
other side.
9. Before turning on the water supply, remove the sump
from the filter head and install the filter cartridge (See
Page 11).
Figure 7
A. WATER FILTER ON HOUSE MAIN WATER PIPE, TO FILTER ALL HOUSEHOLD WATER
USING COMPRESSION FITTINGS (See Figure 3 on Page 6)
IN OUT
Measure to shoulder
inside of fittings.
Copper pipe butts
against this shoulder.
D =
________”
Figure 9
Figure 8
Figure 10
Ground
Wire
Clamp
(2)
Nut
Brass
Ferrule
Brass
Ferrule
Nut
Nut
Brass
Ferrule
Nut
Fitting
WATER FLOW
GROUNDING INFORMATION:
The house cold water pipe is often used to ground electrical outlets in the home. Grounding protects you from
electrical shock. Installing the water filter housing may
have broken this ground. To restore, buy and install a #4
copper wire across the filter, tightly clamped at both
ends, as shown in Figure 10.
D
Page 8

8
Questions? Call The Kenmore Water Line 1-800-426-9345 or visit KenmoreWater.com
Installation - Type B
B. WATER FILTER ON HOUSE MAIN WATER PIPE, TO FILTER ALL HOUSEHOLD WATER
USING SOLDERED COPPER FITTINGS (See Figure 4 on Page 6)
MATERIALS AND TOOLS NEEDED:
You will need 2 sweat adaptors, 3/4" NPT x sweat (sweat
end to fit your main water pipe), lead-free solder and
flux, soldering torch, Teflon tape, sandpaper or emery
cloth, open end (to fit sweat adaptor) or adjustable jaw
wrench.
INSTALLATION STEPS
CAUTION: Heat created when soldering can damage
the water filter’s plastic parts. Be sure to use the following procedure to protect the water filter.
1. IMPORTANT: Turn off the water supply to the main
pipe. Open a high and low faucet in the water system
to drain the pipe.
2. On the main water pipe, where you will install the filter, use a tubing cutter to remove a section of pipe
about 12" long. Use sandpaper or emery cloth to thoroughly clean and remove all burrs and rough edges,
from both pipe ends.
NOTE: When soldering, use lead-free solder and flux
only. Be sure pipe and fittings are properly
cleaned.
3. Solder a sweat adaptor onto one of the pipe ends (See
Figure 11).
4. Place, but do not solder, a straight connector onto the
other pipe end (See Figure 11).
5. Remove the sump from the filter head and set the
sump aside.
6. After it cools, apply 4 wraps of Teflon tape to the
threads on the sweat adaptor fitting (See Figure 12).
7. With the IN side of the water filter toward incoming
water, carefully, turn the filter head onto the sweat
adaptor fitting (See Figure 12). Do not cross-thread, or
over-tighten and crack the filter head.
8. Turn a sweat adaptor fitting into the other side of the
filter head and hand tighten only. Using a tape measure or ruler, measure the distance “D” as shown in
Figure 13. Mark this same dimension on a length of
copper pipe. Cut the length of pipe.
9. Remove the sweat adaptor fitting from the filter head
and solder to the cut length of pipe.
10. After it cools, apply 4 wraps of Teflon tape to the
threads on the sweat adaptor fitting. Apply flux and
Figure 11
Straight
Connector
Sweat
Adaptor
IN
OUT
Figure 12
Filter
Head
WATER FLOW
Sweat
Adaptor
Apply
Teflon Tape
Figure 13
place the pipe end of the soldered assembly into the
straight connector. Then, turn the adaptor end into
the filter head and tighten.
11. Solder both sides of the straight connector.
12. Before replacing the sump and turning on the water
supply, install the filter cartridge (See Page 11).
NOTE: Read the “Grounding Information” on Page 7,
and comply with the instructions if required to
maintain continuity.
continued
D
D
Page 9

D. WATER FILTER UNDERSINK, TO FILTER WATER TO ONE FAUCET
(See Figure 6 on Page 6)
9
Questions? Call The Kenmore Water Line 1-800-426-9345 or visit KenmoreWater.com
Installation - Type C
C. WATER FILTER ON HOUSE MAIN WATER PIPE, TO FILTER ALL HOUSEHOLD WATER
USING THREADED PIPE & FITTINGS (See Figure 5 on Page 6)
MATERIALS AND TOOLS NEEDED:
For threaded pipe installation, you will need a pipe
threading tool, pipe wrenches, pipe joint compound,
union fittings and pipe nipples. Connect the filter housing as typically shown in Figure 5 on Page 6.
INSTALLATION NOTES
Use pipe joint compound on all external threads.
Do not turn pipe or fittings too tightly into the filter
head or you may break it.
It is important to have some linear movement in the
house main water pipe. This will allow you to tighten
union fittings without damaging the filter head, if
pipe lengths are not exact.
NOTE: Read the “Grounding Information” on Page 7,
and comply with the instructions if required to
maintain continuity.
INSTALLATION STEPS
1. Close the cold water side shutoff valve. Usually, there
already is a shutoff under the sink. If not, close the
main water shutoff valve near the water meter or pressure tank.
2. Cut and remove a section of the cold water pipe.
3. If you are plumbing with flexible tubing, hang or sup-
port the filter housing in some manner. If using rigid
pipe, be sure to allow a minimum of 2" clearance
under the filter for sump removal when changing the
filter cartridge.
4. Use the plumbing procedures on Page 7 if using com-
pression fittings. Follow procedures on Page 8 for
sweat copper and threaded pipe installation. Be sure
water flow is to the filter IN side, and from the OUT
side to the faucet.
NOTE: A grounding jumper wire is not required.
5. Before turning on the water supply, remove the sump
from the filter head and install the filter cartridge (See
Page 11).
Installation - Type D
Page 10

10
Questions? Call The Kenmore Water Line 1-800-426-9345 or visit KenmoreWater.com
Filter Cartridge Life
Several variables determine how long a cartridge will
last. These include:
How much water you use.
How much sediment, taste and/or odor, or other
unwanted substance, is in the water.
Use the following information as a guide. However, no
matter which type of cartridge you are using, you will
know it is time to replace it when you first notice the
return of the unwanted substance in your water. Filter
cartridges are available from your local Sears store and
www.sears.com.
The filter cartridges require replacement 3 or 4 times a
year when used for whole house filtering. Average cartridge life when filtering water to one faucet is 6 months
or more. This average time varies depending on the type
of cartridge and water conditions.
SEDIMENT CARTRIDGES: Filtering sediments, you
will know it's time to replace the cartridge when water
pressure drops at house faucets.
TASTE & ODOR CARTRIDGES: Filtering taste and
odor, you will know it's time to replace the cartridge
when the taste and odor returns. If the cartridge is also
for sediment removal, you could notice a pressure drop
before the return of taste and odor.
Water Treatment Filter Cartridges
Filter cartridges are available from Sears to remove:
sediments
tastes and odors
Many bad tastes and/or odors are reduced from water
using an activated carbon cartridge. It is most often
used to remove chlorine taste and odor.
SEDIMENT FILTER CARTRIDGES
Sediment cartridges remove sand, silt, clay, dirt and
other sediments from water.
Sediment Filter Cartridge, 25 Micron: Sears Item No.
42-38478 (included) filters the larger sediments from
water, and allows higher flows at less pressure drop.
Sediment Filter Cartridge, 5 Micron: Sears Item No. 4238478 (optional) filters fine sediments from water, often
to a single faucet.
TASTE & ODOR CARTRIDGES
Sears has several optional taste and odor filter cartridges
available. These filters are used to filter the water to one
faucet and are not intended for whole house filtration.
These are:
Sears Item No. 42-34370: For reduction of chlorine taste
and odor (one faucet).
Sears Item No. 42-34365: For chlorine reduction, plus
reduction of chemical contaminants (one faucet).
Sears Item No. 42-34373: Premium taste and odor (one
faucet).
Sears Item No. 42-34377: Taste and odor, plus lead reduction (one faucet).
Page 11

11
Questions? Call The Kenmore Water Line 1-800-426-9345 or visit KenmoreWater.com
Filter Cartridge Replacement
NOTE: A special adjustable wrench (42-34334) is includ-
ed for both turning the head valve and for
removing the sump. See instructions for use on
Page 12.
CAUTION: Never remove the sump with water pressure
in the filter.
1. Turn the filter valve handle to the “OFF” or “BYPASS”
position to relieve pressure in the filter. It is normal
for a small amount of water to come out from under
the top cap as pressure is being relived.
2. Turn the sump to the left to remove from the head (See
Figure 14). Be careful, as the sump is full of water. Do
not lose the large o-ring seal.
3. Be sure the inside of the sump is clean. Thoroughly
wash with warm, soapy water and rinse.
4. Remove the wrapper from the new filter cartridge and
insert the filter cartridge into the sump. Some cartridges fit either way, while others fit only one way.
Observe markings on the cartridge, or on the wrapper.
5. Lightly lubricate the o-ring seal, in the sump, with silicone grease (available at your local hardware store).
Be sure it is fully seated in the groove.
6. Hold the sump up to the filter head, aligning the center hole in the cartridge with the protrusion on the
bottom of the head.
NOTE: If the sump will not tighten up to the head, you
may have the cartridge in upside down or not
centered in the sump. Take the cartridge out and
check for correct orientation.
7. Being careful not to cross-thread, turn the sump to the
right onto the filter head and tighten securely.
8. If the filter is installed for whole house water filtering,
partially open a house faucet on the outlet side of the
filter housing. Open the sink cold faucet if the filter is
an undersink installation. Then, turn the filter valve
handle to the “ON” position (See Figure 15) and allow
the filter housing to fill with water.
9. Close the house faucet. Then, check for leaks between
the sump and the head.
NOTE: If a leak is occurring, turn off the water supply
and depressurize the filter. Then, remove the
sump and check the o-ring for cuts, flat spots,
etc., and sealing surfaces for foreign material.
Clean the o-ring and lubricate with silicone
grease. Carefully press into the groove in the
sump.
10. Taste and Odor Cartridges: A taste and odor car-
tridge contains activated carbon, a black powder.
When new, open a filtered water faucet and allow
fine carbon particles to purge from the cartridge.
Close the faucet when you no longer see the “fines”
in the filtered water.
Figure 14
Turn to the left
to remove
O-ring Seal
Head
Turn Valve Handle to
“OFF” or “BYPASS”
before removing sump
Filter
Cartridge
Sump
Figure 15
Turn to the right
to tighten
Sump
Head
Turn Valve Handle
to “ON” after
tightening sump
continued
Page 12

12
Questions? Call The Kenmore Water Line 1-800-426-9345 or visit KenmoreWater.com
Adjustable Filter Wrench
The adjustable filter wrench provided is intended
to:
Help turn the valve handle to the “ON”, “OFF” or
“BYPASS” positions.
Remove the sump for easy filter changes.
TURNING THE VALVE HANDLE
The “Push/Slide” button on the wrench will need to be
pushed in and the slide moved up into the wrench ring
(See Figure 17) to fit on the valve handle.
The valve handle turns clockwise from the “ON” position toward the “OFF” and “BYPASS” positions and,
counterclockwise from the “BYPASS” position toward
the “OFF” and “ON” positions (See Figure 18).
CAUTION: Forcing the valve handle beyond the “ON”
or “BYPASS” positions will damage the
valve (See Figure 16).
The valve has a pressure relief valve built in, so there
will be a small amount of water coming out from under
the top cap when the valve is being turned from position
to position.
REMOVING THE SUMP
The slide will need to be pushed back into the wrench
handle to clear the wrench ring (See Figure 19). Push in
the “Push/Slide” button on the wrench, and push the
slide back into the wrench handle.
IMPORTANT: Remember to turn the valve to “BYPASS”
or “OFF” before removing the sump.
To remove the sump, turn it to the left (See Figure 14 on
Page 11).
Figure 17
Move
Slide Up
Push/Slide
Button
Figure 19
Move
Slide Down
Push/Slide
Button
Figure 16
Valve Turning
Range
Figure 18
Turn Counterclockwise
toward “OFF” and “ON”
Turn
Clockwise
toward “OFF”
and “BYPASS”
Page 13

13
Questions? Call The Kenmore Water Line 1-800-426-9345 or visit KenmoreWater.com
Specifications
Supply water maximum pressure . . . . . . . . . . . . . . . . . . . . . . . . . . . . . . . . . . . . .40-100 psi (276-689 kPa)
Supply water temperature limits . . . . . . . . . . . . . . . . . . . . . . . . . . . . . . . . . . . . . . . . . . .40-100 °F (5-40 °C)
Inlet - Outlet . . . . . . . . . . . . . . . . . . . . . . . . . . . . . . . . . . . . . . . . . . . . . . . . . . . . . . . . . . . . . . . . . . . . 3/4” NPT
Installations In The Commonwealth Of Massachusetts: The Commonwealth of Massachusetts requires installation be performed by a licensed plumber. Plumbing code 248-CMR of the Commonwealth of Massachusetts
must be followed in these cases.
Page 14

14
Questions? Call The Kenmore Water Line 1-800-426-9345 or visit KenmoreWater.com
Repair Parts
Key No. Part No. Description
1 7164944 Head Assembly
2 42-34345 O-ring, 3-7/8” I.D. x 4.1/8” O.D.
3 7156543 Sump
4 42-34334 Wrench, Adjustable
7293890 Owner’s Manual
5 42-38478 Sediment Cartridge, 25 micron
42-38480 Sediment Cartridge, 5 micron
42-34370
Taste & Odor Cartridge
42-34373
Taste & Odor Cartridge, Premium
42-34365
Taste & Odor / Chemical Contaminant Cartridge
42-34377
Taste & Odor / Lead Reduction Cartridge
Not illustrated.
Optional replacement cartridges available from your local Sears store, online at
www.sears.com or from Sears Parts at 1-800-469-4663. Not included.
Not to be used for whole house applications.
1
3
4
2
5
Page 15

15
Questions? Call The Kenmore Water Line 1-800-426-9345 or visit KenmoreWater.com
Notes
Page 16

Your Home
For repair – in your home – of all major brand appliances,
lawn and garden equipment, or heating and cooling systems,
no matter who made it, no matter who sold it!
For the replacement parts, accessories and
owner’s manuals that you need to do-it-yourself.
For Sears professional installation of home appliances
and items like garage door openers and water heaters.
1-800-4-MY-HOME
®
(1-800-469-4663)
Call anytime, day or night (U.S.A. and Canada)
www.sears.com www.sears.ca
For expert home solutions advice: www.managemyhome.com
Our Home
For repair of carry-in items like vacuums, lawn equipment,
and electronics, call or go on-line for the location of your nearest
Sears Parts & Repair Service Center
1-800-488-1222 (U.S.A.) 1-800-469-4663 (Canada)
Call anytime, day or night
www.sears.com www.sears.ca
To purchase a protection agreement on a product serviced by Sears:
1-800-827-6655 (U.S.A.) 1-800-361-6665 (Canada)
Para pedir servicio de reparación
a domicilio, y para ordenar piezas:
1-888-SU-HOGAR
®
(1-888-784-6427)
Au Canada pour service en français:
1-800-LE-FOYER
MC
(1-800-533-6937)
www.sears.ca
® Registered Trademark / TMTrademark / SMService Mark of Sears Brands, LLC
® Marca Registrada /
TM
Marca de Fábrica / SMMarca de Servicio de Sears Brands, LLC
MC
Marque de commerce / MDMarque de déposée de Sears Brands, LLC
© Sears Brands, LLC
Get it fixed, at your home or ours!
 Loading...