

Kenmore 625.382080, ELITE 625.382080 Owner's Manual

OWNER'S MANUAL
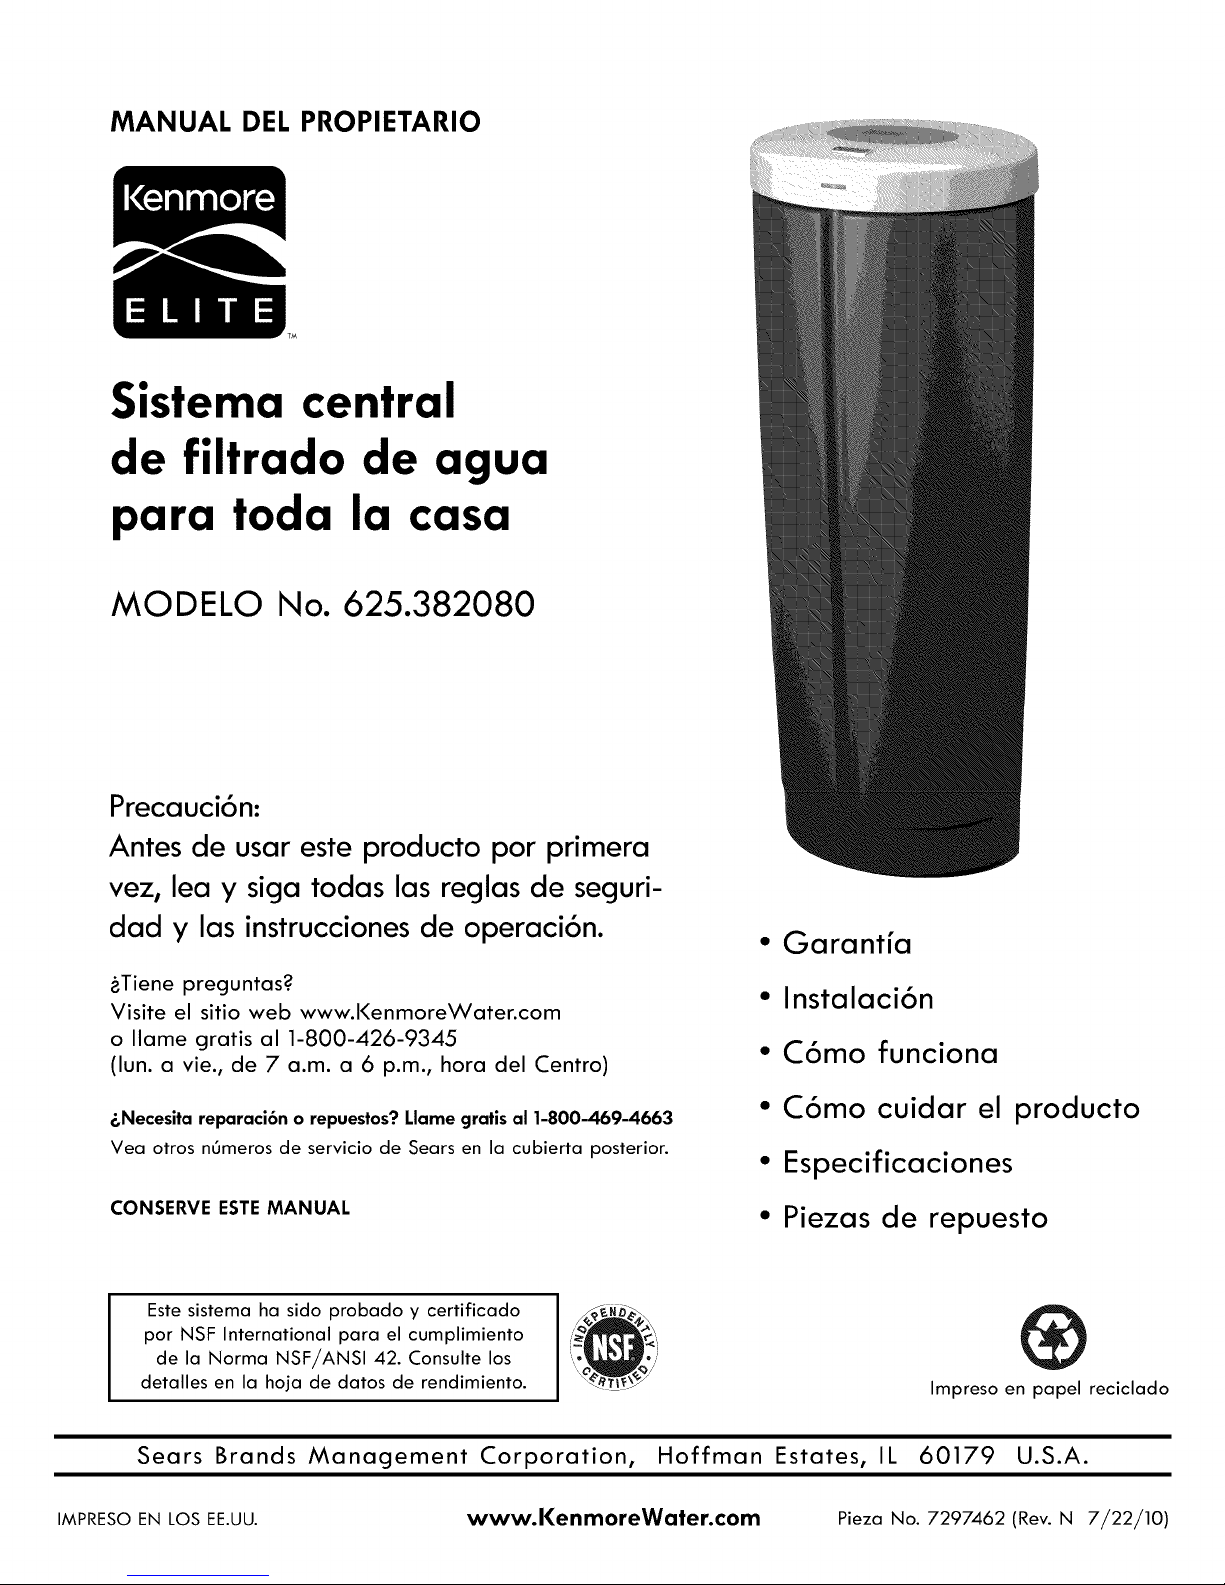
Central Water
Whole Home
Filtration System
MODEL NO. 625.382080
Caution:
Read and follow all safety rules and operating
instructions before first use of this product.
Questions ?
Visit www.KenmoreWater.com
or call toll free 1-800-426-9345 (M - F, 7 AM - 6 PM CST)
Repair or Parts ? Call toll free 1-800-469-4663
See back cover for other Sears service numbers.
SAVE THIS MANUAL
System tested and certified by NSF International
against NSF/ANSI Standard 42.
See performance data sheet for details.
• Warranty
• Installation
• How It Works
• Care Of
• Specifications
• Repair Parts
®
Printed on recycled paper
Sears Brands Management Corporation, Hoffman Estates, IL 60179 U.S.A.
PRINTED IN U.S.A. www.KenmoreWater.com Part No. 7297462 (Rev. N 7/22/10)

WARRANTY ON THE KENMORE CENTRAL WATER
WHOLE HOME FILTRATION SYSTEM
ONE YEAR LIMITED WARRANTY ON CENTRAL WATER WHOLE HOME FILTRATION SYSTEM
When installed, operated and maintained according to all instructions supplied with the product, if this
Central Water Whole Home Filtration System fails due to a defect in material or workmanship within one year
from the date of purchase, call 1-800-4-MY-HOME ®to arrange for free repair.
TEN YEAR LIMITED WARRANTY AGAINST LEAKS
When installed, operated and maintained according to all instructions supplied with the product, if the Central
Water Whole Home Filtration System filter bed tank develops a leak within ten years from the date of pur-
chase, call 1-800-4-MY-HOME ®to arrange for free tank replacement. After the first year you must pay an ini-
tial trip charge.
All warranty coverage does not include the filter bed, which is an expendable item.
If this Central Water Whole Home Filtration System is ever used for other than private family purposes, all
warranty coverage applies for only 90 days from the date of purchase.
This warranty covers only defects in material and workmanship. Sears will NOT pay for:
1.A service technician to instruct the user in correct product installation, operation or maintenance.
2. A service technician to clean or maintain this product.
3. Damage to or failure of this product if it is not installed, operated or maintained according to the all instruc-
tions supplied with the product.
4. Damage to or failure of this product resulting from accident, abuse, misuse or use for other than its intend-
ed purpose.
5. Damage to or failure of this product caused by the use of detergents, cleaners, chemicals or utensils other
than those recommended in all instructions supplied with the product.
6. Damage to or failure of parts or systems resulting from unauthorized modifications made to this product.
Disclaimer of implied warranties; limitation of remedies
Customer's sole and exclusive remedy under this limited warranty shall be product repair as provided herein.
Implied warranties, including warranties of merchantability or fitness for a particular purpose, are limited to
one year or the shortest period allowed by law. Sears shall not be liable for incidental or consequential dam-
ages. Some states and provinces do not allow the exclusion or limitation of incidental or consequential dam-
ages, or limitation on the duration of implied warranties of merchantability or fitness, so these exclusions or
limitations may not apply to you.
This warranty applies only while this appliance is used in the United States or Canada.
This warranty gives you specific legal rights, and you may also have other rights which vary from state to
state.
Sears Brands Management Corporation, Hoffman Estates, IL 60179
Sears Canada Inc., Toronto, Ontario, Canada M5B 2M5
Questions? Call The Kenmore Water Line 1-800-426-9345 or visit KenmoreWater.com
Unpack and Check Shipment ..................................................................... 4
Installation Requirements ...................................................................... 5-6
Installation ................................................................................. 7-10
How a Central Water Filtration System Works ....................................................... 11
Programming the Central Water System ........................................................... 12
Start Up Procedure ............................................................................ 13
Customizing Features / Options ............................................................... 14-16
Care of Your Central Water Filtration System ..................................................... 17-18
Troubleshooting ............................................................................ 19-21
Dimensions .................................................................................. 22
Specifications ................................................................................ 23
Wiring Schematic ............................................................................. 23
Exploded View & Parts List ................................................................... 24-27
• Read all steps and guides carefully before installing
and using your Central Water Whole Home Filtration
System. Follow all steps exactly to correctly install.
Reading this manual will also help you to get all the •
benefits from the Central Water Whole Home Filtration
System.
• Do not attempt to use this product to make safe drink-
ing water from non-potable water sources. Do not
use the system on microbiologically unsafe water, or
water of unknown quality without adequate disinfec- •
tion before or after the system.
• Use only lead-free solder and flux for all sweat-solder
connections, as required by federal codes.
• Use care when handling the Central Water Whole
Home Filtration System. Do not turn upside down or
drop.
• Avoid installing in direct sunlight. Excessive sun heat
may cause distortion or other damage to non-metallic
parts. •
• Check with your local public works department for
plumbing and sanitation codes. You must follow their
guides as you install the system. Follow your local
codes if they differ with guides in this manual. In
Massachusetts, plumbing code 248-CMR 3.00 and
10.00 shall be adhered to. Consult with a licensed
plumber.
The Central Water Whole Home Filtration System
works on water pressures of 30 psi (minimum) to 125
psi (maximum). If your house water pressure is over
the maximum, install a pressure reducing valve in the
water supply pipe to the Central Water Home
Filtration System.
The Central Water Whole Home Filtration System
works on 24 volt, 60 Hz electrical power only, supplied
by a direct plug-in transformer (included). Be sure to
use the included transformer and plug it into a nomi-
nal 120V, 60 cycle household outlet that is properly
protected by an overcurrent device such as a circuit
breaker or fuse. If transformer is replaced, use only
the authorized service, Class II, 24V 10VA trans-
former.
Do not install the Central Water Whole Home
Filtration System outside, or in extreme hot or cold
temperatures. Temperature of the water supply to the
Central Water Whole Home Filtration System must be
between 40°F and 120°F. Do not install on hot water.
Questions? Call The Kenmore Water Line 1-800-426-9345 or visit KenmoreWater.com
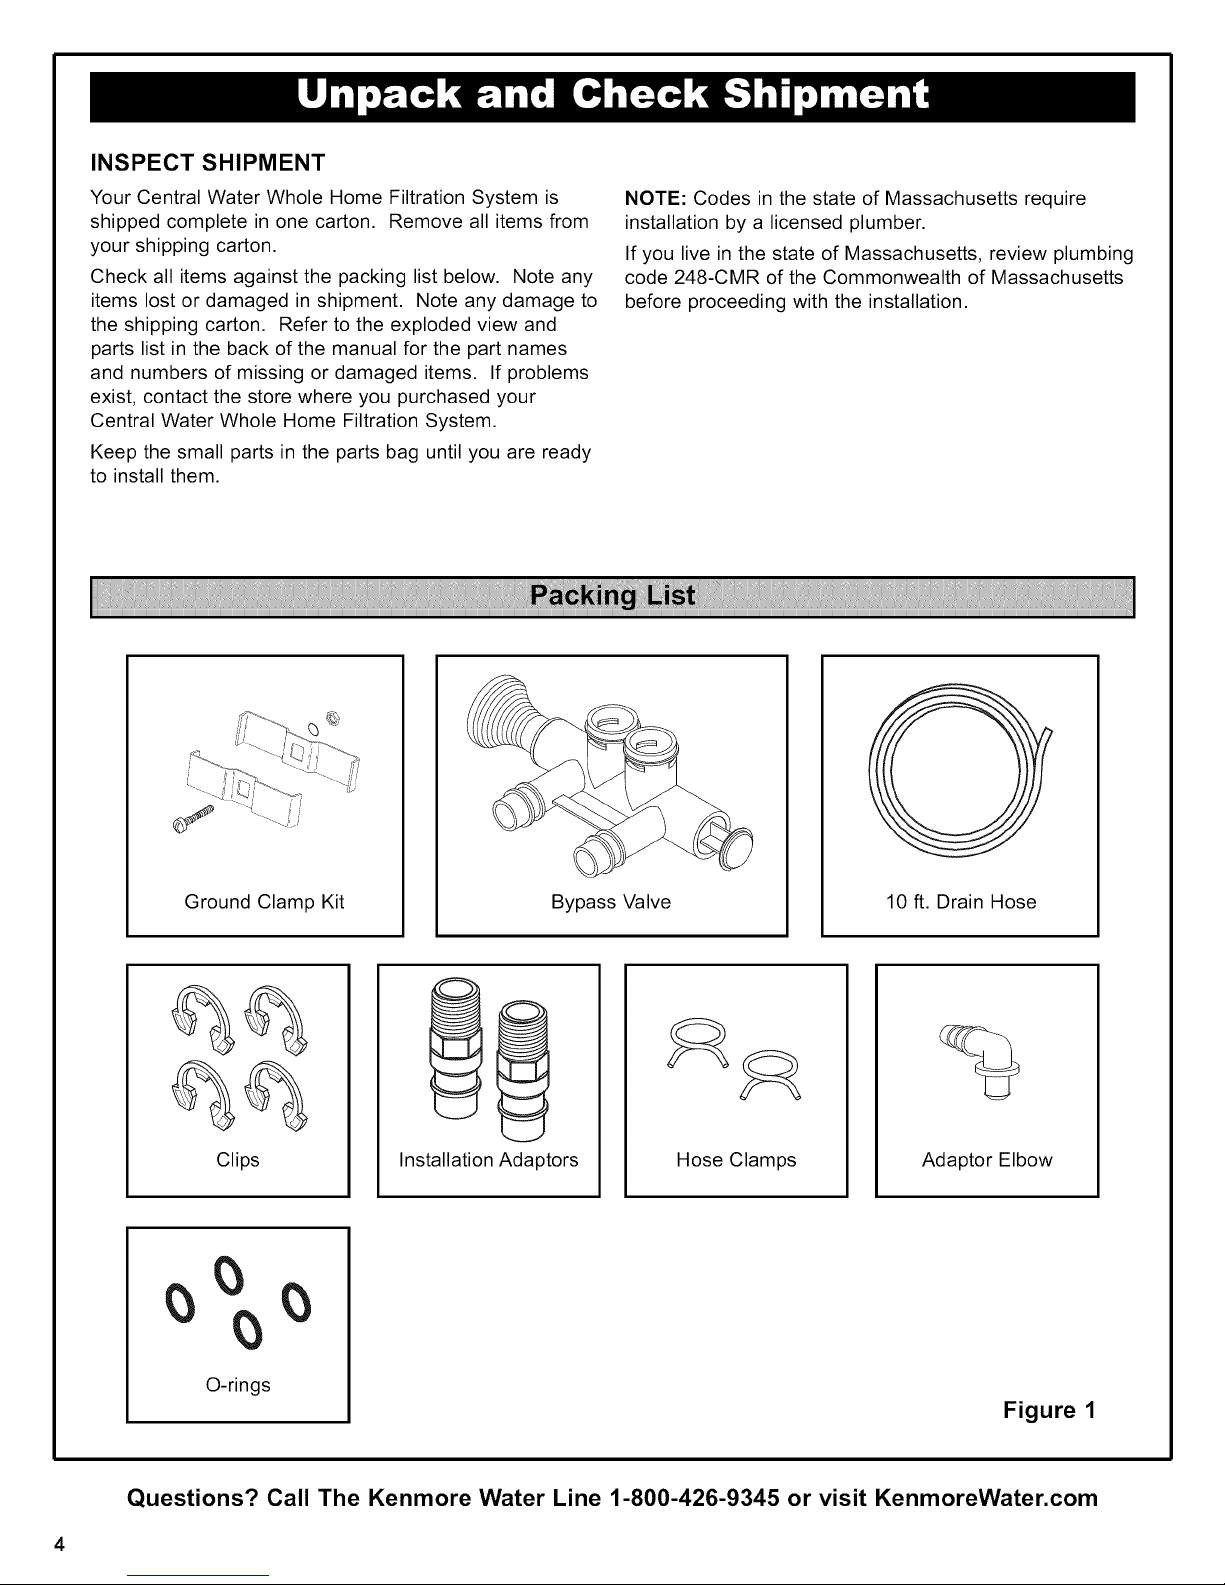
INSPECT SHIPMENT
Your Central Water Whole Home Filtration System is
shipped complete in one carton. Remove all items from
your shipping carton.
Check all items against the packing list below. Note any
items lost or damaged in shipment. Note any damage to
the shipping carton. Refer to the exploded view and
parts list in the back of the manual for the part names
and numbers of missing or damaged items. If problems
exist, contact the store where you purchased your
Central Water Whole Home Filtration System.
Keep the small parts in the parts bag until you are ready
to install them.
NOTE: Codes in the state of Massachusetts require
installation by a licensed plumber.
If you live in the state of Massachusetts, review plumbing
code 248-CMR of the Commonwealth of Massachusetts
before proceeding with the installation.
Ground Clamp Kit Bypass Valve
Clips Installation Adaptors Hose Clamps Adaptor Elbow
O-rings
10 ft. Drain Hose
Figure 1
Questions? Call The Kenmore Water Line 1-800-426-9345 or visit KenmoreWater.com
TOOLS NEEDED
LOCATION REQUIREMENTS
Assemble the required tools before starting installation.
Read and follow instructions provided with any tools
listed here.
• Screwdriver
• Tape measure
• Pliers
If using Soldered Copper Pipe
• Tubing cutter
• Lead-free solder and flux
• Propane torch
• Emery cloth, sandpaper or steel wool
• Misc. copper pipe fittings
If using Threaded Pipe
• Pipe cutter or hacksaw
• Pipe joint compound
• Threading tool
• Misc. threaded pipe fittings
If using CPVC Plastic
• Pipe cutter
• Solvent cement
• Hacksaw
• Primer
• Adjustable wrench
If using Other
• Other pipe and fittings suitable for potable water as
required by piping system manufacturer and local
codes and/or ordinances.
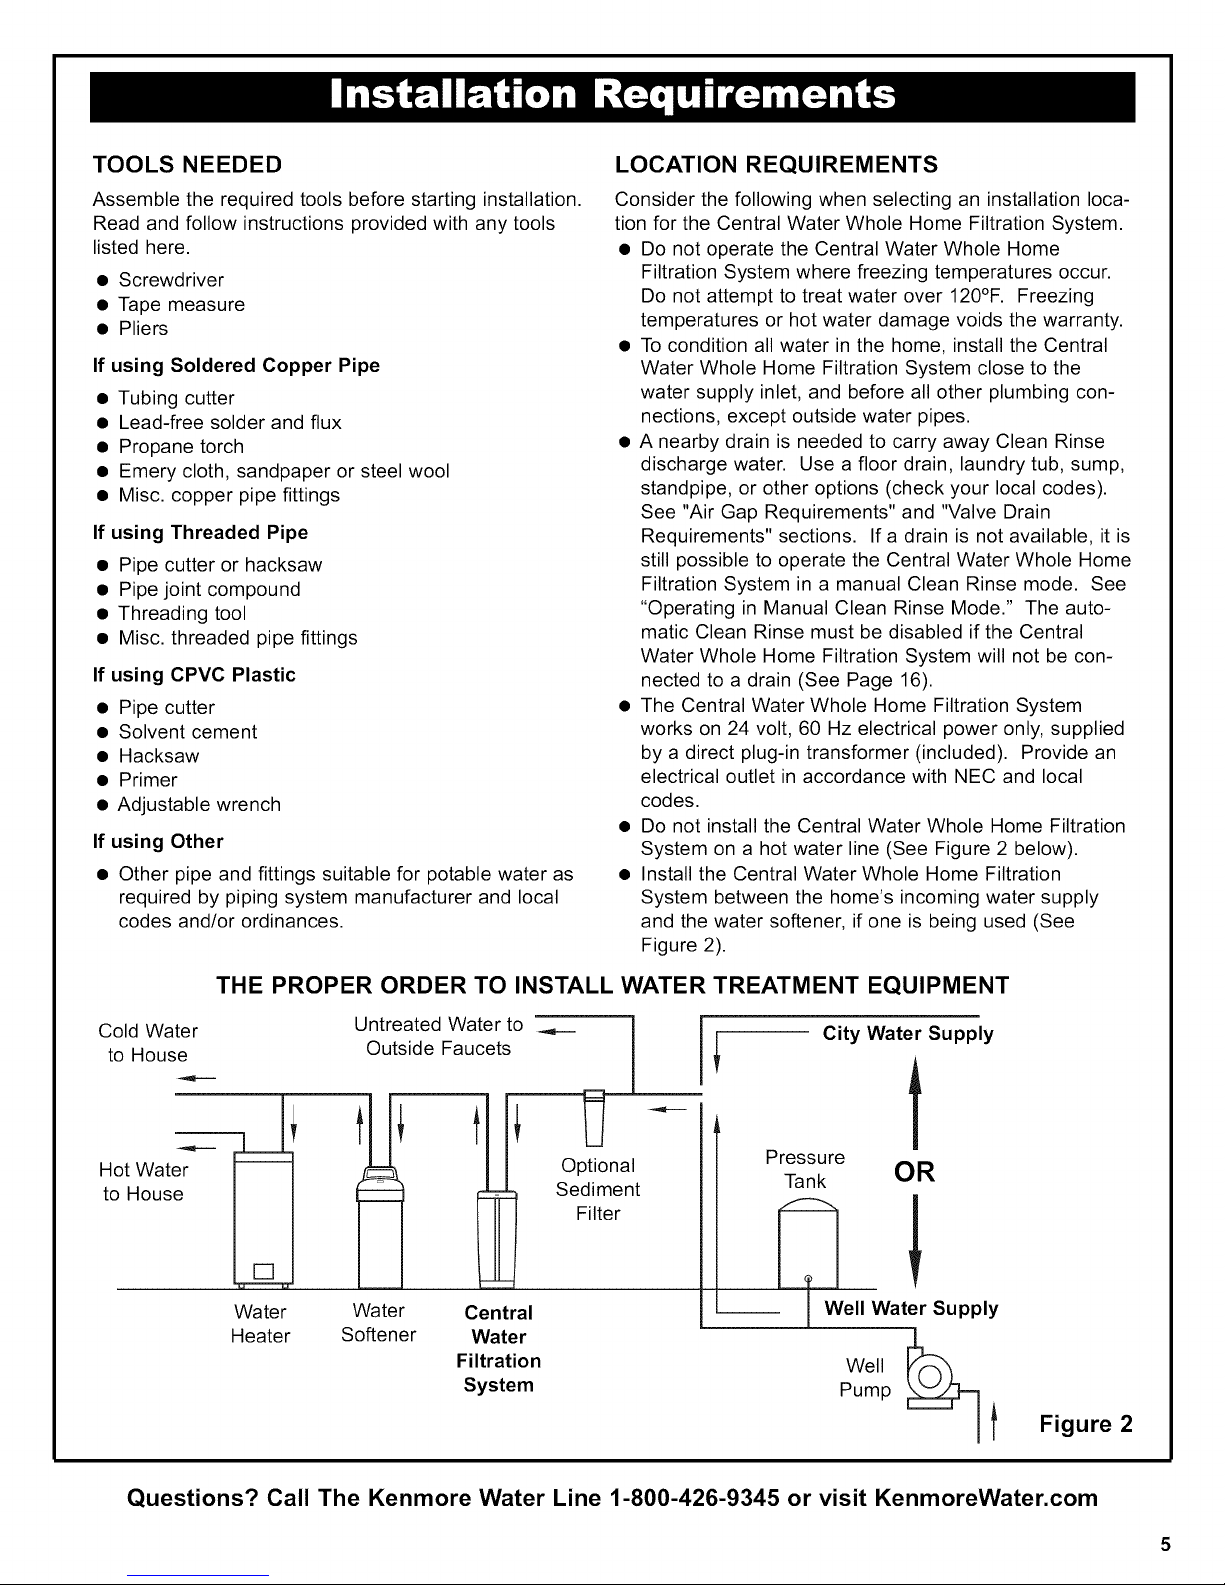
Consider the following when selecting an installation loca-
tion for the Central Water Whole Home Filtration System.
• Do not operate the Central Water Whole Home
Filtration System where freezing temperatures occur.
Do not attempt to treat water over 120°F. Freezing
temperatures or hot water damage voids the warranty.
• To condition all water in the home, install the Central
Water Whole Home Filtration System close to the
water supply inlet, and before all other plumbing con-
nections, except outside water pipes.
• A nearby drain is needed to carry away Clean Rinse
discharge water. Use a floor drain, laundry tub, sump,
standpipe, or other options (check your local codes).
See "Air Gap Requirements" and "Valve Drain
Requirements" sections. If a drain is not available, it is
still possible to operate the Central Water Whole Home
Filtration System in a manual Clean Rinse mode. See
"Operating in Manual Clean Rinse Mode." The auto-
matic Clean Rinse must be disabled if the Central
Water Whole Home Filtration System will not be con-
nected to a drain (See Page 16).
• The Central Water Whole Home Filtration System
works on 24 volt, 60 Hz electrical power only, supplied
by a direct plug-in transformer (included). Provide an
electrical outlet in accordance with NEC and local
codes.
• Do not install the Central Water Whole Home Filtration
System on a hot water line (See Figure 2 below).
• Install the Central Water Whole Home Filtration
System between the home's incoming water supply
and the water softener, if one is being used (See
Figure 2).
THE PROPER ORDER TO INSTALL WATER TREATMENT EQUIPMENT
Cold Water
to House
Untreated Water to
Outside Faucets
City Water Supply
t
Hot Water
to House
Water
Heater
Water
Softener
Central
Water
Filtration
System
Optional
Sediment
Filter
Questions? Call The Kenmore Water Line 1-800-426-9345 or visit KenmoreWater.com
Pressure
Tank OR
I Well Water
Pump
Well _
Supply
f
Figure 2
PLUMBING CODES
VALVE DRAIN REQUIREMENTS
All plumbing must be completed in accordance with
national, state and local plumbing codes.
In the state of Massachusetts: The Commonwealth
of Massachusetts plumbing code 248-CMR shall
be adhered to. A licensed plumber shall be used
for this installation.
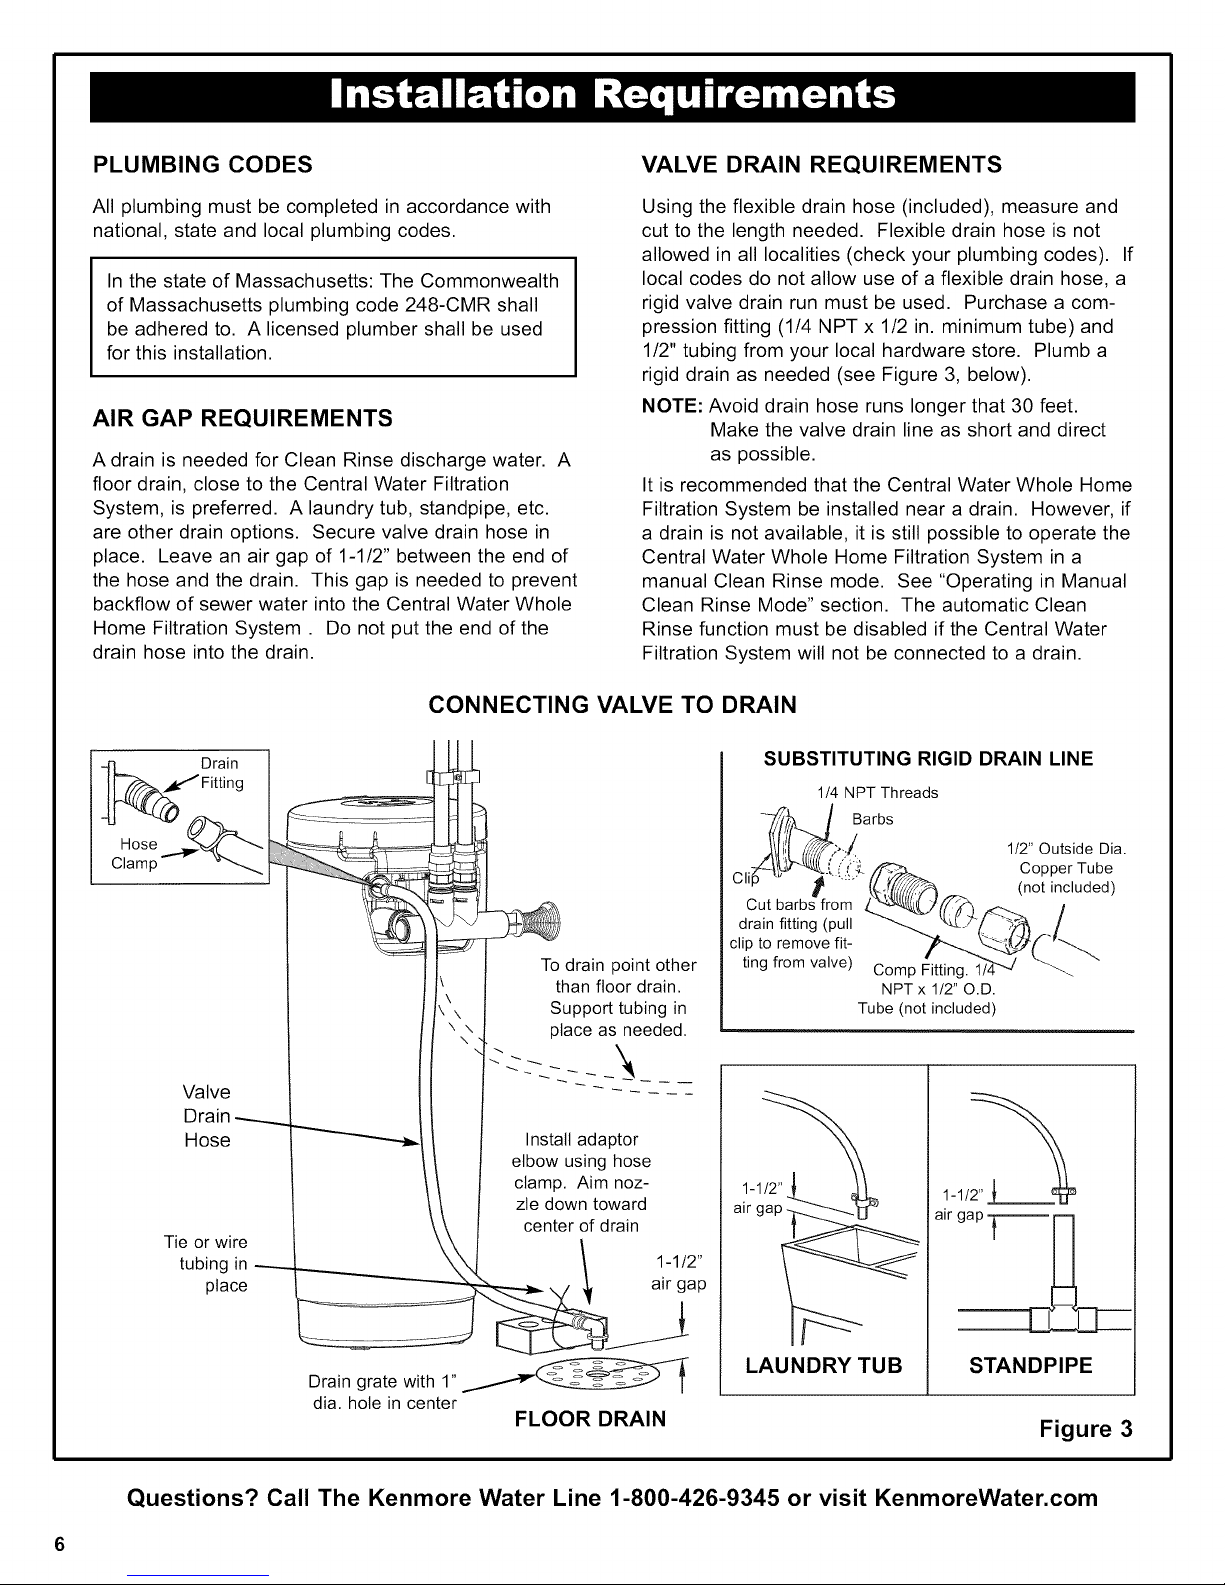
AIR GAP REQUIREMENTS
A drain is needed for Clean Rinse discharge water. A
floor drain, close to the Central Water Filtration
System, is preferred. A laundry tub, standpipe, etc.
are other drain options. Secure valve drain hose in
place. Leave an air gap of 1-1/2" between the end of
the hose and the drain. This gap is needed to prevent
backflow of sewer water into the Central Water Whole
Home Filtration System. Do not put the end of the
drain hose into the drain.
CONNECTING VALVE TO DRAIN
DrainI
Fitting /
ose2%--
Clamp '_-_-_ _-_--
To drain point other
than floor drain.
Support tubing in
place as needed.
Using the flexible drain hose (included), measure and
cut to the length needed. Flexible drain hose is not
allowed in all localities (check your plumbing codes). If
local codes do not allow use of a flexible drain hose, a
rigid valve drain run must be used. Purchase a com-
pression fitting (1/4 NPT x 1/2 in. minimum tube) and
1/2" tubing from your local hardware store. Plumb a
rigid drain as needed (see Figure 3, below).
NOTE: Avoid drain hose runs longer that 30 feet.
Make the valve drain line as short and direct
as possible.
It is recommended that the Central Water Whole Home
Filtration System be installed near a drain. However, if
a drain is not available, it is still possible to operate the
Central Water Whole Home Filtration System in a
manual Clean Rinse mode. See "Operating in Manual
Clean Rinse Mode" section. The automatic Clean
Rinse function must be disabled if the Central Water
Filtration System will not be connected to a drain.
SUBSTITUTING RIGID DRAIN LINE
1/4 NPT Threads
_,j/i_J Barbs
._/_,.;o_:/ 1/2" Outside Dis.
_,,Zz_iC"_'&.." (i/__ _ Copper Tube
blip " _ .... (_.._/_/7_/._ (not included)
Cut barbs from /..._.J_f_ A .
drain fitting (pull -_ "_L/-'r'b'_ -I
clip to remove fit- _'---__._¢ _..
ting from valve) Comp Fitting. 1-7"__-/ _.. "
NPT x 1/2" O.D.
Tube (not included)
Valve
Drain -........_.
Hose
Tie or wire
tubing in
place
Drain grate with 1"
dia. hole in center
Questions? Call The Kenmore Water Line 1-800-426-9345 or visit KenmoreWater.com
Install adaptor
elbow using hose
clamp. Aim noz-
zle down toward
center of drain
FLOOR DRAIN
1-1/2"
air gap
air
LAUNDRY TUB STANDPIPE
Figure 3
TURN OFF WATER SUPPLY LEVEL IF NECESSARY
1. Close the main water supply valve, near the well
pump or water meter.
2. Open all faucets to drain water from the house
pipes.
NOTE: Be sure not to drain water from the water
heater, as damage to the water heater ele-
ments could result.
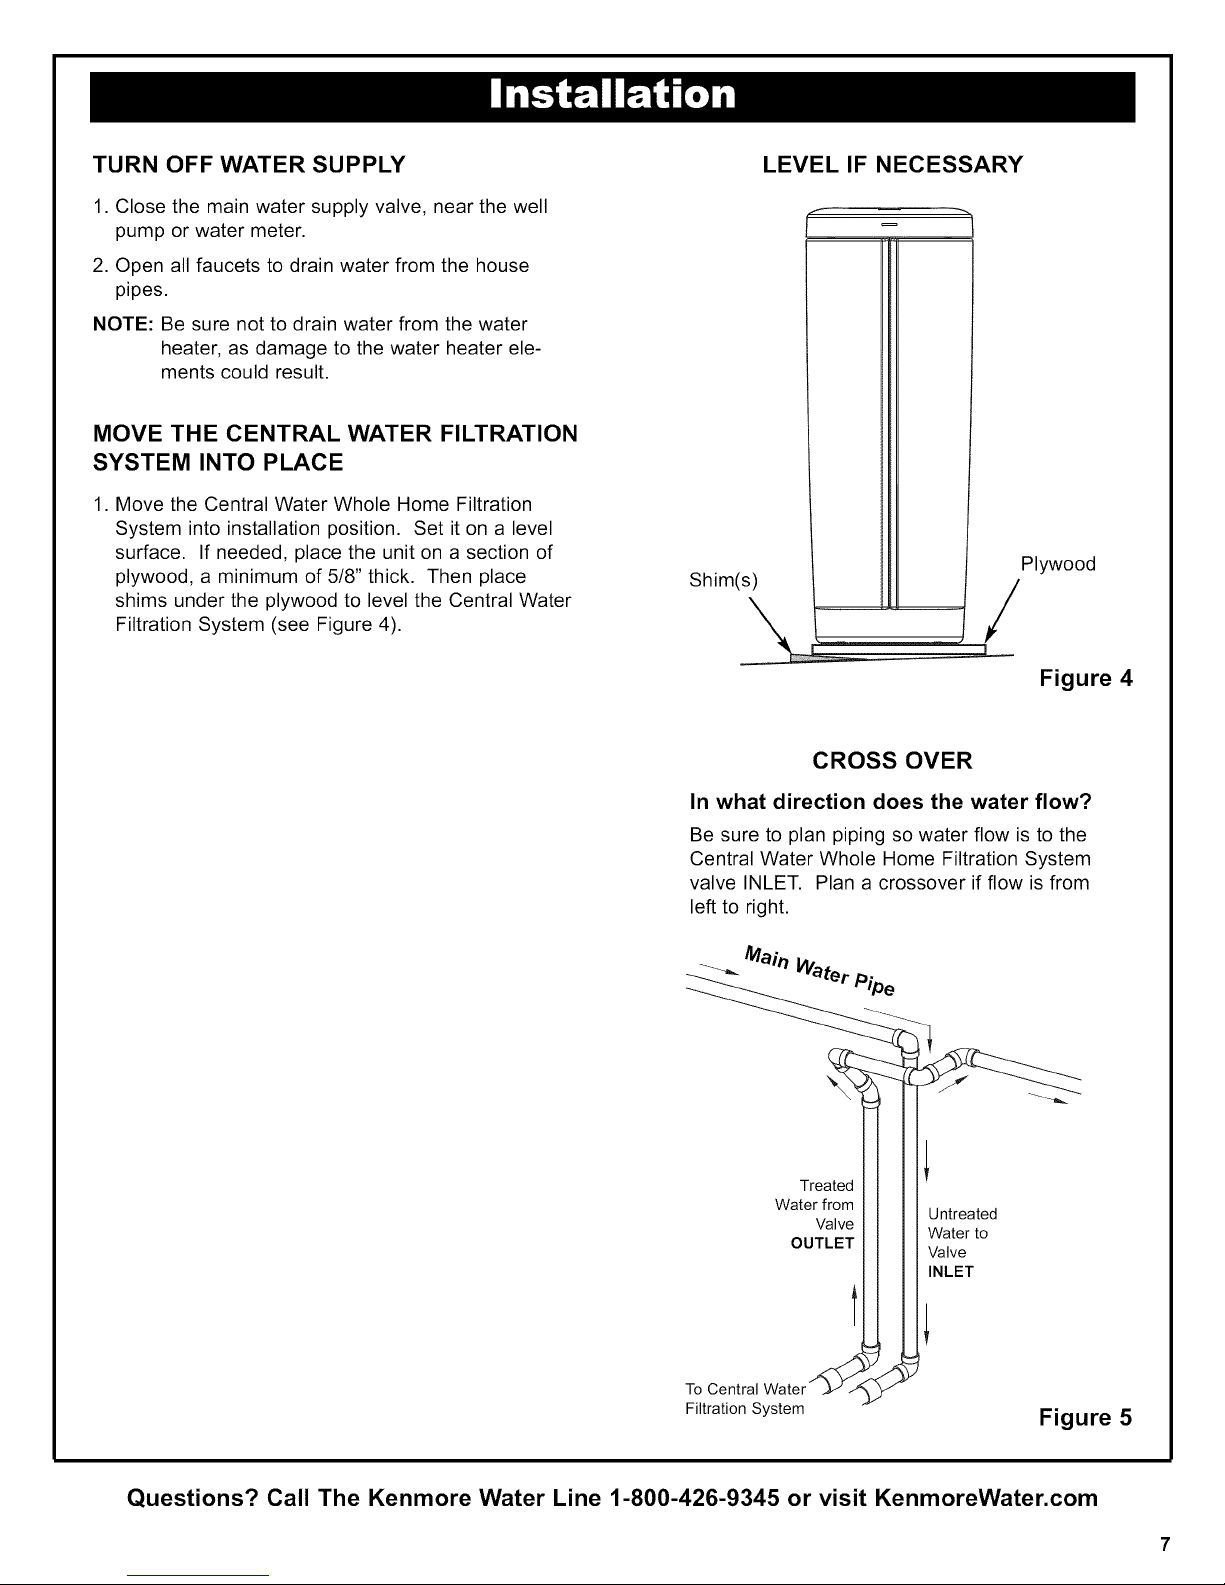
MOVE THE CENTRAL WATER FILTRATION
SYSTEM INTO PLACE
1. Move the Central Water Whole Home Filtration
System into installation position. Set it on a level
surface. If needed, place the unit on a section of
plywood, a minimum of 5/8" thick. Then place
shims under the plywood to level the Central Water
Filtration System (see Figure 4).
Shim(s)
/
Plywood
Figure 4
CROSS OVER
In what direction does the water flow?
Be sure to plan piping so water flow is to the
Central Water Whole Home Filtration System
valve INLET. Plan a crossover if flow is from
left to right.
Main
---_ WaterPipe
Treated
Water from
Valve
OUTLET
Untreated
Water to
Valve
INLET
t
Questions? Call The Kenmore Water Line 1-800-426-9345 or visit KenmoreWater.com
To Central
Filtration System
Figure 5
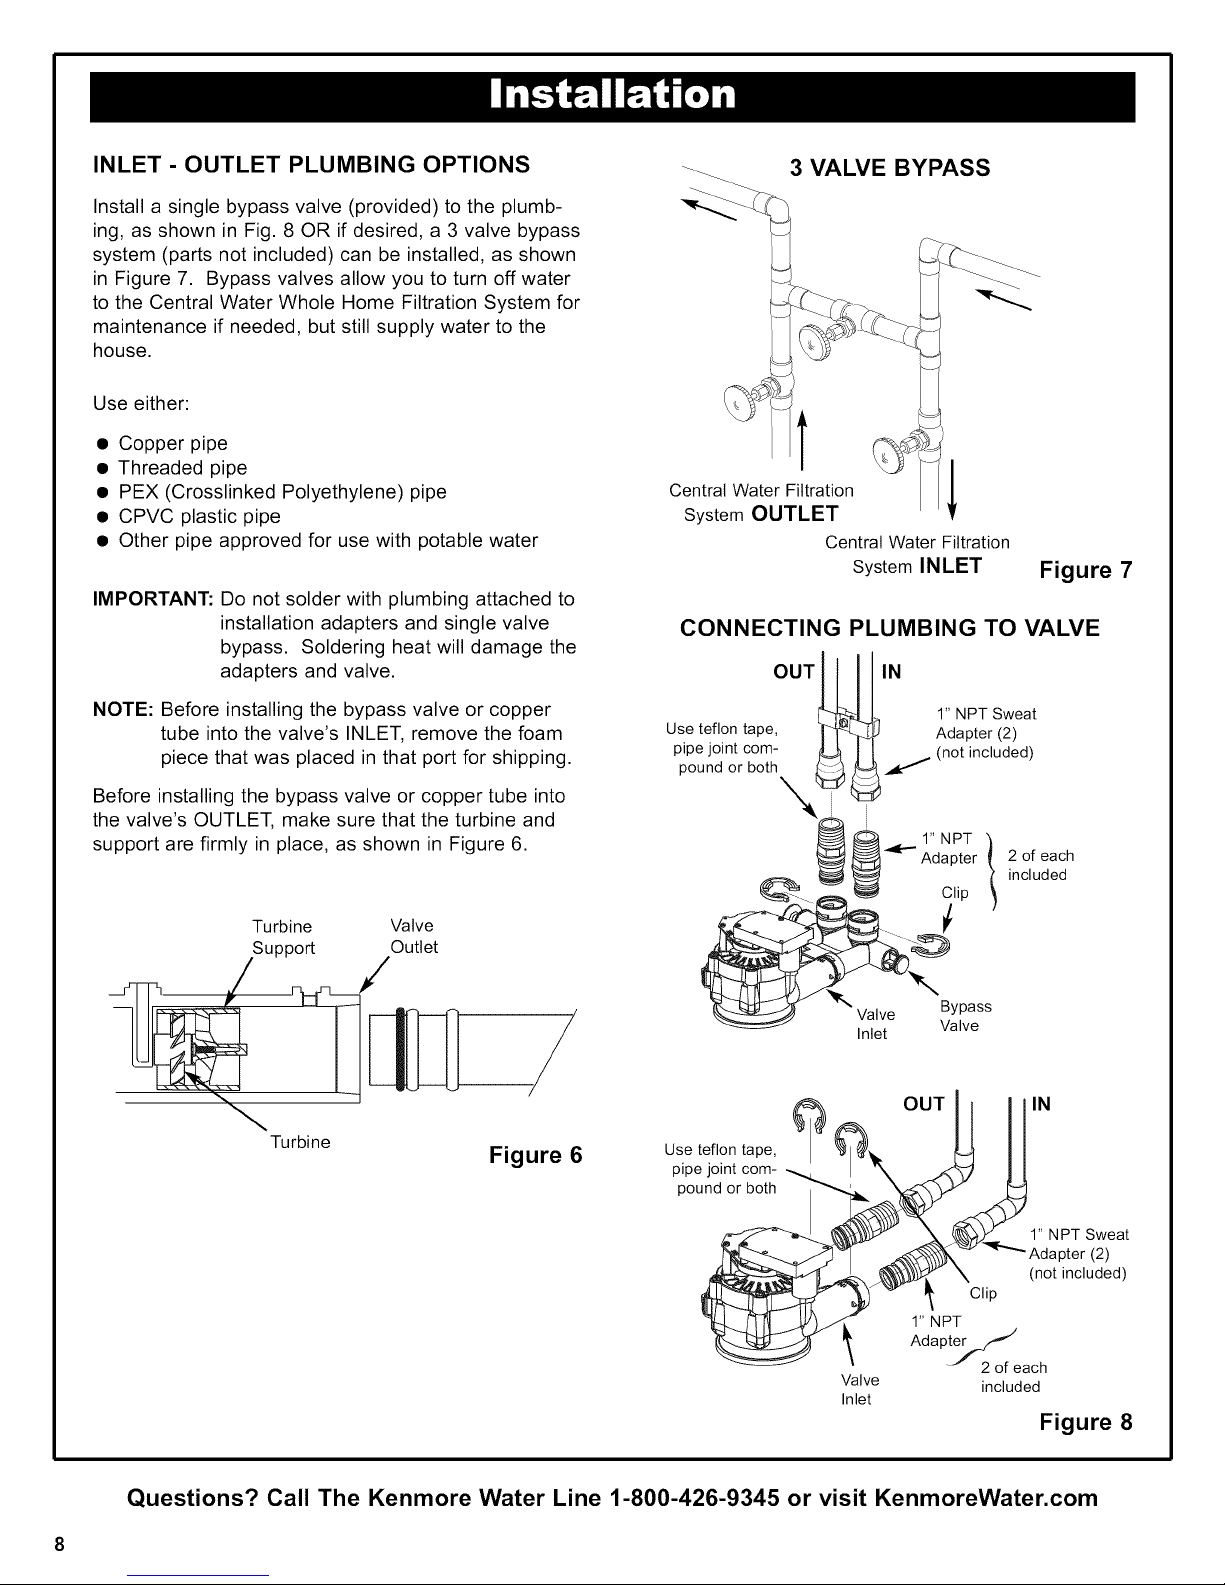
INLET - OUTLET PLUMBING OPTIONS
Install a single bypass valve (provided) to the plumb-
ing, as shown in Fig. 8 OR if desired, a 3 valve bypass
system (parts not included) can be installed, as shown
in Figure 7. Bypass valves allow you to turn off water
to the Central Water Whole Home Filtration System for
maintenance if needed, but still supply water to the
house.
Use either:
• Copper pipe
• Threaded pipe
• PEX (Crosslinked Polyethylene) pipe
• CPVC plastic pipe
• Other pipe approved for use with potable water
IMPORTANT: Do not solder with plumbing attached to
installation adapters and single valve
bypass. Soldering heat will damage the
adapters and valve.
3 VALVE BYPASS
Central Water Filtration
System OUTLET
Central Water Filtration
System INLET
Figure 7
CONNECTING PLUMBING TO VALVE
OUT
IN
NOTE: Before installing the bypass valve or copper
tube into the valve's INLET, remove the foam
piece that was placed in that port for shipping.
Before installing the bypass valve or copper tube into
the valve's OUTLET, make sure that the turbine and
support are firmly in place, as shown in Figure 6.
Turbine Valve
Support Outlet
Turbine
Figure 6 Use teflon tape,
Use teflon tape,
pipe joint com-
pound or both
@ 41.--- ,_'dNpP:r
1" NPT Sweat
Adapter (2)
(not included)
2 of each
included
%
Valve Bypass
Inlet
/
pipe joint com-
pound or both
Valve
Inlet
Valve
OUT ! IN
1" NPT Sweat
Adapter (2)
(not included)
Clip
1" NPT
Adapter _
J 2 of each
included
Figure 8
Questions? Call The Kenmore Water Line 1-800-426-9345 or visit KenmoreWater.com
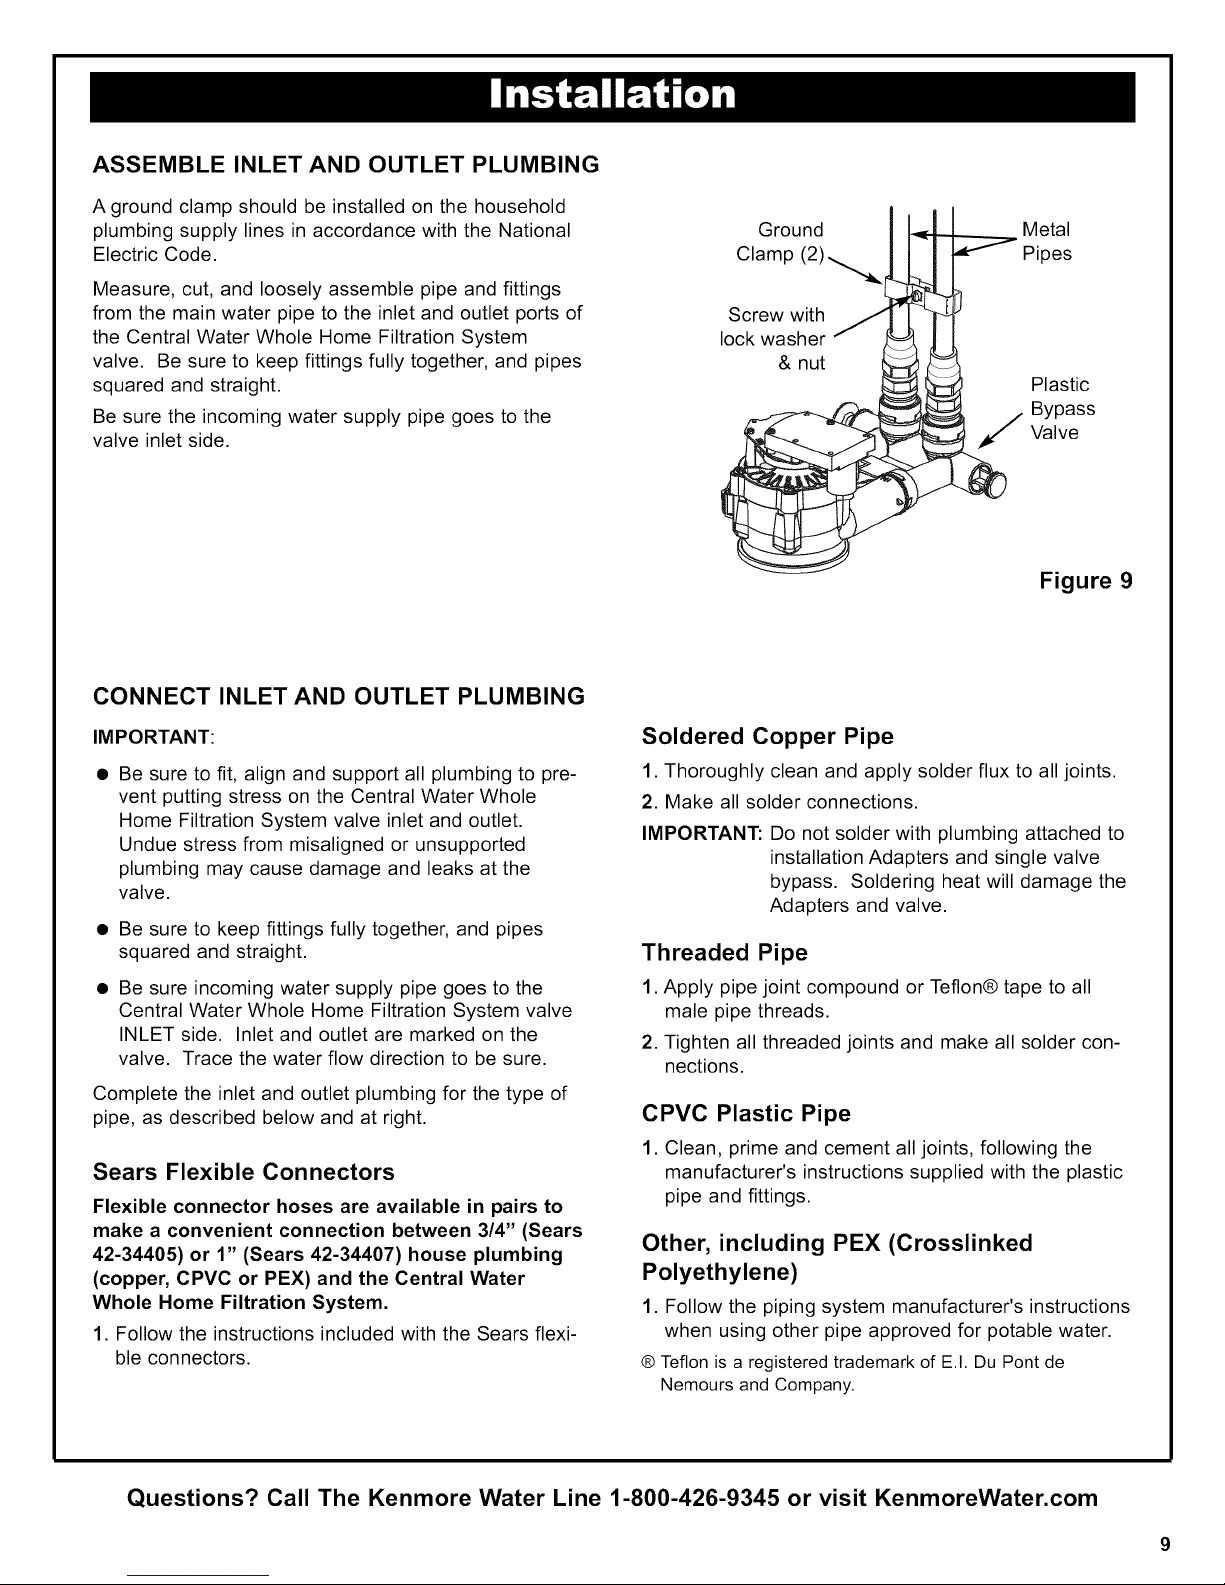
ASSEMBLE INLET AND OUTLET PLUMBING
A ground clamp should be installed on the household
plumbing supply lines in accordance with the National
Electric Code.
Metal
Measure, cut, and loosely assemble pipe and fittings
from the main water pipe to the inlet and outlet ports of
the Central Water Whole Home Filtration System
valve. Be sure to keep fittings fully together, and pipes
squared and straight.
Be sure the incoming water supply pipe goes to the
valve inlet side.
CONNECT INLET AND OUTLET PLUMBING
IMPORTANT:
Be sure to fit, align and support all plumbing to pre-
vent putting stress on the Central Water Whole
Home Filtration System valve inlet and outlet.
Undue stress from misaligned or unsupported
plumbing may cause damage and leaks at the
valve.
Be sure to keep fittings fully together, and pipes
squared and straight.
Be sure incoming water supply pipe goes to the
Central Water Whole Home Filtration System valve
INLET side. Inlet and outlet are marked on the
valve. Trace the water flow direction to be sure.
Complete the inlet and outlet plumbing for the type of
pipe, as described below and at right.
Sears Flexible Connectors
Flexible connector hoses are available in pairs to
make a convenient connection between 3/4" (Sears
42-34405) or 1" (Sears 42-34407) house plumbing
(copper, CPVC or PEX) and the Central Water
Whole Home Filtration System.
1. Follow the instructions included with the Sears flexi-
ble connectors.
- Pipes
Screw with
lock washer
& nut
Plastic
Bypass
'/Valve
Figure 9
Soldered Copper Pipe
1. Thoroughly clean and apply solder flux to all joints.
2. Make all solder connections.
IMPORTANT: Do not solder with plumbing attached to
installation Adapters and single valve
bypass. Soldering heat will damage the
Adapters and valve.
Threaded Pipe
1. Apply pipe joint compound or Teflon@ tape to all
male pipe threads.
2. Tighten all threaded joints and make all solder con-
nections.
C
PVC Plastic Pipe
1.
Clean, prime and cement all joints, following the
manufacturer's instructions supplied with the plastic
pipe and fittings.
Other, including PEX (Crosslinked
Polyethylene)
1. Follow the piping system manufacturer's instructions
when using other pipe approved for potable water.
® Teflon is a registered trademark of E.I. Du Pont de
Nemours and Company.
Questions? Call The Kenmore Water Line 1-800-426-9345 or visit KenmoreWater.com
9
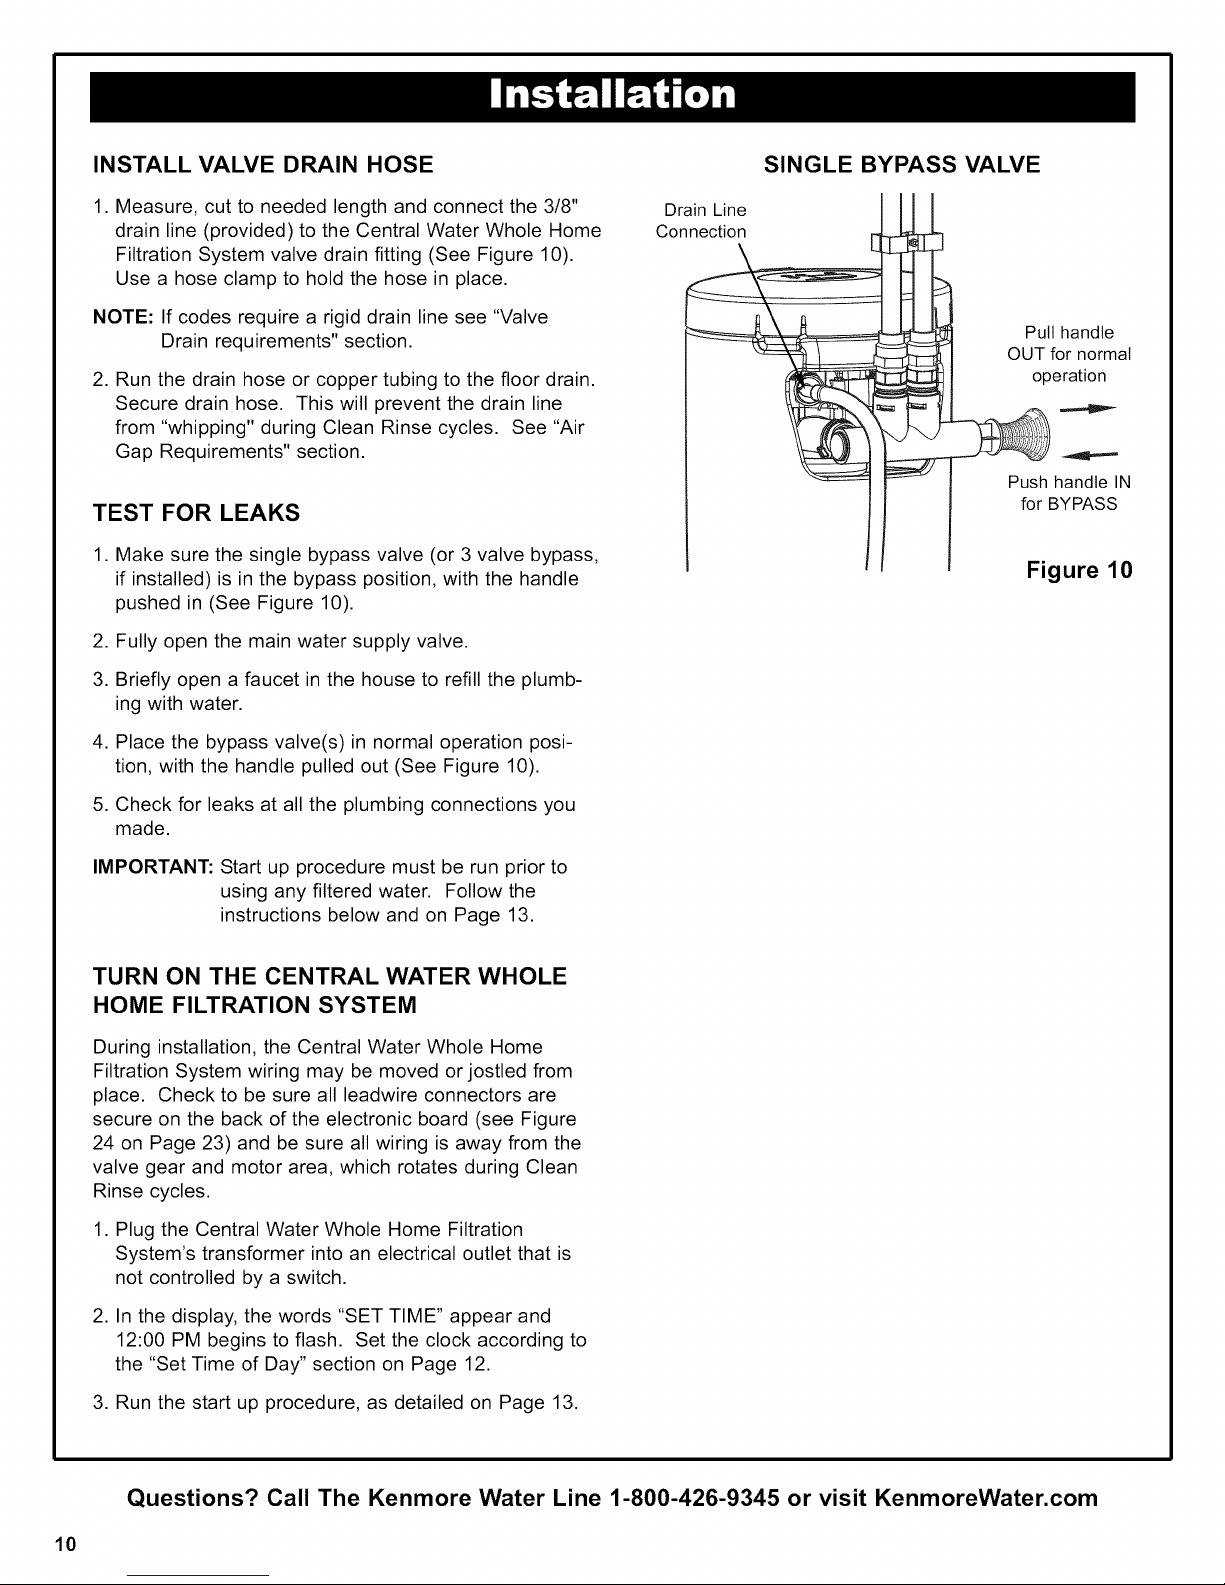
INSTALL VALVE DRAIN HOSE SINGLE BYPASS VALVE
1. Measure, cut to needed length and connect the 3/8"
drain line (provided) to the Central Water Whole Home
Filtration System valve drain fitting (See Figure 10).
Use a hose clamp to hold the hose in place.
NOTE: If codes require a rigid drain line see "Valve
Drain requirements" section.
2. Run the drain hose or copper tubing to the floor drain.
Secure drain hose. This will prevent the drain line
from "whipping" during Clean Rinse cycles. See "Air
Gap Requirements" section.
TEST FOR LEAKS
1. Make sure the single bypass valve (or 3 valve bypass,
if installed) is in the bypass position, with the handle
pushed in (See Figure 10).
2. Fully open the main water supply valve.
3. Briefly open a faucet in the house to refill the plumb-
ing with water.
4. Place the bypass valve(s)in normal operation posi-
tion, with the handle pulled out (See Figure 10).
Drain Line
Connection
__] Pull handte
OUoTfe°ratq°_mat
T_
Push handle IN
for BYPASS
Figure 10
5. Check for leaks at all the plumbing connections you
made.
IMPORTANT: Start up procedure must be run prior to
using any filtered water. Follow the
instructions below and on Page 13.
TURN ON THE CENTRAL WATER WHOLE
HOME FILTRATION SYSTEM
During installation, the Central Water Whole Home
Filtration System wiring may be moved or jostled from
place. Check to be sure all leadwire connectors are
secure on the back of the electronic board (see Figure
24 on Page 23) and be sure all wiring is away from the
valve gear and motor area, which rotates during Clean
Rinse cycles.
,
Plug the Central Water Whole Home Filtration
System's transformer into an electrical outlet that is
not controlled by a switch.
,
In the display, the words "SET TIME" appear and
12:00 PM begins to flash. Set the clock according to
the "Set Time of Day" section on Page 12.
3. Run the start up procedure, as detailed on Page 13.
Questions? Call The Kenmore Water Line 1-800-426-9345 or visit KenmoreWater.com
10
NORMAL OPERATION
During normal operation water enters the Central
Water Whole Home Filtration System and flows
through several filtration processes where tastes,
odors and sediment are reduced.
APPLICATIONS FOR A CENTRAL WATER
FILTRATION SYSTEM
Do not use the Central Water Whole Home
Filtration System with water that is microbiologically
unsafe or of unknown quality without adequate dis-
infection before or after the system.
CLEAN RINSE CYCLE
A Clean Rinse cycle will automatically be initiated
based on how many gallons of water have been fil-
tered through the system (or after 14 days if no water
has passed through the system in that time). The
Clean Rinse cycle lifts and expands the media bed to
rejuvenate the media and then repacks the bed for
continued use. During the Clean Rinse cycle, dirt,
sediment, etc. are flushed from the Central Water
Whole Home Filtration System down the drain.
The Central Water Whole Home Filtration System
may not be an effective treatment method for water
sources with a hydrogen sulfide problem (rotten egg
odor or taste) If your water has hydrogen sulfide,
contact your local Sears store associate for
Kenmore solutions.
The Central Water Filtration System will not remove
iron and is not intended to replace iron treatment
equipment.
Although the Central Water Filtration System has
sediment filter capabilities, additional sediment filtra-
tion may be needed in problem water applications.
Questions? Call The Kenmore Water Line 1-800-426-9345 or visit KenmoreWater.com
11
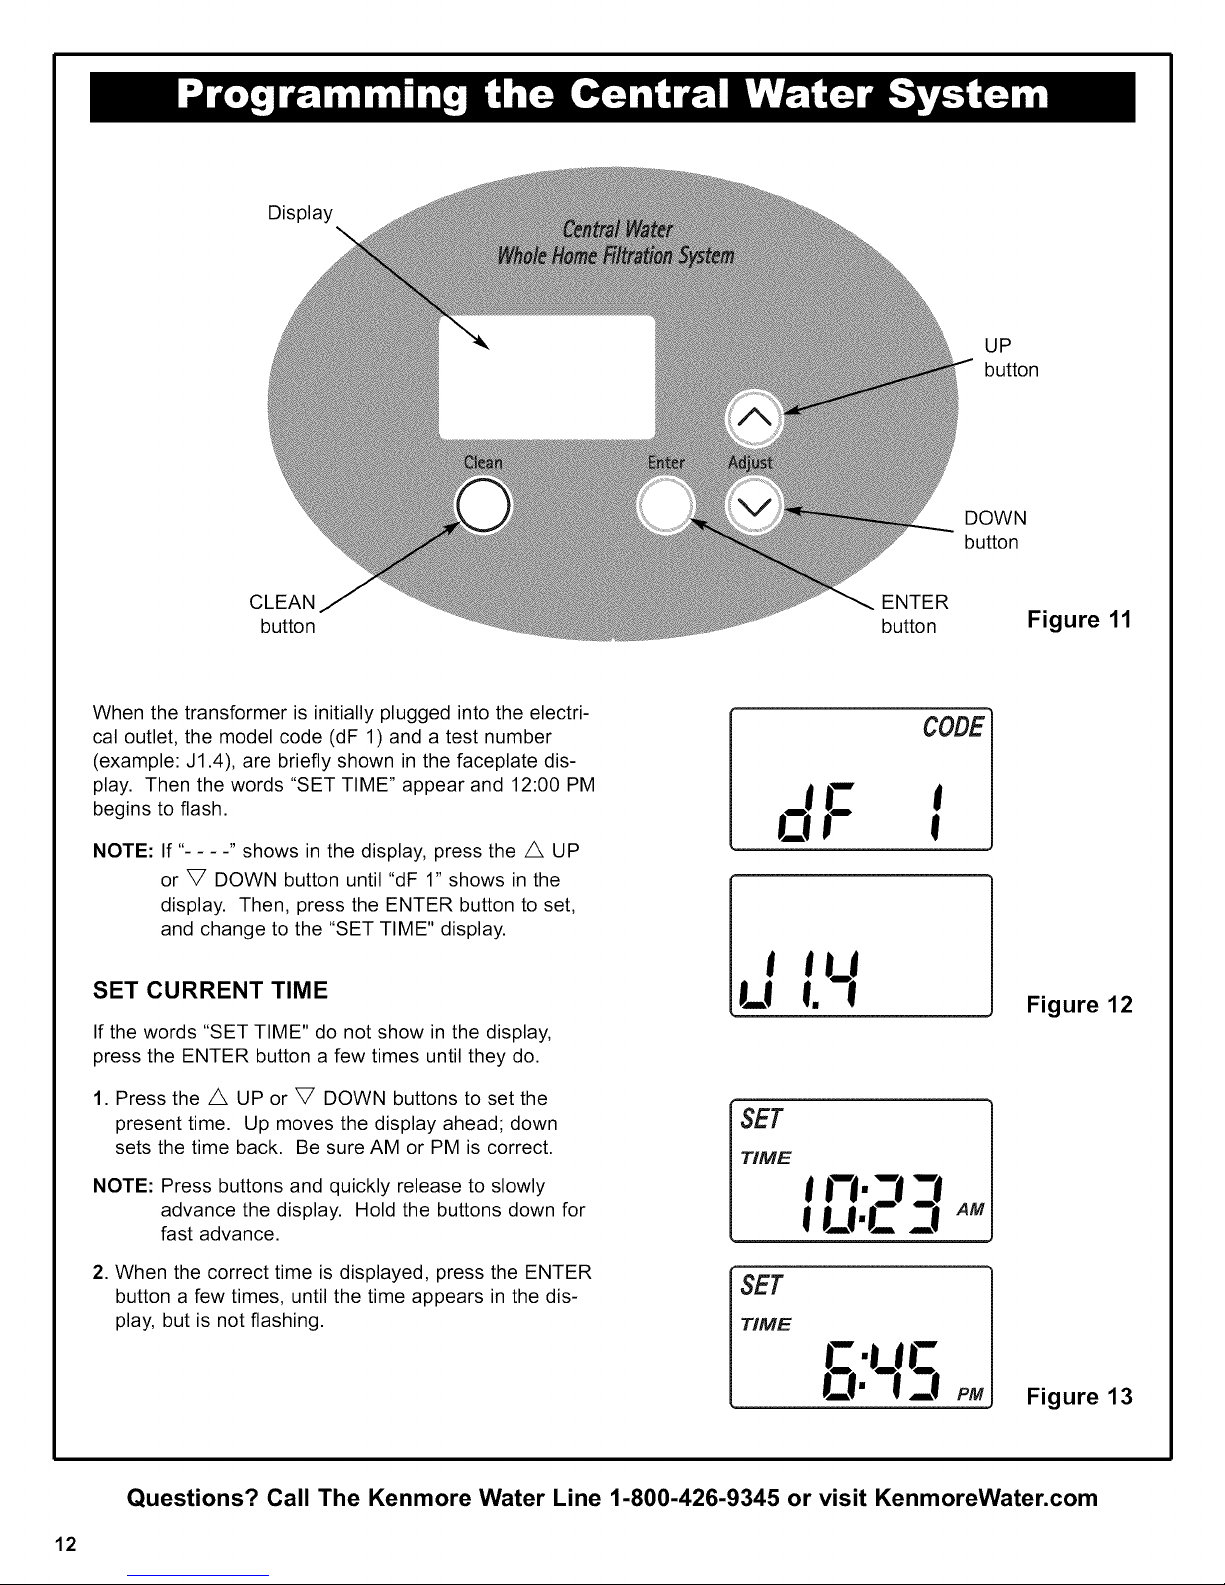
Display
UP
button
DOWN
button
CLEAN
button
When the transformer is initially plugged into the electri-
cal outlet, the model code (dF 1) and a test number
(example: J1.4), are briefly shown in the faceplate dis-
play. Then the words "SET TIME" appear and 12:00 PM
begins to flash.
NOTE: If "- - - -" shows in the display, press the /X UP
or V DOWN button until "dF 1" shows in the
display. Then, press the ENTER button to set,
and change to the "SET TIME" display.
SET CURRENT TIME
If the words "SET TIME" do not show in the display,
press the ENTER button a few times until they do.
1. Press the /X UP or V DOWN buttons to set the
present time. Up moves the display ahead; down
sets the time back. Be sure AM or PM is correct.
NOTE: Press buttons and quickly release to slowly
advance the display. Hold the buttons down for
fast advance.
TIME
ENTER
button
FI.D
Figure 11
CODE
Figure 12
2. When the correct time is displayed, press the ENTER
button a few times, until the time appears in the dis-
play, but is not flashing.
Questions? Call The Kenmore Water Line 1-800-426-9345 or visit KenmoreWater.com
12
SET
TIME
I •
l_llC
Figure 13
IMPORTANT:
Run the start up cycle immediately after
completing installation, before using any
water in the home.
During the start up cycle:
The filtration media in this Central Water Whole Home
Filtration System contains a small number of harmless
activated carbon particles generated during shipping
that are small enough to exit the system with water
flow. It is normal for these particles to cause a tempo-
rary discoloration of the water coming out of the sys-
tem. To avoid discolored water at your home's faucets
the system's start up cycle should be initiated to rinse
the particles and any discolored water down the drain.
If the Central Water Whole Home Filtration System is
used without first running the start up cycle, you will
notice that the water will temporarily have a gray color
until the particles have exited the system.
To Initiate the start up cycle:
1. Make sure the drain hose is attached to the Central
Water Whole Home Filtration System and the other
end is secured over a drain (see "Install Valve Drain
Hose" on Page 10).
2. Make sure bypass valve is in the "service" (open or
filtered water) position and the home's water supply
is turned on.
3. Press and hold the CLEAN button to initiate the
start up cycle. The button can be released when
you hear the valve changing position and
"RECHARGE NOW" flashes in the display.
Throughout the start up cycle you will hear the valve
changing position and notice the flow of water to drain
starting and stopping. The start up cycle will take
approximately 20 minutes. Avoid using water during
this time. Do not set the time of day or press other
buttons during the start up cycle, as this will interrupt
the start up cycle. Do not unplug the transformer dur-
ing the start up cycle. If the start up cycle is interrupt-
ed, it should be initiated again and allowed to run to
completion.
After the start up cycle:
Once the start up procedure completes successfully, it
cannot be initiated a second time. The Central Water
Whole Home Filtration System will automatically return
to the normal operation position. Once the start up
cycle has run, a faucet in the home should be opened
and water allowed to run for 10 minutes at the sys-
tem's rated flow. If, after running the start up cycle, the
water still appears discolored, manually run Clean
Rinse cycles (See Page 14) until the water is clear.
If the time of day was not set before the start up cycle,
set it now (See Page 12).
Check the new plumbing connections and joints once
more for leaks.
Questions? Call The Kenmore Water Line 1-800-426-9345 or visit KenmoreWater.com
13
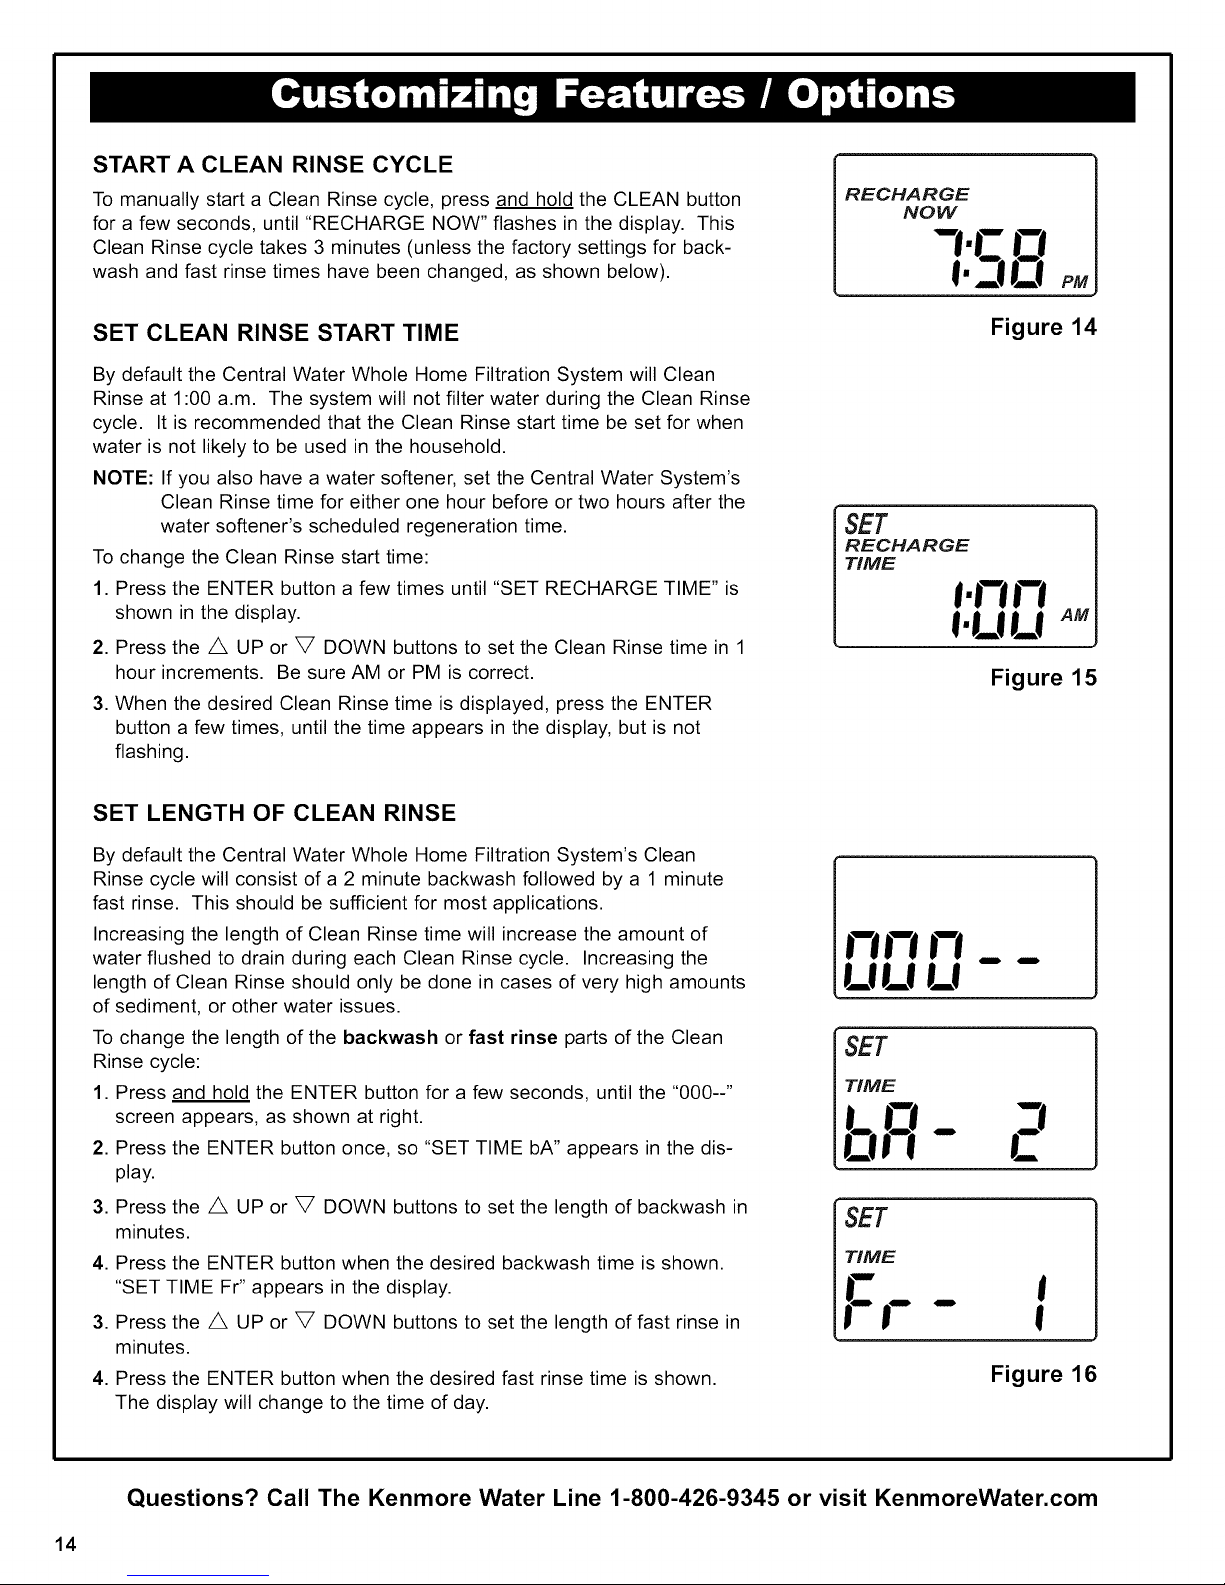
START A CLEAN RINSE CYCLE
To manually start a Clean Rinse cycle, press and hold the CLEAN button
for a few seconds, until "RECHARGE NOW" flashes in the display. This
Clean Rinse cycle takes 3 minutes (unless the factory settings for back-
wash and fast rinse times have been changed, as shown below).
RECHARGE
NOW
SET CLEAN RINSE START TIME
By default the Central Water Whole Home Filtration System will Clean
Rinse at 1:00 a.m. The system will not filter water during the Clean Rinse
cycle. It is recommended that the Clean Rinse start time be set for when
water is not likely to be used in the household.
NOTE: If you also have a water softener, set the Central Water System's
Clean Rinse time for either one hour before or two hours after the
water softener's scheduled regeneration time.
To change the Clean Rinse start time:
1. Press the ENTER button a few times until "SET RECHARGE TIME" is
shown in the display.
2. Press the /X UP or V DOWN buttons to set the Clean Rinse time in 1
hour increments. Be sure AM or PM is correct.
,
When the desired Clean Rinse time is displayed, press the ENTER
button a few times, until the time appears in the display, but is not
flashing.
SET LENGTH OF CLEAN RINSE
By default the Central Water Whole Home Filtration System's Clean
Rinse cycle will consist of a 2 minute backwash followed by a 1 minute
fast rinse. This should be sufficient for most applications.
Increasing the length of Clean Rinse time will increase the amount of
water flushed to drain during each Clean Rinse cycle. Increasing the
length of Clean Rinse should only be done in cases of very high amounts
of sediment, or other water issues.
To change the length of the backwash or fast rinse parts of the Clean
Rinse cycle:
1. Press and hold the ENTER button for a few seconds, until the "000--"
screen appears, as shown at right.
2. Press the ENTER button once, so "SET TIME bA" appears in the dis-
play.
3. Press the /X UP or V DOWN buttons to set the length of backwash in
minutes.
4. Press the ENTER button when the desired backwash time is shown.
"SET TIME Fr" appears in the display.
3. Press the /X UP or V DOWN buttons to set the length of fast rinse in
minutes.
, Press the ENTER button when the desired fast rinse time is shown.
The display will change to the time of day.
Figure 14
RECHARGE
TIME
I.FtFI
I.ULI AM
Figure 15
FIFI Fl ____
UUU
TIME
LO
1,211!
m
SET
TIME
FF- I
Figure 16
Questions? Call The Kenmore Water Line 1-800-426-9345 or visit KenmoreWater.com
14
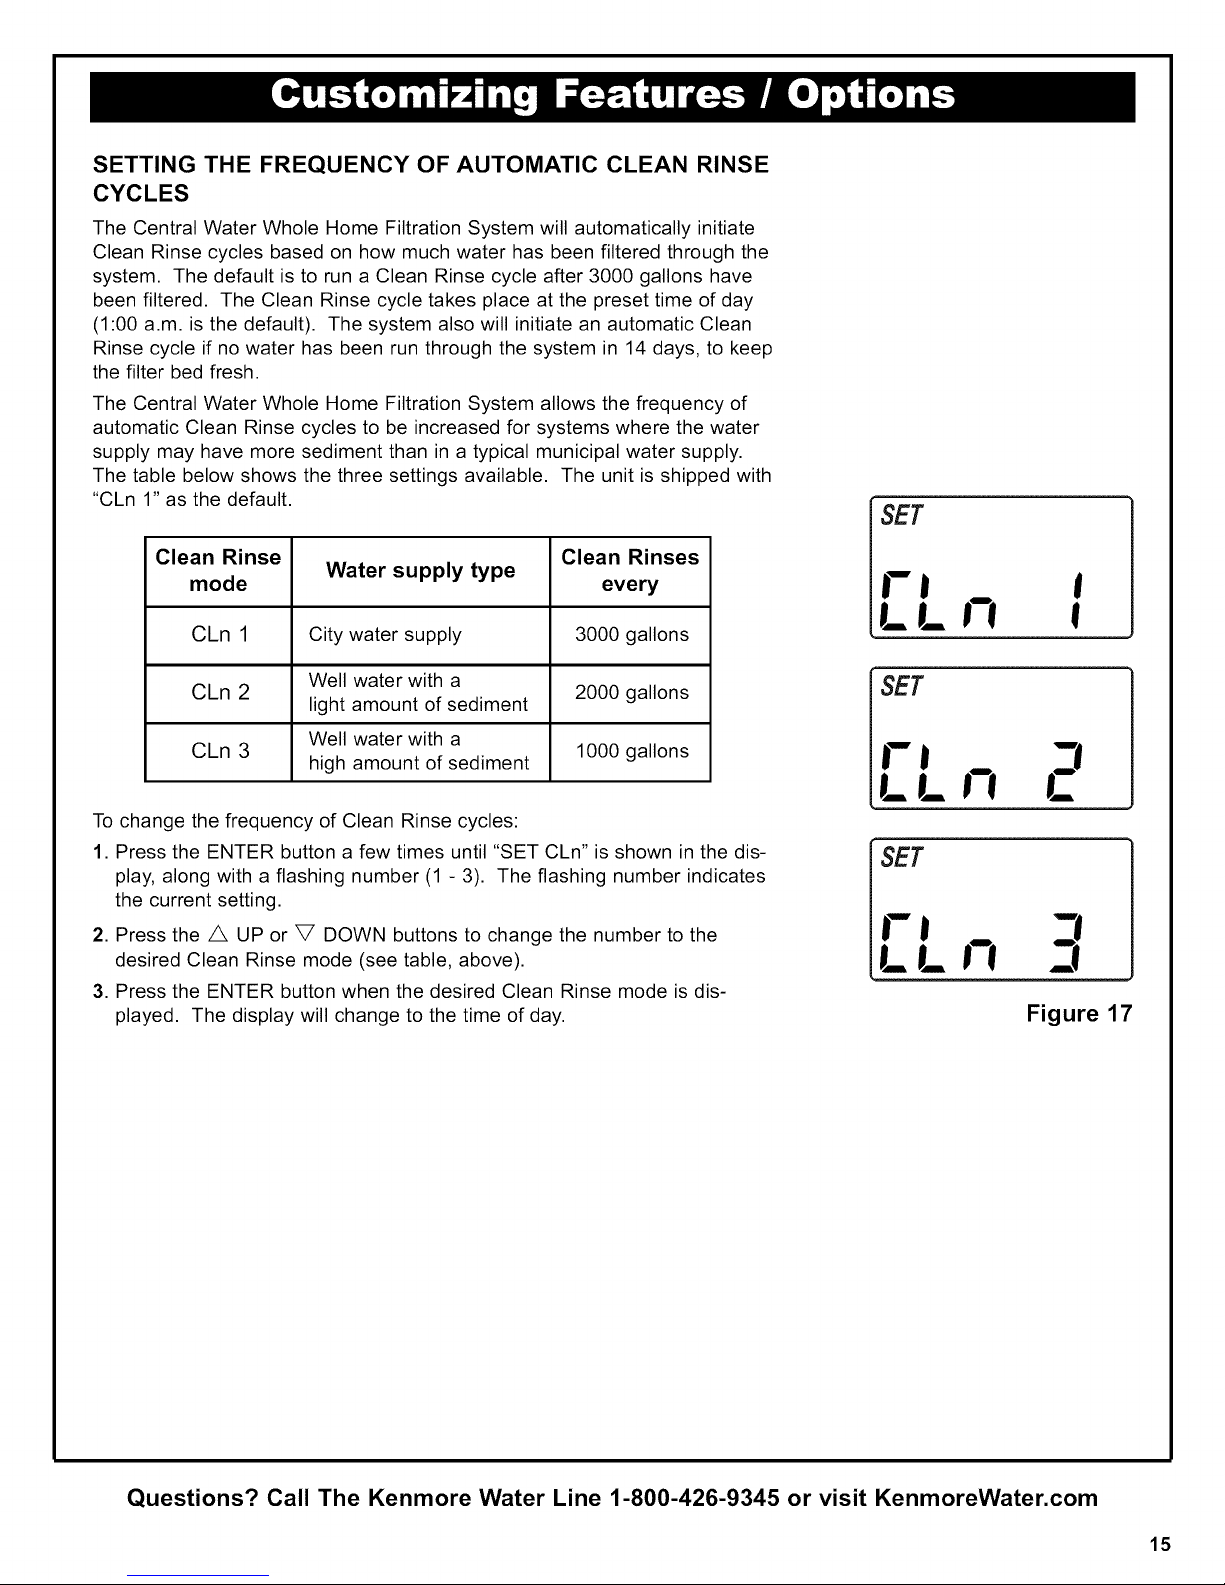
SETTING THE FREQUENCY OF AUTOMATIC CLEAN RINSE
CYCLES
The Central Water Whole Home Filtration System will automatically initiate
Clean Rinse cycles based on how much water has been filtered through the
system. The default is to run a Clean Rinse cycle after 3000 gallons have
been filtered. The Clean Rinse cycle takes place at the preset time of day
(1:00 a.m. is the default). The system also will initiate an automatic Clean
Rinse cycle if no water has been run through the system in 14 days, to keep
the filter bed fresh.
The Central Water Whole Home Filtration System allows the frequency of
automatic Clean Rinse cycles to be increased for systems where the water
supply may have more sediment than in a typical municipal water supply.
The table below shows the three settings available. The unit is shipped with
"CLn 1" as the default.
Clean Rinse Clean Rinses
mode Water supply type every
CLn 1 City water supply 3000 gallons
Well water with a
CLn 2 light amount of sediment 2000 gallons
Well water with a
CLn 3 high amount of sediment 1000 gallons
To change the frequency of Clean Rinse cycles:
1. Press the ENTER button a few times until "SET CLn" is shown in the dis-
play, along with a flashing number (1 - 3). The flashing number indicates
the current setting.
2. Press the /X UP or V DOWN buttons to change the number to the
desired Clean Rinse mode (see table, above).
3. Press the ENTER button when the desired Clean Rinse mode is dis-
played. The display will change to the time of day.
-SET
r!
LLI-I !
-SET
If-!
ILLN 2
-SET
r!
LLI-!
Figure 17
Questions? Call The Kenmore Water Line 1-800-426-9345 or visit KenmoreWater.com
15
OPERATING IN MANUAL CLEAN RINSE MODE
Clean Rinse cycles will run automatically, unless the automatic Clean Rinse
function has been disabled. If this function has been disabled, it will be
necessary to manually initiate any Clean Rinse cycles. It is recommended
that a Clean Rinse cycle should be run at least once each month, or more
frequently if necessary.
A manual Clean Rinse mode may be used when a drain (required for auto-
matic Clean Rinse) is not available. However, it is recommended that auto-
matic Clean Rinse be used if the drain requirements can be met.
IMPORTANT: During the Clean Rinse cycle, whether manually or automati-
cally initiated, water will flow from the valve drain port at 3.4 gallons per
min. for 3 minutes. If a permanent drain line has not been installed, provi-
sions must be made for the drain flow prior to initiating a Clean Rinse cycle
You must have empty containers ready that will hold at least 15 gallons of
water.
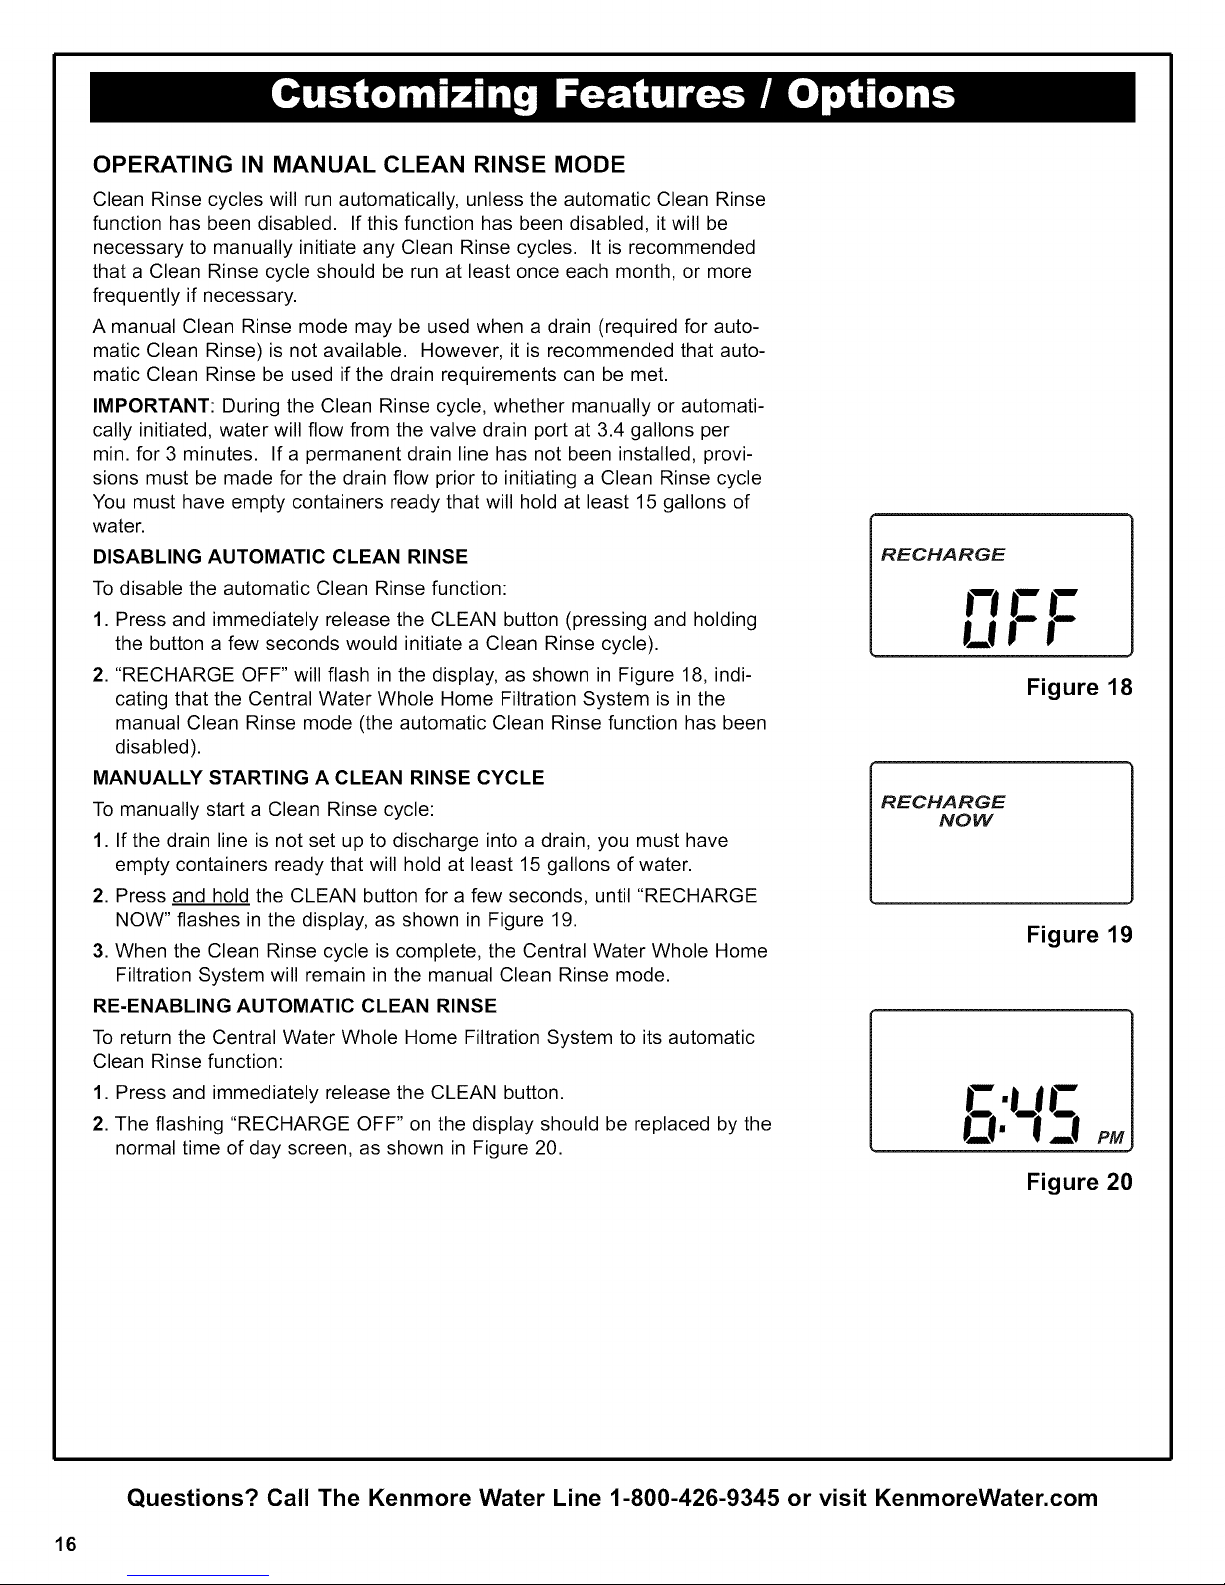
DISABLING AUTOMATIC CLEAN RINSE
To disable the automatic Clean Rinse function:
1. Press and immediately release the CLEAN button (pressing and holding
the button a few seconds would initiate a Clean Rinse cycle).
2. "RECHARGE OFF" will flash in the display, as shown in Figure 18, indi-
cating that the Central Water Whole Home Filtration System is in the
manual Clean Rinse mode (the automatic Clean Rinse function has been
disabled).
MANUALLY STARTING A CLEAN RINSE CYCLE
To manually start a Clean Rinse cycle:
1. If the drain line is not set up to discharge into a drain, you must have
empty containers ready that will hold at least 15 gallons of water.
2. Press and hold the CLEAN button for a few seconds, until "RECHARGE
NOW" flashes in the display, as shown in Figure 19.
3. When the Clean Rinse cycle is complete, the Central Water Whole Home
Filtration System will remain in the manual Clean Rinse mode.
RE-ENABLING AUTOMATIC CLEAN RINSE
To return the Central Water Whole Home Filtration System to its automatic
Clean Rinse function:
1. Press and immediately release the CLEAN button.
2. The flashing "RECHARGE OFF" on the display should be replaced by the
normal time of day screen, as shown in Figure 20.
RECHARGE
Figure 18
RECHARGE
NOW
Figure 19
C.UC I
111.13pM
Questions? Call The Kenmore Water Line 1-800-426-9345 or visit KenmoreWater.com
16
Figure 20
POWER OUTAGE MEMORY
If electrical power to the Central Water Whole Home
Filtration System is lost, "memory" built into the con-
troller circuitry will keep all settings for up to eight
hours, While the power is out, the display is blank and
the Central Water Whole Home Filtration System will
not Clean Rinse,
When electrical power is restored, you have to reset
the time of day only if the display is flashing. The
Clean Rinse TIME never requires resetting unless a
change is desired. Even if the clock is incorrect after a
long power outage, the Central Water Whole Home
Filtration System works as it should to keep your water
treated. However, Clean Rinse cycles may occur at
the wrong time of day until you reset the clock to the
correct time of day.
NOTE: If the Central Water Whole Home Filtration
System was in a Clean Rinse cycle when
power was lost, it will now finish the cycle.
VACATIONS AND EXTENDED PERIODS OF
NO WATER USE
If your Central Water Whole Home Filtration System
will not be used for an extended period of time (sever-
al months), please follow one of these recommenda-
tions:
If the water supply to the unit is not turned off, and
the automatic Clean Rinse function has not been
disabled, then no further actions are required. The
Central Water Filtration System will clean itself
every 14 days if no water has run through it.
If you do not want Clean Rinse cycle to be running
automatically while you are gone, it is recommend-
ed that you unplug the Central Water Whole Home
Filtration System and either shut off the water sup-
ply or place the bypass valve(s) into the bypass
position.
If the Clean Rinse cycle cannot be automatically
run, due to the water supply being shut off, the
transformer being unplugged or the automatic
Clean Rinse function being disabled, then it is rec-
ommended that a minimum of 2 manually initiated
Clean Rinse cycles be performed when the system
is placed back into operation (see Start a Clean
Rinse Cycle section on Page 14).
In any installation where there is a possibility of
freezing, the Central Water Filtration System should
be disconnected and the water drained (see Protect
the Central Water Whole Home Filtration System
from Freezing section on Page 18).
Questions? Call The Kenmore Water Line 1-800-426-9345 or visit KenmoreWater.com
17
PROTECT THE CENTRAL WATER FILTRA-
TION SYSTEM FROM FREEZING
If the Central Water Whole Home Filtration System is
installed where it could freeze (summer cabin, lake
home, etc.), you must drain all water from it to stop
possible freeze damage. If the system freezes, cracks
may develop in plastic parts, which will leak causing
damage.
To drain the unit:
1. Close the shut-off valve on the house main water
pipe, near the water meter or pressure tank.
2. Open a faucet in the filtered water pipes to vent
pressure in the unit.
3. Move the stem in the single bypass valve to bypass.
Close the inlet and outlet valve in a 3 valve bypass
system, and open the bypass valve. If you want
water in the house pipes again, reopen the shut-off
valve on the main water pipe.
4. Unplug the transformer at the wall outlet. Take off
the drain hose if it will interfere with moving the
Central Water Whole Home Filtration System into
position over the drain.
5. Remove the large holding clips at the Central Water
Whole Home Filtration System inlet and outlet (See
Figure 8 on Page 8). Separate the unit from the
plastic installation adaptors, or from the bypass
valve.
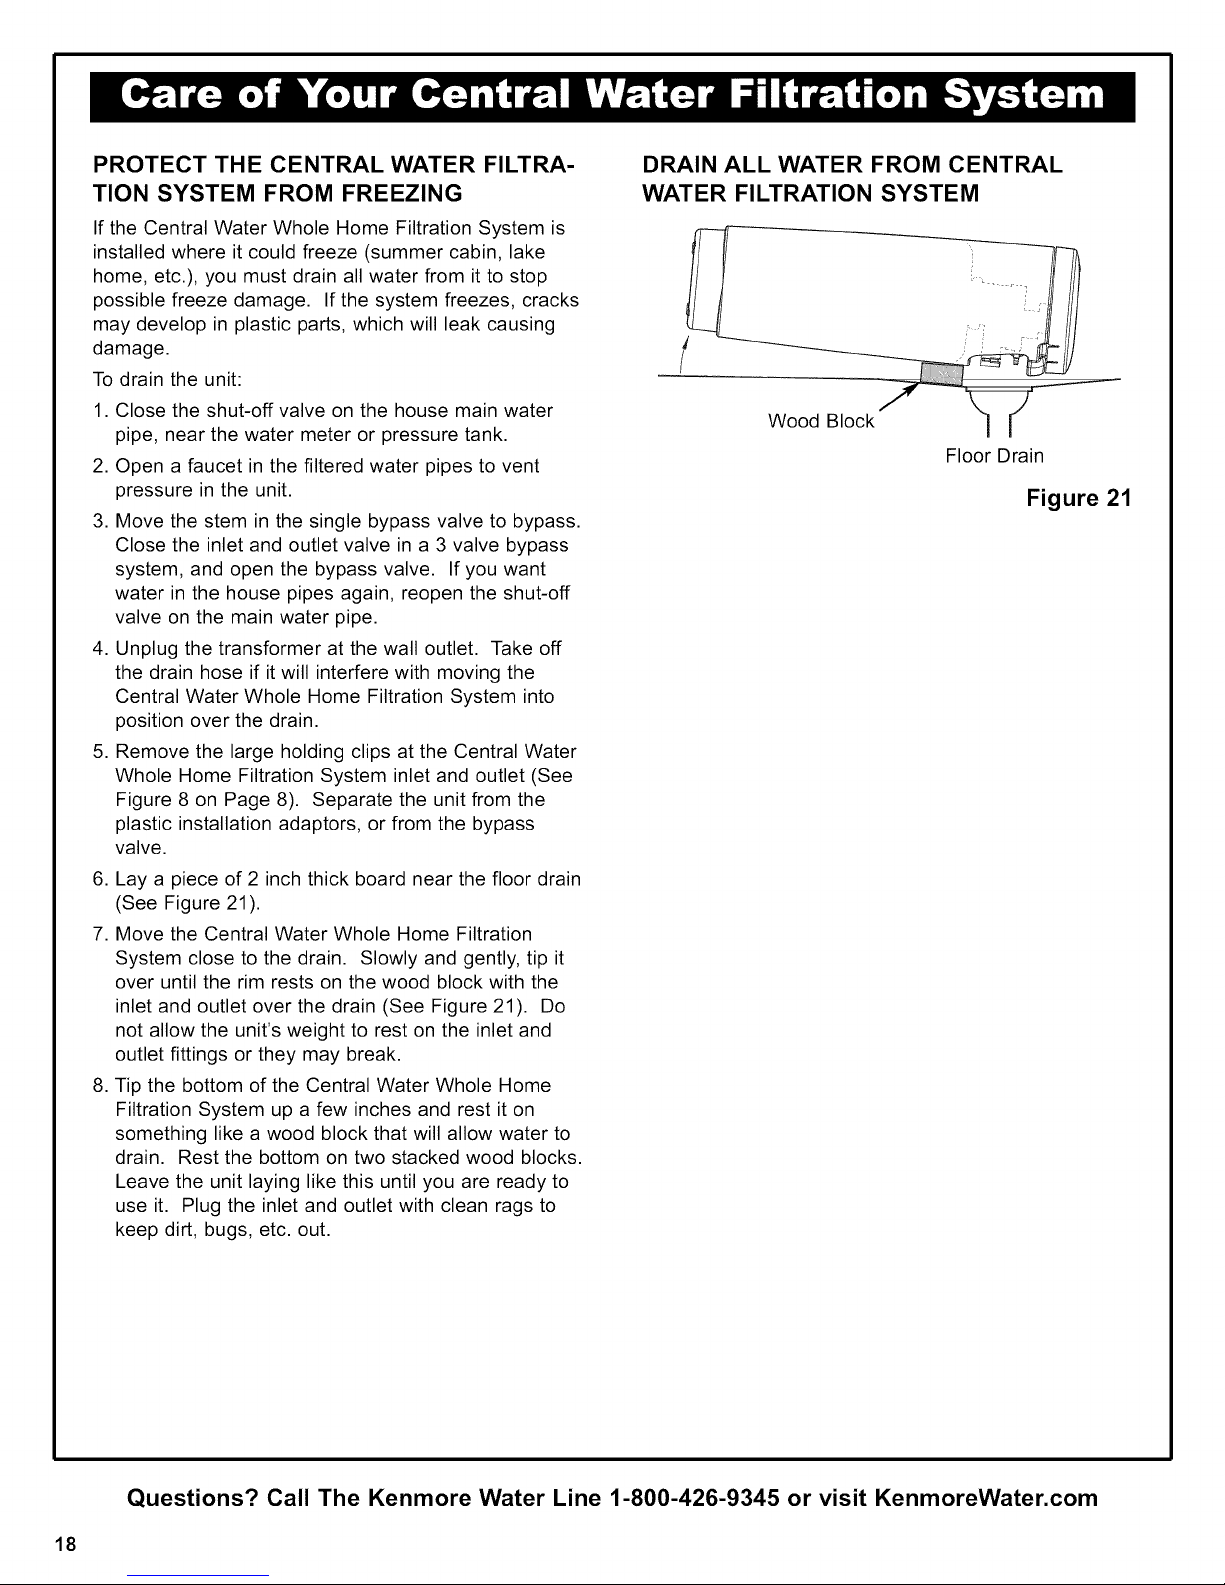
6. Lay a piece of 2 inch thick board near the floor drain
(See Figure 21).
7. Move the Central Water Whole Home Filtration
System close to the drain. Slowly and gently, tip it
over until the rim rests on the wood block with the
inlet and outlet over the drain (See Figure 21). Do
not allow the unit's weight to rest on the inlet and
outlet fittings or they may break.
8. Tip the bottom of the Central Water Whole Home
Filtration System up a few inches and rest it on
something like a wood block that will allow water to
drain. Rest the bottom on two stacked wood blocks.
Leave the unit laying like this until you are ready to
use it. Plug the inlet and outlet with clean rags to
keep dirt, bugs, etc. out.
DRAIN ALL WATER FROM CENTRAL
WATER FILTRATION SYSTEM
Wood Block
Floor Drain
Figure 21
Questions? Call The Kenmore Water Line 1-800-426-9345 or visit KenmoreWater.com
18
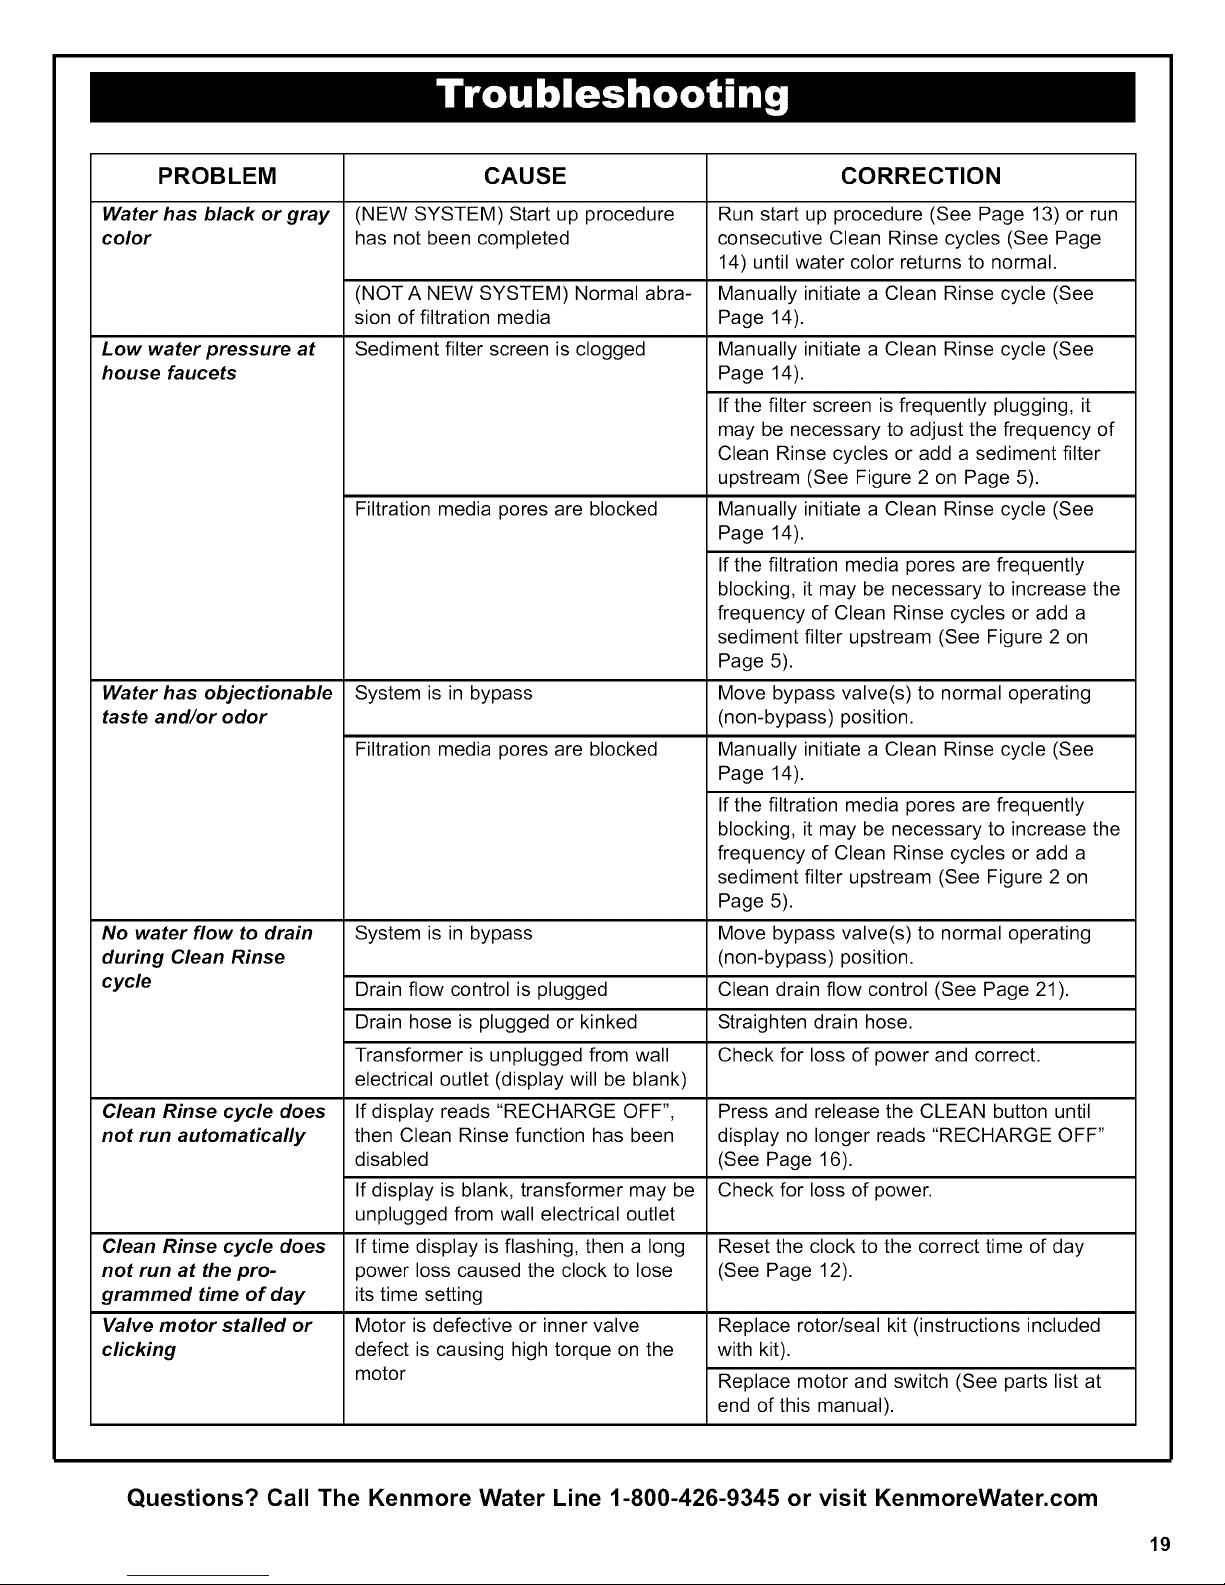
PROB LEM CAUSE CORRECTION
Water has black or gray (NEW SYSTEM) Start up procedure Run start up procedure (See Page 13) or run
color has not been completed
(NOTA NEW SYSTEM) Normal abra-
sion of filtration media
Sediment filter screen is cloggedLow water pressure at
house faucets
Filtration media pores are blocked
Water has objectionable System is in bypass
taste and/or odor
Filtration media pores are blocked
No water flow to drain System is in bypass
during Clean Rinse
cycle Drain flow control is plugged
Drain hose is plugged or kinked
Transformer is unplugged from wall
electrical outlet (display will be blank)
Clean Rinse cycle does If display reads "RECHARGE OFF", Press and release the CLEAN button until
not run automatically then Clean Rinse function has been display no longer reads "RECHARGE OFF"
disabled (See Page 16).
If display is blank, transformer may be
unplugged from wall electrical outlet
Clean Rinse cycle does
not run at the pro-
grammed time of day
Valve motor stalled or
clicking
If time display is flashing, then a long
power loss caused the clock to lose
its time setting
Motor is defective or inner valve
defect is causing high torque on the
motor
consecutive Clean Rinse cycles (See Page
14) until water color returns to normal.
Manually initiate a Clean Rinse cycle (See
Page 14).
Manually initiate a Clean Rinse cycle (See
Page 14).
If the filter screen is frequently plugging, it
may be necessary to adjust the frequency of
Clean Rinse cycles or add a sediment filter
upstream (See Figure 2 on Page 5).
Manually initiate a Clean Rinse cycle (See
Page 14).
If the filtration media pores are frequently
blocking, it may be necessary to increase the
frequency of Clean Rinse cycles or add a
sediment filter upstream (See Figure 2 on
Page 5).
Move bypass valve(s) to normal operating
(non-bypass) position.
Manually initiate a Clean Rinse cycle (See
Page 14).
If the filtration media pores are frequently
blocking, it may be necessary to increase the
frequency of Clean Rinse cycles or add a
sediment filter upstream (See Figure 2 on
Page 5).
Move bypass valve(s) to normal operating
(non-bypass) position.
Clean drain flow control (See Page 21).
Straighten drain hose.
Check for loss of power and correct.
Check for loss of power.
Reset the clock to the correct time of day
(See Page 12).
Replace rotor/seal kit (instructions included
with kit).
Replace motor and switch (See parts list at
end of this manual).
Questions? Call The Kenmore Water Line 1-800-426-9345 or visit KenmoreWater.com
19
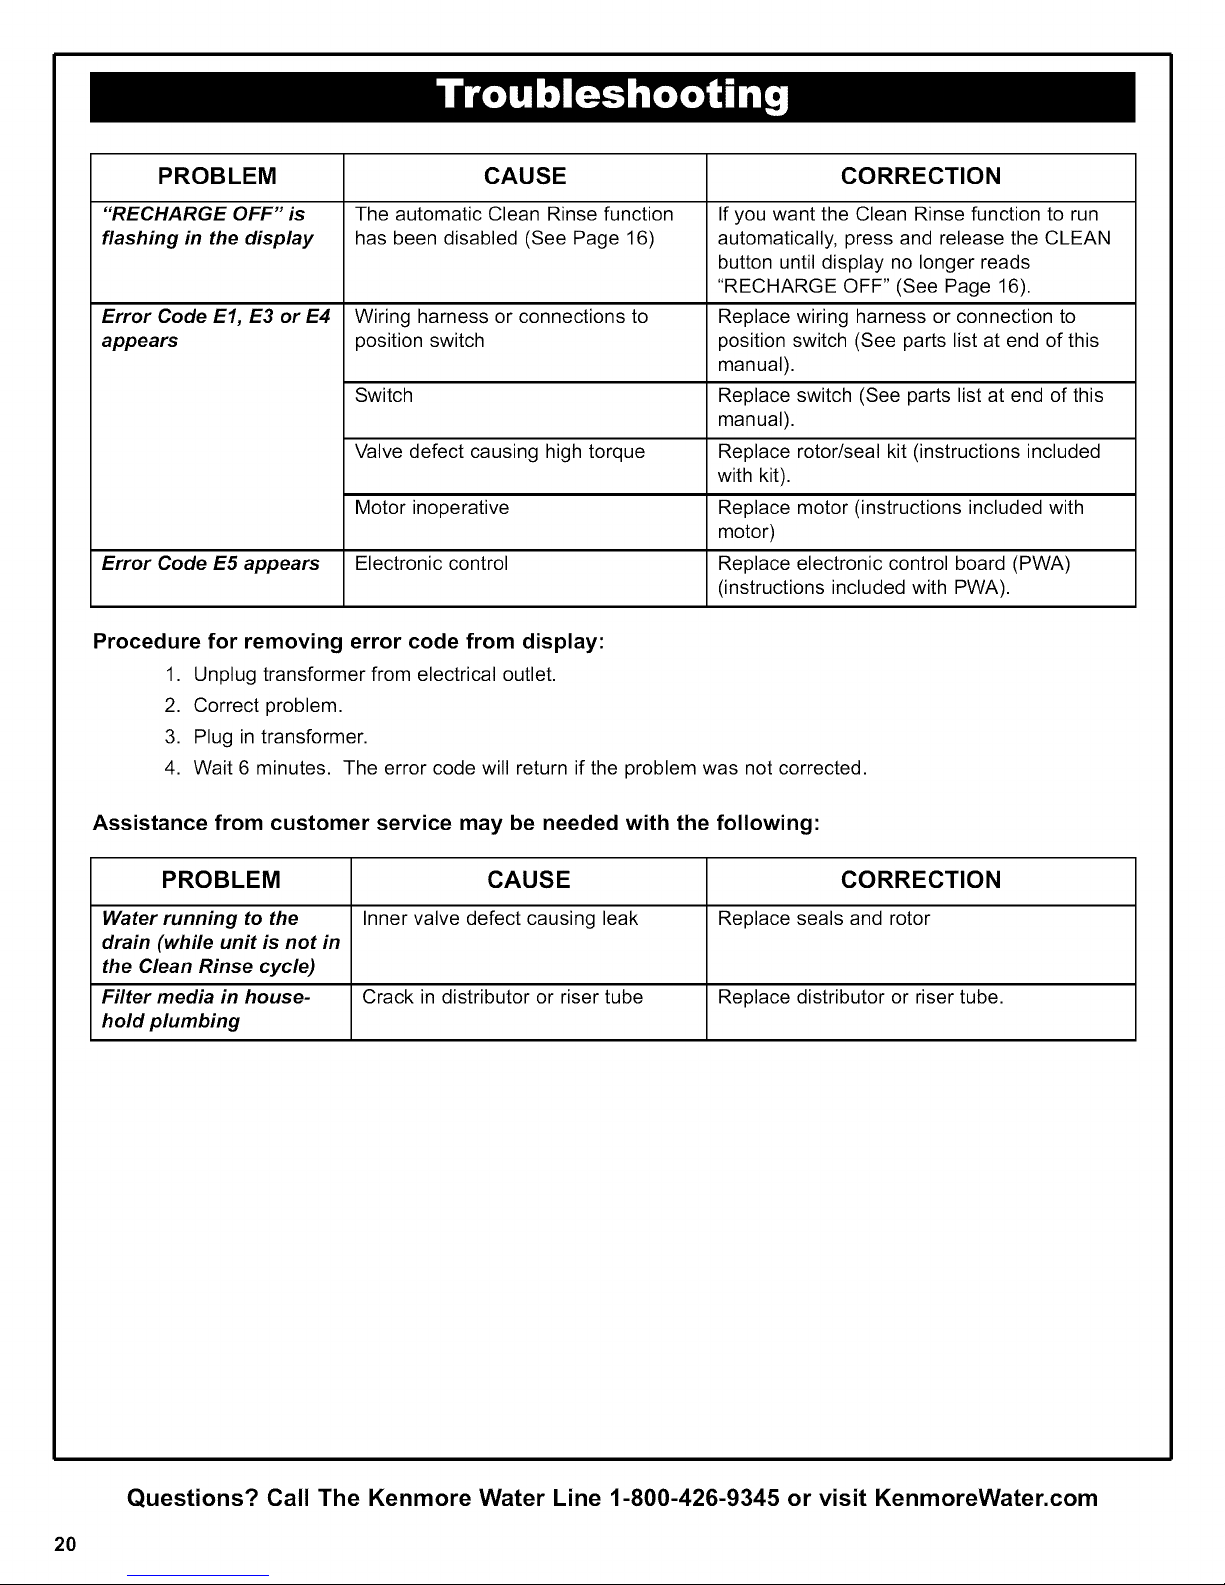
PROB LEM CAUSE CORRECTION
"RECHARGE OFF" is The automatic Clean Rinse function Ifyou want the Clean Rinse function to run
flashing in the display has been disabled (See Page 16) automatically, press and release the CLEAN
button until display no longer reads
"RECHARGE OFF" (See Page 16).
Error Code El, E3 or E4 Wiring harness or connections to Replace wiring harness or connection to
appears position switch position switch (See parts list at end of this
manual).
Switch Replace switch (See parts list at end of this
manual).
Valve defect causing high torque Replace rotor/seal kit (instructions included
with kit).
Motor inoperative Replace motor (instructions included with
motor)
Error Code E5 appears Electronic control Replace electronic control board (PWA)
(instructions included with PWA).
Procedure for removing error code from display:
1. Unplug transformer from electrical outlet.
2. Correct problem.
3. Plug in transformer.
4. Wait 6 minutes. The error code will return if the problem was not corrected.
Assistance from customer service may be needed with the following:
PROBLEM CAUSE CORRECTION
Water running to the Inner valve defect causing leak Replace seals and rotor
drain (while unit is not in
the Clean Rinse cycle)
Filter media in house- Crack in distributor or riser tube Replace distributor or riser tube.
hold plumbing
Questions? Call The Kenmore Water Line 1-800-426-9345 or visit KenmoreWater.com
20
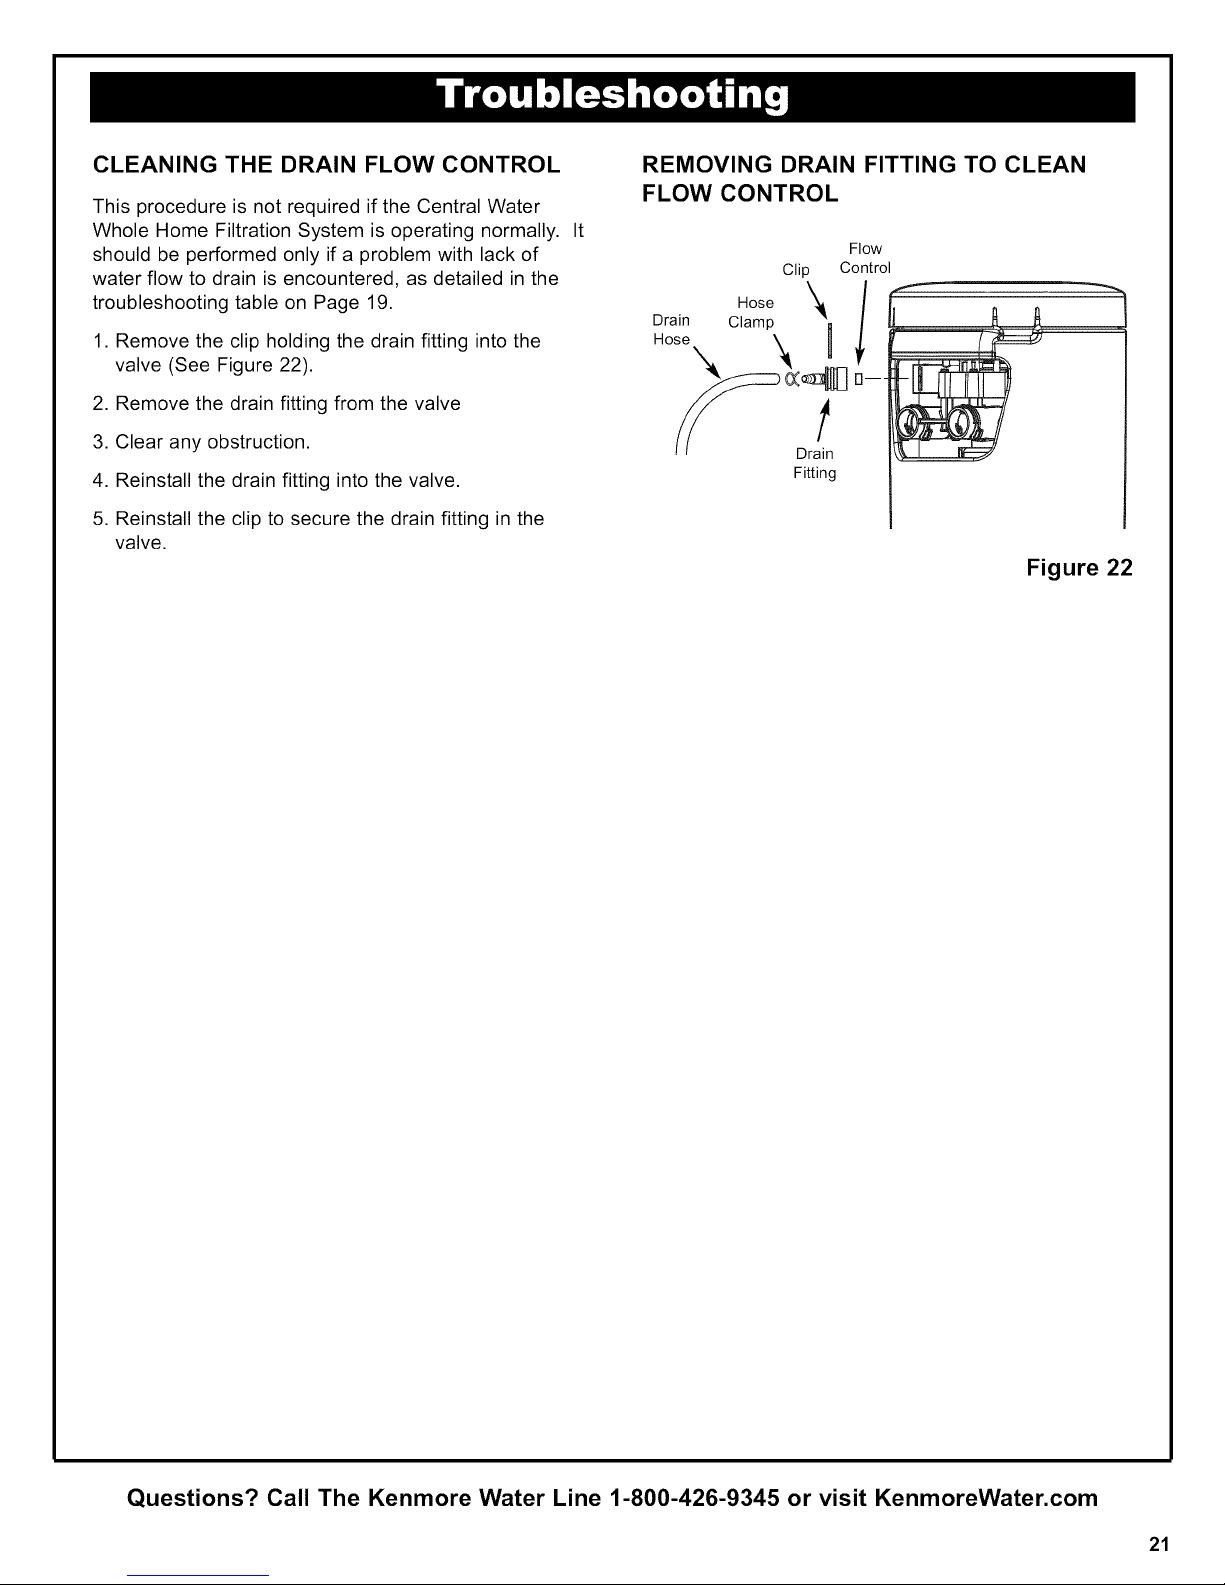
CLEANING THE DRAIN FLOW CONTROL
This procedure is not required if the Central Water
Whole Home Filtration System is operating normally. It
should be performed only if a problem with lack of
water flow to drain is encountered, as detailed in the
troubleshooting table on Page 19.
1. Remove the clip holding the drain fitting into the
valve (See Figure 22).
2. Remove the drain fitting from the valve
3. Clear any obstruction.
4. Reinstall the drain fitting into the valve.
5. Reinstall the clip to secure the drain fitting in the
valve.
REMOVING DRAIN FITTING TO CLEAN
FLOW CONTROL
Flow
Control
Clip
Drain
Hose
c,"a°S:\ ]
\ H
0(_ u---
J
!
Drain
Fitting
Figure 22
Questions? Call The Kenmore Water Line 1-800-426-9345 or visit KenmoreWater.com
21
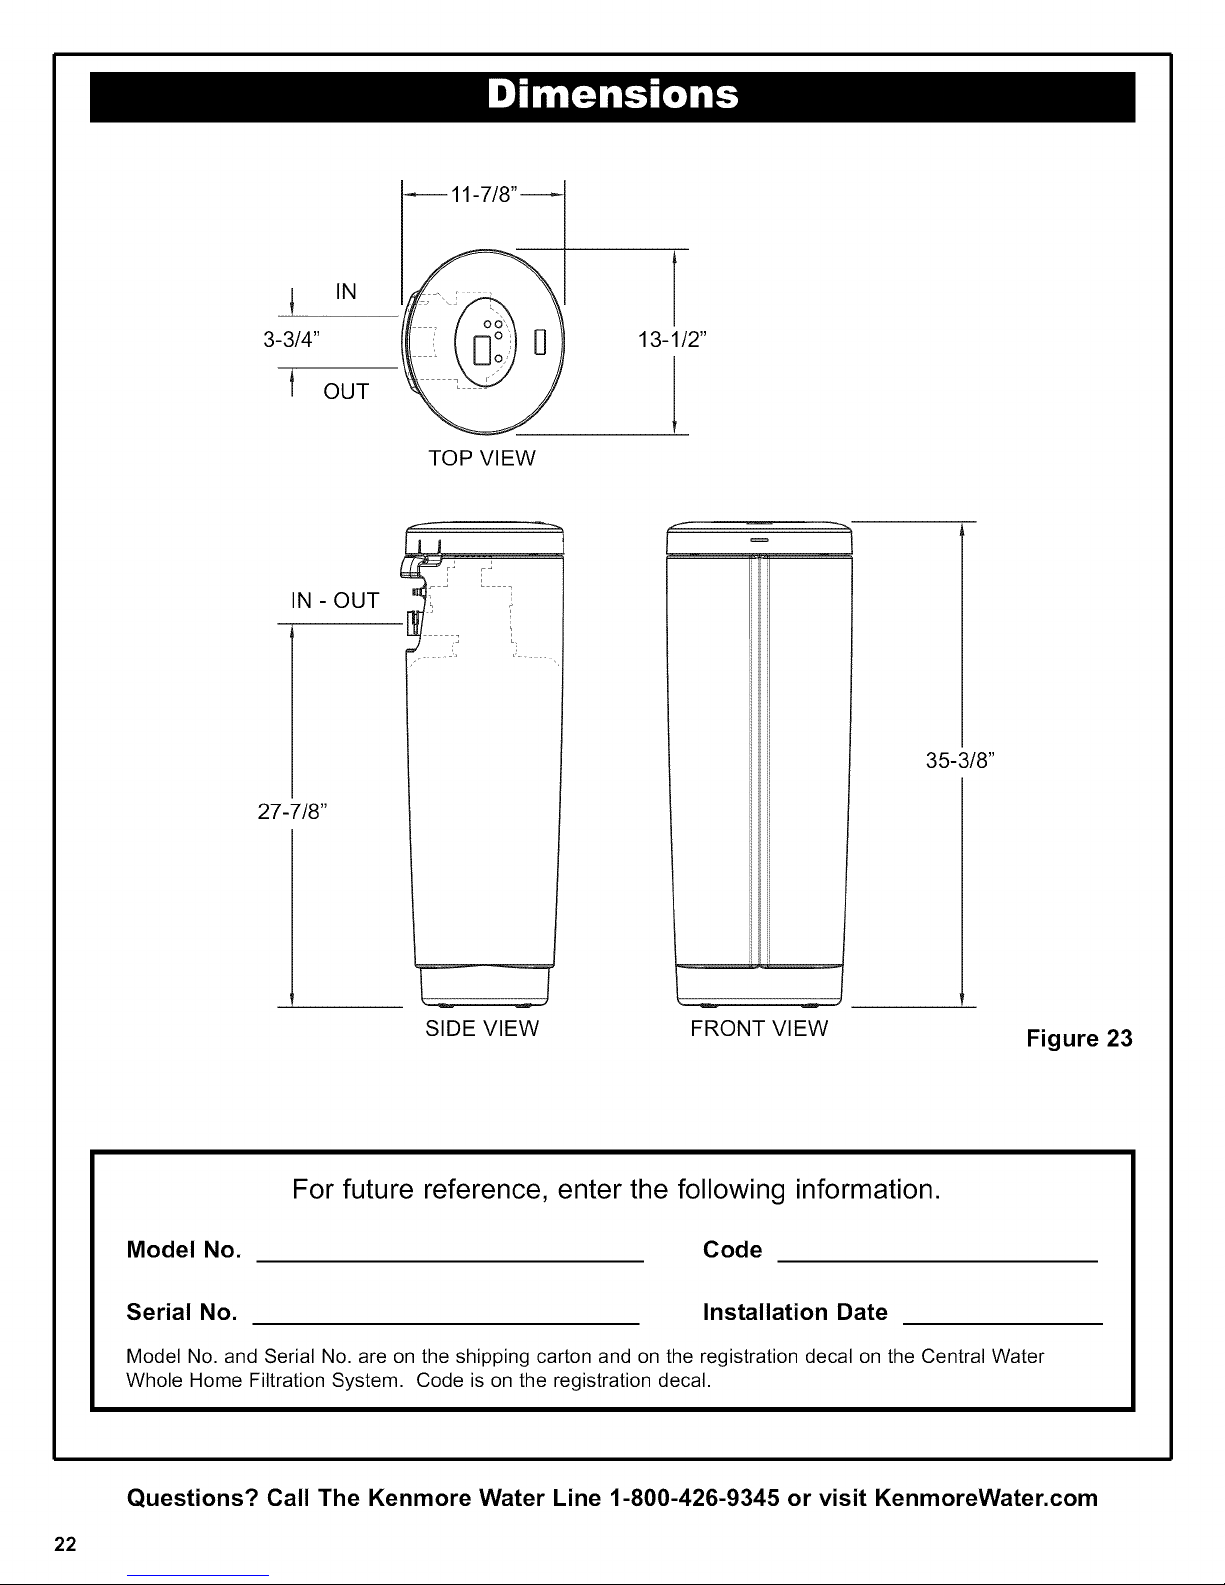
! IN
3-3/4"
t OUT
IN - OUT
11-7/8" _
TOP VIEW
35-3/8"
27-7/8"
SIDE VIEW FRONT VIEW
For future reference, enter the following information.
Model No. Code
Serial No. Installation Date
Model No. and Serial No. are on the shipping carton and on the registration decal on the Central Water
Whole Home Filtration System. Code is on the registration decal.
Figure 23
Questions? Call The Kenmore Water Line 1-800-426-9345 or visit KenmoreWater.com
22
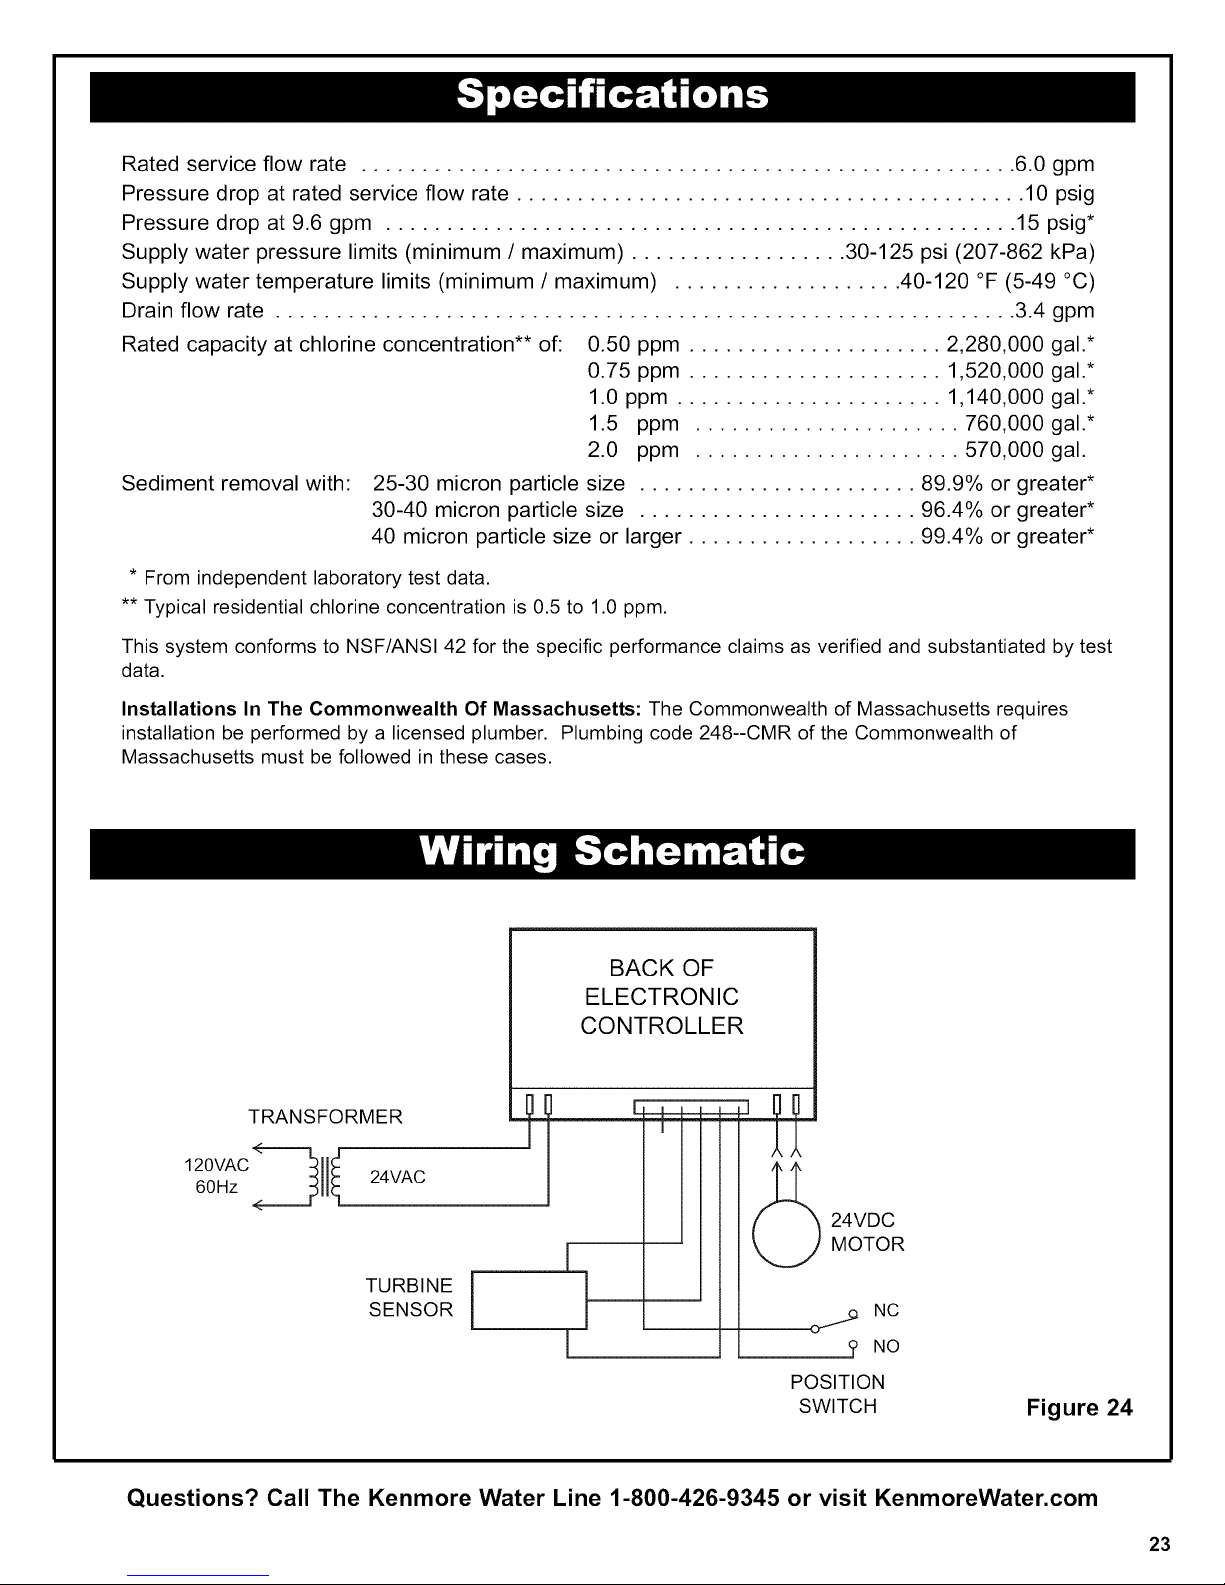
Rated service flow rate ...................................................... 6.0 gpm
Pressure drop at rated service flow rate .......................................... 10 psig
Pressure drop at 9.6 gpm .................................................... 15 psig*
Supply water pressure limits (minimum / maximum) .................. 30-125 psi (207-862 kPa)
Supply water temperature limits (minimum / maximum) ................... 40-120 °F (5-49 °C)
Drain flow rate ............................................................. 3.4 gpm
Rated capacity at chlorine concentration** of: 0.50 ppm ..................... 2,280,000 gal.*
0.75 ppm ..................... 1,520,000 gal.*
1.0 ppm ...................... 1,140,000 gal.*
1.5 ppm ...................... 760,000 gal.*
2.0 ppm ...................... 570,000 gal.
Sediment removal with: 25-30 micron particle size ....................... 89.9% or greater*
30-40 micron particle size ....................... 96.4% or greater*
40 micron particle size or larger ................... 99.4% or greater*
* From independent laboratory test data.
** Typical residential chlorine concentration is 0.5 to 1.0 ppm.
This system conforms to NSF/ANSI 42 for the specific performance claims as verified and substantiated by test
data.
Installations In The Commonwealth Of Massachusetts: The Commonwealth of Massachusetts requires
installation be performed by a licensed plumber. Plumbing code 248--CMR of the Commonwealth of
Massachusetts must be followed in these cases.
TRANSFORMER
120VAC
60Hz
_ I 24VAC
SENSOR
TURBINE I
Questions? Call The Kenmore Water Line 1-800-426-9345 or visit KenmoreWater.com
ELECTRONIC
CONTROLLER
I
m
BACK OF
ii
POSITION
SWITCH
24VDC
MOTOR
NC
? NO
Figure 24
23
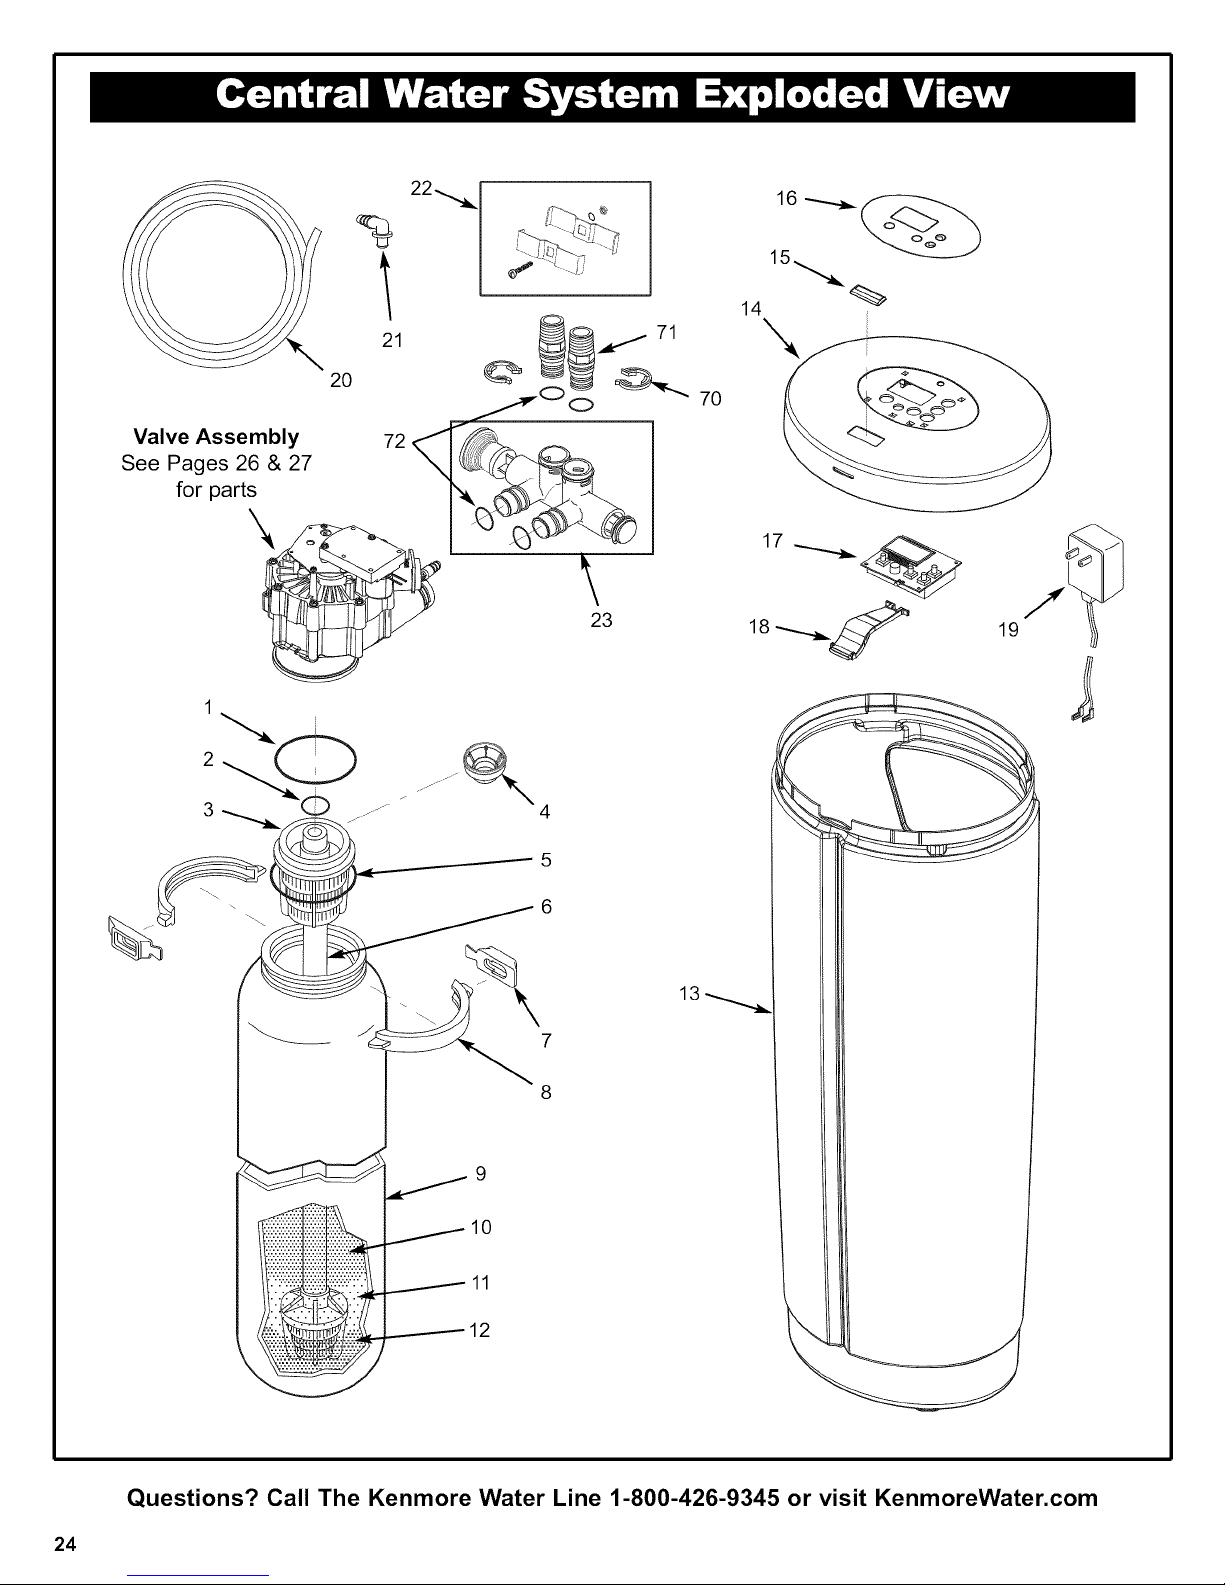
Valve Assembly
See Pages 26 & 27
for parts
14
\
5
10
11
12
6
13
7
8
9
Questions? Call The Kenmore Water Line 1-800-426-9345 or visit KenmoreWater.com
24

KeyNo. PartNo. Description
Assembly,ReplacementMineralTank,with
• 7302623 media,associatedcomponents&outershroud
tank(IncludesKeyNos.1through13)
1 7170296 O-Ring,2-7/8"x3-1/4"
2 7170254 O-Ring,13/16"x 1-1/16"
3 7077870 TopDistributor
4 7265025 FilterScreen
5 7170270 O-Ring,2-3/4"x3"
6 7105047 Repl.BottomDistributor
7 7088033 RetainerClip(2req.)
8 7176292 ClampSection(2req.)
9 "k MineralTank,8"x25"
10 "k ActivatedCarbon,10Ibs.
11 "k FilterSand,5Ibs.
12 "k Gravel,6Ibs.
13 "k OuterShroudTank
14 7297111 Cover(orderbadge&decalbelow)
15 7302542 KenmoreBadge
16 7297365 FaceplateDecal
17 7302592 Repl.ElectronicControlBoard(PWA)
18 7297373 LightPipe
19 7275907 Transformer
20 7290509 DrainTube,10ft.
21 1103200 TubeAdaptor(Elbow)
22 7248706 GroundingKit
23 7214383 BypassValve(incl.2 ofKeyNo.72)
• 7297462 Owner'sManual
• Not illustrated.
•k' Mineral Tank, media, outer shroud tank and rim can only be purchased as
part of the Replacement Mineral Tank Assembly (See top of list).
Questions? Call The Kenmore Water Line 1-800-426-9345 or visit KenmoreWater.com
25
50
I
\
57
60 59 58
7o
71
"__72
73
74
79
Questions? Call The Kenmore Water Line 11800-426-9345 or visit KenmoreWater.com
26
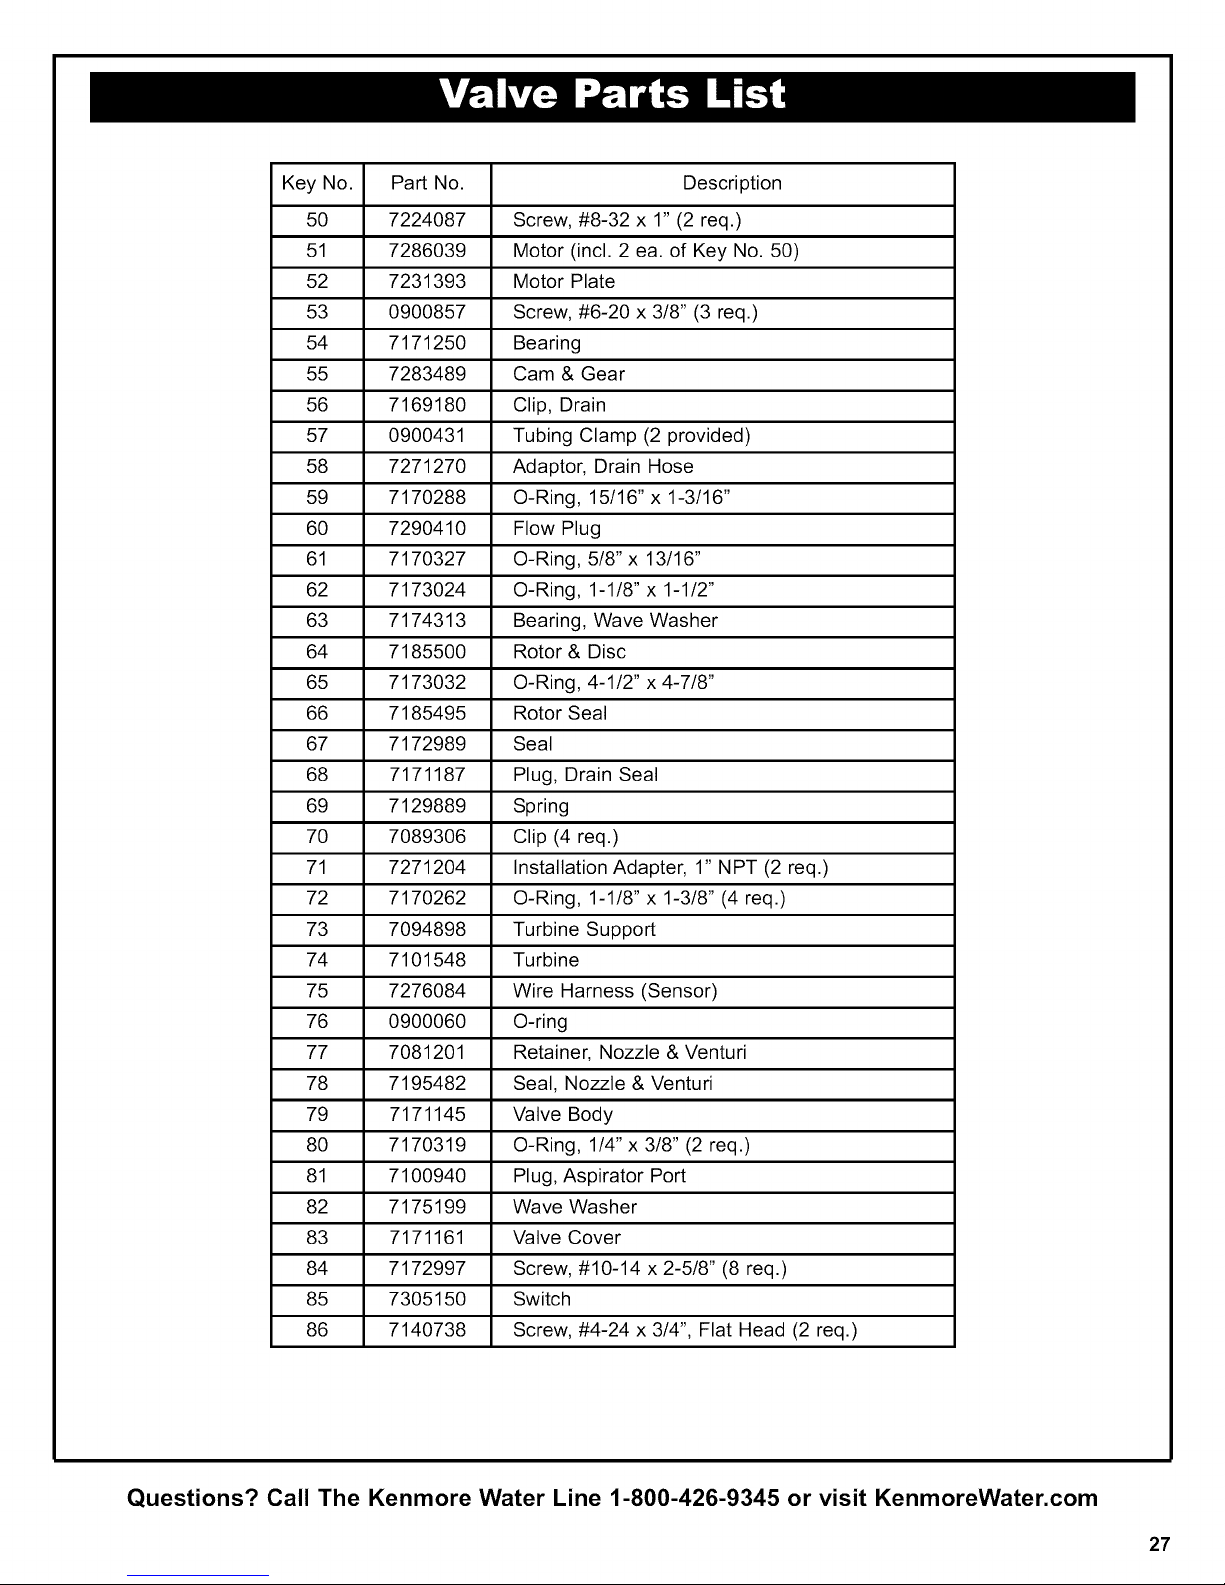
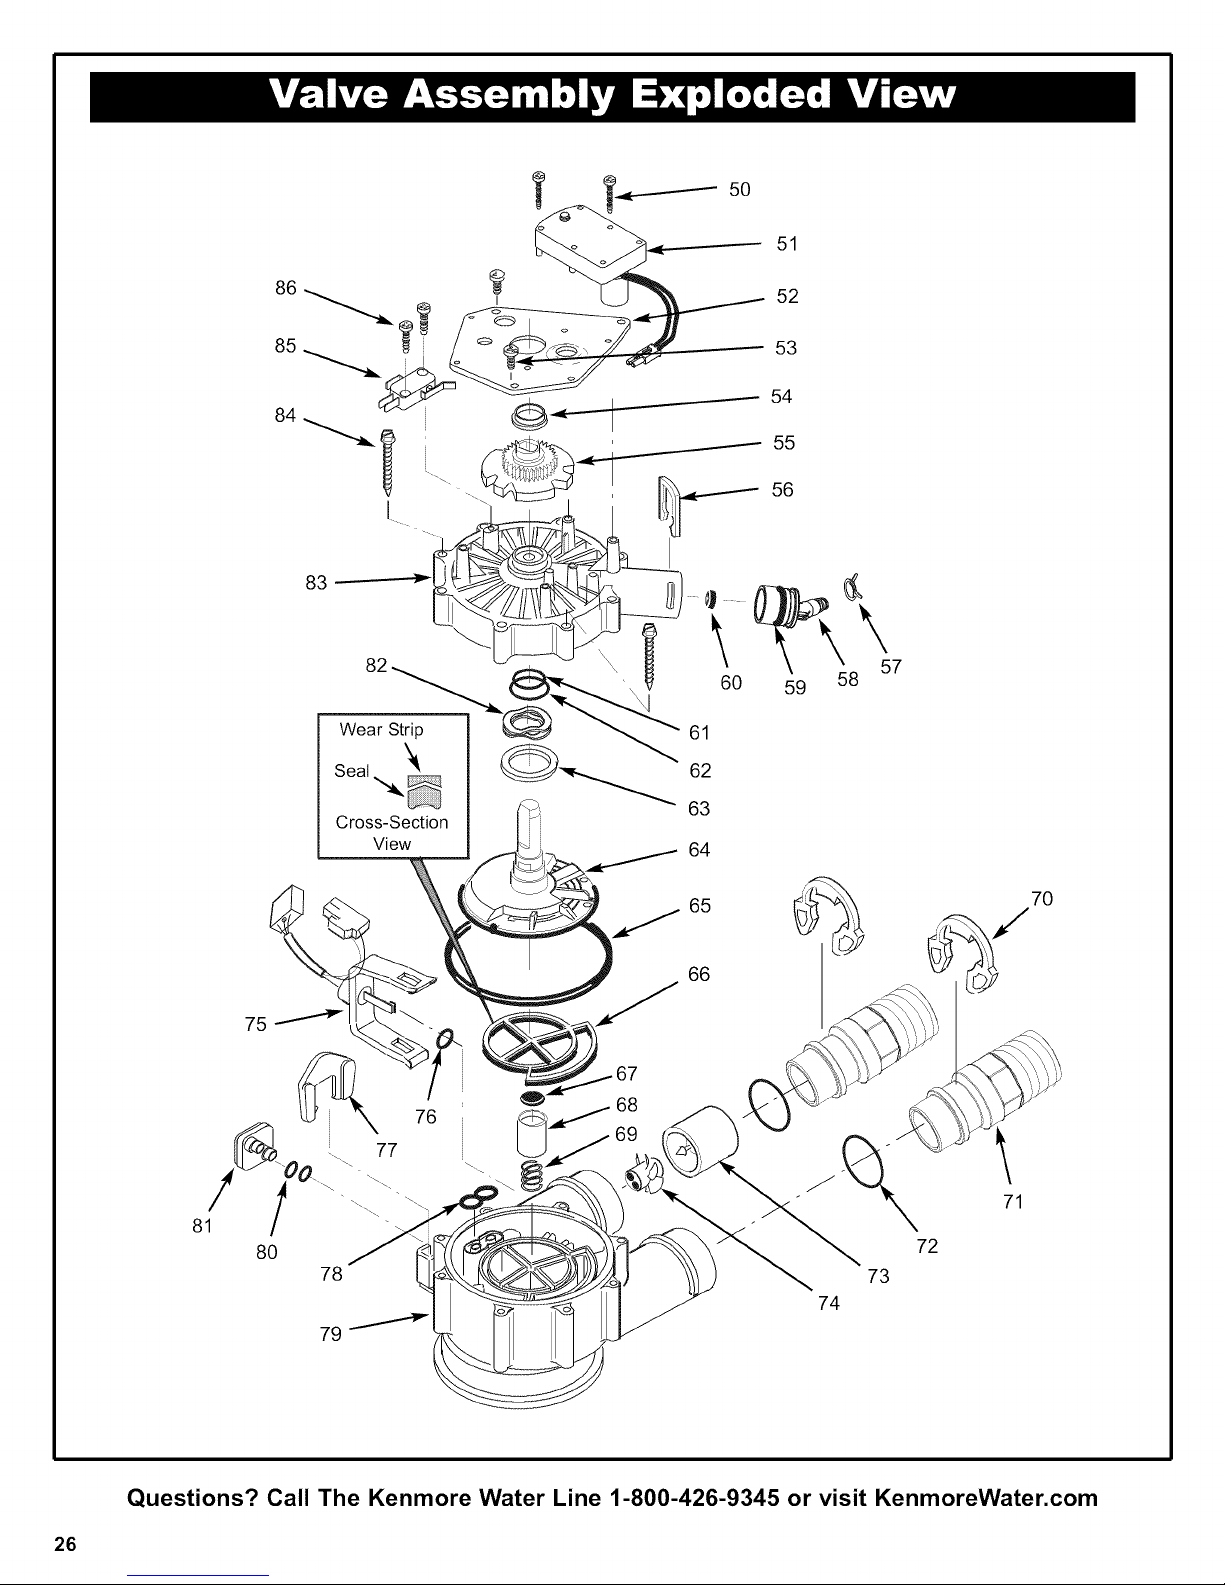
Key No. Part No. Description
50 7224087 Screw, #8-32 x 1" (2 req.)
51 7286039 Motor (incl. 2 ea. of Key No. 50)
52 7231393 Motor Plate
53 0900857 Screw, #6-20 x 3/8" (3 req.)
54 7171250 Bearing
55 7283489 Cam & Gear
56 7169180 Clip, Drain
57 0900431 Tubing Clamp (2 provided)
58 7271270 Adaptor, Drain Hose
59 7170288 O-Ring, 15/16" x 1-3/16"
60 7290410 Flow Plug
61 7170327 O-Ring, 5/8" x 13/16"
62 7173024 O-Ring, 1-1/8" x 1-1/2"
63 7174313 Bearing, Wave Washer
64 7185500 Rotor & Disc
65 7173032 O-Ring, 4-1/2" x 4-7/8"
66 7185495 Rotor Seal
67 7172989 Seal
68 7171187 Plug, Drain Seal
69 7129889 Spring
70 7089306 Clip (4 req.)
71 7271204 Installation Adapter, 1" NPT (2 req.)
72 7170262 O-Ring, 1-1/8" x 1-3/8" (4 req.)
73 7094898 Turbine Support
74 7101548 Turbine
75 7276084 Wire Harness (Sensor)
76 0900060 O-ring
77 7081201 Retainer, Nozzle & Venturi
78 7195482 Seal, Nozzle & Venturi
79 7171145 Valve Body
80 7170319 O-Ring, 1/4" x 3/8" (2 req.)
81 7100940 Plug, Aspirator Port
82 7175199 Wave Washer
83 7171161 Valve Cover
84 7172997 Screw, #10-14 x 2-5/8" (8 req.)
85 7305150 Switch
86 7140738 Screw, #4-24 x 3/4", Flat Head (2 req.)
Questions? Call The Kenmore Water Line 1-800-426-9345 or visit KenmoreWater.com
27
Your Home
For expert troubleshooting and home solutions advice:
Our Home
For repair of carry-in items like vacuums, lawn equipment,
and electronics, call anytime for the location of your nearest
Sears Parts & Repair Service Center
1-800-488-1222 (U.S.A.) 1-800-469-4663 (Canada)
www.sears.com www.sears.ca
To purchase a protection agreement on a product serviced by Sears:
1-800-827-6655 (U.S.A.) 1-800-361-6665 (Canada)
Para pedir servicio de reparacidn
a domicilio, y para ordenar piezas:
1-888-SU-HOGAR ®
(1-888-784-6427)
www.sears.com
® Registered Trademark / TMTrademark of KCD IP, LLC in the United States, or Sears Brands, LLC in other countries
® Marca Registrada / TMMarca de Fabrica de KCD IP, LLC en Estados Unidos, o Sears Brands, LLC en otros parses
MCMarque de commerce / MDMarque depos6e de Sears Brands, LLC
Au Canada pour service en frangais:
1-800-LE-FOYER Mc
(1-800-533-6937)
www.sears.ca
MANUAL DEL PROPIETARIO
Sistema central
de filtrado de agua
para toda la casa
MODELO No. 625.382080
Precauci6n:
Antes de usar este producto por primera
vez, lea y siga toclas las reglas de seguri-
dad y las instrucciones de operaci6n.
_Tiene preguntas?
Visite el sitio web www.KenmoreWater.com
o Ilame gratis al 1-800-426-9345
(lun. a vie., de 7 a.m. a 6 p.m., hora del Centro)
i.Necesita reparaci6n o repuestos? Llame gratis al 1-800-469-4663
Vea otros n0meros de servicio de Sears en la cubierta posterior.
CONSERVE ESTE MANUAL
Este sistema ha sido probado y certificado
por NSF International para el cumplimiento
de la Norma NSF/ANSI 42. Consulte los
detalles en la hoja de datos de rendimiento.
• Garanfia
• Instalaci6n
• C6mo funciona
• C6mo cuidar el producto
• Especificaciones
• Piezas de repuesto
®
Impreso en papel reciclado
Sears Brands Management Corporation, Hoffman
IMPRESO EN LOS EE.UU. www.KenmoreWater.com
Estates, IL 60179 U.S.A.
Pieza No. 7297462 (Rev. N 7/22/10)
GARANTiA PARA EL SISTEMA CENTRAL KENMORE
DE FILTRADO DE AGUA PARA TODA LA CASA
GARANTJA LIMITADA DE UN ANO PARA EL SISTEMA CENTRAL KENMORE DE FILTRADO DE AGUA
PARA TODA LA CASA
Cuando se haya instalado, operado y mantenido conforme a todas las instrucciones suministradas con el
producto, si este sistema central de filtrado de agua para toda la casa fallara debido a defectos en materiales
o mano de obra dentro de un a_o a partir de la fecha de compra, Ilame al 1-800-4-MY-HOME ® para solicitar
la reparaci6n gratuita.
GARANTJA LIMITADA DE DIEZ ANOS CONTRA FUGAS
Cuando se haya instalado, operado y mantenido conforme a todas las instrucciones suministradas con el
producto, si el tanque con base filtrante del sistema central de filtrado de agua para toda la casa tuviera una
fuga dentro de los diez a_os de la fecha de compra, Ilame al 1-800-4-MY-HOME ®para solicitar el reemplazo
gratuito del tanque. Despues del primer a_o, usted debera pagar un cargo inicial por viaje.
La cobertura de la garantia total no incluye la base filtrante, la cual es un articulo consumible.
Si este sistema central de filtrado de agua para toda la casa Ilegara a usarse alguna vez con un prop6sito
ajeno al de una familia privada, toda la cobertura de la garantia se aplicara por s61o90 dias a partir de la
fecha de compra.
La presente garantia solo cubre defectos en materiales y mano de obra. Sears NO pagara:
1.A un tecnico de servicio para instruir al usuario sobre la forma correcta de instalar, operar o mantener
el producto.
2. A un tecnico de servicio para limpiar o dar mantenimiento a este producto.
3. El da_o o la falla de este producto si no se instala, opera ni mantiene conforme a todas las instrucciones
suministradas con el producto.
4. El da_o o la falla de este producto originado por accidentes, maltratos, uso incorrecto o uso ajeno al
prop6sito de dise_o.
5. El da_o o la falla de este producto causado por el uso de detergentes, productos de limpieza, productos
quimicos o utensilios que no sean los recomendados en todas las instrucciones suministradas con
el producto.
6. El da_o o la falla de piezas o sistemas originado por modificaciones no autorizadas hechas a este producto.
Exencion de responsabilidad por garantias implicitas; limitacion de recursos
Conforme a la presente garantia limitada, el recurso _nico y exclusivo para el cliente sera la reparaci6n del
producto segQn Io aqui estipulado. Las garantias implicitas, incluyendo las garantias de comerciabilidad o
aptitud para un prop6sito en particular, se limitan a un a_o o al periodo mas breve que permite la ley. Sears
no se responsabilizara de da_os imprevistos o emergentes. En ciertas jurisdicciones no se permite la
exclusi6n o limitaci6n de da_os imprevistos o emergentes, o no se permite la limitaci6n de la duraci6n de las
garantias implicitas de comerciabilidad o aptitud, de modo que las presentes exclusiones o limitaciones
podrian no aplicarse a usted.
Esta garantia se aplicara solamente mientras este artefacto se use en los Estados Unidos o Canada.
Esta garantia le otorga derechos legales especificos, yes posible que usted tambien tenga otros derechos,
los cuales varian de una jurisdicci6n a otra.
Sears Brands Management Corporation, Hoffman Estates, IL 60179
Sears Canada Inc., Toronto, Ontario, Canada M5B 2M5
&Tiene preguntas? Llame a la linea de ayuda de Kenmore Water al 1-800-426-9345 o
visite el sitio web KenmoreWater.com.
 Loading...