

Kenmore 625.3486 User Manual

OWNER’S
MANUAL
MODEL NO.
625.348600
Caution:
Read and Follow
All Safety Rules and
Operating Instructions
Before First Use of
This Product.
Kenmore
High Flow Deluxe Demand
Water Softener
If you have questions when
installing, operating or main
taining your softener, and
when setting the timer, call
this toll-free number...
1-800-426-9345
SAVE THIS MANUAL
Sears, Roebuck and Co., Hoffman Estates, IL 60179 USA
PRINTED IN U.S.A.
♦ Warranty
♦ Start Up / Setting Tinner
♦ How It Works
♦ Care Of
♦ Specifications
♦ Repair Parts
Use plastic bag and tie provided, to hang manuals nearby
the softener for future reference.

WARRANTY
SEARS RESIDENTIAL W/VTER SOFTENER
FULL ONE YEAR WARRANTY ON WATER SOFTENER
For one year from the date of purchase, when this water softener is installed and maintained in ac
cordance with our instructions, Sears will repair, free of charge, defects in material or workmanship
in this water softener.
FULL TEN YEAR WARRANTY AGAINST LEAKS
For ten years from the date of purchase. Sears will furnish and install a new current model water
softener tank or salt storage drum, free of charge, if either the tank or drum develop a leak.
TO OBTAIN WARRANTY SERVlOE, SIMPLY CONTAOTTHE NEAREST SEARS SERVlOE CENTER
THROUGHOUT THE UNITED STATES. This warranty applies only while this product is in use in the
United States.
This warranty gives you specific legal rights, and you may have other rights which vary from state to
state.
Sears, Roebuck and Co., D/817 WA, Hoffman Estates, IL 60179
If you want your water softener professionally installed, talk to your Sears Salesman. He will arrange for a
prompt, quality installation by Sears Authorized Installers.
SEARS INSTALLATION POLICY
All installation labor arranged by Sears shall be
performed in a neat, workmanlike manner in accor
dance with generally accepted trade practices. Fur
ther, all installations shall comply with all local laws,
codes, regulations, and ordinances. Customer shall
also be protected, during installation, by insurance
relating to Property Damage, Workman's Com
In addition to any warranty extended to you on the
Sears merchandise involved, which warranty be
comes effective the date the merchandise in installed,
should the workmanship of any Sears arranged
installation prove faulty within one year. Sears will,
upon notice from you, cause such faults to be
corrected at no additional cost to you.
SEARS INSTALLATION WARRANTY
pensation and Public Liability.
FACTS AND FIGURES TO KEEP
Fill in the blanks below and keep this book in a safe
place so you always have these facts.
Water Softener Model No.t
Serial Number________________________________
Date Installed
Water Hardness_
Iron Content
*pH
___________
Water Pressure_
Water Flow Rate
____
______________________
_Grains Per Gallon
Parts Per Million
Taste And/Or Odor
_Pounds/Square Inch
Gallons Per Minute
t The model number is on the rating decal, located
on the rim, under the salt hole cover.

TABLE OF CONTENTS
SECTION 1 SOFTENER START UP
PAGE
NO.
A. SAFETY GUIDES
B. CHECK LIST OF STEP-BY-STEP GUIDES TO INSTALL
C. PROGRAM THE TIMER
D. SANITIZING THE WATER SOFTENER
E. FILL THE STORAGE TANK WITH SALT
SECTION 2 HOW YOUR WATER SOFTENER WORKS
A. FACE PLATE TIMER FEATURES
B. SOFT WATER SERVICE AND REGENERATION
SECTION 3 CARE OF YOUR SOFTENER
A. SALT: REFILLING STORAGE TANK, SALT BRIDGE
B. KEEPING THE WATER SOFTENER CLEAN
C. KEEP THE SOFTENER FROM FREEZING
D. HELPFUL HINTS CHECKLIST
4
5
6-7
8
9
10-11
12-14
15
16
17
18
SECTION 4 OTHER THINGS TO KNOW
A. DIMENSIONS/SPECIFICATIONS 19
SECTION 5 SERVICE TECH INFORMATION
A. TROUBLESHOOTING
B. ROTARY VALVE SERVICE 24
WATER FLOW THROUGH THE SOFTENER VALVE 25-27
0.
SECTION 6 REPAIR PARTS
20-23
28-31

SECTION 1
1A. SAFETY GUIDES
WATER SOFTENER START-UP
A Read all steps, guides and rules carefully before
installing and using your new water softener. Follow
all steps exactly to correctly install. Failure to follow
them could cause personal injury or property dam
age. Reading this book will also help you to get all of
the benefits from your water softener.
A Your water softener will remove hardness miner
als and “clear water” iron from water, up to the limits
shown on page 19. It will not remove other types of
iron, acids, tastes and odors, etc. It will not purify
polluted water or make it safe to drink.
A Protect the softener and piping from freezing.
Damage from freezing voids the softener warranty.
See page 17.
CAUTIONS
PLEASE READ AND COMPLY WITH THE FOLLOW
ING GUIDES TO PREVENT DAMAGE TO THE SOFT
ENER OR OTHER PROPERTY, PERSONAL INJURY,
OR POSSIBLE FATAL SHOCK.
A THIS SOFTENER WORKS ON 24 VOLTS ONLY. BE
SURE TO USE THE TRANSFORMER INCLUDED,
AND PLUG IT INTO A 120V OUTLET.
A Unplug the transformer right away if the power
cable sould become damaged or frayed. Make re
pairs before plugging back into the power outlet.
A Always unplug the softener from electrical power
before removing outer valve covers.
SECTION 1
1B. CHECK LIST OF ALL STEP-BY-STEP GUIDES TO INSTALL
To be sure you have done all the steps to install the
softener, read the following list. Refer to the
Installation Manual, part no. 7183613, for step-by
step guides.
Page numbers referred to are in the Installation
Manual unless otherwise noted.
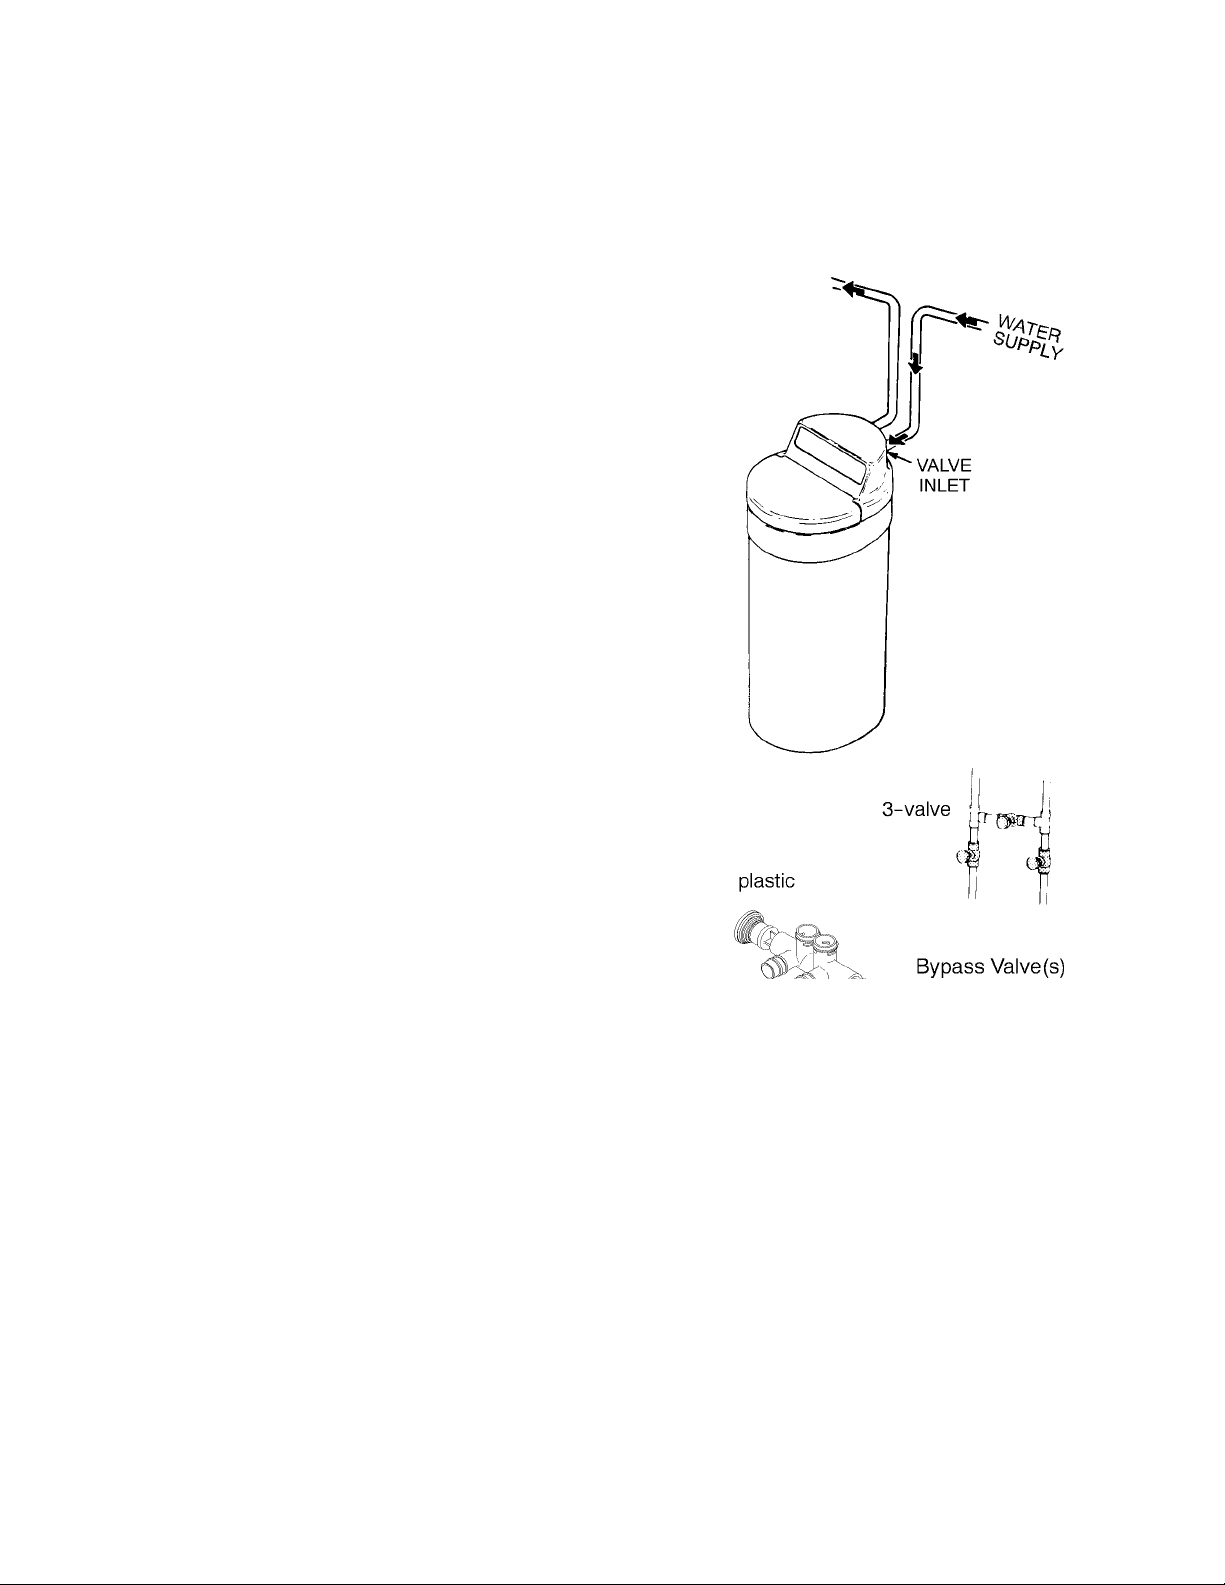
Is the house water flow going INTO the softener
valve INLET? Trace piping to be sure. See pages
10 and 11.
Is the plumbing bypass valve (or 3 valves) set for
SERVICE? Bypass valve(s) should always re
main in soft water service position. Position in
"bypass" only if needed for softener repairs. See
FIG. 12, page 19 of this manual.
WATER SOFTENER START-UP
✓ Is the valve drain hose connected the right way,
and without sharp bends or kinks that could
stop or reduce water flow? See page 16.
Page numbers referred to are in the Installation
Manual unless otherwise noted.
✓ Is the softener power cable connected to the
transformer? Is the transformer plugged into an
inside, 120V-60HZ electrical outlet? See page 20
in the installation manual, and the wiring sche
matic on page 20 of this manual.
✓ Be sure to restart the water heater. See page 20.
4
NOTE: The state of Massachusetts requires a licensed
plumber to perform the installation.
SECTION 1
WATER SOFTENER START-UP
1C.
FIG. 1
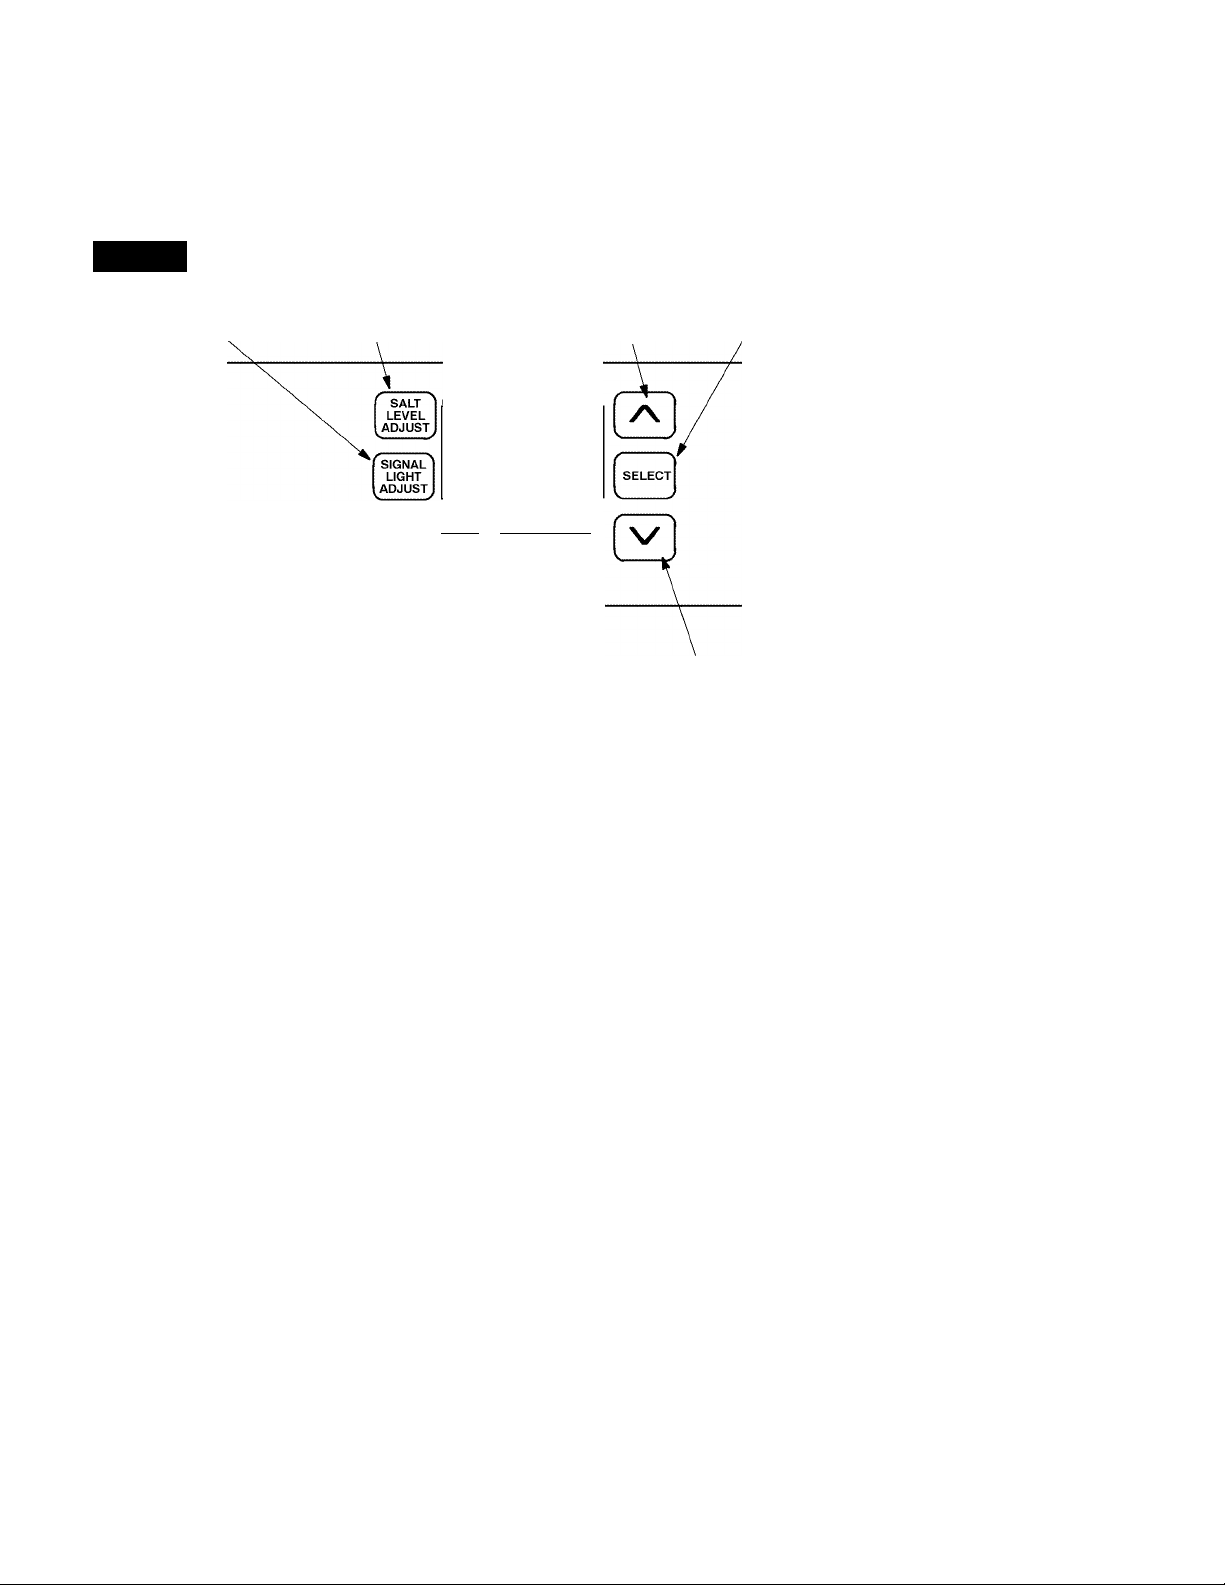
signal light adjust salt level adjust display
Kenmore Water Line
for Customer Assistance
1’800-426-9345
LOWr\
SALT^
ON/OFF-HOLD button
(Recharge Tonight-Now)
PROGRAM THE TIMER
UP button SELECT button
RECHARGE TONIGHT
ON/OFF
RECHARGE NOW
HOLD
DOWN button
UUÀ
High Flow
Deluxe Demand Water Softener
with Dual Segment Electronic Display
When the transformer is plugged in, the model
code HF31, and a test number (example: kll) show
in the face plate display for 4 seconds. Then, 12:00
AM and PRESENT TIME begin to flash.
.U.C
3 I
u
I I
i\
I Zl.rirH“
IL'UU
PRESENT TIME
I I
NOTES:
If SR - - shows in the display, press the UP Q or
DOWN Qbutton until HF31 shows. Then, press
the SELECT button to set, and change to the flash
ing
PRESENT TIME display.
To check the model code, unplug the transformer
at the wall outlet and plug in again, if other than
HF31 shows, see page 18 to reset.
SOUND "BEEPER": A "beeper" sounds while
pressing buttons for timer set-up. One beep signals
a change in the face plate display. Repeated beeps
mean the timer will not accept a change from the
button you have pressed, telling you to use another
button. For example, while setting the hardness
(step 2), the beeper sounds repeatedly when the
display reaches 1 using the DOWN button, or the
highest hardness setting using the UP button.
1. SET PRESENT TIME OF DAY:
NOTE:
If the words PRESENT TIME do not show in the
display, press the SELECT button (FIG. 1) until
they do, or see the previous notes.
■ Press the UP / DOWN buttons to set the present
time. Press UP to move the display ahead; press
DOWN to move the time backward.
If the present time is between
noon and midnight, be sure PM
shows.
If the present time is between
midnight and noon, be sure AM
shows.
' -1 : 50 '“
PRESENT TIME
I |-|riM
I I'30
PRESENT TIME
NOTE:
Each press of the UP /DOWN buttons changes the
time by 1 minute. Holding the buttons in changes
the time 32 minutes each second.

SECTION 1
WATER SOFTENER START-UP
1C.
PROGRAM THE TIMER
2. SET WATER HARDNESS NUMBER:
■ Press the SELECT button once to display 25
(flashing) and HARDNESS.
The grains per gallon (gpg)
hardness of your water supply
is on your water analysis re
port. Be sure to enter water test
results on page
2, for future
reference.
NOTE:
If your water supply contains iron, compensate for
it by adding to the water hardness number. For
exanrple, assume your water is 20 gpghard and contains
2 ppm iron. Add 5 to the hardness number for each 1
ppm of iron. In this example, you would use 30 for your
hardness number.
20 gpg hardness
2 ppm iron X 5 = 10
(times)
+10
30 HARDNESS NUMBER
■ Press the UP / DOWN buttons to set your water
hardness number in the display. The DOWN
button moves the display to 1. The UP button
moves the display to the highest setting (see
maximum setting for your model in the specifica
tions).
NOTE:
Each press of the UP / DOWN button changes the
display by 1 between 1 and 25. Between 25 and the
highest number, the display changes 5 at a
time...25, 30, 35, etc. Holding the UP or DOWN
button in changes the display twice each second.
Automatic Bypass, page 14). If a different recharge
time setting would be better for your household,
do the following.
■ Press the UP / DOWN buttons to set the desired
recharge starting hour. Be sure to observe the
AM-PM as you did when setting the present time
of day.
NOTE:
Each press of the UP / DOWN buttons changes the
display 1 hour. Holding the buttons in changes the
display twice each second.
4. SET CLEAN FEATURE (optional):
■ Press the SELECT button to display OFF
(flashing) and CEEAN.
This feature is beneficial on
water supplies containing iron
and/or high amounts of sedi
ments (sand, silt, dirt, etc.).
When set to ON, a backwash
and fast rinse cycle will occur
first, proceeding the normal re
generation sequence (see page
12). This provides extra clean
ing of the resin bed before it is
regenerated with the salt brine. To conserve water,
if your water supply does not contain iron or
sediments, be sure this feature is set to OFF. Use the
UP / Down buttons to change the ON / OFF
displays.
■ Press the SELECT button once again, to return
the present time, and RECHARGE TONIGHT in the
display.
3. SET RECHARGE (REGENERATION) TIME:
■ Press the SELECT button to display 2:00 AM
(flashing) and RECHARGE TIME.
At the 2:00 AM recharge time
setting, the softener begins re
j.i II I'»'“
C'UU
RECHARGE
TIME
generation (see pages 12 and
13) at 2:00 AM, ending no later
than 4:00 AM. This is a good time in most
households because water is not being used (see
IF YOU NEED HELP PROGRAMMING THE TIMER, CALL TOLL FREE, NUMBER
1-800-426-9345. SEE PAGES 10 AND 11 EOR OTHER EACE PEATE TIMER EEATURES.
8 OFf
5
RECHARGE TONIGH7
3
2
r,in™
WATER FLOW

SECTION 1
1D. SANITIZING THE WATER SOFTENER
WATER SOFTENER START-UP
Care is taken at the factory to keep your water
softener clean and sanitary. Materials used to make
the softener will not infect or contaminate your
water supply, and will not cause bacteria to form or
grow. However, during shipping, storage, instal
ling and operating, bacteria could get into the
softener. For this reason, sanitizing as follows is
suggested® when installing.
1. The first time you sanitize your softener, be
sure to do all steps in the installation manual,
and on pages 5, 6 and 7 of this manual first.
2. Lift the salt hole cover and use a pail or hose to
fill the salt storage tank with at least 3 gallons of
water.
3. Remove the brinewell cover (FIG. 3) and pour
about 3/4 ounce, or 1 to 2 tablespoons, of
common
co, BoPeep, White Sail, Eagle, etc.) in the
softener brinewell.
4. Press the ON/OFF-HOLD button and hold for 3
seconds to start a recharge. This first recharge
does several things.
5.25% household bleach (Clorox, Lin-
FIG. 2 ADD WATER
— It draws the bleach into and through the
softener to sanitize it.
— It fills the salt tank to the water level need
ed.
— It gets all the air out of the resin tank.
— It prepares the resin bed (see page 12) for
service.
NOTES:
This recharge takes about 2-1/2 or 2-3/4 hours,
depending on the salt type setting (page 7).
You can sanitize the softener with or without
salt in the storage tank.
®
Recommended by the Water Quality Association. On
some water supplies, the water softener may need pe
riodic disinfecting.
8
SECTION 1
1E. FILL THE STORAGE TANK WITH SALT
WATER SOFTENER START-UP
Brine (salt dissolved in water) is needed for each
and every regeneration. The water for making
brine is metered into the salt storage tank by the
softener. However, you must keep the tank filled
with salt.
Fill the tank with NUGGET or PELLET water
softener salt. DO NOT use rock salts, as they have
dirt and sediments that will stop the softener from
working.
Before filling, be sure the brinewell cover is in place
on the top of the brinewell. Salt storage capacity is
shown on page 20.
system (see page 10).
NOTES:
The salt monitor system, page 10, is calibrated to
the density of nugget or pellet water softener salt.
The monitor will not work as accurately with other
types of salt including rock and solar.
In humid areas, it is best to fill the storage tank
half-full, and to refill it more often. Salt bridging
(see page 15) occurs more often when conditions
are humid.
WATER SOFTENING SALT WITH IRON REMOV
ING ADDITIVES — Some salts have an additive to
help the softener handle iron in the water supply.
Although this additive may help to keep the
softener resin clean, it may also release corrosive
fumes that will weaken and shorten the life of some
softener parts.
Be sure to set the salt monitor
FIG.3
Sodium information: Water softeners using sodium
chloride for regeneration add sodium to the water.
Persons who are on sodium restricted diets should
consider the added sodium as part of their overall
sodium intake.
For example, if your water supply is 15 grains hard,
you would have to drink 3 quarts of softened water
to consume 335 milligrams of sodium. That is
equivalent to eating 2-1 / 2 slices of white bread.
ADD SALT
brinewell
cover
brinewell
Persons who are concerned about their drinking
water should consider a Kenmore Drinking Water
System that will remove or reduce in excess of 90%
of the sodium and other drinking water contami
nants.
You have now finished the water softener start up. After the sanitizing recharge, on
page 8, the softener will be giving you soft water.
SECTION 2
2A. FACEPLATE TIMER FEATURES
HOW YOUR WATER SOFTENER WORKS
EXTRA RECHARGE
Sometimes, a manually started regeneration (re
charge) may be desired, or needed. Two examples
are:
- You have used more water than usual (guests
visiting) and you may run out of soft water before
the next timer started regeneration.
- You did not refill the softener with salt before it
was gone.
You can start a regeneration right away, or you can
set the timer to regenerate at the next 2:00 AM (or
other preset recharge time). Do the following.
RECHARGE NOW
■ Press the ON/OFF-HOLD
button and hold until *RE-
CHARGE, Serv and Eill begin
to flash in the display. Upon
6
' I'UO
5
RECHARGE
■*
2
___ _ ___
WmMLQW.
__ _
reaching fill, the first cycle of
regeneration, the flashing
Serv goes off and Eili is
on steady. RECEIARGE continues to flash. This
regeneration will last for about 2 hours. After the
2 hours, you will have soft water again.
indicator light to remind you to refill the storage
tank with salt. To set this monitor system:
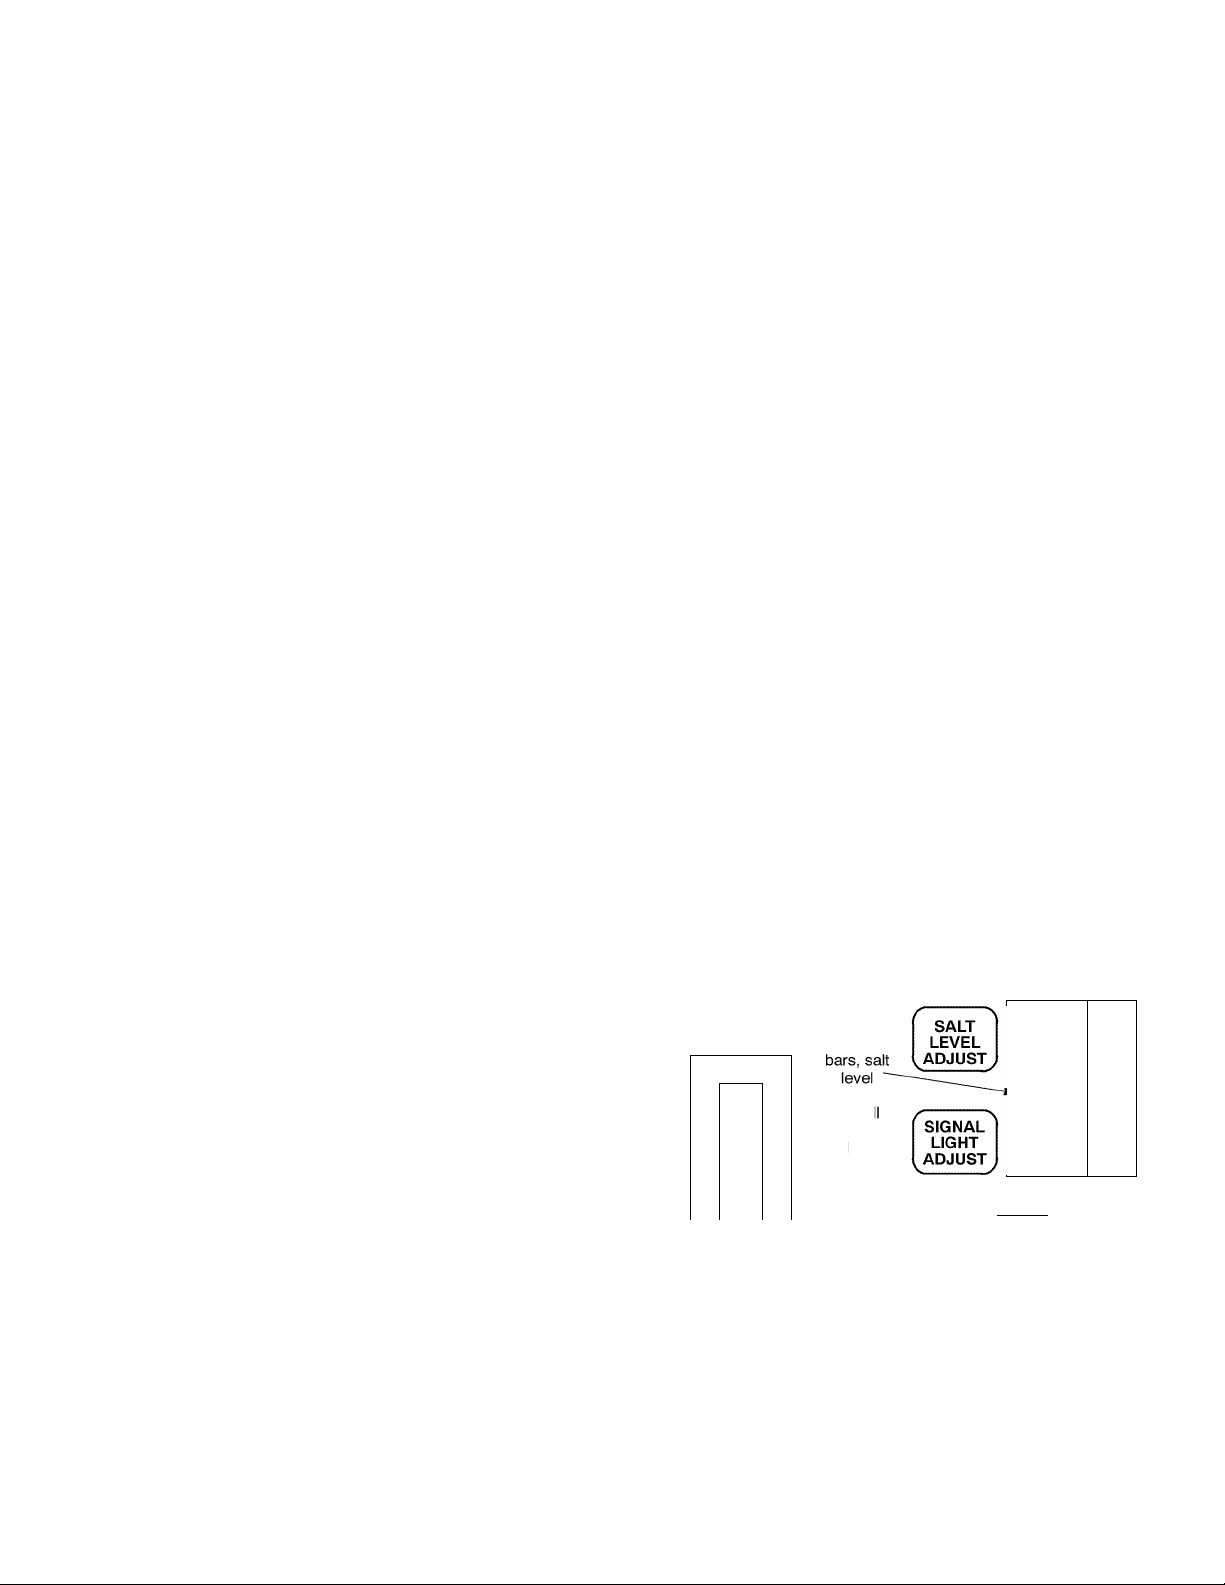
1. Lift the salt hole cover and level the salt in the
storage tank.
2. The salt level decal, on the brinewell inside the
tank, has numbers from 0 to 8 (see drawing on
page 9 and below). Observe the number the
leveled salt is at or closest to.
3. Now, press the SALT LEVEL ADJUST button
until black bars display up to the salt level
number. For example, the pictures below show
the salt level at 6.
4. Finally, set the level you want the low salt
indicator light to come on. Press the SIGNAL
LIGHT ADJUST button until a (Y) shows
opposite this number. In the example below,
the light will come one when the stored salt
drops to level 2. At level 2, the storage tank is
about 1/3 full. This is the lowest you should
allow the stored salt level to drop to. To turn the
salt monitor off, press the SIGNAL LIGHT
ADJUST button until OFF shows above.
=^NOTE:
If the CLEAN feature is set to ON, a cleaning
backwash {CEEAN and Bkwsh or Rinse flashes in
the display, along with the minutes of the clean
cycle remaining) precedes the recharge.
RECHARGE TONIGHT
■ Press and release (do not
hold) the ON / OFF-HOLD
button. RECHARGE TO
NIGHT flashes in the display,
8 OFf
6
5
2
I'UO
RECHARGE TONIC
WATER FLOW
and the softener begins regen
eration at the next preset recharge time. Press
and release the ON/OFF-HOLD button once
more if you decide to cancel the regeneration,
and RECHARGE TONIGHT
SALT MONITOR SYSTEM
The face plate timer has a low salt monitor with an
NOTE:
For accurate salt monitor operation, always use
nugget or pellet water softener salt. See page 9.
8
7
■ 6
■ 5
4
■ 3
■ 2
■ 1 k’
ON/OFF
HOLD
salt
level
A
SALT
LEVEL
_ 6
8
7
- brinewel
- decal
indicator light
LOW
SALT^
10
 Loading...