

Page 1

Use & Care Guide
Guía de Uso y Cuidado
Guide d’utilisation et d’entretien
English / Español / Français
Models / Modelos / Modèles: 4178413*, 4179413*
Ken more Elite.
Front Load Dryer
Secadora a Cargo Frontal
Sécheuse à Chargement Frontal
* = Color number, número de color, le numéro de couleur
P/N 137413300 A (1012)
Sears Brands Management Corporation
Hoffman Estates, IL 60179 U.S.A.
www.kenmore.com
www.sears.com
Sears Canada Inc.
Toronto, Ontario, Canada MSB 2C3
www.sears.ca
Page 2

Record Model/Serial Numbers
Important Safety Instructions
The model and serial numbers of your washer are found on
the washer serial plate located on the inside of the door.
Record and retain these numbers.
Model Number
______________________
Serial Number
Purchase Date
^ WARNING
For your safety the following information in
this manual must be followed to minimize the
risk of fire or explosion or to prevent property
damage, personal injury or death.
Do not store or use gasoline or other
flammable vapors and liquids in the vicinity
of this or any other appliance.
WHAT TO DO IF YOU SMELL GAS:
• Do not try to light any appliance.
• Do not touch any electrical switch; do not
use any phone in your building.
• Clear the room, building or area of all
occupants.
This Use and Care Guide provides general operating
instructions for your dryer. It also contains information
about features for several other models. Your dryer may
not have every feature included.
The instructions appearing in this Use and Care Guide are
not meant to cover every possible condition and situation
that may occur. Common sense and caution must be
practiced when installing, operating and maintaining any
appliance. Use the dryer only as instructed in this Use &
Care Guide.
Recognize safety symbols, words and
labels
Safety items throughout this manual are labeled with
a WARNING or CAUTION based on the risk type as
described below:
Definitions
/f\ This is the safety alert symbol. It is used to alert you
to potential personal injury hazards. Obey all safety
messages that follow this symbol to avoid possible injury or
death.
A DANGER
DANGER indicates an imminently hazardous situation
which, if not avoided, will result in death or serious injury.
• Immediately call your gas supplier from
a neighbor’s phone. Follow the gas
supplier’s instructions.
• If you cannot reach your gas supplier, call
the fire department.
Installation and service must be performed
by a qualified installer, service agency or
the gas supplier.
Table of Contents
Important Safety Instructions
Warranty / Protection Agreement
Features......................................................................................6
Operating Instructions............................................................7-15
Care and Cleaning
Solutions to Common Problems...........................................17-19
Notes.........................................................................................20
Español.....................................................................................21
Français....................................................................................41
....................................................................
...................................................
................................................
2-4
16
A WARNING
WARNING indicates a potentially hazardous situation
which, if not avoided, could result in death or serious
injury.
A CAUTION
CAUTION indicates a potentially hazardous situation
which, if not avoided, may result in minor or moderate
injury.
5
IMPORTANT
IMPORTANT indicates installation, operation or
maintenance information which is important but not
hazard-related.
Save these instructions
for future reference.
Page 3
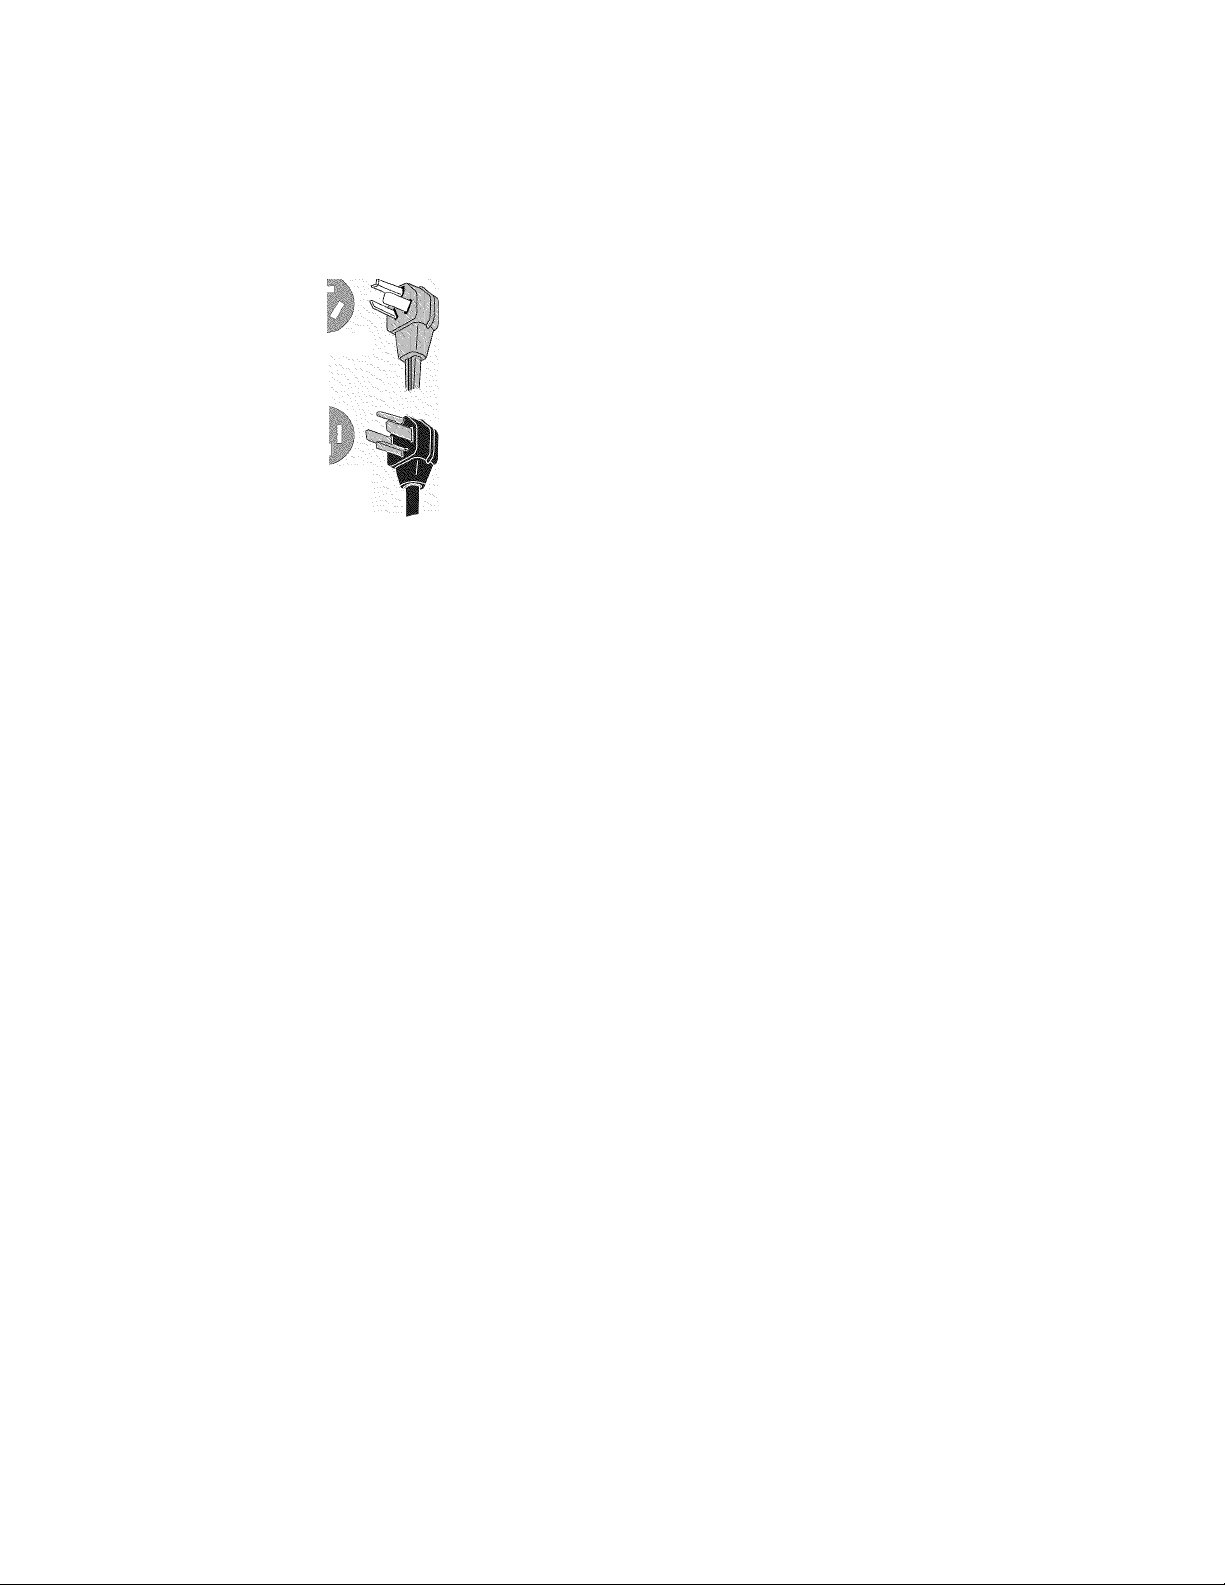
Important Safety Instructions
240 V Electric Dryer
10-30R
3-wire
(fused 30 amp)
14-30R
4-wire
(fused 30 amp)
Avoid fire hazard or electrical shock. Do not use an adaptor plug or extension cord or remove grounding
prong from electrical power cord. Failure to follow this warning can cause serious injury, fire or death.
UL-approved service
cord must be installed
on electric dryers (not
provided with unit
except those
manufactured for sale
in Canada).
120 V Gas Dryer
Grounding type
wall receptacle
Do not, under
any circumstances,
IH M
' ' grou
Power cord with
3-prong grounded plug \jk
bypass the
grounding prong.
remove,
A WARNING - RISK OF FIRE
To reduce the risk of fire, electrical shock, or injury to persons when using this dryer, comply with the basic warnings
listed below. Failure to comply with these warnings could result in serious personal injuries.
You can be killed or seriously injured if you don’t follow these Important Safety Instructions:
PREVENT FIRE
• Do not dry items that have been previously cleaned in,
soaked in, or spotted with gasoline, cleaning solvents,
kerosene, waxes, etc. Do not store these items on or near
the dryer. These substances give off vapors that could
ignite or explode.
• Do not place items exposed to cooking oils in your dryer.
Items contaminated with cooking oils may contribute to a
chemical reaction that could cause a load to catch fire.
• Do not dry articles containing rubber, plastic or similar
materials such as bras, galoshes, bath mats, rugs, bibs,
baby pants, plastic bags and pillows that may melt or
burn. Some rubber materials, when heated, can under
certain circumstances produce fire by spontaneous com
bustion.
^ WARNING
FIRE HAZARD
A clothes dryer produces combustible lint. The dryer must
be connected to an outdoors exhaust. Regularly inspect the
outdoor exhaust opening and remove any accumulation of
lint around the opening and in the surrounding area.
Clean the lint screen before or after each load. The
interior of the dryer, lint screen housing and exhaust duct
should be cleaned approximately every 18 months by
qualified service personnel. An excessive amount of lint
build-up in these areas could result in inefficient drying
and possible fire. See Care and Cleaning.
Do not operate the dryer if the lint screen is blocked,
damaged or missing. Fire hazard, overheating and dam
age to fabrics can occur.
Do not obstruct the flow of ventilating air. Do not stack
or place laundry or throw rugs against the front or back
of the dryer.
Do not spray any type of aerosol into, on or near dryer
at any time.
Do not use fabric softeners or products to eliminate
static unless recommended by the manufacturer of the
fabric softener or product.
Do not continue to use the dryer is you hear squeaking,
grinding, rubbing or other unusual noises. This could be a
sign of mechanical breakdown and lead to fire or serious
injury. Contact a qualified technician immediately.
Failure to comply with these warnings could result in fire,
explosion, serious bodily injury and/or damage to the
rubber or plastic parts of the dryer.
Page 4

Important Safety Instructions
PROTECT CHILDREN
• Do not allow children to play on or in the dryer. Close
supervision of children is necessary when the dryer is
used near children. As children grow, teach them the
proper, safe use of all appliances.
• Destroy the carton, plastic bag and other packing ma
terials after the dryer is unpacked. Children might use
them for play. Cartons covered with rugs, bedspreads or
plastic sheets can become airtight chambers.
• Keep laundry products out of children’s reach. To prevent
personal injury, observe all warnings on product labels.
• Before the dryer is removed from service or discarded,
remove the dryer door to prevent accidental entrapment.
• Failure to comply with these warnings could result in seri
ous personal injuries.
PREVENT INJURY
• To prevent shock hazard and assure stability during
operation, the dryer must be installed and electrically
grounded by a qualified service person in accordance
with local codes. Installation instructions are packed in
the dryer for the installer’s reference. Refer to INSTAL
LATION INSTRUCTIONS for detailed grounding proce
dures. If the dryer is moved to a new location, have it
checked and reinstalled by a qualified service person.
• To prevent personal injury or damage to the dryer, the
electrical power cord of a gas dryer must be plugged
into a properly grounded and polarized 3-prong outlet.
The third grounding prong must never be removed. Never
ground the dryer to a gas pipe. Do not use an extension
cord or an adaptor plug.
• ALWAYS disconnect the dryer from the electrical supply
before attempting any service or cleaning. Failure to do
so can result in electrical shock or injury.
• Do not use any type spray cleanser when cleaning dryer
interior. Hazardous fumes or electrical shock could occur.
• To prevent injury, do not reach into the dryer if the drum
is moving. Wait until the dryer has stopped completely
before reaching into the drum.
PREVENT INJURY AND DAMAGE TO THE DRYER
• All repairs and servicing must be performed by a Sears
or other qualified service dealer unless specifically rec
ommended in this Use and Care Guide. Use only autho
rized factory parts.
• Do not tamper with controls.
• Do not install or store the dryer where it will be exposed
to the weather.
• A thermal limiter switch automatically turns off the
motor in the unlikely event of an overheated situation
(electric dryers only). A service technician must replace
the thermal limiter switch after correcting the fault.
• Failure to comply with these warnings could result in seri
ous personal injuries.
A CAUTION
The California Safe Drinking Water and Toxic Enforcement Act requires the Governor of California to publish a list of
substances known to the state to cause cancer, birth defects or other reproductive harm, and requires businesses to warn
customer of potential exposure to such substances. Included in this list are soot and carbon monoxide, both of which
may be produced by the use of this product.
: H NOTE
The instructions appearing in this Use and Care Guide are not meant to cover every possible condition and situation that
may occur. Common sense and caution must be practiced when installing, operating and maintaining any appliance.
Page 5

Kenmore Appliance Warranty
Master Protection Agreements
One Year Limited Warranty
When installed, operated and maintained according to
all instructions supplied with the product, if this appliance
fails due to a defect in material or workmanship within one
year from the date of purchase, call 1-800-4-MY-HOME®
to arrange for free repair.
If this appliance is used for other than private family pur
poses, this warranty applies for only 90 days from the date
of purchase.
This warranty covers only defects in material and work
manship. Sears will NOT pay for:
1. Expendable items that can wear out from normal use,
including but not limited to filters, belts, light bulbs and
bags.
2. A service technician to instruct the user in correct
product installation, operation or maintenance.
3. A service technician to clean or maintain this product.
4. Damage to or failure of this product if it is not installed,
operated or maintained according to all instructions
supplied with the product.
5. Damage to or failure of this product resulting from
accident, abuse, misuse or use for other than its
intended purpose.
6. Damage to or failure of this product caused by the use
of detergents, cleaners, chemicals or utensils other than
those recommended in all instructions supplied with the
product.
7. Damage to or failure of parts or systems resulting from
unauthorized modifications made to this product.
Disclaimer of implied warranties; limitation of remedies
Customer’s sole and exclusive remedy under this limited
warranty shall be product repair as provided herein. Im
plied warranties, including warranties of merchantability
or fitness for a particular purpose, are limited to one year
or the shortest period allowed by law. Sears shall not be
liable for incidental or consequential damages. Some states
and provinces do not allow the exclusion or limitation of
incidental or consequential damages, or limitations on the
duration of implied warranties of merchantability or fitness,
so these exclusions or limitations may not apply to you.
This warranty applies only while this appliance is used in
the United States and Canada.
This warranty gives you specific legal rights, and you may
also have other rights which vary from state to state.
Sears Brands Management Corporation, Hoffman Estates,
IL 60179
Sears Canada Inc., Toronto, Ontario, Canada MSB 2C3
Congratulations on making a smart purchase. Your new
Kenmore® product is designed and manufactured for years
of dependable operation. But like all products, it may re
quire preventive maintenance or repair from time to time.
That’s when having a Master Protection Agreement can
save you money and aggravation.
The Master Protection Agreement also helps extend the life
of your new product. Here’s what the Agreement* includes:
• Parts and labor needed to help keep products
operating properly under normal use, not just defects.
Our coverage goes well beyond the product warranty.
No deductibles, no functional failure excluded from
coverage — real protection.
• Expert service by a force of more than 10,000
authorized Sears service technicians, which means
someone you can trust will be working on your product.
• Unlimited service calls and nationwide service, as often
as you want us, whenever you want us.
• “No-lemon” guarantee — replacement of your covered
product if four or more product failures occur within
twelve months.
• Product replacement if your covered product can not be
fixed.
• Annual Preventive Maintenance Check at your request —
no extra charge.
• Fast help by phone — we call it Rapid Resolution —
phone support from a Sears representative on all
products. Think of us as a “talking owner’s manual”.
• Power surge protection against electrical damage due
to power fluctuations.
• $250 Food Loss Protection annually for any food
spoilage that is the result of mechanical failure of any
covered refrigerator or freezer.
• Rental reimbursement if repair of your covered product
takes longer than promised.
• 10% discount off the regular price of any non-covered
repair service and related installed parts.
Once you purchase the Agreement, a simple phone call is
all that it takes for you to schedule service. You can call
anytime day or night, or schedule a service appointment
online.
The Master Protection Agreement is a risk free purchase.
If you cancel for any reason during the product warranty
period, we will provide a full refund. Or, a prorated refund
anytime after the product warranty period expires. Pur
chase your Master Protection Agreement today!
Some limitations and exclusions apply. For prices and ad
ditional information in the U.S.A. call 1-800-827-6655.
* Coverage in Canada varies on some items. For full de
tails call Sears Canada at 1-800-361-6665.
Sears Installation Service
For Sears professional installation of home appliances, ga
rage door openers, water heaters, and other major home
items, in the U.S.A. or Canada call 1-800-4-MY-HOME®.
Page 6
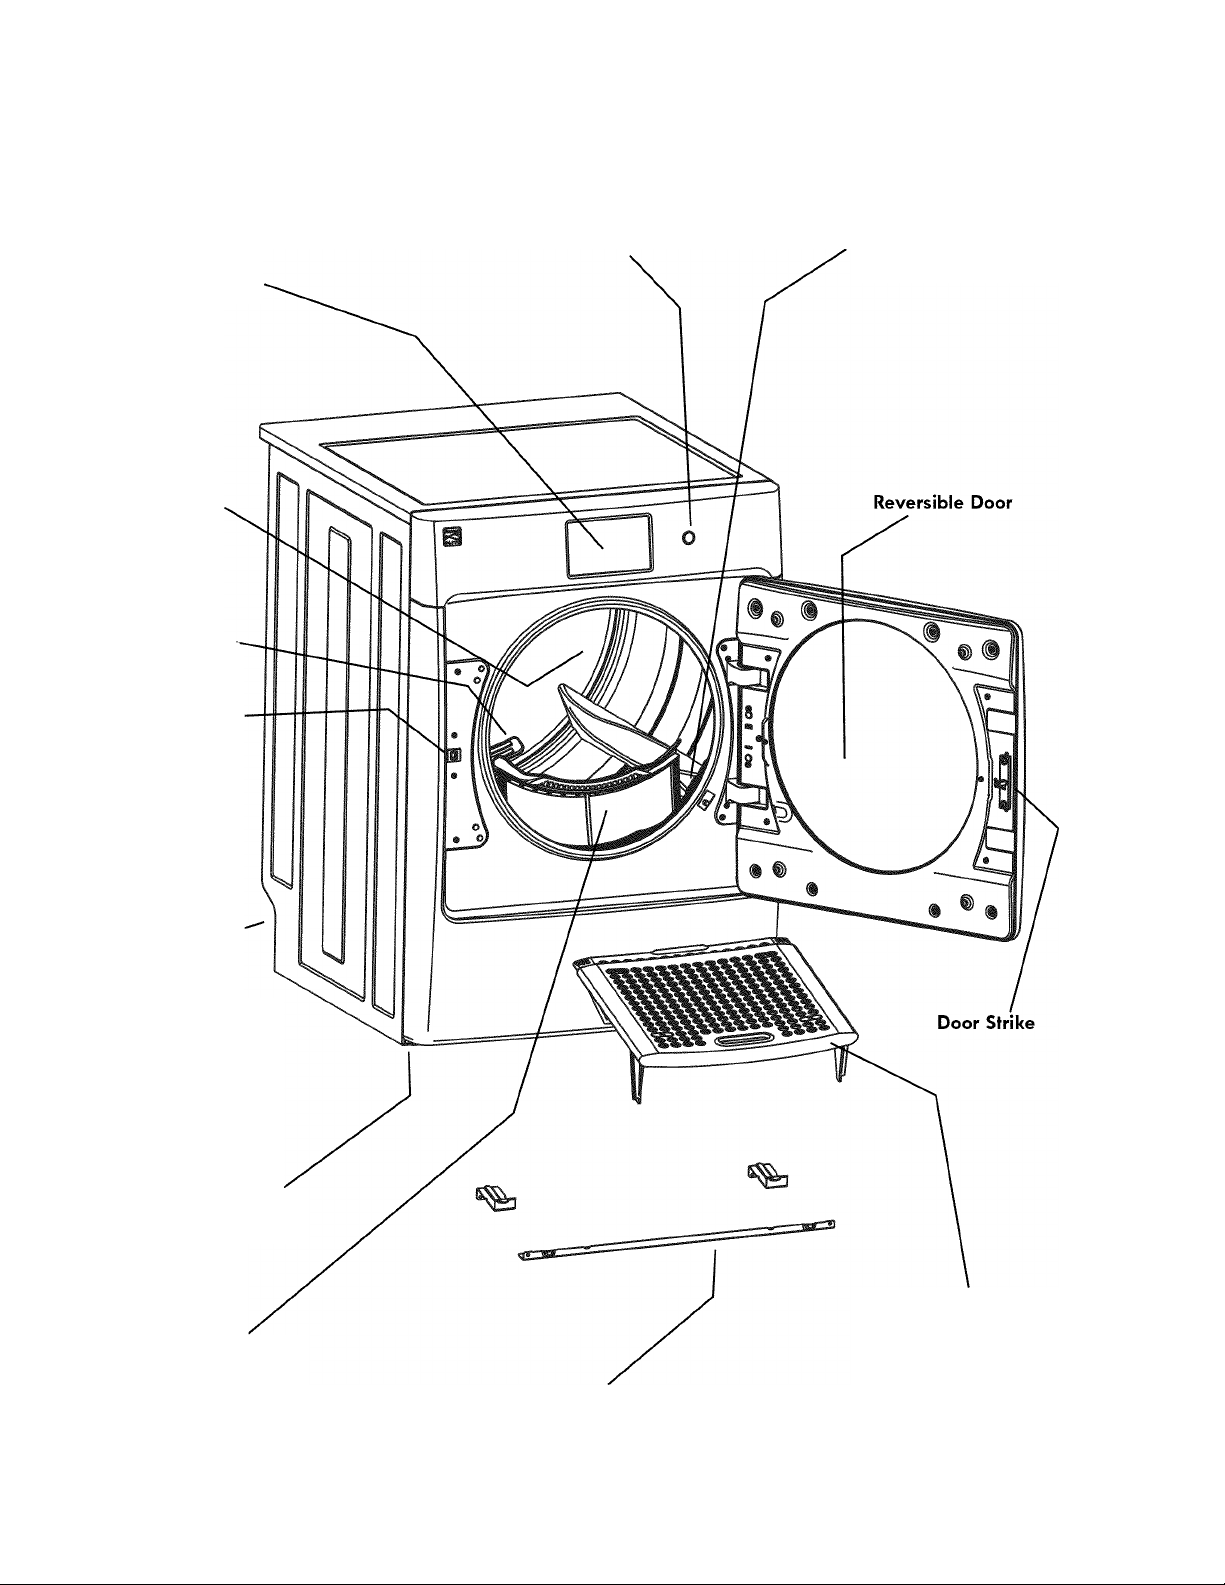
Features
Full-color LCD
touch screen
Drum Light
Large Surface
Moisture Sensor
(rear)
Door Latch
POWER button
Small Surface
Moisture Sensor
(front)
Exhaust Channel
Outlet
Adjustable
Leveling Legs
Lint Filter
Stacking Kit for Mounting on
Matching Washer*
Collapsible
Drying Rack*
*Not all models come with drying rack and
stacking kit from the factory. They may be
purchased as accessories.
Page 7
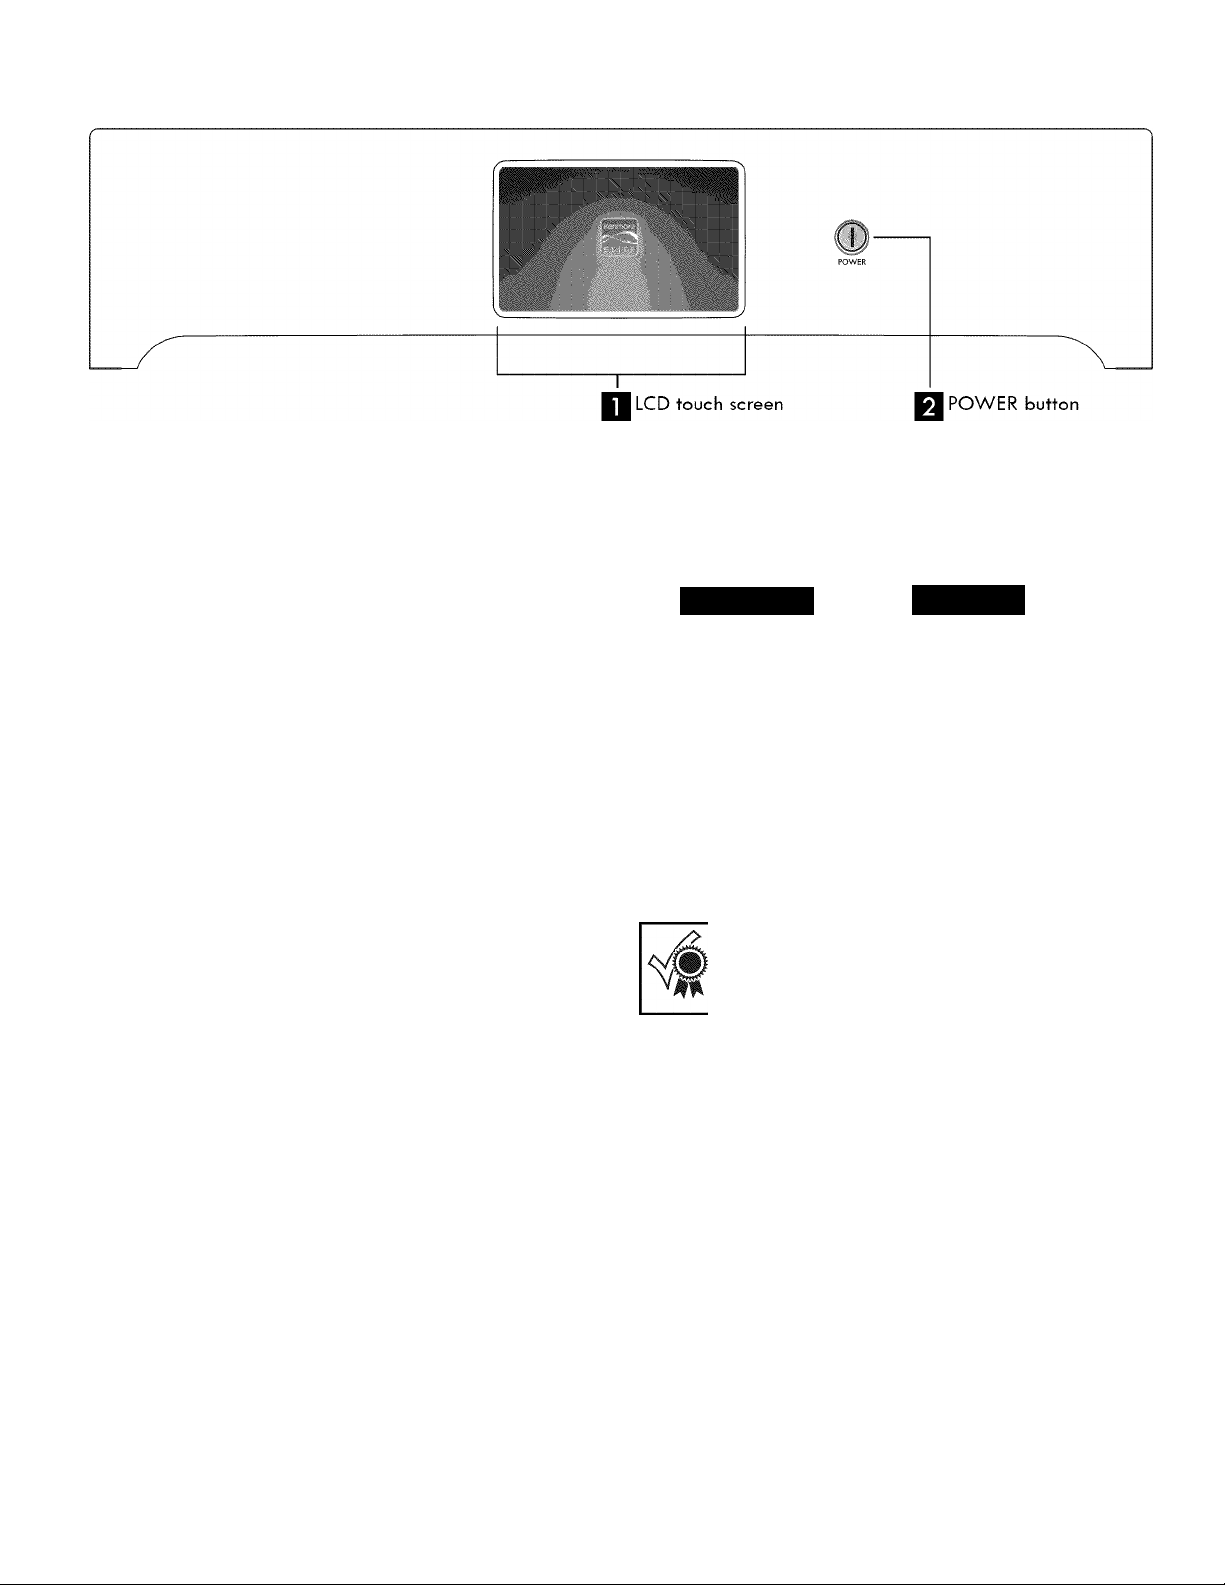
This manual covers many models and not all cycles, options, or features listed are available on every model. Screen images
shown are for reference only. Your model may differ.
Cycle Selection
Operating Instructions
Press the POWER button turn on the unit. Use the
touch screen to select the desired cycle. To scroll
through the cycles 1) press the left or right arrow, 2)
“press and drag” the list or 3) “touch and flick” the
list. Touch the desired cycle to select it. The selected
cycle will be highlighted.
To change the cycle once the cycle has begun, press
PAUSE then CANCEL, select a new cycle, and press
► START again.
SCREEN DISPLAY MODES
Standy Mode - after 5 minutes of inactivity LCD
backlight goes down to 10%. Touching the screen
brings back the backlight to the user settings.
Sleep Mode - after 25 minutes of inactivity from
Standby, the LCD turns completely off. To wake up
LCD press POWER.
Aulo Dry Cycles
Auto Dry cycles take the guesswork out of selecting the
correct drying time for each load. Moisture sensing bars at
the back of the dryer drum sense the moisture level of the
load as it tumbles through the heated air. With Auto Dry
cycles, the load will automatically be dried at the selected
temperature to the desired dryness level.
Auto Dry cycles save time and energy and protect fabrics.
When the load has reached the selected dryness level, it
will continue to tumble during a cool down period. This
helps reduce wrinkling and makes items easier to handle
during unloading.
Drying time varies depending on size and dampness of
load and fabric type. If the load is too small or almost dry,
the moisture sensing bars may not detect enough moisture
to continue the cycle and the cycle may end after a few
minutes. If this occurs, select a Timed Dry cycle.
f.tteam V.l>:ed
Ptrfresh Lo
Duty '
Touch Up
N..
m
For best results
Follow the fabric care label instructions on
items to be dried.
Room temperature and humidity, type of installation and
electrical voltage or gas pressure can also affect drying
time.
Normal
Select this cycle to dry everyday fabrics including cot
tons, linens and sheets.
Heavy Duty
Select this Auto Dry cycle to dry durable fabrics such as
heavily soiled jeans and overalls.
Towels
Select this cycle to dry heavy loads such as towels and
non-rubber-backed bath mats.
Page 8
Operating Instructions
Cycle Selection, continued
Khaki/Jeans
Select this Auto Dry cycle for drying an entire load of
lightly to normally soiled denim jeans or similarly-col
ored cotton khakis.
Kids Wear
Select this specialty cycle for drying kids clothing and
baby wear with Soft Heat technology.
Délicates
Select this Auto Dry cycle for knits and delicate items.
Ultra Délicates
Select this Auto Dry cycle for silks and other very deli
cate items.
Allergen
Select this Auto Dry cycle where you wish to reduce
allergens as you dry your load. Items prone to heat dam
age are not recommended for this cycle.
Sanitize
Select this Auto Dry cycle for durable fabrics and towels
to remove harmful bacteria from your clothing or other
items where sanitization is desired.
E note
This cycle has been certified by NSF International®,
an independent third-party testing and certification
organization dedicated to public health, safety and
environmental protection.
NSF Protocol P154
Sanitization Performance of
Residential Clothes Dryers
This option will kill 99.9% of bacteria with no carryover of
bacteria between loads. A higher temperature is required.
Please check fabric care labels to prevent damage.
Bulky/Bedding
Select this Auto Dry cycle to dry bedding and bulky
items such as comforters, blankets, sleeping bags and
parkas.
Casual
Select this cycle to dry cottons, blends and permanent
press items with a no-iron finish.
Mixed Load
Select this Auto Dry cycle to dry loads containing a mix
of fabrics.
Timed Dry Cycles
WARNING
A
FIRE HAZARD i
To avoid fire hazard, do not use heat to dry items i
containing feathers or down, foam rubber, plastics ;
similarly textured, rubber-like materials. Use the Timed
Dry cycle and the Air Only setting.
Steam Refresh
Select this cycle to refresh fabrics, release wrinkles, remove
odors, and reduce static by injecting the perfect amount of
steam into clothing that has been left in the dryer, stored in
crowded closets, drawers, or unpacked luggage.
E note
• Steam may not necessarily be visible inside drum
during the Steam Refresh cycle.
• Steam may not be present during entire cycle.
• It is not recommended to use fabric softener sheets
with Steam Cycles or Options as it may cause staining |
on clothes. :
Express Dry
Select this timed cycle to quickly dry small loads in 18
minutes.
Touch Up
Select Touch Up to help remove wrinkles from clean and
dry items that were not taken from the dryer at the end
of the cycle. It provides approximately 10 minutes of
tumbling followed by a 5-minute cool down period.
Timed Dry
To manually select the drying time for any load, scroll to
select to Timed Dry. Select the appropriate drying time
with the drying time button on the setting panel.
Because this is not an Auto Dry cycle, you will not be
able to select a dryness level.
9 MyCycle
Choose on of your three most used cycles preloaded with
your favorite settings and options. Up to three users can
each have three favorite 9 MyCycles.
See 9 Save MyCycle in the “Home Screen Options” sec
tion of this guide for instructions on customizing up to 3
cycles.
Page 9
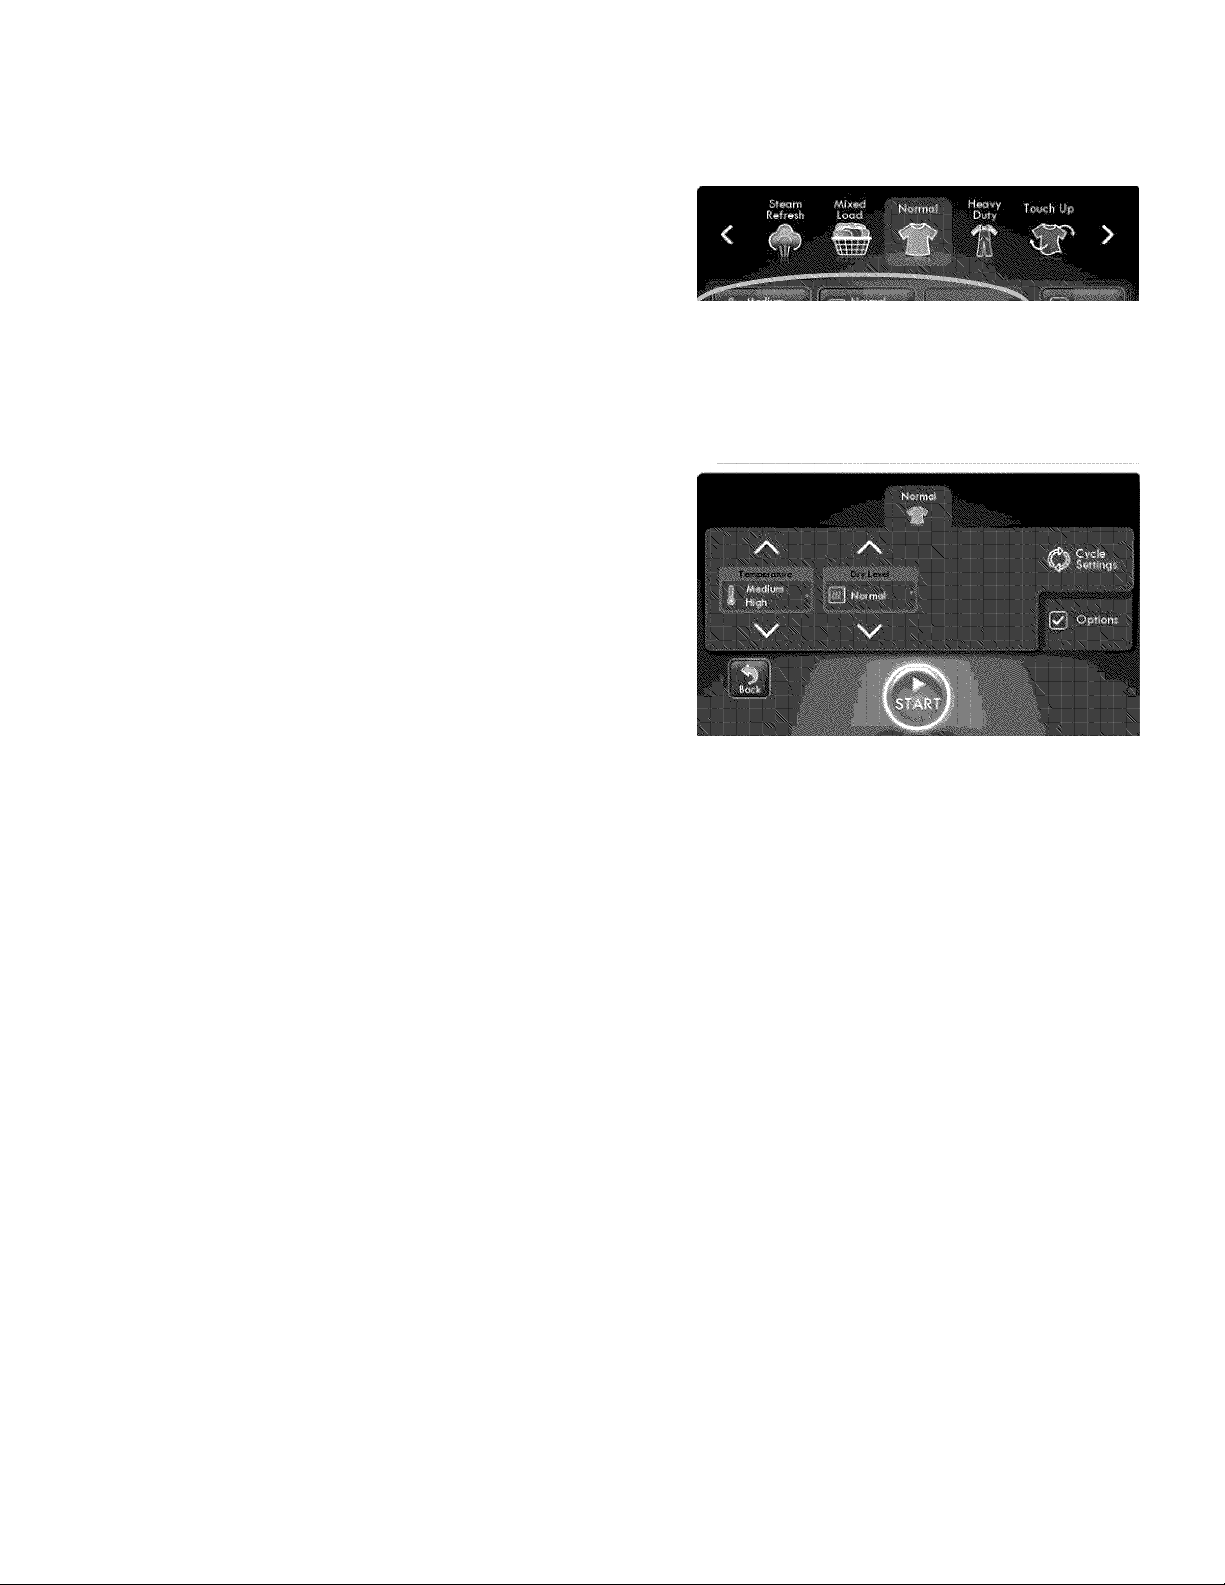
Cycle Settings
Appropriate drying Temperature and Dryness Level will au
tomatically be displayed for each cycle. The settings can be
changed before the cycle is started.
To adjust cycle settings, press any of the settings buttons to
navigate to the cycle settings screen. Scroll through the tem
perature, dry level, or drying time selections by pressing the up
or down arrows corresponding to each setting.
To protect your fabrics, not all settings are available with every
cycle. Only the settings available for a particular cycle will be
displayed. After you have made the desired adjustments, press
the Back button to return to the home screen or ► START to
begin the cycle.
E note
To change the settings after the cycle starts, press N! PAUSE
and then press the Cycle Settings button. Adjust the settings
and press START to resume the cycle.
Operating Instructions
DRYING TEMPERATURE
Extra High
Recommended for towels and heavy duty loads.
High
Recommended for durable fabrics.
Medium High
Recommended for most cotton fabrics.
Medium
Recommended for wrinkle free, easy care, lightweight
fabrics and bulky loads.
Medium Low
Recommended for knits.
Low
Recommended for delicate fabrics.
Air Only
This setting (no heat) can only be used with a Timed Dry
cycle to dry items containing feathers, down, foam rub
ber, plastics or rubber-like materials; to refresh clothing,
stuffed animal, pillows or blankets; and to dust draperies.
DRY LEVEL (Auto Dry)
Select the Normal dry level for most Auto Dry cycles.
Occasionally a load may seem too damp or over-dried
at the end of the cycle. To increase drying time for similar
loads in the future, select a higher setting. For loads requir
ing less drying time, select a lower setting.
Select Damp Dry for items you wish to partially dry before
hanging or ironing.
DRYING TIME (Timed Dry)
Press the time button to select from 10 to 90 minutes of
drying time in 10-minute increments. This setting is only
available with the Timed Dry cycle.
Page 10
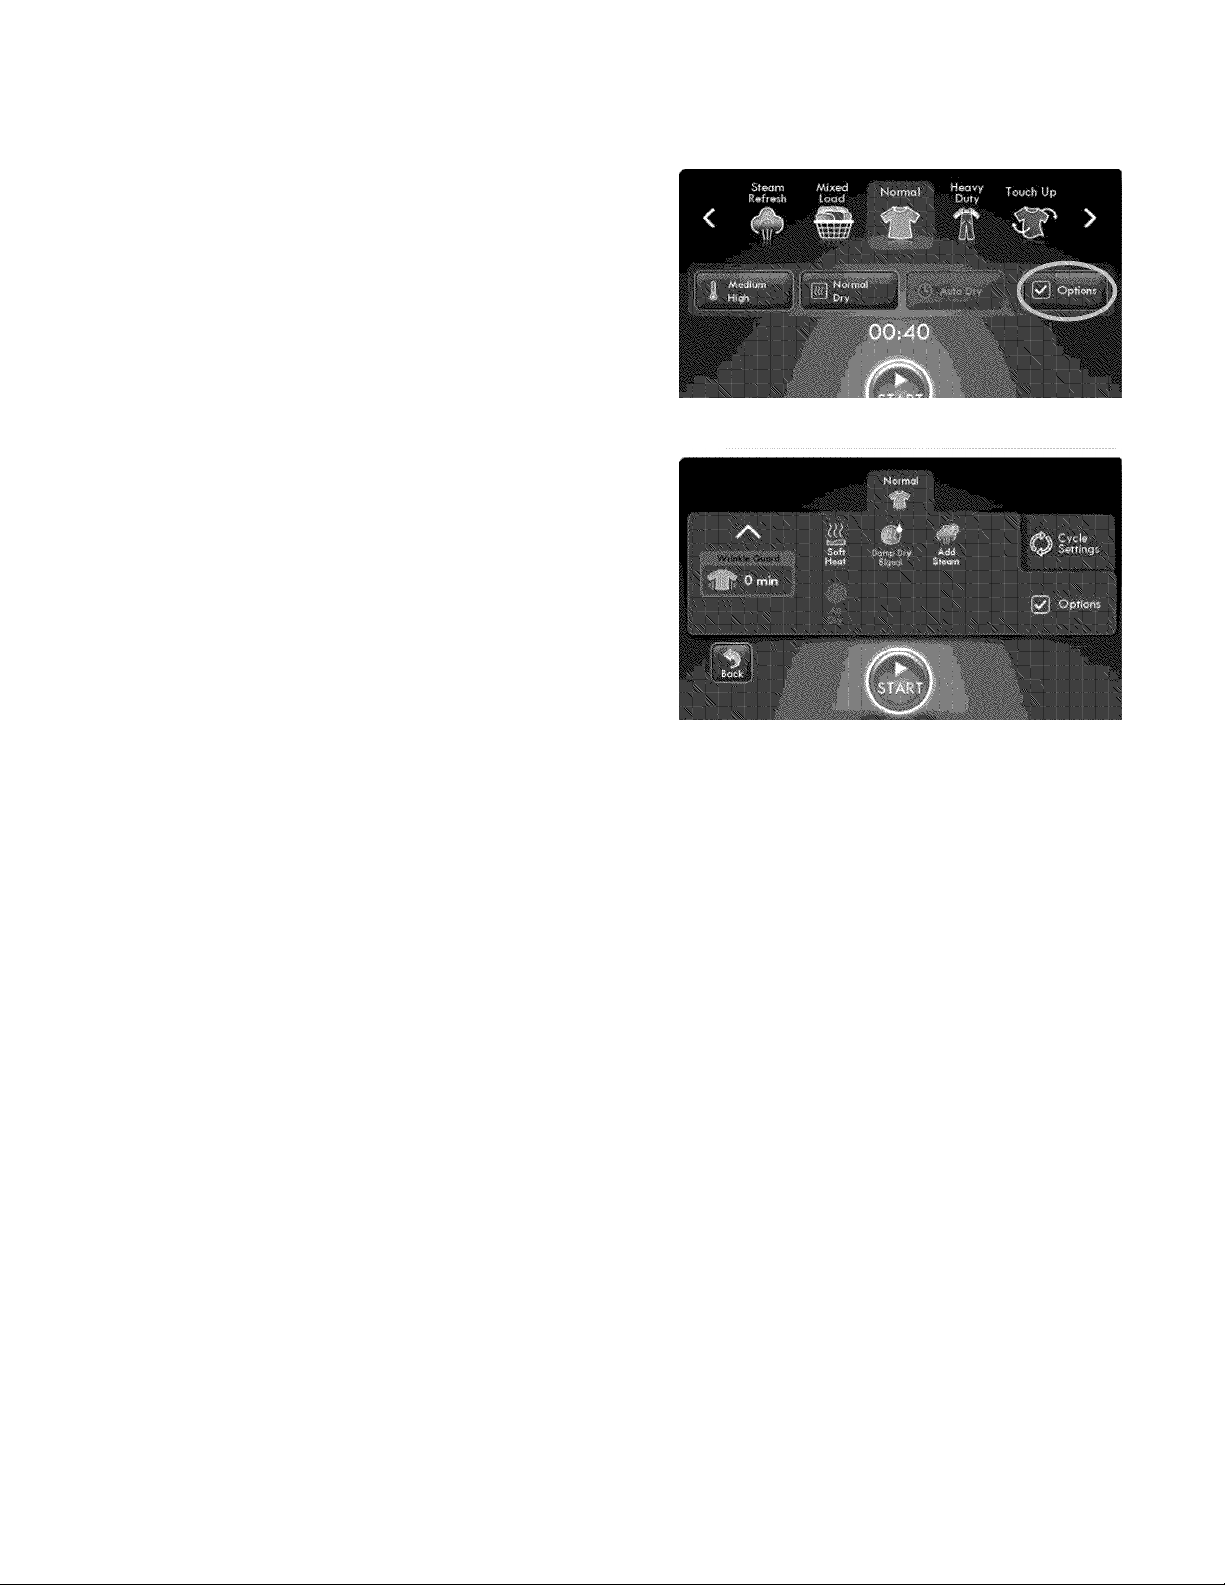
Operating Instructions
Cycle Options
Appropriate Options will automatically be displayed for each
cycle. The number of options selected will be displayed numeri
cally on the Options button. Options can be added or deleted
before the cycle is started.
To adjust options, press the Options button to navigate to the
options screen. To add options, press the corresponding options
buttons. Selected options will be highlighted. To delete options,
press the corresponding options buttons again.
To protect your fabrics, not all options are available with every
cycle. If an option is not available with a particular cycle, it is
faded out. Occasionally, options in the same cycle will conflict
with each other, such as Soft Heat and Air Dry. When this hap
pens, the option selected first will cause the conflicting option to
not be selectable. After you have made the desired adjustments,
press the Back button to return to the home screen or ► START
to begin the cycle.
E NOTE
To change the options after the cycle starts, press H! PAUSE and
then press the Cycle Settings button. Adjust the settings and
press ► START to resume the cycle.
Wrinkle Guard
Select Wrinkle Guard if the dried load might not be
removed promptly at the end of the cycle. The dry
load will continue tumbling without heat to help reduce
wrinkling. When Chime is selected, a beep will be heard
periodically. The load may be removed any time during
Wrinkle Guard.
Soft Heat
Select the Soft Heat option to protect a load from exces
sive heat which can lead to shrinking and over-drying.
The drying temperature will be gradually reduced as the
load dries.
Add Steam
The Add Steam option injects steam into the clothing
prior to cool down to reduce wrinkling.
V NOTE
Steam may not necessarily be visible inside drum
during the Add Steam option.
It is not recommended to use fabric softener sheets
with Steam Cycles or Options as it may cause staining
on clothes.
Damp Dry Signal
For loads that contain some items you plan to hang dry,
flat dry or iron, add the Damp Dry Signal option to any
Auto Dry cycle. If the Chime is turned up, a chime will
sound when the load has reached the Damp Dry dryness
level to remind you to remove those items to hang dry,
dry flat or iron dry. Open the door, remove those items,
close the door and press the START button to continue
drying the remaining items.
Air Dry
This setting (no heat) can only be used with a Timed Dry
cycle to dry items containing feathers, down, foam rub
ber, plastics or rubber-like materials; to refresh clothing,
stuffed animal, pillows or blankets; and to dust draperies.
10
Page 11
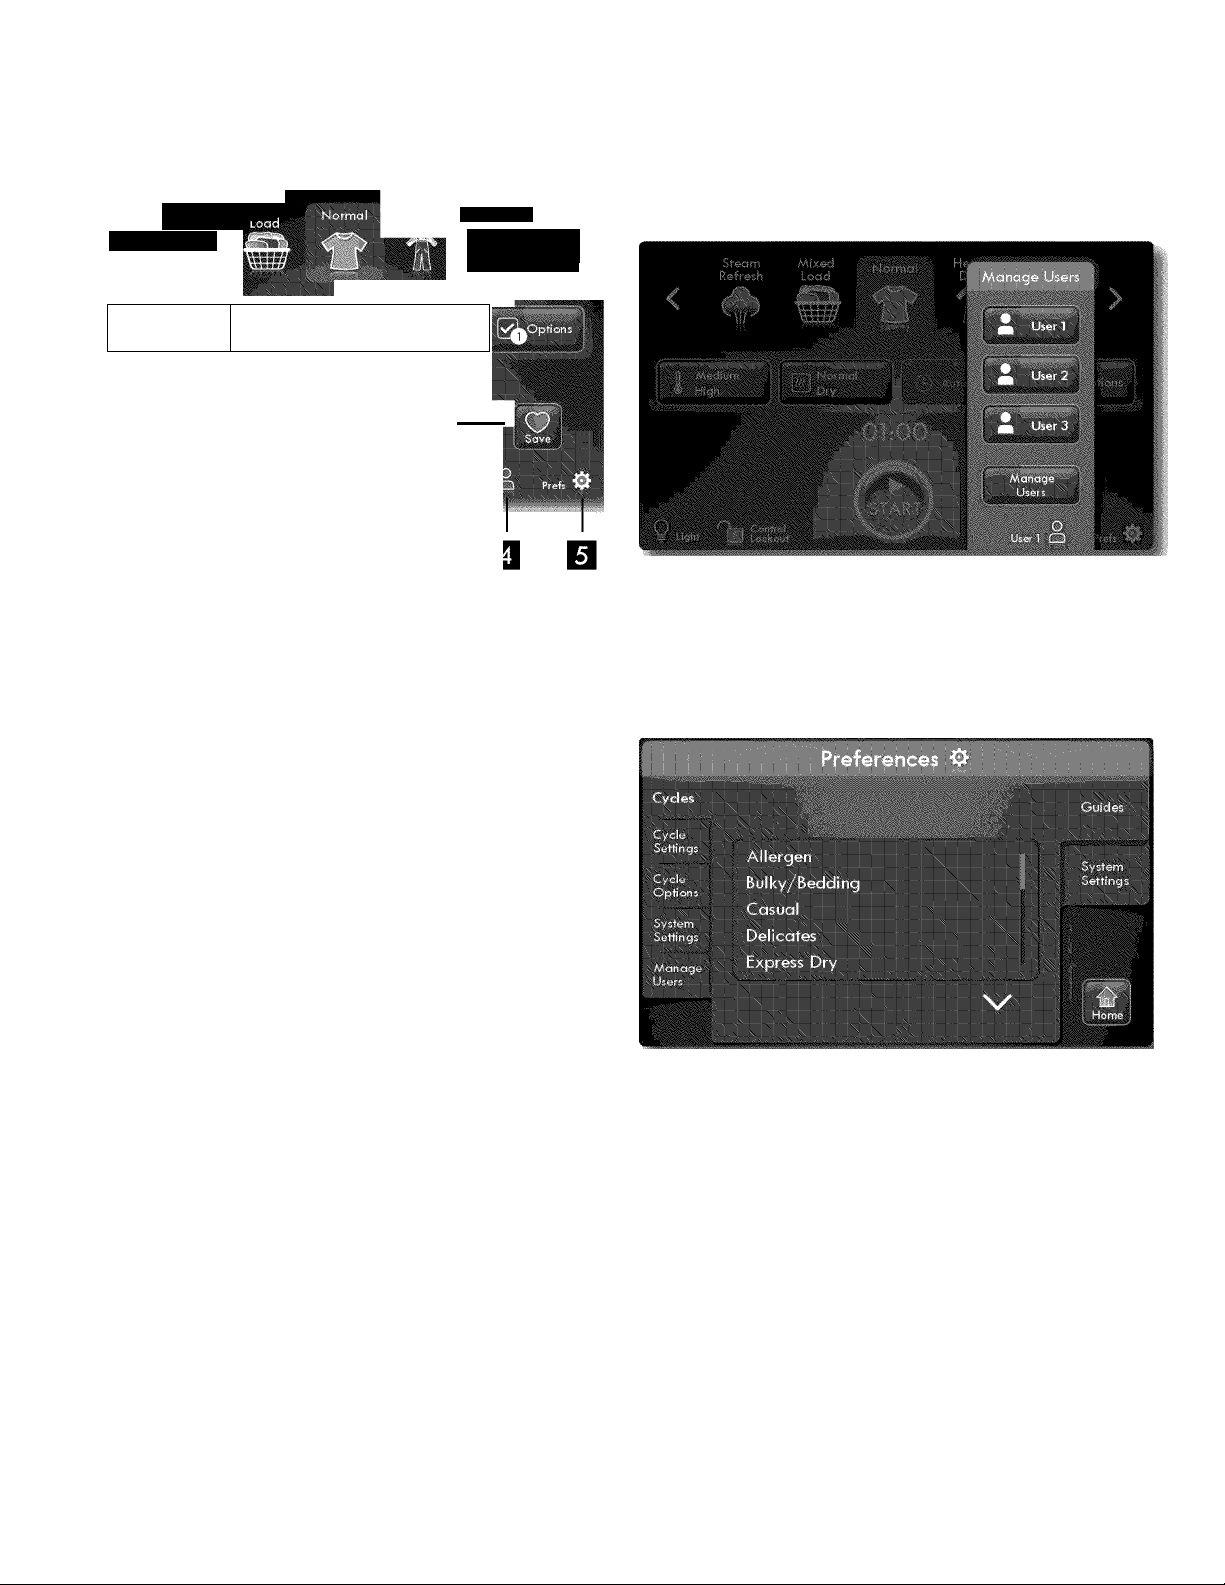
Home Screen Options
Operating Instructions
Steam Miffed
Refre-.h
Touch Up
McA
—
■
mm,
Q Drum Light (1)
The drum light will come on whenever the door is opened
to illuminate the drum during loading and unloading.
Closing the door turns off the light. The drum light will
automatically turn off if the door is left open more than 3
minutes.
You can activate the drum light during a cycle by pressing
light bulb icon Q. The light will stay on during the cycle for
3 minutes. To turn it off, press the icon again.
i
User (4)
Manage users by pressing the User icon on the Home screen.
>
Up to three Users are available. Within the Manage Users
screen you may clear Users, change User icons, or delete
9 MyCycles within a particular user.
0 Preferences (5) - Guides
Enter the Preferences screen by pressing the 0 Prefs icon
on the Home screen.
Control Lockout, Press & Hold (2)
To lock the controls between or during cycles, press and
hold the Control Lockout icon for 5 seconds. Press the
large lock icon to unlock the controls when you are ready
to operate the washer. Use this feature to reduce the likeli
hood of accidental operation by children.
Save MyCycle (3)
Customize and save your most used cycles with your pre
ferred settings and options. Press 9 Save for up to three
custom 9 MyCycles. The customized cycle will be saved
to the active User. If you have populated all three avail
able 9 MyCycles, you will be asked which one you would
like to overwrite if you request to save another.
E NOTE
If you pause a 9 MyCycle and adjust options or settings,
the adjustments will not automatically be saved. You
must press 9 Save again to retain the adjustments.
On the Guides tab you can: browse descriptions of each
wash cycle; view details of cycle settings, options and
systems settings; and follow directions on how to manage
users.
0 Preferences (5) - System Settings
On the System Settings tab you can adjust the Chime set
ting from Off to Loud and adjust the display brightness for
ease of viewing in your installation setting. Using the lower
buttons you may: change the interface language; run the
Install Cycle; reset the unit to factory defaults; or calibrate
the touch screen.
n
Page 12
Operating Instructions
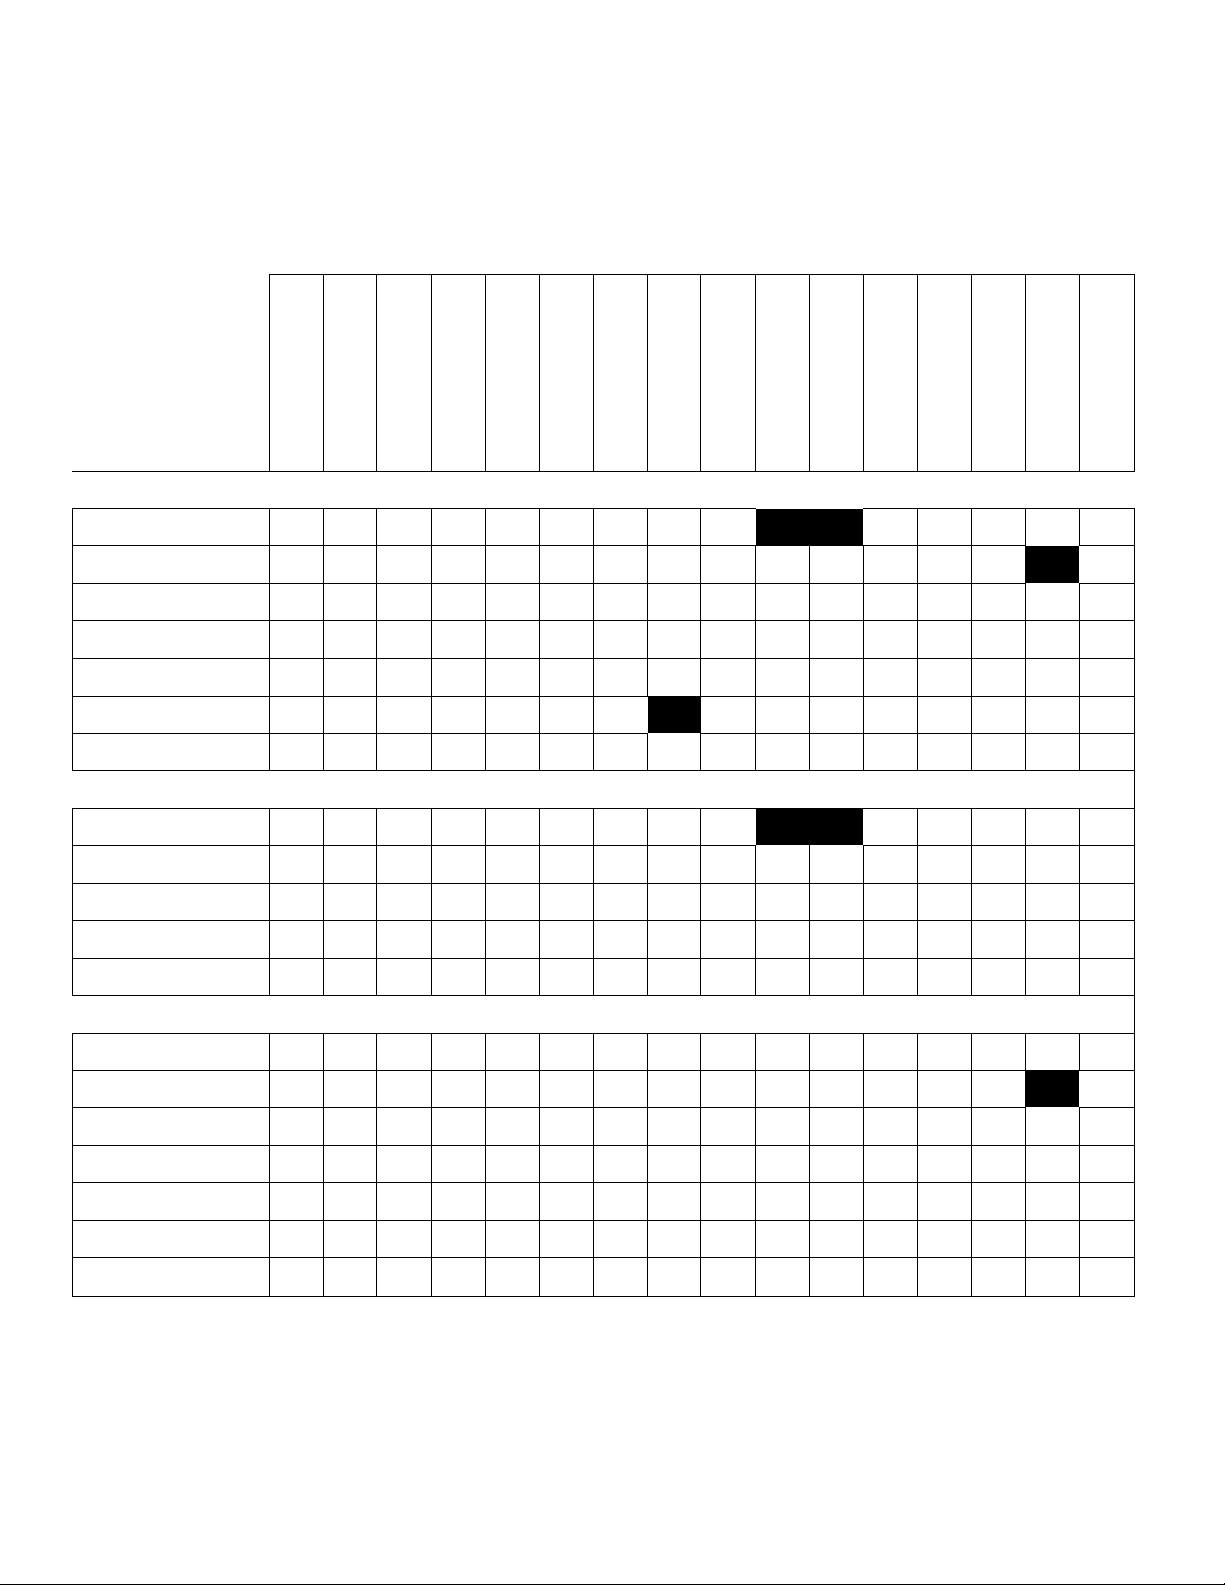
Dryer Settings Chart
These temperatures, dryness levels and options are available with the following cycles:
Temp
Extra High
High
Medium High
Medium
Medium Low
Low
Air Only
Dry Level
Extra
More
Normal
Less
c
3
a
Q
o
E
b
z
✓ ✓ ✓
Z)
>■
>
u
D
3
0)
X
✓
✓
o
0)
15
0)
o
JZ
s/
✓ ✓
V
V
0)
B
_y
b
O
O
_o
!
"D
"o
V
✓
>
"q
Q
D
5
✓
c
Q
0)
T5
E’
0)
_QJ
E
_
t—
O'
c
T5
0)
0)
CD
_N
’£
o
CO
o
>■
3
b
3
CD
u
b
>-
Q
o
a
X
LU
T5
D
0)
O
QL
T5
E
0)
o
X
o
5
(B
Damp
Options
Wrinkle Guard
Add Steam
Damp Dry Signal
Soft Heat
Air Dry
Drum Light
Control Lockout
✓
V
— Available selections. I I — Cycle defaults. I — Non-modifiable presets.
12
Page 13
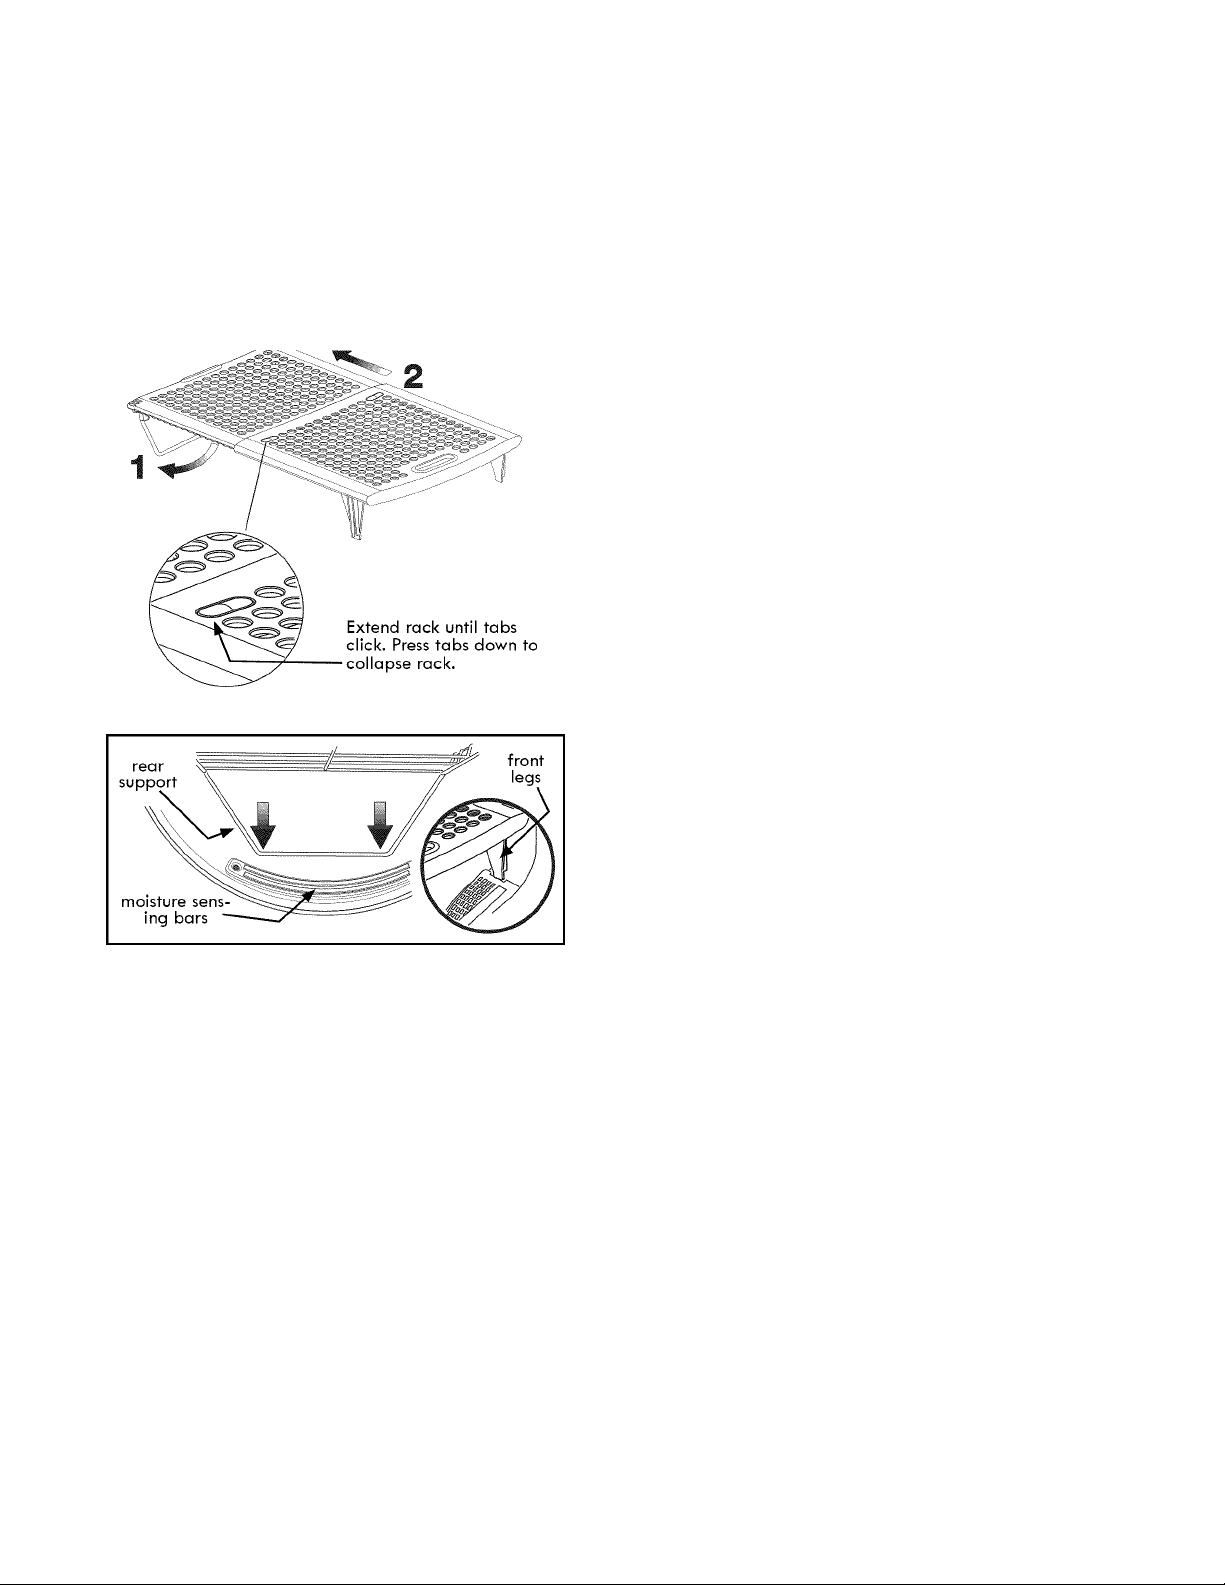
Other Features
Drying Rack
Use the drying rack to dry items which should not be
tumble dried. Fold down the metal support on the back
of the rack and slowly extend the rack until the lock tabs
click into place. Insert the rack into the dryer drum, resting
the back support on the moisture sensor bars and the front
legs on each side of the lint filter slot.
Operating Instructions
Reversible Door
Your dryer is equipped with a reversible door. The door
can be hinged on the right or left side.
E] NOTE
For step-by-step instructions on DOOR REVERSAL, refer
to the Installation Instructions supplied with this dryer.
Check Exhaust
The Check Exhaust feature may alert you to performance
characteristics that are indicative of poor airflow through
your venting system. If such a situation occurs, a “Check
Exhaust” warning will be displayed during the remain
der of the cycle. You should immediately unplug your
dryer and inspect your venting system. Make any repairs
or perform any cleaning procedures necessary. Also call
1-800-4-MY-HOME® for information regarding duct clean
ing services offered through Sears.
Place items to be dried on top of the rack, leaving space
between items and not allowing them to hang over the
sides or through the holes. The weight should not exceed
10 lbs (4.5 kg). Select Timed Dry with Air Fluff option for
items containing plastic, foam rubber, rubber-like materi
als, feathers or down.
When items are dry, remove the rack, push the two center
tabs to collapse the rack and fold up the back support.
Store the drying rack in a convenient location.
IMPORTANT
The Check Exhaust feature is not intended to replace
the requirements for scheduled vent inspection and >
routine maintenance as described in this Use and Care
Guide and also in the Installation Instructions. It is the
owner’s responsibility to continue to maintain a freeflowing vent system.
If Check Exhaust alerts are repeatedly overlooked, de
creased drying performance will be noticed and some cycles
may not perform complete duration.
Maintaining a clean exhaust system improves operating
efficiency and helps minimize service calls, saving you time
and money.
13
Page 14
Operating Instructions
Operating Your Dryer
A WARNING
To reduce the risk of fire, electric shock or injury to >
persons, read the IMPORTANT SAFETY INSTRUCTIONS *
in this Use and Care Guide before operating your dryer.
1 Prepare load for drying.
• Dry items of similar fabric, weight and construction in
the same load.
• Separate dark items from light-colored items. Sepa
rate items that shed lint from those that attract lint.
• Check for stains which may not have been removed
in washing. Repeat stain removal process and wash
again before drying. Dryer heat may permanently
set some stains.
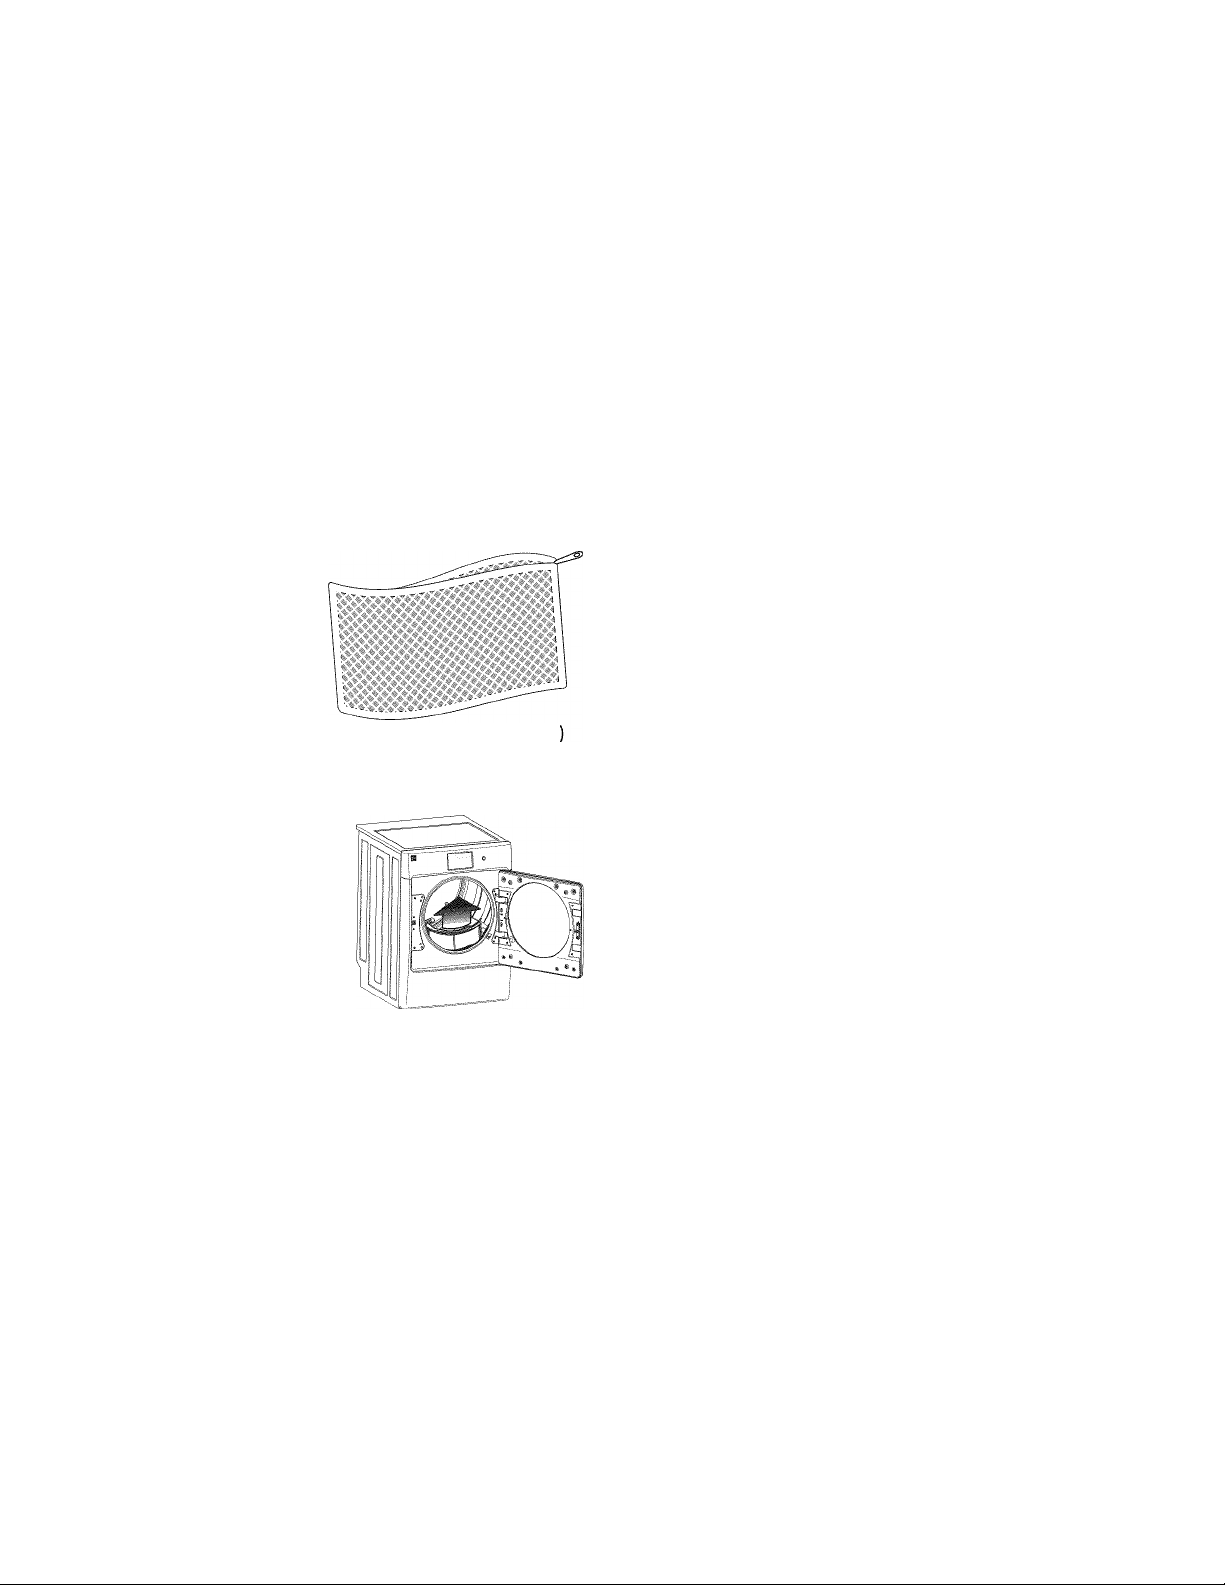
• Place delicate or small
items in a mesh bag.
• Be sure buckles, but
tons and trim are heat
proof and won’t dam
age the drum finish.
Close zippers, button
buttons, fasten hooks
and Velcro®-like fasteners. Tie strings and sashes to
prevent snagging and tangling.
2 Check that the lint filter
is clean and in place.
Load the dryer and
close the door.
• Load items loosely. The
average wet load will fill
the drum 1/3 to 1/2 full.
Items need room to tumble freely for even drying
and less wrinkling.
• If desired, place a dryer fabric softener sheet on top
of the load at the beginning of the cycle.
• To save energy and time and avoid uneven drying
and wrinkling, do not overload the dryer.
• When drying large items, dry only two or three items
at a time. Fill out the load with small and medium
sized items.
• For delicate or very small loads, add two or three
similar items to improve tumbling action.
(Mesh bag not included.
4 Select the appropriate cycle and settings for
each load.
E note
Over-drying can cause wrinkles, shrinkage, lint, harshness
and a build up of static electricity.
• Press the POWER button turn on the unit.
• Scroll in either direction to select the cycle desired.
• The estimated cycle time, suitable drying temperature,
dryness level and the number of options will auto
matically be indicated for the cycle selected. See the
Dryer Settings Chart for more details.
• To change the settings, press the Temperature or Dry
Level buttons to enter the cycle settings screen. Make
your desired adjustments and press the Back button.
• To change options, press the Options button to enter
the options screen. A check mark will indicate each
option has been selected. To deselect an option, sim
ply press a checked option and the check mark will
be removed.
V\ NOTE
To provide the best care for your laundry, not every
setting or option is available with every cycle. If a setting
or option is not available for the cycle selected, the
indicator will not light.
5 Start the cycle.
• Close the door and press ► START. The dryer wil
operate with the door open. A pop-up window will
displayed as a reminder to close the door.
• To change the cycle once the cycle has begun, press
POWER to cancel the current cycle, press POWER to
turn on unit again, select a new cycle, and press
► START again.
• To add or remove items when the dryer is running,
open the door. The dryer will stop when the door is
opened. Allow the drum to come to a complete stop
before reaching inside.
• Close the door and press ► START to resume the cycle.
• A signal will sound at the end of the cycle if the
Chime preference is activated.
6 When the cycle ends, remove items immedi
ately and hang or fold.
not
be
IMPORTANT
Clean the lint filter after every load.
14
Page 15
Operating Instructions
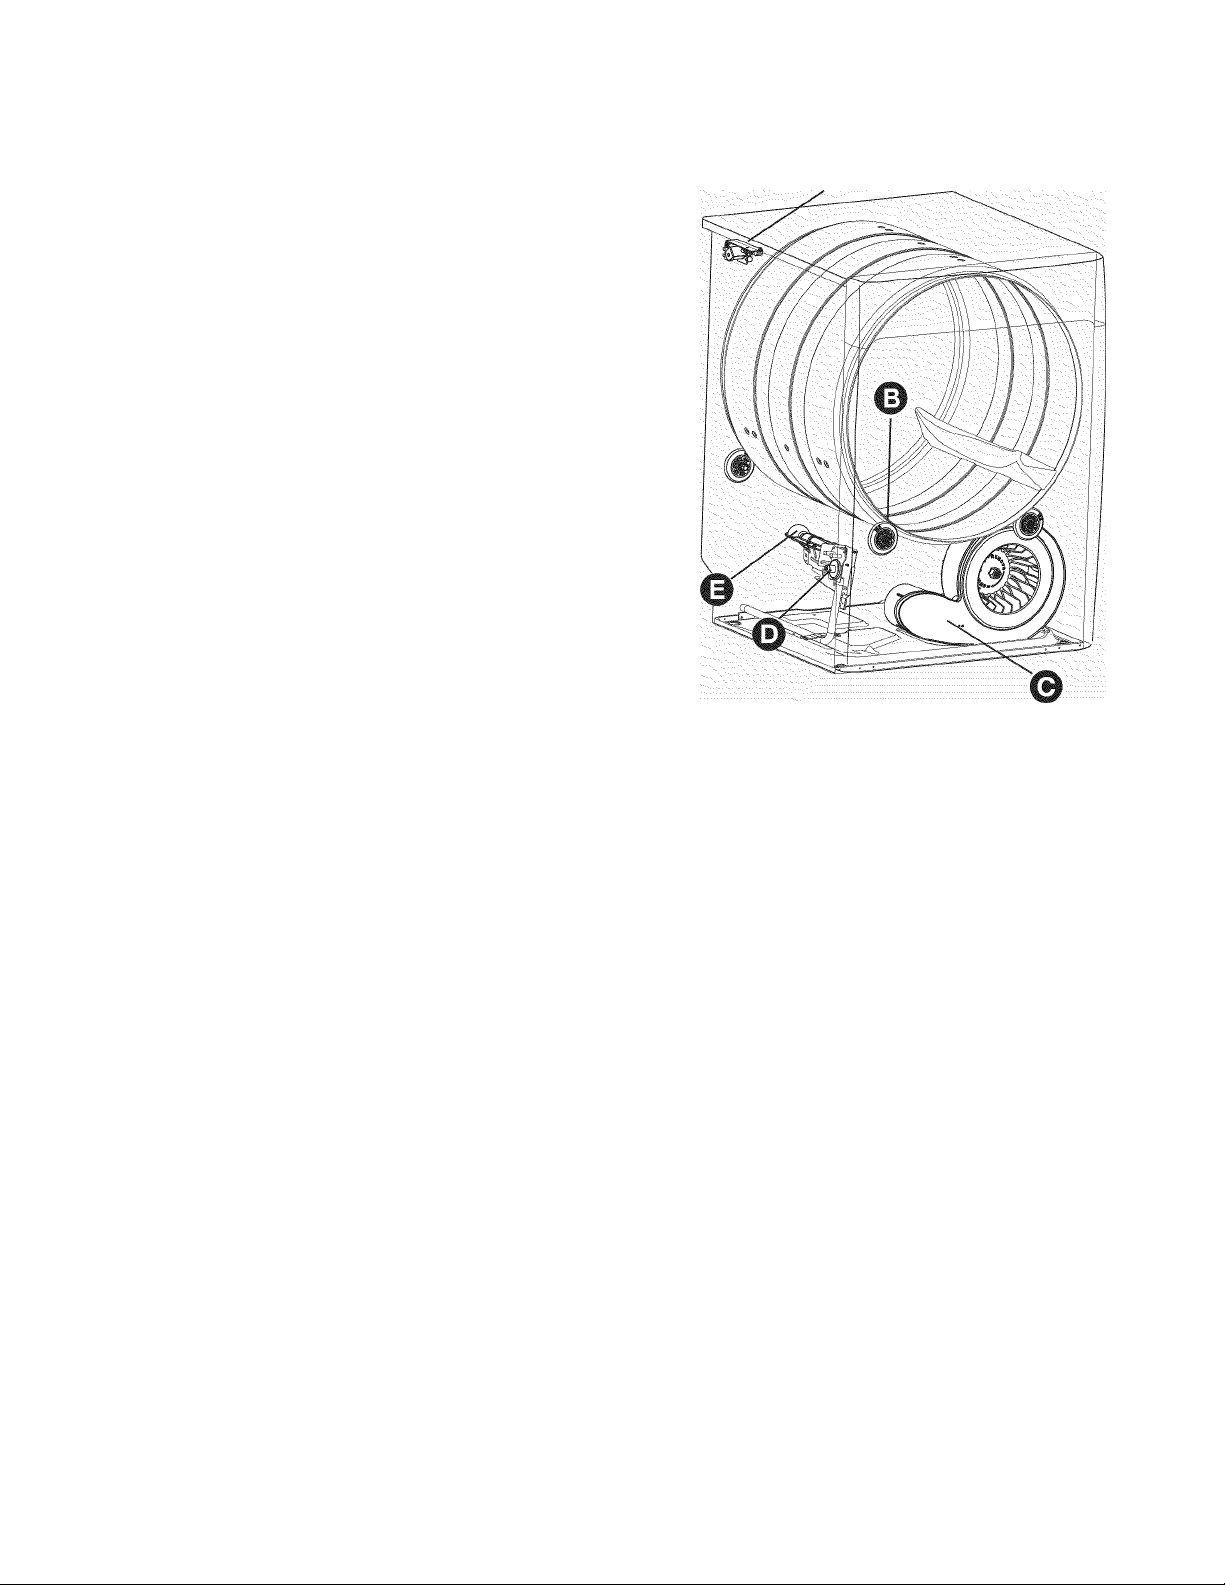
Normal Operating Sounds
You may or may not hear the following sounds from your
new dryer:
A. WATER VALVE The flow of water is controlled by electric
solenoids. During operation there may be a clicking sound
as the valve opens and closes to control the water flow.
B. SUSPENSION ROLLERS The dryer drum is supported
by a set of suspension rollers. At times there may be a
thumping or rolling sound when the dryer starts. This may
happen if the dryer has not been in use for a period of
time, or after a heavy load has remained in the dryer
drum for an extended period, creating a temporary flat
spot on the edge of the roller. The noise should dissipate
as the dryer operates and any flat spots smooth out.
C. AIR FLOW SYSTEM Your dryer is equipped with a high
volume air handling system. In some installations there
may be some sounds associated with air movement
throughout the dryer, including the air duct, blower, and
exhaust system. This is normal and can vary with load
size and type.
D. GAS VALVE (Gas models only.) The flow of gas is
controlled by electric solenoids. During operation there
may be a clicking sound as the valve opens and closes to
control the gas flow.
E. GAS BURNER (Gas models only.) When the burner is
operating, there may be sounds generated as the air flow
mixes with the gas flame. This noise is normal and will
only occur when the gas is ignited in the combustion tube.
o
^ CAUTION
Do not continue to use the dryer if you hear squeaking,
grinding, rubbing or other unusual noises. This could
be a sign of mechanical breakdown and lead to
fire or serious injury. Contact a qualified technician
immediately.
15
Page 16
Care and Cleaning
^ WARNING
FIRE HAZARD
A clothes dryer produces combustible lint. The dryer must be connected
to an outdoors exhaust. Regularly inspect the outdoor exhaust opening
and remove any accumulation of lint around the opening and in the
surrounding area.
^ WARNING
To reduce risk of fire or serious injury to persons or property, comply with
the basic warnings listed in the Important Safety Instructions and those
listed below. <
• Before cleaning the dryer interior, unplug the electrical power cord to
avoid electrical shock hazards.
• Do not use any type of spray cleanser when cleaning the dryer interior.
Hazardous fumes or electrical shock could occur.
IMPORTANT
Clean the lint filter after every load.
H IMPORTANT
Do not store or place laundry products
on top of dryer at any time. They can
damage the finish or controls.
INSIDE
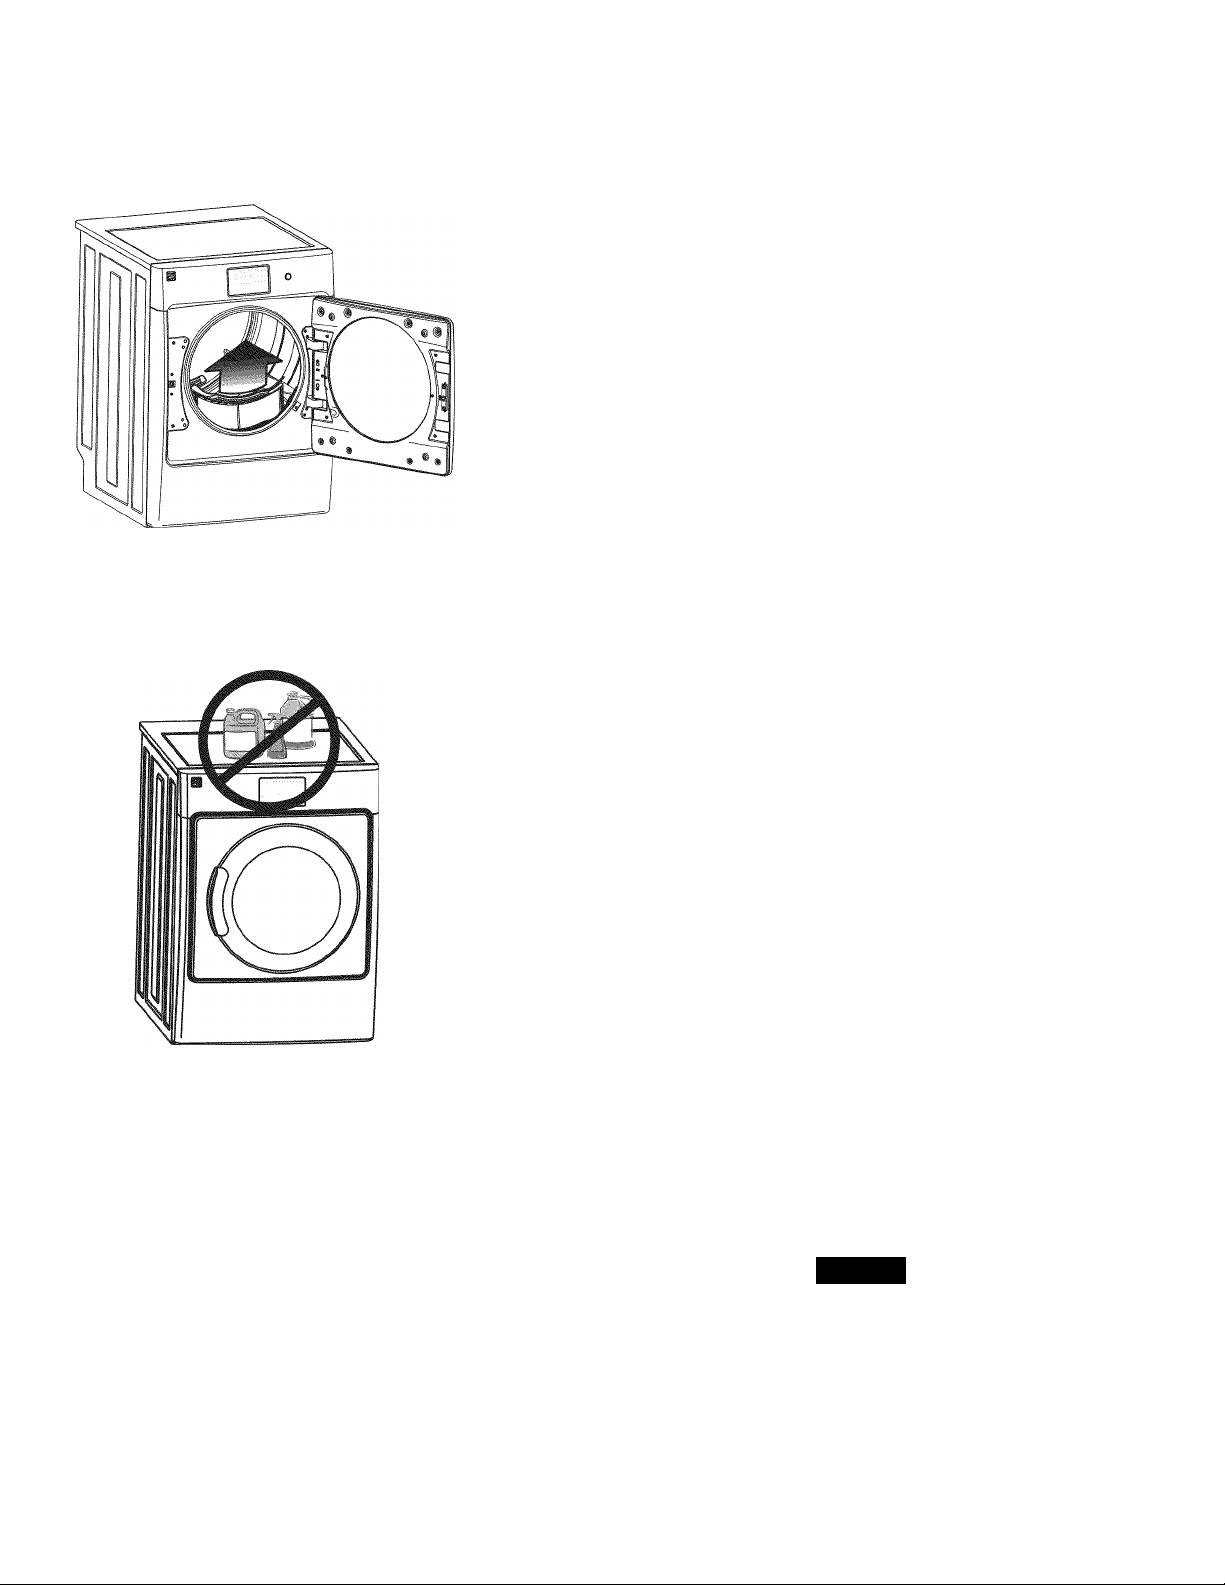
• Clean the lint filter after every load. Lint build-up on the filter restricts
air flow, which causes longer drying times. The filter is located at the
bottom of the door opening. Remove by pulling straight up. Remove the
lint and replace the filter.
• Occasionally a waxy build-up may form on the lint filter and/or mois
ture sensing bars from using dryer-added fabric softener sheets. To
remove this build-up, wash the filter and bars with warm, soapy water.
Dry the filter thoroughly and replace. Do not operate the dryer without
the lint filter in place.
• If the dryer drum becomes stained from noncolorfast fabrics, clean the
drum with a damp cloth and a mild liquid household cleanser. Remove
cleanser residue before drying the next load.
• Every 18 months an authorized servicer should clean the dryer cabinet
interior and exhaust duct. These areas can collect lint and dust over time.
An excessive amount of lint build-up could result in inefficient drying and
possible fire hazard.
OUTSIDE
• Clean the cabinet with mild soap and water. Never use harsh, gritty or
abrasive cleansers.
• If the cabinet becomes stained, clean with diluted chlorine bleach (1 part
bleach to 8 parts water). Rinse several times with clear water.
• Remove glue residue remaining from tape or labels with a mixture of
warm water and mild detergent.
• When cleaning chrome parts use a window cleaner with ammonia or
mild soap and water.
• Before moving the dryer, place a strip of cardboard or thin flberboard
under the front leveling legs to prevent damage to the floor.
Instructions for Cleaning LCD Touch Screen
Use a soft cloth to clean the screen.
Gently wipe in one direction - top to bottom, or side
to side.
Cleaners can be used for heavily soiled screens. Ap
proved cleaners are: glass cleaners or mild soap and
water. Apply first to a soft cloth and then wipe the
screen.
After using an approved cleaner, ensure all edges and
corners are dry after wiping.
DON’T
Spray cleaner directly to the screen
Apply excessive force to the screen during cleaning.
Use harsh solvents or abrasive cleaners on the screen.
Unapproved cleaners or applicators include: bleach,
drain cleaners, oven cleaners, strong acids, abrasive
towels, brushes, or steel wool.
16
Page 17
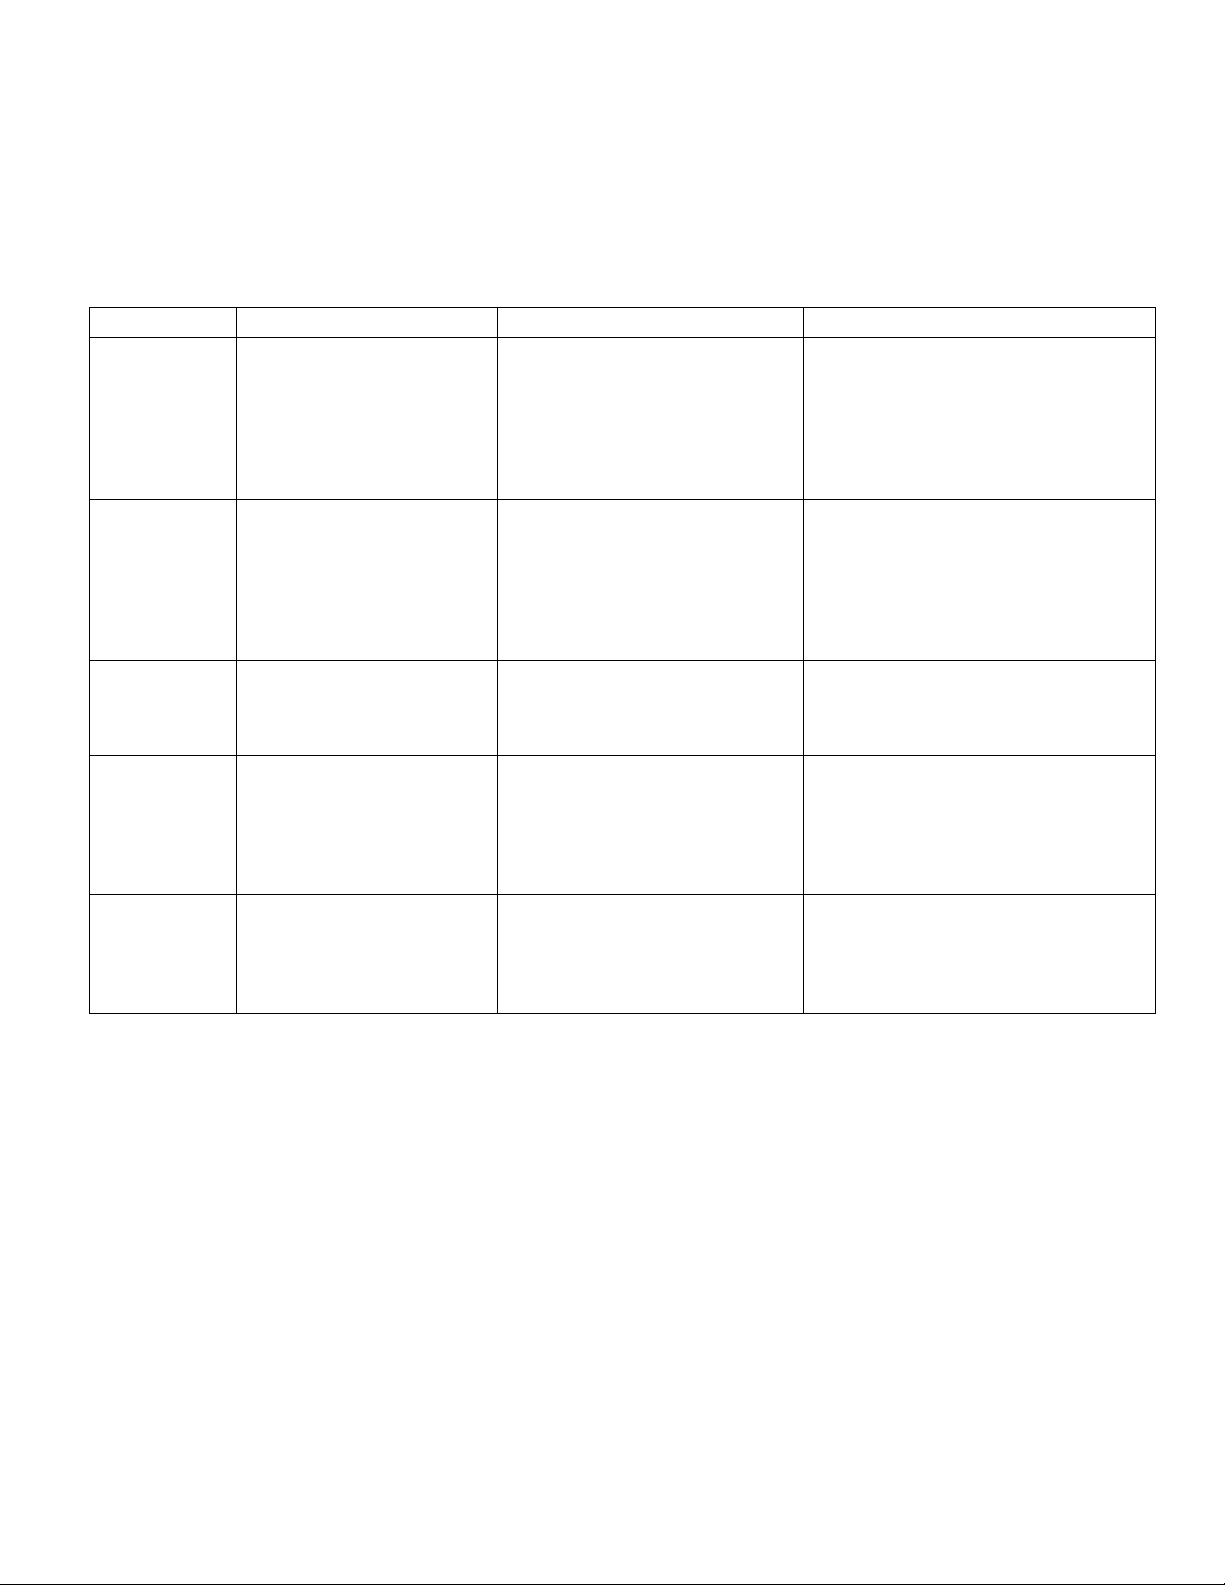
Solutions to Common Problems
Common Drying Problems
Many drying problems involve poor cleaning results from washing, including poor soil and stain removal, residues of lint
and scum, and fabric damage. For satisfactory drying results, follow these suggestions provided by The Soap and Deter
gent Association.
PROBLEM POSSIBLE CAUSES SOLUTIONS PREVENTIVE MEASURES
Greasy, oily
stains
Lint • Overloading.
Pilling
(Fibers break
off, ball up and
cling to fabric.)
Shrinking • Temperature too high.
Wrinkling • Overloading.
• Fabric softener sheet. • Rub fabric softener stains with bar
soap. Rinse and rewash.
• Reduce load size and rewash
• Overdrying causes static
electricity.
• Lint screen not clean when
cycle began.
• Lint “pills” clinging to fabric
• Overdrying. • Use a lint brush or shaver to re
• Overdrying.
• Leaving items in dryer after
cycle ends.
using liquid fabric softener in the
final rinse.
• Or, add a fabric softener sheet
and tumble without heat.
• Use lint brush or roller to remove
lint.
move lint pills.
• Irreversible condition. • Follow fabric core label directions.
• Reduce load size and tumble
at medium or low heat for 5-10
minutes.
• Remove items immediately. Hang
or fold.
• Add a few bath towels to small loads
for proper tumbling.
• Some “silk-like” fabrics should be air
dried.
• Use proper drying temperature.
• Place fabric softener sheet on top of
load before starting the dryer.
• Do not overload dryer.
• Use fabric softener in washer or dryer
to reduce static electricity.
• Remove items when they ore slightly
damp to ovoid overdrying.
• Check that lint filter is clean and in
place.
• Use fabric softener to lubricate fibers.
• When ironing, use spray starch or fabric
finish on collars and cuffs.
• Turn items inside out to reduce abrasion.
• If shrinking is o concern, check load
often.
• Remove items while slightly damp and
hang or lay fiat to complete drying.
• Block knits into shape.
• Do not overload dryer.
• Remove items os soon os cycle ends.
17
Page 18
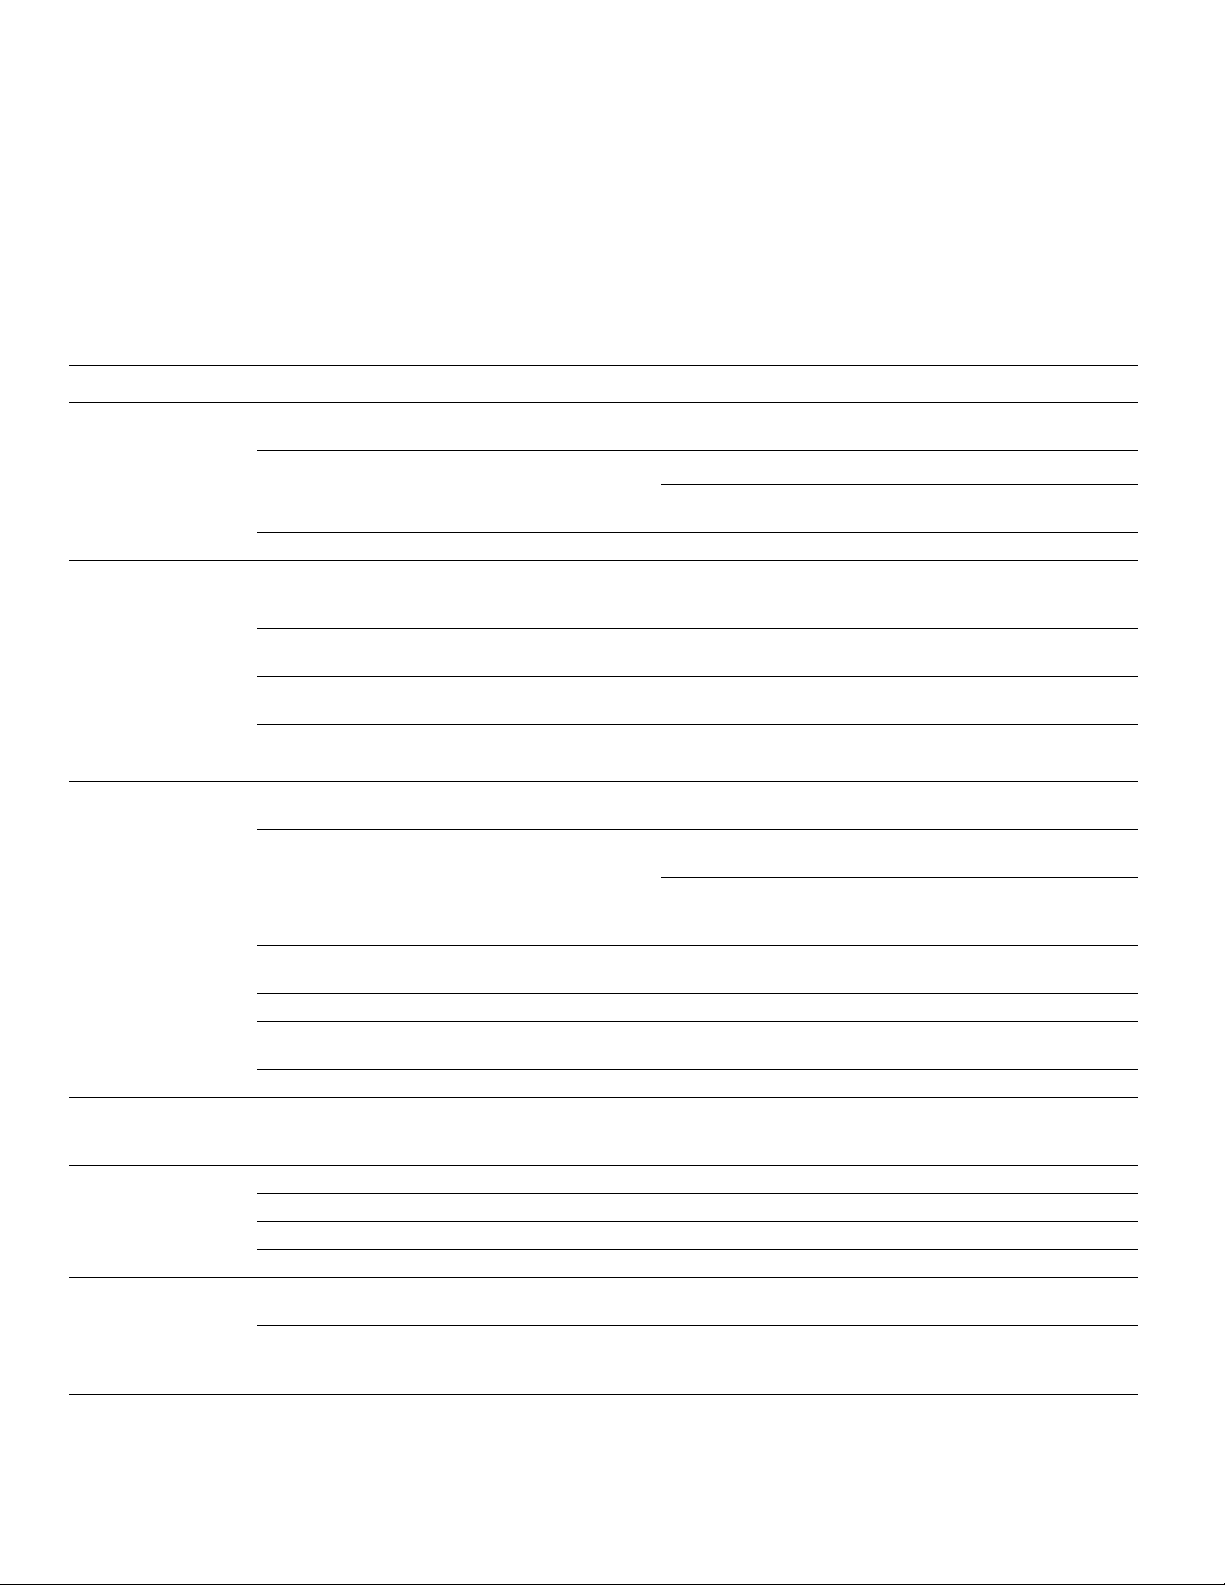
Solutions to Common Problems
Avoid Service Checklist
Before calling for service, review this list. It may save both time and expense. The list includes common occurrences that
are not the result of defective workmanship or materials in this dryer.
IMPORTANT
Disconnect dryer from electrical service before performing any work on unit or on associated
systems (including electrical supply, gas inlet, water inlet or exhaust venting).
OCCURRENCE POSSIBLE CAUSE SOLUTION
Dryer does not start. Electrical power cord is not securely plugged in or
plug may be loose.
House fuse blown or circuit breaker tripped. Reset circuit breaker or replace fuse.
Thermal limiter tripped. Call Sears or another qualified service dealer for replacement.
Dryer runs but won’t
heat.
Drying cycle takes too
long, outside of the
dryer feels too hot or
smells hot.
Drying cycle stops after
only a few minutes,
leaving load wet
Excessive wrinkling. Dryer is overloaded. Do not overload. See "Operating Instructions.”
Scratching or chipping
of the drum finish.
There are 2 house fuses in the dryer circuit. If 1 of the 2
fuses is blown, the drum may turn but the heater will not
operate (electric models).
Gas supply valve is not open (gas models). Check to make sure supply valve is open. See INSTALLATION
Dryer does not have enough air supply to support the
burner flame (gas models).
LP gas supply tank is empty or there has been a utility
interruption of natural gas (gas models).
Lint filter is clogged with lint. Make sure all lint has been removed from the dryer lint filter
Exhaust duct requirements have not been met. Exhaust duct must be at least 4 inches in diameter and made of
Electric dryer is connected to a 208 volt circuit. Drying time will be 20% longer than drying on a 240 volt
Drying procedures have not been followed. See "Operating Instructions.”
Outside exhaust hood or exhaust duct may be
clogged or restricted.
High humidity. Use a dehumidifier near the dryer.
Check Exhaust alerts have been overlooked and the
dryer shuts down after a few minutes.
Items left in dryer too long. Remove items as soon as cycle ends.
Insufficient sorting of items. See "Operating Instructions.”
Drying temperature too high. Follow fabric care label instructions.
Foreign objects such as coins, pins, clips or buttons are
inside the dryer.*
Permanently attached items such as belt buckles,
zippers and fasteners may be hitting the inside of the
drum.*
*Drum damage caused by foreign objects or permanently attached items is not covered by the warranty.
Make sure the plug fits tightly in wall outlet.
Make sure electrical line is not overloaded and the dryer is on a
separate circuit.
Replace fuse.
INSTRUCTIONS for procedure.
See INSTALLATION INSTRUCTIONS.
Refill or replace tank.
Dryer should heat when utility service is restored.
before starting each cycle.
rigid or semi-rigid metal.
When in place, the duct must have no more than four 90°
bends and must not exceed length listed in INSTALLATION
INSTRUCTIONS.
circuit.
Clean out any obstruction.
Immediately inspect your venting system and make any repairs
or perform any cleaning procedures necessary.
Always remove foreign objects from pockets before laundering.
Remove objects from drum and restart dryer.
It may be necessary to sew a scrap of material securely around
ornaments before drying to prevent scratching and damage to
the dryer.
18
Page 19
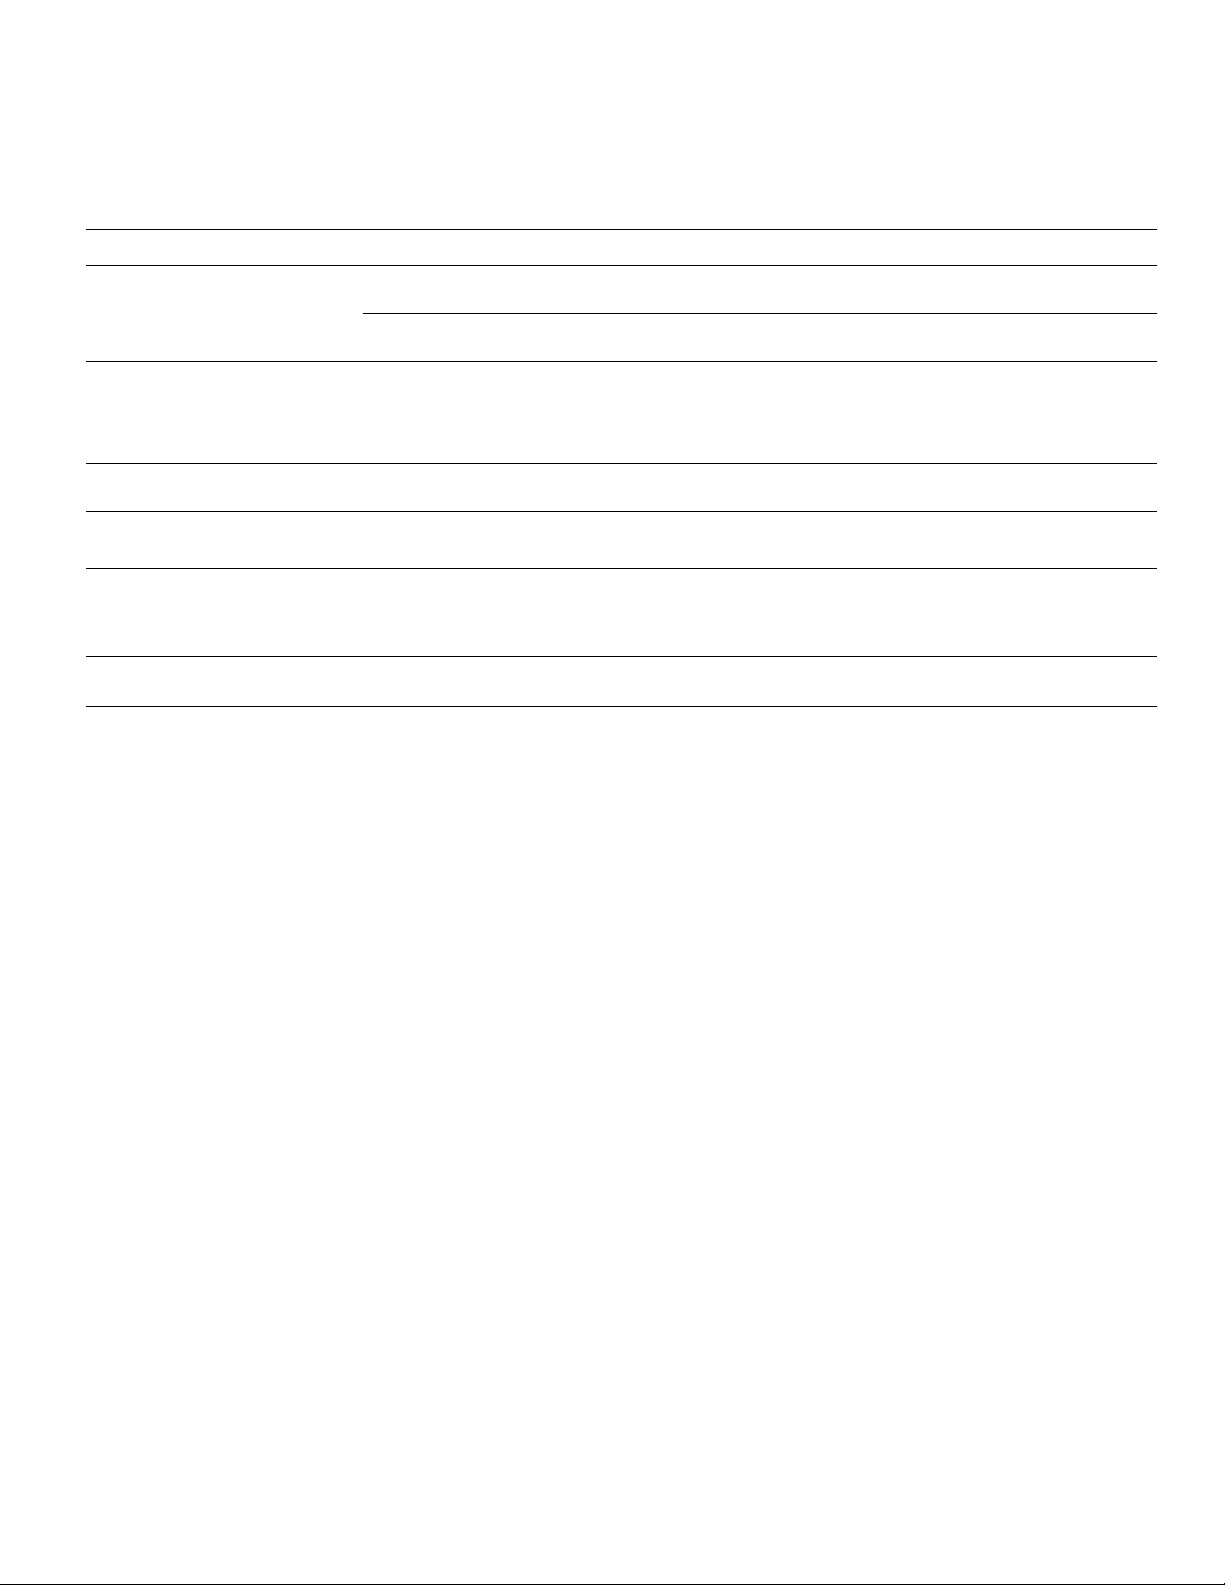
Solutions to Common Problems
Avoid Service Checklist, continued
DISPLAYED IN LCD POSSIBLE CAUSE SOLUTION
Check Exhaust
(Displayed during or at the end
of a full cycle)
Check Exhaust
(Displayed at the end of a short,
terminated cycle, leaving a wet
load in the drum)
Service Cord
Load to small
Check Exhaust feature has detected perfor
mance issues related to vent restriction.
Check Exhaust feature has detected perfor
mance issues from overloading dryer drum.
Check Exhaust alerts have been overlooked and
the dryer shuts down after a fev/ minutes.
Incorrectly installed service cord on electric dryer. Unplug dryer and refer to Installation Instructions for
Load is too small to estimate correct dry time in
Auto Dry cycle.
Immediately inspect your venting system and make any
repairs or perform any cleaning procedures necessary.
Reduce load in drum and restart.
Immediately inspect your venting system and make any
repairs or perform any cleaning procedures necessary.
correct service cord v/iring procedures.
Dry items in a Timed Dry cycle.
No Gas
Call Service
Gas is not detected at burner tube of gas dryer. Inspect that gas line connection is still installed on dryer
gas inlet, and fully open gas supply valve. If gas line is
not yet installed, correctly install gas line connection ac
cording to Installation Instructions.
Error detected can only be resolved by calling
service technician.
Call 1-800-4-MY-HOME (1-800-469-4663) for assis
tance.
19
Page 20

Notes
20
 Loading...