

Page 1
Kenmore
INSTRUCTIONS
MODEL 1230/1240/1250 • ZIG* ZAG SEWING MACHINE
#52917
il
ij
f'S
i
I
f
Page 2

TABLE OF CONTENTS
Section I Knowing Your Sewing Machine
Section I
Page 1
Identifying Parts
Installing and Connecting Machine
Bobbin......................................................................5, 6, 7
Threading-Top Thread................................................... 8
Using the Controls
Top Tension Control
Bobbin Tension Adjusting......................................11
Checking Tensions
Stitch Length Control
Stitch Width Control
Reverse Stitch Control
Special Stitch Variegator........................................ 15
Special Stitch Dial...................................................16a, b
Pressure Regulator.................................................
Feed Dog Control.....................................................18
Sewing Light
Seam Guide...............................................................19
Accessories
Needles......................................................................20
Needle, Thread, Fabric Chart..................................21
Presser Feet..............................................................22
..........................................................
.............................
............................................
..................................................
..............................................
................................................
............................................
............................................................18
2, 3
9, 10
12
13
14
15
17
4
Section n Starting to Sew
Garment Construction Stitches
Straight Stitching
Zigzag Stitching......................................................... 4
Overcasting................................................................ 4
Stretch Stitching
Special Finishing Stitches
Blind Hemming ........................................................
Satjn Stitching........................................................... 7
Mending...................................................................... 7
Appliqueing.............................................................. 8
Buttonholing.........................................................9, 10
ButtonSewing, Bar Tacking....................................11
Maxi Stitch Stretch
Feather Stretch.........................................................12
Darning, Writing and Monogramming
Zipper Application....................................................14
Section HI Checking Performance Problems
Section W Caring For The Machine
Cleaning Feed Dogs and Shuttle ...........................
Oiling Under Arm Cover Plate
and in Face Cover Plate............................................ 2
Oiling Underside....................................................... 2
Parts List......................................................................3, 4
..........................................................
........................................................
.......................................................
..................................................
...................
1
2, 3
5
6
11
13
1
Page 3
Section I
Page 2
Knowing Your Sewing Machine
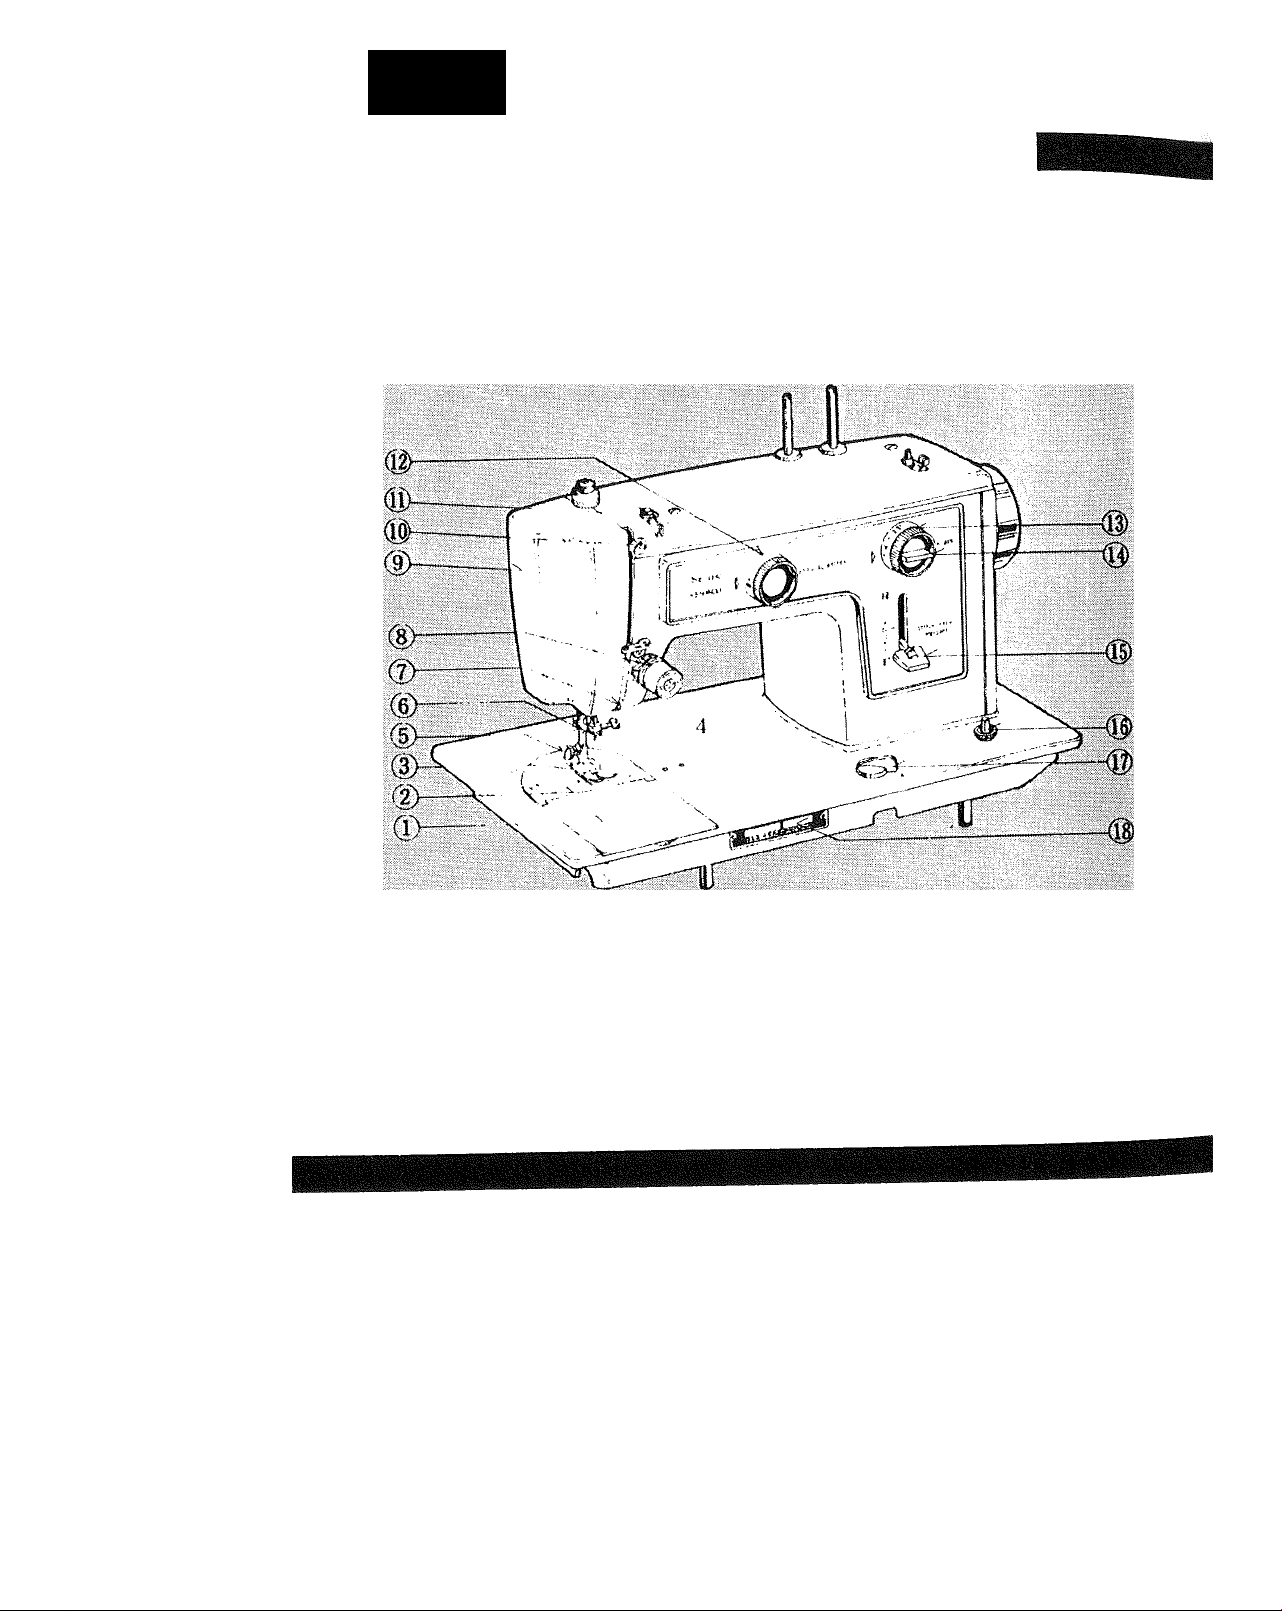
1. Hand Hole Cover Plate
2. Seam Guide Lines
3. Presser Foot
4. Needle Clamp Screw
5. Presser Foot Screw
6. Thread Guide
7. Face Cover Thread Guide
8. Top Thread Tension Control
9. Face Cover Plate
10. Take-up Lever
11. Upper Thread Guide
12. Special Stitch Dial
(Model 1250 only)
13. Stitch Width Control
14. Special Stitch Variegator
(Models 1240,1250 only)
15. Stitch Length and
Reverse Stitch Control
16. Light and Power Switch
17. Feed Dog Control
18. Nomenclature Plate
Page 4
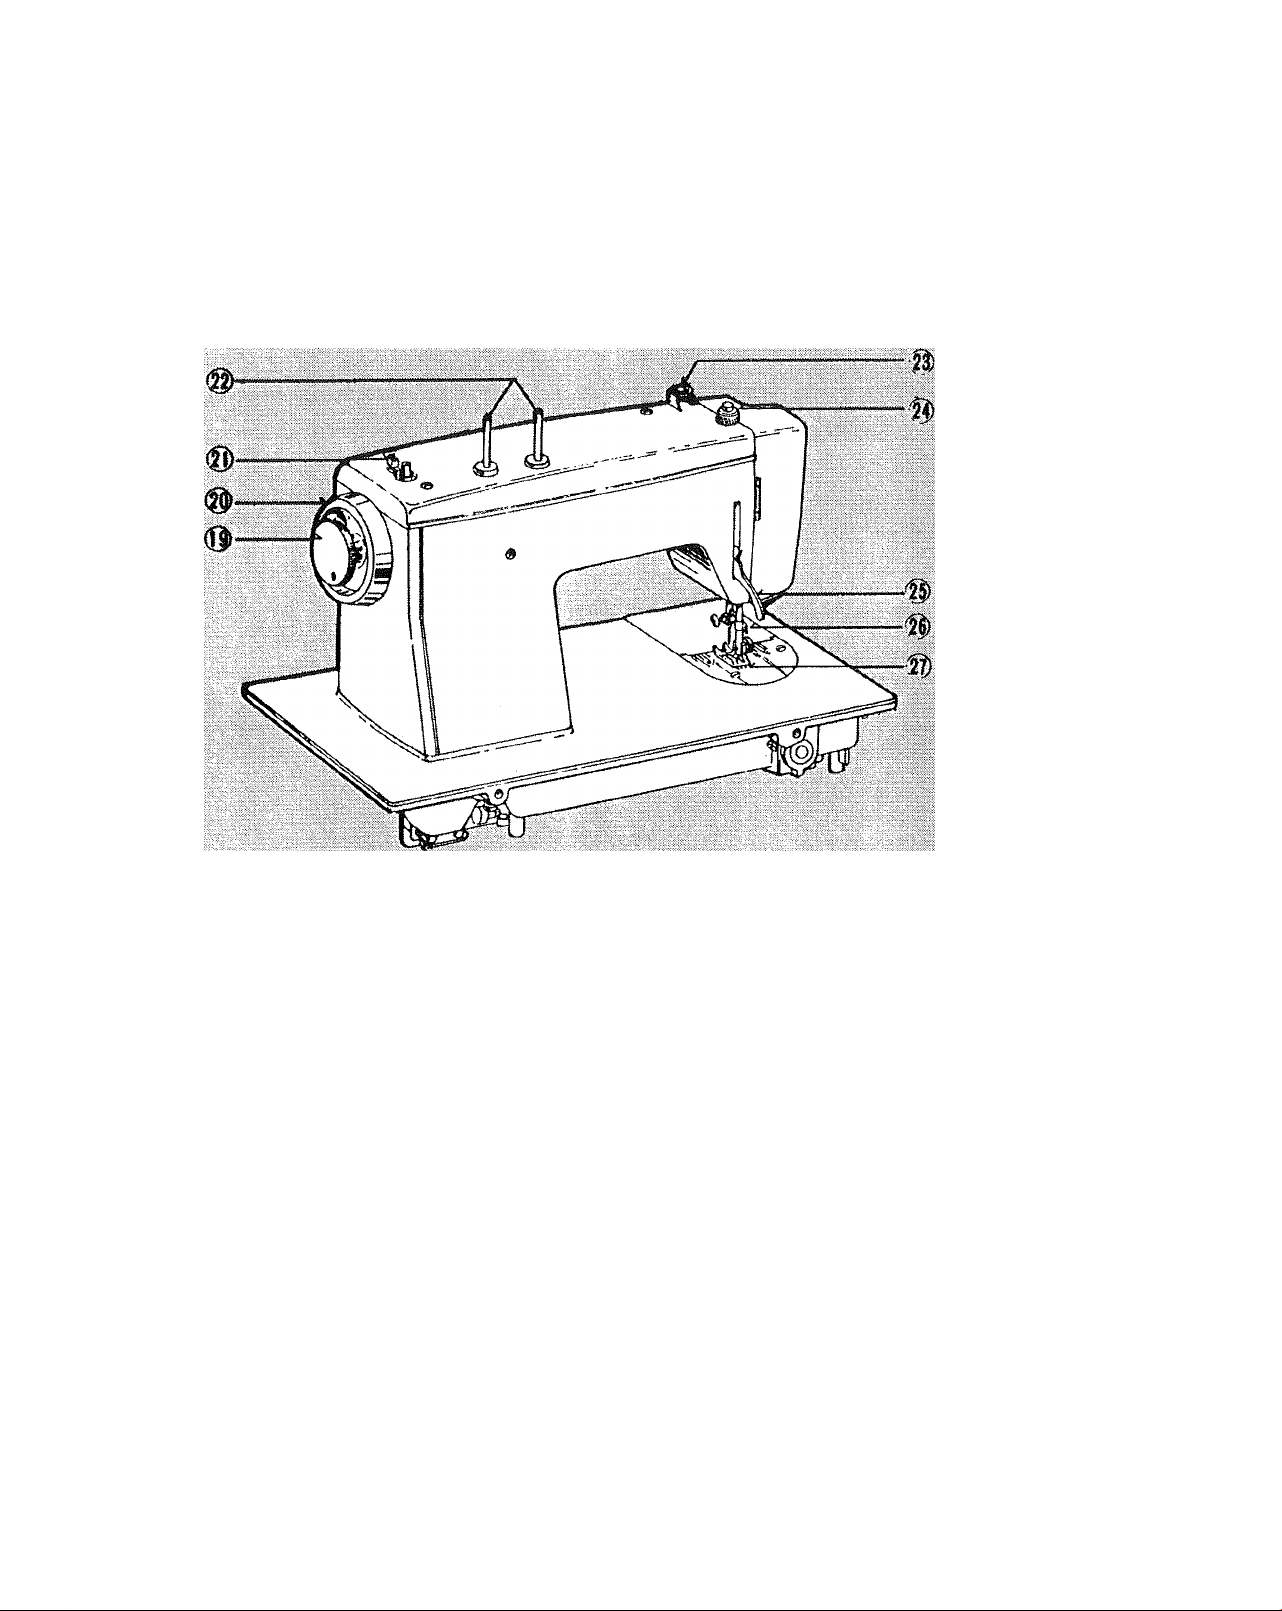
19. Clutch Knob
20.
Hand Wheel
21.
Bobbin Winder
22.
Thread Spool Pins
23.
Bobbin Winder Tension Disc
24. Pressure Regulator
25. Presser Foot Lever
26.
Thread Cutter
27. Feed Dogs
Page 5
Section I
Page 4
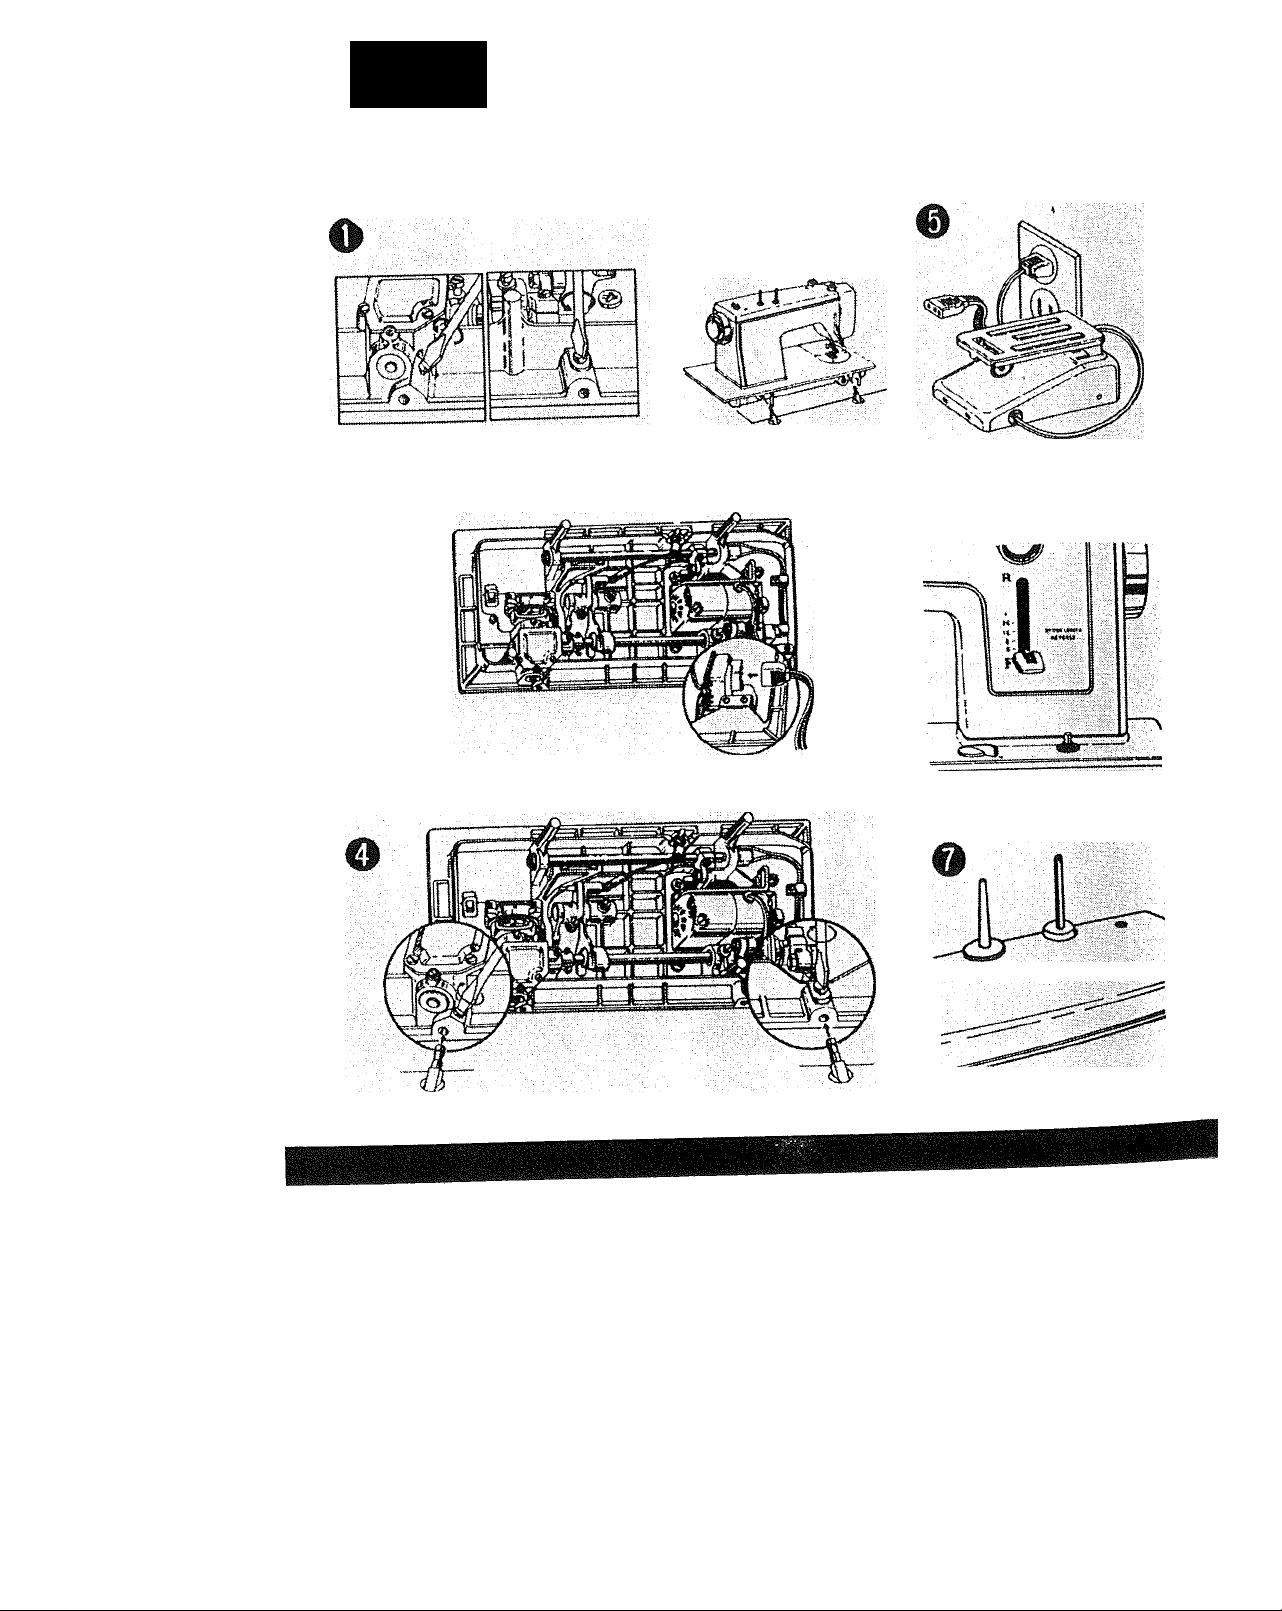
INSTALLING MACHINE
0
0
1. Loosen the two hinge screws under
holes in the rear edge of the machine
bed.
2. Raise hinge pins in the cabinet cutout.
3. Slip machine head onto the pins and
tighten hinge screws securely.
4. Push the speed control plug onto
three-prong connector under the bed
plate. Lower machine head to front
cabinet flap.
Plug the speed control cord into any
110-120 volt wall outlet.
Turn on power by pushing light an
6.
power switch.
Screw spool pins firmly in place wUh
7.
screwdriver. Place the plastic sp
holder onto the spool pin. Holder ana
pins are packed in the accessory o •
Page 6
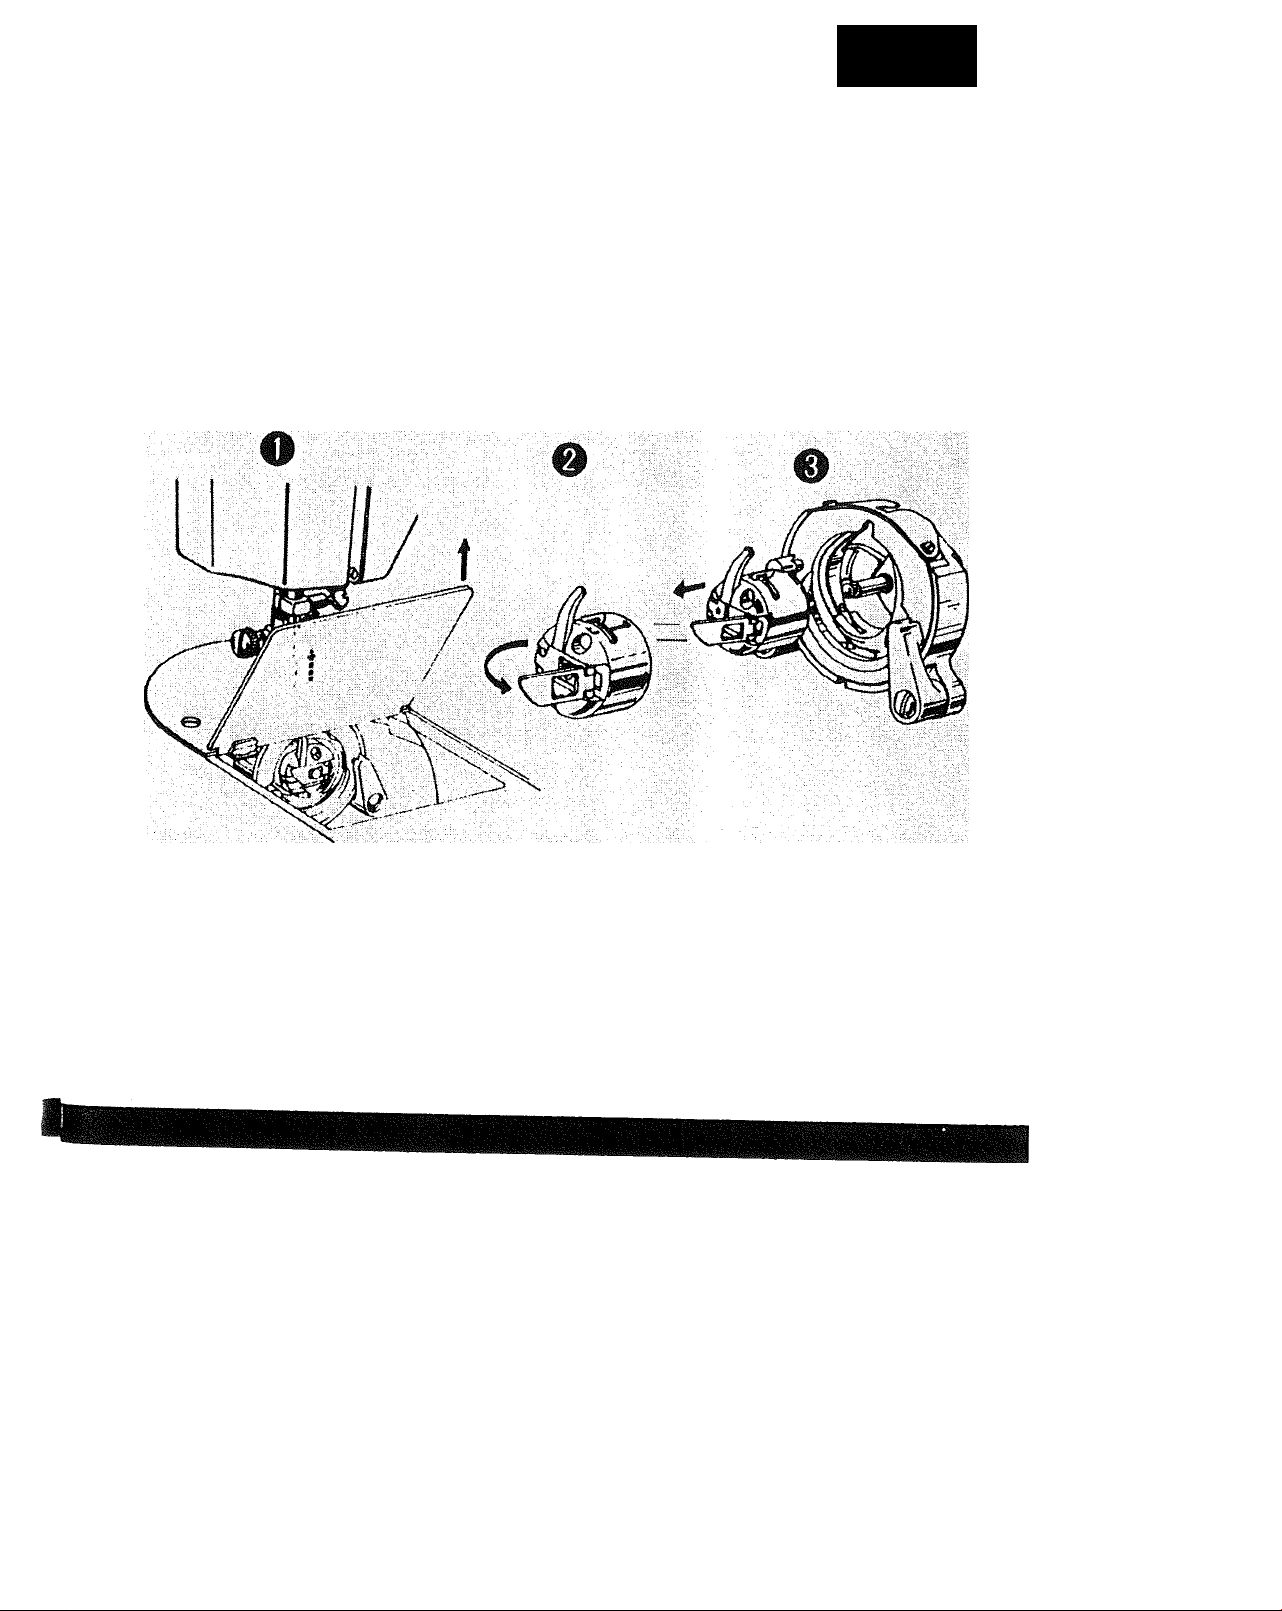
REMOVING BOBBIN CASE FROM SHUTTLE
Section I
Page 5
1. Turn hand wheel to raise needle to
its highest position. Lift hand hole
cover plate.
2. Pull open latch of bobbin case.
3. Pull bobbin case straight out of
shuttle.
To thread the bobbin case, see
page 7.
Page 7
Section I
Page 6
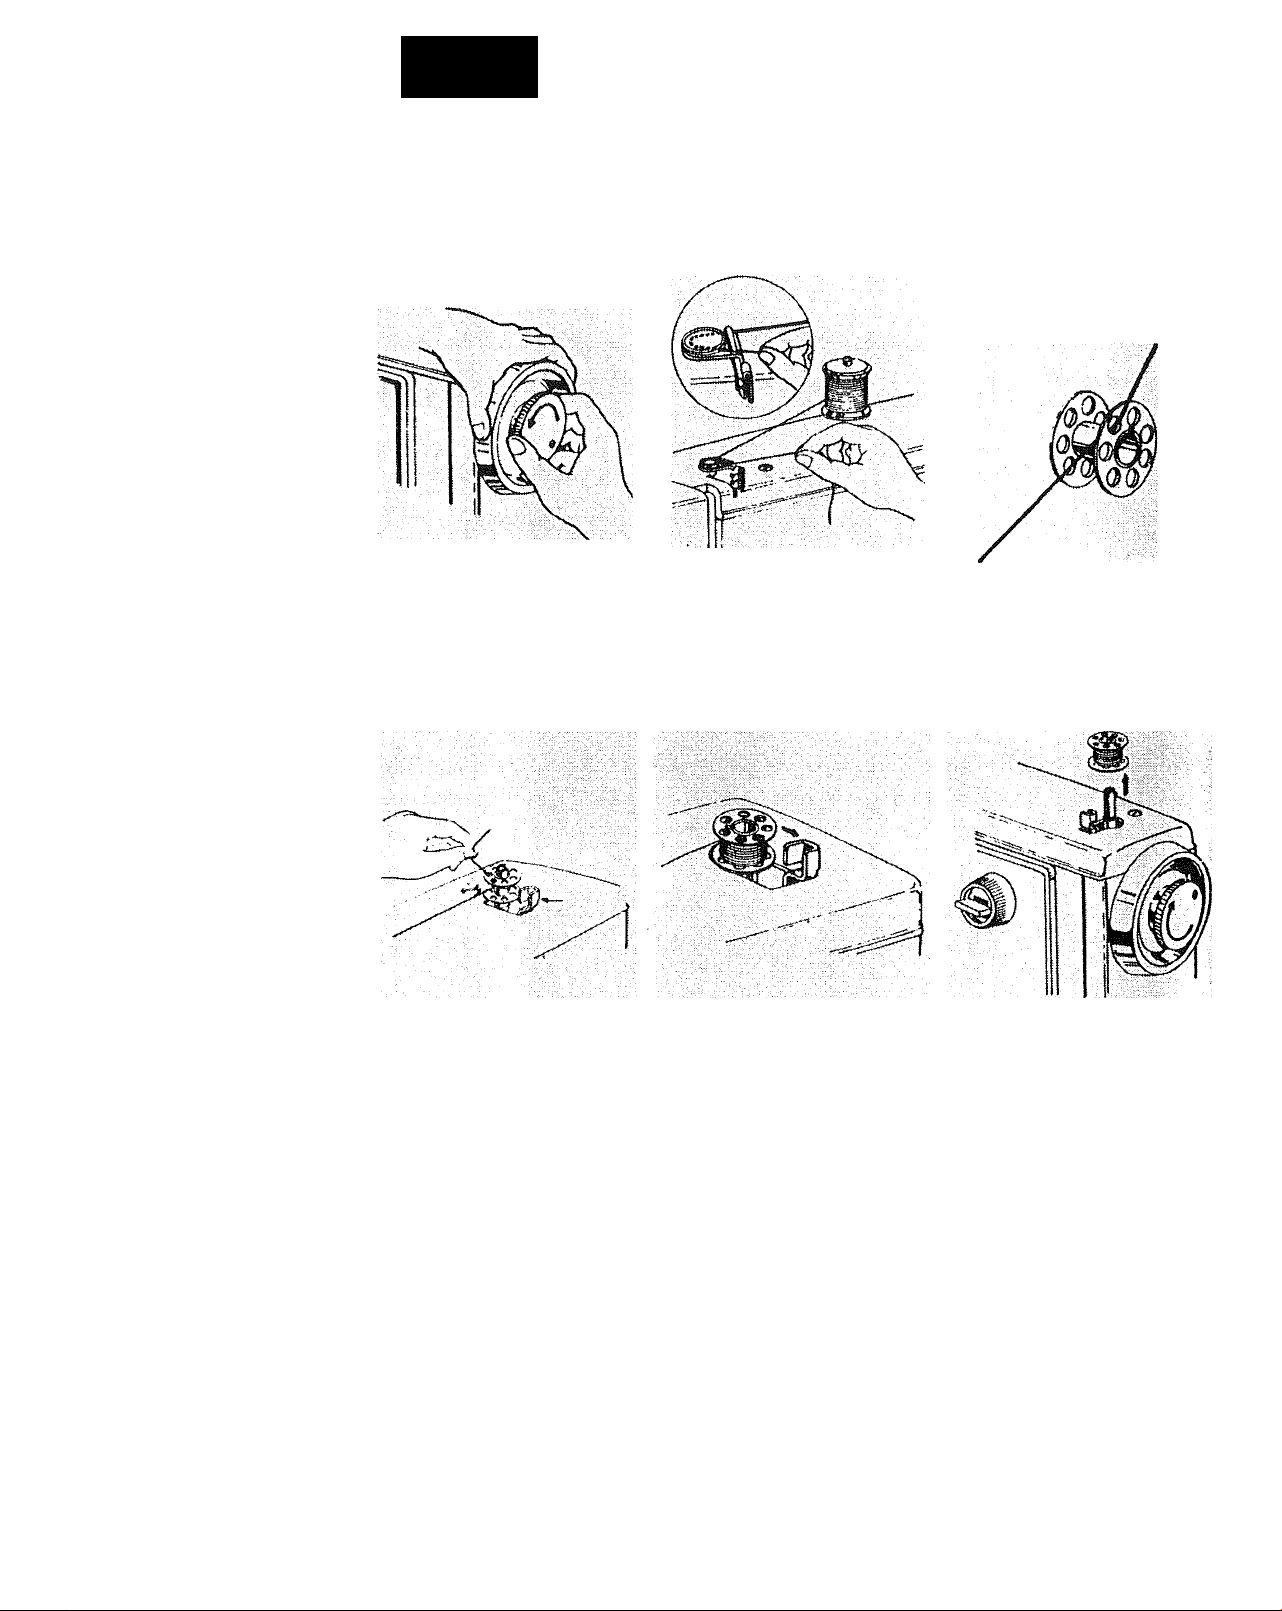
WINDING THE BOBBIN
o
o
e
0
o
1. Release clutch by turning clutch knob
toward you.
2. Draw thread from spool through
bobbin winder tension discs as shown.
3. Pull end of thread through hole in
bobbin as shown.
4. Place bobbin onto bobbin winder shaft
with end of thread coming from the top
of the bobbin. Push bobbin winder
latch against bobbin until it clicks.
Holding onto end of thread, start
machine. When bobbin is slightly filled,
snip off end of thread.
5. Start machine. Wind thread until
bobbin winder latch releases.
6. Tighten clutch knob and remove
bobbin.
Two spool pins have been included with
this machine to aid in bobbin winding. By
placing a spool of thread on the second
spool pin, you may wind your bobbin
without unthreading the machine.
Page 8
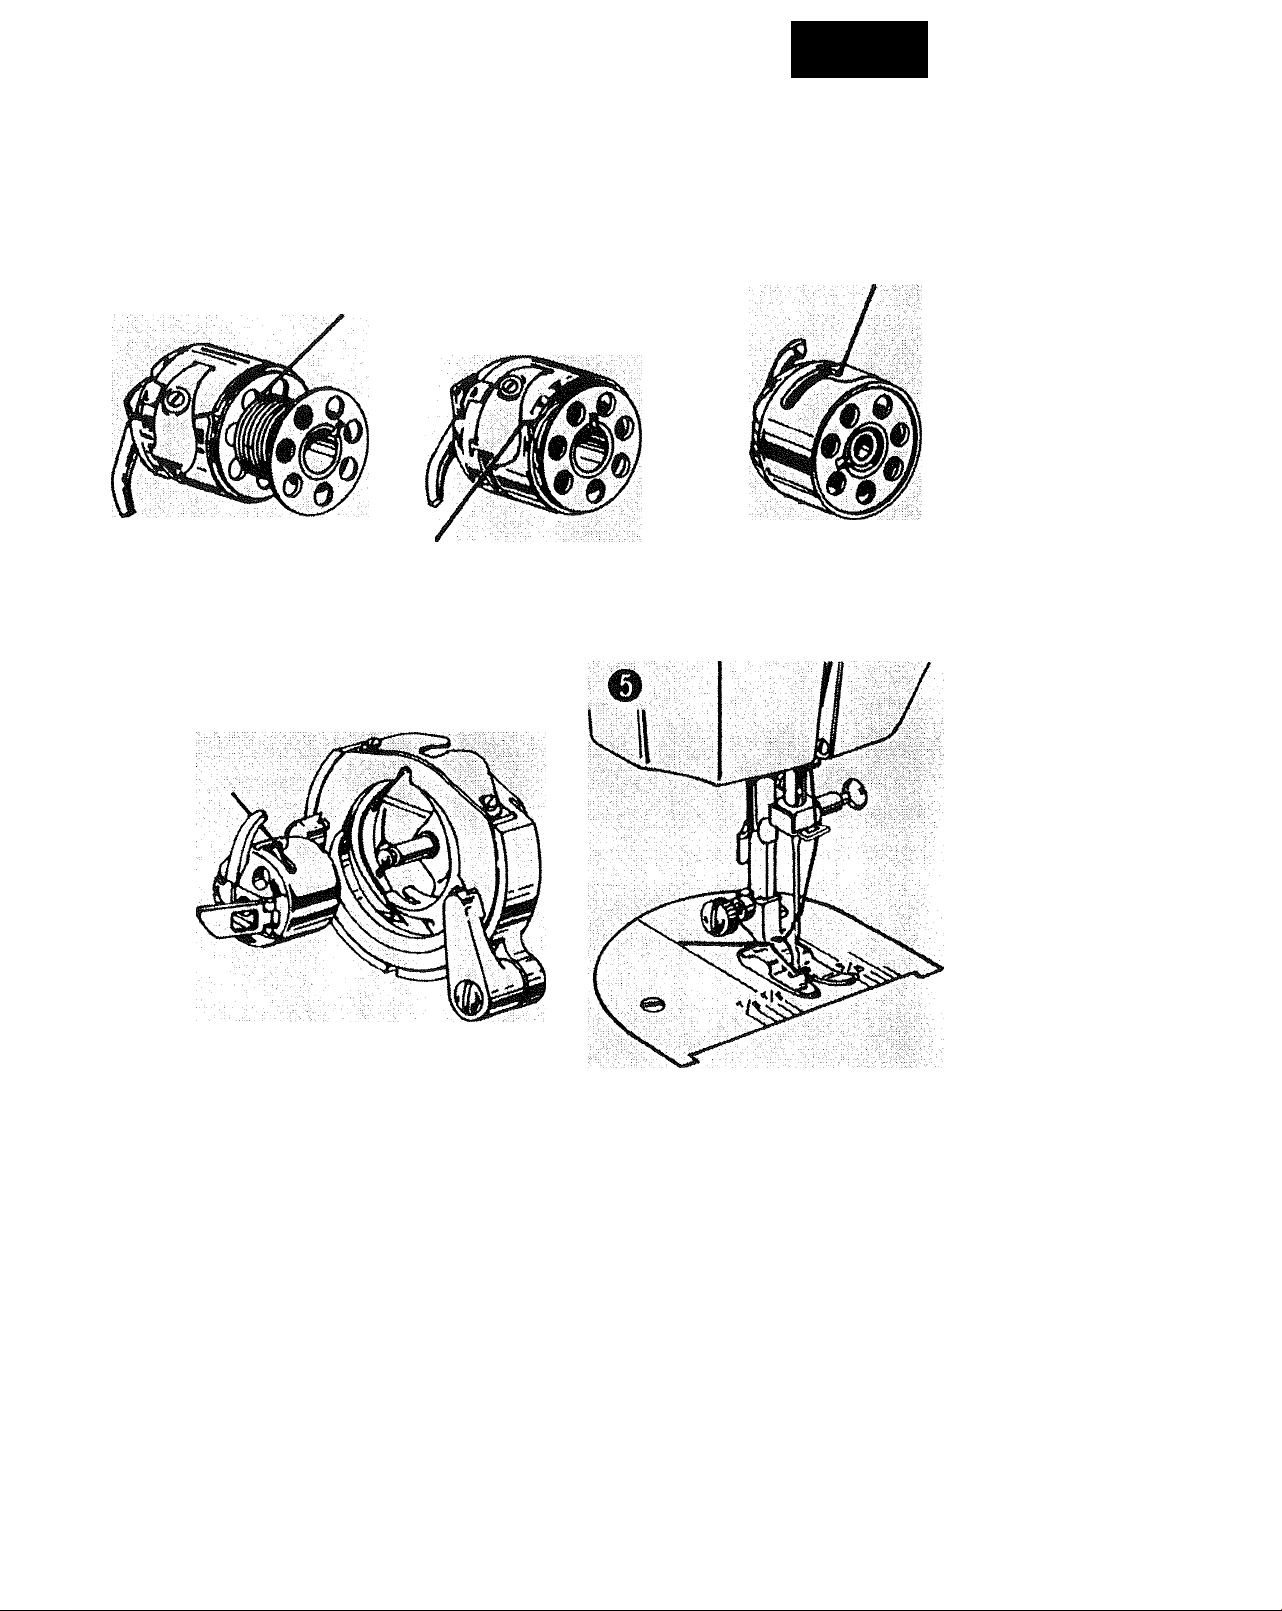
THREADING THE BOBBIN CASE
Section I
Page 7
o
e
0
1. Insert bobbin into bobbin case
making sure thread is coming from
bobbin as shown.
2. Pull thread through slot of case as
shown.
3. Pull thread under tension spring.
4. Turn hand wheel to raise needle to
its highest position. Holding latch
open, position case into shuttle, and
release latch. Case should lock into
place when latch is released.
Hold needle thread loosely in left
hand and rotate hand wheel toward
you one complete turn. Bring bobbin
thread up by pulling upper thread.
Page 9
Section I
Page 8
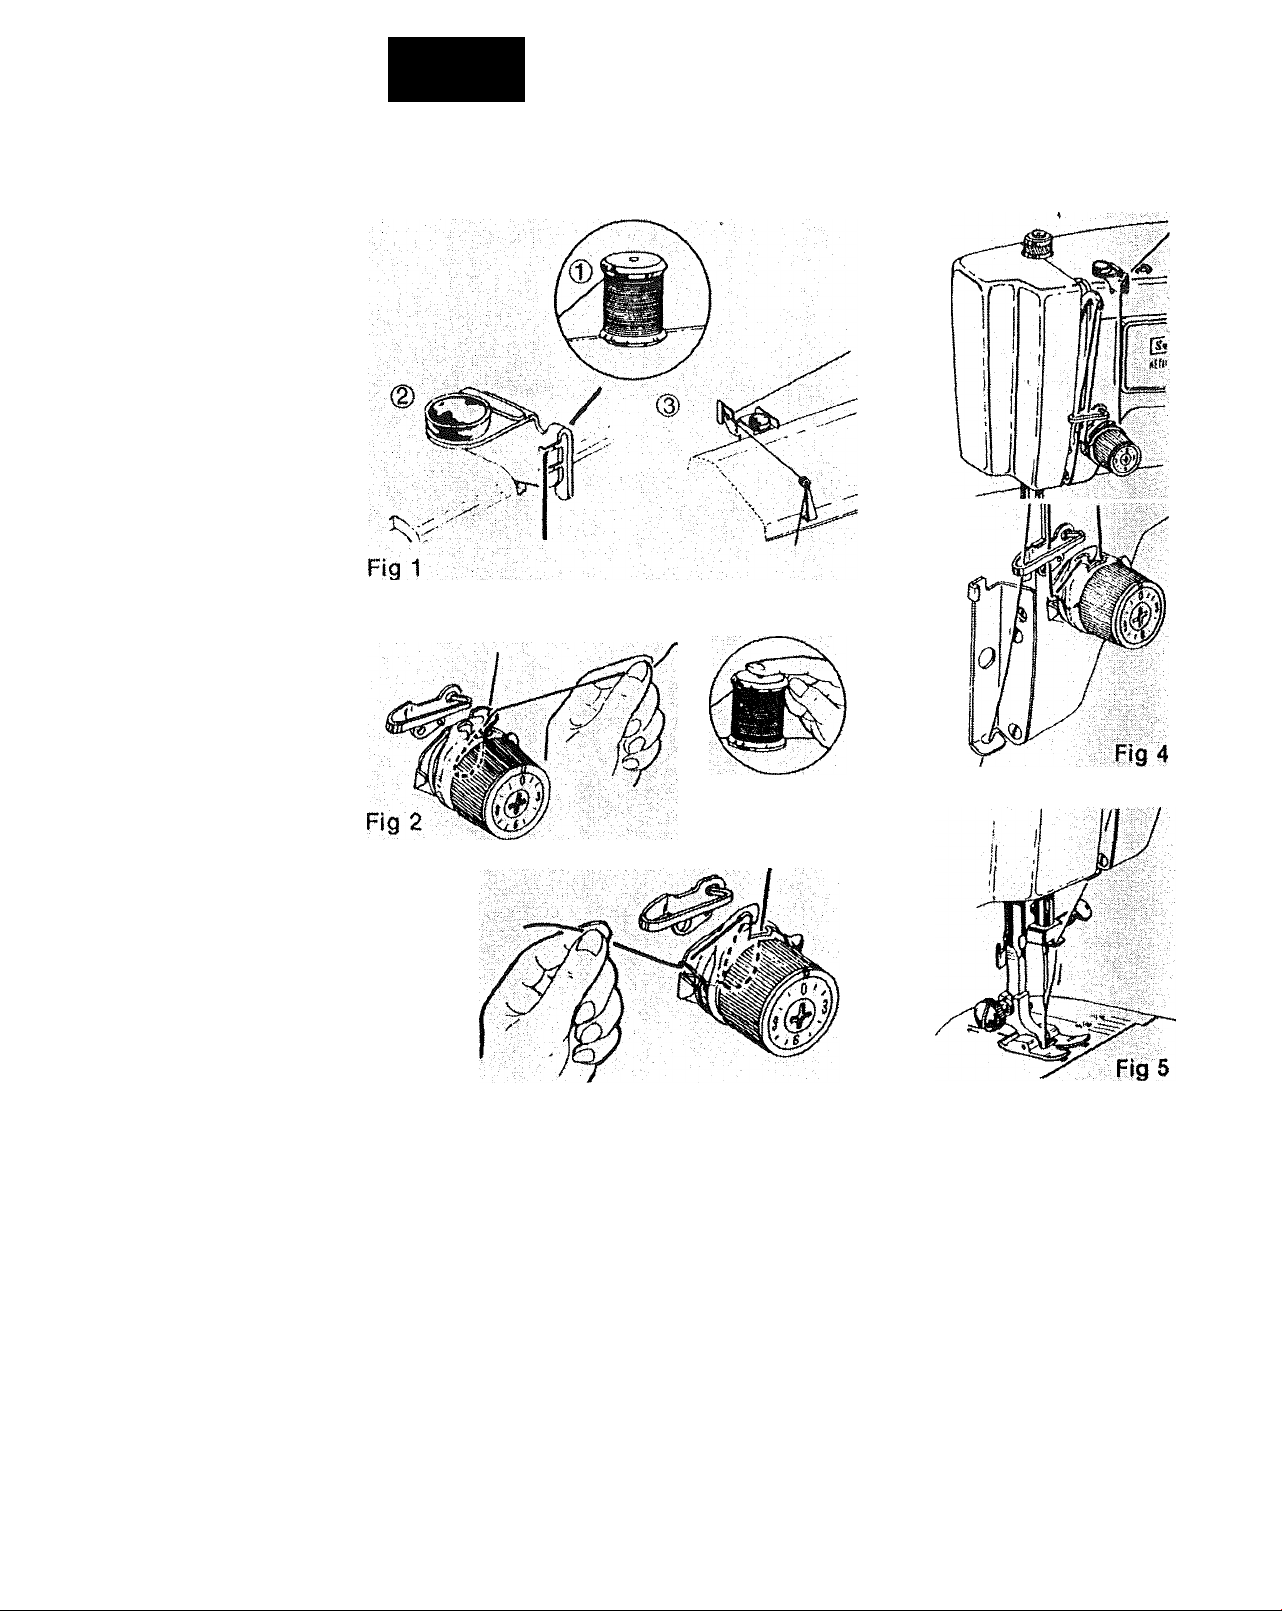
THREADING OF TOP THREAD
Fig3
Place thread on spool pin as shown,
with the thread coming from the back
of the spool (Fig. 1-©). Draw thread
through the top thread guide(s) (Fig.
1-@or ®).
Holding the spool with the right hand,
2.
pull the thread through the tension
discs. The spring wire loop should be
pulled up until the thread passes
beyond the beak of the hook. Fig. 2.
After the thread has slipped into the
hook, allow the spring wire to return to
position by releasing the thread spool.
Fig. 3.
Continue threading through the front
thread guide, hook thread into take up
lever and down through path shown in
Fig. 4 and 5.
Always thread needle in direction as
5.
shown in Fig, 5.
Page 10
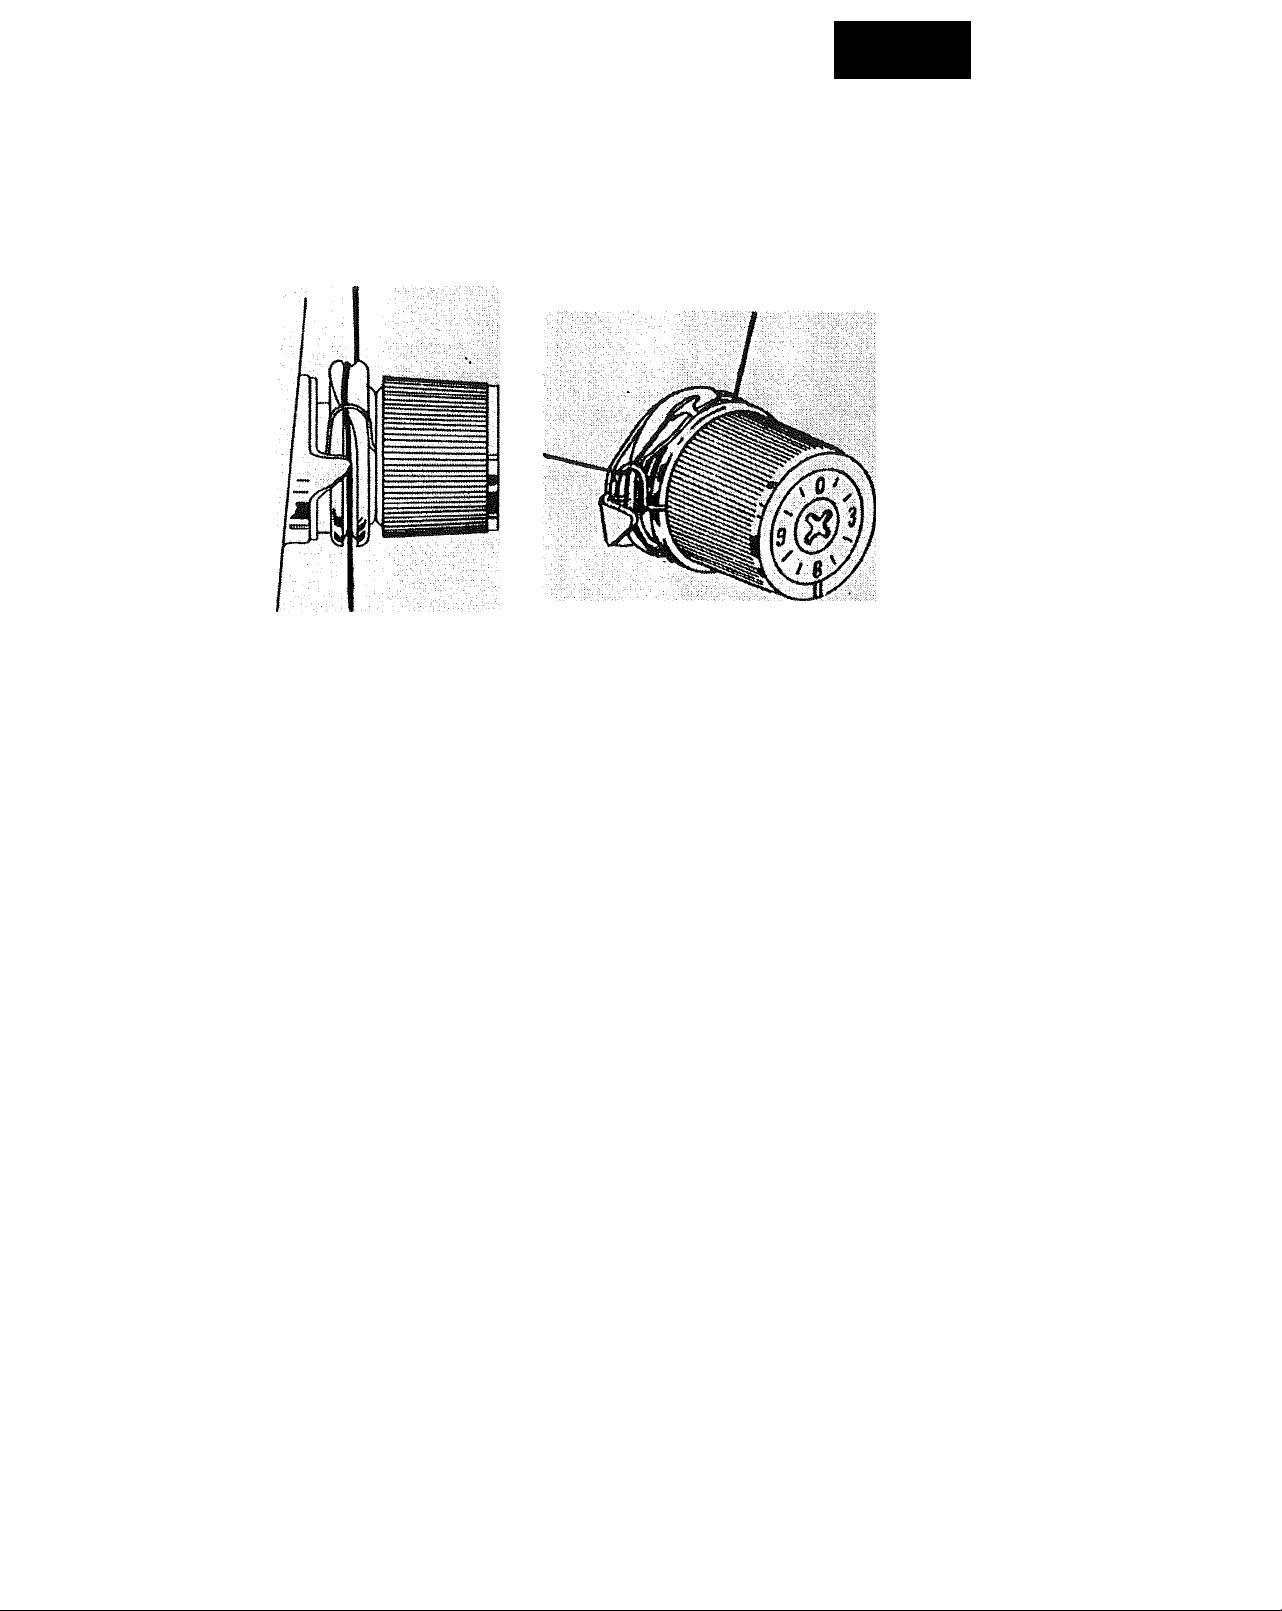
CONTROLS
TOP TENSION CONTROL
Section I
Page 9
Probably the most important control on your machine is this one that regulates your
top thread tension. It consists of discs between which the thread passes. The
pressure on these discs is regulated by turning the dial. The higher the number, the
tighter the tension.
There are many reasons for having to reset your tension. The best tension for one
fabric may not be correct for another. The required tension depends upon the
stiffness of the fabric, thickness of the fabric, numbers of layers of fabric being
sewn, as vyell as the type of stitch you are making.
It is best to test the stitching on a scrap of the fabric you are using before starting to
make a garment. To adjust for the correct stitch; see next page.
Page 11
Section I
Page io
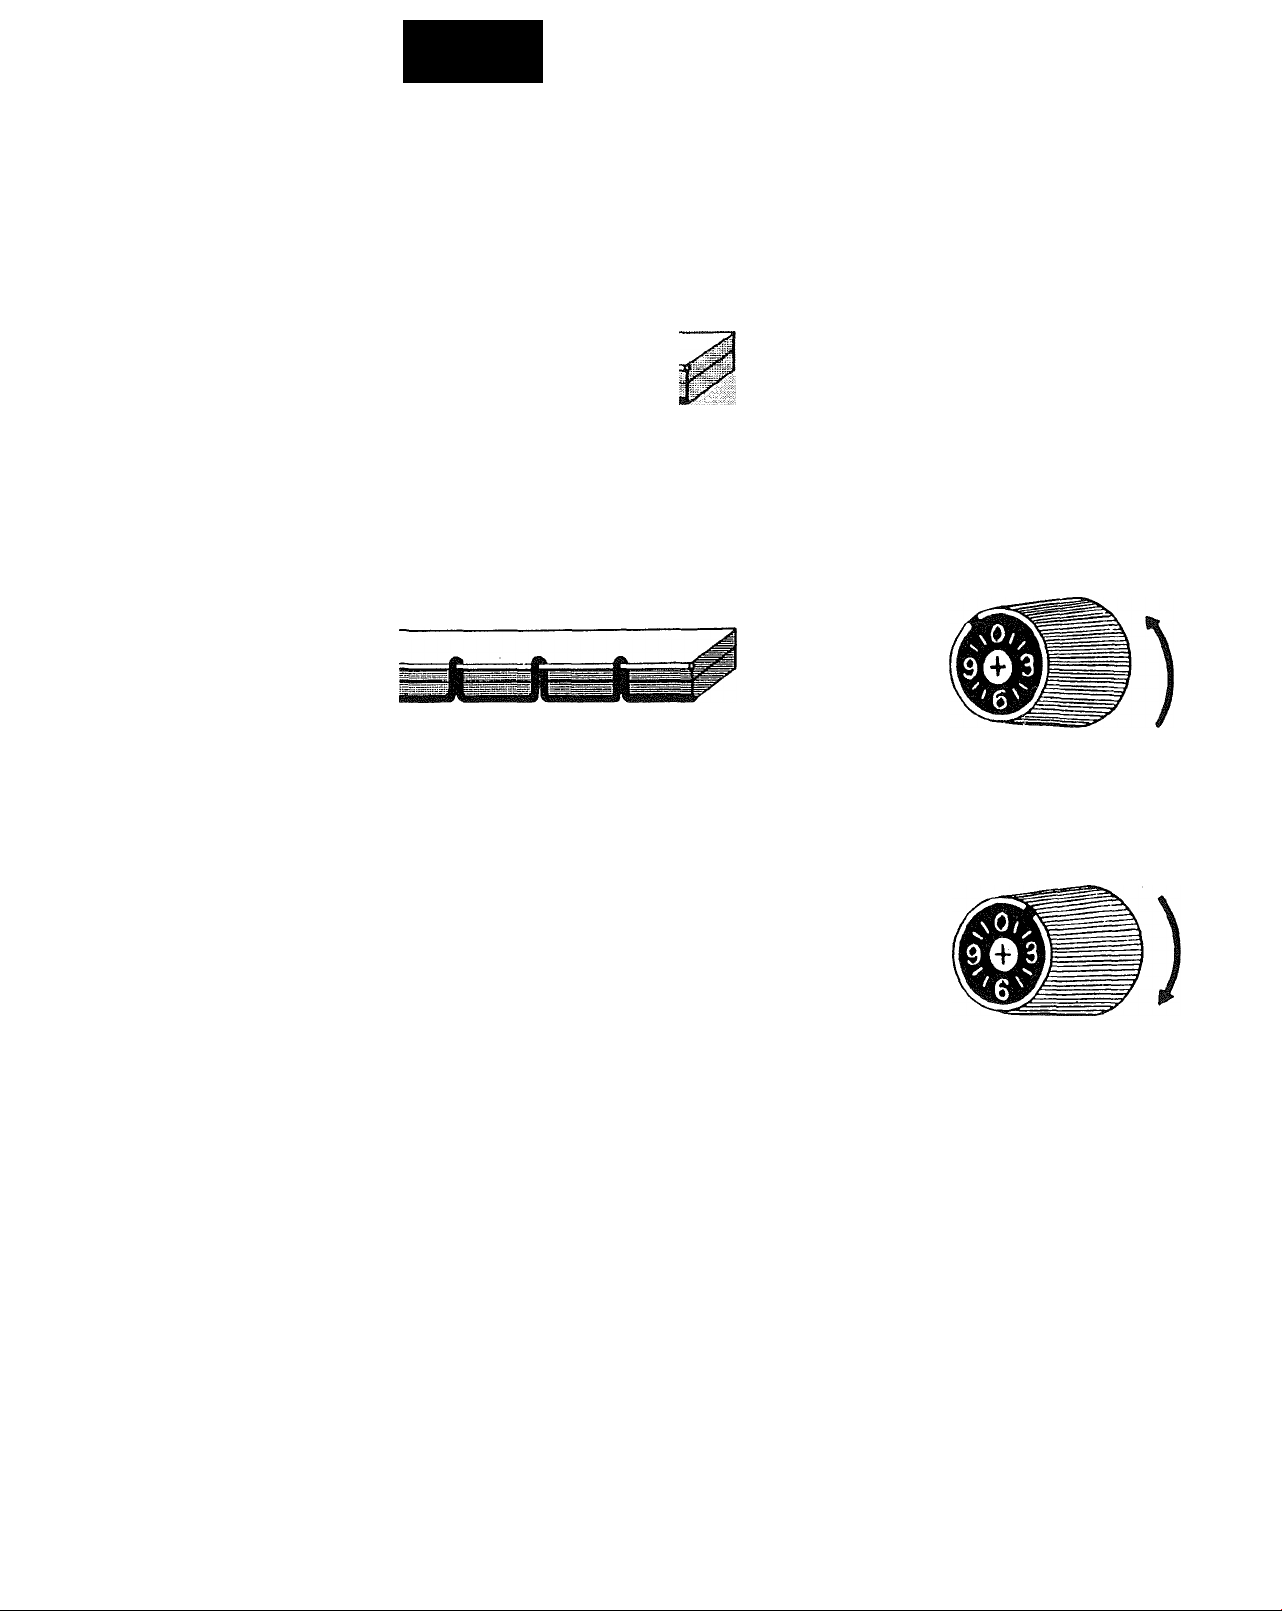
ADJUSTING TOP TENSIONS
^ Upper thread too tight
A perfect straight stitch will have
threads locked between the two
layers of fabric with no loops on
top or bottom.
^ Upper thread too loose
Decrease Tension
Increase Tension
Page 12
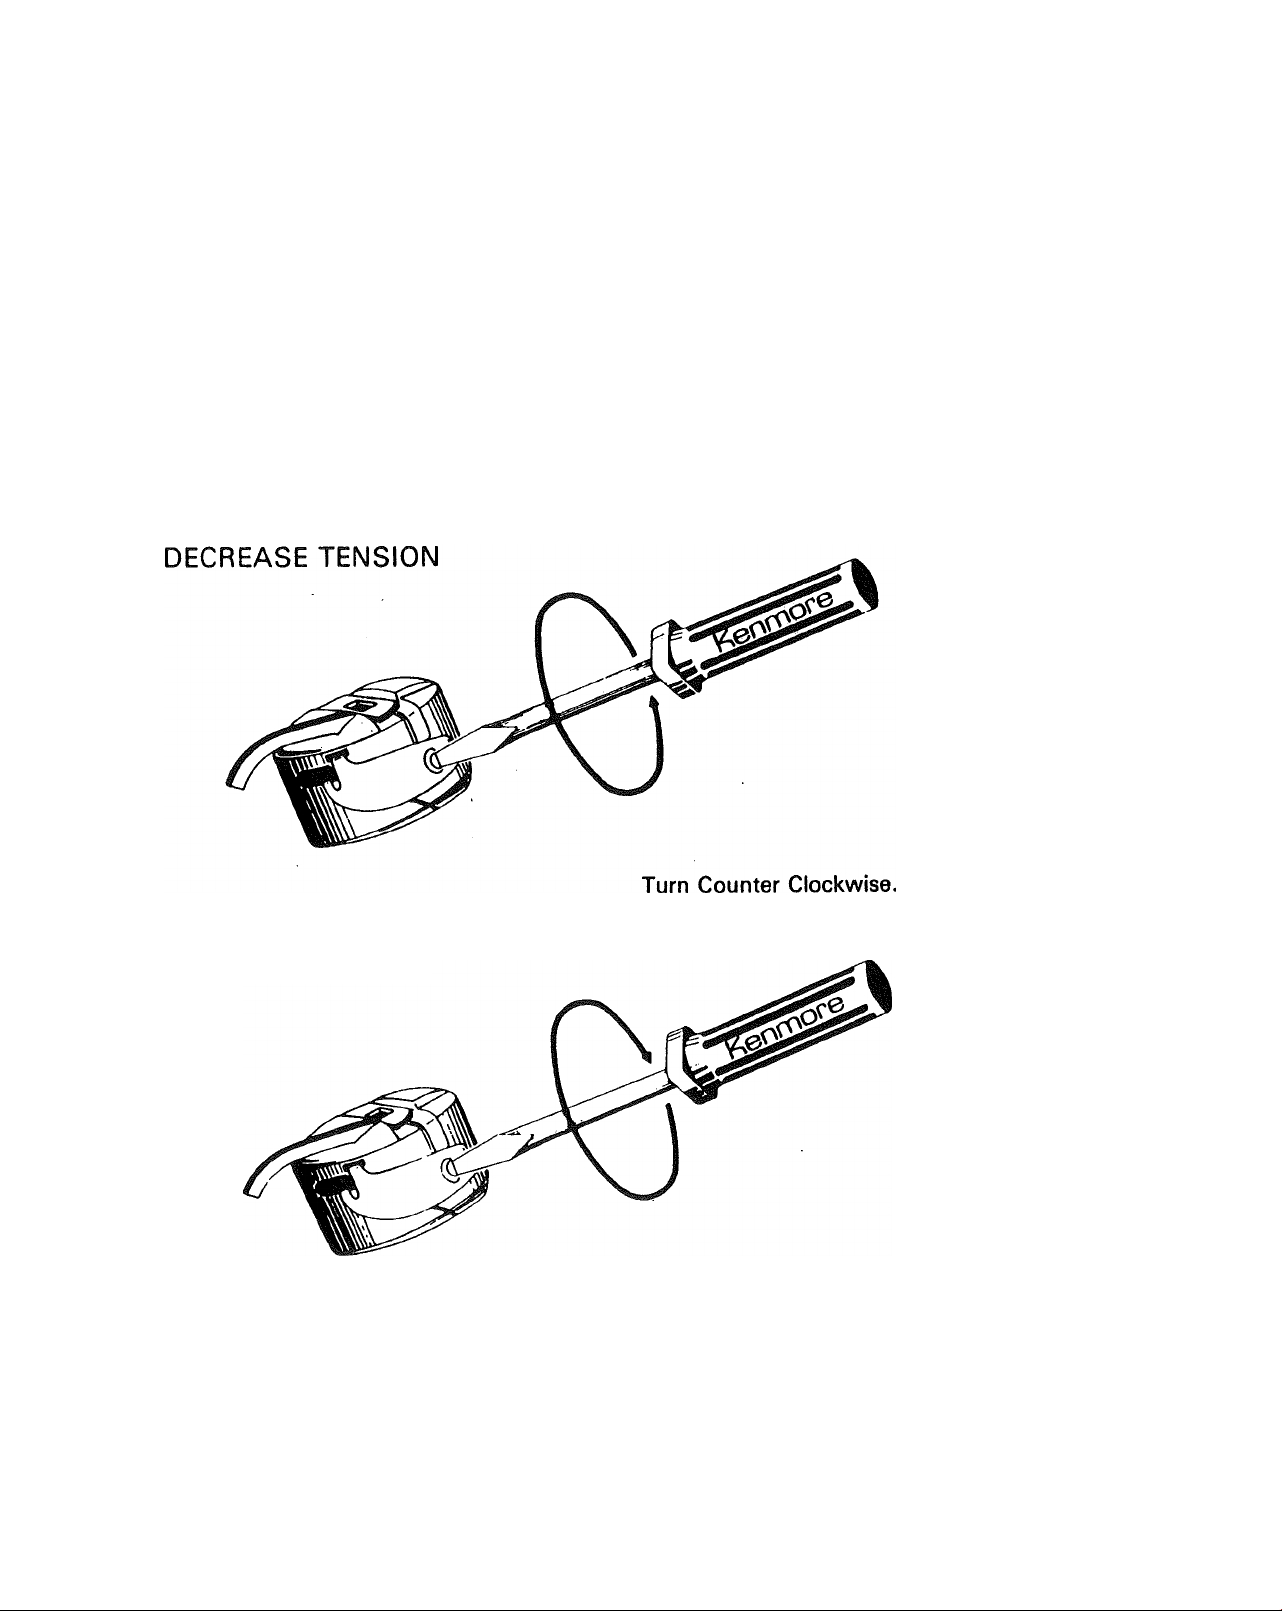
ADJUSTING BOBBIN TENSIONS
Bobbin tension requires adjusting less frequently than the upper thread tension.
If the stitch is satisfactory but the seanr) is puckered, it may be necessary to loosen
the tension on both the top and bottom threads. Be sure to balance them as
Indicated on page 10.
When adjusting the tension on the bobbin case, make slight adjustments with a
screwdriver. Correct tensions will produce the stitch shown on page 10.
INCREASE TENSION
Turn Clockwise.
Page 13

Section I
Page 12
To check the thread tension balance, be sure to use mercerized thread of the same
size on the top and on the bobbin, and a sharp, correctly sized needle for the fabric
you are sewing. Begin with a full bobbin. Set the stitch length for about 12 stitches
per inch.
Fold a 6" square of fabric in half diagonally, forming a triangle. Make a line of
stitching W' in from the fold.
a. If seam is puckered-both tensions are too tight.
b. If the bottom thread lays on the fabric-tighten upper thread tension, and
repeat test. See Fig. 3, Page 10.
c. If the top thread lays on the fabric-loosen upper thread tension, and repeat
test. See Fig. 2, Page 10.
Grasp the stitching and pull with a snap to make the threads break.
a. If both threads break-tensions are balanced.
b. If neither thread breaks-both tensions are too loose.
c. If upper thread breaks-loosen top tension,
d. If lower thread breaks-tighten top tension.
Both threads do not have to break at the same place, but they should break on the
same snap.
It is necessary to reduce the upper thread tension somewhat when zigzag stitching.
The wider the stitch, the less tension that is needed. This Is particularly important
when making designs. It is not desirable to have any of bottom thread visible on the
right side of the fabric when satin stitching.
Page 14
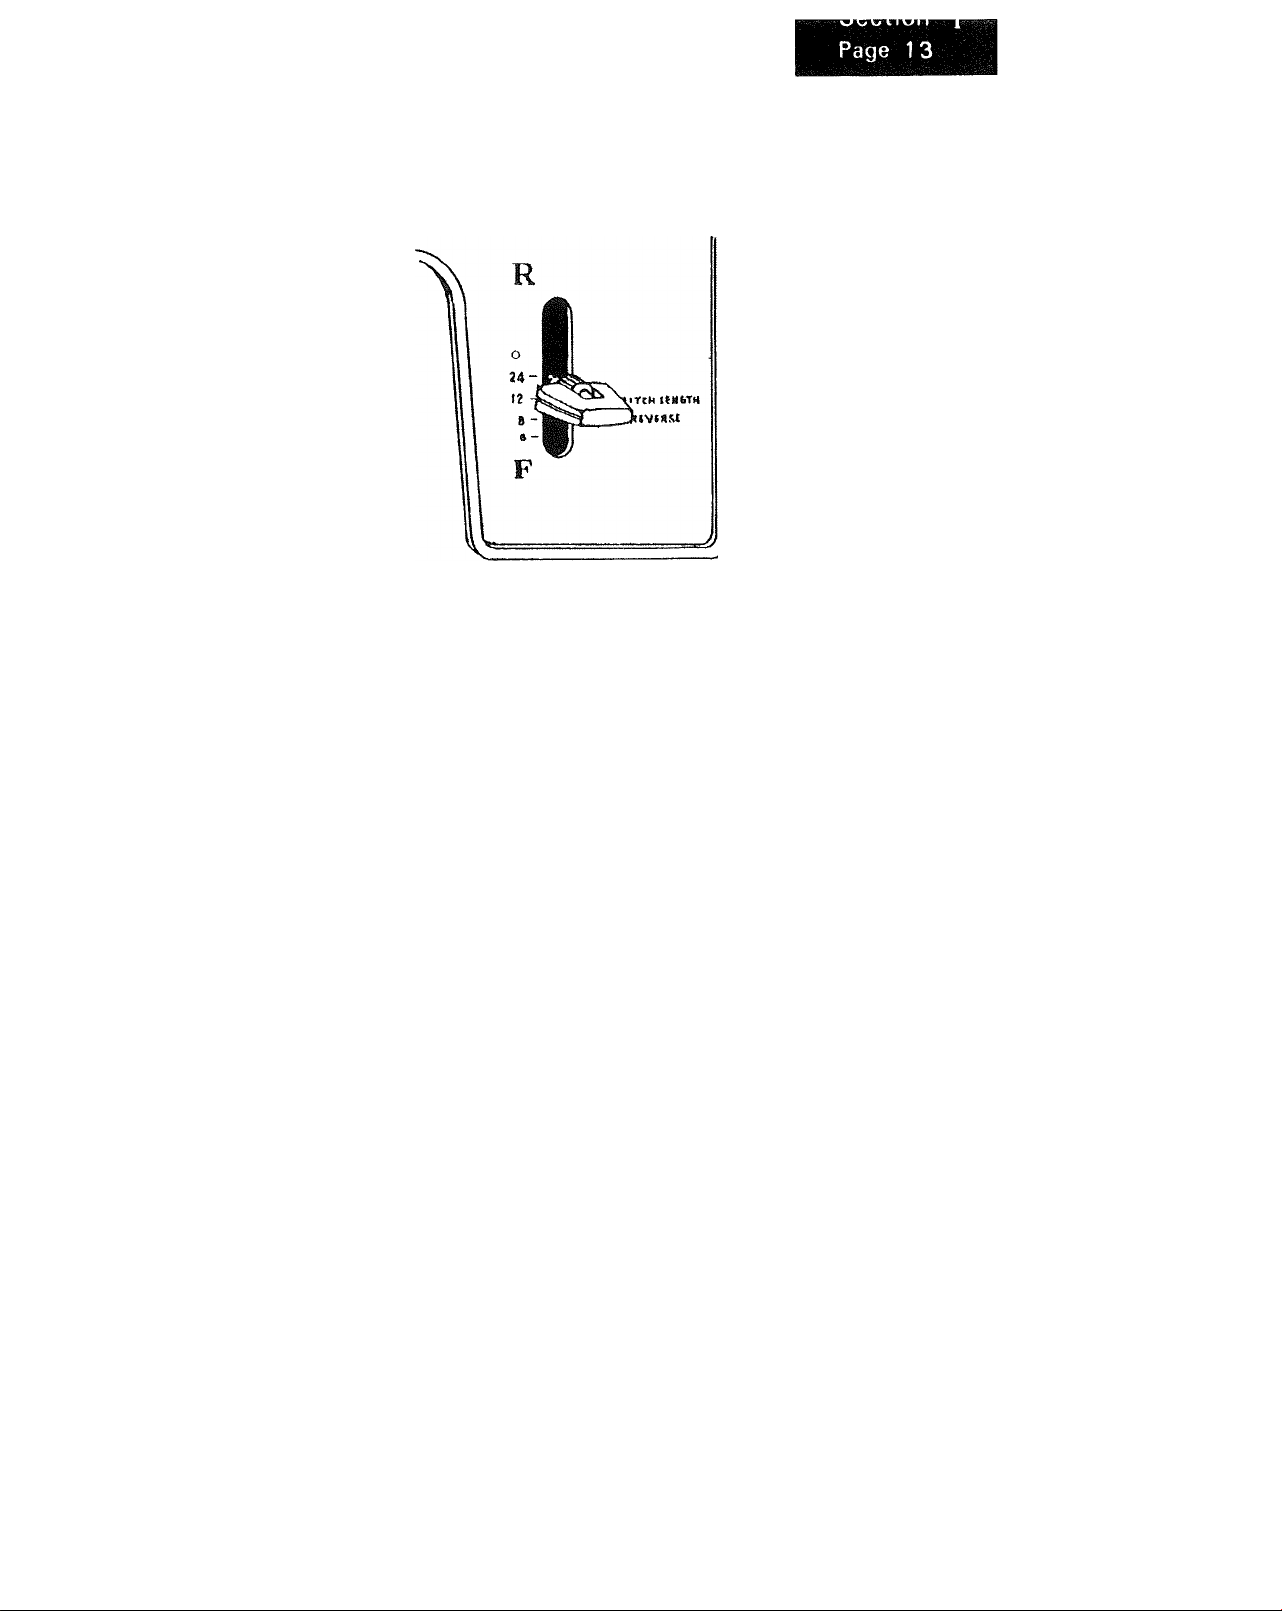
The stitch length control regulates the length of the stitch you select. THE
HIGHER THE NUMBER-THE SHORTER THE STITCH.
The stitch setting you use will be determined by the thickness of the fabric you
are sewing. A longer stitch setting should be used for thicker fabric or more
layers of fabric.
The middle range of the control is the 10-12 stitch per inch range which Is the
most commonly used.
The basting and stretch stitch are made by adjusting the lever to make the
longest possible stitch. When adjusting for shorter stitches, select the stitch
length and tighten the knob In the center of the lever handle to remain at the
same setting. The knob must be loosened to readjust the lever.
Page 15
Section I
Page 14
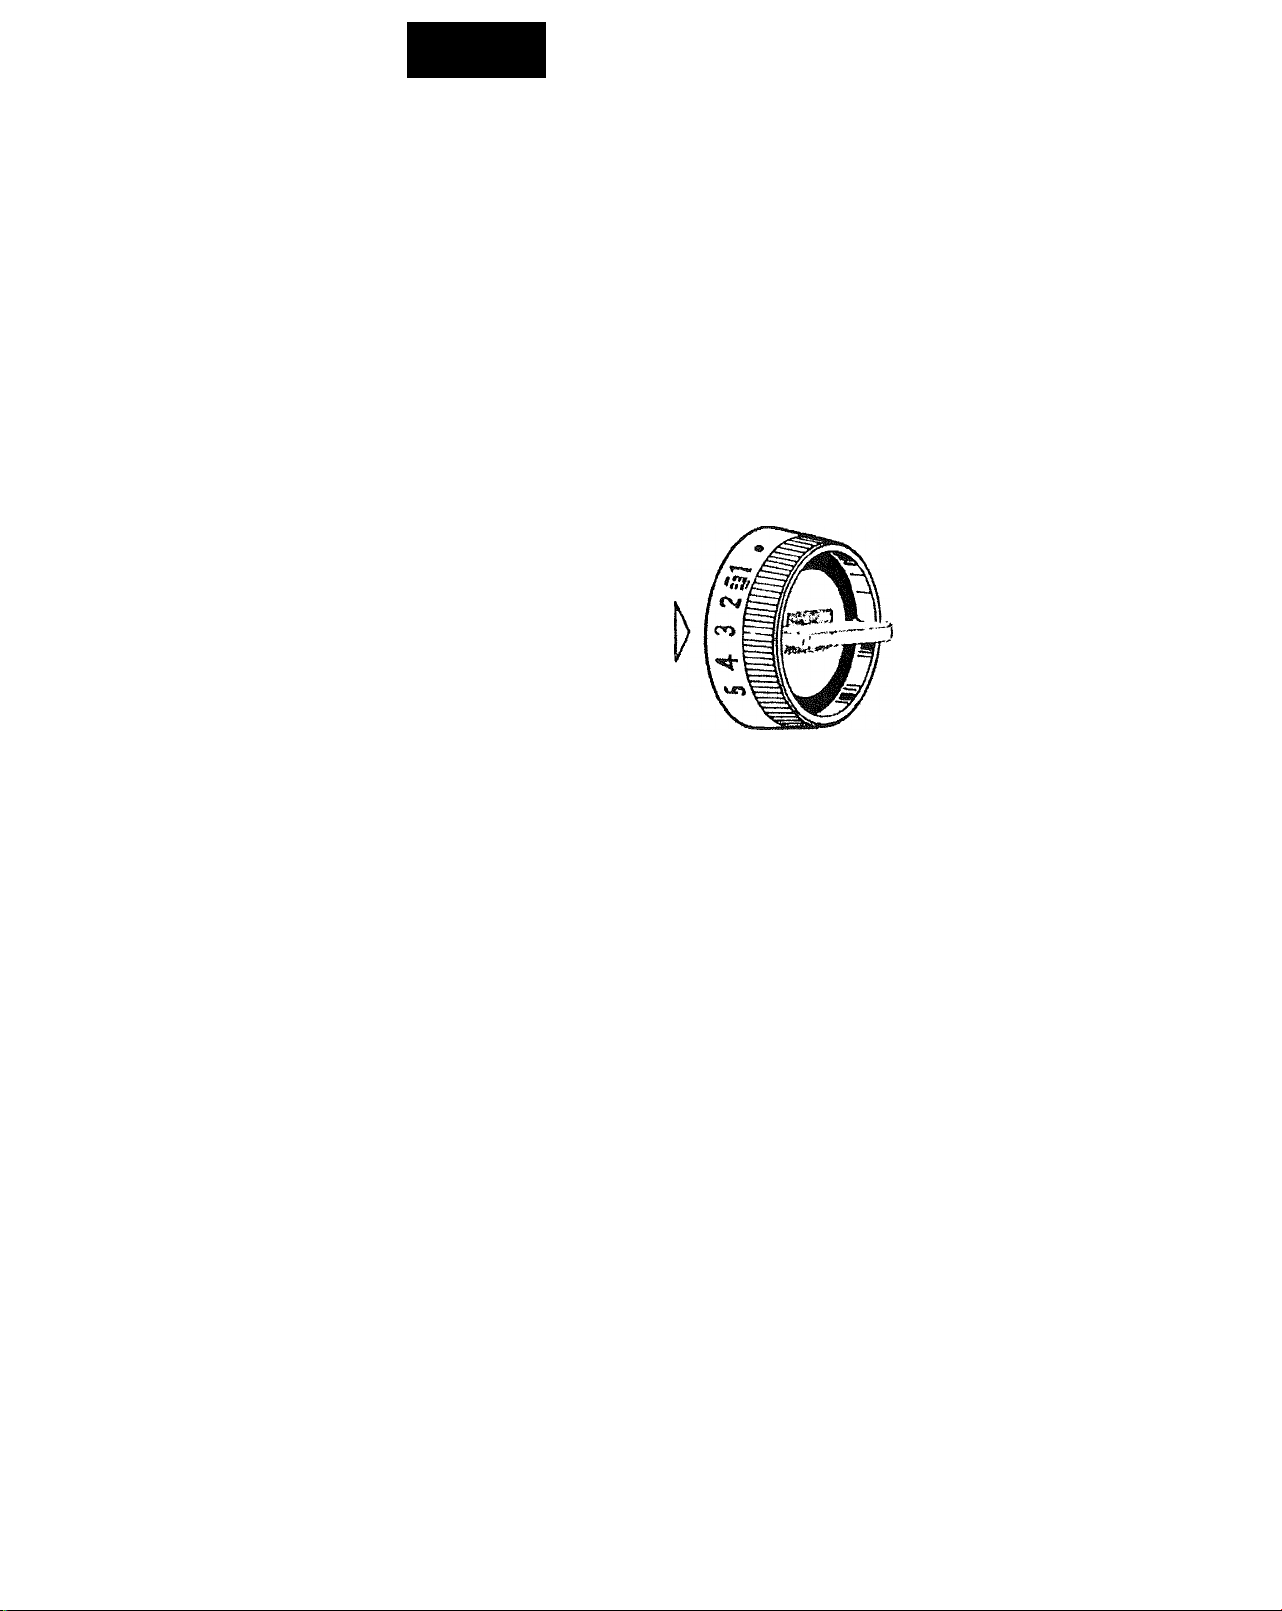
The stitch width control regulates the width of the stitch you select. THE
HIGHER THE NUMBER, THE WIDER THE STITCH.
You may vary your zigzag stitch width by adjusting this control to the setting you
desire.
This control must be on the Red Dot in order to do straight stitching. Before
turning control, make sure needle is above fabric.
You will note a simulated buttonhole between the numbers 2 and 1 on the
control. This is the setting to be used when a buttonhole is sewn. The control
may have to be adjusted slightly in either direction depending on the weight of
the fabric being used.
Page 16
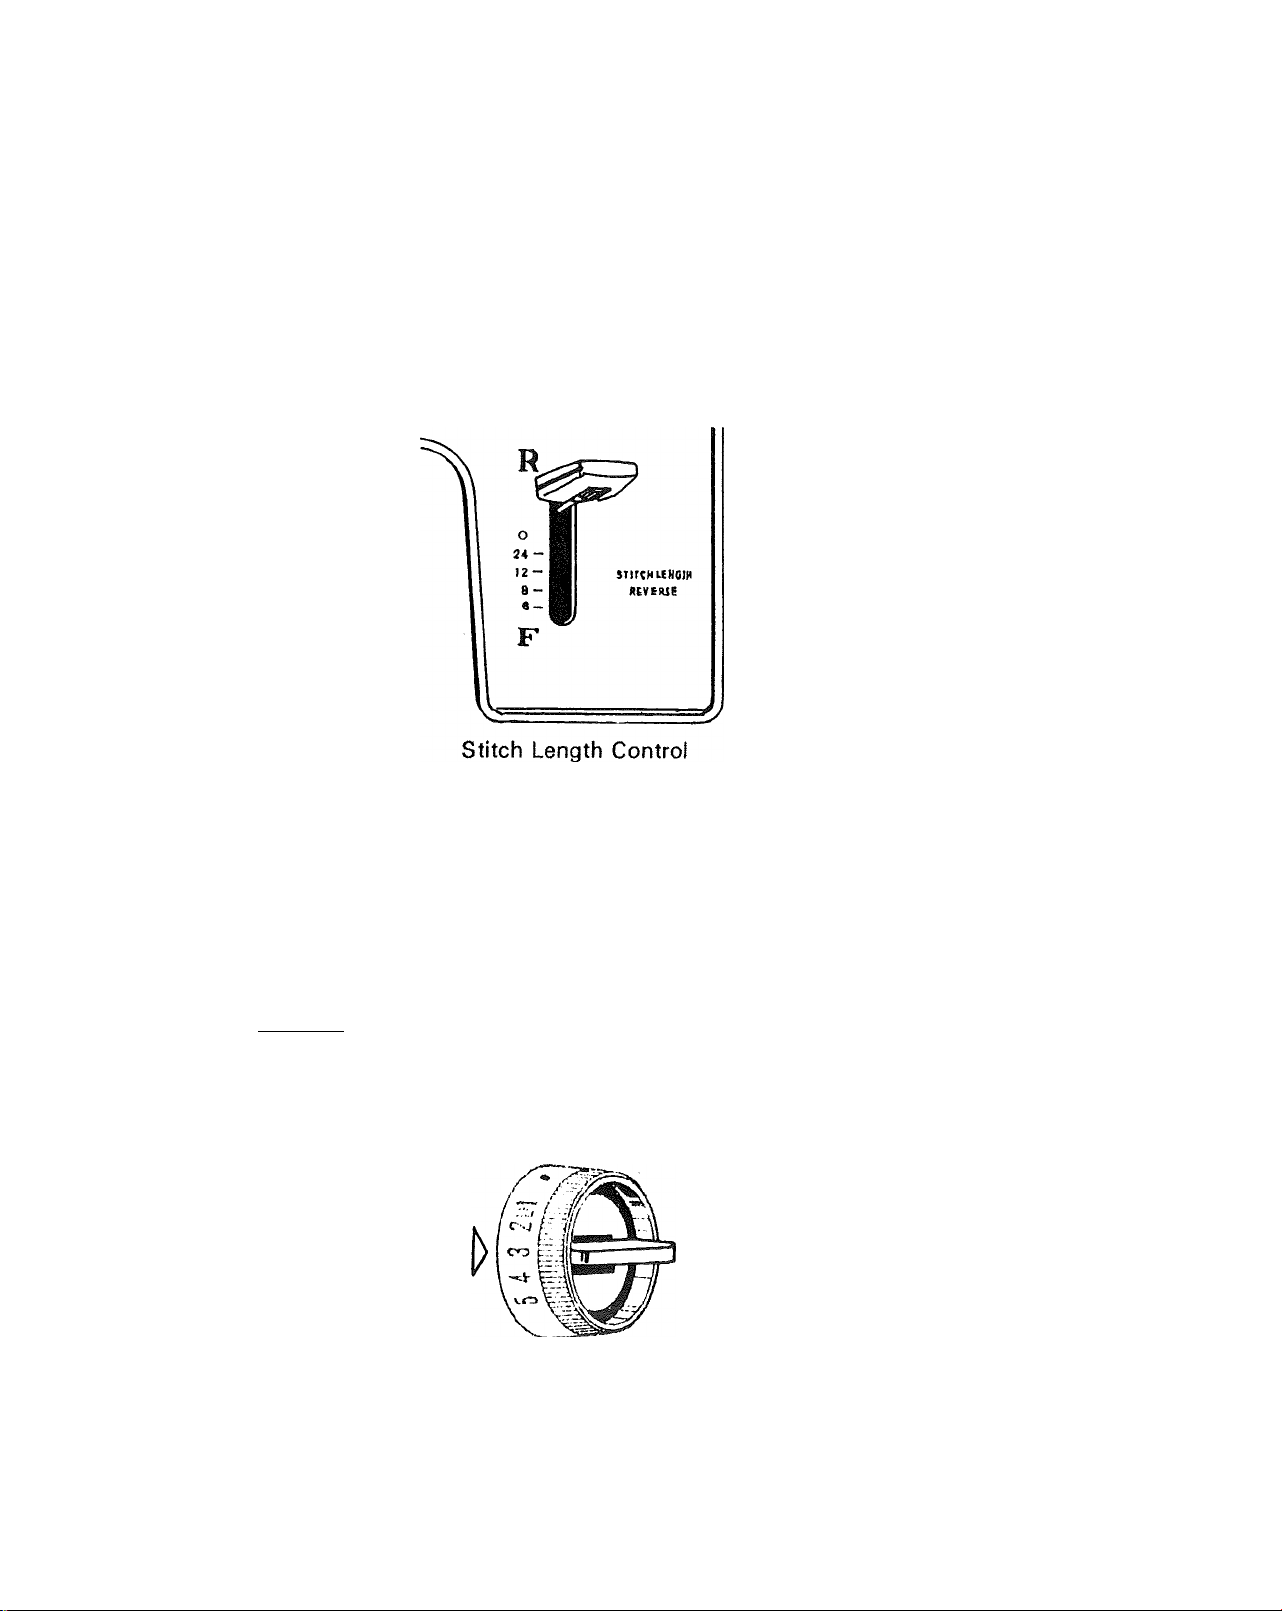
It is best to begin and end seams with a few stitches taken In reverse. This Is
called back tacking. Back tacking fastens the end of the seams firmly and
prevents raveling.
When reverse stitching Is needed, simply raise the Stitch Length Lever to R to
sew in reverse. The fabric will start feeding backward and seam will be fastened.
The center portion of this control gives you the means of varying the stitches on
the Special Stitch Dial. When the control is turned with the red mark on top the
machine sews forward only. When the control is turned with black mark on top
the forward designs are varied by machine sewing in a forward and reverse
manner. Carefully read directions given In the next section of the book in order
to accomplish the various stitches correctly.
Special Stitch Variegator
Page 17
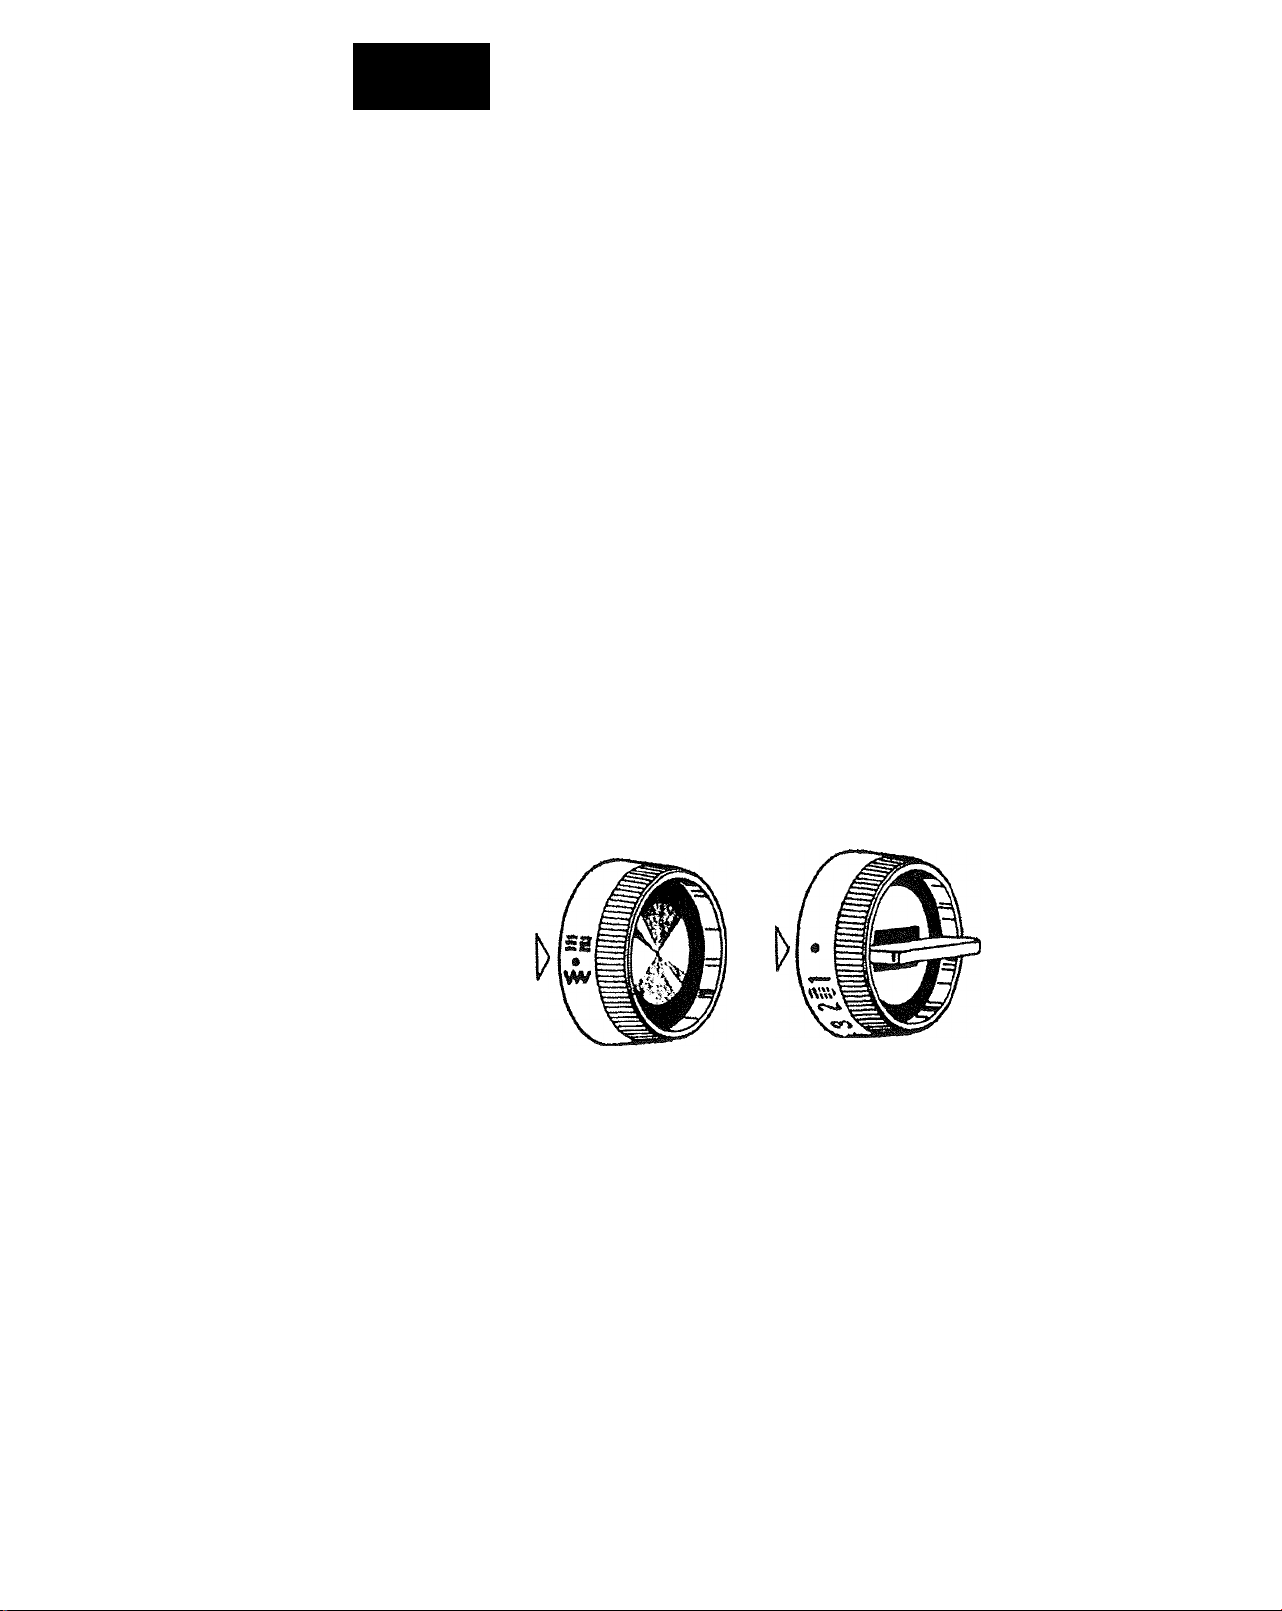
Section I
Page 16a
A.,1 smohas
Sa^Xo^sScf V W la. ba sa. with .ha Rad mark on .op.
fading .ha con.ro,, maka sura naadla is abova .abrio and S.,.ch Wid.h
Control is at red dot.
Tha sauing i,lus.ra.ad abova is .ha ona
setting you may straight stitch, ottinns of vour other controls, carefully
Page 18
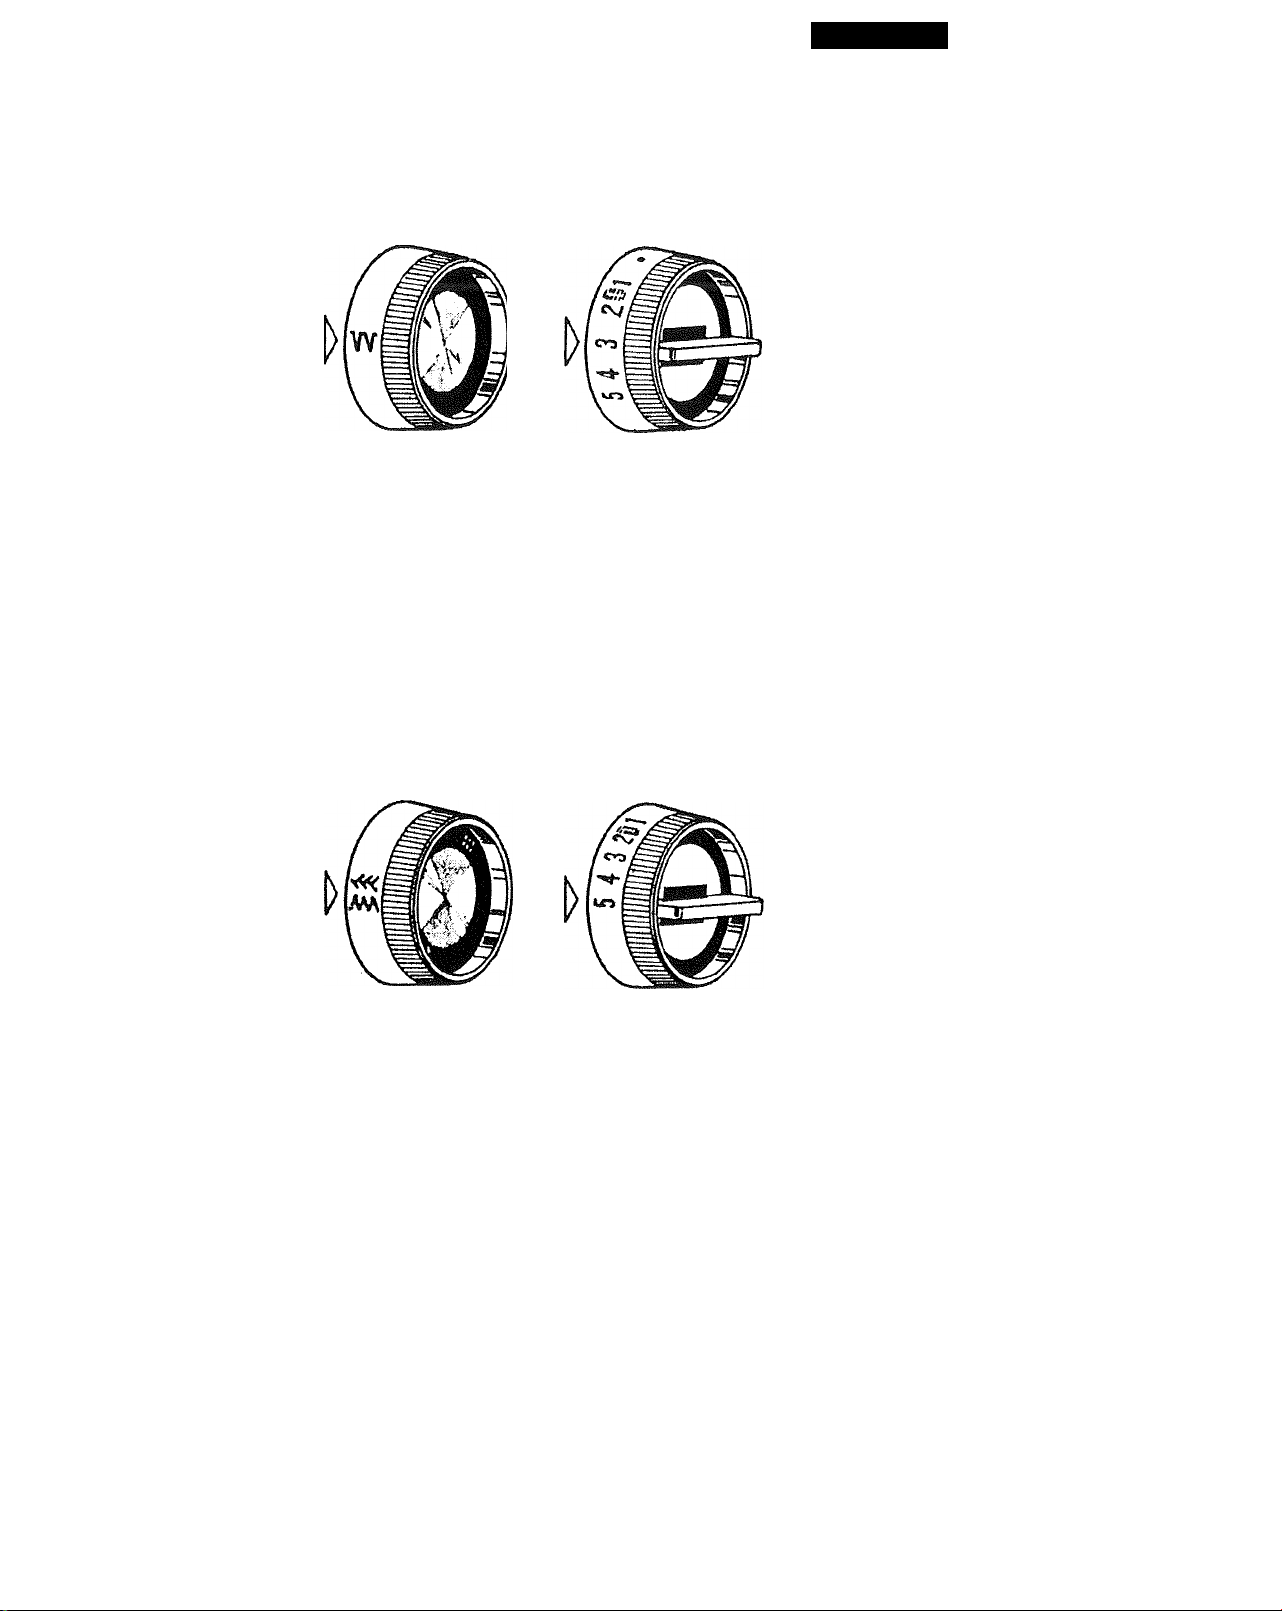
Page 16 b
Blind hems are made by using the setting shown above with the Stitch
Variegator set with the Red mark on top.
You will find that much of your sewing is in the mending category. For this
reason you have been provided with a stitch for the repair of tears. Use of the
stitch setting shown is given in more detail in the next section under Mending;
Maxi Stitch Stretch and Feather Stretch stitchings.
Page 19
Section I
Page 17
OTHER ADJUSTMENTS OF MACHINE IN SEWING ,
In addition to the obvious controls of your machine there are other small regulators
and controls to aid you in using your sewing machine.
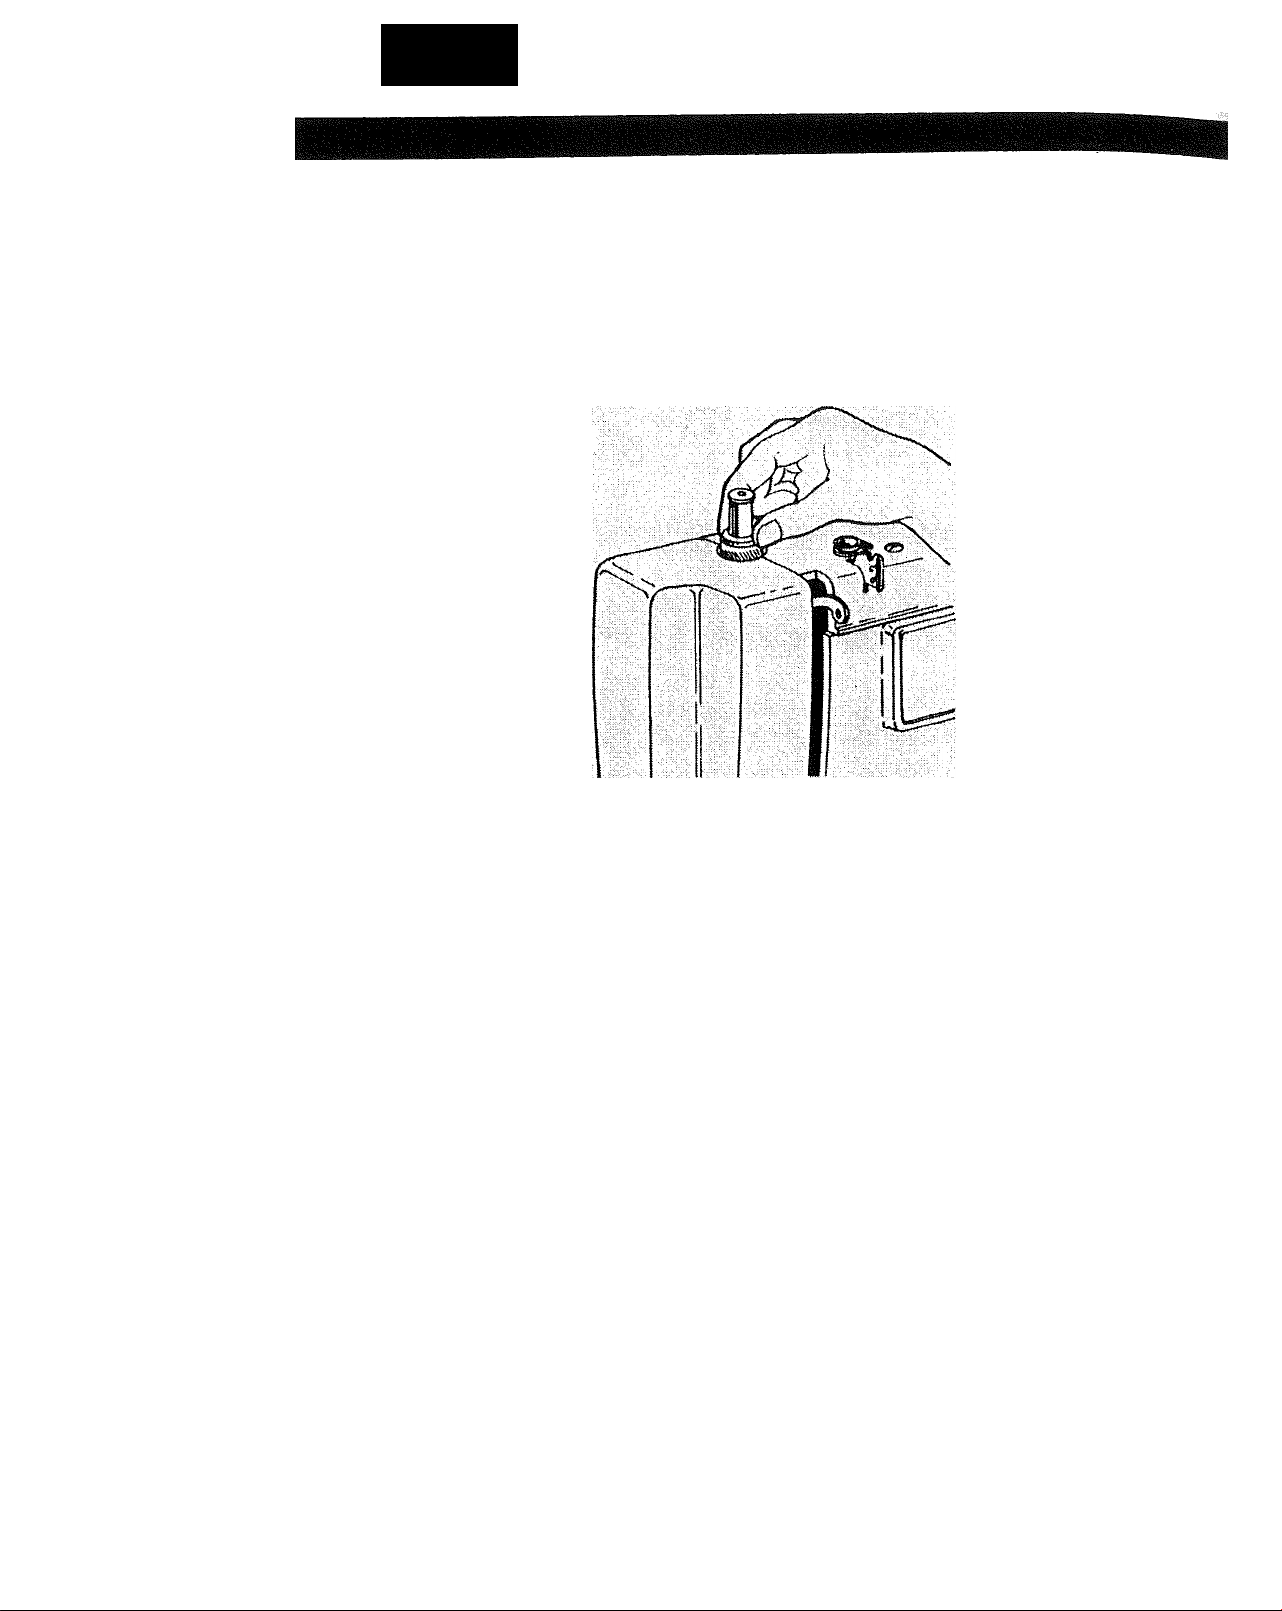
PRESSER FOOT PRESSURE REGULATOR
Push down outer ring of presser foot pressure regulator (See above illustration). This
will release pressure of presser foot. To increase pressure, push down inner pin until
suitable pressure is obtained. For ordinary sewing, the inner pin should be all the way
down. •
Insufficient pressure may cause poor feeding of the fabric, skipped stitches, or
difficulty in guiding the fabric.
When sewing multiple thickness or heavy fabric reduce the pressure. Increase
pressure when sewing lighter weight fabrics. If feed dog or presser foot marks
appear on the fabric, reduce the pressure.
Page 20
Page 1 8
FEED DOG CONTROL
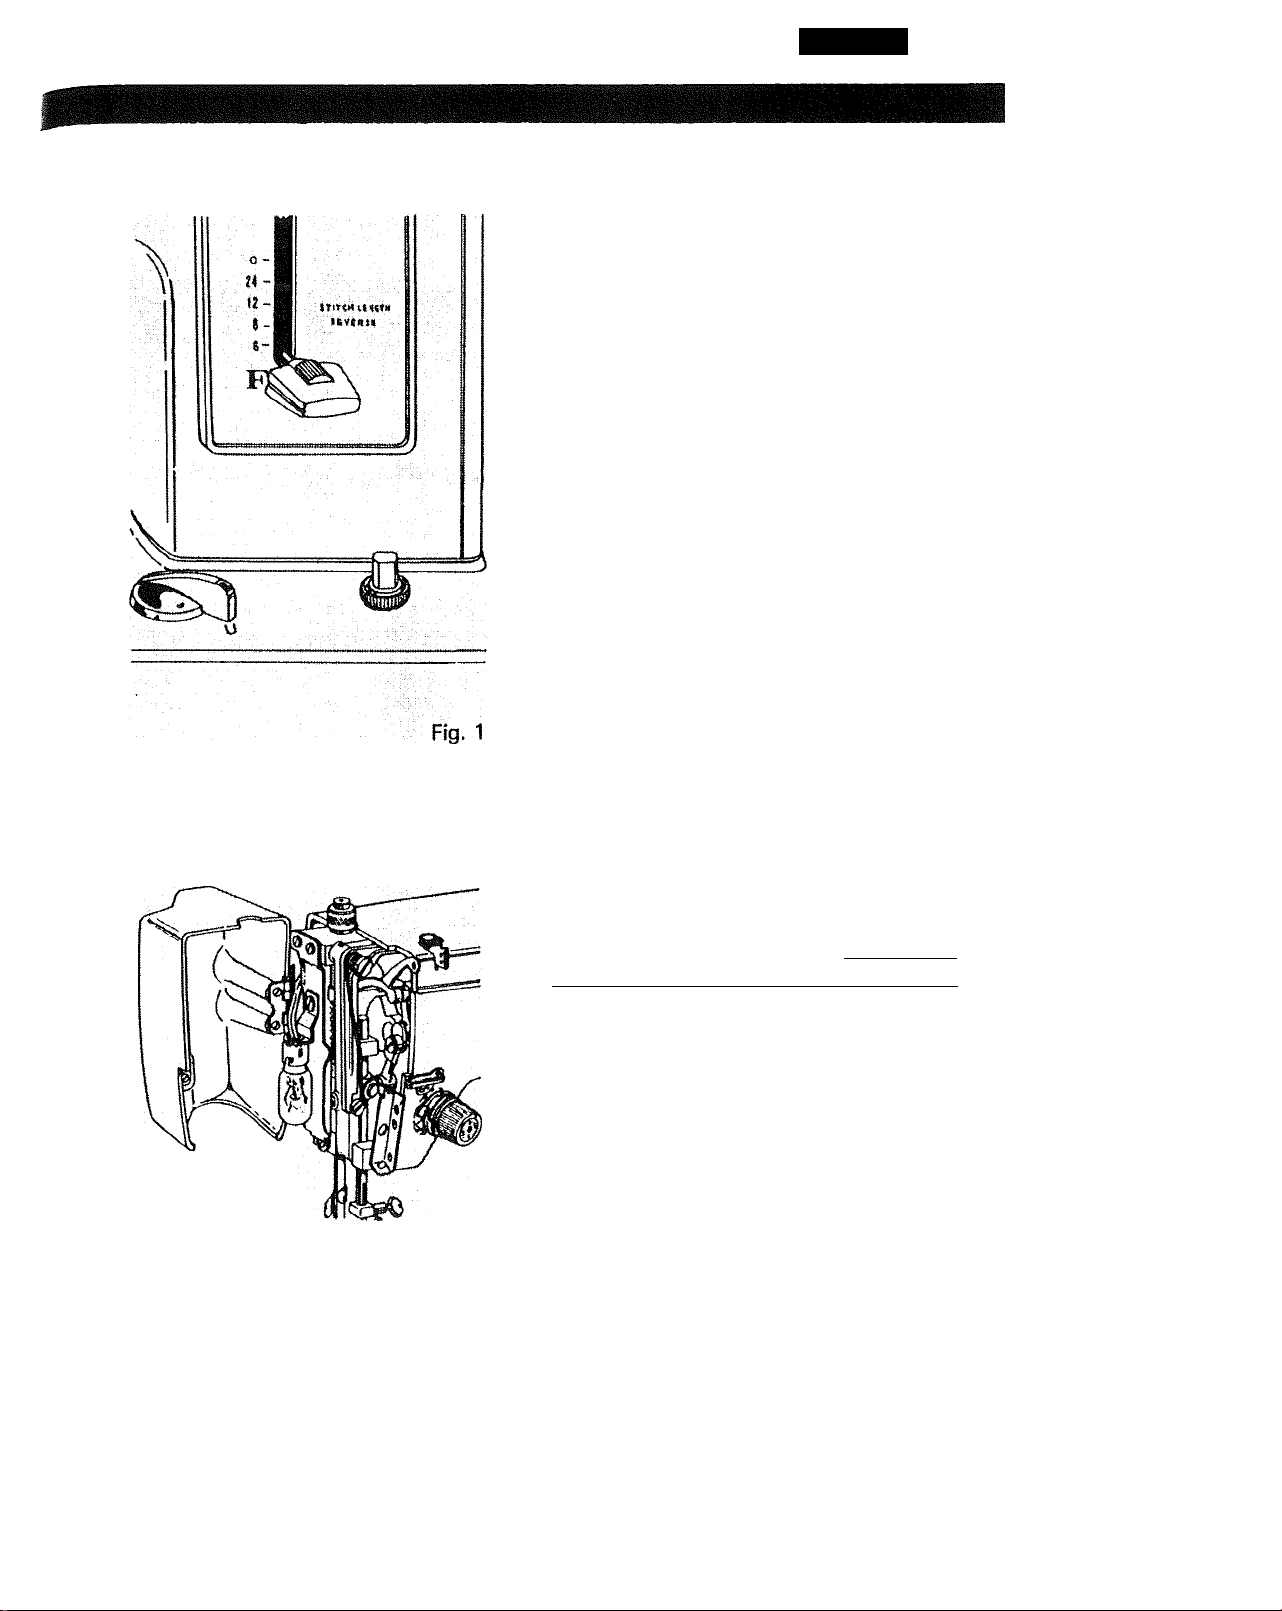
The feed dog control is located on the
right front of the machine bedplate.
There are a few times when you want to
control the feeding of the fabric
yourself. When the control is set to the
left, the feed dogs drop and do not
move the fabric.
For most of your sewing the feed dog
control is turned to "U". (Feed dog up)
Fig. 2
SEWING LIGHT
The light and power switch shown at
left provides the electric current for the
motor as well as the light. In order to
operate the machine, this switch must
be on.
To turn on the light, depress the switch.
If you are interrupted while sewing and
must leave the machine unattended,
just turn off the switch and the machine
cannot be started accidentally.
The sewing light is located inside the
face cover plate as shown. To replace
the bulb, push switch to off, unplug
machine and swing the face cover plate
open. Push up on the bulb slightly and
turn bulb to the left. Remove bulb from
socket. Push in new bulb and turn to the
right.
Page 21
Section I
Page 1 9
SEAM GUIDES .
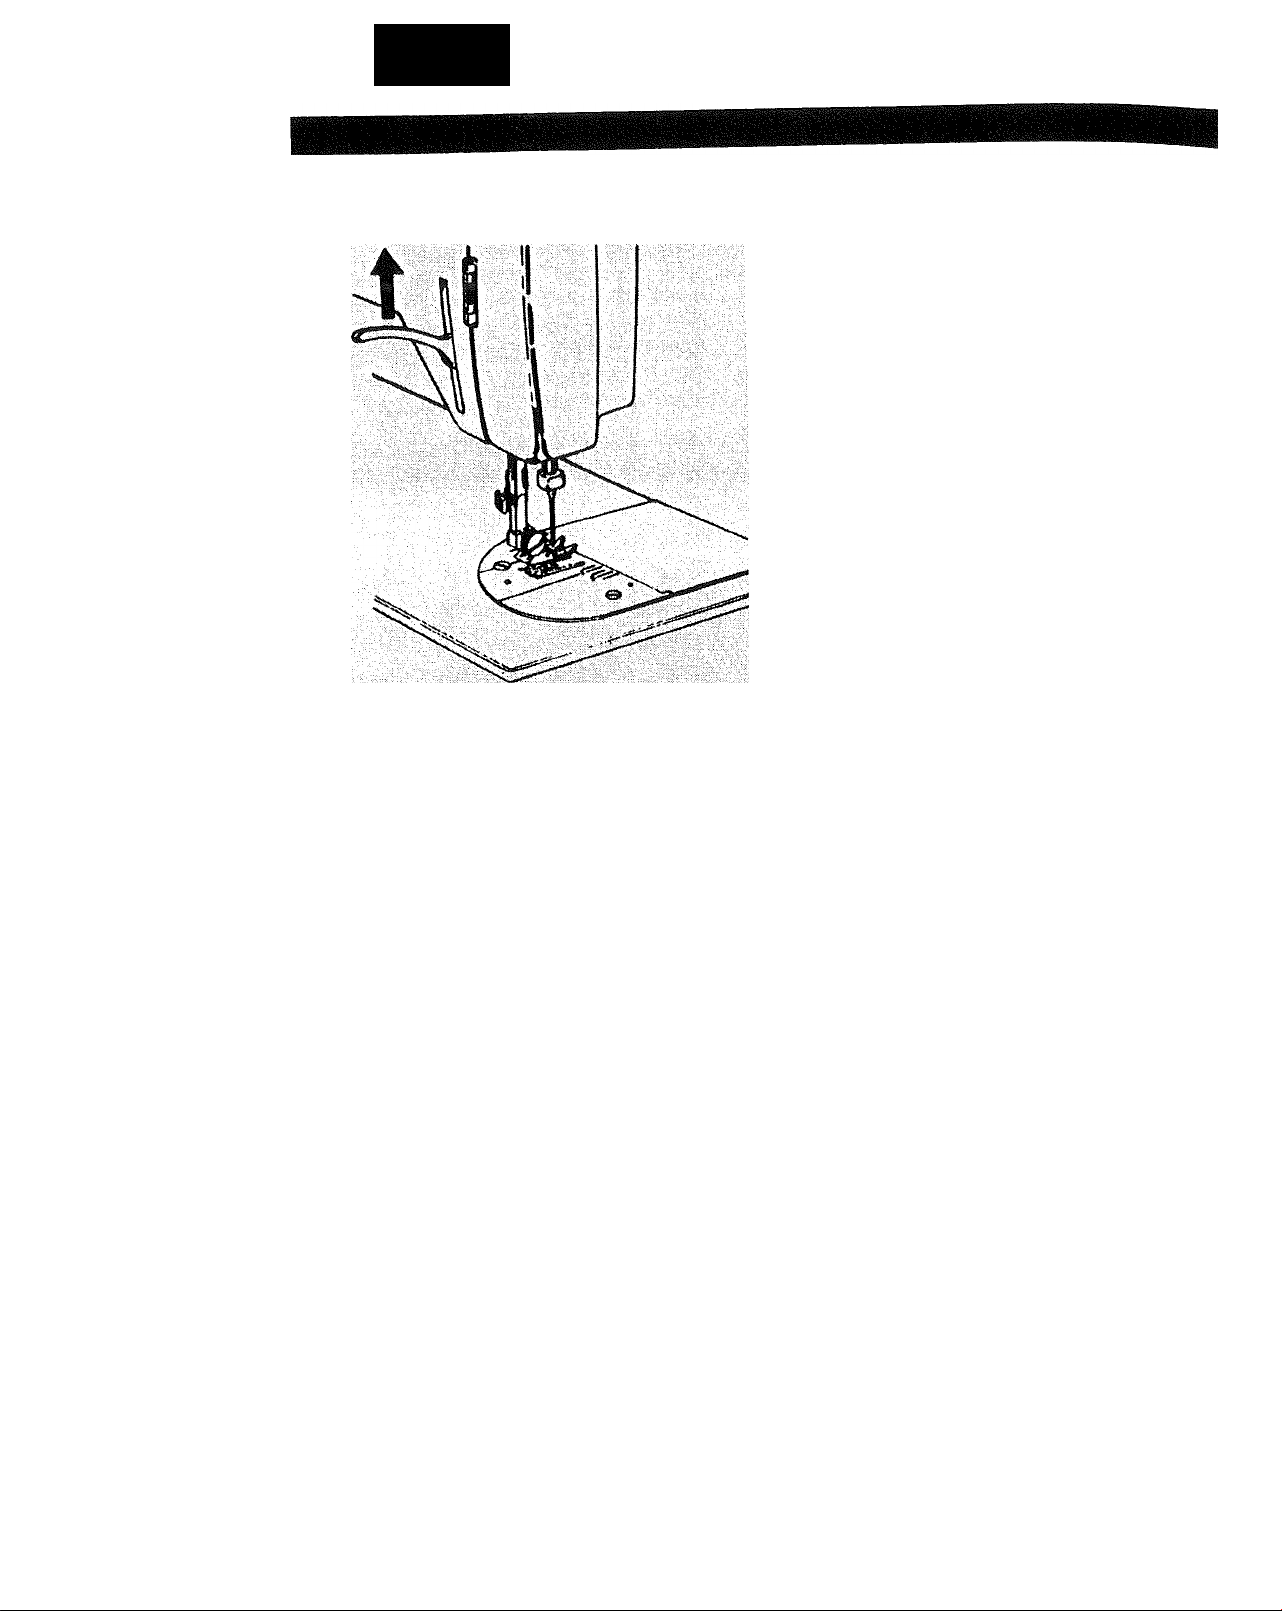
Seam guides are printed on either side
of the needle plate to aid you in guiding
your fabric. THE GUIDE LINE
EXTENDING ABOVE THE RIGHT SIDE
OF THE NEEDLE PLATE IS THE "ALL
IMPORTANT" 5/8" SEAM LINE.
PRESSER FOOT LEVER
To aid you in the placement of heavy
fabrics under the presser foot, the lever
can raise foot beyond the normal "up"
position. This is also an aid in changing
your presser feet.
Page 22
ACCESSORIES
Section
Page 20
NEEDLES
lit
Tr”!
Fig. 1
Use KENMORE needles. The size of the
needle should conform with the size of
the thread and both should be suitable
to the fabric (See next page).
Never use a bent needle or one with a
blunt point.
Fig. 1. shows you the exact length of
your needle. Be sure you never use one
in your machine that is not this exact
length.
You will find among your accessories a
"Q NEEDLE"- with blue shank. This
special needle is to be used when
sewing knits and certain difficult
synthetic fabrics. If you experience
skipped stitches in any of your sewing,
use "Q nkedlf:”.» .
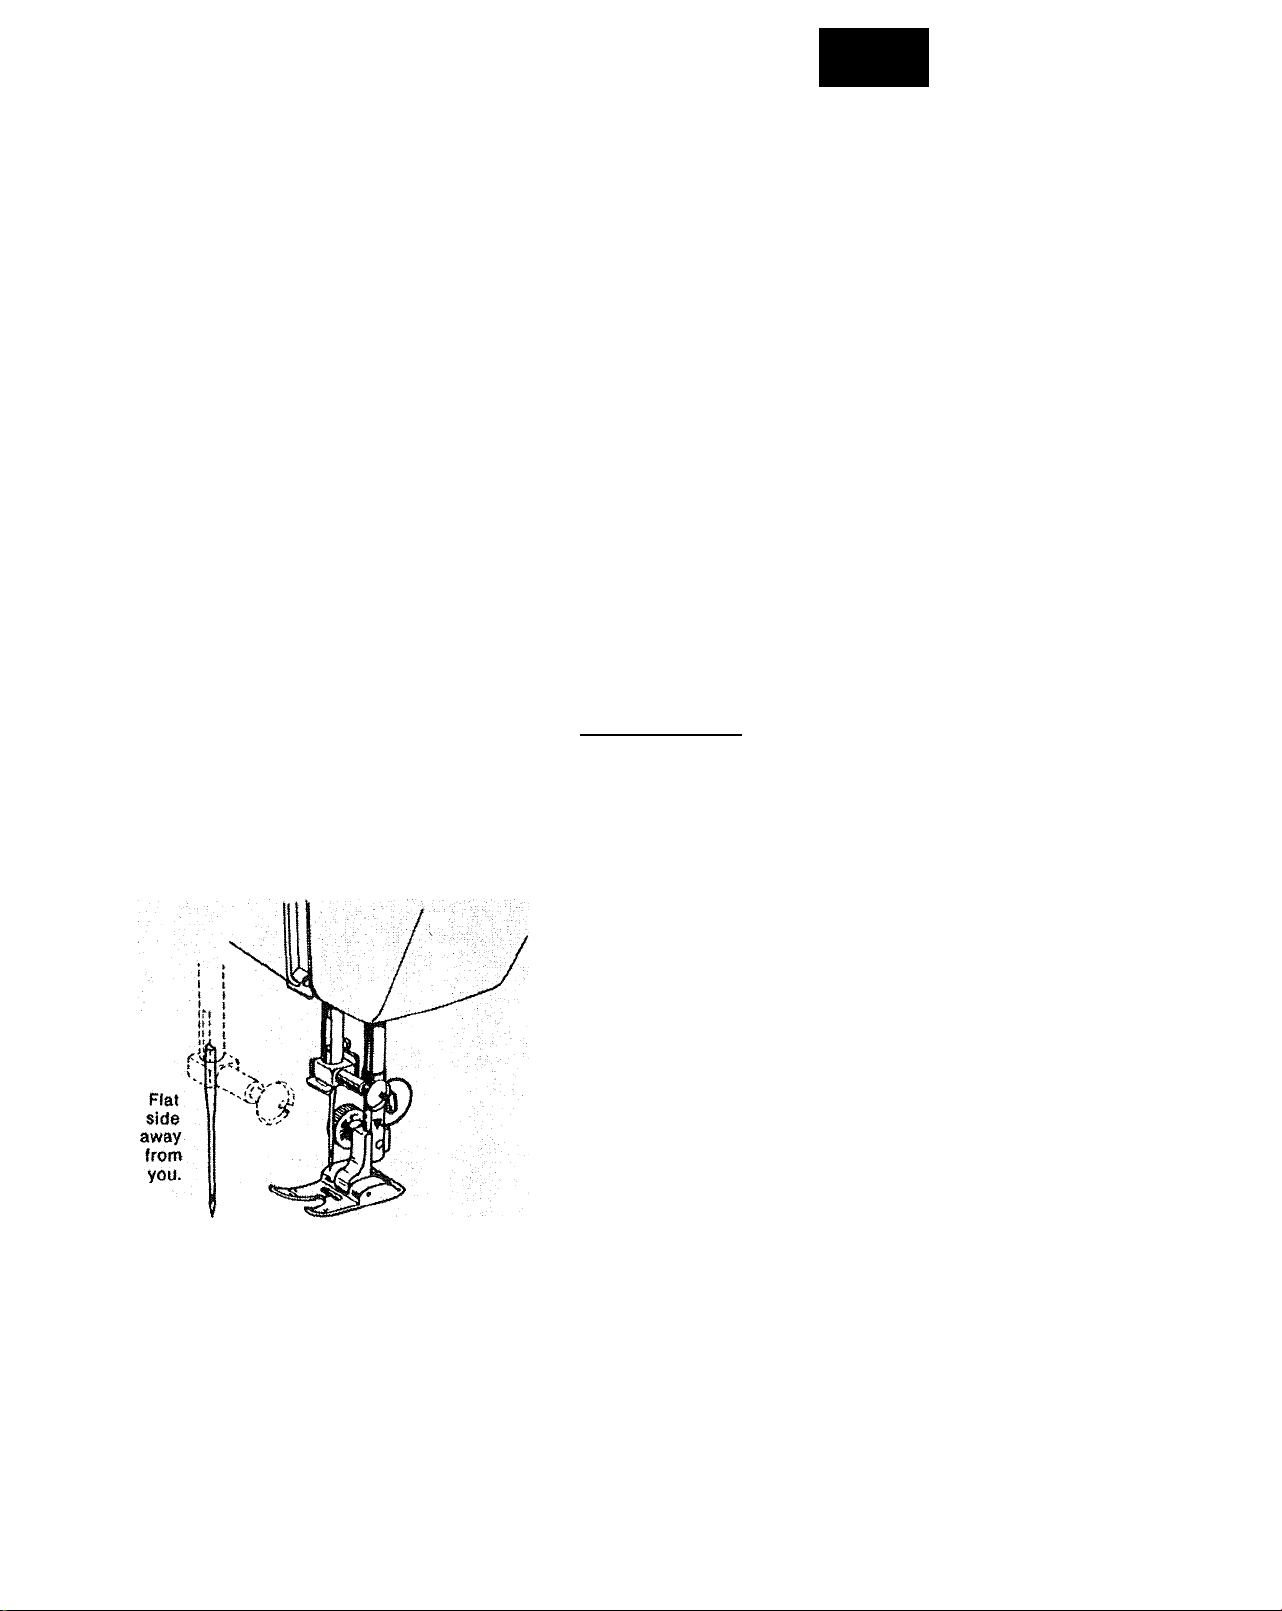
FLACEf^ENT OF NEEDLE
Raise needle bar to its highest position
by turning the hand wheel toward you.
Loosen the needle clamp screw. Hold
ing the needle with the flat side away
from you, slip the needle into the needle
bar. When it is in as far as it will go,
tighten the needle clamp screw with
screwdriver provided in the accessory
kit.
Page 23

Section
Page 21
NEEDLE, THREAD AND FABRIC CHART
THREAD SIZE
Polyester Core/Cotton Wrip
Fine Mercerized Cotton
Polyester Synthetic
Silk A
60 Mercerized Cotton
Polyester Synthetic
Silk A
50 Mercerized Cotton
Mercerized Heavy Duty
Polyester Synthetic
Silk A
Heavy Duty Mercerized Cotton
Polyester Synthetic
Silk A
Silk Buttonhole Twist
NEEDLE
SIZE
9 or 11
14 or 16
18
16,18 or
•QNEEDl-E".
FABRIC
Lightweight; Batiste, Dimity,
Chiffon, Silks, Synthetic Jerseys,
Fine Lace, Organza, Crepe,
Taffettà, Voile, Organdy
Mediurii Weight; Cotton, Cotton
Blends, percale. Gingham,
Shantung, Pique, Seersucker,
Satin, Knits, Vinyl, Suitings,
Linen, Wool Crepe, Leather
Medium Heavyweight: Corduroy,
Denim, Wool, Sailcloth, Wool
Flannel, Gabardine, Velvets,
Leather
Heavy weight: Coatings,
Upholstery, Cotton Duck, Heavy
Twills, Canvas
Decorative Top Stitching on all
types of fabric
Polyester Synthetic
60 Mercerized Cotton
“O SKT
{‘•Q NEEDLE"..
and
Q FOOT“..)
Synthetic Knits and Stretch Fabrics:
Polyester Double Knits, Nylon
Tricot, Jersey, Stretch Terry,
Spandex, Ciré Tricot
Page 24
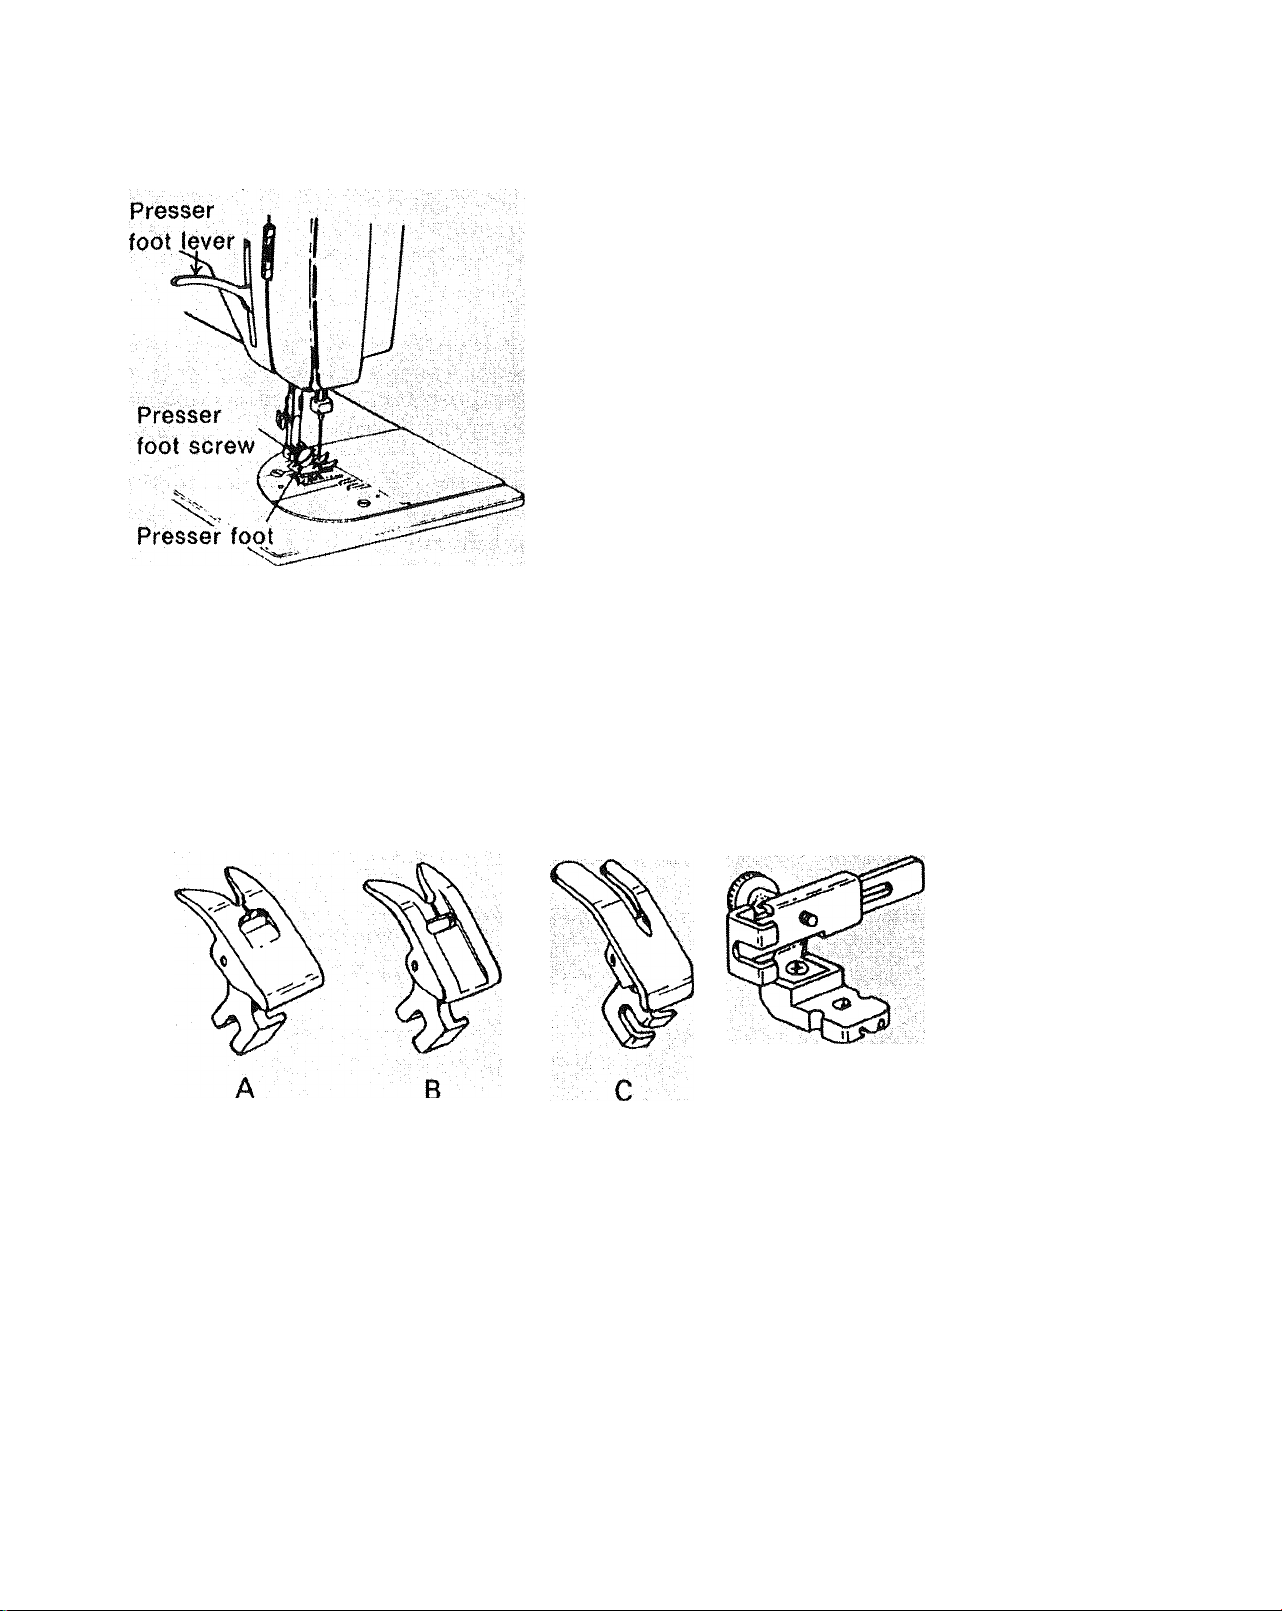
PRESSER FEET
Thé various presser feet that come with
your Kenmore Sewing Machine are
designed to help you to do every kind of
sewing easily and perfectly.
To change the presser foot:
1. Raise the needle to its highest
position by turning hand wheel
towards you.
2. Raise the presser bar to its highest
position by lifting the presser foot
lever.
3. Loosen the presser foot screw. (You
do not need to remove the screw)
4. Choose the proper foot. Insert from
the front.
5. Tighten the screw using the large
screwdriver to make certain the foot
is secure.
You have been given a variety of presser feet:
A. Zigzag Stitch Foot
B. Satin Stitch Foot
C. Straight Stitch Foot
D. Zipper Foot
D
Page 25

Starting to Sewl
Now that you are familiar with the controls on your machine and with the
accessories provided for the machine, you are ready to start to sew with your new
Kenmore sewing machine. Below are some good habits to follow each time you sit
down to sew:
1. Check the needle-it should be straight, properly set and sharp on the point.
It should be the correct size for the fabric and thread being used. Change your
needle frequently. Many of the new fabrics made of synthetic blends tend to dull
the needles more easily than fabrics made of natural fibers.
2. Before placing the material on the machine, see that the ends of the threads have
been drawn about 4 inches to the rear of the machine. Hold on to threads during
the sewing of the first 3 or 4 stitches of the seam.
3. Test the machine stitch on a scrap of fabric you plan to use. The fabric should be
double thickness. Adjust the machine for the length of stitch and tension suitable
to your fabric.
4. Fabric should be placed under the presser foot with the bulk of the material to the
left of the needle and the right edge of the material placed on the 5/8" seam
marking on the needle plate when making a simple searn.
5. Run the machine at a slow even speed. The more pressure you put on the speed
control, the faster the machine will sew.
6. Fasten each seam by back tacking at the beginning and end of the seam.
7. Always finish sewing each seam with the needle at its highest point.
8. Guide the fabric gently with your hand |n front of the needle. Never pull or hold
the fabric in such a way that the normal feeding is altered.
9. When turning the hand wheel manually, always turn it toward you.
Page 26
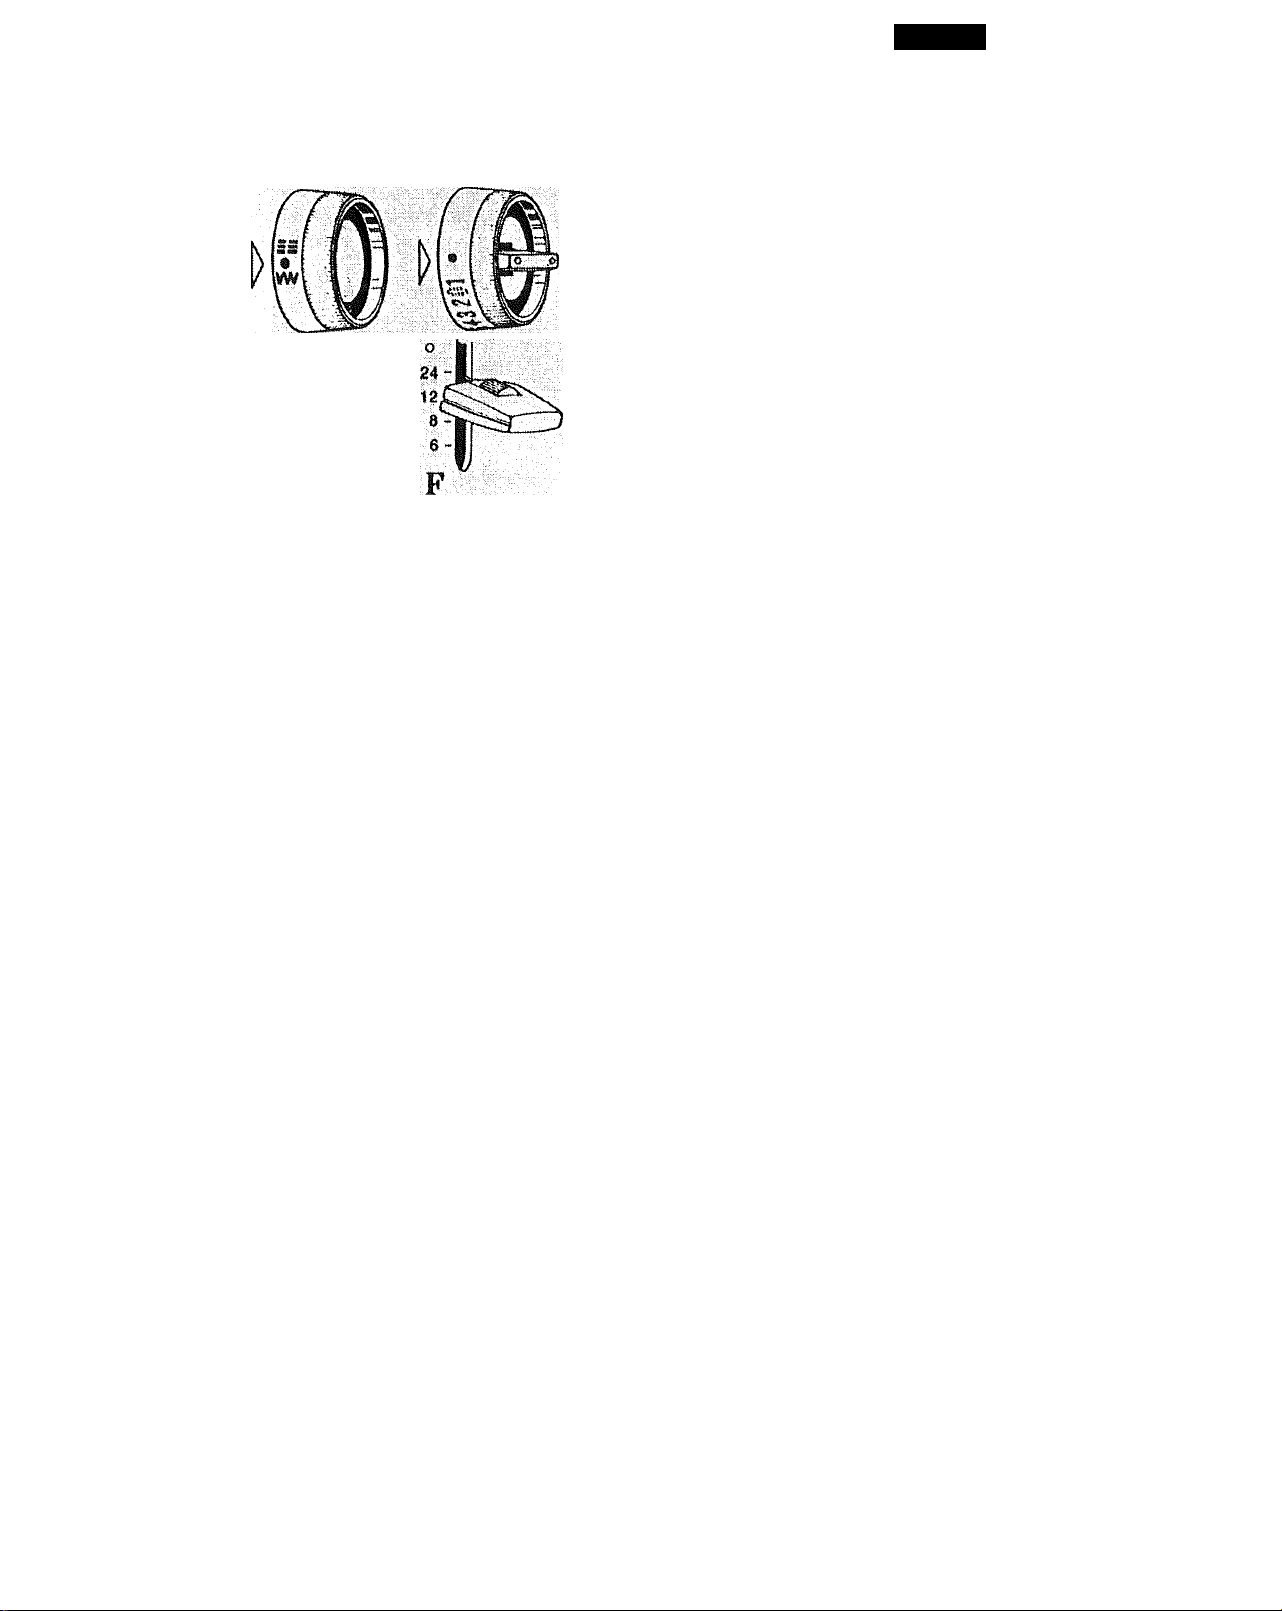
GAHMENT CONSTRUCTfOIM STITCHESi
STRAIGHT STITCHING
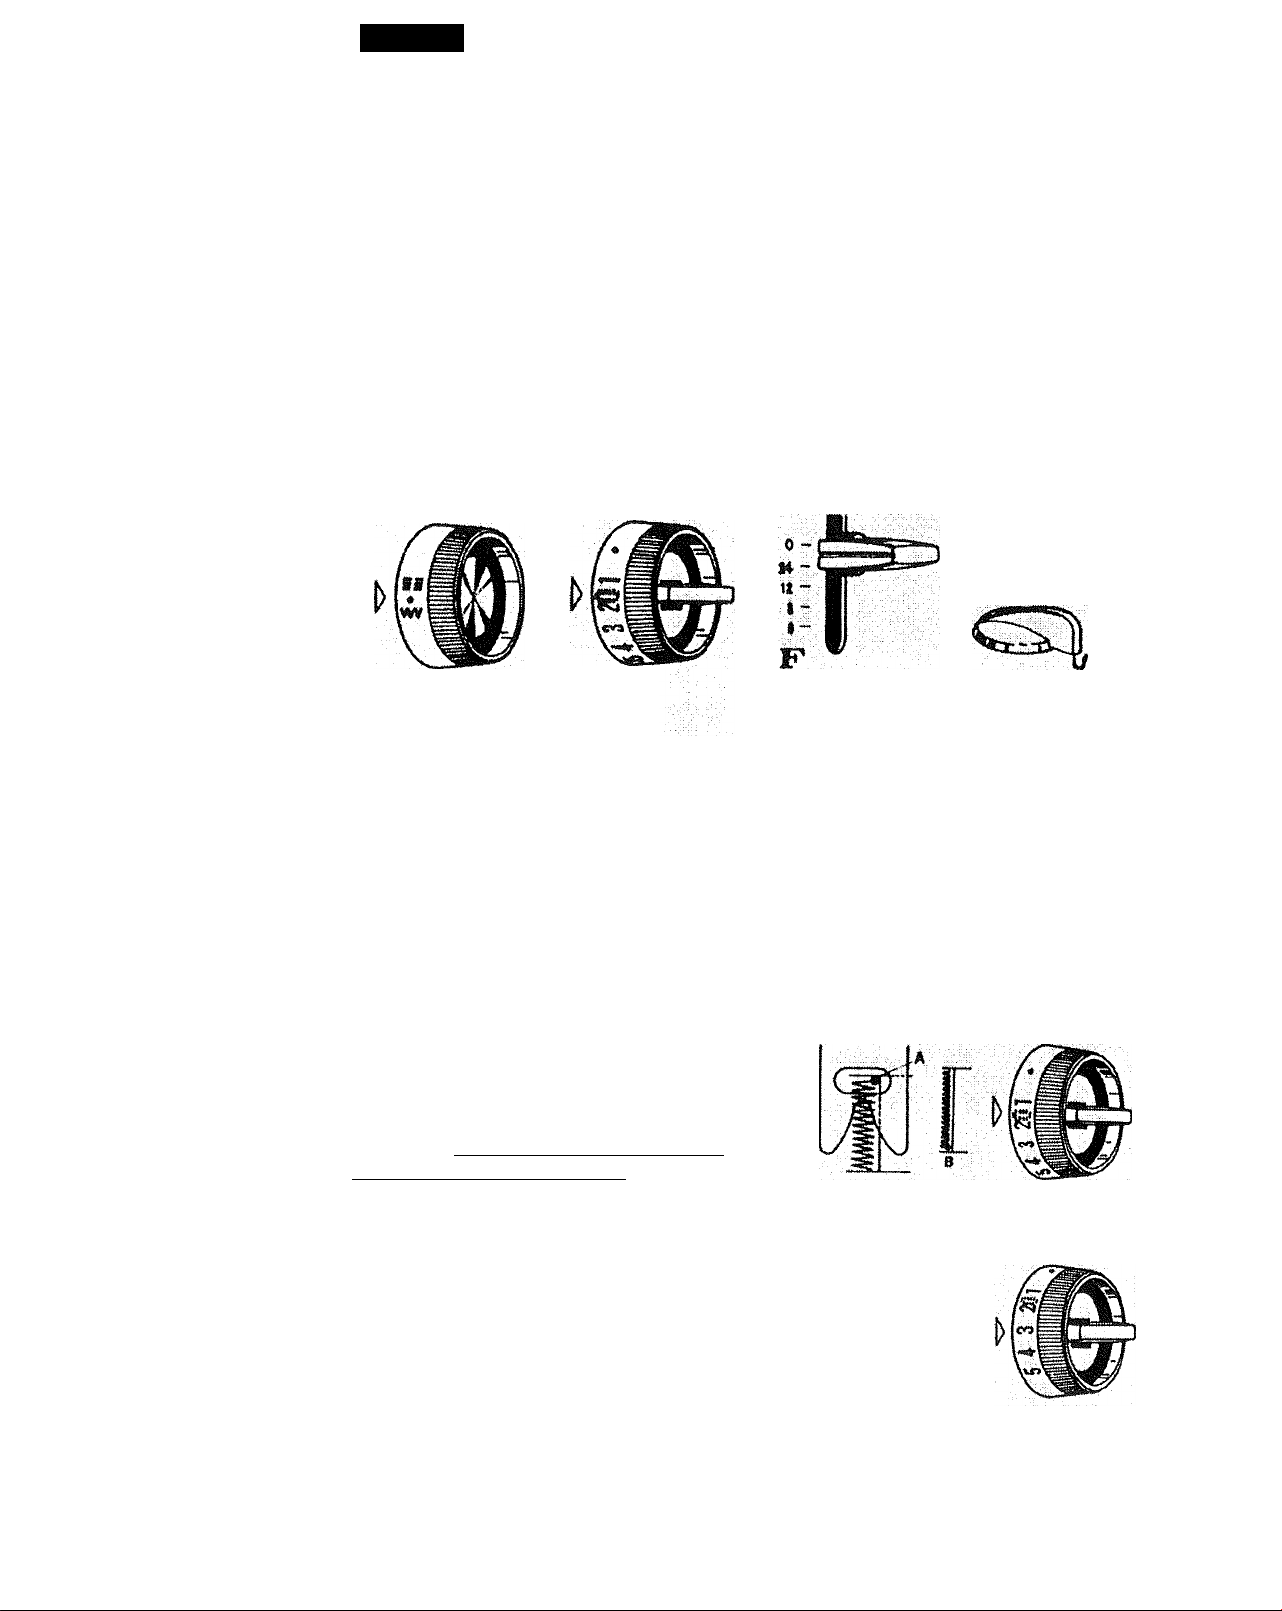
SETTINGS:
Special Stitch Dial -(Model 1250 only.
Special Stitch Variegator- Red mark on top
(Model 1250 only)
Stitch Width Control - Red Dot .
Stitch Length Control - 8 to 12
Straight Stitch Foot
Set your machine just as shown in the
illustration in order to straight stitch.
It is important that each dial have the
above setting. Before setting turn hand
wheel toward you, so that needle is
above fabric.
Page 2
(Model 1250)
Red dot to the
left(Model1240)
You will find in garment construction that you are doing two types of sewingtemporary and permanent.
1. Temporary stitching-Usually the longest stitch possible and often done on a
single layer of fabric. The various types of temporary stitching are:
Basting
Stay stitching
Guide line marking
Page 27
Page 3
Permanent stitching-This is the actual stitching that holds the garment together.
Much of this stitching is visible on the outside of the garment and therefore must
be good looking.
The best length stitch to use for medium weight fabrics is 10-12 stitches per inch.
This is in the middle range of the Stitch Length Control.
You must remember to lengthen the stitch for heavier fabrics, multiple layers of
fabric and thicker seams. Some of these seams are:
Common two layer seams
Curved two layer seams
Top stitched three layer seams
Top stitched four layer seams
When you have two seams crossing each other with considerable thickness, sew
slowly and carefully so the seam will be as strong as possible in this area.
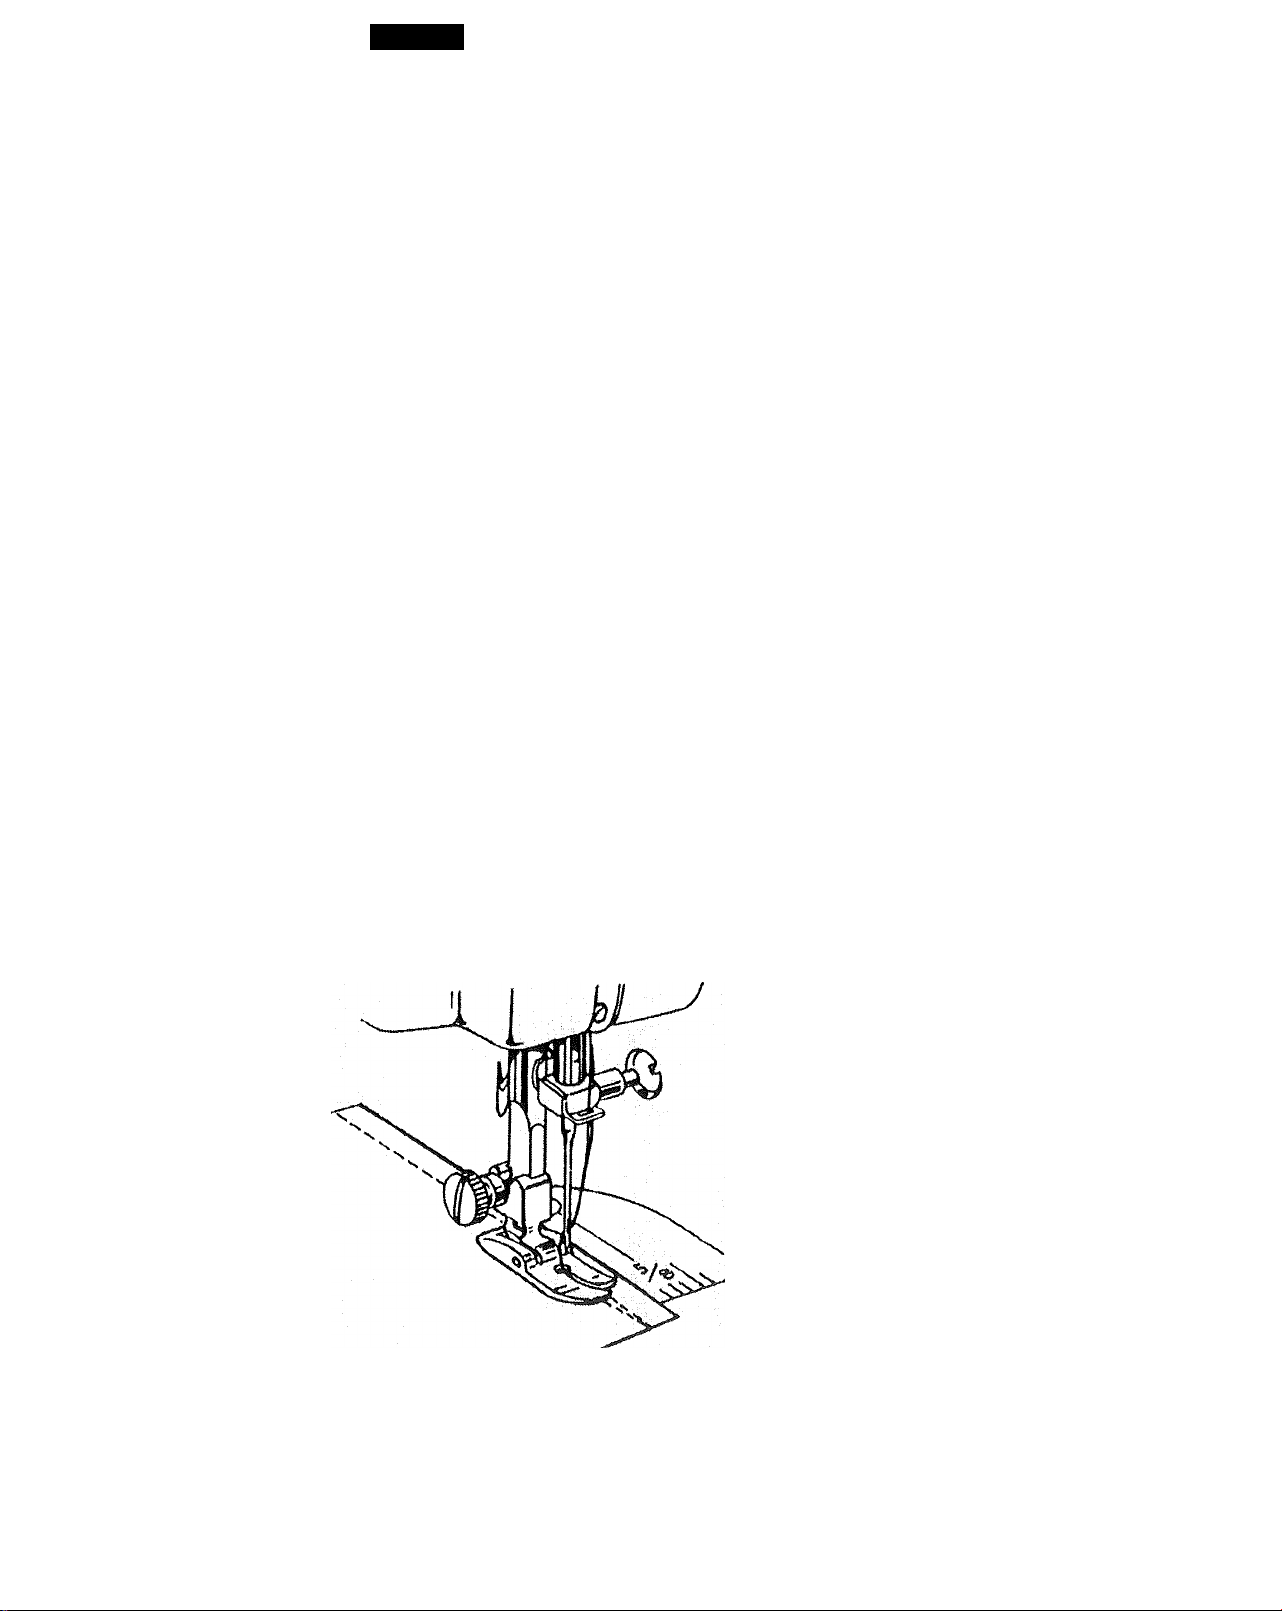
FASTENING A SEAM (Backtacking)
Be sure both threads are drawn back
under the presser foot. Lower needle
into fabric about inch from beginning
of seam. Raise the Stitch Length
Control to R and stitch in reverse until
needle reaches beginning of seam.
Lower the control to again stitch
forwards and complete seam. When
you reach the end, raise the control and
sew back over ]4 inch of completed
seam.
Page 28
(Model 1250 only) o
^ ^ ^ ^ ^ ^ ^ ^ ^ ^ ^ 24
12
■"■ ^ ': 8
■ ■ ■■:.■, 8-
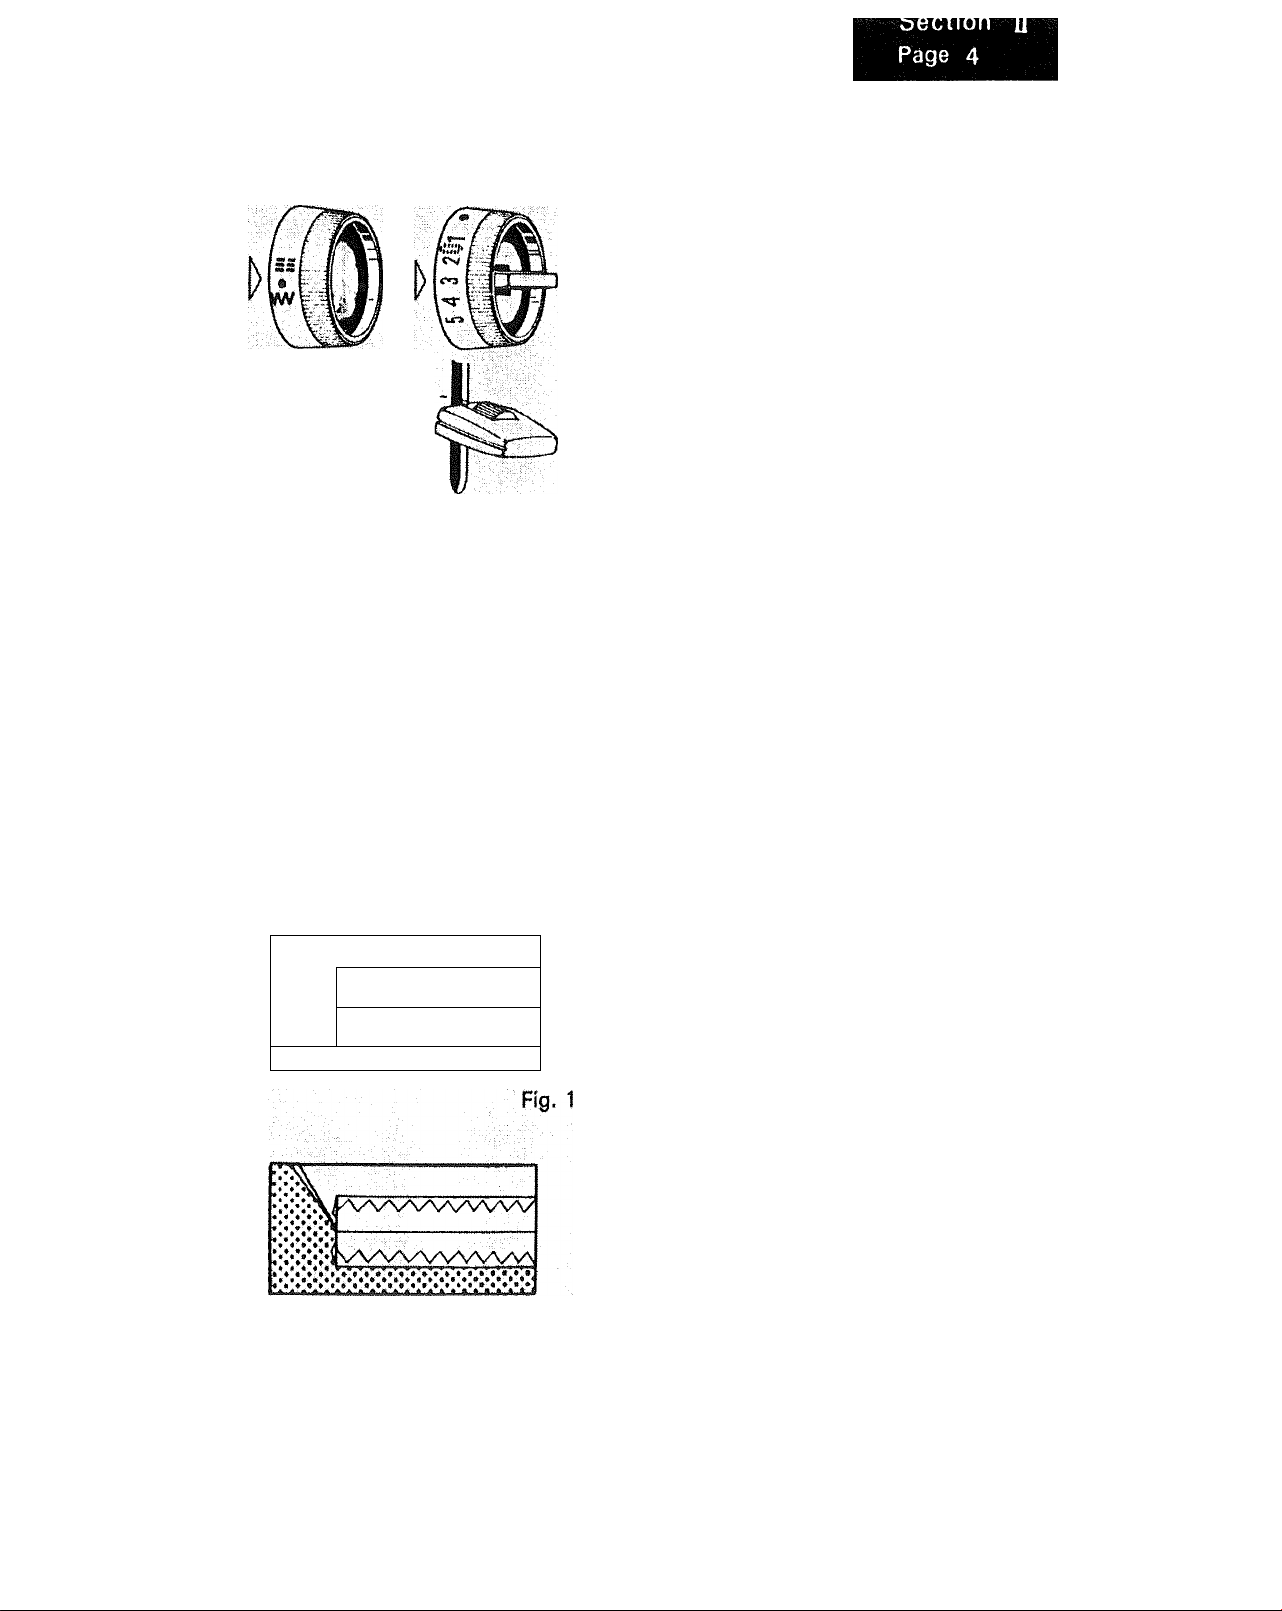
ZIGZAG STITCHING
SETTINGS:
Special Stitch Dial -I® ¡¡¡(Model 1250 only)
Special Stitch Variegator- Red mark on top
(Model 1250)
Red dot to the
left (Model 1240)
Stitch Width Control
Stitch Length Control
Zigzag Stitch Foot
This type of stitching greatly expands
the use of your machine. This is the
feature that enables you to overcast
seams, applique and monogram.
Simply use the settings indicated in the
illustration for the simple zigzag. Follow
directions given below and in the
following pages for more specific uses.
- 2 to 5 ’
-Any setting except
White Dot
* *
<;7VVVV7VVVV';
‘.'.•.•A
X*.*,*.*
»*4*il***»*«
*********** *«••••***•'
OVERCASTING
This is one of the more frequently used
zigzag stitches in garment construction.
You may want to overcast along the raw
edge of each seam allowance or fold the
raw edge toward the garment and
stitch.
Fig. 1 shows the raw edge finished.
Fig. 2 illustrates the folded edge stitch
ed.
Stitch so the needle pierces the fabric
just short of the outside edge. Raw or
worn edges of older garments can be
overcast to prevent further raveling.
Fig. 2
Page 29
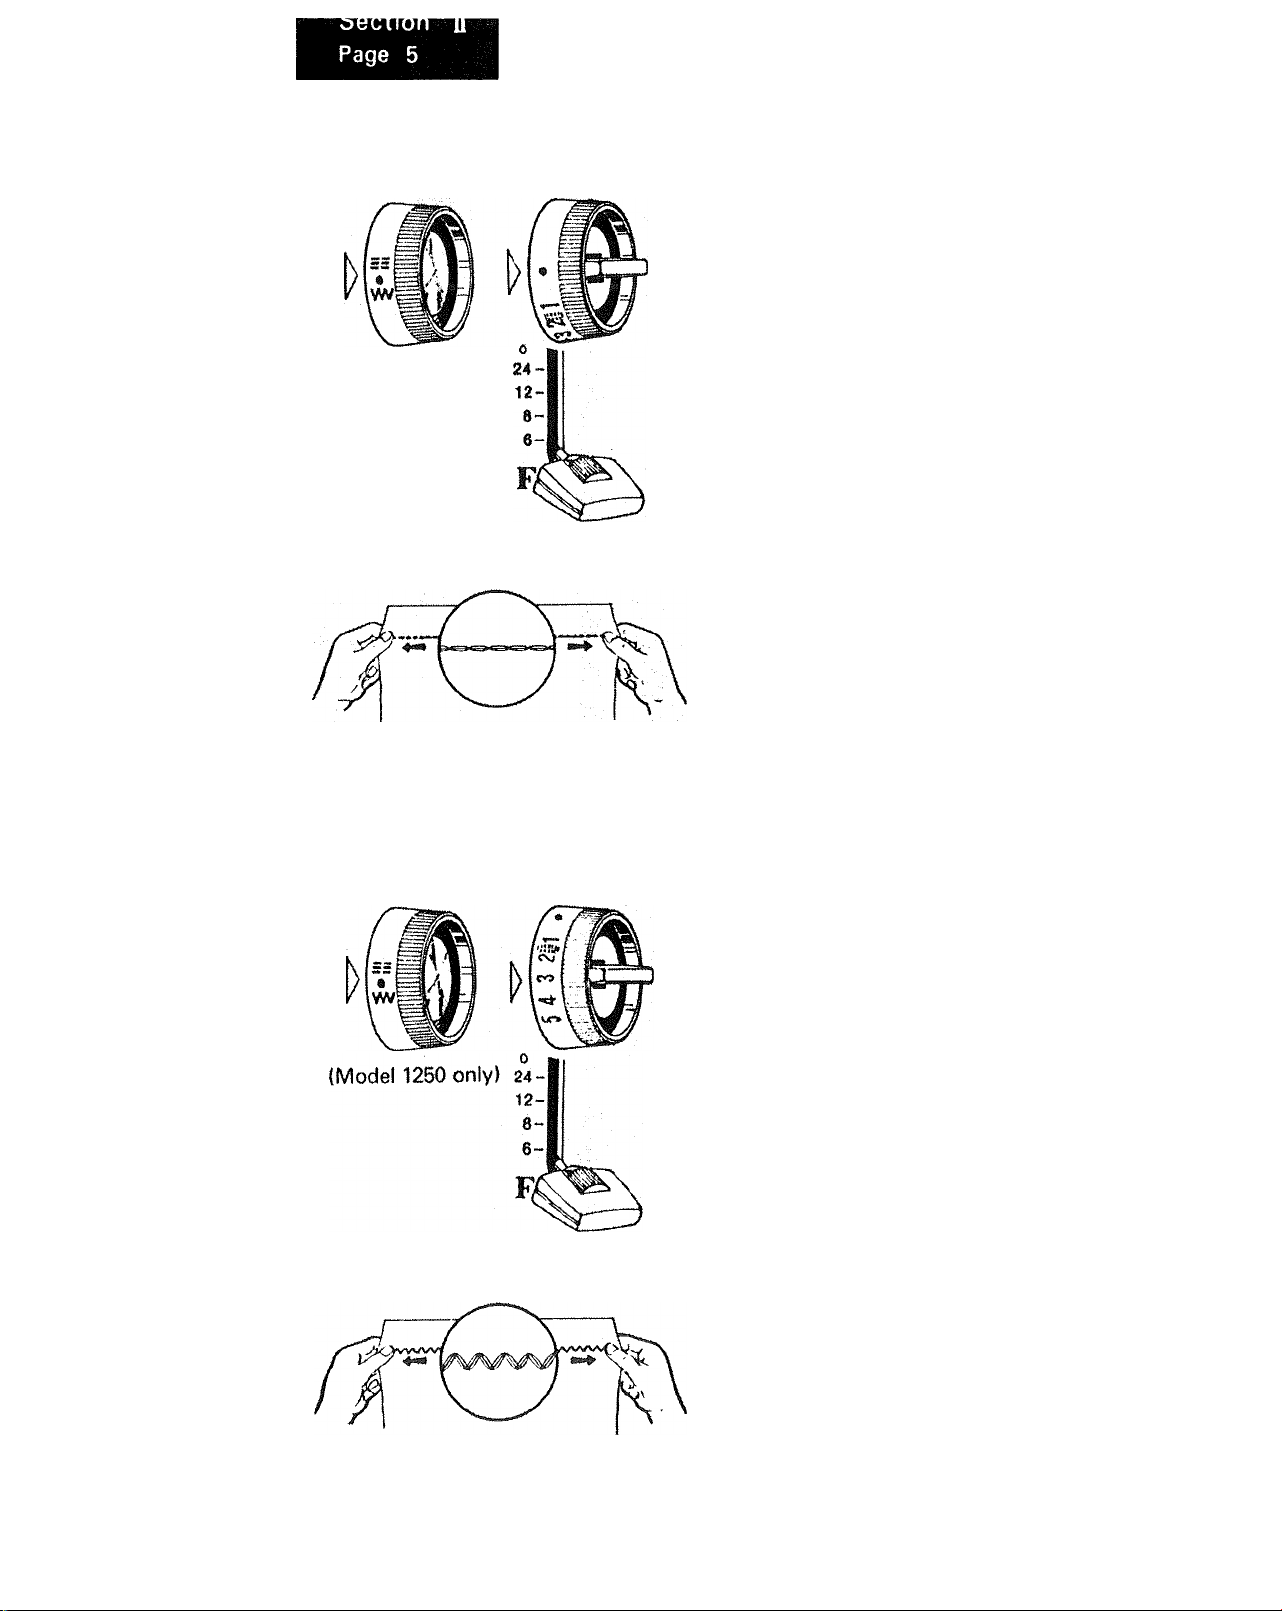
STRAIGHT STRETCH
STITCHING (Models 1^40, 1250)
SETTINGS:
Special Stitch Dial - f®!" (Model 1250 only)
Special Stitch Variegator-Black mark on
top (Model 1250)
White circle to
the left
(Model 1240)
Stitc Width Control - Red Dot
Stitch Length Control - All the way down
Straight Stitch Foot
Use this special stretch stitch with knitted
fabrics and othre fabrics that stretch. iSew
as you do a regular straight stitch seam.
The machine will make triple lock stitches
back and forth which gives the stretch to
the seam. See illustration.
This stitch enables you tp press open your
seam as with any straight stitched seam.
The seam will stretch with the fabric
without breaking the thread.
This is also a good stitch to use on curved
seams that will receive a great deal of
strain when worn, such as in children's
shorts and slacks as well as adult sport
clothes.
RICK-RACK STRETCH
STITCHING (Models 1240, 1250)
SETTINGS:
Special Stitch Dial - J®l!l (Model 1250 only)
Special Stitch Variegator-Black mark on
top (Model 1250)
White circle to
the left
(Model 1240)
Stitch Width Control - Any number 2 to 5
Stitch Length Control - All the way down
Zigzag Stitch Foot
Use this special stitch for all-purpose
heavy duty sewing of stretch fabrics.
Sew as you do a regular plain zigzag
seam. The machine will make triple lock
stitches back and forth of a fixed stitch
length, to give the stretch to seam.
For further directions, see GENERAL
GUIDANCE FOR SEWING ON
STRETCH FABRICS in the next section
of the book.
Page 30
Page 6
SPECIAL FiWISHING STITCHES
After the basic construction of your garment is finished, there are still many finishing
touches to be done. To aid your completion of your garment, the Kenmore has been
designed to do the following tasks that formerly had to be done by hand.
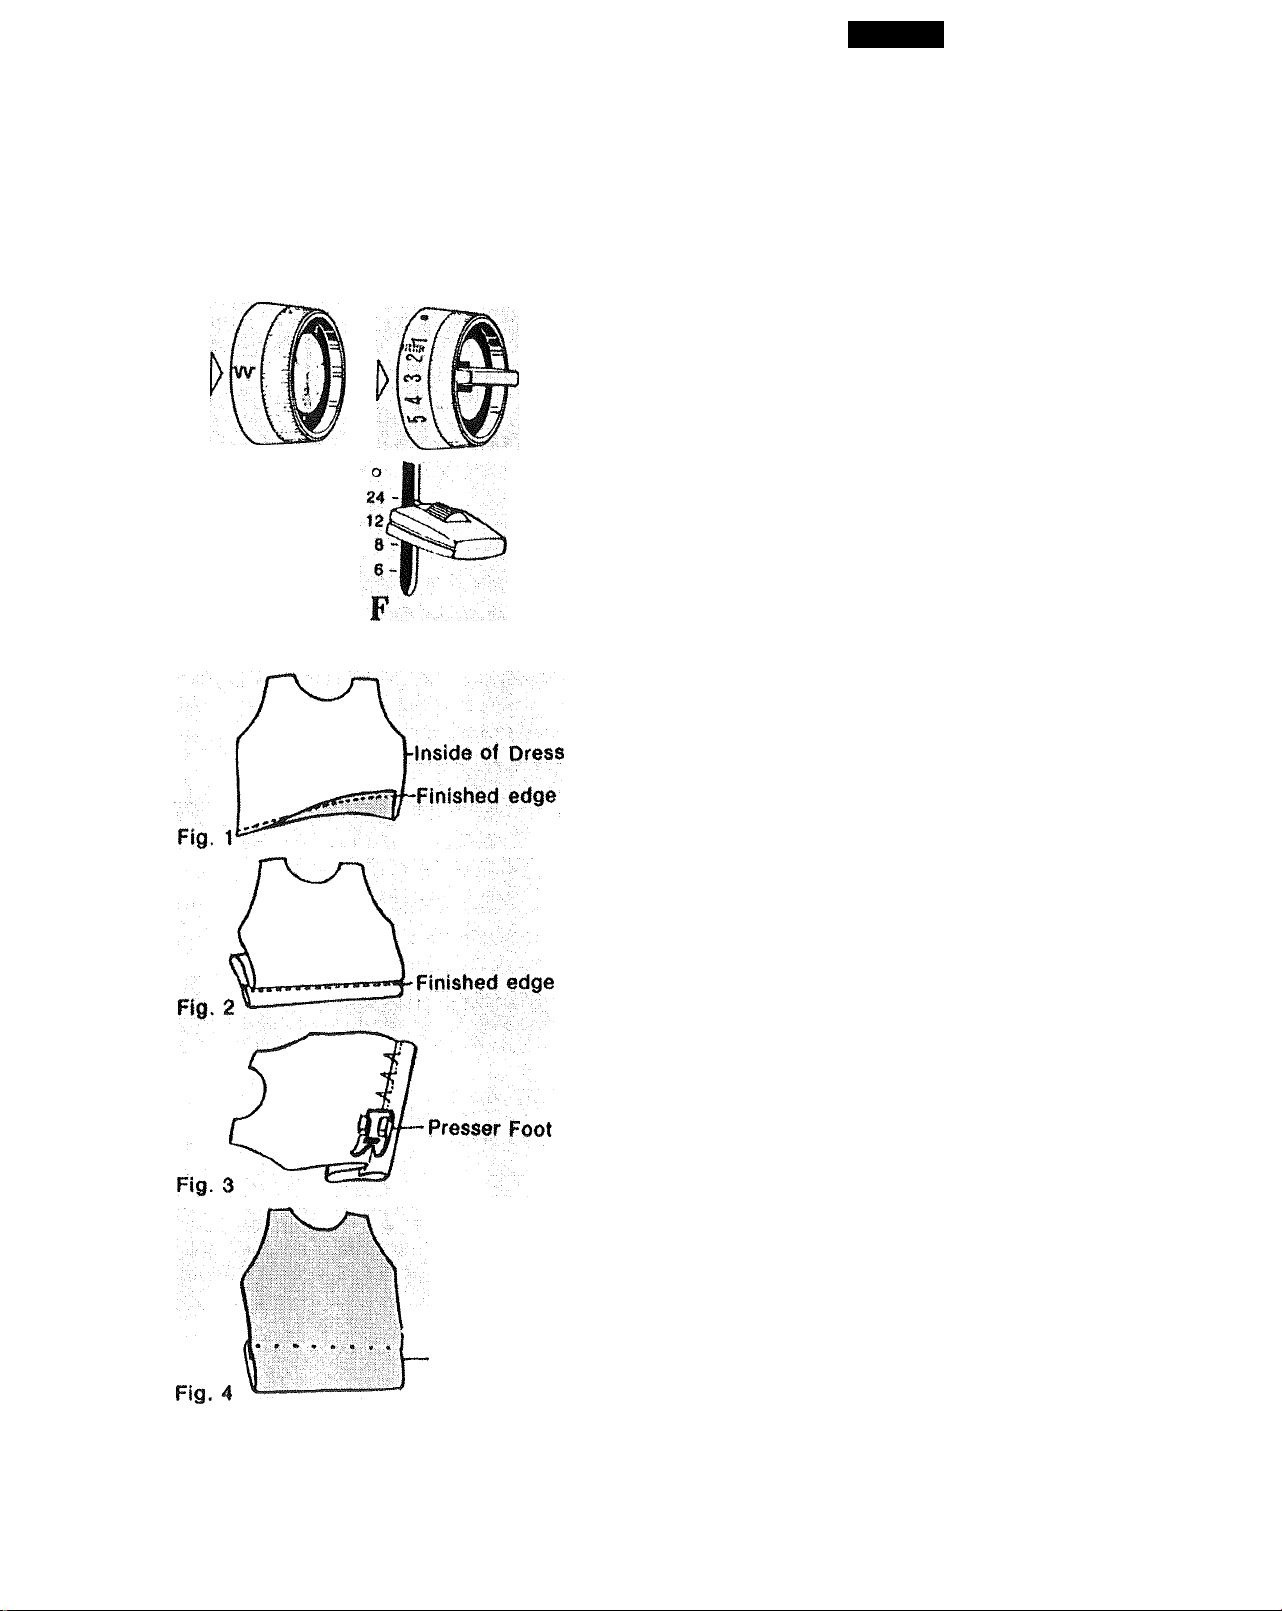
BLIND HEMMING
(Model 1250 only)
SETTINGS:
Special Stitch Dial - W
Special Stitch Variegator-Red mark on top
Stitch Width Control - 2 to 3
Stitch Length Control - about 8 to 12
Zigzag Stitch Foot
1. Finish edge of hem anyway you
desire. Turn up hem appropriate
width. (Fig. 1)
2. Fold garment away from hem
leaving 1/8" of hem edge extending.
(Fig. 2)
Place garment under presser foot in
such a manner that straight stitches
will be sewn on extended edge.
The zigzag stitch should just catch
the fold of the garment. (Fig. 3)
Right side
finished hem
4. Press both sides of the finished hem.
The right side of the garment will
show only the blind stitches. (Fig. 4)
Page 31
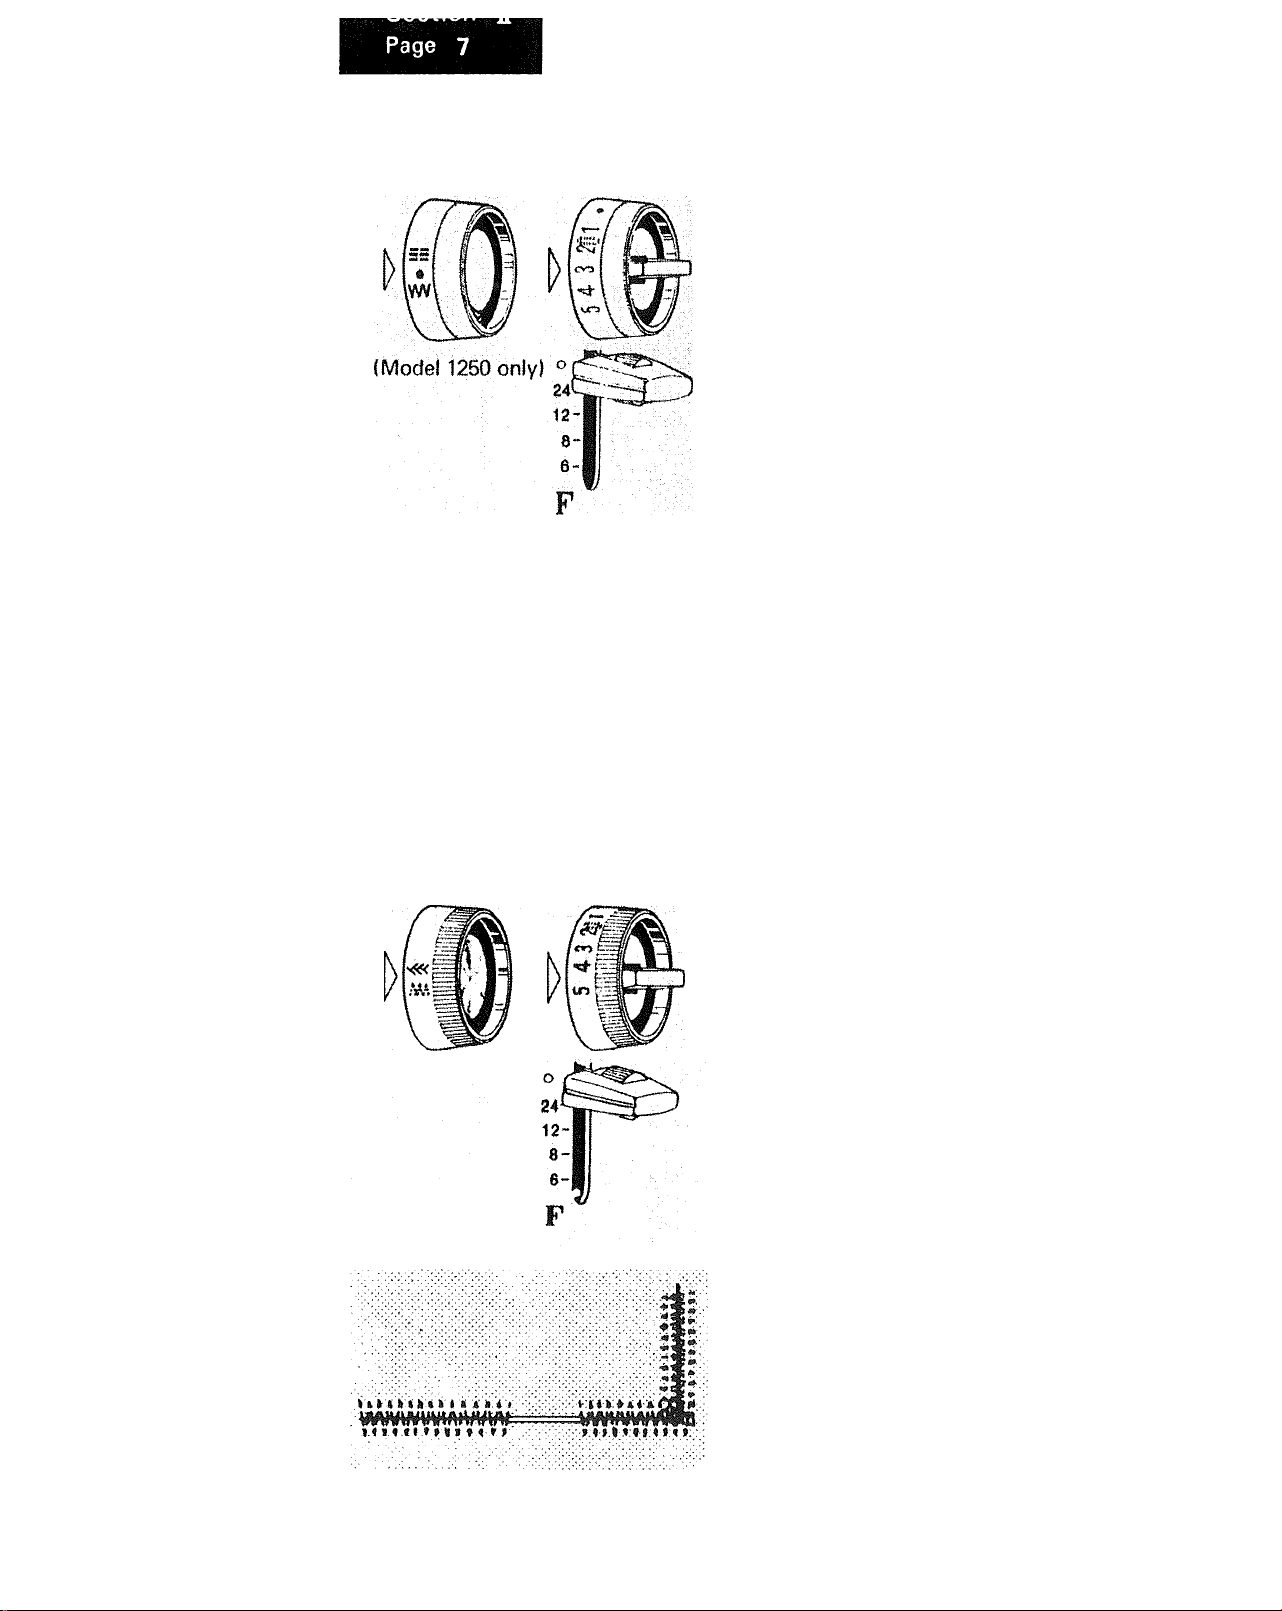
SATIN STITCHING
SETTINGS:
Special Stitch Dial - 111 (Model 1250 only)
Special Stitch Variegator-Red mark on top
(Model 1250)
Red dot to the
left(Model1240)
Stitch Width Control - Any number 2 to 5
Stitch Length Control - Between 24 and
white dot
Satin Stitch Foot
Closely spaced zigzag stitches are called satin stitches. This is an attractive stitch
used for appliqueing, monogramming, buttonhole making.
Whenever you are using this stitch, it is well to remember to loosen the" tension of
the top thread slightly. The wider the stitch you make, the looser the tension should
be.
If you are stitching on a very soft fabric, it is well to use-a backing of tissue paper or
interfacing for a well formed stitch. Puckering of the material will be eliminated and
the bobbin thread will not be visible on the right side of the fabric.
As with all special stitches, it is best to make a sample design on your fabric before
starting the design on the garment.
MENDING
(Model 1250 only)
SETTINGS:
Special Stitch Dial Special Stitch Variegator-Red mark on top
Stitch Width control - 4 to 5
Stitch Length Control - Any setting except
Zigzag Stitch Foot
To repair a straight or three-cornered
tear, position the tear under the needle
in such a way that the stitching catches
both sides of the tear. When mending a
three-cornered tear, stitch from each
end to thè center. It is well to use a piece
of fabric under the tear for reinforce
ment.
\<<V
white dot
Page 32
Page 8
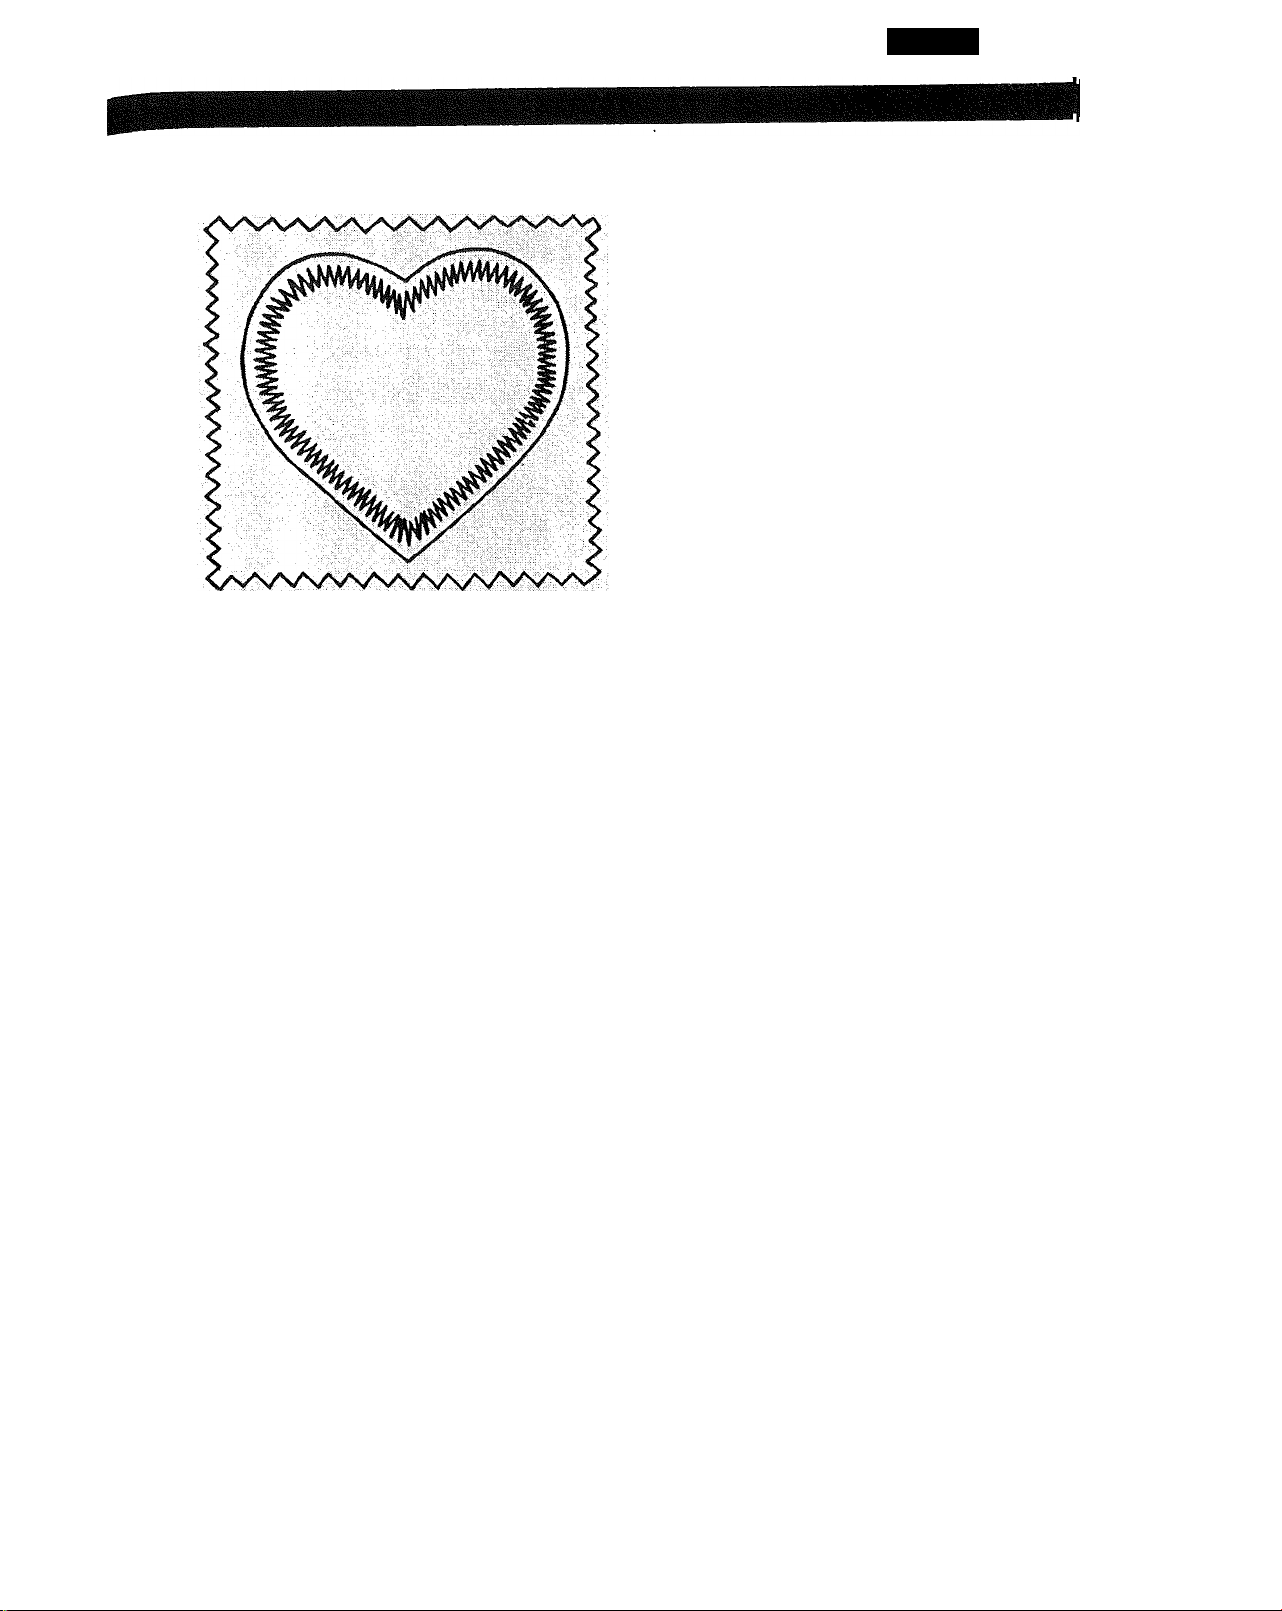
APPLIQUEING
SETTINGS:
Same as with Satin Stitching
Select an applique design to be applied
to your garment and baste it in place.
Satin stitch around the raw edge of the
applique completely covering the edge.
You may want to do this with a
contrasting color of thread or same
color.
Page 33
Page 9
BUTTOMHOLING
SETTINGS: .
Special Stitch Dial - (Model 1250 only)
Special Stitch Variegator- Red mark on top
(Model 1250)
Red dot to the
left (Model 1240)
Stitch Width Control - IJ
Stitch Length Control - Between 24 and
white dot
Satin Stitch Foot
Special Stitch
(Model 1250 only)
Stitch
Width
1. Mark the buttonhole length at both
ends and also the center line.
See Fig. 1
2. Position fabric under needle. The
first stroke of the needle should be to
the right and pierce fabric at point.
A. Stitch forward on left side of
buttonhole until desired length is
obtained. Stop with needle in fabric
on right side of stitching. Point BT
See Fig. 2
3. Raise presser foot and turn material
and set stitch width control to three.
Lower, presser foot and take one
stitch to the left. Point B to C.
See Fig. 3
Stitch
Length
C..B
Feed Dog
Control
Fig. 1
Fig. 2
Fig. 3
Page 34
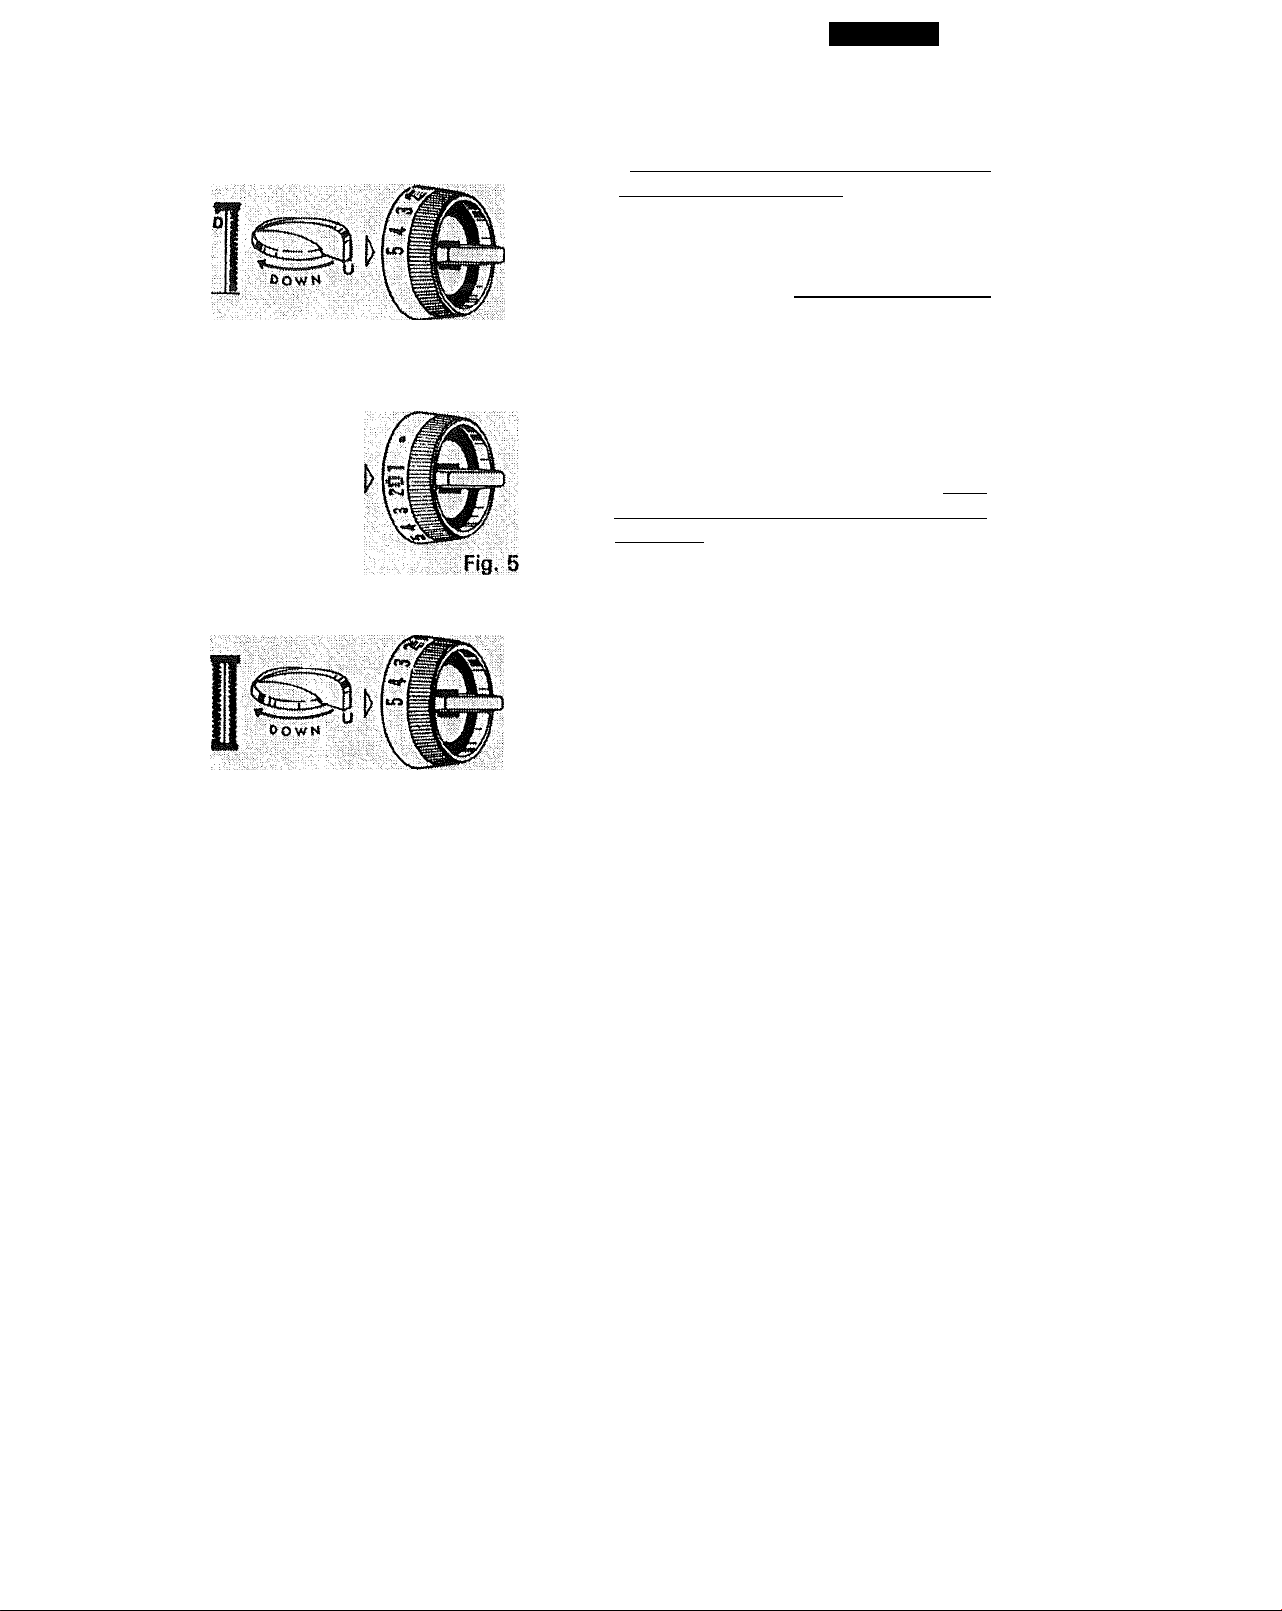
Fig, 4
Page 10
4. Raise presser foot with needle in
fabric and turn stitch width control
to 5. Drop feed dogs and lower
presser foot. Bartack about three
stitches. See Fig. 4. Complete
bartacking with needle on the left
side of stitching. Point D. See Fig. 4
5. Raise presser foot and reset stitch
width control to original setting.
Raise feed dogs and lower presser
foot. Sew other side of buttonhole
until desired length is obtained. Stop
with needle in fabric on left side of
stitching. Point E. See Fig. 5
Raise presser foot. Set stitch width
control to 5. Drop feed dogs. Lower
presser foot and bartack about three
(3) stitches. Remove fabric from
machine.
Fig. 6
If there is too much space between side stitching, increase the stitch width.
Depending upon the fabric on which you are sewing, or your own preference in
buttonholes, you may increase or decrease the width of the sides and the space in
the center by varying the original width settings and step 5, up to a maximum of 2.
Remember, an incerase in the number will widen the sides. A decrease will narrow
the sides.
Page 35
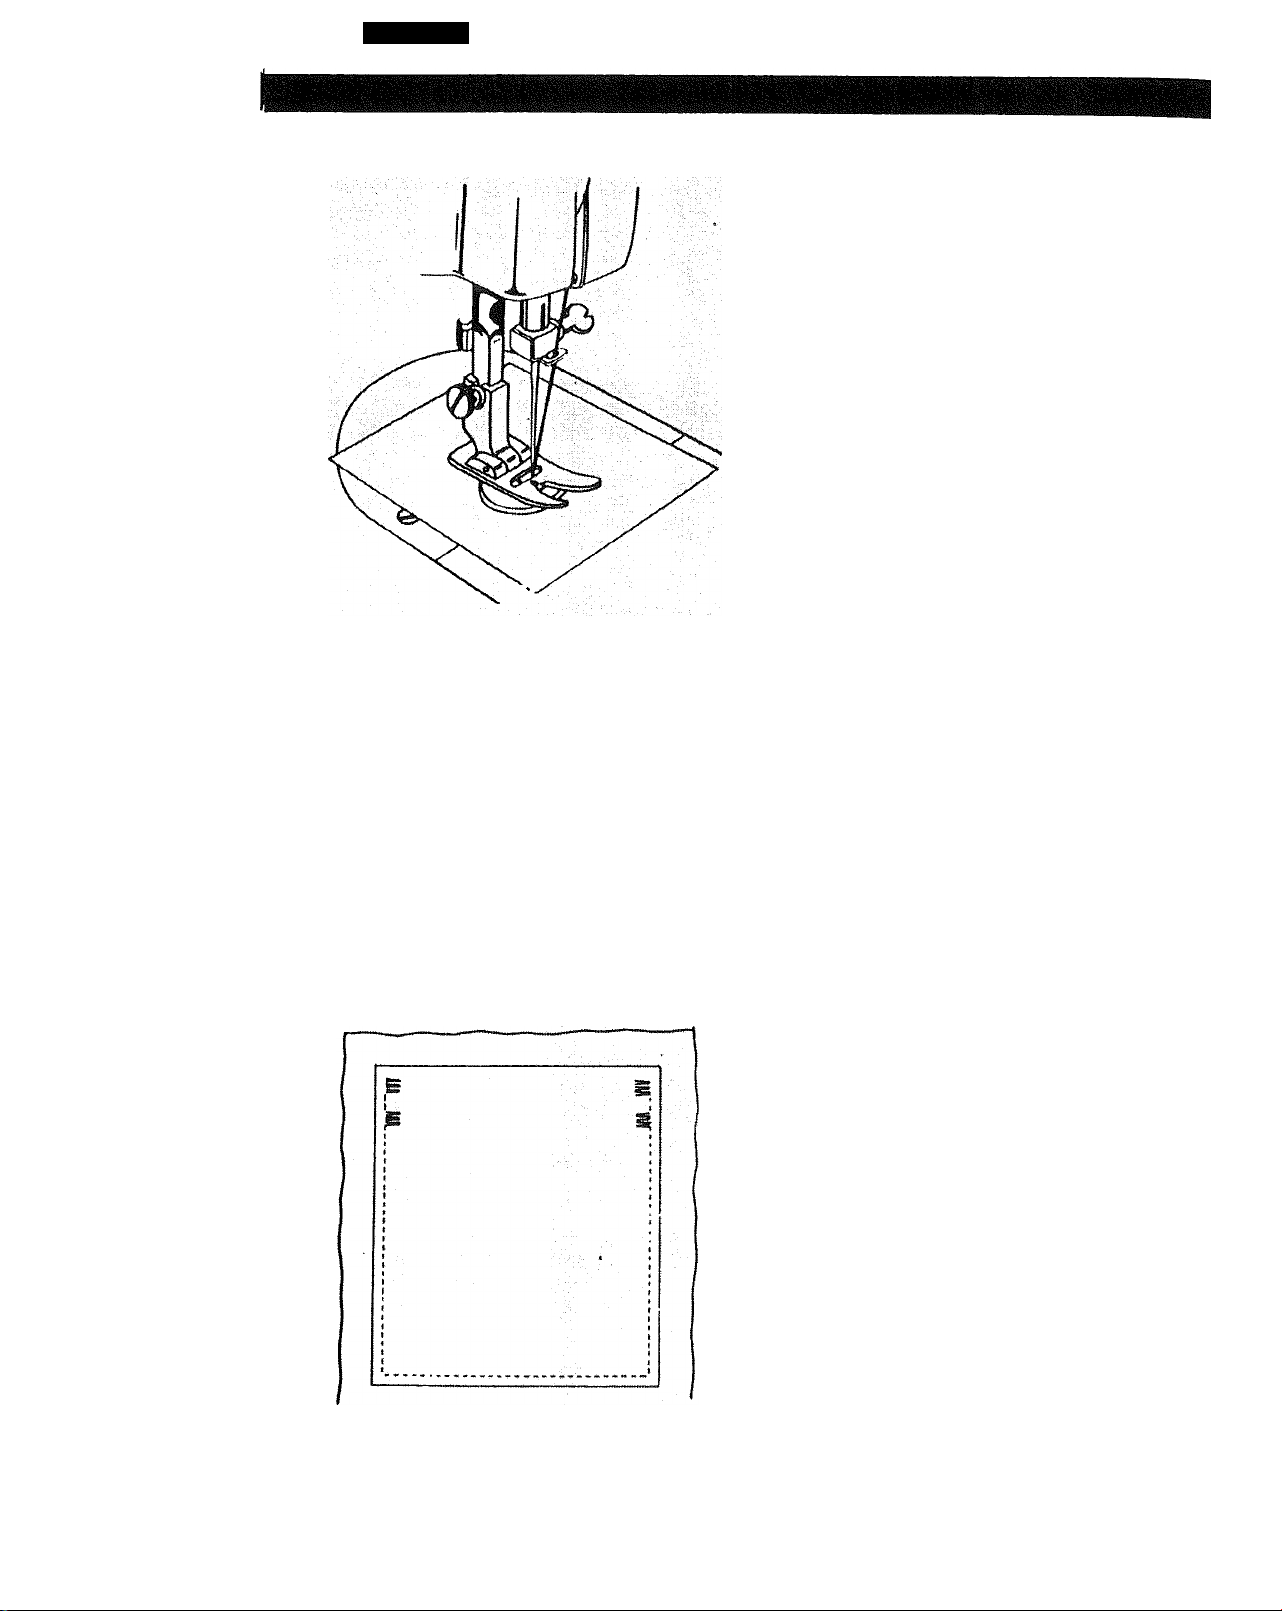
Page ii
BUTTON SEWING
SETTINGS:
Special Stitch Dial -1®[" (Model 1250 only)
Special Stitch Variegator- Red mark on top
(Model 1250)
Red dot to the
left (Model 1240)
Feed Dog - Down ,
Zigzag Stitch Foot
1. Align two holes of button with slot
of presser foot and lower foot to
hold the button securely.
2. Turn hand wheel manually until
needle point is just above button.
3. Adjust stitch width control so needle
will enter left hole of the button.
4. Turn hand wheel again by hand so
needle enters second hole. Readjust
stitch width if necessary. Stitch a
number of times.
5. Finish sewing with an extra two
inches of thread remaining. Draw
these threads to reverse side of
garment and tie.
BAR TACKING
SETTINGS:
Special Stitch Dial - (Model 1250 only)
Special Stitch Variegator- Red mark on top
(Model 1250)
Red dot to the
left(Model1240)
Stitch Width Control - 2 to 5
Stitch Length Control - Between 24 and
white dot
Zigzag Stitch Foot
This stitch is similar to a very short satin
stitch and is used to reinforce points of
strain such as corners of pockets and
straps on lingerie.
Sew 4 to 6 zigzag stitches.
Page 36
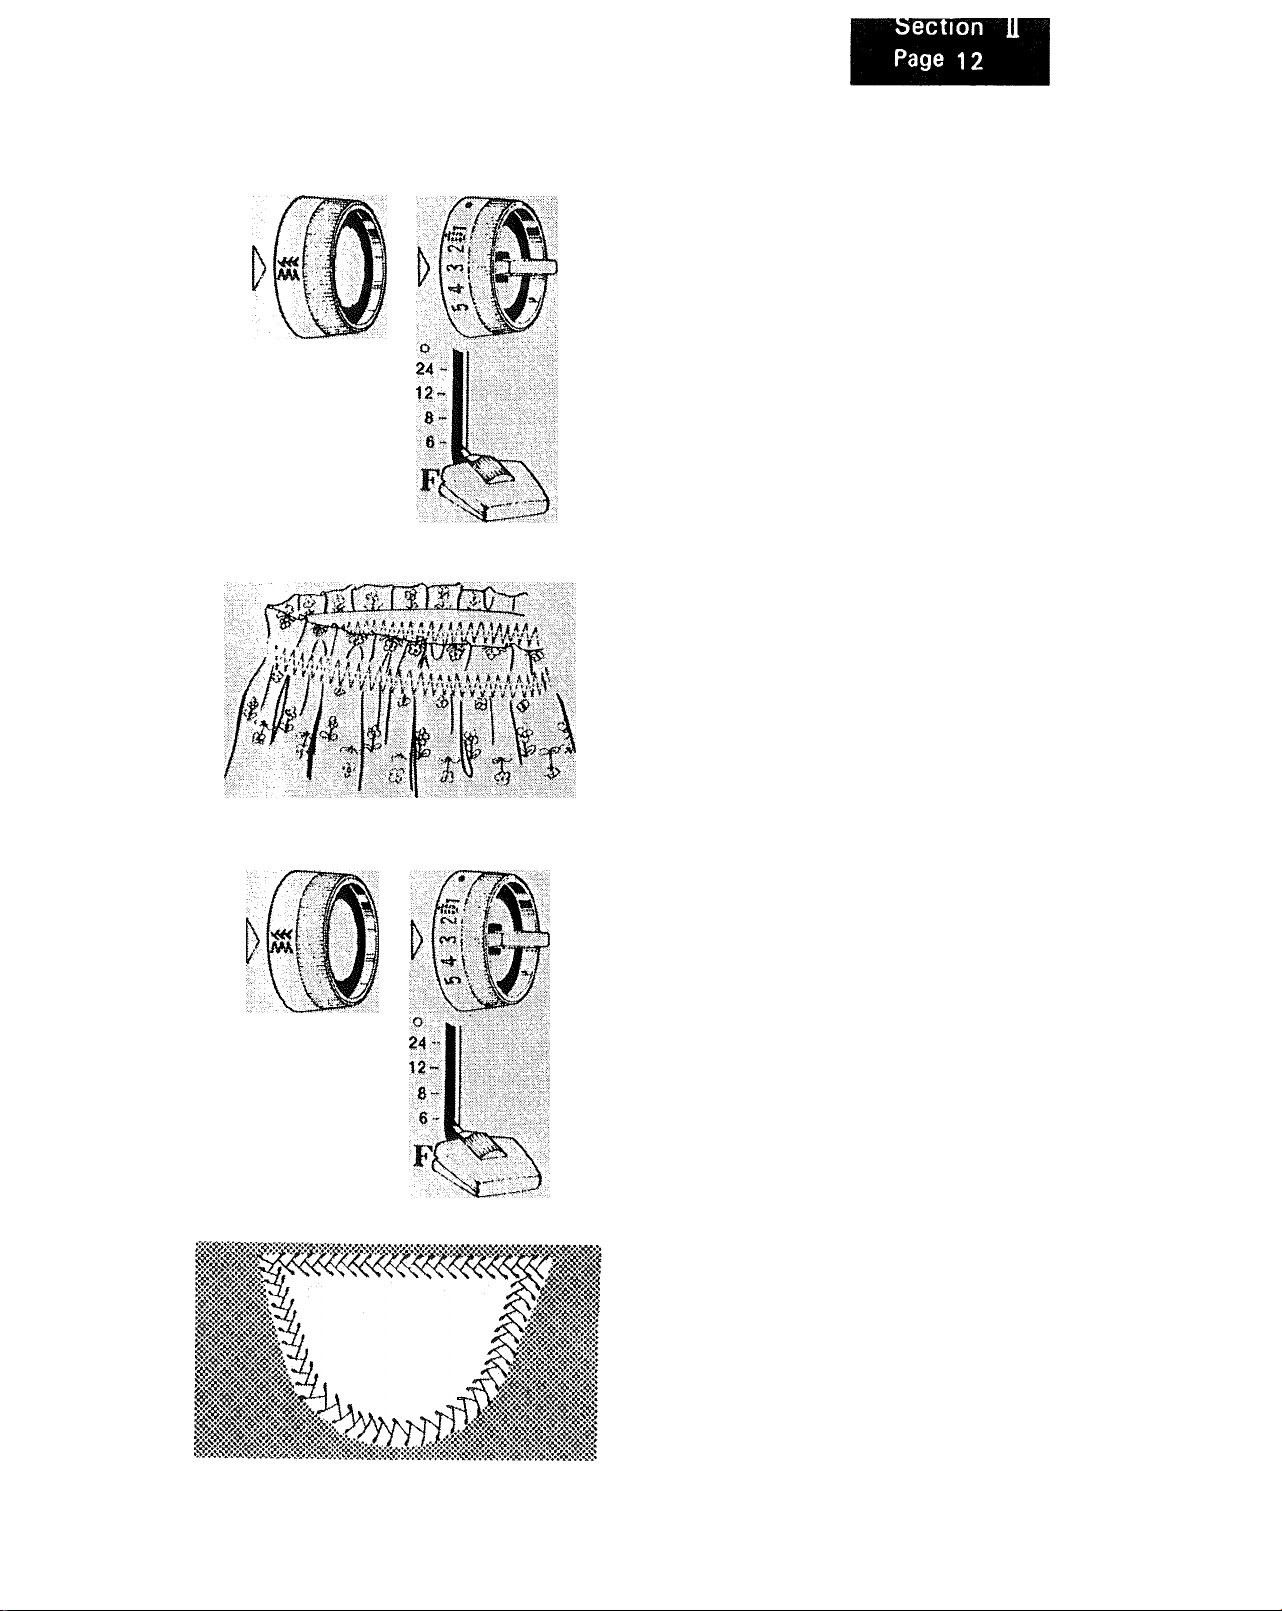
MAXI-STITCH
STRETCH STITCHING
(Model 1250 only)
SETTINGS;
Special Stitch Dial -
Special Stitch Variegator- Red mark on top
Stitch Width Control - 2 to 5
Stitch Length Control - Any setting except
white dot
Zigzag Stitch Foot
The elastic used in lingerie, swimwear
and sportswear may be sewn into place
with this stitch.
Simply stitch the elastic into place
around-the waist, armhole or leg of the
garment.
The elastic may have to be stretched
slightly to fit the area of the garment.
Try and distribute the elastic evenly by
marking it into quarters and matching
with corresponding quarter marks of the
garment.
FEATHER STRETCH
STITCHING
(Model 1250 only)
SETTINGS:
Special Stitch Dial - /W;
Special Stitch Variegator - Black mark on
top
Stitch Width Control - 3 to 5
Stitch Length Control - All the way down
Zigzag Stitch Foot
This specially designed stitch is very
useful to sew on appliques, insert panels
and lace when making lingerie or girdles.
For further directions, see GENERAL
GUIDANCE FOR SEWING ON
STRETCH FABRICS in the next section
of the book.
Page 37
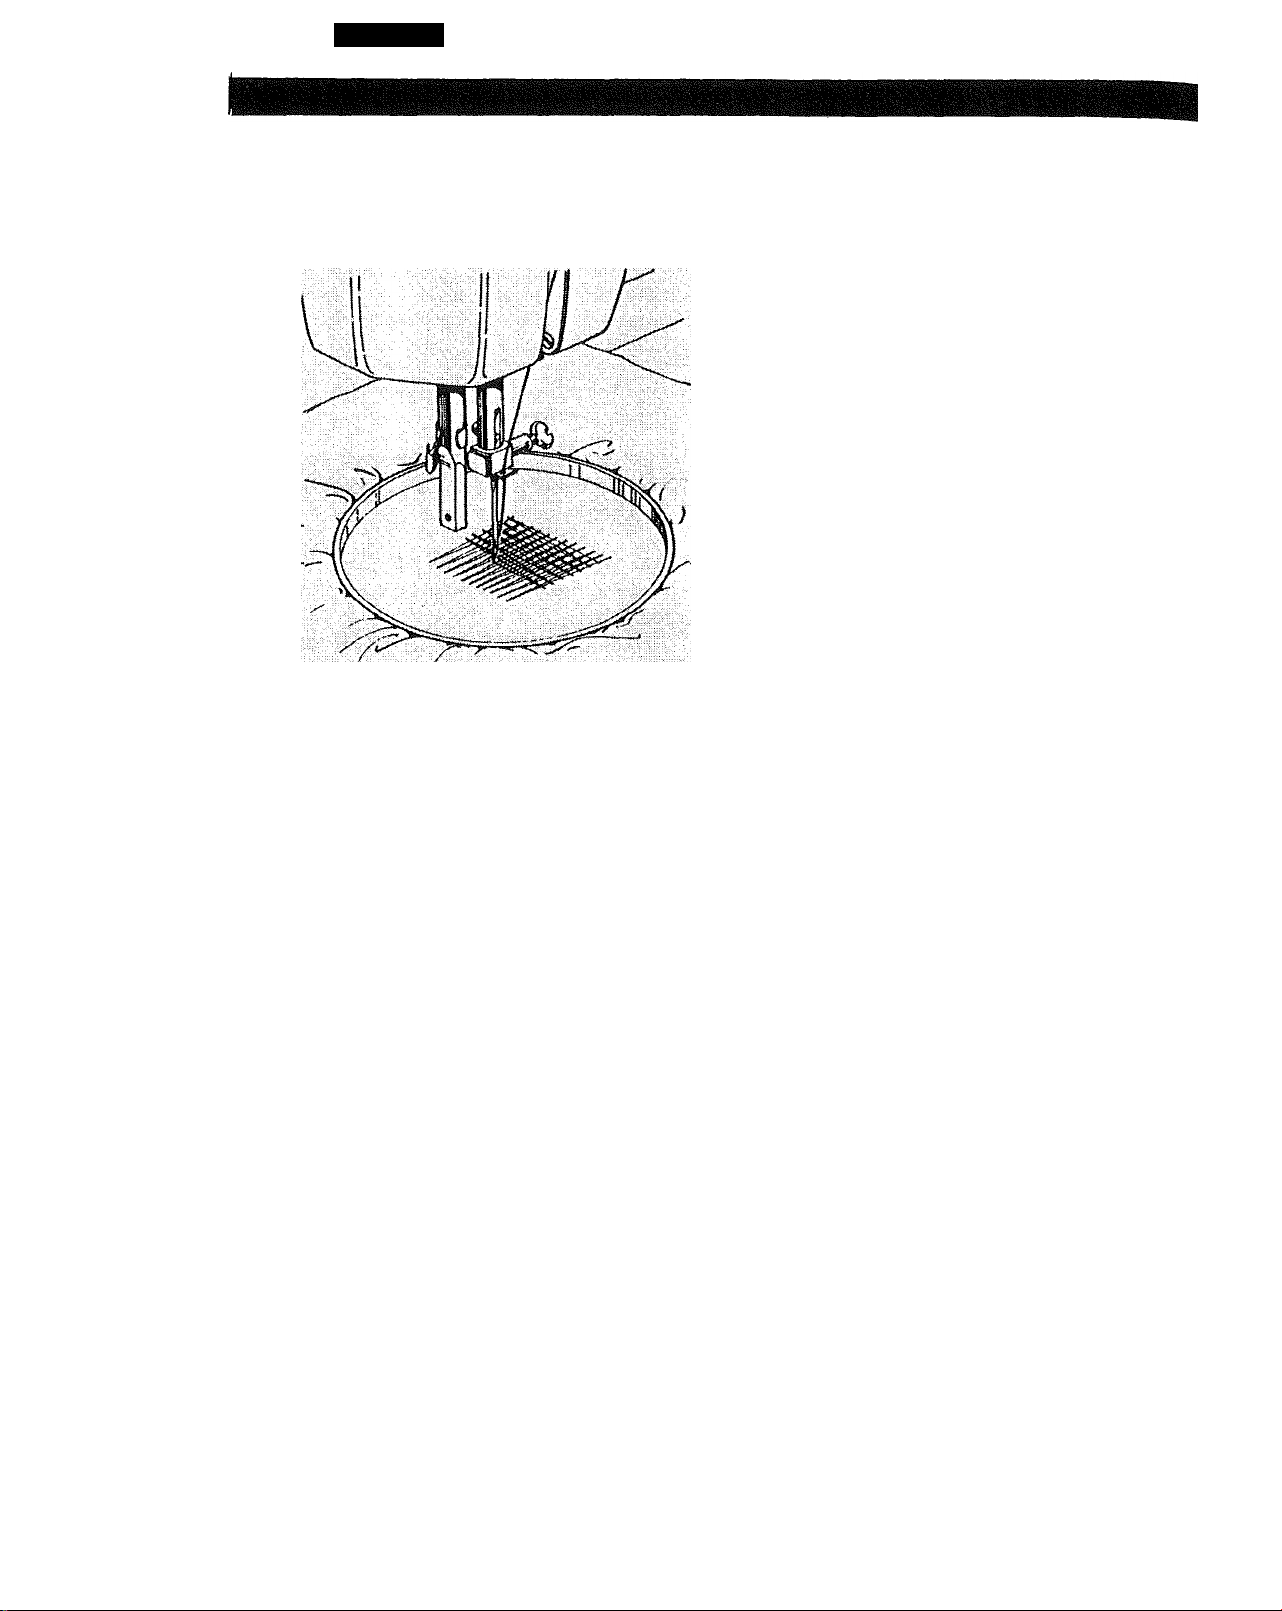
Page 1 3
DARNING
SETTINGS:
Special Stitch Dial - (Model 1250 only)
Special Stitch Variegator- Red mark on top
(Model 1250)
Red dot to the
left (Model 1240)
Stitch Width Control - Red Dot
Feed Dog - Down
No Presser Foot
Remove presser foot, stretch fabric be
tween embroidery hoops with hole
centered. Draw the bobbin thread up
through the fabric by holding the top
thread and taking one stitch at the spot
where you wish to start darning.
Lowering the presser bar, start sewing
at a slow to medium speed. Move the
fabric back and forth with a steady
rhythm to cover the darning area. When
it is covered, turn the fabric and sew
another layer of stitching across the first
layer of stitching.
WRITING AND
MONOGRAMMING
SETTINGS:
Free hand
Stitch Width Control - Any setting
Feed Dog - Down
No Presser Foot
Draw initials or words to be sewn on
fabric and fit fabric into embroidefy
hoops. Writing is done with either
zigzag or straight stitching. Remove
presser foot. Set stitch width for
straight or zigzag stitches as desired.
Slip hoop and fabric under the needle,
lower presser bar and take one stitch to
raise bobbin thread through fabric.
Using a medium speed, stitch along
marked outline, guiding fabric carefully
by hands.
Page 38
Page 14
ZIPPER APPLICATION
SETTINGS;Special Stitch Dial - i*m (Model 1250 only)
Special Stitch Variegator- Red mark on top
(Model 1250)
Red dot to the
left (Model 1240)
Stitch Width Control - Red Dot
Stitch Length Control - 10 to 12
Zipper Foot
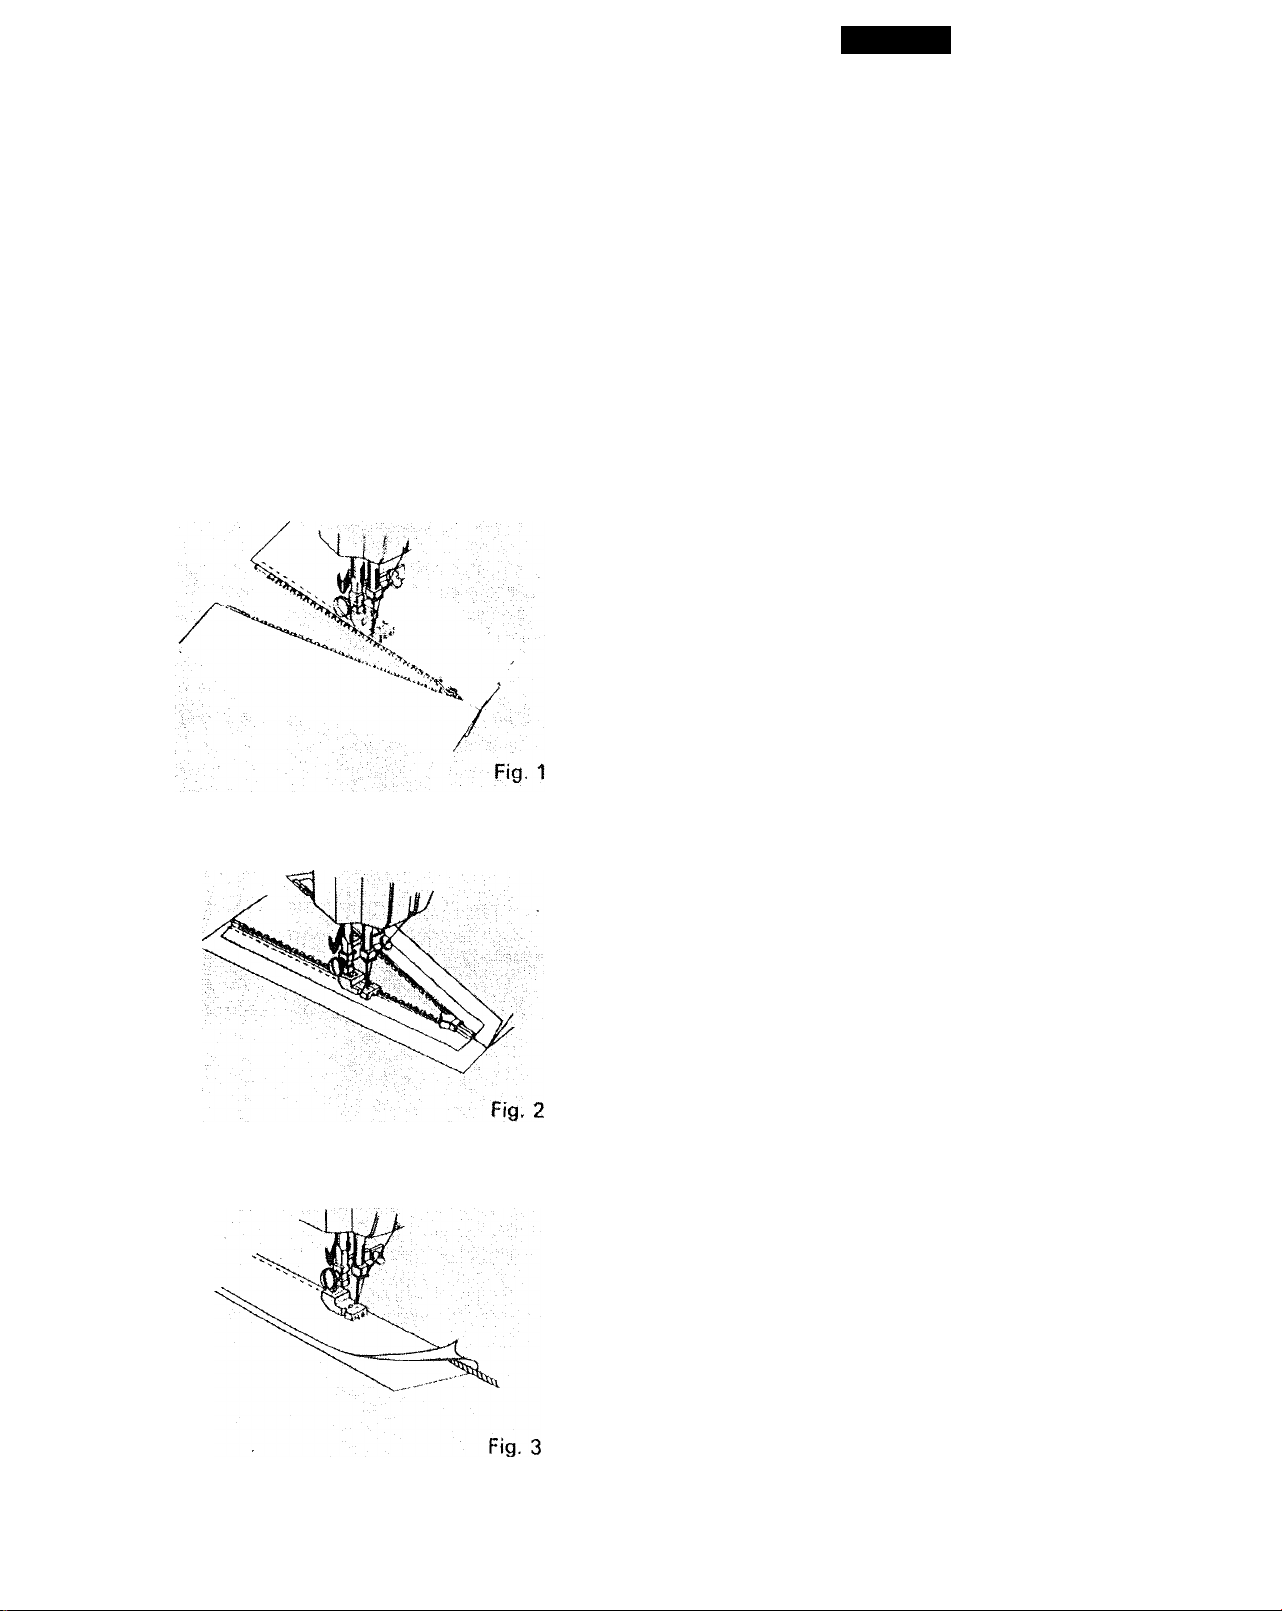
REGULAR ZIPPER
The foot is adjustable for use on the
right or left side of the needle when
sewing the regular type of zipper. Adjust
the foot so the needle clears the side
notch on the foot. See Fig. 1. Carefully
follow directions given on the zipper
package.
INVISIBLE ZIPPER
Adjust the foot so the needle is sewing
through the center hole of the foot af'd
one groove of the foot is rl i-r-g on t
teeth of the zipper. See Fig. ¿. Follovw
the zipper manufacturer's instructions.
After zipper has been inserted, finish
sewing seam by shifting foot to side
position sewing through side notch.
CORDING
Foot can also be used to make cording
for slipcovers etc. Cover a cord with a
strip of bias fabric and sew as shown in
Fig. 3.
Page 39
GUIDANCE For Your Selection of the Best Kind of Stitch For Your Stretch Fabrics.
Specially for Stretch
USE
Use on stretch knit fabrics. Use to
repair knit ready made garments where
seams need give. Use to seam areas of
stress in children's and adult sports
wear-crotch seams, armholes', etc.
Sew center seam of men's neck ties.
Sew any seam that is on the bias and
STRAIGHT STRETCH
(Models 1240, 1250)
RICK-RACK STRETCH
(Models 1240,1250)
must give.
Use for all-purpose heavy duty sewing
of stretch fabrics. Same usages as that
of zigzag stitch on lighter weight
stretch fabrics.
VSV>W
FEATHER STRETCH .
(Model 1250)
\ A A A A «
\ $ \ t \ 1 \ t \ 1
V V V V V
MAXI STITCH STRETCH
(Model 1250)
Useful Stitches with Stretch Applications
wvw\
PLAIN ZIGZAG
•Y"VY‘
BLIND STITCH
, (Model 1250)
Sew appliques, insert panels and lace
on lingerie and girdles.
Sew on all types of elastics in swim
wear, lingerie, and sportswear.
USE
Use for all-purpose stretch sewing,
seam finishing, edge finishing, or
attaching stretch laces.
Overcast seam finishing on all types of
stretch fabrics.
Flexible blind hemming.
Page 40

Section
Page 2
Fabric
Nylon Tricot
Terry Cloth
Regular
Corduroy
Terry Cloth
Stretch
Leather
Stretch knits for
Swimwear and
Ski wear or
Girdles
Special Stitches to Use
Straight stretch or Rick-Rack
stretch. (Model 1240,1250)
Feather stretch. (Model 1250)
Blind hem. (Model 1250)
Straight or simple zigzag.
Straight stretch or Rick-Rack
stretch. (Model 1240, 1250)
Feather stretch. (Model 1250)
Maxi stitch stretch. (Model 1250)
Straight stretch or Rick-Rack
stretch. (Model 1240,1250)
Feather stretch. (Model 1250)
Maxi stitch stretch. (Model 1250)
Straight or simple zigzag.
Straight stretch or Rick-Rack
stretch. (Model 1240,1250)
Feather stretch. (Model 1250)
Maxi stitch stretch. (Model 1250)
Mending stitch. (Model 1250)
Special Notions to Use
Sharp new needle. Size 9
or 11.
Synthetic thread.
Mercerized thread.
Size 14 needle.
Mercerized thread.
Size 14 needle.
Mercerized or silk thread.
Size 14 needle.
Pressure on presser foot.
Synthetic thread.
Sharp new needie Size 9
orll.
Lace Seam tape.
Pre-shrunk zippers.
New fabrics are coming on the market all the time. Remember that soft fabrics may
need to be stabilized a little. This is especially true when buttonholing,
monogramming, or design sewing as the stitches are so close together. A backing of
tissue paper or interfacting may assist you in your sewing. The paper may be torn
away and the interfacing cut away after sewing. Check your fabric by making
samples of the designs, monograms, or buttonholes on a scrap of fabric before
sewing on your garment.
Page 41

Checking Performance Problems what to do
PROBLEM^ :
Irregular
Stitches
. . .Breaking- ■, Incorrect size needle. Choose correct size needle for thread and fabric.
Needle
Bunching of
. Thread . ,
Puckering
PROBABLE CAUSE
Incorrect size needle,
improper threading.
Loose upper thread tension.
Pulling fabric.
Light pressure On presser foot.
Loose presser foot.
Unevenly wound bobbin.
Nicks or burrs on shuttle.
Nicks or burrs at hole of needle
plate. ■■■:„ '■
Pulling fabric.
Incorrect setting of needle.
Loose presser foot.
Upp>er and lower threads not drawn
back under presser foot before
starting seam. are formed.
Incorrect thread tension(s).
Light pressure on presser foot.
Using two different sizes or kinds
of thread.
Bent or blunt needle.
Loose presser foot.
Fabric too sheer or too soft.
Choose correct size needle for thread and fabric.
Rethread machine.
Tighten upper thread tension.
Do not pull fabric; guide it gently.
Increase pressure on presser foot
Reset presser foot
Rewind bobbin.
Replace shuttle, or polish off burrs completely.
Replace needle plate, or polish off burrs completely.
Do not pull fabric; guide it gently.
Reset needle. •
Reset presser foot
When starting a seam be sure to draw both threads under and
back of presser foot about 4" and hold until a few stitches
Reset thread tension(s).
increase pressure on presser foot
Upper thread and bobbin thread should be same size an4 kind.
Insert new needle.
Reset presser foot
Use underlay of tissue paper. ^ ^ ^
CORRECTION
Page 42

PROBLEM
PROBABLE CAUSE CORRECTION
Skipping
Stitches
Breaking Upper
Thread
Breaking Bobbin
Thread
Fabric not
Moving
incorrect size needle.
Certain knits and synthetics.
Bent or blunt needle.
Incorrect setting of needle.
Tight upper thread tension.
Light pressure on presser foot.
Starting to stitch too fast.
improper threading. Rethread machine.
Tight upper thread tension.
Incorrect size needle
Sharp eye in needle.
Nicks or burrs on shuttle.
Nicks or burrs at hole of needle
plate.
improper bobbin case threading.
Tight bobbin thread tension.
Lint in bobbin case or shuttle.
Feed dog down. Raise feed dog. ’
Light pressure on presser foot.
Thread knotted under fabric.
Choose correct size needle for thread and fabric.
Use "Q NEKDLEV,
Insert new needle.
Reset needle.
Loosen upper thread tension.
increase pressure on presser foot.
Start to stitch at a medium speed.
Loosen upper thread tension.
Choose correct size needle for thread and fabric.
Insert new needle.
Replace shuttle, or polish off burrs completely.
Replace needle plate, or polish off burrs completely.
Check bobbin case threading.
Loosen bobbin thread tension.
Clean bobbin case and shuttle.
Increase pressure on presser foot.
Place both threads back under presser foot before
beginning to stitch.
Machine Jamming
Knocking Noise
Thread caught in shuttle. Disassemble and clean shuttle.
Page 43
Caring for the Machine
CLEANING AND OILING
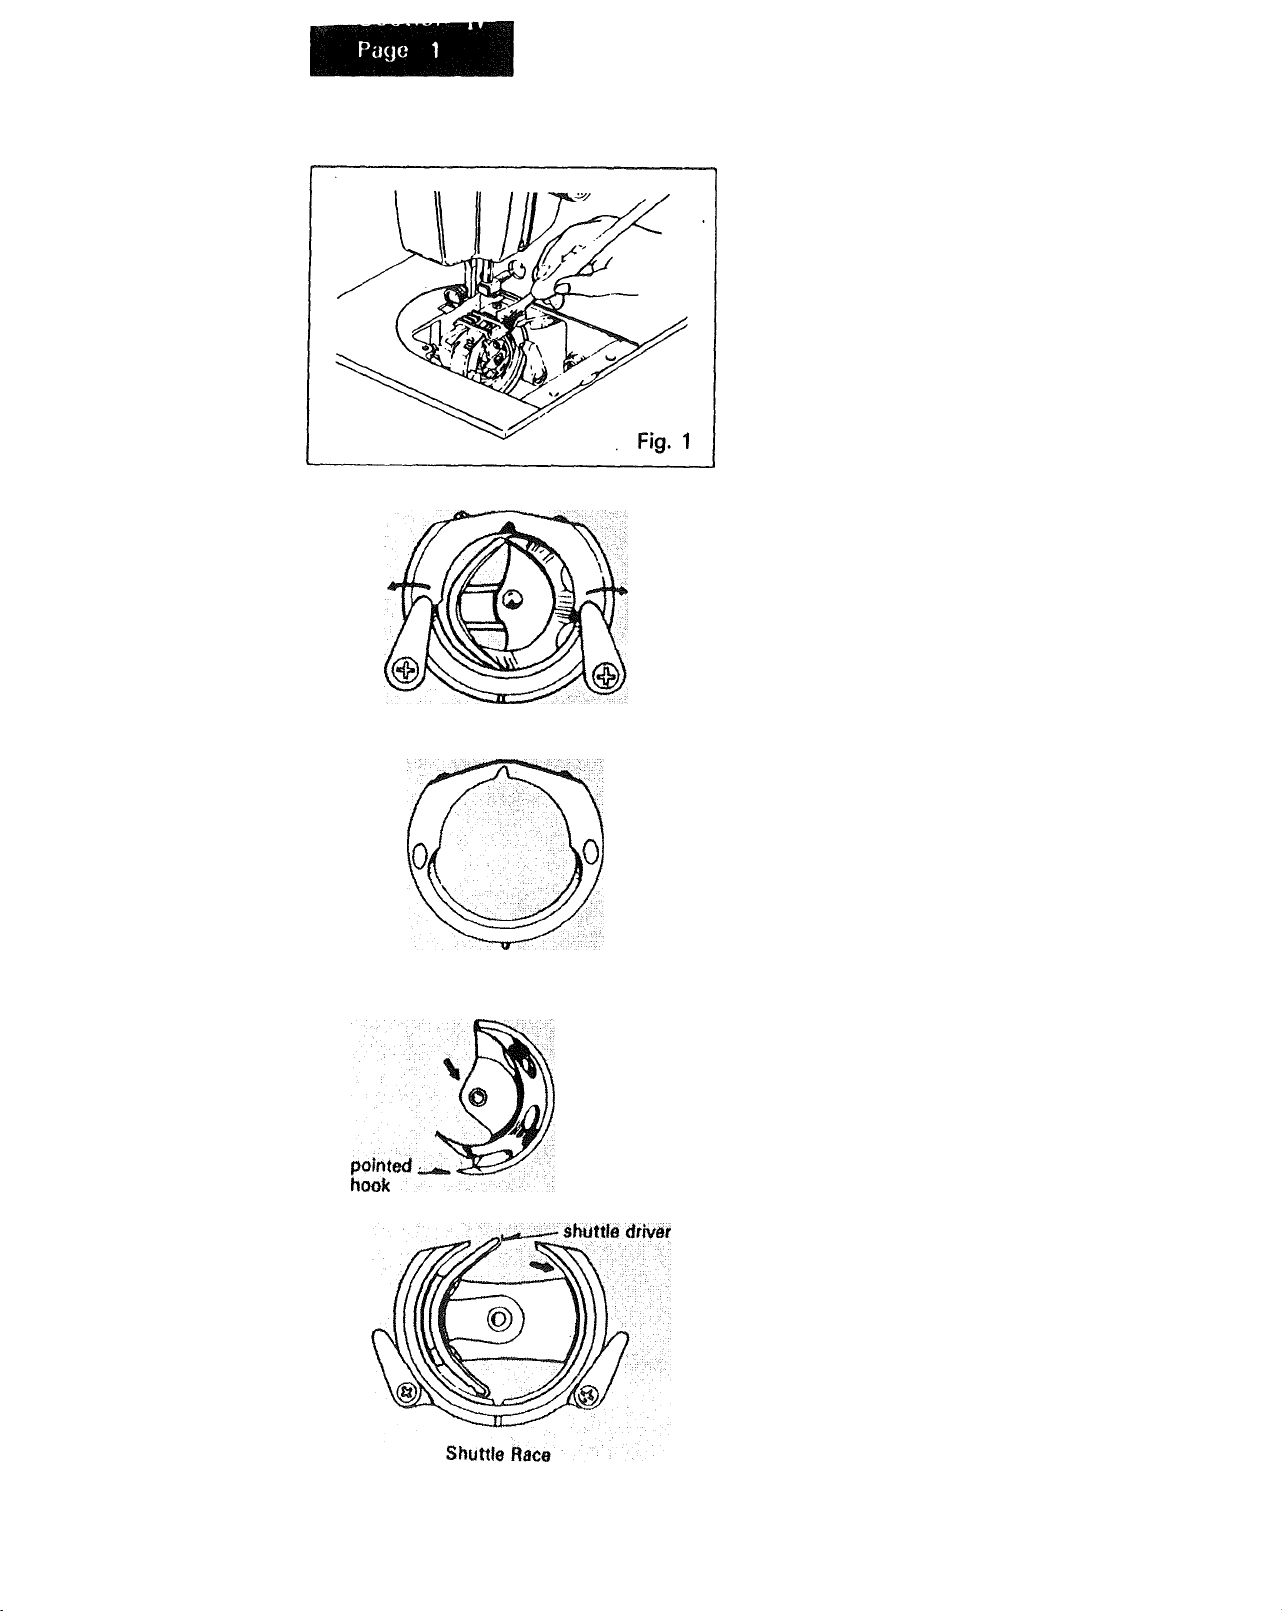
Fig. 1 Cleaning the feed dogs with a
To insure the best possible operation of
your machine, it is necessary to keep the
essential parts clean at all times. Using a
small brush, remove the lint that
accumulates in the shuttle area and
around the feed dogs.
Fig. 2 Parts of the Shuttle Assembly
To Clean the Shuttle Area:
1. This area must be kept free of dust,
lever
■ lever
Shuttle Assembly
lint and occasional tangled thread.
Raise the needle bar to its highest
point and remove the bobbin case.
2. Push levers of shuttle race aside and
lift shuttle race cover and shuttle
out.
brush.
L
Shuttle Race Cover
Shuttle
3. Clean the shuttle race with small
brush.
4. Put a drop of sewing machine oil on
the center pin of the shuttle and
shuttle race, (see arrows)
To Replace Shuttle Assembly:
1. Position shuttle race as illustrated so
that race is forming half moon on the
left side of the machine.
2. Hold shuttle by center pin and po
sition shuttle so as to form a half
moon on the right side. Pointed
hook will be on the bottom.
3. Place shuttle race cover into place
over shuttle assembly.
4. Snap the levers into position.
Fig. 2
Page 44
Section IV
Page 2
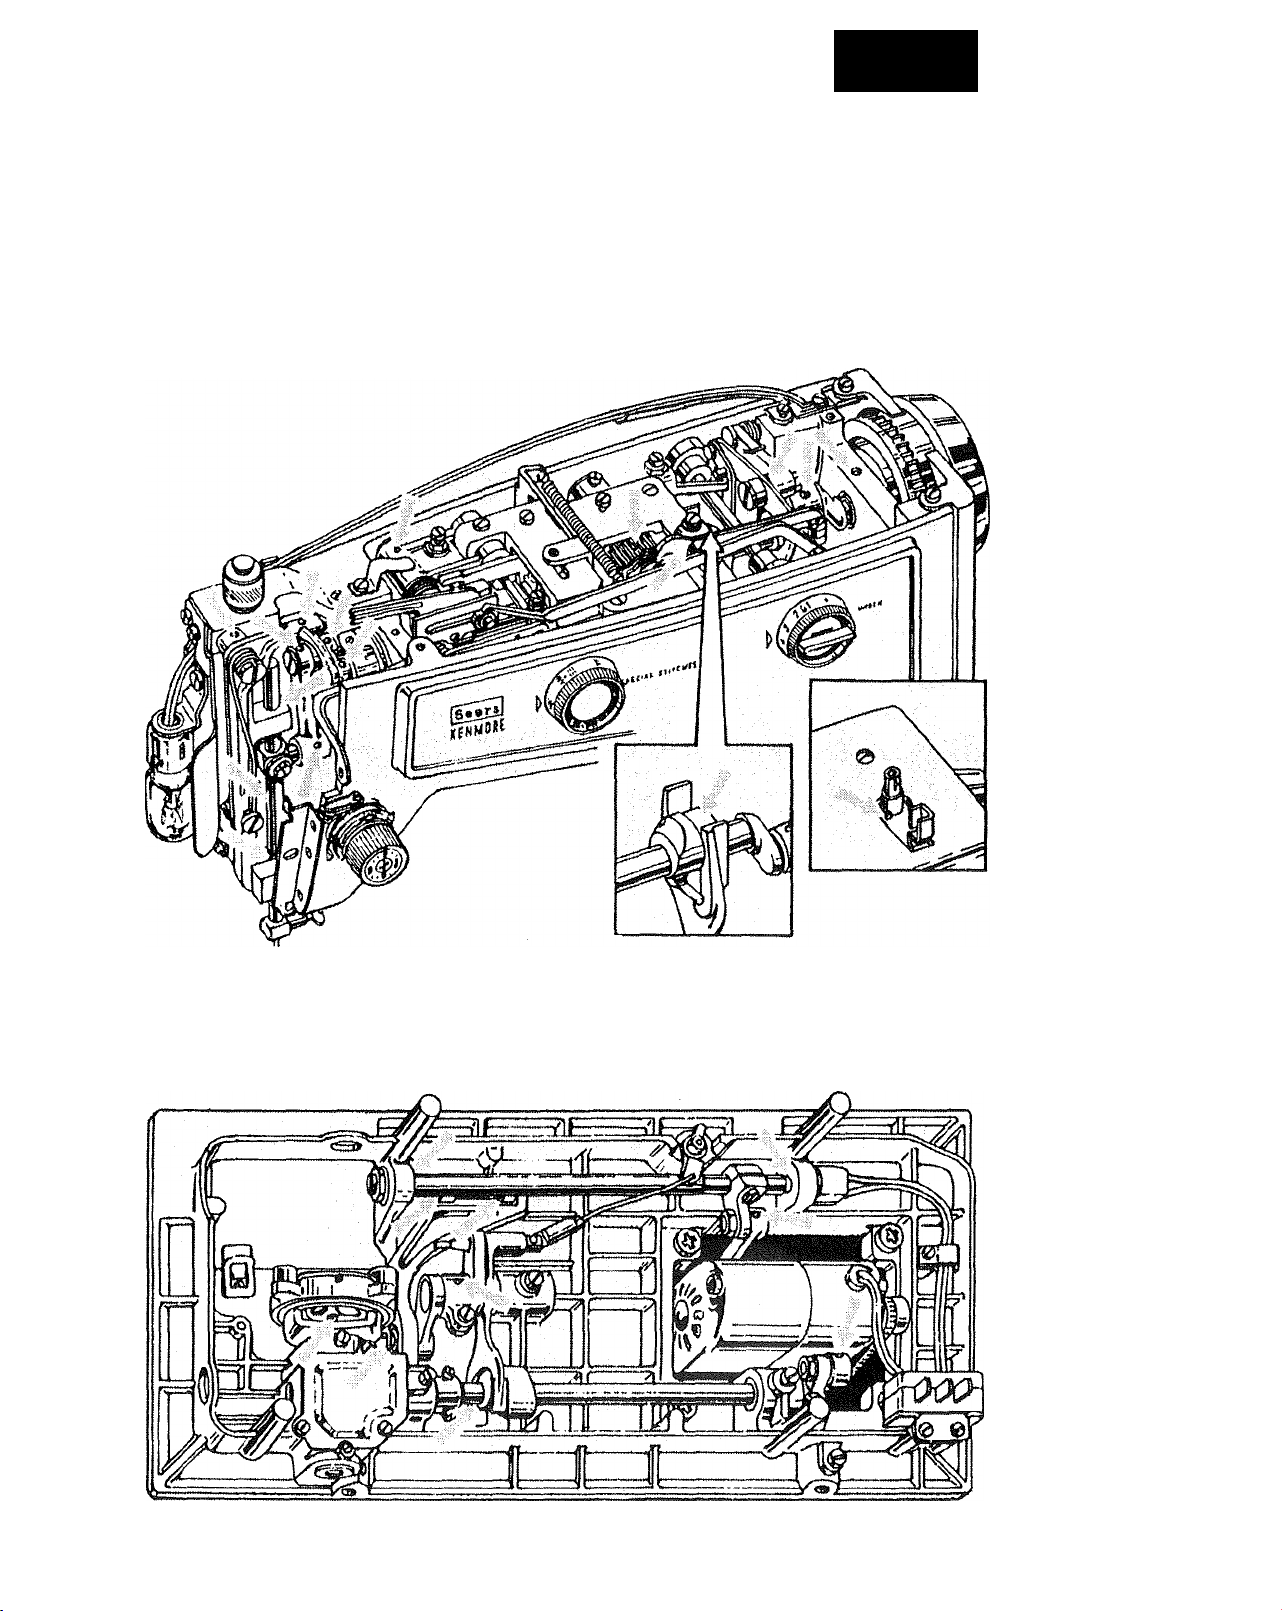
OILING UNDER TOP COVER PLATE AND IN FACE COVER
PLATE
Remove the top cover plate and swing the face cover plate open to oil points
indicated.
To remove top cover plate, unscrew two bolts on the top cover plate and lift cover
plate.
OILING UNDERSIDE
Tilt machine head back to oil points .indicated below.
Page 45
Section IV
Pacjo 3
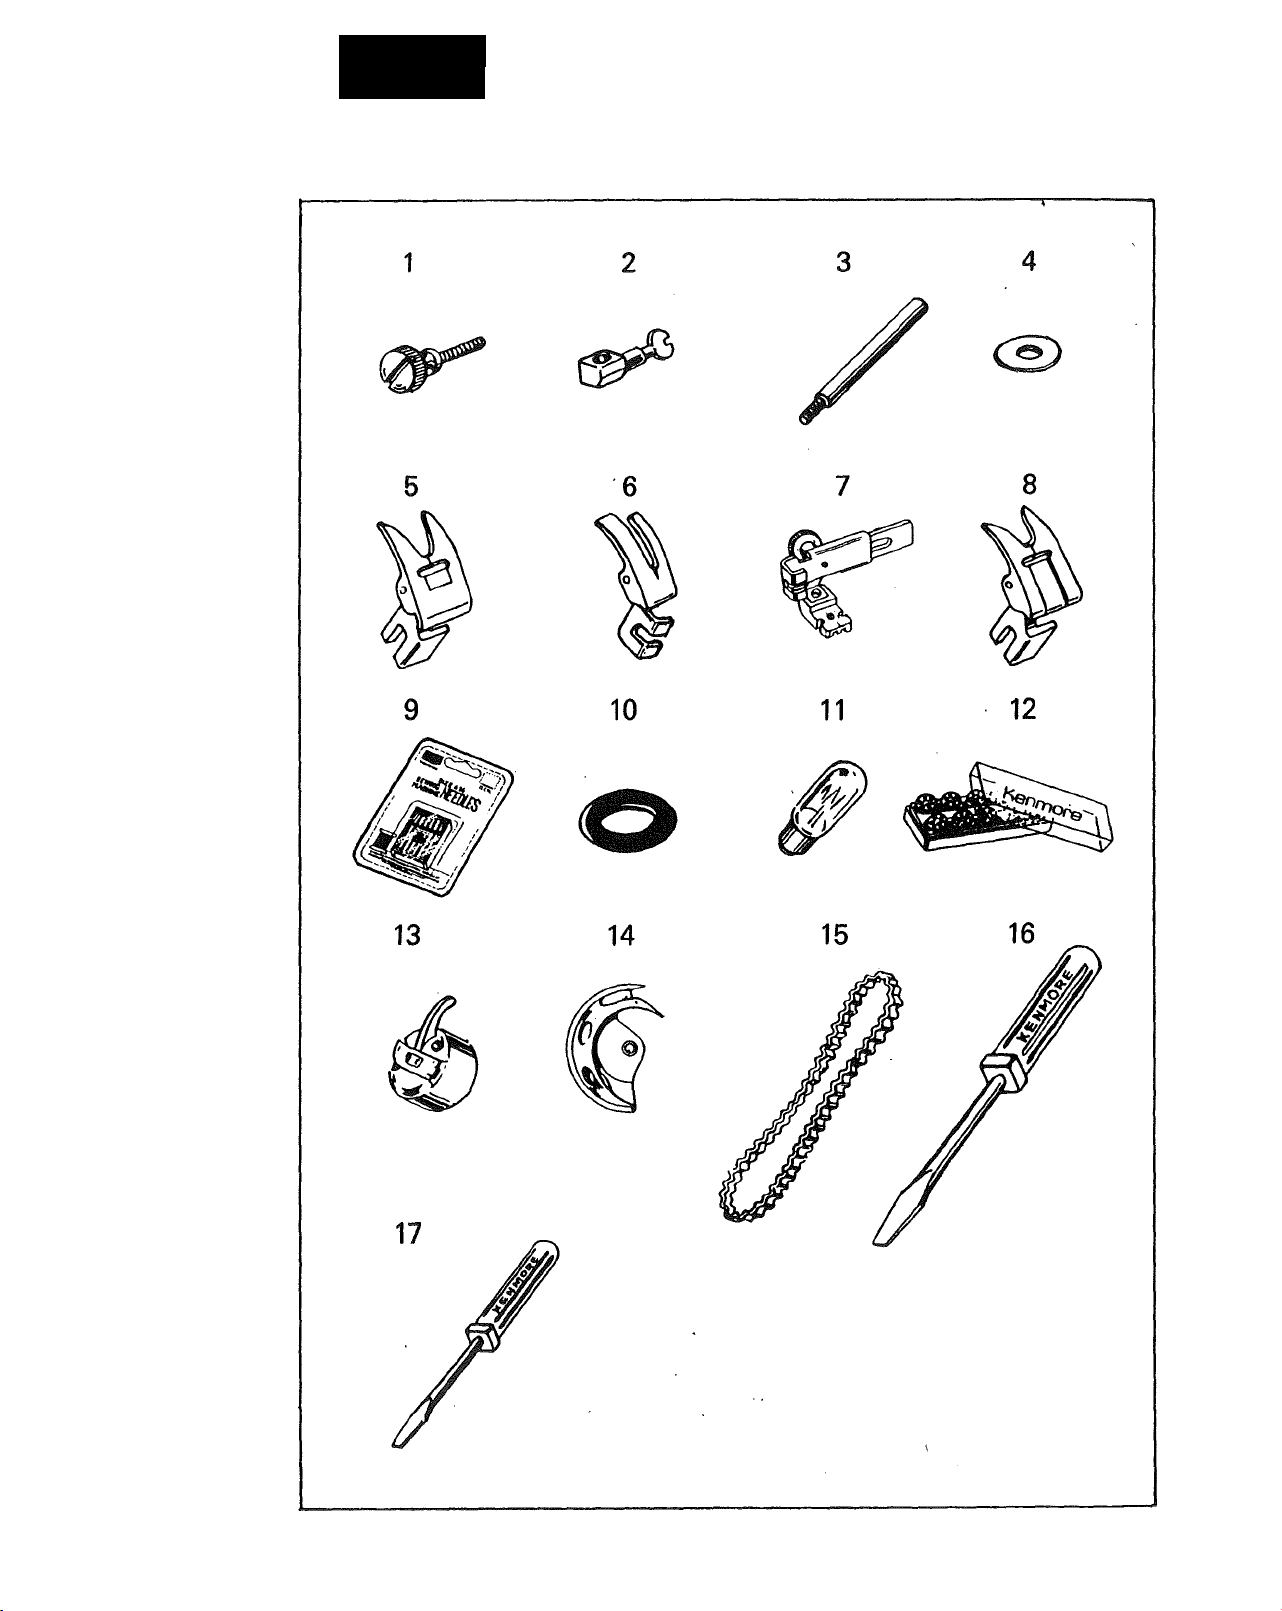
PARTS LIST
Page 46
Section 17
Page 4
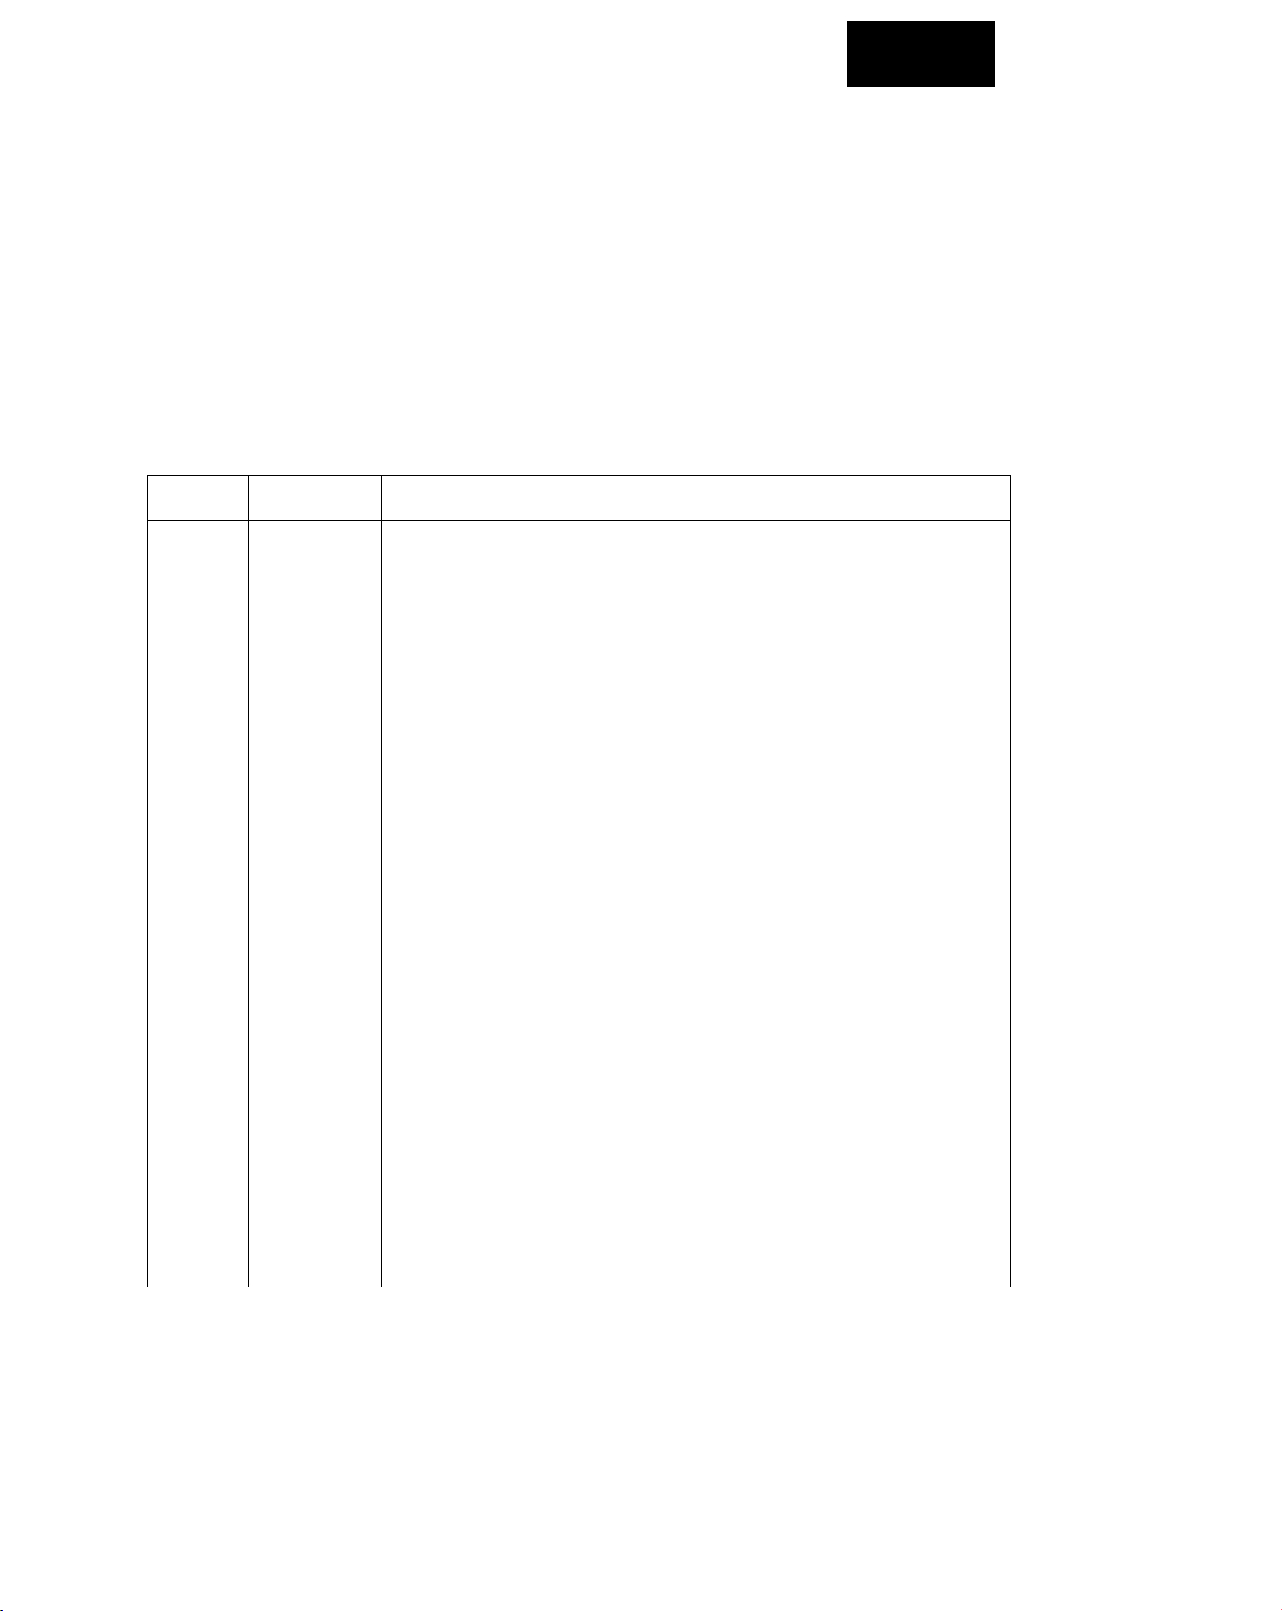
PARTS LIST
All parts listed herein may be ordered from any Sears, Roebuck and Co. or
Simpsons-Sears Limited store or service center. ,
WHEN ORDERING REPAIR PARTS, ALWAYS GIVE THE FOLLOWING
INFORMATION:
1. PART NUMBER
3. MODEL NUMBER shown on the nomenclature
plate. (See Section 1, page 3 for location.)
If the parts you need are not stocked locally, your order will be electronically
transmitted to a Sears Repair Parts Distribution Center for expedited handling.
2. PART DESCRIPTION
4. NAME OF ITEM
Ref. No. Part No.
1
2
3
4
5
6
7
8
9
10
11
12
13
14
15
16
17
135
214203 Needle clamp
231008 Thread spool pin
200878
9363
6873
6757 Zipper foot
214383 Satin stitch foot
*6740 Pack of No. 9 needles in orange pack
*6741
*6742 Pack of No. 14 needles in red pack
*6743 Pack of No. 16 needles in green pack
*6744 Pack of No. 18 needles in blue pack
*6746
1939
6797 Light bulb
*6862 Box of bobbins (10 pcs)
6510
47 Shuttle
214381 Sewing machine belt
3015 Large screwdriver
3016
Description
Presser foot screw
Spool holder
Zigzag stitch foot
Straight stitch foot
Pack of No. 11 needles in yellow pack
Pack of "Q NEEDLES”.» in chocolate pack
Bobbin winder rubber ring
Bobbin case
Small screwdriver
*These items are not furnished with the machine, but may
be ordered per instructions above.
Page 47

SEWING MACHINE
Now that you have purchased your Sewing Machine, should a
need ever exist for repair parts or service, simply contact any
Sears Service Center and most Sears, Roebuck and Co. or
Simpsons-Sears Limited Stores. Be sure to provide all pertinent
facts when you call or visit.
The model number of your Sewing Machine will be shown on
your nomenclature plate on the front side of bedplate of your
Sewing Machine. See Section 1, Page 2 for location.
WHEN ORDERING REPAIR PARTS, ALWAYS GIVE THE
FOLLOWING INFORMATION:
*MODEL NUMBER *NAME OF ITEM *PART DESCRIPTION
If the parts you need are not stocked locally, your order will be
electronically transmitted to a Sears Repair Parts Distribution
Center for handling.
SEARS, ROEBUCK AND CO.. Chicago, IL60684 U.S.A. and
SIMPSONS-SEARS LIMITED, Toronto, Ontario. Canada
Part No. 52917 (H®
 Loading...