

Page 1
■'i
..........
................if"
..........
INSTRUCTIONS
M OD E L 12 32-ZIG- Z A G SE W IN G M A CH IN E
Page 2

Sears, Roebuck and Co.
Dear Homemaker:
You have just invesieti in a very fine stretch stitch sewing machine Be
fore using your new Kenmore machine, please pause for a moment and
carefully read this booklet which contains instructions on how to oper
ate arid care for your machine
Specific instructions are given on threading, tension adjustments, clean
ing, oiling, etc This will help you obtain the best sewing lesults and
avoid unnecessary service expense for conditions beyond our control
Advice on the operation and care of your machine is always available at
your nearest Sears Retaii Store
Please remembei, any correspondence or reference to your machine
must mention the model number and serial number of your machine
Kenmore Sewing Machine
Record in space provided below the model number
and serial number of this appliance The mode! num
ber and serial number ate located on the nomenclature
plate, as identified on Page 3 of this booklet
Mode! No
Retain these numbers for future reference.
Sériai No
Page 3

TABLE OF
COWTEWTS
Section
identifying Ports
Installing Machine ,
Converting to Free-orm Sewing
Winding the Bobbin
Threading the Bobbin Case ,
Threading of Top Thread ,
Using the Controls
Adjusting Top Tension
Adjusting Bobbin Tension
Checking Tensions
Stitch Width Control
Stitch Length Control
Reverse Stitch Control ,
Stretch Stitch Control
Pressure Regulator
Sewing Light
Seam Guides
Presser Foot Lever
Accessories
Needles
Needle, Thread and Fabric Chart
Presser Feet
2, 3
4
5
, 6
7
8
. 9
fO
, 11
12. 13
12. 13
14
14
15
16
, 17
17
18
19
20
Section
Section
II Starting to Sew
Garment Construction Stitches
Straight Stitching
Zigzag Stitching
Stretch Stitching
Specipf Finishing Stitches
Satin Stitching. Appliqueing
Buttonhole Making ,
Zipper-Application
Button Sewing, Bar Tacking
Darning
Free-arm Sewing
III Checking Performance Problems
IV Caring for the Machine
Cleaning Feed Dogs and Shuttle
Oiling Under Arm Cover Plate
Oiling Underside
Oiling in Face Cover Plate
Parts List
1
, 2
3
, 4
5
6
7
, 8
9
10
1
2
3
4
5,6
Page 4
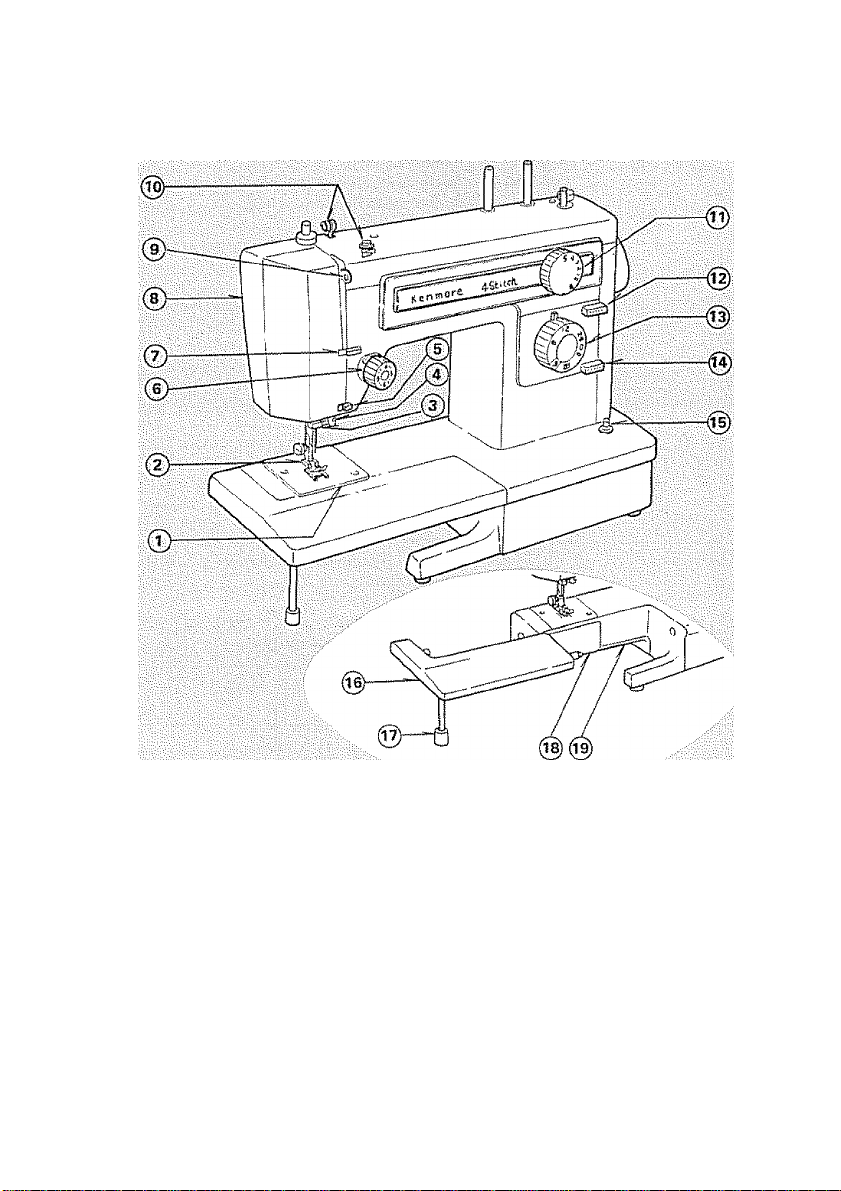
1, Needle Plate
2, Presset Foot
3, Thread Guide
4, Needle Clamp Screw
5 Thread Guide
6. Top Thread Tension Control
7, Face Cover Thread Guide
8 Face Cover Plate
9. Take-up Lever
10. Upper Thread Guides
11, Stitch Width Control
12, Stretch Stitch Control
13, Stitch Length Control
14 Reverse Stitch Control
15. Light and Power Switch
16. Extension Tabie
17. Support Leg
18. Shuttle Cover
19. Free Arm
Page 5
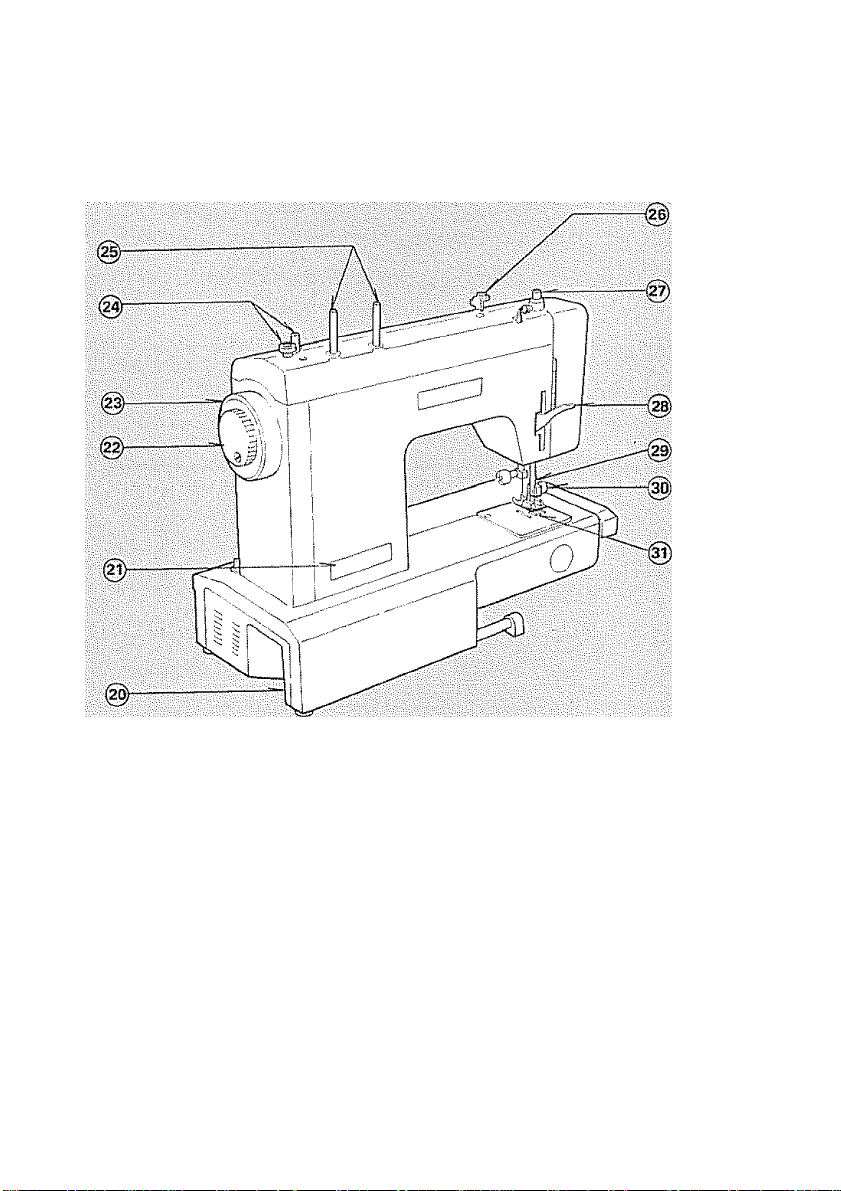
20, Electric Cord Receptacle
21, Nomenclature Plate
22, Clutch Knob
23, Hand Wheel
24, Bobbin Winder
25 Thread Spool Pins
26, Bobbin Winder Tension Disc
27. Pressure Regulator
28 Presser Foot Lever
29, Thread Cutter
30, Presser Foot Thumb Screw
31, Feed Dogs
Page 6
i i\! S TA L LI ly G IVi A C HI l\l E
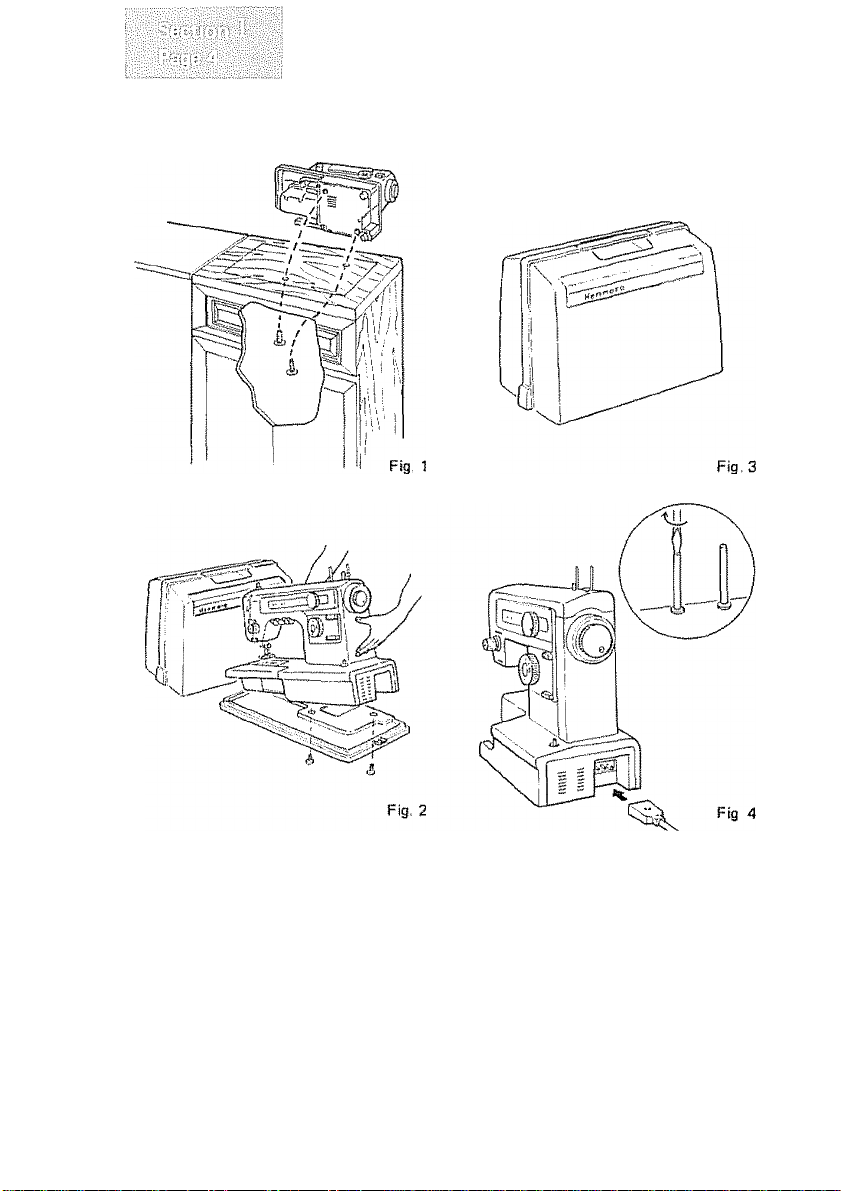
To install the machine i.n cabinet, posi
tion machine haad on cabinet platform
so that holes on bottom of machine
match those on board Insert washers
and screws and tighten into place, I Fig
1) ¡Follow instructions provided with
Sears Cabinet, Screws and washers are
supplied with cabinet,)
A separate base and cover is available to
carry the machine when needed
To install machine in carrying case, set
machirte into base, with word FRONT in
base facing you (Fig, 21
Place cover on machine with word
"SEARS’" on handle facing you. The
case slopes in the same direction of the
machine, (Fig. 31
Push the speed control plug onto threeprong connector. Plug rnachine cord into
any 110-120 volt wall outlet. Turn on
power by pushing light and power
switch, (Fig. 4)
Spool pins are packed in accessory box.
Screw thread spool pirts in place securely
with a screw driver. Position nylon discs
as shown in illustration.
Page 7
CO W« EfiTHV i'i k. i::: - kk S i; If If f f'J
Fig- 1
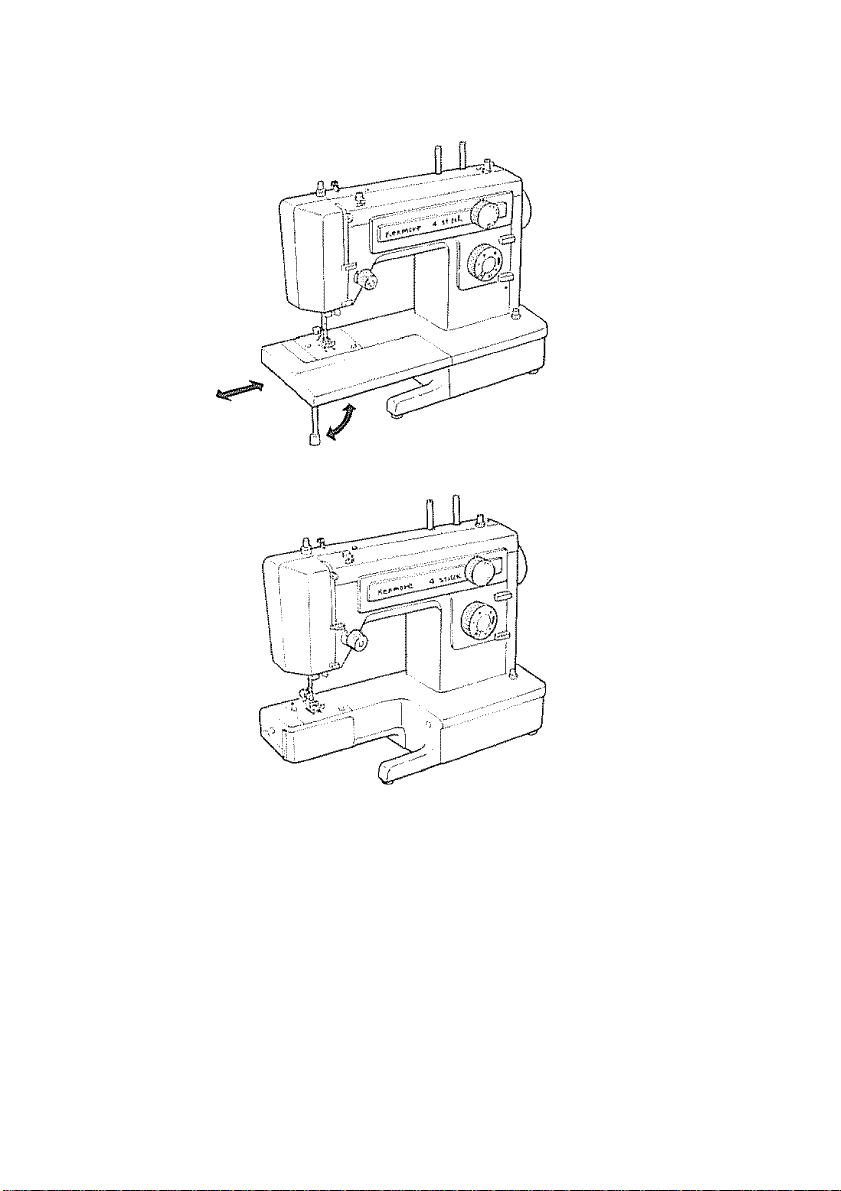
1. Remove the extension table from the 2 To replace the table, simply slide it along
machine by folding the support leg up
and pulling table to the left (Fig 1.2}
the free arm to its oriaitial position and
place supporting leg in down position
(Fig,, 1)
Fig 2
Page 8
©
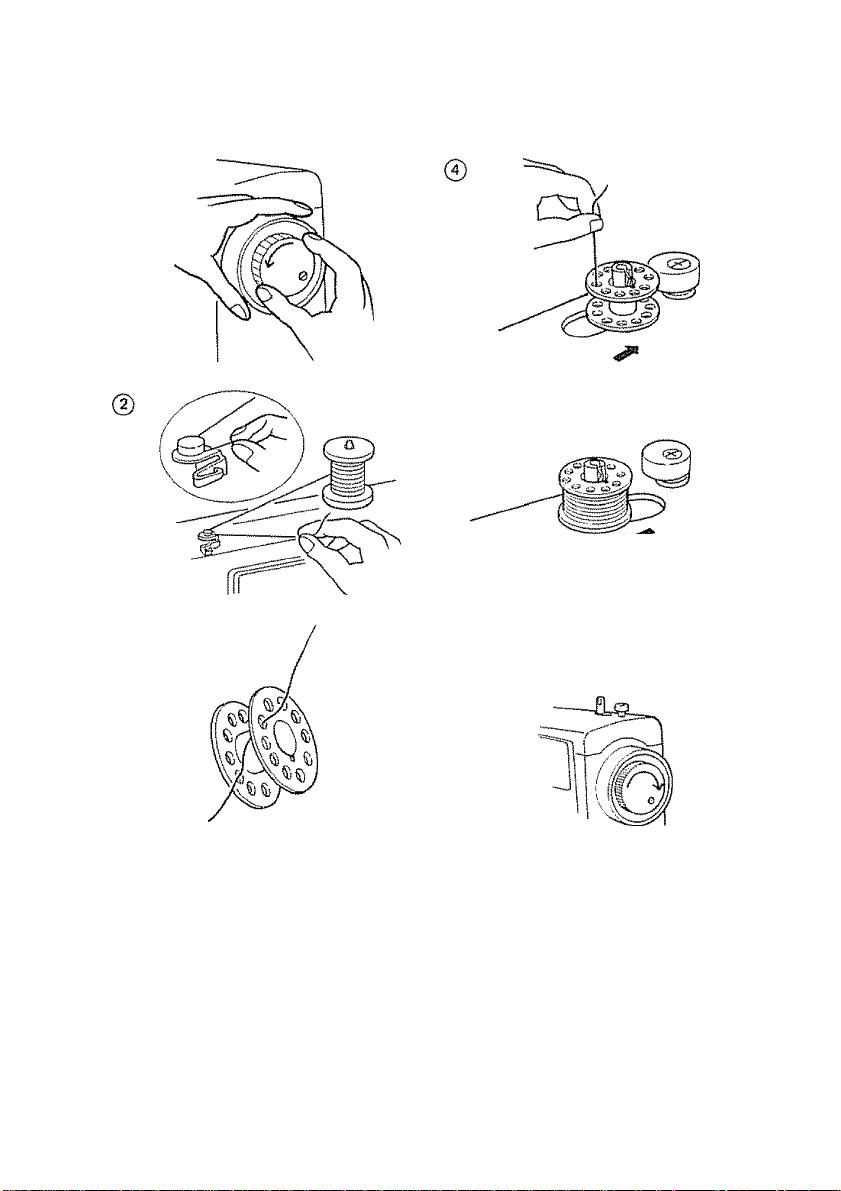
1, Release clutch by turning clutch
knob toward you,
2, Draw thread from spool through
bobbin winder tension disc as
shown.
3, Pull end of thread through hole in
bobbin as shown.
4, Place bobbin onto bobbin winder
shaft with end of thread coming
from the top of the bobbin. Push
bobbin winder shaft to the right
until it clicks, Holding onto end of
thread, start machine. When bobbin
is slightly filled, snip off end of
thread,
5. Start machine. Wind thread until
bobbin winder shaft releases,
6. Tighten clutch knob and remove
bobbin.
Page 9
illilll
liilliiil
(!)
0
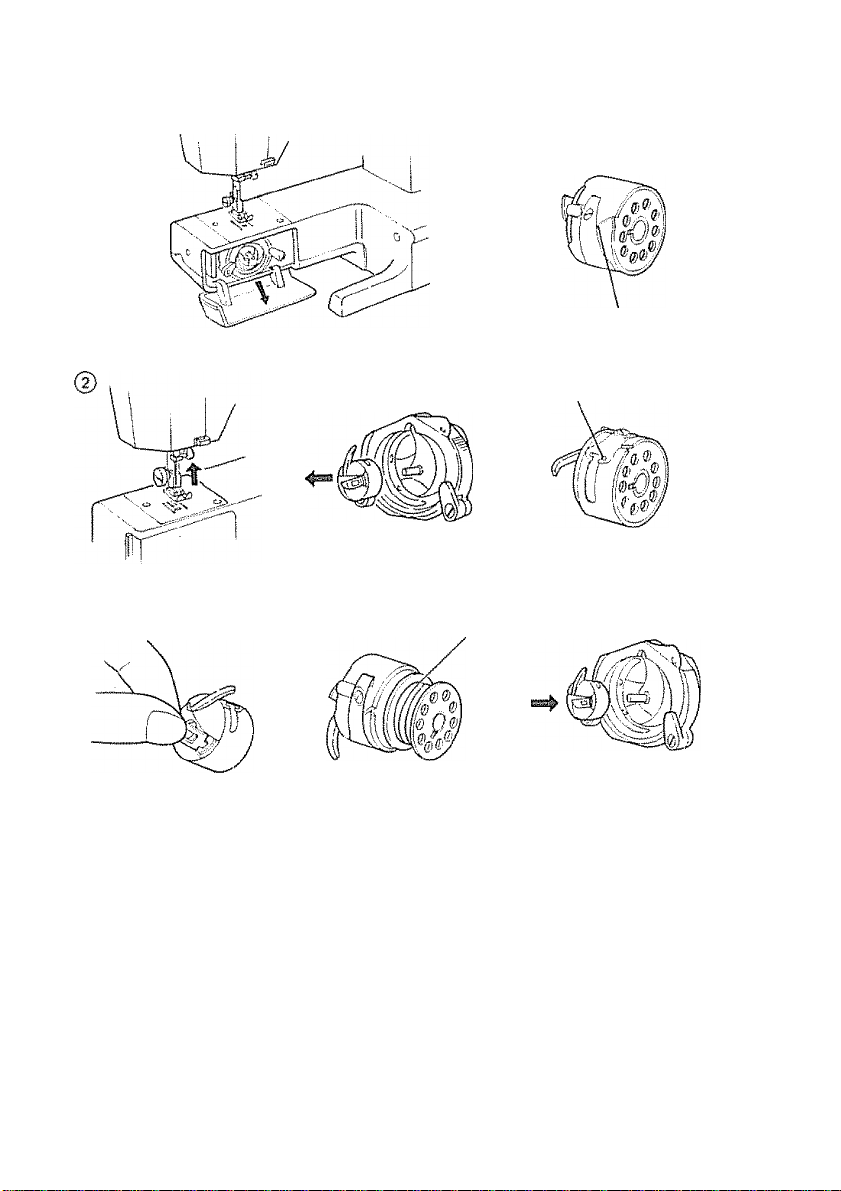
1, Remove the extension table from
the machine by pulling it to the
left Open the shuttle cover,
2, Raise needle to its highest position
by rotating hand wheel toward you,,
3, To remove bobbin case from shut
tle, pull open latch of bobbin case,
4, Pull bobbin case straight out of
shuttle
0
iiiiiiiHiiiiiaai
5, Insert bobbin into bobbin case
making sure thread is coming from
bobbin as shown,
6., Pull thread through slot of case as
shown,
7. Pull thread under tension spring.
8, Holding latch open, position case
into shuttle, and release latch. Case
should lock into place when latch is
released-
Page 10
Fig, 1
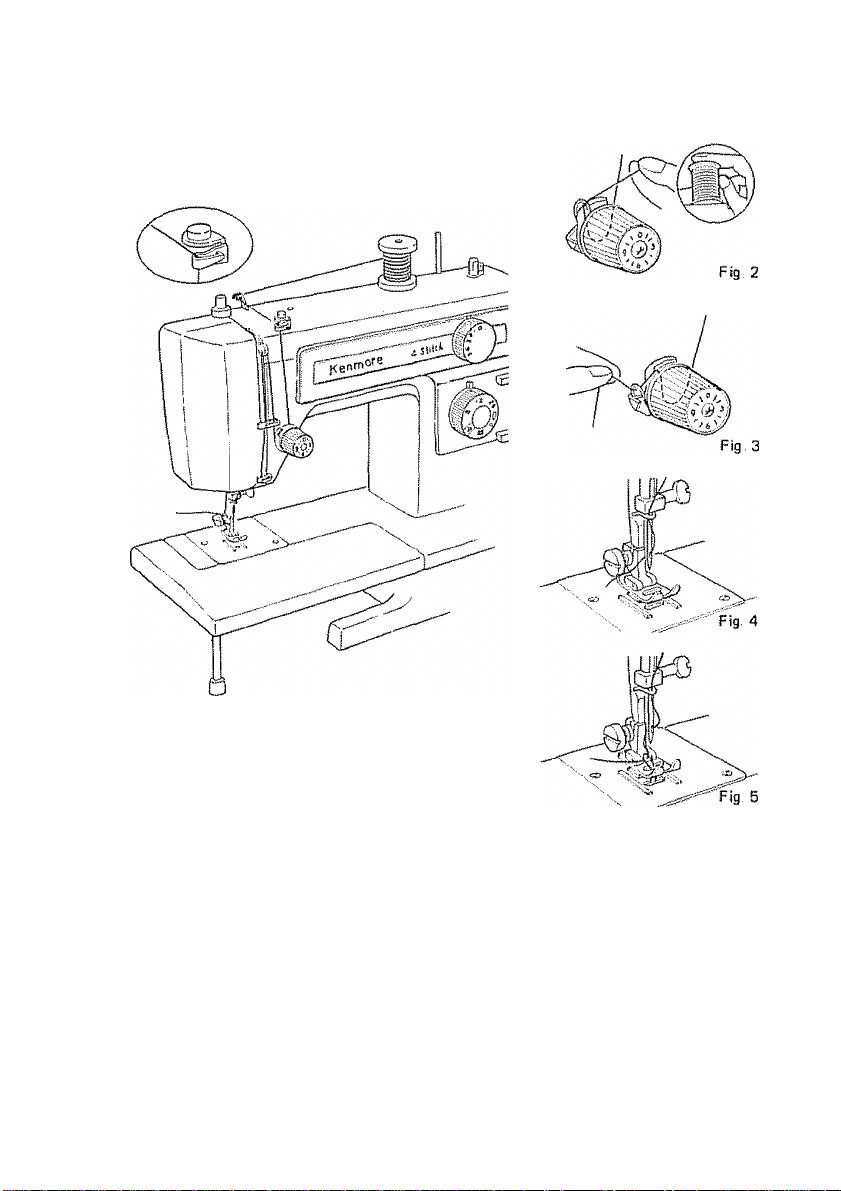
Place thread on spool pin as shown
with thread coming from the back of
the spool. Draw thread through the
top thread guides. Holding the spool
stationary with right hand, pull the
end of the thread between the tension
discs as shown,. Pull the spring wire
loop up and past the top hook until
the thread can be slipped into the
hook (See Fig,. 2), When the thread is
released, the spring wire loop will re
turn to position (See Fig. 3) with
thread in proper place. Release spool
of thread and continue to thread
machine exactly as shown. Needle
must always be threaded in direction
as shown in Fig. 4,
Hold needle thread loosely in left hand
and rotate hand wheel toward you one
complete turn. Bring bobbin thread up
by pulling upper thread, (Fig, 5)
Page 11
wmmwmmmi
mMsmitmirnKm
rnmismgr
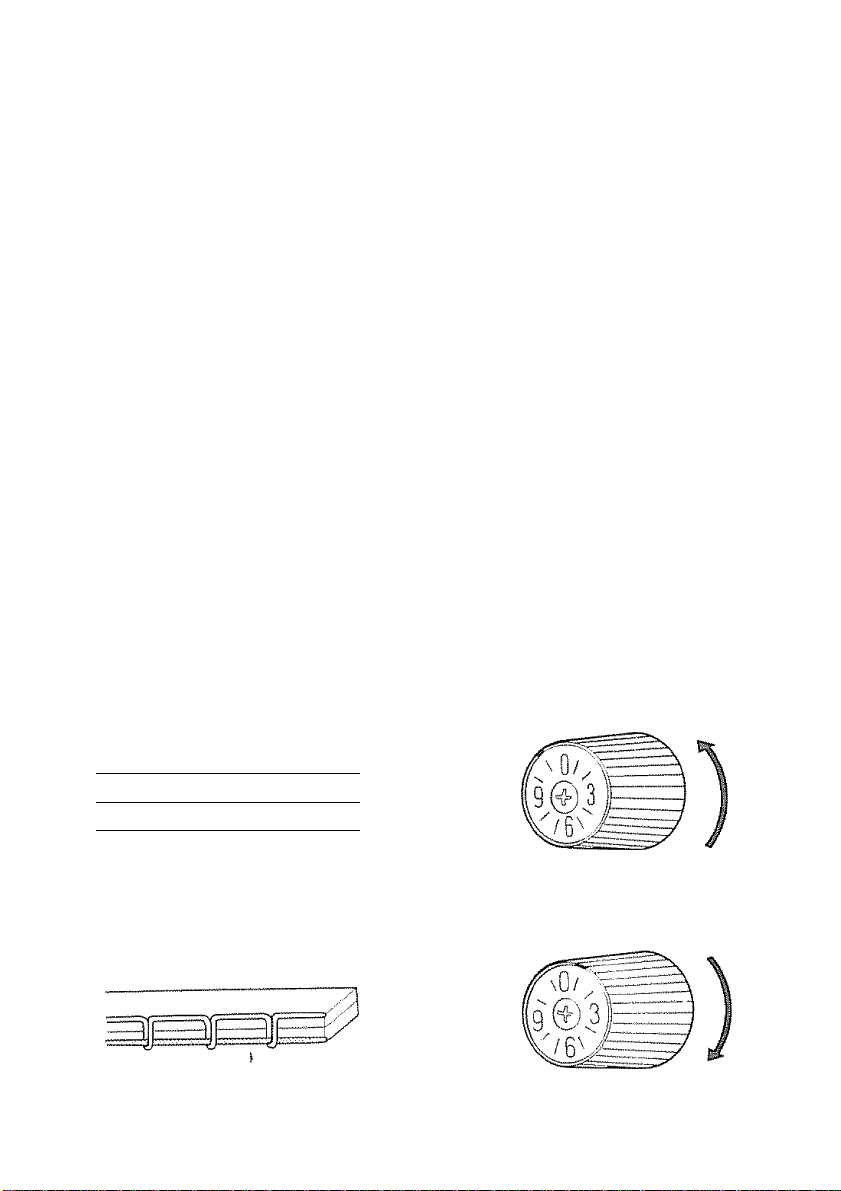
Probably the most important control on your machine is this one that regulates
your top thread tension, it consists of discs between which the thread passes.
The pressure on these discs is regulated by turning the dial. The higher the num
ber, the tighter the tension
There are many reasons for having to reset your tension. The best tension for
one fabric may not be correct for another. The required tension depends upon
the stiffness of the fabric, thickness of the fabric, numbers of layers of fabric be
ing sewn, as well as the type of stitch you are making.
It is best to test the stitching on a scrap of the fabric you are using before
starting to make a garment
___
___
_______________________
1 have threads locked between the
A perfect straight stitch will
3
toops on top or bottom.
Upper thread too tight
® Upper thread too loose
Decrease Tension
Increase Tension
Page 12
ADJySllWG BOBBliM TEWSlOiyS
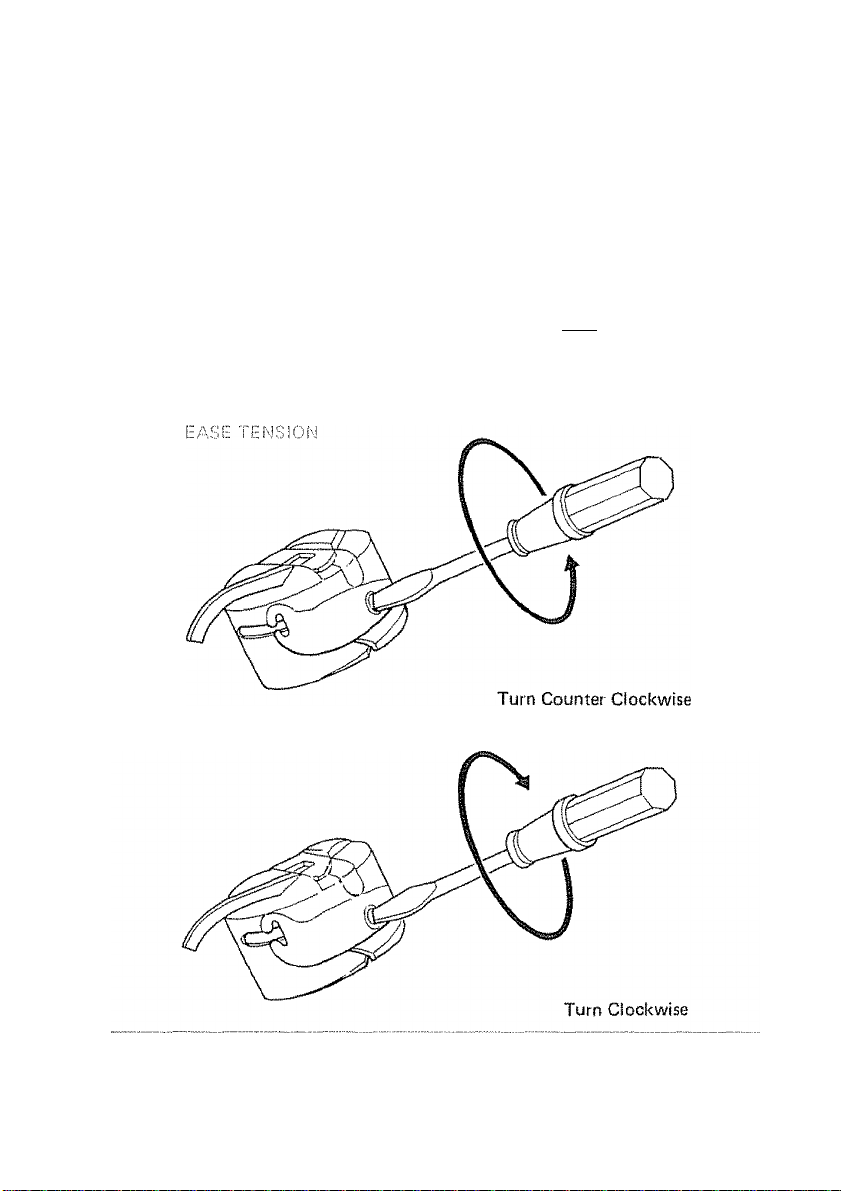
Bobbin tension requires adjusting less frequently than the upper thread tension.
If the stitch is satisfactory but the seam is puckered, it may be necessary to
loosen the tension on both the top and bottom threads. Be sure to balance them
as indicated on Page 9,
When adjusting the tension on the bobbin case, make slight adjustments with a
screwdriver.
IMCRfEASE TENSION
Page 13

“»ill
lilll
SB iiiili
The easiest way to check tensions is to sew a medium zig zag stitch on the fabric
you will be using. Use the appropriate type of thread and needle,, Use different
colors of thread on the bobbin and upper spool
Sew a line of medium zig-zag stitches The bobbin thread should not show on
the top of the fabric
Adjust the top tension if necessary to achieve the stitch formation mentioned
above
Ifii
1
UNDESIRABLE
TOP SIDE OF FABRIC
DESIRABLE
Page 14

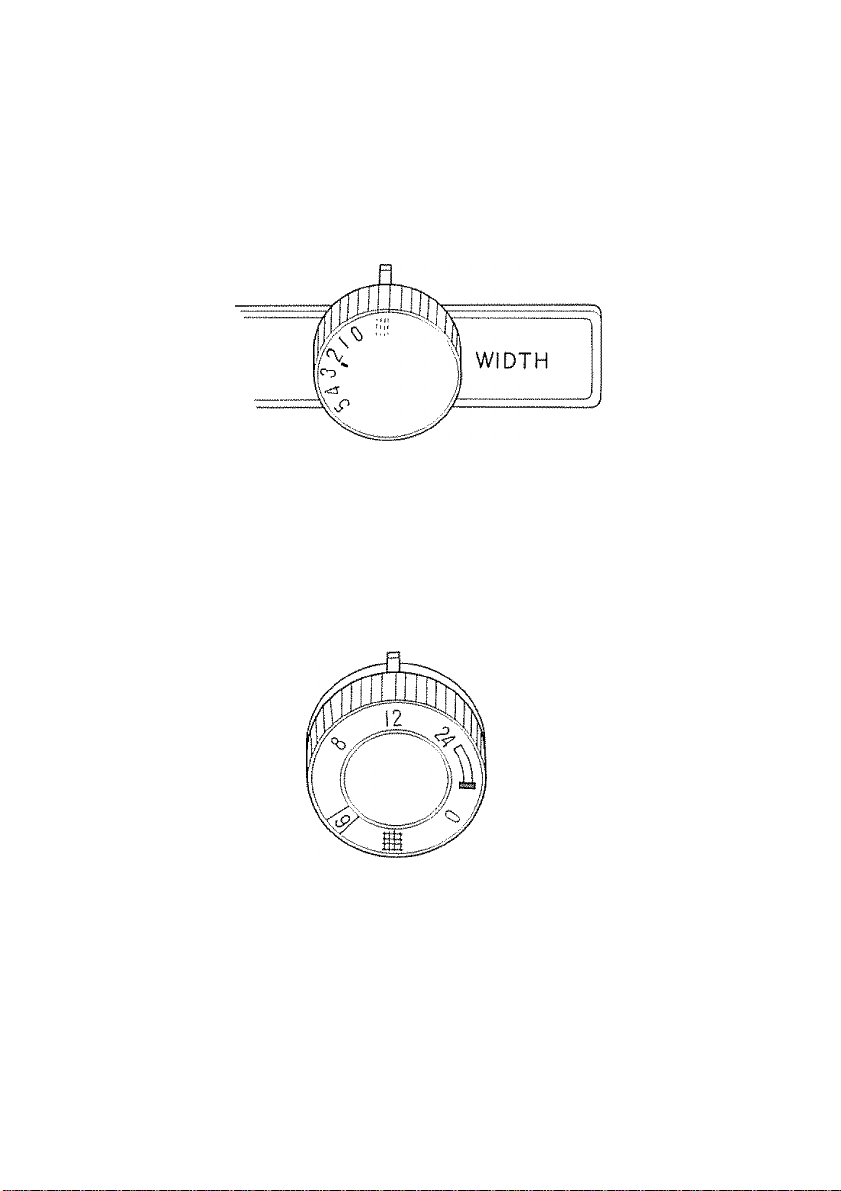
This control regulates the width of the stitch you select, THE HIGHER THEIMUMBER-THE WIDER THE STITCH. You may vary your zigzag stitch width
by adjusting this control to the setting you desire. , :
This control must be set on i ii| position in order to do straight stitching.
The stitch length control regulates the length of the stitch you select. THE
HIGHER THE NUMBER-THE SHORTER THE STITCH. ,
The number on stitch length control indicates the approximate number of
stitches per inch. The stitch setting you use will be determined by the thickness
of the fabric you are sewing.
A longer stitch setting should be used for thicker fabric or more layers of fabric.
The middle range of the control is the 10-12 stitch per inch range which is the
most commonly used. ,
A basting stitch is made by using the longest possible stitch setting-6 stitches per
inch. .
The white & gr-een marking on the control is the setting used for the
shortest stitches such as in Satin Stitching.
The marking ^ on the control Is the setting used for darning or embroidering.
Page 15
LENGTH
Page 16
illililili
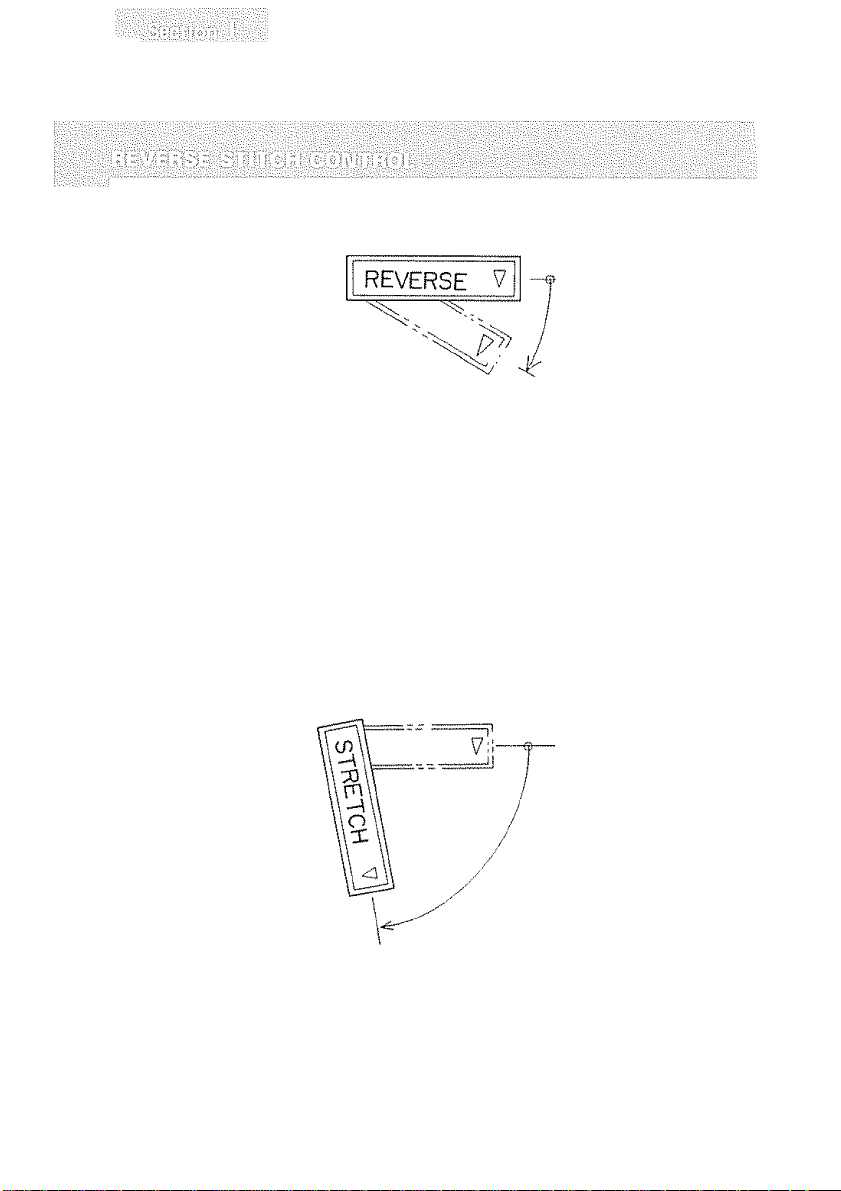
It is best to begin and end seams with a few stitches taken in reverse. This is
called back tacking. Back tacking fastens the ends of the seams firmly and
prevents raveling.
When reverse stitching is needed, turn the control clockwise and hold there dur
ing sewing. The fabric will immediately start feeding backwards and seam will be
fastened.
This control determines the feed of the feed dogs. All simple forward stitches
require that this control be set at horizontal position. These stitches are the
strait^t and zigzag stitches.
Straight stretch and rick-rack stretch stitches require the control to be set at
vertical position.
Page 17
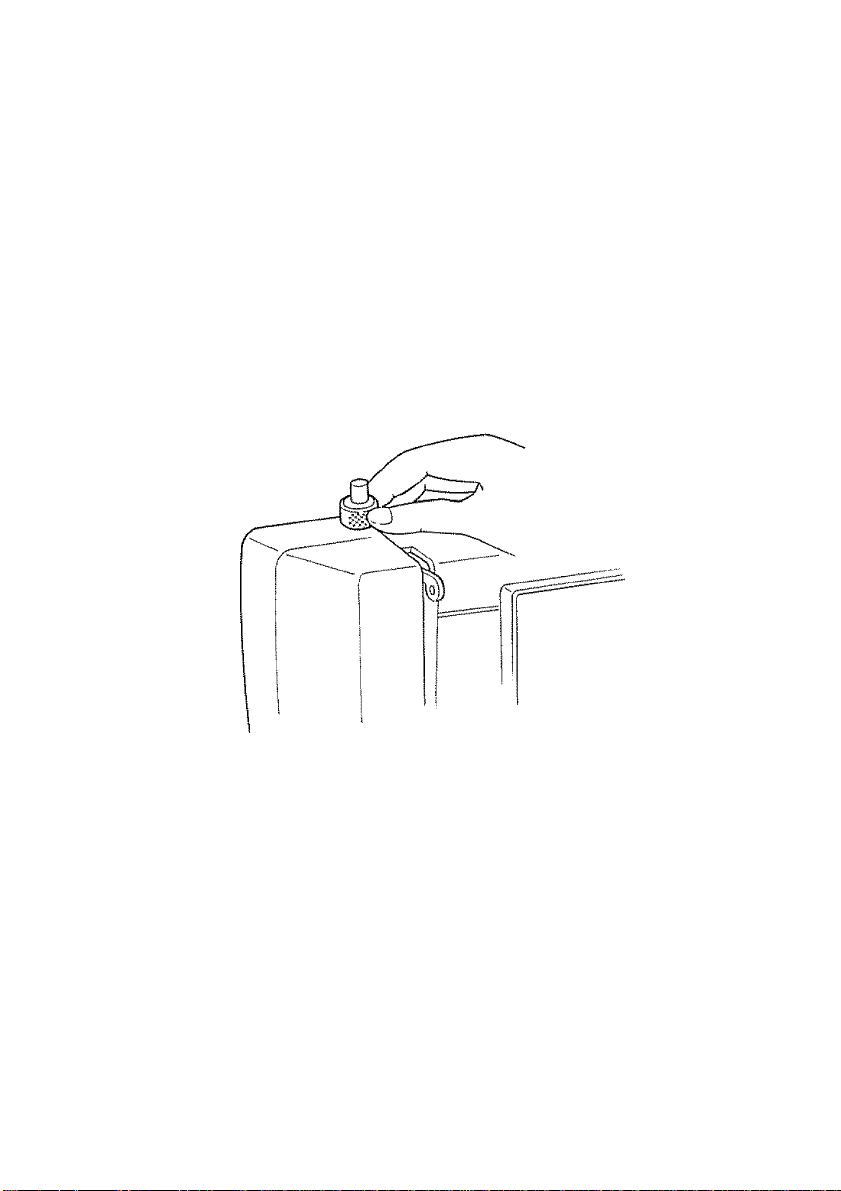
In addition to the obvious controls of your machine, there are other smai
regulators and controls to aid you in using your sewing machine.
Push down the outer ring of the pressure regulator. This will release the pressure
on the presser foot. (See above)
To increase the pressure, push down inner pin until a suitable pressure is
obtained..
Insufficient pressure may cause poor feeding of the fabric, skipped stitches, or
difficulty in guiding the fabric. If feed dogs or presser foot marks appear on the
fabric, reduce the pressure.
When sewing multiple thickness or heavy fabric, reduce the pressure. Increase
pressure when sewing lighter weight fabrics
Page 18
WOSIeMSM
Fig. 1
SEVVIiyG LiG|.-r
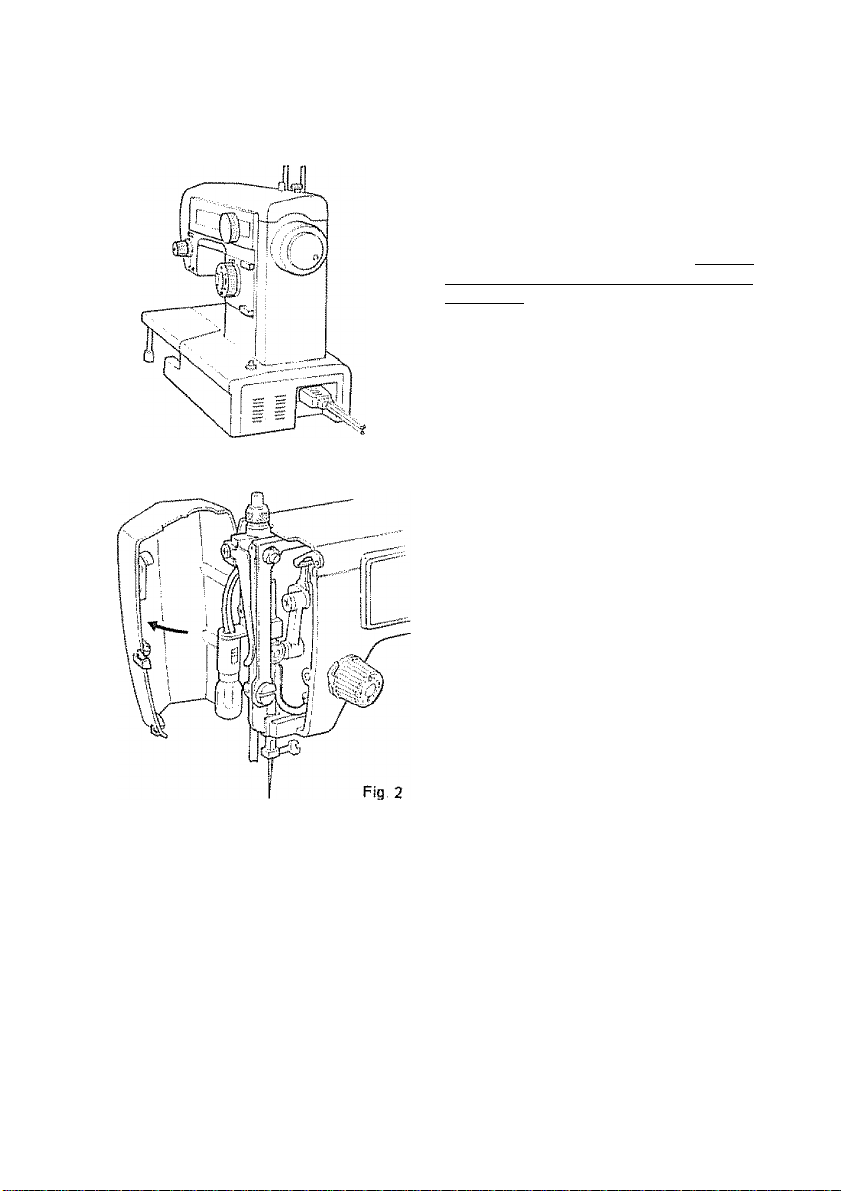
The light and power switch shown in
Fig, 1 provides the electric current for
the motor as well as the light In order
to operate the machine, this switch
must be on.
To turn on the light, depress the
switch. If you are interrupted while
sewing and must leave the machine un
attended, just turn off the switch and
the machine cannot be started ac
cidentally.
The sewing light is located in the face
cover as shown. To replace the bulb,
turn the light off and open the face
cover. Push the bulb up and turn the
bulb counter-clockwise and remove it
from the socket
Push a new bulb in and turn it
clockwise,
NOTE:
First, unplug the machine prior to re
moving and replacing the bulb. Be
aware that the light bulb may be
warm.
Page 19
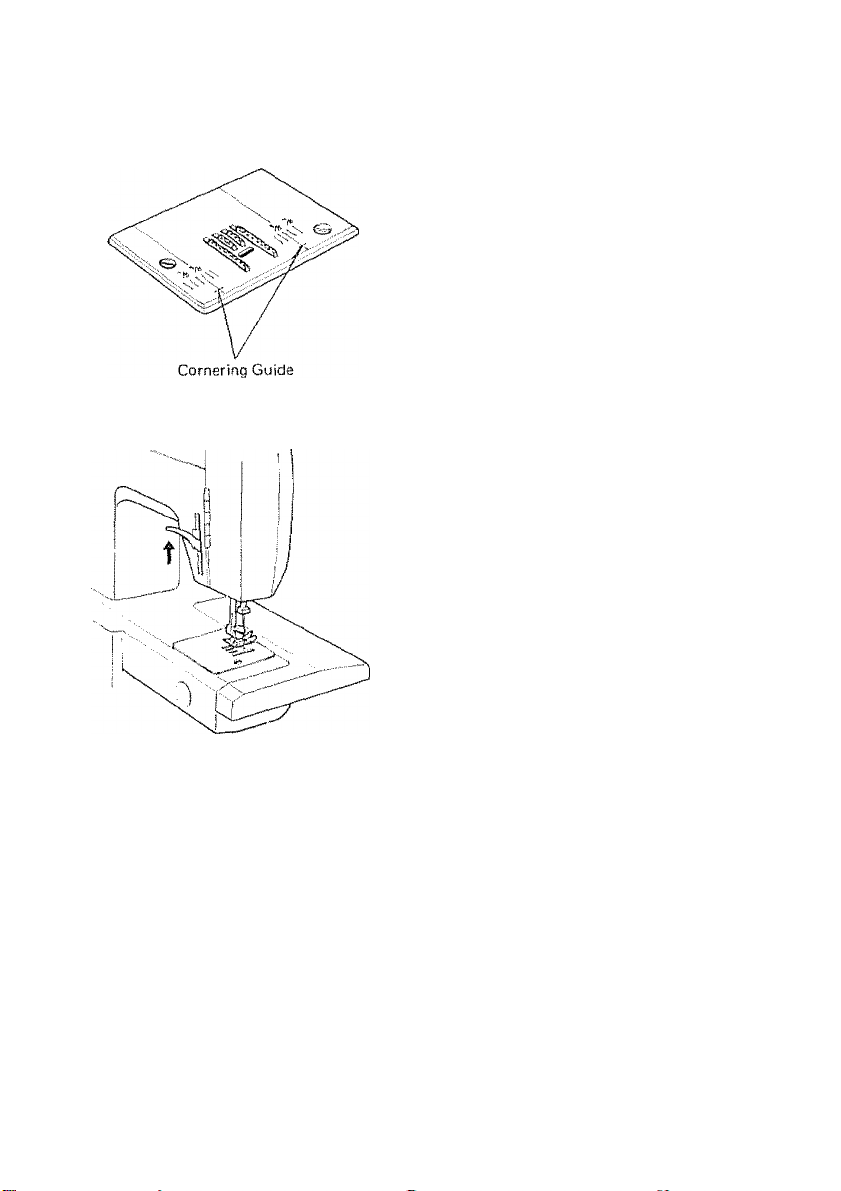
Seam guides are printed on either side
of the needle plate to aid you in guid
ing your fabric. THE GUIDE LINE
EXTENDING ALONG THE RIGHT
SIDE OF THE NEEDLE PLATE IS
THE "ALL IMPORTANT" 5/8"
SEAM LINE
The cornering guides are convenient
when turning a square corner 5/8"
from the fabric edge.. See next section
of this book for directions.
To aid you in the placement of heavy
fabrics under the presser foot, the
lever can raise foot beyond the normal
"up" position. This is also an aid in
changing your presser feet
Page 20
ACCESSORiE:
Flat
side
away
from
you
A)
11 1
Fig. 1
Use KENMORE needles. The size of
the needle should conform with the
size of the thread and both should be
suitable to the fabric (See next page).
Never use a bent needle or one with a
blunt point.
Fig. 1, shows you the exact length of
your needle. Be sure you never use one
in your machine that is not this exact
length,
"Q Needle" with blue shank is avail
able at any store or service center of
Sears Roebuck and Co, or Simpson
Sears Limited, This special needle is
to be used when sewing certain knits
and difficult synthetic fabrics, If you
experience skipped stitches in any of
your sewing, use "Q Needle",
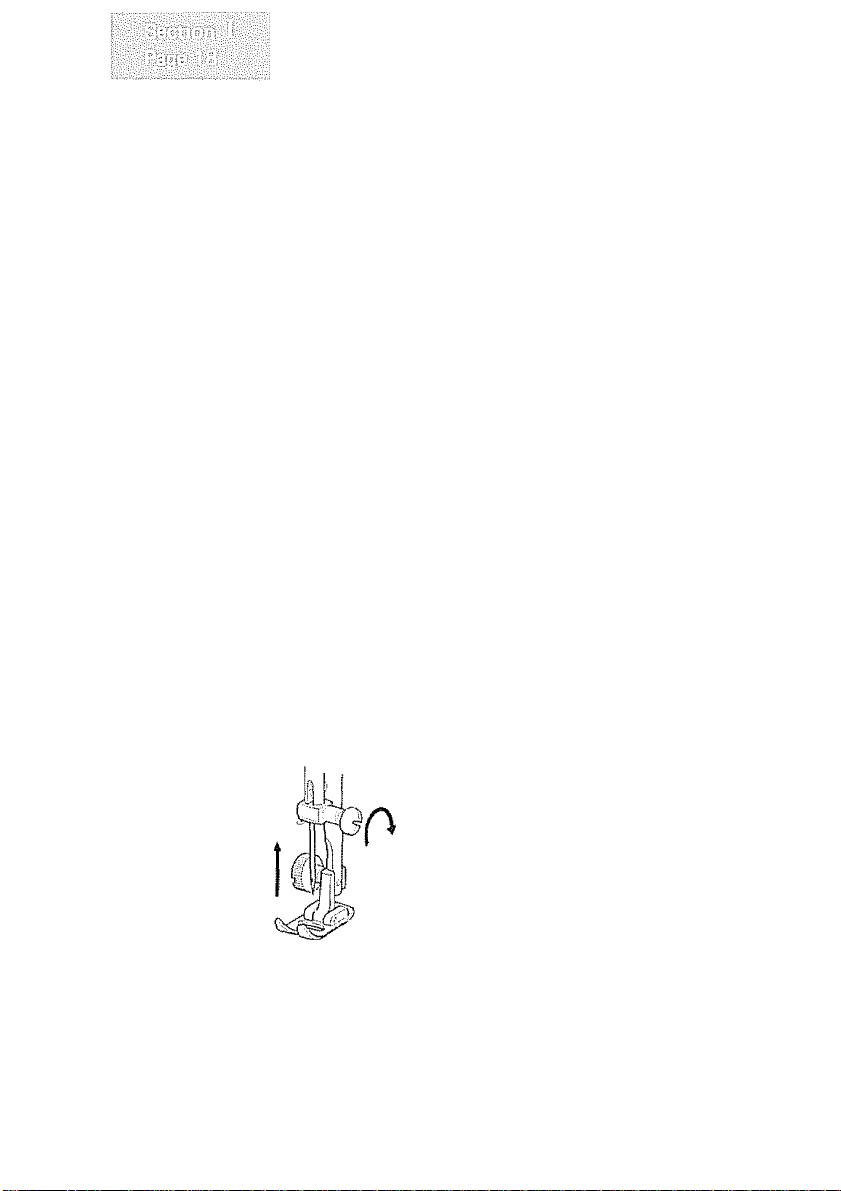
Raise needle bar to its highest position
by turning the hand wheel toward
you. Loosen the needle clamp screw.
Holding the needle with the flat side
away from you, slip the needle into
the needle bar. When it is in as far as it
will go, tighten the needle clamp screw
with a screwdriver.
Page 21

AEIO rE.BR::G CHaA'"
iiBBISiiffiAISi
Lightweight:
Batiste, Dimity, Chiffon,
Silks, Synthetic Jerseys,
Fine Lace, Organza,
Crepe, Taffeta. Voile,
Organdy
Wladium Weight;
Cotton, Cotton Blends,
Percale, Gingham,
gShantung^
Seersucker, Satin, Knits,
Vinyi Suitings, Linen,
g;WppilCr§3e^iL
iWedium Heavy Weight:
Corduroy, Denim, Wool,
Sailcloth, Wool Flannel,
Gabardine, Velvets,
gLeatfierifllgl
Heavy Weight:
Coatings, Upholstery,
Cotton Duck, Heavy
Decorative top-stitching
on all types of fabric
Synthetic Knits and
Stretch:
Polyester Double Knits,
Nylon Tricot, Jersey,
Stretch Terry, Spandex,
Ciro Tricot
r; NEEDLE
;VSIZE AND V
i^;:C0L0Rj;;s':
ì9-brpwn:;h
11-ORANGE y
::y;i4-RED/p;
/Àyyi4-BEDlVyy:
:::':y-'::Oryy-vy',v\-;
p6-PURPLEy;;
8-pREEN yv
-16-PORPLEi
PS-GREÉN :yv
:-yyy-i;^or.yy'^y^y:'
yy::;Q-BLUE.;yyy::
yyyQ-BLUEy'Vy;
:^’yyy wtthyy-;.y''N'
y;Q FOOT"
THREAD SIZE
Polyester Core/Cotton
Wrap
Fine Mercerized Cotton
Silk A
50 Mercerized Cotton
Polyester Core/Cotton
Wrap
Silk A
50 Mercerized Cotton
Mercerized Heavy-Duty
Polyester Core/Cotton
Wrap
Silk A
Heavy Duty Mercerized
Cotton
Polyester Core/Cotton
Wrap
Silk A
Buttonhole Twist
(Use as top thread only}
Polyester Core Cotton
Wrap
50 Mercerized Cotton
RECOMMENDED
STITCH LENGTH
SETTING
12 stitches
per inch
10 to 12 stitches
per inch
8 to 10 stitches
per inch
8 stitches
per inch
6 stitches
per inch
10 for Regular
or
6 for Stretch
Stitches
Page 22
t:3|ss!»3E
iiSaii
imiMSmMSSS
PRESS EFi FEET
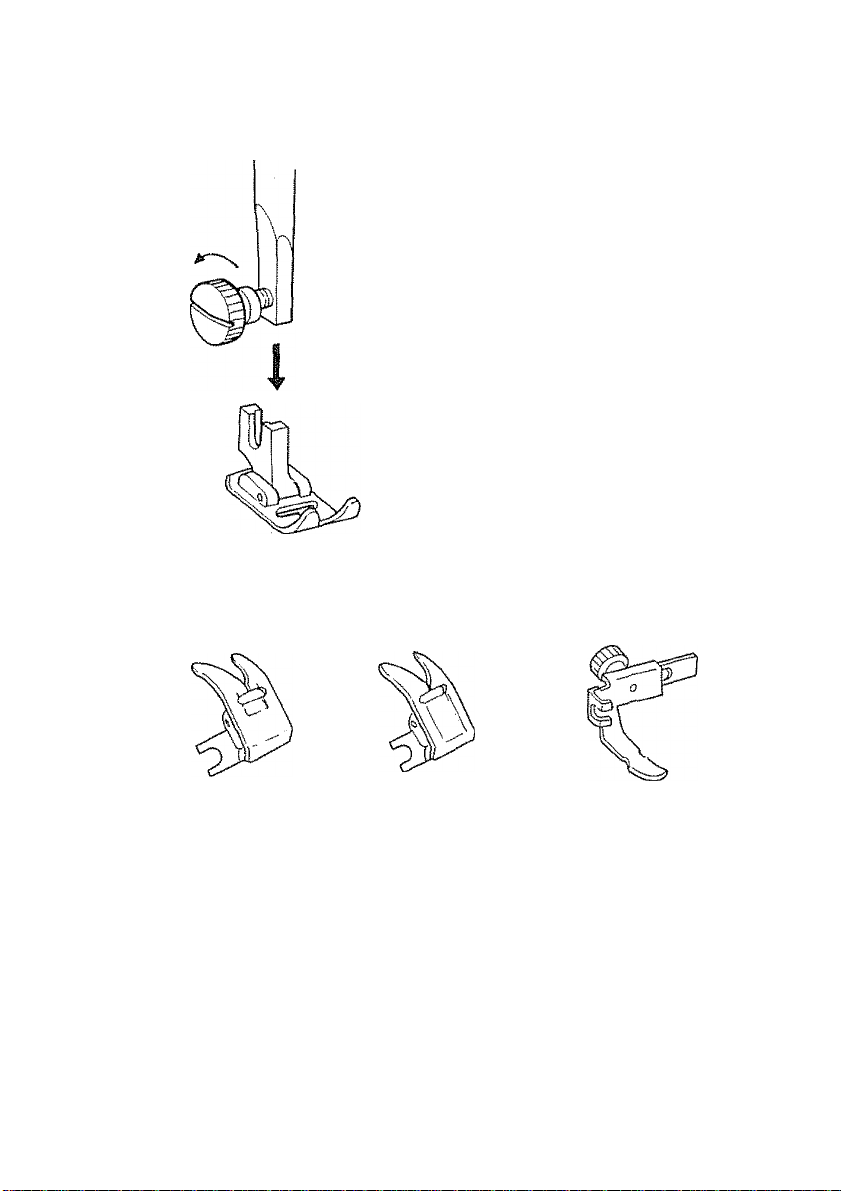
To change the various presser feet,
raise the presser bar to its highest posi
tion by lifting the presser foot lever,
Loosen the presser foot thumb screw,
choose the proper foot, insert from
the bottom Tighten the screw using
the large screw driver to make certain
the foot is secure
You have been given a variety of presser feet:
A. Zigzag Foot
B. Satin Stitch Foot
C. Zipper Foot
NOTE:
Additional feet and attachments are available at most large retail stores or
through the catalog. Please select attachments for left needle position with
low bar.
Page 23

ij-'i
Starting to Se'
Now tliat you are familiar with the conti'ols on your machine and with the ac
cessories provided for the machine, you are ready to start to sew with your new
Kenmore sewing machine Below are some good habits to follow each time you
sit down to sew:
1. Test the needle it should be straight, properly set and sharp on the point. It
should be the correct size for the fabric and thread being used.. Do not be
afraid to change your needle frequently . Many of the new fabrics made of
synthetic blends tend to dull the needles more easily than fabrics made of
natural fibers.
2. Before placing the material on the machine, see that the ends of the threads
have been drawn about 4 inches to the rear of the machine. Hold on to
threads during the sewing of the first 3 or 4 stitches of the seam.
3. Test the machine stitch on a scrap of fabric you plan to use. The fabric
should be double thickness. Adjust the machine for the length of stitch and
tension suitable to your fabric.
4. Fabric should be placed under the presser foot with the bulk of the material
to the left of the needle and the right edge of the material placed on the 5/8"
seam marking on the needle plate when making a simple seam.
5. Run the machine at a slow even speed. The more pressure you put on the
speed control, the faster the machine will sew.
6. Fasten each seam by back tacking at the beginning and end of the seam,
7 Always finish sewing each seam with the needle at its highest point,
8, Guide the fabric gently with your hand in front of the needle, Never pull or
hold the fabric in such a way that the normal feeding is altered
9. When turning the hand wheel manually, always turn it toward you,
Page 24
gasLi0i! il>
GARMENT CONSTRUCTION STITCHES
STRAIGHT STOTCHOWG
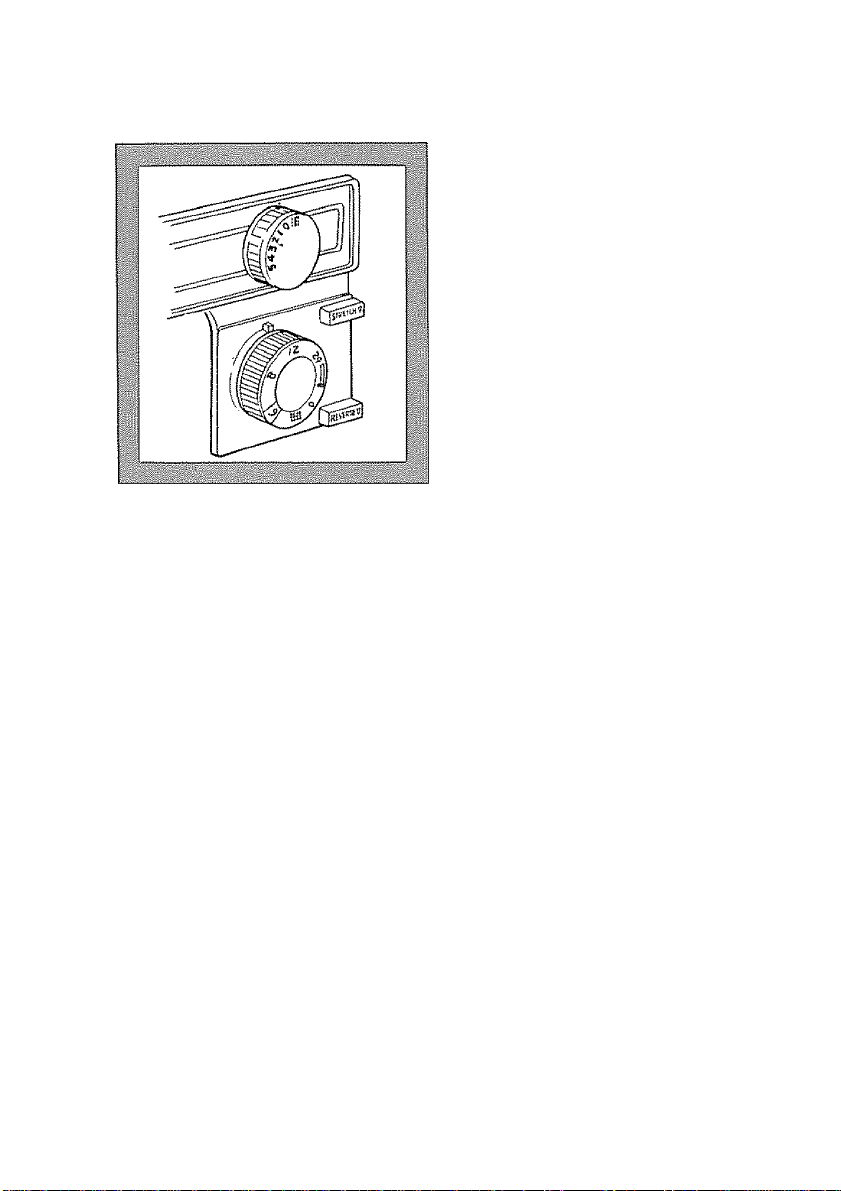
Set your machine just as shown in the
illustration in order to straight stitch .
It is important each dial has the fol
lowing settings: •
SETTINGS
Stretch Stitch Control
Stitch Width Control .
Stitch Length Control
Zigzag Presser Foot
You will find in garment construction that you are doing two types of sewingtemporary and permanent,
1, Temporary stitching-Usually the longest stitch possible and often done on a
single layer of fabric. The various types of temporary stitching are;
Basting
Stay stitching
Guide line marking
2 Permanent stitohing-This is the actual stitching that holds the garment to
gether. Much of this stitching is visible on the outside of the garment and
therefore must be good looking.
The best length stitch to use for medium weight fabrics is 10-12 stitches per
inch. This is in the middle range of the Stitch Length Control.
You must remember to lengthen the stitch for heavier fabrics, multiple layers of
fabric and thicker seams. Some of these seams are:
Common two layer seams
Curved two layer seams
Top stitched three layer seams
Top stitched four layer seams
When you have two seams crossing each other with considerable thickness, sew
slowly and carefully so the seam will be as strong as possible in this area.
............... „Horizontal
..................
..................
j|j|
12 to 6
FASTENING A SEAM
Be sure both threads are drawn back under the presser foot. Lower needle into
fabric about 1/2 inch from beginning of seam. Turn the reverse stitch control
clockwise and stitch in reverse until needle reaches beginning of seam. Release
control and complete seam.. When you reach the end, turn the control clockwise
and sew back over 1/2 inch of completed seam.
Page 25
^ì-icìil'iojpri .‘li!
TURNIWG A SQUARE CORNER
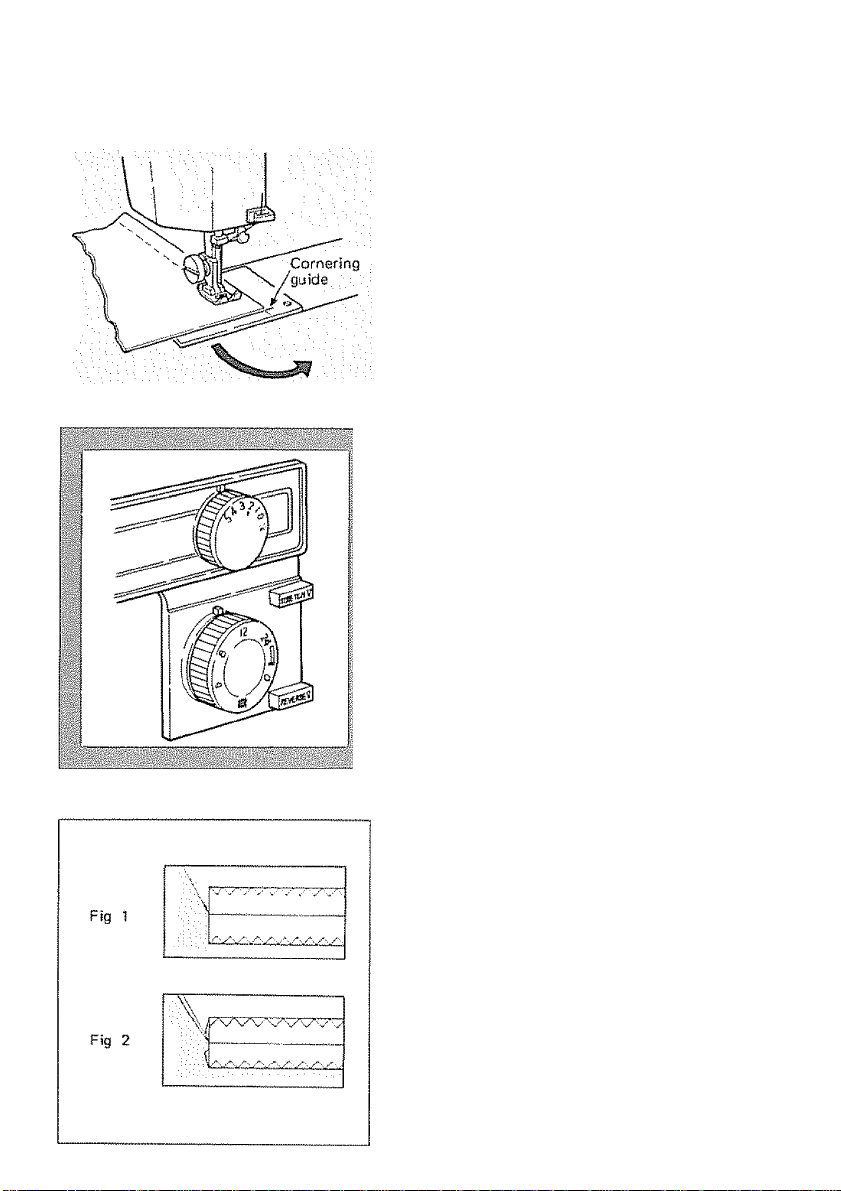
To turn a square corner 5/8" from the
fabric edge, stop stitching with the
needle tip piercing the fabric, when
reaching the cornering guide as shown.
Raise the presser foot, turn fabric.
!Mew stitching line will align with 5/8”
seam guide on side of needle plate.
Lower the presser foot and begin
stitching in new direction.
ZIGZAG STITCHING
SETTINGS
Stretch Stitch Control,
Stitch Width Control .
Stitch Length Control .
Zigzag Presser Foot
Horizontal
1 to 5
Any Number
This type of stitching greatly expands
the use of your machine, This is the
feature that enables you to overcast
seams, applique and buttonhole.
Simply use the settings indicated in
the illustration for the simple zigzag.
Follow directions given in the follow
ing pages for more specific uses.
OVERCASTING
This is one of the more frequently
used zigzag stitches in garment const
ruction, You may want to overcast
along the raw edge of each seam allow
ance or fold the raw edge toward the
garment and stitch,
Fig, 1 shows the raw edge finished,
Fig, 2 illustrates the folded edge
stitched
Stitch so the needle pierces the fabric
just short of the outside edge, Raw or
worn edges of older garments can be
overcast to prevent further raveling
Page 26
STRAIGHT STRETCH
STITCHIWG
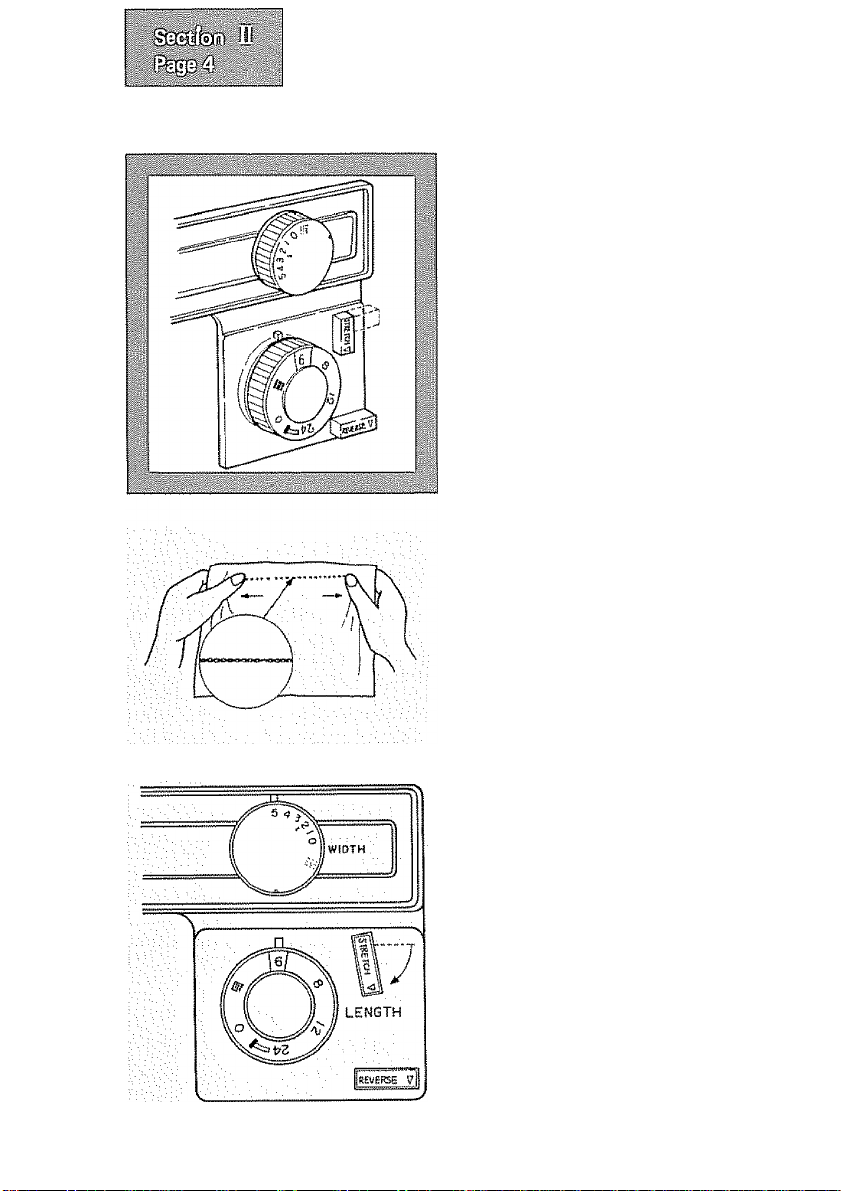
SETTINGS
Stretch Stitch Control
Stitch Width Control., |!ii
Stitch Length Control
Zigzag Presser Foot
Use this stretch stitch with knitted
fabric and other fabrics that stretch.
Sew as you do with regular straight
stitch seaming. The seam may be pres
sed open as with any regular seam, but
will stretch if necessary.
This is also a good stitch to use on
curved seams regardless of the type of
fabric. Any seam that will receive a
great deal of strain when worn should
be sewn with the stretch stitch. Use in
children's shorts and slacks as well as
adult sports clothes.
................
.............. ...
Vertical
6
ZIGZAG STRETCH
STITCHING
SETTINGS
Stretch Stitch Control
Stitch Width Control
Stitch Length Control............. ,
Zigzag Presser Foot
Sew on stretch fabrics in any area that
you might use a zigzag stitch. This
stitch can be used as a decorative top
stitch as well.
..............
.................
, Vertical
„ 2 to 5
.6
Page 27
'ijriñirtyü,
SPECIAL FIWISHIINJG STITCHES
After the basic construction of your garment is finished, there are still many
finishing touches to be clone To aid your completion of your garment, the Kenmore has been designed to do the following tasks that formerly had to be done
by hand
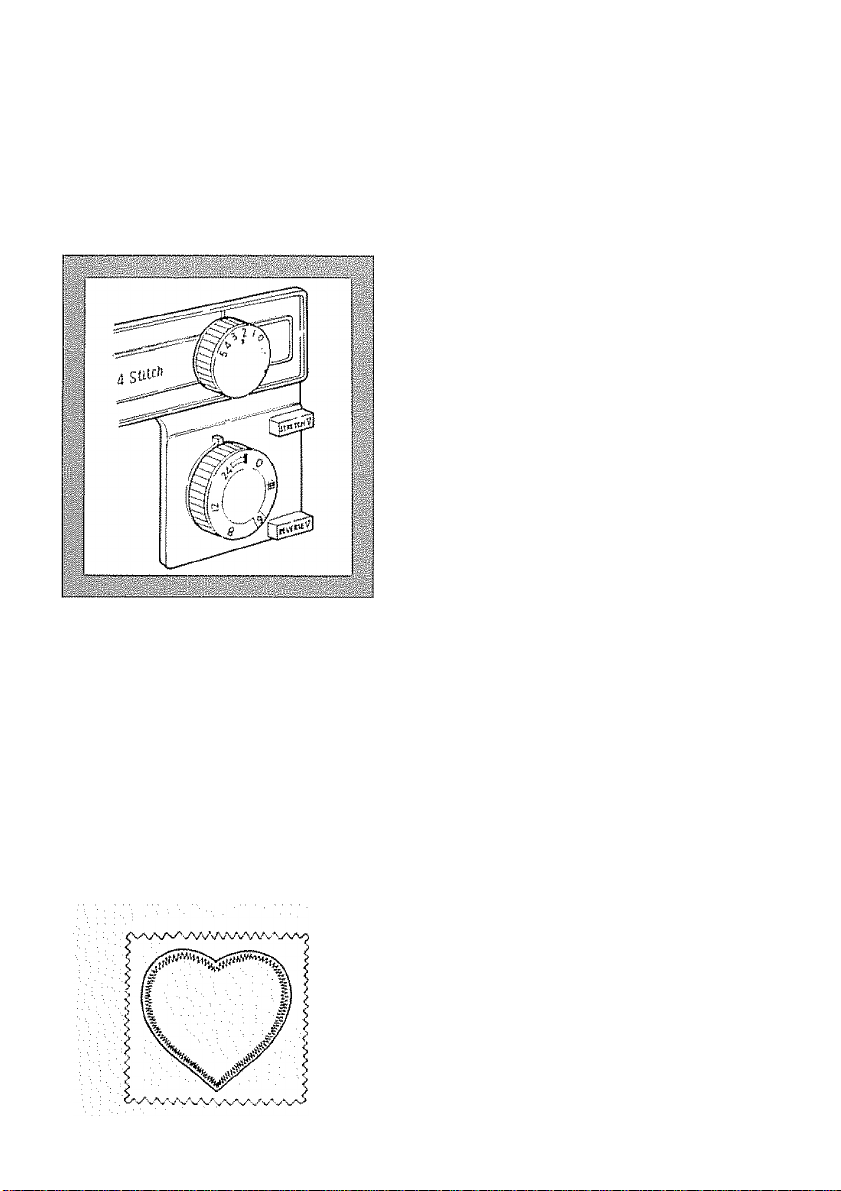
SATIW STITCHING
SETTINGS
Stretch Stitch Control ,
Stitch Width Control
........
Stitch Length Control ,, .
Satin Stitch Foot
Horizontal
2 to 5
Green Zone
Closely spaced zigzag stitches are called satin stitches This is an attractive stitch
used for appliqueing, buttonhole making.
Whenever you are using this stitch, it is well to remember to loosen the tension
of the top thread slightly. The wider the stitch you make, the looser the tension
should be.
If you are stitching on a very soft fabric, it is well to use a backing of tissue
paper or interfacing for a well formed stitch,. Puckering of the materia! will be
eliminated and the bobbin thread will not be visible on the top side of the fabric.
As with all special stitches, it is best to make a sample design on your fabric
before starting the design on the garment.
APPLIQUEING
SETTINGS
Same as with Satin Stitching
Select an applique design to be applied
to your garment and baste it in place.
Satin stitch around the raw edge of the
applique completely covering the edge
You may want to do this with a con
trasting color of thread or self color .
Page 28
ш
Ш
BUTTOWHOLE МАКШе
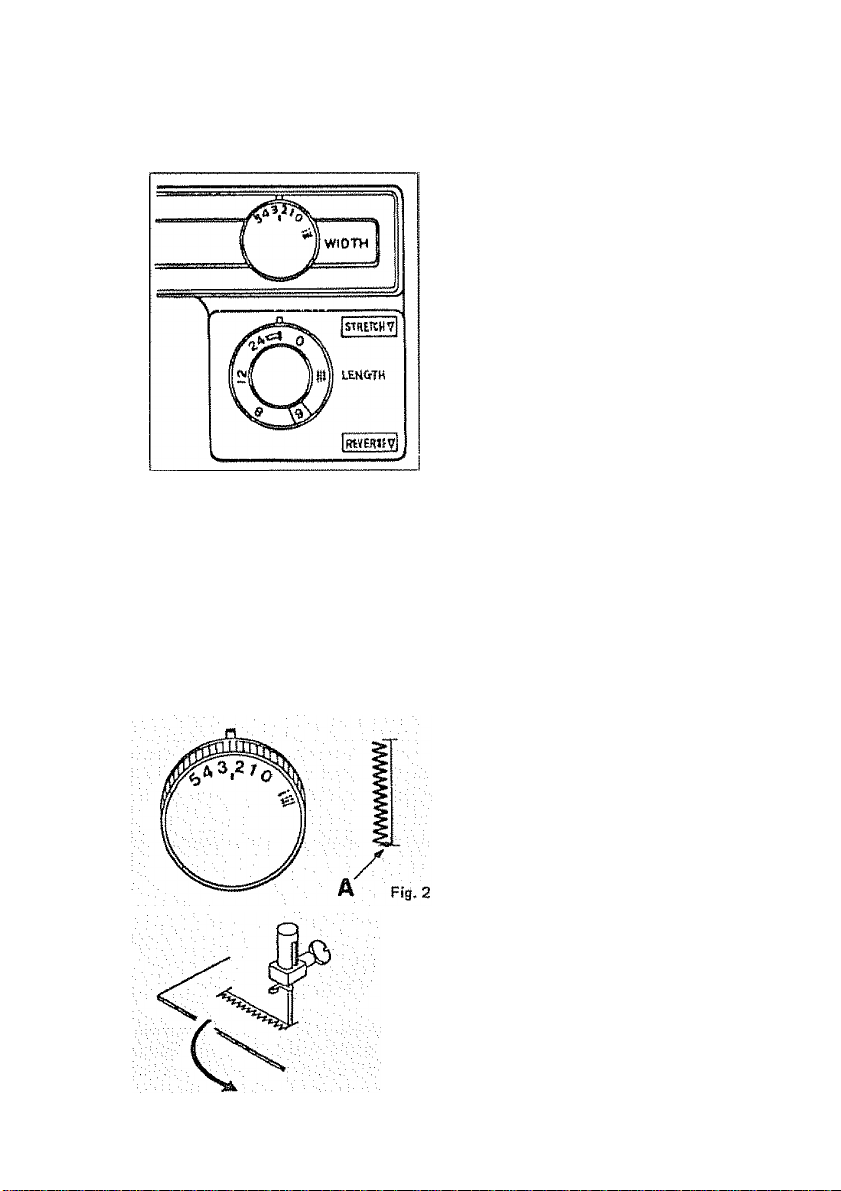
SETTINGS
Stretch Stitch Control,
Stitch Width Control. ,
Stitch Length Control.
Satin Stitch Foot
Always make a practice buttonhole on
a scrap of fabric you plan to use, Try
the buttonhole with the button you
will use.
Always use an interfacing in area of
garment where buttonholes are placed,
Tissue paper or regular interfacing can
be used. Tear paper away after
stitching, if it is used.
Mark the buttonhole length at both
ends and also the center line See Fig, 1
Horizontal
.Green Zone
.Green Zone
■
■ Ftg. 1
Fig. 3
Set Stitch Width Control to Green
Zone. Stitch forward on left side of
buttonhole until desired length is ob
tained, Stop with needie in fabric on
right side of stitching. {Point A). See
Fig, 2,
Raise Presser Foot with needie in
fabric and turn fabric around 180
degrees using needle as a pivot. See
Fig 3,
Page 29
Fig, 4
I.I'
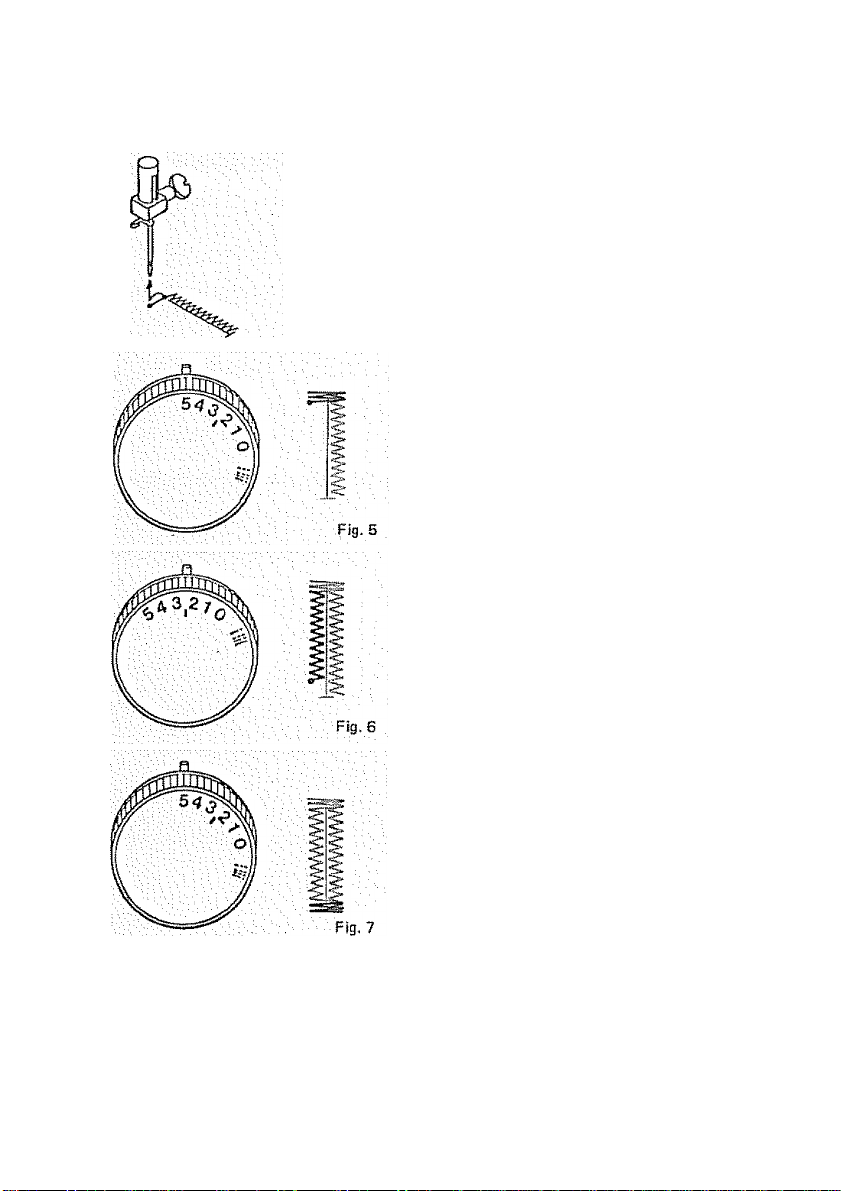
Lower Presser Foot and stitch one
stitch to left by turning Hand Wheel
toward you and raise needle. See Fig 4.
Set Stitch Width Control to 5 and
make bartack with a few stitches and
raise needle. See Fig. 5
Set Stitch Width Control to Green
Zone and sew other side of buttonhole
stopping a few stitches before desired
length and raise needle. See Fig 6,
Set Stitch Width Control to 5 and
make bartack a few stitches See Fig 7
Remove fabric from machine.
Depending upon the fabrics on which you are sewing, or your own preference in
buttonholes, you may slightly decrease the width of the sides and the spaces in
the center by varying the stitch width settings.
Page 30
lii
ZIPPER APPLICATIOW
SETTINGS
.....
.....
.Horizontal
0
12
Stretch Stitch Control,
Stitch Width Control
Stitch Length Control
Zipper Foot
REGULAR ZIPPER
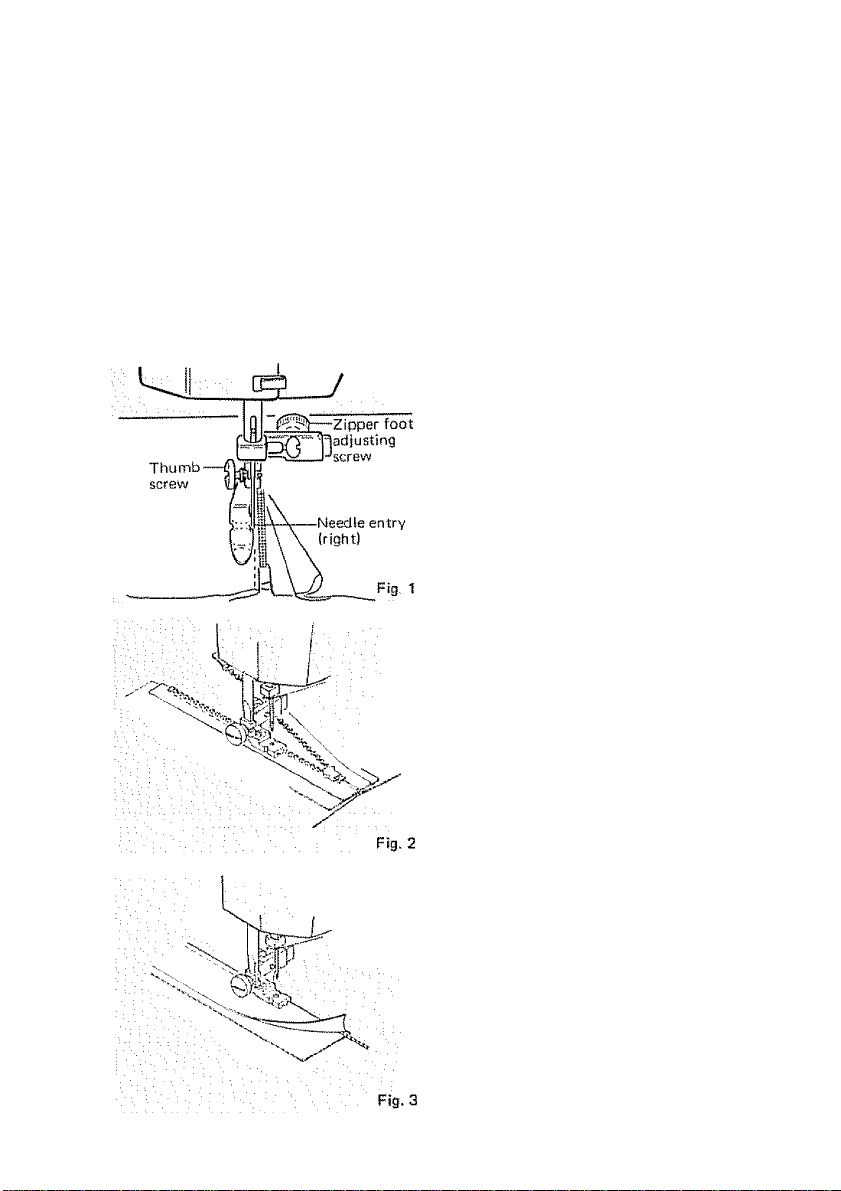
Pin or baste zipper to fabric and place
the work in position under the presser
foot. Loosen the zipper foot adjusting
screw to set the foot on the left side of
the needle, and sew the left side zipper
as shown. (Fig, 1i To sew the right'
side zipper, loosen the screw and bring
the foot to the right side of the needle.
INVISIBLE ZIPPER
Adjust the foot so the needle is sewing
through the center hole of the foot
and one groove of the foot is riding on
the teeth of the zipper, See Fig, 2. Fol
low the zipper manufacturer's instruc
tions.
After zipper has been inserted, finish
sewing seam by shifting foot to side
position sewing through side notch,
CORDING
Foot can also be used to make cording
for slipcovers etc. Cover a cord with a
strip of bias fabric and sew as shown in
Fig. 3.
NOTE:
Use "Low Bar Sewing Machine ZIP
PER FOOT" (6757) for "invisible
zipper" and "cording", which will be
obtained at any stores of Sears Roe
buck and Co,, and Simpsons-Sears
Limited
Page 31
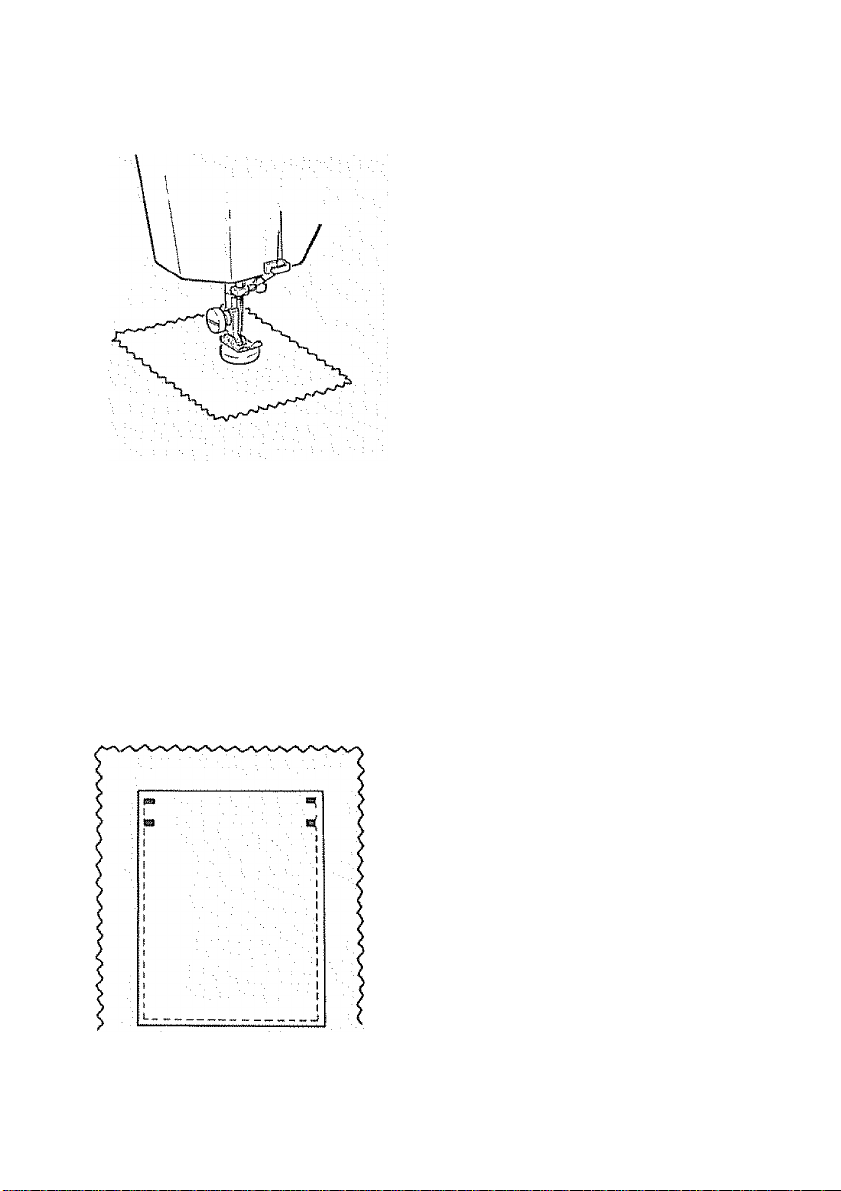
l[i j
BUTTON SEWING
SETTiNGS
Stretch Stitch Control. .
Stitch Width Control
.......
. -Horizontal
..Must be
adjusted
Stitch Length Control ,
Zigzag Presser Foot
1. Align two holes of button with slot
of presser foot and lower foot to
hold the button securely
2. Turn hand wheel manually until
needle point is just above button,
3. Adjust stitch width control so
needle will enter left hole of the
button,
4- Turn hand wheel again by hand so
needle enters second hole. Readjust
stitch width if necessary. Stitch a
number of times .
5. Finish sewing with an extra two
inches of thread remaining. Draw
these threads to reverse side of gar
ment and tie.
BAR TACKING
SETTINGS
Stretch Stitch Control.
Stitch Width Control,,,
Stitch Length Control
Horizontal
. 1 to 5
.Green Zone
Zigzag Presser Foot
This stitch is similar to a very short
satin stitch and is used to reinforce
points of strain such as corners of
pockets and straps on lingerie.
Sew 4 to 6 zigzag stitches.
Page 32
:
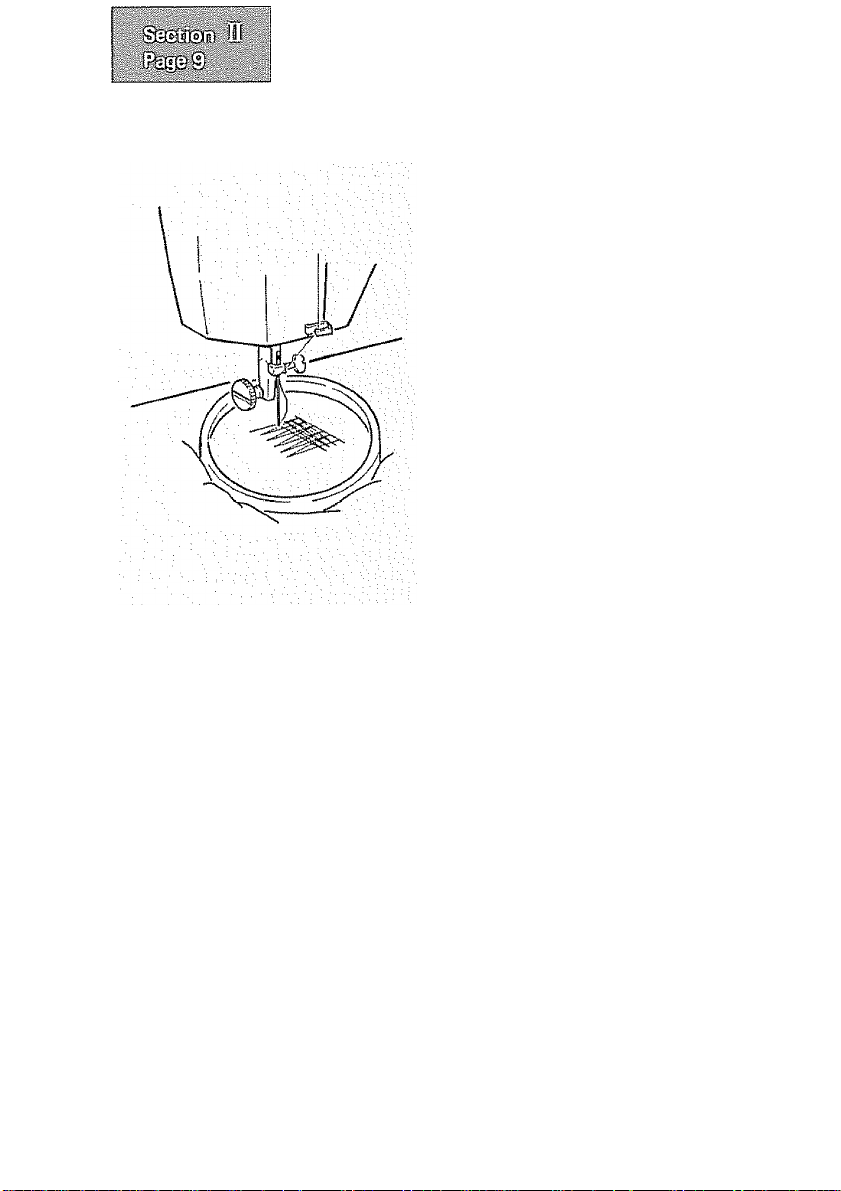
DARWIWG
SETTINGS
Stretch Stitch Control
Stitch Width Control
Stitch Length Control
No Presser Foot
Remove presser foot, stretch fabric be
tween embroidery hoops with hole
centered. Draw the bobbin thread up
through the fabric by holding the top
thread and taking one stitch at the
spot where you wish to start darning.
Lowering the presser bar, start sewing
at a slow to medium speed. Move the
fabric back and forth with a steady
rhythm to cover the darning area.
When it is covered, turn the fabric and
sew another layer of stitching across
the first layer of stitching,.
...................
......................
..................
Horizontal
j‘,ii
iif
Page 33
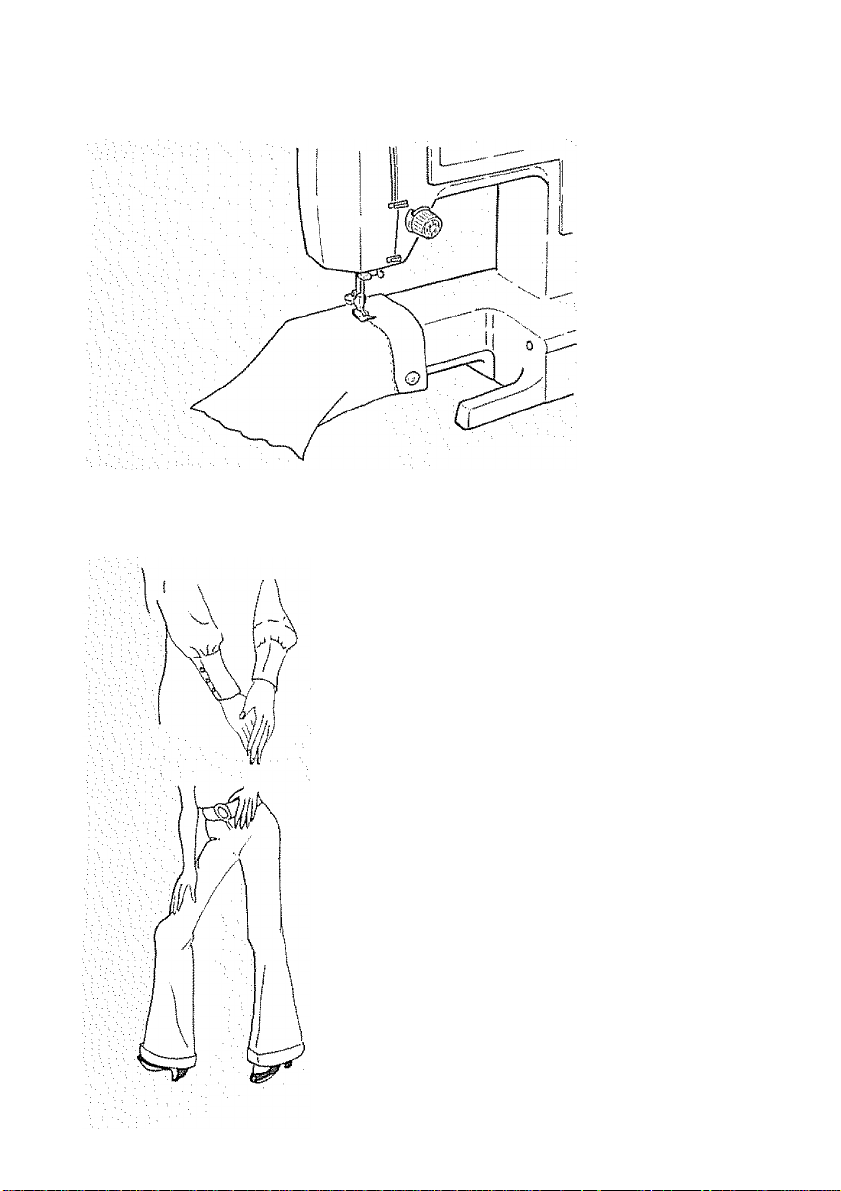
FREE-ARM SEWIWG
5i;iO!;j9Jn:
‘■''U’ii' i
This sewing machine can be used like a
flat bed machine, but easily converts
to free arm machine by removing the
extension table .
The free arm enables you to sew
tubular types of pieces more easily
Just slip the sleeve or pants leg on the
free arm as shown above.
You will find many uses for this free
arm feature such as:
1 Mend elbows and knees of garments
more easily
2. Sew in sleeves more easily. This is
especially true when sewing smaller
garments.
3. Applique, embroider or hem
around edges of cuffs or pants legs,
4. Sewing in elastic casings in skirts or
pants at the waistline.
Page 34

Checking Performance Problems what to do
i
I ‘-B -2)
PROBLEM
lrr;;|]u:^r Srixch.ES
BrL'uiiifij
BLr.CillF-H 0!
ThrL'jd
Puckering
1
PROBABLE CAUSE
Incorrect size needle.
Improper threading.
Loose upper thread tension.
Pulling fabric.
Light pressure on presser foot.
Loose presser foot.
Unevenly wound bobbin.
Nicks or burrs on shuttle.
Nicks or burrs at hole of needle
plate.
Pulling fabric.
Incorrect size needle.
Incorrect setting of needle.
Loose presser foot.
Upper and lower threads not drawn
back under presser foot before
starting seam.
Incorrect thread tension(s).
Light pressure on presser foot.
Using two different sizes or kinds
of thread.
Bent or blunt needle.
Loose presser foot.
Fabric too sheer or too soft.
CORRECTION
Choose correct srze needle for thread and fabnc.
Rethread machine.
Tighten upper thread tension.
Do not pull fabric; guide it gently.
Increase pressure on presser foot.
Reset presser foot.
Rewind bobbin.
Replace shuttle, or polish off burrs completely.
Replace needle plate, or polish off burrs completely.
Do not pull fabric; guide it gently.
Choose correct size needle for thread and fabnc.
Reset needle.
Beset presser foot.
When starting a seam be sure to draw both threads under and
back of presser foot about 4" and hold until a few stitches
are formed.
Reset thread tensionls).
Increase pressure on presser foot.
Upper thread and bobbin thread should be.same size and kind.
Insert new needle.
Reset presser foot.
Use underlay of tissue paper.
Page 35

' PROBLEM
PROBABLE CAUSE CORRECTiON
Skipping SLitchcs
Breaking Upper
Threed
Breaking Behbin
Th'E.-d
F.sh'ie not f/owin;|
M' rhi-ip Janmin:;
Kfocking Noise
Inoor-eoi size needle.
Certain knit: and ayniketios.
Bant or h'unt needle.
Inocrrect setting of naeri e.
Tight upper thread tension.
Light 0!assure on p'esser foot.
Starting to stiten too 'sst.
Improper threading.
Tight upper thread tension.
Incorrect size needle.
Sharp eye in needle.
Nicks or burrs on shuttle.
Nicks or burrs at hole of needle
plate.
improper bobbin case threading. >
Tight bobbin thread tension.
Lint in bobbin case or shuttle.
Stitcmlength'icbh^
v; ppSitioHSlljLiHSiiffi
i Lighti preSsif e;:bn i p^
■.^'.:Thrsad'(khdttedffi
Thread caught in shuttle. Disassemble and dean shuttle.
Choose correct size needle for thread and fabric.
: : Use''QNEEDLE'%,..
Insert new needle.
Reset needle.
Loosen upper thread tension. .
: . Increase pressure on presser foot.
Start to stitch at a medium speed.
Rethread machine.
Loosen upper thread tension.
Choose correct size needle for thread and fabric.
Insert new needle.
Replace shuttle, or polish off burrs completely.
Replace needle plate, or polish off burrs completely.
Check bobbin case threading.
Loosen bobbin thread tension.
Clean bobbin case and shuttle.
Stitch length between 6 to 24.
Increase pressure on presser foot.
Place both threads back under presser toot before beginning
to stitch.
Page 36
,13.'
i:
CLEAWING AND OILING
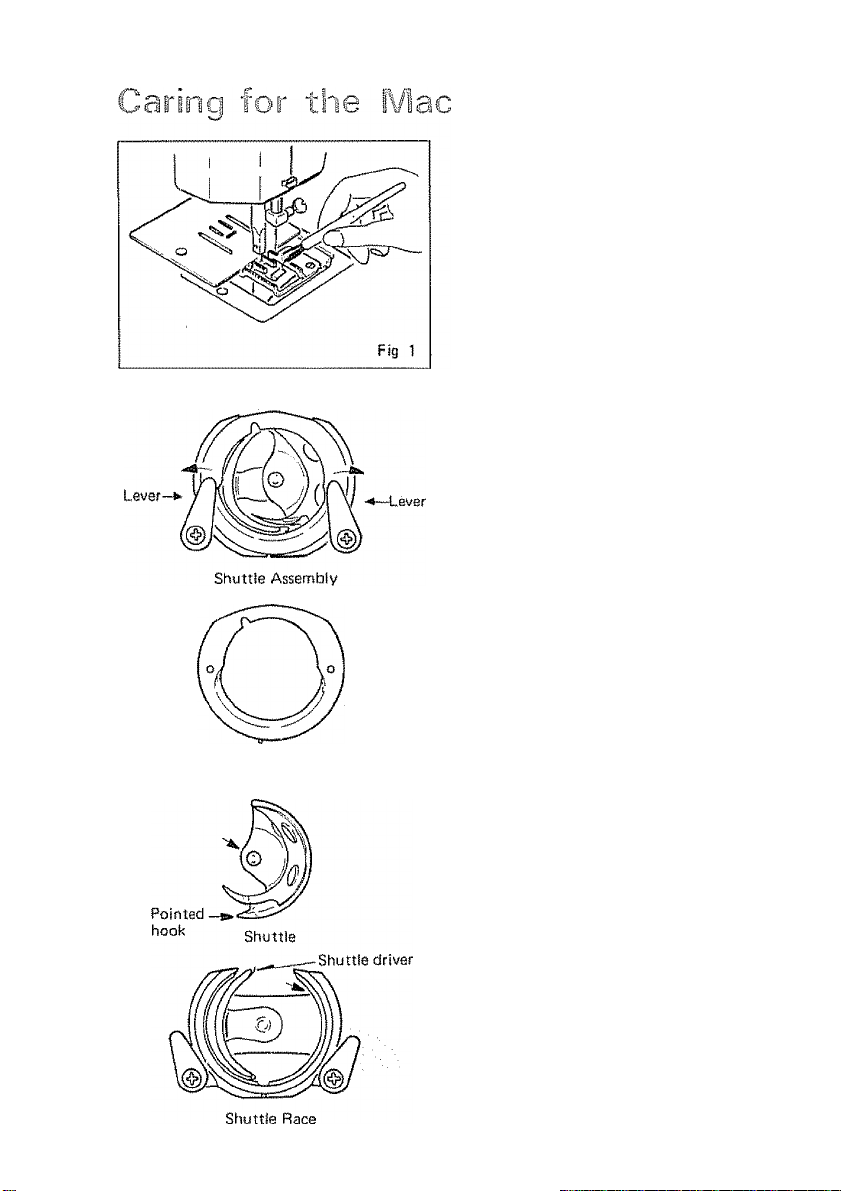
Fig 1 Cleaning the feed dogs with a
brush.
To insure the best possible operation
of your machine, it is necessary to
keep the essential parts clean at all
times. Using a small brush, remove the
int that accumulates in the shuttle
area and around the feed dogs.
Fig. 2 Parts of the Shuttle Assembly
To Clean the Shuttle Area:
1, This area must be kept free of dust,
lint and occasional tangled thread.
Raise the needle bar to its highest
point and remove the bobbin case.
2, Push levers of shuttle race aside and
lift shuttle race cover and shuttle
out.
3, Clean the shuttle race with small
brush.
4, Put a drop of oil on the center pin
of the shuttle and shuttle race, (see
arrows)
Shuttle Race Cover
To Replace Shuttle Assembly:
1, Position shuttle race as illustrated
so that race is forming half moon
on the left side of the machine
2, Hold shuttle by center pin and posi
tion shuttle so as to form a half
moon on the right side Pointed
hook will be on the bottom.
3. Place shuttle race cover Into place
over shuttle assembly,
4. Snap the levers into position
Fig. 2
Page 37
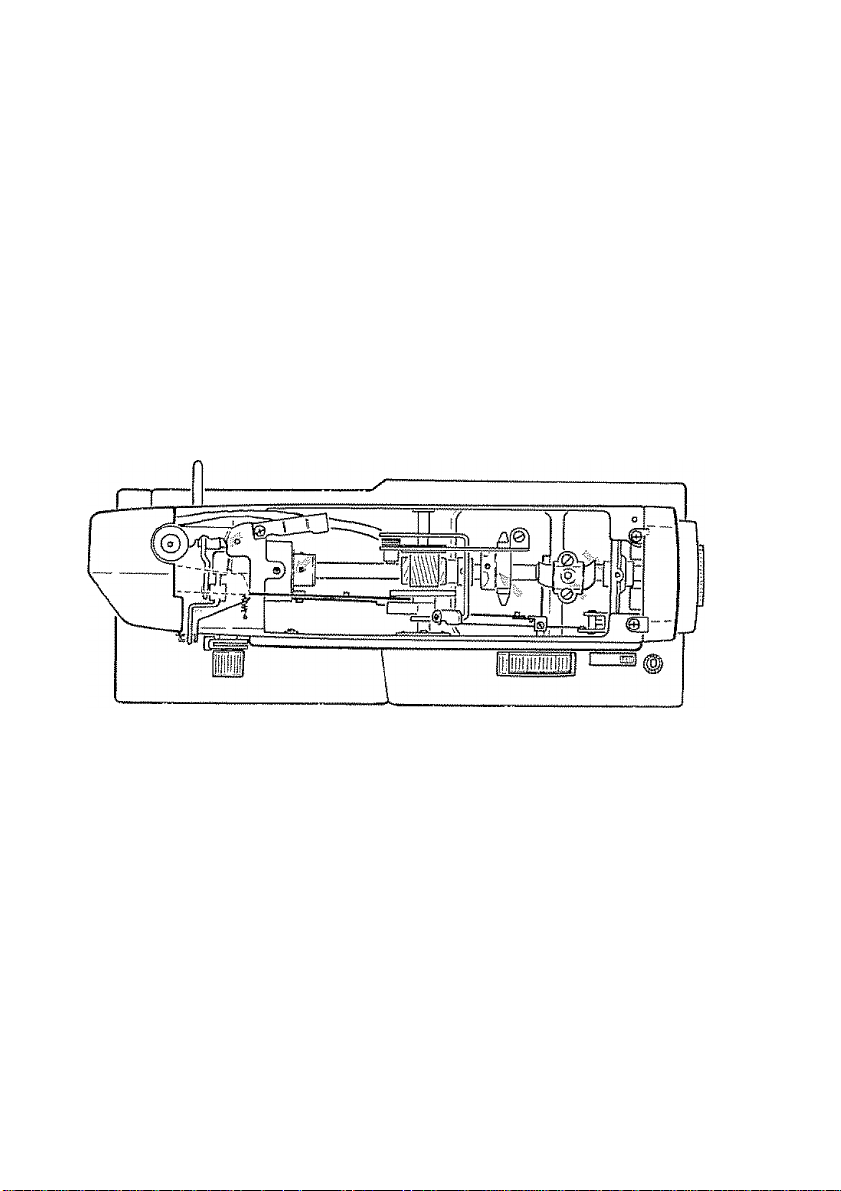
OiLiWG UWDER AFIM COVEIR PLATE
Remove arm cover plate to oil points indicated in top of machine head. To re
move cover plate, loosen up two top screws and lift the cover plate as illustrated
below.
Page 38
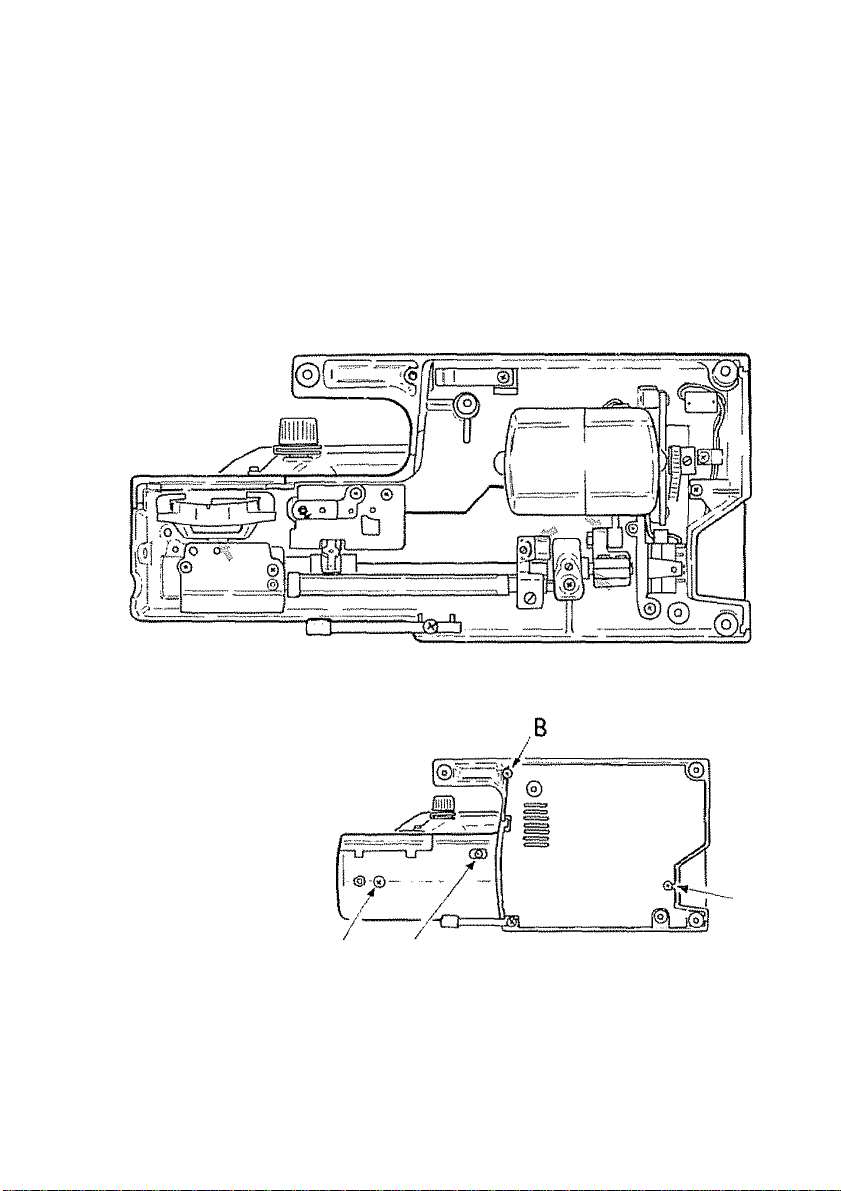
OiLif\IG UWD€BS1DE
Tilt machine head back and remove bottom covers to oil points indicated on
underside of machine. To remove bottom covers, remove screws (A), {Bi, <C),
and (D) as shown below,,
D
A
Page 39
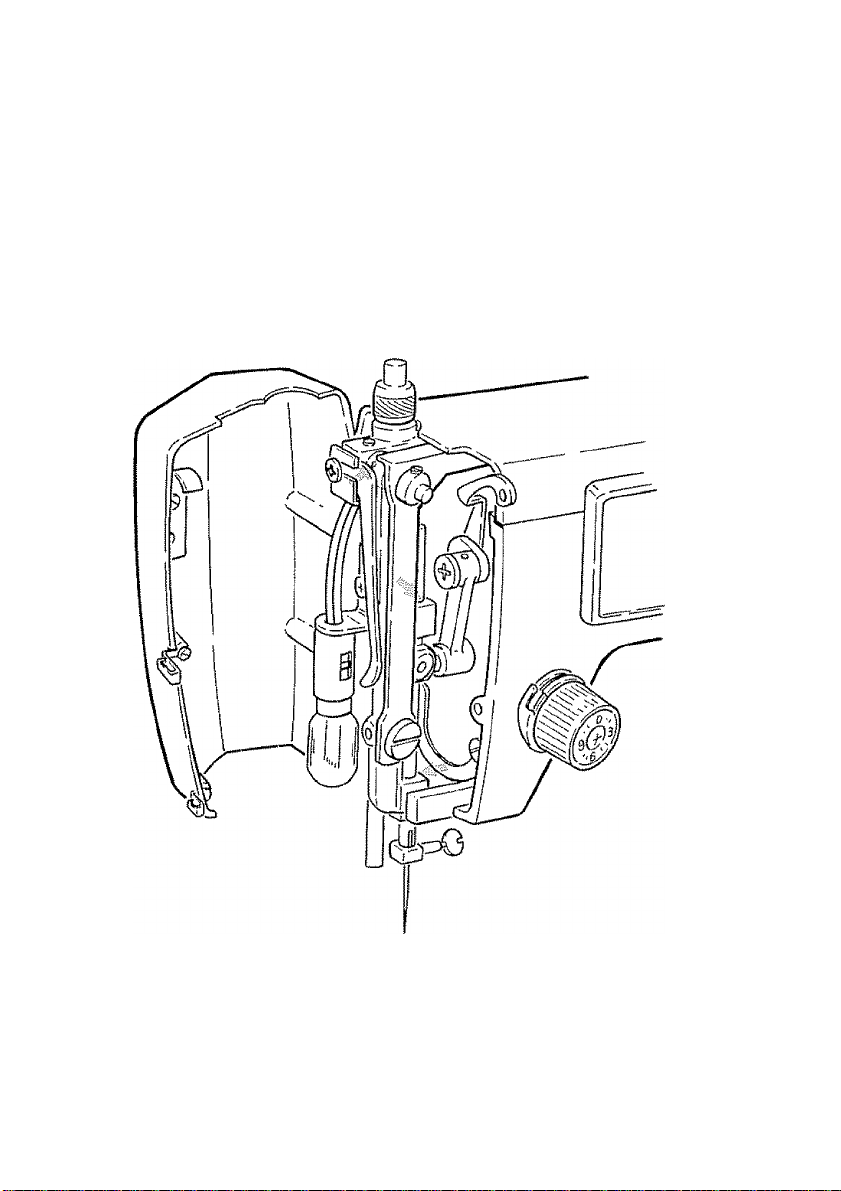
OiLiWG try FACE COVER PLAFE
Open face cover plate and oil points in illustration
Page 40
IjV/
•“'ÏÏî'Îtj
L,
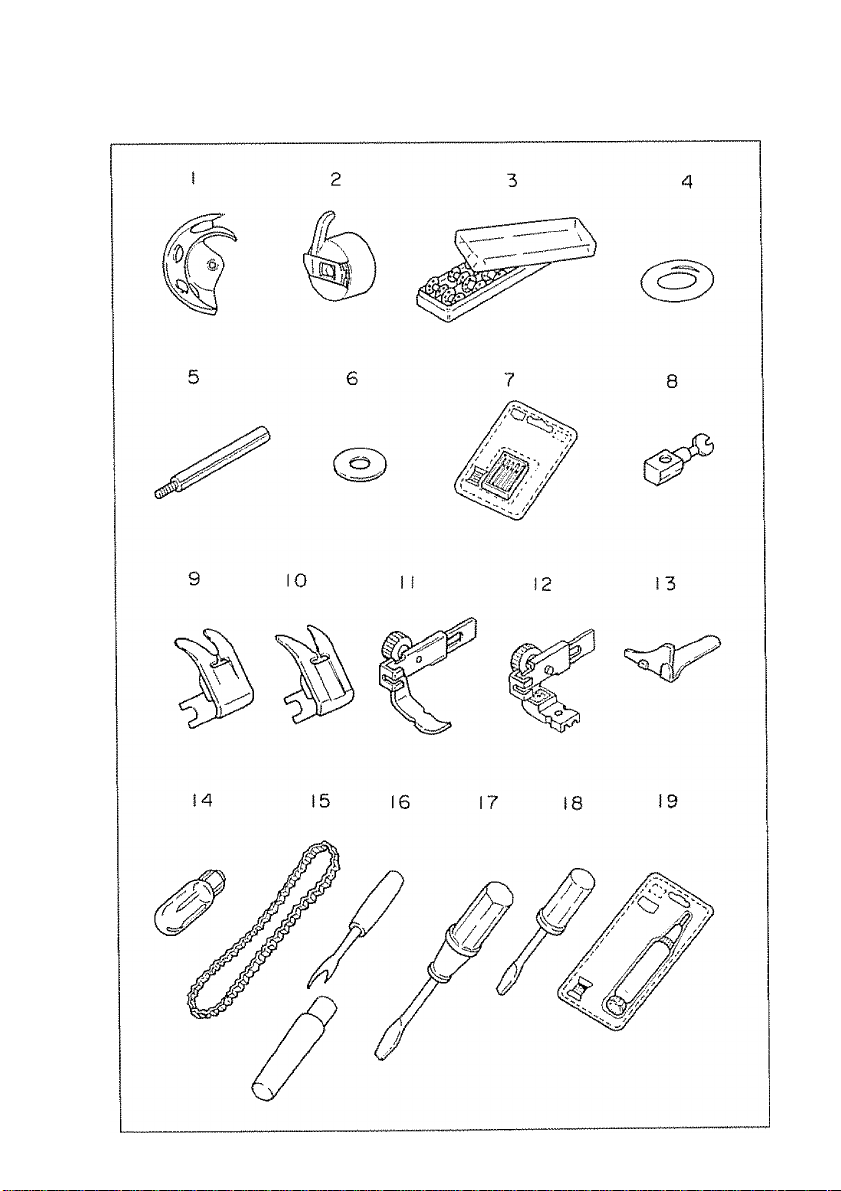
PARTS LÍST
Page 41
IIISililiM
All parts listed herein may be ordered from any Sears, Roebuck and Co, or
Simpsons - Sears Limited store or service center,
WHEN ORDERING REPAIR PARTS, ALWAYS GIVE THE FOLLOWING
INFORMATION:
L PART NUMBER
3 MODEL NUMBER
If the parts you need are not stocked locally, your order will be electronically
transmitted to a Sears Repair Parts Distribution Center for expedited handling.
Ref. No., Part No. Description
2 PART DESCRIPTION
4„ NAME OF ITEM
Sill
1
2
3
4 1939
5
6
7
8
9
10
11
12
13
14
15
16
17
18
19
*6862
6551 No, 11 Single needles <ORG)
*6746
36353
40390 Standard zigzag foot
593401008
*6757
*6864
40164
33379
41670
41669
*6889
47 Shuttle
6510 Bobbin case
Bobbin box with 10 bobbins
Bobbin winder rubber ring
8286
2273
6550
6552
6553
6554
6870
6797
6830
Thread spool pin
Nylon disc
No. 9 Single needles (BRN)
No, 14 Single needles (RED)
No, 16 Single needles (PUR)
No 18 Single needles (GRN)
"Q NEEDLES"«
Needle clamp with screw
Satin stitch foot
Zipper foot
Zipper foot
Needle threader
Light bulb
Motor belt
Motor belt
Buttonhole opener
Large screw driver
Small screw driver
Oil and lint brush
“These items are not furnished with the machine, but may be ordered per
instructions above.
Page 42

ЛЕР
Page 43

WARRANTY
FULL 25-YEAR WARRANTY ON SEWING MACHINE HEAD
For 25 years from the first day of use in your home. Sears will,
free of charge, repair defects in materiai or workmanship which
appear in the sewing machine head
FULL TWO YEAR WARRANTY ON ELECTRICAL EQUIPMENT
OF SEWING MACHINE
For two years from the first day of use in your home. Sears will,
free of charge, repair defects in material or workmanship which
appear in the electrical equipment of the sewing machine, includ
ing motor, wiring, switch and speed control
FULL 90-DAY WARRANTY ON ALL PARTS AND MECHANICAL
ADJUSTMENTS
For 90 days from the first day of use in your home. Sears will,
free of charge, replace any parts and provide mechanica! service
necessary for proper operation of the sewing machine, except for
normal maintenance
To obtain warranty service described above, simply contact the nearest
Sears store or Service Center througlrout the United States..
This warranty gives you specific legal rights, and you may also have
other rights which vgry from stale to stale
#
I
#
f
I SEARS, ROEBUCK AND CO , Sears Tower, BSC 41-3, Chicago, IL 60684
Page 44

SEWING MACHINE
Now that you have purchased your Sewing Machine, should a
need ever exist for repair parts or service, simply contact any
Sears Service Center and most Sears, Roebuck and Co..
Be sure to provide ail pertinent facts when you call or visit.
The model number of your Sewing Machine will be shown on
your nomenclature plat© on the back of your Sewing Machine.
See Section 1, page 3 for location.
S-385
WHEN ORDERING REPAIR PARTS, ALWAYS GIVE THE
FOLLOWING INFORMATION; |
‘MODEL NUMBER ‘NAME OF ITEM ‘PART DESCRIPTION |
If the parts you need are not stocked locally, your order will be |
electronically transmitted to a Sears Repair Parts Distribution |
Center for handling. |
I
SEARS, ROEBUCK AND CO., Chicago, IL60684 U.S.A.
Printsd in Taiwan Part No , 647800104 (ST)
I
 Loading...