

Page 1
INSTRUCTIONS
MODEL 20/21/23/1206/1300
ZIG-ZAG SEWING MACHINE
Page 2

Adjusting for Good Stitching ....
Bobbin:
Inserting & Threading
Picking up Bobbin Thread ......
Removing - -
Winding
Buttonholes.........................
Buttons
.........................................................
Cleaning *
........
...................*
....................
...............................................
...
..................
...................*........................
'•
.... • •
...
...
Connecting Machine..........
Corner, Turning
Darning .
.....
..................
...
Fastening a Seam
Feed Dog Control
Hems: Blind Stitched Hem . . • • * •
Identification, Head Parts
....................................
Installing Machine Head in Cabinet ■ ■
Inserting & Removing Material • . - . •
Needle:
Needle Size
Needle & Thread Chart.......
. ■ .26
. . . 8
. . TO
. . . 6
. . . 7
• . -17
■ ■ -21
.
- 22,23
... 4
- - -15
. . -20
- - -11
- . -15
- 18,19
. . 2,3
... 4
. . - 14
■ ■ 5
... 5
Placement
......
..................
...
Oiling Instructions
Overcasting
Parts List
Presser Foot, Changing .......
■ - • -15
Presser Foot Pressure, Adjusting • Sewing Light-
Stitch Length ..........
Stitch Width ...........
. . . Tl
... -16
Stitching:
Reverse ...................................
...
. . . - . - -11
Straight
Zigzag
Tension:
Upper Thread -
.........................
...
. . .
Lower Thread
Threading:
Bobbin Case
Upper Thread
Thread Chart
What To Do .............
, c
- ' 22,23
, , . .21
. . . -27
- ■ ■ -10
.... 4
. . 11,16
... .16
- . - -12
■ . ■ -13
.... 8
... 9
... - 5
■ -24,25
Page 3
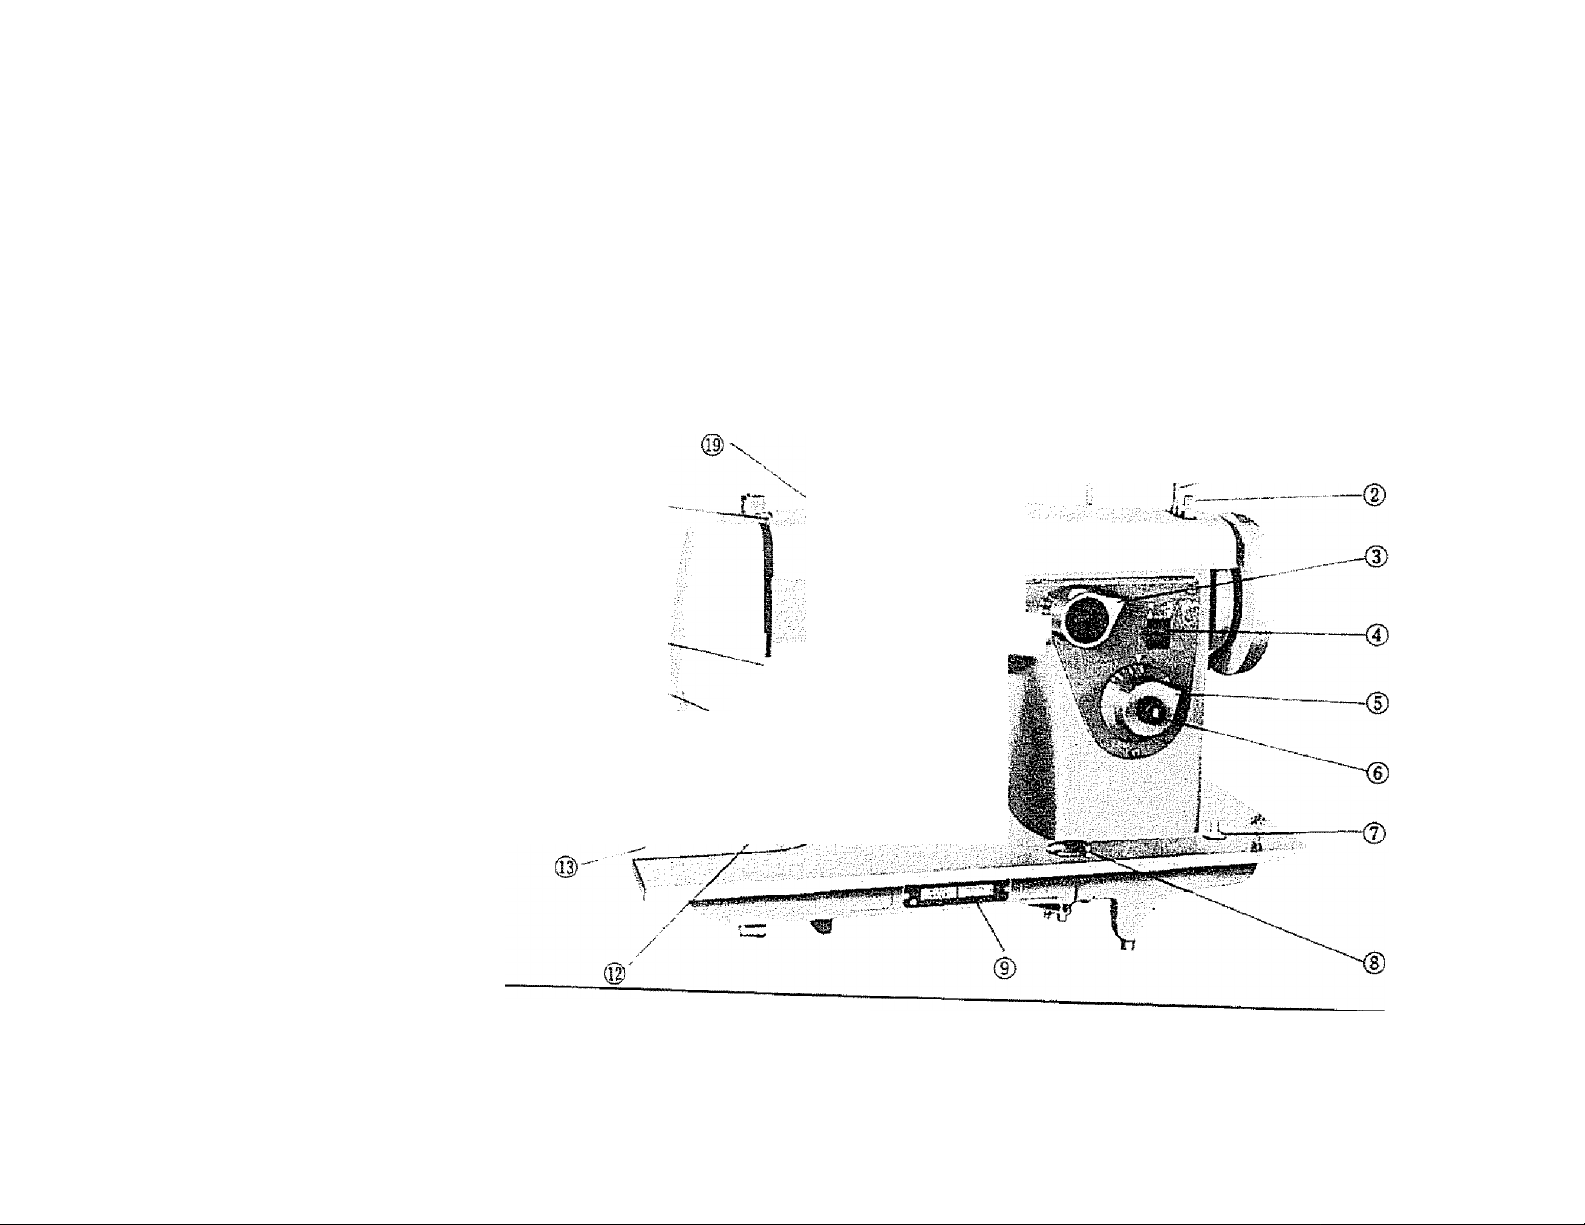
FRONT VIEW
(R)- -,
5'"^ ■ ■-
..
•>;v-
if
y
/
, .' /'1-4
y
■ a
"r
i.
Bobbin Winder Spindle
Bobbin Winder Latcb
Stitch Width Control
4.
Stitch Width Limner
•J! •
Stitch Length Control
6.
Reverse Stitch Push Button
7.
Light Switch
Feed Dog Control
9.
Nomenclature Plate
10.
Needle Plate
n.
Needle Clamp Screw
J2.
Feed Dog
¡3.
Hand Hole Cover Plate
14.
Pressor Foot
15.
Prosser Foot Screw
16.
Thread Guides
17.
Upper Thread Tension Control
IS.
Thread Take-up Lever
19.
Upper Thread Guide
20.
Bobbin Winder Thread Guide
Page 4
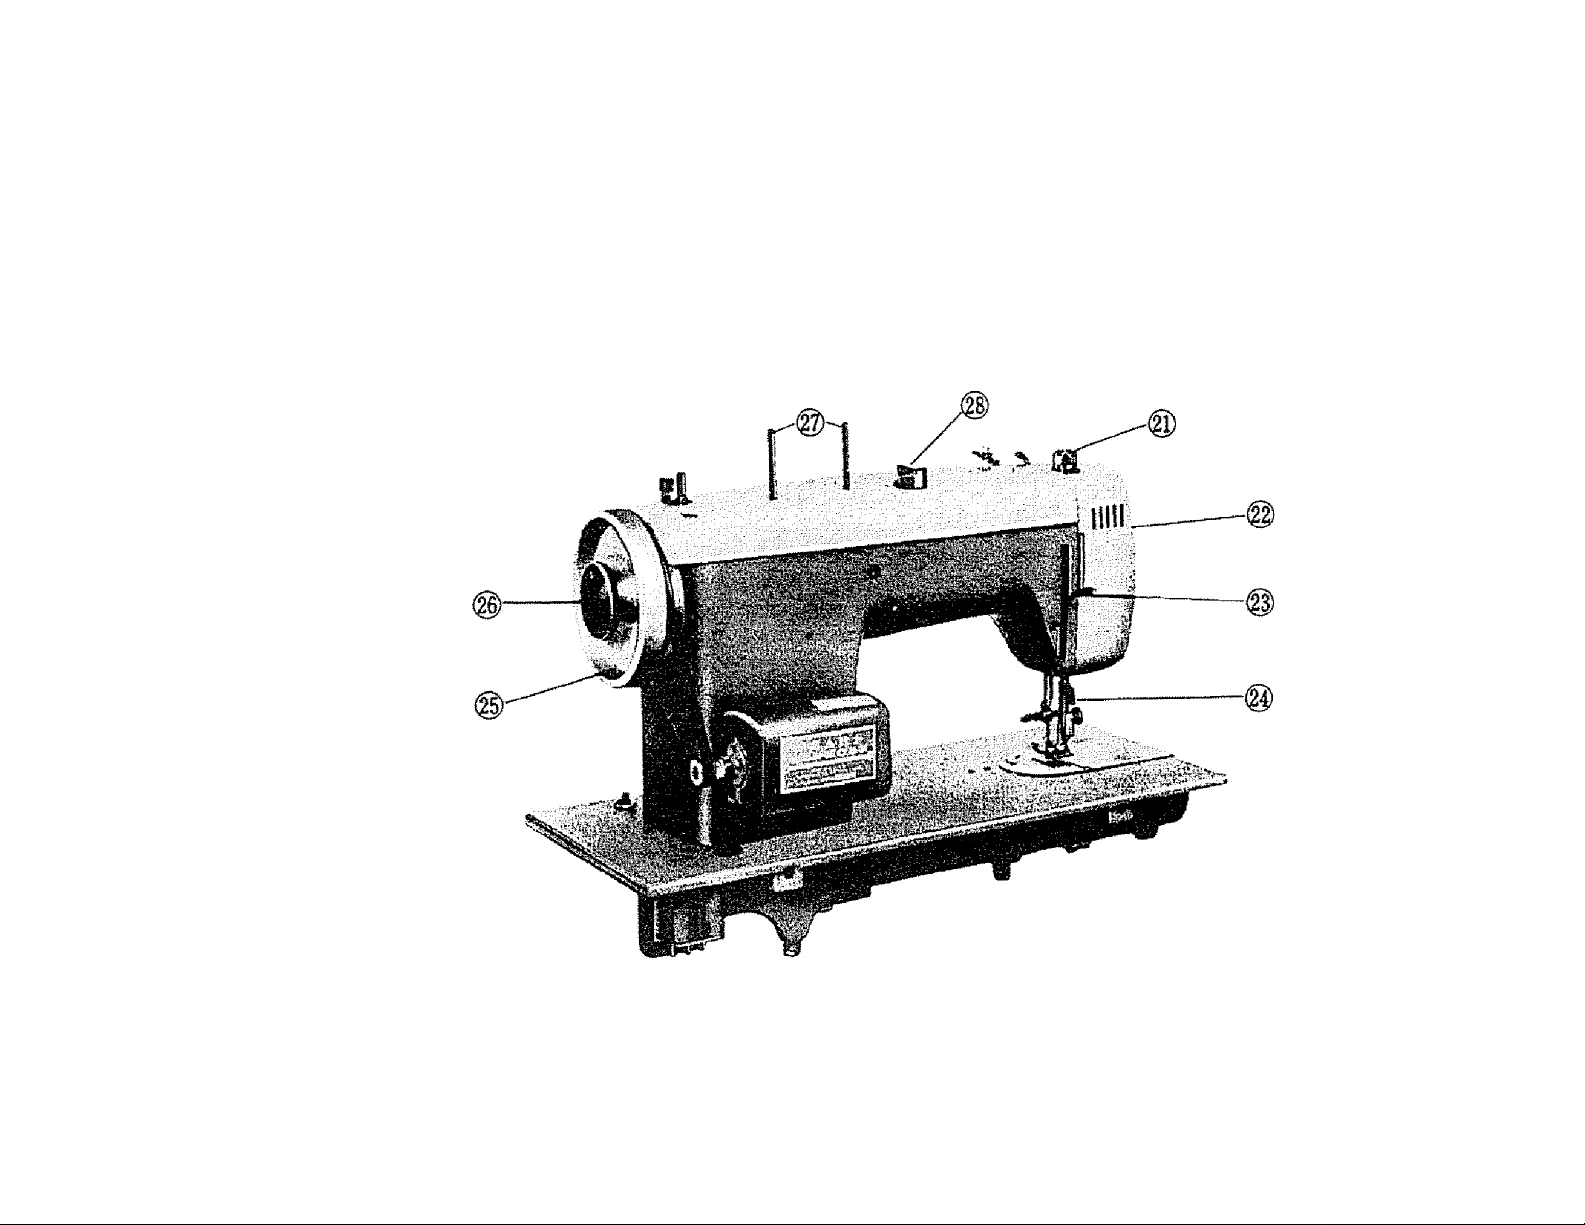
BACK VIEW
2L Presser Foot Pressure
Regulator
22. Face Plate
23. Presser Foot Lever
24. Thread Cutter
25. Hand Wheel
26. Clutch Release
2?. Thread Spool Pins
28. Blind Stitch Knob
(Modek21,1300 only)
Page 5
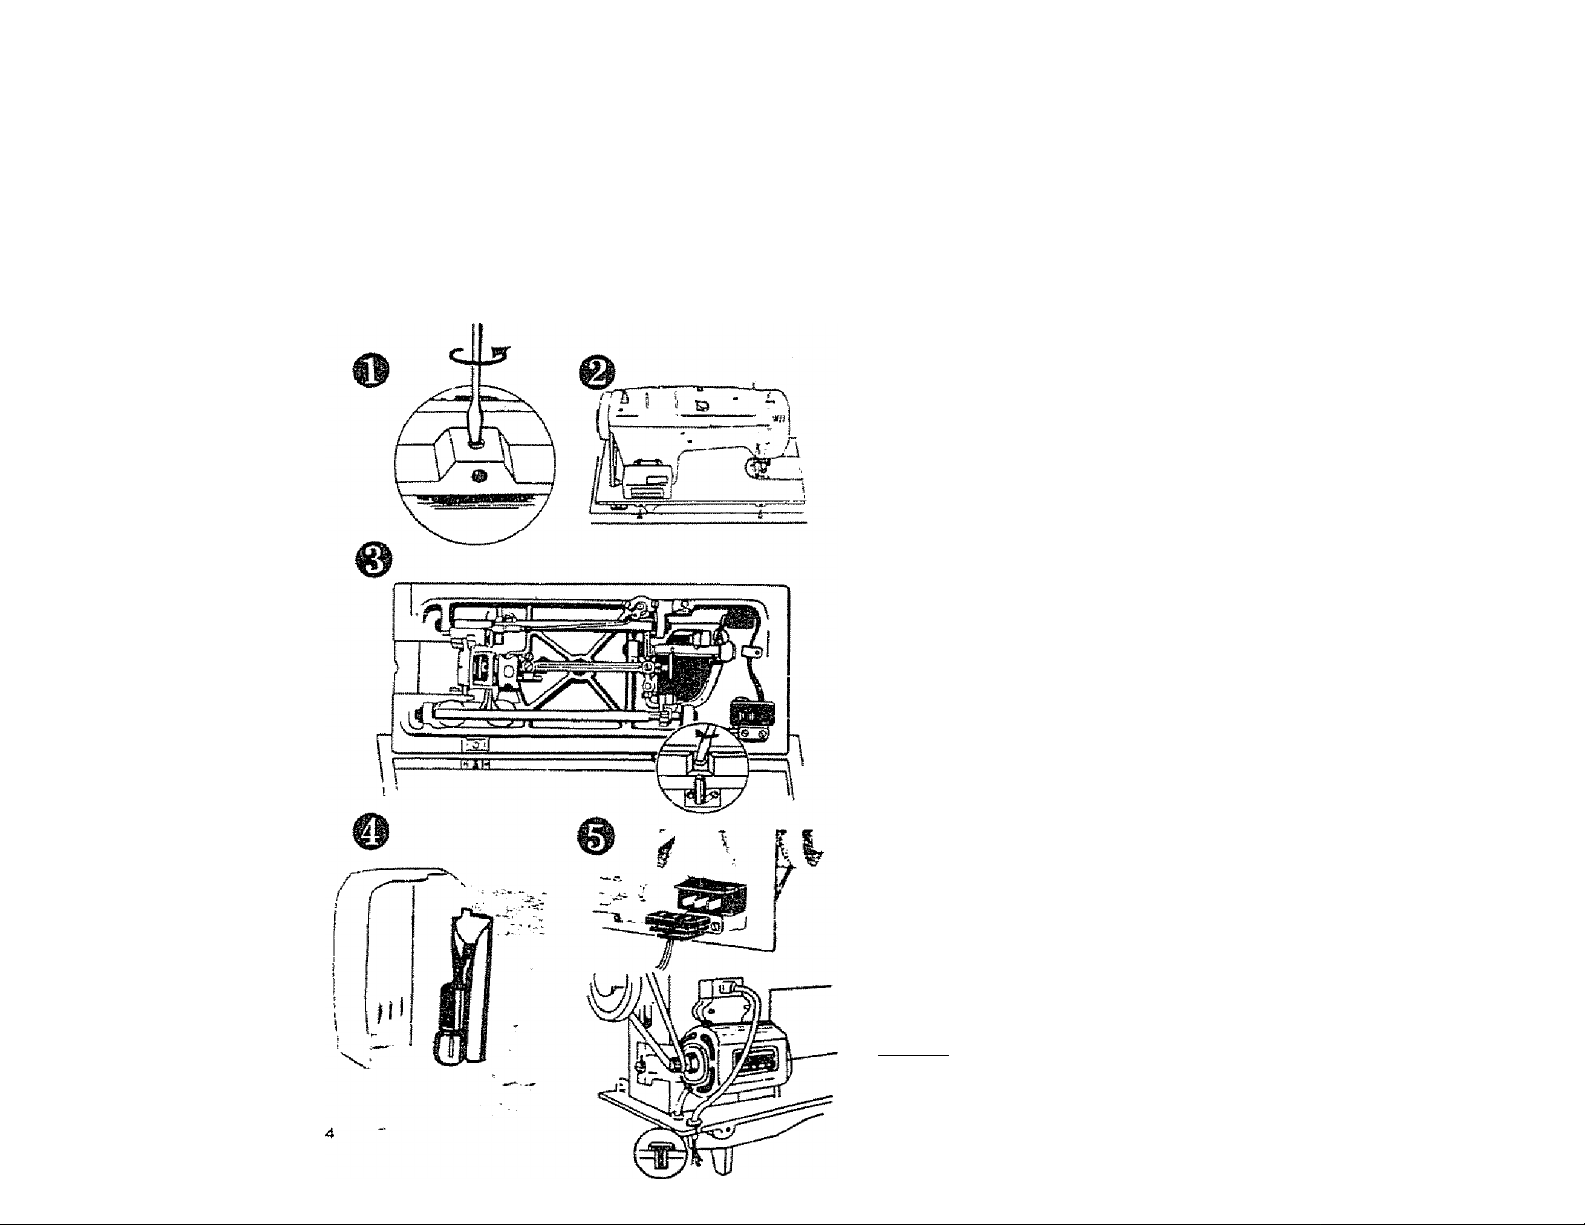
INSTALLING MACHINE HEAD IN PORTABLE
AND CABINET
Loosen the two hinge screws under holes in the rear edge of the
machine bed (1).
Raise hinge pins in the cabinet cutout (2),
Slip machine head onto the pins and tighten hinge screws securely
O).
Lower machine head to front flap.
Screw spool pins m place. Lay the plastic discs over the spool pins.
Discs and pins are packed m the accessory box.
SEWING LIGHT (Models 21, 1300 only)
The sewing light is located inside the face plate as shown.
It may be turned on or off by pushing the light switch.
To remove the buib, disconnect the sewing machine and swing open
the face plate. Push bulb in slightly, turn it counterclockwise and
remove. To replace, push new bulb in and turn clockwise. See
illustration 4.
CONNECTING MACHINE
Push foot or knee control connector onto connector under the
marbinfi bedplate, or over the motor. See illustratioii 5. Push the
two prong plug of the control into any 110*120 V. wall outlet. When
installing in cabinet. Insert grommet with cord in bedplate.
Page 6
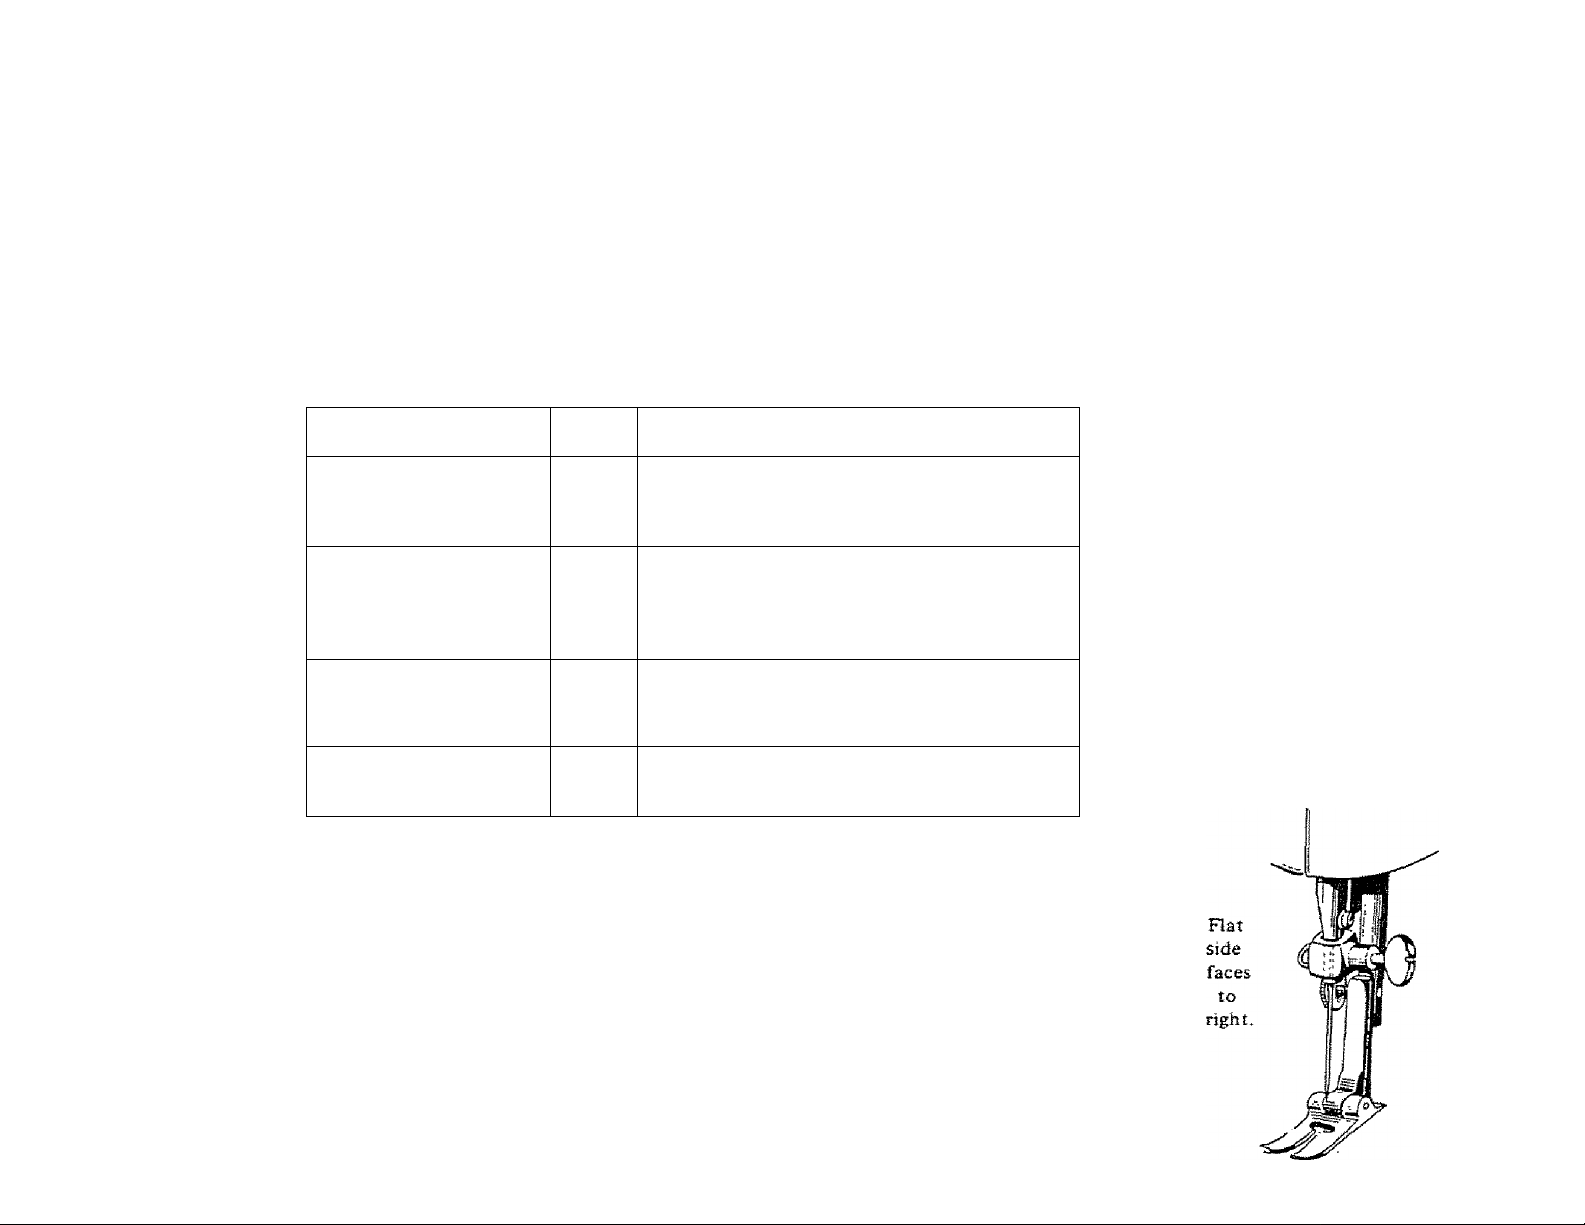
NEEDLE AND THREAD TABLE
THREAD SIZE
Cotton 60—100
Synthetic
Silk A
Cotton 60—80
Mercerized 50
Synthetic
Silk A
Cotton 40—60
Mercerized 50
Mercerized heavy duty
Cotton 30—50
Mercerized heavy duty
NEEDLE
SIZE
11
14
16
18
fabric
Sheer cottons, silks, and synthetics
Fine Laces
Medium weight cottons
Medium weight silks
Medium weight synthetics
Light weight woolens
Heavy weight cottons
Medium to heavy weight woolens
Heavy drapery fabrics
Heaviest cottons as for men's work clothes
Heaviest woolen coating
NEEDLE SIZE
Use KENMORE needles. The size of the needle should conform to the size
of the thread and both should be suitable to the material
The same size thread should be used in the bobbin as on the upper part of the
machine for ordinary sewing.
Never use a bent needle nor one with a blunt point.
This is the exact length of the needle to
be used in your machine. Comparison
with this illustration will determine
whether the needle you have is the cor
rect one for your machine.
PLACEMENT OF NEEDLE
Raise take-up lever to its highest position
by turning hand wheel toward you.
Loosen needle clamp screw.
Hold needle so that the flat side is to your
right, slip blunt end of needle as far as n
will go into needle clamp.
Tighten needle into place with clamp
screw.
Page 7
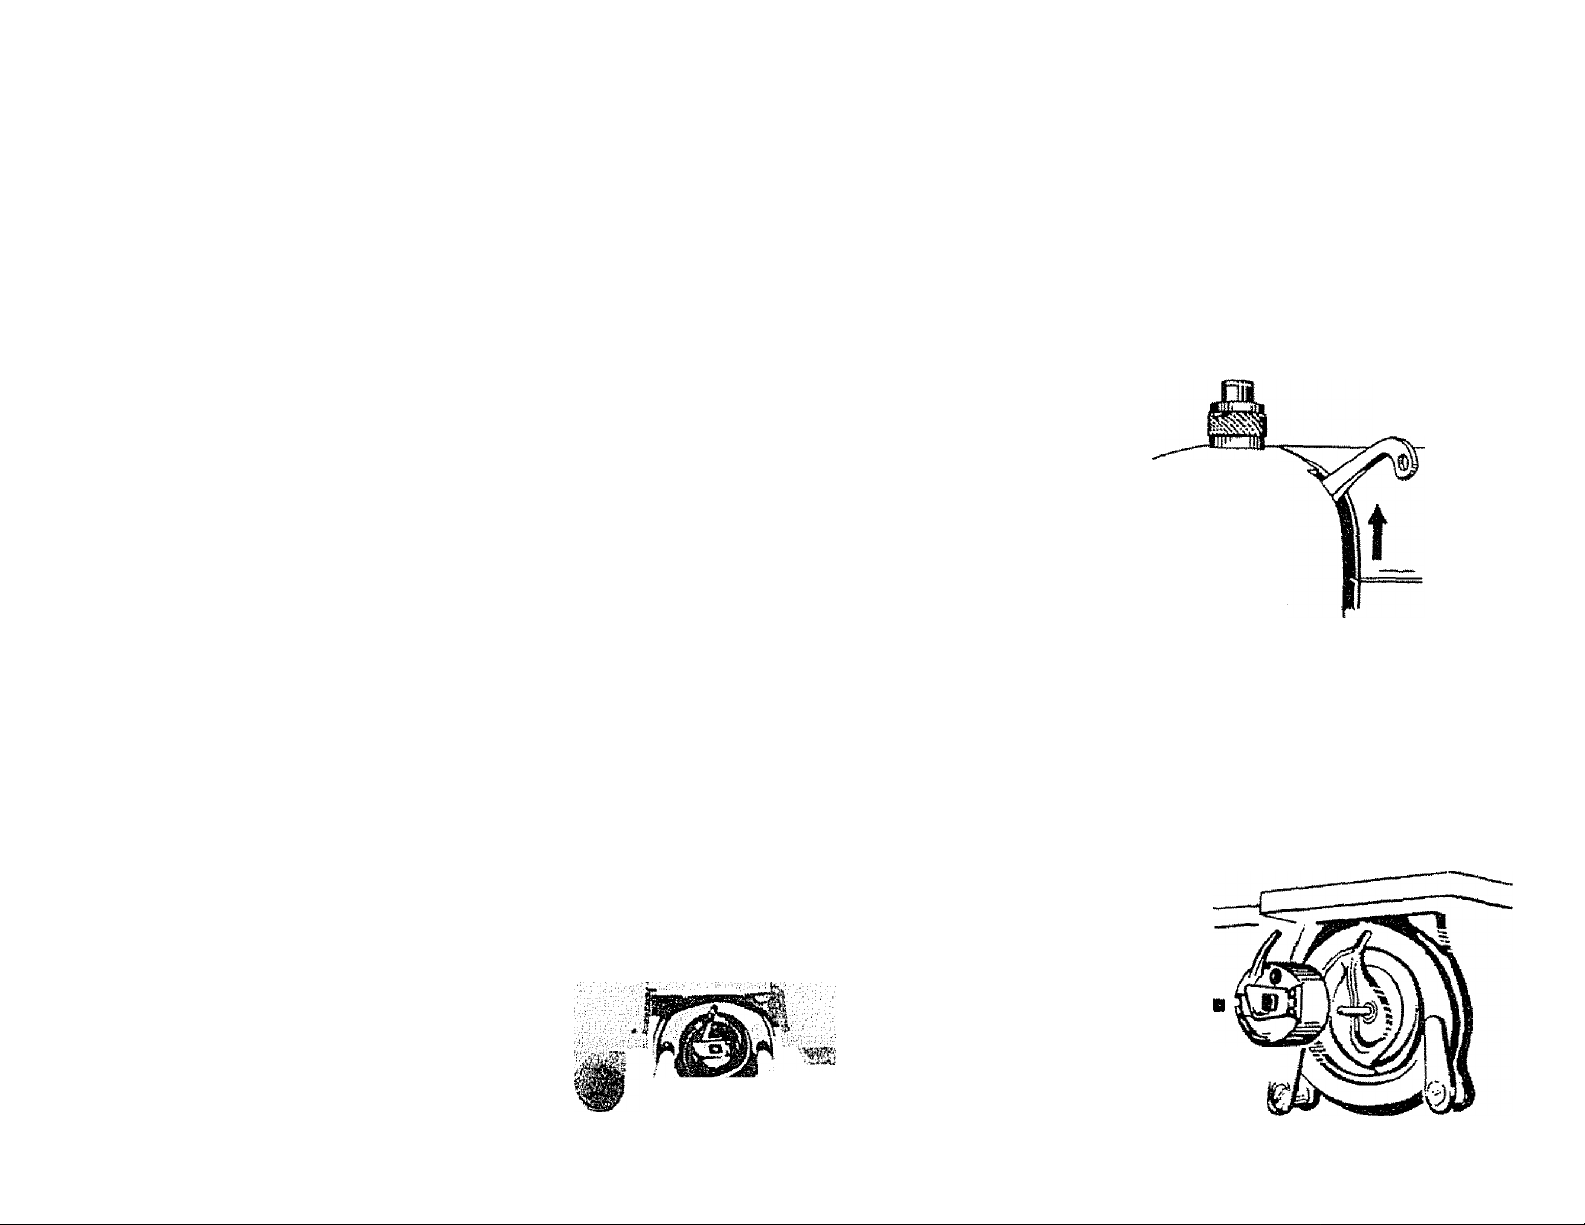
REMOVING BOBBIN CASE FROM SHUHLE
/
Puli
out
latch.
Take up
lever
at Its
highest
position.
C&¡
Pull bobbin /
case straight
out.
Page 8
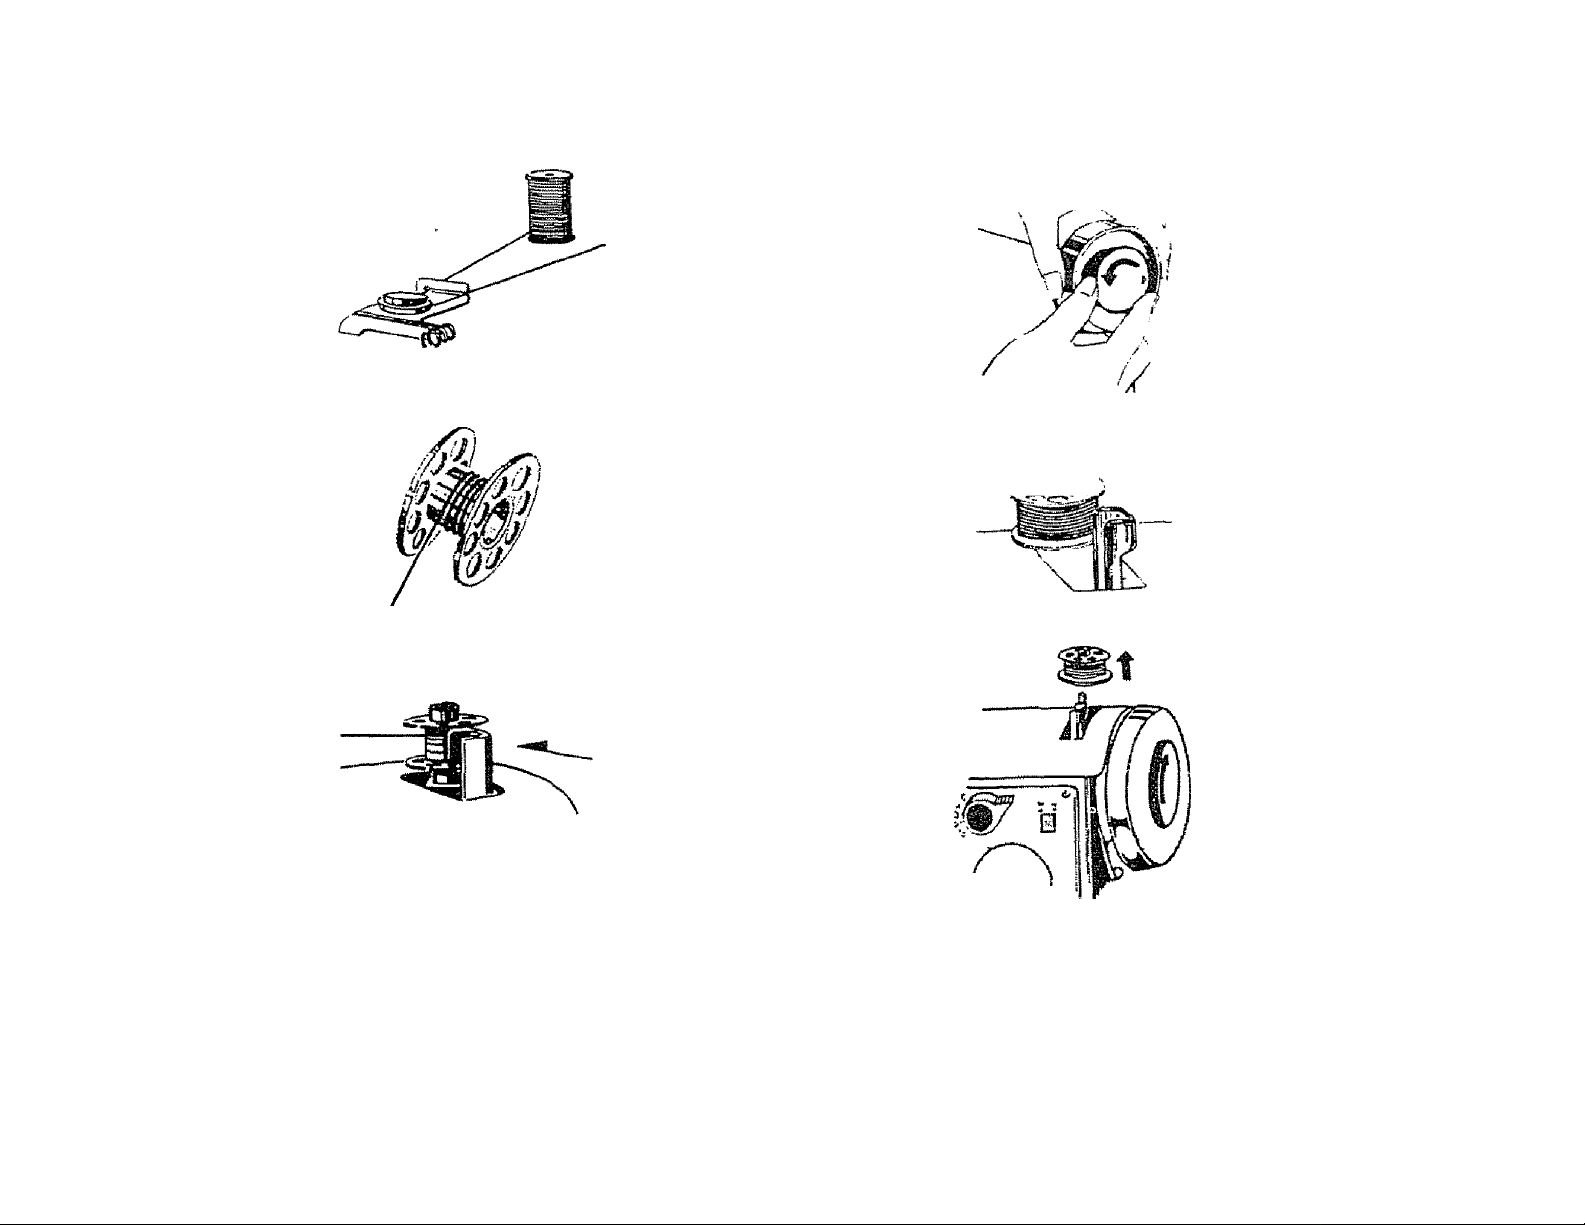
WINDING THE BOBBIN
o
Place thread on spool
post. Draw thread as
shown.
0
Wind thread around
bobbin a few times,
front to back.
m
Place bobbin onto bobbin
winder shaft.
Push bobbin winder latch
unti! it clicks.
Release clutch by turn
ing clutch knob toward
you. Start machine.
When bobbin is fuU, wind
ing mechanism stops.
Tighten clutch knob and
remove bobbin.
Page 9
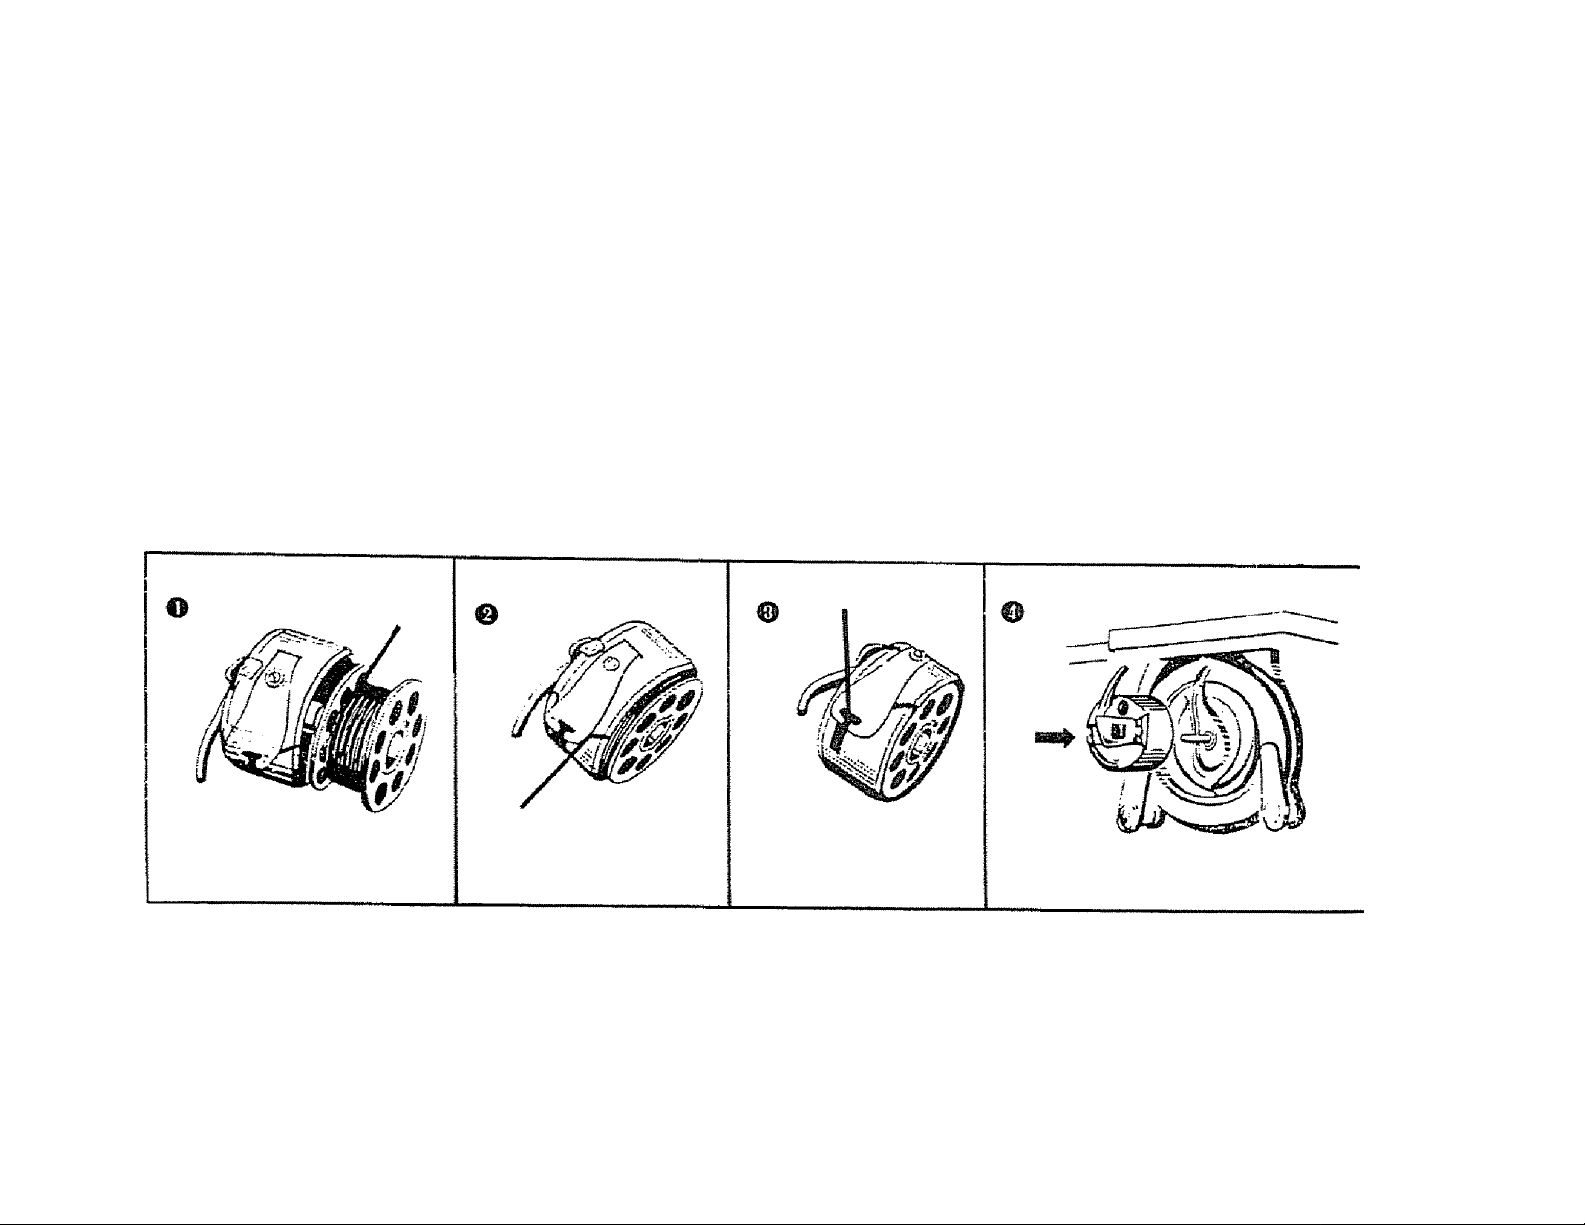
INSERTING BOBBIN INTO BOBBIN CASE...CASE INTO SHUTTLE
<1- Guide bobbin onto center pm of bobbin case.
Pull thread through slot.
Pull thread under tension spring.
O Holding latch, position case into shuttle, then release latch.
Page 10
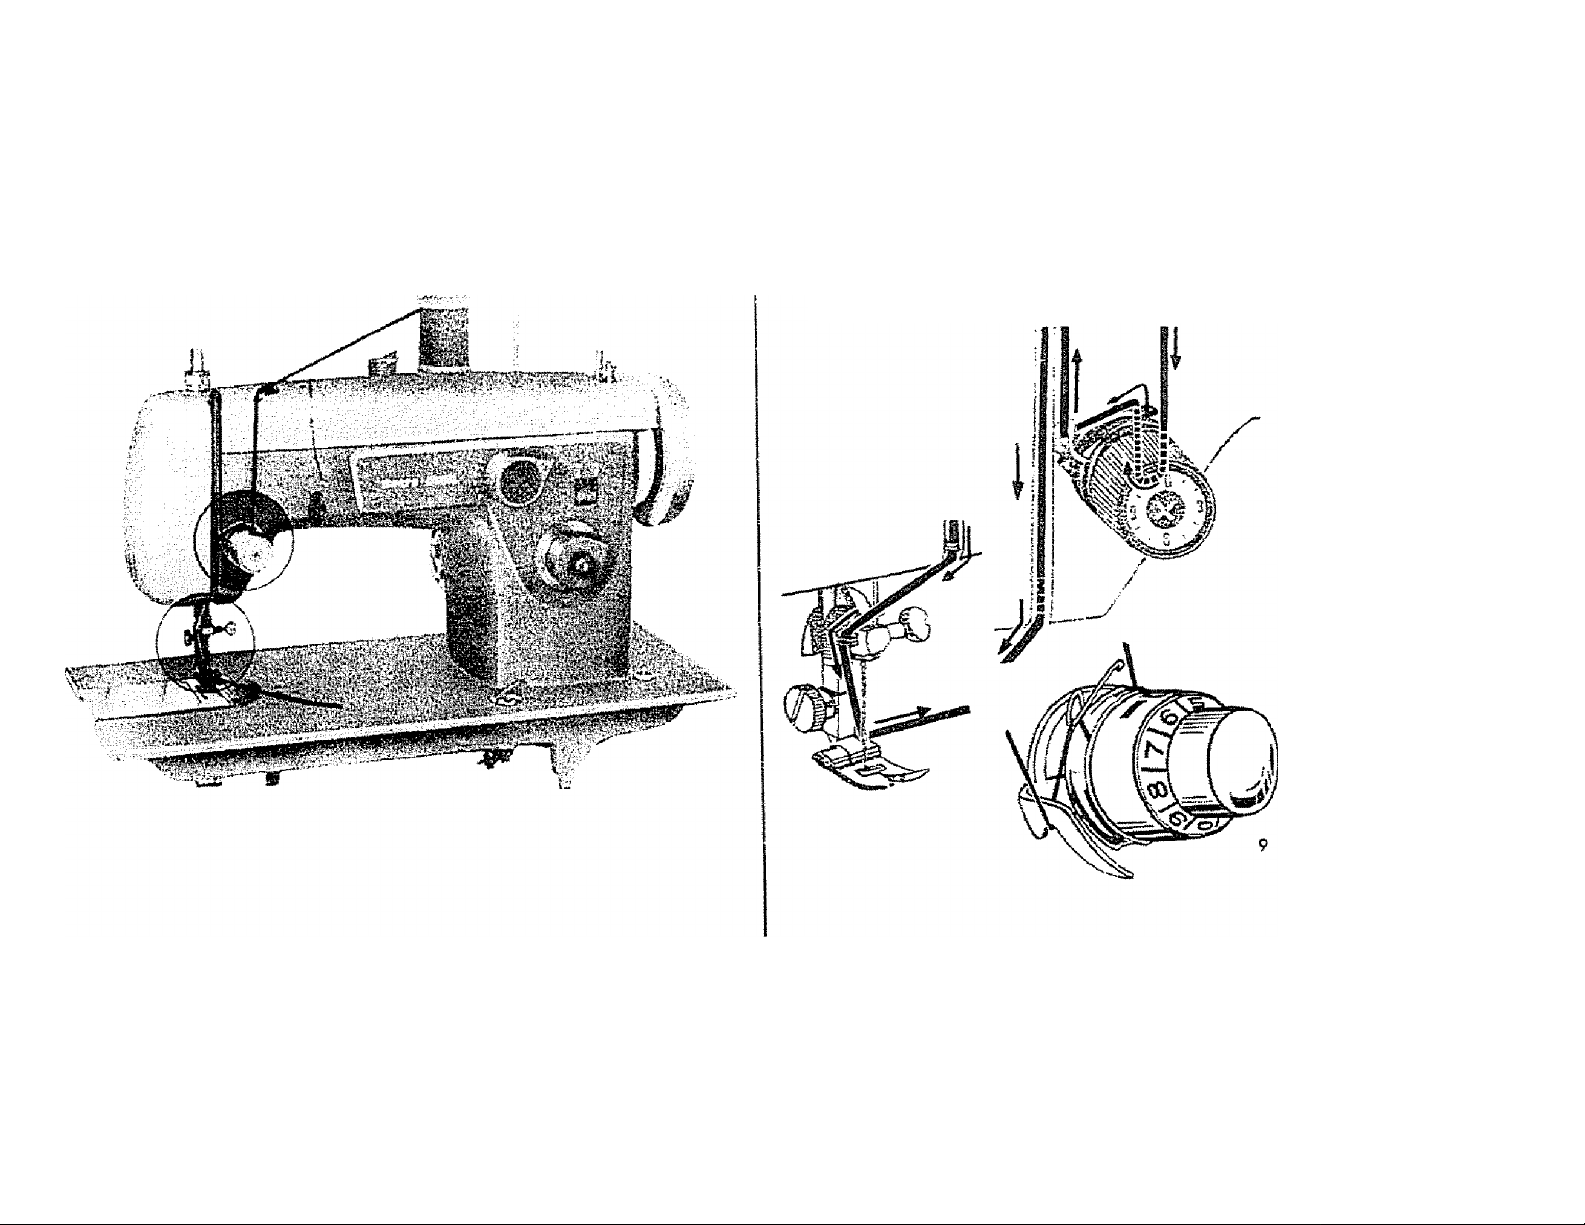
THREADING UPPER MACHINE
Place thread as iDustrated between discs of the
Thread Tension Control.
Prevent the spoo! of thread from turning and
by holding the end of the thread puM spring
wire loop up and past the top hook untit the
thread can be slipped into the hook. When
thread tension is released, the spring wire loop
wiil return to position as shown with the thread
in proper place.
Release spool of thread and continue to thread
machine as iiiustrated.
Page 11
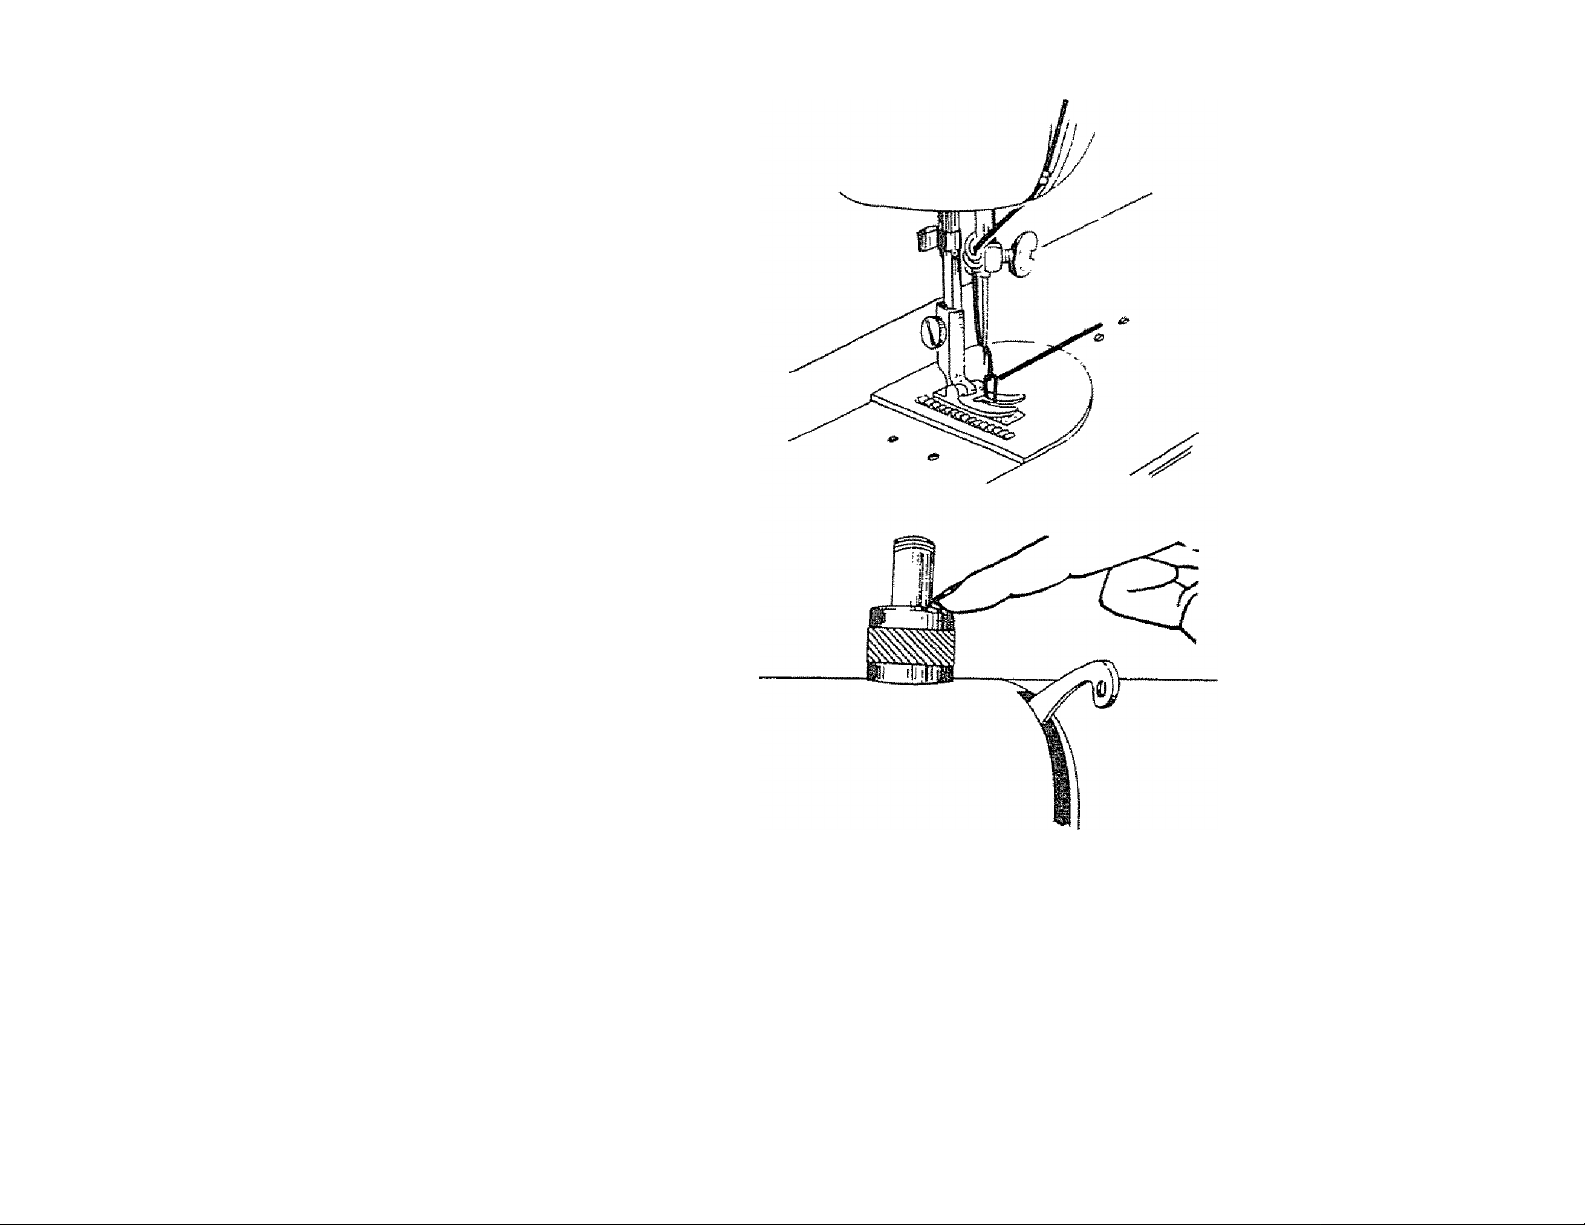
PICKINQ yp BOBBIN THREAD
Raise presser foot lever.
Hold needle thread loosely in left hand and rotate
hand wheel toward you one complete turn.
Bring bobbin thread up by pulling upper thread (See
illustration).
Place threads back under presser foot.
ADJUSTING THE PRESSURE
OF THE PRESSER FOOT
Push down outer ring of presser foot pressure regulator
(See illustration). This will release pressure of presser
foot. To increase pressure, push down inner pin until
suitable pressure is obtained.
For ordinary sewing, the inner pin should be about half
way down. When sewing multiple thickness or heavy
material, reduce the pressure. Increase it when sewing
sheer fabncs.
insufficient pressure may cause skipped stitches or
difficulty in guiding the fabric, if feed dog or presser
foot marks appear on the fabric, reduce the pressure.
Page 12
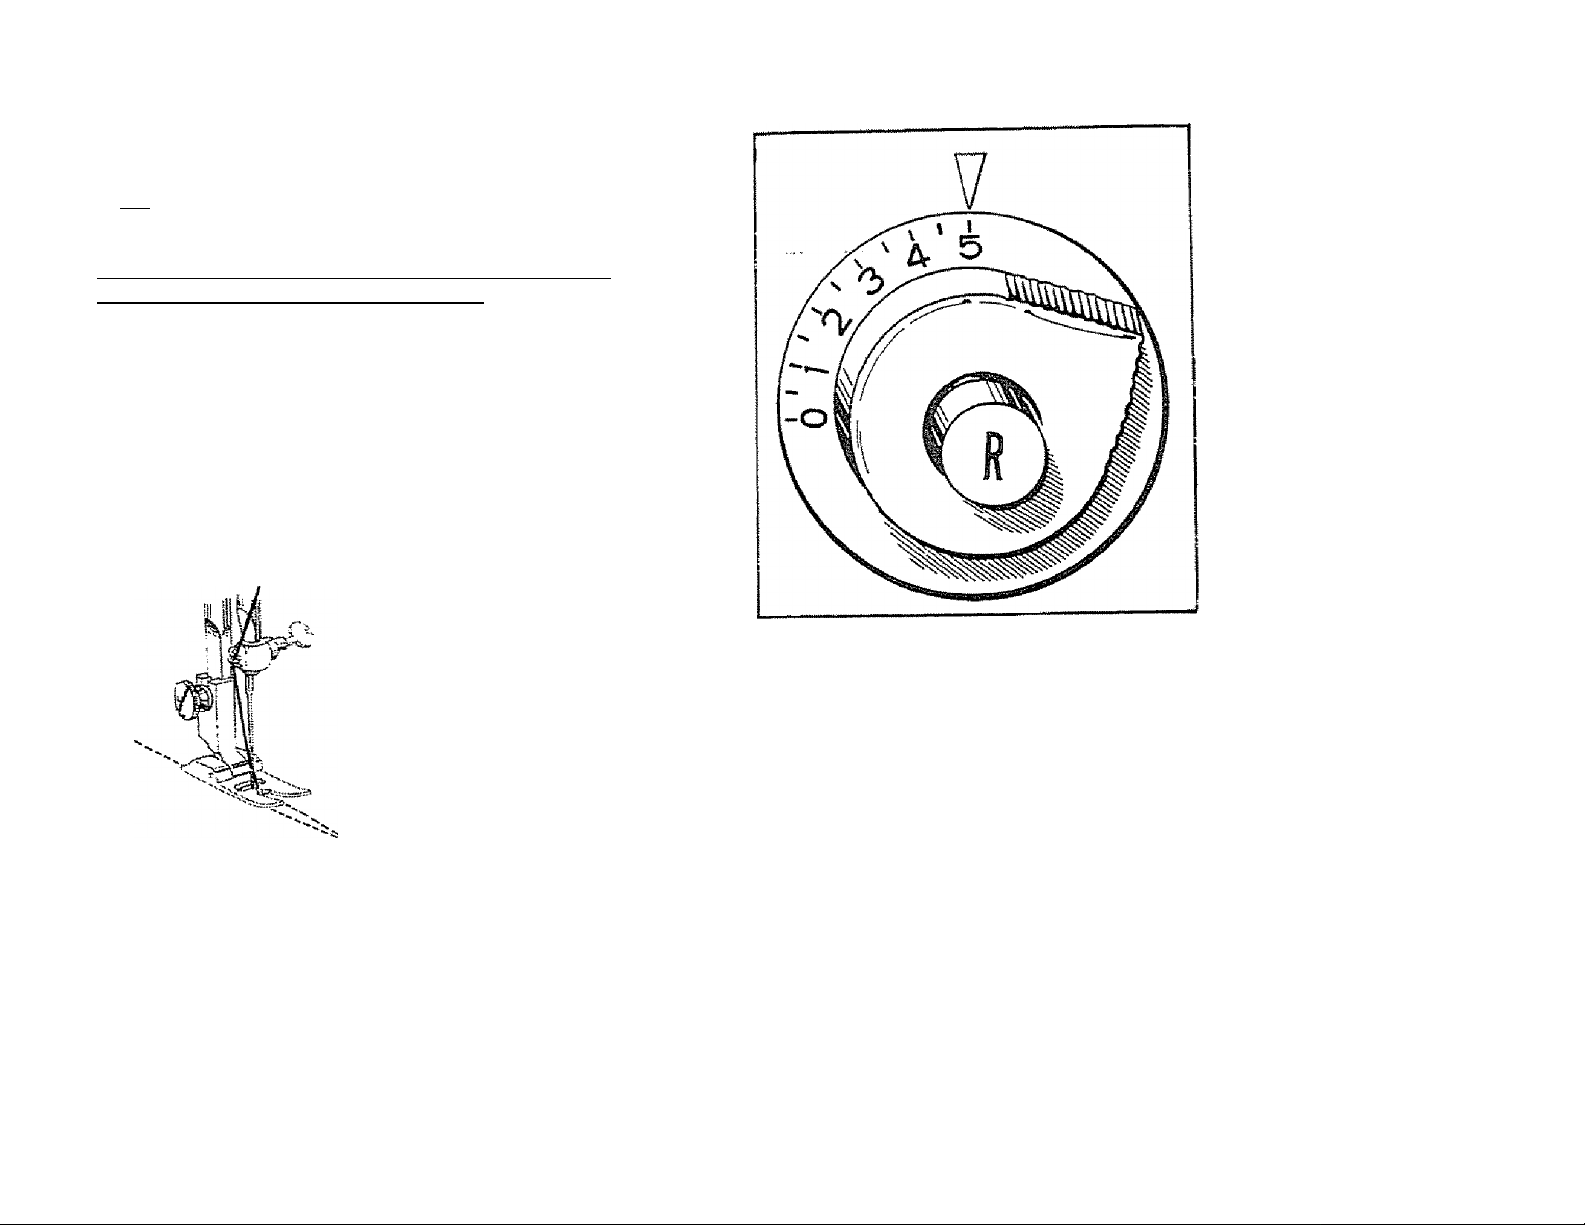
SETTING STITCH LENGTH
Tum knob to any desired stitch length position between
0 aofi 5. At No. 5, the longest stitch is obtained. The
size of stitch you select will depend on the fabric you
are sewing.
The blind stitch knob must be on the ‘*OFF” position
for aH operations except blind stitching. (Models 21,
1300 only) For straight stitching the stitch width
control must be set at 0.
REVERSE STITCHING
To sew in reverse, push the reverse stitch button as far
in as possible. Keep the button pushed as long as you
need reverse stitching. When you cease pushing, the
button returns and the machine stitches forward.
Be sure both threads are drawn back about 4 inches under the presser foot. Lower
needle into fabric about Vi inch from beginning of seam. Lower presser foot, push
reverse button for reverse stitching. Stitch backwards until needle reaches beginning of
seam. Release button for forward stitching and complete seam. When you reach the
end of the seam, push reverse button and sew back over Vi inch of complered seam. This
is called back tacking.
FASTENING A SEAM
11
Page 13
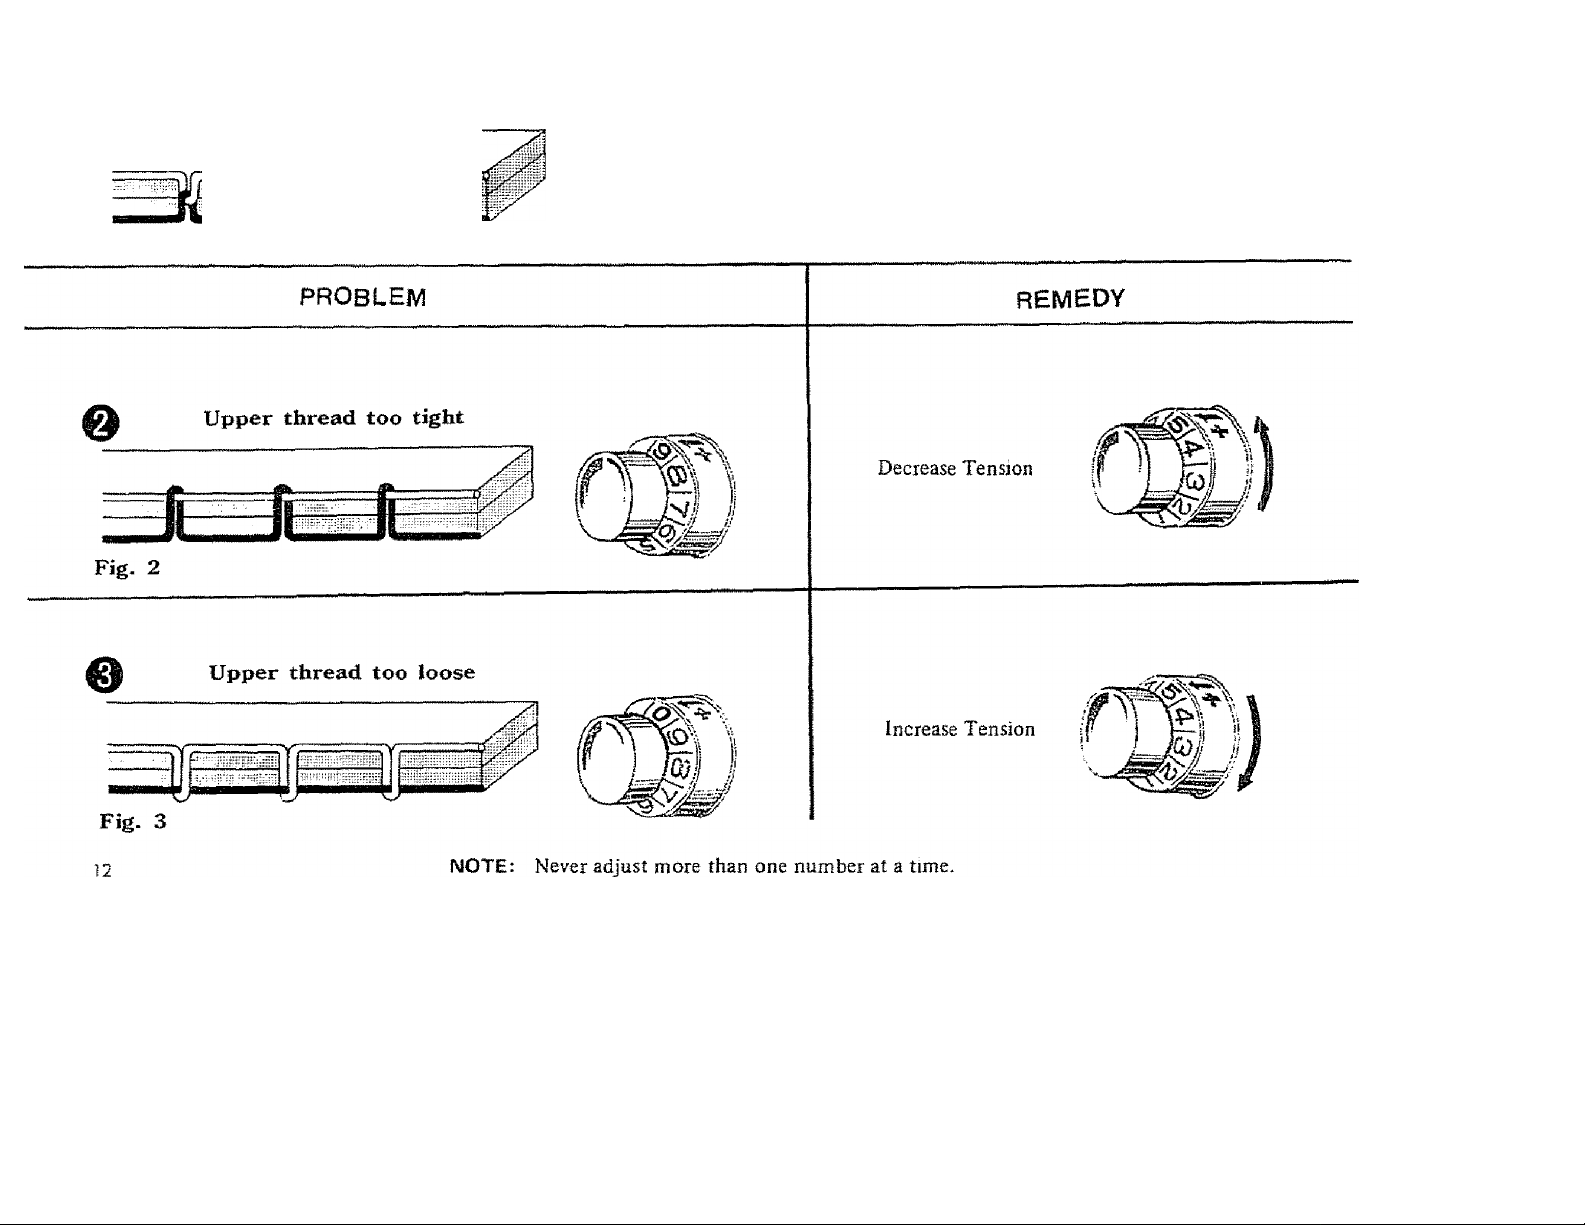
Fig, 1
ADJUSTING TENSIONS
A perfect stitch will have threads locked between the two layers
of fabric with no loops on top or bottom.
Page 14
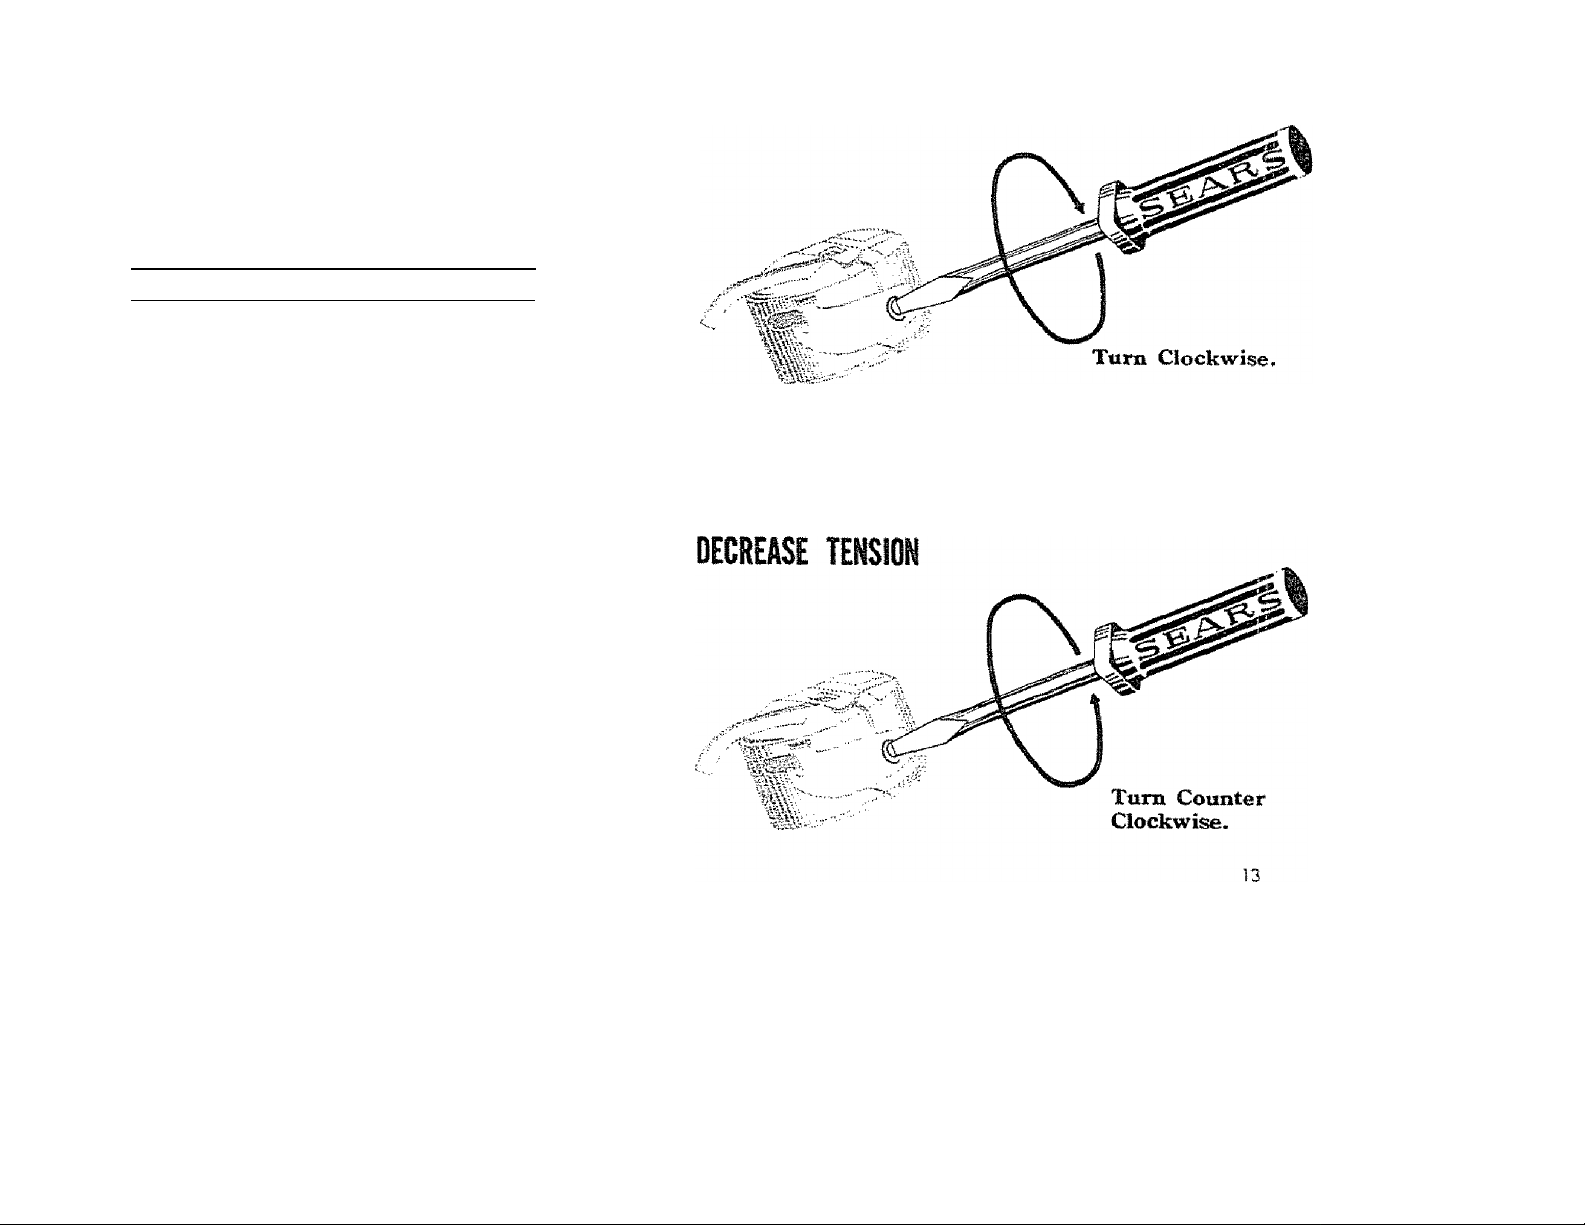
When stitching is unsatisfactory as in figures
2 and 3, adjust the upper thread tension.
Lower thread tension requires adjustment
less frequently than the upper thread
tension.
When stitch is satisfactory, as in Fipre I and
seam is badly puckered, the cause may be
tight tensions and both upper and lower
may be adjusted. (See page 26)
INCREASE TENSION
When adjusting the tension on the bobbin
case, make slight adjustments with a screw
driver. (See page 26)
Page 15

INSERTING AND REMOVING THE MATERIA
For all kinds of sewing, consult chart page 5.
Before placing the matenal on the machine see that:
• The presser foot and needle clamp screws are both
tight.
• The sizes of needle and thread suit the kind of work
to be done.
• The needle and the thread take-up lever are at their
highest position.
• The ends of threads have been drawn about 4 inches
to the rear of the machine.
• The feed dogs are up.
• Stitch length and width controls are set at desired
settings.
Expenment by sewing on the fabric to be used to
determine tension adjustments and correct stitch
settings.
Place matenal under the presser foot, insert the needle
into the material by turning the hand wheel toward
you, lower presser foot and start sewing.
To facilitate placement of heavy fabrics under the
presser foot, the presser foot lever can be raised
beyond the normal “up” position.
To remove the work, first turn the hand wheel toward
you until the needle and the thread take-up lever are
at their highest position, then raise the presser foot,
draw material to the rear and cut off excess thread
with the thread cutter located on the presser bar.
IMPORTANT: Always turn the hand wheel toward
you! When the machine is not being used, place a
piece of material over the feed dog and lower the pres
ser foot. Always have fabric under the presser foot
when operating the machine. Operating threaded
machine without fabric will cause it to jam by forcing
Uni into the shuttle. See Pages 22 & 23.
14
Page 16
TURNING A CORNER
Stop your sewing machine and make sure needle ts in
fabric. Raise presser foot. Turn fabnc to de.sired direc
tion. Lower presser foot and go on with your stitching.
FEED DOG CONTROL
This knob is situated on right front of machine bed.
When knob is turned to the left, feed dog docs not move
material. This allows the operator freedom of movement
of material. For regular sewing, turn knob to the right.
‘Ti’’ {Feed dog up).
CHANGING THE PRESSER FEET
The various presser feet available for certain kinds of
work are to be fastened to the presser bar.
To attach the foot, raise the presser bar to its highest
position by raising the presser foot lever.
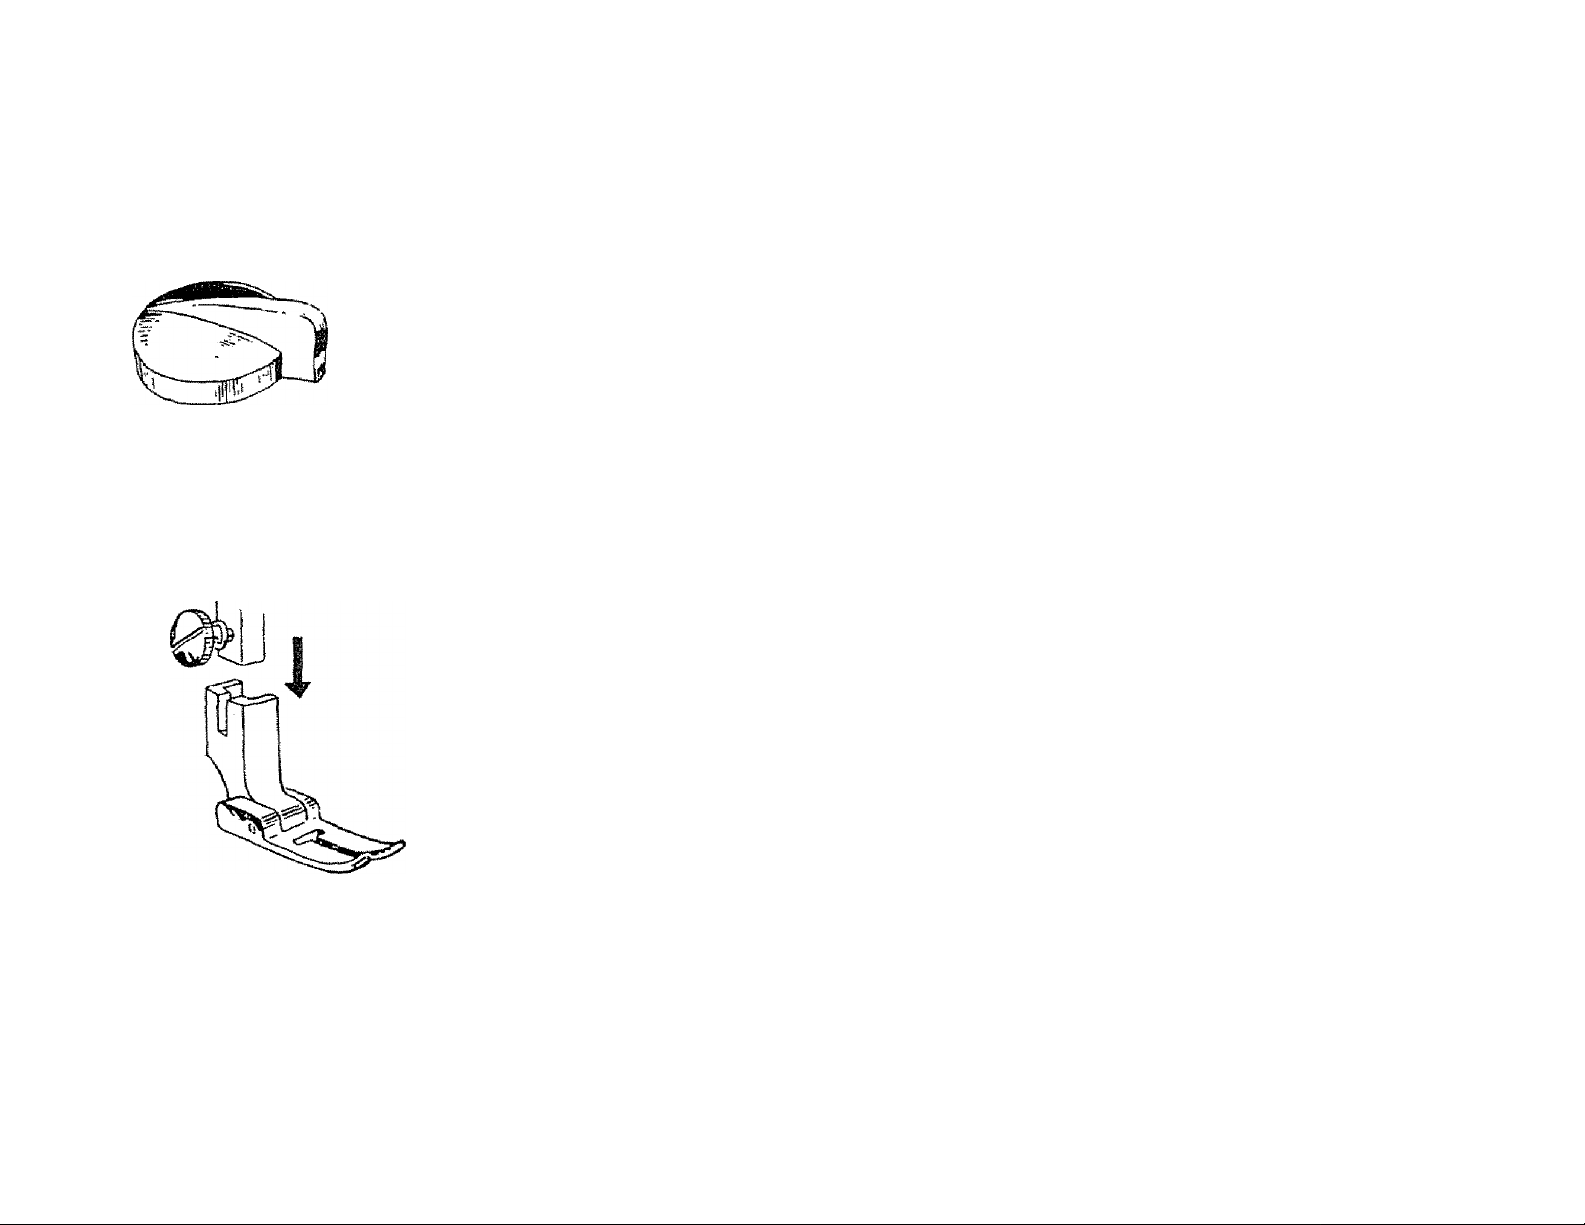
Loosen the presser foot thumb screw, choose the proper
foot, insert from the front. Tighten the screw using the
large screwdriver and make sure that the foot is secure.
15
Page 17
ZIGZAG CONTROL
W N
Д V
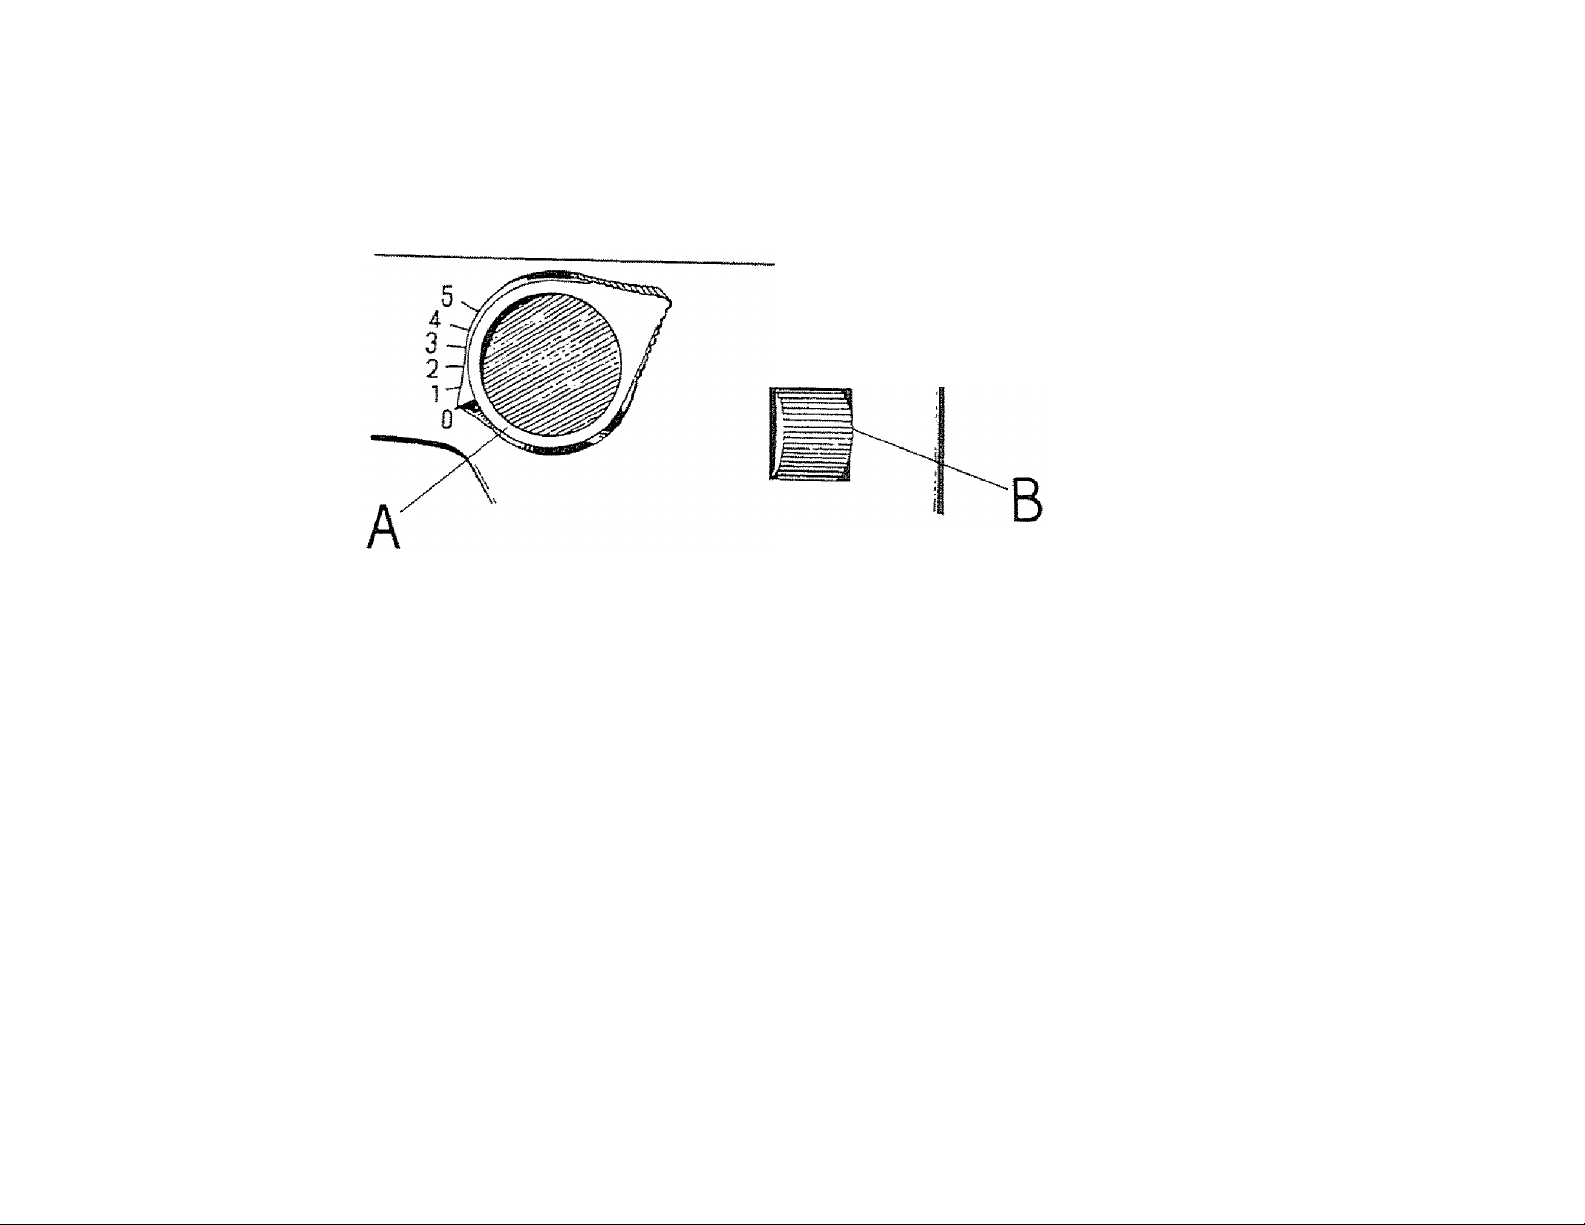
To produce a zigzag stitch, turn the stitch width limiter В upward. A.s the knob is moved up, the stitch becomes wider.
The indicator on the stitch width control knob A points to the numerical setting. The width knob can be manually turned
to a higher number, but the limiter must be rolled dowmward to produce a narrower zigzag .stitch. Zig-zag stitch width
increases from No. I setting to the No. 5 setting. Straight stitching is possible only when the knob is at the 0 position.
Zig-zag stitchmg will be practical for repairing elastic garments, .seaming knitted garments, overcasting scams, tacking
points of strain, binding blankets, and stitching darts in interfacings.
16
Page 18
BUTTONHOLES
Stitch length about
Stuch Width about 2
Feed doi; control to nsht
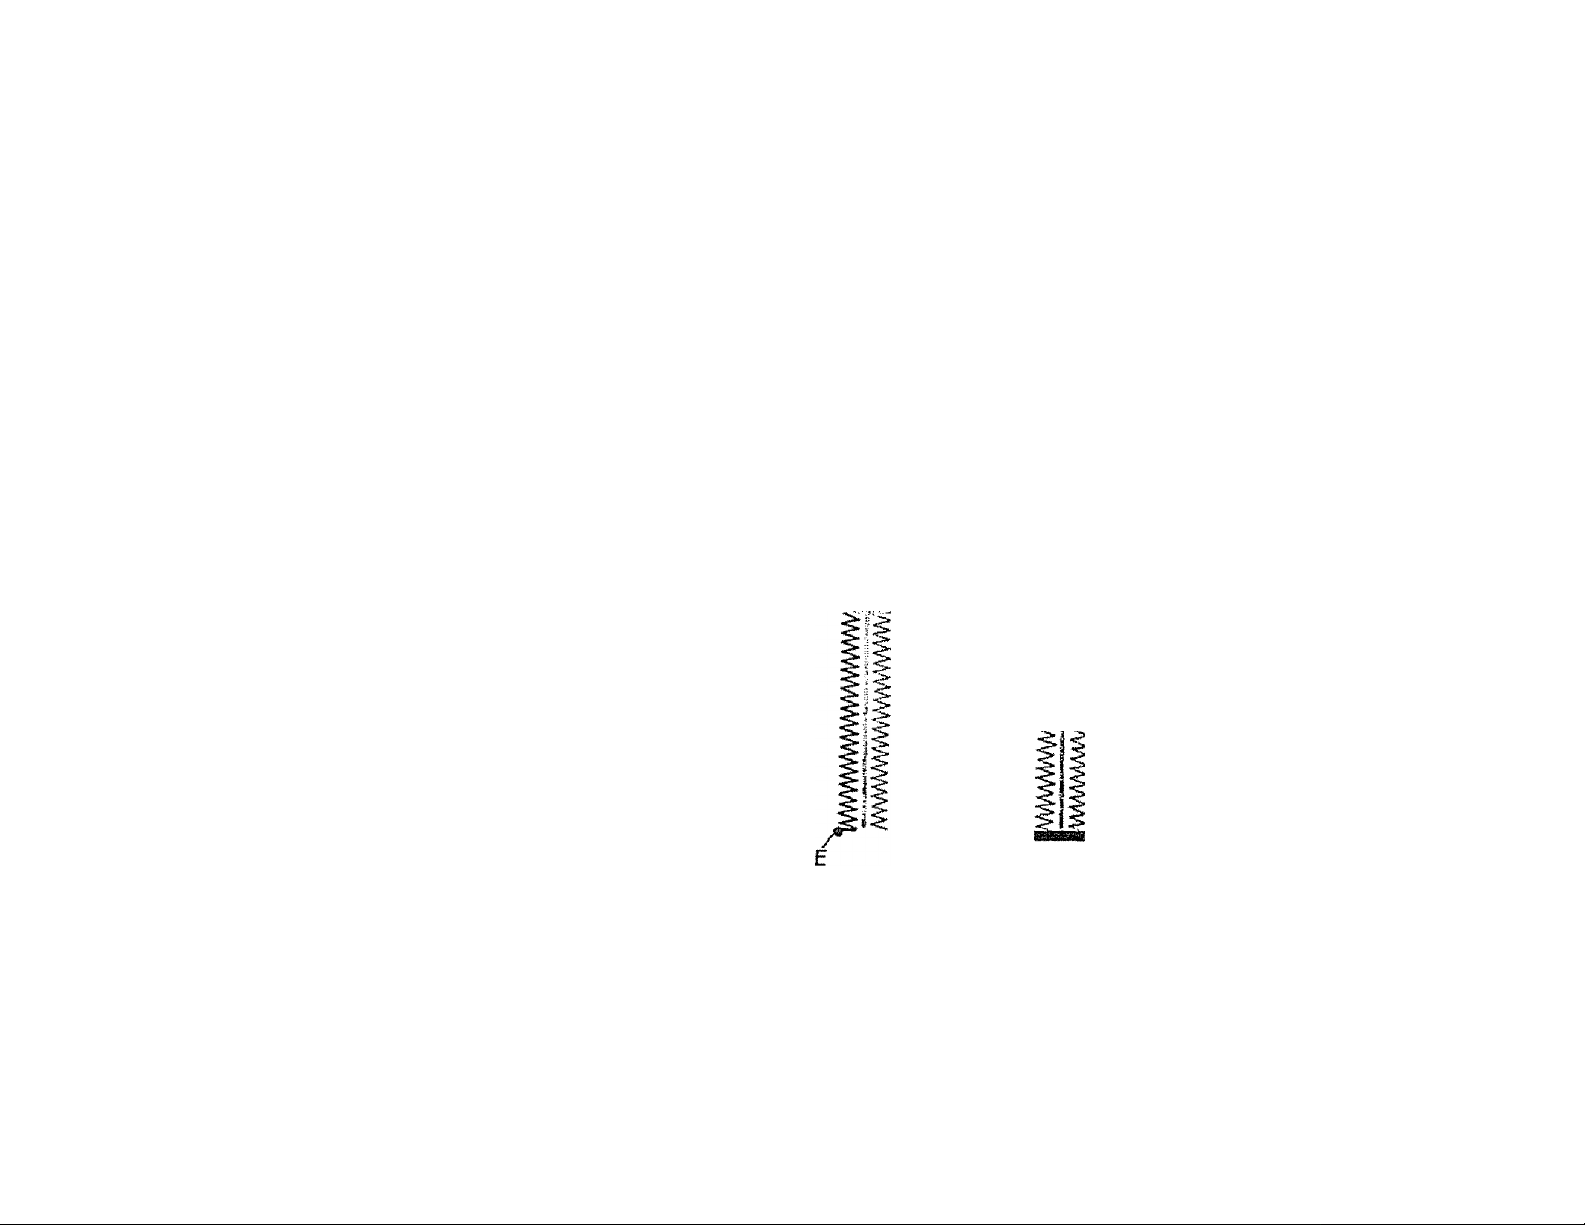
1. Stitch forward until desired length for buttonhole is obtained. Stop with needle on the left side of stitching !A). Drop feed
dog, set stuch width control on IVi and take one stitch to the right (B).
2. Raise presser foot and turn material with needle m material. Lower presser foot and take one stuch to the left (C).
3. Turn stitch width control to 5 and sew 4 stitches. This method of fastening the ends of buttonholes is called bartackmg.
Bartaking should be completed with needle on the left side (D).
4. Set stitch width back to 2. Raise feed dogs and sew back to other end of buttonhole. Stop with needle on the left (E).
5. Turn stitch width control to 5. Drop feed dog and bartack. Raise feed dog.
It IS recommended that tailor's chalk be used to determine length of buttonhole before sewing. For a firm buttonhole, she
stitching can be repeated over the same area, then cut buttonhole opening. For a professional look to your butionhole use an
interfacing between the layers of fabric.
D
\
A 8
■1
17
Page 19
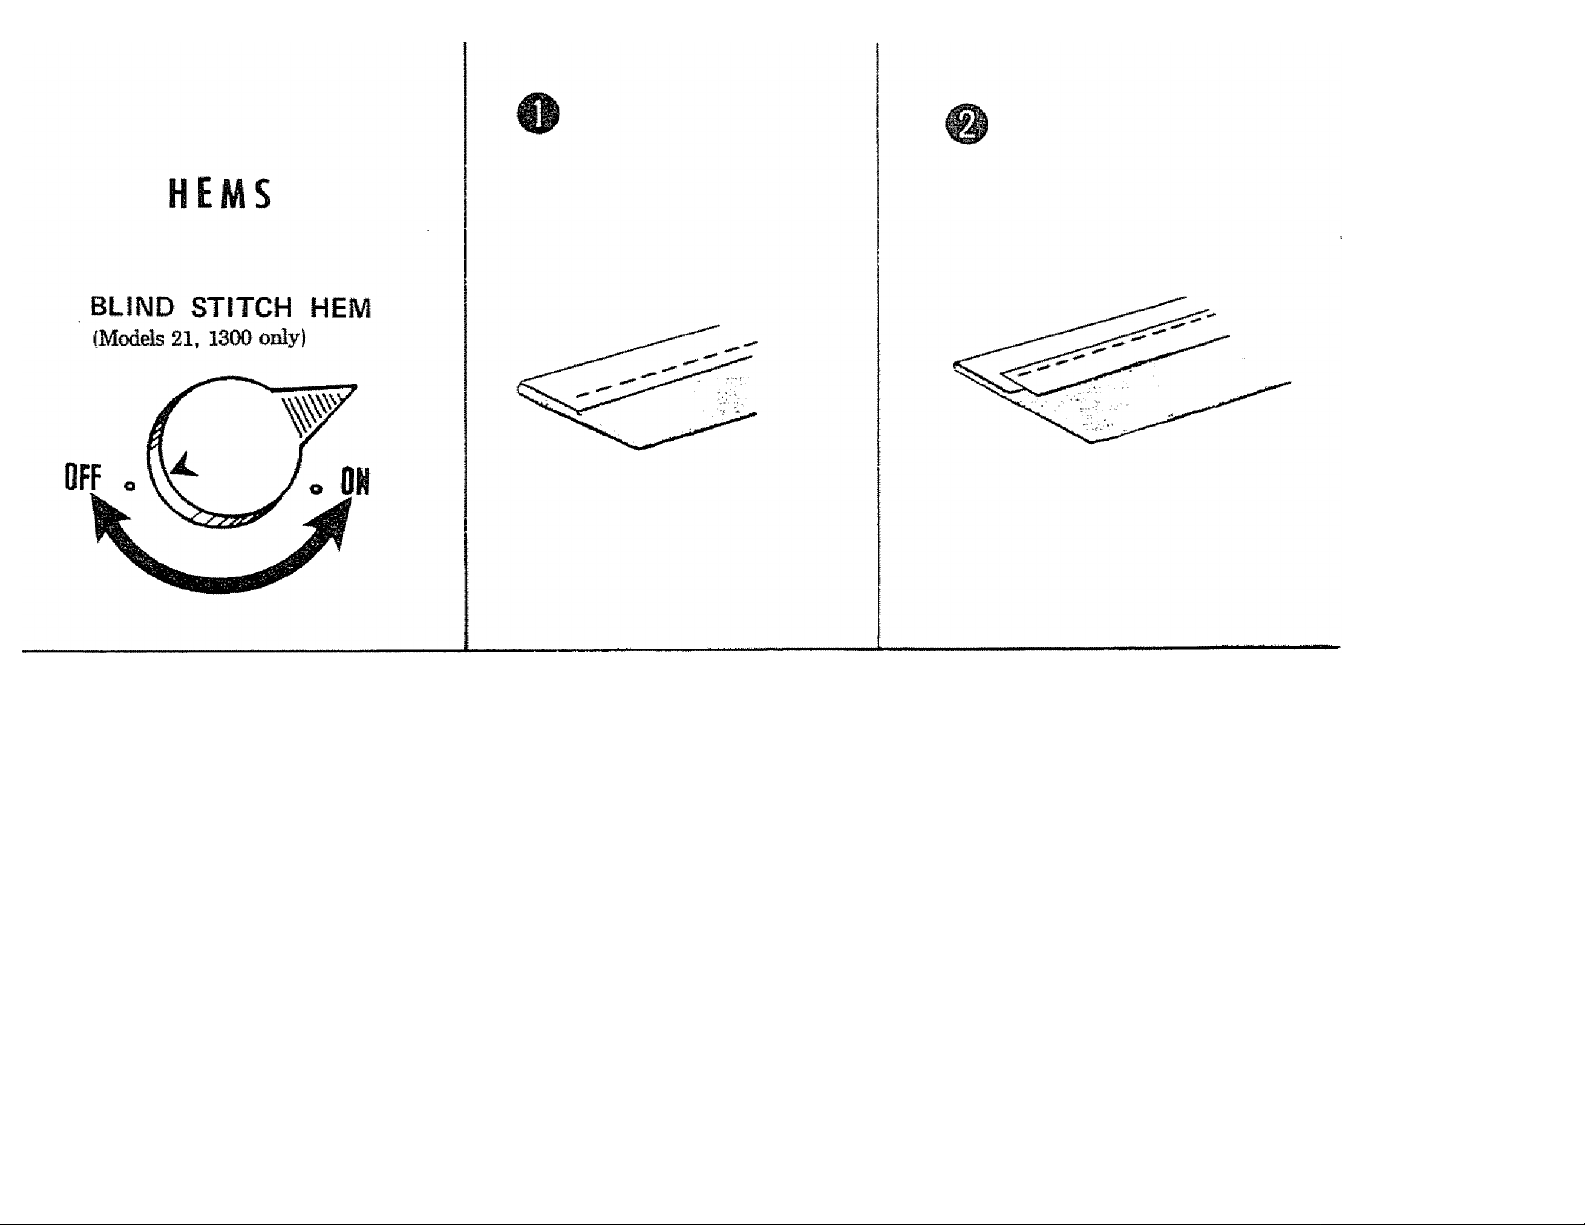
The Blind Stitch Knob must be
on the “OFF” position for all
operations except blind stitching.
iB
1- Prepare the hem with a turned
and edgestitched finish, or
2. Apply seam tape along the
raw edge with citner straight
or zig zag stitching, then fold
hem as shown.
Page 20
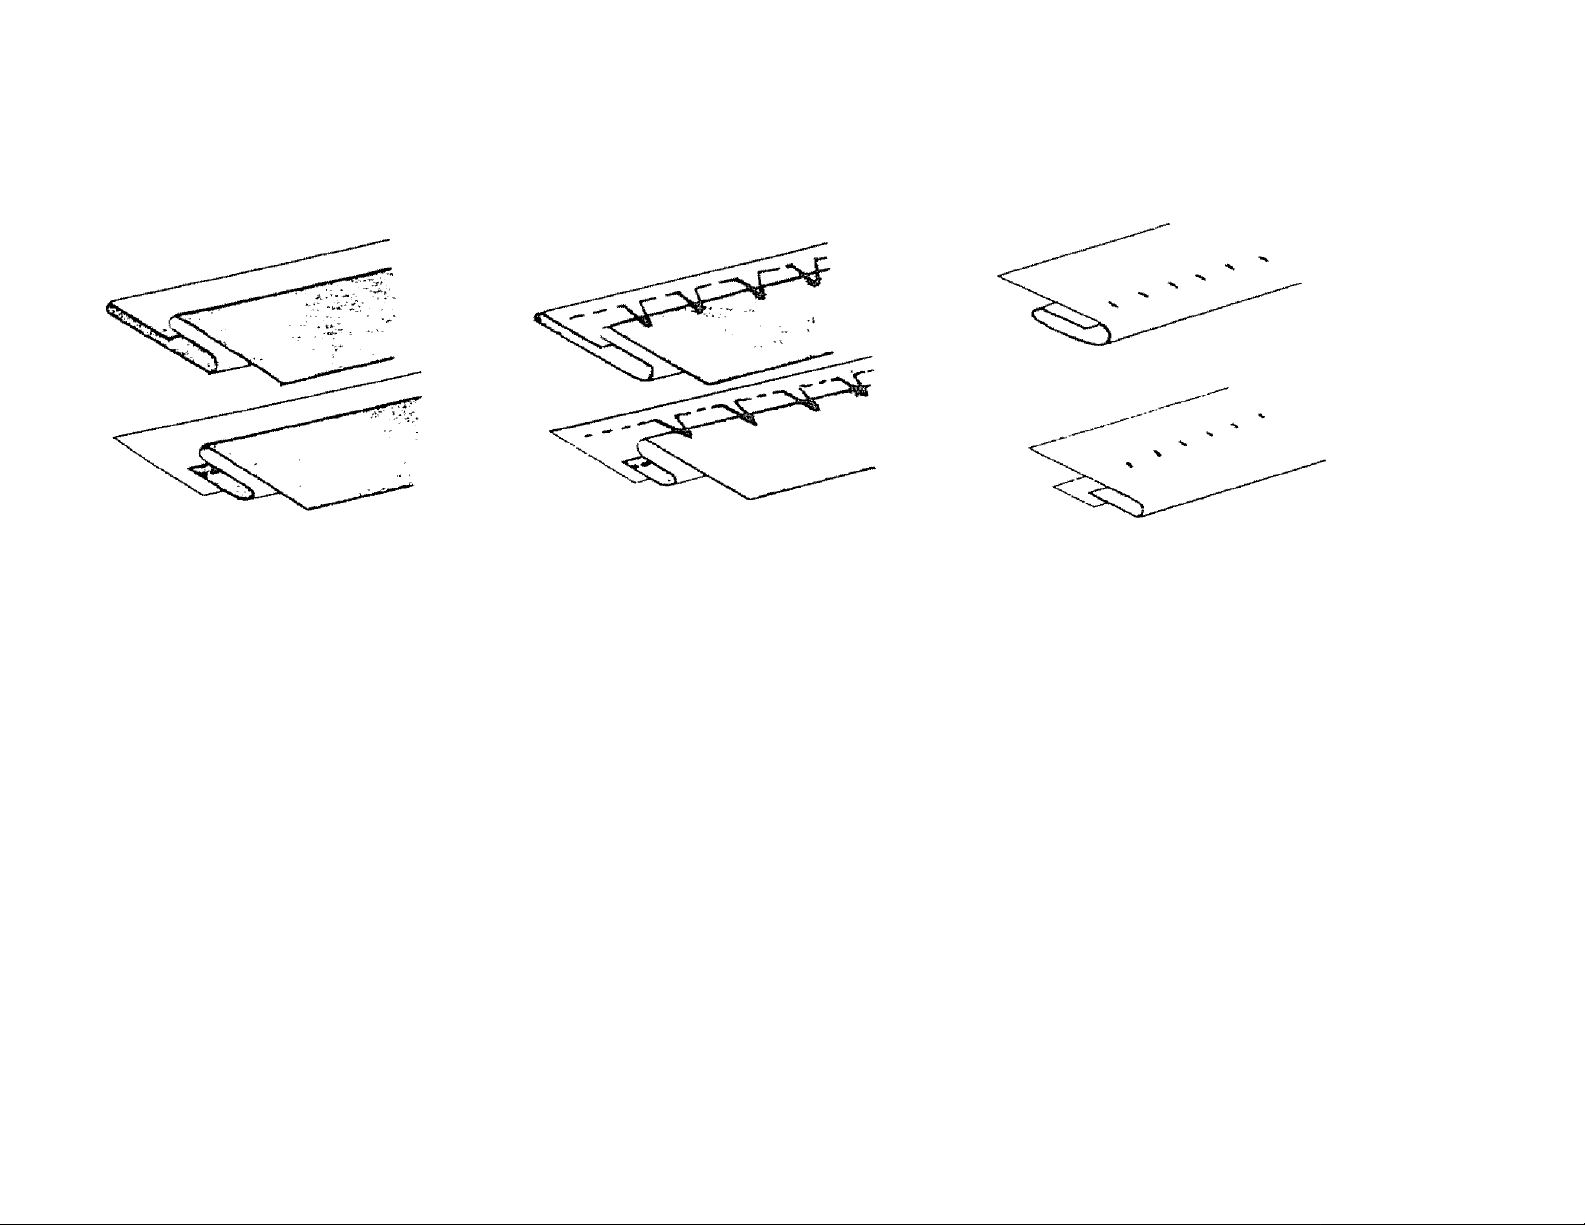
3. Make second foid as shown.
Turn blind stitch knob (black
arrow) to the “ON” position.
Set stitch width at 0 and
siiich length 2-3 (as desired).
Then, blind stitch along fold
until hem is completed.
Unfold, exposing right side of
maieriai with completed blind
stitching.
Press hem.
19
Page 21

WITH PRESSER FOOT;
1. Turn feed dog control to left.
2. Press down outer ring of presser foot pressure regulator, see page 10. With regulator in this posi
tion mending, monogram work, etc. may be done.
3. Stretch fabnc tightly between two spring embroidery hoops and place under needle.
The presser bar can be raised to accommodate the embroidery hoop by pulling up on the presser
foot lever.
4. Lower presser bar so thread will have some tension. When you start to dam, move fabnc back and
forth to cover darning area. Then turn fabric and continue sewing at right-angles to the previous
stitching. Always use medium machine speed. You can make any length stitches dfesired. Slow
movement of fabric will make short darning stitches. Fast movement will make long stitches.
5. When you finish darning, raise presser foot and remove fabric. Increase pressure for general sewing
by pressing center pin of presser foot pressure regulator.
Turn feed dog control to right.
WITHOUT pmssm footj
DARNING
20
1. Turn feed dog control to left.
2. Remove presser foot.
Proceed as directed under steps 3 and 4 above.
5. When you finish darning, raise the presser bar and remove fabric. Replace presser foot.
Turn feed dog control to right.
Page 22
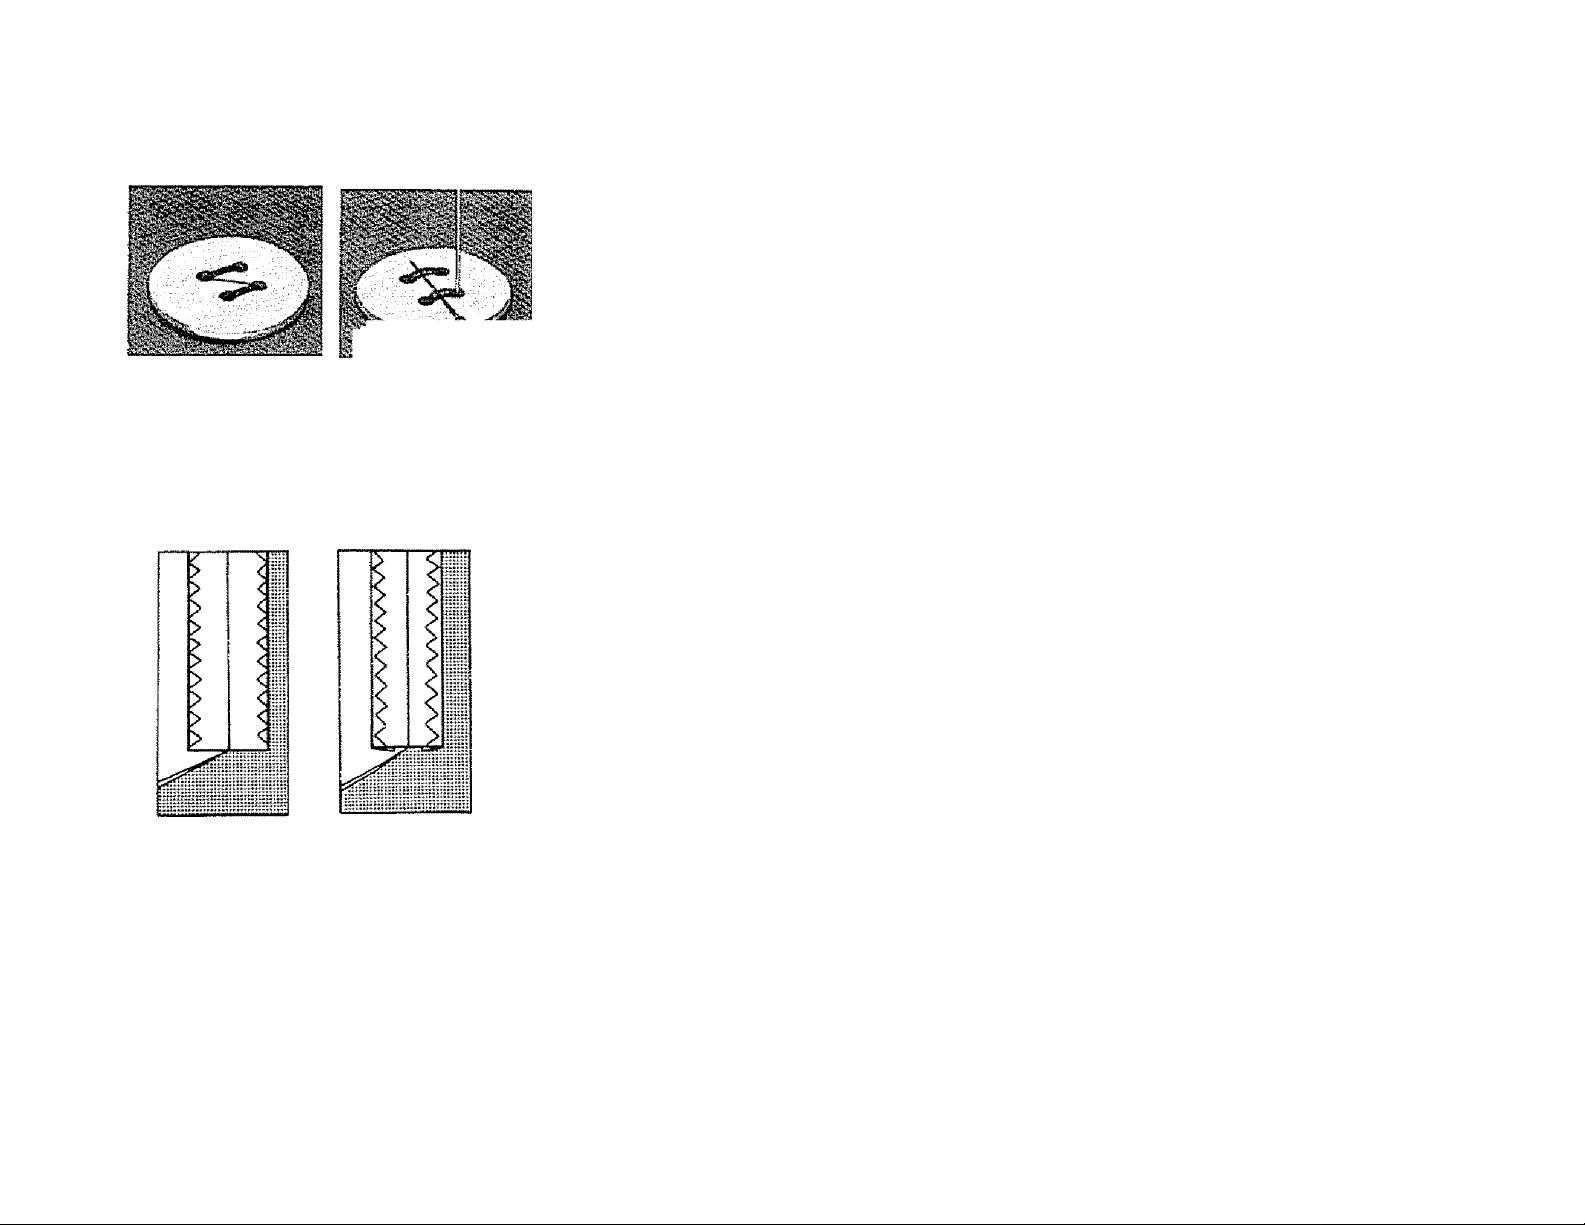
L Turn feed dog control to left. Place needle into left hole of button,
align holes with slot of presser foot and lower presser foot,
2, Set stitch width control at width between holes of button. Test
width by turning handwheel slowly. Take several zigzag stitches to
sew on button, ending with needle on left side.
3. Set stitch width control at 0. Take a few stitches in left hole of
button to lock threads.
Pull threads to wrona side.
NOTE: To make a small thread shank when sewing on a flat button,
place a straight pm or needle between the holes of the button.
OVERCASTING
Set stitch width to 5. Set stitch length at 5, Zigzag stitch around raw
edge of fabric to completely cover the edge.
21
Page 23
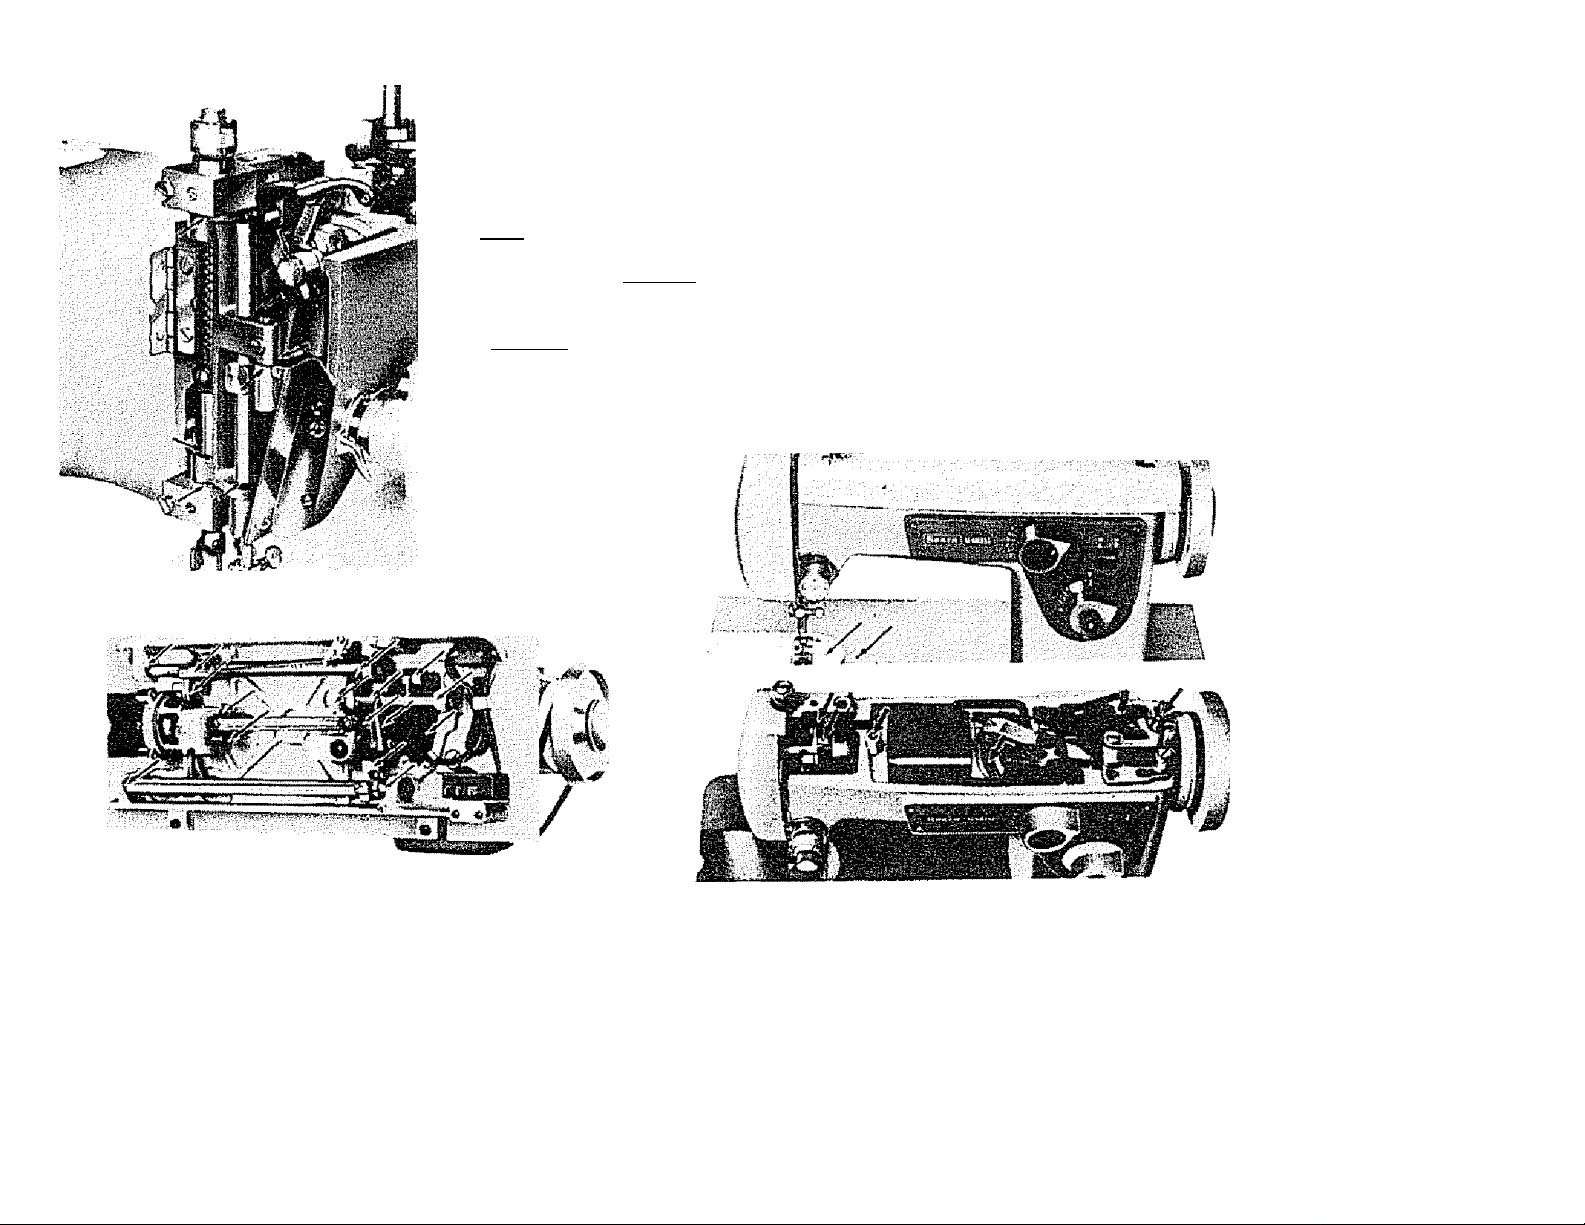
CLEANING AND OILING
Keep the moving parts free from dust aad threads for quiet and efficient operation.
Cleaning be done with a small brash, never with a sharp or pointed tool. When
mflchme runs hard or makes excessive noise, place a drop of KENMOHE sewing
machine oil at the points indicated by arrows.
To oil top of the machine, place a few drops of oil through the holes on the top cover
plate whie the needle is at the lowest point, or remove top cover plate by unscrewing
two screws and oU at the points indicat^ by arrows. (Model 1206)
TUt machiriA head back to oil points indicated on underside of machine head.
.......................
y
22
Page 24
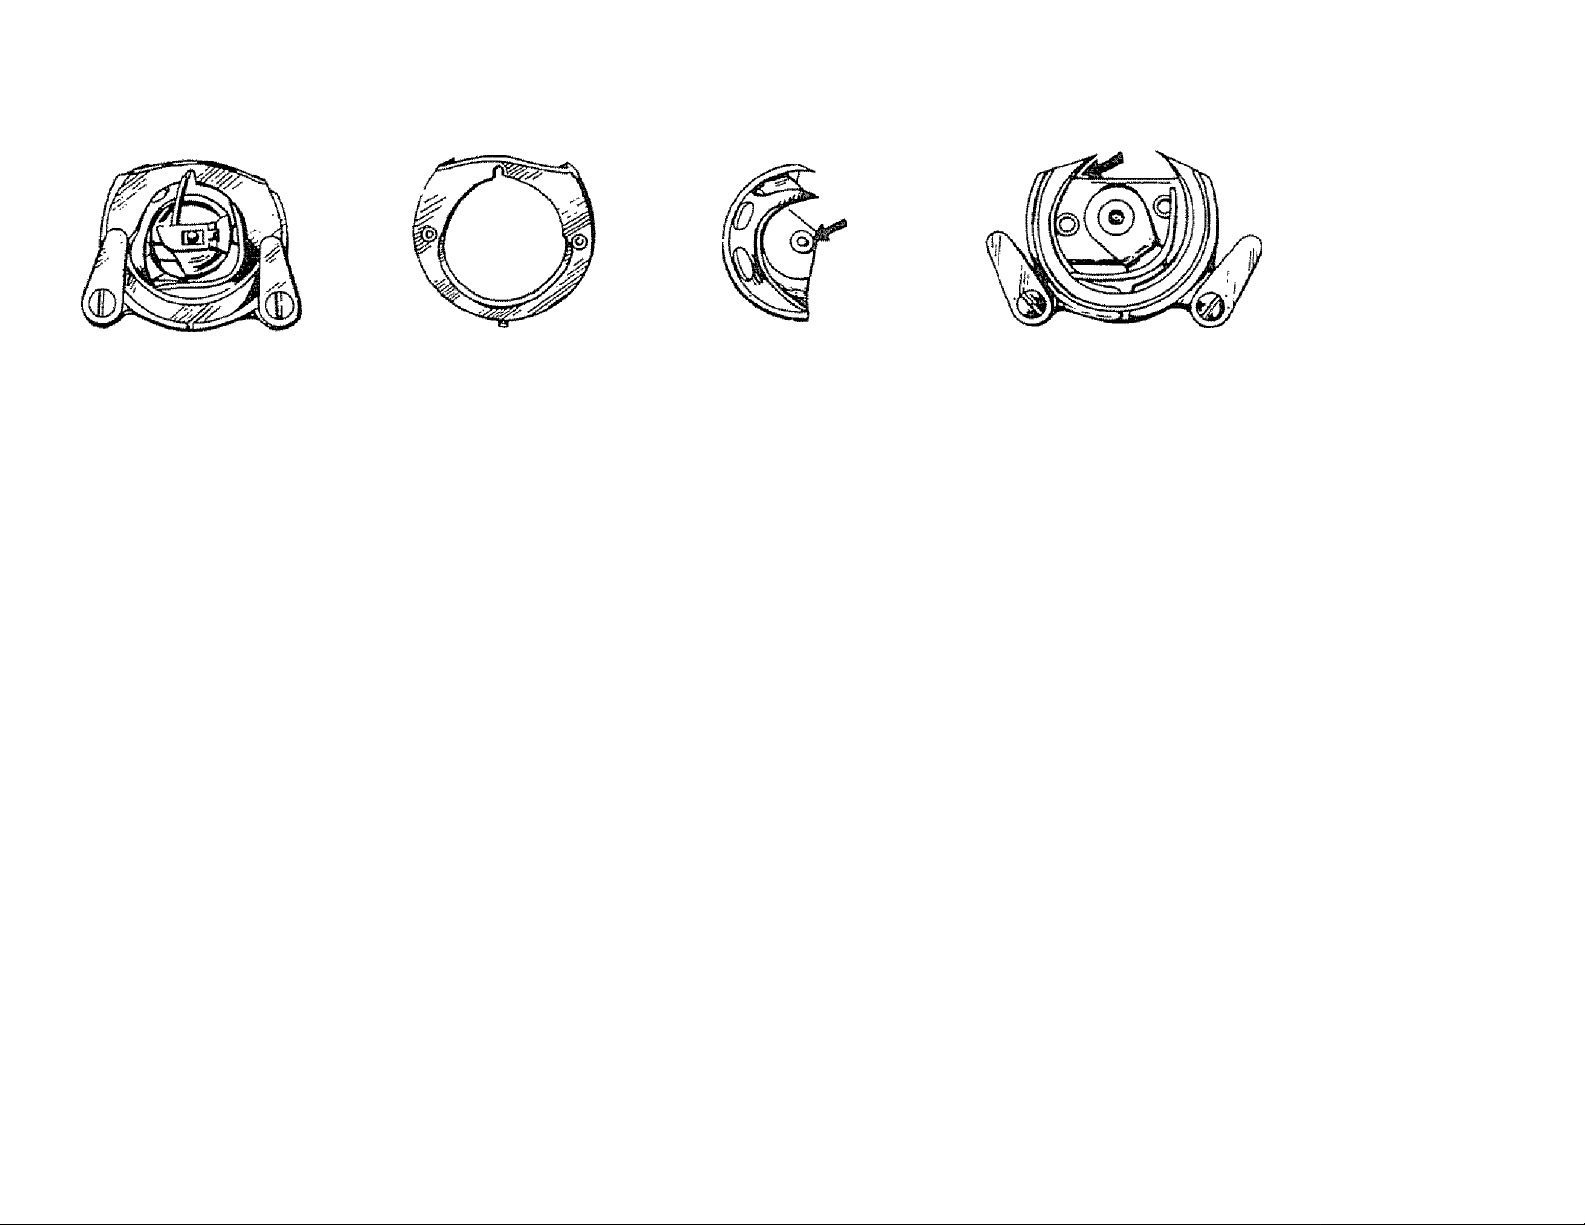
Shuttle Assembly
It may be necessary to clean the shuttle area occasionally.
L Raise the needle bar to its highest point and remove bobbin case.
2. Push levers sideways of the shuttle assembly and lift shuttle and shuttle race cover out by the center pin.
3. Clean the shuttle race of any lint or small particles of thread with a small brush.
4. Put a drop of oil on the center pin of the shuttle and on shuttle race {see arrows).
To reassemble, hold shuttle by center pin and fit carefully into assembly opposite the shuttle driver.
Slip shuttle race cover into place. Snap the levers into position.
Occasionally, remove the needle plate and clean feed dog with a soft brush.
Shuttle Race Cover
Shuttle
Shttle Race
23
Page 25

WHAT TO DO
PROBLEM
Incorrect Size needle.
Improper threading.
1 rregular
Stitches
Breaking
Needles
Bunching of
Thread
Puckering of thread.
Loose upper thread tension.
Pulling fabric.
Light pressure on presser toot.
Loose presser foot.
Unevenly wound bobbin.
Pulling tabnc.
Incorrect size needle.
Incorrect setting of needle,
Loose presser foot.
Upper and lower threads not
drawn back under presser foot.
Feed dog down.
Incorrect thread tens’tonIsL
Light pressure on presser foot.
Using two different sizes or kinds
Bent or blunt needle.
Loose presser foot.
Fabric too sheer or too soft.
PROBABLE CAUSE
CORRECTION
Choose correct size needle for thread and fabric (page 5),
Rethread machine (page 9).
Tighten upper thread tension (page 12).
Do not pull fabric; guide it gently.
Increase pressure on presser foot (page 10).
Reset presser toot.
Rewind bobbin (page 7).
Do not pull fabric; guide it gently.
Choose correct size needle for thread and fabric (page 5).
Reset needle (page 5).
Reset presser foot.
Draw both threads back under presser foot Ipsge 10).
Raise feed dog.
Reset thread tension isHpage 12, 13).
Increase pressure on presser toot (page 10).
Upper thread and bobbin thread should be same size and kind.
Insert new needle (page 5).
Reset presser foot.
Use underlay of tissure paper or tarleton when stitching.
24
Page 26

PROBLEM
PROBABLE CAUSE
CORRECTION
Skipping
Stitches
Breaking Upper
Thread
Breaking Bobbin
Thread
Fabric not
Moving
Machine Jamming
{Knocking NoiSe}
incorrect size needle.
Bent or blunt needle,
incorrect setting of needle.
Tight upper thread tension.
Light pressure on presser foot.
Starting to stitch too fast,
improper threading.
Tight upper thread tension,
incorrect size needle.
Sharp eye in needle.
Improper bobbin case threading.
Tight bobbin thread tension.
Lint in bobbin case or shuttle.
Feed dog down.
Light pressure on presser foot.
Threads knotted under fabric.
Thread caught in shuttle.
Choose correct size needle tor thread and fabric (page 5K
Insert new needle (page 51.
Reset needle (page 51.
Loosen upper thread tension (page 12).
Increase pressure on presser fool (page 10).
Start to stitch at a medium speed.
Rethread machine (page 91.
Loosen upper thread tension (page 121.
Choose correct size need)© for thread and fabric (page 5).
insert new needle {page 5).
Check bobbin case threading (page 81.
Loosen bobbin thread tension (page 13),
Clean bobbin case and shuttle (page 22 & 23).
Raise feed dog.
Increase pressure on presser toot (page 10).
Place both threads back under presser foot before beginning to stitch.
Disassemble and clean shuttle (page 22 & 23).
25
Page 27

ADJUSTING YOUR SEWING MACHINE FOR GOOD STITCHES
When your sewmg machine does not sew a properly locked stitch, check the following:
1. Insert a new needle of the correct size for the thread and fabnc you are using. Consult chart on page five
for needle size.
2. The upper and bobbin thread should be the same thread.
3. Check threading carefully. See page 8-9.
4. Check the thread tension balance. Use mercerized thread and a correct size needle for the fabric you are
using. Do not try this test with synthetic thread as it will not break.
Begin with a full bobbin, properly threaded into the case. Set the stitch length at about 12 stitches per inch.
Fold a six inch square of your fabnc in half diagonally, forming a triangle. Make a line of stitching Vz" from
fold.
a. If seam is puckered-both tensions are too tight.
b. If the bottom thread lays on the fabric-tighten upper thread tension, and repeat test.
See page 12, Figure 3.
c. If the top thread lays on the fabric-loosen upper thread tension and repeat test.
See page 12, Figure 2.
Grasp the stitching and pull evenly and firmly until one or both threads break.
a. If both threads break-tensions are balanced.
b. If neither thread breaks—both tensions are too loose.
c. If upper thread breaks-loosen upper tension.
d. If lower thread breaks-tighten upper tension.
26
Both threads do not have to break at the same place, but they should break on the same snap.
Bobbin tension may be reset by the following procedure. Start with a loose bobbin thread tension. Tighten the
spring screw gradually -until bobbin case and full bobbin can be gently lifted from your hand by the end of the
bobbin thread.
Page 28
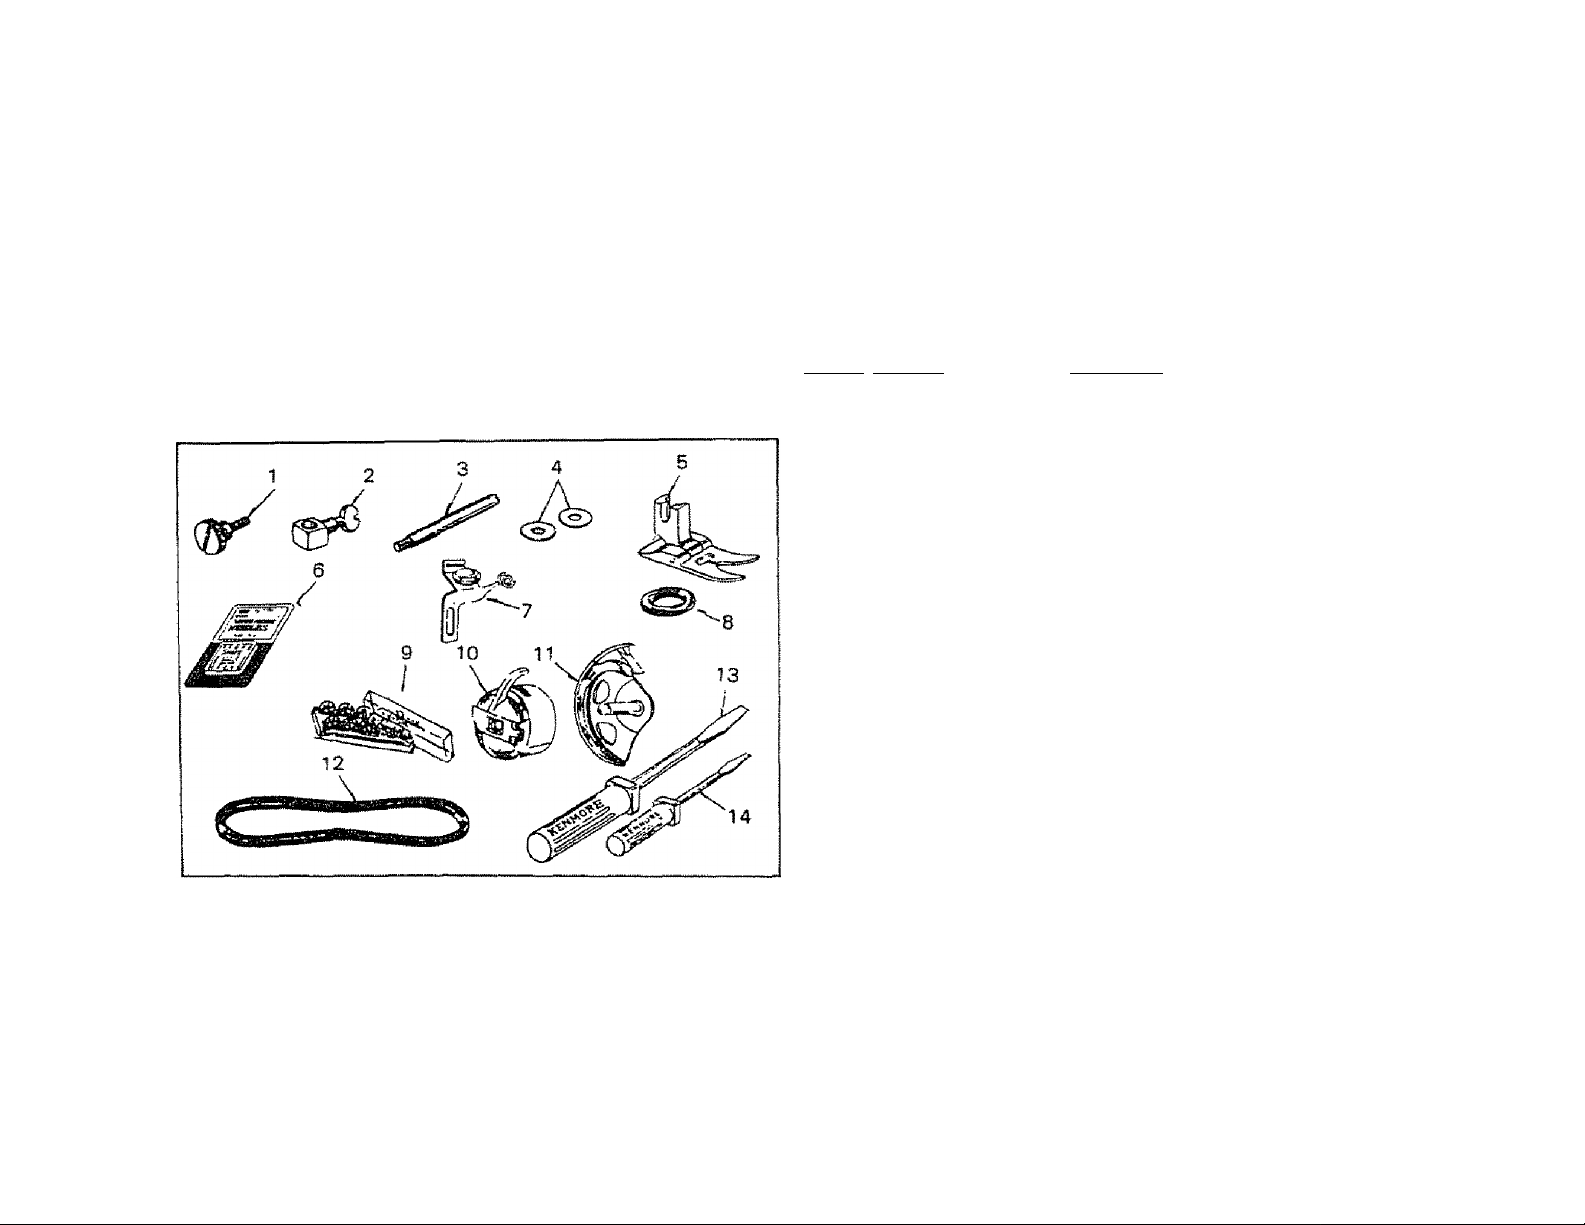
PARTS LIST
Ail parts listed here may be ordered through your nearest Sears or Simpssns-Sears retail store, catalog sales office or
mail order house.
When ordering these parts, please be sure to mention the following references;
1. Model & serial numbers of machine shown on the nomenclature plate. See page 2.
2. Parts number(s) and desodption(s) here.
When ordering by mail, prices will be furnished on request, ox parts will be shipped at prevailing prices and you will
be billed accordingly. Ref. No. Parts No. Description
1 135 Presser foot thumb screw
2 201201 Needle clamp
3 8286 Thread spool pin
4 2273 Nylon disc
5 4607 Presser foot
6 6741 Pack of #11 needles
(Yellow pack)
6742 Pack of #14 needles
(Red pack)
6743 Pack of #16 needles
(Green pack)
6744 Pack of #18 needles
(Blue pack)
7 201709 Bobbin winder thread and
top thread guide
8 1939 Bobbin winder rubber ring
9 6862 Pack of bobbin (10 pcs )
10 6510 Bobbin case
11 47 Shuttle hook
12 6902 Motor rubber belt
13 3015 Large screwdriver
14 3016 Small screwdriver
27
Page 29

SEWING MACHINE
Now that you have purchased your Sewing Machine, should a need ever exist for
repair parts or service, simply contact any Sears Service Center and most Sears,
Roebuck and Co. or Simpsons-Sears Limited Stores. Be sure to provide a!!
pertinent facts when your call or visit. ■
The mode! number of your Sewing Machine will be shown on your nomenclature
plate on the front side of bedplate of your Sewing Machine. See page 2 for
location.
WHEN ORDERING REPAiR PARTS, ALWAYS GIVE THE FOLLOWING
INFORMATION:
'MODEL NUMBER
If the parts you need are not stocked locally, your order will be eiectronically
transmitted to a Sears Repair Parts Distribution Center for handling.
.......
*NAME OF ITEM *PART DESCRIPTION
SEARS, ROEBUCiC AND CO., Chicago, IL 6ÛS84 y.S.A. and
SiMPSONS-SEARS LIMITED, Toronto, Ontario, Canada
Part No. 55053 ŒD
 Loading...