

Kenmore 116.37213793 Owner's Manual
I
......... IIII '
I IIII I II I I
in
+
IL
I
IIII III
I I
I I
*imr
qll IIIIII II I III I I III III II I I I III
II III I II I IIIIIIII III III IIIII
'I I II I
II
II I l u
+
n i
IIIIII IIIII IIII I I
IIIIII I III II I I I I
I IIIIIIIIIII II IIIII IIIII
lJ IIIII IIII III II I
" "" I IIIIII
IIIIIIIIIII III IIIIIIIII IIIIIIII
II
L IIIIII III I I
IIIII II IIIII I IIIII II
E
q
il
M
I
m
m
0 WNER'SMANUAL
II
I I I III I I II I
,nl
I I
III
II II
IIII
I II IIII
I
+
Vacuum Cleaner
i
m
m
B
m
i
w
i
A
READTHISMANUAL for important safety,
assembly and operating instructions.
C_ 1ZAMJ_U_-437_355


------CONTENTS
WARRANTY .............................. 3
SERVICE ................................. 3
IMPORTANT SAFETYINSTRUCTIONS....... 4
PARTSAND FEATURES.................... 5
ASSEMBLY.............................. 6-7
ATTACHMENT ASSEMBLY................. 7
USE ....................................... 8
How to Start ............................. 8
How to Select Proper Height for Cleaning ... 8
Attachments ............................ 9
Attachment Use Chart .................... 9
Vacuum Storage ........................ 10
Proper assembly and safe use of your vacuum cleaner are your responsibilities. Your cleaner is
intended only for household use. The cleaner should be stored in a dry, indoor area. Read this Owner's
Manual carefully forimportant use and safety information.
NARRANTY
VACUUM CARE ......................... 10
Bag Changing ....................... 1I-I 2
Motor SafetyFilterCleaning ............... 12
BeltChanging, BrushChanging
and BrushCleaning ................... 13-15
Cleaning Exteriorand Attachments ........15
LightBulb Changing ..................... 16
Clog Removal ........................... 17
Motor Protector ......................... 17
TROUBLESHOOTING ..................... 18
I
KENMORE VACUUM CLEANER
FULLONE-YEAR WARRANTY
When used for private household purposes, if within
one year from the date of purchase, this vacuum
cleaner fails due to a defect in material or
workmanship, RETURN IT TO THE NEAREST SEARS
SERVICE CENTER/DEPARTMENTIN THE UNITEDSTATES,
and Sears will repair it free of charge.
This warranty gives you spedflc legal rights, and you
may also have other rights which vary from state to
state.
SEARS,ROEBUCKAND CO., D1817 WA,
Hoffrnan Estates,IL 60179
If you need service or parts, visit your nearest Sears
Service Center or the Service Department located at
most Sears Retail Stores. They will be able to solve
your problem and supply any needed replacement
parts. Any service needed other than described in
this Owner's Manual should be done by a Sears
authorized service representative.
How to Order Repair Parts
When requesting service or ordering parts, have the
following information available:
I. Model number.
2. Serial number.
3. Description of problem.
4. Part number.
5. Name of part.
English Speaking:
To Call TollFree For Service:
To Call Toll Free For Parts:
Spanish Speaking:
To Call TollFree For Service:
To Call TollFree For Parts:
(I-800-4-REPAJR)
(I-800-473-7247)
(I-800-FON-PART)
(I-800-366-7278)
(I-800-626-5811)
(I-800-659-7084)
MPORTANT SAFETYINSTRUCTIONS
°
To reduce the risk of fire, electrical shock, injury to persons or damage when using your
WJcuum cleaner, follow basic safety precautions including the following:
Read thismanual before assembling or using
yourvacuum cleaner.
Use your cleaner only as described in this
manual. Use only with Sears recommended
attachments.
To reduce the riskof electricalshock - Do not
use outdoorsoron wet surfaces.
Disconnect electrical supply before servicing
or cleaning out brush area. Failure to do so
could result in electrical shock or brush
suddenly starting.
Always turncleaneroffbeforeunplugging.
Do not unplug by pulling on cord. To unplug,
grasp the plug, not the cord.
Do not use with damaged cord or plug. If
cleaner is not working as it should, has been
dropped, damaged, left outdoors, or dropped
into water, return it to a Sears Service
Center/Department.
Do not pull or carry by cord, use cord as a
handle, close door on cord, or pull cord
around sharp edges or corners. Do not run
cleaner over cord. Keep cord away from
heated surfaces.
Do not leave cleaner when plugged in.
Unplugfrom outletwhen not inuseand before
servicing.
Do not allow to be used as a toy. Close
attention is necessary when used by or near
children.
Do nothandleplugorcleanerwithwet hands.
Do notput any objects into openings.
Do not use with any opening blocked; keep
free of dust, lint, hair and anything that may
reduce air flow.
Keep hair, loose clothing, fingers, and all parts
of body away from openings and moving
parts.
Do not use cleaner without dust bag and/or
filters in place. Always change the dust bag
after vacuuming carpet cleaners or freshener,
powders and fine dust. These products clog
the bag, reduce airflow and can cause the
bag to burst. Failure to change bag could
cause permanent damage to the cleaner.
Do not use the cleaner to pick up sharp hard
objects, small toys, pins, paper, etc. They may
damage the cleaner ordust bag.
Do not pick up anything that is burning or
smoking, such as cigarettes, matches, or
hot ashes.
Do not use cleaner to pick up flammable or
combustible liquids (gasoline, cleaning fluids,
perfumes, etc.), or use in areas where they
may be present. The fumes from these
substances can create a fire hazard or
explosion.
Use extra care when cleaning on stairs. Do not
put on chairs, tables, etc. Keep on floor.
You are responsible for making sure that your
vacuum cleaner isnot used by anyone unable
to operate it properly.
SAVETHESEINSTRUCTIONS
Proper assembly and safe use of your vacuum cleaner are your respon_'bilities.
Yourcleaner is intended only for household use. Thecleaner should be stored ina dry, indoor area.
_ Read thisOwner's Manual carefully forimportant use and safety information.
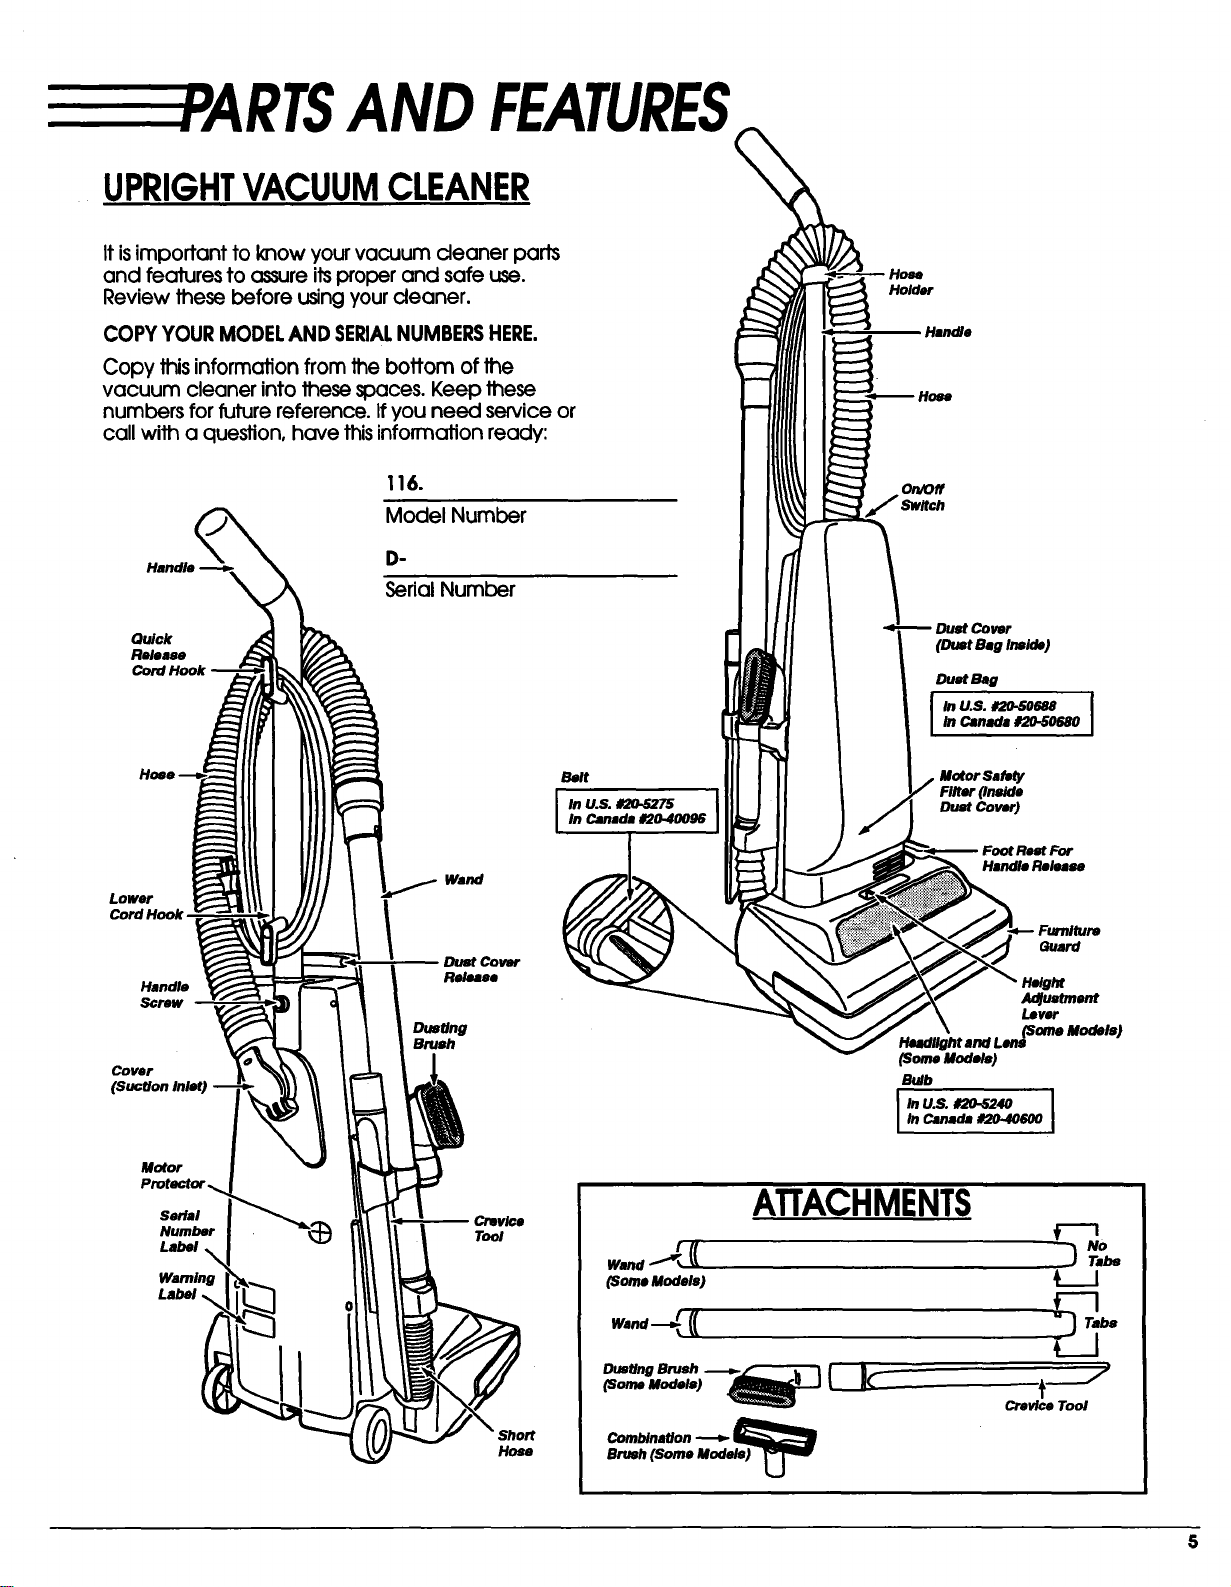
RTSAND FEATURES
UPRIGHTVACUUMCLEANER
It isimportant to know your vacuum cleaner parts
and features to assure itsproper and safe use.
Review these before usingyour cleaner.
COPY YOUR MODEL AND SERIALNUMBERSHERE.
Copy this information from the bottom of the
vacuum cleaner into these spaces. Keep these
numbers for future reference. If you need service or
call with a question, have this information ready:
Holder
• Handle
Qulck
Release
Lower
Cord Hook
Handle
Screw
Cover
(SucUon Inlet)
116.
Model Number
O.
Sed_ Number
Wand
Dust Cover
Relume
Dusting
Brush
Belt
i InU.S,d_4_._'PSOnCanada #20-40096
On/Off
(Duet Bag Inaido)
DuM Beg
In Canada rJO-S0680
J In U.S. #2O-5O688
, Motor Safety
Filter (Inoida
Dust Cowr)
Foot Rest For
Handle Release
Headllghtand Lens
(SomeMode)
Bulb
I In U.S. r_240 IIn Canada #20-40600
Guard
Heigl_
Adlu_men¢
Lover
(Some Models)
Motor
Serial
Number
Label
Waming
Tool
w.nd_,(
(SomaModels)
Wand'_f_ (_
Dusting Brush .__
Brush(Some Models)
Combination-_
ATTACHMENTS
Tabs
J
Crevice Tool
S
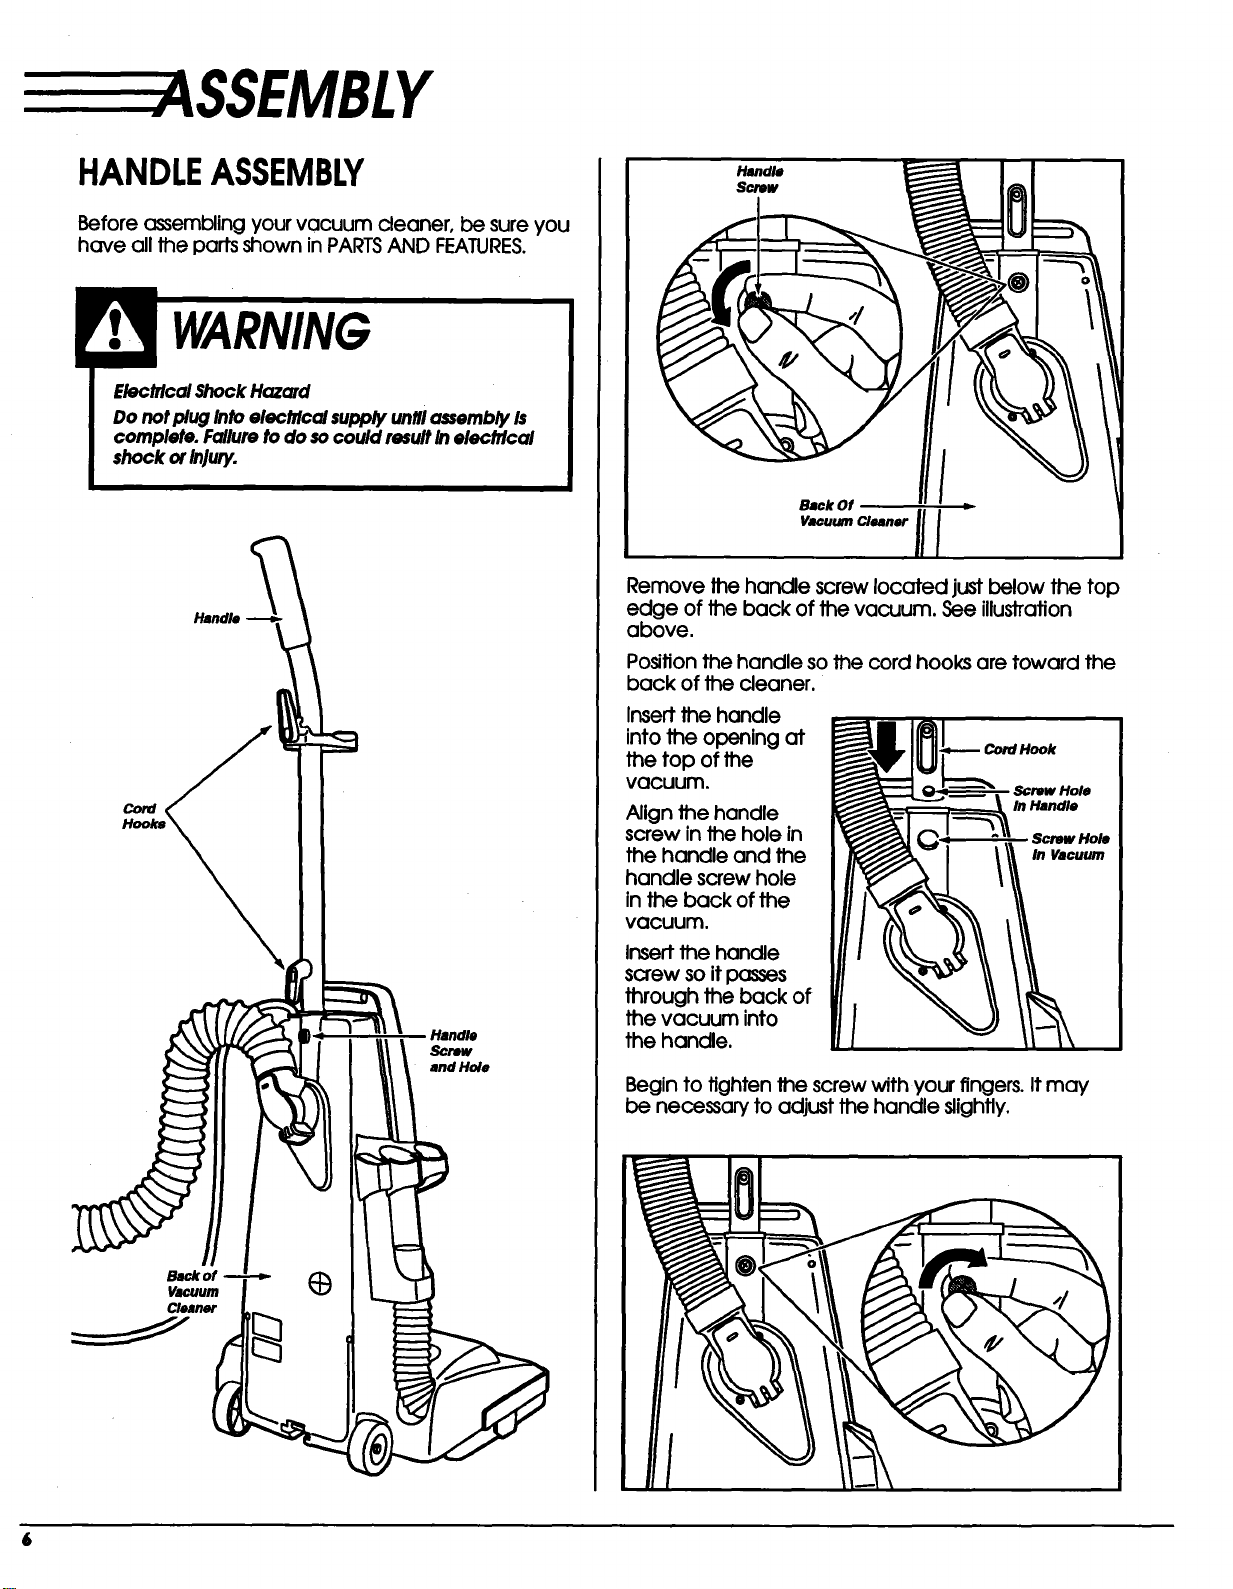
-----ASSEMBLY
HANDLEASSEMBLY
Before assembling your vacuum cleaner, be sure you
have all the parts shown in PARTSAND FEATURES.
ElectrtoolShockHazard
Do not plugIntoelectrical supplyuntilassemblyIs
complete. Fallureto do socould resultIn electrical
shock orInjury.
Cord
Handle
Screw
and Hole
Handle
Screw
I
Back Of
VacuumCl'nerll I
Remove the handle screw located justbelow the top
edge of the back of the vacuum. See illustration
above.
Position the handle so the cord hooks are toward the
back of the cleaner.
Insert the handle
into the opening at
the top of the
vacuum.
Align the handle
screw in the hole in
the handle and the
handle screw hole
in the back of the
vacuum.
Insert the handle
screw so it passes
through the back of
the vacuum into
the handle.
Begin to tighten the screw wfth your fingers. It may
be necessary to adjust the handle slightly.
6
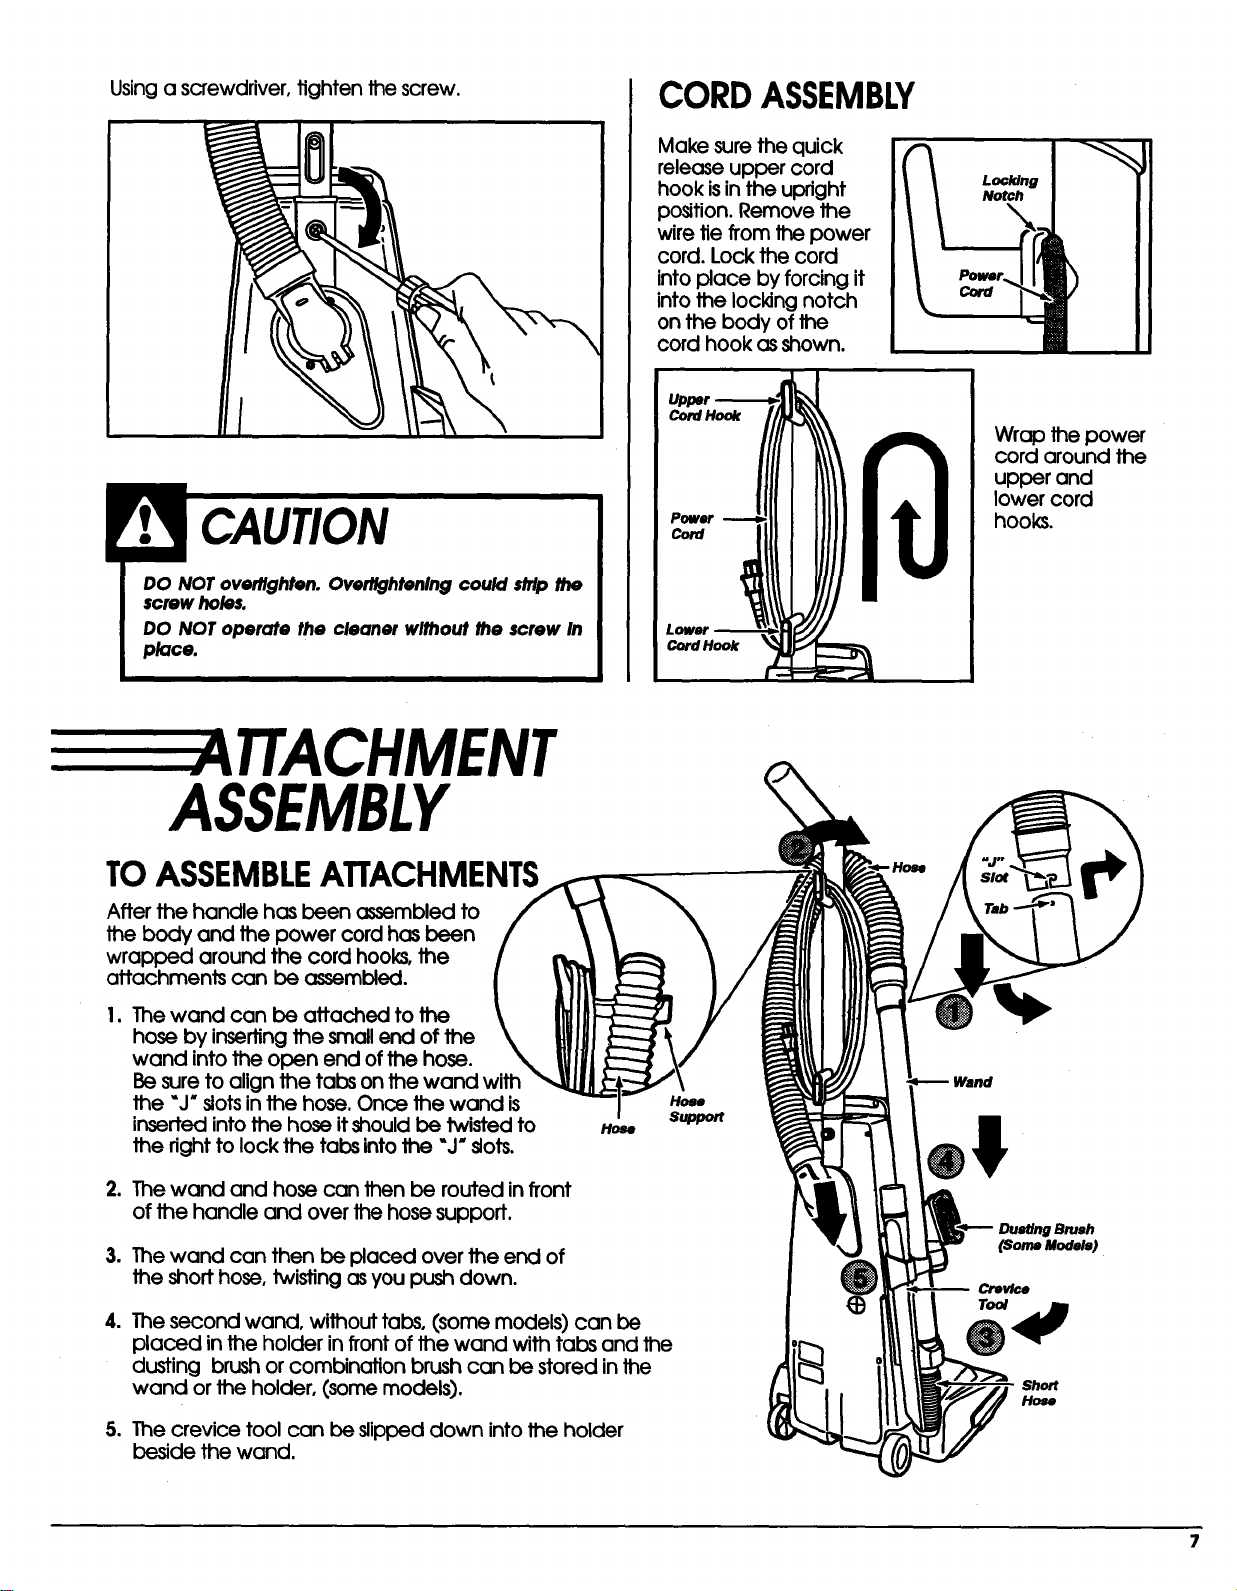
Using a screwdriver, tighten the screw.
DO NOT overtlghten. Overtlghtenlngcould stripthe
screw holes.
DO NOT operate the cleaner without the screw In
place.
CORDASSEMBLY
Make sure the quick
release upper cord
hook isin the upright
position. Remove the
wire tie from the power
cord. Lock the cord
into place by forcing it
into the Iocldng notch
on the body of the
cord hook as shown.
Upper
Cord
"_ Locking I _'_
| Notch I
Wrap the power
cord around the
upper and
lower cord
hooks.
TTACHMENT
ASSEMBLY
TOASSEMBLEATTACHMENTS
After the handle has been assembled to
the body and the power cord has been
wrapped around the cord hooks, the
attachments can be assembled.
I. The wand can be attached tothe
hose by insertingthe smallend ofthe
wand intothe open end ofthe hose.
Be sureto alignthe tabson thewand with
the "J*slotsinthehose.Once the wand is
insertedintothe hose itshouldbe twistedto
the righttolockthe tabsintothe "J*slots.
2. The wand and hose can then be routed in front
of the handle and over the hose support.
3. The wand can then be placed over the end of
the short hose, twisting as you push down.
4. The second wand, without tabs, (some models) can be
placed in the holder in front of the wand with tabs and the
dusting brush or combination brush can be stored in the
wand or the holder, (some models).
H_
support
DuwUngBrush
(Some Models)
Short
5. The crevicetoolcan be slippeddown intothe holder
beside the wand.
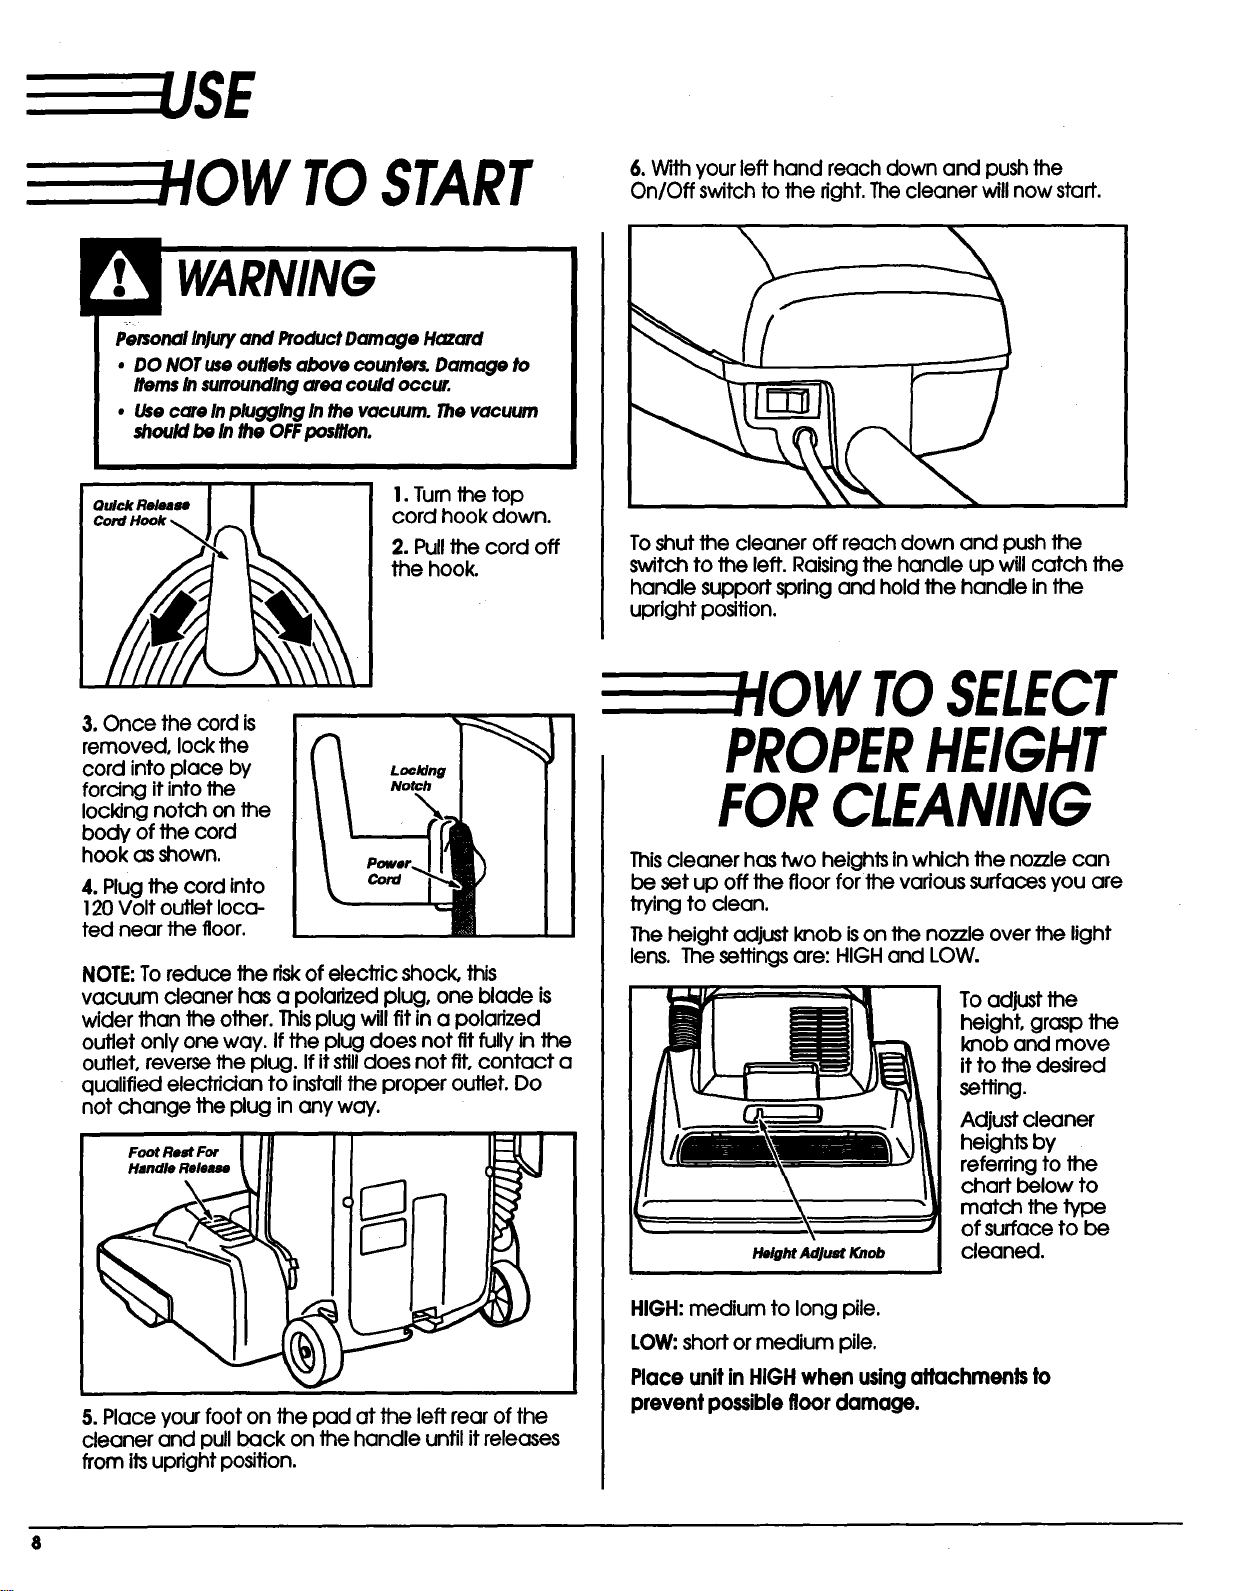
TOSTART
PersonalInjuryand ProductDamage Hazard
• DO NOTuse outletsabove counter&Damage to
ItemsInsurroundIng area could occur.
• Usecare Inplugging Inthe vacuum. Thevacuum
shouldbe Inthe OFFposition.
6. With your left hand reach down and push the
On/Oft switch to the right. The cleaner will now start.
Quick Release
3.Once the cord is
removed, lockthe
cord intoplace by
forcingitintothe
lockingnotch on the
body ofthe cord
hook as shown.
4.Plugthe cord into
120 Voltoutletloca-
ted near the floor.
NOTE:To reduce the riskof electric shock, this
vacuum cleaner has a polarized plug, one blade is
wider than the other. Thisplug will fit in a polarized
outlet only one way. If the plug does not fit fully in the
outlet, reverse the plug. Ifitstilldoes not fit, contact a
qualified electridan to installthe proper outlet. Do
not change the plug in any way.
Handle Release
I.Turnthetop
cord hook down.
2. Pull the cord off
the hook.
Locldng
Notch
Powor
Cord
To shut the cleaner off reach down and push the
switch to the left. Raising the handle up will catch the
handle support spring and hold the handle in the
upright position.
WTOSELECT
PROPERHEIGHT
FORCLEANING
This cleaner has two heights in which the nozzle can
be set up oft the floor for the various surfaces you are
trying to clean.
The height adjust knob ison the nozzle over the light
lens. The settings are" HIGH and LOW.
To adjust the
height, grasp the
knob and move
it to the desired
setting.
Adjust cleaner
heights by
referring to the
chart below to
match the type
of surface to be
Height Adjust Knob
cleaned.
5. Place your foot on the pad at the left rear of the
cleaner and pull back on the handle until itreleases
from its upright position.
HIGH: medium to long pile.
LOW: short or medium pile.
Place unit in HIGH when using attachments to
prevent possible floor damage.
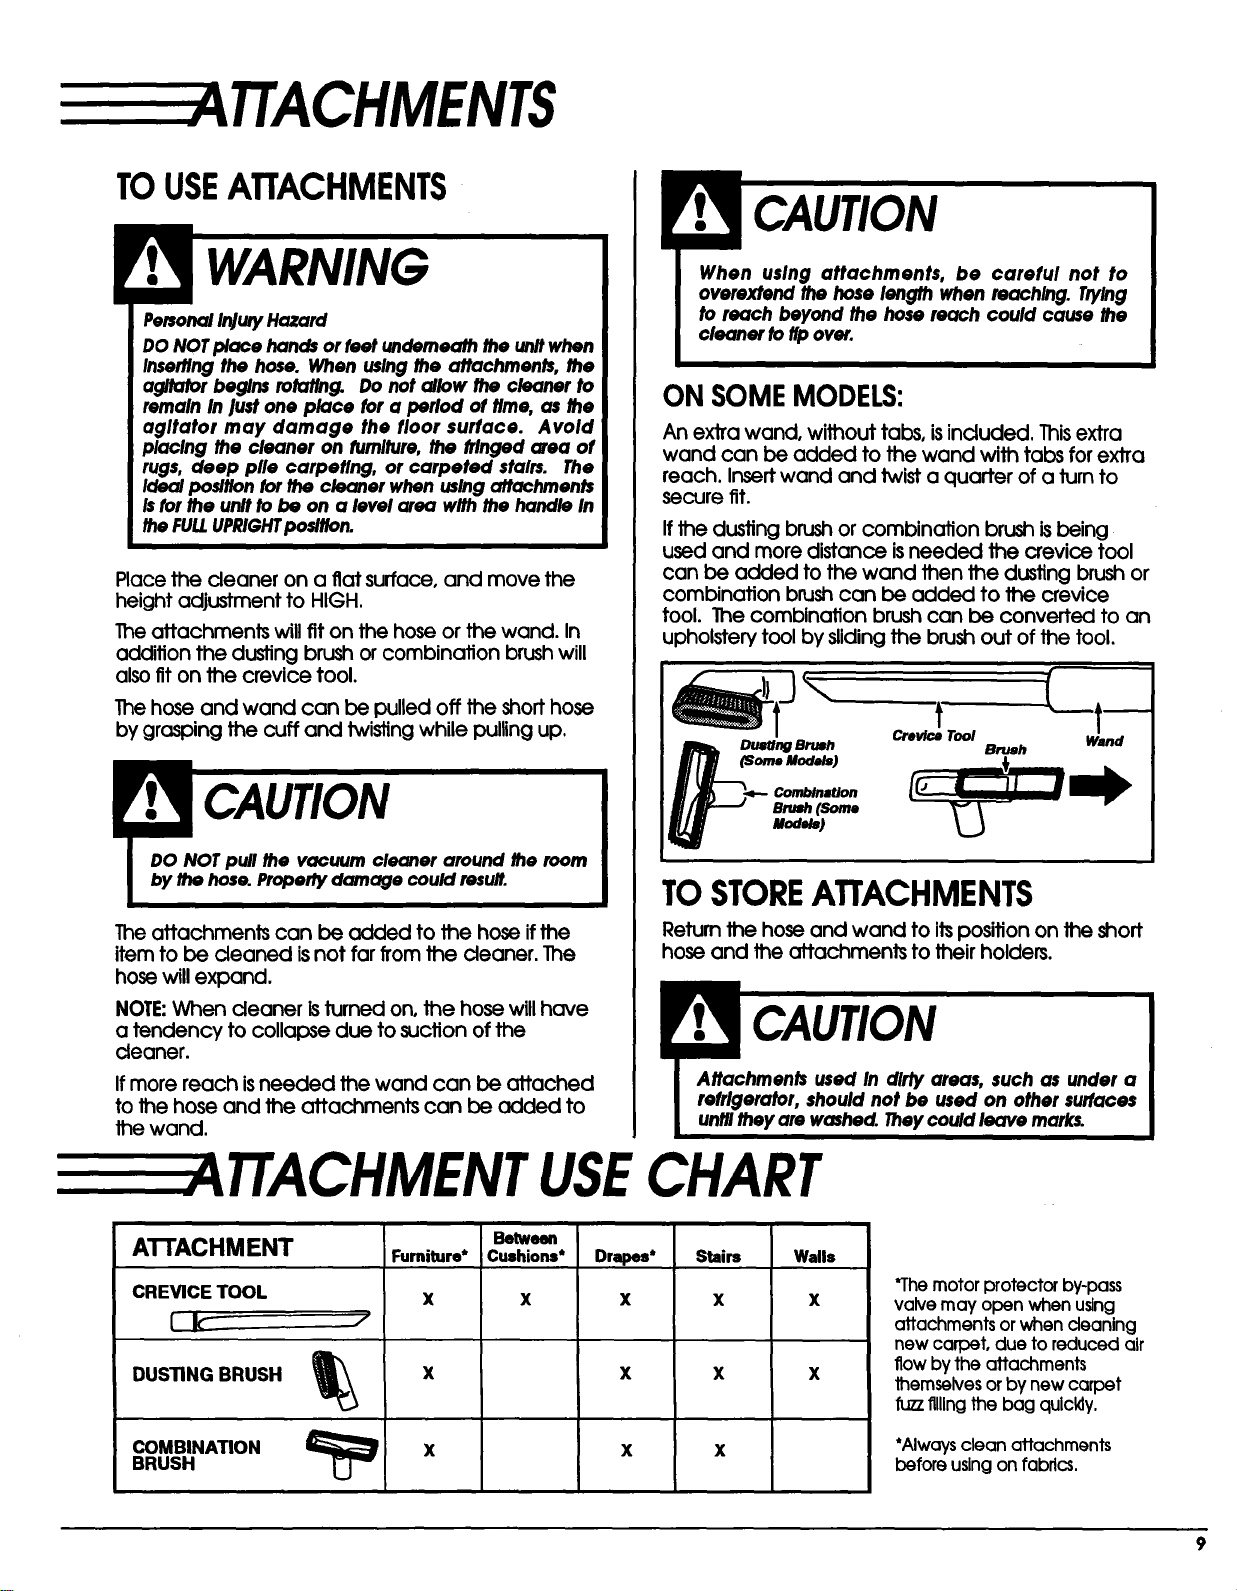
TTACHMENTS
TOUSEATTACHMENTS
Persor_lIr_uryHazard
DONOTplace handsor feet underneaththe unltwhen
Insertingthe hose. When uslngthe attachments, the
agitator begins rotating. Do not allow the cleaner to
remaln In Justone place for a perlod of time, as lhe
agltator may damage the floor surface. Avold
placlng the cleaner on fumlture, the frlnged area of
rugs, deep plle carpeting, or carpeted stalrs. The
Ideal posltionfor the cleaner when uslngattachments
Isfor the unltto be on a level area wlth the handle In
theFULLUPRIGHTposltion.
Place the cleaner on a fiat surface, and move the
height adjustment to HIGH.
The attachments will fit on the hose or the wand. In
addition the dusting brush or combination brush will
also fit on the crevice tool.
CAUTION
When uslng attachments, be careful not to
overextend the hose length when reachlng. Trylng
to reach beyond the hose reach could cause the
cleaner to tipover.
ON SOMEMODELS:
An extra wand, without tabs, is included. Thisextra
wand can be added to the wand with tabs for extra
reach. Insertwand and twist a quarter of a turn to
secure fit.
If the dusting brush or combination brush isbeing
used and more distance isneeded the crevice tool
can be added to the wand then the dusting brush or
combination brushcan be added to the crevice
tool. The combination brush can be converted to an
upholstery tool by sliding the brush out of the tool.
The hose and wand can be pulled off the short hose
by grasping the cuff and twisting while pulling up.
Dusting Brumh Brush
_3ome Models)
Combination
Brush (Some
Rod_)
TOSTOREATTACHMENTS
The attachments can be added to the hose if the
item to be cleaned is not far from the cleaner.
hose will expand.
NOTE:When cleaner isturned on, the hose will have
a tendency to collapse due to suction of the
cleaner.
If more reach is needed the wand can be attached
to the hose and the attachments can be added to
the wand.
Return the hose and wand to its position on the short
hose and the attachments to their holders.
TTACHMENT USECHART
A'I-rACHM ENT
CREVICE TOOL
I k--
DUSTING BRUSH
Furniture*
X
j'
Between
Cushions*
X
Drapes*
X
X
Stairs
x
X
Walls
x
X
Crevice Tool Wand
"Themotorprotectorby-pass
valvemay open when using
attachmentsorwhen cleaning
new carpet,due toreducedair
flowbytheattachments
themselvesorbynew carpet
fuzzfllllngthebag quickly.
COMBINATION
BRUSH
X
X
*Always clean attachments
before usingon fabrics.

Handle
Quick
Release
Cord Hook
Power
Cord
CUUMSTORAGE
Gather the cord
and wrap it loosely
around the upper
and lower cord
hooks.
Store the cleaner
in a dry, indoor
area, on the floor
with the handle
locked inthe
upright position.
ElectricalShockand PersonalInjuryHazard
Wrappingthe cord foo tightlyputssffesson the cord
and can cause cord damage. A damaged cord Is
an electrlcal shock hazard and could cause
personalInjuryor damage.
CUUMCARE
ALWAYS FOLLOW ALLSAFETY
PRECAUTIONS WHEN CLEANING AND
SERVICING THEVACUUM CLEANER.
ElectricalShockOr PersonalInJmyHazard
Disconnect electrical supply before servicing or
cleaning the unit. Failure to do so could result In
electrical shock or personal Injury from cleaner
suddan_start_g.
I0
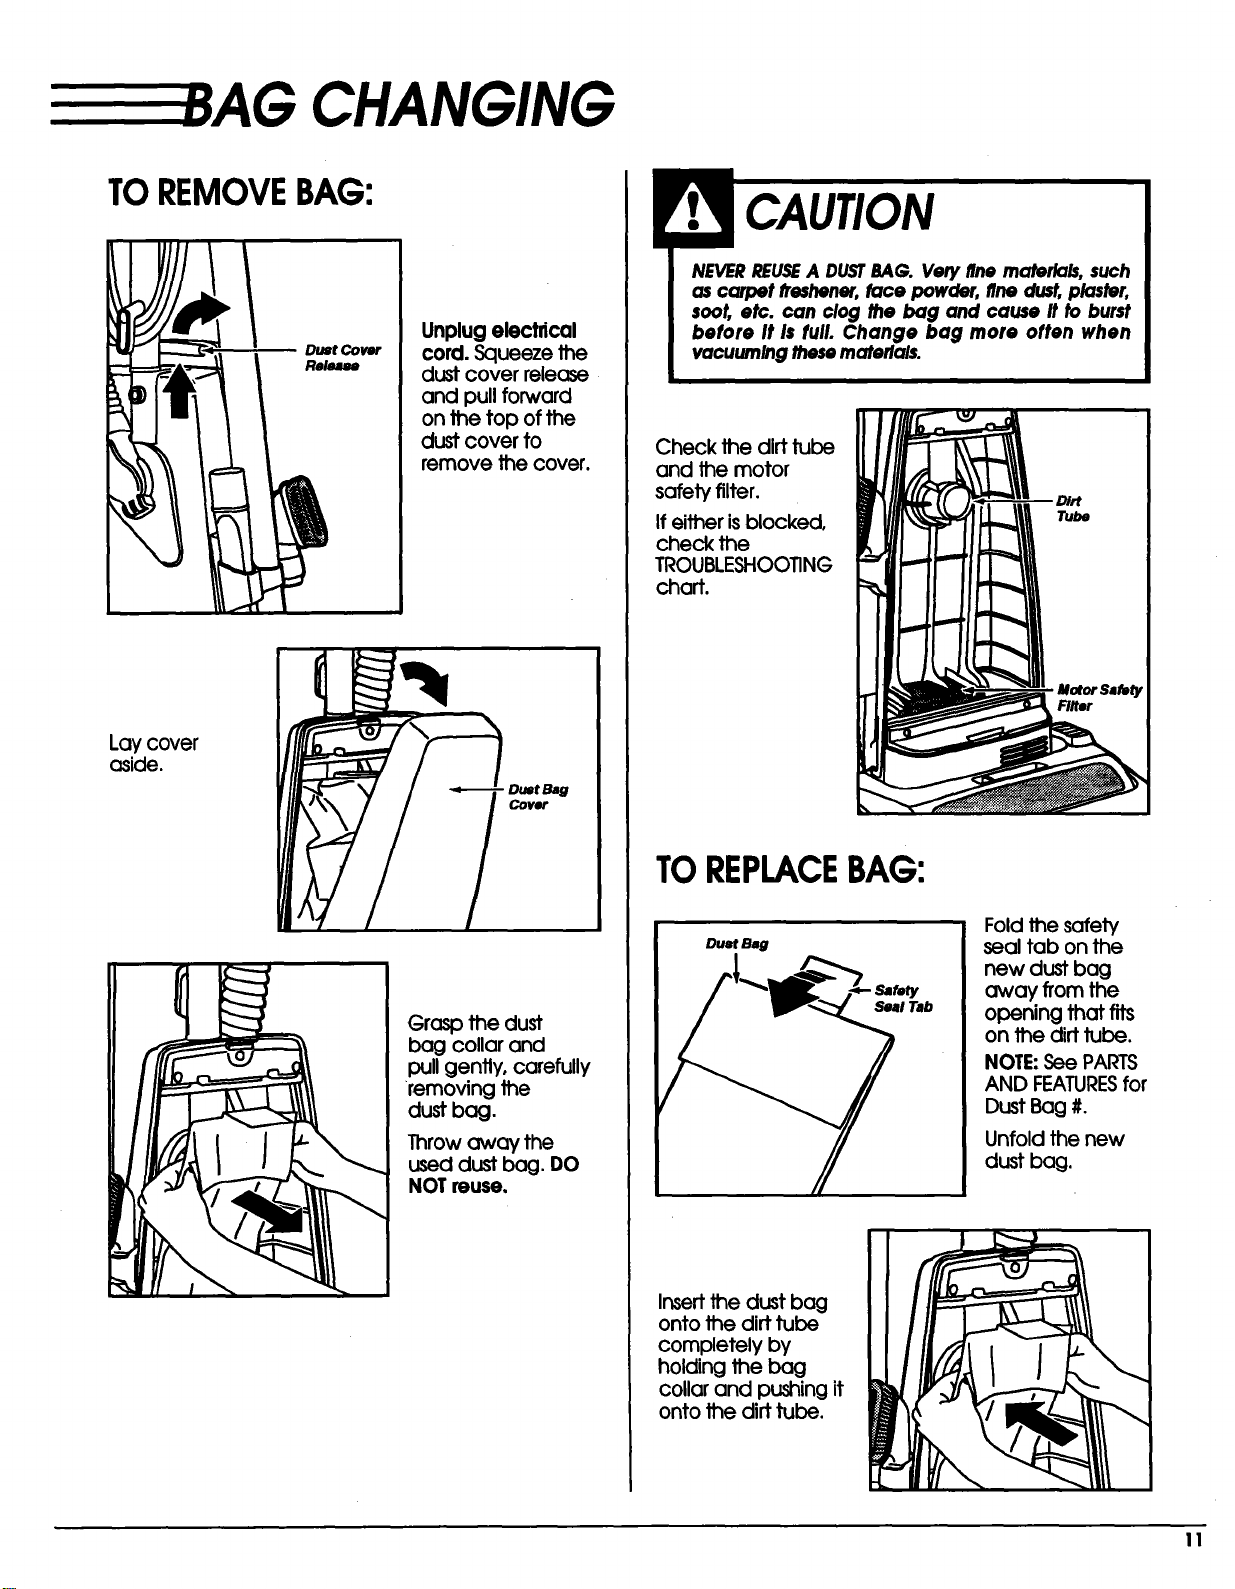
CHANGING
TOREMOVEBAG:
Dumt Cover
Relea_
Unplug electncal
cord. Squeeze the
dust cover release
and pull forward
on the top of the
dust cover to
remove the cover.
NEVERREUSEA DUSTBAG. Very fine materials, such
as carpet frashener,face powder, fine dust,plaster,
soot, etc. can clog the bag and cause It to burst
before It Is full. Change bag more often when
vocuumlngthesemateflals.
Check the dirt tube
and the motor
safety filter.
If either is blocked,
check the
TROUBLESHOOTING
chart.
Lay cover
aside.
DuRt Bag
Cover
Grasp the dust
bag collar and
pull gently, carefully
removing the
dust bag.
Throw away the
used dust bag. DO
NOT muse.
TOREPLACEBAG:
DuM Bag
Insert the dust bag
onto the dirt tube
completely by
holding the bag
collar and pushing it
onto the dirt tube.
Fold the safety
seal tab on the
new dust bag
away from the
opening that fits
on the dirt tube.
NOTE:See PARTS
AND FEATURESfor
Dust Bag #.
Unfold the new
dust bag.
!!
 Loading...